
Hidden Expedition:
Devil's Triangle
Platform: Mac, Windows
![]() The Bermuda triangle. Remote, mysterious, possibly infested with aliens. The perfect spot to set a hidden object/adventure hybrid. And what a place to set the long anticipated fourth Hidden Expedition game, Hidden Expedition: Devil's Triangle. Yes, the Hidden Expedition Adventure Team (H.E.A.T.) is back and ready to brave the unknown! Let's follow along, shall we?
The Bermuda triangle. Remote, mysterious, possibly infested with aliens. The perfect spot to set a hidden object/adventure hybrid. And what a place to set the long anticipated fourth Hidden Expedition game, Hidden Expedition: Devil's Triangle. Yes, the Hidden Expedition Adventure Team (H.E.A.T.) is back and ready to brave the unknown! Let's follow along, shall we?
 Before the game begins we are treated to a lovely cut scene in which one of H.E.A.T.'s best pilots suddenly crashes in the Bermuda Triangle. It is up to you, intrepid explorer of the Amazon, Everest, and the Titanic, to find her. Aboard H.E.A.T.'s new submarine (powered with an experimental power supply made of the glow beetles from Hidden Expedition: Amazon) you get underway on a mission to find the missing pilot. But before you begin you will have to find and install the amazing new power source. Easy, right?
Once you get started in the submarine, things begin to go wrong. A broken radio, electrical problems, giant ugly fish, and nasty pirates all make accomplishing the task a bit... difficult. And once the pirates steal your precious power supply you find yourself stranded on an uncharted island that is inhabited by some folks who are, well, let's say eccentric, shall we?
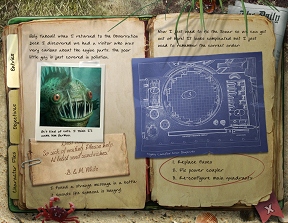
Gameplay is fairly simple. Once you are in a scene, sweep it with your cursor and watch closely. The cursor will change into a hand when you encounter things that can be picked up or manipulated, an eye for things that can be examined closer, and a strange blue ripple for things that may be of interest. There's a handy tutorial that will walk you through the gameplay dynamic in the beginning. There is also a journal that copies down important information you can review later. Even if you don't need the journal to remember things, check it out anyway for the funny biographies of the characters involved in the story. Each scene may include hidden object areas, tasks to complete, or puzzles to solve (sometimes all three). You will often have to travel back and forth to several areas to find all the objects needed to complete a task, making the game a true point-and-click adventure.
 Some, in fact, might take exception to the way the scenes play out. Directions are not spoon-fed to you; once you are in a scene (or series of scenes) you will have to use your ability to observe and synthesize to determine what needs to be done. Hints can occasionally be found by talking to various characters, but mostly you are on your own. This evokes the past classics of point-and-click adventure (games like Myst, or Uninvited), for those who are old enough to remember the good old days.
Hidden object scenes themselves break down into two different categories: pure HOG and find the match HOG. In the regular hidden object scenes you will usually receive the obligatory list (not always, though, some scenes are simply "find all the flowers" or things of that nature). Click on a list item to see a silhouette, or use a hint to find an object. You begin each area with a certain number of hints, but Devil's Triangle has jettisoned the "find certain objects to gain hints" dynamic in favor of a refilling hint timer. Once you use the hints you have just wait as the timer refills. Mini-games can be played through using hints to skip if the player finds them too difficult.
What is really different are the match HOG scenes. The instructions will tell you "find 12 pairs of matched objects", and the fun begins. Do the chocolate chip cookies match with a fortune cookie (they're both cookies) or do they match with the glass of milk? As the game progresses the match HOG scenes require more thought as some pairings require a bit of a mental leap. These scenes make a nice change from the standard HOG found in most adventure/hidden object hybrids.
 Analysis: Wow. In many ways Hidden Expedition: Devil's Triangle was definitely worth the wait. The combination of story, art, music, sound effects, everything shows what a massive amount of work went into making the fourth in the series a fantastic experience. Voice acting has been added in to give the characters more... well, character. Fortunately, only the beginnings of conversations have the voice-overs, once you get into the multiple choice conversation it switches over to all-text, keeping those scenes from dragging down the pace.
Hidden Expedition: Devil's Triangle has gone a step further than the other Hidden Expedition games. While the others were either pure object finding or the same with an adventure overlay, Devil's Triangle is more of a point-and-click adventure with HOG elements. Most areas don't have any form of hidden objects at all, just pure puzzle solving.
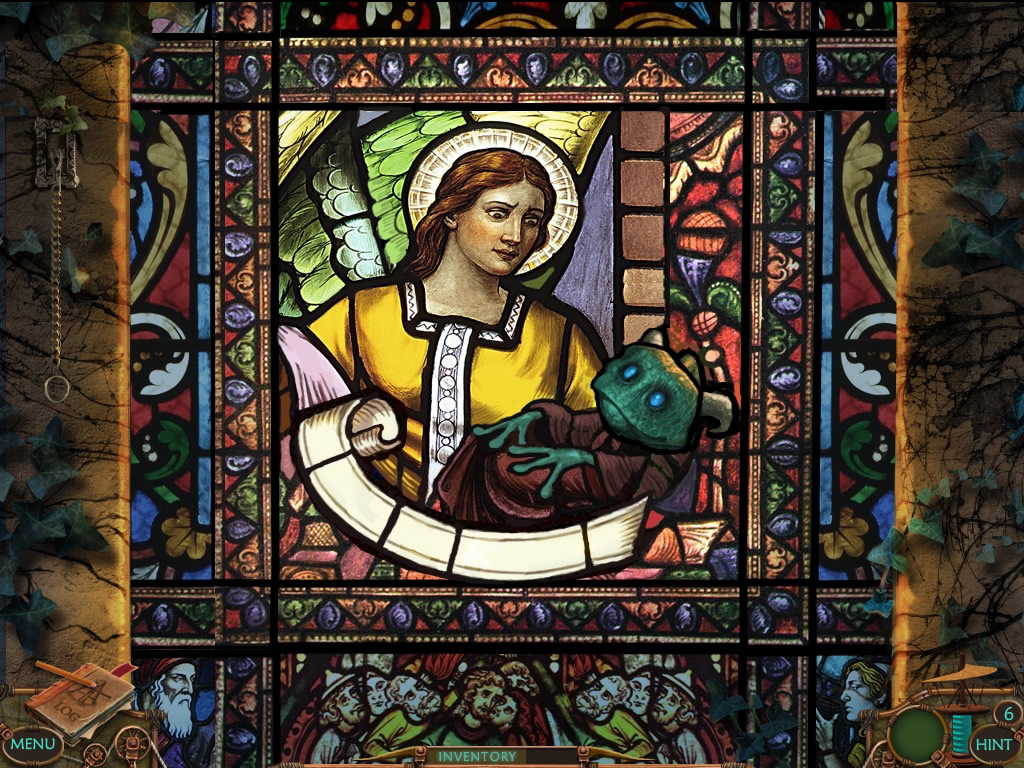
How to even begin discussing the artwork? As with all Hidden Expedition games massive amounts of effort have gone into making each scene look wonderful. In the beginning the scenes are more sedate, but as you move on to the island and further along you will encounter areas of breathtaking beauty. Once you find Gideon's house you may slow down just to pause and say "wow" as you encounter each room or scenic vista. The hidden object scenes begin to look like high renaissance art, the mini-games and puzzles are masterpieces on their own. There is a sumptuous look to Hidden Expedition: Devil's Triangle that is rarely achieved in a hidden object game. Take time to enjoy the scenery.
There are, however, a few things that keep this from being the perfect game. Solving a scene without hints is one thing, but the mini-games will pop up with no directions and no info button to let the player know what is expected of them. This can lead to frustration with some of the more esoteric games. Hidden Expedition: Devil's Triangle is also shorter than it could have been, and ends abruptly setting up a sequel rather than gifting the player with a complete story as its predecessors did.
Flaws aside, Hidden Expedition: Devil's Triangle is a gorgeous, fun, mind-bending casual gameplay ride. Fans of the old series should not be disappointed, and folks new to the Hidden Expedition games can enjoy as well. And, of course, any old fuddy-duddies (like me) who remember the days of the classic adventure game should enjoy the nostalgia of a point-and-click done right. So what are you waiting for? Get out there and find that lost pilot!
![]() Windows:
Windows:
Download the demo
Get the full version
![]() Mac OS X:
Mac OS X:
Download the demo
Get the full version


Walkthrough Guide
(Please allow page to fully load for spoiler tags to be functional.)
Hidden Expedition: Devil's Triangle - Walkthrough
General Tips
There is no time limit
There is no penalty for random clicking
Most items in hidden-object-scenes are random - except inventory/puzzle items
You will have log file which contains three different parts
1. Entries - here you fill find the story and notes, passwords, codes you discover while playing. This can come handy as you will need some informations in later scenes.
2. Objectives- here you can have a look for your objectives right now, when you are not sure anymore.
3. Character Files - you will find pictures of the people you meet - click the pictures to get further informations.
There are two ways to get a hint (next to possible informations in your log files):
In ho-scenes you can click a word in your search list and the silhouette of the item will be shown in the green circle low right corner.
Or click the word "hint" and then the object you are looking for - it will be shown directly in the scene.
A hint will also allow you to skip a lot of the puzzles, but be aware, that the hint skips the complete puzzle not only a part.
The hint will reload constantly, so that you will have more and more hints, when you do not use them and used ones will be replaced quickly - seen as this, the hint is endless.
You will see different icons in the scene, while hovering over it with your cursor
Arrows - they show you the directions you can go to. The arrow at the bottom of the screen will always bring you back to where you came from.
Hand - you can pick up something.
Eye - have a closer look (you will get a nearby view by clicking).
Blue circles- areas of interest - click it to see what happens or use an inventory item with it (this will only appear a few times, in the later levels, they forgot about it, it seems).
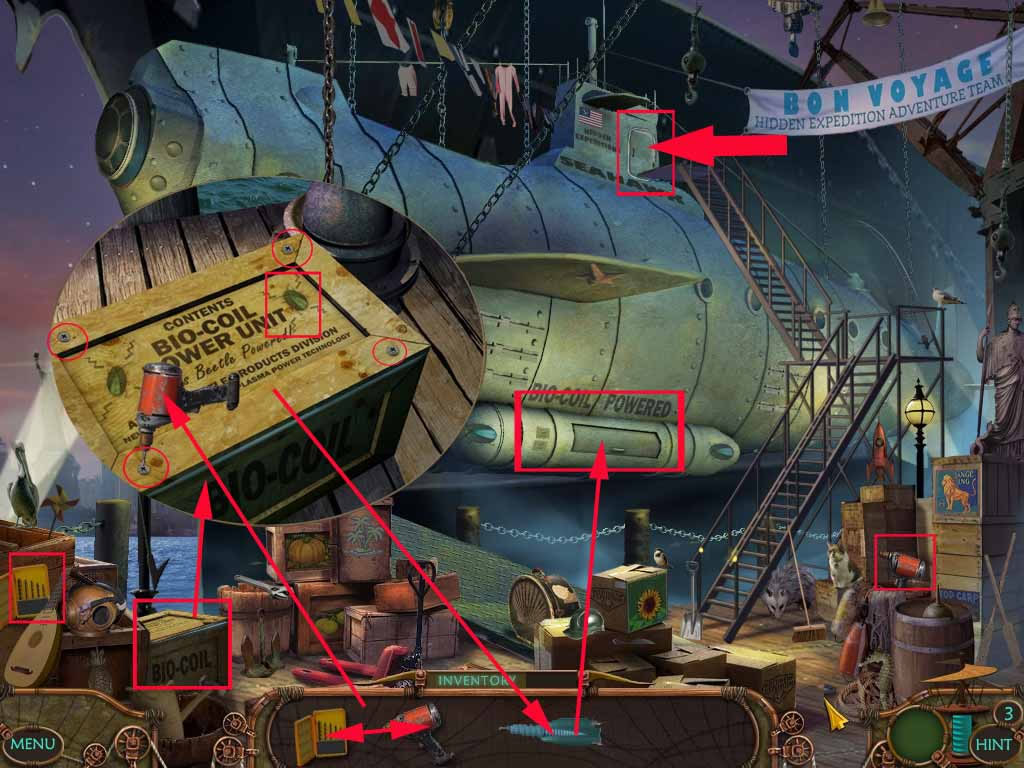
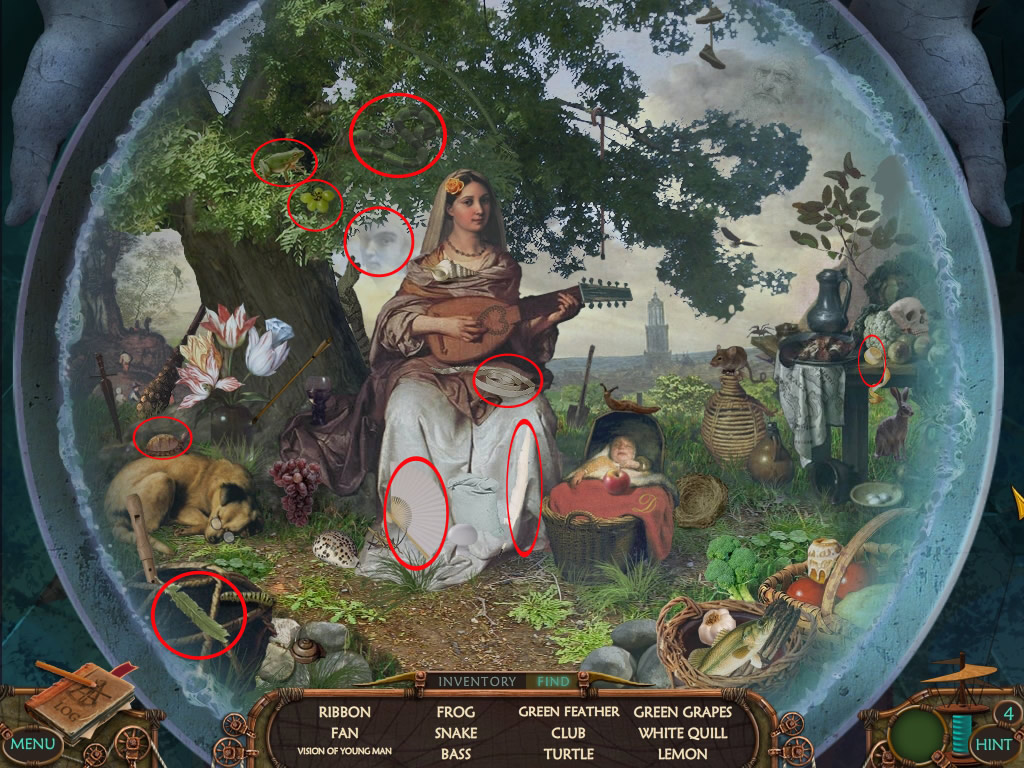
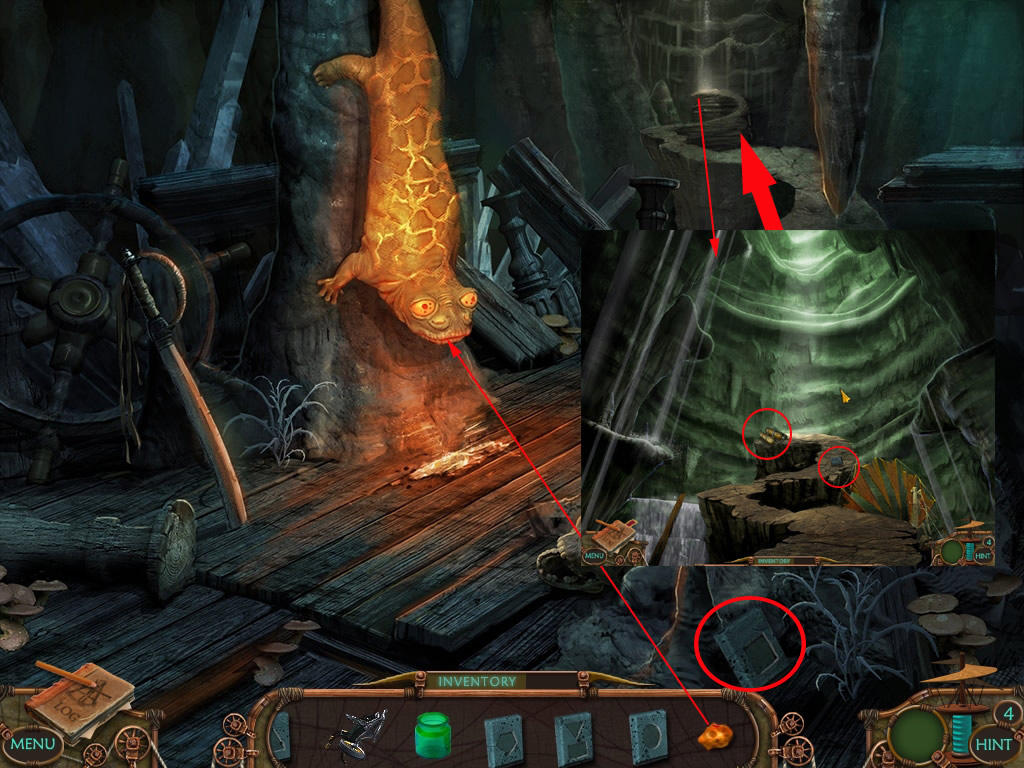
Chapter 1: New York - Present Day
In front of the submarine
Look for items from your list.
You will find the box of drill bits low left on the crate.
After finding all objects, you will be ask to find the drill.
Pick it up on the right side below the crate with the lion on.
Open your inventory and combine drill and drill bits to get a working drill.
Click the crate saying "BIO COIL" to get a nearby view.
Click one of the bugs to get an entry in your log files.
Get the drill out of your inventory and open the screws.
The top of the drill bit has to be placed on the screw, otherwise it will not work.
The crate top will open - click the Bio-Coil to get it into your inventory.
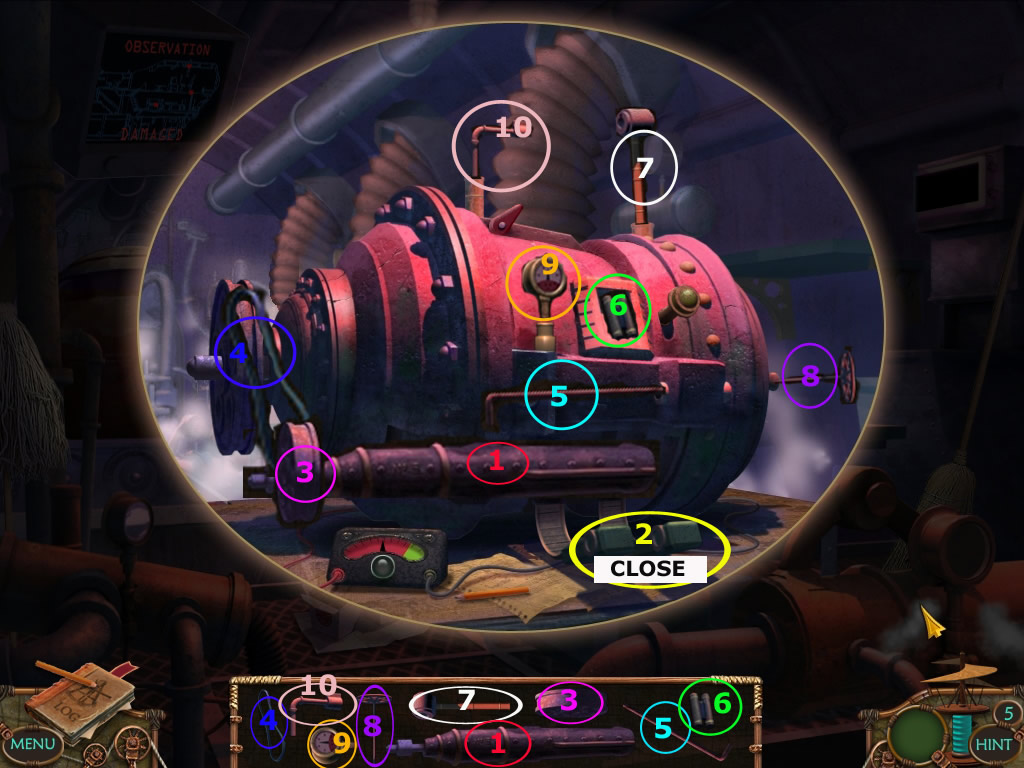
Open the Bio-Hatch of the submarine by clicking, place the Bio-Coil into it and close the hatch with another click.
The door of the submarine upper right opens.
Click to enter.
Screenshot
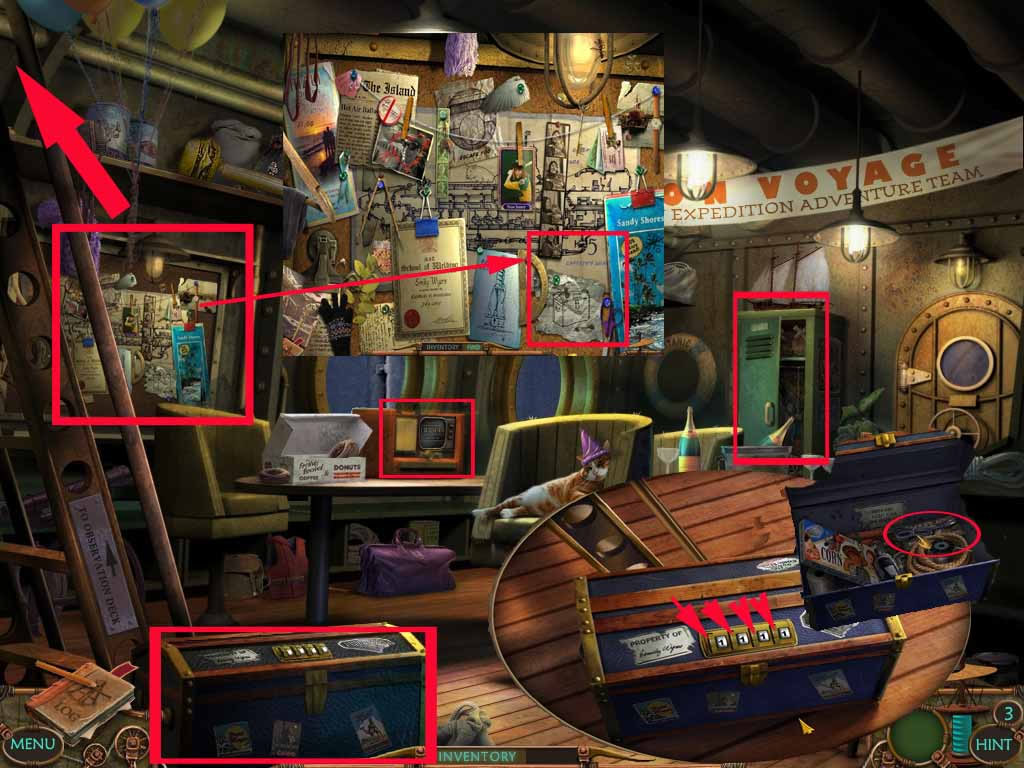
The broken radio
Talk to Emilia.
Click the radio on the table below the porthole - you will get a nearby view.
Click the broken cable, antenna and the place with the missing knob.
Screenshot
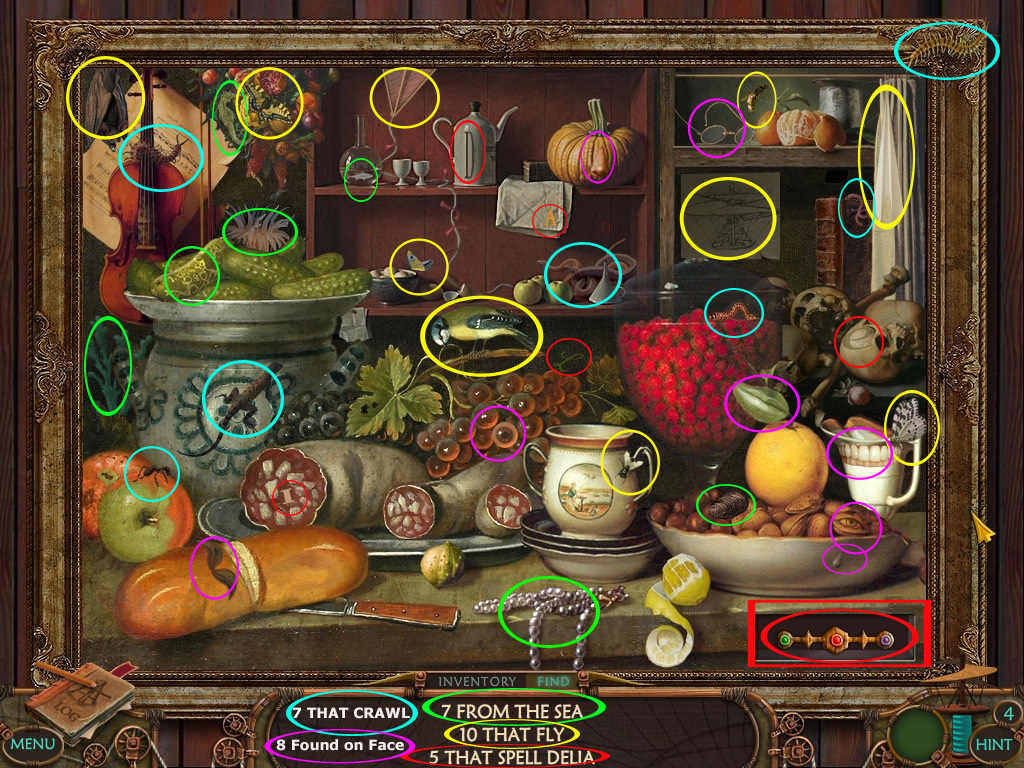
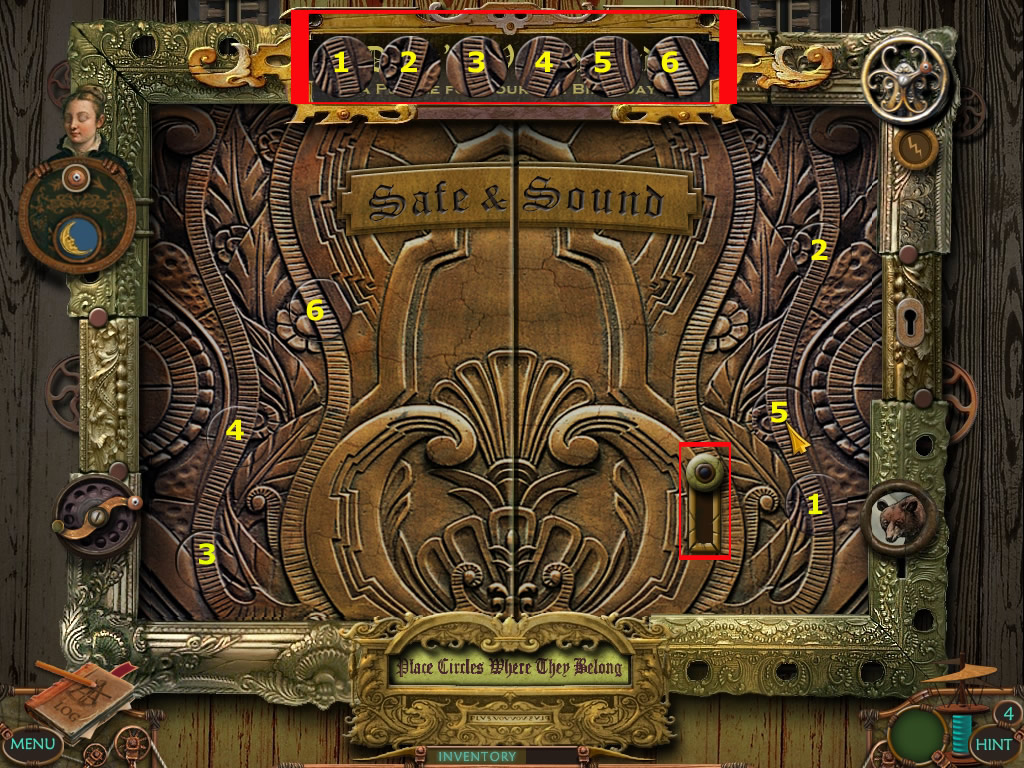
Click the green locker at the right and a mini game pops up.
You need to find 12 pairs related to each other.
That does not mean, that they do have to look alike. A ball-drawing and a real ball is a pair as well as earth and moon or horseshoe and shoe.
The solutions is random, but I marked some pairs on the screenshot.
All players will have to find the pair of keys - one at the locker door, the other one hanging at chain at the jacket.
After finding all 12 pairs, you will be asked to get the hanger, inside the locker in front of the jacket.
Screenshot
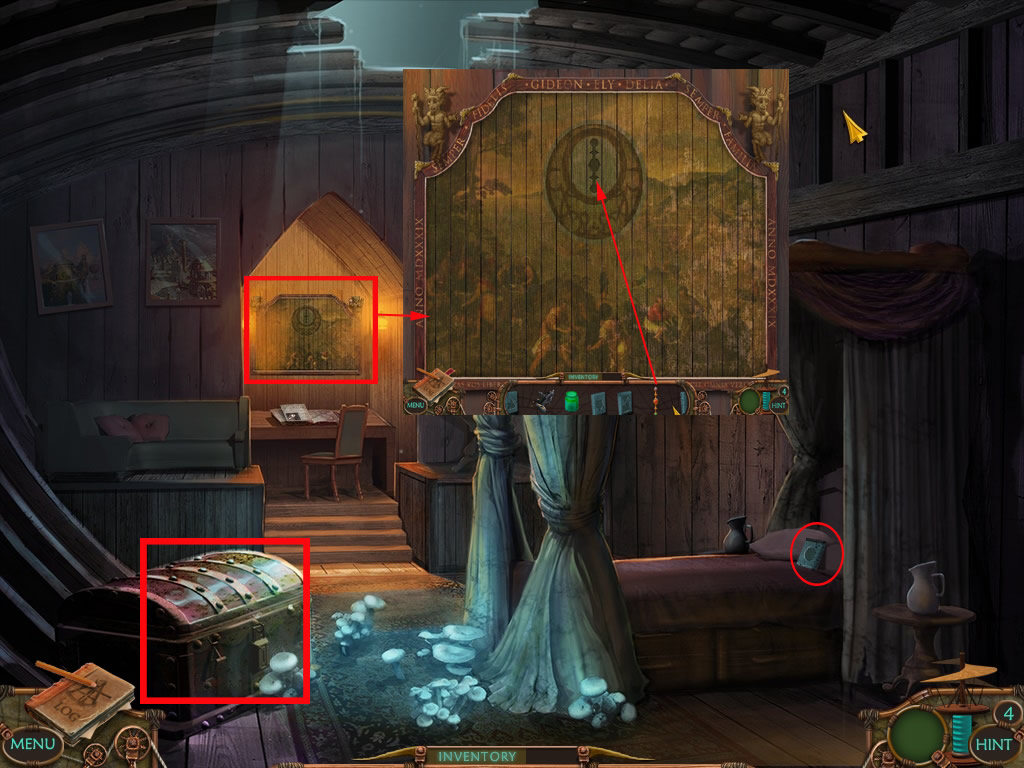
Click the note board left side at the wall.
A ho-scene opens.
The objects are random, but you will be asked to get the trunk after finding all.
You want to click the drawing on the lower right side.
Underneath you will find a (random) number. It will be copied into your log files.
Screenshot
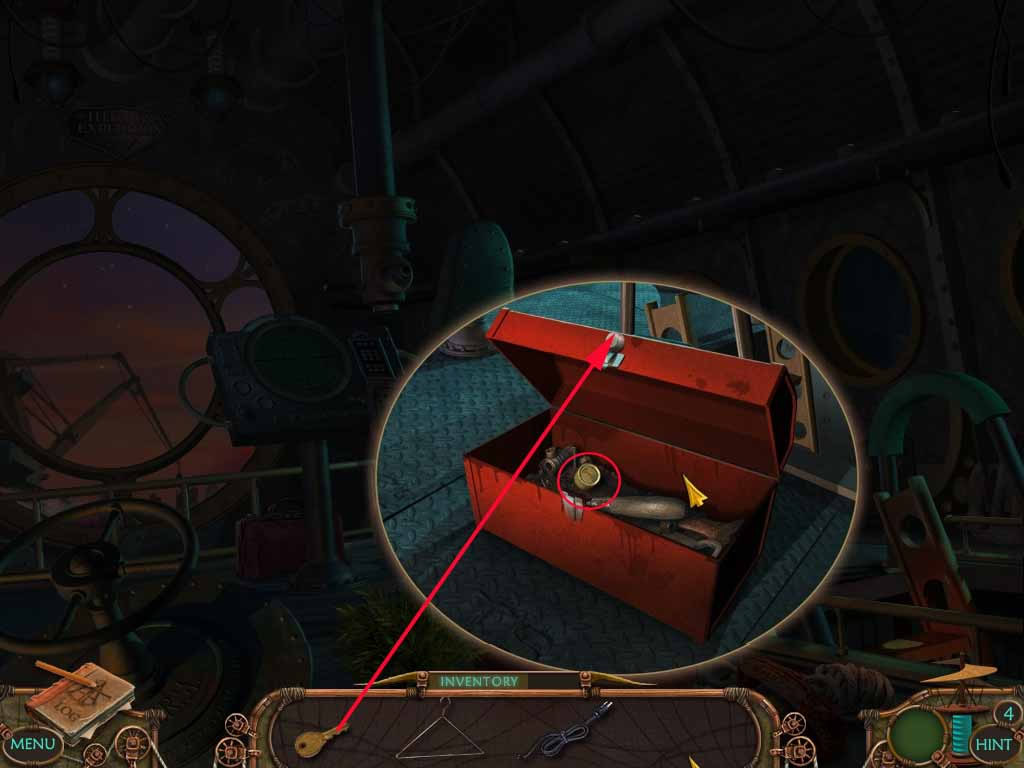
Click the trunk on the floor low left.
There is a number lock.
Change the numbers by clicking the little golden gears left to each number - use the numbers, you just found underneath the trunk drawing.
The trunk opens - pick up the cable, right in the back.
Now go up the stairs on the left.
You will see a red tool box on the floor.
Click it to get a nearby view and open it with the key from your inventory.
Get out the golden knob for the radio.
Screenshot
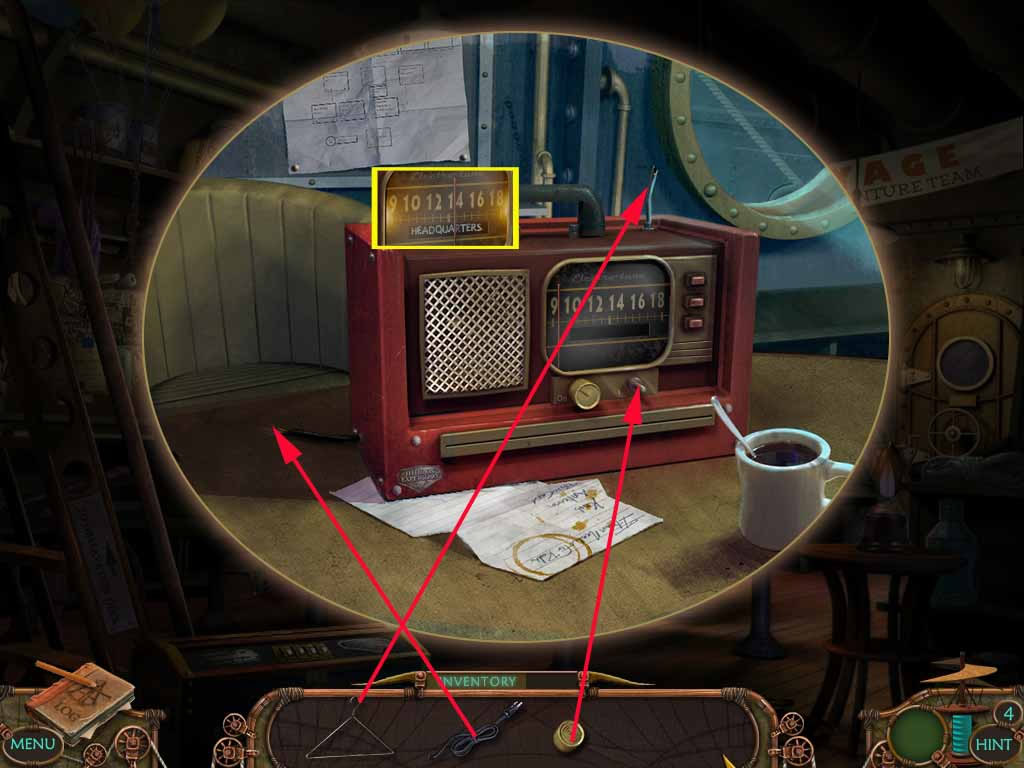
Go down again.
Click the radio to get a nearby view.
Use the hanger as antenna, click the cable low left at the broken one and place the knob right next to the other one.
Click the left knob to turn the radio on.
Click the right knob gently to find HEADQUATERS - the word will be shown in the display bar below.
It will be between 1 and 4 of the 14.
Screenshot
After a short cut scene you will be brought upstairs.
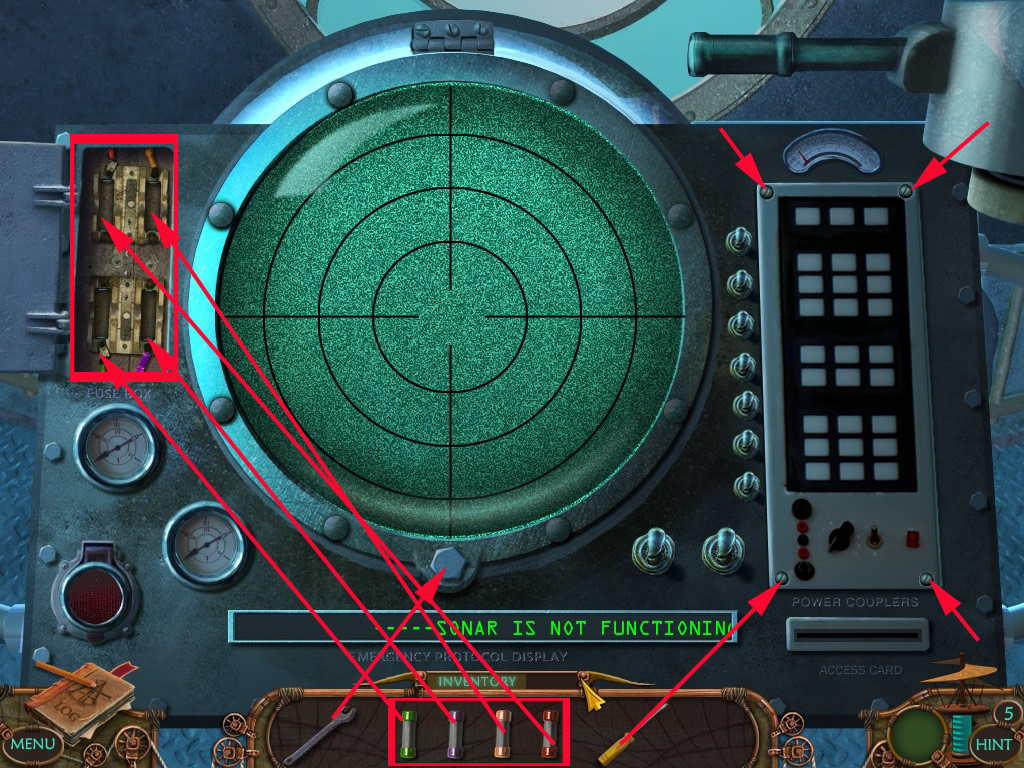
The broken sonar
Click the sonar and get the keycard low left.
Open the compartment in the upper left corner and click the broken fuses. They will disappear.
Screenshot
Clicking other spots on the sonar you learn, that you need a screwdriver and a wrench.
Go to the radio room and click the door on the right side.
Use the card from your inventory with the card reader.
Go forward and enter the next room.
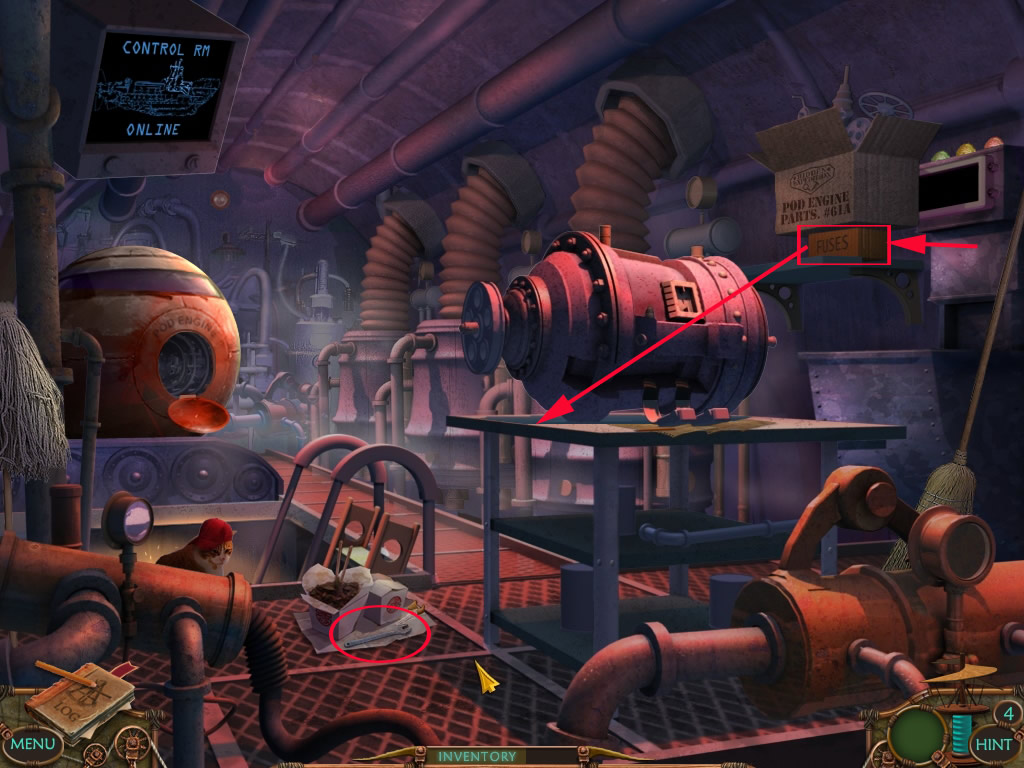
In front of you on the floor, you see Chinese take away boxes. Click them and get the wrench in front of the boxes.
Look at the upper right.
You see a box above a little box with the word "Fuses".
Click the fuses box, till it the upper box will fall to the right, the fuses-box to the left.
Get the fuses box.
Screenshot
Unfortunately the big box contained important details, you will have to get them back.
Go back to the sonar room.
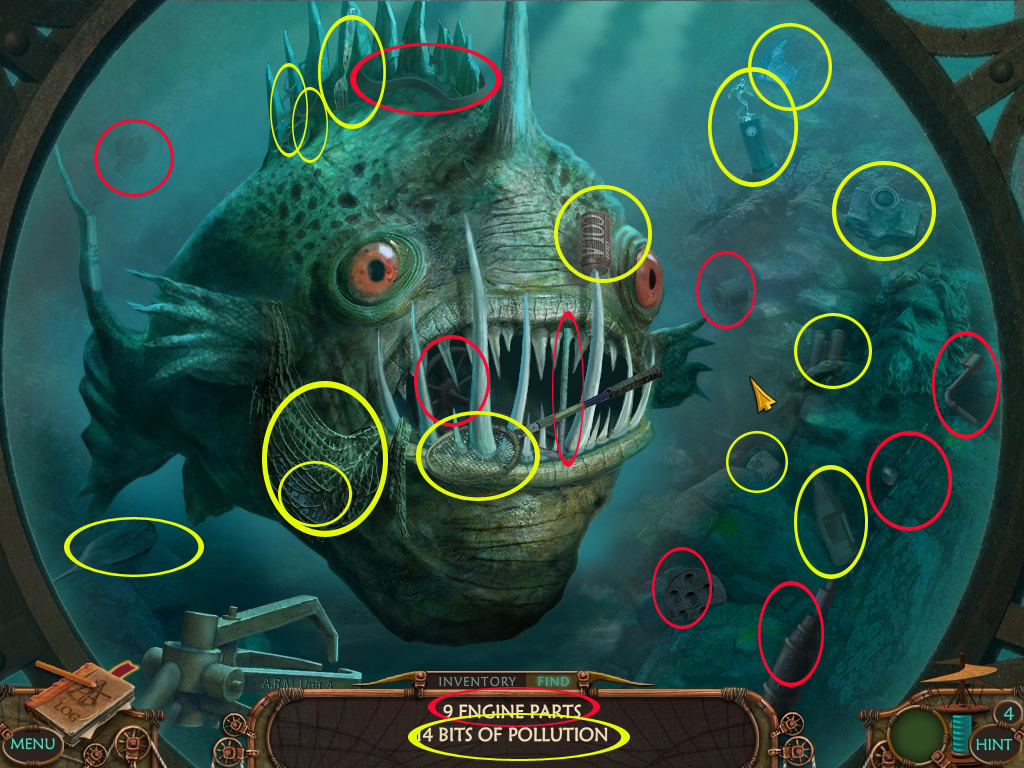
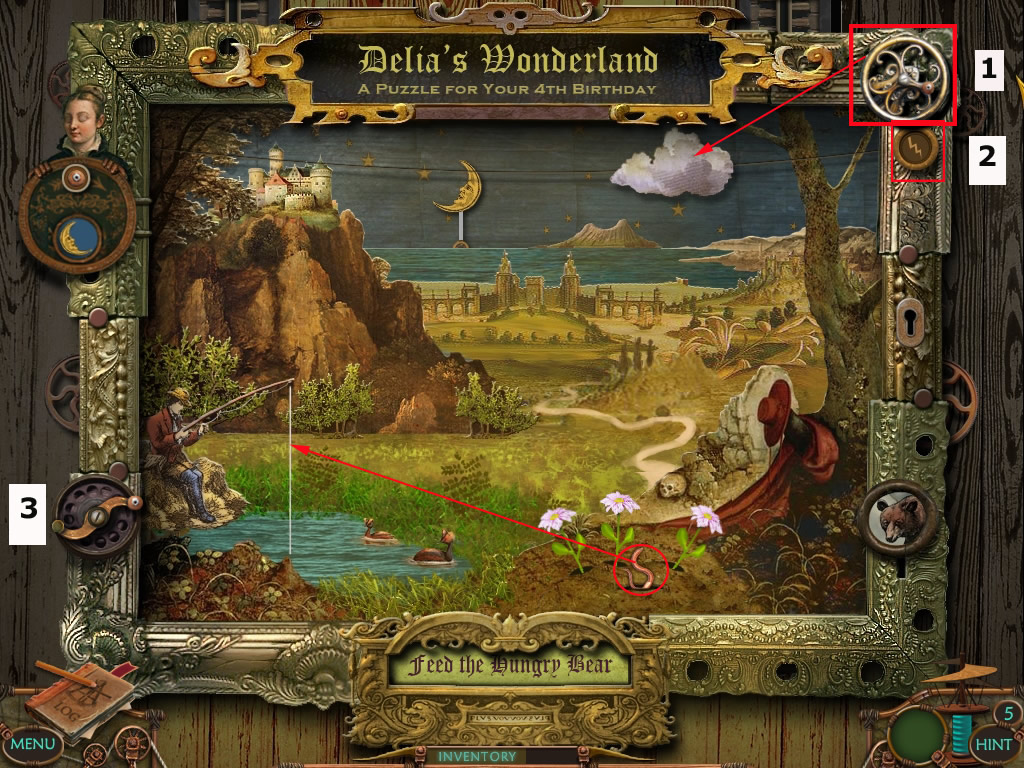
At the back window, you will see a huge fish - click it to get a nearby view.
It is a ho-scene you will have to find civilization trash and the motor parts, you just lost.
These items are not random.
When you click the net at the right side of the fish's mouth, you will find a message in a bottle.
Click the bottle to get the message.
Screenshot
After finding the last object, a screwdriver will fall down in the water on the right side.
Pick it up and go back to the sonar.
Place the fuses from your inventory in the compartment top left according to their colors.
Get the screwdriver an click all four screws at the right side. You want to take take, that the top of the screwdriver exactly points on the screw. Otherwise, the screwdriver will go back into the inventory
Screenshot
When done, a mini-game is waiting for you.
The goal is to line the teeth elements up with the ones that are facing them (short teeth match up with long teeth).
To do so, you need to click the switches left next to the field. Each switch will move one or more elements in one or the other direction.
The reset-button will bring all elements back to start position.
With the engage-handle, you can see, if you've done well - if so, the cover will close and everything is fine. If not you will have to try again.
The hint-button will solve the puzzle for you.
Seen from top to bottom, I numbered the switches from 1-7.
To get the teeth in the correct positions you will need to click them once in the following order: 1, 6, 3, 5, 7
Use now the engage-handle.
Screenshot
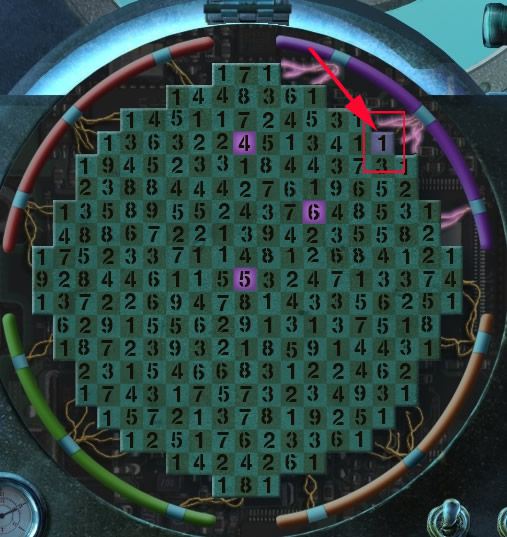
Get the wrench out of the inventory and open the sonar cover at the bolt at the bottom.
In the middle you see a blinking 5.
Your goal is it to connect 1 cable of the colored power cords with a activated number on the board.
To do so, click the 5 in the middle - the light will move exactly five steps into each directions.
Now other numbers are highlighted. You need to find out, which numbers to click to come to one of the connecting number fields.
Which color you need will always be shown by the color of the highlighted numbers.
For purple (top right)you need to click: 5 - (top)1 - 4 - 6 - 1 - 3 - 1
You will see the last 1 blinking. It has a connection to the power cord. Click it and the connection is complete.
Screenshot
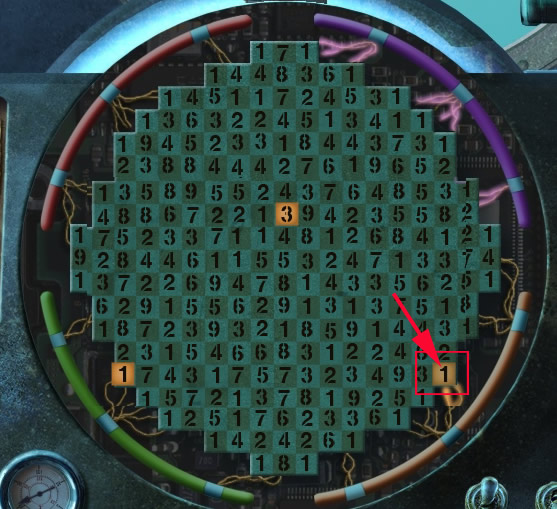
Now the 5 in the middle will be highlighted again, this time in another color.
As this you will have to connect the other power cords as well.
For pink (bottom left) you need to click: 5 - 7 - 1 (as your color is pink, you will want to click the 1 on the right side)
Screenshot
For green (bottom right) you to click: 5 - 7 - 1 (this time, you need to click the 1 on the left side)
Screenshot
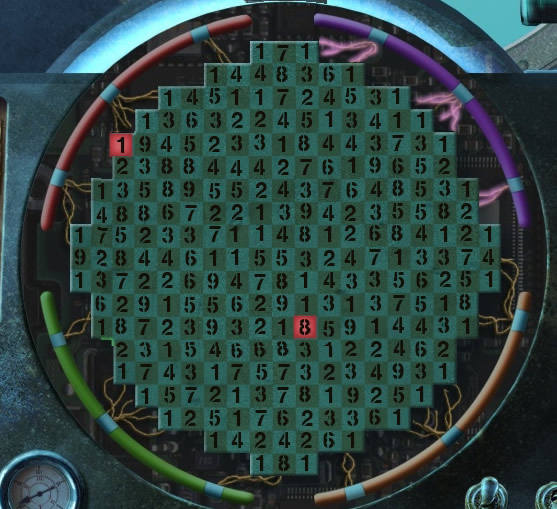
For red you need to click: 5 - (top)1 - 8 - 1
Screenshot
A cut scene follows - go back to the machine room.
The broken sonar
Click the motor on the left to get a nearby view.
Your goal is it to use the parts from your inventory to repair the motor.
You will have to do so in the right order, otherwise, some things will not work out.
Please have a look at the screenshot to see the right order.
Screenshot
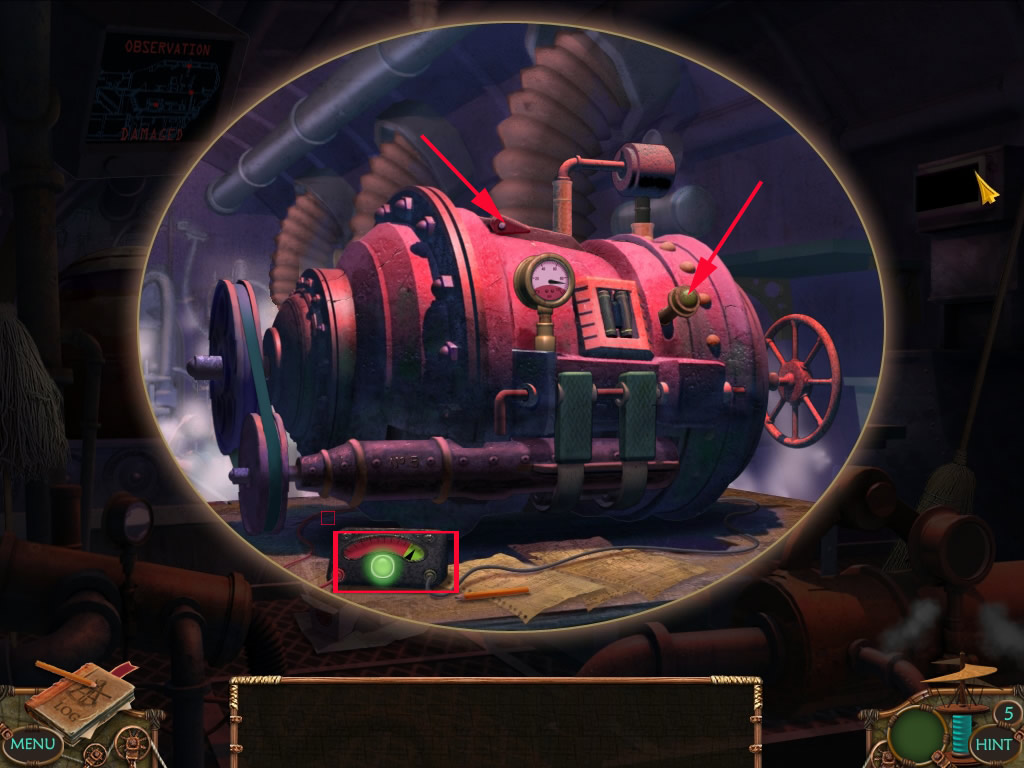
After placing all parts, click the red switch at the top, then the handle right side in the front.
The display low left has to show green, then everything is ok.
Screenshot
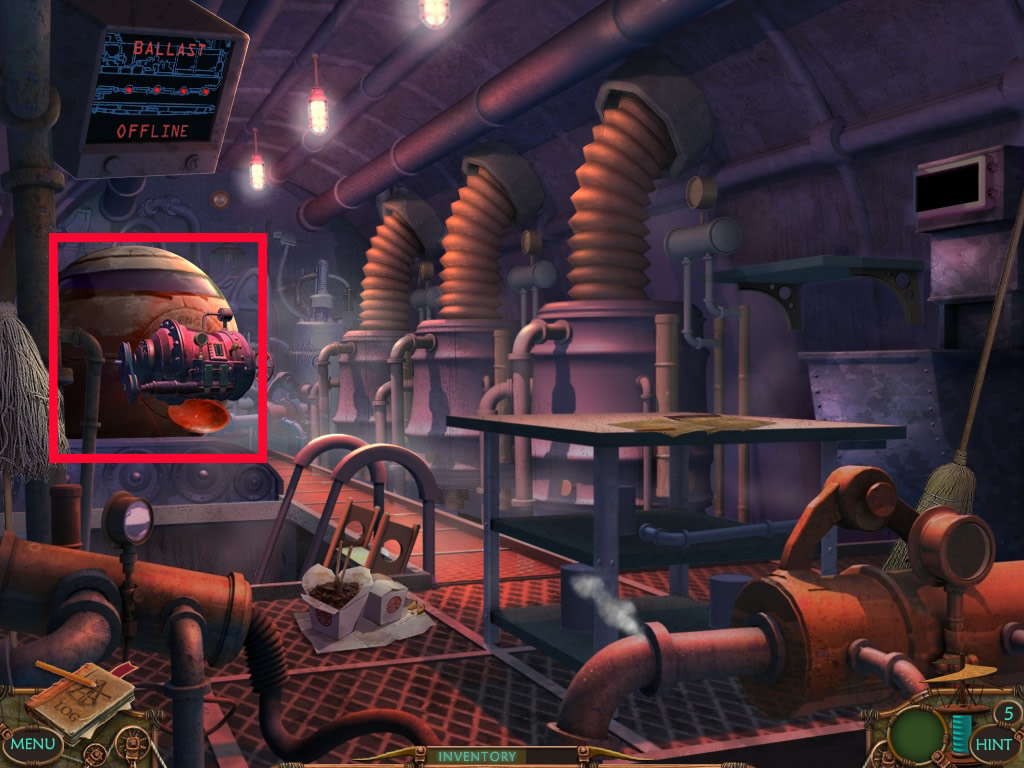
Click the motor to get it into your inventory and place it on the escape pod after.
Emely tells you that the pirates stole the bio-coil and you will have to get it back.
Screenshot
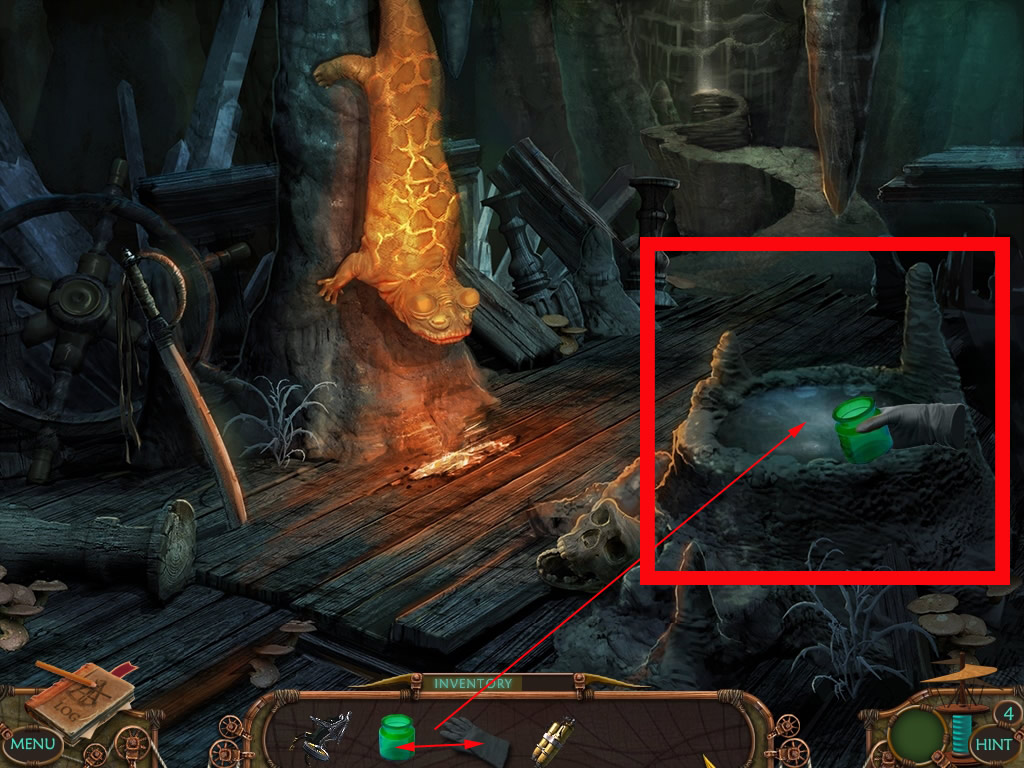
Chapter 2: Devil's Triangle
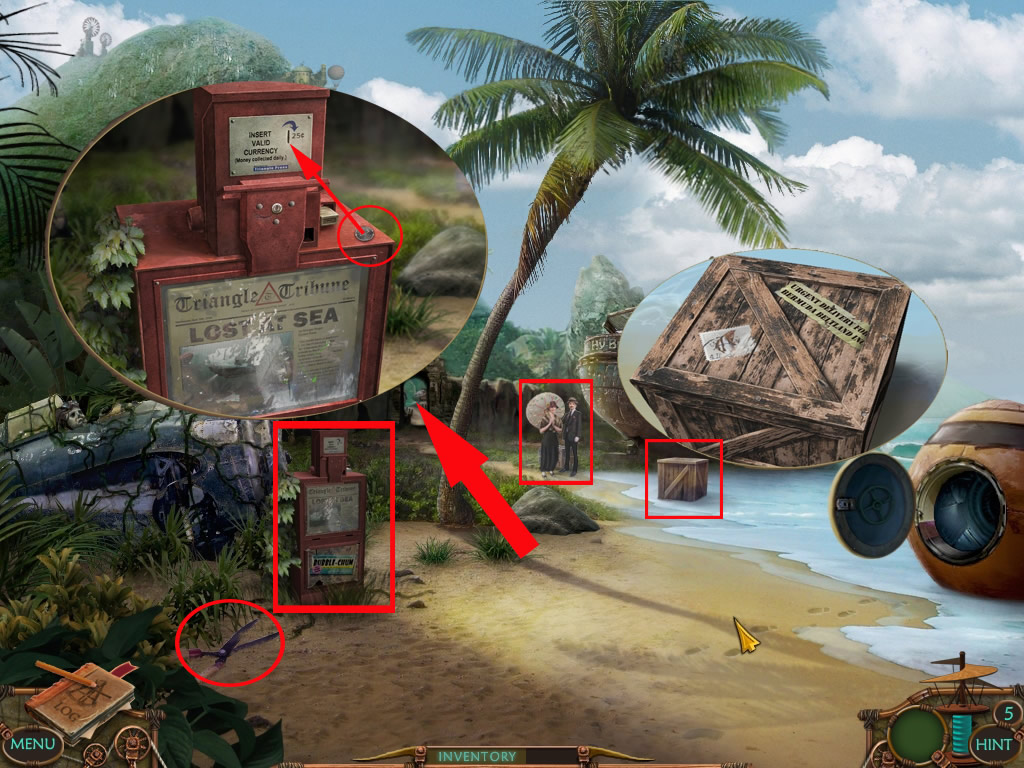
At the shore
Pick up the garden shears from the ground, left.
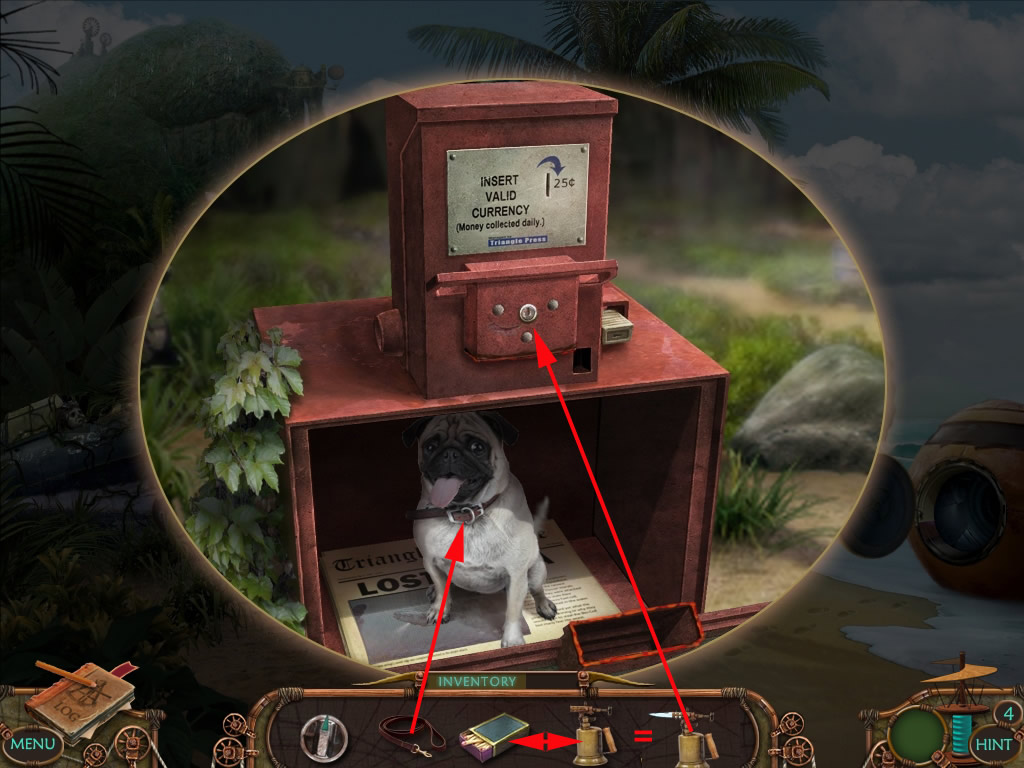
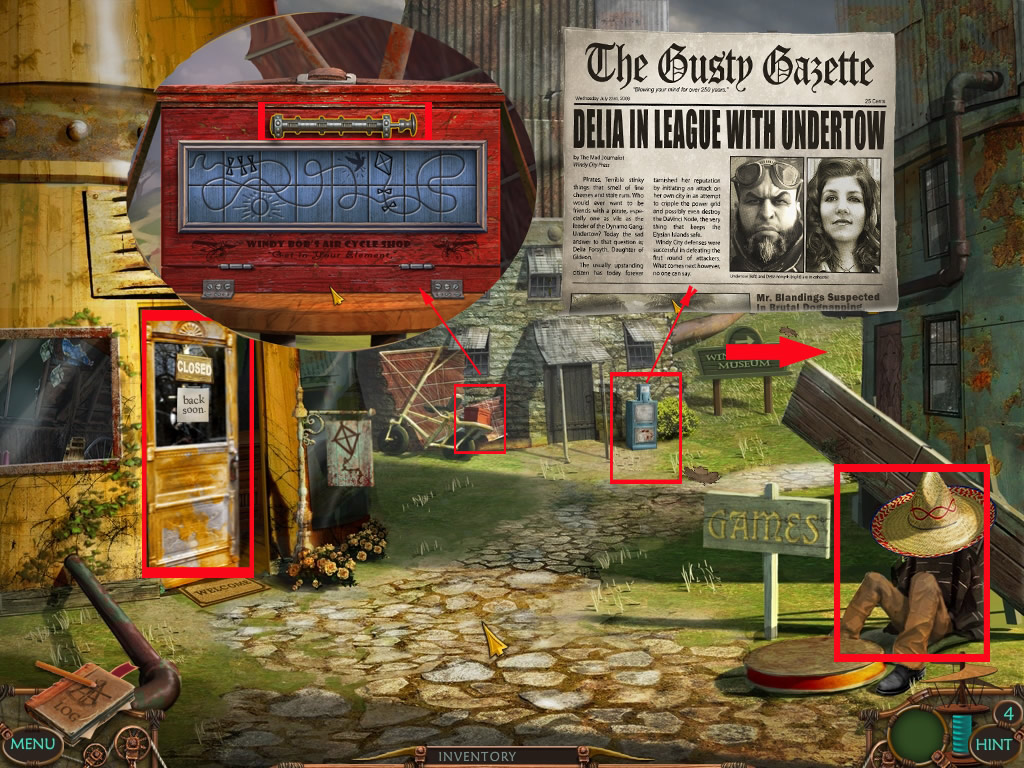
Click the newspaper stand. Top right you have a coin - get it and place it onto the coin slot on top
It does not work, seems you will have to come back later.
Click the crate in the water far right. It is closed - you will have to find some to open it.
Talk with couple in the back.
Use all options, till they asked you to help finding their dog and told you about Gideon.
Left behind the couple is an arch. Use it to move on.
Screenshot
The Lucky Lady /Bingo Boat
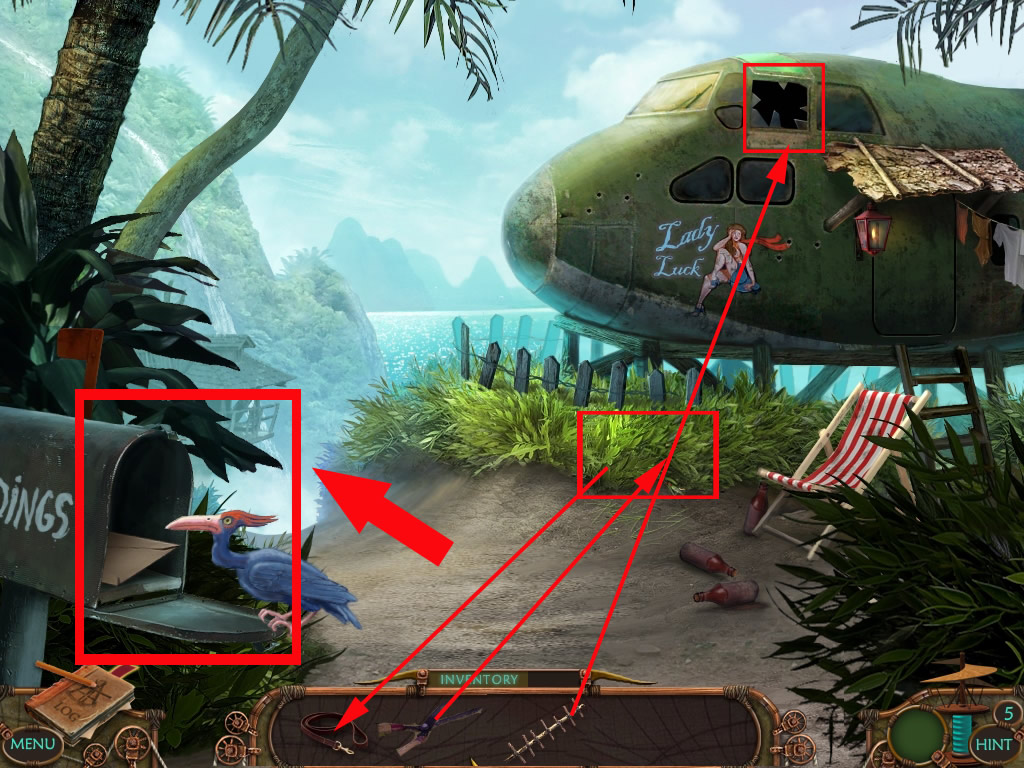
There is a letter in the mail box left, but when you try to grab it, the bird gets a little unfriendly. Come back, when you found some to feed him.
At the right side you can see a broken window on top of the "Lucky Lady" but it is to high to reach. You will need a ladder.
Use the garden shears at the gras spot in front of the "Lucky Lady" and you will find a dog leash.
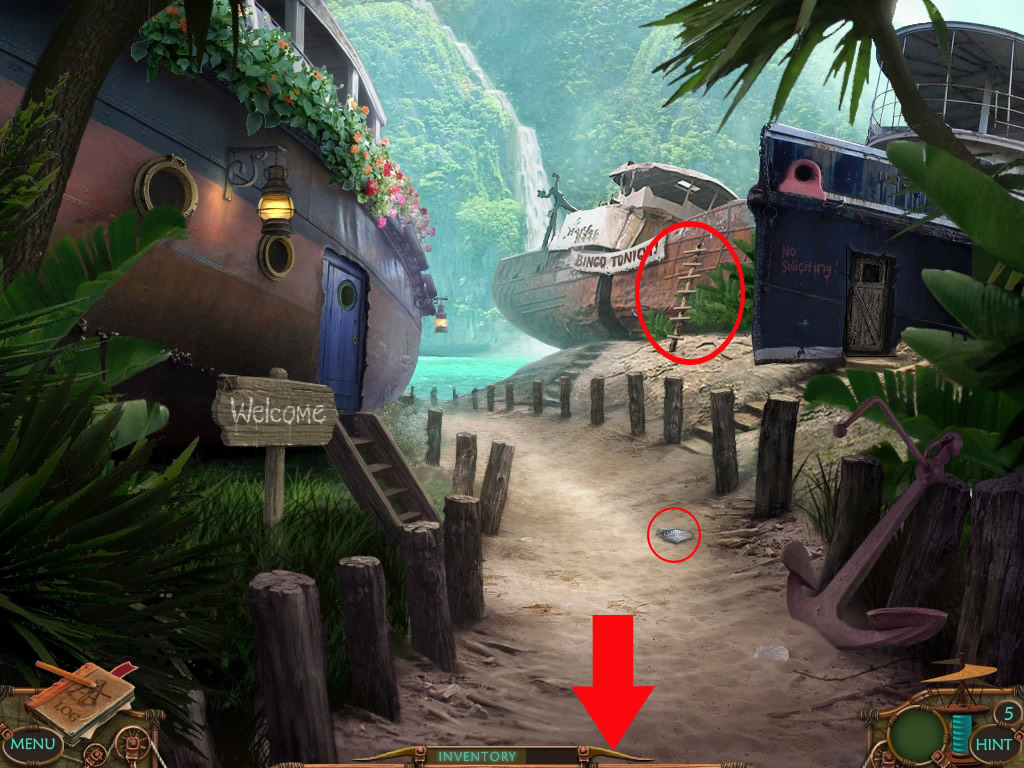
Follow the way and you will see a ship with a banner "Bingo Tonight" - grab the ladder right next to the banner.
On the ground you will find a silver batch of the HE-Team.
Screenshot
Go back and place the ladder at the broken window of the "Lucky Lady".
Screenshot
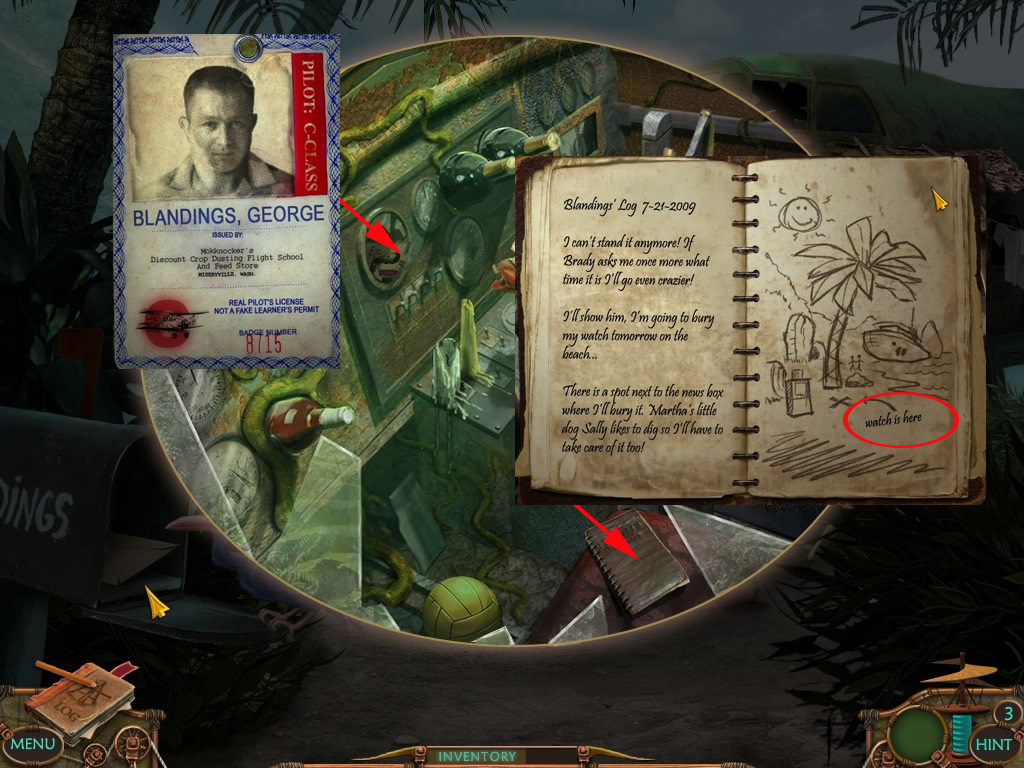
Click the window again and you will have a look into the cockpit.
Click the book in the low right and you find a description about a hidden watch.
In the little compartment in the middle you will find an ID Card.
Clikc the ID Card to leave the scene.
Screenshot
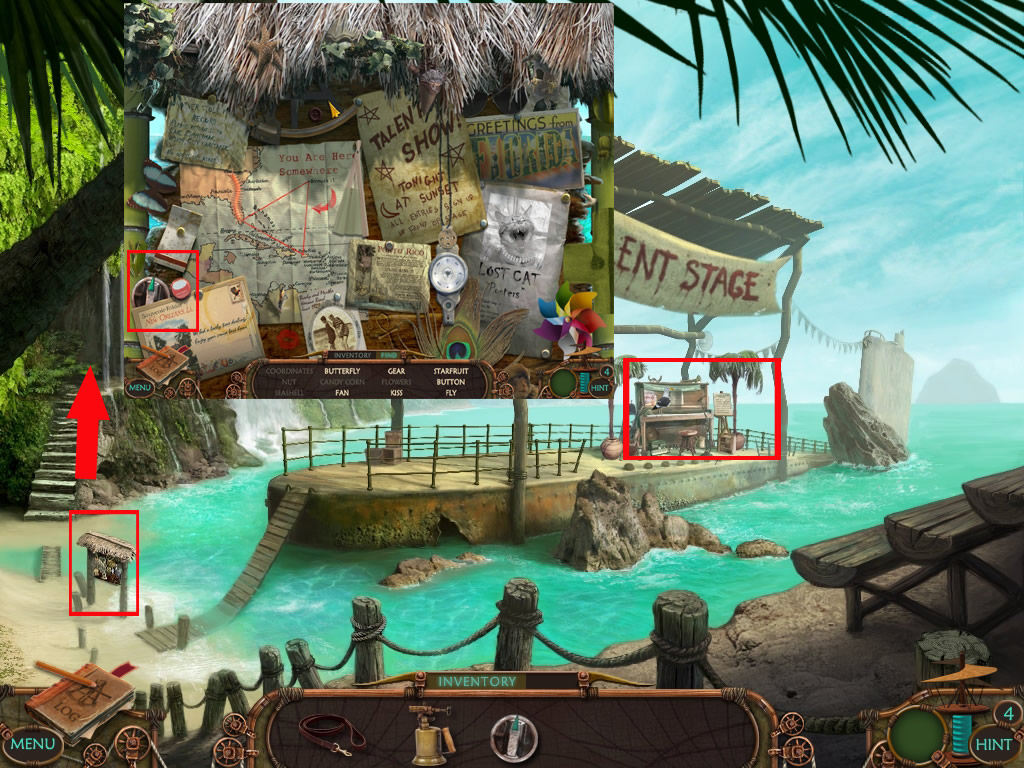
Use the arrow in the far middle to come to the talent stage.
Talent Stage
There are 2 hidden object scenes here.
Click the wooden sign, that turns out to be a note board, left side.
Find all object and you will be asked to get the button - you will find it low left, with a green fingernail on it.
Around the "black board" on the left side.
Find all objects, after that are asked you to gather the button.
Screenshot
The piano on the right side is the next one.
The items are random, but I marked the ones I had: 9 pieces of paraphernalia for dancing, 10 music symbols, 10 for Mr. Blanding's act.
The last thing to find will be the light torch left under the piano.
Screenshot
To the end, you must find the blowtorch, that stands below lower left the piano.
Use the stairs far left to come to the next location.
Elevator
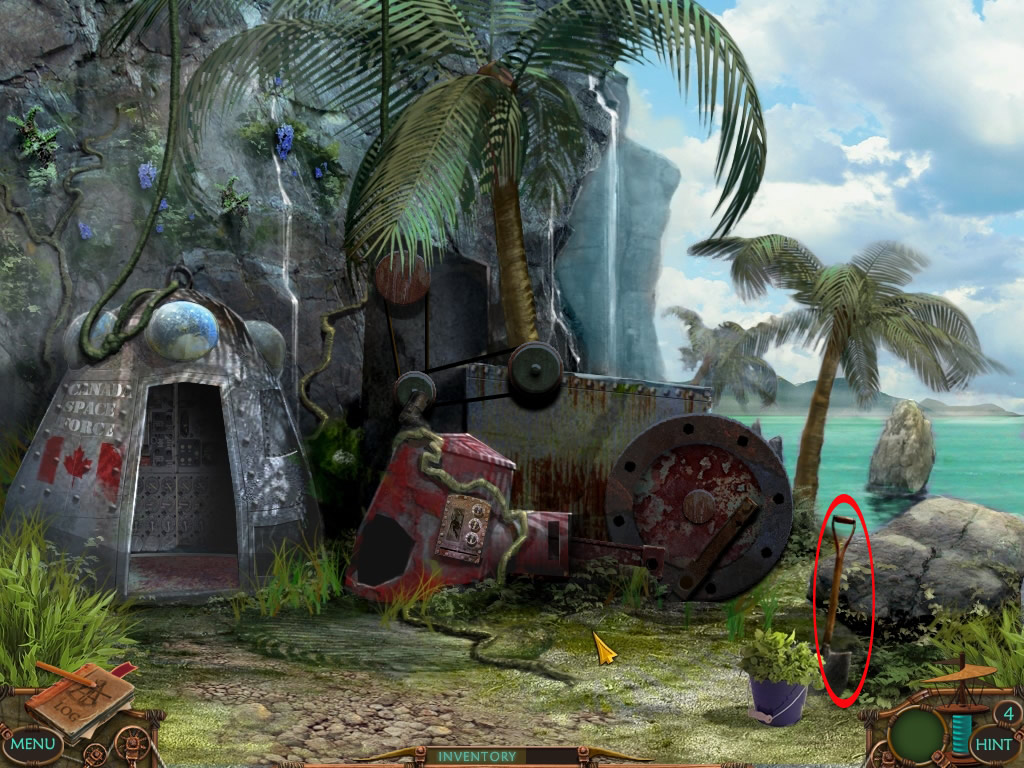
All you can do here right now is picking up the shovel at the right side.
Clicking the elevator and the machine, you learn, that there is missing some parts, that's why the elevator does not work.
Screenshot
By clicking four times at the bottom of the screen, you will come back to the shore.
At the shore
Use the shovel to dig a hole in front of the palm tree.
Click the whole to find a red box.
Click twice to open and remove the first cover of the box.
Grab the piece of paper - it says: Missing dog in todays news.....
Underneath the paper you will find a match box and at the left you can pick up the watch.
Screenshot
Now click the news stand again.
Combine inside the inventory blow torch and matches.
Use the working blowtorch at the lock of the newsstand.
The door opens and you found the dog.
Get the leach out of your inventory, click it at the dog and now you can grab him.
Screenshot
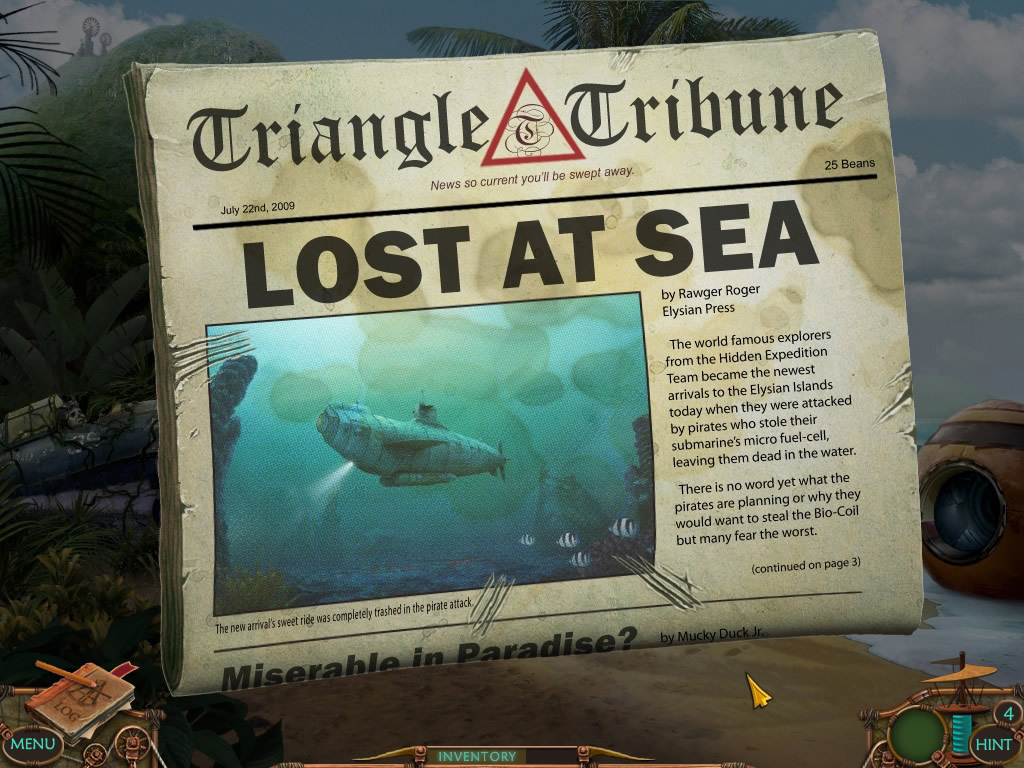
Click also the newspapers to read about the last ship lost at sea.
Screenshot
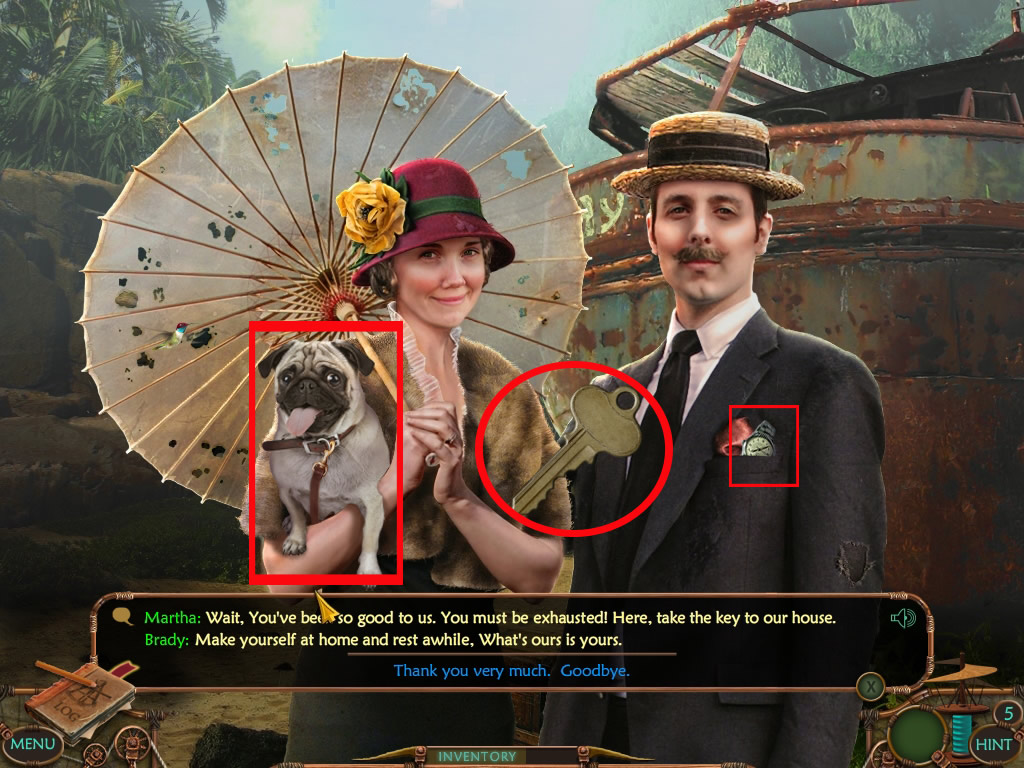
Now click the couple and give them watch and dog.
They will give you the key of their house for you to rest.
Screenshot
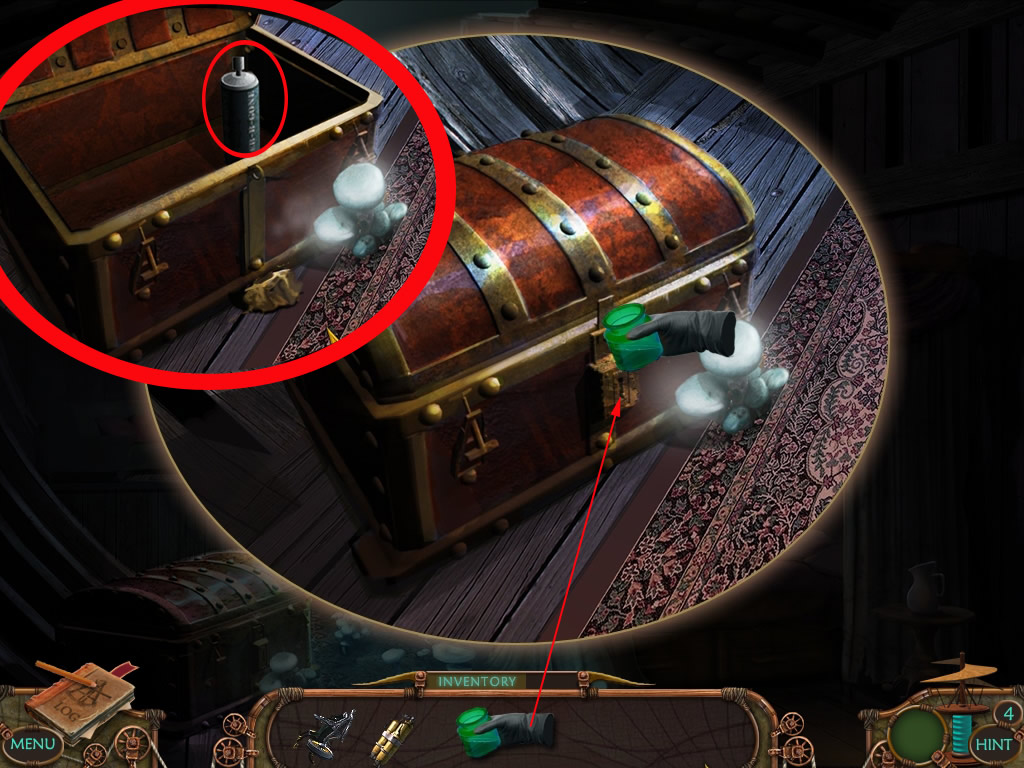
Go to the place with the Bingo Boat.
House of Marge and Brady
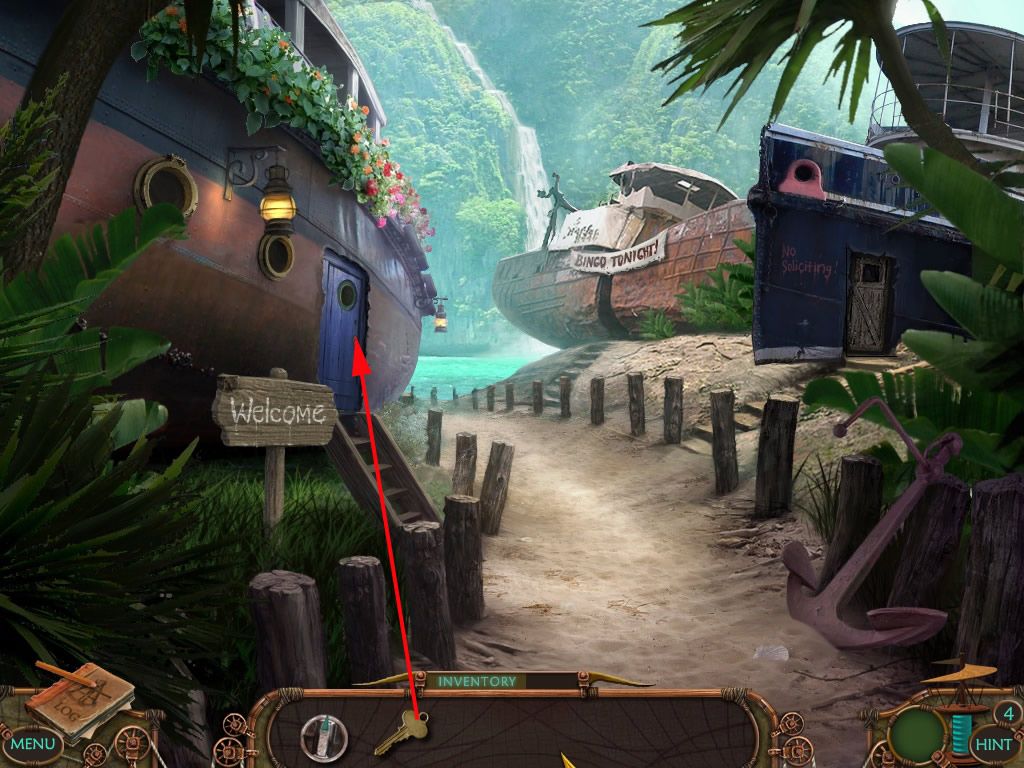
Use the key at the blue door of the ship to your left and enter.
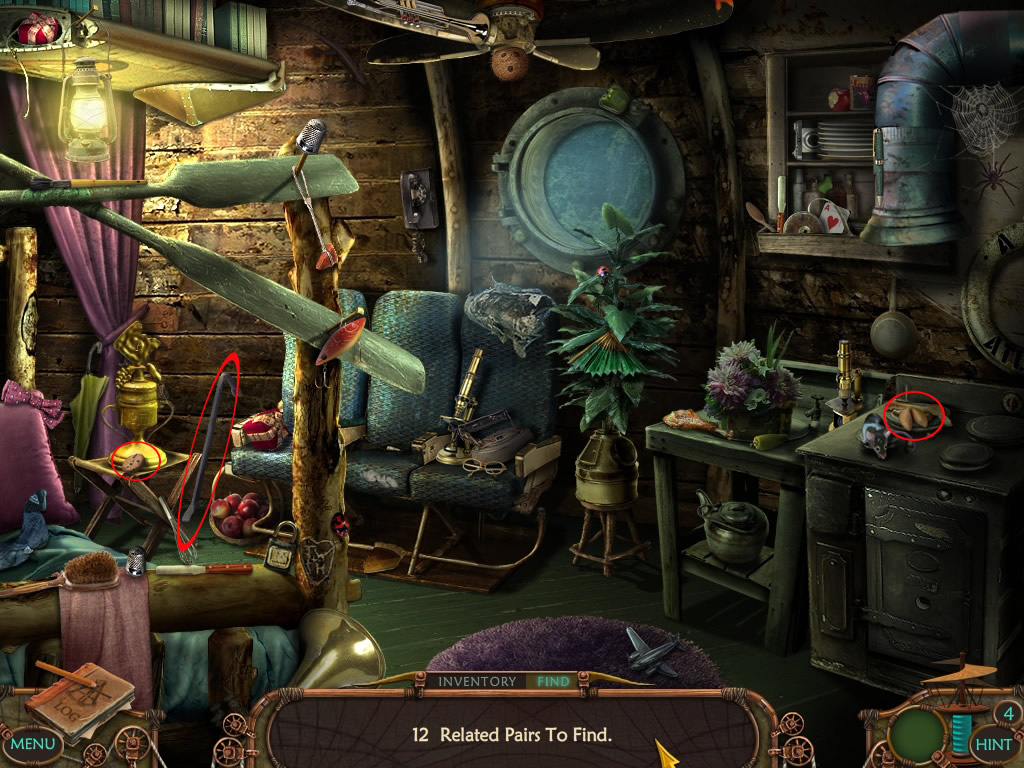
Screenshot
Find pairs related to each other.
All pairs do have the fortune cookie (on the oven, right side) and the normal cookie (left side, in front of the trophy).
After finding all pairs you need to find the crowbar, leaning at the wall far left.
Screenshot
Go back to the shore
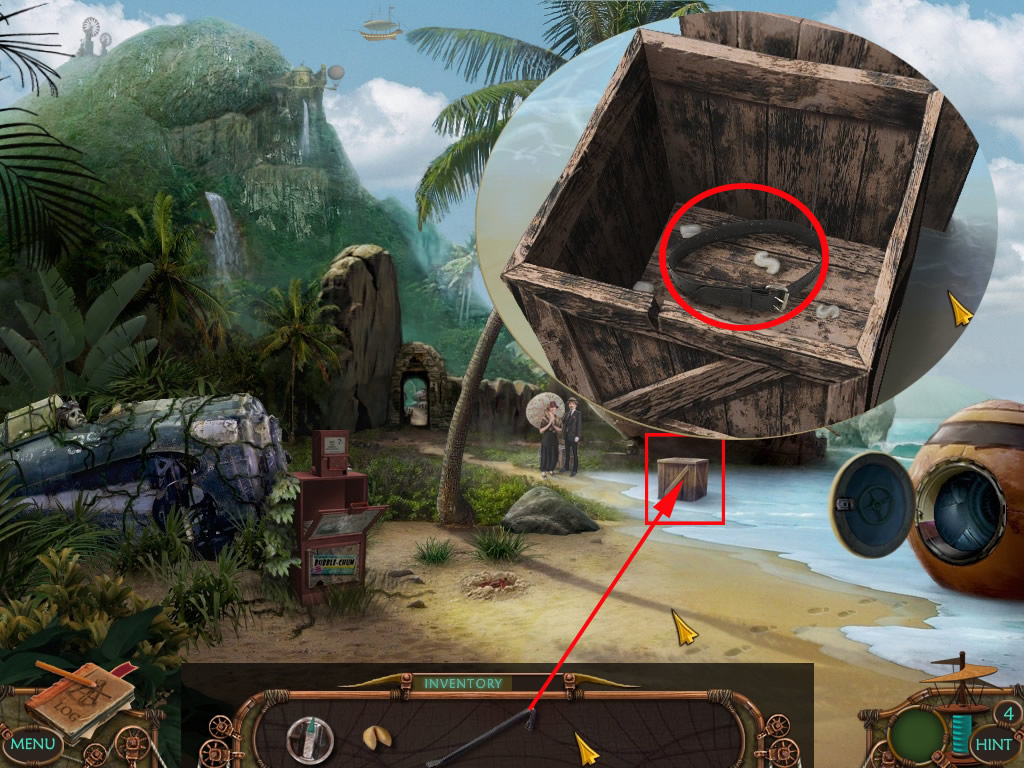
At the shore
Click the crate in the water and you will get a nearby view.
Use the crowbar to open it and click till you find the belt at the bottom of the crate.
Screenshot
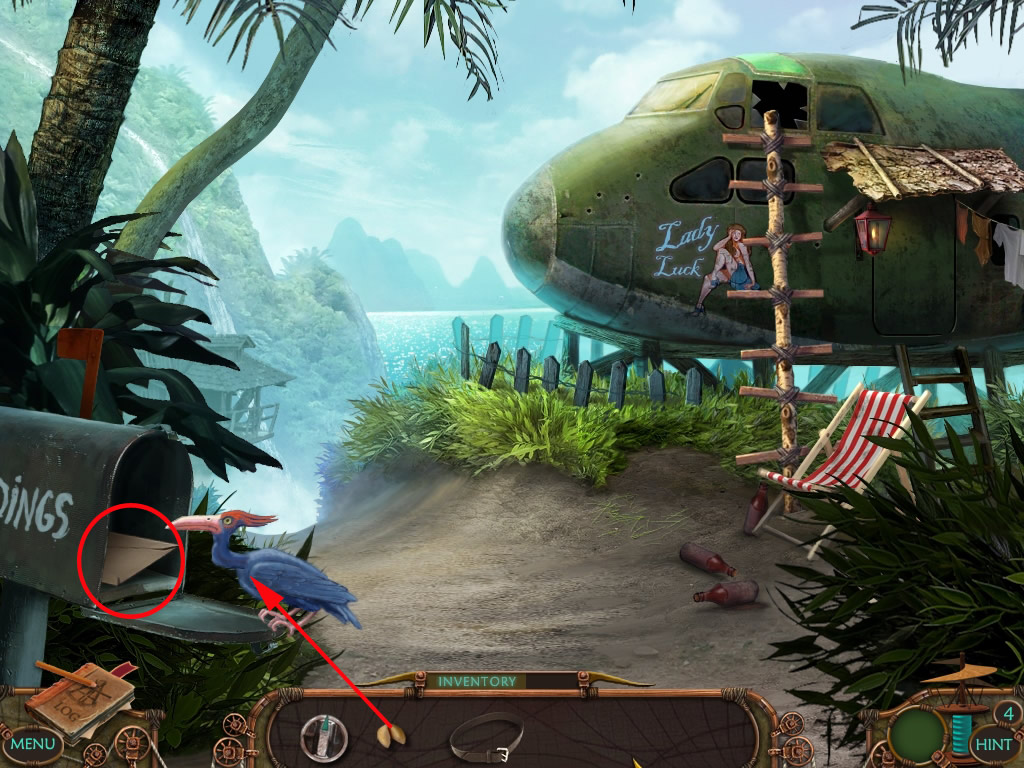
Move on to the scene with the "Lucky Lady".
The letter
Get the fortune cookie out of the inventory and give it to the bird.
Wait a moment, till the bird flys away and grab the letter from the mailbox.
Screenshot
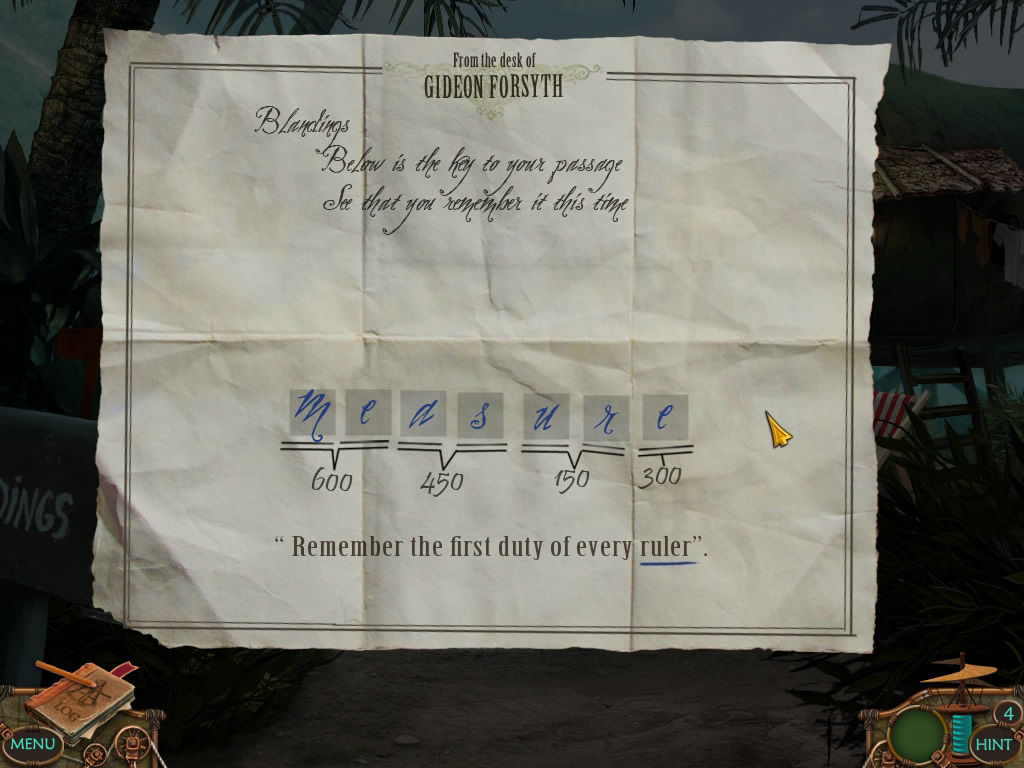
Click the letter's seal and a mini-game opens.
In the middle of the letter, you will see a blue written note.
At the outsides you see parts of words written in gold.
You need to click the golden word parts and place the same letters amongst the words in blue.
Matching letters will dissapear.
Upper and lower cases to not matter, parts can go from one word to the others, some parts you can only place, when letters already disappeared.
The solution is always the same, but the golden word parts can be placed in different ways.
All golden parts have to be used
After placing all, the last blue letters will be placed in the bar at the bottom but unsorted.
Screenshot
You will need to find the solution.
Swap letters by clicking them.
Use the sentence at the bottom as a hint:
MEASURE
Screenshot
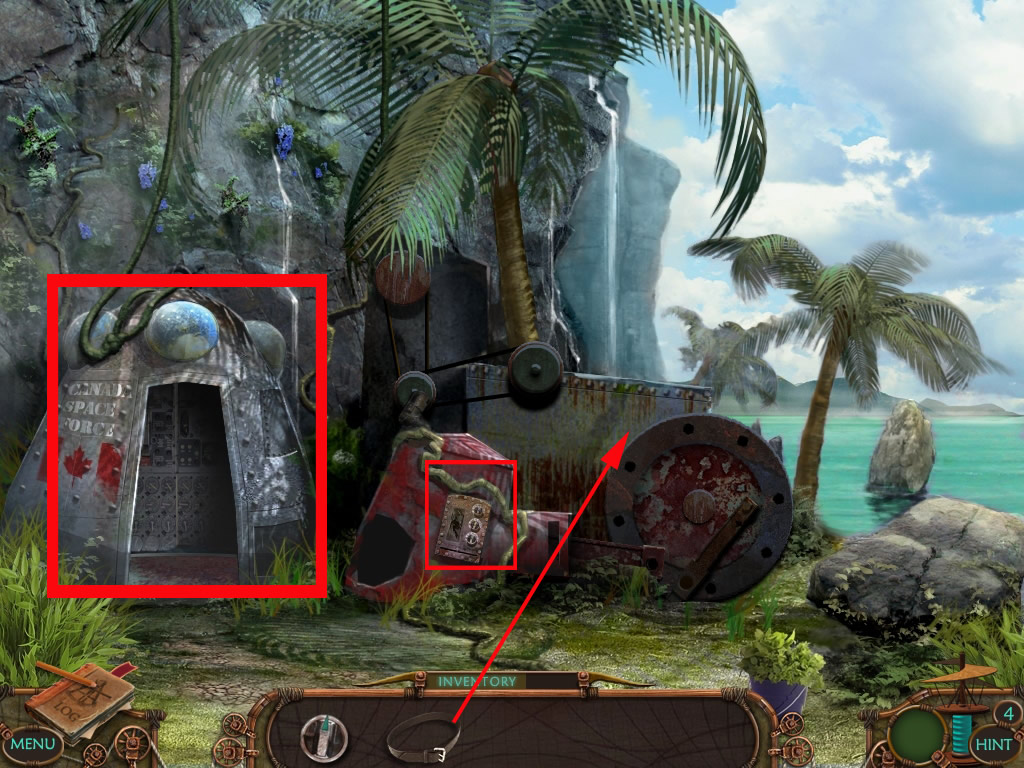
Now go on to the elevator.
Elevator
Get the belt from your inventory and place it at the elevator's motor.
Now click the little box at the left side of the motor.
Screenshot
A knob is missing, so get the one out of your inventory and place it at the empty spot.
You can see letters with arrows, pointing each to one of the meters.
Opening your log files you realize that the letters are the ones you sorted to the word MEASURE before.
The numbers below on the letter are giving you the way how to solve the puzzle.
Now click the switches and the slide according to the log files:
ME - 600, AS - 450, UR - 150, E - 300
Doing it right will let the lamp top right light
Screenshot
Click the elevator and a cut scene will bring you to your next location.
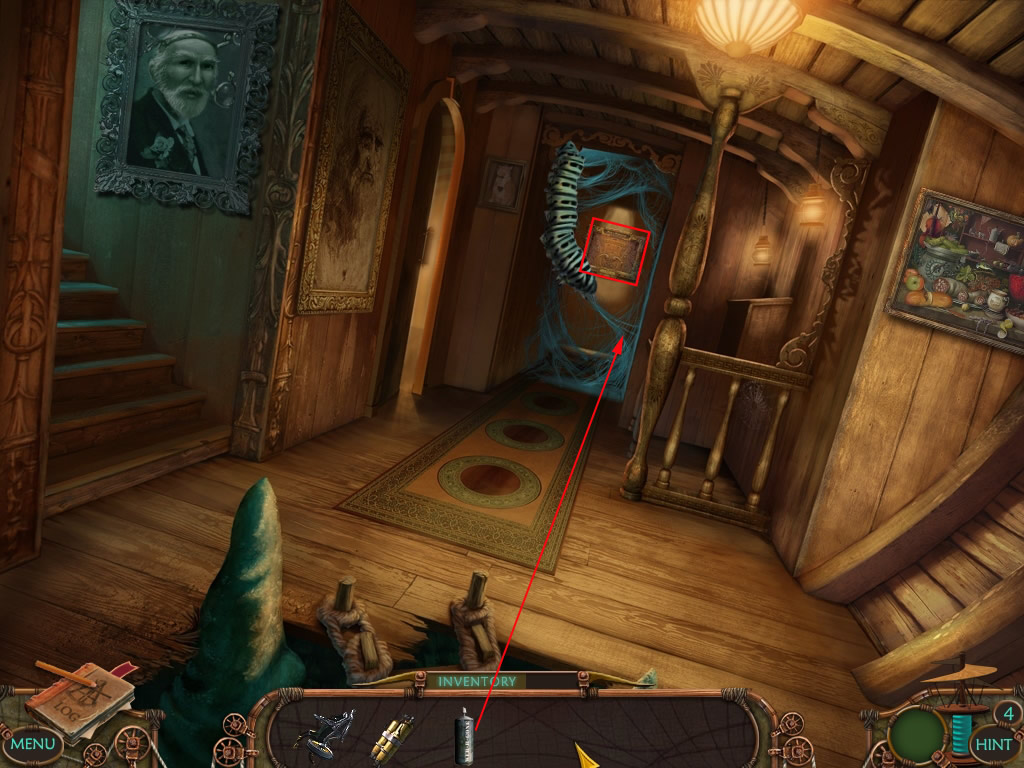
Chapter 3: A Strange Meeting
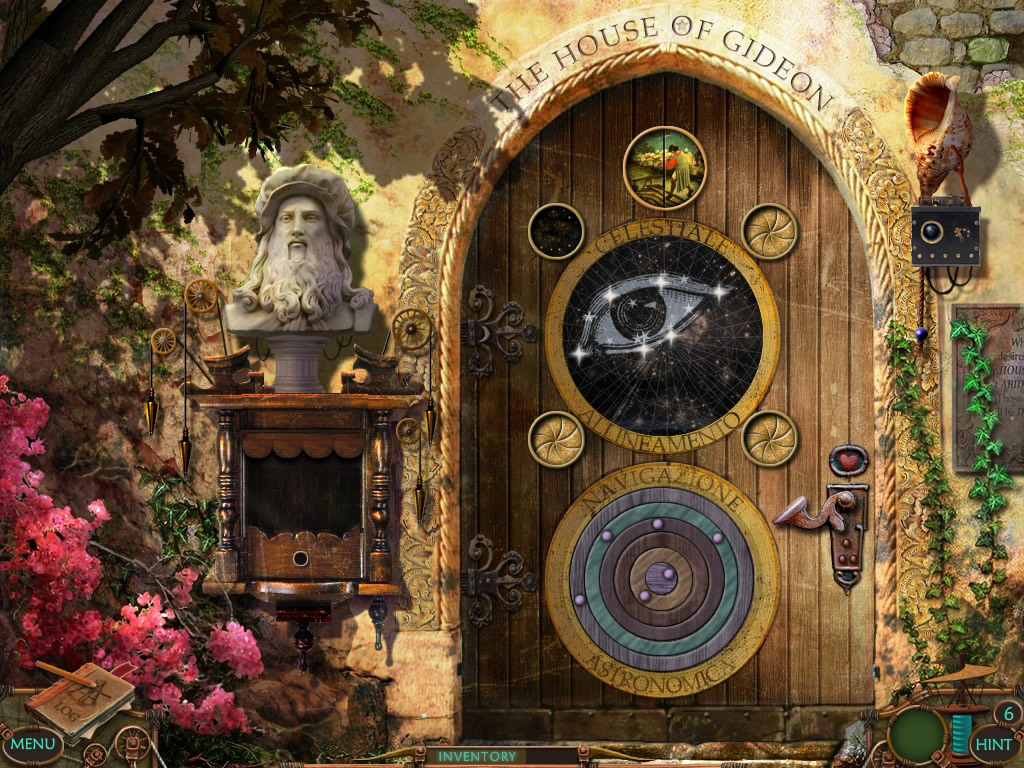
At the door
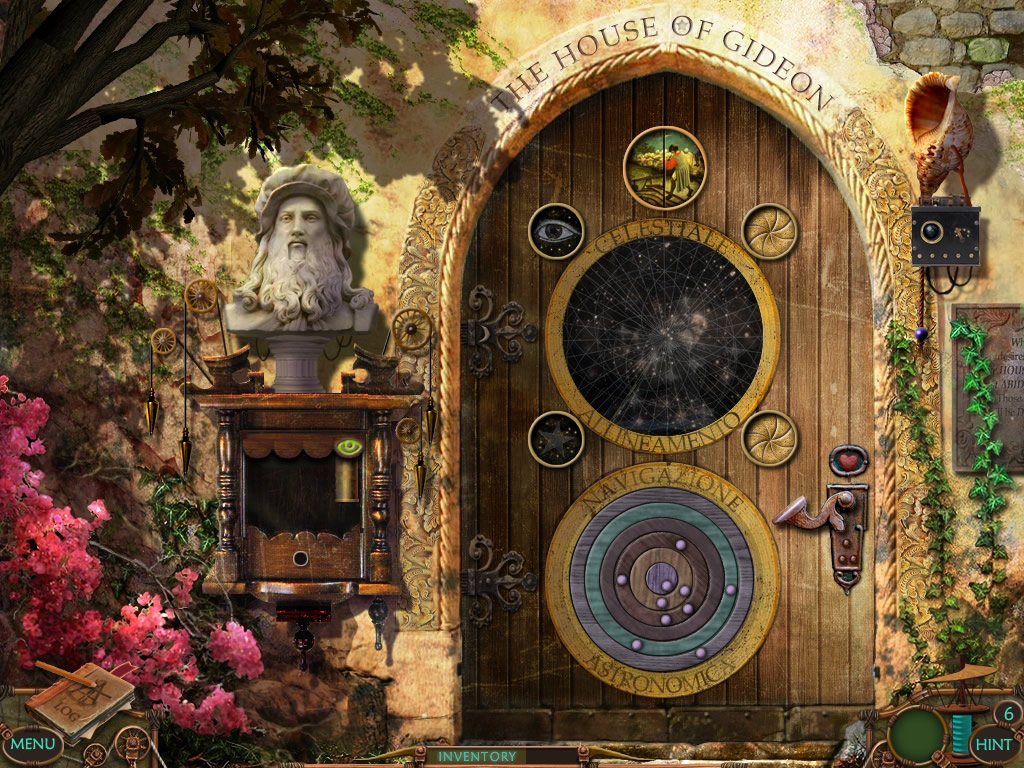
Click the far middle to reach Gideon's house.
Top right next to the door is a bell - click it and Gideon will tell you, that you have to let yourselves in.
In the middle you see movable disc with little knobs on.
Your goal is it, to turn the discs to light up stars at the star constellation on top. The right constellation will change to a picture which will appear in one of the circles around the star picture.
Click the discs to turn them.
By turning you need to watch the constellation picture. When a start lights up, you are at the right place. Move the next disc.
A disc will always light up as many stars as the disc has knobs. All stars have to light up the same time.
Discs without a knob do not have to be moved.
The screenshots show you the right positions.
Eye
Screenshot
Star
Screenshot
Heart
Screenshot
Moon
Screenshot
After finding all four constellations the fives circle on top will open.
Grab the handle inside and place it at the slot of the box at the left.
Click it and the symbols will start spinning.
Wait a moment and the door will open.
Screenshot
Patio
Get the stained glass piece from the stairs, left.
Click the tree and find the needed objects from your list.
After finding all, you will be asked to get the blow pipe.
You will find it left behind the skeleton hand.
Use the stairs to go up in to the hall
Screenshot
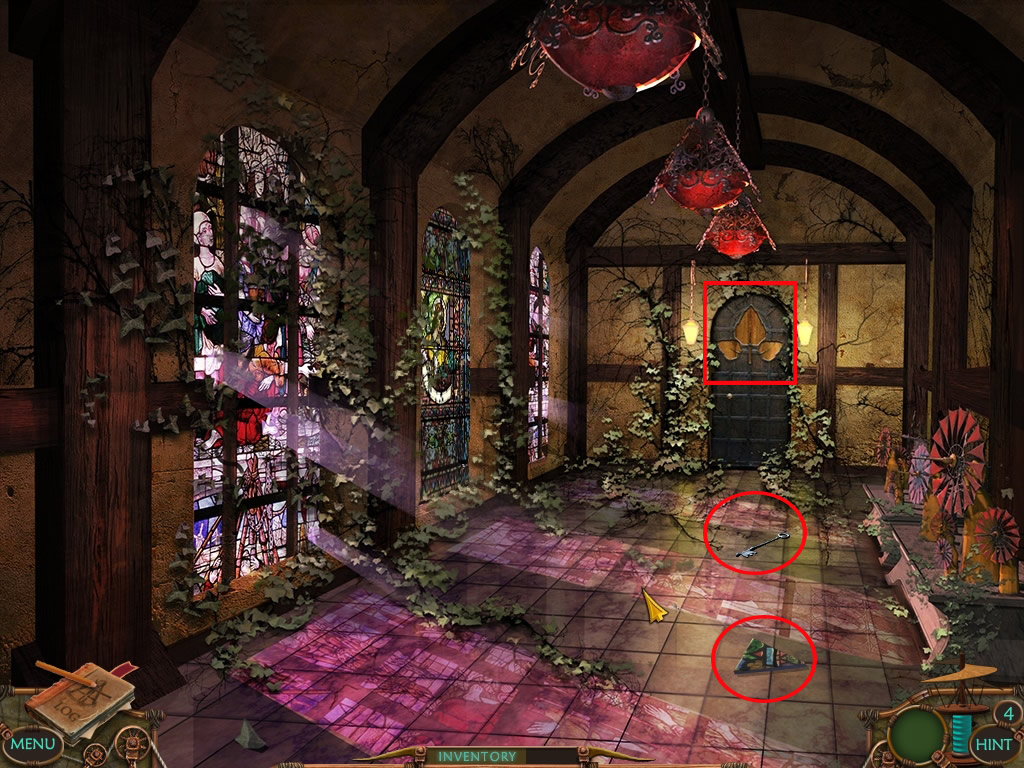
Hall
On the floor you will find a stained glass piece and a key a little behind.
The door is closed, so go back to the patio and from there into the vestibule you get access to behind the tree.
Screenshot
Vestibule
Pick up the stained glass piece at the left on the ground.
Click the telescope to learn, that the eye piece is missing.
Click the desk at the right and open the casket with the key from your inventory.
Grab the beaker.
Because of the water, you can't touch the lock of the door to your right.
Use the stairs to reach an ambulatory.
Screenshot
Ambulatory
Pick up the stained glass piece in the middle.
Far middle you can see a silver device, but you can't use it yet.
Screenshot
Go back to the patio and up to the hall.
Hall
Click the middle window to activate a puzzle.
First get the stained glass piece left.
Now look at the window. It has 6 circles - 3 on top, 3 at the bottom.
Click the circles moves the different parts. Hovering over the circle will lighten the one you are going to move by clicking.
You also see white spots, all part of a geometric shape as your stained glass pieces.
Your first goal is it to turn the circles, so that you can place back the missing shapes.
When having a complete shaped white spot, you can place the according shape from your inventory at once or first make all shapes and then place the stained glass pieces.
The following step by step solution allows both:
I numbered the circles from left to right- top 1-3, bottom 4-6
Screenshot
Click once: 1, 2, 1, 2, 3 (star and pentagon are ready)
2 (square is ready)
5 (circle and heptagon is ready)
Now the circles have to be moved, till the picture is complete.
Click: 5, 1, 2, 1, 2, 3, 3, 1, 4, 5, 6
The door in the back will open as soon as the picture is complete.
Screenshot
Enter the botanic lab.
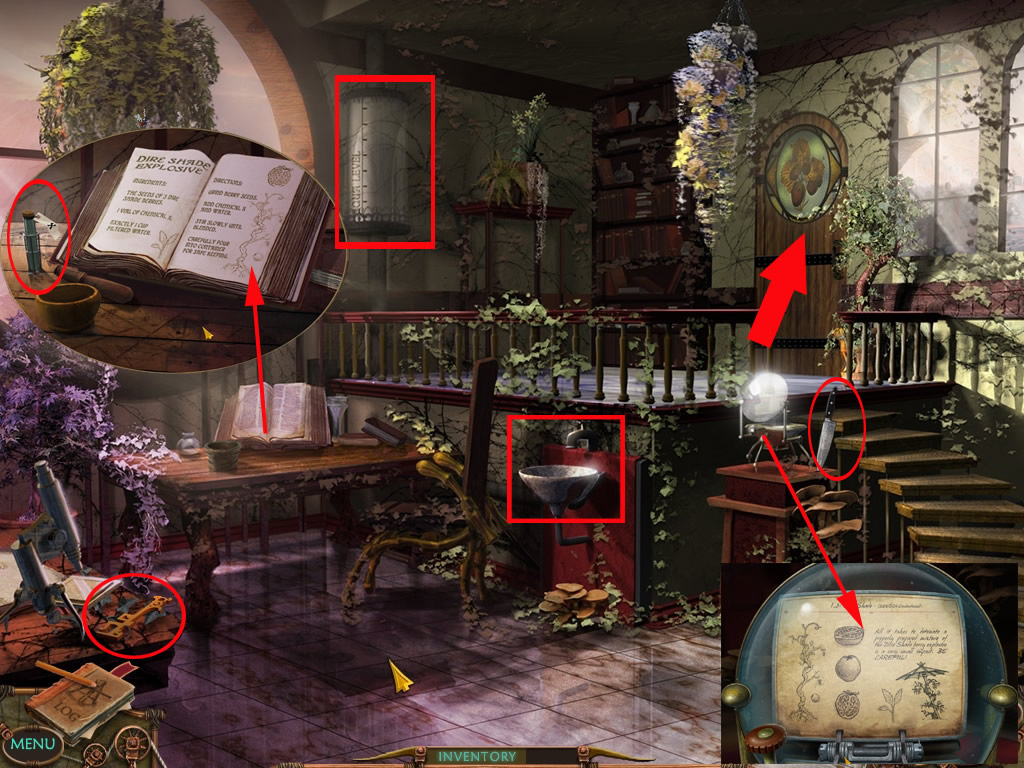
Botanic Lab
Get the key from the table low left.
Click the book on the table and get the test tube with Chemical X.
Read the instructions in the book, you will need 3 seeds from Dire Shade Beries, 1 x Chemical X and 1 cup filtered water.
Get the knife from the table next to the stairs.
Click the reader on this table and switch pages with the lever left side.
Read the page about Dire Shade.
The faucet in the sink only drops, the water tank in the back is empty.
Screenshot
Enter the garden through the door in the back.
Garden
Grab the cup low left.
Click the tree on the right side, you will get some berries.
There is nothing left to to, so go back to the ambulatory.
Screenshot
Ambulatory
Click the silver device in the back and place the key in the lock.
Click the key till the symbol at the right lights up. It's the same symbol as on the door to the botanic lab.
Use the lever left side.
Screenshot
Go back to the botanic lab
Botanic Lab
The water tank in the back is now filled.
Click to faucet to make the water run and fill your cup from the inventory.
It will go back fill into your inventory automatically.
Click the book left to get a nearby view.
Place the the berries on the table and use the knife to cut them. Click three times to cut all berries.
Pick up the berries and place them in the mortar - use the pestle to crush them by clicking.
Get the cup with water and the test tube with Chemical X out of the inventory and give both into the mortar.
Use the pestle to stir.
Get the beaker out of your inventory and click it at the mortar to pour the liquid into it.
Screenshot
Enter the garden.
Garden
Click that thing at the right and you will get a nearby view.
Pour the elixir you just made in the middle of that thing.
The nearby view closes and you need to get the blow pipe out of your inventory.
Click it onto that thing.
A short cut scene shows you the explosion..
Screenshot
No water is running anymore - go back to the vestibule.
Vestibule
Click the device left next to the door at the left.
The solution is random as the start positions are random.
Click on the green bars to rotate the letters around.
Your goal is to turn all the letters facing in the same direction.
The vertical green bars flip the connected letters in a horizontal manner.
The horizontal bars flip the connected letters in a vertical manner.
You only have a numbered amount of trials - when ever flipping a letter couple, one of the letters of the word ENTRARE at the top gets dark. After all letters are dark, you will start over with a new board.
A hint will skip the puzzle.
Screenshot
When all "G" are facing the same direction, the door will open.
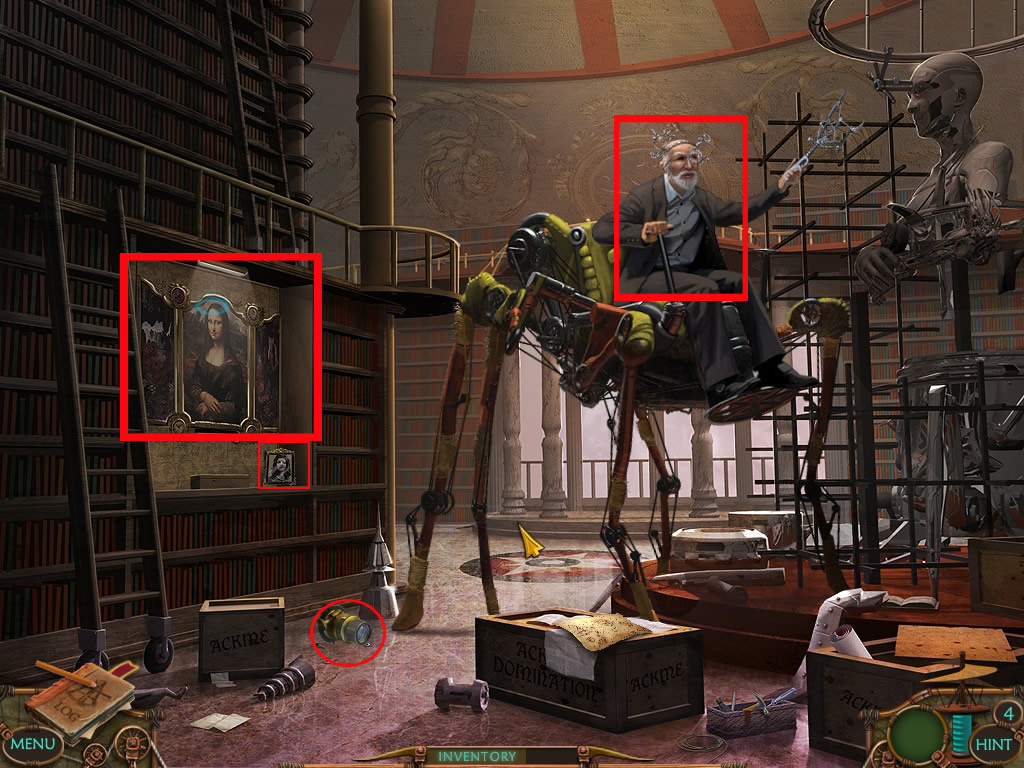
Gideon
Talk with Gideon.
To get back the Bio-Coil, you need to talk with his daughter Delia - she is in her lab and you will need two marbles to enter.
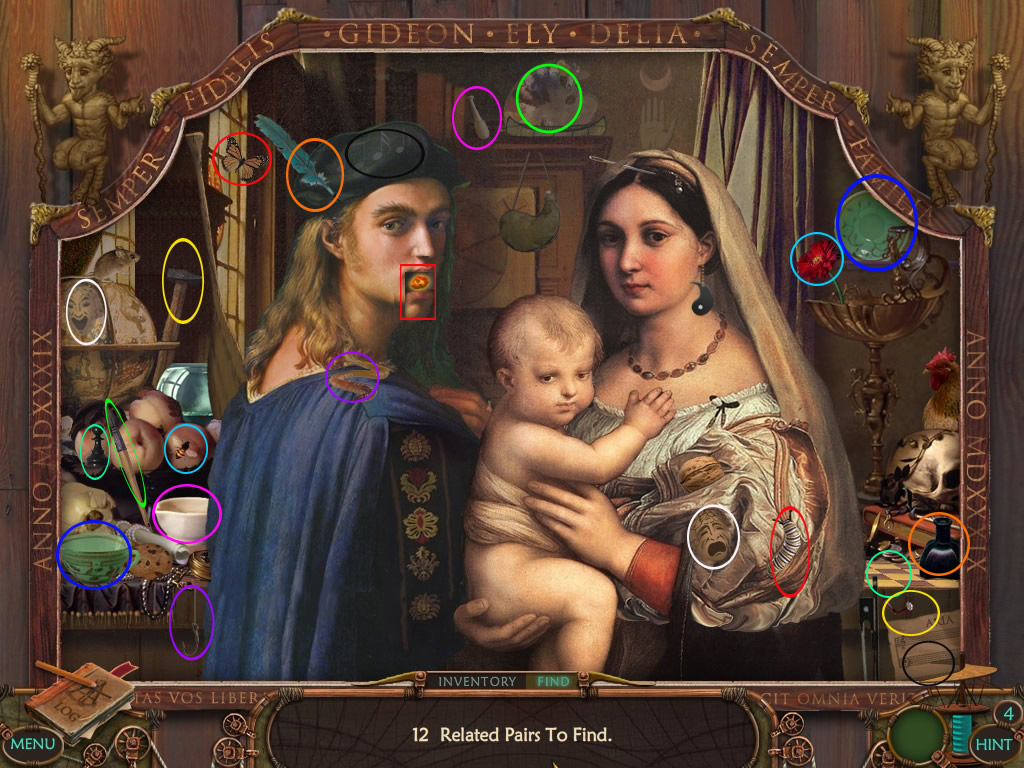
Pick up the eye piece from the floor and then the painting from Mona Lisa.
Screenshot
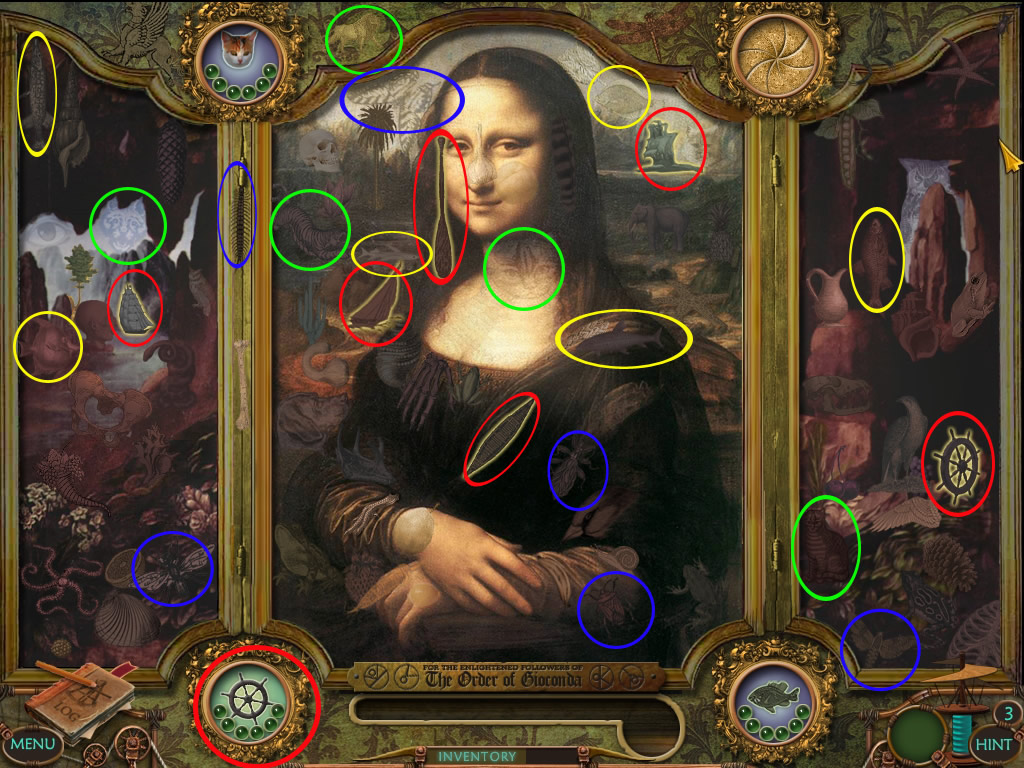
There are circles at all four edges of the painting - one will you a picture.
You need to look for 6 related items to the example picture - related in the meaning off: Seeing a ship wheel makes you looking for ships, paddle, canoe or paddles.
The topics are random, the screenshot shows you: Boat, Cats, Bugs, Fishes.
For each topic you need to find 6 relatives, how much you still have left, you can see at the green dots below the picture circle.
Screenshot
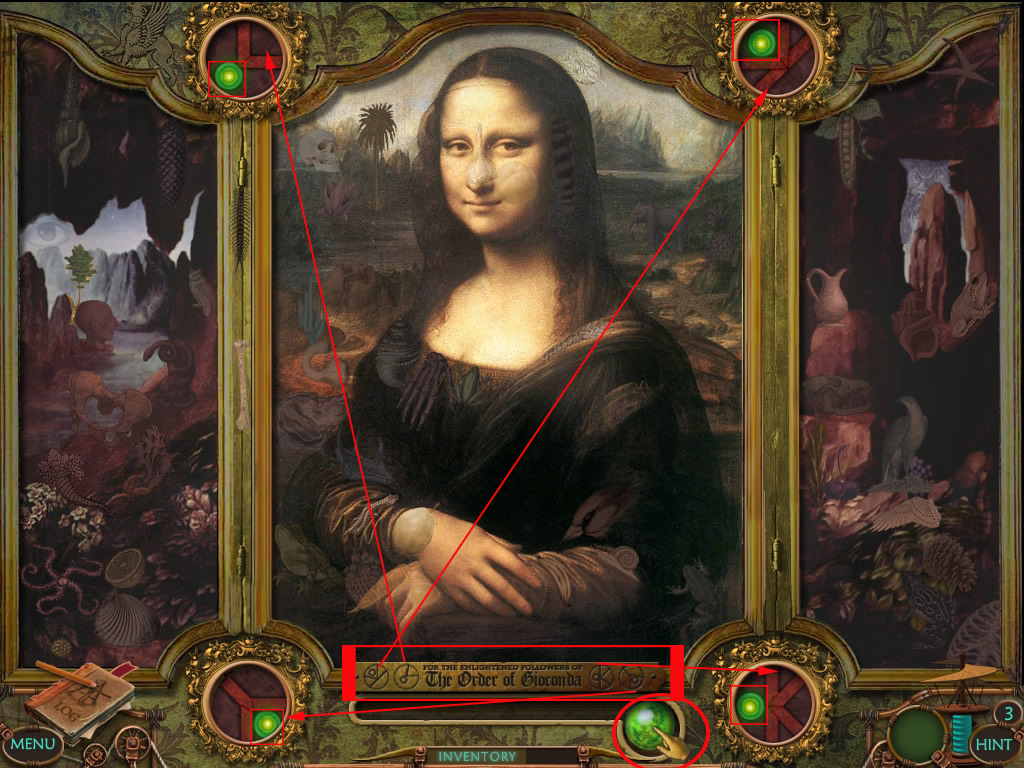
After finishing this part, you will see a figurine in each circle.
Below the painting you see a bar with the same figurines, but in different positions.
Two green marbles will come - pick them up.
Screenshot
Go to the vestibule.
Vestibule
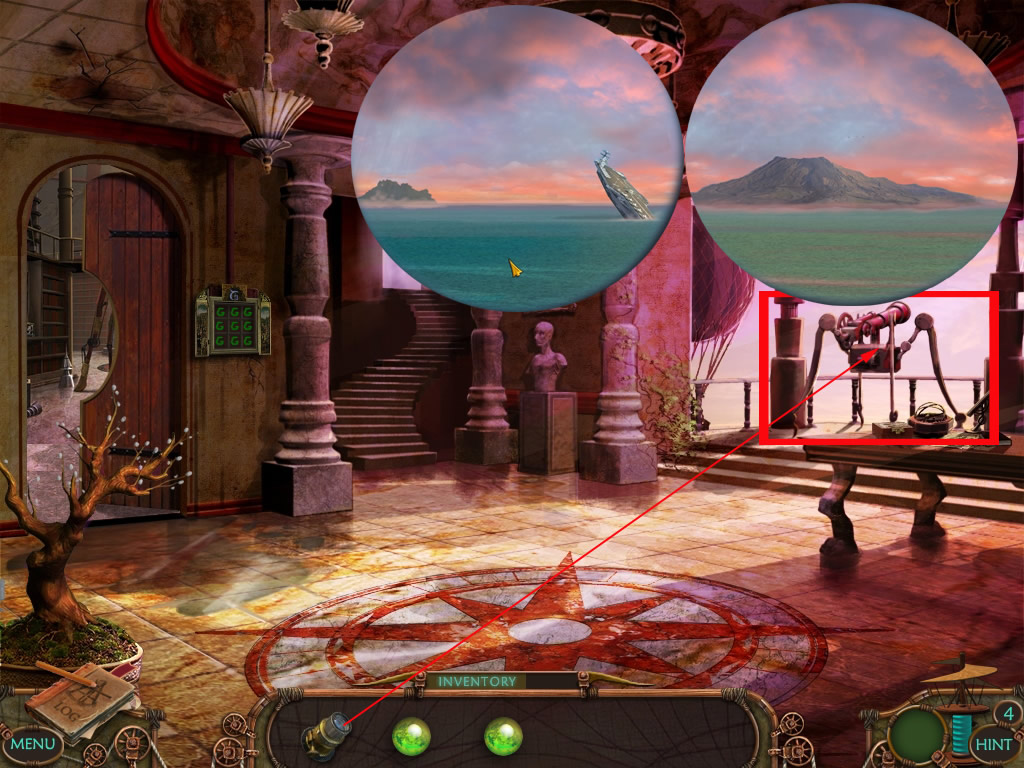
Click the eye piece from your inventory and click it at the telescope.
You will see a sinking ship.
Moving your mouse to the left or right will show you another island and a vulcano.
Screenshot
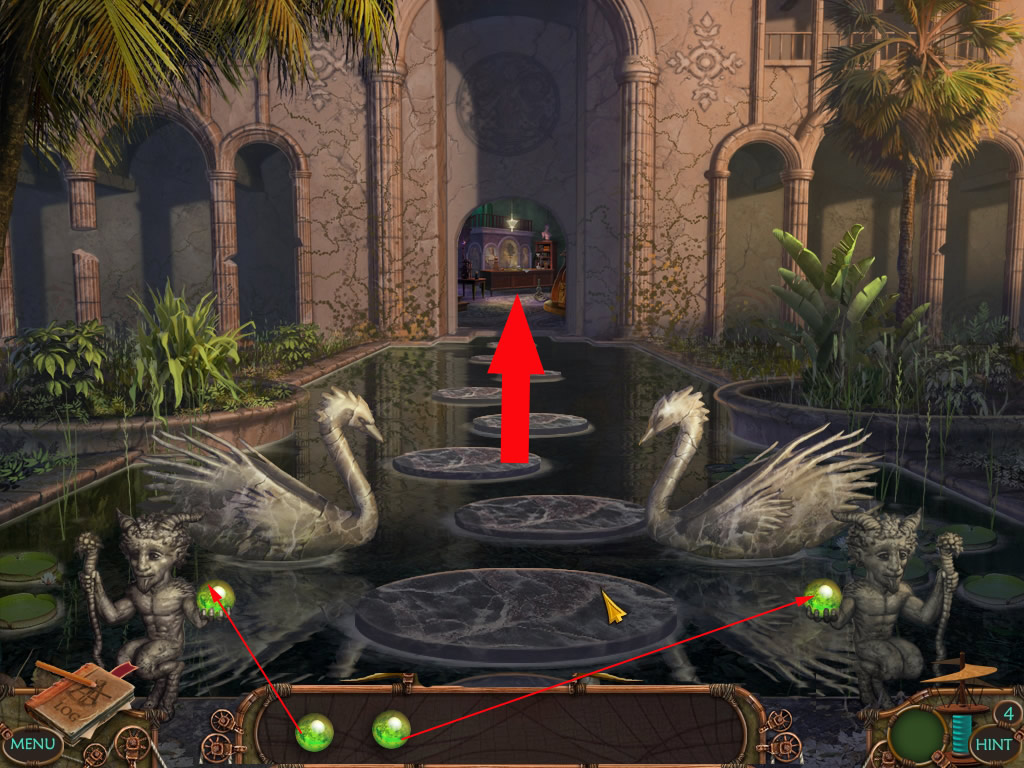
Go back into the garden.
Garden
Place your cursor in the far middle at the swans and click the arrow.
Get the green marbles out of the inventory and place one in the open hand of each statue left and right.
A cut scenes shows you how the door opens.
Screenshot
Click the entrance - on the work bench at the back you see the container with the Bio Coil.
Click it - Delia appears and throws a bottle with liquid after you... you loose conscious.
Screenshot
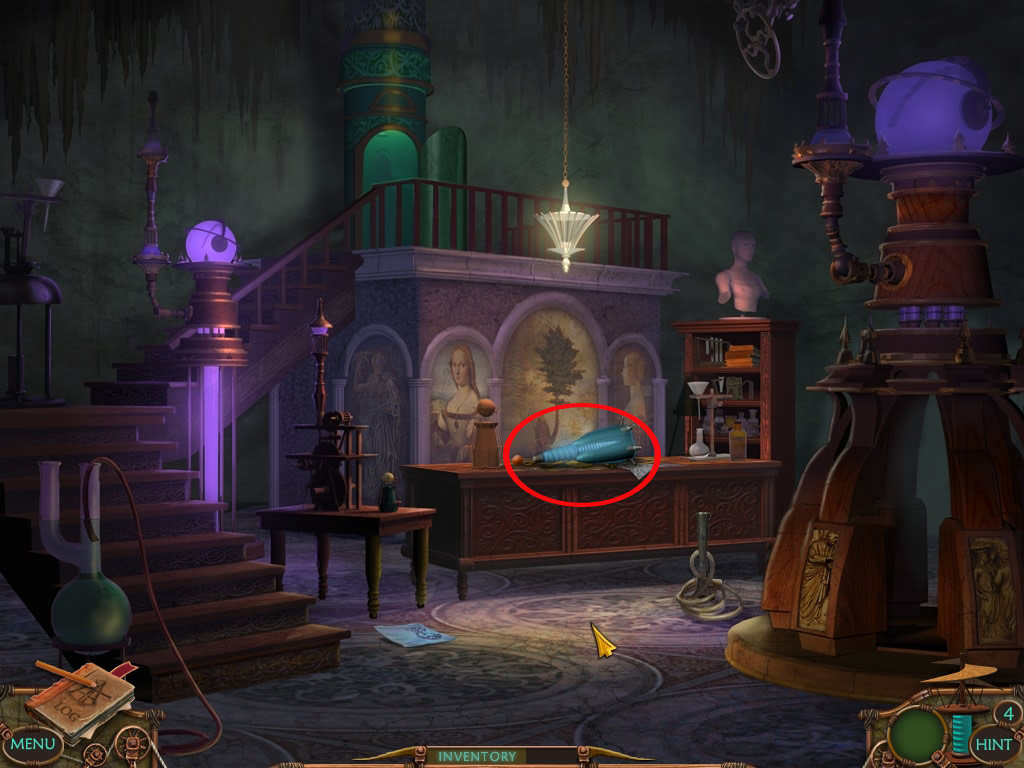
Delia's Lab
Click the blue print left on the floor.
It seems the Bio Coil is needed for a machine to talk with people in the past.
Screenshot
Click the work bench to activate a scene finding related items.
The items are random, but a few are marked on the screenshot.
After finding all, you are asked to find a letter - click the envelope in the middle
Screenshot
On top of the letter, you will find a (random) number - it will be copied to your log files.
Screenshot
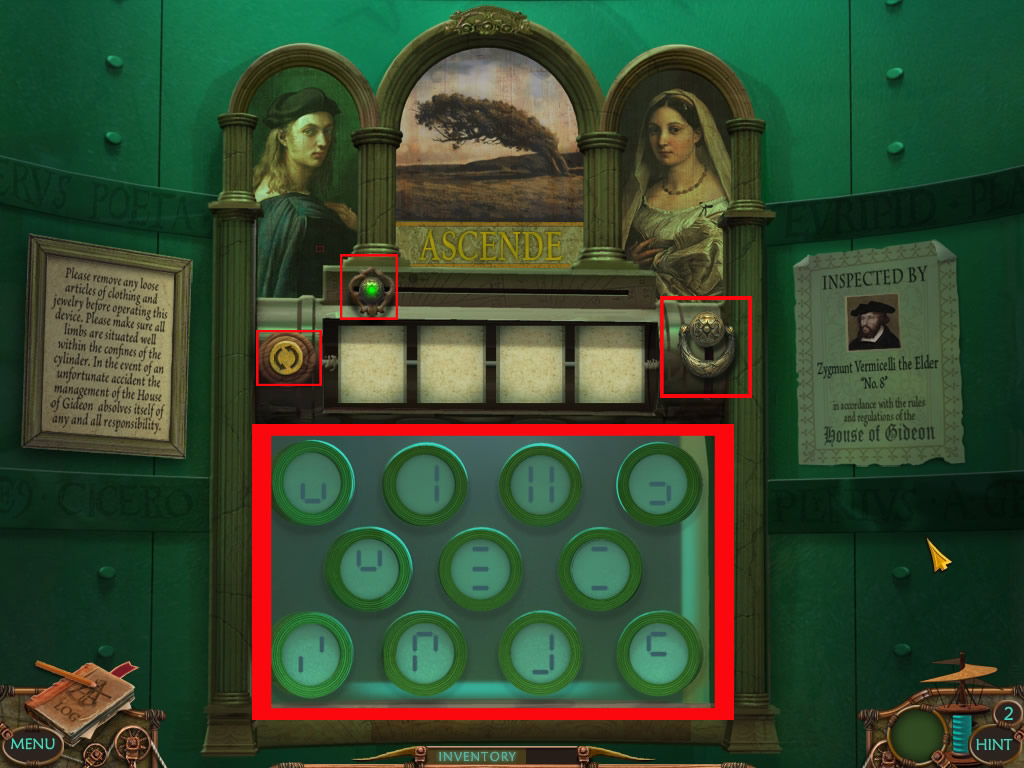
Click the green tube top middle.
Screenshot
Here you have to give in these numbers from the letter, but this is not so easy.
The machine allows only digital numbers.
You will not be able to enter the number as a whole unit, you have to find the 2 symbols that make up that digital image of the number.
Click on a tile at the bottom to select it.
Then click on a symbol at the bottom of the puzzle. The symbol you clicked will be entered into the tile you selected.
Use the double arrows on the left button to flip the tile so you can input the symbol that completes that particular number.
Repeat the same procedure for the next 3 numbers.
To move between the empty fields click first the green knob above, then the field you want to place the next number.
You do not have to flip first all the time, you can also do first only one part of your numbers, then flip and do the second part. It is up to you, what seems to be easier for you.
The screenshot shows a list with the symbol combinations of all numbers.
Screenshot
Once all the numbers have been placed correctly, click on the knob on the right to enter your selections.
If the numbers are correct, you will see a shot cut scene, bringing you to your next location.
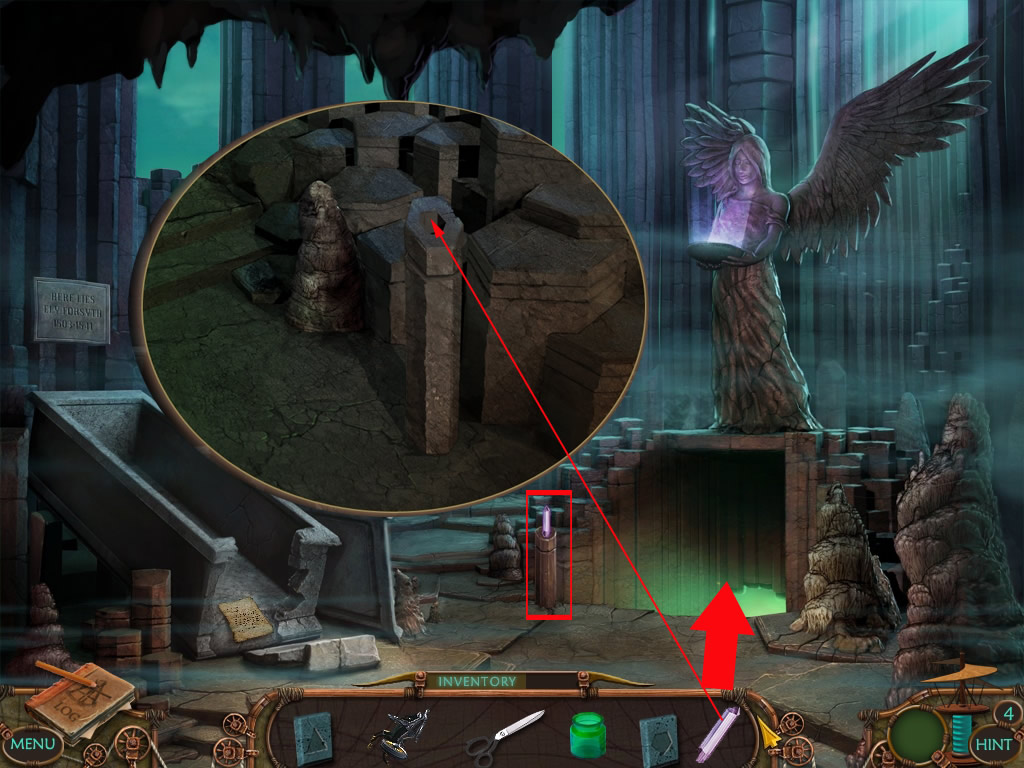
Chapter 4: Burried Secret
Crystal Cave
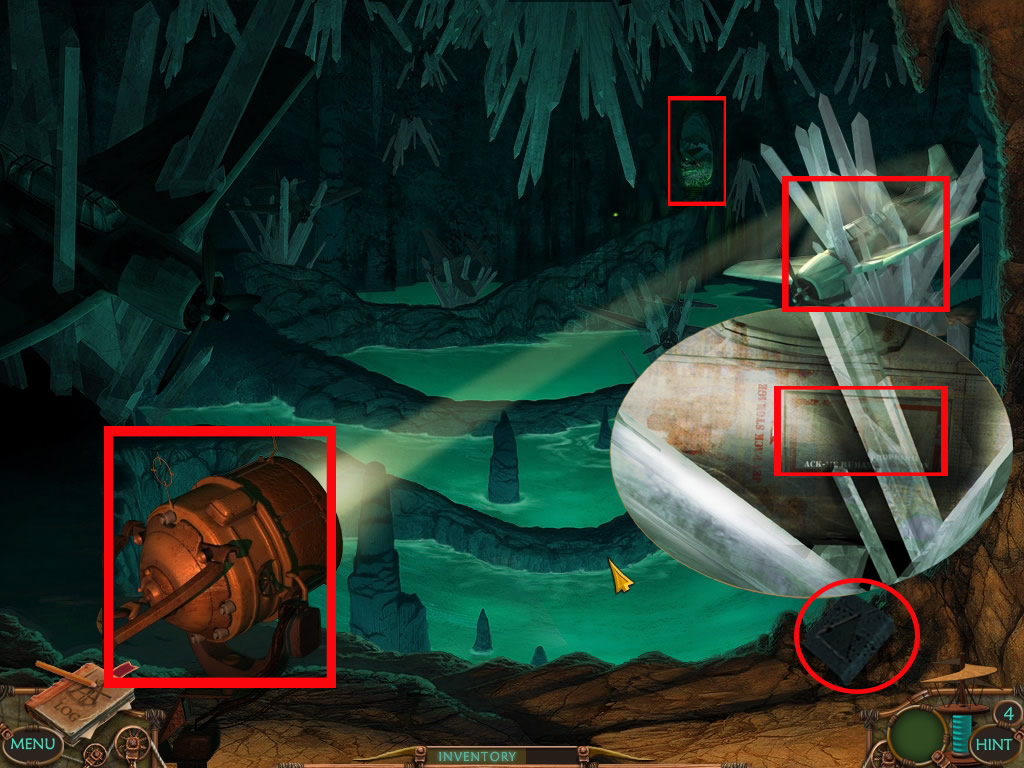
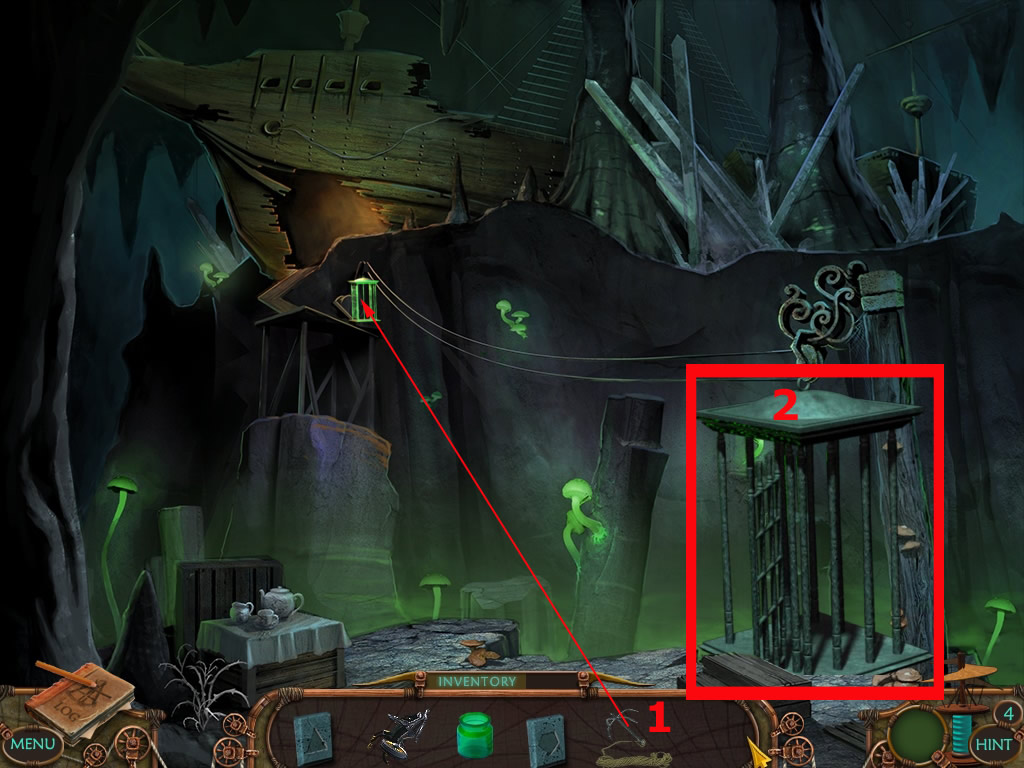
Pick up the stone from the ground on the right.
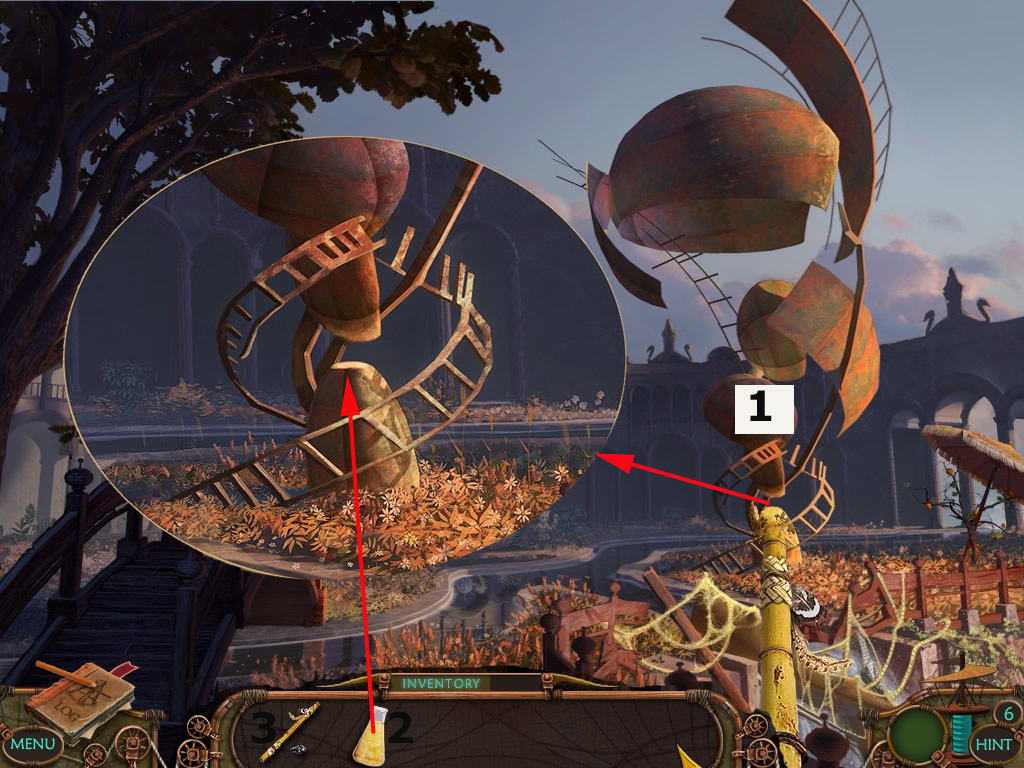
Click the spotlight left - click it, till you see the plane at the right side behind the huge crystals.
Click the plane to get a nearby view and click the compartment cover.
It can't open completely because of the crystal.
Leave this view and click the spotlight till you see the exit in the top right.
Click there to leave this cave.
Screenshot
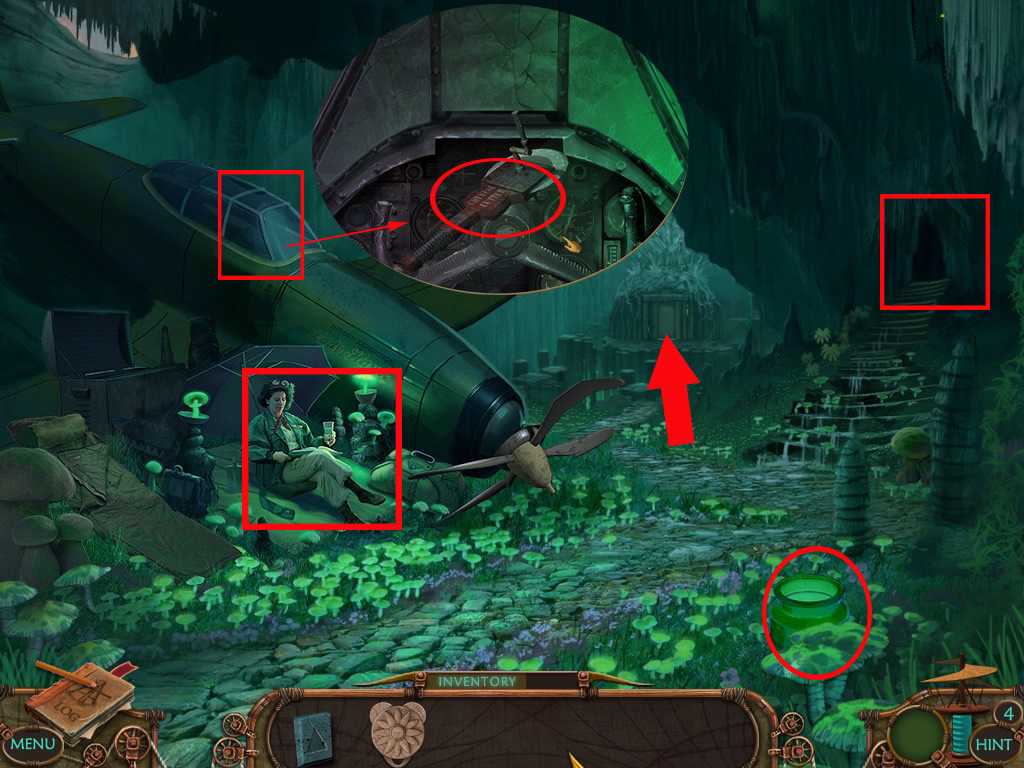
Cave with Phoebe
Talk with Phoebe - after the conversation she will give you a heart-shaped stone.
Click the cockpit behind her to get a nearby view.
Take the crystal cutter - the nearby view will close automatically.
Pick up the glass from the ground right side.
There is also another cave entrance at the right side, but you can only see stones and have nothing to remove them.
Screenshot
Go back where you came from.
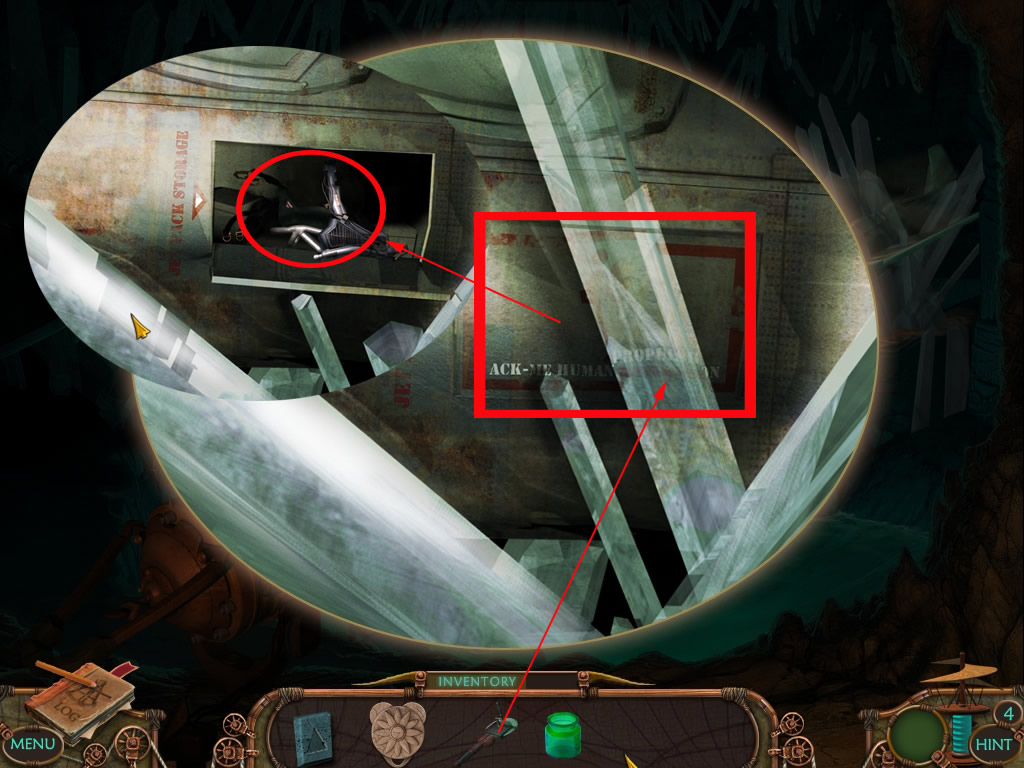
Crystal Cave
Use the spotlight to highlight the plane and click to get a nearby view.
Use the crystal cutter to cut the crystal and click the compartment cover to open it.
Grab the jetpack frame.
Use the spotlight to highlight the exit.
Screenshot
In the cave with Phoebe you can move on far right.
The Angel
Click the door with the heart-shaped spot and place there the stone Phoebe gave you.
Screenshot
Enter and pick up the stone right side.
Left you will find a scissors and a letter from Delia's mother.
Screenshot
Click the angel and you will get a ho-scene with random items.
Screenshot
After the scene you will Gideon in a short cut scene.
Grab the crystal you see after this.
Use the crystal on the pillar right in front of the angel.
The pedestal underneath the angel opens and gives free a way.
Screenshot
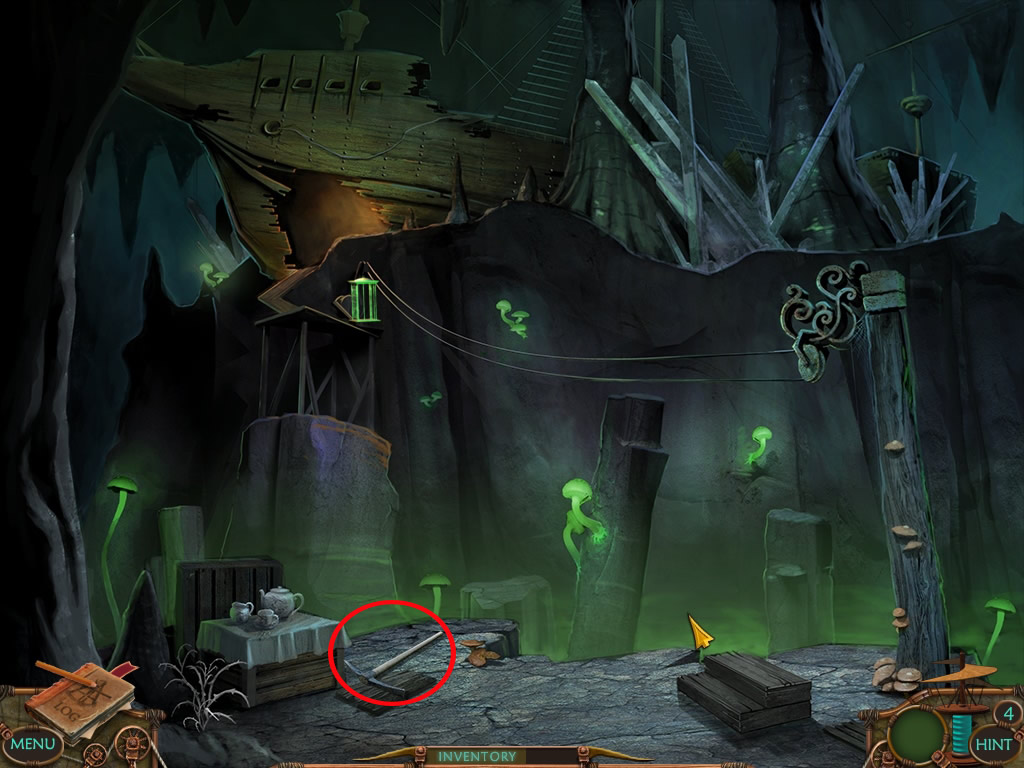
Enter.
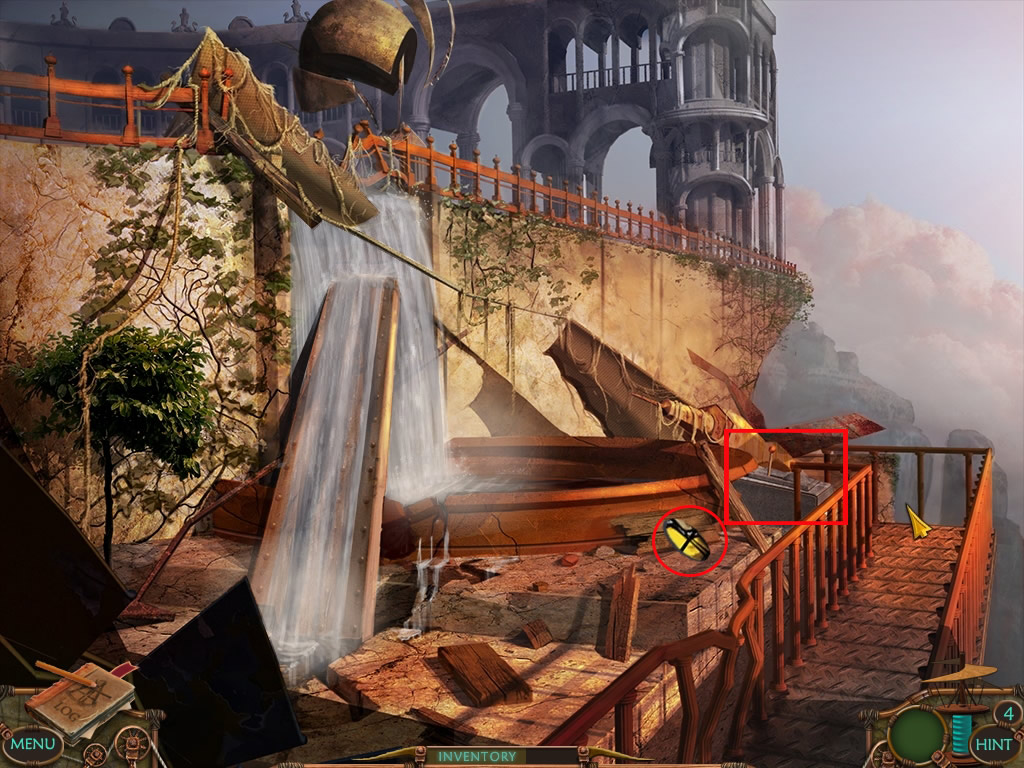
The Tram
There is a pick axe left on the ground - grab it.
Nothing else can be done right now, go back to the cave with Phoebe.
Screenshot
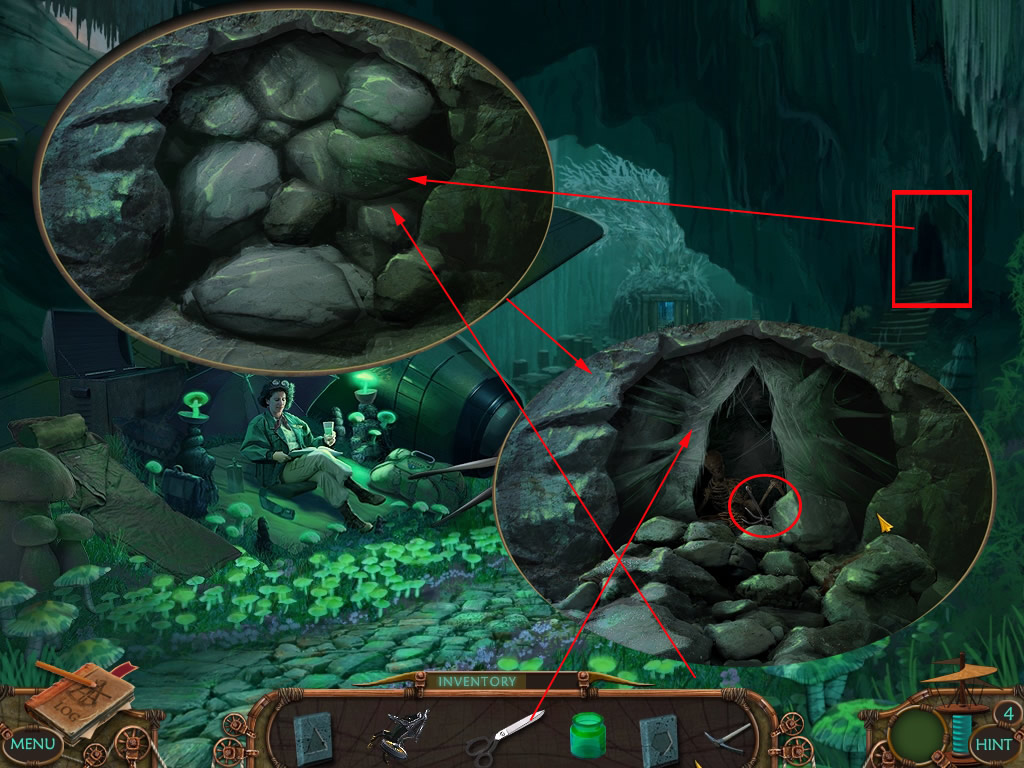
Cave with Phoebe
Click the cave on the right to get a nearby view.
Get the pick axe out of your inventory and remove the stones.
Use the scissors to cut the cocoon.
Click the skeleton to get the grabbling hook-
Screenshot
Go back to the tram.
The Tram
Place the grappling hook on the gondola that's on the upper left side of the chasm.
The gondola will come down and you will be brought to the ship.
You are brought automatically into the ship.
Screenshot
Gideon's home - hall
Get the stone on the left.
This stone is hard to get, you can easily come to the location behind the steps. Try to place the hand directly below the stone.
For the worm you will take care later.
Click the painting at the right side to enter a ho-scene.
Screenshot
You will have to find related objects to a topic.
They topics are random, five different ones are marked in the screenshot.
After finding all at the bottom left of the painting a compartment opens - get out the key.
Screenshot
Enter the room left in front of the worm.
Gideon's bedroom
Pick up the stone from the bed right side.
The trunk at the left looks interesting, but we can't do any with it yet.
Click the board in the far middle and place the key in the middle.
The board opens an a scene where you have to find related items.
Screenshot
Not only the items are random, also the scene as it can have a few random objects for everyone.
The screenshot marks a few pairs.
After finding the last pair, young Gideon opens its mouth an you can get a flint stone out.
Screenshot
Leave the bedroom and use the stairs to enter the ship's deck.
Ship's Deck
On the right side of the scene another stone is laying for you.
The fire lizard does not want to let you go through, so give him the flint stone, that will make him sleep.
Click in the far middle to come to the exit.
Get the fuel tank and the stone.
Screenshot
Now go back to the cave behind the one with Phoebe (5x arrow at the bottom of the screen).
Gravestone Puzzle
There is a puzzle in this cave on the top left.
Click the gravestones you see to get a nearby view.
You see empty slots with numbers on the gravestone.
Take a look at the stones in your inventory - all stones have a different amount of edges (or none=circle)
Place the stones in the slots according to the number and the number of edges (Triangle = 3, Square = 0)
A stone in the right slot will be highlighted.
After placing all stones in the right place, the grave cover will move.
Get the gloves out of the compartment.
Screenshot
Go back on the ship's deck.
Ship's Deck
At the right side you see kind of stone cauldron with liquid.
It is acid, so combine the glass and the glove inside your inventory and click the so prepared glass at the cauldron.
The glass/glove will get filled back into your inventory.
Screenshot
Go down and enter Gideon's bedroom again.
Gideon's bedroom
Click the trunk on the left side to get a nearby view.
Get the acid out of your inventory and pour it over the middle lock.
Click the top again to open the trunk and get out the bottle with "Web Remover"
Screenshot
Go back into the hall.
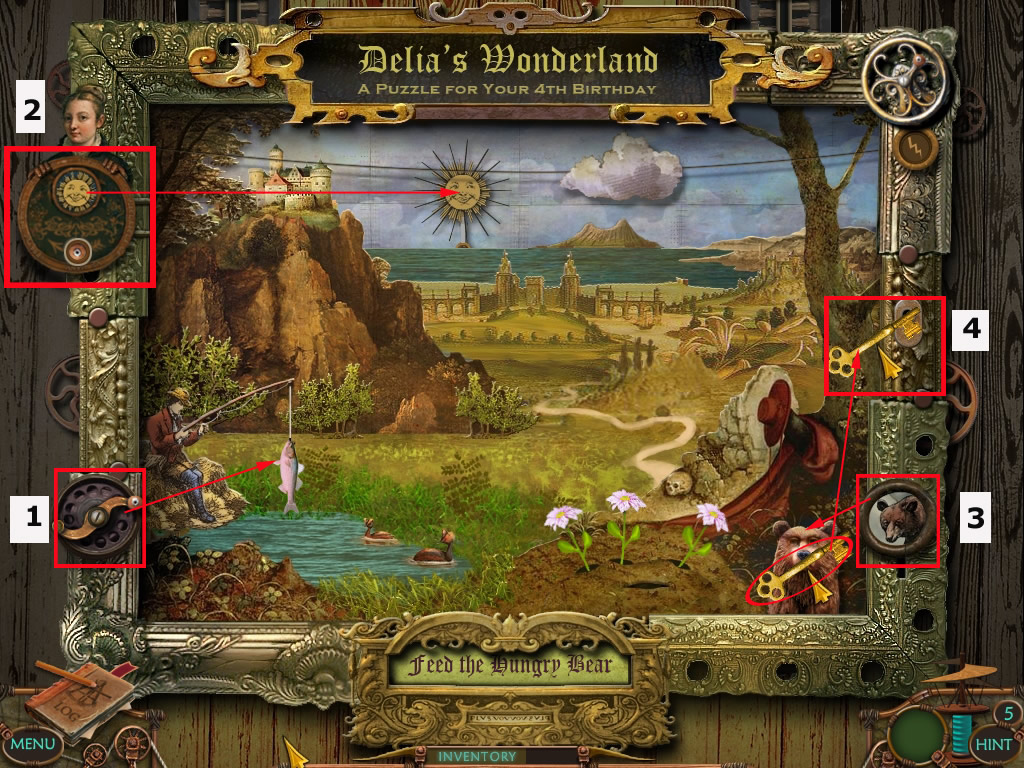
The Worm
Use the web-remover with the worm's web.
The web disappears and the worm as well.
Screenshot
Click the square in the far back and a puzzle opens.
First you will have to place the circle from the top into the according spots.
After placing all circles, click the lever in the lower right part of the scene.
When you placed the circles well, the puzzle will open - when nothing happens, you will have to see, where you might made a mistake.
Screenshot
When the puzzle is open, click the wheel top right above the thunder - a cloud appears, click till it is is above the piece of soil in the low right.
Click the thunder button a few times, till it starts raining. The rain will let some flowers grow and a worm appears.
Pick up the worm.
Now use the wheel left next to the fisher - the fishing rod comes up and you can place the worm at the hook.
You have to click it exactly at the hook, otherwise the worm will go back into your inventory.
Click the wheel again and the rod will go down in the water again.
Screenshot
Click the wheel for the fisher once more, the rod comes up and you can grab a fish.
Now click the button below the woman's picture top left.
The moon will be sun.
Press the bear button low right and a bear will appear.
Feed the bear with the fish and you will get a key for it.
Use the key at the key hole middle right side.
Screenshot
The puzzle opens - get out the jetpack handle.
Screenshot
Go back on the deck an in the back to the exit.
The Exit
Combine the frame, the fuel tank and the handle in the inventory.
Get the jetpack out of your inventory and click it somewhere in the scene.
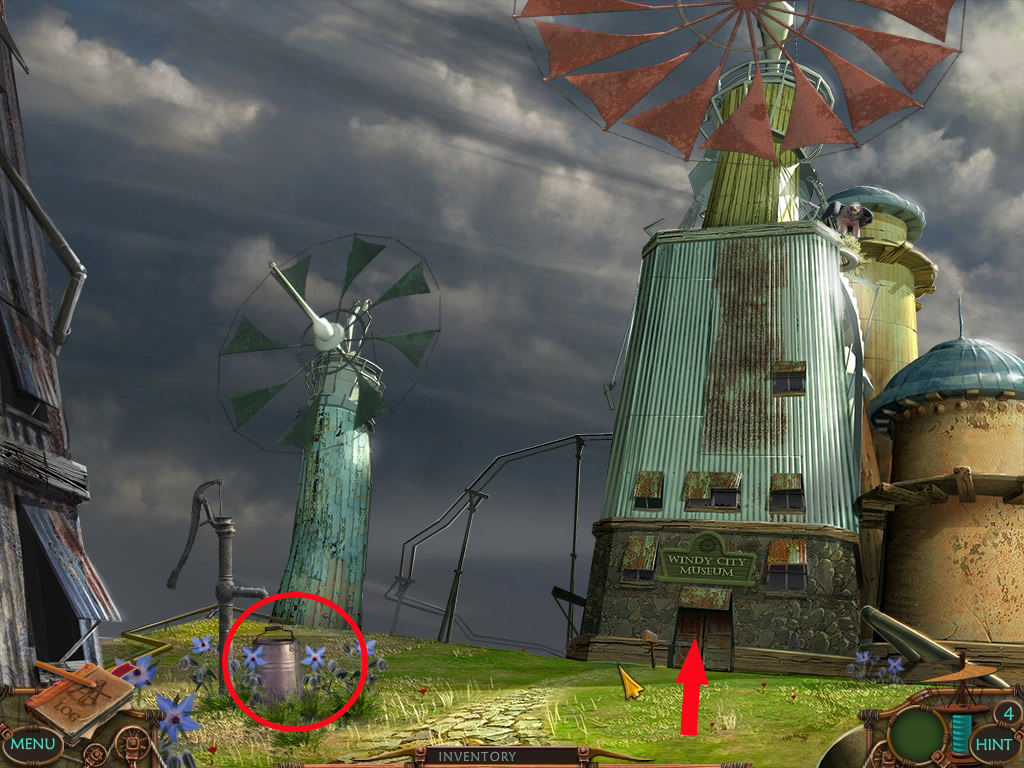
You will leave the caves and land in Windy City
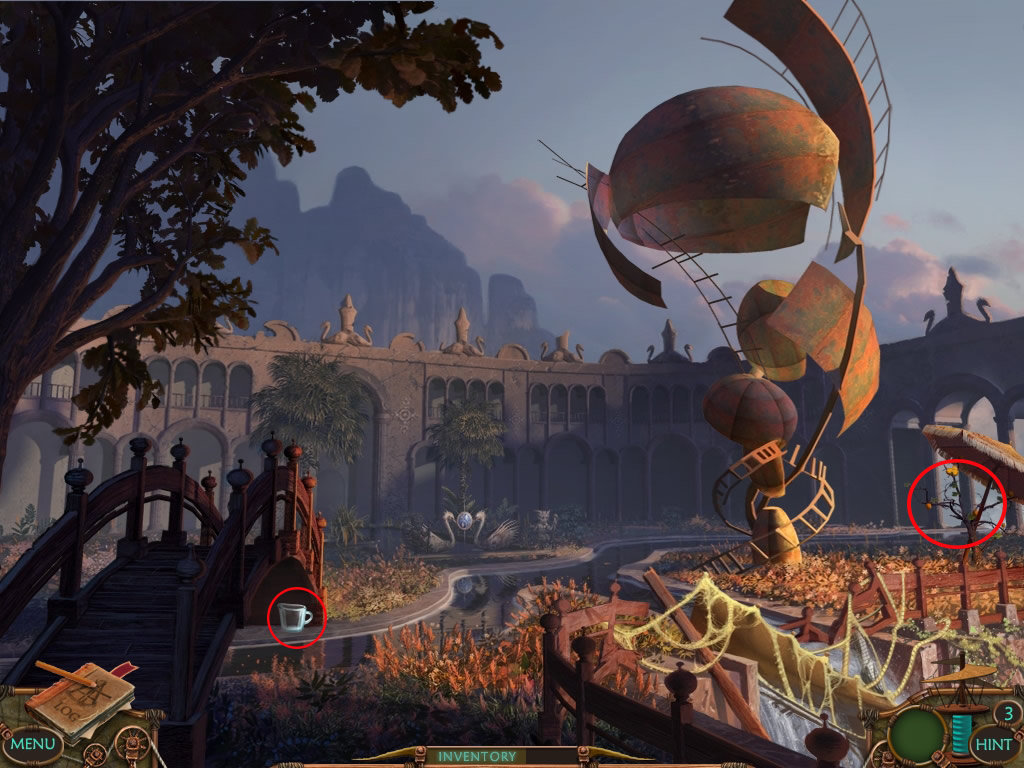
Chapter 5: Showdown in Windy City
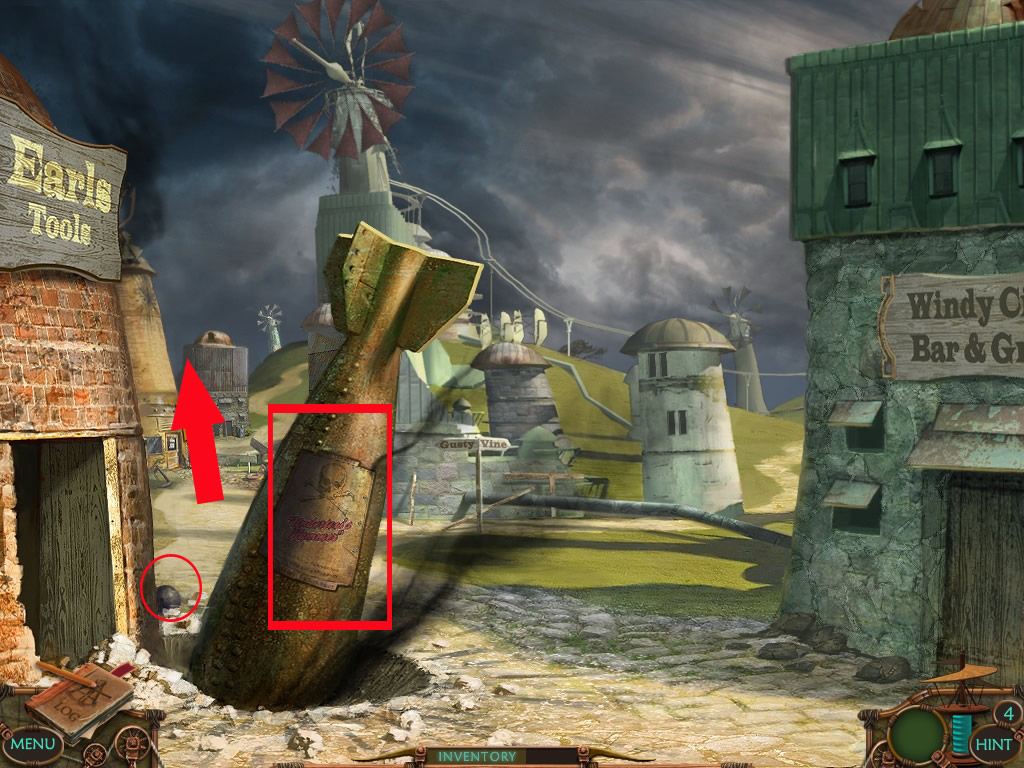
The Bomb
You see Delia flying away with a jetpack.
Use the arrow at the bottom middle to come down on the street.
Talk to Earl.
Get the cannon ball left behind the bomb.
Use the arrow below in the middle in order to come on the street.
Screenshot
Go to the main street, in which you let indicate your mouse pointer to the left of the arrow
Main Street
Click the Mexican guy to learn, that you will need a gold coin to play.
The shop left side is closed, you will have to come back later.
Far right you see a blue news stand - click it to read, that Delia works together now with the pirates.
Far left you see a red box - click it to get a nearby view.
You will first have to do the puzzle.
Click two tiles and they will swap places. When all tiles are in the right place, the lock on top will be highlighted.
Click it to open the box.
Screenshot
This is a very special hidden object scene and it is not random.
In the list you will only see a few of the objects you need to find.
Some of the found objects will go into your inventory.
Other objects you wont be able to see - you will need to use one of the inventory items inside the box to find your wanted object.
The hint will always use an inventory object to make the search object visible.
This is the list of objects to find with inventory object in the order of appearing in the scene:
Waterbug - click the water bottle at the right and the bug will come out, click it to get it out of the list.
Moth - click the propeller cap left side and the moth will fly away. She will take place top right corner of the box it. Click it there.
Lizard - get the knife out of your inventory and use it with eggs in the nest - the lizard baby comes out and you can pick it up
Peeler - get the scissors out of the inventory and cut the thread around the black box. Take the peeler
Worm - use the peeler with the apple - the worm will come out.
Stopwatch /Can Opener - Use the key to open the green box. Get the stopwatch and the can opener.
3 Sardines - use the can opener with the fish tin can.
Nail - use the hammer with the nail head on the left side in the plank. Use the top of the hammer, otherwise it will not be recognized.
Airplane Decal - use the putty knife and click three times at the newspaper at the bottom - the decal will appear and you can click it
Hacksaw/Candy bar - use the oil can with the metal box, get out hack saw and candy bar.
Heart - use the toothbrush to clean right next to the padlock - the heart will appear.
Open Padlock - use the hack saw to open the padlock. Click it to make it disappear.
Hat Pin - Sweap the dirt in the right back corner with the broom. Pick up the hat pin.
Multi-Tool - Pick the hat pin into the balloon and get the mulit - tool.
After having the multi-tool, the window will close - go to the right, to the Museum.
Museum
Pick up the bucket on the left and enter the museum.
Screenshot
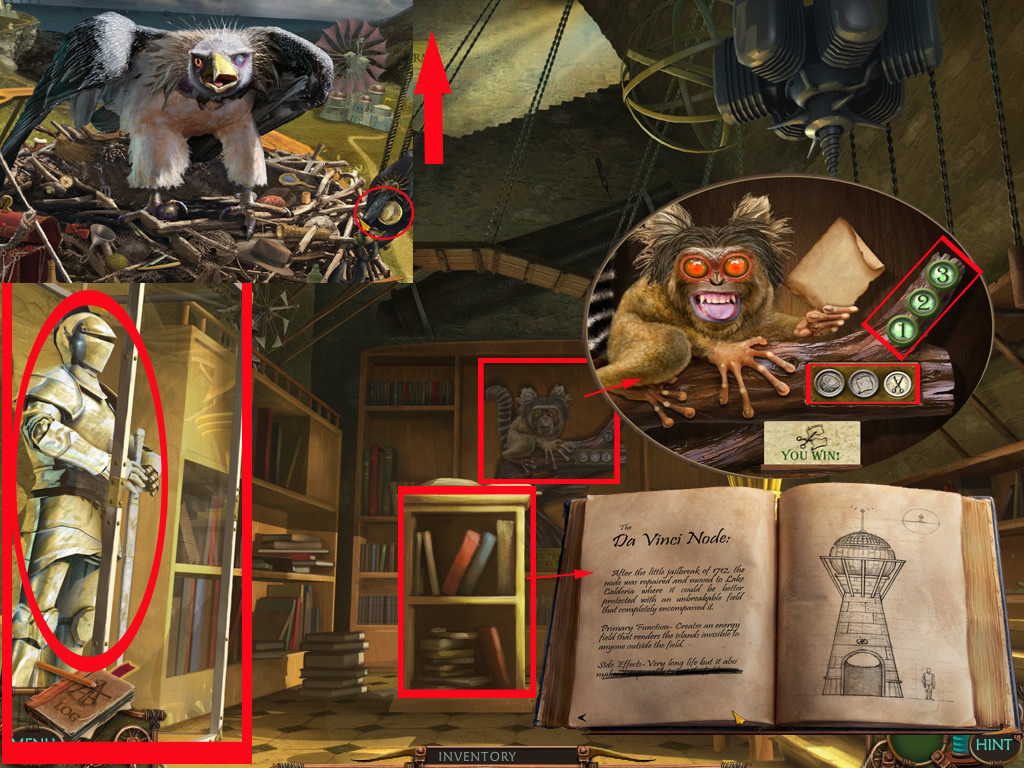
Left side you see a armor, but you can't take it as there is glass in front.
Click the bookshelf in the middle on the floor. Click to find the page about the "Da Vinci Node".
At the back you see a monkey - click it to activate a mini-game.
Your goal is to beat the money at coconut, paper, scissors.
Choose the coconut, the paper or the scissors by clicking on one of the round icons at the bottom.
After you made your choice, the monkey will show you his.
To win, you need one of the following combinations:
You: coconut - monkey: scissors (coconut smashes scissors)
You:scissors - monkey: paper (scissors cuts paper)
You: paper - monkey: coconut (paper wraps coconut)
You will need to win three times - each time you win, one of the number icons will be highlighted.
There is no restriction how often you are allowed to play, just win three time.
The monkey does not like to loose and will throw a coconut which smashes the glass in front of the armor which you are able to take now.
Now place your cursor on the top of the screen and you will be brought to the bird's nest.
Get the gold coin at the right side of the nest.
Screenshot
Go back to the main street.
Main Street
Screenshot
Get the coin out of the inventory and give it to the mexican guy.
A mini-game opens.
You will need to complete the picture by placing the tiles into the right spot.
Click and drag a tile to the spot you want to place it.
Click it to turn it around.
The hint will place one tile at the right spot.
Screenshot
You will be rewarded with a certificate for a free kite.
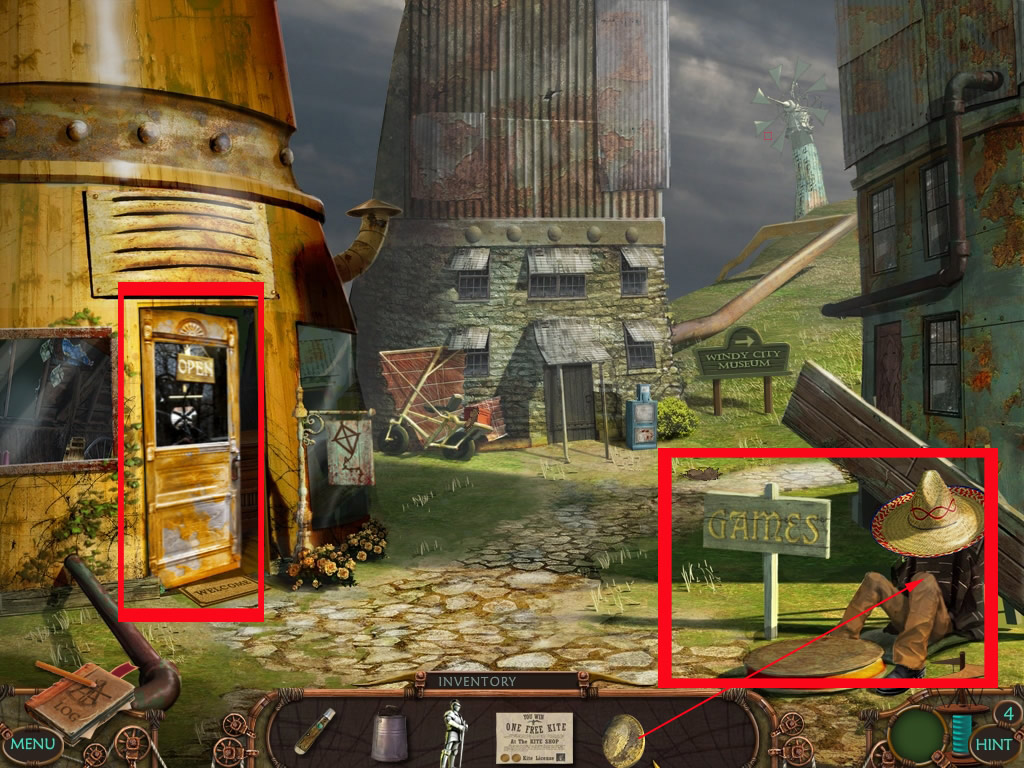
Enter the shop on the left.
A hidden object scene opens - find all wanted items.
After finding all you will be asked to get the soccer ball, left next to the table on the ground.
Give the certificate to the robot.
You may choose a kite - choose the big white one top right.
Screenshot
Go back to the bomb.
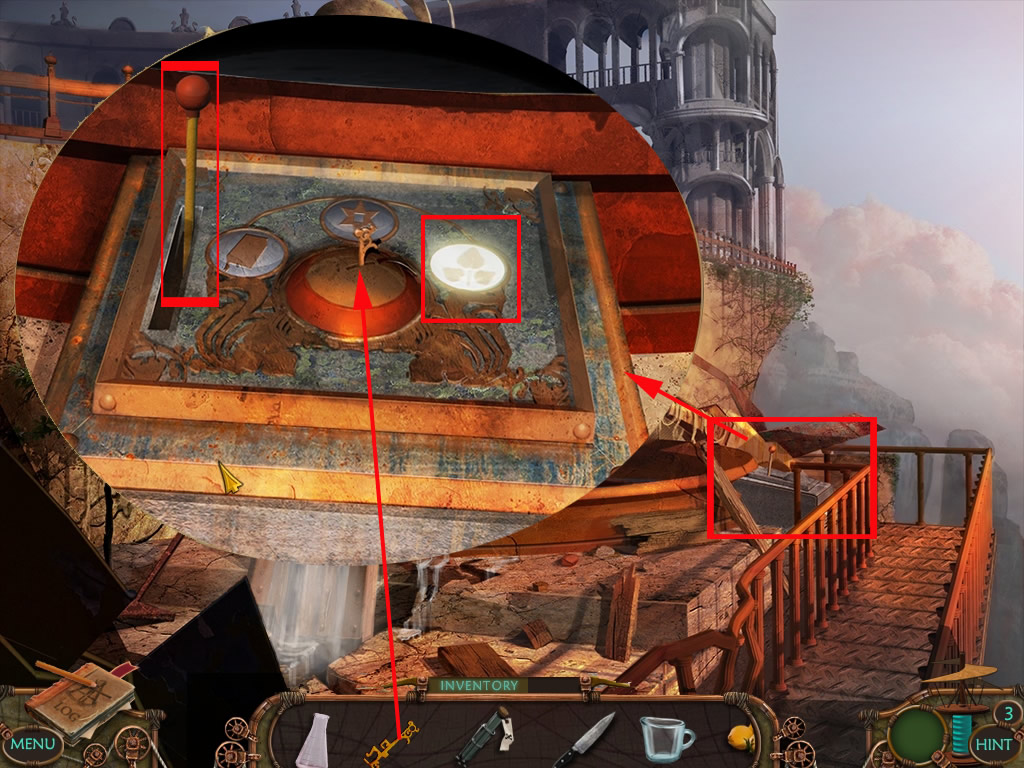
The Bomb
Click the bomb to get a nearby view.
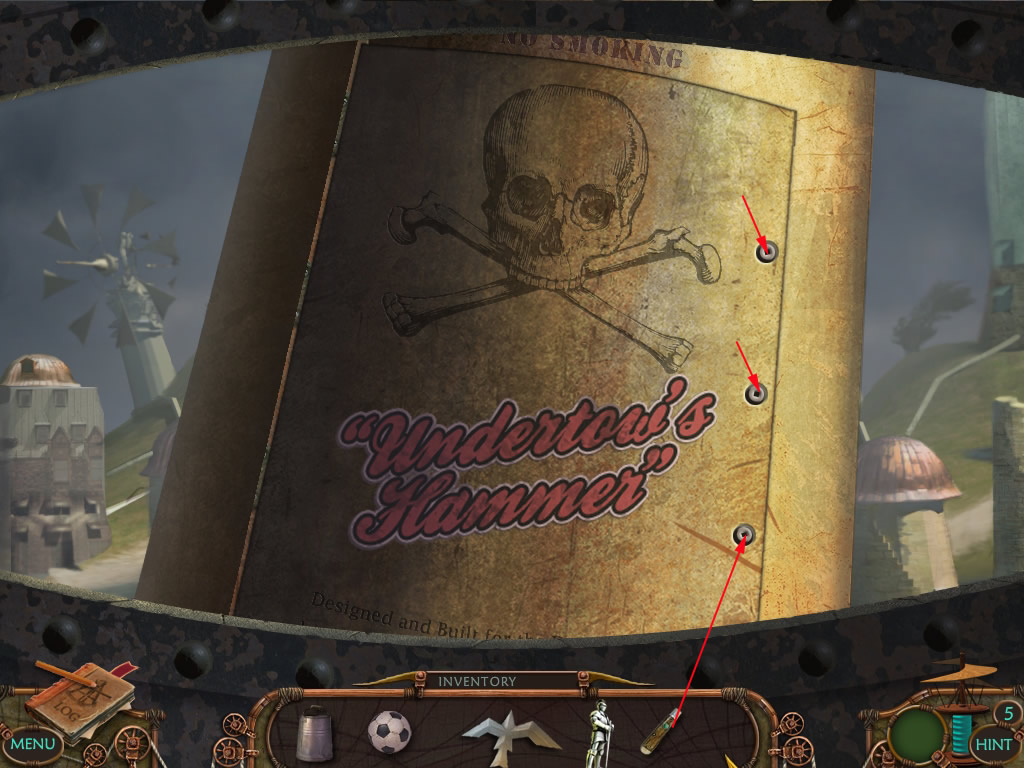
Use the multi-tool from your inventory - it will change into a screwdriver - with the three screws at the right.
Screenshot
Your first task is to take care, that all symbol cards at the bottom are open the same time.
The triangle already works and you see a green light at one of the time controls above.
Now find the lamps that will open the other symbol cards according to the triangle by clicking the right lamp at the other time controls.
You can click one of the lamps - if it is not the right one, just try another one.
When all symbol cards do have the same rhythm, the compartment with the cables will stay open.
Use the multi-tool as a knife and cut the cables in the right order.
The order you can see at the paper left, where you see colored squares, connected with arrows.
Only the blue square has only one arrow line going away from it, so this is the first cable.
Follow the arrows to find the right order.
Blue, red, yellow, pink, green
Screenshot
You made it and can enter the shed to the left.
The Shed
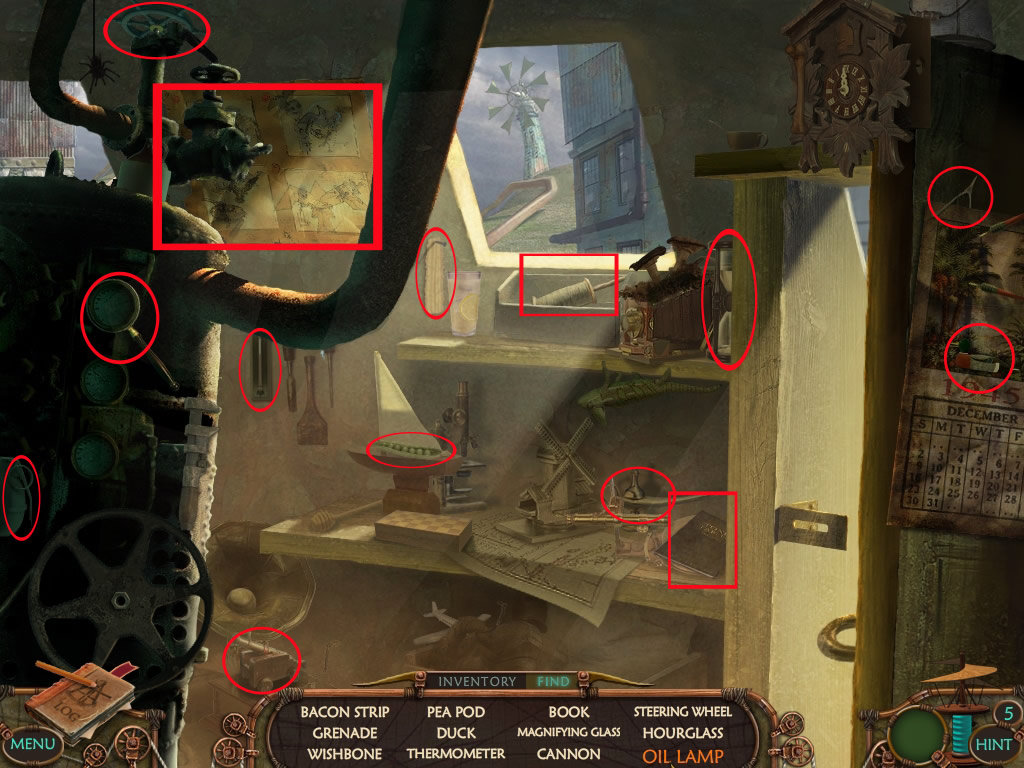
You will come into a hidden object scene.
Most of the items are random, but the book in the shelf right side, every one will have.
When you pick it up, it will open and show you a tone table.
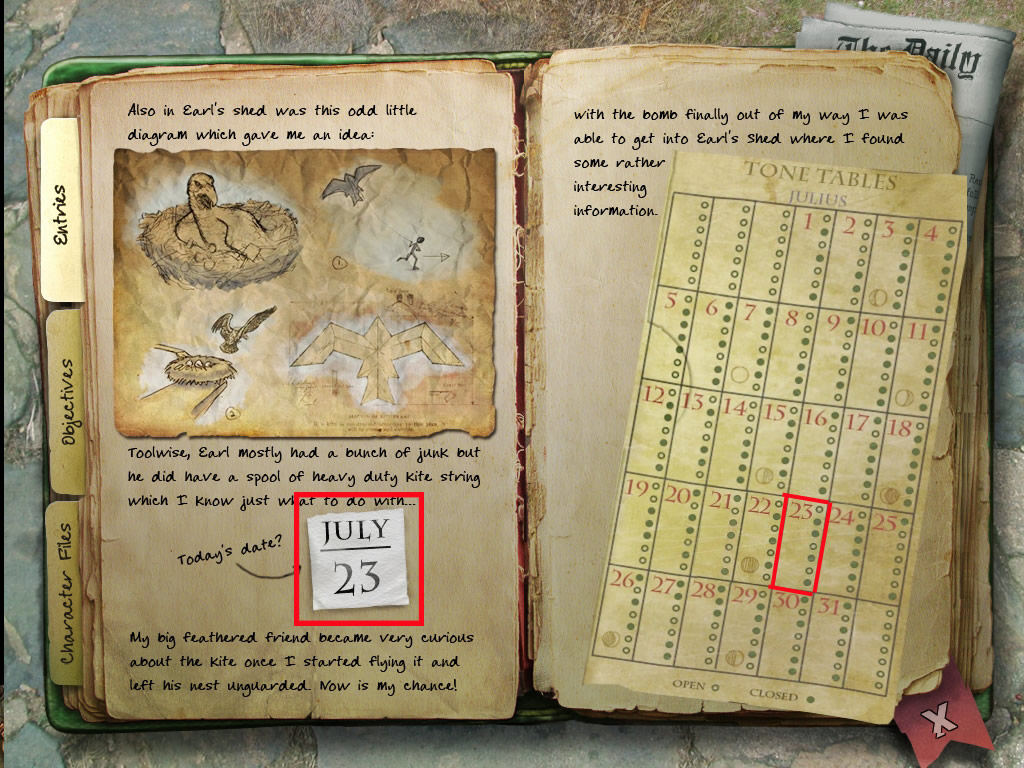
It will be copied into your lock files, together with date "today".
Screenshot
After finding all objects you will be asked to get the kite string - to find under the window in the back.
Screenshot
The scene closes - you to the Museum.
Museum
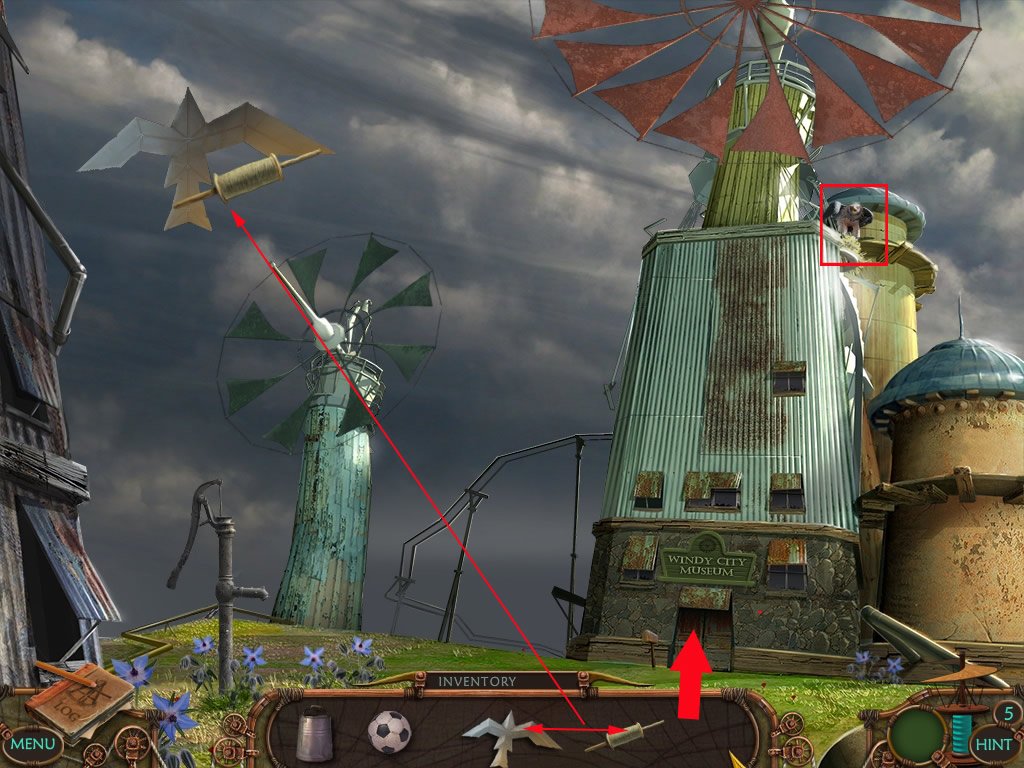
When you are in front of the museum, combine kite and string inside your inventory.
Click the kite somewhere into the scene and it will fly.
The eagle from the bird's nest feels attracted to it and leaves the nest.
Screenshot
Enter the museum and go up the bird's nest.
It is a hidden object scene with random objects - last thing to get is the cannon ball in the middle of the nest.
Screenshot
After finding all a ladder appears at the left of the nest.
Go back to the bomb and place your cursor in the low right corner.
Click to enter the power station.
Power Station
Enter the Power Station.
Pick up the cannon ball from the ground right side.
Look at the Reed Instrument - there is an uncovered hole.
Get the soccer ball out of the inventory and place it at the hole.
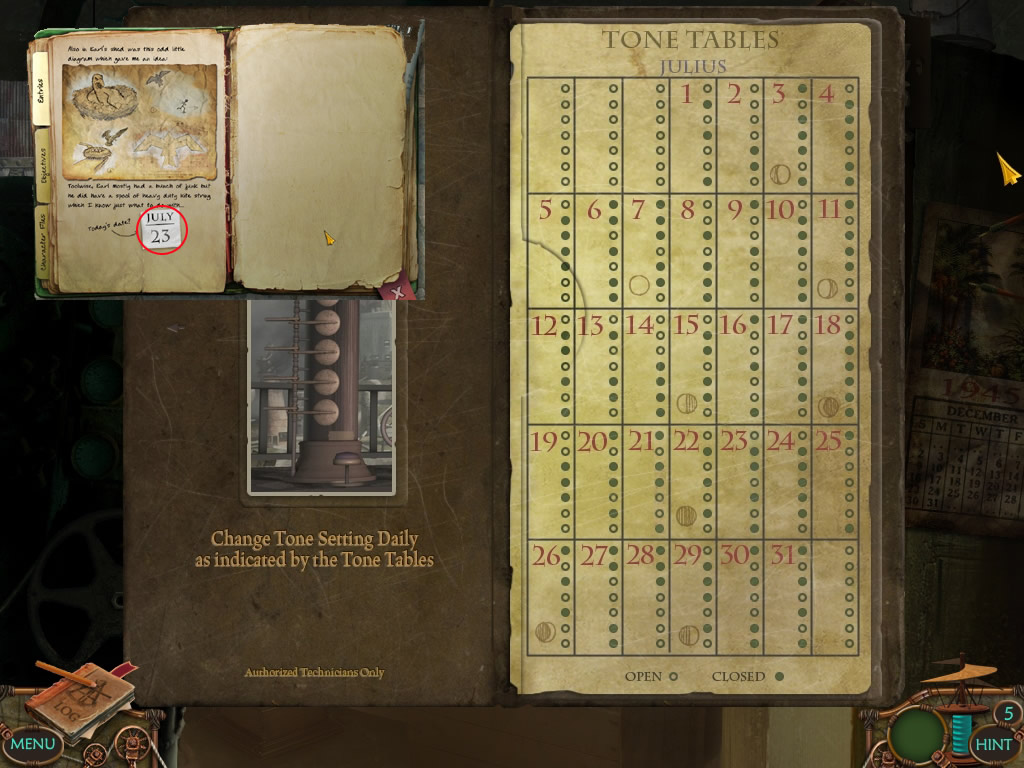
Click the sign right next to the instrument - it tells you that the tone has to be changed daily.
Open your log files and have a look at the tone table.
Today is, according to the note - the 23 of July
Look at the tone table for this date and remember the tone sequence.
A gray circle means closed, a white one open.
Screenshot
Close the log file and click the cover of the instrument according the tone table:
From top to bottom: Open, closed, closed, open, closed.
Now click the pink button in front of the instrument.
Screenshot
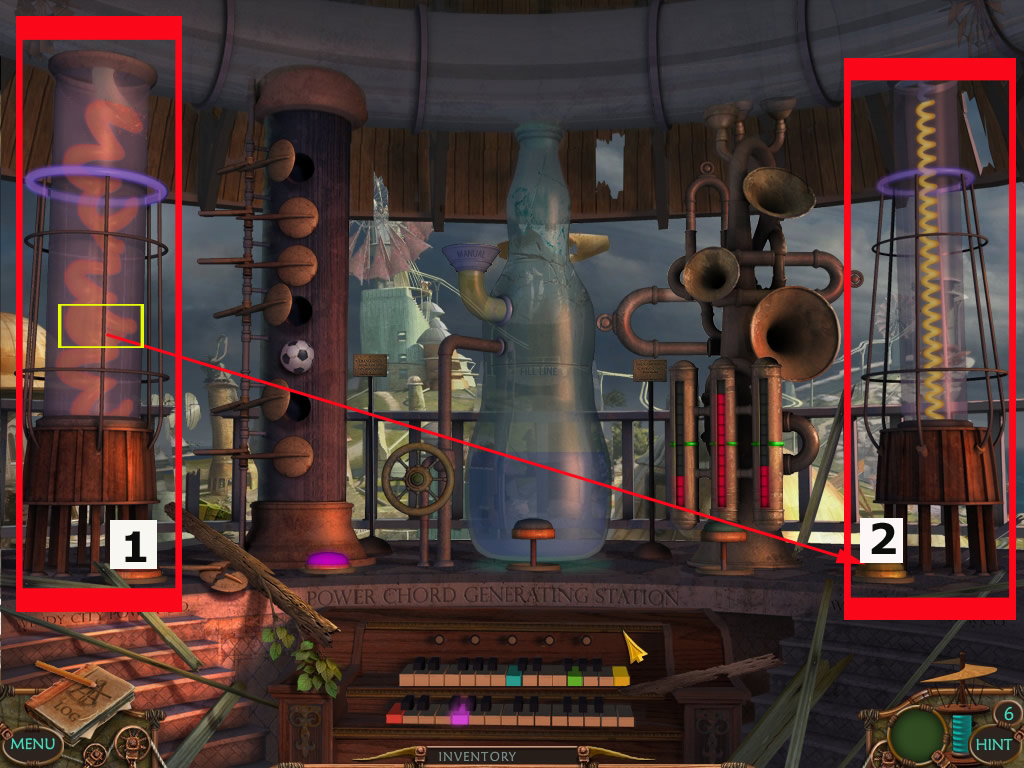
The next puzzle is about the two columns left and right.
Click the knobs in front of the columns and you will see, that both get filled with liquid and work their way up but with different speed.
But the sign left beside the right column says, that they will have to reach the marker at the same time.
So click first the slower column, the left one - when the liquid is at the half of the knot, click the other one.
Please the screenshot for the exact point to click the left column.
Screenshot
When you did it right, both knobs in front of the columns will stay activated.
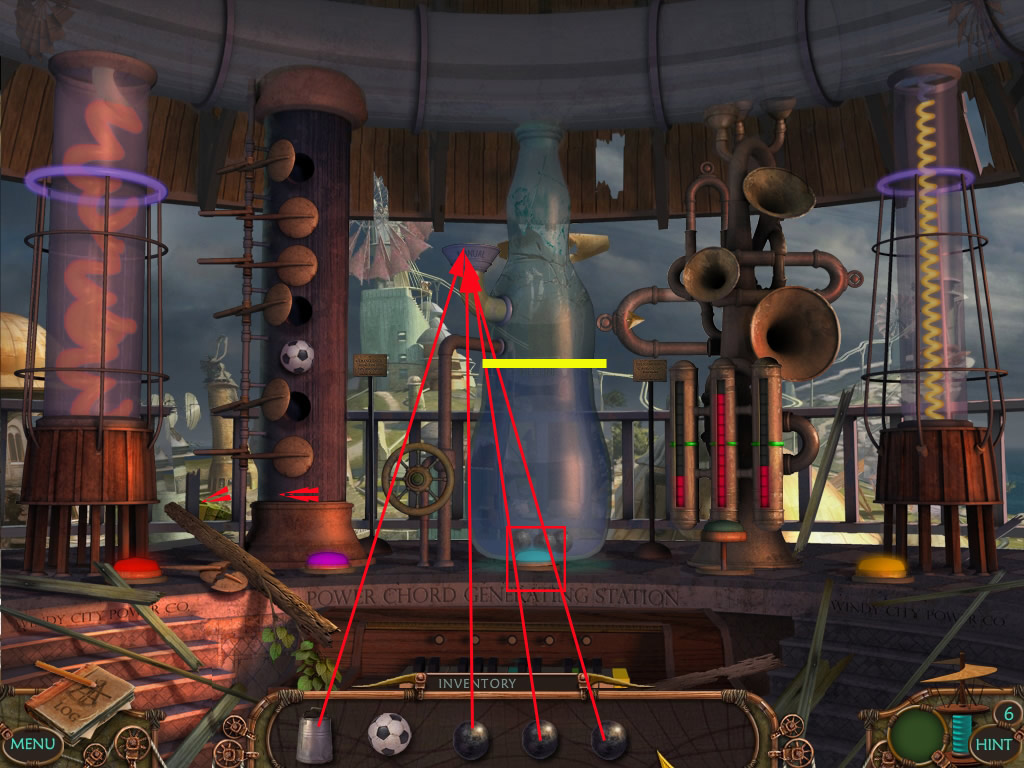
The third instrument form left shows a water level underneath the filling level.
Get the three cannonballs and the bucket out of the inventory and place the at the funnel top left of the instrument.
Now water- and filling level are equal.
You will have to click exactly the opening of the funnel, otherwise it will not work out.
Click the blue knob in front of the instrument.
Screenshot
For the last instrument your goal is to place all the light arrays at the bottom of the instrument on the same level on the green line.
There are 3 tubes on the instrument, each tube can move in 2 directions.
The left and right tubes can be moved to the left or to the right. The tube on top can be moved up or down, but this one we do not need.
You will see a tiny gold arrow appear when you hover your mouse over each tube.
I marked the left tube with A the right one with B.
Now click the A 3 x with the arrow to the right.
Click B first 11x with the arrow to the right.
Click B now 5 x with the arrow to the left.
Click the knob in front of the instrument.
All knobs activated the colored keys of the piano at the bottom.
Click it to activate the Simon Says puzzle.
You will be given one color, click it on the keys.
The knobs will show you then the first and second color and you have to repeat it.
Every time it will be one color more.
Making a mistake will make you start from the beginning.
Red
Red-green
Red-green-yellow
Red-green-yellow-pink
Red-green-yellow-pink-blue
Screenshot
Now there is power.
Go back to the birds nest and climb up the ladder.
Tram
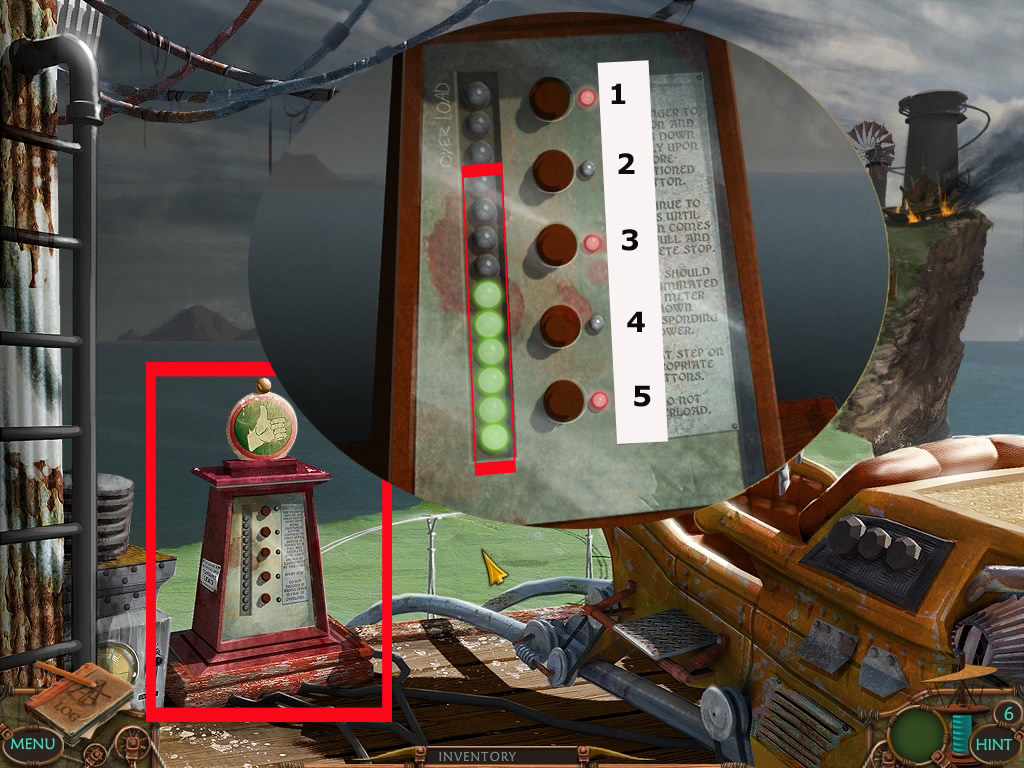
Click the tram-control at the left and a mini-game opens.
You will need to give enough energy to move the tram, but not to much to not overload the controls.
Each button at the side activates a different amount of energy, shown by green lamps.
To see from top to bottom (1-5) you need to click 1-3-5
Screenshot
The tram moves and you will be brought to Delia's house
Finale
Click on the ground next to Delia to come down.
Watch the cut scene.
Pick up Delia from the floor and place her in the glider.
Watch the cut scene.
When Gideons machine grabs the Bio-Coil, click the lever left to the screen.
Watch the cut scene.
Click the glider to fly away with Delia.
Screenshot
Watch the cut scene.
THE END!
And as always we have Kayleigh to thank for the massive walkthrough :D!
Posted by: Kero |
October 28, 2009 3:46 PM
|
October 28, 2009 3:46 PM