
Awakening: The Skyward Castle
Platform: Mac, Windows

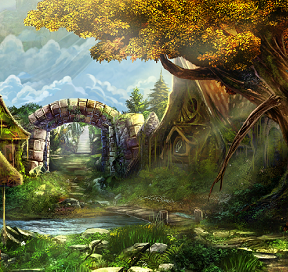
![]() Once upon a time, in a land far, far away, there lived a princess named Sophia who was having a horrible, very bad, not good day. Poor Princess Sophia woke up in an abandoned castle to discover that (a) she'd overslept by about 100 years, (b) all the humans including her family had booked for places unknown, and (c) there was no local wi-fi. Being the intrepid Princess that she is, Sophia immediately set out to find the rest of humanity along with a decent half-caf mocha latte. Yes, our favorite non-magical princess is back in Awakening: The Skyward Castle, the fourth and final installment of Boomzap's popular adventure hybrid Awakening series.
Once upon a time, in a land far, far away, there lived a princess named Sophia who was having a horrible, very bad, not good day. Poor Princess Sophia woke up in an abandoned castle to discover that (a) she'd overslept by about 100 years, (b) all the humans including her family had booked for places unknown, and (c) there was no local wi-fi. Being the intrepid Princess that she is, Sophia immediately set out to find the rest of humanity along with a decent half-caf mocha latte. Yes, our favorite non-magical princess is back in Awakening: The Skyward Castle, the fourth and final installment of Boomzap's popular adventure hybrid Awakening series.
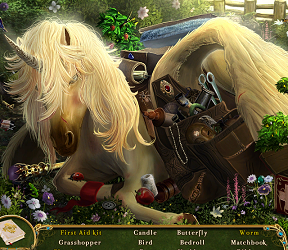
 When we last saw our heroine she was flying towards the floating city where humanity now lived on the back of a flying unicorn (just go with it). Now she has crash-landed, injuring the poor unicorn while doing so, and must find help for her fantastical friend from the locals. Unfortunately, they all seem to have disappeared or been turned into stone, so once again she must travel the length and breadth of the land in search of what went wrong and to fix it using only the power of her wits and her traveling companions: a pyromaniac pocket dragon and an irritating owl named Randolph. At this point you have to wonder what is up with all of the magical inhabitants of this place that they are in constant need of rescue from someone who doesn't even have magic, merely the power of her own logic.
As with most hybrids, Awakening: The Skyward Castle contains a mix of hidden object scenes, mini-games, and puzzles to solve along the way to smashing most of the Sleeping Beauty cliches. Hidden object scenes themselves require a lot of interactivity to complete, and the mini-games and puzzles are a nice mix of both familiar and original designs. What sets the Awakening games apart, however, are the inclusion of one particular type of puzzle that will be played over and over again throughout the game. The first three games featured mahjong (Awakening: The Dreamless Castle), card games (Awakening: Moonfell Wood), and tangrams (Awakening: The Goblin Kingdom). This time around you'll be faced with a series of nonograms, aka picross games. As with the earlier games in the series once regular gameplay has been completed there is a feature allowing you to play nonograms as stand-alone puzzles from the main menu.
 Awakening: The Skyward Castle contains all of the usual controls associated with a well-designed adventure, including a changing cursor, a bottom-loading inventory, a handy notebook to keep track of the story and clues, and a refilling hint feature that also works as a skip feature for the mini-games. The notebook is divided into two sections, one which keeps track of the actual storyline and clues, and another which holds a running tally of goals to help the player keep on track. A nice separate feature is a map of the amazing floating island which can be used for one-click navigation back to places you've already been which helps minimize one of the great complaints of today's point-and-click adventures, namely the constant wandering back and forth. Gameplay hints come in several different flavors, from a plethora of sparkling lights to highlight areas of interest to advice as well as the aforementioned refilling timer and a quick and easy tutorial at the beginning of the game.
Analysis: Much has been said in reviews of the previous games of the series about the gorgeous scenery, the lovely music, the whimsical characters, etc. but two things really make Awakening: The Skyward Castle and the previous games in the series really stand out: the depth of gameplay available and the absorbing storyline. After playing one of Boomzap's intensively puzzle-heavy games other hybrids tend to feel like all story and no substance, with gameplay sacrificed upon the altar of pretty or scary. The four Awakening games pack so much gameplay punch that all other adventure hybrids suffer by comparison.
 As Princess Sophia travels through a luscious background of hand-painted fancy while interacting with some interesting characters, she also illustrates why the story shines through as much as the gameplay. Sophia is at what would seem like a huge disadvantage, a non-magical character in a magical world, yet she perseveres through all the obstacles in her path using not magic, nor her looks, nor help from a handy prince charming, but through the application of her brain. Princess Sophia's advantage is her smarts, a nice message neatly conveyed against a backdrop of flaming dragons, flying unicorns, and snarking goblins. Stay in school, kids!
Boomzap has paid particular attention to the puzzles and mini-games within Awakening: The Skyward Castle, featuring a nice mix of the familiar and the new. The hidden object scenes are nicely interactive and very engaging, and even the familiar mini-games feature some nice twists to make them feel fresh. Best yet are the three modes of play which cover a wide range of adventure gaming skills. The relaxed mode is chock-full of sparkles, hints, advice, and a quickly refilling hint timer. The Normal mode features far less sparkles, a slower refilling timer, and less narrative advice. The difficult "Dreadmyre" mode features no advice or sparkles and no mini-game or puzzle skipping.
There are a few minor issues to be sure, especially with the tight clickable areas in the hidden object scenes. This is a very minor complaint and doesn't detract at all from the stunning gameplay available within Awakening: The Skyward Castle, which brings a satisfying conclusion to a fantastical series. With its meaty story, hefty length, and vast array of puzzles Awakening: The Skyward Castle is one of the best adventure hybrids this year and a definite must play.
A Collector's Edition is also available. It includes wallpapers, concept art, extra gameplay, and a built-in strategy guide. Remember that Big Fish Game Club Members pay only $13.99 for Collector's Editions, and collector's editions count 3 card punches of 6 total needed for a free game.
![]() Windows:
Windows:
Download the demo
Order the full version
Also available: Collector's Edition
![]() Mac OS X:
Mac OS X:
Download the demo
Order the full version
Also available: Collector's Edition


Walkthrough Guide
(Please allow page to fully load for spoiler tags to be functional.)
Awakening: The Skyward Castle
Basic Information
Starting Screen
Upon first play you will enter in the name that you want to play under.
On the bottom right is the option of Settings.
In Settings you can:
Change screen resolution.
Change sound and music volume.
Change the cursor to custom or normal.
Turn on or off achievement announcements.
Access the credits.
On the left is the option for the Epilogue and Nonogram, which are only available in the Collector's Edition and upon completion of the main game.
You can have multiple accounts and can change/access them by clicking the bottom middle of the screen.
On the very bottom right is the Play button, which will start the game.
When you hit Play, you are given three different difficulties to choose from for gameplay:
Relaxed: The skip and hint meters fill up rapidly, "guidance," is available when help is needed.
Normal: Hint and skip meters fill up at a slower pace, and no guidance is available.
Dreadmyre: Hint meter fills up very slow, there is no glittering on active areas, skipping puzzles is not allowed, nor is guidance available.
Game Screen
Above the journal is a question mark that when clicked will open a tab with the task you are supposed to complete, and if you click on the text, it will give you guidance on how to complete that task.
On the bottom left is your journal, which keeps track of information obtained and also lists the tasks you must complete.
Under the journal is the Menu button, which will allow you to make the same changes as the settings tab from the starting screen, or to exit to the starting screen.
At the bottom of the screen in the middle is your inventory where all items you obtain will be displayed.
To the right is the map which when opened will display all the areas that you will visit during the game. You can also use the map to transport between locations that you have already visited.
To the right of the map is the owl that will give you hints when clicked.
Your cursor will change when it is hovered over specific active areas:
When you hover over an object you can pick up, the cursor will become a grasping hand.
Areas that can be examined will change the cursor to a magnifying glass.
When you go in a specific direction, a pointed arrow will appear to show the direction you can go.
When the cursor changes to a chat bubble, that means you can speak with the person or thing you're hovering over.
You will get the Pocket Dragon once you start exploring the first scene. The Pocket Dragon will light things on fire.
Achievements
Warm Welcome: Start a warm fire and splint the unicorn's wing before leaving the first scene.
Family Values: Save the Wingferry family.
Eagle Eye: Use the telescopes in the Barracks Courtyard, Aviary Entrance, and the spyglass on the broken telescope stand in the Cliffside Caverns.
Assassination Attempt: Try to shoot the gargoyle from the rafters with the bow and arrows.
Yo Ho Ho: Try to share the bottle of krug with Captain Jackdaw.
Look Out!: Try to shoot Skullface with the bow and arrows.
Savage Treatment: Try to get Skullface down using fire.
No, Thank You: Complete all the bonus nonograms, excluding classics.
Echoes of the Past: Find the message in the bottle at the Bridged Crossings, look at the Fairy Queens statue in the High Gardens, examine all the moon murals in the Starward Corridor, find Jackdaws Diary in the Captains Cabin, and examine all the statues in the Crystal Mausoleum.
Mini-Mechanic: Perform basic repairs on the Wingferry's control panel.
Forgemaster: Prove your mettle at metal working in the Armory's forge.
Green Thumb: Cultivate the herbs with the correct soil mixtures.
Plumber and Princess: Restore the flow of water in the vineyard in three minutes or less.
Wardrobe Warrior: Complete the wardrobe hidden object scene in eight minutes or less.
Picture Puzzlemaster: Complete all story mode nonograms picture puzzles in five minutes or less.
Does This Look Familiar?: Discover your old bedroom in a new locale.
Puppetmaster: Revive Jyx in five attempts or less.
Crown Princess: Solve the guardian stone's crown sudoku puzzle in three minutes or less.
Little Big Princess: Escape from the Chest of Lute while micro-sized.
Village Hopeful: Complete chapter 1.
Noble of the Sky: Complete chapter 2.
Castle Crasher: Complete chapter 3.
Savior Queen: Complete chapter 4.
Par One: Complete chapter 1 in one hour or less.
Two-Timer: Complete chapter 2 in two hours or less.
Triptych of Fate: Complete chapter 3 in one and a half hours or less.
Foray into the Future: Complete chapter 4 in one hour or less.
Bane of Darkness: Complete the game in five and a half hours or less.
Keen Lookout: Complete five hidden or reverse hidden object games in six minutes or less.
Sharpened Senses: Complete ten hidden or reverse hidden object games in six minutes or less.
Acute Awareness: Complete twenty hidden object or reverse hidden object games in six minutes or less.
Beacon of Brilliance: Complete all hidden object or reverse hidden object games in six minutes or less.
Force of Will: Complete all twenty mini-games without any hints.
Steel Yourself: Complete forty mini-games without any hints.
Immoveable Object: Complete eighty mini-games without any hints.
True Grit: Complete all mini-games without any hints.
Puzzle Trickster: Complete 20 non-hidden object mini-games without skipping.
Conqueror of the Dead: Complete the game on Dreadmyre difficult.
Queen of Hearts: Complete the game in five and a half hours or less with no skip or hints on hardest difficulty.
The Empress: Earn all the achievements.
The Story
Chapter One: Landsong Village
Creating New Pathways at the Bridged Crossings
Pick up the bandages on the grass on the left side of the path.
Grab the sunsky flower that is the tallest stemmed of the flowers on the left side of the path.
Zoom in on the campfire sticks. Pick up the Pocket Dragon, which will be added to your bar.
Use the Pocket Dragon to light a fire on the campfire sticks.
Examine the injured unicorn to start a hidden object scene.
To create the glowing scepter, you will have to find all the gems and place them on the scepter.
To complete the first aid kit, you will have to place the splints, forceps, gauze, restraints, and disinfectant.
Once you pick up the first aid kit the worm is revealed.
You receive a splint.
Use the splint on the unicorn. Doing this will earn you the achievement Warm Welcome.
Once done with this, walk forward to the Ancient Goldleaf.
Zoom in on the statue of the girl and use the sunsky flower on the broken stalk in her hands.
Once the little girl has broken free, speak with her.
Grab the goldleaf branch.
Look at the root cache that is now where the little girl had been standing before.
Pick up the jewelled emblems and take note of the disturbed dirt.
Moved forward to the Bridged Crossings.
Investigate the slab of stone that is to the right of the sloped path.
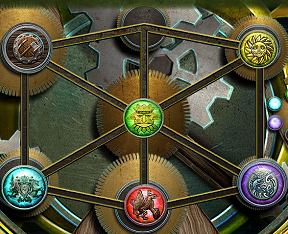
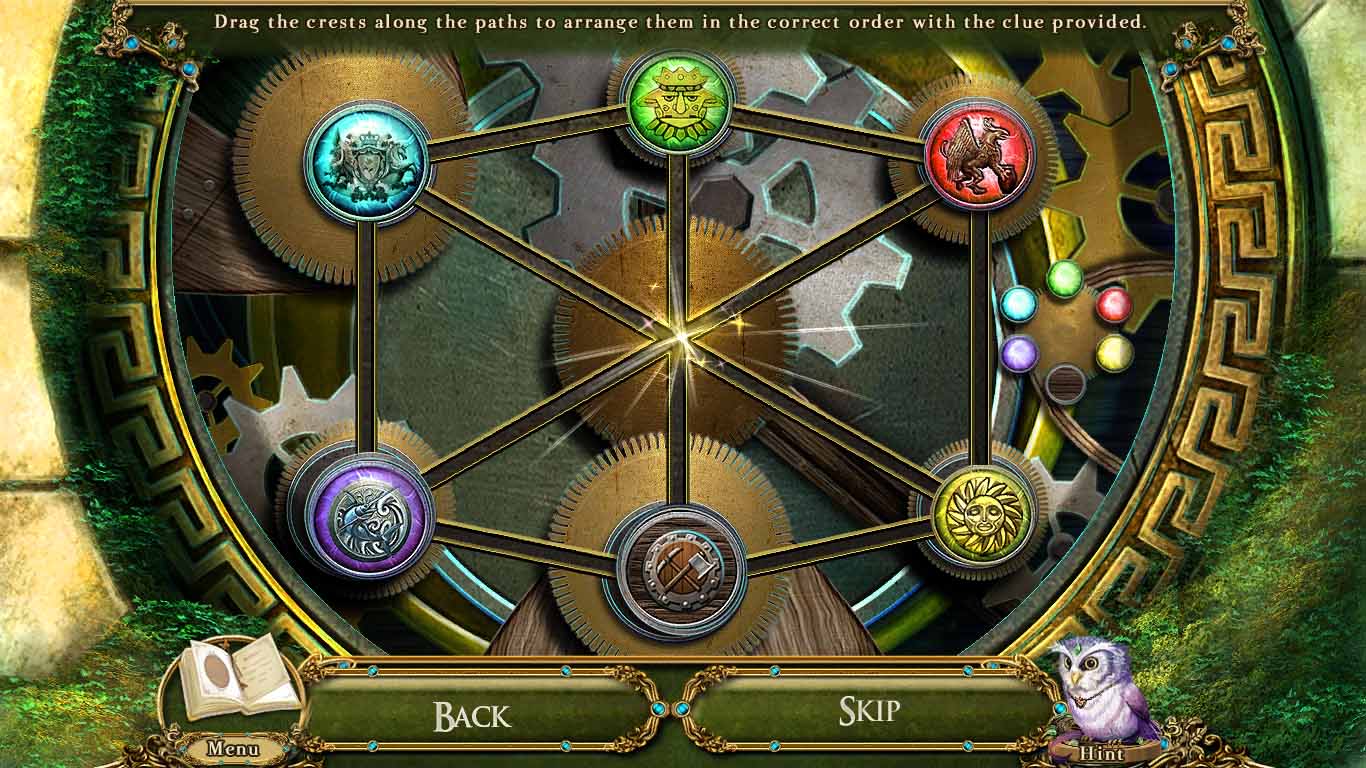
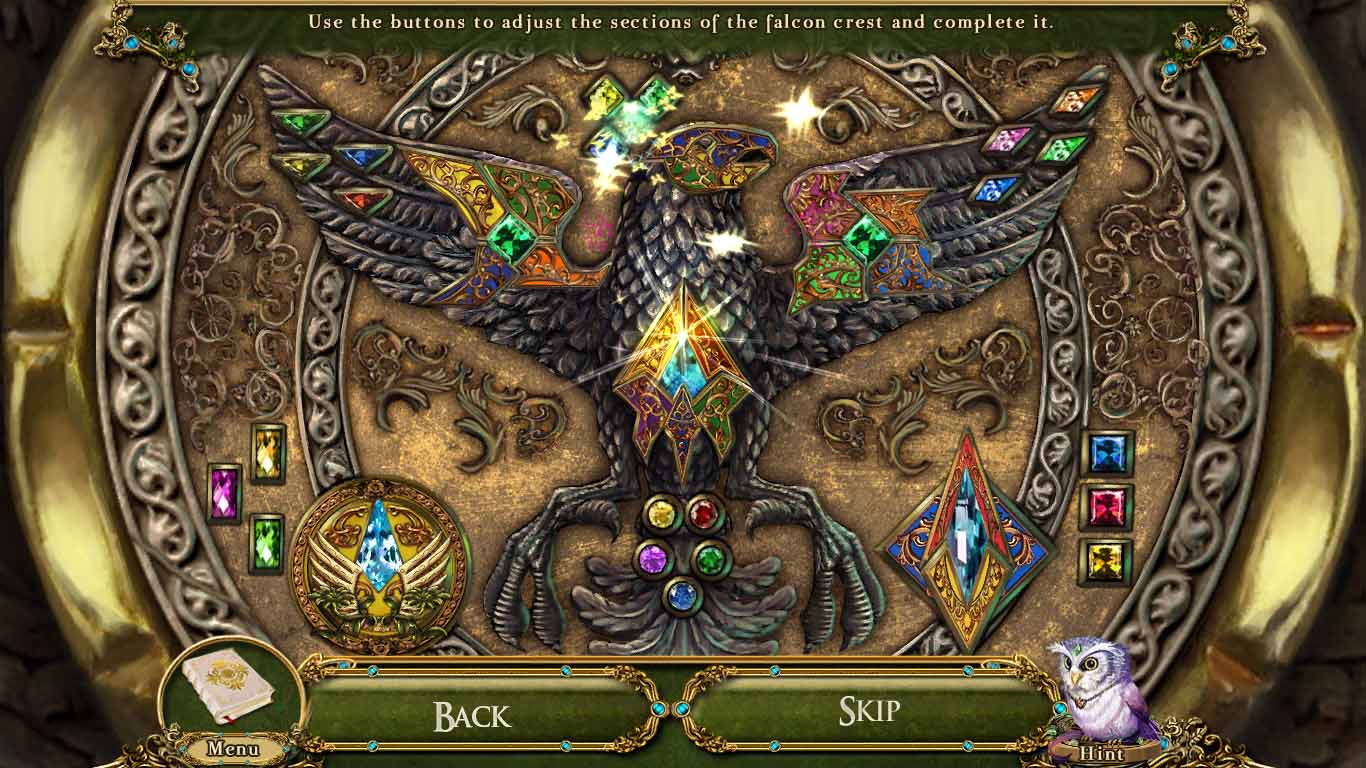
Place the jewelled emblems on the surface to start a puzzle.
You must slide the crests around until they are in the correct spot. To the right of the bigger emblems is a smaller showing of how the crests should be appropriately placed.
This puzzle is randomized, but the places where the emblems need to be placed will always be the same.
Screenshot
Now the slope has a staircase and the boulder has been moved to give an entrance to the cave.
Getting a Crowbar
Zoom in on the vines on the tree and use the Pocket Dragon to burn the vines away.
Pick up the corkscrew from the top of the bottle, then click on the bottle to read the message inside of it.
Go left through to the Faireground Entrance.
Look at the pile of rocks on the immediate right and pick up the leather gloves.
Zoom in on the pillar, click on the poster, then pick up the portcullis fillings.
Investigate the drainpipe and use the goldenleaf branch to open the cover. Click on the keys to retrieve them.
Go back to the Bridged Crossings.
Go forward up the slope to the Crystal Generator.
Examine the left reflector and pick up the empty oil can.
Investiate the silver portcullis and place the portcullis fillings on it to start a puzzle.
Screenshot
Once done, you will open the gate. Go forward to the Wingferry.
Speak with the little girl, then zoom in on her grandfather. Pick up the two quilt patches.
Examine the Entrance to the Enginarium.
This will start a puzzle where you must find twelve switches.
Open the chest to receive hammer and nails.
Pick up the crowbar and use it to pry the wooden board from under the paneling with the keyhole.
Place the wooden board on the bottom of the ladder. Use the hammer and nails to fix the ladder and get to the high up switch.
Use the hammer to bust open the crack on the wall.
Pick up the key on the wall and place it in the keyhole, then move the tile up to reveal a switch.
You receive a crowbar.
Repairing the Repair Manual
Pick up the shovel.
Examine the footlocker and click on the top gear, then move it down to reveal a keyhole.
Use the keyring on the keyhole to open the footlocker.
Examine the spare parts to start a puzzle. You must pair together items that need each other to work properly.
Saw and wooden planks.
Flyers hat and goggles.
Knuts and wrench.
Paintbrush and paint.
Matches and lantern. To reveal the lantern, click on the white cloth that's covering it.
Screwdriver and screws.
Chain and gear.
Sunflower and potting soil in plant pot.
T square and triangle ruler.
Sewing needle and thimble.
Chisel and mallet.
Quiver and crossbow.
An old repair manual is available, but is missing a page that you must find.
Zoom in on the oil drum and use the corkscrew on it.
Place the empty oil can on the opening and click on the hand pump. You receive a filled oil can.
Go back once and zoom in on the rusty chains. Use the filled oil can to fix them and receive chains.
Return to the Ancient Goldleaf and zoom in on the root cache. Use the shovel to dig up the dirt.
Use the leather gloves on the vines.
Use the crowbar on the metal grate.
Use the Pocket Dragon to get rid of the dry roots.
Use the corkscrew to take off the top lid. Click on the inside to receive machine parts.
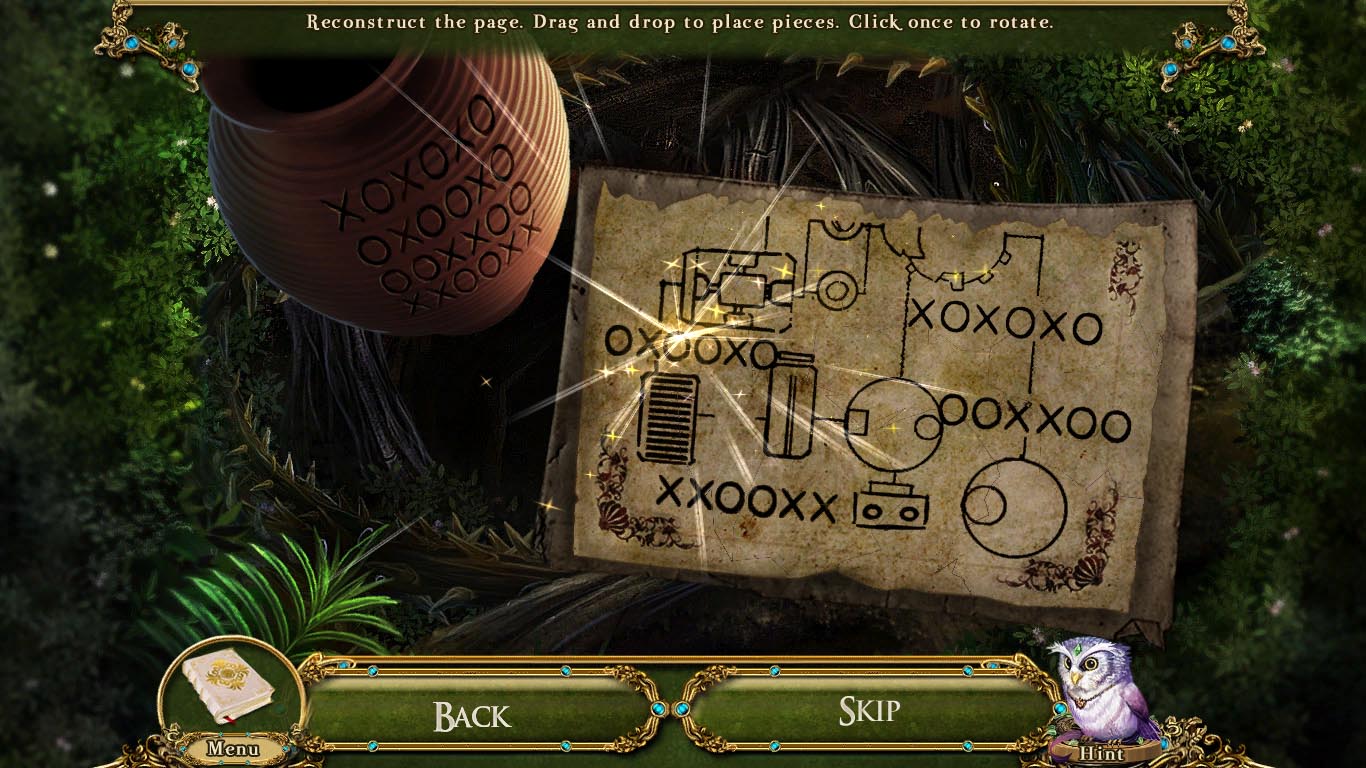
Underneath the machine parts are torn pieces of paper. Click on the torn pieces to start a puzzle where you must piece together a page.
Screenshot
Once done, you receive schematic paper.
Look at the lid you took off the jar and click on it to receive the third quilt patch.
Return to the Enginarium and examine the foot locker. Click on the manual and place the schematic paper inside.
You receive the repair manual.
Obtaining Rattan Sticks
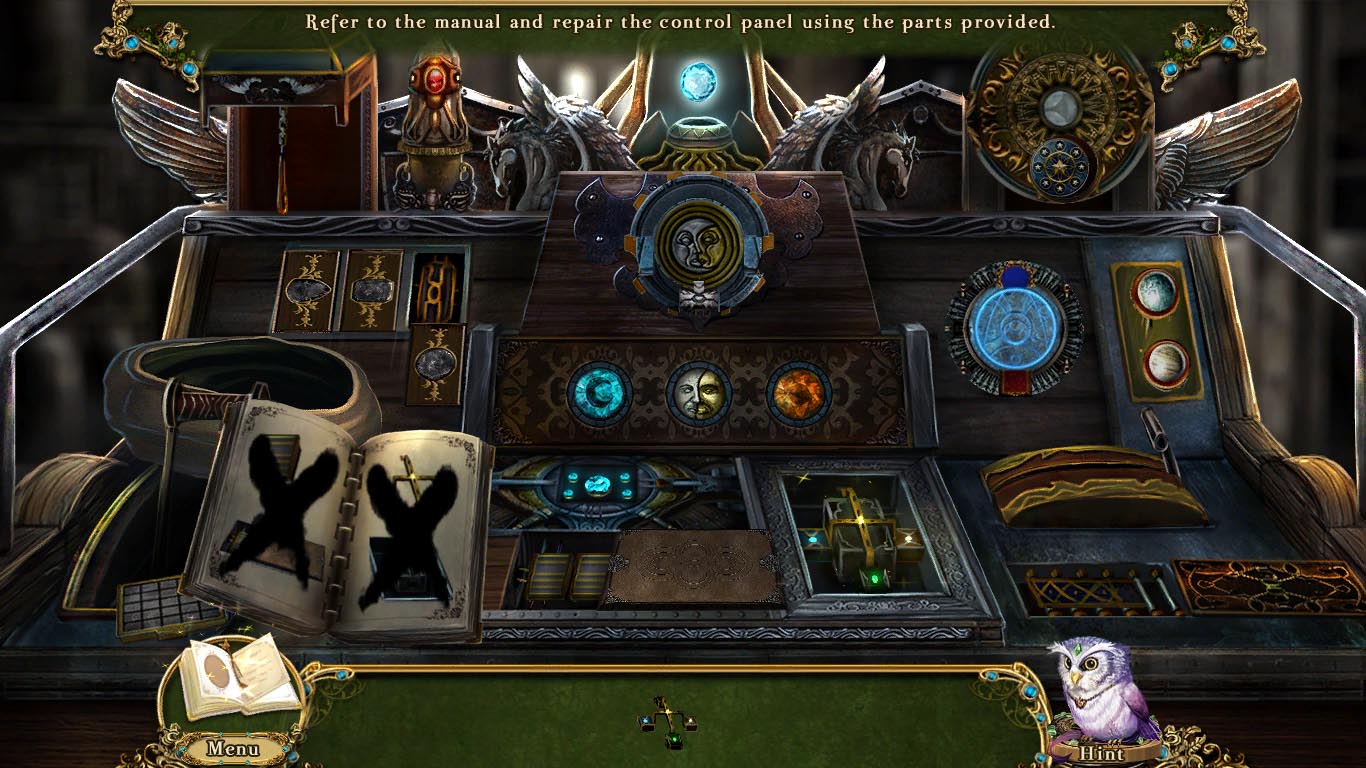
Investigate the lower control panel and place the repair manual and machine parts on the top to start a puzzle.
In this puzzle, you must look at the manual to place the parts in their correct spots to fix the control panel.
Screenshot
Completing this puzzle will gain you the Mini-Mechanic achievement.
When completed, press on the fuse box to start another puzzle where you must complete a path three times in a row.
Screenshot
After you have finished the puzzle, click on the lever to the right to turn on the engine. Go outside.
Go to the Faireground Entrance.
Zoom in on the winch and take the fourth quilt patch.
Attach the chain to the winch and press on the safety locks to start a puzzle.
You must move the red block to the designated square.
Screenshot
After finishing this, click on the lever to turn it and remove the debris.
Go forward to the Faire of Stars.
Look at the bamboo scaffolding to start a hidden object scene.
Click on the rope twice to raise the lockbox.
Click on the lockbox to retrieve multiple items.
Grab the three different weights and hang them from the wooden box to open it.
Take the birdseed from the box and place it on the birdhouse to make the bird come out.
You receive clippers.
Use the clippers on the rope to obtain a bamboo pole.
Go left into the Weaver's Hut.
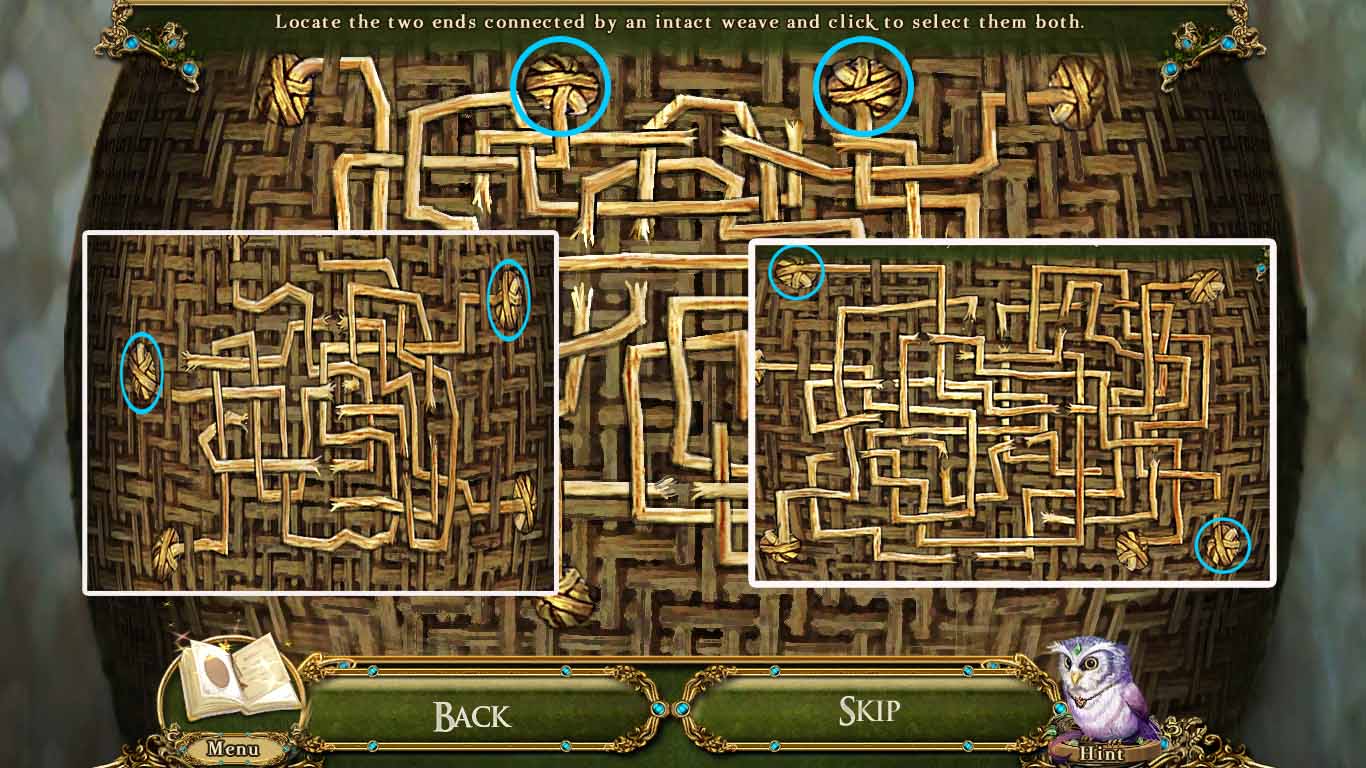
Click on the rattan basket to start a three-step puzzle, where you must find the lines that aren't broken and press on both ends.
Screenshot
You receive rattan sticks.
Waking the Wingferry Master
Click to pick up the rags and dustpan and broom.
Use the Pocket Dragon to light the candle, then pick up the lit candle.
Go back once, then walk forward to the huge statue.
Pick up the fifth quilt patch.
Use the clippers on the rope to receive rope.
Take a look at the metal plate at the top left of the stone.
Go back twice and zoom in on the squabbit hole. Use the dustpan and broom to clean up the debris.
A hidden object scene is now available: click to start it.
You must find twelve carrots.
Use the mallet to smash open the piggy bank and find a carrot.
Pick up the fly swatter and use it on the fly. Pick up the fly and place it on the spider web to reveal a carrot.
Grab the protruding branch and use it on the rat trap to get that carrot.
Pick up the brush and use it on the pile of dirt to reveal a chisel. Use the chisel on the soft brick next to the mouse.
Use the brush to clean up the dirty pile to the left of where you pick the brush up.
Pick up the crystal and place it in the socket to reveal a carrot.
You receive a bunch of carrots.
Give the bunch of carrots to the squabbit.
Go forward once and give the squabbit to the little boy statue.
Speak with the boy after he is returned to life and obtain the sixth and final quilt patch.
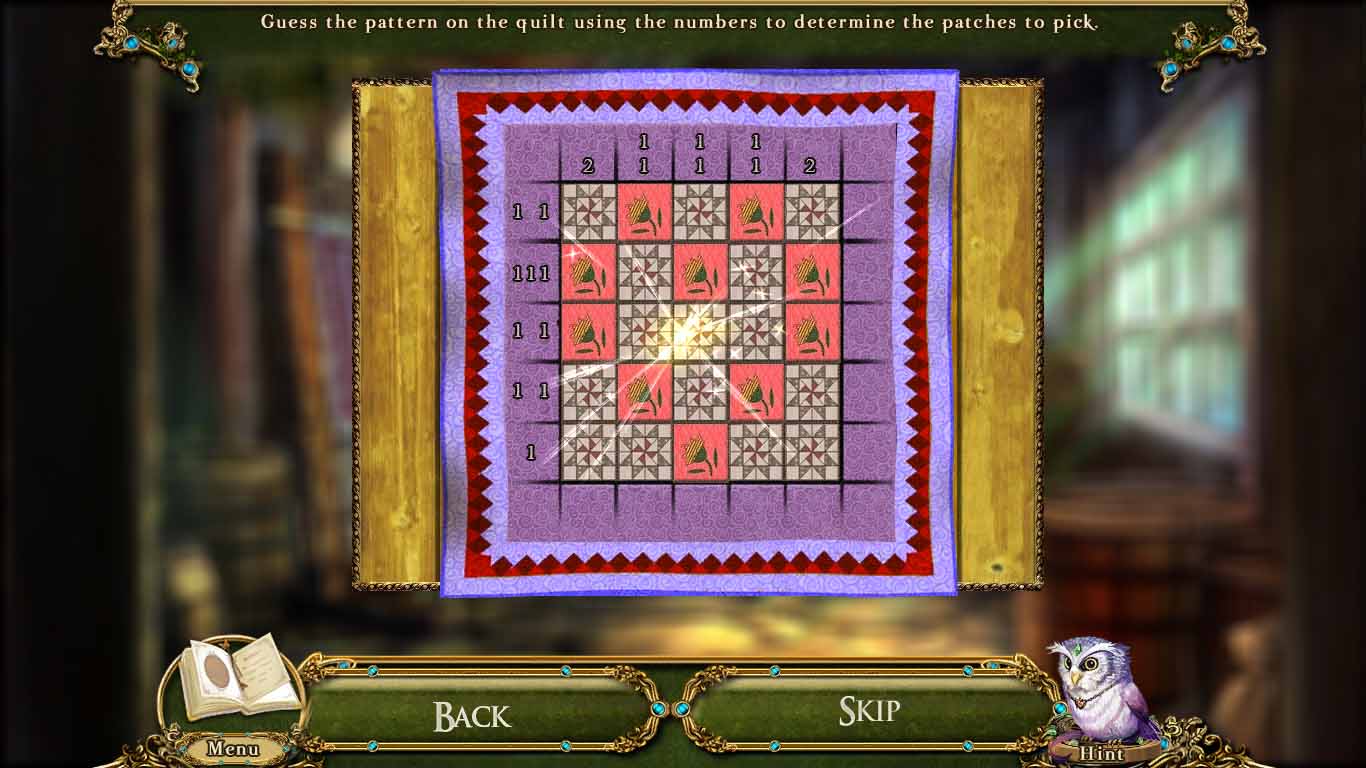
Go inside the Weaver's Hut and zoom in on the loom. Place all six quilt patch pieces on the loom to start a puzzle.
Screenshot
After you complete the magic quilt, pick up the pocket watch.
Go to the Wingferry and give the pocket watch to the old man statue to bring him back to life.
Once the Wingferry master is awake, speak with him. He will give you a screwdriver.
Reaching the Cloud Court
Go to the Faire of Stars and go forward to the huge statue.
Inspect the metal plate and use the screwdriver four times on each screw to take off the plate and receive the lantern diagram.
Use the rags to clean away the cobwebs, which will create sticky rags on a stick.
Click on the statue mechanism to start a puzzle.
Move the pieces so that they match the image underneath the emblems.
Screenshot
Go back twice and zoom into the window to the left of the squabbit hole. Use the sticky rags on a stick to get the craft paper.
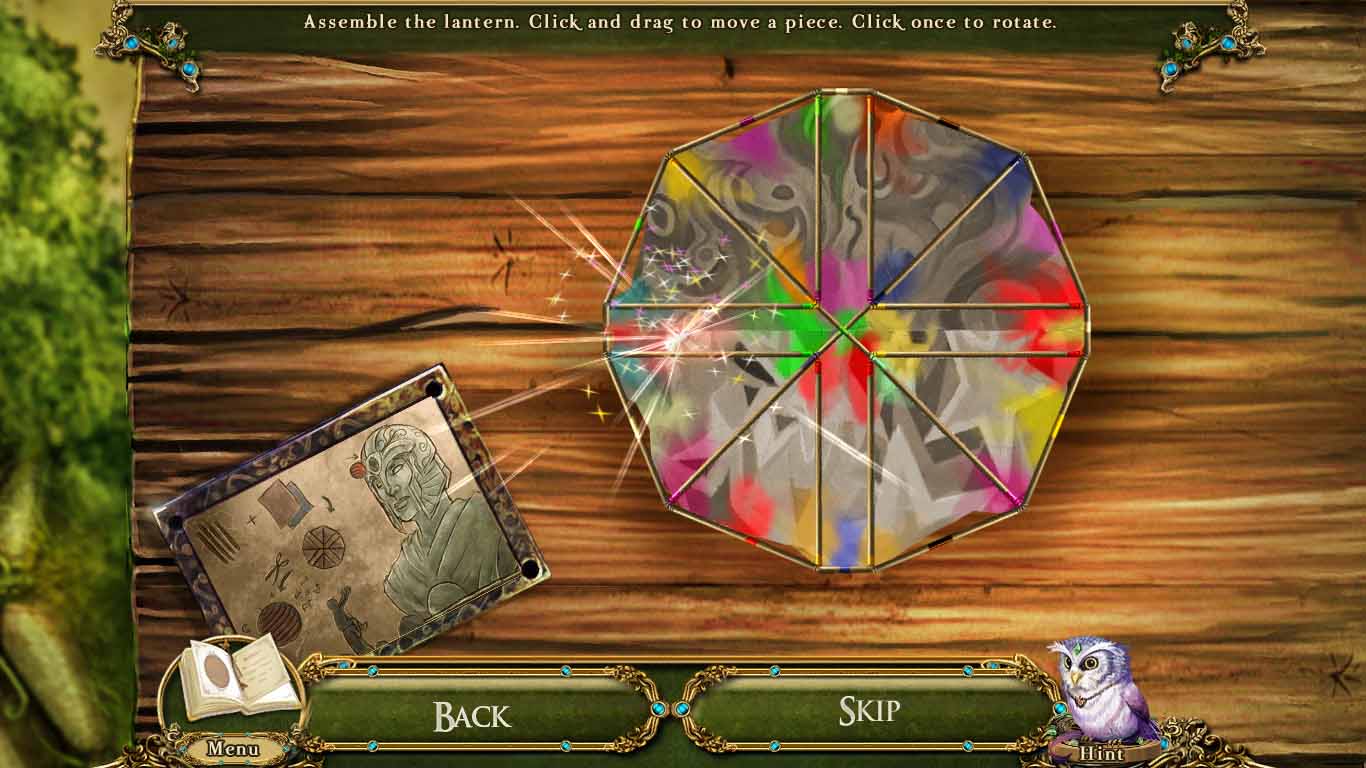
Go forward once and examine the children's work bench. Place the lantern diagram on the table.
Place the rattan sticks on the table followed by the craft paper then click on the directions to start a puzzle where you piece together the craft paper on the rattan sticks.
Screenshot
Use the clippers on the lantern to cut the shapes out and start a puzzle where you have to find the correct creature based on the riddle.
Place the candle inside the lantern to finish it and retrieve the lantern.
Go forward to the huge statue and place the lantern in the empty circle on the forehead.
Pick up the sky crystals.
Go to the crystal generator. Zoom in on the left reflector and place a sky crystal in the holder. Use the filled oil can on the three different winches.
Use the bamboo stick on the biggest winch to turn it. Put the rope on the left winch.
Pick up the pumice.
Zoom in on the right reflector and put the sky crystal in the holder.
Place the pumice on the reflector and move it back and forth to start a mini-game where you must select all the silhouettes as they appear.
Examine the crystal controls to start a puzzle. Move the parts to mirror the image on the left.
Screenshot
Go to the Enginarium and zoom in on the upper control panel. Place the lever on the broken lever to fix it.
Press on the lever to flip the switch.
Chapter Two: Cloud Court
Getting into the Greenhouse
Click on the unicorn to get the task of helping him get healed.
Go up the stairs to the Barracks Entrance.
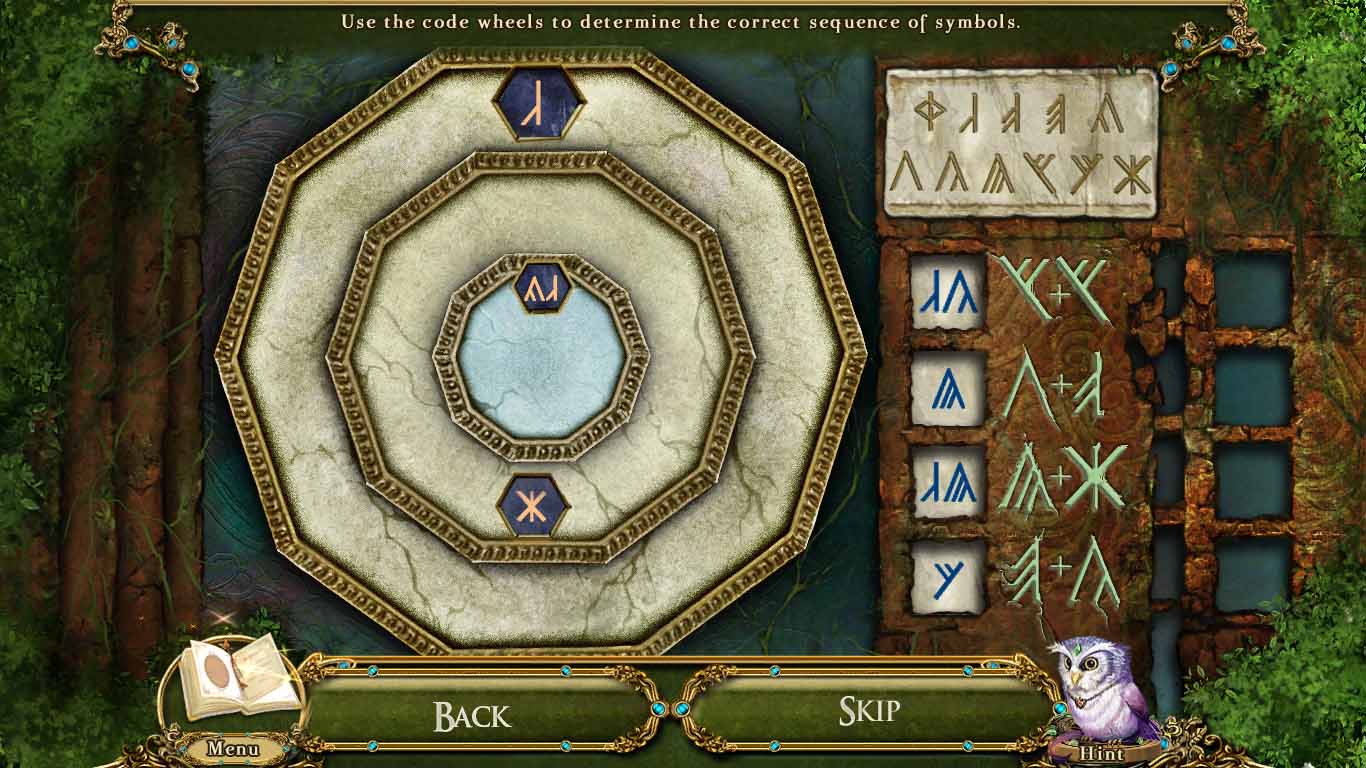
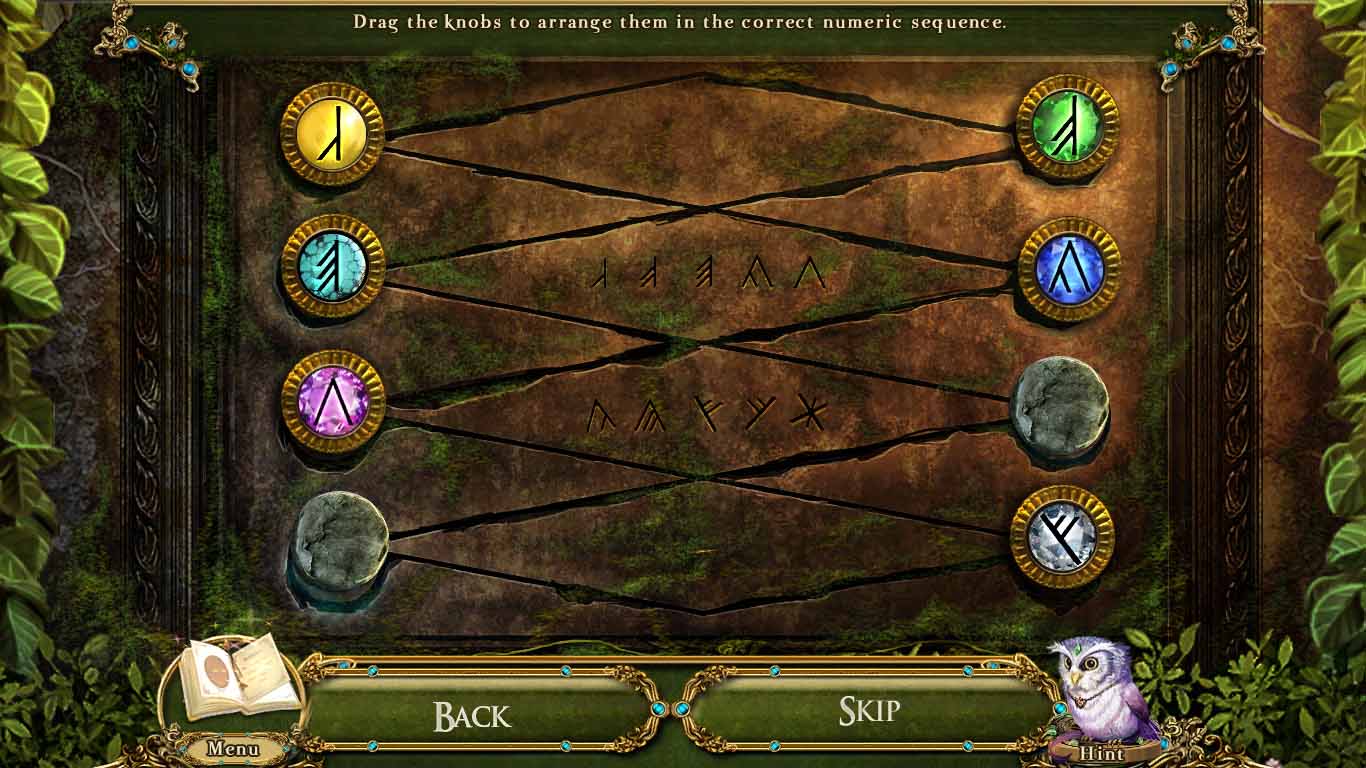
Go left to the castle bridge and click on the gate to start a puzzle.
There is a numeric legend at the top left. Underneath this are four boxes that have two numbers adding together: you must change the number symbol on the left to correctly display the solution.
Screenshot
Walk forward to the Ivory Gates. Try to walk forward into the castle.
Use the Pocket Dragon on the dried vines.
Pick up the key.
Go back once and zoom into the wooden box in the gate house. Use the key in the lock and pick up the oak ring.
Return to the Castle Landing and zoom in on the Briar Gate. Place the oak ring in the empty slot to start a puzzle.
Rotate the rings on each ring to have the images facing the proper direction.
Screenshot
Go through to the High Gardens.
Investigate the crystal lattice and pick up the first of three gemstones and the first of four stone tablets.
Go forward to the Giant Goldleaf Oak.
Look at the petrified faun and pick up the second gemstone and second stone tablet.
Click on the satchel to open it and pick up the greenhouse key and the first of four quilt patches.
Go back to the High Gardens and use the greenhouse key on the Greenhouse to start a mini-game.
Turn the dials so they properly match the clock time and time of night or day.
Screenshot
Go into the Greenhouse when you finish.
Obtaining the Barracks Pass
Examine the garden shed to start a hidden object scene where you must find the correct flower as it appears on the bottom bar. You will have to flip switches to obtain different types of flowers because light helps them bloom.
You receive garden shears.
Click on the shed once more and use the garden shears to cut away the overgrowth.
Pick up the third and final gemstone.
Return to the crystal lattice and place the gemstones on the wooden board to start a puzzle.
You have to move the pieces to be in the correct numerical order.
Screenshot
When the flowers grow, pick up the final two stone tablets.
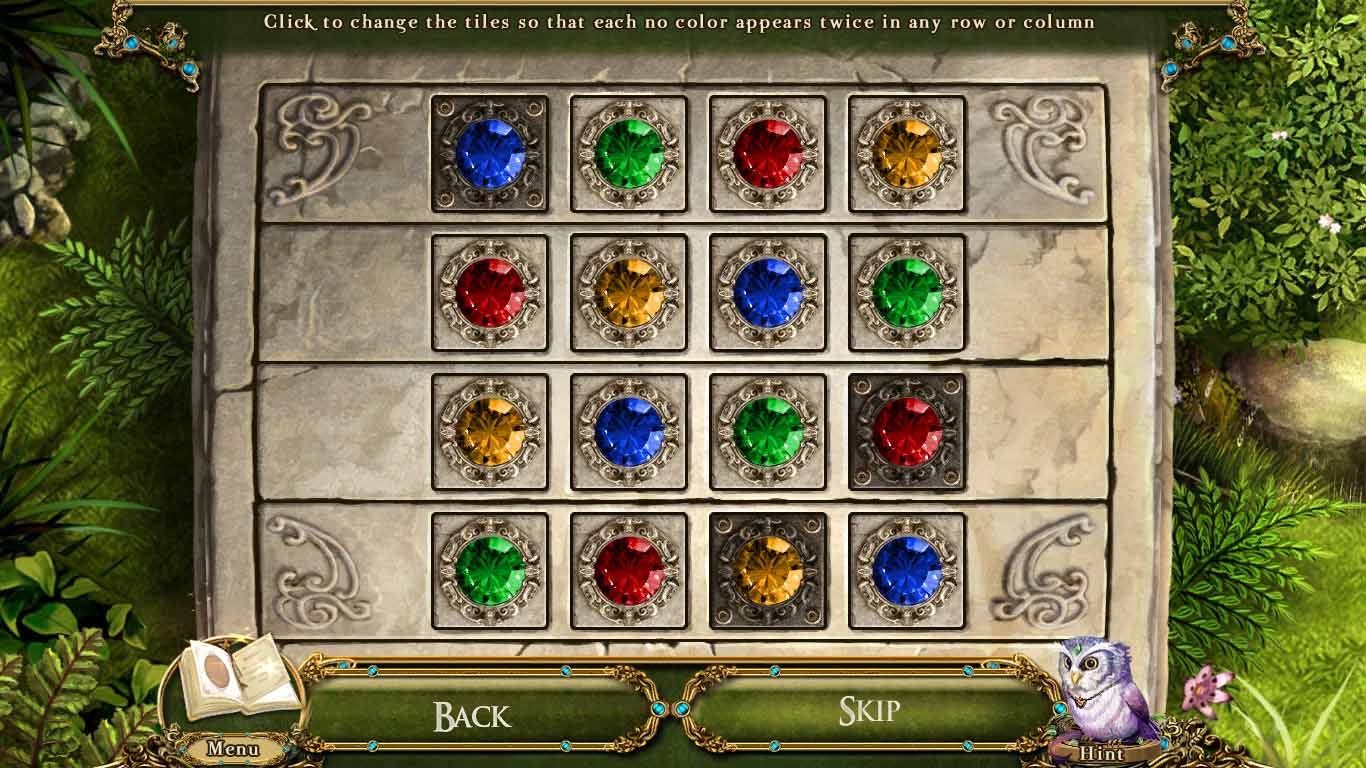
Go to the Barracks Entrance and zoom in on the stone chest. Place the four stone tablets on the chest to start a puzzle.
You must flip the colored gems over so that there are no repeating colors in any line.
Screenshot
Once done, pick up the torn page and broken hilt.
Go to the Giant Goldleaf Oak and zoom in on the petrified faun. Place the torn page on the book to revive her.
Speak with the faun, and you'll receive a scroll of medicinal herbs. Go to the Greenhouse.
Go into the greenhouse shed and place the scroll of medicinal herbs on the table. Then click on the box of eggs to start a puzzle where you have to get rid of all the wrong eggs until only the cockatrice egg remains.
You receive the cockatrice egg.
Return to the faun at the Giant Goldleaf Oak and give her the cockatrice egg. She'll give you the Barracks pass.
Getting the Round Whetstone
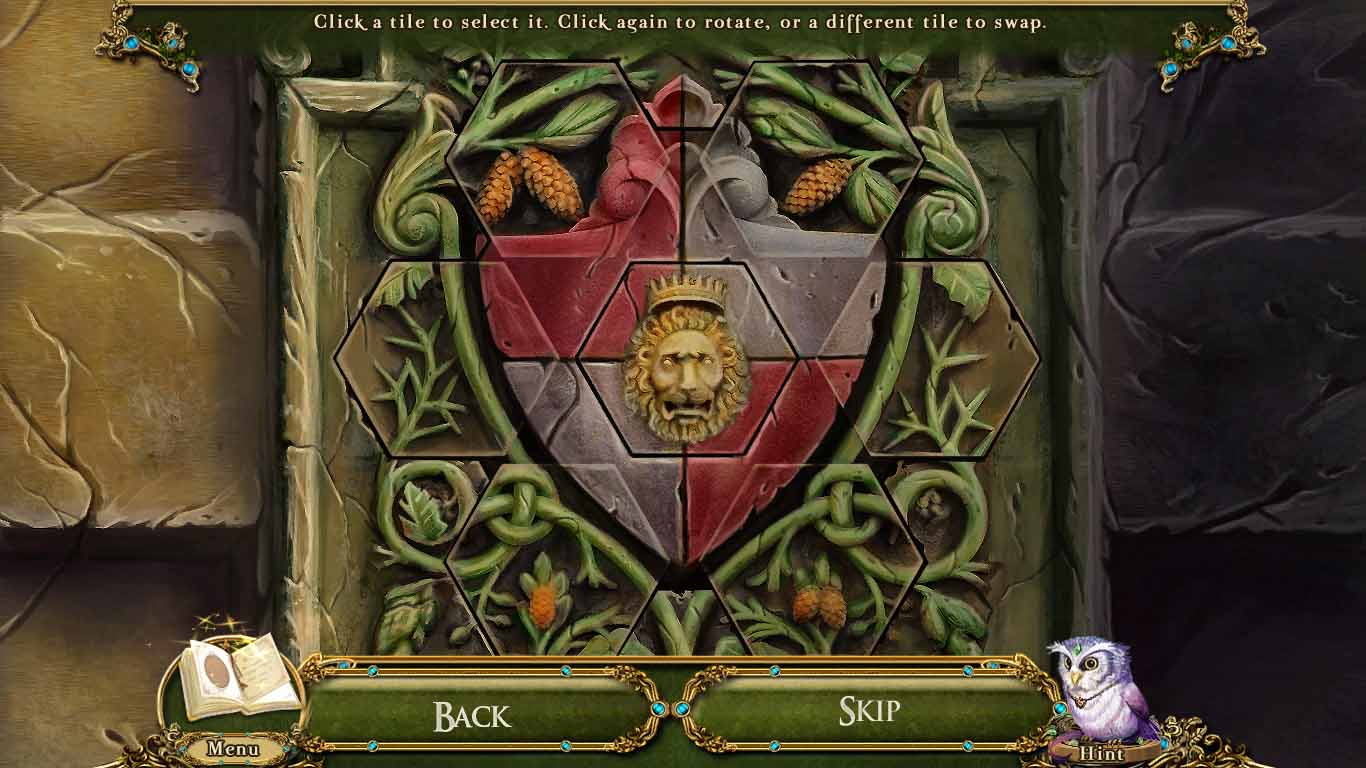
Go to the Barracks Entrance and zoom in on the door. Place the barracks pass on the door to start the puzzle.
Rotate the pieces so that they form the crest correctly. Double click to swap the tiles.
Screenshot
Go through the door into the Barracks Courtyard. Look through the telescope for part of an achievement.
Click on the ballista and use the broken hilt on the blade stuck on the right side to create a rusty sword.
Look at the armory entrance door and read the note. Use the rusty sword to break the lock.
Go forward into the armory.
Click on the Blacksmith's Forge to start a hidden object scene where you must place the items back where they belong.
You receive grease and the first of four incubator pieces.
Return to the courtyard and zoom in on the ballista. Use the grease on the gears, then pull the lever to start a mini-game.
You must press the red and blue buttons once the aim is in the perfect shape of a +.
Go into the windmill and zoom in on the boards to your right. Use the rusty sword to break them and then use the Pocket Dragon on the chain.
Go down to the cave entrance through the hole where the sandbag fell.
Pick up the sandbag, then pick up the first of three soil conditioners from the little water well to the left.
Move back twice, go through the armory entrance, then move forward to the portcullis. Attach the sandbag on the chain to the right of the portcullis.
Go through the door to the barracks.
Click on the guard and pick up the crusty chainmail and the quilt patch.
Look at the sand bucket and pick up the second soil conditioner ,then pick up the sand bucket.
Zoom in on the scrap metal pile to start a hidden object scene.
You receive a round whetstone.
Getting Herbs for Alchemy
Press on the door to open it and have an easy way back and forth through the barracks.
Go back to the windmill, then down to the cave entrance. Examine the sand pile and use the sand bucket to pick it up.
Place the crusty chainmail in the bucket and move it back and forth repeatedly until you receive chainmail.
Go to the armory and zoom in on the grindstone. Place the round whetstone on the rack and then use the rusty sword on the round whetstone. Then spin the stone repeatedly.
You receive sharp sword.
Go forward into the barracks and inspect the guard. Place the chainmail and sharp sword on him to restore him.
Look at the locker to start a puzzle. You must rotate the circles so that the circles on the right resemble the guide on the top left.
Screenshot
You receive the second incubator part and the third soil conditioner.
Go forward and speak with the faun.
You receive herb seeds and medical notes.
Go to the greenhouse and enter the garden shed.
Place the herb seeds in the pots and place the soil conditioners on the bags to start a puzzle.
Purple Pot: Black bag, green bag, grey bag.
Blue Pot: Beige bag, green bag, blue bag.
Green Pot: Grey bag, beige bag, white bag.
Yellow Pot: Yellow bag, black bag, blue bag.
You receive herb saplings.
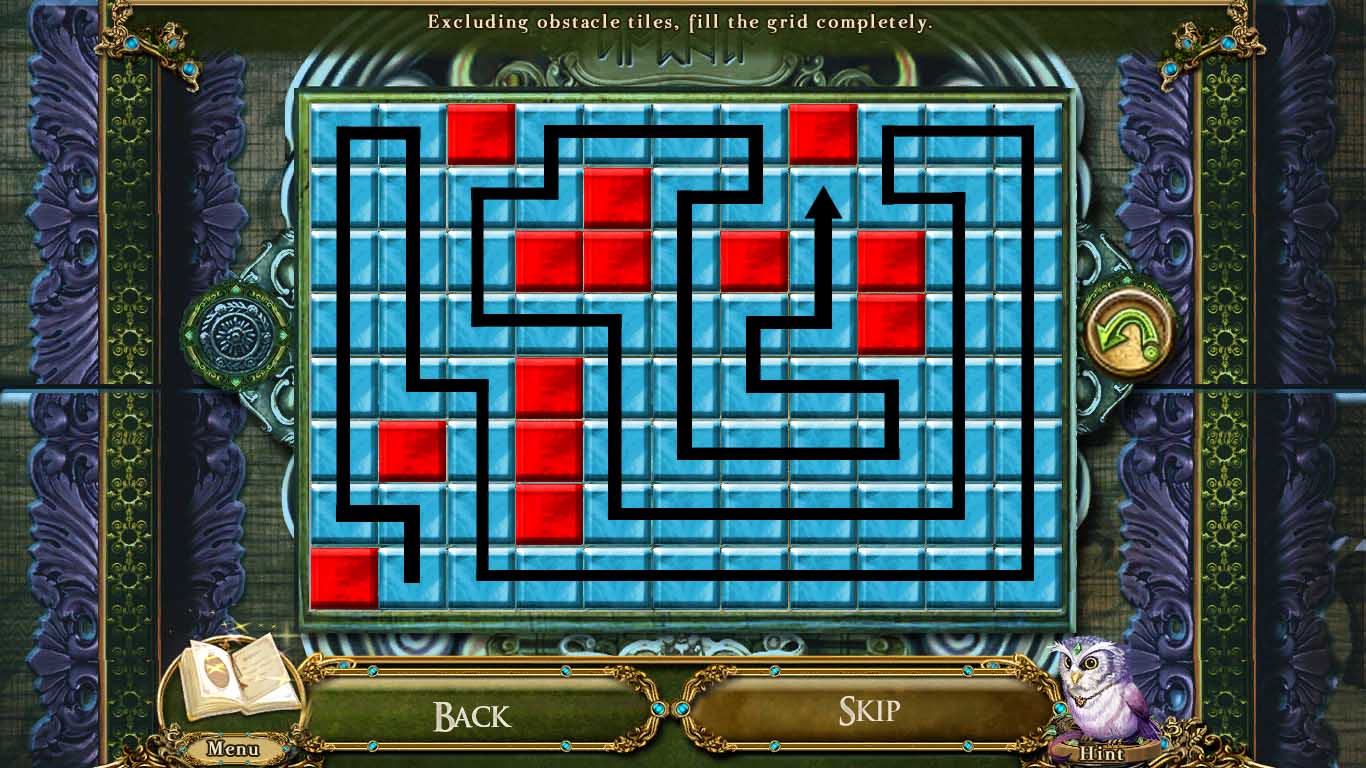
Look at the plant cultivator and place the herb saplings inside to start a puzzle. You must go in a line and hit every box without overlapping.
Screenshot
You receive dewglint, sapphirebud, sparkleleaf, and sunbright.
Grabbing the Last Incubator Part
Go to the Windmill and zoom in on the alchemy table. Use the Pocket Dragon to light the burner.
Place the dewglint, sapphirebud, sparkleleaf, and sunbright in the dishes. Put the medical notes on the table to start a puzzle.
Make the mixtures based on the diagram. The two flowers connected with a red line mean they do not make a mixture. The only two flowers that do not mix together are the sunbright and sapphirebud (the yellow and blue flower).
White and blue flower.
Blue and purple flower.
White, blue, and purple flower.
You receive healing poultices.
Go to the Castle Landing and use the healing poultices on the unicorn to start a puzzle.
Use the red poultice to cure cuts.
Use the purple poultice to cure bruises.
Once the unicorn is healed, click on it to fly to the aviary.
Look through the telescope to view the basilisk.
Zoom in on the Aviary Entrance to start a puzzle where you must press on the colored buttons to move the tiles so that they fit the slots.
Screenshot
When the door is opened walk through into the Aviary.
Pick up the three birdfeeders, then click on the storeroom door to reveal a hidden object scene.
Pick up the orange fruit and give it to the monkey hand to reveal the monkey.
Click on the bushes under the monkey to reveal a machine part.
Use the watercan on the plant above where you revealed the machine part to get one of the yellow flowers.
You receive the last incubator part and a handle.
Getting the Weapons Cabinet Key
Go to the Windmill-crystal forge.
Click on the trapdoor to receive a gaff hook.
Examine the crystal forge and read the essence of fire page. Pick up the third quilt patch.
Go right into the gear room to start a hidden object scene where you need to find twelve windmill spurs.
You receive windmill spurs.
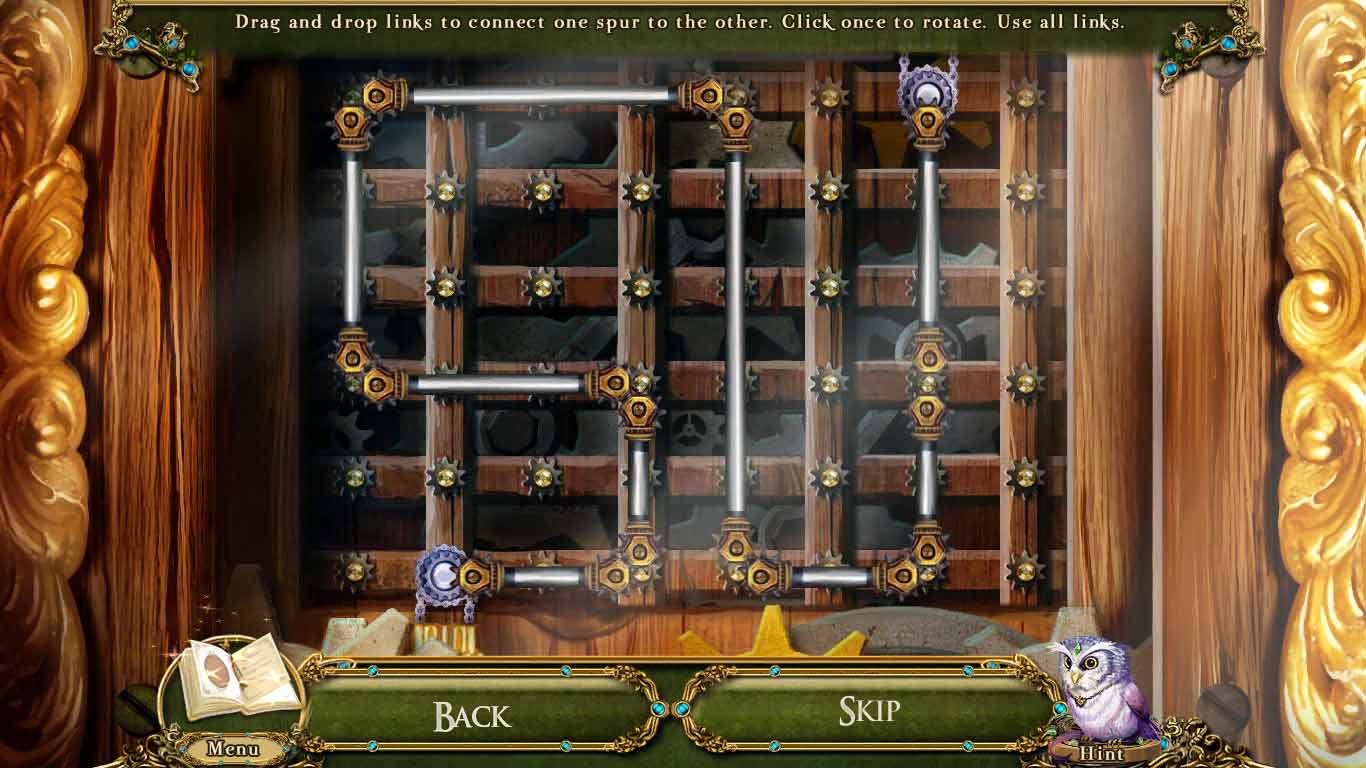
Click on the gear room again to go inside. Look at the gear box and read the note. Place the handle on the empty spot and press on it to open the gear box. Place the windmill spurs on the space to start a puzzle.
You must connect the spurs by using all the links to make one continuous line.
Screenshot
Pick up the broken bow.
Go to the crystal lattice in the High Gardens and grab the bronze grapes by using the gaff hook.
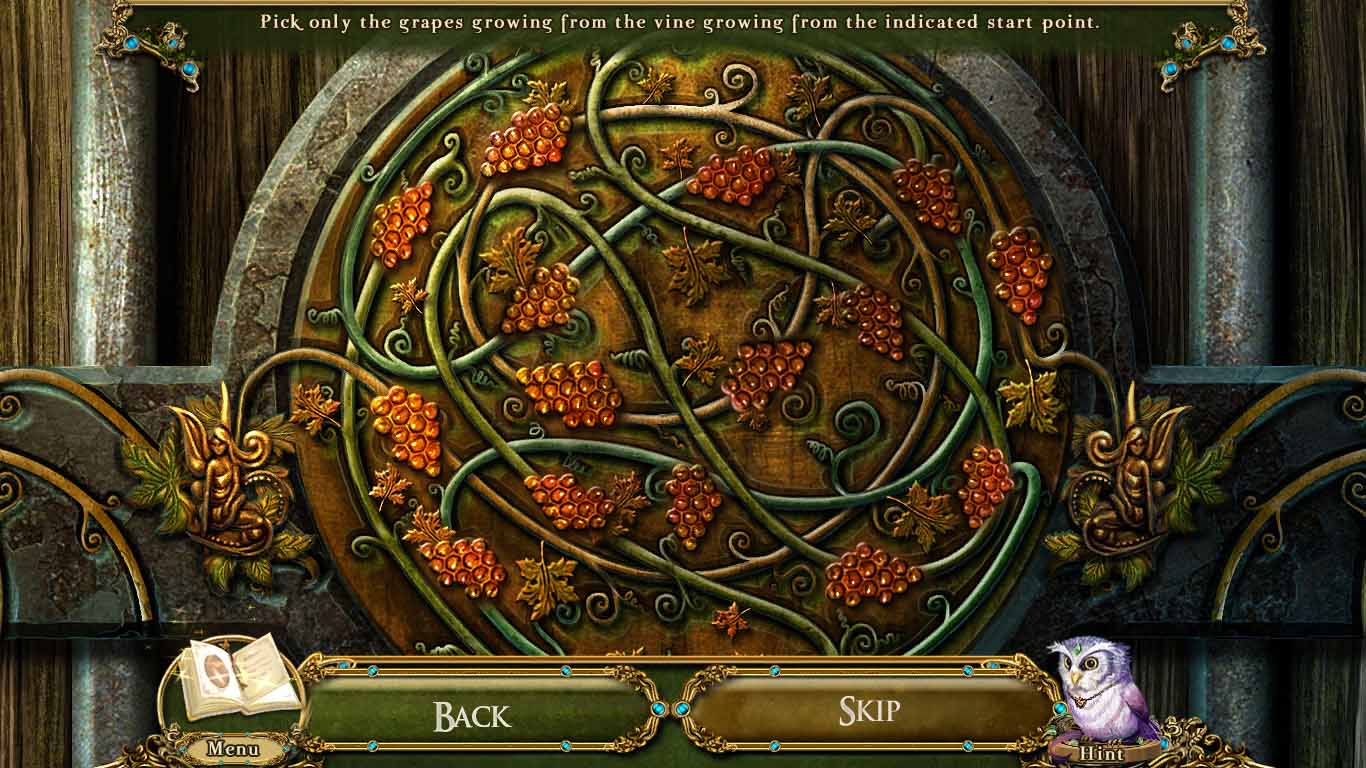
Head to the Giant Goldleaf Oak and zoom into the gate. Place the bronze grapes on it to start a puzzle.
Pick the grapes that are on the vine held by the two fairies.
Screenshot
Move forward into the vineyard.
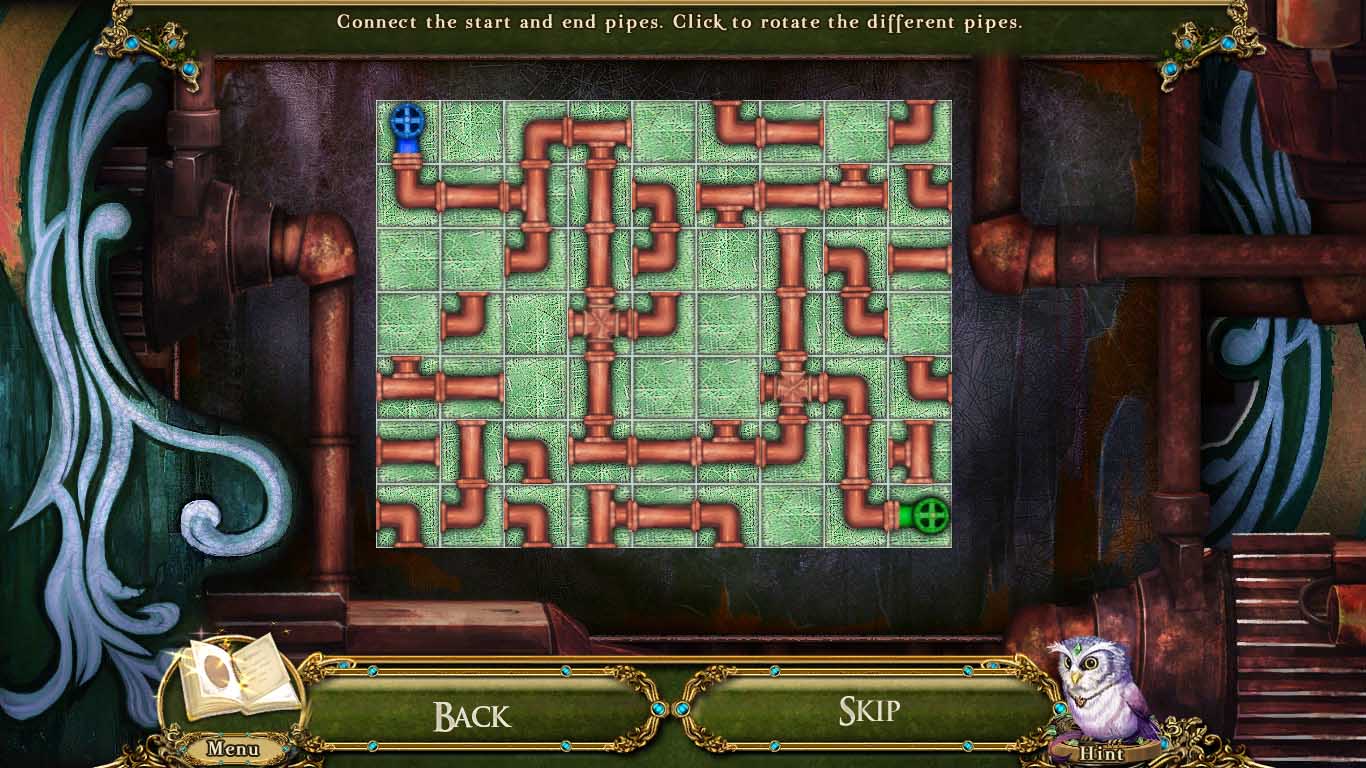
Zoom in on the water control system and use the Pocket Dragon on the door three times to open it and start a puzzle.
Move the pipes around so the starting pipe and end pipe are hooked up to one another.
Screenshot
Examine the vine bed and use the hook gaff to grab the key. This will start a hidden object scene where you need to find the items as they appear on the inventory bar.
You receive the weapons cabinet key.
Getting the Cockatrice Chick
Go to the barracks and head inside to the armory. Use the weapons cabinet key on the weapons cabinet. You receive one of eight dragon's teeth.
Click on the cabinet to open it up further. Place the broken bow on the table followed by the goldenleaf branch.
Pick up the saw and use it on the goldenleaf branch to start a mini-game.
Cut along the dotted line as best you can, then place the proper pieces on the bow. When done, pick up the goldenleaf bow.
Go to the windmill and go down to the cliffside caves. Pick up the Pocket Dragon from the rock.
Use the Pocket Dragon to burn the tapestry.
Pick up the quiver, the fourth quilt patch, and the four dragon's teeth.
Look at the cave entrance and use the bow and arrow to shoot the rolled up tapestry down. Place the quilt patches on the tapestry to start a puzzle.
Screenshot
Pick up the sixth dragon's tooth.
Go forward to the Cliffside Caverns.
Zoom in on the broken brazier to start a puzzle. You must piece the brazier back together.
Screenshot
Use the Pocket Dragon to cook the sablecorn once the brazier is fixed.
Pick up the popped sablecorn and the remaining two dragon's teeth.
Click on the stone dragon and place the dragon's teeth on it. This will start a puzzle where you must correctly place the teeth in the jaw.
Screenshot
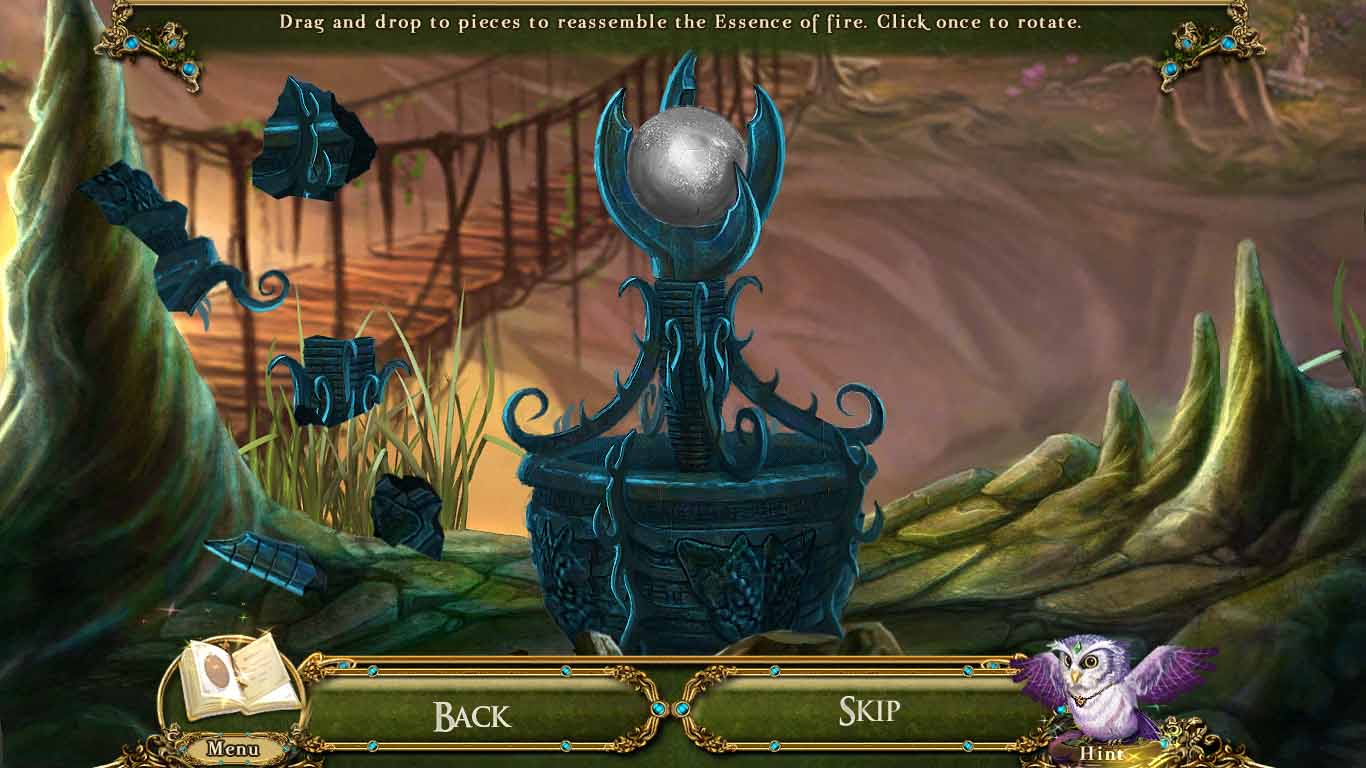
Use the Pocket Dragon on the essence of fire machine. Place the incubator parts on it once the bulb is lit.
This will start a puzzle where you have to piece the essence of fire back together.
Place the cockatrice egg in the incubator. You receive the essence of fire and the cockatrice chick.
Getting into the Skyward Castle
Examine the telescope on the other side of the bridge. Pick up the spyglass, then place it on the stand to view the Wingferry family in the distance.
Go back into the windmill and look at the alchemy workstation. Click on the bulletin board to start a hidden object scene where you must find six book pages, then six flowers, then find six animals.
A formula book appears. Press on it to start a puzzle where you must make a growth potion for the cockatrice.
Purple and yellow flowers.
Blue and white flowers.
Red potion and white flower.
Blue flower, pink potion, and brown potion.
Purple flower, yellow flower, red potion, and orange potion.
Use the popped sablecorn on the growth potion. Place the cockatrice chick on the dosed sablecorn.
Go back twice and hang a birdfeeder from the hanging branch on the tree left of the chest. Placed some popped sablecorn in the birdfeeder.
Go left to the castle bridge and hang another birdfeeder from the metal hook and filled it with popped sablecorn.
Move forward once more and hang the last birdfeeder from the overgrown lamp post and place popped sablecorn in it.
Return to outside of the barracks and speak with the guard.
Place the spyglass on the ballista.
Go to the windmill and go upstairs to the crystal forge. Examine the crystal forge and place the essence of fire on it to start a puzzle.
Draw the shapes shown on the left on the crystal. At the end you receive ballista bolt head.
Return to the ballista and place the ballista bolt head on it.
A mini-game will start where you must shoot down twelve target boards to recalibrate the ballista.
Chapter Three: The Skyward Castle
Getting into Sophia's Bedroom
Pick up the apron from the left bannister.
Go to the Grand Archway.
Zoom in on the petrified maid and take the kitchen knife. Place the apron on her.
Look at the torch on the wall to the left of the gargoyle. Use the Pocket Dragon to light it on fire, then pick up the lit torch.
Go back to the entrance.
Inspect the broken chair and use the lit torch in order to see. Use the kitchen knife to cut open the seam and pick up the first piece of the cipher key.
Grab the broken chair leg as well.
Examine the glowing pillars to start a hidden object scene where you must find the runes as they appear on your bar.
You receive the second cipher key fragment.
Inspect the perforated banner and use the bow and arrow to shoot down the third cipher key fragment that you must pick up.
Examine the sunward gate and pick up the final piece of cipher key fragment from a chip in the left wall.
Use the cipher key fragments on the gate to start a puzzle where you must change the lower tiles to pair with the upper tiles appropriately.
Unicorn.
Rose.
Crown.
Shield.
Hippogryph.
Screenshot
Press on the gate controls to make the gate lift up.
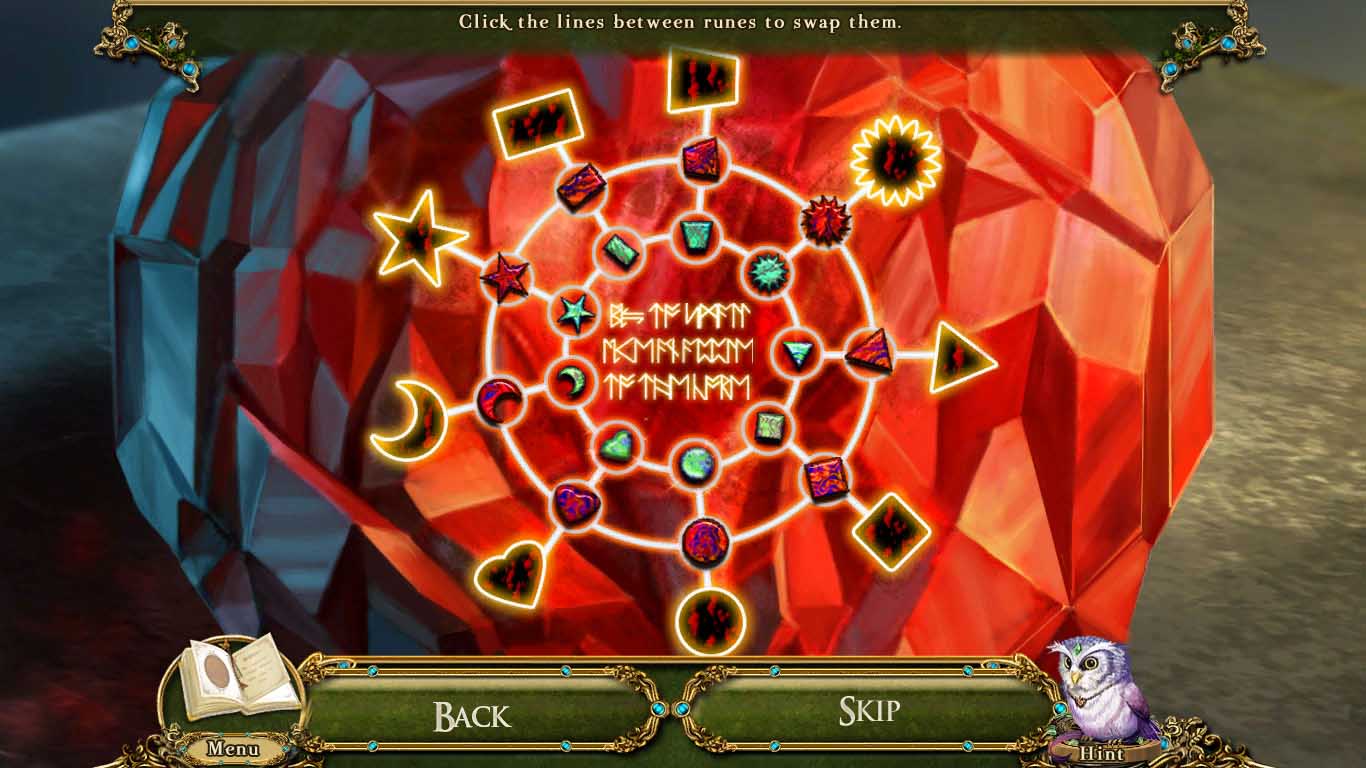
Look at the familiar-looking door to start a puzzle where you must swap tiles to match colors with the line of colors above.
Red.
Purple.
Blue.
Green.
Yellow.
Screenshot
Go into the bedroom.
Obtaining the Silver Star
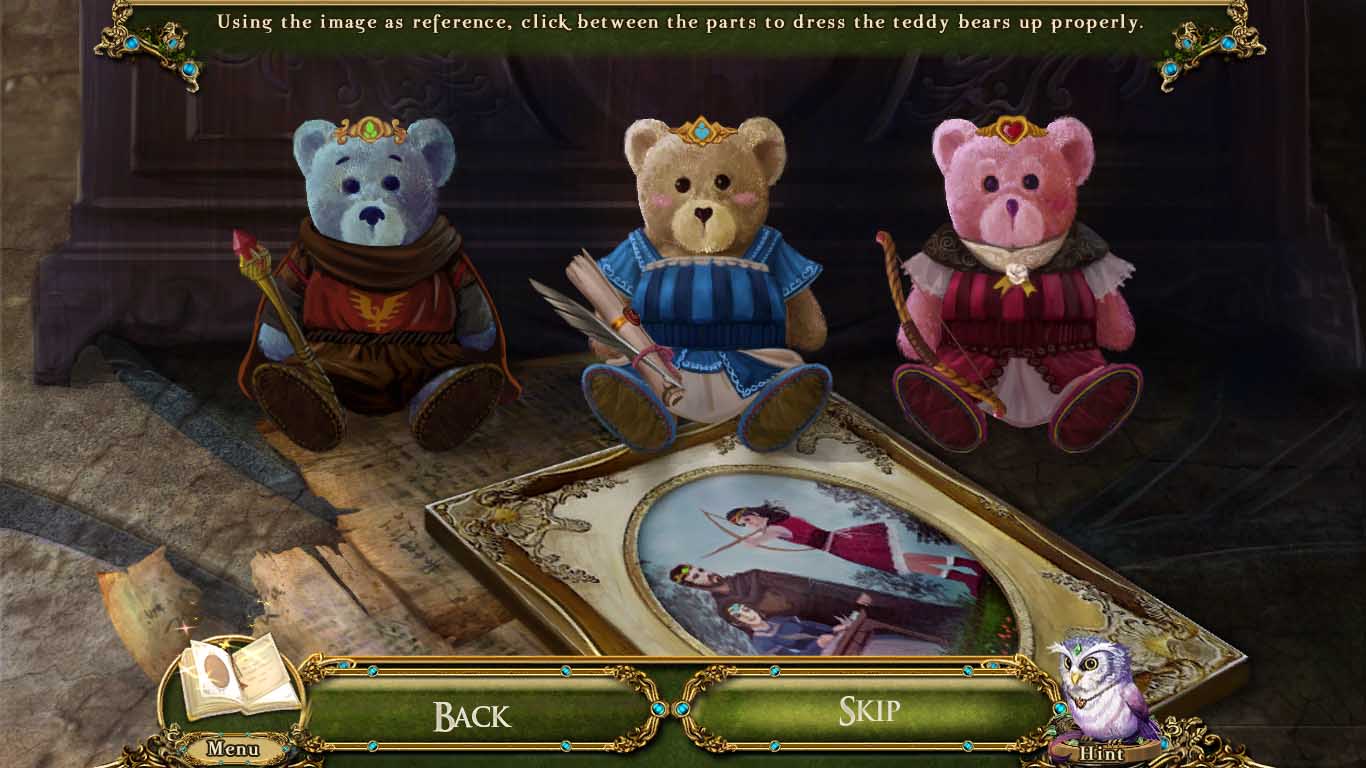
Look at the teddy bears to start a puzzle. Based on the picture of the people in the book switch the clothes, weapons, and tiaras on the bears.
Left Bear: Green crown, red-brown outfit, scepter, brown shoes.
Middle Bear: Blue crown, blue outfit, scroll and quill, blue shoes.
Right Bear: Red crown, red outfit, bow and arrows, red shoes.
Screenshot
Pick up the doorknob and the first of five runes.
Look at the dressing table and pick up the first of five quilt patches and the second rune.
Examine the balcony and pick up the third rune. Take note of the key.
Go back to the corridor and look at the sun painting: click on it to receive the sun emblem.
Zoom in on the cartographers door and place the doorknob on the door. Press on the knob to turn it.
Go into the cartographers room.
Press on the star map to start the puzzle where you will have to move the strings around so none are crossing.
Pick up the fourth set of runes.
Look at the map desk and piece together the papers to form a coherent image.
Screenshot
Pick up the loupe.
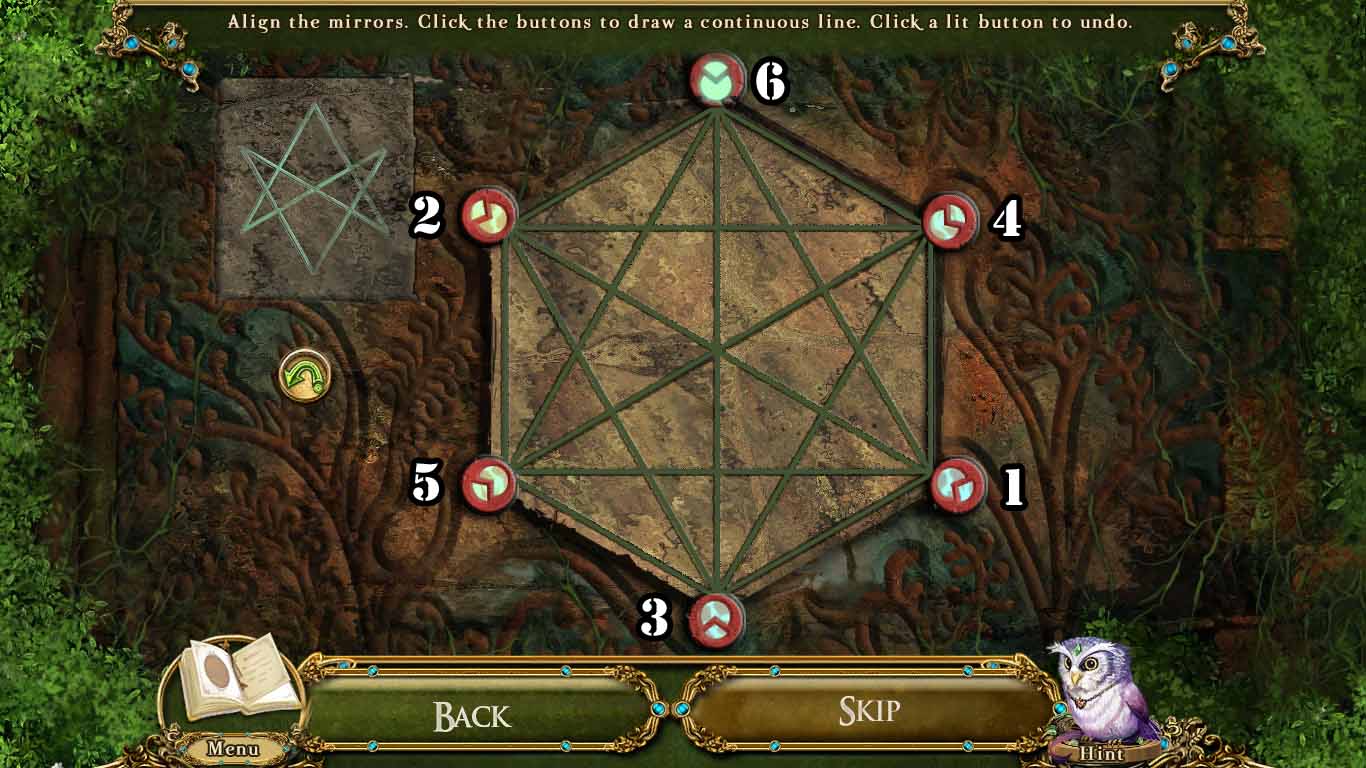
Check out the book display case which will start a puzzle. You have to mimic the image on the left and make a continuous line without overlapping.
Screenshot
Grab the compass half and the last runes.
Go back to the bedroom and zoom in on the mirror. Place the runes on the mirror, then use the loupe to look closer and start a puzzle.
Screenshot
Grab the silver star from the mirror.
Making the Cartographer's Compass
Walk back twice then go left to the starward gate.
Use the silver star on the middle of the door, then press on it to open the doorway.
Look at the moon mural.
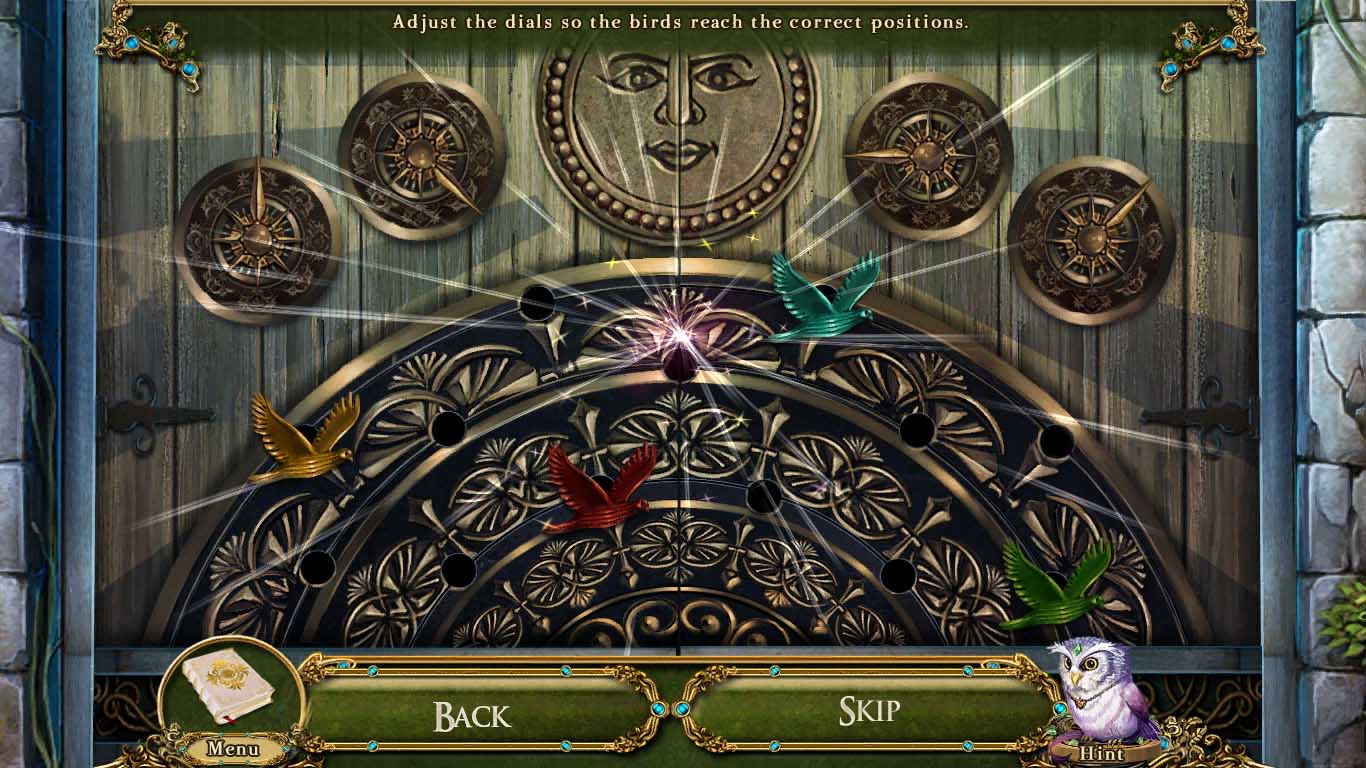
Zoom in on the door to the Wizards retreat. Place the sun emblem on the door.
When the puzzles start you will press on the different dials to move the birds to the proper location based on where they were on the sun mural.
Screenshot
The puzzle is randomized, so multiple play throughs will not be the same, but the birds will always be in the same place.
Go right into the wizard's retreat.
Inspect the petrified cartographer and pick up the wax tablet.
Examine the specimen storage and pick up the second quilt patch.
Look at the worktable station. Place the wax tablet in the mold. Use the Pocket Dragon to melt the wax, then pick up the wax mold.
Go to Sophia's bedroom and go out to the balcony. Place the wax mold over the key, then use the Pocket Dragon on it.
Take the key mold and return once more to the wizard's retreat.
Zoom into the worktable and use the key mold on the instant freeze bottle.
You receive a liquid key mold. Examine the specimen storage and place the liquid key mold inside.
Pick up the frostbreath key.
Head back to Sophia's bedroom and examine the wardrobe. Use the frostbreath key in the lock.
Go into the walk-in wardrobe and look at the doll-makers stand to start a hidden object scene.
Use the scissors on the cloth to cut out the bear shape, then use the scissors to cut open a sack for cloth stuffing. Use the cloth stuffing on the bear and finish it with the needle and thread.
Place the straw on the hat model, then use the hairpins on it. Click on the measuring tape to use it on the hat. Use the scissors to finish the hat.
Pick up the chalk and use it to draw the outline for the dress. Place the pink fabric on top of it and use the scissors to cut it out.
Dress up the teddy bear afterward.
You receive a quilt patch and the other compass half. The cartographer's compass is created.
Getting Shimmergems
Go back to the wizards retreat and give the cartographer's compass to the petrified cartographer.
Speak with the cartographer to receive the solar key.
Move back to the corridor and zoom in on the solar room door. Place the solar key in the lock and then rotate repeatedly until the doors open.
Walk forward into the solarium.
Check the astral banner and pick up the fourth quilt patch.
Zoom in on the puppet stage and speak with Xim, then look at Jyx.
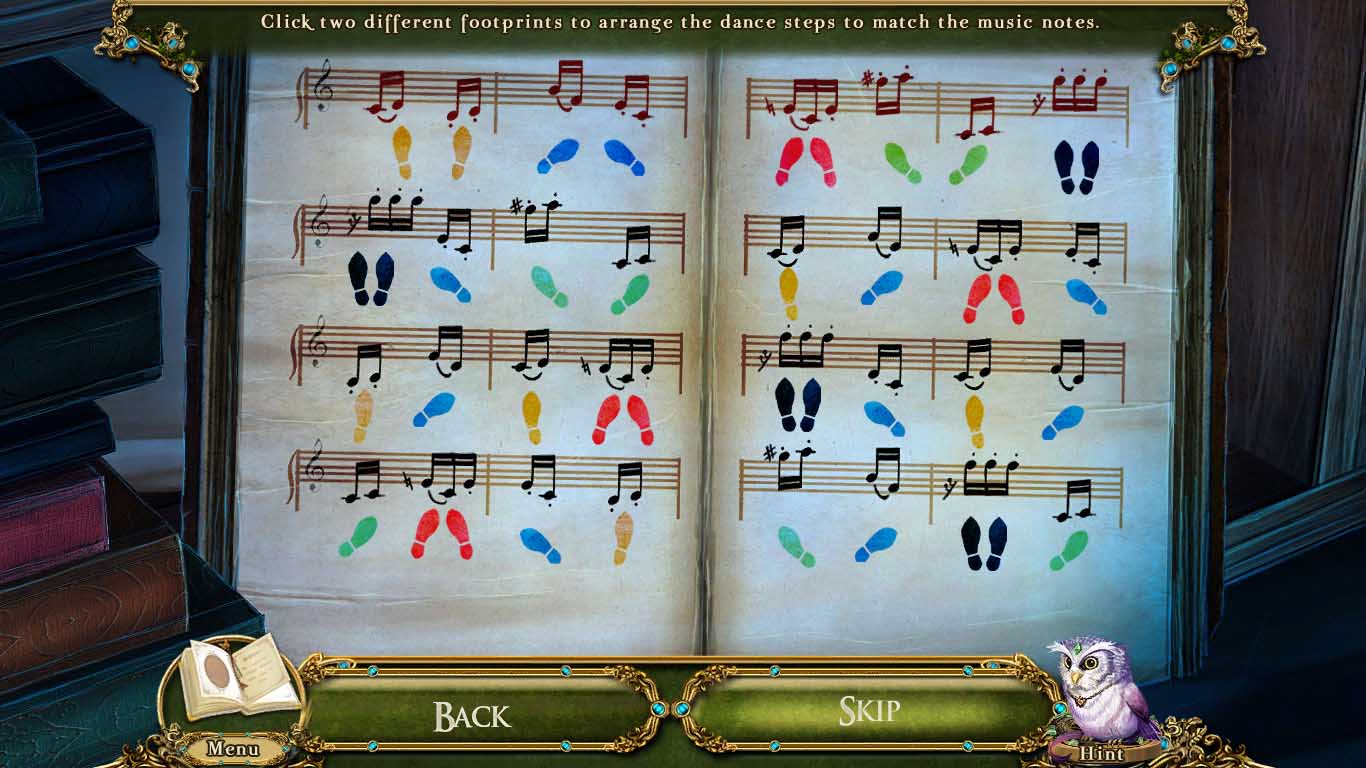
Click on the musicians stand to start a hidden object scene.
You receive music sheets.
Go to Sophia's room and go into the walk in closet.
Examine the bookshelf and place the music sheets on the music book to start a puzzle where you must place the correct steps with the correct music symbol. The first row shows the correct symbols.
Screenshot
Pick up the music box.
Go back to the solarium and click on the puppet stage. Place the music box on Xim to start a puzzle.
Music symbol one: Third line.
Music symbol two: Fourth line.
Music symbol three: First line.
Music symbol four: Second line.
Music symbol five: Third line.
Music symbol six: Fifth line.
Speak with Xim and Jyx, and you'll receive shimmergems.
Receiving Padded Gloves
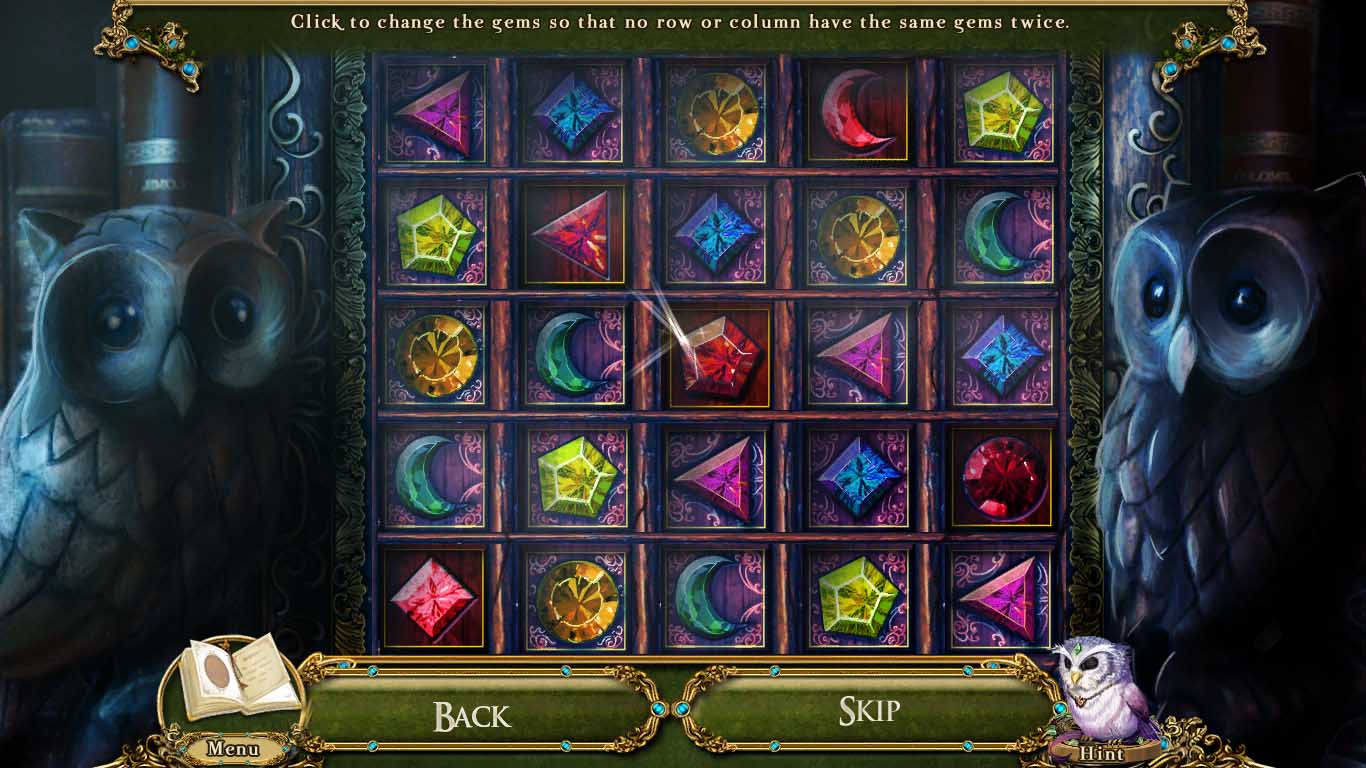
Go to the wizard's retreat room once more and zoom in on the research room door. Place the shimmergems on the door to start a puzzle.
Click and swap gems so that each row only has one of each color in it. Repeating colors are bad.
Screenshot
Go forward into the research room once done.
Look closer at the crystal brazier to start a mini-game. Pick the gems in the correct order. The order is drawn on the crystal behind the gems, and when you hover over the gem it shows which symbol it represents.
Pink.
Purple.
Blue.
Green.
Yellow.
Orange.
Red.
Clear/light blue.
Look at the right bookshelf and read the book on the far left on gargoyles. Flip through all the pages to the end and pick up the cloth sun.
Look at the left bookshelf and read the book titled Astrological Events and Phenomena. Flip through to the very end and pick up the cloth moon.
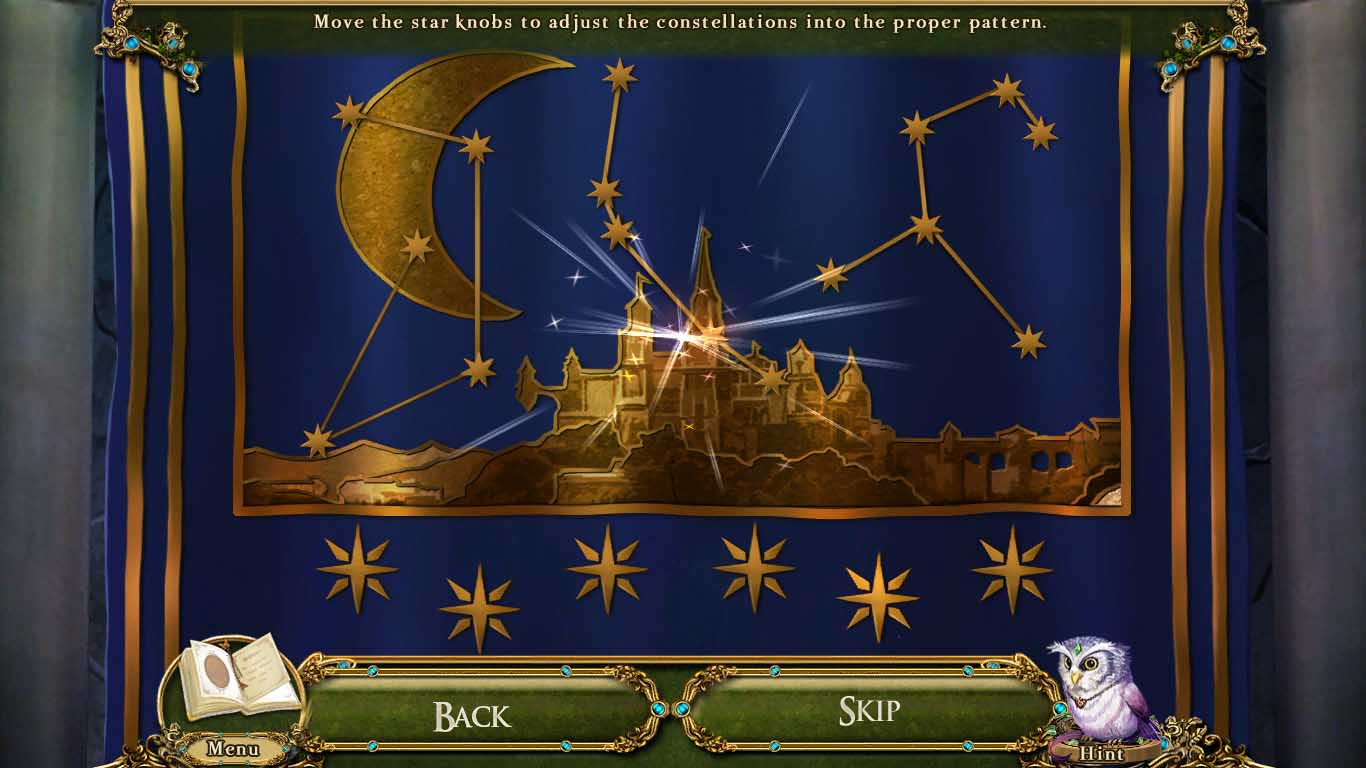
Go to the solarium and zoom in on the astral banner. Place the cloth moon and cloth sun on the two patches.
This will start a puzzle where you must move the star knobs in order to make the constellations appear as they did on the moon painting in the corridor near the wizards retreat.
The puzzle is randomized, and the number of turns will be different, but the constellations will always be the same.
Screenshot
Head to Sophia's bedroom and examine the ruined balcony. Attempt to pick up the star then go back and move into the walk in closet. Select the clothing wardrobe to start a hidden object scene where you must find fourteen gloves.
There will be a puzzle in order to open an area for a glove where you must make sure no scarves have the same color or shape repeating in the lines.
Screenshot
After finishing, you receive padded gloves.
Getting the Frost Charm
Go back out to the balcony and use the padded gloves to pick up the reigning star.
Speak with the cartographer.
Go to the research room and click on the glowing mural and use the reigning star on it to start a puzzle.
When one of the middle runes lights up press on the matching rune on the outside to lock it and stop it from flickering.
Move forward into the secret chamber.
Press on the glowing prism to hear a story and receive the tesseract prism.
Pick up the stepladder.
Zoom in on the fireplace to start a hidden object scene.
Lift the left skillet to reveal the heart.
Pull on the chain to make the iron available to grab.
Move the loose brick on the far right of the mantel to retrieve the locket.
Use the broom on the soot in the bottom right to reveal the tripod.
Pick up the fireplace poker and use it on the embers to locate the fireproof pouch.
You receive a fireproof pouch.
Move back once and zoom in on the incubator. Use the padded gloves to open it up.
Use the fireproof pouch on the fire charm to pick it up.
Walk forward into the secret room and use the fire charm on the water pipe to the right of the fireplace.
Use the Pocket Dragon on the fire charm to break the pipe open.
Click on the cauldron to move it where the water is spurting out. You obtain a cauldron of water.
Go to the wizard's retreat and inspect the specimen storage. Place the fire charm into the storage.
Use the broken chair leg on the frost charm to obtain it. The fire charm will be added back into your inventory.
Ascending
Head over to the cartographer's room and speak with the cartographer.
Place the step ladder on the maintenance hatch and examine it to start a puzzle where you must move the shapes so that the designated square can escape the box.
After finishing, go up into the rafters.
Put the broken chair leg in the middle of the crossbeams. Hang the cauldron of water from it, then place the fire charm in the water.
Use the Pocket Dragon on the fire charm to heat it up.
Go to the grand archway and use the frost charm on the gargoyle.
Use the bow and arrows to shoot the counterweight.
Speak with the maid to receive the final quilt patch.
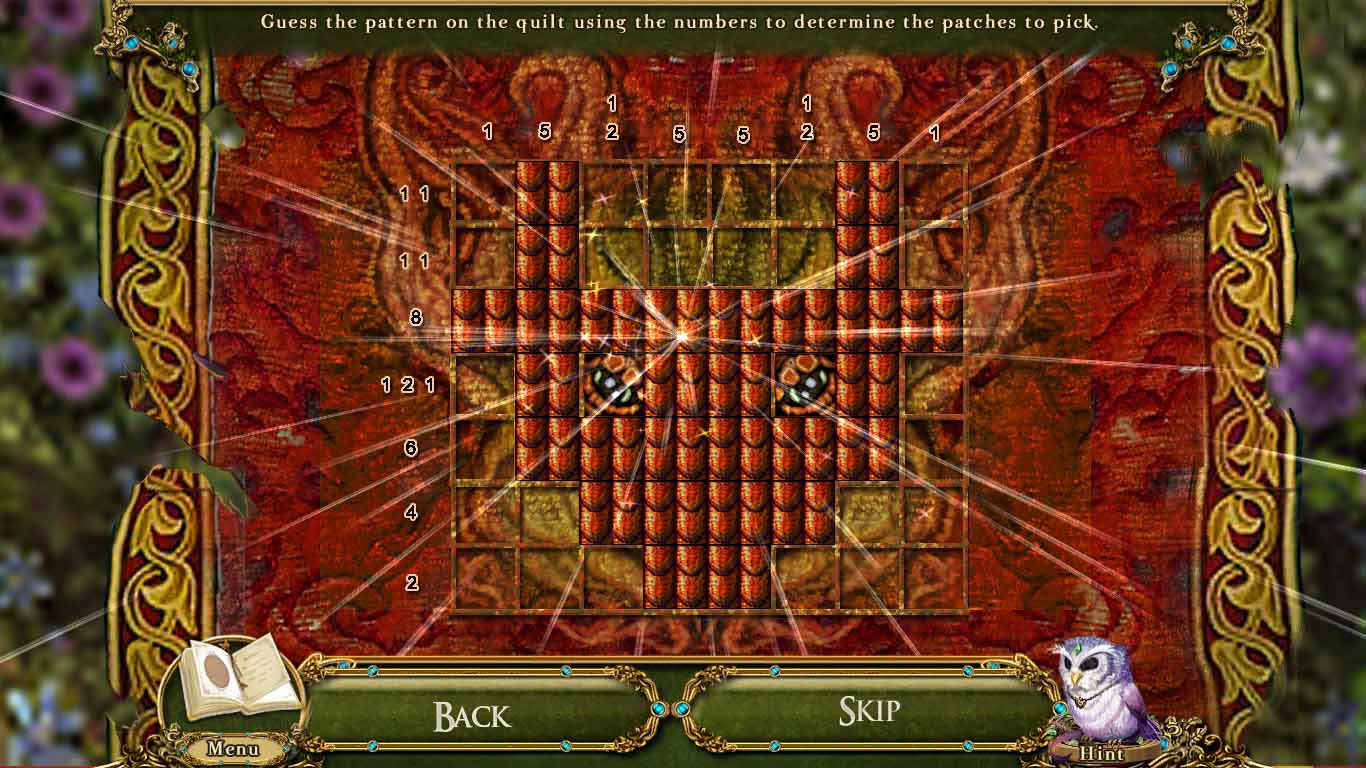
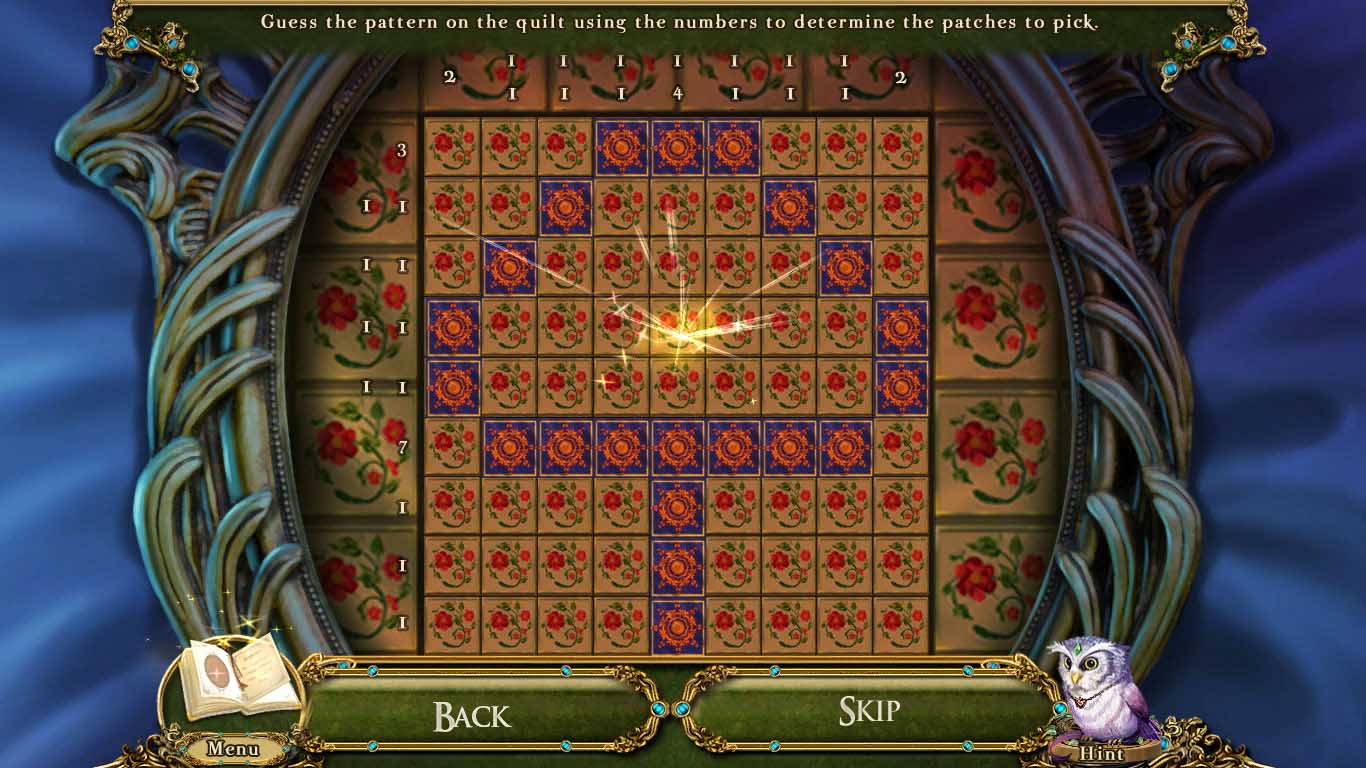
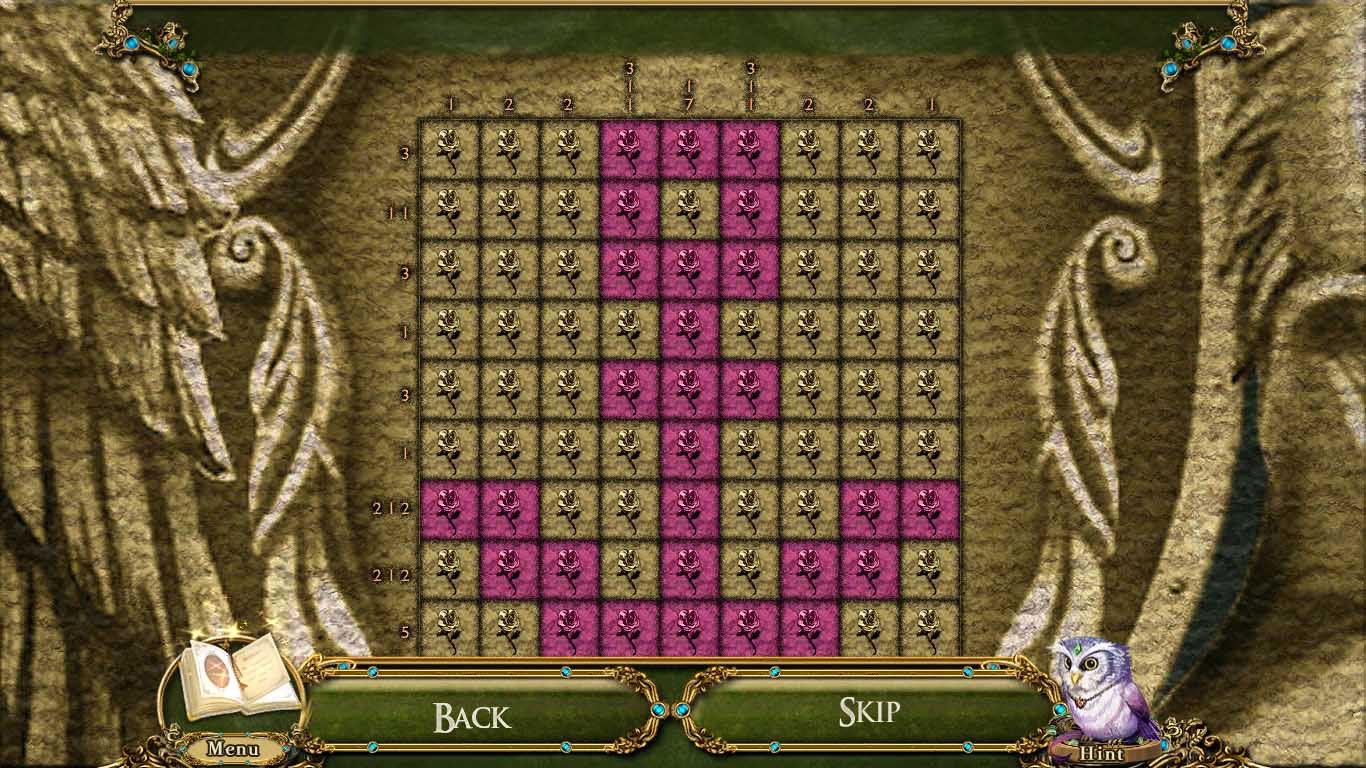
Go to Sophia's room and zoom in on the pillow on the bed. Place the quilt patches on the pillow to start a puzzle.
Flip over the correct patches to match the number needed for each row and column.
Screenshot
Pick up the paradise pendant, then return to the grand archway.
Examine the door and place the paradise pendant in the groove.
Put the story boards in order to complete the puzzle.
Screenshot
Go forward through the door.
Chapter Four: Ascension
Getting a Peg Leg
Examine the crystal tree and use the bow and arrows to shoot down and receive the ruby apple.
Go left into the antechamber and speak with Skullface.
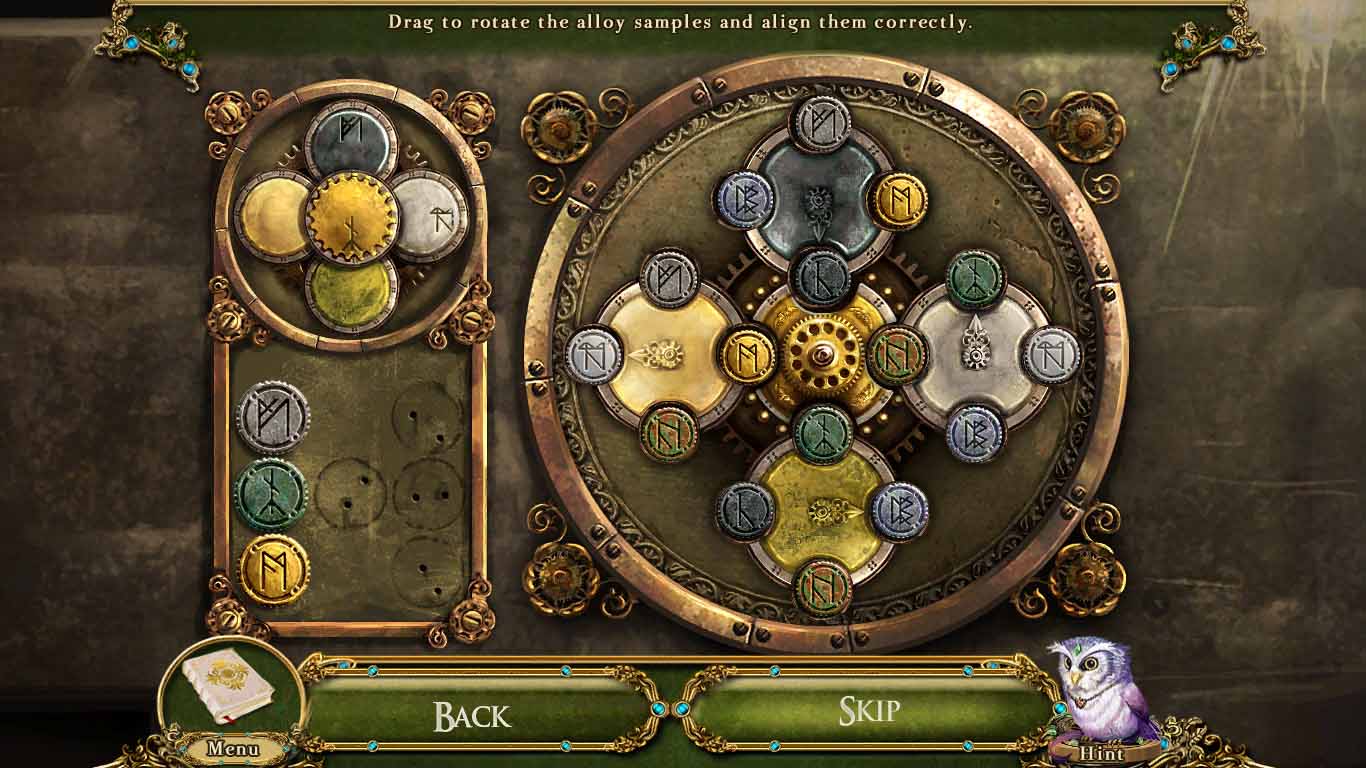
Look at the pedestal and place the ruby apple on it to start a mini-game.
You must have the shapes in the proper ring and aligned with the like shapes.
Screenshot
Pick up all five sigil stones.
Go back once, then go right to the conduit.
Inspect the conduit controls and place the five sigil stones on the slab.
A mini-game will start where you must click on matching pairs of constellations to get rid of them.
Click to go to the navigator's cradle.
Look at the navigator's console and pick up the tuning fork.
Move back and try using the tuning fork on the dark crystal. Go back twice when it doesn't work and attune the tuning crystal on the two dark crystals on the crystal tree.
Go into the antechamber and use the tuning fork on the dark crystal inside. You receive a tuned fork.
Return once more to the navigator's cradle and use the tuned fork on the dark crystal.
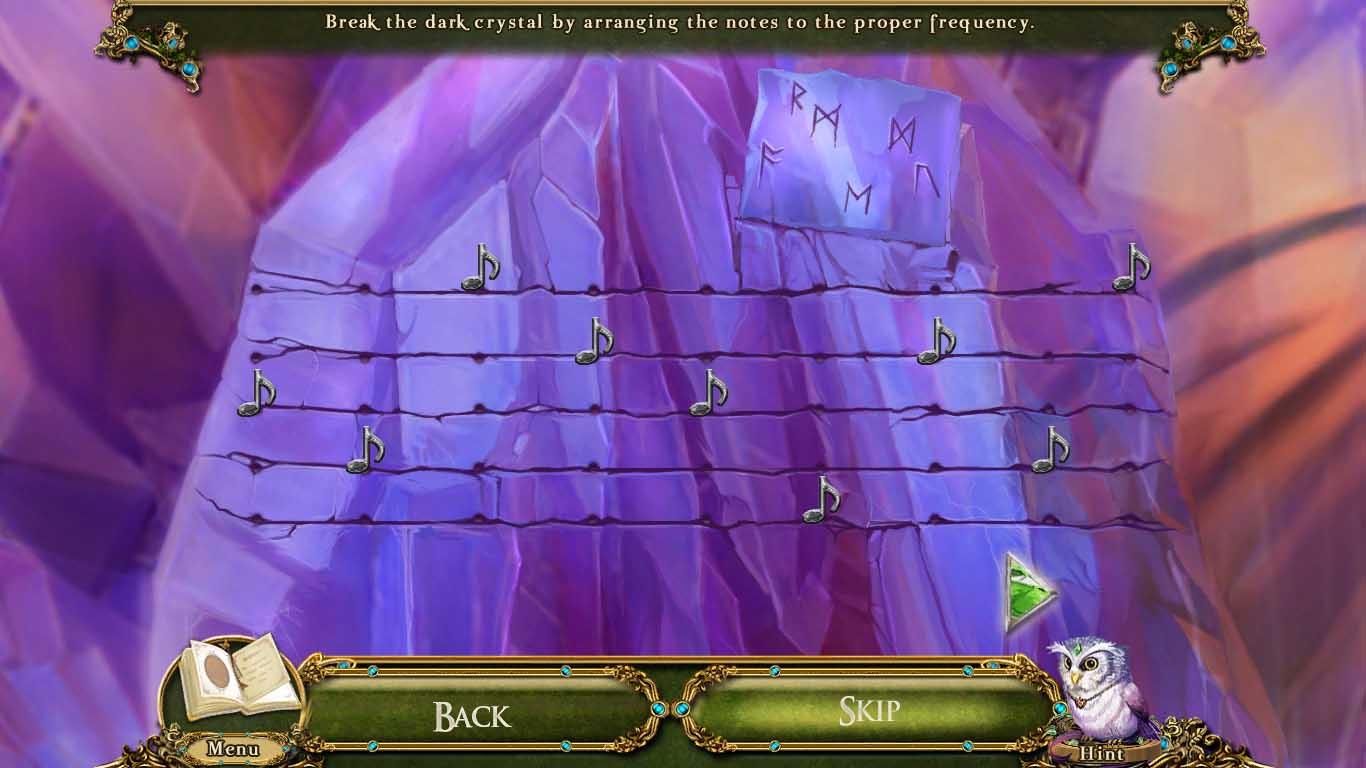
A puzzle will start where you must place the music notes in the correct spot.
Music note one: Line three.
Music note two: Line four.
Music note three: Line one.
Music note four: Line two.
Music note five: Line three.
Music note six: Line five.
Music note seven: Line two.
Music note eight: Line four.
Music note nine: Line one.
Zoom in on the navigator to start a hidden object scene.
Click on the seashell panels to reveal the compass and scroll. Chalk is revealed also.
Pick up the chalk and use it to draw a moustache on the navigator.
Grab the crowbar and use it to pry open the lid of the crate to get to the cutlass.
Use the knife on the ritual doll to get the straw.
Click on the boot to remove the laces. Pick up the laces and place them on the talisman to complete it.
Lift the top of the urn lid to get the telescope.
Screenshot
You receive a peg leg.
Getting Inside the Captain's Chest
Go to the antechamber and place the peg leg on the broken stool. Use the stool to grab Skullface.
You will have to solve riddles for him in order to have him as a friend.
You receive Skullface the talisman.
Go back to the navigator's cradle and place Skullface the talisman on the navigator.
Speak with Captain Jackdaw to obtain the captain's bracelet.
Move back to the crystal tree and examine the guardian stone. Place the captain's bracelet in the circular indent to start a puzzle.
Hover over the stones to see what color it changes the middle stone two. When a pair of stones match, click on them to remove them.
Pick up the tapestry patch.
Move back and go into the antechamber.
Click on the tattered tapestry and place the tapestry patch in the empty spot. This will start a puzzle that mimics all the other quilt puzzles, where you must flop over patches to complete an image and have the correct number flipped for each row and column.
Screenshot
Pick up the wheel handle.
Return to the navigator's cradle and zoom in on the captain's cabin door. Place the wheel handle on the shadowed spot.
Turn the wheel until the door opens. The captain will speak with you when this happens and offer you an item, but you have to complete a puzzle to be given the item.
Swap pegs to untangle the lines of string.
You receive a gem of giants.
Go into the captain's cabin.
Examine the chest and place the gem of giants in the keyhole. This will start a puzzle where you must match the pairs of circles.
Drinking Some Krug
Use the Pocket Dragon on the match inside the chest.
Pick up the steel button.
Move the sapphire right to the coin purse.
Click on the coin purse and use the Pocket Dragon on the clasp. Use the steel button to pry it open afterward.
Look inside to start a hidden object scene.
You receive a safety pin.
Use the safety pin to open the vanity case. You get a bent safety pin back.
Use the bent safety pin on the spool of thread. You receive a grappling hook.
Look in the vanity case. Use the grappling hook on the comb to get it. It gets stuck because of hair. Click on the cuticle scissors twice to cut the hair.
You receive the comb.
Go back once and place the comb under the keyhole. To stabilize the comb use the grappling hook on it. Examine the keyhole to start a puzzle.
Move the knobs to clear the keyhole of all obstruction.
The buttons are numbered 1-5 starting from left and going right.
Press button 1 three times.
Press button 3 four times.
Press button 5 three times.
Press button 2 two times.
Press button 1 four times.
Press button 2 three times.
Once done, look at the chest now that it's open. Pick up the rope pulley and iron crown.
Grab the keyring from the right side of the doorway arch.
Look at the desk drawers and open the middle drawer. Read the diary for part of an achievement.
Move back once.
Zoom in on the captain's stash and use the keyring in the lock. Click to turn and open the chest.
Pick up the pickaxe.
Give the keyring to Captain Jackdaw. He will give you a bottle of krug. Try to give him the bottle of krug to earn the achievement for trying to drink with him.
Defeating Evil
Leave and go to the antechamber.
Examine the statue and place the rope pulley on the statue.
Use the pickaxe to destroy the loose masonry.
Pour the bottle of krug on the ropes, then use the Pocket Dragon to burn the ropes.
Place the iron crown on the kingmaker statue. The crown will turn to gold. Once it does this, place the reigning star on it. You receive the princess crown.
Pick up the emerald gemleaves.
Go back to the crystal tree and inspect the guardian stone.
Place the princess crown on the circle to trigger a puzzle.
You must change the runes around so that no rows or columns have a rune in it more than once.
Screenshot
Look closely at the crystal branch and place the emerald gemleaves on it.
Pick up the sigil orb.
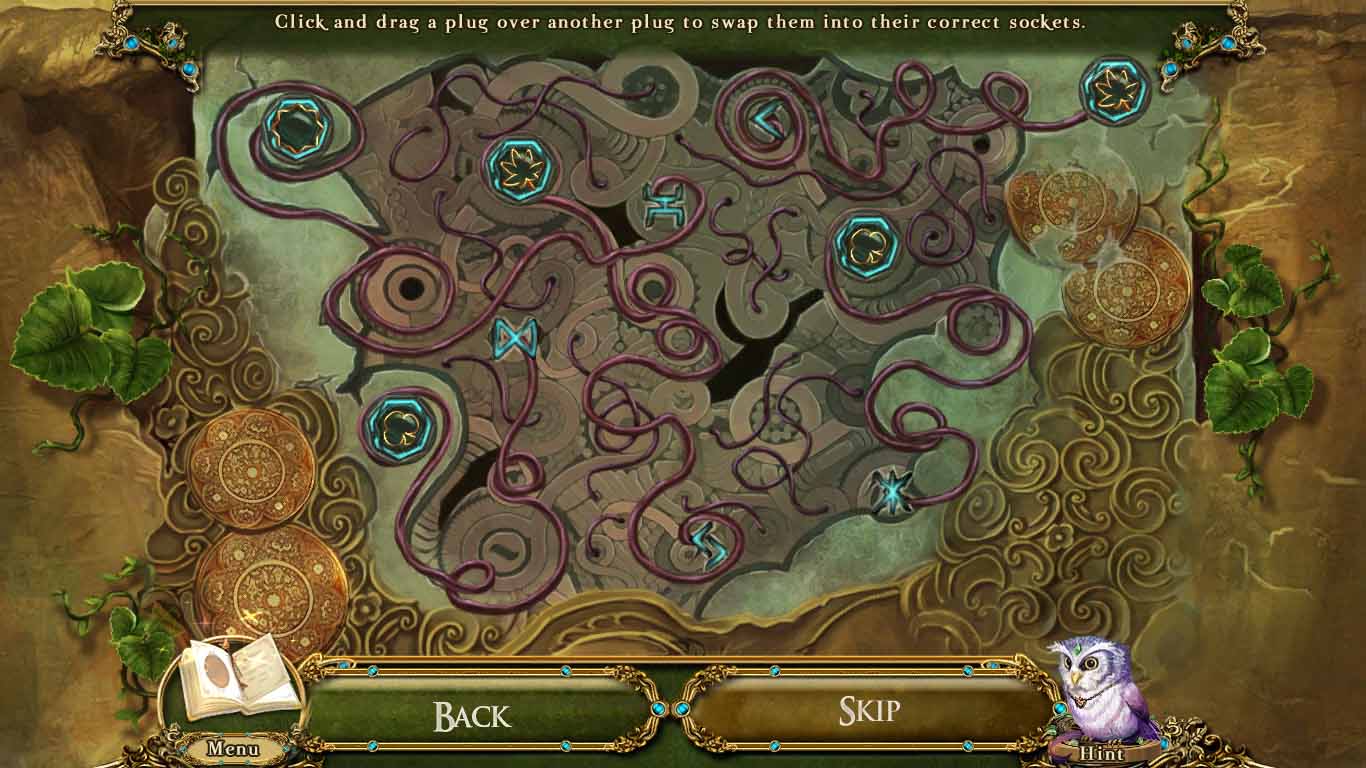
Go right into the conduit and inspect the conduit controls. Place the sigil orb in the empty spot to start a puzzle. You must press on the nodes to create the lines without backtracking over any that are previously lit.
Screenshot
Go down to the crystal mausoleum.
Zoom in on the jewelled box to start a puzzle where you must light up the boxes in a single consecutive line without backtracking.
Screenshot
Pick up the steering wheel, then speak with Patrick's shade.
Head up to the navigator's cradle. Inspect the navigator's console and place the steering wheel on the console.
Spin the wheel until the cut scene starts.
Go back and speak with Captain Jackdaw.
Click on the bubble to break it. Use the tesseract prism on the shadow.
To get through the mirrors, choose the mirror with the image that is different from all the others.
Posted by: Meaghan |
August 29, 2012 4:54 PM
|
August 29, 2012 4:54 PM