
Awakening:
The Goblin Kingdom
Platform: Mac, Windows

![]()
 If you've ever seen Disney's version of "Sleeping Beauty" you would think that all a cursed princess had to do was fall asleep for 100 years and wait for a handsome prince to rescue her. It goes without saying that they lived happily ever after, and she probably never lifted a finger again. Unfortunately for Princess Sophia, the heroine of Boomzap's fabulous new hidden object adventure hybrid, happily ever after seems a long time coming. First she had to find her way out of her own cursed castle, encountering no handsome prince, merely a series of disgruntled goblins. Then she had to find her way through an enchanted wood to find the fairy queen. Now, In Awakening: The Goblin Kingdom, there is still no rest for the weary Princess as she must journey to the heart of the goblin kingdom to discover where the heck her people have gone. What with all the questing and puzzle solving involved the poor girl must be exhausted by now. Where's a prince when you need him? Or at least a cab?
 Awakening: The Goblin Kingdom is the third of the fabulous Awakening series of adventure games. In Awakening: The Dreaming Castle poor Sophia awoke from her hundred year nap to find the castle deserted (except for the aforementioned goblins) and she had to find her way out using mostly her wits as the poor girl was born with a bit of a problem: she had no intrinsic magical powers, a rarity amongst her people. In Awakening: Moonfell Wood Sophia trudged onwards, searching for her family and the rest of the folks of the kingdom, aided only by a helper fairy and a cute little pocket dragon. Now Sophia is back and still searching, accompanied by the pocket dragon and a new companion to aid her along the way, a rather stuck-up little owl named Randolph who is at least helpful with the hints as the story unfolds. Something is rotten in the state of Goblinhome and Sophia must discover what is up before war erupts between the humans and the goblins, with the other magical creatures of the forest such as gnomes and fairies caught in the middle of the conflict.
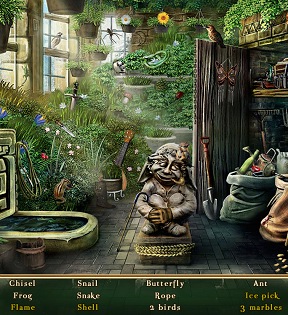
As with the first two games, Awakening: The Goblin Kingdom plays like a point-and-click adventure with some hidden object elements tacked on. The game is very puzzle-heavy, with the familiar (pipe puzzles, jigsaws, sliders and the like) mixed with a few original puzzles (mostly code-breaker types). Effort has been made to up the ante with the hidden object finding, including the necessity of rearranging things within the scene to find a certain object mixed with scenes that depend not on lists of things to find but pictures, silhouettes, or finding items based on hints and riddles. The mini-games and puzzles range from amazingly easy to difficult and can be skipped after a certain amount of time. Exploring the various locations is as simple as the click of a mouse, and a changing cursor is around to indicate areas to go, places to explore, puzzles, and conversations to be had. Yes, Princess Sophia can't do it all on her own so she will be depending upon the help and guidance of goblins, gnomes, the fairy queen (in a cameo appearance) and her own traveling companions. Eventually, hopefully, she will finally find the rest of the humans and prevent a major war.
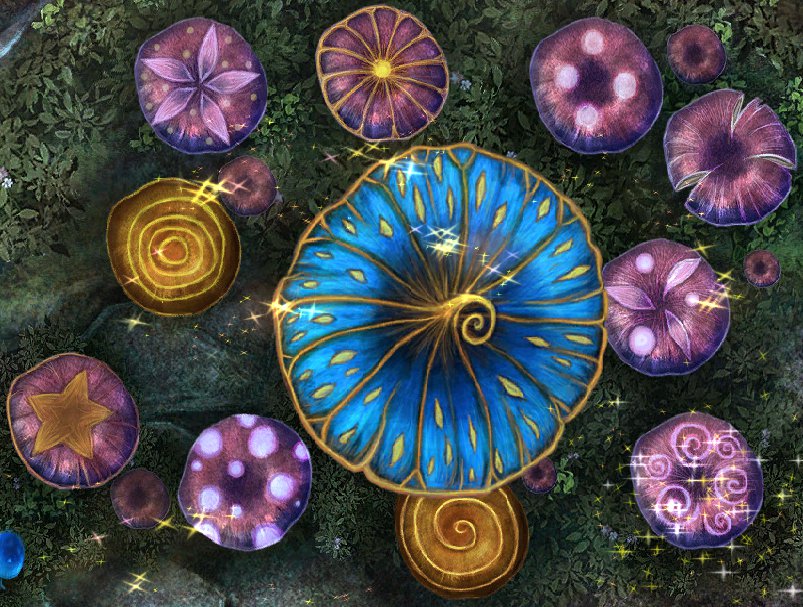
 Analysis: The Awakening series of adventures has always been reliable for two things: beautiful graphics and puzzle-heavy gameplay, and Awakening: The Goblin Kingdom delivers both in spades. Boomzap has eschewed the hyper-realism of 3D rendering and gone with a fantastic, fantastical hand-painted look that suits the storyline perfectly. Lovely, lyrical music accompanies the poor princess along the way as she journeys from deep in a mine to a train station, from a cell in the goblin king's castle to a seedy tavern, from the gnome village to the goblin king's throne room, and multiple points in-between.
The puzzles and mini-games are a mixed bag of difficulties and special effort has been made to add little twists here and there to make gameplay more interesting. The pipe puzzles and other familiar games each have their own unique signature and the original puzzles are amusing and challenging. And just as The Dreaming Castle featured a large series of "goblinjong" puzzles (aka mahjong), and Moonfell Wood featured card-based games, The Goblin Kingdom has kept the pattern with a new batch of repeating games, this time tangrams, those tricky geometric re-create the shape puzzles. Also keeping the gameplay fresh are the varieties available within the hidden object finding, which even include a "reverse" hidden object scene reminiscent of Enlightenus, where the player has to put objects back into the scene rather than find them. The designers have also found a nice balance of hand-holding within the game, ranging from discreet sparks of light to helpful hints from Randolph the snooty owl, as well as a handy journal that not only keeps track of found information but a running list of goals to accomplish as well so the gamer rarely flounders about without a clue.
 As stunning as the lush artwork is, however, it can be a bit of a handicap in the hidden object scenes, where finding painted objects laid out on top of a painted scene can be a bit difficult for anyone with less than perfect eyesight. There are also minor problems with clickable areas which can be especially tight within the hidden object scenes, as well as overlap with navigation areas causing a bit of confusion at times. On the plus side is the widely varied gameplay, including two modes, "normal" and "casual", making the game accessible to a wide audience and with a wide variety of adventuring skills.
Awakening: The Goblin Kingdom is a magical enchanted ride and a worthy successor to the games that preceded it. As before when you complete the main story there are a nice variety of the main puzzles (tangrams) available from the game menu to prolong the experience. If you disdain skipping puzzles and prefer to play in the more advanced ("normal") mode the adventurer can look forward to around four to five hours of gaming time for the story plus the Epilogue, pretty good for an adventure hybrid these days. Gorgeous, fun and compelling, The Goblin Kingdom is everything you could want in a hidden object adventure hybrid and more.
A Collector's Edition is also available. It includes wallpapers, concept art, the soundtrack, cut-scenes, bonus gameplay, and a built-in strategy guide. Remember that Big Fish Game Club Members pay only $13.99 for Collector's Editions (or 2 club credits), and collector's editions count 3 card punches of 6 total needed for a free game.
![]() Windows:
Windows:
Download the demo
Get the full version
Also available: Collector's Edition
![]() Mac OS X:
Mac OS X:
Download the demo
Get the full version
Also available: Collector's Edition


Walkthrough Guide
(Please allow page to fully load for spoiler tags to be functional.)
Awakening: The Goblin Kingdom Walkthrough
Part 1: General Tips, Ch 1-2
General Tips
Not sure what to do now? Check out your journal. There's a tab above the left side that lists your goals.
If you wait awhile, areas of interest will sparkle for a second.
Many puzzles will randomize if you back out and try again.
You never need to assemble parts of your inventory together, so if you think two items should go together, it means you're still missing a part of the whole.
The walkthrough below attempts to complete the game with the least amount of backtracking. It is structured by chapters first, then goals and finally locations. It also lists where an item was found when you are told to use it.
Chapter 1 - Mountain Outpost
Outside the Outpost
Collect the three mossflowers.
Use the mossflowers on the pocket dragon and collect him.
Collect the owl, Ran, as well.
Enter the rooftop patio.
GOAL: Finding a way inside the outpost
Rooftop Patio
Talk to the goblin guard for some important information.
Examine the icy patch in the middle.
Use the pocket dragon on the ice until it is melted.
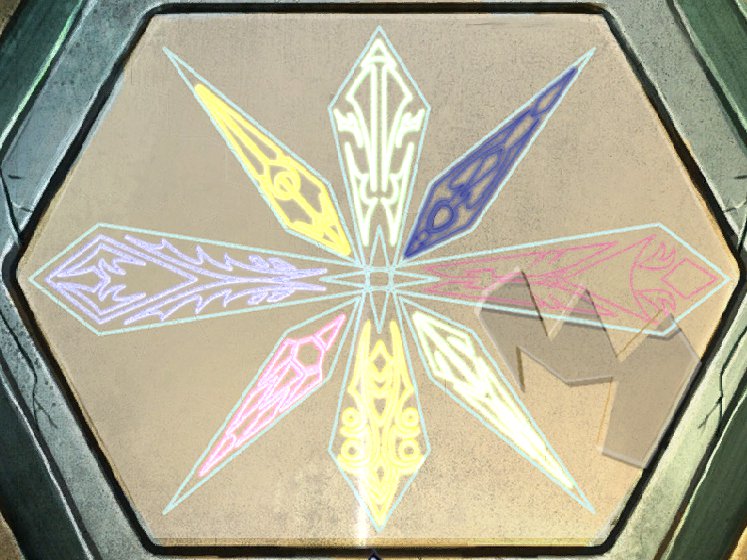
Solve the ring alignment puzzle.
The middle ring stays put, so use it as a reference point.
Click and drag the 2nd and outer rings to align them.
Click the hexagon tiles to swap them out.
The screenshot below can be used as reference if you're stuck.
Screenshot
Collect the goblin shield.
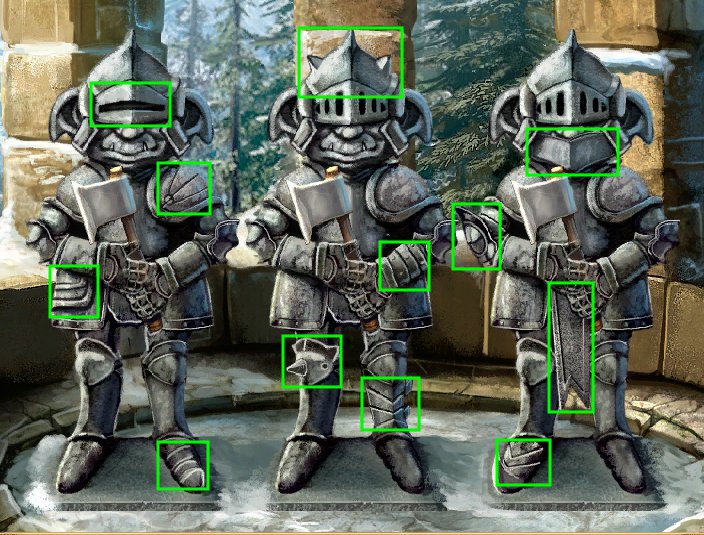
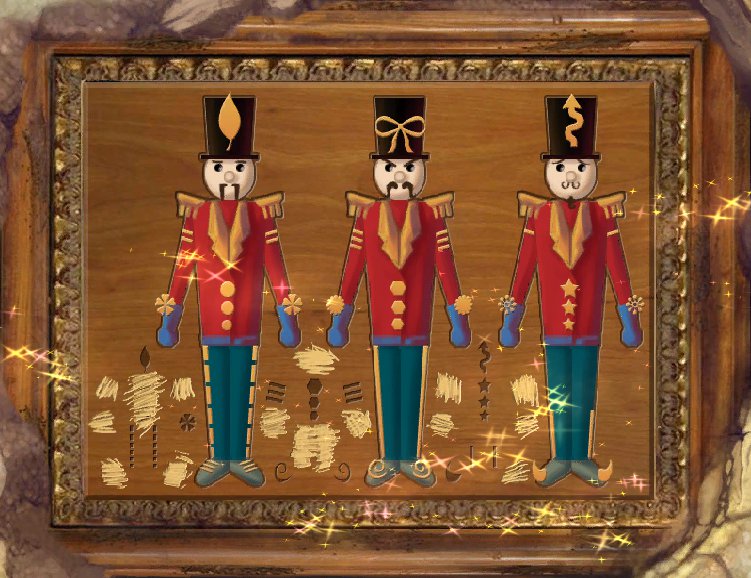
Examine the goblin guard in the back.
Solve the spot-the-difference puzzle.
There are 12 differences spread out amongst the three goblins.
Use the screenshot below if you're stuck.
Screenshot
Collect the goblin axe.
Examine the strong box on the left.
Collect the coin on top.
Use the goblin axe (from the goblin guard puzzle) to cut the rope.
You can't open the strong box yet. Back up.
Examine the telescope by the strong box.
Use the coin (from the strong box) on the telescope.
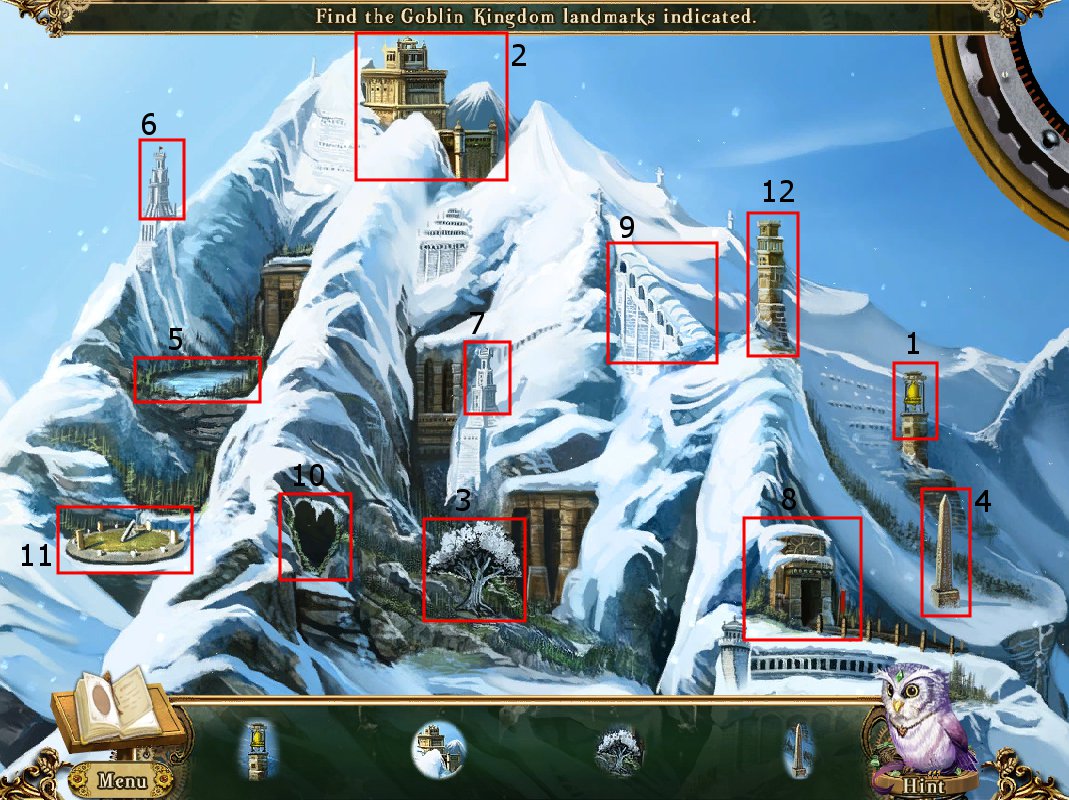
Solve the 'match the picture' puzzle by clicking the landmarks indicated at the bottom.
Use the screenshot below if you're having trouble.
Screenshot
Collect the eight prism spheres.
Go back to the strong box.
Use the prism spheres (from the telescope) on the box.
Solve the prism sphere puzzle by swapping the spheres.
The object s under each sphere correspond to a color. Place that colored sphere onto the picture of that object.
Red rose.
Pink chrysanthemum.
White snowflake.
Purple eggplant.
Yellow banana.
Green leaf.
Blue raindrop.
Orange orange.
Collect the pickaxe and Bolgin coin.
Click the rail map to jot down the details of the goblin crest.
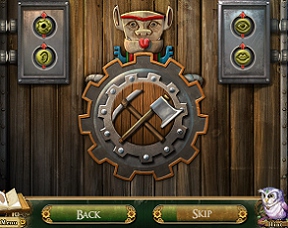
Examine the goblin gate.
Use the goblin shield from the icy patch.
Use the goblin axe (from the goblin guard) and pickaxe (from the strong box).
Solve the goblin crest puzzle by pressing the buttons at the top left and top right to change different aspects of the crest.
Check out your journal for a quick peek for reference.
Spiked crest.
Horizontal ears.
Kind, all-black eyes.
Straight mouth with two bottom teeth showing.
Enter the arched walkway.
Arched Walkway
Examine the flyer.
Back up.
If you like, you can examine the view of the golden kingdom.
Enter the generator room.
GOAL: Fixing the elevator
Generator Room
Talk to the goblin engineer. He's lost his blueprints!
Examine the frozen obstruction.
There's a wheel frozen to the water wheel. You can't get it out yet.
Collect the bellows on the left and the firewood in the lower right corner
Back up.
Collect two other pieces of wood, on the left snow patch and to the right of the bridge.
Examine the grating below the bridge.
Use your pocket dragon until the ice is melted.
Collect the goblin screwdriver.
Back up.
Examine the engine box.
Solve the engine box puzzle by clicking two pieces to swap them.
The pieces are the same color across and the same shape up and down (dark on top, light on bottom).
The shape is the moon; each shape representing a phase.
Arrangement of the shapes:
Left to right: sliver, half, 3/4, full.
Top to bottom: black, dark grey, light grey, white.
Collect the blueprints and goblin sealant.
Back up.
Give the blueprints (from the engine box) to the goblin engineer.
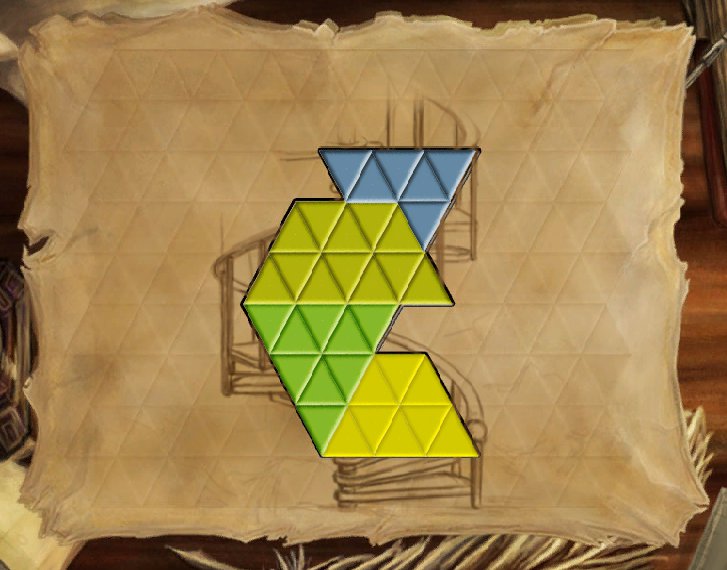
Solve the tangram puzzle by clicking a piece once to rotate counterclockwise and dragging it onto the graph.
A good strategy is to try and place the bigger pieces first.
Use the screenshot below if you're stuck.
Screenshot
Enter the cistern.
Cistern
Talk to the goblin engineer. Now you need to start up the furnace.
Collect the two pieces of firewood and goblin hammer.
Firewood: left of the wooden plank and right of the dam turn valve.
Goblin hammer: at the top of the stairs, to the left of the engineer.
Examine the totem on the opposite wall to jot a sketch of it into your journal.
Examine the furnace.
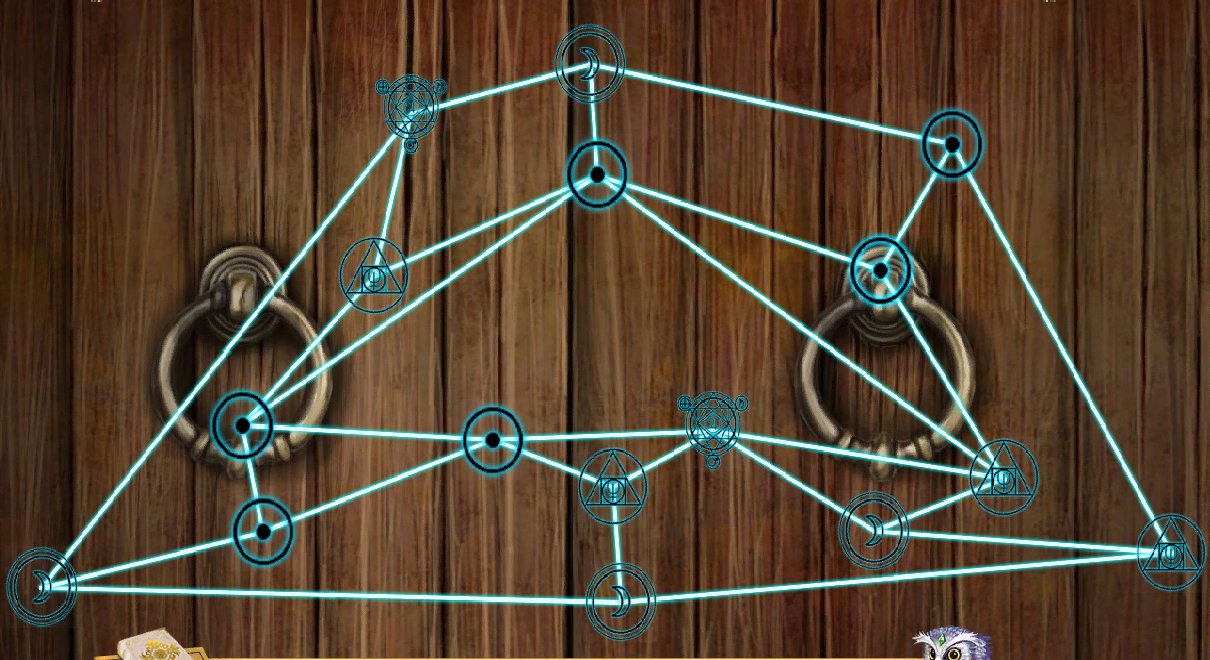
Taking a glance at your journal, solve the furnace puzzle by using the four buttons on the lower right.
The top two buttons move the inner ring.
The 1st button moves it clockwise 3, the 2nd button counterclockwise 2.
The bottom two buttons move the outer ring.
The 3rd button moves it clockwise 2, the 4th button counterclockwise 3.
The rings' starting positions are randomized. If you're having trouble, get the correct totem towards the top and keep moving it back and forth.
The middle totem is the one with a purple gem and closed mouth. The bottom totem is the orange tiger.
Use the bellows (from the frozen obstruction in the generator room) until you've blown off enough of the soot.
Collect the Bolgin coin and gate handle.
Use the firewood on the furnace. The location of each piece:
The generator room, on the left snow patch.
The generator room, to the right of the bridge.
The frozen obstruction area (water wheel) of the generator room.
The cistern to the right of the dam turn valve.
The cistern to the left of the wooden plank.
Back up.
Head back down to the generator room.
Generator Room (again)
Examine the greenhouse gate.
Use the gate handle (from the furnace) on the greenhouse gate to enter.
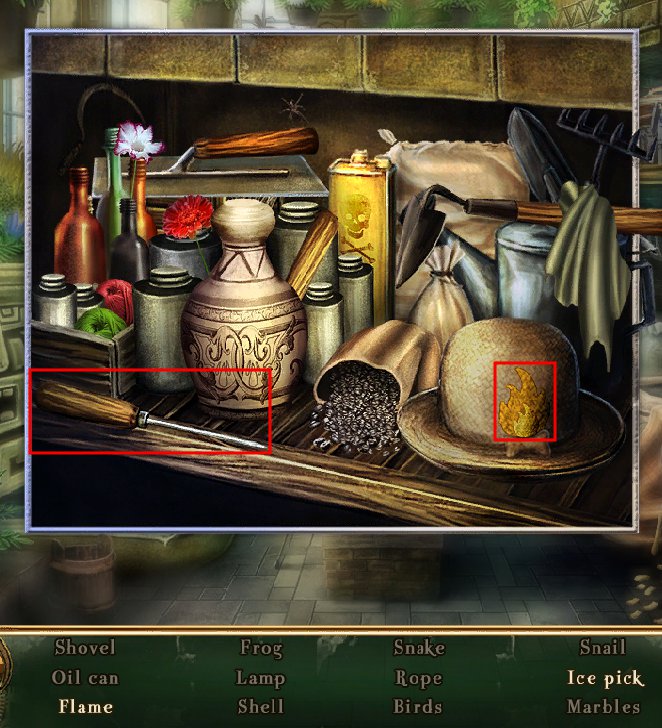
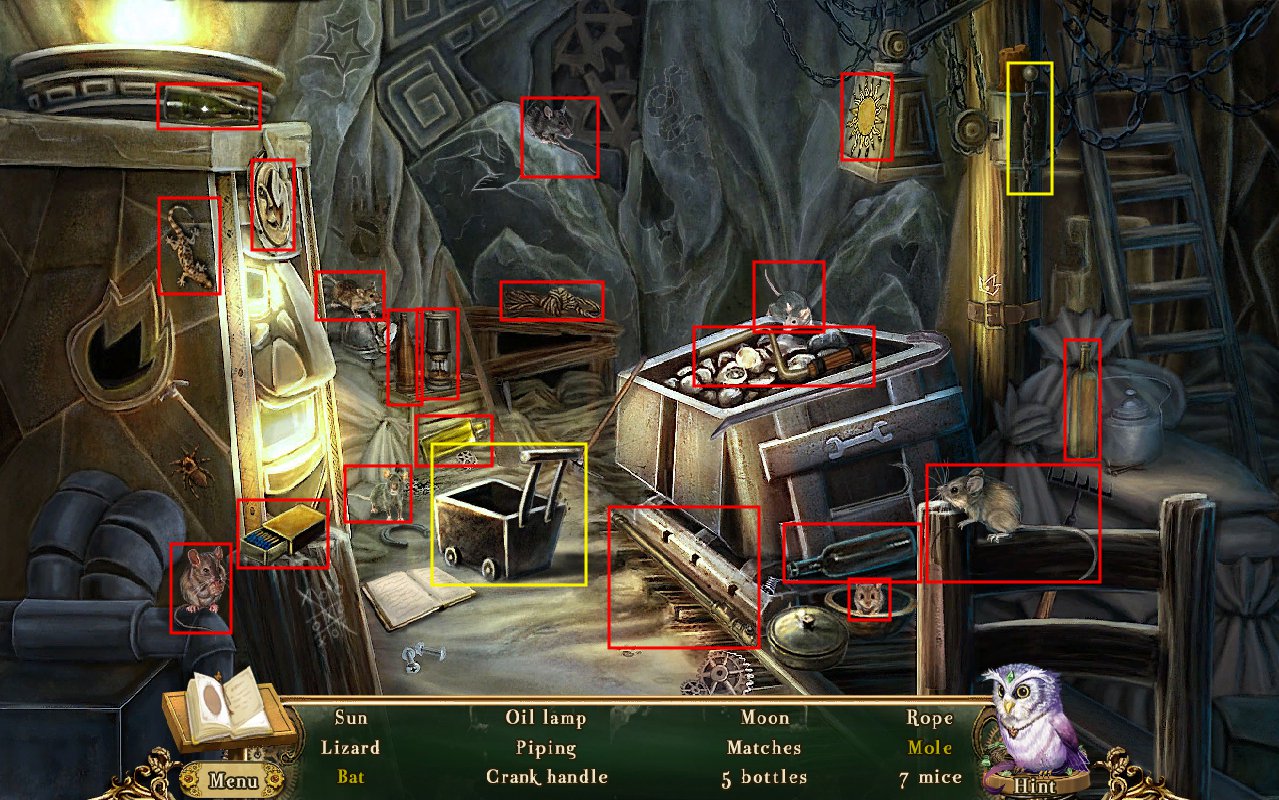
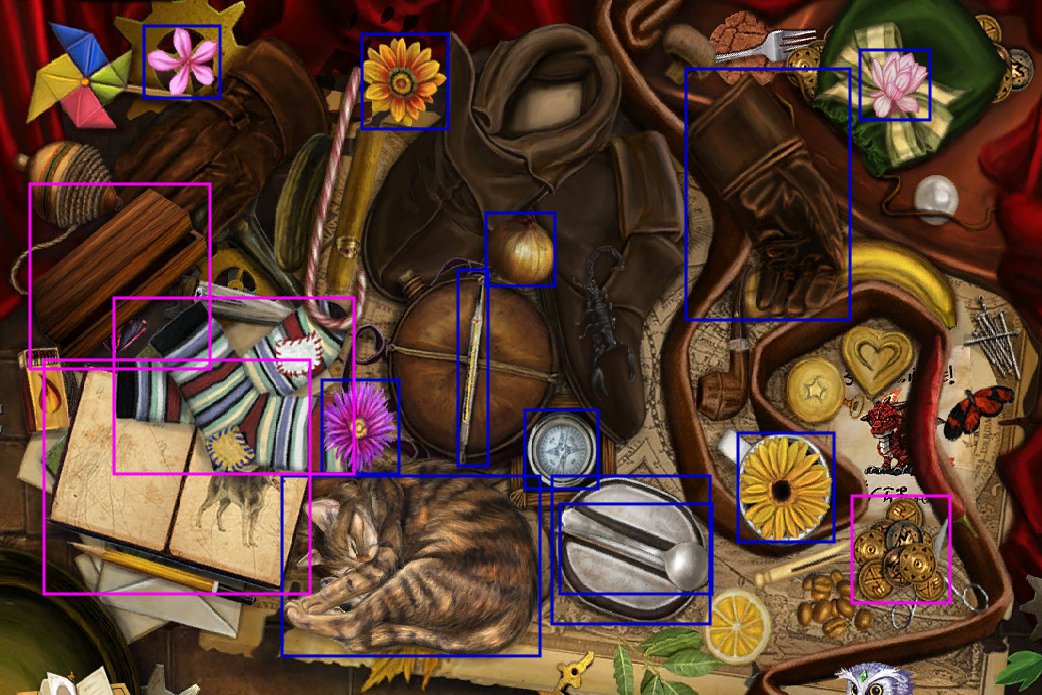
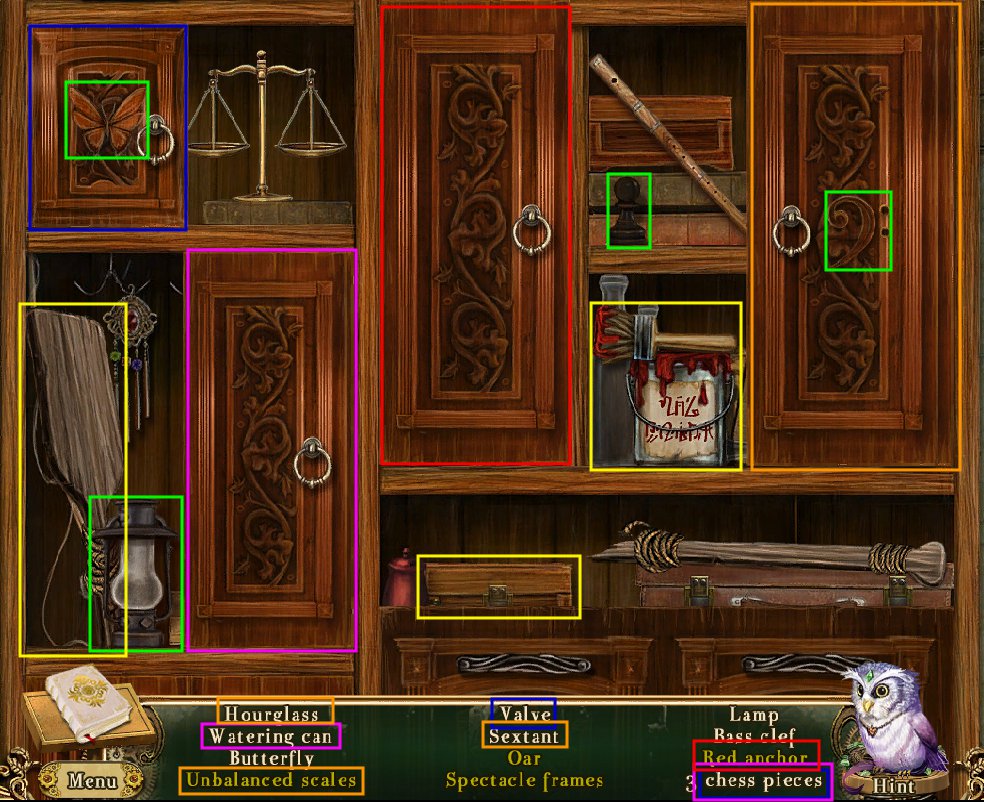
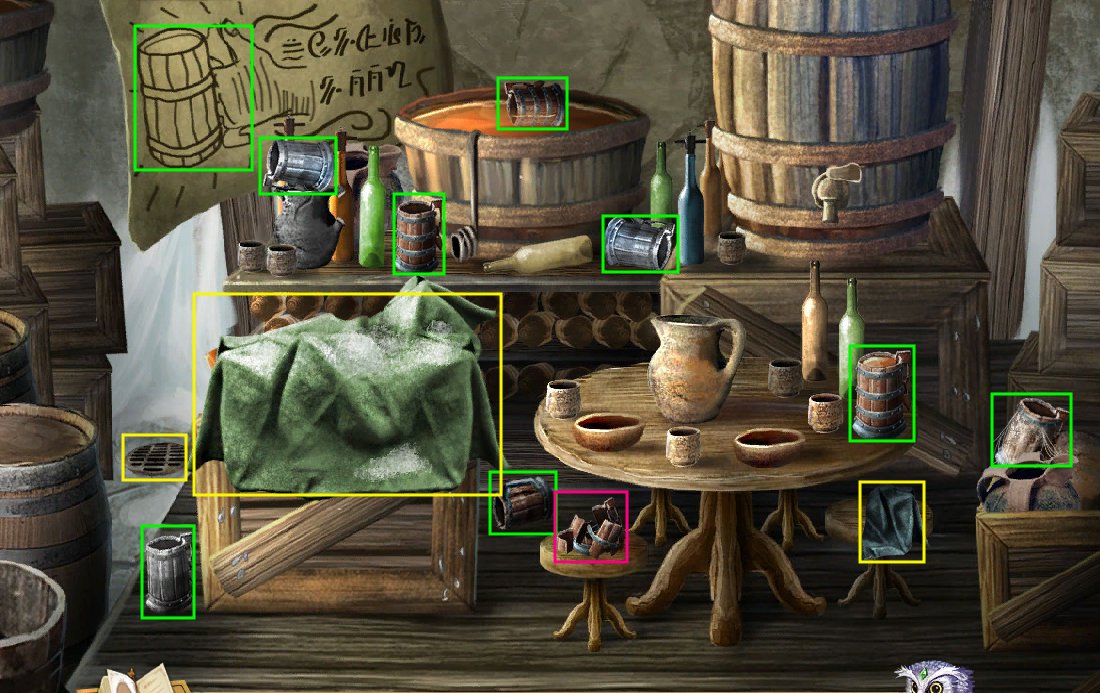
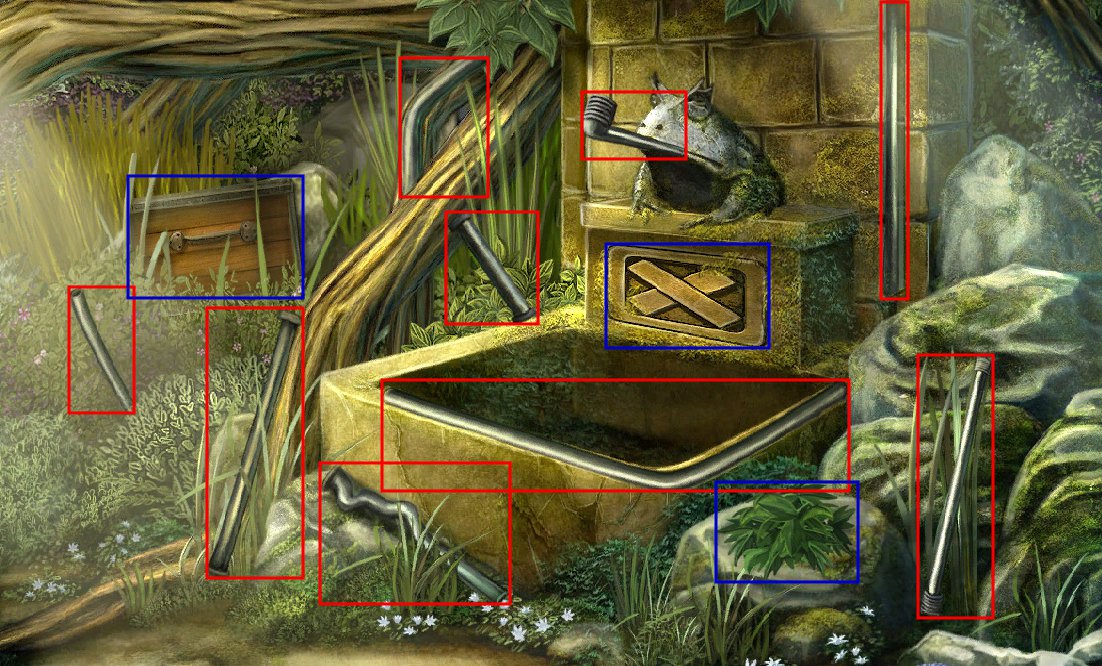
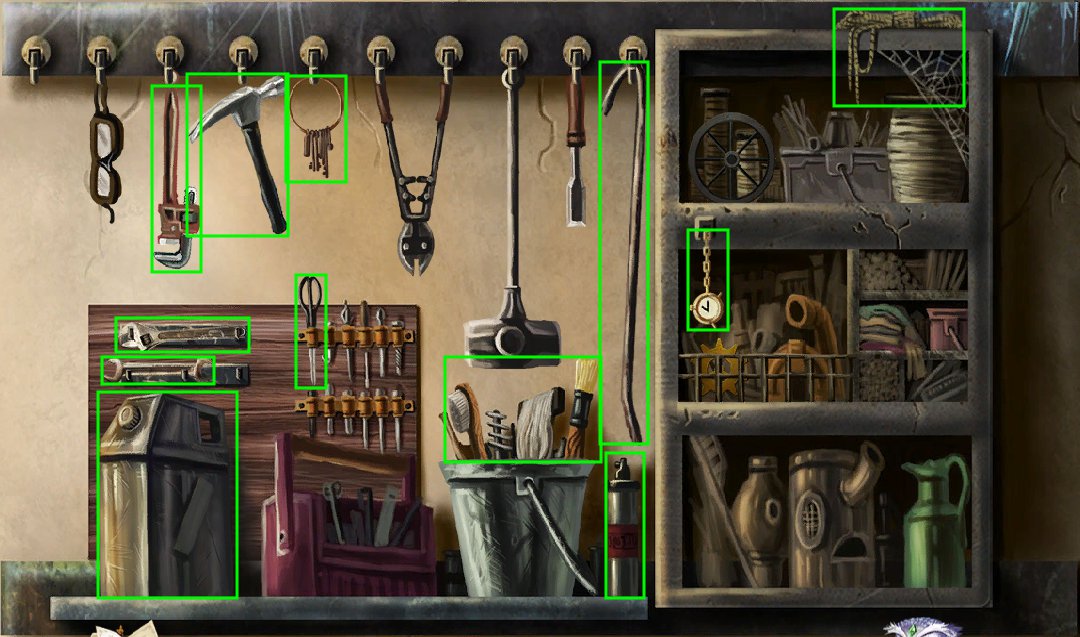
Solve the hidden-object puzzle.
The white items are ones readily visible.
The yellow items are only accessible by finding secondary views or discovering their hiding place.
The first screenshot below shows the white items boxed in red and the secondary areas boxed in yellow.
The second two are of those areas.
One alternate item encountered is boxed in pink.
Screenshot
Screenshot
Screenshot
You receive the ice pick for your efforts.
Examine the frozen obstruction.
Use the ice pick (from the greenhouse).
Take the wheelbarrow wheel.
Head back to the cistern.
Cistern (again)
Examine the rubble in the corner.
Use the wheel (from the frozen obstruction) on the wheelbarrow.
Move the three stone blocks, then click the wheelbarrow to move them.
Solve the stone block jigsaw puzzle by clicking to rotate clockwise and dragging to place.
The blocks must be assembled from the bottom up.
The area you can currently build in will be shaded.
Use the screenshot below as reference if you're having trouble.
Screenshot
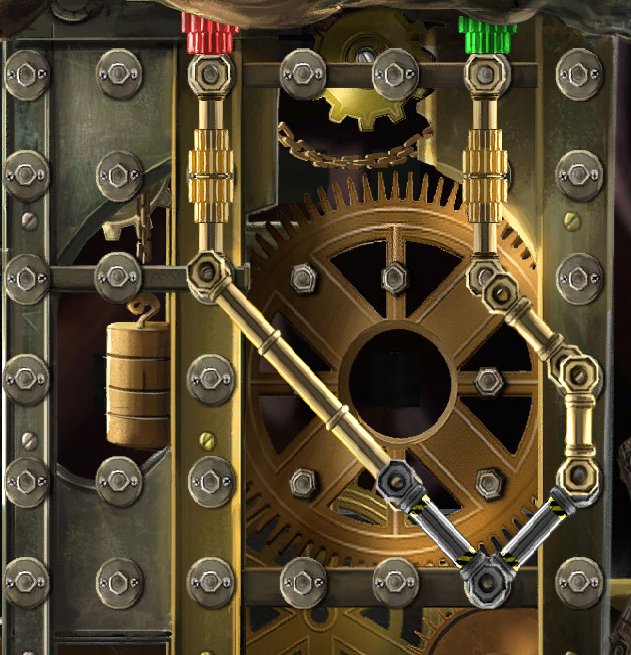
Examine the furnace.
Use the pocket dragon on the wood.
Solve the valve puzzle by clicking each valve when its corresponding meter reads green.
The correlations aren't up and down.
Follow the connecting pipes to figure out which valve goes to which meter.
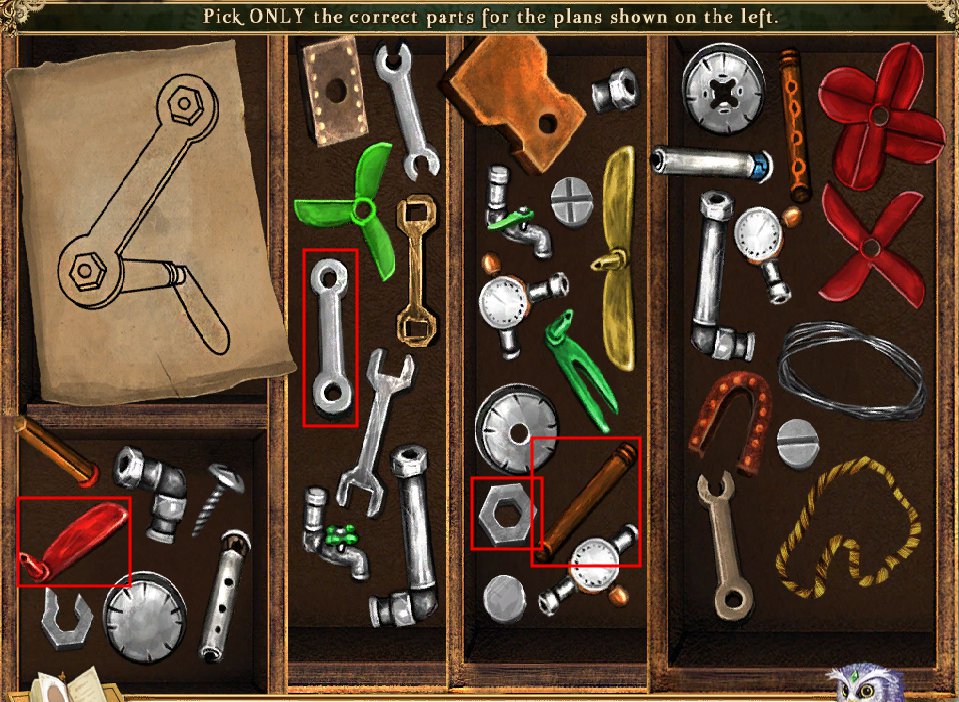
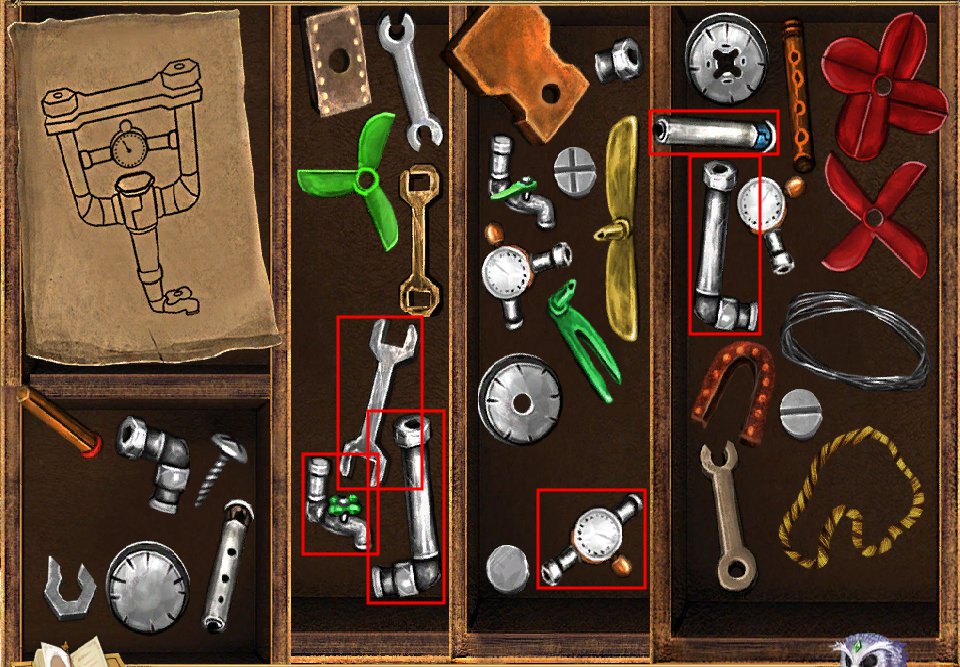
Examine the goblin toolbox that was frozen in the water.
Solve the puzzle by clicking the correctly shaped pieces for the plan shown. Each piece will be colored if correct.
If you need help, use the screenshots below for each of the three plans. The correct parts are boxed in red.
Screenshot
Screenshot
Screenshot
You get the goblin wrench for your efforts.
Head back down to the generator room.
Generator Room (last time)
Talk to the goblin engineer. You need to fix the engine box now.
Examine the engine box.
Use the goblin tools on the engine. Their locations:
The generator room, in the grating.
The generator room, in the engine box.
The cistern, at the top of the stairs.
The cistern, in the goblin toolbox.
Each tool has four parts on which to use them.
Screwdriver: the screws on the right.
Hammer: the bent pipes in the middle and above the large metal box.
Wrench: the loose bolts on the left.
Sealant: on the cracks in the piping and the metal box.
Talk to the engineer again and enter the elevator.
Examine the elevator controls.
The third button is a Bolgin coin; collect it.
Push the middle button and go to the train station.
GOAL: Getting a train ticket
Train Station
Collect the two pieces of charcoal, on each side of the walkway.
Collect the two steampipes (green & purple) both on the right.
Enter the ticketing station.
Ticketing Station
Collect two more charcoal pieces, under the typewriter and right of the message capsule.
Collect a green steam pipe in the lower right.
Examine the clerk's desk.
Look at the newspaper to grab a clipping for your journal.
Collect the magnifying glass.
Open the drawer.
Take the elevator button.
Back up twice.
Examine the typewriter.
Take the Bolgin coin.
Back up.
Go back to the train station and go into the elevator.
Use the elevator button (from the clerk's desk drawer).
Click that button and go to the mines.
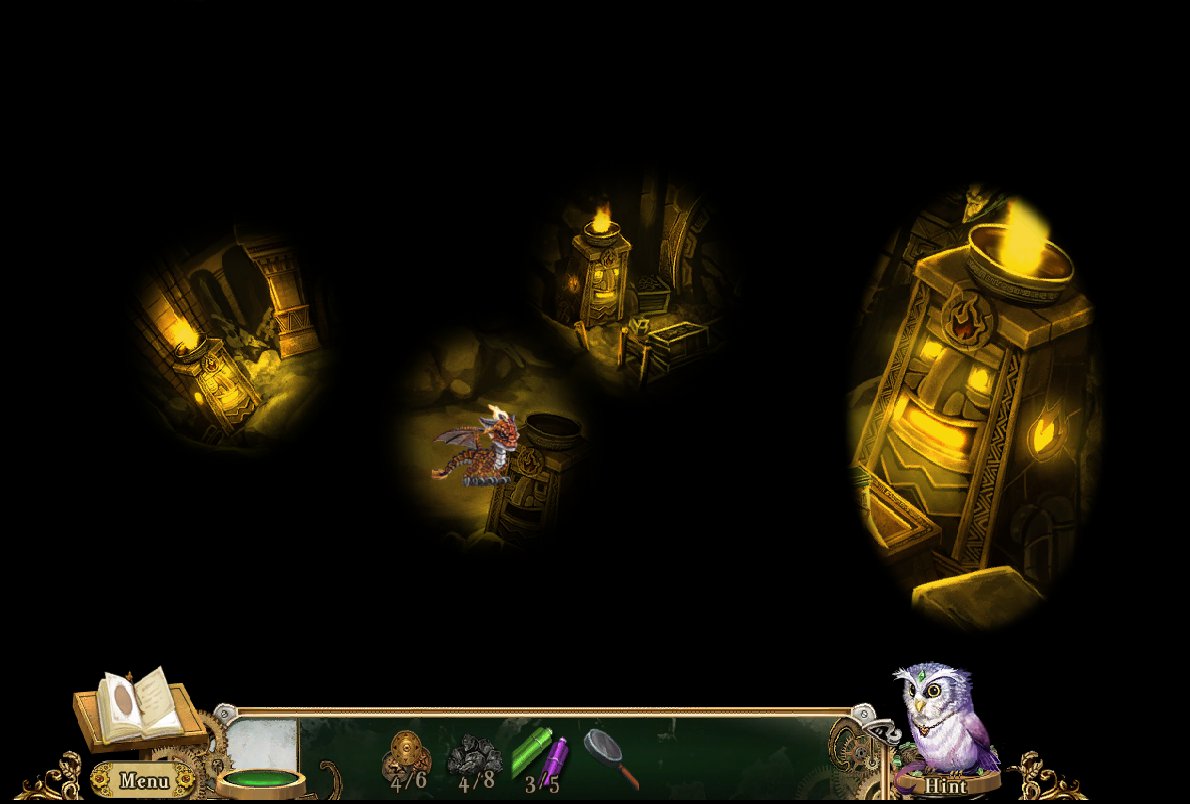
Mines
Use the pocket dragon to light the four torches.
The torches are columns with faces on the side and a bowl on top.
Use the screenshot below if you're having trouble finding them. The last one is not lit yet.
Screenshot
Collect the two steam pipes, on the stairs and on the boulder below the gem sorting table.
Collect the two pieces of charcoal, at the foot of the sorting table and on the stairs.
Examine the gem sorting table.
Collect the typewriter key.
Look at the unsorted gems.
Use the magnifying glass (from the clerk's table in the ticketing station) on the unsorted gems.
Change the sand background in this match-3 minigame by clicking adjacent gems to swap and get three of the same item in a row.
Starting at the bottom allows incidental matches above.
If you're stuck finding a match, just wait a little and the game will indicate a swap.
You get a gemstone collection for your efforts!
Back up.
Examine the collapsed mine tunnel.
Solve the hidden-object puzzle.
Same conventions as the previous hidden-object puzzle with two hidden areas again.
If you get stuck, you can use the screenshot below where the white items are boxed in red and the hidden area items are boxed in yellow.
Screenshot
You get a crank handle for your efforts!
Examine the storeroom.
Solve the code puzzle by dragging the colored ring to the corresponding numbers and clicking the white squares to enter the correct code.
This puzzle works much like a decoder ring. You are given a key to the code to help you figure out how far to rotate each ring.
The emerald ring puzzle is a number-symbol code.
The key for this puzzle is 4-butterfly.
Now set the ring so it reads that. Enter the correct symbols given this configuration.
3-eight petal flower
9-rose
0-heart
The squares around each button will drop once the correct combination is entered.
The ruby ring puzzle is a number sequence code with part of the ring missing numbers.
The key for this puzzle is black 7-red 8.
The ring sequence is still missing numbers: it's the Fibonacci sequence.
8 between 5 and 13.
55 between 34 and 89.
Now set the ring so it matches the key. Enter the correct numbers given this configuration.
Black 3-red 1
Black 1-red 55
Black 6-red 5
Good job! Collect the charcoal and fuel oil.
Go back up the elevator to the train station.
Train Station (again)
Examine the raised bridge.
Collect the typewriter key.
The mechanism is missing steam pipes, so use them. The location of each steam pipe:
The train station, on left side of walkway.
The train station, on the right side of walkway.
The ticketing station, on the ground.
The mines, on the stairs to the left.
The mines, on the boulder below the gem sorting table.
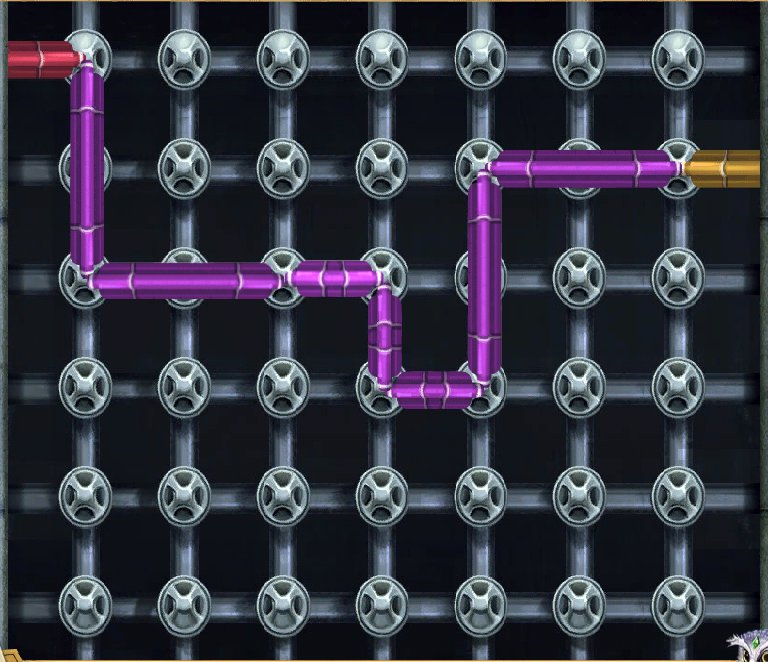
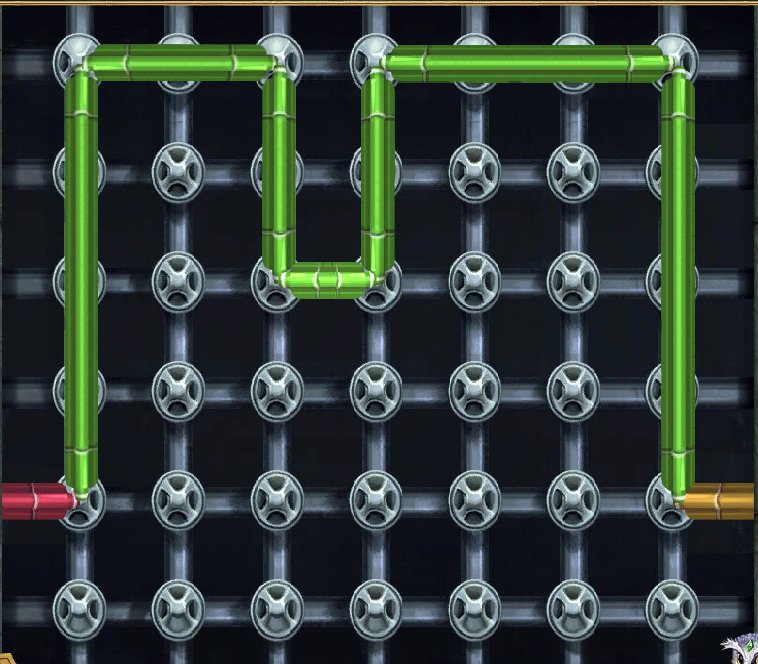
Solve the steam pipe puzzle by clicking the pipes to rotate them and dragging to place them on the grid to connect the red and yellow ends.
There are more than one solution to each set.
Starting with the bigger pieces may help you.
If you're stuck, the two screenshots below offer a possible solution for each set.
Screenshot
Screenshot
Examine the frozen train carriage.
Collect the charcoal on the steps.
Back up.
Examine the cargo crane.
Use the crank handle (from the collapsed mine tunnel).
Lower the pan into the mines.
Back up.
Go back down to the mines.
Mines (again)
Examine the charcoal brazier you lowered.
Collect the Bolgin coin.
Use the charcoal pieces on the brazier. The location of all eight pieces:
The train station, on the right side of the walkway.
The train station, on the left side of the walkway.
The ticketing station, under the typewriter.
The ticketing station, right of the message capsule dispenser.
The mines, at the foot of the gem sorting table.
The mines, on the right side of the stairs.
The mines, in the storeroom.
The train station, on the steps of the frozen train carriage.
Use the fuel oil (from the storeroom in the mines) on the charcoal.
Now it's time to use the pocket dragon.
Back up and return to the train station.
Train Station (third time)
Examine the lowered crane cargo.
Raise the charcoal brazier.
Back up. Hey, the carriage is free!
Examine the train carriage to enter.
Solve the hidden-object puzzle.
Use the screenshot below if you're stuck. The white items are boxed in green, the hidden/special areas in yellow.
Alternate items are boxed in pink.
Screenshot
You receive printing paper for your efforts.
Re-enter the ticketing station.
Ticketing Station (again)
Examine the clerk's desk.
Use the unsorted gems (from the gem sorting table in the mines) on the box.
Solve the jewel box puzzle by clicking the gears to rotate the system and clicking the icons to swap.
The gems in the lower left let you know how to discover the correct icons from the gears.
Rotate the gears until the correct gem is boxed within the bolted metal. The icons are not left-right specific, so you just need to match them with the correct gem.
Aqua teardrop : bunny/spade
Green rectangle : fleur-de-lis/star
Yellow circle : club/crown
Pink heart : moon/heart
Collect the Bolgin coin.
Go back outside to the train station.
Train Station (fourth time)
Talk to the mysterious peddler.
Solve his pocket watch match puzzle by clicking the two identical watches. Each design is usually set to different times.
You receive a pocket watch for your efforts.
Click the ink ribbon on his cart to purchase it. The location of the Bolgin coins:
The rooftop patio, in the strong box.
The cistern, in the furnace.
The elevator, in place of the bottom button.
The ticketing station, on the typewriter.
The mines, on the charcoal brazier, lowered from the train station.
The ticketing station, in the ornamented jewel box in the clerk's desk drawer.
Re-enter the ticketing station.
Ticketing Station (last time)
Examine the message capsule dispenser.
Solve the color rotation puzzle by clicking the counterclockwise buttons to rotate the circles on all four sides.
The goal is to get the like-colored circles along the edges that are the same color (green on top, red on right, blue on bottom, yellow on left).
The initial position of the circles is randomized, so there is no single answer, just a strategy.
Isolate the circles when possible. When putting corner circles in, get the two colors together in order before rotating it in.
Collect the empty message capsule.
Back up.
Examine the ticketing machine.
Collect the typewriter key.
Read the instruction panel.
Look at the route map.
Click Gobholme to jot down the station code in your journal.
Back up.
Examine the typewriter.
Replace the missing keys. The location of the typewriter keys:
The mines, on the gem sorting table.
The train station, on the raised bridge.
The ticketing station, at the ticketing machine.
Use the typewriter ink ribbon (purchased from the mysterious peddler at the train station).
Use the printing paper (from the frozen train carriage at the train station).
Peeking at your journal for reference, push the proper keys in order for the station code for Gobholme.
Use screenshot below as reference if needed.
Screenshot
Push the enter key and receive a printed station code for your efforts.
Back up.
Examine the clerk's desk.
First you need to set down the empty message capsule (from the message capsule dispenser) by using it on the capsule stand.
Next insert the printed station code (made at the typewriter).
Collect the completed message capsule.
Examine the ticketing machine.
Put the capsule in the message tube.
Collect the train ticket.
Head back outside, give the ticket to the conductor and be on your way!
Gobholme
Head to the palace grounds.
Talk to the palace guards.
Speak to King Grimble.
Chapter 2 - The Dark Tower
GOAL: Escaping Prison
Prison Cell
Examine the window.
Talk to Ran and the Pocket Dragon to regain their help.
Collect the wooden puppet and replica tower.
Look at the interesting arrangement of towers outside to make note of them in your journal.
Examine the webbed over wall.
>Use the Pocket Dragon on the webbing until it's all gone.
Solve the brick memory puzzle by clicking bricks to flip them over, two at a time.
This is like a regular memory puzzle, except the pairs are not the same object: they're related objects.
The positions are randomized, so there's no single answer.
As a strategy, you can go systematically through the bricks to better help you remember their positions.
If you find the matches confusing, here are the pairs:
Bee-flower
Horse-horseshoe
Nail-hammer
Socks-shoe
Arrow-bow
Carrot-bunny
Feather-bird
Umbrella-rain
Sailboat-water
Leaf-tree
Sun-moon
Chair-table
Collect the wooden puppet and palette with paint.
Examine the round table.
Collect the cardboard cheese and cardboard fish.
Back up.
Examine the diorama.
Collect the picture scrap.
Pull the braided rope.
Collect the wooden puppet hanging in the flying machine.
Pull each set of tabs inward to collect the picture scraps.
Use the cardboard fish in the bowl and the cardboard cheese in the trap (both from the round table).
Click the dog to start the action.
Collect the toy bone and picture scrap.
Examine the puppet rack.
Use the replica tower (from the window) on the empty slot.
Solve the height-match puzzle by clicking the dial below each tower to set the height.
You can peek at your journal for help on what the heights are.
The heights are: 3-1-2-5-4
Use the picture scraps on the lightened patch. The location of the picture scraps:
The diorama, on the plain background.
The diorama, on the cardboard human royalty.
The diorama, on the Goblin King.
The diorama, left in the wake of the dog chasing the cat chasing the mouse.
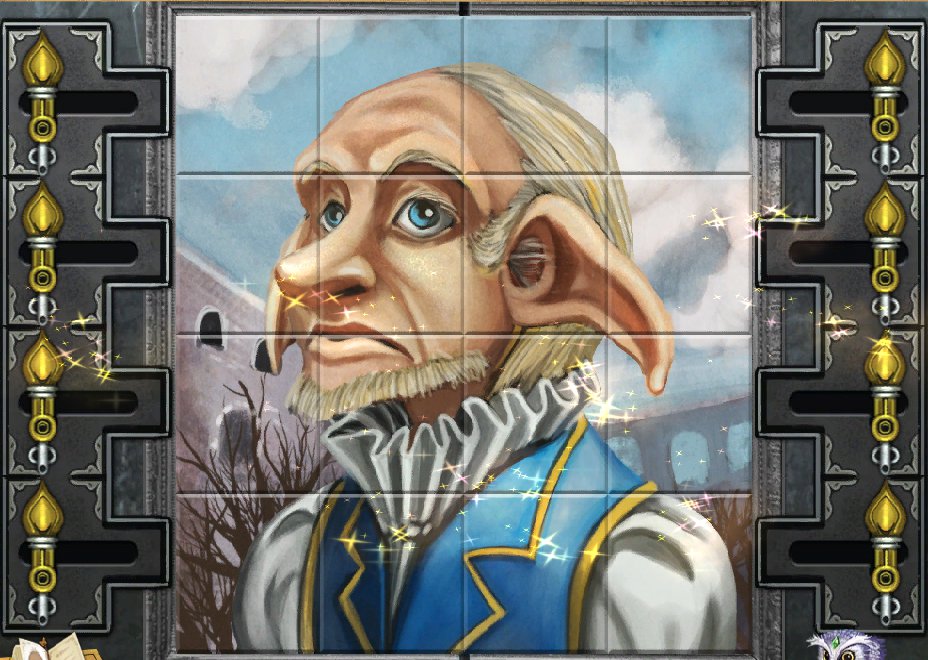
Solve the jigsaw puzzle by clicking a piece to rotate it and dragging it to the proper spot.
If you're having trouble, use the screenshot below as reference.
Screenshot
Use the wooden puppets on the empty cubbies. The location of the wooden puppets:
The window.
The webbed-over wall.
The diorama, on the flying machine.
Solve the puppet order puzzle by clicking two puppets to swap them.
Use the picture you just assembled as reference for their positions. From left to right, top to bottom:
Girl in purple with bow in hat.
Boy in blue, diamonds on clothes.
Boy in red with feather in hat.
Boy in purple, plaid on clothes.
Girl in red with glasses.
Girl in blue with bow on dress.
Use the paint with palette (from the webbed over wall) on him.
Solve the puppet paint puzzle by clicking a color and using it in the appropriate areas.
He's colored symmetrically.
There are often leftover paint flakes to help identify the needed color.
Xim the Magic puppet joins you.
Use Xim (from the diorama) on the pile of puppet parts.
Solve the hidden-object puzzle by clicking the item described in the clues.
The items are not described in the same order everytime, so below are a screenshot with the items boxed in yellow and a list of the clues and which item they're describing.
Screenshot
List of clues:
"They have little compartments for my fingers, and they come in a pair!" - gloves
"I keep a bottle of this around whenever I need to touch up some chipped paint." - bottle of paint
"It's a long tool, with a sharp metal tip. I turn it a few times to tighten the screws in my joints." - screwdriver
"A good foundation is essential for the perfect puppet blush. It's compact too, just the right size!" - blush
"It's a wooden stick with a little fuzzy thing at the end I can use to apply paint to myself." - paintbrush
"I'll clomp around in these solid leather things when I get a chance to go walking again!" - shoes
"They're red, and I can wear them. They even come with little suspenders!" - overalls
"It's supposed to go on my head, but it's so big and floppy I can never keep it on!" - hat
"It's wound around a spindle, and soft and flexible, but strong enough to stitch my clothes together." - thread
Examine the round table.
Use the toy bone (from the diorama) to receive the forked stick
Examine the cell door.
Use forked stick (from toy dog on round table) on access door.
Use Xim on access door.
Leave the cell.
GOAL: Flying out of Gobholme
Leodici's Workshop
Talk to the inventor.
Examine the balcony with Flying Machine.
Collect flying machine blueprints.
Back up.
Talk to the inventor again.
Examine the storeroom.
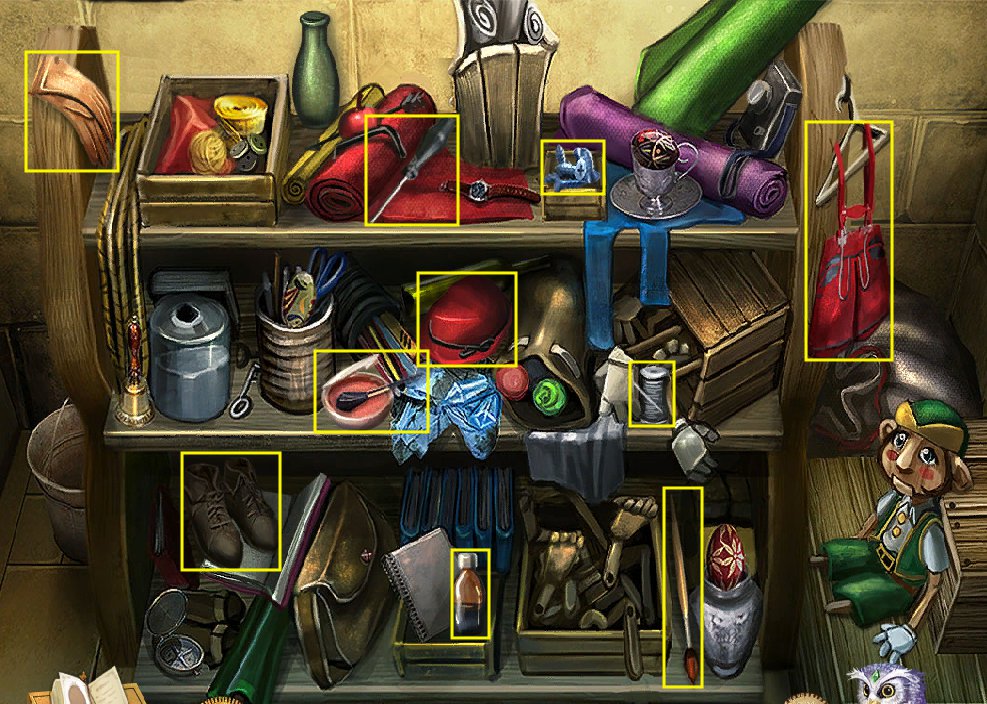
Solve the hidden-object puzzle by clicking an item from the list and finding its place.
You should be looking for a related item to pair it with. List of matching pairs:
Paintbrush : paint can
Pipe : ash tray
Wrench : toolbox
Suit of armor : armor rack
Silver comb : hand mirror
Nut : bolt
Iron key : lock
Wooden spoon : bowl
Quill pen : ink jar
Pepper : salt
Mortar : pestle
Sword : scabbard
Use the screenshot below if you're having trouble finding the matching items, which are boxed in green.
Screenshot
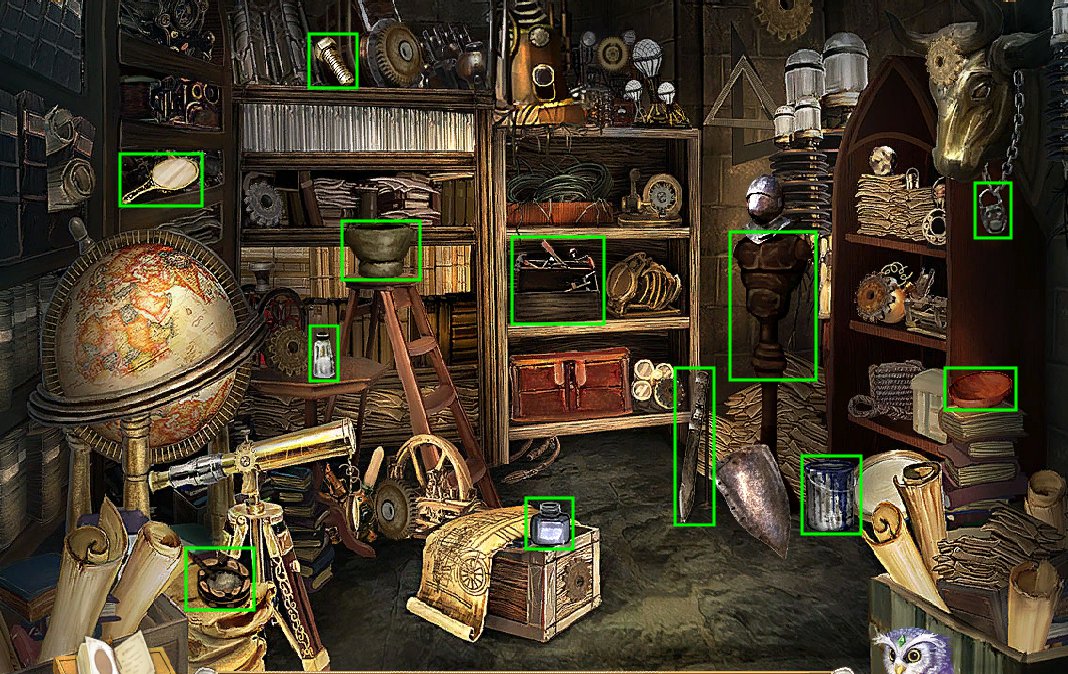
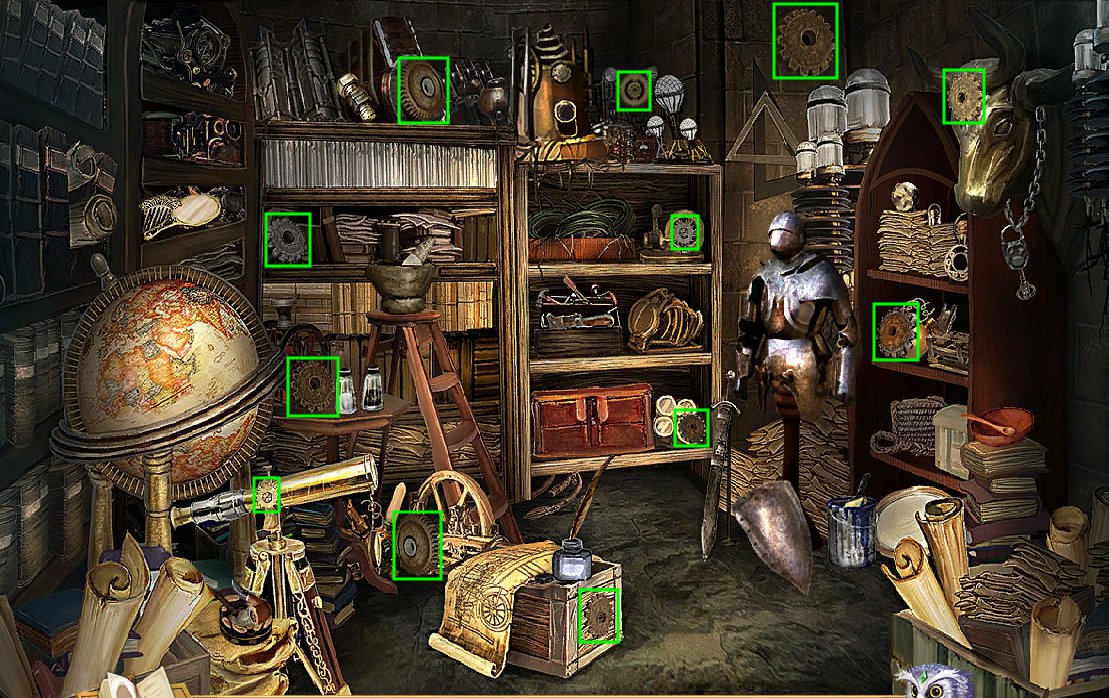
Now solve the hidden-object puzzle by finding the 12 gears. Use the screenshot below if you're having trouble.
Screenshot
You receive a gear assembly for your efforts.
You receive a brass cipher plate from the inventor.
Collect the scissors on the inventors desk.
Examine the drafting table.
Use the brass cipher plate (from the inventor) on the plate mount.
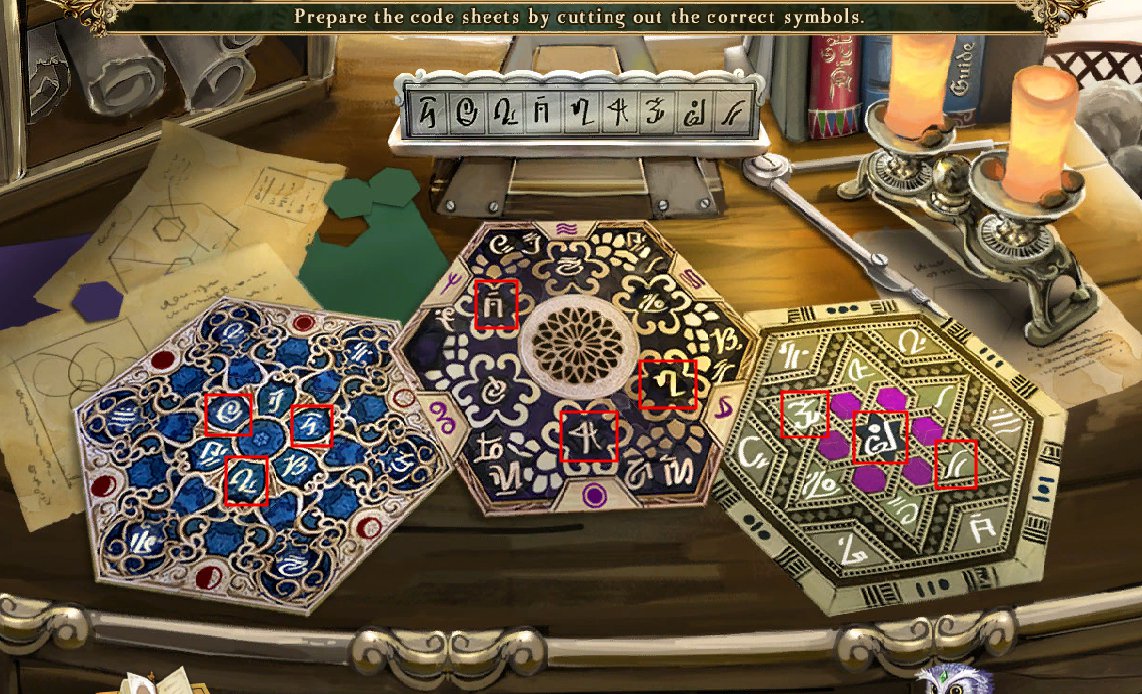
Use the scissors (from the desk) on the code sheets.
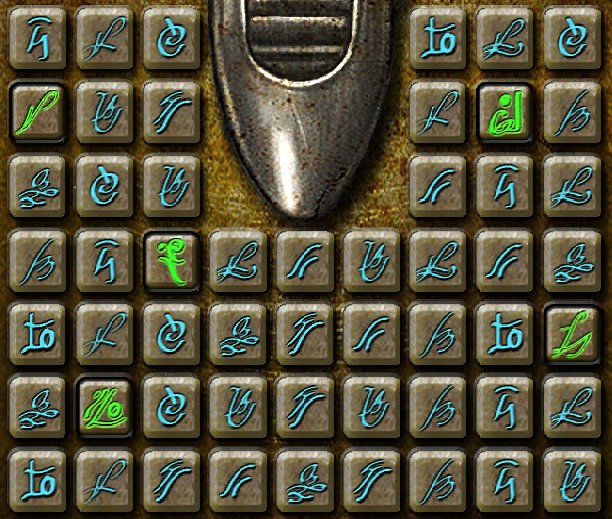
Solve the code sheet puzzle by cutting the correct symbols.
Use the cipher plate as reference.
There are three symbols per sheet. Use the screenshot below if you're having trouble.
Screenshot
You receive code sheets for your efforts.
Examine elevator control panel.
Use code sheet on panel.
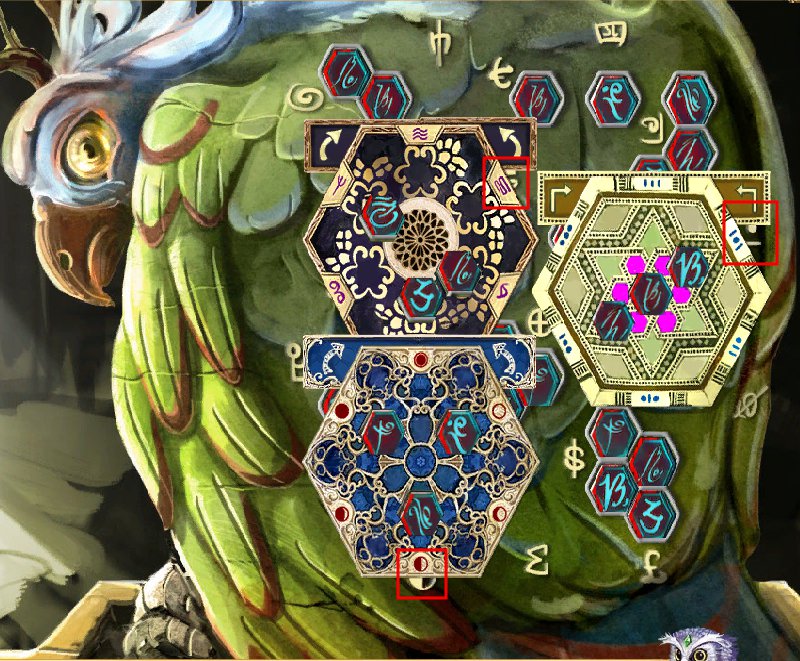
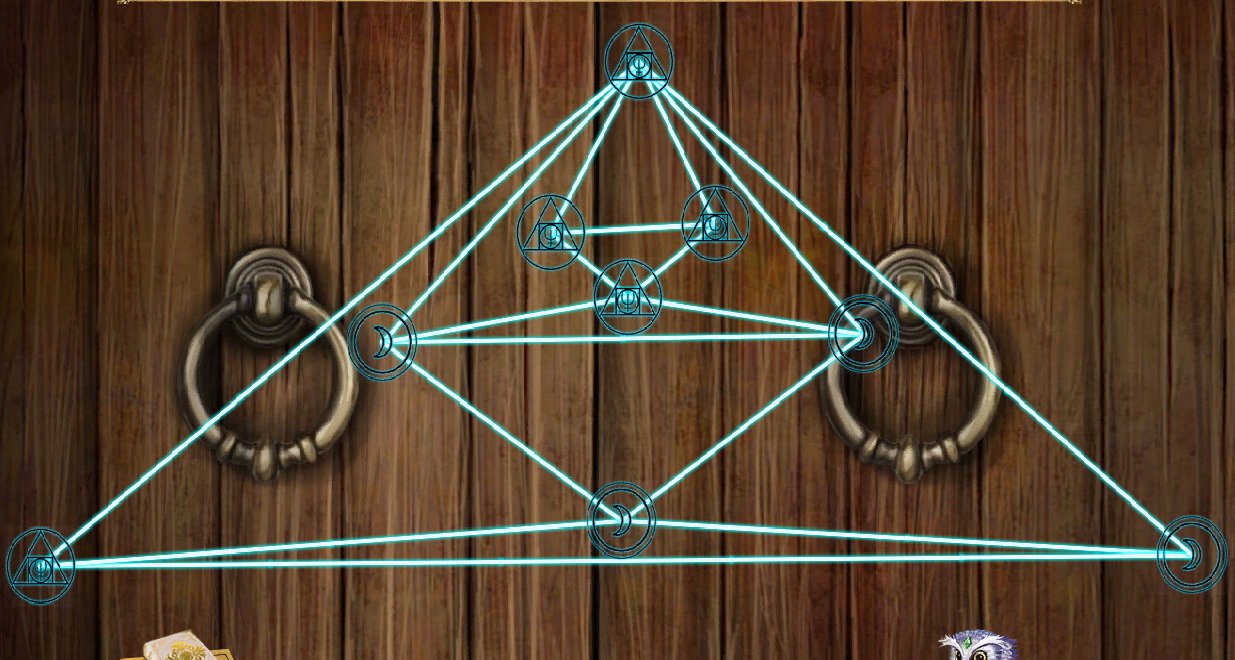
Solve the cipher puzzle by correctly placing each code sheet in the right orientation.
Click the arrows to rotate each sheet in either direction.
Use the symbols along the sides of the sheets to help with orientation.
Use the screenshot below if you're having trouble. It shows placement and has the helper symbols boxed in red.
Screenshot
Now push the contained buttons to open the control panel.
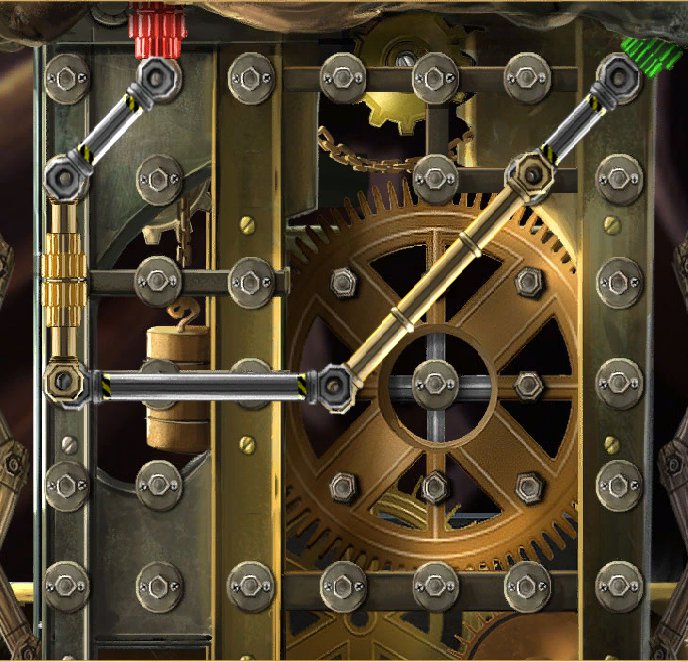
Use the gear assembly (from storeroom) on panel.
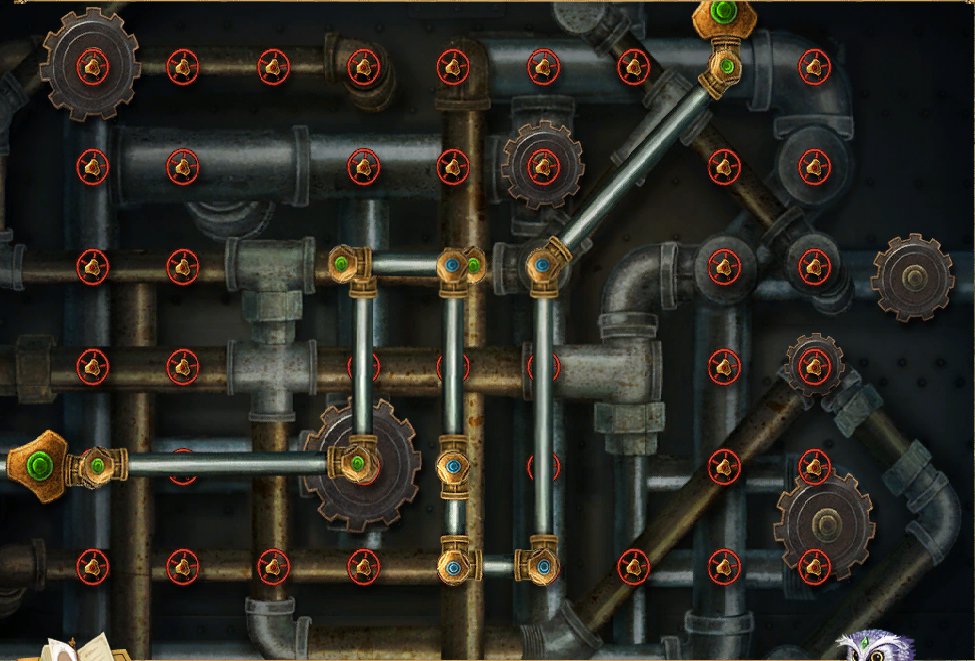
Solve the linkage puzzle by connecting the red and green screwheads.
This functions like the steam pipe puzzle, but now the pieces can work diagonally as well.
Again, there is no single answer for either set, so the screenshots below offer just one possible answer for each.
Screenshot
Screenshot
Pull the elevator call lever and head downstairs.
GOAL: Finding the complete encyclopedia
Tower Atrium
Examine the jumbled pile.
Solve the hidden-object puzzle. This puzzle involves manipulating some items to create what's on your list.
Use the screenshot below if you're having trouble, the items needing manipulation are boxed in pink.
Screenshot
You receive four bolgins and the Encyclopedia Goblinnica Volume 1 for your efforts.
Enter Goaler's chambers.
Goaler's Chambers
Move the potted plant to reveal the Encyclopedia Goblinnica Volume 2 and collect it.
Examine the waste paper basket. Move the garbage around to reveal the Goblin superglue. Collect it.
Examine the display case.
Use the superglue (from the waste paper basket) on the trophy fish by running the cursor over the broken edges.
Carefully follow the lines.
If you mess up, simply push the reset button in the upper left.
A good strategy is to glue the shorter lines first before tackling the longer one.
You receive the trophy fish for your efforts.
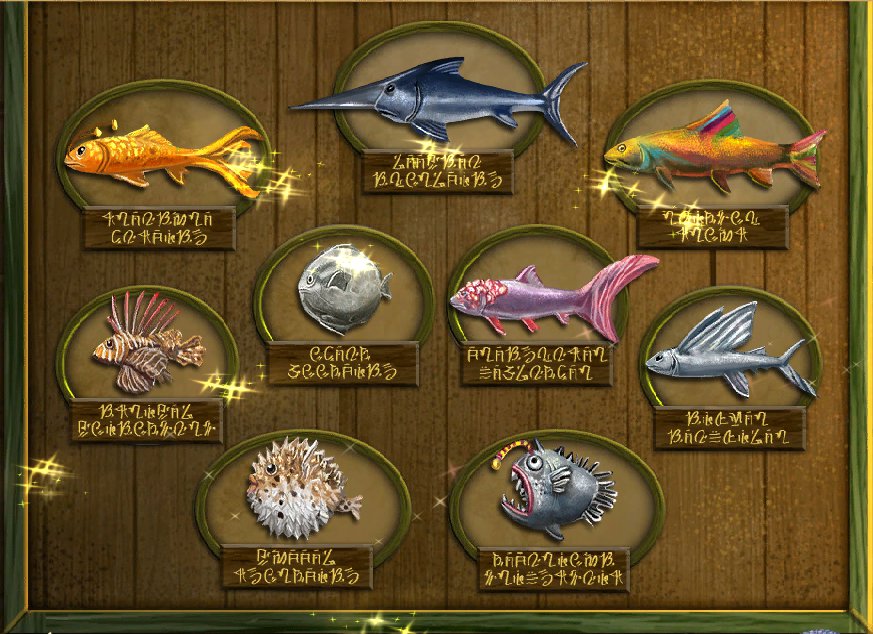
Back up. Examine the trophy wall.
Use the trophy fish (from the display case) on the empty placard.
Solve the fish match puzzle by clicking two fish to swap them.
Read the descriptions to help you match the fish. Use the screenshot below if you're having trouble.
Screenshot
Collect the prize fishing reel.
Examine the armoire. Solve the spot-the-difference puzzle.
Click only the differences on the right hand side.
Use the screenshot below if you're having trouble.
Screenshot
You receive the Encyclopedia Goblinnica Volume 3 for your efforts.
Enter registry room.
Registry Room
Examine the filing cabinet. Pull out each file to read them.
One file will tell you which shelf contains a volume of the encyclopedia. Another file will contain your personal information!
Back up. Examine the specified shelf from the filing cabinet.
The possible shelves are marked with a red ribbon.
Collect the Encyclopedia Goblinnica Volume 5.
Examine stacked books.
Collect the Encyclopedia Goblinnica Volume 6 off the top.
Collect the Bolgin coin and toy crank.
Re-enter the gaoler's chambers.
Goaler's Chambers (again)
Examine the desk.
Examine the toy monkey.
Use the toy crank (from the stacked books in the registry room). Wind up the organ and watch the monkey dance.
Collect the Encyclopedia Goblinnica Volume 4.
Back up. Go back out to the tower atrium.
Tower Atrium (again)
Examine the antique bookshelf.
Several volumes are missing, so replace them. The location of the volumes:
The tower atrium, in the jumbled pile.
The gaoler's chambers, behind the potted plant.
The goaler's chambers, in the armoire.
The goaler's chambers, in the desk.
The registry room, on a specified shelf.
The registry room, on the staked books.
Solve the alphabetical order puzzle by clicking two volumes to swap them.
Use the letter chart as reference for alphabetical order (left to right, top to bottom).
There are labels and the beginning and end of each shelf that let you know the exact volume that belongs there.
There is no single answer since the letters on the volumes are random, so you will have to work through systematically.
Enter the secret chamber.
GOAL: Finding the last blueprints
Secret Chamber
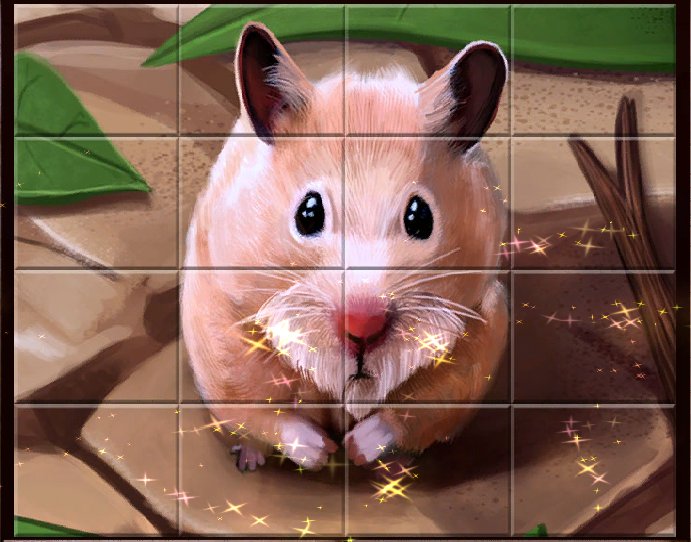
Examine the rat cage.
Solve the order guessing puzzle by clicking each spoke in turn.
The puzzle works progressively so that if you guess the wrong spoke along the order, you will have to restart immediately.
If you're stuck:
Middle right
Lower left
Upper right
Middle left
Lower right
Upper left
Collect Nibbles and receive a Bolgin for your efforts.
Go out to the tower atrium.
Tower Atrium (third time)
Talk to mysterious peddler. Give him Nibbles (from rat cage in secret chamber).
Click the wrapped lockpicking set to pay for them.
Location of Bolgin coins:
The tower atrium, in the jumbled pile (x4).
The registry room, on stacked books.
The secret chamber, in the rat cage.
Go back into the gaoler's chambers.
Gaoler's Chambers (third time)
Examine the desk. Use the wrapped lockpicking set (from mysterious peddler in tower atrium) on drawer.
Solve the lock puzzle by clicking the symbols at the bottom. This works much like the one from the furnace in Chapter 1.
Receive a blueprint from the wrapping paper and collect the lion crest.
Exit to the tower atrium.
Tower Atrium (fourth time)
Examine the large display case.
Examine the swordfish crest. Solve the spokes puzzle by clicking the different buttons to release or insert a set of spokes.
Start out by pressing each button in turn to see which spokes it affects, then pressing again to undo the actions. Buttons to push:
Middle right.
Middle left.
Upper left.
Lower left.
Upper right.
Collect the swordfish crest.
Back up. Re-enter the secret chamber.
Secret Chamber (again)
Examine the silver gear lever.
Use the swordfish crest (from the large display case in the atrium) on the silver gear lever.
Solve the gear match puzzle by clicking each gear to rotate them. Rotate each gear until the blue shapes are lined up with the same black shapes below.
Pull the lever.
Examine the golden gear lever.
Use the lion crest on the gear lever.
Solve the gear match puzzle by dragging each gear around.
The point is to match each symbol on the center of the gear to the one in the hole.
It is not a same-shape match. You're looking for a related shape. If you're having trouble:
Bee : flower
Catepillar : butterfly
Lightning : cloud
Jewelry : diamonds
Pull the lever.
Go back into the atrium.
Atrium (last time)
Examine the opened display case. Collect the prize fishing hook.
Enter gaoler's chambers.
Gaoler's Chambers (last time)
Examine opened display case.
Collect prize fishing rod.
You now have a fully assembled prize fishing rod. The location of fishing rod parts:
Reel from the gaoler's chambers, on the trophy wall.
Hook from the tower atrium, in the display case.
Rod from the gaoler's chambers, in the display case.
Examine open window.
Use the completed fishing rod on the lodged blueprint.
Receive the flying machine blueprints.
Go back upstairs to Leodici's workshop.
Leodici's Workshop (again)
Show Leodici the blueprints. The location of the blueprints:
Leodici's workshop, off the balcony.
The wrapping paper from the lockpicking set, from the mysterious peddler.
The gaoler's chambers, fished out the window.
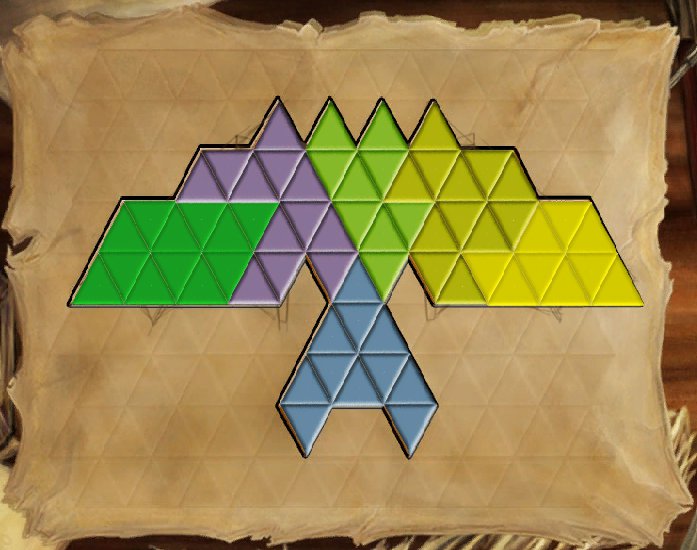
Examine the balcony.
Use the blueprints on the flying machine.
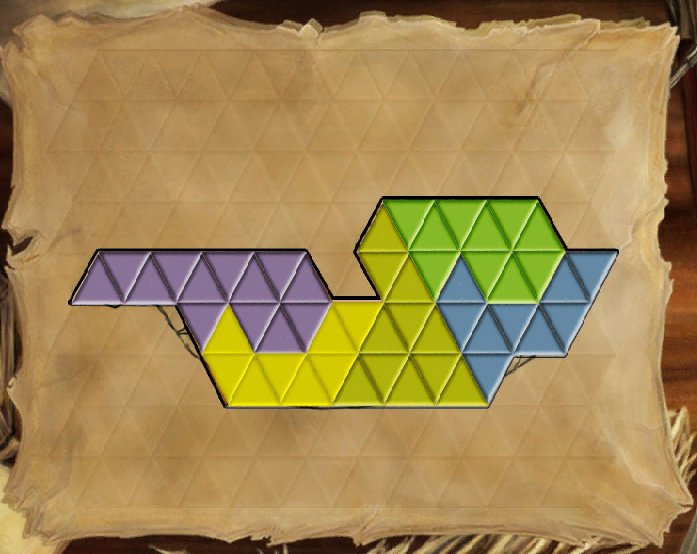
Solve the flying machine tangram.
Use the screenshot below if you're having trouble.
Screenshot
Up, up and away . . .
Posted by: Kyh |
September 6, 2011 7:47 PM
|
September 6, 2011 7:47 PM
Awakening: The Goblin Kingdom Walkthrough
Part 2: Ch 3-4, epilogue
Chapter 3 - The Fungal Forest
GOAL: Earning the gnomes' trust
Rope Bridge
Collect the empty glowspore lamp.
Head to the village square.
Village Square
Speak to the gnomish elder.
Enter the Wise One's hut.
Wise One's Hut
Speak to the Wise One.
Examine the planting trough. Collect the potting soil.
Back up. Head back out to the village square and enter the ancient shrine.
Ancient Shrine
Examine the mushroom hedgerow.
Clear plant debris and collect glitterstone hidden beneath.
Look at bare rock.
Use the potting soil on the bare rock.
Collect the five inkcap mushroom spores by clicking the mushrooms (not all will give a spore).
Now click the glowing mushroom to release a silver glowspore.
Use the empty glowspore lamp (from rope bridge) on the spore.
Head back to the Wise One's hut.
Wise One's Hut (again)
Give Wise One the silver glowspore.
Solve the hidden-object puzzle. Use the screenshot below if you need help. Items that need to be manipulated first are boxed in yellow.
Screenshot
You receive a moongleam crystal for your efforts.
Head out to the village square.
GOAL: Consecrating the Oracle shrine
Village Square (again)
Speak to the gnomish elder.
Solve the butterfly puzzle by clicking the butterfly matching his description.
Read all three clues to determine which butterfly is correct. If you're having trouble, the location of each butterfly:
2nd row down, 2nd column right
1st row down, last column right
4th row down, 2nd column right
Receive a glitterstone for your efforts.
Look at glowspore lantern. Solve the shape match puzzle by clicking a matching pair of shapes.
In the center is a brief description of the shape for which you are looking.
The placement of the shapes as well as the order of the clues is randomized.
Not all the pairs will be split between the top and bottom halves.
The clues and matching shapes:
"Round and red, yet not the apple of my eye." - pomegranate
"I sprout like a weed, yet of leaves I have no need." - mushroom
"Lucky to have, lucky to hold, four leaves unfold!" - clover
"I'm more slippery than a toad, but less warty." - frog
"Scales I have, a tail too, yet I dwell not on the land unlike you." - fish
"Purple and cheerful, we're a tight bunch!" - grapes
"I'll chase a cat, but I'll stop for bones at the drop of a hat." - dog
"Orange and crunchy, rabbits love me for munchies!" - carrot
"Soft and furry, white like snow, I have long ears too you know." - bunny
"A mane I have, a lion I'm not, I run with the wind like a bullet shot." - horse
"Yellow and sour, kiss me and your puckered lips won't be dour!" - lemon
"I float on the water, yet fly like a bird." - duck
You receive a glitterstone for your efforts.
Collect the resin knife next to the elder.
Head to the statue of the Oracle.
Statue of the Oracle
If you'd like, you can have a chat with the Oracle.
Collect the bark paper.
Re-enter Wise One's hut.
Wise One's Hut (third time)
Examine the mortar and pestle.
Use the glitterstones on the mortar. The location of the glitterstones:
The ancient shrine, on the bare rock.
The village square, from the gnomish elder.
The village square, from the glowspore lantern.
Grind each stone down.
Solve the dust mix puzzle by clicking a color to the left and mixing it with the ones in the tray.
The mixtures work like paint colors (red+blue=purple, etc).
The goal is to make the pile of dust on the tray into its background color. The color combinations (left to right, top to bottom):
Add yellow.
Add white.
Add yellow.
Add black.
Add red.
Add blue.
Add blue.
Add black.
Add black.
You receive glitterstone dust for your efforts.
Now go back to the ancient shrine.
Ancient Shrine
Examine the shrines to the Oracle.
Examine the desecrated aspect of wisdom.
Use the glitterstone dust (from the mortar and pestle in Wise One's hut).
Solve the dust coloring puzzle by clicking a color and dragging it in the area to fill it.
Use the watercolor in the upper left as reference.
Like in previous coloring puzzles, the picture is symmetrical.
Examine the desecrated aspect of faith.
Use the moongleam crystal (from Wise One's hut).
Solve the etched glass jigsaw.
Use the screenshot below if you're having trouble.
Screenshot
Collect the resin collection kit.
Back up.
Examine the Golden Needle pine.
Use the resin knife (from the village square).
Drag the knife across the bark to remove it.
Use the resin collection kit (from the aspect of faith of the shrines of the Oracle in the ancient shrine).
Solve the linkage puzzle.
This puzzle works like previous ones where you click a link to rotate and drag it to place.
What's different about this one is that there seems to be more links than you need, but you must use them all.
Use the screenshot below if you're having trouble. It shows only one of many possible possibilities.
Screenshot
You receive trollbane resin for your efforts.
Examine the shrines to the Oracle.
Examine the desecrated aspect of courage.
Use the trollbane resin (from the golden needle pine in the ancient shrine).
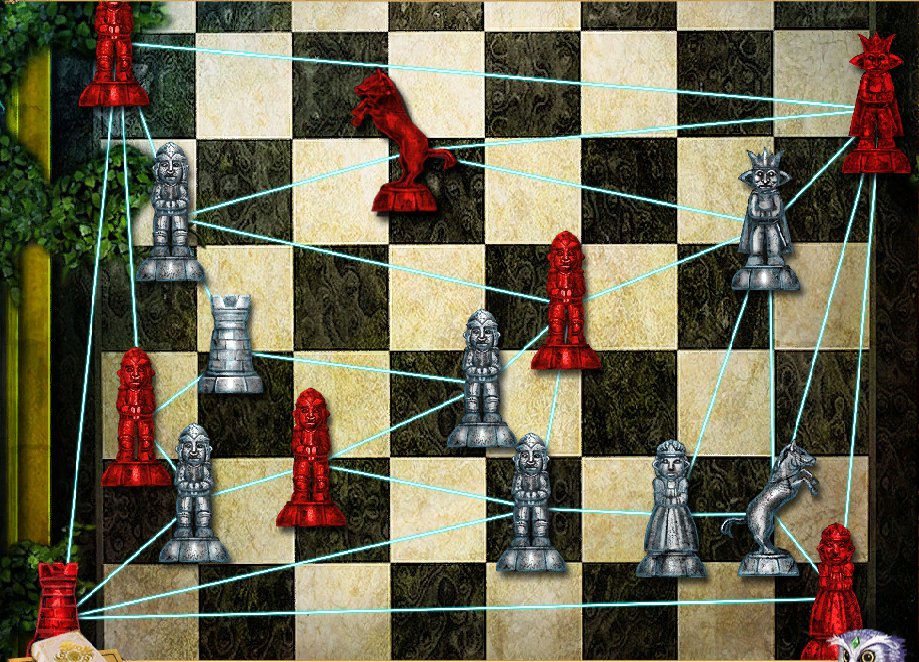
Solve the untangle puzzle by dragging the chess pieces around.
Your goal is to have all the wires white colored.
If two wires cross, they will be colored red.
A general strategy you can use is putting the pieces with more linkages toward the center and the ones with fewer outward.
Use the screenshots below if you're having trouble; they show the end position of all the pieces.
Your pieces might be different, so use the number of links and what it's linked to to help you figure out the solution from the screenshots.
Screenshot
Screenshot
Screenshot
Head back to the village square.
Village Square (third time)
Speak to the Wise one. You receive an encryption plate.
Go back to the ancient shrine.
GOAL: Gathering ingredients for potion
Ancient Shrine
Examine the gate to the sacred grove.
Use the encryption plate (from the Wise One in the village square).
Solve the gate key puzzle by setting the correct hand/color combination on the lower right.
Drag the dials on the left to decode the encryption plate.
The finger code from the plate should be lined up with the up arrow on the top dial.
The color code from the plate should be lined up with the down arrow on the bottom dial.
Where the two dials overlap is what should be entered in the keys to the right.
The correct combination:
Blue-two
Red-fist/four
Green-four
Yellow-two/one
Enter the sacred grove.
Sacred Grove
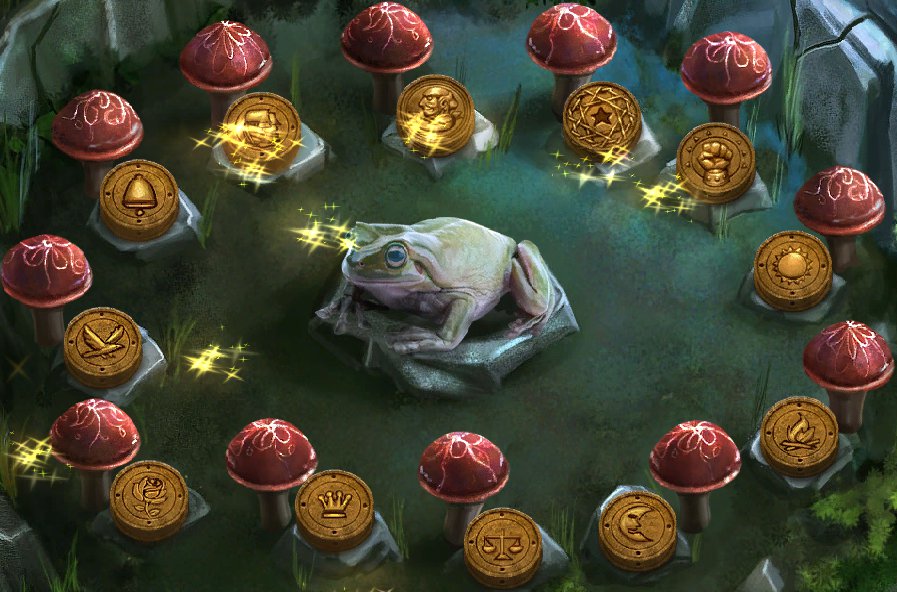
Examine the fairy ring.
Solve the bolgin match puzzle by clicking two coins to swap them.
The mushrooms have a preference on the coins, so talk to them to find out what it is.
Match the correct coin to each mushroom based on the clues they give you.
Use the screenshot below if you're having trouble.
Screenshot
You are rewarded with a Bolgin and fairy ring spores for your efforts.
Examine the stone basin. Collect the Bolgin.
Back up. Head to the entrance to the hedge maze.
Entrance to the Hedge Maze
Examine the singing shrooms
Look at the glass chimes.
Solve the glass bead puzzles by clicking groups of two or more of the same bead.
All the beads must be cleared off the screen, so carefully consider the order you clear the beads.
The order of bead clearing:
The first set:
Middle two hearts
Middle blue circles
Left and right six hearts
All the gread beads
All the red beads
All the blue beads
The second set:
All the blue beads
Bottom eight gold stars
All the red hearts
The rest of the gold stars
All the green beads
The third set:
Square of gold stars at bottom
The rest of the gold stars
All the red hearts
All the green beads
All the blue beads
Collect the Bolgin.
Read the sign for each shroom to find out what they want.
Use the fairy ring spores (from the fairy ring in the sacred grove) on the Bass Shroom.
Solve the mushroom dance puzzle by dragging each mushroom into the their correct position.
Below each mushroom is a picture of the design on the correct mushroom.
Use the screenshot below if you're having trouble.
Screenshot
Back up.
Go back to the Wise One's hut.
Wise One's Hut (fourth time)
Examine the planting trough.
Use the inkcap mushroom spores (from the mushroom hedgerow in the ancient shrine) on the trough.
Use the bark paper (from the statue of the Oracle) on the mushrooms.
Solve the rorschach puzzle by drawing a mirror image of the picture given.
This puzzle works like the fish glueing one from before.
Press the green reset button if you mess up.
You receive abstract drawings for your efforts.
Head back over to the sacred grove.
Sacred Grove (again)
Examine the ornate crate.
Collect the Bolgin.
Open the latch cover.
Solve the sliding tile puzzle by dragging a block adjacent to the blank spot to the move it there.
The final position of the missing block is randomized, so there is no single answer.
As a strategy, you can start by completing one of the edges and working your way across.
Use the screenshot below as a reference if you're having trouble.
Screenshot
Use the Bolgins on the sign to the obtain vial.
The location of the Bolgins:
The sacred grove, from the fairy ring.
The sacred grove, at the stone basin.
The entrance to the hedge maze, at the singing shrooms, after waking them.
The sacred grove, on the ornate crate.
Examine the lichen patch on the tree to the right.
Solve the dewdrop pair puzzle by clicking each matching set of dewdrops.
Pay attention to the color and design.
When all the pairs are collected, click the remaining dewdrop.
You receive pure dew-water for your efforts.
Re-enter entrance to the hedge maze.
Entrance to the Hedge Maze (again)
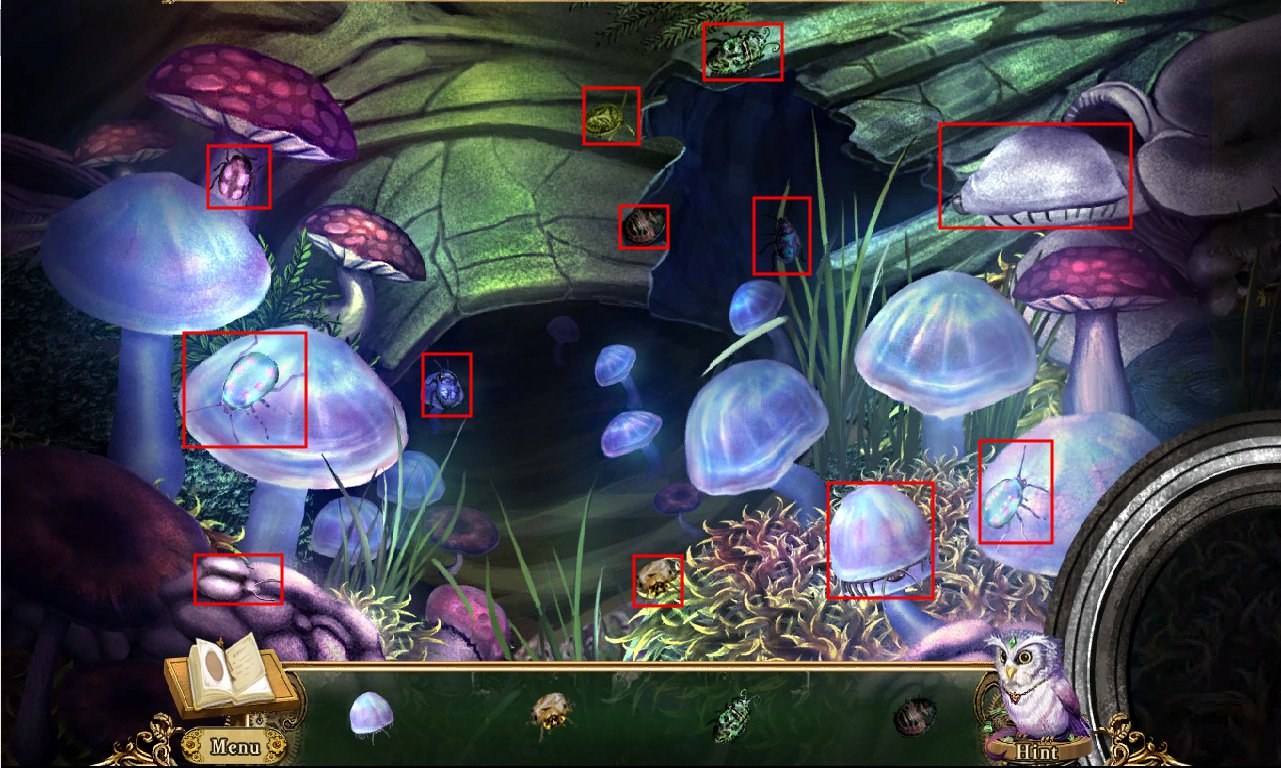
Examine the singing shrooms.
Use the abstract painting (from the planting trough in the Wise One's Hut) on the Baritone Shroom.
Collect the round lens.
Use the round lens on the Chorus Shroom.
Solve the bug hidden-object puzzle by clicking the bugs shown at the bottom. Use the screenshot below if you're having trouble.
Screenshot
Use the pure dew-water (from the lichen patch at the sacred grove) on the Tenor Shroom.
Collect the fungal tweezers.
Use the fungal tweezers (from Tenor Shroom) on the Lead Shroom.
Solve the odd spot puzzle by clicking the odd-one-out spot.
Look for a slight difference in coloring.
Of the song the shrooms sing for you, look at the words in yellow for directions to the maze.
Back up. Enter tangled hedge maze.
Tangled Hedge Maze
Use the clues from the singing shrooms for directions to the maze, peeking at your journal for help.
Right
Right
Up
Left
Up
Collect the spore of the venerated toadstool.
Back up to the sacred grove.
Sacred Grove (third time)
Examine the stone basin.
Use the crystal vial on the basin.
You receive a vial of liquid mojo and torn boat blueprints.
Go over to the Wise One's hut.
Wise One's Hut (last time)
Give the Wise One the vial of liquid mojo (from the stone basin in the sacred grove) and spore of venerated toadstool (from tangled hedge maze).
You receive a potion of Goblin disguise.
Head out to the village square and into the underground lake pier.
Underground Lake Pier
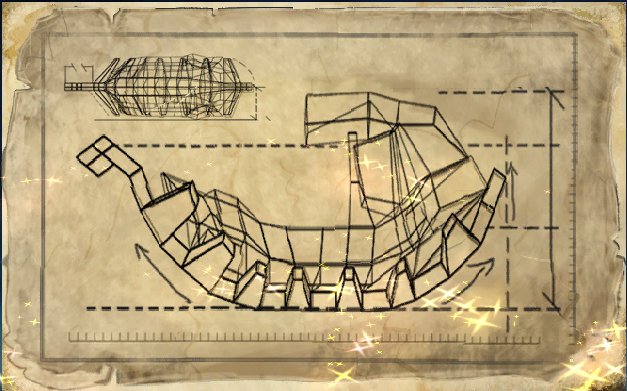
Use the torn blueprints on the boat.
Solve the jigsaw by clicking pieces to rotate and dragging them to place.
There are two layers to the puzzle. The top layer is sheer.
Use the screenshots below for reference. The first one is the bottom layer, the second the top.
Screenshot
Screenshot
Now solve the gnome boat tangram puzzle.
Use the screenshot below for help.
Screenshot
Click the boat to take the disguise potion and head back to the goblin kingdom.
Chapter 4 - Return to the Gobholme
GOAL: Getting into the town
Boathouse
Collect the moonflower nectar and delicious olives from under the docking frame.
Examine the fishing net.
Solve the fish pair clue match puzzle.
Use the clues to find the correct fish to click.
The clues are given randomly, so the clues below are unordered.
The clues and descriptions of the fish:
"Named for a beautiful insect, yet waterbound are we, we don't start out as caterpillars most fortunately!" - blue fish with antennae and fins like wings
"Flat like a plate, round like the moon, we're often called ugly with faces like ground bait." - large brown fish
"Striped in alternating bands of dark and bright, we see the world simply, in black and in white." - striped black and white fish
"Amber like dusk and dawn, with tapered tails and white faces. We're quite a sight!" - golden fish with skinny tails
"Bright and colorful, red, orange, green and blue, we're living rainbows with multiple hues!" - rainbow colored fish
"Small and silvery, grouped in schools, others call us smart but it's hard to be fools." - silver fish group
"We're never apart, so close as to be lovers, we blush as bright as cherry tarts!" - pairs of red fish
You receive rainbow scales for your efforts.
Examine the wheelie bag.
Solve the wheelie bag combo puzzle by clicking the unique buttons.
The buttons that are not unique have four or five duplicates, so they should be easier to spot.
Use the screenshot below if you're having trouble.
Screenshot
Open bag and collect wheelie bag caster.
Use the caster on the bag.
Move the bag and collect the moonflower nectars on the floor and above the wooden shelves.
Examine the wooden shelves.
Solve the hidden-object puzzle.
There is a lot of item and environment manipulation involved to complete the list.
Use the screenshot below if you're having trouble.
The correct areas for items are colorcoded as best as possible (green is visible items, yellow show items needed manipulation, the rest are colored for their cabinet doors).
Screenshot
You receive spectacle frames for your efforts.
Examine the ragged curtains.
Read the handwritten note.
Collect the rag cloth.
Back up. Move the wheelie bag.
Examine the docking frame.
Solve the match 3 puzzle to clear the grime off the surface.
Now use the rag cloth to finish the job.
Set down the spectacle frames (from the wooden shelves).
Use the rainbow scales (from the fishing net).
Solve the jigsaw by clicking to rotate and dragging into place.
Use the edges of the pieces (ragged/smooth) to help you determine which side.
You receive prismatic glasses for your efforts.
Examine the salt-encrusted wooden door.
Use the prismatic glasses (assembled at docking frame) on the door.
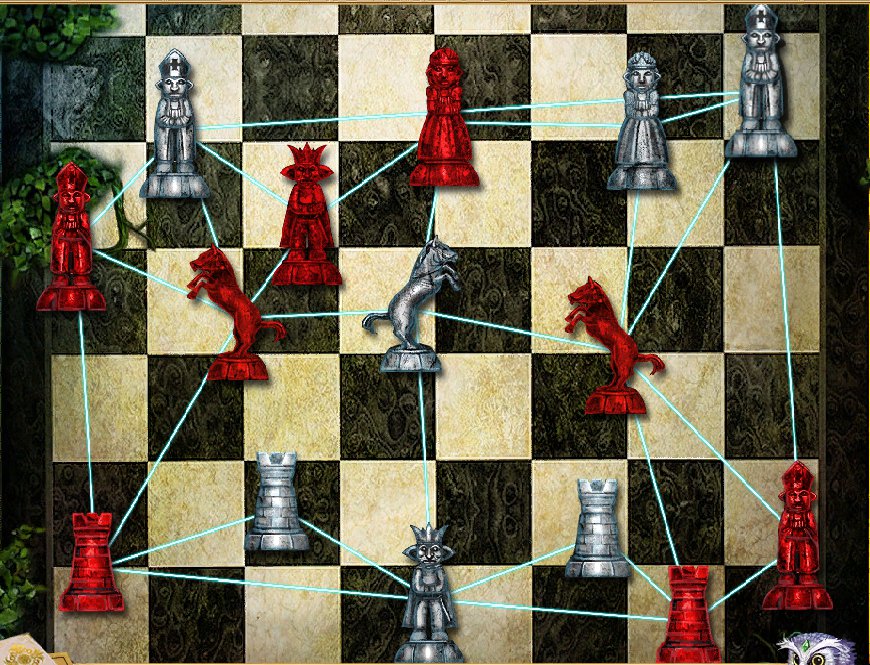
Solve the untangling puzzle by dragging the pieces until all the links are blue.
This works just like the chess piece puzzle from the shrines to the Oracle.
The symbols are randomized, but you can use the screenshots below as a starting point.
Screenshot
Screenshot
Screenshot
Head out to the town square.
GOAL: Getting into the palace
Town Square
Go to the palace grounds and speak with a palace guard.
They won't let you in unless you're disguised, so go back to the town square.
Enter the Heave 'n Ho! tavern.
Heave 'n Ho! Tavern
Collect the moonflower nectar and delicious olives.
Head back outside.
Town Square (again)
Speak to the mysterious peddler.
Follow him into the dark alley.
Dark Alley
Try to speak to the mysterious peddler again.
Back up and collect the moonflower nectar.
Look at the loose wooden panel and collect the delicious olives.
Examine the wooden pallets.
Examine the secure container and solve the tile puzzle.
Click the tiles to rotate them; click another tile to swap.
As you correctly place tiles, the tabs on the sides will open up.
Use the screenshot below as a reference if you need help.
Screenshot
Collect the moonflower necter.
Head back out into the town square.
Town Square (third time)
The merchants are finally open! Examine the refreshment stand.
Give him the delicious olives. The location of the olives:
The boathouse, under the docking frame.
The tavern, on the bar.
The dark alley, in the loose wooden panel.
Solve the hidden-object puzzle. Use the screenshot below if you need help, area of manipulation are boxed in yellow.
Screenshot
For help with the tankard boxed in pink, use the screenshot below.
Screenshot
You receive two Bolgins for your efforts.
Examine the souvenir stand.
Solve the odd-one-out puzzle by clicking the different item.
Edging detail (or lack thereof) is what often separates these items.
You receive two bolgins for your efforts.
Examine the fruit stand.
Solve the berry pair puzzle by clicking each pair of berries, then clicking the lone berry at the end.
Receive a Bolgin for your efforts.
Examine the shipwright's stand.
Solve the float tangram puzzle. Use the screenshot below if you're having trouble.
Screenshot
Receive heavy duty chains for your efforts.
Speak to the stonemason.
Give him the chains (from the shipwright).
Solve the timing puzzle by clicking the crank when both meters read green.
Receive two more Bolgins for your efforts.
Re-enter the tavern.
Heave 'n Ho! Tavern (again)
Speak to the Goblin bartender.
Solve the cellar maze puzzle by correctly navigating the way to the end.
The color of the torches straight ahead indicate the correct direction to go.
If the torches burn blue, you've gone the wrong way and must head backwards to the exit.
It takes some trial and error, but there is a pattern to the madness.
The torches run red, yellow and green indicating left, straight and right, respectively (like a traffic light).
Collect the cask of Alex's Finest 100-year special.
Back up. Give the cask to the bartender.
You receive a Bolgin for your efforts.
Head back to the dark alley.
Dark Alley (again)
Speak to the peddler and purchase the sap of sleeping poppy. The location of the Bolgins:
2x from refreshment stand.
2x from souvenir stand.
1x from fruit vendor.
2x from stonemason.
1x from bartender, for fetching flask from cellar.
The peddler tells you how to acquire a clipped coin and to search behind the throne, once you make it in the palace.
Go back up into the tavern.
Heave 'n Ho! Tavern (third time)
Use the clipped coin on the shifty goblins.
Examine the cocktail bar.
Collect the moonflower nectar.
Fill the empty nectar bottle. The location of the moonflower nectars:
The boathouse, under the docking frame.
The boathouse, under the wheelie bag.
The boathouse, on the wooden shelves.
The tavern, on the bar.
The dark alley, by the stairs.
The dark alley, in the secure container on the wooden pallet.
The tavern, behind the bar.
Solve the object match puzzle by clicking the cocktail mix below and picking the correct bottle above. Use the recipe book to give you the correct cocktail mix/bottle pairing.
You receive unmixed cocktail for your efforts.
Pour the unmixed cocktail into the cocktail mixer and shake.
You receive a moonrock cocktail shooter for your efforts.
Pour the cocktail into the empty glass.
Add the sap of sleeping poppy (from the mysterious peddler in the dark alley).
Once the guard is passed out and drug into the dark alley, steal his clothes and head to the palace grounds.
Palace Grounds
Speak to a palace guard.
Answer the security questions.
These questions are about details from the game so far. The answers to the questions:
Leodici
Xim
Venerated Toadstool
The Oracle
Grimble
Enter the palace.
GOAL: Overthrowing Grimble
The Palace
Look behind the Goblin king's throne.
Use the pocket dragon on the wooden panel.
Collect the Goblin blueprints.
Solve the tangram puzzle.
Use the screenshot below if you're having trouble.
Screenshot
Hold off Grimble's attacks by solving the match 3/link puzzle.
This puzzle work like a match 3, but instead of clicking a set, you drag your mouse across them.
A set can include pieces connected diagonally.
Despite the rushed nature of the storyline, there is no time limit.
Change the color of the background at each position for three boards, each time gaining an additional symbol with which to deal.
Congratulations! You've beat the game!!!
Epilogue - Homecoming
GOAL: Getting across the gorge
Train Station
Examine the locker 1.
Solve the odd-one-out puzzle. There are slight differences to the shapes.
Collect the bronze key.
Examine the train station gate.
Use the bronze key (from locker 1) on the keyhole and turn.
Exit to the border crossing.
Border Crossing
Examine the checkpoint building.
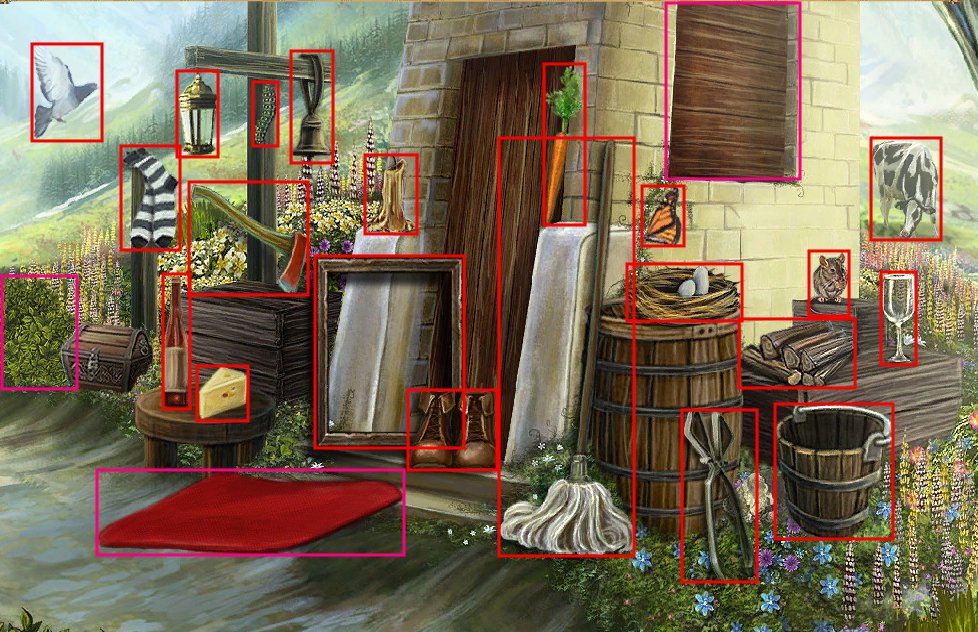
Solve the related pair match puzzle.
There are 12 pairs. Use the screenshot and pair list below if you're having trouble. Areas of manipulation are boxed in pink.
Screenshot
Pair listing:
Bird : nest
Socks : shoes
Wine bottle : wine glass
Cheese : mouse
Axe : firewood
Lamp : candle
Cowbell : cow
Picture frame : picture
Carrot : bunny
Mop : bucket
Caterpillar : butterfly
Fireplace tongs : fireplace poker
You receive a fireplace poker for your efforts.
Head off to the overgrown path.
Overgrown Path
Examine the scarecrow.
Collect the broom.
Open his pouch and collect sewing kit.
Use the poker on the hat and receive a keyring.
Move on the into the gorge.
Gorge
Collect the headless shovel.
Examine the elemental altar. Collect the screwdriver.
Back up. Return to the border crossing.
Border Crossing (again)
Examine the checkpoint building.
Use the keyring on the doorknob and turn key.
Collect the slingshot.
Look through the tourist guidebook.
Click the paper taped inside to make note of it in your journal.
Back up.
Examine the turnpike.
Use the screwdriver on the screws.
Collect the turnpike.
Go on to the bridge.
Bridge
Collect the shovel head and length of rope.
Examine the loose mortar.
Use the shovel on the loose mortar.
Solve the nutcracker puzzle by clicking two body parts to swap.
Use the sketches at bottom to help correctly swap the body parts.
The left/right arms and feet swap out separately but are matched to the other side.
Use the screenshot below if you need help.
Screenshot
Collect the fold of silk.
Head back and out to the overgrown path.
Overgrown path (again)
Use the slingshot on the pile of rocks.
Use the loaded slingshot on the magpie nest.
Examine the fallen nest.
Move leaves around to reveal what's underneath.
Collect the crystal fragment and locker keycard.
Go back to the train station.
Train Station (again)
Examine locker 29.
Use the keycard on the locker.
Solve the numerical key code by clicking the set of five buttons until they have the correct number of dots.
Look at the scrap of paper for a clue in how to decipher the colors. Each color represents a number.
Color-number correlations:
Red=1
Purple=5
Yellow=4
Blue=3
Green=2
Add the numbers from the combos above each button to get the correct number of dots. Combination answer:
10, 7, 12, 4, 16
Collect the crystal fragment and make note of treasure map.
Use the broom on the dirty floor.
Open the loose floor panels.
Examine the trapdoor.
Use the turnpike on the trapdoor.
Use the length of rope on the trapdoor.
Climb down.
Find the oil lamp and use the pocket dragon on the it.
Collect the hemp sack and wooden bucket.
Examine the sacks of grain.
Use the shovel on the sacks of grain.
Collect the crystal fragment.
Head back up.
Go out and over to the overgrown path.
Overgrown Path (third time)
Use the shovel on the buried treasure. Collect the dirty lump.
Back up. Return to the border crossing.
Border Crossing (third time)
Examine the checkpoint building.
Examine the folding fan.
Use the fold of silk (from the loose mortar on the bridge) on the fan.
Solve the fan jigsaw puzzle.
Use the screenshot below for help.
Screenshot
Use the sewing kit (from the bag of the scarecrow in overgrown path) on the fan and solve the sewing puzzle.
You get the folding fan for your efforts.
Collect the crystal fragment.
Examine the dried out fountain.
Solve the hidden-object puzzle. Use the screenshot below if you need help. Areas of manipulation are boxed in blue.
Screenshot
You receive water pipes for your efforts.
Use the water pipes on the dried out fountain.
Solve the connection puzzle. Use the screenshots below if you're having trouble.
Screenshot
Screenshot
Use the wooden bucket (from trapdoor in train station) on the fountain.
Use the dirty lump (from the buried treasure in the overgrown path) on the bucket and collect crystal fragment.
Dump out the water and refill the bucket.
Go to the overgrown path.
Overgrown Path (third time)
Examine the buried treasure.
Use the hemp sack (from the trapdoor in the train station) on the mound of dirt for a sack with soil.
Move on the to the gorge.
Gorge (again)
Examine the elemental altar.
Use the pocket dragon on the fire altar.
Use the bucket of water (from the fountain at the border crossing) on the water altar.
Use the sack of soil (from the buried treasure in the overgrown path) on the earth altar.
Use the folding fan (from the checkpoint building in the border crossing) on the air altar.
Cross the bridge into the hamlet and enter the weathered lodge.
GOAL: Catching a ride on the a unicorn
Weathered Lodge
Speak to the old caretaker.
Solve the goblinjong puzzles by clicking matching tiles to eliminate them.
This puzzle works basically like mahjong.
If you get stuck, you can reshuffle the tiles once or undo your last move.
The goal is to find the pair of key tiles.
Cecil gives you a crystal fragment.
Examine the silver box.
Use the crystal fragments on the silver box. Location of fragments:
The overgrown path, in the fallen nest.
The train station, in locker 29.
The train station, in the sacks of grain down the trapdoor.
The border crossing, in the checkpoint building under the folding fan.
The border crossing, from the washed off dirty lump.
The weathered lodge, from Cecil.
Solve the unicorn jigsaw puzzle.
Collect the unicorn horn.
Look at the painting on the right to make note of it in your journal.
Go back outside and to the stables.
Stables
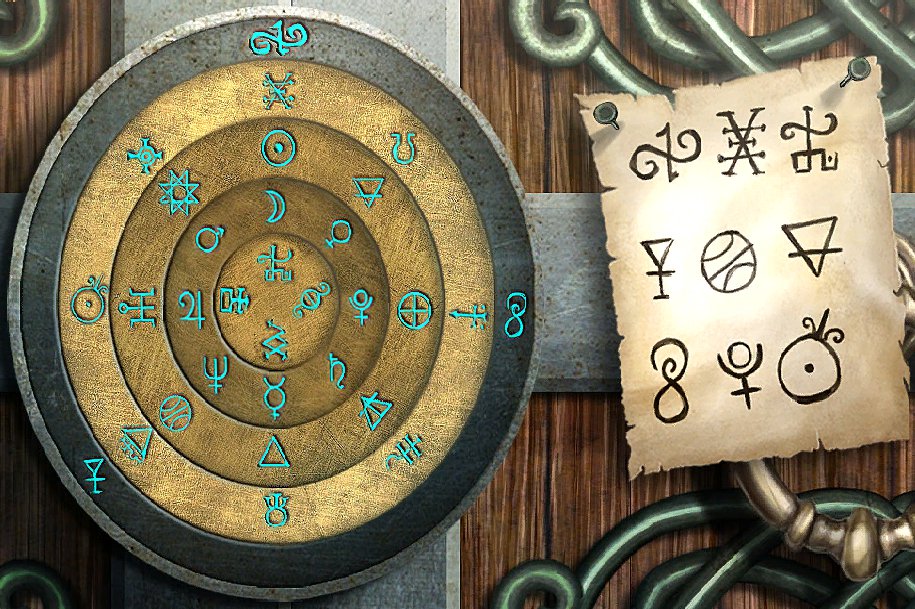
Solve the door code by dragging each circle around to get the right combinations.
On the painting, each of the rows of three symbols shows you which ones should line up through the center.
The symbols on the painting are not necessarily right next to each other on the lock.
Use the screenshot below if you're having trouble.
Screenshot
Enter the stables.
Collect the pitchfork.
Pull the tarp to reveal stone statue.
Examine the statue.
The unicorn statue is missing a horn, so use the unicorn horn (from the silver box in the weathered lodge).
The unicorn comes to life, and you receive a smithy key.
Examine the feed trough. Collect the pressed iron plate.
Back up. Look at door to the blacksmithy.
Use the smithy key (from the unicorn) on the door handle and turn it.
Enter the blacksmithy.
Blacksmithy
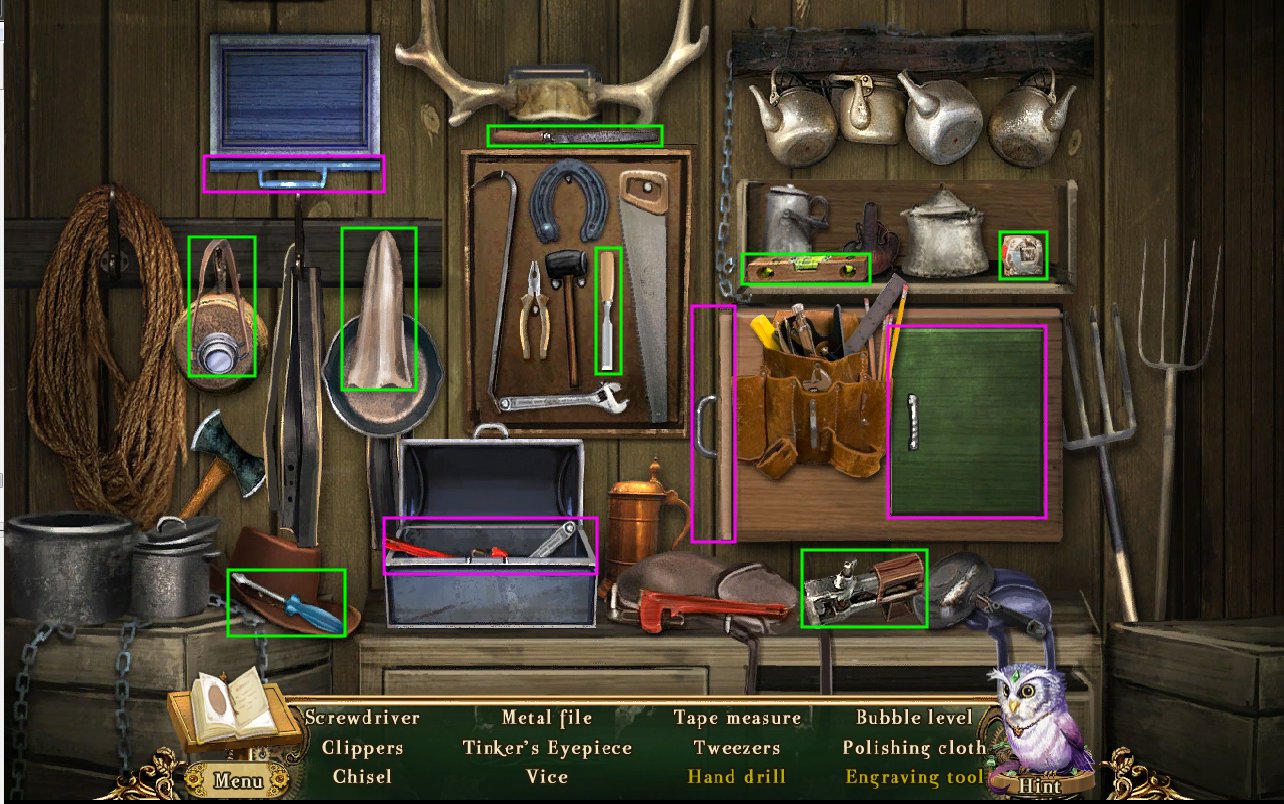
Examine the tool rack.
Solve the tool rack shadow hidden-object puzzle. Use the screenshot below for help.
Screenshot
You receive a bolt cutter for your efforts.
Head back out to the hamlet and approach the tinker's shed.
Tinker's Shed
Use the bolt cutter (from the tool rack in the smithy) on the shed doors.
Enter the tinker's shed.
Solve the shed hidden-object puzzle.
Use the screenshot below for help.
Screenshot
You receive tinker's tools for your efforts.
Go back over to the blacksmithy.
Blacksmithy (again)
Examine the anvil.
Use the pressed iron plate (from the feed trough in stables) on the anvil.
Use the pocket dragon on the iron plate and follow the outline to melt it.
You receive a rough iron key for your efforts.
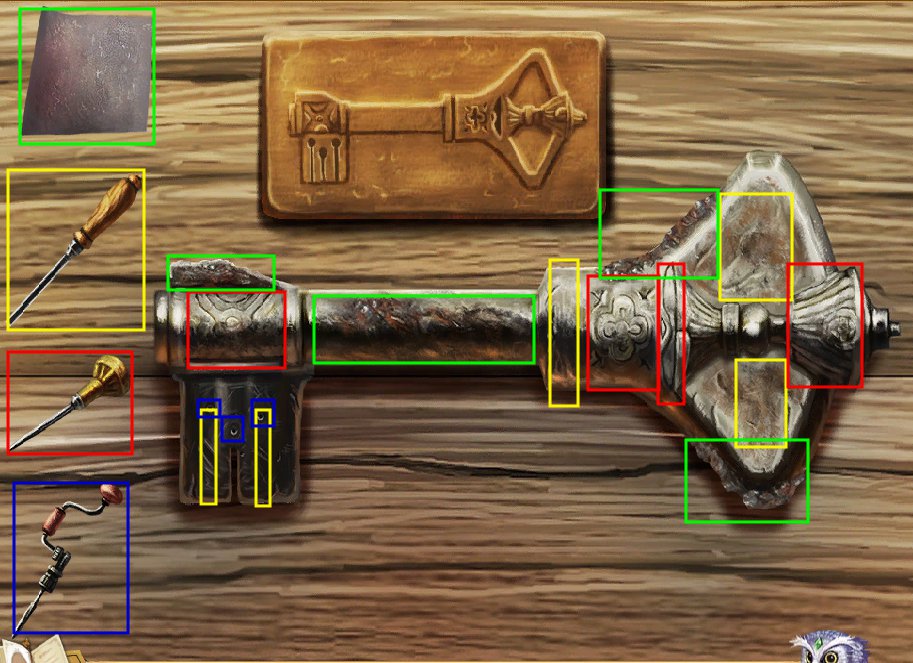
Examine the tool bench.
Use the rough iron key (from anvil after melting pressed iron plate) and tinker's tool (from tinker's shed) on the bench.
Solve the tool puzzle by using the correct tool on the correct part of the key to make it match the drawing above it. Use the screenshot below if you're having trouble.
Screenshot
You now finally have the iron key!
Head back outside and to the feed silo.
Feed Silo
Use the iron key (from tool bench in blacksmithy) on the silo doors.
Enter the feed silo.
Use the pitchfork on the iridescent haystack and put it in the empty hay sack until the hay is gone.
Collect the ebony crest and sack of iridescent hay.
Return to the weathered lodge.
Weathered Lodge (again)
Examine the grooming kit display.
Use the ebony crest (from under iridescent hay in feed silo) on the locked display case.
Solve the dial puzzle by clicking the dials around the crest to get the picture to line up.
The picture starts out in a randomized position, so there is no single answer.
To start out with, you should turn each dial to find out what parts it affects.
Working outside in may be the easiest strategy.
Collect the diamond key and grooming kit.
Head back to the stables.
Stables (again)
Examine the tackle rack.
Use the diamond key (from the grooming kit display in the weathered lodge) on the tackle rack.
Turn key and collect unicorn tackle.
Pull the lever down.
Examine the feed trough
Use the sack of iridescent hay (from feed silo) on the trough.
Use the grooming kit (from grooming kit display in weathered lodge on the unicorn.
Solve the tool use puzzle by using the correct tool on the correct part of the unicorn.
Using the wrong tool on the an area may undo any work you've done to it.
Some tools need to be used in a certain order.
Use the screenshot below if you need help.
Screenshot
Use the unicorn tackle on the unicorn.
Head back to the weathered lodge to talk to Cecil.
Weatered Lodge (last time)
Speak to the old caretaker.
Head back to the bridge by the border crossing.
Bridge (again)
Click the unicorn to ride him up into the sky.
Congratulations!! You've beat the epilogue and completed the story!!!
Posted by: Kyh |
September 6, 2011 7:49 PM
|
September 6, 2011 7:49 PM