
![]()
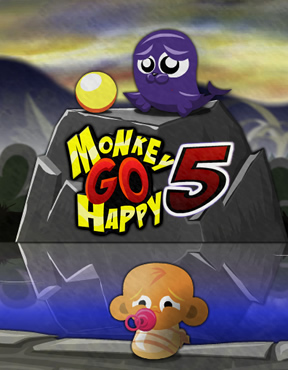 The monkeys of Pencil Kids' Monkey GO Happy series enjoy a symbiotic simian relationship with gamers: they sit around making pathetic faces in absurd puzzle scenarios, and gamers use their point-and-click skills to figure out how to make them happy, whereupon the monkeys gyrate around in merriment and hopefully bring a smile to the gamer.
The latest game, Monkey GO Happy 5, is rather short (only 15 levels plus a bonus) and on the easy side, with rather straightforward predicaments and a changing cursor to identify hotspots. The shooting mini-game has no time limit, so you can keep trying to shoot targets until you meet the goal. The series' quirky art and music are in great form, and like in previous installments, a new monkey character is introduced.
Play all the Monkey GO Happy games:
This game works perfectly as a silly start to your morning, a quick coffee break, or a last wind-down when you're too tired to brain any longer.


Walkthrough Guide
(Please allow page to fully load for spoiler tags to be functional.)
Monkey Go Happy 5 Walkthrough
Stage 1
Click the green twig sticking out of the side of the palm tree to remove it.
Place the green twig in the pile of chicken feed.
Click the chicken to lure over the alligator.
Stage 2
Pick up the crowbar on the ground behind the monkey.
Use the crowbar to open the box of dynamite.
Take a stick of dynamite from the opened crate and light in on the burning torch.
Place the torch in the rock wall at the right side of the scene.
Stage 3
Click the glass jar of gumballs to knock it to the ground.
Flip the red switch to turn on the light in the side room.
Click the corner of the safe in the middle of the doorway to the left to move the safe into the room.
Click the lock in the center of the safe to zoom in.
Count the number of purple gumballs, yellow gumballs, and red gumballs to find the combination.
8 purple - 3 yellow - 6 red
Pick up the record inside the safe, then place it on the record player.
Turn the handle at the side of the gramophone to play the music.
Stage 4
Drop the painting to distract the painter.
While he's busy, click the black bag to throw it over the wall.
Pick up the paint brush on the ground, then use it on the palette to coat it with paint.
Use the paintbrush on the painting to add some "artistic license".
Stage 5
Open the door to the magnet shop.
Remove the three boxes to reveal the Magnet.
Open the trunk at the back of the car.
Take the Rope from the trunk and it will automatically combine with your Magnet.
Use the Rope And Magnet on the grate in the road to pull out the Car Key.
Give the Car Key to the man standing beside the car.
Stage 6
Move the tall cabinet aside to find the hidden switch.
Flip the switch to reveal a secret doorway.
Take the Key from the floor at the doorway.
Use the Key to open the cupboard under the window.
Pick up the Balloon inside the cupboard.
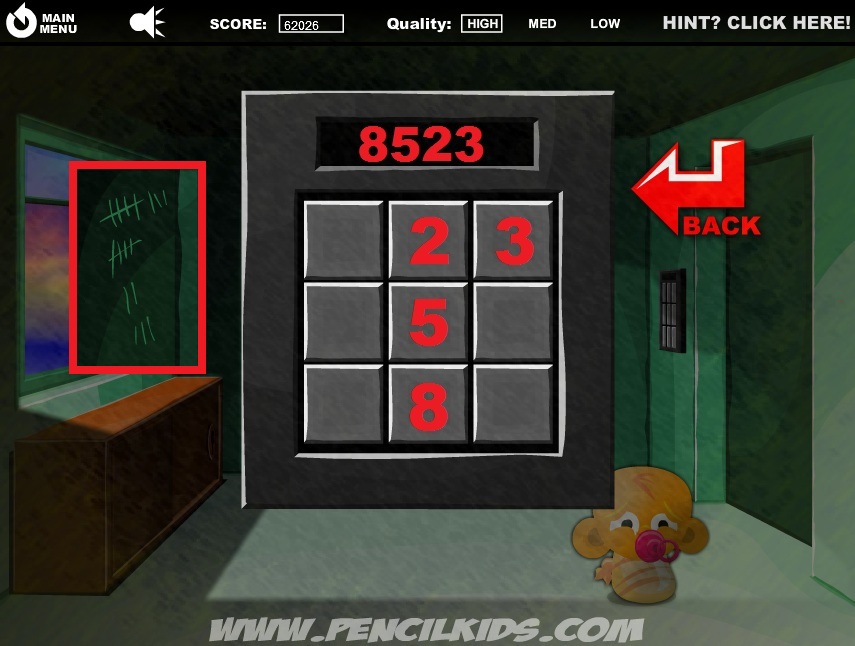
Click the electric lock at the side of the right door to zoom in.
Going from top to bottom, count the number of scratches on the wall behind the secret doorway to find the combination.
8 - 5 - 2 - 3
To enter in the combination, press the buttons on the lock in the same order you would find them on a number pad (like on a keyboard).
Screenshot.
Click the pump behind the right doorway to move it to the middle of the room.
Attach the Balloon to the hose at the end of the pump.
Click the pump once to fill the balloon, then click the balloon to detach it.
Stage 7
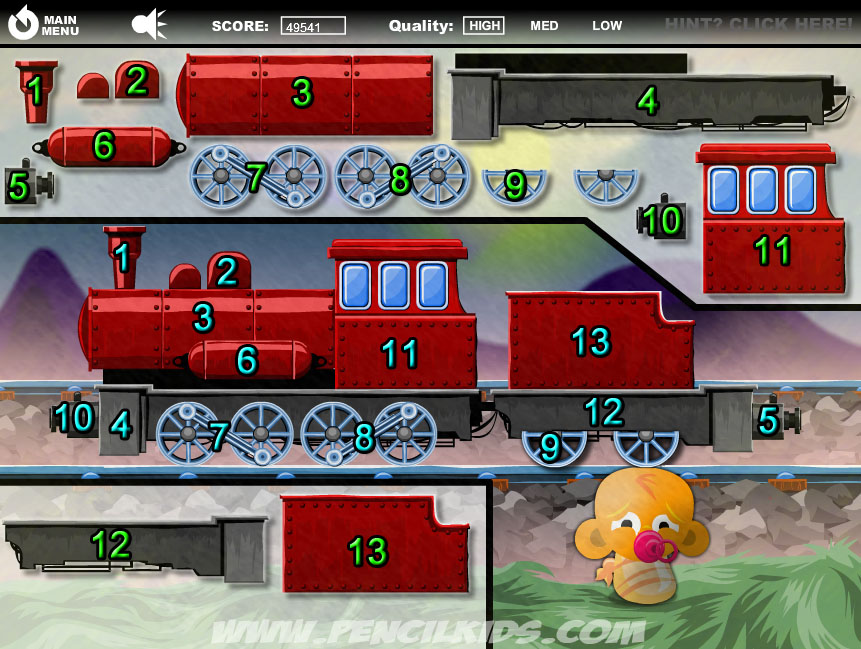
Place all of the pieces of the train into the correct positions inside the silhouette on the tracks.
Screenshot.
Stage 8
Click the button panel at the left side of the truck to zoom in.
The top button raises and lowers the upper ramp and the bottom button raises and lowers the lower ramp.
Push the bottom button once to lower the ramp.
Click the blue car to drive it onto the bottom platform of the truck.
Repeat the process two more times until the bottom platform has 3 blue cars on it.
This time, press the top button to lower the top ramp.
Move the next two blue cars to the top platform of the truck.
Finally, press both red buttons to raise the ramps so the truck can drive away.
Stage 9
Find the four crab-shaped dials, then place them on the four sockets in the middle of the left and right columns.
The first crab is on the ground in the shadowy area at the bottom left corner of the scene.
The second crab is behind the lower right corner of the left fence.
The third crab is at the foot of the right gargoyle.
The fourth crab is at the bottom of the right column.
Screenshot.
Turn the crabs to face the opposite direction of the arrows in the middle of the left and right fence.
The upper crab on the left column should face to the left.
The lower crab on the left column should face down.
The upper crab on the right column should face right.
The lower crab on the right column should face left.
Screenshot.
Stage 10
Move the right can on the middle shelf to find the key.
Use the key to open the left door.
Click the second knob from the left on the rack above the television to reveal a second hidden door behind the first doorway.
Pick up the tape on the floor in the doorway, then insert it into the tape player.
Press the red button on the television screen to turn it on.
Push the Play button (the left button with the triangle icon) on the tape player to start the game.
Click the big red button to play the minigame.
Press the big red button any time you want your character to turn right.
Navigate your character to pick up the key and exit the room without hitting any of the walls.
Stage 11
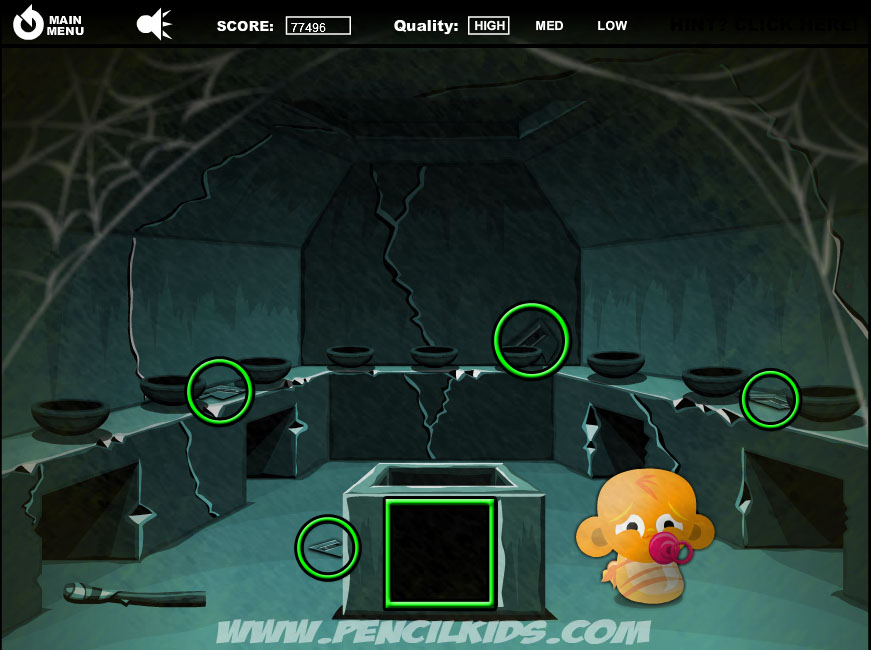
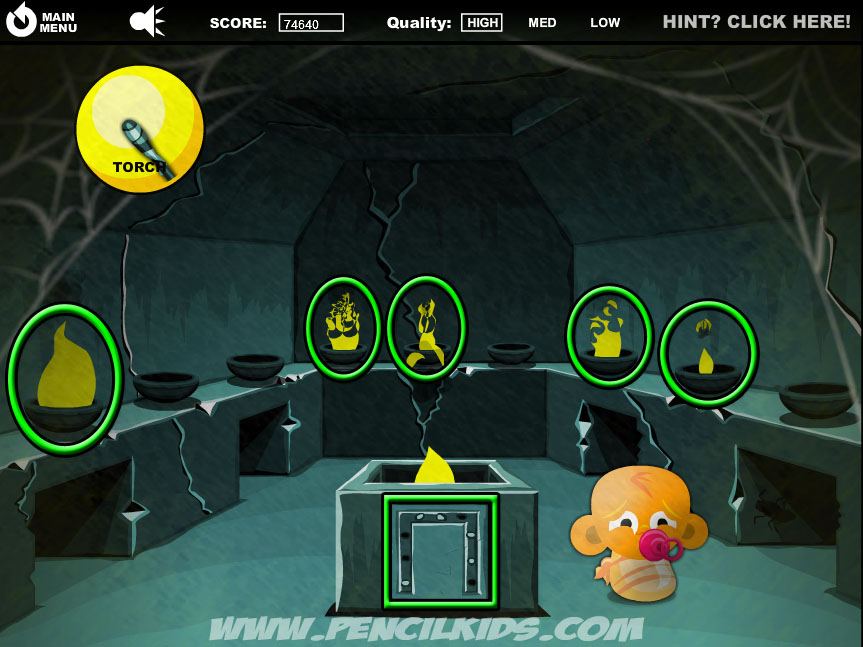
Pick up the Torch that's lying on the ground.
Find all four pieces of the mosaic.
Screenshot.
Place the mosaic pieces into the square at the front of the altar in the middle of the room to start the fire.
Light the Torch on the fire, then use the torch to put the fire in the bowls.
Refer to the image on the mosaic to find which of the bowls need to be lit.
A white dot represents a lit bowl and a black dot represents an unlit bowl.
Screenshot.
Try to light the fires as quickly as possible, or they will burn out after a short time.
Stage 12
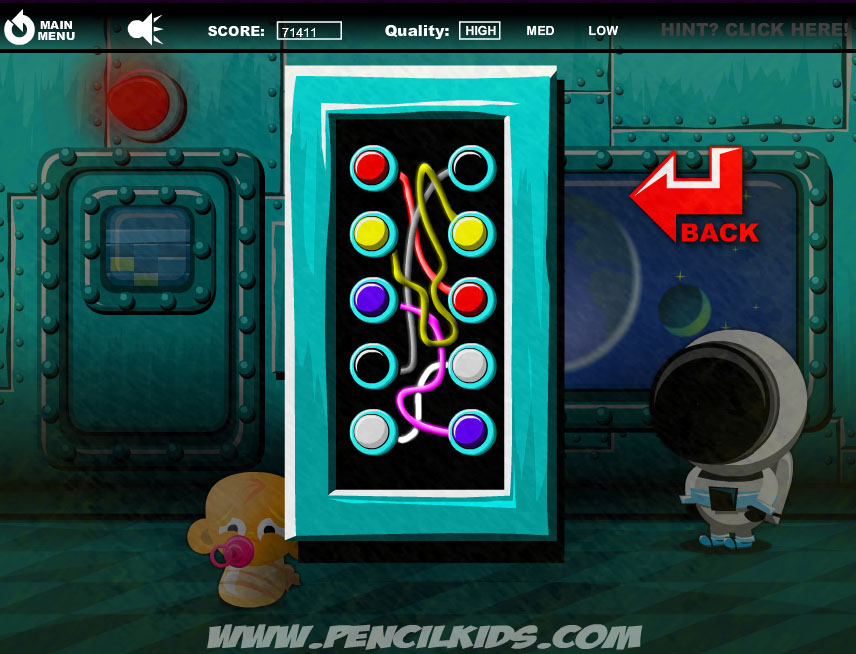
Pick up the screwdriver at the bottom of the window.
Use the screwdriver to open the panel beside the door.
Click the uncovered wire panel to zoom in.
Change the colors of each button on the right side to match the color of the left button it is connected to by the wires.
From top to bottom the order is: Black, Yellow, Red, White, Purple.
Screenshot.
Click the astronaut to send him through the open door.
Click the green light to close the door.
Stage 13
Pick up the net on the ground near the lower right corner of the scene.
Use the net on the water four times to find a key.
Use the key to open the lock on the outhouse.
Take the bucket of fish from the outhouse, then feed the fish to the seal.
Click the ball to give it to the seal.
Stage 14
Drop the jug on the fence post to reveal a key.
Use the key to open the locked door to the house and reveal the broom.
Take the broom from the opened doorway and give it to the woman.
Take the sheet hanging from the clothes line, then put it in the chimney to make it black.
Give the black rag to the old woman to make it into a cape.
Open the window at the top of the house to reveal the hat.
Take the hat at the opened window and give it to the old woman to complete the witch outfit.
Stage 15
Pick up the gun, then click the target in the center of the screen to start the shooting game.
Level 1: Shoot 5 targets in the windows to beat the level.
Level 2: Shoot all of the moving targets; don't worry if you miss a target the first time, they will come back around again.
Level 3: Wait for the bulb above the target to light up, then shoot the target.
Level 4: Shoot 6 targets falling from parachutes.
Level 5: Shoot the yellow targets but do not shoot the blue targets.
Stage 16 (Final Stage)
"You have 240 seconds to pick up as many bananas as you can. Each banana picked adds 100 points to your final score."
Knock over the flower pot to find the key.
Use the key to open the left door.
Take the blue gem on the floor in the left building.
Put the blue gem in the empty socket on the outer left side of the base of the statue.
Open the window to the chapel to find the Cloth.
Place the cloth inside the barrel.
Open the lower window in the left building to find the candle.
Open the upper window int he left building to find the green gem.
Put the green gem in the empty socket on the outer right side of the base of the statue.
Use the candle from your inventory on the burning candle inside the hanging lantern.
Use the lit candle on the rag inside the barrel to explode the wall in the left building.
Take the lockpick from the hole in the wall.
Use the lockpick to open the door to the right building.
Place the lit candle inside the dark doorway of the right building to light the room.
Take the red gem on the floor inside the right building.
Put the red gem in the empty socket on the inner left side of the base of the statue.
Open the cabinet in the right building to find the knocker.
Place the knocker on the door to the chapel.
Take the yellow gem at the top of the opened chapel door.
Put the yellow gem in the empty socket on the inner right side of the base of the statue.
Take the banana ornament on the ground in the right building.
Put the banana ornament in the monkey statue's hand to lower the platform.
When the platform raises back up, it will show different sized bells in order from left to right: big, medium, small, small, medium, big.
Click the chapel bells in the order shown on the platform to reveal the mine cart.
Find and collect any remaining bananas to complete the stage.
Posted by: Trinn |
April 30, 2012 4:41 AM
|
April 30, 2012 4:41 AM