

![]() Ever wake up and say "I need some adventure in my life?" or "What I really need is to drive myself insane looking for cunningly hidden object pieces in ridiculously picturesque settings." It's ok, you can admit those kinds of things here, and Magic Encyclopedia: Moon Light will fill that "magical journey sprawling over five continents" adventure/hidden object gap you've been looking to fill.
Ever wake up and say "I need some adventure in my life?" or "What I really need is to drive myself insane looking for cunningly hidden object pieces in ridiculously picturesque settings." It's ok, you can admit those kinds of things here, and Magic Encyclopedia: Moon Light will fill that "magical journey sprawling over five continents" adventure/hidden object gap you've been looking to fill.
 Developed by Alawar and Vendel Games, Magic Encyclopedia: Moon Light is the sequel to Magic Encyclopedia which put you in the shoes of a young magic student, Katrina, running all over the globe in search of her brother. Moon Light features a slightly older Katrina who is still a student at the Magic Academy. Now, however, she's drowning in homework and plagued by terrible nightmares. Salvation arrives when an origami messenger crane brings news that your professor has disappeared and your brother is hot on his trail. Katrina must make a momentous decision: homework... global adventure... homework... who are you kidding? Get moving!
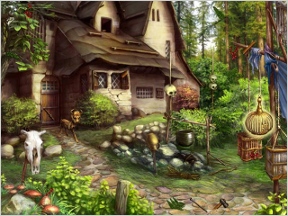
Essentially a hidden object game with adventure elements, Magic Encyclopedia: Moon Light takes you from a Mayan temple to a Russian cottage, from a German castle to a Pearl Diver's hut in the South Pacific. The messenger crane comes along for the ride, giving a quick tutorial in the game's dynamics and leading the player to each scene as the story unfolds. The premise is simple: in each scene there are certain objects that need to be found. However, like Flux Family Secrets, the objects are broken into pieces, which can make gameplay a little tricky. Once assembled, items can be used in scenes to unlock more items or unlock some surprisingly tough mini-games. And don't forget to collect the jewels to activate the professor's amulet!
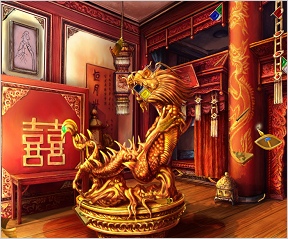
Navigation through the scenes is quick and easy, quite an improvement over the original game. Each area can have up to four different locations with scenes that are interconnected. This means you'll need to move back and forth to amass all object pieces to complete a section. Despite this complexity, none of the sections involve more than two separate locations, allowing the player the choice of participating in small doses or devouring the game in one long marathon. Movement between connected areas is accomplished by clicking special coins in the control panel, allowing you to travel back and forth between a Chinese temple and a Mongolian Yurt with ease. Cursor changes indicate areas that need a closer look (eye), mini puzzles (question mark), things to take (hand), things that need manipulation (hammer), and doorways to other rooms (animated legs). When encountering something new the friendly messenger crane appears to give helpful advice.
 Analysis: Sequels can be worrisome. Things that are minor annoyances the first time around can become major aggravations if allowed to continue. No such problems here! Gone are the slow load times and slamming doors between scenes that plagued Magic Encyclopedia. Gone also is the clumsy and annoying "search for (blank)" to acquire more hints. Hints are on a refilling timer, and a timer to skip the mini-games is also a welcome addition. The mini-games themselves are less "I've seen that before" and lean more towards pure logic. Animations between the scenes run more quickly while imparting vital story information. One of the bright spots of this game is the method of dividing the adventure into stand-alone bite-sized chunks, making it perfect for casual gameplay.
Finding object pieces can be tricky, as its more difficult to find abstract shapes than specific items. There's very little of the standard "hiding pieces behind other things, having them lurk in dark corners, or burying them in tons of clutter" that characterize so many hidden object games. No, the object pieces lay boldly on top of the scene, blending in so cunningly that it will amaze you even as you move towards permanent eye-strain attempting to find them.
Let's pause for a moment and discuss the backgrounds themselves. Part of the charm of the first Magic Encyclopedia was the storybook-style hand-drawn scenery, making you feel as if you were wandering through a fairy tale. Instead of sticking to the same formula or jettisoning the concept altogether, Magic Encyclopedia: Moon Light kicks up the volume and takes it to dizzying new heights. Still lovingly hand-crafted with bright, bold colors, each scene is a work of art in its own right, tempting the player to simply gaze in wonder. If the first Magic Encyclopedia was like wandering through an enchanted book, Magic Encyclopedia: Moon Light is like floating through a surrealist work of art.
Magic Encyclopedia: Moon Light is a solid, satisfying, stunning addition to the adventure/hidden object genre. A beautiful game to get lost in!
![]() Windows:
Windows:
Download the demo
Get the full version
![]() Mac OS X:
Mac OS X:
Not available.
Try Boot Camp or Parallels or CrossOver Games.


Walkthrough Guide
(Please allow page to fully load for spoiler tags to be functional.)
Magic Encyclopedia 2: Moonlight - Walkthrough
General Tips
There is no time limit, you can play in your own pace.
Mini games also do not have a time limit
You do not look for complete objects but for parts of the objects.
An item you found all parts of goes automatically into your inventory.
You will use inventory items in the scene you are just in or in any other scene of the chapter.
You will not take an object with you into the next chapter.
Inventory items are used to activate mini games, perform actions, interact with other things to get other parts of objects or simply to open something.
Top right you will see one or two gold coins. These do show the different locations of the chapter.
The upper coins shows where you are right now.
By clicking the bottom coin, you can move to the other location.
You can also reach the location by using the map. To do so click the little crystal ball at the top right.
Place you did not finish yet, do not have a red flag on the map.
Each location will have one to three additional places you will have to go to.
You will recognize doors or entrances or arches by a green shining and walking feet at your cursor.
Not all place can be entered or are obviously at once.
There are five different symbols, you will see at your cursor during the game:
A hand: You open something, push or pull without another object is needed to perform the action.
A hammer: An inventory object is used to interact. That does not mean, that you already have to have this object. It is possible, that you will find it at another place or even the other location.
An eye: When you see an eye, just click. It will be bring you into a dark corner, under a chair or another place, you can't look at by normal looking.
Feet: There is another place to go. It does not mean, that you always can go there at once. Sometime you will have to do other things before being able to move on.
A question mark: You will have to do a mini game to get another object part or make something work.
Minigames can be skipped but not at once. You will have to wait till the button in the left button corner of the mini game window is activated.
It has no influence of the game if you skip a mini game or play it.
With the button in the top left corner of the minigame window you can reset the mini game to the original state.
A lot but not all mini games are random, so there is only an explanation possible, not a solution.
All mini games can be played from the menu after playing the once in the game.
In each scene you want also to find one or two gems.
They are not always easy to find and ofte do blend in with the item, there are hidden on.
At the end of the game you will need all gems, otherwise you will not be able to play the final scene.
During the main game, the hint does not show the locations of the gems.
If you do not find them all, you will have to go back to the places where you missed one or more. The places are shown on the map by blue flags.
You do not have to play the complete level again, simply look for the gems.
Now the hint will show you the gems.
The hint is endless and reloads very fast.
It shows hidden parts of object or shows you a place where you have to interact with an inventory item now.
In last case the tip will not show you, which inventory item you need to use.
If there is nothing to do in the scene anymore and you press the tip, it will tell you, that you will have to look something else now.
The tip is not used after this and can be used in the next location at once.
The walkthrough shows the order of moving, which seemed for us the most usefull way.
That does not mean, that this is the only right order.
You can choose to go to another location first or another place.
Please be just aware, that in this case things might not working out as described in the walkthrough and you might have to come back later.
The Walkthrough is in the most logical order.
Note: When there is more than one spoiler for a location you will find the screenshot with all items always in the first one
Chapter 1 Tutorial/Monastery
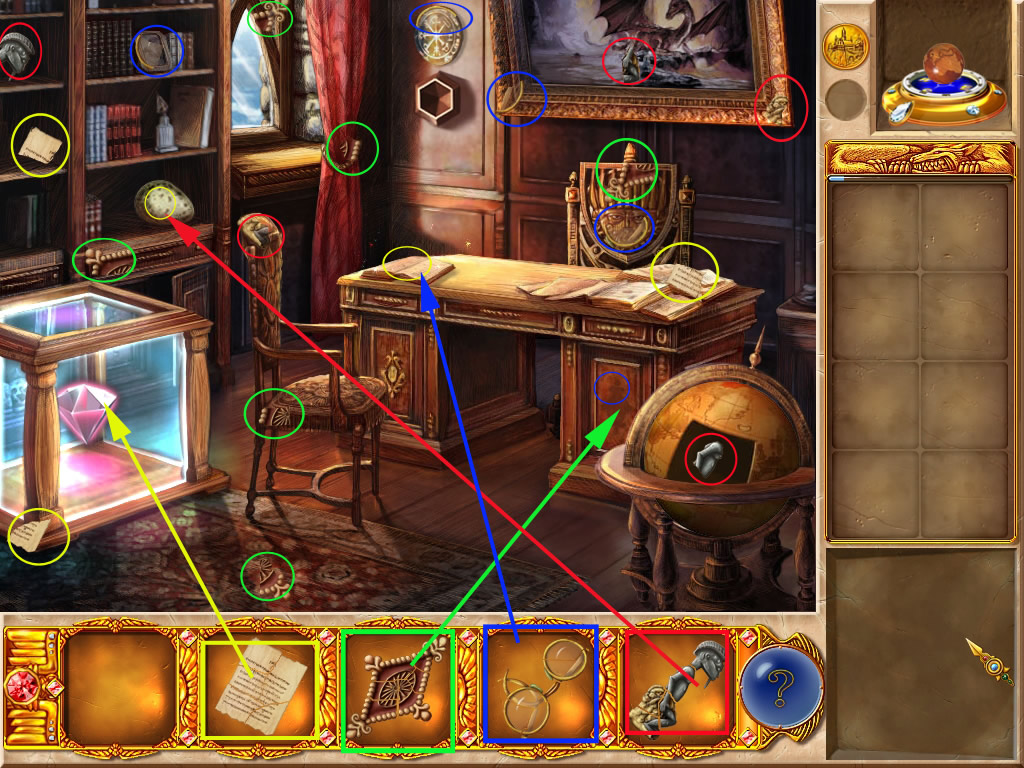
Magic Academy/Tutorial
Follow the tutorial and find all parts for your list
Use the statue to smash the dragon egg in the shelf left. It breaks and you will find a a part of a spell.
The ornament will take place that the right front side of the desk - a compartment opens and you will get a part of the glasses.
Place the glasses on the book, left side of the desk - you will receive the last part of the spell.
Place the spell at the glass cube lower left corner. The diamond inside the glass cube will automatically go into the free spot on the door right next to the window.
The painting right next to the door will move up - click do enter the next scene.
Screenshot
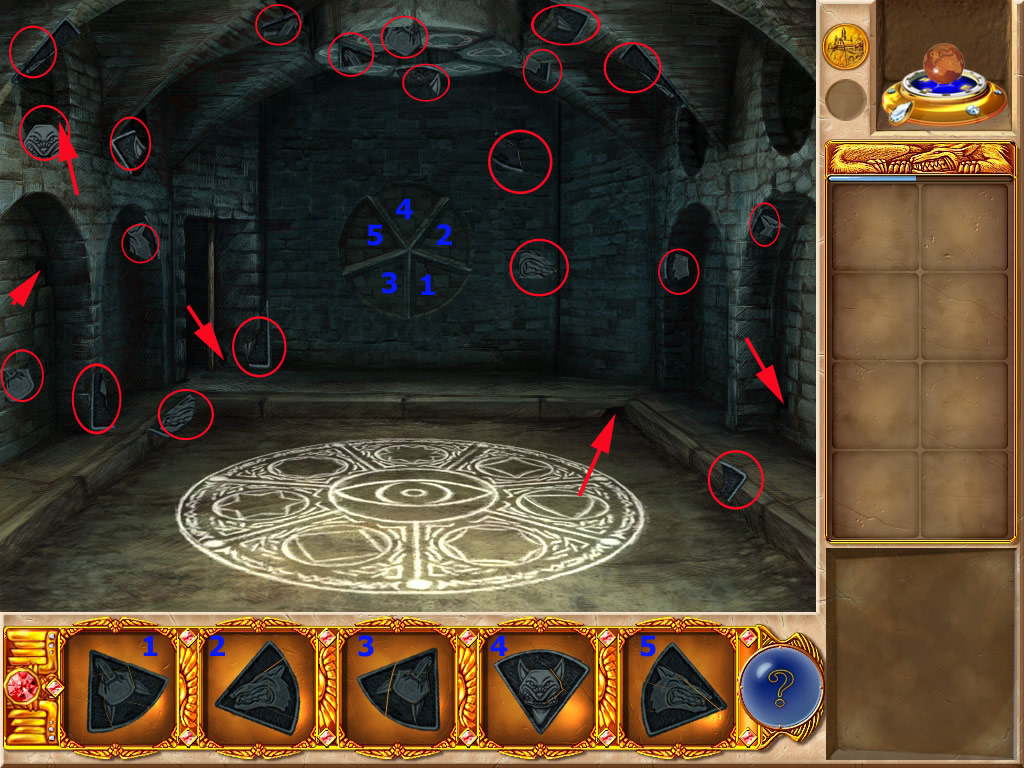
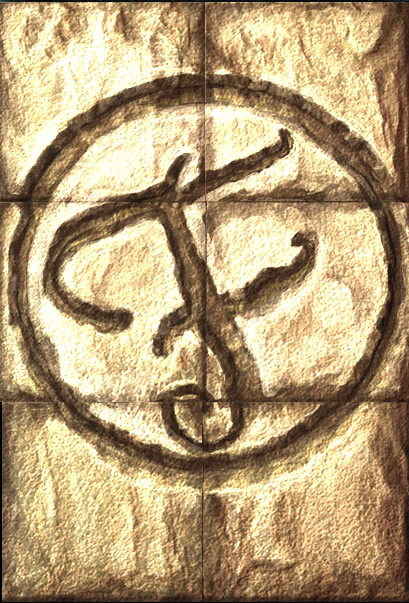
Tibet - Basement
Find the 25 parts of the medallion.
Screenshot
Place them at the back in the according slot and click the light spot, that is shown after.
A mini game opens. By clicking to parts, they will swap places.
Reassemble the picture.
Screenshot
Get the scroll and and use the map to move on to the Tibetan monastery.
Tibetan Monastery - outside
Look for the parts of your objects
The horn belongs at the chin of the upper face - the mouth opens and a part of the heart can be found.
The heart has to be used as clapper of the bell, left side - a part of the lei is falling down.
The statue belongs between the two others, left of the way - a part of the way opens and you will find another part for your list.
Place the lei at the statue right side.
Right of its pedestal a compartment opens.
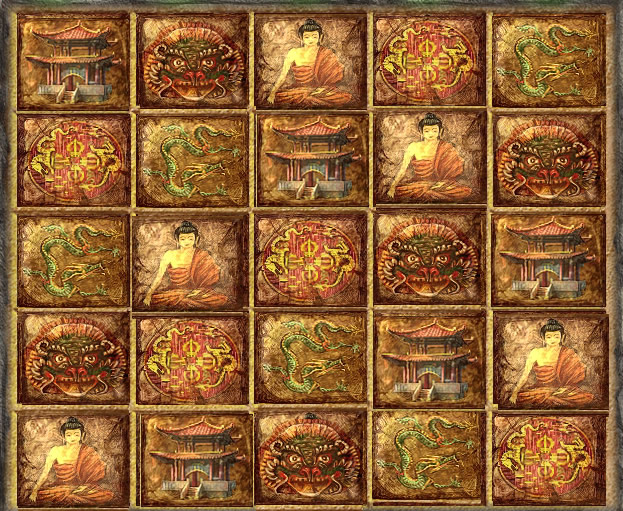
Click it again to access the mini game.
It is a sudoku with pictures.
By clicking a tile, the picture will change.
Its your goal to arrange the pictures, so that there will be not two of a kind in one row or one column.
A lot of solutions are possible, the screenshot shows an example.
Screenshot
You will be rewarded with a diamond.
The Tibetan symbol belongs on the roof, right side.
This will open the door and you can enter the monastery.
Screenshot
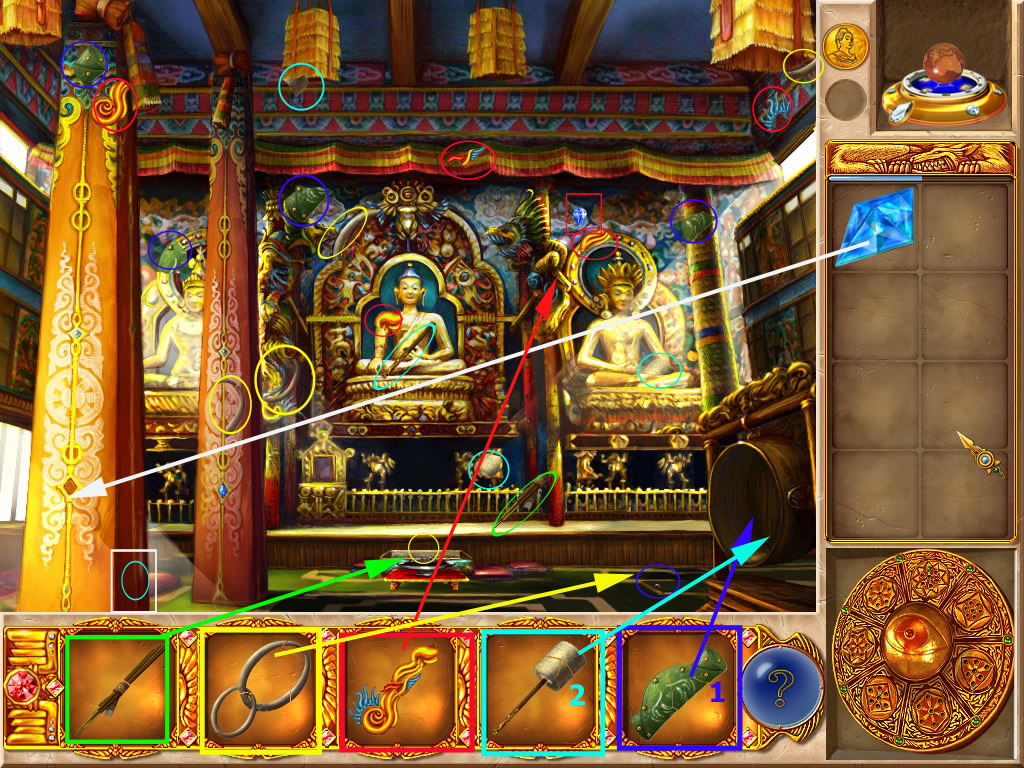
Inside the monastery
Find the parts for your list.
The golden tail is for the lion at the right side, what does not make him more happy. Both lions do have to be calmed down.
Place the incense stick in the fire bowl in front of the lions on the ground.
Wait a moment, after the lions calmed down, a part of the ring falls down.
Use the ring at the trap door on the ground far right. You now can look inside and and get out the object part.
The diamond from your inventory finds its place at the lower part of the left column.
Bottom right at the column a little compartment opens - grab out the object part.
Now place first the drum cover and then the drum stick at the drum right side.
In front of the left Buddha on the throne a another small one will appear, holding a scroll.
Grap the scroll
Screenshot
Chapter 2 Fortune teller's Hut
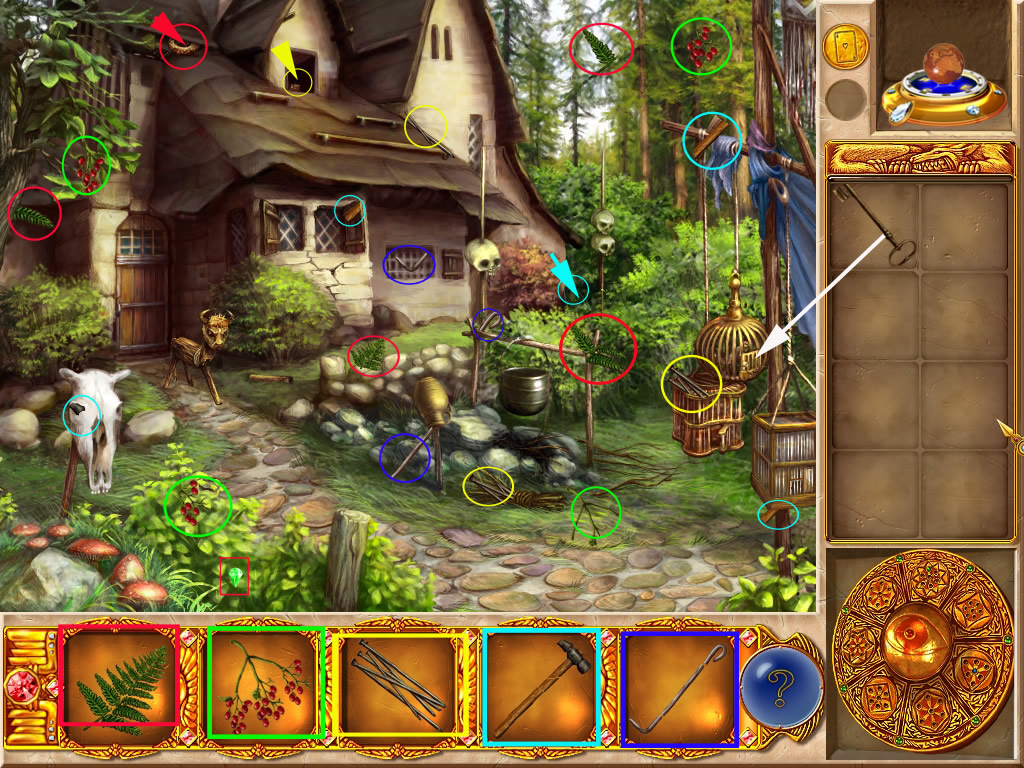
Hut outside
Look for the details of you list objects.
Repair the wooden ram on the way with hammer and nails.
The ram moves out of the way and you can enter the house, as soon as you have everything except a piece of the fern.
The birds nest high above the door is empty in the moment.
You can't free the bird in the cage left side right now.
Screenshot
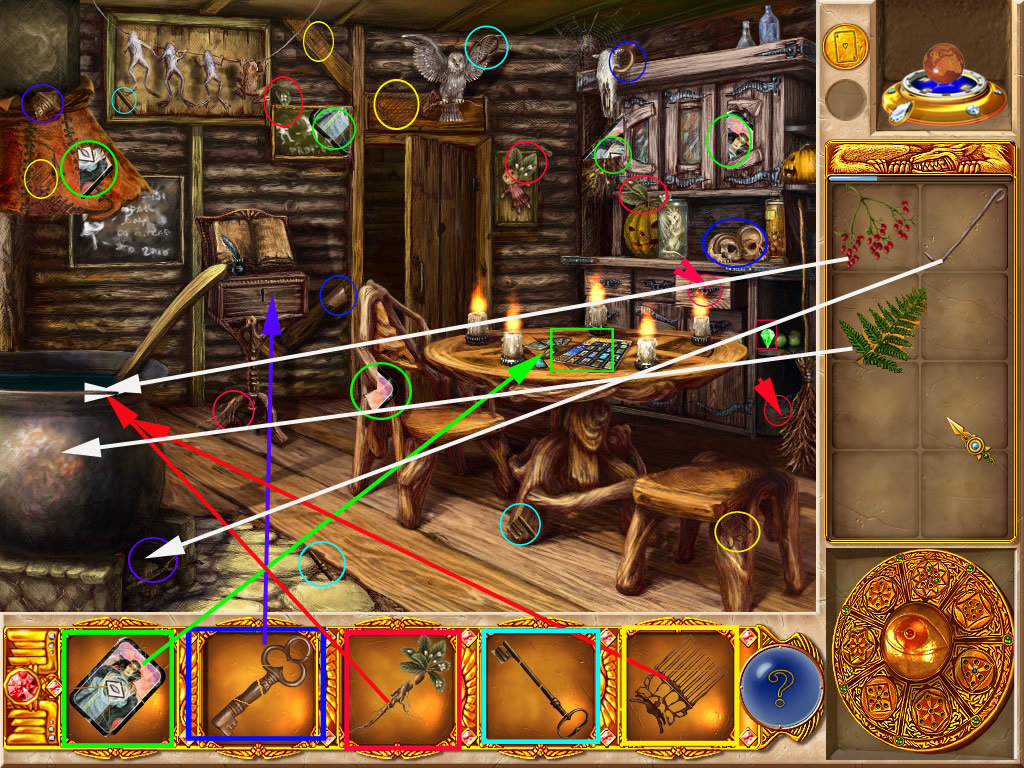
Hut - inside
Find the parts for your list.
After finding all card pieces, put it on the table to the other cards and click the cards again to activate a mini game.
Click and drag the cards from the right side into the empty places.
Arrange the cards according to the elements of which they're made and their basic nature according to the combination of the left and top picture.
For example: A woman is standing in the wind. This card has to be placed at the meeting point of the wind symbol on the left and the woman picture at the top.
So it would be second column from left, second field from bottom.
Screenshot
You will be rewarded with a paper sheet, someone wrote on with invisible ink.
Hold the sheet over the burning candle - it goes back into your inventory automatically.
Click the sheet with the now visible spell at the cauldron left side
Poke with the fire poker underneath the cauldron to spark the fire again.
Put the berries, the root, the comb and the fern in the cauldron.
To get the last part of the the fern, you need the slim key.
Go outside after finding all pieces of it.
Open the bird cage at the right side with the key.
The bird will fly away and let fall something in the birds nest far above the hut's door.
Click the nest to look into it - you will find the last piece of the fern
Put the fern in the cauldron and the fire underneath will extinguish.
You will find there instead the last piece of the other key.
Open the drawer left to the door and grab the scroll
Screenshot
Chapter 3 - German Castle
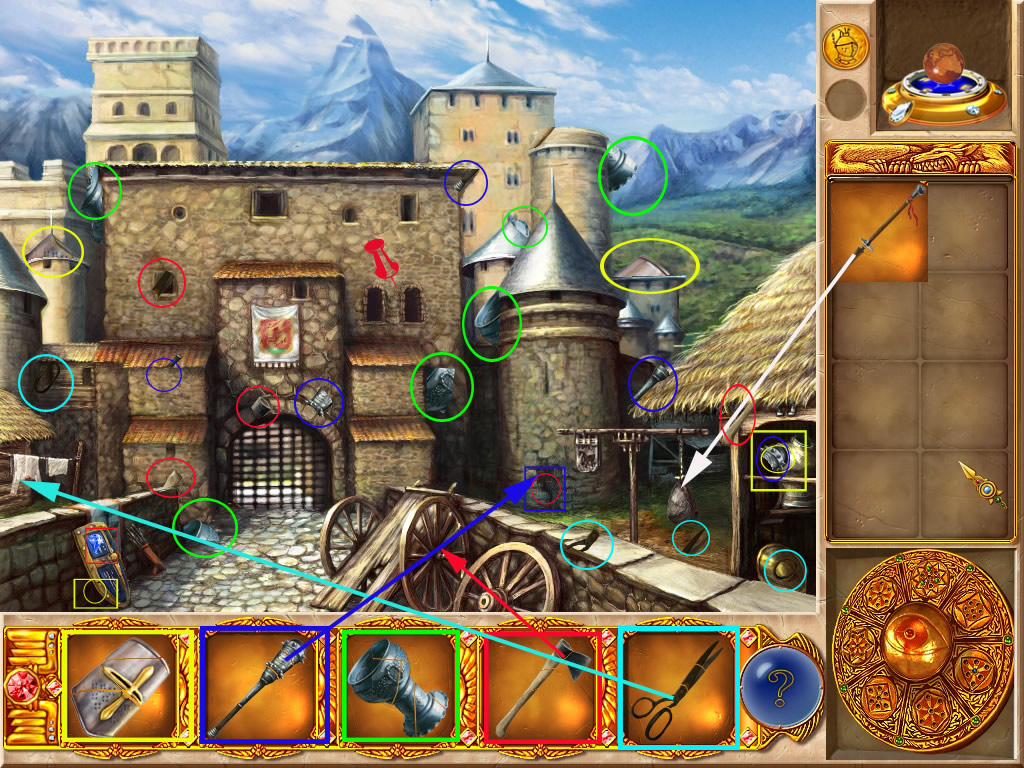
German Castle outside
Find the parts for your list objects.
Cut the clothesline at the left with the scissors and the rope will come in your inventory automatically.
Use the axe to get wood from the wagon right side.
The wood lays on the ground, click the rope at it and you will get a ladder, which will automatically take place at the right windows of the castle.
You will be able to find everything except the last piece of the helmet.
You will have to come back for this later.
To enter the castle, click the ladder.
After you collected inside all parts of the lance, come back an use it at the sack, hanging right side.
You will get the last part of the helmet.
Screenshot
German Castle - Inside
Find all parts for your list objects.
After finding the lance go outside to the last piece of the helmet (see spoiler there)
Place the helmet on the armor left side and you will receive a part of the battle axe.
Use the battle axe to open the trunk, right side on the floor - look inside and grab the last part of the key.
The key will open the fireplace clock and you will get the last piece of the the shield.
Place the shield above the door far right and the door opens.
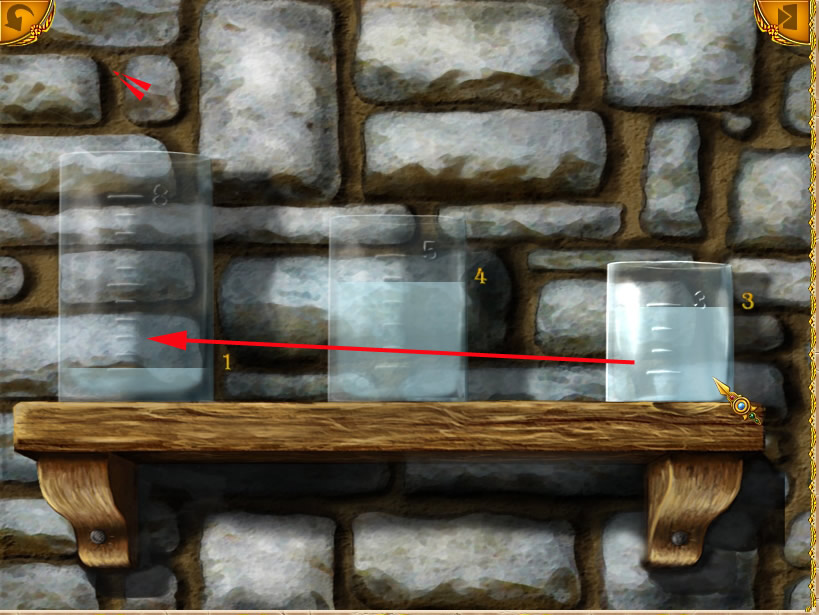
Click the door again to activate a mini game.
Pour water from one jar to another by clicking on the jars.
Goal is to have 4 liters each in the first and second jar seen form left.
Click first the jar you want to pour water out and second the jar you want to pour water in.
Each jar will always be filled as much as possible.
Each jar will always be emptied as much as possible.
Solution:
Pour water from the 8 liter jar into the 5 liter jar
Pour water from the 5 liter jar into the 3 liter jar
Pour water from the 3 liter jar into the 8 liter jar
Pour water from the 5 liter jar into the 3 liter jar
Pour water from the 8 liter jar into the 5 liter jar
Pour water from the 5 liter jar into the 3 liter jar
Pour water from the 3 liter jar into the 8 liter jar
Screenshot
The door opens - get the goblet from your inventory and click it at the open door.
The goblet will get back filled into your inventory.
Use the water goblet to extinguish the fire in the fire place.
Get the last piece of the wheel and place it at the canon right side to the fireplace.
Out of the canon pipe, your writing roll comes.
Screenshot
Chapter 4 - Asia/Temple of the Golden Dragon
Outside the hut
Look for the pieces of your list objects.
After completed the coin, drag it on the play board - on the ground, right next to the fire.
A minigame will open.
Swap the silver and gold coins in 7 or less moves.
The single slots are connected by lines - clicking a coin will move it along one of this lines, when there is a free slot at the end.
Having more then one free slot, the game will show you question marks. Click the question mark on the slot, you want the coin to move to.
Using your seven moves without success will restart the mini game.
There are several ways to solve this, the following solution is just one example.
Seen the slots in the upper row from 1-4 (left to right) and the slots in the lower row from 5-8 (left to right).
The first number shows which coin has to be moved, the second number where to move the coin to:
2 -> 1
6 -> 2
4 -> 6
7 -> 4
3 -> 7
5 -> 3
1 -> 5
Screenshot
You will find a part of the boot.
Place the boot right next to the door on the ground.
Enter the hut
Screenshot
Inside the hut
Find the parts for your list items.
The top from your inventory goes on the steaming tea pot low right.
The pillow belongs to the blankets in the far middle.
When you also have the light wooden spoon complete, use the coin in the upper right or the map to move the palace of the golden dragon.
Screenshot
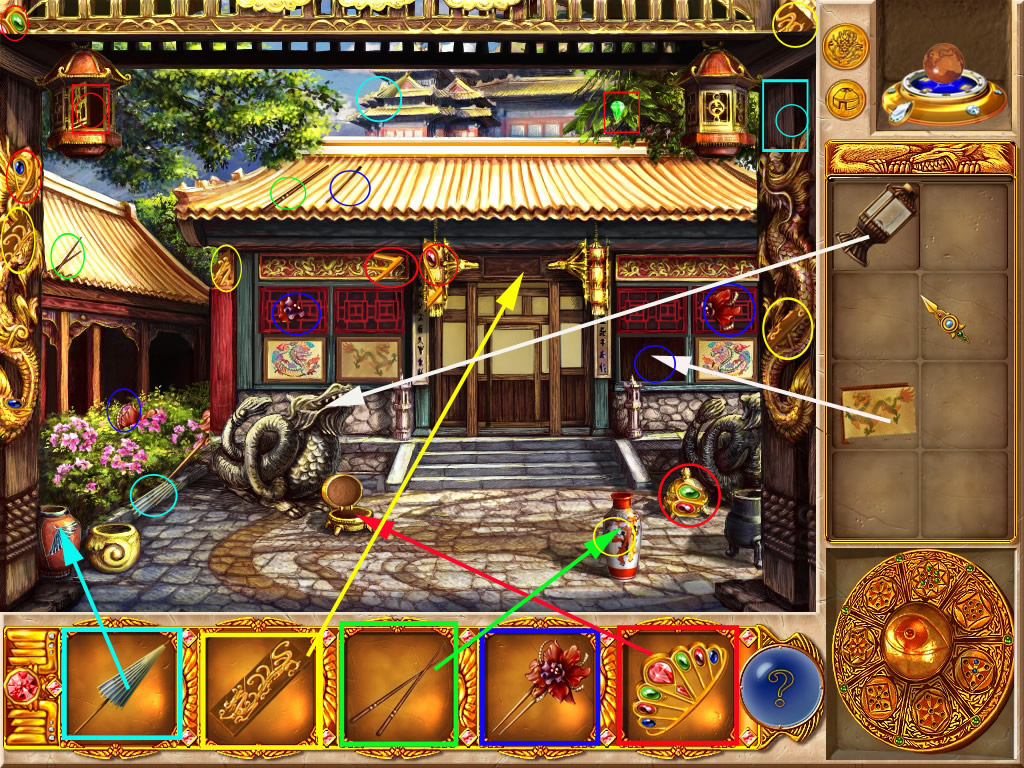
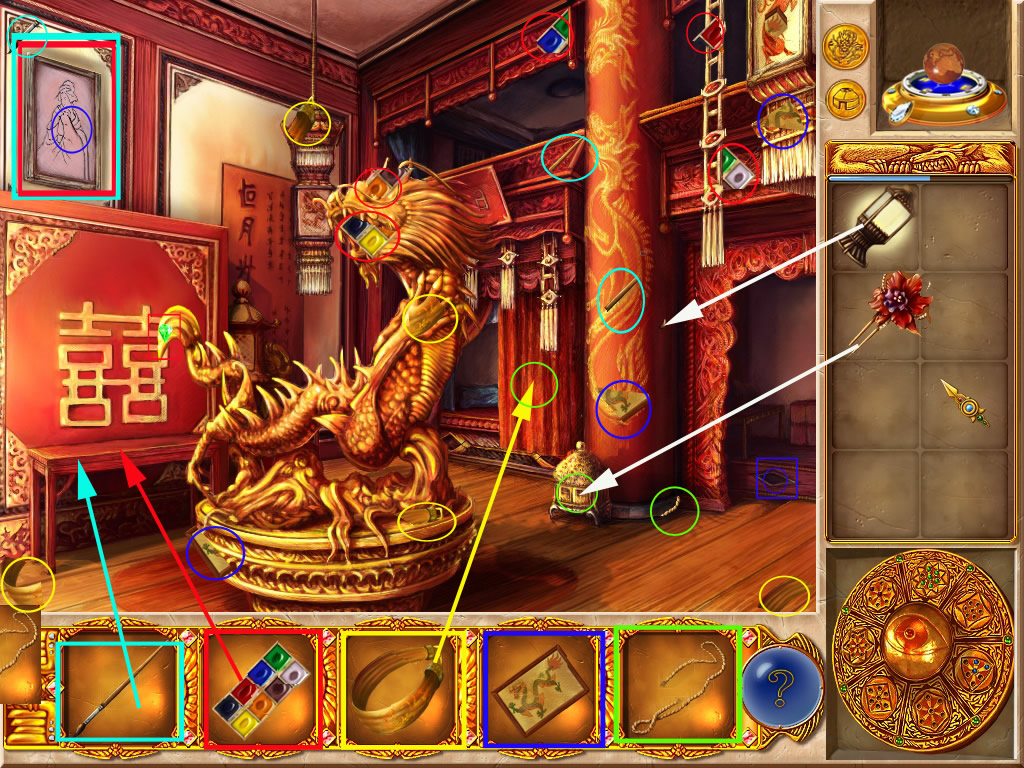
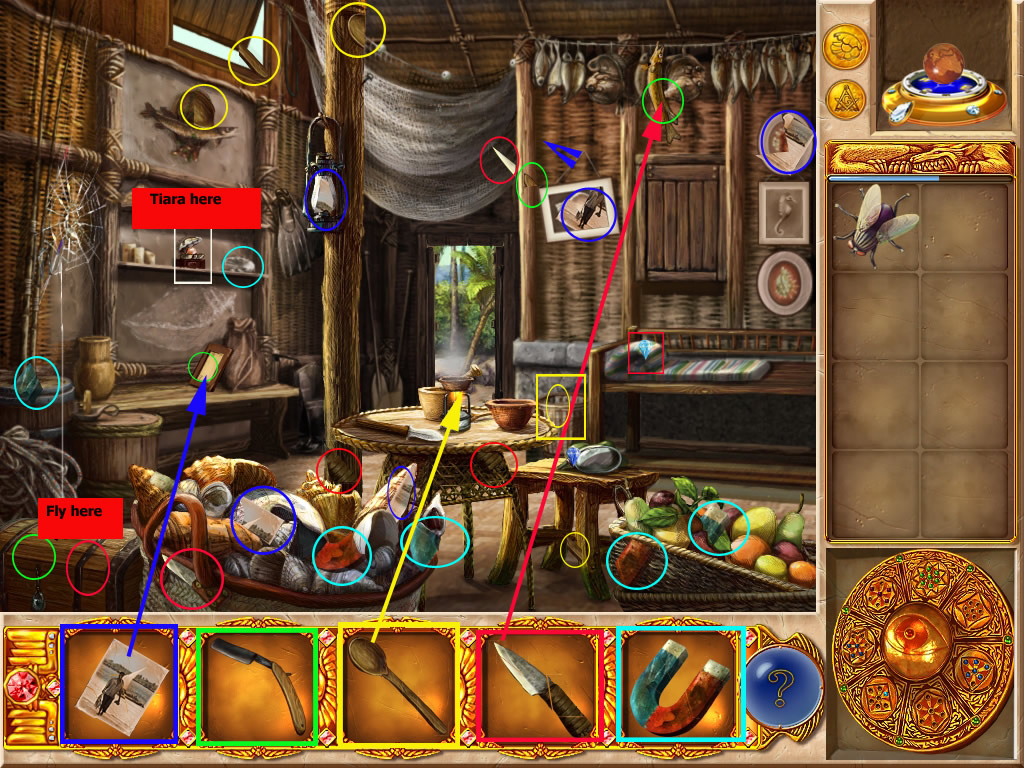
Palace of the Golden Dragon - outside
Find the parts of your list items.
Place the tiara in the little box in front of the left dragon.
He turns his head and spit out a part of the chop sticks.
Use the chop sticks to get another piece of your list items out of the vase on the ground, low right.
Click the lantern at the fire breathing dragon and it will lit the lantern.
Place the umbrella in the umbrella stand left side on the ground.
It will open and show you a picture.
Place the wooden plank above the door and it will open.
Enter the palace.
Screenshot
Palace of the Golden Dragon - inside
Find the parts of your list items.
Place the lantern at the hook - right column far middle.
Now you can have a look inside the hole, shaped as a diamond below the alcove far right.
The wide bind belongs at the curtain of the far left alcove.
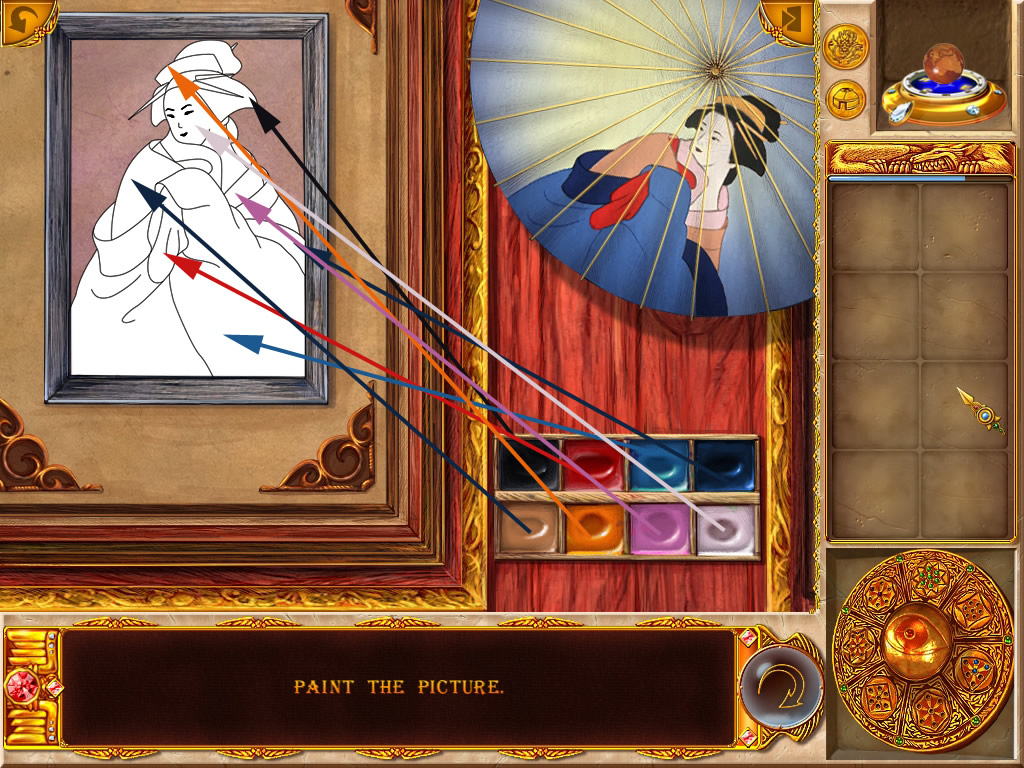
Place the paintbrush and paint palette on the bench left side below the painting.
Click the painting to activate a mini game.
Paint the uncolored picture in the same way as the colored picture from the umbrella outside is showing.
For this click first the color you want to use and then the spot you want to use it.
When you make a mistake just click with the right color at this spot and it will change.
Don't forget to color the face with white.
Screenshot
You will receive the last part of the picture.
Screenshot
Go outside
Palace of the Golden Dragon - outside
Place the picture at the empty spot right side at the palace wall.
A mini game opens.
Memory: Find the matching pairs.
You will get the last part of the hair pin.
Go inside the palace again.
Palace of the Golden Dragon - inside
Open the little casket on the ground in front of the column with the hair pin and find the last piece of the rope.
Head back to Asia
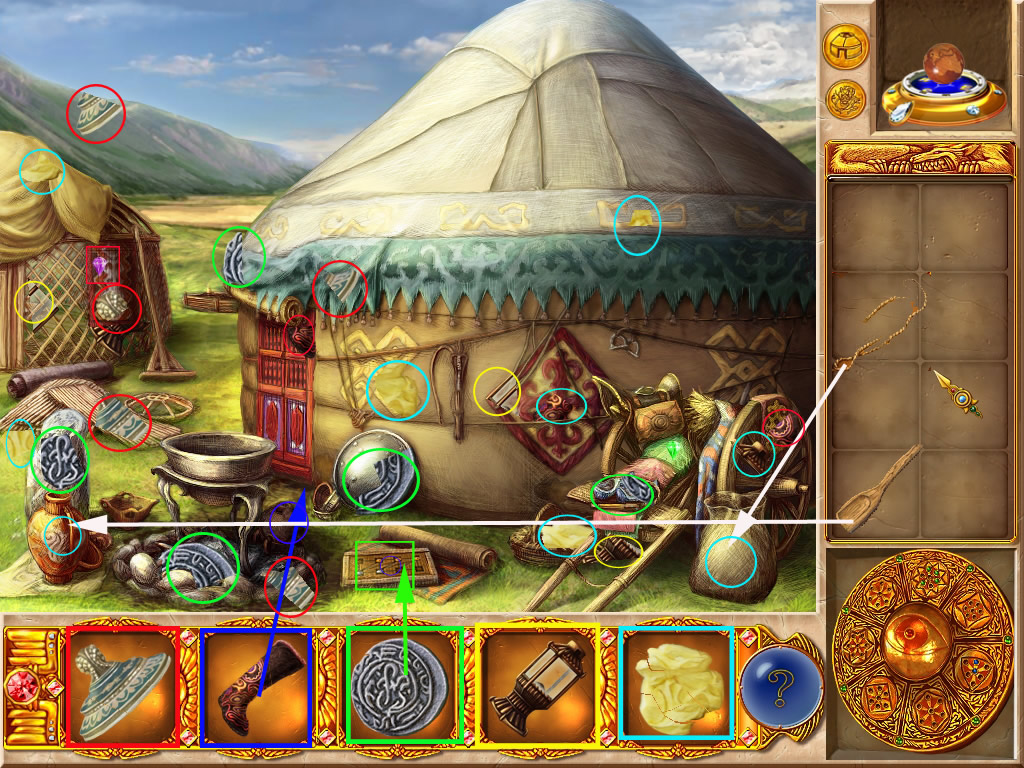
Outside the hut
Use the light wooden spoon and stir in the butter churn low left.
You will receive a piece of butter.
Close the sack right side with the rope and you will be rewarded with the last piece of butter.
Enter the hut.
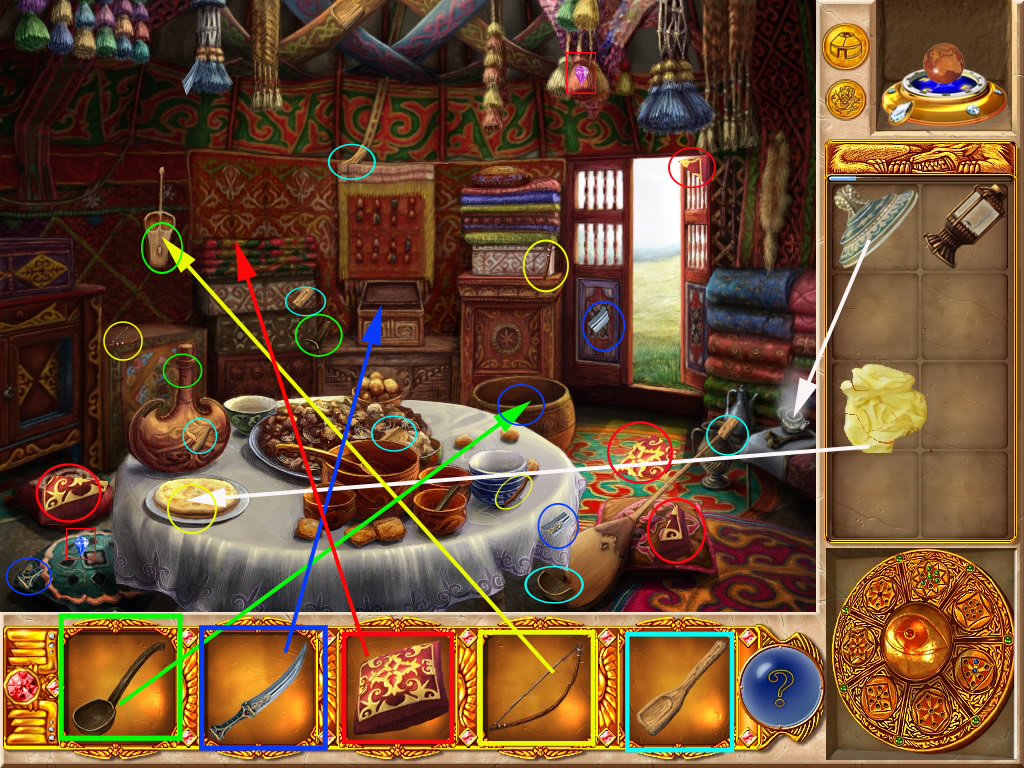
Inside the hut
Click the butter onto the pancakes left on the table.
Use the bow at the wooden quiver far middle at the wall.
Now you have the last piece of the dark wooden ladle.
Click it at the cauldron right behind the table.
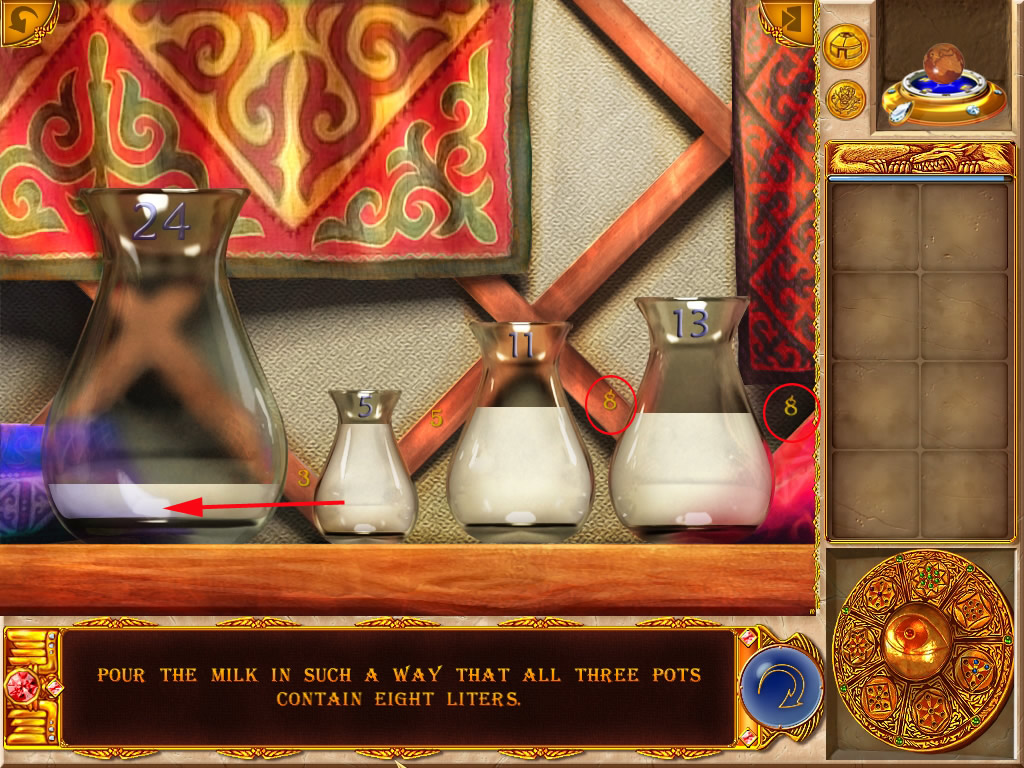
Click it again and a mini game opens.
Pour milk from one jar to another by clicking on the jars.
Goal is to have 8 liters each in the three big jars
Click first the jar you want to pour milk out and second the jar you want to pour milk in.
Each jar will always be filled as much as possible.
Each jar will always be emptied as much as possible.
The first number shows the jar, you pour milk out and the second number the jar you pour the milk in.
24 -> 13
13 -> 5
13 -> 11
5 -> 24
24 -> 13
13 -> 5
5 -> 24
Screenshot
Use now the dagger to open the dark wooden box underneath the wall hanging.
Grab the scroll.
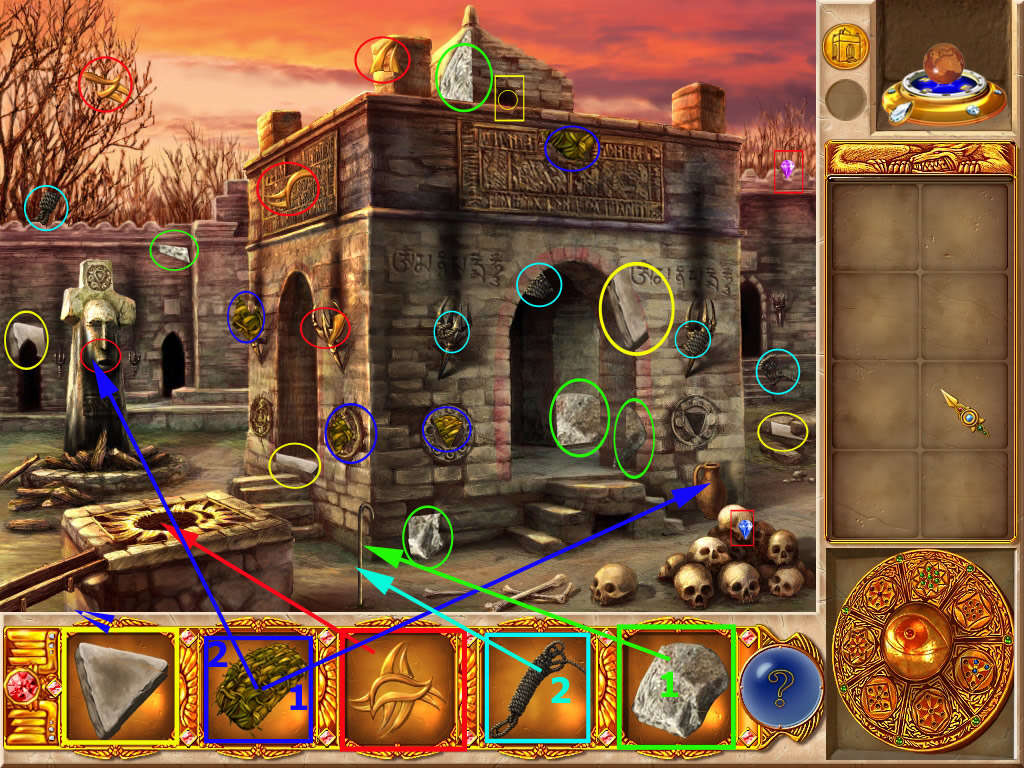
Chapter 5 - Fire Worshipers Temple
Outside the temple
Look for the parts for your your list items.
You wont be able to find the last part of the golden item.
The triangle stone goes right next to the entrance.
Click again and a mini game opens.
It is random, so there is no solution to show.
It is your goal, to bring all symbols to the space according to their shape.
The star shaped slot will stay empty and can be used to slide.
When you are ready, water will pour out of the stone into the jar underneath.
Use the sponge at the jar - it will go back in your inventory, when it is wet.
Now clean the statue at the left side with the wet sponge.
You will find the last part of the golden symbol.
Click the symbol in the middle of the sunflower on the stone cover low left.
The cover will move.
Get the stone out of the inventory and use it as a hammer with the cane in the ground right next to the sunflower.
Click the rope at it.
Now you can climb down.
Screenshot
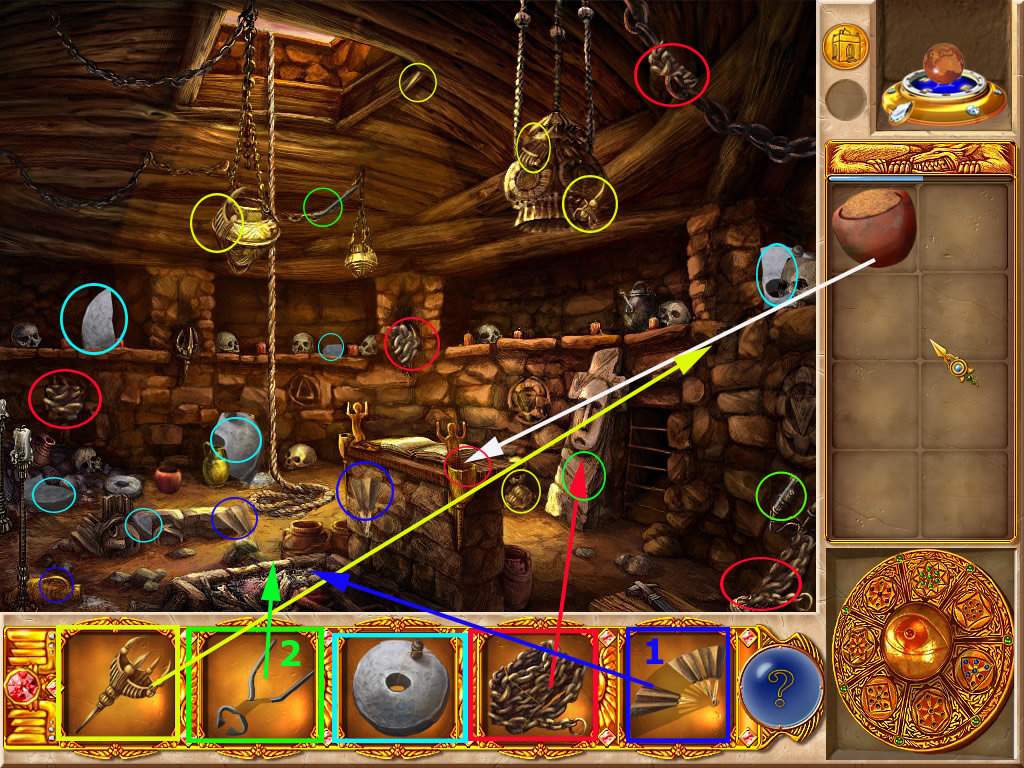
Temple - Underground
Look for the item parts of your list.
The mill wheel goes far left on the ground onto the other one.
A stone will be crushed and after a short moment you will get a bowl with fire stones in your inventory.
Click them into the golden bin right side of the altar - you will receive a object part.
The torch holder goes into the hole right next to the closed gate.
Place the chain around the huge stone left to the gate - it will be automatically combined with the gate as will.
Click the torch, it is a mechanism, the gate will open and move the stone also.
Behind the stone you will find another part of your items.
Use the fan to sparkle the fire at the bottom again.
With the caliper you can get out a piece of coal.
Go back outside and place the coal onto the wood in front of the altar left.
You will receive the scroll
Screenshot
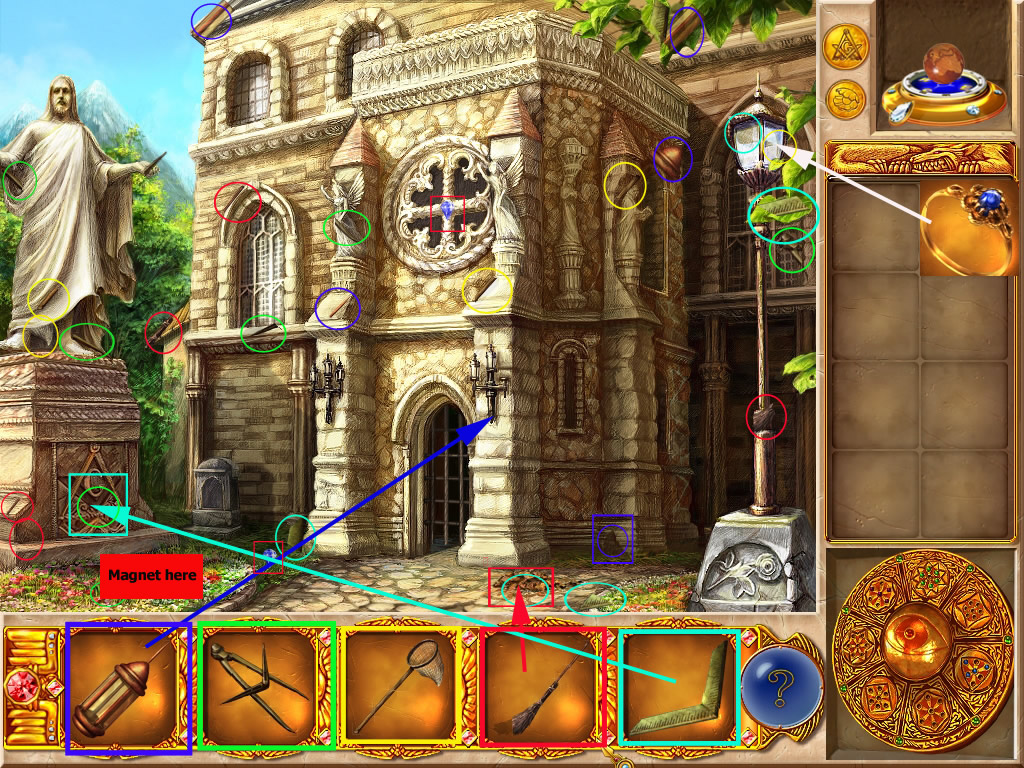
Chapter 6 - Mason/Pearl Diver's Hut
Mason - outside
Look for the parts of your list.
The lantern goes right on top next to the gate and will open it.
With the broom you can wipe away the leaves on the ground - you will find an item part.
The triangle goes at the base of the statue left side.
Click the base again to activate a mini game.
The starting positions of the puzzle are random, so no solution can be given.
Flip the tokens until every one is showing the same side.
You can use the hint, when you get stuck.
Clicking one token will always flip the entire row and column.
When you are done, one part of the compass will fall into the grass, another part will appear at the base of the statue.
Enter now through the gate.
Screenshot
Mason - inside
Collect the parts for your list objects.
After finding the ring, go out side and cut with it the glass of the street lantern right side.
You will find the last part of the net.
Use the coin in the upper right or the map to go the pearl diver's hut.
Screenshot
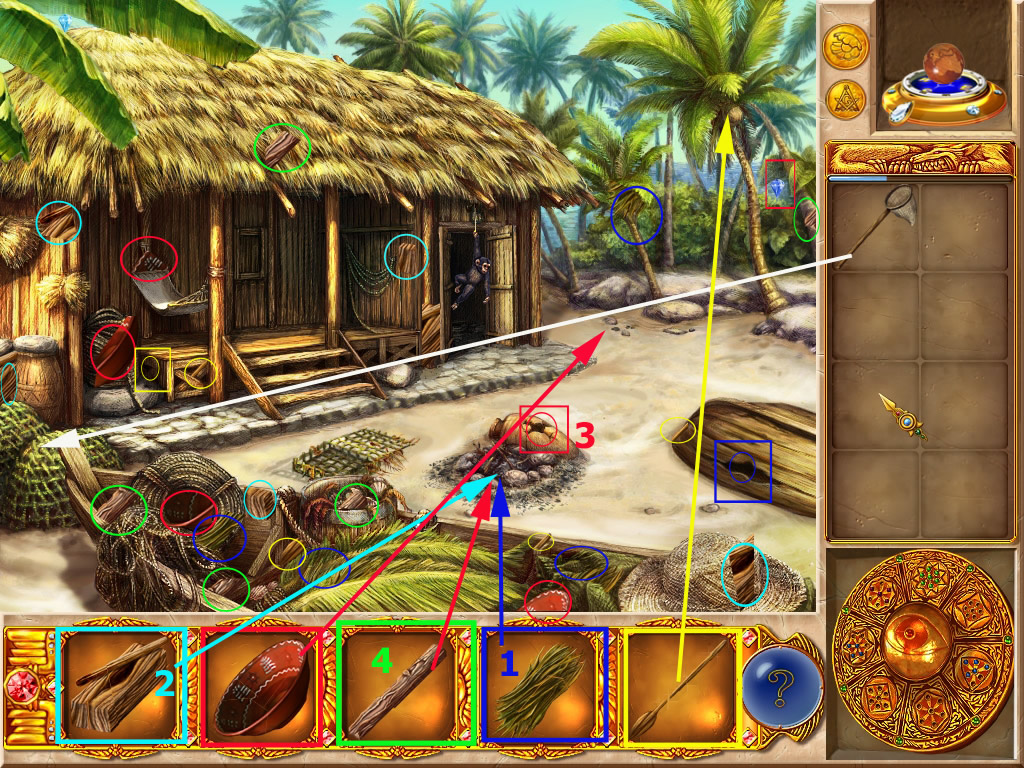
Pearl Diver's Hut - outside
Find the parts for your list items.
Use the net to catch a fly, left side behind the boat.
Place first the grass and then the thick block of wood on the fire place.
The crab will get a little "overheated" and will move. Have a look inside the vase.
Hold the wooden log into the fire, it will go back with a pointed end.
Use the spoon to get the coconut of the tree far right.
It will fall on the ground - use the pointed log to open it.
Now click the bowl at the coconut, it will be filled with milk.
Give it to the monkey - he will disappear and you can enter the hut.
Screenshot
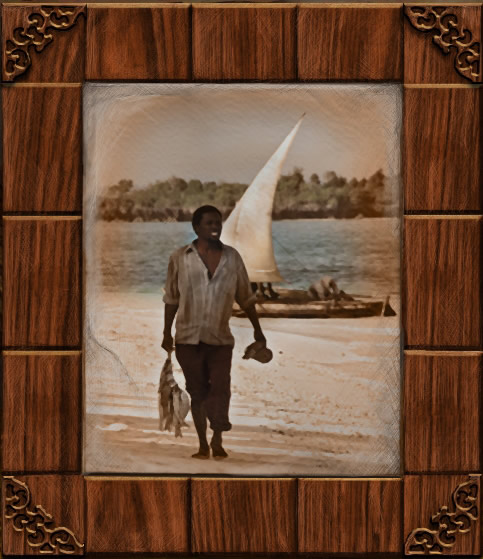
Pearl Diver's Hut - inside
Find all parts from your list.
Click the fly onto the spider on the chest, bottom left.
The spider will move into its net above and the chest opens.
Get the parts out of it.
After collecting all parts of the picture, click it at the frame, left side.
Click the frame again to activate a mini game.
Its a slider puzzle with random solutions.
You will have to drag the rows and columns till to reassemble the picture.
Screenshot
You will find a part of your list items behind, when you finished the puzzle.
Cut the fish on the top with the pocket knife.
With the spoon you will be able to get a part out of the steaming bowl on the table.
After finding all, go back to the Mason
Screenshot
Mason - outside
Place the magnet on the grass and get the last part of the compass.
Enter the Mason
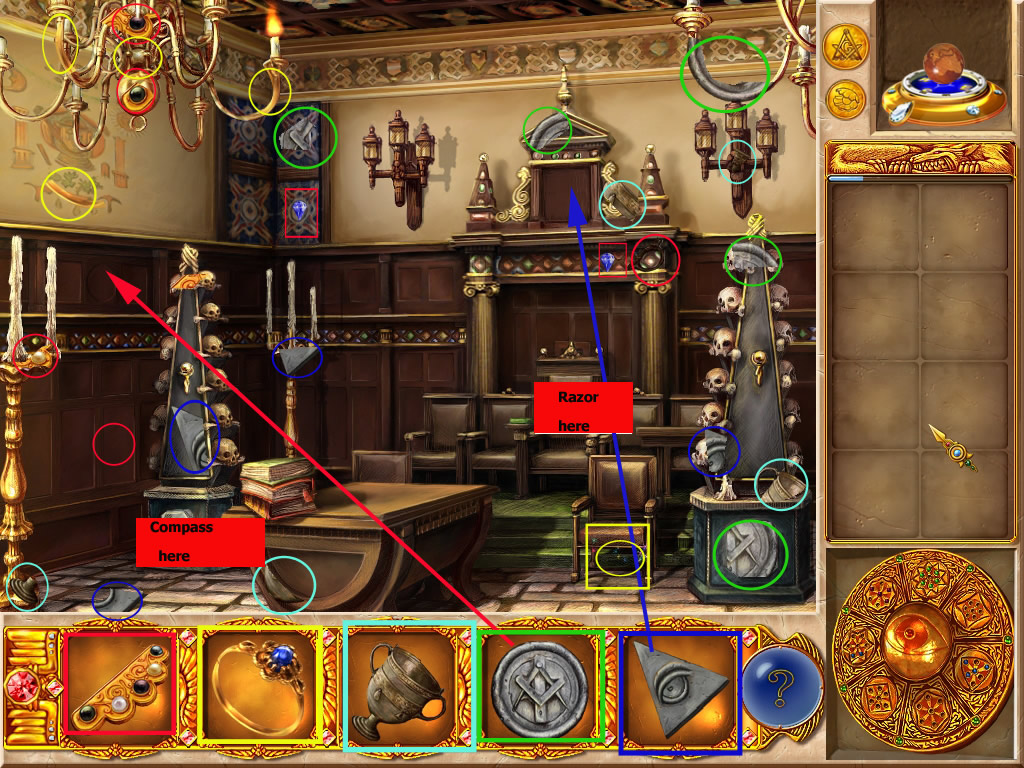
Mason - inside
Use the compass at the white square underneath the left skull stand.
Place the triangle stone far middle at the wall into the empty frame.
Use the razor at the chair, far middle.
Use the bowl with the flickering candle.
The candle will move around the room - when she stops, you will see the last part of the tiara.
Go and enter the pearl diver's hut.
Pearl Diver's hut - inside
Click at the shell, left side in the middle shelf.
Place the tiara in the empty spot.
A compartment will open and you can get out the scroll.
Chapter 7 - The Wizard's House and Labyrinth
Wizard's House - outside
Find the parts for your list items.
After finding the torch and the wreath, move to the Labyrinth.
Screenshot
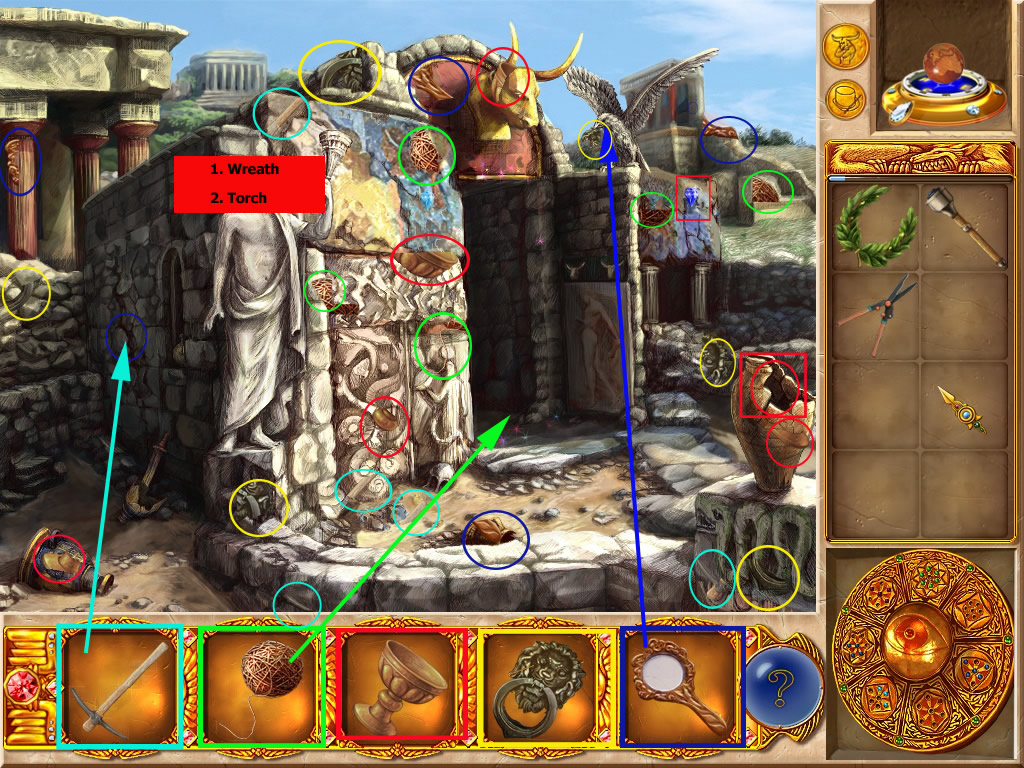
Labyrinth - Entrance
Find the parts for you list items.
The wreath goes at the statue left side.
Light your torch at the statues fire.
Left side you can see a crack at the stone wall of the labyrinth - use the pick axe to get the last part of the mirror.
Click the mirror at the bird - it will fly away and let fall a part of your items.
Click the thread at the entrance of the labyrinth and you will be able to enter.
028Screenshot
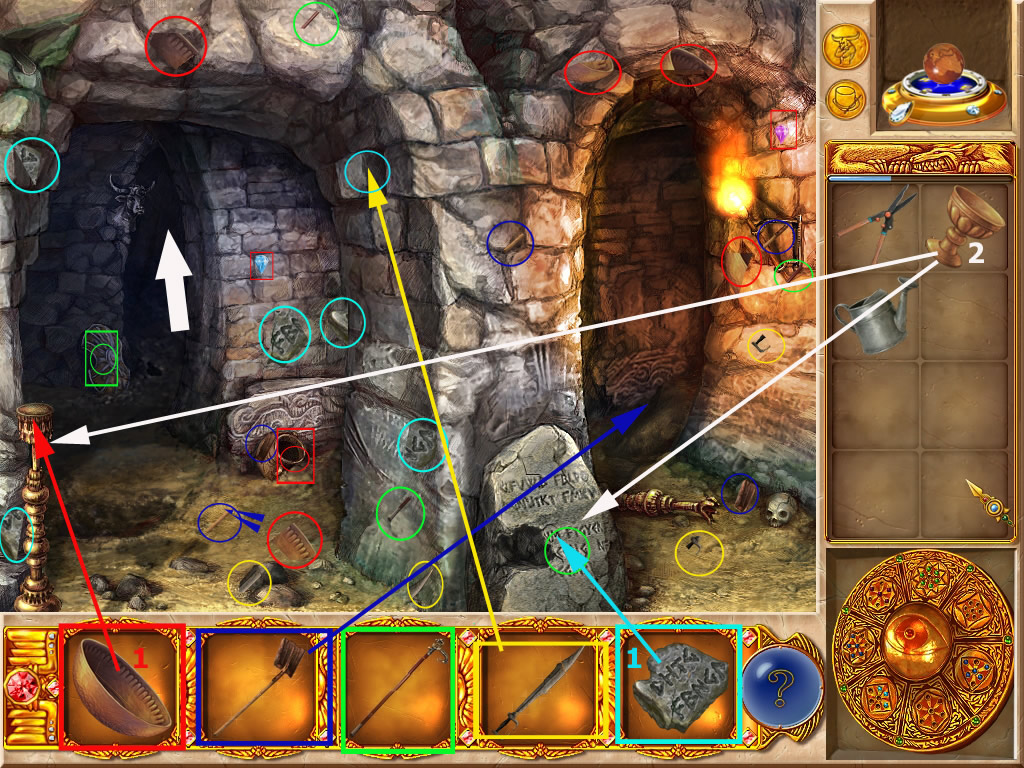
Labyrinth - inside
Use your torch to light the torch at the wall right side - now you can see.
Find the parts for your list items.
The bowl goes on the column left side.
Place the goblet on the water in the bowl, it goes back into your inventory, when it is filled.
Dig a hole with the shovel in the far right of the right labyrinth part.
Use the sword to loosen the stone on the top of the right wall in the left labyrinth part..
Place the stone at the rock in the middle.
Pour the water out of the goblet onto the glowing rock.
Click the rock again to activate a mini game.
The starting positions of the puzzle are random, so no solution can be given.
Click the tokens to move till there are two of a kind at each side.
Which symbols are where is not important.
You can use the hint, when you get stuck.
After finding all, you can go back to the wizard's house.
Screenshot
Wizard's House - outside
Place the door knocker at the door, but you still can't enter.
Clean the pipe right side of the house with the cane.
Click the watering can at the water barrel and water the plant right behind the carriage.
An apple grows - use the shears to get the apple.
Place the apple on the hedgehog's back.
He will go away and you will find the last part of the long stick.
Use it to open the window at the bottom right of the house.
Enter the wizard's house.
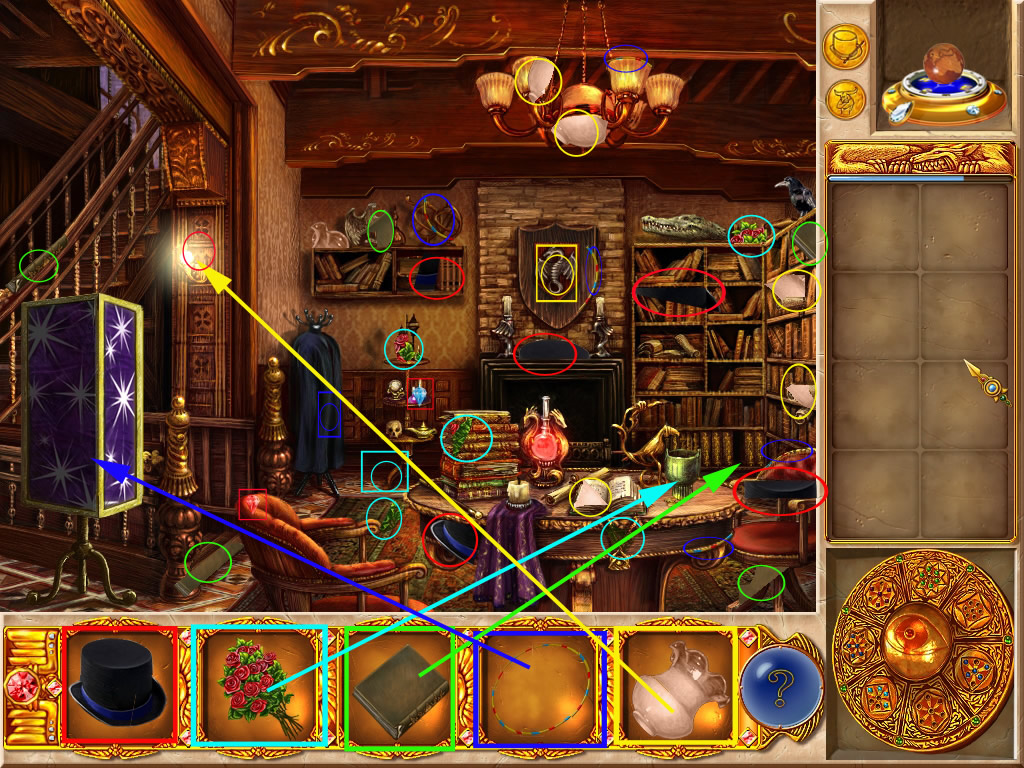
Wizard's House - inside
Find the parts of your list items.
Click the crest at the wall in the back and it moves.
Click the opening to activate a mini game.
Arrange the items so they are all inside the shape but nothing is touching the walls or each other.
You can turn the parts with right click.
An object at the right place will lock.
Screenshot
Place the flowers in the vase on the table.
Place the lamp shade at the lamp behind the magic box, left side.
A compartment above opens and you will get a part of your list items.
Place the book the the bottom self far right.
The crocodile on the upper shelf will open its mouth and you will get a part of the hat.
Click the hat at the candle in front of the lamp, till the lamp is green.
Now place the hat on the roses - a bunny comes out of the hat.
Click the magic box to open and drag the bunny inside.
Close the door and click the hoop at the magic box.
Open the door again and grab the scroll.
Screenshot
Chapter 8 - Egypt/Art Museum
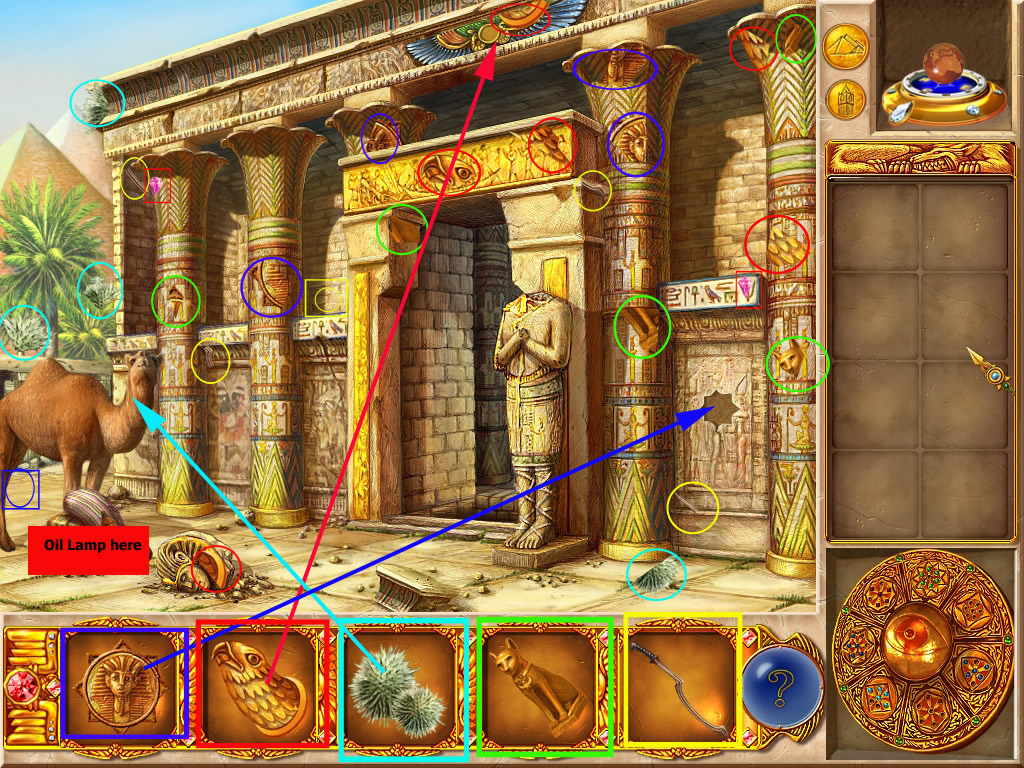
Egypt - outside
Find the parts for your list items.
The eagles head goes on the top in the middle at the round disk.
It shows you, where the cat has to go to.
Feed the camel with the cactus.
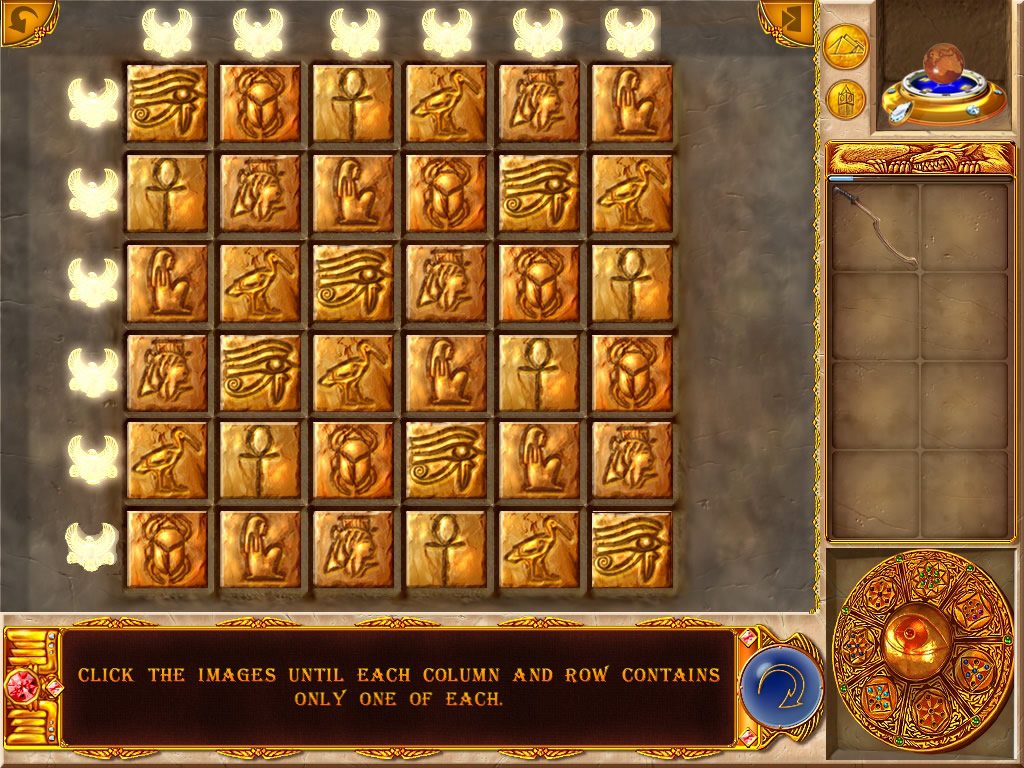
Click the sun at the empty spot right next to the entrance.
Click it again to activate a mini game.
It is a picture-sudoko.
By clicking the tiles, they do change their pictures.
Each picture can only be once in each row and each column.
Please see the screenshot for the solution.
Screenshot
Place the cat above the door - now you can enter.
Screenshot
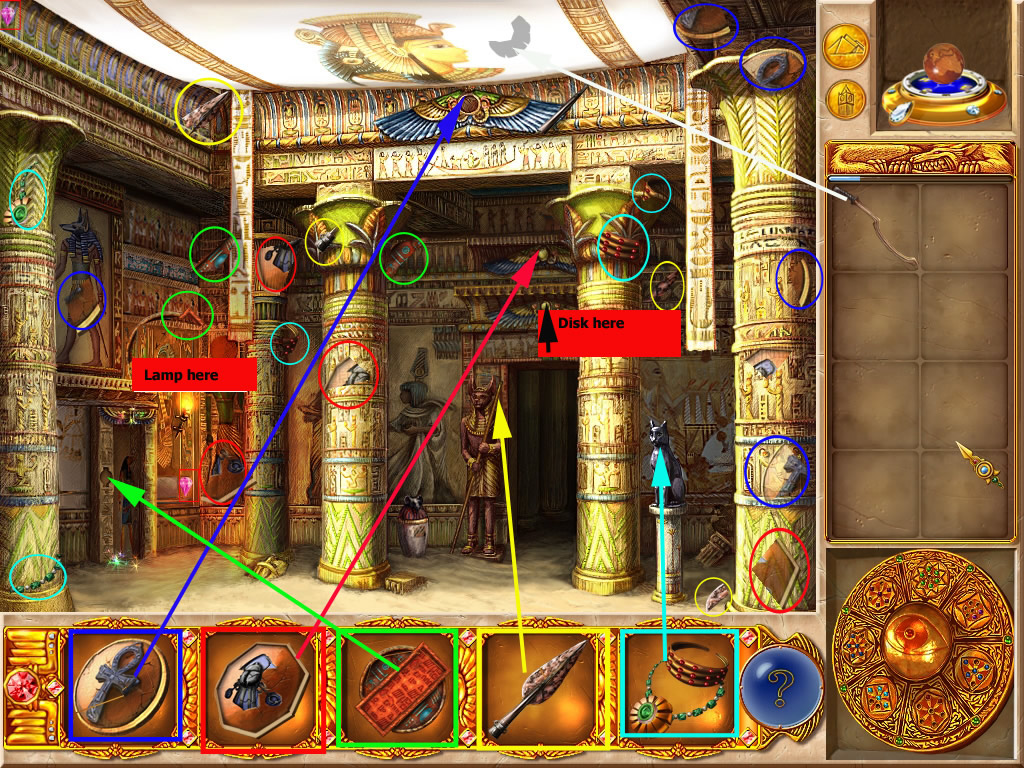
Egypt - inside
Find the parts for your list items.
The sword will help you to reach the part from the ceiling.
The guard get the arrow head. For this, he will step beside, so that you can enter the next room.
The round disc belongs at the top of this entrance.
Click the collar at the cat.
Now enter the room next to the guard.
Screenshot
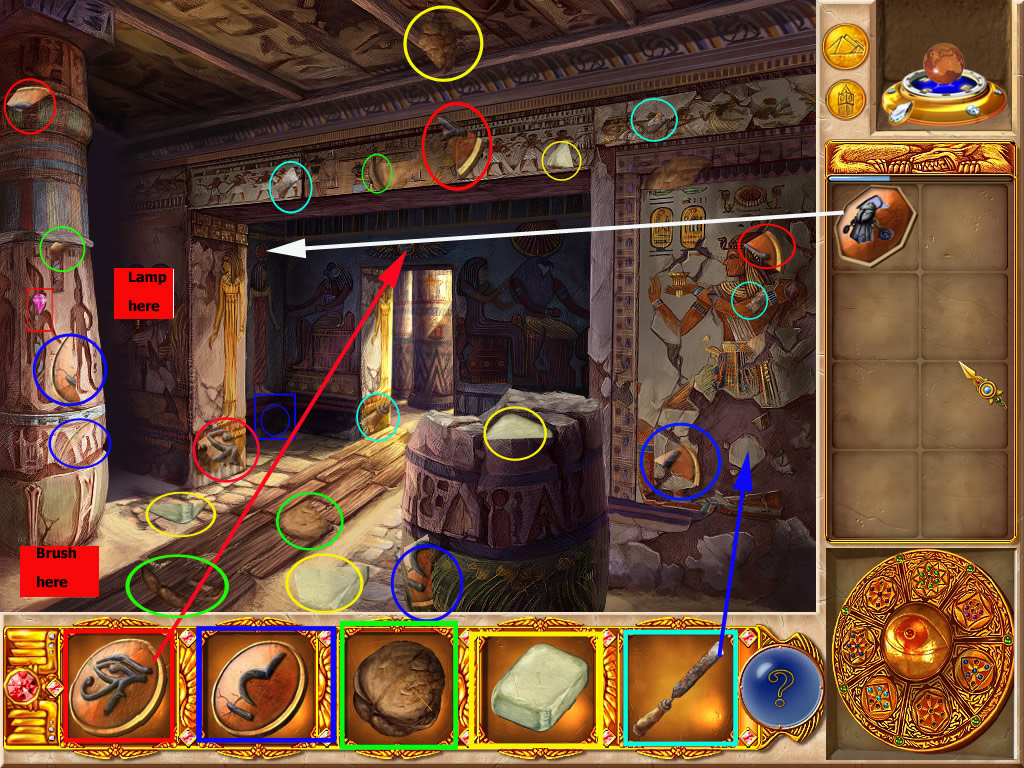
Egypt - Room behind the Guard
Find the parts for your list items.
The disc you brought from the other room belongs far left in the empty spot on top.
A stone will fall down, click it to activate a mini game.
You will have to flip the tokens, till all show the same picture.
You can use the hint, when you get stuck.
The game is random.
With the chisel you have to loose the stone right next to the wall painting.
When you have the eraser and the nut complete, go to the Art Museum.
Screenshot
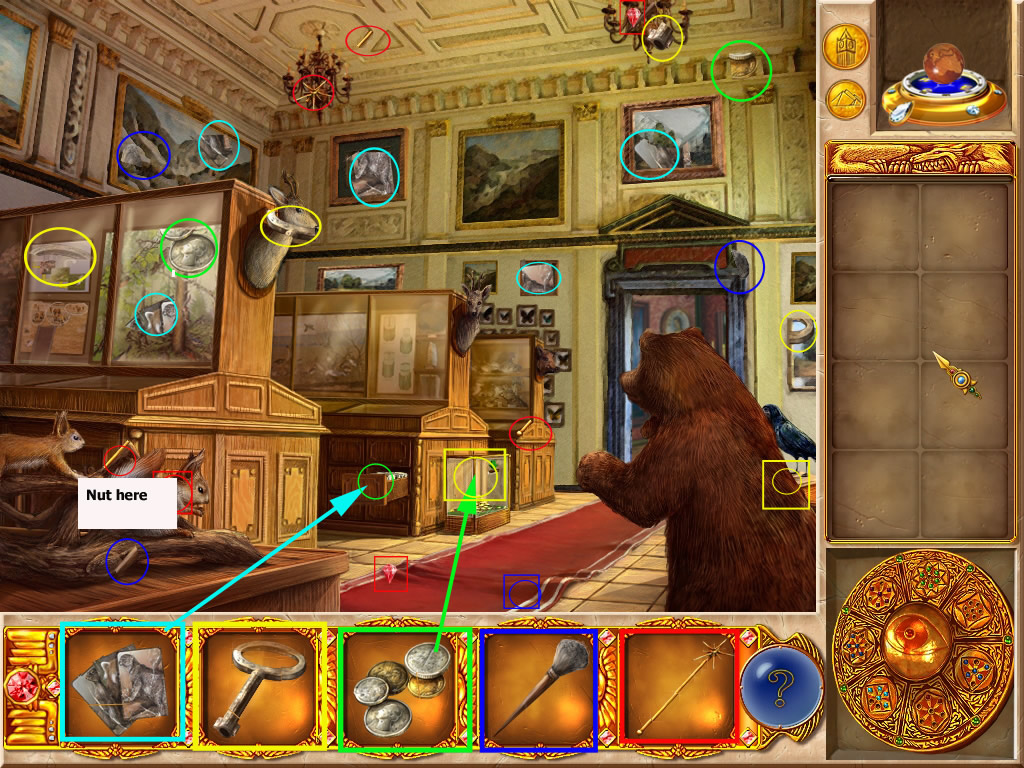
Art Museum - First Room
Find the parts for your list items.
Give the nut to the first squirrel on the left.
Pull the carpet to get another part of your items.
Use the magic wand at the second squirrel left and right side at the bear and the raven.
They will all disappear.
Place the cards in the open drawer.
Click the drawer again to activate a mini game.
It is a memory, find the matching pairs.
The memory goes into the box in front of the shelfs.
Enter the second room
Screenshot
Art Museum - 2. Room
Find the parts for your list items.
Change the pictures with the picture above the vase in the back.
With the key open the drawer at the desk left in the back.
The medal goes to the guy without head.
With the monocle you can read the writing underneath the painting with the lady.
Use the erase to remove the inscription.
The wooden plank goes on the ground, below the lady's painting.
Click both vases one after each other.
After finding all go back to Egypt.
Screenshot
Egypt after the Art Museum
Outside: Click the oil lamp left on the ground at the oily batch - it is filled now.
Enter the first room and light the oil lamp at the burning torch far left.
Enter the room behind the guard.
Place the lamp at the hook between the two columns left.
Now you can look at the dark part and find a part of your items.
Use the brush to clean the ground in front of the first column left.
Go back into the first room
Place the disc above the door.
Place the last disc next to the door at the left side.
The door opens and you can grab the scroll.
Click near the left to fill the lamp.
Venice/Maya Observatory
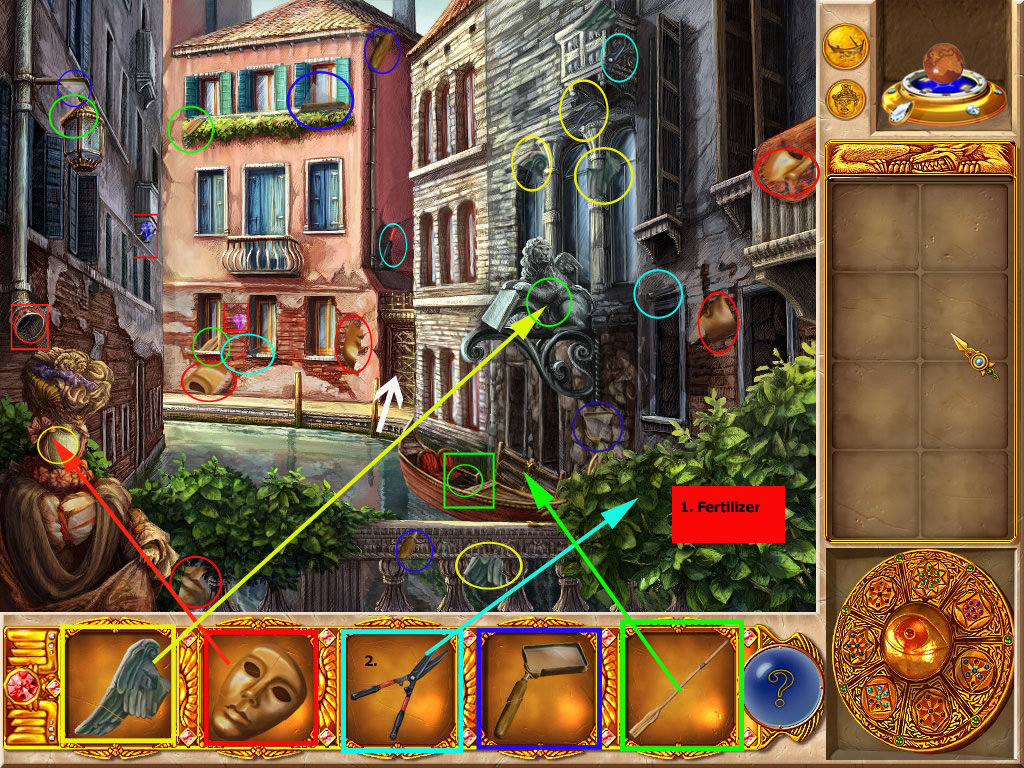
Venice - outside
Look for the parts of your list items.
The mask goes at the figure low left.
The wing belongs to the angel, right side, at the middle of the house.
Place the oars at the boat.
Click it again and it will bring you to the gate between the houses.
Enter the gate.
Screenshot
Venice - inside
Find the parts of your list items.
With the handle you can close the window.
Open the upper door of the drawer and you will find a part of your list items at the upper part of the open door.
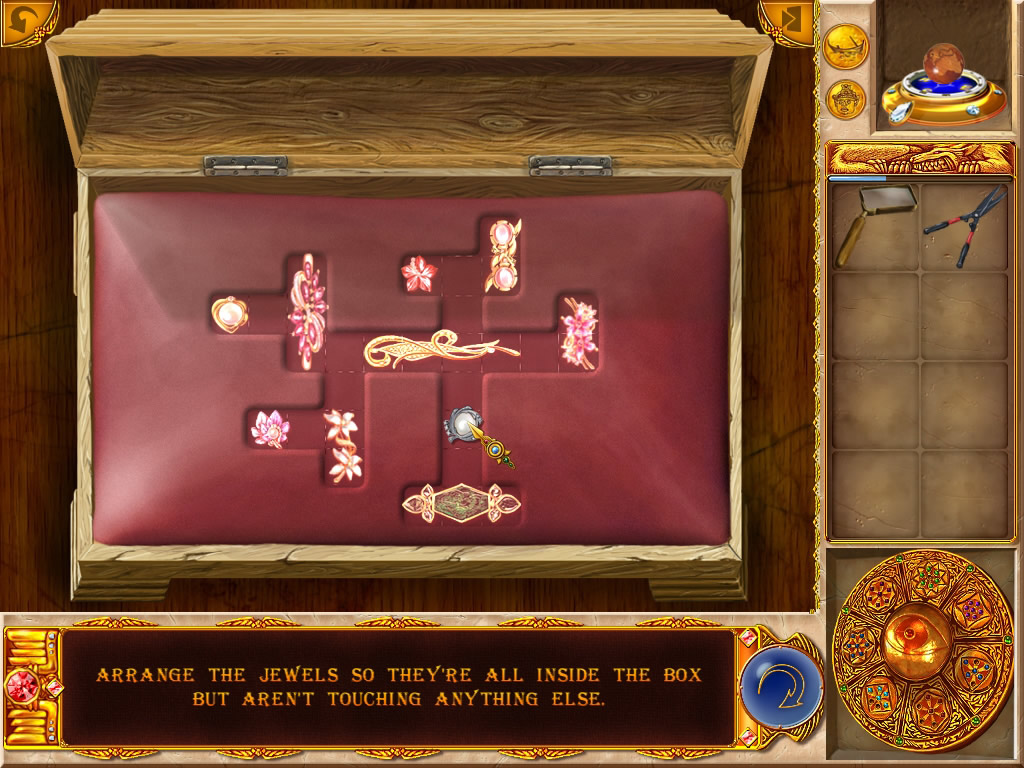
Open the lower left door of the drawer and you will see a jewelery box.
Click the chain at the jewelery box and click again to activate a mini game.
Arrange the items so they are all inside the shape but nothing is touching the walls or each other.
You can turn the parts with right click.
An object at the right place will lock.
Screenshot
Now move on to the Mayan Observatory
Screenshot
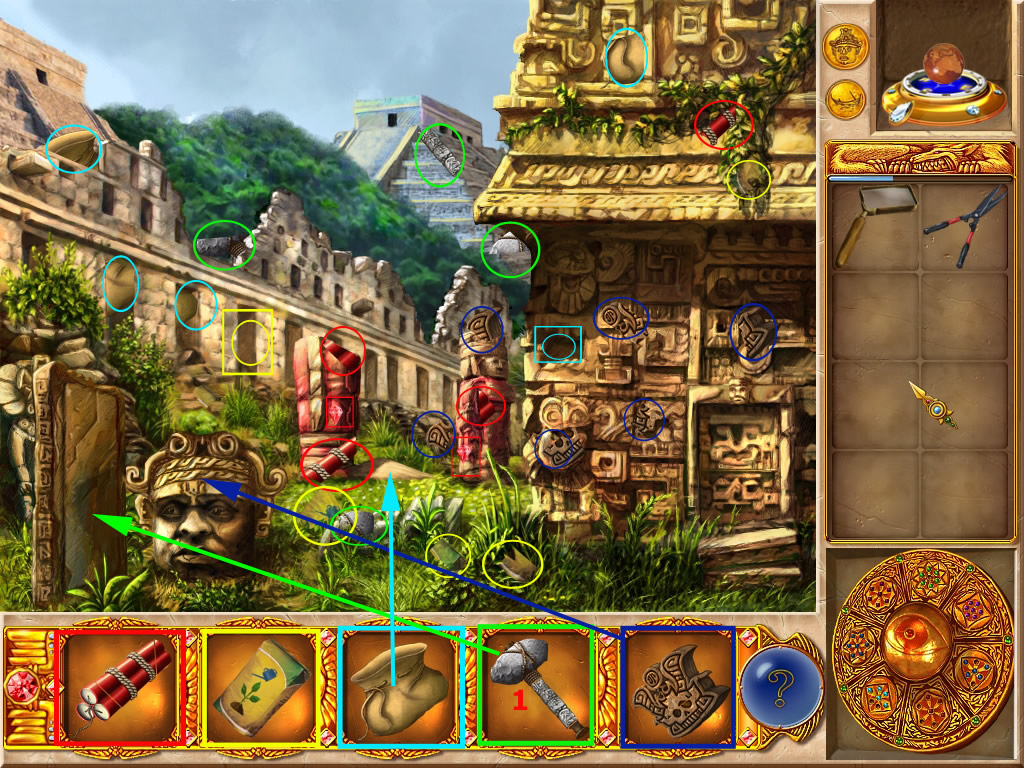
Mayan Observatory - 1. Location
Find the parts for your list items.
The stone goes at the head of the stone head left side.
Use the hammer to remove most of the dirt from the mirror left next to the stone head.
Fill the sack with sand from the ground between the two red shimmering poles in the middle of the scene.
Use the sack to clean the mirror.
Place the dynamite in front of the closed entrance at the right.
Use the magnifier to light the dynamite.
Enter the 2. location
Screenshot
Mayan Observatory - 2. Location
Find the parts of your list items.
The stone with the symbols goes at the sun wall, lower left.
The wall moves.
Go back to Venice.
Screenshot
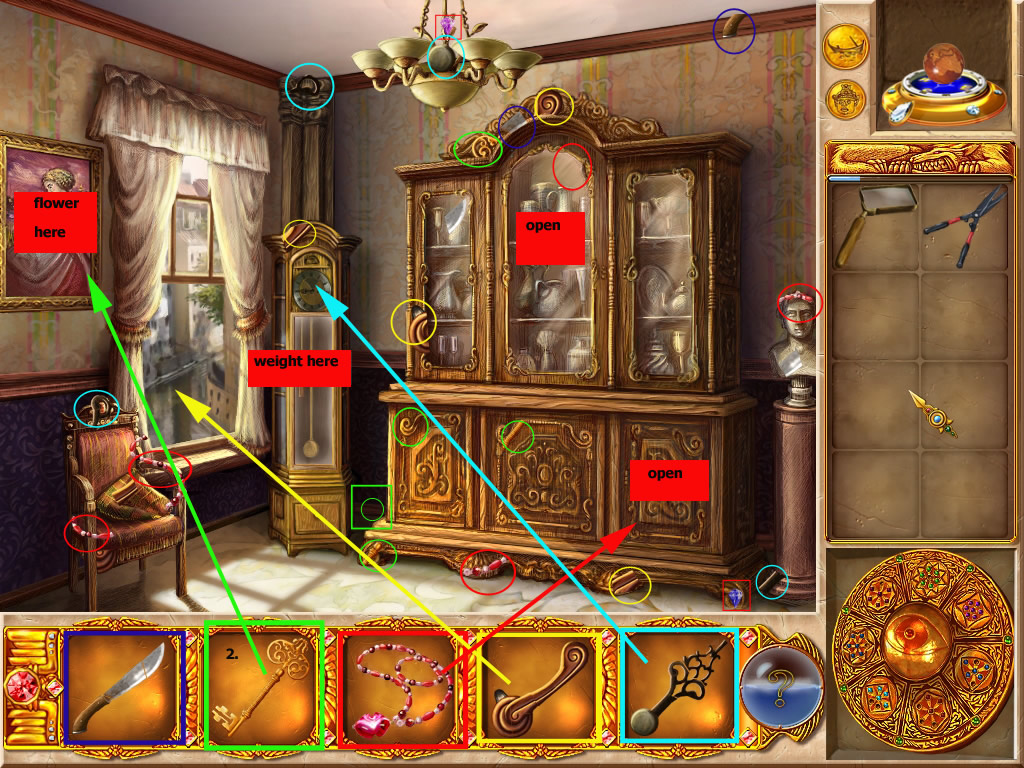
Venice - in and outside
Click the fertilizer at the leaves low right side.
Cut the flower and go inside the house.
Open the door at the clock and place the weight inside.
The clock hand goes at the clock face.
Click the flower at the painting left side at the wall.
The picture moves - use the key to open the safe.
Go back to the second mayan location
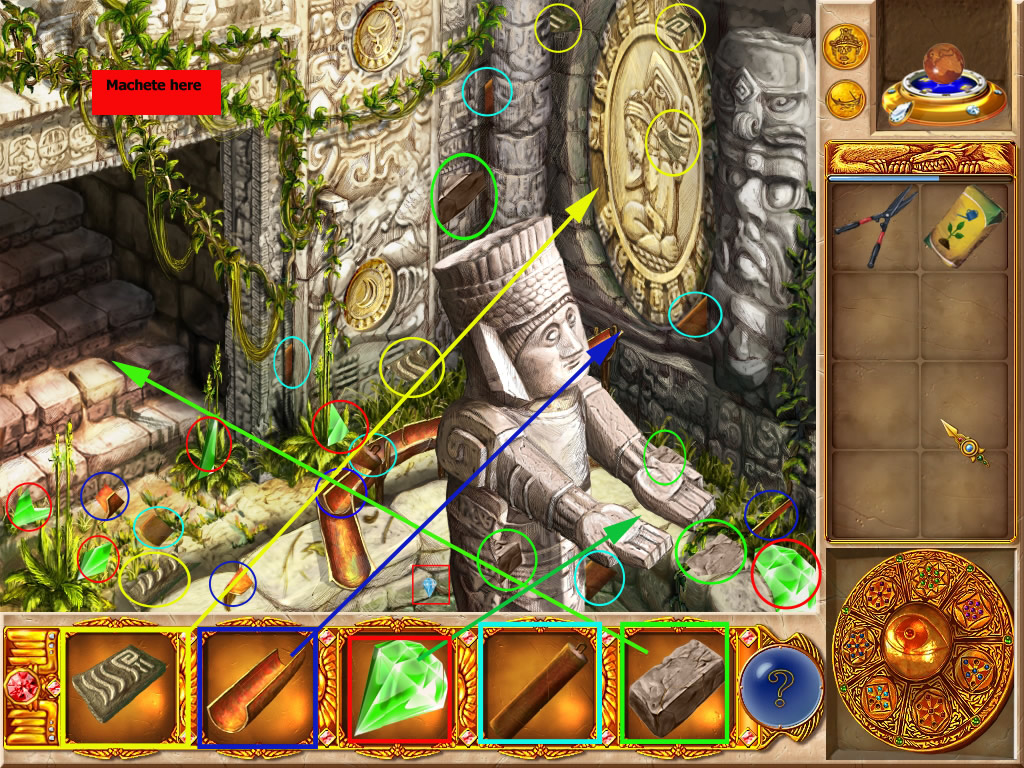
Mayan Observatory - 2. Location
Use the machete at the vine upper left.
Place the stone on the broken stair left side - you know can have a look there.
Place the pipe at the pipeline at the side of the water.
Give the statue the diamond.
Follow and click the golden beam.
At this point, you will not be able to move on, if you did not find all gems.
In this case you will have to go back to the places where you missed one or more. The places are shown on the map by blue flags.
You do not have to play the complete level again, simply look for the gems.
Now the hint will show you the gems.
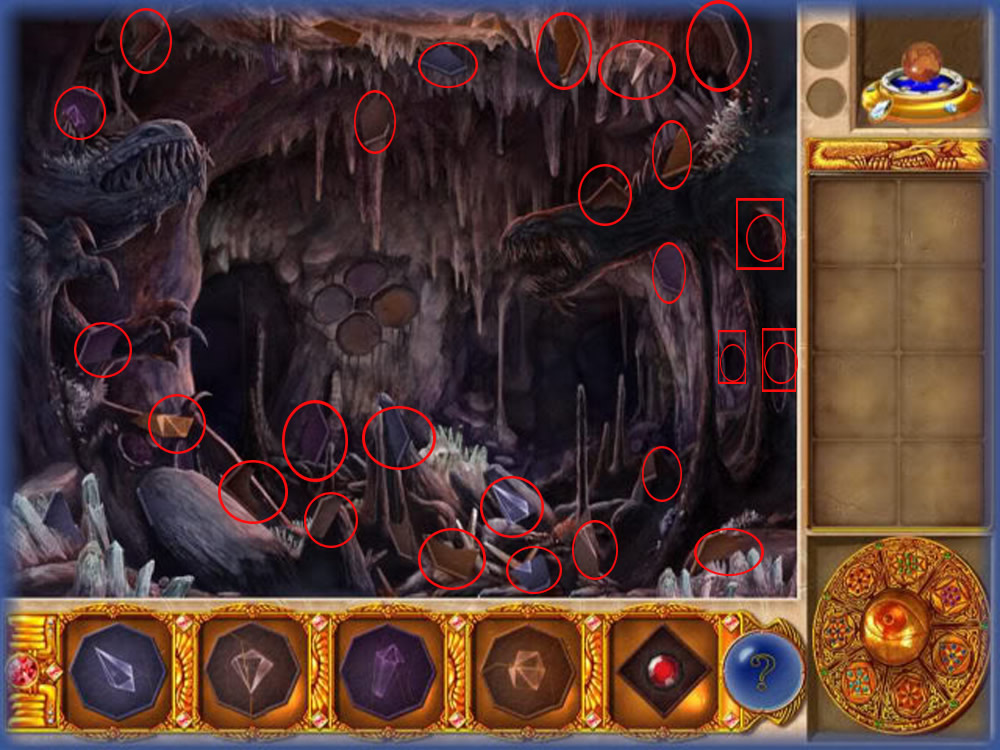
Final
Click the white beam.
Look for all parts for the discs and place them in the right slots.
Click the dragon which will be highlighted by a red beam.
Enjoy the end.
Screenshot
And as always thanks to Kayleigh for the great walkthrough :D
Posted by: Kero |
July 11, 2009 7:03 PM
|
July 11, 2009 7:03 PM