
Witches' Legacy: The Charleston Curse
Platform: Mac, Windows

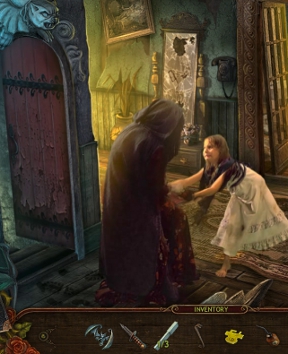
![]() You got 99 problems and a witch ain't one!... or, at least, that was true before Witches' Legacy: The Charleston Curse, a hidden-object adventure from EleFun Games. After a letter claiming that you're the sole living relative to an orphaned little girl arrives on your doorstep from her caretaker, you decide to set out and get to the bottom of things... one to be brained over the head and locked in an attic for your trouble. Escaping seems like a good idea, but you've already gotten yourself tangled up in a family with one very dangerous past, and if you want to get out alive, you'll have to solve the mysteries of the house and your heritage, and tangle with one seriously nasty old crone to boot. Witches, man.
You got 99 problems and a witch ain't one!... or, at least, that was true before Witches' Legacy: The Charleston Curse, a hidden-object adventure from EleFun Games. After a letter claiming that you're the sole living relative to an orphaned little girl arrives on your doorstep from her caretaker, you decide to set out and get to the bottom of things... one to be brained over the head and locked in an attic for your trouble. Escaping seems like a good idea, but you've already gotten yourself tangled up in a family with one very dangerous past, and if you want to get out alive, you'll have to solve the mysteries of the house and your heritage, and tangle with one seriously nasty old crone to boot. Witches, man.
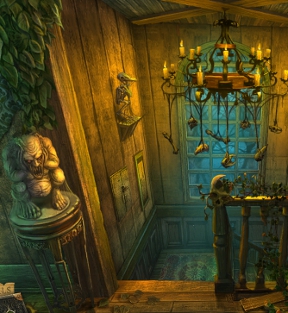 While ultimately your goal is to get out of the house de-witched (which is kind of like being de-loused, but with more cackling), you'd be a pretty bad person if you didn't at least try to find and rescue Lynn, the little girl, as well. Of course, this isn't your typical house; it's packed full of all manner of strange and unearthly obstacles, from petulant doorknobs with colds to the hungry living darkness that resides under the stairs. As you explore, gathering items and solving hidden-object scenes, you'll also discover that Lynn has a rather unique talent; the drawings she leaves behind are magical, and will begin to animate and reveal to you a little more of the story once you have a few pieces.
Analysis: Witches' Legacy: The Charleston Curse is that rare sort of game that can have you simultaneously chuckling and intrigued from the get-go. Through a combination of multiple different visual animation styles and an appealing sense of dramatic flair, which mostly works although the full motion video actors can look somewhat out of place, it manages to pull you into its cheesy twisted fairy-tale-esque story and keep you engaged. The story and gameplay move along at a brisk pace, rarely leaving you to feel like you're shuffling around aimlessly, and continually tosses you little cutscenes and Lynn's magical drawings to keep you interested. Since most hidden-object games take a lazier approach to engaging the player, leaving you feeling like you're taking a household tour with Ben Stein who stops periodically to make you sort through his boxes of "Garage Sale Treasures", Witches' Legacy winds up feeling a lot more interesting.
 The gameplay is a bit of a mixed bag, in that while none of it is bad, the lion's share of the puzzles are going to be exceedingly familiar to anyone who's ever played a few games in the genre. You'll encounter the usual adventure game frustrations of being able to use only one specific item in any given situation when you have eight that could do the job just as well, but Witches' Legacy at least tries to keep you entertained while you hunt around. The environments are gorgeous, and packed full of witchy details that makes it worth spending a little time admiring each one. The hidden-object scenes are by and large clear and well done, and the little mini-puzzles in each one required to find specific "hidden" items help keep them interesting. Well, as interesting as they can be once you know you've already found the specific item you were rooting through all this junk for but they force you to complete it anyway. The game does lean somewhat more towards traditional adventure gameplay, however, so those of you who prefer your games to not bury you under an avalanche of hidden-object scenes will probably be pleased.
While Witches' Legacy: The Charleston Curse is far from what you'd call serious or earth-shattering, it is a beautiful, colourful, and creative campy good time. It's exactly the sort of well-made and just plain fun game you can use to relax in the evening. It's popcorn gaming at its finest, shameless B movie indulgence, and if that sounds good to you, then you'll definitely want to check out the demo. At around four hours or longer to complete, it might not be the lengthiest title around, but for me, speaking as someone who tends to burn out on sheer volume of hidden-object adventures we see, this was definitely one of the most enjoyable titles to cross my plate in a long time. Give the demo a try and see if you don't enjoy all the quality and creativity this one has to offer.
A Collector's Edition is also available. It contains a bonus chapter, art gallery, strategy guide, and more. Remember that Big Fish Game Club Members pay only $13.99 for Collector's Editions (or 2 club credits), and collector's editions count 3 card punches of 6 total needed for a free game.
![]() Windows:
Windows:
Download the demo
Get the full version
Also available: Collector's Edition
![]() Mac OS X:
Mac OS X:
Download the demo
Get the full version
Also available: Collector's Edition


Walkthrough Guide
(Please allow page to fully load for spoiler tags to be functional.)
Witches' Legacy: The Charleston Curse Collector's Edition walkthrough
General Info
At the start of a new game, you have a choice between two difficulties: Regular mode and Expert mode.
In Regular mode, the Hint and Skip buttons recharge more quickly, and sparkles will indicate active areas.
In Expert mode, the Hint and Skip buttons have a slower recharge timer, and there are no sparkles to indicate active zones.
Use the cursor to interact with the environment. The cursor will change to a magnifying glass when you can inspect an area more closely or start a puzzle or hidden object scene, a directional arrow when you can move to a different location, and a hand when you can pick up an item to add it to your Inventory or interact directly with the environment.
The Inventory is the bar located at the bottom of the screen which contains all the items you will need to progress through the game.
Click in your Inventory to select it, then click on an area in the game to attempt to use the item. Often, once an item is used, it will disappear from your inventory.
Click the arrows at the left and right sides of the inventory to toggle through the list.
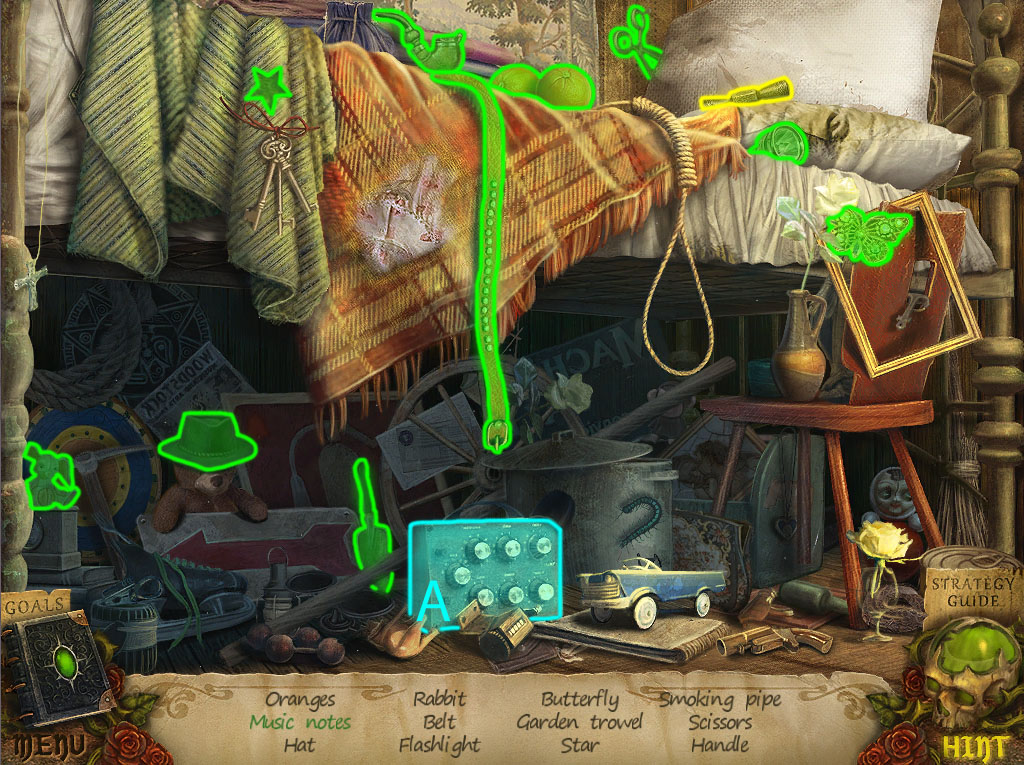
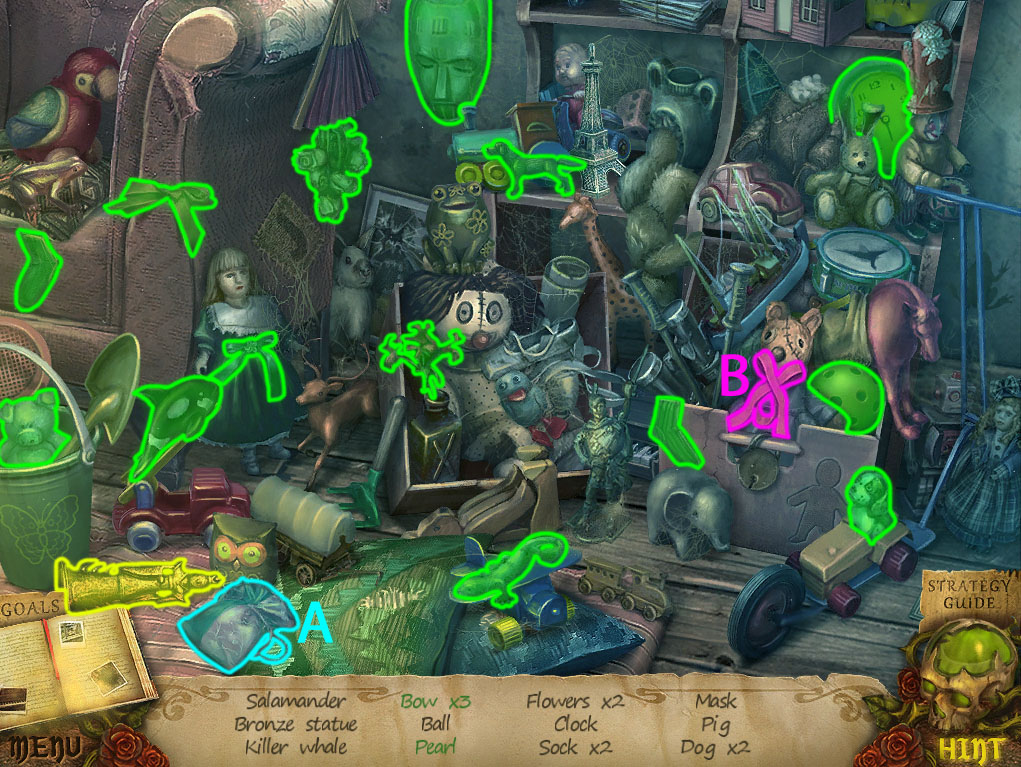
Hidden object scenes are areas indicated by sparkles, where you must collect various randomized objects listed at the bottom to receive a new inventory item upon completion.
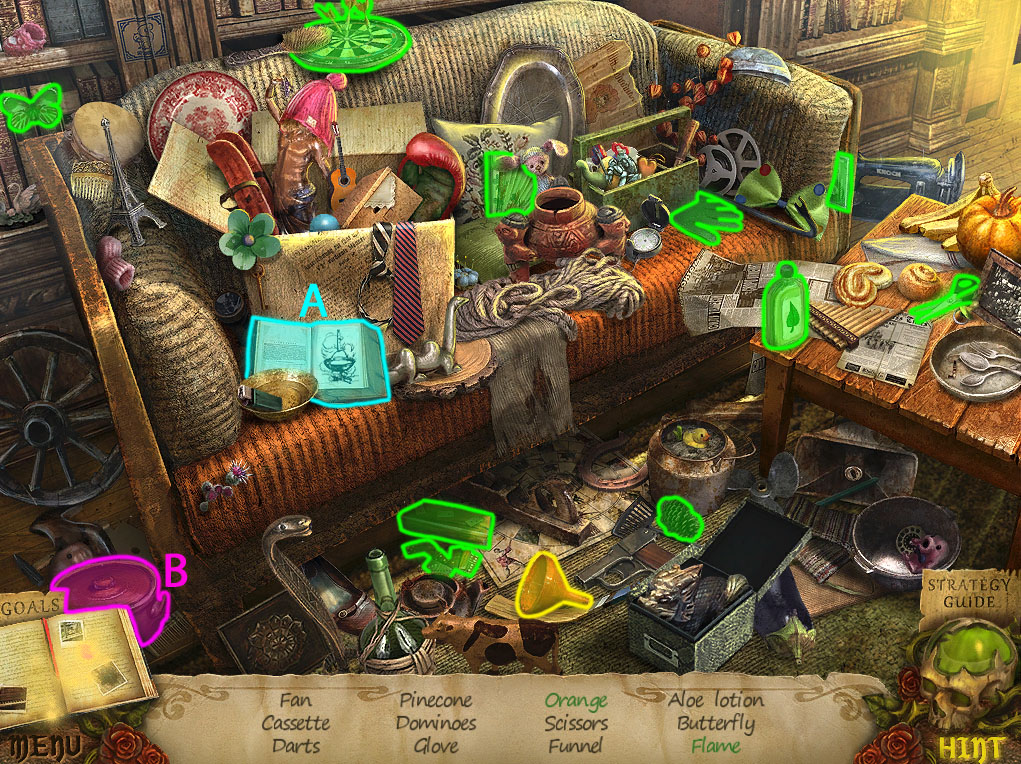
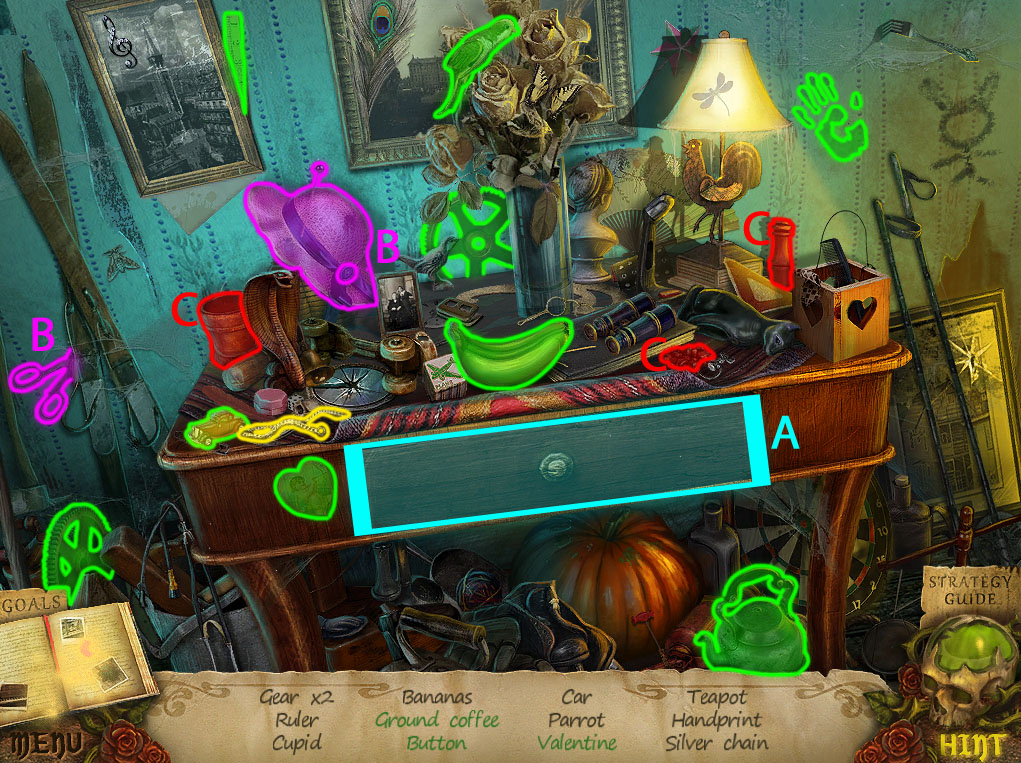
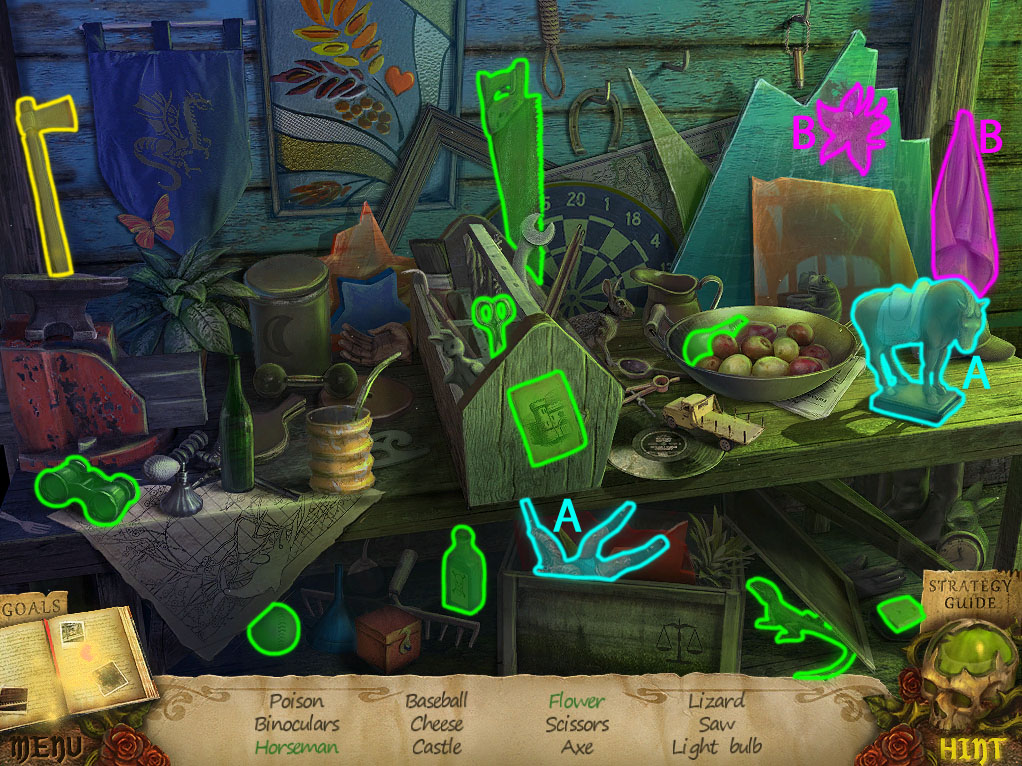
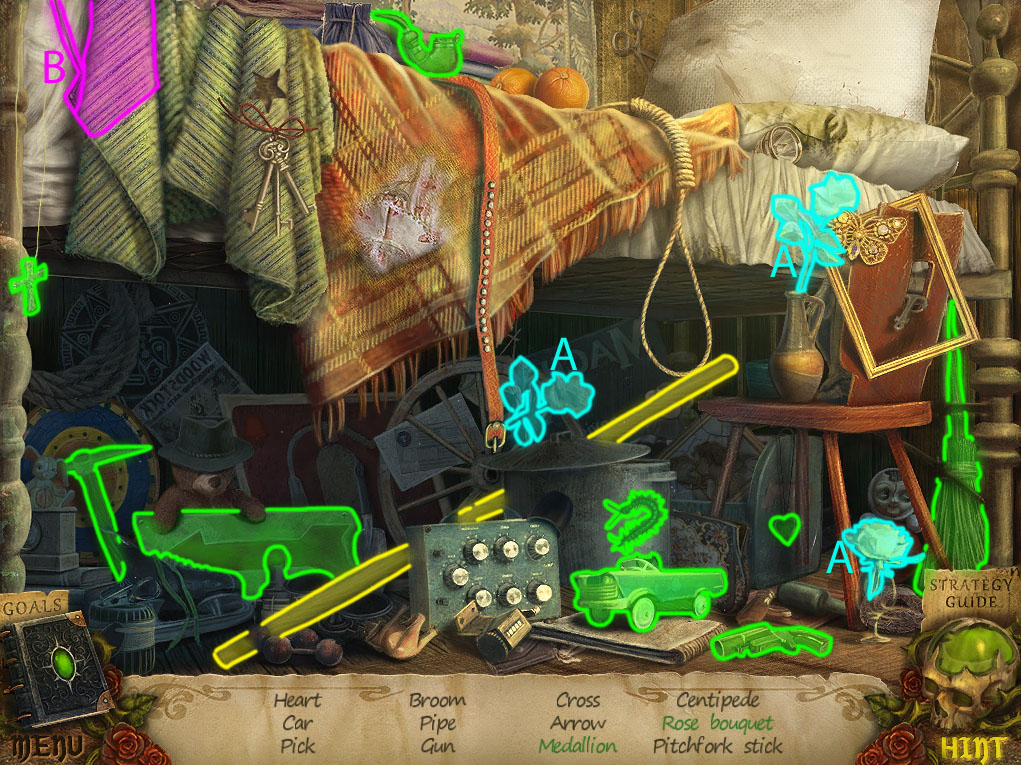
In screenshots, the random items are highlighted in green, the inventory item you receive at the end is highlighted in yellow, and interactive areas are highlighted in blue or purple.
To the right of the Inventory bar is the Hint button.
The Hint button can be used to reveal an item during a hidden object scene or to show you the next step of your adventure if you're stuck.
While solving a puzzle, the Hint button will change to a Skip button. Press the Skip button once it charges to immediately complete the puzzle.
On the left side of the Inventory is the Journal.
The Journal tracks important information and plot points; it also collects the Magical Drawing fragments you find throughout your game.
When all the pieces of a Magical Drawing have been found, click the completed drawing in the Journal to watch an animated clip that offers hints for future puzzles.
Above the Journal is the Goals tab; mouse over the tab to find a list of tasks that you must complete in order to progress further in the game.
Under the Journal is the Menu button. Click the Menu button to view an in-game menu where you can pause the game, change the visual and audio options, or Exit to the main menu.
Chapter 1
Inside the Car
Click the envelope on top of the dashboard to zoom in.
Open the envelope to find the ripped piece of the Magical Drawing and the letter.
Continue forward to go to the Gate.
Gate
Take the Stick on the grass in front of the gate.
Click the spiderweb at the top of the right column for a closer look.
Use the Stick to tear down the spider's web.
Click the rope to open the gate.
Speak with the girl to go to the Attic.
Attic
Click the small table to zoom in and take the Flashlight.
Click the dark corner of the room to look underneath the wooden boards.
Place the flashlight on the floor, then click the button to turn it on.
Take the Screwdriver and the second half of the Magical Drawing.
Click the completed Magical Drawing #1 in the journal, then note the three symbols the little girl draws at the end of the clip.
Inspect the large chest for a closer look.
Use the Screwdriver to remove the lock and receive the Screw.
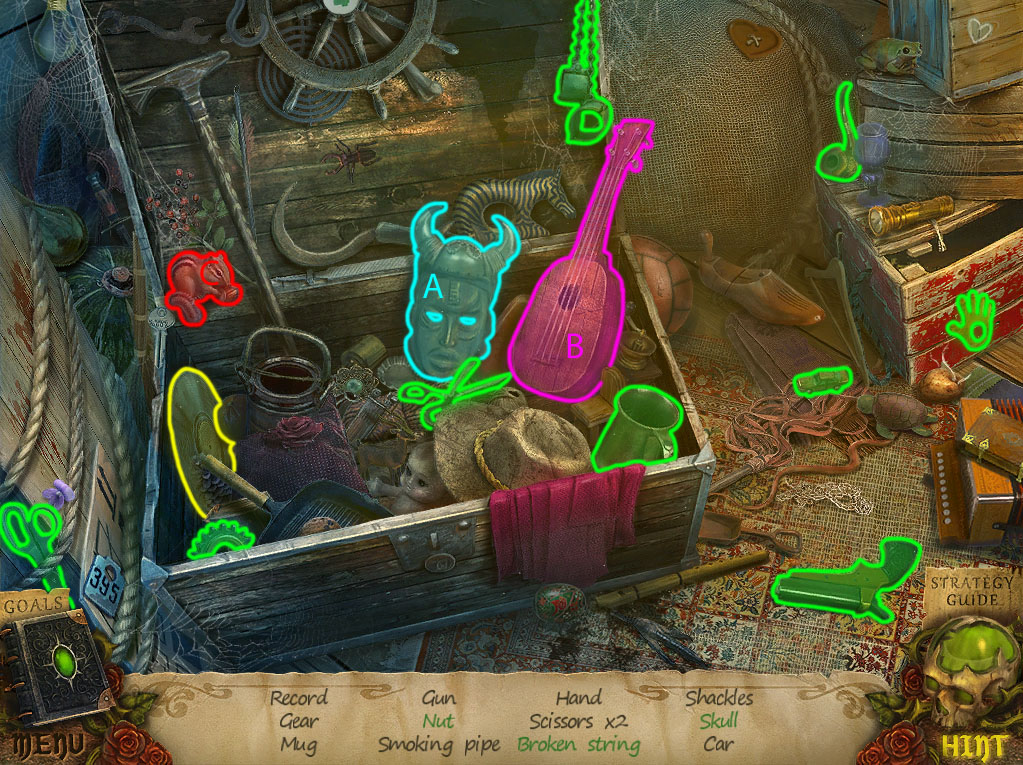
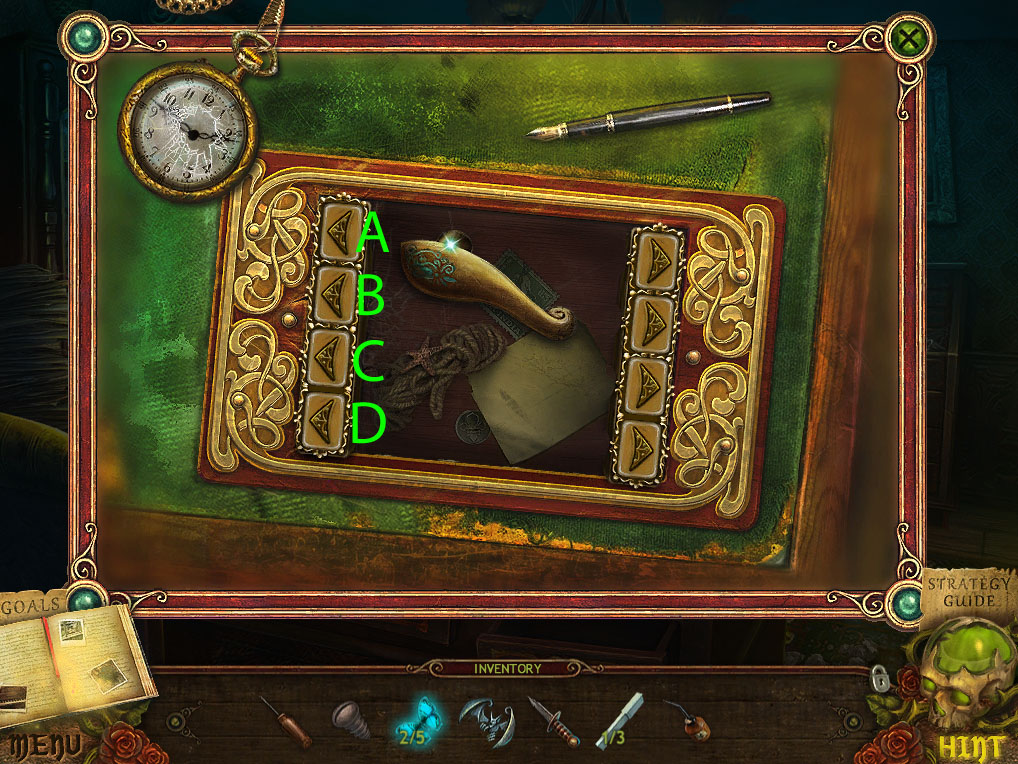
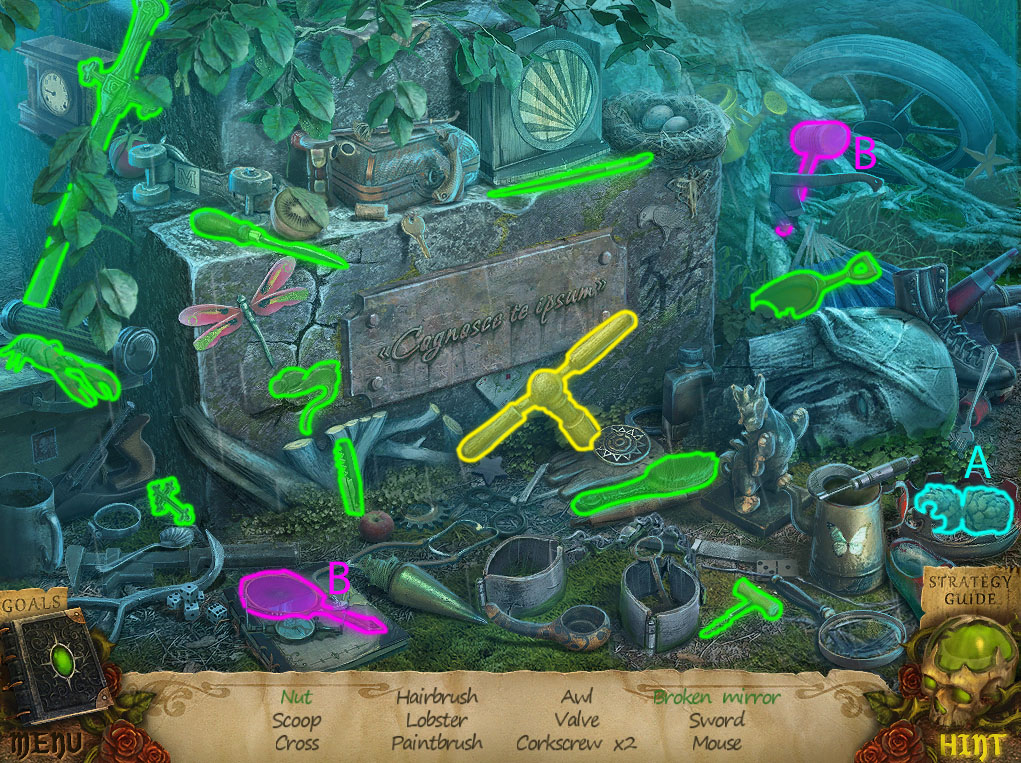
Click the open chest to start the hidden object scene.
Move the horned mask to find the Skull (A).
Click the lyre to make the Broken String (B).
Click the chipmunk, and it will throw the Nut (C).
Screenshot.
Once the hidden object scene is complete, you will receive the Vinyl Record.
Click the record player to zoom in.
Place the Vinyl Record on top of the turntable to start the puzzle.
Rotate the buttons to match the symbols from the Magical Drawing #1 in the Journal.
Click the left button four times, click the right button two times, click the center button 6 times.
Click the red lever to play the record.
Solution.
Once the puzzle is solved, click the open drawer under the record player to zoom in and take the Girl's Cameo and the family portrait picture.
Take the Ladder leaning against the wall under the window.
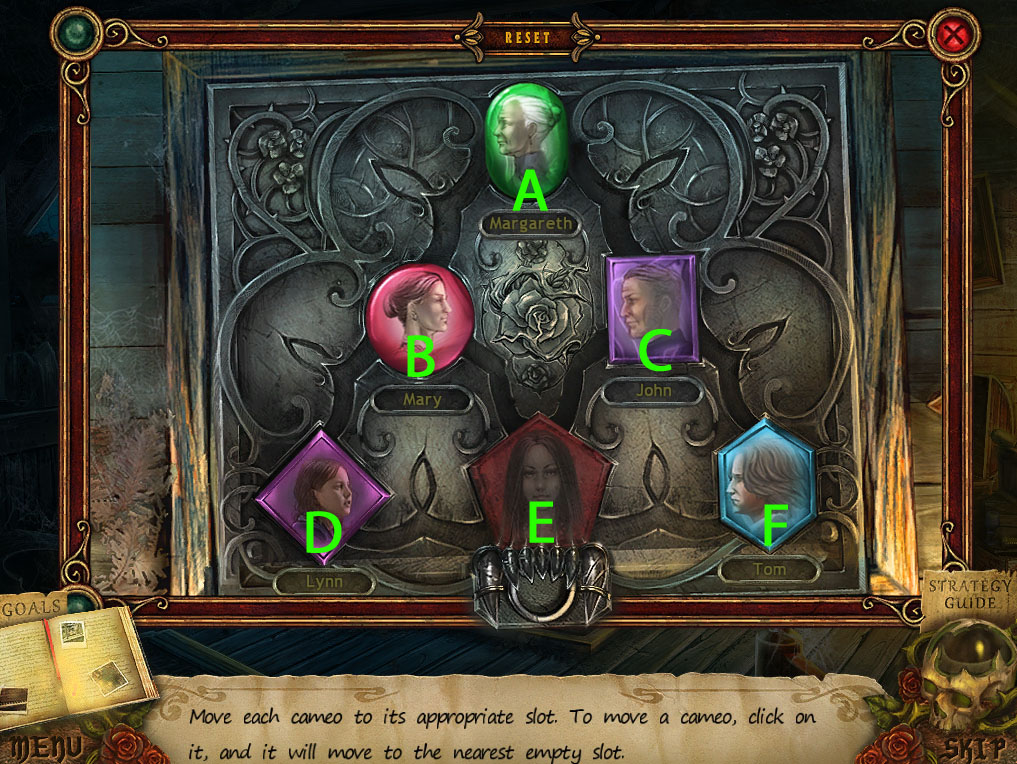
Inspect the framed family tree on the floor for a closer look.
Add the Girl's Cameo to the picture to start the puzzle.
Arrange the family portraits into the correct position to solve the puzzle.
Click a portrait to move it along the track into an adjacent empty space.
Note the age and gender of the people as well as the shape of the cameos to find their location on the family tree.
When a portrait is in the right place, it will glow brightly.
Click the spaces on the board in the following order: D, B, A, C, F, E, D, B, E.
Solution.
Once the puzzle is solved, click the open hatch under the lifted picture to look down.
Place the Ladder down the open hatch, then go down the ladder to the Upstairs Hallway.
Upstairs Hallway
Click the little girl to speak with her.
Inspect the small table for a closer look.
Open the drawer and take the Butterfly 1/5 and the address note inside.
Continue forward to the Passage.
Passage
Take the piece of the Magical Drawing on the floor.
Click the window to look outside.
Click the witch to start the cutscene, then take the Saline Solution on the windowsill.
Click the table to start the hidden object scene.
Open the drawer to find the Brush (A).
Turn on the lamp to reveal the Dragonfly (B).
Open the ring box to find the Ring (C).
Screenshot.
Once the hidden object scene is complete, you will receive the Gargoyle.
Go forward to the Landing.
Landing
Click the fusebox on the left wall under the bird skeleton to zoom in.
Take the Butterfly 2/5 on top of the lock.
Go right to face the Right Corridor.
Right Corridor
Click the painting hanging on the left wall to zoom in and take the Knife.
Inspect the box on the chair for a closer look.
Read the note on top of the box to learn it opens with a signet ring.
Go back to the Landing, then continue left to face the Left Corridor.
Left Corridor
Click the window on the right wall to zoom in.
Click the drapes to open them, then take the Piano Key 1/3 on the windowsill.
Inspect the first aid kit on the left wall.
Use the Knife to cut through the right side of the tape, then remove the tape from the left side of the box.
Click the handle to open the first aid kit.
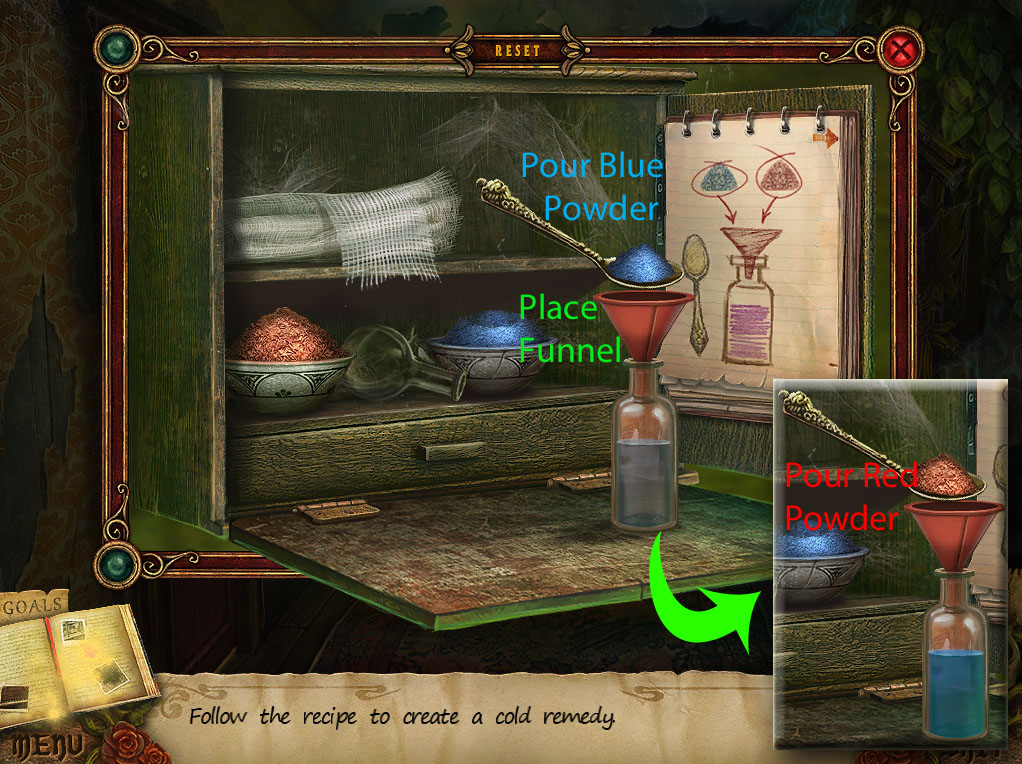
Place the Saline Solution on the tray at the bottom to start the puzzle.
Create the potion by following the recipe in the notepad at the side door of the first aid kid.
First place the funnel at the top of the saline solution.
Use the spoon to pour the red powder and the blue powder into the saline solution.
Solution Part 1.
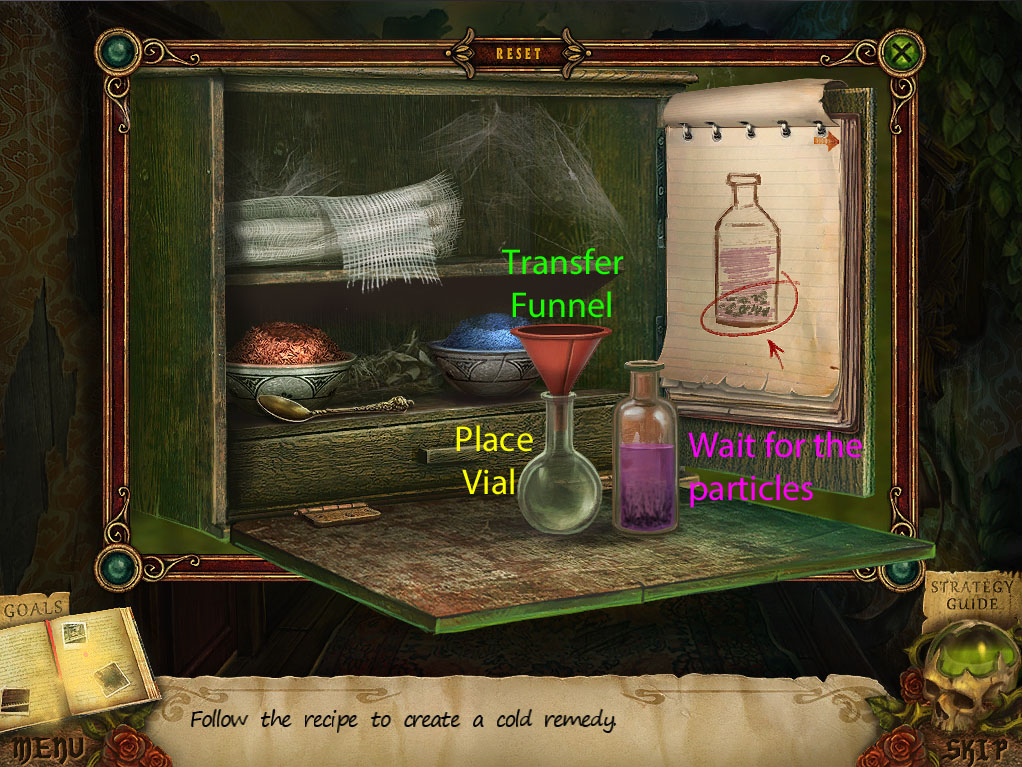
Click the empty vial to set it on the tray.
Once the particles settle at the bottom of the saline solution, transfer the funnel to the empty vial.
Solution Part 2.
Next, place the mesh cloth over the top of the funnel.
Pour the saline solution into the empty vial.
Solution Part 3.
Once the recipe is complete, remove the funnel and take the completed Cold Remedy.
Inspect the door knob of the left door for a closer look.
Use the Cold Remedy on the door knob.
Go through the open door to the Study.
Study
Read the papers at the lower right corner of the desk.
Inspect the cupboard against the back wall.
Click the teacup to zoom in, then take the Sugar on the dish.
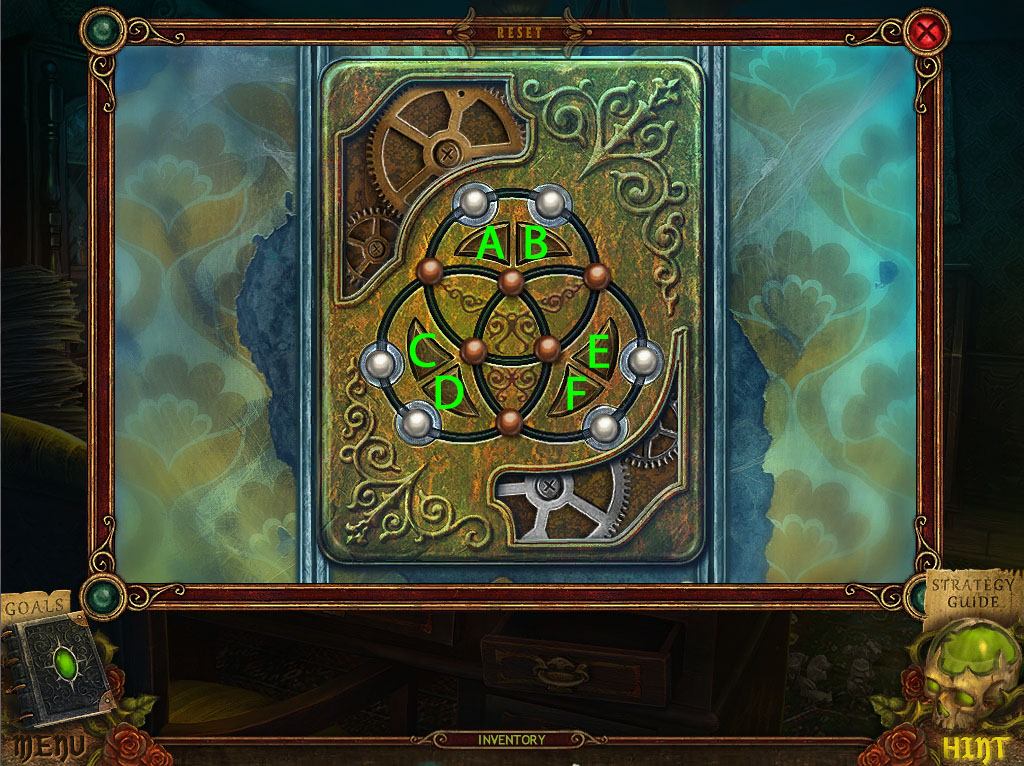
Click the mask on the wall for a closer look, then click the mask again to start the puzzle.
Align the white marbles into the two white slots of each ring.
Click the arrow buttons to rotate the marbles in their corresponding rings clockwise or counterclockwise.
Click the buttons in the following order: C, F, D x2, A, F x2, B, E x2, B
Solution.
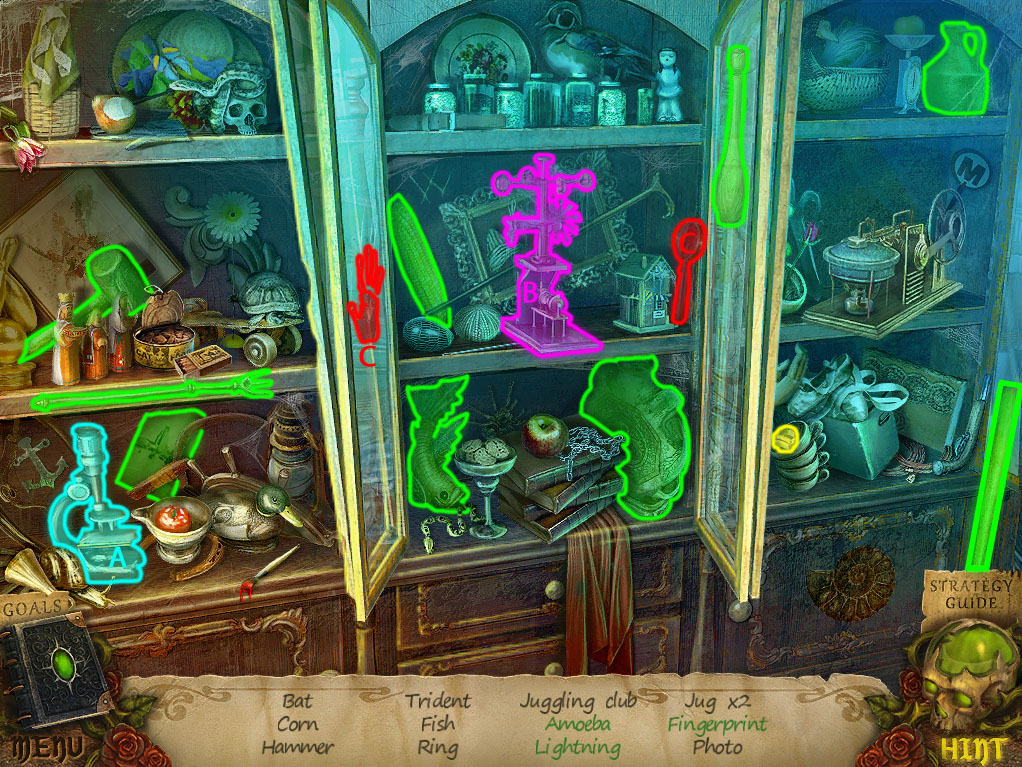
Once the puzzle is solved, click the open cupboards to start the hidden object scene.
Click the microscope to view the Amoeba (A).
Click the miniature generator four times to generate the Lightning (B).
Use the magnifying glass on the handprint to find the Fingerprint (C).
Screenshot.
Once the hidden object scene is complete, you will receive the Signet Ring.
Go back to the Passage.
Passage
Click the small box on the floor for a closer look.
Turn the key to open the box.
Give the Sugar to the imp inside the box, then take the discarded Screw Lock Key from the floor.
Go forward to the Landing.
Landing
Inspect the fusebox on the left wall under the bird skeleton.
Use the Screw Lock Key on the screw lock at the center of the box to open the door.
Take the Oil Can behind the cobweb covered fuse panel.
Go right to the Right Corridor.
Right Corridor
Click the box on the chair for a closer look.
Use the Signet Ring on the lock to open the box.
Remove the shredded paper inside the box to find the Mechanism Piece.
Return to the Study.
Study
Inspect the mechanism at the lower left corner of the desk for a closer look.
Add the Mechanism Piece to the top two bars of the panel to start the puzzle.
Use the arrow buttons to retract the metal bars all the way down into the left side.
Clicking the left facing arrow will move the corresponding bar inward and the right facing arrow will move it outward; however, it will also affect a 2nd bar in either the same direction or inversely.
Click the arrows in the following order: B x4, C x3, B, D x2, A, C, D.
Solution.
Once the puzzle is solved, take the Window Handle from the revealed cache in the desk.
Exit the room to the Right Corridor.
Right Corridor
Click the right window to zoom in, then click the middle of the windowpane for a closer look.
Add the Window Handle to the half on the windowpane.
Click the handle to turn it, then click the window to open it.
Go through the open window to the Tree House.
Chapter 2
Tree House
Click the book in the lower left corner to zoom in.
Take the Butterfly 3/5 on top of the journal, then click the cover to open it.
Inspect the image of the butterfly lantern, then turn to the last page and take the Magical Drawing fragment.
Click the hatch at the floor for a closer look.
Use the Knife to cut through the bindings around the rope ladder.
Go down to the Forest, then continue forward to the Graveyard.
Graveyard
Speak with the little girl sitting at the graves.
Click the vines at the base of the left statue to zoom in and take the Shears Part.
Go back to the Forest.
Forest
Inspect the base of the right tree for a closer look.
Take the Butterfly 4/5 on top of the root.
Use the Shear Part on the other half lying on the ground.
Add the Screw to the hole at the center of the two parts, then tighten it with the Screwdriver.
Take the completed Shears.
Again, go forward to the Graveyard.
Graveyard
Click the base of the left statue to zoom in.
Use the Shears to cut through the vines covering the grave.
Click the statue to start the hidden object scene.
Feed the egg to the snake to reveal the Crystal (A).
Move the leafy branch to find the Anchor (B).
Use the rag to clean the stained plaque, revealing North America (C).
Screenshot.
Once the hidden object scene is complete, you will receive the Crowbar.
Go back once to the Forest.
Forest
Click the crate on the ground for a closer look.
Use the Crowbar to open the lid.
Take the Saw Handle inside the open crate.
Go up the ladder to the Tree House.
Tree House
Inspect the saw blade stuck in the tree trunk at the upper left corner.
Combine the Saw Handle with the saw blade.
Lubricate the rusted blade with the Oil Can, then take the Saw from the tree.
Return to the Landing.
Landing
Click the loose floorboard under the banister to zoom in.
Use the Crowbar to lift the board.
Take the Lock Piece and the Magical Drawing fragment from the revealed cache.
Click the completed Magical Drawing #2 in the journal and note the four digit combination to the locked drawer shown in the clip.
Go right to the Right Corridor.
Right Corridor
Click the glass doors for a closer look.
Use the Saw to cut through the board barricading the door.
Click the open door to inspect the balcony.
Read the note wrapped around the dead carrier pigeon's leg.
Take the Butterfly 5/5 on top of the tea pot handle.
Click the lid of the lantern to open it.
Place all five of the Butterflies into the lantern, replace the lid and take the Lantern.
Go back to the landing, then continue down to the Stairway.
Stairway
Use the Lantern on the black cloud blocking the stairs.
Go down the stairs to the 1st Floor Hallway.
Chapter 3
1st Floor Hallway
Click the witch to start the cutscene.
Continue left to the Foyer.
Foyer
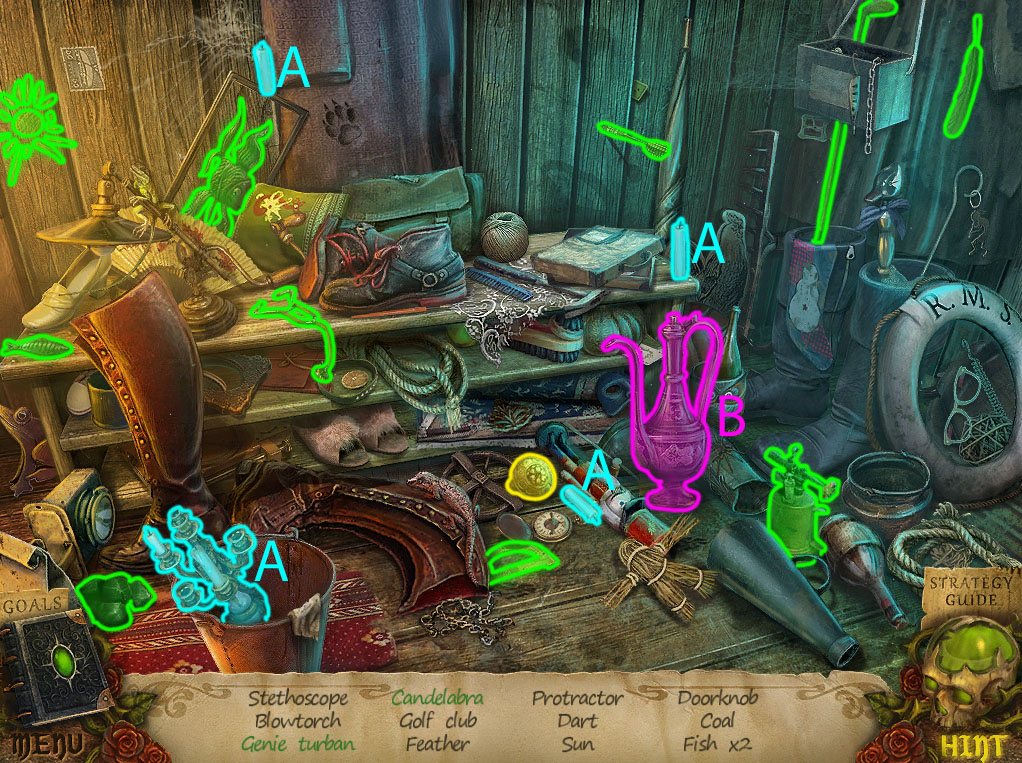
Click the shoe rack to start the hidden object scene.
Add the three candles to the candlesticks to complete the Candelabra (A).
Rub the lamp to find the Genie Turban (B).
Screenshot.
Once the hidden object scene is complete, you will receive the Door Knob.
Click the teddy bear on the bench to zoom in.
Use the Knife to cut through the bear's stitching, then take the revealed Spoke.
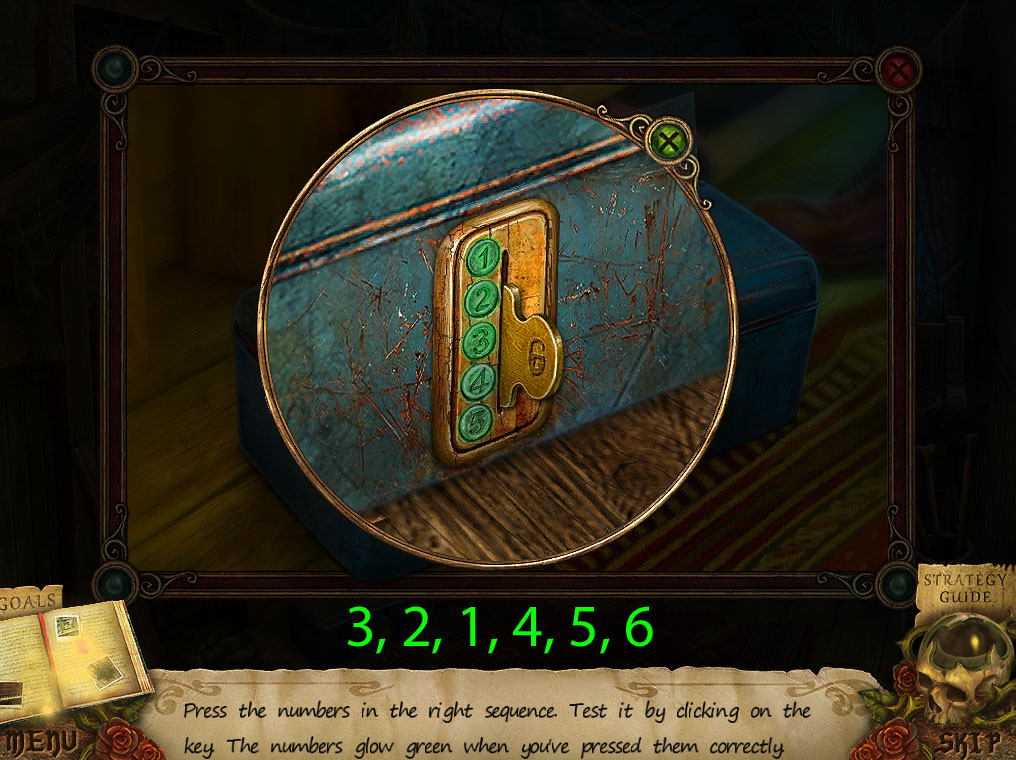
Inspect the lockbox on the floor by the shoe rack, then click the lock for a closer look.
Add the Lock Piece to the slot in the lock to start the puzzle.
Press the buttons in the correct sequence to open the lock.
Using trial and error, press all of the six buttons, including the lock piece in the slot.
Buttons that are pressed in the correct sequence will glow green, while incorrect buttons will glow red.
Press the buttons in the following order: 3, 2, 1, 4, 5, 6.
Solution.
Once the puzzle is solved, take the Formed Key from the open lockbox.
Go back to the 1st Floor Hallway.
1st Floor Hallway
Inspect the box with the flame icon at the lower right side of the open doorway.
Use the Formed Key on the insert at the top of the box.
Turn the key and click the lid to open the box, then take the Spray inside.
Go forward to the Dining Room.
Dining Room
Click the box on the sofa to zoom in and take a piece of the Magical Drawing.
Take the Rag hanging over the side of the dining table.
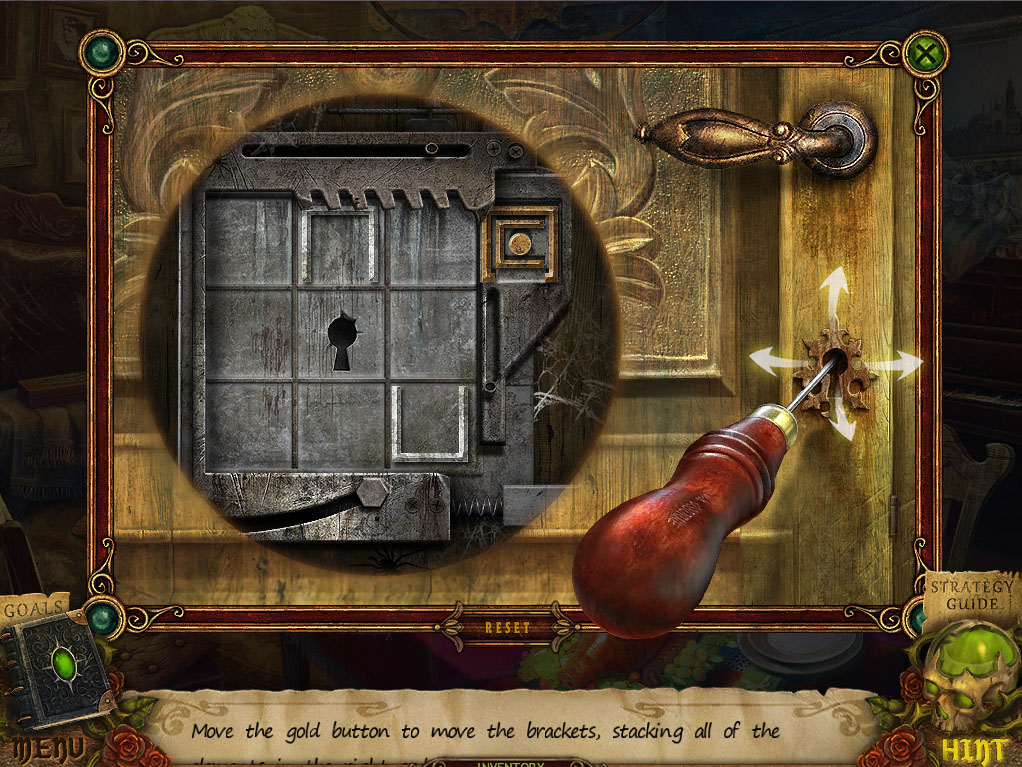
Click the closed door for a closer look.
Use the Spoke on the keyhole to start the puzzle.
Move the button to push the gold brackets into the slot outside the lock mechanism.
Push the directional arrows under the door knob to move the button up, down, left, or right around the board.
The button can't move through obstacles such as the wall or the brackets, but it can go inside a bracket to move it around the board.
Click the arrows in the following order: Down, Right, Up x2, Down, Left x2, Down, Right, Up x2
Solution Part 1.
Left, Down, Right, Down, Left, Up, Right x2, Down
Solution Part 2.
Left, Up, Left, Up, Right, Down x2, Right, Up x2.
Solution Part 3.
Once the puzzle is solved, click the handle to open the door, then go through the open door to the Library.
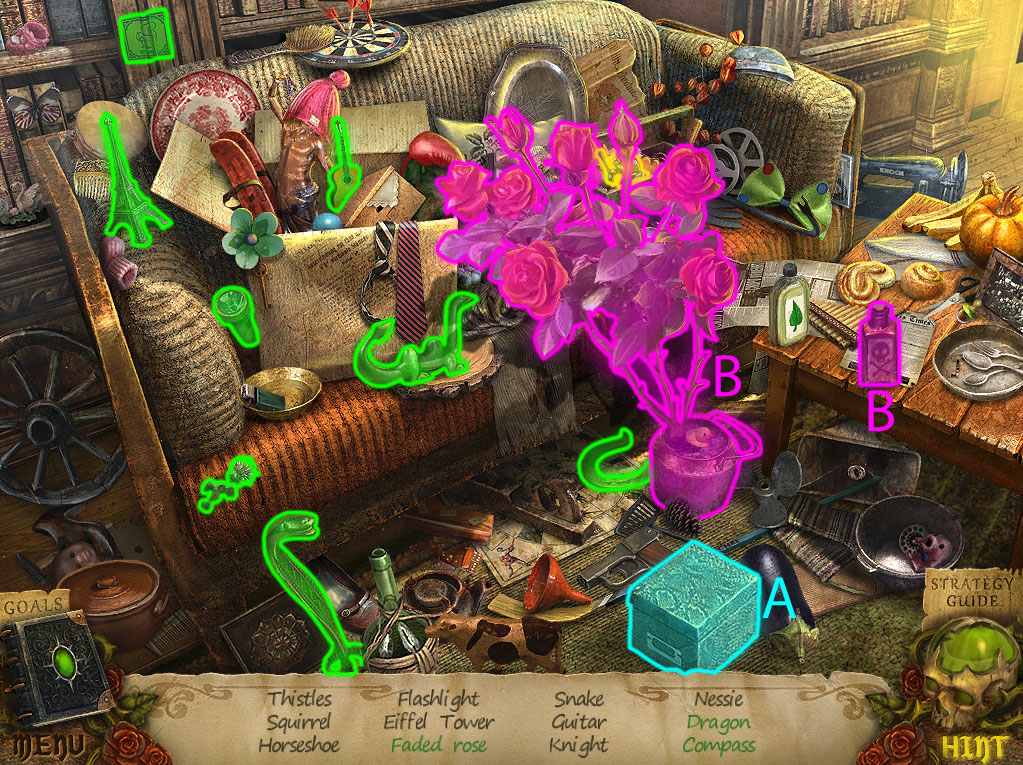
Library
Click the sofa to start the hidden object scene.
Open the box to find the Dragon (A).
Use the poison on the flower pot to make the Faded Rose (B) and reveal both the Knight and the Compass on the couch.
Screenshot.
Once the hidden object scene is complete, you will receive the Knight.
Inspect the boarded-up grandfather clock.
Use the Crowbar four times at the end of both planks, then take the four pried Nails from the boards.
Take the Piano Key 2/3 on top of the table.
Go back to the 1st Floor Hallway.
1st Floor Hallway
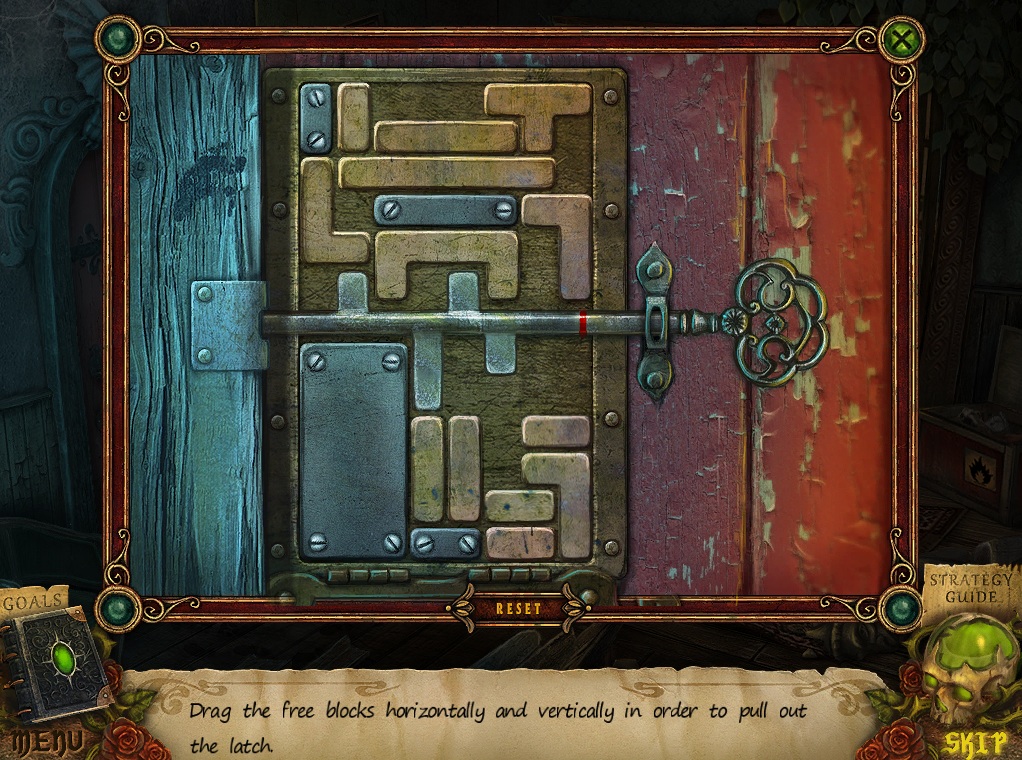
Click the handle of the closed door for a closer look.
Add the Gargoyle and the Knight to the plate over the lock to start the puzzle.
Drag the blocks around the board to free the key from the lock.
Click and drag a block vertically or horizontally into an empty space on the board.
You can also drag the key outward when the area around the teeth of the key is cleared.
Click the reset button at the bottom to reset the puzzle if you are stuck.
Solution Part 1.
Solution Part 2.
Once the puzzle is solved, go through the open door to the Cellar.
Cellar
Click the imp standing at the rune on the floor to chase it away.
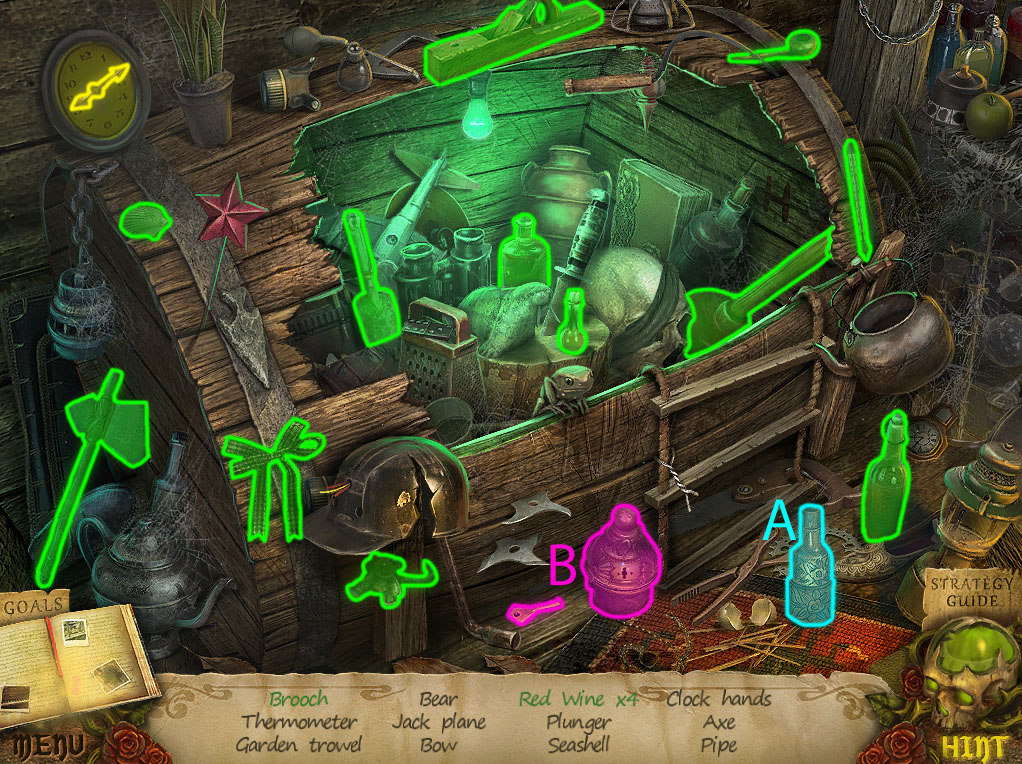
Click the barrel to start the hidden object scene.
Open the bottle to find the fourth Red Wine (A).
Use the key on the locked jewelry box to reveal the Brooch (B).
Screenshot.
Once the hidden object scene is complete, you will receive the Clock Arrow.
Use the Rag on the puddle on the floor at the foot of the stairs, then take the Wet Rag.
Return to the Foyer.
Foyer
Click the imp sitting on the bench to chase it away.
Inspect the red hot door knob of the closed door.
Use the Wet Rag to wipe off the fire sign under the door knob, then click the knob to open the door.
Go through the open door to the Backyard Porch.
Chapter 4
Backyard Porch
Click Tom's spirit to speak with him.
Take the Rope Ladder on the floor beside the mat.
Go left to face the Side Window, then continue forward to the Barn Entrance.
Barn Entrance
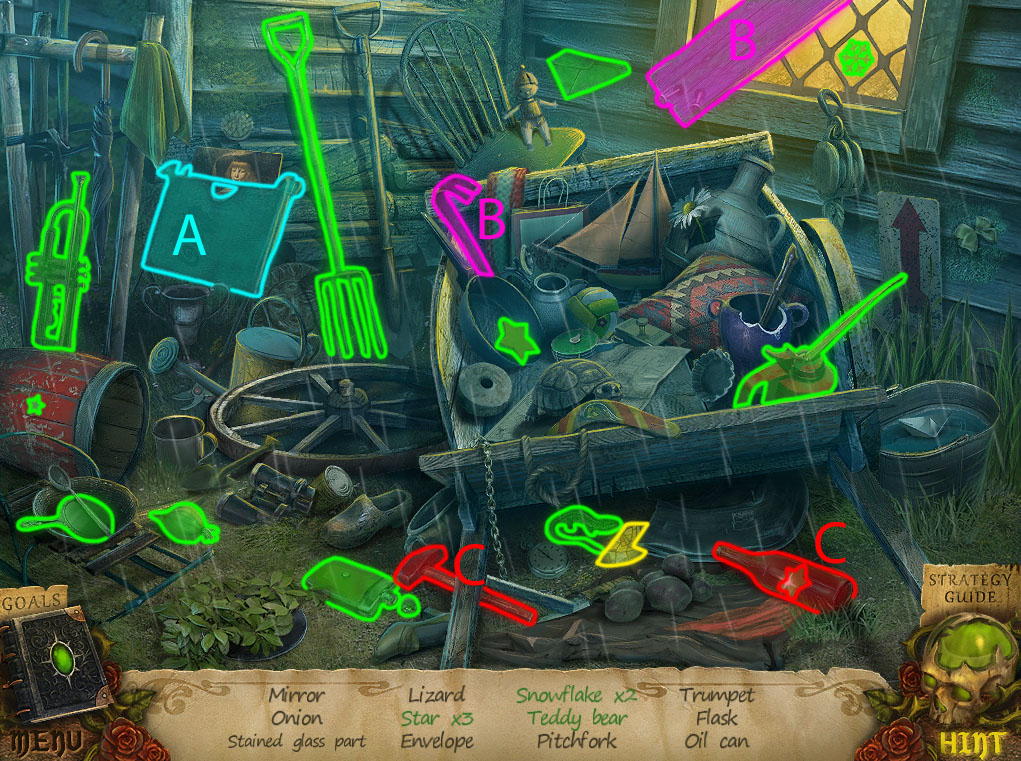
Click the pile of junk at the corner of the building to start the hidden object scene.
Open the folding chair to find the Teddy Bear (A).
Use the crowbar to remove the board, revealing the second Snowflake (B).
Use the hammer to smash the glass bottle to find the third Star (C).
Screenshot.
Once the hidden object scene is complete, you will receive the Stained Glass Part 1/2.
Inspect the barrels in the cart for a closer look.
Take the Hammer sticking out of the cart.
Go back to the Side Window.
Side Window
Click the window to zoom in.
Use the Hammer to knock out the rusted bolt.
Click the window to open it, then climb inside to the Bricked Bedroom.
Bricked Bedroom
Take the Magical Drawing fragment on top of the bed next to the doctor's bag.
Click under the bed to start the hidden object scene.
Turn on the radio to play the Music Notes (A).
Screenshot.
Once the hidden object scene is complete, you will receive the Knob 1/2.
Read the note on top of the serving cart.
Return to the Upstairs Hallway.
Upstairs Hallway
Click the closed door covered in handprints to zoom in.
Click the frame to the door handle to place it over the keyhole.
Set the four Nails into the holes at the corner of the frame, then use the Hammer three times on each nail to hammer them down.
Add the Door Knob to the door to start the puzzle.
Click the buttons in their order in the zodiac.
Around the door knob are 12 buttons with symbols representing the signs of the zodiac, which must be pushed in the correct sequence.
If a button is pushed correctly, it will lock in place and become highlighted in blue
If it is incorrectly selected, the door knob will flash red in the center and the puzzle will reset.
Solution.
Go through the open door to Lynn's Bedroom.
Lynn's Bedroom
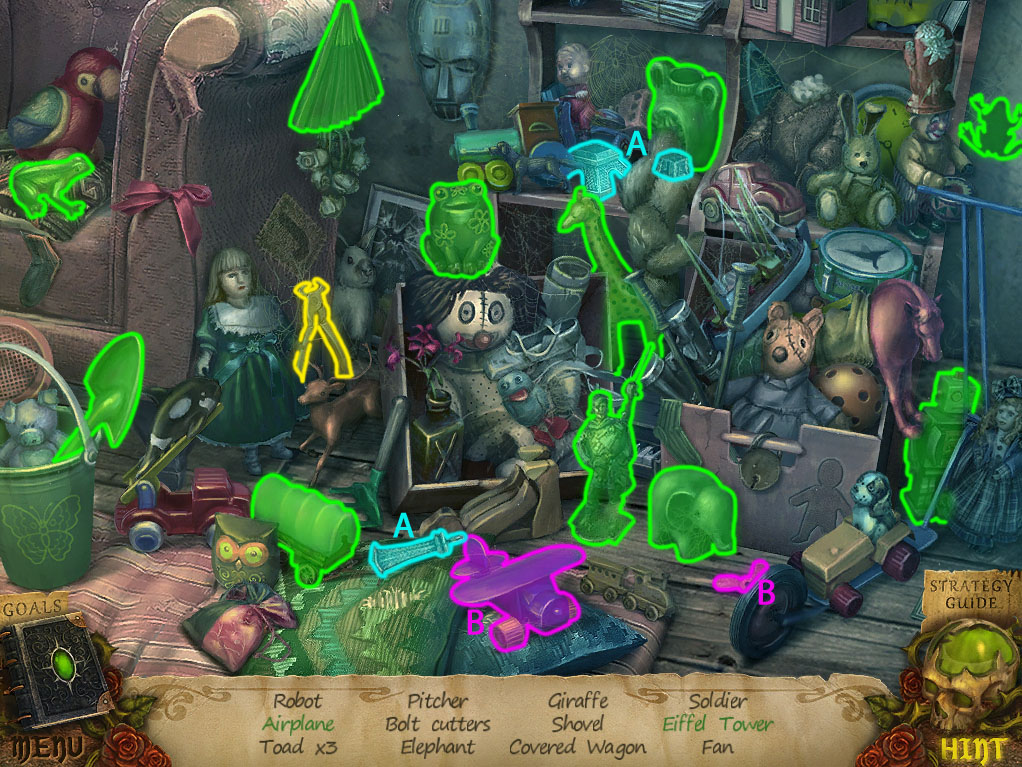
Click the bookshelf to start the hidden object scene.
Stack the pieces of the structure to complete the Eiffel Tower (A).
Add the propellor to the toy Airplane (B).
Screenshot.
Once the hidden object scene is complete, you will receive the Nippers.
Inspect the small table for the doll's tea set for a closer look.
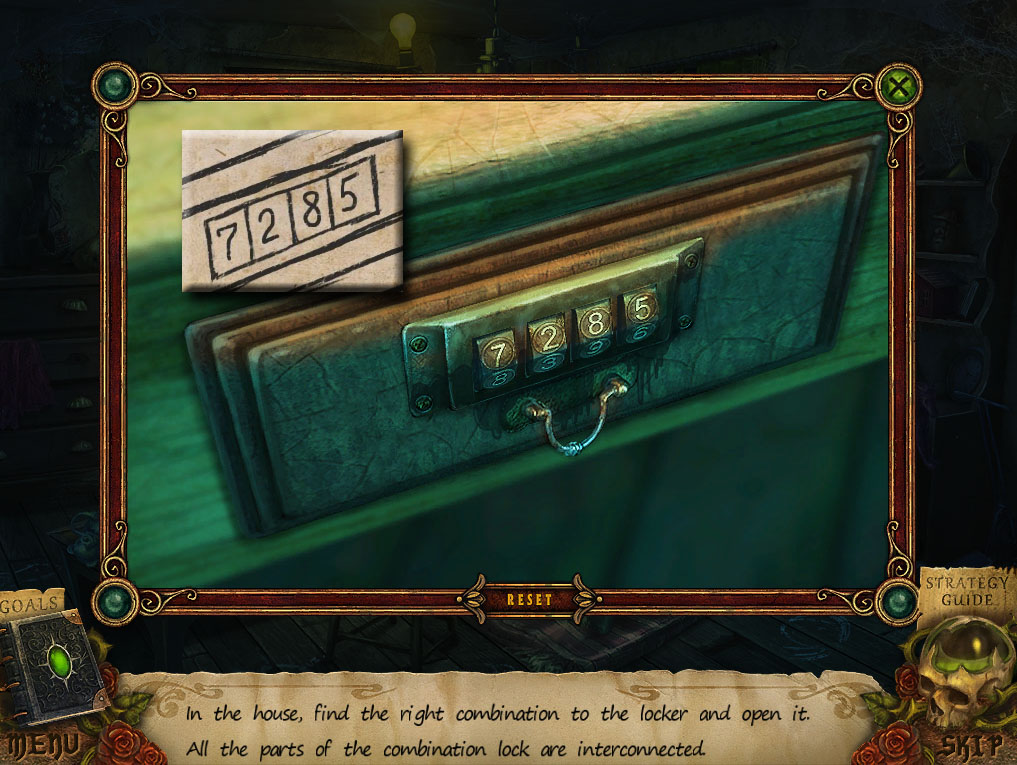
Use the Oil Can on the rusted combination lock buttons to start the puzzle.
Enter the four digit combination found by watching the Magical Drawing #2 clip.
Click the buttons to cycle through the numbers 0-9.
Solution.
Once the puzzle is solved, click the drawer to open it, then take the Amulet Fragments 1/3 and the Magical Drawing piece.
Return to the Barn Entrance, click the door to open it, then continue forward to the Barn.
Barn
Click the green door to zoom in.
Use the Nippers to remove the padlock and chain.
Click the door to open it, then continue forward to the Toolshed.
Toolshed
Take the Ignition Fluid on the floor under the work table.
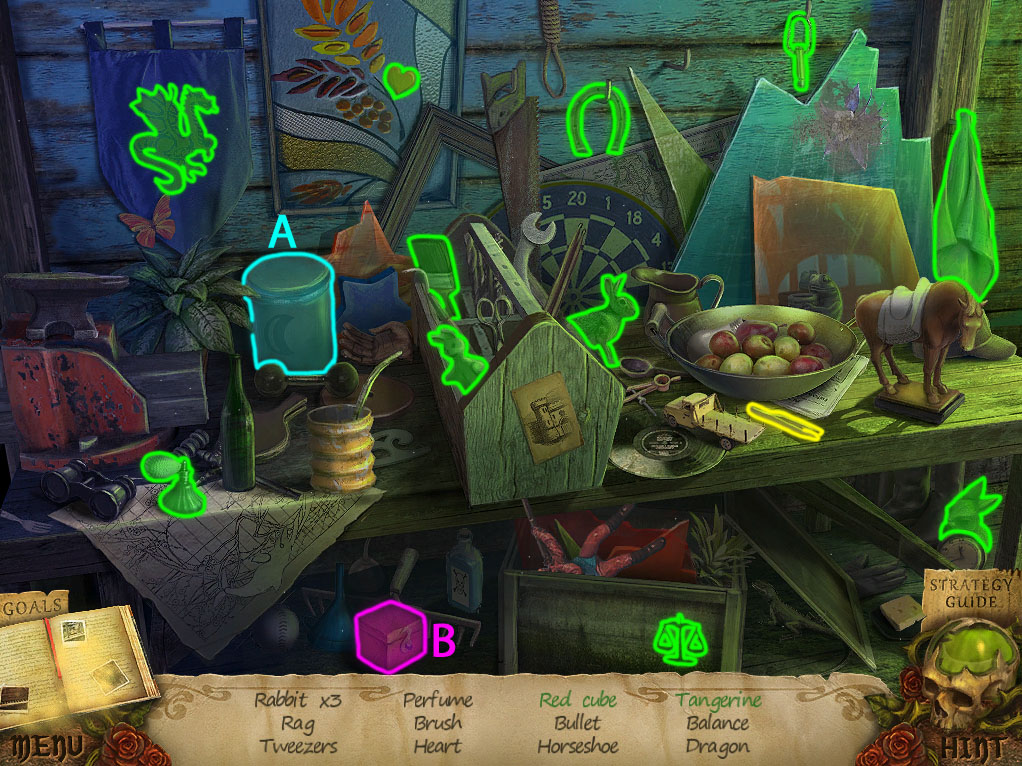
Click the work table to start the hidden object scene.
Open the tin can to find the Red Cube (A).
Open the orange box to find the Tangerine (B).
Screenshot.
Once the hidden object scene is complete, you will receive the Tweezers.
Go back to the Library.
Library
Click the couch to repeat the hidden object scene.
Click the open book to start the Flame (A).
Open the pot to find the Orange (B).
Screenshot.
Once the hidden object scene is complete, you will receive the Funnel.
Return to Lynn's Bedroom.
Lynn's Bedroom
Inspect the small table for a closer look.
Use the Tweezers to open the secret compartment inside the drawer.
Take the revealed Puzzle Piece.
Go to the Passage.
Passage
Click the table to repeat the hidden object scene.
Open the drawer to find the Valentine (A).
Use the scissors to cut the Button off the hat (B).
Place the coffee beans in the mortar, then crush it with the pestle into Ground Coffee (C).
Screenshot.
Once the hidden object scene is complete, you will receive the Silver Chain.
Return to the Toolshed.
Toolshed
Click the work table to repeat the hidden object scene.
Place the figurine on the horse to make the Horseman (A).
Wipe the glass with the rag to reveal the Flower (B).
Screenshot.
Once the hidden object scene is complete, you will receive the Axe.
Inspect the decorative box on the table for a closer look.
Add the Puzzle Piece to the round plate to start the puzzle.
Arrange the stained glass pieces to complete the picture.
Click a glass shard to select it, then click an area on the round board to set it down.
If a piece is correctly positioned, it will lock in place.
Solution.
Once the puzzle is solved, click the round plate to open the box.
Take the Magical Drawing fragment and the Stained Glass Part 2/2 inside the box.
Click the completed Magical Drawing #3 in the journal. Note the time that Tom sets the clock in the Library to at the end of the clip.
Go back once to the Barn.
Barn
Click the log on top of the stump to zoom in.
Use the Axe four times to split the logs, then take the chopped Wood.
Return to the Right Corridor upstairs.
Right Corridor
Click the stained glass above the door for a closer look.
Add the two Stained Glass Parts from your inventory to the circle above the door.
Go through the open left door to the Cage Room.
Cage Room
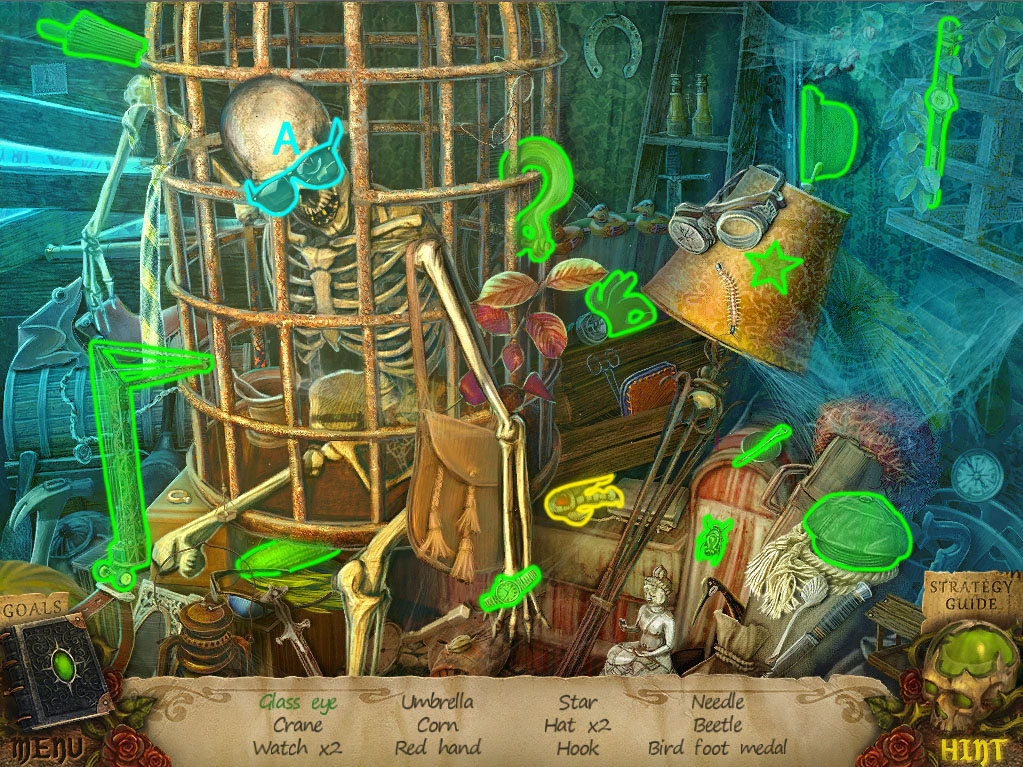
Click the sofa chair to start the hidden object scene.
Lift the skeleton's sunglasses to find the Glass Eye (A).
Screenshot.
Once the hidden object scene is complete, you will receive the Bird's Paw.
Remove the cloth covering the left hanging cage and read the papers inside of it. Note the picture of the colored cabinet drawers.
Take the Magical Drawing fragment on top of the rug on the floor.
Go to the Study.
Study
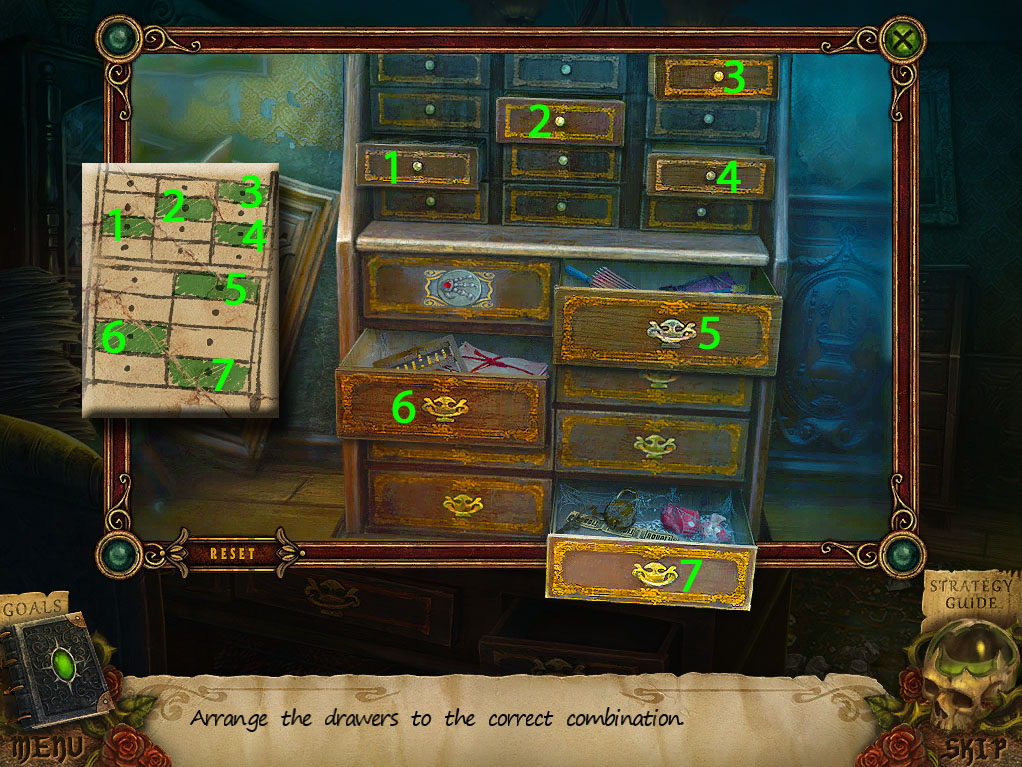
Inspect the cabinet for a closer look.
Add the Bird's Paw to the insert in the upper left drawer of the bottom section, then turn the paw to start the puzzle.
Open the correct drawers, following the picture found in the Cage Room.
Click any of the drawers in the upper or lower sections to open or close them.
Drawers highlighted in green from the paper found in the Cage Room indicate open drawers.
Solution.
Once the puzzle is solved, go through the revealed doorway to the Secret Room.
Chapter 5
Secret Room
Use the Spray on the two clouds of flies.
Read the book on the table, then turn to the last page to find the Magical Drawing fragment.
Click the chair to move it towards the table.
Click the shelves above the table to zoom in.
Click the cobwebs to remove them, then take the vial of Blood on the upper left side of the shelf.
Go back to the Study.
Study
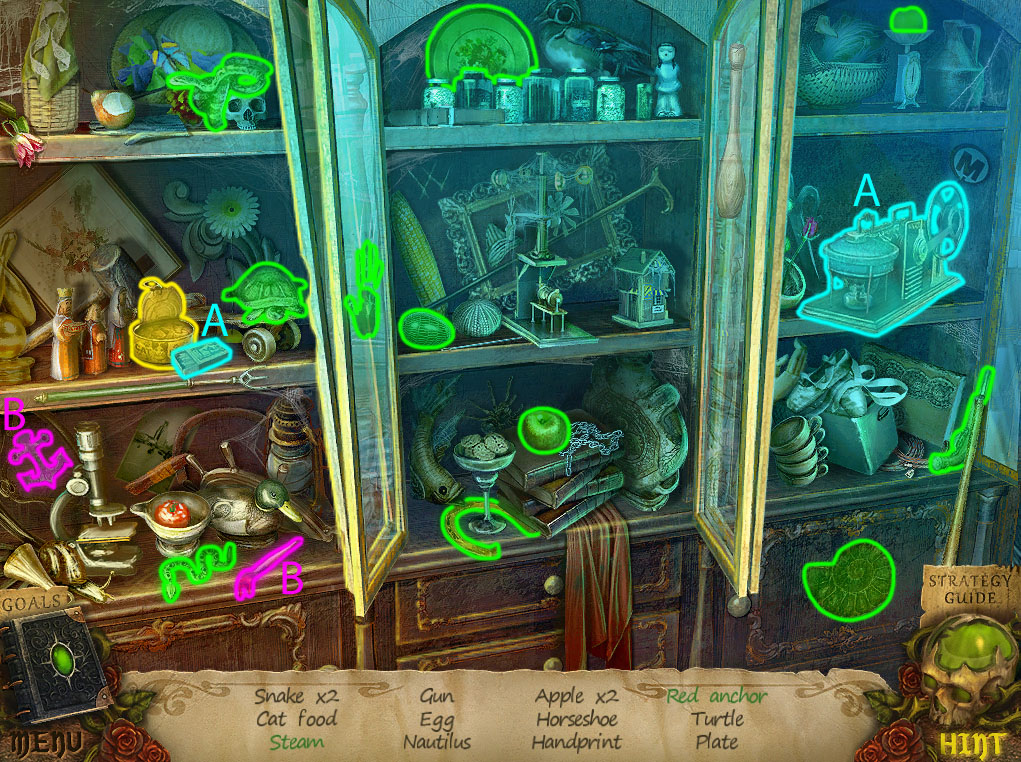
Click the cupboard to repeat the hidden object scene.
Use the matchbox on the machine to create the cloud of Steam (A).
Use the paintbrush on the white anchor to paint it into a Red Anchor (B).
Screenshot.
Once the hidden object scene is complete, you will receive the Cat Food.
Return to the Barn Entrance.
Barn Entrance
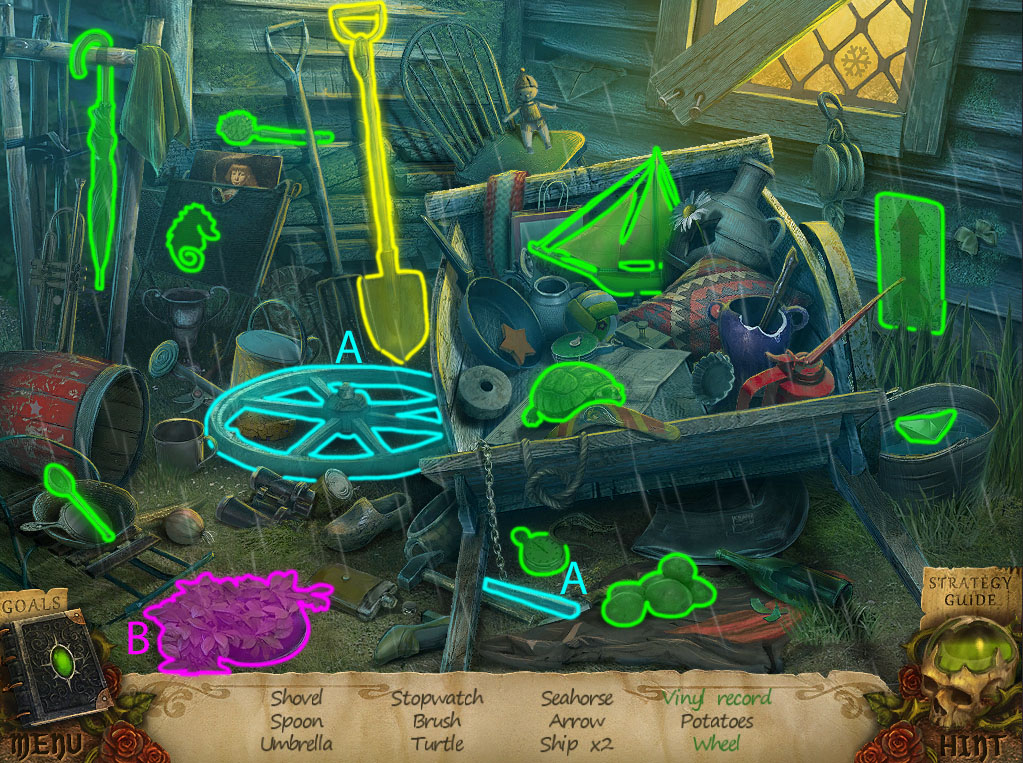
Click the pile of junk to repeat the hidden object scene.
Add the spoke to complete the Wheel (A).
Remove the leaves to find the Vinyl Record (B).
Screenshot.
Once the hidden object scene is complete, you will receive the Shovel.
Go into the Barn.
Barn
Click the cat sitting on the stall to zoom in.
Give the Cat Food to the cat.
Take the Chalk attached to the collar around its neck.
Read the paper posted on the wall beside the window.
Return to the Graveyard.
Graveyard
Click the statue to repeat the hidden object scene.
Open the pinecones to find the Nut (A).
Use the hammer to smash the Broken Mirror (B).
Screenshot.
Once the hidden object scene is complete, you will receive the Grave Key.
Use the Shovel three times on the grave under the cross.
Inspect the coffin inside the grave for a closer look.
Put the Grave Key in the lock at the center of the coffin, then turn the key twice.
Open the coffin lid and click the corpse to speak with the ghost.
Click the patch in the middle of the corpse's clothing to zoom in.
Use the Knife to cut through the stitching around the patch, then lift the patch to find the Knob 2/2.
Go all the way back to the Right Corridor.
Right Corridor
Click the wallsafe to the left of the door to zoom in.
Place the two Knobs in the two holes at the sides of the safe, then turn the handles to start the puzzle.
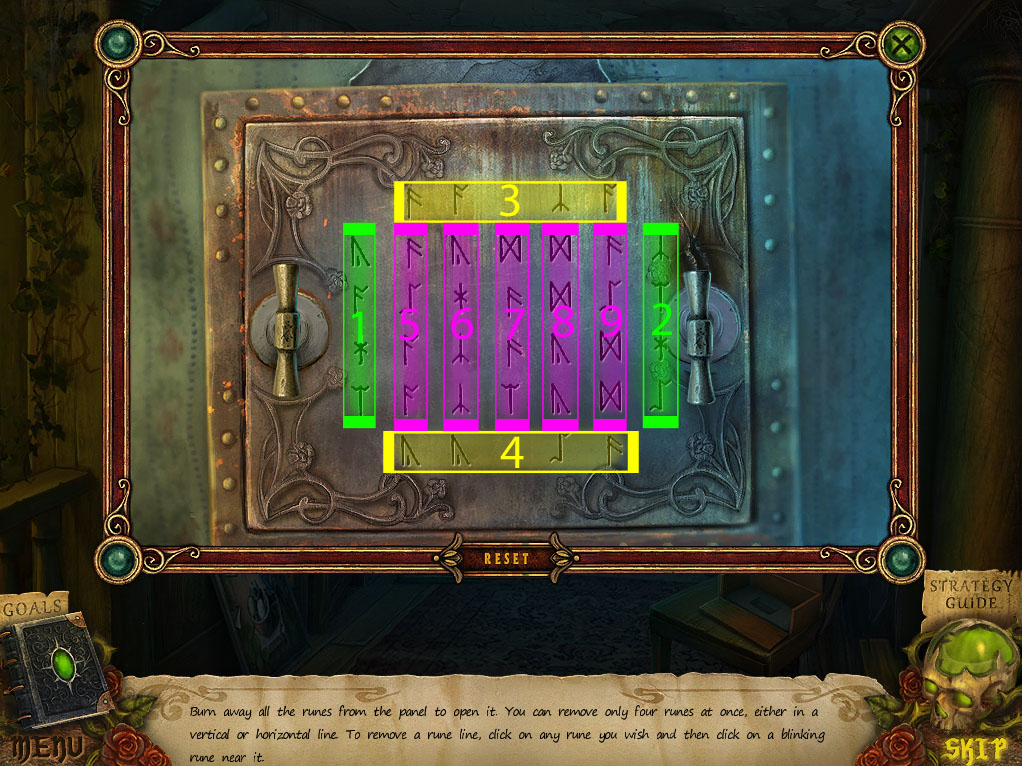
Clear all the runes from the safe by removing them in horizontal or vertical lines of four.
Click a rune to select it, then click the flashing rune four spaces away to remove the line.
A line of four symbols can still be cleared even if there is a gap between the runes, and the shape of the symbol is insignificant.
Solution.
Click the safe to open it, then take the Clock Weight and the Amulet Fragments 2/3 inside.
Return to the Library downstairs.
Library
Click the book on the shelf above the ladder to look inside.
Turn the page to find the telegram, then go to the end of the book and take the Magical Drawing fragment.
Click the completed Magical Drawing #4 in the journal to watch the clip. Note the symbol drawn to start the fire.
Click the grandfather clock to zoom in.
Place the Clock Weight at the end of the right chain.
Use the Hammer to smash the glass over the face of the clock.
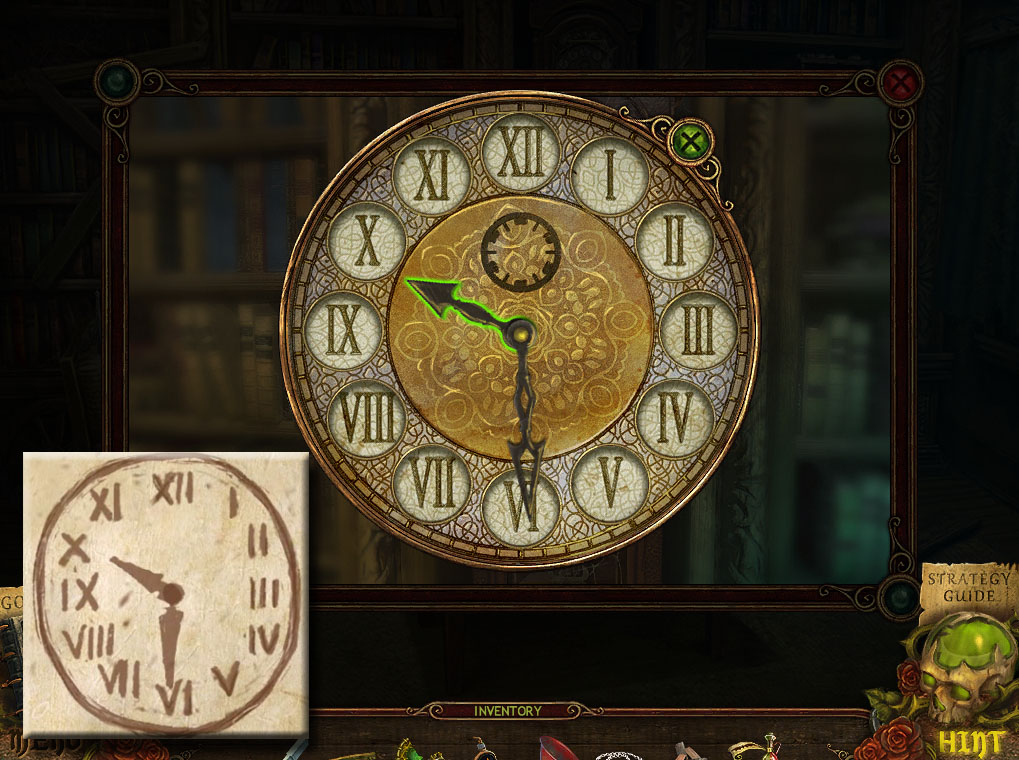
Add the Clock Arrow to the face of the clock to start the puzzle.
Set the time on the clock to the time shown in the Magical Drawing #3 clip.
Click the clock hand to select it, then click a number on the clock to move it to that position.
The minute hand goes to the VI (six) and the hour hand goes to X (ten) to change the time to 10:30.
Solution.
Once the puzzle is solved, click the revealed compartment inside the clock to zoom in and take the papers, the Valve, and the Sheet Music.
Go to the Foyer.
Foyer
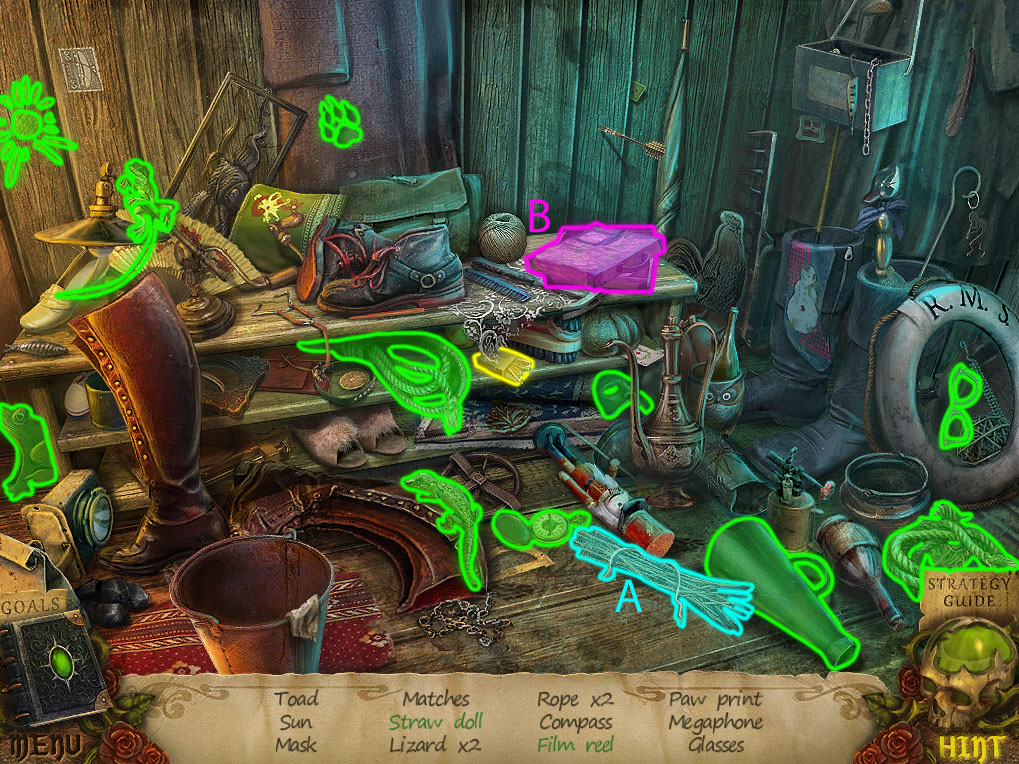
Click the shoe rack to repeat the hidden object scene.
Click the patch of straw several times to make the Straw Doll (A).
Open the box to find the Film Reel (B).
Screenshot.
Once the hidden object scene is complete, you will receive the Matches.
Go back to the Dining Room.
Dining Room
Inspect the fireplace for a closer look.
Place the Wood inside the fireplace.
Douse the wood with the Ignition Fluid, then light the wood with the Matches.
Return to the Bricked Bedroom.
Bricked Bedroom
Click underneath the bed to repeat the hidden object scene.
Add the two roses to the vase to complete the Rose Bouquet (A).
Move the green blanket to find the Medallion (B).
Screenshot.
Once the hidden object scene is complete, you will receive the Pitchfork Stick.
Click the sink to zoom in.
Add the Valve to the tap.
Go back to the Basement.
Basement
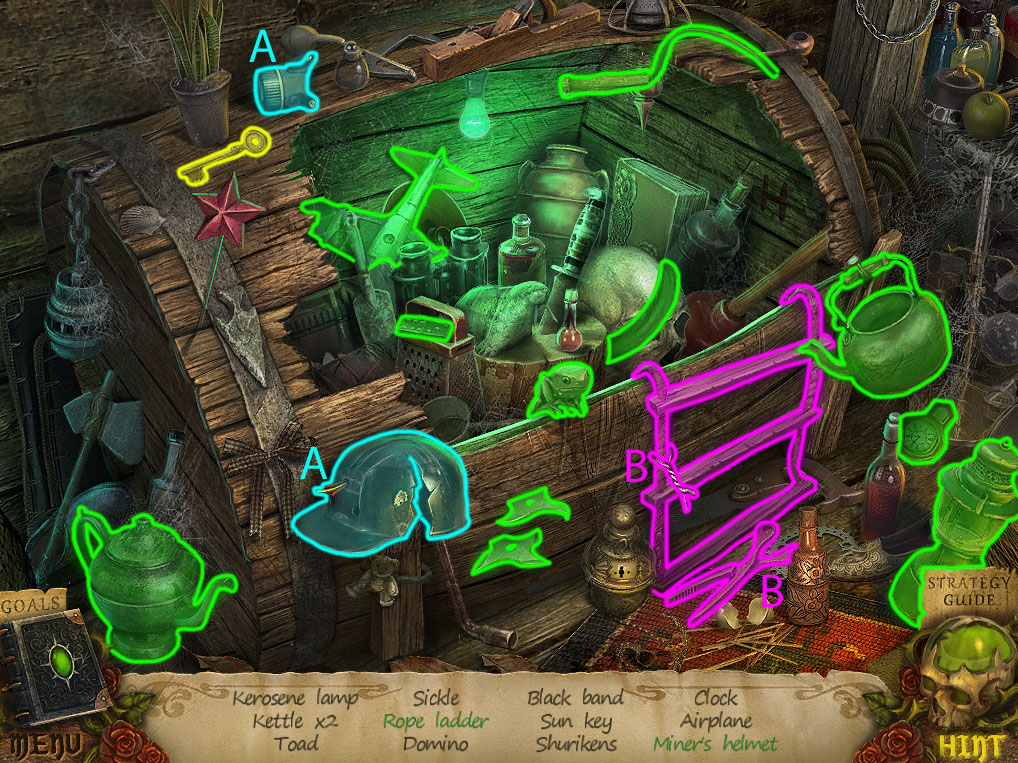
Click the barrel to repeat the hidden object scene.
Add the flashlight to the frayed wires to complete the Miner's Helmet (A).
Remove the wire with the tongs to free the Rope Ladder (B).
Screenshot.
Once the hidden object scene is complete, you will receive the Sun Key.
Click the pitchfork prong at the bottom of the broken shelf.
Add the Pitchfork Stick to the prong, then take the completed Pitchfork.
Return to the Cage Room.
Cage Room
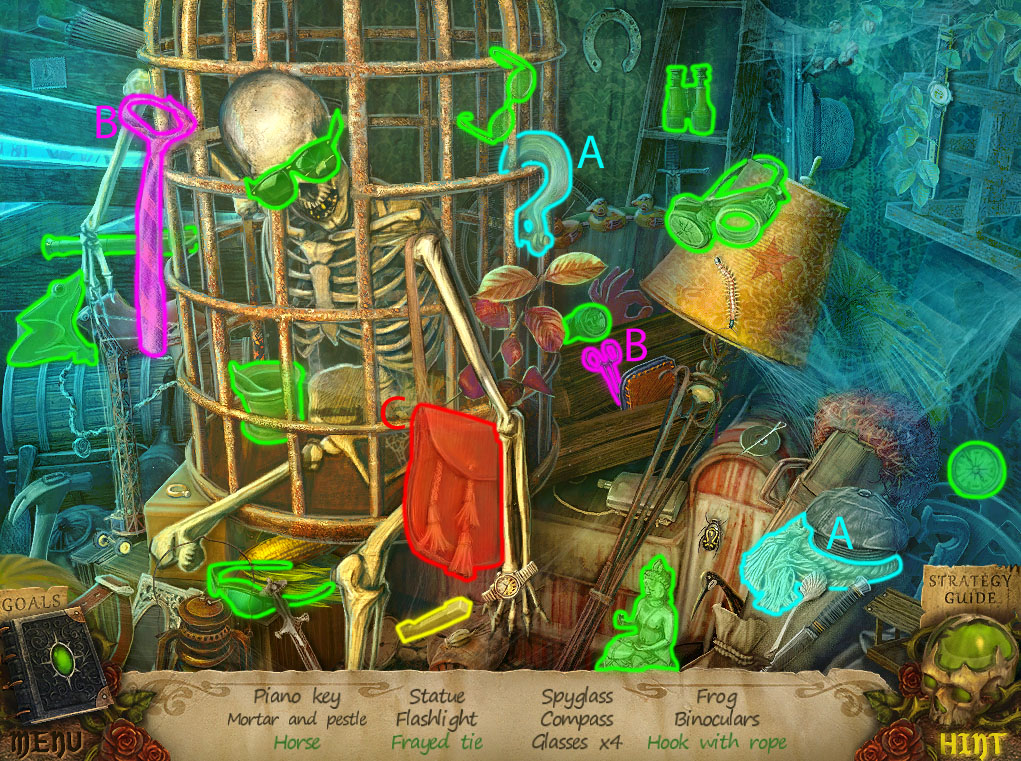
Click the skeleton in the large cage to repeat the hidden object scene.
Attach the hook to the rope to make the Rope with Hook (A).
Use the scissors to cut the collar of the tie to make it a Frayed Tie (B).
Open the satchel to find the Horse (C).
Screenshot.
Once the hidden object scene is complete, you will receive the Piano Key 3/3.
Click the upper cabinet of the cupboard to zoom in.
Use the Sun Key and turn it the lock to open the cabinet door.
Return to the Barn.
Barn
Use the Pitchfork on the haystack four times.
Take the revealed Magical Drawing and Gas Can on the floor.
Click the completed Magical Drawing #5 in the journal to discover the way through the well to the secret dungeon.
Go to the Backyard Porch, then continue right twice, past the Possessed Tree to reach the Well.
Chapter 6
Well
Click the imp at the bottom of the cracked wall to chase it away.
Take the Car Key lying in the grass.
Go back once to the Possessed Tree.
Possessed Tree
Click the peeled trunk of the tree above its eyes to zoom in.
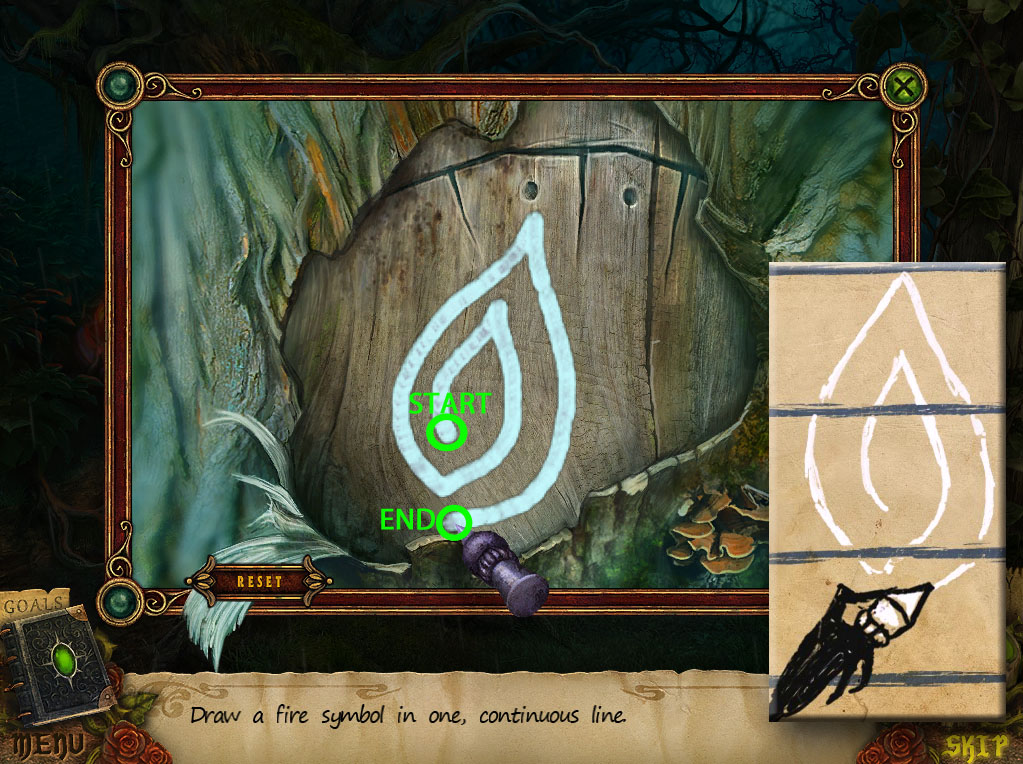
Use the Chalk on the area of peeled bark to start the puzzle.
To solve this puzzle, trace the symbol with the chalk in one continuous motion as seen in the Magical Drawing #4 clip.
Click and drag the mouse from the start of the line on the inside of the flame to the end of the line.
If you let go of the chalk before the drawing is complete, the puzzle will reset.
Solution.
Once the puzzle is solved, click the side of the released car to zoom in.
Click the small door open to lift the cover to the gas tank.
Place the Funnel inside the tank, then pour the fuel from the Gas Can inside.
Remove the funnel then close the cover.
Open the side door and go inside the car.
Click the right button under the radio to open the trunk.
Use the Car Key on the ignition and turn the key to start the car.
Move forward to drive the car into the Well, opening the entrance, then exit the car to step back outside.
Inspect the open trunk to find the Jack and the Strap inside.
Go to the Barn Entrance.
Barn Entrance
Inspect the broken wheelbarrow for a closer look.
Place the Jack at the place for the missing wheel, then use the Jack to lift the cart.
Take the revealed Hose underneath the raised cart.
Return to the Basement
Basement
Click the broken pipe on the wall to zoom in.
Place the Hose in the gap between the broken pipes.
Click the valve to restore the water supply.
Go to the Bricked Bedroom.
Bricked Bedroom
Click the sink for a closer look.
Click the tap to turn on the water, then take the filled Pan with Water.
Go back to the Dining Room.
Dining Room
Inspect the piano for a closer look.
Add the three Piano Keys to the keyboard, then place the Sheet Music on the music stand above the keys to start the puzzle.
Click the keys to play the notes in the correct order.
At the time of this walkthrough, the sheet music is currently incorrect, so you must use a process of trial and error to find the correct keys.
Click a key to test it; if it is correct, the note in the sheet music will light blue.
If a key is played incorrectly, the puzzle will reset.
Solution.
Once the puzzle is solved, take the Amulet Fragments 3/3 from the revealed cache.
Click the lit fireplace to zoom in.
Place the Pan with Water on the rack over the fire, then remove the lid from the pot.
Add the Blood, Silver Chain, and the Amulet Fragments to the boiling pot to receive the completed Amulet.
Take the Pan with Magic Water off the rack.
Return to Lynn's Bedroom.
Lynn's Bedroom
Click the shelves to repeat the hidden object scene.
Open the bag to find the Pearl (A).
Click the ribbon at the teddy bear's collar to tie the Bow (B).
Screenshot.
Once the hidden object scene is complete, you will receive the Statue.
Inspect the filthy doll on the sofa chair for a closer look.
Use the Pan with Magic Water to wash the doll, then take the Metal Rose from the hole in its stomach.
Go to the Cage Room
Cage Room
Click the open cupboard to look inside.
Place the Statue on the pedestal in the middle of the other statues to start the puzzle.
Arrange the statues on the platforms so that they are all at equal height.
The statues have varying weights, and setting them on one platform will also affect a second platform.
Click a statue to select it, then click a different statue to swap their positions.
Solution.
Once the puzzle is solved, take the Rose Leaf from the revealed cache.
Return to the Well.
Well
Click the lid covering the well to open it.
Place the Rope Ladder into the well.
Go down the ladder to the Secret Dungeon, then continue forward to the Bridge.
Bridge
Click the torn rope at the post to the bridge to zoom in.
Attach the Strap to the post to repair the bridge.
Go across the bridge to the Skeletal Doorway>
Skeletal Doorway
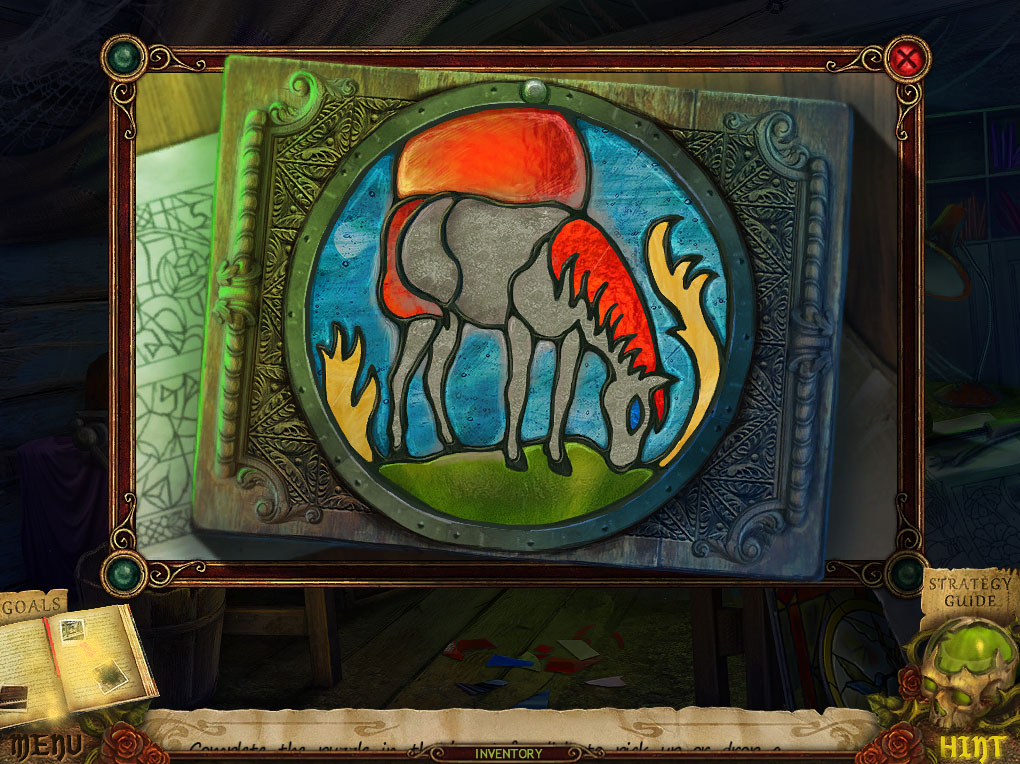
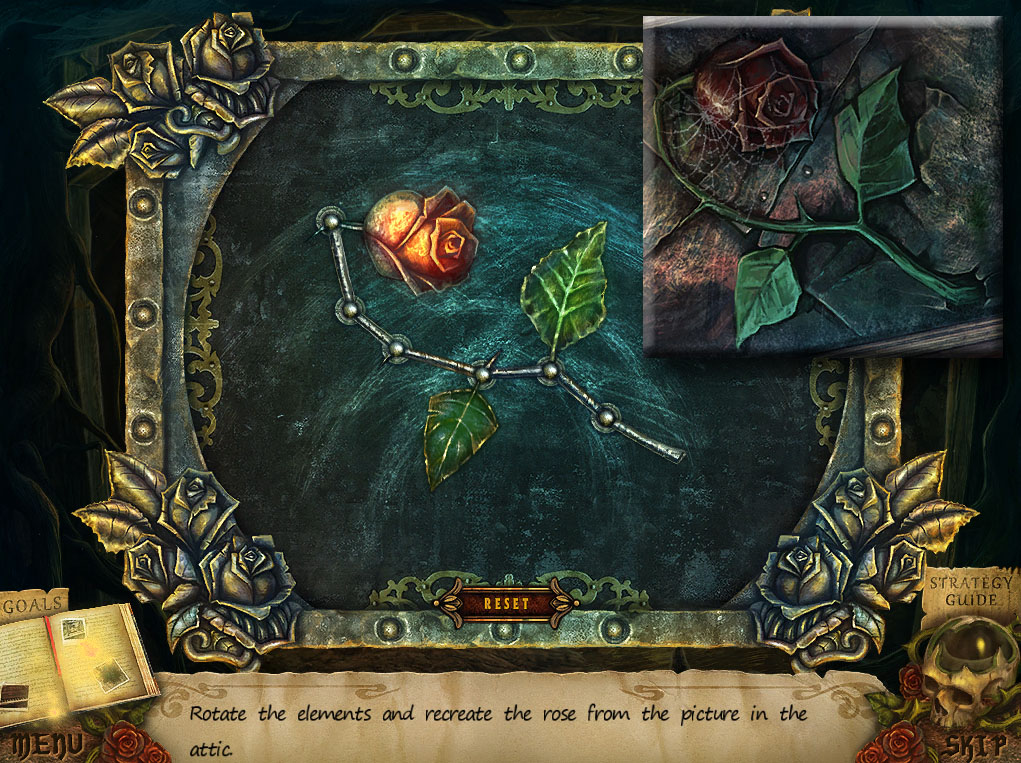
Inspect the plate in the center of the door for a closer look.
Add the Metal Rose and the Rose Leaf to the plate to start the puzzle.
Rotate the three pieces of the rose to arrange them according to the painting found in the attic.
Click the metal joints in the sections of the rose to rotate their corresponding pieces.
Click the Reset button at the bottom to restart the puzzle.
Solution.
Once the puzzle is solved, go through the open door to the Altar.
Altar
Use the Amulet on the witch.
The End
Posted by: Trinn |
January 23, 2012 4:31 PM
|
January 23, 2012 4:31 PM