
 Wednesday is here, let's play!
With Selfdefiant you return to school. Nobody wants your homework - the school is empty - you just need to find your way out. With pleasure! Next comes lovely game by nettaigyo and asaha which wants you to find fifty hearts in their fairy tale land. Fun and soothing effect guaranteed. TomoLaSiDo then trapped you in their room, hid several holly branches there plus six parts of the key, as usual. From Rinnogogo we get emotional and colorful adventure with confused and pathetic bear.
Have a good time and enjoy!
Back to school with Selfdefiant. From some reason you stayed locked up in a school corridor. Many doors are opened but unfortunately not the main door - and you even don't know which are the main ones. Each locked door requires specific key, but the keys aren't just lying around, they are well hidden, mostly in boxes with codes. Your only chance for freedom is to open everything and let yourself surprise.
The cursor is changing, autosave, one ending.
This one (by nettaigyo and asaha) is not an escape. It's very well done, cute and relaxing find-the-item game with really nice tune. And simple - just find fifty hearts and click on them. You start in the 'middle area'. There are four more, closed for now, and to open them up you need to solve few simple puzzles. At the beginning, you're able to solve only one which opens a gate and so you may 'hunt' for the hearts in the new area (where you can solve another puzzle which lets you through another gate...etc.). Hearts can be black or white, some very small and some are only partially visible. To move around click and drag the game screen. Beside pluses mentioned, the game is kind, too. When you find all the hearts in an area it will tell you. Very helpful.
The cursor isn't changing, no save button, one ending.
You need to find six holly branches to completely fulfill the task in the last TomoLaSiDo's game. But five is ok, you'll be able to get away with one less. Some branches are very thorny indeed and the game doesn't want you to get hurted, so look for some aid. Can you escape?
The cursor isn't changing, autosave, one ending.

Again you wander in Rinnogogo's woods when suddenly - a bear! A sad one, crying for help. The bear isn't trying to move you or trick you - he's genuinely unhappy about the loss of a key. He's absolutely sure it must be somewhere in his house but unfortunately he's not able to find it. The goal is clear. Solve all the puzzles you stumble upon, search the house thoroughly, every corner, every drawer and cabinet, until you discover the key. Notice, that you'll need some time for this beautiful game; although the house isn't big, there is more content than it seems at first.
The cursor isn't changing, autosave, two endings
P.S. Here is the latest game by Pixelkobo: Reoda: Chapter 6. Good game, but it kept freezing on my pc (three restarts). It has autosave so not a big deal.
We love escape games, and our readers love talking about them and sharing hints! How about you? Let us know what you think, ask for clues, or help out other players in the comments below.


In Heartreasure - How do you turn on the power to get the color hearts?
The three puzzles:
Turn on the power. Blue Heart
Who dug the holes? Red Heart
Something to do with music notes. Green Heart
The Yellow Heart gets check mark when you complete the upper area. At least that is how it worked for me.
Well I'm completely stuck. 21 of 50
Turn on the power? There is no plug / outlet that I can find as indicated in the clue.
Who dug the holes? I have clicked on every character that I can see. I have no idea who dug the holes.
Music? The clue has a music bar with three heart notes. What does that mean? There are three kitties on stage playing but clicking them does nothing. Clicking the heart notes in the clue does nothing.
Is anyone else struggling with this? Or did I get up stewpid this morning.
I'm in the same boat as you, 4red3s. 21/50 and I have no idea how to solve the remaining puzzles. I've clicked everywhere, but got nothing. I accidentally got the yellow heart area unlocked, but I have no clue how I did it.
Possibly a neat little game, but this roadblock is *very* frustrating.
Thorzdad and 4red3s, I'm stuck where you are, but with 22 hearts. To unlock the yellow heart
click on the faucet to drain the pond as shown in the hint when you click the yellow heart
I think I'll have to come back to this one later.
I'll only have time to play these tomorrow, but why's the bear title missing like a polar bear in a snowstorm?
And if we're going to mention the Reoda series, perhaps it would be good to start from the first even if the earliest ones were (in my opinion) not as great.
Heartreasure
the first puzzle
is for the yellow heart gate
as mentioned zoz click on the faucet to drain the pond
it's opened!
the second puzzle
is for the green heart gate
look, there is a piano in the yellow area!
you can play it!
push the three required keys
g,f,c
it's opened!
the third puzzle
is for the red heart gate
in the lower left corner of the green area are many holes
who dugs them?
look, a mole!
click him
oh no, he run away!
click him again
repeat 4-5 times
until the mole gives up
it's opened!
the fourth puzzle
is for the blue heart gate
insert the huge plug into the giant socket
look, a new melody appeared on the screen
go to the piano in yellow area
let's play the new melody!
it's opened!
About Pixelkobo. I had difficulties with their games (freezing and lagging) and I never post games which I can't get through easily.
It's much better now with my new pc.
You're right, it would be better to post Reoda from the first chapter. I'll replay them and see.
Heartreasure: I've gotten 46 of 50. I can't find four more in the yellow section.
It will tell you when you've found all of an area and the colored heart will change to a crown, and some areas aren't visible at first. Also, some are very, very tiny.
Let me know if you need help with the music.
Okay, I'm down to two left and I'm stumped.
If you want to know,
General comments:
Most of them aren't actually puzzles, just figuring out what tiny splotch is a "heart."
You kind of need to know how to read music/what notes the piano keys are.
Also there are
five
areas to clear
In other words, five crowns to get: blue, yellow, green, red, black/white
Ha Ha Ha good find kktkkr with the polar bear in a snowstorm.
The snowstorm is over so the bear is there now.
I came back today to play Heartreasure. The game loaded but only the bottom part and the waterfall on the right side of the game is displayed.
The top part is just a blank white area. Maybe I'm going crazy but I am sure that there was more yesterday.
Am I missing something?
Okay, I'm having one of those days. To see the rest you have to solve the yellow heart.
Sorry.
I think I did it...
"Congratulations for finding all"
I had four crowns. But I am sure that my heart count was 49.
Then the message saying I won?
I did two things that seemed to make it easier:
1. I zoomed in my screen to 133%
2. I resisted the temptation to open more gates until I had cleared the one I was in.
That was a delightful game. I usually don't like hidden object type games. But the tiny animation rewards given when a little heart was found were wonderful.
Thanks for posting this game!
I have 49 of 50 and have all but the yellow crown, however there are
5 crowns not four, red, blue, green, yellow black
ha! Finally found number 50!
looking forward to these. keep us updated on walkthroughs as usual.
I'm glad I came back to this. I would not have gotten the music clue without the WT by chrpa (thank you!) and googling "how to read music". All in all, fun little game/
How to read music:
the second puzzle
there are seven white keys on the keyboard
from left to right: C, D, E, F, G, A, B (or H)
the second puzzle which opens the green heart area wants you to play G, F, C
it's the fifth, the fourth, the first key from left
the fourth puzzle
there are five black keys on the keyboard
from left to right: Db, Eb, Gb, Ab, Bb
the fourth puzzle which opens the blue heart area wants you to play C, D, F, Eb, Bb
it's the first, the second and the fourth white key, and the second and the fifth black key
Short game first, because I expect the Heartreasure walkthrough to take a while.
Highschool Escape
Exploration
You start off in a hallway with colored lockers and lots of arrows for moving around. In front of the blue lockers, there's a box with a five-digit lock.
This school is going to get confusing, so let's explore clockwise. But first, you might notice that the back door on the right wall has no arrow. It's locked with a silver keyhole, a phrase that might scare you if you've played Selfdefiant's other series.
Go left to geography class. The changing cursor helps you find that the stack of notes beside the globe hides a paper clip.
Go right and go forward to the hall, where you see that the tops of some of the chairs are brightly colored. Click the curtains to draw them, and you find a box with five yellow sliders.
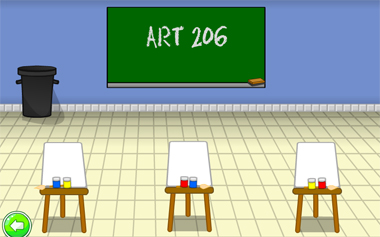
Back out and go right to art class, where all you can find is a blackboard eraser.
Go left and turn around by clicking the bottom of the screen. In this very similar view, you find that one of the blue lockers on the left has a green star marked on it. Taking a closer look, you also spot a small hole in its handle. The double doors in front are locked with a black keyhole.
Go left to… some class where the whiteboard is covered in chalk. The pink box on the left has twelve color buttons.
Go right and right again to the library. Once again, the cursor helps you out by letting you find that all the yellow books are clickable. Once you make all seven of them gray, a green marble appears.
Erase
As the game suggests, you should use the eraser to remove the chalk from the mysterious classroom.
Doing so reveals five stars.
Heights
Use the starry clue to unlock the slider box on stage.
Hint: if you're looking closely, each star on the chalkboard appears at a different height, but there are only four possible heights for the sliders.
Find the two stars closest in height. Those are supposed to be the same.
After considering the above, you find that the stars (from left to right) are the 2nd, 3rd, 1st, 4th, 2nd heights from the top.
Click the sliders 1, 2, 0, 3, 1 times, and open the box to find a red marble.
Colors
Use the clue from the chairs in the hall to unlock the pink box in the mysterious room.
The red/yellow/blue/purple tips aren't lined up vertically, but like their chairs they're lined up in two rows:
R Y B B Y P
P R B Y P R
Click the buttons
1 3 5 5 3 6
6 1 5 3 6 1
times, then open the box to find a black key.
Black
Use the key to unlock the double doors and enter the canteen.
This dining room seems empty except for weird colored food, but you still manage to find the jammed cupboard door under the drink dispenser, a bunch of bottles you can't take, and the locked door with a gold keyhole.
Wire
Use the paper clip on the small hole in the locker marked with a green star to open it and find a blue marble.
Spell
Use the clue from the geography classroom to unlock the box beside the art room entrance.
The small lines under Geography are placed beneath the letters GRAPH.
Enter that into the box and open it to find a screwdriver.
Drive
Use the screwdriver to pry the jammed cupboard door open. Inside, you find a silver key.
Silver
Use the key to unlock the side door beside the hall entrance.
This room seems like a cozy principal's office, but Mr. Douglas doesn't seem to be in, which means you can examine the box behind his chair to find three round slots.
(Weird stuff on this screen: a sunflower painting with more flowers than stems, a wall clock with a very different time from before, and a globe that shows more continents than the one you saw before.)
Marbles
You have collected three marbles, so place them into the box and push the button to open it and find a gold key.
Gold
Use the gold key on the door in the dining room to escape!
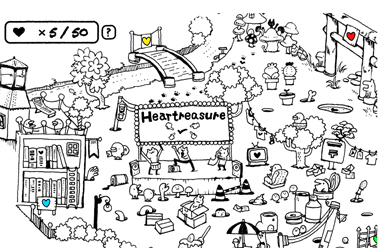
Heartreasure
(Tags above the game: Cat, Hidden Object, Puzzle, Cute, Simple, Action, 2D, Others, Easy)
It's not a coincidence that the game's title can also be read as hear-treasure. Some knowledge of music notation (read the comments above) is required, but I'll repeat it when necessary.
Start
(I won't be describing everything, but I will mention enough to find the important stuff.)
The first thing you see after you start is a cat band performing on stage, with four hands on the sign pointing to the heart shape on it.
This is the only heart that will be that easy. As a previous comment mentioned, many of the hearts you need to find are tiny, and you can make the game easier by making it bigger. Zoom the browser window or open the game frame in its own tab. (The link under the game will put the frame in fullscreen but that does not make it bigger.)
At the very least, you should be able to easily see and aim at each of the thumbs on the sign.
Anyway, you also see four brightly colored heart signs on different kinds of gateways, each having a different hint on it. I strongly recommend, especially for the starting area, that you finish exploring each area before working on the hints.
Hearts 1
Drag the screen to center the screen on the check mark you just made, and divide the visible area into four quadrants. (It seems you can drag indefinitely in each direction, but I wouldn't recommend it.)
Center: 1 (you just clicked it)
Upper left: 1
Click the heart in the traffic light to make it flash.
Upper right: 4
Click the heart-shaped pawprint to make it normal.
Turn the floating heart above the large mushroom into a cat.
The bottom flower pot has a heart plant that becomes a flower.
Turn the heart on the edge of the sign to make it a circle.
Lower right: 6
Remove a heart from a hanging shirt to make it flap in the wind.
Click the heart on the TV to change the channel to show quick-moving worms.
Take the heart seal from a hanging envelope to make it flap in the wind.
Remove the heart from a giant drinking can to crush it.
Click the heart between two chicks to bring them together.
Click the heart-shaped chair beside the umbrella to make a cat appear.
Lower left: 2
Remove the heart from the left cake, along with a large bite of it.
Turn the heart on one of the books into a fish.
You should now get an Area Clear popup, which also turns the center heart/checkmark into a crown.
Yellow
Find a specific object that will help you drain the pond.
Click the pump near the base of the waterfall, which makes a yellow heart appear.
Click that heart to make an entirely new region appear!
Hearts 2
The entire region north of the river is now visible, featuring lots of huge desserts and a giant piano keyboard.
A caterpillar crawls out from the keyboard, and let's use its face as the center for dividing the region into quadrants.
Upper left: 3
Click the heart on the giant scoop of ice-cream to melt it.
Turn the heart directly above that melted scoop into a star.
Eat the heart-shaped apple on the tree to the left.
Upper right: 2
One of the beans on the tree to the right is a heart until you click it.
Remove the top-right inverted heart-shaped seed on the watermelon along with a bite.
Lower right: 2
Turn the heart flag from the ice-cream nearest the caterpillar's face into a cat.
Click the heart at the bottom right of the message board, turning it into a cherry.
Lower left: 1
Click the heart in the lollipop above the fish in the river.
The Area Clear message also turns the yellow heart sign into a crown.
Green
The hint given by the green heart sign is for the piano.
Some elementary theory to help you read the hint:
Musical notes are commonly drawn as ovals (with various embellishments) but this time they are hearts. That's not a problem since we only care about the notes' pitches, as each piano key plays a different pitch.
On a piano, the white keys (from left to right) play the C major scale. The keyboard has already been trimmed down to start with C and end with B:
C D E F G A B
The five horizontal lines form a musical stave. Notes can be drawn either on the lines or between adjacent lines.
The presence of accidental symbols indicates an adjustment in note pitch. Since there are none here, the scale is C major and every note drawn (on or between lines) is played by a white key.
The treble clef at the left tells you the pitches. The line through the center of the clef (i.e. the center of the spiral) is designated as G (more specifically, G4). This means the second-lowest line on the stave is G.
Higher-pitched notes are higher on the stave, and vice versa. In our case, a note of F would be drawn between the bottom two lines and E would be drawn on the bottom line.
When a note is too low (or too high) for the stave, additional short ledger lines are added until the written note is once again on or between lines. This does not affect any notes that are already on the stave.
The hint tells you to play the notes G F C.
So push the 5th, 4th, 1st white keys on the piano keyboard, which makes a green heart appear on the nearby book. Click it to unlock the next area.
Hearts 3
The massive area in the bottom right is now visible, inviting you to explore it. (My favorite object here is the sign with the arrow pointing the wrong way.)
Use the green heart/checkmark to divide the area into quadrants. Well, there's only three quadrants.
Upper right: 2
Take the heart on the worm on the giant flower.
Remove the heart from the snowman to leave some buttons.
Lower right: 3
Turn the heart on the sign near the shore into a fish.
Turn the heart on the elephant's trunk into an elephant.
Take the heart from the treasure chest, which opens up.
Lower left: 5
A fish on the shore has a heart-shaped mouth that opens up.
Take the heart from the spit roast.
Turn the heart-shaped spot (fourth from the top) on the giraffe into a triangle.
Turn the heart on top of the cactus nearest the panda into a star.
Turn the heart-shaped spot on the dice circular.
Area clear! The green sign is now a crown.
Red
Looks like someone here really likes holes. One of them is particularly suspicious.
The patch of ground at the bottom is completely covered with holes, and a mole is sticking out of one of them.
Click the mole, who runs to a different hole. Click it again. And again. And again and again. Finally, a red heart appears, and clicking it unlocks the next area.
Hearts 4
The top-right area is very Japanese, but the tall tower has a garage with a car in it. Let's use that as the center, dividing the area into quadrants.
Upper left: 4
The fish jumping out of water has a heart on its tail.
A giant heart hangs from offscreen along with the other decorations, until you click it.
The flowery decoration to its right has a heart near the bottom that becomes a flower.
In the tower, taking the heart from the chick makes it a scary onion.
Upper right: 1
The shrimp on top of the tower holds a heart.
Lower right: 3
The fried shrimp under the kite has a heart-shaped tail.
The fish along the right edge has a heart spot that becomes a butterfly.
The large tree under the folding screen has a heart on the bottom section of its trunk.
Area clear, and you get a red crown.
Blue
On the side of the tower, click the plug (or the power socket) to plug it in, then use it to play the piano again.
The extra music theory that you have to know for this:
Together, the white and black keys on the piano (from left to right) play the chromatic scale. On this scale, the interval between any two adjacent keys/pitches is a semitone.
The flat ♭ sign is attached to the note on its left, and lowers that note's pitch by one semitone.
The notes C D F are played on the 1st, 2nd, 4th white keys, whereas E♭ and B♭ are played on the 2nd and 5th black keys.
Push those keys on the piano, and a blue heart appears on the book. Click it to unlock the next area.
Hearts 5
The new industrial area has a rather irregular shape, but you can keep track of it by remembering which areas were covered before.
Looking straight down from the blue checkmark, you find a lightbulb that we'll use as the center this time.
Upper left: 4
Take the heart from the sign on the side of the bookshelf. Now it's a missing pet poster.
Take the heart from the fishbowl. This does not save the fish.
Turn the heart in the tank of the fish hospital into a fish.
Click the heart hidden in the candle flame to make it move.
Upper right: 1
Take the heart from the elevator doors to open them.
Lower right: 3
Turn the white heart on the black mushroom into a circular spot.
Remove the heart beside the chick, tearing the paper it's attached to.
Click the heart on the switch nearby. Nothing happens.
Lower left: 2
Turn the pixelated heart on the mushroom machine into a smiley face.
Take the heart from the left eye of the skull.
Area complete! You'd get a black crown here, but the game is also complete! Congratulations!
Bonus: map and map walkthrough
Here's a crudely glued-together map.
And here's a smaller map walkthrough with stuff highlighted. Zoom in on it!
Escape Challenge 102: Room with Holly
Based on the Japanese title and Wikipedia, it appears that this is actually holly olive or false holly. But we'll keep it simple and just call it holly.
Exploration
This room has a rectangular window, a square table and a cushion on the floor. The box on the table seems to contain a white hand shape and it has a four-digit lock. Look at the potted plant on the right to find a capsule with a key piece, and check the vase beside the window to find a holly branch.
Turn left. The table here is actually a machine with a face drawn on a ball, a holly leaf bent back, an orange bar, and a button that releases something. You also see a framed picture of a holly branch on the wall, as well as a wall box with four digit buttons each having a yellow circle.
Turn left to face the locked door. The stopped wall clock has something weird going on with its numbering, the machine beneath has a holly leaf covering another capsule, and the blue bin beside is empty. (There's also something else that I'll come back to later.)
Turn left to face a chest of drawers. There's a two-button drawer marked with the digit 5, a three-button drawer with numbered buttons that change to shapes, and a three-button drawer where each button cycles through different numbers of lines. Above it, a framed picture of a hand has a four-digit clue.
Walk into the corridor to enter the toilet, where you can look right, up and left to find a drawing of a rather aggressive fish.
Hand
Use the clue from the framed picture above the drawers to unlock the white box in front of the window.
Since the hand on the box is a mirror image of that in the picture, reflect the clue to get the code 2112, and enter that into the box to get the glove from inside.
Thorned
Use the glove to lift the leaf on the large machine.
It has a teasing face on the back, because it turns out that in this game you don't have another hand available to pick up the capsule.
Back out and check the bottom of the machine to find a poorly camouflaged flap that lets the key piece out.
Lines
Use the clue from the vase beside the window to unlock the bottom drawer.
The lines across the vase appear in groups of 2, 1, 3.
Set the drawer accordingly and open it to find a holly branch and key piece.
Three digits
Use the clue from the clock to unlock the middle drawer.
The digit 1 appears in four places, and those places form a diamond shape. Similarly, 2 appears in three places forming a triangle, and 3 in four places forming a wide rectangle.
Click the buttons 3, 4, 2 times and open the drawer to find another holly branch and key piece.
Asymmetry
Use the clue from the holly picture to unlock the top drawer.
Only four of the leaves in the picture have only five thorns, and they appear (from bottom up or top down) on the right, left, left, right sides.
Push the RLLR buttons and open the drawer to find a holly branch and key piece.
Hurt
Figure out how to operate the head machine.
If you just release the branch by clicking the button, it gets stopped by the orange bar.
If you click the bar just once, the handle gets stopped by the bar, with the same result.
So click the bar twice and push the button, which is good enough for you to get the key piece.
Back out, look at the machine again and pick up the holly branch.
You've completed the key and can leave, but there's one more puzzle left.
Yellow
Use one remaining clue from the game to unlock the wall box.
The only clue in that particular shade of yellow is the
goodmessage you got from the head machine.What does it have to do with circles and how do you get four digits?
Count the number of loops in each letter, getting the code 2111.
Enter that into the wall box and open it to find the last holly branch.
With your collection complete, leave through the door to end the game!
Item list
6 key pieces:
Top left: in top drawer
Top middle: in middle drawer
Top right: in bottom drawer
Bottom left: from head machine.
Bottom middle: from big machine
Bottom right: on potted plant
6 holly branches:
In vase beside window
In bottom drawer
In middle drawer
In top drawer
From head machine
In wall box
I Met a Bear
Just like a real bear, the puzzles in this game don't really follow the rules. Maybe you might find it fun. Or maybe it's hard to bear.
Exploration
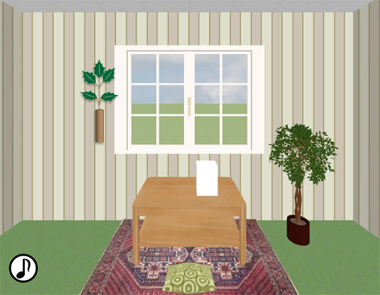
The crying bear on the couch holds a box he has no key for. In front of him, there's a glass table without anything interesting on it. On the left, a shelf has various books including a Forest Picture Book you can't read. And on the right beside the tree, there's a five-color box.
Turn right. On this screen, you can zoom in on the nine-button box on the table, as well as the jars and locked cupboard on the right.
Turn right, and click the white carpet you see to walk into the bedroom. The bed has a pair of green glasses under the pillow and an unlit lantern in front. The chest of drawers beside has an unusual arrangement of both its drawers and the numbered boxes on top. And there's a wall panel beside with nails at its corners.
Click the left side of the drawers to find a hidden one.
Before you enter the bedroom (or just after you leave) pick up a stick from the base of the left wall.
Turn right to face the locked door, which has a five-digit keypad beside and a rack of plant pots in front. You can take a closer look at the bicycle on the left, then at the back of the bicycle where the seat is screwed on. Also beside all those plants there's a light switch you can't use next to a locked door with a keyhole.
Boxed
Use the clue on top of the chest of drawers to do something with them.
Ignoring the rightmost drawer, It seems like you would be able to put in the corner clue if there was just one more drawer at the top left.
But it really exists, hidden on the left side!
So click the drawers in the bottom left and top middle, click the left edge and click that drawer, then return back to the front side and click the bottom middle drawer, which contains a screwdriver.
Dismantle
Use the screwdriver to remove the seat from the bicycle, then use it again to remove the seat from the supporting metal column.
(The bear has now vanished and the box is on the table.)
Books
Use the clue from the bookshelf to unlock the box on the dining table.
(Hint: don't overthink it!)
Each compartment has a different number of books, which tells you what order to push them in.
The vertical word LEAF refers to the potted plant on top of the bookshelf, which means you need to mentally rotate the clue counter-clockwise to make it fit.
After rotation, you find that the clue now reads
- 1 -

3 5 -

2 - 4
so push the top, bottom-left, left, bottom-right, center buttons to unlock the box and find a green heart key.
Use the heart key to unlock the cupboard and find a crowbar that's chained inside.
Bear
You seem to be stuck now, but exploring the room again you find the bear sitting beside the bed.
Checking in on him, he reveals the beer glass in his hand, then takes the quilt down from the wall to cover his flushed face.
Where the quilt was, you find a picture telling you to take a break, and clicking it makes it rise to reveal a password box.
Break
If you're familiar with Rinnogogo's games, you might already be expecting the password to be made out of letters. Where can you find a clue with letters?
Put the break picture back down and use the glasses on it. The whole picture turns green but four of its letters are extra bright.
So click the picture again, type
Lakeinto the password box (lowercase is okay) and push the Enter button.The picture pops back down and its corners are now flashing.
Corner
Use the clue you just saw from the break picture to unlock the wall panel.
Follow the flashing sequence ⌞⌜⌞⌝⌟ ⌝ by clicking the nails at those corners of the panel.
The whole panel comes off, and it turns out to be a box with a wire sticking out! You also see a matching wire in the wall where it was.
Panel
Place the removed wall panel in the cupboard next to the crowbar, then click the crowbar to pry the cover off.
Then put the panel back in the wall, which leaves a small hole on a vertical track.
Place the metal column from the bicycle into the opened wall panel, where it acts as a lever handle.
Then flip it to open up a deep hidden compartment in the wall!
Zooming in on that compartment, you find a ladder on its floor, but you can't reach it.
Tall
Even if you use the metal stick on the ladder, you find that it doesn't move! You're going to need something else.
Looking around the room again, you find the bear sitting on the couch once more, and he asks for the stick.
Give the stick to the bear, who bends the end into a small corner.
Now you can use the stick to retrieve the ladder.
At first glance it may seem that there's nothing in the room that requires a ladder to reach, but remember that you just failed to take the ladder because it was out of reach!
Zoom out and place the ladder in front of the compartment you got it from, and then click that compartment again to climb inside.
You see a plate clue on the left wall above a white rectangle consisting of six columns that can be made half-height or invisible. Also, there's a clothes rack with several items, and a mousehole where the mouse seems quite timid.
Hanger
Use the clue from the clothes rack to unlock the box on the floor beside the tree.
There are five items on the rack. Paying attention to where they connect with the central column, you find that their colors are black, blue, blue, green, red.
Click the buttons 0 3 3 2 1 times and open the box to find a four-digit lock.
Plate
Use the clue from the kitchen cupboard to unlock the white rectangle puzzle.
The first and third jars are empty, and the second and last jars are half-empty.
So click the columns 2 1 2 0 0 1 times and push the Enter button to open up a tray with a Yellow star key.
Use the star key to unlock the bathroom door, and go in.
The bear is taking a shower! How did he even get inside?
Bath
After leaving the room and going back in, the bear is nowhere to be seen but there's now a note in the basket.
(The text on the side of the note reads Forest Onsen Center.)
Click the note and flip it over to find another clue.
Leave the room again and push the light switch, which controls the bathroom.
Go back inside, and you find a row of colored digits as well as something flashing in the corner.
Turn the lights back on and click the corner at the right side to find an apple coin.
(Then turn them back off so you can easily access the number clue.)
Digits
Use the number clues you've seen to unlock the four-digit lock.
Hint: start by figuring out the front side.
Eventually you'd expect to replace the left side of 3=1 with all the numbers on the back of the note, but the numbers on the note don't all appear in the bathroom. This means that it's the numbers on the right side of the equation that should come from the bathroom.
Looking for the green 1 in the bathroom clue, you find that it's the third green digit.
Following the same logic, the 2nd yellow, 3rd red, 2nd green, 1st white digit form the code 5936. Enter that into the lock and open it to find a blue key.
Blue
The bear (now back on the couch) is really anticipating this now, so give the blue key to him to unlock the box.
Aw, now he's sad and you might be too. The box contains a cheese wedge and a smaller padlocked box!
Trade
Return to the mousehole and place the cheese on the ground, then click it to offer it to the mouse.
Back out into the bedroom and zoom in on the mousehole again, where the mouse now asks for two coins in exchange for matches.
But at least you can take the pink ribbon off the mouse's tail. (This ribbon only appears if you already have the coin from the bathroom.)
You may have seen where to use this ribbon already, or maybe not because there's no visual feedback for it.
Beside the glass table on the floor is a shiny handle. Use the ribbon on it to form a loop and lift up the floor panel, revealing another coin!
Give both coins to the mouse, and you get the matchbox.
Flame
Open up the lantern by the bed and light the candle with the matchbox. Close it to view a clue with four digits.
(It's possible to light the lantern without opening it, but then the clue won't immediately appear.)
Then use that clue to unlock the four-digit lock again.
Putting the digits from the lantern in order (yellow, red, green, white) gives you the code 4280.
Enter that in the lock and open it to find a gold key.
Use the key to unlock the padlocked box, which contains a bear plushie and a folded note with green digits.
Green
Use clues from the new note and the potted plants to unlock the door.
Each plant on the rack has a different number of leaves, giving you a sequence of digits to read.
The digits in those spots on the note form the code 23684.
Enter that in the keypad to open the door, and leave through it to end the game!
Missed
The drunk bear on the end screen tells you there's something else to be done.
So push the "to another end" button, and check the room out again.
The bear is now on the toilet bowl, seemingly having a bad time.
Give him the plushie and he comes out to thank you. Now you can leave through the door for the proper ending!
(The text on the end screen thanks you for being a friend to the end.)
I'm in the same boat as you, 4red3s. 21/50 and I have no idea how to solve the remaining puzzles. I've clicked everywhere, but got nothing McDVOICE
Update