
 Autumn is coming, days start getting shorter - good, more time for playing!The Weekday Escape is here!
This week are all three games animals themed; the creators' approach to animals is different though. The room by tomoLaSiDo overflows with tame chipmunks which can be easily catched so the only problem stays to find them. Kamonosoukutsu's animals are very civilised, wearing human dress, knowing how to use a chair and even having human wishes. Dassyutu's animal is predatory and ferocious, maybe hungry too, and very dangerous. Will you escape?
Have a good time and enjoy!

Beautiful round window in wooden tomoLaSiDo room probably stayed opened for a while, so several chipmunks got inside hungry for sunflower seeds stored here and now they are hidden somewhere around the house. They all seem quite domesticated, and after you catch them they peacefully sit in the inventory slot gnawing on something, but one chipmunk is special - it's well trained rodent which helps you to solve puzzles or to get to inaccessible place - and a seed is the only reward it wants!
The cursor is not changing, no save button, one ending.
Kamonosoukutsu locked you in a small room with several coded drawers and boxes. Ms Pig (nice dress!) and Mr Bull (nice nostril ring!) are locked here too, but they don't seem to worry about it much, they just want you to find something for them because their little hoofs aren't very useful when it comes to using screwdriver or pushing small buttons. They are not ungrateful, if you bring them the jewel and the statuette, they would repay you for it.
The cursor is not changing, save button, one ending.
The game is available for Android too.
Fierce animal in Dassyutu's room isn't overstatement or joke, there isn't any pink box labelled 'fierce animal' with three months old kitty inside, it's bloodthirsty creature and the game may end quickly with 'game over' screen stained with suspicious red stains...fortunately there's safe button! The room where you find yourself isn't locked, it doesn't need it, as the guardian doesn't let anybody pass, keenly watching the exit with little yellow eyes. Your goal is to find the way around it...
The cursor is not changing, save button, one ending.
We love escape games, and our readers love talking about them and sharing hints! How about you? Let us know what you think, ask for clues, or help out other players in the comments below.


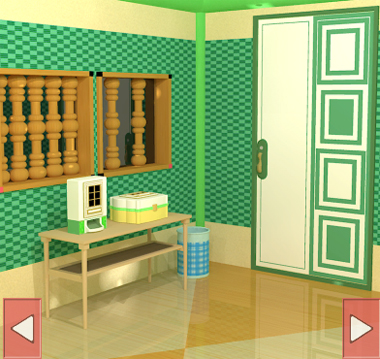
Escape Challenge 67: Room with Chipmunks
I don't actually think the windows in these rooms can be opened, which means… these chipmunks are pets?
Exploration
In front of the classic round window, you find a table with a box of seeds. Clicking on the box spills some seeds on the table, and you add a seed to your inventory. The tail on the left belongs to a chipmunk, and you spot a similar tail of a chipmunk in the potted plant. To the right of the window, a wooden panel has four arrow buttons, two of which are marked with circles. Each button opens the panel in that direction, and you can pick up the (capsule containing a) key piece from the ledge outside. (You need to close the panel before you can back out.)
Turn right to find a table with three colorful spinner wheels on top. The picture on the wall has some two columns of different-sized circles with different shaded rectangles between them.
If you look closer at the picture, you find three green symbols on the frame.
Also, look under the table to find a key piece.
Turn right to face the door. The wall clock has three vertical stripes running across it. All the drawers beneath that are locked. One has a three-digit lock, one has a three-color lock and one has a three-digit lock but the digits are on brown backgrounds.
Turn right. There's a small horizontal hole in the wall with a key piece in it. Unfortunately, it appears to be entirely covered in glass except for the left end. Beneath that, the blue bin is empty but has a chipmunk hiding behind.
Enter the corridor which leads to the toilet. A panel in the right wall lets you see out into the main room, and you can also sit down and look right, up, and left to find a drawing of four chipmunks sleeping in a row.
Feed
While the wall panel is open, you can place a seed on the ledge outside, but it vanishes once you reopen the panel.
That is, unless you use the clue on the wall panel to work some magic.
The circles on the arrows tell you which of them to click: the left one first and the right one second.
So open the panel towards the left, place the seed, then close the panel and reopen it towards the right.
It's a chipmunk, and you can select this one in your inventory!
Trail
Dump the seeds on the table again, and let the chipmunk feed on them.
Then use the clue it gave you to unlock the top drawer. (Don't worry if you missed the clue, there's more in the box!)
The path of the chipmunk traces out the digits 216, so enter that in the drawer, then open it to find a key piece.
Big and small
The rectangle clue from the picture reminds you of the stripes on the clock, so use those clues to unlock the bottom drawer.
In the picture, the smaller circle becomes larger, the larger circle becomes smaller, and the rectangle eventually becomes as thin as a minus sign.
This means that you should take the difference of each pair of numbers covered by a stripe. From left to right, this gives you 11−7=4, 12−6=6, 5−1=4.
So enter 464 in the lock and open the drawer to find another key piece and chipmunk.
Circular
You can place the chipmunk on the table with wheels. He runs across the table and rotates the wheels, but that doesn't give you the correct code for the middle drawer.
What else can you do there?
The three 0s between the lines on the table are actually outlines that you can place seeds on. However, there's another clue you need to use here.
Since the green color of the outlines matches the clue on the picture frame above, you need to follow that clue by only placing seeds on the left and right spots.
Place the chipmunk on the table again. This time, all the wheels stop on green.
So click each button of the middle drawer twice, then open it to find another key piece.
Train
Place the chipmunk in the hole, and it pushes the capsule to the end of the tube.
You can then access that end from the toilet to get the key piece.
Now that you have all the key pieces (and chipmunks), you can open the door and escape!
Item list
6 key pieces:
Top left: in top drawer
Top middle: in middle drawer
Top right: in bottom drawer
Bottom left: on outside ledge
Bottom middle: in tube
Bottom right: under wheel table
5 chipmunks:
(usable) On outside ledge
On chair beside table
Behind potted plant
Behind blue bin
In bottom drawer
1 other item:
Seed, taken from box
Room with Two Animals
Exploration
(As with last time, there are things you can pixel-hunt but I won't mention them until you reach their clues.)
You start facing the locked exit door. To the left, a table holds a tall box with a grid of six buttons and a wide box with three letter buttons each marked with a pair of colored rectangles. The bin on the right holds a black heart piece. You can also look at the windows, which are blocked by different numbers of decorative columns and have black and pink squares at the corners of their wooden frames.
Turn right to find a cow who asks for his statuette (looks like a trophy award to me).
Turn right to find two display cabinets. The short wide one holds six letter signs each surrounded by a pair of dolls wearing colored hats. Looking at the cupboard doors beneath them, you find the left one locked with three geometric shape buttons, and the right one unlocked and containing a clue. As for the tall display cabinet, the glass doors are locked (and require a key) and the three drawer locks have a grid of 6 pairs of colored buttons, a grid of 4 flashing buttons and a a row of 3 digit buttons. While looking at the drawers, you also spot another clue painted on the wall to the right.
Turn right to find a pig asking for her (nose?) ring. In addition to the single window on the left, you also see a panel fastened by a screw.
Twelve buttons
Use the clue in the left cabinet to unlock the top drawer in the right cabinet.
Click the buttons corresponding to the four dolls with green hats:
Gr rr

rr GG

rG rr
Open the drawer to find a jewel box with screws, and a clue with colored hearts at the bottom of the drawer.
Three letters
Use the clue in the left cabinet again to unlock the three-letter box on the first screen.
The colors above each button on the box indicate the dolls which hold the respective letter. So for example the first letter is held by two dolls with green hats: E. (There are actually two Es to choose from, the correct one is white.)
Following the other colors, you work out that the entire code is ESC. After you enter that, you can open the box to find a heart and another clue with colored hearts.
Six buttons
Use the clue under the left cabinet to unlock the six-button box on the first screen.
The letters E, S, C, A, P, E (both Es being blue) are in the top right, top left, bottom left, left middle, bottom right, top right positions in the cabinet.
So click the buttons in those positions, then push the big button to make the box dispense a blue key.
Unlock 1
Use the blue key to open the right display cabinet. Instead of just blindly turning over all the cups here, let's look elsewhere for more clues.
Corners
Use the clue beside the right display cabinet to unlock the middle drawer.
The windows with 1, 2, 3, 4, 5 columns have pink squares in their top right, bottom right, bottom left, top left, bottom left corners.
So push the ⌝⌟ ⌞⌜⌞ buttons, then open the drawer to find another heart on top of a clue involving some cups.
Map
The clue in the middle drawer tells you to look in under some of the cups. The top middle one hides a heart piece, while looking under the left ones in the second and third row and the bottom right one (as hinted by the green arrows) reveals shapes.
So use that clue to unlock the left door beneath the left cabinet.
The top, middle, bottom squares in the clue are connected by arrows to the cups hiding a square, hexagon, pentagon.
So click the buttons on the lock 2, 4, 3 times, then open the door to find a screwdriver chained to the cupboard as well as yet another heart clue.
Unscrew 1
Use the box on the screwdriver to open it up, and you find the ring!
Reward
Give the ring to the pig, who rewards you with another heart piece.
Talk to her again, and she says something about a green arrow.
Since the arrow points at the ceiling, look up to find a duck holding a sign. (Yes, he's been there the whole time.)
Three digits
Enter the code the duck gives you into the bottom drawer.
516
Opening the drawer reveals a box with five heart-shaped slots.
Hearts
When you place all five hearts in the slots, they light up and become colored heart buttons.
So use the other clues in the room to unlock this box.
The available colors are (pastel shades of) blue, green, yellow, white, red, and the heart clues read:
Top drawer: Y??W
Left cabinet door: R??G
Shallow box: B?G
Using the interpretation that each question mark represents exactly one heart, there's only one way to put those clues together.
From the longer heart clues, you deduce that the first two hearts are yellow and red in some order, and the last two are white and green in some order. This means the blue heart from the shorter clue can only be in the middle, so the fifth heart is green, the fourth is white, the first is yellow and the second is red.
Make the hearts YRBWG by clicking them 2, 4, 0, 3, 1 times, then open the box to find a pair of pliers.
Snip
Use the pliers to cut free the screwdriver.
Unscrew 2
Unscrew the wall panel beside the pig. Inside, you find the cow statuette!
Victory
Return the statuette to the cow, who gives you a green key in return, and thanks you once more.
Use the key on the door to leave!
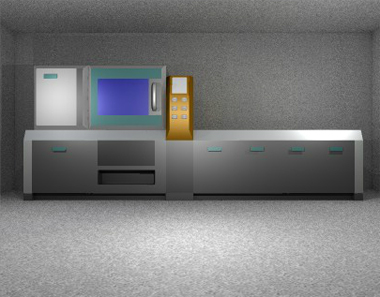
Fierce Animal Escape
What have they got in there, King Kong?
Exploration
As you can see from the intro, the "fierce animal" is in a cage by the exit door. It's so green and adorable! I'm sure it wouldn't mind if I just take a closer look at the doorknob… GROWL!
GAME OVER
Alright, let's proceed with caution instead, and use the Save button a lot. Since you can't touch the door, you have to be careful while clicking the cage. Without opening the gate, take a look at the lock (which needs four parts to repair) and the bracket on the floor.
Also click the top of the cage to find a coin there.
Back on the first screen, there's a shelf which holds a metallic mold, a chunky smartphone battery, a locked padlock and a coin. To the right of that, there's a filing cabinet whose four drawer locks have an input box, four buttons marked with symbols, four buttons marked with arrows, and four colored buttons.
The filing cabinet also has a coin on top and a pair of earphones below.
Turn right to face a shelf with colorful boxes. You can read the label on each box by clicking and holding to see its year and weight.
While looking at the boxes, click the top right corner (past the red box) to find a metal ingot.
Also click the left, bottom and right sides of the shelf to find a note (with a list of weights) and 2 coins.
Turn right to face a sophisticated-looking oven with a four-digit lock. The cupboards seem to be all for show, but you can click those on the right to find a bottle of detergent.
While looking at the tops of the cupboards where you got the detergent, click the left side of the screen to look at the corner and find a coin.
Click the hole beneath the machine to find another coin.
Turn right to find a light wireframe rack which holds a dustcloth, a smartphone (without battery) in a white container, a coin in a black container and some clay in a glass dish. There's also a complicated machine which requires a memory card.
Look under the rack to find a coin, and look under the machine to find a brown stain on the floor.
While looking at that stain, click the right edge of the screen to find a wrench.
You only have nine coins, but you've looked everywhere that it's safe to look. Speaking of, it's a good idea to save the game now.
Clean 1
Use the dustcloth on the brown stain to wipe it off, revealing four red digits.
Where can you use that clue?
Enter those digits (4321) in the oven to unlock it, and the game tells you it's a microwave.
Bake
Fill the mold with clay, and place it in the microwave to get a ceramic key.
(Don't try this at home — a quick googling indicates that microwaving is unsafe or ineffective with many types of clay.)
Unlock
Use the key to unlock the padlock. This gets you nothing for now.
Connected
Inset the battery into the phone, then plug in the earphones.
Clicking the phone makes it read out some letters (which the game helpfully transcribes for you).
So type those letters into the input box of the top drawer.
After typing MIKE, you can open the drawer to find a memory card.
Data
Place the memory card in the machine, which then tells you that it needs some metal.
So place the metal bar in there too, and the machine mills it into a metal plate with some precisely shaped holes in it.
Shapes
Use the clue from the metal bar to unlock the second drawer.
Click the star, circle, triangle, square (2134) buttons, then open the drawer to find a harmonica which is also covered in dirt. Hmmm…
Could this dirt be from the drawer? As you poke around in the drawer by tapping the sides and bottom, the false bottom of the drawer comes off to reveal another piece of cloth.
Clean 2
Apply the detergent to the cloth and use it to clean the harmonica, making four numbers appear. (You can get to this point with the dustcloth, but the game won't let you use that for harmonica cleaning.)
Since the harmonica is clean, you can also blow right beneath each of the numbers. Instead of musical tones, the harmonica speaks several direction words (which the game also transcribes).
Directional
Use the clue from the harmonica to unlock the third drawer.
The numbered holes of the harmonica (from 1 to 4) speak words that name the ↑→↓← directions.
So push those buttons in that order (or more simply, from the left side to the right) to open the drawer. Inside, there's a note that just reads 2018.
Assorted
Use the clues from both notes to unlock the bottom drawer.
Each box labeled 2018 has a different weight:
--- --- 600 100

300 400 --- ---

700 --- 500 200
In particular, the other (first) note tells you to find boxes weighing 100g, 200g, 300g, 400g. Those boxes are red, green, blue, yellow.
So click the 3rd, 2nd, 1st, 4th buttons from the left to open the drawer, and take the bolts and nuts from inside.
Now that you're done with the puzzles, it's a good time to save your game again.
Lock
Zoom in on the missing lock of the cage, and use any of the remaining items in the right column (nuts and bolts, bracket, wrench) to replace the lock using all of them.
Then secure it with the padlock. Thanks for waiting, fierce animal!
Left
Clicking on the door will let you leave, but before you go… where's that last coin? It has to be here somewhere, and you've checked everywhere else!
Except for the door itself. The coin isn't hidden on the door, so it must be beside the door.
Click (anywhere) to the left of the door to zoom in on the corner where the last coin is. With the whole game complete, it's time to leave the room, and leave the fierce animal behind.
Update