
 Winter is still strong, no signs of spring yet - never mind, stay at home and play! The new Weekday Escape is out!
The first game is by Escape Game Club, a very promising newbie - their game is number 0002 - that's the spirit! Hopefully, we'll get more from them soon, with that enthusiasm! Factory.112 returns with a beautiful game, maybe a little shorter than you would expect, but otherwise it's perfect. Riddle Escape gives you a chance to experience a little adventure - explore and escape very unusual underground place.
Have a good time and enjoy!
Escape Game Club is a newcomer, but if I smuggle their game into Retro Weekday Escape, I think nobody would notice; it's old fashioned game. However, there are modern conveniences like save button or music (sounds very familiar but I can't remember from where) and you can switch between English and Japanese even during playing. No special knowledge required.
The cursor is not changing, save button, one ending.
Factory.112's games design is outstanding, very clean and detailed - last time we met them in WE N°152 and it was a pleasure! This game is very good too - but there is a language barrier, I'm sorry. It's not unbeatable though! Later in the game you find a list with seven expressions and after closer inspection you find, that some of them are repeating and that you need to know only four - here they are:
1 テレビ
2 デスクライト
3 ゲーム機
4 ギターアンプ
You can brute force the code of course, but twenty four options are a bit much; if there is some Murphy's law concerning cryptography, I'm sure it says something like "solution is always the last tried option, if not, you made a typo and you must start again". Google Translator is quicker.
The cursor is changing, no save button (autosave doesn't work on my PC), one ending.
The game is available for Android and iPhone too.
You return with Riddle Escape to ruins of...what? A castle or a temple, maybe a labyrinth? This is not important; the place, for whatever purpose it was created, is romantic and mysterious, and stimulates imagination. The only escape way is underground canal and this little boat is waiting for you, but you have to find a paddle first - there is no point in looking for it now, though. The game is linear as usual, so start with these boxes and cases around, and you will work your way to it soon! The other end of the canal is too waiting for exploration!
The cursor is not changing, autosave, one ending.
The game is avalable for Android too.
We love escape games, and our readers love talking about them and sharing hints! How about you? Let us know what you think, ask for clues, or help out other players in the comments below.


I really enjoy the puzzles from this maker, despite all the bugs I ran into while playing this.
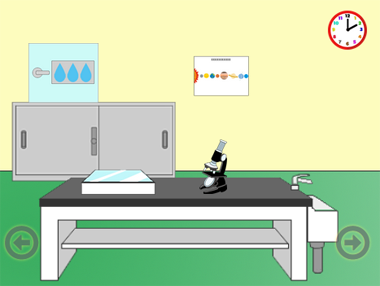
Escape From Laboratory
Things will be a bit less confusing if you switch the language to English before you start, although you can do this, and change the sound and music volume (independently!), during the game from its menu.
There's a story (below the game) to why you're escaping this lab/"Science Room", but I'm not going to translate it because boy it's long.
Exploration
You face a lab table with a microscope on it, no slide included. On its left, some black sand is enclosed in a glass case fastened to the table, and it blocks off a letter clue that you really want to read. To the right, a sink is working and you can even leave the water running! Behind it on the wall, a safe with a colored raindrop code sits on a locked cupboard with two sliding doors. There's also a poster with the sun and eight planets on it, and a very colorful wall clock that seems to have stopped.
Turn right to face the exit door, which isn't locked. Instead, the sliding door on the left is held shut by a memory alloy bar running across the right side. Above the bar, the Earth is painted on the door, with a rectangular slot and a rectangular panel.
Turn right to face a locker, which isn't locked either. It contains only a dustcloth. The table on the right has a pretty convenient weighing scale on it, and it also has an eight-digit drawer.
Turn right to face another lab table with a Bunsen burner frame next to a beam balance with two interesting markings. There's also a hole in the wall with 500g written in red on the back. Just when you thought you're done exploring, you notice something under this table, so reach down and pick up a memo with the chemical formula for water.
H₂O
The memo has a water drop on it, so your instincts tell you to wet it in the sink.
Do so, and extra gray markings appear on it. They seem a little familiar…
The markings match the shapes on the eight-digit table, the clock hands, and the clock frame.
Matching those markings up with the real things, you find that the H (table frame) is orange, the 2 is green and the O is red.
So go up to the three-drop safe, and click the drop buttons 2, 1, 4 times.
The safe opens and you can take a bar magnet from inside.
Fe
Use the magnet on the glass case, parting the sands to reveal some letters. (Or Japanese kanji and kana, if you still haven't switched your language.)
So use that clue to unlock the eight-digit drawer. Due to a bug in the game, you will need to enter the whole code at once without backing away from the drawer.
The S, U, J, e, Ma, Me, V, N letters appear at the start of planet names on the poster.
Those planets are 6, 7, 5, 3, 4, 1, 2, 8 in order away from the sun, so enter 67534128 in the drawer to open it and find a box of weights, which you can open up to look at.
50g
You can now test the weights out by balancing them. How much should you put on each pan?
Put 50g of weights on each pan: 20+30 on the left and 10+40 on the right.
The "50g balance" panel slides down so you can take a key, and shuts afterwards.
Unlock
Use the key to unlock the cupboard with sliding doors, and pick up an empty beaker from behind the left door and an alcohol lamp behind the right.
Polar
Place the magnet in the slot in the exit door, and the globe opens up so you can take a matchbox.
ΔH
Fill the beaker in the sink, then place it on the stand, add the lamp and light it.
It boils immediately and you can only pick up the hot water beaker by using the dustcloth.
Transformation
Use the hot water beaker on the bar, causing it to bar no longer.
The door slides open, revealing another door with a seven-digit lock. So many chemical symbols, but who are you?
500g
Fill the beaker again. It weighs exactly 500g, as you can check with the weighing scale.
So place the filled beaker in the hole in the wall, and a compartment opens up so you can take a coin.
100g
This coin is going to help you "100g balance", but first we should figure out how much it weighs.
Let's see… 40 grams! Now what?
Place 40+60g on one pan and 40+30+20+10 on the other, where one of the 40s is your coin.
(Due to a bug, you can also make 100=40+40+20 by placing the coin twice.)
The lower compartment of the balance opens, and you can take the prepared slide from it.
Deceit
Place the prepared slide in the microscope to view the final clue.
Save your game from the menu, and then use the clue to unlock the exit door.
The phrase "I am liar" can be spelt with the chemical symbols I, Am, Li, Ar for elements with atomic numbers 53, 95, 3, 18.
So enter 5395318 in the door to open it and leave.
Dr. Key and S. Cape greet you at the end. (Or so I think, I haven't paid much attention to the story.)
Mistake
Load your game, and push the blue door back to the left.
Pick up and replace the magnet. With the bar gone, the compartment opens further to reveal a red button.
Click the now-open doorway to leave through the staff door.
A couple of thoughts. First, on Home Sweet Home EX, specifically with respect to the code that comes from the list:
It took me far too long to try the code where it actually ends up needing to be input. I kept trying to use it on:
the power switches, both the colored ones and the switches that are part of the devices they power themselves. I tried them alone, in combination (first switch the colored one and then the one on the device), and starting in either the all-on state or the all-off state. Obviously, none of that works. But I kept trying it because the hint seemed to suggest that it was easy to put in a "typo."
Finally, for Escape from Ruins 2: this was mostly really easy, but I ended up stuck on the:
leaf puzzle. Because the leaves in the clue are oriented differently from the leaves on the box, I mentally rotated the clue so that they would match. It didn't work, so I assumed that I needed to find another leaf to go in the spot where one seemed to be missing, and didn't try the puzzle unrotated for an embarassingly long time.
For Home Sweet Home, I think gameplay will be enhanced if I provide translations of those Japanese words:
テレビ: television
デスクライト: desk lamp
ゲーム機: game console
ギターアンプ: guitar amp
Here's your weekly dose of dubious translations!
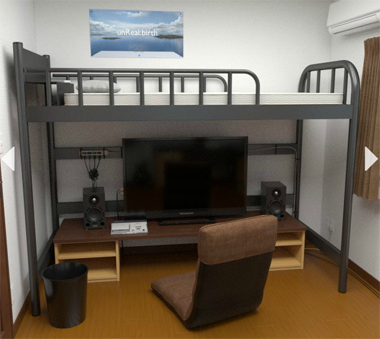
Home Sweet Home EX
An older brother (going on travel tomorrow) has painstakingly prepared an escape game for his younger brother (soon returning). As their father (with no knowledge of escapes), you went in to check on him and set off the prank!
Exploration
The door that closed on its own behind you is missing its doorknob, and you quickly realize that you need it to escape. The wardrobe next to it has a giant padlock (where did he even find that?).
Turn left to face the desk, and look out the window at the nice weather. The digital wall clock isn't working, and the desk lamp doesn't seem to have power. Wait, what's this on the desk?
It's a printed letter.
"Dear little brother, if you're reading this it means you've escaped your own room. Well done for now. Knowing you, you would come to my room to grab one of my manga in revenge. I know you.
By the way, it's fine if you found my pranks weak. From here on, it's the real thing. Take your time. From your older brother."
Looking at the brand new desk chair, you recall him bringing a large package here. Look under the table to find a guitar amplifier (could it be a clue?), which doesn't have power either. Pick up the blue book next to it which it screwed shut (feels like it's not just a book, he's crafty as ever!). The rest of the shelves are empty for the purpose of the escape game, of couse. Examine the expensive looking guitar and the empty drawers. Wait, the top one doesn't open even though it's unlocked.
Maybe look at it from a different angle?
Pulling the drawers out, you find that the top drawer is held shut by a bolt on the side.
You also notice a metallic guitar pick among the guitar strings near the head.
Turn left. There's more windows, and the wires from the desk extend across the floor below them. In the corner you can see the air-con (only bought and replaced, barely used).
Turn left to face the loft bed. Even though the bed on top looks interesting, you need a ladder to get up there. Below, there's a home theater with large TV, high-end speakers and a retro-looking gaming device (no power) with an empty disk drive and a card that you don't dare to touch, with a legless chair in front. All the power in the room seems to come from the socket in the lower-right and pass through the power strip in the upper left, whose switches are nicely color-coded while the wires are tangled beyond hope. Look in the trashcan to find a hexagonal socket, useless without its handle.
Click the left edge of the TV to find its power button. Of course, that doesn't work yet.
Unscrew
With no screwdriver in sight, you decide to improvise and use the guitar pick instead.
The book opens up to reveal a diskette (but not the floppy disk you're used to) with a padlock printed on its label.
Power up!
Let's just flip all the switches on the power bar so we can turn stuff on. You can turn on the desk lamp and amplifier, to no effect.
Push the button on the TV to turn it on.
"No input signal. Check that connected devices are powered on."
Okay, let's turn the console on by sliding the gray switch.
"Mega Graphics 0.0.0. Insert Disk."
We have a disk! Insert it in the console, where it fits exactly.
A clue with numbers and arrows appears on the TV.
Rotary
The diskette label had a padlock. Could the TV clue be part of the padlock?
Start in the clockwise direction (click the right side of the lock), going from 0 to 7.
Then reverse direction to 3, and again to 11, and so on.
Once done, the padlock opens and falls away. ("Looks like I guessed right. Well, they say part of skill is luck. Even I could make this kind of game!")
The wardrobe is empty except for some hangers, a ladder (must have been difficult to move there) and a mysterious box with four colored buttons.
Climb
Use the ladder on the bed, where a fresh-looking poster is pasted, no, pinned to the wall.
The air-con controller is here, but what you're really interested in is the pillow, which hides a ratchet handle.
Click the nearly-invisible down arrow to climb back down.
Unbolt
The ratchet (socket wrench) handle is useless without a socket, but you knew that already.
Use the socket on the handle or vice versa to assemble the wrench.
Then use it to remove the bolt on the side of the top drawer. Isn't this going a bit too far for a prank?
(Examining the wrench again: "That was easy for my first time using this. I'm keeping it in my toolbox.")
Open the top drawer to find an eraser.
"Heavy duty! Erases everything from existence!" (in illegible fine print: "Erasing has limits. Please refrain from using to resolve personal issues"???)
You don't really have a need for the eraser, so you remove it and unfold the cover to find a note written on the inside:
"1 Television 2 Desk light 3 Television 4 Game machine 5 Guitar amp 6 Desk light 7 Guitar amp".
Power down!
Use the remaining clues from the room to unlock the box in the wardrobe.
By flipping the green, red, blue, yellow switches one at a time, you find that they control the power to the desk light, game machine, TV and guitar amp.
So the sequence written in the eraser cover directs you to push the blue, green, blue, red, yellow, green, yellow buttons.
Push the BGBRYGY (RURLDUD) buttons, and the box ejects the doorknob.
(Examining the eraser cover again: "Such small writing though…")
Ending
Use the doorknob on the door, and open it.
"So that's what escape games are. A long-unfelt sense of accomplishment fills my heart. I had no time to enjoy the room, just trying things which weren't too complicated."
"Hey! Who got into my room?!"
can't seem to get Laboratory to work. I keep clicking new game and it just sits there. I refreshed 3 times and still nothing.
kk I think you linkled the wrong game too. there is a RKG poster behind the bed in the room when you start the game. tuirns out this game is compatible with google and I was using IE. anyway, if you have time tio change the link, that would be cool :)
kk
the guitar pick is not removable from the guitar. I tried clicking on it several times.
am I doing something wrong?
Okay, I didn't know there was a requirement for that item.
Examine (click) the screw on the blue book, and then you should be able to get the pick.
Not sure if any other spots in the game behave the same way.
yeah I figured that out. but the link to the first game is wring as everything you said was not in the game so I think the link is incorrect unless you fixed it already
I don't actually write/control the posts, but both links on the page work for me. (The tags though... please fix the tags, JIG!)
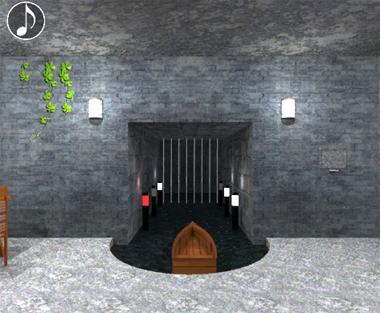
Escape From Ruins 2
It may feel like it, but this game isn't twice as long as the first.
Exploration
You start off facing a small boat pointed towards a set of iron bars. The lamps along the side are a little weird, with some off and one red. Before you go anywhere, examine the vines at the top left of the screen and the sealed stone panel on the right with a round indentation in its tray.
Turn right to face a mostly featureless wall on which the lamps seem a little asymmetric. The safe on the left has three buttons in a column with horizontal stripes on each, and the matching one on the right has three digits under some geometric drawings. There's also a wooden box on the small table below, with three concentric rings that can be recolored.
Turn right to face a screen with only one lamp over a framed picture of boats with an arrow marking. The table beneath holds a more ornate light fixture, missing a bulb. On the right of the room is a cupboard, the top two doors locked and requiring a key, and the bottom two screwed shut.
Turn right to face a much brighter screen. The safe on the left has six buttons that turn white when pressed (except for the top-left one, which remains red). On the right, there's a hole in the wall with three vases and a wooden safe that's missing something from its top. Below the hole, there's a table where a board has four candle holders (one candle missing) around a winged horse figure, and another wooden safe is missing a rectangular part. The corner of the table is marked with a crescent moon and the number 35. In front of the table, there's a chair which you can't move because it's screwed to the ground. Click its back to take a closer look at the pattern of horizontal bars.
Striped
Use the clue from the chair back to unlock the safe with three buttons arranged vertically.
The bars on the back occur in groups of 4, 2, 3.
So click the buttons 3, 1, 2 times to open the safe. Inside, there's a geometric number clue, and another wooden box with three buttons that fill with green from the top down.
Circle Triangle
Use the geometric clue to unlock the three-digit safe on the same wall.
The shapes comprise:
Circle (4) + Down Triangle (5)
Up Triangle (3) + Down Triangle (5)
Up Triangle (3)
and the corresponding numbers add up to 9, 8, 3.
So enter 983 in the safe to open it. There's a filled circle on the back wall next to the number 12, and concentric rings of colored disks on the bottom.
Color Rings
Use the clue from the colored disks to unlock the safe on the small table below.
The rings on the clue are (from outside in) red, green, blue.
So click the rings on the round box 0, 2, 1 times to open it. Take the matchbox.
Lantern
Use the clue from the lamps in the canal to unlock the safe with six buttons on the table screen.
On the same side as the red light, only the far lamp is lit. On the other side, only the far lamp is unlit.
So reproduce the pattern by clicking the right button in the top row and the left and middle buttons in the bottom row.
The safe opens and you find three colored stones on different-shaped stone plates.
Greening
Use the clue from the hanging vines to unlock the safe with green bar buttons (beneath the geometric clue).
The middle vine is longest, followed by the right vine and then the left.
So click the buttons (from left to right) 1, 3, 2 times to open the safe. Take the white rectangular button.
Button
Place the button in the safe on the table, then use the clue from the matching shaped plates to unlock it.
The stones on the circle, square, triangle plates are blue, yellow, red.
So press the shape buttons 0, 2, 1 times, then push the white button to open the box. Take the candle from inside.
Light up
Place the candle in the last candle holder on the horse board, then light all four candles with the matchbox. A compartment opens up so you can take a golden key.
Unlock
Use the key to unlock the top cupboard doors, and open them to find a wide variety of things. The left (dark) safe on the top shelf has two buttons that flash a familiar silhouette. The right (light) safe has three buttons that also show familiar curves. There's a clue on the side with a (slightly more than) semicircle next to 46.
The lower shelf has three different colored books, which are completely empty except for page numbers and a cross printed on a different page on each book. There's also a matching white cross to the right of the books.
Cross
Place the white cross in the safe above the table, and use the clue from the colored books to unlock it.
The green, blue, red books have their crosses printed on pages 2, 5, 4.
Since the digits in the safe are red, green, blue, you need to enter 425 to open it. Take the note with several identical lamp symbols and a red cross.
Dig
Use the clue from the note to find treasure.
The note indicates to look at the wall with two asymmetric lamps. So click the floor under the left safe there to find an oar.
Hold
Use the clue from the vases above the table to unlock the right safe in the cupboard.
The left vase has only one handle pointing left, the right only has one pointing right, and the middle one has both.
So click the buttons 1, 0, 2 times to open the safe. Take the lightbulb from inside.
Flash
Attach the lightbulb to the lights on the table (on the same wall as the cupboard).
Then push the white button in between the bulbs to watch them light up in order.
And then use that clue to unlock the other safe in the cupboard.
The bulbs light up in the LLRRL order, so push those buttons on the safe to open it. Take the red orb.
Marble
Place the red orb in the stone panel on the first screen, which opens up to reveal three wooden buttons.
So use other clues from this room to push those buttons in the correct order.
Each symbol appears next to two digits:
Crescent: 35
Circle: 12
Semicircle: 46
So click the CCLRLR buttons to open up the iron bars.
Swerve
Use your oar on the boat, and then use the clue from the boat picture to steer it through the tunnels.
With the arrow facing forward (up), the boat should point in the RRLRL directions.
So click those sides of the screen, and you emerge at the other end.
Exploration 2
No, the celebratory music doesn't signal the end of the game! You're just in a new room open to the orange sky(box), facing the boat, a box on a small table that's missing a seashell, and four oddly rounded lilypads with card suits painted in white on them.
Back out and turn right. On this wall, there's an ink splatter over a round box with eight leaf buttons, and shelves with seashells are mounted above a wooden table where a box has three square slots, and three hourglasses next to the box seem to be defying the laws of physics. There's also another hole higher up, but you can't reach it unless you do something to the raised block beneath it.
Turn right. The double doors here are surrounded by a three-letter safe on the left and a pedestal with four spherical sockets on the right.
Turn right. There's a small locker with more bar buttons, this time in white and filling from the bottom up. Next to it, a five-button box rests on a table, where each button shows a circle that turns red when clicked. Next to that, there are four pillars of different heights, where the tallest one has a towel you can just barely reach and the shortest one has a six-button safe missing a round object, as well as a weird rectangular cutout in the wall with letters painted above it.
Wipe
Dip the towel in the water, and use it to clean up the ink splodge, revealing white and red circles.
So use that clue to unlock the safe next to the pillars.
The second and third circles in the clue are red, so click the corresponding buttons on the box to open it.
Inside, you find an hourglass without any sand in it.
Base
Place the empty hourglass on the safe on the shortest pillar, and use the clue from the other hourglasses to unlock it.
The sand is on the top in the left hourglass, bottom in the middle and both in the right.
So press the left and right buttons on the top row and the middle and right buttons on the bottom row.
The box opens and you can take a flowery square panel.
Buildup
Use the clue from the pillars to unlock the locker.
Click the buttons 0, 2, 3, 1 times to match the relative heights of the pillars.
The locker opens. Inside, you find a box with colored buttons and a familiar pegasus figurine. There's also a small basin of water with three leaves in it.
Leaves
Use the clue from the leaf basin to unlock the box under the ink splatter/circle clue.
The leaves float at the top-left, right and bottom edges of the basin, so click those three buttons to open the box and find another square panel.
Behind
Take the boat back to the first room (you have to use the paddle on it again) and check out the candles which have now burnt out. The only trace left of them are four colored circles in the candle holders.
So take the boat again, and use that clue to unlock the matching box in the locker.
The circles are (in clockwise order) red, blue, yellow, green, with the horse facing green and red.
The figure on the safe faces the other way, so you should color the squares
Yellow(3) Green(2)

Blue(1) Red(0)
Click the buttons that many times to open the box and find the last square panel.
Connect
Place all 3 square panels in the box on the wooden table, and open it to find a screwdriver.
Unscrew
Bring the screwdriver back to the first room and use it to unscrew the bottom cupboard doors.
Inside, you find only a seashell and a yellow orb.
Also use it to unscrew the chair, which you now carry with you.
You're done with this room! Pick the red orb back up as you leave.
Shells
Place the seashell in the box next to the boat, and use the clue from the seashell shelves to solve it.
The shell shelves have (from left to right) 3, 2, 7 shells.
So enter those numbers in the safe, which opens so you can get a blue orb.
Climb
Place the chair on the raised stone step beside the table, and climb up to the hole, which has a pot of soil, a safe with four shrinking card suit buttons, and a plank with some numbers and arrows marked on it.
213
Place the plank above the short pillar and below the letters, then use its clue to unlock the three-letter safe next to the doors.
The numbers 1, 2, 3, point to the letters SKY, so enter that in the safe to open it and find an empty vase.
Hydrate
Fill the vase in the water, and use it on the pot of soil, which grows four colored flowers.
Suits
Use the clue from the lilypads to unlock the card suit safe.
The lilypads (from smallest to largest) have the club, diamond, spade, heart suits on them.
So click the buttons 1, 3, 2, 0 times to match the relative sizes of the pads.
The safe opens and you see a red X inside. Of course, it's another note that also has two red circles drawn on it.
Polkadot
Following the clue on this note, you click above and in between the two red circles on the wall clue, then open the compartment to find a green orb.
Four colors
Use the clue from the blooming flowers to unlock the final door.
The flowers are (clockwise from top) red, blue, green, yellow.
So place the orbs in the pedestal accordingly (in my inventory, they are green yellow blue red from left to right).
You hear the door unlock, so click it to leave and view the congratulation screen.
In Escape from the Ruins 2 I noticed:
The candles burn down before you leave the first room, so if you write down the colors before you leave in the boat, you do not have to go back to the first room in the step you have labelled "Behind".
Wrong tags are my fault, I'm sorry. Thank you for pointing out, I didn't notice. I'll write Jeff right now.
"Nice article !!!
Thankyou so much for sharing
It is really very helpful !!!
Other than these, visit http://www.electronicwale.com/ for electronic items in Gurgaon."
Update