
 The new Weekday Escape is here, time to reward yourself after a week's hard work!
A long time has passed since you visited Maroya's place. The kittens are still there, not a day older and waiting for your help. After you are done with cats, little robot in Cyonmage's game needs your help too in the experiment measuring its intelligence quotient. The next Gatamari's game is a long one and requires concentration and "do not disturb" sign on door. And finally comes a special bonus, an excellent game by Leonard 2:50!
Have a good time and enjoy!
 Marshmalow's New Home: 5th Room
Three years ago you (or better, two kittens you play for) moved with Maroya into a new home and explored the 3rd Room (WE N°45) and the 4th Room (WE°51). Now you are back in the same place helping the kittens to occupy the 5th Room. They are two, the bigger brown kitten afraid of heights (it's older and therefore wiser and knows already) and the smaller grey lighhearted kitten not afraid of anything (no experince yet). You (the kittens) are stuck in a hall and some boxes from Catamazon are blocking the corridor so you have to figure out how to get to the room door in a different way. By solving several puzzles, of course; one puzzle expects you to know Ghost Leg Rules as many Japanese game does, so here they are: Ghost Leg. There is obviously a story behind the game, but only for those who can read Japanese, I'm sorry. There isn't any language barrier limiting the gameplay. The cursor is changing, no save button, one ending.
 Karakuri Robot Escape Experiment 2
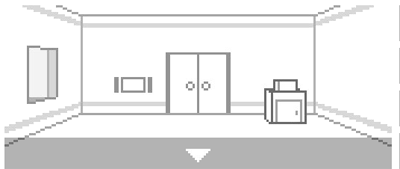
Small Cyonmage's game is very retro and very sweet. Music, graphic and style reminds a lot about beginnings of computer gaming, everything is black and white and pixelated (even though the game involves a bit of pixelhunting). Surprising items can be found at unexpected places and solution of puzzles is not very logic, true, but playful and cute. You'll meet two exotic dancers wishing to start dancing and being very excited about it. After you help them, they start "intense passionate dance" and I'm sure you don't want to miss it!
The cursor is not changing, no save button, one ending.
 Gatamari Escape 10 - Gate Escape 5
You are getting deeper into the Gatamari's universe (previous games can be found in WE - Retro Editions N°3,4,5,6) and as your experience grows, games grow too, this one is significantly larger than previous. You pop up in Ancient Egypt themed room with many devices seeming more complicated than they really are, and notice, that few important items for escaping are in your inventory already. Don't forget to look closely at everything you find! A goal is to activate the pentagram and conjure a lighter (aka a torch) to be able to pass dangerous corridor and move further.
The cursor is not changing, save button.
No animals were harmed in the making of this game and playing; the scarab beetle you find is a little misused but at the end it's fine. I've checked and you can too - before you leave the room, take a look. You will see obviously happy beetle.
I was so glad when I found this game, really enjoyed it. I hope you'll enjoy it too!
This game is charming and clever and magic and so original! Would be a star of Weekday Escapes, if there were not for two difficulties in the game... that's why it's posted as a bonus game. The first difficulty is language barrier in one puzzle and the fact, that kanji can't be copied from the gamescreen. Here are the signs you need: 親 人 中 薬 小. The second is a bug in Firefox; therefore I recommend to play in Chrome (I didn't try other browsers). It is possible to get through in Firefox, but not easily.
We met Leonard 2:50 before, in WE - Retro Edition N°2. This game is a bit different, practical witchcraft was added to escape game genre giving really interesting twist to puzzles and their solutions. Sadly, it seems that the path was not followed by any developer.
The cursor is changing, no save button, two endings.
Notice: I strongly recommend to play this game in Chrome (a bug in Firefox)!
We love escape games, and our readers love talking about them and sharing hints! How about you? Let us know what you think, ask for clues, or help out other players in the comments below.


The link for Magicians Room doesn't work
It works here...maybe try again?
can't wait for the walkthroughs :)
it works now idk why it didn't before
Marshmallow's New Home 5
Maro and Komaro (or Mallow and Little Mallow) have "just" moved in to their new house, and have just managed to break into the fourth room (the bathroom on the stairs doesn't count). Sure, it took basically two years, but the kitty conquest never stops!
Exploration
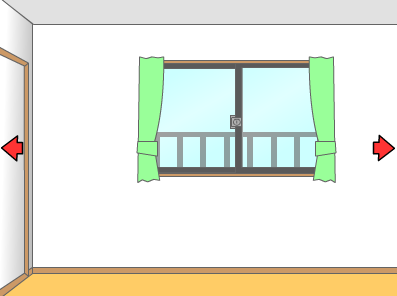
Apparently you're Maro, and you can click on Komaro in your interface… to get hints in Japanese. This immediately pays off on the first screen with locked windows and plain green curtains, when
it tells you to play with the curtains a little, and you find a green key taped to the bottom-left corner.
Turn right to the corridor blocked off with four badly stacked Catmazon (Meowmazon? Amewzon?) boxes. Why are those still here?
Turn right to find a doorway which leads back to the room from last game. You don't need to go back there, but you do need to pick up the coin in front of it.
Turn right to find a locked cupboard in the wall.
Unlock 1
Use the key from the curtain to unlock the cupboard.
Inside, there are interesting red books, not-so-interesting yellow books, a two-button green box, and another locked door on the left which has a keypad with a card slot.
You pick up one of the red books, and it shows a clue with arrows down and up the sides of a box, two circles, a pair of scissors… and the rest of the pages seem to be stuck together!
Vertical
Use the clue from the stacked boxes (and the book) to unlock the green box.
The third box from the top (i.e. the second from the bottom) is offset to the left relative to the others.
So click the RRLR RLRR buttons on the box to unlock it, and take the metal key from inside.
Unlock 2
Use the metal key to unlock the window leading to the balcony, and crawl through (either side of) it.
Komaro really wants to see what floor we're on, so lean over the railing to get a thrilling view of some calming scenery: trees, rocks and flowers arranged neatly in the garden below.
You can also pick up a pair of scissors from the left side of the balcony, and look out over the right side to find another balcony really close by.
Cut here
Flip all the way through the red book, and use your scissors on the right page facing the scissor marking.
This cuts open the paper pocket so you can get a card with some interesting markings on it.
Swipe
Use the card on the reader in the door, and then use the clue from the card to enter the correct code.
(Komaro reminds you how to use the "about item" button.)
The pictures on the front of the card are Tree, Rock, Flower, and the operators on the back are ×2 ×1 ÷2, which gives the following numbers:
Tree: 3×2=6

Rock: 4×1=4

Flower: 6÷2=3
So enter 643 in the keypad (only three digits) to unlock the door, and take the wooden plank (with convenient handles) from inside.
Connect
Use the wooden plank on the right side of the balcony to form a makeshift bridge, then click it to cross over. (You can skip the animation by clicking again.)
Looking around the new balcony, you can see that there are no more balconies to climb onto. So grab the coin from the left side of the balcony, then back out into the open window.
Exploration 2
Start by turning left to face a bookshelf full of red books next to a black door that's somehow floating off the floor. Picking around the books, you find one about counting line crossings (second shelf on the left), a completely blank book with a blue-and-white piece of cardboard (bottom shelf on the left), and a picture book with red outlines and instructions on how to cut out the pages (bottom shelf on the right).
Turn right to find a railing blocking off another stairway, blocked off with a pet door that has tiny digits on its four corners.
Turn right. On the nearby wall are some cupboards. The top pair of doors is too high to reach, and the bottom pair of doors is locked with a three-digit lock. Next to them is a desk whose chair is padlocked to the ground. On the desk is a map with several regions circled (or starred/squared/triangled). The top drawer is unlocked and appears to be empty, and the bottom drawer is locked and needs a four-digit code where each digit is superimposed on a symbol.
Komaro finds it interesting that you can't see all the way to the back of the top drawer… so click on the dark area to take a closer look and find a coin.
Also click on the base of the stacked boxes to find another coin.
Turn right one last time to the window you entered from, and draw the curtains to find a grid of white dots with some dots colored in.
Intersect
Use the clue from the map on the desk (and one of the books on the shelf) to unlock the lower desk drawer.
Hint: T-intersections don't count.
The circle, star, square, triangle regions contain 2, 3, 4, 1 crossings.
So enter that to unlock the drawer, then (back up and) open it to find a box cutter.
Cut out
Use the box cutter on the red outlined items of the picture book on the bottom of the right shelf: the right cupboard, the left snowman, the lower-right petal of the flower.
Now the left pages of the book each have a hole revealing the page beneath.
Digital
Use the exposed regions on the book's left pages to unlock the cupboard next to the desk.
The Dark Room region on the Flower page forms the digit 7.
The Flower region on the Moon/Bunny page forms the digit 8.
The Bunny region on the Sakura page forms the digit 3.
So enter 783 in the lock to open the cupboard. Inside, there's a complicated pink device and a simple green coin box.
Phantom
Komaro informs you that the sticks on the pink device look like an amidakuji, and that there appears to be something on the back.
So click on the left edge to zoom in and find a long slot.
Use the blue cardboard on the slot, then zoom back out to find that the white rectangle match up with the wooden frame.
So trace the circle, crescent and triangle symbols through the amidakuji (vertically downward, crossing a bar to another column whenever available), and the traces form the digits 257 in the rectangles.
So enter that in the lock, and get a coin from the device.
Vend
You should now have five coins:
In front of doors back
Left of first balcony
Back of top drawer of desk
In front of stacked boxes, next to desk
From pink device
So use all the coins on the green box, and open it up to get another metal key.
Unlock 3
Use the key from the green box to unlock the padlock on the chair.
Then step back from the chair to give it space, and click on it to move it.
Top tier
The chair is right in front of the cupboard, so click on the top doors to open them, and pick up a cyan safe from inside.
The safe has three unlit lights on the front, a grid of four buttons on the face to the left, four colored sliders on the face to the left of that, and a four-digit lock on the face to the left of that with some other clues.
Four-digit
Follow the clues on the dragonfly face of the safe to solve its puzzle.
Hint: in print publishing, the crop/trim/registration marks are called tonbo (dragonfly), because of the cross-shape of the centering marks.
Imagine trimming the pattern down to exact size with four straight cuts. The negative space then reads 3761.
So enter that in the box, which makes a loud sound.
Sliders
Use the clues from the dotted curtain to solve the slider puzzle of the safe.
The red, yellow, green, blue dots are on the 2nd, 4th, 5th, 1st horizontal rows from the top.
So place the sliders accordingly (4, 1, 2, 3 clicks), which makes a loud sound.
Grid
Use the clues from the pet door to solve the grid puzzle of the safe.
The digits 1 to 7 occur in the UL UR LL UR LR UL LL corners.
So click the ⌜⌝ ⌞⌝⌟ ⌜⌞ buttons, which makes another loud sound.
In the box
All three puzzles made a loud sound, but they also lit the lights on the front of the box.
This unlocks the box, so open it to get a simple metal key.
Use this last key on the black door to open it and escape.
More walkthroughs on the way, but these are games with substantial length!
Yes the link for Magicians works when it wants!
Regardless the browser.
Karakuri Robot Escape Experiment 2
The mysterious scientist is back with another operational experiment, an IQ test in the form of another escape room! Since you avoided the fatal traps in the first game, there won't be any in this one.
(Note that the Sound button mutes only the music. Also, Cyonmage has a slightly different system for using objects than you might be used to, so read the in-game help if you have trouble.)
Exploration
You start off facing double-doors locked by a four-digit panel beside them. To the right, there's a locked safe with a box on top that's too greasy to take. On the left wall, four rice balls sit in a row, and you can only take one at a time: a round one (but you're not hungry), a triangular one (beautifully sculpted), a square one (you don't know the filling), and a weird one (who even made this?).
Turn around to find two exotic dancers who want to dance energetically and are looking for new music. On the left of the room is a cupboard where both the top doors and top drawer can't be opened. The bottom one works though, and you can get a piece of blotting paper (but your skin's already clean!).
Pick up a cog from the right foot of the left dancer.
Also check the left side of the cupboard to find a triangular hole.
Grease
Use the blotting paper to pick up the clear box on top of the safe on the first screen.
Then use the cog on the bottom of the box to get jump boots.
Optional: pick up more blotting paper and give it to the dancers to clean them up and boost their popularity.
High
Use the jump boots on the wall above the cupboard to zoom in on the top of the cupboard, where there's a square hole.
So take the square rice ball and place it in the hole, and you hear a sound behind you.
Turn around to find that the safe on the floor has opened up. Inside, there's a puzzle that looks like whack-a-mole, but it has three buttons at the bottom.
Rise
Hint: each button affects a certain set of holes, and each hole cycles through closed/open/up in the same order.
(Back out to reset the mole puzzle.)
Hit each of the A, B buttons twice and then C once to solve the puzzle, which gives you Dance Scroll A.
Lump
Bring the square rice ball back and swap it for the triangular one, and place that in the left side of the cupboard.
The sound nearby tells you the top cupboard drawer is now unlocked. It has a round hole in it.
Swap the triangular rice ball for the round one, and place that in the top drawer.
The sound nearby tells you the top cupboard doors are now unlocked, so take Dance Scroll B from inside.
Dance
Use the dance scrolls A and B on the left and right dancers (in either order).
A: "Yhaaa!"
B: "Yo!"
(They also yell different things in the Japanese text. You can sync up their dances by using the scrolls in the right timing, but there's no bonus for it.)
A panel opens up nearby, and they give you advice on how to solve it.
Arrange
Drag the pieces into position, rotating them as you go. (Both the positions and orientations are randomized.)
The lower-right square should be empty at the end, but when you're done, the panel should show a four-digit number.
Escape
So use the four-digit code (1453) to unlock the doors and escape.
i couldn't figure out the
Slider/rotating puzzle at the end of Karikuri
but I liked it just the same. Canl;t wait for the last 2 walkthroughs. :)
got any new walkthroughs?
It's time to put the "do not disturb" sign up!
Gate Escape 5
Last time on Gate Escape...
The numbers tell you that your quest for the Holy Grail is over halfway through. Only three trials and three treasures left to go. Can a Cutter, Reacher, Driver and Decoder save you from the darkness that looms ahead?
Exploration
You start off with nothing but your box cutter, pointer, pair of screwdrivers and codebook from the previous games.
Good news: there's no locked door stopping you from advancing. Bad news: the platform into the dark room leads to a deadly drop pit. To the left of the doorway is a pink picture with tilty corners.
Turn left. In the right corner of the wall, a stack of illustrated Egyptian people appear next to a picture of a mummy and pyramids in the night. A pipe runs down the wall and into a LOCK box with green and blue buttons with a circle and arrow pointing to it, and a horizontal section of pipe is secured in place by screws and has a ball resting in it. Above that, a blue panel has two round pink buttons beneath, and you can feel wind escaping from the cracks.
Turn left. In the left corner is a similar stack of people and a similar picture of pyramids in the day and a man with feathered headdress (Amun-Ra), and the left wall has a spatula hung on it... no, it's tied to the wall! There's also ten square lockers arranged in a pyramid on the wall ahead, where only the top one is unlocked and contains a small platform and the word START. On the floor here is a Lighter seal with an Eye of Providence.
Turn left to find the doorway back. A plaque next to it is covered with what seems to be dried mud. On the right, a light blue panel has a matching button on top which doesn't work, and a stone tablet beneath has a gem in a triangle and four symbols written vertically with an arrow running downward.
Turn left. In the right corner is another stack of people and another daytime pyramid picture with a man in a bird mask (Ra-Horakhty), next to a clear pyramid of blue glass in the floor. The pyramid has an eye marking next to one of its sides, and the faces glow when clicked. A downward passage is visible through the pyramid. There's a pink door on this wall with a green button above it that doesn't work, and a purple safe with three buttons that cycle through different numbers of dots when clicked.
Turn left. In the left corner is another stack of people and another daytime pyramid picture with a man wearing a modern-looking crown with gems (I don't recognize this one). There's a complicated machine with buttons and lights and holes and the instructions next to it don't help much. Under the machine, there are four locked compartments with different symbols on it. There's also a hole in the floor which appears to contain a miniature mummy and an UP button that you can't reach.
Tools
Extend your pointer and use it to push the UP button, then pick up the mummy figurine.
Turn left twice, and use your screwdrivers to loosen the section of pipe, then pick it up and retrieve the pink ball from inside.
Turn left and use your knife to cut the spatula free.
Scrape
Turn left again to the dirt-covered plaque. You can't scrape it with the Cutter due to the risk of the blade breaking.
So use the spatula instead, and the dirt comes right off to reveal a triptych of a baby, and adult and an old man.
Riddle
Use the clue from the dirt-covered picture to unlock the purple panel.
According to the Riddle of the Sphinx, man moves on four legs, then two, then three.
Click the buttons 4, 2, 3 times, and the panel opens up so you can get a sphinx figure with one paw raised like a maneki neko.
Pyramid
Use the sphinx on the START box of the pyramid, and the others open in quick succession, ending on the right with a crowned figurine in an OK box.
Each of the other boxes has a sphinx in it with either its left or right paw raised.
Too fast for you? Pick up the sphinx from the top, and examine the base of the figurine to find a switch.
Flip it from F(ast) to S(low), and put it back in the box to make the others open slowly.
Fortune
Use the clues from the nine sphinxes to open the two-button safe above the pipe.
In the order that they appear, the raised paws are (our) RLLRLRRRL paws.
So click those buttons, and the safe opens with a loud sound, and something comes flying out of the vent in the back and over your head. The vent is still blowing intermittent puffs of air.
Pick up the bird-headed figurine.
Turn right twice to the screen with the complicated device, and pick up the folded note from the floor.
Roller
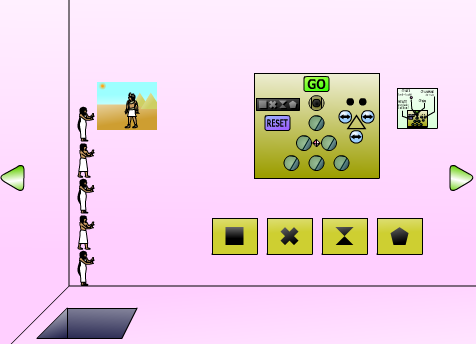
The instructions for the complicated device read:
A ball can be SET in the hole up to four times, after which the device will lock up and not accept any more.
The three buttons on the right, which CHANGE the directions of the slopes, can be pressed up to a total of 2 times when activated.
The GO button drops the ball, after which it will follow the slopes under it to one of the four boxes.
The RESET button will unlock the device and reset it to its initial state, as if no balls had been inserted.
Use the clues from the stone tablet to operate it.
The ball should roll into all four slots: hourglass, square, pentagon and then cross (3rd, 1st, 4th, 2nd from the left.)
Hint: Only one position of the slopes makes the ball go to Square (leftmost box) and Pentagon (rightmost box).
Label the top-left button for the triangle A, the top-right button B, the bottom button C.
Then the buttons that need to be pressed are:
Hourglass: B+C (or A+C)
Square: B+C (or A+C) again
Pentagon: B only
Cross: B+C or A only
Pick up the ball again, as well as the feathered figurine that fell out with it.
Passage
Use the clue from the folded note to unlock the clear glass pyramid next to the pink door.
The path on the note breaks up into several congruent shapes:
>V^V<V><VThis match the diagonal edges of the pyramid's LUDURULRU sides.
So click those sides, and the glass slides away to let you proceed down the passage.
Exploration 2
Crawling down the ladder into darkness, you find a panel of switches on the right wall, none of which seem to have any effect in this room.
So move forward into a room with four holes in the wall, each having their own blue button that lights up the back wall. A vent on the ground is marked with a clue with four people, an arrow, and a purple button.
Turn left to follow the ceiling pipes to an air pump with three outlets. It's sending air through a section of purple pipe on the right, controlled by a blue valve. The pipe on top has been blown up, but it's controlled by a green valve anyway. The pipe on the left is controlled by a red valve, but a long section of it is missing. There's a target on the wall between the two left pipes, and just looking at it gives you chills.
Turn right twice to follow the left ceiling pipe into the opposite wall. Under its end, there's a wall painting of an archer with a red hole where the arrow tip should be. For some reason, you're not optimistic about what it does.
Pressure
Fix the red pipe by inserting the blue and purple sections, then redirect the wind by turning both the red and blue valves.
You hear a whoosh...
...and the arrow goes right past your ear and into the target. Pick it up, and then take the note from it.
Aimed
Go back upstairs, and use the clue from the arrow note to unlock the tilty corner puzzle on the starting screen.
The bows are pointed in the UL UR UL LL LR UL LR LL directions.
So click the arrows that point in those directions, on the opposite corners of the lock: ⌟ ⌞⌟⌝ ⌜⌟ ⌜⌝.
The panel comes off to reveal an empty space, so flip it over to find a metal plate with two people drawn on both sides of another large empty space.
As you run your fingers along the metal surface, you feel a clue hidden there.
Emboss
Use the muddy spatula on the back of the arrow panel to spread the mud over it and scrape it off. The resulting clue has four card suits in boxes at different heights.
Heights
Use the clue from the arrow panel to solve the figurine puzzle.
Examine the pictures around the first room. Using the stacks of people as a guide, you find that the feather crown picture is highest, followed by the mummy, followed by the gemmed crown, followed by the bird head.
The corresponding boxes on the panel contain the suits Club, Heart, Spade, Diamond, which are the 4th, 3rd, 1st, 2nd from the left.
So place the crown, bird, mummy and feather figurines in the boxes from left to right.
The mummy picture was set in the nighttime, so turn the light in the third (heart) box off, and leave the rest on.
Then push the purple button, and the vent platform rises from the floor!
So take the sleeping dung beetle from it.
Tumblebug
(You might want to mute your sound for this one.)
Use the beetle on the missing pipe section in the first room, and then give it the pink ball.
He rolls the ball up the slope and into the LOCK box, and then gives you a pitiful look.
Anyway, the green and blue buttons now work, so click on the blue button to find a safe with three colorful dials, and the green button to open the pink door into another room.
(The dung beetle looks angry.)
Exploration 3
Each wall of this room has the same clues but slightly different: an arc of suns, a conga line of people, a different row of people holding symbols, and a row of pyramids.
But something is clearly missing from the walls.
Contrast
The dials on the panel have star, circle and triangle marks, but there's nothing star-shaped in the side room. Why is that?
Because the stars are only visible at night! Go back down the ladder and flip the middle light switch.
Then go back into the now-dark side room, and some constellations are now visible on the walls.
Quantity
Use the clues from the side room to unlock the safe with three dials.
Hint: start by decoding the words on the walls.
Matching the symbols with letters in your Emerald Tablet, you find that the words on the walls read Green, Blue, Red, Yellow in clockwise order.
The numbers of stars, circles (suns) and triangles (pyramids) on each wall are:
Green: 7, 4, 9
Blue: 4, 6, 5
Red: 5, 5, 6
Yellow: 7, 9, 8
You have to enter that in the dials, but how?
Balance
There's only one solution for each dial that has the correct number of symbols for each color. It's easier to find them by trial-and-error, but if you want to use logical deduction, here are some hints:
Star (7G 5R 7Y 4B): Start with the red and yellow sectors.
Circle (4G 5R 9Y 6B): Start with the green and red sectors.
Triangle (9G 6R 8Y 5B): Start with the blue sectors.
Turn the star, circle and triangle dials 7 times counter-clockwise, 5 clockwise, 6 clockwise, so that the sectors clockwise from 12 o'clock are:
Star: 2, 1, 2, 2, 0, 1
Circle: 1, 1, 2, 0, 1, 2
Triangle: 1, 3, 1, 1, 3, 1
Press the OK button, which stays on.
Glow
The seal on the floor is glowing, so click it to summon Lighter.
Use him on the deadly path ahead, and his sun-powered arrow soars into the room and deals massive damage to the darkness. Another swift victory!
With a pompous air, he "rewards" you with a flashlight. Despite his assurances that its power is as unending as the Nile, you decide to leave it off.
Still chuckling, he fades away, leaving you with a slight ringing in your ears.
Escape
Give your now-happy dung beetle a last farewell, then head into the last room.
As warned, the floor is almost completely missing, and the creaky boards would have been impossible to cross in the darkness.
And so you end up in an empty room with only one OPEN button. You push it and it opens the path forward, or rather, down. You fell anywaaaaaay!
A huge cushion saves your life, which puts you in front of another not-door. But that's for the next game!
seems to be a problem with the getamari instrictions for the
Pipe. it said to put the piece of pipe I got from the blue side then put it on the red side. then click red and blue valves and an arrow would go to the target where i'd collect it. it didn't happen.
please help.
cancel that but what's the deal with the
dung beetle? I have waited over 10 minutes and he won't push the ball to unlock the thing at the bottom as the blue and green buttons do nothing.
Please help.
@Paul:
The unlocking sequence should start once you use the pink ball on him. Check the box at the end of the pipe if it says UNLOCK.
yeah I was confused. the walkthrough you said said
one color opens this and the other opens that. So I assumed you had to click those 2 things but you only had to click the doors itself.
my mistake. Anyway so far I like 2 of the 3 so far. I can't wait for the 4th walkthrough :)
It's a game that makes you want to wear a pointy hat and robes! (Even before Halloween.)
magicians_room
It's time for a true test of your magic skill… in an escape room, of course!
Exploration
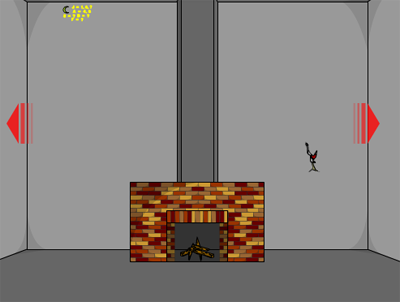
You start off facing an unlit fireplace with a folded paper note hidden on its top, which shows a clock over a rectangular grid with the lower-right rectangle outlined in red. There's a yellowish clue in the top-left corner, and a button hidden in a crack in the wall on the right side.
Click the left side of the fireplace to find a black ankh drawn on the side.
Turn left to find a screen with a red seal on the floor and barred windows, as well as a clue on the wall with two jagged lines superimposed over a circled star.
Turn left to find locked "automatic" glass doors with a keypad beside them that doesn't work, a grate in the top-right corner with something green glimmering through it, and a stone pedestal on the left that's too heavy to move.
Check the bottom of the glass doors. There's a magic card on the other side that looks like it would fit in the gap, but you can't reach it from this side.
Turn left to find a chest of drawers with a four-digit safe (marked with three letters) and a folded note showing arrows and a water droplet symbol. The upper-left locked drawer needs a key, the upper-right one needs a four-letter code and has some white lines beneath it, the lower-right one needs a four-digit code that looks like a time, and the lower-left one is unlocked and contains a torn note with some Japanese kanji. There's also a completely black painting on this screen that spooks you a little when you click it, and has dot patterns on the four corners of its frame.
Nighttime
Use the clue from the clock note to unlock the lower-right drawer.
(The digits of the lock are controlled by clicking above and below them.)
The note shows 11:15, but the PM clue suggests that the time is better represented as 23:15.
So enter 2315 in the lock, and (step back and) open the drawer to find a fairy card, which has a hexagram on the back with two tips colored in.
Transform
Use the fairy card on the red seal, and now you're a fairy! (Use the arrows in the bottom-right to hover around.) There are two main things to do, and we can leave the exploration for later.
First, fly up above the fireplace and read the yellow clue with a crescent moon and several "equations".
Second, fly through the grate next to the glass doors, then hover down and push the card on the floor through the door gap.
When you're done, return to the red seal and use the fairy card on it again, then return to the glass doors and pick up the ice card.
Lunar
Use the clue from the yellow clue to unlock the four-digit box on the chest of drawers.
Hint 1: Each letter represents one number, and one of the numbers has two digits.
Hint 2: What is "moon" a synonym for (in both English and Japanese)?
The numbers in the clue represent months, and the letters are their initials.
So S D F = September December February = 9 12 2.
Enter 9122 in the lock, and the box opens up so you can get a fire card.
Lighter
Use the fire card on the fireplace to light the fire, which makes an Eye of Horus appear above.
Then click on the side of the fireplace (again), and pick up the cross from where the brick fell out.
Latin
Use the cross on the painting to exorcise it, revealing a clue with four letters(?) on a rectangular grid background with the upper-right rectangle outlined in red.
This also makes the painting into a tilty corner safe.
So use the clue from the painting to unlock the upper-right drawer.
The figures with the painting combine with the markings on the drawer to give LFTH.
Enter that in the drawer to unlock it and get a spanner.
Climb
To reach the grate, you need to be taller, say by standing on a pedestal.
And the pedestal is too heavy to push all the way across.
So use the ice card on the floor in front of the glass doors to make it slippy.
Then push the pedestal under the grate.
Then climb up and remove the grate using the spanner (on its bolts).
Inside, there's a key and a green symbol (that I can't identify) on the wall of the vent.
Smash
The cracked wall next to the fireplace is too solid to break with the spanner alone.
Use the ice card on it and then the spanner, then push the red button to turn on the keypad.
Backdoor
We haven't found the keypad code anywhere, so it's time to explore more.
Use the fairy card to transform again, and pass through the air vent into the next room. You don't have to look far to find the code.
A panel next to the door (that was previously unlit) shows the code 0928.
So transform back and enter that code in the keypad. Now you can just walk through the glass doors normally.
Exploration 2
Walking through the glass doors, you see a shelf with candles hiding a white clue on the back wall and a red skull in its top left. Next to it on the same wall is a working clock that can be opened.
Turn right to find a panel with a hexagram pattern formed by six triangular buttons that don't work and a hexagonal hole in the middle. Above it, there's a blue mark at the top of the wall.
If you fly to it as a fairy, you'll find that the blue mark is a skull.
Turn right to find the doors back, as well as the other end of the air vent and keypad code panel. On the right side of the wall is a back scratcher in a cage, and two buttons on the wall on either side of a torn note with kanji.
Turn right to find a stone hand on a pedestal. There's a wall shelf on the left with three books labeled with roman numerals and a skull, and you can shift the books around to examine a clue with a jagged line over a circled star. On the right is a grid of nine buttons with the same circled star design. The buttons sit flush with the panel, but you can push them to move them out of or into the panel.
If you look closely, you'll find a huge stain at the top left of the bookshelf.
Crenellation
Superimpose the clues with jagged lines to get the clue for the star button panel.
The bumps in the lines form a grid as follows:
Down Flat Flat

Flat Up Down

Up Up Flat
so push the buttons
2 0 0

0 1 2

1 1 0
times accordingly, and the buttons on the hexagram panel light up, and a crystal ball appears in the stone hand.
Five of a kind
Use the torn note from your inventory to complete the one on the wall, then solve its kanji puzzle by pressing the buttons on either side.
The 親人中薬小 kanji are initials of Japanese names for fingers, in order from inside out: thumb, index, middle, ring, pinky.
Notice that the ring finger 薬指 is fourth in this order, as indicated on the note.
Thus 小小人人中薬親 represents the digits 5522341.
Click the green button 5 times, then the cyan button 5 times, and so on. When you're done, the bars open up to let you take the backscratcher.
Wand
Zoom in on the hand of the backscratcher, which has colored nails, and use the crystal ball on it.
Then use the backscratcher on the red seal to summon a shadowy figure… no, that's you holding the wand!
But you seem to have forgotten part of your spell, and you need to fill in the question marks to finish the spell.
So use the clue from the wand/backscratcher to complete the spell.
The nails on the backscratcher (in the same order as above) are yellow, green, blue, black, red.
You've seen symbols of those colors at the fireplace, air vent, ceiling, fireplace and candle shelf.
So enter those symbols by clicking the question marks 1, 2, 5, 3, 5 times (with the eye being 1), and then click the GO bubble. It begins to storm outside, so heavily that rain seeps in through the window.
Fluid
Use the arrow note on the water below the window, and (randomized) digits appear on the soaked note between the arrows.
So use those digits to unlock the painting.
Click the corners of the painting with the numbers of dots indicated on the note: top left for 1, top right for 2, etc.
Then click on the painting to lift it up and find a safe inside with three colored buttons and a flame symbol at the upper-left.
Flaming
Use the fire card to light the colorful candles, producing colorful flames.
Then use that clue to unlock the colorful safe.
From left to right, the flames are RGGRBGB.
So click the LRRLCRC buttons, and open the box to get another key.
Unlock 1
Use the key you just got on the top-left drawer to unlock it and get a time card from inside.
Colorful
Use the clues from all four magic cards to solve the hexagram puzzle in the wall.
Flip each card over, and note the colored tips, which are (clockwise from top) blue, white, black, purple, red, green.
So click the corresponding buttons 2, 3, 5, 0, 4, 1 times, and the whole hexagram turns a sunshiny yellow. Also, a black star shape appears over the candle shelf.
Fly to the black star as a fairy to find roman numerals on its tips.
Fast forward
Shift the books to the right, and use the time card on the bookshelf stain to reveal a golden safe.
Also use the time card on the candles to put them out.
The code behind has six triangles and a hexagon.
Seven buttons
Use the clue from the candle shelf to unlock the hexagram wall.
Click the U, LL, UR, UL, LR, D, C buttons (which don't move anymore, but make sounds).
The hand pedestal drops into the floor, and a blue seal platform appears in its place.
Unlock 2
Use the other key (from the air vent) on the golden safe to unlock it and find a note inside: a circled star with (randomized) symbols at its tips.
Conjure
Click the blue seal platform to cast another spell. This time, the clue is in the golden safe.
So enter the symbols from the star note in the safe in the pentagram order according to the black star clue.
An energy beam emanates from you and opens up the hexagram wall.
Normal End
Leave through the escape passage (as human or fairy) to end the game.
Complete End
Stick your hand in the fireplace and pull out a burnt card.
Then use your time card to restore it to a complete card.
Leave through the escape passage (as human or fairy) to end the game with a slightly different credits screen.
seems to be a glitch on the
water note, even though it shows the numbers, as soon as I xzoom back in the note, the numbers are gone and I can't re wet the not to see them again.
makes it hard to finish now.
anyone? need help on the magicians room. read spoiler above.
This is the bug mentioned in the comment. You can't avoid it, the only way how to get through in Firefox is to be ready and memorize the digits...play the game in Chrome, there isn't this problem.
ok i'll try.
I did try it again
under Google and I did see a difference. My browser of choice was IE so it looks as if IE and Firefox both had the same glitch.
Anyway thanks for the help.
Not at all. I'm glad it helped.
Lol, did anyone else get to the end of Gate Escape 5 and
expect to see a laughing panda looking down on you after you pressed the button?
For the slider puzzle at the end of "Karakuri Robot Escape Experiment 2":
I didn't notice at first that the background showed which tile should go in each place, and in which orientation. Once I noticed that, the puzzle became a standard slider puzzle.
Update