
 This week the Weekday Escape presents three games from the past. It's Retro Edition time!
Magical Esklavos takes you to the blue foggy forest where wild calla flowers grow and shining gemstones can be found in the grass. With Petithima you get into some forgotten and abandoned garden - well, forgotten by mankind, nature is doing fine here, everything is green and birds are chirping merrily. Finally, Gatamari gives you a chance to get one step closer to the Holy Grail!
Have a good time and enjoy!
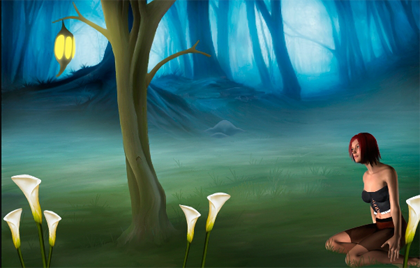
Familiar Esklavos' tune invites you deeper and deeper to the forest until you find a magical portal, closed and guarded by two skulls on poles. Skulls are apparently missing something. Yes, lower jaws, but that isn't your concern. They look so sad with their empty sockets...can you activate them somehow and get out through the portal? While exploring the forest you find enough items, puzzles and clues for smooth escape!
The cursor is changing, no save button, one ending.
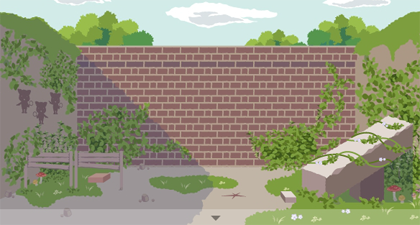
In Petithima's relaxing game you find yourself in neglected garden, a high wall all around and no door. Do not despair! You don't have to drink suspicious water dripping from the huge pipe or eat mushrooms to survive. There are some interesting things lying around, forgotten or just thrown away, and they can be used for escape! No need to hurry, music is soothing, the sky is blue and the place feels surprisingly pleasant.Take your time.
The cursor is changing, save button, one ending.
 Gatamari Escape 9 - Gate Escape 4
This is the fourth trial on your journey to the Holy Grail - the fourth room by Gatamari where you can get another precious item essential for the quest - a decoder. If you solve all the puzzles. At the beginning is skippable intro which sumes up your actual progress and items acquired in previous installments - a cutter, a pointer and two screwdrivers - notice that they are in your inventory already. Now you need a decoder for translating instructions on signboard next to exit door as you are lost without it. Is it rabbit head and Saturn, what you see? An accordion?? No. This won't get you anywhere. You'd rather start with puzzles!
The cursor is not changing, save button.
We love escape games, and our readers love talking about them and sharing hints! How about you? Let us know what you think, ask for clues, or help out other players in the comments below.


I spent way too long trying to type that one symbol here, but couldn't find it.
Magic Forest Escape 3
What? You don't know any magic? Perhaps you'll still be able to stumble out of the forest by using things randomly. (Just remember that you'll need an empty hand to pick some things up.)
Exploration
You start off on a screen with a lady missing her ring. She sits next to a pair of huge flowers. Towards the left of the screen, there's another pair and another trio of the same flowers. There's also a tree with a bright yellow lantern hanging from it, and a pile of dirt further towards the rear.
Move forward into the forest. On this twisty wooden bridge, a crowbar lies next to a locked wooden chest. A spider cocoon hangs from the top-right corner of the screen, and some clue notes are stuck to the two trees next to the bridge.
Further into the forest, a candle burns on a small platform in the middle of a clearing. It's not just a normal candle — this one burns blue! The three trees nearby have small holes in each of their trunks.
Move right. Two skulls on poles guard a "magic door" with their creepy blank stares. A bird sits silently on the left tree, and a red candle burns on a platform under it, which also holds a note with a dark circle passing through six light ones, and a bunch of tiny pebbles to go along with the note. Seven flowers grow in the lower-right corner, adding some color to the scene.
Pry
The platform with the red candle looks a little different from the blue candle one…
It has a little metal corner sticking out the front, so use the crowbar to pry it off and get to the golden ring.
Return
Give the ring to the lady on the first screen, who returns your favor with a crystal flower. She doesn't seem eager to leave the forest, though.
The crystal on the flower appears pure white.
Floral
You can use the crystal flower on the lantern and candles to turn its crystal yellow, blue or red.
And then you can use it on the flowers in the first screen to turn them the same color.
Perhaps you could find a color clue for the flowers.
Copy the pattern from the flowers on the screen with the skulls, turning the left and right flowers yellow, the second-left and second-right flowers red, and the middle three flowers blue.
A creepy eyeball falls from the top of the screen.
Only one eye? Look for more clues.
One of the notes on the trees mentioned blue and red flowers.
So turn all the flowers blue to get a black key, and then all the flowers red to get a green gem.
Unlock
Use the black key to unlock the chest, then click on it to get another green gem.
Then click on it again to get a shovel, then click on it yet again to get a sword.
Slashy
Use the sword on the spider cocoon to get another eye.
Diggy
Use the shovel on the pile of dirt to find a third green gem inside.
Greed
Use the green gems on the cavities in the tree trunks. Nothing happens.
But now you can click on the gems to make wheels of symbols appear. So use the clue from the pink note on a tree to rotate the wheels accordingly. (The wheels will disappear after some time, and clicking the gems after that will make them reset.)
Click the upper-left wheel 8 times (after clicking the gem), the upper-right one 11 times and the lower-right one 9 times.
Another eye falls from the top of the screen.
Round
Solve the puzzle next to the red candle by using the pebbles in the light spots according to the clue from the other tree note.
(This clue is randomized.)
The pebbles light up in different colors according to the circle on which they're placed: white, yellow, red, blue, green, black clockwise from the top-left. So place the corresponding number of pebbles from the note on each circle.
The last eye drops.
Gaze
Use all four eyeballs on the skulls' eye sockets, then click the magic door to pass through and escape.
Hey, I remember this one from when it was last posted! There's a walkthrough in the comments there, but here's another in my style.
MADARAKINOKO
The name means Spotted Mushroom(s), but they're just for decoration here.
Exploration
Make full use of your changing cursor to pixel-hunt for items!
You start off facing a brick wall with one darker row of bricks. A stack of stone blocks on the right is wrapped in vines, and you can pick up one smaller stone block from the ground, next to a star-shaped crack. On the left, a four-digit safe is hidden under short fences, and a clue to the left on the left wall has three cats holding magnifying glasses, each pointing in different directions.
They're pointing at tiny dots on the wall.
Turn around to the only other screen in this game. The wall in front has a wide sewer pipe with water flowing out of it, marked by a water drop symbol over three dotted lines. It also has a glimmer among the vines to the left which you can click to get a magnifying glass. To the right of the pipe, there's a shovel in the ground and a lighter-colored portion of the right wall with a crack in it. On the left, there's an unlit lantern on a crate containing a three-symbol locked box, next to a dark hole in the wall.
Spot
Use the magnifying glass on the dots that the cats on the wall point to, to find three symbols that unlock the box in your inventory.
The cats point to the hot spring, heart and spiral symbols, so enter that in the box (1, 4, 3 clicks) and then open the box to find a hammer.
Cracks
Use the shovel on the crack in the ground to dig up a cracked urn.
Then use the hammer to smash it and get a cleaver, whose edge seems a bit jagged.
Use the hammer on the cracked wall to get a small seed with a leaf sticking out of it. The seed also has a faint line running across its middle.
Edge
Use the knife on the stone block to sharpen it, then it on the seed to slice it in half, retaining only the hollow bottom half seed.
Also use the knife to slice off the vines on the large blocks.
Splash
Use the half seed on the pipe to fill it with water, then use it again on the dotted lines above the pipe to reveal a four-digit code.
Then use that code to unlock the box under the fences.
Enter 3562 in the box, then open it to find a smaller box — a matchbox!
Ignite
Examine your lantern and use the matchbox to light it, then use it on the dark hole in the wall to find a climbing hook.
Ascend
Examine the vine rope in your inventory and use the hook on it, then use the resulting rope on the top of the brick wall.
Then click it to climb over and end the game.
Gate Escape 4
Previously on Gate Escape...
Not even a screwed-down door can hold you back in the quest for the Holy Grail. But perhaps this next trial, with a metal plate in an alien language, will. Let's see what you can do with a Cutter, Reacher and Driver!
Exploration
You start out with only the three treasures you brought along: a box cutter, a pointer, and a pair of screwdrivers.
Staring at the plate of symbols beside the locked exit door, you immediately deduce that it's a language that you can't read.
Turn right. There's a purple plate on the floor in the left corner, and a circular panel on the wall with three gem-shaped sockets.
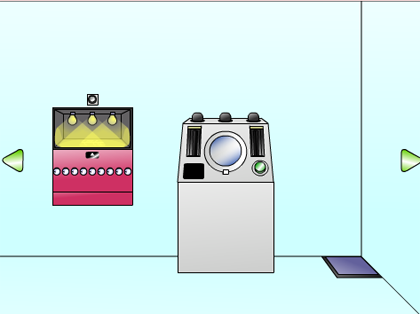
Turn right to find a device in the wall with an empty box lit by three lightbulbs controlled by a single button above it, with nine dials under an upward-pointing button on its lower section. The lightbulbs don't all turn off: you can turn off either the left or right light, but that dims it just enough to make you notice a clue scratched in yellow on the bottom of the box. The dials all don't turn all the way around either: none of them can point right.
Next to that device, there's another machine with three darkened lamps on its top, as well as cylindrical slots on either side of a washing machine-like door, which you can open up to access another square-shaped slot. It has a green button in its lower-right corner, but that button currently does nothing. Finally, there's another purple plate on the floor in the right corner.
Click the left edge of the washing machine to find some sort of ball hidden in the gap behind. So use your Reacher to get a squarish stone.
Turn right. There's a stone tablet on the floor displaying a minimalistic clue, with four triangles surrounding a diamond-shaped gem over two rectangles shaded in different proportions connected by a rightward-pointing arrow. Next to it is the doorway from the previous game, which you can't and don't need to go back through. There's also a lever to it's right, so pull it… whoops, it's a trap. Saved once again by your incredible reflexes! Check out the rock that fell and cracker to find another stone within.
Turn right. The purple plate in the left corner sits on a raised column with white and black stripes along one side, and plain cyan color on the other. Next to it, a bookcase with loads of books stands next to a sign with downward arrows connecting vertical bars, a horizontal dotted line and a button that doesn't work. On picking the books up, you find that they're fake, and you can only carry up to 15 of them at a time.
Turn right. There's a blue panel on the wall above four different-colored buttons, as well as a Decoder seal and a purple plate in the right corner.
Juggle
Place 10 books (5 at a time) on the raised purple plate, and it sinks down into the floor. Looking around the room, you find that the purple plate clockwise from it is now raised, and has a different set of stripes and a green color on the other side.
So pick up those 10 books (while not holding books in your hand), and place them on the now-raised purple plate, and it sinks down and the plate clockwise from it rises, with its own stripes and a pink color.
You get the drill. Do it once more, and the pink column sinks and a brown column rises. Do it once more, and the brown column sinks and the original cyan column rises.
Now that you've seen all the columns, you can use the clue from the stripes to unlock the blue wall panel.
The stripes combine to form a clue where the stripes from top to bottom are black on only the green, brown, cyan, pink, green, green, brown, pink, cyan, brown columns.
So click the ⌜⌟ ⌞⌝ ⌜⌜⌟⌝ ⌞⌟ buttons, and the panel opens up to let you take two test tubes of purple liquid.
Dense
You could keep shifting those books forever, but there's one way to break the cycle, as hinted by the sign next to the bookcase.
Place 10 books on the unraised plate clockwise from the raised one, then pick up the rest of the books from the bookcase and weigh down the raised plate.
Now all four columns remain down, so click the button on the sign next to the bookcase, and it slides aside to reveal a hidden passage.
Exploration 2
This room has bookcases on both sides, and a device with four triangular buttons on the wall in front, surrounding a diamond-shaped gem. There's also a trolley screwed to the wall, so use your Driver to get it. This will certainly improve your book-carrying abilities!
Click on each bookcase to examine it, and remove all 40 of the books. Behind the books, there's a hole drilled into the back of each shelf. Each bookcase also has a patterned base, with a short light strip followed by a long dark one on the left, and a short dark strip followed by a long light one on the right. There's also a sack beside the left one which is tied really tightly shut.
So use your Cutter to open the sack and find another stone inside.
Corners
Follow the clue from the stone tablet to unlock the device in the bookcase room.
The clues from the left bookcase need to be rotated clockwise to match the left rectangle on the tablet, and the clues from the right bookcase need to be rotated counter-clockwise to match the right rectangle.
After rotation, the holes (bottom to top on the left, top to bottom on the right) end up on the LL UL LR UL and UR LL LR LL corners.
So click the ⌞⌜⌟ ⌜⌝ ⌞⌟ ⌞ buttons, and the panel opens up to let you take two test tubes of blue-green liquid.
Branched
Use the clue from the lightbulb box to unlock its lower section.
The main line branches off in the up, down, up, up, up, down, up, down, down directions.
So click the dials 1, 3, 1, 1, 1, 3, 1, 3, 3 times.
The lower section opens up and you can get two test tubes of orange liquid.
Science
You should now have purple, blue-green and orange test tubes.
Use the squarish rock (which was hidden in the gap) in the "washing machine", and the left and right lamps on the machine glow purple and orange.
So use the appropriate test tubes on the slots, close the lid and turn it on.
Obeying the scary warning signs, you wait patiently until a red OK appears, then open the lid to find a yellow gem!
Do the same with the round rock from the door trap (using the blue-green and purple liquids) to get a blue gem, then do the same with the irregular rock from the bookcase room (using the orange and blue-green liquids), and you get a green gem at the end of it.
Use all three gems in the gem-shaped sockets in the wall.
A weird sound accompanies the appearance of a red triangle, then suddenly all the gems are gone and a hidden passage opens in the wall.
Exploration 3
A lengthy animation explains that you have to hit two red buttons at the "same time". The two buttons are shielded behind glass at the end of narrow shelves marked with white stripes, linked to a diamond-shaped panel in the wall with all three colored gems and an additional gem-shaped hole.
Held
You can't reach both buttons yourself even using a pointer, so look for something else to help.
Hint: there are exactly 60 stripes.
Pick up all 60 books you can find (while not having books selected), and place them on the stripes.
"Like this… line them up… getting nervous… careful now… that's the last one."
Then face the doorway and click either end of the book-domino chain.
Beep! The shelves close up and some red fluid ominously flows along the channels towards the diamond panel, covering it and dissolving all the gems.
Eventually, only a red gem is left, so pick it up and turn around to leave… but the door slams shut and now you're trapped!
(You could have left if you didn't pick it up, but you can't progress in the game without it anyway.)
Linear
The door lock has ten black lines over four pairs of up and down buttons around sets of five white lines. (Seems like there should be six instead of five.) Clicking any up button turns one of its white lines black and one of the black lines white, and clicking the down buttons does the reverse, unless there are no more lines in any set to flip.
Look for a clue to the lock.
Turn right from the door to find LIFE written on the shelf.
The letters L, I, F, E have 2, 1, 3, 4 linear strokes.
So click the up buttons that many times, then click OK to unlock the door and leave.
Decipher
The Decode seal is glowing, so click it to summon… three guys?
"It's so narrow!"
"You've summoned us?"
"We're Decoder."
"But we do not lend our powers so easily. (Not that I mind…)"
"We have no shortage of people to lend our powers to. (Well actually…)"
"We'll have to see if you're worthy. (So then.)"
"Oh! That stone you have! Yes, that's it!"
"Well, you can use us for now."
"Very well. (No doubt.)"
"Indeed, we'll take it."
"So then, call us if needed."
"(Is this alright?)"
So Decoder takes your precious gem and vanishes into your inventory.
Use Decoder on the clue next to the exit door, and they work some incredible magic tricks to turn it into English.
"This is the one and only genuine truth!"
So follow the clue, now in English, to unlock the final door.
The clue reads "Knock R four L eleven R six L two", so zoom in on the door knockers and click the right door knocker 4 times, the left one 11 times, the right one 6 times and the left one twice.
The door creaks open, but before you go, Decoder wants to thank you with some treasure: a small fraction of their wisdom distilled into a codebook, which has the just-solved code printed across its glowing pages.
Leave through the door to end the game and view a teaser for the next.
In writing this walkthrough, I noticed that this Retro Escape is numbered wrong, and that's preventing the previous Retro Escape from being accessed properly (oh no!).
Oh. I didn't notice that the game was posted earlier. Thank you for pointing out. I'm so sorry...I've almost double posted another game, found out, replaced it by Petithima and apparently double posted again. It must have been destiny! And yes, the WE is numbered wrong, I've already told Jeff.
Hello everyone. I fixed the problem.
The graphic links to an older (July 26) version of Weekday Escape
Update