
 It's Retro Weekday Escape time and four atmospheric and magic games are waiting for you!
We start in enchanting and tidy room by 10 Color Dots, full of lavender smell. After we leave it, Kiterescu takes us first to the laboratory apparently researching teddy bears and also a cactus, and then to Japanese style room. Our journey continues with Gatamari in another room full of strange devices, one of them shooting ninja stars, threatening innocent escapists!
Have a good time and enjoy!

The room by 10 Color Dots is very purple indeed. It's also lavender, mauve and violet, with a drop of brown and green. Besides its color harmonies pleasing to the eye there is more. Changing cursor and clean surface help to find not so obvious hotspots and make playing more fluent, clues are understandable, puzzles are intuitive and wandering around such a beautiful room relaxing. And the last puzzle is simply elegant with interesting twist!
The cursor is changing, no save button, one ending. The game is completely mute.
As promised, two games by Kiteretsu are coming this week to finish the series. If you missed the previous ones, there are direct links to them in each game. Both games are cute and well playable, with smooth and clean graphics. Good observation is important, although some spots are not exactly hidden, they are less visible and can be easily overlooked...
After you finish Escuest 3, don't hurry to the next room, slow down and think, haven't you forgotten anything? If you borrow something, you should return it, right?
The cursor is not changing, save button, one ending.
 Gatamari's series starts with skippable retrospection, reminding you about the journey you've made and items you've gained, a cutter and a pointer. They are useful, but for escape are necessary two screwdrivers as the escape door is secured with two screws, a slot and a cross ones. The room is equipped for its only purpose, escaping, and even neglected maintenance is an integral part of escaping process! Many carefully build puzzles are to be solved before the final magic part (drivers conjuring) starts!
The cursor is not changing, save button.
We love escape games, and our readers love talking about them and sharing hints! How about you? Let us know what you think, ask for clues, or help out other players in the comments below.


looking forward to the walkthroughs as usual.
Purple Room ... Is there a way to switch to english?
The games are Japanese only, but you shouldn't miss much by not reading the descriptions.
Escape from a Purplish Room
Well, there's my daily dose of the color purple.
Author hints
Below the game page, the following three hints are given:
Look for the whole password.
Right and left, spot the difference.
○ panels, ○ digits, ○×○ buttons.
Exploration
(Pixel-hunt hotspots are in spoiler tags.)
You start off facing a door with a green light switch on its left. On the right side, there's a shelf with nothing interesting on it, above a cupboard with two locked sliding doors, the left of which needs a binary code. The right cupboard door doesn't have a lock, so you'll need something else to open it.
Check the lower-right corner of the cupboard to find a screw.
Turn left. Three small pictures hang on the wall, with two curtains between them. Click on the curtains to open them and look at the windows. They're slightly different, and there's a coin on the right windowsill. Below that, a small table has a locked drawer with four colored buttons, and it has a box with three empty square spots and nine buttons which don't do anything yet.
The table sits on a semicircular patterned carpet, so check its corners. There's nothing under the left and right corners, but there's a round key under the front.
Turn left. There's a cupboard with three purely decorative shelves and three doors. The upper-left door is unlocked, so open it and take a tin of tea leaves. (According to the description, it rattles when you shake it.) The middle-right door is locked and needs a key, and the lower-left door is locked and needs a three-digit code, with some geometric shapes above the digits. There's also a painting on the wall with a grid of colored squares, and a trash bin with loads of crumpled paper balls, but nothing useful.
The right side of the painting has a hinge that's fastened by screws.
Click the bin several times to move it aside and reveal a locked trapdoor.
Turn left. There's a potted plant which does nothing interesting, and a sofa with a cushion you can't move and a plate of assorted cookies.
Check the bottom-left corner of the sofa to find a cookie on the floor.
10-yen wonder
Use the coin on the tea tin, then click it again to open the lid. Take the square key from inside.
Also use the coin on the hidden trapdoor to unlock it and get a flower panel.
Unlock 1
Use the square key to unlock the middle-right door of the cupboard with shelves.
Inside, there's a box of cookies.
C is for
Use the clue from the cookies (all eighteen of them) to unlock the three-digit cupboard door.
Count each type of cookie.
Jam cookies: 3+2=5
Checkered: 4+4=8
Plain cookies: 2+2+1=5
Enter 585 in the door (by clicking the downward-pointing buttons) to open it and get a screwdriver.
Driver?
Use the screwdriver to unscrew the hinge on the painting and remove it, then click on the painting to swing it aside.
In the hidden compartment, there's a leaf panel and a switch. Flip the switch, and a light turns on inside.
Also use the screwdriver on the right of the cupboard on the first screen, releasing its right door.
Inside, there's a book and a locked box. Click on the bookmark to read the book, which has a very interesting clue in it.
Unlock 2
Use the round key on the locked box to open it and get a berry panel.
Two-leaf
Use the clue from the bookmark to unlock the left cupboard door.
Since the red button has to be pressed last, the leaves on the bookmark should be read from top to bottom.
So press the LLRRL buttons and then the big red button, which turns purple.
Open the door to find a bunch of purple fabrics and paper rolls, none of which you can pick up, and a spray bottle filled with water.
Dark
Turn off the lights using the switch next to the door.
Turn left twice to find that the three pictures on the wall have glowing outlines, and the left one has the number 840 written on it in glowing digits. Under the left window, an equals sign is also glowing.
Turn left. The light behind the painting shines through in a square shape, lighting up the corners of four neighboring squares.
Once you're done exploring, (turn left twice again and) turn the lights back on.
Colored
Use the clue from the painting in the dark to unlock the drawer with square buttons.
The buttons should be pink, green, purple (indigo), blue (lilac).
So click them 1, 3, 4, 2 times. The drawer slides open and you can take a handkerchief from it.
Hunt
Follow the clue from the book to find a hidden spot.
Look rightwards from a leaf and upwards from the cushion on the screen with a sofa. The cursor should change over the required spot, and there's a clue here, but it's covered by dirt.
Clean
Use the spray bottle on the handkerchief to wet a corner, then use the handkerchief to clean up the dirt and reveal a three-digit number.
Then unfold the wet handkerchief to find another three-digit number.
Math
Use all three panels on the box with nine buttons, and then use the clues from around the room to figure out which buttons to press.
Hint: you should need to press four buttons. Which four?
Each panel (and picture) represents a number, and each button represents a digit:
Panel/row 1: 840 (glowing digits)

Panel/row 2: 762 (written on wall)

Panel/row 3: 195 (wet handkerchief)
which fits in an equation according to the screen with the pictures and windows:
840+762-195=That's 1407, so click the bottom-left, top-middle, top-right and left-middle buttons.
Then open the box to take a flower key.
Use the flower key on the main door to unlock it and escape.
ESCUEST 3
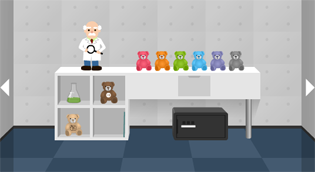
And we're back in the ESCUEST series. Last time, we had some help breaking down the door. But now we're in a lab, and the door's not quite as flimsy.
Exploration
You start off facing a black door with a black box next to it, completely plain with nothing on its sides.
Turn right to a screen with a desk where six teddy bears of different colors sit on the top, right above a locked drawer with no lock, above a three-digit safe with a mathematical clue. The bears raise their arms when you click them. On the left side of the desk, four shelves hold a flask of green fluid, a brown bear numbered 98, a lighter brown bear which with a flower clue which hides a matchbox, and a notebook tucked in the corner detailing various chemical procedures, with blank pages and a more complicated flower clue at the end. Above the shelves, a small scientist figurine holds a magnifying glass. Oh no, he's mad that you took it! And it's missing a lens anyway!
Turn right to a screen facing the previous room. There's no going back now, but at least you brought a screwdriver from there.
Turn right to a screen with a lab table which has heating apparatus, a glass cup with different-colored pens, and some cracks in the front. There's also a panel with screws on the left and a picture frame on the wall with a grid of digits and a flower symbol. (Yes, the grid is a table, but I'm not going to call it that.)
Lift the pens out of their cup and take the glass lens beneath.
Unscrew
Use your screwdriver ro remove each screw on the panel, then remove the whole panel to find a hidden compartment with a cactus and a numbered triangle clue.
Beary
Use the clue from the table to raise the arms of the six bears.
The first two cracks form an outline of a bear with (our) left arm raised. Similarly, the next four cracks form the outline of two bears touching paws, and so on.
So click the bears 2, 1, 2, 0, 2, 1 times, then open the drawer and take a flask of blue fluid which is marked with a star.
Math
Use the number clues to unlock the safe under the desk.
The numbers are
⚫ = 98 (brown teddy bear)

★ = 120 (blue water level)

▲ = 3 (beside cactus)
So the formula evaluates to (98+120)×3 = 654.
Enter 654 into the safe and open it to get a pill.
Chemistry
Follow the instructions on the book to make some growth formula.
Place the green fluid on the stand and add the pill to it, then light the burner and move it under the stand, then pour in the blue fluid.
Pick up the flask of red growth formula.
Biology
Use the growth formula on the cactus. Back out and zoom back in, and it's grown a flower.
Magnify
The flower is too tiny, so we need to fix the magnifying glass to look at it.
Use the lens on the frame, and use the assembled magnifying glass on the flower.
Flower
The black box next to the door has opened up, so use the flower codes to unlock it.
According to the light brown bear, you should go around the flower in clockwise order starting from the largest petal.
The colors of the petals are red, green, yellow... and the letters in the notebook are N W V...
According to the grid of digits, the code is
R N = 3

G W = 4

Y V = 1

B X = 9

G V = 1

Y W = 5
So enter 341915 in the box to unlock the door. Save your game.
Escape
Go through the door to end the game, and get a credits screen with the scientist figure. Hmm... is he still angry at you?
Load your game and give the magnifying glass to the scientist before you go. Now he's happy on the end screen.
ESCUEST 4
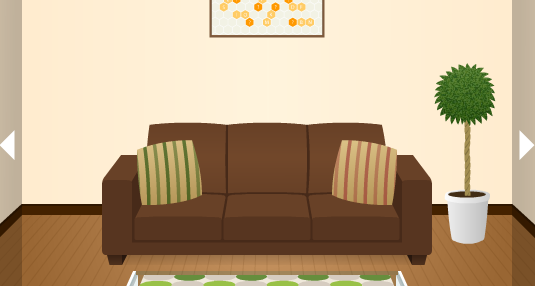
Finally, we're back in a somewhat normal escape room. (It's been over 2 years since the last game, but you wouldn't know if the description didn't say so.)
Exploration
(No, you don't get to keep the magnifying glass.)
As usual, you start off facing a locked exit door. The safe on the left has a grid of nine round buttons. There's a locked six-letter box on the floor and a clock in the upper-right with some interesting shapes around each number. (It's a working clock too!)
Turn left. Here, a sofa has two cushions, and the left one hides a glimmering object... it's a paperclip. There's a picture above the sofa, a hexagonal pattern with some letters and question marks. The table in front has a patterned tablecloth in various shades of green, and lifting it up reveals a green unlabeled CD. There's a potted plant with leaves that shake when you click them. So do that four times, and a key flies out and lands behind the sofa. You can look under the sofa to see it, but you can't reach it.
Turn left. As usual, this door leads to the previous room/game, so you don't need it. However, there's a Mondrian picture in the upper-right with four color grids.
Turn left to a screen with a computer on a desk. Look at the drawers on the side: the top one is locked, the middle one is unlocked and contains a pair of pliers, and the bottom one (actually a safe) is locked and needs a code of seven presses of twelve buttons, arranged like on the clock. The bottom safe also has a scrap of paper next to it with the same shapes as on the clock, but the code is incomplete. The computer isn't on, so examine the keyboard, which has another paper scrap piece of the clue, and a power button on its right side. So turn it on to make the screen display a clue with hexagonal shapes.
Now that the computer's on, click the right edge of the monitor to find a slot for a CD.
Qwerty
Use the hexagonal clues with the keyboard layout to unlock the six-letter box.
Match the shapes on screen to those above the sofa:
RF? IO? MK? ?BN ?DF SE?Align each shape to the keyboard, and the question marks land on the
C L O V E Rkeys.So enter CLOVER in the box, and open it to find a white-and-blue square tile, the white squares touching at their corners.
The bottom of the box is a different color, so click it to remove it and find another paper scrap beneath.
Connect
Examine the paper scraps and drag them to piece the code together.
Then use that code to unlock the safe with 12 buttons.
The shapes in the clue are at the 10 5 1 4 8 7 12 positions on the clock. (It's a binary representation, by the way.)
So click the buttons in those positions, and open the safe to find a grabber and another square tile with three white squares in a different pattern.
Retrieve
That grabber's really short, so examine it and click the middle joint to extend it.
Then use it under the sofa to reach the key.
Freedom
Use the key to unlock the exit door, then open it...
...to find a corridor with iron bars at the end.
There's also a missing brick in the lower-right, but it's not obvious what to do there yet.
Crack
Use the pliers to unbend the paperclip, and use them again to bend the end into a wriggly shape.
Use this handmade lockpick to unlock the top drawer, then open it to find a small shovel and a square tile with four white squares.
Diggy
Zoom in on the corridor wall where the missing brick is, and use the shovel on the dirt to find a square tile with three white squares.
Data
Insert the CD in the monitor's slot, and an icon appears on the screen. So click it to view a clue.
Then use that clue to unlock the box next to the door.
Click the buttons in the
127

386

954
order, and then open the box to find four square spaces.
Patterned
Use the clue from the colored grids next to the entrance door to place the four tiles in the box.
Match the white squares on the tiles to those on the grids.
The tiles (from left to right in the inventory) match the UL LR LL UR grids.
So place them in those spots, and the bars in the corridor raise up.
Escape through the corridor to get an end screen with enthusiastic congratulations.
There's a missing
"in the link markup.Gate Escape 3
Don't worry, these rooms are perfectly safe.
Previously on Gate Escape...
The search for the Holy Grail continues through the ruins. With two trials cleared and two "treasures" obtained, what new obstacles await? (The two tiny screws on this next door, of course.)
Exploration
Your inventory is one space larger than last time, but it's still empty except for a box cutter and a pointer.
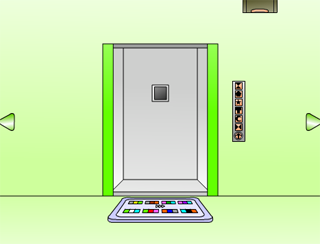
You start off facing a sliding door that's screwed shut with two different types of screws. Next to it, there's a stone tablet (again!) with a blue gem and a grid of symbols.
Turn right. There's a Driver seal on the floor, and a clock with some weirdly shaped hands and three buttons, and a green donut where its pendulum should be, but the compartment is locked.
Turn right. There's another locked sliding door where you have to get a boat to some sort of goal.
Turn right. The elevator from the previous game is here, but you can't go back even if you wanted. Take the colorful floor mat, and look at the elevator button... buttons? You can't even push them because they're just symbols drawn on the wall. There's also something high up in the upper-right, so extend your trusty Reacher to get the orange ring.
Turn right. A pedestal has a four-pointed star carved in its base and a black circular area on the top. On the wall, an evil face holds something in its teeth. You can push its nose to no effect.
Turn right. A Keep Out sign hangs on the wall, but what's this gray r- oops, looks like we removed the sign. Take the blank paper from the sign anyway and whoa, the sign hid a secret passageway!
Go forward into the small room with a red line on the floor and pipes running across the ceiling to holes on the right wall, with matching holes on the left wall, and is that a LED display on top? There's also an orange device in the middle of the room... oh no you tripped an alarm! Good thing your fantastic reflexes let you dodge those shurikens.
Symbolic
Use the clues from the elevator "buttons" and the stone tablet to get the boat to its goal.
Follow the round elevator button (an up arrow) and read the symbols from bottom to top: sideways hourglass, crescent, T, star, pentagon, hourglass.
Find the symbols on the stone tablet, noting that each symbol is either horizontally, vertically or diagonally aligned with the previous.
So draw a path through the symbols, and it passes through several left and right arrows on the way.
The arrows point in the R LR RRL RR L directions.
So click those buttons on the door, and then the GO button.
The door unlocks, so you can open it...
A hotpot hangs from the ceiling. So take the gray ring off its hook, then lift the pot lid. Mmm, it's filled with water, and you're a bit hungry already. But you have to focus!
Soak your piece of paper in the pot, and now it has a clue with dice faces on a grid marked with crossed swords.
Cover
The pot lid has handles on the top, and their dimensions look like it'll fit something else.
So use the pot lid on the holes on the right side of the shuriken room.
Then trigger the alarm and cross your fingers.
It worked! Retrieve the pot lid and take the three shurikens from it, each one with a different-colored tip.
Now that the trap's out of shurikens, you can examine the device in the middle, which has a blue button with eight spring-loaded sliders on all sides.
Slider
Use the clue from the paper to unlock the slider device.
The 1, 2, 3, 4, 5 dice faces appear on the left, upper-left, right, bottom, upper-right sides of the OK square.
So click the sliders on those sides, and then the blue button.
A compartment opens up so you can take a lime ring.
Sharp
Use the red-tipped shuriken on the top of the pedestal outside, then rotate it with the arrows in the upper corners so that the red tip matches the marking. Then do the same for the blue and green shurikens.
A crescent shape lights up on the right side of the circle.
Also, the eyes on the wall light up, so press the triangular button there to open up the creature's jaws...
Ow, that must hurt. There's spaces for five rings and a large gray button, and the cyan ring is resting against the side of this hole. There's also a letter S hidden in the top-left of the hole.
Pick up the tooth plate from the floor, and flip it over to find a clue with a letter S and colored lines.
Time
Use the clues from the pedestal to set the time and moon phase on the clock.
Hint: The shuriken points aren't all the same length. In fact, two of them should stand out.
The point in the 10 o'clock position is shorter and the one in the 2 o'clock position is longer.
So the shorter clock hand (scythe) should be pointing to 10, the longer hand (bell) should point to 2, and the background should show a crescent moon on the right.
Click the buttons 7, 8, 7 times, and you hear a click.
So open the door of the clock and cut the cord with your trusty Cutter to get the pink ring.
Five rings
Use the color clues to place the rings in the correct slots.
The lines on the plate are blue, yellow, red, green.
On the floor mat, blue occurs between the colors orange and gray. Similarly, yellow occurs between gray and lime, red between lime and pink, green between pink and cyan.
So from left to right, the rings should be orange, gray, lime, pink, cyan. (4th, 3rd, 2nd, 5th, 1st rings in your inventory.)
Press the button, lighting up the middle of all the rings, and marking all the clues as used.
Glow
The Driver seal is now glowing, so click it to summon, wait for it...
...he's late, isn't he?
Never mind, apparently that's just his "military strategy".
Use the Driver on the exit door, and his dual-wielding technique clears both screws simultaneously, forming the 士 (samurai) kanji.
He gives you his set of twin screwdrivers, assuring you that they will unscrew anything.
Then he makes a quick but polite disappearance, leaving you alone in the room once again.
Leave through the door to view the teaser for the next game.
In the last puzzle of the Purplish Room, how in the world does the solution translate into which buttons to push on the box on the table?
@ray9na:
First notice that there are
9 buttons in 3 rows of 3, beside 3 pictures, and
9 digits in 3 3-digit clues, marked by 3 pictures.
All the digits are different.
Imagine that
the buttons form a keypad like on a phone, but scrambled (and one digit is missing). Which digit goes where?
The buttons represent
one digit each:
840

762

195
where the rows are 3-digit clues arranged according to the 3 pictures on the side.
To enter the solution,
look for 1407 in the grid: 1 is on the lower-left button, 4 the top button, 0 the upper-right button and 7 the left button.
Oh! Of course!
Thank you.
Update