
 After a long pause, Retro Weekday Escape is here for your retro fun!
Sweet game by Sanpoman locks you in a room with dangerous looking flower. Don't be afraid of it, it can't bite you and not being a triffid, it stays in its flowerpot. With Hottategoya you get lost in a maze for a while and after you leave it, there is a labyrinth by Gatamari where awaits you a battle with evil spirit. Very late Christmas present waits for you at the end!
For those who hate mazes and labyrinths - try Robamimi's Kumakinoko or Fake, perfect one room escapes!
Have a good time and enjoy!
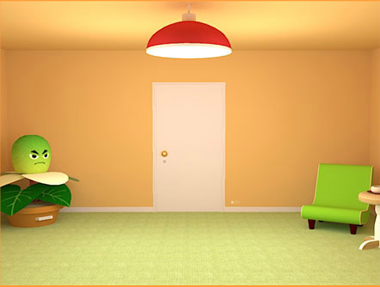
Lovely Sanpoman's room is one of those which you don't want to escape from. You feel like in a doll's house and if there was a bed it would be a perfectly safe and cosy hideout.
The angry plant in the room's corner is dokudami (Houttuynia Cordata). Don't judge by its look, the poor plant is only trying to seem poisonous (probably mimicry) to distract humans from harvesting. Its uses are many. Leaves, roots and flowers can be used for culinary purposes and also for healing; the beverage dokudami cha is made from the dried leaves and remarkably sharpens your senses (according to the game, Wikipedia is silent about it).
There are some hints visible in plain sight and don' worry, you can pass the game without understanding notes in Japanese on message board. Just start, it's a fun!
The cursor is changing, save button, one ending.

Welcome in Hottategoya's concrete maze. It's not a big one but quite confusing, luckily you find a map soon (or later if you get lost a bit). However, the place is not hopeless even without the map, there are letters and signs on its walls here and there, and also direction of sunrays can help, it's open-air maze and the sun casts sharp shadows on high bare concrete walls. The architecture is beautiful as in all Hottategoya's rooms, pure and stylish, especially the room with red floor tiles! You have enough time to enjoy it as getting out takes more time than you would expect for a game with three puzzles only.
The cursor is not changing, no save button, one ending.
Do you remember the quest for the Holy Grail (I mean the grail which you didn't get)? The quest is here: WE - Retro Editions N°3, 4, 5, 6, 7, 8 and 9.
Once again you return to Gatamari's world. After short skippable intro you find yourself somewhere nearby the North Pole and all the warriors summoned during seven trials are here, too. In the lower right corner of the gamescreen is a map and yellow blinking arrow marks your position. You can't return, can't do anything in this room (yet) so you follow the only possible direction... suddenly thick white fog appears and you face black reindeer with huge bat wings and very sharp antlers! Warriors start disappearing one after another from your inventory! The reindeer's nose starts glowing red and the creature also disappears...what was it? Rudolf the Red-Nosed Reindeer, possessed by a demon?!
What now - one door is grilled and closed, the other secured by two different screws, your inventory empty - but there is also this pentagram-like thing with writing 'driver' - can you activate it (feeling a little bit déjà vu...)? Can you get to the centre of the maze, summon all the warriors on your path and help Rudolf by exorcizing evil spirits possessing him?
At the end summoned Presenter offers you a present. You can take only one from six. Before you leave (with or without any) use the save button, because each choice leads to different ending!
The cursor is not changing, save button, seven endings.
We love escape games, and our readers love talking about them and sharing hints! How about you? Let us know what you think, ask for clues, or help out other players in the comments below.


Dokudami Room
From the backstory you can (maybe) read in the last menu option:
Sanpoman's house has been overrun by dokudami, whose unending growth (even when plucked) and its pungent stink earned it the nickname Dokudamidaa. Despite that troublesome smell, there are various benefits from making it into tea, and it might even help you escape.
Exploration
You start off facing the exit door, and a giant dokudami with its own card slot sits to the left. Beside the door, there's a drawing with four rectangles in a row, the left one filled in.
Turn right so you can take a better look at the lime green recliner. Look around both sides of it to find a pair of gloves and another rectangle clue. The small table beside the recliner has an empty (large) teacup next to it.
Turn right to face the fridge, which has two arrow buttons on the freezer door and another rectangle clue on the fridge door. Since it's unlocked, you can open it to find, of course, dokudami growing in the cold. Checking the door, you also find a numbered checkerboard clue on the top.
Next to the fridge is a noticeboard. The top note tells you that the rectangle holds writing that only healthy people can read. Thankfully, the bottom note has a recipe for tea that will make you healthy no matter what. All you have to do is
Pluck 8 leaves of the inexhaustible dokudami.
Dehydrate the leaves in the dryer.
Cut the dried leaves finely with scissors.
Place the leaf bits and hot water in the teapot, and pour the tea out into a teacup.
While you think about that, check out the kitchen counter. You can zoom in on the wall tile pattern by zooming in on it. The sink works, the stove works (but only the right side), and there's a teapot in between. The cupboard door beneath the sink is locked with a four-color code, and the drawer beneath the stove doesn't open. The dryer is beneath the drawer, and it works perfectly, so the point of interest here is the rectangle clue on its front.
Turn right to find a nice empty wall. Your exploration is complete!
Four colors
Use the rectangular clues to unlock the cupboard door beneath the sink.
The clues each have a different box filled in.
1st box: beside the door (orange)
2nd box: on side of chair (lime)
3rd box: on dryer (brown)
4th box: on fridge (pink)
What? There's no orange? Use the closest color, yellow.
So you need to click the buttons 6, 3, 1, 4 times. The audio and text confirm that the door is now unlocked, so you can open it and take the blue enamelled pot.
Stick your head in there and flip the bright orange switch. You hear something unlock nearby.
Now you can open the drawer and take the scissors from inside.
Potion
Use the gloves on the dokudami in the fridge. You may need to click twice, and you will need to click the left option (はい) to confirm.
But that only gets you 2 leaves!
Close and reopen the fridge door, and the plant instantly regrows. So repeat the process to get 2 leaves, and then another 2 leaves, and then another 2 leaves.
The gloves are used up and all eight leaves are in a pile, so it's time to put them in the dryer.
Open the dryer, put the leaves in, close the dryer, push the button, open the dryer, take the dried leaves!
Use the scissors on the dried leaves to slice them finely.
Place the leaf bits in the teapot. Now for the difficult bit: you need boiling water in the other pot.
So fill the enameled pot in the sink, place it on the stove and turn that on, and "wait" for it to boil.
All you need to do is turn left and then right, and the water's finished boiling. So pour it into the teapot.
And then pour it into the teacup. Tea's ready! Drink up!
(But of course, you have to confirm that too.)
Healthy
Go back to the notice board and click the rectangle to use your super-healthy powers.
An arrow clue appears on it, so use that to unlock the freezer.
Push the LLRRLRL buttons, and open the freezer to find a dokudami card.
Points
Use the card in the giant dokudami, which… blushes?
You can now click the tips of the petals to light them up, so use the remaining clues from the game to solve that puzzle.
The clue on top of the fridge door tells you to look at the wall tiles in a certain order.
Those tiles are highlighted pink on the RDRDLRL petals.
So click those petals on the giant dokudami, whose head pops open to give you a key.
Use it on the locked door to escape… to a lawn covered with dokudami. At least it's herbal!
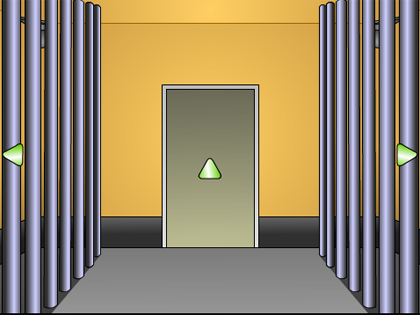
Escape From the Concrete Maze
I have my doubts over whether this maze would be as challenging if it were actually built.
Exploration: stumbling around
You start off facing a T-shaped wall, which is just a regular wall with two doorways cut out in the corners. Get ready to see this a lot. Before you go anywhere, turn around the room to find two green Os on the wall to the left of the door wall.
Go through the left corridor. This wall has only one doorway on the right corner, but it has another pair of green letters: XZ. Turn left to find a box that holds a map.
You're still not sure where you are, so walk forward along through the doorway next to XZ. The room here has a red floor, a star pedestal with a color puzzle, and another pair of green letters on the floor.
Time to read that map again.
Exploration: with a map
You should have figured out that you're now in room V, and the first two rooms were IV and II.
Walk through the left exit to the central room, which has regular polygonal shapes on the two side walls, and an actual locked door beside where you entered. That door has a sign over it with three symbols.
Now that you're facing that door, go through the right path to room III, which has a moon pedestal with shape buttons, and another pair of green letters on a wall.
Walk through the left exit to room I, which has two more letters and a box with a colorful note.
Walk through the exit next to the letters to the unlabeled room. In the shadows, there's a sun pedestal with digit buttons forming a keypad.
Triangles
Walk through the left doors twice to reach room V again (with the red floor), and use the clue from the note to unlock the star pedestal.
Blue is common to all the triangles, and is adjacent to all the other five colors. So place it in the center.
The triangles then indicate that red is clockwise from yellow, white clockwise from red and so on. So the colors on the puzzle must be
-G---

K-B-Y

-W-R-
Click the button in the top row twice, the buttons in the middle row 0, 3, 4 times, and those in the bottom row 5 and 1 times.
Then click OK. You hear a chime and the buttons turn off. The star on the pedestal now glows green.
Regular Polygons
Go back to room III (left path, turn left twice, right path), and use clues from the map and maze to unlock the moon pedestal.
The shapes appear on the walls of the middle room. Since the door is in the upward direction on the map, the arrow on the map tells you to look at the shapes in counter-clockwise order starting from the door.
The shapes you need have 4, 6, 5, 3, 5, 5 sides. Click the ⌝⌟ ⌞⌜⌞⌞ buttons on the pedestal. Another chime sounds and the moon now glows green.
Digits
Go back to room I, and use the remaining clues from the maze to unlock the sun pedestal.
The roman numeral rooms each have a pair of letters. From I to V, the letters in the rooms are SI, XZ, ER, OO, NE.
This spells Six Zero One, so push the 6, 0, 1 buttons. The chime sounds and the sun glows green.
Escape
Return to the center room, where the symbols above the door are all glowing. Open the door and leave.
As a reward, you get a bird's eye view of the maze.
The Gate Escape walkthrough will take a while, for at least seven reasons. Stay tuned.
enjoyed the walkthroughs as usual KK. can't wait for the Gatamari one :)
There's a good chance I mistranslated some of the story text. That's the real hard part.
Gatamari Escape 19:
Gate Escape X (Special)
Intro / Previously on Gate Escape:
Legends tell of a Holy Grail which can grant any wish. This is the story of an adventurer who sought the Grail... and what happened after he (you) failed.
Instead of the Grail, you returned with a band of bothersome fellows. Needless to say, they were all expelled from your tiny six-tatami-mat apartment, and moved to a shabby rented cottage. But none of them could hold a part-time job for long, and the nightly banquets proved unsustainable. In desperation, they turned to the ancient texts.
"In this world, at the northern end of ends, over a snowy mountain in a frigid land, there's a magical box which can get you anything you desire."
As dubious as it sounds, you can't help but travel there. And over that snowy mountain, you find a house in the middle of nowhere. Nobody answers the door, but it's unlocked. So despite the creepy vibe, you all crowd into the house sheltered from the cold.
Exploration 1
Your inventory is tiny again, and its filled with the seven real treasures. Now you have a map of the whole house, which has a spiral shape for some reason.
Everything interesting in this room has been blocked off by these two rows of iron bars, and none of your treasures seem to work against them. So you can only move forward to the next room.
Exploration 2
A bright light fills the room, followed by a reindeer with demonic wings and its evil laugh.
"I don't know who you are or where you come from, but all who stand in my way must disappear. DARKNESS MODE!"
The light fades to darkness, and indeed, all your companions vanish, with various moans and variations on "oh no". Where did everyone go?
The lights come back on, as blindingly bright as before.
"Hah ha! I've sealed all your partners away!"
"S-sealed?"
"Looks like you're left all alone. Now, which cooking method to use..."
"No wait just a moment you're being too quick. I'm not tasty, my meat's tough."
And then you're saved by the bell, or rather the red nose.
"Dang, looks like I've not fully captured this body. No matter, you can't escape. I'll be back to torment you."
He's gone, but you're not in the clear. It's time to rescue your friends!
Let's start by exploring this room for real. Your path forward is blocked by a familiar-looking gate with its sliding metal door fastened shut with two screws. In every corner of the ceiling is a light that's turned off.
Turn right to find a clue with a chain of numbers connected by arrows, with equals signs and diamond shapes below the arrows.
Turn right to find the way back blocked by metal bars. Let's see how tough they really aaaaargh, they're electrified! Looks like you have no choice.
Turn right to find a green panel on the wall with five sliders controlled by buttons. Beneath it on the floor is a familiar magic seal marked Driver.
Plus Minus
Solve the puzzle in this second room to release the Driver.
Each slider corresponds to an arrow in the clue.
To convert 0 to 5, you need to add 5. So the first slider should be raised to +5, which is the top position.
Similarly, the other sliders should be placed at -3, +2, -1, -2.
Push the OK button and its lamp lights up in green.
So click the seal to release the Driver.
He mutters something about negligence being part of his strategy, and welcomes you back to assist him in battle.
Whatever. At least he gets to show off that fancy screwdriver move on the gate. Moving on!
Exploration 3
You come face to face with a weird device on the wall, and a Decoder seal on the floor. Before you try it, look around the room, which has more of those ceiling lights (which I'm going to ignore from here on), an encrypted sign on the left wall, and a numeric keypad on the door to the right.
Take Two
Play around with the device, whose tutorial gives you a good guide on how the minigame works. "Take 2" is an instruction that tells you to click your green circle when it would be second in order after one of the rival red circles.
That is to say, it's a reflex game where you need to click just after the first red circle switches but before the second.
There's no trick or pattern, just play the game. After you clear the first stage, you move on to a harder level where you have to "Take 3" with three rivals present.
After you beat that, there's an even harder level where you "Take 2 and 5" with five rivals. That is to say, you need to click twice: once after the first rival moves, and then again after the third rival who's numbered 4.
Clearing the game allows you to release Decoder from their uncomfortably narrow seal.
Readable
So use them to read the sign, or perhaps read beyond the bounds of reality to convert the sign to English.
Problem is, we now have letters where we need digits.
The sign tells you to remove the letters C, T, N from Selection, and then turn the remaining letters upside down.
SELEIO upside down is 013735. So enter that in the keypad to open the door to the next room.
Exploration 4
Your next obstacle is a familiar one: a pair of closed doors with the open button located above them, way out of reach.
Turn left to find a weird clue with lettered balls and bars in red and blue. Beside it, there's a device that shows you how the basics of how the balls will work.
Turn left twice to find a locked panel with seven letters in two rows marked with a red N and blue S. Beneath the safe, a simple Reach-er seal is drawn on the ground.
Attraction
The balls on the sign can't move, but you can predict how they would, according to the rules demonstrated in the example.
In short: red balls move towards the blue bar and vice versa. Balls with both colors will migrate towards the nearest bar, and rotate until the same color faces away (which, in both cases, puts blue on top).
Thus, the final positions of the balls are:
B# Bar Letter

------------

#1 Red, (z)

#2 Blue (c) <- Not a letter u

#3 Blue (o)

#4 Blue (d)

#5 Red, (i)

#6 Red, (p)

#7 Blue (e)
The balls in the top (red) and bottom (blue) rows then spell out
zipcode, so enter that in the safe panel, and the seal now glows green.You summon a rather agitated Reacher, who opens up the door really easily. You don't share his vengeful bloodlust, but at least you can proceed.
Exploration 5
Right above the Lighter seal on the floor is a device with eight color buttons around a circle with red and white rectangle markings.
Turn left to find some photos attached to a board, with people dressed in different colors.
Turn left twice more to find the exit doorway, which is completely dark.
Spatial
Use the clue from the photos to set the colors correctly.
All the characters in the photos are seated at a round table, and the candles on the table are marked on the panel.
Analyzing the photos, you find that:
White sits in front of the candelabrum with three candles.
Pink sits in front of a white candle, with Blue on the right (clockwise).
Aqua (light blue) sits at a red candle with Yellow beside him clockwise.
Gray sits at the other white candle, with Orange beside and Aqua trying to photobomb from the clockwise side.
Green is... too absorbed in his selfie for us to learn anything.
Hint 1: There's only one position at the table which hasn't been described, so that one belongs to Green.
Hint 2: Using Aqua's photos, you can figure out which candle is which.
From the clues, you deduce that White is at the top of the diagram, and clockwise from her are Green, Gray, Orange, Aqua, Yellow, Pink, Blue.
Click the buttons (clockwise from top) 8, 1, 3, 6, 7, 2, 4, 5 times, and then press OK to complete the puzzle.
You summon Lighter, whose cheers you up with his bright personality while he lights up the way ahead. His optimistic yelling does leave your ear ringing a bit.
Exploration 6
Because the puzzle in this room cannot be easily reset, you should save your game here.
You face a thick glass door which seems really tough. On the wall to the left is a picture of snowmen. On the wall to the right is a device with the same picture but jumbled up, and a Hammer seal on the floor below.
Sliding
Solve the slider puzzle to fix the picture.
Note: Gatamari gives some pointers in the blog post linked on the game page, but there's no concrete solution. While he prefers to arrange the pattern row by row, I prefer to assemble individual snowmen in a convenient order.
Here's one such solution:
In the following, rows and columns are numbered starting from the top and left. So "L334" = "move the third row (from top) left twice, and the bottom row left once".
Start by assembling some snowmen:
U2 R233 U34Gray, Red, Blue snowmen appear, and we're on the way to another Red.
R33444 D11 L12 R34Four snowmen now fill the left 2 columns.
U5 L3 U5 D4 R33 U46 L3Let's move the new gray and blue in.
L1122 D33 R1122 U3344And then the green.
R333444 D66 L333444We have seven snowmen in a pile, and we can get the eighth easily:
D6 R44 D6 L44The remaining two snowmen!
D6 R2 D6 L22 D55 R2Now we can push snowmen instead of blocks.
D66 L11122234 U2D5, and we're done!!The light should turn green. Save your game once more so you don't have to solve that all again.
Hammer unleashes his destructive instincts on the glass door. As the glass shards fall gently from the air, you thank him and move on.
Exploration 7
The locked panel in this room has a bunch of colored circles on lines and arrows pointing down. Two of those arrows are on buttons on the left and right sides. On the floor is the Cutter seal.
The clue for the panel is on the wall to the left, and has similar circles on lines, but the lines are see-saws.
The exit of this room has its handles tied tightly shut with a rope.
Topple
Use the clue to figure out which buttons to press on the device.
The clue gives you conversion rates between the weights of blue, pink and yellow balls.
After a little math, you find that the ratio of weights from pink to yellow to blue is 2:3:5.
So set the weights of the balls to 2, 3 and 5 units. The sets on the device weigh:
4 < 6
8 < 9
5 > 3
5 < 7
7 > 6
9 < 10
The down arrow means you have to choose the heavier sides (which will sink on the balance), so push the RRLRLR buttons to solve the puzzle.
Summon Cutter. Use him on the rope, and he slices the room in half.
Never mind, reality is still in one piece, and only the rope is broken. Proceed!
Exploration 8
Is it just me, or do the puzzles seem to get simpler? There's just a three-digit safe with digits in red, blue and black here. On the floor is an Unlocker seal (yes, the one you spent hours to reach last time).
Fittingly, the exit to this room is a simple locked door. Nothing fancy.
The clues for this room are a stopped clock over the return doorway, and an unusual note on the wall with red, blue and black squares.
Clock
Use the clues around the room to unlock the three-digit safe.
The time on the clock appears to be 08:20:36 (you know it's 08 and not 20 because of the AM on the note).
That's way too many digits to fit in the safe, but not if you do a particular conversion first.
The ratio 8∶20∶36 reduces to 2:5:9. So enter 259 in the safe to turn on its light.
You can now summon Unlocker, who tells you that while the adversary here is a demon unknown to him, it is not an unknown threat.
Sit back while he forges a magnificent key, which shrinks to fit the keyhole. He leaves it to you to lead the way in the final battle.
Final Room
As you step into the ninth room, you're showered in bright lights, and the mysterious creature reappears.
"So, you've revived your companions, not bad.
"But this body is already fully mine. You can no longer interfere.
"This time, I'll seal every single one of you! No second chances!
"DARKNESS MODE! Let's see where you can aim now!"
Use Lighter to clear out the darkness.
"What? Fine then. MIRAGE MODE!
"Fuhuhu, which one's the real me? You don't know!"
Of course, neither one is.
"Haha, missed me!"
Driver uses his dual-wield to spin both out.
"Ugh, so dizzy. FLIGHT MODE!
"Now you can't hit me! You can't even reach me!"
But of course Reacher can, and brings him down with a thud.
"Grr... I'm getting angry! BEAM MODE!
"This should end it! You're the one controlling this, right? Lock on!
"It's pointless! Soon I'll be charged up!"
You clear up that lock-on with Unlocker ("I don't even need my underlings for this!"), and the shot backfires onto the creature.
"So it's come to this. SHIELD MODE!"
That shield is easily smashed by Hammer, and the creature switches to SPELL MODE.
Yep, that sure looks like a spell.
Decoder provides some clarity, and it turns out that the ominous spell text is just a cry for help.
"Youuu!" The reindeer falls flat and the TRUE MODE demon floats out of its body.
"If you attack me any further, this body will not be able to take it!"
How cowardly!
"Whatever you say. You have no chance of winning. Go ahead and attack!"
So you let Cutter do some work on him, cutting off just the demon's tail. And then it floats off.
The reindeer rises into the air, lands back on its feet, and returns to normal.
"Wh- What was I doing?"
"You were possessed by a weird thing."
"Oh, right. That's it. Please help me!"
"No no, that's over already."
"Not that! My master has been sealed away by that thing!"
"Master? A master of a reindeer would be..."
"Please help, or all the world's misfortune will be wrap " [text goes offscreen]
"S-such an important task. I got it! I'll start by helping you."
"It should still be sealed in the first room. I'll go with you!"
So you get the reindeer.
Extrication
What's that thing on the reindeer's neck?
"Oh right, my master put a note in my collar!"
Click the note to retrieve it. What even is this?
Turn left to find a lever on the wall with symbolic labels above and below. Flip it, and the iron bars de-electrify, and the lights switch on!
But only some of the lights. So walk around every room, and zoom in on the lit lights to mark them on your map.
Only four rooms have glowing colored lights, with two in each of those four rooms. Before you know it, you're back at the first room.
You can't leave through the door, not without treasure! So look around the room to find a metal plate on one wall and a four-button device on the opposite wall, above a Presenter seal on the floor.
Light show
Use the clues you got to solve the last puzzle.
The clue on the device says that you need to go from White to Red in 13 steps.
The lights in the house (that you marked on the map) suggest that you should do so by going from white to pink, then blue, then green, then red.
And then there's that note...
The white light is in the upper-right corner of its room (on the map).
The letter C on the map indicates that the next corners in the sequence are upper-left, lower-left, lower-right.
The sequence from pink to blue is in the Z room, so you should continue with that sequence of corners, and so on.
The completed sequence (from the letters CZUN) uses the corners
⌝ ⌜⌞⌟ ⌞⌝ ⌜⌞⌟⌝⌟ ⌜⌞.
So push those buttons to unlock the panel.
And then you summon Presenter, who thanks you for saving both him and Rudolph. Looks like you saved Christmas!
They can't stay because they have some catching up to do, but your presents are already prepared: just take whatever you like from the box behind.
(But save your game first!)
Ending
Got your save game ready? Let's pick up some presents and go home for the Christmas party. You can only take one with you, but feel free to change your mind.
Pink
It looks like the wonderful box of giving is just a Christmas present. Let's see what's inside.
...It's a high-grade sound sleeping pillow! You're really grateful for this, as it's impossible to fall asleep huddled with everyone else. Mmm, it's fluffy with just the right amount of rebound.
Now you can sleep soundly... never mind, no pillow will get rid of that Lighter's potent sleeptalking.
Blue
...It's Murder of Escape Manor, that detective novel you've always wanted to read!
Hmm, the mysteries just get deeper and deeper.
Y: "It's rare to see people who still read books."
B: "I'd never find anyone who reads."
G: "Well then."
That doesn't sound like a compliment.
Y: "We want to read more of this nation's books."
B: "Yeah, our inquisitiveness has not been exhausted."
G: "Well then"
Y: "Could we read that for a bit?"
"But I was at the good part... okay, just a bit."
Y: "Thanks! We'll finish it quickly."
...quickly?
"Emerald Tablet!"
Y: "The killer was Yamada, eh."
B: "So Yamada did it."
G: "It was Yamada, huh?"
Green
...It's a simple alarm clock! What a lifesaver, you have to get up early tomorrow to sell cakes.
Now to set it for 7 am.
RRRING! *yawn* Maybe five minutes more.
Looks like Driver can't put up with that ruckus, and he subjects it to a quick dismantlement.
Yellow (small)
It's really small! Let's see.
...Aw yeah! It's a voucher for a meat buffet! Think of all the beef you can eat- aargh!
Calm down there, Hammer! Looks like we'll be eating the usual turkey instead.
Yellow (large)
...Whoa, it's a lavish seafood hotpot set!
Let's prepare the tuna. Oh, Cutter's such a helpful guy! Now for the "daikorn".
Oops, there goes the chopping board. Hey, don't just sneak away!
White
Another small package. What could it be?
...It's a sushi buffet ticket! Om nom nom... you might have ordered too much.
And we're out of soy sauce. Why's it in such a high place?
"Leave it to me!"
"Don't, I'm sure there's something we can step on-"
*extend* *spill*
Yeah, we saw that coming.
Special Ending
Presents are for kids. Let's just go home and party!
(Leave without taking a present. If you're holding one, put it back.)
Looks like the box of giving is no more than a Christmas present. Even though you desired something and didn't get it, you feel a sense of happiness right now. Even though you walked away empty-handed, you were relieved to have protected that thing. Good things will always be around... probably.
While the excitement is nice, these people don't really know their limits. The toilet's the only place to get some peace and quiet, or so you thought when you got interrupted.
(Knock knock.)
"Alright, just give me a while."
"Lemegeton!"
"Huh? What are you doing?"
Click! How'd it get unlocked from outside?
"What are you doing in there?"
"You can see it! Hurry up and close the door please!"
"It would be good if you'll hurry up, put on your pants and come out."
"Alright I got it, so just close the door for now!"
("Sigh, I'm so gonna drive them out.")
(I'm very unsure in translation for this entire scene.)
Oh, it's snowing!
"Look! The figure from before is galloping!"
"Looks like he's waving to give thanks."
"On closer look."
"Now, shall we get back to the banquet?"
"Huh? You're still doing that?"
"If you see something unusual, it's your duty to tell us!"
It's not just because they want to drink? That's alright, you'll keep company the whole night.
Instead of the ending screen for the other six endings (title of the game and END), you get an end screen with a Merry Xmas message and a glowing white sleigh flying around.
...and that's the end of the series! (Unless he makes more, but don't get your hopes up.)
kk,having a problem with
snowman puzzle. I followed the directions 2 times on the slider puzzle on snowman and I still have a few unmatched snowmen. I'm not sure if it's me or a few steps were missed.
if you or someone could help i'd appreciate it.
@Paul: It seems to be working for me (though I'd like some confirmation from anybody who's tried it). Anyway, I now have some screenshots you can compare your board against.
Update