
Timeless: The Forgotten Town
Platform: Mac, Windows
![]() As we get older we begin to develop a nostalgia for the past, and sometimes that past is not our own but something further back in time. Some folks long for the return of the 50s, some want to travel back to Victorian times, and one massively popular novel series makes folks want to travel back to Scotland around the time of Culloden. Strange, really, because most of us when faced with the actual reality of those times would head for the nearest exit, especially once they sussed out the bathroom facilities...
As we get older we begin to develop a nostalgia for the past, and sometimes that past is not our own but something further back in time. Some folks long for the return of the 50s, some want to travel back to Victorian times, and one massively popular novel series makes folks want to travel back to Scotland around the time of Culloden. Strange, really, because most of us when faced with the actual reality of those times would head for the nearest exit, especially once they sussed out the bathroom facilities...
 Where was I going with this? Oh yes, if you want to travel back to a kinder, gentler time but don't want to deal with all of the hassles (uncomfortable clothes, the societal attitudes, etc.) then perhaps you should check out Boolat Games' latest adventure/hidden object hybrid Timeless: The Forgotten Town, which takes you back to the past without having to deal with the lack of personal hygiene and dodging horse poop in the streets.
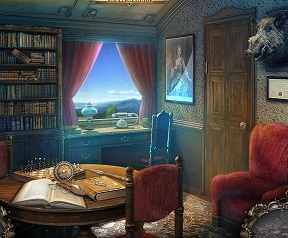
Timeless: The Forgotten Town begins with you, the hero (or heroine) on a train heading for the next destination of your lovely European vacation. As the train passes through a tunnel something strange happens when a mysterious red-cloaked figure starts cackling maniacally in your general direction and the next thing you know your fellow passengers have disappeared and you are on a train to nowhere, all alone. Mind you, the train itself has transformed into the luxurious accommodations of a private car belonging to one of the filthy rich back in the Edwardian era, so at least you won't be uncomfortable. Pretty soon you'll (hopefully) manage to stop the train and disembark at the town that time forgot, inhabited by sad or angry ghosts and the aforementioned dude in red who has targeted you as the next victim of his nefarious scheme. Aided by the ghosts and the writings of at least one other traveler who unfortunately fell victim to the plot you must explore this lovely place and piece together the clues of what happened and stop the madness before you, too, succumb to a fate worse than death.
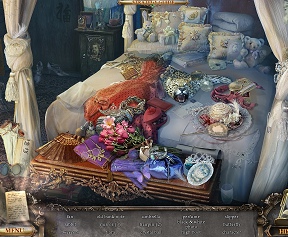
Basically, the game is a classic point-and-click adventure with an overlay of hidden object finding, so navigating your way around the train (and later, the town) is accomplished with a click of the mouse. Timeless: The Forgotten Town features the standard changing cursor option that reveals items you can pick up (a hand), places that can be examined (a magnifying glass), and of course, places where you can travel (an arrow). Your objective, if you choose to accept it, is to wander around, pick up and examine a lot of objects, solve some mini-games and puzzles, and defeat the evil red cape guy to free this poor town (and its ghost inhabitants) from his nefarious curse. Useful information found along the way goes into a handy journal and useful items go into a bottom-screen inventory to be used later. The game also features a nice refilling hint timer that can be used both within hidden object scenes and without.
 Perhaps the thing most hybrid adventure players will appreciate is the fact that Timeless: The Forgotten Town has both a skippable tutorial and two modes of play: easy for those who are newer to the genre and advanced for those who disdain hand-holding. The easy mode features a plethora of hints featuring glints, sparkles, and cascades of colored light to highlight interesting areas, as well as a quickly refilling hint timer that also doubles as a skip feature for the mini-games. The advanced mode, on the other hand, disdains all but a tiny, minor glint of light to indicate areas of interest, including the hidden object scenes, along with a hint timer that refills very slowly and a "too many clicks" penalty that last a lot longer than in the easy mode. The beginning tutorial is skippable as well once you've found your journal and hint timer. The different gameplay modes and the skippable (or not) tutorial make this a game that a wide spectrum of players can enjoy, from the amateur to the hardcore adventurer.
Analysis: Yes, yet another adventure/hidden object hybrid, and a Collector's Edition to boot. Just because the market is glutted right now with a lot of knock-offs and copycats doesn't mean that you shouldn't give a really well-designed game like Timeless: The Forgotten Town a try. In fact, you should definitely give it a whirl as it is decidedly worth the effort both in terms of visual beauty and fantastic gameplay, especially the mini-games and puzzles, which are a mix of the comfortably familiar (gear puzzles, etc.) and the wickedly original (the cunning slot machine/mini-adventure game).
 The backgrounds of both the train and the town that time forgot are stunning hand-painted masterpieces that fit the time (1907) and the place (a quaint town somewhere in Europe, perhaps Germany or Switzerland, judging by the scenery). Despite the ghosts and the evil red guy the musical accompaniment is not full of blaring horns or spooky riffs, but rather light and pastoral airs that match the atmosphere of this adorable little town. Spookiness is added by the advancing storyline and the quiet yet effective incidental sounds: bird song, creaking wood, rustling leaves, that serve to emphasize the point that not only has time passed this place by but it is deserted of all human life save yours.
If there is a downside to Timeless: The Forgotten Town it is that gameplay is rather short, especially if you play in easy mode. And as is common in many Collector's Editions you don't get a satisfying ending or a complete story unless you play the "extra" adventure, which at least adds another hour to the playing time. These "extra" adventure sections should not feel like they were amputated from the end of the story, leaving those who buy the regular edition to feel cheated out of a "proper" ending. However, you still do get an ending in the regular gameplay, even it it does feel a bit rushed and doesn't answer many outstanding questions.
In this case, it is definitely worth the extra few bucks to purchase the Collector's Edition for the extra gameplay, which not only rounds out the story but adds a considerable amount of playing time to this time-traveling adventure. Gorgeous, entertaining, and fit for both the noob and the advanced adventure gamer, Timeless: The Forgotten Town is a feast of astounding visuals and amusing gameplay. Do not, however, expect an exciting roller-coaster ride of adventure in game form. Instead, enjoy a quiet and meditative stroll down avenues of the past, probably a lot more entertaining than actually being there.
A Collector's Edition is also available. It includes wallpapers, concept art, the music soundtrack, a hefty extra adventure, and a built-in strategy guide. Remember that Big Fish Game Club Members pay only $13.99 for Collector's Editions (or 2 club credits), and collector's editions count 3 card punches of 6 total needed for a free game.
![]() Windows:
Windows:
Download the demo
Get the full version
Also available: Collector's Edition
![]() Mac OS X:
Mac OS X:
Download the demo
Get the full version
Also available: Collector's Edition


Walkthrough Guide
(Please allow page to fully load for spoiler tags to be functional.)
Timeless: The Forgotten Town Walkthrough
General Information
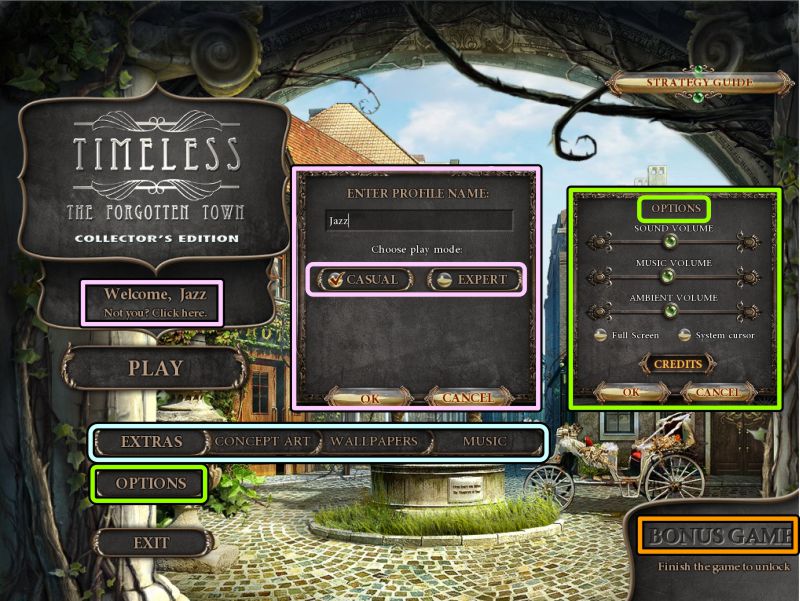
From the Main Menu, you can Play, Continue, or Exit the game and choose your Profile and Options.
If you purchased the Collector's Edition, you will have access to a Bonus Game once you have completed the basic adventure.
You can also click on "Extras" for Concept Art, Wallpaper, and Music, all of which become available as you progress through the game.
When you choose your profile, you will be asked to choose a mode of play.
Casual Mode has helpful sparkles, the Hint and Skip buttons refill faster, and the rapid clicking penalty in Hidden Object Scenes is shorter.
Expert Mode is more challenging with fewer sparkles, Hint and Skip buttons take longer to refill, and the rapid clicking penalty is longer.
Options include Full versus Windowed screen; Custom Cursor; Sound, Music and Ambient volume; plus you can view the Credits.
Once you choose your Options, they are the same for all profiles you play, but you do have the option to change one or more from the scene Menu.
"Not You" lets you create or delete profiles and choose between the ones you created.
Screenshot
Scene Navigation
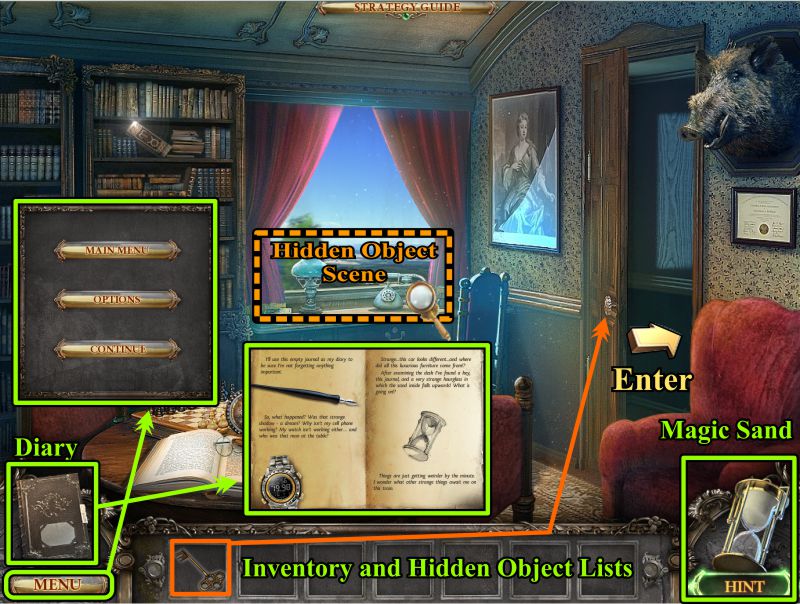
There is no timer, but there is a click penalty in Hidden Object Scenes that will make your cursor crazy.
When your cursor gem glows a light blue, there is something to be done there.
Hints are unlimited once the Hint hourglass in the lower right corner refills.
The hourglass contains magic sand to help locate hidden objects, or show you the next step of your adventure.
In the lower left is your Diary, with notes and observations about your adventure.
Below the Diary is the Menu, where you can change your options, resume the game, or quit to the Main Menu.
In the lower center of the screen is your Inventory, and where Hidden Object Scene lists or silhouettes are shown.
If you need to identify an item in your Inventory, mouse over it for its name.
Some of the Hidden Object scenes will show you silhouettes of objects to gather in the scene.
Hidden Object Scenes are randomized, but will be marked because when you return to the same location, the items may then be on your list or group of silhouettes.
There will be an item for your Inventory from each Hidden Object Scene that will be marked in turquoise blue.
Mini Games have a Skip option that takes time to fill.
Some Mini Games also have an option to let you begin again, and will be noted for that game.
Screenshot
Chapter 1: The Train
Lounge Car
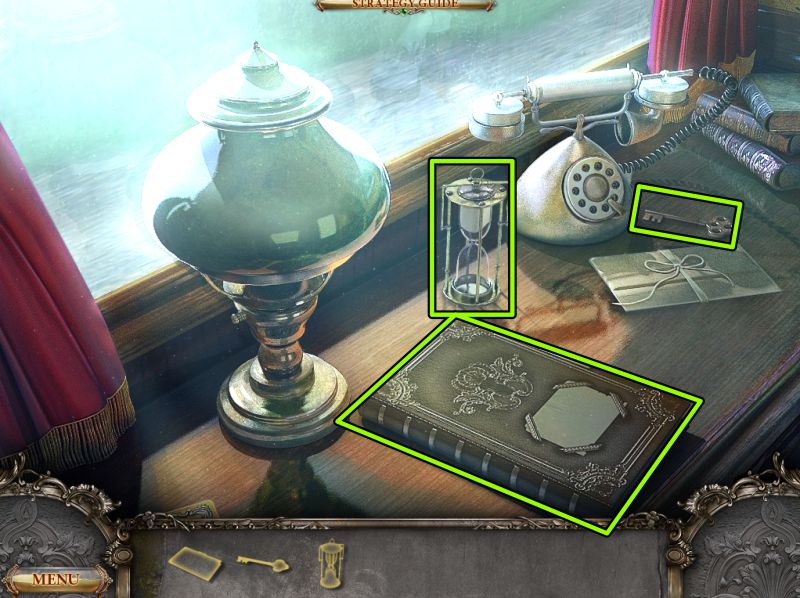
Click on the desk to play a Hidden Object Scene to get your Diary, the Magic Sand hourglass for your Hints, and the key to the door.
You will be given your choice to view the Tutorial or not.
Desk Hidden Object Scene
Match the objects in the scene with the silhouettes.
Unlock the door with the key and go to the next car.
Screenshot
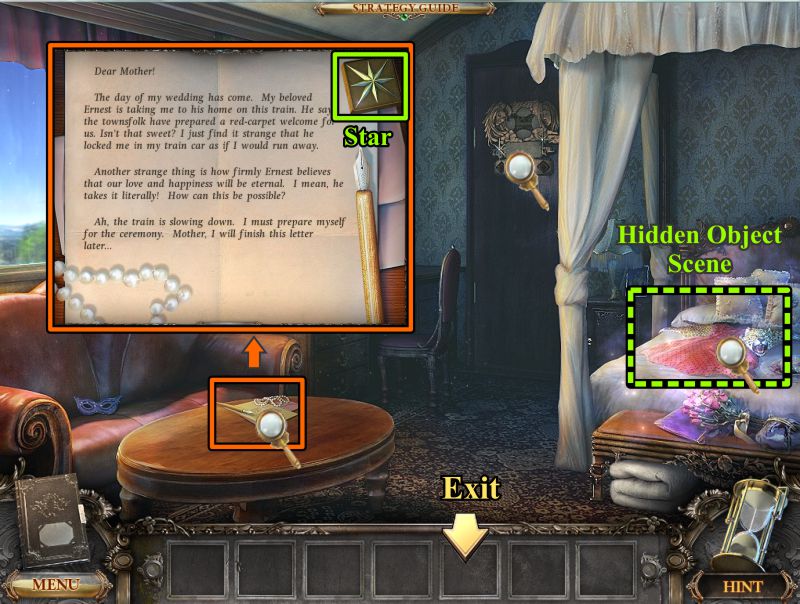
Sleeping Car
Zoom in on the note on the table and take the Star.
Play the Hidden Object Scene on the bed, check up the door to the next car, and exit down to the Lounge Car.
Screenshot
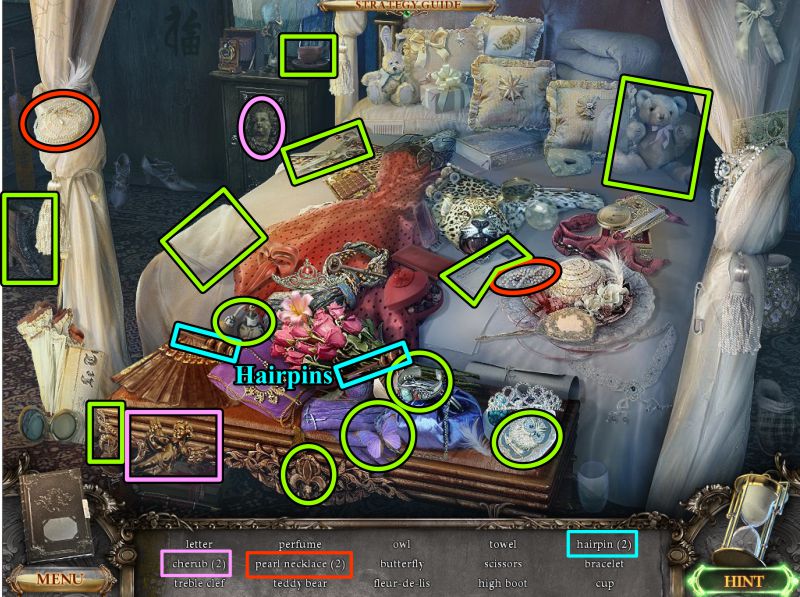
Bed Hidden Object Scene
Collect everything on your list, and you will have 2 Hairpins for your Inventory.
Screenshot
Lounge Car
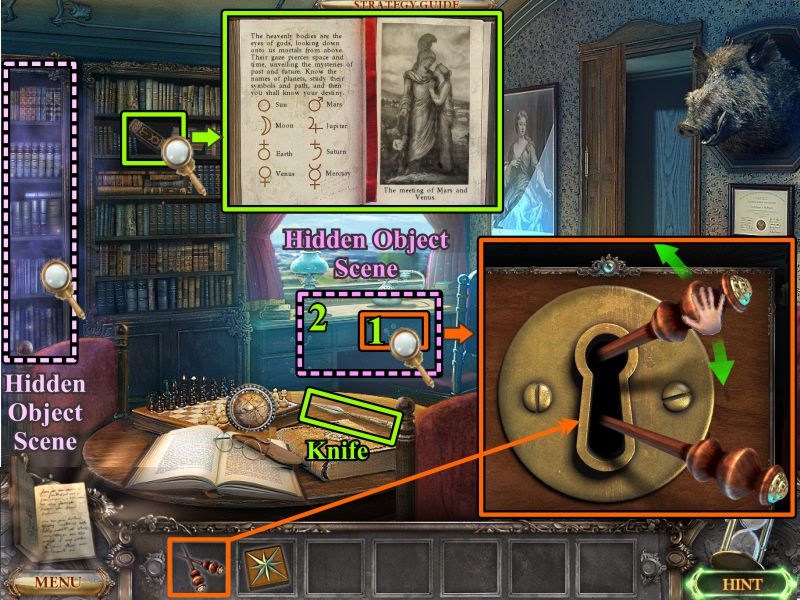
Pick up the Knife on the desk.
Zoom in on the desk drawer and insert the 2 Hairpins.
The top Hairpin moves up and down, and the bottom Hairpin moves into the lock.
Move the top Hairpin slowly to the bottom one.
When the bottom one quivers, push on it.
Repeat this action until the drawer opens for a Hidden Object Scene.
Zoom in on the bookcase and read the astrology book.
Play the Hidden Object Scene in the bookcase.
Screenshot
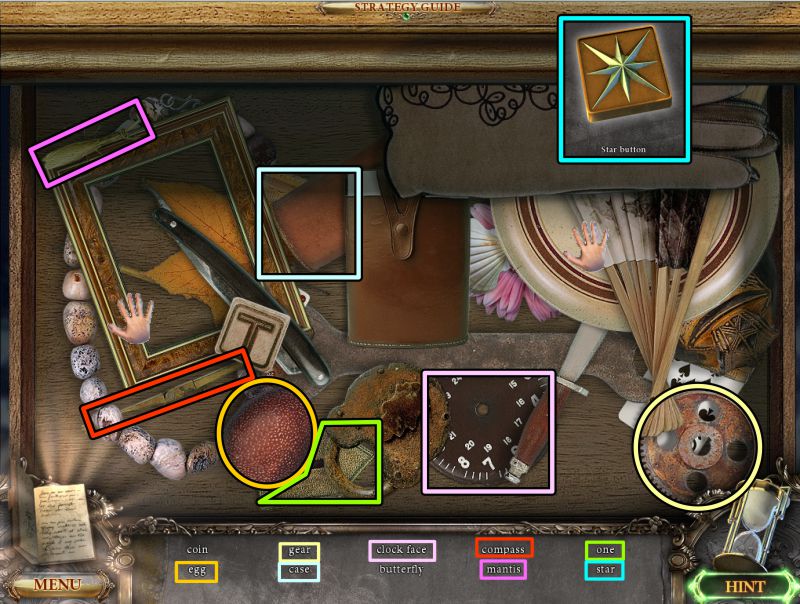
Desk Drawer Hidden Object Scene
Your goal is to move the objects in the drawer around to uncover the items on your list.
You will come away with a Star for your Inventory.
Screenshot
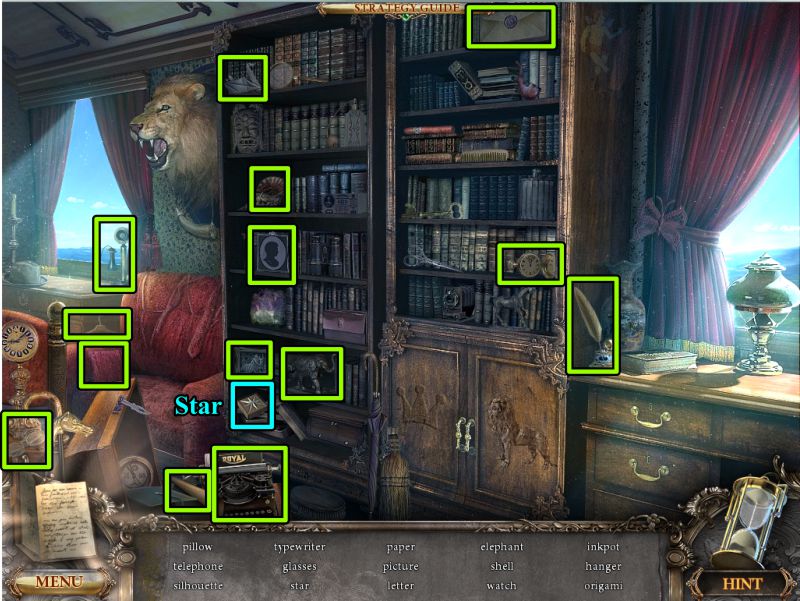
Bookcase Hidden Object Scene
Find everything on your list to get another Star.
Return to the Sleeping Car.
Screenshot
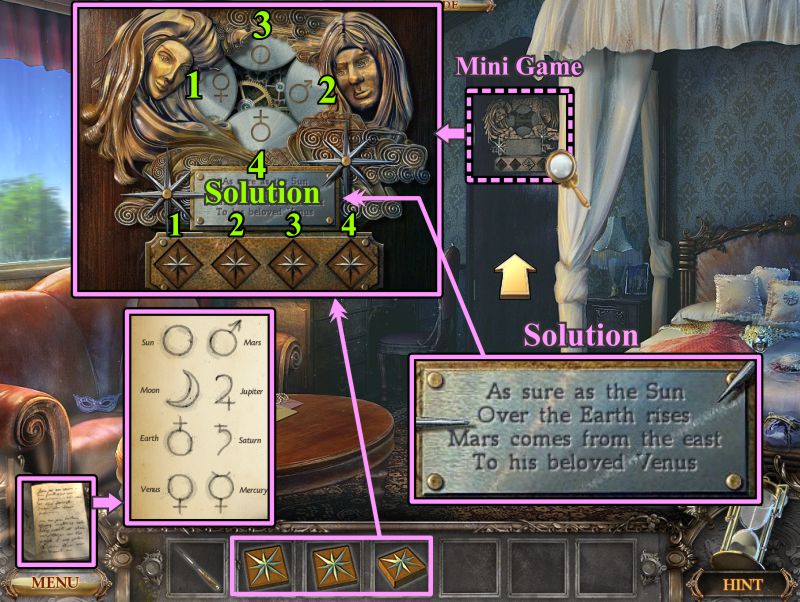
Mars and Venus Mini Game
Zoom in on the door for a Mini Game to open it.
Place the 3 missing Stars that become buttons to turn the gears on the door.
Check your Diary for the meaning of the symbols.
The plaque below the gears tells you which symbols to use and their locations.
The solution is shown in the screenshot.
Go through the door to the next car.
Screenshot
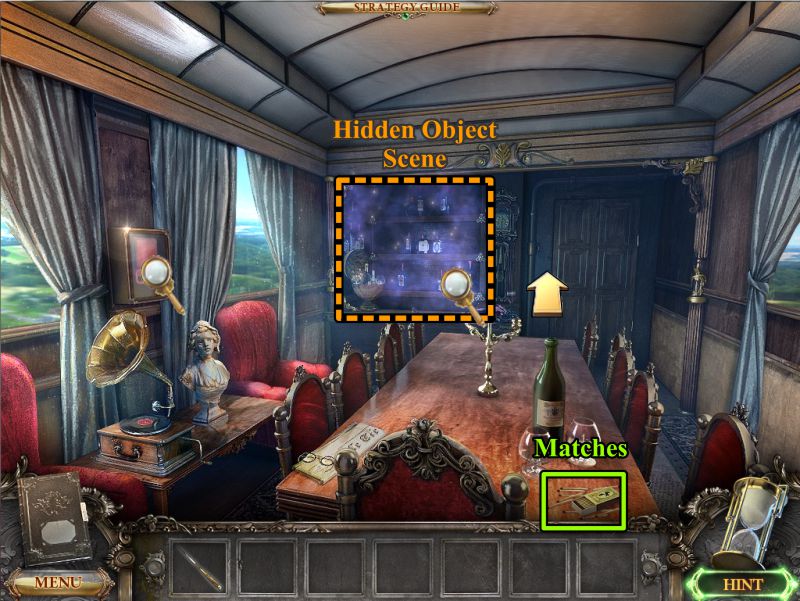
Dining Car
Pick up the matches on the table, play the Hidden Object Scene at the bar, and go to the next car.
Screenshot
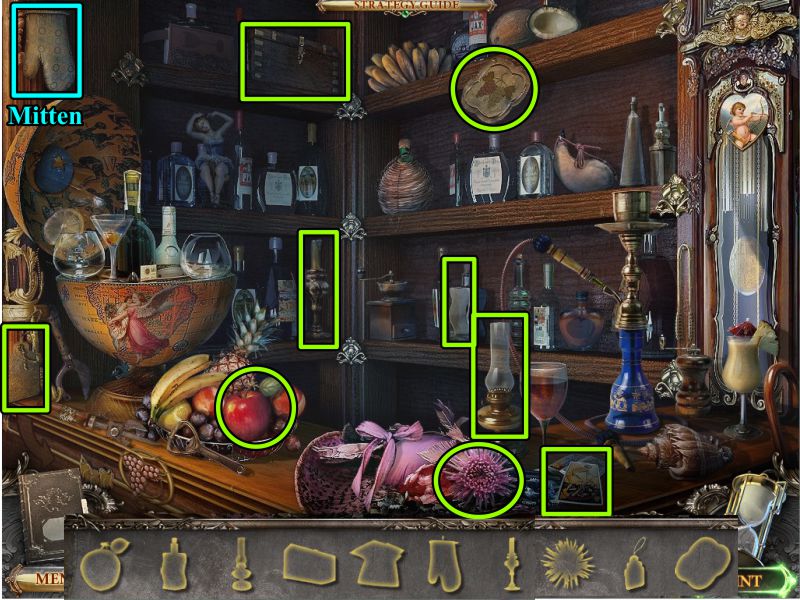
Bar Hidden Object Scene
Collect all the silhouettes to get a Mitten.
Screenshot
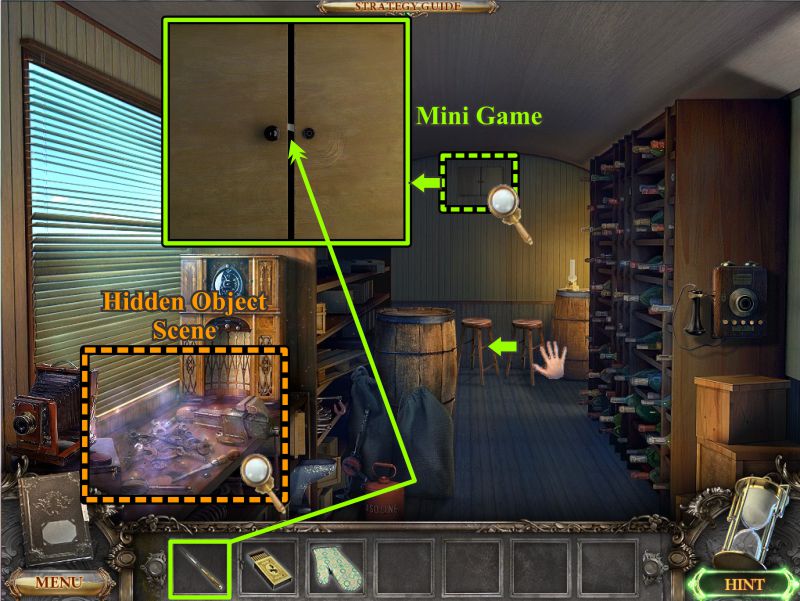
Storage Car
Play the Hidden Object Scene.
Move the stool over so you can zoom in on the cabinet on the back wall.
Use you knife to open it for a Mini Game.
Screenshot
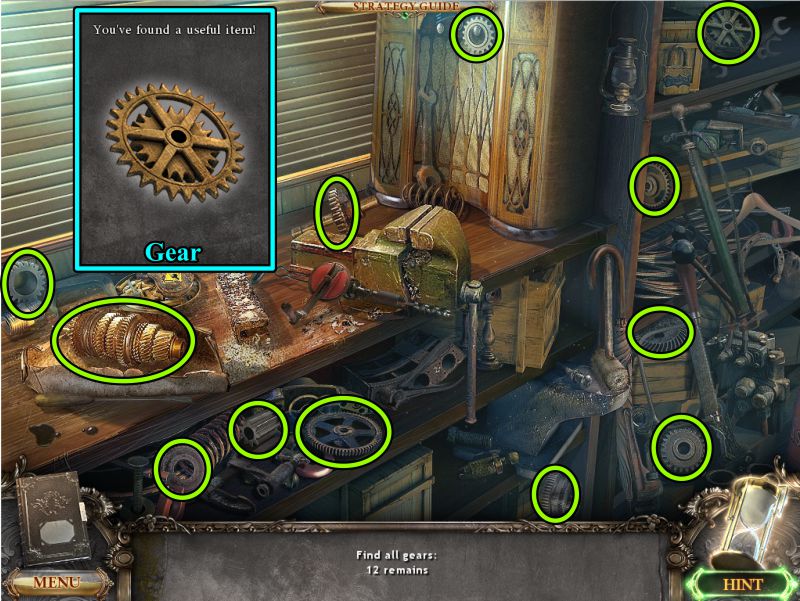
Gears Hidden Object Scene
Collect all 12 gears to get a special gear.
Screenshot
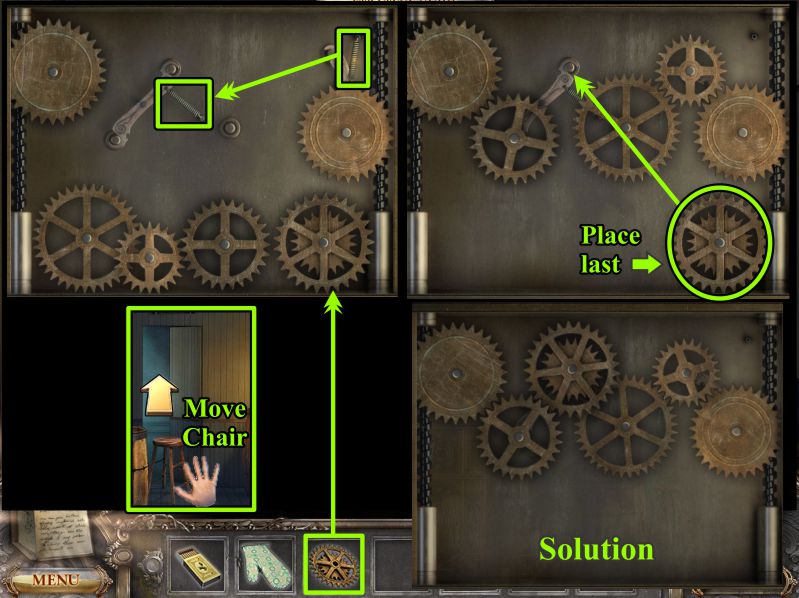
Gears Mini Game
Place your gear in the cabinet.
Move the spring at the right to the position shown in the screenshot.
Place the 3 gears on the left as shown in the screenshot.
Place the double gear last, because you are using the inner gear to make it all work.
Move the stool out of your way and go through the door.
Screenshot
Chapter 2: Stop The Train
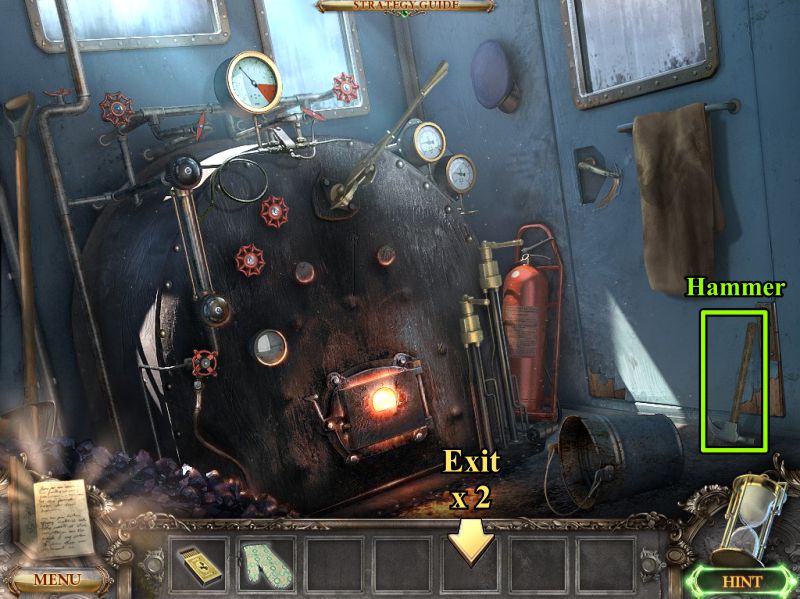
Steam Engine
Take the Hammer and go down twice to the Dining Car.
Screenshot
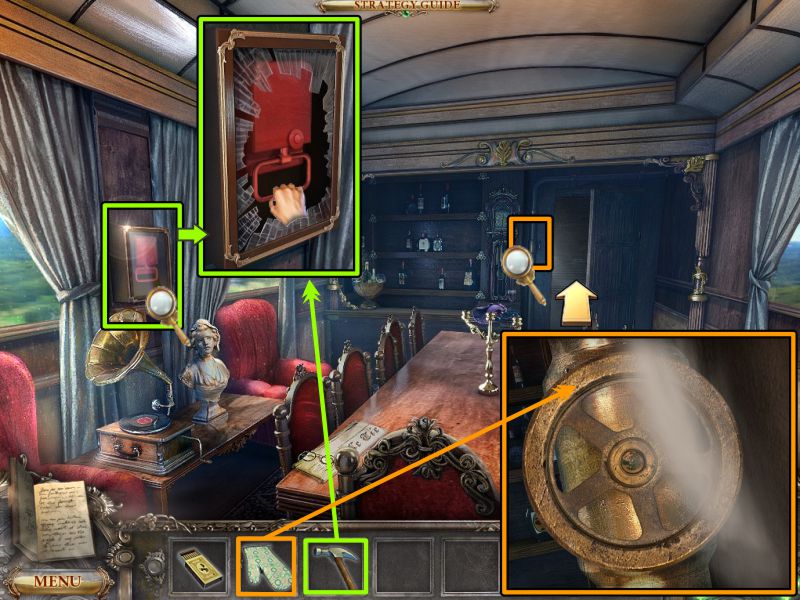
Dining Car
Zoom in on the emergency brake, then use the hammer to break the glass.
Pull the brake to stop the train.
The apparition in the red cloak appears and does something to the steam pipe as he disappears. Zoom in on the pipe and use the Mitten to turn off the valve.
Return to the Storage Car.
Screenshot
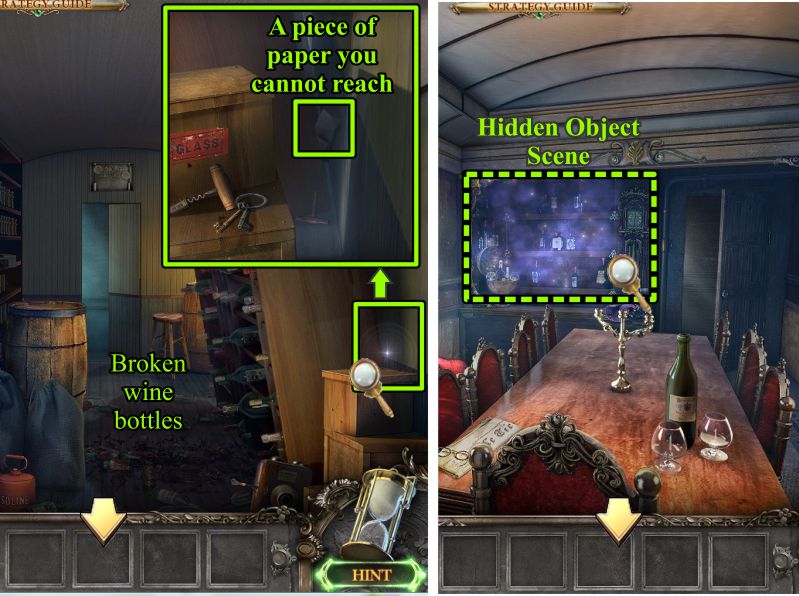
Storage and Dining Cars
When the train tried to stop, the wine rack tipped, causing a lot of bottles to fall and break. Look behind the rack and note the piece of paper out of your reach.
Return to the Dining Car and Play the Hidden Object Scene.
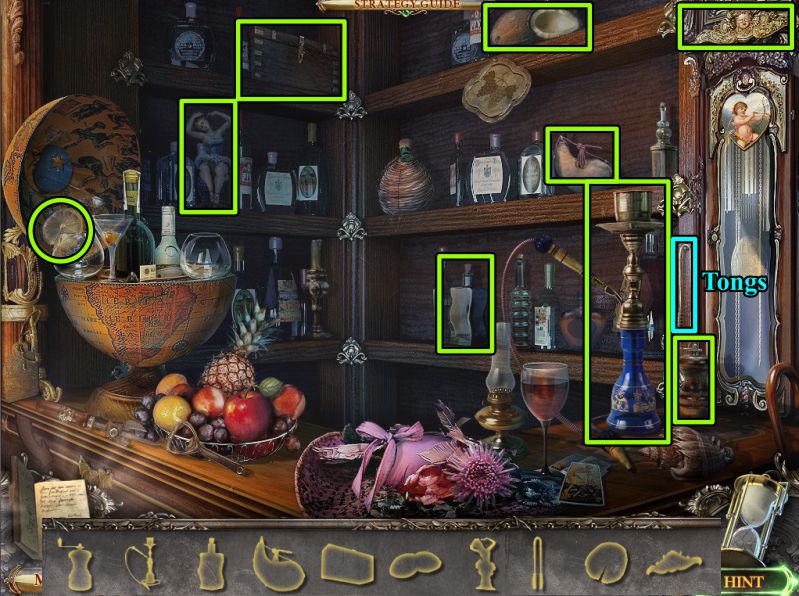
Screenshot
Bar Hidden Object Scene
Match all the silhouettes with objects, including the Tongs for your Inventory.
Go down to the Sleeping Car.
Screenshot
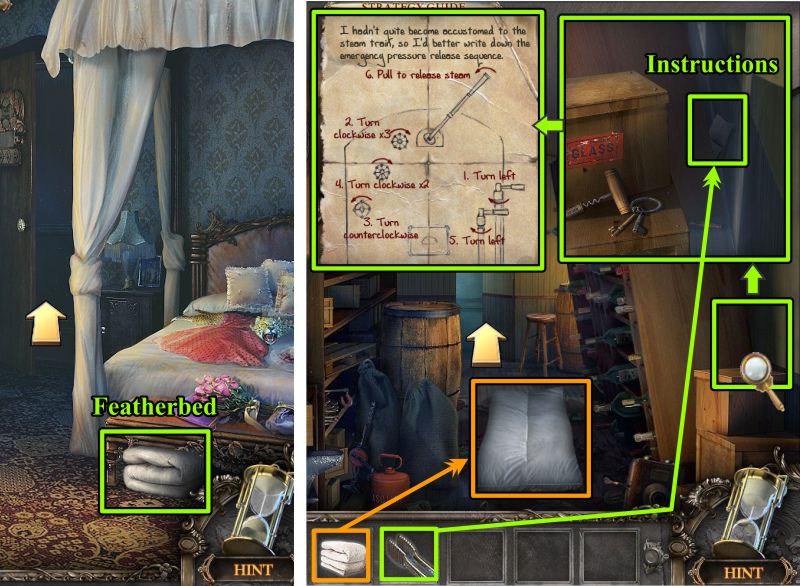
Sleeping and Storage Cars
Grab the Featherbed and head to the Storage Car.
Place the Featherbed over the broken bottles.
Zoom in behind the wine rack, and use the Tongs to get the piece of paper; it turns out to be instructions for how to turn off the steam engine.
Take the Instructions and go to the Engine Car.
Screenshot
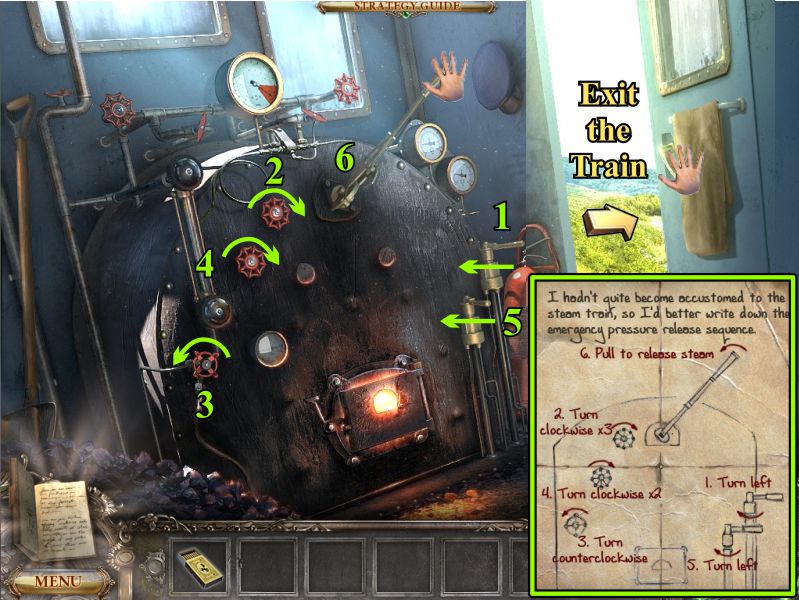
Steam Engine
Follow the instructions as marked in the screenshot to shut off the steam.
Turn handle 1 left.
Turn valve 2 three times to the right.
Turn valve 3 once to the left.
Turn valve 4 twice to the right.
Turn handle 5 to the left.
Push lever 6 to stop the train.
Open the door and exit the train.
Screenshot
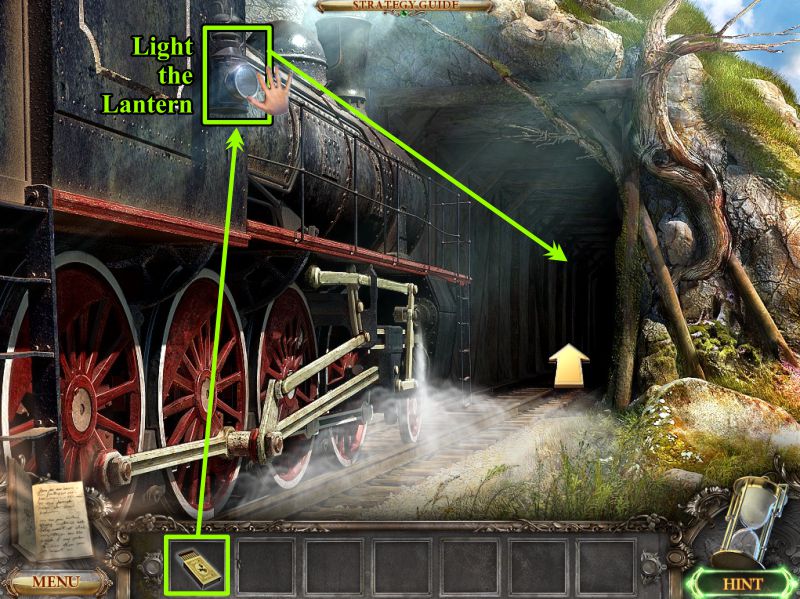
Stopped Train
There is a dark tunnel just ahead. Use your matches to light the train lantern.
Grab it and go forward into the tunnel.
Screenshot
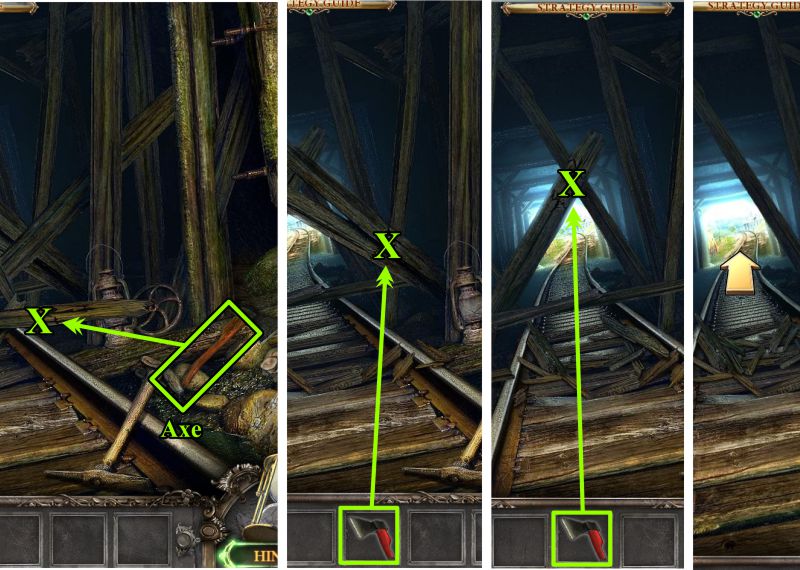
Tunnel
Pick up the Axe and use it on the weak spots in the beams, as shown in the screenshot.
The tunnel starts to collapse, so make a run for it.
Screenshot
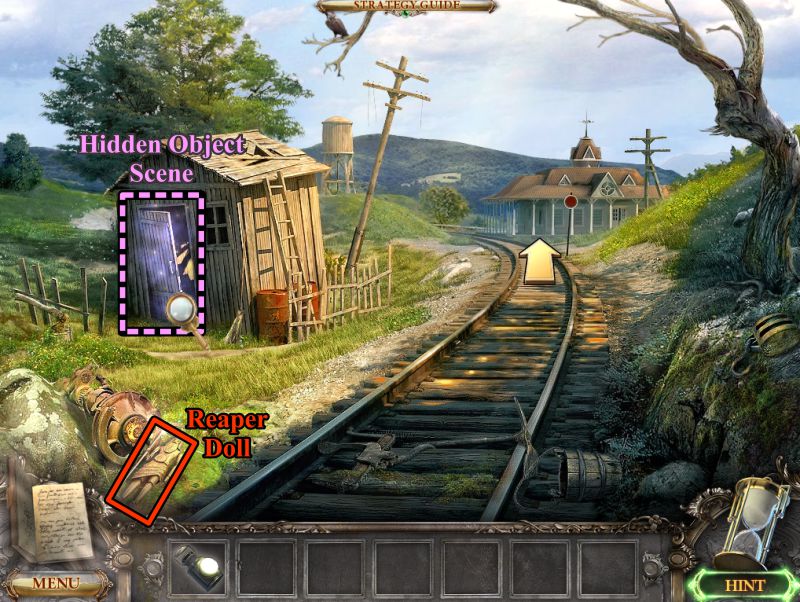
Chapter 3: Mondwald
To The Train Station
You made it, so pick up the Reaper Doll.
Play the Hidden Object Scene in the Tool Shed, then go up the tracks to the station.
Screenshot
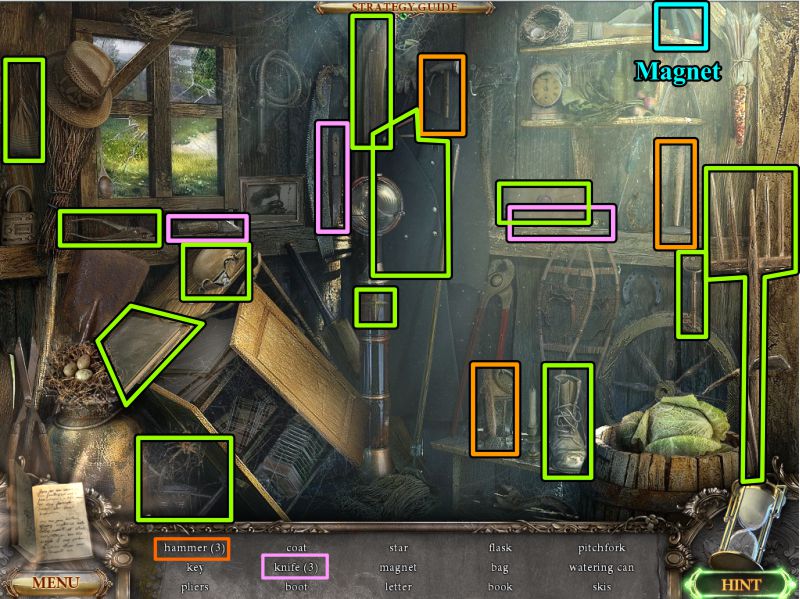
Tool Shed Hidden Object Scene
Collect everything to get a Magnet.
Screenshot
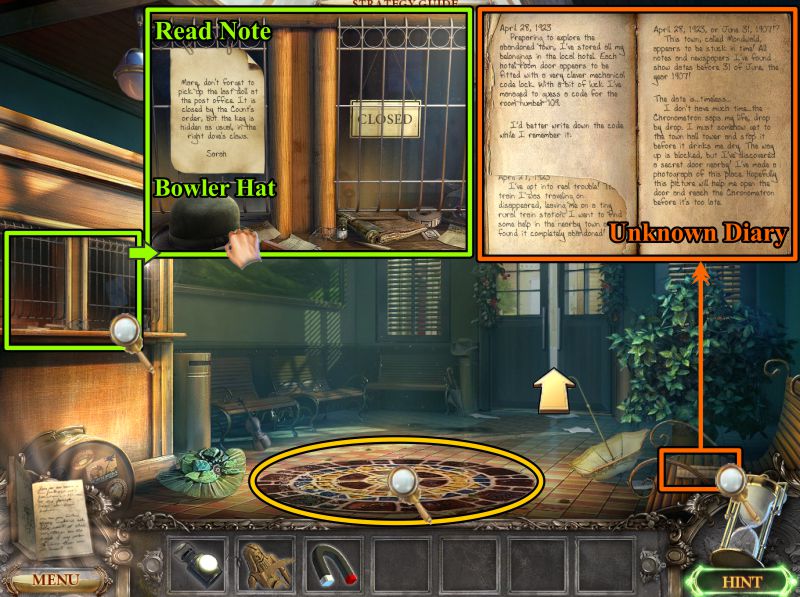
Train Station
Zoom in on the ticket counter, read the note, and take the Bowler Hat.
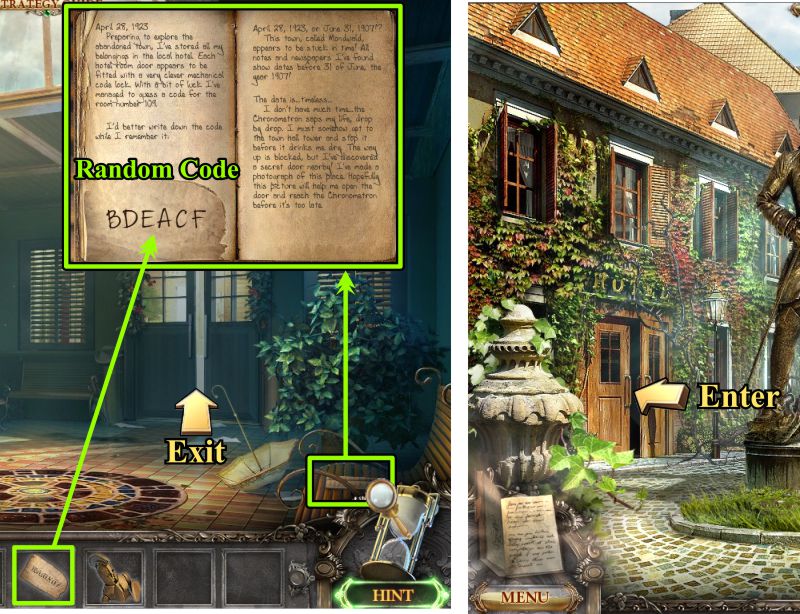
Zoom in on the unknown diary on the bench to the right, and note the torn page with a missing code.
Look at the mosaic, then exit the Train Station.
Screenshot
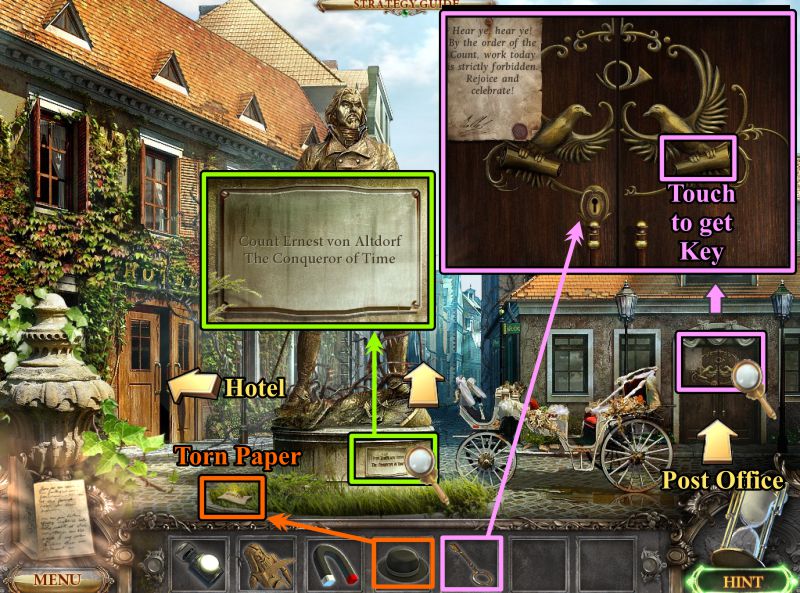
Town Square
Zoom in on the statue to see who it is.
Try to pick up the Torn Paper, and it will blow to another location.
Trap it somewhere with the Bowler Hat to pick it up.
Zoom in on the Post Office door.
The note at the Train Station said the key is hidden in the right dove's claws, so touch what the right dove is perched on to get the key.
Open the Post Office door and go inside.
Screenshot
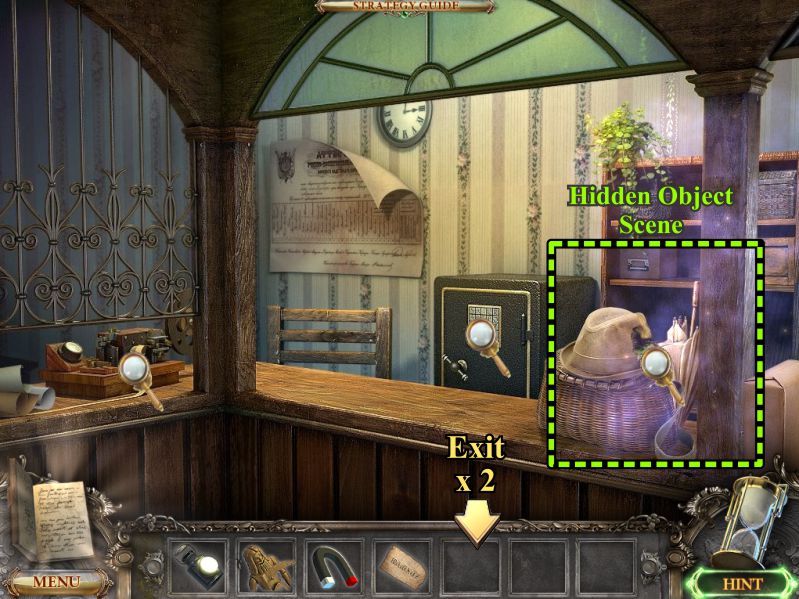
Post Office
Check out the safe and telegraph, then play the Hidden Object scene on the shelves, and exit down to the Train Station.
Screenshot
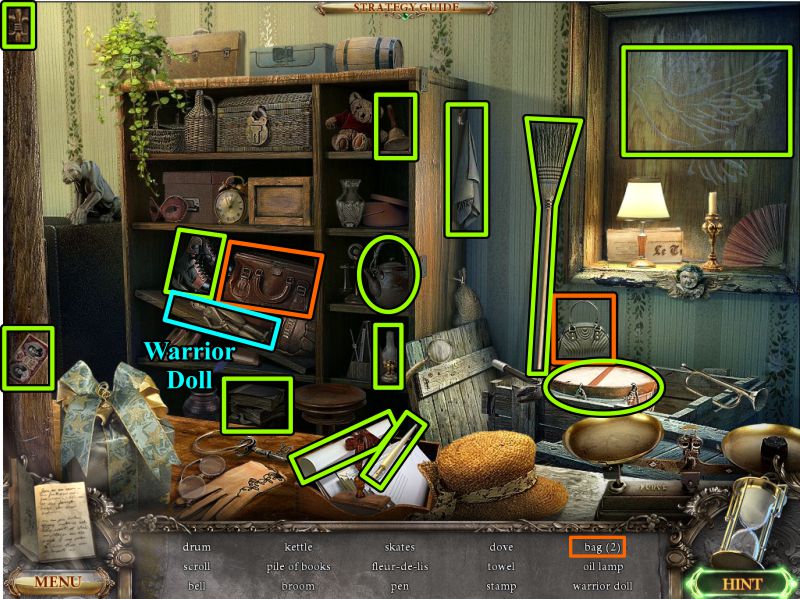
Post Office Hidden Object Scene
Collect everything to get the Warrior Doll.
Screenshot
Train Station and Hotel Entrance
Zoom in on the diary on the bench and place your code.
The letters of the code are random for each player.
The code will be recorded in your Diary.
Exit to the Hotel.
Screenshot
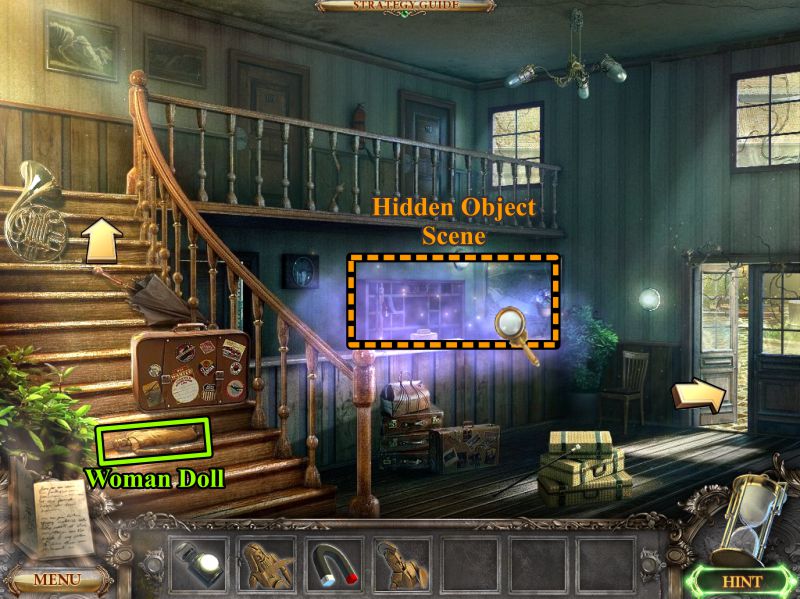
Hotel Lobby
Pick up the Woman Doll on the Stairs, play the Hidden Object Scene at the Reception Desk, and go upstairs.
Screenshot
Reception Desk Hidden Object Scene
Match the objects to the silhouettes to get Yarn for your Inventory.
Screenshot
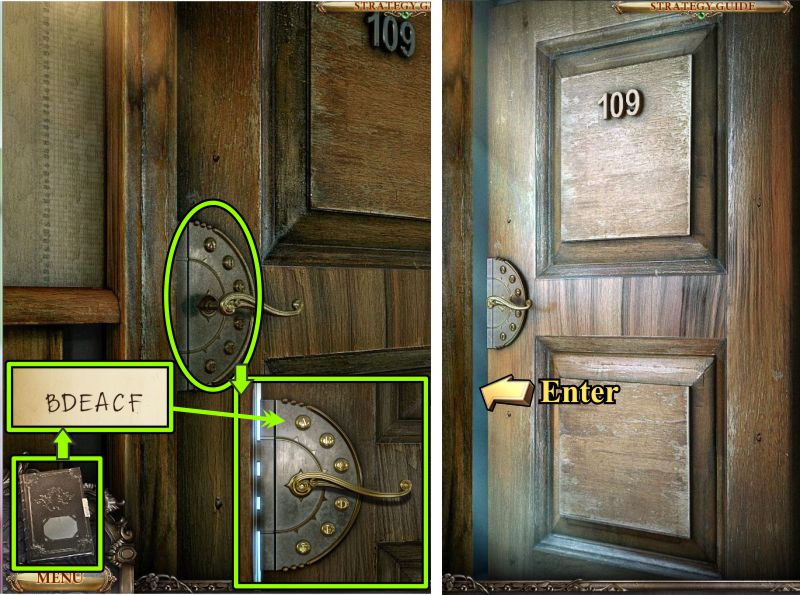
Room 109
Zoom in on the lock for Room 109 and enter the code from your Diary.
Open the door and enter.
Screenshot
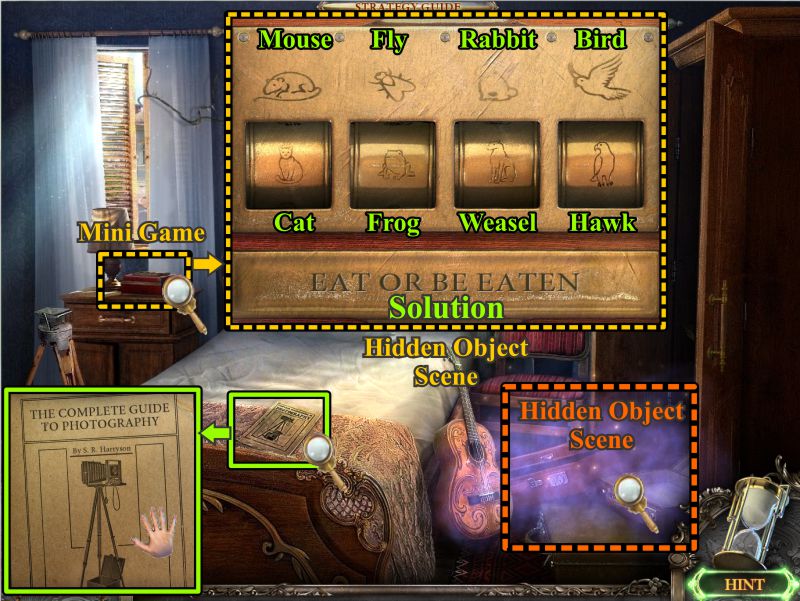
Room 109
Pick up the Photography Guide on the bed.
Play the Hidden Object Scene in the luggage.
Zoom in on the box on the nightstand for a Mini Game.
Eat or Be Eaten Mini Game
Your goal is to move the rollers to the predator, who eats the critter pictured above.
The solution is shown in the screenshot.
Screenshot
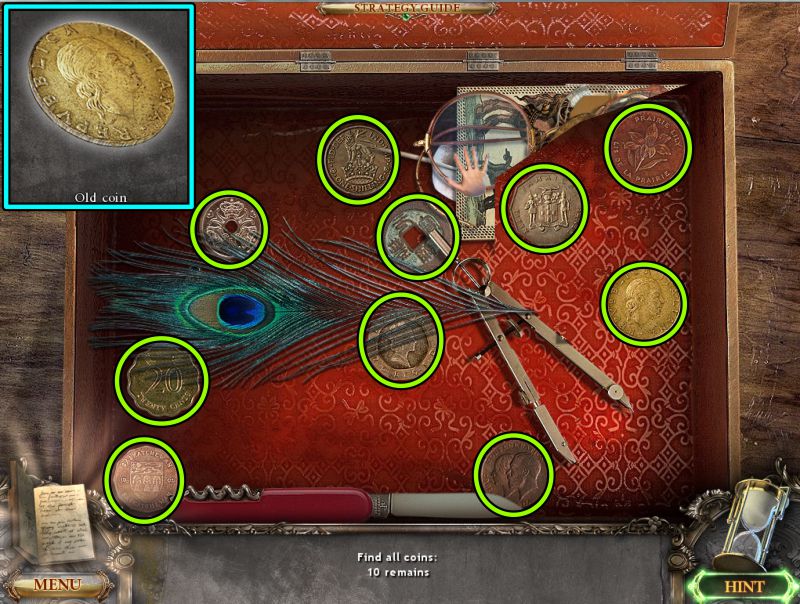
Coin Hidden Object Scene
Once you have finished the Mini Game, the box will open.
Move everything around so you can collect the 10 coins in the box. See the screenshot for their location.
You will get an Old Coin for your Inventory.
Screenshot
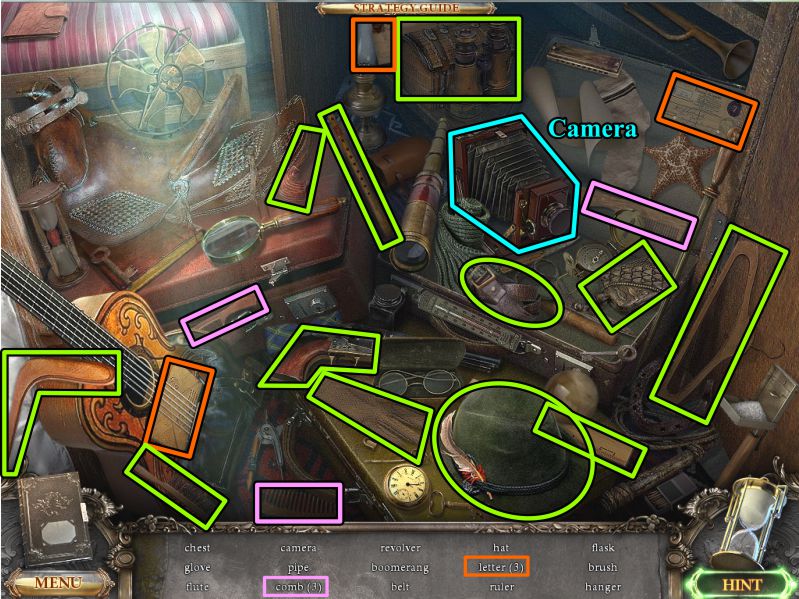
Luggage Hidden Object Scene
Collect your list of objects to get a Camera.
Go downstairs and exit the Hotel.
Go forward on the side street.
Screenshot
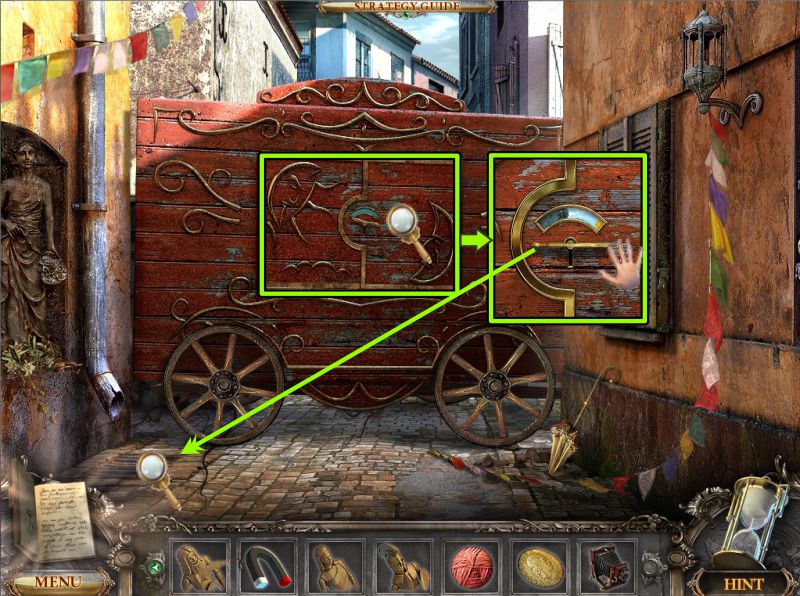
Wagon
There is a Wagon blocking your path to the Center of Town.
Zoom in, turn the key, and it will fly into the drain at the left.
Screenshot
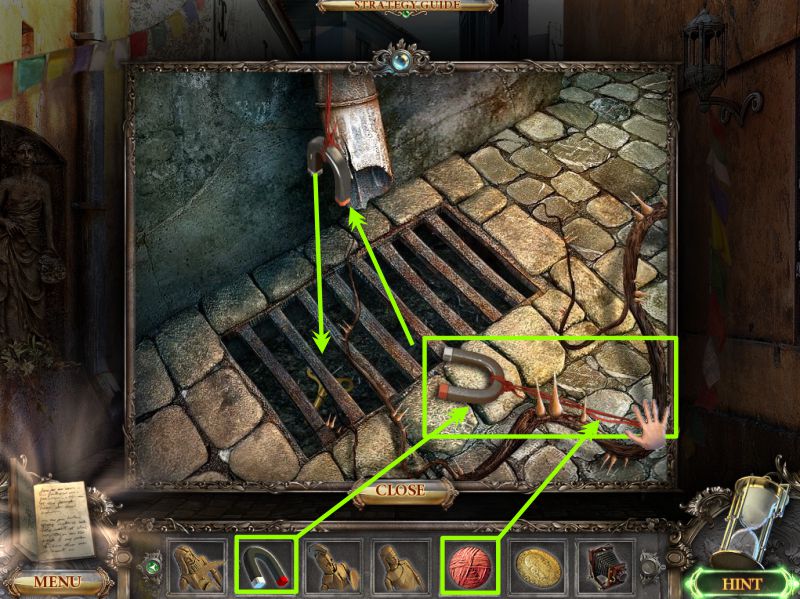
Grate
Zoom in on the Grate, place your Magnet on the ground, and then the Yarn.
The Yarn will attach itself to the Magnet, so collect it.
Use the Magnet to retrieve the Key.
Screenshot
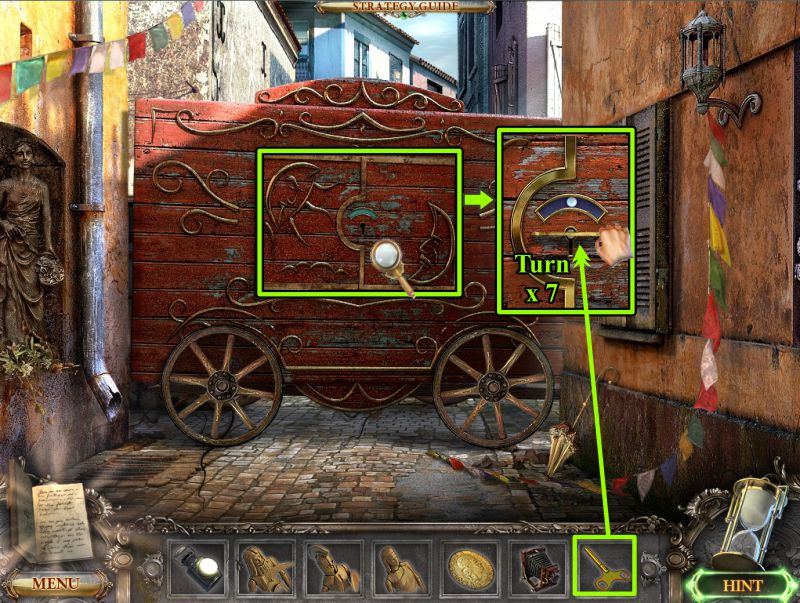
Wagon
Zoom in on the doors, place the Key in the keyhole, and turn the Key 7 times.
Screenshot
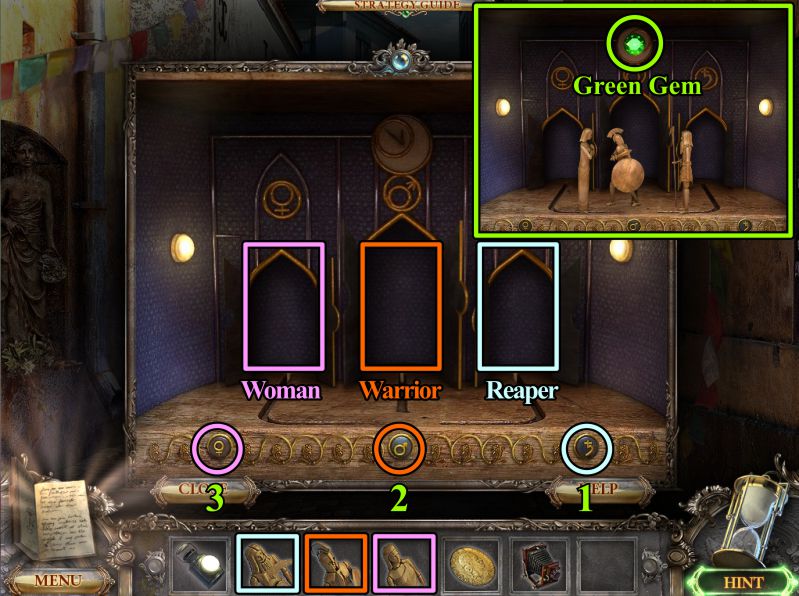
Doll Theater Mini Game
There is a Doll Theater inside the Wagon, so place your 3 Dolls there.
The doors will close behind them, so your goal is to use the buttons below to bring them on stage in the correct order.
Select the Reaper and then the Warrior.
The Warrior will attack the Reaper, who will return behind the door.
Select the Woman, who will be happy the Warrior saved her.
Take the Green Gem that appears above the doors.
The Wagon will move and Magister Corvus appears.
Screenshot
Chapter 4: Town Center
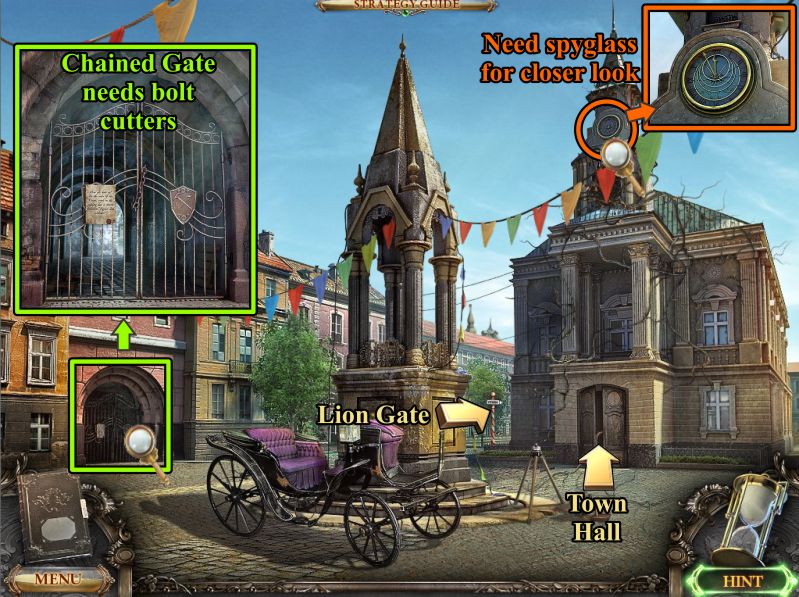
Center of Town
Go up the stairs to the Center of Town.
The archway at the left is chained shut, so you need to find some bolt cutters.
Check out the clock tower; you need a spyglass for a closer look.
Enter Town Hall.
Screenshot
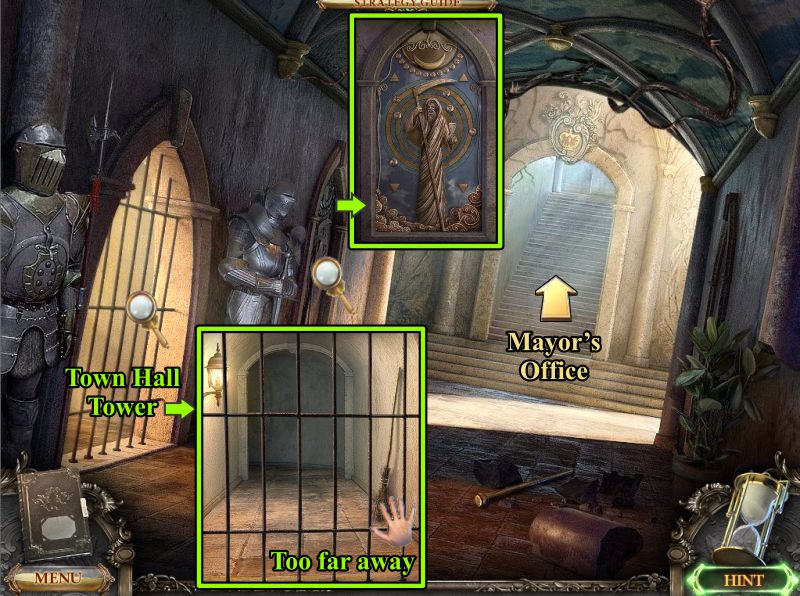
Town Hall
The door to the Tower is fenced off.
There is a broom against the wall, but you can't reach it.
Check out the bas relief, and then go upstairs to the Mayor's Office.
Screenshot
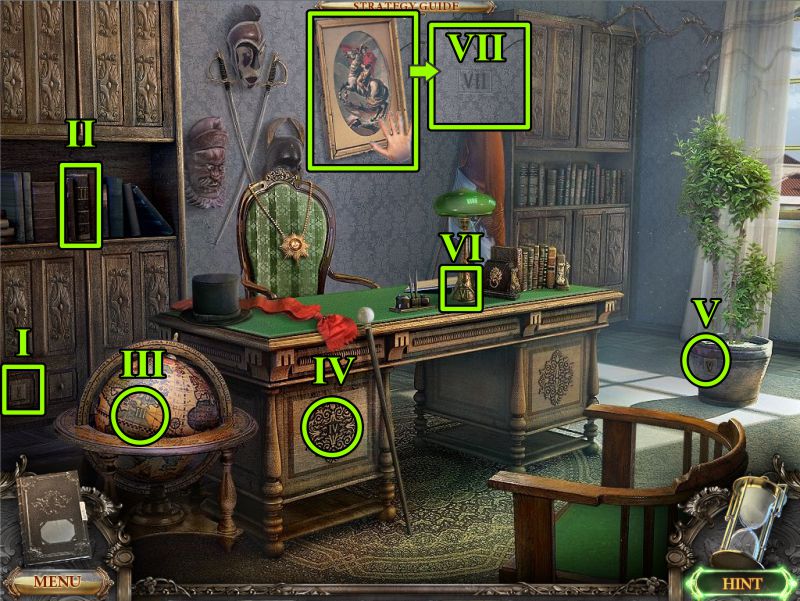
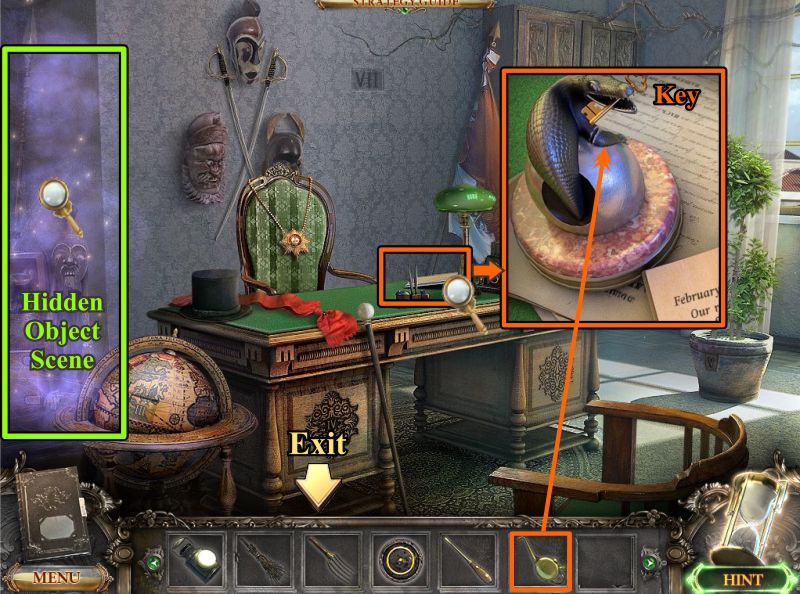
Mayor's Office
There are a bunch of Roman Numerals on objects in the room. If you click on one, it will say to find a lower number, so start with "I" and select them in order, as shown in the screenshot.
Move the picture on the wall to find "VII". The cabinet will move, revealing a secret compartment.
Screenshot
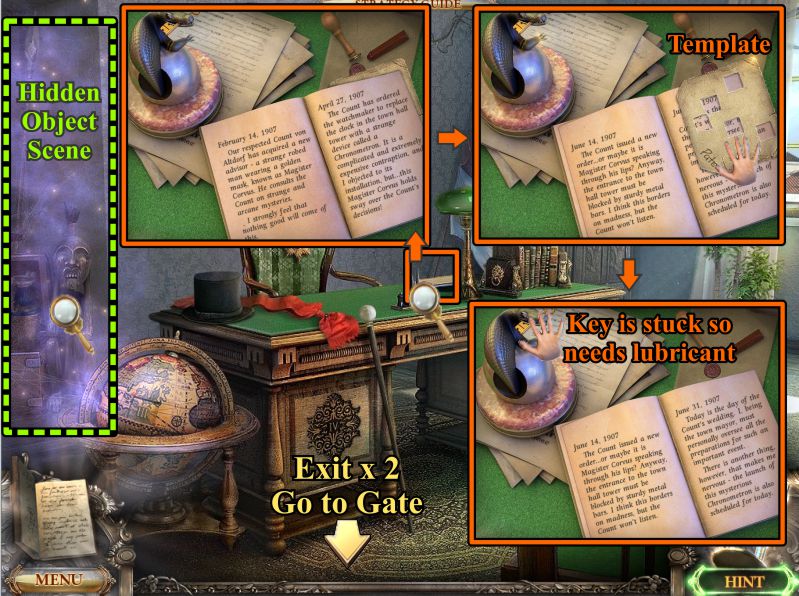
Play the Hidden Object Scene.
Zoom in on the Mayor's desk to read his notes.
Turn the page and take the Template.
There is a key in the alligator's mouth, but it is stuck and needs lubricant.
Exit down twice, and go down the street to the left of Town Hall.
Screenshot
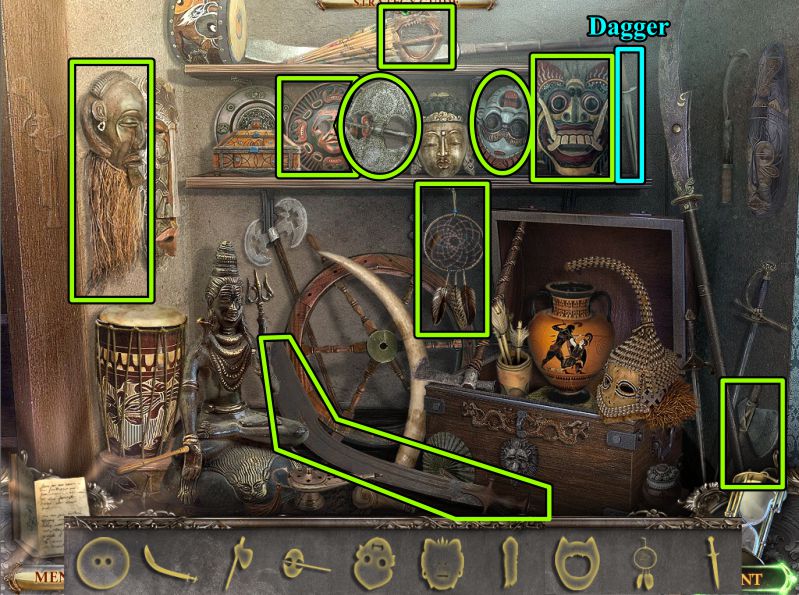
Mayor's Office Hidden Object Scene
Match the objects to the silhouettes to get a Dagger for your Inventory.
Screenshot
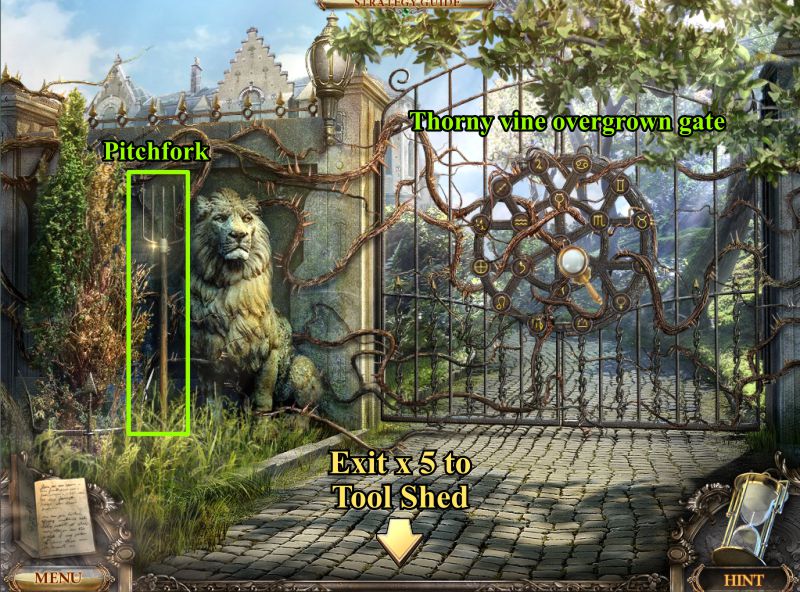
Lion Gate
There are thorny vines covering the gate, so you can't open it.
Take the Pitchfork next to the lion, and exit down 5 times to the Tool Shed.
Screenshot
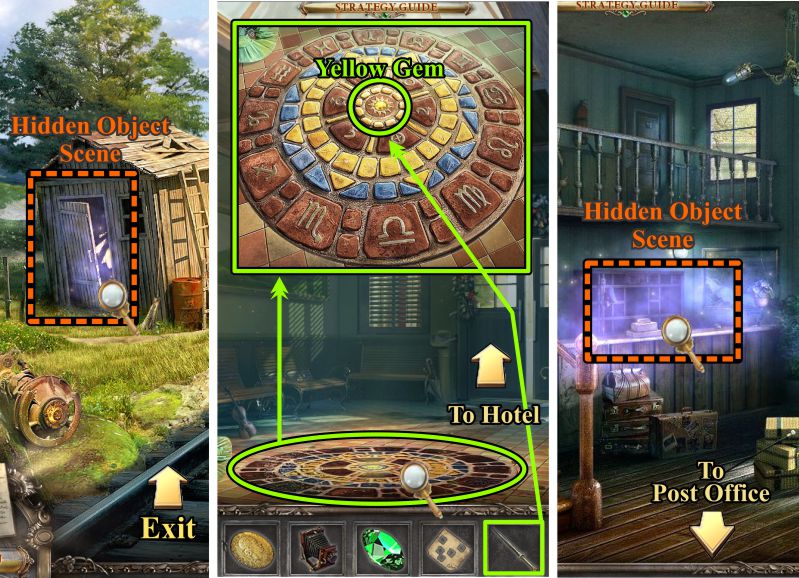
Tool Shed, Train Station, and Post Office
Play the Hidden Object Scene in the Tool Shed, then go to the Train Station.
Zoom in on the mosaic and use your Dagger to remove the Yellow Gem.
Make sure you touch the mosaic, so the symbols are recorded in your Diary.
Exit to the Hotel, then play the Hidden Object Scene there before going to the Post Office.
Screenshot
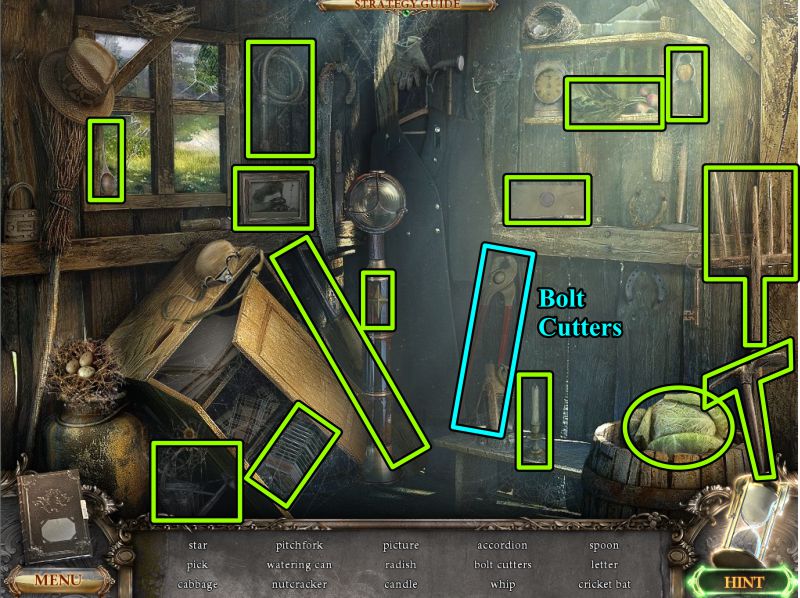
Tool Shed Hidden Object Scene
Gather everything on your list to get the Bolt Cutters.
Screenshot
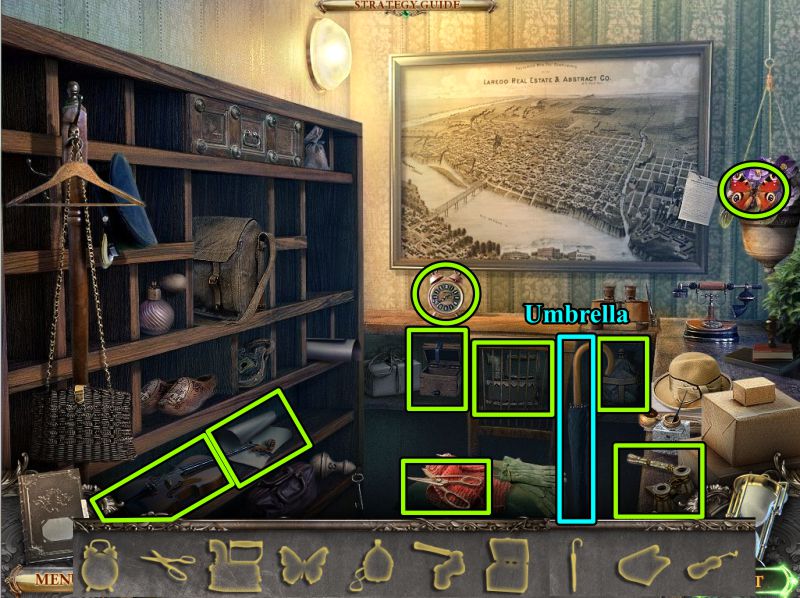
Hotel Lobby Hidden Object Scene
You will get an Umbrella for your Inventory.
Screenshot
Post Office
Zoom in on the safe and place your Template. Notice the word "Pater" written on the Template.
Press the keypad to spell out PATER, as shown in the screenshot.
Take the Express Telegram inside the safe.
Play the Hidden Object Scene, then exit to Center of Town.
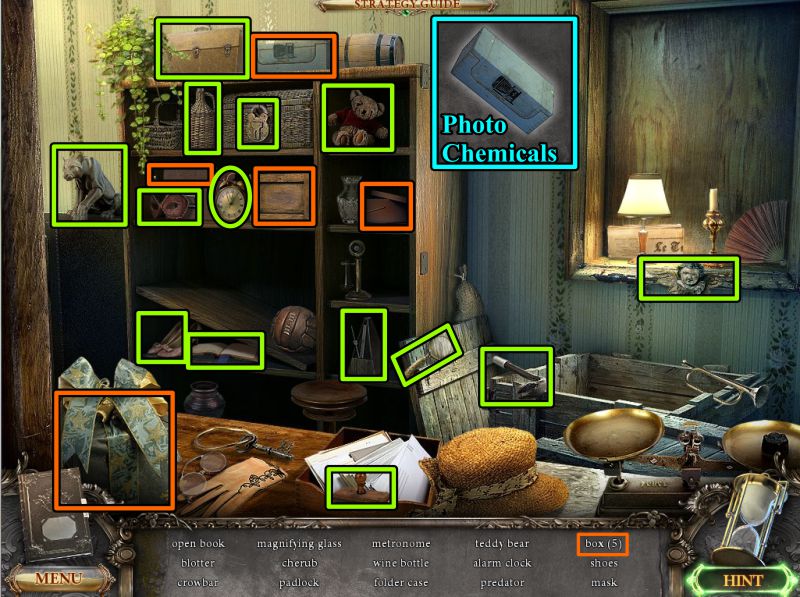
Post Office Hidden Object Scene
Collect everything, which includes 5 boxes, one of which is a box of Photo Chemicals.
Screenshot
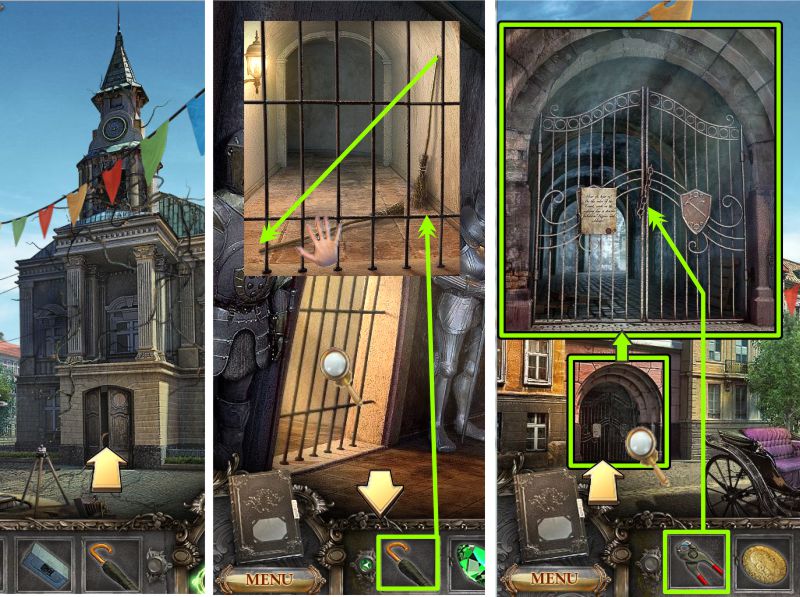
Town Hall and Archway
Go inside Town Hall and use the Umbrella to retrieve the broom behind the bars.
Go to the Archway and use your Bolt Cutters to cut the chain, so you can go down the street.
Screenshot
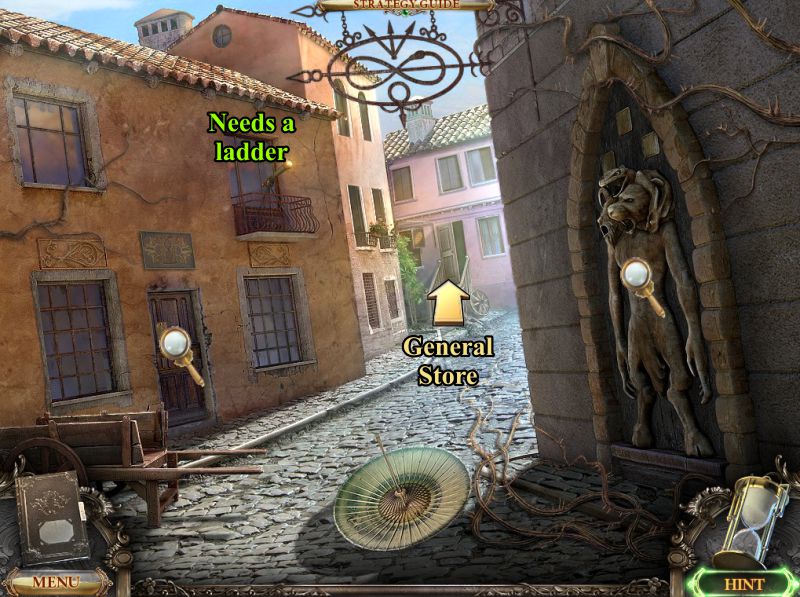
Chapter 5: Through The Archway
Empty Street
Check out the magnifying glasses in the screenshot, and note you need a ladder to get an object on the balcony.
Enter the General Store.
Screenshot
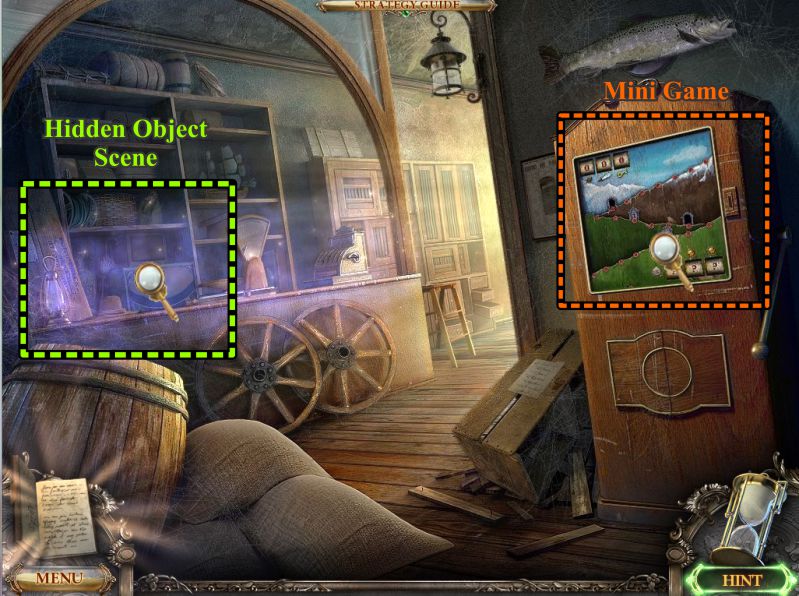
General Store
Play the Hidden Object Scene and the Mini Game.
Screenshot
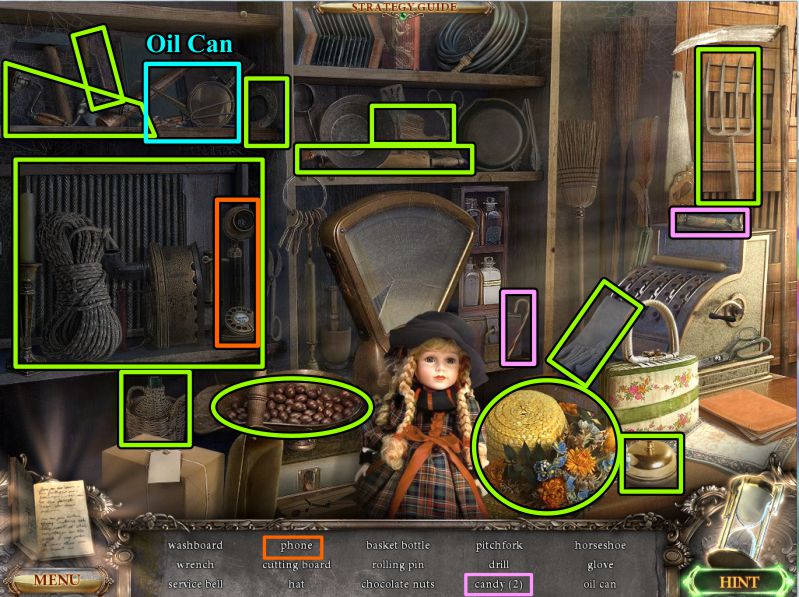
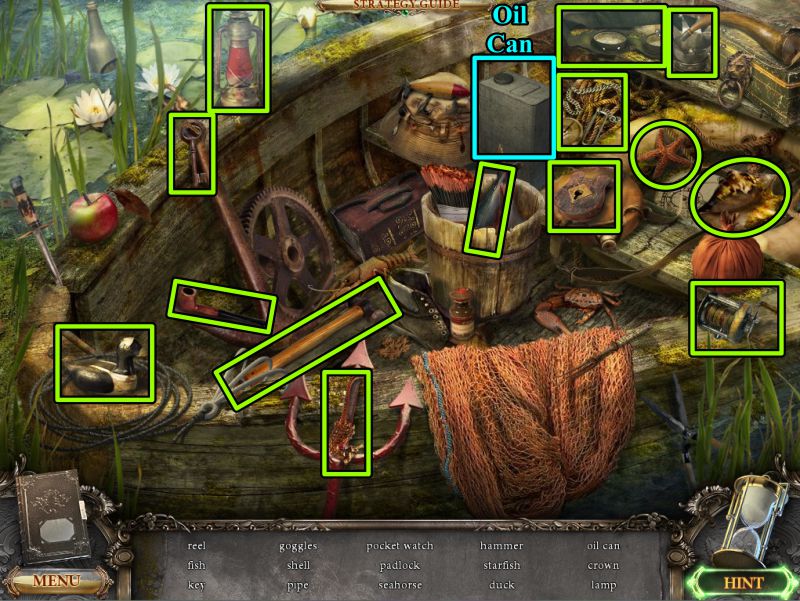
General Store Hidden Object Scene
Collect everything to get an Oil Can.
Screenshot
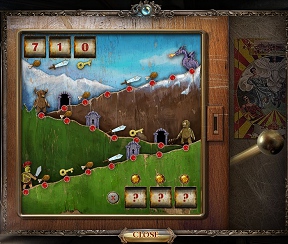
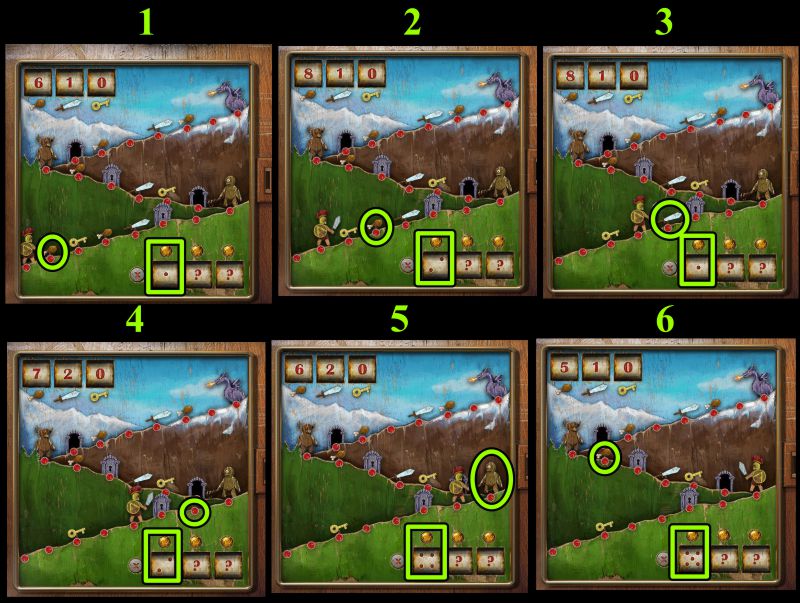
Slot Machine Mini Game
Zoom in on the strange slot machine and insert your Old Coin to trigger the Mini Game.
Your goal is to get your hero past the 2 bears and to the top of the hill, where he can slay the dragon.
Along the way, you can collect food, keys, and swords.
The numbers in the upper left corner indicate how many you have of these 3 items.
The lower right corner has a Reset button if your journey isn't going quite right.
The 3 question marks to the right is where the dots representing the spaces he can travel will appear.
The buttons above are where you will select the dots you want to use.
Each time you pull the handle, it will cost you 1 food point.
You can have as many as 3 pulls in a round if you have enough food points.
If you run out of food points, you have to start over.
If you encounter a bear or the dragon with zero sword points, you will be defeated.
When your hero lands on a dot, he collects whatever is there.
If you collect a key and land on one of the 2 dots with a locked door, you will unlock it and end up on the next dot with an open door.
Make sure you have enough food for the trip, and a sword to defeat each bear and the dragon.
Screenshot
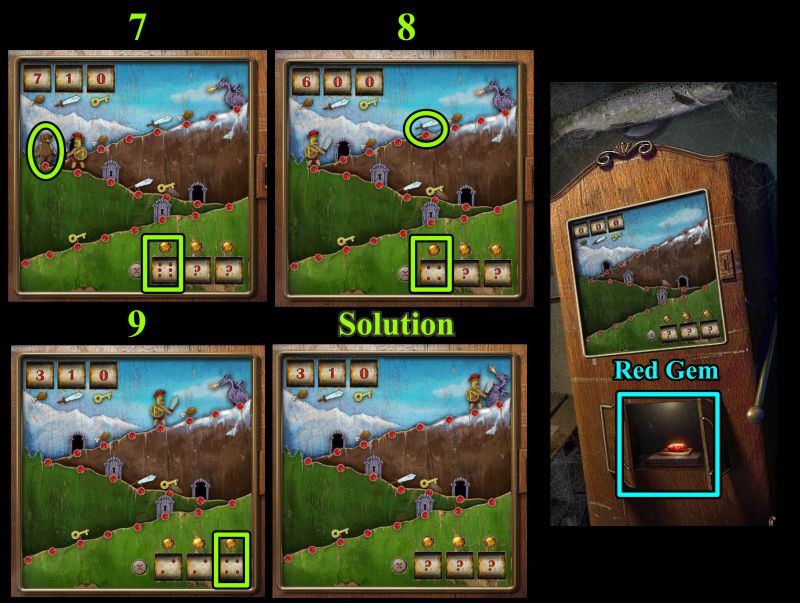
All pulls are random, but a sample winning solution is shown in the 2 screenshots below.
First pull is a 1, so he collects food.
Next pull is a 2, so he collects more food.
A 1 gets him another sword.
He travels 2 and lands in front of the bear.
A pull of 4 allows him to defeat the bear with one of his swords and land on the bear's dot.
The 5 puts him in front of the next bear where he collects food.
Screenshot
The 6 is more than you need to defeat this next bear.
The 4 is important because you gain a sword to defeat the dragon.
First and second pulls were both 2, which won't get is past the dragon, so the third pull is a 4 which was selected.
The dragon is defeated, and the machine opens to display a Red Gem.
Take the gem and leave the General Store.
Screenshot
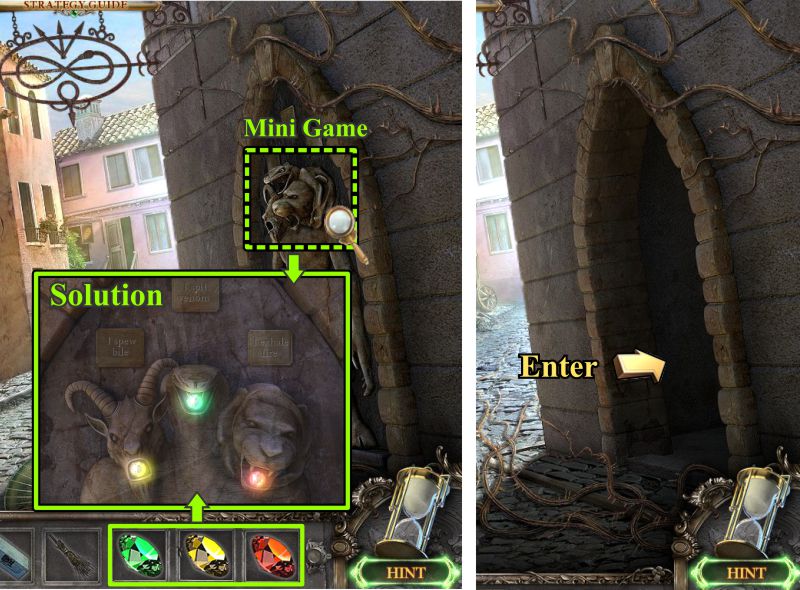
Animal Head Mini Game
Go to the statue on the right and zoom in for a Mini Game.
Place the correct colored gem in the animals' mouths.
The solution is shown in the screenshot.
The statue moves, revealing a door to enter.
Screenshot
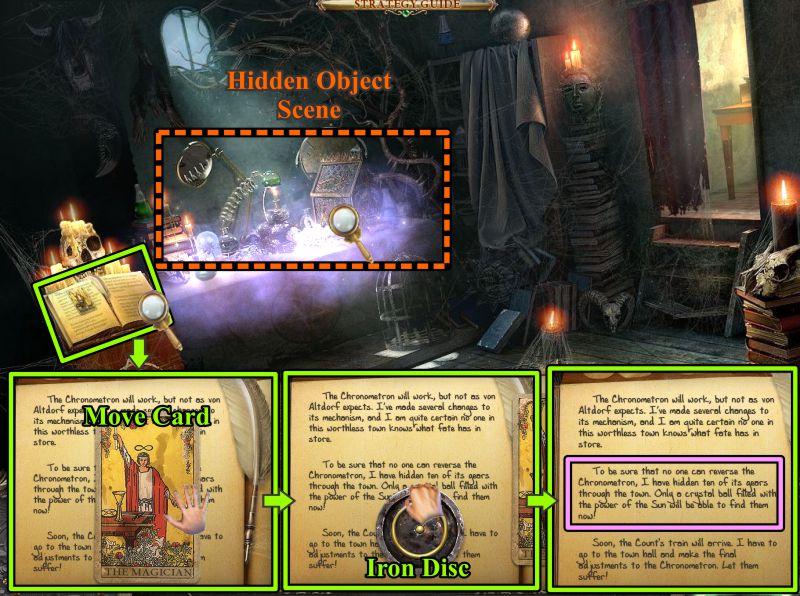
Alchemist's Workshop
The creepy looking room appears to be the Alchemist's Workshop.
Zoom in on the open book, move the card, and take the Iron Disc.
Take note of the paragraph marked in the screenshot.
Play the Hidden Object Scene.
Screenshot
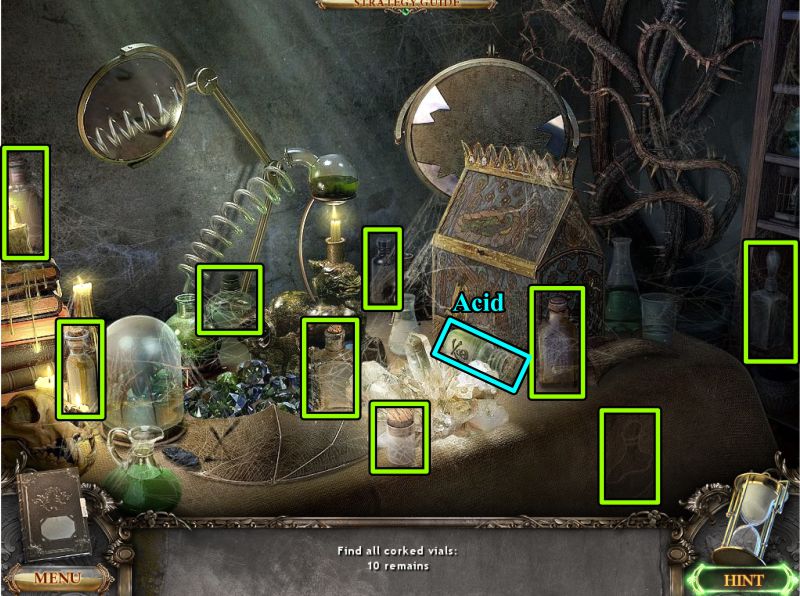
Acid Hidden Object Scene
Collect the 10 corked vials that are marked in the screenshot.
You will get a vial of Acid for your Inventory.
Screenshot
General Store Hidden Object Scene
Return to the General Store for another Hidden Object Scene to get the Red Lampshade.
Go back to the Alchemist's Workshop and zoom in on the door at the right.
Screenshot
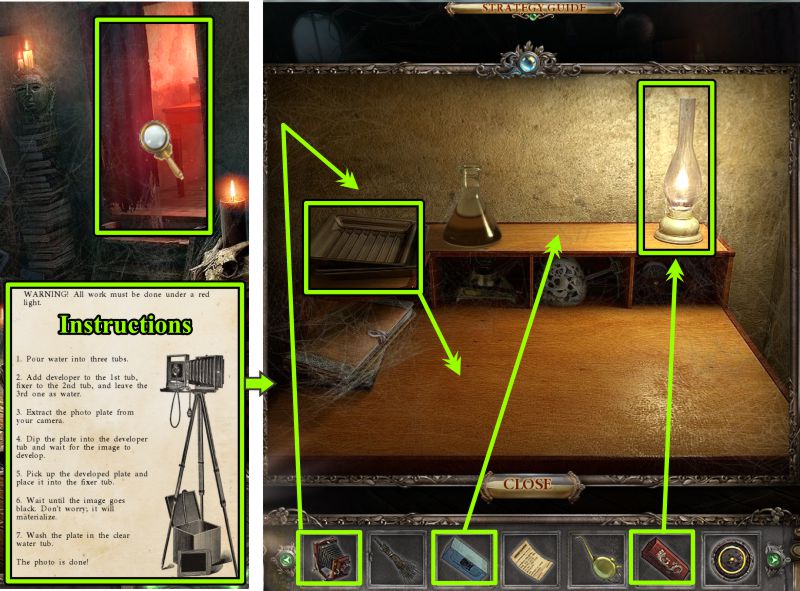
Photography Lab
Check the Instructions in your Diary and begin your photograph development.
Place the Red Lampshade over the lamp.
Place the Photo Chemicals on the shelf next to the lamp.
Arrange the 3 trays on the table.
Screenshot
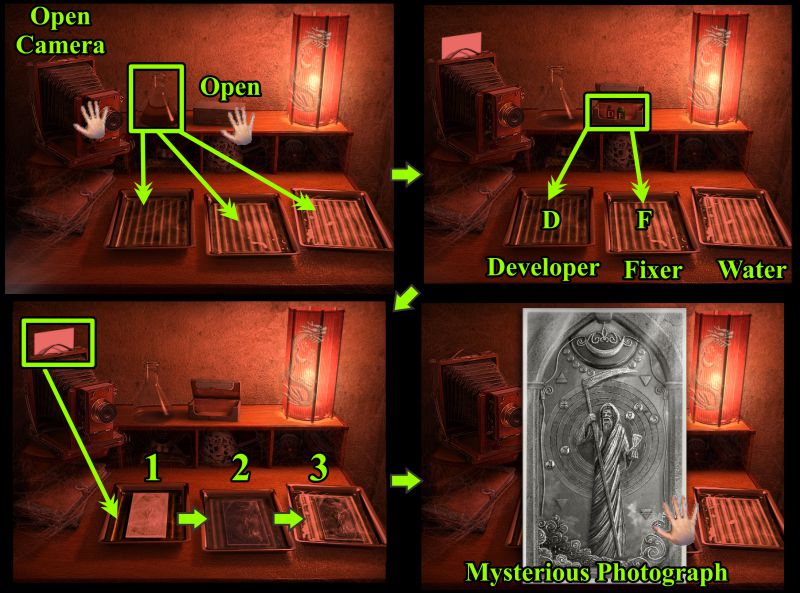
Place the Camera where the trays were and open it.
Pour the beaker of water in each of the trays.
Open the Photo Chemical box.
Pour the developer "D" in the first tray.
Pour the Fixer "F" in the second tray.
Take the photo plate from the camera and dip it in the first tray until an image appears.
Pick it up and place it in tray 2 to set the image.
Place it in the clear water to rinse it off.
Take the photo that resembles the bas relief at Town Hall.
Exit to the street and go to the door across the way.
Screenshot
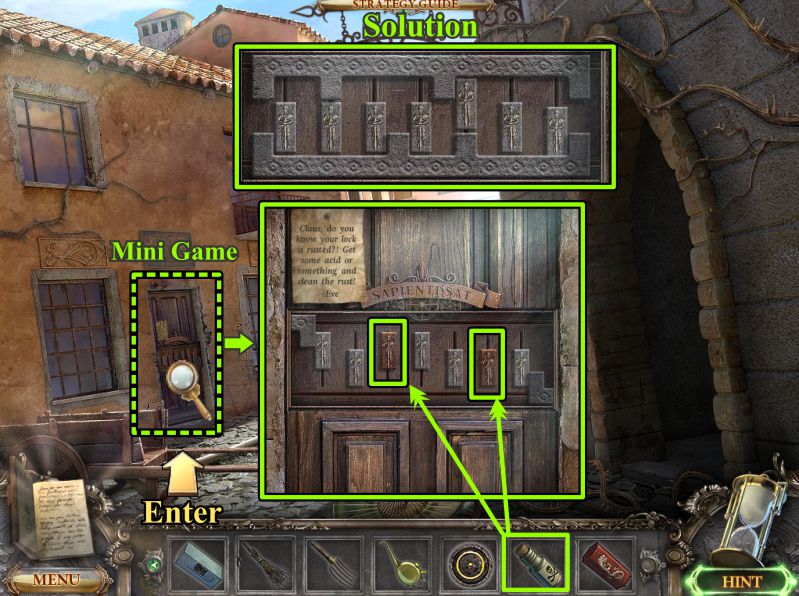
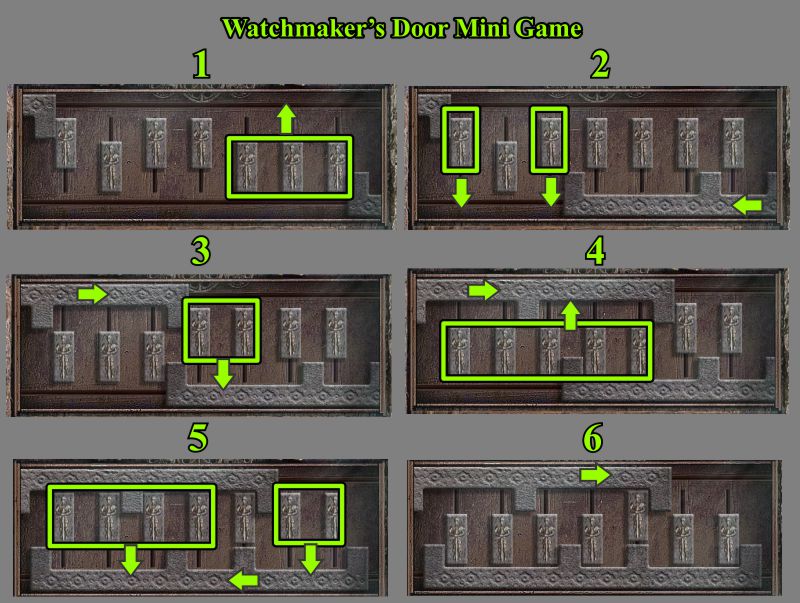
Watchmaker's Door
Zoom in for a close up of the door.
Use the Vial of Acid to remove the rust from the two sliders marked in the screenshot.
Your goal is to move the sliders around so the upper and lower bars look like the solution in the screenshot.
Screenshot
Watchmaker's Door Mini Game
See the screenshot for the step-by-step solution.
Screenshot
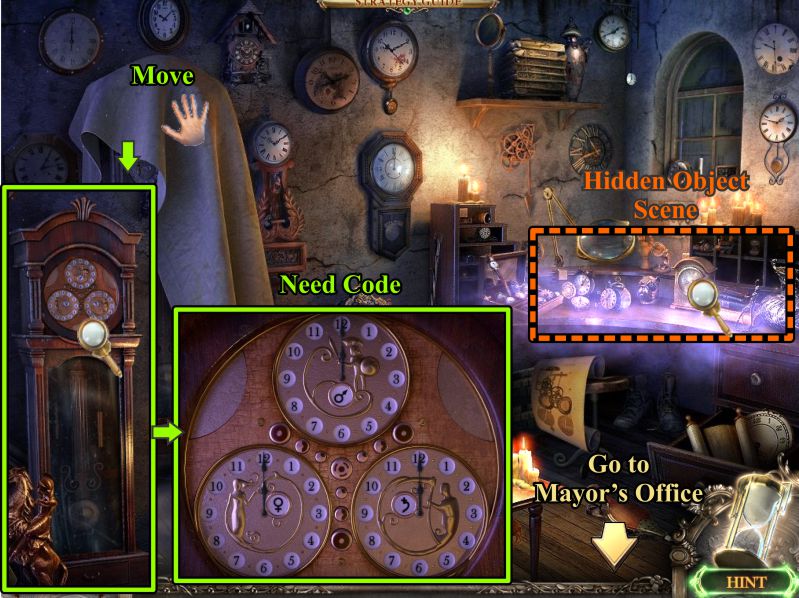
Watchmaker's Workshop
Enter the Watchmaker's Workshop, remove the cloth on the clock, and look at it close up.
Play the Hidden Object Scene.
Screenshot
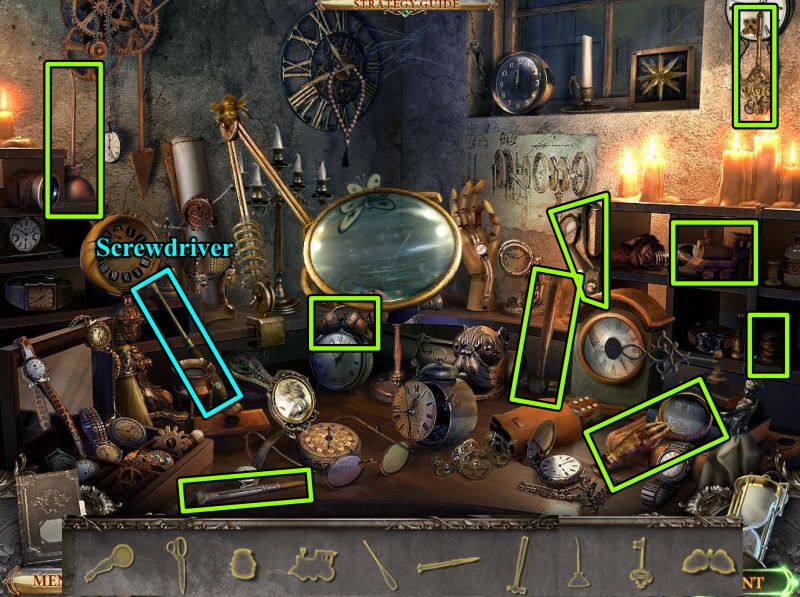
Watchmaker's Workshop Hidden Object Scene
Collect everything to get a Screwdriver.
Go to the Mayor's Office.
Screenshot
Mayor's Office
Zoom in on the desk and use the Oil Can on the alligator.
Move his paw, then take the Key from his jaw.
Play the Hidden Object Scene, then exit to down.
Screenshot
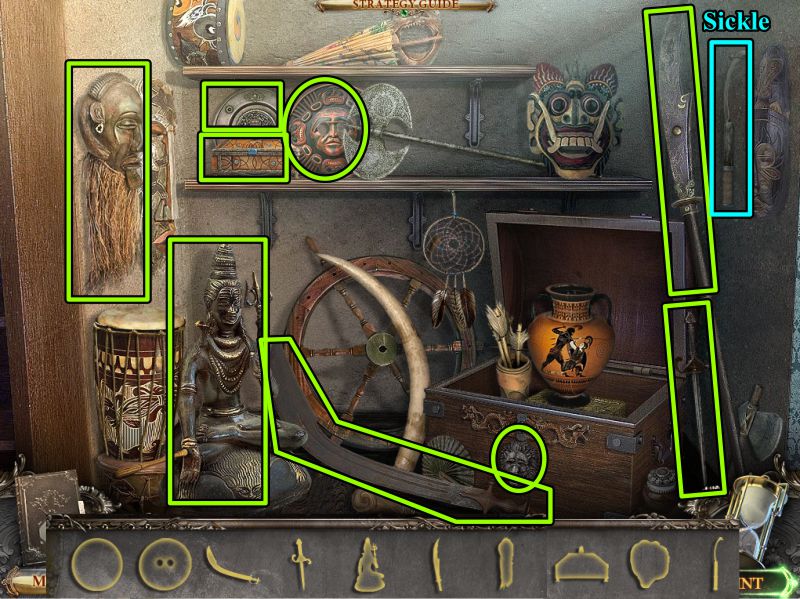
Mayor's Office Hidden Object Scene
You will get a Sickle for your Inventory when you match all the silhouettes.
Screenshot
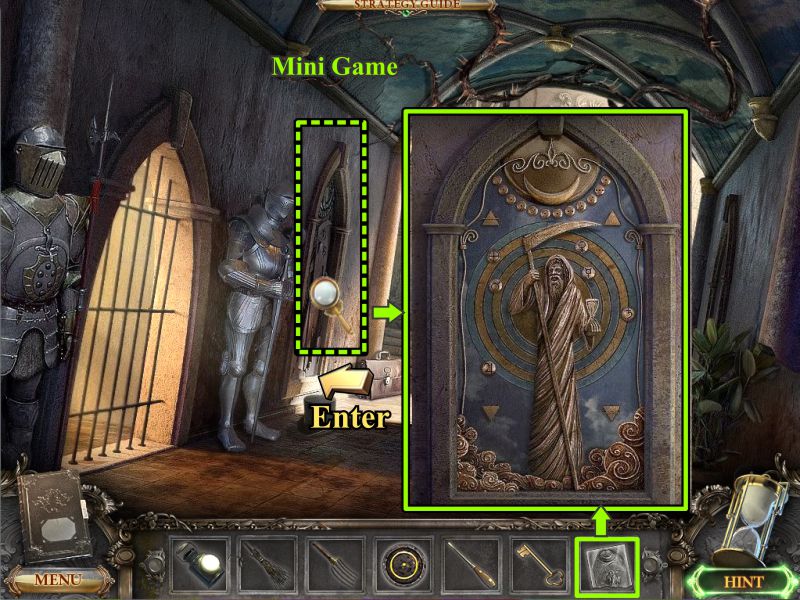
Town Hall Bas Relief
Zoom in on the bas relief for a Mini Game and place your photo.
Screenshot
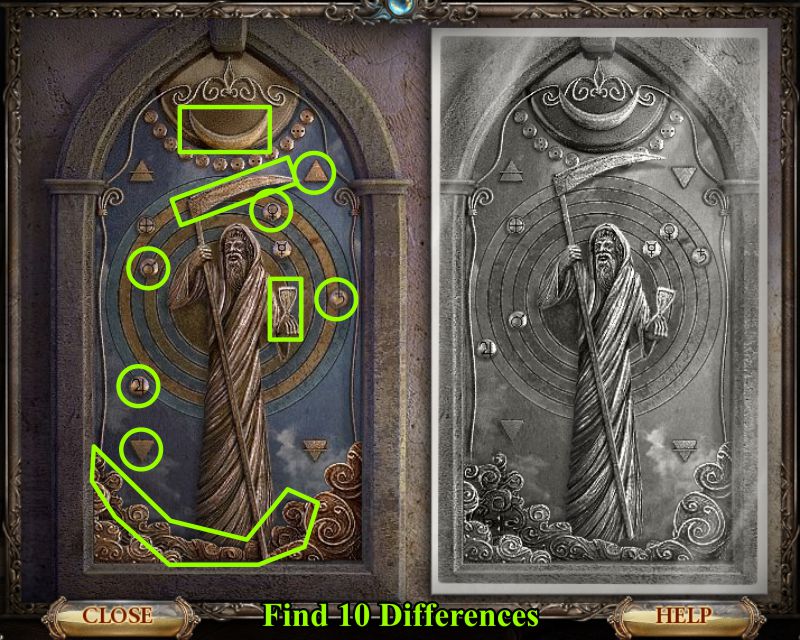
Reaper Find the Differences
Find the 10 differences between the bas relief and the photo, and mark them on the bas relief.
See the screenshot for the solution.
Screenshot
Chapter 6: Magister Corvus
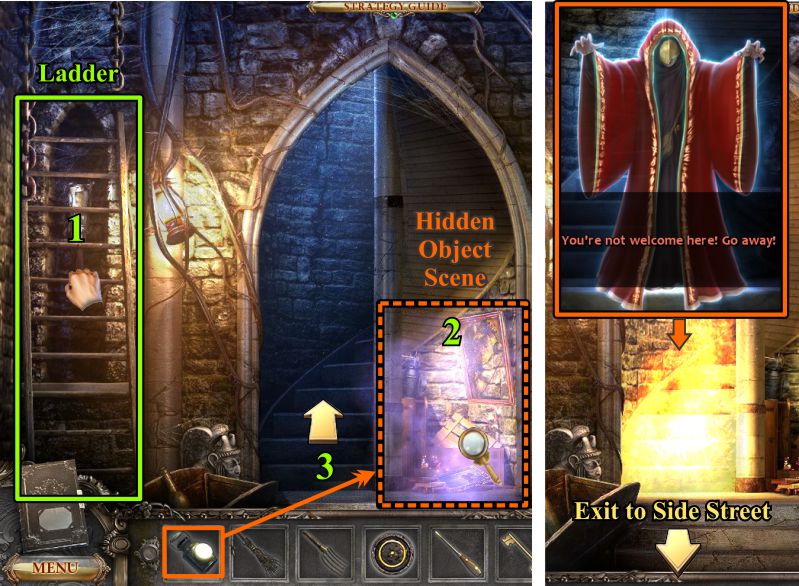
Secret Room
The bas relief will disappear, and a door to a secret room opens.
Take the ladder.
Place your lantern in the dark corner for the Hidden Object Scene.
Try to go up the stairs and the red-cloaked apparition will appear blocking your way and creating fire to stop you.
Exit and go to the side street.
Screenshot
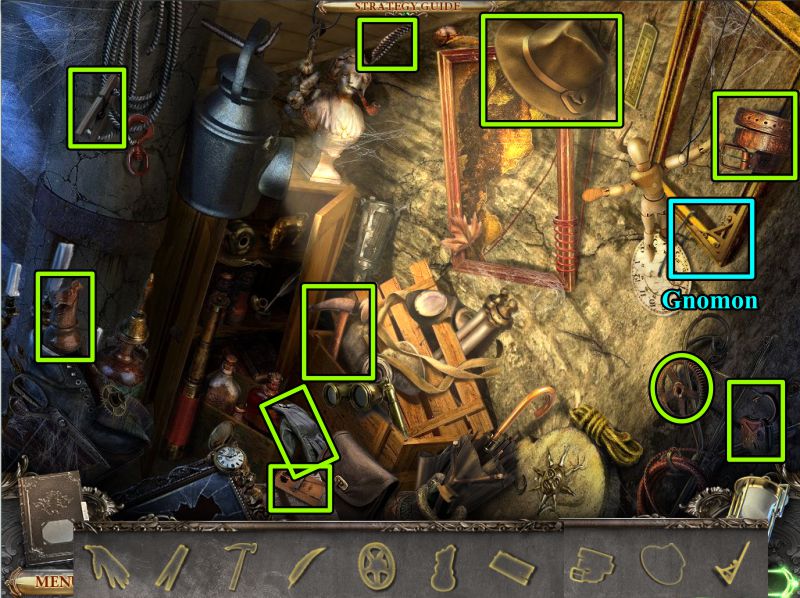
Secret Room Hidden Object Scene
When you collect everything, you will have a Gnomon, which is part of a sundial.
Screenshot
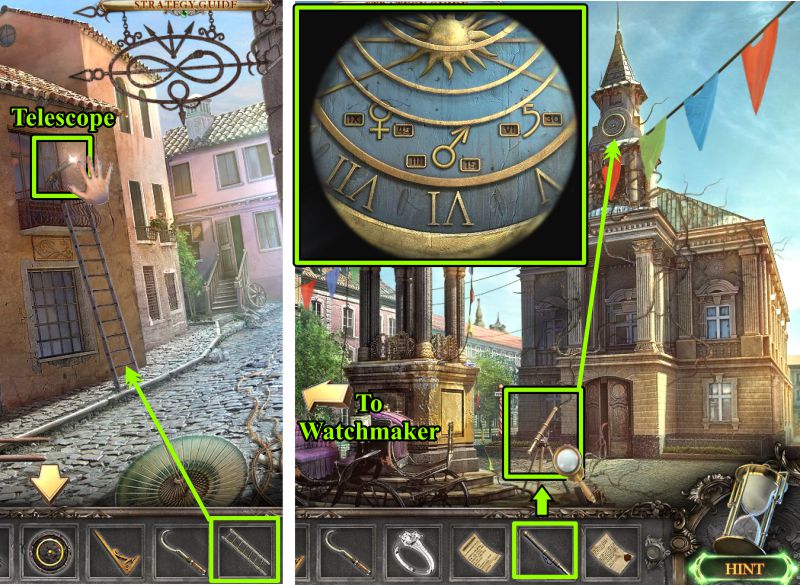
Archway Street and Town Center
Place the ladder at the balcony and take the Telescope.
Exit down and place the Telescope on the camera stand.
Zoom in on the telescope to read the clock.
Go to the Watchmaker's Workshop.
Screenshot
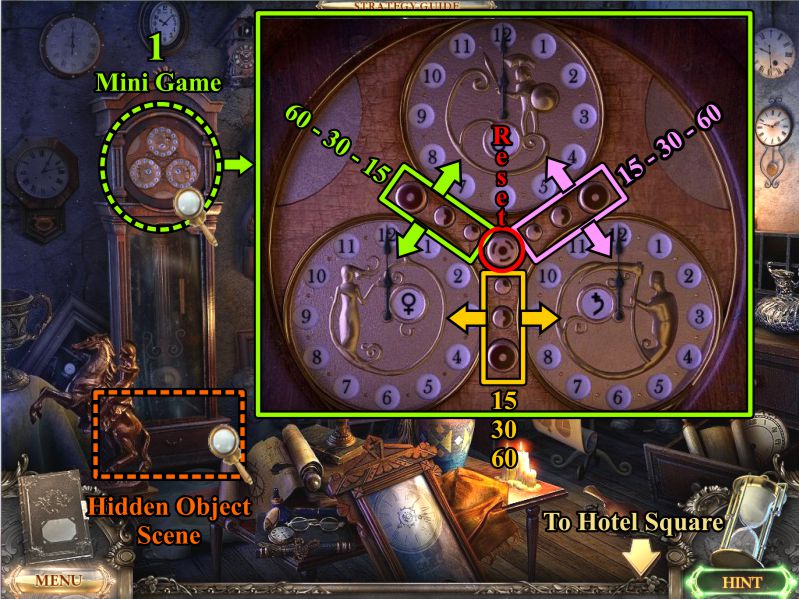
Watchmaker's Workshop
Zoom in on the clock for a Mini Game.
The center button is to reset the game.
The other buttons rotate the clock faces by 60, 30, or 15 minutes.
See the screenshot to see which buttons rotate which clock faces.
When you have correctly set the time, the drawer below will open for a Hidden Object Scene.
Screenshot
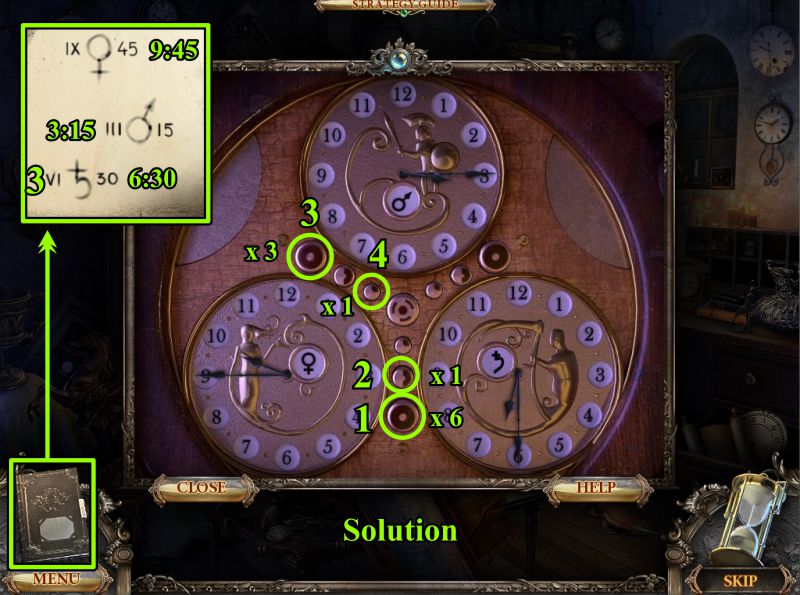
Clock Mini Game
Your goal is to set the top clock to 3:15, the left clock to 9:45, and the right clock to 6:30.
See the screenshot for the numbering of the buttons, and how to arrive at the solution.
Move the buttons as follows: 1 x 6, 2 once, 3 x 3, and 4 once.
Screenshot
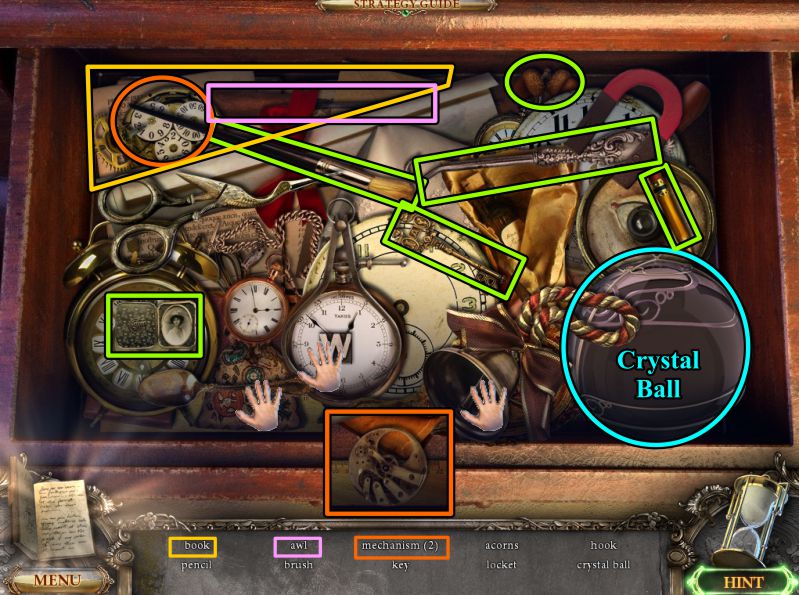
Clock Drawer Hidden Object Scene
To find everything on your list, you will need to move the objects.
You will receive a Crystal Ball for your Inventory.
Screenshot
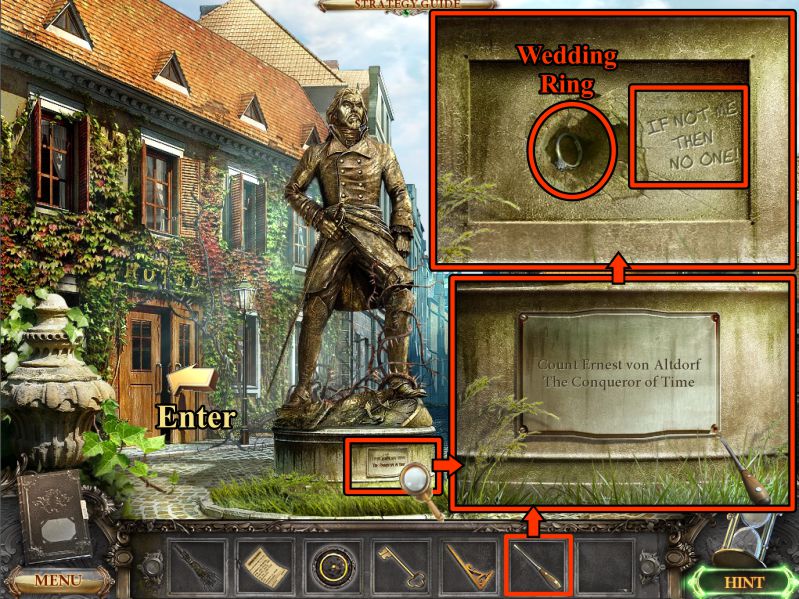
Town Square
Go to the Town Square and zoom in on Ernest's statue.
Use your screwdriver to remove the plaque.
Read the etching and take the Wedding Ring.
Enter the Hotel.
Screenshot
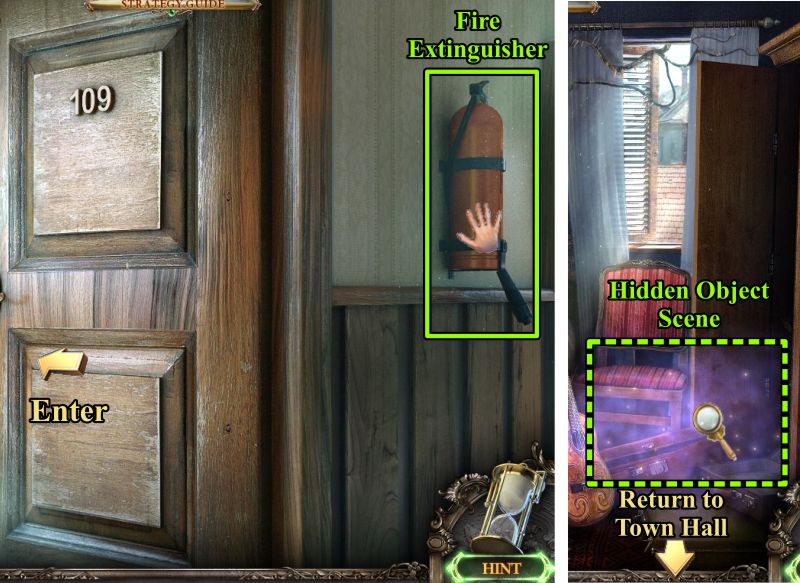
Room 109
Go upstairs and take the Fire Extinguisher.
Enter Room 109 and play the Hidden Object Scene in the Luggage.
Return to Town Hall when you are finished here.
Screenshot
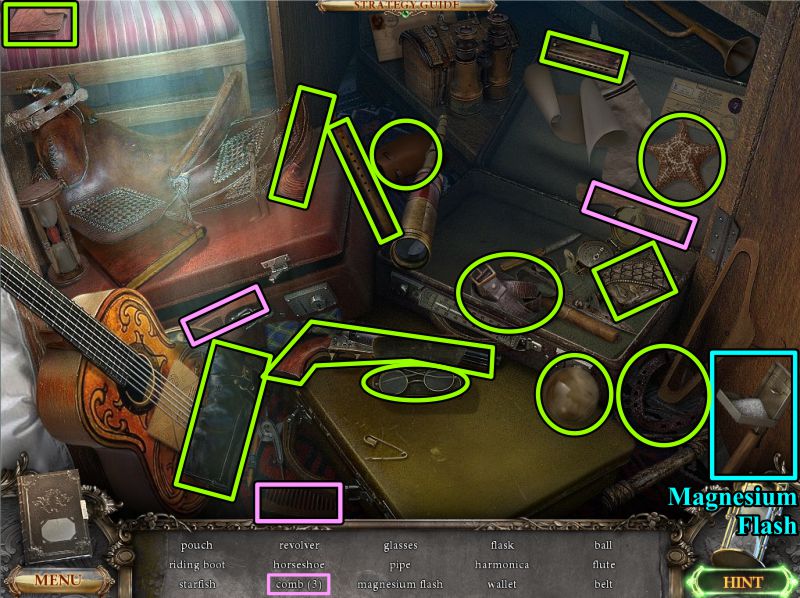
Luggage Hidden Object Scene
Collect everything to get the Magnesium Flash.
Screenshot
Secret Room
Use the Fire Extinguisher to put out the fire.
Try to go upstairs, and Magister Corvus appears to create lightning.
Place the Pitchfork in the lightning, and try to go upstairs.
He's back with another spell, so use your Magnesium Flash to put out the smoke.
Go upstairs.
Screenshot
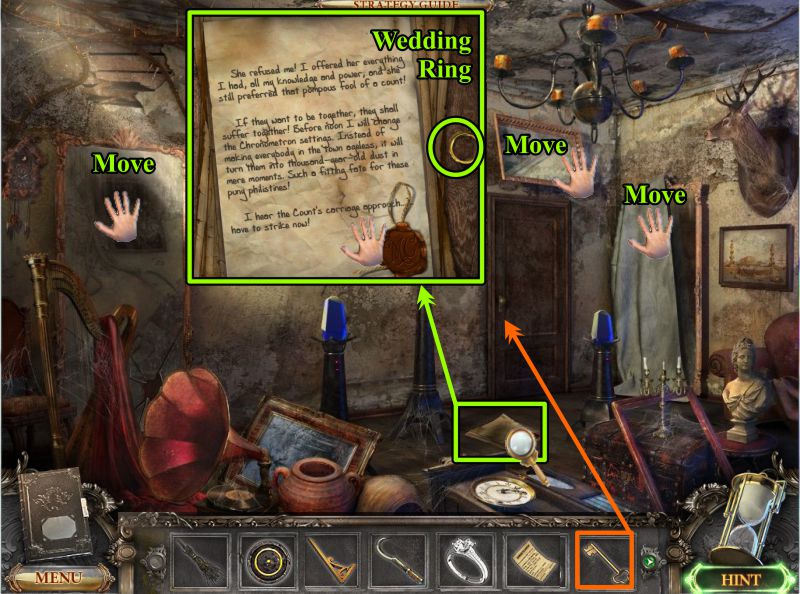
Top of Town Hall
Zoom in on the paper on the floor, and collect the note and the Wedding Ring.
Move the mirror on the left and the one above the door.
Remove the cloth from the mirror on the right.
Use your Key to unlock the door.
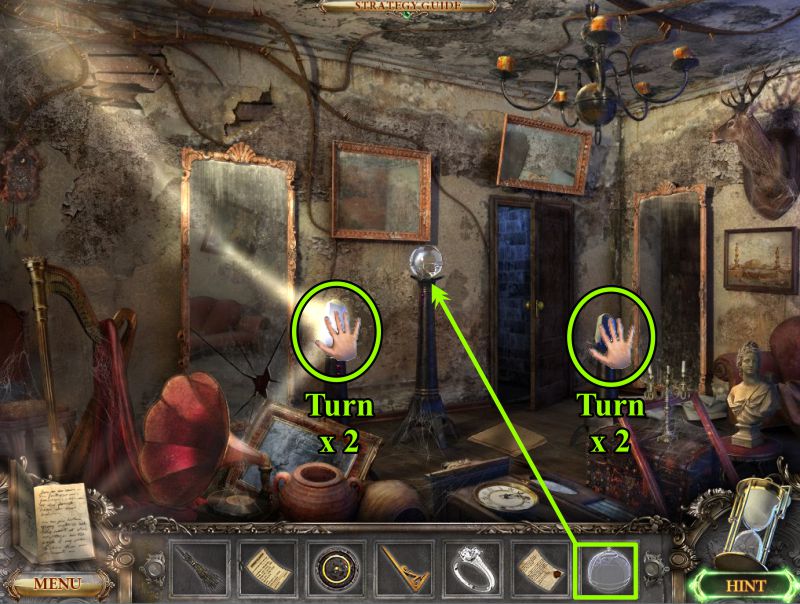
Screenshot
Place you Crystal Ball on the stand and turn each of the crystals two times.
Screenshot
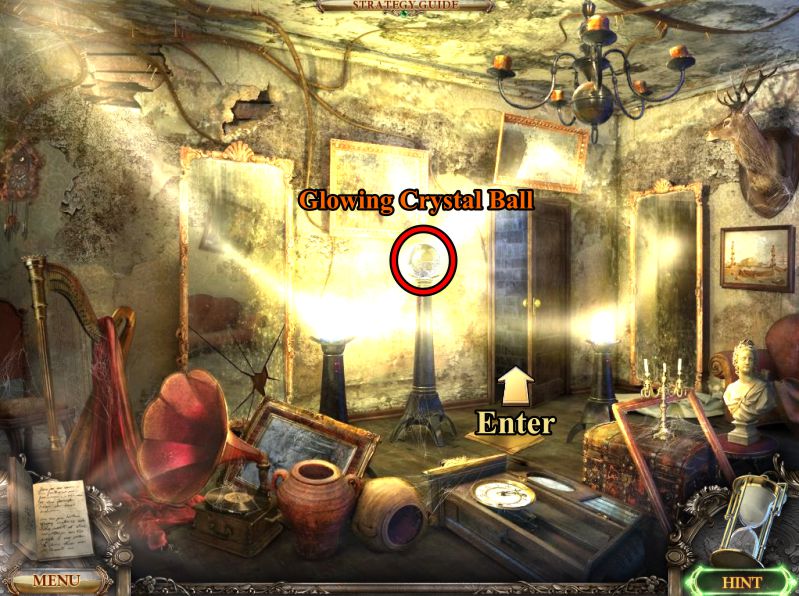
Take the Glowing Crystal Ball and enter the next room.
Screenshot
Chapter 7: The Chronometron
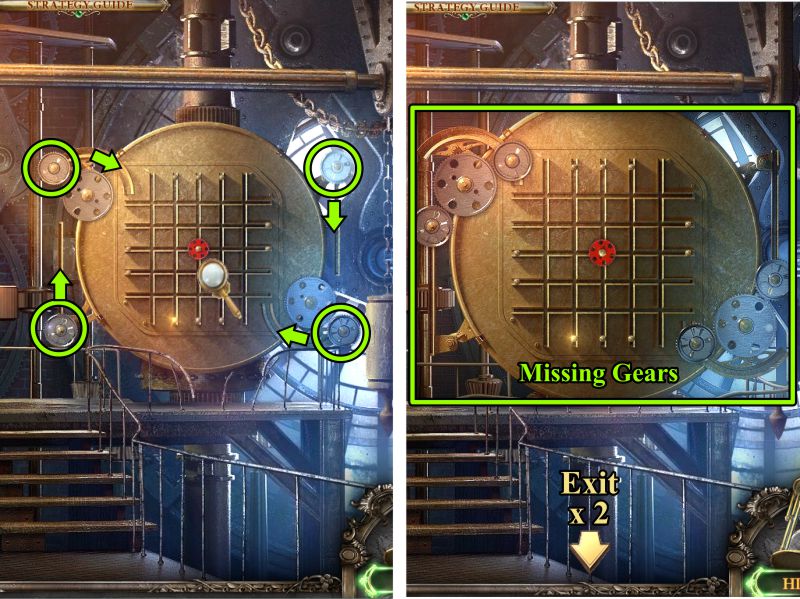
Clock Tower
You have found the clock on top of the Town Hall.
Zoom in and move the gears as shown in the screenshot.
10 other gears are missing, so exit down twice.
Screenshot
Secret Room, Main Chamber, and Town Center
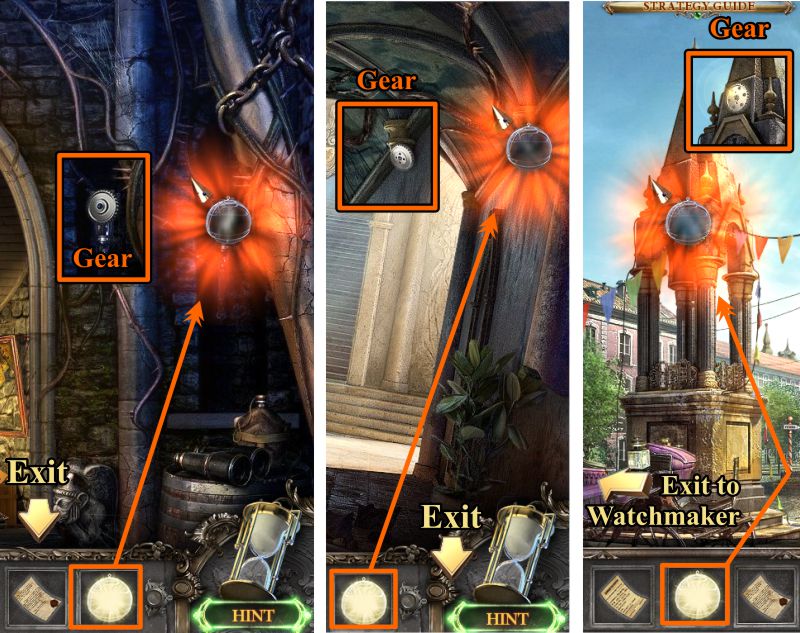
Use the Crystal Ball to find the 10 gears.
Move it around the three scenes in the screenshot until it glows the darkest orange.
Click the area: The Crystal Ball will go back into your Inventory, and a gear appears.
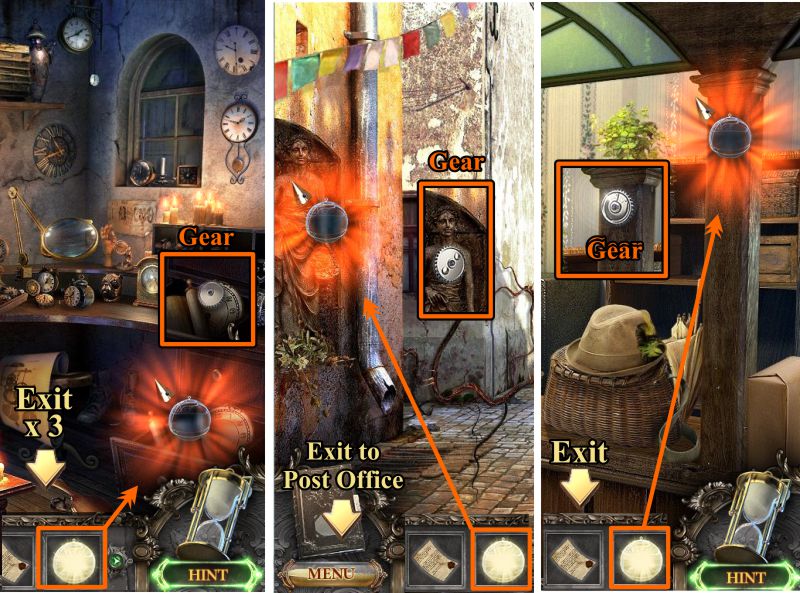
Collect your first 3 gears, and to the to Watchmaker's Workshop.
Screenshot
Watchmaker's Workshop, Street Post Office, and Post Office
Use your Crystal Ball to find 3 more gears at the locations in the screenshot.
Screenshot
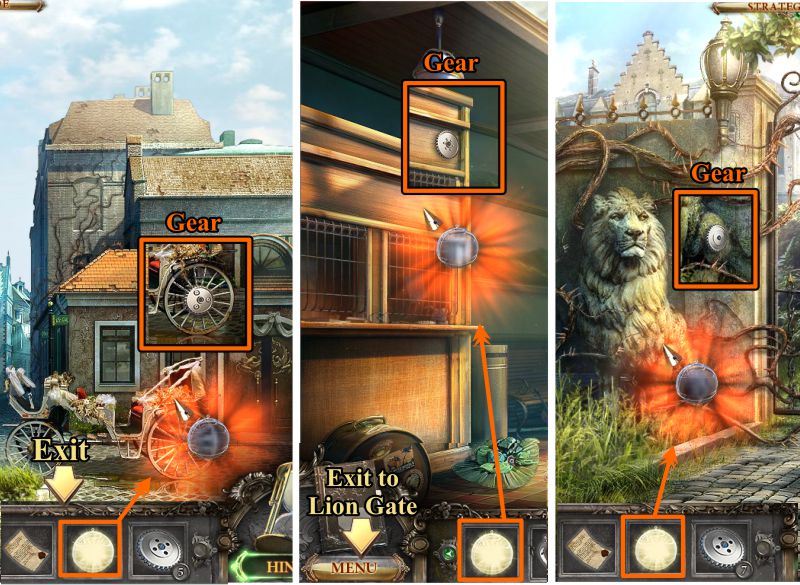
Town Square, Train Station, and Lion Gate
Use your Crystal Ball to find 3 more gears, as shown in the screenshot.
Screenshot
Lion Gate Mini Game
Use your Sickle to remove the vines from the gate.
Zoom in on the lock and place the two Wedding Rings in your Inventory on the lock as shown in the screenshot.
Your goal is to move the astrological symbols around to match the pattern from the Train Station mosaic.
There is a free space marked in pink where you can move the disc you want by clicking on it.
Both the inner and outer circles rotate as shown.
Screenshot
Astrological Lock Mini Game
When you have moved all the discs to match the solution, place the Iron Disc from your Inventory in the center. The gate will open for you to enter.
Screenshot
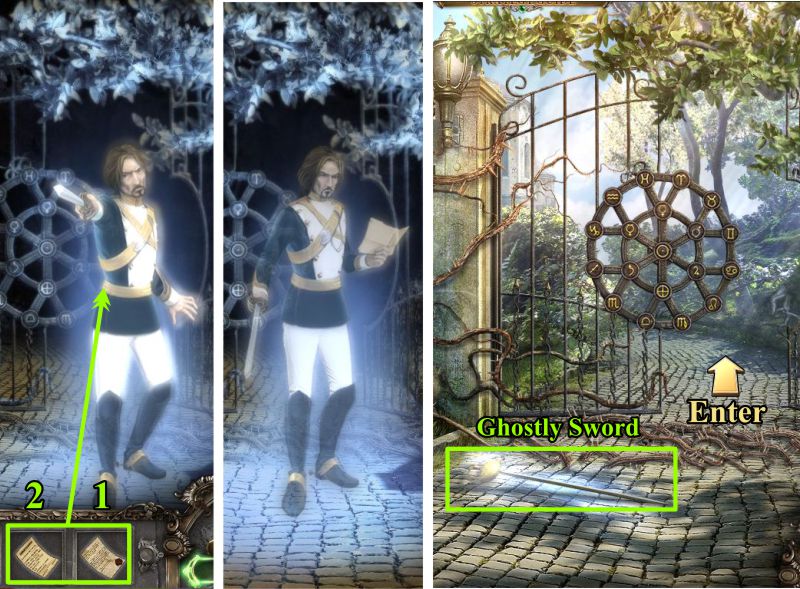
Ernest and the Lion Gate
The ghostly image of Ernest appears to prevent you from entering his property.
Give him the note with the seal, and then the telegram.
Realizing he has been betrayed, he gives you his Ghostly Sword.
Collect the sword and go through the gate.
Screenshot
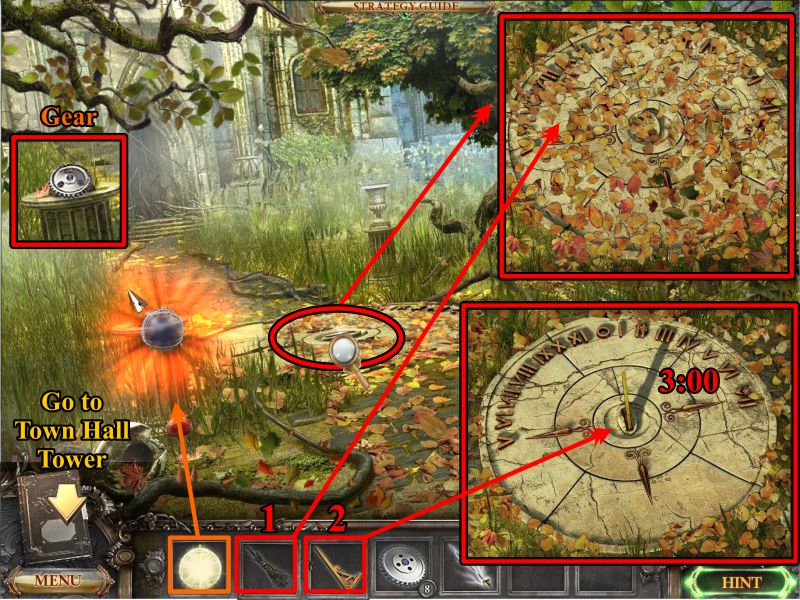
Palace Garden
Use the Crystal Ball to get the last gear.
Zoom in on the sundial and use your broom to sweep off the leaves.
Place the Gnomon on the sundial, and it will cast a shadow at 3:00.
Go to the Town Hall clock tower.
Screenshot
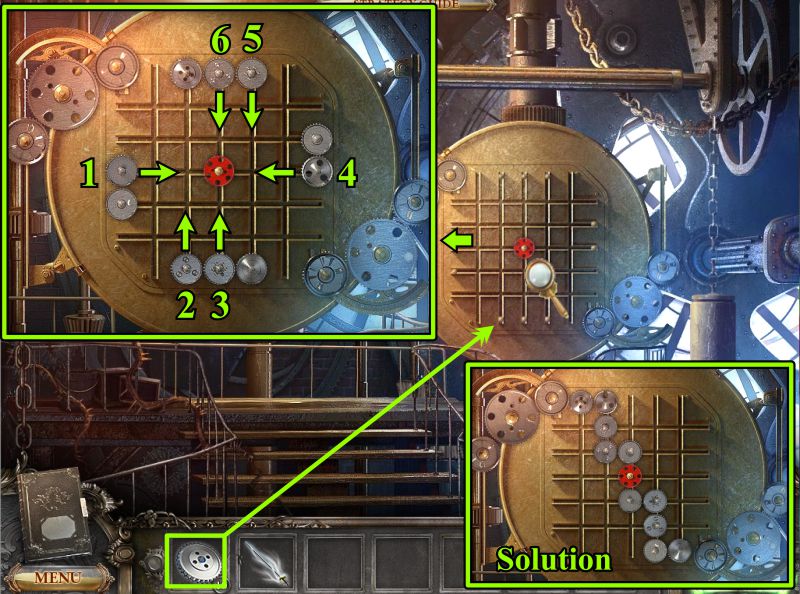
Gear Mini Game
Zoom in on the back side of the clock and place each of the 10 gears to trigger a Mini Game.
Your goal is to line up all the gears, as shown in the screenshot solution, so they will all rotate.
Move the first bunch of gears as shown in the screenshot.
Screenshot
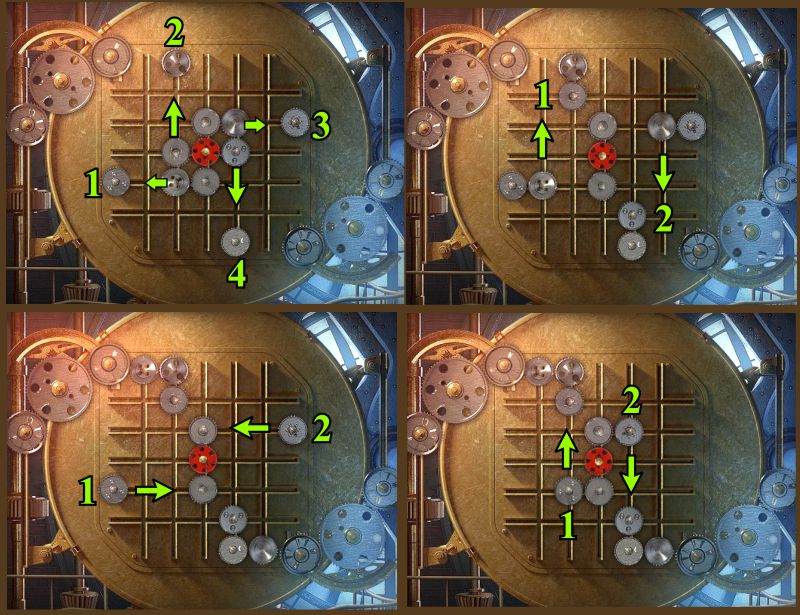
Continue moving the gears as shown in the rest of the step-by-step solution.
Screenshot
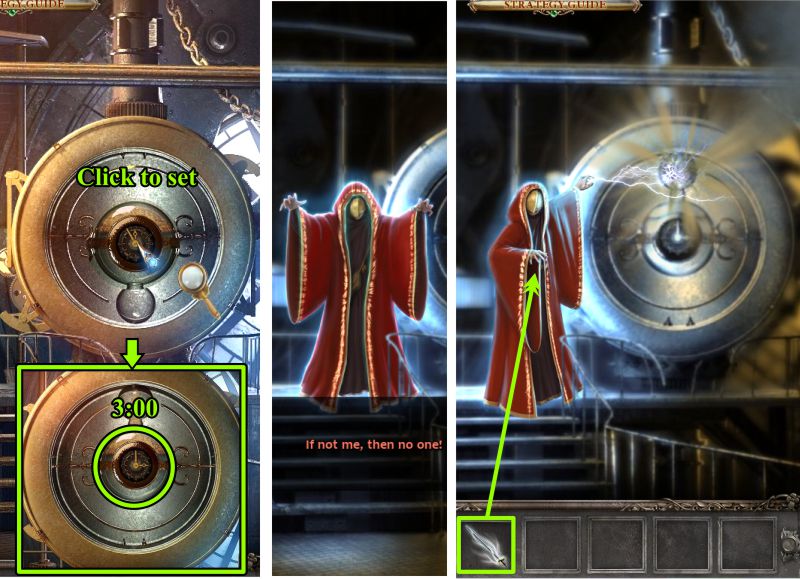
Clock
The clock turns around so you can zoom in and set the time to 3:00.
Magister Corvus appears and drains the sand from the clock.
Use your Ghostly Sword to strike him down.
Screenshot
Main Chamber
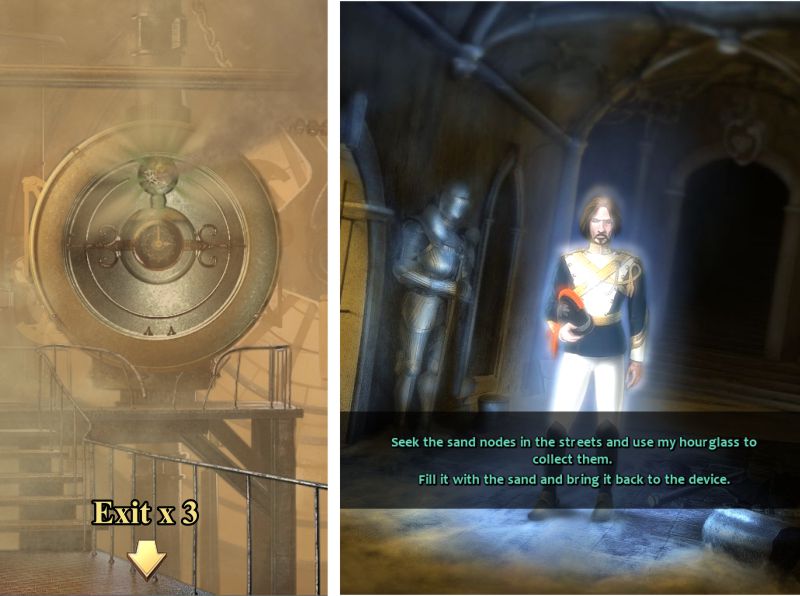
Sand is everywhere. You hear something, so exit down 3 times.
Ernest appears and tells you to collect sand nodes in his hourglass.
Screenshot
Main Chamber
The Magic Sand hourglass will go into your Inventory, so you will temporarily have no Hints.
Place the hourglass on the Sand Node shown in the screenshot and collect it.
Exit down 3 times.
Screenshot
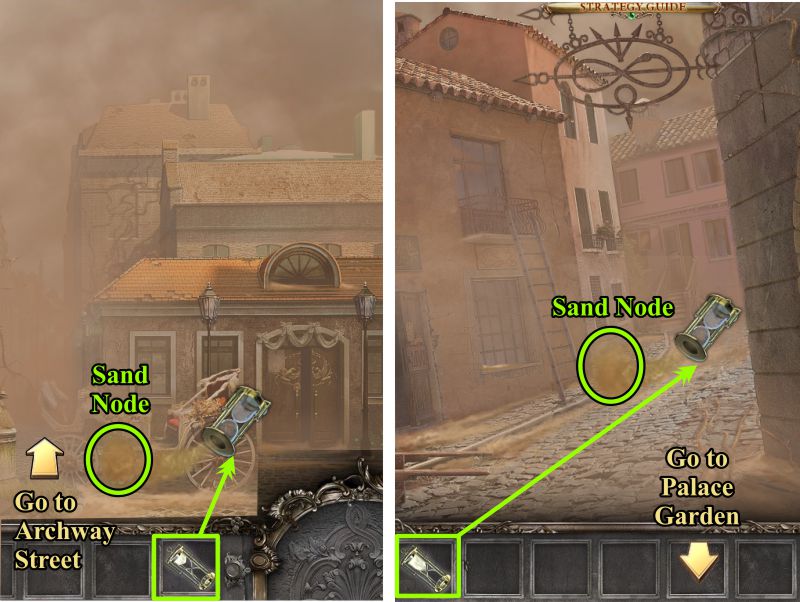
Town Square and Archway Street
Collect the Sand Nodes shown in the screenshot.
Screenshot
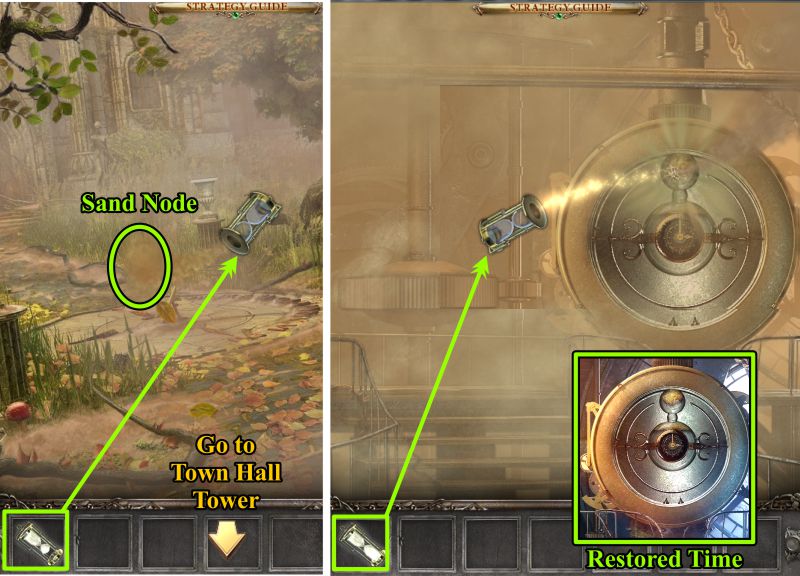
Palace Garden and Clock Tower
Collect the last Sand Node in the Palace Garden, then return to the Clock Tower.
Place the sand from the hourglass in the clock to stop the action of the Chronometron.
Screenshot
Congratulations, you have brought time back to Monwald.
Posted by: Jazz |
July 31, 2011 11:06 AM
|
July 31, 2011 11:06 AM
Timeless: The Forgotten Town
Bonus Game Walkthrough
General Information
Although you have saved the town, Ernest and his bride-to-be are still trapped in the Palace.
They have been unable to see or touch each other for a hundred years.
Your goal is to reunite them so they can be together.
Select Play under Bonus Game to begin the adventure.
Palace Garden
Take the Golden Plate at the left, and note the sundial is still at 3:00.
Take the Unicorn, then zoom in on the planter.
Take the Magnifying Glass and Golden Plate.
Play the Hidden Object Scene.
Screenshot
Palace Garden Hidden Object Scene
Your Inventory item will be an Oil Can.
Screenshot
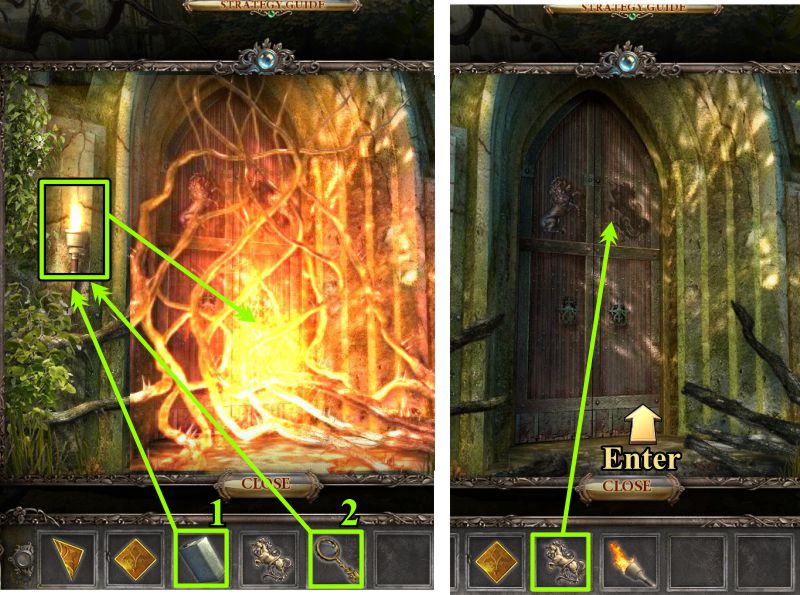
Palace Door
Zoom in on the Palace Door.
Place the oil on the torch, then use the Magnifying Glass to direct the sun to light it.
Take the torch and use it to burn away the vines on the door.
Place the Unicorn in the vacant place shown in the screenshot.
When the door opens, enter.
Screenshot
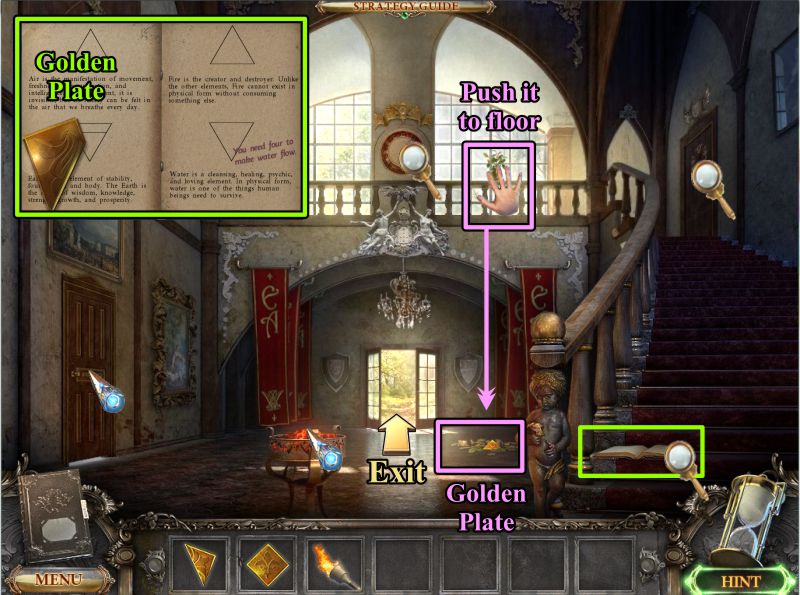
Foyer
Zoom on the open book on the stairway, and take the Golden Plate.
Touch the door at the left, and you will be told to go away.
Note the clock, the burning coals, and locked door at the top of the stairs.
Knock over the plant on the railing so that it falls to the floor.
Take the Golden Plate and exit through the door at the back.
Screenshot
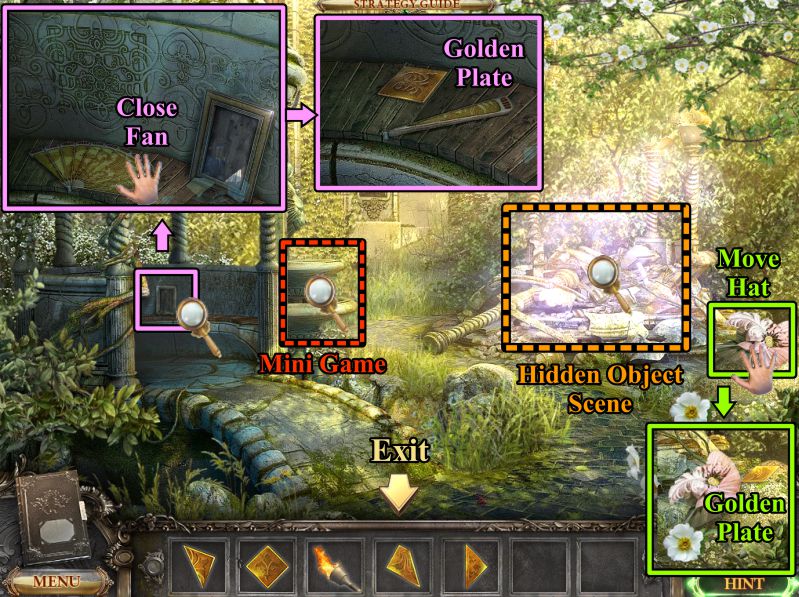
Inner Garden
Zoom in on the Gazebo, close the fan, and take the Golden Plate.
Move the hat at the right and take the Golden Plate.
Play the Hidden Object Scene and the Mini Game.
Screenshot
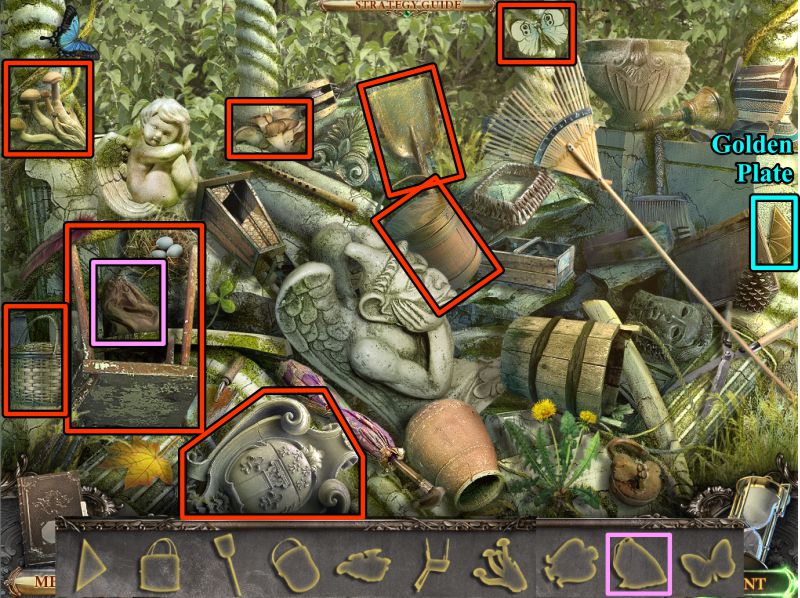
Inner Garden Hidden Object Scene
You will get another Golden Plate for your Inventory when you have matched all the objects to their silhouettes.
Screenshot
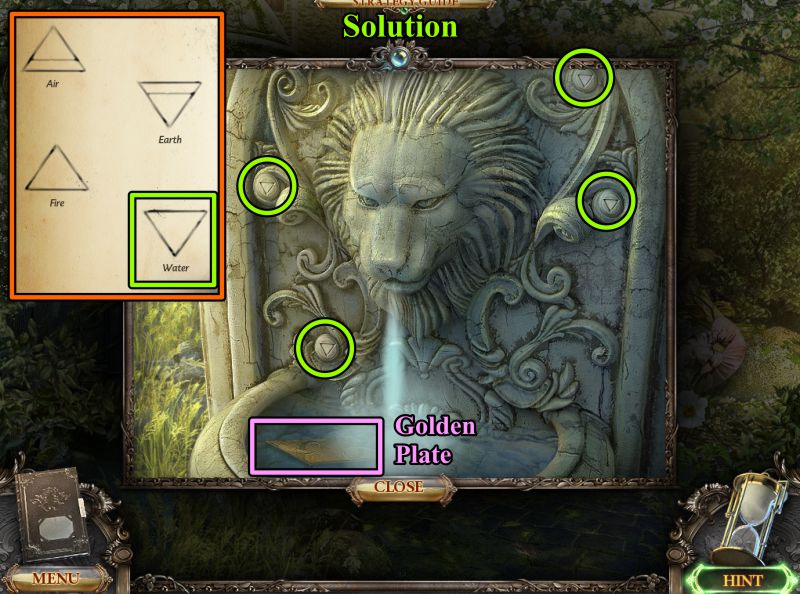
Fountain Mini Game
Your goal is to get the fountain to flow again.
Note the Diary page with the element symbols.
The one for water is a single triangle that is pointed down.
Change the 4 buttons shown in the screenshot to this symbol.
The water flows and a Golden Plate floats to the surface for you to collect.
Screenshot
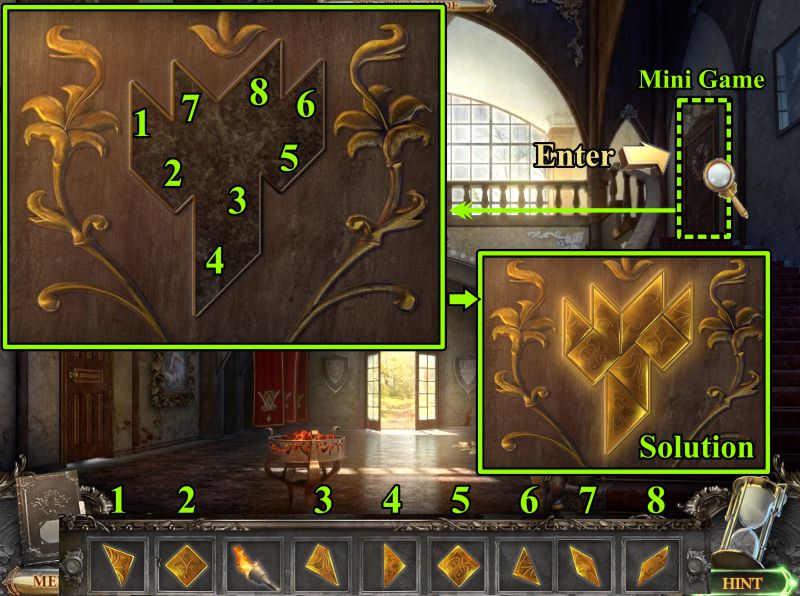
Bedroom Door Mini Game
Go into the Foyer to play the Mini Game to open the Bedroom Door.
See the screenshot for the solution.
The Golden Plates are numbered and their location is matched on the door.
Enter the room.
Screenshot
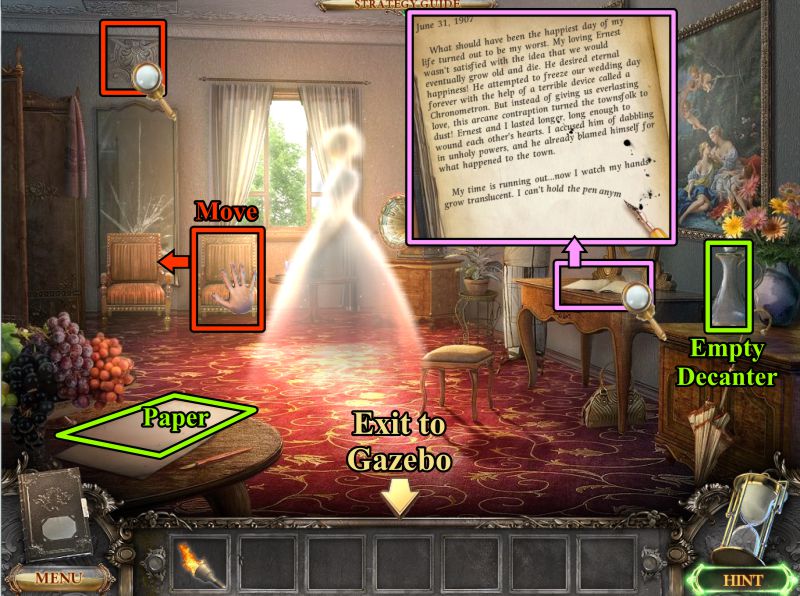
Nathalie's Bedroom
Talk to Nathalie, who says she wants some ink to write a note to Ernest.
Take the Paper on the table at the left and the Empty Decanter on the right.
Zoom in on the table with the open book and read Nathalie's note.
Move the chair in front of the mirror so you can check out what is up by the ceiling.
Exit to the Gazebo.
Screenshot
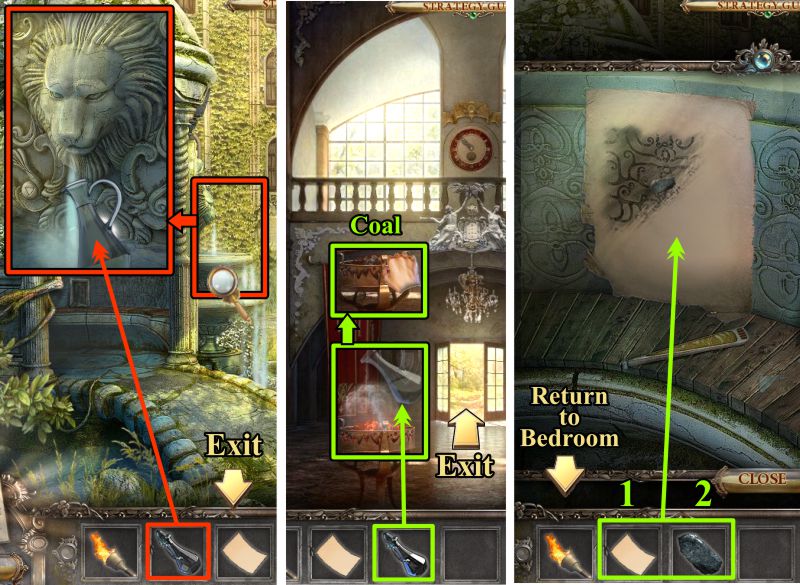
Fountain, Foyer, and Gazebo
Zoom in on the fountain and fill you Empty Decanter with water.
Go to the Foyer and put out the coals.
Take a piece of Coal and return to the Gazebo.
Zoom in on the bench, place you paper over the pattern.
Use the Coal to copy the pattern. The paper will go into your Diary.
Return to the Bedroom.
Screenshot
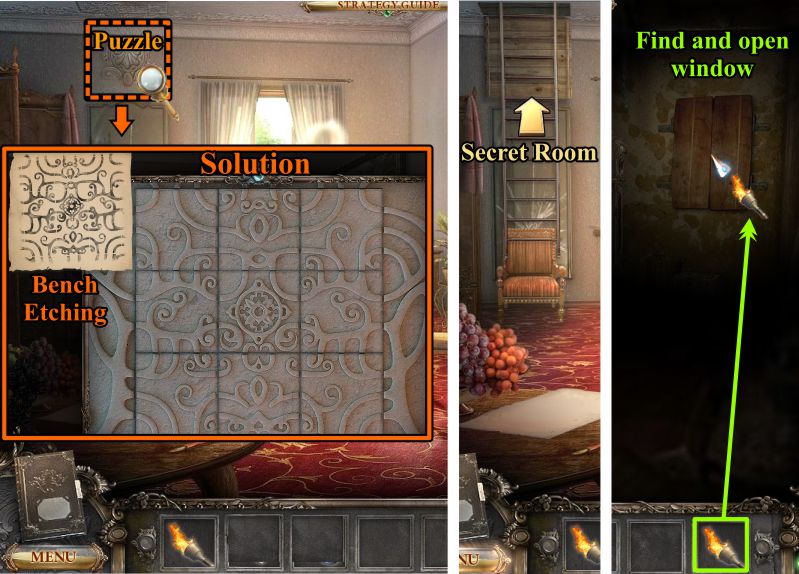
Bedroom and Secret Room
Zoom in on the Puzzle. The Bench Etching will appear for you to use as a guide to complete the Puzzle.
Turn the tiles until the pattern looks like the screenshot solution.
Go up the ladder that appears.
It's too dark to see, so use your Torch to find the window, and open it.
Screenshot
Secret Room
Note the cobwebs and shield.
Look out the window to see something stuck in the roof that you can't reach.
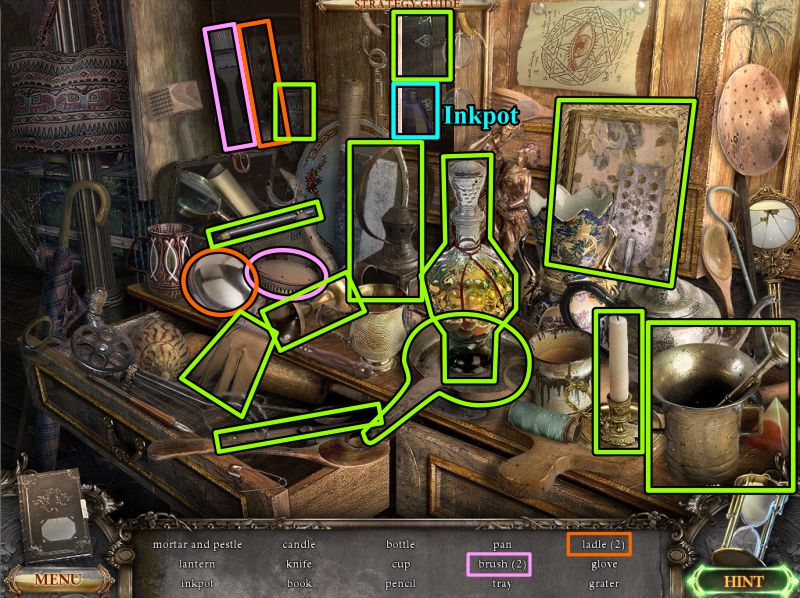
Play the Hidden Object Scene, then return to the Bedroom.
Screenshot
Secret Room Hidden Object Scene
Your Inventory item will be an Inkpot.
Screenshot
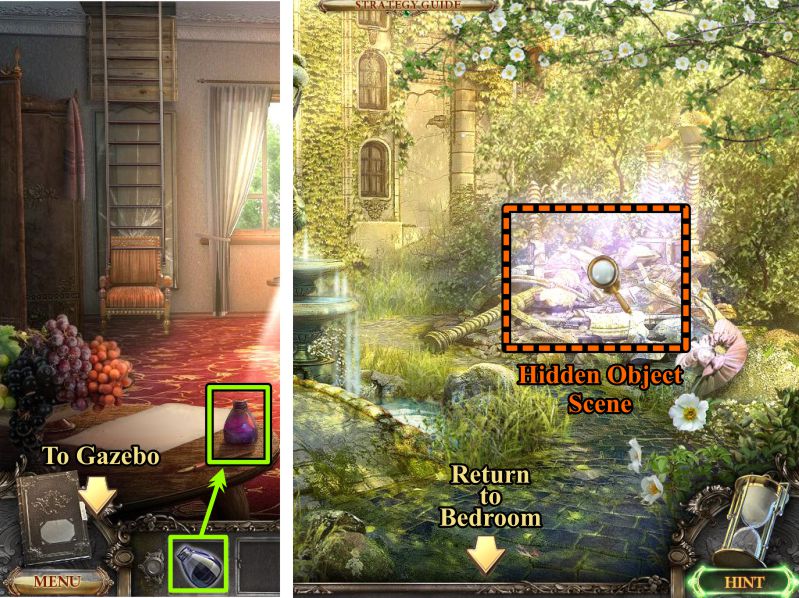
Bedroom and Inner Garden
Place the Inkpot on the writing table, and Nathalie will attempt to write.
It isn't working, so she says she needs a feather pen.
Go to the Gazebo area, and play the Hidden Object Scene.
Screenshot
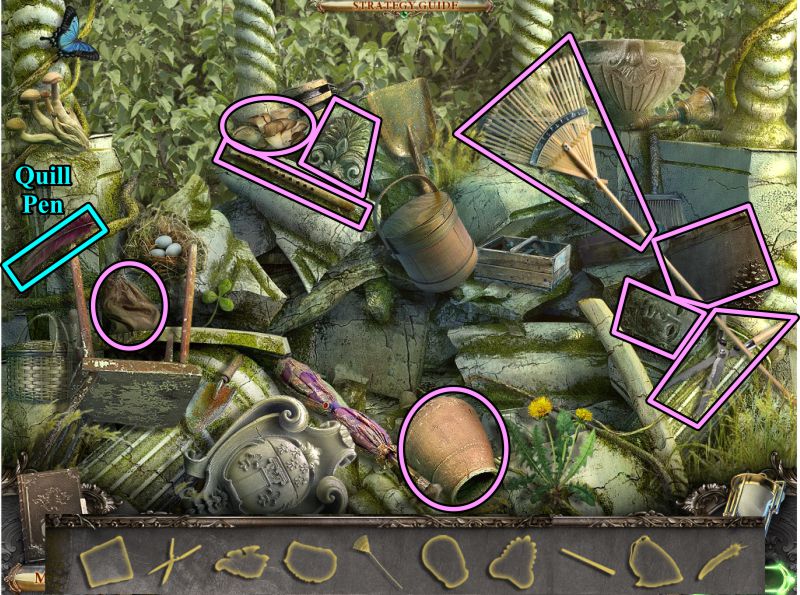
Inner Garden Hidden Object Scene
You will get a Quill Pen for your Inventory, so return to the Bedroom.
Screenshot
Bedroom
Place the Quill Pen in the Inkpot, and Nathalie will write a letter to Ernest.
Take the letter to the Foyer.
Screenshot
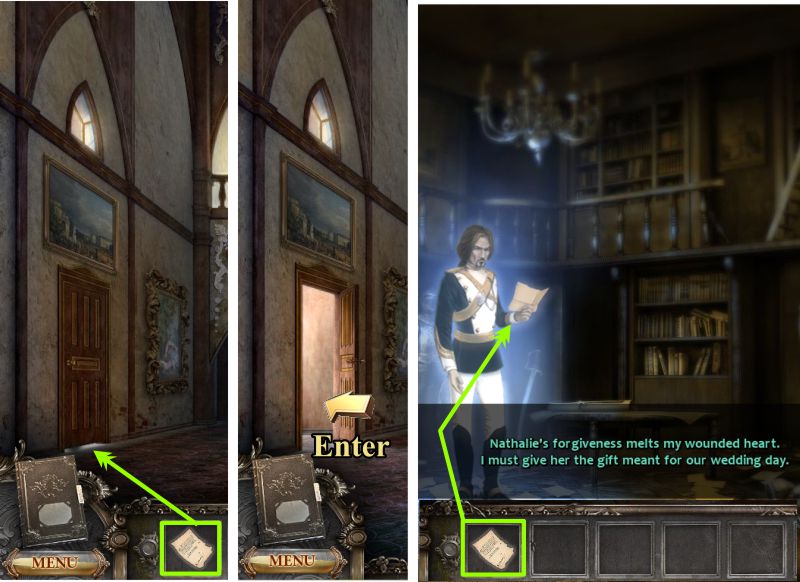
Foyer and Library
Slip the letter under the door, and Ernest will open the door for you to enter.
He reads the letter and wants you to help him given her the gift that was meant for their wedding day.
First, you must find and open the safe.
Screenshot
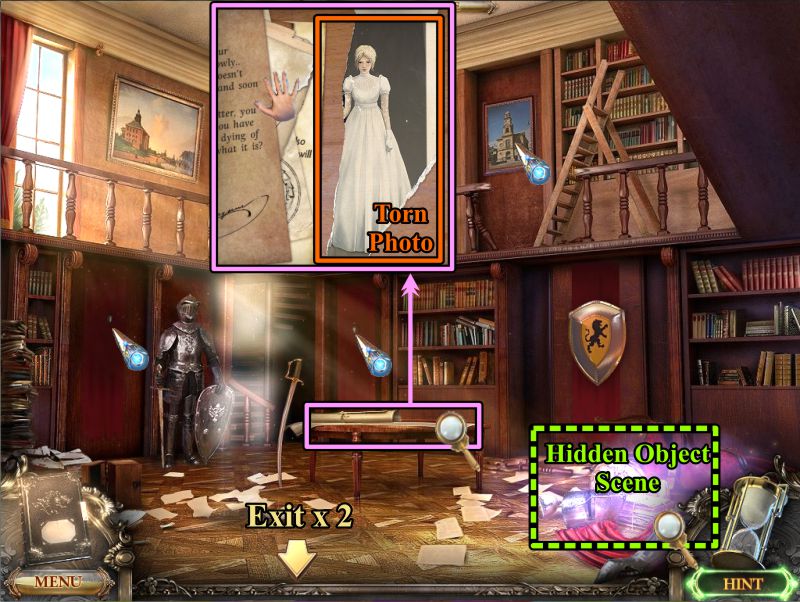
Library
Note the places in the screenshot marked with the cursor for more information.
Zoom in on table and move everything around until you can pick up a Torn Photo.
Play the Hidden Object Scene.
Screenshot
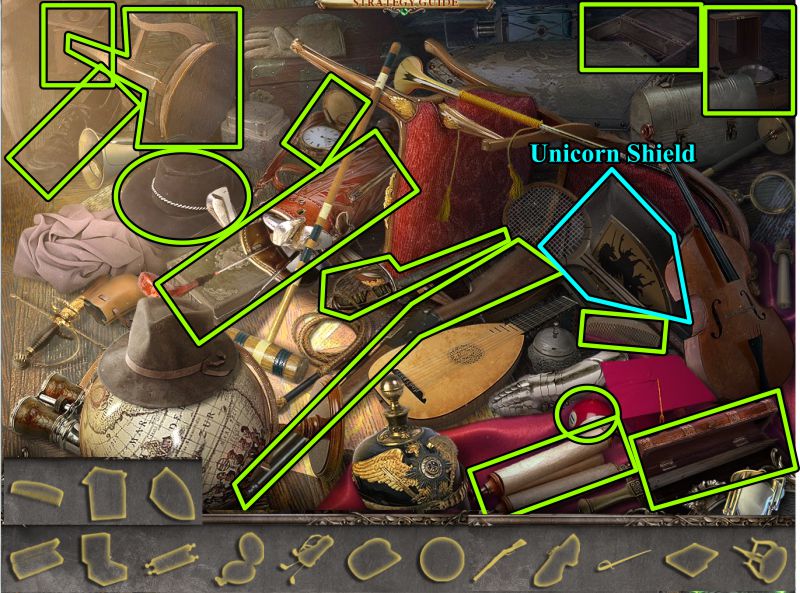
Library Hidden Object Scene
You will get a Unicorn Shield for your Inventory.
Screenshot
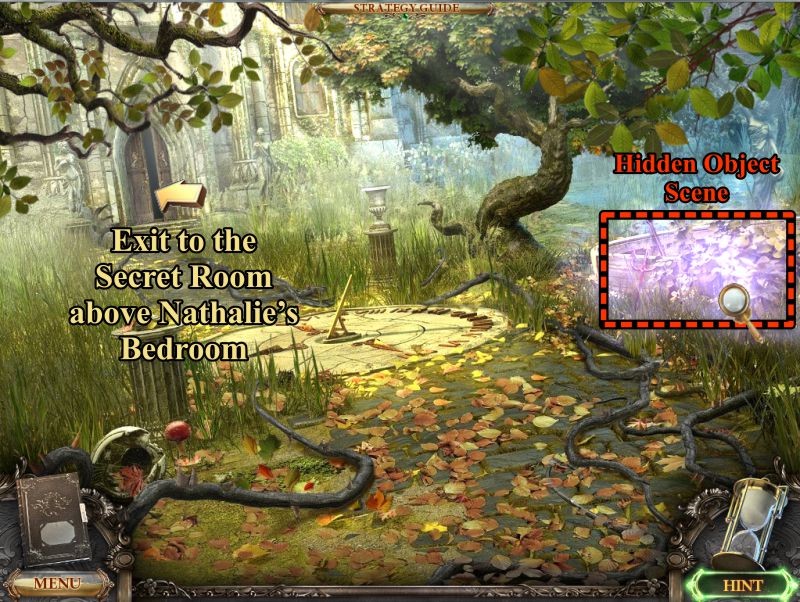
Palace Garden
Go to the Palace Garden and play the Hidden Object Scene.
Exit to the Secret Room above Nathalie's Bedroom.
Screenshot
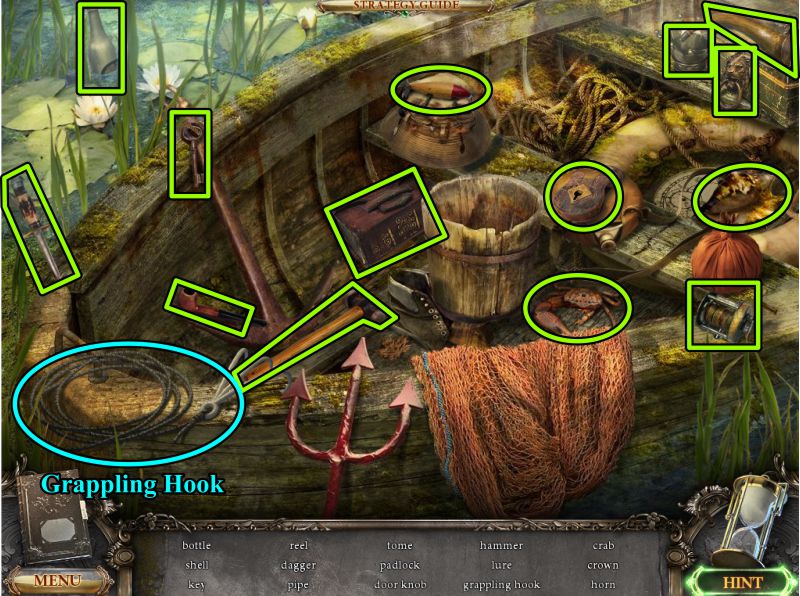
Palace Garden Hidden Object Scene
Your Inventory item is a Grappling Hook.
Screenshot
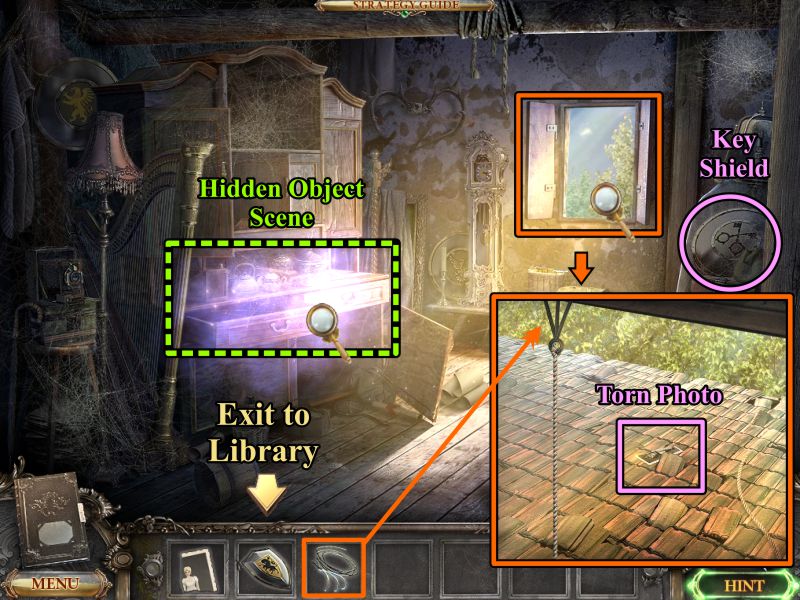
Secret Room
Look out the window and place your Grappling hook on the upper roof edge.
Grab the Torn Photo, then come back inside.
Take the Key Shield, then play the Hidden Object Scene.
Screenshot
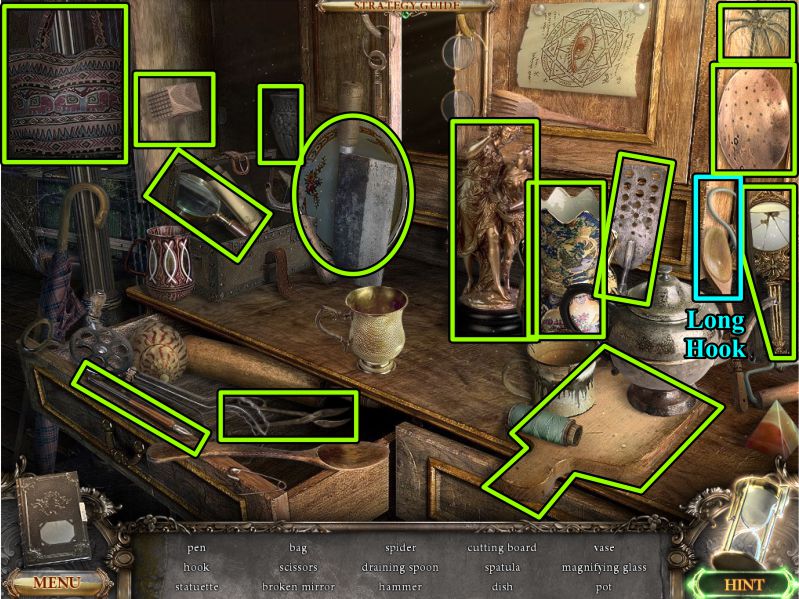
Secret Room Hidden Object Scene
You will receive a Long Hook for your Inventory.
Screenshot
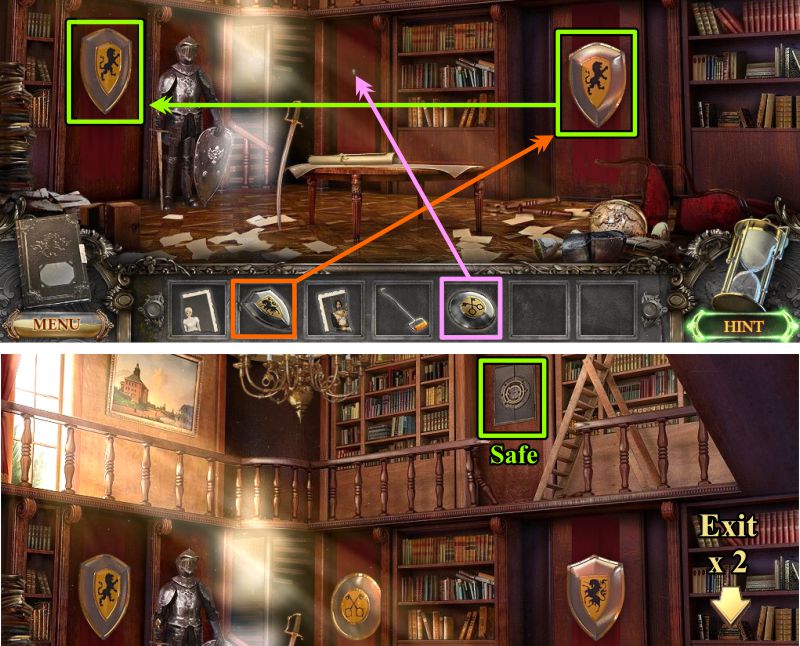
Library
Go to the Library. Move the Lion Shield to the left panel.
Place the Unicorn Shield on the right panel and the Key Shield in the middle. The picture above will move, revealing the safe.
Talk to Ernest, and then go to the Palace Garden.
Screenshot
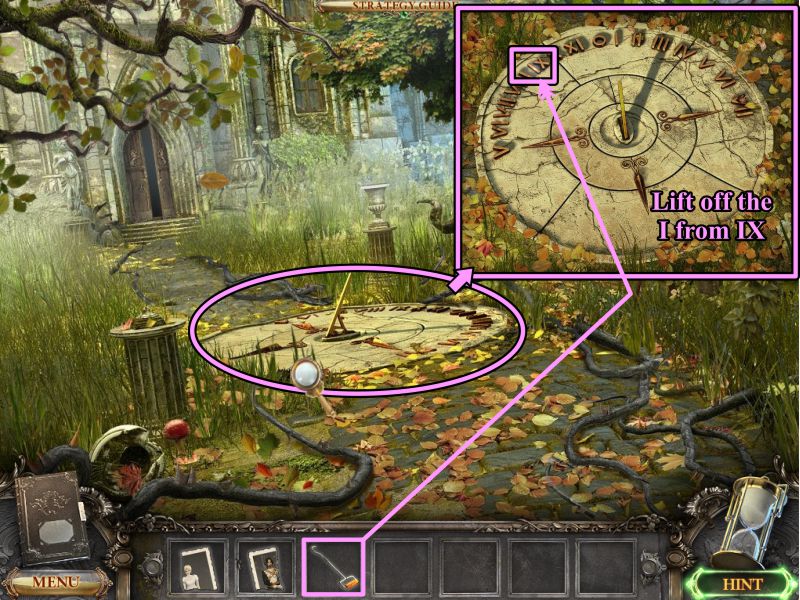
Palace Garden
Zoom in on the sundial and use your Hook to lift off the "I" from the IX.
Take the "I" back to the Library.
Screenshot
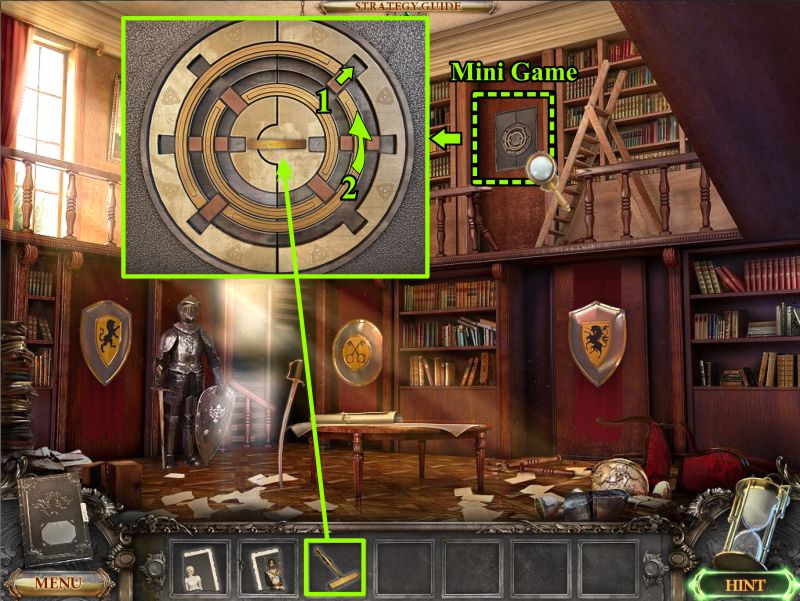
Library Safe Mini Game
Zoom in on the safe and place the Key to trigger a Mini Game to open the safe.
Your goal is to move the semi-circle pieces to either side so the middle will open.
Move the block marked in the screenshot outward, then rotate the marked semi-circle as far as it can go.
Screenshot
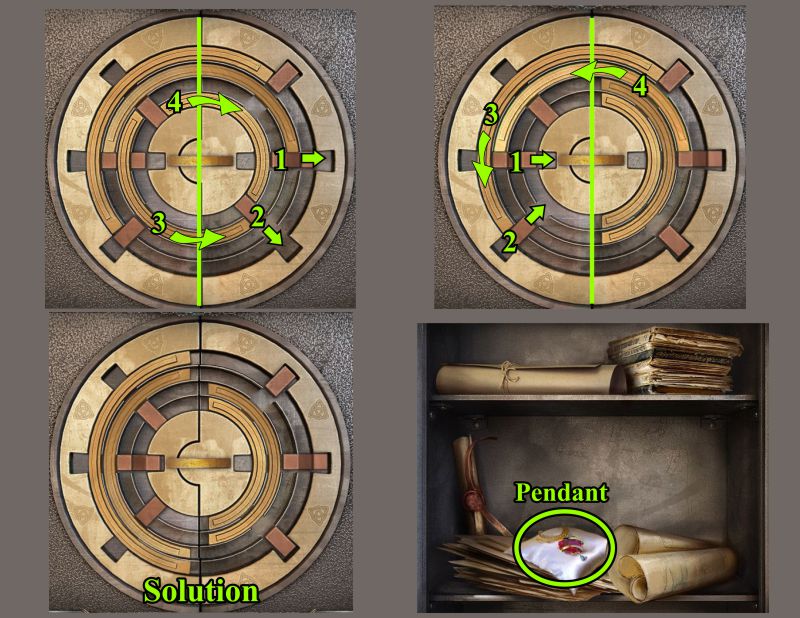
Move the two marked blocks outward, then rotate the two semi-circles so they do not cover the middle.
Move the two marked blocks inward, then rotate the remaining semi-circles as shown in the screenshot.
See the screenshot solution. Take the Pendant from the open safe.
Ernest will tell you to take the gift to Nathalie, so go to her Bedroom.
Screenshot
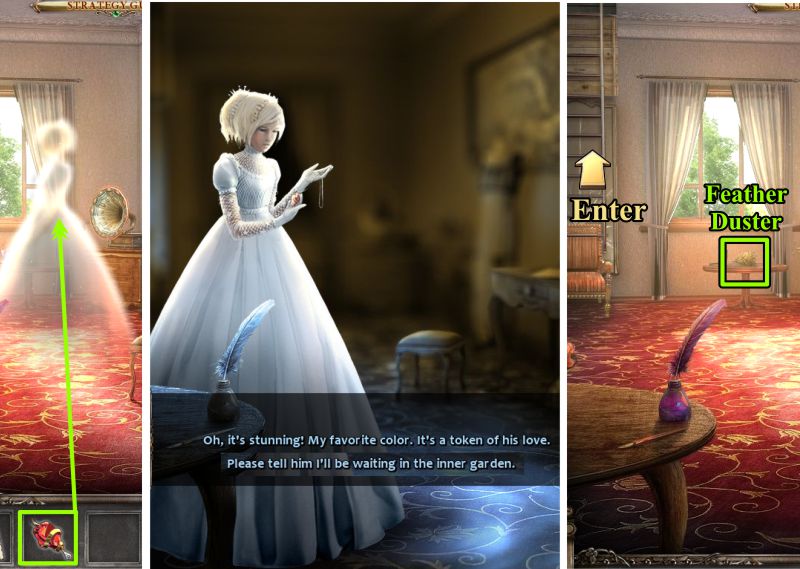
Bedroom
Give Nathalie the Pendant, and she will go to the Inner Garden to wait for Ernest.
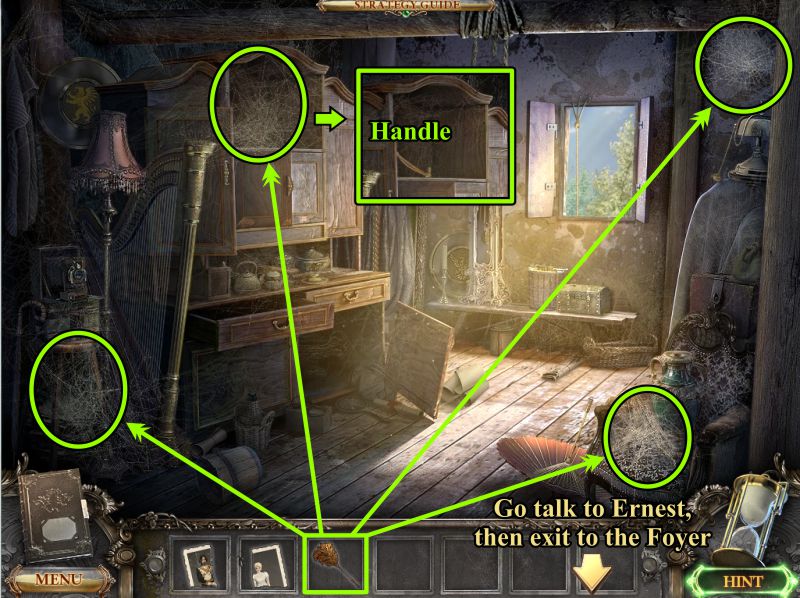
Take the Feather Duster from the table, then go up to the Secret Room.
Screenshot
Secret Room
Use the Feather Duster on the cobwebs shown in the screenshot.
The cabinet will reveal a Handle to take.
Go talk to Ernest, then exit to the Foyer.
Screenshot
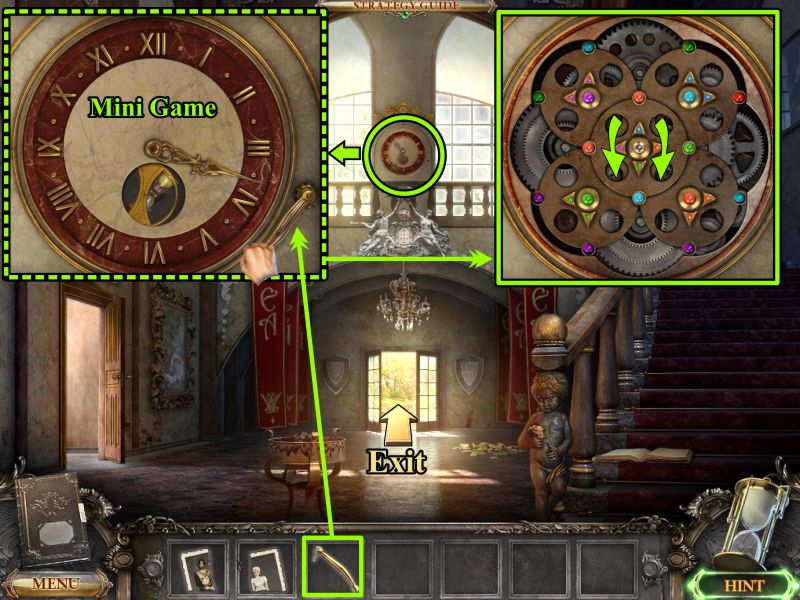
Foyer Clock Mini Game
Zoom in on the clock and place the Handle.
Move the Handle to trigger a Mini Game.
Your goal is to rotate the discs so that the arrows and dots match in color.
The center disc is marked in the screenshot to show how all of the discs move.
Screenshot
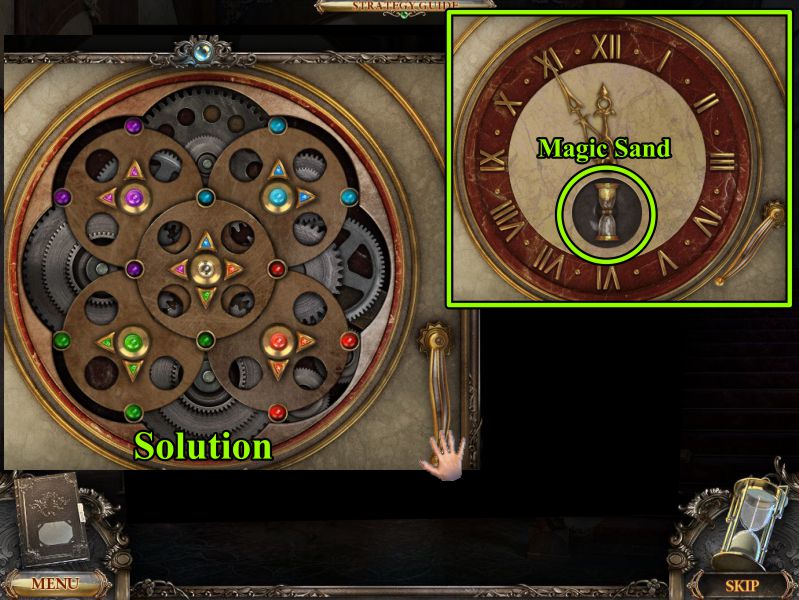
The solution is shown in the screenshot.
Move the handle to the left, and the clock face will appear again.
Take the hourglass with the Magic Sand, then go out to the Gazebo.
Screenshot
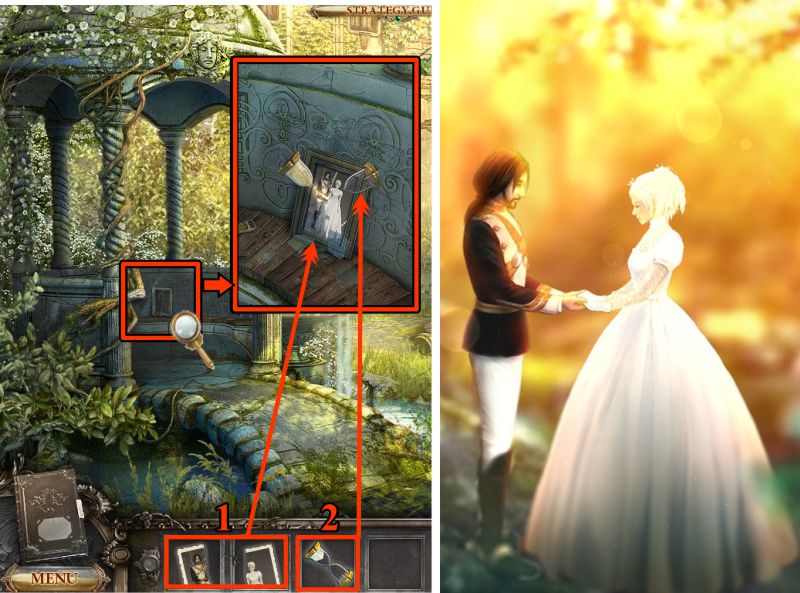
Gazebo
Zoom in on the bench and place the Torn Photos.
Place the Magic Sand on the photo, and the spell will be broken.
Screenshot
Ernest and Nathalie are reunited, so they can go back to town.
You are on your train to finish your vacation.
Will everybody live happily ever after? Watch the cut scene to find out.
Posted by: Jazz |
August 5, 2011 5:39 PM
|
August 5, 2011 5:39 PM