
![]() Whether it's some kid driving 88 MPH in a modified DeLorean, two high schoolers having a most excellent journey in a special phone booth, or a quirky British guy in a scarf stepping out of a strange police box, popular culture has shown that people enjoy a good time-traveling tale. It comes as no surprise then that the developers at Artifex Mundi have tapped into this compelling chrono-concept in their latest hidden object adventure game, Time Mysteries: Inheritance.
Whether it's some kid driving 88 MPH in a modified DeLorean, two high schoolers having a most excellent journey in a special phone booth, or a quirky British guy in a scarf stepping out of a strange police box, popular culture has shown that people enjoy a good time-traveling tale. It comes as no surprise then that the developers at Artifex Mundi have tapped into this compelling chrono-concept in their latest hidden object adventure game, Time Mysteries: Inheritance.
 In this new title, you play a pretty young English physicist named Vivien Ambrose who travels to her father's country house to celebrate a recent award. Upon arriving she notices something amiss — who's that mysterious figure in her father's abandoned attic, and what was that sudden flash of light up there? After investigating, she finds her father missing and a cryptic note about her inheritance, seven rings, and a crystal ball. What follows is a time-traveling adventure spanning over a millennium, filled with varied locales, interesting characters, and numerous puzzles.
As an adventure-puzzler, Time Mysteries: Inheritance relies on your powers of observation along with nimble point-and-click mouse skills. In the adventure game portion, you get to travel to different locations, examine areas, and pick up objects (made easier thanks to a context-sensitive cursor and visible "hotspots"). Certain contextual puzzles require you to use a number of items from your inventory while consulting your diary to accomplish various tasks. Along the way you will encounter different characters and have text dialogues with them over beautifully-rendered scenes.
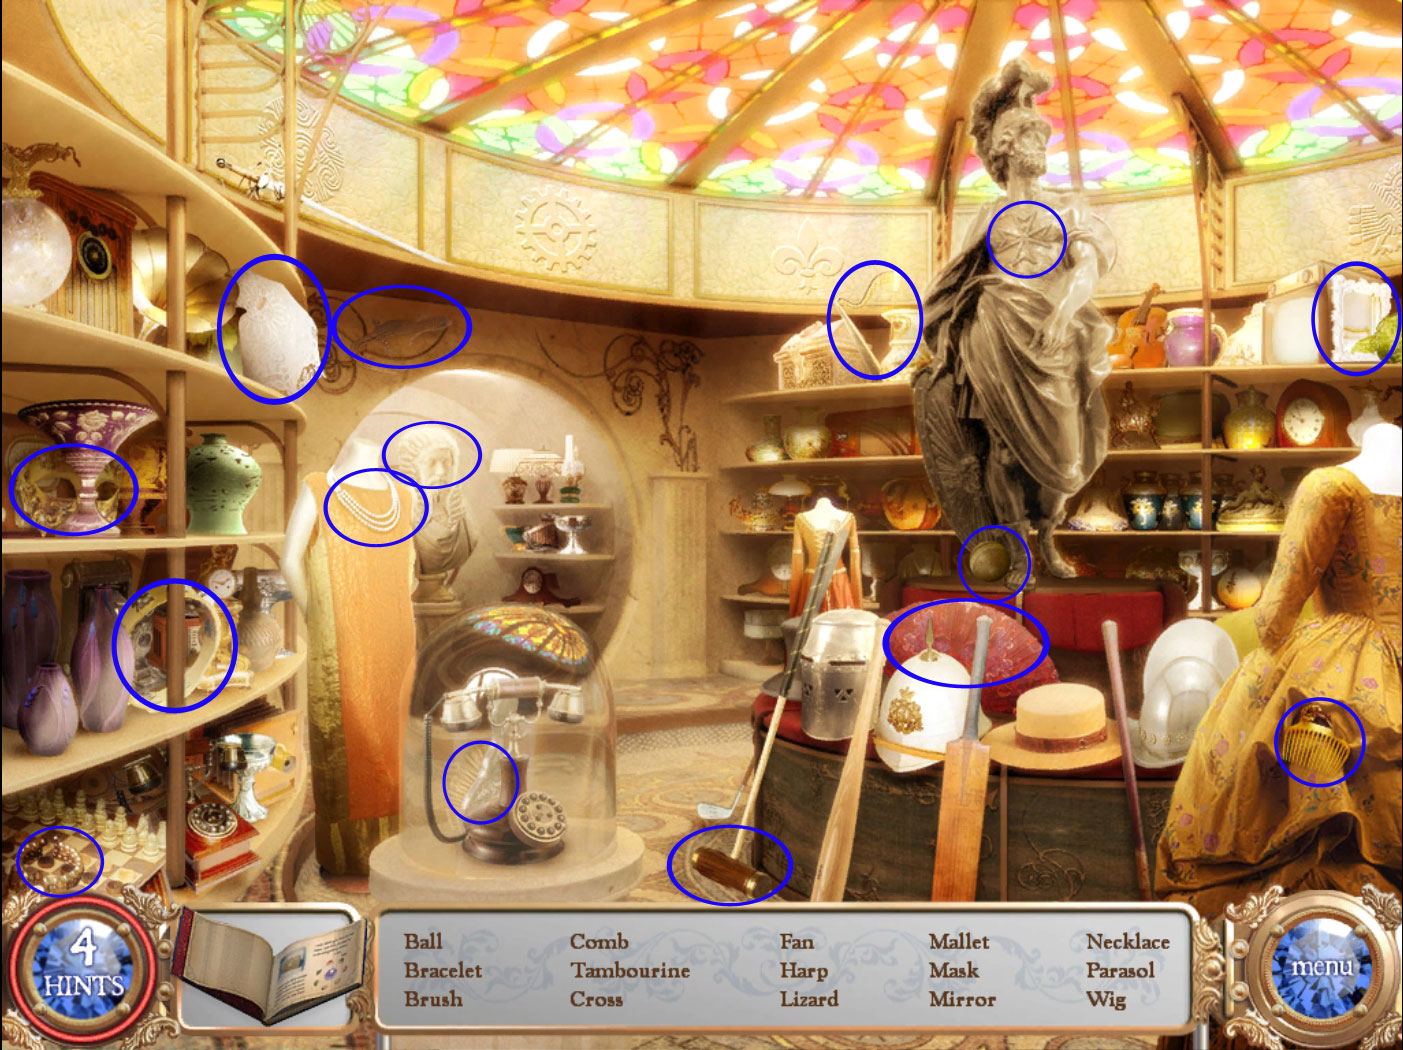
The meat and potatoes of gameplay, however, is the game's distinctive puzzles. There are around 18 assorted types of puzzles to be solved over the course of the game, each of them nicely themed around the storyline as Vivien traverses time and space to find her father. The vast majority of the puzzles are densely-populated hidden object scenes with a unique list of objects to find. No time limits get in the way of solving any of these puzzles, and hints are generously offered thanks to a recharging hint and skip system. In addition, many traditional puzzles make their appearance, including spot-the-difference, Towers of Hanoi, tangrams, and Mastermind.
 Analysis: I was happily surprised at the quality and level of engagement in Time Mysteries: Inheritance. This was one of my first exposures to downloadable games in a while, and in it I found an offering worthy of software found on store shelves. The graphics are lush and impressive, with a hand-painted look to them. The stationary scenes make good use of different lighting and animated effects to make them more dynamic. Further heightening the game's immersive quality is its excellent music soundtrack, which effectively places you in the time period Vivien happens to be visiting.
The adventure aspect of Time Mysteries: Inheritance is entertaining and geared towards the more casual gamer. I never encountered a situation where I didn't know what to do or where to go, but at the same time didn't feel that things were being made too easy for me. Each object has a fairly clear use, and talking to characters or referring to your diary makes things pretty clear. The storyline is a little far-fetched at times (Vivien can converse in perfect modern English with her 7th Century ancestor!), but interesting nonetheless, and makes you want to learn a bit more about the Ambrose lineage as you play.
As far as the puzzles go, they are challenging without being too difficult, and the high quality of the graphics makes playing through them quite fun. There isn't too much ramp-up in difficulty — most of the hidden object screens are similar in their number of objects and their deviousness in object placement. A few puzzles, such as the chess-knight level and the puzzle involving filling a board with toggled runes, will likely require much plugging away and experimentation before they are vanquished. Having the hint button readily available without serious consequence (except for having to play a match-3 mini-game to recharge your hints) means that you shouldn't have much difficulty getting through the game. For more seasoned gamers, an "expert" mode is available if you want fewer opportunities for hints and less visible hotspots.
Time Mysteries: Inheritance is a fun puzzler and adventure offering that should appeal to most casual gamers looking for an enjoyable experience across various settings. It uses the time-traveling concept to good advantage, giving players a nice assortment of puzzles and locations you might not normally find together in a single game. While some hard core adventure fans and puzzle solvers might feel this 3-5 hour offering leaves them wanting more, this game delivers an entertaining experience overall. It even leaves the door open at the end for a sequel, so perhaps we may see more time-bending titles with the Ambrose clan in the future... or perhaps the past? So think about putting aside some time yourself for this time bending game and see if you can tackle the challenge and help rescue Vivien's lost father.
![]() Windows:
Windows:
Download the demo
Get the full version
![]() Mac OS X:
Mac OS X:
Download the demo
Get the full version


Walkthrough Guide
(Please allow page to fully load for spoiler tags to be functional.)
Time Mysteries: Inheritance - Walkthrough
General
When your cursor turns into a hand you can pick up objects.
When your cursor turns into a magnifying glass you can look closely at an object.
You can replenish the number of hints by playing a Match 3 mini-game as often as needed. You will get access to the mini game whenever you run out of hints.
Moving around your cursor on the scene, you will see arrows directing you to another location appear. You won't find this for all locations.
Some things need to be clicked in order to trigger another action even though you cannot do anything with those things yet.
Mini games can be skipped.
Chapter 1: The Attic
Pick up the diary in the middle of the room and read the entry.
Click the chest at the back wall - you will need a key.
Click the dresser left side and take the key on the middle hook.
Use the key to open the chest.
Click the pentagram on the lid, the photo and the lock shaped like a medallion.
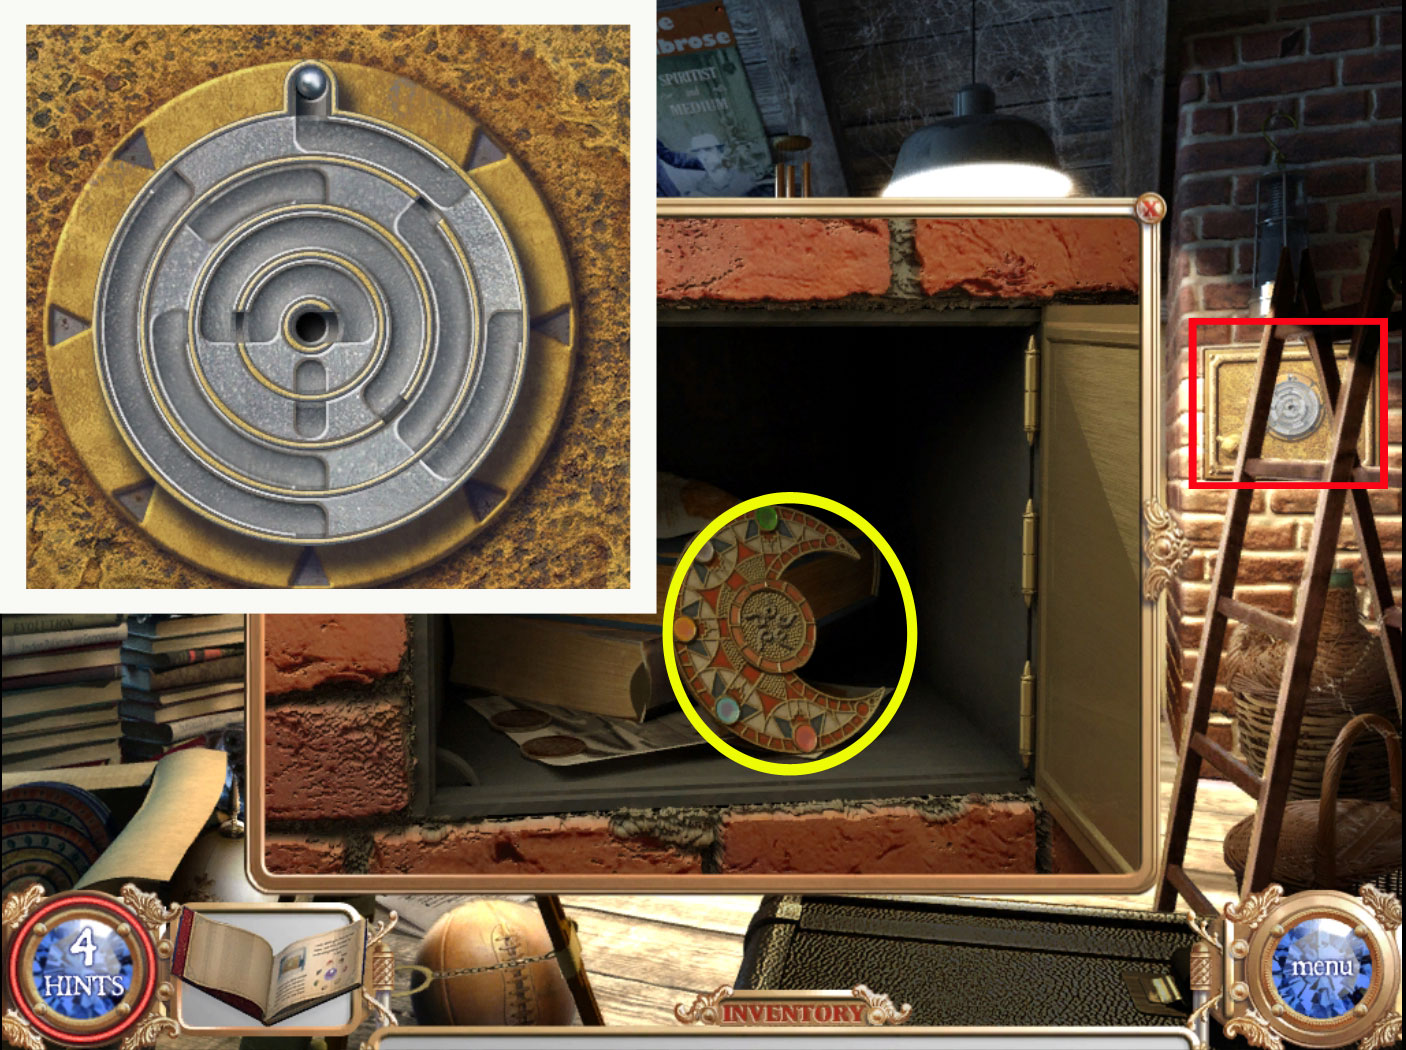
Click the gold plate on the right wall behind the ladder.
Rotate the circles to create a path for the ball on the top to go into the hole in the middle.
The ball will move as soon as the path is created but not before.
Click the handle to open the safe and get out the medallion.
Screenshot
Take a closer look at the chest again and use the medallion at the lock on the bottom of the chest.
Take the crystal ball.
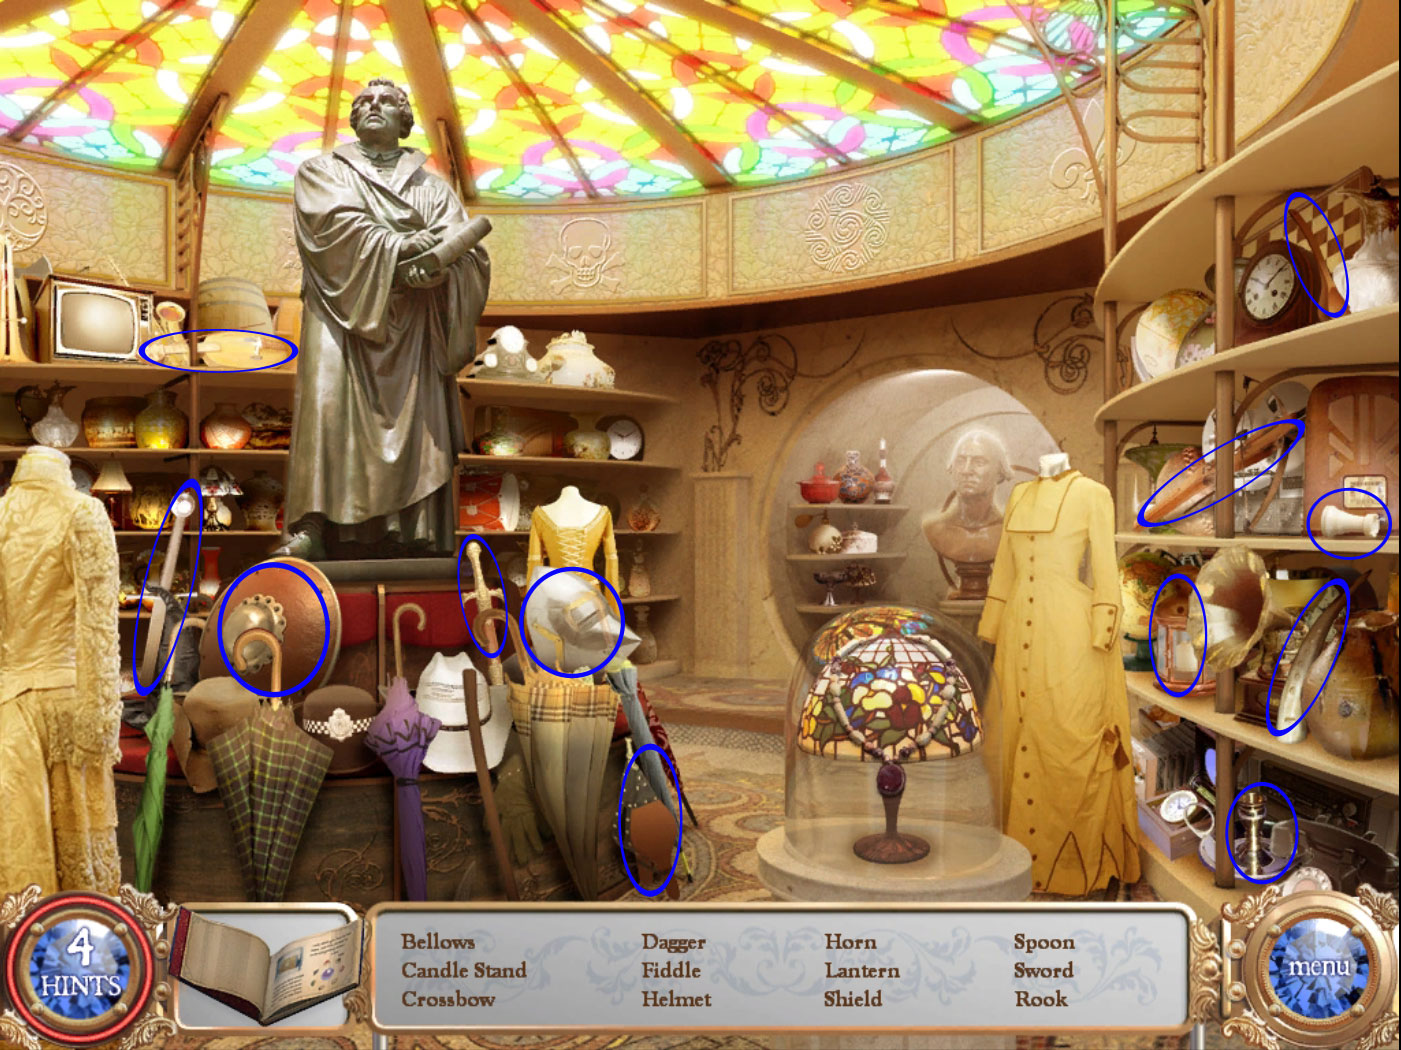
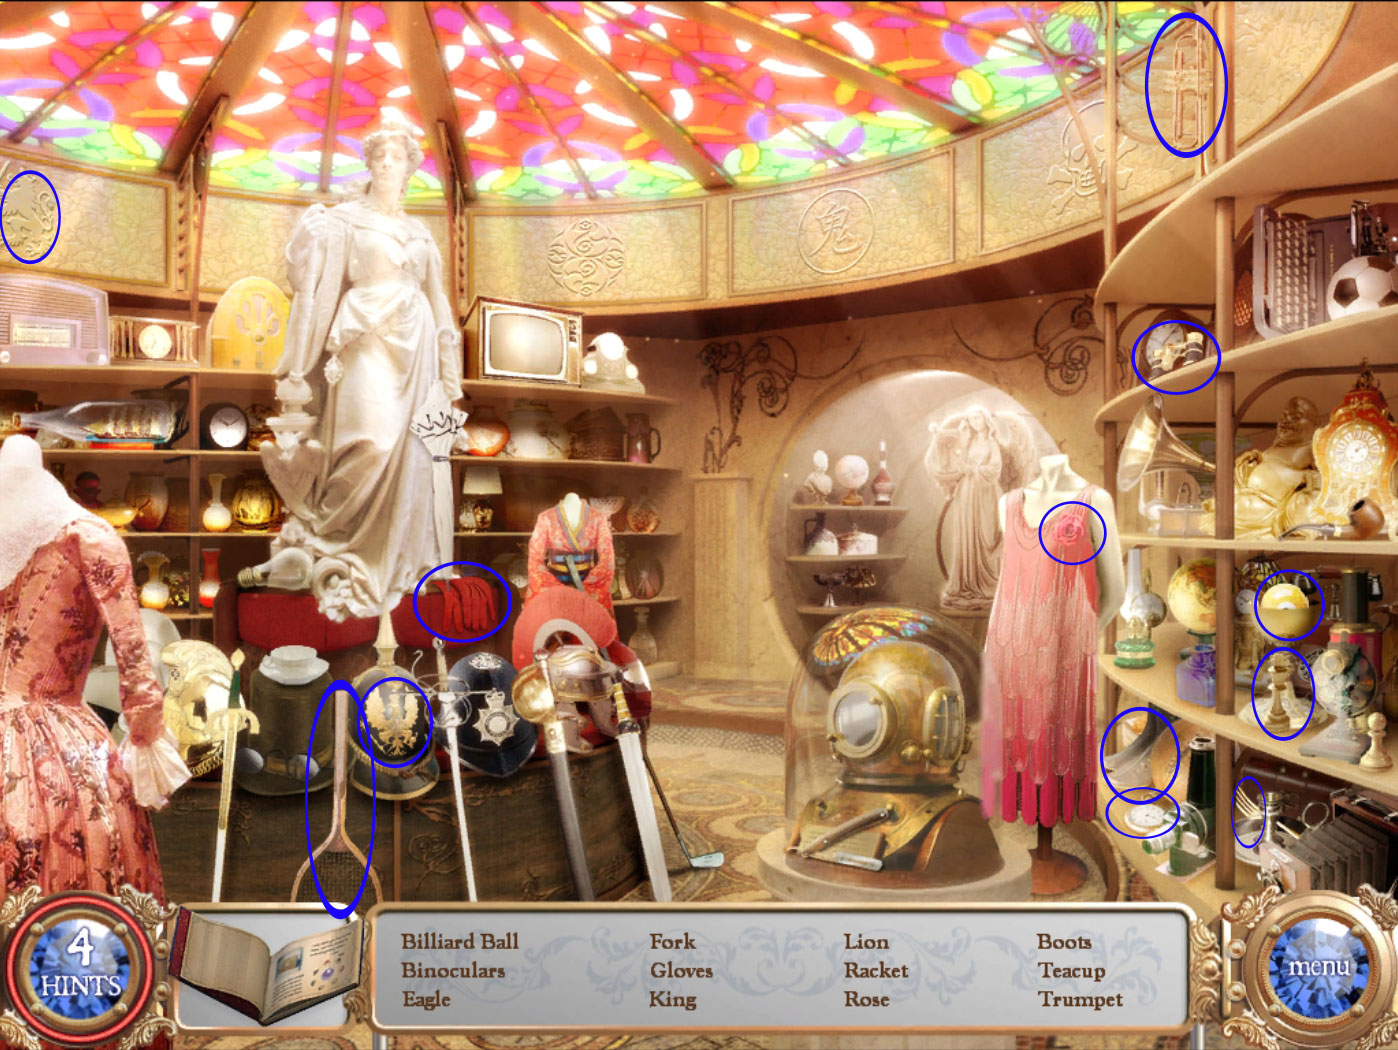
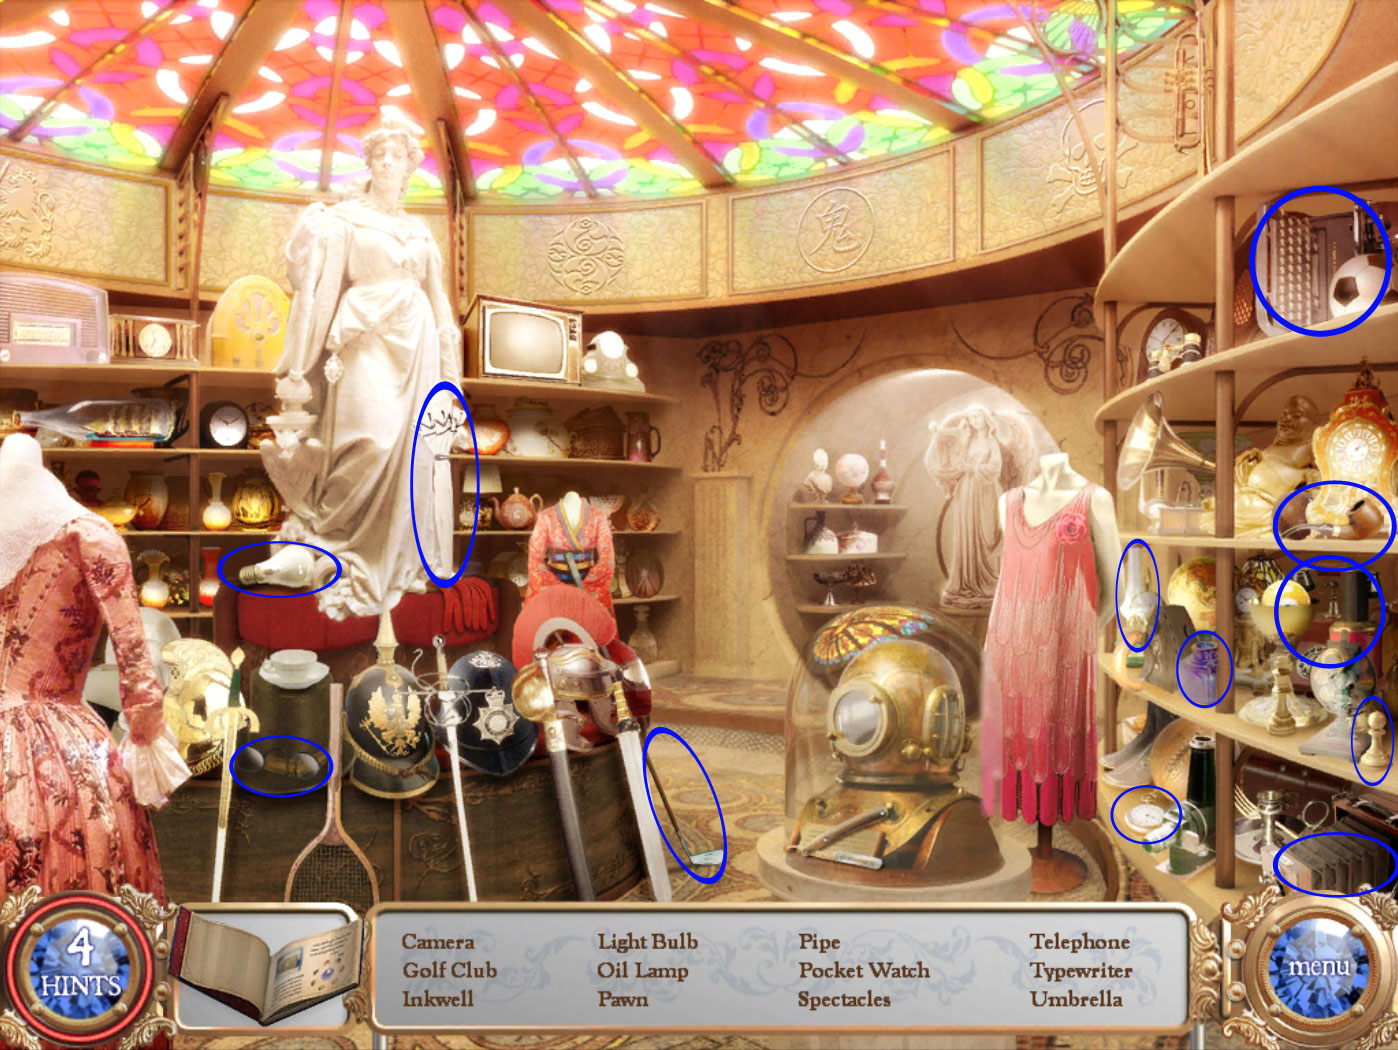
Click the books in the low left corner and play the hidden-object scene.
The scissors will be added to your inventory.
Click the chest again and use the scissors on the pentagram on the lid.
Take the magic rings.
After the cut scene click 2x on the arrow on the bottom and go right to the 13th Century Archive Room.
Find the listed objects from the 13th century - they will be all added to your inventory.
Screenshot
Click the nexus machine in front of you and place your objects on the right plate.
Leave the scene with the arrow on the bottom and enter the door on the low left which is wide open.
Chapter 2: 13th Century
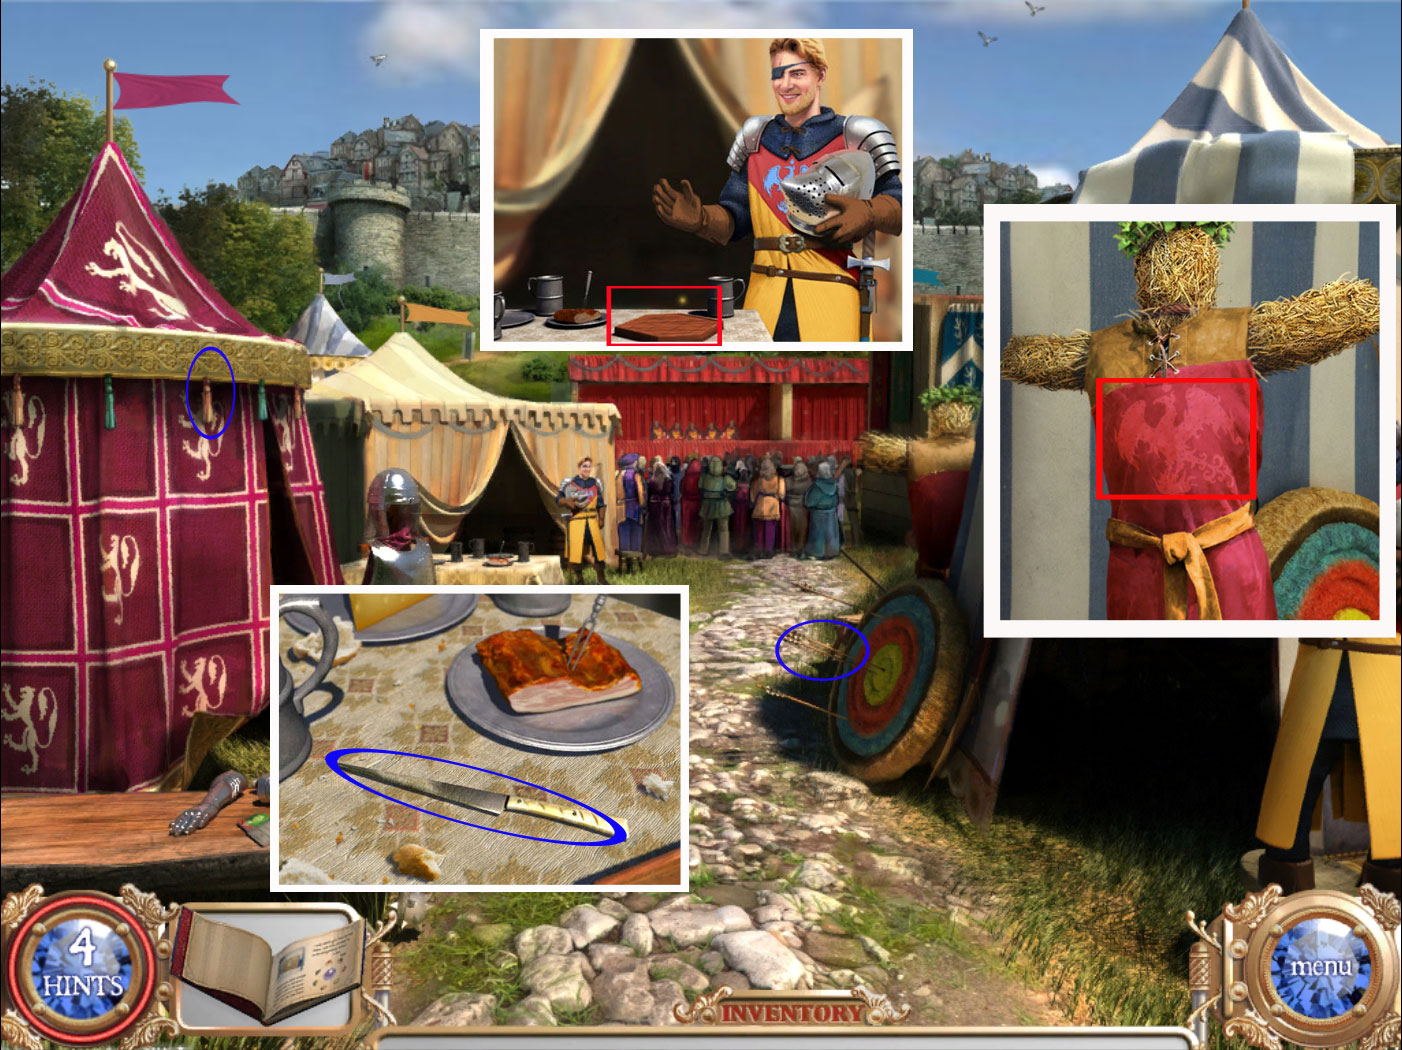
Tents
Click the table far left in front of the yellow tent and take the knife.
Grab the middle tassel from the tent on the left.
Take an arrow from the target on the right side.
Speak with the knight in front of the yellow tent - you need to play a game with him in order to get decent clothes.
Click the table in front of the yellow tent again and click the wooden plate.
Match the shields.
Click the Dummy behind the blue-white striped tent on the right - you will get a closer view. Click the crest on its chest.
Go straight ahead to the town square.
Screenshot
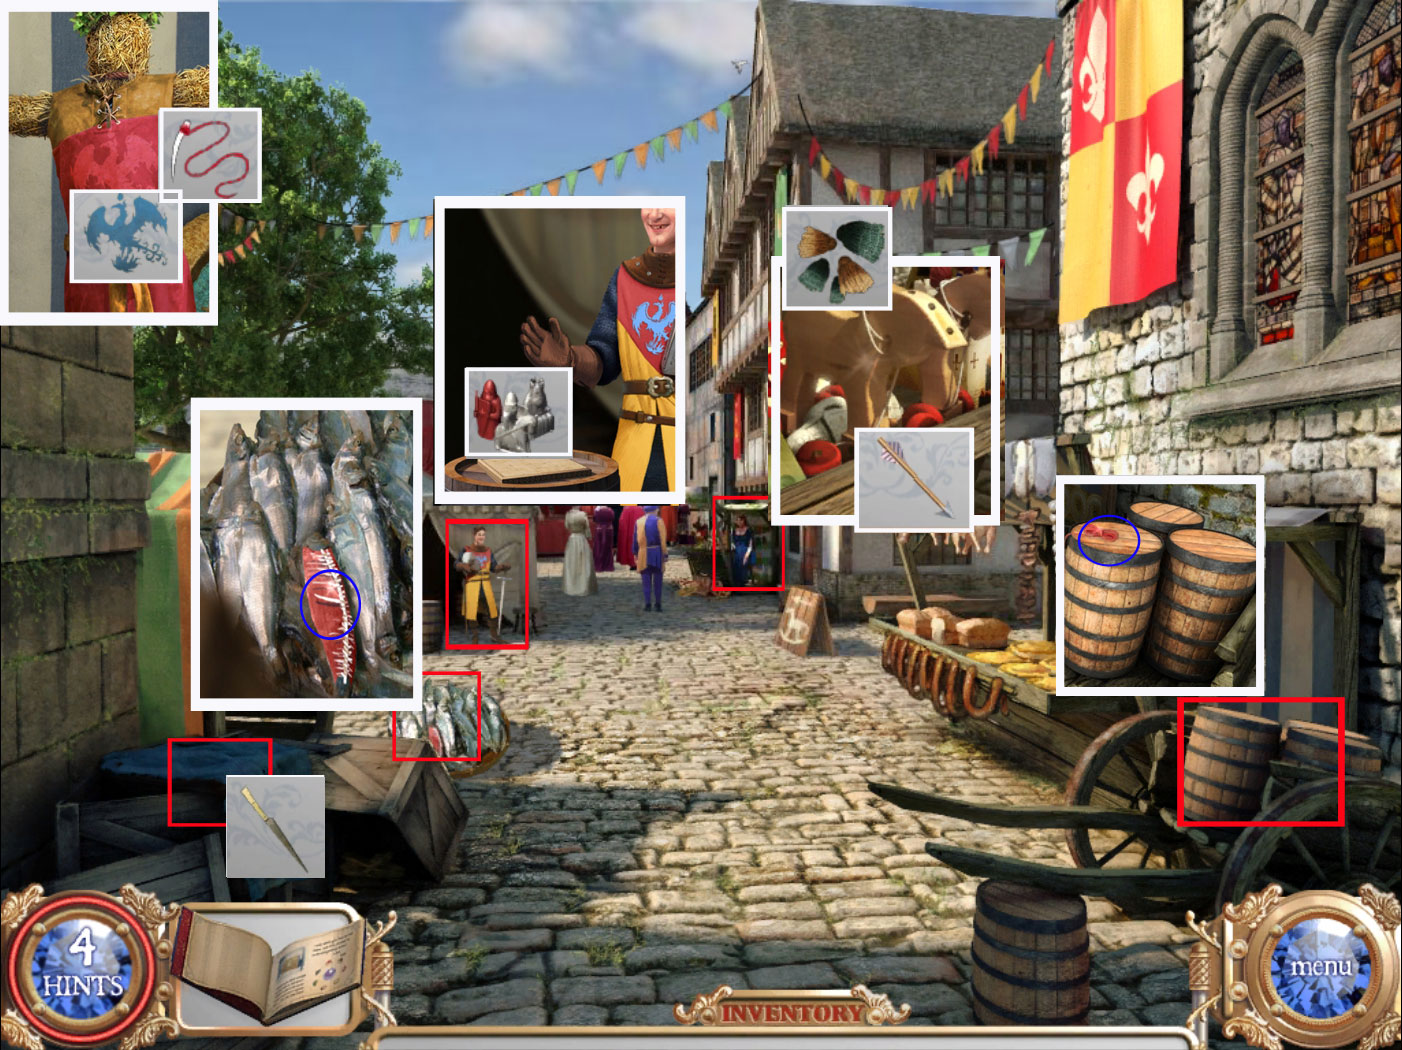
Town Square
Click on the barrels to the right and take the thread.
Click on the fish to the left on the ground - get a part of the fish skeleton for a needle.
It will combine in you inventory as Thread and Needle.
Use the knife on the blue material on the left to get a heraldic.
Go back to the tents, click the dummy and place the heraldic on the crest. Sew it with thread and needle.
Take the completed emblem - it will show up automatically on your clothes.
Go back to the Town Square.
Click on the market stall on the far right.
Talk to the Lady and fix the wooden horse for her.
Use the tassels from your inventory as mane and the arrow as stick for the wheel.
Play the hidden-object scene to obtain chess figures.
Speak to Sir Bodwin on the far left in front of the tent.
To get his ring he wants you to play with him.
Click the table in front of him and place the chess figures on the wooden board.
Screenshot
Move the knight in an L shape, one step over and two up or other way around. The ending point will turn red.
You goal is to turn all the squares red.
If you end on a square you have already turned red, it will turn white again.
The spoiler will give you a step-by-step-solution
Imagine the horizontal rows as 1-4 (seen from left to right) and the vertical rows as A-D (seen from top to bottom)
C2
B4
D3
C1
A2
C3
A4
B2
D1
C3
B1
A3
C4
D2
B3
A1
C2
D4
C2
A3
B1
C3
B1
A3
Head back to the tents.
Tents/Sir Bodwin
Enter the blue striped tent and play the hidden-object scene.
A jewelry box will go into your inventory.
Return to Sir Bodwin and give him the jewelry box.
Take the magic ring.
You will be automatically brought back to the Nexus device.
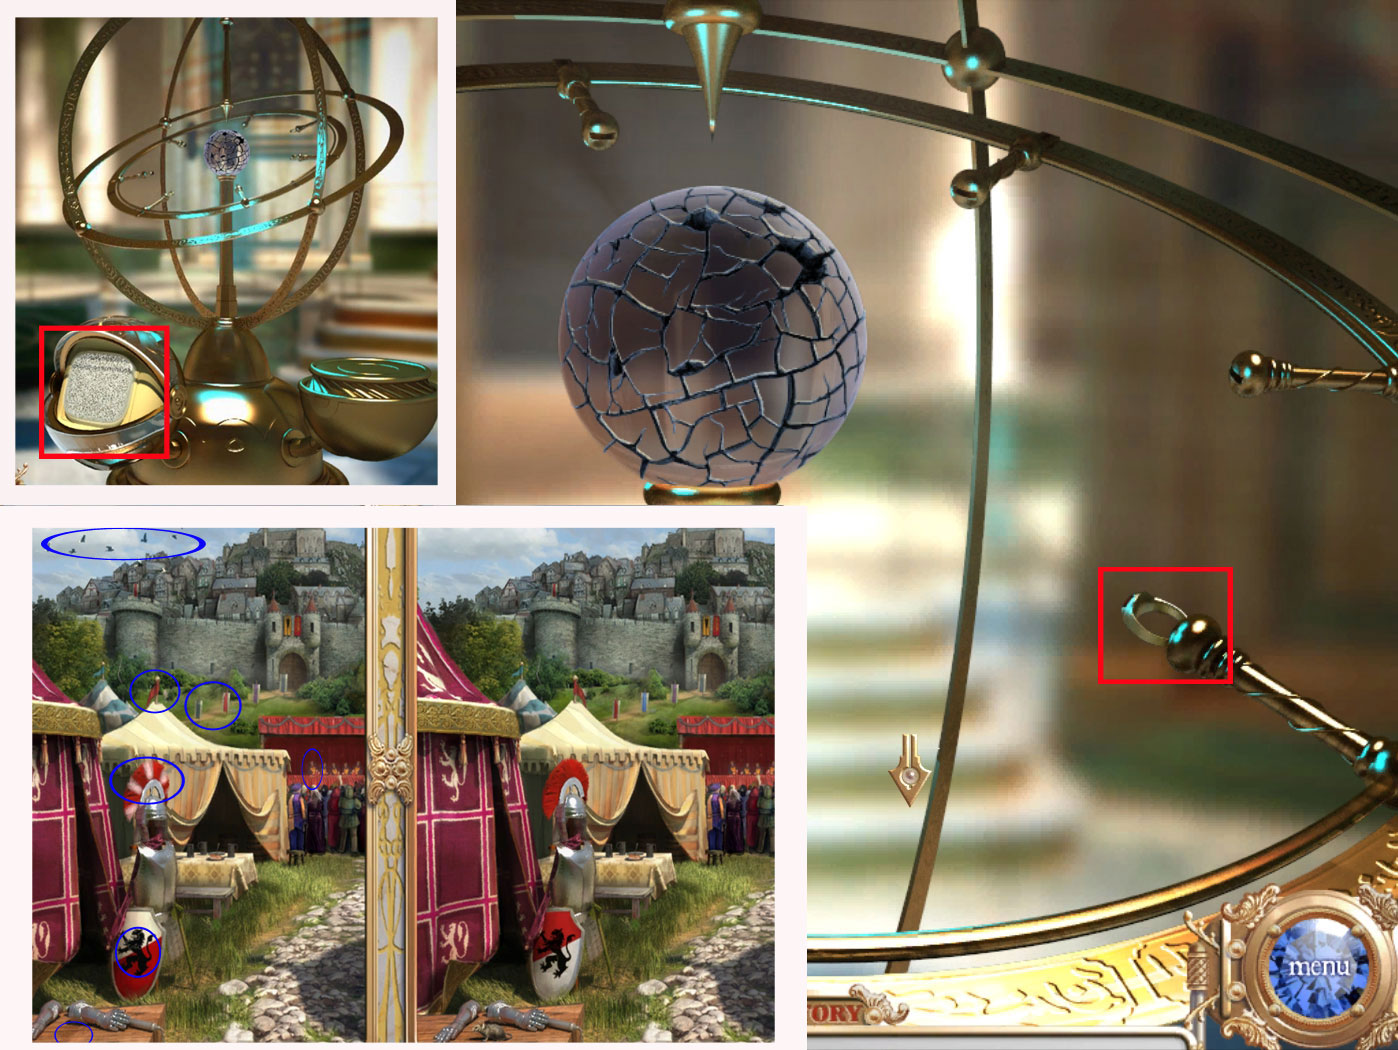
Nexus
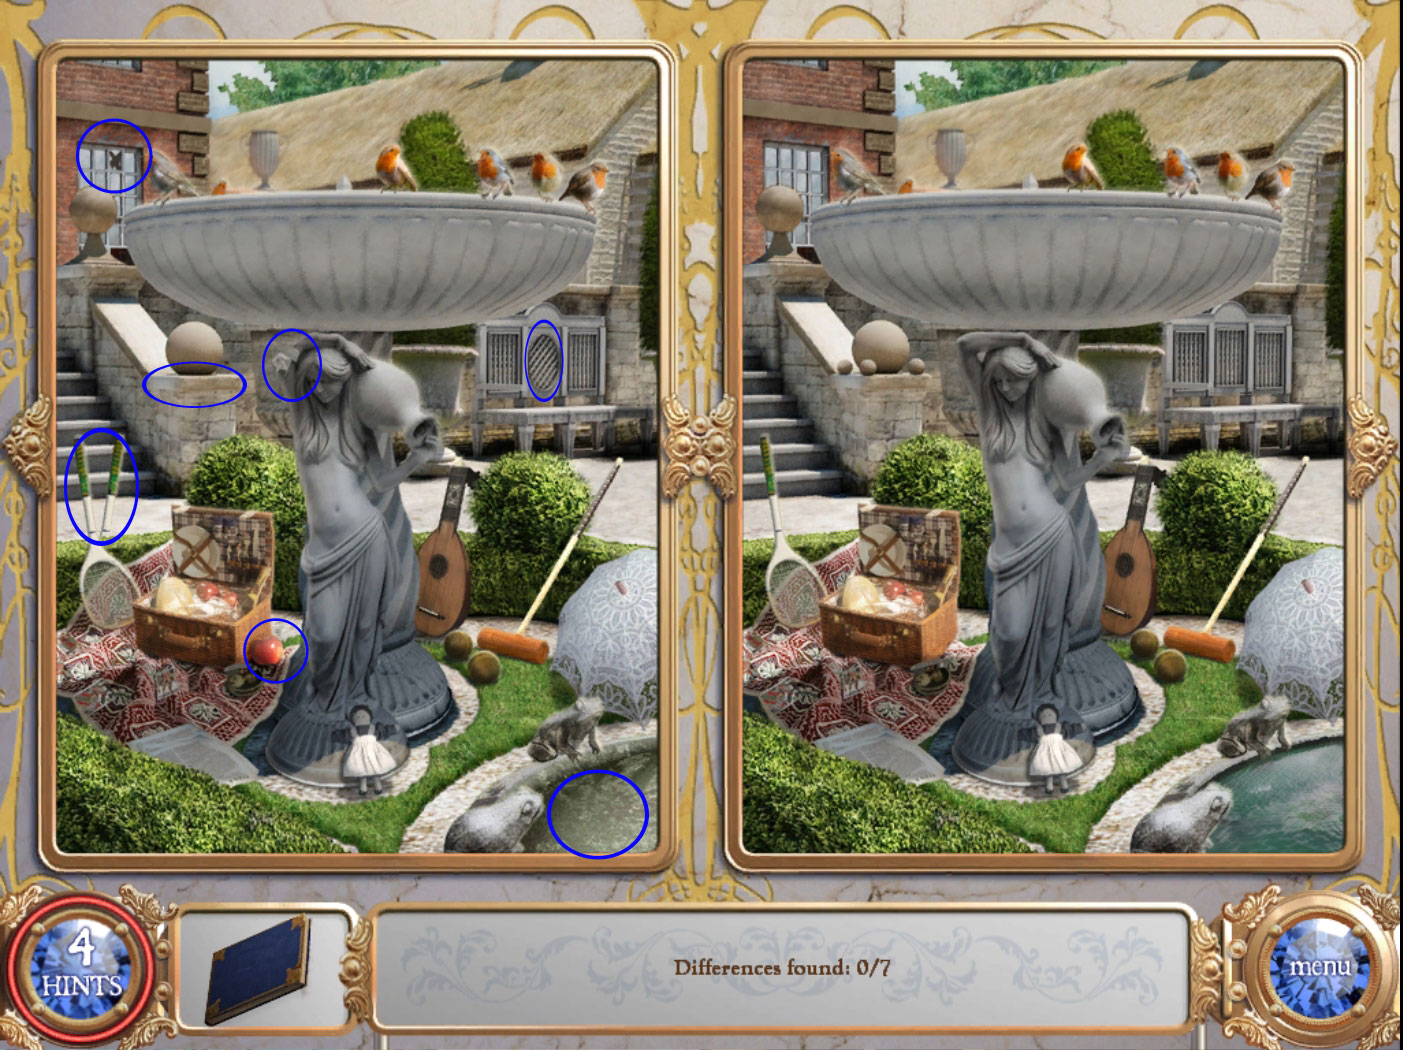
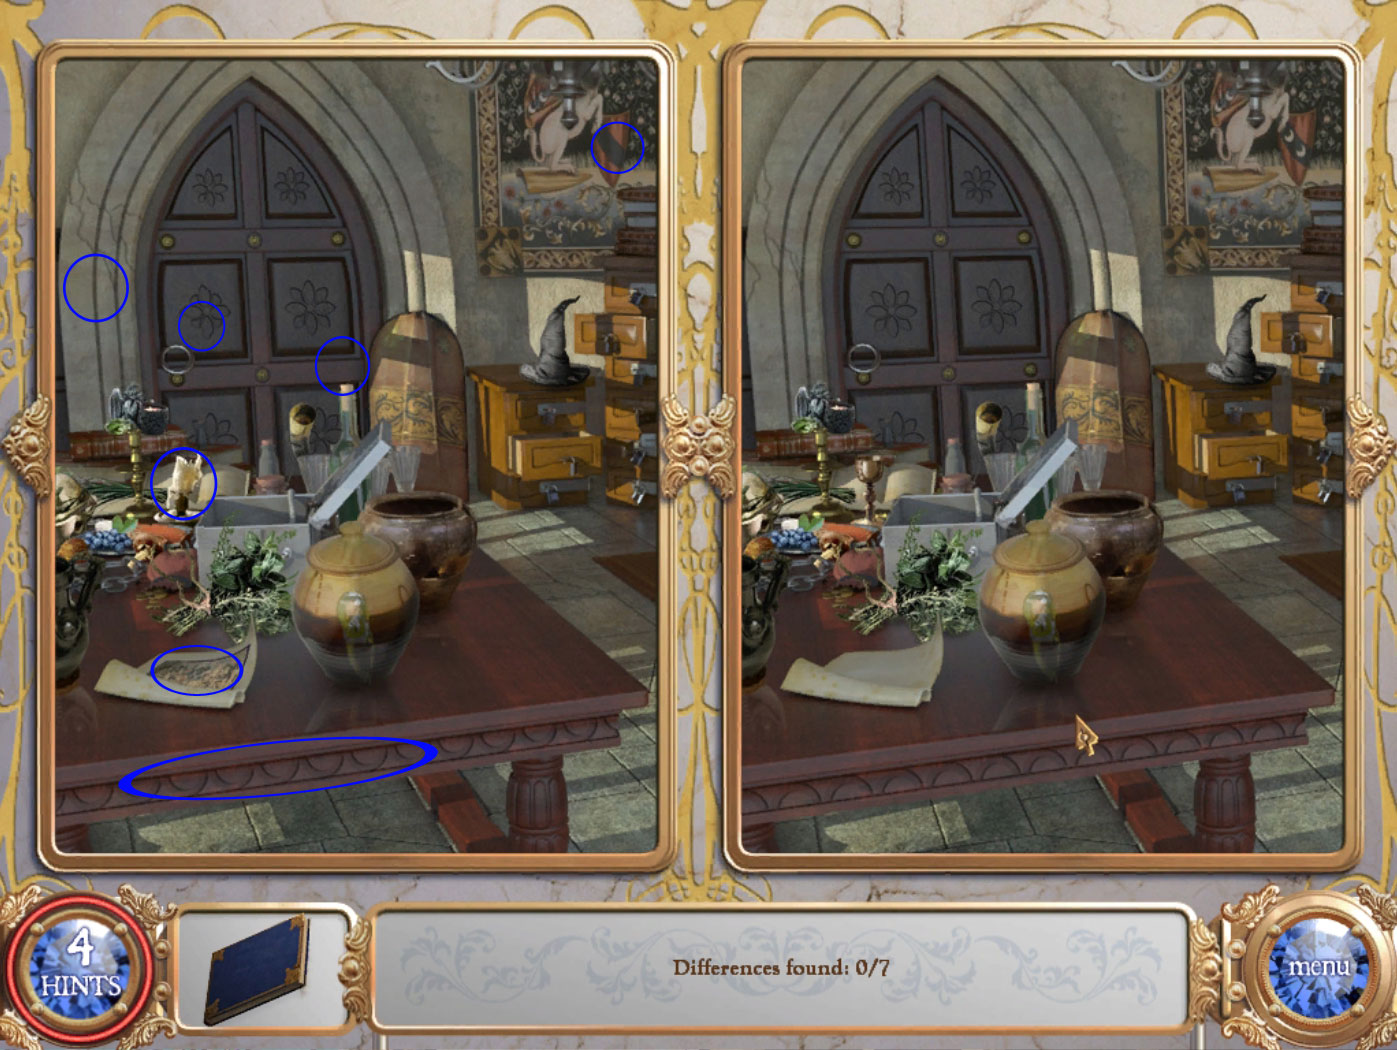
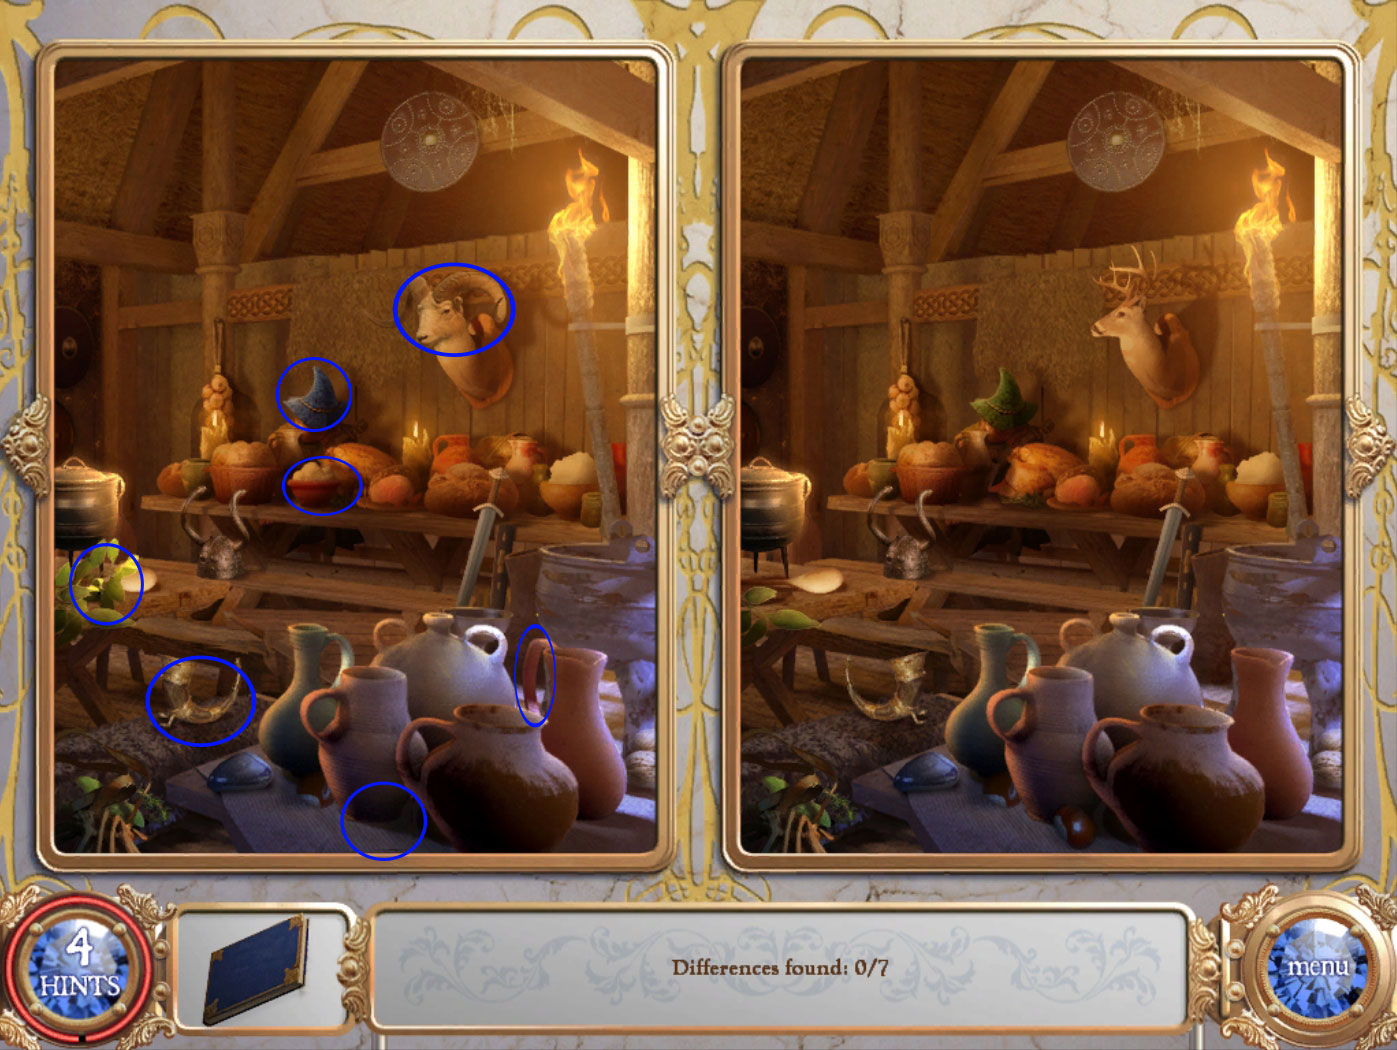
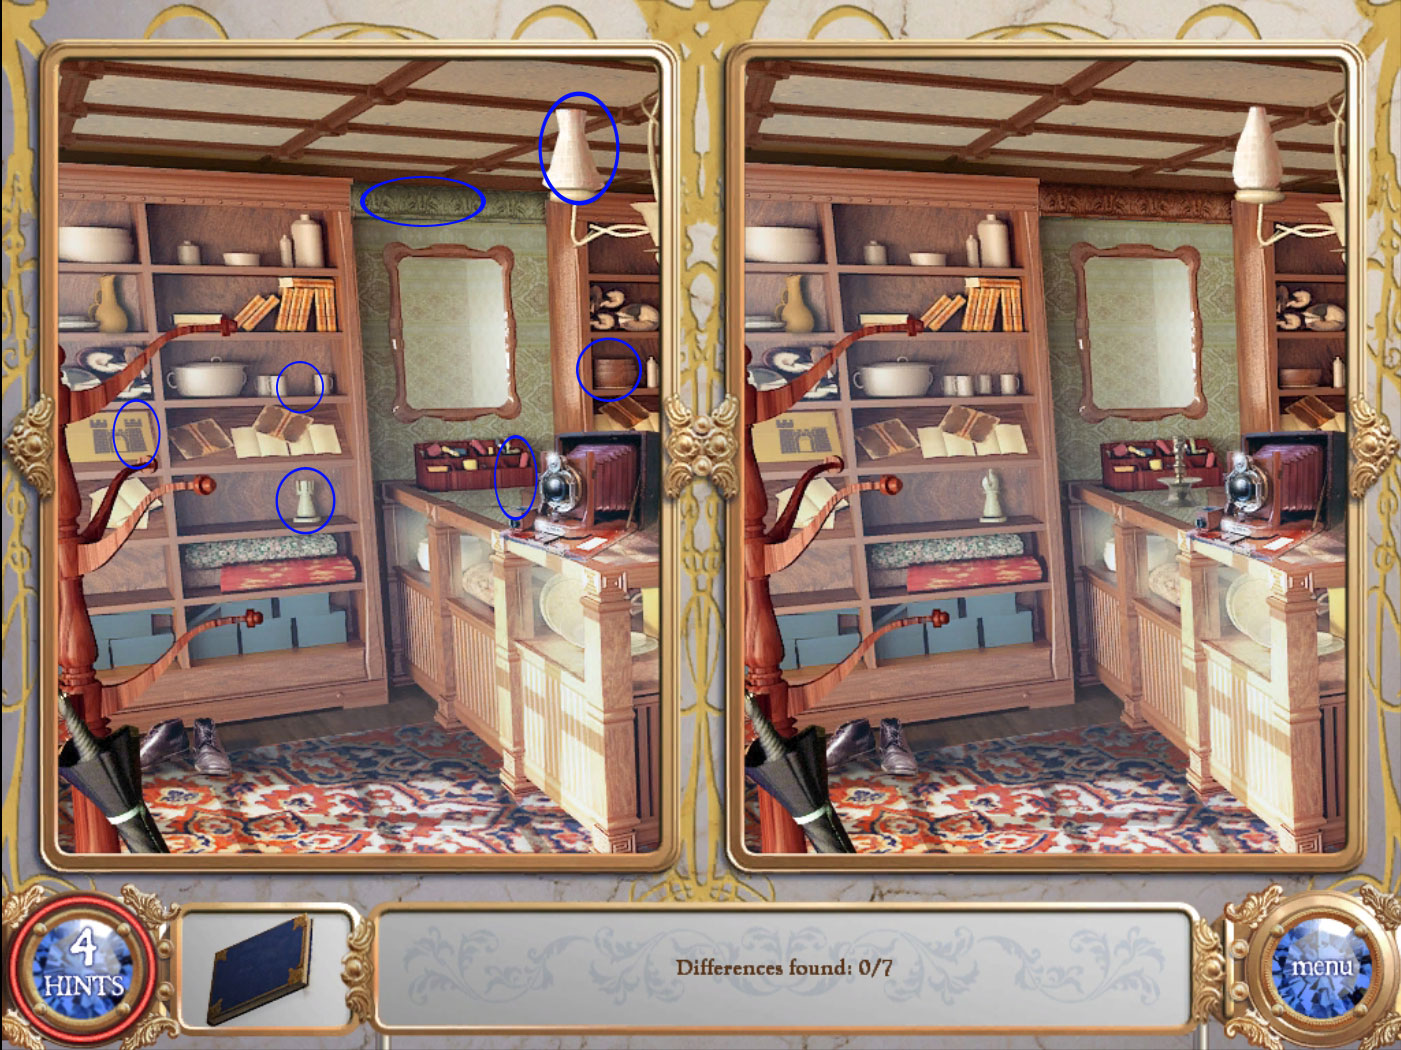
Place the ring somewhere, step back once and click the left sphere to obtain a "Find the Difference" scene.
Screenshot
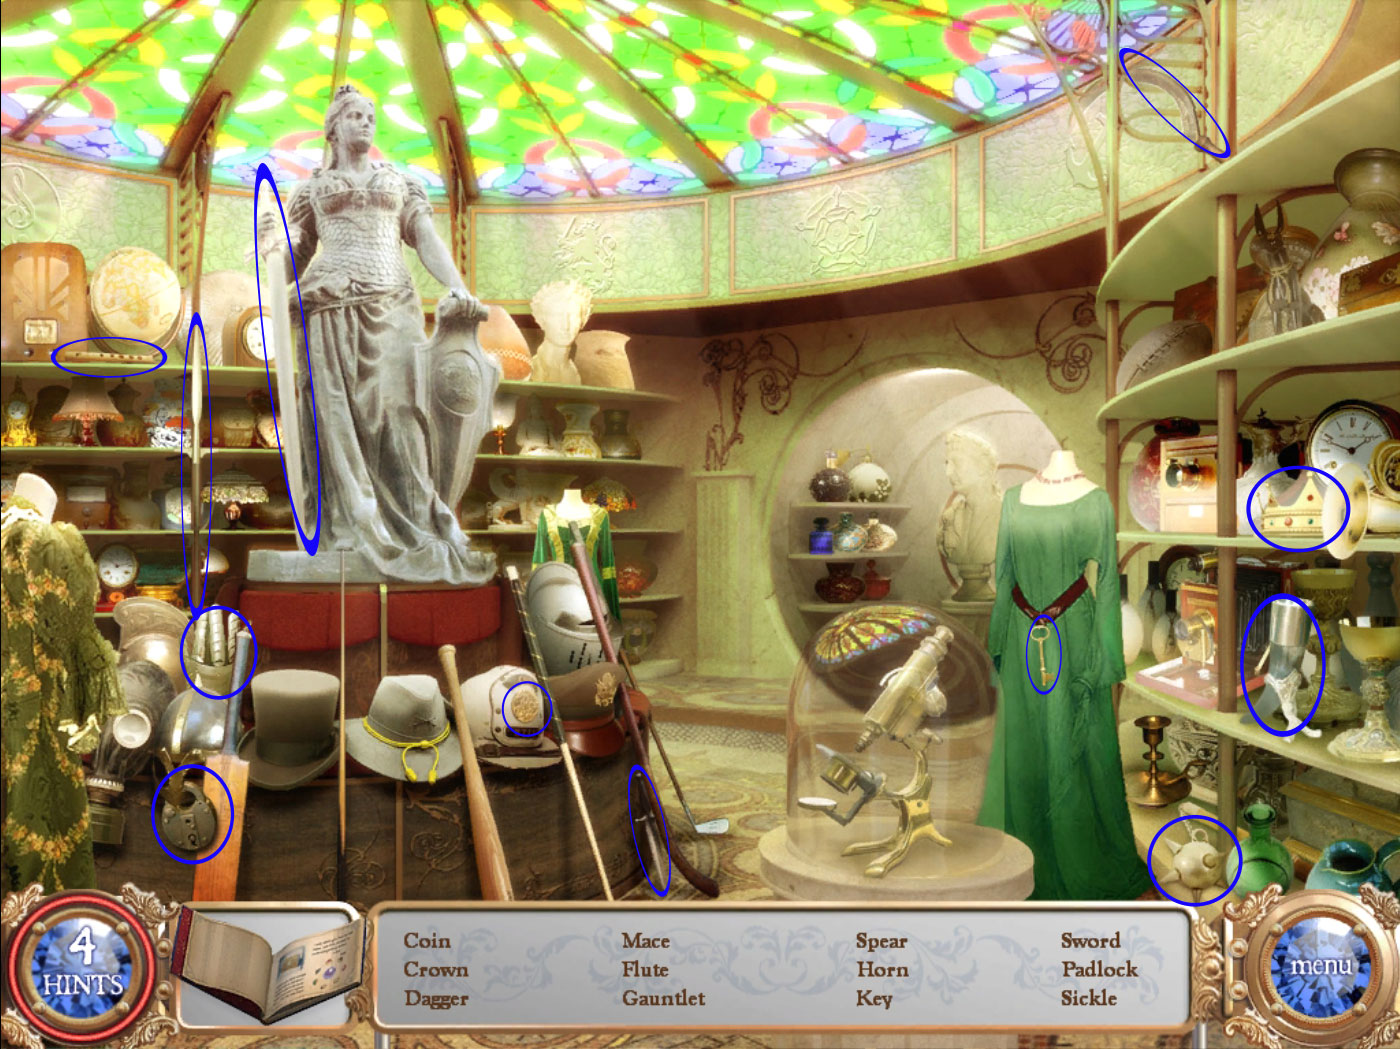
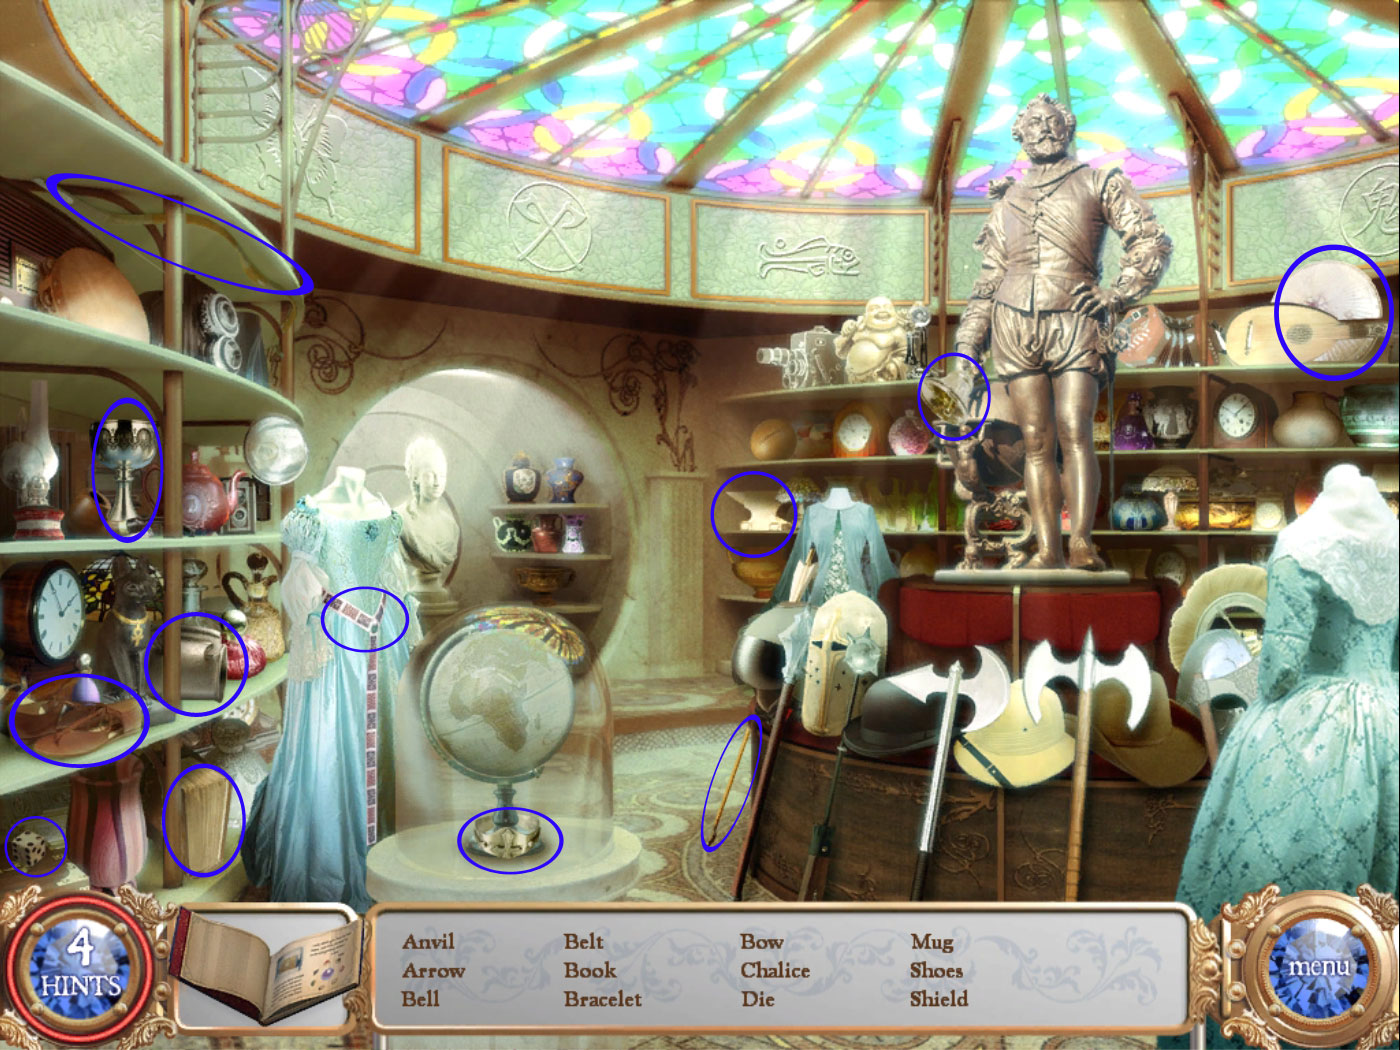
Enter the 19th Century archive and find the listed objects. They will all go into your inventory.
Screenshot
Place the objects on the right plate of the Nexus.
Go through the door right side on the middle which is open now.
Chapter 3: 19th Century
Dining Room
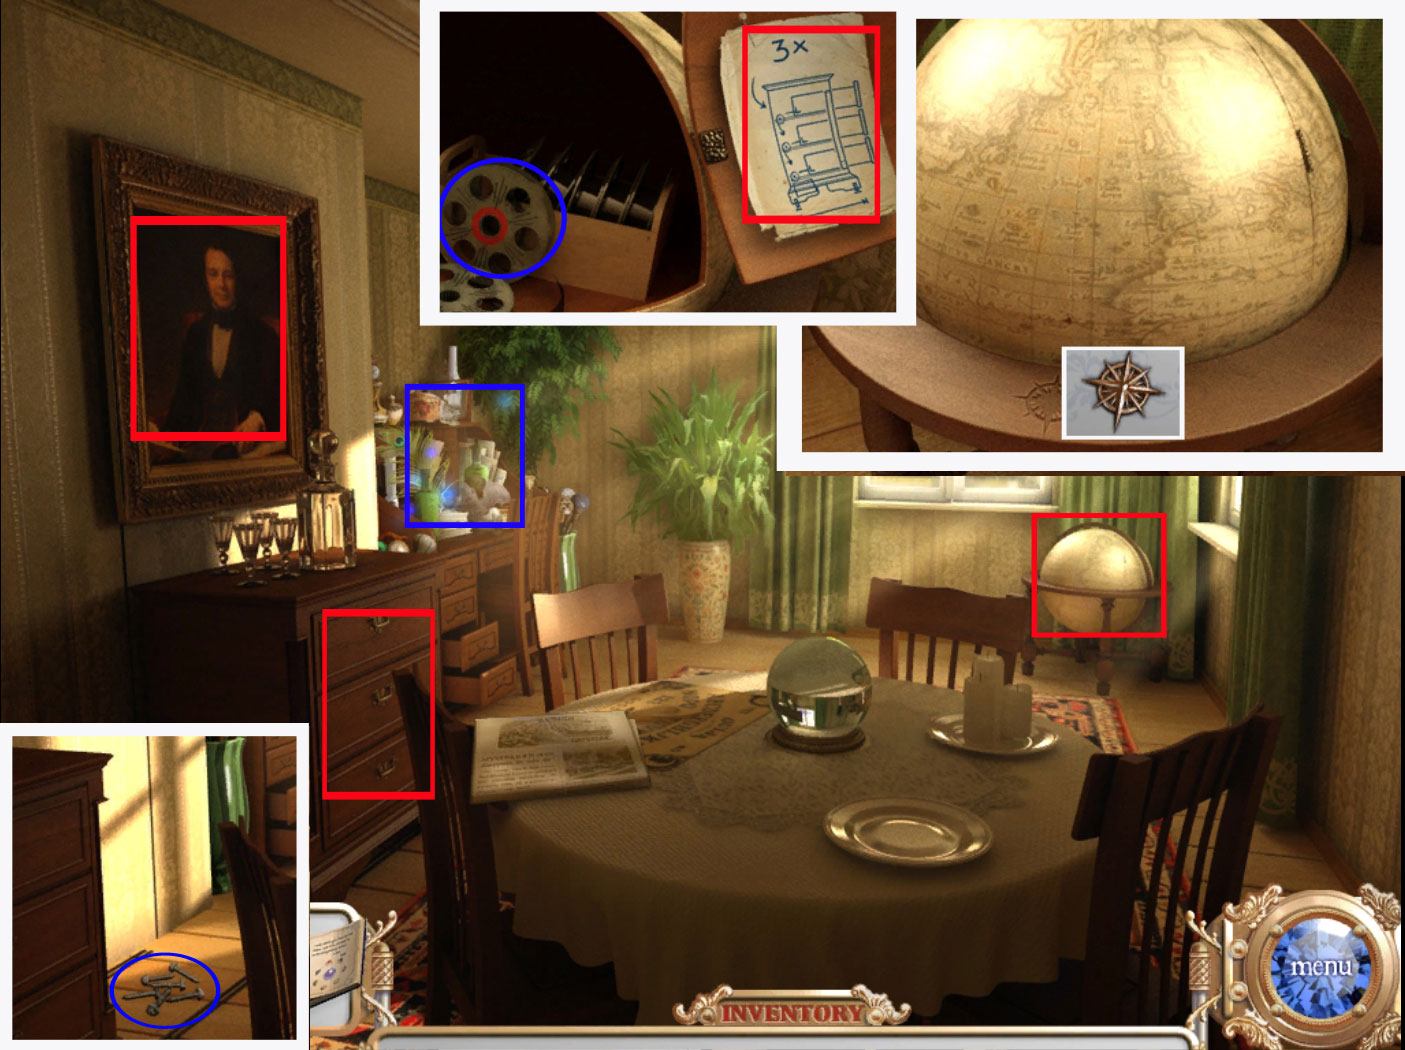
Click the desk on the far left to play a hidden-object scene. You will get a (compass) rose for your inventory.
Click the globe in the right upper corner and place this rose in the front slot.
The globe opens; look at the drawing on the right side.
Take the film roll with the red marking.
Open all three drawers on the dresser.
The dresser moves. Pick up the screws from the floor.
Click on the painting and it will fall down.
Screenshot
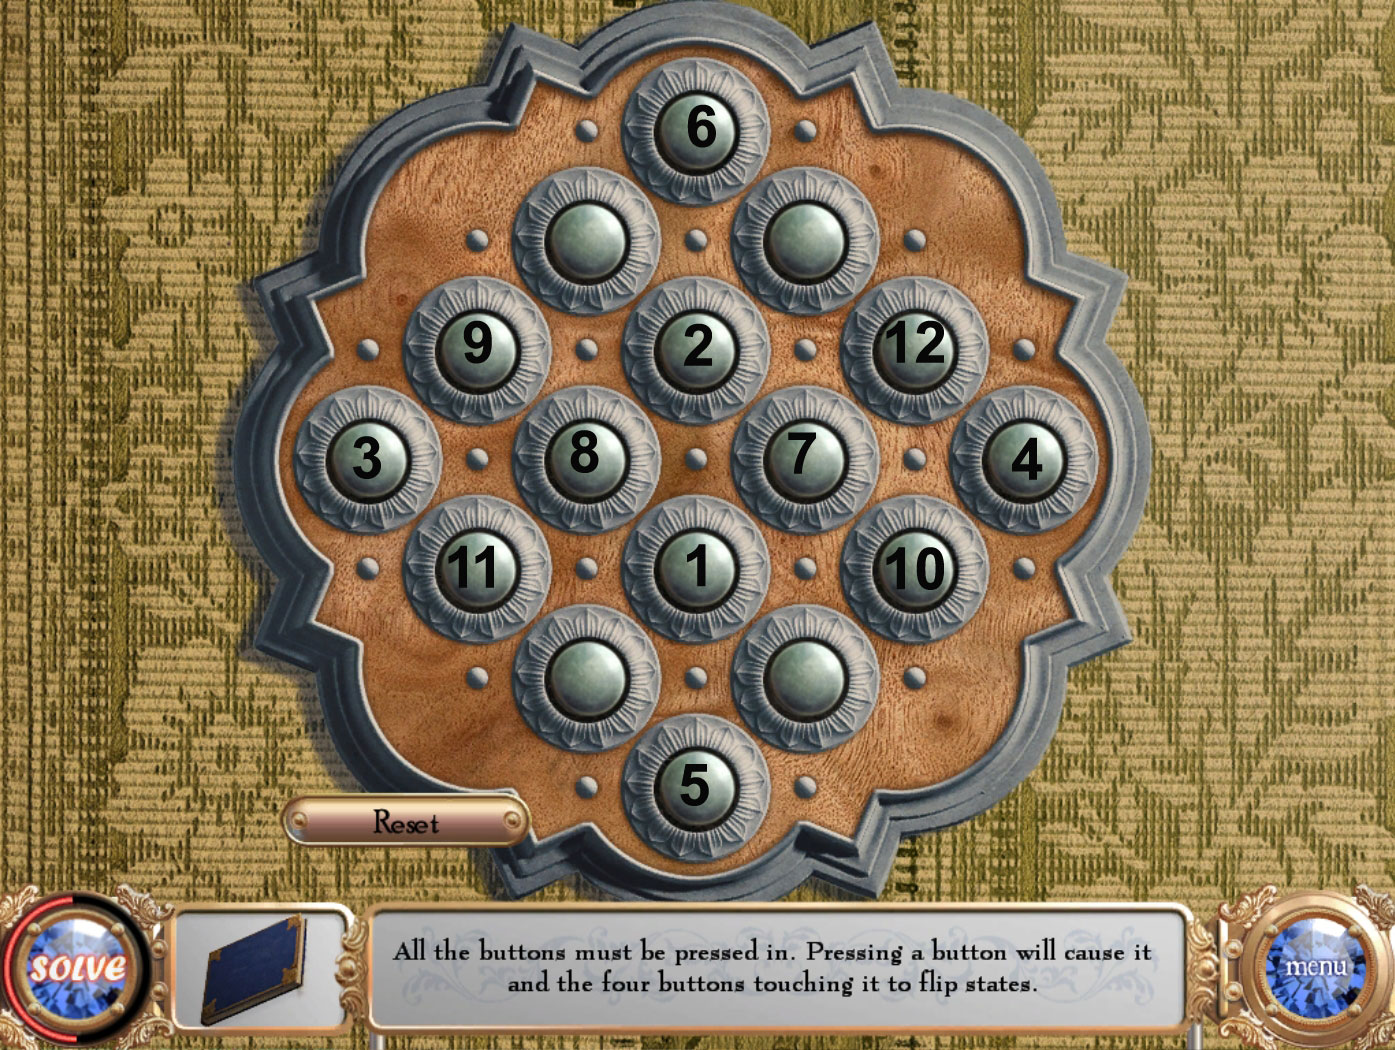
Click on the plate you now see on the wall to activate a mini game.
You need to push the buttons in the correct order so that at the end all buttons are pushed in.
Pushing a button will affect the button itself and all adjacent buttons around.
Please see screenshot for a solution.
Screenshot
The door opens - enter the Film Room.
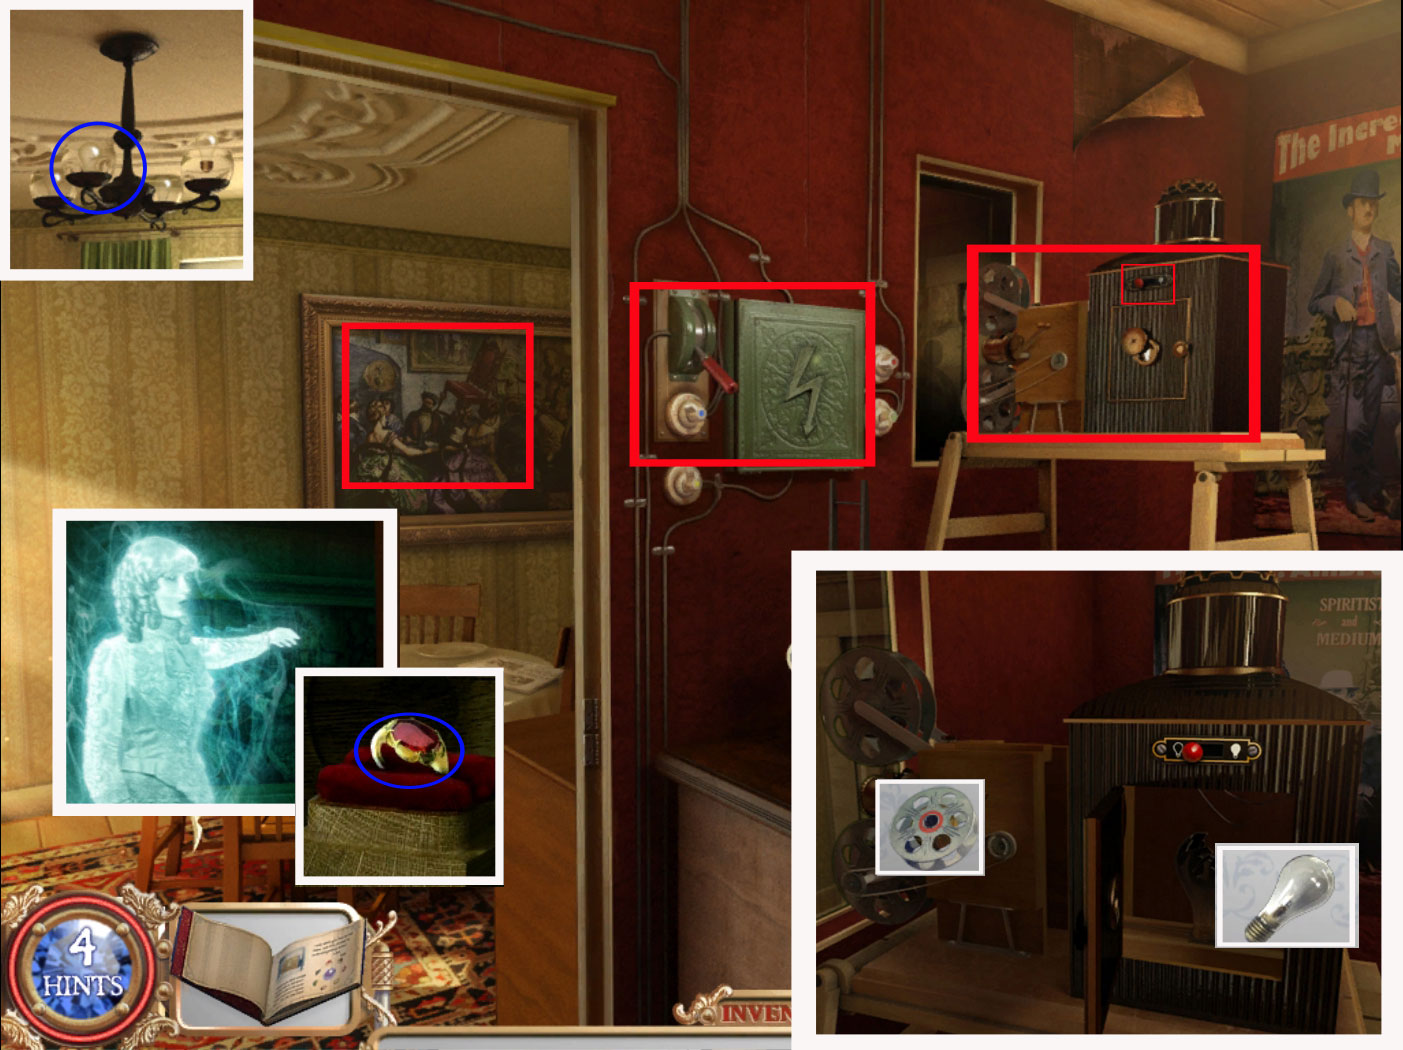
Film Room
From this perspective you can see another painting in the Dining Room.
Click it and play the hidden object scene to obtain a cable.
Click on the projector and then push the little red button near the top.
Watch the cut scene.
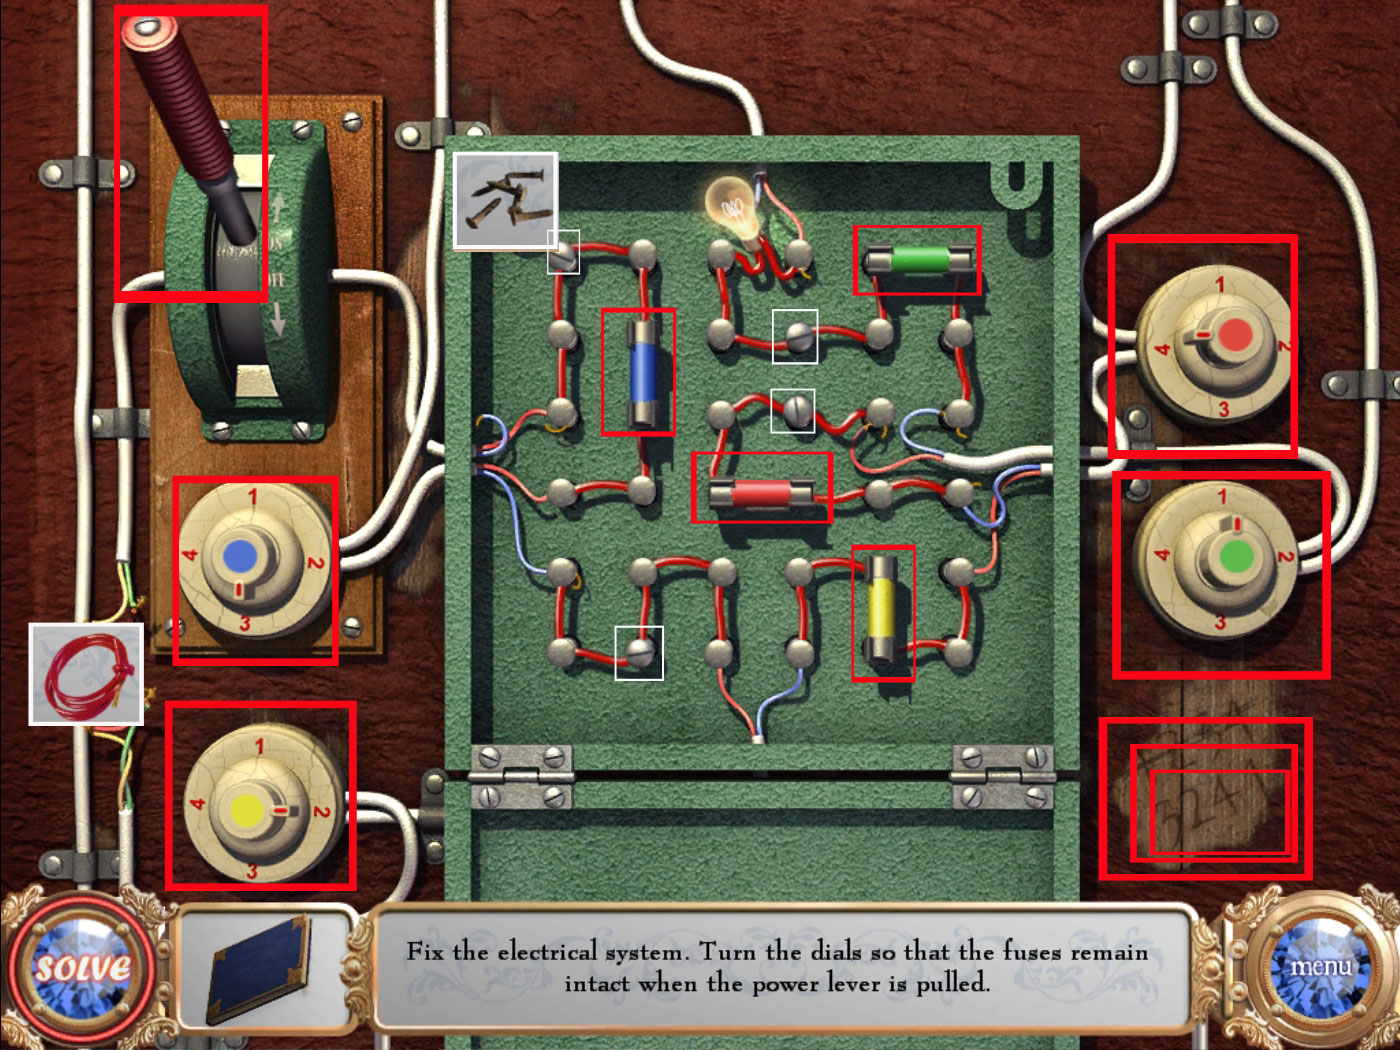
Now click the electrical box on the wall.
Place the screws in the appropriate holes and click the fuses to reposition them.
Place the cable on the split wires on the left side.
There are numbers etched on the bottom right.
Turn the dials to point them to the numbers of the etching.
Turn: upper left = 3, upper right = 4, lower left = 2, lower right = 1
Click the lever when all is done.
Screenshot
Still, it does not work.
Take a closer look on the projector and click the door to open.
Remove the broken bulb.
You will find a new one by clicking the ceiling lamp in the Dining Room.
Place the bulb and click the film from your inventory on the front of the projector.
Click the little red button.
The ghost is pointing onto the painting - click it twice to find a hidden compartment.
Click the compartment and take the magic ring.
Screenshot
You will be brought to the Nexus.
Nexus
Place the ring somewhere, step back once and click the left sphere to obtain a "Find the Difference" scene.
Screenshot
Enter the 17th Century archive and find the listed objects. They will all go into your inventory.
Screenshot
Place the objects on the right plate of the Nexus.
Go through the open door.
Chapter 4: 17th Century
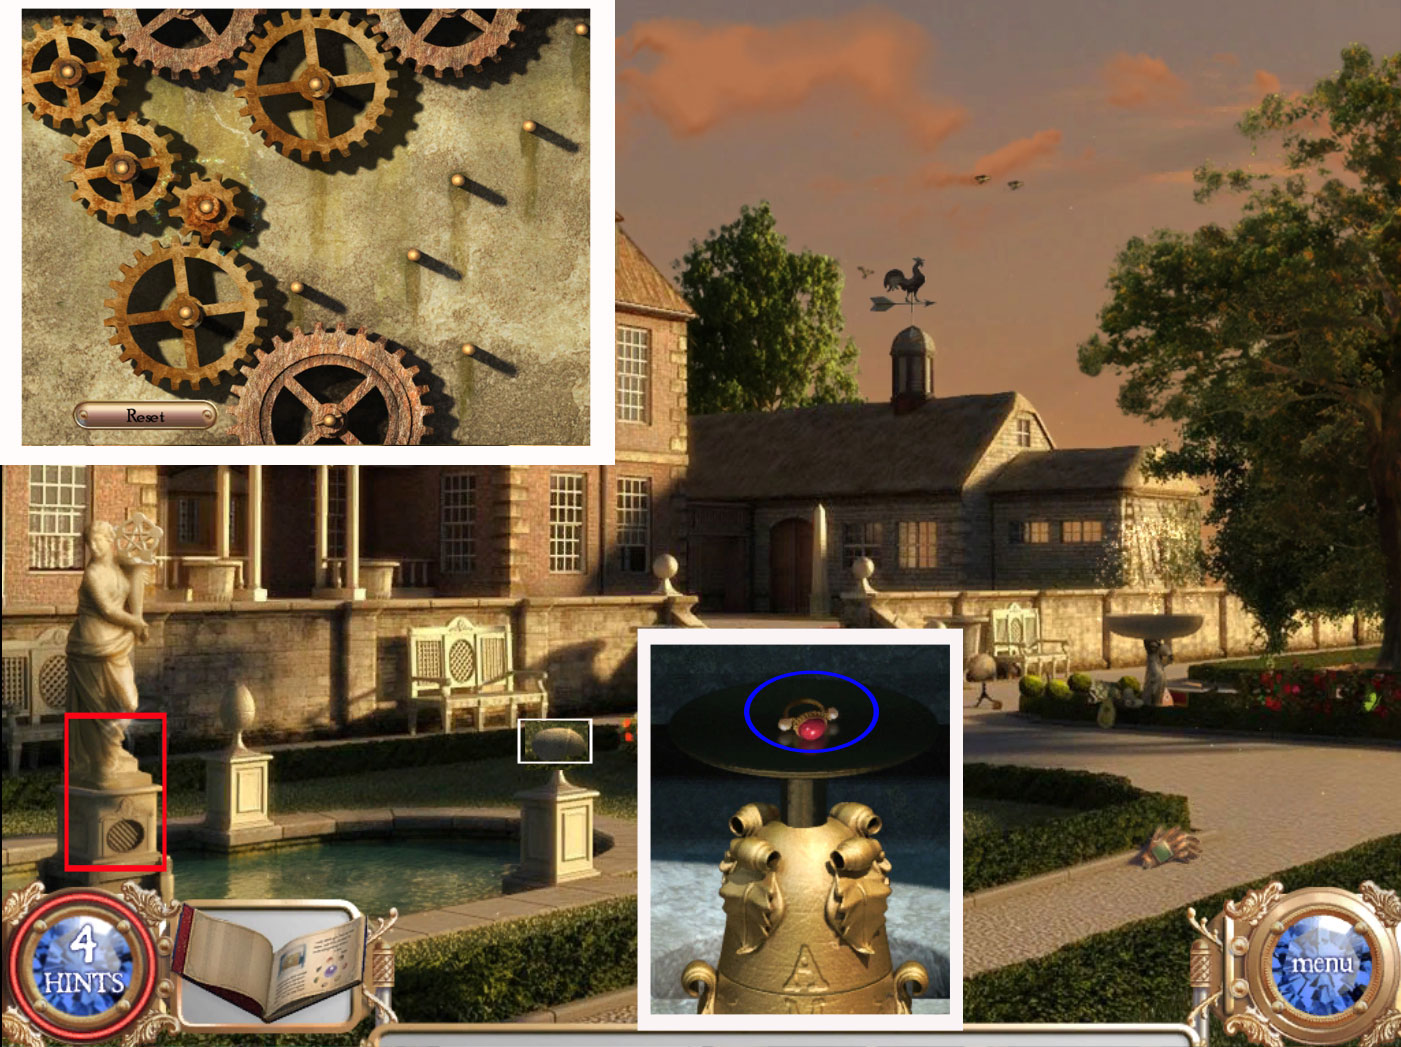
Manor outside
Click the fountain on the far right and play the hidden-object scene.
A gear will go into your inventory.
Pick up the stone egg from the grass.
You can't do anything else here right now, so enter the Manor.
Manor inside
Grab the gear from the top of the bookshelf on the right.
Click the painting in front of the fireplace to expose a gear.
Click the gear to activate the bookshelf.
Click the bookshelf
Find the listed items and you will get a thermometer, beaker, empty bottle and a pot for your inventory.
Go outside and use the pot to get water from the pond on the left.
Screenshot
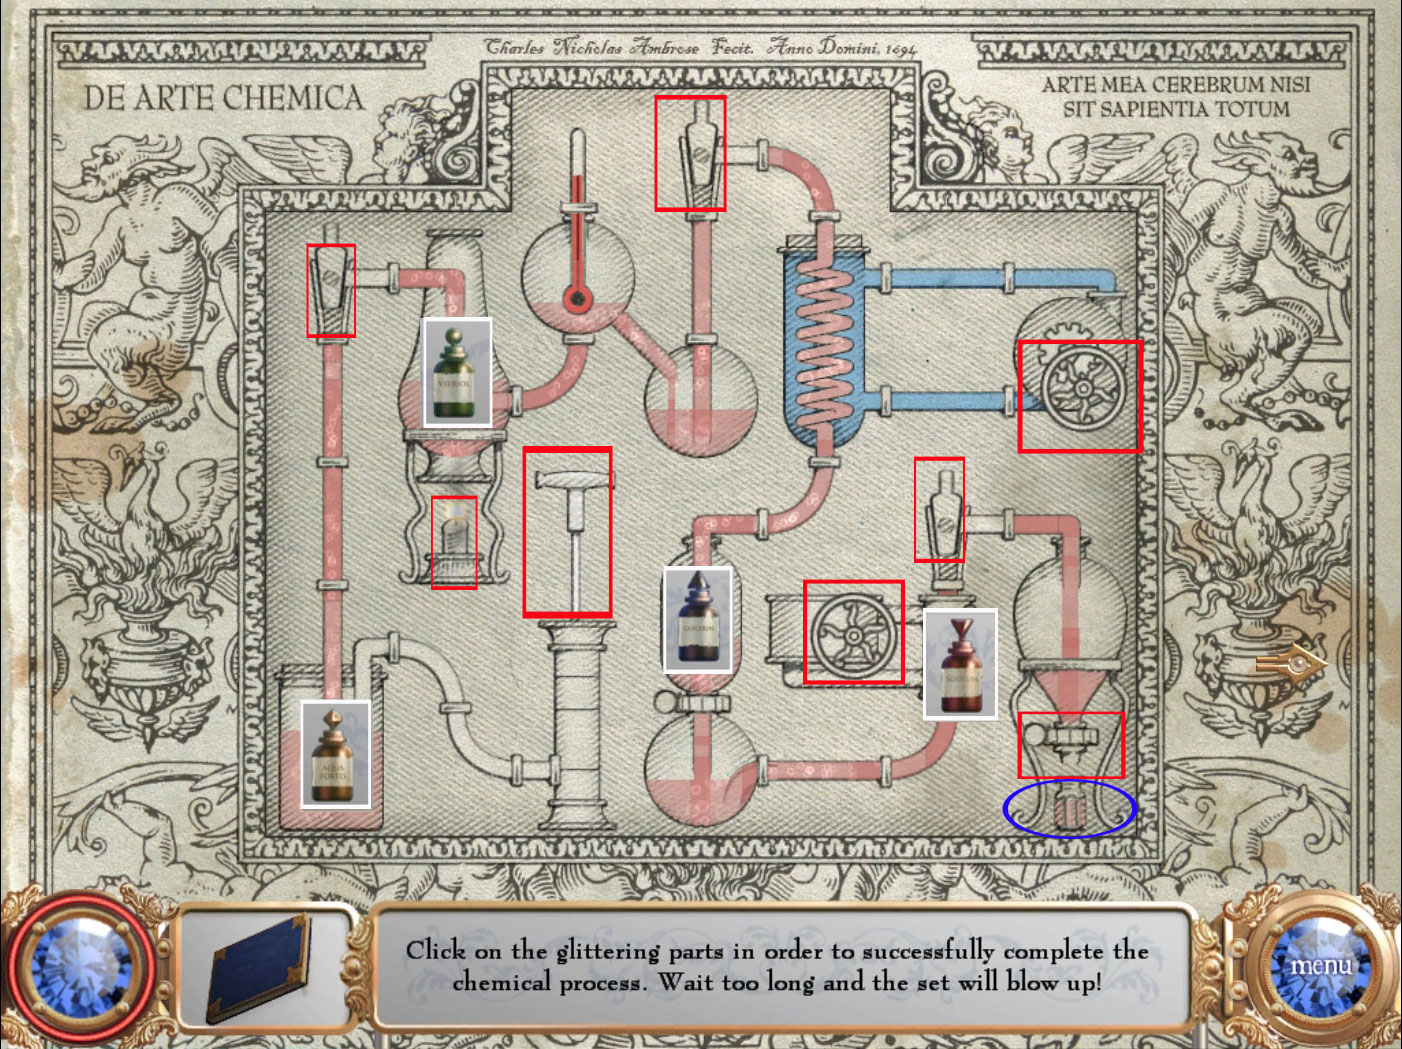
Go back inside and click the table.
Place the items you found before on the appropriate spots. They are marked in the same color as the items are.
Now, on the scheme, place the bottles by matching the colors.
As the liquid passes through, a different section sparkles.
Click on the sparkling part quickly. When you do it too late, the mini game will reset and you have to start over.
Go on clicking the sparkling parts until the liquid goes into the vial at the end.
Take the vial.
Screenshot
Place the vial on the gear of the fire place.
After the blast you will find a second gear in your inventory.
Click the debris and play a hidden-object scene.
You will receive a third gear.
Leave the Manor.
Manor outside
Click the stone egg onto the pedestal on the right side.
A stone path appears on the water.
Click the statue and place the three gears from your inventory on any peg inside.
You now have five moveable gears.
Place them in a way so that they are all connected.
Click on the weight above the gears.
Another mini game appears.
Move all the pieces from the right post to the middle post without stacking any larger ring on top of a smaller ring.
There are four pieces: One shows only the letter "A", one the letters "MBR", one the letters "OSE" and the base.
Move A to the left.
Move MBR to the middle.
Move A to the middle.
Move OSE to the left.
Move A to the right.
Move MBR to the left.
Move A to the left.
Move the base to the middle.
Move A to the middle.
Move MBR to the right.
Move A to the right.
Move OSE to the middle.
Move A to the left.
Move MBR to the middle.
Move A to the middle
Take the ring.
Screenshot
Nexus
Place the ring somewhere, step back once and click the left sphere to obtain a "Find the Difference" scene.
Screenshot
Enter the 15th Century archive and find the listed objects. They will all go into your inventory.
Screenshot
Place the objects on the right plate of the Nexus.
Go through the open door.
Chapter 5: 15th Century
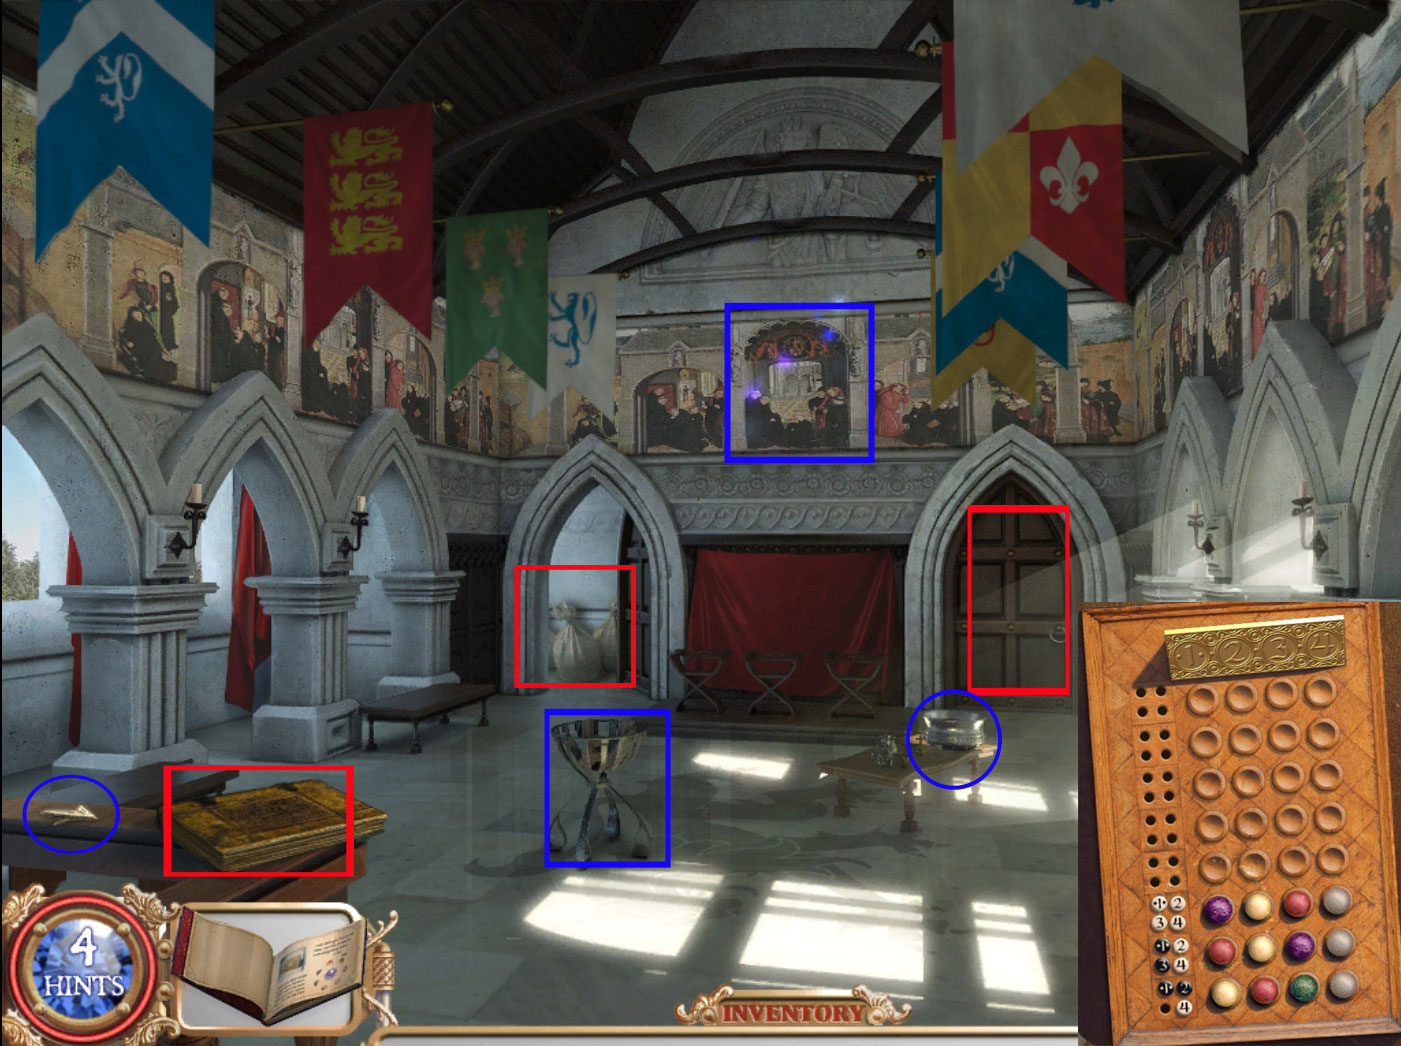
Hall
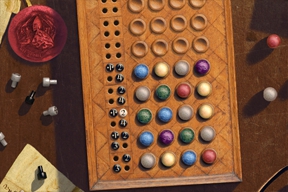
Talk with the man on the far right - you will have to play a game.
Guess the correct order and colors of the marble placement.
Place the marbles you think are correct on the bottom row and check what the pegs on the left say when you have placed them all.
The black pegs indicate the correct color in the incorrect spot; the white pegs indicate the correct color in the correct spot; missing pegs mean that color isn't included at all.
1 - 4 is seen from left to right.
Using the information from the pegs on the bottom row, move up a row and place the marbles again.
Used marbles will be replaced, repeat until you get four white pegs.
You will receive a key.
Click the painting above the red cloth and play the hidden-object scene. You will get an apple medallion.
Click the key part on the railing on the lower left and read the book on the lower left.
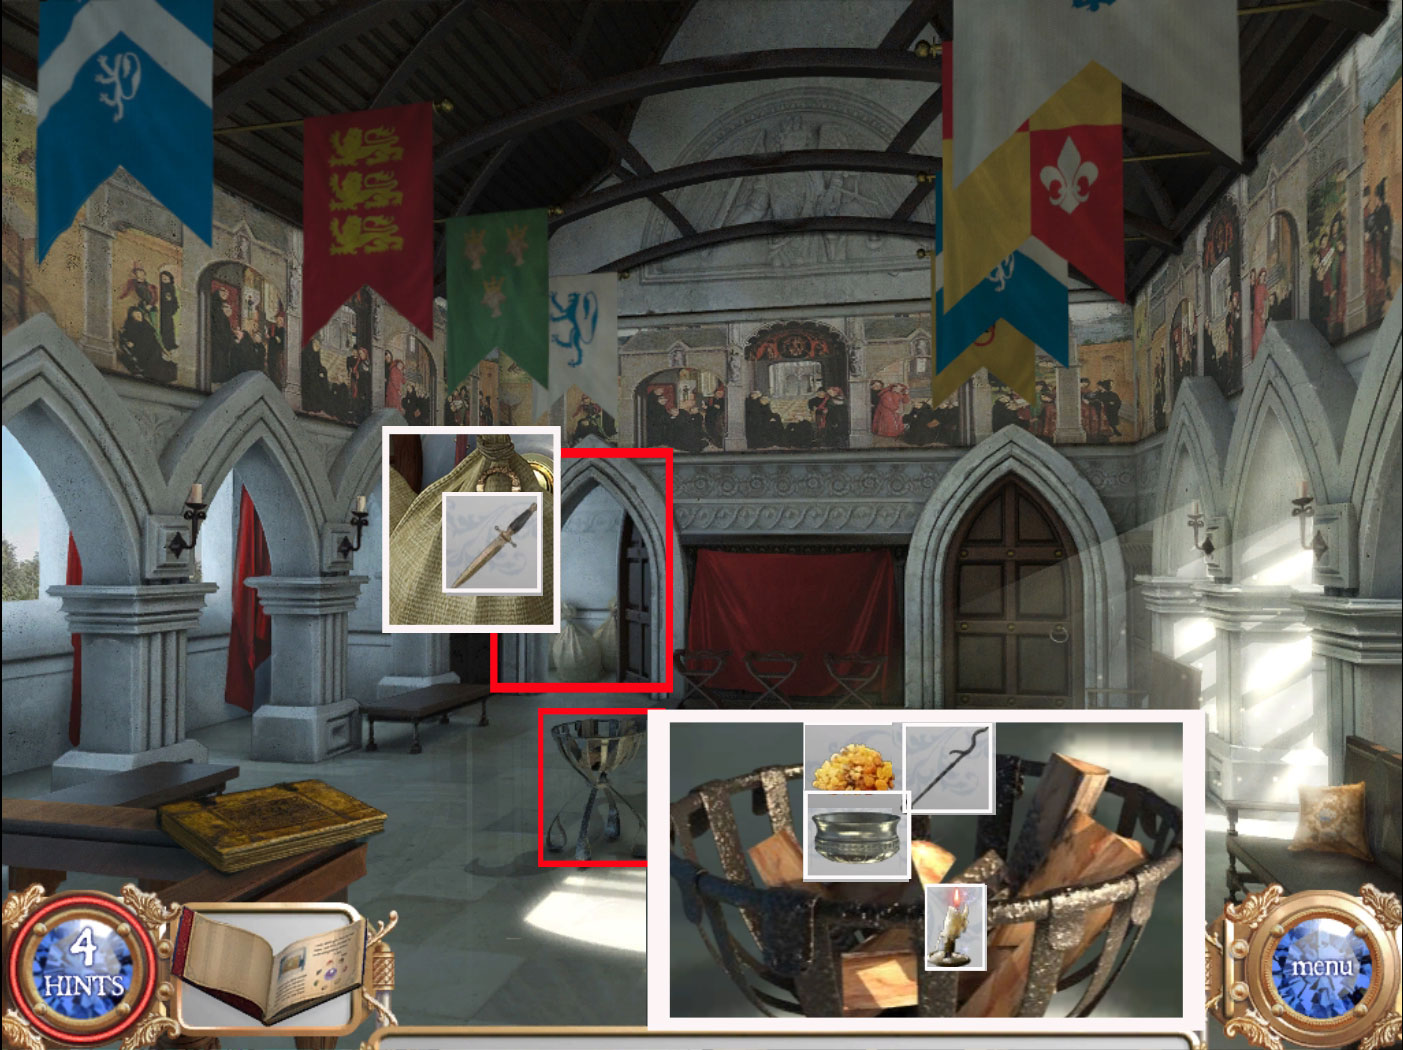
Pick up the silver bowl from the table in the middle of the room.
Have a look at the sack through the door on the left - it is tied.
Have a look at the fire pit in the middle of the room - you need something with which to light the fire.
Click the door on the right next to the red cloth.
Screenshot
Evidence Room
After the cut scene click on the table.
Play the hidden object scene to obtain another key part.
Take the fire poker on the right of the fireplace.
Get the key from the mantle.
Click on the ground to the left of the mantle and try to grab the key part.
As it does not work try to use the poker to get the key part.
It does not work - you will have to come back later.
Click the small cabinet and use the gold key to open the lock.
Take the dagger.
Click the cabinet left next to the fire place and use the silver key to open the lock.
Use the apple medallion on the locked leather pouch in the drawer to activate a mini game.
Grab the tiles from the triangle and place them on the square to restore the picture.
Tiles can be turned with a left click.
Tiles in the correct place will lock.
Pick up the resin from the pouch when it is open.
Click the chest in front of the fire place. You need a special key for it.
Click the cabinet on the right side. The lock is rusty; you will need something strong to pry it open.
Return to the Hall.
Screenshot
Hall
Click the sack through the door on the left and use the knife to open it.
This will activate a hidden-object scene.
You will obtain a crowbar.
Click the fire pit and use the candle to light the fire.
Place the silver bowl onto the fire pit and put the resin into the bowl.
When you have melted the resin, use the fire poker with it.
Screenshot
Enter the Evidence Room again.
Evidence Room
Click on the cabinet on the right of the fireplace and use the crowbar to pry open the rusty lock.
Take the key part from inside the drawer.
Click on the ground to the left next to the fireplace and use the now sticky poker on the key part.
Place the 4 key parts one by one on the chest lock.
Take the magic ring.
Nexus
Place the ring somewhere, step back once and click the left sphere to obtain a "Find the Difference" scene.
Screenshot
Enter the 8th Century archive and find the listed objects. They will all go into your inventory.
Screenshot
Place the objects on the right plate of the Nexus.
Go through the open door.
Chapter 6: 8th Century
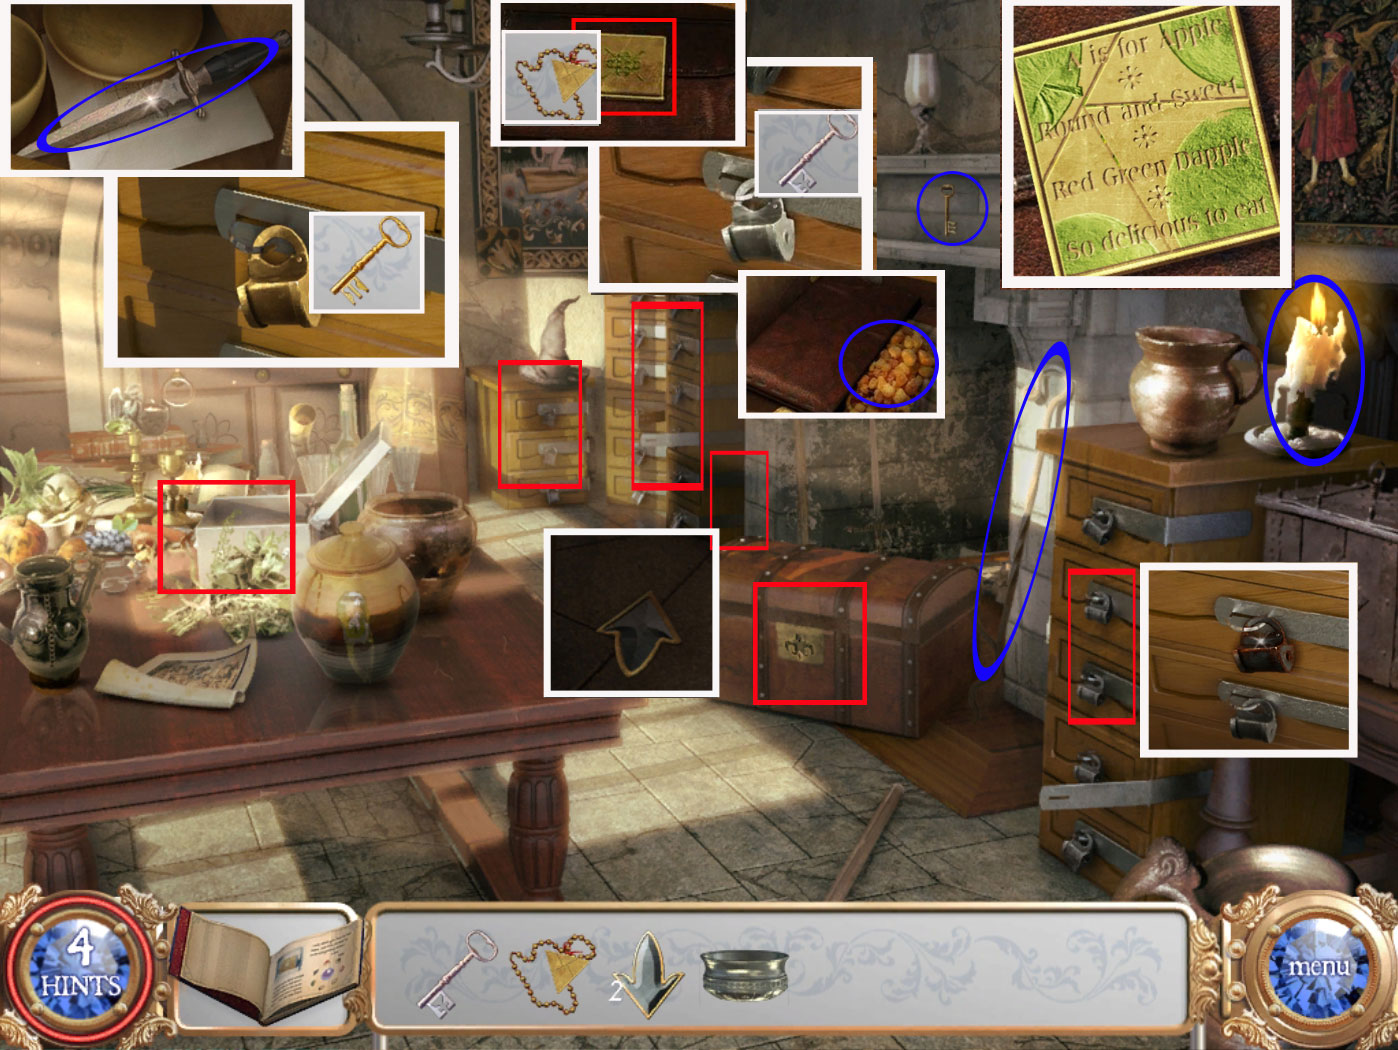
Alchemist Hut
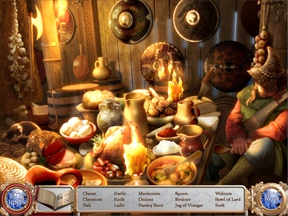
Enter the Alchemist hut on the right and click the table on the far right to play a hidden-object scene.
You will get a bottle of vinegar for your inventory.
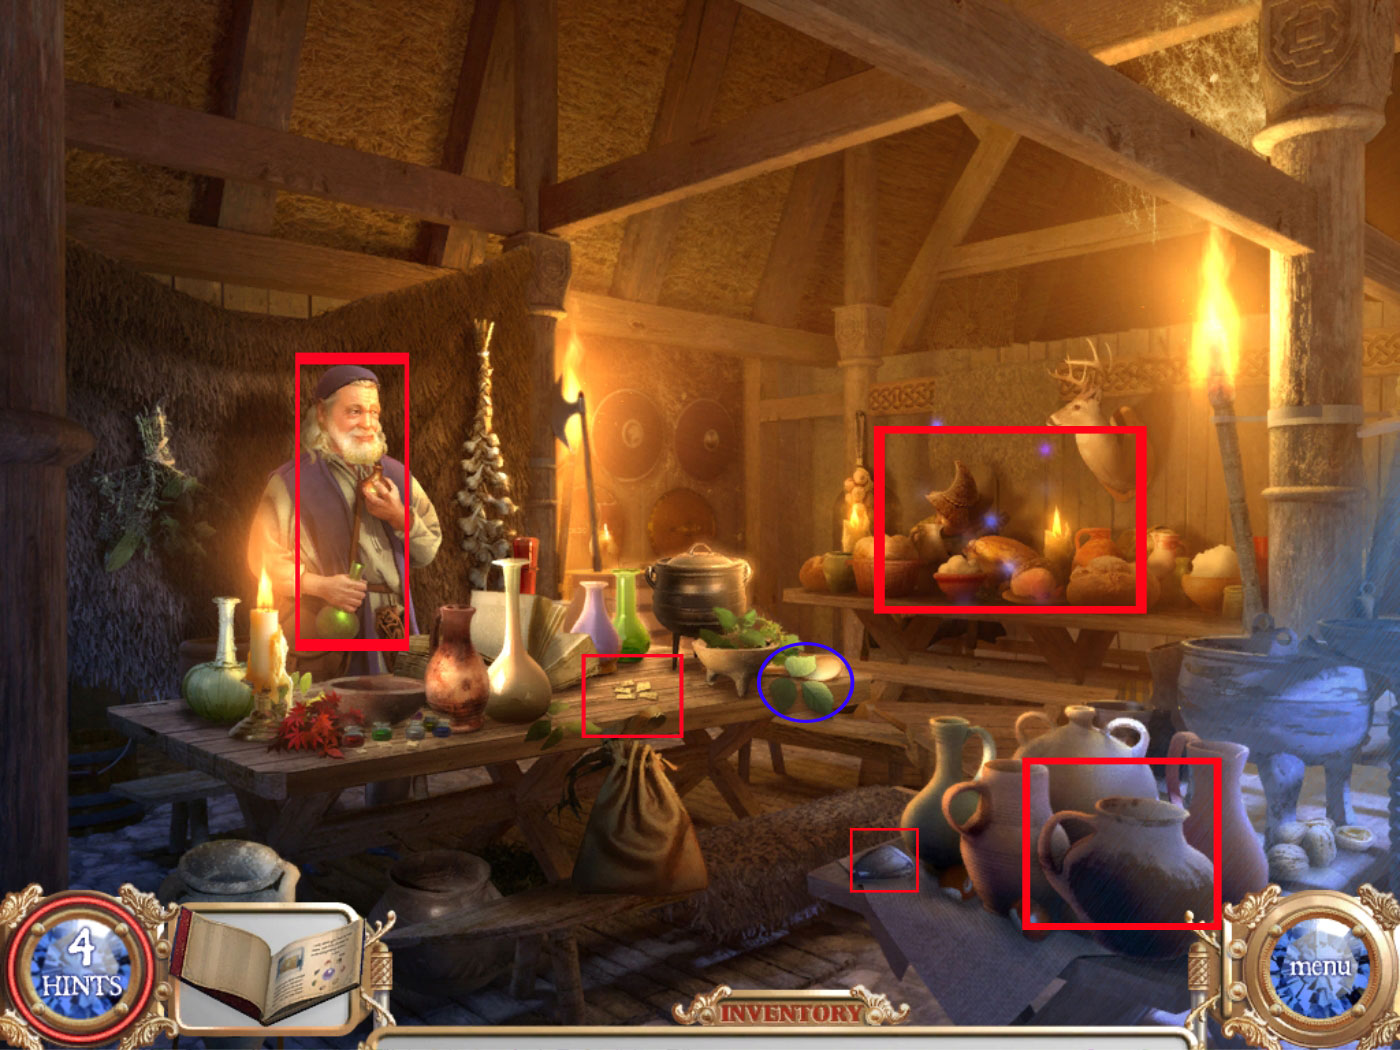
Talk with the Alchemist
Get the leaves from the table. The Alchemist is standing behind it. You will find them at the right end.
Click the ripped note on the same table in the middle.
Click the stone on the table in the low left corner to learn it is a magnetic stone.
Click this table and the jugs to learn what you need to do.
Screenshot
Leave the hut.
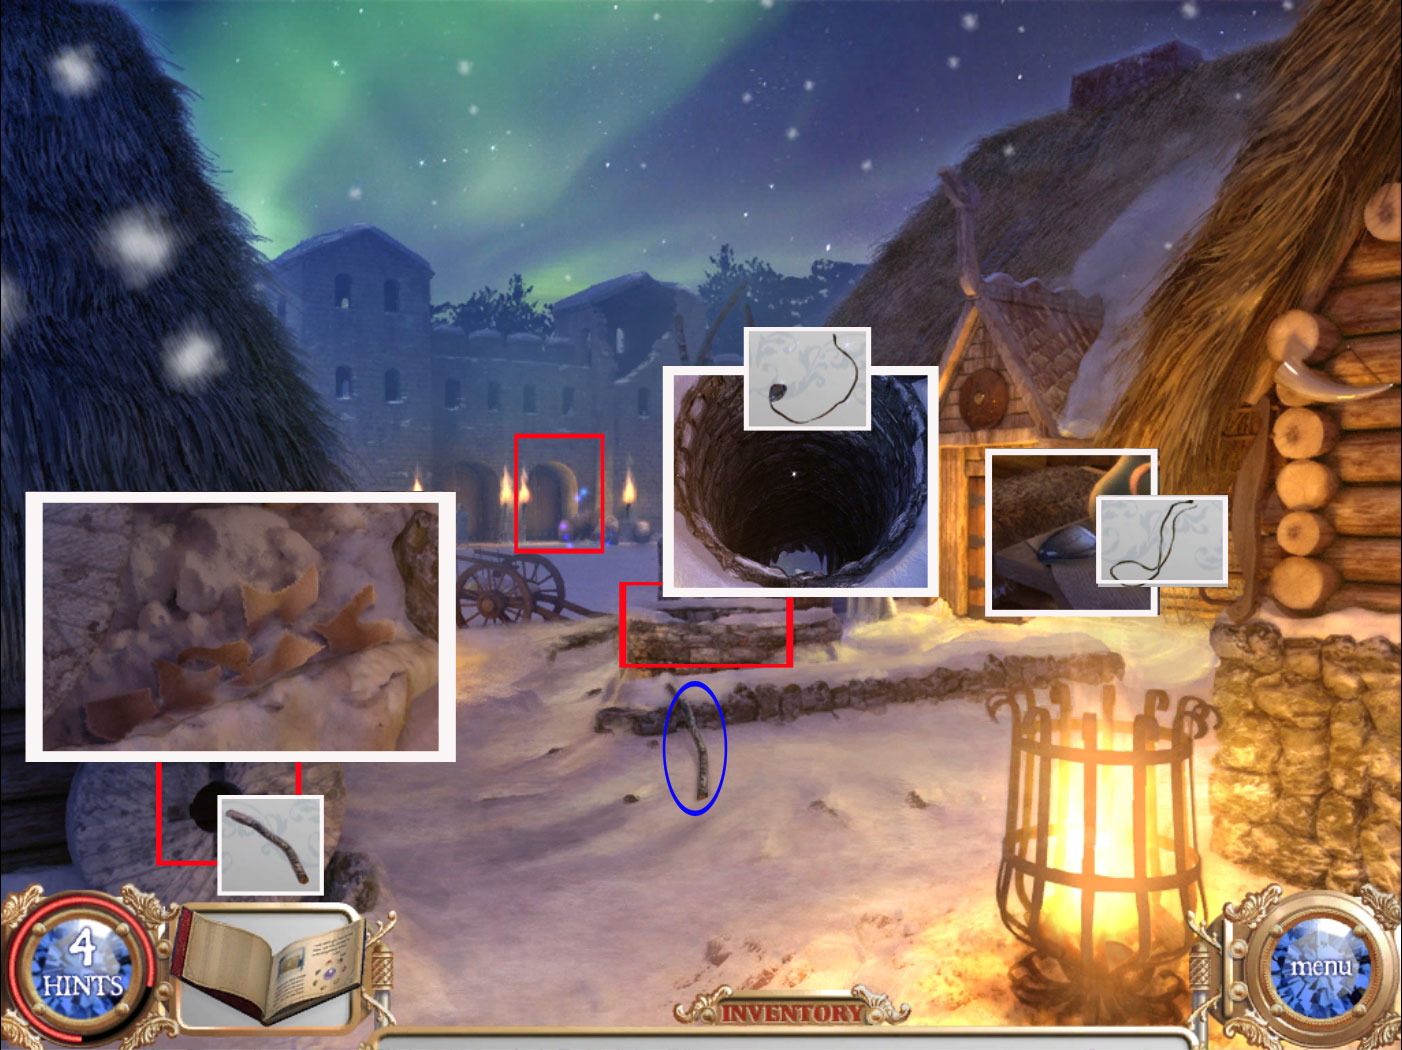
Outside the hut
Click the right door of the building in the background to play a hidden-object scene.
You will receive a string.
Head into the hut and click the magnetic stone with the string.
Pick up the pole from the ground.
Use the pole to move the wheel on the left.
Pick up the ripped notes.
Click the well and use the stone with string to find a bottle with poison.
Screenshot
Enter the hut again.
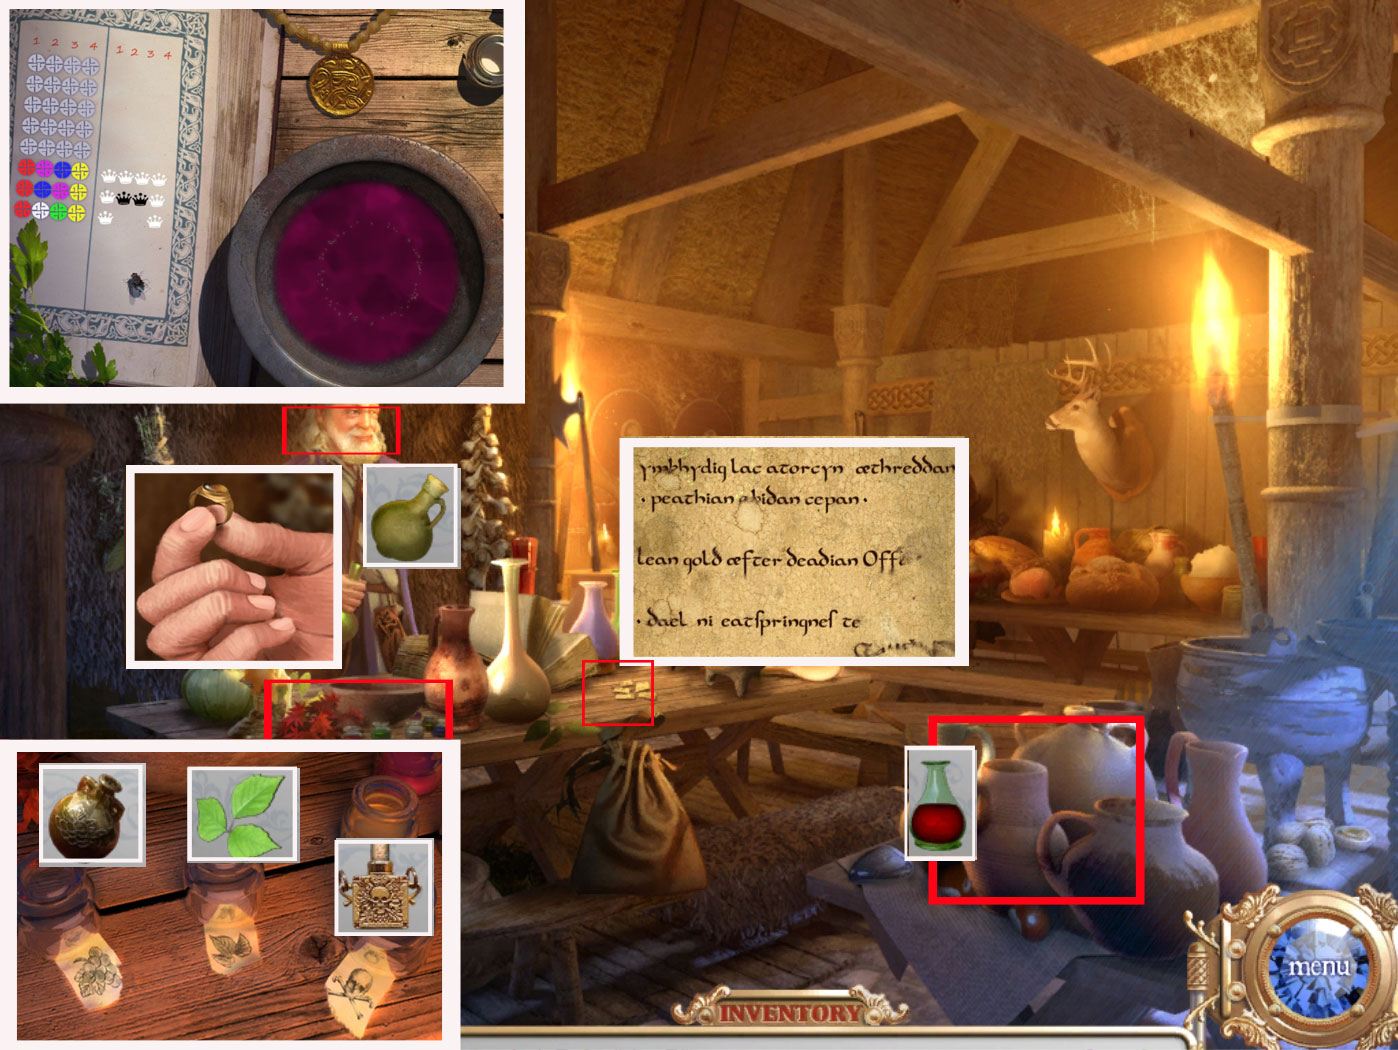
Alchemist Hut
Place the pieces of paper on ripped note on the table.
Reassemble the paper; you can rotate them by left-clicking.
A paper piece at the right place will change its color and can't be moved anymore.
Talk with the alchemist.
Click on the bottles on the table in front of him.
Place vinegar, poison ivy and poison in the appropriate jars.
This activates a mini-game.
Place 4 colors in the bowl and then check the colors of the crowns in the journal on the right.
A white crown means you have the correct color in the correct spot.
A black crown means you have a correct color but it needs to be in a different spot.
No crown means that that color is not to be used at all.
Continue on until you have all the correct colors in order.
The screenshot shows an example; the solution is random.
You will obtain a potion.
Click the table on the right and use the potion on each jug.
You will be told when you found the poisoned wine.
Take it in your inventory and give it to the Alchemist.
Take the magic ring.
Screenshot
Nexus
Place the ring somewhere, step back once and click the left sphere to obtain a "Find the Difference" scene.
Screenshot
Enter the 7th Century archive and find the listed objects. They will all go into your inventory.
Screenshot
Place the objects on the right plate of the Nexus.
Go through the open door.
Chapter 7: 7th Century
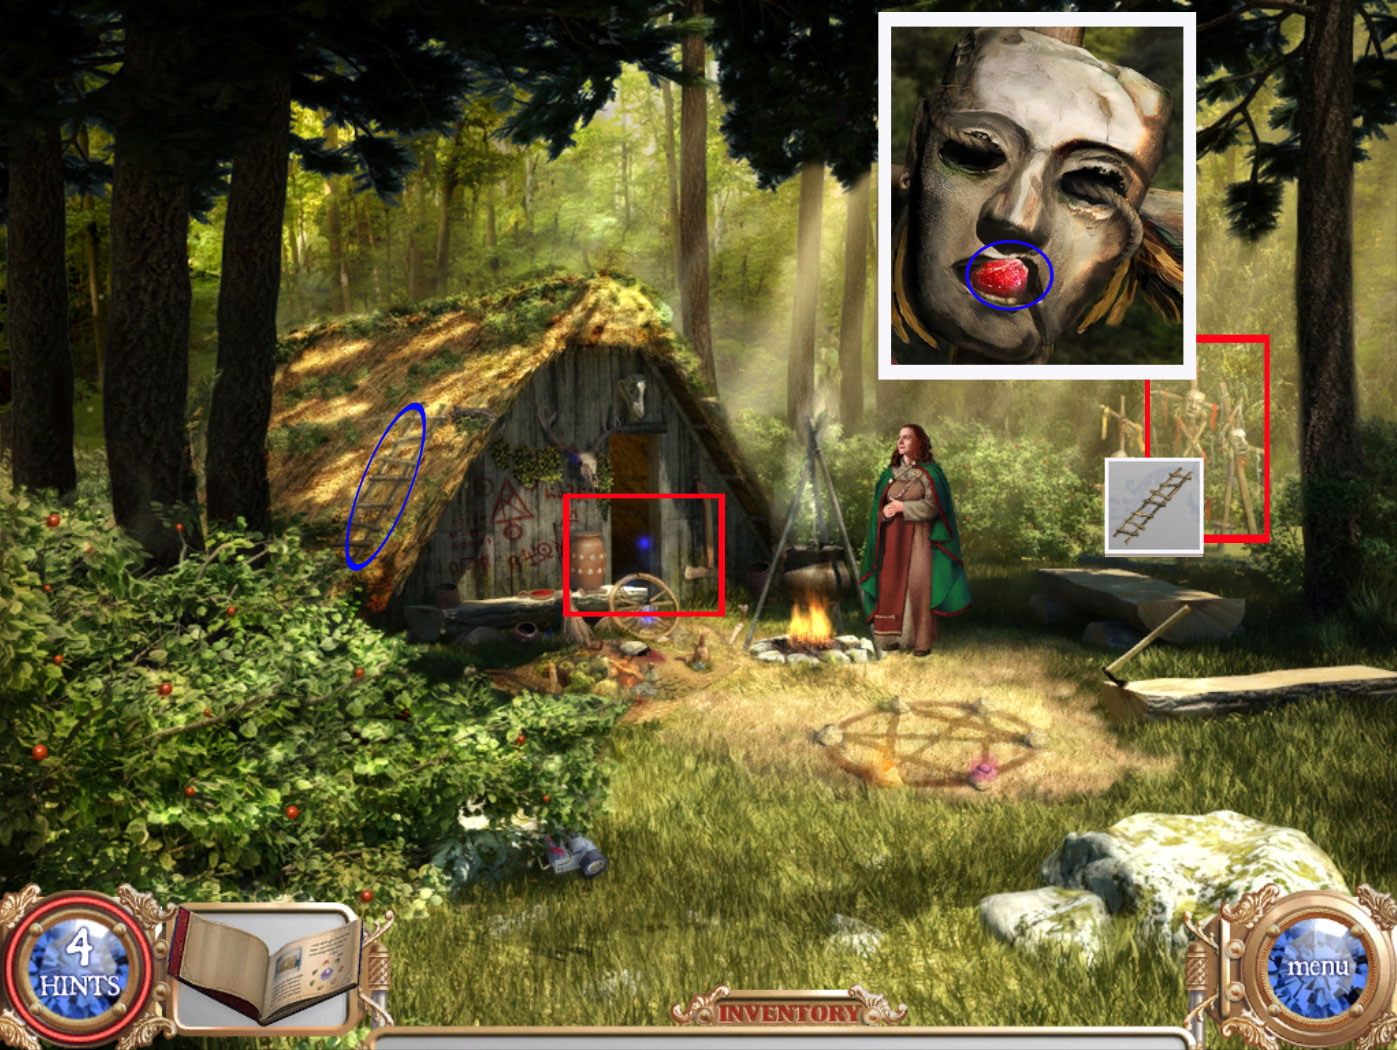
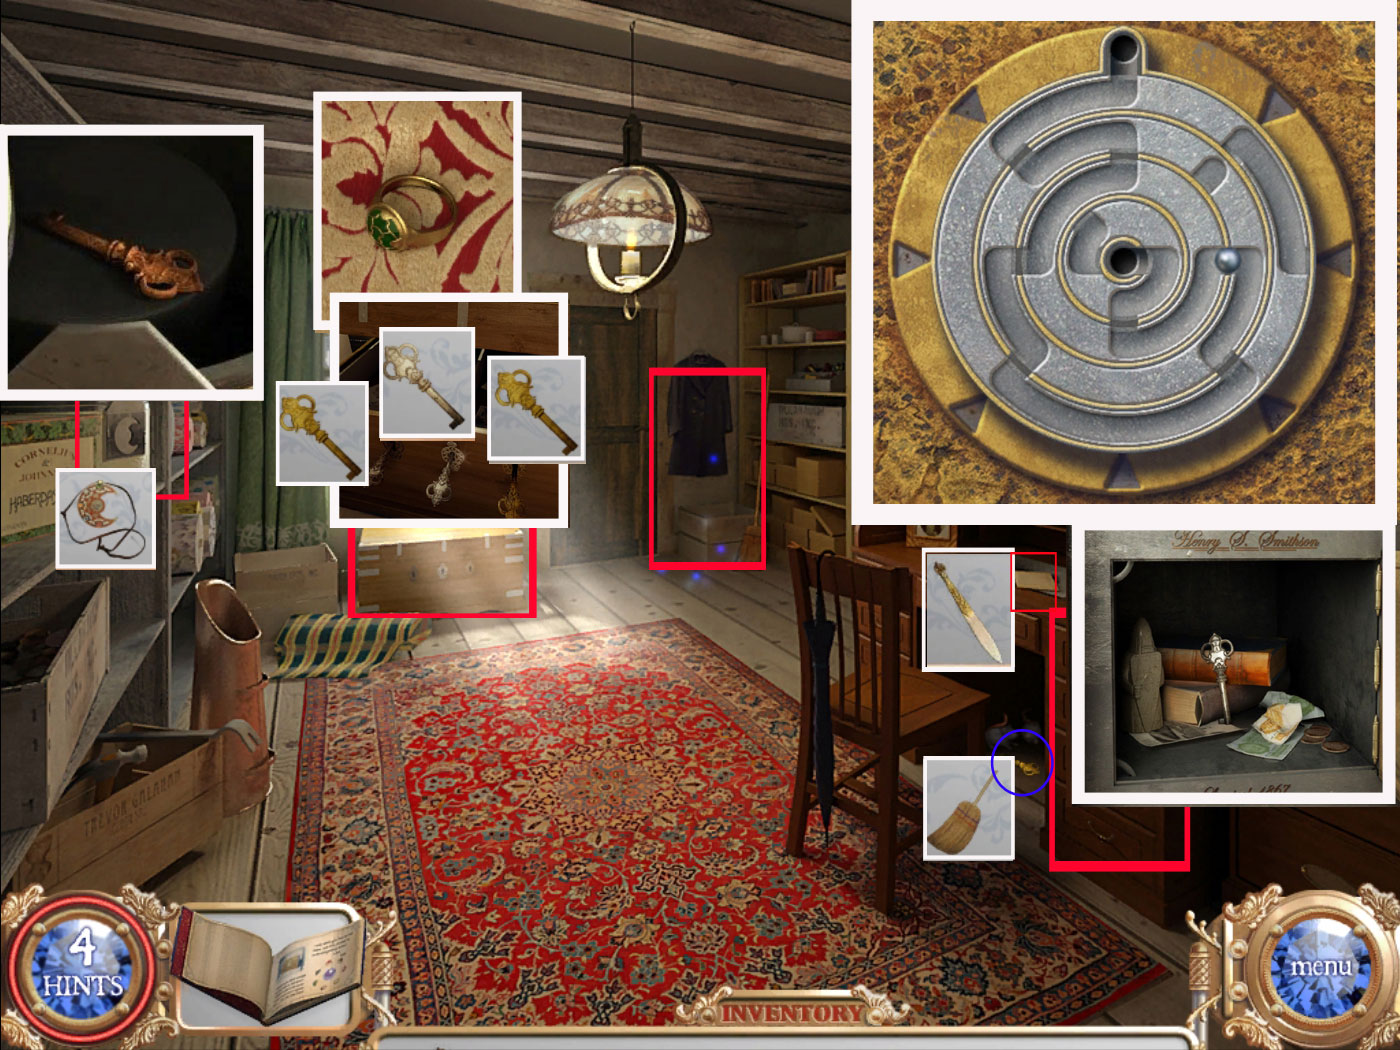
In front of the Witch's House
Talk with the witch.
Click the front of the house to play the hidden-object scene. You will obtain a pearl.
Get the ladder from the left side of the roof.
Place the ladder at the masks on the far right and grab the ruby from the mask's nose.
Enter the house.
Screenshot
Inside the house
Click the upper right corner of the blanket in the lower left and grab the sapphire.
Get the emerald from the bench on the far left.
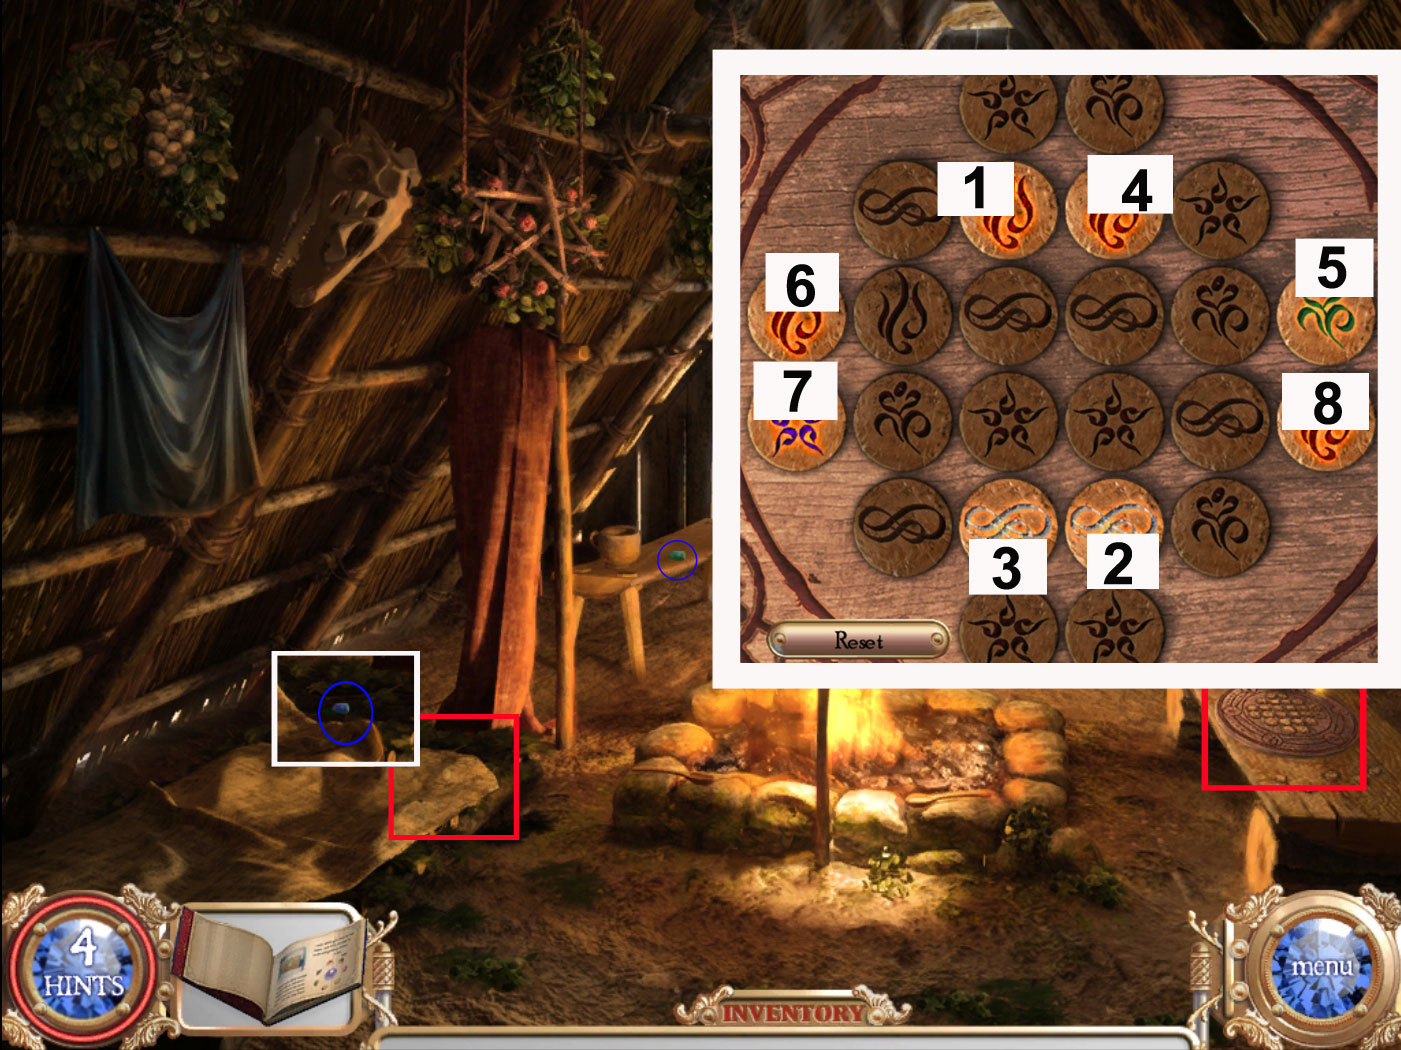
Click the bench on the right to activate a mini-game.
Your goal is to light up all the runes by clicking on them.
You can click on lighted runes as well as dark runes.
Clicking on a rune will have an effect on the surrounding runes.
For a solution please see screenshot.
Screenshot
You will receive a board for your inventory.
Exit the house.
Outside the house
Click the hexagram on the ground.
Place the board in the middle and the jewels on the stones, based on the color of the symbols.
Talk with the witch again.
She needs ingredients.
Enter the house and play the hidden-object scene.
You will get a pouch of ingredient.
Go outside and give it to the witch.
Click her again to talk and click the hexagram.
Click on a charm in the center of the hexagon that matches a glowing one on one of the 4 corners.
Do this with all charms - you will have to play three times.
This time you do not get a ring - but the cut scenes shows you the location of the next ring.
Nexus
Enter the 11th Century archive and find the listed objects. They will all go into your inventory.
Screenshot
Place the objects on the right plate of the Nexus.
Go through the open door.
Chapter 8: 11th Century
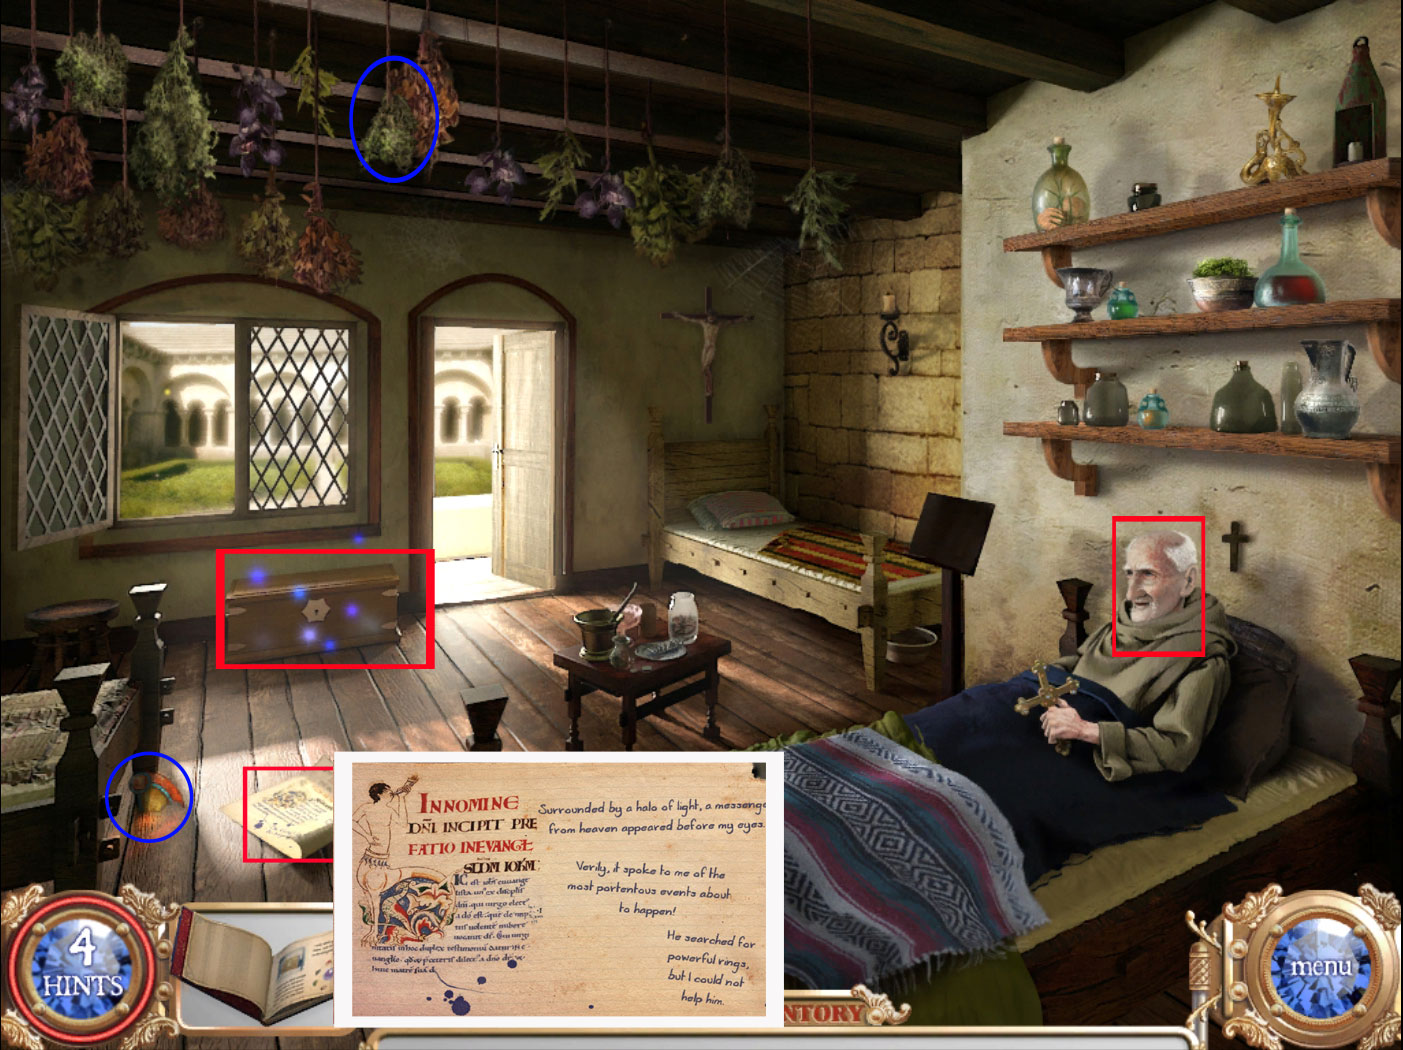
Monk's Cell
Click the monk two times to speak with him.
Click the trunk to the left of the door to play a hidden-object scene.
You will receive a Mandrake root.
Pick up the stained glass fragment from the ground on the right of the bed.
Read the note.
Get the Valerian from the hanging dried herbs above the door.
Leave the cell.
Screenshot
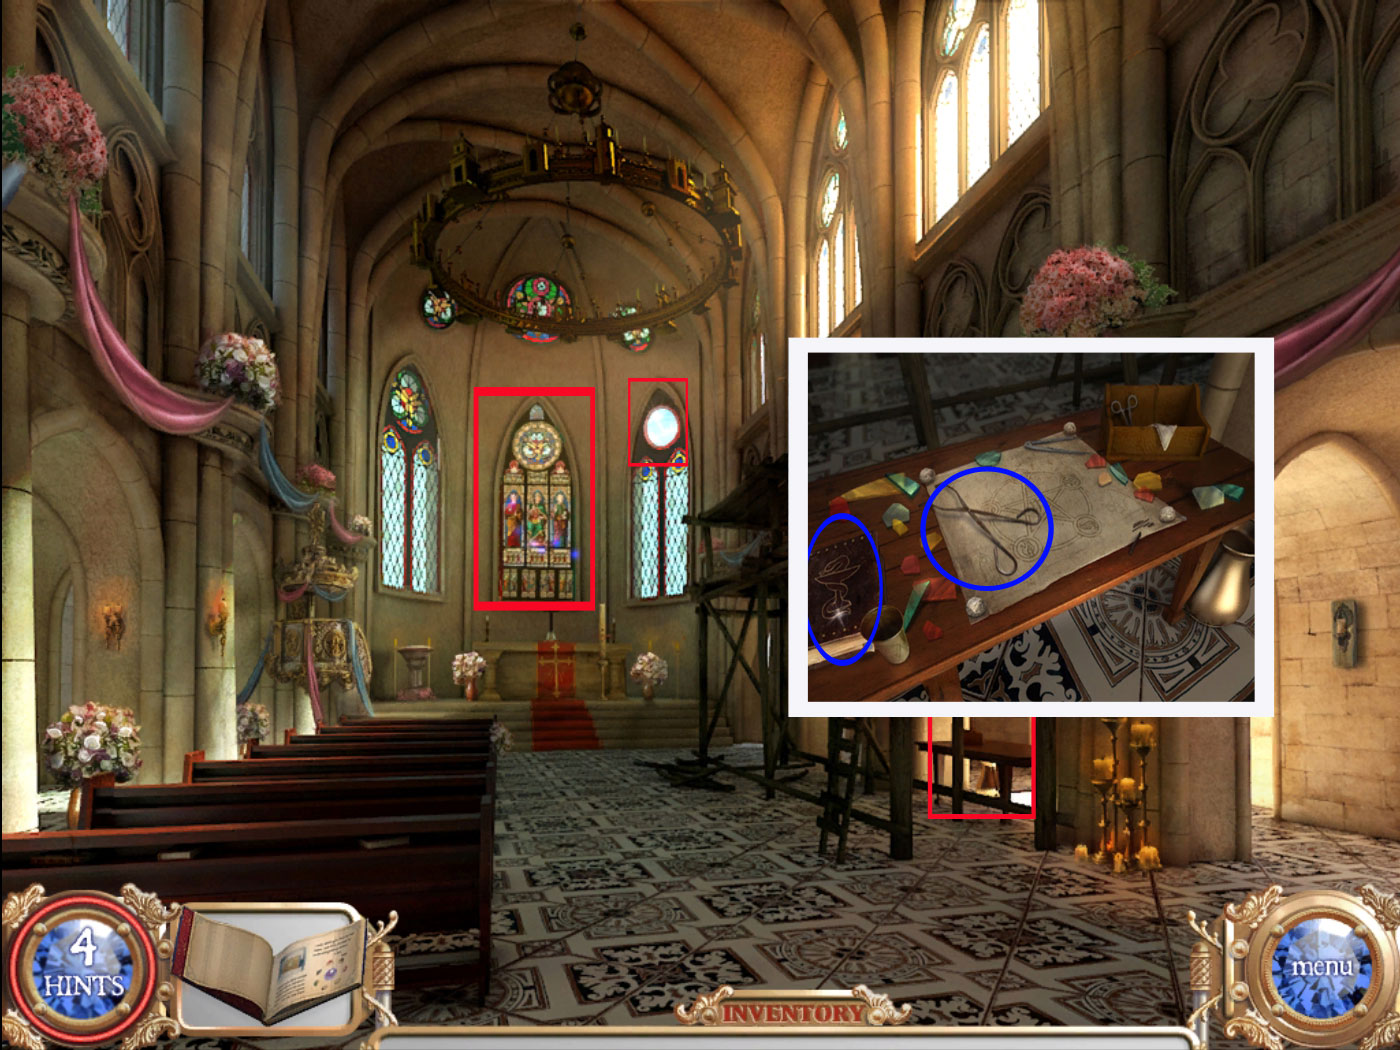
Abby
Click the large stained glass window on the back and play the hidden-object scene to obtain another stained glass fragment.
Click the top of the right window where the stained glass is missing.
Click the table on the right and grab the book and the pliers.
Head back to the monk's cell.
Screenshot
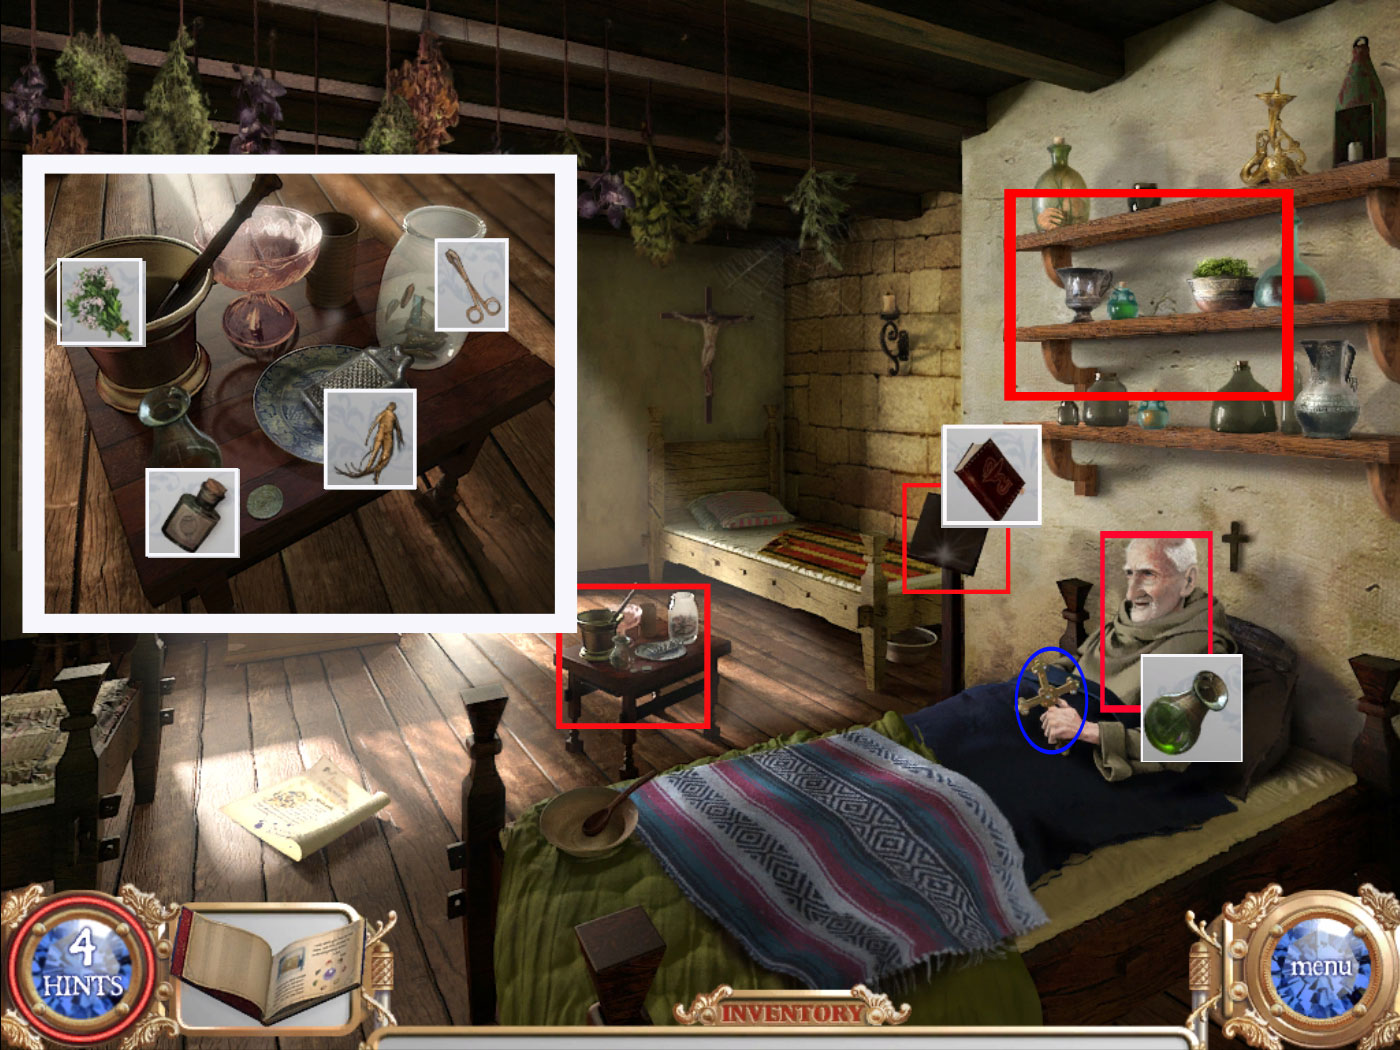
Monk's Cell
Place the book on the bookstand to the left of the monk.
Click on the shelves above the monkís head.
You will have to find the bottle that is shown in the book on the left side.
When you have found the bottle, another one will appear and the bottles on the shelf will change.
Finding all bottles will give you poppy juice for your inventory.
Click on the table to the left of the bed.
Use the pliers on the jar of leeches to get a stained glass fragment.
Use the valerian on the mortar and pestle.
Use the mandrake root on the grater.
Place first the poppy juice in the beaker, followed by the grated root and the valerian powder.
You will get healing potion.
Give the potion to the monk and take the cross out of his hand as soon as he is sleeping.
Screenshot
Leave the monk' cell.
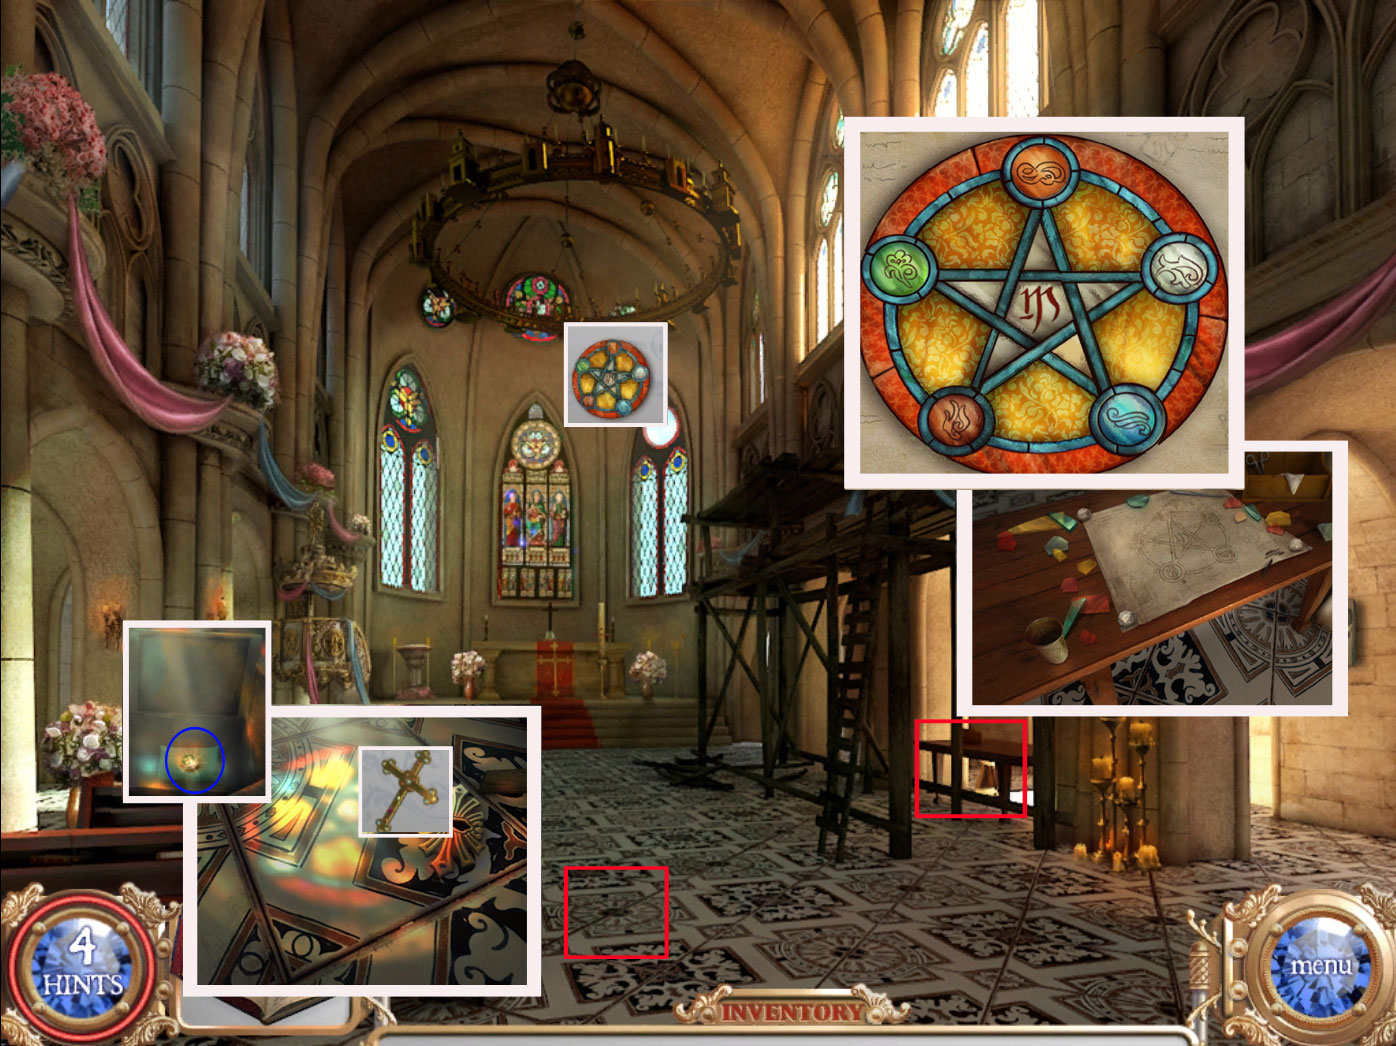
Abby
Click the table on the right and place all stained glass fragments from your inventory on the template and assemble the stained glass.
With a left-click you can rotate the parts and they will lock into place when you drag them onto the right spot.
This will give you a complete stained glass; place it in the empty spot on the top of the right window.
The repaired window gives a light beam ending on the ground.
Click it and use the cross to open the lock.
Take the magic key.
Screenshot
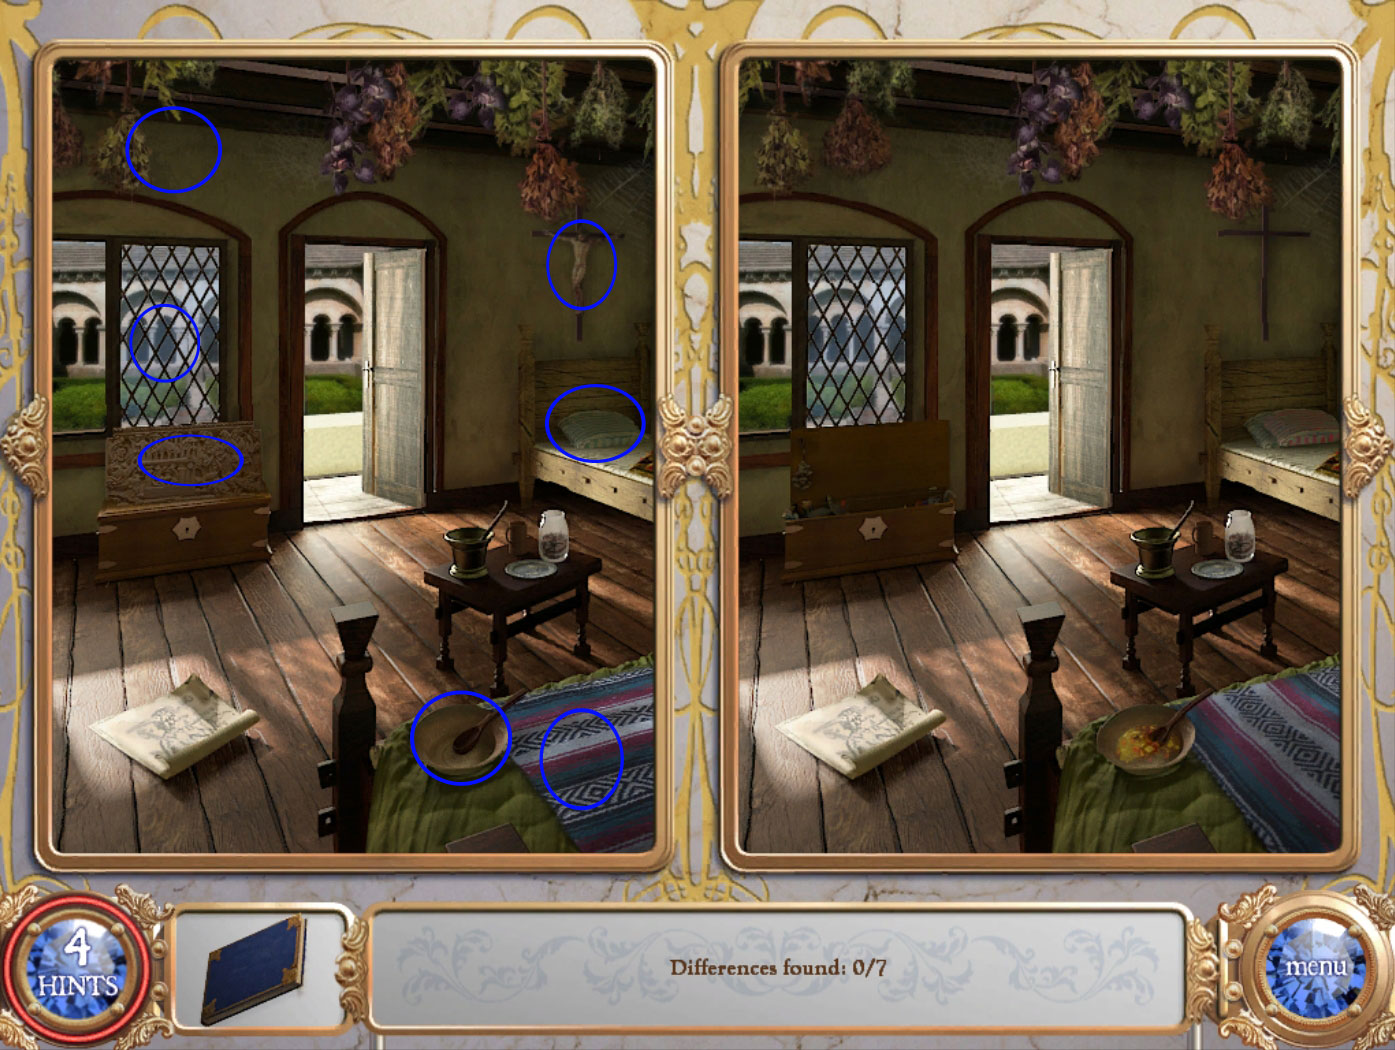
Nexus
Place the ring somewhere, step back once and click the left sphere to obtain a "Find the Difference" scene.
Screenshot
Enter the 19th Century archive and find the listed objects. They will all go into your inventory.
Screenshot
Place the objects on the right plate of the Nexus.
Go through the open door.
Chapter 9: 19th Century
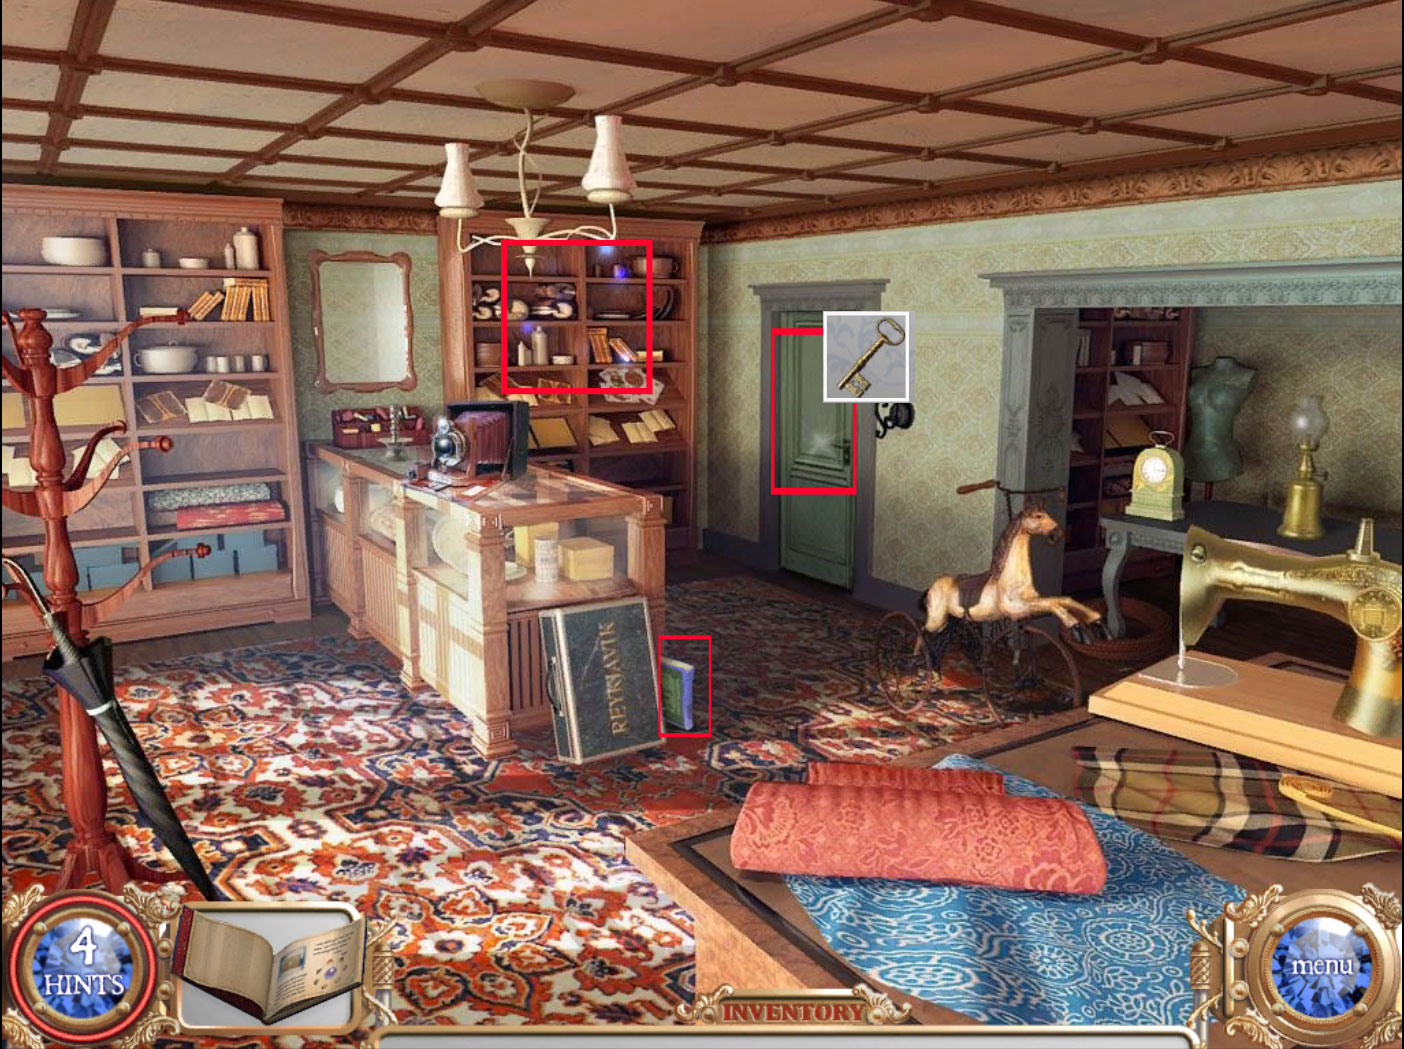
Workshop
Play the hidden object-scene and obtain a key.
Play the hidden object-scene activated now on the left bookshelf and get a letter opener.
Check the book on the floor to the right of the suitcase.
Use the key to open the door on the far right.
Screenshot
Enter the office.
Office
Play the hidden-scene on the far right to obtain a broom.
Use the broom to get the key underneath the desk on the right side.
Click the left drawers on the right hand side of the desk to find the safe.
To open the safe, you will need to rotate the rings in order to create a path for the ball to go from the top hole to the center.
Once all rings are in the right position, the ball will move.
The safe opens and you can grab a key.
Open the letter on the desk with the letter opener.
Click the hat box on the shelf to the left side; click the lock to learn that the key for this is hidden in the display.
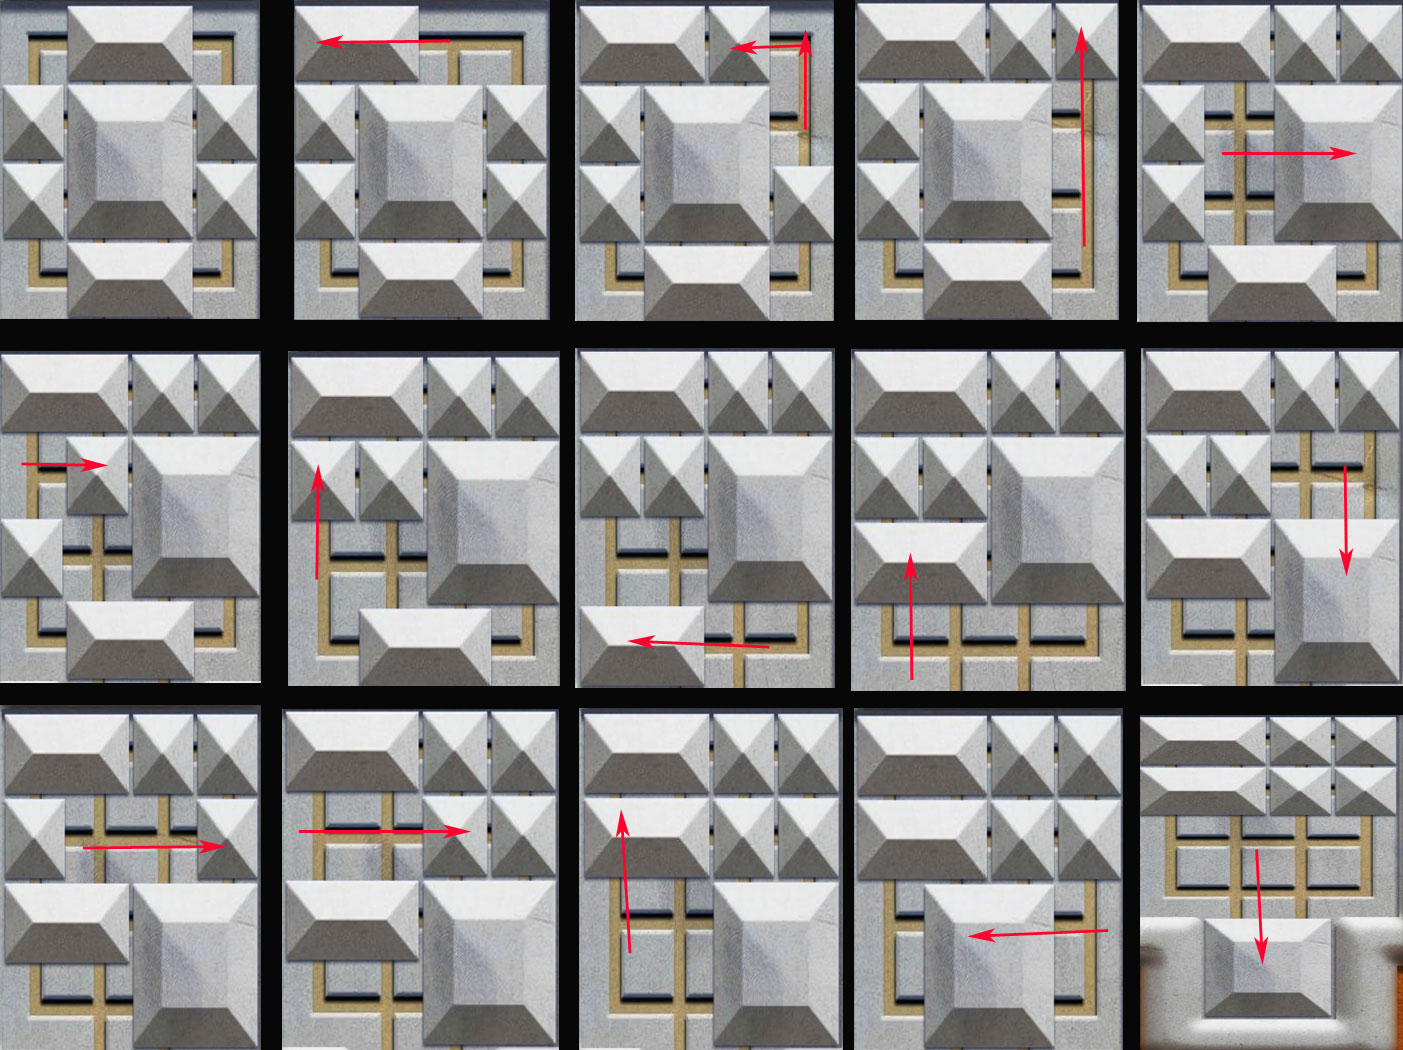
Go back to the Workshop and click the display.
Your goal is to move the large square to the empty space at the bottom of the lock.
Move the tiles by dragging them to an empty space.
You will receive a moon medallion when the lock opens.
For a step-by step solution please see screenshot.
Screenshot
Head back to the office.
Click the hat box again and place the medallion into the slot.
Get the key out of the open box.
Click the chest below the window and insert all three keys.
The box opens; take the last magic ring.
Screenshot
Nexus
Place the ring somewhere, step back once and click the left sphere to obtain a "Find the Difference" scene.
Screenshot
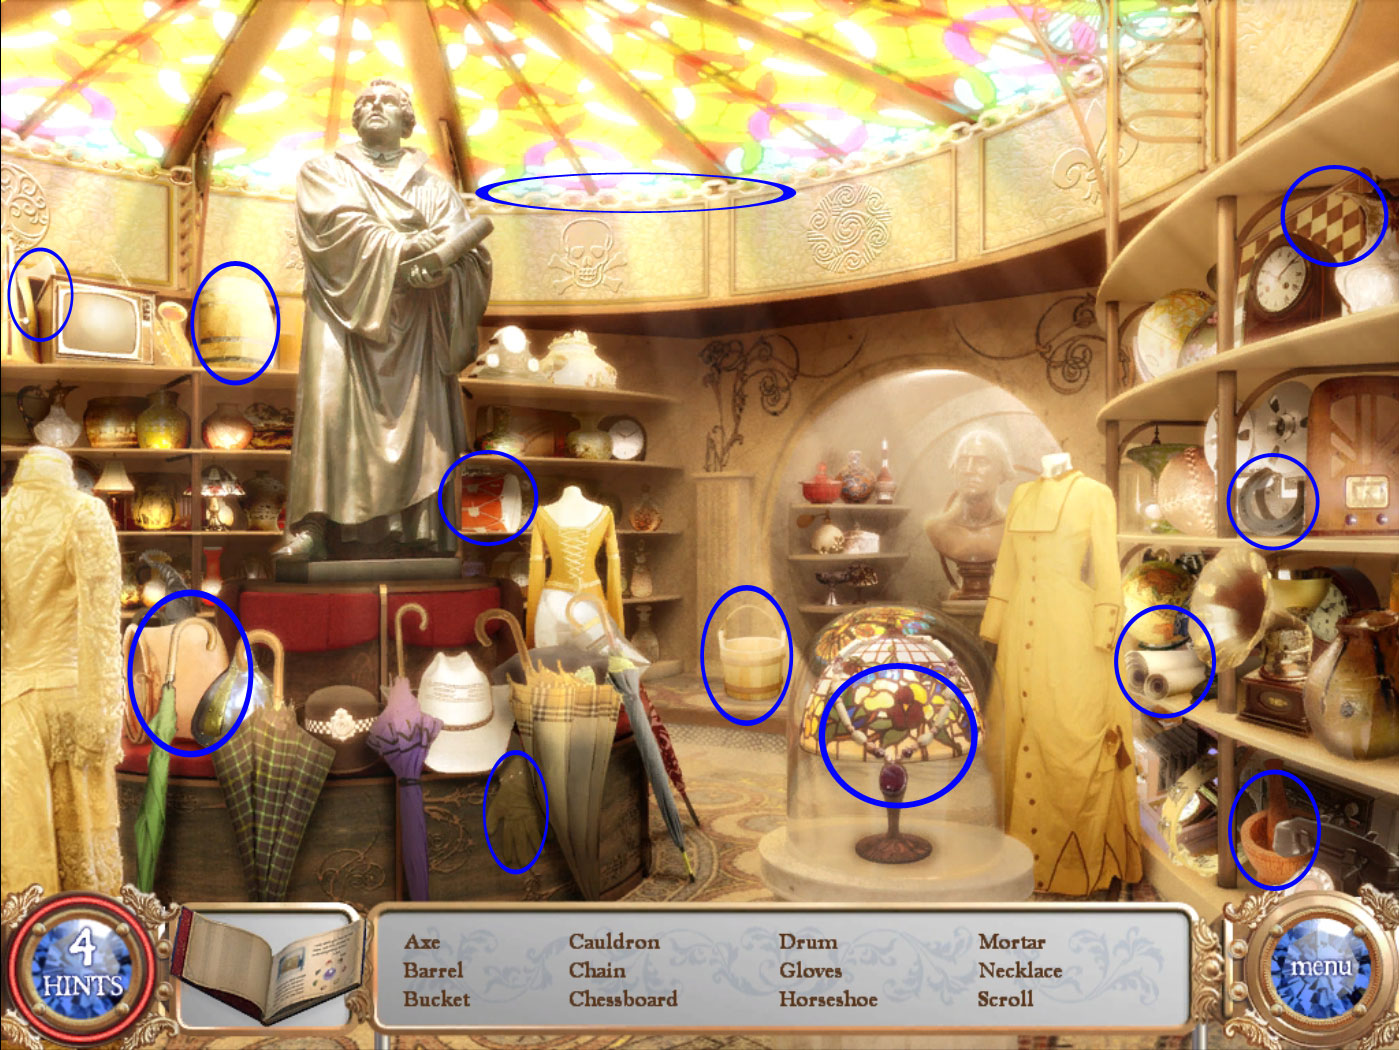
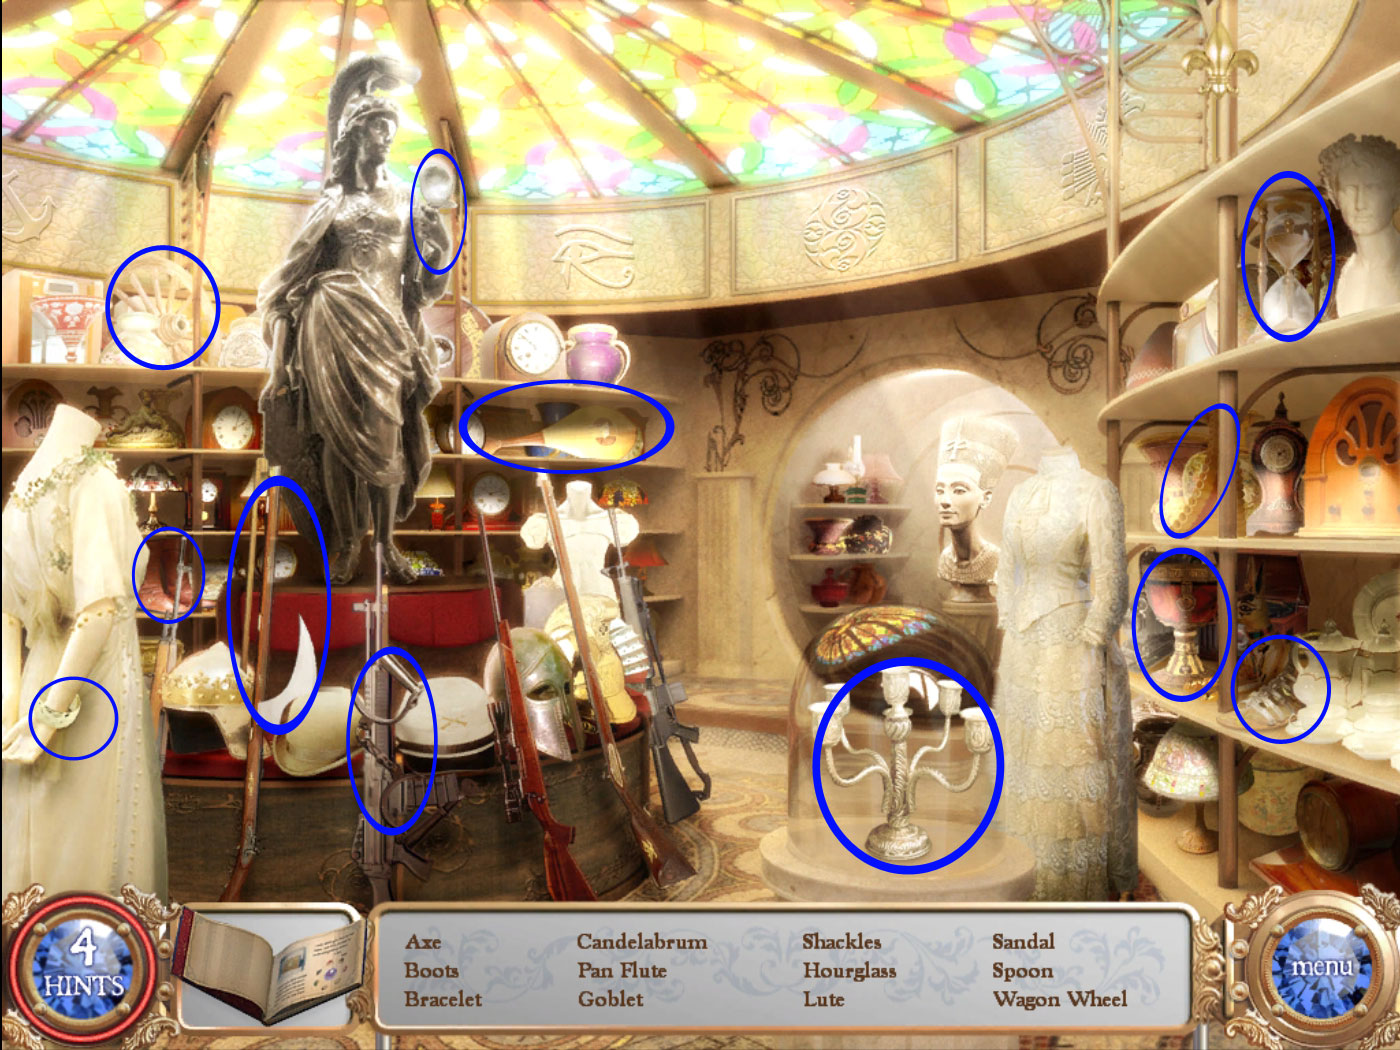
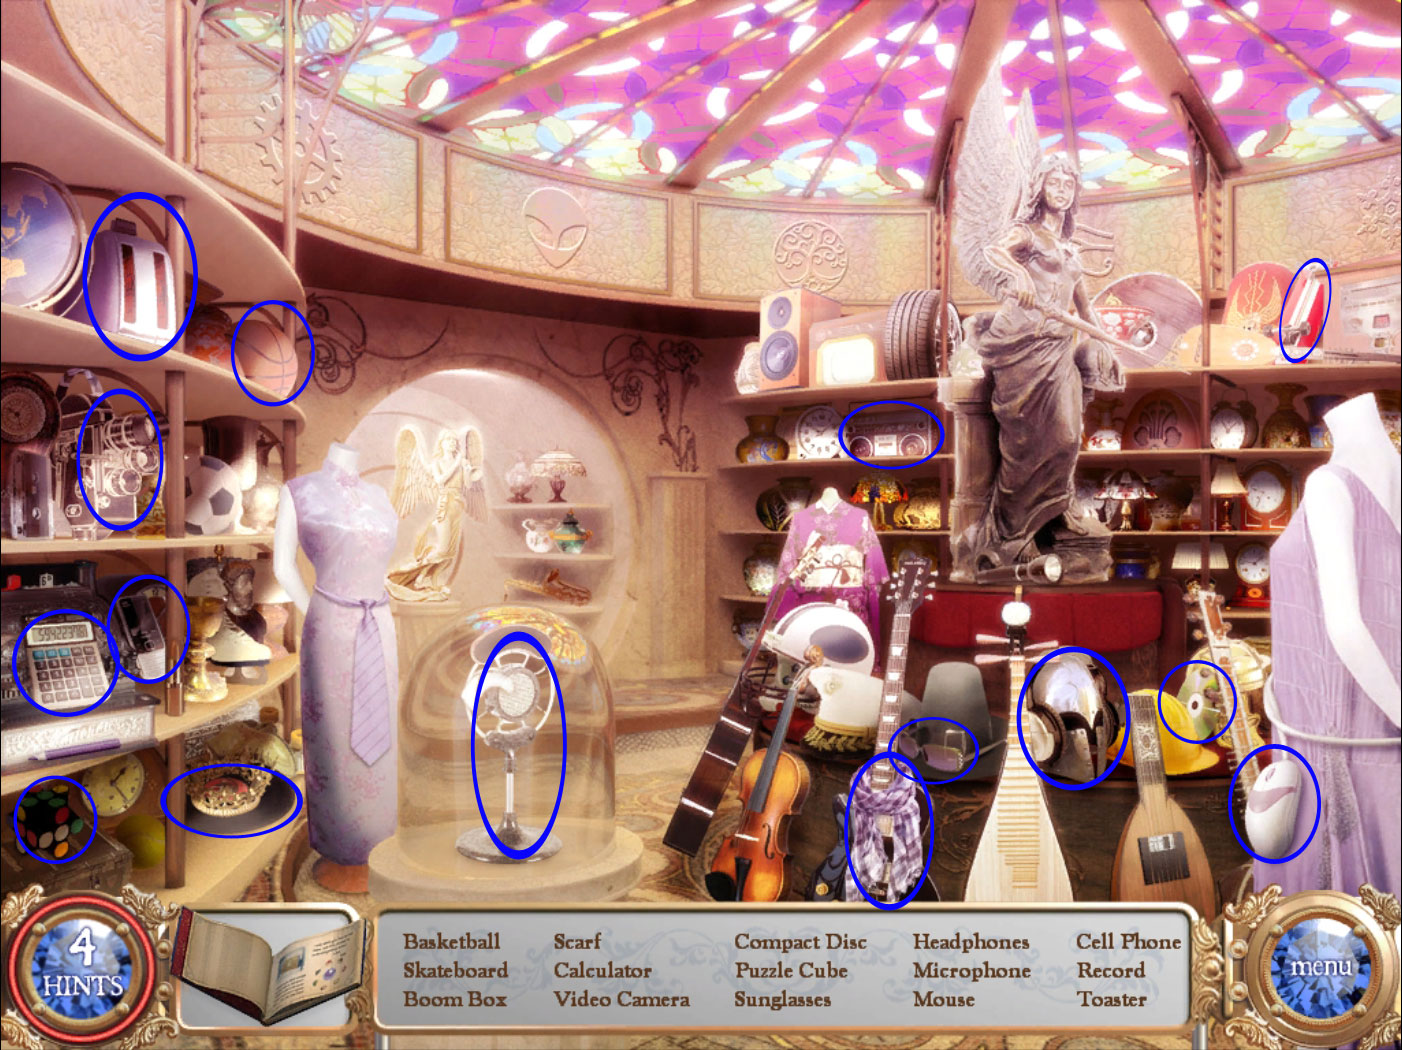
Enter the 21th Century archive and find the listed objects. They will all go into your inventory.
Screenshot
Place the objects on the right plate of the Nexus.
Go through the open door.
Chapter 10: 21th Century
Attic
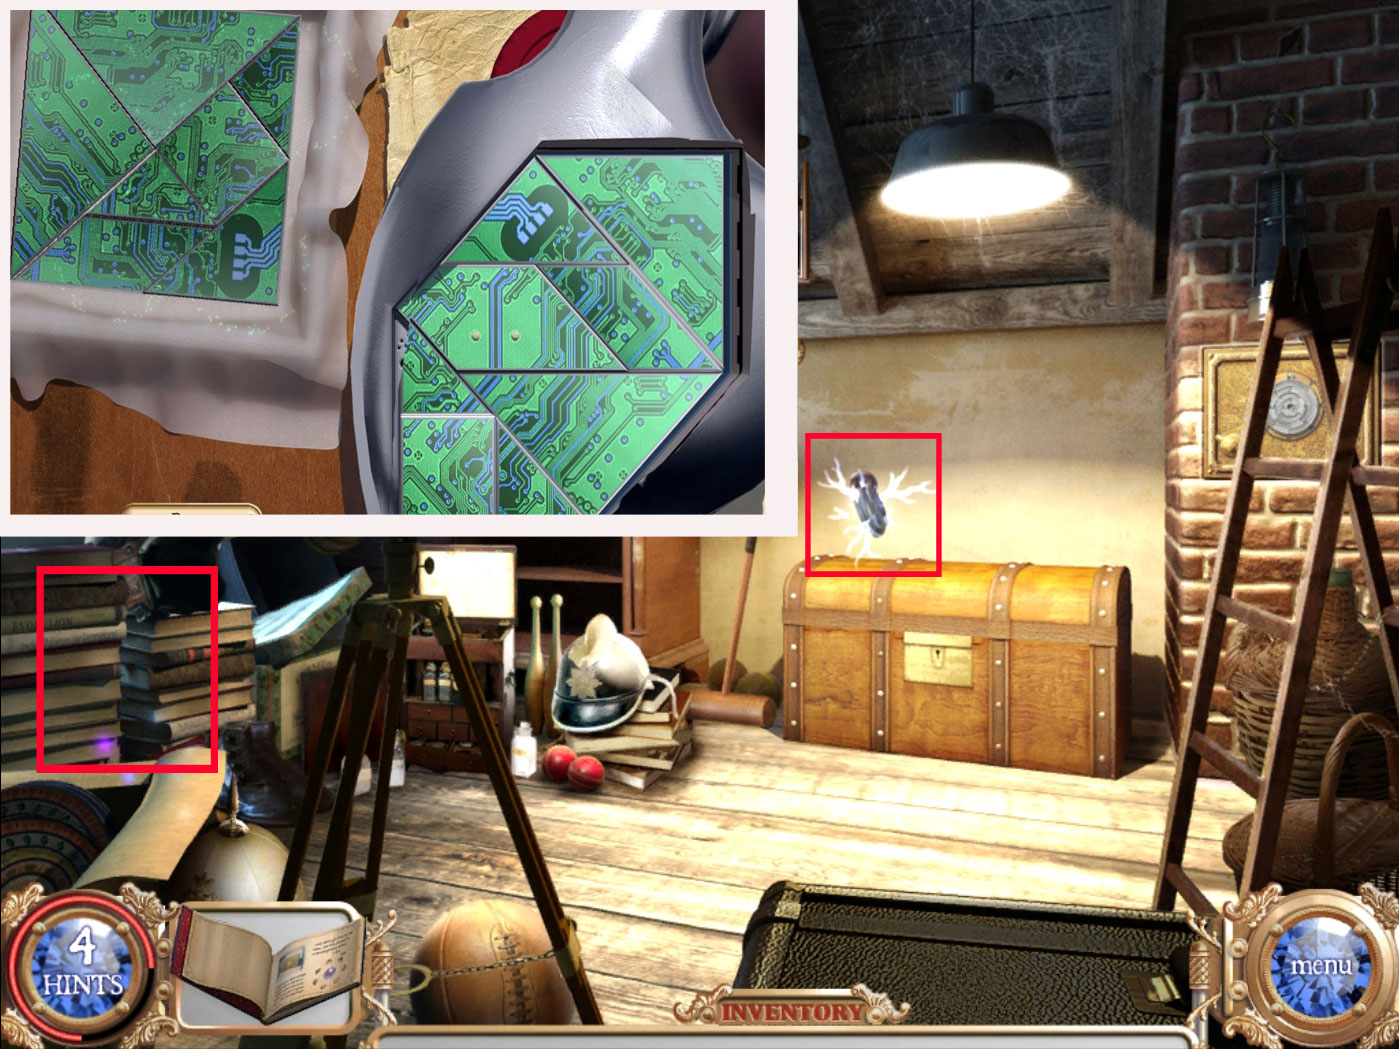
Click the book staple on the low left side and play the hidden-object scene.
The device parts will go into your inventory.
Click them onto the flying device.
Use the pieces from the square on the left and drag them onto the hexagon.
You can rotate the pieces by left-clicking.
Arrange them so that none are overlapping.
They will lock into place when correct.
Screenshot
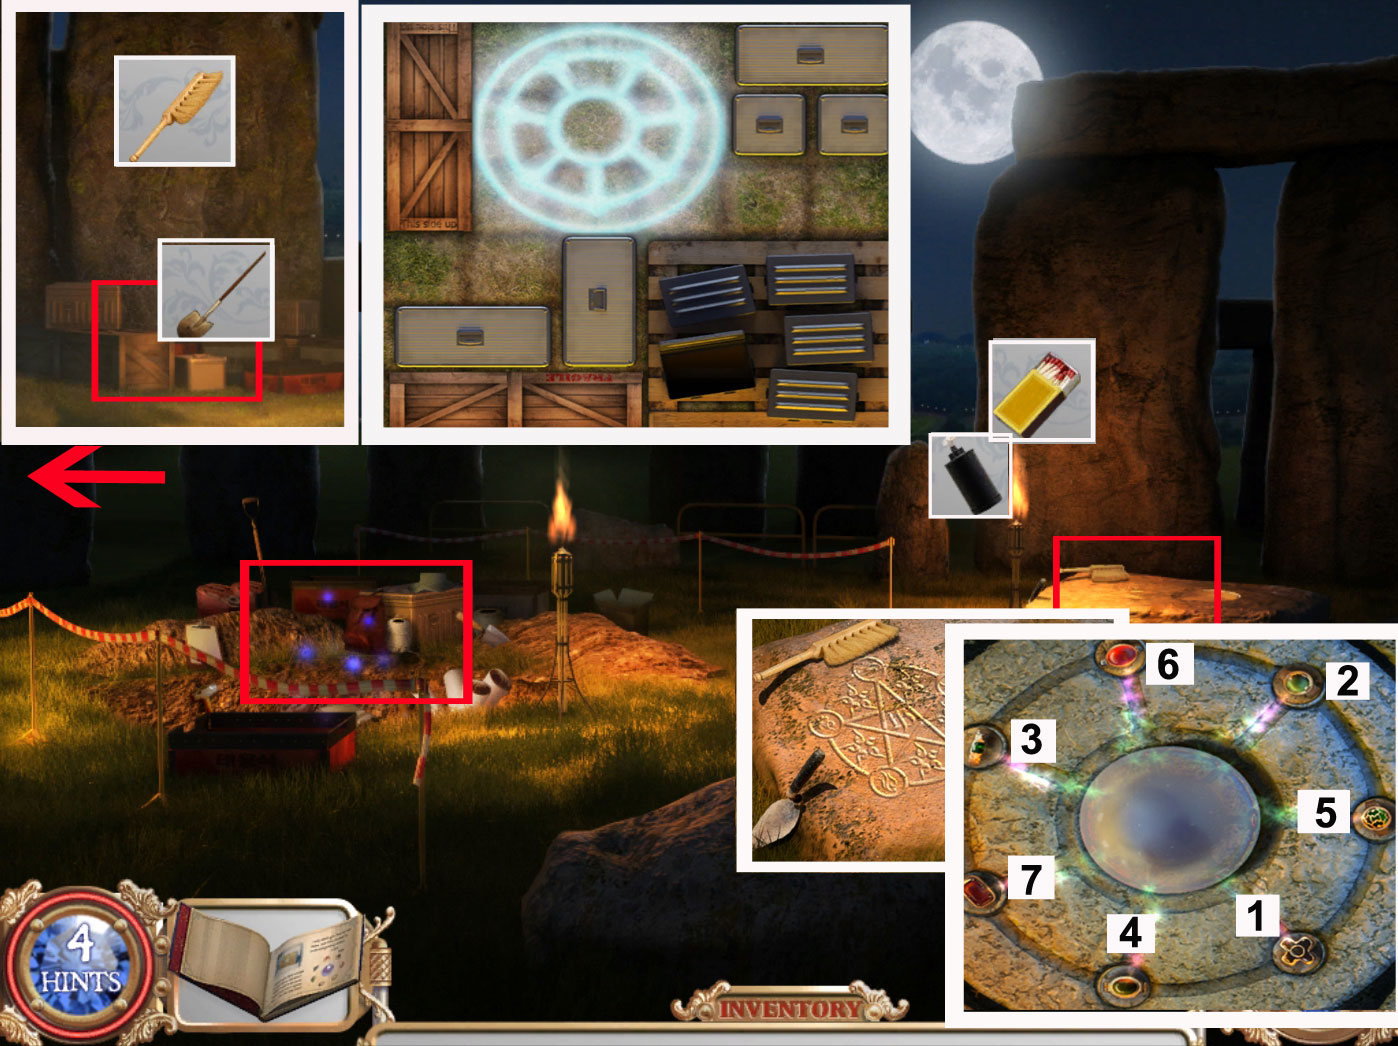
Chapter 11: Stonehenge
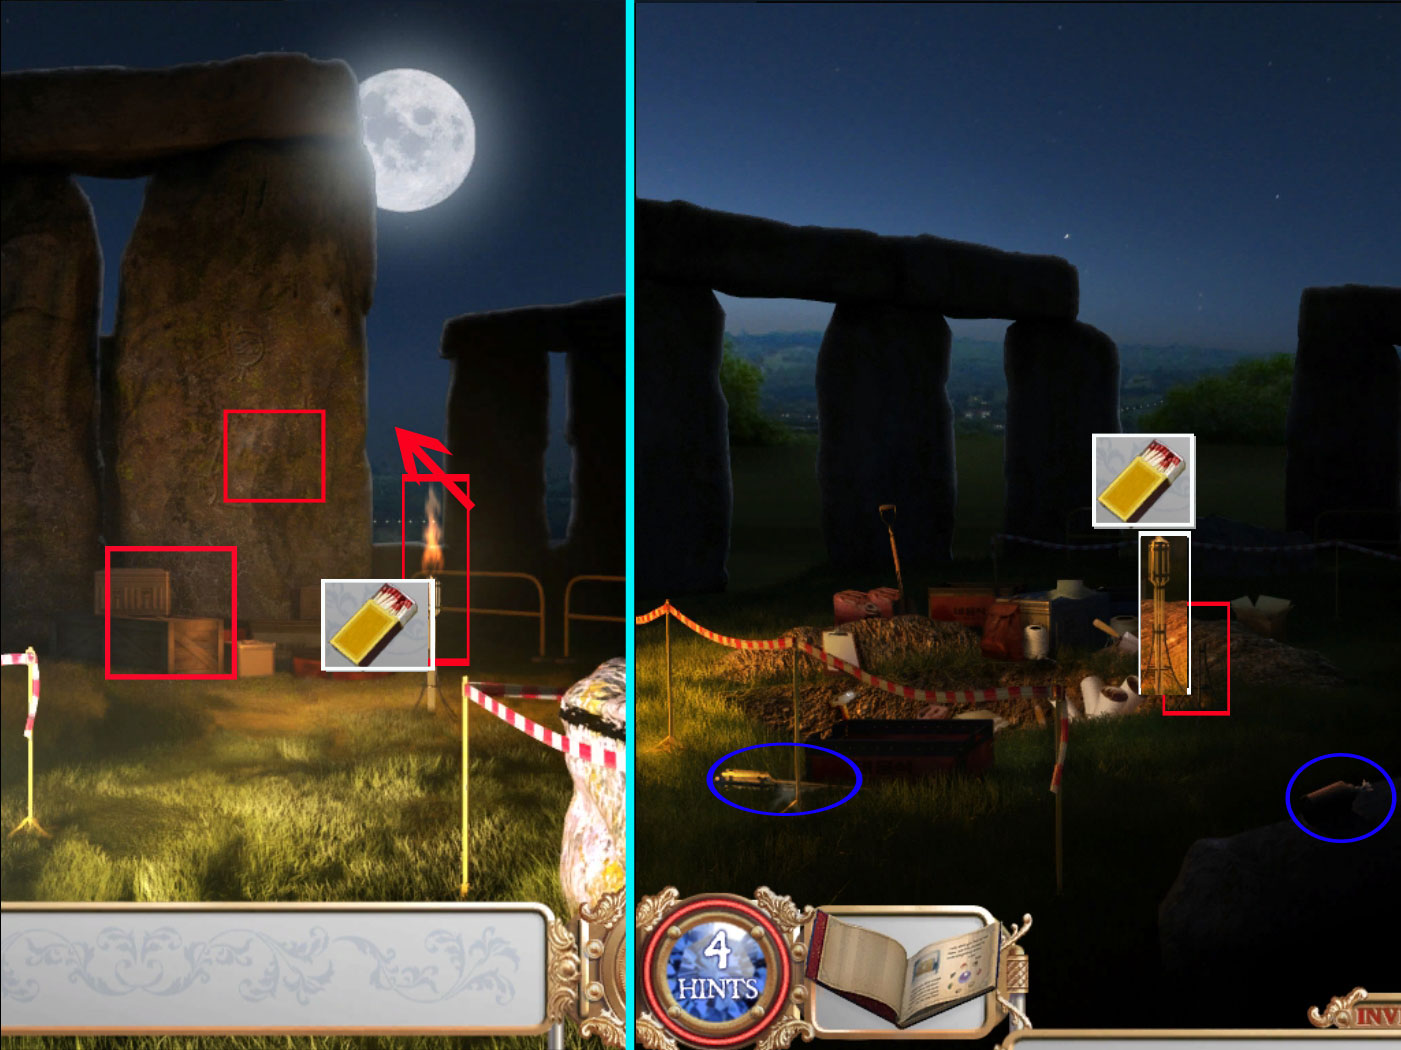
Click on the crates on the far left in front of the stone and play the hidden-object scene.
You will receive matches.
Light the torch in the middle of the scene and click the left stone.
Walk between the left and right stones.
Pick up the torch on the lower left and place it in the holder.
Use the matches to light it.
Pick up the oil can from the stone on the right.
Use it with the torch at the far right and light the torch with the matches.
Screenshot
Click the stone on the ground on the right of the torch and pick up the brush.
Click the item on the left and play the hidden-object scene.
Head over to the left and use the brush on the mossy stone.
Click the items below and move the crates so that the symbol is fully exposed and glowing.
The crates can be moved in any directions and there are a lot of solutions possible. One example you can see on the screenshot below.
Use the shovel on the object in the ground and a druid disk will go into your inventory.
Go back to the other side again and click the stone next to the torch.
Place the druid disk into the slot and click it again.
Turn all the rings toward the crystal ball so that all the beams of light are lit.
Turn the rings by clicking. Clicking one ring will affect the two adjacent rings.
For the solution please see screenshot.
Screenshot
Watch what happens and enjoy .... THE END
Thanks to Kayleigh for the walkthrough!
Posted by: Mike |
October 29, 2010 5:28 PM
|
October 29, 2010 5:28 PM