
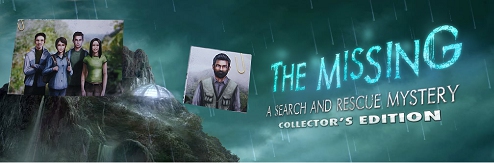
The Missing:
A Search and Rescue Mystery
Platform: Mac, Windows
![]() The life of a search and rescue pilot is an exciting one, isn't it? At any given moment you might be hauling crab fishermen from the Bering Sea, making a daring rescue three quarters of the way up Mount Everest, heck, you might even be the second in line to the throne of England! Although, come to think of it, only one particular search and rescue pilot would be able to fulfill that last one. Nevertheless, it's an exciting and extremely dangerous job, and it just happens to be the occupation of the hero of The Mission: A Search and Rescue Mystery, the newest adventure/hidden object hybrid from Sulus Games. I'm thinking, though, that in this game this particular pilot is not exactly the Duke of Cambridge.
The life of a search and rescue pilot is an exciting one, isn't it? At any given moment you might be hauling crab fishermen from the Bering Sea, making a daring rescue three quarters of the way up Mount Everest, heck, you might even be the second in line to the throne of England! Although, come to think of it, only one particular search and rescue pilot would be able to fulfill that last one. Nevertheless, it's an exciting and extremely dangerous job, and it just happens to be the occupation of the hero of The Mission: A Search and Rescue Mystery, the newest adventure/hidden object hybrid from Sulus Games. I'm thinking, though, that in this game this particular pilot is not exactly the Duke of Cambridge.
 A professor and his four students have gone missing on a tiny, almost invisible island (actually two islands) in the middle of the ocean, the only clue to their fate is a mysterious rescue call from said island. Our intrepid pilot friend rushes to the scene only to be trapped by the strange and unseasonable weather that is swirling about the place. Pretty soon it becomes apparent that something pretty bad has gone down and that there is more to the disappearances than just bad luck and chancy weather. The professor's research, you see, has awakened something, and that something is stalking every living thing on the island. Can the plucky pilot fix whatever has gone wrong and find all of the missing folks before time runs out? That, dear gamer, is entirely in your hands.
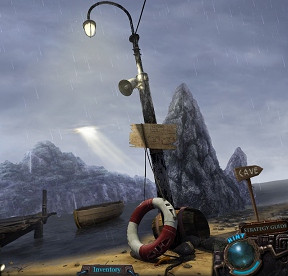
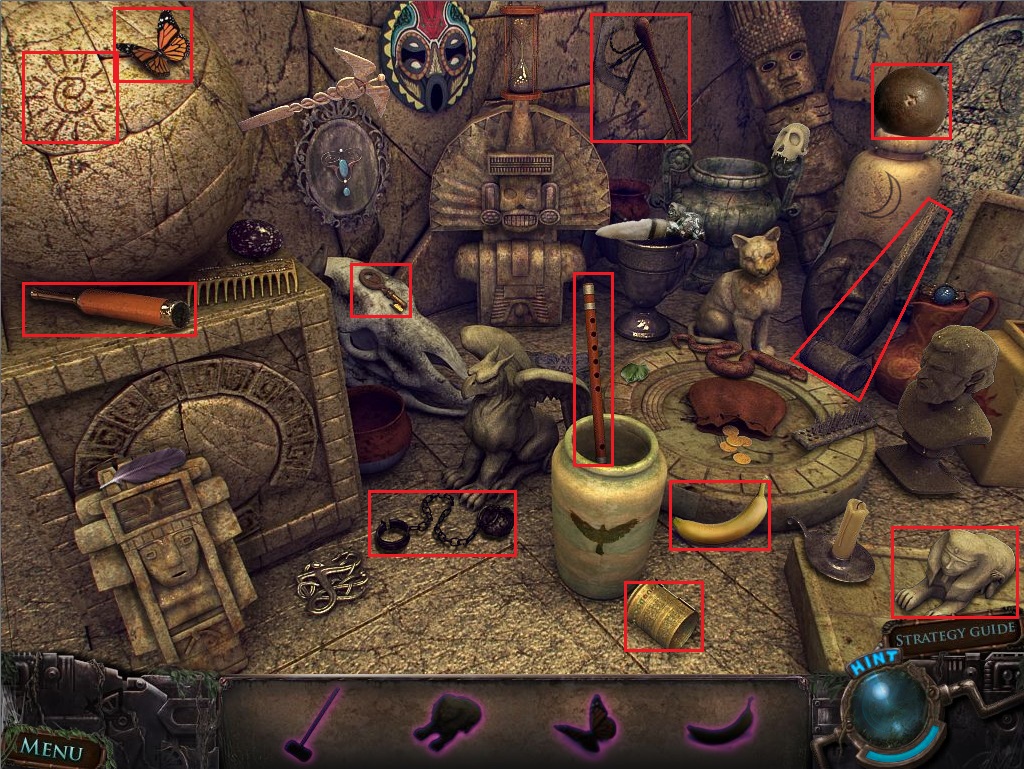
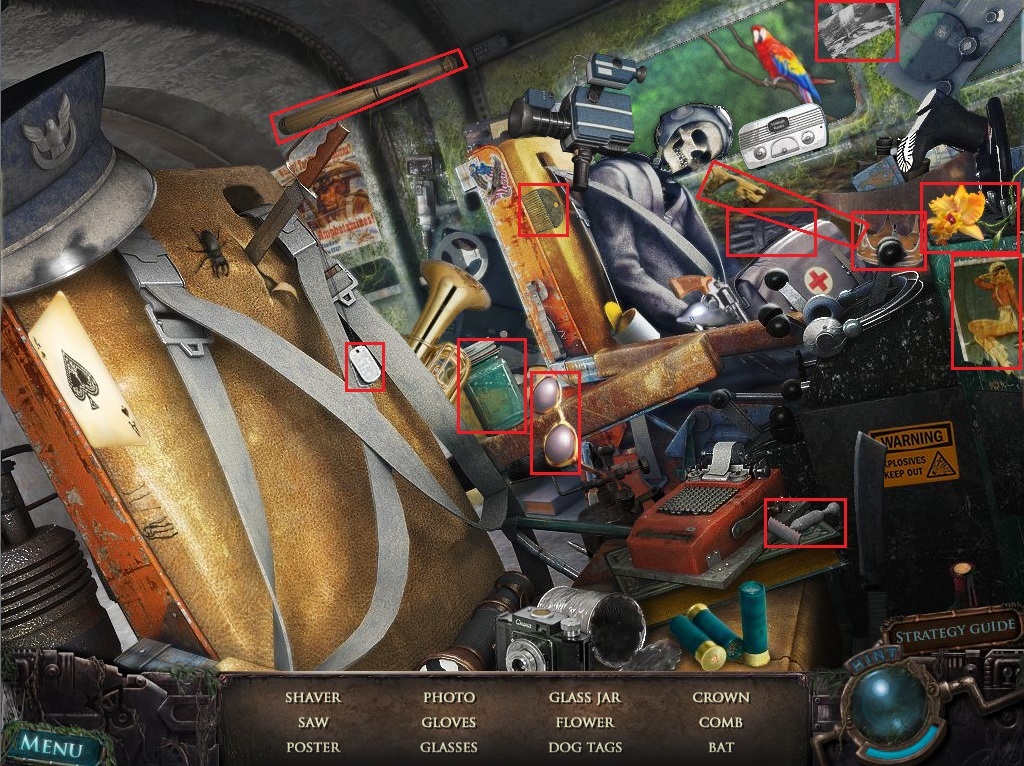
After the harrowing opening animation the game begins on Toto island, home of Professor Kelvin and his research team. The player must navigate their way around the island and interact with the scenery with a simple point and click of the mouse. The Mission: A Search and Rescue Mystery features that staple of the adventure hybrid, a changing cursor, which indicates things that can be picked up, things that can be examined, and areas to which you can travel. Sparkles of various colors indicate either places of interest, mini-games and puzzles, and of course the obligatory hidden object scenes where you collect a lot of stuff to find one useful item. Found items will then be used to solve other games and puzzles and eventually the central mystery of the island itself and the fate of its inhabitants will be revealed.
 The mini-games and puzzles are the best part of The Mission: A Search and Rescue Mystery. Although there will be some familiar tropes along the way (it's just not an adventure hybrid without a pipe puzzle, is it?) many are either new and original or ones that are not used all that often in the adventure/hidden object field. Better yet is the difficulty of the puzzles which increases the further into the island you go, involving a lot of spatial reasoning, logic, and observational skills. Good thing there's your trusty notebook keeping track of various clues you find along the way, otherwise you'd be in for a lot of backtracking. Eventually you will reason your way to the dramatic ending and learn the secrets of the mysterious islands.
Analysis: The MIssion: A Search and Rescue Mystery is not your average adventure hybrid, which is a good thing. The emphasis here is on the mini-games and puzzles with the hidden objects scenes seeming to be almost an afterthought, not that that's a bad thing. Oh contraire! With less emphasis on picking up tons of items and more emphasis on pure logic The Mission plays almost like a pure adventure game, or even their modern flash descendants, room escape games.
 A lot of work and effort has gone into the look and feel of The Mission: A Search and Rescue Mystery. The backgrounds are pretty stunning, even in the gloomy light of the storm (and the later conjured darkness), and the moody music and incidental sounds only add to the increasing tension as you rush to rescue the professor and his students from...whatever fate awaits them. Sorry, you'll have to enjoy the ratcheting tension spoiler free.
If there is a downside to this atmospheric and challenging game it is that those beautiful backgrounds are a bit underutilized. They're pretty to look at, but there's not much to do in any of the scenes that you wander through during your adventure. More hidden object scenes are not necessarily needed, which would simply feel like padding, but when you've created such exciting and elaborate places to visit it would be nice if you could interact with them more. Because you can't, and due to the fact that each hidden object scene is only accessed once, that means that The Mission: A Search and Rescue Mystery is shorter than it could have been. Of course, most of the adventure hybrids on the market today suffer from the same problem: shrinking gameplay. The story itself, although interesting, is also pretty predictable and the storyline, characters, and settings seem a bit ripped off from Lost.
Despite the shortcomings The Mission: A Search and Rescue Mystery is still a blast to play if only for those puzzles. For those who miss the days of classic point-and-click adventuring this is a game that, while not completely resurrecting the old days, certainly comes closer than most on the market. Moody, atmospheric, and challenging, this game is one that will grip the player from the first crack of thunder to the dramatic denouement. Give The Mission: A Search and Rescue Mystery a whirl and become the heroic pilot you've always wanted to be without the accompanying danger (or Discovery Channel camera crews).
A Collector's Edition is also available. It includes concept art, wallpapers, a well-written built-in game guide, and a hefty side adventure that covers the professor's early days on the island, long before he was a professor. Remember that Big Fish Game Club Members pay only $13.99 for Collector's Editions (or 2 club credits), and collector's editions count 3 card punches of 6 total needed for a free game.
![]() Windows:
Windows:
Download the demo
Get the full version
Also available: Collector's Edition
![]() Mac OS X:
Mac OS X:
Also available: Collector's Edition


Walkthrough Guide
(Please allow page to fully load for spoiler tags to be functional.)
The Missing: A Search and Rescue Mystery Walkthrough (Collector's Edition) Part 1: General Knowledge & Chapters 1-4
General Knowledge
The Missing: A Search and Rescue Mystery is a hidden object adventure game, where the cursor is used to interact with the environment.
When the cursor is over an area where you can zoom in to take a closer look, the cursor will change to a magnifying glass.
The cursor will change to a large arrow when hovering over a travel area. By clicking this area, you can move to the next screen or go back to an old screen.
When the cursor is over an item that you can pick up, it will change to a hand.
When the cursor is over a puzzle, it will change to a puzzle piece shape.
At the bottom of the screen is the toolbar, which has many helpful items at your disposal.
In the left corner is the Menu button, which takes you to the in-game menu where you can change the options, find basic help instructions, and exit to the main menu.
Next to the Menu button is the Notebook. The Notebook contains important information noted along your journey. Access the Notebook to find instructions for certain puzzles and details about the story.
In the right corner is the Hint button. Pressing the Hint button can offer instructions to a puzzle, find an item during a hidden object scene, or show you the next area to go in your adventure.
Between the two corners is the inventory bar. Items collected during the game are placed in the inventory. Click an item from your inventory to use it on interactable areas throughout the game.
Chapter 1
Small Hut
Click the casebook on top of the plane dashboard.
Step outside the plane and onto the dock.
Click the camera hanging from the welcome sign.
Cycle through the photos by clicking the "Next" arrow all the way to the last picture.
Take the Crystal(1/56) below the sign.
Go left to the area outside the hut and the cage.
Click the sand in front of the small steps to zoom in.
Examine the strange footprint in the sand.
Click the crate on the ground to zoom in.
Examine the schematics and take the Crystal(2/56)
Step inside the hut.
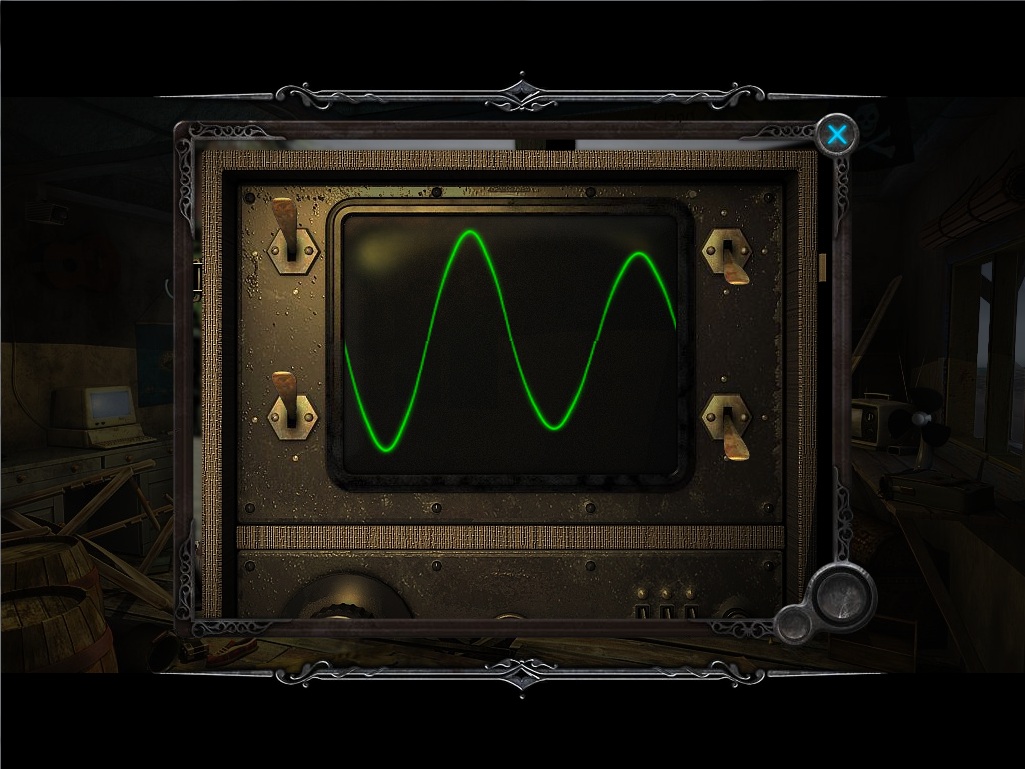
Click the radio in front of the window to start the mini-game.
To solve the mini-game, match the frequency of the green wave to the dotted line on the screen.
Click any of the four levers to alter the frequency.
Switching one of the levers can also affect another lever.
Solution.
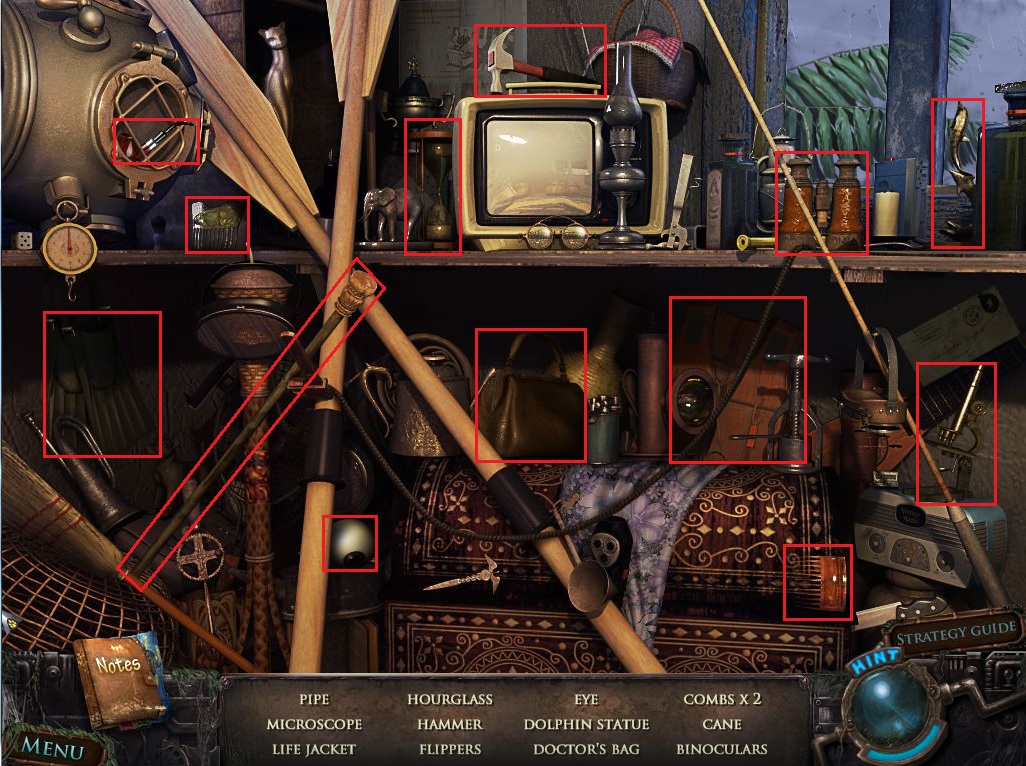
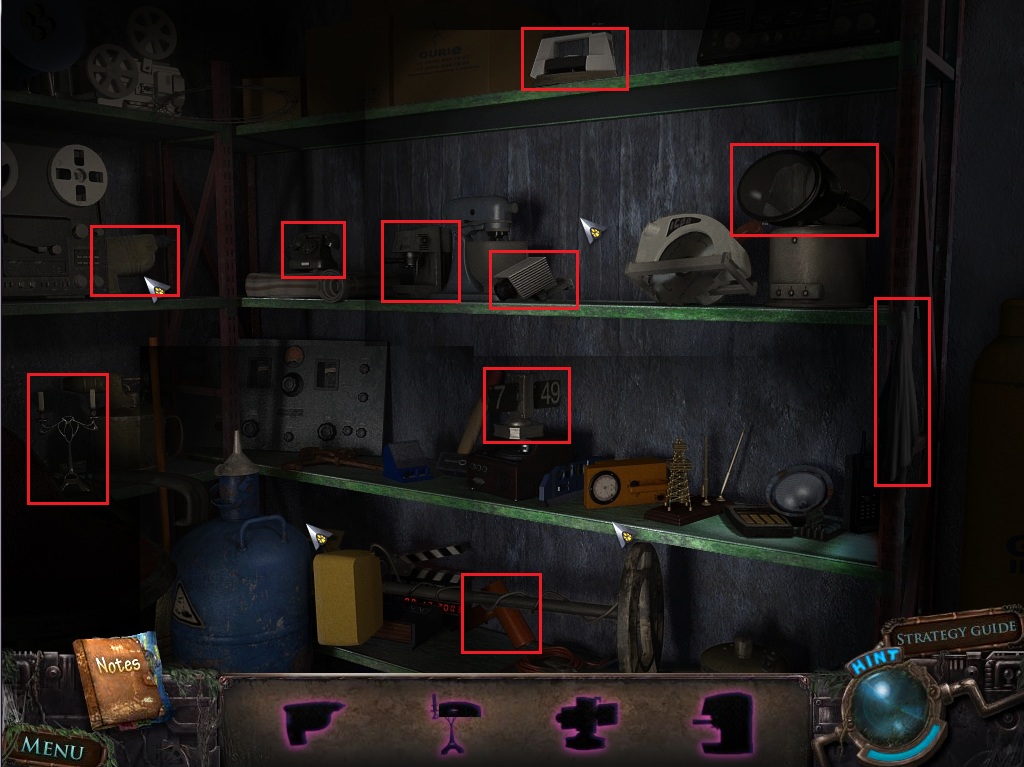
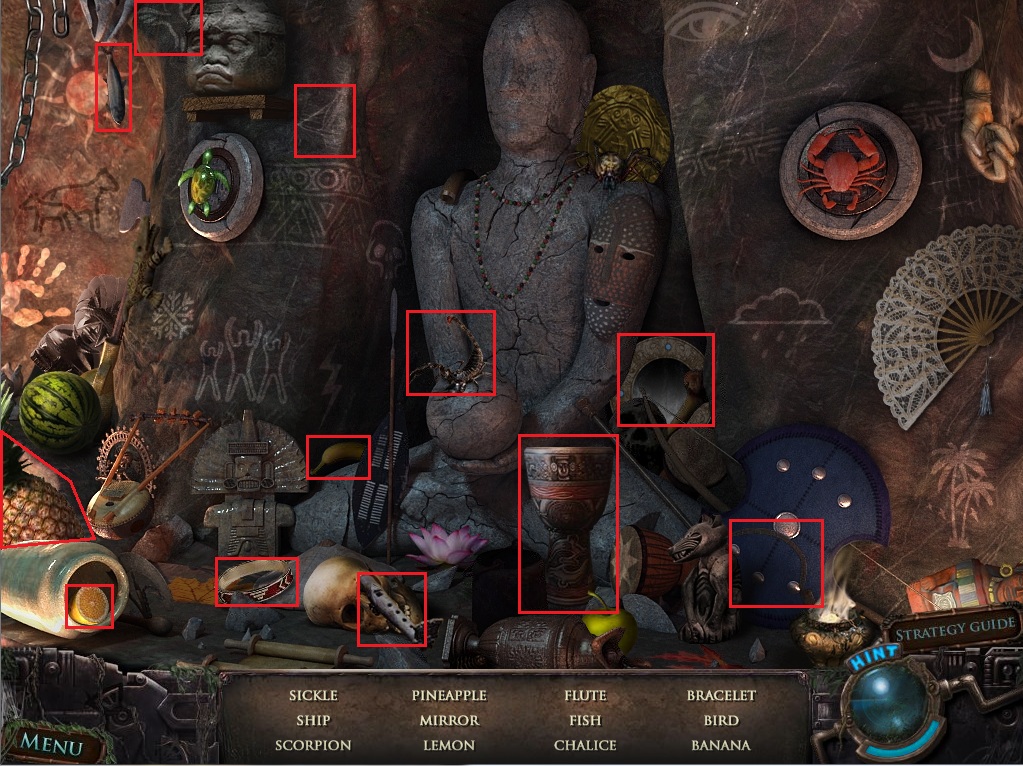
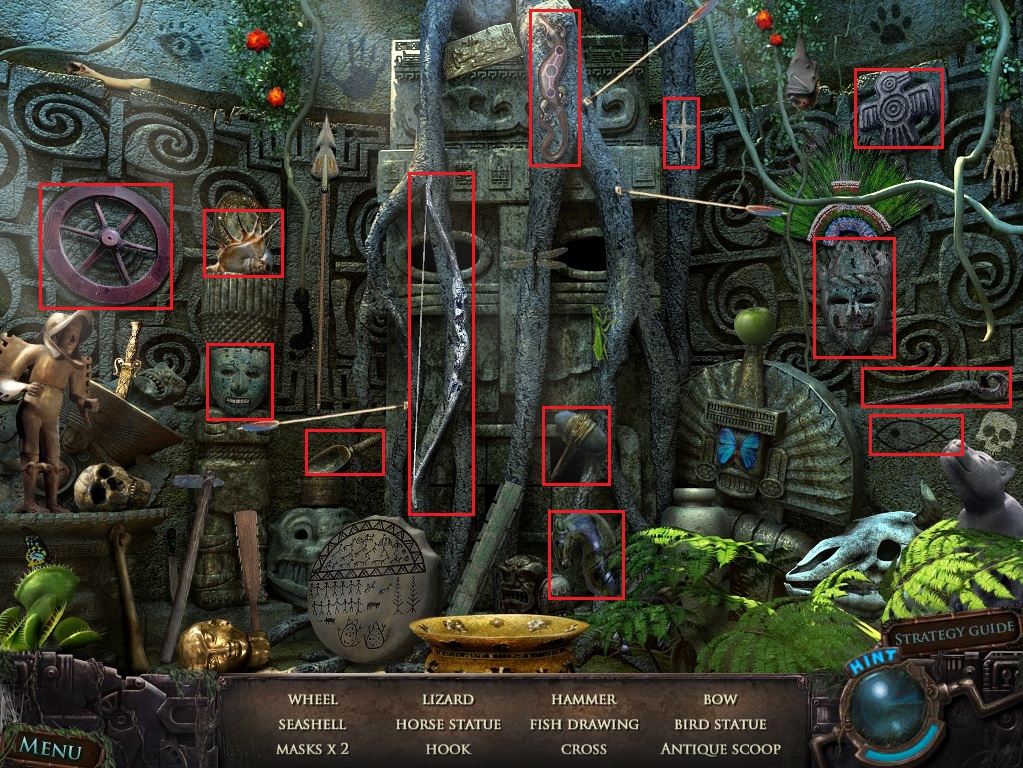
Click the area under the radio to start the hidden object scene.
Screenshot.
Once the hidden object scene is complete, you will receive a Hammer.
Click the piggybank on the floor to zoom in.
Use the Hammer from your inventory to smash the piggy bank.
Examine the crumpled note to find the last two digits of a code.
Click the computer on the left table to zoom in.
Examine the note with the first two digits to the safe password.
Go through the broken wall to reach the bridge in the jungle.
The Bridge
Click the safe in front of the bridge to zoom in.
Punch in the four numbers found in the piggy bank and on the computer screen.
The combination is 1-5-0-7
Click the opened safe to look inside.
Take the Weapon.
Click the bridge.
Take the Crystal(3/56) by the left side of the broken bridge.
Return to the plane on the beach docks.
Small Hut
Click the ignition to start the plane.
Click the steering wheel to move the plane towards the water.
Push the throttle to take off.
Air Crash
Take the flashlight shining on the ground.
Take the Hammer on top of the book.
Click the front of the plane to move forward.
Use the Hammer on the crack in the windshield.
Chapter 2
The Pier
Click the backpack on the shore to zoom in.
Go left towards the pier.
Click the signboard on the lamppost.
Take the Crystal(4/56) on the side of the pier.
Click the rowboat to zoom in.
Take the Axe.
Go back once, then follow the cave sign to the right.
The Cave
Click the table under the tarp to zoom in.
Examine the drawing of a creature.
Go forward to the door in the rock wall.
Go through the empty wall into the caverns.
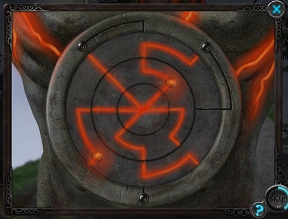
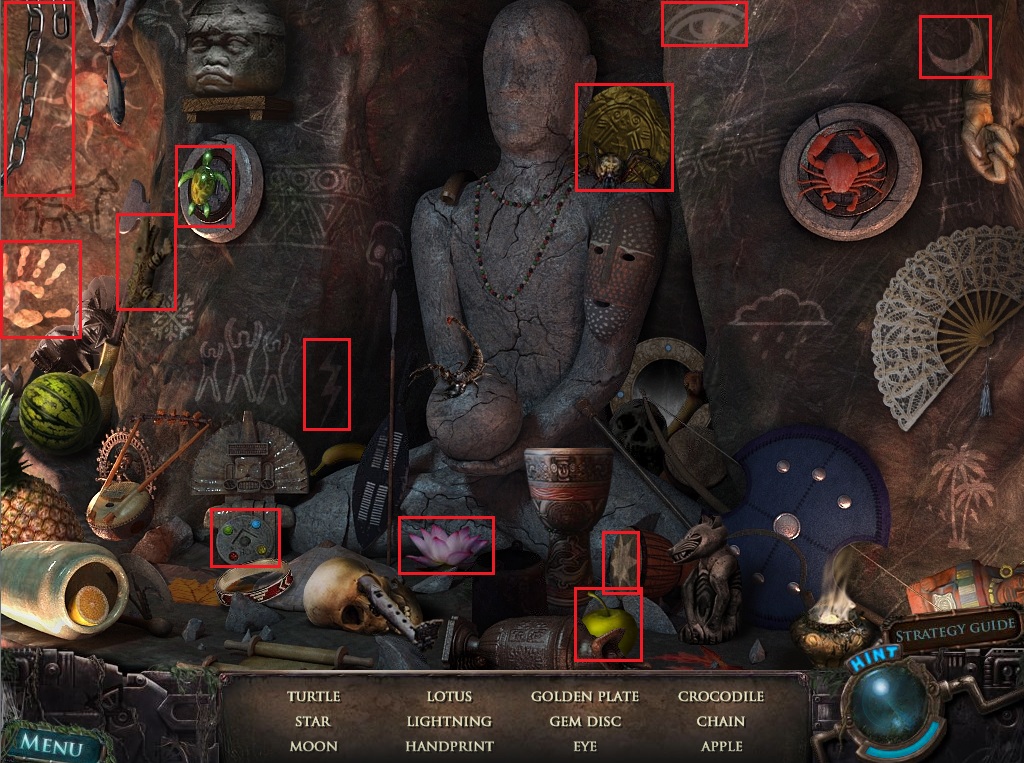
Click the colorful circle on the left wall to zoom in.
Take the Amulet between the figure's hands.
Go down to the end of the tunnel.
Take the Crystal(5/56) to the left of the stone steps.
Exit the cave and go all the way back to the entrance gate of the island.
The Pier
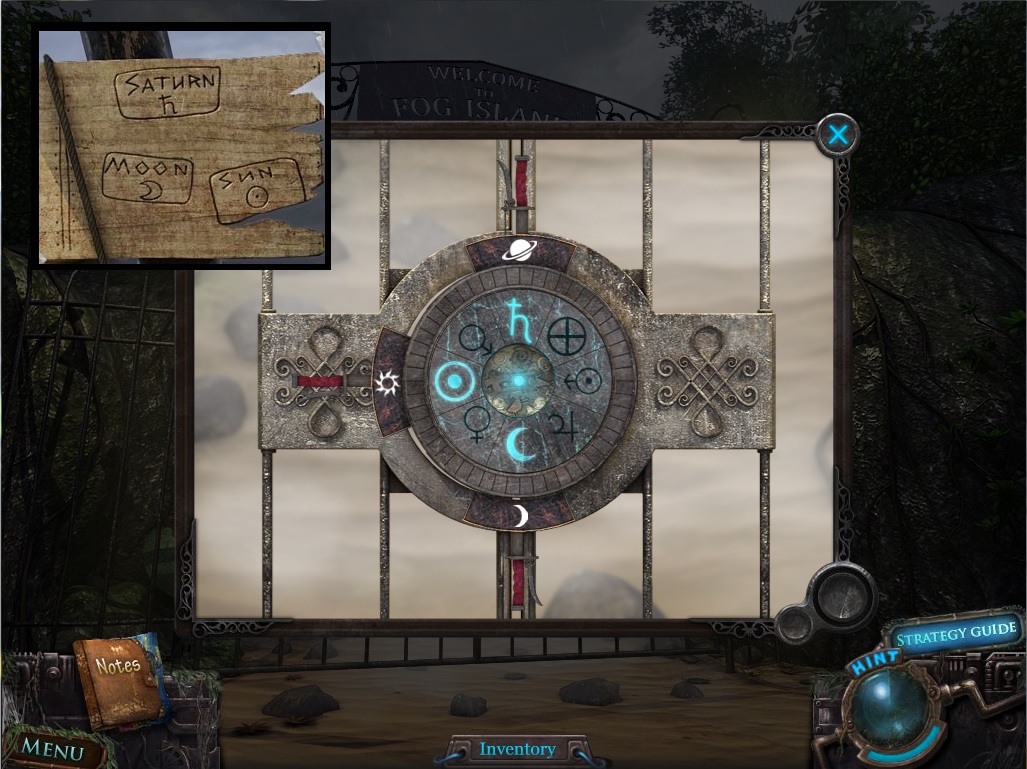
Click the lock in the middle of the gate to zoom in.
Place the Amulet from your inventory into the hole in the round lock mechanism to start the minigame.
To solve this minigame, move the blades to their matching symbols on the wheel.
The correct order is noted in the Diary: Saturn, Moon, Sun.
Click and drag a blade to move its tile around the wheel.
When a tile is aligned with a symbol along the wheel, that symbol will glow blue.
Solution.
Follow the path through the open gate.
The Garage
Take the Crystal(6/56) below the lamppost.
Click the sign in the bushes to view a map of the island.
Follow the left path to the garage.
Go right towards the bridge.
Pull the handle of the control panel.
Go back one screen to the garage.
Click the large blue door to inside the garage.
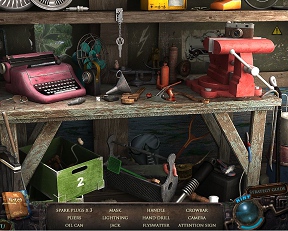
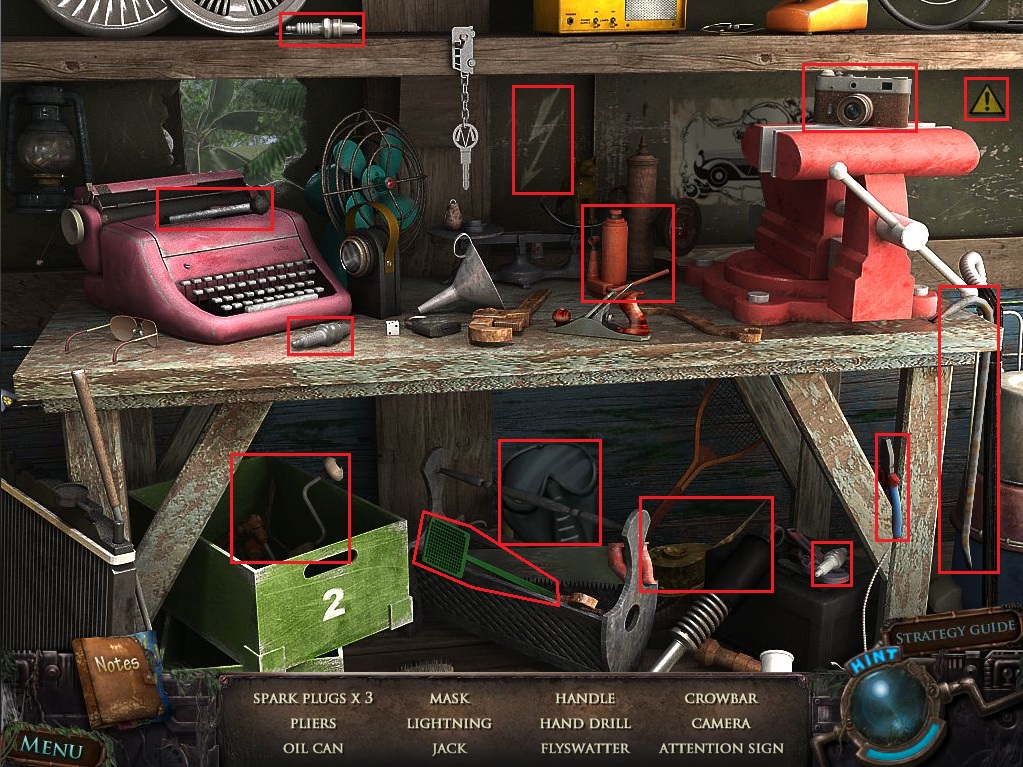
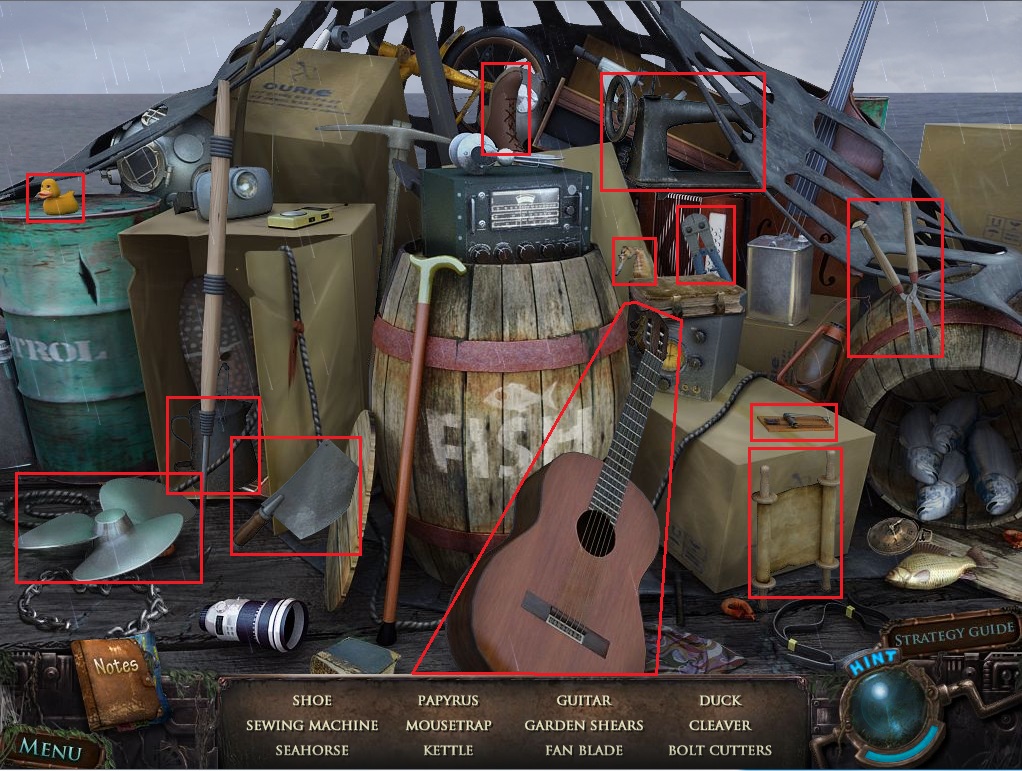
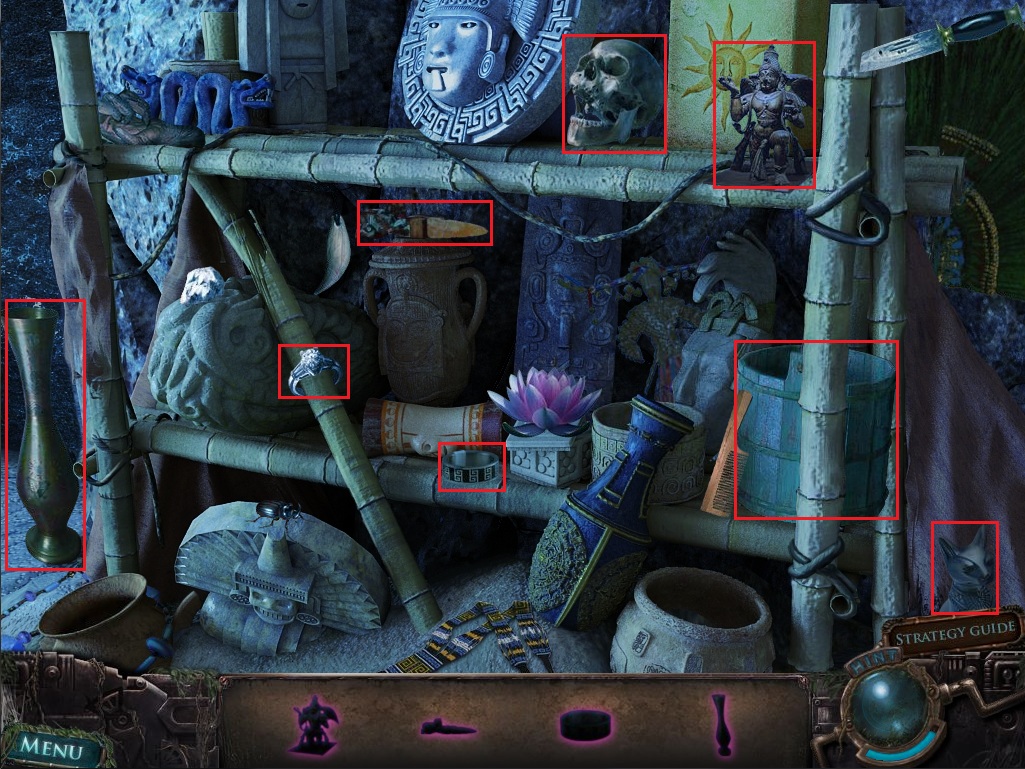
Click the worktable to start the hidden object scene.
Screenshot.
Once the hidden object scene is complete, you will receive a Handle.
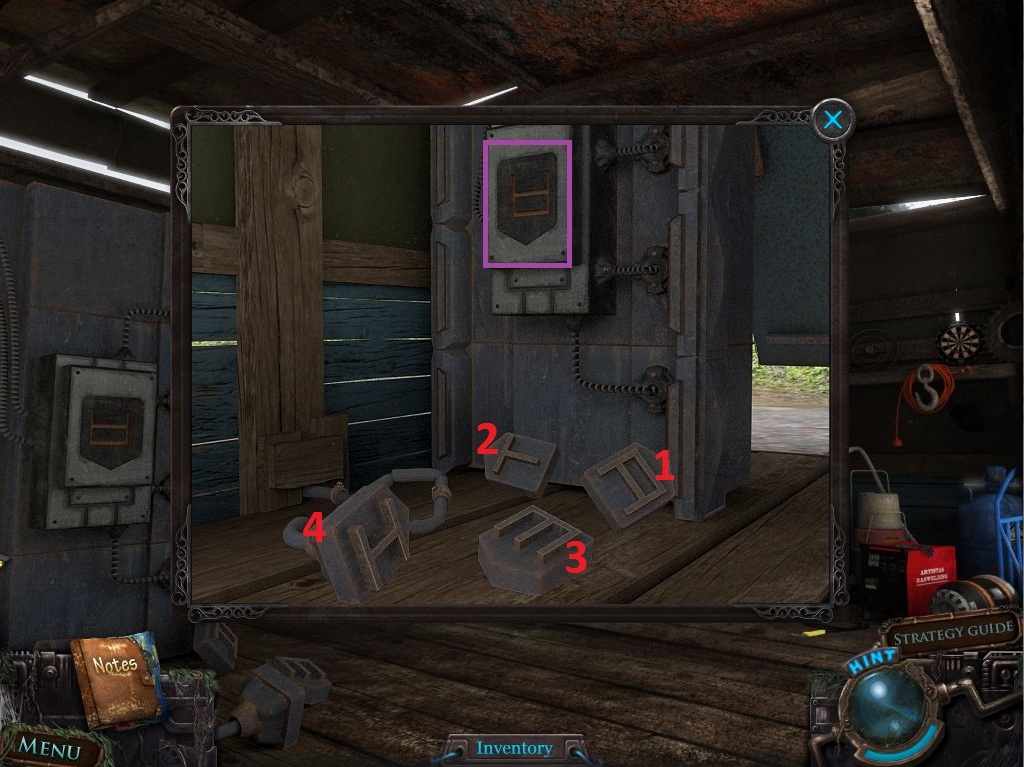
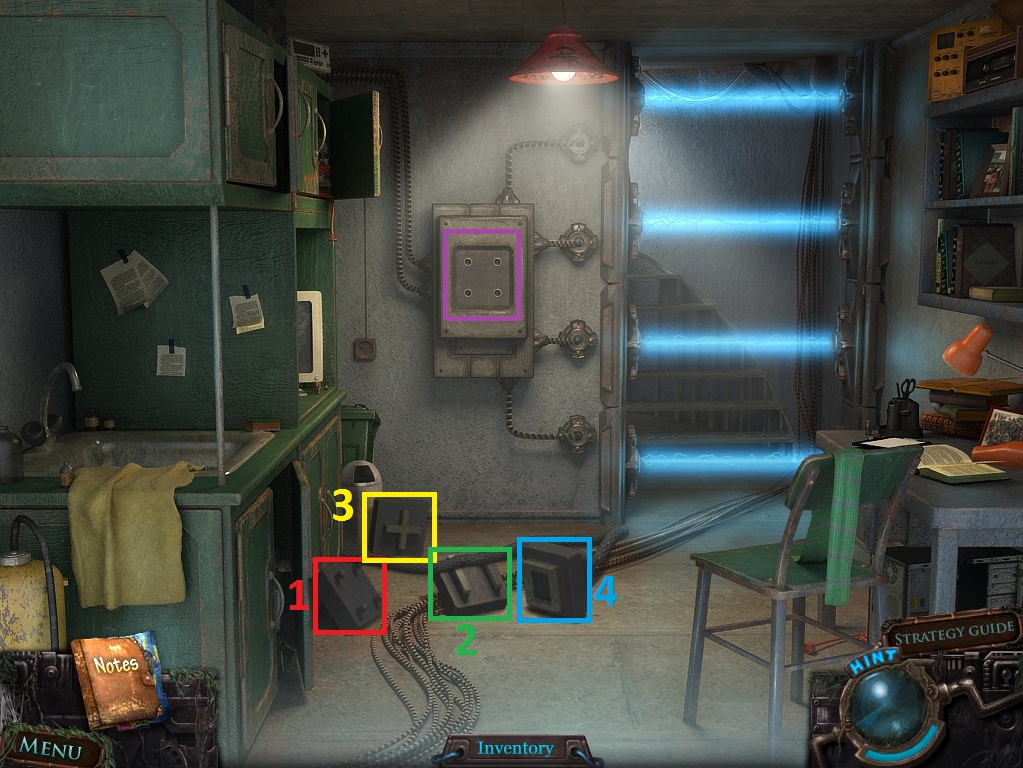
Click the mechanism to the left of the garage door to start the minigame puzzle.
To solve this puzzle, attach the letter-shaped pieces in the correct order.
First attach the A-shaped button.
Then, attach the T-shaped button.
Next, attach the E-shaped button.
Lastly, attach the I-shaped button.
Solution.
Exit the garage and go back one screen to the path.
Move forward to the bridge mechanism.
Pull the switch to lower the bridge.
Use the Axe from your inventory to chop through the roots.
Move forward across the bridge.
Click the base of the statue to examine the etching.
Follow the right path to the van.
Weather Station
Open the car door.
Click the van to look inside.
Go forward to the weather station building.
Click the dummy on the ground beside the building to zoom in.
Take the second Handle from the doll's hands.
Go forward towards the crane behind the building.
Take the Crystal(7/56) at the cement base of the machinery.
Click the crane to zoom in.
Add the two Handles from your inventory to the control panel.
Use the left handle to move the crane all the way to the right.
Use the right handle to drop the bag down to the ground.
Click the bag of junk dropped on the pier to begin the hidden object scene.
Screenshot.
Once the hidden object scene is complete, you will receive Bolt Cutters.
Go back one screen to the station building.
Click the door to zoom in.
Use the Bolt Cutters on the chain around the doorknob.
Go through the open door into the building.
Take the First-aid Kit on the bed.
Click the glowing computer screen to zoom in.
Click the fuse panel on the wall to view the puzzle.
To solve this puzzle, bring power to all of the red lights by connecting the wires.
Click a wire to rotate it.
If a wire has power, the light in the center will glow red.
Solution.
Once the puzzle is solved, click the open fusebox to zoom in.
Take the Battery out of the panel.
Back up twice to return to the van.
Click the van to go inside.
Use the First-aid Kit from your inventory on the injured man.
Go back one screen to the area with the large statue.
Give the injured man the Bolt Cutters.
Follow him through the gate.
The Lighthouse
Take the Crystal(8/56) on the dirt path.
Click the wood bench to zoom in.
Read the newspaper folded on the bench.
Go up the path to the lighthouse.
Click the door to the building.
Go left to the telescope device.
Take the Crystal(9/56) on the ground.
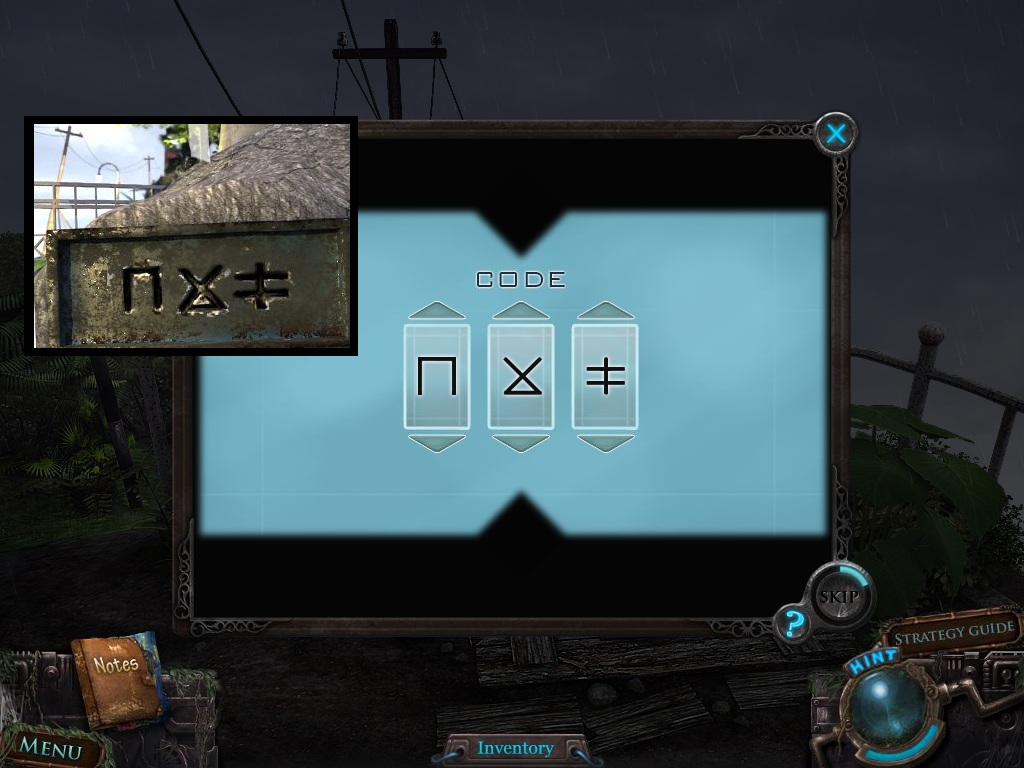
Click the panel in the middle of the telescope device to zoom in.
Put the Battery from your inventory inside the panel.
Click the scope to see through the lense.
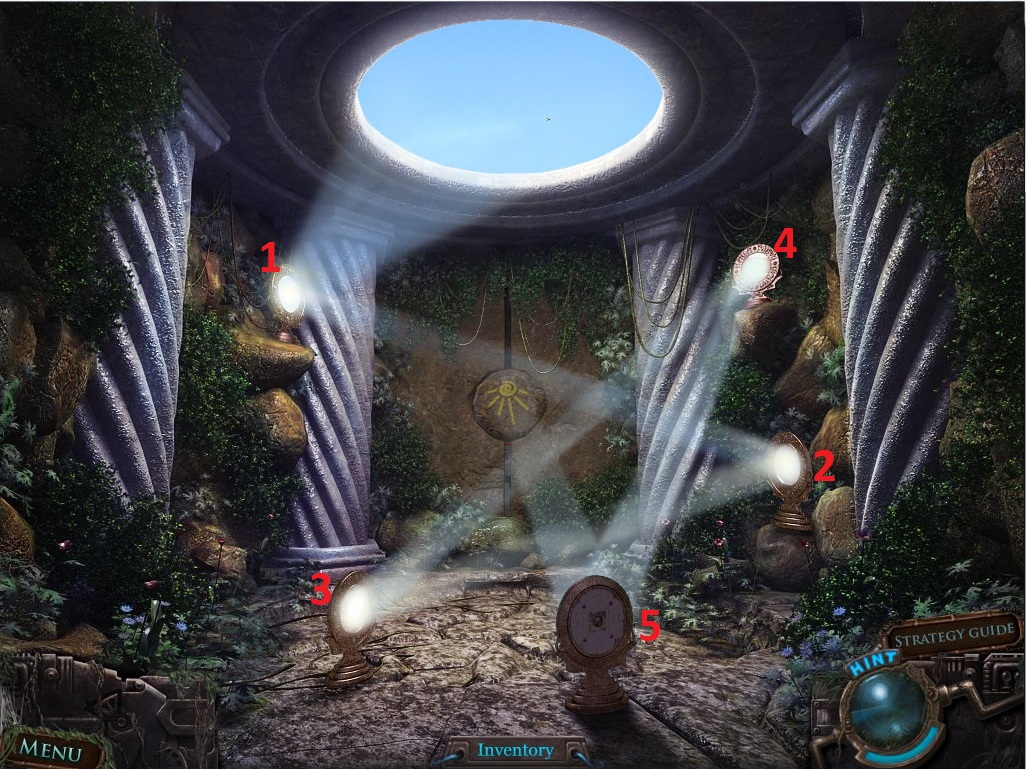
Enter in the code you found at the base of the statue and also noted in the Notebook.
Screenshot.
Leave the lighthouse area and return to the statue in the garage area.
Click the statue to zoom in to the minigame puzzle.
To solve this puzzle, arrange all the tiles so the round buttons are all connected to the center.
Click a circular tile and drag it to rotate the tile clockwise or counter clockwise.
The outer ring will not rotate.
When there is a continuous path from the center tile to an outer tile, the lines will glow red.
Solution.
When the puzzle is solved a compartment behind the plate of the statue will lift, revealing a Red Gem and a code.
Go back to the garage, then follow the sign on the left to the bunker.
The Bunker
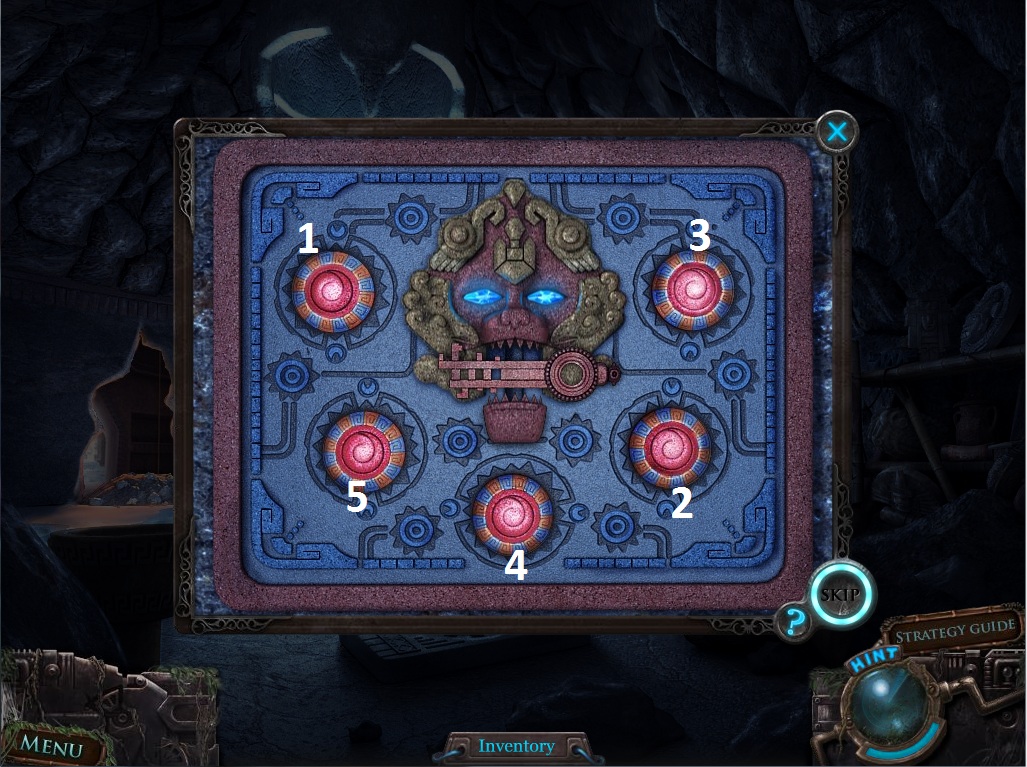
Click the top of the bunker vault door to start the puzzle.
To solve this puzzle, rotate the handles in the correct order.
Click left and right arrows beside each of the four handles to rotate it clockwise or counterclockwise, respectively.
Follow the order found on the paper inside the statue, also found in the Notebook.
Turn the top left handle counterclockwise three times.
Turn the top right handle counterclockwise three times.
Turn the bottom left handle clockwise four times.
Turn the bottom right handle counterclockwise two times.
Solution.
Take the glowing Crystal(10/56) on the ground in front of the bunker.
Go through the opened door into the vault.
Take the Crystal(11/56) on the ground under the power boxes.
Move forward towards the door.
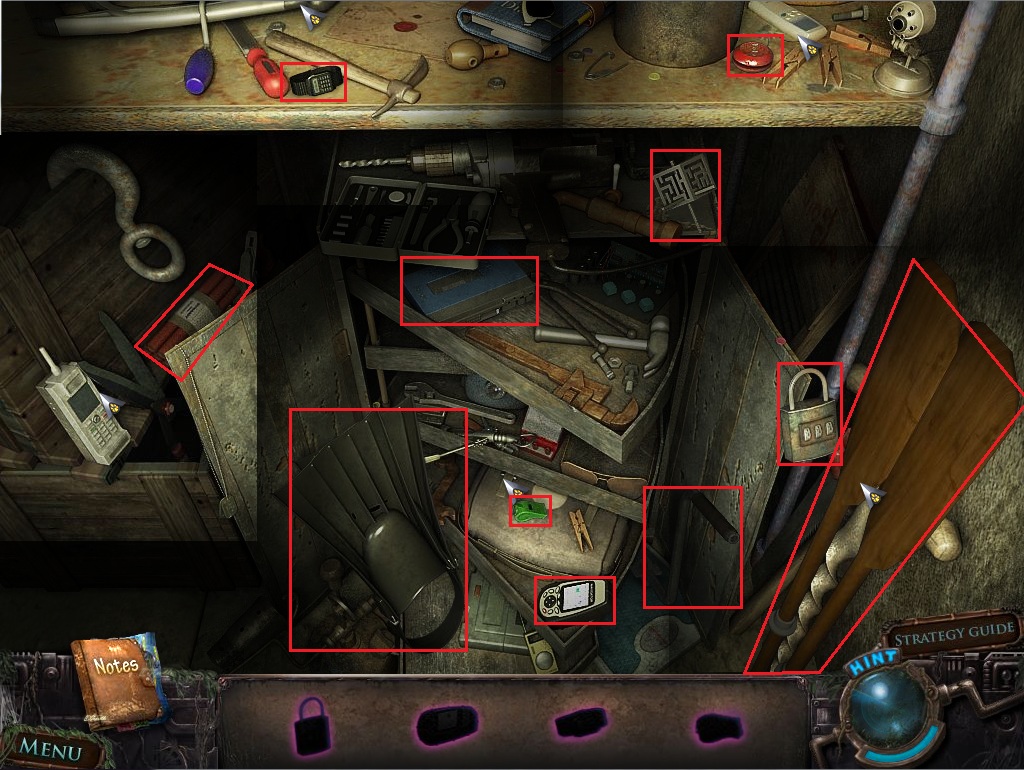
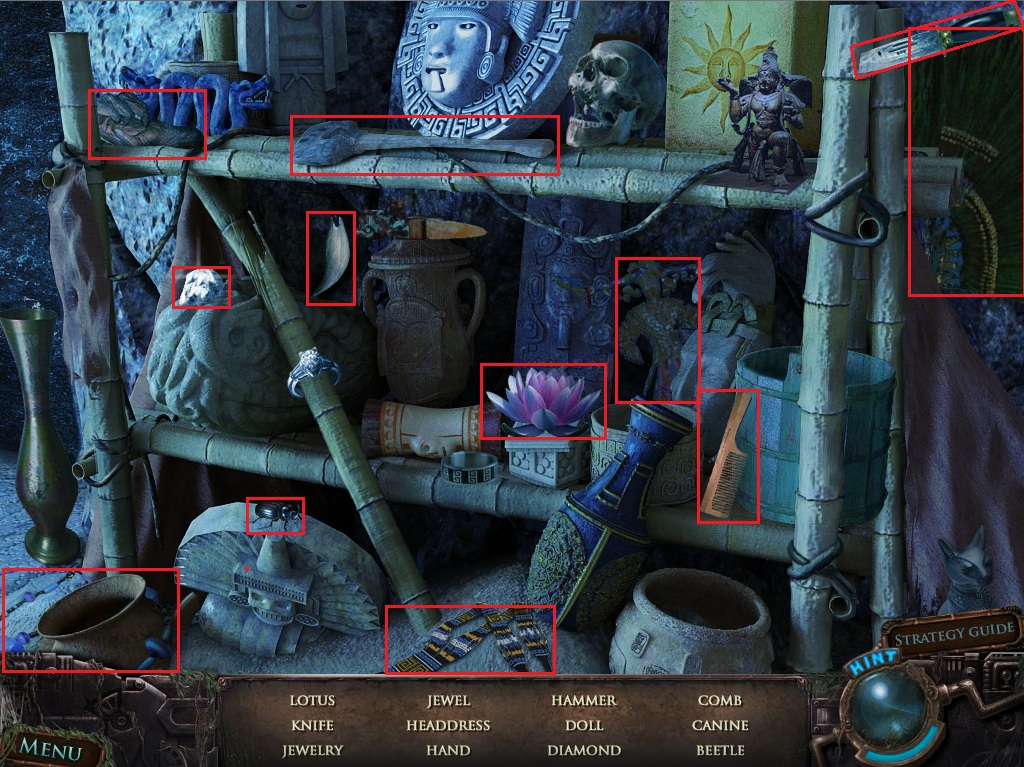
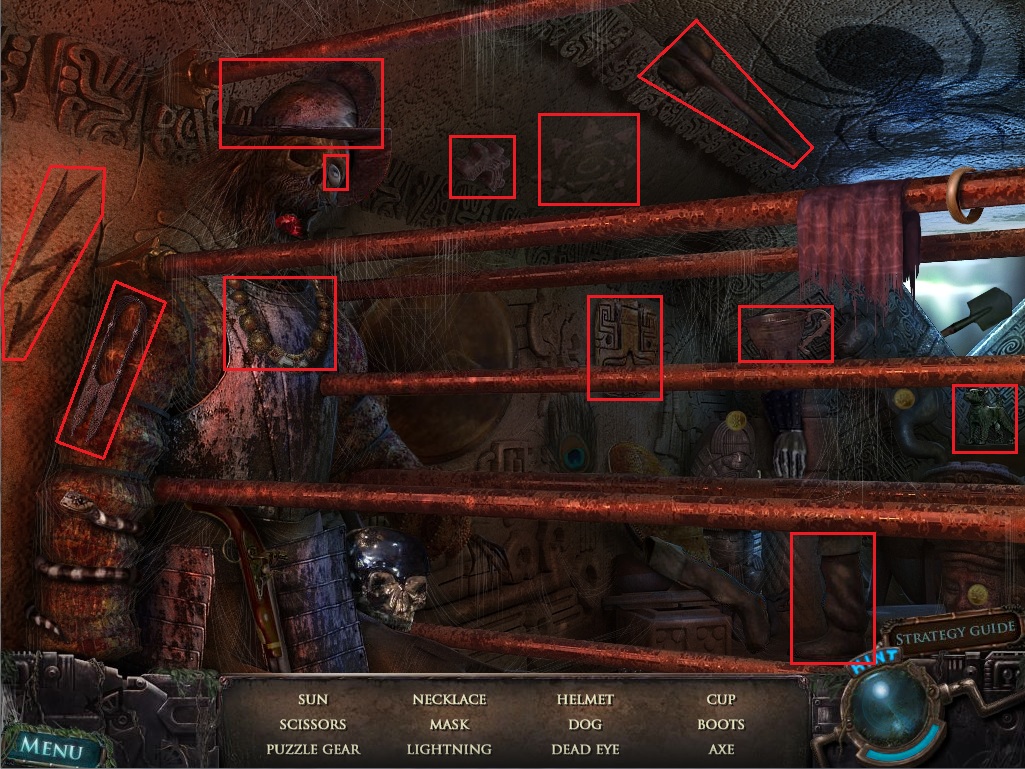
Click the shelves to start the hidden object scene.
Find the objects that are similar in shape to the silhouettes in the list at the bottom.
Screenshot.
Once the hidden object scene is complete, you will receive a pair of Oars.
Step outside the bunker and go back one screen to the garage.
The Garage
Take the Crystal(12/56) sticking out of the grass.
Return to the lighthouse.
The Lighthouse
Take the crystal on the ground in front of the lighthouse door.
Go all the way back to the pier.
The Pier
Take the smoldering Crystal(13/56) that falls from the sky.
Go forward to the camp area outside the cave entrance.
The Cave
Take the Crystal(14/56) in the sand by the water.
Return to the pier.
The Pier
Use the Oars from your inventory on the small rowboat.
Click the boat to leave Fog island.
Air Crash
Ignore the pile of debris for now, and keep moving forward to reach Toto Island.
Chapter 3
The Jungle
Take the Crystal(15/56) on the boards of the pier.
Follow the path forward.
Take the Crystal(16/56) on the ground to the left.
Click the board to view a map of Toto Island.
Click the path to the right.
Click the right path again to the front of the warehouse.
Take the Crystal(17/56) on the ground beside the broken sentry gate.
Go down into the underground storage.
Underground Storage
Take the Crystal(18/56) off the left table.
Click the shelves to start the hidden object scene.
Screenshot.
Once the hidden object scene is complete, you will receive a Rag.
Go back three screens to return to Anna in the jungle.
The Jungle
Click Anna to speak with her.
Follow her direction to the left path.
Take the Crystal(19/56) on the ground between the two puddles.
Go left again towards the cliffs, then forward to the camp.
The Camp
Take the Crystal(20/56) on the ground in front of the tent.
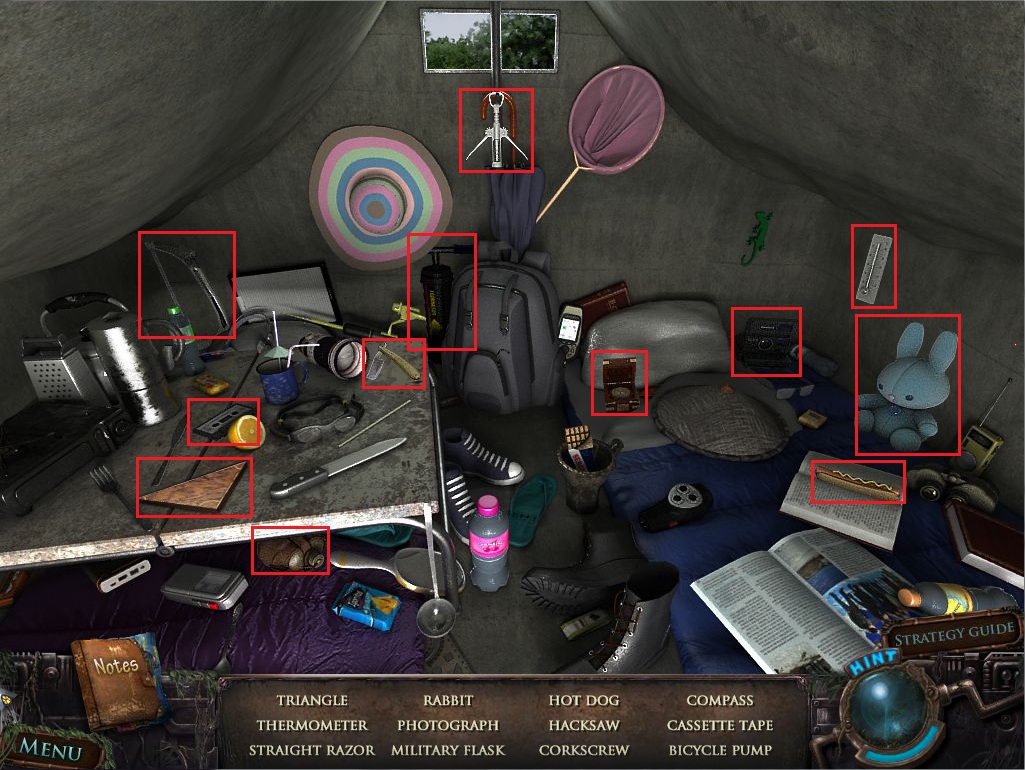
Click the tent to start the hidden object scene.
Screenshot.
Once the hidden object scene is complete, you will receive a Triangle.
Move right towards Anna.
Take the Crystal(21/56) in front of the collapsed tent.
Click the monkey with the key in its hands.
Click the small wooden box in front of the green and orange tent to zoom in.
Add the Triangle from your inventory to start the puzzle.
To solve this puzzle, move the red slider through all of the lines in the box.
Click a blue circle to move the red slider along the path to that point.
The slider can only go through each line one time.
Once a path has been taken, that line will be highlighted.
Solution.
Use the Rag from your inventory on the dirty object inside the box.
Take the note nailed to the tree.
Give the cleaned Necklace to the monkey to receive the Gate Key.
Go back four times to the crossroads in the jungle.
The Jungle
Move forward towards the electrified gate.
Take the Crystal(22/56) on the ground in front of the gate.
Take the note above the electric panel.
Follow the sign to the left, then go up the path to the mansion gate.
The Mansion
Take the Crystal(23/56) stuck in the vines to the right.
Click the padlock in the center of the gate to zoom in.
Use the Gate Key from your inventory on the keyhole.
Go through the open gate onto the mansion grounds.
Take the Crystal(24/56) in the middle path.
Move right towards the fountain.
Take the Crystal(25/56) on the ground.
Take the Knight's Sword sticking out the rabbit shrubbery.
Go back one screen to the stairs.
Take the Crystal(26/56) on the second step.
Move one screen left.
Take the Crystal(27/56) on the ground.
Move forward towards the cannon.
Take the note taped to the base of the cannon.
Take the Crystal(28/56) on the ground behind the cannon.
Click the cannon to face it towards the building.
Return to the steps in front of the mansion, then go through the front door.
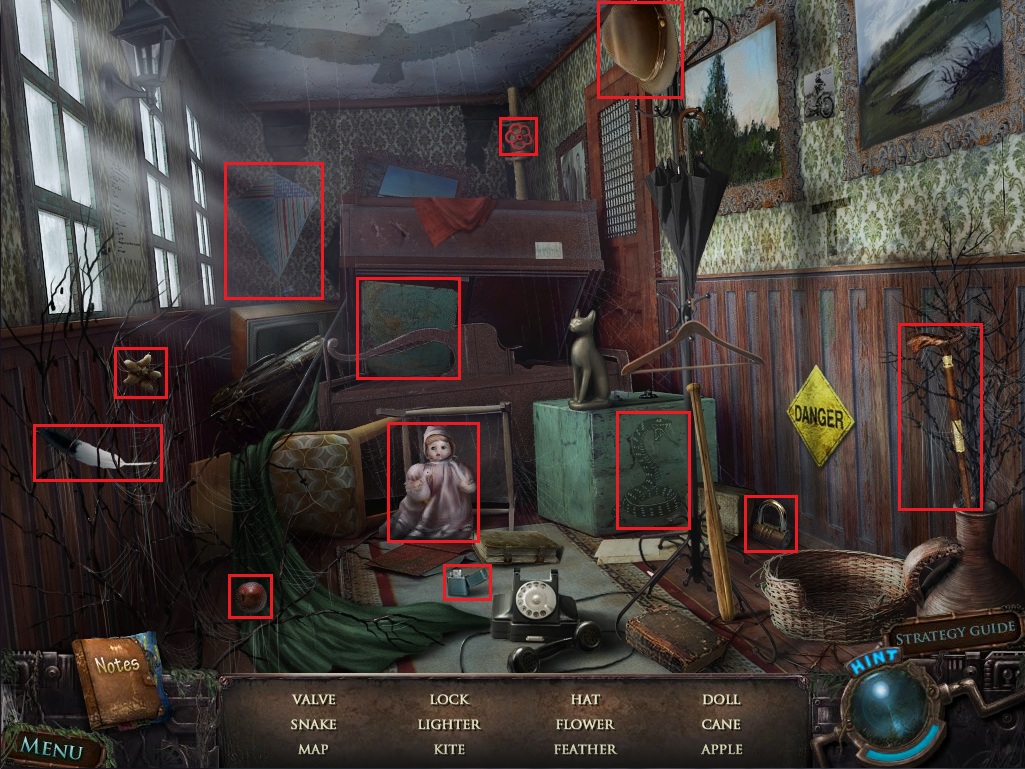
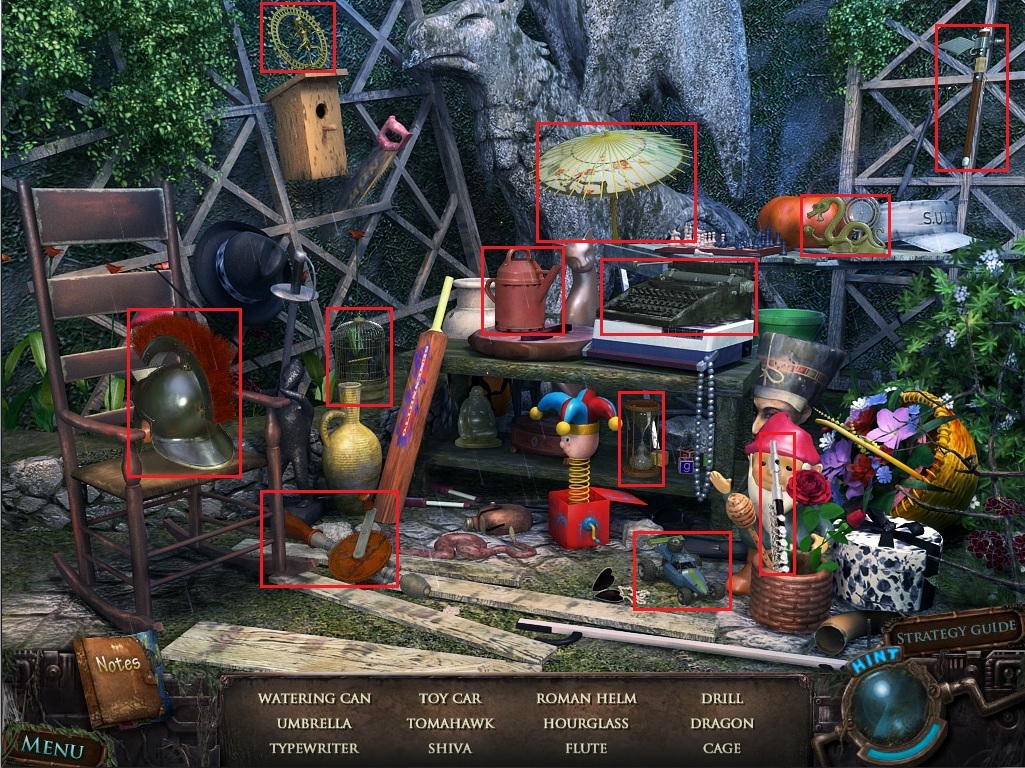
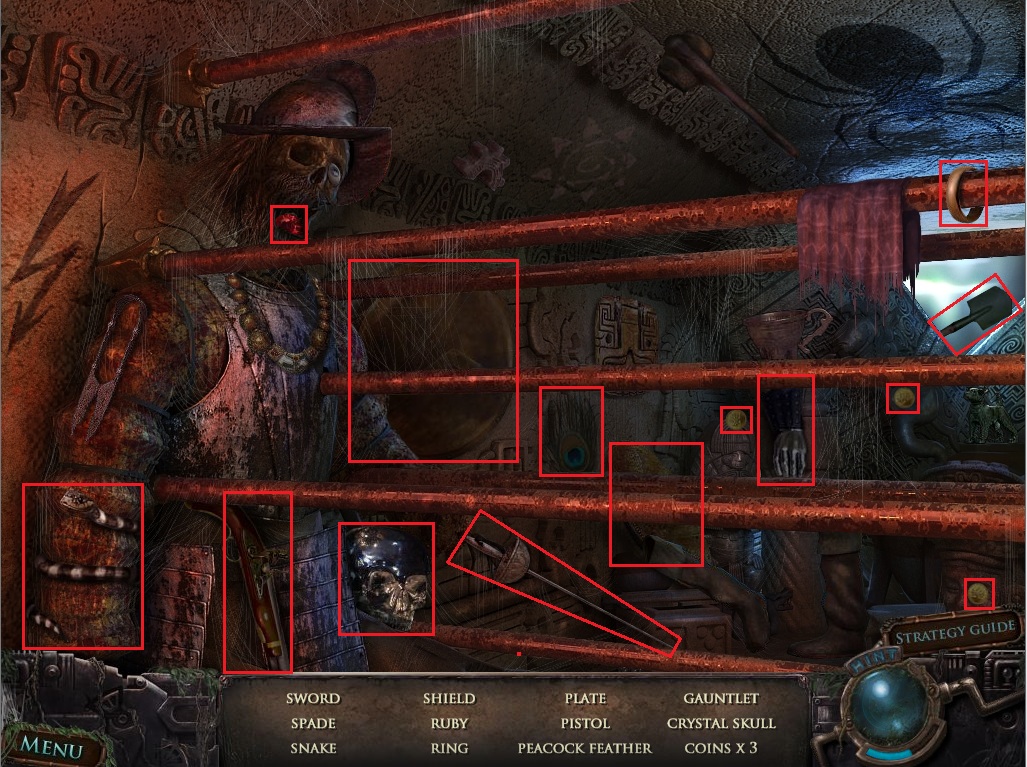
Click the left corner of the room to start the hidden object scene.
Screenshot.
Once the hidden object scene is complete you will receive a Lighter.
Go up the stairs.
Take the Crystal(29/56) on the banister.
Go through the door on the left into the astronomy room.
Click the left table to begin the hidden object scene.
Screenshot.
Once the hidden object scene is complete you will receive a Wick.
Take the note taped to the right of the window.
Click the blackboard on the right wall to view a list of constellations.
Return to the cannon outside the mansion.
Add the Wick to the cannon, then light it with the Lighter.
Go through the hole in the wall.
Take the Cannonball stuck in the wall.
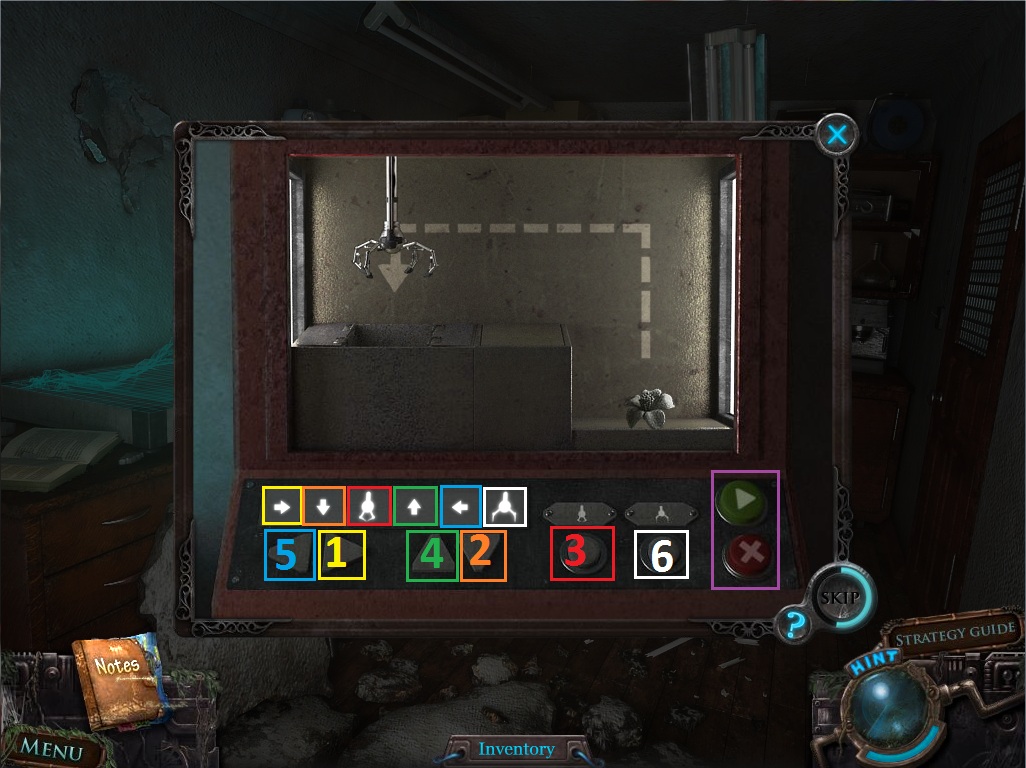
Click the large claw mechanism in the corner of the room to start the minigame puzzle.
To solve this puzzle, pick up the flower with the claw.
Push the up, down, left, right, grab, and release buttons to make the preset directions for the claw to travel.
Push the green arrow button to start the mechanism, or push the red x button to clear the controls and start over.
The correct order is: Right, Down, Grab, Up, Left, Release.
Solution.
Once the puzzle is complete, you will receive a stone Flower.
Exit the room and go right to the area in front of the garden gate.
Place the Cannonball from your inventory on the stone slab in front of the broken fountain.
Go through the open gate into the garden.
Take the Crystal(30/56) from the flower bush to the left.
Go forward, left, and then forward again to reach the statue.
Click the statue's outstretched hand to zoom in.
Take the Green Gem and replace it with the Flower from your inventory.
Take the Katana from her scabbard.
Go back two screens.
Click the top of the small gate to start the minigame puzzle.
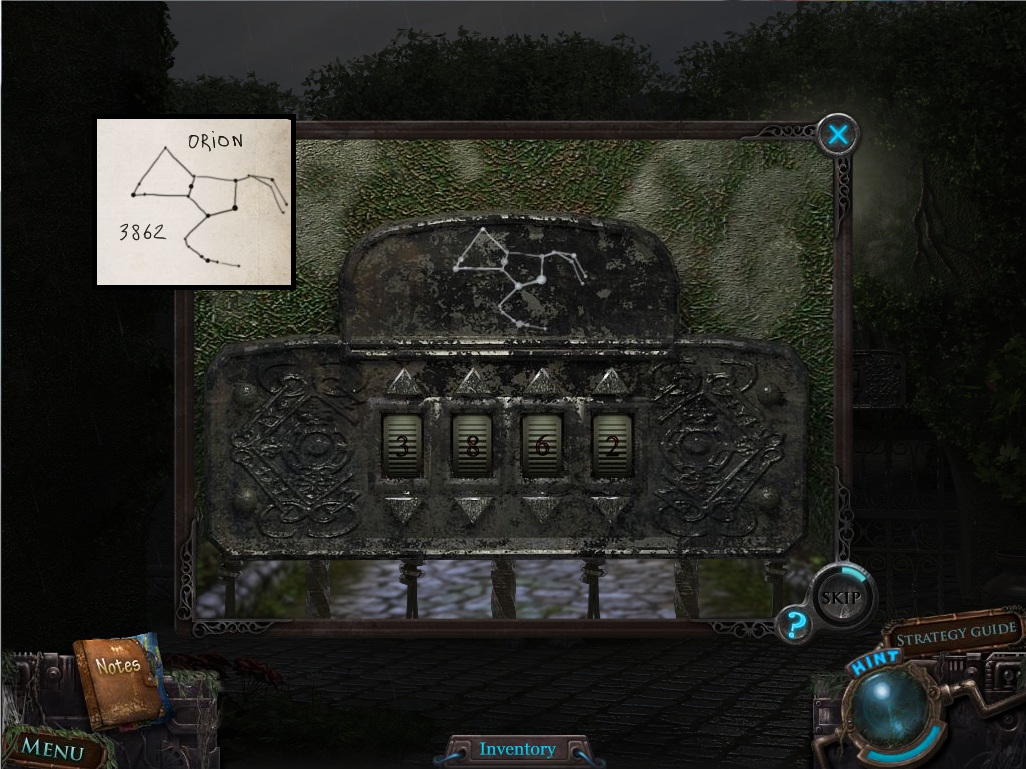
To solve this puzzle, enter in the correct combination that matches the constellation on the plaque.
According to the blackboard in the astronomy room, the constellation is Orion.
The code is also found in the Notebook, 3-8-6-2.
Solution.
Go through the opened gate.
Take the Crystal(31/56) in the right flowerbed.
Click the rear left corner of the garden to start the hidden object scene.
Screenshot.
Once the hidden object scene is complete, you will receive a Roman Helmet.
Leave the garden and return to the inside of the mansion.
Go through the door to the right.
Take the Crystal(32/56) on the round rug.
Take the note nailed to the frame of the door at the end of the hall.
Click the patterned shield leaning against the overturned table to give it to the warrior in the front right of the hall.
Use the Sword from your inventory on the knight in front left.
Click the samurai in the back right corner to zoom in.
Give the samurai the Katana.
Click the legionnaire in the back left corner to zoom in.
Give the legionnaire the Roman Helmet.
Go through the opened door.
Click the Professor to speak with him.
Take the Crystal(33/56) on the left table.
Take the Handle from the panel on the back wall.
Take the note taped to the green metal drawer.
Leave the mansion and go all the way back to the electrified gate in the jungle.
The Jungle
Click the panel next to the road sign to zoom in.
Add the Handle from your inventory to the panel, then click it shut off the power.
Go through the open gate.
Chapter 4
Through the Gate
Take the Crystal(34/56) on the ground between the tire tracks.
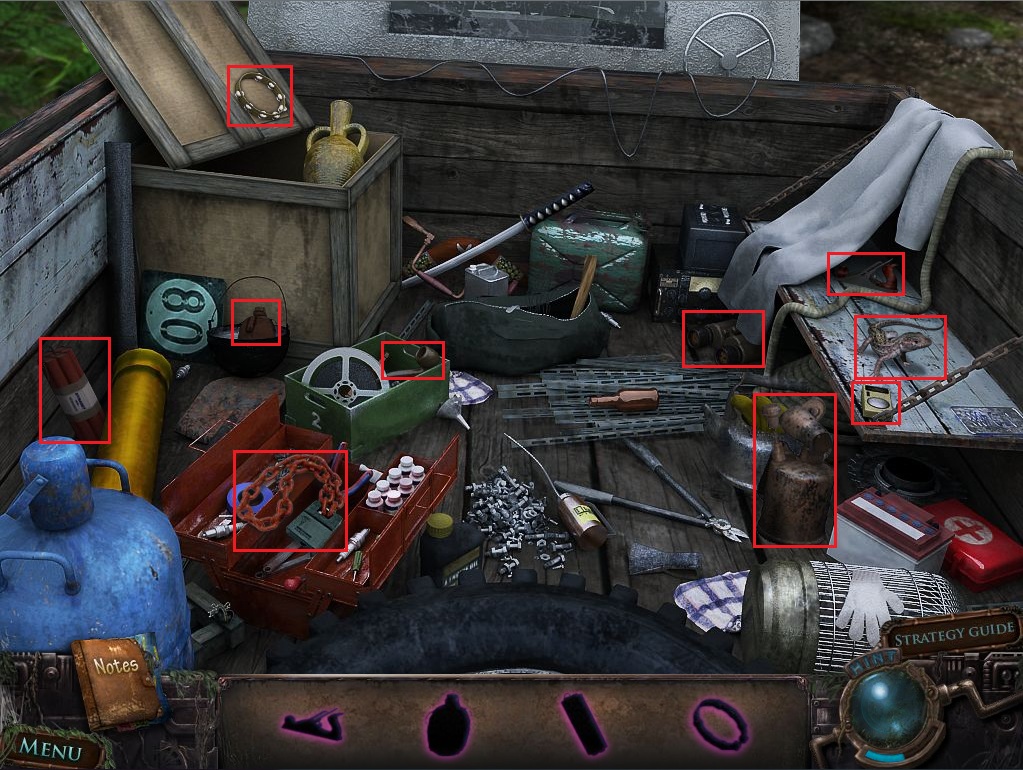
Click the back of the truck to start the hidden object scene.
Screenshot.
Once the hidden object scene is complete, you will receive a Blowtorch.
Take the right path.
Take the Crystal(35/56) on the ground at the fork in the road.
Go left.
Take the Crystal(36/56) and the Wrench on the ground in front of the broken bridge.
Go back one screen.
Take the right path to the swamp.
The Swamp
Take the Crystal(37/56) on the bridge.
Use the Axe from your inventory on the splintered tree to the left.
Go forward across the makeshift bridge.
Click the ladder to zoom in.
Use the Hammer from your inventory on the broken ladder steps.
Go up into the tree house.
Take the Crystal(38/56) on the crates under the table.
Click the left corner of the tree house to start the hidden object scene.
Screenshot.
Once the hidden object scene is complete, you will receive a Rope.
Attach the Rope to the pulley system.
Go down the ladder and attach the other end of the rope to the box in the swamp
Climb back up into the tree house and click the pulley system to drag up the swamp.
Go back down the ladder and click the box to zoom in.
Open the box and take the Coat inside.
Follow the path forward to the bridge.
Take the Crystal(39/56) on the left railing.
Go forward one more time to reach the cement platform.
Take the Crystal(40/56) by the long hose on the ground.
Go down the step ladder to the lower platform.
Take the Crystal(41/56) in front of the open door.
Take the note taped to the back wall.
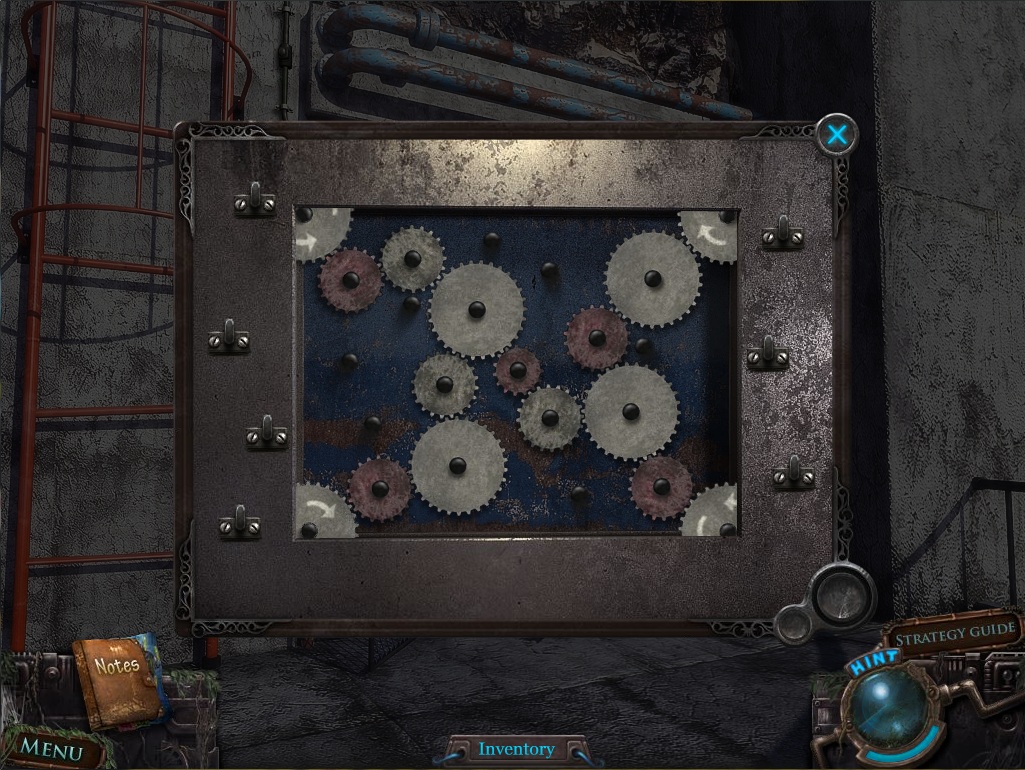
Click the panel inside the fenced area to start the gears puzzle.
To start this puzzle, arrange the gears so that all the mechanisms in the four corners are rotating in the correct direction.
Click and hold a gear to select it, then drag it and release it on a knob to place it.
Gears cannot be placed where they will overlap with other obstacles.
Solution.
Go back up the ladder then step inside the elevator.
Push the down button to travel to the underwater station.
Underwater Station
Take the Crystal(42/56) by the vines on the ground.
Go through the door on the left.
Take the Crystal(43/56) on top of the right control panel.
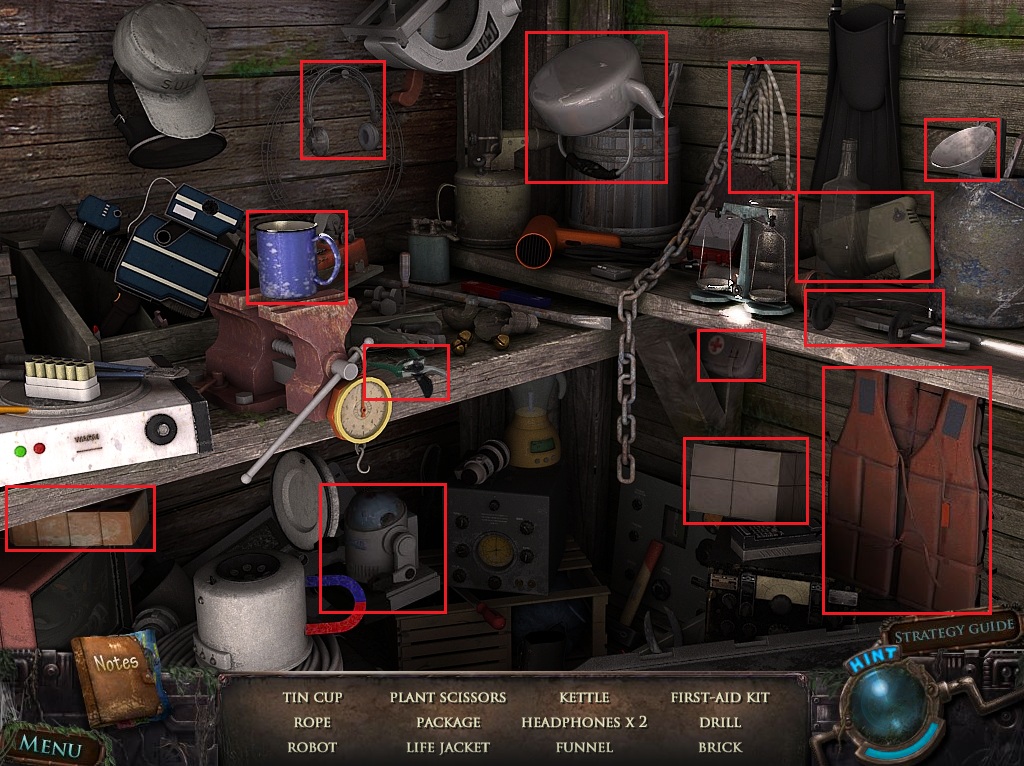
Click the shelves to start the hidden object scene.
Screenshot.
Once the hidden object scene is complete, you will receive a Dagger.
Exit the room.
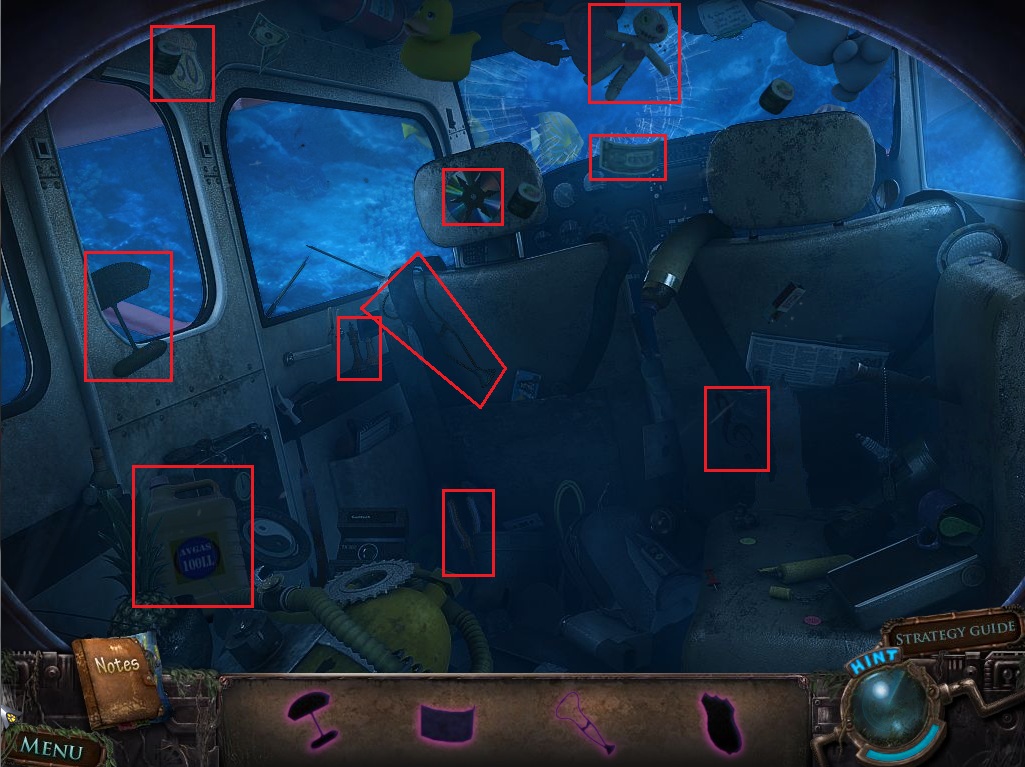
Take the Pipe from the front door, then step through the opened door.
Take the Crystal(44/56) next to the canisters.
Take the note taped to the left pole.
Use the Dagger from your inventory on the rope around the crates.
Click the power box right of the door to zoom in.
Push down the handle to turn off the power.
Click the door to zoom in.
Use the Wrench on the broken pipe.
Replace it with the Pipe from your inventory.
Go through the open door.
Click the corner of the room to start the hidden object scene.
Screenshot.
Once the hidden object scene is complete, you will receive a Lamp.
Go up the scaffolds to the top of the submersible.
Take the note taped to the hatch.
Click the hatch to zoom in.
Use the Blowtorch from your inventory on the chain.
Click the handle to open the hatch, then step inside.
Take the Crystal(45/56) on top of the right mechanism.
Take the Aqualung on the floor.
Leave Toto Island and go all the way back to the air crash scene.
Air Crash
Click the pile of debris to zoom in.
Dive all the way down to the crashed airplane.
Click the front windshield to start the hidden object scene.
Screenshot.
Once the hidden object scene is complete, you will receive Aviation Gas.
Return to the surface of the water and go forward to Fog Island.
Fog Island
Go back one screen.
Taking the glowing Crystal(46/56) from the beach sands.
Get into the rowboat and go back to the shores of Toto Island.
Posted by: Trinn |
July 13, 2011 12:52 PM
|
July 13, 2011 12:52 PM
The Missing: A Search and Rescue Mystery Walkthrough (Collector's Edition) Part 2: Chapters 5-6 & Bonus Chapter
Chapter 5
The Gate
At the crossroads of the broken down truck, take the left path to reach the bridge.
Take the Crystal(47/56) on the ground in front of the bridge.
Cross the bridge to the ice station gate.
Take the Crystal(48/56) on top of the red barrel.
Click the gate mechanism to zoom in.
Use the Aviation Gas from your inventory on the funnel in the gas tank.
Click the gate mechanism again to open the gate.
Go forward through the tunnel.
Ice Station
Take the Crystal(49/56) and note on the ground by the old machinery.
Click the red light at the bottom of the dome to zoom in.
Take the Crystal(50/56) in front of the door.
Go through the door to the inside of the ice station.
Take the Crystal(51/56) stuck in the right snowbank.
Go forward to the buried building, then go right one screen, and forward again.
Go up the stairs into the lit building.
Take the Crystal(52/56) next to the sink.
Take the Nitrogen on the left counter.
Click the right cabinet to zoom in.
Click the latch to unlock the cabinet, then click the doors to open it.
Take the Shovel.
Exit the building and return to the structure buried in snow.
Use the Shovel from your inventory on the pile of snow and go through the uncovered door.
Take the Crystal(53/56) on the table next to the book.
Click the barrel in the back to start the hidden object scene.
Screenshot.
Once the hidden object scene is complete, you will receive a Jack.
Exit the building and go right and forward to the building up the stairs, then continue along the path to the right.
Click the ice structure to zoom in.
Go forward to the frozen door.
Take the cubes of Ice on the ground and the Blue Gem in the square panel left of the door.
Return to the building where George Nielsen is taking refuge.
Click the left table to zoom in.
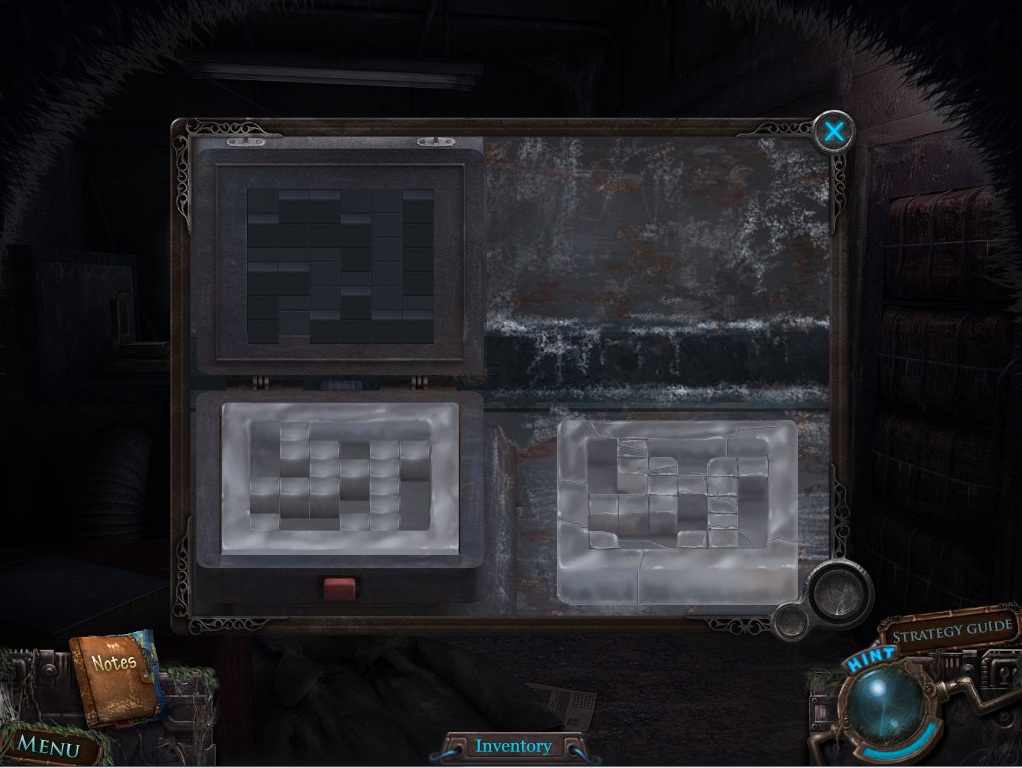
Place the Ice from your inventory on the table to start the ice lock puzzle.
To solve this puzzle, copy the pattern of ice cubes aligned on the table with the ice cubes in the lower half of the mechanism.
Press the buttons at the top of the device to push them down.
The device works like a waffle iron; a button that is raised in the top half will press down the cubes in the lower half.
Push the red button to make an impression.
Note that the pattern at the top half is an inverted version of the pattern that appears on the impressed cubes in the lower half.
Solution.
Once the puzzle is solved, you will receive an Ice Key.
Return to the vault door of the large, frozen ice structure.
Place the Ice Key from your inventory in the square-shaped panel to the left of the door.
Go through the opened door into the frozen cave.
Use the Jack from your inventory on the metal bars.
Go through the bars to the door.
Take the cluster of Crystals(54,55,& 56/56) above the pile of statues.
Click the metal door to open it, then go through the door.
Take the note taped to the metal pole on the left and the note taped to the front of the large machine.
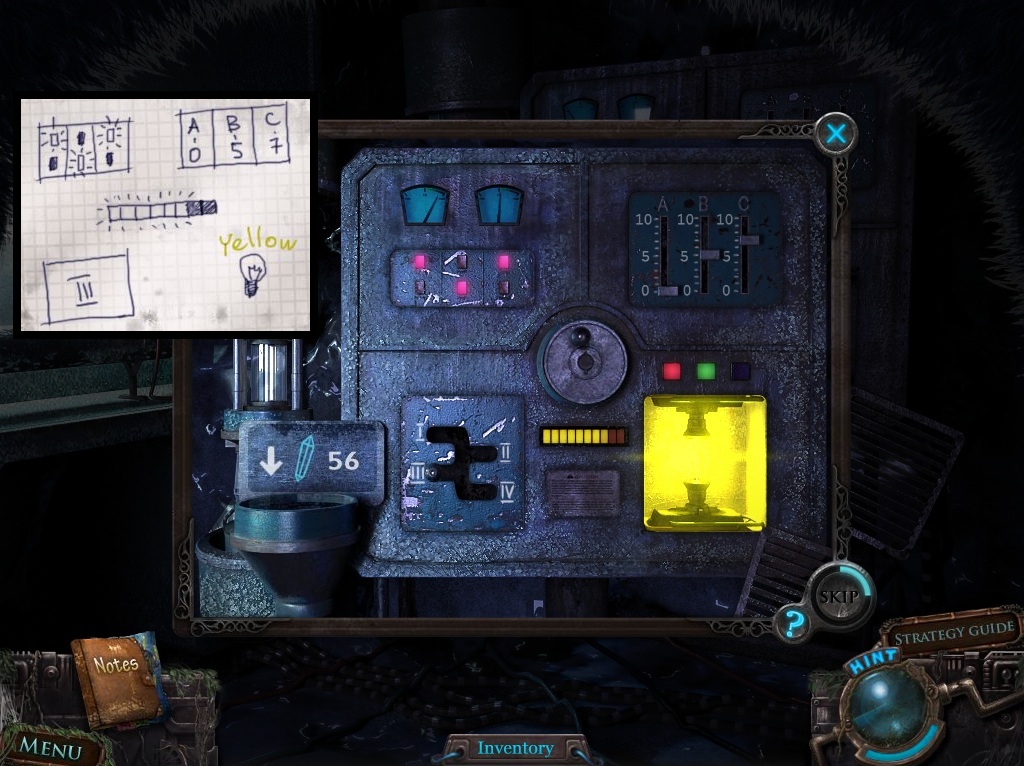
Click the machine to start the lightning puzzle.
To solve this puzzle, start the machine by following the directions left by the professor.
First place all 56 Crystals from your inventory into the hole marked "56".
Put the Lamp from your inventory into the empty compartment in the bottom left corner of the machine.
Above the lamp are three buttons.
Press the Red button and then the Green button to turn the lamplight yellow.
Shift the lever in the bottom left corner of the machine from Roman numeral I to Roman numeral III.
Push the purple buttons in the top left corner so that in the first row the top light is on, in the second row the bottom light is on, and in the third row the top light is on.
Drag the dials in the top right corner to set the dial at A to 0, the dial at B to 5, and the dial at C to 7.
Hold onto the round crank in the center of the machine and rapidly spin it clockwise until all but 2 of the yellow lights in the bars below are illuminated.
Solution.
Use the Nitrogen from your inventory on the lightning charged battery.
Click the cooled battery to add the Energy Capsule to your inventory.
Go all the way back to the tunnel entrance outside the ice station dome.
Take the Yellow Gem from George's hand.
Click the illuminated drawing on the wall to take the portal to Fog Island.
Chapter 6
The Cave
Click the door at the end of the cave to zoom in.
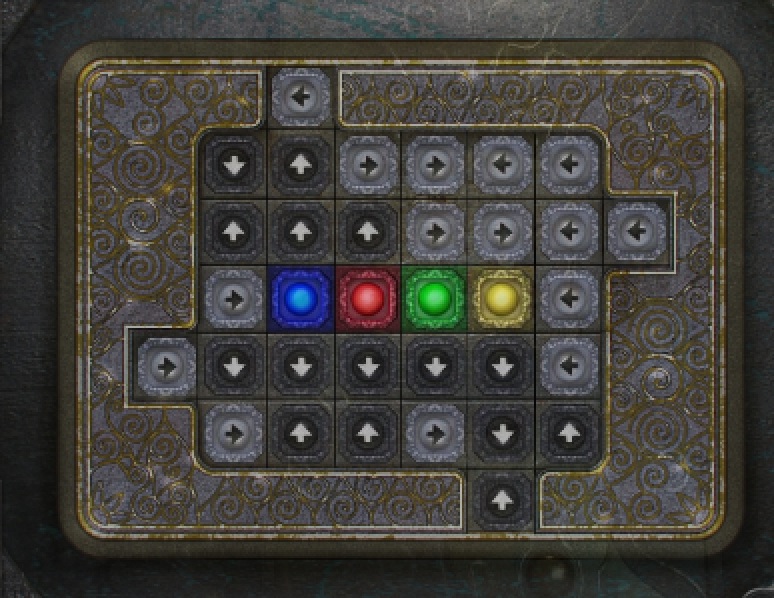
Add the four colored Gems from your inventory to the colored spaces on the door to start the puzzle.
To solve this puzzle, move the Red, Yellow, Blue, and Green gems into their respective colored tiles on the grid.
Clicking one of the grey stone tiles will swap positions with the adjacent tile in the direction its arrow is pointing to.
Once an arrowed tile hits a wall, it will reverse and point in the opposite direction.
When a colored gem is in the correct colored square, it will glow brightly.
Solution.
Go through the open open door.
Click the pipe leaning against the metal door up the small steps to push it open, revealing a path to the bunker.
Do not go through the open door yet. Instead, take the door on the left.
Move towards the cell on the right.
Click the lock on the cell door to zoom in.
Use the Hammer from your inventory on the weak lock.
Click Samantha to receive the Key.
Use the passage through the bunker to go all the way back to the lighthouse.
The Lighthouse
Go left to the telescope device.
Click the glowing red panel in the middle of the telescope to zoom in.
Use the Nitrogen from your inventory on the battery.
Click the cooled down Battery to add it to your inventory.
Click the locked door to the lighthouse to zoom in.
Use the Key from your inventory on the keyhole.
Go through the open door inside the lighthouse.
In the corner of the room is a minigame puzzle similar to the one in the garage.
To solve this puzzle, attach the symbol pieces to the outlet on the wall to draw down the laser barrier.
Click a piece with a shape that match the outlet to attach it to the wall.
First attach the four-pronged button.
Then attach the two parallel lines button.
Next attach the t-shaped button.
Last attach the square button.
Solution.
Once the puzzle is solved, the laser barrier will come down.
Go up the stairs.
Click the opening mechanism left of the gate to zoom in.
Take the Screwdriver stuck in the battery.
Replace the old battery with the Batter from your inventory.
Press the lever above the green light to open the gate.
Go up the stairs to the top of the lighthouse.
Click Lucas to speak with him.
Use the tranquilizer Weapon from your inventory on the creature.
Click the missile outside the door to zoom in.
Use the Screwdriver and then the Hammer from your inventory on the panel of the missile.
Add the Energy Capsule to the empty compartment inside the missile.
Use the Lighter from your inventory on the bottom of the missile.
Bonus Chapter - Collector's Edition
When the game has been completed, the extras will be unlocked.
Click extras to access the bonus content, then click Bonus Level to start the extra chapter.
The Bonus Content under the level will not be unlocked until the bonus level is completed.
The River
Click the dead aviator to zoom in.
Take the Lighter attached to his vest.
Go forward to the statue.
The Statue
Click the board in the statue's hands to start the minigame puzzle.
To solve this puzzle, arrange the board with the correct element pieces.
There are three colored pieces each representing three different elements.
The red piece is fire, the green piece is earth, and the blue piece is water.
According to the hint at the bottom of the board: fire beats earth, earth beats water, and water beats fire.
The top row of elements on the board cannot be changed, but clicking the buttons at the bottom row cycles through the three elements.
Starting from the left, arrange the bottom row accordingly:
Solution.
Press the button in the center to test your solution.
Once the puzzle is solved, take the revealed Mask in the statue's hands.
Click the pedestal to the right of the cave entrance to zoom in.
Use the Lighter from your inventory on the jar filled with oil.
Step inside the cave.
The Cave
Click the seated statue to start the hidden object scene.
Screenshot.
Once the hidden object scene is complete, you will receive a Gem Disk.
Click the seated statue on the left to zoom in.
Take the Sand from the statue's hands.
Exit the cave to reach the statue area, then take the right path to the air crash site.
Air Crash Site
Click the plane to start the hidden object scene.
Screenshot.
Once the hidden object scene is complete, you will receive a Pickaxe.
Use the green Sand from your inventory on the nest of snakes.
Go up the path to the gate.
The Gate
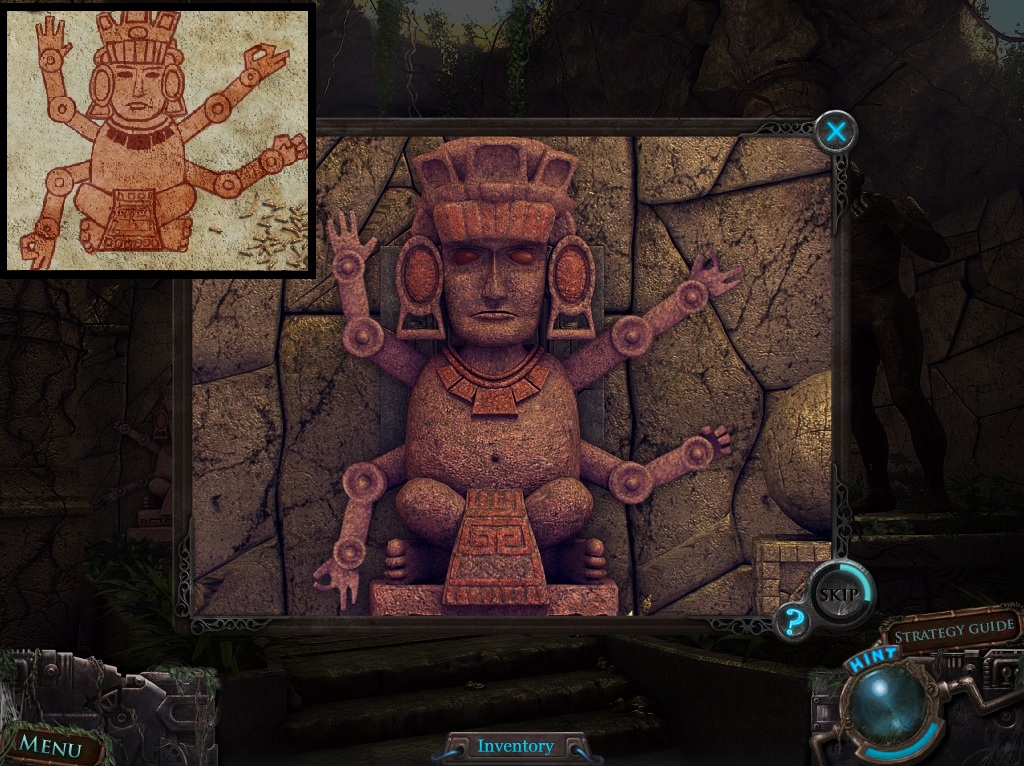
Click the drawing to the right of the gate to view a diagram of a statue with several arms.
Click the gate to zoom in.
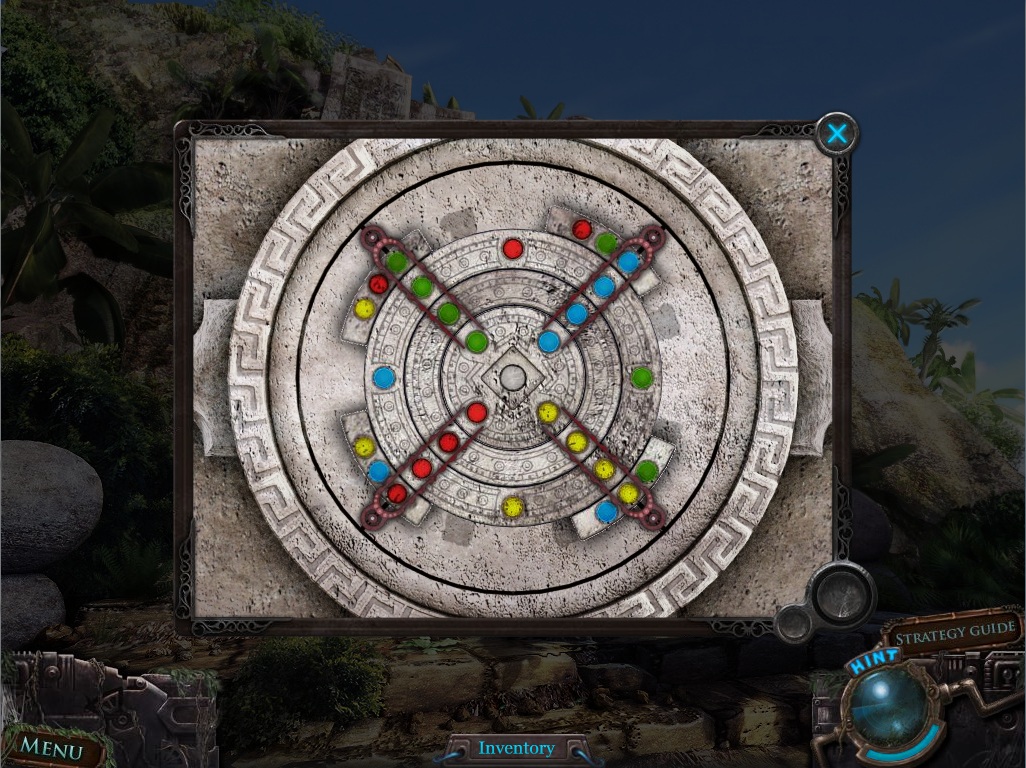
Add the Gem Disk from your inventory to the center of the large stone disk to start the puzzle.
To solve this puzzle align all of the rings on the disk to make rows of matching colors.
Click and drag a disk ring to rotate it clockwise.
Place the rings so that a row of all yellow, blue, red, and green colors are inside each of the four metal pins.
Solution.
Go through the open gate into the temple.
The Temple
Click the corner of the room to start the hidden object scene.
Screenshot.
Once the hidden object scene is complete, you will receive a Key.
Click the right statue to zoom in.
Place the Mask from your inventory on the statue's face.
Take the Ruby from the statue's hand.
Click the statue in the corner of the room to start the puzzle.
To solve this puzzle, arrange the statue's arms to match the diagram outside by the gate.
Click the dial at the top of each arm to change the position of the hands.
Click the dial in the middle of each arm to change the position of the elbow.
Solution.
Go forward into the frozen chamber.
Frozen Chamber
Click the skeleton to zoom in.
Use the Key from your inventory on the lock attached to the chains.
Take the Amulet from the corpse's neck.
Use the Pickaxe from your inventory on the statuette in the block of ice.
Take the freed Statuette of Ice on the small pedestal.
Return to the air crash site.
Air Crash Site
Click the statue leaning against the rocks under the plane to zoom in.
Add the Ruby from your inventory to the missing eye.
Take the Red Crystal from the statue's mouth.
Click the plane to repeat the hidden object scene.
Screenshot.
Once the hidden object scene is complete you will receive a Glass Jar.
Return to the gate.
The Gate
Click the drawing to the right of the gate to zoom in.
Use the Glass Jar from your inventory on the termites in the corner of the drawing.
Return to the river.
The River
Click the crate of TNT to zoom in.
Use the jar of Termites on the crate.
Take the revealed TNT.
Return to the cave.
The Cave
Click the seated statue on the right to repeat the hidden object scene.
Screenshot.
Once the hidden object scene is complete, you will receive a Mirror.
Use the Pickaxe from your inventory on the chunk of crystals to receive a Blue Crystal.
Return to the temple.
The Temple
Click the panel next to the statue with multiple arms.
Add the Red Crystal from your inventory to the space above the sun button.
Add the Blue Crystal to the space above the rain button.
Push the blue button and the chamber at the back of the temple will rotate.
Go through the doorway into the rain chamber.
Rain Chamber
Click the broken column to zoom in.
Place the Amulet from your inventory into the space at the top of the column to start the minigame puzzle.
As you are in the rain chamber, press all the buttons with symbols representing water.
If the correct button is pressed, one of the three crystals at the top will glow.
Click the rain button, the fish button, and the wave button.
Solution.
Once the puzzle is solved the chamber will fill with water, revealing the Statuette of Water.
Exit the rain chamber and return to the temple.
The Temple
Click the corner of the temple to repeat the hidden object scene.
Screenshot.
Once the hidden object scene is complete, you will receive a Brush.
Click the crystal panel to the left of the door.
Push the sun button to rotate the chamber in the back of the temple.
Go through the door into the sun chamber.
Sun Chamber
Add the Mirror from your inventory to the space next to the middle left column.
Use the Brush from your inventory on the dirty mirror in the ground.
Rotate the mirrors to reflect the light towards the sun pendant in the middle of the door.
Screenshot.
Take the revealed Statuette of Light.
Return to the cave.
The Cave
Click the blocked doorway at the back of the cave to zoom in.
Use the TNT from your inventory on the rocks.
Ignite the TNT with the Lighter.
Go through the unblocked door into the statuette room.
Statuette Room
Above the closed door in the back of the room are three large recesses.
Put the Statuette of Light in the red compartment.
Put the Statuette of Water in the blue compartment.
Put the Statuette of Ice in the white compartment.
Go through the opened door into the well.
The Well
Click the shelves to start the hidden object scene.
Screenshot.
Once the hidden object scene is complete, you will receive a Hammer.
Use the Hammer on the crack in the wall behind the well.
Go through the hole into the catacombs.
Catacombs
Take the First Plate in the corner of the room.
Leave the room for now and move forward towards the fountain.
The Fountain
Click the frozen fountain to zoom in.
Take the Ice Artifact in the center of the fountainhead's headdress.
Go through the door on the right to reach the lava pit.
Lava Pit
Click the blocked antechamber to the right to start the hidden object scene.
Screenshot.
Once the hidden object scene is complete, you will receive a Sword.
Use the Ice Artifact from your inventory on the lava pit to create a path of ice.
Click the pedestal to zoom in.
Take the Fire Artifact on top of the pedestal.
Go back to the catacombs.
Catacombs
Use the Sword from your inventory on the rope holding up the doll.
Take the Doll when it drops to the ground.
Go forward to the fountain.
The Fountain
Use the Fire Artifact from your inventory on the frozen statue.
Go through the door on the left to the trap room.
Trap Room
Use the Doll from your inventory on the hook hanging from the ceiling to disable the trap.
Take the Puzzle Object on the ground past the trap.
Go forward to the solar room.
Solar Room
Click the vines on the left to start the hidden object scene.
Screenshot.
Once the hidden object scene is complete, you will receive an Antique Scoop.
Take the Third Plate leaning against the right column.
Return to well.
The Well
Click the shelves to repeat the hidden object scene.
Screenshot.
Once the hidden object scene is complete, you will receive a Bucket.
Use the Antique Scoop from your inventory on the pile of earth blocking the right doorway.
Click the stone square on the back wall to zoom in.
Add the Puzzle Object from your inventory to the space a the bottom of the board to start the puzzle.
To solve this puzzle, press the buttons in the correct order to release the key.
Click a button to press it.
If incorrect, the figure's eyes will glow red and his jaw will remain clamped.
If the button is correct, the figure's eyes will glow blue and the button will also illuminate.
Solution.
Once the puzzle is solved, take the Big Key from the figure's mouth.
Return to the fountain.
The Fountain
Use the Bucket from your inventory on the water in the Fountain.
Go right to reach the lava pit.
Lava Pit
Take the Second Plate leaning against the pile of boulders next to the stairs.
Click the door at the top of the stairs to zoom in.
Use the Big Key from your inventory on the large keyhole in the center of the door, then click the key to turn it.
Go through the open door into the elemental room.
Elemental Room
Click the gears on the left wall to zoom in.
Take the Right Gear fragment from the middle prong.
Go back to the lava pit.
Lava Pit
Click the blocked passage to repeat the hidden object scene.
Screenshot
Once the hidden object scene is complete you will receive the left Gear Fragment.
Return to the well.
The Well
Click the large stone slab on the ground with the gear-shaped center to zoom in.
Put the two Gear Fragments from your inventory into the spaces.
Use the Fire Artifact to heat the fragments.
Use the Ice Artifact to rebond the fragments together.
Take the bonded Gear.
Return to the elemental room.
Elemental Room
Click the gear panel in the corner of the room to zoom in.
Add the Gear from your inventory to the space at the middle prong.
Go through the open doorway into the king's hall.
King's Hall
Click the button mechanism on the right wall.
Click the left crystal to add the Uncharged Crystal to your inventory.
Return to the solar room.
Solar Room
Place the Dead Crystal from your inventory onto the round area in the center of the room.
Push the lever attached to the right column to charge the crystal with a bolt of lightning.
Take the Crystal from the ground.
Click the roots over the left wall to repeat the hidden object scene.
Screenshot
Once the hidden object scene is complete, you will receive a Crown Detail.
Return to the king's hall.
King's Hall
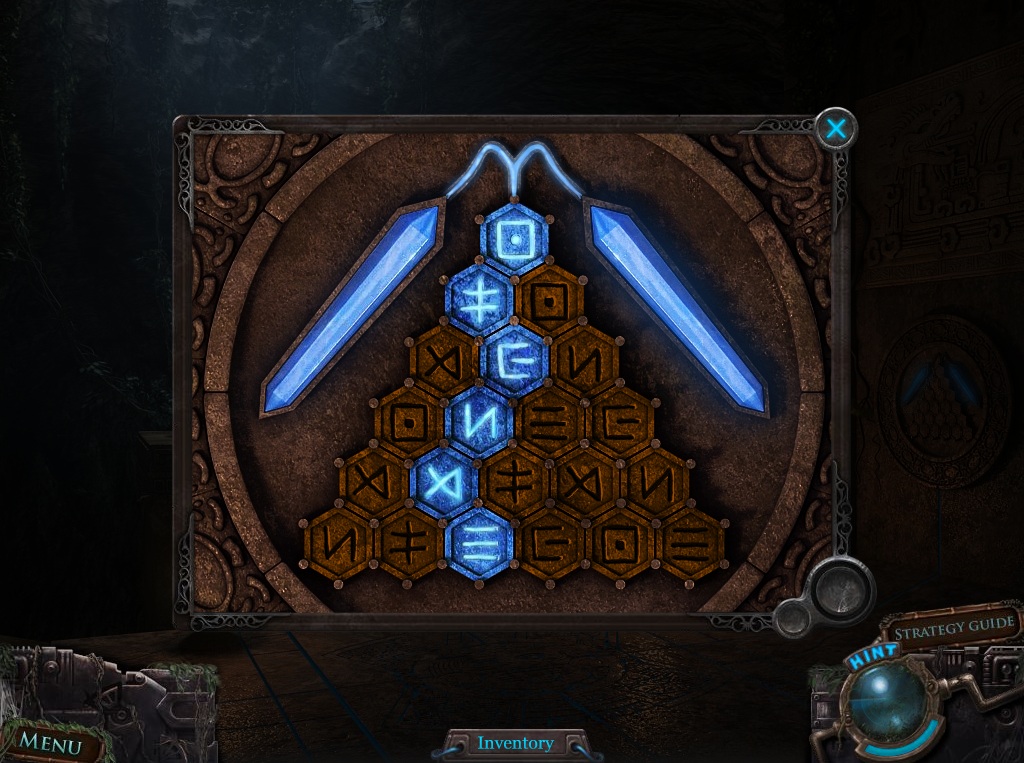
Click the button mechanism on the right wall to zoom in.
Place the Crystal back in its space on the left to start the puzzle.
To solve this puzzle, press the correct sequence of buttons down the pyramid.
Starting at the top of the pyramid, the only choice is the square with the dot in the middle.
Pick a connected symbol from each row that has a unique symbol, meaning you can't pick another tile that has a pattern with a square and a dot in the middle.
If correctly selected, a tile will glow blue.
If the tile is a repeat of a previous selection, both will glow red.
Solution.
Once the puzzle is solved a path to the king's throne will appear.
Click the throne to zoom in.
Take the Fourth Plate behind the skeleton's leg.
Click the crown to take a closer look.
Add the Crown Detail from your inventory to the left space of the design.
Take the revealed fake Hand.
Return to the catacombs.
Catacombs
Click the sarcophagus to zoom in.
Use the Hand from your inventory on the imprint of the coffin's seal.
Click the coffin to zoom in.
Take the feathered Fan by the corpse's shoulder.
Return to the solar room.
Solar Room
Add all four Plates from your inventory to the carving on the back wall.
When the creature is summoned, push the handle to call the lightning.
Take the Wooden Mask dropped on the ground.
Return to the elemental room.
Elemental Room
Around the room are four pedestals representing four elements: earth, air, fire, and water.
Click the red fire pedestal.
Place the Wooden Mask from your inventory onto the top.
Use the Fire Artifact on the mask.
Click the blue water pedestal.
Pour in the Bucket with Water from your inventory.
Click the white air pedestal.
Use the Fan from your inventory to blow down wind.
Click the yellow earth pedestal
Use the trowel filled with Earth from your inventory on the pedestal.
Go through the opened doorway.
The End
Posted by: Trinn |
July 13, 2011 12:53 PM
|
July 13, 2011 12:53 PM