
The Agency of Anomalies:
Cinderstone Orphanage
Platform: Mac, Windows
![]() The word 'orphanage' tends to conjure up images of starving waifs in ragged clothes begging for more gruel, doesn't it? However, the so-named orphanage in today's fantastic adventure hybrid from Orneon is not that type of orphanage, or at least, it doesn't appear so at first. This is a place for "special" children, children who have abilities that are outside of the norm. Unfortunately something has happened to both the orphanage and the children in The Agency of anomalies: Cinderstone Orphanage and it must quickly be put to rights before something terrible happens. Something even more terrible than a musical about cheeky pickpockets.
The word 'orphanage' tends to conjure up images of starving waifs in ragged clothes begging for more gruel, doesn't it? However, the so-named orphanage in today's fantastic adventure hybrid from Orneon is not that type of orphanage, or at least, it doesn't appear so at first. This is a place for "special" children, children who have abilities that are outside of the norm. Unfortunately something has happened to both the orphanage and the children in The Agency of anomalies: Cinderstone Orphanage and it must quickly be put to rights before something terrible happens. Something even more terrible than a musical about cheeky pickpockets.
 Once again you are an agent of the Agency of Anomalies and you've volunteered for a doozy of a case: The Cinderstone Orphanage just blown up, but the children that should have been inside and their caretaker are mysteriously missing. Are they alive? Are they dead? And just what caused the fire? You must discover all this and more while exploring the burnt wreck of the institution, helped along by the caretaker and the children themselves (or, at least, ghostly apparitions that claim to be the caretaker and the children). They say they are not dead but trapped, and something is sapping their strength and powers. Oh yes, that's right, everyone there, even the caretaker, have psychic powers of some sort, but they are being drained and cannot help unless you can find that which mattered most to each person and restore it. By accomplishing that each person will then lend you their powers to help solve the mystery and save them before time runs out.
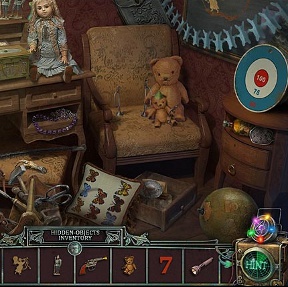
The Agency of Anomalies: Cinderstone Orphanage is basically a point-and-click adventure wedded with a hidden object game, so the gameplay consists of problem solving, object finding, and some beautiful and fun mini-games and puzzles. The mouse cursor of course changes to aid in the gameplay, and along with narrative hints and a refilling hint feature you will also find an additional gadget that allows you to utilize the various abilities that you pick up from the children along the way. Each person has a different ability, and each will become helpful in their own way as you work your way towards some answers. A bottom loading inventory contains the many objects you pick up along the way, either a result of the hidden object scenes or items that were just scattered about, victims of the explosion that rocked the facility before you arrived. Helpful sparks (in the regular mode of play) highlight areas of interest and showers of sparks indicate hidden object scenes, either the classic "list" type or a cool version of "reverse" scenes, where you are placing items back into the scenery rather than pulling them out.
 Analysis Although marketed as a supernatural story, The Agency of Anomalies: Cinderstone Orphanage is not a scary, creepy thriller. Instead it plays more like a mystery procedural, and quickly draws the player into its engrossing story. The caretaker and the children share their back-stories with you as you rush to rescue them from...well, whatever happened (don't want to spoil the ending or anything). As with its predecessor, The Agency of Anomalies: Mystic Hospital what you are presented with is a very interesting story-line that unfolds in a nicely paced manner with informative cut-scenes and tidbits of information garnered from the surroundings.
And what surroundings you will find in this beautiful game. The backgrounds are beautiful and richly detailed, despite the fact that they are a little worse for the wear, what with the explosion and fire and all. The music is choral and can be a little grating at times, but still matches the stunning scenery pretty well. The hidden object scenes are sharp and detailed, making them easy on the eyes. The mini-games and puzzles are pretty familiar variations on ones we've seen before, but are gorgeous and fun and are evenly scattered throughout the game making for some very nice pacing.
 For those who want flat out creepy, scary, and a lot of jump scares then this might not be the game for you. If you want a thoughtful, involving, engrossing mystery with scattered supernatural elements, then definitely give The Agency of anomalies: Cinderstone Orphanage a try. There's a surprising amount of gameplay to be had in the basic adventure, and for those who wish to spring for the Collector's Edition you will get yet another chapter of gameplay as well as the ability to play some of the more fun mini-games. Two modes of play ensure that a wide variety of players will enjoy this mysterious ride.
A Collector's Edition is also available. It includes bonus achievements, collectibles, a built-in strategy guide, and extra gameplay. Remember that Big Fish Game Club Members pay only $13.99 for Collector's Editions (or 2 club credits), and collector's editions count 3 card punches of 6 total needed for a free game.
![]() Windows:
Windows:
Download the demo
Get the full version
Also available: Collector's Edition
![]() Mac OS X:
Mac OS X:
Download the demo
Get the full version
Also available: Collector's Edition


Walkthrough Guide
(Please allow page to fully load for spoiler tags to be functional.)
The Agency of Anomalies:
The Cinderstone Orphanage walkthrough
Gameplay
Basic Information
From the menu you have the option to turn on or off the volume of music and sound effects.
You can choose between fullscreen and widescreen.
Extras gives you the option of playing mini-games, accessing a strategy guide, seeing the available achievements, and playing a bonus adventure.
To play the mini-games and the bonus adventure, you need to beat the game.
In a hidden object scene, if an item is written in red, that means you need to do something in the scene before the object is available.
The cursor will change on the screen as you scroll over various things.
The cursor will become a magnifying glass if you are to look at a scene closer.
If you can go down a certain path, a navigation arrow will appear when you hover over that area.
The cursor will become a hand with a pointed finger when you can touch an object.
If you are able to pick an object up, the cursor will turn into an open hand ready to grasp something.
Your Notebook stores useful information and documents that you can look back on.
At the bottom of your screen is an inventory bar.
If you need a hint, click on the Anomalous Activity Detector (AAD).
In the game you will receive paranormal powers from various phantoms. Glowing spheres (the power) will be added to your Nexus where you can access them to help you along.
When you need to use a power, the Nexus will glow.
There are two difficulty levels available:
Regular: Hints recharge at a faster rate and areas that can be interacted with will sparkle.
Advanced: Hints recharge at a slower rate and there are no indicative sparkles.
If there is a single sparkle, that indicates an active zone to be investigated.
If there are multiple sparkles (an anomaly), then that indicates a hidden object scene or a hidden object puzzle.
Achievements
I've Got the Power- The first power is obtained.
Almost There- All the machine details are placed correctly.
Deltiology- Thirty-three postcards found.
Intelligence- All the secret materials have been found.
Pathfinder- Hidden object puzzle completed without penalty.
Expert Pathfinder- All hidden object puzzles completed without penalty.
Power Keeper- All the paranormal powers are obtained.
Eagle Eye- Hidden object scene completed without hints.
Expert Eagle Eye- All hidden object scenes completed without hints.
Perfectionist- Game completed, all mini-game and hidden object puzzles completed.
Mini-Gamer- One mini-game completed (no skip button used).
Expert Mini-Gamer- All mini-games completed (no skip button used).
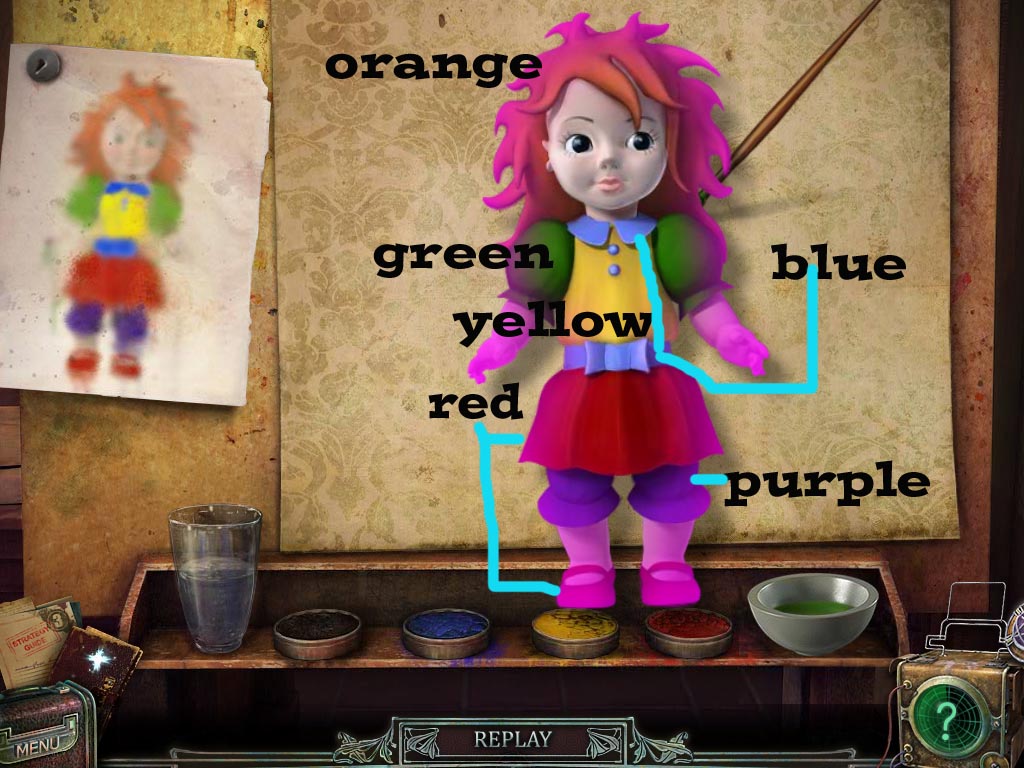
Abilities:
Yellow- Can change the size of an object.
Blue- Provides X-Ray vision, allowing you to see through things.
Red- Telekinesis (you can move objects).
Green- Restoration ability, allows you to repair broken objects.
Purple- The ability to make pictured items become real.
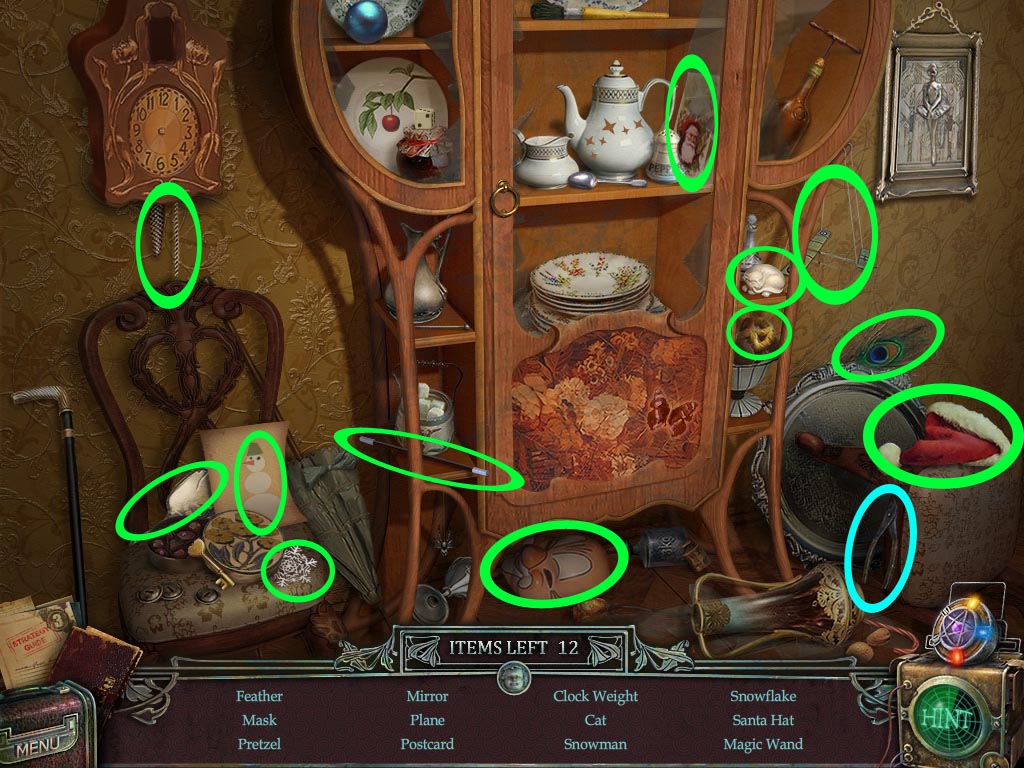
Colors
In hidden object scenes, items on the list will be circled by green.
An object that will become part of your inventory will be circled in blue.
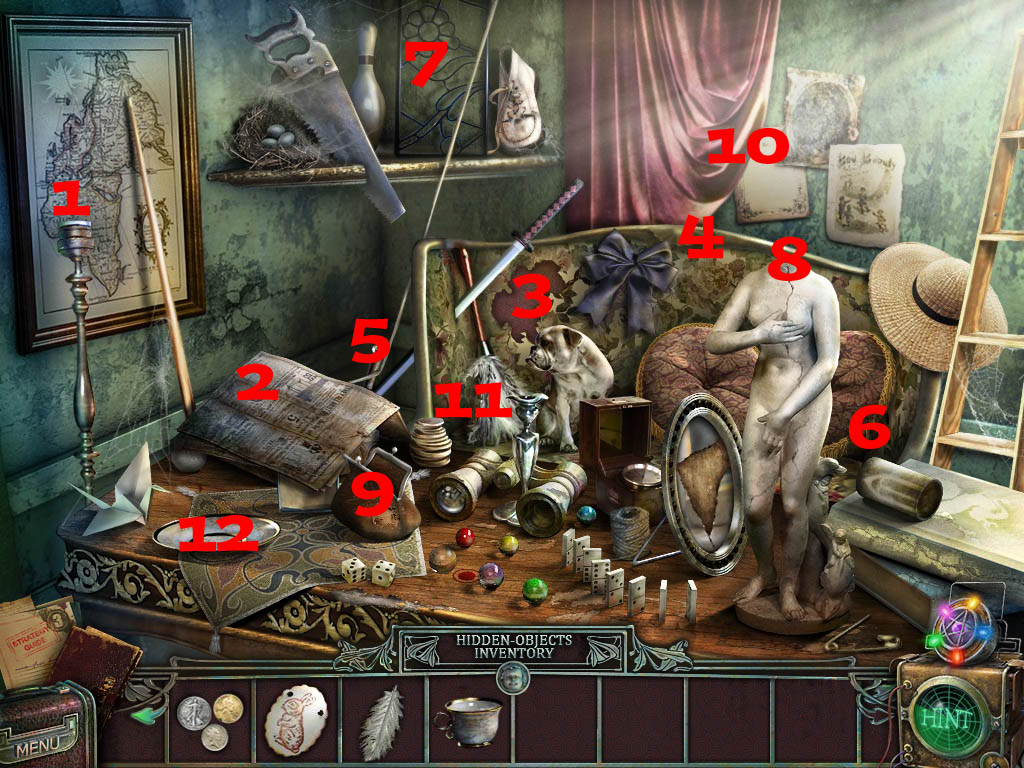
Scene One: The Orphanage
Getting the First Paranormal Power
On the floor to the right of the entrance door there is a postcard.
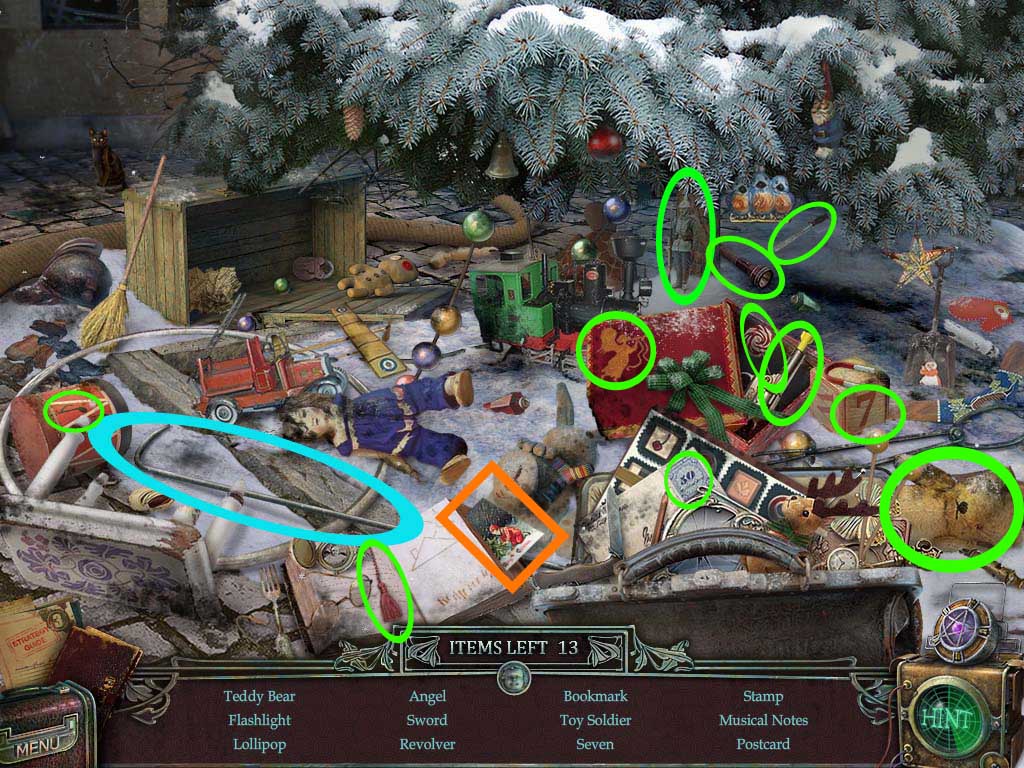
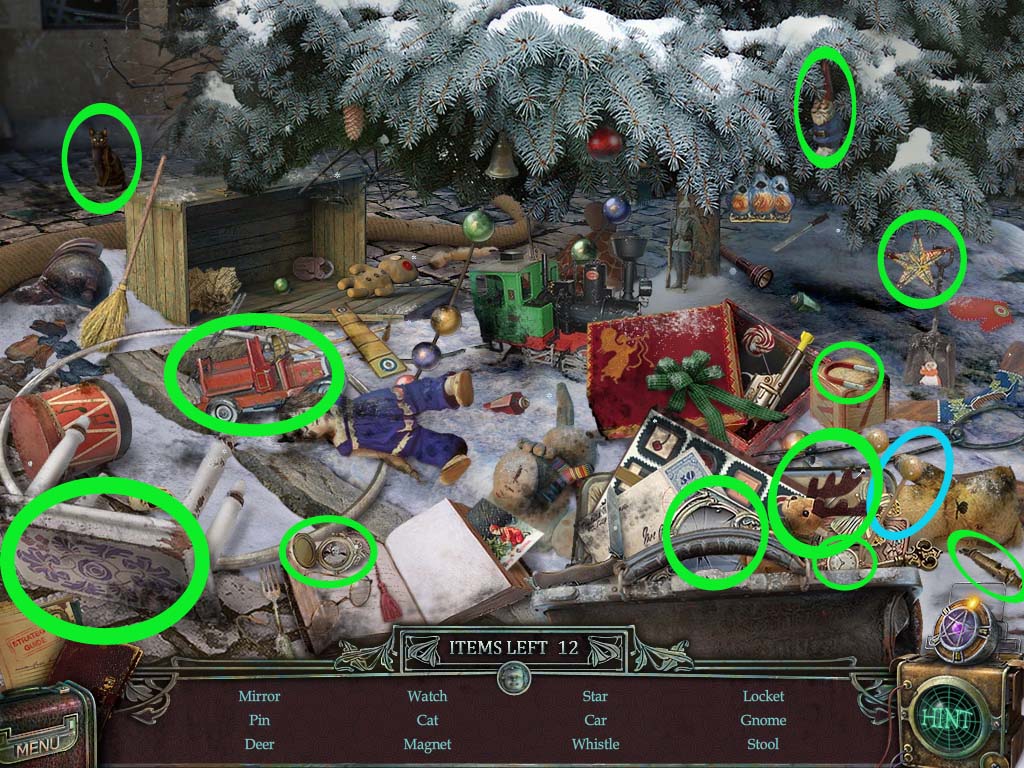
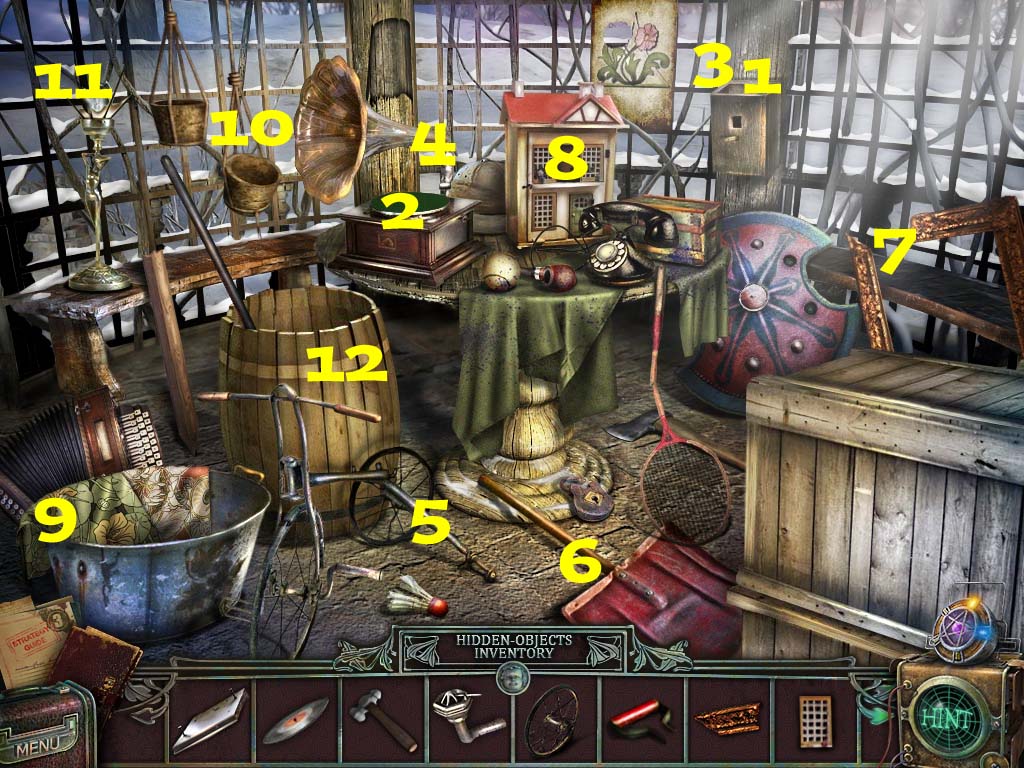
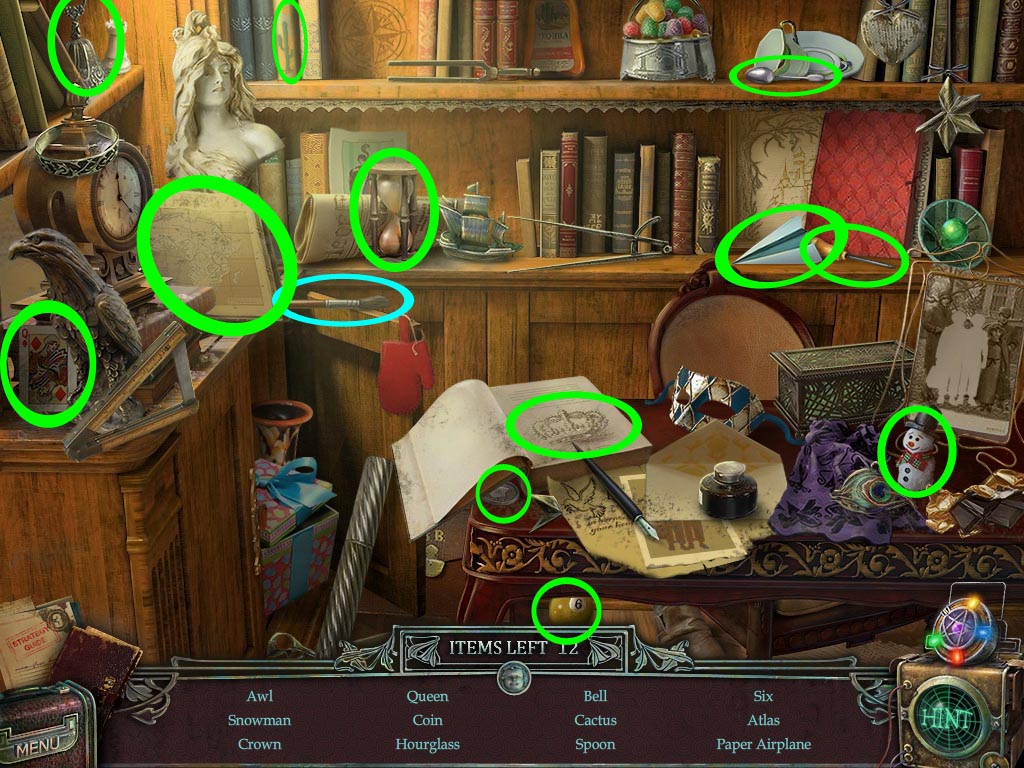
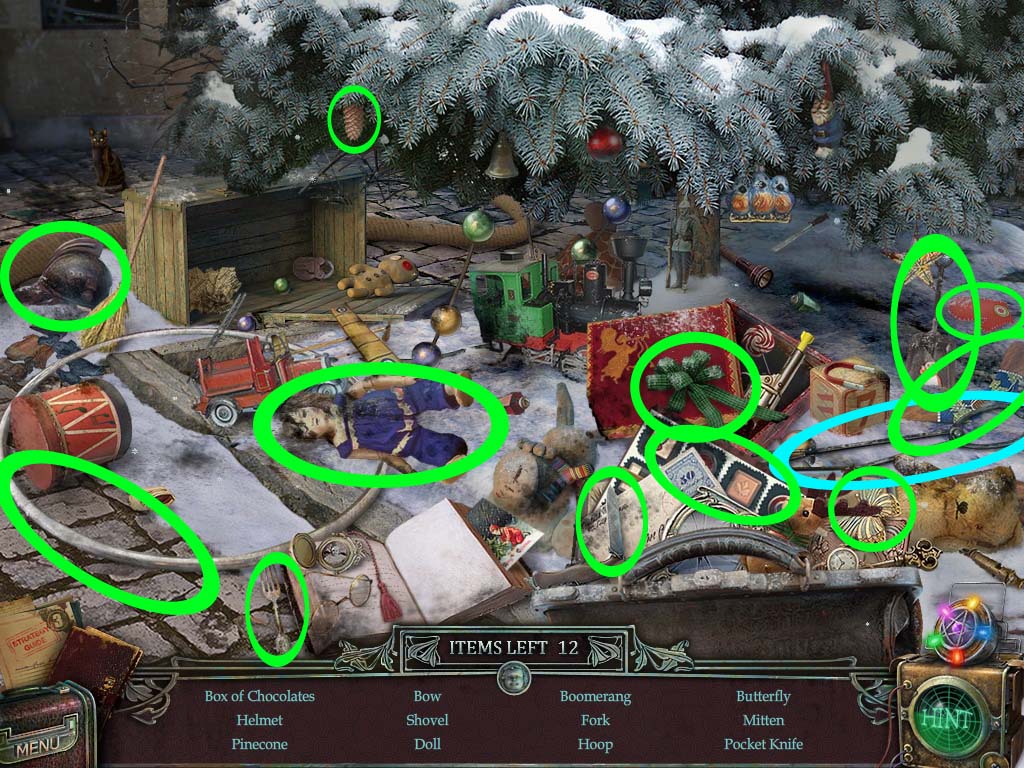
Start the hidden object scene to the right, underneath the Christmas tree.
Use the pencil on the open book to draw the house you need.
Screenshot
Grab the gaff, an object that looks like an overlarge crowbar.
Investigate the entrance door.
Pick up the glowing handle to the left of the wreath.
Investigate the window to the right of the building and use the gaff to break it open.
The postcard is on the floor to the left of the birdcage.
Grab the Volume Nine book from the desk.
Look more closely at the desk drawer.
Pick up the tile near the leg of the desk.
Investigate the door.
Attach the glowing handle.
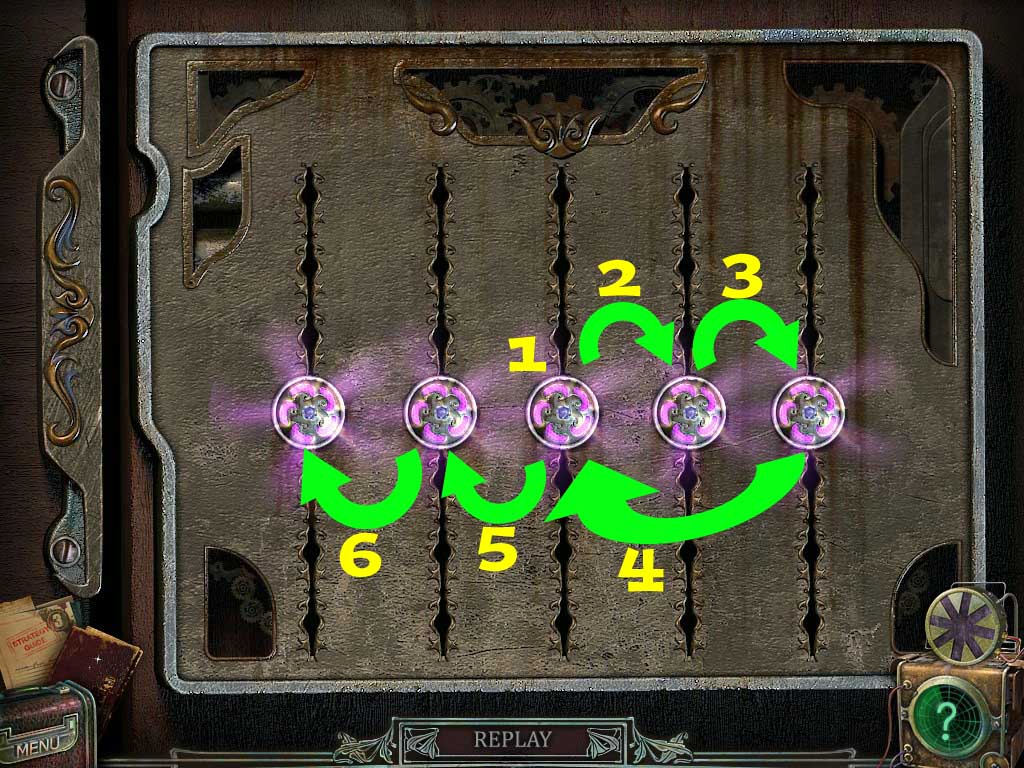
A puzzle will start: You want to line up all the handles along the middle line. When you move one handle, one or more others will move along as well.
Move the third handle to the middle.
Move the fourth handle to the middle.
Move the fifth handle to the middle.
Move the third handle to the middle once again.
Move the second handle to the middle.
Move the first handle to the middle.
Screenshot
Move to the next room.
On the stained glass windows above the blocked door to the right is a postcard.
Pick up the switch handle.
Pick up the document.
Investigate the grate.
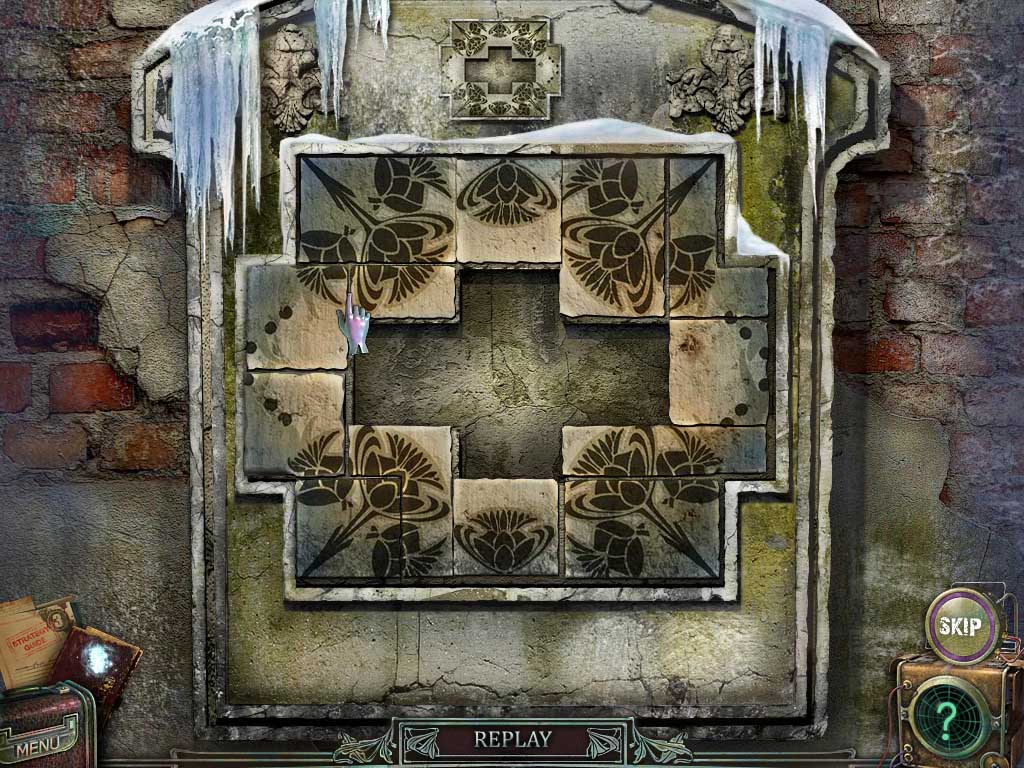
Place the tile on the puzzle board.
Press on one square and then another to have them switch spots.
Screenshot
Go down the trapdoor.
Investigate the machine to the back right of the room.
Place the switch handle on the machine.
Grab Volume 4 that's to the right of the machine when zoomed in.
There is a postcard above the door on the left, held under by the speaker.
Return to the previous room.
Go through the doorway that's now lit up.
There is a postcard on the right side on top of the blue locker.
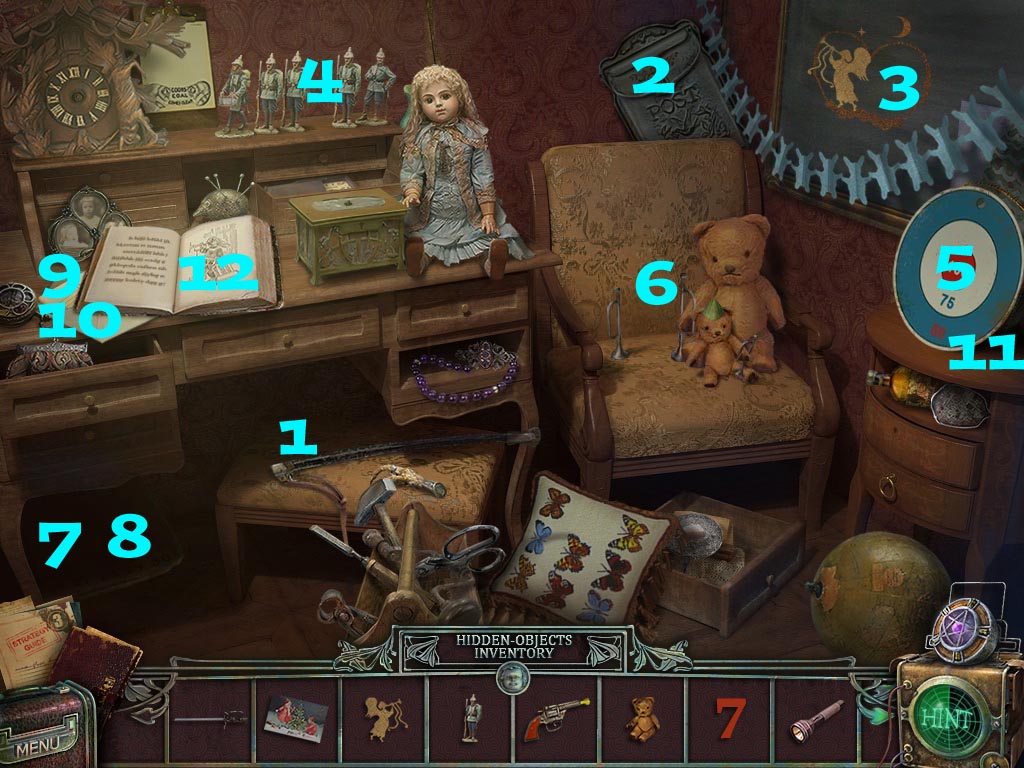
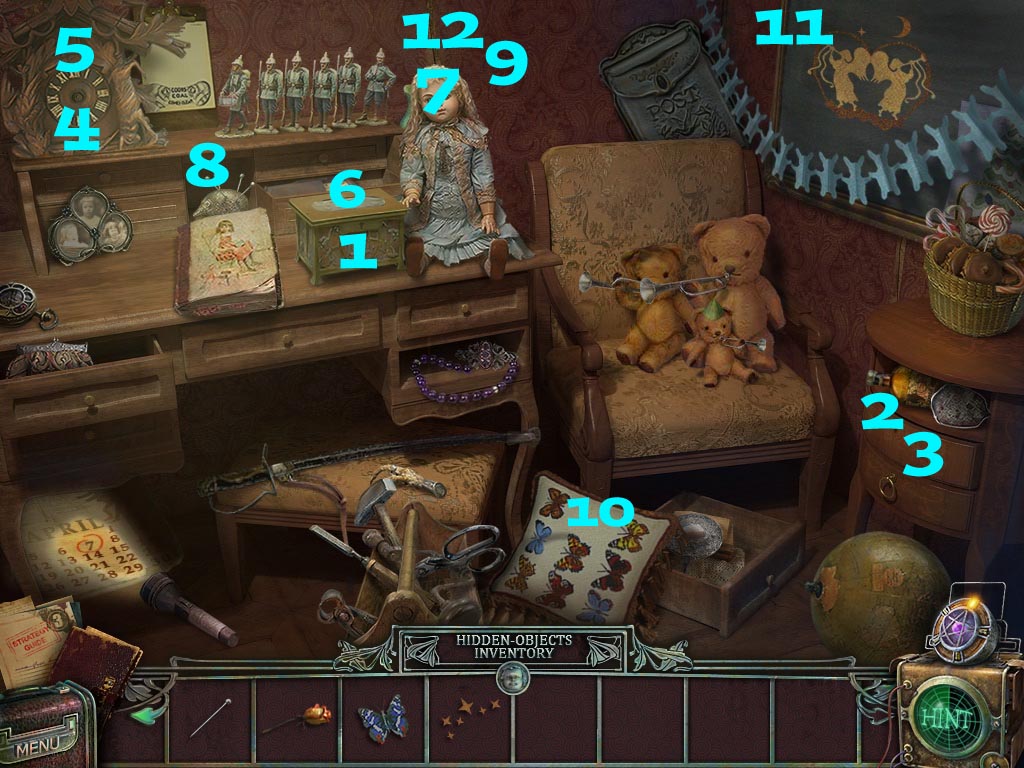
Click on the hidden object puzzle to the back left.
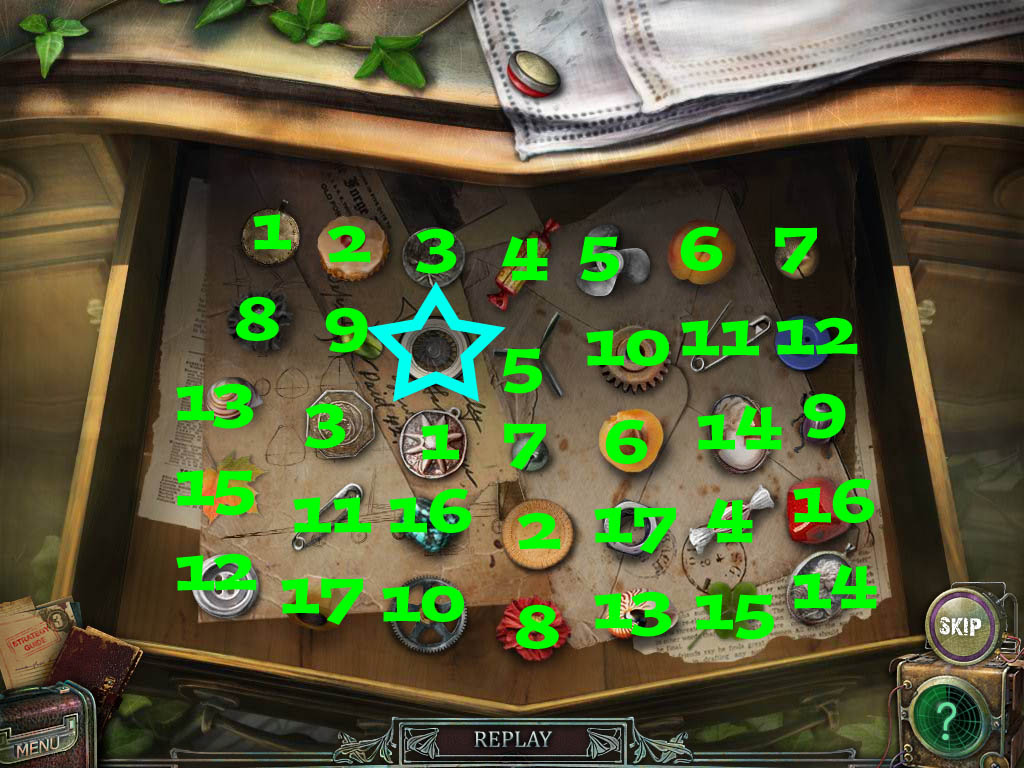
In this, instead of finding the items listed, you will be putting items into the scene where they fit properly.
Sabre- Placed in sheath.
Postcard- Placed in Post Bag.
Angel- Inside the heart.
Toy Soldier- With his companions.
Revolver- Use on target.
Teddy Bear- Place with his family.
Seven- On the calendar.
Flashlight- You must use this first to light the path for the seven.
Stamp- Put on envelope.
Music Notes- Placed on card under book.
Lollipop- Placed in basket revealed after using the revolver.
Bookmark- In the book, paves the way for the music notes and stamp.
Screenshot
You receive a screwdriver.
Leave the room and go back outside of the orphanage.
Follow the shade.
Investigate the crates to the left of the angel statue.
Pick up the Volume 6.
There is a postcard in the tree on the branch holding the Christmas lights.
Head back through the window into the first room.
Investigate the desk drawer.
Use the screwdriver and grab the Volume 3.
Pick up the document.
Investigate the bookshelf and return all the books.
Grab the glowing orb of power.
Getting the Second Paranormal Power
Use your ability to enlarge the axe on the typewriter, then pick it up.
Go to the next room and use the axe to chop the boards blocking the door.
Pick up the scissors.
Pick up the keys located above the picture on the left side of the room.
There is a postcard in between the painting and the chair on the left side of the room.
Use your ability on the cannon.
Click on it to blow away the bricked door.
Once through the door start the hidden object scene.
Click on the clock pendulum to reveal the cuckoo.
Screenshot
You receive a wrench.
On the seat of the left chair next to the table there is a postcard.
Go through the door to the back right of the room.
Pick up the blue toy car.
Use your enlarging ability on the drum, then pick it up.
There is a postcard leaning against the present to the left of the tree.
Investigate the present on the table.
Click on the lid, then pick up the yellow keys that are inside of it.
Click on the navigation arrow on the right of the screen to go to the next room.
Investigate the clock.
Use the wrench to open the clock face.
Use your ability to enlarge the gears, then pick them up.
To the very right of the screen on the floor next to the toy airplane is a postcard.
Investigate the door.
Pick up the ball bearings that are to the left of the door.
Return to the previous room.
Investigate the door.
Use the screwdriver to loosen the screws.
Place the gears on the lock.
Screenshot
Enter the doorway.
On the shelf above the pantry door is a postcard.
Pick up the key to the right of the ladel.
Investigate the stove area.
Click on the window to open it, then click on the icicle to shatter it. Pick up the icicle bits.
Investigate the cabinet.
Use the scissors to cut the binding then open the cabinet.
Pick up the glass cleaner.
Leave the room and go to the room where the lockers are.
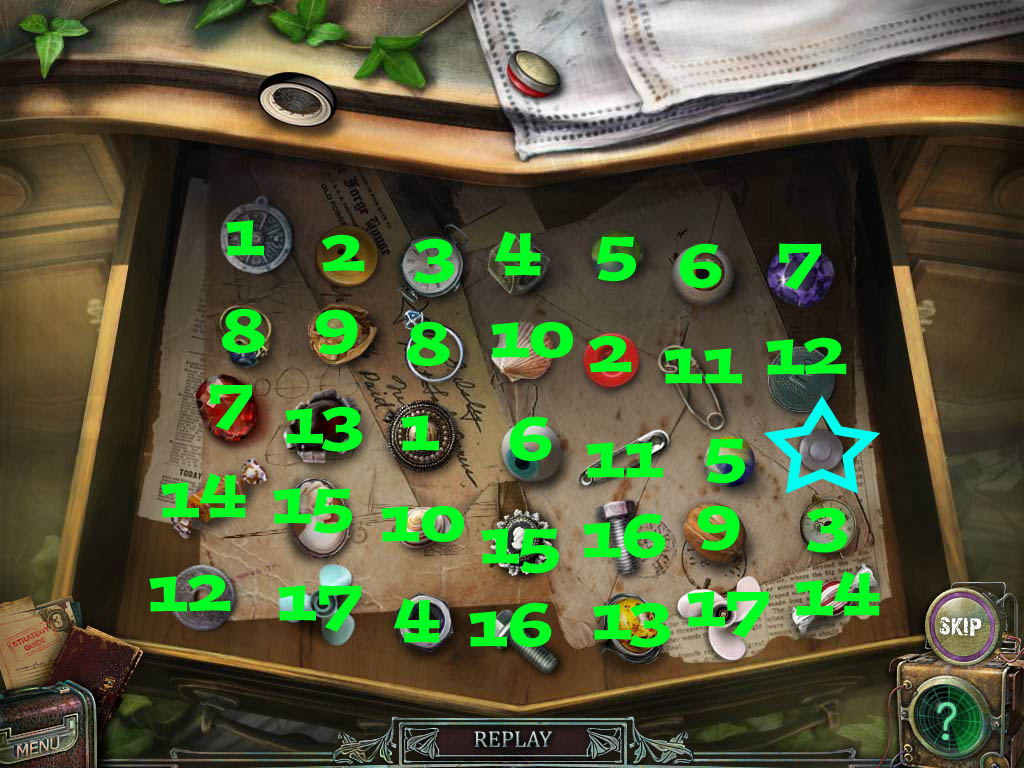
Start the hidden object puzzle.
Key.
Doorpull.
Cherry- Place on the cake in the drawer.
Clockhands.
Cuckoo.
Ballerina.
Bow.
Pin.
Dry Rose- Put in the vase that was behind the doll.
Butterfly.
Stars.
Jug of Water- Pour into the vase where you placed the dry rose.
Screenshot
You receive a toy fishing pole.
Investigate the lockers.
Use the key to open the blue locker.
Pick up the guitar.
Go to the door and use the key in your inventory.
Go through the door.
Pick up the machine part 3 item.
Pick up the blue keys
Investigate the books on the bookcase.
Click on the fourth book to the right, the greenish one to the left of the yellow book.
Click on the page and grab the half sheet of music.
Investigate the box on the floor.
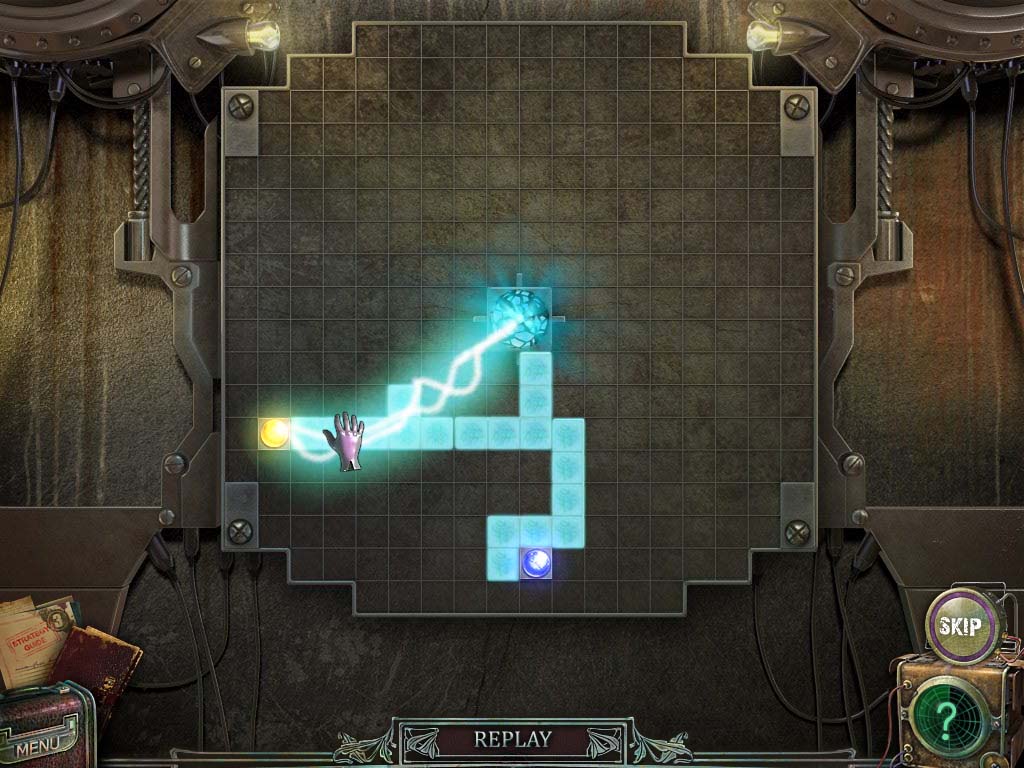
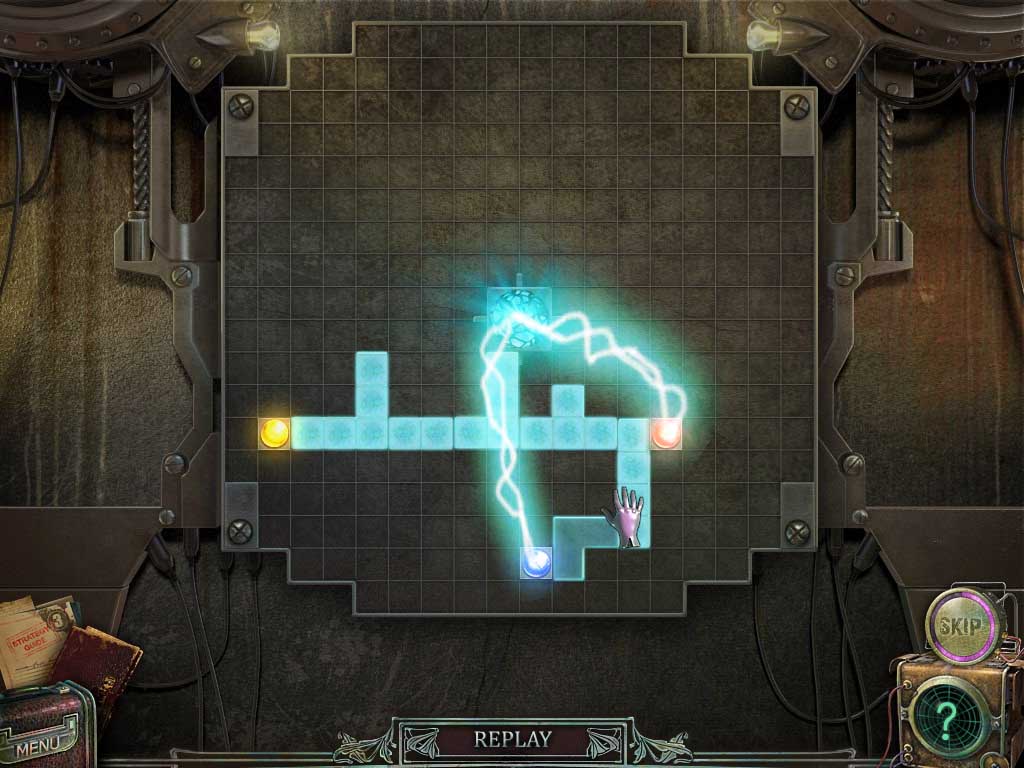
Place the ball bearing on the puzzle game.
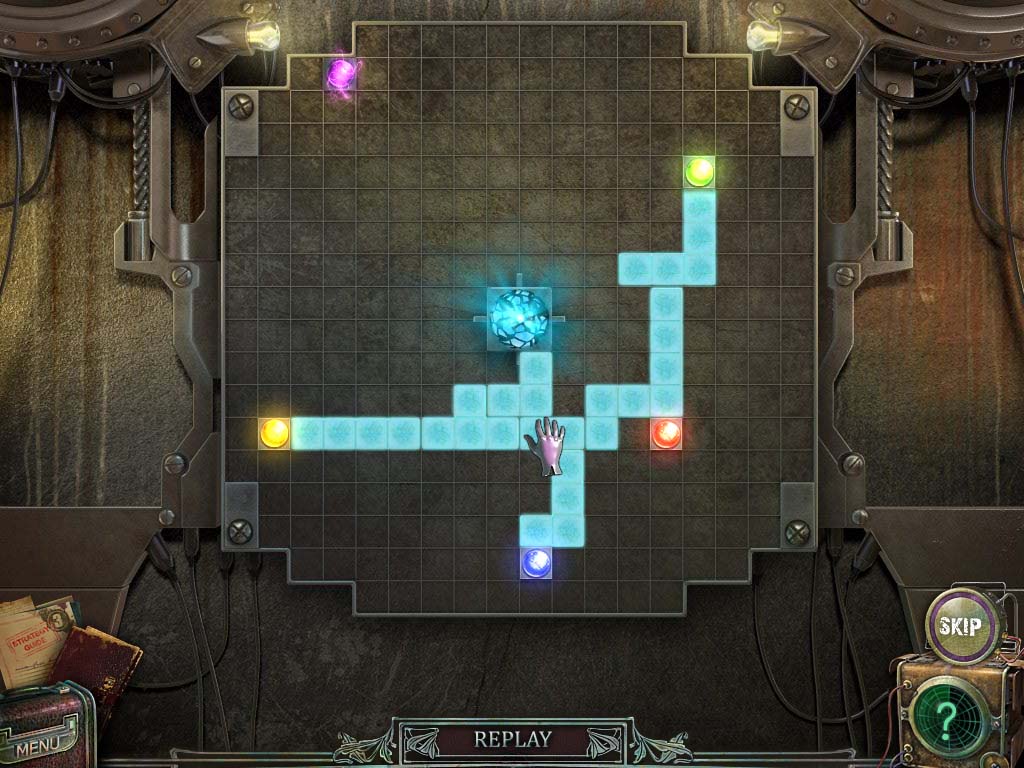
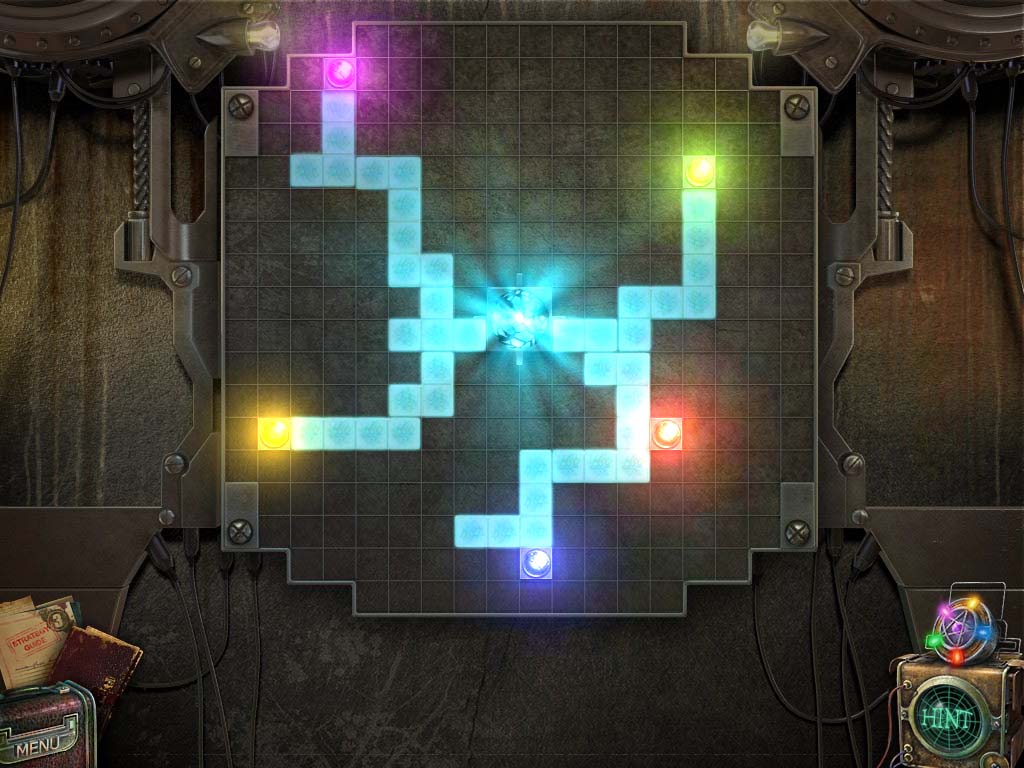
The game is fortunately simple: you click on the ball and drag it through the maze.
You must pass over all the colors to reach the end.
Screenshot
Screenshot
Grab the part of recipe from the box.
There is a postcard under the book to the left of the firetruck.
Return to the dining room (the room that you got into after blowing down the brick door).
Click on the desk.
Place the blue keys and the yellow keys on the puzzle.
Screenshot
Once you have solved the puzzle, pick up the metronome.
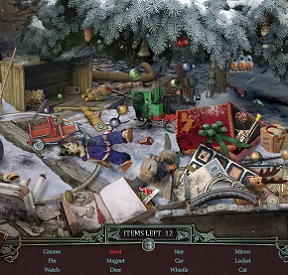
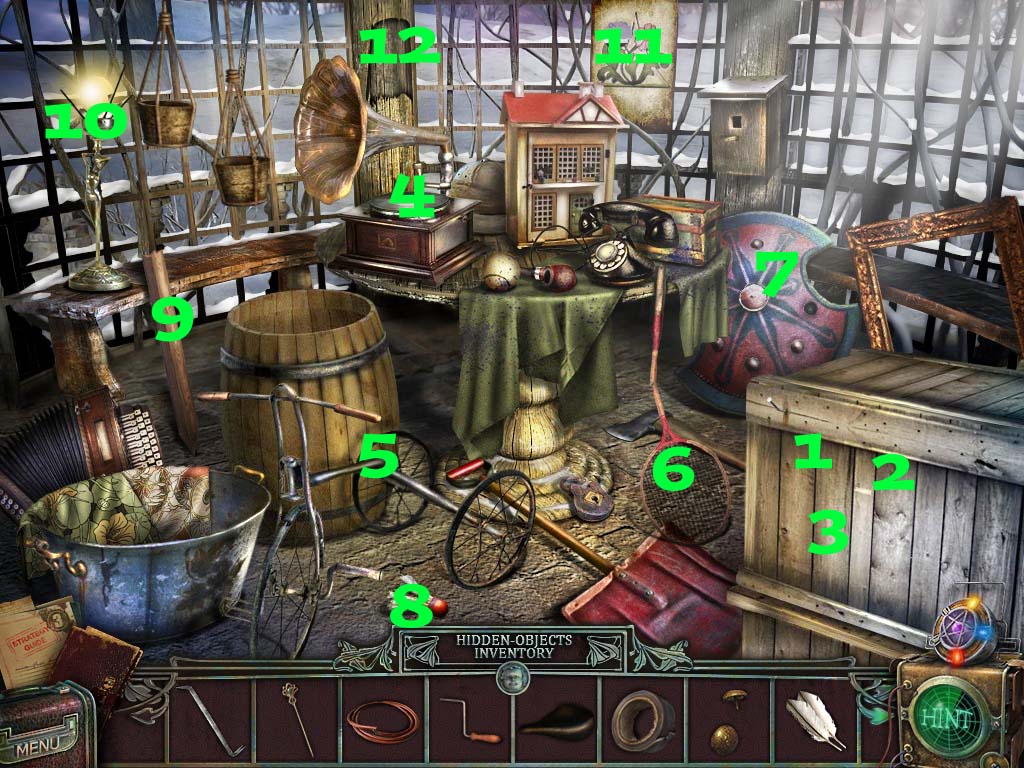
Go all the way back outside and start the hidden object scene.
Grab the broken stool piece that's to the right of the snowman shovel and connect it with the stool.
The pin is directly behind the deer's antler's.
Screenshot
Collect the drumsticks.
Go to the left where you see the drawing of the house on the tree.
Click on the angel statue and use the scissors to cut down the horn.
Return to the room where you first met Phillip, the one with the piano and stage.
Place all the instruments and the metronome on the bench which has the paper picturing all the items.
Obtain the second power: X-Ray vision.
Getting to the Gazebo
Go to the kitchen and use the X-Ray vision to look behind the door.
Use the fishing pole to reach the handle.
Pick up the rag.
Pick up the paper clip that's on the ceiling light.
Pick up the part of recipe that fell once you picked up the paperclip.
On the top shelf to the far left on the left side of the room is a postcard.
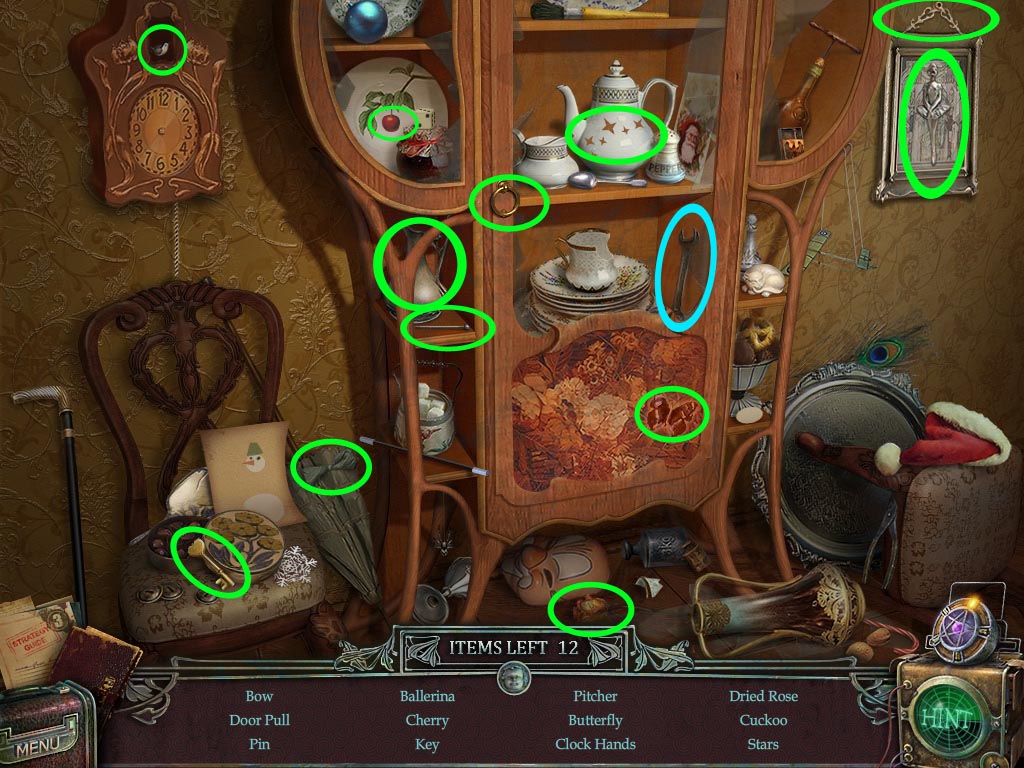
Start the hidden object puzzle.
Wine Label
Jam Label
Canned Fish Label
Jug Label
Olive Label
Glue Label
Coffee Label
Pickle Label
Honey Label
Milk Label
Tomato Juice Label
Acid Label
Screenshot
Return to the room where you got the ball bearing from.
Click on the dirty picture hanging on the wall.
Use the glass cleaner and the rag to clean it.
Use the X-Ray vision ability to look behind the picture.
Go back twice to the dining room.
Investigate the cabinet to the right of the room.
Use the paper clip on the lock to start a puzzle.
Click on the third bearing three times.
Click on the first two times.
Click on the fourth two times.
Click on the fifth one time.
Pick up the beaker.
Start the hidden object scene.
Grab the broken piece of cup from the floor and reattach it to the cup.
Collect the matches.
Screenshot
Go to the kitchen and investigate the stove.
Place the recipe halves on the wall to the top right of the stove.
Turn the gas on by clicking the handle directly below the empty burner.
Use the matches on the stove.
Place the beaker on the stove top.
Pour the acid into the beaker.
Put the ice on the beaker to cool it down.
Click on the beaker.
Go to the room where you just learned the story of Mike.
Use the diluted acid on the door.
Go through the door.
Scene Two: The Gazebo
Getting the Third Paranormal Power
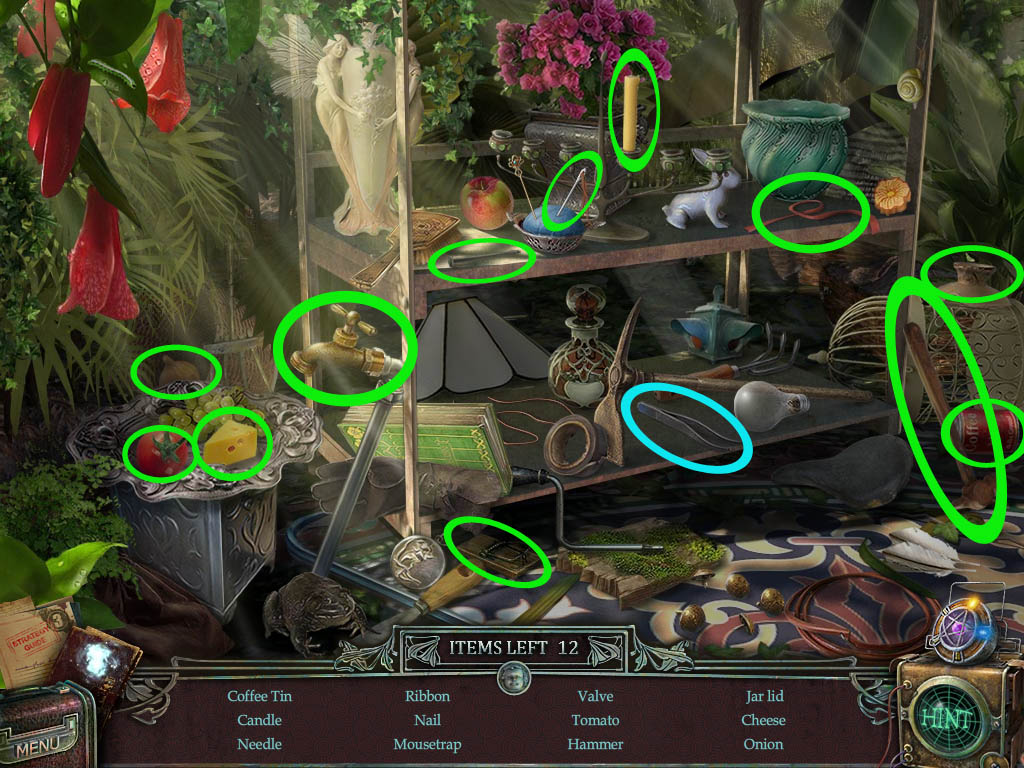
There is a postcard in the top branches of the plant to your direct left.
Start the hidden object scene.
Use the wrench on the spigot to get the valve.
Screenshot
You receive the tweezers.
Go to the left.
Against the middle tree on the right side is a postcard.
Use the yellow ability to shrink the plant with the elephant on it.
Click on the boards to the left and pick up the knife handle.
Go to the kitchen to attach the knife handle to the knife.
Return to the greenhouse.
Cut the ivy with the knife. You will have to hack at the ivy three times.
Pick up the machine part.
Click on the keypad and use the blue power (X-Ray vision) to look through it.
Use the tweezers to remove the six ivy pieces.
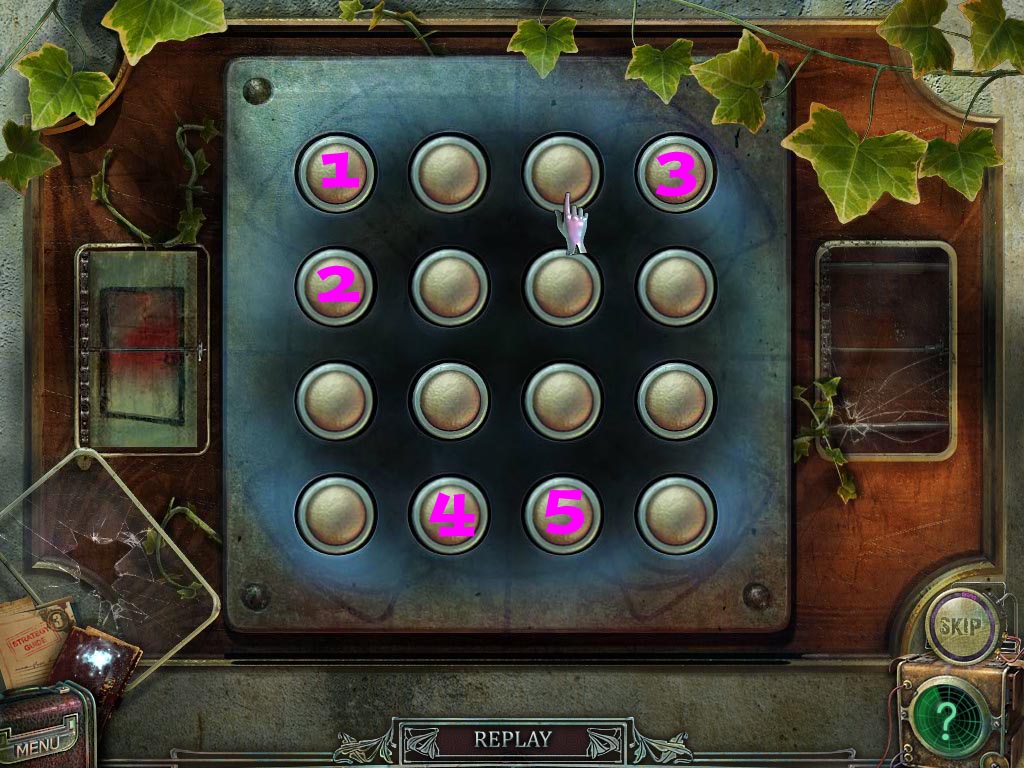
Start the puzzle.
Click the first button on the top left first.
Click the button directly below the first button second.
Click the button on the top row to the far right third.
Click the second button on the bottom row fourth.
Click the third button on the bottom row last.
Screenshot
Go through the door.
In the branches to the top right of the screen there is a postcard.
Click on the pigeon, then grab the yellow toy car.
Click to go left.
Click on the birdhouse and pick up the gear.
Hidden amongst the bushes on the ground to the left is a postcard.
Go over the bridge. To the left side of the bridge on the ground is a postcard.
Go forward toward the gate.
Pick up the hacksaw.
To the right on the box that you can see between the fence is a postcard.
Go back twice to where the birdhouse was and click left to go to the gazebo.
On the top left of the gazebo is a postcard.
Use the hacksaw on the boards blocking the entrance three times.
Start the hidden object puzzle.
Roof.
Record.
Hammer- Use on the birdhouse roof to hammer the nail.
Gramophone Head.
Wheel.
Spade Handle.
Frame Piece.
Mini Windows.
Metal Handle.
Rope.
Lamp.
Iron Hoop.
Screenshot
You receive a broom.
Click on the fountain and pick up the oil can.
Go back four times to the original room you entered into.
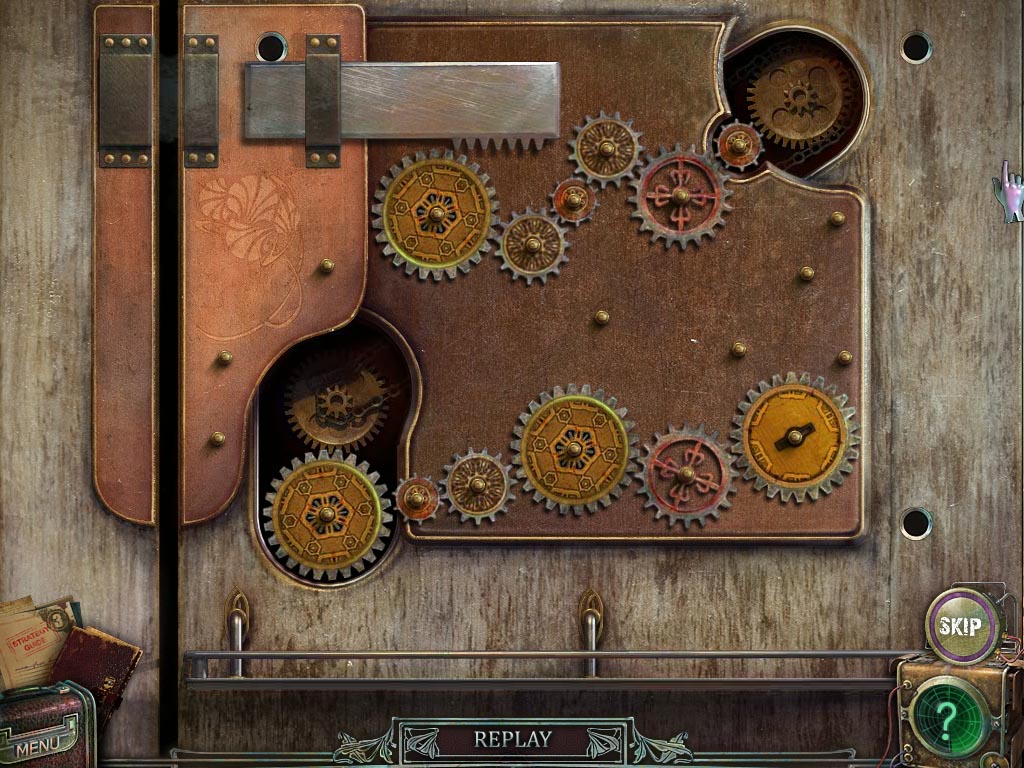
Click on the cabinet and use the gear key to start a puzzle.
You will have to do three variations of the puzzle.
Screenshot
Screenshot
Screenshot
Pick up the car parts.
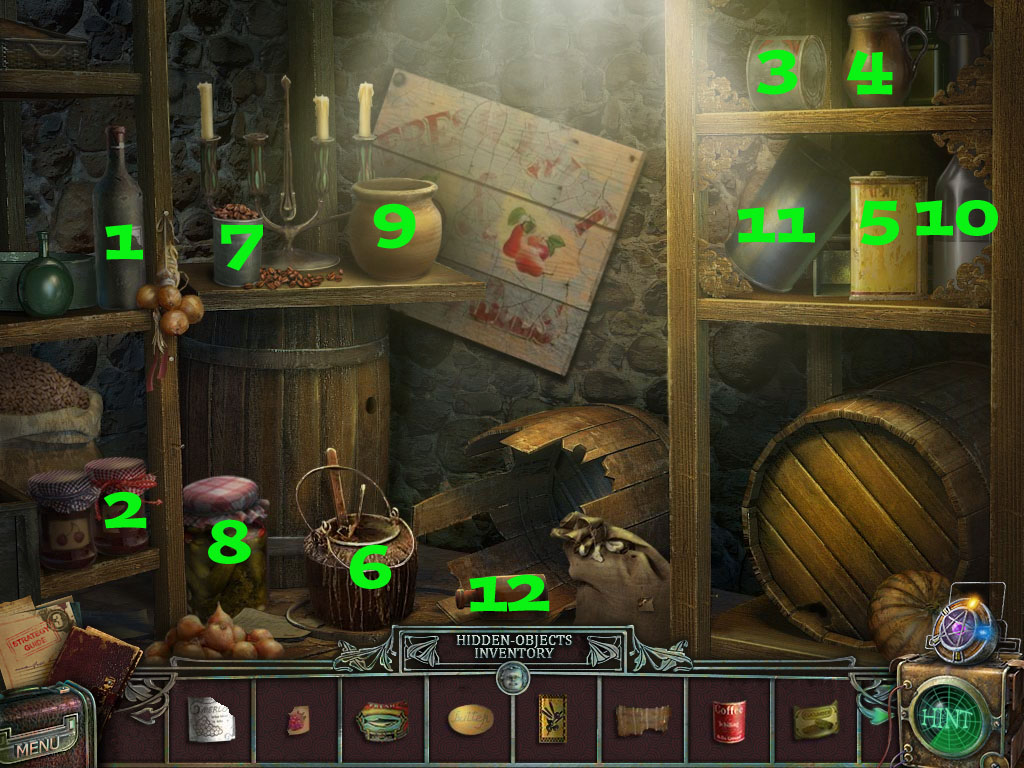
Go back to the kitchen pantry.
Use the can of oil on the ice pick, then pick it up.
Start the hidden object puzzle.
Needle.
Onion.
Ribbon.
Coffee Jar.
Honey Jar Lid.
Candle.
Nail.
Hammer.
Tomato.
Valve.
Mousetrap.
Cheese.
Screenshot
You receive crackers.
Go back to where the birdhouse is.
Use the crackers on the birdhouse.
Investigate the ground.
Use the broom four times to sweep away snow and reveal a broken toy car. Pick it up.
Head to the gazebo.
Click on the fountain and use the ice pick four times to chip out the ice toy car. Grab it.
Go back to the kitchen. Click on the stove.
Turn the gas on and use the matches on the stove.
Hold the ice toy car over the fire to melt the ice, then take green toy car.
Return to the room with the four blocks on the floor.
Place all the toy cars on the blocks.
Fix the broken toy car with the car parts you got earlier on.
Take the penknife.
Take the third power- Telekinesis.
Getting to the Treehouse
Start the hidden object scene.
Use the scraper on the floor under the faucet to scrape the moss of the wooden board.
Screenshot
You receive a wrench.
Go forward twice to where the broken swing is.
Cut the rope of the swing with the penknife.
Go left.
Use the wrench on the swing with the doll and take the pipe.
Go to the gazebo and use the penknife on the tin cans hanging from the gazebo.
Start the hidden object puzzle.
Crowbar-Opens the crate to reveal a sewing machine.
Leather Belt- Place on the revealed sewing machine to move the cloth.
Pin- Place with the other revealed pins.
Gramophone Handle.
Seat.
Insulating Tape.
Tacks.
Feathers.
Sword Hilt.
Lampshade.
Wooden Flower.
Wooden Board.
Screenshot
You receive a scoop net.
Go the the pond with the tugboat in the water.
Pick up the dovecote key and the blurry picture.
Go to the left and then over the bridge.
Put the pipe, rope, and tin cans on the scarecrow.
Use your telekinetic ability on the scarecrow.
Scare the bird away and then pick up machine part 4.
Go towards the gate.
Use the dovecote key on the lock.
Use your telekinetic power on the ladder, then go into the dovecote.
Take the feathers.
On the top left side of the cage is a postcard.
Go back six times to the room with the toy cars.
Start the hidden object scene.
Click on the red flowers to the top left.
Screenshot
Take the bowstring.
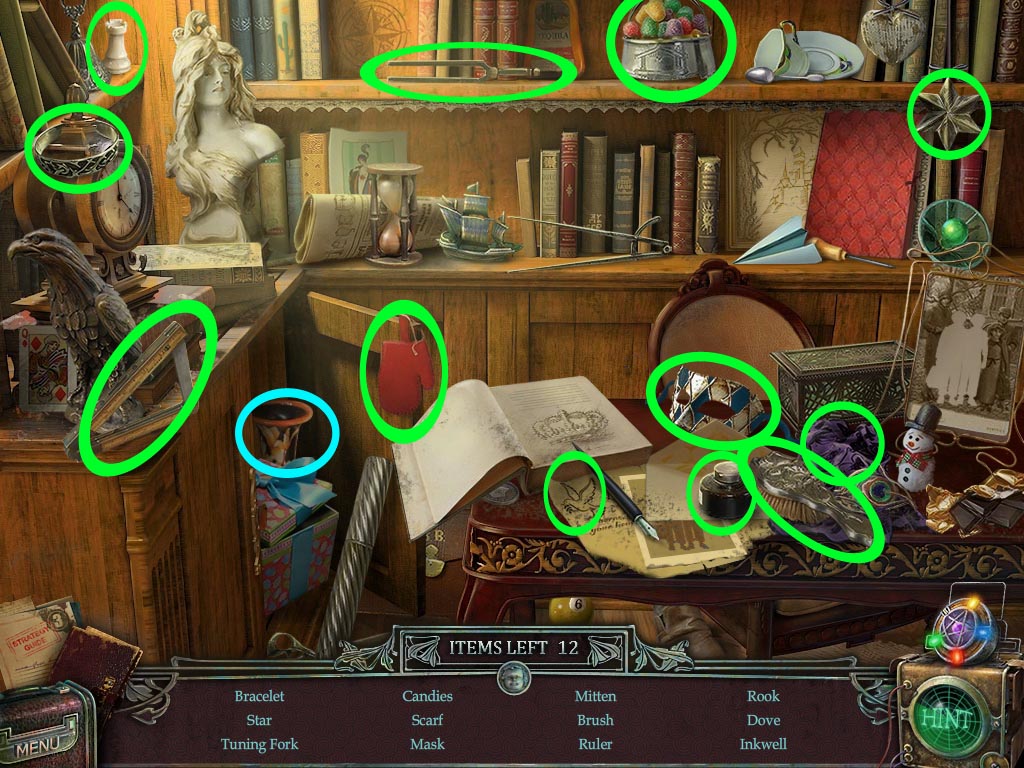
Go to the dining room and start the hidden object scene.
Put the snowball on the drawing.
Screenshot
You receive pliers.
Return to the dovecote and use the pliers on the wire caging.
Pick up the cage, half of music sheet, and machine part.
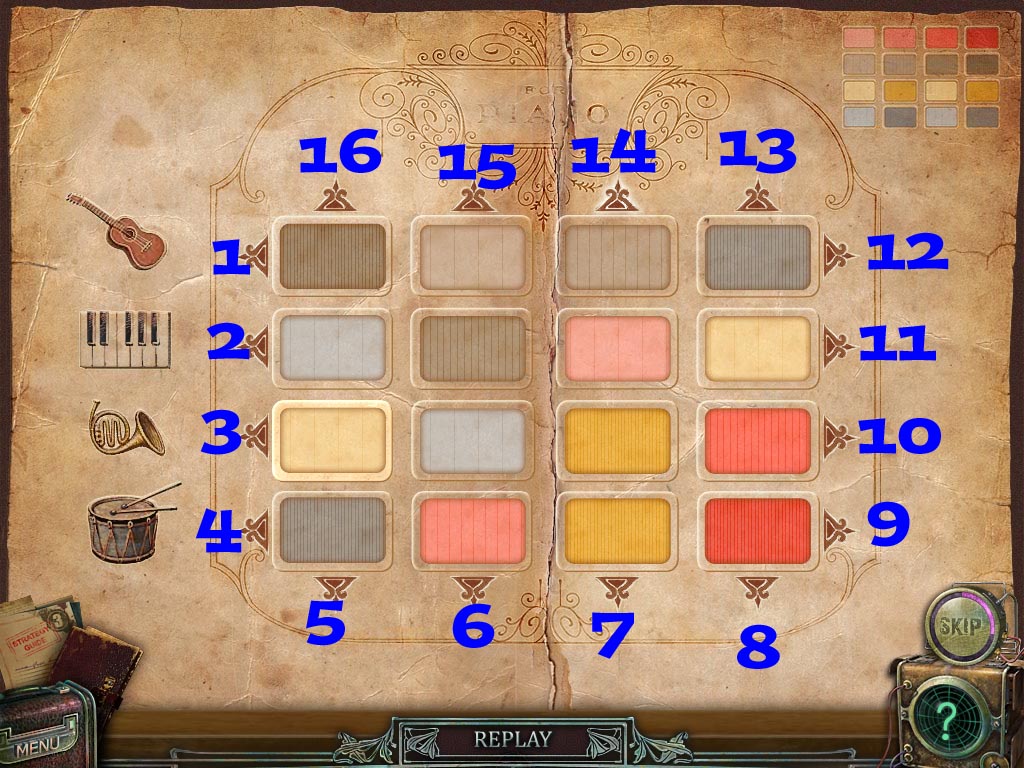
Go the the music room.
Investigate the piano and place both half of music sheets on the stand.
Start the minipuzzle.
You will have to move the rectangles in the proper spot.
The correct way is shown in the top right corner.
The arrows are labeled 1-16: Press that arrow in the stated order to complete the puzzle.
Press arrow 4.
Press arrow 2.
Press arrow 3.
Press arrow 16 three times.
Press arrow 15.
Press arrow 14 two times.
Press arrow 11.
Press arrow 13.
Press arrow 5.
Press arrow 1.
Press arrow 16.
Press arrow 12.
Press arrow 16 three times.
Press arrow 3.
Press arrow 5.
Press arrow 3.
Press arrow 16.
Press arrow 11.
Press arrow 5 two times.
Press arrow 4.
Press arrow 16 two times.
Press arrow 7 two times.
Press arrow 9 two times.
Press arrow 14 two times.
Press arrow 8 two times.
Press arrow 4.
Press arrow 13 two times.
Press arrow 8.
Press arrow 9.
Press arrow 13.
Press arrow 7.
Press arrow 4.
Press arrow 14.
Press arrow 6.
Press arrow 5.
Press arrow 9.
Press arrow 16.
Press arrow 15.
Press arrow 9.
Press arrow 5.
Press arrow 4.
Press arrow 16.
Press arrow 4.
Screenshot
Get the bow down from the moon with your telekinetic power.
Return to the outside where the angel statue is.
Investigate the crate and place the feathers, bow, and bowstring on top of it.
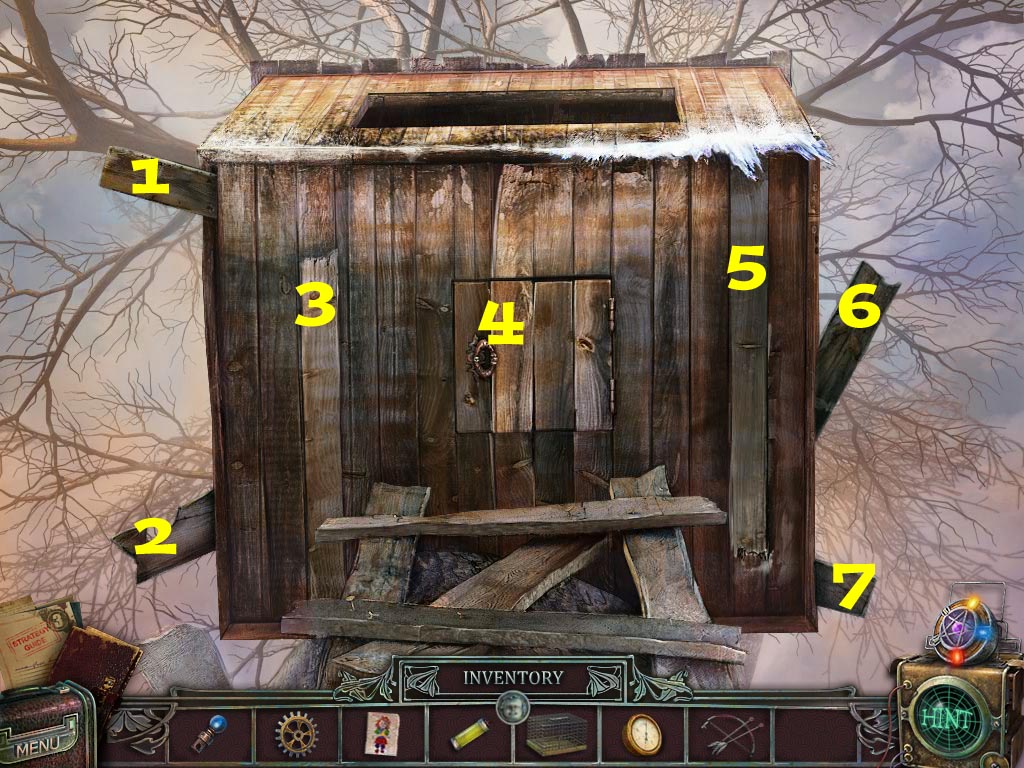
Take the newly formed archery set.
Investigate the tree house, then place the archery set on it to start a puzzle.
There are three rounds for the puzzle.
Shoot spot 1 and 4.
Shoot spot 2, 7, 4, and 6.
Shoot spot 1, 6, 2, 7, 3, 5, and 4.
Screenshot
Pick up the fallen paper and head into the tree house.
Scene Three: The Treehouse
Getting the Fourth Paranormal Power
Above and between the pictures of the bear and goose is the postcard.
Start the hidden object scene.
Use the needle on the torn whale.
Screenshot
You receive the altimeter.
Use your telekinesis ability on the two shutters on the window across the way.
Once the bridge has formed, cross it and go forward.
On the windowsill to the left is a postcard.
Go through the door to the next room.
On the archway to the right is a postcard.
Investigate the broken window, then use your telekinetic powers on the boards.
Go through the door on your left.
In the box under the desk is a postcard.
Investigate the stool.
Take the caged squirrel.
Click on the poster that was behind the caged squirrel and grab the part of code.
Go back to the tree house and place the caged squirrel next to the empty cage.
Pick up the cage hook.
Go over the bridge once more and examine the machine to the left.
Use the altimeter on the fuse to the top right.
Use the cage hook to pull out the fuse.
Plug the fuse into the device on the right. This will start a puzzle.
Press the appropriate wires to activate them.
Screenshot
Go through the right door.
On the board to the top left there is a postcard.
Use your telekinesis ability on the board.
Investigate the wood pile and pick up the part of code.
Go to the art room and examine the drawer.
Put both parts of code on the drawer.
Press on the triangle, 6, and 8 and pick up the hedgehog food.
Go back twice and go right.
Investigate the pile of wood and place the empty cage on top of it.
Put the hedgehog food in the cage.
Return to the treehouse and place the caged hedgehog next to the caged squirrel.
Pick up the rubber glove, then go forward and go through the left doorway.
Click on the switch, then put the rubber glove on it.
Go through the right door.
On top of the shower curtain holder is a postcard.
Grab the secret material that's behind the mirror.
Use your telekinetic ability on the wooden boards at the back.
Investigate the first aid kit, open it, and pick up the bandage and leaf key.
Go to the locker room inside the orphanage.
Investigate the lockers and use the leaf key on the red locker.
Pick up the basket.
Go back to the bathroom.
Use the bandage on the rabbit and then put the rabbit in the basket.
Return to the treehouse and put the rabbit with the other animals.
Take the fourth power: restoration.
To the Library
Return to the bathroom and use the restorative ability on the broken machine part.
Pick up the newly fixed machine part.
Go back once.
Investigate the right door at the very end of the hallway.
Use the restorative ability on the broken key.
Open the door and enter.
Scene Four: The Library
Getting the Fifth Paranormal Power
On the bookcase to the left, straight ahead of line of sight, is a postcard.
Start the hidden object scene.
Place Africa on the map book to the left.
Screenshot
You receive a brush.
Pick up the palette from the floor.
Go left into the bedroom.
On the lounge chair to the right of the teddy bear is a postcard.
Investigate the pillows and click on the top one.
Pick up the brush key.
Return to the room with the lockers and use the brush key on the remaining locker.
Pick up the picture pieces, empty glass, and yellow paint.
Return to the bathroom and use the glass on the water filled tub. You receive a glass filled with water.
Go to the treehouse and begin the hidden object scene.
Put the stained glass flower on the empty stained glass.
Screenshot
You receive a scalpel.
Go to the library and start the hidden object scene.
Connect the star fragment with the broken star to make the star whole.
Screenshot
You receive vase piece 1.
Investigate the wallpaper and use the scalpel on it to collect canvas.
Go through the door on the left.
Open and then investigate the drawer. Use your restorative ability on the organizer.
Open the organizer and place the picture pieces on it to activate the puzzle.
Screenshot
Take the doll image.
Investigate the pillow and cut it open with the scalpel.
Pick up the blue paint.
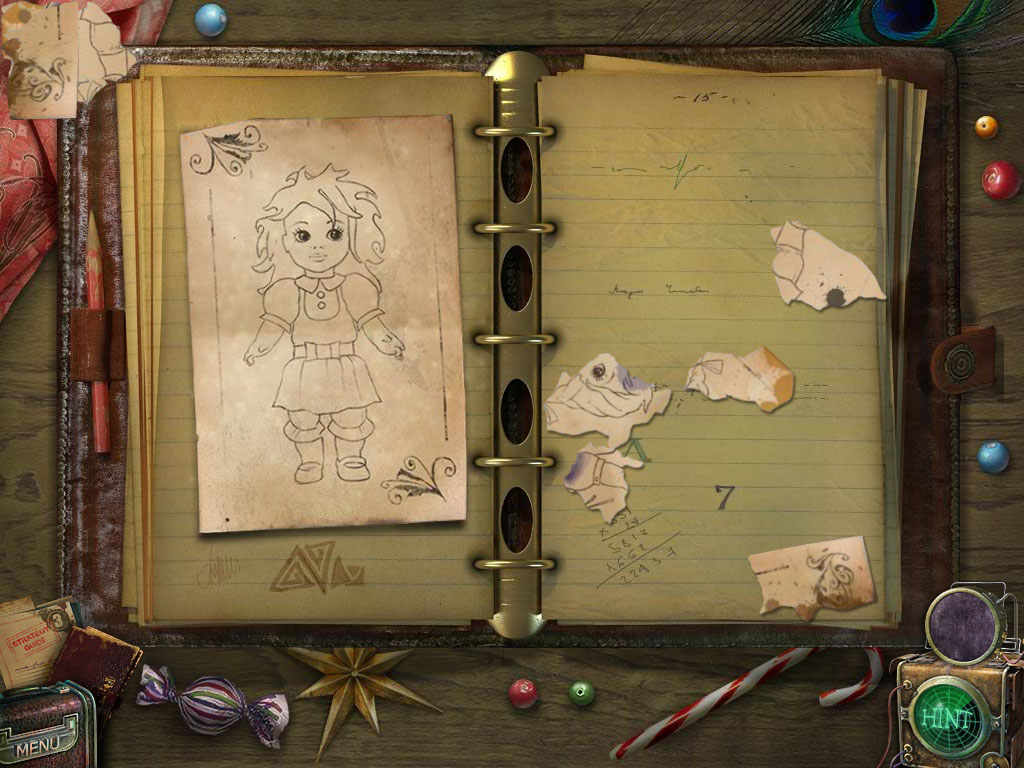
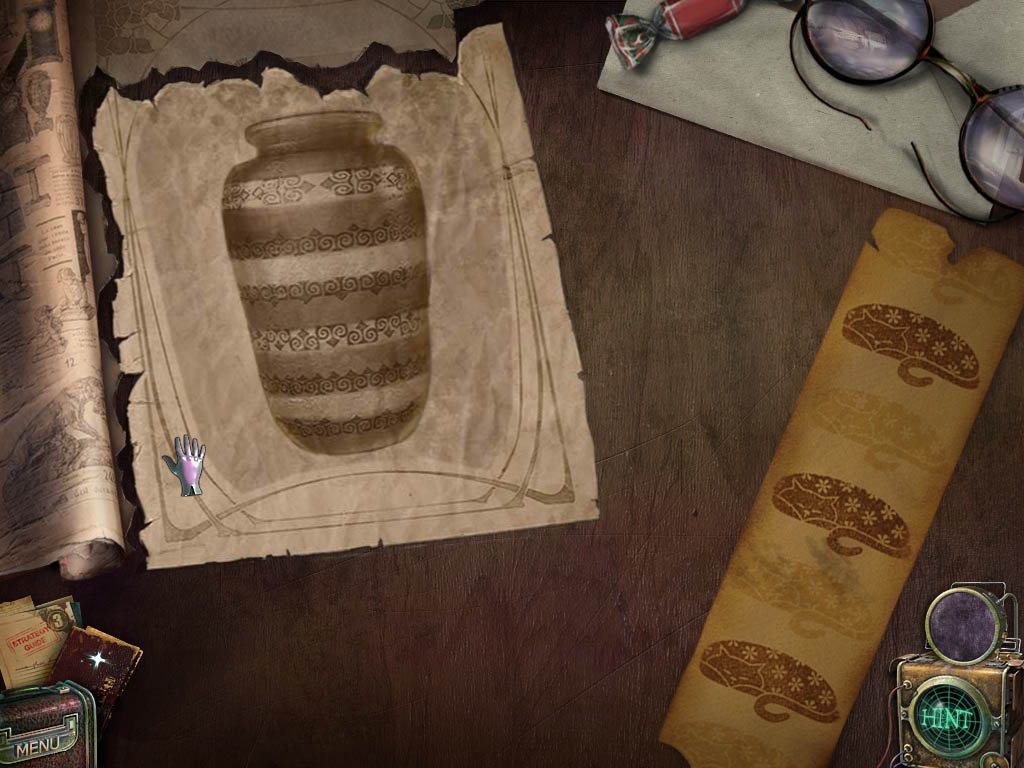
Go to the art room and click on the easel.
Put down the canvas, blue paint, yellow paint, blurry picture, brush, the doll image, and the glass filled with water.
Start the puzzle.
For the first part, click the images until the doll on the canvas matches the doll from the journal.
The second part requires you to properly paint the doll.
Screenshot
Once done, collect the fifth and final power: The power to make drawings real.
Getting to the Boy's Room
Pick up the painting of the bridge.
Go back twice then turn right into the room where you originally got the hedgehog.
Put the bridge painting on the ground then use the purple power.
Cross over the bridge.
Under the chair on the left is a postcard.
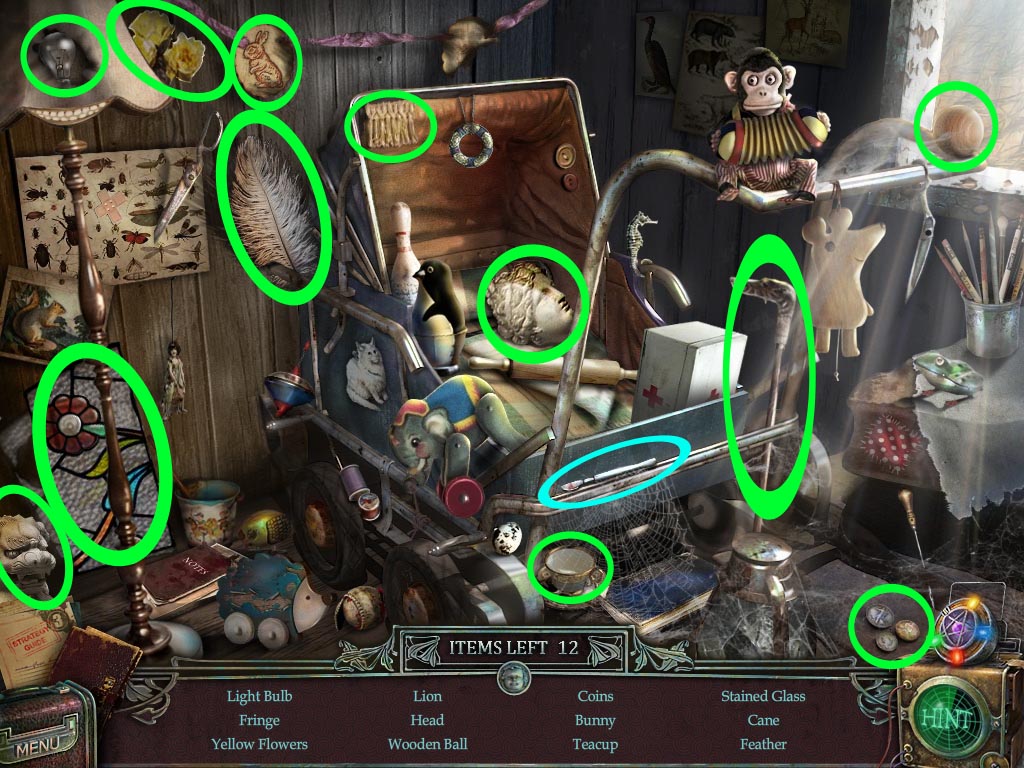
Start the hidden object puzzle.
Bulb.
Lion- After placing the rabbit on the rope, a slab will appear for the lion statue.
Flower.
Wooden Ball.
Dog Cane Head.
Fringe.
Stained Glass.
Head.
Coins.
Bunny- After using the dog cane head, a line will appear with other rabbits. Place the rabbit on the rope.
Feather.
Cup.
Screenshot
You receive a piece of plaque.
Go through the left door.
Under the desk to the right is a postcard.
Pick up the crowbar.
Click on the shelf and pick up the pencil.
Go back and investigate the right door.
Use the crowbar to open the door, then go through it.
On the bed to the right of the far left pillow is a postcard.
Use your restoration ability on the sledgehammer, then pick it up.
Go back, then go through the door on the left.
Hit the wall with the sledgehammer two times to break it down. Go through to reach the boys' room.
Scene Five: The Boy's Room
Revealing the Truth
Once in the boy's room, there is a postcard on the wall in between the two pictures of airplanes on the right.
Start the hidden object scene.
Drag the die to the dice to reveal the nine.
Screenshot
You receive the box key.
Take the drawing paper.
Go back once and use the box key on the small box.
Pick up the painted vase pieces from inside.
Go back once more.
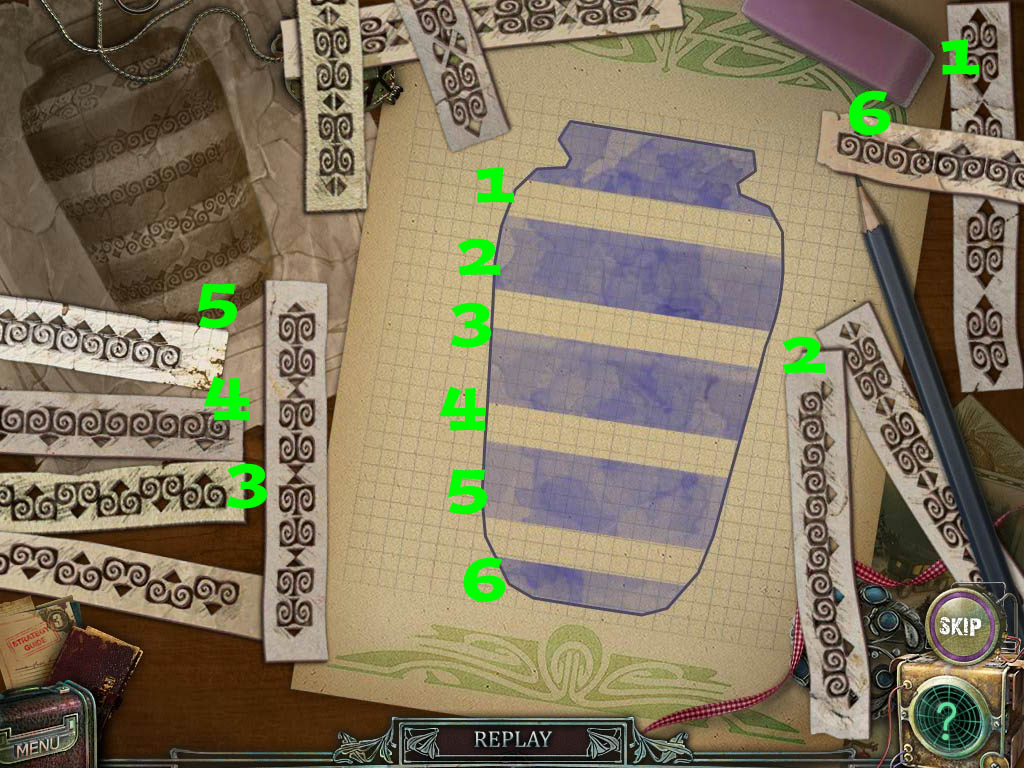
Investigate the desk and put the painted vase pieces on it.
Once the puzzle is activated, move the pieces to create a vase.
Screenhshot
Pick up the magazine piece.
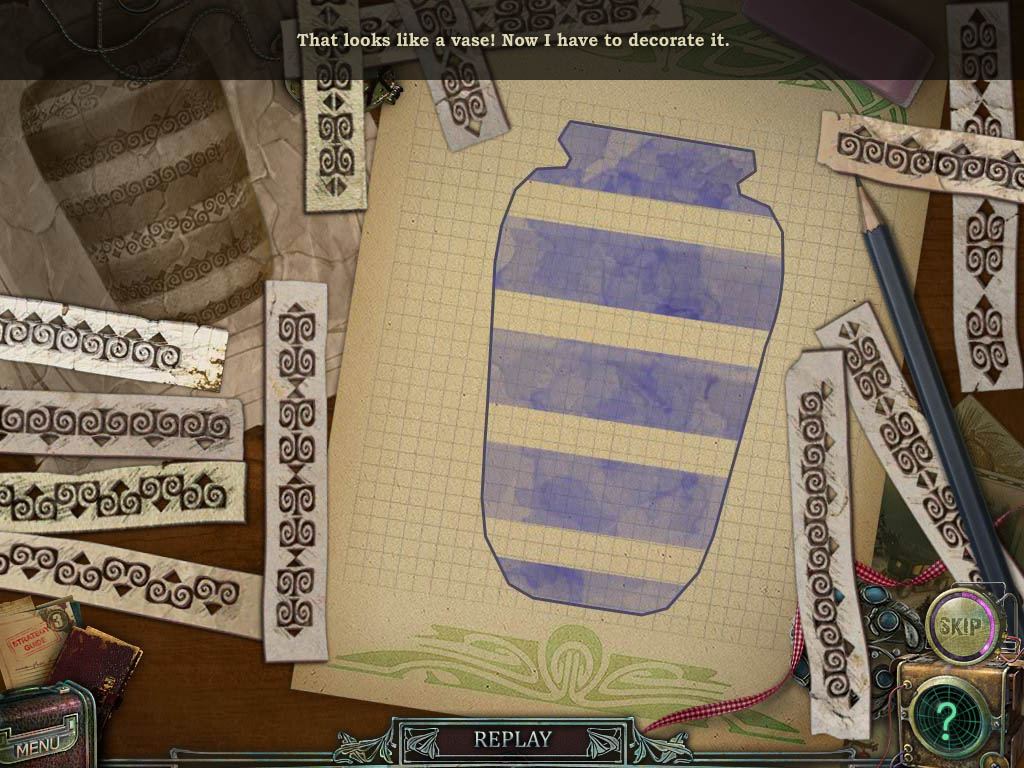
Head through the door on the right and investigate the tray on the bed.
Put the pencil, drawing paper, and magazine page on the tray to start a puzzle.
For this puzzle you must connect the dots to make a vase. By pressing on the dots a line will be drawn.
For the second part you will need to use the strips of paper to decorate the vase properly.
Screenshot
Screenshot
Once finished, use the purple power to make the vase real. Pick it up.
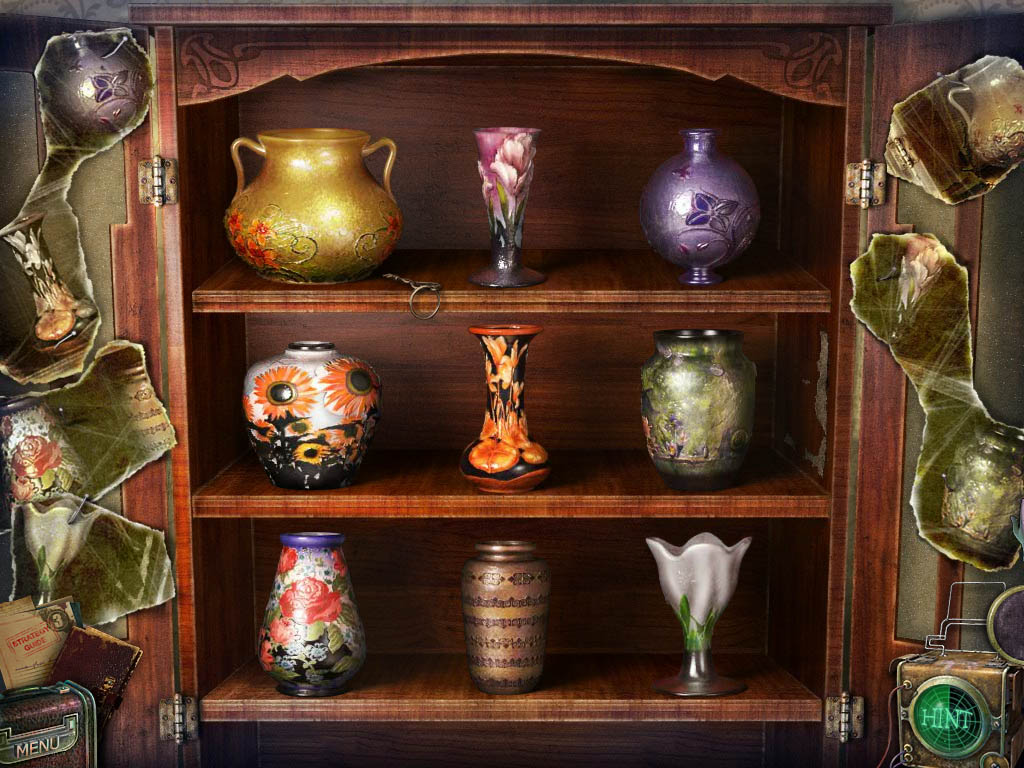
Investigate the dresser to the right and use the green power on the broken vase.
Place the other two vase pieces on the shelf.
Shift the vases around to look as they do in the picture used for reference.
Screenshot
Take the clock key.
Investigate the clock and use the clock key to open the lock.
Pick up the map, plaque piece, and tiles.
Go back once and start the hidden object puzzle.
Pencil-Case.
Dragon.
Marble.
Domino.
Medal.
Tassel.
Lampshade.
Matches- Use these to light the candle.
Candle.
Mirror.
Lens.
Wind Rose.
Screenshot
You receive the door overlay.
Head through the door on the left and through the hole in the wall.
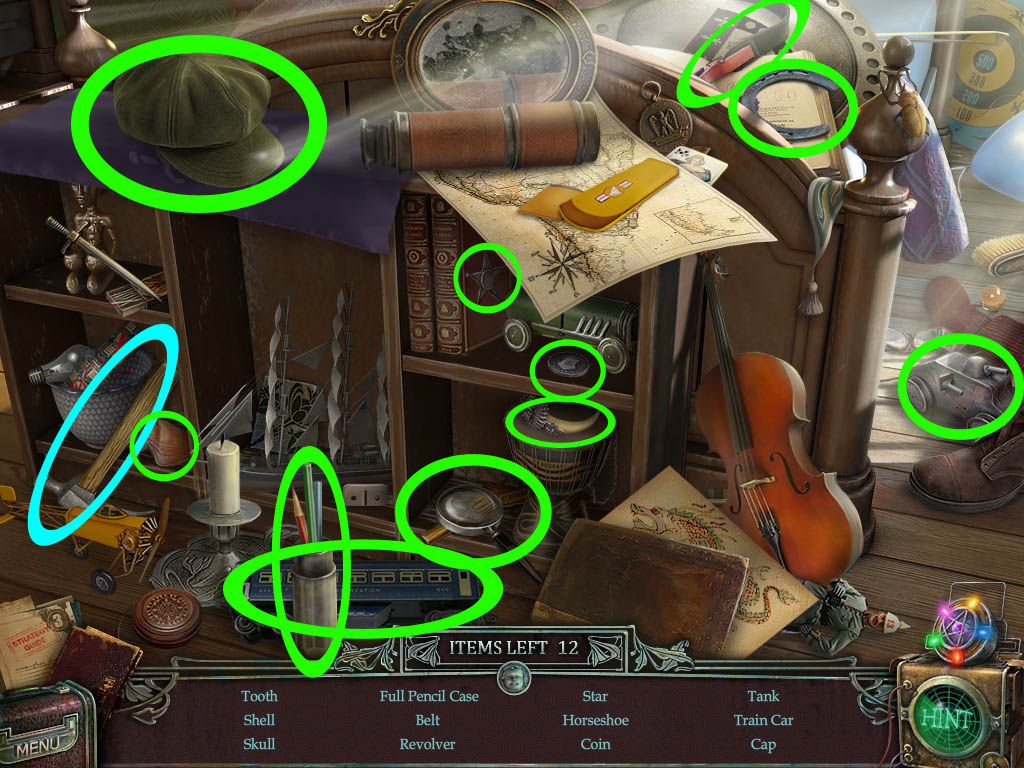
Start the hidden object scene.
The skull is part of a jolly roger located under the cap.
You will need to combine the pencil with the pencil case.
Screenshot
You receive a hammer.
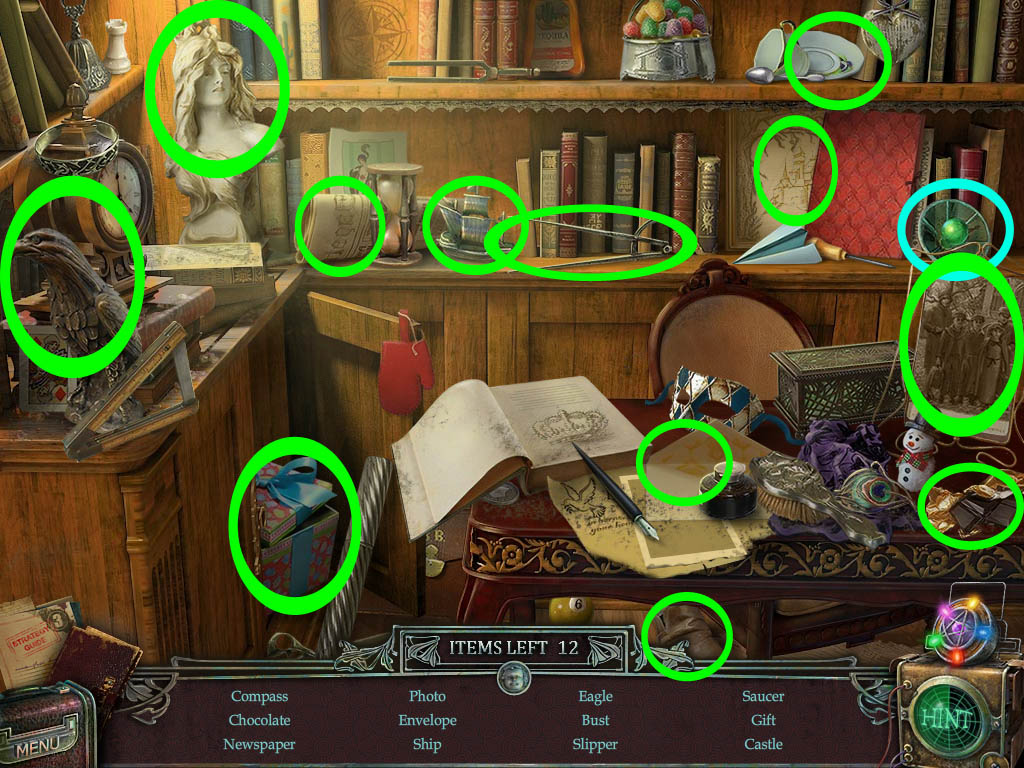
Go to the library and start the hidden object scene.
Place the people in the frame.
Screenshot
You receive machine part 6.
Go to the left.
Examine the floor to the right and use the hammer to lift up the nails.
Grab the tiles and overlay piece.
Go to the boy's room and start the hidden object scene.
Put the wings on the airplane.
Screenshot
You receive the third piece of plaque.
Click on the poster of the airplane and place the tiles on it.
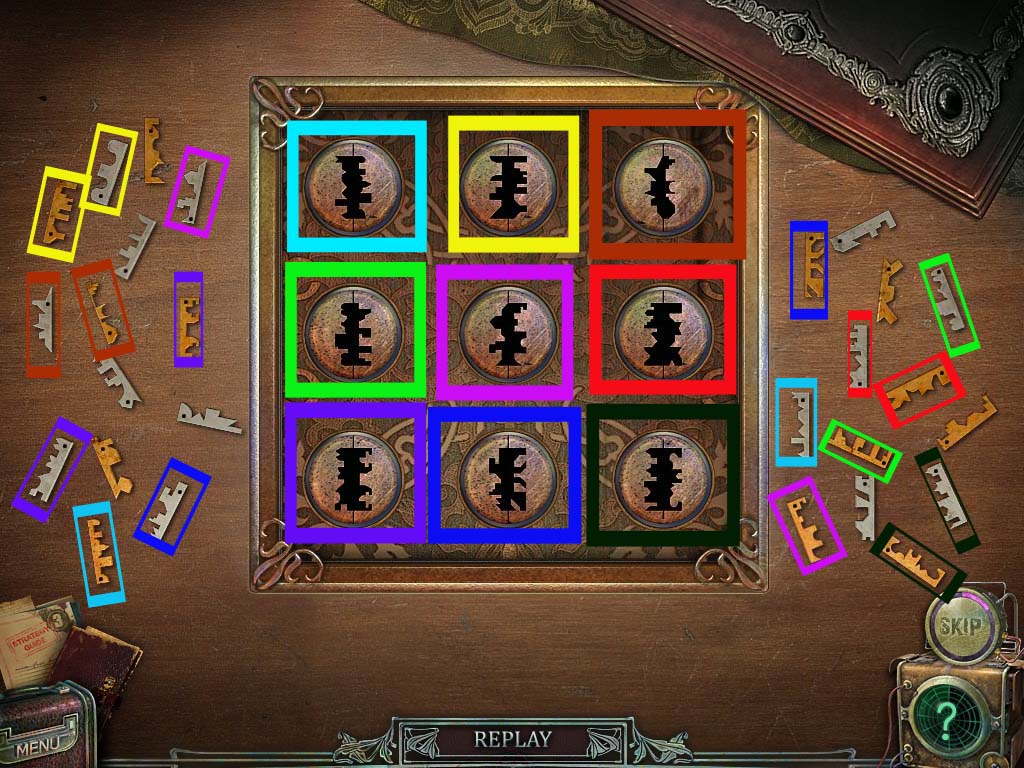
This starts a puzzle where you must put the tile pieces in the proper spot.
Screenshot
You receive the fourth overlay piece.
Return to the treehouse and start the hidden object scene.
Combine the two scissor halves.
Screenshot
You receive the overlay piece 3.
Go down twice and examine the device. Put all the plaque pieces on it to start a puzzle.
Screenshot
Start the hidden object scene.
Put the arm back on the doll.
Screenshot
You receive coal tongs.
Go to the basement (where the machine is) and zoom in on the door to the left.
Place all the overlay pieces on the empty space to begin a puzzle.
You must spin the different pieces in the correct order to have them create the finished image.
Click the first solid ring the surrounds the star four times.
Click the points of the star four times.
Screenshot
Go through the door on the left and pick up the key.
Return outside to the orphanage entrance.
Click on the panel to the right and use the key on it.
Use the tongs on the fireball, then click on the tongs once more to grab the fireball.
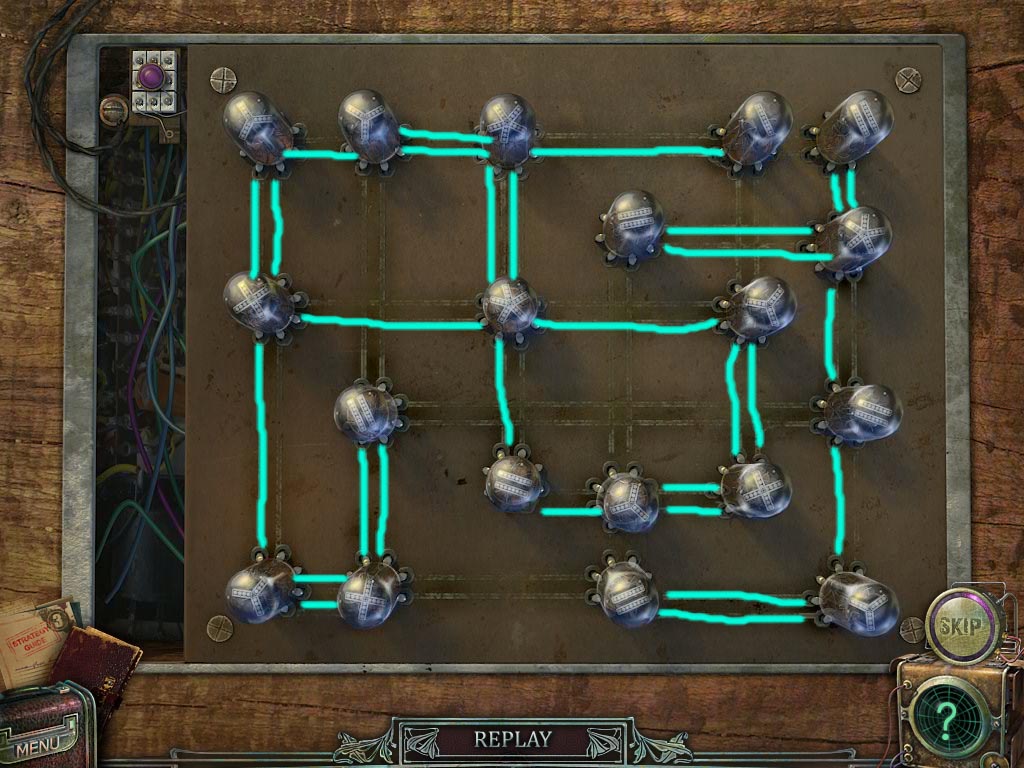
Return to the basement and start placing all the machine parts on the machine.
Place the fireball on the machine and click the device at the bottom to begin a puzzle.
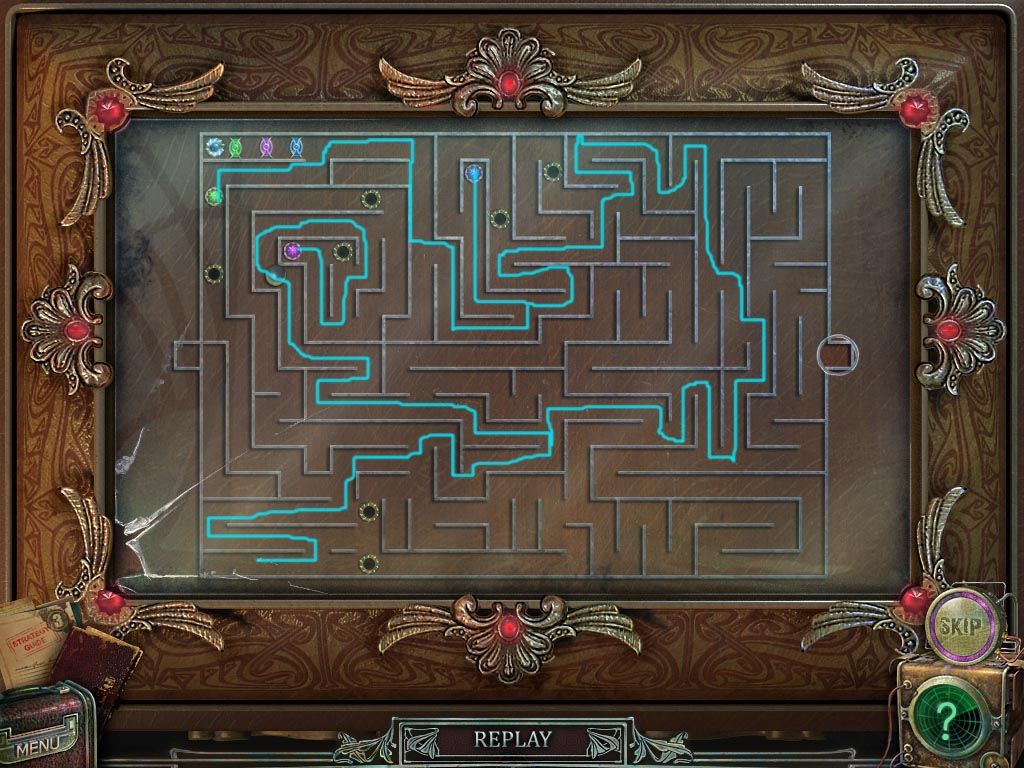
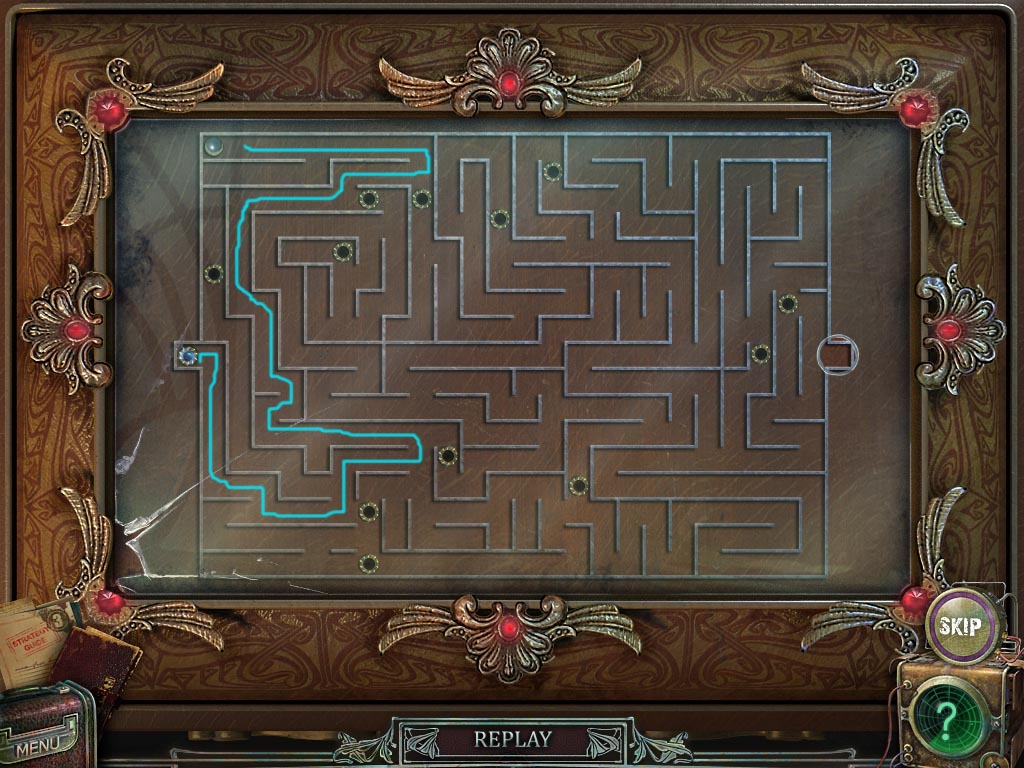
There are five rounds of the puzzle: in each you must connect the different balls of power.
Screenshot
Screenshot
Screenshot
Screenshot
Screenshot
Posted by: Meaghan |
February 13, 2012 6:50 PM
|
February 13, 2012 6:50 PM