

![]() "The people of the village began to gather in the square, between the post office and the bank, around ten o'clock." If you've ever read The Lottery, or one of its numerous clones, you should be familiar with the rise of the hairs on the back of your neck, the creeping sense of fear. Welcome to Strange Cases: The Tarot Card Mystery, a game that manages to convey that overwhelming sense of dread so well you may find yourself glancing over your shoulder in paranoia as you play.
"The people of the village began to gather in the square, between the post office and the bank, around ten o'clock." If you've ever read The Lottery, or one of its numerous clones, you should be familiar with the rise of the hairs on the back of your neck, the creeping sense of fear. Welcome to Strange Cases: The Tarot Card Mystery, a game that manages to convey that overwhelming sense of dread so well you may find yourself glancing over your shoulder in paranoia as you play.
 "It was a dark and stormy night..." Okay, enough of that. Strange Cases: The Tarot Card Mystery is a new hidden object/adventure/mystery hybrid by Sulus Games. You play FBI agent Claire Ellery assigned to a case in a fishing village so small it can't be found by GPS, which should be your first hint that something's rotten. You've been called out on the case of three girls who have been kidnapped. The local police are uncooperative, and a mysterious stranger keeps leaving you odd clues on tarot cards scattered around the place. What's an FBI agent to do?
At first Strange Cases: The Tarot Card Mystery seems to be a pretty generic story: basic kidnapping, uncooperative local authorities, dark and spooky small town, etc. Then the mayor and doctor start acting suspiciously and it goes downhill from there. Like all hidden object games, there will be lots of items to find. Unlike most hidden object games, many of the items are actually useful in your search for the culprit!
Tarot cards you find will either give a written list, a group of silhouettes, or an object (or objects) of which pieces need to be found. It's a lovely way to integrate the hidden object lists into the game without breaking stride. Some scenes will include all three types of tarot and you can work back and forth between the cards or concentrate on just one. Some items go into your inventory and will become useful later. Navigation is either by moving within the scene (indicated by an arrow mouse change) or through handy Polaroid photos that accumulate in the case file. Just click on a pic to return to that area.
 Analysis: There are many, many hidden object/adventure/mystery hybrids out there. What makes Strange Cases: The Tarot Card Mystery any different? The story. The artwork. The mini-games. Oh, and how all three are seamlessly integrated.
Although the basic plot has been done many times before, as you work through the narrative it begins to dawn on you that there is indeed more going on than the game tells you. This happens gradually, in the tradition of the best horror/mystery stories. The art for the dialogue scenes has a lovely washed hand-painted feel, while the HOG scenes are bright, clear, 3D and photorealistic. Surprisingly the two styles work well together, each heightening the mood of the story. The mini-games lean heavily towards logic and puzzle solving rather than just being iterations of games you've seen before. There's at least one mini-game/puzzle that could have been lifted directly from a room escape game.
Hidden object scenes themselves are a pleasant surprise. Each view is bright and clear, with very little clutter. No burying objects ten deep in a room and trying to find something in the resultant mess. A refilling hint timer is always welcome, as is a skip function for the mini-games. There's also a handy mute feature in the options if the atmospheric music and sound effects become annoying. Handy cursor changes round out the playability of the game. A magnifying glass will let you know when something needs to be investigated further, a rotating gear will indicate something that needs to be manipulated, and an arrow points the way to other areas to explore.
 Unfortunately there are a few minor problems that can detract from gameplay. The "click area" when picking up items in the hidden object scenes is so tight that the point of the mouse cursor needs to be directly on an object. Multiple incorrect clicks will result in a spinning cursor, forcing you to slow down, and this can happen quite often even while trying to pick up the correct item. Broadening the click area would have been a good idea. The story itself, while fantastic, is way too short. You will leave the game wanting so much more.
Seamless integration, though, is what makes Strange Cases: The Tarot Card Mystery stand out from the pack. From the dialogue scenes to the hidden object scenes to the mini-games, everything flows so easily that you might find yourself several moves into a mini-game before you realize what has happened, leaving you to enjoy the deepening sense of paranoia. Are the cops in on it? The Mayor? Everyone? Play Strange Cases: The Tarot Card Mystery to find out.
![]() Windows:
Windows:
Download the demo
Get the full version
![]() Mac OS X:
Mac OS X:
Download the demo
Get the full version


Walkthrough Guide
(Please allow page to fully load for spoiler tags to be functional.)
Strange Cases: The Tarot Card Mystery Walkthrough
Chapter 1
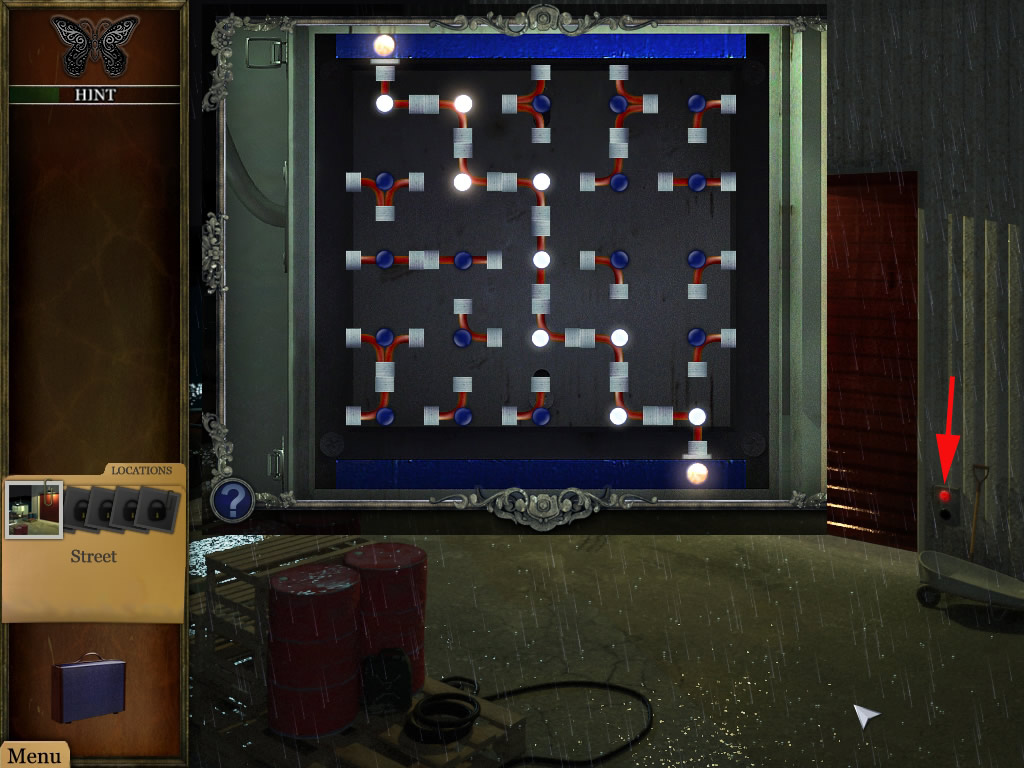
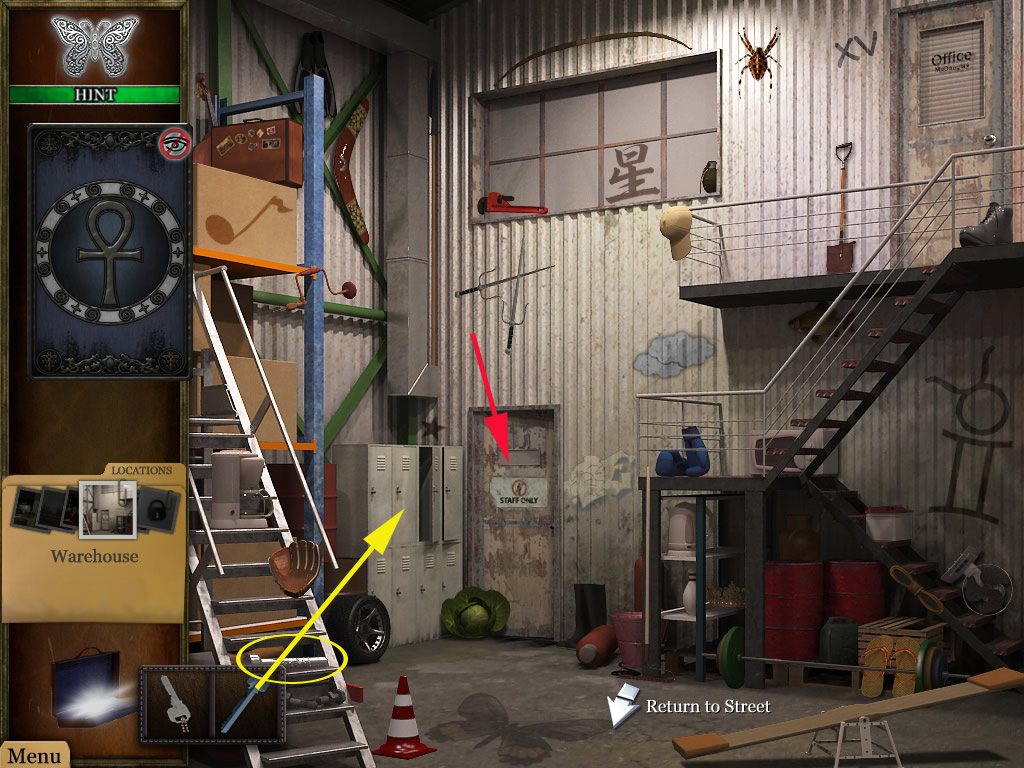
Warehouse, outside
Clicking the red button at the right side of the gate will activate an minigame.
Your goal is it, to make a straight connection between the power source in the top left and the node in the low right corner.
You can turn the parts by clicking, but you do not have to use all parts. Just make a connection.
There are several solutions possible, the screenshot shows one.
Screenshot
The door will open, enter the ware house.
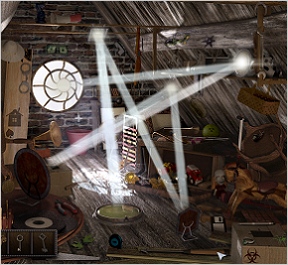
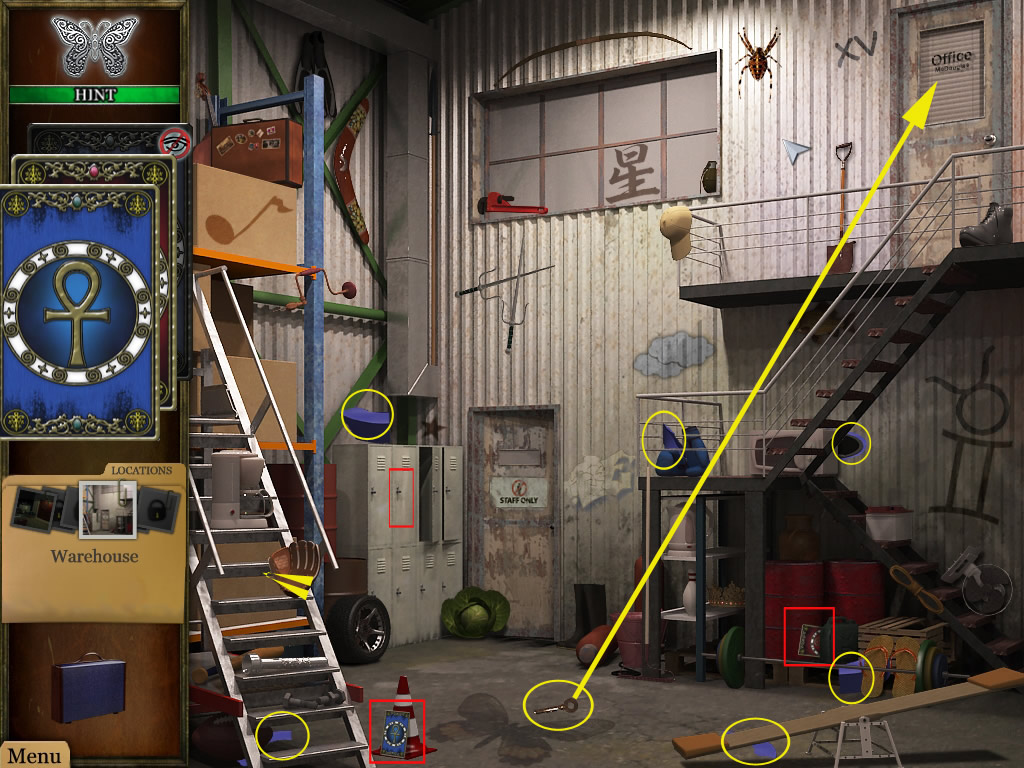
Warehouse, inside
Pick up the blue tarot card from the floor.
The key you will find on the floor as well. It will go into your inventory.
The red tarot card is located at the right side in front of the barrels.
Find the six parts of the blue tape.
It will go into your inventory.
Get the key out of your inventory and click it at the office door, top right corner and enter the office.
Screenshot
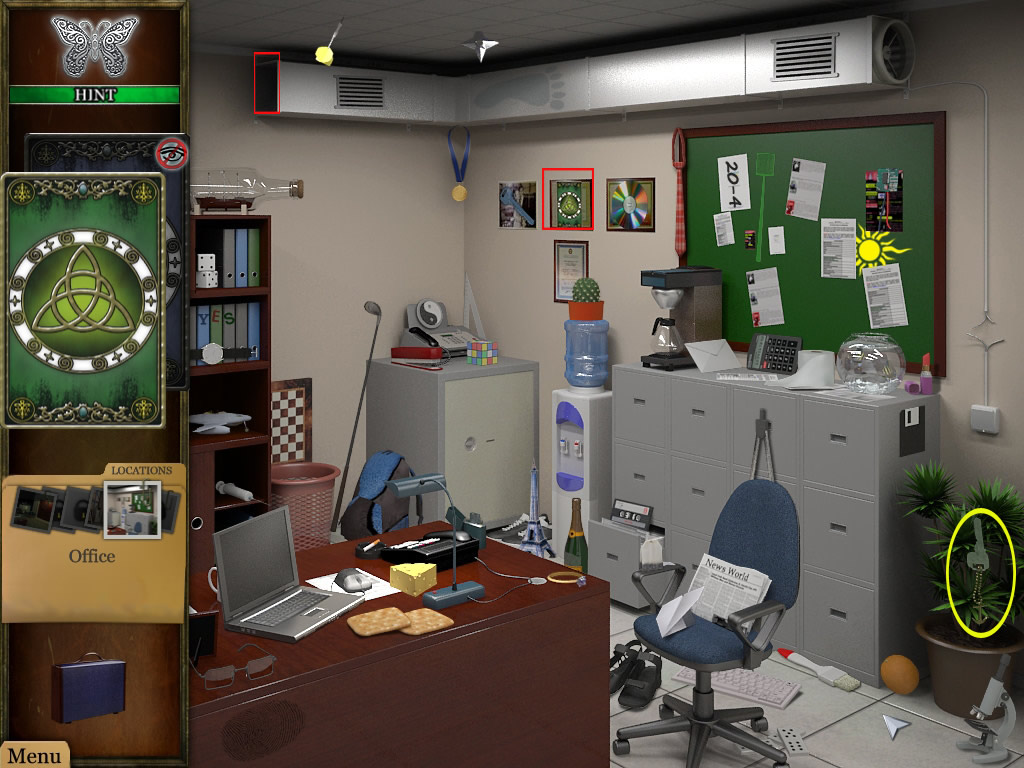
Office
You will find the green tarot card in the back at the right wall, middle of the three pictures there.
Find all items on the card.
The key you will find in the plant, low left corner and goes into your inventory
Screenshot
Use the first picture from the left, from the photos on the left side, above the inventory-suitcase, to leave the warehouse.
Click the boat and there the left door.
Boat, inside
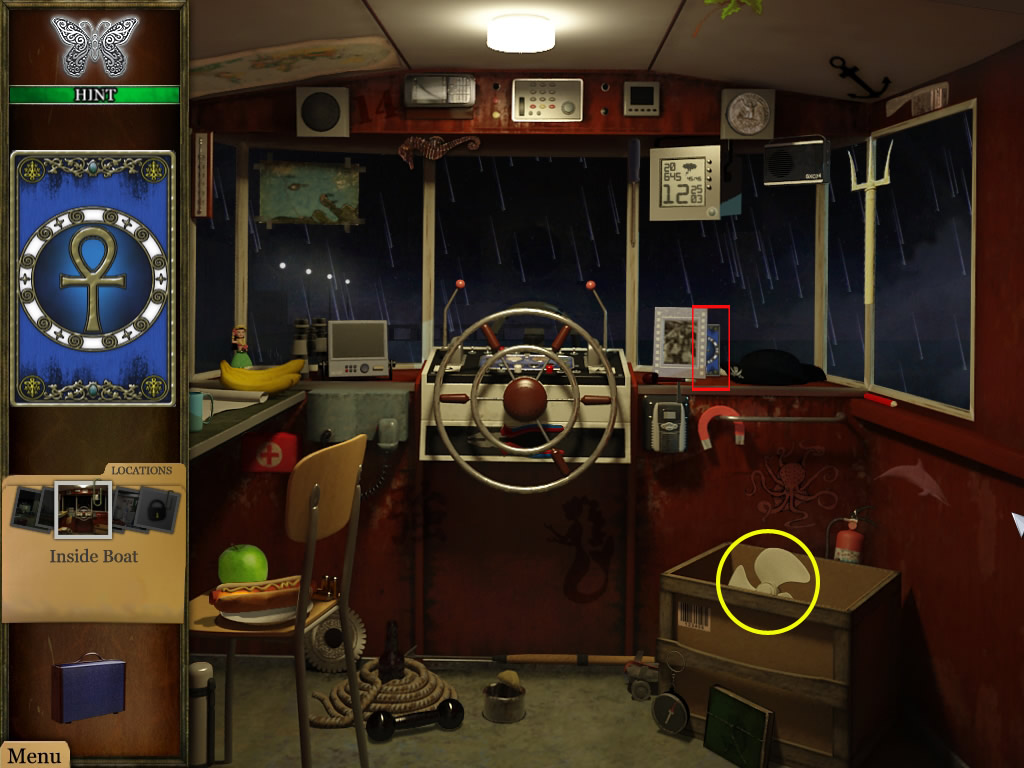
You will find the blue tarot card at the right front window, half hidden behind a photo frame.
Find all items.
The fan, located in the crate low left, goes into your inventory.
Screenshot
Using the photo, go back into the office.
Office
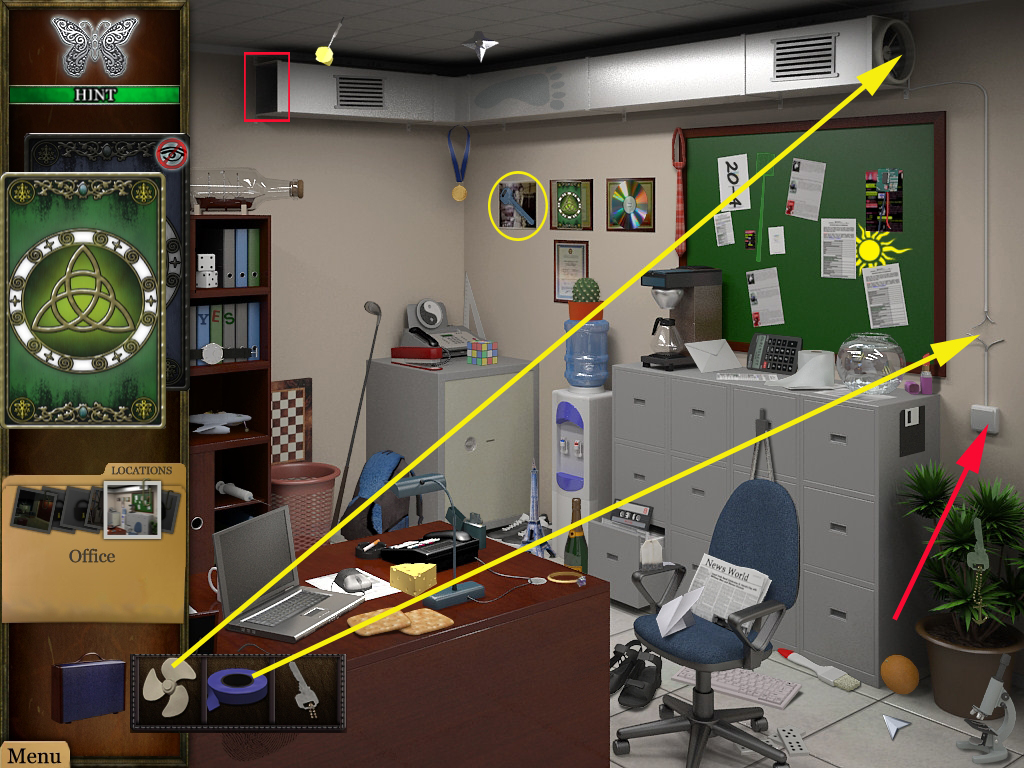
Open your inventory and get out the blue tape.
Fix the cables at the right side, above the switch
Get the fan out of your inventory and place it at the round spot, top right at the end of the cables.
Click the switch and the blue tarot card will fall out of the fan at the left side and land on the floor.
Find the needed objects.
The key is located right in the back at the wall, on the first picture.
It goes into your inventory.
Screenshot
Leave the office by using the white arrow, showing up, when you hoover your mouse over the lower part of the scene.
Warehouse, inside
Get the blue key out of your inventory and open the second locker door from left.
Get the blue tarot-card out.
Find all items.
The flashlight is located on the stairs low left corner and goes into your inventory.
Screenshot
Open the door at the back right "Staff only".
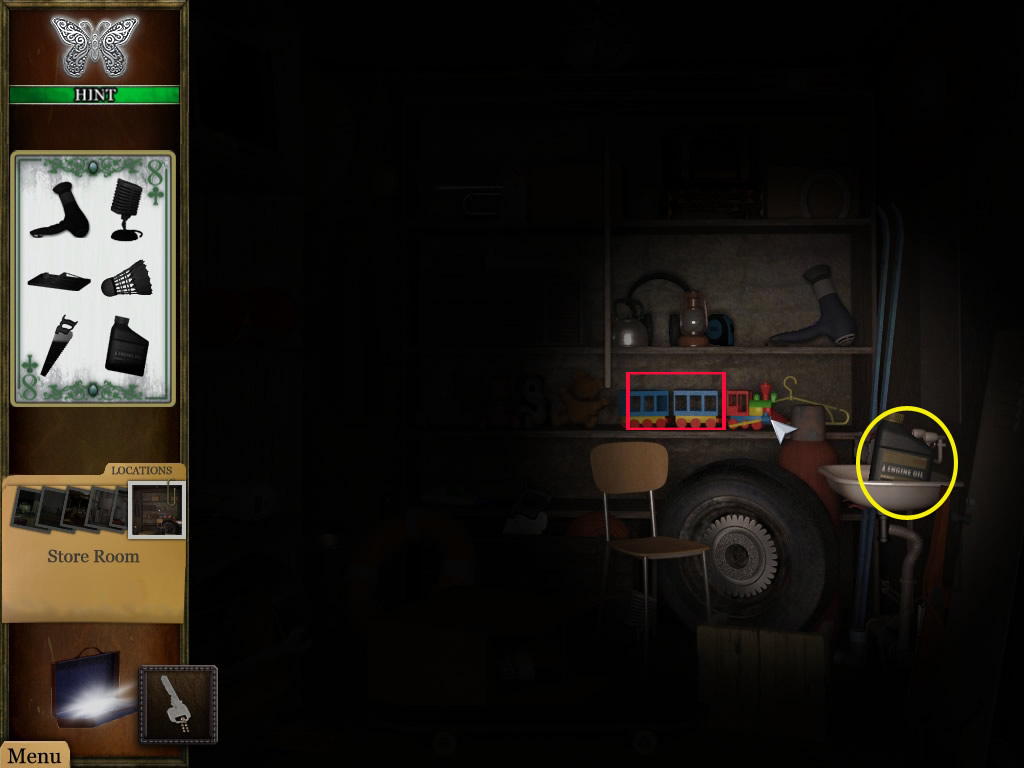
Store Room
Get the flashlight out of the inventory and click somewhere on the scene.
Now you will a have a little light.
The green tarot card you will find right side on the shelf, hidden behind a toy train.
Find all the objects.
The oil can you will find in the sink, left side.
Go back to the boat.
Screenshot
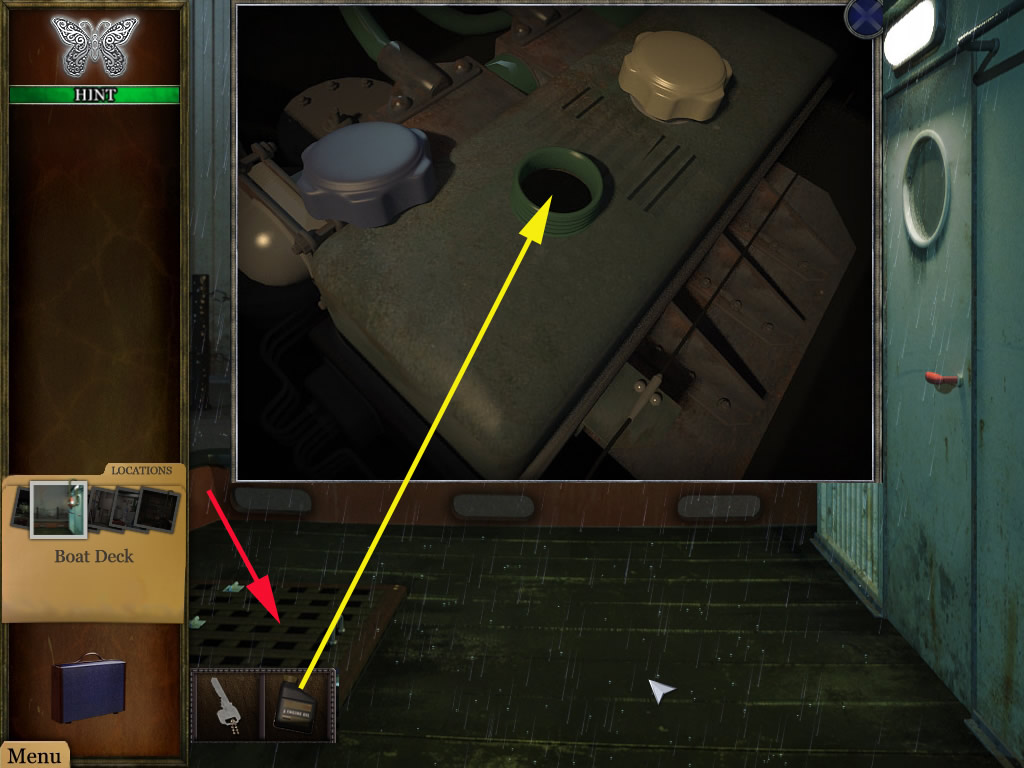
Boat Deck
Click the lid at the left side, covering the engine.
Click again and you will get a closer look.
Get the oil can out of your inventory and place it on the open crank case.
It will close automatically.
Screenshot
Enter the boat through the door.
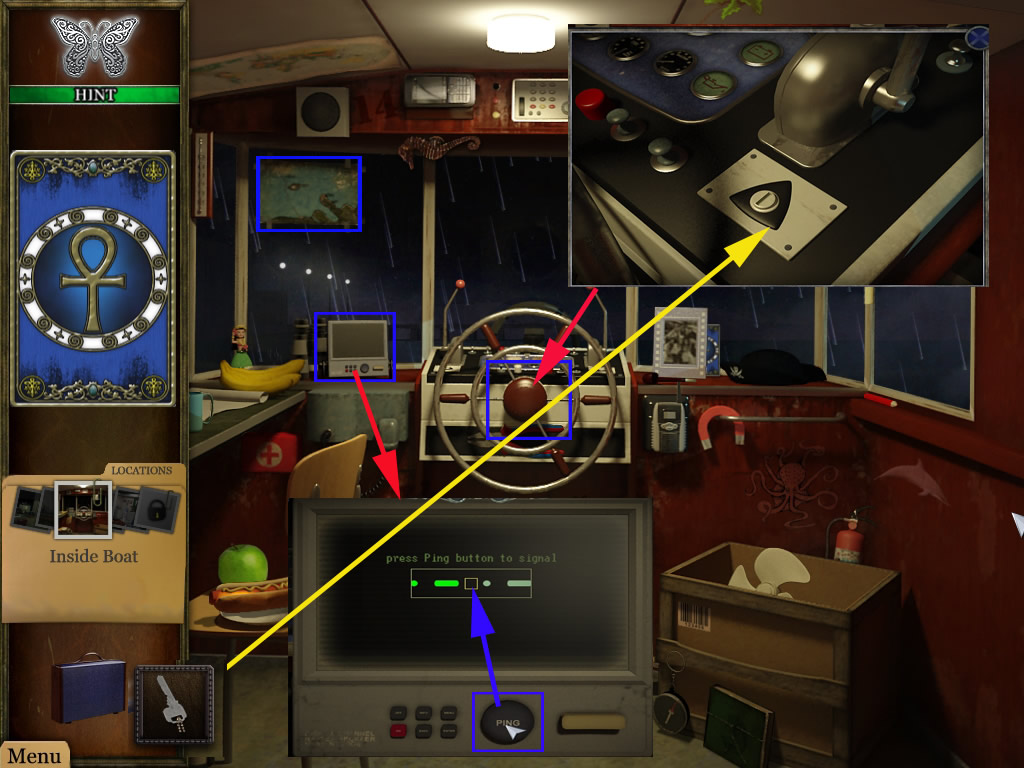
Boat, Inside
Click the map top left of the front window.
It shows a way, where to go, but it is not of further importance.
Click the steering wheel, you will get a closer look.
Open your inventory and grab the key, place it at the keyhole.
Click the key again and the boat will start.
You will have a short cut scene, after this, the radio left side is blinking.
Click it to get a closer look.
To activate the game, click on the Ping button.
You will see some signals floating through the scene.
For the short button, click on the Ping button as soon as it enters the center square; then release the mouse right away.
For the long button, click and hold the Ping button from the moment it enters the center square and release it as soon as the button is completely green.
It can be kind of tricky to get the right moment - If you fail, you will have to start over from the beginning.
Screenshot
A cut scene follows.
Chapter 2
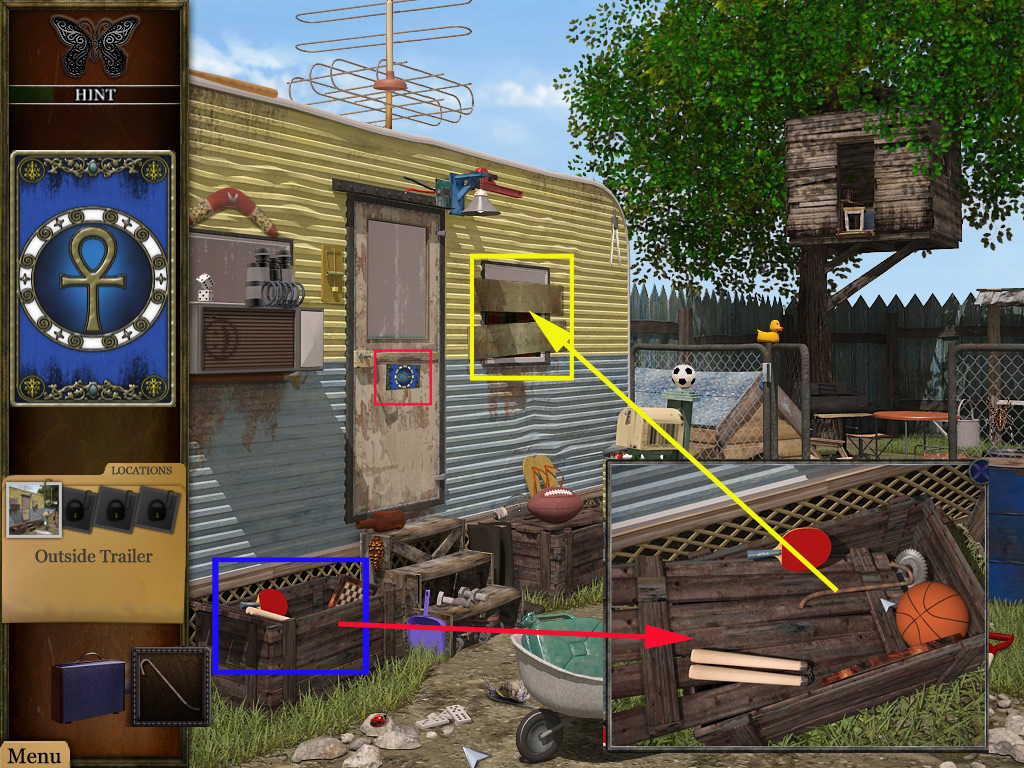
Trailer, outside
You will find the blue tarot card at the trailer door, left.
Find the items.
Click the wooden crate low left on the ground in front of the trailer and grab the crowbar.
It goes into your inventory.
After finding all objects, use the crowbar to remove the boards from the window right next to the trailer's door.
Screenshot
Enter the trailer.
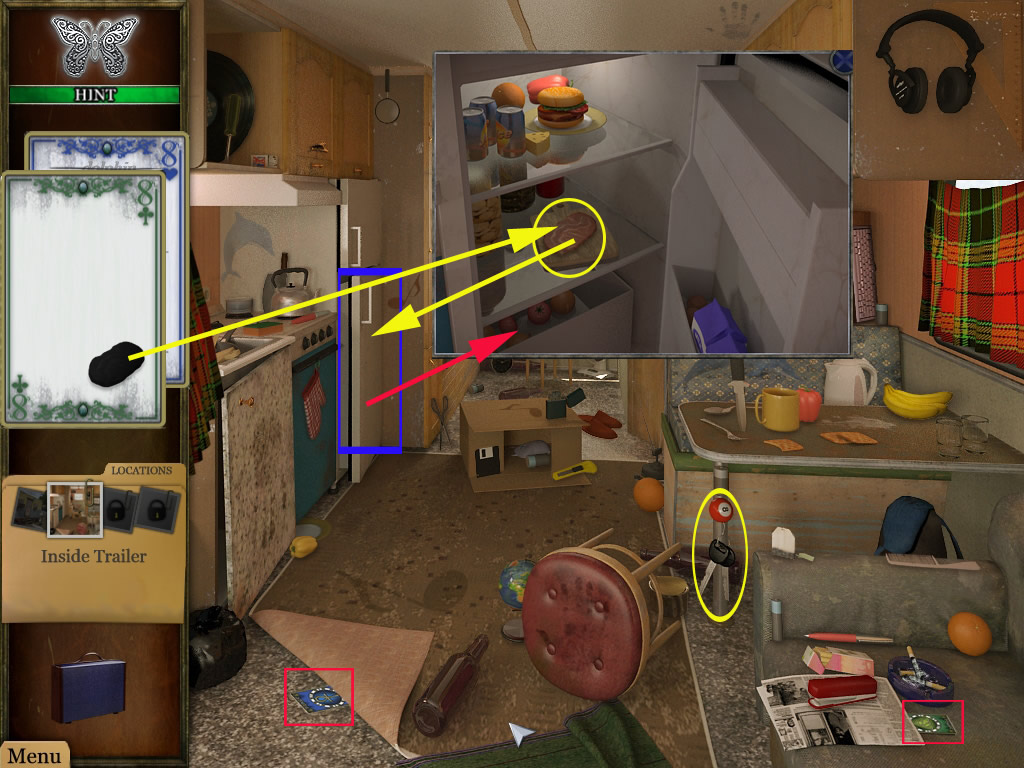
Trailer,inside
The green tarot card you will find right side on the table, the blue one, low left on the floor.
Look for the items.
The truck keys are located at the leg of the table, low right side.
For the meat, you will have to open the cooler and get it out.
Both are inventory items.
Screenshot
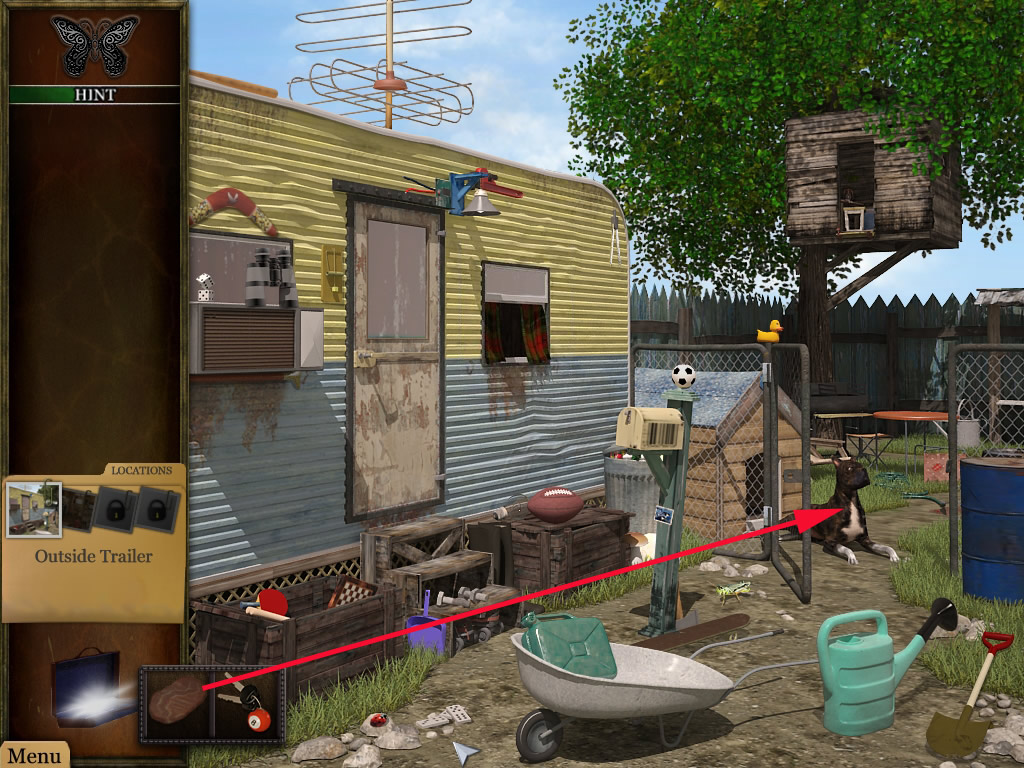
Leave the trailer by clicking the curtain left.
Outside open your inventory, grab the steak and give it to the dog.
He will let you enter the backyard now.
Screenshot
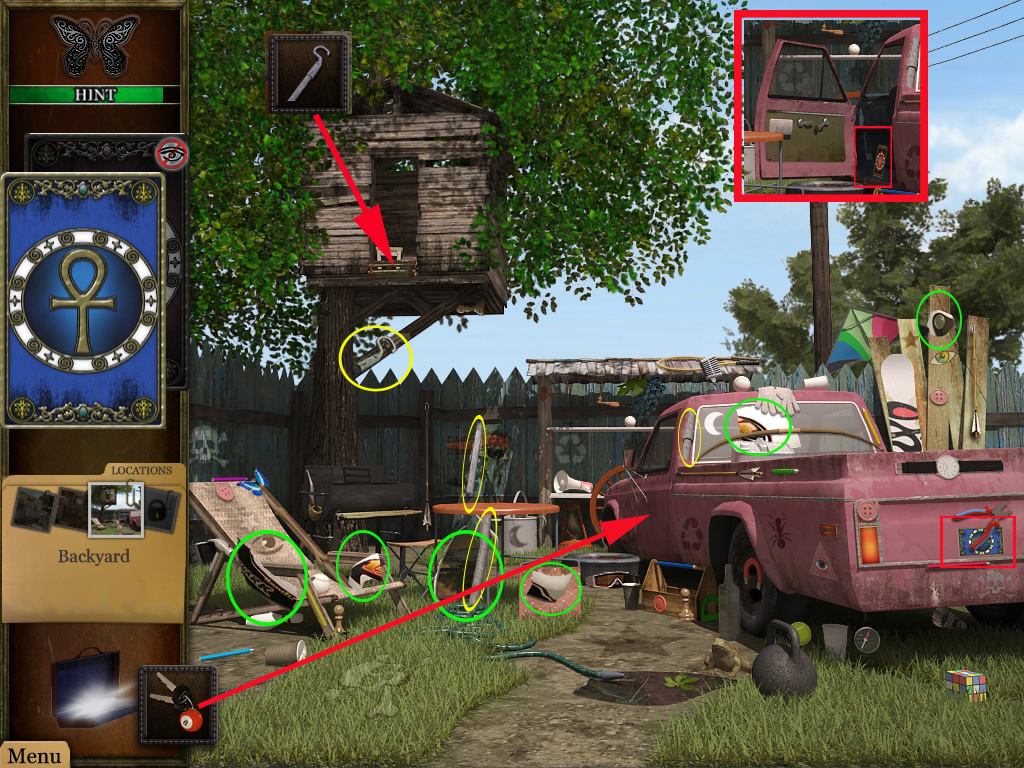
Backyard
The blue tarot card is used as numberplate at the back of the truck.
For the red card, get the key from the inventory and open the truck's door.
Grab the card and close the car door again with a click. Otherwise you might not see all needed items.
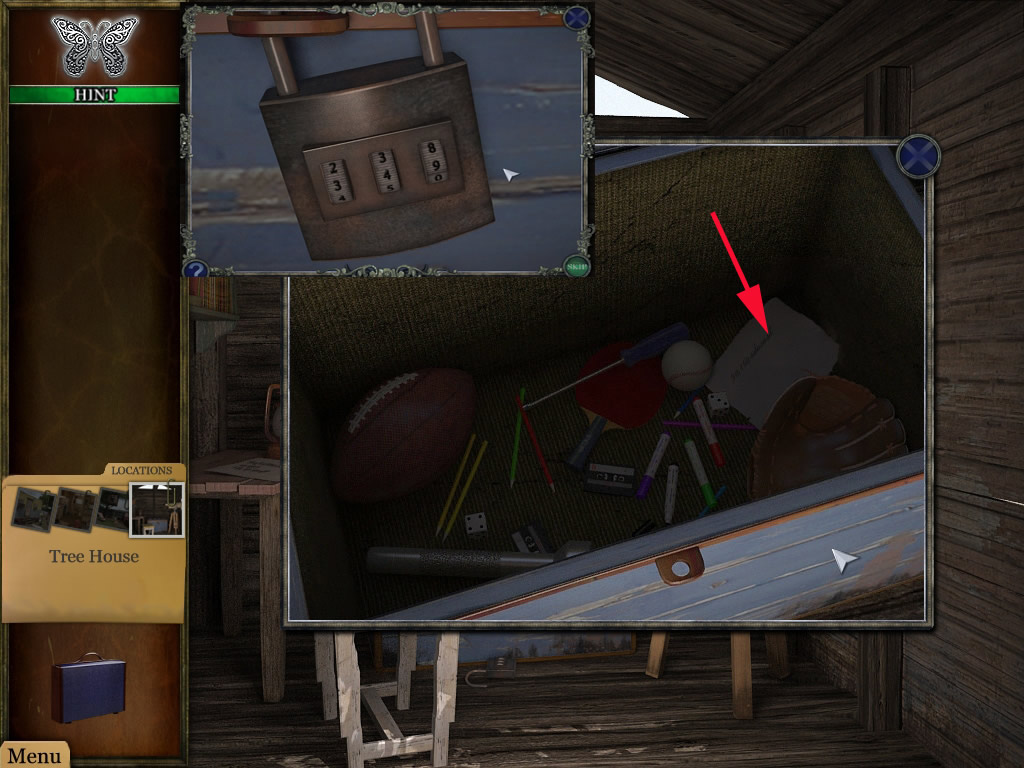
Have a look for the six parts of the helmet. You will find them highlighted in green on the screenshot.
The three parts of the pol (highlighted in yellow on the screenshot) will go into your inventory after.
The hook is located at the branch on the tree, right under the tree house.
Hook and pole will be automatically combined inside the inventory.
Get it out and pull down the rope ladder with it.
You can now enter the tree house.
Screenshot
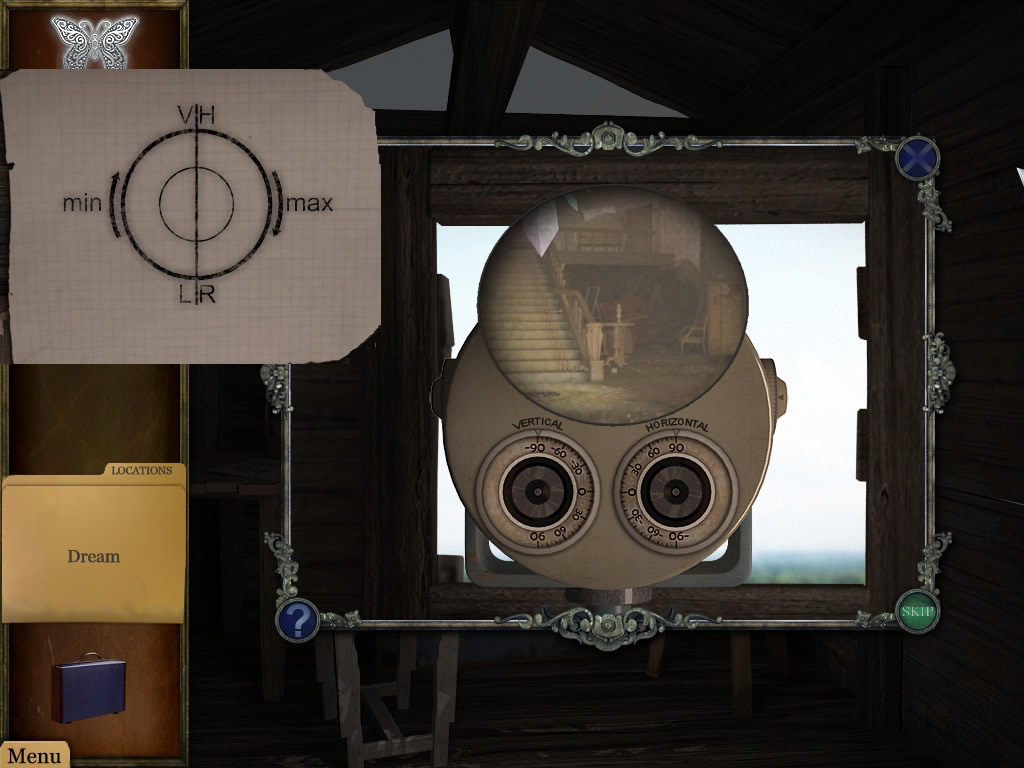
Tree House
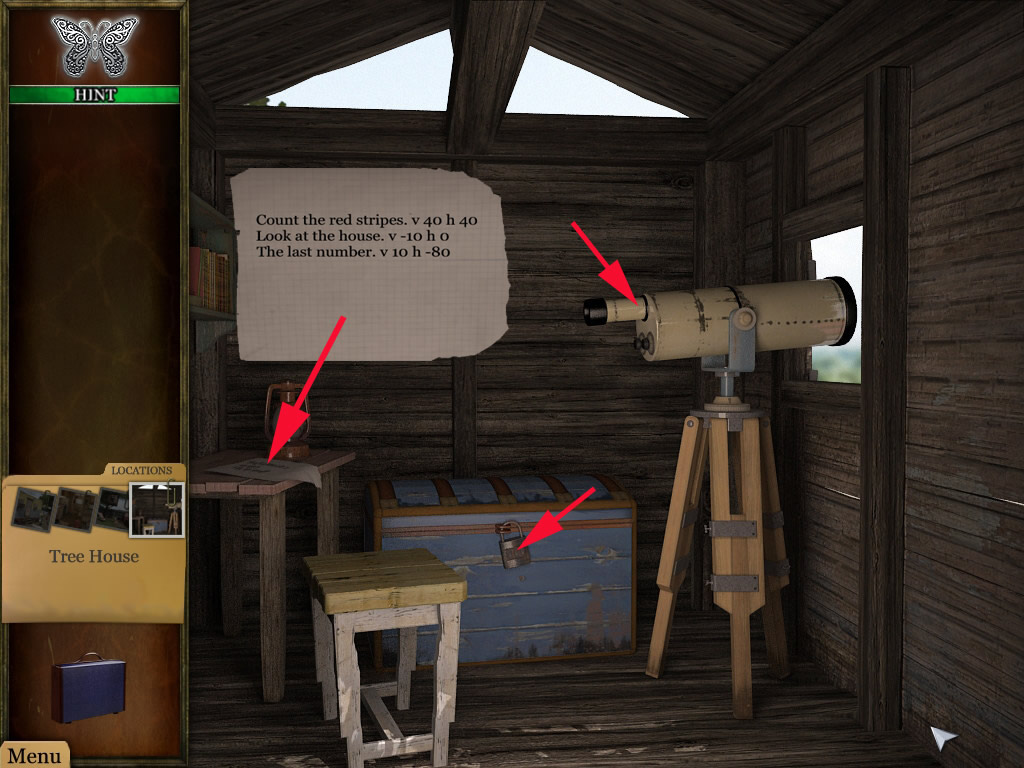
Click the note on the table left.
It will show you coordinates for the telescope and give you hints, what to look for.
Screenshot
v = vertical
h = horizontal
Use the left button for the vertical coordinates, the right one for the horizontal.
Hold the mouse button pressed while moving the buttons and pay attention to the - before some of the coordinates.
Turning the button to the left will bring you to the negative, to the right to the positive coordinates.
Each graduation counts for 5.
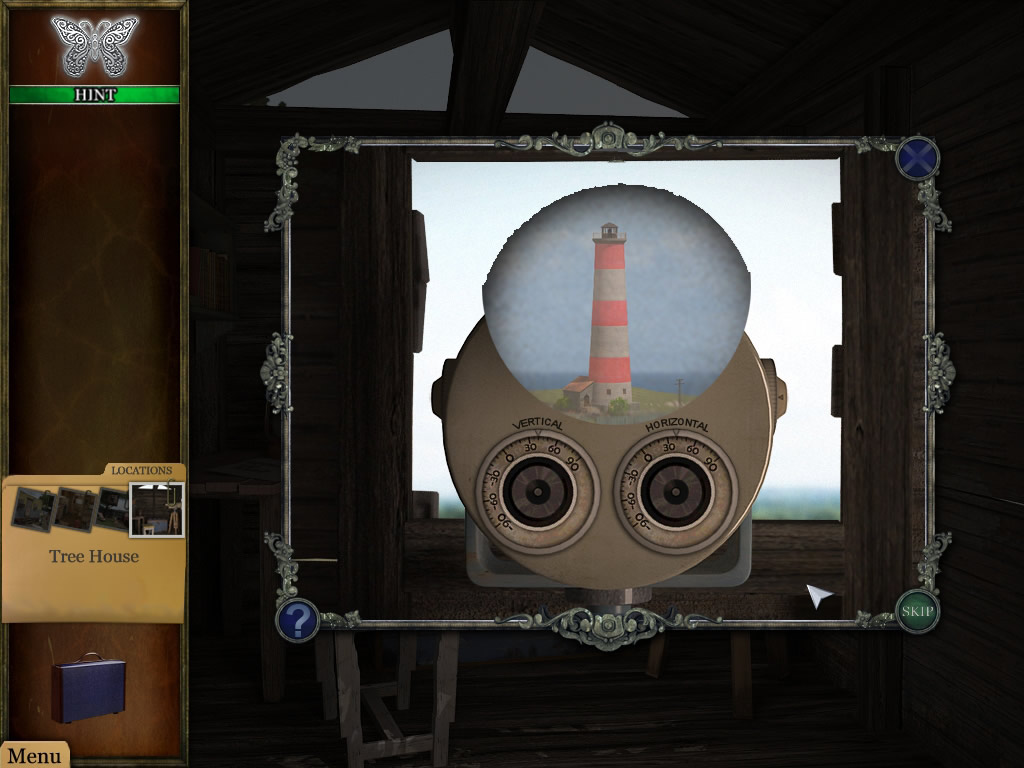
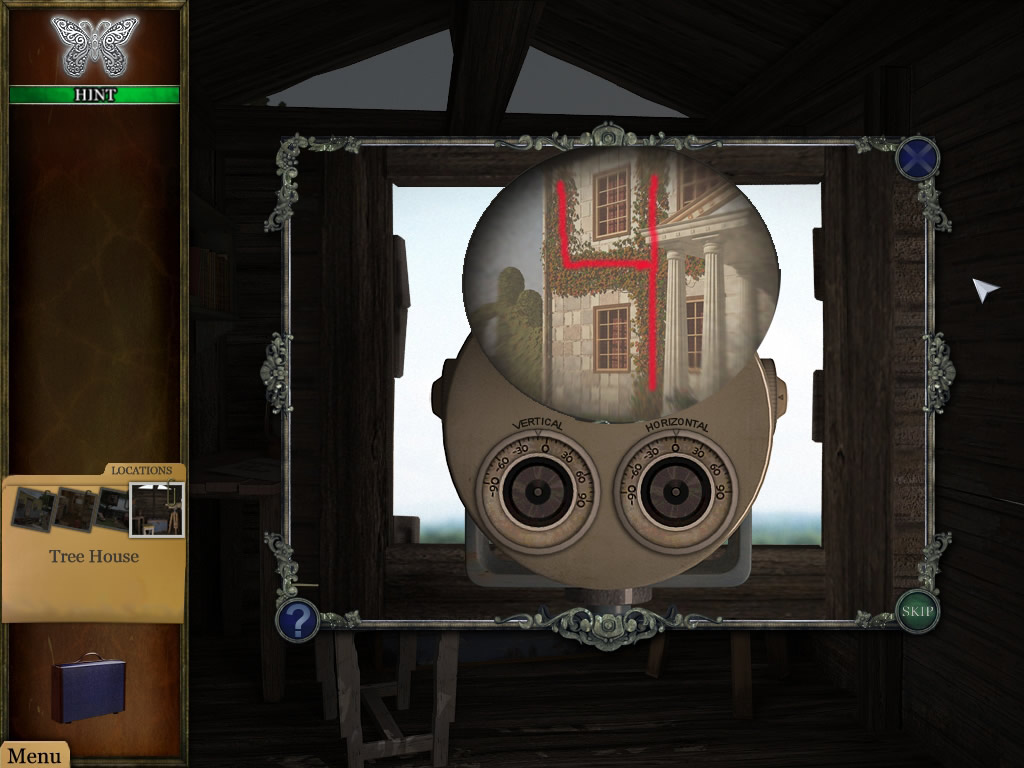
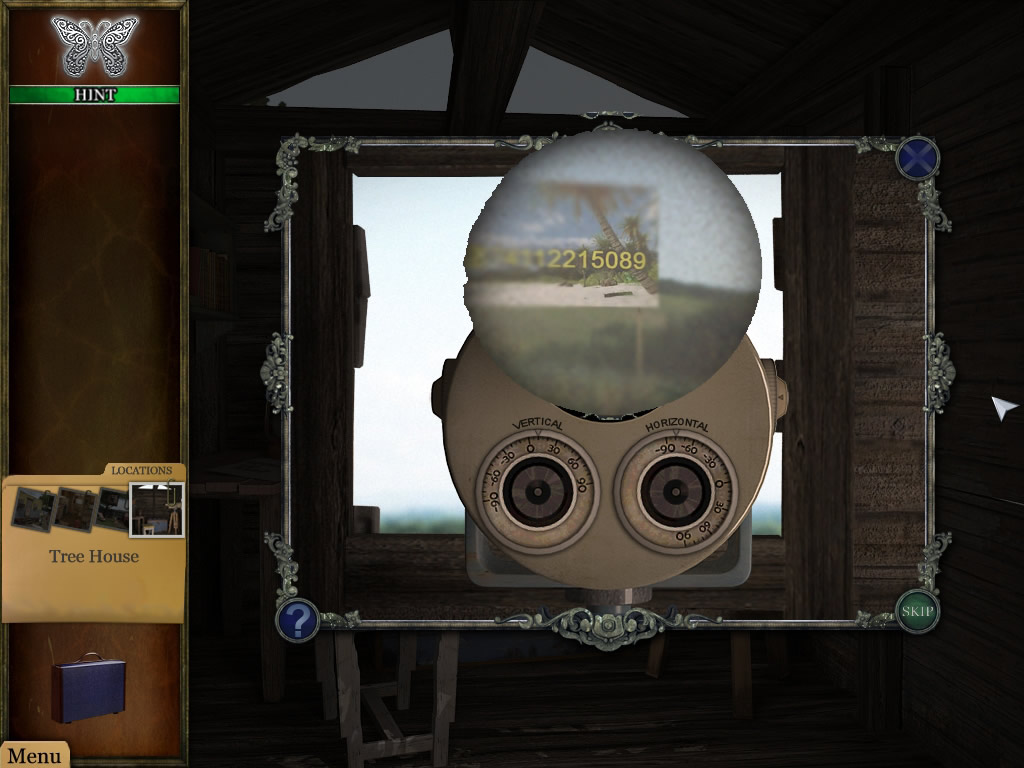
After having the right coordinates, click the lens. You will see a picture.
Count the stripes
Look at the house
Last number
Now click the blue wooden chest at the back wall and change the numbers on the lock according to the numbers you found on the pictures you saw.
Do it in the same order, the note gave you the hints.
3 - 4 - 9
The chest opens, click the note in the right back corner.
Screenshot
You will get a new coordinate, this time it is the next place for you to go.
Click the picture and you will be brought there automatically
Next location
Chapter 3
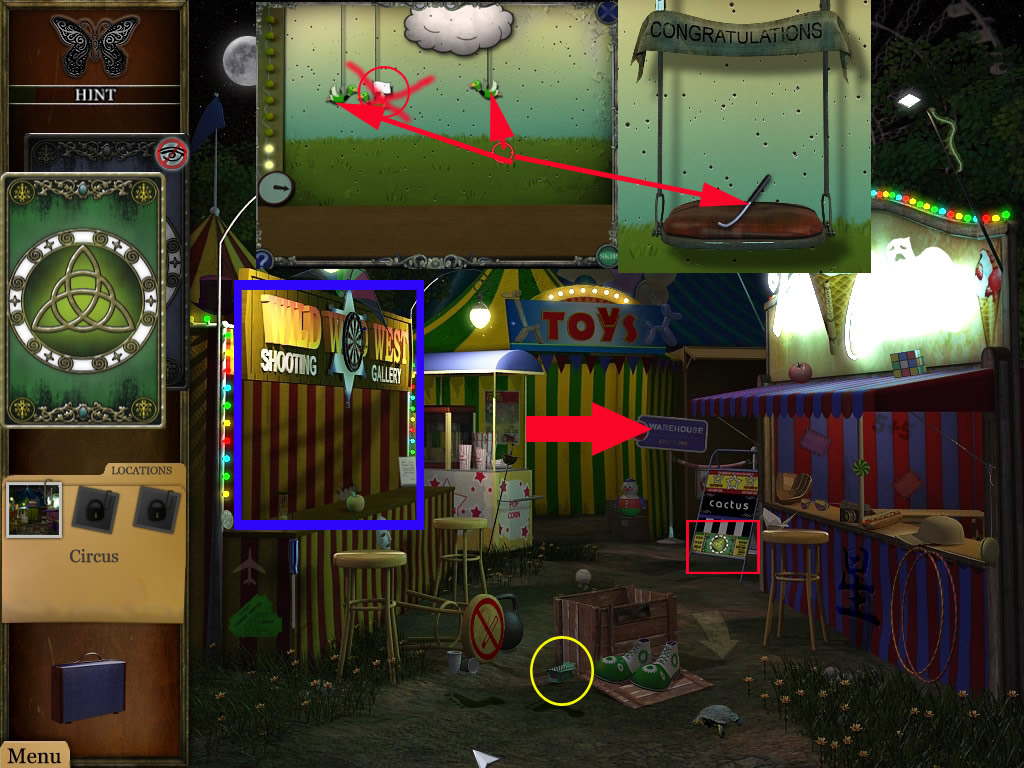
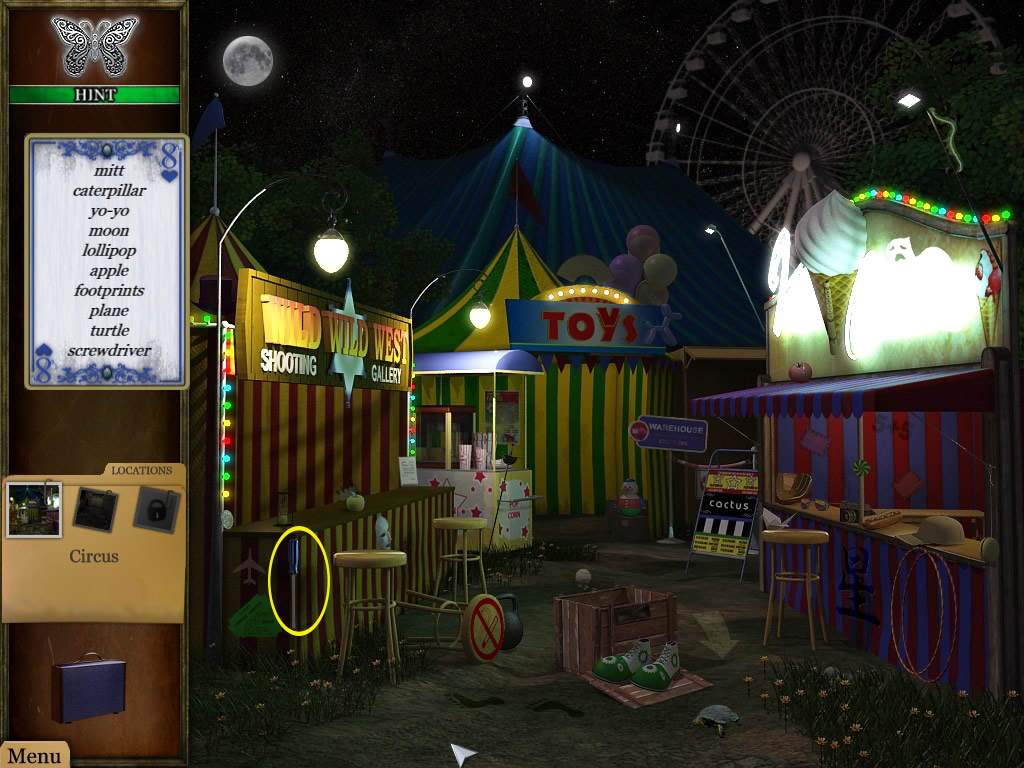
Circus
The green tarot card you will find right side, between the tent and the booth.
Find the items.
The box with bullets you will find on the floor in the middle, left next to the wooden crate.
After finding all, they will go into your inventory.
The other tarot card, you cannot find yet.
Click the left booth.
Your goal is to shoot the ducks that are not carrying a white peace flag.
Each time you shoot a flagless duck, one light bulb on the left side of the screen will light up.
Each duck you shoot that has a flag will count against you and will decrease your counter by two.
Once you've shot 10 ducks successfully, the handle will appear on the scene.
Click on the handle to enter it into your inventory.
Screenshot
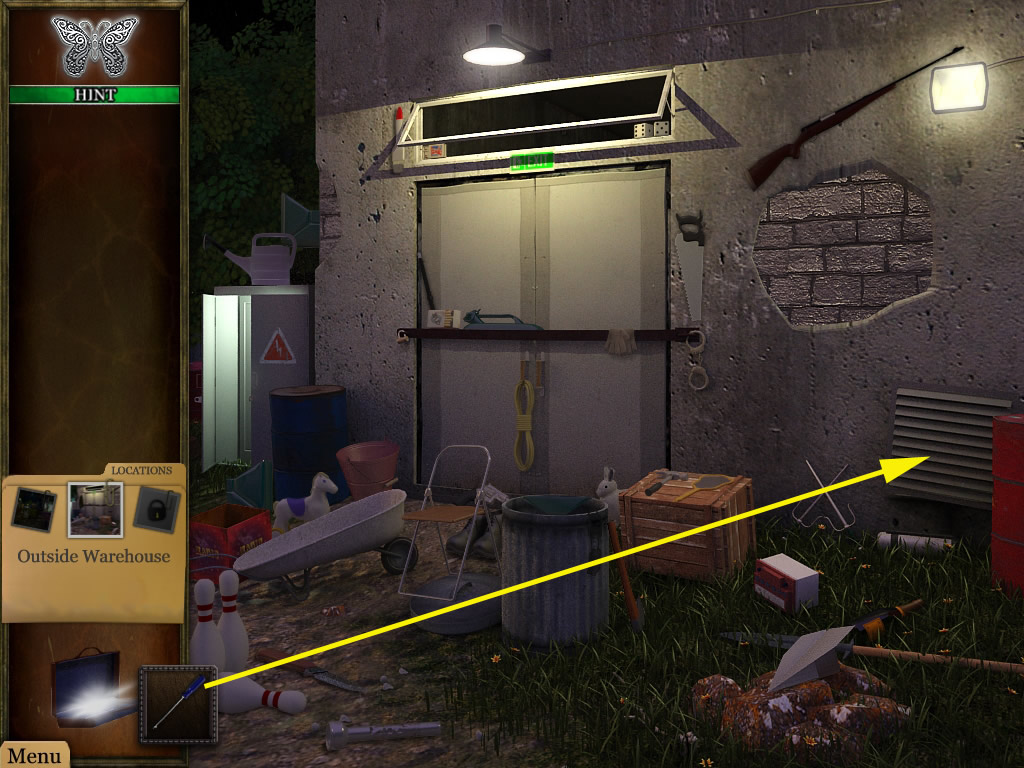
Click the sign "Warehouse", in the back, right next to the tent.
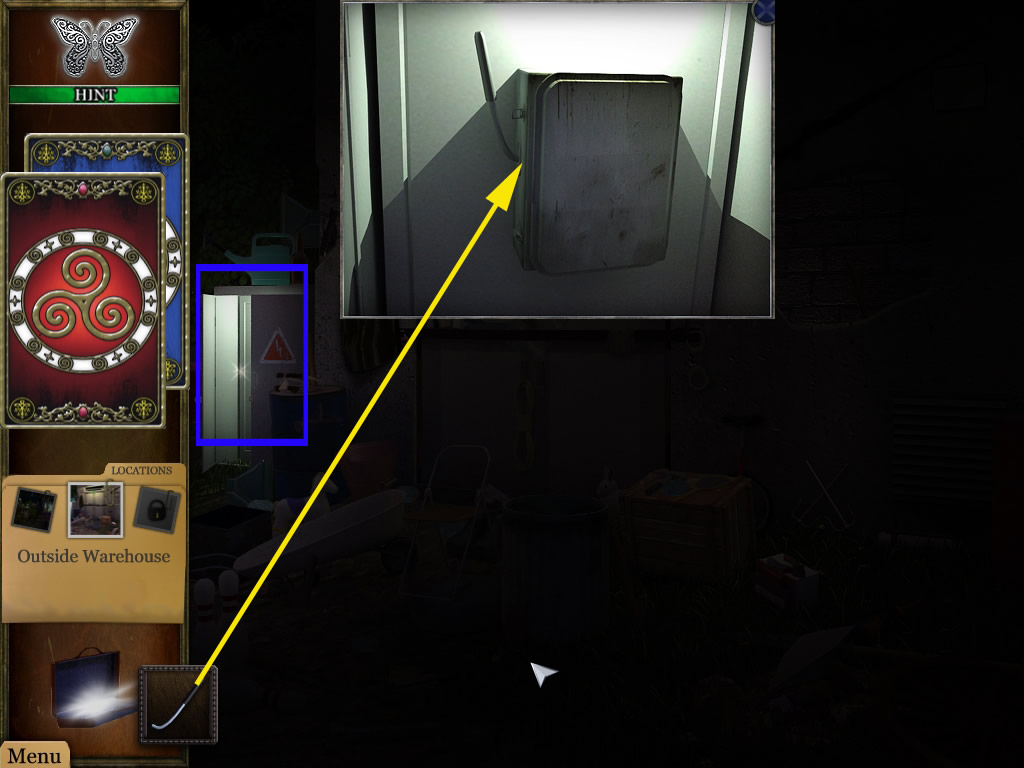
Warehouse, outside
It is dark, the only thing you can see is the fuse box at the left.
Click it to get a close view.
Get the handle out of your inventory and place it at the empty slot left side of the fuse box.
Click it and you will have light.
Screenshot
The blue tarot card is located top left next to the house, the red one at the wooden crate, right next to the warehouse entrance.
The 5 parts of the shovel are highlighted in green in the Screenshot.
The 6 coins are highlighted in yellow and will go into your inventory.
The joystick, at the entrance, right side above the latch, is also an inventory item.
Screenshot
Go back to the circus.
Circus
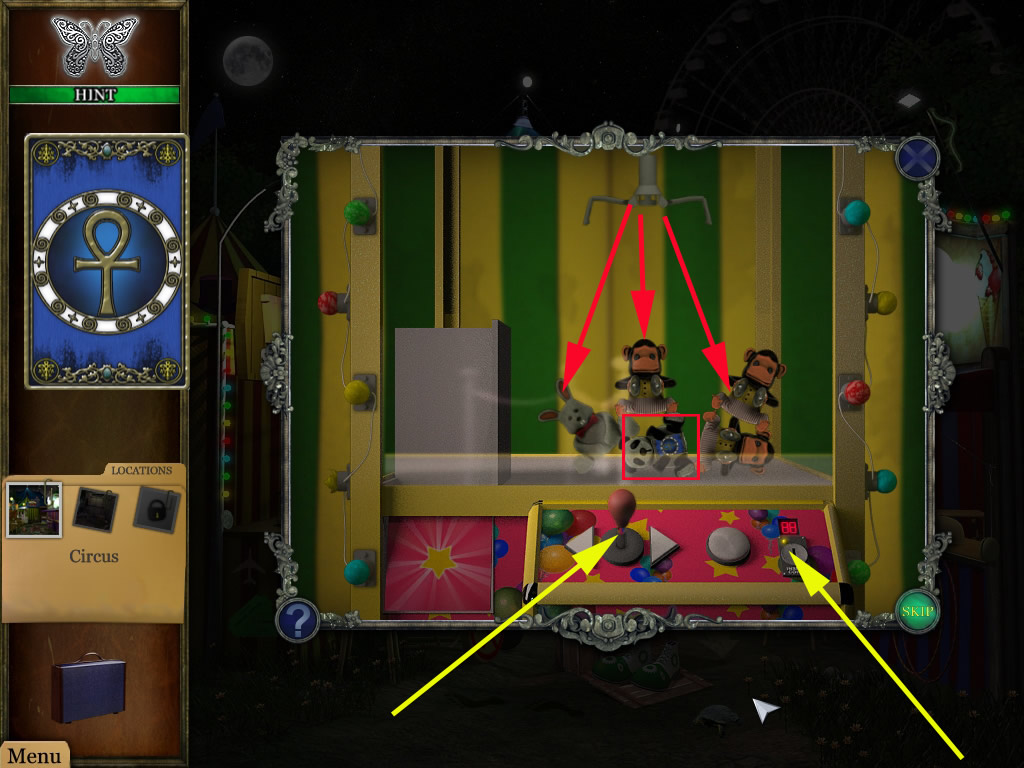
Click the tent under word "Toys".
A minigame opens.
Grab the joystick from your inventory and place it between the two arrows.
Place the coins on the coin slot, right side.
Your goal is to move the stuffed animals out of the way so you can grab the panda bear that has the blue tarot card.
You can use the arrows on each side of the joystick to move the claw from side to side.
Press the round button when the claw is positioned correctly, and the claw will try to pick whichever stuffed animal is in its path.
You will have to move several animals out of the way by grabbing them and dropping them in the chute that is on the left side of the booth.
As soon as you pick up the bear with the tarot card, you will be taken back to the circus to look for more items.
Screenshot
Look for the objects.
You will find the screwdriver at the lower part of the left booth.
Its an inventory item.
Screenshot
Go back to the warehouse.
Warehouse outside/inside
Use the screwdriver at the vent low right side of the house.
Enter the warehouse through the hole.
Screenshot
Get the blue tarot card from the beam in the back at the wall.
Find the items.
In order to find the keys, you will need to open the closet, right side. Just click it and you will get a look inside.
Grab the key to get it into your inventory.
Use the key to open the green box on the floor in the back.
Get the green tarot - card.
The crowbar at the top of the open box will also go into your inventory.
Use this to open the crate on the ground, after you found all other items.
You will get a closer look.
Grab the little scroll. It is a newspaper article about three girl, found dead 100 years ago.
Click the picture and you will be brought to your next location.
Screenshot
Chapter 4
Hall
There is nothing you can do here, right now, but you have the choice to go:
Top left: Study
Top right: Attic
Low right: Basement
You can go on where ever you want.
The walkthrough shows the shortest way and starts with the study
Study
One blue tarot card you can take from left next to the desk, half hidden from a shield.
The other blue tarot card you will find left underneath the first one, on the ground, half hidden by the desk leg.
The green tarot card is located at the wall, left next under the window at the right side.
Find all items.
The key from one of the blue cards will find on the round table in the back, left to the window.
The oval mirror is located under the window on the right side.
The puzzle item from the green tarot card is laying on the desk.
All three items will go into your inventory.
Also have a look at the piece of paper, left side of the desk. It is a drawing.
In the middle of the desk, you can click a jigsaw puzzle, but you can't solve it as you do not have all parts yet.
Screenshot
For the moment, there is nothing more to do up here, so we go to the attic.
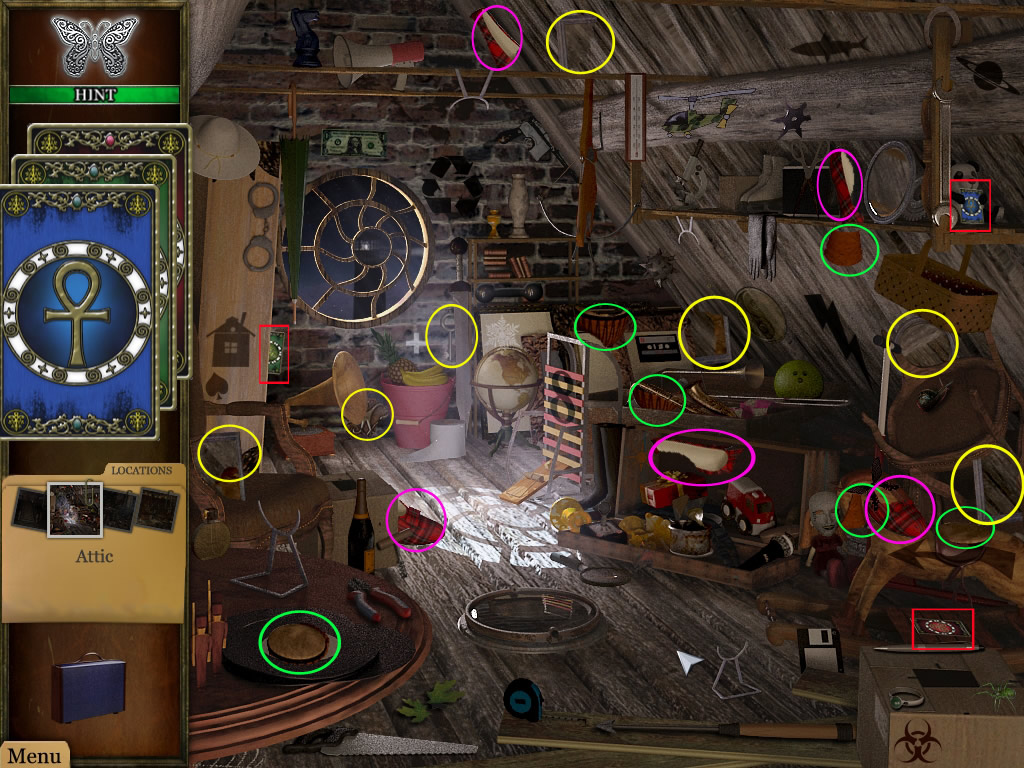
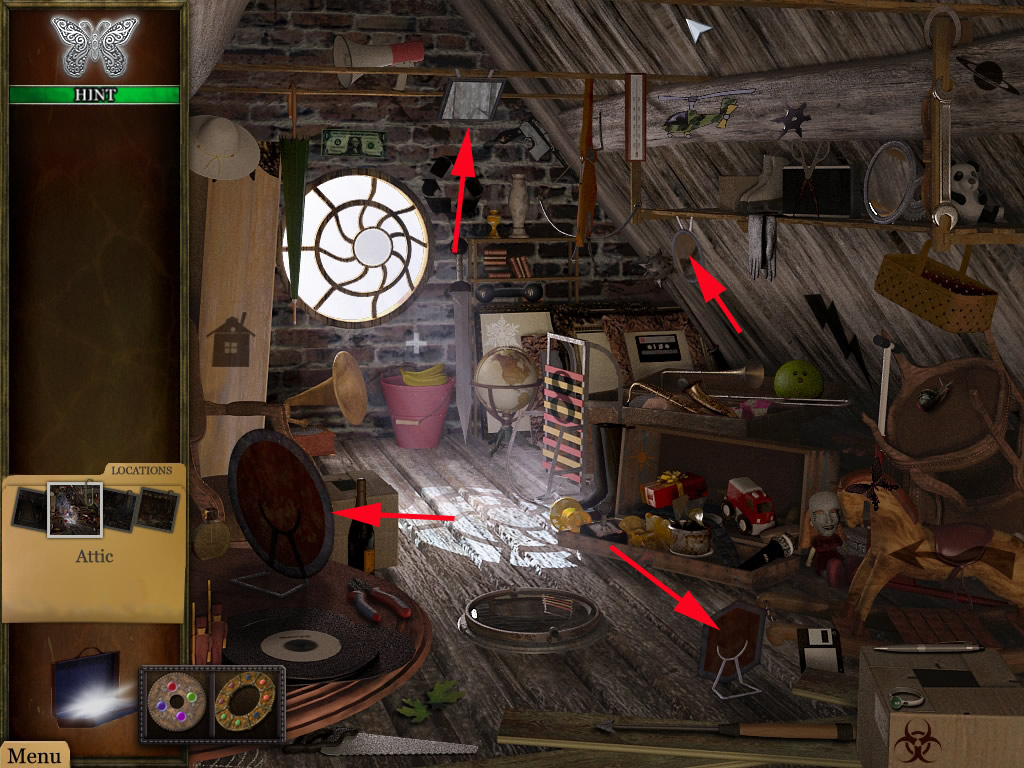
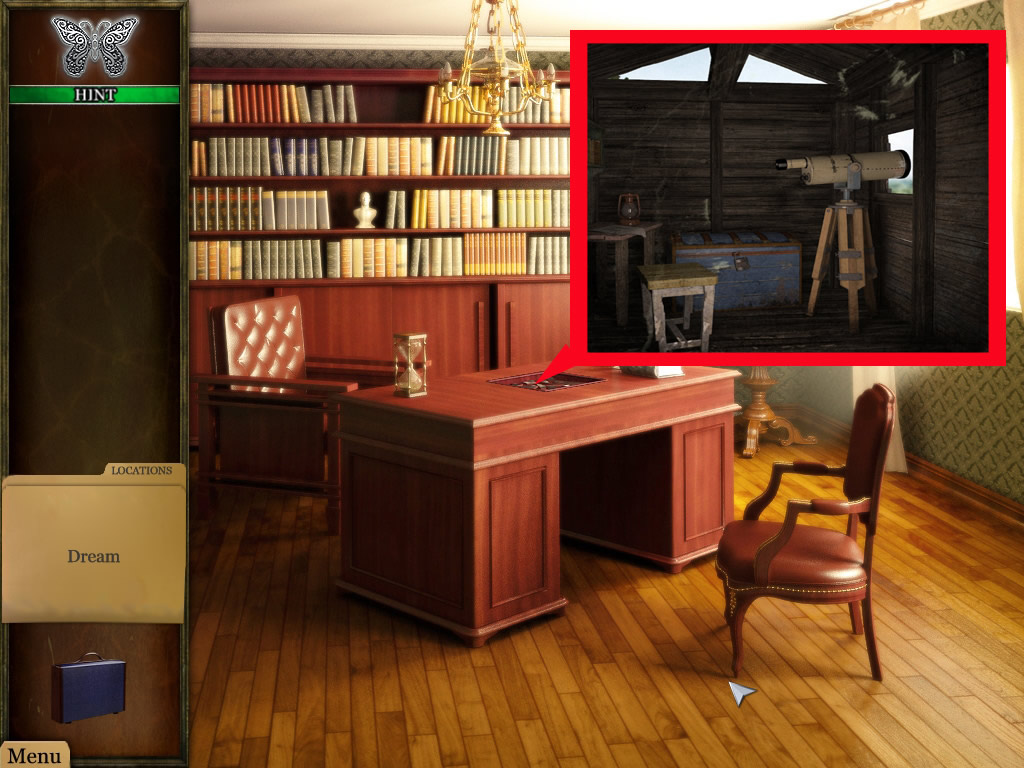
Attic
The red tarot card you will find right side behind the box on the floor.
The blue tarot card you will find right side on the shelf.
The green tarot card you will find left side in the back, half hidden behind the wooden board.
The drums are highlighted in green on the screenshot.
The slippers are highlighted in pink on the screenshot.
The mirror is highlighted in yellow on the screenshot and will go into your inventory.
Get the puzzle piece from underneath the window.
The round mirror is on the right side at the wall, underneath the shelf.
Grab the key from the wall underneath the window.
All will go into your inventory.
Now go to the basement.
Screenshot
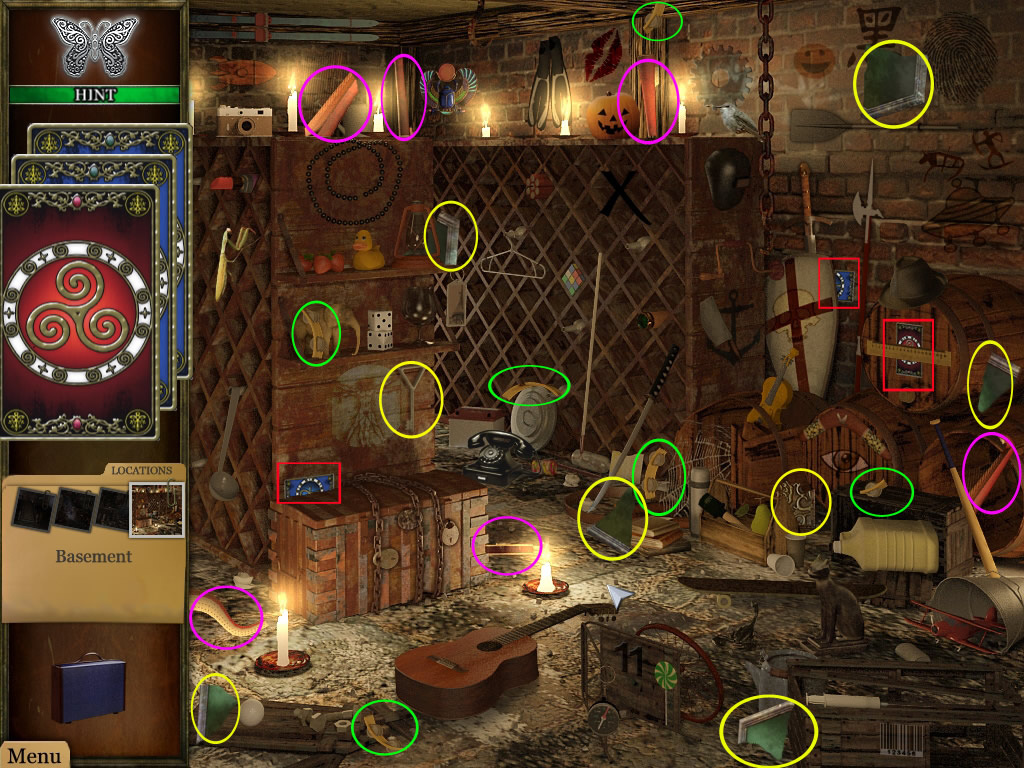
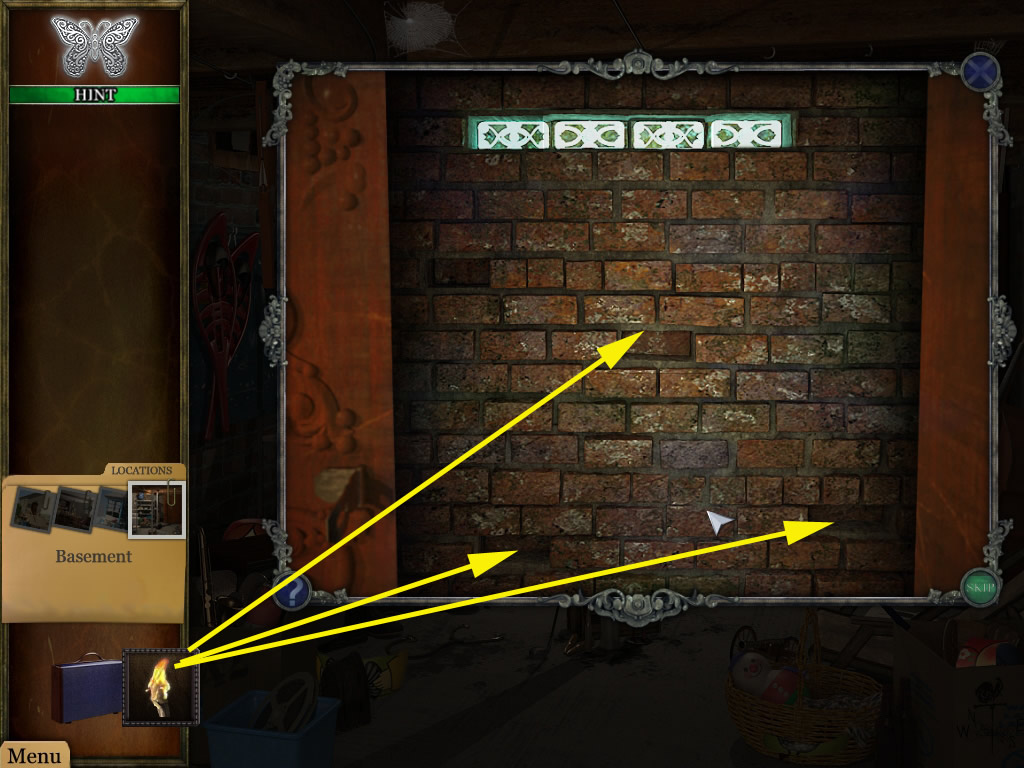
Basement
Get the red tarot card from the barrel, right side.
A blue tarot card is located left next above the red, half hidden by a shield.
Get the second blue tarot card for the locked chest on the floor in the lower part of the scene.
6 parts for the tambourine - highlighted red in the screenshot.
6 part of the harp are highlighted in pink.
6 parts for the mirror - highlighted yellow and will go into your inventory.
The puzzle piece you can get left in front of the lower barrel on the right side of the scene.
The key will be above the chest.
Screenshot
As you have all three keys, click the chest and open each lock with one of the keys from your inventory.
Screenshot
Get the round disc and return to the study.
Study
Click the puzzle on the desk and open your inventory.
Drag the puzzle pieces from your inventory into the pop up window and assemble the picture.
Parts at the right place are locked.
Screenshot
When you are done, a slider puzzle appears.
Move the parts, so that the one left can move to the lock on the right.
For a step by step solution please have a look at the screenshot.
Screenshot
Click the disc, which appears and go back to the attic.
Attic
The four mirrors from your inventory have now to be placed in the right mirror holders.
They have to be in the correct holders, otherwise it will not work out.
From left to the right:
The round mirror goes on the table.
Place the square mirror on top in front of the window.
The oval mirror goes right side on the shelf.
And the hexagon mirror has to be placed at the bottom on the floor.
When you made a mistake, you can get the mirror out by clicking it and place it somewhere else.
Screenshot
The last thing to do: Go down into the hall.
Attic
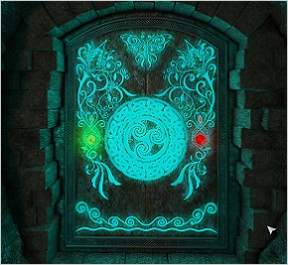
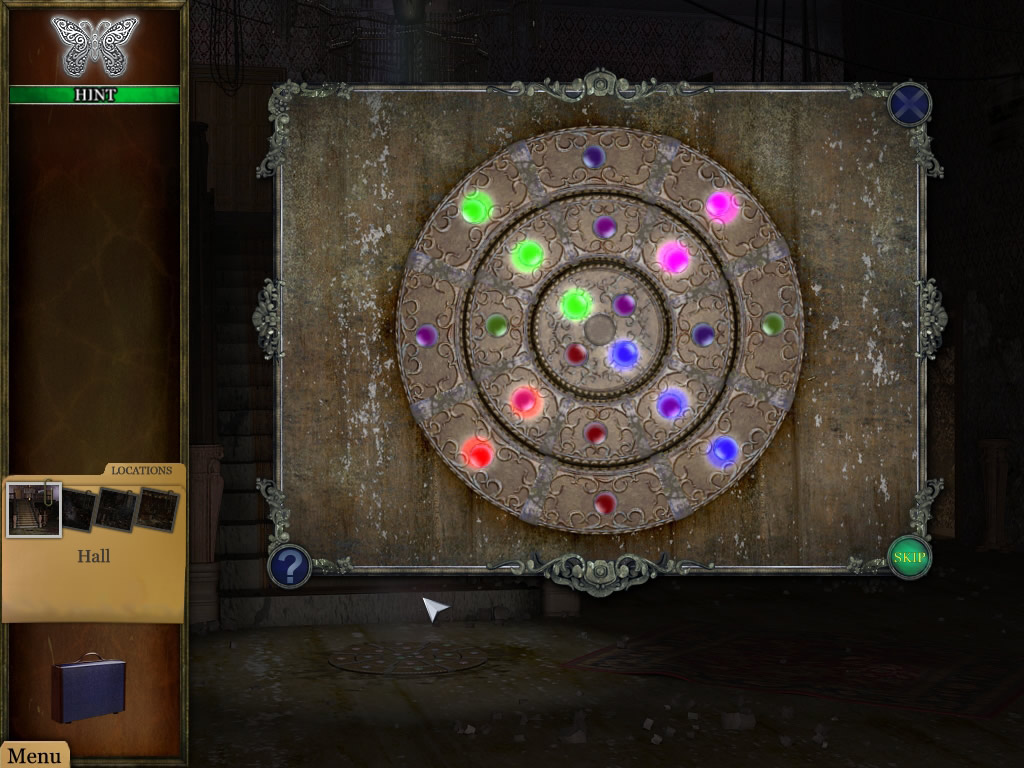
Once you get back down to the hall, click on the hole that is on the lower left side of the floor, in front of the steps, and a puzzle will appear.
Grab the two disks from inventory and place them in the empty slots that are on the puzzle.
Your goal is to move all three rings so they line up with the four colored lights in the middle.
Move the rings with pressed left mouse button till the colored spheres on the discs are matching with the color, the highlight shows you.
Screenshot
Click the little paper, that will appear in the middle.
It is an article about the mayor.
Click the photo and you will be brought to his house automatically.
Chapter 5
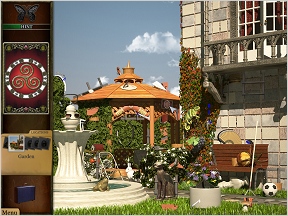
Front Door/Garden
There is nothing to do at the front door, go left into the garden.
You will find the red tarot card in the middle at the roof of the pavilion.
The 7 parts of the lawn mower are highlighted in green on the screenshot.
The 9 parts of the bass are highlighted in pink.
The 8 parts of the bicycle are highlighted in light blue.
The 7 parts of the ladder are highlighted in yellow. The ladder goes into your inventory.
Open the inventory and place the ladder at the open balcony door top right.
Enter the house.
Screenshot
Bedroom
The blue tarot card you will find left, half hidden from the blanket on the bed.
You will have to come back, as the other card is not to see yet.
Find the items.
The door handle is located on the floor in the lower part, half under the bed.
It goes into your inventory from you can place it at the door.
Open the door by clicking.
Screenshot
You are standing at the top of stairs.
There is nothing to do here, you can just decide, where to go now.
Left - to the hall.
Right - to the kitchen.
It is your choice, where to go first, but you will not be able to do any in the kitchen before you haven't been in the hall.
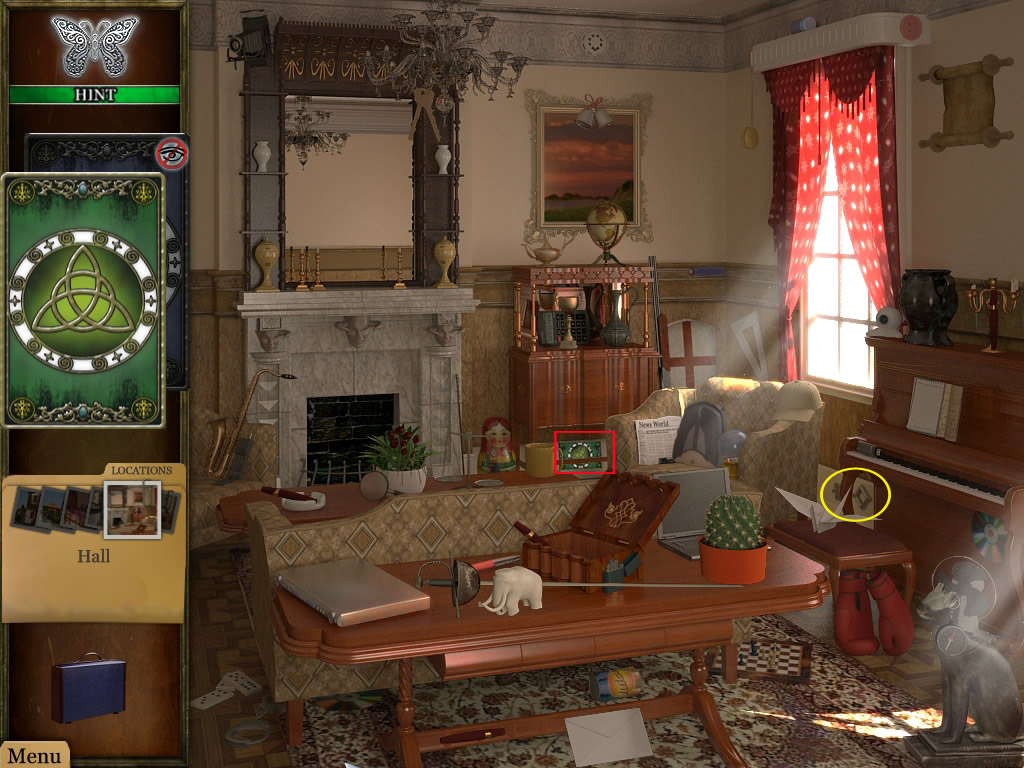
Hall
Get the green tarot card from the back, right side underneath the cabinet.
You will have to come back later, as the other card is not to see yet.
The key is at the wall underneath the window, left to the piano.
Find the other items as well.
You can't do anything else here, to head over to the kitchen.
Screenshot
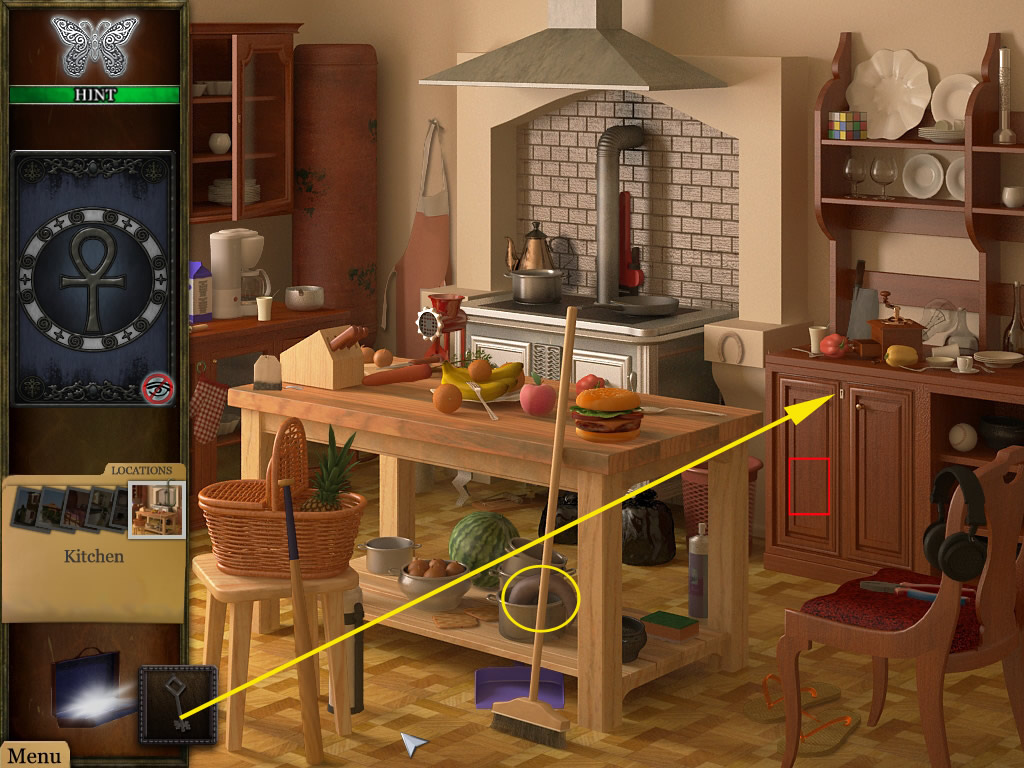
Kitchen
Get the key out of your inventory and open the door of the kitchen counter right side.
Get the tarot card out and look for the items.
The horn you will find underneath the table, right side, half in a bowl.
Screenshot
Go back to the hall.
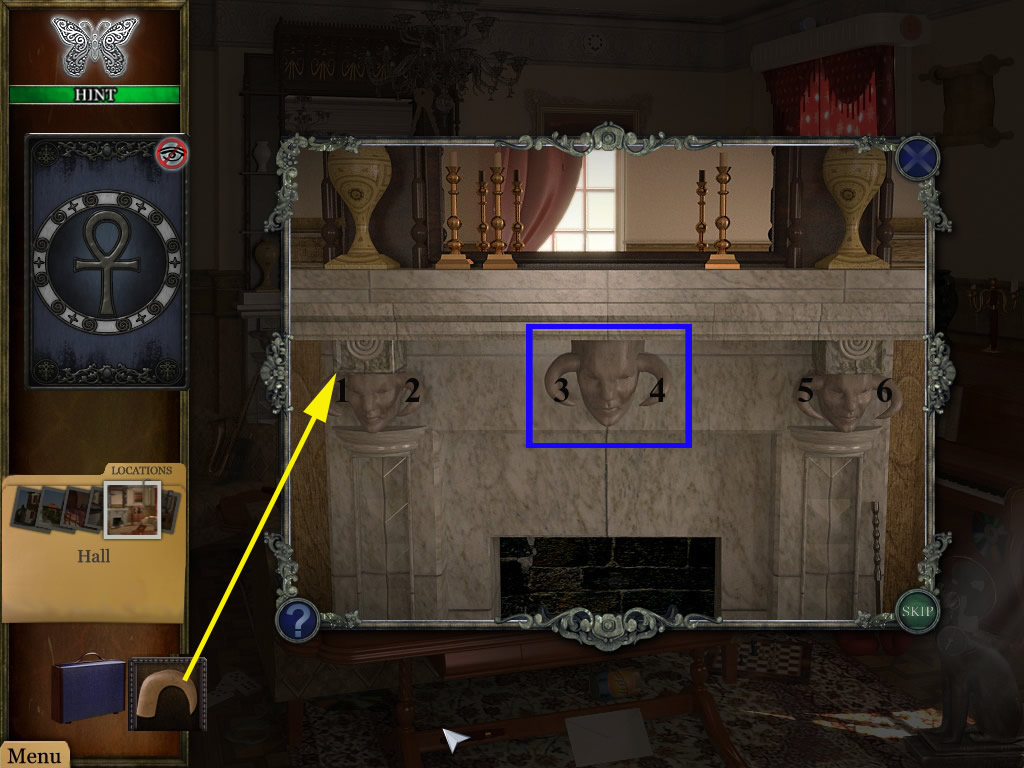
Hall
Click the fire place, open your inventory and click the horn at the gargoyle to the left.
Now click the middle gargoyle head once and the horns to change there positions.
Your goal is to click on the horns until they are all aligned.
Each horn you click affects another horn.
I numbered the horns from 1 through 6, seen from left to right.
The solution is random, I can only give you the two I had.
1, 2, 5, 6, 2
2, 1, 6, 5, 3, 5, 4, 5
Once the horns are aligned, the blue tarot card will appear on the mantle of the fireplace.
On the top, you will see now a safe.
Screenshot
Find all the items.
The key is located in the chandelier above the fire place.
Screenshot
Go back to the bedroom
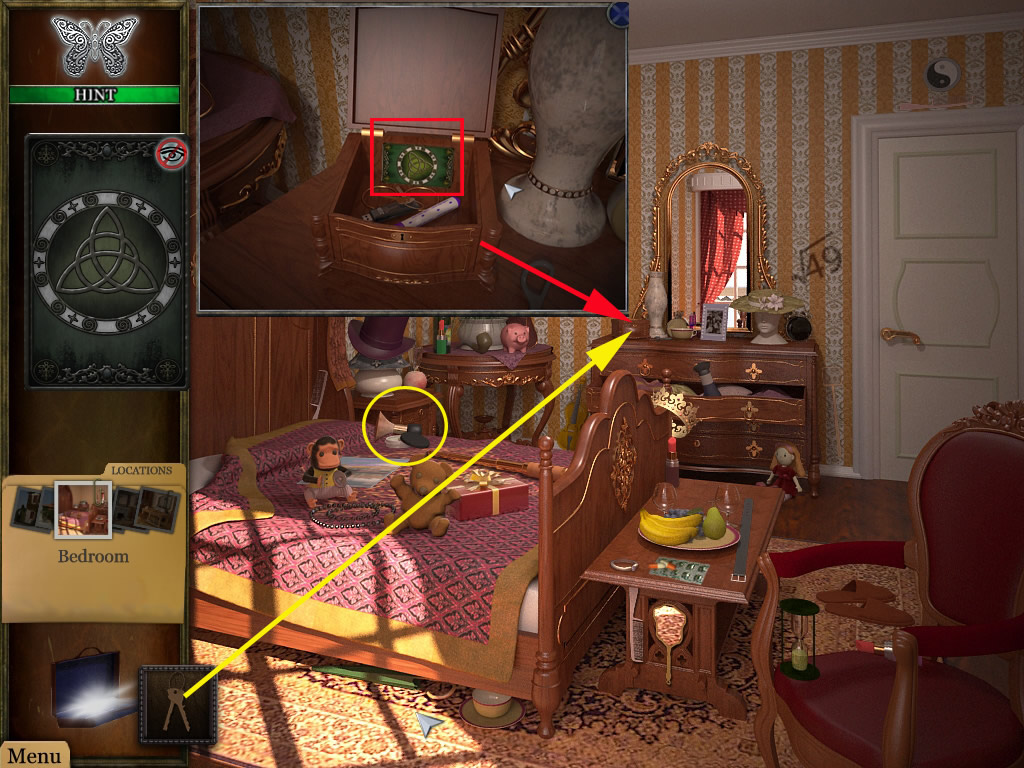
Bedroom
Click the little jewellery box left side of the dresser.
Get the key out of the inventory and get out the tarot card.
Find the items.
The powder you will find on the bed.
Go down to the hall
Screenshot
Hall
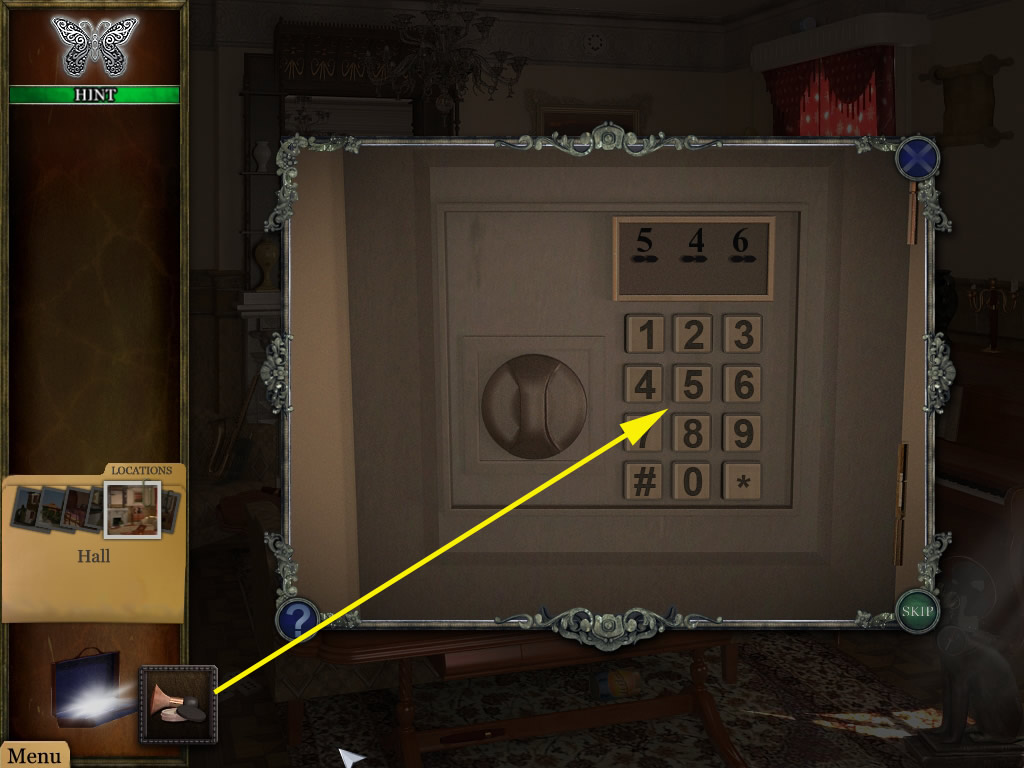
Click the safe and get the powder out of your inventory
Click the powder on the keypad and you will see fingerprints on the number 4 5 6
I don't know if this is random as I always had the same numbers.
Now you do have to find the right combination.
As there are only 6 possible, this will be done fast.
Use the keypad to give in the combination
5 4 6
The safe opens.
Click into the safe and you will see an old photo.
Click it and you will be brought to the lighthouse.
Screenshot
Chapter 6
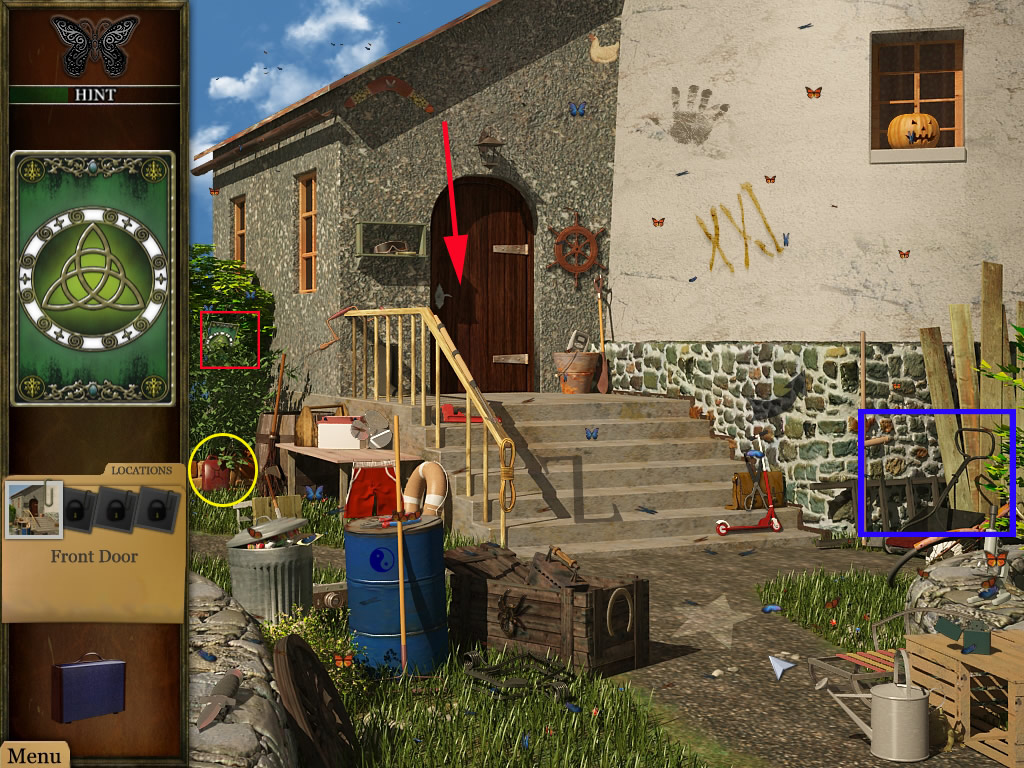
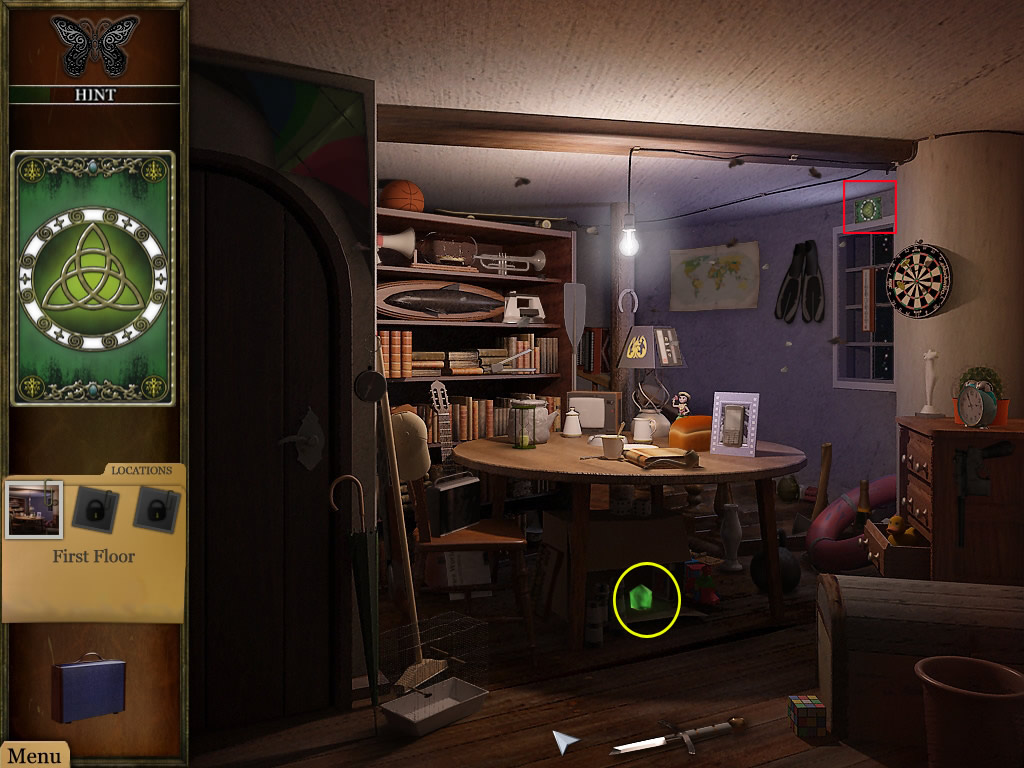
Front Door/Garden
You will find the green tarot card at the left between the leaves.
The red gas can you will find also left in front of the bushes.
Make sure, that you click the spot at the low right side with the wood.
There can be an object hidden. If not you do not have to bother with that spot.
After finding all items, enter the lighthouse through the door.
Screenshot
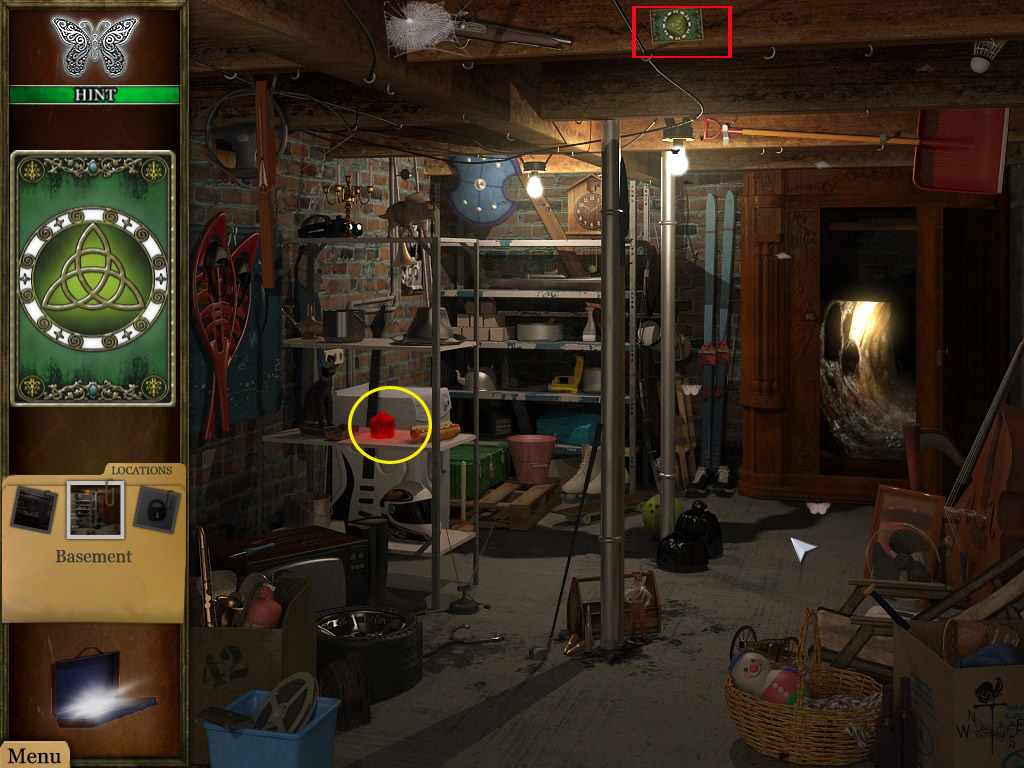
First Floor/Basement
Click the scratch on the floor - you can see a tarot card there, but not grab it yet.
Left through the door, you come to the basement,
The stairs in the back right lead to the lantern room.
You can choose, where you want to go, the walkthrough goes into the basement.
Enter the basement.
The blue tarot card is located top left at the beam.
The red one you will find right side at the bass.
The items on the red tarot card can be random, I highlighted in the screenshot all I had.
The rag is the same for everyone, highlighted in yellow and will go into your inventory.
The shirt is highlighted in green.
The Russian doll is highlighted in pink.
The computer chip is highlighted in light blue.
The crowbar is on the top middle left. It also goes into your inventory.
Screenshot
Now go upstairs to the lantern room.
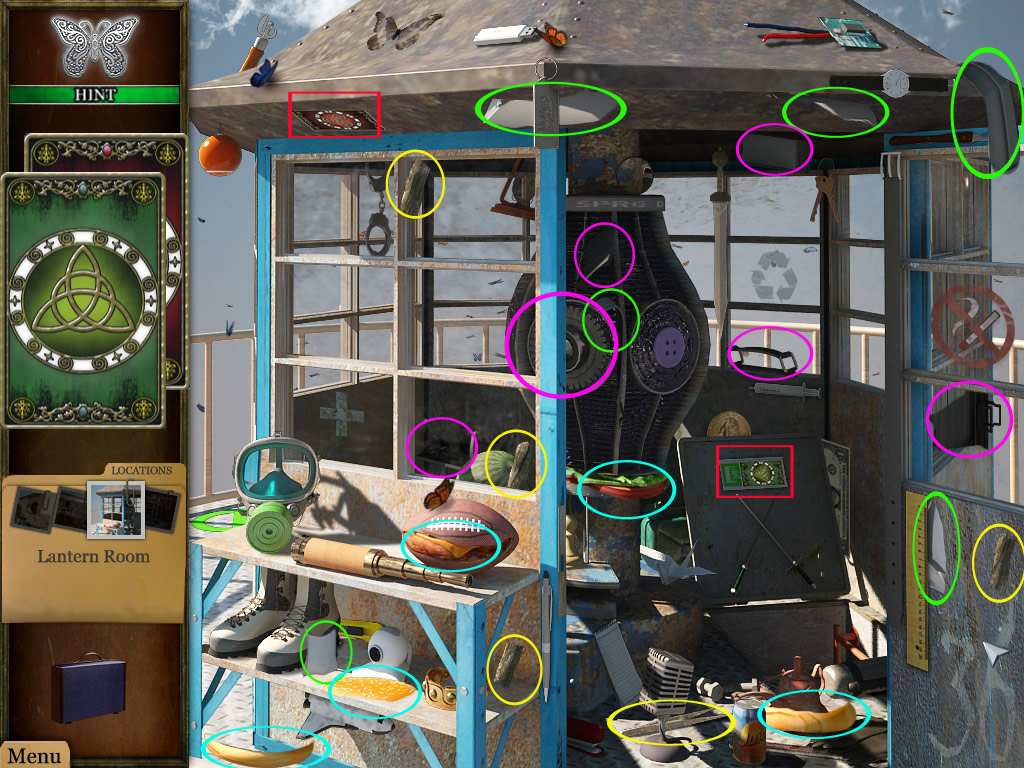
Lantern Room
The red tarot card is located at the left side of the lighthouse roof.
The green one you will find on the metal plate, right next to the lighthouse lamp.
The items on the red tarot card can be random, I highlighted in the screenshot all I had.
The rod is for all the same, in the screenshot highlighted in yellow and will go into your inventory.
The backpack is highlighted in green.
The camera is highlighted in pink.
The hamburger is highlighted in light blue.
The tweezers, on the ground, is also going into your inventory.
After finding all, the rod, the rag and the gas can will be automatically be combined to a torch.
Screenshot
Go down to the first floor.
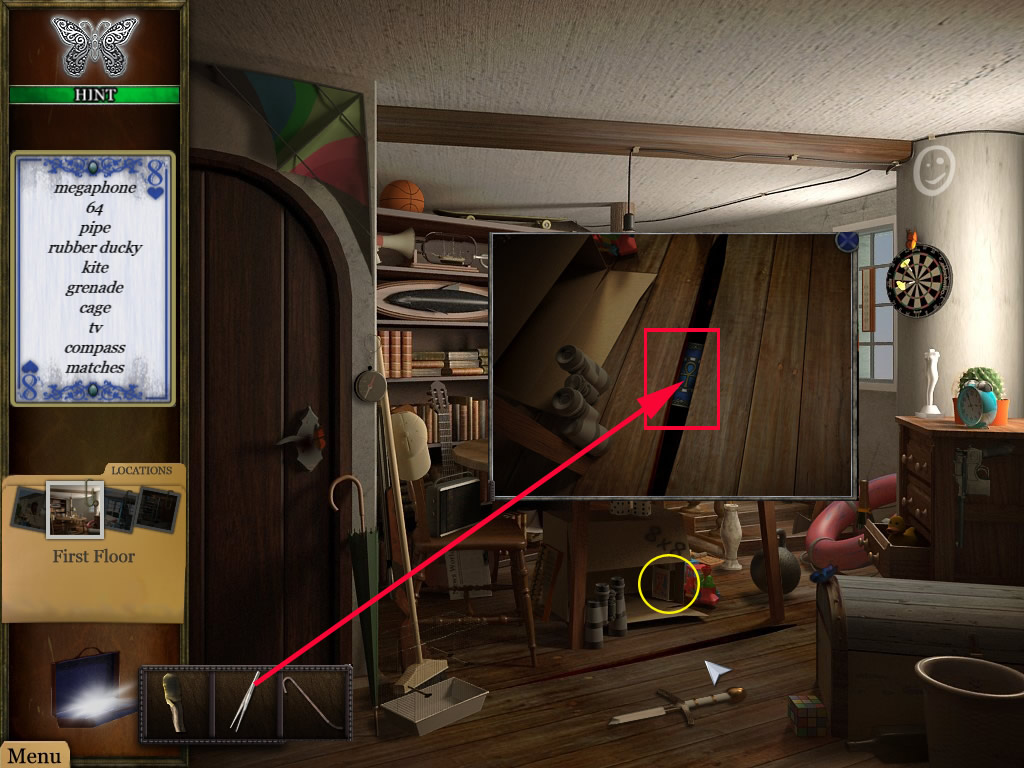
First Floor
Use the tweezers from your inventory to get the tarot card out of the scratch on the floor.
Find the items.
The matches are in the box, right side, under the table.
After finding all, the matches will be combined with the torch and you will have a burning torch.
Screenshot
Go to the basement.
Basement
Use the crowbar at the lock in the back.
Once the door opens, click on it for a closer view.
Your goal is to place the torch in the right spots so the bricks on top get illuminated.
Each time you touch the right brick with the torch, one of the blocks on top of the scene will light up.
Please look at the screenshot for the correct bricks that you need to place the torch on.
Screenshot
Follow the cut scene
Chapter 7
Hall/Study
Wait till the hall appears in his original shape, then click the left door at the top.
Click the desk and solve the puzzle.
Tiles at the right place will be locked.
You will see the tree house.
Click it and you will be brought there.
Screenshot
Tree House/Hall
Click the paper left side on the table.
The piece of paper shows you the direction in which you need to turn the knobs.
The coordinates that you need to enter are: v -90 and h 90.
The vertical lens needs to be turned all the way to the right, as far as it can go.
The horizontal lens needs to be turned all the way to the left, as far as it can go.
Click on the lens once you see the picture of the hall in the mansion, and you will be taken back to that location.
Screenshot
Click the crystal you see in the middle. It will break and you will wake up in a cell.
Chapter 8
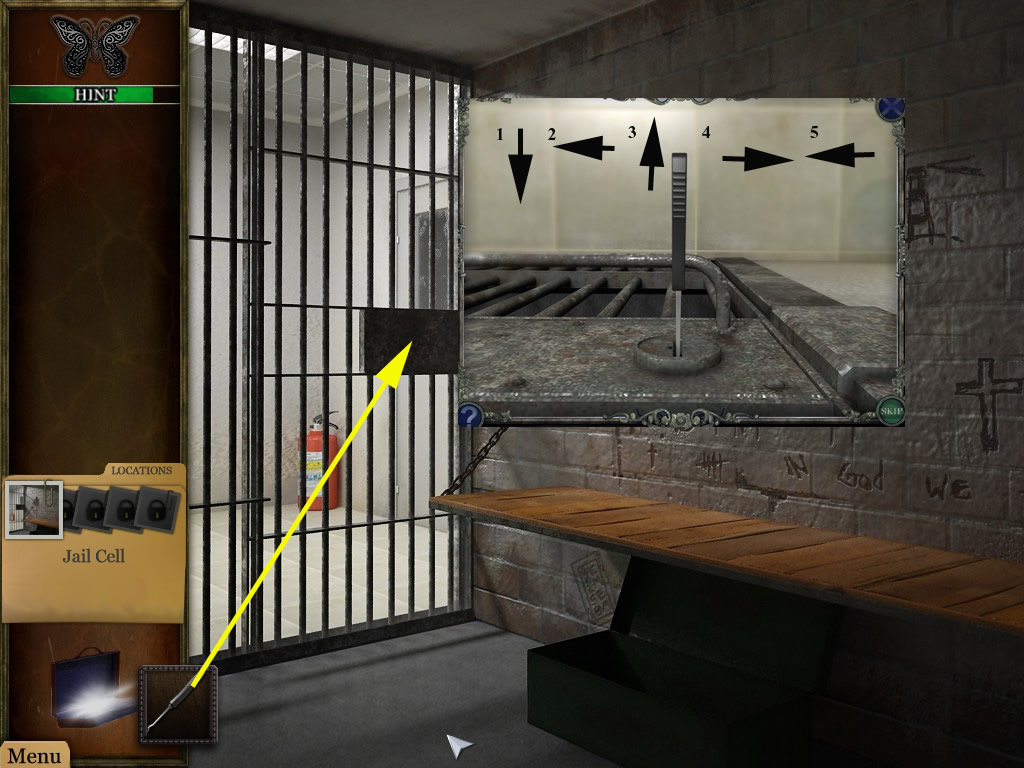
Jail Cell
Have a look at the markings at the wall right side. You will need them soon.
In your inventory you already have a nail file.
Get it and place it at the cell door lock.
You will get a closer look.
Your goal it is, to open the lock by moving the nail file in the right directions.
Doing the right movement will bring the nail file a little lower.
Doing the wrong movement and the nail file will come out of the lock a little again.
The nail file will always go back one step, when you do a wrong movement.
You will have to do the movements in the right order to open the lock.
To move it, click the nail file and move it with pressed mouse button in the direction.
If it is the right direction, it goes lower (playing with sound you will here a little noise)
If it is wrong directions, it comes out a little bit.
If it did not recognize your movement, nothing will happen. Make sure, that you move the nail file always till something happens.
Forward, left, back, right, left
The lock opens and you can leave the cell.
Screenshot
Click the door in the back to come into the corridor.
Corridor/Cell/Corridor
Click the lock at the left door.
When you use the question mark button, it will tell you, that the code is hidden in the cell.
Go back.
Click first the etching underneath the bed at the wall, right side.
You will see the the letters:
GE
TM
SE
EM
Now click the markings at the wall above the bed.
The tic tac to - game shows all this letters also.
Look for the letter combinations.
GE - a triangle = 3
TM - four lines = 4
SE - a number = 2
EM - a number = 0
Screenshot
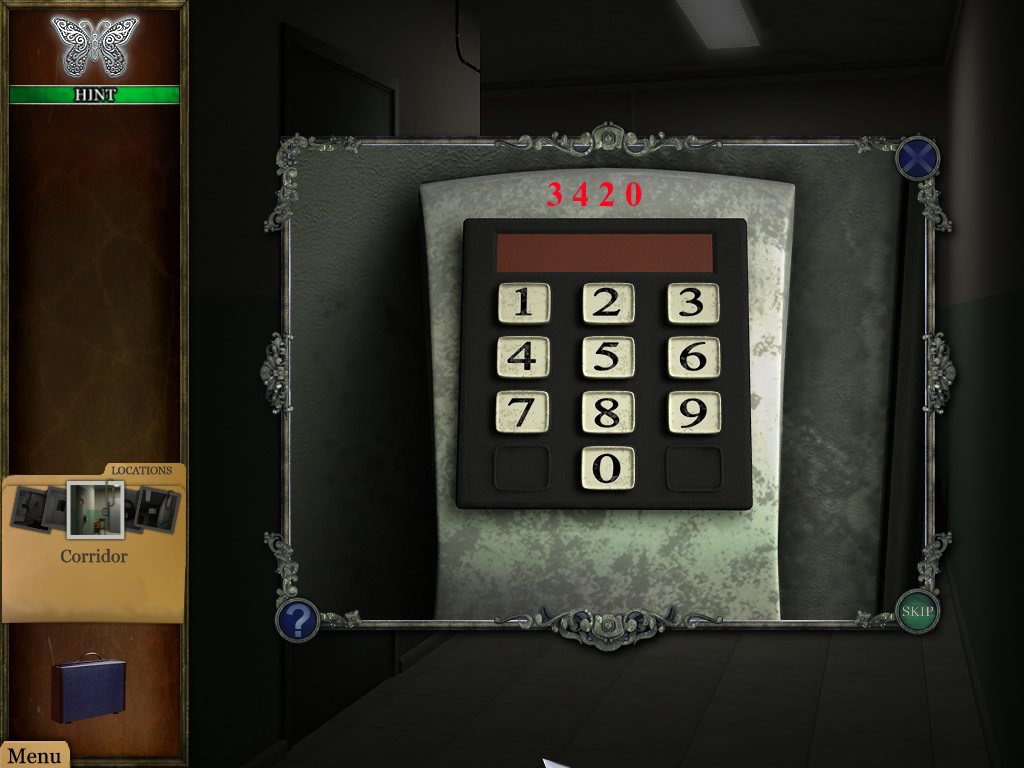
Go back to the door and use the keypad to enter the combination
3 4 2 0
Screenshot
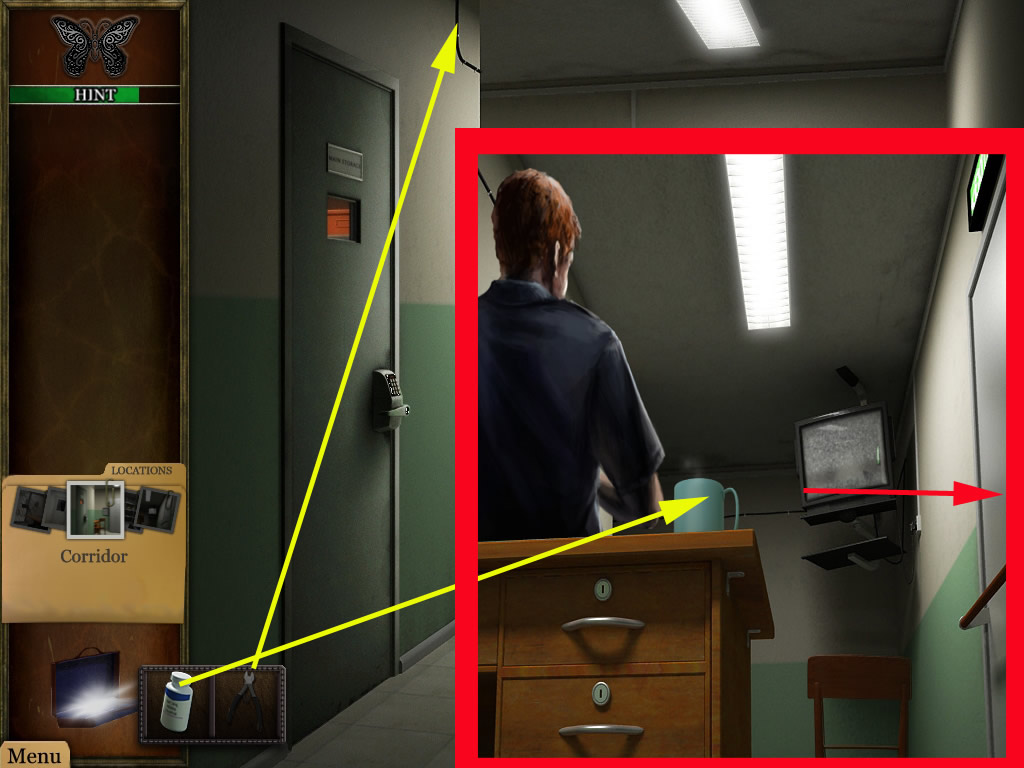
Store Room
The tarot cards you will find in the middle of the scene in the back, under the shelf and on the second shelf form the right.
The bottle with laxatives is standing right side on the middle shelf.
The wire cutter you will find at the wall in the right shelf.
Screenshot
Leave the room.
Corridor/Fire Exit
Get the wire cutter out of your inventory and cut the black wires right above the storage room door.
You will be brought automatically to the fire exit.
After the first guard left, use the laxatives and place it at the coffee cup.
Click the door and you will be brought to the lighthouse.
Screenshot
Chapter 9
First Floor
Back right top you will find the tarot card.
Find all items.
The green crystal is located under the table and goes into your inventory.
Go to the basement.
Screenshot
Basement
Get the tarot card from the top middle.
Find all items.
The red crystal on the front shelf goes into your inventory.
Screenshot
Go through the secret hall to the cave.
Cave
Open your inventory and place the red crystal in the right slot and the green one in the left slot.
Wait a moment till all ornaments are lightened up.
Screenshot
Enjoy the END
Super-awesome-wooty-tooty-flip-bam-booty to Kayleigh for this awesome walkthrough! \o/!
Posted by: Kero |
August 9, 2009 7:55 PM
|
August 9, 2009 7:55 PM