

![]() When has mysteriously inheriting property, especially an abandoned manor on a private island, ever lead to anything good in a horror movie? Ricardo Chellini sees the event as a stroke of luck and a sign that his mundane life is finally turning around, but those of us with saturated with spooky fiction know this is right up there with buying a vintage car the last several owners died horribly in in terms of red flags. Artogon Games invites you to turn off the lights for another atmospheric and unnerving hidden-object adventure Shiver: Poltergeist.
When has mysteriously inheriting property, especially an abandoned manor on a private island, ever lead to anything good in a horror movie? Ricardo Chellini sees the event as a stroke of luck and a sign that his mundane life is finally turning around, but those of us with saturated with spooky fiction know this is right up there with buying a vintage car the last several owners died horribly in in terms of red flags. Artogon Games invites you to turn off the lights for another atmospheric and unnerving hidden-object adventure Shiver: Poltergeist.
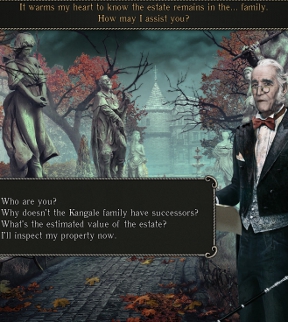 Because this is a horror story, you can expect that when Ricardo arrives at his newfound island everything is not lovely and normal and cheery. The place appears to be in disrepair, despite a very wall mannered butler, and there's also the issue of the strange lighthouse he can see from his new porch that gives him the creeps for some reason. When fiery apparitions begin making an appearance and Ricardo notices an uncanny resemblance between himself and one of the manor's former owners, he realises his inheritance might have more than a few strings attached. You can change the difficulty setting whenever you like under the options menu, so don't sweat over the choice at the start of the game. Gather items, solve puzzles, and try not to be too put off when statues start weeping blood and leaving notes of obsessive, threatening love. After all, in some cultures, that's the ultimate sign of affection, right?... right?... hm. This finally explains the restraining order I got from Steve Valentine.
Analysis: Vanishing Hitchhiker was a bit of a milestone in the hidden-object adventure genre because it proved those games could be genuinely scary. While Poltergeist doesn't have quite as many shockingly frightening moments, it actually does better with its atmosphere and pacing. The game is about as creepy as you can get, with corner-of-your-eye style frights, and the story is also more constrained this time around so the big scares and startling moments you do get feel like they have something to do with the narrative as opposed to just making you squeal. Poltergeist is also drop-dead gorgeous, with beautiful environments and artwork you always want to see more of. Combined with the occasionally excitable but otherwise beautifully moody soundtrack and the heavy atmosphere, you've got one genuinely immersive game... apart from the distractingly goofy in-game narrative text. Holy cannoli indeed. As a caveat, it's also worth mentioning that there are a few scenes that might be a bit nauseating for people with a fear of heights.
 Though it takes a while to really get going, the story is actually a really intriguing driving force behind the game. You know almost immediately that you've got a vengeful spirit after you, so the gameplay focuses on finding out why in addition to getting out alive. In appropriate mystery fashion, it's all a bit more complicated than you might think after the first few clues. The gameplay itself, while nothing to really call original, is at least solid and engaging. The camera and flashlight make a reappearance, leading to more wonderfully creepy moments (though not as many as you'd hope), and while you'll need to solve a few puzzles and hidden-object scenes, there's much more straight-up adventure gameplay than you might expect. Naturally, this means you can expect a few obtuse item usage moments, but the hint function can help lead the way if you get stuck or just missed an interactive spot.
At close to four hours for the main game, Shiver: Poltergeist is a decent length, but like its predecessor also unfortunately suffers from having the game end on a cliffhanger that's only resolved if you play the bonus content available in the Collector's Edition. This bonus content also deals with the big fat question mark left over from the main storyline. While you could technically call it a day after finishing the main game and resolving the poltergeist issue, story completionists are going to be left disappointed unless they fork over the extra cash for the Collector's Edition, which is a disappointment. Still, though not quite as scary as Vanishing Hitchhiker, Shiver: Poltergeist is a brilliantly atmospheric, fun, and engaging game that marries a ghost story with a whodunnit murder mystery. Definitely give the demo a try, and don't forget to turn down the lights.
A Collector's Edition is also available. It contains a bonus chapter, art gallery, strategy guide, and more. Remember that Big Fish Game Club Members pay only $13.99 for Collector's Editions (or 2 club credits), and collector's editions count 3 card punches of 6 total needed for a free game.
![]() Windows:
Windows:
Download the demo
Get the full version
Also available: Collector's Edition
![]() Mac OS X:
Mac OS X:
Download the demo
Get the full version
Also available: Collector's Edition


Walkthrough Guide
(Please allow page to fully load for spoiler tags to be functional.)
Shiver: Poltergeist Walkthrough (Part 1)
General Info
At the start of a new game, you have a choice of three difficulties: Casual Mode, Advanced Mode, and Expert mode.
In Casual Mode the Hint and Skip buttons will recharge more quickly and sparkles will indicate active areas more frequently. This is a good setting for beginner players.
In Advanced Mode the Hint and Skip buttons recharge more slowly, and most other hints are unavailable, providing a more challenging experience than Casual Mode.
In the Expert mode the Hint and Skip buttons are completely disabled, and there are no sparkles to indicate active areas. This is the hardest difficult setting, suggested only for experienced players
Use the cursor to interact with the environment.
The cursor will change to an eyeball when you can investigate an area or start a puzzle or hidden object scene.
The cursor changes to a directional arrow when you can move to a different location.
The cursor changes to a hand when you can pick up an item to add it to your Inventory or when you can interact directly with the environment.
The cursor changes to a speech bubble when you can talk to another character.
The cursor changes to a rotating gear in an area where you can use an item from your Inventory.
The Inventory is the toolbar located at the bottom of the screen.
Your Inventory bar contains all of the items you will need to progress through the game.
Click an item in your Inventory to select it, then click on an area in the game to attempt to use the item.
Often, once an item is used, it will disappear permanently from your Inventory.
To the left of the Inventory bar is the Hint button.
The Hint button can be used to reveal an item during a hidden object scene or to show you the next step of your adventure if you're stuck.
While solving a puzzle, click the Skip button once it is fully charged to immediately complete the puzzle.
You can also click the question mark to view the puzzle instructions.
Hidden object scenes are areas indicated by sparkles. For these, you must collect various randomized objects listed at the bottom to receive a new inventory item upon completion.
Interactive items in a hidden object scene are shown in yellow lettering on the list.
Combine two or more items to complete an interactive item.
The Flashlight is found at the lower right corner of the toolbar.
Activate the Flashlight to light dark areas where you point your cursor.
Beside the Flashlight is the Camera.
When the Camera shakes while looking at a scene, click it to take a picture.
The photographs from the camera will offer clues about the scene.
On the left side of the Inventory bar is the Diary.
The Diary contains helpful information and tracks your progress through the story.
Access the Diary tab to find pictures and text that can help you solve puzzles and follow the story.
Click the left or right arrows at the sides of the Diary to flip through the pages, or click the double arrows to turn to the first or last page.
Click the Tasks tab to view a list of uncompleted goals needed to progress further.
View the Photos tab to see all of the pictures taken with the Camera.
The Story tab consists of all of the discovered notes that contain important information to the plot.
To the left of the Diary button is the Menu button.
Click the Menu button to return to the Main Menu where you can edit the audio or video Options, change the Cursor, alter the Difficulty, or return to the Main Menu.
Chapter 1
Pier
Screenshot.
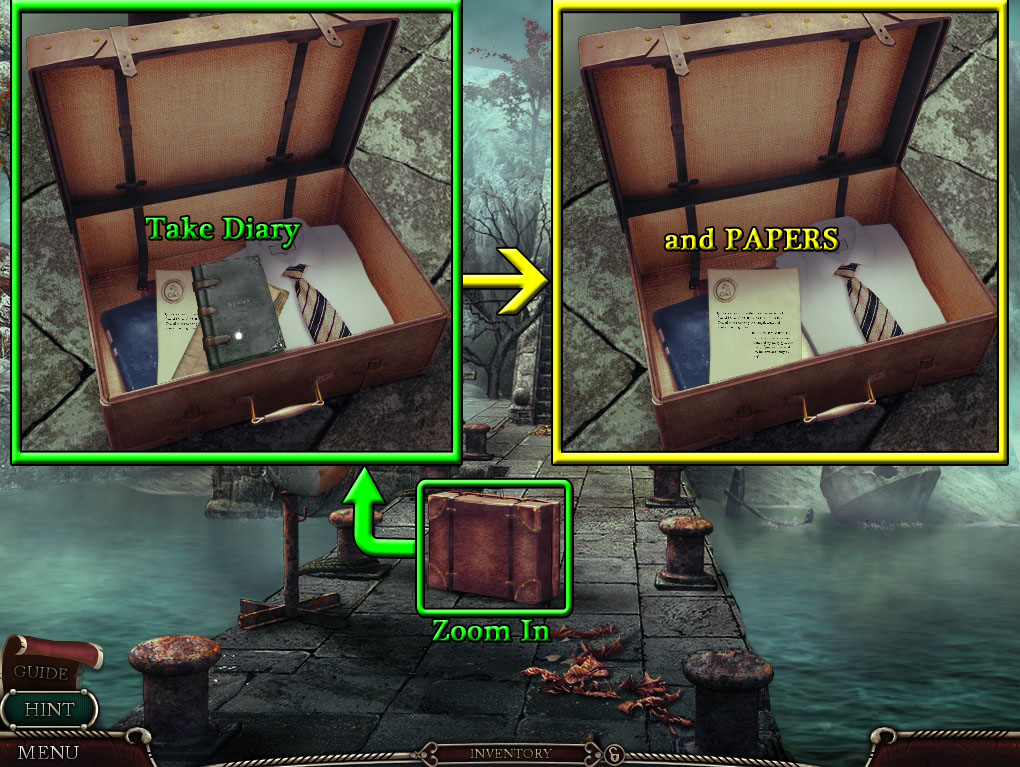
Open the suitcase on the ground, then click the suitcase to look inside.
Pick up the Diary with the map to add it to your toolbar and take the PAPERS from the suitcase.
Go up the stairs to the Statue Pathway.
Statue Pathway
Screenshot.
Give the PAPERS (from the suitcase at the Pier) to James the butler.
Speak with James, then continue forward to the Fountain and move left to the Hedges.
Hedges
Speak with James again to learn more about the estate.
Go up the stairs to the Porch.
Porch
Screenshot.
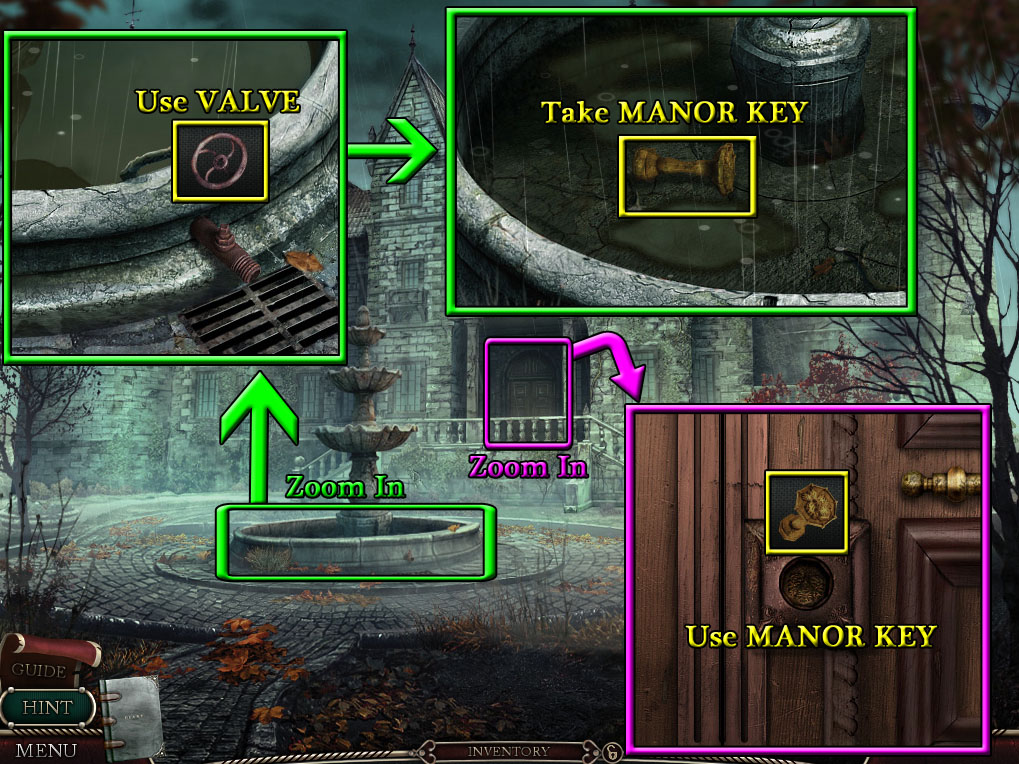
Click the rusty pipe in the middle of the right wall to zoom in.
Click the VALVE to remove it from the pipe and add it to your inventory.
Go back to the Fountain.
Fountain
Screenshot.
Inspect the fountain for a closer look.
Add the VALVE (from the pipe at the Porch) to the faucet over the drain at the side of the fountain.
Click the valve to drain the water from the basin.
Pick up the MANOR KEY from the empty fountain.
Click the front door to the mansion to zoom in.
Add the MANOR KEY to the lock in the middle of the door.
Turn the key to open the door.
Continue forward to enter the Foyer.
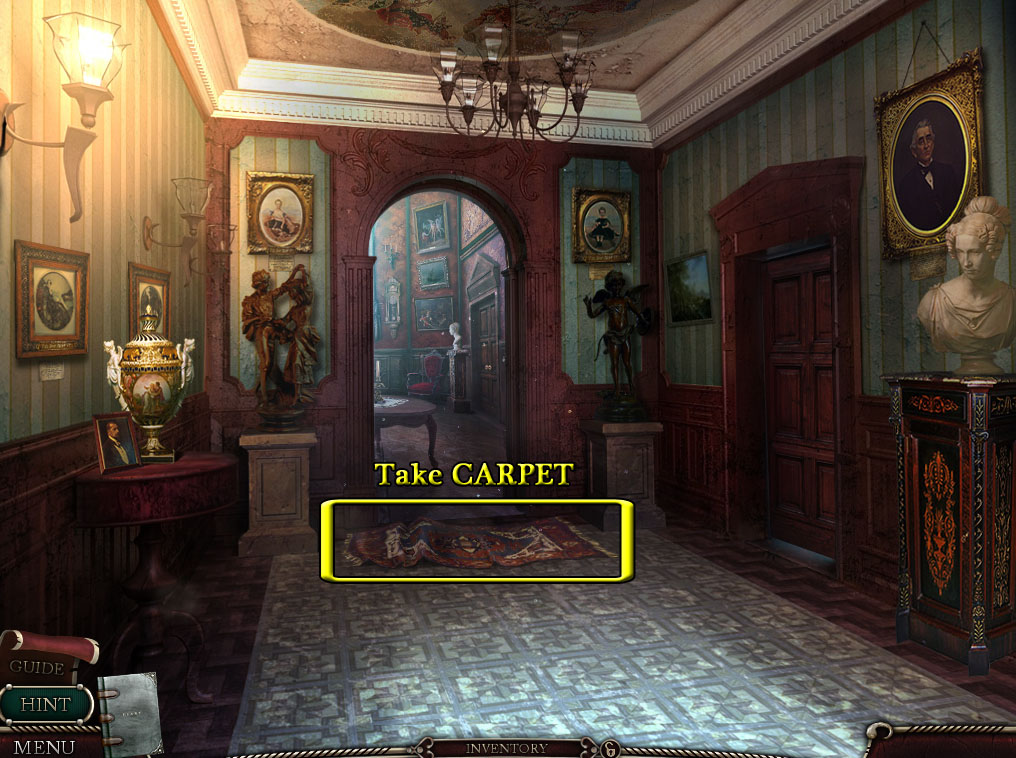
Foyer
Screenshot.
Pick up the CARPET at the foot of the open doorway.
Move forward to go to the Great Hall.
Great Hall
Screenshot.
Take the crumpled newspaper on the floor to add it to your Diary.
Pick up the painting at the foot of the stairs, then hang it on the wall space between the two windows.
Use the CARPET (from the floor in the Foyer) to put out the flames on the stairs.
Take the TORN PORTRAIT on top of the round table.
Go up the stairs to the 2nd Floor Landing.
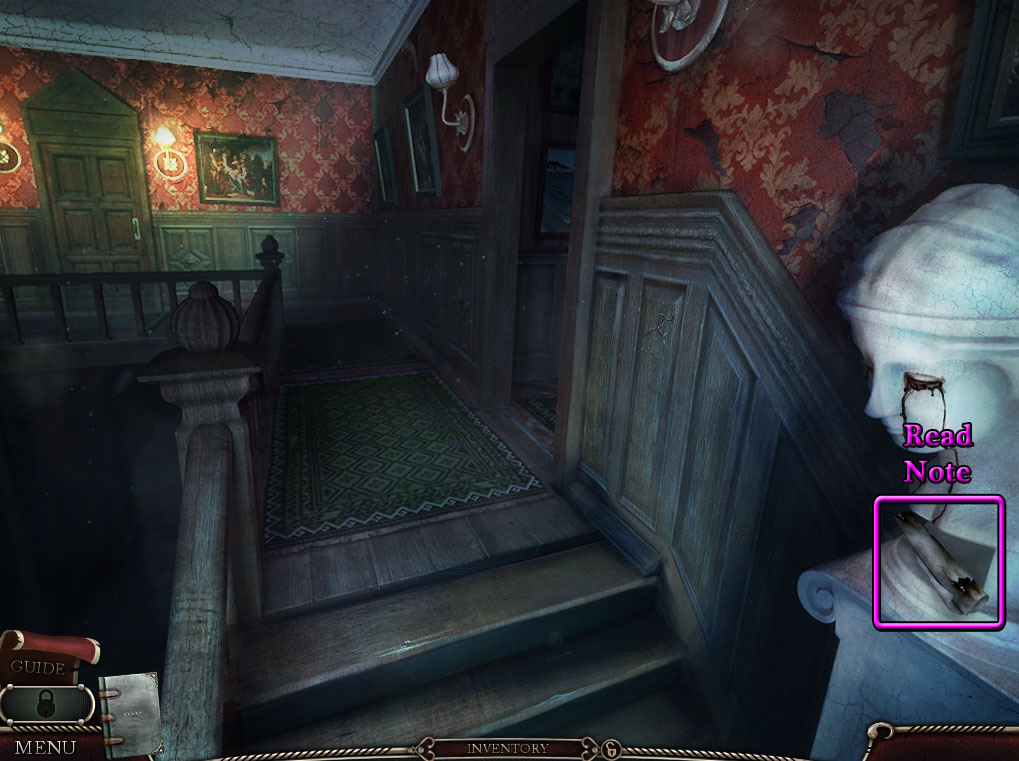
2nd Floor Landing
Screenshot.
Read the note under the crying bust to add it to the Diary.
Move right to the Corridor.
Corridor
Screenshot.
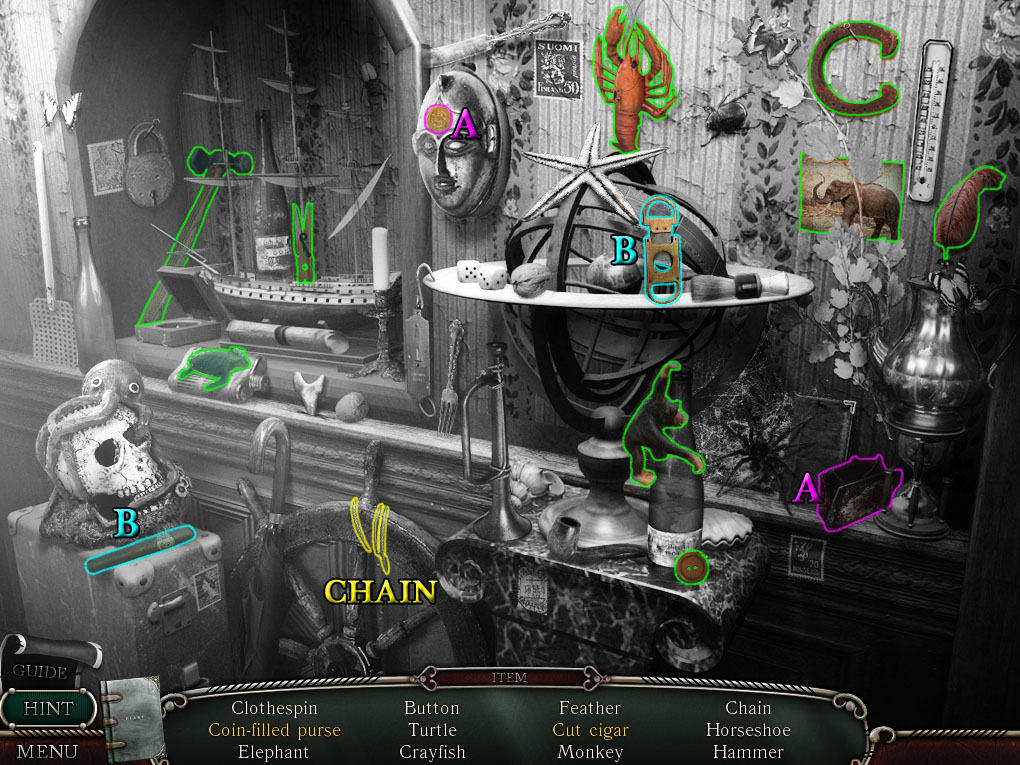
Click the ship in the small alcove to start the hidden object scene.
Add the coin to the purse to complete the Coinfilled Purse (A).
Use the cigar cutter on the cigar to make it a Cut Cigar (B).
Screenshot.
Once the hidden object scene is complete, you will receive the NECKLACE CHAIN.
Continue down the hall to the Corridor End.
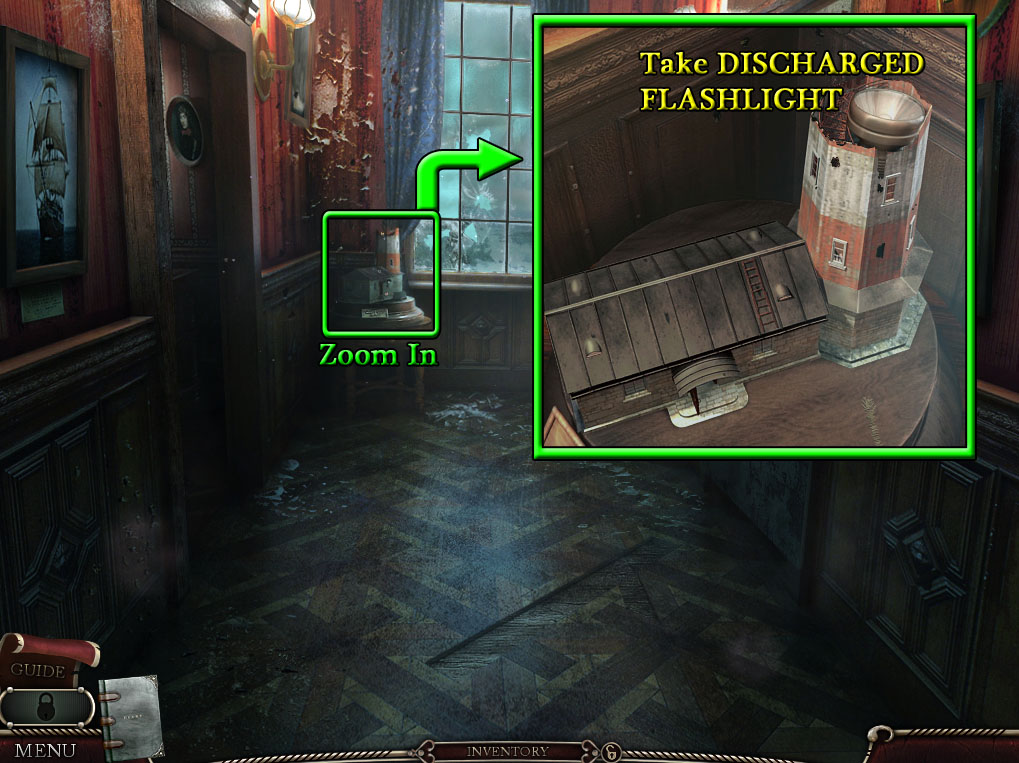
Corridor End
Screenshot.
Click the miniature lighthouse on the left end table to zoom in.
Take the DISCHARGED FLASHLIGHT inside the lighthouse tower.
Go through the left doorway to the Side Room.
Side Room
Screenshot.
Click the vase on the left table to knock it over.
Inspect the broken shards on the floor.
Move away the vase fragments to find the CLOAK ROOM KEY.
Go back to the Foyer.
Foyer
Screenshot.
Click the right door for a closer look.
Use the CLOAK ROOM KEY (from the broken vase in the Side Room) on the lock.
Go through the open door into the Cloak Room.
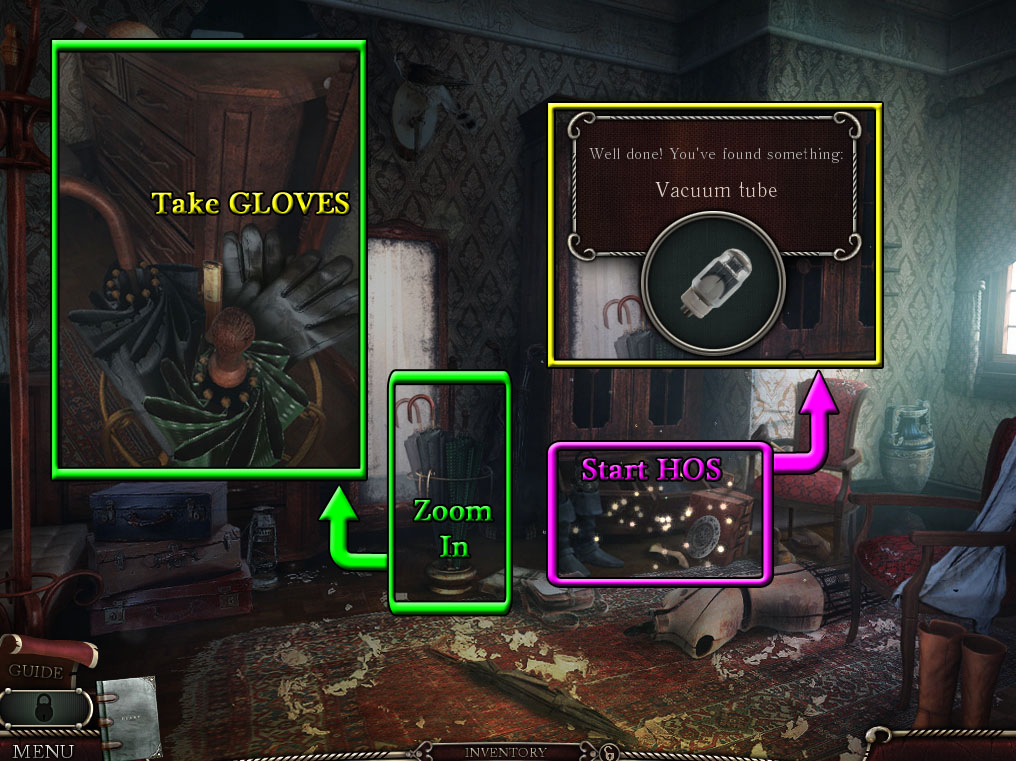
Cloak Room
Screenshot.
Click the drawers at the bottom of the wardrobe to start the hidden object scene.
Use the stamp on the envelope to make the Sealed Letter (A).
Unlock the padlock with the key to free the Nut (B).
Screenshot.
Once the hidden object scene is complete, you will receive the VACUUM TUBE.
Click the umbrella stand to zoom in.
Take the GLOVES on top of the umbrella handles.
Return to the 2nd Floor landing, open the left door, then move left to enter the Study.
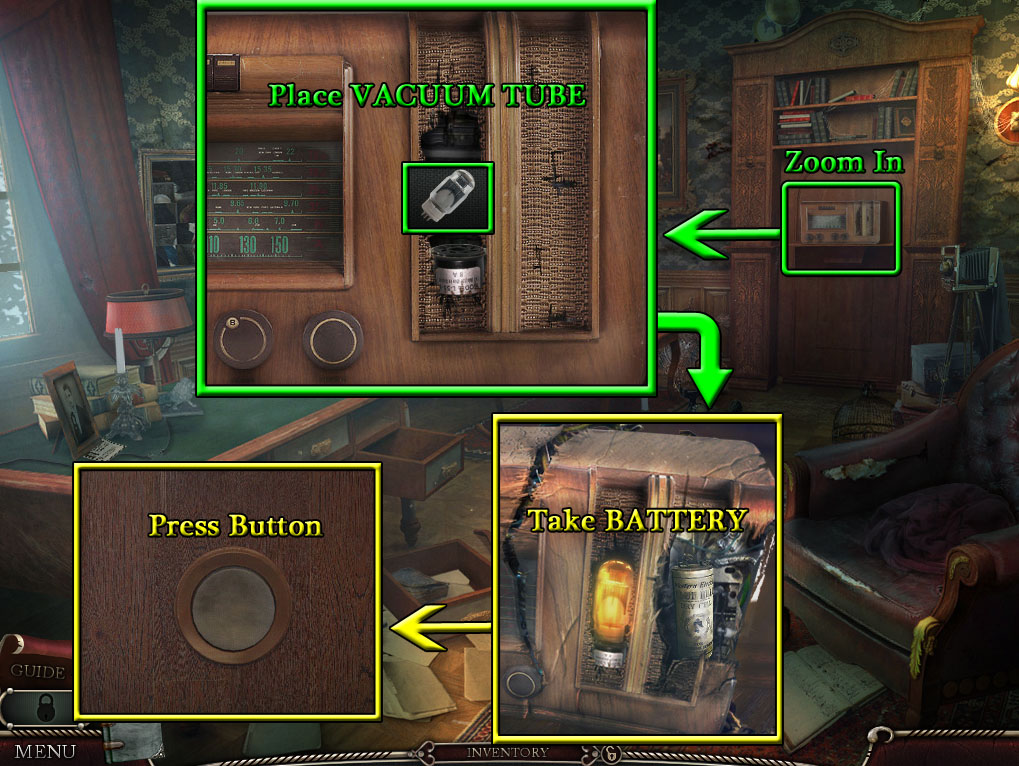
Study
Screenshot.
Click the sparking wire on the table for a closer look.
Read the newspaper clipping to add it to your Diary.
Inspect the radio on the bottom wall shelf under the books.
Add the VACUUM TUBE (from the Cloak Room hidden object scene) to the empty socket in the radio.
After the radio falls on the ground, click it again to zoom in.
Take the BATTERY from the smashed right side of the radio.
The BATTERY will combine with the DISCHARGED FLASHLIGHT in your inventory to complete the FLASHLIGHT.
Click the shelf where the radio was placed for a closer look.
Press the white button in the middle of the wood panel to open the door.
Go through the open door to the Secret Room.
Secret Room
Screenshot.
Take the BROKEN SABER from the scabard hanging at the top of the back wall.
Click the coffee table for a closer look.
Read the newspaper clipping to add it to the Diary.
Pick up the MATCHBOX on the table.
Click the fireplace to zoom in.
If you attempt to take the box, the coals inside the fireplace will catch fire.
Return to the Corridor, open the right door, then continue right to enter the Bathroom.
Bathroom
Screenshot.
Activate the Flashlight on your toolbar to see around the dark room.
Inspect the inside of the bath tub.
Click the chain to pull out the plug and drain the water.
Use the MATCHBOX (from the coffee table in the Secret Room) on the lantern to illuminate the area.
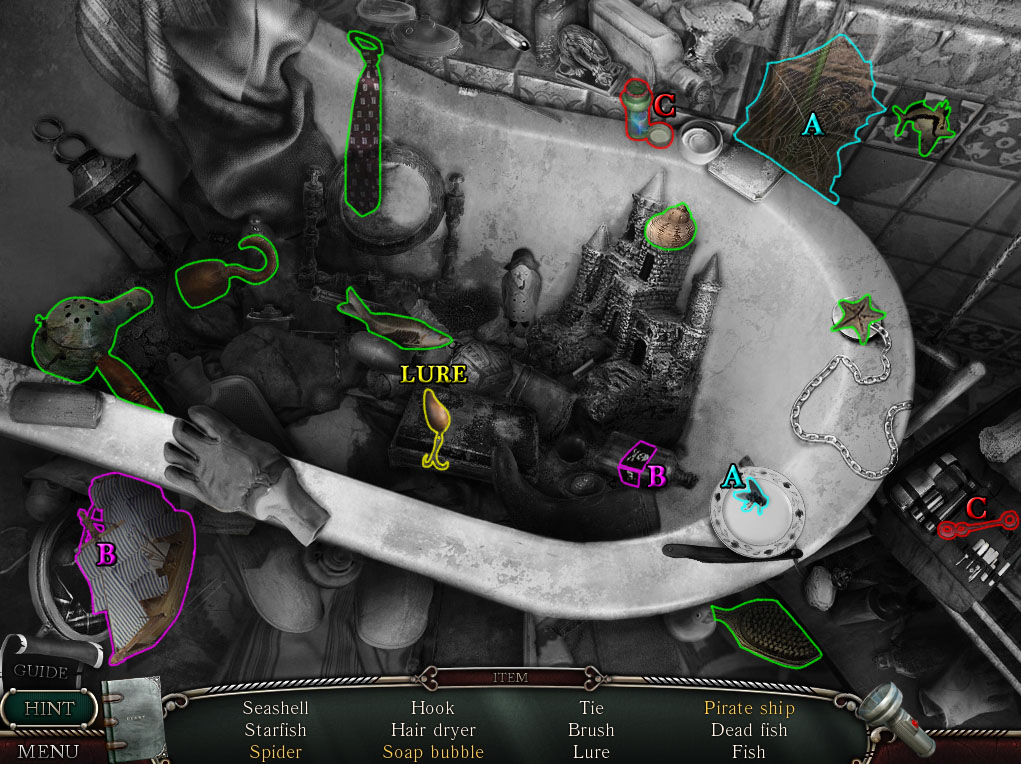
Click the empty bath tub to start the hidden object scene.
Place the fly on the web to find the Spider (A).
Add the "Jolly Roger" flag to the sails to complete the Pirate Ship (B).
Use the bubble wand on the bottle of soap to make the Soap Bubble (C).
Screenshot.
Once the hidden object scene is complete, you will receive the LURE.
Go back to the Corridor End.
Corridor End
Screenshot.
Use the BROKEN SABER (from the mounted scabard in the Secret Room) three times to remove all of boards covering the right doorway.
Open the door and continue right to the Child's Bedroom.
Chapter 2
Child's Bedroom
Pick up the HUNTING RIFLE by the toy blocks on the floor.
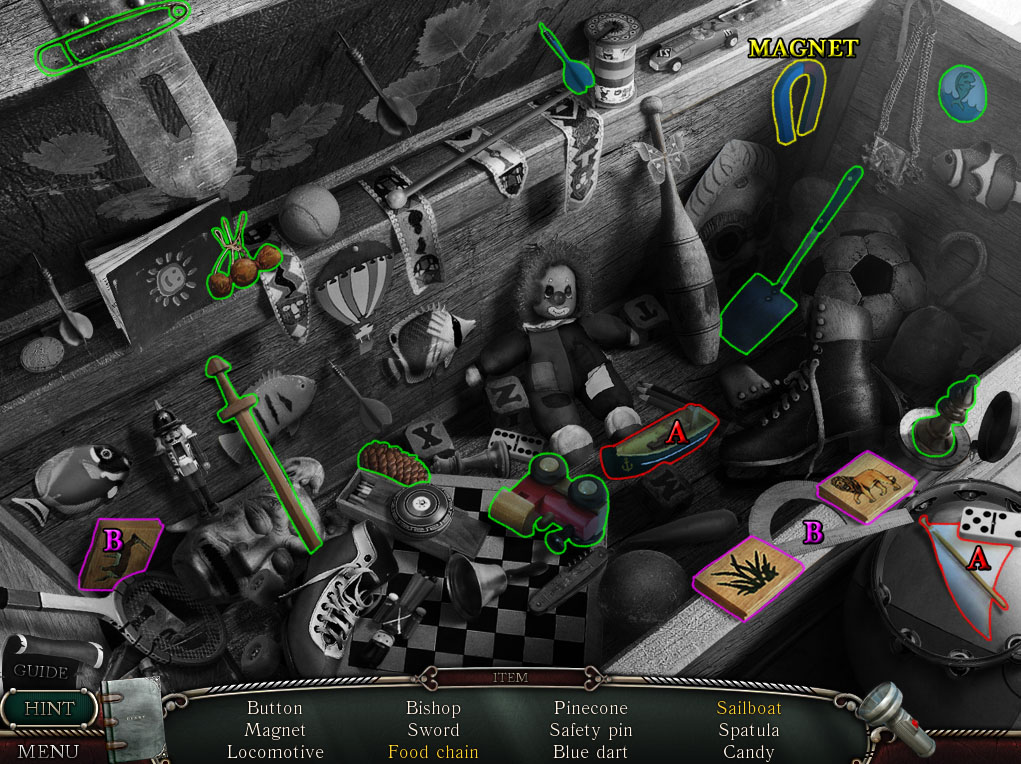
Click the toy chest to start the hidden object scene.
Add the sail to the boat to complete the Sailboat (A).
Place the antelope tile between the lion and grass tiles to make the Food Chain (B).
Screenshot.
Once the hidden object scene is complete, you will receive the MAGNET.
Inspect the fishbowl on top of the round table at the corner of the room.
Take the INCOMPLETE FISHING ROD inside the bowl.
The INCOMPLETE FISHING ROD will combine with the LURE in your inventory to complete the FISHING ROD.
Open the back door, then click the open doorway to look out over the balcony.
Use the FISHING ROD to reel in the ROPE LADDER.
Attach the ROPE LADDER to the ropes tied around the railing.
Climb down the ladder to travel to the Cliffside.
Cliffside
Move forward towards the doorway.
Click the pole on the ground to pick it up, then place the pole behind the gate over the door.
Pick up the BATHTUB LEG below the large boulder.
Go back to the Bathroom.
Bathroom
Replace the jack at the corner of the tub with the BATHTUB LEG (from the boulder at the Cliffside).
Pick up the discarded JACK on the floor.
Return to the Side Room.
Side Room
Inspect the mirror hanging on the wall to the right of the door.
Use the JACK (from the bathtub at the Bathroom) to smash the glass.
Take the PANEL PIECE from the corner of the frame.
Go back to the Great Hall.
Great Hall
Click the crack in the middle of the floor to zoom in.
Use the MAGNET (from the Child's Bedroom hidden object scene) on the crack to pull out the HAIRPIN.
Return to the Cloak Room.
Cloak Room
Click the wardrobe for a closer look.
Use the HAIRPIN (from the hole in the floor at the Great Hall) to pick the lock.
Click the coat to look inside the pocket, then take the ELECTRICAL TAPE inside.
Go to the Study.
Study
Inspect the sparking wire on top of the table.
Use the ELECTRICAL TAPE (from the coat pocket in the Cloak Room) to fix the wire.
Take the KEY from the lampshade.
Click the framed portrait on the left wall for a closer look.
Add the PANEL PIECE to the painting to start the minigame.
Arrange the tiles to complete the image.
Click a tile to select it, then click a different tile to swap their positions.
Solution.
After the puzzle is solved, read the note that falls to the floor to add it to your Diary.
Click the opened wall cache to look inside.
Take the CAMERA to add it to your toolbar.
Take the MARBLE 1/2 inside the cache.
Click the drawer in the middle of the desk to zoom in.
Use the KEY on the locked handle.
Take the SCREWDRIVER and the FRAME inside the drawer.
Return to the Side Room.
Side Room
After the cutscene, click the right door for a closer look.
Use the SCREWDRIVER (from the desk drawer in the Study) to remove the upper left SCREW and add it to your inventory.
Go through the open door to the Richard's Bedroom.
Richard's Bedroom
Click the painting on the bed to zoom in.
Read the note at the top of the painting to add it to your Diary.
Place the TORN PORTRAIT (from the table at the Great Hall) over the hole in the painting.
Click the fallen cupboard for a closer look.
Read the note inside the top drawer.
Take the PUZZLE BOX on top of the bed.
Return to the Cliffside.
Cliffisde
Read the note at the side of the left rock.
Move forward towards the door.
Use the JACK (from the bathtub in the Bathroom) to push the boulder off the cliff.
Click the door to open it, then continue forward to the Library.
Library
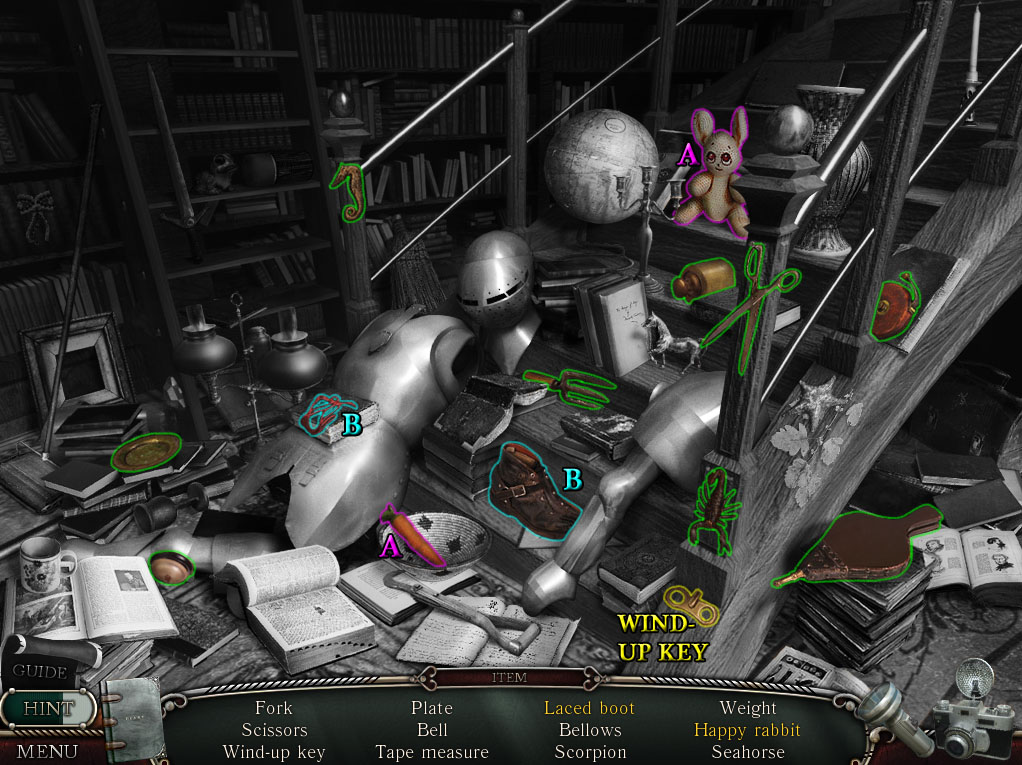
Click the bookcase to start the hidden object scene.
Give the carrot to the stuffed rabbit to make it a Happy Rabbit (A).
Add the shoelace to the boot to complete the Laced Boot (B).
Screenshot.
Once the hidden object scene is complete, you will receive the WIND-UP KEY.
Click the top of the desk for a closer look.
Read the paper on the desk, then take the STENCIL underneath it.
The STENCIL will automaticaly combine with the FRAME (from the desk drawer in the Study) in your inventory to complete the SLIDE.
Click the right door behind the balcony to zoom in.
Take the FIRE EXTINGUISHER hanging on the wall.
Inspect the double doors at the top of the stairs.
Take a picture with the Camera in your toolbar to view the photo of the snakes holding two marbles.
Go back to the Child's Bedroom.
Child's Bedroom
Click the projector for a closer look.
Click the top of the projector to lift the lid.
Light the wick with the MATCHBOX (from the coffee table in the Secret Room).
Insert the SLIDE (from the desk in the Library) into the slot at the side of the projector.
Note the four highlighted symbols on the projection screen.
Inspect the broken toy train on the floor.
Add the SCREW (from the door hinge in the Side Room) to the small wheel.
Place the wheel on the side of the train.
Use the SCREWDRIVER (from the desk drawer in the Study) to tighten the screw and repair the train.
Put the WIND-UP KEY (from the Library hidden object scene) inside the socket at the side of the train to send it down the tracks.
Wait for the train to go through the tunnel, then pick up the CARTRIDGE from the train as it moves around the tracks.
The CARTRIDGE will automatically combine with the HUNTING RIFLE to complete the LOADED RIFLE.
Go to the Side Room.
Side Room
Click the left door to zoom in.
Use the LOADED RIFLE (from the toy train in the Child's Bedroom) to blast through the lock.
After firing the shot, the LOADED RIFLE will revert back to the empty HUNTING RIFLE.
Go through the open door on the left to Cathy's Bedroom.
Cathy's Bedroom
Activate the Flashlight in your toolbar to light the room.
Click the bed for a closer look.
Move the blanket away to find a note and the FIGURINE.
Click the dressing table to start the hidden object scene.
Put the two apples in the basket to complete the Apple Basket (A).
Place the flower on the side of the hat to make it a Floral Hat (B).
Screenshot.
Once the hidden object scene is complete, you will receive the JEWEL BOX.
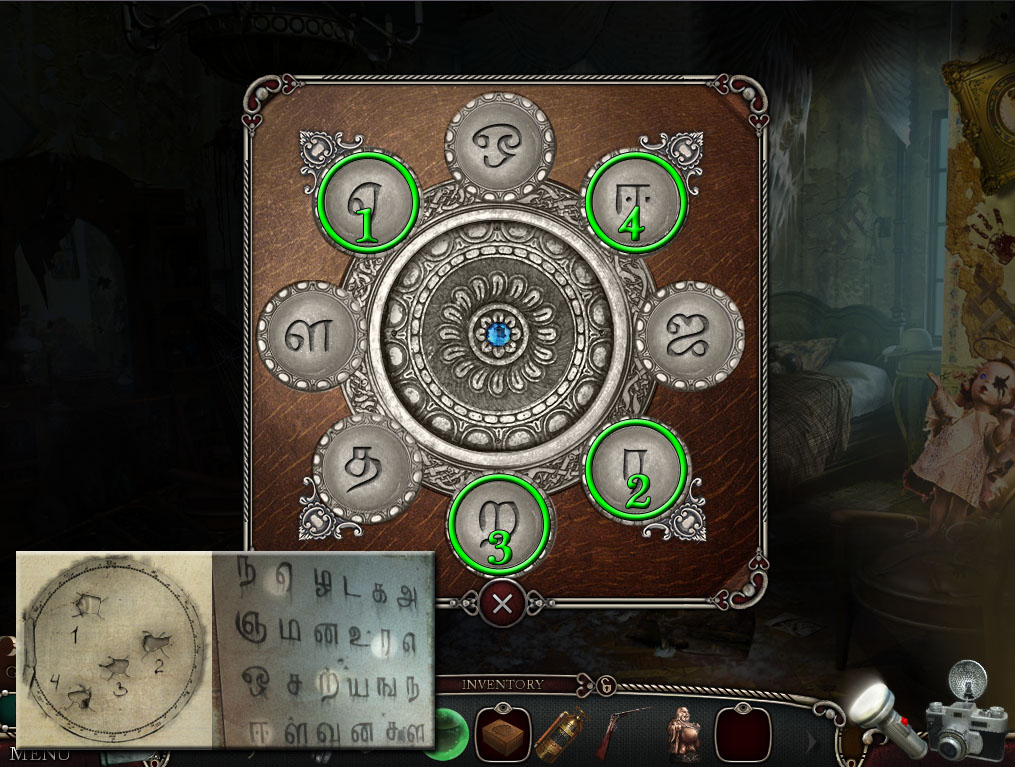
Inspect the JEWEL BOX in your inventory to start the minigame.
Push the buttons on the puzzle box that match the symbols from the projection screen in the Child's Bedroom.
Refer to the stencil in your Diary for the correct order from 1-4.
Solution.
After the puzzle is solved, take the BEADS inside the open box.
Return to the Secret Room.
Secret Room
Click the fireplace for a closer look.
Use the FIRE EXTINGUISHER (from the wall in the Library) to douse the flames.
Use the GLOVES (from the umbrella stand in the coat room) to pick up the ORIENTAL BOX.
Inspect the ORIENTAL BOX in your inventory.
Place the FIGURINE (from under the bed covers in Cathy's Bedroom) on the left spring to open the box.
Take the AMULET on the red cushion inside the box.
The AMULET will automatically combine with the BEADS (from inside the jewel box from Cathy's Bedroom hidden object scene) to complete the NECKLACE.
Place the NECKLACE on the statue.
Take the HOUR HAND from the statue's open hand.
Go back to the Foyer.
Foyer
Click the clock hanging on the right wall beside the window to zoom in.
Use the Camera in your toolbar to take a picture of the clock.
Note the time in the photo is set to 12:10.
Add the HOUR HAND (from the statue in the Secret Room) to the face of the clock.
Click and drag the hour and minute hands to match the time in the photograph.
Take the PUZZLE PART from the owl's mouth that springs out of the clock.
Inspect the PUZZLE BOX (from the bed in Richard's Bedroom) in your inventory.
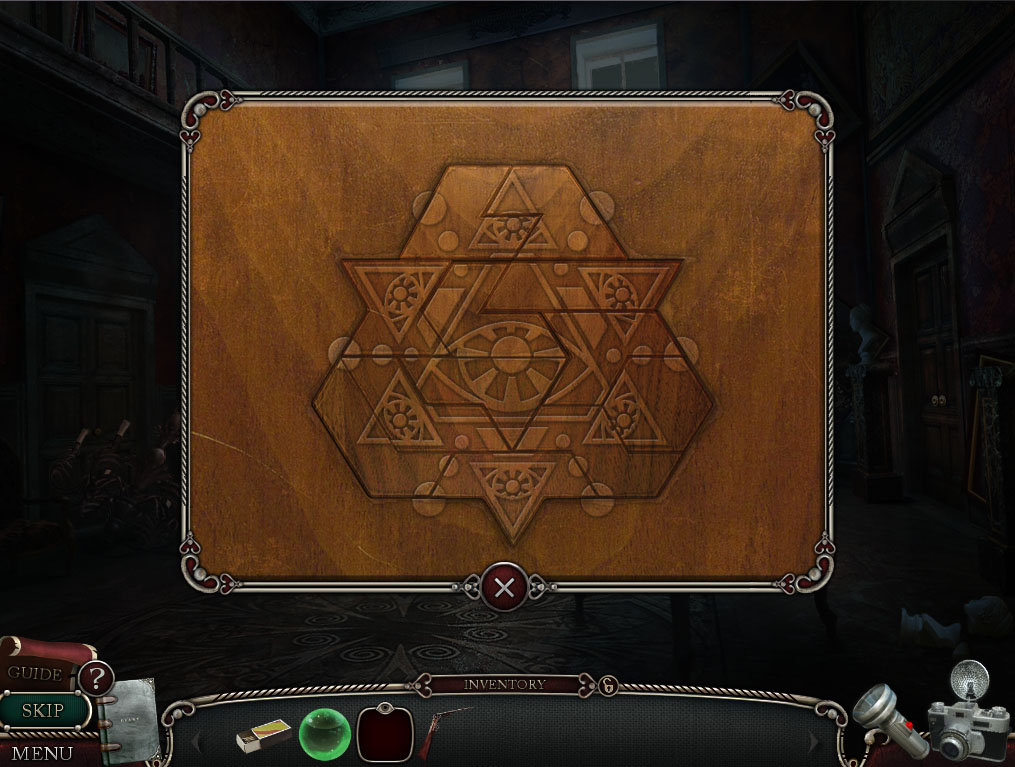
Add the PUZZLE PART to the box to start the minigame.
Arrange the tiles so that all of them fit within the design.
Click and drag a piece to move it around the frame, then release the mouse to place it.
Use the outline of the carved shape and the patterns inside the puzzle pieces to help you find their correct positions.
Solution.
After the puzzle is solved, open the envelope inside the box to read the note, then take the MARBLE 2/2 underneath.
Go to the Library.
Library
Click the doors at the top of the stairs for a closer look.
Place the two MARBLES inside the mouths of the door handles shaped like snakes.
MARBLE 1/2 is found in the wall cache from the portrait puzzle in the Study.
MARBLE 2/2 is from the completed puzzle box in the Foyer.
Go through the open door to the Hall of Mirrors.
Hall of Mirrors
Click the locket in the middle of the floor to zoom in.
Open the locket to start the cut scene.
Chapter 3
Fountain
After the cut scene, you will wake in the garden.
Speak with the butler, then move left to the Hedges.
Hedges
Click the burning bush for a closer look.
Pick up the BASIN on the ground beside the bush.
Go back to the Pier.
Pier
Use the BASIN (from the ground at the Hedges) to collect the ocean water.
You will receive a BASIN WITH WATER.
Return to the Hedges.
Hedges
Click the burning bush for a closer look.
Use the BASIN WITH WATER (from the ocean water at the Pier) to douse the flames.
Remove the burned twigs, then continue forward to the Archway.
Archway
Activate the Camera in your toolbar to take a picture of the area.
Note the glowing shrubs behind the right statue in the photograph.
Move forward to reach the Stable Gates.
Stable Gates
Pick up the SHAFT on the road in front of the right gate.
Continue left to the Truck.
Truck
Click the open car door to look inside.
Take the BOLT CUTTERS on top of the seat.
Read the note over the dashboard to add it to your Diary.
Go back to the Stable Gates, then move right to the Courtyard.
Courtyard
Click the bale of hay for a closer look.
Remove the pieces of hay three more times to reveal the CRANK STARTER.
Click the bicycle to zoom in.
Read the note by the rear wheel to add it to your Diary.
Open the satchel to find the OIL CAN.
Inspect the glowing window beside the door to the middle building.
Use the SHAFT (from the ground at the Stable Gates) three times to smash through the glass.
Go through the window into the Cabin.
Cabin
Activate the Flashlight in your toolbar to light the room.
Click the bed to start the hidden object scene.
Place the candle on the candlestick to complete the Candlestick with Candle (A).
Screenshot.
Once the hidden object scene is complete, you will receive the LIGHTER.
Inspect the basin attached to the wall under the round mirror.
Take the DULL BLADE inside the basin.
Click the fishing pole in the back left corner of the room to zoom in.
Use the BOLT CUTTERS (from the seat inside the Truck) to cut off the FISHING LINE.
Click the barred left door for a closer look.
Use the BOLT CUTTERS to remove the nails in the board.
Click the door to open it, then continue left to the Stables.
Stables
Click the trough in the closest stall for a closer look.
Use the bucket to scoop up the oats and collect the CAN OF OATS.
Take the revealed CORKED BOTTLE under the oats in the trough.
Click the rear stall to zoom in.
Pick up the HAMMER leaning against the wall.
Go back to the Courtyard, then turn right to reach the Garage.
Garage
Pick up the BELLOWS on top of the crate in the lower left corner.
Click the barrels stacked behind the car to start the hidden object scene.
Use the magnet on the hay to find the Needle in a Haystack (A).
Add the feather to the inkpot to complete the Ink Stand (B).
Screenshot.
Once the hidden object scene is complete, you will receive the HANDLE.
Go forward through the archway to the Forge.
Forge
Click the anvil to zoom in.
Pick up the bolt, then place it in the center of the shears.
Use the HAMMER (from the back stall at the Stables) to set the bolt.
Take the completed SHEARS>
Click the grindstone for a closer look.
Use the DULL BLADE (from the basin in the Cabin) on the grindstone to sharpen the BLADE.
Go back to the Garage.
Garage
Click the carriage to look inside.
Take the LANTERN on top of the seat.
Use the BLADE (from the grindstone at the Forge) to cut a piece of LEATHER from the seat cushion.
Return to the Cabin.
Cabin
Click the cupboard for a closer look.
Add the HANDLE (from the Garage hidden object scene) to open the door.
Take the CORKSCREW inside the cupboard.
The CORKSCREW will automatically combine with the CORKED BOTTLE (from the trough in the Stables) in your inventory to separate the BOTTLE and the CORK.
Go back to the Archway.
Archway
Click the bush behind the right statue to zoom in.
Use the SHEARS (from the anvil at the Forge) four times to remove all of the branches.
Continue down the revealed path to the Dead Tree.
Dead Tree
Click the lower right roots of the tree to zoom in.
Read the NOTE on the ground to add it to your inventory.
Click the stream at the top of the waterfall for a closer look.
Take the STRANGE PLATE out of the mud and water.
Inspect the bird house hanging from the tree branch.
Take the IGNITION KEY at the side of the bird house.
Pour the CAN OF OATS (from the trough in the stall at the Stables) into the feeder to lure the bird.
Give the NOTE to the carrier pigeon, then take the NEEDLE that drops onto the bird house base.
The NEEDLE will automatically combine with the FISHING LINE (from the fishing rod in the Cabin) to complete the NEEDLE AND THREAD.
Inspect the BELLOWS (from the crate in the Garage) in your inventory.
Place the strip of LEATHER (from the seat of the carriage in the Garage) on the hole at the side.
Sew on the piece of leather using the NEEDLE AND THREAD to repair the BELLOWS.
Click the hearts carved in the tree trunk for a close-up.
Activate the Camera in your toolbar to take a picture.
Note the lit candle and the two rings set inside the hearts in the photograph.
Return to the Garage.
Garage
Click the chest on the back of the carriage to zoom in.
Add the STRANGE PLATE (from the stream at the Dead Tree) to the lock.
Take the BROKEN CROSSBOW inside the open chest.
Go back to the Truck.
Truck
Click the truck to look inside.
Put the IGNITION KEY (from the bird house at the Dead Tree) into the ignition.
Turn the key, then step back outside.
Place the CRANK STARTER (from the bale of hay in the courtyard) into the socket at the bottom of the grille.
Click and drag the crank in a clockwise motion to start the car.
After the truck goes into reverse, pick up the MIRROR that falls to the ground.
Continue forward to the Statue Plaza.
Posted by: Trinn |
April 3, 2012 5:25 PM
|
April 3, 2012 5:25 PM
Shiver: Poltergeist Walkthrough (Part 2)
Chapter Four: The Garden
As you enter the garden, (after moving the car and picking up the mirror piece), you'll notice a BENCH on the left side of a statue in the center of the screen:
Screenshot.
Look closer at the bench.
Take the HOLE-RIDDLED BARREL.
Examine the BARREL and notice its hole:
Put the CORK (from the BOTTLE you got in The Stables) in the barrel's hole to fix it.
Now you have a complete, and very bouyant, BARREL.
Go Left; you'll be outside a greenhouse. On the path in front of you is a...NOTE. Pick it up and read it.
Screenshot.
Go straight to enter the greenhouse. Pick up a couple items:
Examine the water hose on the left side of the room. Use your BLADE (found in The Stables) to get a piece of HOSE.
Also take the SCOOP.
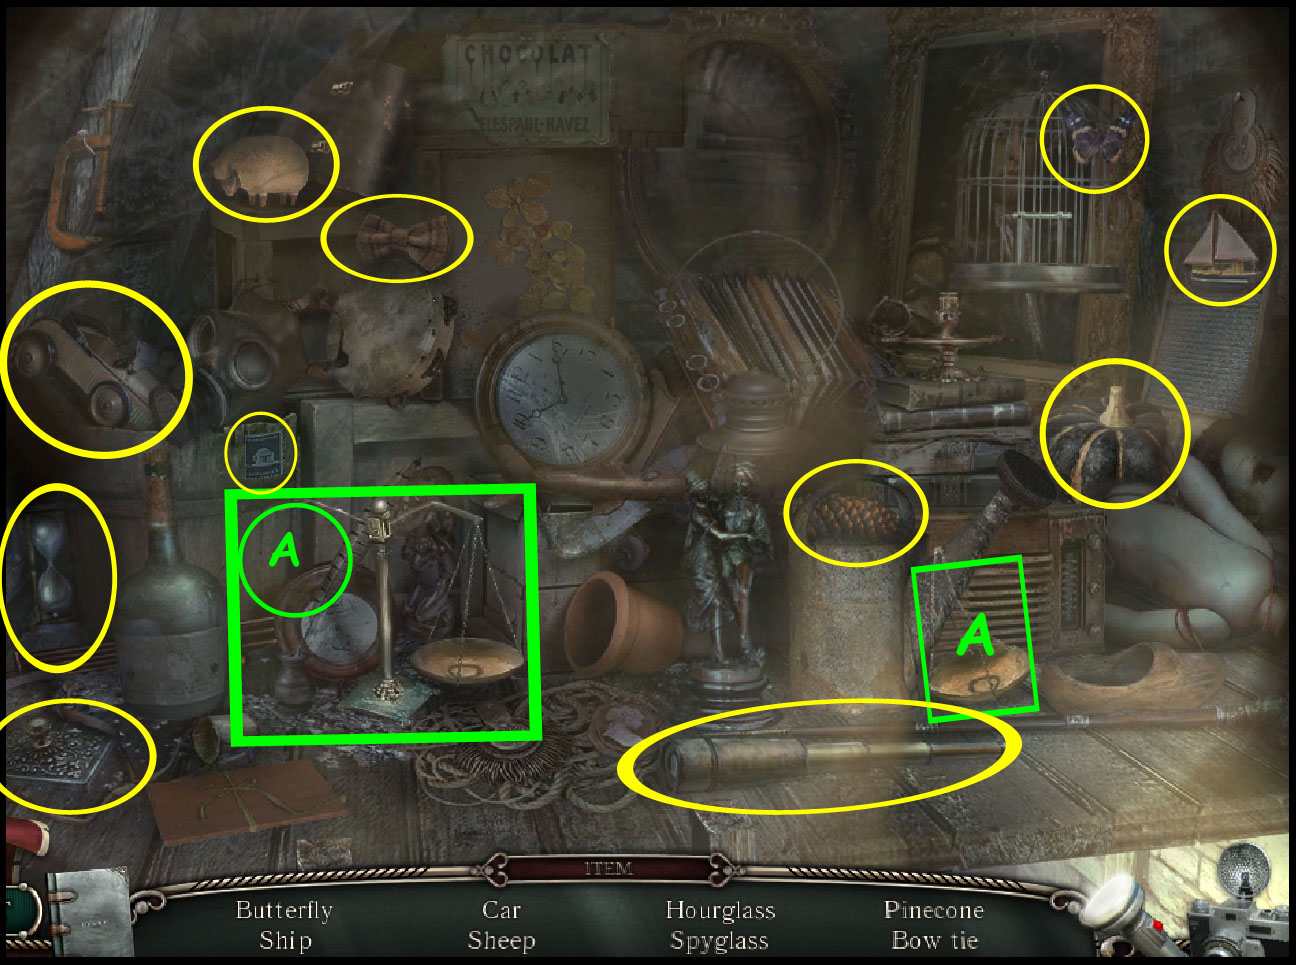
Zoom in on the plants on the right side of the room to start a Hidden Object Search (see screenshot):
Screenshot.
Find all the objects to earn GARDENING STAKES.
The NAILS in your inventory (from The Stables) will be added to the STAKES to create:
BOLTS.
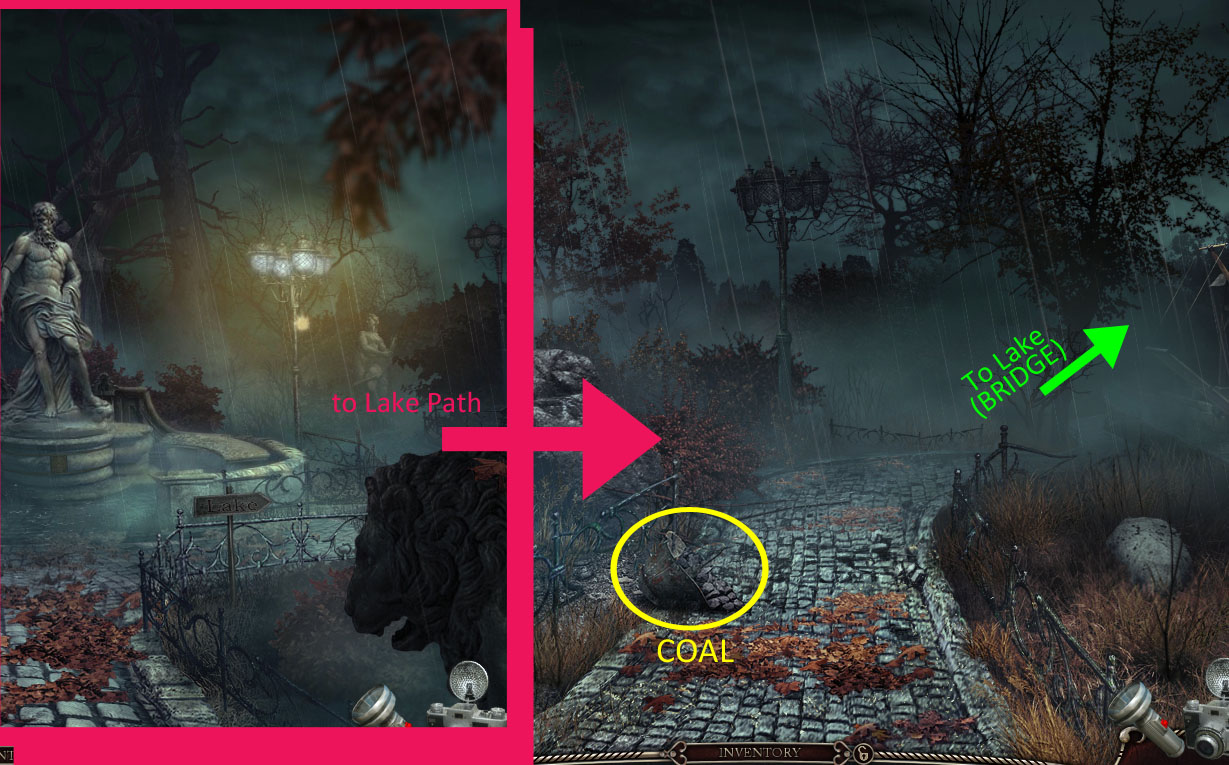
Leave the greenhouse (go back twice), then move right past the statue to enter the path to the lake.
There's a pail of coal on the path in front of you; close in on it to...
Screenshot.
take the COAL.
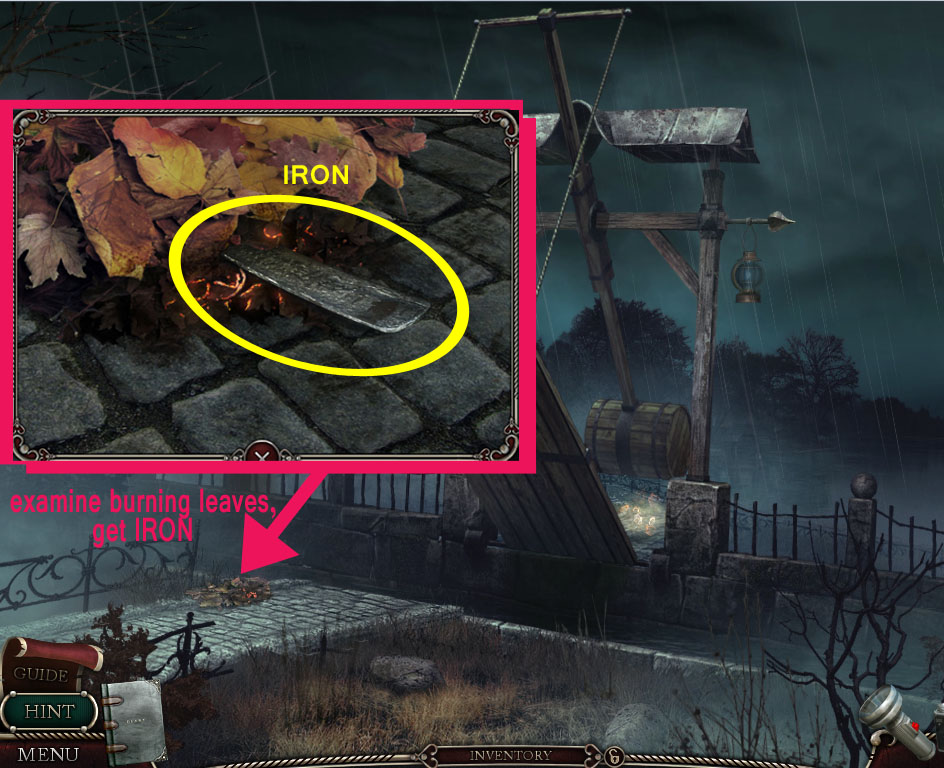
Continue up the path to the right; you'll see some leaves burning along the path before the raised bridge...
Screenshot.
Examine the burning leaves and take a piece of IRON.
Now you need to return to the blacksmith room at the Stables;
back up four times and turn right toward the stables, then turn right two more times to enter the blacksmith.
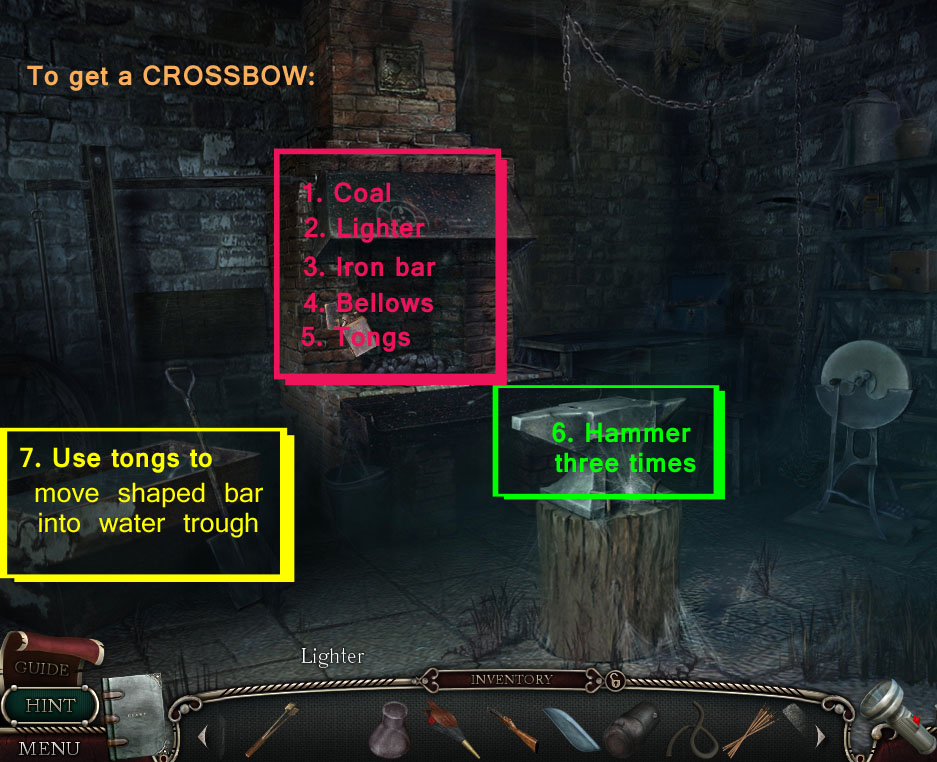
Time to transform that piece of iron into something more useful:
Screenshot.
Put the COAL (found on path to the lake) in the fireplace.
Use your LIGHTER to start a fire.
Put the IRON BAR (from burning leaves by the raised bridge) in the fire.
Use the BELLOWS (repaired in chapter 3) to fan the flames.
Use your TONGS (found in the stables, dark room) to remove the HOT IRON BAR from the fire and place it on the anvil.
Using your HAMMER, bang out the piece of iron 3 times until it takes shape.
With the tongs, move the newly shaped iron into the water trough to cool it off; you now have...
a BOW
The new piece will add to the broken crossbow and bolts (from the greenhouse) to become...
a CROSSBOW.
Before going back to the lake, there's something important you need to grab by the lover's tree:
Back up four times then turn right toward the lover's tree.
Screenshot.
Zoom in on the soft ground at the base of the tree (under the pigeon feeder). Time to find out what's buried here:
Use your SCOOP (from the greenhouse) to dig up a Jar.
Open the jar to get:
a Note
and a KEY HALF.
Now that you have a key half and a clue where to find the other piece, return to the lake so you can cross the bridge onto the lake:
Back out once then go forward, move ahead again along the left side of the scene into the park. Turn right past the statue, then go forward two more times until you're standing in front of the raised bridge again.
In order to lower the bridge, lighten that heavy barrel that's holding it up:
Take out your CROSSBOW and aim it at the barrel:
Wait until the crosshairs are at the bottom of the barrel and click to shoot.
You may need to do this more than once until you shot a hole large enough to drain the barrel.
When the barrel empties, the bridge will lower.
Screenshot.
Now go forward to the lake.
Continued in Chapter Five: the Lake.
Chapter Five: The Lake
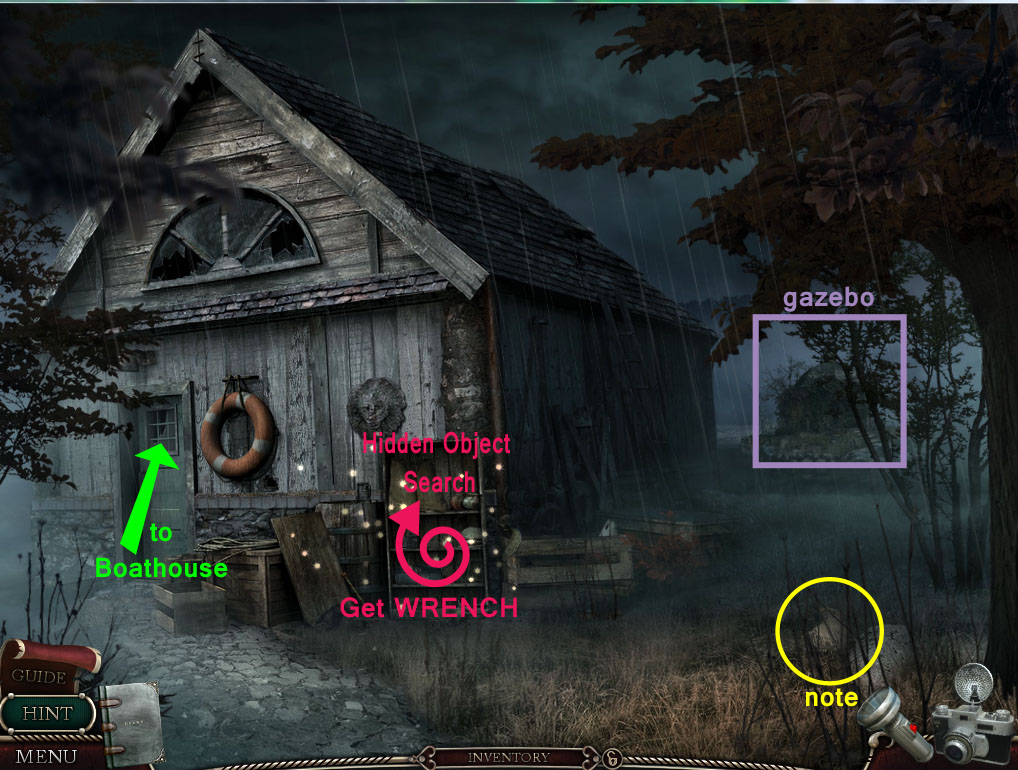
When you pass over the bridge to the lake, you'll arrive outside of a boathouse.
Screenshot.
Pick up the NOTE and read it.
There is a gazebo on a little island in the background; take a closer look to see the carrier pigeon. Does it have a reply message? To find out, find a way to the gazebo.
Click on the stacks of supplies outside the boat house to begin another Hidden Object Search:
Screenshot.
Find all the objects on your list to get...
a WRENCH.
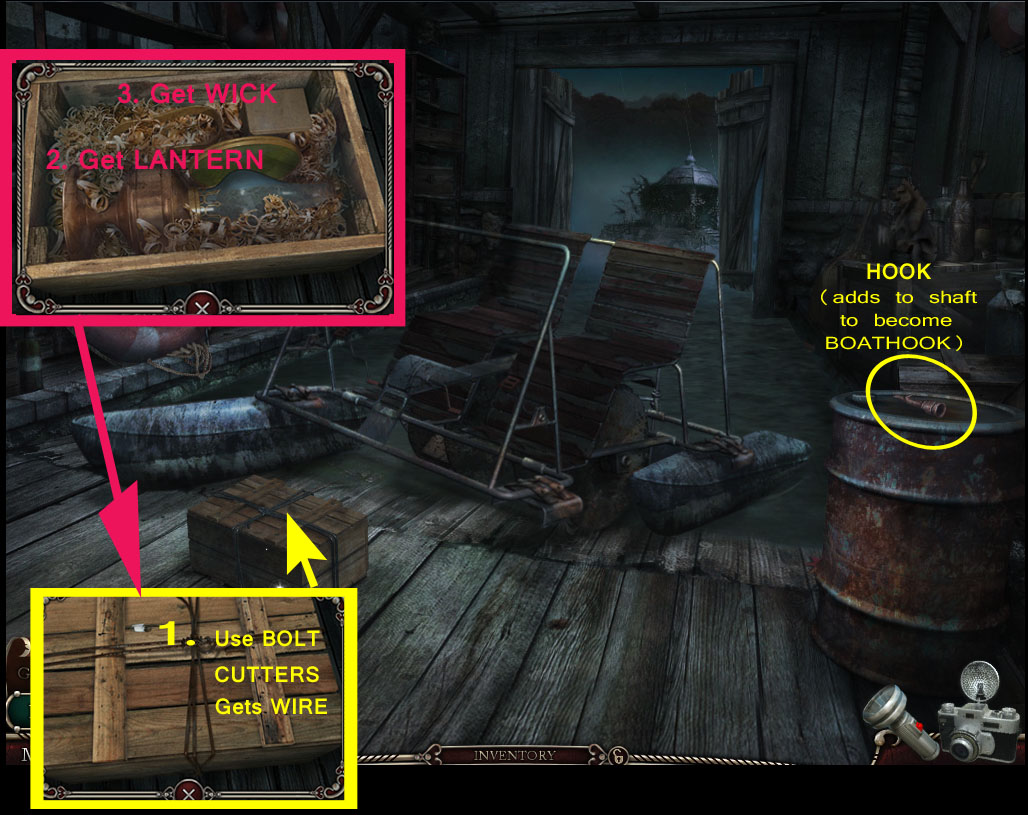
Go through the door into the boathouse; first, gather a few objects:
Screenshot.
Zoom in on the crate and use BOLT CUTTERS to remove the wire. The WIRE will be added to your inventory.
Then, from inside the opened crate, get the WICK and another LANTERN.
On top of the fuel drum is a HOOK. Take it. It will join with the POLE already in your inventory to become a BOATHOOK.
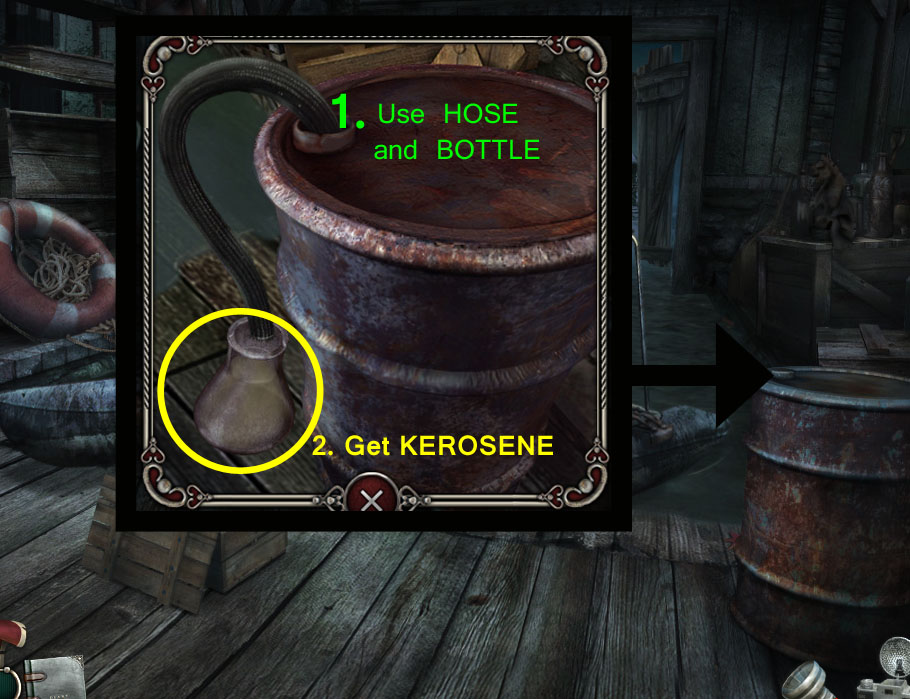
Now, zoom in on the fuel drum to get some kerosene:
Screenshot.
First put the HOSE (found in the greenhouse) in the spout on top of the drum.
Then place the EMPTY BOTTLE (from the stables) at the other end of the hose.
The bottle will automatically fill; pick it up to get some KEROSENE.
Back up twice until you're at the bridge again. Examine the lantern hanging on the right side of the bridge support...
Use your BOATHOOK to get a third LANTERN.
Return to the stables yard (back four times then right).
Use the WRENCH on the bike to get a CHAIN.
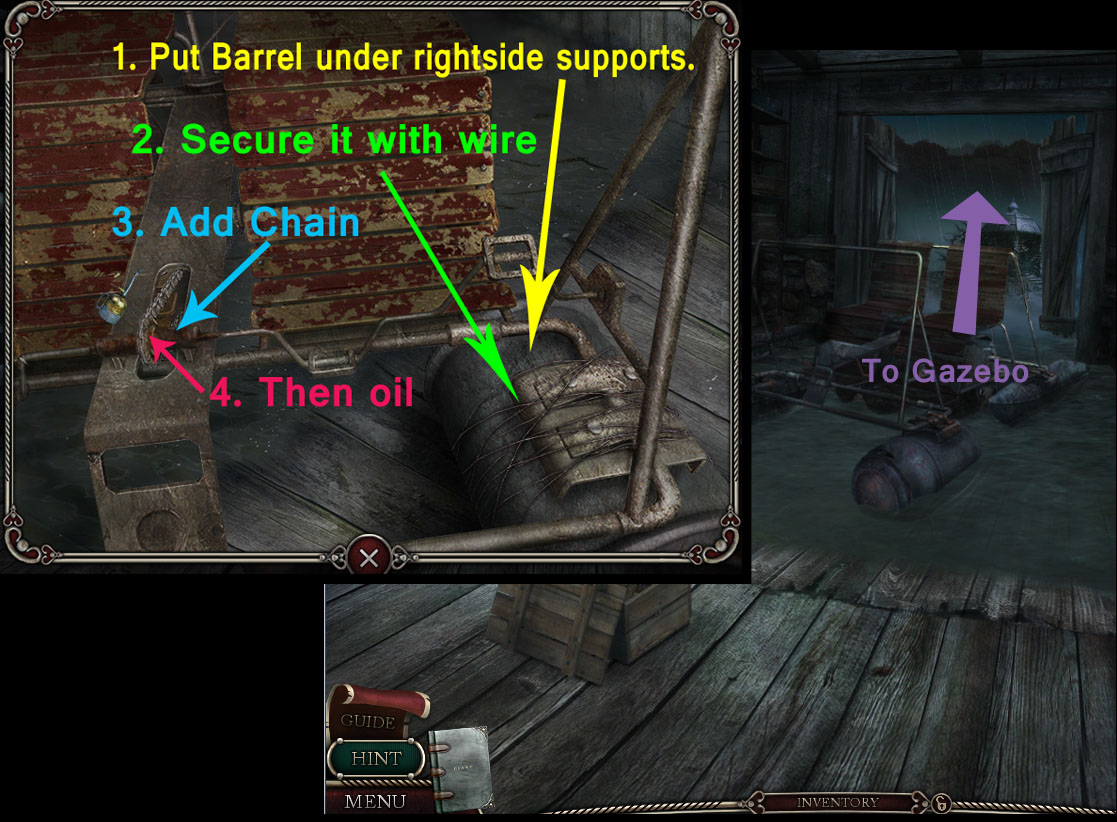
Head back to the boathouse again and prepare the boat for launch:
Screenshot.
Put the BARREL under the right edge of the boat's frame.
Use the WIRE to secure it there.
Next, put the CHAIN in the center of the frame.
Then, use the OIL CAN on it.
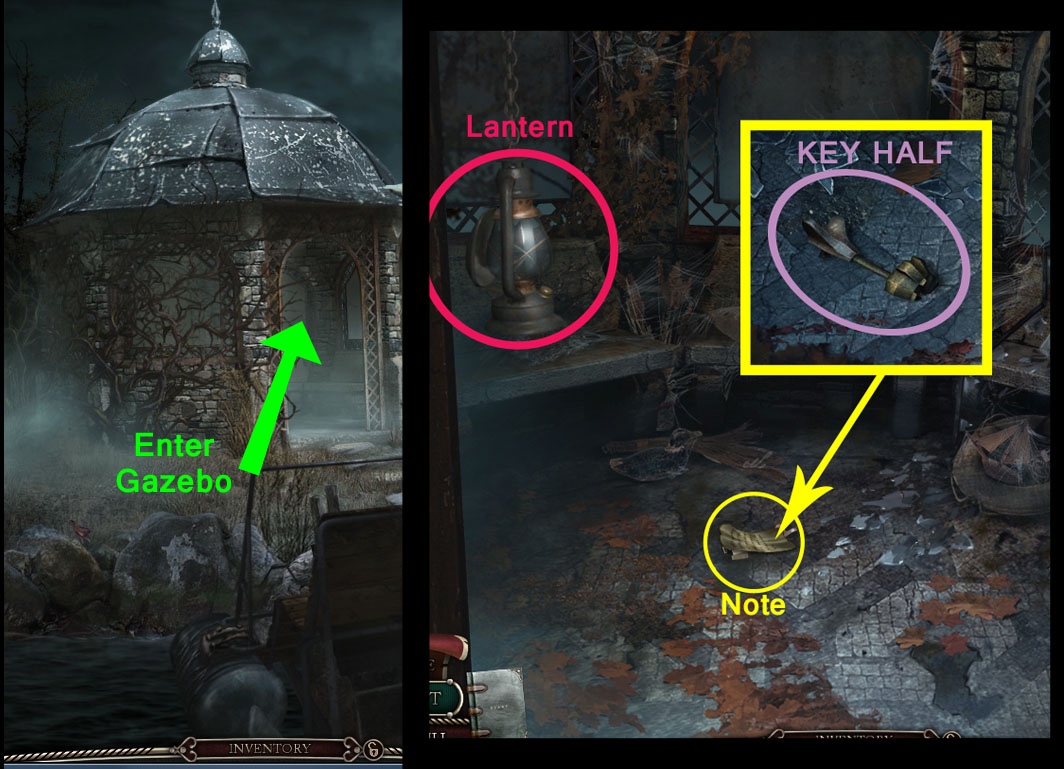
The boat will launch once it's repaired correctly. Click it to go to The Gazebo, then continue forward to enter the gazebo and collect a few more items:
Screenshot.
After watching a short story scene, pick up the NOTE and examine it.
Underneath the note is the other KEY HALF. Take it.
The two key halves will join together to form a KEY.
Click on the LANTERN hanging on the left side to add a fourth to your collection.
Now go back six times, turn left, then continue straight a couple more times to pass through the Greenhouse.
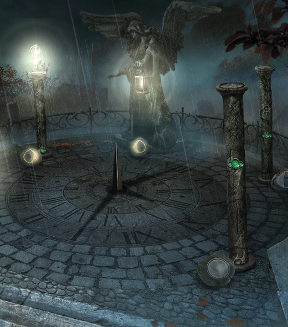
Here you'll see a statue of guardian angel overlooking a strange...sundial. Or moon dial? With your four lanterns, you're ready to set up for another puzzle.
Use your camera. It provides the clue for what you should do here. Or refer to the spoilers and screenshots below.
Screenshot.
Prepare the middle lantern:
Zoom in on the lantern held by the guardian angel statue.
Insert the WICK.
Add KEROSENE.
Use the LIGHTER.
Place the MIRROR.
The lantern should now be glowing.
Place the other four lanterns on the correct pillars:
Screenshot.
The information gained from solving this puzzle is automatically added to your journal. You can also take another picture.
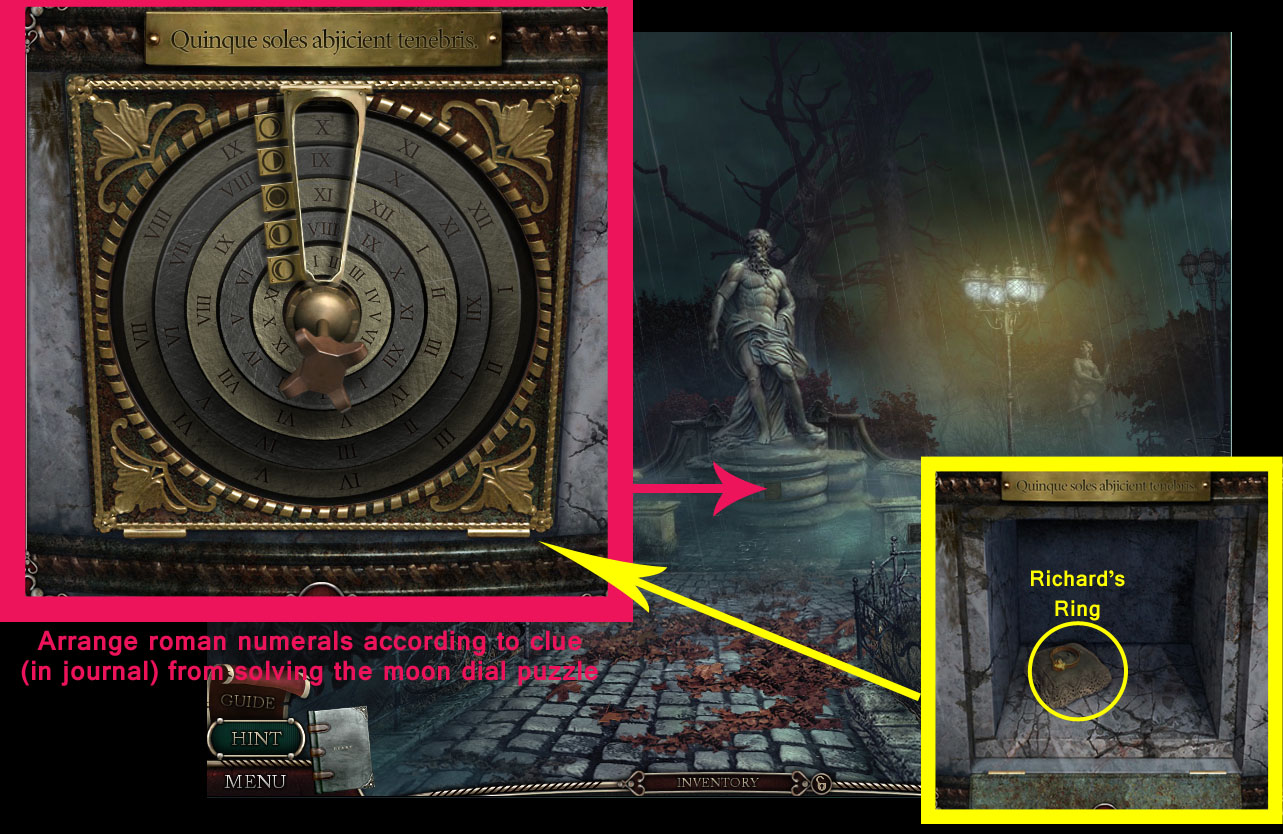
Now you have the information needed to see what's in the zeus statue. Back up three times, then zoom in on the base of the statue:
First, insert the KEY in the middle.
Then, turn each dial so each phase of the moon is lined up with the correct roman numeral.
See your journal for a picture of the moondial.
Solution:
(from top to bottom)
Waxing Crescent = X
First Quarter = IX
Full Moon = XI
Last Quarter = VIII
Waning Crescent = I
Note: the designs on the statue are in relief, meaning the darker shape represents that phase of the moon.
Screenshot.
With the correct solution, the door at the base of the statue opens.
Take the note, then take RICHARD'S RING.
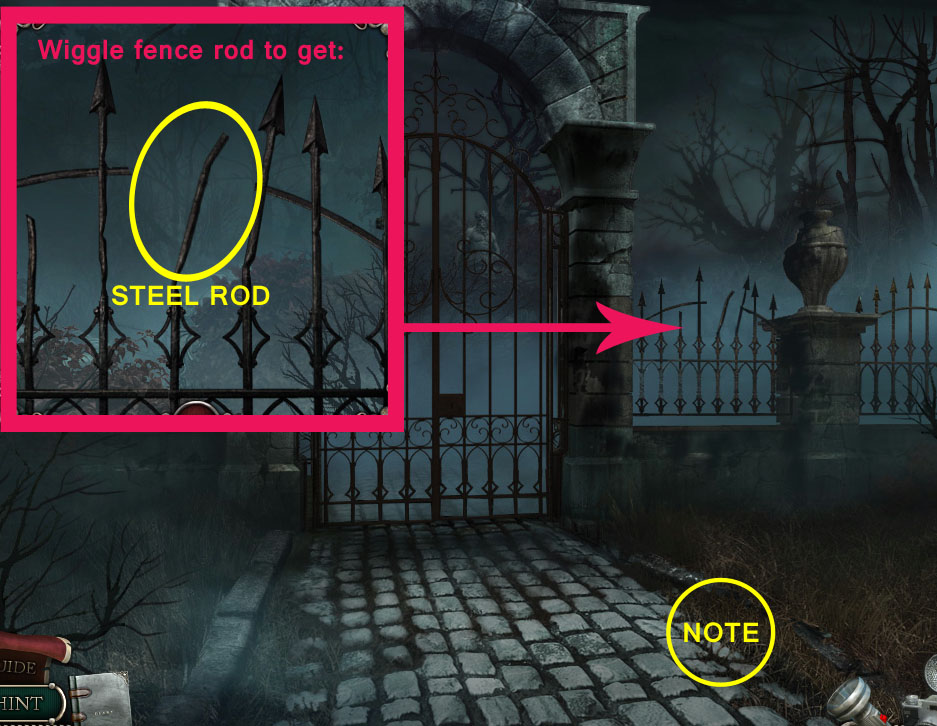
Go backwards down the path, through the gates. After a short cutscene with the poltergeist, the gate is left in ruins.
Pick up the NOTE left behind.
Examine the bars on the right side of the fence.
Wiggle the fence bar until a STEEL ROD comes out.
Screenshot.
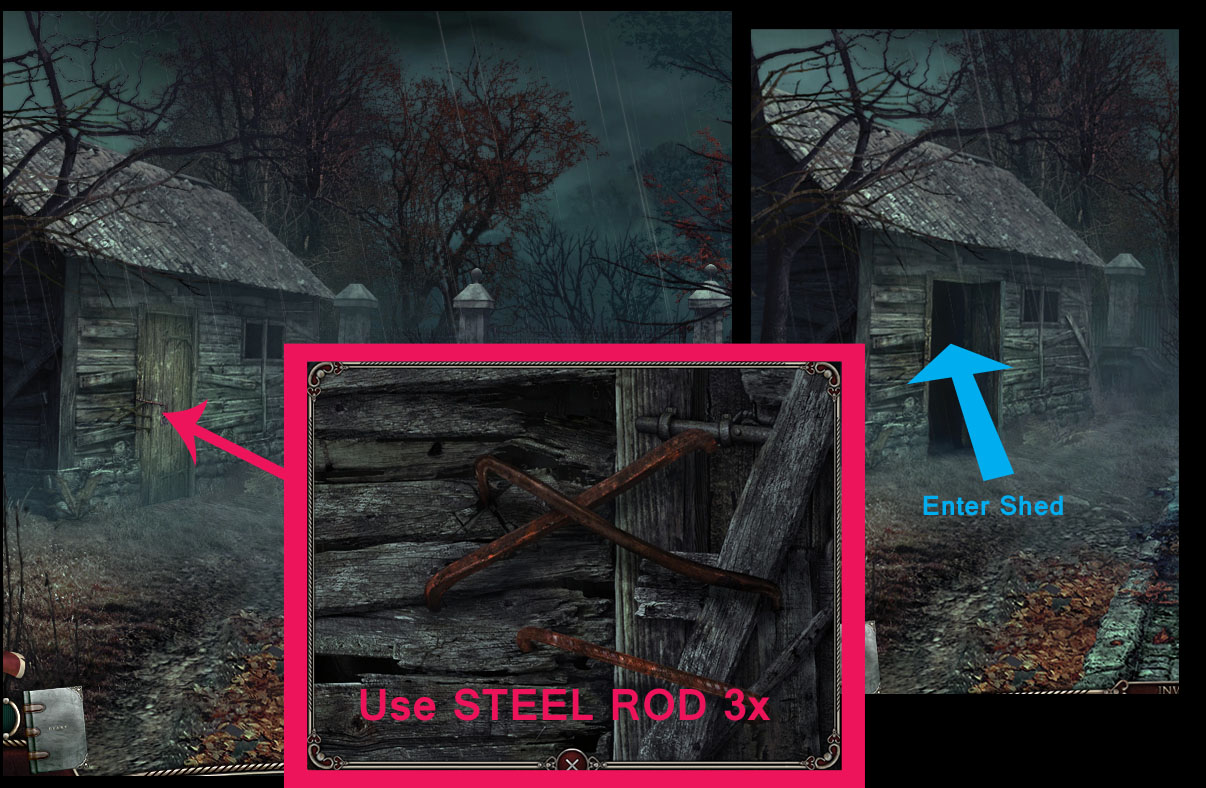
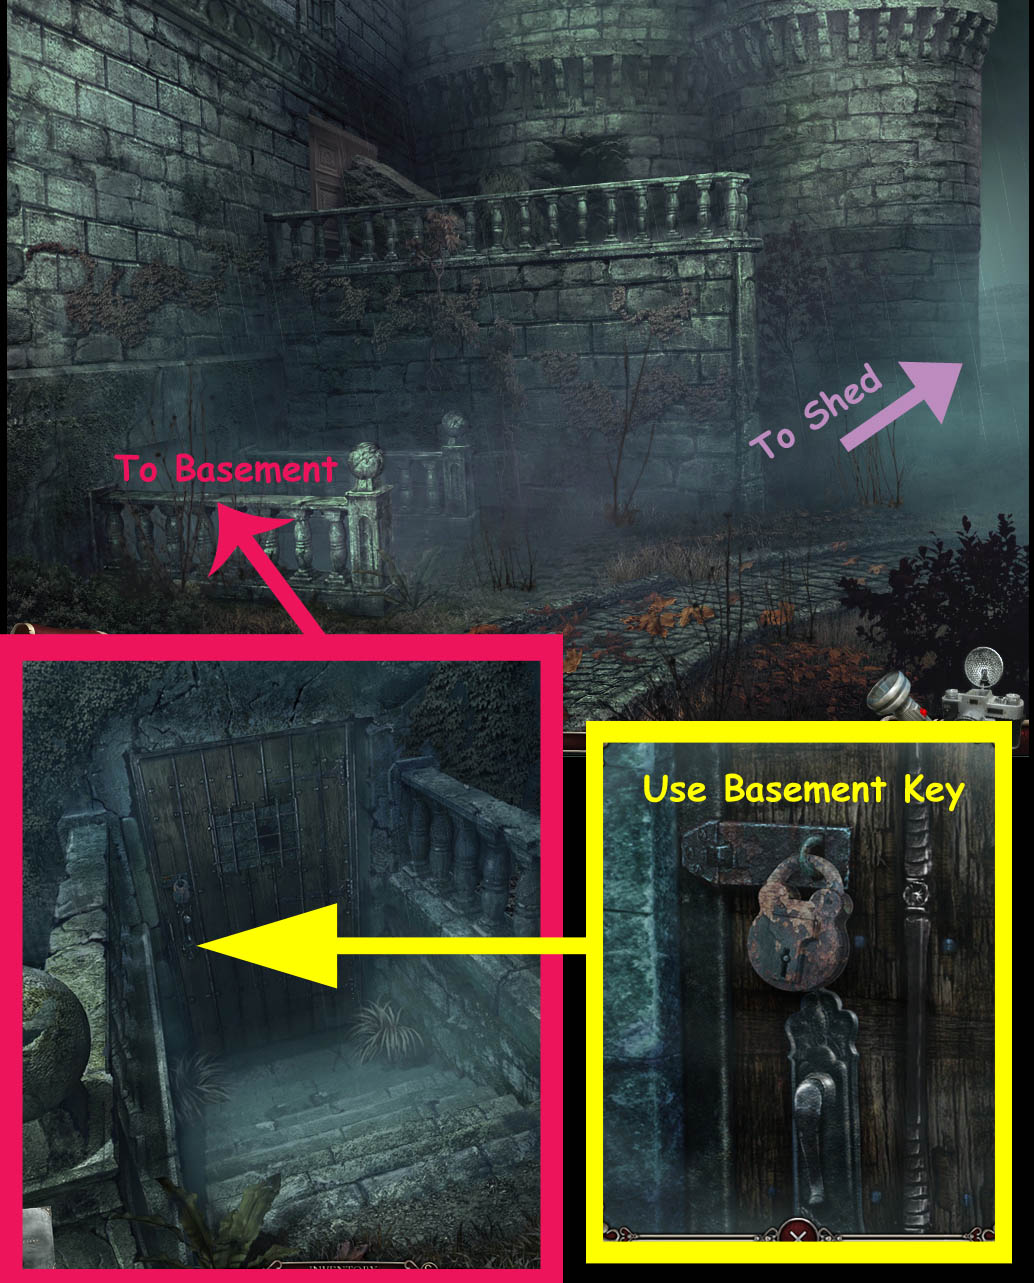
Go back four times then turn right. Turn right again until you're in front of an old shed. Click on its door, which is bolted shut.
Use the STEEL ROD three times to pry the fastenings from the door.
Go inside.
Screenshot.
Continued in Chapter Six: The Manor
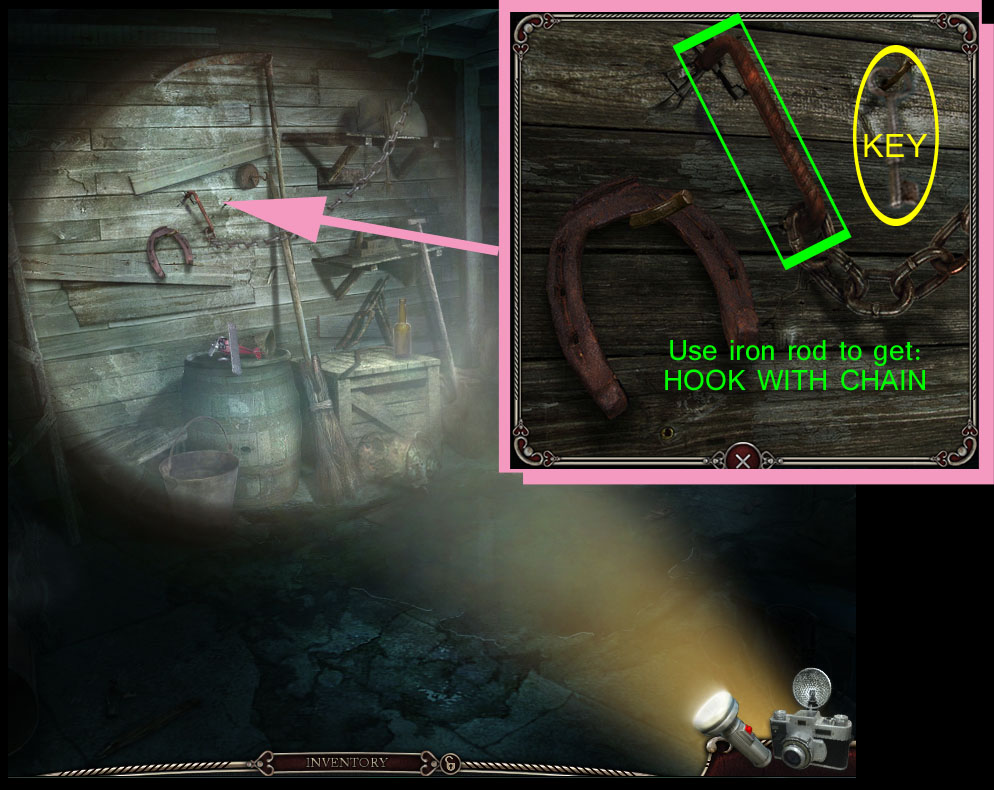
Chapter Six: The Manor
Once you enter the Shed, you'll need your Flashlight to look around.
Screenshot.
In the middle of the wall in front of you is another iron fastener; zoom in on it.
Grab the BASEMENT KEY.
Use the STEEL ROD on the iron fastener to pull it out of the wall: You'll end up with a CHAIN WITH HOOK.
Now go back outside and return to the locked basement door (back out two times and turn left).
Screenshot.
Use the BASEMENT KEY to open the door and enter the Basement.
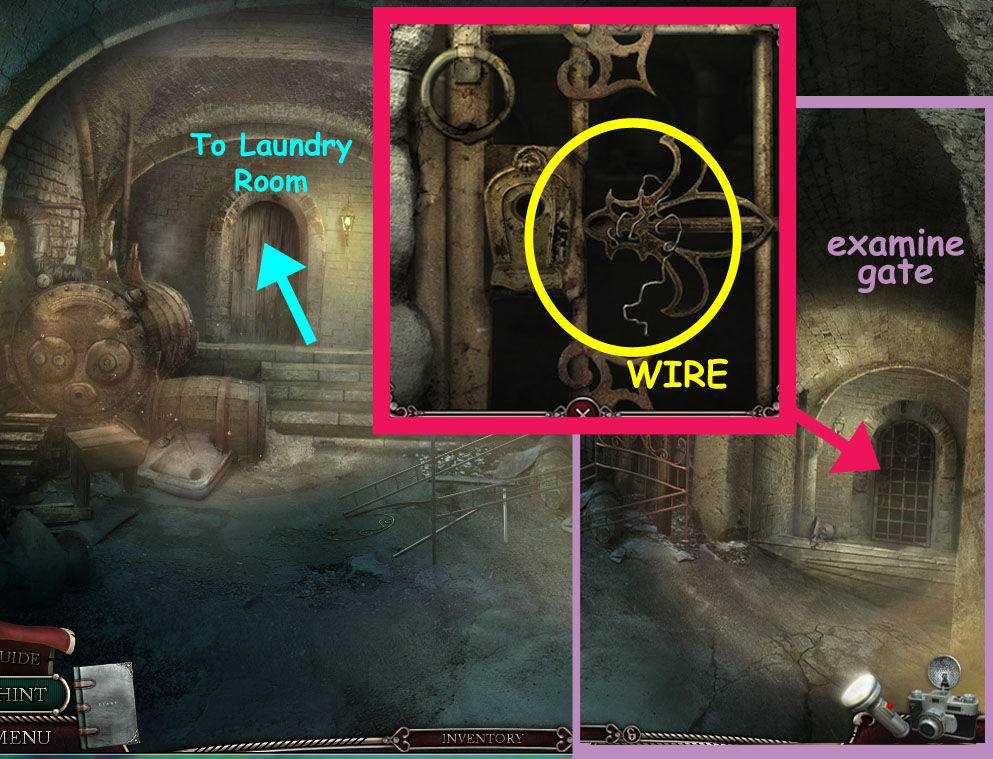
Turn on your Flashlight see all areas of the room. Shine it toward the right side of the screen to find an iron door; zoom in on it...
Screenshot.
...take the WIRE that's tangled in the filigree.
Back out. Open and go through the door in the back, left side of the screen.
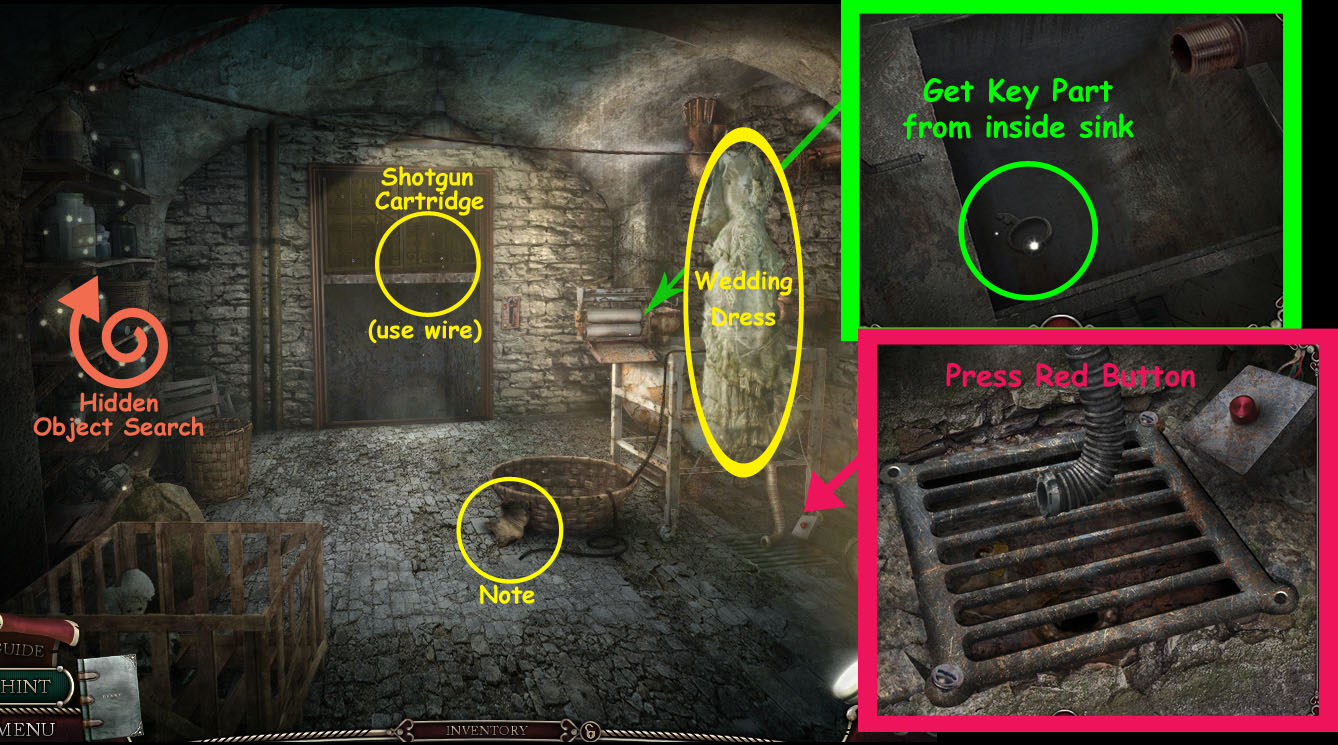
Screenshot.
Pick up the note and read it.
Now, look inside the elevator...
Using your WIRE, pull out the shotgun CARTRIDGE.
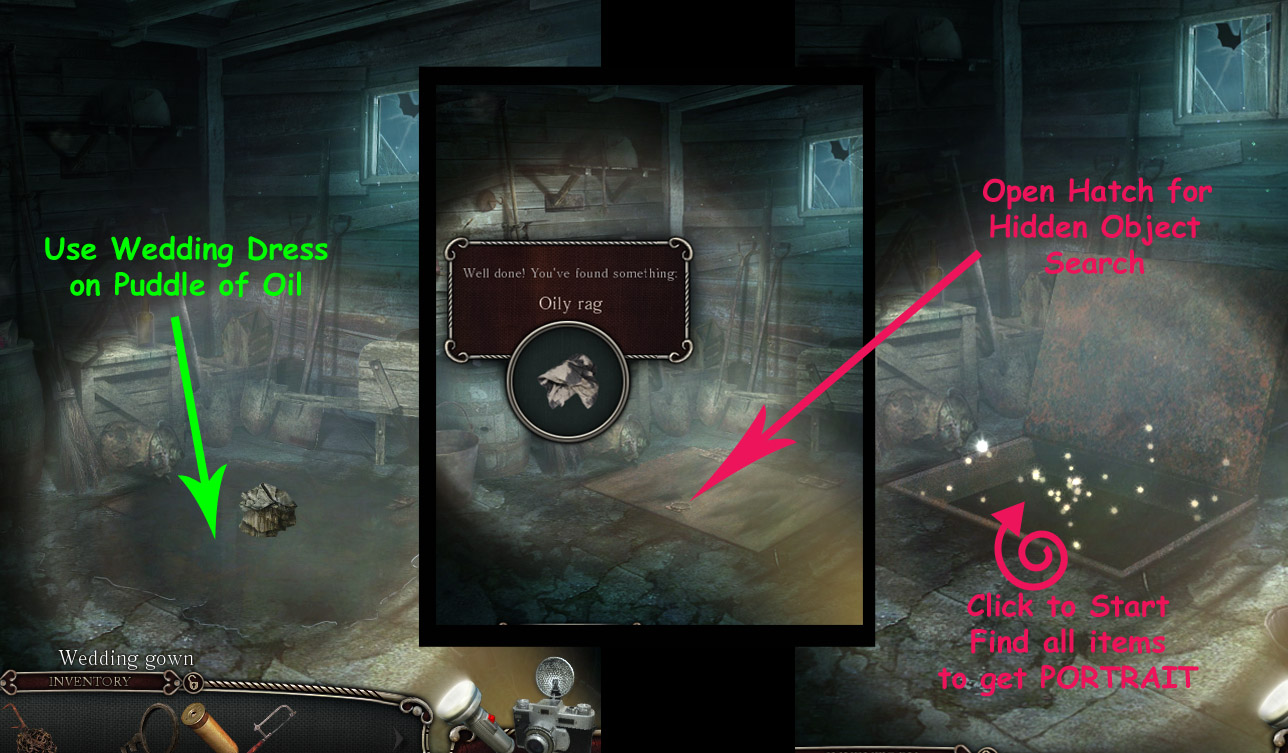
There's a WEDDING GOWN hanging up on the right; get it.
Examine the wash sink (was behind the wedding gown) to get a KEY PART.
Below that is a grate; zoom in on it and press the red button.
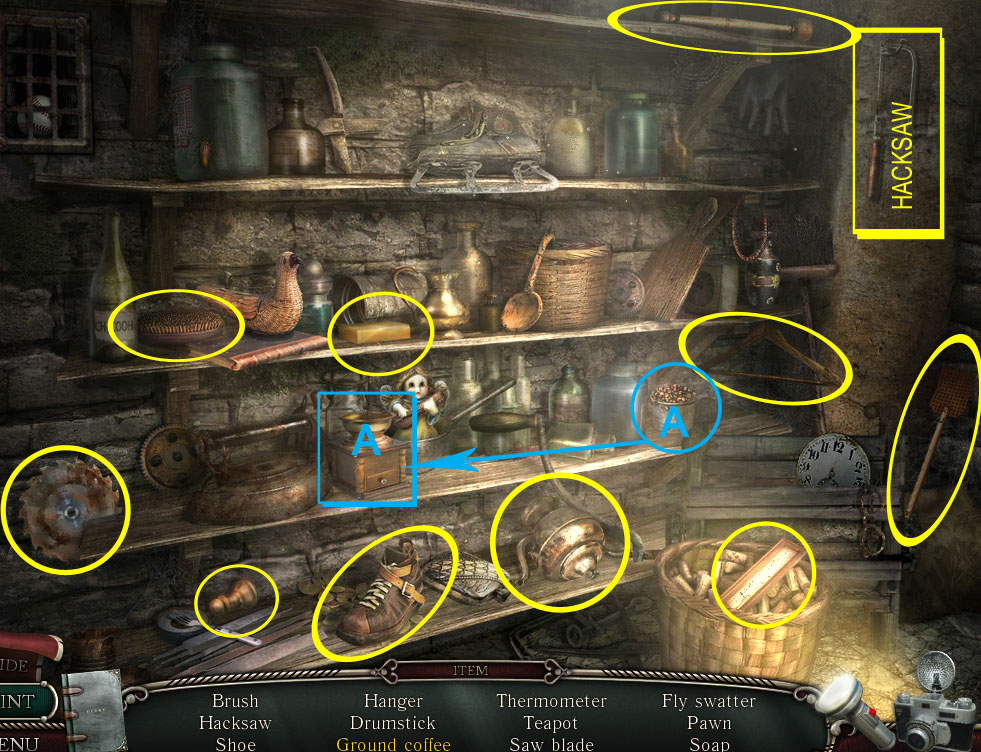
The shelves on the left are a Hidden Object Search. Click them to start...
Screenshot.
When you're found all the listed objects, you'll come away with a: HACKSAW
Now go back into the shed (go back three times, turn right, then left to enter the shed). Use your flashlight.
Screenshot.
Using the WEDDING GOWN, mop up the pool of oil on the floor of the shed.
Now have an OILY RAG
...and can see a hatch.
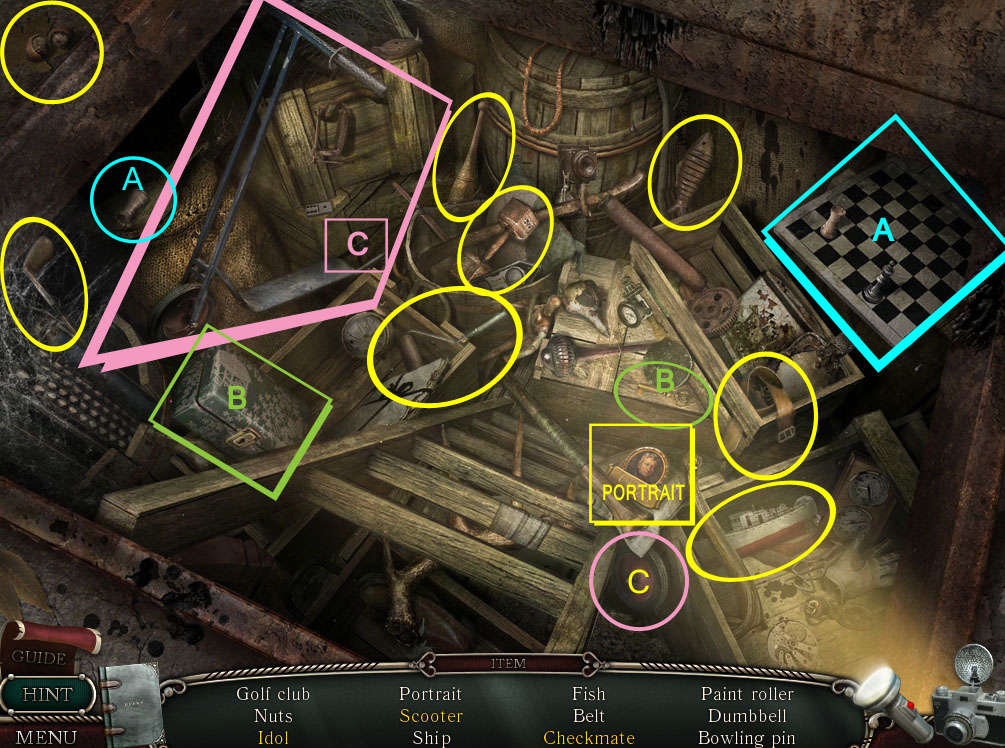
Click on the hatch to begin another Hidden Object Search:
Screenshot.
Finding all the objects earns a PORTRAIT.
Return to the basement (back up two times, turn left, go straight).
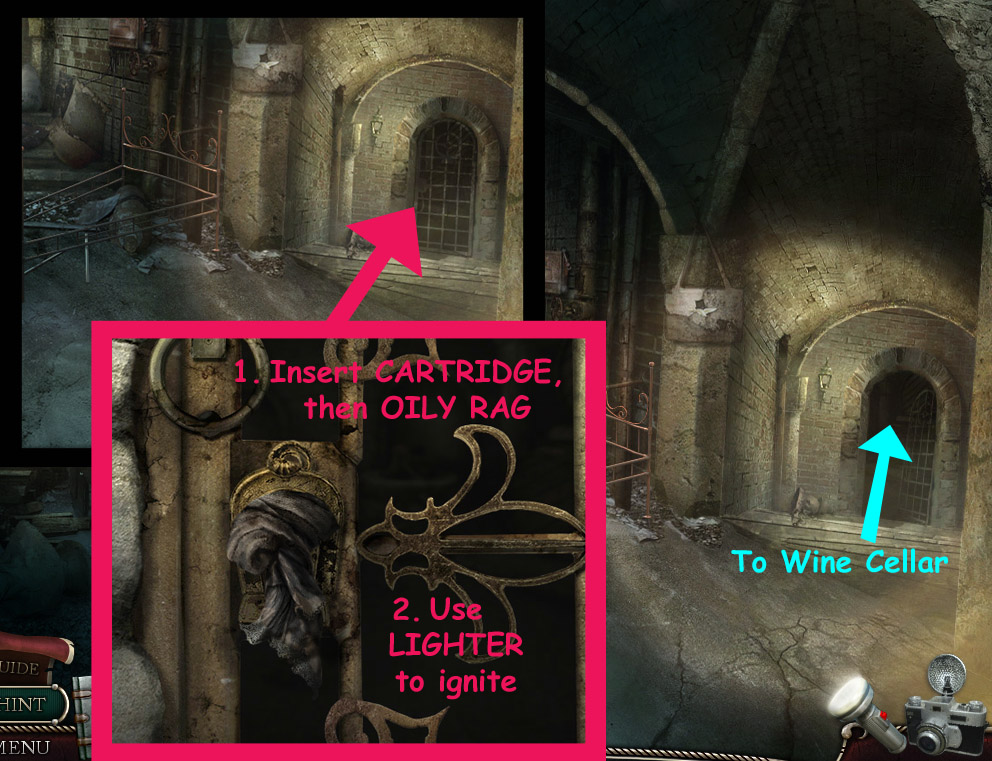
Inside the basement, use your flashlight again to see and zoom in on the metal gate on the right.
Screenshot.
1st - Put the shotgun CARTRIDGE into the lock opening.
then add the OILY RAG.
2nd - ignite it with your LIGHTER.
It will explode, causing the door to swing open.
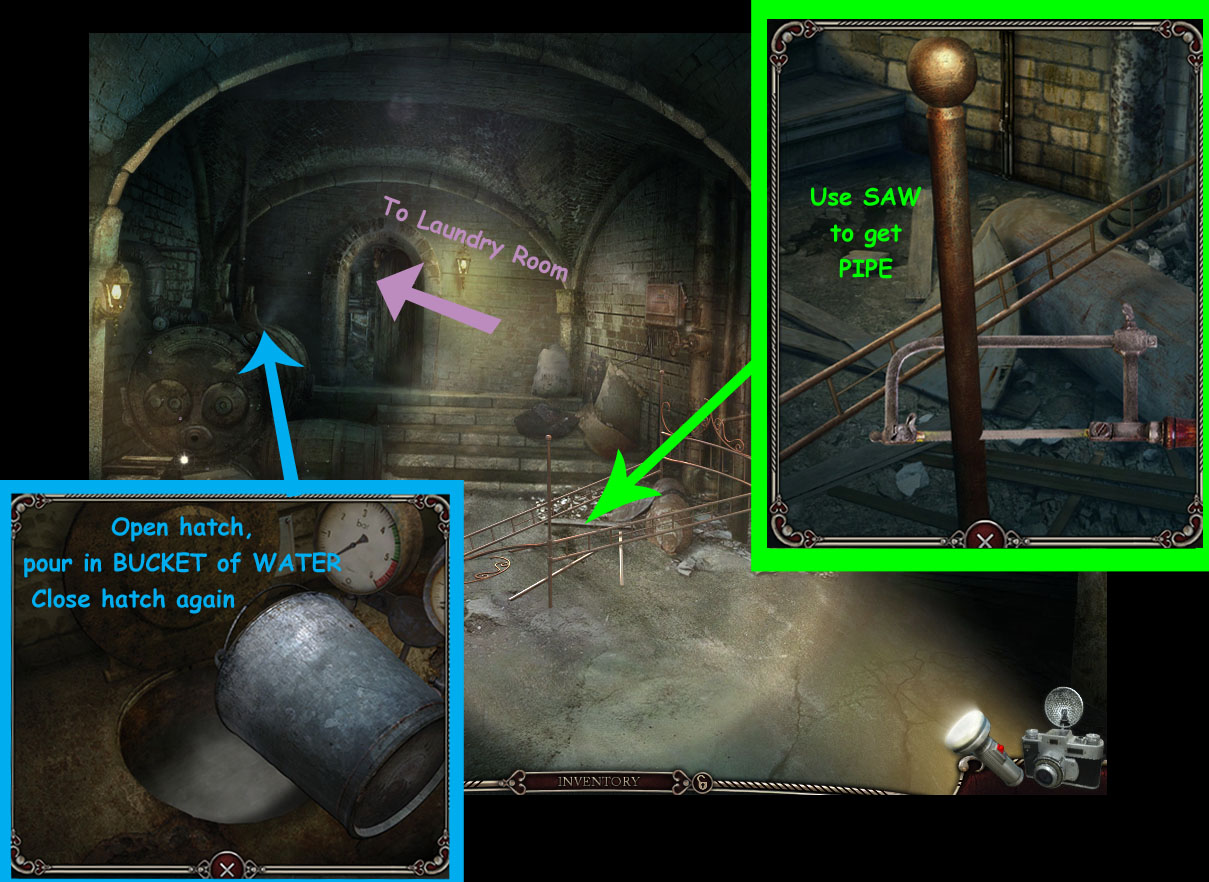
Go through the newly-opened gate to the wine cellar. With your Flashlight still on, look around the room.
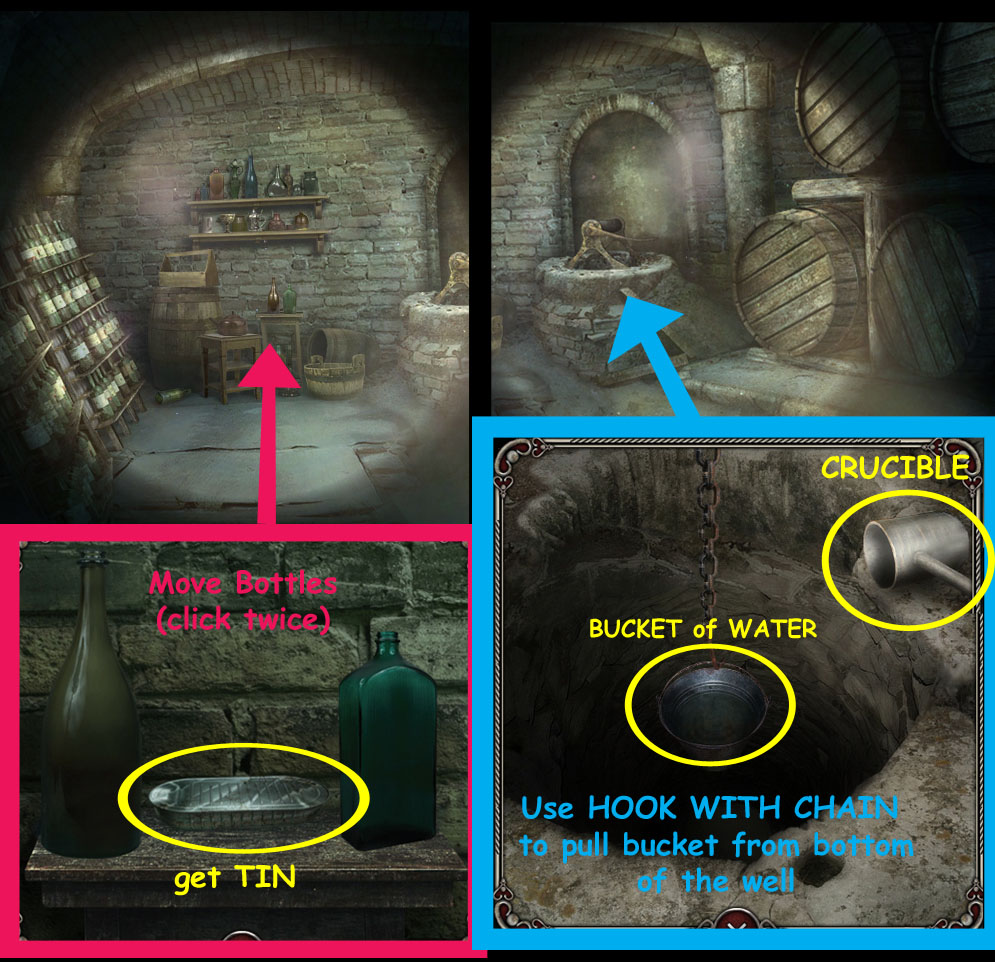
Screenshot.
On the table are some bottles; zoom in on them and click around until you find the TIN. Take it.
Next, look inside the well. Get the CRUCIBLE.
Still in the well, using the CHAIN WITH HOOK, pull up a BUCKET OF WATER.
Back out into the main basement area again.
Screenshot.
Zoom in on the iron bed:
Use your SAW off a piece of the bed frame to get a PIPE.
Now inspect the boiler; open the hatch...it needs more water.
Pour your BUCKET OF WATER inside the boiler.
and close the hatch again.
Go through the back door into the laundry room.Inspect the wall by the elevator:
Screenshot.
Put the PIPE in slot to form a lever.
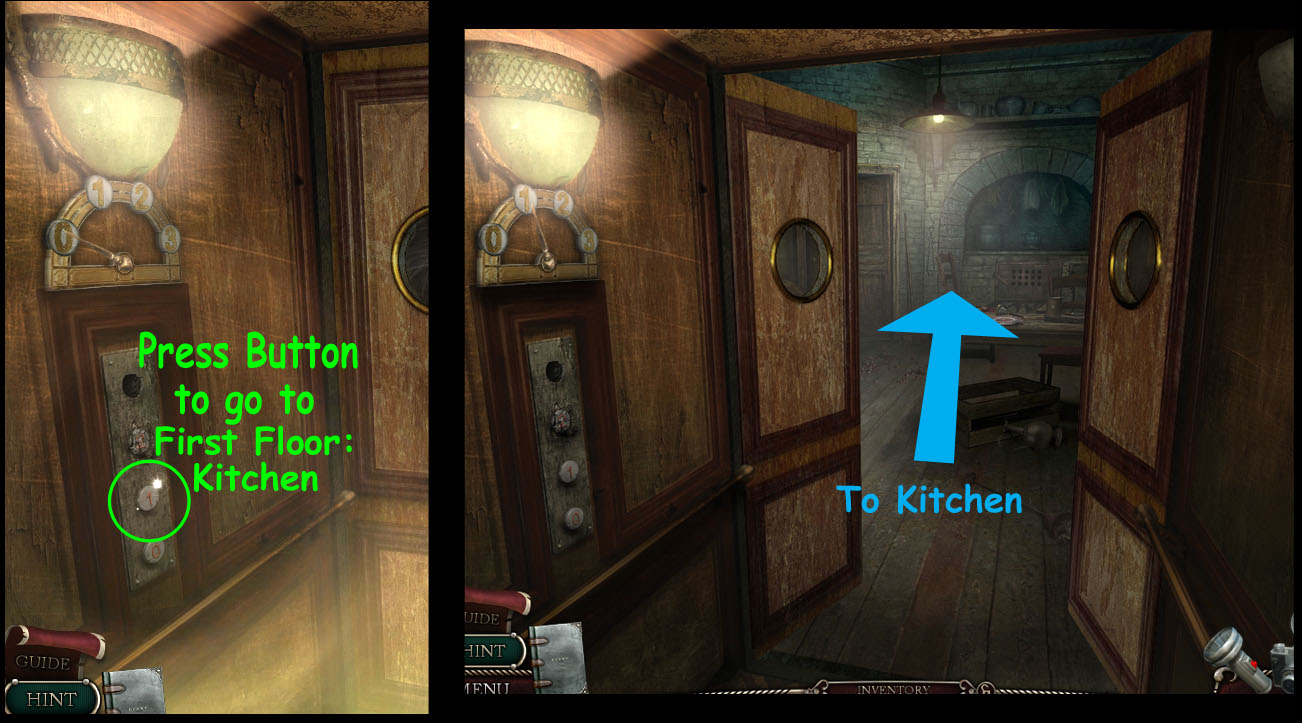
Pull the new lever: elevator will arrive and its doors will open.
Enter the elevator and press the "1" button on the control panel (0 is the basement).
Screenshot.
When you arrive at the first floor, exit the elevator into the kitchen.
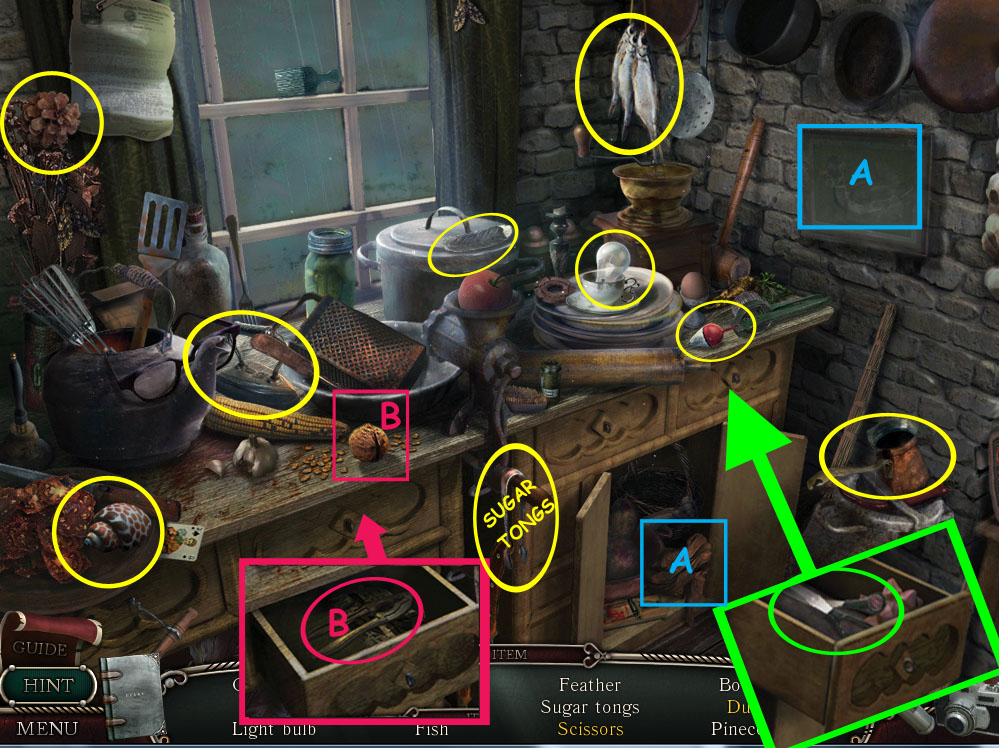
Inside the kitchen, look closer at the stove:
Screenshot.
Get the POKER leaning against the left edge.
Open the stove and get the Note.
The kitchen cabinet is a Hidden Object Search. Click it to begin:
Screenshot.
When you've found all the listed objects, you'll get SUGAR TONGS.
Go through the door and continue forward into the Dining Room.
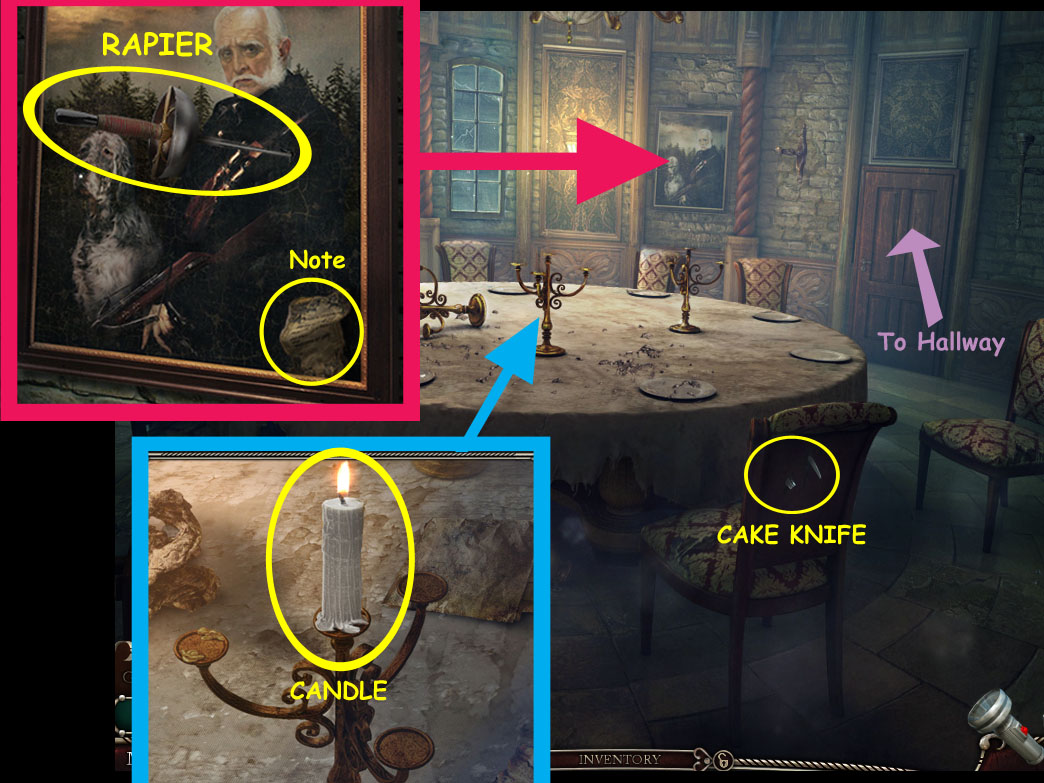
Screenshot.
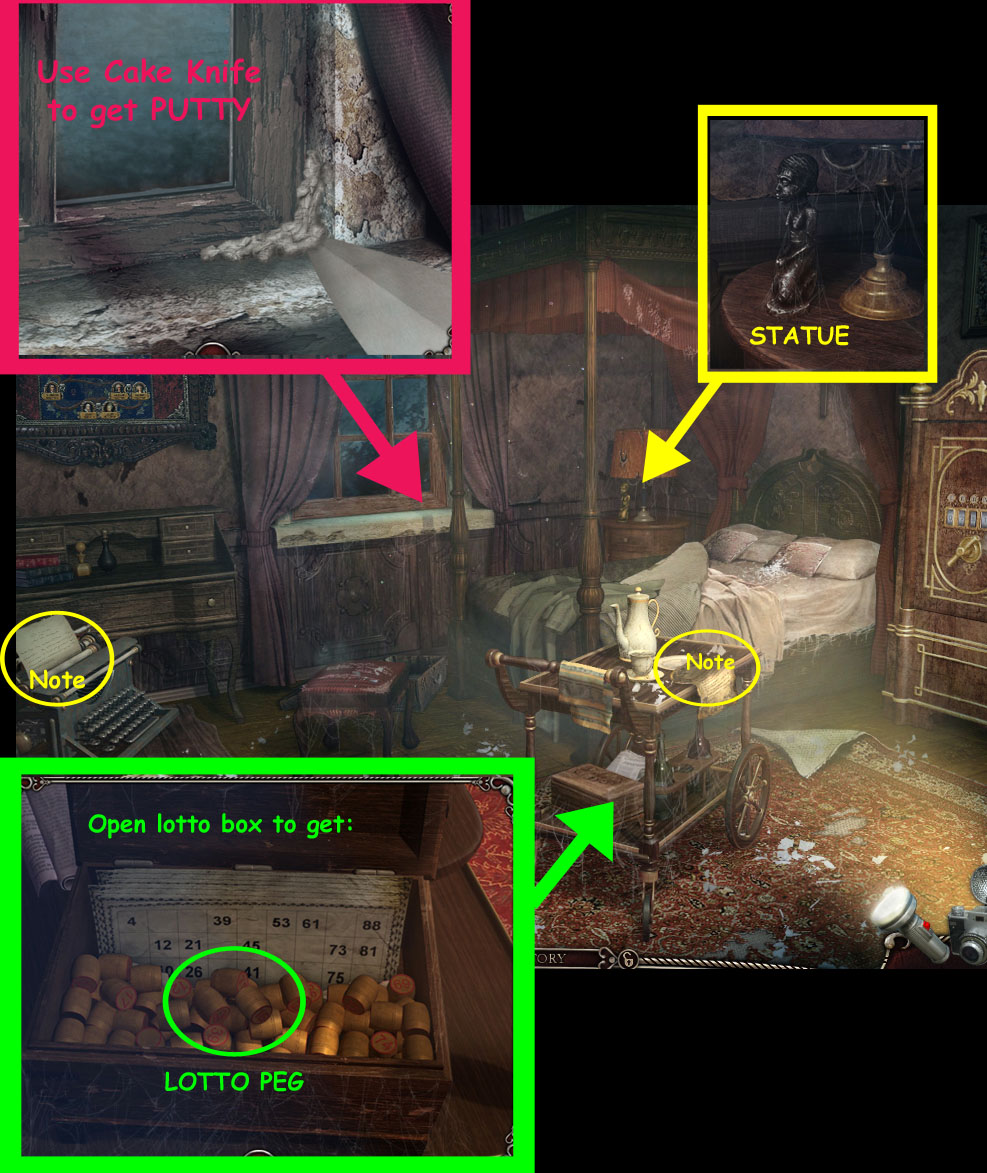
Grab the CAKE KNIFE from the chair.
Zoom in on the table: take the CANDLE.
Click on the picture to get another note and a RAPIER.
Go out the door in back to the Hallway. Here you'll need your flashlight again.Zoom in on the door on the other end of the hallway:
Screenshot.
Using your SUGAR TONGS, get the other KEY PART.
Open and go through the door on the left to the Bedroom.
Screenshot.
On the nightstand is a STATUETTE; take it. It will combine with your crucible to make a METAL STATUE.
Pick up the note from the side table.Look at the safe and then at the typewriter to find two more notes.
Zoom in on the window...
Between the pane and ledge you'll find PUTTY.
Use your CAKE KNIFE to scrape off the putty.
You'll end up with a RAPIER WITH PUTTY.
Open the lotto box under the serving tray:
and get a LOTTO KEG.
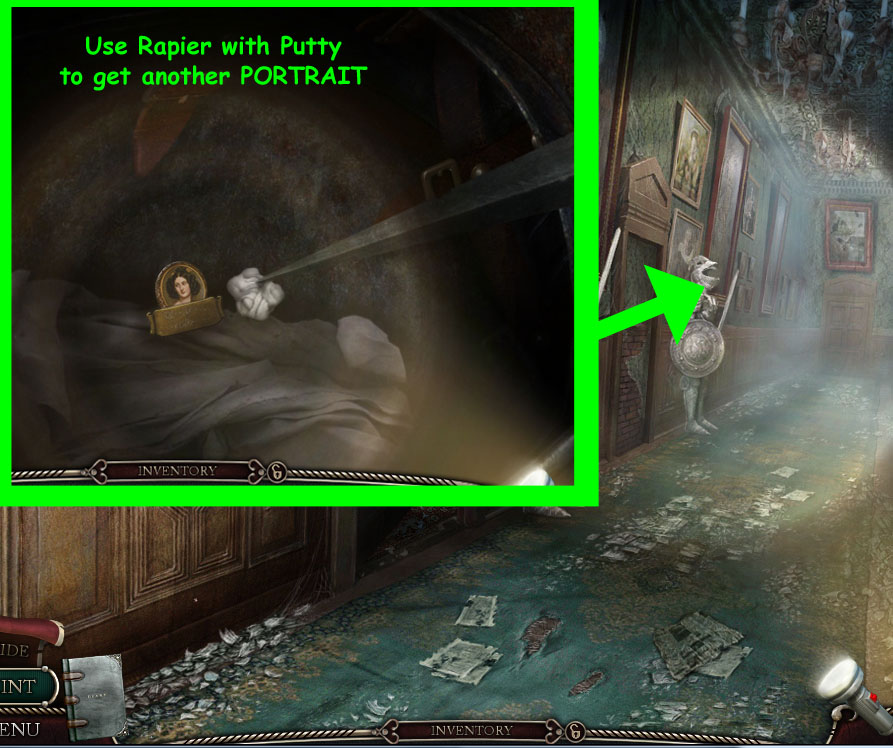
Go back out into the hallway. Shine your flashlight on the suit of armor in the back and zoom in:
Screenshot.
Use your RAPIER WITH PUTTY to reach the object deep inside:
another PORTRAIT.
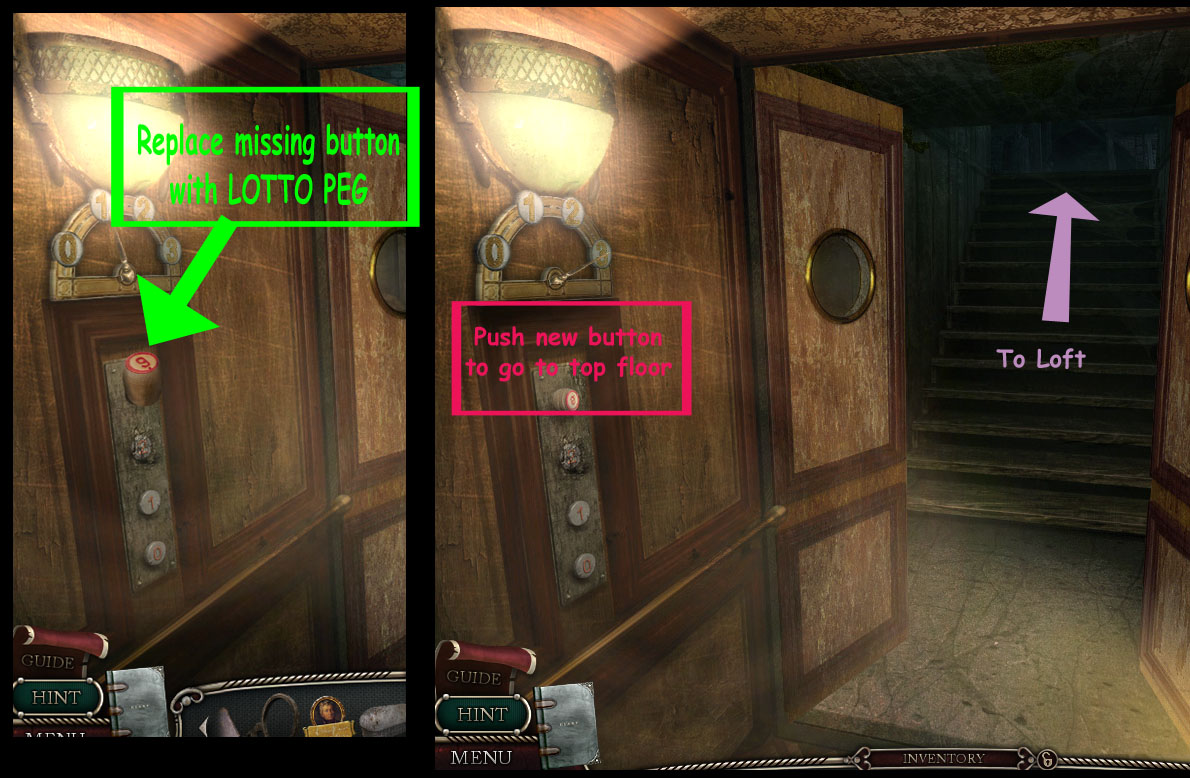
Return to the Elevator by going back three times:
Screenshot.
Use the LOTTO KEG to replace the missing elevator button (would be 4th floor).
Push it to travel up to the loft.
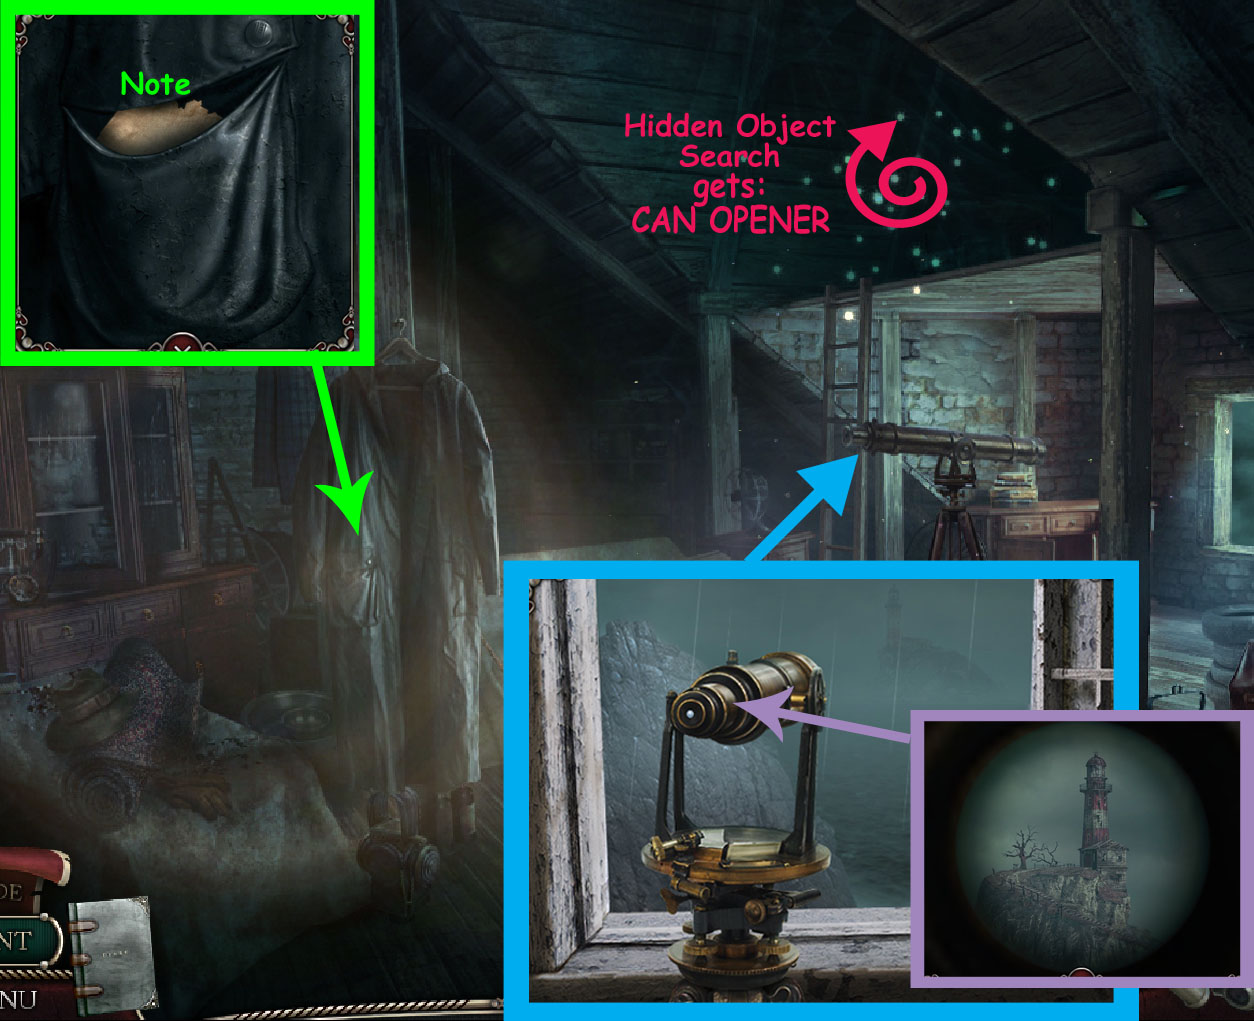
Chapter Seven: The Loft
From the top of the elevator, exit into the loft. Here you'll need your flashlight again.
Screenshot.
Get a note from the coat hanging on a peg in front of you.
Higher up in the loft is another Hidden Object Search. Click it to begin (keep your flashlight on).
Screenshot.
When you've found all the objects listed, you'll get a TIN OPENER.
The tin opener will combine with the tin in your inventory to become an empty TIN.
Now you're ready to repair the key halves. Return to the lover's tree:
Back out into the elevator. Push the bottom button to go down to the basement.
Back out of elevator and continue backwards four more times after that to stand in front of the house.
Go straight toward the front door, pick up the note next to the left column. Back up again.
Turn left twice toward the garden trellis then turn right to the tree.
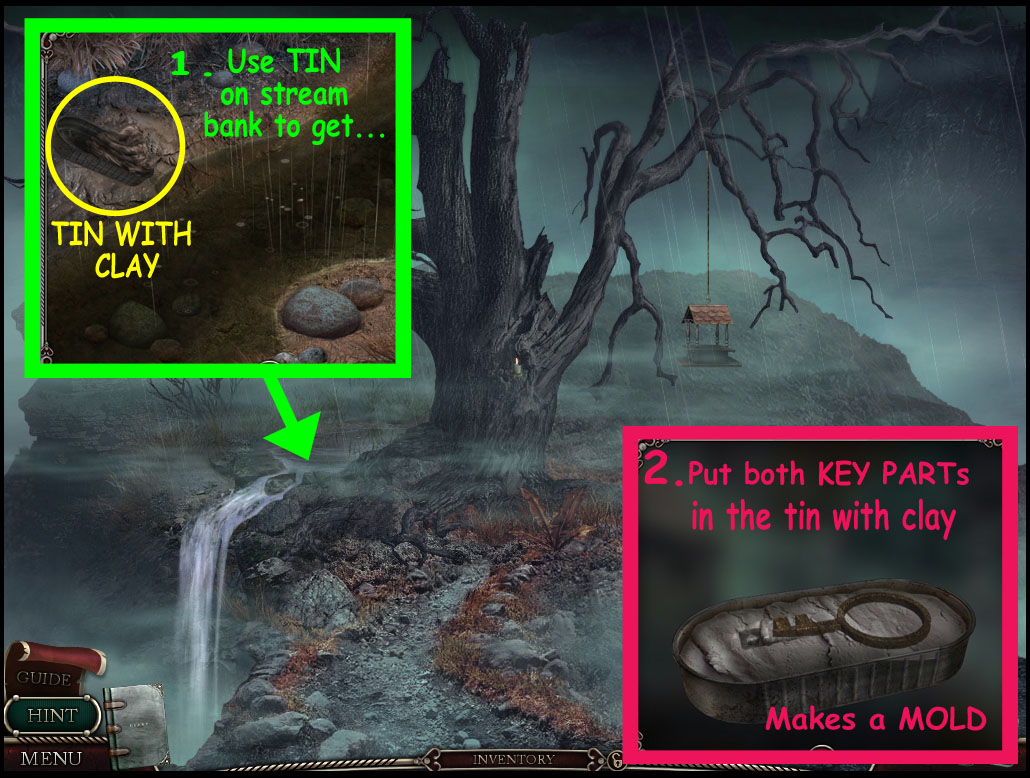
At the lover's tree, zoom in on the stream on the leftside of the tree.
Screenshot.
There's some soft clay on the stream bank. Use the TIN to scoop up the clay.
Put each of the two broken KEY HALVES in the TIN WITH CLAY.
The keys in the clay tin will form a MOLD so you can make a new key.
Now you need to Return to the blacksmith's workshop.
Back out, go straight, turn right twice, then forward into the blacksmith's shop. Make a new key:
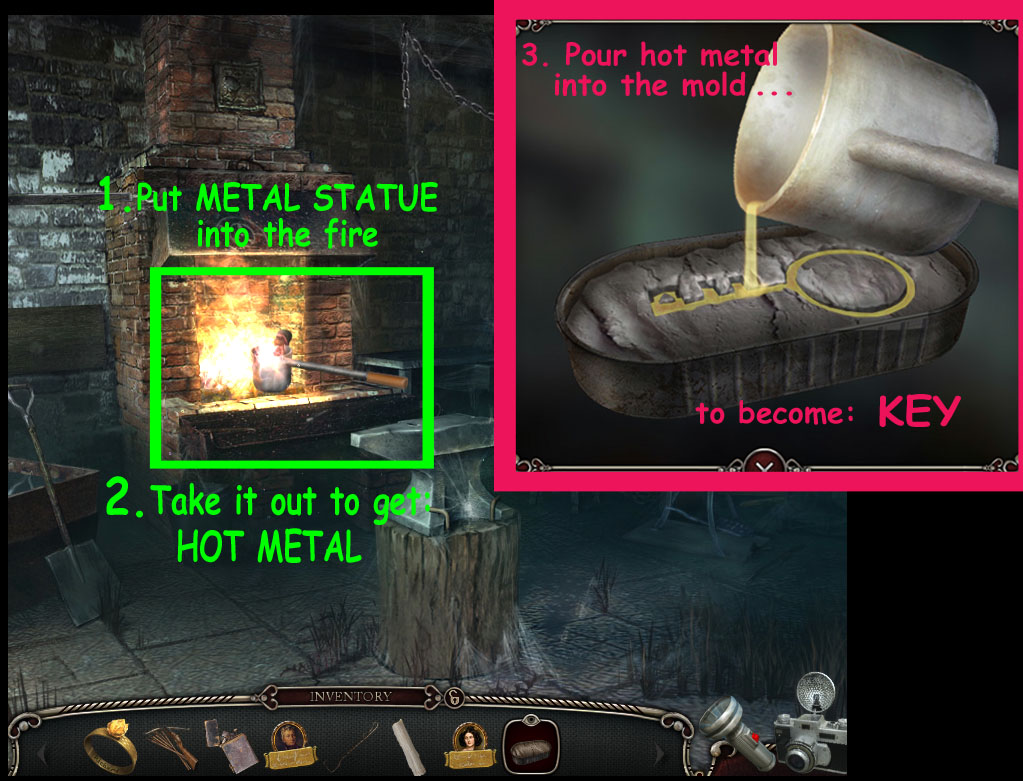
Screenshot.
Put the METAL STATUE into the fire then take it out to get HOT METAL.
Pour the HOT METAL into the MOLD
The metal hardens to become a KEY.
Now you can open the door at the end of the hallway.
Return to the manor's kitchen:
Go back six times until you're in front of the house again. Then, go right and down into the basement. Go through the door.
Go forward into the laundry then into the elevator. Push the first floor button.
When the elevator stops, exit and go forward into the dining room. Watch as a plate drops to the floor.
Pick up the BROKEN CHINA from under the table.
Screenshot.
Next, continue through the door to the Hallway. Use your flashlight here.
Zoom in on the door lock where you found the other broken key half. Use your now whole KEY to unlock the door and enter.
Inside the back bedroom, you still need your flashlight.
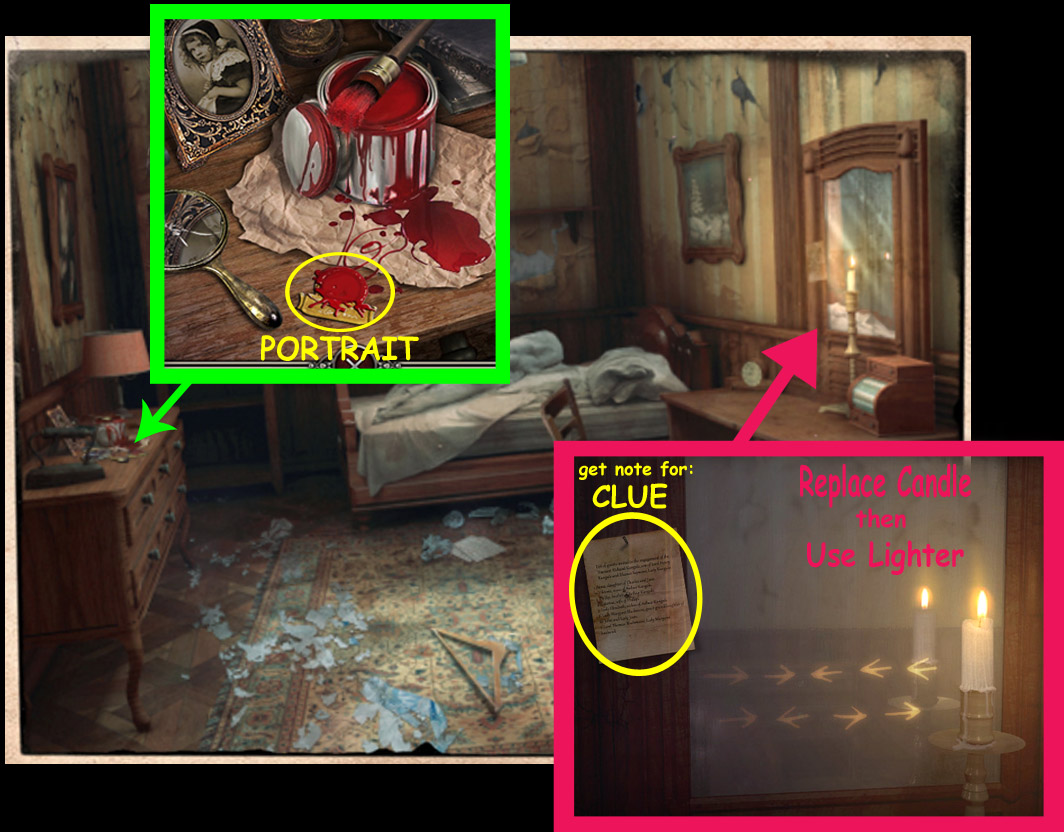
Screenshot.
Look on the dresser to get another PORTRAIT that's covered in red paint.
Zoom in on the mirror next. Use your camera to get a clue:
Put the CANDLE in the holder and use the LIGHTER to light it.
An important clue will appear in the mirror; it will also be added to your journal.
Also take the NOTE from the mirror for another necessary clue.
Return to the elevator (back out once) and select the top floor. When it stops, go forward into the loft.
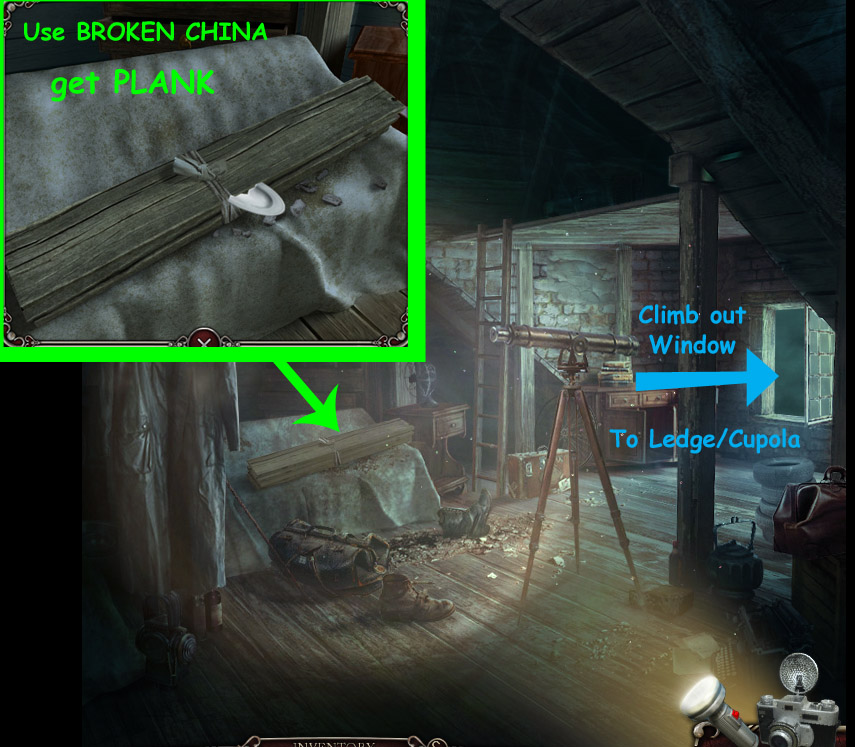
Screenshot.
Zoom in on the planks of wood and take the note.
Then, using the BROKEN CHINA, cut the rope binding the planks of wood and get a PLANK.
Climb out the window. After trying to go forward, the ledge will crumble.
Screenshot.
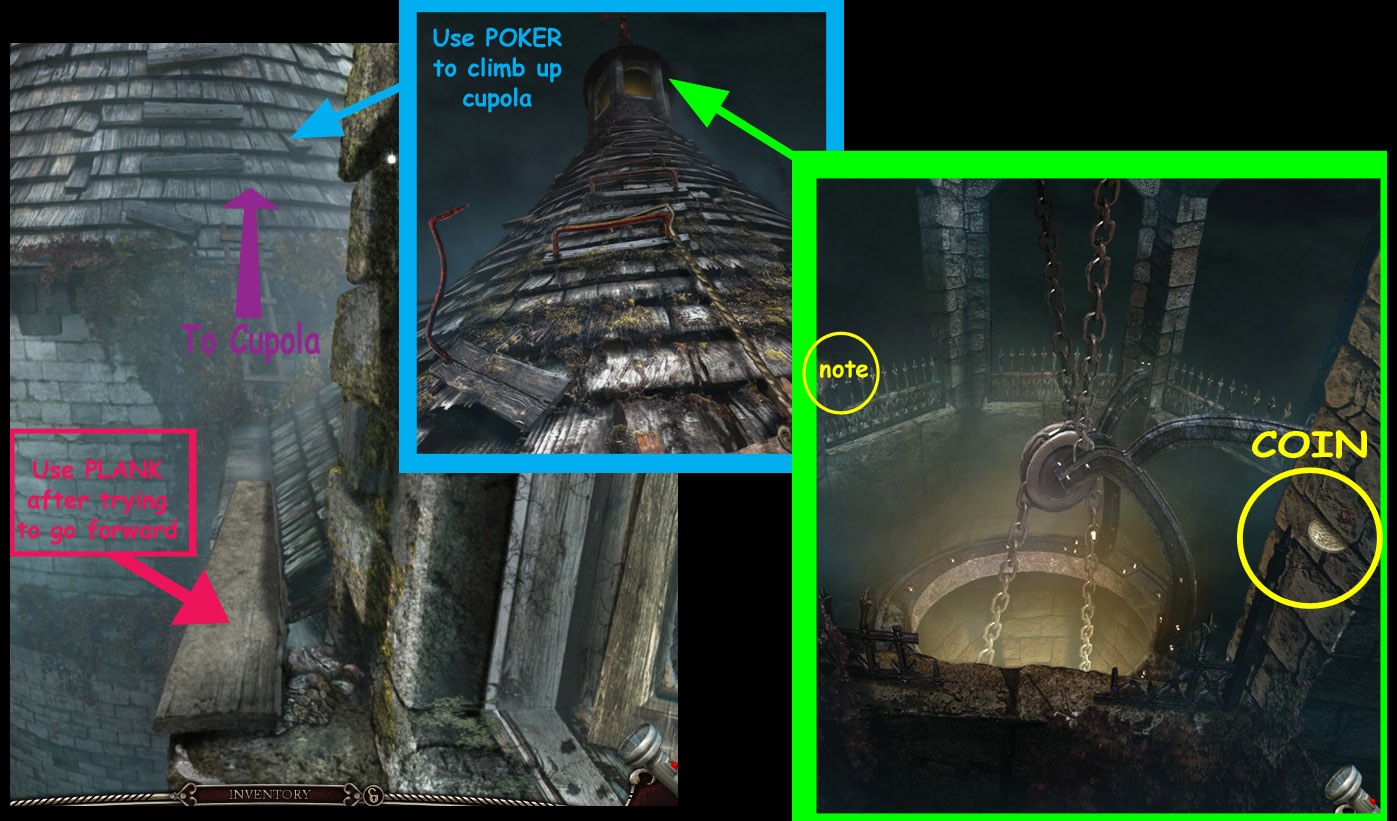
Use the PLANK to continue forward to the cupola.
Using the POKER, pull yourself up the rungs to the top of the tower.
There is a COIN stuck in the beam nearest you; get it.
Get a note from the opposite ledge.
Return to the laundry room: (back twice, right, and back again; take elevator to ground floor, back out).
Screenshot.
Using your BROKEN CHINA on the rope above the elevator doors, get some TWINE.
It will become CROSSBOW WITH TWINE.
Zoom in on the grate in the floor.
Use the COIN to remove the screws and open the grate.
Now you can reach another PORTRAIT.
Go back upstairs, through the loft to the cupola:
enter elevator, press top floor button, exit elevator up to the loft, go out the window, move strait across the plank and then up the tower to the cupola.
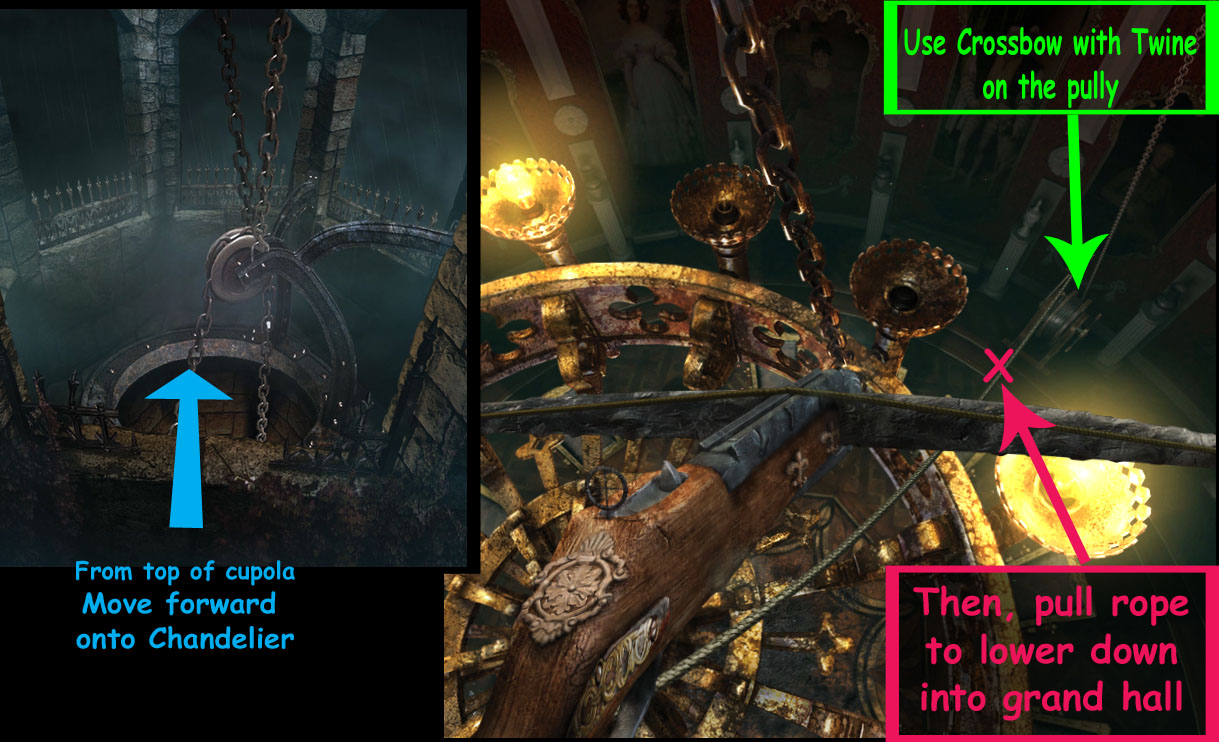
Now move forward, out onto the chandelier.
Screenshot.
Take out your CROSSBOW WITH TWINE and shoot at the lever on the right.
Pull on the rope to lower yourself into the hall.
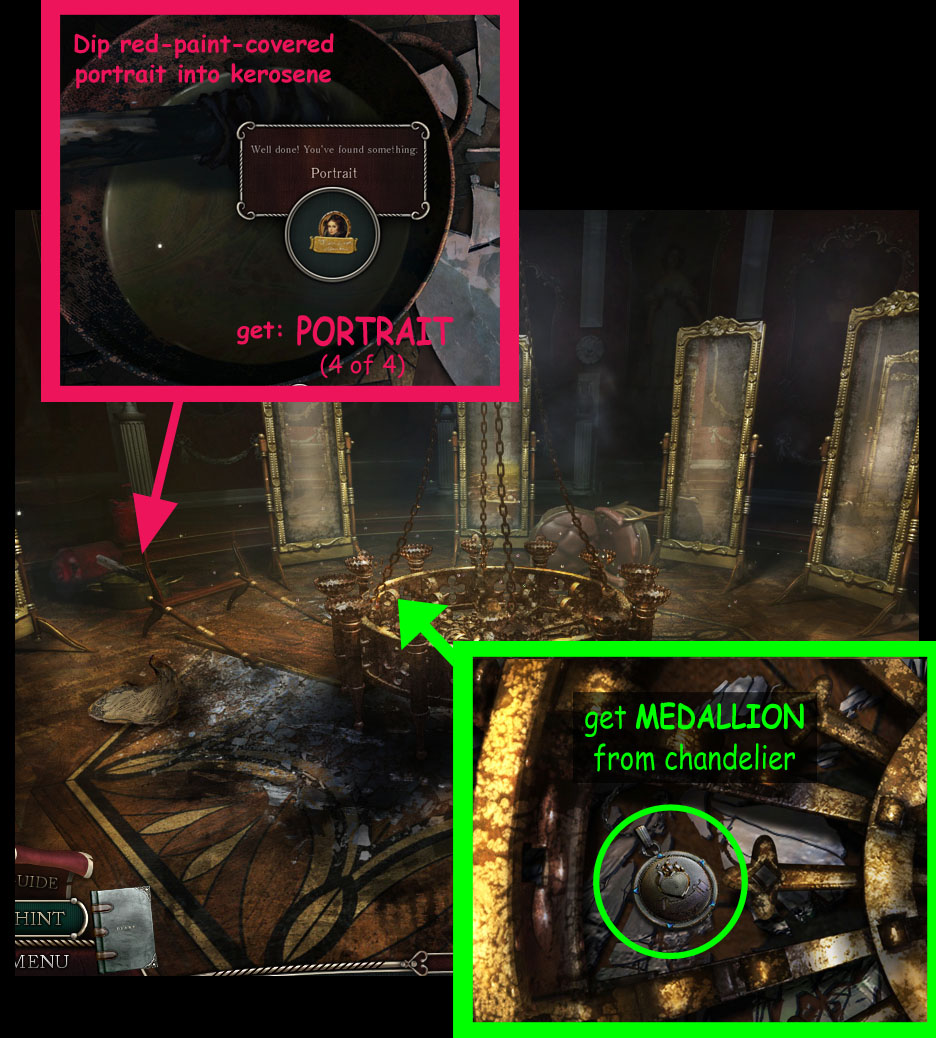
Screenshot.
Examine the chandelier to find a MEDALLION.
Pick up a Note on left side of the chandelier.
In the back is a pail of kerosene; zoom in on it:
Dip the paint covered PORTRAIT into the kerosene to clean it off.
Now return to the main bedroom on the first floor:
Go back up the chandelier, backwards two times, right into the window, then back into the elevator; push the first floor button; exit out the elevator, forward to the dining room, then out the door to the hallway. Go in the first door.
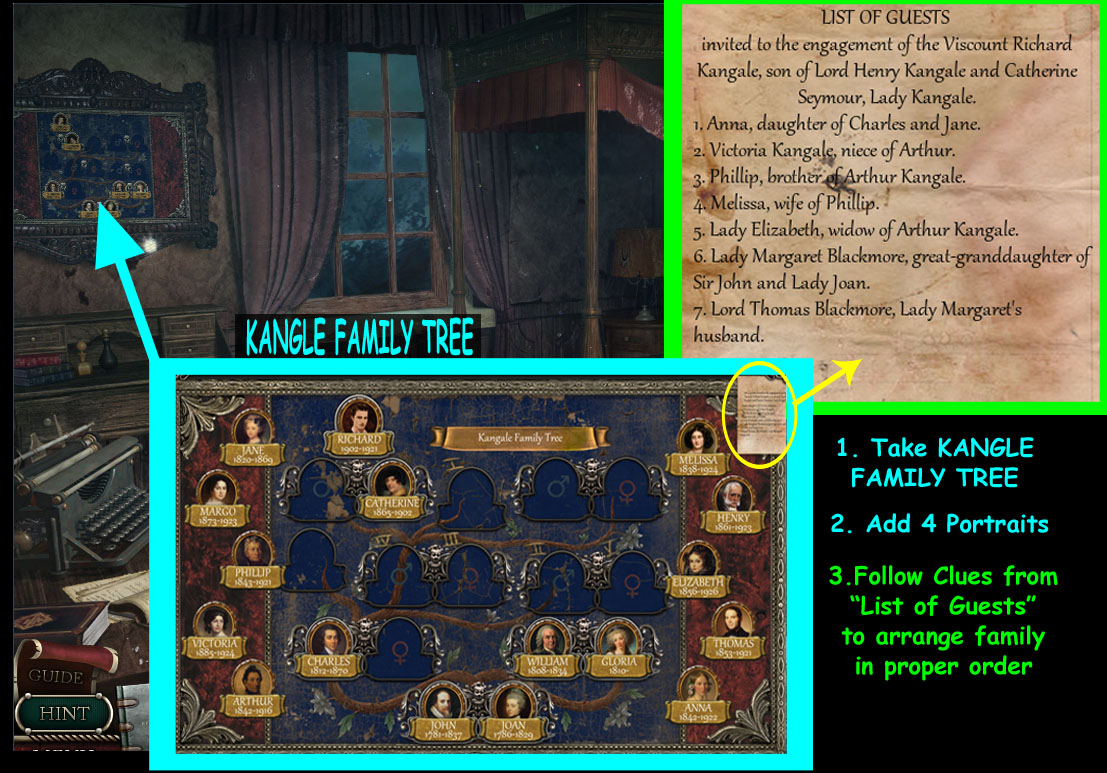
Inside the main bedroom...Get the KANGALE FAMILY TREE off the wall above the fireplace. Solve the puzzle to get the safe code:
Screenshot.
If you followed this walkthrough exactly, you have 4 of 4 PORTRAITS. Place them onto the KANGLE FAMILY TREE.
Open the NOTE (found on the mirror in back bedroom) to read the "guest list" which gives clues about how each person is related.
Along with the clues from the guest list, use the male and female symbols on the tree painting to assist you.
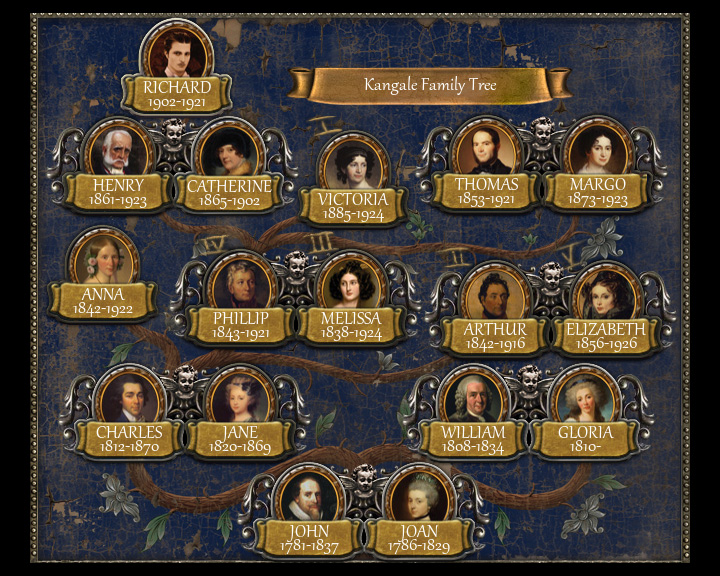
Arrange the portraits on the Kangle Family Tree so that each family member is in the correct spot...
SOLUTION:
Screenshot.
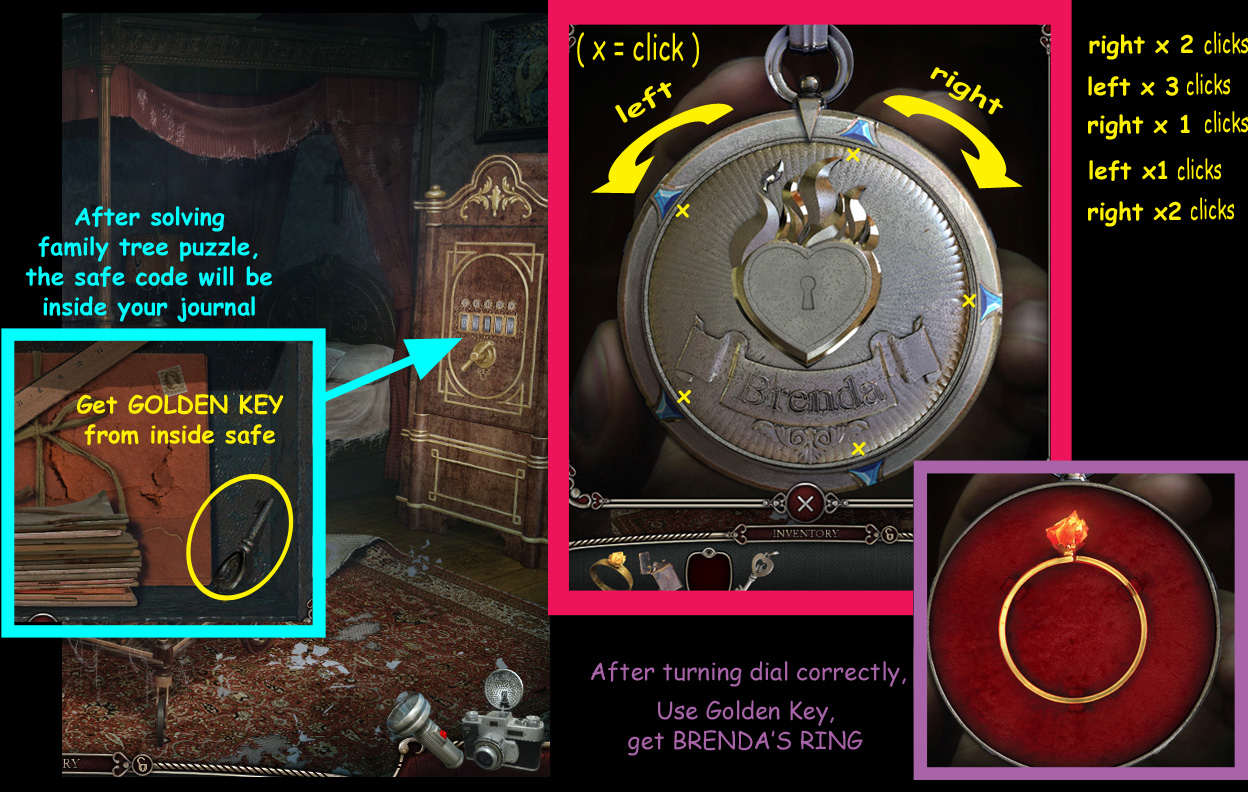
Now you have the information needed to open the safe; zoom in on it:
Take the note. It tells you "The code is the last digits of the first years."
When you solved the Kangle Family Tree, those digits were automatically recorded into your journal.
Read your journal to get the safe's code.**
Solutions vary each game.
Enter those dates as a five-digit code on the safe. Click each dial until it turns to the desired number. When finished, turn the handle.
Screenshot.
Inside the safe you'll find a GOLDEN KEY. Take it.
Get your GOLDEN MEDALLION out from your inventory.
Open your journal to the snapshot of the mirror in the back bedroom.
Each blue gem represents one position.
Turn the dial in the direction and number of positions as shown by the arrows in the mirror:
right 2x -- left 3x -- right -- left -- right 2x
When you've turned the dial correctly, the keyhole in the middle will open.
Use the GOLDEN KEY on the medallion's lock:
Get BRENDA'S RING from inside the medallion.
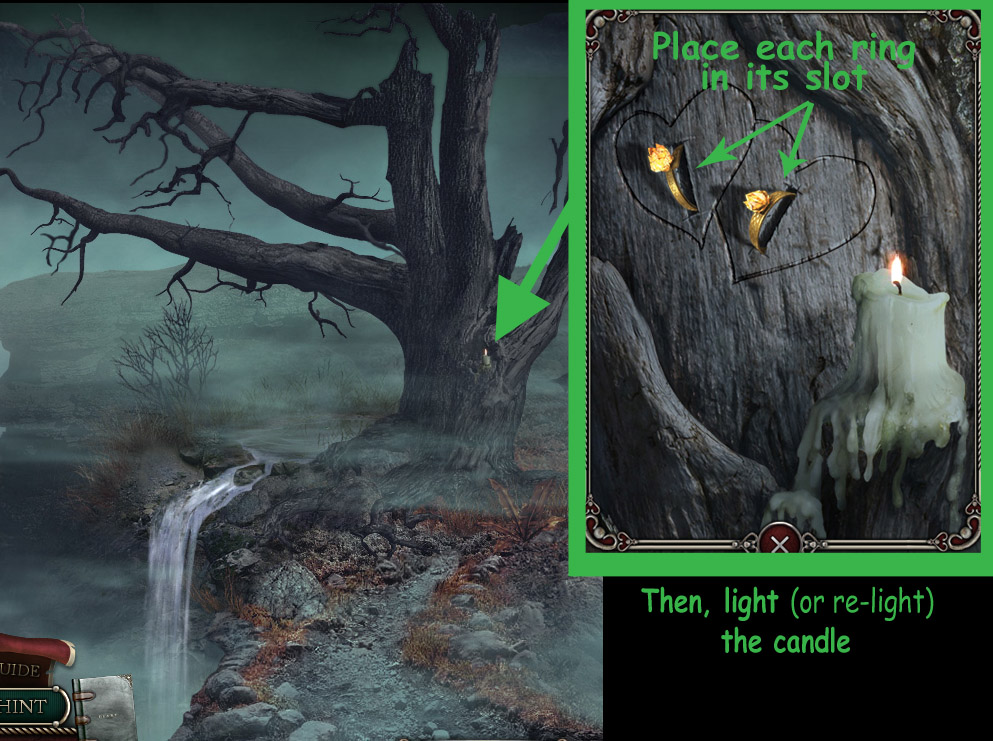
Now you can return to the lover's tree to perform the ring ceremony.
Back out four times until you reach the elevator. Select the bottom button. Back up five more times. From in front of the house, turn left twice toward the garden trellis. Then turn right to the tree.
At the stream/tree, zoom in on the knot in the tree:
Screenshot.
Insert each of the two rings into the slots in the middle of the carved heart.
Using your LIGHTER, light the candle.
With the rings in place and the candle lit, the final scenes of the standard edition game are shown.
NOTE: for more story, continue to the bonus chapter of the collector's edition.
Posted by: elle |
April 6, 2012 2:14 PM
|
April 6, 2012 2:14 PM