
Shadow Wolf Mysteries:
Bane of the Family
Platform: Mac, Windows
![]() According to popular myth, werewolves are pretty much all over the place, leading normal lives just like the rest of us tax-paying citizens. For the most part, they're pretty normal. Walking around, visiting Starbucks, and maybe even holding the door for you when your hands are full. But when it's the full moon, werewolf kind has a difficult time blending in. And we're not just talking about the smell! In the new hidden object adventure game from ERS Game Studio, Shadow Wolf Mysteries: Bane of the Family, you get to dive a bit deeper into the family structure of a family of werewolves, learning all about their curse and how this odd transformation travels from parents to children.
According to popular myth, werewolves are pretty much all over the place, leading normal lives just like the rest of us tax-paying citizens. For the most part, they're pretty normal. Walking around, visiting Starbucks, and maybe even holding the door for you when your hands are full. But when it's the full moon, werewolf kind has a difficult time blending in. And we're not just talking about the smell! In the new hidden object adventure game from ERS Game Studio, Shadow Wolf Mysteries: Bane of the Family, you get to dive a bit deeper into the family structure of a family of werewolves, learning all about their curse and how this odd transformation travels from parents to children.
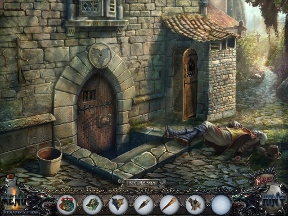 The structure of Shadow Wolf Mysteries 2 is similar to the previous game, Shadow Wolf Mysteries: Curse of the Full Moon, as well as most hidden object adventure hybrids out there. Walking around the bleak landscape (seriously, Count De la Fer, plant a flower!), you'll note a number of highly-useful items just laying around. Naturally, it's your job to gather them and keep them safe in your inventory, all the while looking for puzzles to solve using said objects. Your initial mission is to investigate outside of the manor so you can deliver a message to the Count about his daughter's "unusual" illness. Soon, you discover that illness is more like "pre-werewolfedness", Veronica is the Count's daughter, and turning into shaggy beasts of the night kind of runs in the family. So, yipes and all that jazz. What phase is the moon in tonight?
One thing Shadow Wolf Mysteries is good at is throwing puzzles in your way, and it seems like every time you take a step, a puzzle prevents you from continuing. That's a good thing, of course, as this game wouldn't be much of a game if you just walked around looking at things. Most puzzles are multi-tiered in nature, but they're logical and never too difficult to solve. Getting a light for a dark passageway, for example, might require you to find a torch, locate an oil barrel, break the barrel open with some tool, soak the torch, then light it. Mini-games are just as numerous, but hidden object scenes are far less common, giving this game a strong casual adventure sort of style.
 Analysis: ERS Game Studio is well-known for its hidden object hybrids, such as Redemption Cemetery, the Dark Tales series, Haunted Halls: Green Hills Sanitarium, and a good dozen or so more. In fact, if you haven't played one of the team's games, you probably haven't played many hidden object adventures at all. With that sort of universality, you know something is being done right, and Shadow Wolf Mysteries: Bane of the Family is a fine example of that.
Here's some more good news for casual adventure fans: Shadow Wolf Mysteries: Bane of the Family is a fairly long game. Including the bonus content found in the Collector's Edition, you can expect about five hours of game time, almost twice the average release these days. The initial sections offer little challenge, but after things warm up a bit, you'll stumble a few times trying to make your way around. The hint system works flawlessly, so even if you're caught, there's always a way to get a little nudge.
The only real downer with Shadow Wolf Mysteries is the fact that it follows ERS Game Studio's formula so tightly, it almost feels like a retread for fans of the team's releases. The story is unique, of course, as are the puzzles and general setting, but after more than a dozen games, it's tough to overlook the developmental skeleton there. That's not to say the game suffers in quality, it's just a lingering sense of sameness that's always behind a corner, though you never see it straight on.
Reliably entertaining, smart puzzles, quirky horror-inspired story and a plethora of mini-games, a new ERS Game Studio release is as good as hidden object gold.
A Collector's Edition is also available. It contains bonus content, a strategy guide, soundtrack, concept art, wallpapers, and more. Remember that Big Fish Game Club Members pay only $13.99 for Collector's Editions (or 2 club credits), and collector's editions count 3 card punches of 6 total needed for a free game.
![]() Windows:
Windows:
Download the demo
Get the full version
Also available: Collector's Edition
![]() Mac OS X:
Mac OS X:
Download the demo
Get the full version
Also available: Collector's Edition


Walkthrough Guide
(Please allow page to fully load for spoiler tags to be functional.)
Shadow Wolf Mysteries: Bane of the Family walkthrough: General Info, Ch. 1-3
General Information
At the start of a new game you have a choice between three difficulties: Regular, Expert, and Hard mode.
In Regular mode the Hint and Skip buttons have the fastest recharge timer and sparkles will frequently indicate active areas.
In Expert mode the Hint and Skip buttons have a slower recharge timer and there are no sparkles to indicate active zones.
In Hard mode the hint and Skip buttons have the slowest recharge timer and active areas are not indicated by sparkles; additionally, the black bar with helpful commentary is also disabled.
Use the cursor to interact with the environment.
The cursor will change to a magnifying glass when you can inspect an area more closely or start a puzzle or hidden object scene, a directional arrow when you can move to a different location, and a hand when you can pick up an item to add it to your Inventory or interact directly with the environment.
The Inventory is the bar located at the bottom of the screen which contains all the items you will need to progress through the game.
Click in your Inventory to select it, then click on an area in the game to attempt to use the item. Often, once an item is used it will disappear from your inventory.
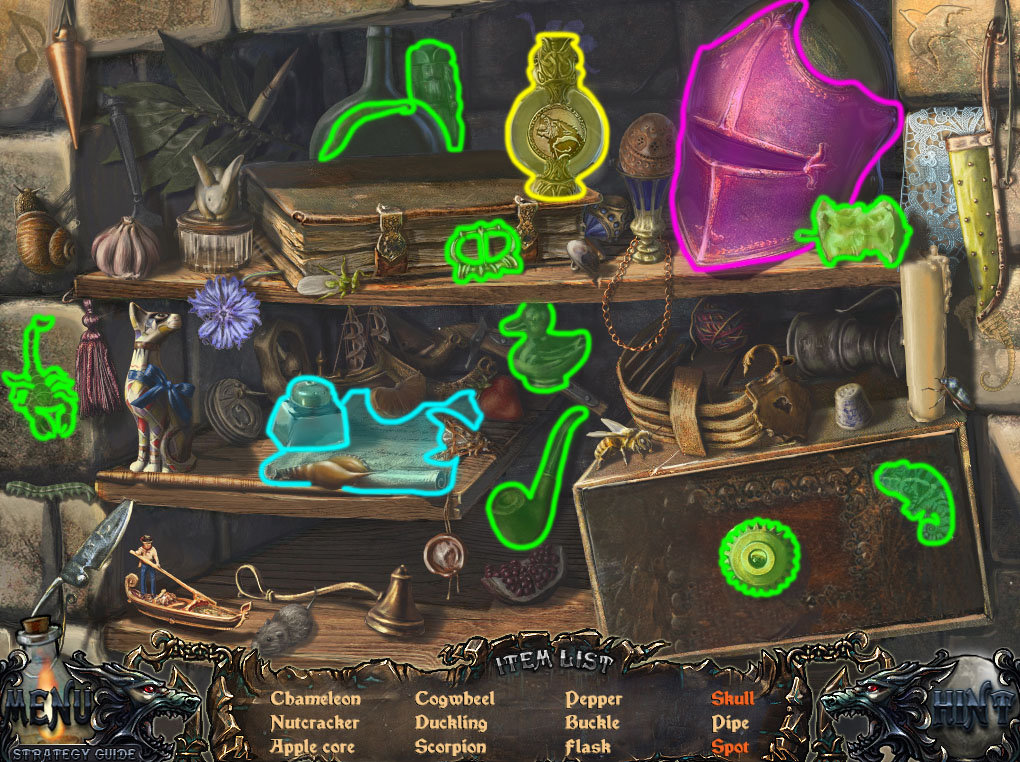
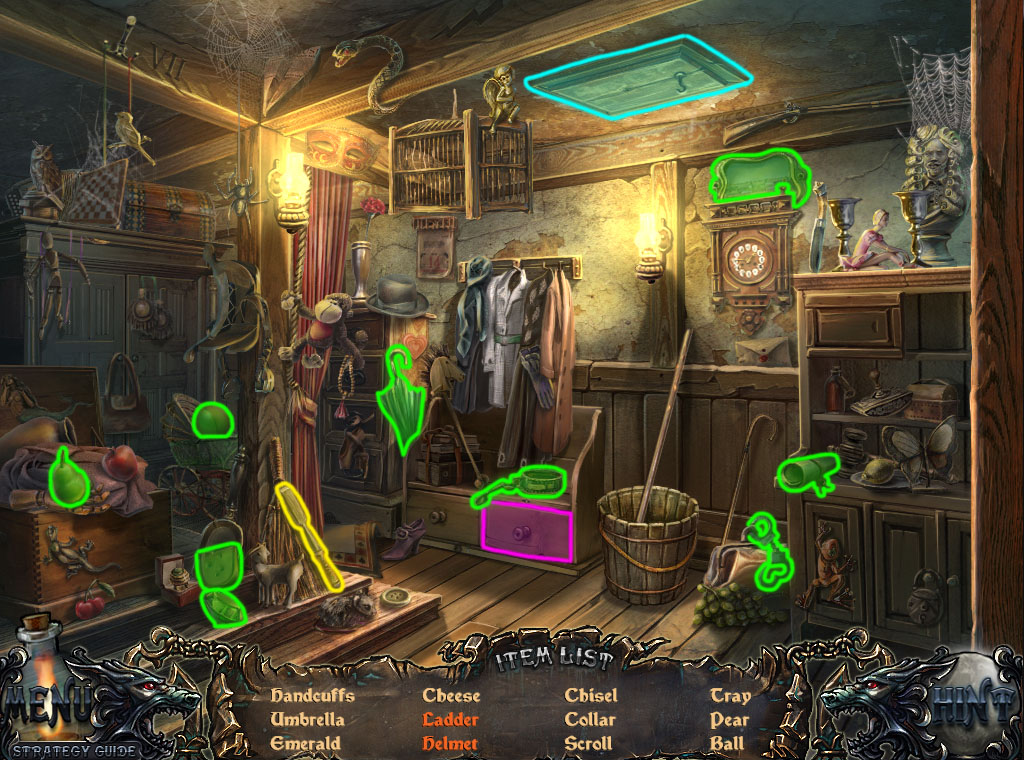
Hidden object scenes are areas indicated by sparkles where you must collect various randomized objects listed at the bottom to receive a new inventory item upon completion.
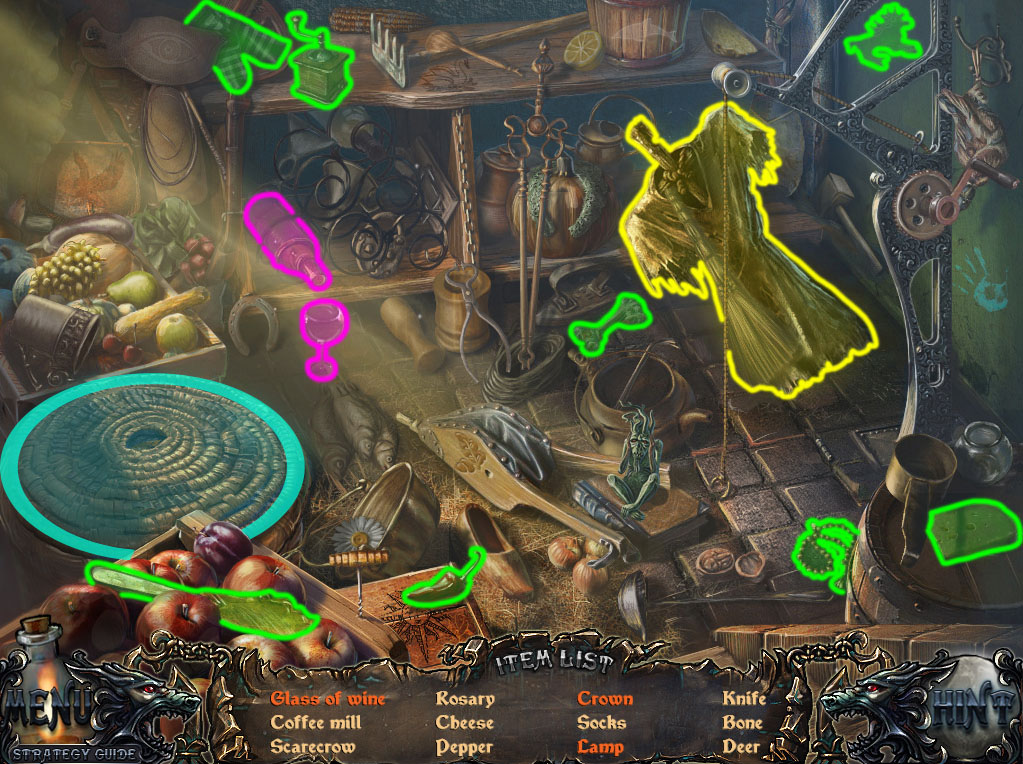
In screenshots, the random items are highlighted in green, the inventory item you receive at the end is highlighted in yellow, and interactive areas are highlighted in blue or purple.
To the right of the Inventory bar is the Hint button. The Hint button can be used to reveal an item during a hidden object scene or to show you the next step of your adventure if you're stuck.
While solving a puzzle, the Hint button will change to a Skip button. Press the Skip button once it charges after 120 seconds to immediately complete the puzzle.
On the left side of the Inventory bar is the Menu button.
Click the Menu button to view an in-game menu where you can pause the game, change the visual and audio Options, look at the Help tips, or Exit to the main menu.
Chapter 1
Estate Entrance
Click the wolf attacking the carriage.
Speak with the woman inside the carriage to receive the Medallion.
Take the Knife on the side of the path.
Click the round mailbox on top of the right pillar to open it, then click it again to look inside.
Use the Knife to cut open the present revealing the Idol 1/2.
Click the scroll to open it, then click it again to read the letter from the Countess De la Fer.
Go forward to the Side Entrance.
Side Entrance
Click the dead coachman for a closer look.
Open the corpse's hand to release the Pincers.
Click the scroll to read the letter from Louise.
Click the bucket to zoom in, then pull out the Stick from the bucket.
Click the open door to the storage room to start the hidden object scene.
Click the wine bottle to fill the Glass of Wine.
Remove the basket lid to reveal the Crown and Lamp.
Screenshot.
Take the unlit Torch from the holder on the wall.
Click the wolf head at the top of the door to zoom in, then click it again to add the Wolf Head to your inventory.
Follow the path forward to the Cemetery.
Cemetery
Click the wolf sitting in the middle of the path.
Click the ladder leaning against the side of the left tomb to zoom in.
Use the Pincers to remove the wires wrapped around the sides of the Stepladder.
Click the door of the right tomb for a closer look.
Place the Wolf Head into the insert in the middle of the door.
Go through the open door into the Crypt.
Crypt
Click the barrel to zoom in.
Use the Stick to push the barrel off the stand.
Click the barrel after it rolls down the stairs to zoom in again, then click the cracked side of the barrel to break it open.
Use the Torch on the puddle of oil spilled on the floor to make it a Torch with Oil.
Click the brazier mounted on the wall above the steps to zoom in.
Place the Torch with Oil into the fire to make it a Burning Torch.
Click the wolf statue in the middle of the room to zoom in, then click the wolf's mouth to read the scroll.
Go back to the Estate Entrance.
Estate Entrance
Click the side of the carriage for a closer look.
Place the Stepladder up to the compartment at the top of the carriage, then click the small door to open it.
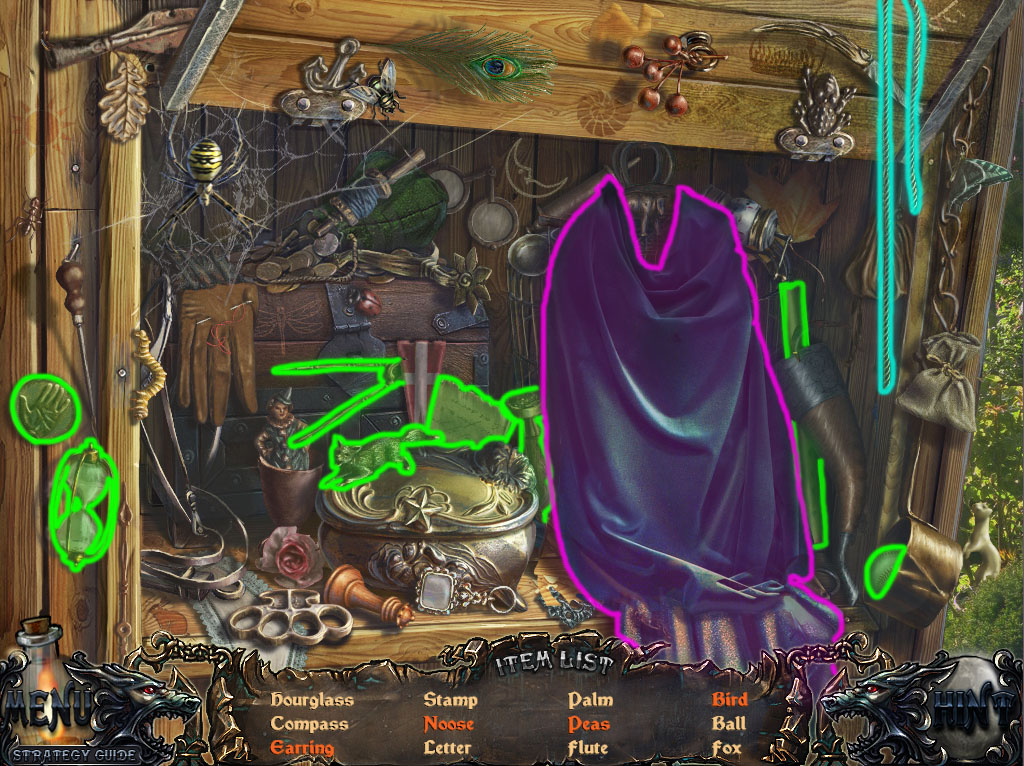
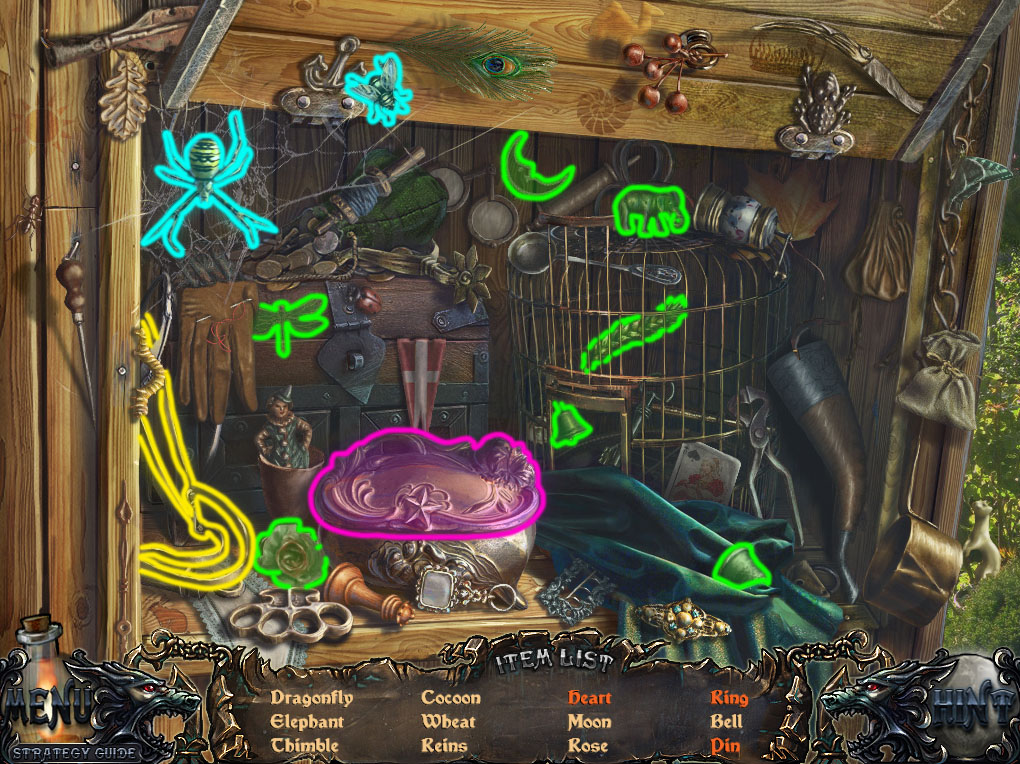
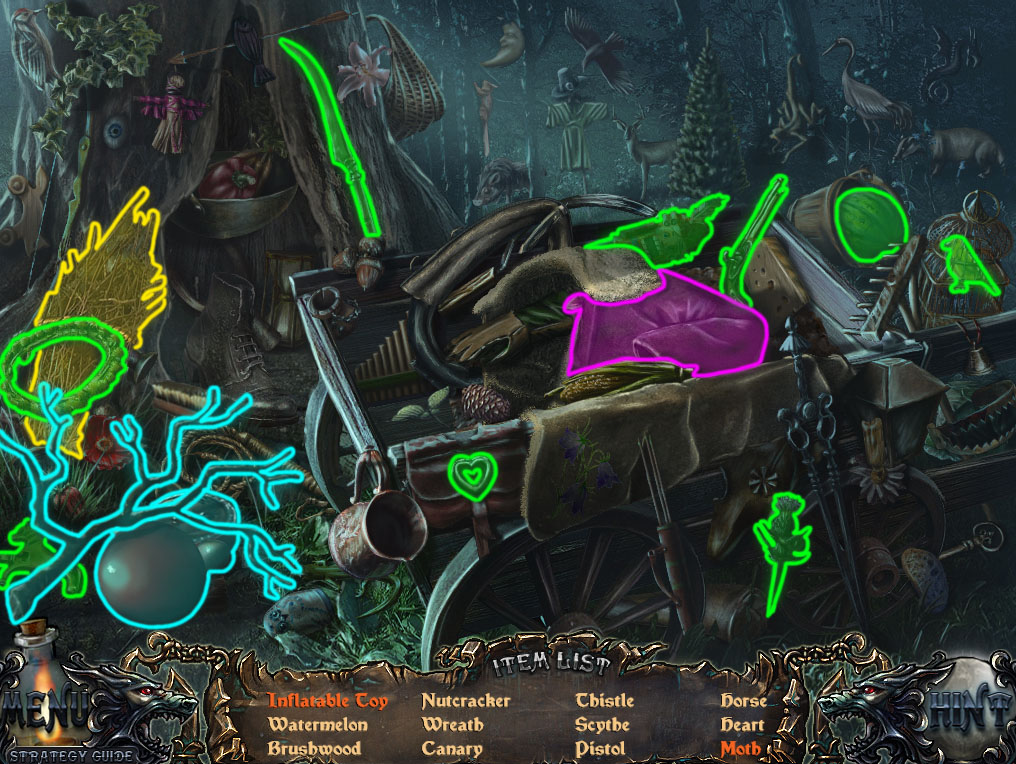
Click the open compartment door to start the hidden object scene.
Click the rope to tie it into a Noose.
Click the drape to pull it off the birdcage, revealing the Earring, Peas, and Bird.
Screenshot.
Once the hidden object scene is complete, you will receive a Noose.
Return to the Cemetery.
Cemetery
Click the tree branch on the dead tree to the left of the path to zoom in.
Use the Noose to pull down the branch, then take the Pumpkin from the tree.
Click the gravestone on the right side of the path with a crow perched on it for a closer look.
Place the Scarecrow in front of the crows, then add the Pumpkin as the head on top.
Take the Symbol from the headstone.
Go into the Crypt.
Crypt
Click the coffin sticking out of the alcove to pull it out into the room.
Click the lid of the coffin for a closer look.
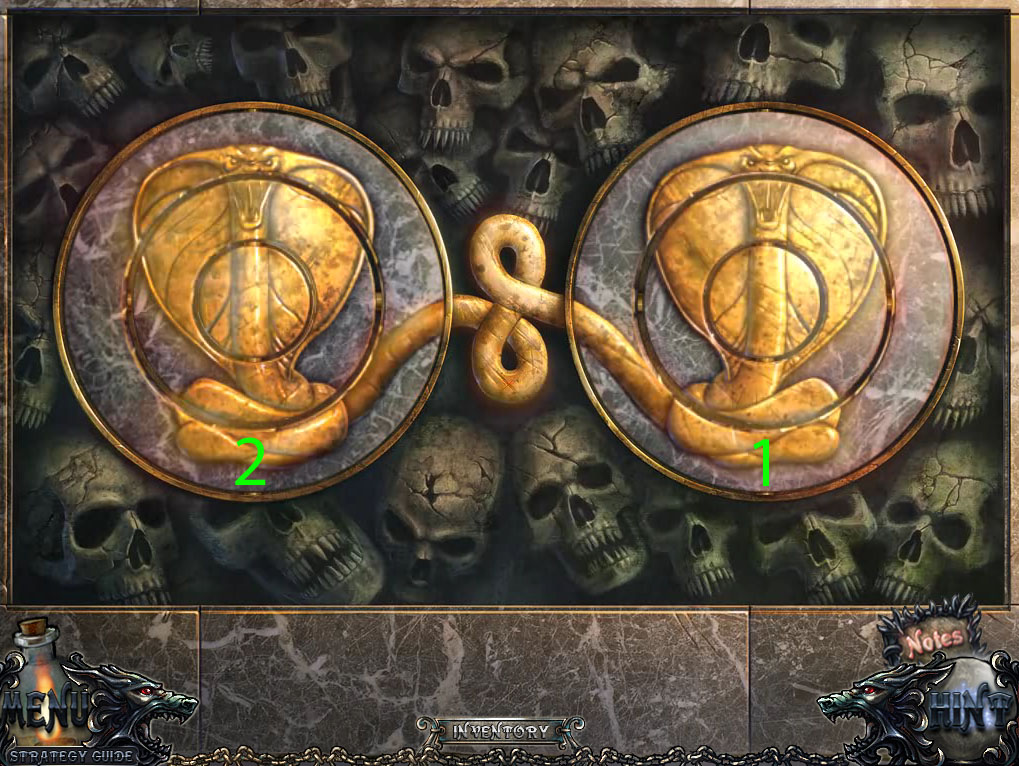
Put the Symbol into the left space to start the puzzle.
Rotate the rings so that the complete image on both discs are matching.
Move the cursor over the rings to highlight which of the plates will rotate by clicking that ring.
This puzzle can be solved in two easy clicks: first click the outside ring of the right disc (1), then click the outside ring of the left disc (2).
Solution.
Once the puzzle is solved, take the Screwdriver from the revealed cache.
Go back to the Side Entrance.
Side Entrance
Click the storage closet to repeat the hidden object scene.
Open the satchel to reveal the Clover and the Comb.
Pull the crank to raise the stone in the floor, revealing the Letter underneath.
Screenshot.
Once the hidden object scene is complete, you will receive the Idol 2/2.
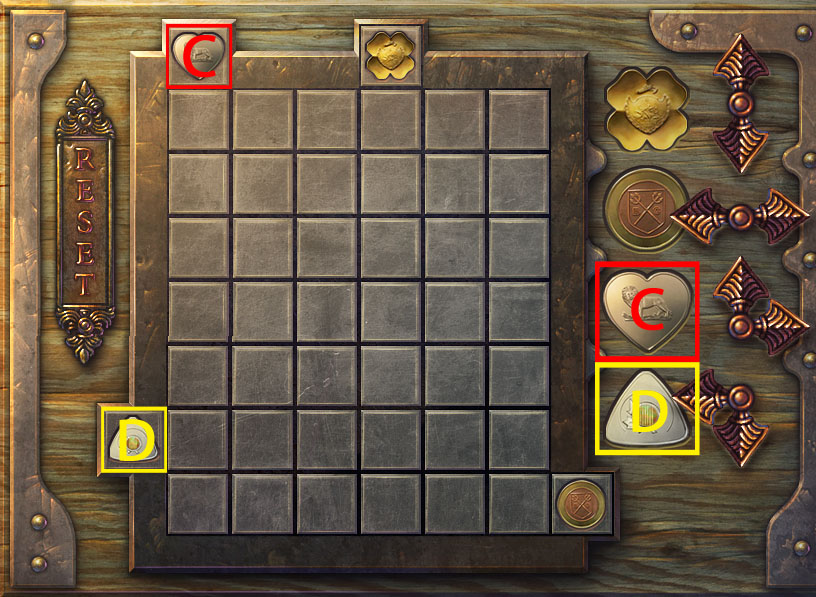
Click the lock on the wooden door to the mansion to zoom in.
Use the Screwdriver to remove the three triangular screws from the sides of the lock plate, then click the plate to remove it.
Click and drag the round gear to align the small gap with the cylinder pin of the lock.
Go through the open door to the Skull Tunnel.
Skull Tunnel
Click the stone wolf head at the top of the front left pillar for a closer look.
Use the Burning Torch on the bowl of oil on top of the wolf's head to light the room.
Click the metal plate in the wall between the two closest pillars on the left wall to start the puzzle.
Arrange the correct four symbols at each corner of the board.
Click the button in the center of each corner to change the symbol inside the circle.
Click the directional arrows at the sides of the gems in the metal blocks to move them to an empty space on the board.
Each corner shows the position of a symbol in a different section of the board.
Solution.
Once the puzzle is solved, press the button in the center to raise the board.
Click the revealed wall cache to start the hidden object scene.
Lift the helmet's visor to reveal the Skull.
Click the ink well to make the Spot of ink on the letter.
Screenshot.
Once the hidden object scene is complete, you will receive the Empty Flask.
Click the alcove in the right wall to zoom in.
Click the stones to move them away, revealing the Cogwheel (1/3).
Continue forward through the tunnel to the Skull Fountain.
Skull Fountain
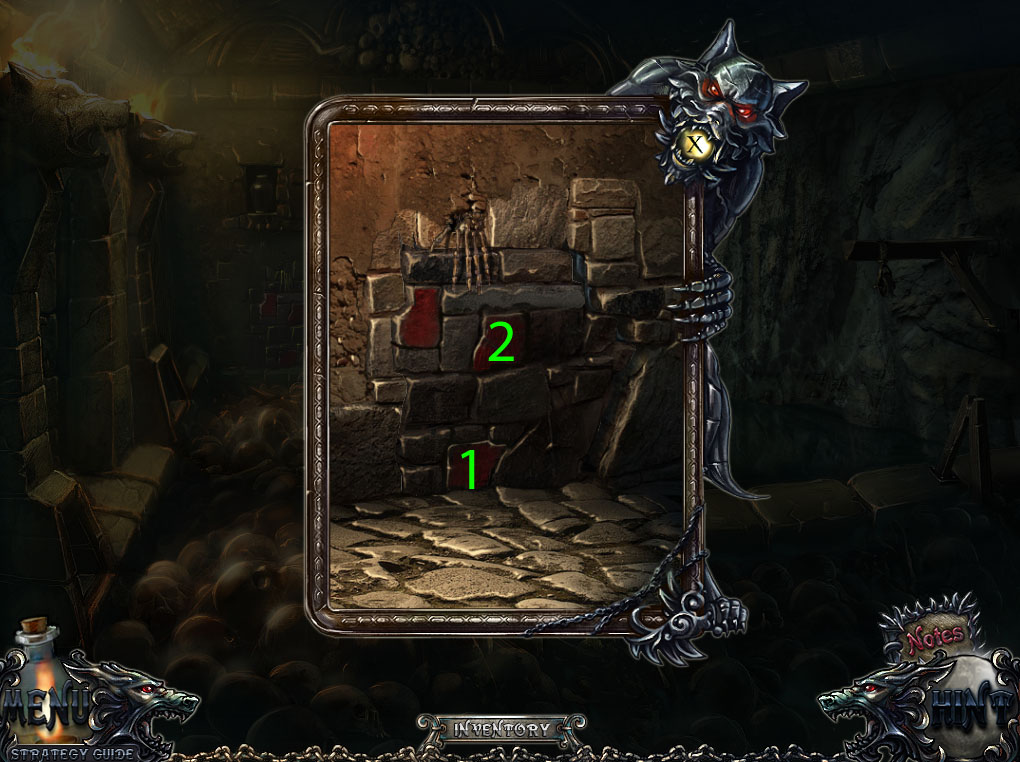
Click the painted bricks on the back wall beside the pool of water to start the minigame.
Push the stones in the correct order so that all of three are pressed down.
Press the bottom brick and then the right brick to tear down the wall.
Solution.
When the skeleton falls through the hole in the wall, take the Casket from its hand.
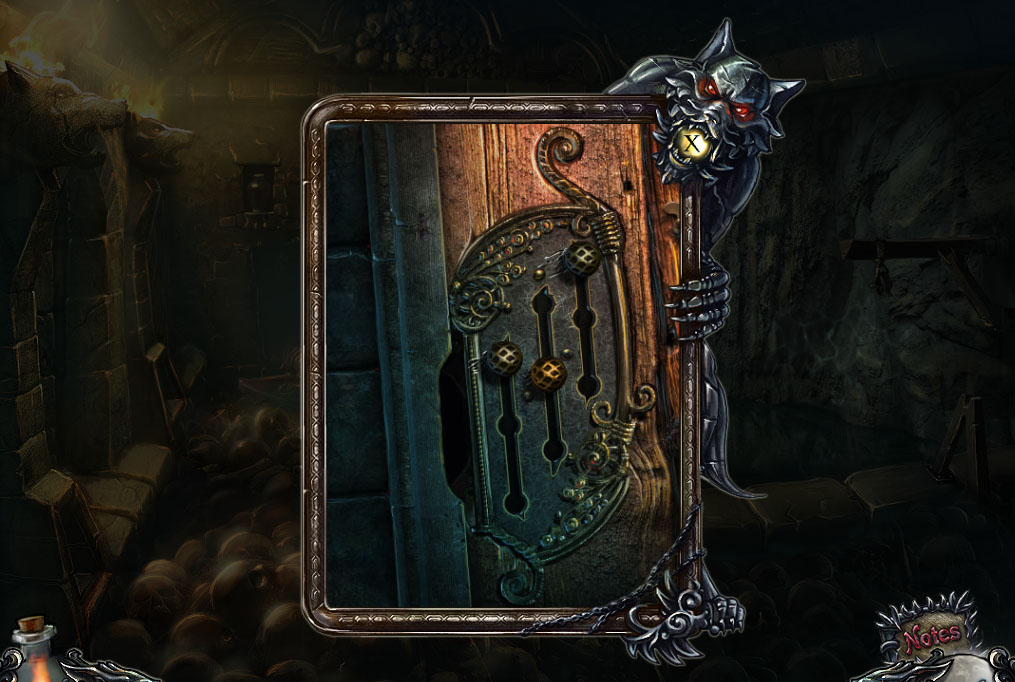
Click the door in the left wall to start the next minigame.
Drag the knobs to lift the three tumblers from the lock.
Move the left tumbler into the top position.
Move the center tumbler into the middle position.
Move the right tumbler into the top position.
Solution.
Go through the open door to the Count's Bedroom.
Count's Bedroom
Give the Count the Medallion.
Take the Dragon Part 1/2 beside the base of the candlestick on top of the left barrel.
Click the small dresser under the cracked mirror to zoom in.
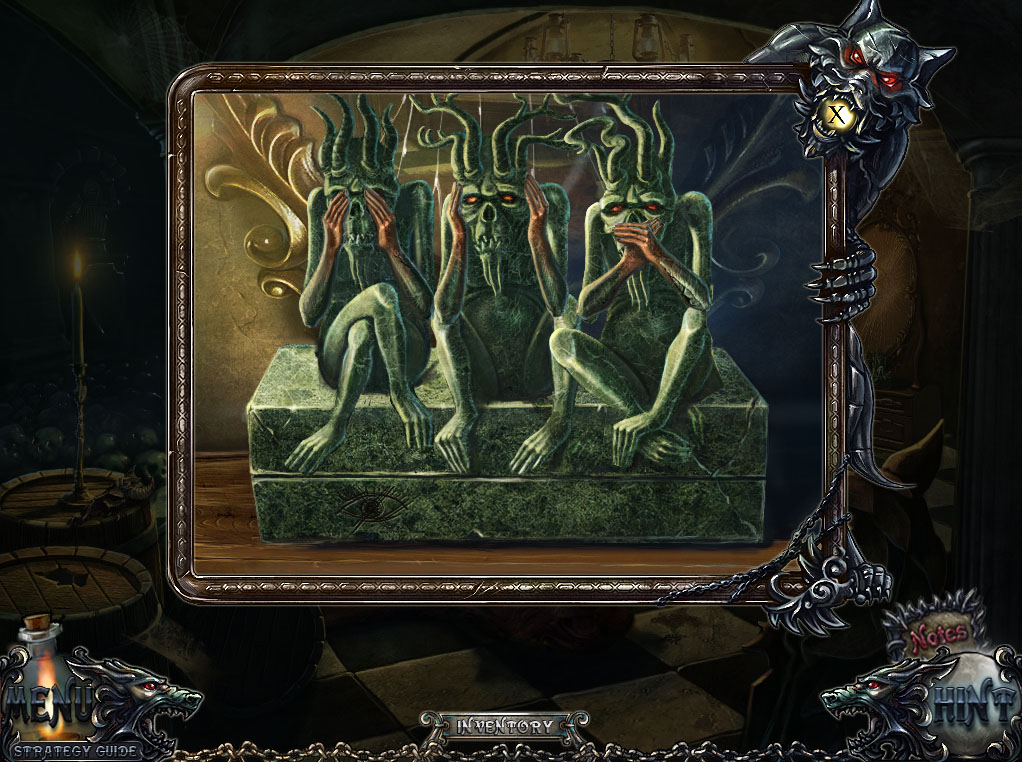
Place the two Idols onto the box to start the minigame.
Arrange the idols' positions in order of the saying "See no evil, hear no evil, speak no evil."
Solution.
Take the Pin and the Dragon Part 2/2 from the open box.
Click the knight in the alcove across the pile of skulls in the back of the room to zoom in.
Place the Casket on top of the table, then click the knight's arm to smash the casket.
Take the Hook from the smashed pile of pieces on the table.
Go back to the Skull Fountain.
Skull Fountain
Click the cart in the pool of water for a closer look.
Use the Pin to remove the wood bolt from the hub, then click the Wheel to add it to your inventory.
Go back to the Skull Tunnel.
Skull Tunnel
Click the carving in the middle of the left wall to zoom in.
Place both the Dragon Parts into the insert in the plaque.
Take the Rope Coil and read the letter inside the revealed wall cache.
Return to the Skull Fountain.
Skull Fountain
Click the crane hanging over the water to zoom in.
Attach the Rope Coil to the crank mechanism to the crane, then add the Hook to the rope under the pulley.
Click the crank to pull the Yoke from the water.
Go back again to the Skull Tunnel.
Skull Tunnel
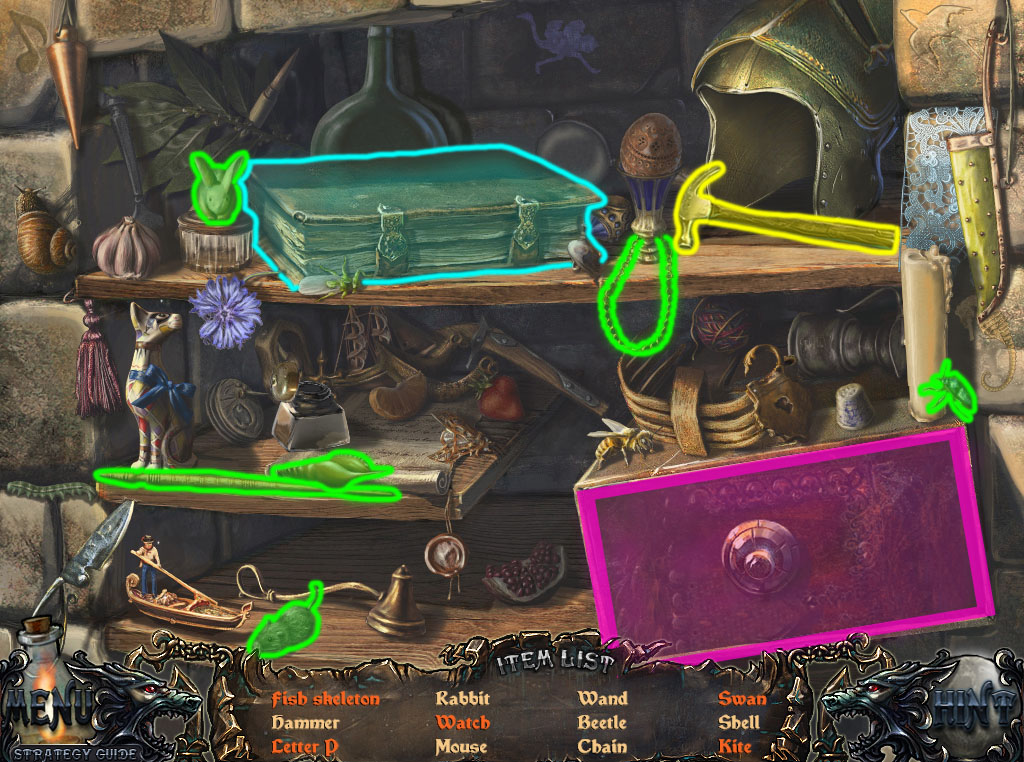
Click the shelves in the left wall to repeat the hidden object scene.
Open the book to uncover the Kite and the Letter P.
Pull open the drawer to reveal the Fish Skeleton, Watch, and Swan.
Screenshot.
Once the hidden object scene is complete, you will receive the Hammer.
Return to the Estate Entrance.
Estate Entrance
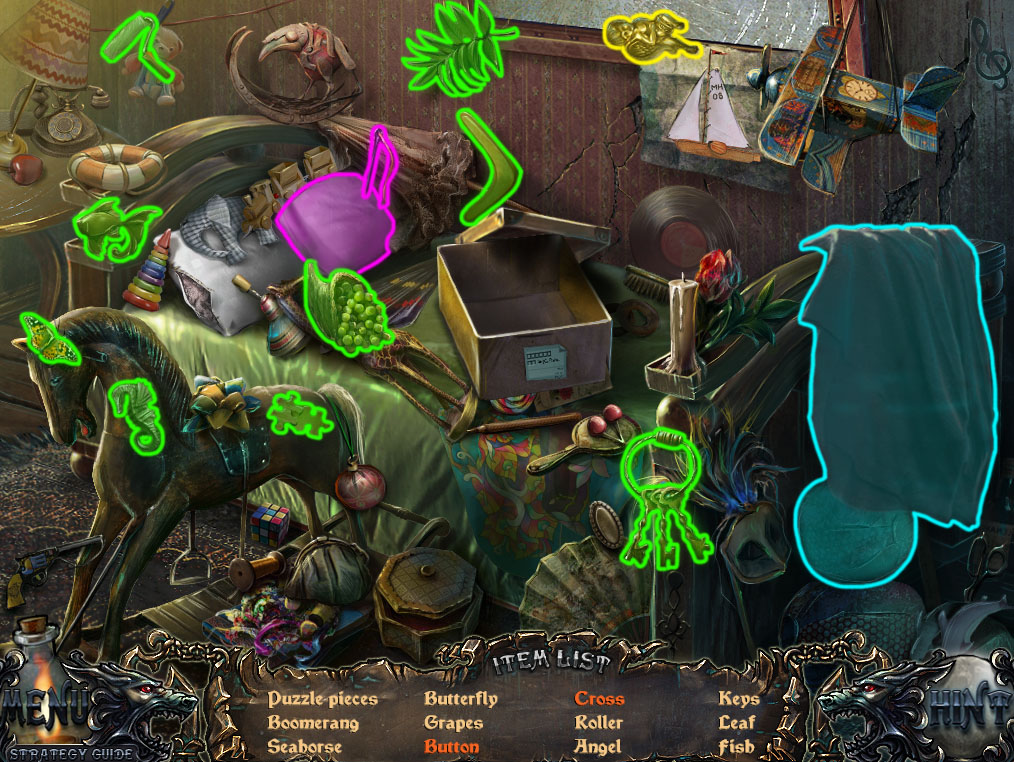
Click the open carriage compartment to repeat the hidden object scene.
Open the jewelry box to reveal the Heart, Ring, and Pin.
Click the spider to wrap the fly in a Cocoon.
Screenshot.
Once the hidden object scene is complete, you will receive the Reins.
Go left to the Meadow.
Meadow
Add the Wheel to the front of the carriage.
Place the Yoke around the horse.
Attach the Reins to the horse, then pick up the loop on the ground and attach that to the carriage.
Go inside the carriage, then click the carriage door to open it and travel forward to the Cliff.
Chapter 2
Cliff
Click the wolf pawing at the boat beside the shed to chase it away.
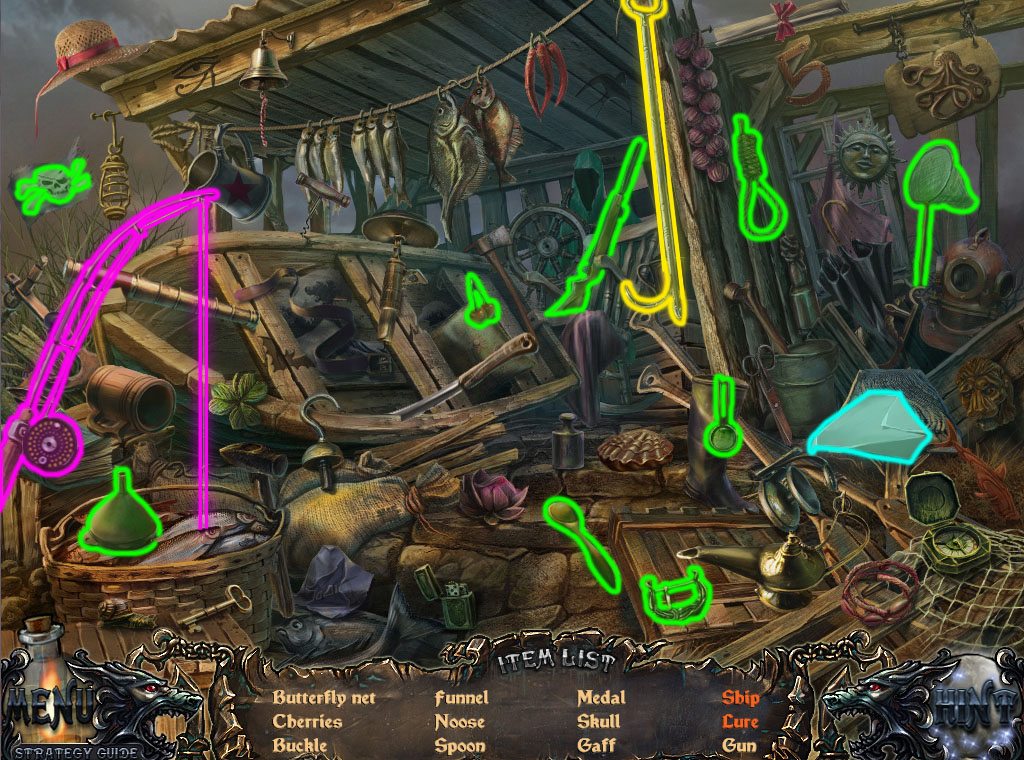
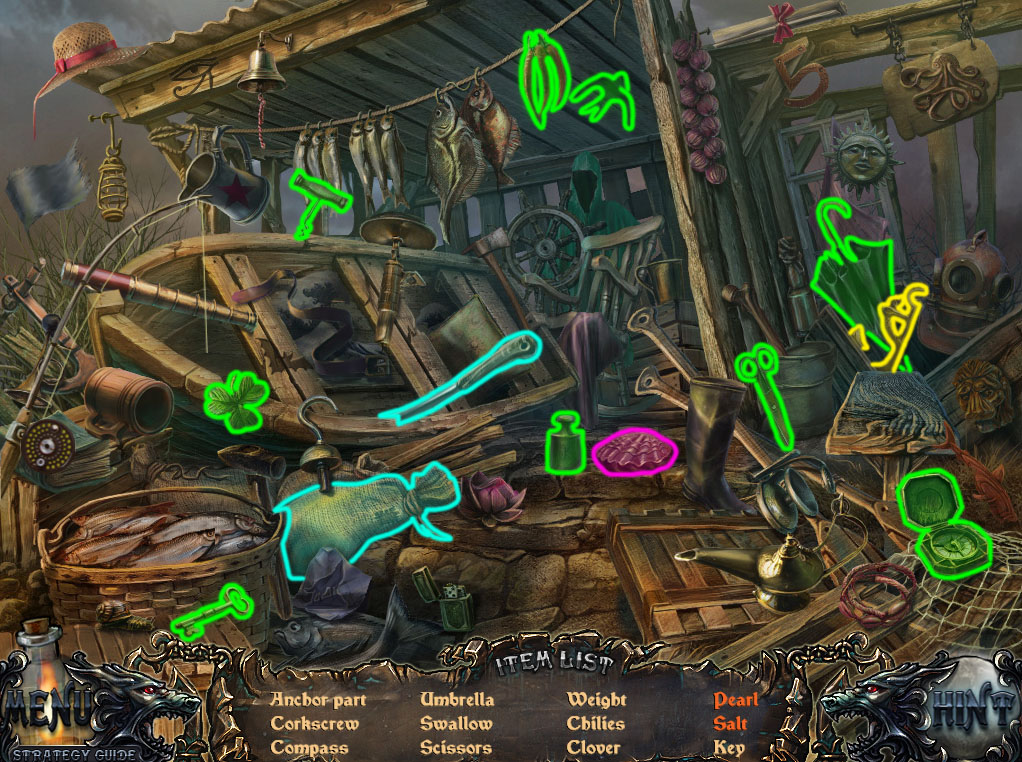
Click the shed to start the hidden object scene.
Click the fishing rod to reel in the Lure.
Click the piece of paper to fold it into a Ship.
Screenshot.
Once the hidden object scene is complete, you will receive the Gaff.
Go up the path to the Lighthouse Entrance.
Lighthouse Entrance
Click the pile of wood lying in the grass to zoom in and take the Boards 1/3.
Click the basket hanging from a rope over the side of the lighthouse to zoom in.
Use the Gaff to pull the basket down, revealing the Saber.
Go back to the Cliff.
Cliff
Click the gate to the dock to view the gangway.
Use the Saber to cut the two ropes holding up the gangway.
Continue forward to the Ship's Deck.
Ship Deck
Click the wolf sitting on the deck to chase it away.
Click the ship's wheel to zoom in and take the red Ribbon wrapped around it.
Click the hatch in the deck to open it, then go down to the Ship Hold.
Ship Hold
Click the captain to speak with him, then take the Captain's Key from his hand.
Go back up to the Ship Deck.
Ship Deck
Click the door to the cabin for a closer look.
Use the Captain's Key, then turn it in the lock to open the door.
Go through the open door to the Captain's Quarters.
Captain's Quarters
Click the seat of the right red chair to zoom in and take the Matches.
Click the weapons mounted on display on the right wall for a closer look.
Use the Ribbon to pull out the clamps around the Harpoon.
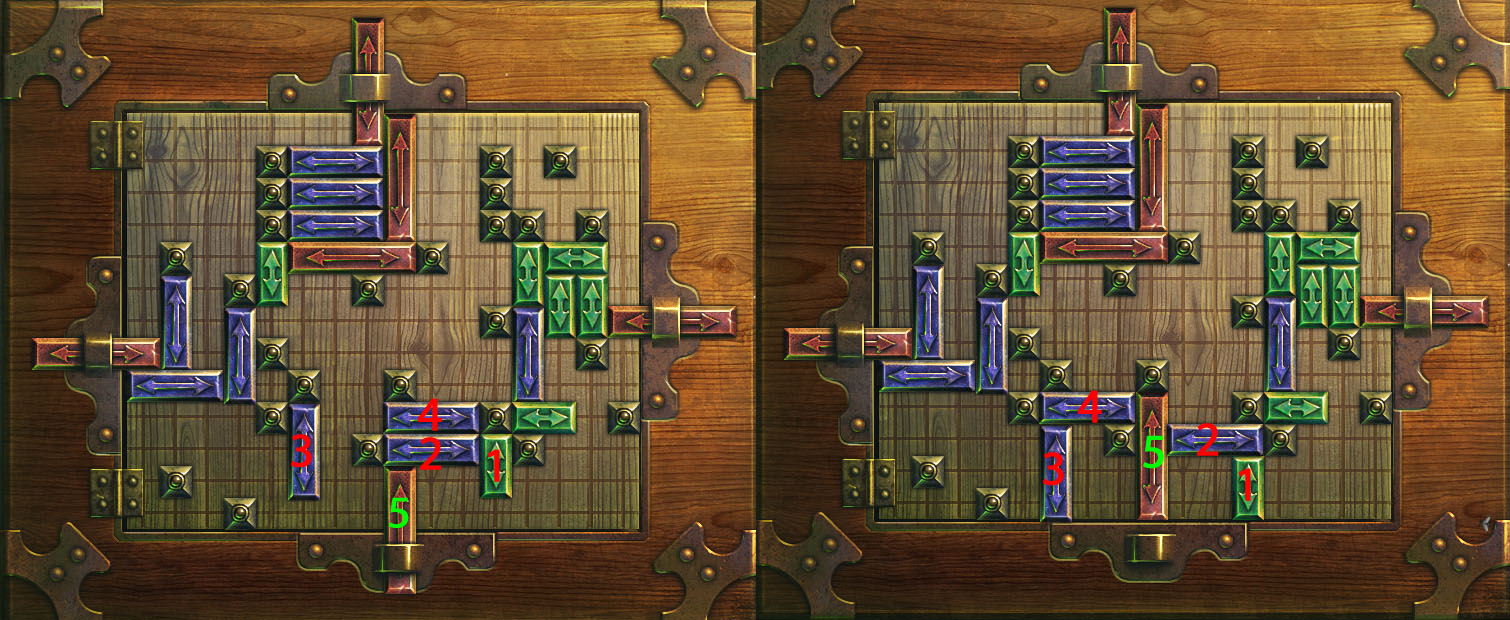
Click the desk to start the puzzle.
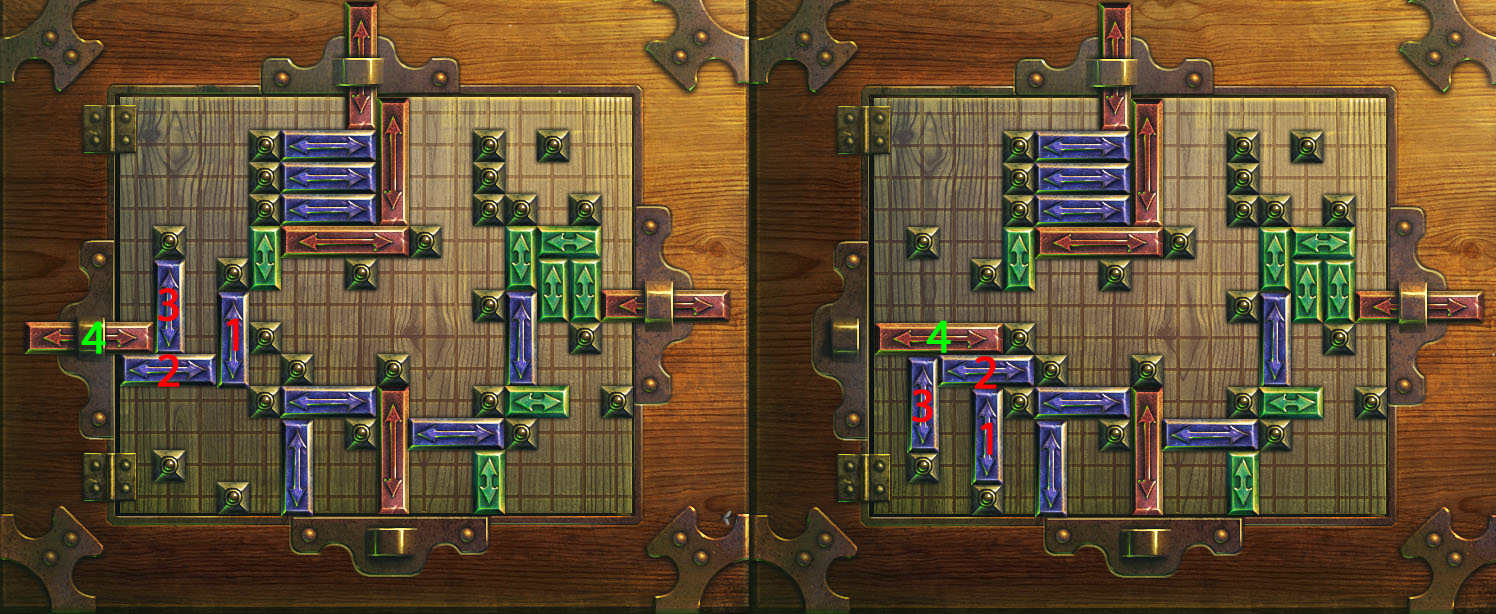
Arrange the blocks on the board to remove the four colored blocks out of the loops at the sides.
Click and drag the blocks to move them into an empty space on the board; blocks can only move in the direction their arrows point to.
Bottom Section: Drag block 1 down. Drag block 2 right. Drag block 3 down. Drag block 4 left. Drag block 5 up.
Solution Part 1
Left Secion: Drag block 1 down. Drag block 2 right. Drag block 3 down. Drag block 4 right.
Solution Part 2
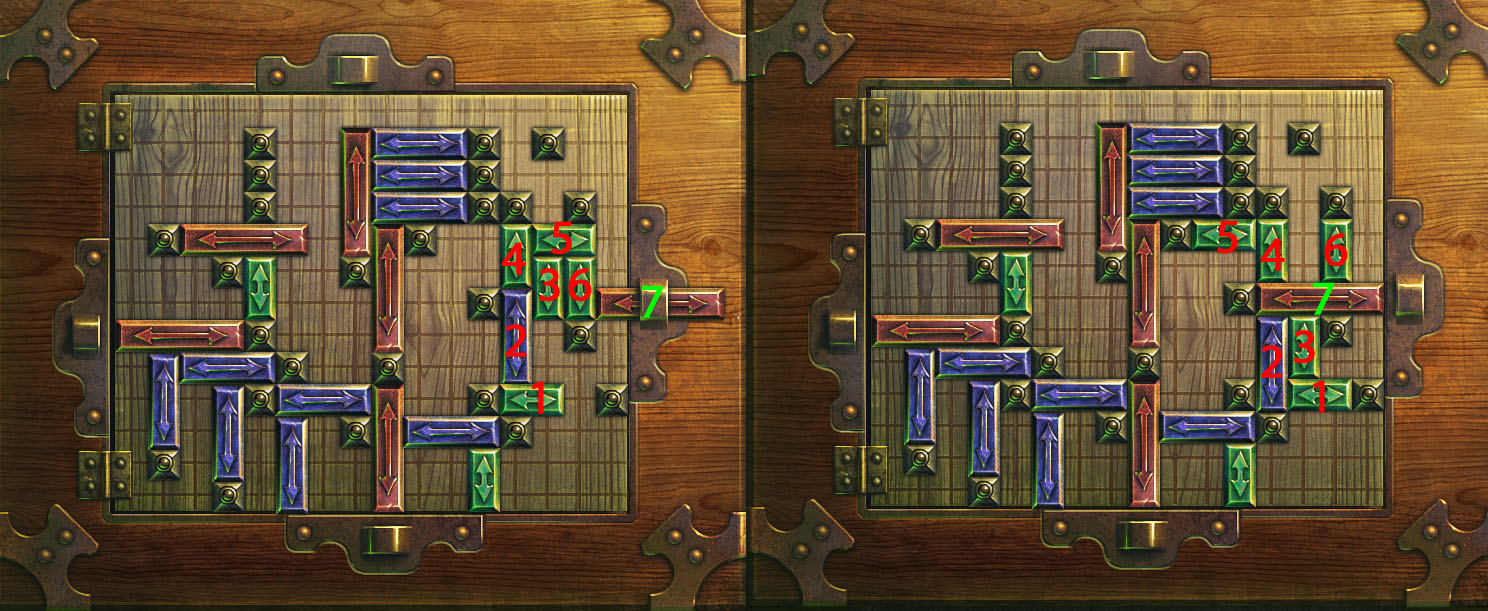
Top Section: Drag block 1 down. Drag block 2 left. Drag block 3 down. Drag blocks 4, 5, and 6 right. Drag block 7 down.
Solution Part 3
Right Section: Drag block 1 right. Drag block 2, 3, and 4 down. Drag block 5 left. Drag block 4 and 6 up. Drag block 7 left.
Solution Part 4
Once the puzzle is solved, take the Lever from the open compartment.
Go back to the Ship Deck.
Ship Deck
Click the ballista over the side of the ship to zoom in.
Arm the ballista with the Harpoon.
Place the Lever on the aiming mechanism under the vertical arrow.
Aim the harpoon at the rowboat floating in the water.
Drag the lever under the vertical arrow clockwise all the way to the end to aim the ballista downwards.
Drag the lever under the horizontal arrow clockwise all the way to the end to aim the ballista to the right.
Click the rope at the end of the arrow shaft to fire the ballista.
Solution.
Take the Cannonball from the rowboat.
Go back to the Cliff.
Cliff
Click the shed to repeat the hidden object scene.
Click the knife to cut open the sack of Salt.
Open the clam to reveal the Pearl.
Screenshot.
Once the hidden object scene is complete, you will receive the Anchor Part 1/2.
Continue forward to the Lighthouse Entrance.
Lighthouse Entrance
Click the cannon for a closer look.
Put the Cannonball inside the cannon's barrel, then click the barrel to aim it at the door.
Light the fuse with the Matches to fire the cannon.
Continue forward into the Lighthouse.
Lighthouse
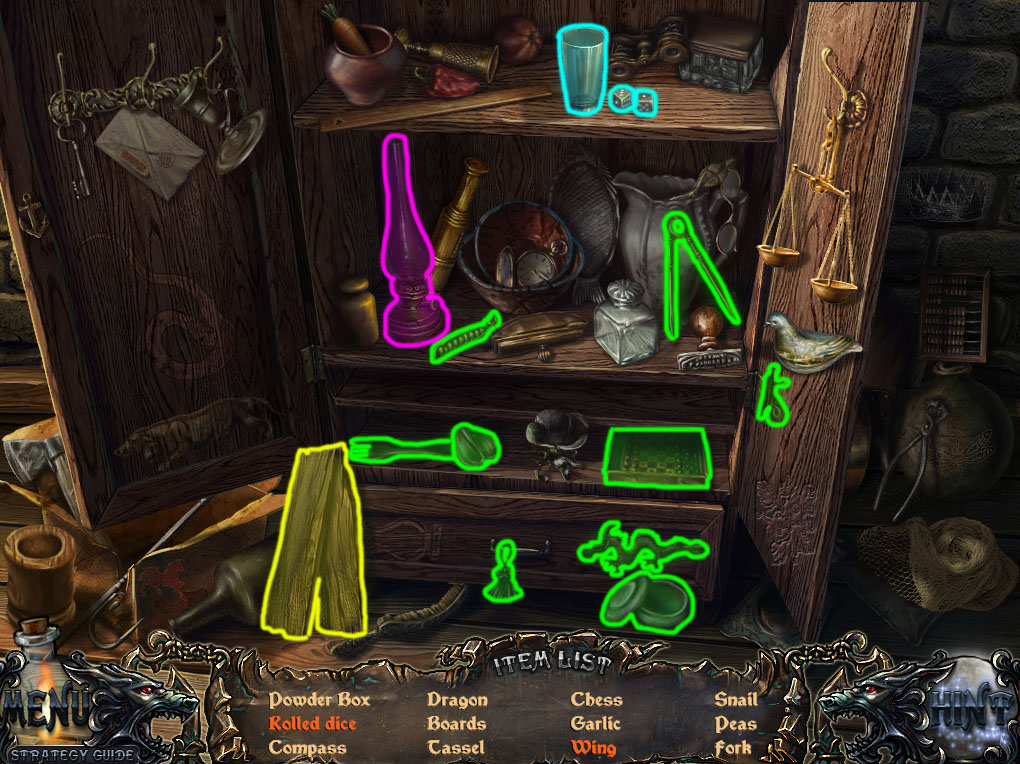
Click the cupboard to start the hidden object scene.
Click the pair of dice to shake them in the cup and then throw out the Rolled Dice on the shelf.
Turn on the lantern to reveal the Wing on the inside wall of the bottom shelf.
Screenshot.
Once the hidden object scene is complete, you will receive the Boards 2/3.
Click the loose floorboard to zoom in, then click the board again to reveal the Cogwheel 2/3 underneath.
Click the dead man's hand to zoom in, then click the hand again to reveal the Button.
Click the button pannel in the wall for a closer look.
Place the Button in the hole at the center to start the puzzle.
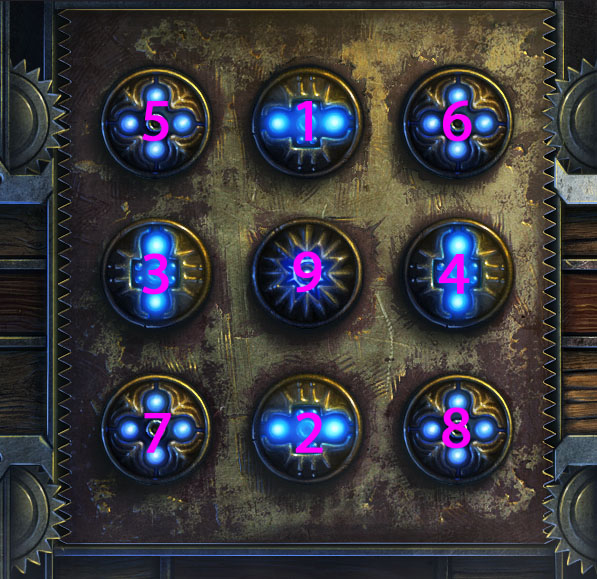
Press the buttons in the correct order so that all of them are lit.
Many buttons have unique effects such as rotating adjacent buttons or turning other buttons on and off.
Part 1: Click the buttons to light all of them blue.
Solution 1.
Part 2: Like the last round, click the buttons to light all of them blue.
Solution 2.
Part 3: Again, click the buttons to light all of them blue.
Clicking a corner button will rotate the two buttons adjacent to it as well as the center button. Clicking either of those adjacent buttons will also light the buttons the round lights are pointing to horizontally, vertically, or diagonally.
Solution 3.
Once the puzzle is solved, take the Lighthouse Key from the revealed compartment.
Click the large gears of the elevator mechanism to zoom in and take the stuck Lever jamming the gears.
Click the lowered elevator for a closer look.
Place the Lever into the slot, then click the lever to raise the elevator to the Lighthouse Watch Room.
Lighthouse Watch Room
Take the Board 3/3 leaning against the base of the right column.
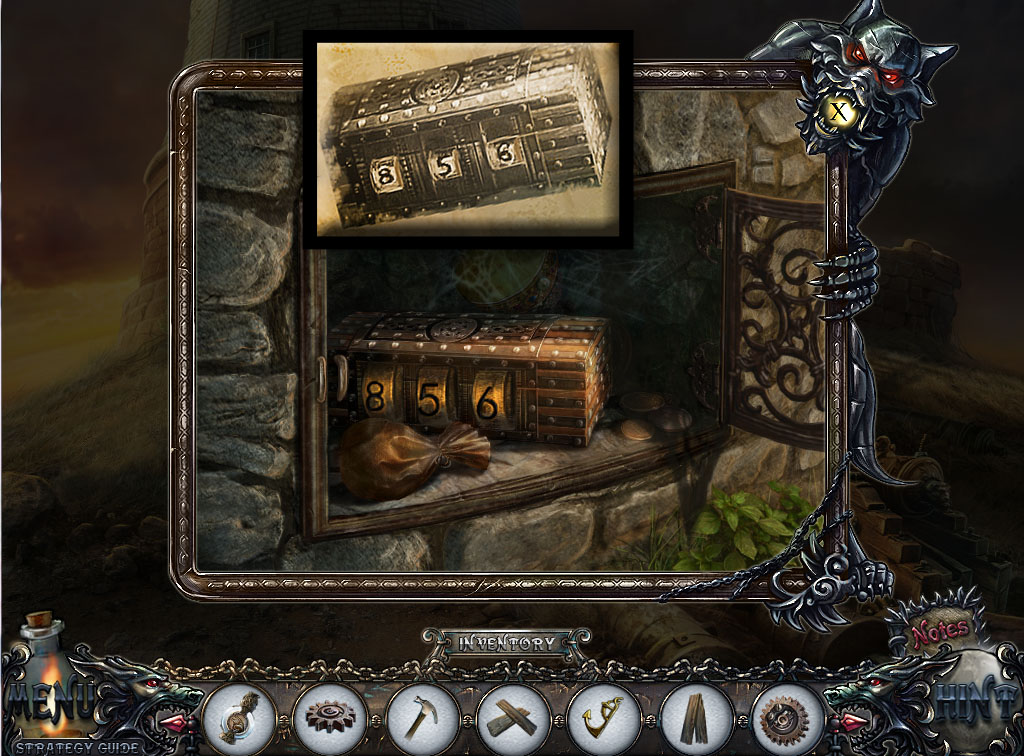
Click the pulley beside the top of the right column for a closer look.
Click the crank to pull in the parcel, then click the parcel to open it.
Read th scroll inside the parcel and note the three digit combination shown in the image.
Pull the lever to lower the elevator, then go back outside to the Lighthouse Entrance.
Lighthouse Entrance
Click the grate to the right of the hole in the wall to zoom in.
Use the Lighthouse Key on the lock, then turn the key to open the grate.
Click the buttons on the lockbox to set the three digit combination found in note.
Screenshot.
Take the Spyglass from the open lockbox.
Go inside the Lighthouse again.
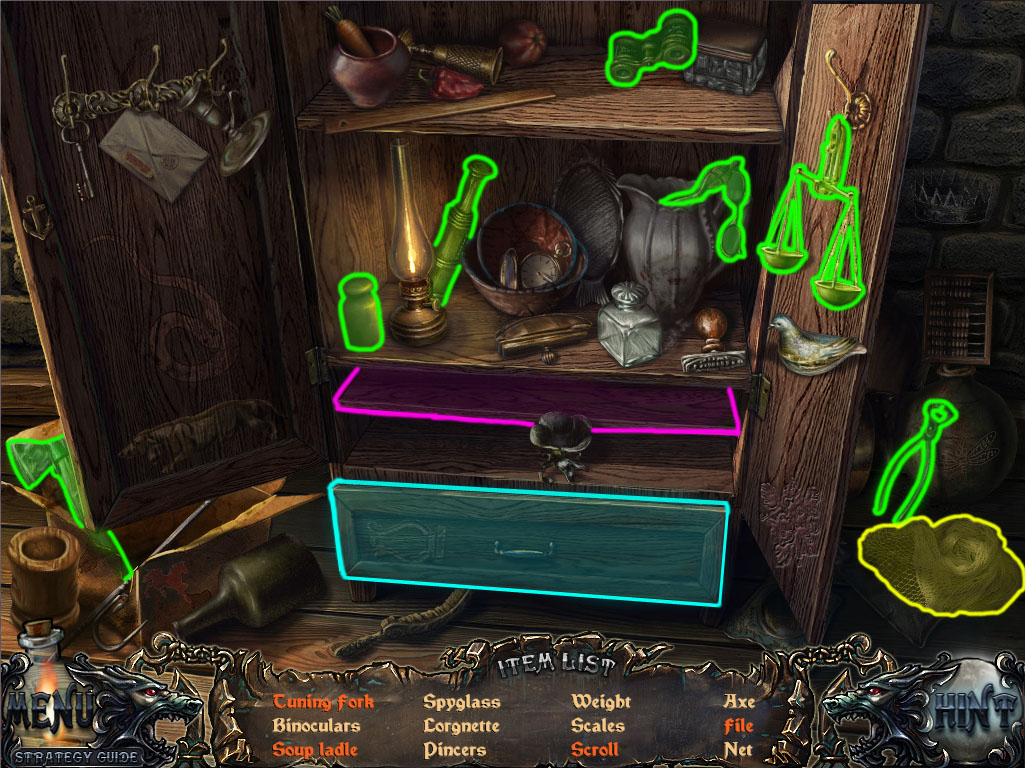
Lighthouse
Click the open cupboard to repeat the hidden object scene.
Break the thin bottom shelf to reveal the File and the Scroll.
Open the drawer at the bottom of the cupboard to reveal the Tuning Fork and the Soup Ladle.
Screenshot.
Once the hidden object scene is complete, you will receive the Fish Net.
Take the elevator to the Lighthouse Watch Room.
Lighthouse Watch Room
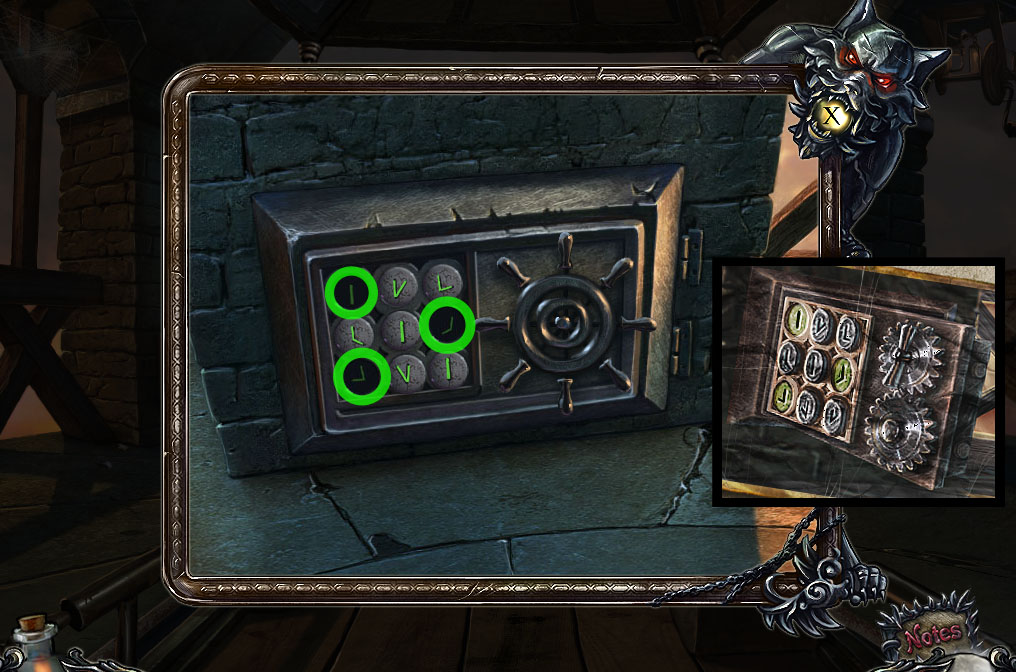
Place the Spyglass on top of the tripod.
Click the spyglass to zoom in, then click it again to turn it towards the opposite lighthouse.
Open the Notes to view a picture of a wall safe with three buttons highlighted in green.
Click the identical wall safe at the base of the left column to zoom in.
Press the three buttons matching the image in the Notes.
Screenshot.
Turn the handle to open the safe, then take the Anchor Part 2/2 inside.
Go back to the Cliff.
Cliff
Click the winch at the side of the cliff for a closer look.
Add the Fish Net to the winch.
Click the handle to pull in the net, then click the net to take the Nails.
Go to the Captain's Quarters.
Captain's Quarters
Click the chest on the floor to zoom in.
Place the two Ship Parts into the insert in the lid.
Take the Cogwheel 3/3 from the open chest.
Return to the Ship Hold.
Ship Hold
Click the leak in the hull to zoom in.
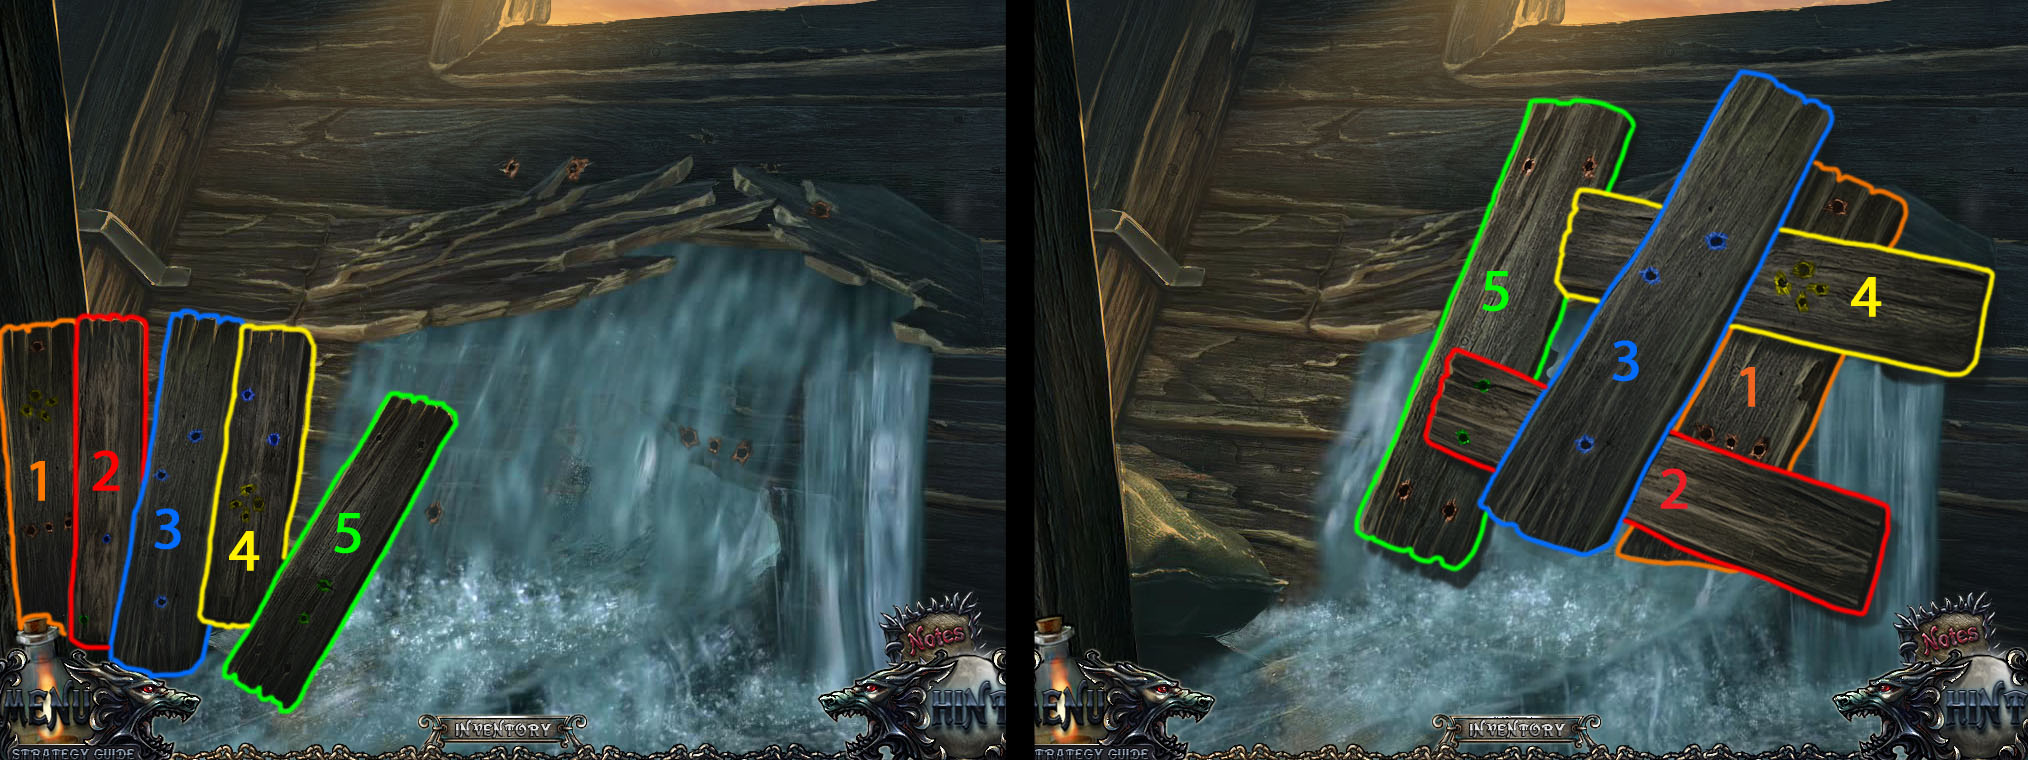
Place the three sets of Boards from your inventory (5 individual boards in total) beside the sandbag to start the minigame.
Correctly arrange the boards by aligning the holes with the hull and by matching the colors.
Screenshot.
Set the Nails into the boards against the wall, then use the Hammer to hammer the nails.
Speak with the captain, then click the steering mechanism to zoom in.
Place the three Cogwheels on the rivets at the base of the steering mechanism to finish the ship repairs.
Chapter 3
Wharf
Click the wolf sitting on the platform to chase it away.
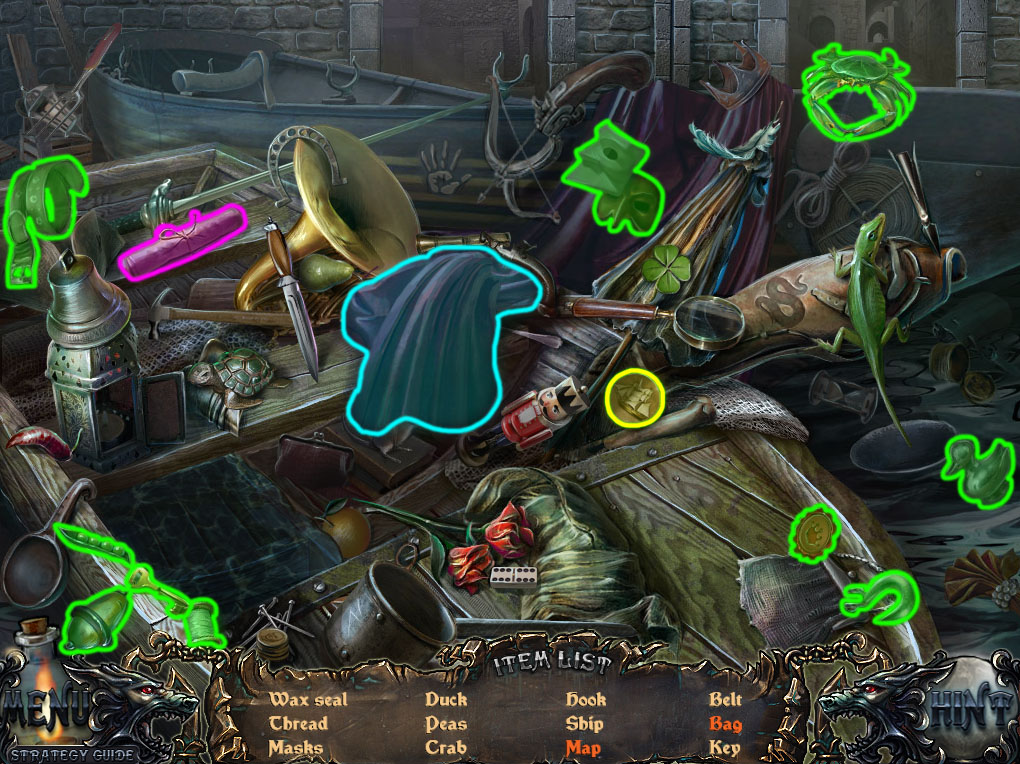
Click the alcove under the right railing to start the hidden object scene.
Lift the end of the purple drape to reveal the Bag.
Unfurl the scroll to find the Map.
Screenshot.
Once the hidden object scene is complete, you will receive the Disc 1/3.
Go left to the Shipyard.
Shipyard
Take the Disc 2/3 on top of the sack on the raised platform.
Click the lid of the crate in the lower right corner to remove it.
Click the open crate to zoom in and take the Part of Tongs.
Go back to the Wharf and then forward to the Alley.
Alley
Click the wolf sitting in the middle of the road to chase it away.
Click the newspapers on the road for a closer look; note the images of the bent lockpick shape as well as the pincers and safe lock.
Move the paper aside to reveal the Puzzle Piece 1/4.
Remove the cloth on top of the cart, then take the brick from the pile in the cart.
Click the tree in front of the wall to zoom in and take the Disc 3/3.
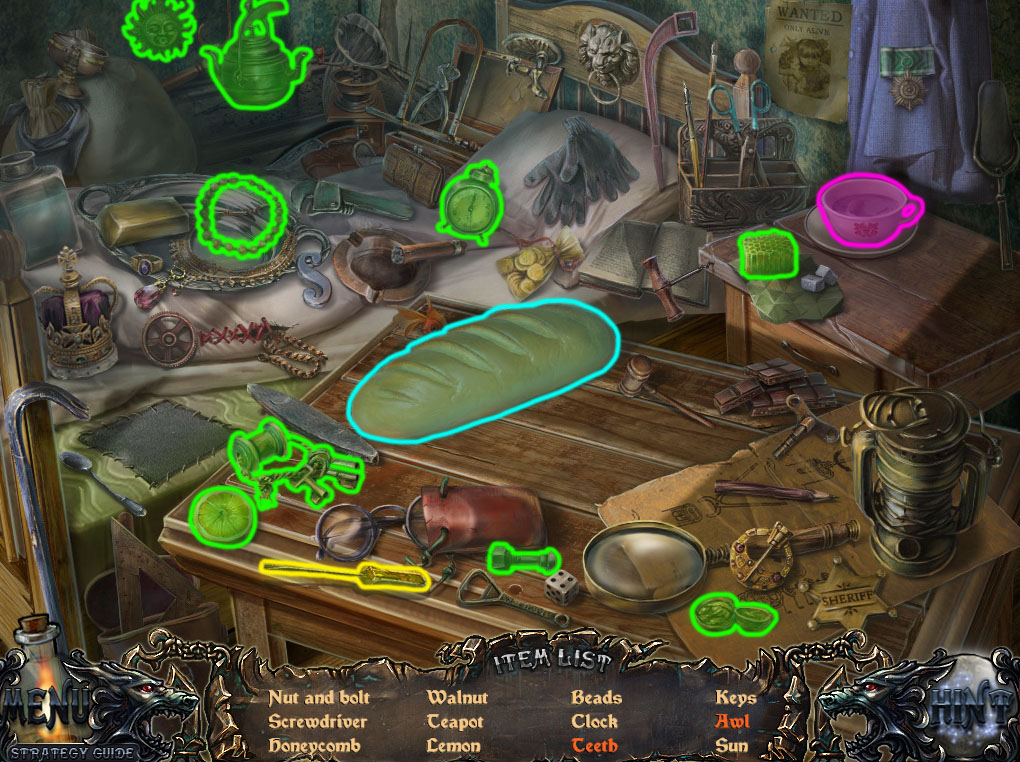
Click the left door to open it, then click the open door to start the hidden object scene.
Split the bread to find the Awl.
Empty the teacup to reveal the Teeth.
Screenshot.
Once the hidden object scene is complete, you will receive the Screwdriver.
Click the window at the bottom of the right building to zoom in.
Use the Brick three times to smash through the glass and take the Fishing Rod.
Return to the Shipyard.
Shipyard
Click the cloth over the crate on the platform to remove it, then click the crate to zoom in.
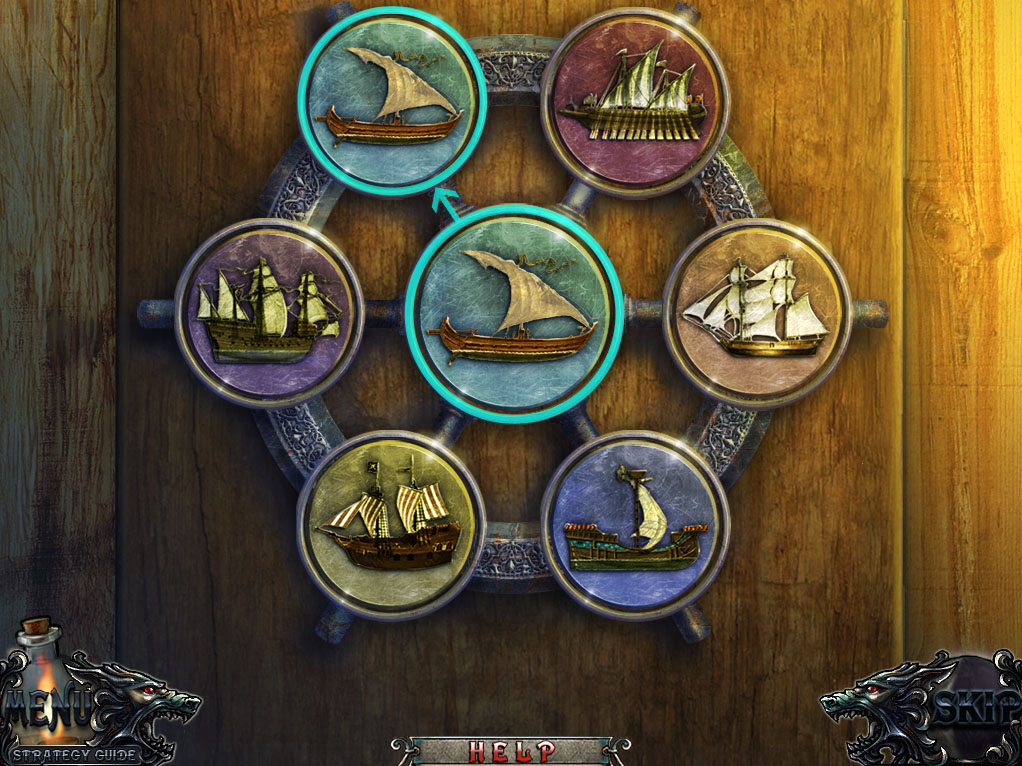
Place the three Discs into the round slots around the wheel to start the minigame.
Match the ship in the center token with its identical pair hidden around the wheel.
Solution.
Once the puzzle is solved, take the Lever from the crate.
Go back to the Wharf.
Wharf
Click the alcove under the railing to repeat the hidden object scene.
Open the furled net to uncover the Boot.
Click the ladle scoop out the water, revealing the Bottle and the Shell.
Screenshot.
Once the hidden object scene is complete, you will receive the Knife.
Click the basket floating in the water to zoom in.
Use the Fishing Rod to reel in the Basket.
Click the crane for a closer look.
Place the Basket on the hooks.
Place the Lever in the crane mechanism, then click the lever to raise the platform.
Go left to the Shipyard, then up the steps to the Ship.
Ship
Click the large crate hanging by a rope to zoom in.
Use the Knife three times to cut through the rope.
After the crate falls, click the smashed floor for a closer look.
Use the Part of Tongs on the second tongs half lying on the floor, then take the completed Pincers.
Click the overturned safe to zoom in.
Just like the image seen on the pile of papers in the Alley, use the Pincers to lift the sides of the lock.
Next, use the Screwdriver in the center slot to pry the lock off the safe.
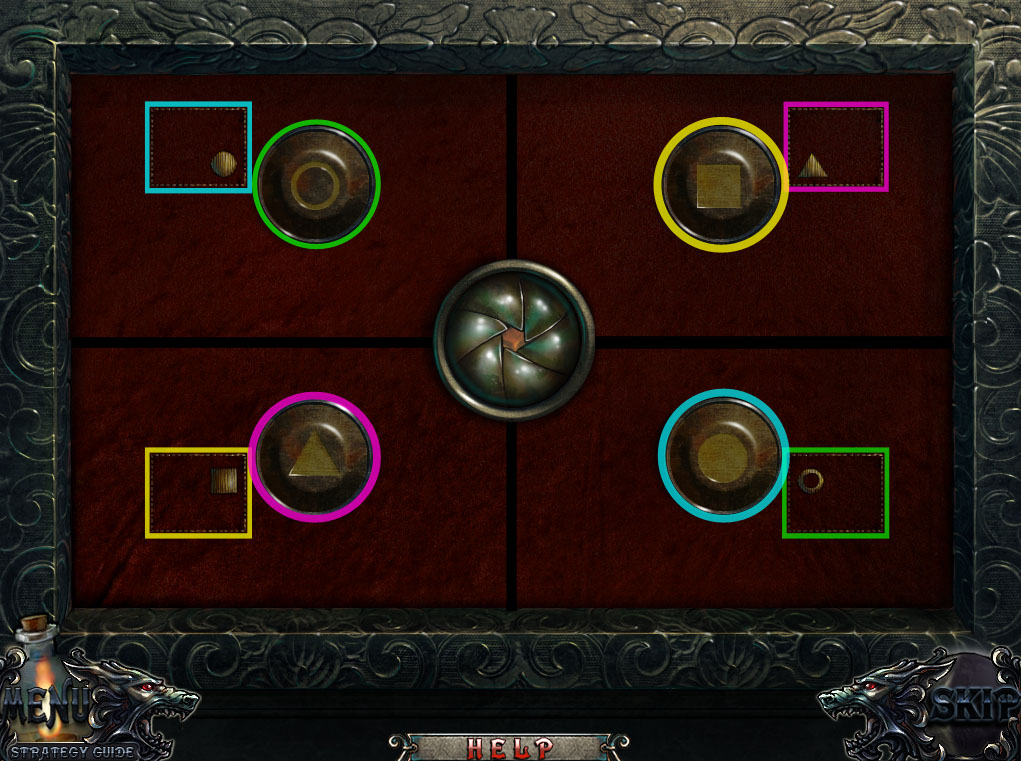
Click the handle to open the safe, then click the box inside to start the puzzle.
Move the shapes into their corresponding spaces around the board.
Each shape can only move in two directions, indicated by the arrows beside the symbols at the right side of the board.
A shape can move into any empty space or push another shape one tile over to take its place.
Move Token B right x3, move token A up, move Token B left, move the Token A up, move the Token B left, move Token A down x5, move Token B right x3, move Token A up x6.
Solution Part 1.
Move Token D left x3, move token C up x5, move Token D down, Move Token D left x2.
Solution Part 2.
Once the puzzle is solved, take the Handle from the open safe.
Go back to the Shipyard.
Shipyard
Click the sawblade stuck in the log for a closer look.
Add the Handle to the blade to complete the Saw.
Return to the Alley.
Alley
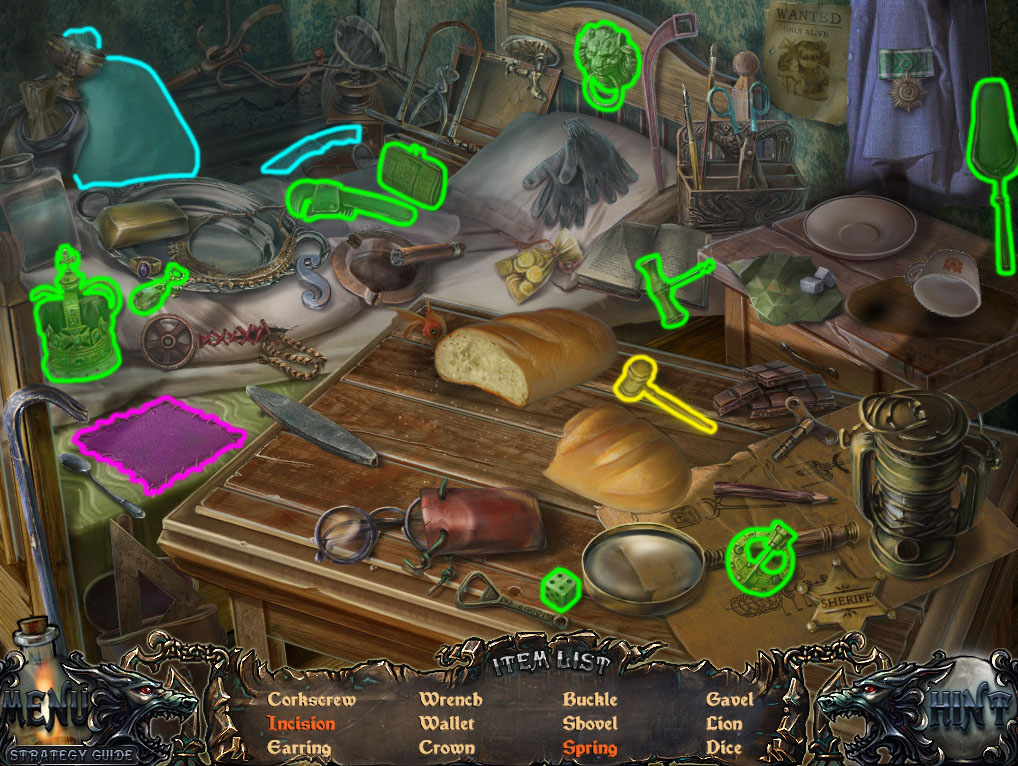
Click the open doorway to repeat the hidden object scene.
Lift the patch in the bed to reveal the Spring.
Click the knife to cut an Incision in the sack.
Screenshot.
Once the hidden object scene is complete, you will receive the Gavel.
Click the tree in front of the short wall to zoom in.
Use the Saw to cut down the tree.
Go forward through the broken wall to the Town Square.
Town Square
Click the wolf standing in the street to chase it away.
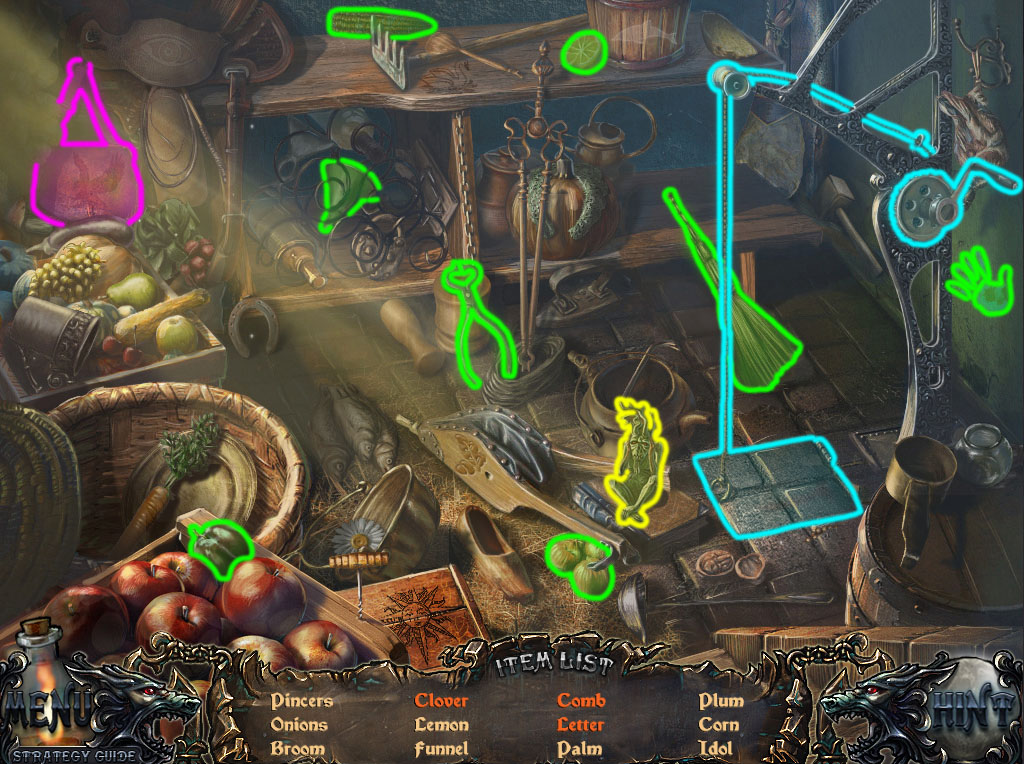
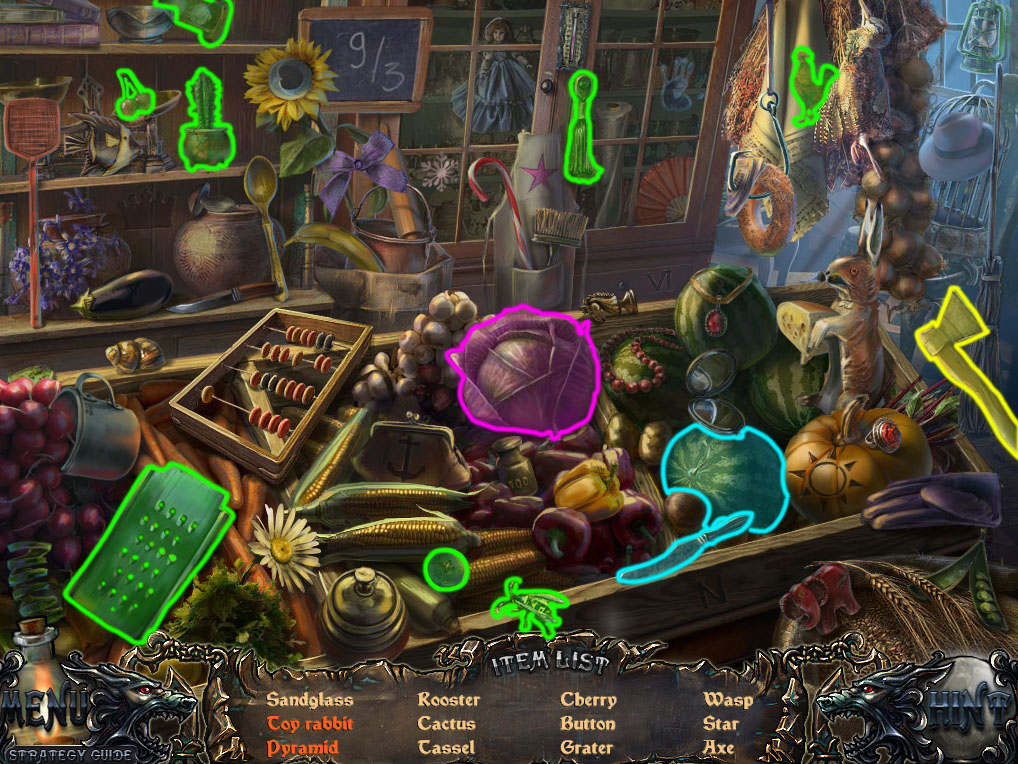
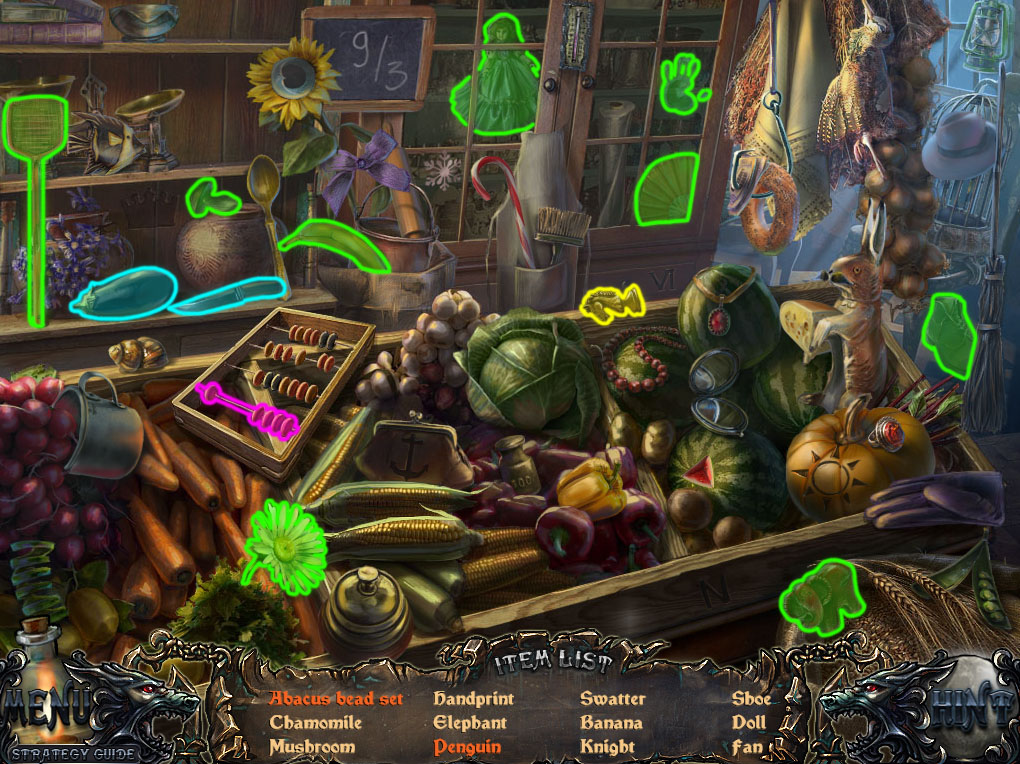
Click the open doorway to the left shop to start the hidden object scene.
Click the head of lettuce to reveal the Toy Rabbit.
Click the knife to cut the Pyramid from the watermelon.
Screenshot.
Once the hidden object scene is complete, you will receive the Axe.
Click the left fence to zoom in.
Use the Axe to chop down the planks of the fence.
Continue through the broken fence to the Town Gates.
Town Gates
Click the wolf to chase it away again.
Click the left tower to start the hidden object scene.
Lift the hat to find the Gloves.
Click the ribbon on the jacket lapel to reveal the Medal.
Screenshot.
Once the hidden object scene is complete, you will receive the Cord with Hook.
Click the purse on the side of the road to zoom in.
Open the purse and take the Hotel Key inside.
Go back to the Town Square.
Town Square
Click the door of the hotel for a closer look.
Use the Hotel Key on the keyhole, then turn the key and click the handle to open the door.
Go through the open door to the Hotel Lobby.
Posted by: Trinn |
January 15, 2012 11:15 PM
|
January 15, 2012 11:15 PM
Shadow Wolf Mysteries: Bane of the Family walkthrough: Ch. 4-6
Chapter 4
Hotel Lobby
Take the Glue on top of the counter.
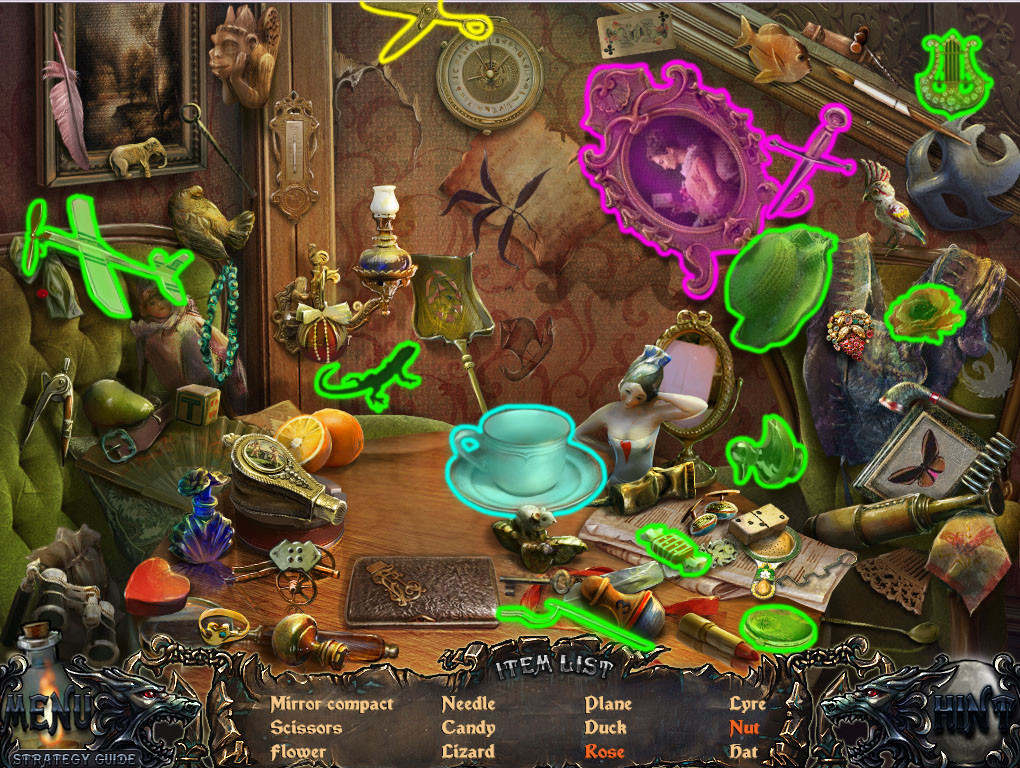
Click the sofa to start the hidden object scene.
Move the teacup to find the Nut.
Lift the dagger from the portrait to reveal the Rose.
Screenshot.
Once the hidden object scene is complete, you will receive the Scissors.
Go through the left doorway to the Corridor.
Corridor
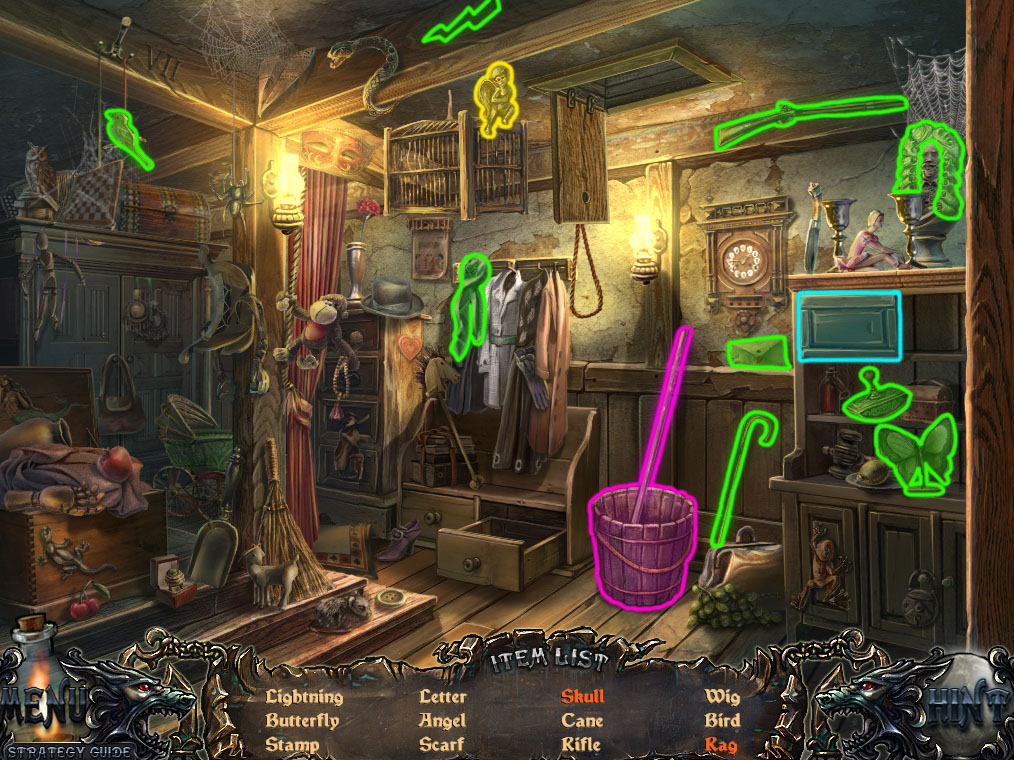
Click the coat rack to start the hidden object scene.
Click the cloth to wrap the Turban.
Remove the drape hanging over the rack to reveal the Belt.
Screenshot.
Once the hidden object scene is complete, you will receive the Part of Bell.
Go through the left doorway to the Dining Room.
Dining Room
Read the note on top of the barstool.
Take the bottle of Alcohol on top of the bar counter.
Click the top of the front right table for a closer look
Click the scattered puzzle pieces on the table until they combine to form the completed Puzzle Piece 2/3.
Click the candlestick on top of the table to zoom in and take the Snuffer.
Take the Handle on the floor underneath the table.
Return to the Hotel Lobby
Hotel Lobby
Click the sofa to repeat the hidden object scene.
Open the cigar case to find the Cigar.
Remove the wallpaper to reveal the Letter.
Screenshot.
Once the hidden object scene is complete, you will receive the Master Key.
Click the figurine on the counter to zoom in.
Put the Gavel in the figurine's hands, then place the Part of Bell on the counter to speak with the hotel concierge.
Click the teaset on the platform up the stairs for a closer look.
Use the Glue on the side of the kettle, then add the Handle.
Click the kettle to empty the water into the teacup, then take the Portrait 1/3 inside.
Go up the stairs to the Landing.
Landing
Take the Parquet leaning against the base of the right wall.
Click the vase of flowers for a closer look.
Take out the flowers, then take the Vase with Water.
Click the suitcase to zoom in, then take the Puzzle Piece 3/3 on top of it.
Go back to the Corridor.
Corridor
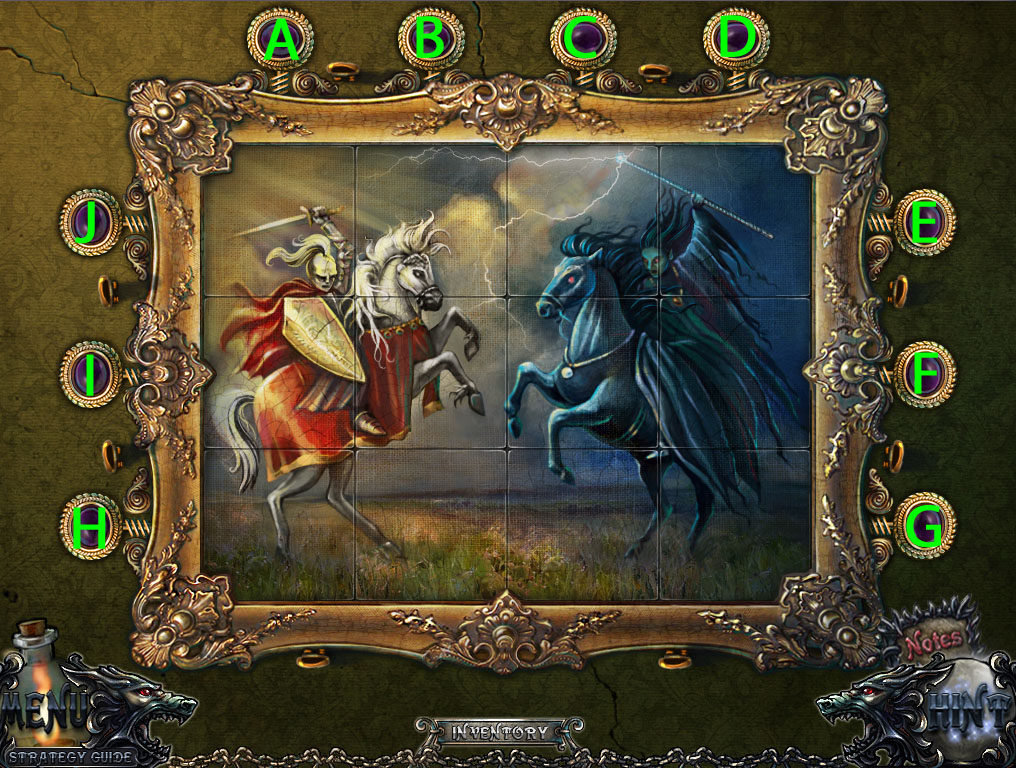
Click the framed puzzle on the wall for a closer look.
Add the three Puzzle Pieces to the frame to start the puzzle.
Click the buttons to arrange the tiles and complete the painting.
Click the buttons in the following order: B, H, J, A, B, C, D.
Solution.
Once the puzzle is solved, take the Picture 1/3 from the wall.
Click the door at the end of the hall to zoom in.
Use the Mastery Key on the lock to start the minigame.
Bend the parts of the lockpick to fit the shape of the lock tumblers.
Click the section of the locks to match the image found on the paper in the Alley.
Solution.
Go through the open door into the Study.
Study
Click the right side of the desk to zoom in.
Use the Snuffer to extinguish the candlestick.
Note the three glowing numbers on the blackboard, 4-3-7.
Click the cupboard on top of the bookcase to zoom in, then click the cupboard again to open the door to the safe.
Enter in the 3 digit combination from the blackboard to open the safe.
Screenshot
Take the Permanganate Acid from the open safe.
Click the left side of the desk for a closer look.
Note the recipe on the paper at the base of the candlestick, then read the ingredients in the journal.
Go back to the Town Gates.
Town Gates
Click the baby carriage on the sidewalk for a closer look.
Click the teddy bear to turn it around, then use the Scissors to cut through the stitching on its back.
Take the Portrait 2/3 inside the teddy bear.
Go back to the Town Square.
Town Square
Click the archway above the right fence to zoom in.
Use the Cord with Hook on the beam, then click the rope to tear down the beam.
Inspect the pile of rubble, then move the junk away to find the Painting 2/3.
Return to the Landing inside the hotel.
Landing
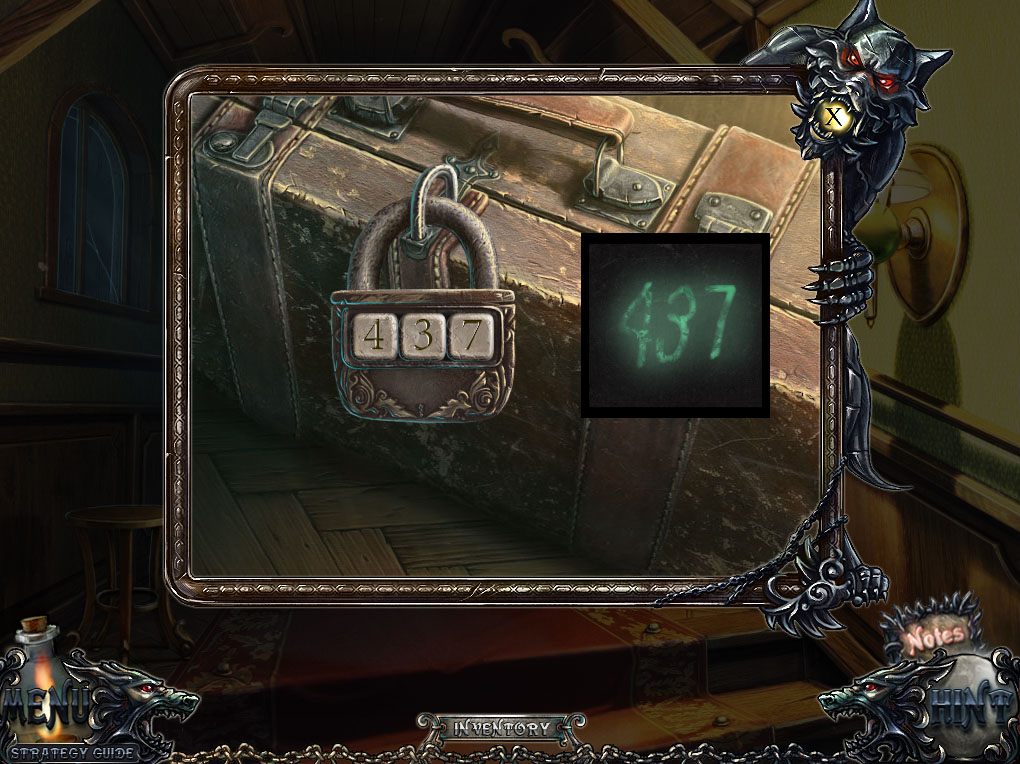
Click the suitcase on the floor to zoom in.
Set the combination to the 3 digit number from the blackboard in the Study.
Screenshot
Click the belt to unstrap it then take the Painting 3/3.
Inspect the metal frame on the wall.
Place the 3 Paintings (one is called Picture) into the spaces around the frame.
Click the paintings on the wall to move them to the end of the tracks.
Take the Iodine from the open compartment.
Return to the Study.
Study
Click the chemistry set on the desk for a closer look.
Use the Iodine, then the Premanganate Acid, and finally the Alcohol on the beaker.
Take the completed Revealing Reagent from the bunson burner.
Go back to the Corridor
Corridor
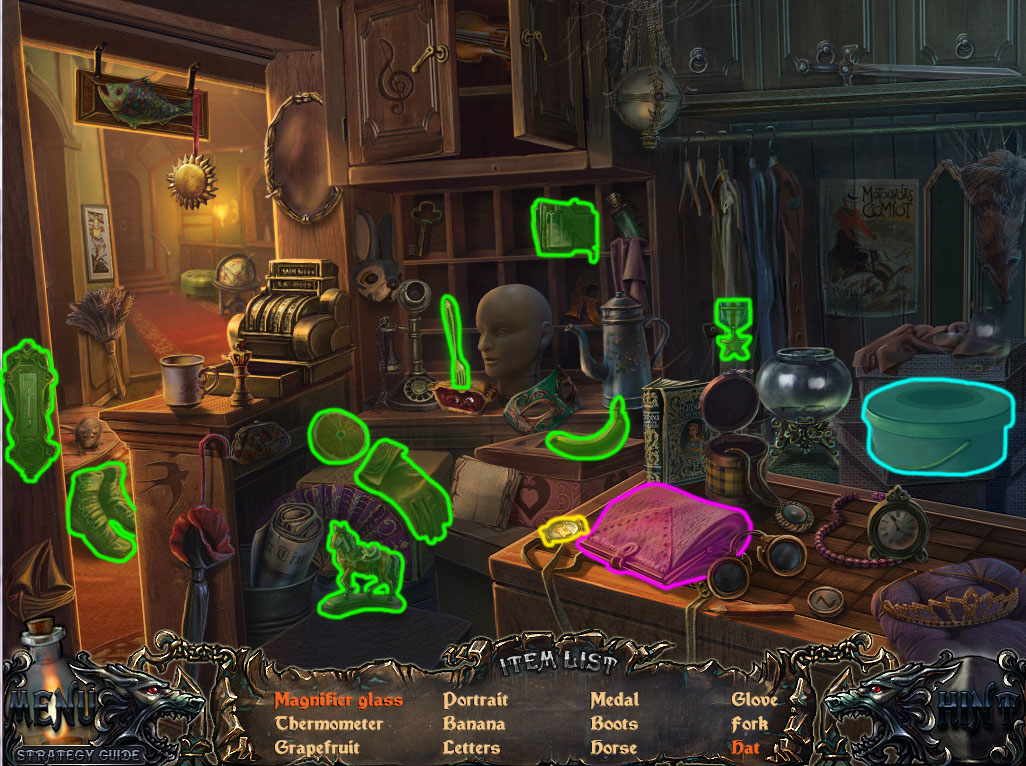
Click the coat rack to repeat the hidden object scene.
Open the purse to find the Magnifier Glass.
Open the hatbox to reveal the Hat.
Screenshot
Once the hidden object scene is complete, you will receive the Portrait 3/3.
Go back to the Hotel Lobby.
Hotel Lobby
Click the sign-in book on the reception counter to zoom in.
Use the Revealing Reagent on the book to reveal the invisible writing.
Speak with the hotel receptionist to receive the Key.
Go upstairs to the Landing.
Landing
Click the door handle to zoom in.
Use the Key on the keyhole, then turn the key and click the handle to open the door.
Go through the open door to the 2nd Floor Hallway.
Chapter 5
2nd Floor Hallway
Click the brush on top of the left cabinet to zoom in and take the Cookie.
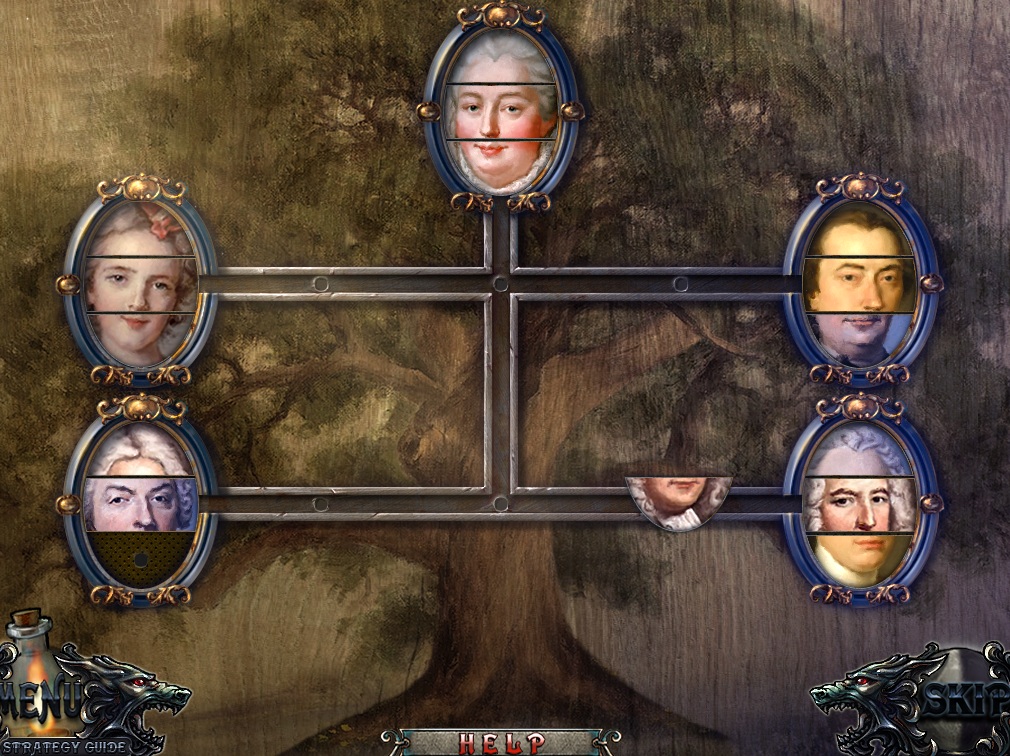
Inspect the framed picture of the family tree above the right cabinet.
Add the three Portraits to the family tree to start the puzzle.
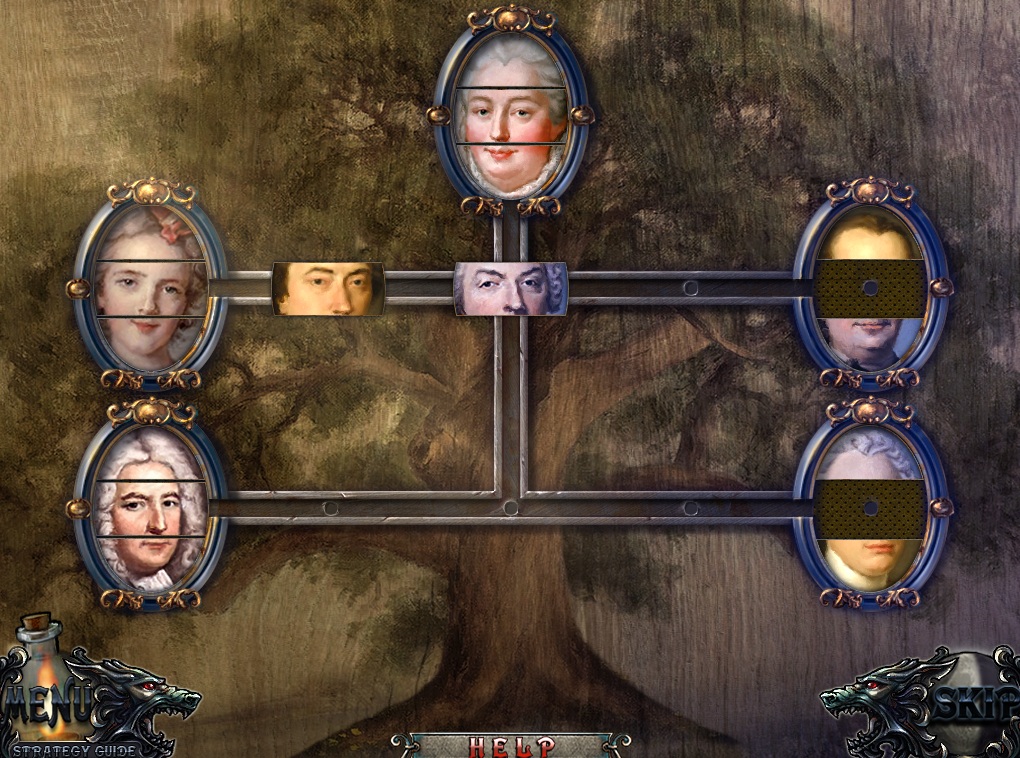
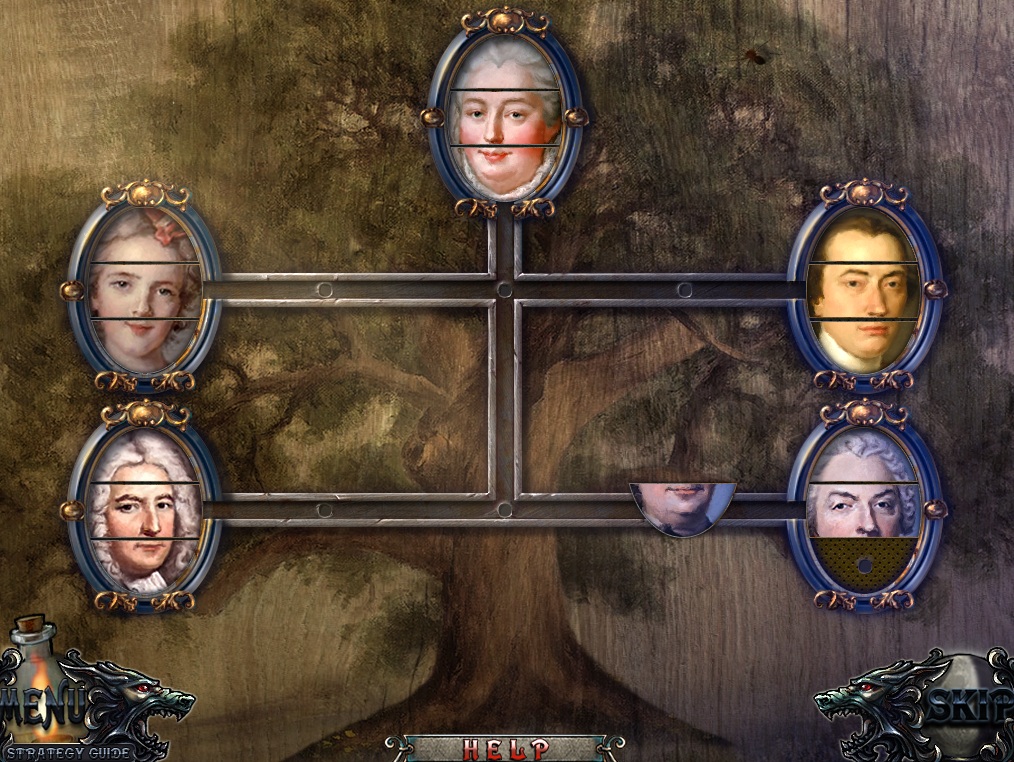
Arrange the pieces of the portraits to complete the picture in each cameo.
Click and drag the picture sections to move them along the track.
Each cameo has three sections: forehead, eyes, and chin; which must be in correct order from top to bottom.
Solution Part 1.
Solution Part 2.
Solution Part 3.
Solution Part 4.
Solution Part 5.
Take the Screwdriver from the revealed cache.
Go back to the Corridor downstairs.
Corridor
Lift the blue cloth covering the bird cage on the floor.
Click the cage to zoom in.
Give the Cookie to the parrot.
Click the latch to open the cage, then take the Blue Earring inside.
Return to the 2nd Floor Hallway.
2nd Floor Hallway
Click the left door to zoom in and take the Towel.
Inspect the door knob of the far right doorway.
Use the Screwdriver four times on the screws at the corners of the doorknob's frame, then click the frame to remove it.
Click the gear to open the door then go through the open door to the Child's Bedroom.
Child's Bedroom
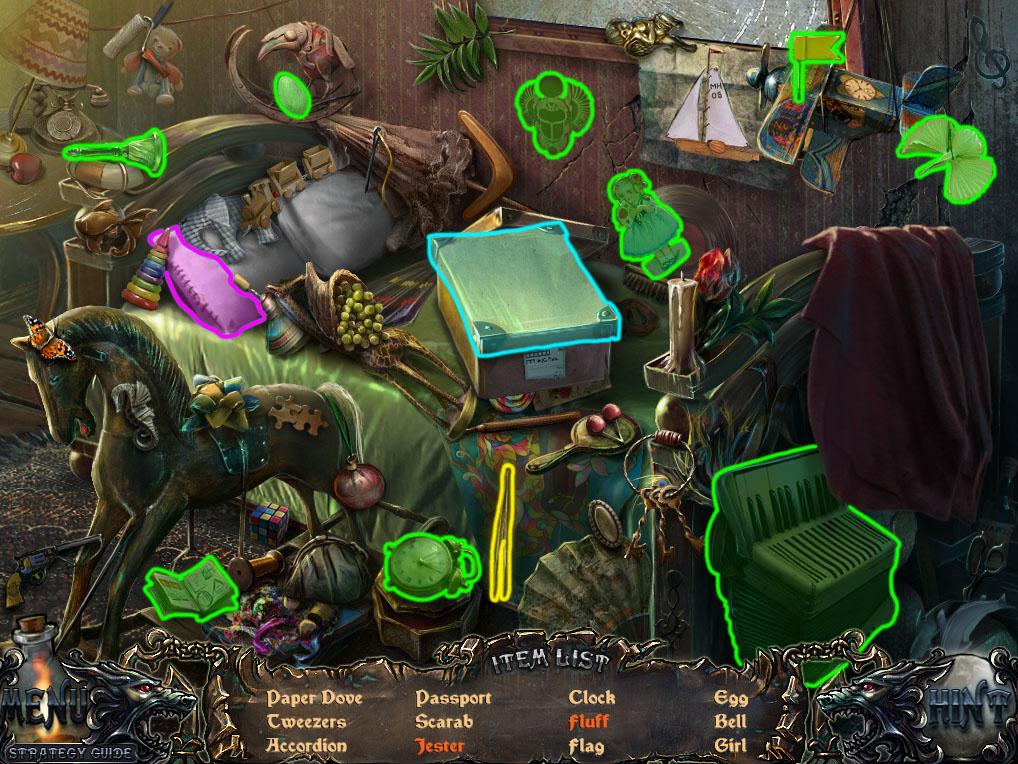
Click the bed to start the hidden object scene.
Open the box to find the Jester.
Click the pillow to tear out the Fluff.
Screenshot
Once the hidden object scene is complete, you will receive the Tweezers.
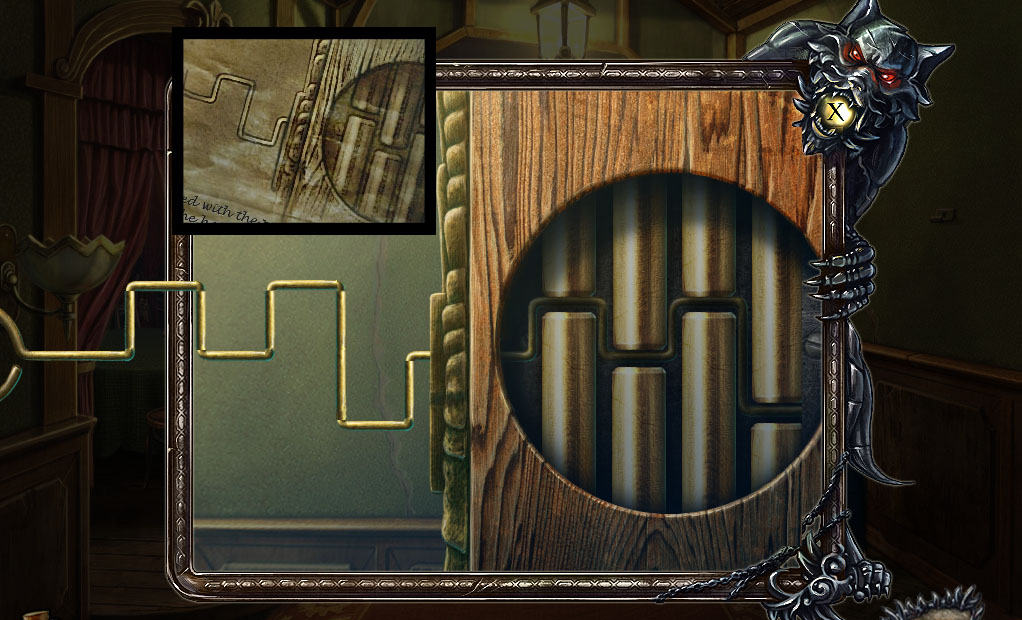
Click the corner of the rug three times to roll it up, then click the floor again to zoom in.
Place the Parquet into the empty space in the floorboards.
Click the boards in order of 1-2-3.
Screenshot
Click the wardrobe to zoom in and take the Wrench.
Go back out to the 2nd Floor Hallway.
2nd Floor Hallway
Click the middle doorway for a closer look.
Remove the lampshade from the wall light, then use the Vase with Water to douse the light.
Use the Tweezers to retrieve the Closet Key inside the lantern.
Use the Closet Key on the lock in the middle door.
Click the open doorway to start the hidden object scene.
Open the drawer to find the Helmet.
Lower the roof hatch to drop the Ladder.
Screenshot
Once the hidden object scene is complete, you will receive the Chisel.
Return to the Child's Bedroom.
Child's Bedroom
Click the windowsill to zoom in.
Use the Chisel to break the lock.
Go through the open window to the Balcony.
Balcony
Take the Umbrella leaning on the wall under the window.
Click the gutter between the wall and the roof shingles to zoom in and take the Allen Key 1/2.
Go back to the Corridor.
Corridor
Click the middle ring in the ceiling to zoom in.
Use the Umbrella to pull down the Magnet.
Return to the Balcony
Balcony
Click the pipe against the wall to inspect it.
Use the Wrench to remove the four bolts at the side of the pipe.
Click the pipe to look inside, then use the Magnet on the pipe to pull out the Dirty Stamp.
Go back to the Corridor.
Corridor
Click the brush on the cabinet for a closer look.
Place the Dirty Stamp on the cloth.
Click the brush to scrub the stamp, then take the Clean Stamp.
Return again to the Balcony.
Balcony
Click the center of the window to zoom in.
Use Clean Stamp on the seal to open the window.
Go through the open door into Room 23.
Room 23
Click the Countess to speak with her.
Click the cupboard under the window to zoom in.
Click the drawer to open it and take the Fish Food inside.
Click underneath the sofa Veronica is sleeping on to zoom in and take the Acid.
Inspect the broken window to find the Angel 1/3.
Go back to the Child's Bedroom.
Child's Bedroom
Click the fish tank on top of the safe to zoom in.
Use the Fish Food on the fish.
Take the Red Earring 2/2 and the Archer 1/2.
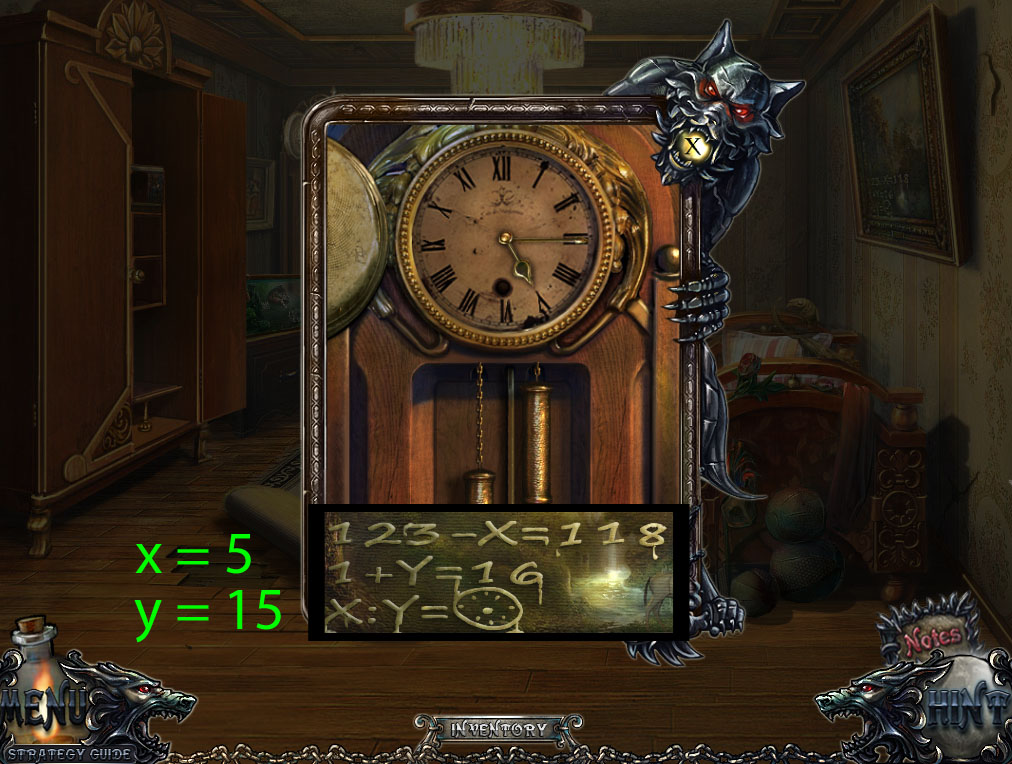
Click the painting hung above the bed for a closer look.
Use the Towel to wipe the paint off the picture.
Solve the equations to find the values for X and Y, and note the clock picture at the bottom.
123 - x = 118.
X = 5.
1 + Y = 16.
Y = 15.
Take the Allen Key 2/2 hanging over the corner of the frame.
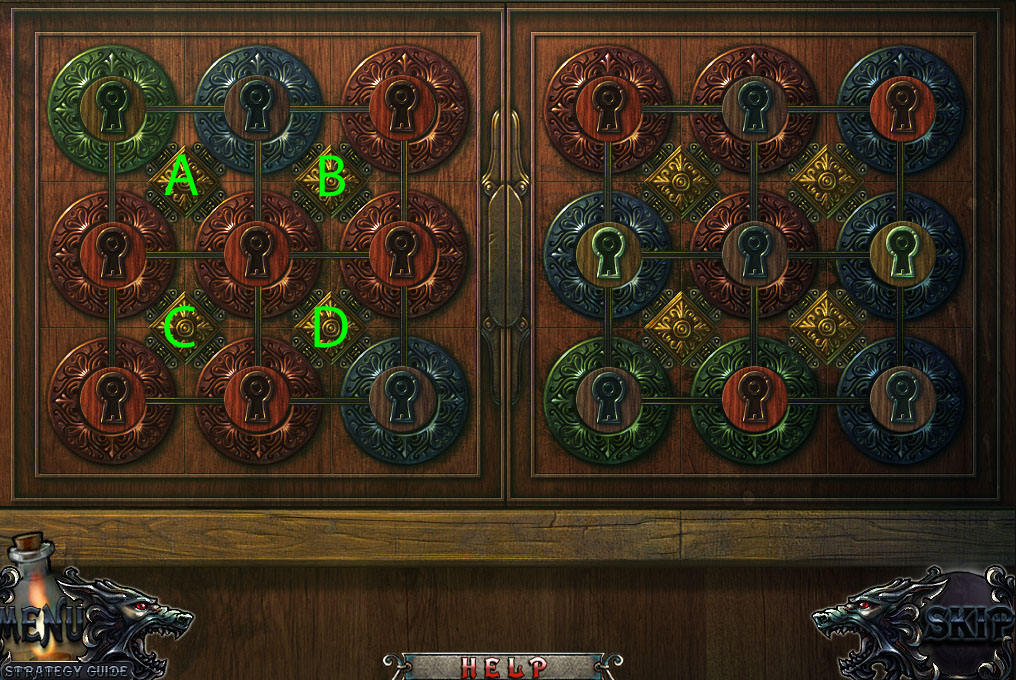
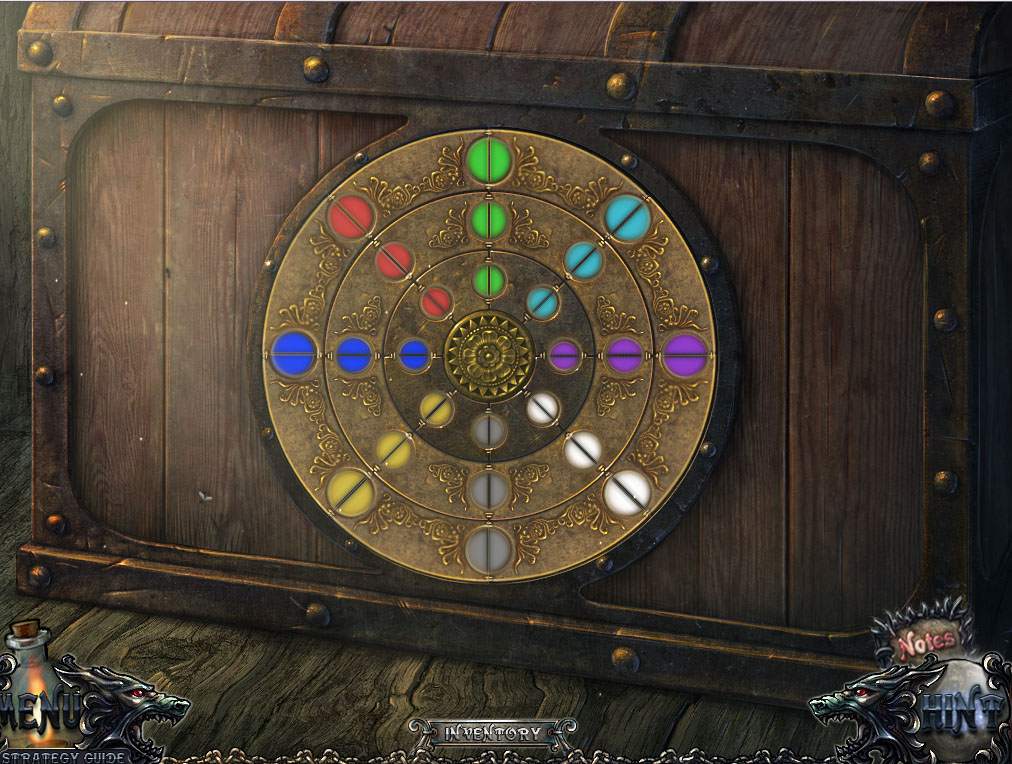
Click the wardrobe to look inside, then click the multi-colored board to start the puzzle.
Arrange the discs so that the all the keyholes of one color are in the rings of the same color.
Click the diamond buttons to rotate the adjacent four discs one position clockwise.
Click the buttons on the left side in the following order: A x 2, B, D x3.
Solution Part 1.
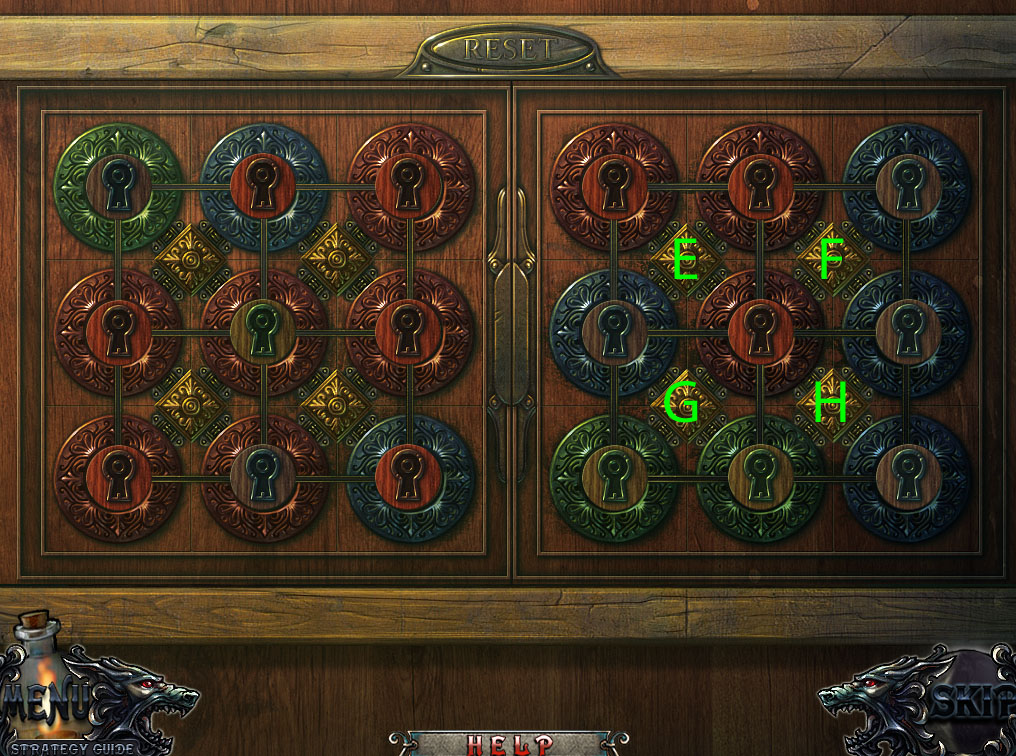
Click the buttons on the right side in the following order: G, H x 2, G, H, E, F x 3.
Solution Part 2.
Once the puzzle is solved, use the two Allen Keys on the hexagonal locks.
Take the Weights from the revealed cache.
Click the grandfather click to zoom in, then add the Weights to the clock to start the minigame.
Drag the hands of the clocks to the correct time according to the equations on the painting.
Move the hour hand to the value for X, 5.
Move the minute hand to the value for Y, 15.
Solution.
Take the Knight 2/2 from the open clock face.
Return to Room 23.
Room 23
Click the small cabinet at the end of the sofa to zoom in.
Place the Red Earring into the snake's left eye and the Blue Earring into the snake's right eye.
Take the bottle of Tears and the Skull 1/2 inside the open drawer.
Click the framed picture on the wall above the stripes chair for a closer look.
Add the two Knights to the picture to start the puzzle.
Arrange the soldiers correctly so that every knight on the left side defeats the enemy on the right side.
The knights should be organized so that their weapons have an advantage against the other side.
Click the start button at the top of the board to test your solution.
Solution.
Once the puzzle is solved, put the Empty Flask in the tray under the tap.
Click the tap to fill the flask, then take the Elixir.
Go back to the Child's Bedroom.
Child's Bedroom
Click the bed to repeat the hidden object scene.
Move the blanket to reveal the Button on top of the ball.
Click the needle to stich a Cross.
Screenshot.
Once the hidden object scene is complete, you will receive the Angel 2/3.
Go back to the Corridor.
Corridor
Click the closet to repeat the hidden object scene.
Click the mop handle in the bucket to pull out the Rag.
Open the drawer to find the Skull.
Screenshot.
Once the hidden object scene is complete, you will receive the Angel 3/3.
Go back to the Study downstairs.
Study
Click the doorway to look into the side room.
Place the three Angels onto the posts around the bed.
Click the hidden door on the back of the lifted bed to open it, revealing the Key.
Go outside to the Town Square.
Town Square
Click the left open door to repeat the hidden object scene.
Click the bead in the abacus to have the Abacus Bead Set.
Click the knife to carve the eggplant into a Penguin.
Screenshot.
Once the hidden object scene is complete, you will receive the Knight.
Click the right doorway to the laboratory to zoom in.
Use the Acid on the sign to burn through the chain.
Use the Key to unlock the door.
Go through the open door to the Laboratory.
Laboratory
Speak with the scientist, then give him the Elixir from your inventory.
Use the Tears on the bottle in the lower left corner of the board with pipes.
Click the cabinet for a closer look.
Click the latch on the cabinet door to open it, then take the Snake Catcher inside.
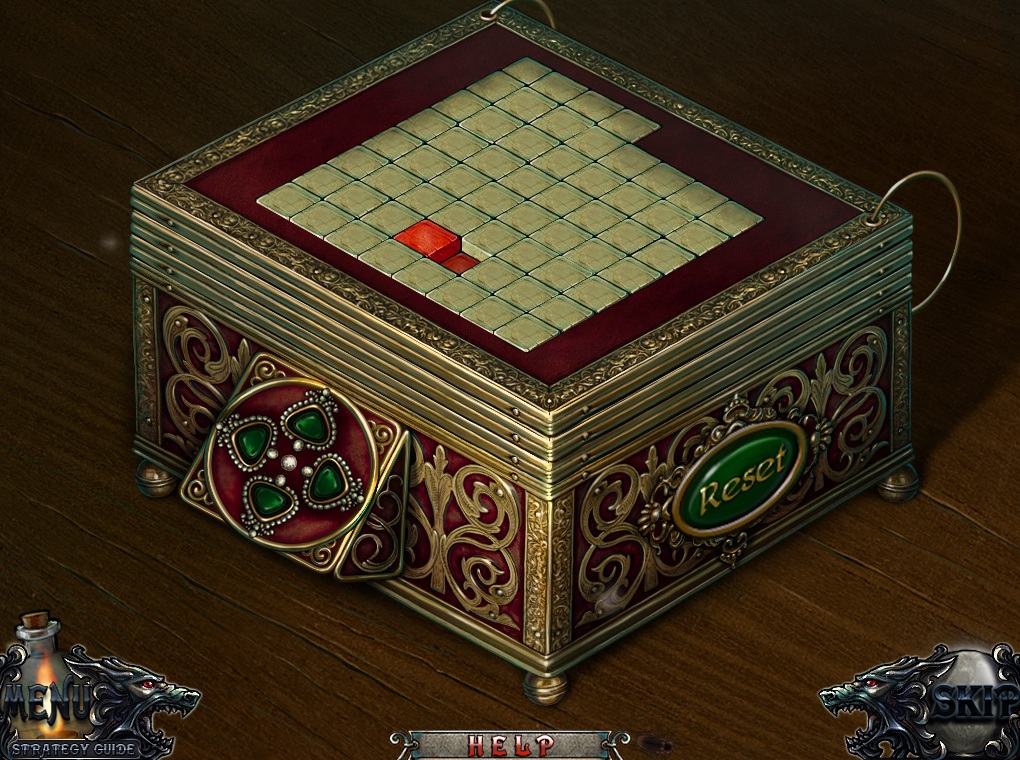
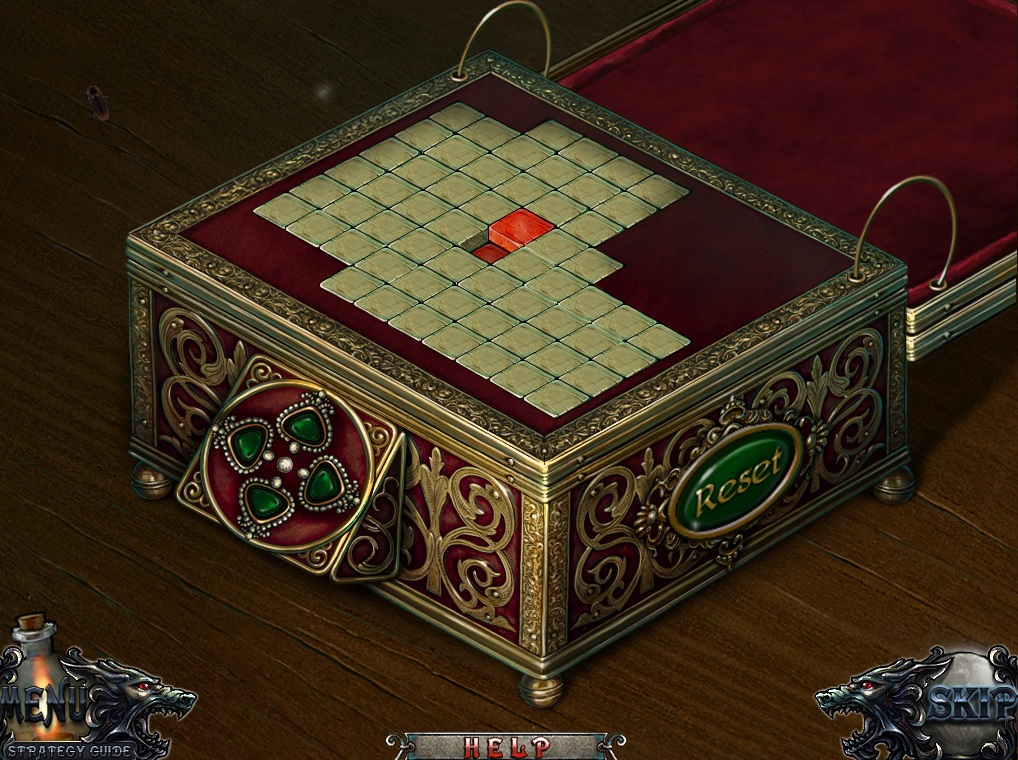
Click the box on the table in the lower right corner of the room to start the puzzle.
Move the red block around the board so that all of the tiles are raised.
Click the arrow buttons on the side of the box to move the block in that direction.
The block must touch the red square last or the puzzle will reset.
The block has to move over a blue square twice in order to raise the tile.
Click the arrows in the following order: Right x 2, Up, Left x 2, Up x 2, Right x 2, Up, Left x 4, Left, Down x 5, Right, Up x 3, Right, Down x 3, Right.
Solution #1.
Click the arrows in the following order: Left, Down, Right, Down x 2, Right, Up x 2, Right, Up, Right x 2, Up, Left x 2, Up, Left x 5, Down x 2, Right, Up, Right x 3, Down, Left.
Solution #2.
Click the arrows in the following order: Right, Down, Right x 2, Left, Right x 2, Down, Left x 2, Right, Left x 3, Up, Left x 2, Right, Left x 2, Up x 3, Right, Down x 2, Right, Up x 2, Down, Up x 2, Right, Down x 2, Up, Down x 2.
Solution #3.
Once the puzzle is solved, take the Tiger Skull 2/2.
Go back to the Study inside the hotel.
Study
Click the left door to look into the side room.
Click the hatch in the floor to open it, then click the revealed panel for a closer look.
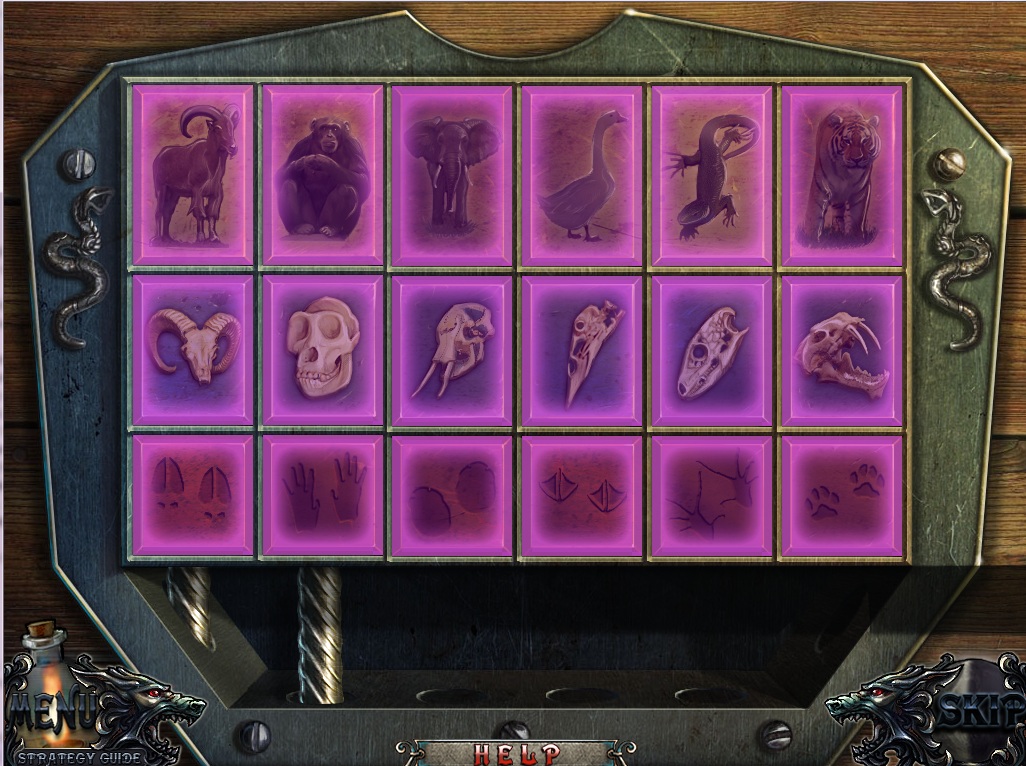
Add the two Skulls to the spaces on the board to start the puzzle.
Match each animal with its correct skull and footprint.
Click a tile to select it, then click another tile in the same category to swap their places.
Once all three tiles for one animal are properly positioned, they will lock in place and glow purple.
Solution.
Once the puzzle is solved, use the Snake Catcher on the box to pull out a Snake.
Return to the Laboratory.
Laboratory
Speak with the scientist again, then click the board with pipes on the table to zoom in.
Use the Snake to pour the venom into the right bottle to start the puzzle.
Rotate the pipes to direct the flow of fluid from both bottles at the sides to the small red bottle at the bottom.
Click a pipe to rotate it 90 degrees clockwise.
Solution.
Once the puzzle is solved, you will receive the Green Elixir.
Inspect the crossbow on top of the crate for a closer look.
Use the Green Elixir on the loaded arrow, then take the Crossbow.
Speak with the scientist a final time to receive the Rook Key.
Go to the Town Gates.
Town Gates
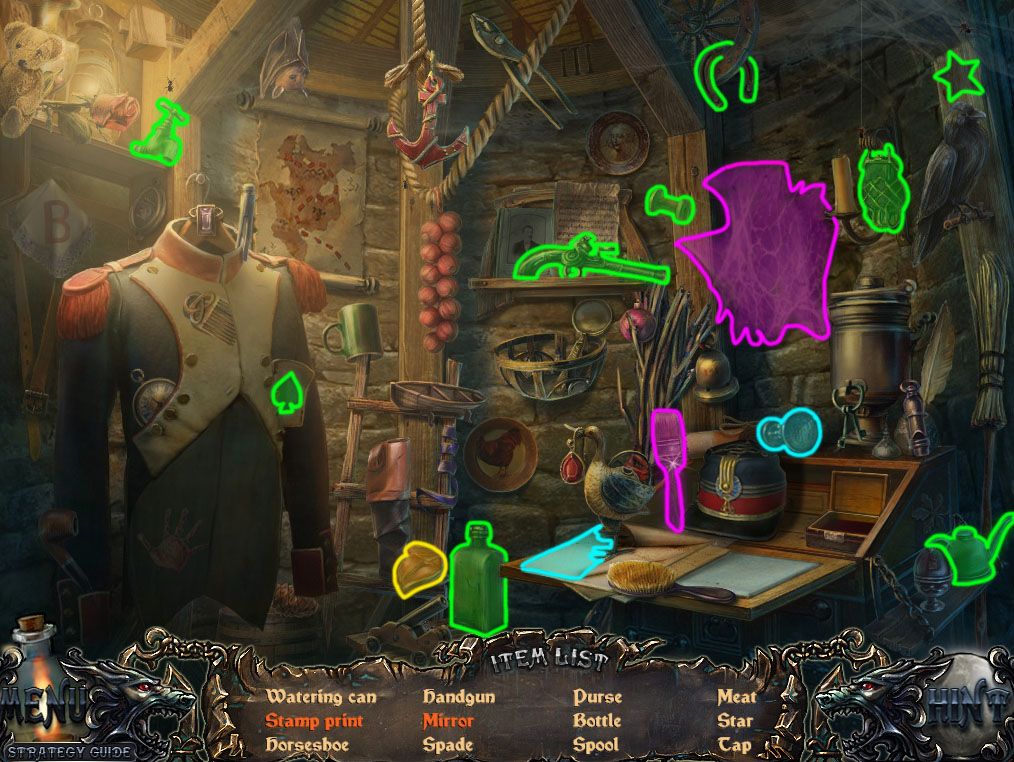
Click the left tower to repeat the hidden object scene.
Click the brush to clean the cobwebs, revealing the Mirror.
Click the stamp to make a Stamp Print on the paper.
Screenshot.
Once the hidden object scene is complete, you will receive the Meat.
Inspect the gate for a closer look.
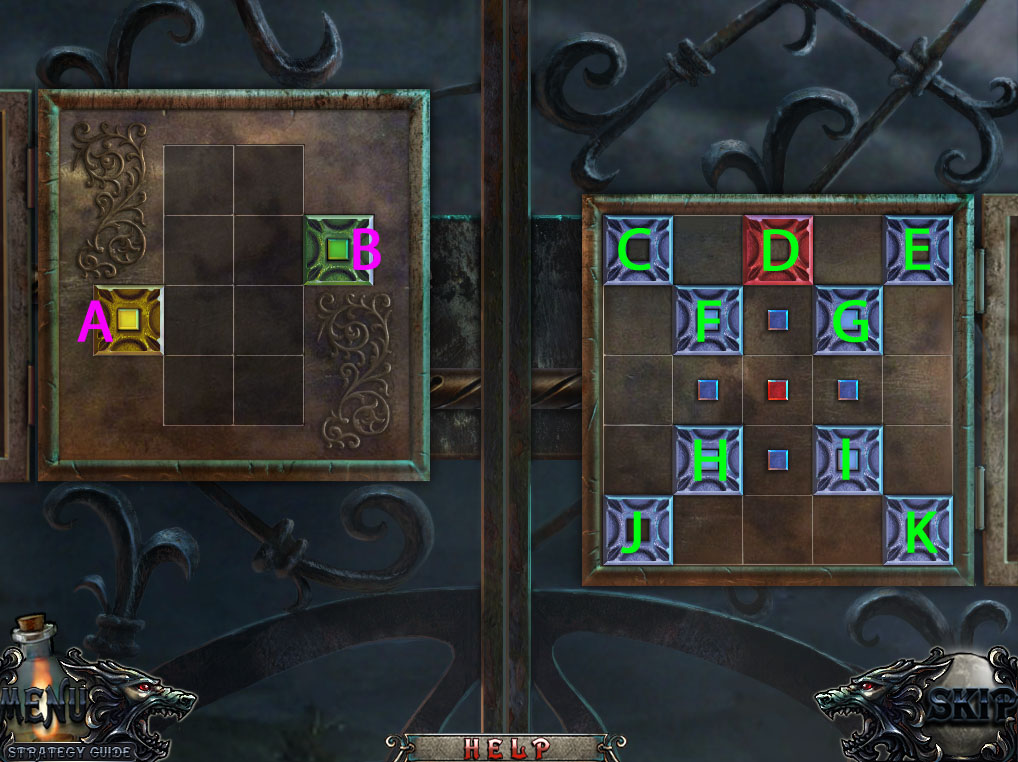
Put the Rook Key in the left plate and the Knight into the right plate to start the puzzle.
Move the tiles into the space with the center square of the same color.
Click and drag a tile to move it in the direction its arrow is pointing.
A tile will continue to move until it hits an obstacle like a wall or another tile.
Move the tiles in the following direction: A left, A up, B right, B Down, B Left, B Up, A right, A down, A left, A up, A left, B left.
Solution #1.
Move the tiles in the following direction: F down, C right, C down, I left, D down, G left, E down, E left, K up, J up, J right, J down, G up, K left, K down, G down.
Solution #2.
Once the puzzle is solved, go through the open gates to the Forest.
Chapter 6
Forest
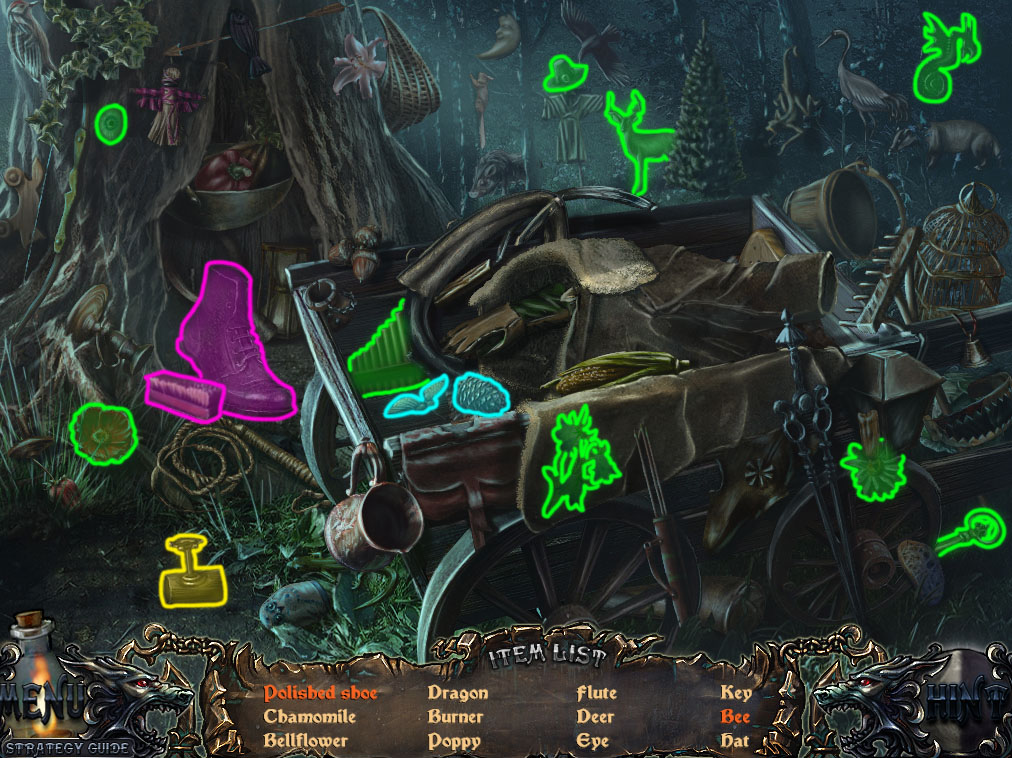
Click the cart in the brush to start the hidden object scene.
Move the branch to find the Inflatable Toy.
Lift the coat sleeve to reveal the Moth.
Screenshot.
Once the hidden object scene is complete, you will receive the Brushwood.
Click the pit to the right of the path to look inside.
Set the Brushwood over the pit, then place the Meat on top of the trap.
Click the pit again to zoom in and take the Wolf Wool.
Follow the path forward to the Cabin Entrance.
Cabin Entrance
Shoot the wolf with the Crossbow, then speak with the Scientist.
Click the tree stump to zoom in and take the Knife.
Click the hollow in the left tree to start the puzzle.
Flip the pieces of the rings to align all the circles with matching colors.
The middle and outer rings must be aligned with circles of the same color as the inner ring.
Click a circle to swap the two adjacent semi-circles.
Solution.
Once the puzzle is solved, take the Medallion 1/3 from the revealed cache.
Go right to the Lumber Mill.
Lumber Mill
Click the stand in the lower right corner to zoom in and take the Mace.
Inspect the hook above the tied logs for a closer look.
Use the Knife three times to cut through the rope.
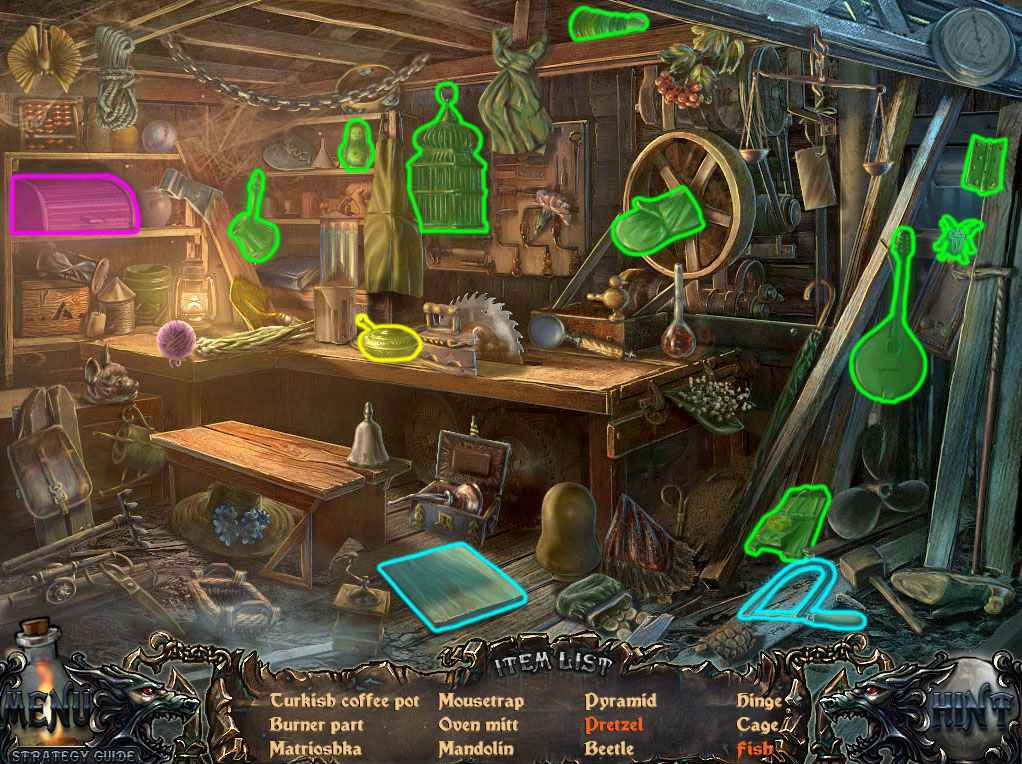
Click the shed to start the hidden object scene.
Click the brush (hidden behind the burner base) to paint the cat to look like a Raccoon.
Open the window to blow the wood shavings on the mannequin head to make the Wig.
Screenshot.
Once the hidden object scene is complete, you will receive the Nail Puller.
Go back to the Forest.
Forest
Click the cart to repeat the hidden object scene.
Click the brush to clean the Polished Shoe.
Click the wings to add them to the pinecone to make the Bee.
Screenshot.
Once the hidden object scene is complete, you will receive the Burner Part 1/3.
Click the box near the skeletons to zoom in.
Use the Mace to smash the box, then take the Medallion 2/3 inside.
Return to the Cabin Entrance, then continue forward into the Cabin.
Cabin
Click the window to the right of the scientist to zoom in.
Use the Nail Puller three times to remove the boards from the window, then click the window to open it.
Click the table to start the hidden object scene.
Open the drawer to find the Burner Part, the Number, and the Rose.
Screenshot.
Once the hidden object scene is complete, you will receive the Burner Part 2/3.
Go through the left door to the Side Room.
Side Room
Take the Scoop Net leaning against the chair.
Click the book the scientist is reading to find the werewolf cure recipe, then turn the page to read about the bunson burner.
Go back to the Lumber Mill.
Lumber Mill
Click the shed to repeat the hidden object scene.
Open the drawer to find the Pretzel.
Use the Saw to carve the board into a Fish.
Screenshot.
Once the hidden object scene is complete, you will receive the Burner Part 3/3.
Inspect the spiderweb in the window for a closer look.
Use the Scoop-Net on the web to catch the Spider.
Return to the Cabin.
Cabin
Click the table to repeat the hidden object scene.
Use the magnifying glass to find Australia on the map.
Click the pen in the inkwell to unfurl the flag with the Jolly Roger.
Screenshot.
Once the hidden object scene is complete, you will receive the Medallion 3/3.
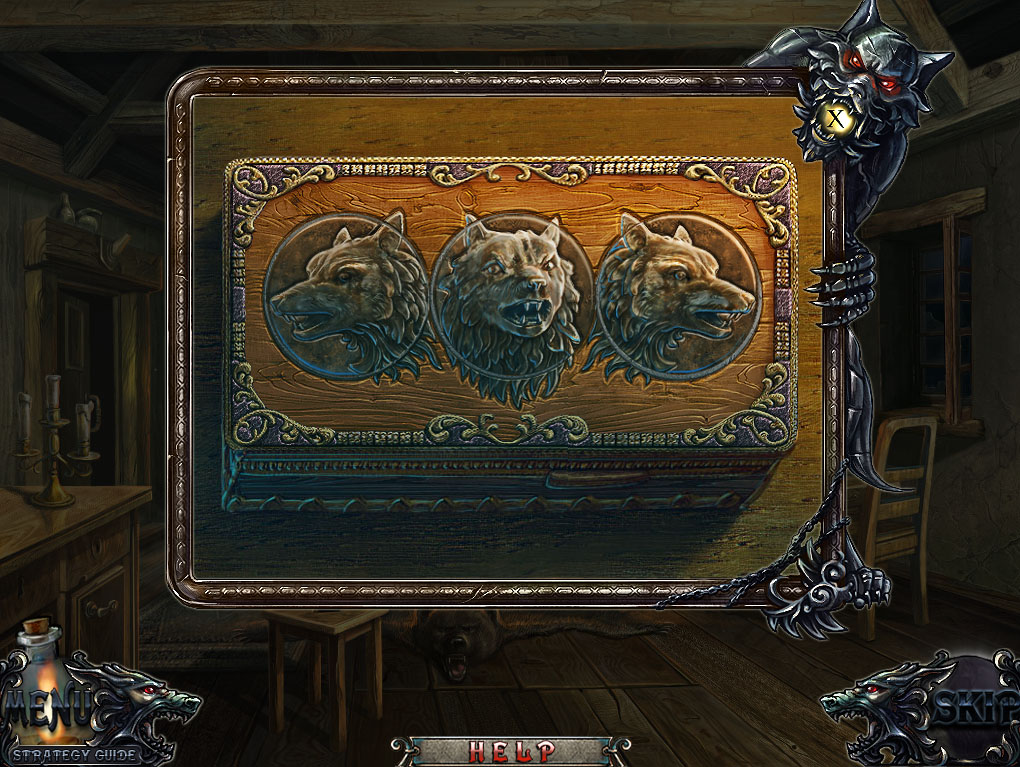
Click the box on the mantle of the fireplace to zoom in.
Place the three Medallions into the round slots at the top of the box to start the minigame.
Arrange the medallions into the correct upright position, aligning each wolf with its ears outside the ring.
Click a medallion to select it, then click another medallion to swap their plcaes.
Click and drag the medallion to rotate it clockwise or counterclockwise.
Solution.
Once the minigame is complete, take the Tube with Blood from the open box.
Go left to the Side Room.
Side Room
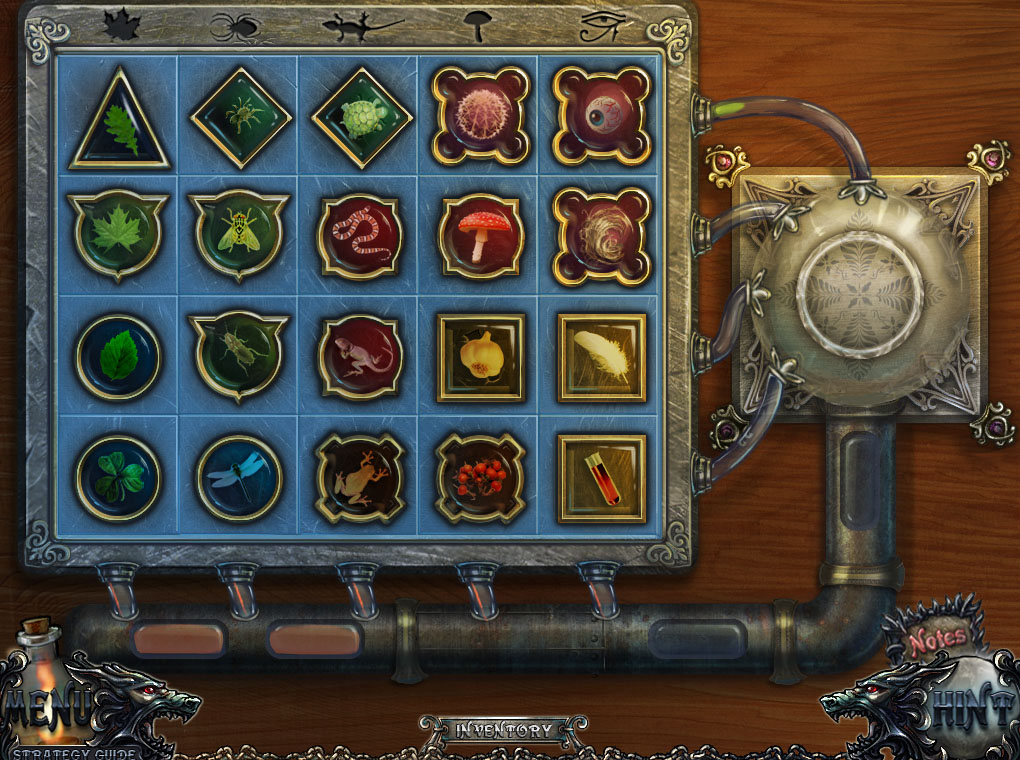
Click the chemistry set on the table to zoom in.
Add the Spider, the Tube with Blood and the Wolf Wool to the board to start the puzzle.
Organize the tiles by category.
Leaves go in the first column on the left, insects go in the second column, reptiles go in the third column, plants go in the fourth column, and mystical ingredients go in the last column.
Click a tile to select it, then click an adjacent tile to swap positions.
Once a column is filled with items of the correct category, it will glow blue and lock in place.
Solution.
Once the puzzle is solved, take the completed Elixir.
Inspect the small table under the candlestick for a closer look.
Place all three Burner Parts on top of the table to assemble the buson burner.
Set the Elixir on top of the burner to complete the potion.
The End
Posted by: Trinn |
January 15, 2012 11:23 PM
|
January 15, 2012 11:23 PM