
Shaban
Platform: Windows

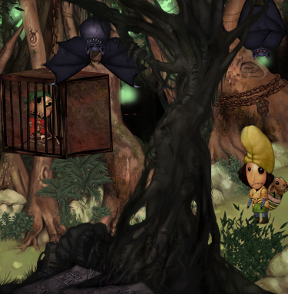
![]() When you lose something valuable, how far will you go to get it back? In Peta Game's Shaban, a shepherd travels across vast ravines, haunted forests and snow-capped peaks to rescue his kidnapped flock. Along the way, he is daunted by the three invidious thieves who stole his sheep in the first place. Now, the little herdsman must repair destroyed conveyances, help villagers in rampaged towns, and fend off the villains outright attacks upon him.
When you lose something valuable, how far will you go to get it back? In Peta Game's Shaban, a shepherd travels across vast ravines, haunted forests and snow-capped peaks to rescue his kidnapped flock. Along the way, he is daunted by the three invidious thieves who stole his sheep in the first place. Now, the little herdsman must repair destroyed conveyances, help villagers in rampaged towns, and fend off the villains outright attacks upon him.
 Your role in this beguiling puzzle adventure game is to help the winsome pilgrim in his sheep recovery quest by solving a slew of thorny puzzles all while enjoying the hand-drawn watercolor surroundings and comic strip style narratives. Move about by pointing and clicking wherever you want to go—an arrow cursor indicates the entrance to a new scene, but otherwise, almost anywhere you click, the characters will follow. The cursor also changes to indicate interactive areas, anything worth a closer look, and items to pick up. A drop down inventory at the top keeps your possessions organized until you're ready to use or combine them.
The story mainly follows the young sheep herder but, for added cuteness, there are times when you play as his pet goat. In fact, some puzzles are only doable by the goat while others are more human friendly. You'll know this by each character's reaction to the puzzles they encounter. The puzzles and mini-games employ the same charm and artwork as the rest of the adventure and include such tasks as uncrossing wires, reassembling torn pictures, solving codes and completing fragmented object searches. There is little in the way of help, though; the "hint" button is just that: a subtle hint. Except in the case of the arcade-type mini-games, there is also no way to skip these puzzles. Even so, it doesn't take long to get the hang of things, and soon you'll be looking forward to the next challenge.
 Analysis: Because both the sheep herder's story and the puzzle instructions are conveyed almost entirely through visuals, there is a meditative feel to Shaban. Most the appeal is in the game's unique style, beautiful design and endearing characters. The story and the gaming elements overlap so that the puzzles convey as much story as any narrative would. Similar to Albert Lamorisse's The Red Balloon, without the intrusion of verbal elements, the experience of playing Shaban becomes more absorbing and poignant.
Even the puzzle instructions (a.k.a. "hints") give little in the way of textual explanation. This might prove frustrating to those who are unaccustomed to this type of gameplay, but at the same time it will be a refreshing delight to those who like figuring things out on their own. Lateral thinking and keen eyesight are also leaned on heavily here. The reflex-based mini-games seem a bit out of place but are good for adding action to the adventure. The exception to the fun, from this reviewer's perspective, was an overly difficult fishing excursion, but it was nothing the "skip" button couldn't solve.
Another good way to describe Shaban is to compare it to Machinarium and The Tiny Bang Story. Still, it has a few more rough edges than those titles along with a distinct hand-made, artisan feel to it. While extremely appealing in both overall design and the unassisted challenge to the puzzles, Shaban tends to vacillate between awkward quirkiness and a quirky charm. Players who are impatient with the slow presentation or who take less stock in aesthetic qualities might not see its appeal. Give it a demo first, see what you think. This is a game that caters to those looking for something uniquely creative, uncommonly gorgeous and simply adora-baaahh!
![]() Windows:
Windows:
Download the demo
Get the full version
![]() Mac OS X:
Mac OS X:
Not available.
Try Boot Camp or Parallels or CrossOver Games.


Walkthrough Guide
(Please allow page to fully load for spoiler tags to be functional.)
Shaban Walkthrough
Note: the missing screenshots will be added soon!
Shepherd's House
Starting out inside the shepherd's house...
Grab the KNAPSACK from the corner of the bed.
Go downstairs (bottom right edge of the screen).
Pick up the MAGNET (outside the sheeps' pen).
Go right to the next scene.
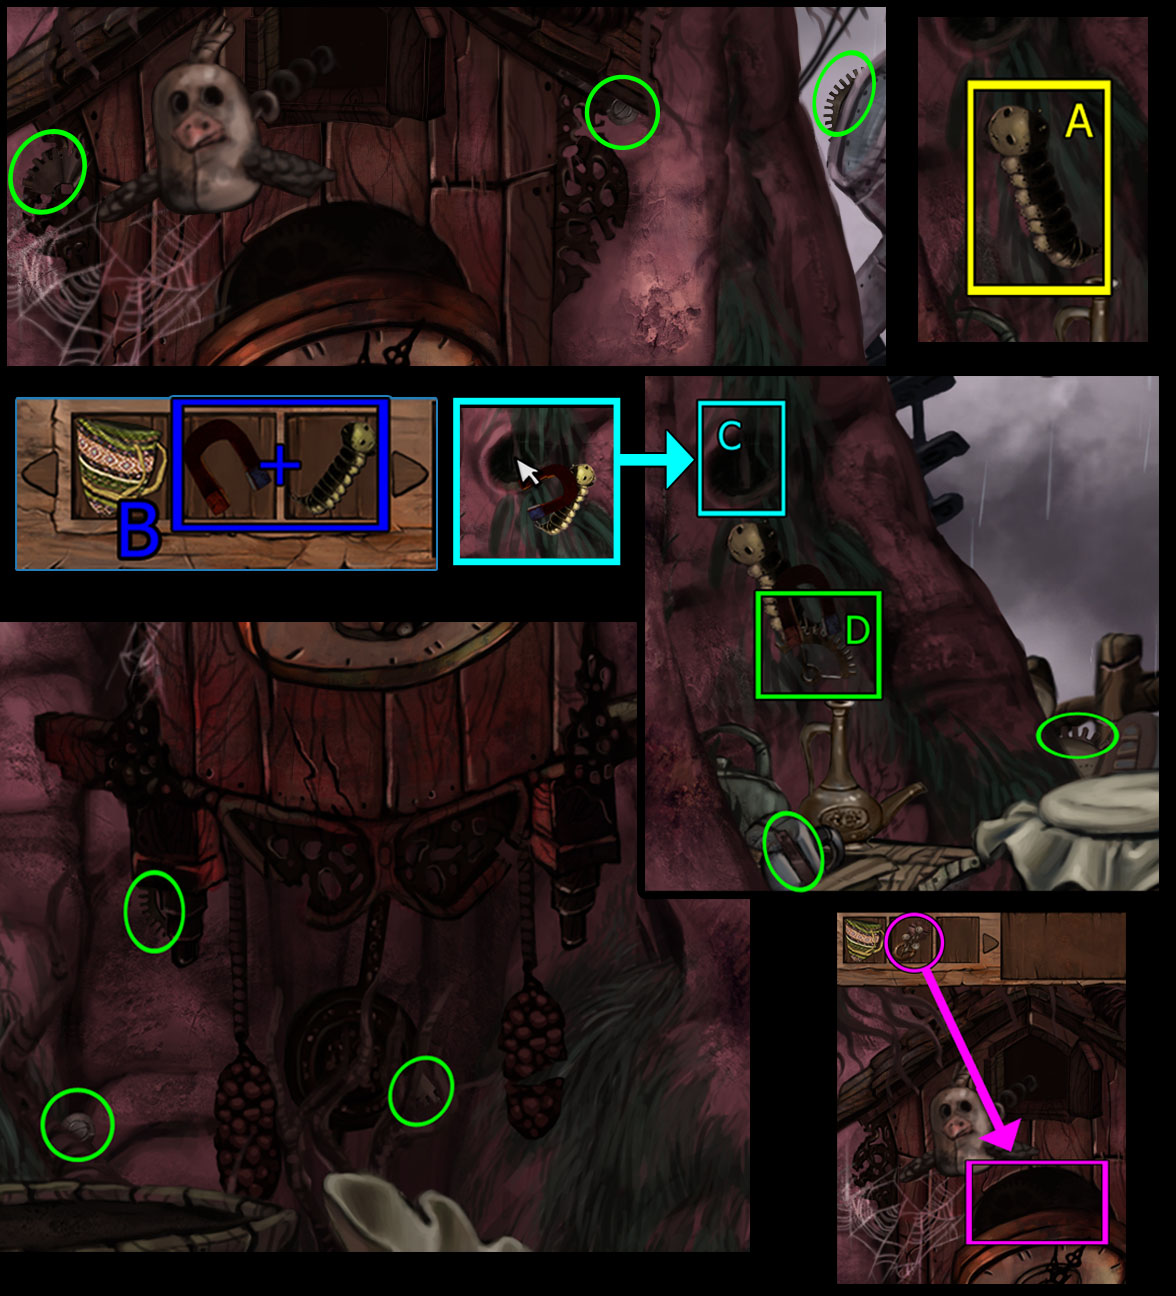
Examine the broken clock to begin a Hidden Object Search:
screenshot: cuckoo clock puzzle
Catch the WORM (A).
In your inventory, combine the WORM with the MAGNET (B).
Then put the WORM+MAGNET into the knothole (C).
When the worm passes by again, get the GEAR PART (D) from it.
After you find all the other gear parts and levers (see screenshots), you'll have a completed CLOCK PART in your inventory.
Put the completed CLOCK PART into the clock.
After the cutscene with the boy and the goat, use the KNAPSACK on the goat to pick him up.
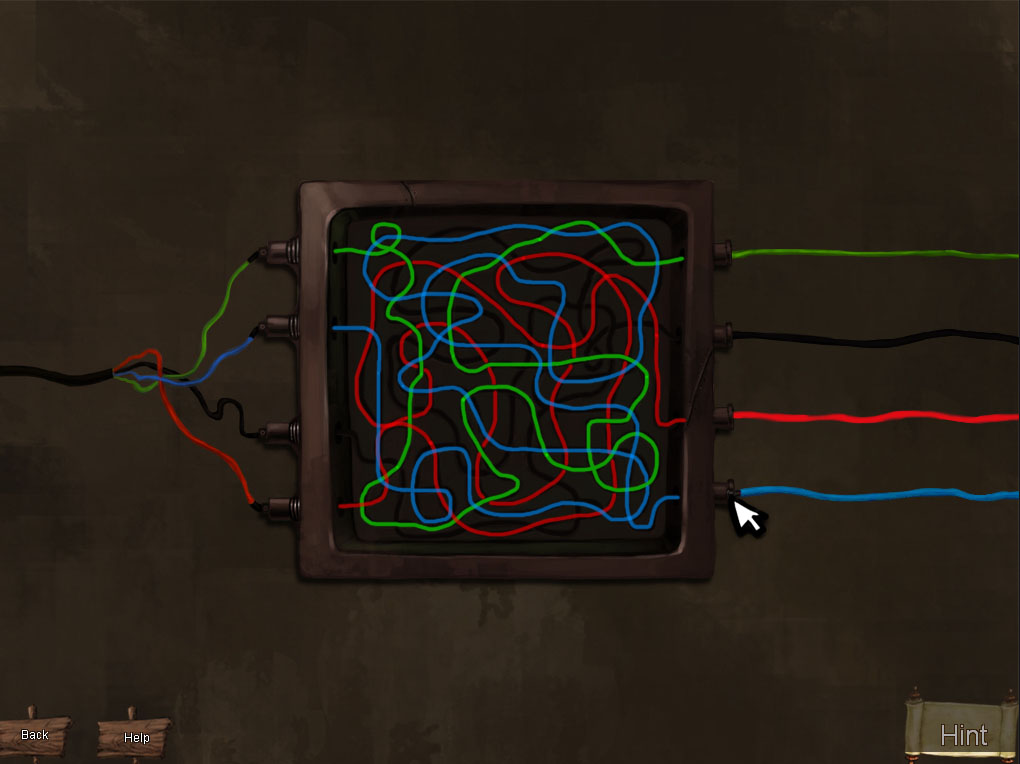
Once inside the house, you play as the goat. Click on the Wire Box underneath the table on the left:
Insert the wires into the correct receptors by tracing a the tangled line from the left to the right side.
The easiest way to solve this is to find the correct placement for two of the wires, then simply try the only two possible combinations for the remaining two wires.
SOLUTION:
From top to bottom:
GREEN
BLACK
RED
BLUE
screenshot: wire puzzle solution
When the wire puzzle is complete, you see the light on the transporter is blinking red.
Go downstairs and go left to the next scene.
Pick up the TRANSPORTER MANUAL from the bottom of the control panel.
Examine the transporter controls:
Notice that each dial is segmented like on a clock.
One dial is broken, permamently set to "35"
Go right and go back inside the house.
Put the TRANSPORTER MANUAL on the small table on the left to begin another puzzle:
Arrange the tattered pieces to make the manual whole again.
Click a piece to pick it up. Drag it to where you want to put it. Then, click again to let go of it.
When a piece is in the correct spot, it will lock into place.
Start with the upper left corner, where a piece is already taped down for you, then work your way around.
When the page is complete, use the METAL 4x4 GRID to identify the correct coordinates for the transporter:
The hint explains that the first dial was set at "35"
Find "35" and center it in the top left square of the METAL 4x4 GRID.
Note the other three numbers.
SOLUTION:
35 - 5
- - - -
20 - 45
Go back out to the Transporter. Examine the transporter control panel:
screenshot: transporter manual solution
Set the dials to the correct numbers according to the transporter manual puzzle you just completed.
The blue buttons will turn the dial clockwise.
The yellow buttons turn the dial counter-clockwise.
When you have the dials set, click the green button on the bottom to start the transporter.
Go left to jump inside the transporter and travel west.
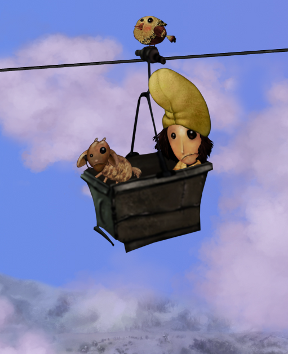
Transporter, Birds and Fish
As you're riding on the transporter, it stops and you are stuck:
Click the goat twice to send him onto the cable.
Click the pully at the top (to hopefully fix it!)
Move your cursor toward the left edge of the screen until it turns into a large arrow indicating you can go left. The goat will scramble that direction.
The bird who has the transporter fuse wants to trade:
Fish for Fuse.
Go left.
Continue left, across the bridge, into the Village.
Pass through the village and go up the stairs to the left.
Talk to the robust man in the red jerkin:
He'll give you a fishing pole if you can give him some money.
Go right back into the center of the village.
Talk to the old man:
He'll pay you to find his cane and glasses.
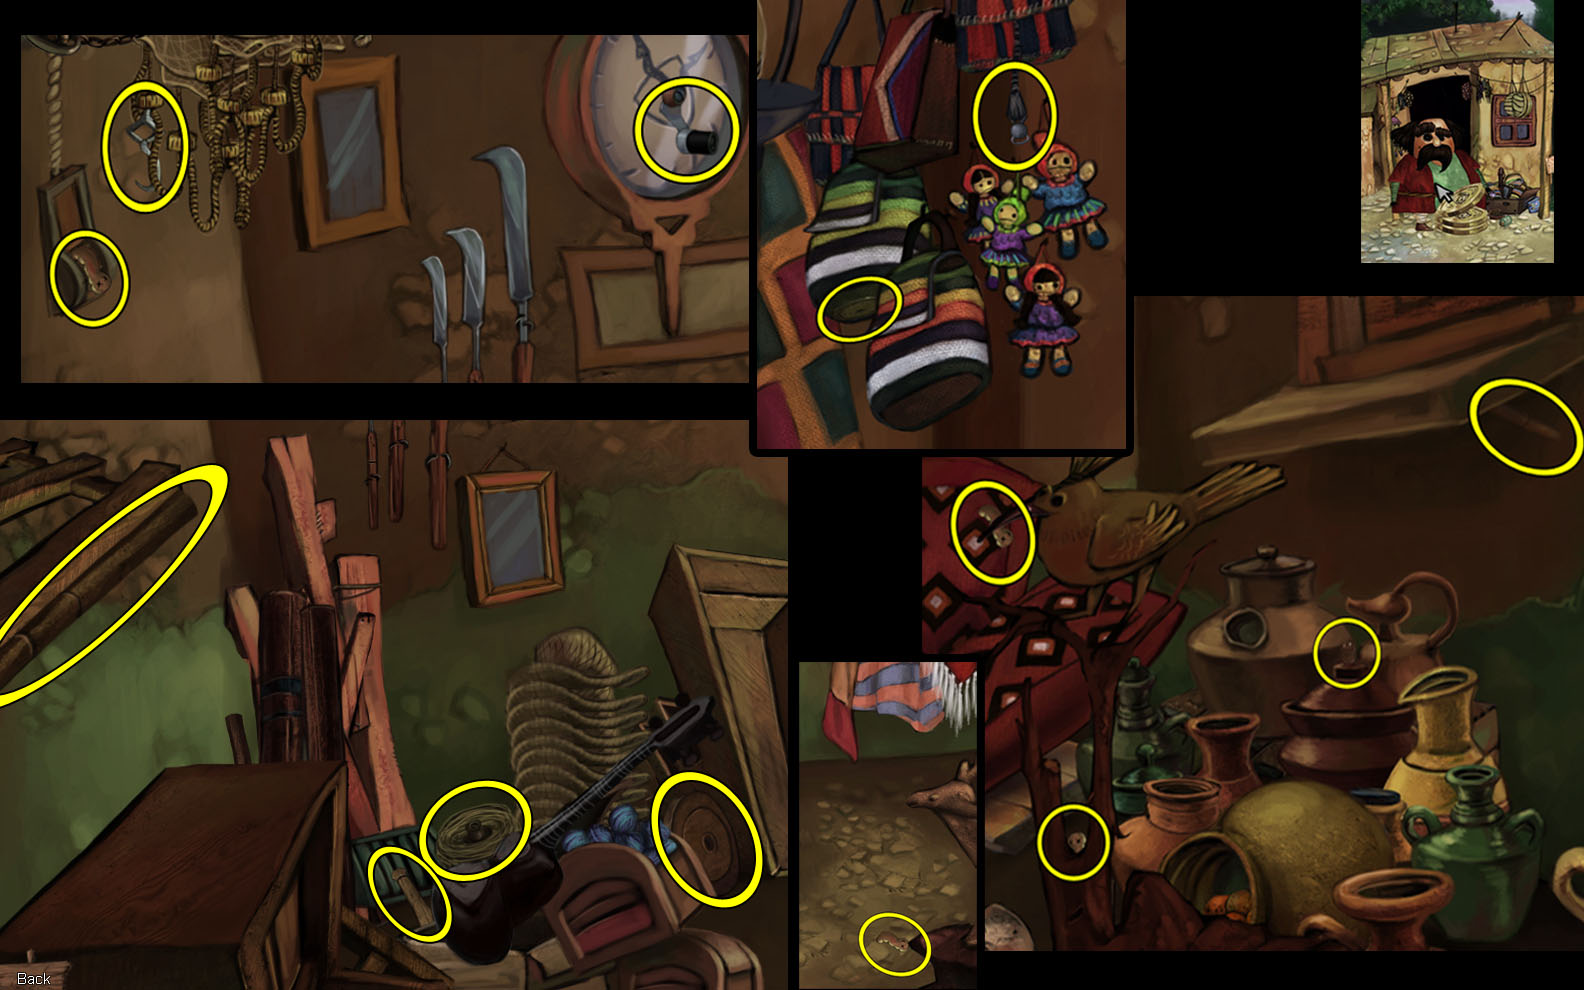
Click on the grate under the window to begin a Hidden Object Search:
screenshot: hidden object search for cane and glasses
Scan the room to find and click on all the pieces of the old man's cane and glasses.
Click on the rat (red eyes) in the pipe so he'll drop a piece.
When you've completed the search, give the GLASSES AND CANE to the old man and he'll give you some COIN.
Go left up the stairs again.
Give the COIN to the mustached man in red and he'll gesture for you to enter his store. Go inside.
Inside is another Hidden Object Search:
screenshot: hidden object search for fishing rod
When you've found everything on the list, you'll have a FISHING ROD.
Continue right through town until you're back on the bridge. Use the FISHING ROD to begin a mini-game:
The object is to catch 16 fish while avoiding the crabs. When a fish jumps out of the water, quickly click on it.
Every fish you catch adds to your total while every crab you catch takes away from it.
Occasionally a crab will sneak up to the bucket in the left corner and try to steal a fish. Quickly click on the would-be thief to stop it.
This mini-game has a "Skip" button; once it fills up and turns yellow (in about 5 minutes), you can opt to skip the game.
The best strategy seems to be keeping your hook centered, going for all the fish that jump in the center of the screen or below, so your hook is never too far from the pail should a crab approach.
After you catch 16 fish, the game will stop and you'll have FISH. Go right.
Give the FISH to the Bird and he will give you the FUSE for the transporter.
Insert the FUSE in the transporter and watch the cutscene.
The Village: Part 2
As the shepherd again, walk left from the west transporter until you come to the river:
Pick up the EMPTY BUCKET.
Continue left into the Village.
Fill the empty bucket in the fountain to get:
BUCKET FILLED.
Use the BUCKET FILLED on the burning house, through the window, where the old man is.
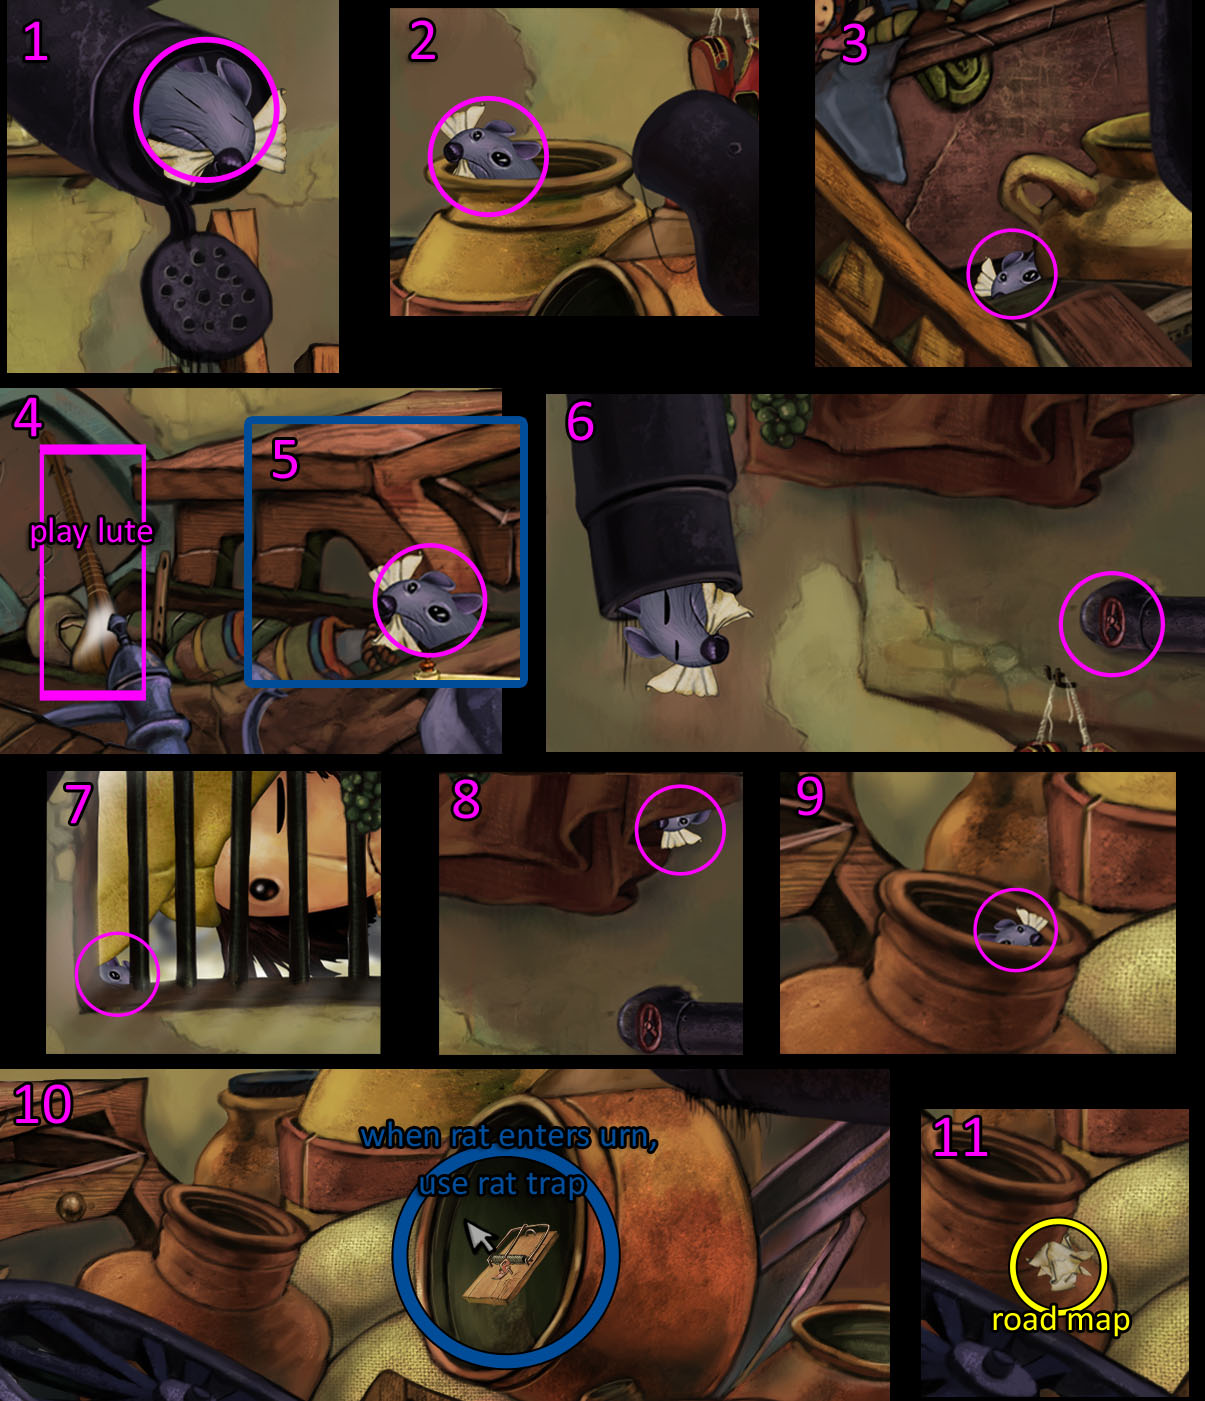
In a short story panel, the old man then asks you to trap the rat. This will automatically begin another Hidden Object Search and a "hide'n'seek" minigame:
First, find all the parts of the rat trap—
screenshot: hidden object search for rat trap
Then, find all of the rats' hiding places—
screenshot: hide'n'seek with rat
The last place the rat lands, a big brass urn, is where you put the rat trap.
Catching the rat will yield a:
torn-up ROAD MAP.
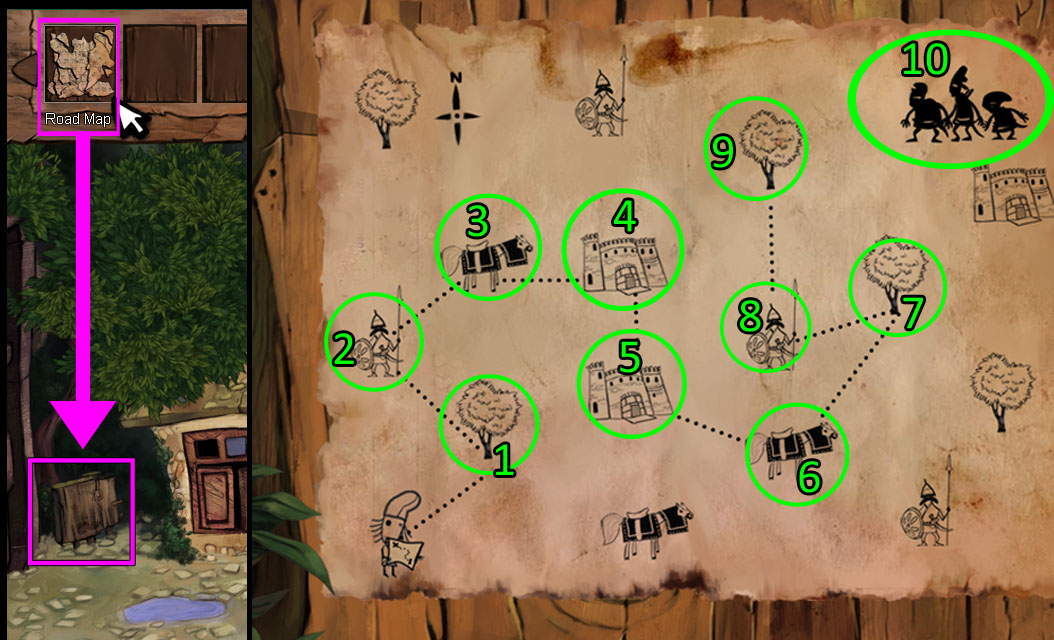
Walk left to the next scene and place the ROAD MAP pieces on the signpost to do another puzzle:
First, arrange all the pieces until the picture is complete.
Then, click to create a path from the shepherd to the thieves. The rules for which symbol you can click on follow a pattern similar to chess. (See screenshot below for solution).
screenshot: road map puzzle
After completing the map puzzles, click on the gate lock to see you need to reconstruct a key:
Go left to the center of town again, and click on the statue to study the shape of the key.
Return to the gate's lock and arrange each part of the key icon until it matches that of the fountain (see screenshot below).
screenshot: gate key puzzle
When you've matched the key, click the green button at the bottom to open the gate.
Go left, through the gate to leave the Village.
The Forest
When you first enter the Forest, you'll see a cage and a lock needing a 3-digit number.
Walk past the cage and then go "DOWN" at the ROAD SIGN.
Click on the stack of stolen goods, next to the boar, to begin another Hidden Object Search:
screenshot: hidden object search for slingshot
Find all the hidden pieces to earn a SLINGSHOT.
Go right then "UP" at the ROAD SIGN.
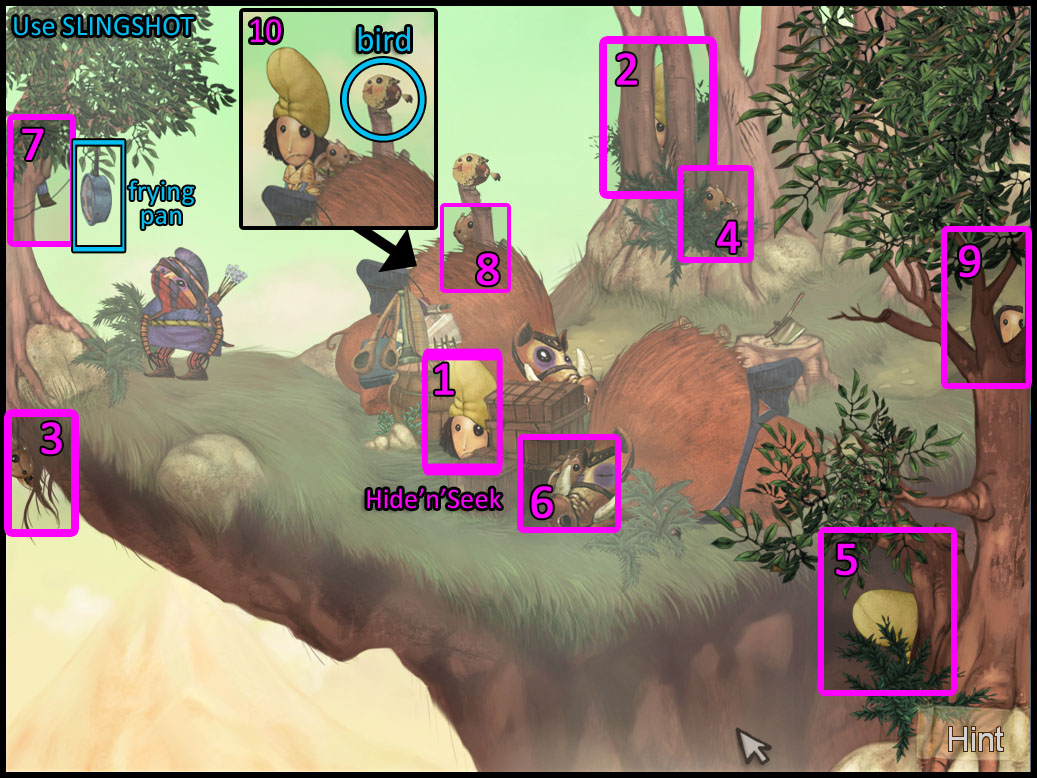
Aim the SLINGSHOT at the frying pan hanging from a branch on the left. This distracts the thief.
Walk a little closer to the center boar and begin another "hide'n'seek" minigame:
The shepherd is trying to sneak up on the bird. Look for him (or parts of him) hiding in the scene until he finally reaches the bird.
Then, click on the BIRD to capture it.
screenshot: hide'n'seek with bird
In your inventory, combine the BIRD with the SLINGSHOT.
Shoot the bird at the frying pan. That will cause a distraction that sends the thieves away from the lower part of their camp.
Click on the pile of stolen goods again to begin another Hidden Object Search:
screenshot: hidden object search for telescope
This time, find all the pieces to create a TELESCOPE.
Use the TELESCOPE to zoom in on the front of the signpost:
Take the TORN PAPER (1/2).
Next, walk up to the upper part of the camp. Use the TELESCOPE again to zoom in on the back side of the sign:
Get the other TORN PAPER (2/2).
Combine both parts of the torn paper to get PAPER. Go back down to stand near the signpost.
Put the PAPER on the sign board to begin a puzzle:
Look for coordinating pairs, clicking on each in succession until you've removed all pairs from the board.
For example, the number 8 matches up with a drawing of 8 lines. The number 3 can be matched with the roman numeral 3.
Some of the matches are less distinct than that, so look closely at shapes, sides, figures, etc..
See screenshot for solution:
screenshot: number symbols puzzle
When you've completed the puzzle, three unmatched number symbols are left alone on the board. This gives you a 3-digit code:
5 4 1
Go right, back to the scene with the cage and the padlock. Examine the PADLOCK and enter the 3-digit code you got from the signpost/paper puzzle (see spoiler above).
The cage will drop and fall open. Take the SWORD from the skeleton.
Go left and "down" at the road sign to return to the lower part of the camp.
Use the SWORD to cut loose the boar and the shepherd will climb on it to ride away.
This starts an action mini-game:
Rapidly click on the BATS as they appear on the screen.
If you're fast enough at removing the bats, the protagonist will advance along the track (depicted above the action).
If you do not accurately click the bats in time, the characters lose progress.
You can choose to end this minigame after about 5 minutes, when the yellow "skip" button fills up. Just click it to skip to the end.
The mini-game ends when you successfully reach the end of the track.
Snowy Mountain Pass
You begin this segment as the goat while the shepherd is stuck under the crashed boar.
Go forward, up the path on the left.
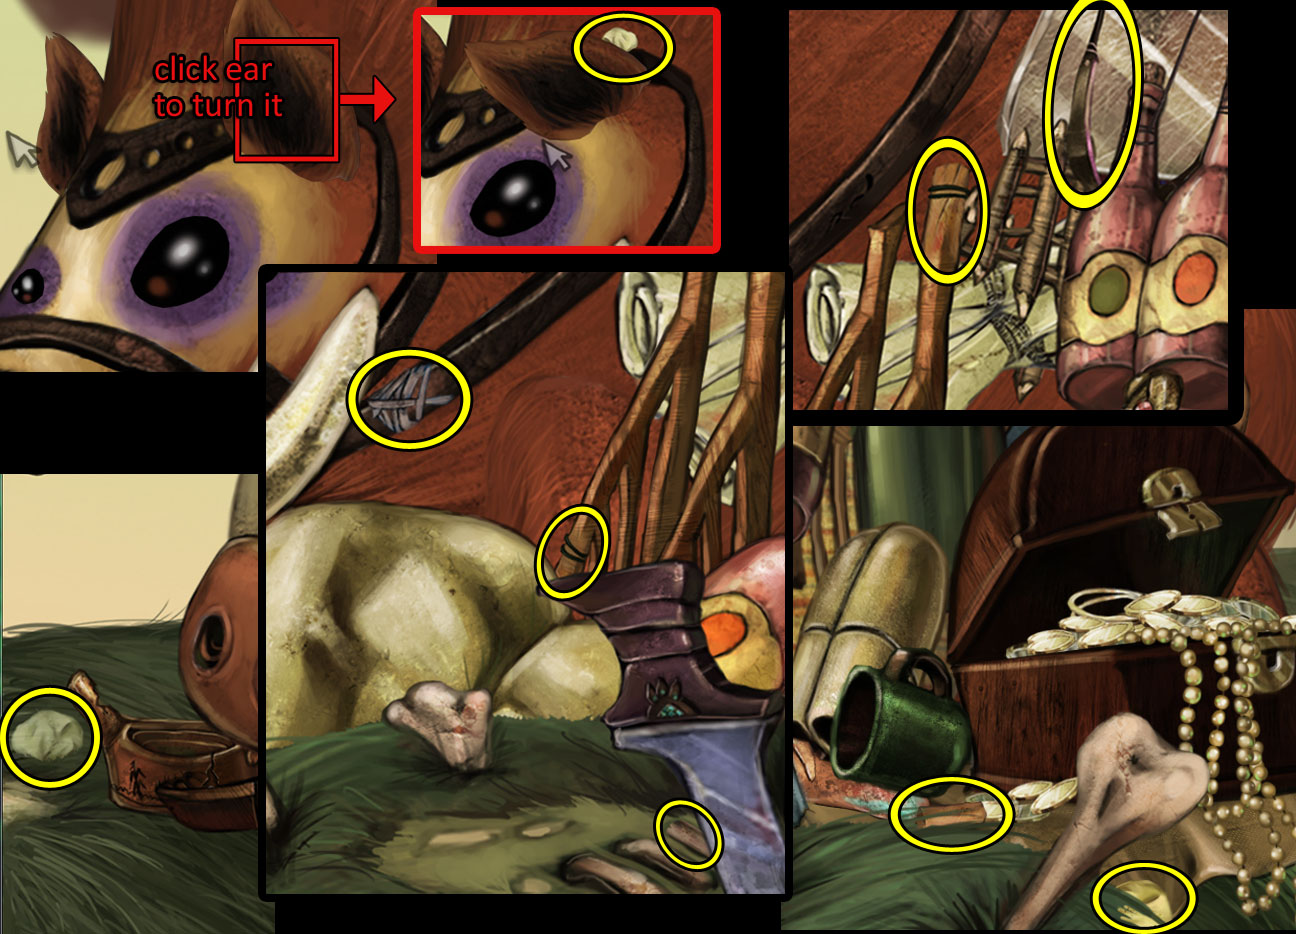
Examine the stash of stolen goods in the cave opening to begin a Hidden Object Search:
screenshot: hidden object search for toolbox
Move the pick up the red oil can (SAUCEPAN) in the lower right corner of the screen. Then, use it on the skeleton hand to take the WRENCH its holding.
Find the rest of the tools on your list to get a TOOLBOX.
Go right. Use the TOOLBOX on the green machine on the right side of the shack to begin another wire-crossed puzzle:
HINT: If the shaking is bothersome, put the game in windowed mode and click outside the game window to pause it.
SOLUTION:
From top to bottom:
BLUE
RED
BLACK
GREEN
When you've completed the wire-crossed puzzle, the generator turns on and the boar leaves.
Pick up the green CAMERA (in the lower right side of the scene).
Use the CAMERA on the passed-out thief and the shepherd will pose for the picture with him.
Next, examine the Road Sign to begin another match game:
First, put the pieces back together until the picture is complete.
Next, match the animals to their type of food, clicking on each in succession.
When all the matched pairs are removed from the board, look at the five symbols that are leftover:
Make a note of the direction they're facing.
screenshot: animal symbols puzzle
Using that information, turn the dials inside the shack:
LEFT - UP - DOWN - RIGHT - RIGHT
With the toll bar up, you can now progress forward to the cave entrance.
Look in the patch of smooth ice to begin another story scene.
Afterwards, click on the stash of goods again to begin another Hidden Object Search and "hide'n'seek" minigame:
First, find all the COSMETIC pieces.
screenshot: hidden object search for cosmetics
Then, try to catch the bird:
Find and click on all the bird's hiding spots until you finally catch him to get FEATHERS.
screenshot: hide'n'seek with bird
When you've completed the search/mini-game and have the COSMETICS and FEATHERS, examine the patch of ice on the side of the mountain:
Use the FEATHERS to clean off the ice patch.
Next, put the THIEF PHOTO in the upper right corner.
Put the COSMETICS below that.
Change the shepherd's appearance to match that of the thief in the photo.
Click the buttons for the eyebrows, eye path, nose and facial hair to cycle through the selections.
See screenshot below for solution.
screenshot: thief impersonation
Now, disguished as the thief, go forward to enter the cave.
Thief Hide-Out Part 1: Sheep's Rescue
As the goat, play a series of short "hide'n'seek" games as you sneak past the guard to reach each of the sheep cages (see screenshots).
screenshot: hide'n'seek for first cage
Find the goat in all his hiding spots until he lands on the first cage.
Then, examine the sign on the cage and match the figures to the weapons they use.
screenshot: first cage's matching puzzle
When completed, bullets will represent a 3-digit code.
Enter that code into the padlock to set the first sheep free.
SOLUTION:
7 9 3
screenshot: hide'n'seek for second cage
Chase the goat again until he reaches the second cage.
Examine the sign and match the figures to their hats.
screenshot: second cage's matching puzzle
When completed, the points on the leftover hats represent the next 3-digit code.
Enter that code into the padlock to set the second sheep free.
SOLUTION:
6 3 5
screenshot: hide'n'seek for third cage
Chase the goat a third time until he reaches the third cage.
Examine the sign and match the figures—animals and people—according to the region or story they're from.
screenshot: third cage's matching puzzle
When completed, count the horn-tips to get the final 3-digit code.
Enter that code into the padlock to set free the third sheep.
SOLUTION:
3 4 2
With all three sheep free, head out the door for another action mini-game:
This time, rapidly click on the OWLS as they appear on the screen.
Progress is made if you are quick, ground is lost if you miss or are not fast enough.
When it turns yellow, you can use the "Skip" button to skip to the end (in about 5 minutes).
The mini-game ends when you successfully reach the end of the track.
Thief Hide-Out Part 2: Confronting the Boss
As the shepherd, your way is blocked through the passage by spindly mechanical legs.
Go down, back to the cave entrance area to see all the empty sheep cages.
Click on the stack of pots in the bottom right corner to begin a Hidden Object Search:
screenshot: hidden object search for PLATES
Find all the plate parts to get metal PLATES.
Go left, up the stairs, back to where the spindly legs are. Examine the control panel on the wall.
Put the metal PLATES on the center of the control panel to begin a puzzle:
Count the dots on each of the three plates.
Notice that the notch in the second plate reveals another dot on the outer plate as it turns.
Click on the dice that have the same number of dots as on the plates. See screenshot below for solution.
screenshot: metal plates/dice puzzle
When you've finished the plates puzzle, you'll get ROYAL PICTURE.
Put the ROYAL PICTURE in the frame on the wall to begin another puzzle:
Reassemble the pieces to reconstruct the picture.
Make a note of the symbols beside each character.
screenshot: royal picture
Using the information from the Royal Picture, change the figures on each of the four statues.
SOLUTION:
From left to right:
RHINO--BAT--CRAB--BEAR PAW
Go through the open door. Inside the kitchen, you need to rescue the sheep by battling the cook.
During the battle, click on each item as soon as it's highlighted:
chain
stake
frying pan
vase
chain
After battling the cook, you must confront the boss. Employ the same strategy as before, clicking each item quickly when it's highlighted:
column
chain
leg
lamp
At the end of the battle, examine the broken panel under the boss' chair to solve another crossed-wires puzzle.
SOLUTION:
From top to bottom:
RED
BLUE
GREEN
BLACK
When the puzzle is complete, sit back and watch the final scenes of Shaban's story. Enjoy!
Posted by: elle |
June 26, 2012 10:45 PM
|
June 26, 2012 10:45 PM