
Secrets of the Dark:
Temple of Night
Platform: Mac, Windows

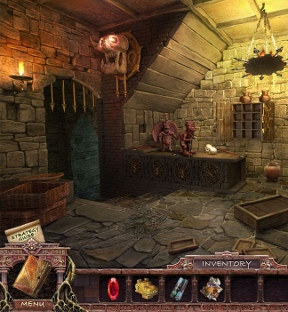
![]() From Orneon, crafters of The Agency of Anomalies: Mystic Hospital, comes Secrets of the Dark: Temple of Night, a hidden object/casual adventure game steeped in legends, demons, and a town that's a little on the strange side. The game uses a creative light/dark mechanism that allows you to peer into the demon world simply by turning off or blocking the lights in a room. This morphs the scene and opens up new passageways, reveals new items and objects to explore, and disseminates new bits of story that you'll gobble up like delicious popcorn.
From Orneon, crafters of The Agency of Anomalies: Mystic Hospital, comes Secrets of the Dark: Temple of Night, a hidden object/casual adventure game steeped in legends, demons, and a town that's a little on the strange side. The game uses a creative light/dark mechanism that allows you to peer into the demon world simply by turning off or blocking the lights in a room. This morphs the scene and opens up new passageways, reveals new items and objects to explore, and disseminates new bits of story that you'll gobble up like delicious popcorn.
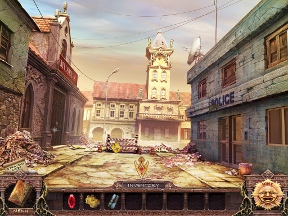 Your journalist friend Peter seems to be in trouble. While staying in an almost deserted town in the middle of the desert, he sends you a message saying he's stumbled upon a demonic plot to break loose and destroy the world. They only need one more sacrifice to pull the job off, and judging by the demons hot on his trail, Peter is that one. You rush off to his rescue, only to find a ghost town filled with creaky signs, locked doors, and more demonic mysteries than a bookshelf filled with H.P. Lovecraft tales.
To save Peter and get to the bottom of this town's mysteries, you'll do what any good casual gamer does: go on a hidden object adventure. Choose between Regular and Advanced Mode at the beginning of the game, the former offering a faster charging hint timer as well as sparkles that denote areas of interest. Search the town as thoroughly as you can, stopping to read pieces of information from strange items you find.
Inevitably, you'll hit an exploration wall and will need to solve some puzzles to continue. To solve a puzzle you'll need some items, and items can be found through general nosiness as well as via hidden object scenes. With the correct item in your inventory, you can return to the scene of the puzzle, insert part A into receptacle C and be on your merry way.
 Analysis: Orneon knows its hidden object adventure games, and Secrets of the Dark: Temple of Night is some of their finest work. The game is delicately crafted from all sides, meshing together a good story with interesting gameplay and puzzles that never rely on trite gaming mechanisms to artificially expand the experience. The result is a full, unique, and well-paced game that is genuinely intriguing to play!
Secrets of the Dark includes a number of fantastic little touches that makes it all the more immersive in nature. The most obvious of these is how many pieces of the environment shift or animate when you click on them, even though they offer nothing and add nothing to the story. Knocking signs down and pushing glasses across the table is a lot of fun! It may not seem like much, but when you feel like you can affect the game world, it becomes yours.
Story is immensely important in Secrets of the Dark, and it's told in a very exciting, intriguing sort of way. You'll find tapes made by Peter as you explore the town. Each will reveal a bit of backstory while furthering your sense of dread. Viewing certain items also fills in some information and encourages you to really explore the game with your cursor, clicking on anything and everything that catches your fancy.
If you're hunting for a hidden object adventure game that's heavy on the latter, lighter on the former, and so steeped in horror-style myth that you'll be afraid to close the curtains in your room, Secrets of the Dark is a definite win. It's well-made from every angle and offers a smart, deep adventure game from beginning to end.
A Collector's Edition is also available. It contains exclusive bonus adventures, a bonus mini-game, wallpapers, and an in-game strategy guide. Remember that Big Fish Game Club Members pay only $13.99 for Collector's Editions (or 2 club credits), and collector's editions count 3 card punches of 6 total needed for a free game.
![]() Windows:
Windows:
Download the demo
Get the full version
Also available: Collector's Edition
![]() Mac OS X:
Mac OS X:
Download the demo
Get the full version
Also available: Collector's Edition


Walkthrough Guide
(Please allow page to fully load for spoiler tags to be functional.)
Secrets of the Dark: Temple of Night Walkthrough
General Information
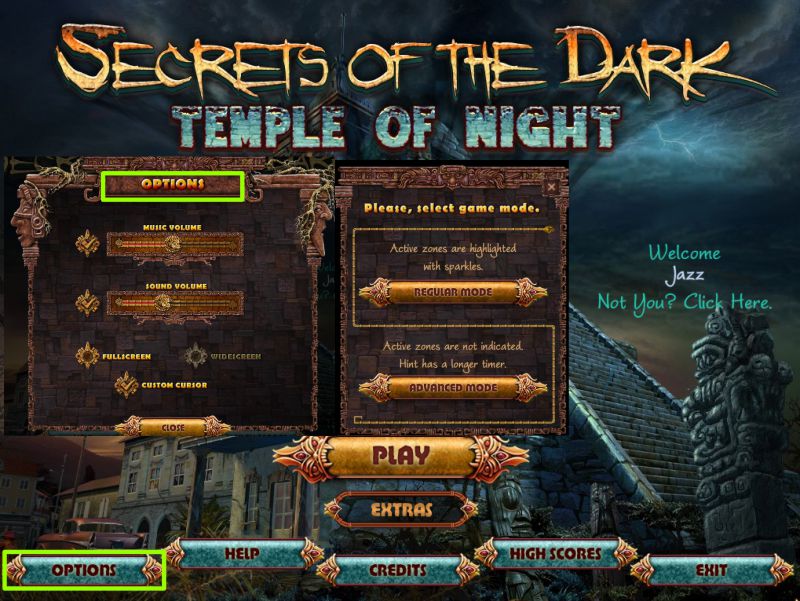
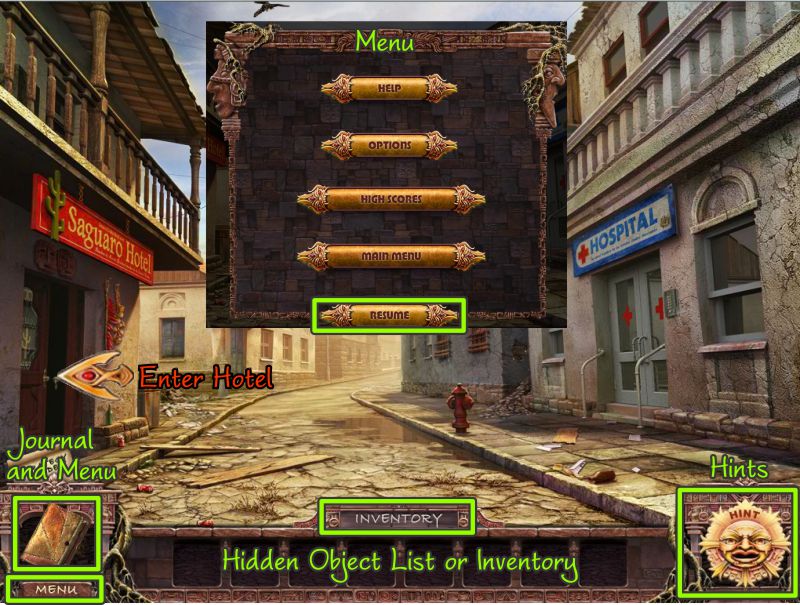
From the Main Menu, you Play or Exit the game and choose your Options.
If you purchased the Collector's Edition, you will have access to Extras once you have completed the basic adventure.
You can also check the High Scores and Credits, or view the Help screen.
When you choose your profile, you will be asked to choose a mode of play. Regular is the more casual mode with active zones highlighted by sparkles. Advanced is the more challenging mode with no active zone help, and Hint button takes longer to refill.
Options include Full versus Windowed screen; Custom Cursor; Music and Sound volume; plus an adjustment for Widescreen if you play in Fullscreen.
Once you choose your Options, they are the same for all profiles you play, but you do have the option to change one or more from the scene Menu.
"Not You" lets you create or delete profiles and choose between the ones you created.
Screenshot
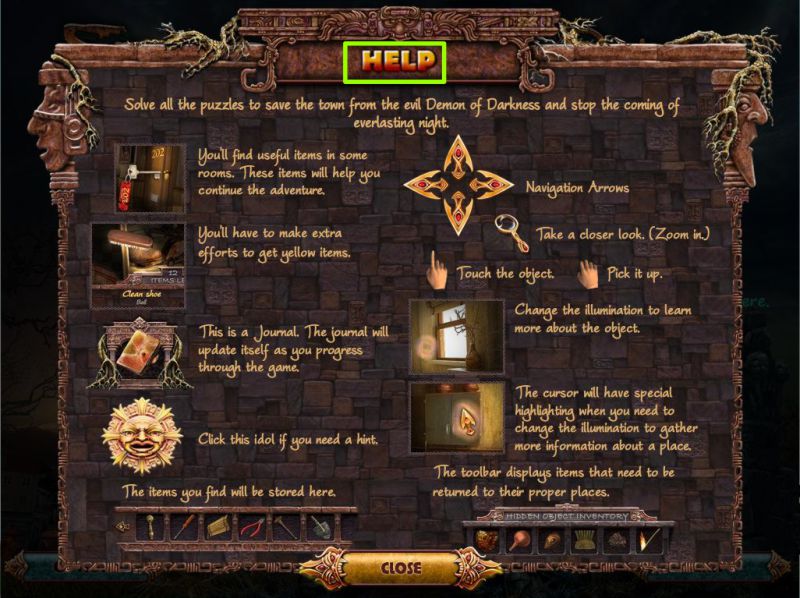
Help Screen
Your cursor will get various attachments to help you during your adventure.
A pointing finger shows that you should touch an object to get more information or to perform a task.
A grabbing hand means you should pick up the object.
A Magnifying Glass is for close-ups.
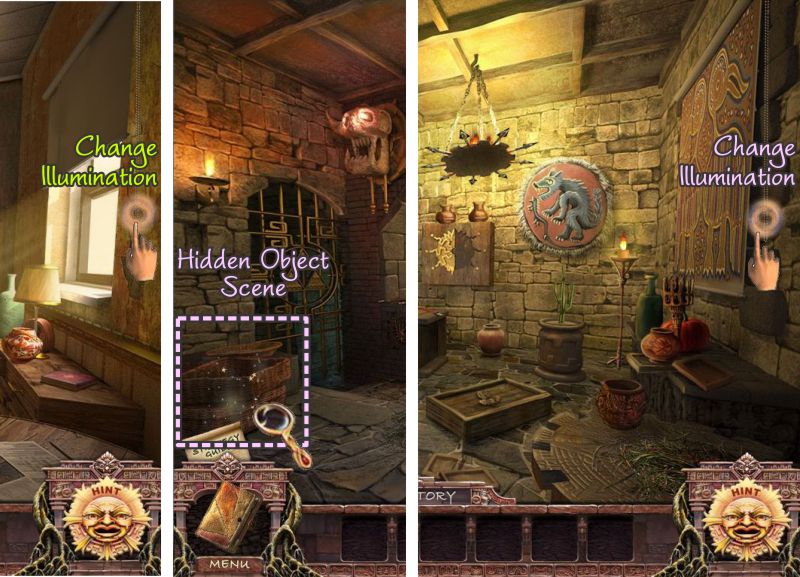
A highlighted area next to a window is for you to touch in order to change the illumination of the scene from light to dark or vice versa.
A cursor with a glow around it means you need to change the illumination to find out more information about an object.
Directional arrows show you where you can exit a scene.
Screenshot
Scene Navigation
In scenes with windows, you will be changing illumination when a window covering is available.
You can only navigate through the town in the "light" illumination, so if you wish to leave a building, make sure the windowed are uncovered.
The "dark" illumination takes you to the ancient world of the demons to complete tasks that aren't available in the light.
You can also perform tasks in the dark to make objects available to you in the light.
There is no timer, but there is a click penalty that will make your cursor crazy and end up in another place on the screen.
Hints are unlimited once the Hint button in the lower right corner refills.
In the lower left is your Journal with notations about your quest.
Below the Journal is the Menu where you can access the Help screen, change your options, check the high scores, resume the game or quit to the Main Menu.
In the center of your screen is your Inventory, and where Hidden Object Scene lists to find or items to replace are shown.
If you need to identify an item in your Inventory, mouse over it for its name.
Some of the Hidden Object scenes will show you a group of objects that are missing from the scene, so you need to place them where they belong.
Hidden Object Scenes are somewhat random, but they will be marked in the screenshots because when you return to the same location, the items may then be on your list.
Above your list of items to find, the game will show the total number of items to find, and how many are left as you start locating them.
There are 12 items listed at the beginning of the scene, but more may pop up as you go along.
After you have completed the list, there will be a Final Item for your Inventory that will be marked in turquoise blue.
Items shown in yellow on the list will require you to perform another task to collect that item.
Mini Games have a Skip option, but it will add 30 minutes to your time if you are keeping score.
Some Mini Games also have a Restart button to let you begin again, if you are having difficulty with the solution.
If you restart and there is more that one round in the game, you will have to restart from the very beginning.
Screenshot
Chapter 1: Enter the Saguaro Hotel
Lobby
Go inside the Hotel, change the illumination to dark, and play the Hidden Object Scene.
Screenshot
Dark Lobby Hidden Object Scene
For this Hidden Object Scene, you will need to return your Inventory items to their rightful places.
In return, you will get a Sapphire Key.
The items are color-coded to show where they belong.
Screenshot
Dark Lobby and Match Mini Game
Zoom in on the box on the floor and place the sapphire key to trigger a Mini Game.
Your goal is to match all the pairs, but the tricky part is that when you do not make a match, the medallions switch places.
When you have completed the game, you will receive Half of a Sun, so zoom in on the cabinet on the wall, and place it there.
Change the illumination back to light.
Screenshot
Light Lobby
Zoom in on the desk and take the key tags.
You opened the key cabinet in dark mode, so check it out and place the key tags to trigger a Mini Game.
Your goal is to find the key to Peter's room.
Match the shape of the key tags to the shape of the keys, and take Peter's room key as shown in the screenshot.
Go up the stairs to the second floor.
Screenshot
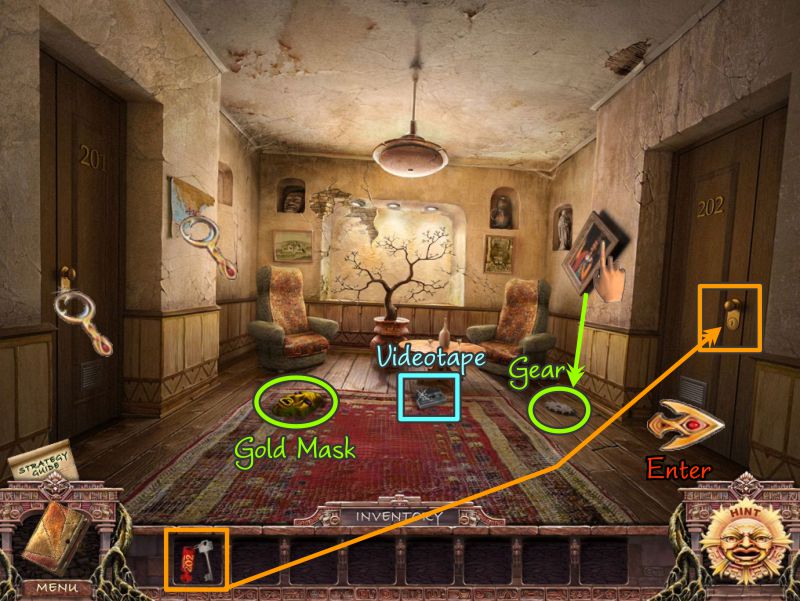
Second Floor Landing
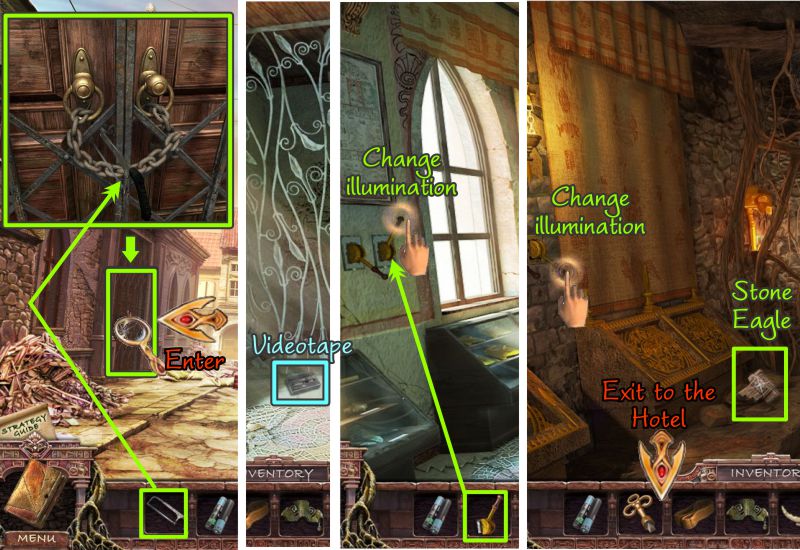
View the Videotape and collect the Gold Mask.
Touch the picture on the right wall, and a Gear will fall for you to collect.
Note the torn map, and that Room 201 is locked from the inside.
Place your key on Room 202 and enter.
Screenshot
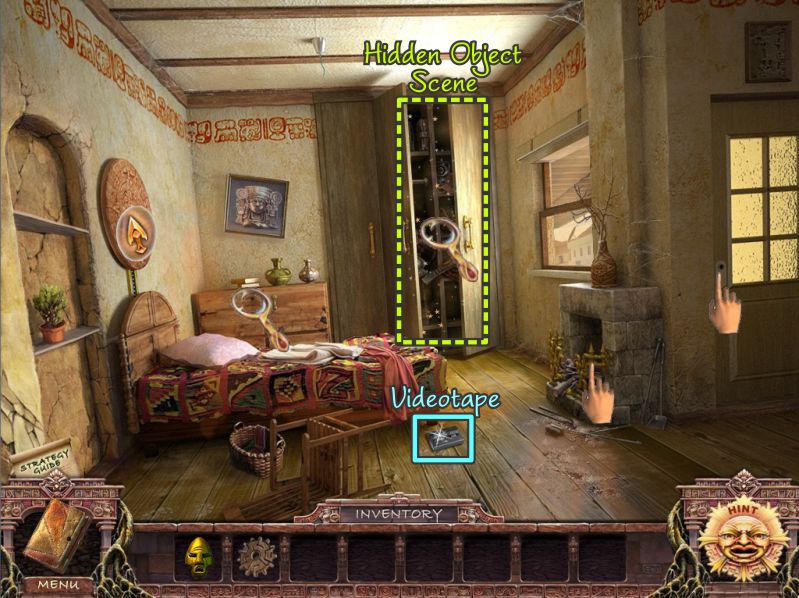
Peter's Room
Pick up the Videotape and check out the places with the pointed finger to gain some information.
You can't darken the room because there is no shade. The chest is missing a handle, and the plaque above the bed isn't available in a light room.
Play the Hidden Object Scene in the closet.
Screenshot
Peter's Room Hidden Object Scene
Collect everything, and the final object will be a Handle for your Inventory.
To get a clean shoe, use the brush on it.
Screenshot
Peter's Room Light
Use the handle to open the chest and take the Roman Shade.
Place the shade on the window and change the illumination to dark.
Screenshot
Peter's Room Dark
Zoom in below the closet on the back wall and place your Gold Mask to trigger a Mini Game.
When you have finished the Mini Game, change the illumination and go downstairs.
Screenshot
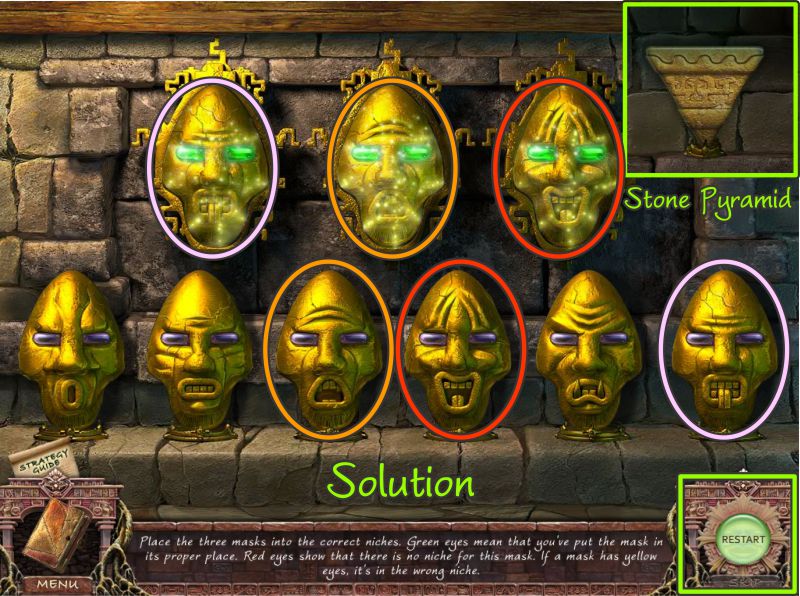
Mask Mini Game
Place the 3 masks marked in the screenshot on the upper row as shown.
If you try it on your own, there is a Restart button if the arrangement doesn't work out.
Green eyes mean you have the right mask in the correct place.
Yellow eyes mean right mask, wrong place, and red eyes mean nothing is correct.
When you complete the game, you will get a Stone Pyramid for your Inventory.
Screenshot
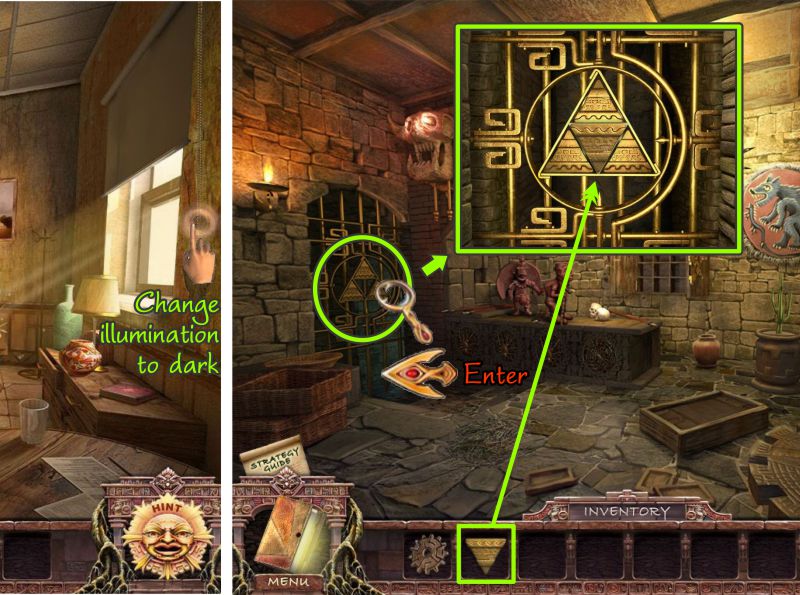
Lobby
Change the illumination in the Lobby to dark.
Zoom in on the gate and place the Stone Pyramid.
Enter the Hotel underground.
Screenshot
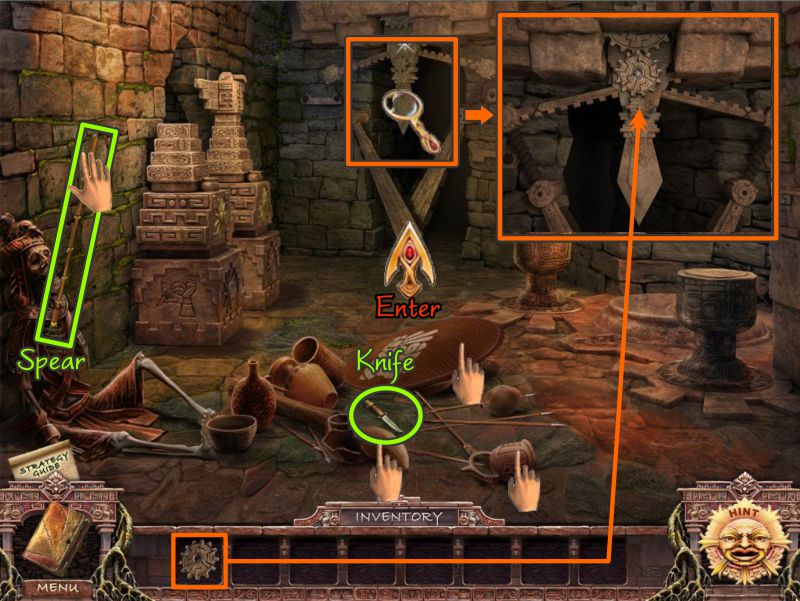
Hotel Underground
Collect the Spear, then move some of the objects on the ground until you find a Knife.
Zoom in on the blocked doorway and place your Gear to open it and enter.
Screenshot
Use the Spear on the coffin and take the Mace inside.
Zoom in on the envelope and take the photo.
Give the mace to the statue on the right and the back wall will open, revealing some missing objects for you to find.
Exit down twice back to the Lobby.
Change the illumination and go upstairs.
Screenshot
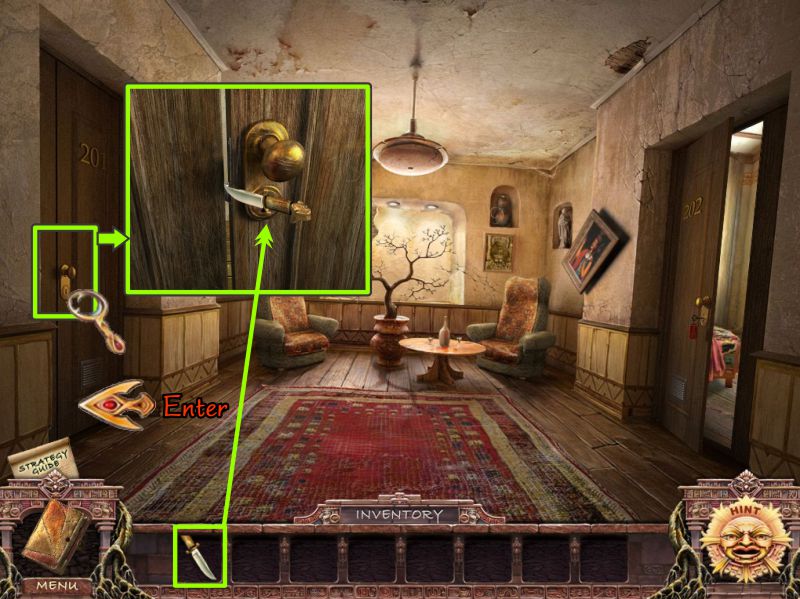
Second Floor Landing
Zoom in on Room 201 on the left and use your Knife to open the door and enter Dr. Black's room.
Screenshot
Dr. Black's Room
Open the back closet.
Zoom in on the journal on the bed and take it for your Journal.
Move the pillow on the bed 3 times to get the Key to the escritoire, which means "writing desk".
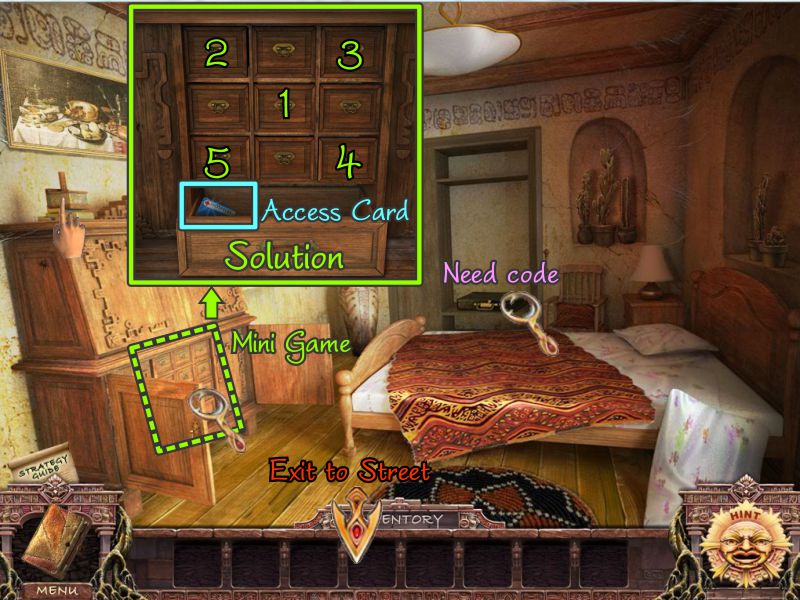
Open the desk door and zoom in again for a Mini Game.
Screenshot
Your goal is to open all the small drawers in order to open the large drawer.
See the screenshot for the solution as to which drawers need to be chosen.
Take the Access Card from the large drawer.
Note that the suitcase in the now-open closet needs a code.
Exit downstairs and out of the Hotel to the street.
Screenshot
Chapter 2: Enter the Hospital
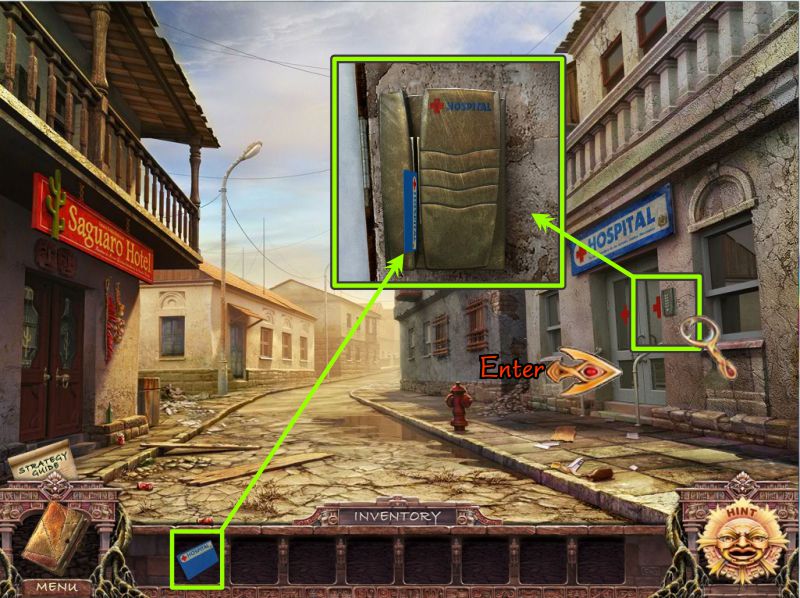
Street
Go across the street to the Hospital and zoom in on the box at the side of the door.
Slide your Access Card and enter the Hospital.
Screenshot
Hospital
Take the Lighter on the desk and examine everything with a magnifying glass.
Zoom in on the x-ray and take the note.
Exit to Peter's Room at the Hotel.
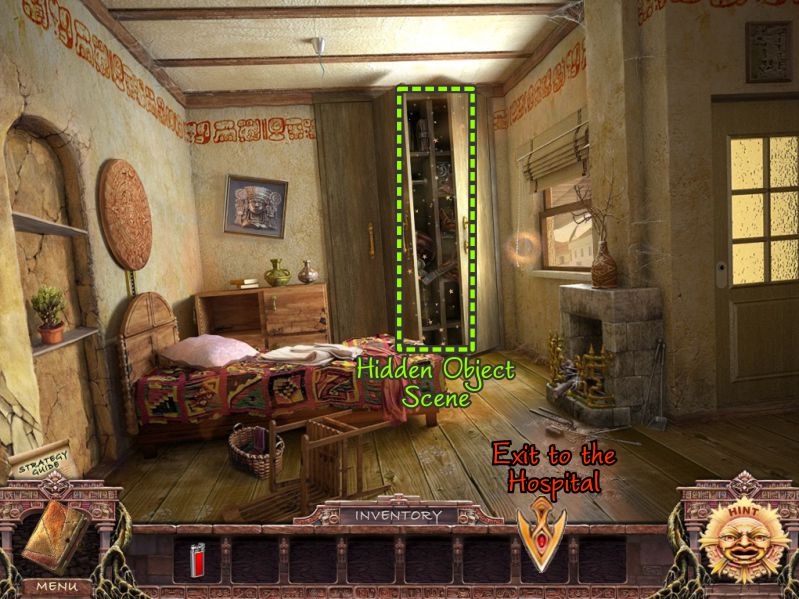
Screenshot
Peter's Room
Play the Hidden Object Scene in the closet and then go back to the Hospital.
Screenshot
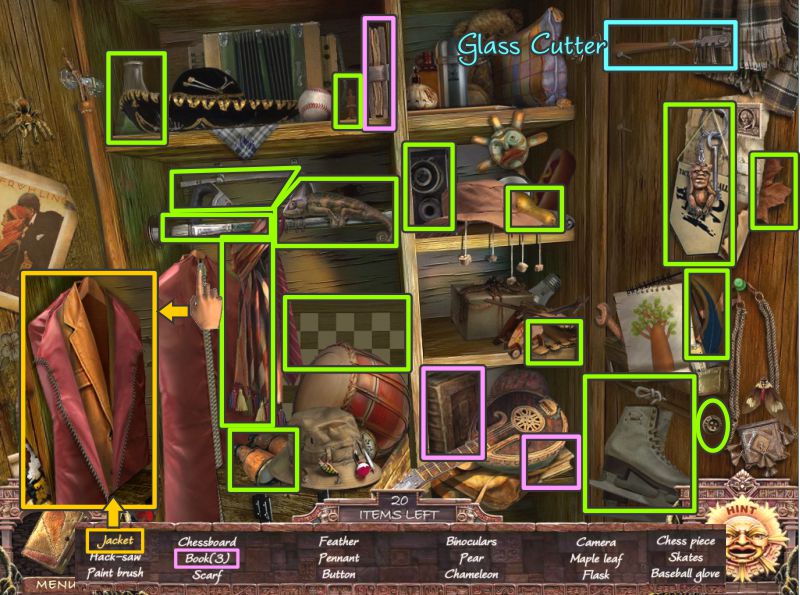
Closet Hidden Object Scene 2
Collect everything on your list to get the final item, a Glass Cutter.
To get the jacket, unzip the garment bag.
Screenshot
Hospital
Zoom in on the medicine cabinet at the right and use your Glass Cutter to be able to get the Wire Cutters.
Zoom in on the wires next to the back door and snip them so you can go through the now-open door.
Screenshot
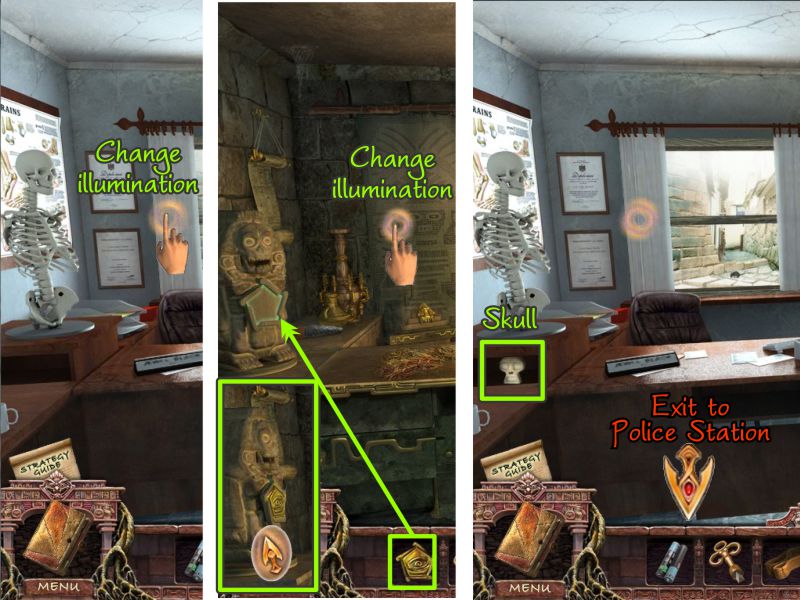
Dr. Black's Office
Dr. Black's Office is missing a curtain, so you can't darken it to see the areas with the halo that are only available in the dark.
Pick up the Videotape and zoom in on the box on the desk.
Take the Button and go to the next room.
Screenshot
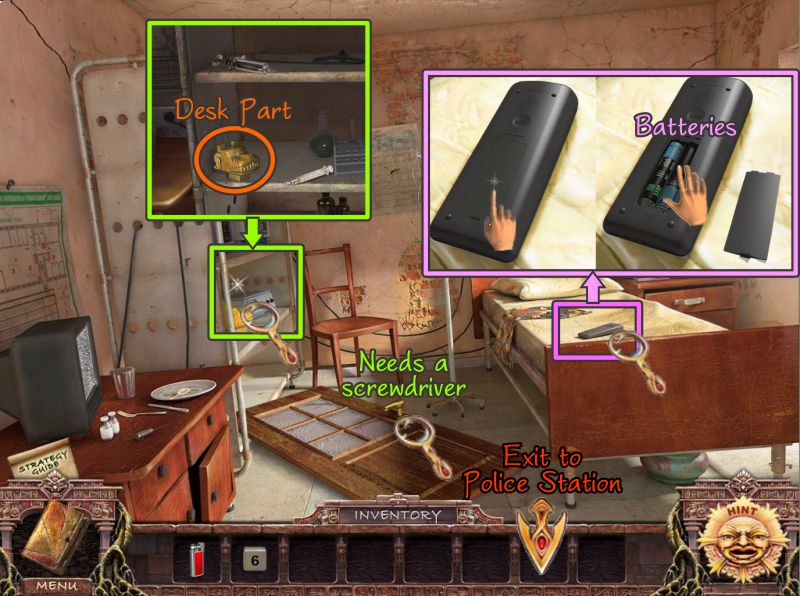
Patient Room
Note the door on the floor requires a screwdriver for you to get the handle.
Zoom in on the shelves and take the Desk Part.
Check out the remote on the bed, open it, and take the Batteries.
Exit to the street and go forward to the Police Station.
Screenshot
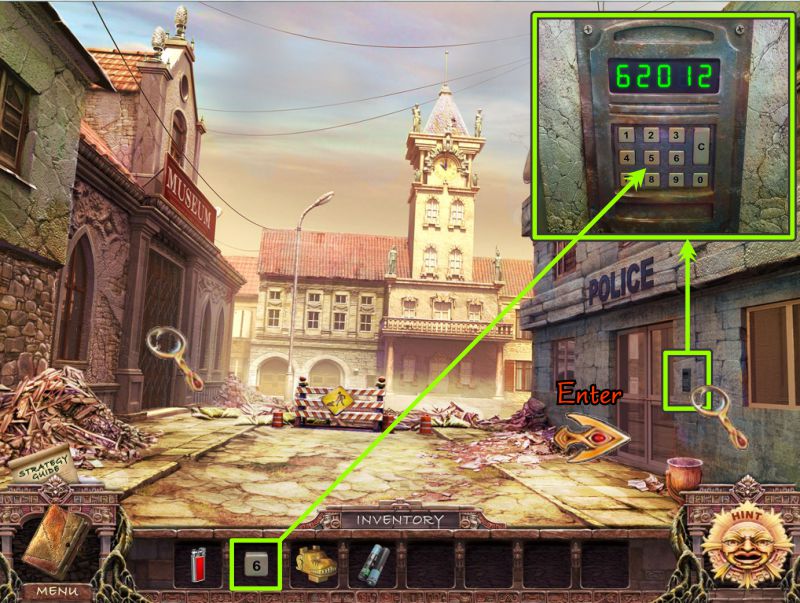
Chapter 3: Enter the Police Station
Street
Zoom in on the box next to the door and place the Button on the keypad.
Enter 62012, which is the new code you found on the note at the Hospital.
Enter when the door opens.
Screenshot
Police Station Reception
Pick up the Videotape and zoom in on the wastebasket to take the Map Piece.
Check out the back door and phone, and then play the Hidden Object Scene in the cabinet before going back to Dr. Black's Room at the Hotel.
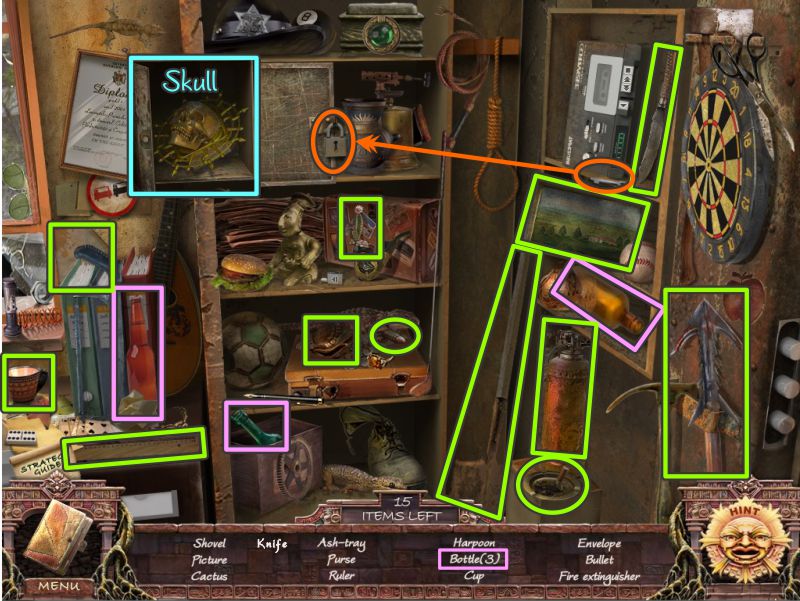
Screenshot
Cabinet Hidden Object Scene
Collect everything on your list to get the Skull.
Use the key to open the lock on the iron box to find the Skull.
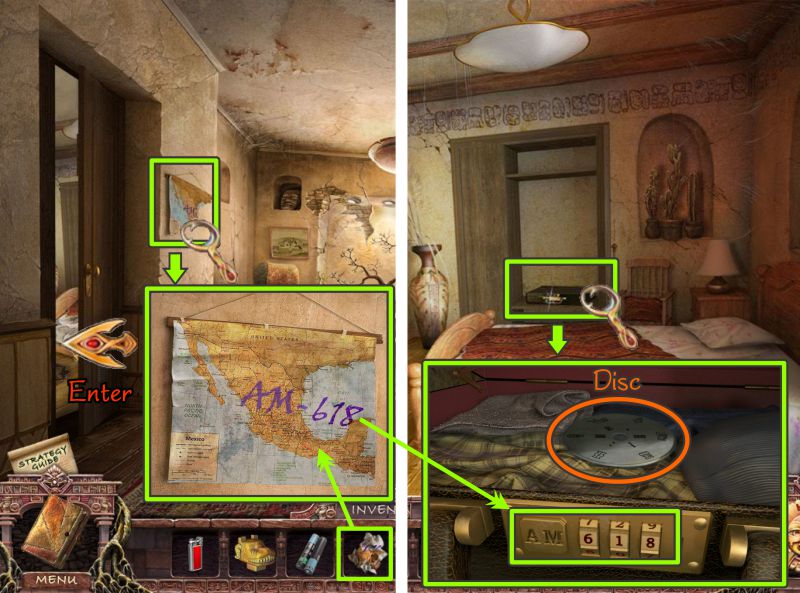
Screenshot
Hotel Landing and Dr. Black's Room
Stop in the second floor landing and place your Map Piece.
Note the number and enter Dr. Black's room.
Zoom in on the suitcase, enter the code from the map and take the Disc.
Screenshot
Dr. Black's Room
Place the Desk Part from your Inventory in its matching place on top of the desk.
The top portion of the desk will open for a Mini Game.
Screenshot
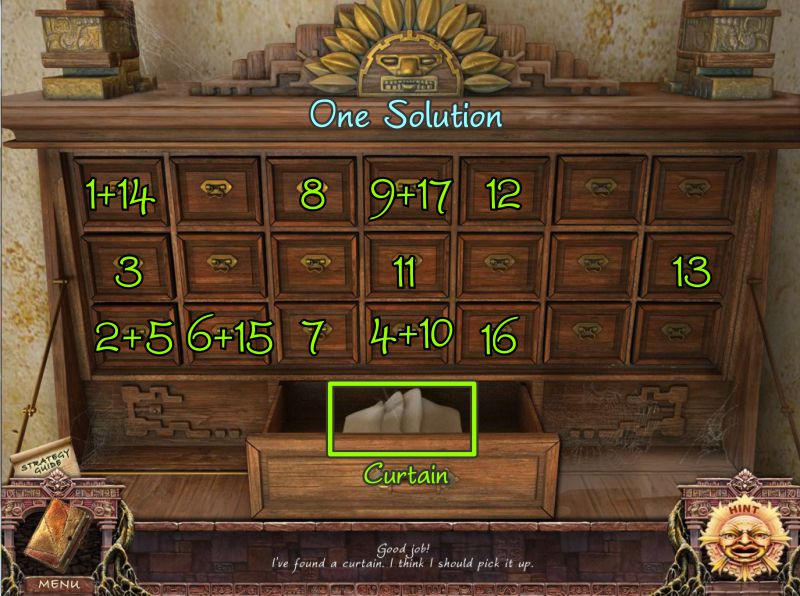
Desk Drawer Mini Game
Once again, you will need to open the small drawers to get to the larger drawer. Check the screenshot for one solution.
Take the Curtain inside the large drawer.
Go across the hall to Peter's Room.
Screenshot
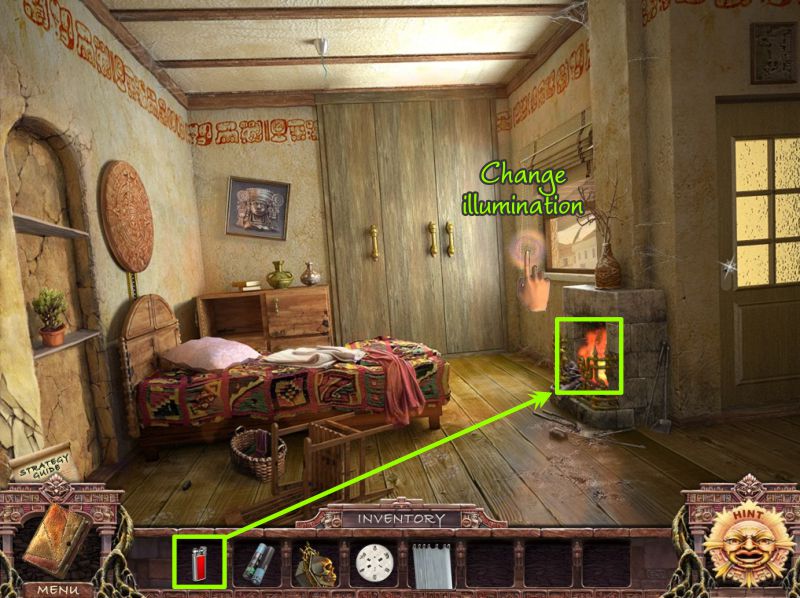
Peter's Room Light
Use your Lighter to light the fireplace.
Change the illumination.
Screenshot
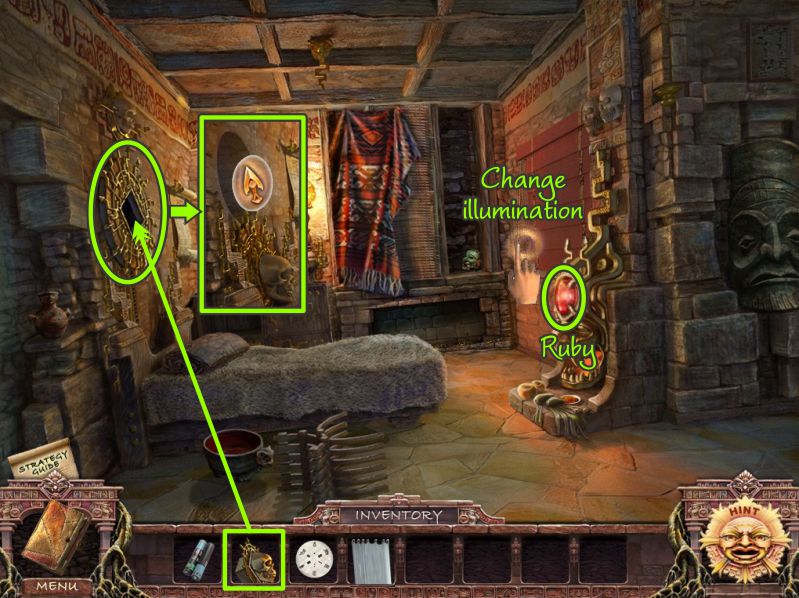
Peter's Room Dark
Tale the Ruby from the fireplace.
Place the Skull in the opening above the bed.
The plaque will lower, but you cannot do anything else in this illumination, so change it back to light.
Screenshot
Peter's Room Light and Dr. Black's Office
Collect the Handle in the hole above the bed and head to the Hospital.
Go to Dr. Black's office, place the Curtain on the window, and change the illumination.
Screenshot
Dr. Black's Office Dark
Zoom in on the picture on the top of the desk, then click on the front of the desk for a Mini Game.
When you have completed the Mini Game, go to the next room.
Screenshot
Desk Mini Game
Use the arrows to move the rows and columns to complete the picture as shown in the screenshot.
Screenshot
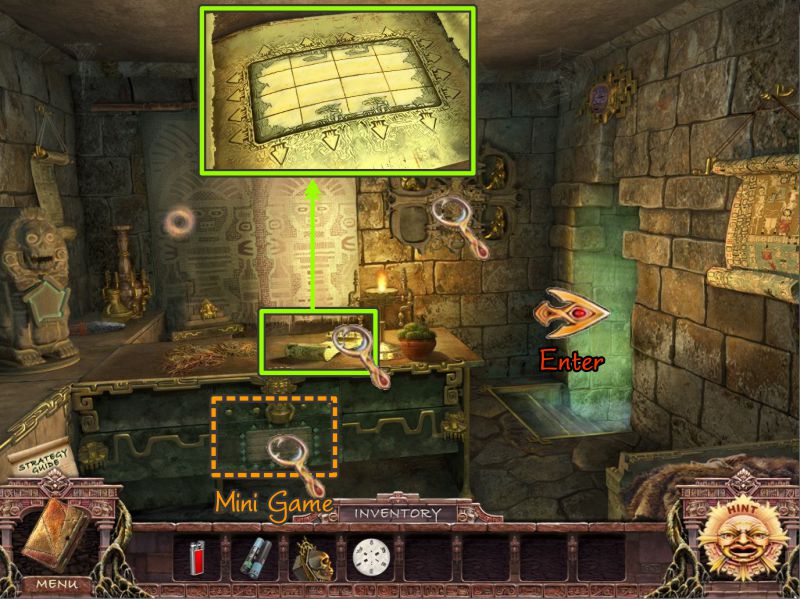
Hospital Room Dark
Check out the magnifying glasses to see what is needed there, then play the Hidden Object Scene.
Screenshot
Niche Hidden Object Scene
Collect everything, and your final object will be a Horn.
Screenshot
Dr. Black's Office
Go back to Dr. Black's Office, change the illumination and collect the Triangular Key at the front of the desk.
Return to the Hotel.
Screenshot
Hotel Lobby
Change the illumination and place the Horn on the beast on the wall.
Its jaw opens, but nothing happens in the dark, so change the illumination to light and take the Plate that appears.
Return to the Hospital.
Screenshot
Dr. Black's Office
Go to Dr. Black's Office and change the illumination.
Place the Plate on the monkey and change the illumination back to light.
Take the Skull on the compartment under the skeleton.
Exit to the Police Station.
Screenshot
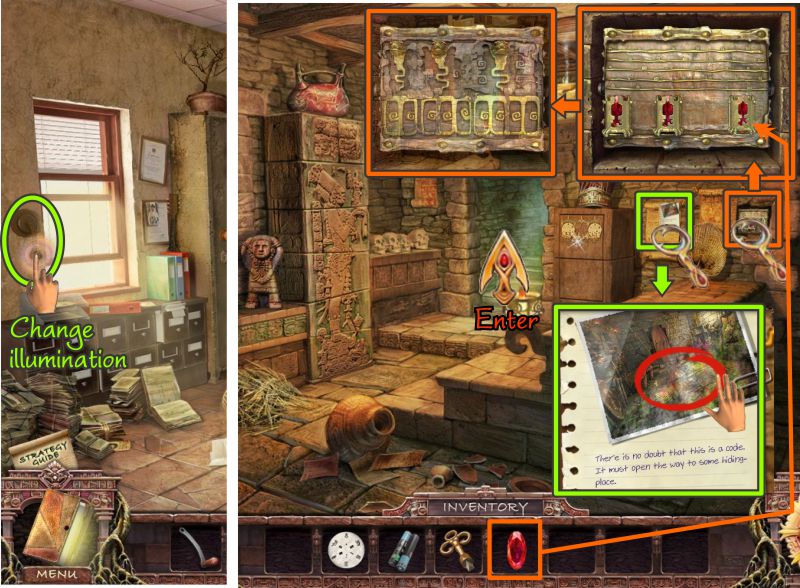
Police Station Dark
Change the illumination to dark.
Zoom in on the back wall and take the photo.
Place the Ruby from your Inventory in the missing space on the mechanism on the right.
Go to the back room.
Screenshot
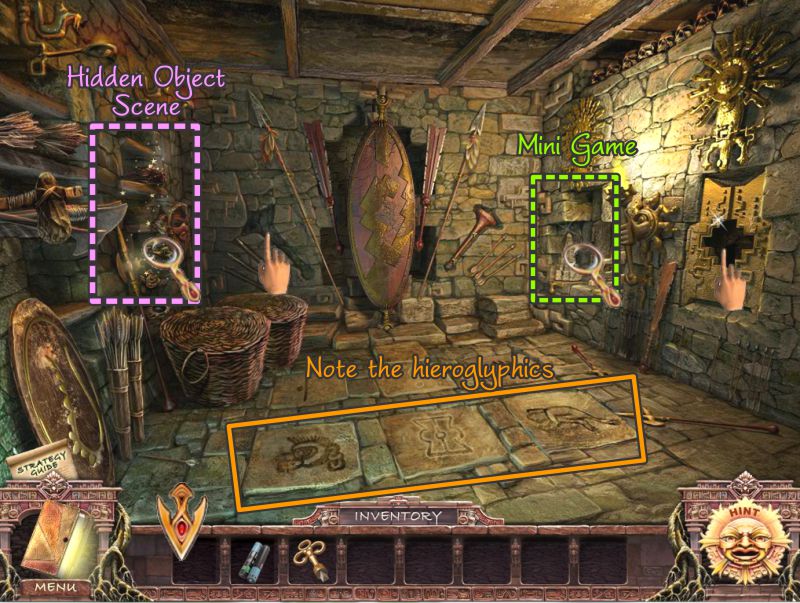
Police Station
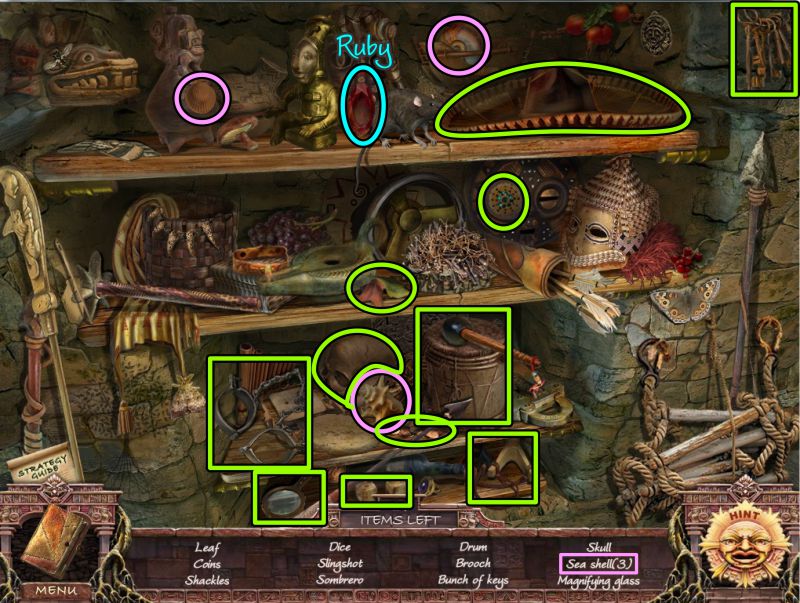
Note the hieroglyphics on the floor and the pointing fingers indicating missing items.
Play the Hidden Object Scene and Mini Game before returning to the other room.
Screenshot
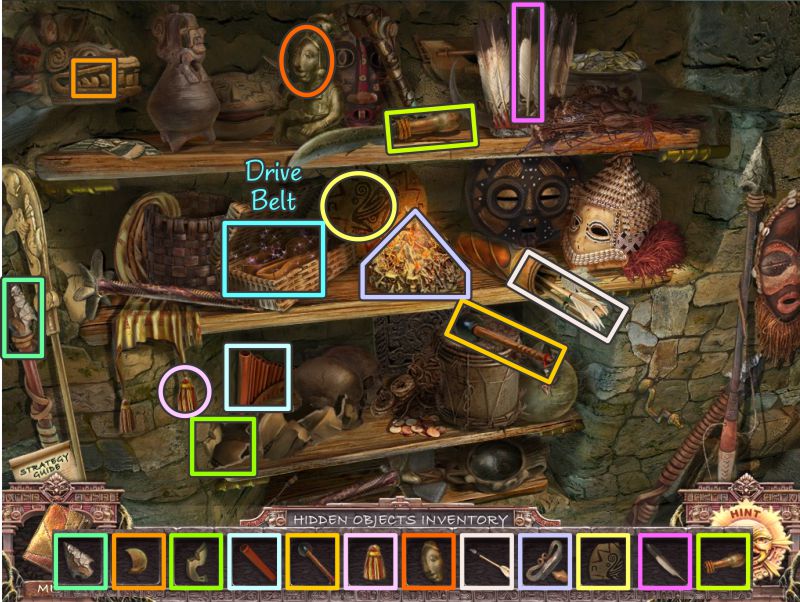
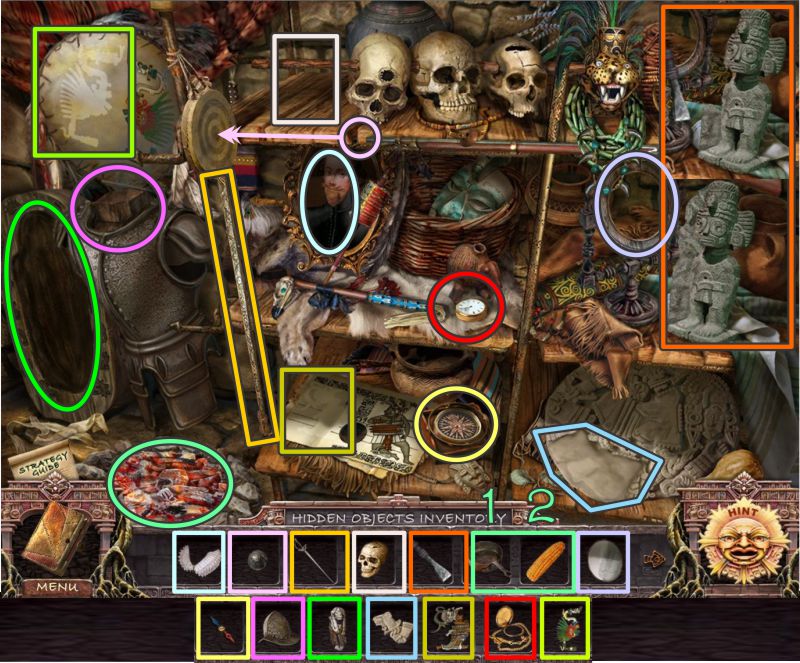
Shelf Hidden Object Scene
Replace all the color-coded objects where they belong.
More objects will be added as you progress until you finally receive a Drive Belt for your Inventory.
Screenshot
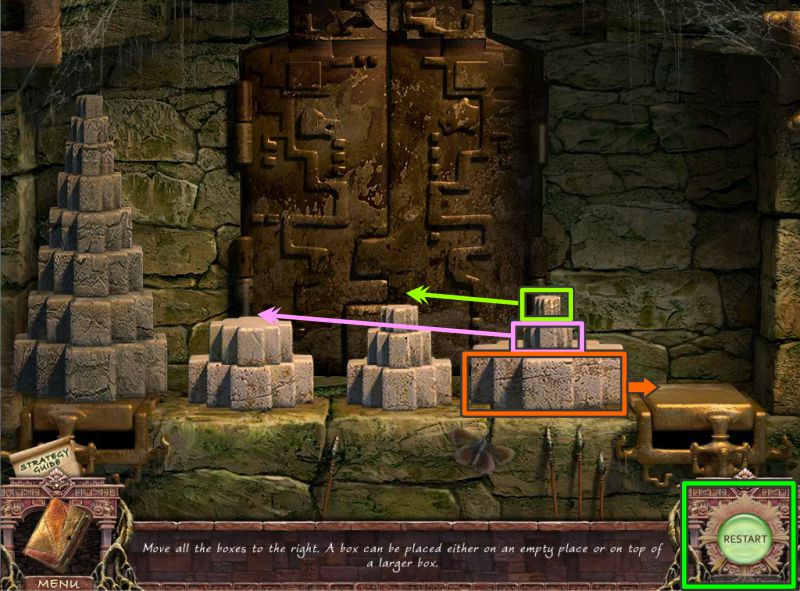
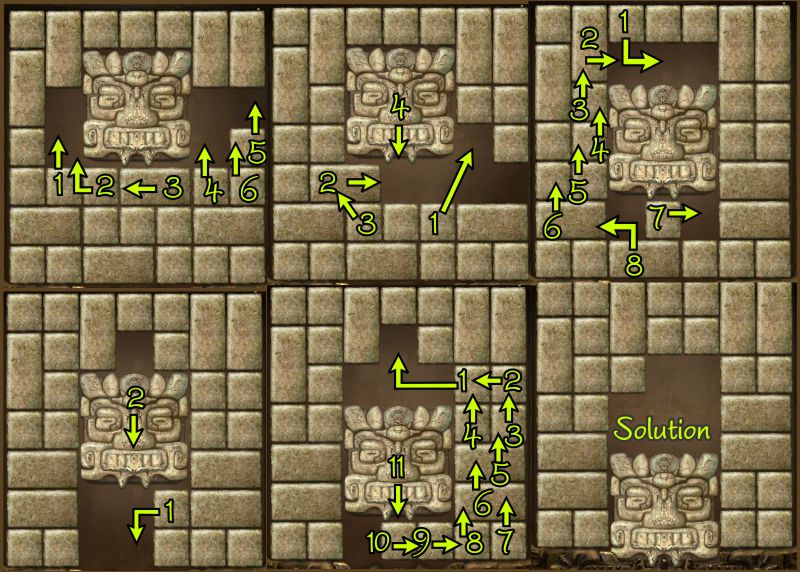
Pyramid Stack Mini Game
Your goal is to move all the single stones to the right to balance out the pyramid on the left.
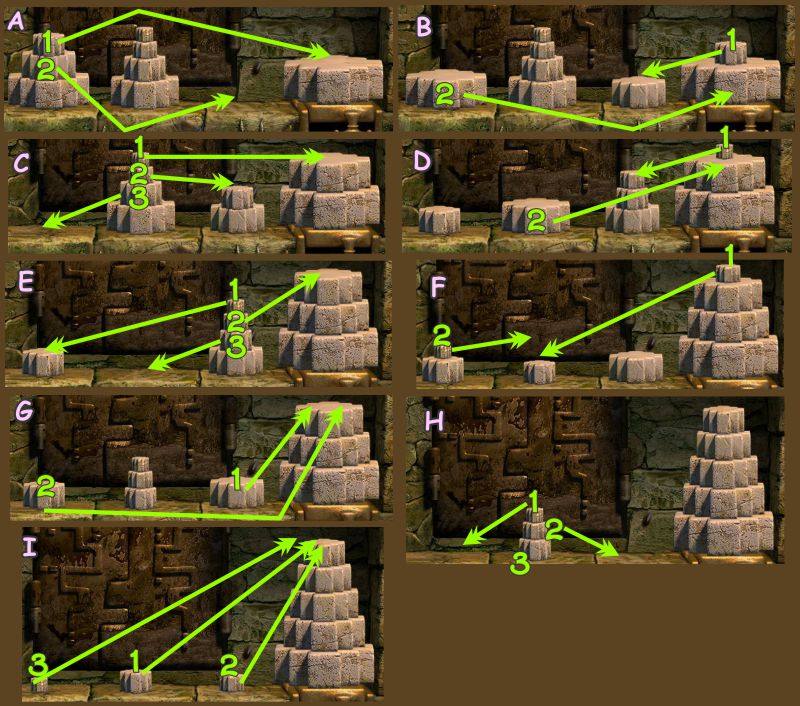
You can only place a small stone on top of a larger stone. Check out the next 2 screenshots for one step-by-step solution.
Screenshot
Screenshot
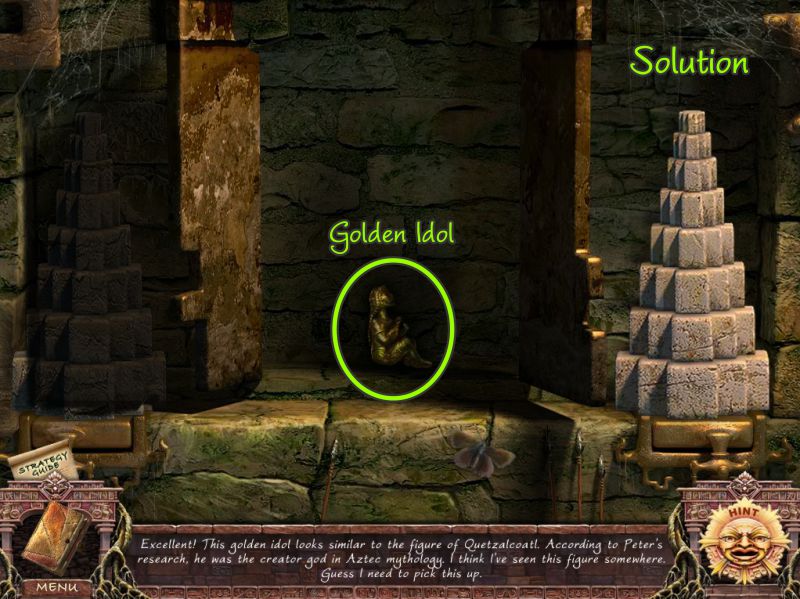
Once you have succeeded in creating a pyramid on the right, the doors will open for you to collect a Golden Idol.
Screenshot
Police Station
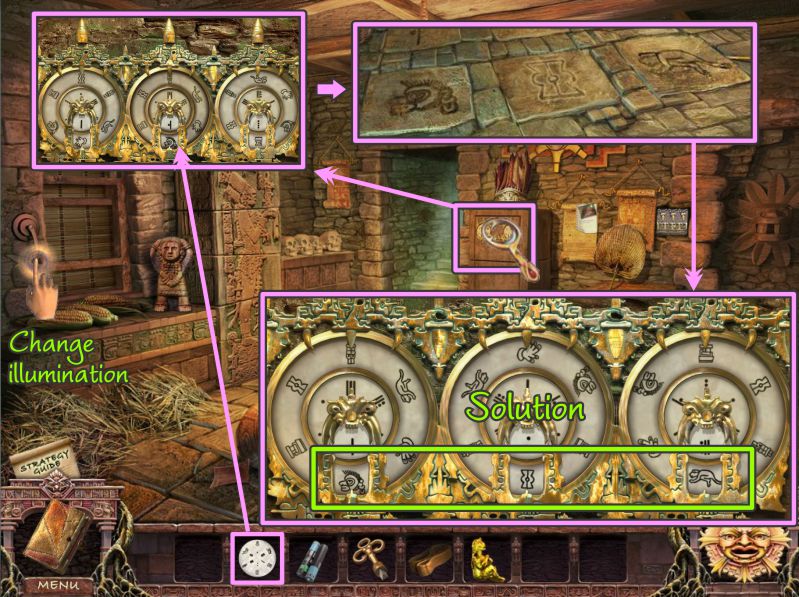
Zoom in on the discs on the cabinet in the back and place your Disc.
Move the 3 discs until the hieroglyphic symbols you saw in the back room are lined up in the bottom square of the discs.
The door will open, but you need to change the illumination to see what's inside.
Screenshot
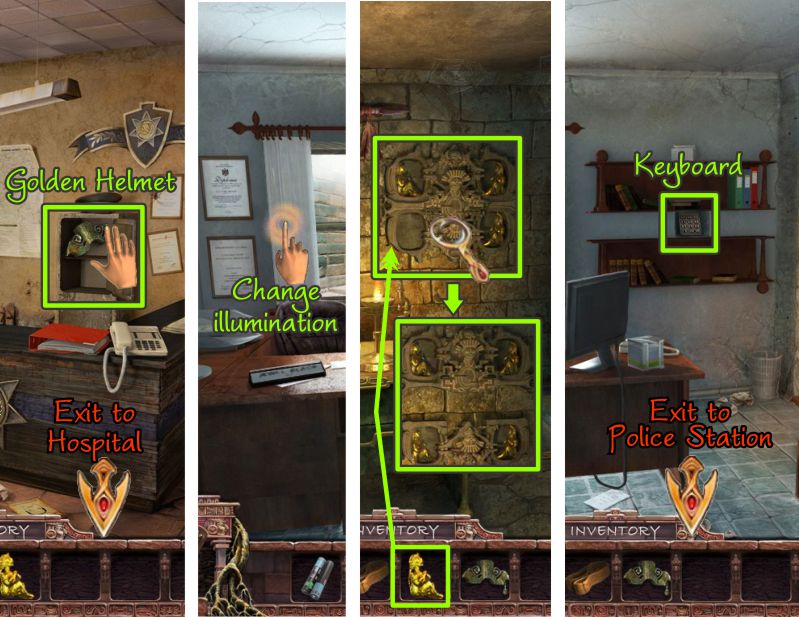
Police Station and Hospital
Take the Golden Helmet and head to the Hospital.
Change the illumination and place your golden idol in the missing space.
The plaque opens, but you need to change the illumination to get whatever is there.
Take the Keyboard from the bookcase and return to the Police Station.
Screenshot
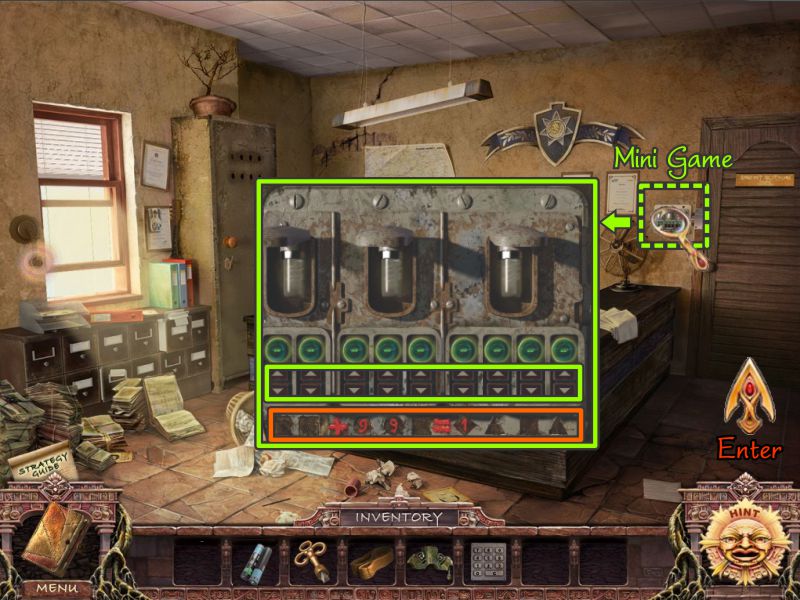
Police Station Reception
Zoom in on the mechanism next to the door to the Sheriff's Office for a Mini Game.
Screenshot
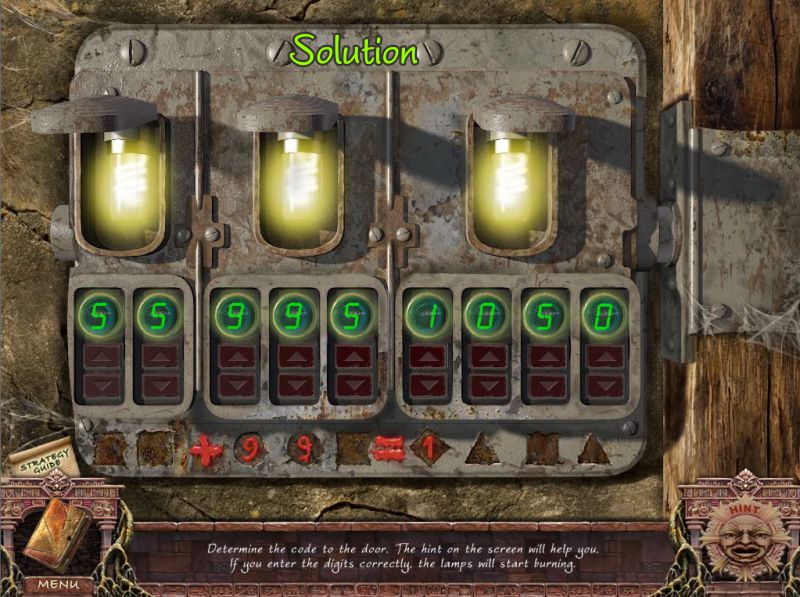
Sheriff's Office Door Mini Game
Your goal is to fill in the missing number of the equation at the bottom so that the 3 lights go on.
Use the up and down arrows until the lights are all lit. Check out the solution in the screenshot.
Screenshot
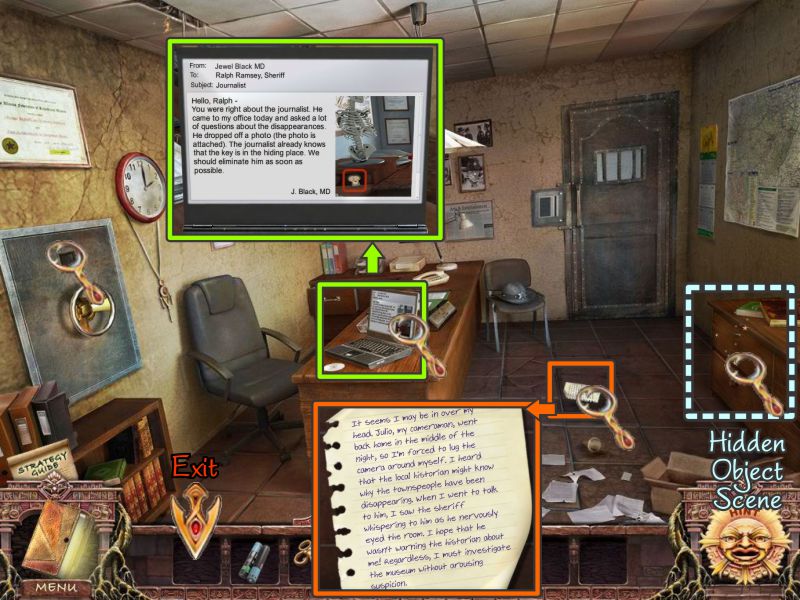
Sheriff's Office
Enter the Sheriff's Office.
Read the note on the computer and pick up the note from the floor.
Play the Hidden Object Scene.
Screenshot
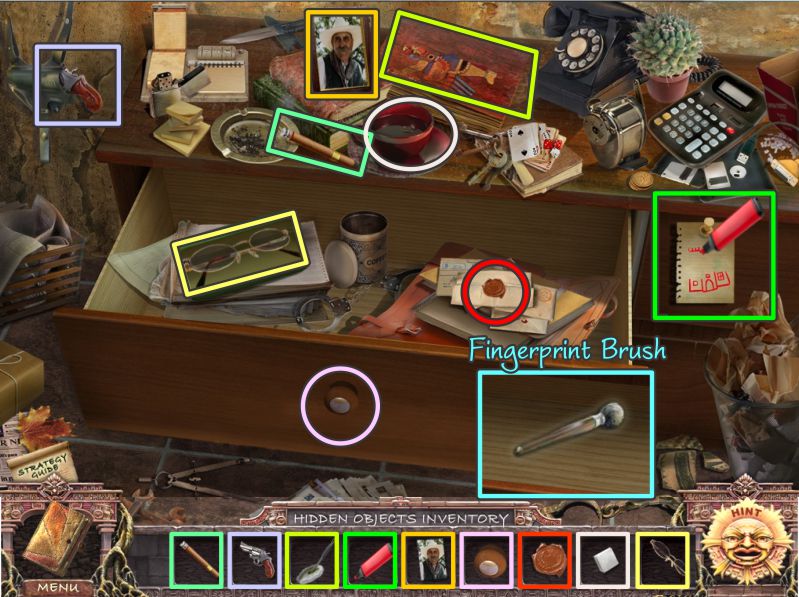
Chest Hidden Object Scene
Replace all the color-coded objects where they belong.
Use the marker to complete the note.
Open the top drawer with the knob, and take the Fingerprint Brush from the bottom drawer when it opens.
Screenshot
Police Station Reception
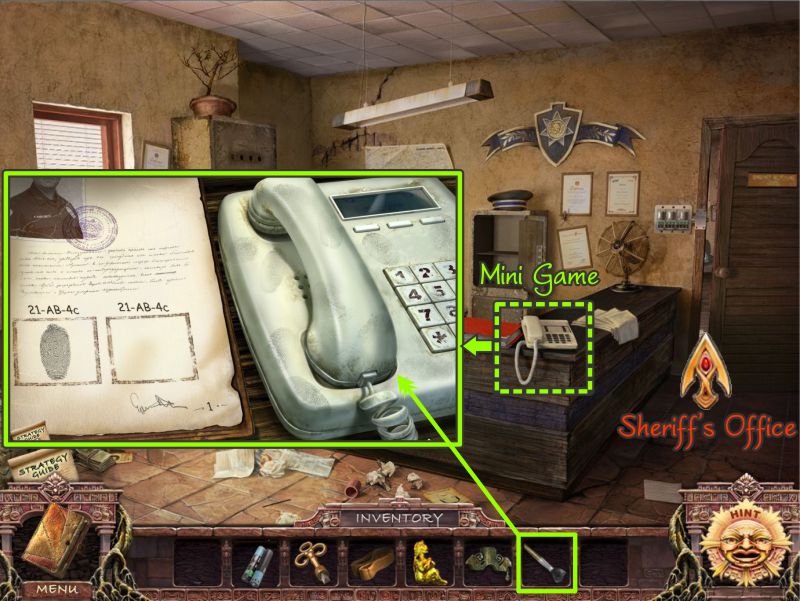
Go to the front office and zoom in on the phone for a Mini Game.
Dust it with your Fingerprint Brush to make the prints more visible.
Screenshot
Fingerprint Mini Game
You will be collecting all the fingerprints off the phone by matching them to the prints in the fingerprint book.
They are marked in the screenshot according to the last number and letter in the book, with the exception of "1c", which appears twice. Part of its other identifying label is included to distinguish them.
The last print you get off the keypad belongs to the Sheriff, so once you have it, return to his office.
Screenshot
Sheriff's Office
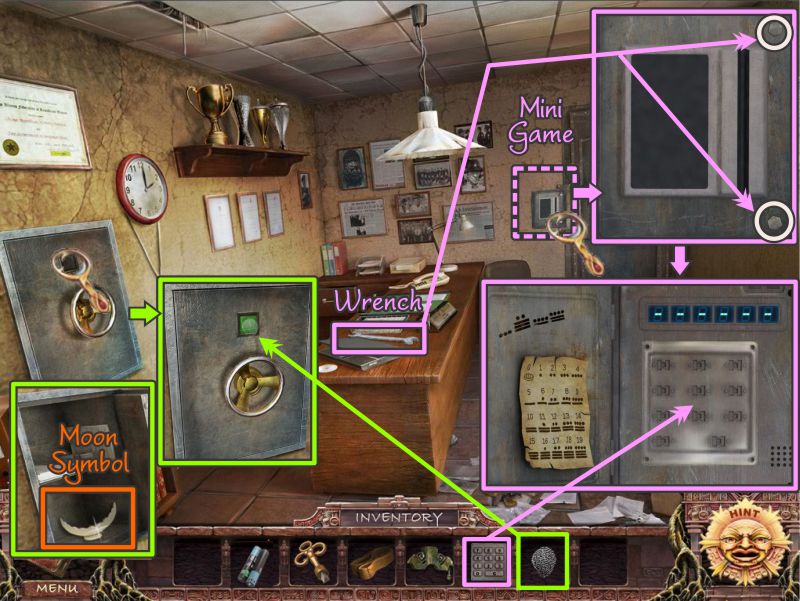
Zoom in on the safe on the left wall and place your fingerprint.
Collect the Moon Symbol inside the safe.
Grab the Wrench off the desk and go to the mechanism to the left of the back door.
Use the wrench to remove the two bolts.
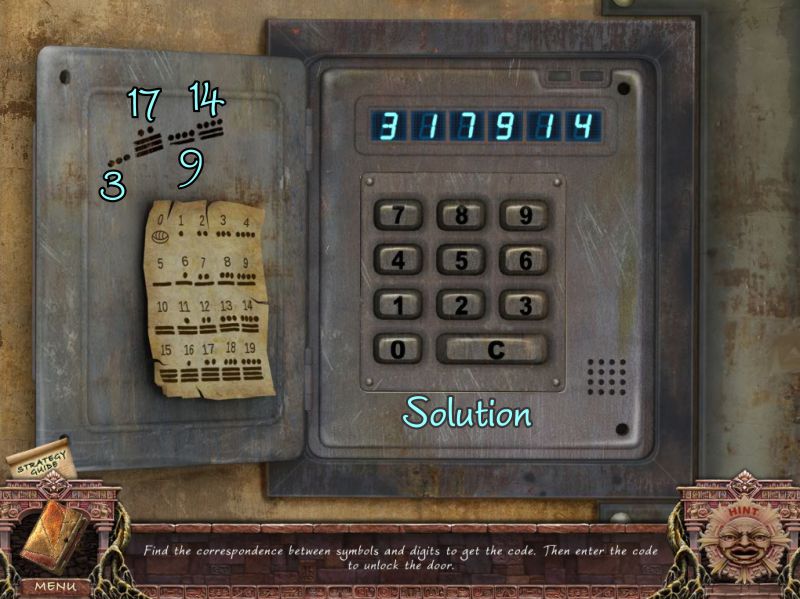
Place the keyboard to trigger the Mini Game.
Screenshot
Storage Room Door Mini Game
Your goal is to find the correlation between the code on the door so you can enter the numbers on the keyboard.
Since the code produces the numbers 3, 17, 9, and 14, the code to open the door is 317914.
Enter the Storage Room.
Screenshot
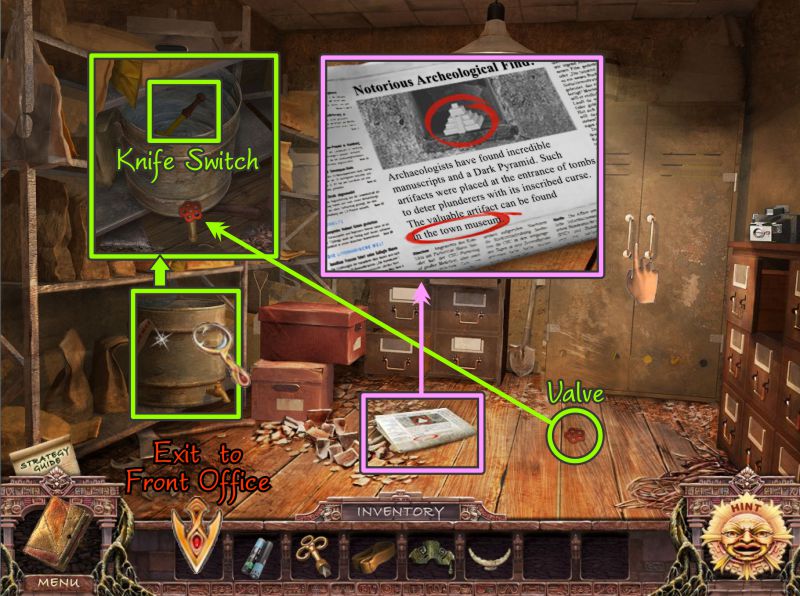
Storage Room
Read the newspaper on the floor, grab the Valve, and open the cabinet.
Zoom in on the barrel on the lower shelf and place the Valve.
The liquid will drain out, leaving you with a Knife Switch to collect.
Return to the front office.
Screenshot
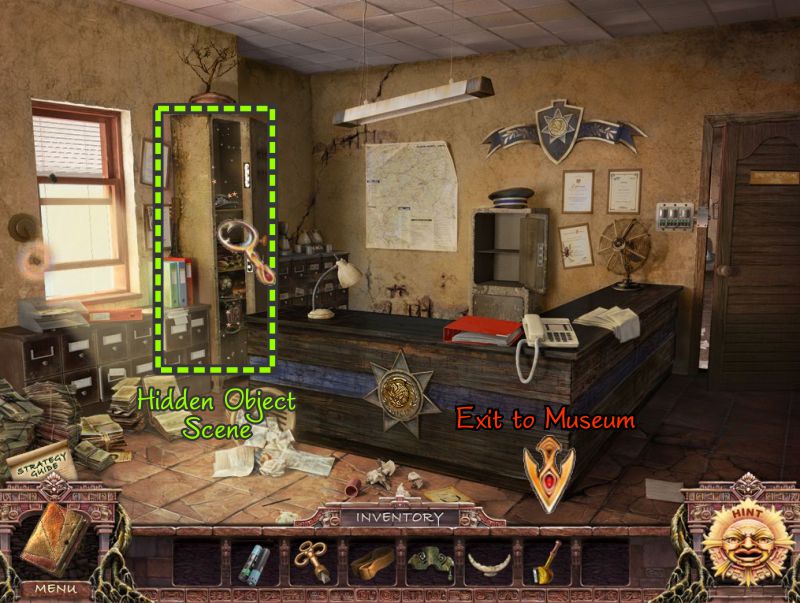
Police Station Reception
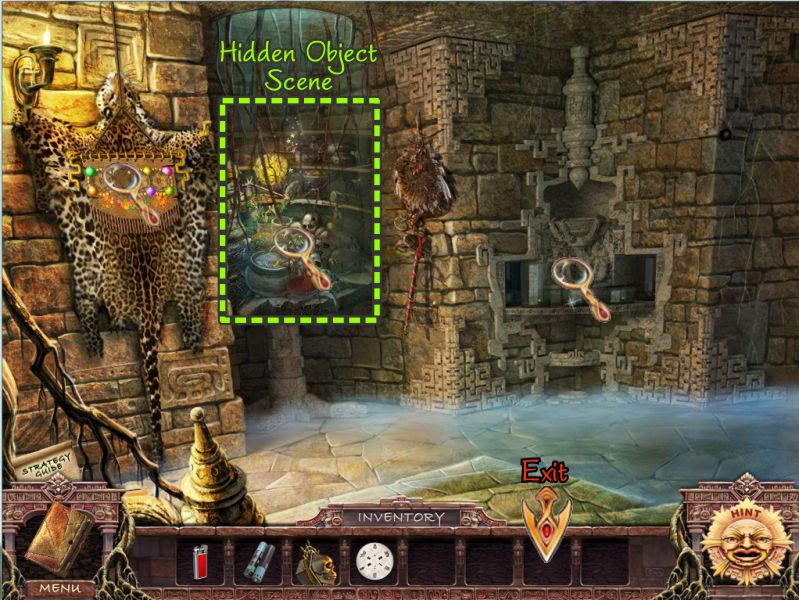
Play the Hidden Object scene in the cabinet, and then exit to the Museum.
Screenshot
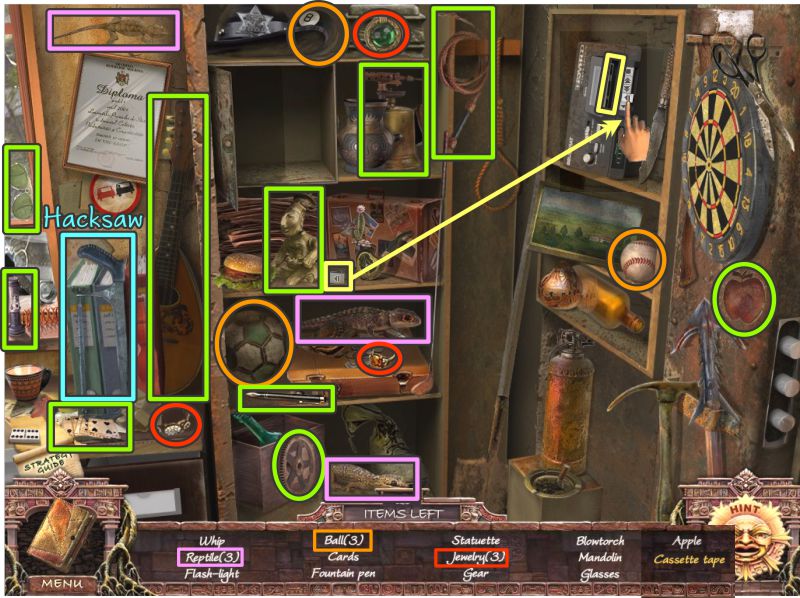
Cabinet Hidden Object Scene
Collect your list of items to receive a Hacksaw.
To collect the cassette tape, place the button on the recorder, press it, and take the tape.
Screenshot
Chapter 4: Enter the Museum
Street and Museum
Go to the door of the Museum, zoom in and use the Hacksaw to cut the chain.
Take the Videotape and change the illumination.
Collect the Stone Eagle, return the illumination to light, and go to the Hotel.
Screenshot
Hotel Light and Dark
Change the illumination and go underground to the first room.
Place the matching Stone Eagle head on the pillar, and the pillars will part, revealing an alcove with a Hidden Object Scene.
Screenshot
Underground Alcove Hidden Object Scene
Collect your list to end up with a Beaker for your Inventory.
To collect the Sun, use the needle and thread to finish the needlework.
Screenshot
Hotel and Hospital
Return to the Lobby and change the illumination.
Go to the Hospital and change the illumination in Dr. Black's office to dark.
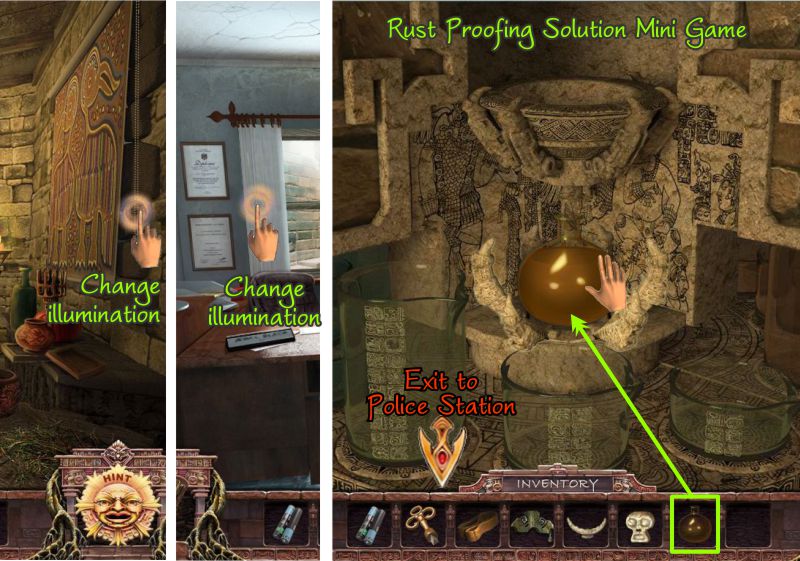
Go to the back room and zoom in on the chemistry area.
Place your Beaker to trigger a Mini Game for making a rust proofing solution.
You will collect the full beaker at the end of the game.
Screenshot
Rust Proofing Solution Mini Game
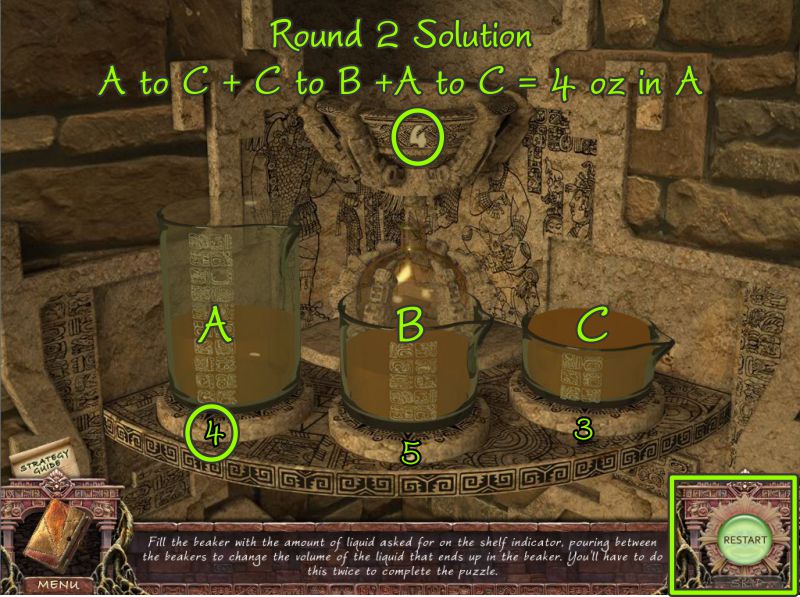
There are two rounds to the game. If you need to use the Restart button, you will return to the first round even if you have completed it.
Please view the screenshot for the solution.
Screenshot
The Round 2 solution is shown in the screenshot.
Screenshot
Police Station Storage Room
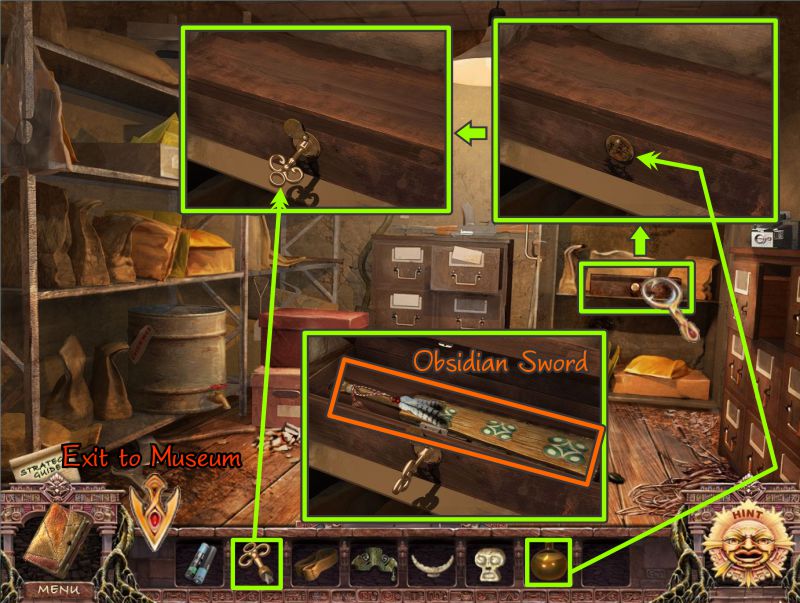
Go to the Storage Room at the Police Station and zoom in on the cabinet.
If you did not already open it on your last visit, do so now and use the anti-rust solution on the rusty lock.
Once the rust is gone, use the triangular key to open the box and take the Obsidian Sword.
Go to the Museum.
Screenshot
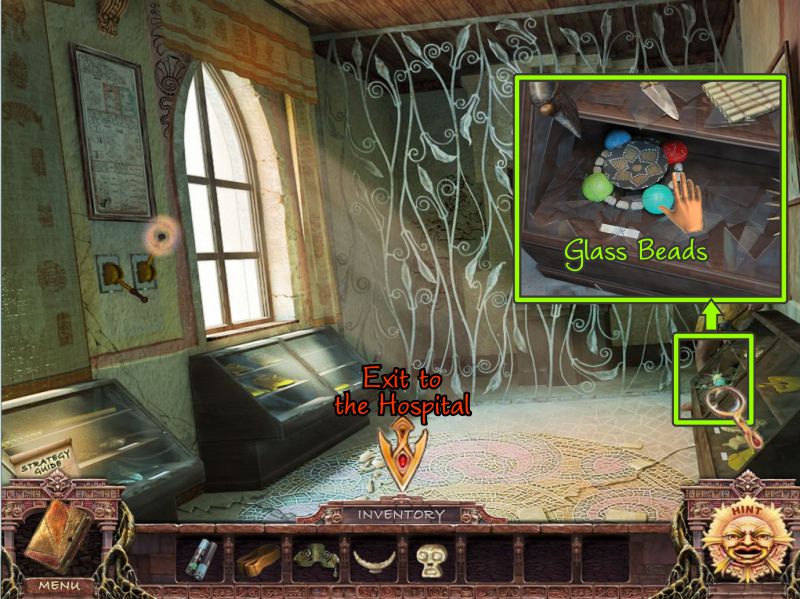
Museum
Change the illumination and give the Obsidian Sword to the statue. He will drop his arm.
Change the illumination back to light so you can see what happened.
Screenshot
When the sword dropped, it broke the display case so that you can now collect the Glass Beads.
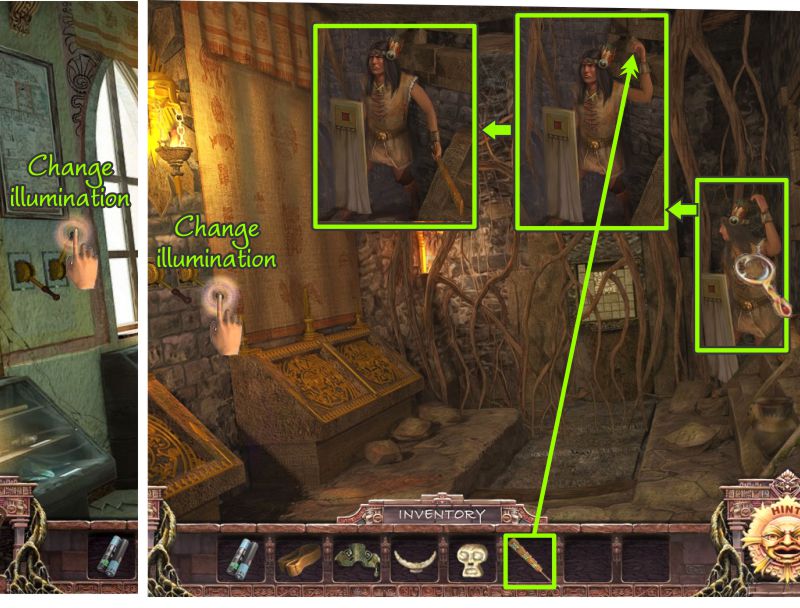
Exit to the Hospital and go to the very back room once you have changed the illumination in Dr. Black's office.
Screenshot
Hospital Dark
Zoom in on the beads and place your Glass Beads to trigger a Mini Game.
Your goal is to make the upper set of beads match the drawing under it.
You need to rotate each circle and keep in mind that the left two beads will rotate with the circle next to it.
The solution is shown in the screenshot, and at the end, you can collect a Machete to take with you to the Museum.
Screenshot
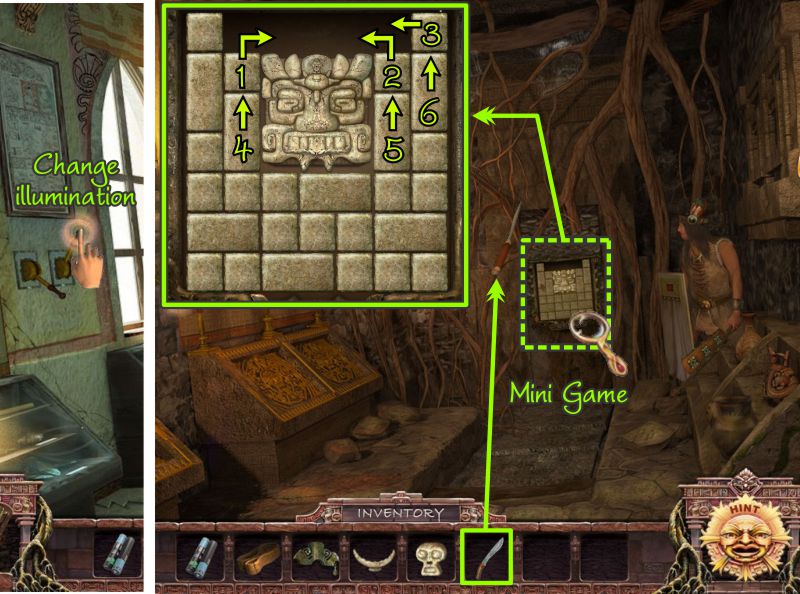
Museum
Change the illumination and use the Machete to clear some of the vines.
Zoom in on the cleared area for a Mini Game.
Museum Slider Mini Game
Your goal is to move the head block to the bottom in order to get you to your next task.
Check the next two screenshots for a solution that works.
Screenshot
Screenshot
Change the illumination back to light and zoom in on the same area for another Mini Game.
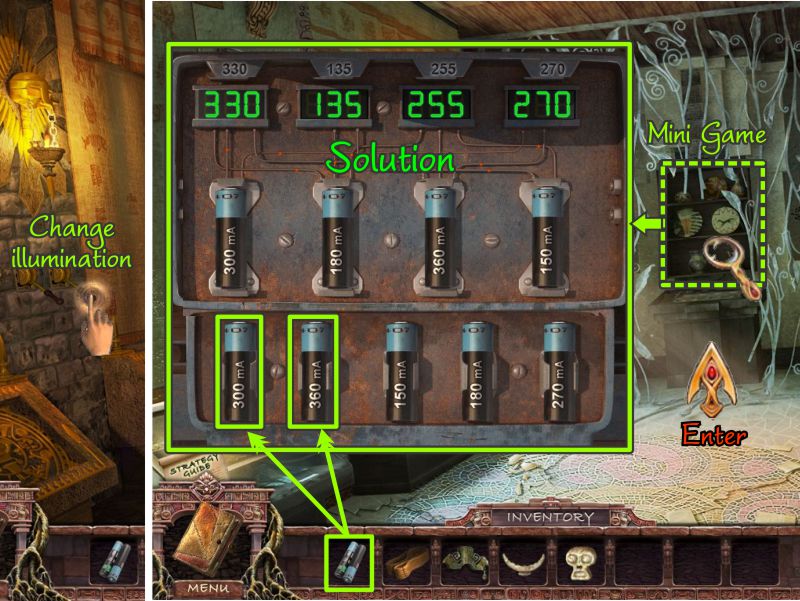
Museum Battery Mini Game
Place the two Batteries from your Inventory to trigger the Mini Game.
Your goal is to place the batteries so that their combined amperages equal the numbers posted above each battery.
The numbers you currently have are shown in LED just under your desired numbers.
The amperages are divided by how much voltage is being directed to the LED strip.
The 300 volt battery is going to 2 places so is 150 volts per target.
The 180 volt battery is divided by 3 so worth 60 volts per use.
The 360 volt battery is also divided by 3 so each segment is worth 120 volts.
The 150 volt battery has only 2 connections, so each is 75.
The solution is shown in the screenshot, but if you want to try it on your own, here is the formula.
To achieve 330, you need portions as follows: 150, 60, and 120.
For 135, you need portions equaling 60 and 120.
255 is a combination of 120, 75, and 180.
270 equals 150 and 120.
Once you have completed the game, the cabinet will disappear, revealing an entrance to another room, so go there.
Screenshot
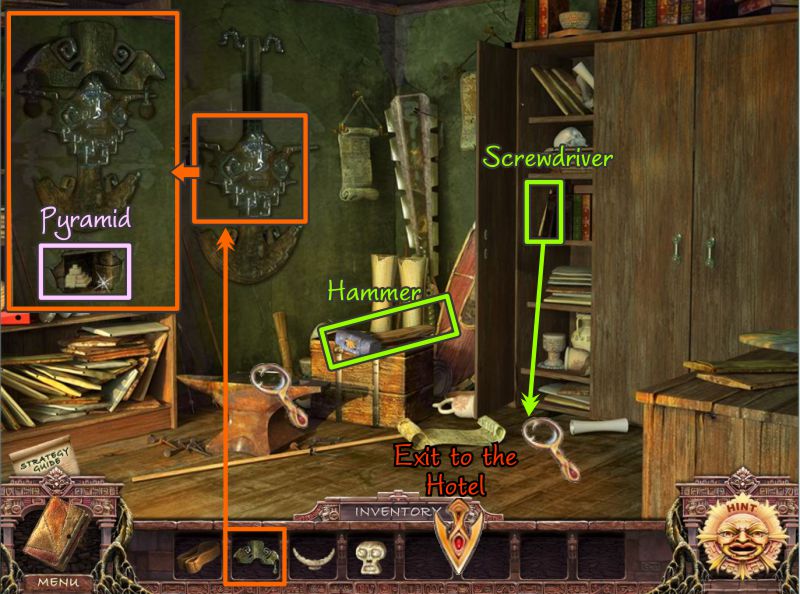
Museum Storage Room
Open the cabinet, and the Screwdriver will fall into a crack in the floor.
Collect the Hammer and place the Golden Helmet as shown in the screenshot.
It will move up, revealing a hidden compartment with a Pyramid you need to collect.
Exit to the Hotel.
Screenshot
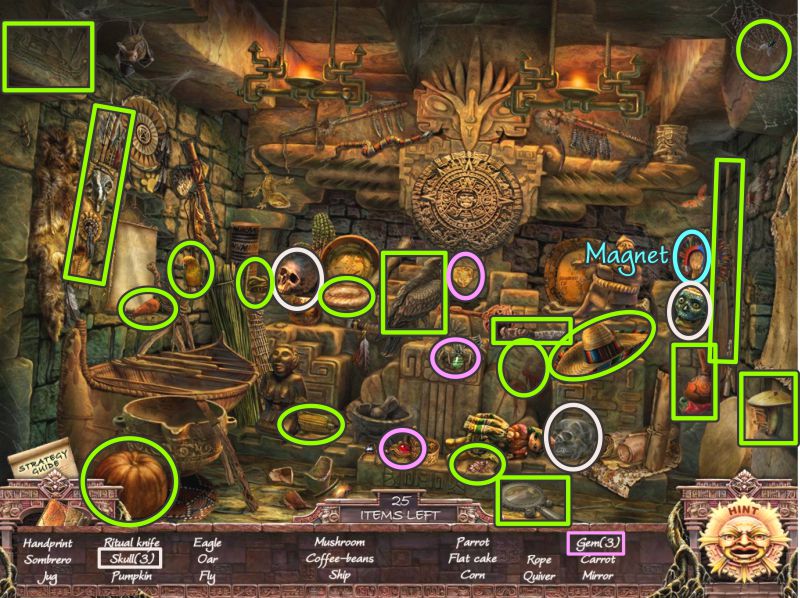
Hotel Underground Hidden Object Scene
Change the illumination and go underground to play another Hidden Object Scene in the Alcove.
Once you have collected everything, you get a magnet so can go back to the Museum Storage Room and retrieve the screwdriver.
Screenshot
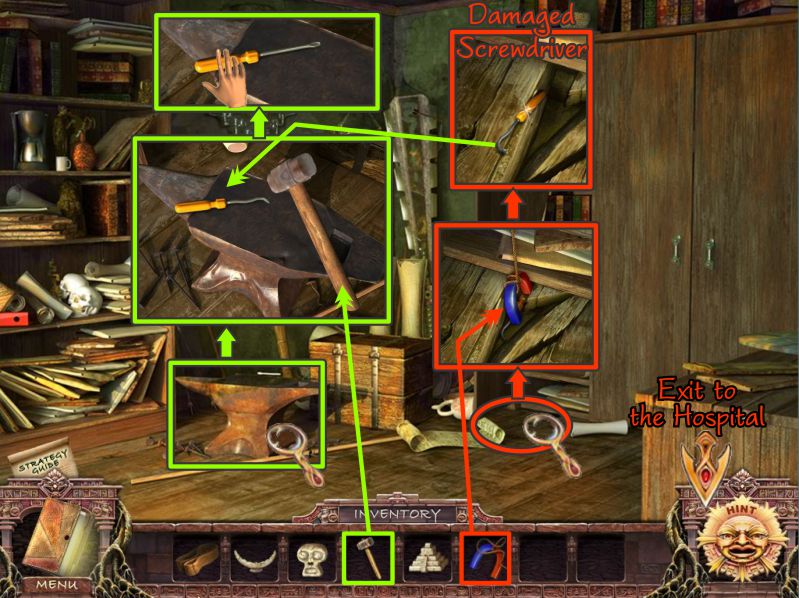
Museum Storage Room
Zoom in on the floor and use your Magnet to retrieve the Screwdriver.
It's a bent up mess, so put it on the anvil.
Use your Hammer to pound it back into shape, and then collect it.
Go to the Patient Room in the Hospital.
Screenshot
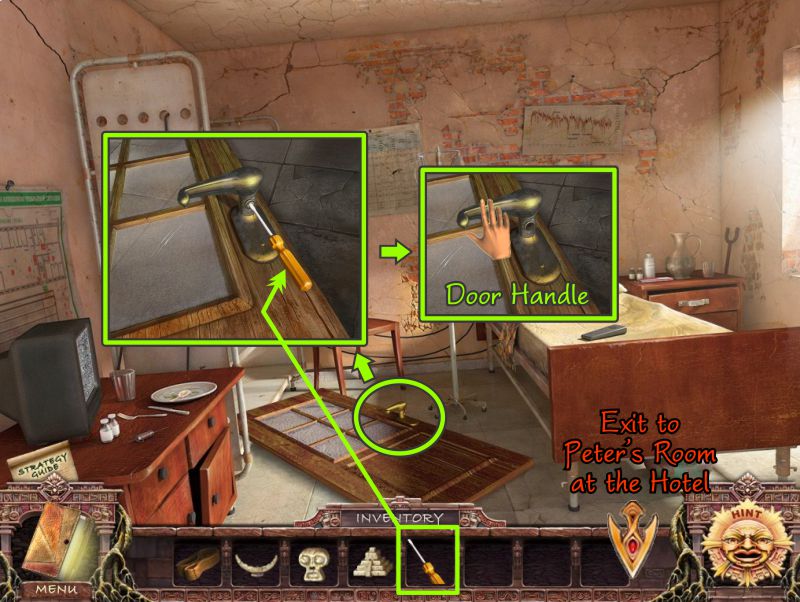
Hospital Patient Room
Zoom in on the door on the floor and unscrew the Door Handle so you can take it back to Peter's Room at the Hotel.
Screenshot
Use the handle to open the door to the balcony in Peter's Room and go there.
The door closes and there is no handle on that side of the door, so you cannot return inside.
Chapter 5: Demon World
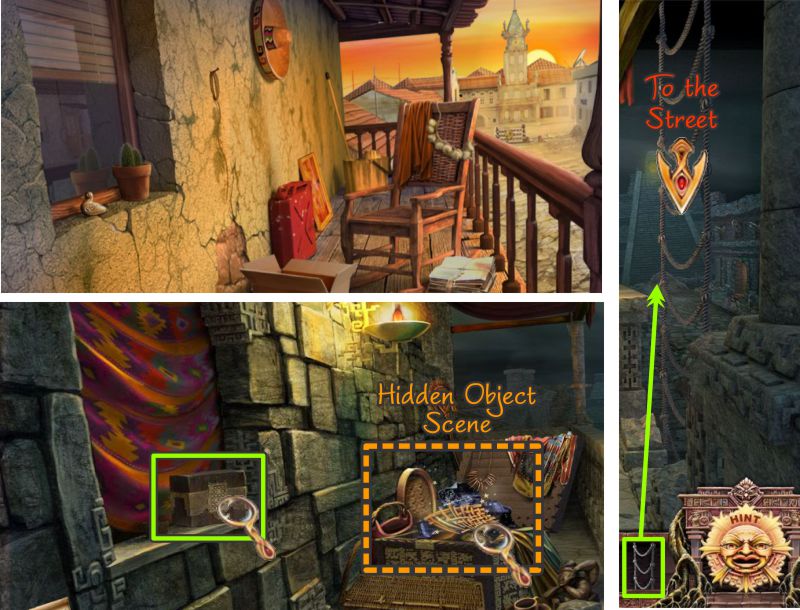
Balcony of Peter's Room
The scene will morph from what the light world sees into the Demon World.
There is no turning back because you must now navigate solely through the darkness, until you can once again bring the light back to the town.
Check the box on the sill and play the Hidden Object Scene that will give you an extension to the rope ladder so you can go down to the Street.
Screenshot
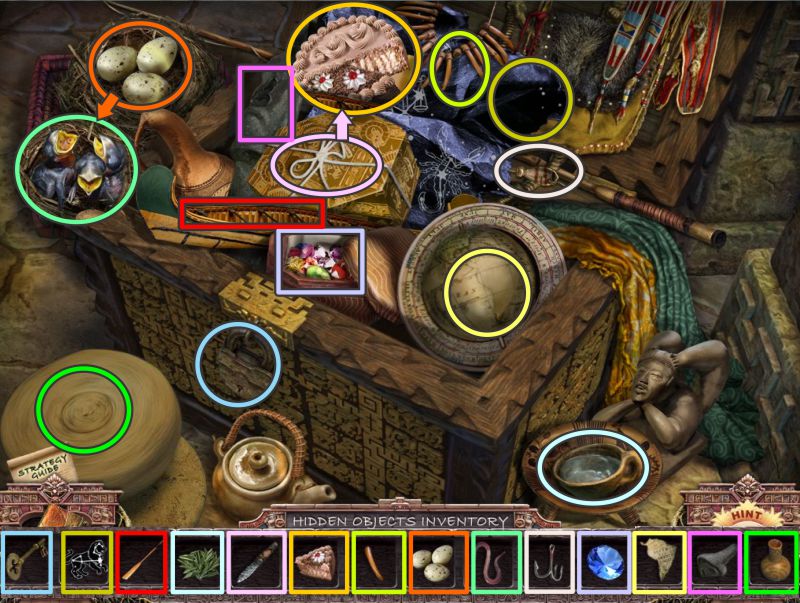
Balcony Hidden Object Scene
Replace all the color-coded objects as shown in the screenshot.
You need to place the eggs in the nest to let them hatch and create birdies to feed with the worm.
Cut the string on the cake box with the knife so it will open, and you can place your piece of cake to make a complete cake.
Once you are done, you will get the Rope Ladder.
Screenshot
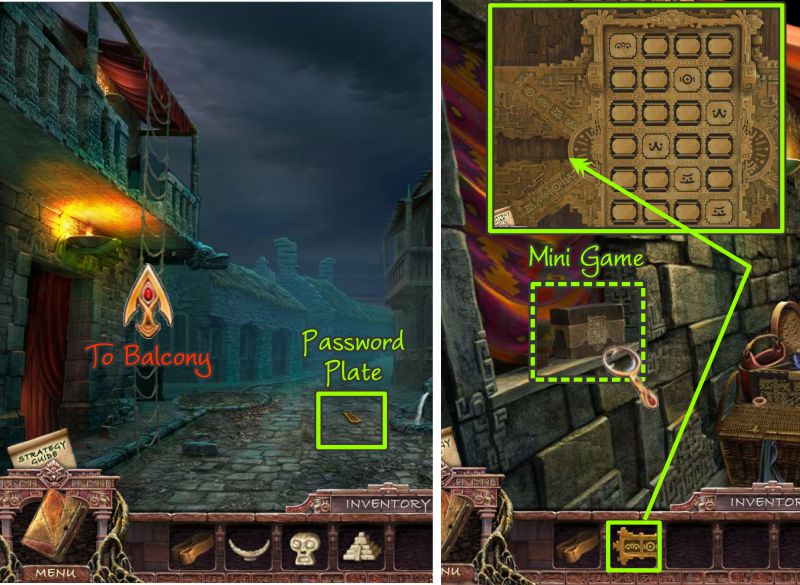
Street and Balcony
Place your Rope ladder as a continuation of the one already there, then climb down it to the Street.
Collect the Password Plate and go back up the ladder to the Balcony.
Click on the box on window sill and place your Password Plate to trigger a Mini Game.
Screenshot
Balcony Box Mini Game
Your goal is to evaluate the outer 6 plates and figure out which symbols to use to complete the passwords needed to open the box.
See the screenshot for the solution to get the Shell Symbol when the box opens.
Screenshot
Hotel Underground Passageway
Go to the Hotel and travel to the underground back room.
Zoom in on the back wall and place all the symbols as shown in the screenshot.
A door will open for you to enter.
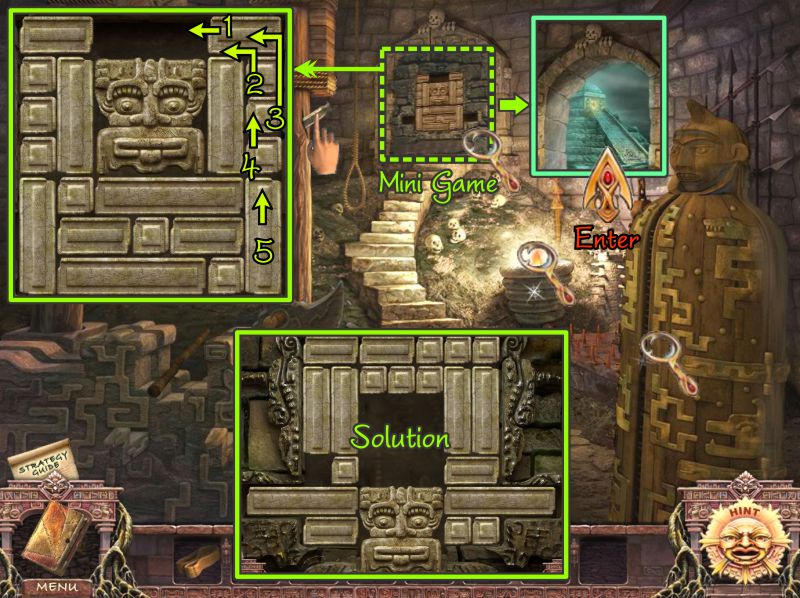
Screenshot
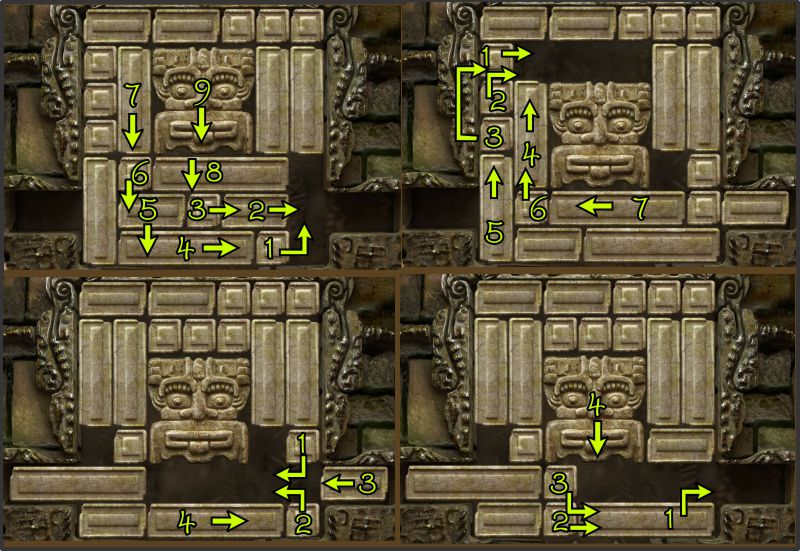
Hotel Underground Exit Slider Mini Game
You have unlocked a passageway to where we don't know as yet.
Click on the far door for another slider Mini Game to open it.
Your goal is to move the stone face to the bottom of the scene.
The first step-by-step is shown in this screenshot, as is the solution.
When it is completed, a new door will open for you to enter.
Screenshot
The rest of the step-by-step is shown in the next screenshot.
There are other ways to go about solving the puzzle, but this one does work.
Screenshot
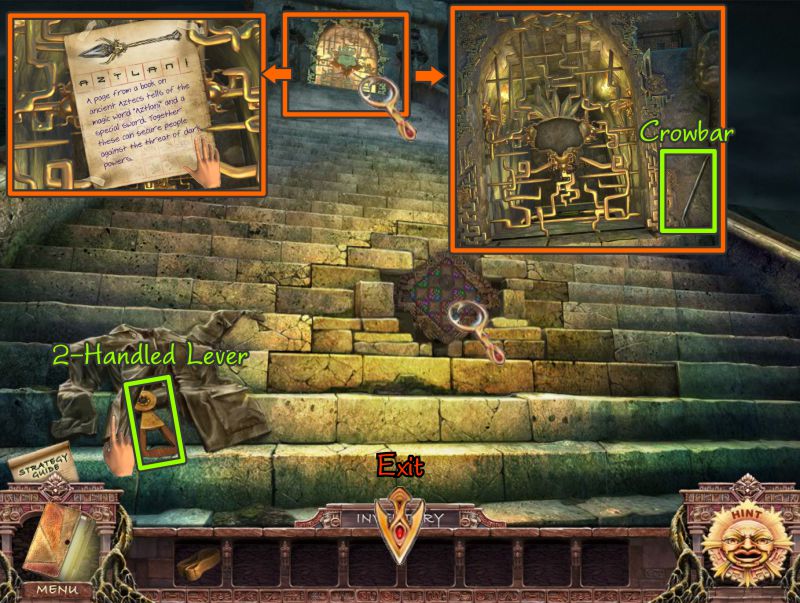
The Pyramid
You at the steps of the Demon Pyramid.
Open the jacket and take the 2-Handled Lever.
Check out the puzzle on the steps and go to the top of the Pyramid.
Zoom in on the gate, read and grab the message, and take the Crowbar.
Go back down to the Underground Passage in the Hotel.
Screenshot
Underground Passage
Check out the sarcophagus and open it with the Crowbar.
Collect the Hieroglyphic Plate inside, then go to the Museum.
Screenshot
Museum
Zoom in on the back wall and place your plate. It will turn and give you access to another room, so go there.
Screenshot
Click on all the magnifying glasses for more information.
Zoom in on the area of the ground shown in the screenshot for a Hexagon Mini Game.
You will get another Beaker to take back to the Hospital chemistry set.
Screenshot
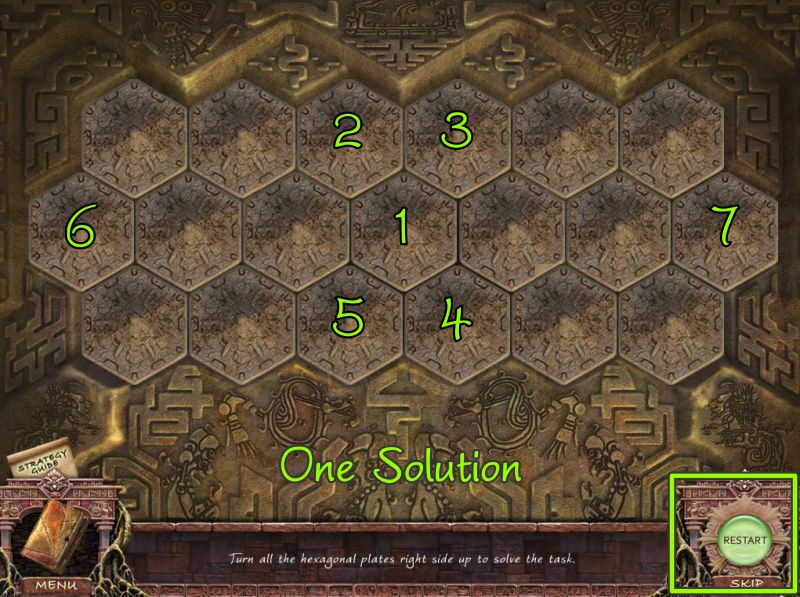
Hexagon Mini Game
Your goal is to turn over all the hexagons so the solution you see in the screenshot appears.
It doesn't really matter in what order you select the hexagons, but you do need to select all the ones marked.
Screenshot
Hospital
Return to the Hospital and play the Hidden Object Scene.
At the end, a section will part for you to grab a Hieroglyphic Plate.
Go to the back room, since you do not have the objects to use the finger point items.
Screenshot
Hospital Shelves Hidden Object Scene
When you have completed returning all color-coded objects to their proper places, you collect the Hieroglyphic Plate.
Screenshot
Hospital Back Room
At the back room of the Hospital, you now have a Hidden Object Scene to complete, as well as another chemistry Mini Game to get some Growing Essence.
Screenshot
Growing Essence Mini Game
Place your Beaker on the chemistry set, and play the two rounds necessary to complete the game.
Do not forget that if you choose to Restart, you will have to begin again in Round 1.
Please check the next two screenshots for the solutions.
Screenshot
Screenshot
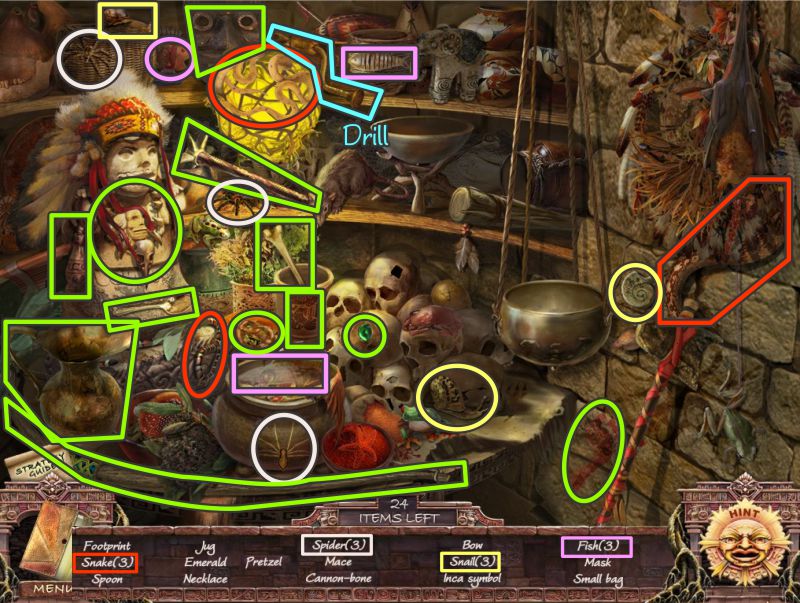
Niche Hidden Object Scene
Collect all your items to get the Drill.
Screenshot
Hotel Lobby
Back at the Hotel, use the Growing Essence on the plant, which will produce a Cane for you to collect.
Go underground and keep going to the top of the Pyramid.
Screenshot
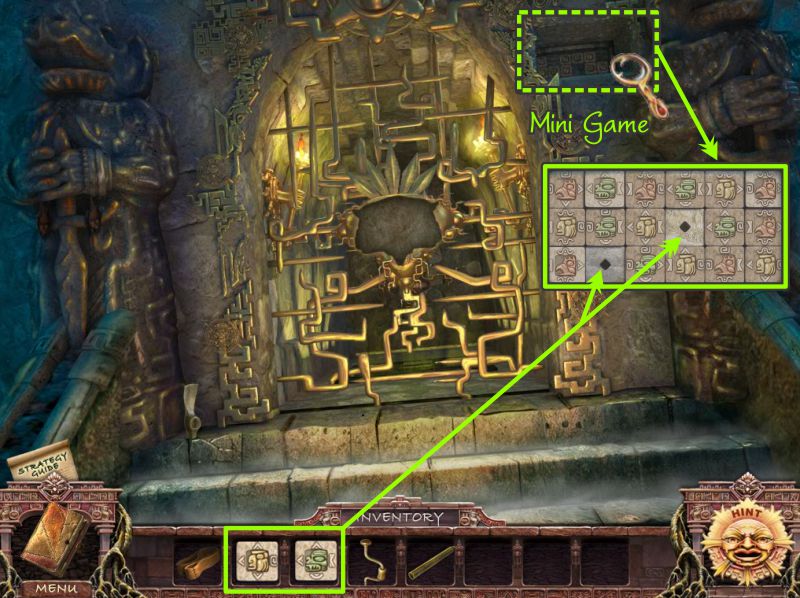
Top of the Pyramid
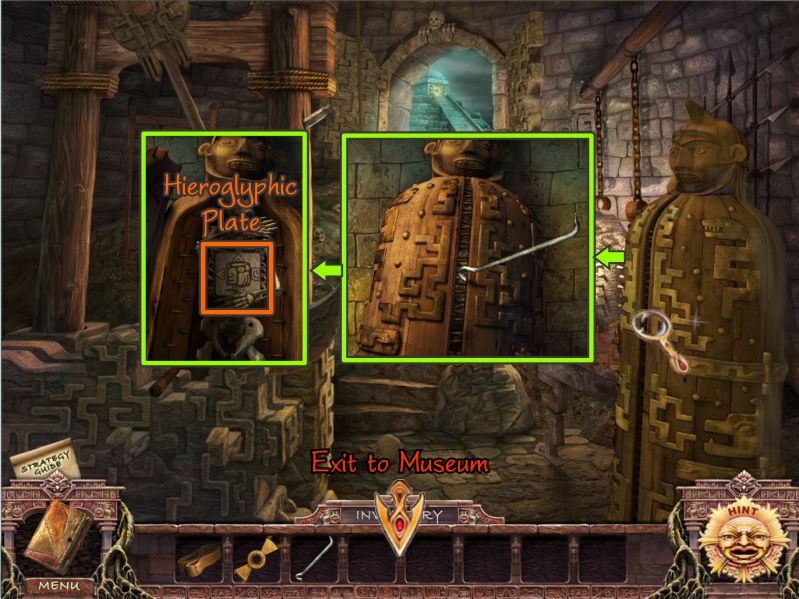
Click on the area at the top right of the gate for a Mini Game.
Place your two hieroglyphic plates to start the game.
Screenshot
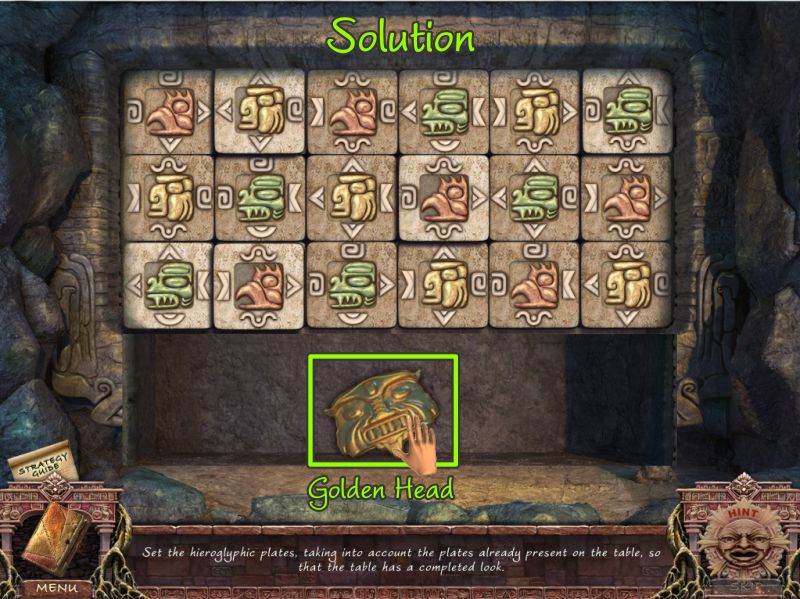
Hieroglyphic Plate Mini Game
Your goal is to match up the plates so they coordinate with the ones next to them.
See the screenshot for the solution, and then pick up the Golden Head.
Screenshot
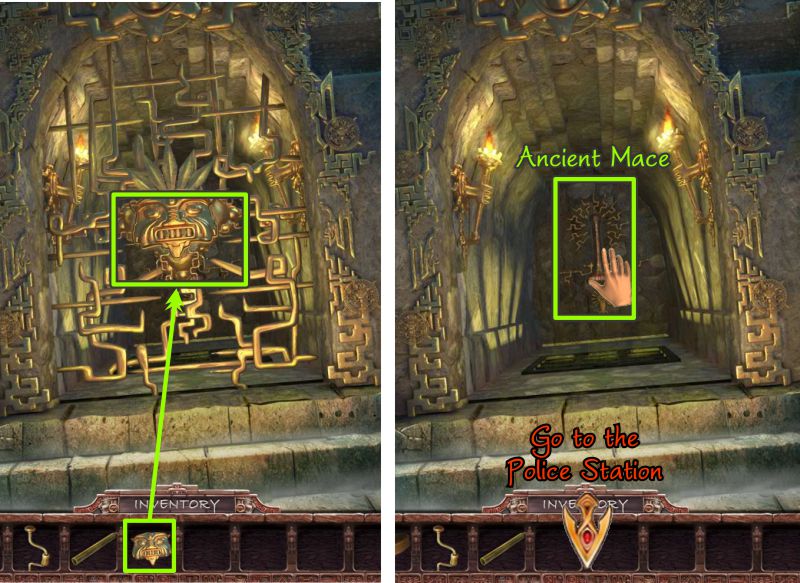
Golden Head Gate
Click on the gate and place the Golden Head you just collected.
The gate will open; grab the Ancient Mace and take it back to the Museum.
Screenshot
Museum
Go to the back room and place the Mace on the wall to match the one already there.
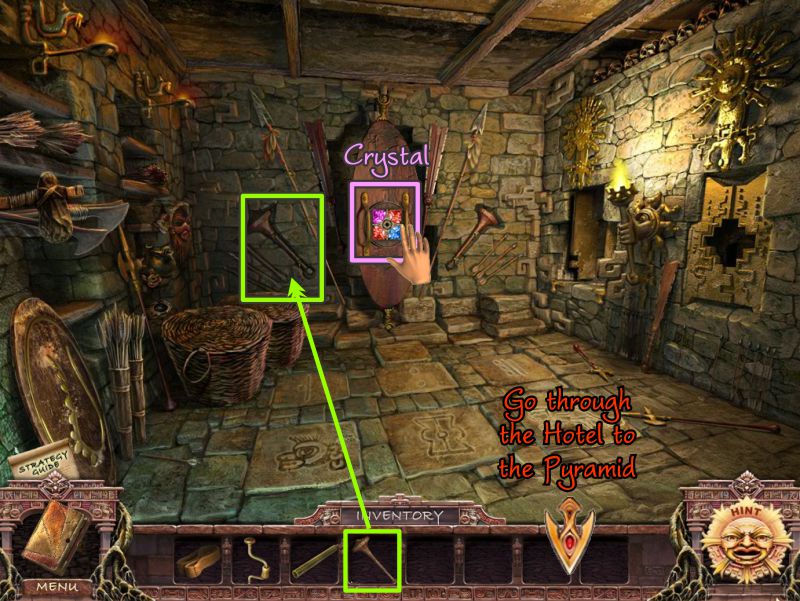
The shield will produce a Crystal, so take it and go to the Pyramid via the Hotel.
Screenshot
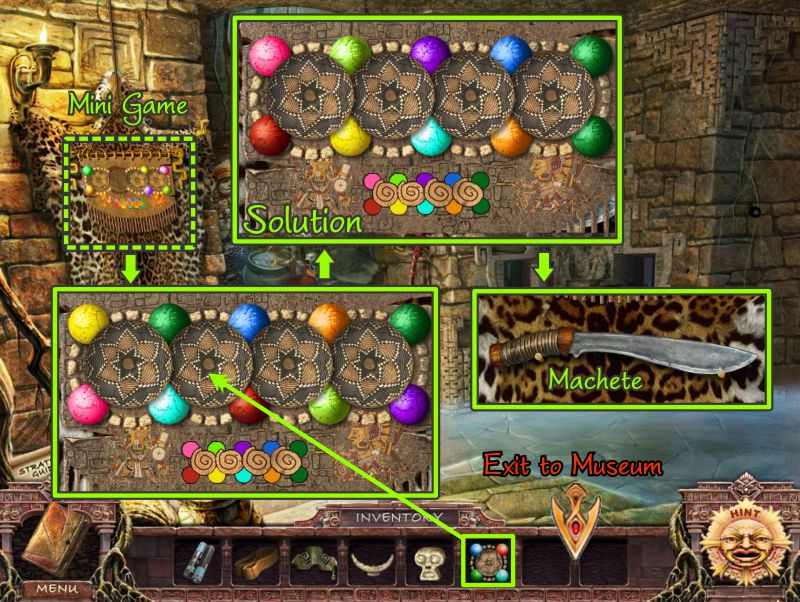
Chapter 6: Enter the Pyramid
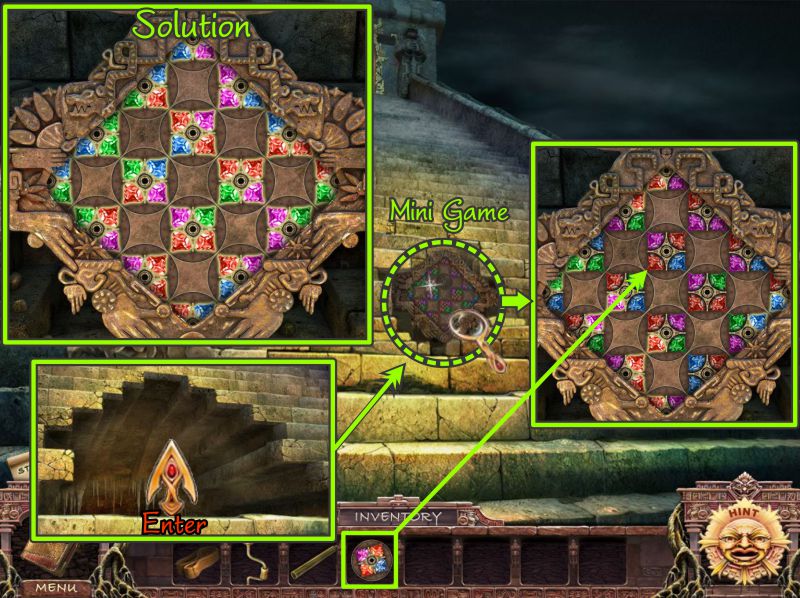
Pyramid Crystal Mini Game
Zoom in on the steps and place your crystal.
Your goal is to make sure all the crystals that touch are matched. See the screenshot for the solution.
When you have completed the game, you will have opened a passage to go inside the Pyramid.
Screenshot
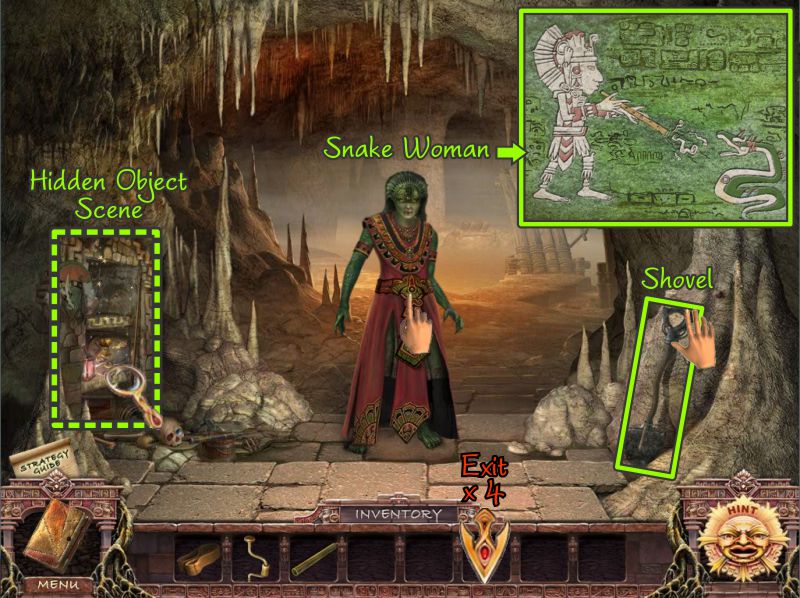
Snake Woman
Your first encounter is with a Snake Woman.
Your knowledge from the Museum tells you that the only way to tame or destroy a snake is with a flute.
Grab the shovel and play the Hidden Object Scene.
Screenshot
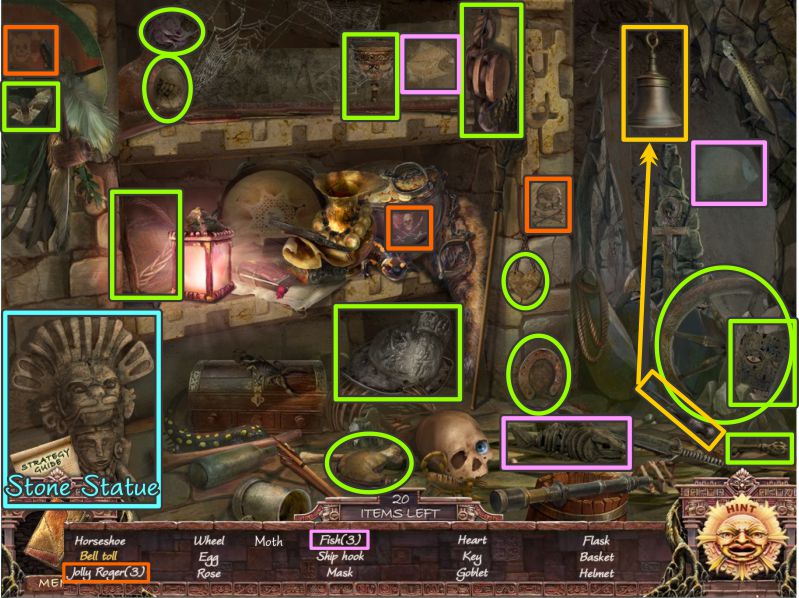
Pyramid Entry Hidden Object Scene
Upon completion, you will receive a Stone Statue.
To get a bell toll, you need to place the clapper on the bell and collect the bell after it rings.
Screenshot
Hotel
Go back to the first underground room at the Hotel.
Place your Stone Statue head on the pedestal, then watch the matching set descend into the ground.
Another pedestal will rise with a Golden Spider on it.
Take the Golden Spider, return to the Lobby, zoom in on the front of the desk, and place the spider.
A compartment will open with a Vice Handle, so take it and go to the Hospital.
Screenshot
Hospital
Zoom in on the vice, place the handle, place the cane, and use the drill to make holes in the cane.
Take what is now a flute and go out into the street.
Screenshot
The Street
Go forward toward the Pyramid.
Use your shovel to dig in the pile of dirt and recover the Winch.
Go through the Hotel and enter the Pyramid.
Screenshot
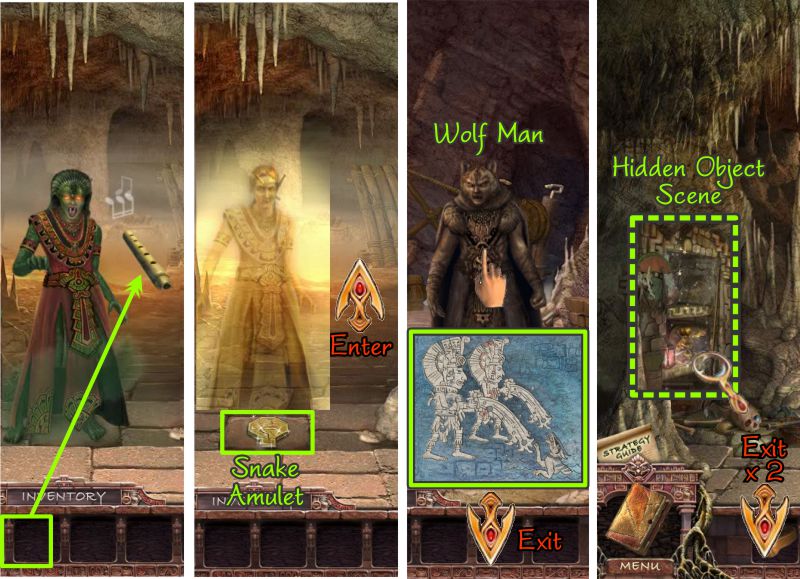
Snake Woman and Wolf Man
Use your Flute to tame the snake and remove the demons from Dr. Black.
Pick up the Snake Amulet and go forward to the Wolf Man.
Go back to the entry and play the Hidden Object Scene.
The Aztecs used water to drown a wolf, so you need to find a way to break the wall.
Screenshot
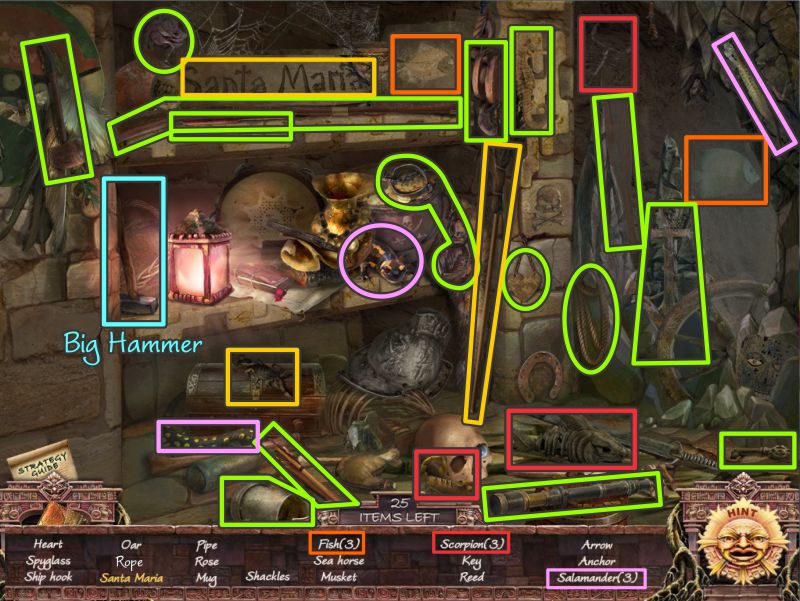
Entry Hidden Object Scene 2
Collect everything on your list, and you will get a Big Hammer for your Inventory.
Screenshot
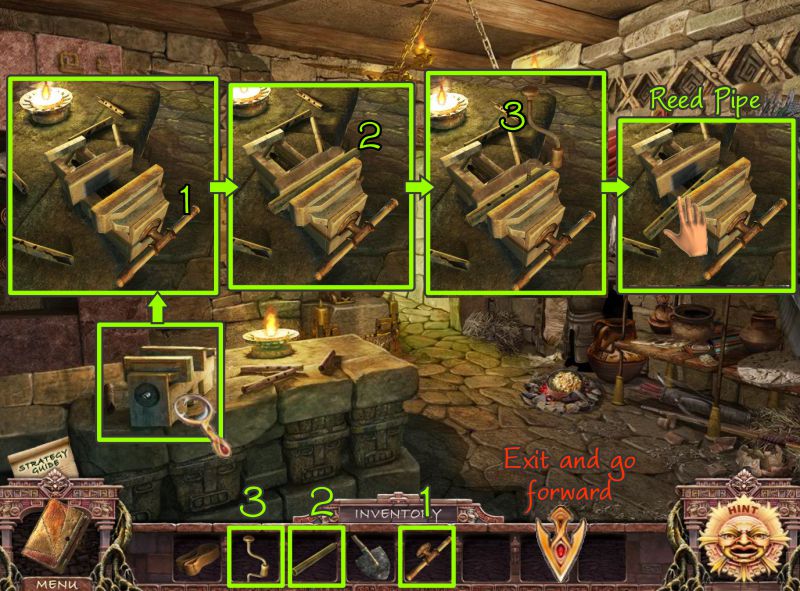
Underground Passageway and Top of the Pyramid
Return to the Underground Passageway in the Hotel and use the Big Hammer on the guillotine.
Pick up the Short Pole and go to the top of the Pyramid.
Place the Short Pole on the axe head to get a Pickaxe.
Go inside the Pyramid to the room with the Wolf Man.
Screenshot
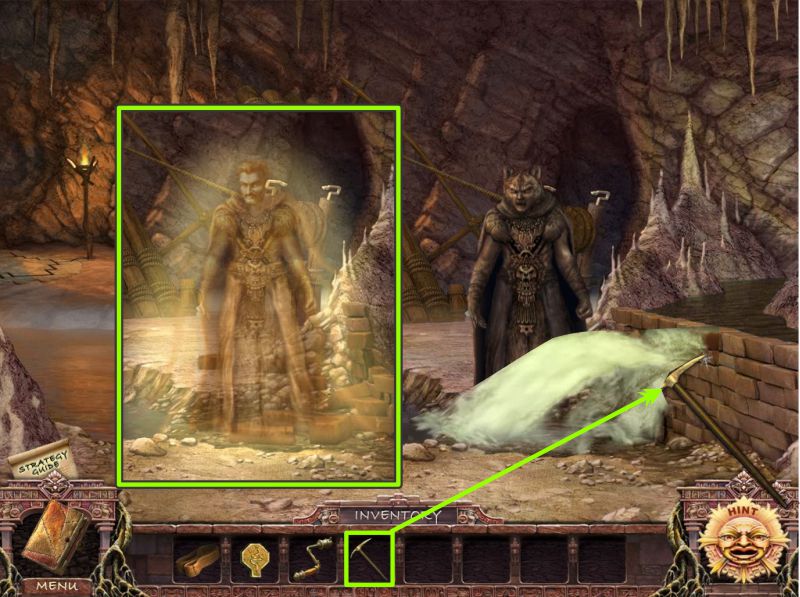
Wolf Man
Use the Pickaxe to break the wall and send the water to the river.
The demons will leave the Wolf Man and turn him back into the Sheriff.
Screenshot
Drawbridge
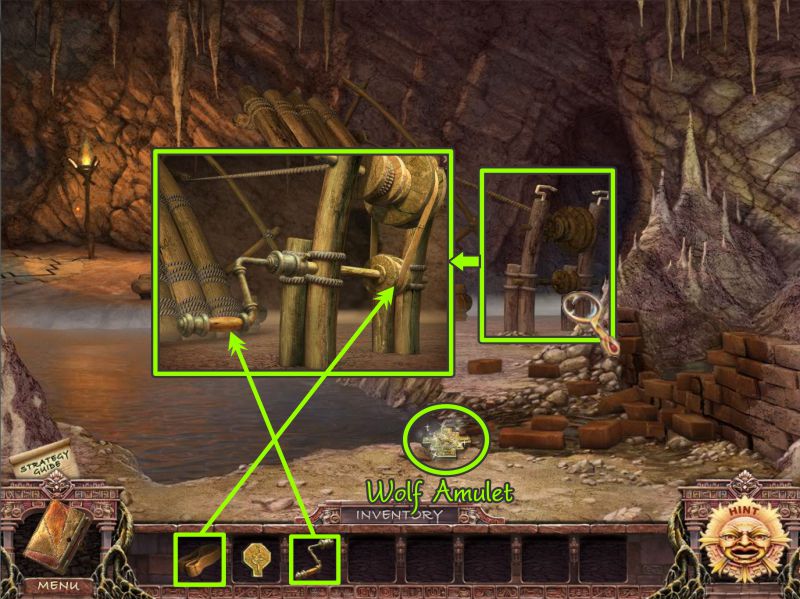
Pick up the Wolf Amulet and zoom in on the Drawbridge.
Place your Drive Belt and Winch on the mechanism, as shown in the screenshot, and the bridge will lower.
Screenshot
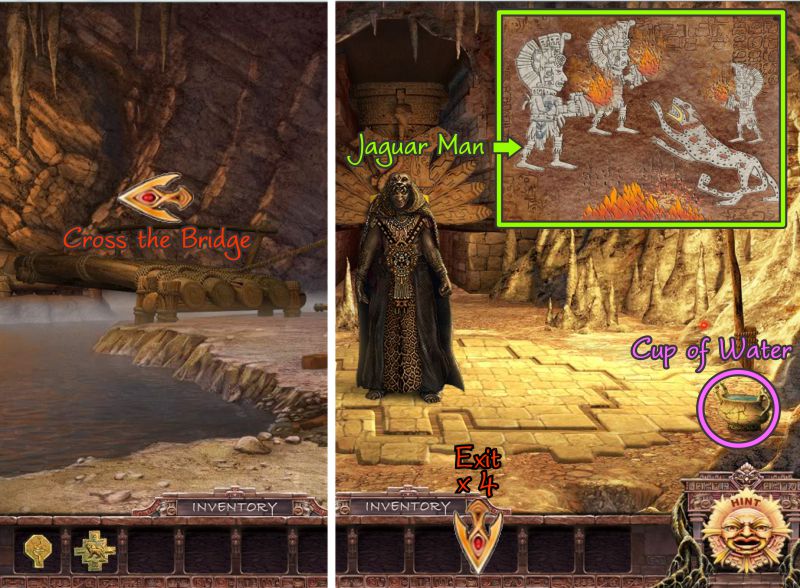
Jaguar Man
Cross the bridge to meet Jaguar Man.
You need to find a way to create fire to destroy him.
Take the Cup of Water, then exit 4 times to Underground Passageway.
Screenshot
Underground Passageway
Use the Cup of Water to put out the fire in the urn.
Take the cooled Pincers, and use them to extract the Chisel from the guillotine.
Return to Jaguar Man.
Screenshot
Jaguar Man
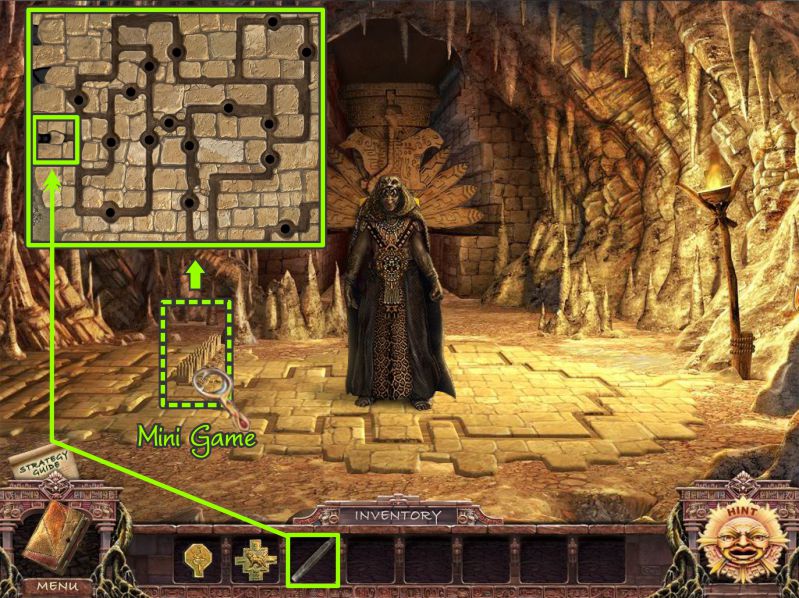
Zoom in on the floor for a Mini Game.
Use the Chisel to remove the piece that is keeping the incendiary liquid from flowing.
Screenshot
Incendiary Liquid Mini Game
Your goal is to place the balls in the correct holes so the liquid will be directed through the maze to the source of the fire.
See the screenshot for the solution.
Screenshot
Museum Archivist
The fire destroys the demons and turns the Jaguar back into the Museum Archivist.
Take the Jaguar Amulet, then exit all the way to the Street.
You now need to place your amulets at the Hospital, Police Station, and Museum. You can choose your locations in any order you wish.
Screenshot
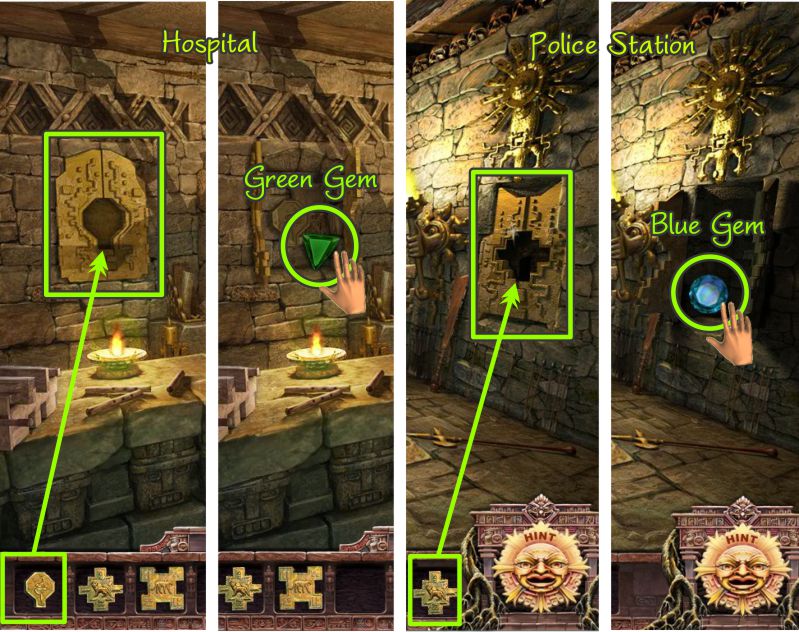
Hospital and Police Station
Place the Snake Amulet at the Hospital and take the Green Gem.
Place the Wolf Amulet at the Police Station and take the Blue Gem.
Screenshot
Museum and Door to the Demon
Place the Jaguar Amulet at the Museum and take the Red Gem.
Return to the Pyramid where you encountered Jaguar Man and zoom in on the triangular stones in the back for a Mini Game.
Place your gems to start the game.
Screenshot
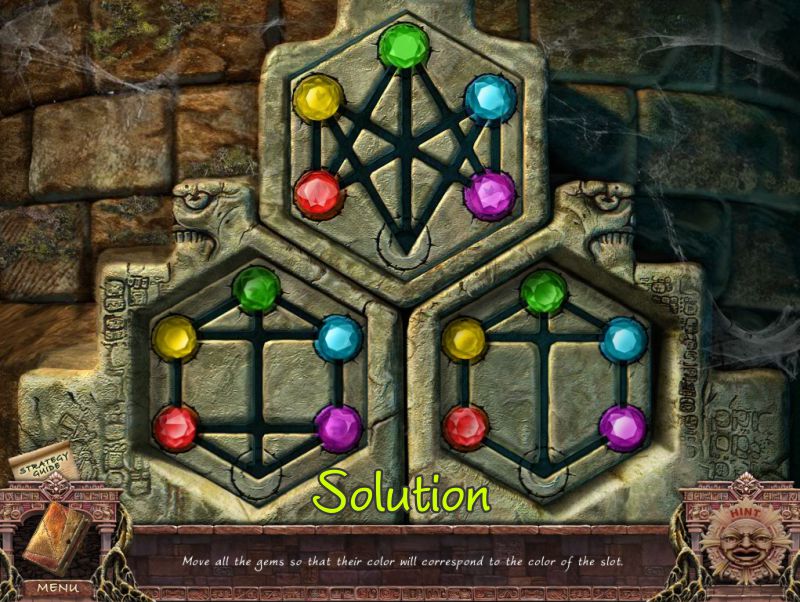
Door to the Demon Mini Game
The plates will turn around with 3 configurations of gems.
Your goal is to move the gems so they coordinate with the color circles underneath the gems.
See the screenshot for a step-by-step solution.
There is a Restart button, but it only works on each individual segment and will not restart from the very beginning.
Screenshot
This screenshot is what the completed game will look like.
Screenshot
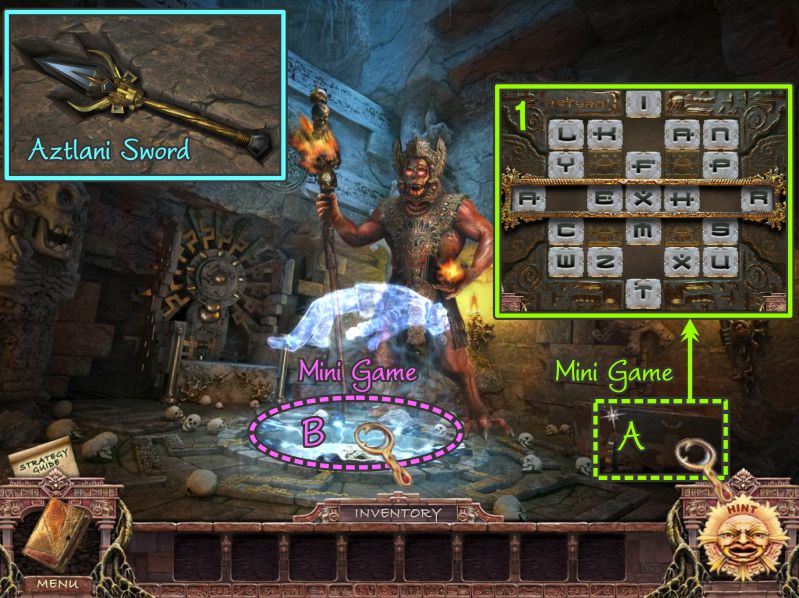
Meet the Demon
Go through the opening to find the Demon with Peter.
There are two Mini Games to be played; start with the one marked "A" in the screenshot.
This is a slider game where your goal is to spell out Aztlani in the center bar.
There is a Restart button if you need it.
The compartment will open with the Aztlani Sword.
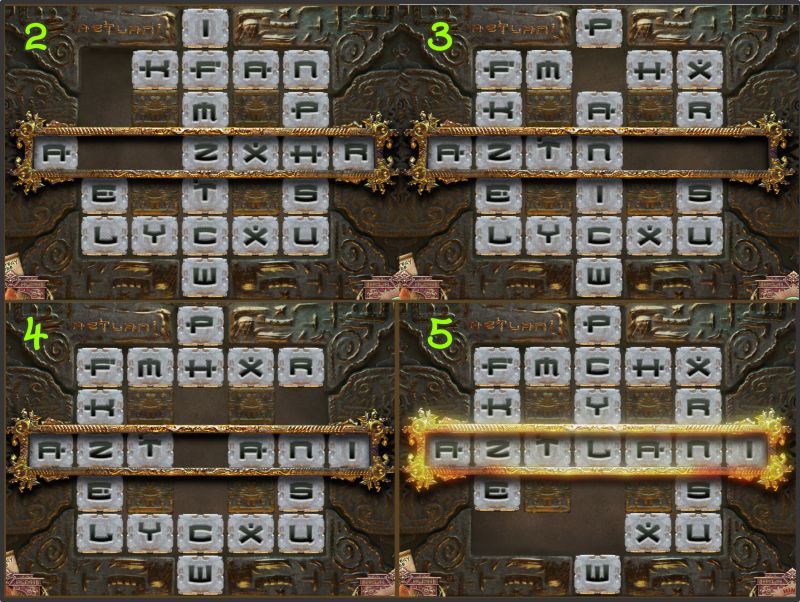
Once you have the sword, zoom in on the area under Peter for the next Mini Game.
Screenshot
Aztlani Mini Game
Move the beginning letters to look like "2" in the screenshot.
Keep sliding the letters to the shown configurations until you achieve your goal.
Screenshot
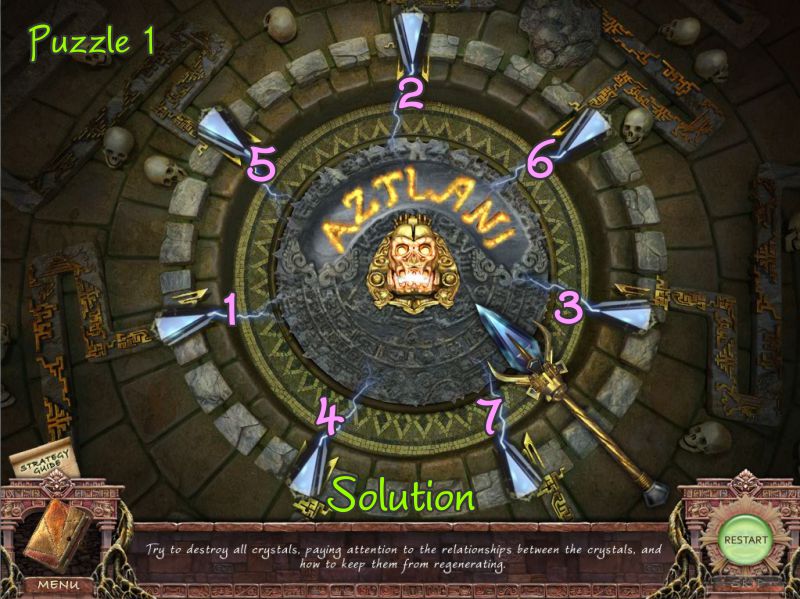
Aztlani Sword Mini Game
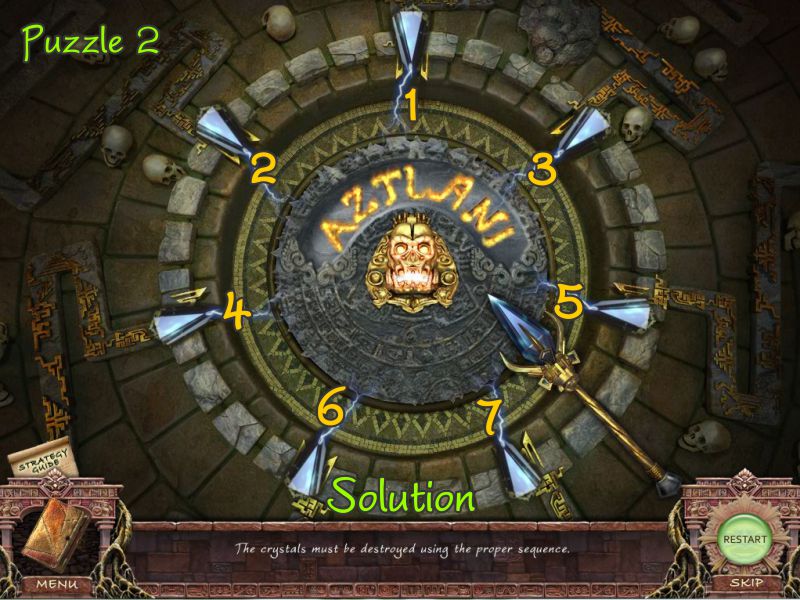
There are 3 puzzles to be solved with the use of the Aztlani Sword.
If you choose to use the Restart button anywhere within the first 2 puzzles, it will take you back to Puzzle 1.
For Puzzle 1, your goal is to destroy all the crystals so they do not regenerate.
Puzzle 1 may be random for each player, so see the screenshot for one solution that worked.
Screenshot
For Puzzle 2, your goal is to destroy the crystals by spelling out the word Aztlani.
The letters are under the crystals and will flash on the screen.
See the screenshot below for the solution.
Screenshot
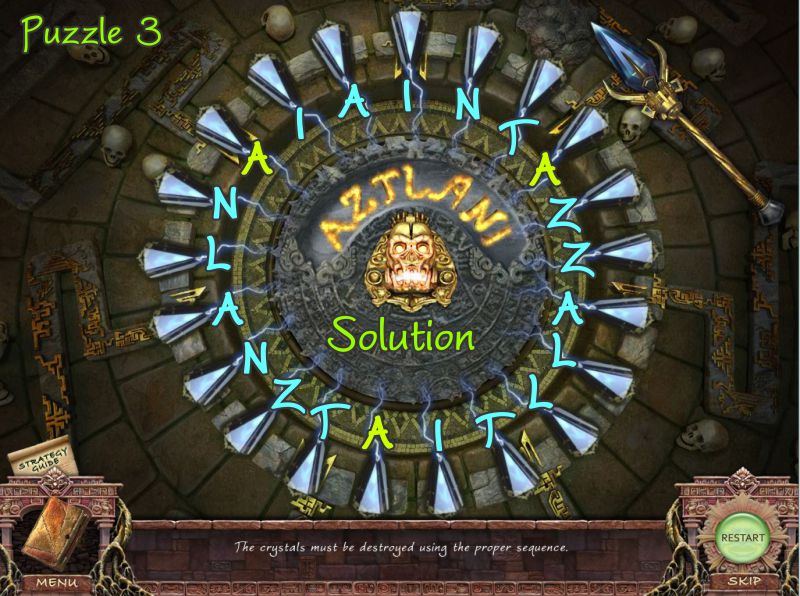
For Puzzle 3, your goal is to destroy sets of 3 letters that spell out Aztlani.
You do not have to spell out the word in exact order, but there are 2 sets of "A", so you need to use the correct set.
One of the sets of "A" is marked in green in the screenshot.
See the screenshot for the solution.
Screenshot
Congratulations! You have destroyed all the crystals and the Demon of Darkness.
Watch the closing scenes.
Posted by: Jazz |
July 1, 2011 7:09 PM
|
July 1, 2011 7:09 PM
Secrets of the Dark: Temple of Night
Book of the Dead Bonus Adventure Walkthrough
General Comments
The Demon of Darkness has been destroyed, but there is some left-over business to be taken care of.
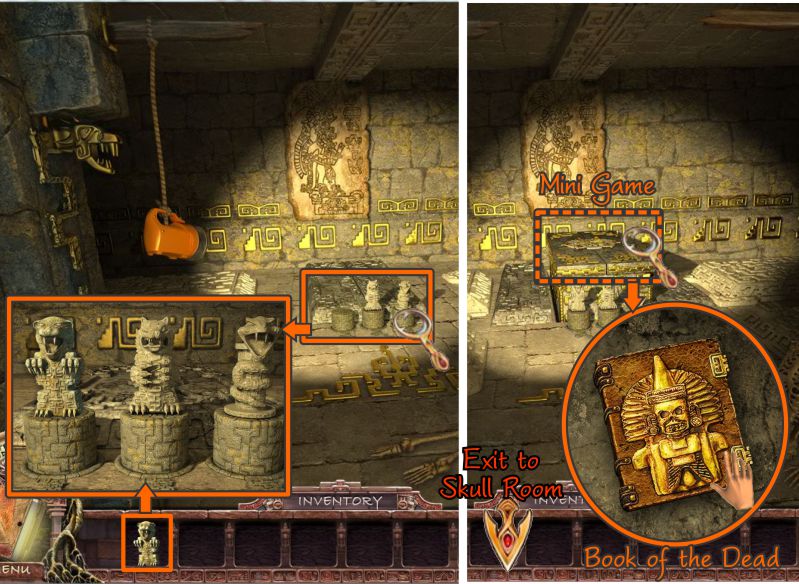
Your goal for the first bonus adventure is to find the Book of the Dead with the names of all the town folk who were sacrificed by the Demon.
Once you find the book and return it to its rightful place in the Town Hall, all of the souls will become free.
Do not press Play from the Main Menu, or you will start the Basic Adventure all over again unless you exit via the "X" in the upper right corner of the box asking what mode you wish to play.
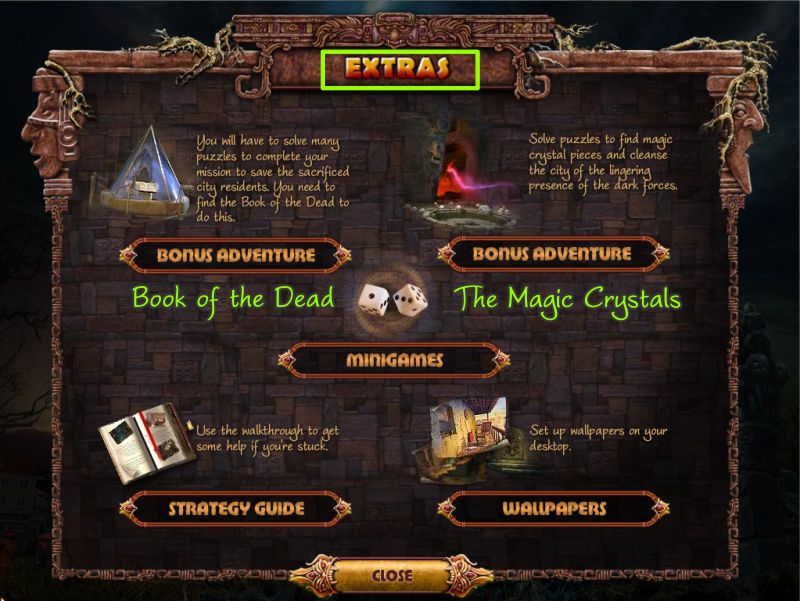
To play the Bonus Adventures, click on "Extras" on the Main Menu.
Book of the Dead is the first Bonus Adventure unlocked.
The Magic Crystals adventure will become available once you've returned the Book of the Dead to its proper place.
Although the necessity to change illumination disappeared in the Basic Adventure when you went out on the balcony in Peter's Room, it is back again for the Bonus Adventure.
When you see the illuminated circle by a window, you can change from light to dark or vice versa.
Extras
If you purchased the Collector's Edition, once you have completed the Basic Adventure, you will get access to two Bonus Adventures.
You will also have an opportunity to replay some of the Basic Adventure Mini Games, and can download game Wallpapers for your desktop.
Screenshot
Chapter 1: Town Hall
Display Room
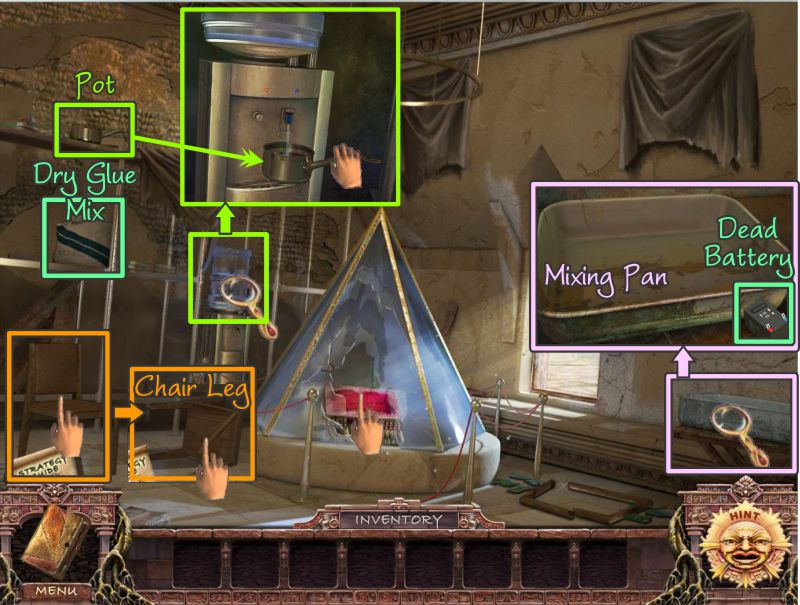
Note the missing book in the display.
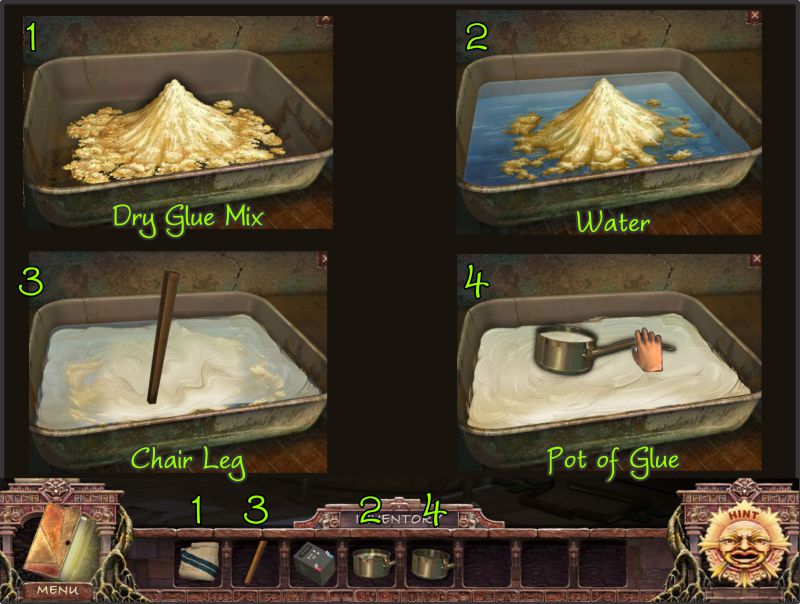
Pick up the Pot and Dry Glue Mix.
Tip the chair over, click on the leg to make it loose, and collect it.
Zoom in on the water cooler and fill the Pot with water.
Zoom in on the Mixing Pan at the right, pick up the Dead Battery, and get ready to mix some glue.
Screenshot
Mix some Glue
Pour the Dry Glue Mix in the mixing pan.
Add the Pot of Water.
Stir the mixture with the Chair Leg.
Use the now empty Pot to collect some glue, and take the Pot of Glue.
Screenshot
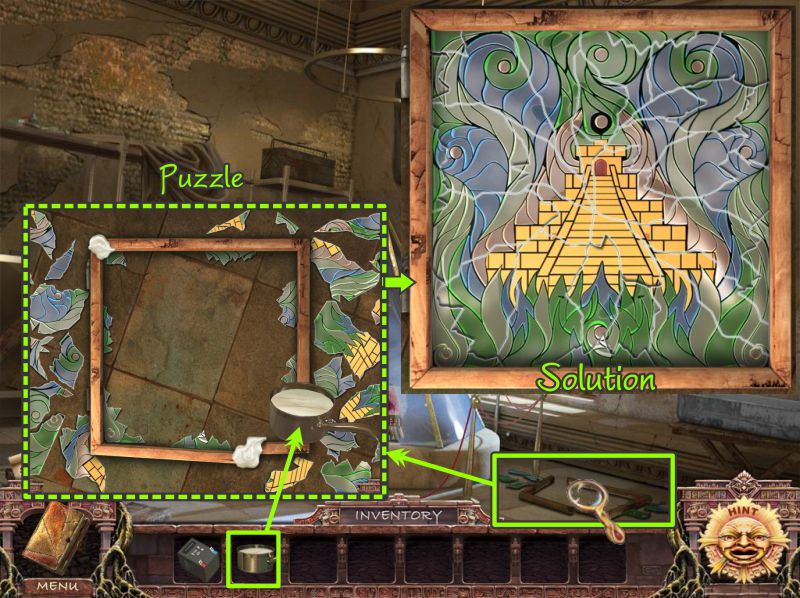
Stained Glass Window Puzzle
Zoom in on the broken frame for the stained glass window.
Use your pot of glue on the two broken places to trigger the puzzle.
Put the jigsaw puzzle together to look like the screenshot.
Screenshot
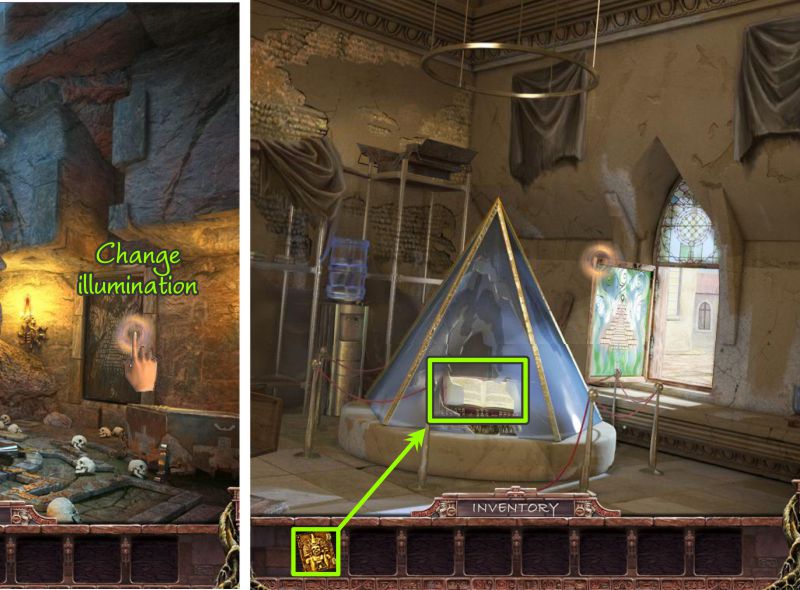
Light and Dark Dimension Display Room
You have now created the ability to darken the room so you can see what is in the dark dimension world.
Change the illumination and pick up the Ritual Knife.
Play the Hidden Object Scene, and then change the illumination back to light.
Screenshot
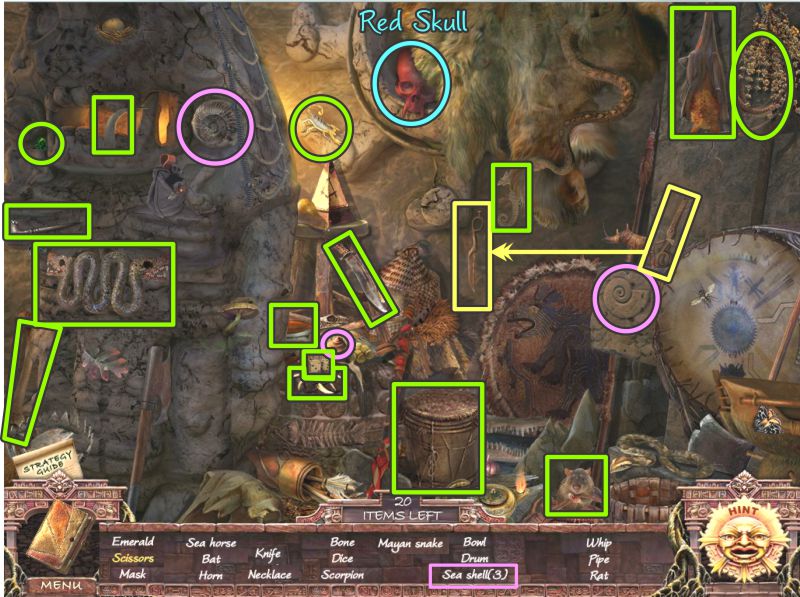
Skull Room Hidden Object Scene
When you have collected everything, you will get the Red Skull.
Place the two pieces of scissors together to collect them.
Screenshot
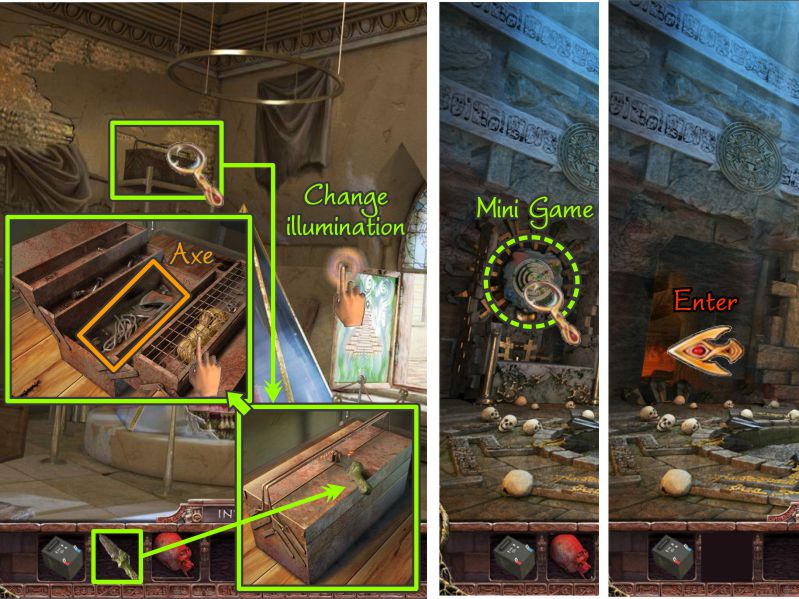
Light and Dark Display Room
Zoom in on the Tool Box on the shelf and use your Ritual Knife to cut the rope.
Grab the Axe and change the illumination back to dark.
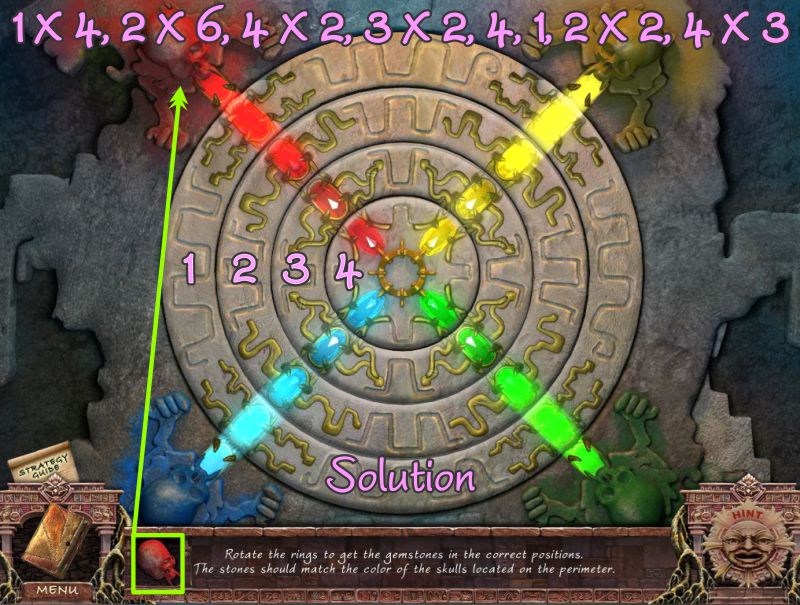
Zoom in on the area shown in the screenshot for a Mini Game.
When you are done, exit to the River of Fire.
Screenshot
Skull Mini Game
Your goal is to make the gemstones in the rings match up with the color of the skulls.
Ring 1 also moves 4; ring 2 moves 1; ring 3 moves 2; and ring 4 moves 3.
See the screenshot for the solution.
Screenshot
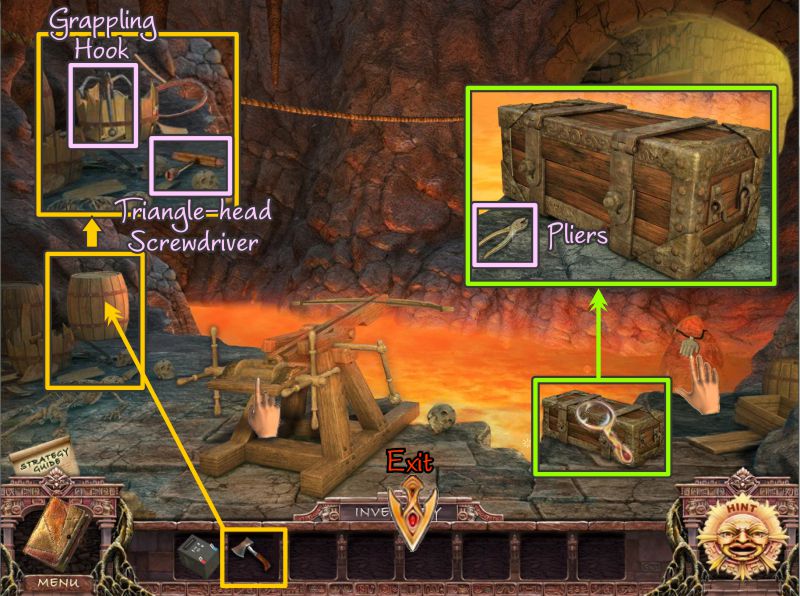
River of Fire
Use your Axe on the barrel to get the Grappling Hook and the Triangular-head Screwdriver that flies out of the barrel.
Zoom in on the chest at the right and grab the pliers.
Check out the mechanism before you return to the Display Room.
Screenshot
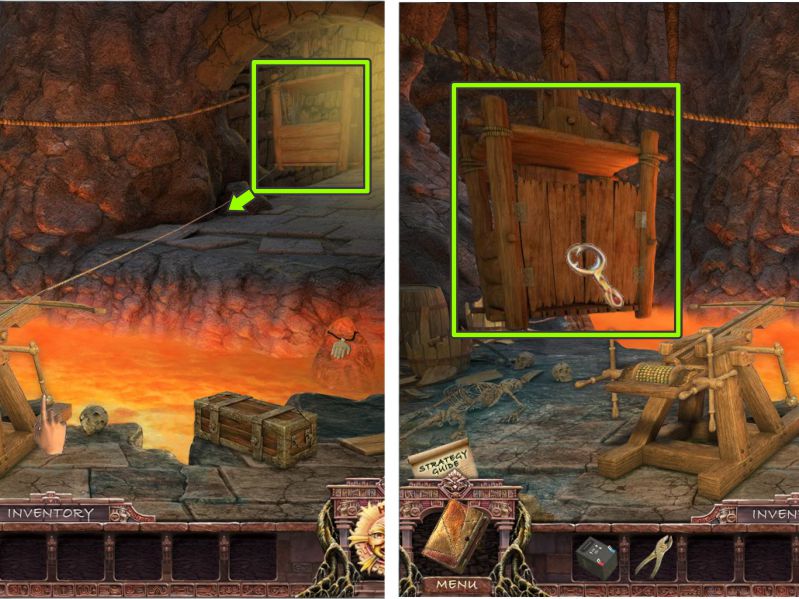
Display Room and River of Fire
Change the illumination and zoom in on the tool box.
Use your Triangular-head Screwdriver to open the portion where the Rope is trapped, and collect it.
Return to the River of Fire.
Place the Grappling Hook and Rope on the mechanism, and then pull the Lever.
Screenshot
You sent the hook and rope to get the Tram and pull it back to where you are.
Zoom in on the Tram.
Screenshot
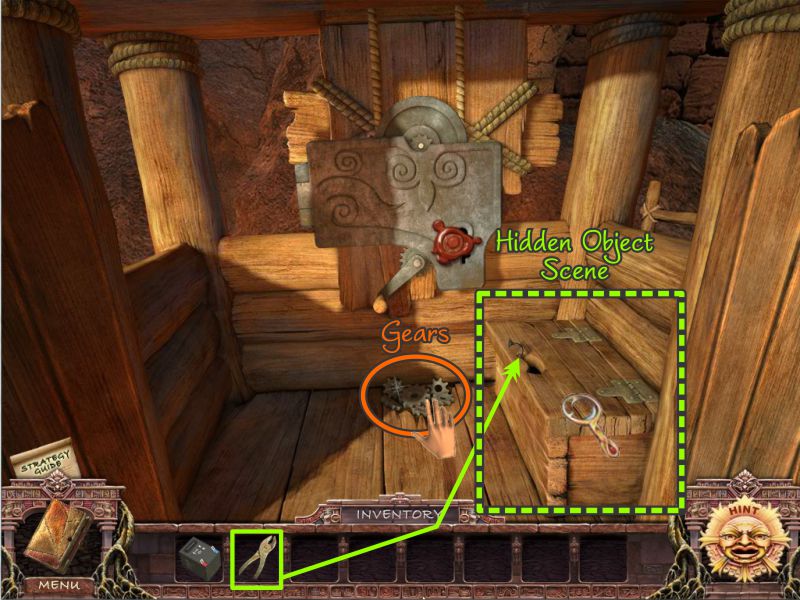
Tram
Grab the Gears and play the Hidden Object Scene.
Screenshot
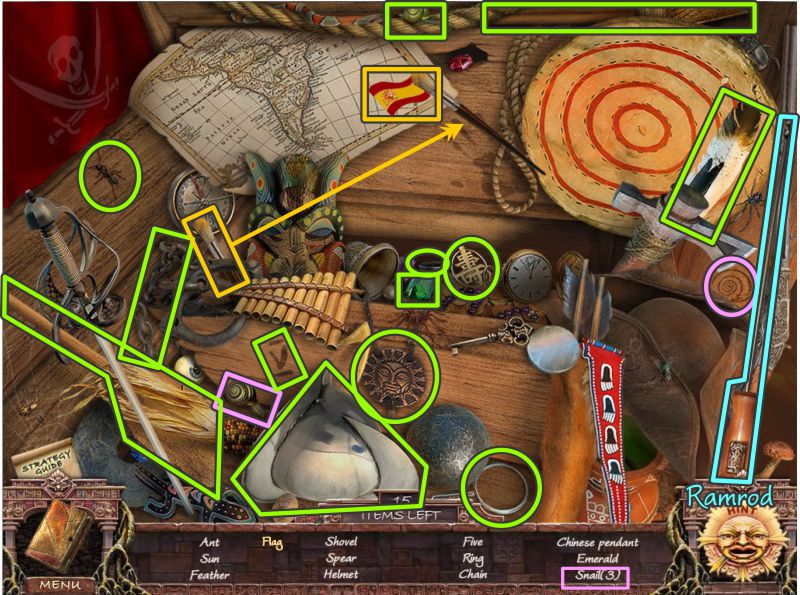
Tram Hidden Object Scene
Your final object will be a Ramrod.
Use the paintbrush to color the stripe on the flag.
Go back to the Skull Room.
Screenshot
Skull Room
Zoom in on the crack, and use your Ramrod to retrieve the Figured Key.
Play the Hidden Object Scene, and go to the River of Fire.
Screenshot
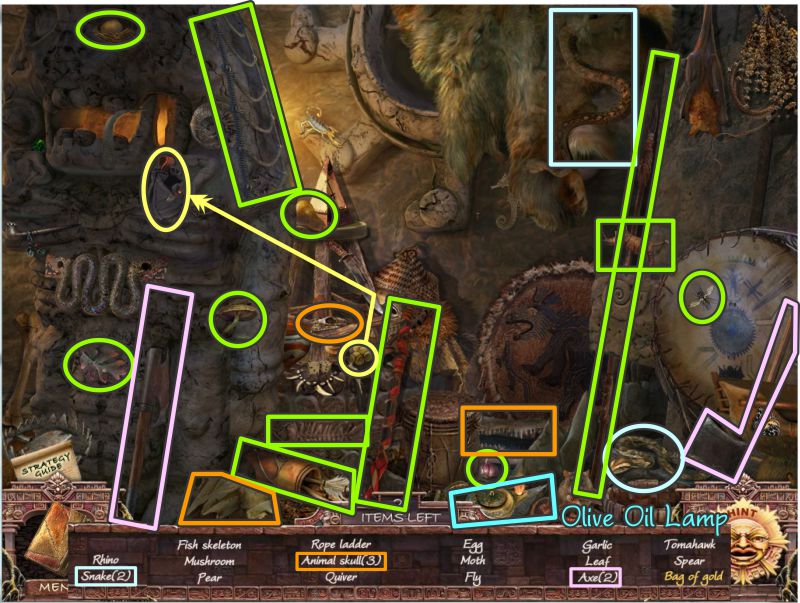
Skull Room Hidden Object Scene
Your Inventory Item will be an Olive Oil Lamp.
To get the Bag of Gold, place the coins in the bag, as shown in the screenshot, and then collect the Bag.
Screenshot
Chapter 2: Other Side of Fire River
Tram
Click on the Tram, and use your Olive Oil Lamp to melt the wax.
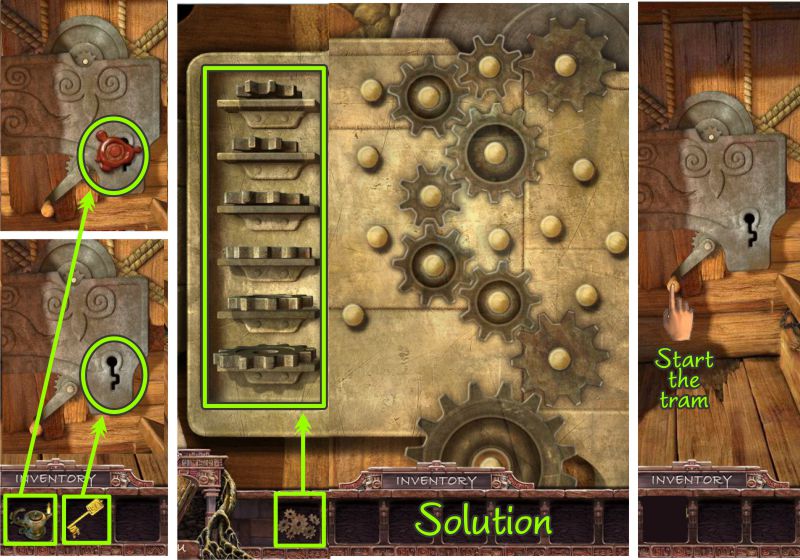
Place your Triangular Key in the hole under the wax to trigger a Mini Game.
Place the Gears to start the game.
Your goal is to place the Gears so as to make the connection between the bottom and top gear.
See the screenshot for the solution, and then press the lever to start the Tram.
Screenshot
Tunnel Across River of Fire
Zoom in on the stairs at the right for a Mini Game.
When you finish the Mini Game, there will be a Hidden Object Scene at the same location.
Screenshot
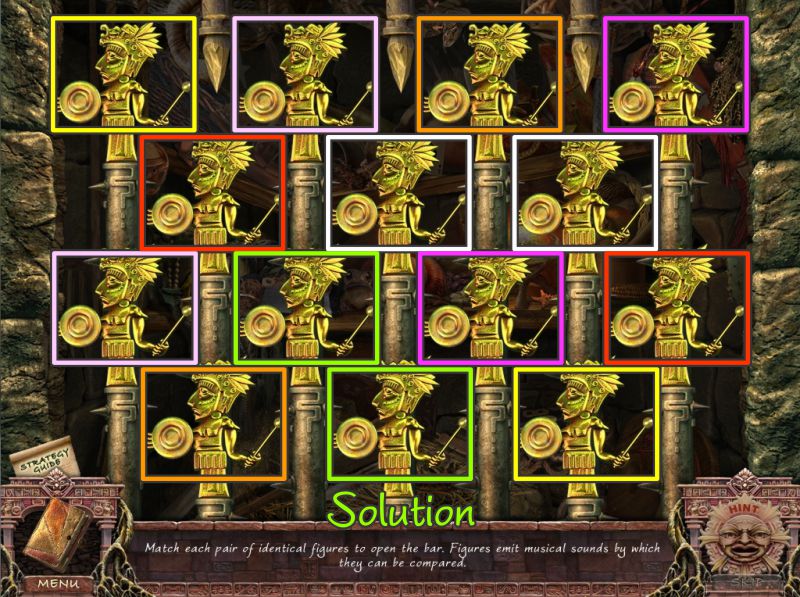
Musical Mini Game
Match pairs of figures according to their musical sounds.
When you click on one, notes will also appear.
See the screenshot for the color-coded match solution.
Screenshot
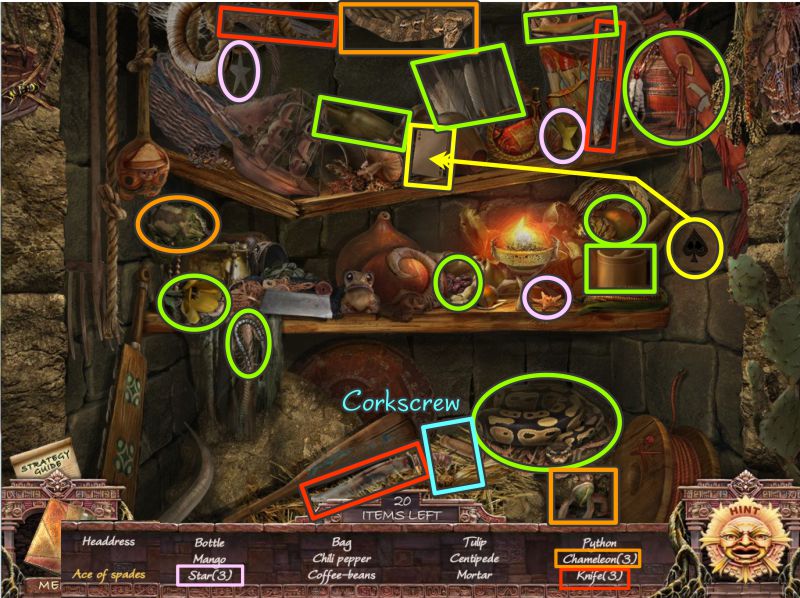
Niche Hidden Object Scene
Place the ace on the card to get the Ace of Spades.
Your Inventory item will be a Corkscrew.
Screenshot
Basement
When you cross over the bridge to go forward, you end up in the basement with a broken ladder.
Use your Olive Oil Lamp to light the torches, pick up the Powder Keg, and move the boards in front 3 times to get to a Crossbar.
Move the rubble in back of it and pick up the Tar.
Place the Tar on the hook above the left torch, and collect the Molten Tar.
Zoom in on the door for a Mini Game.
Screenshot
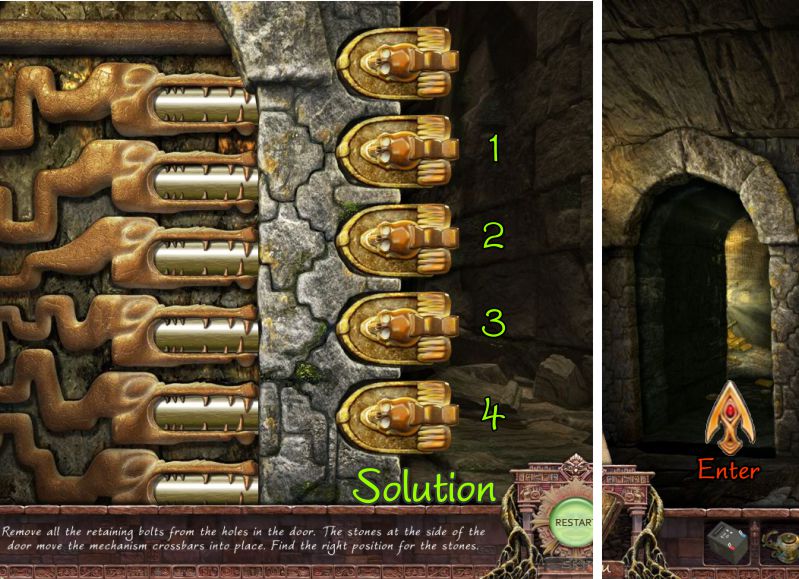
Treasure Room Door Mini Game
Your goal is to remove the bolts to open the door.
The solution is shown in the screenshot.
Enter the room.
Screenshot
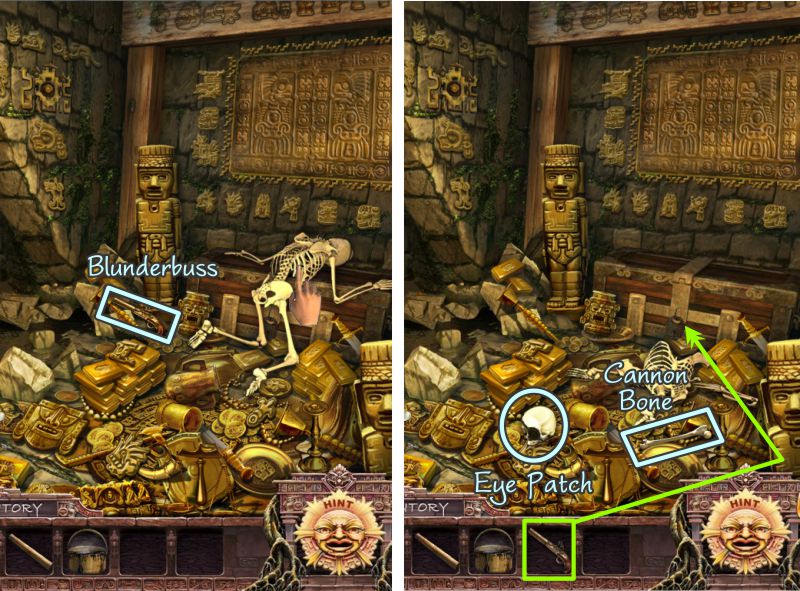
Treasury Room
Collect the Blunderbuss.
Touch the skeleton and it splits apart.
Pick up the Cannon Bone and Eye Patch.
Use the Blunderbuss to shoot the lock off the chest.
Screenshot
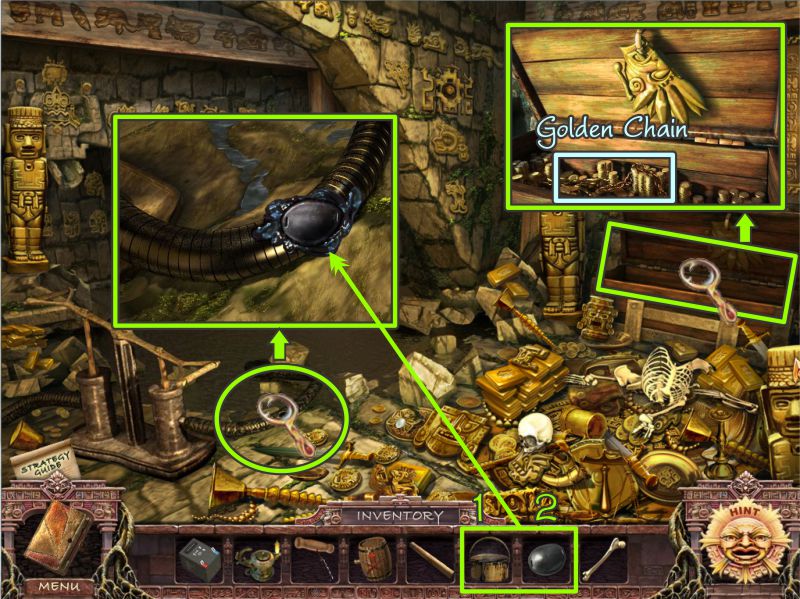
Take the Golden Chain from the chest, and zoom in on the hose for the water pump.
Place your Molten Tar and Eye Patch on the hole, and the pump will suck up the water.
Screenshot
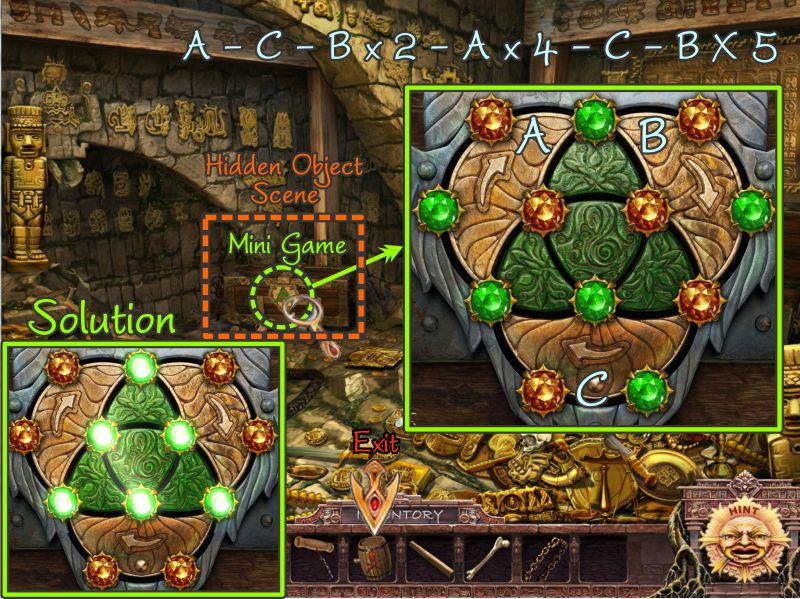
Chest Lock Mini Game
Zoom in on the chest that was under water for a Mini Game to open the lock.
Your goal is to move all the green gems to the center using the arrow.
See the screenshot for one formula to get to the solution.
When you have opened the chest, play the Hidden Object Scene.
Screenshot
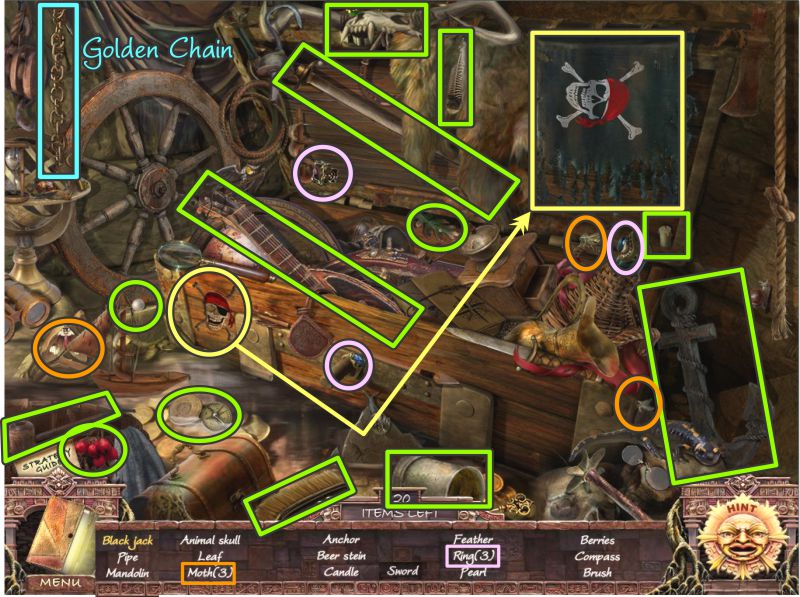
Chest Hidden Object Scene
Place the skull and crossbones on the black material to get a Black Jack.
You will end up with another Golden Chain for your Inventory.
Screenshot
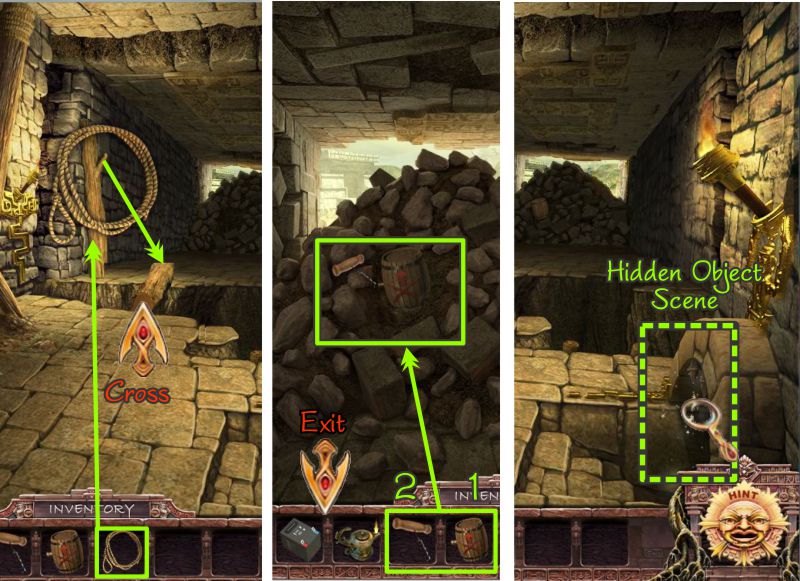
Out of the Basement and Back to the Tram
Exit the Treasure Room, and zoom in on the ladder.
Place the Cannon Bone and Crossbar on the ladder, and use the Golden Chains to secure them.
Exit and open the door to the Tram for a Hidden Object Scene in the bench.
Screenshot
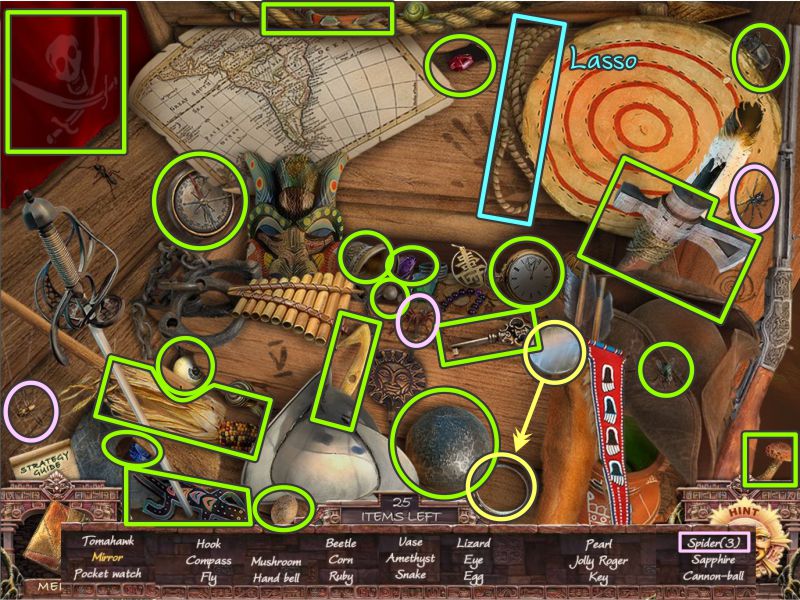
Tram Hidden Object Scene
Place the mirror piece in the frame to collect the Mirror.
Your Inventory item will be a Lasso.
Screenshot
Tunnel Across the River of Fire
Use the Lasso to grab the log on the other side of the chasm to use as a bridge.
Cross over and place your Powder Keg on the pile of rocks blocking the passage.
Use the Corkscrew to open the keg, and go back across to the niche for a Hidden Object Scene.
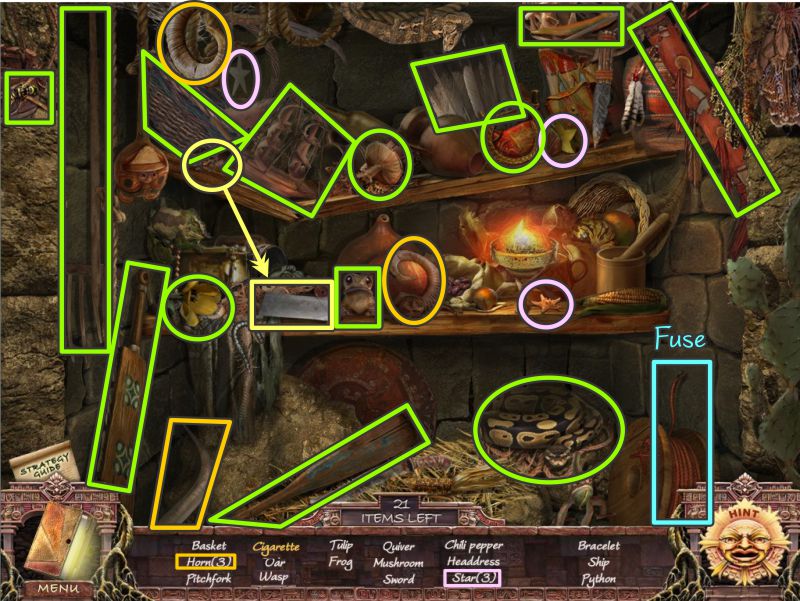
Screenshot
Niche Hidden Object Scene
Place the tobacco on the cigarette paper to get the Cigarette.
Your Inventory item is a Fuse.
Screenshot
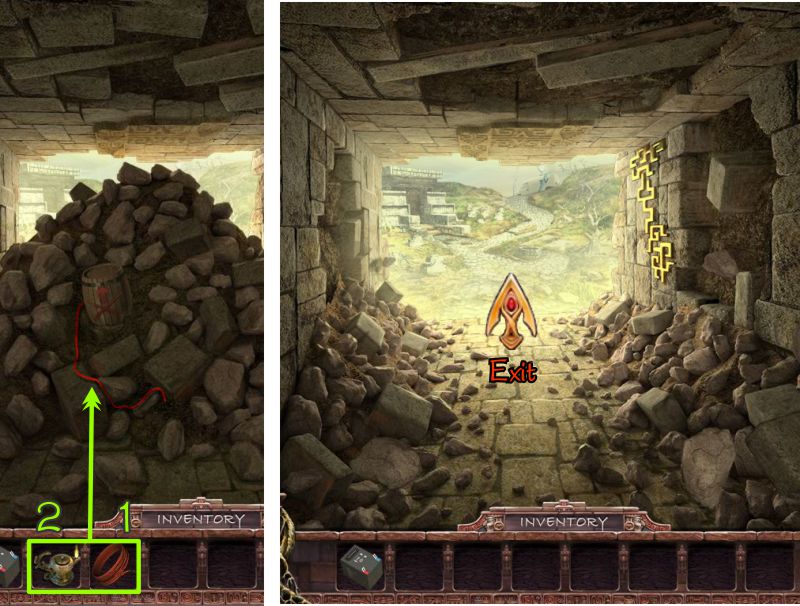
Chapter 3: Out of the Tunnel
Rock Pile
Return to the pile of rocks and attach your Fuse to the Powder Keg.
Light the Fuse with your Olive Oil Lamp, and stand back while the rocks fly.
Exit the tunnel.
Screenshot
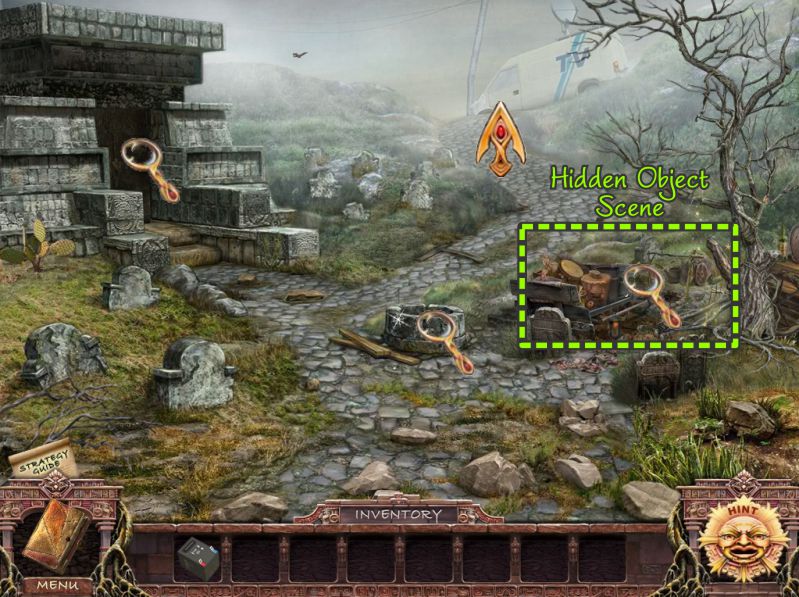
Cemetery
Check out the Crypt and Well.
Play the Hidden Object Scene at the cart.
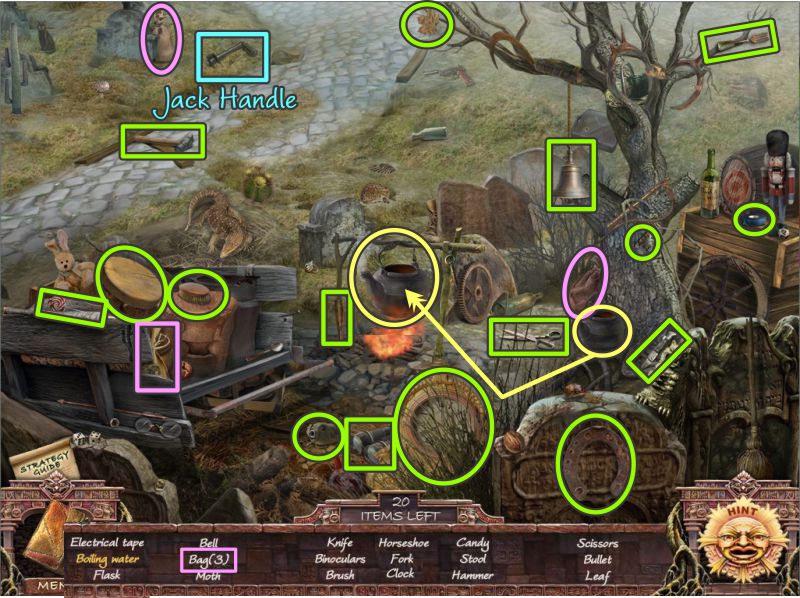
Screenshot
Cemetery Hidden Object Scene
To get Boiling Water, place the kettle over the fire.
Pick up the Jack Handle as the final item for your Inventory, and go up the hill.
Screenshot
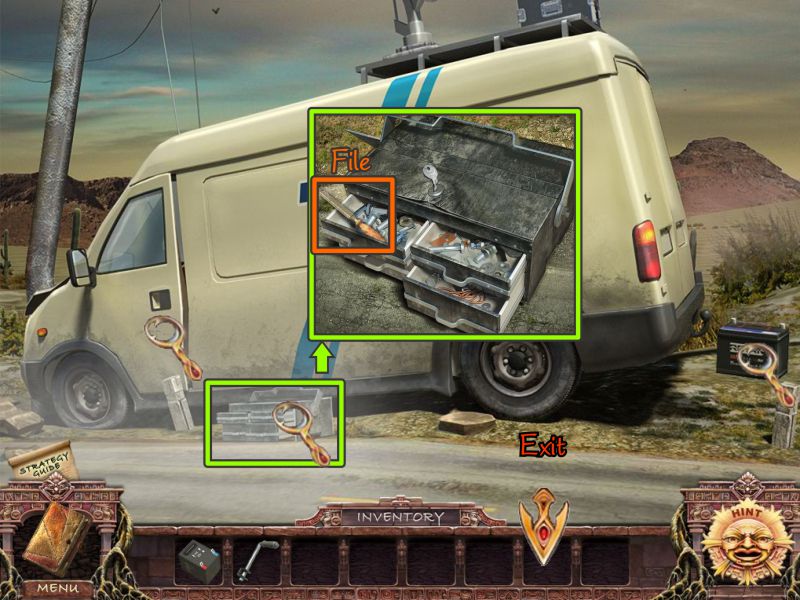
TV Van
The door is jammed shut so you can't get inside the Van, and there are no cables to charge your battery.
Zoom in on the toolbox and take the File.
Return to the Cemetery.
Screenshot
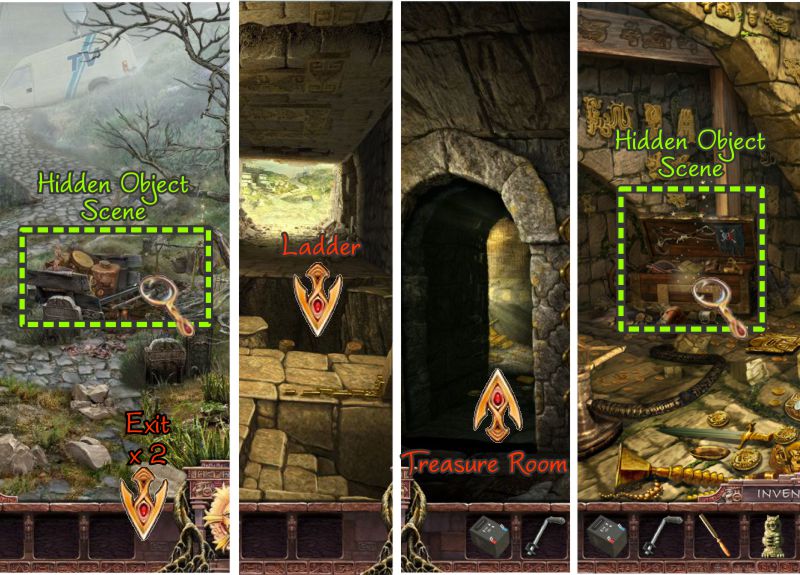
Cemetery and Treasure Room
Zoom in on the cart for a Hidden Object Scene.
Go to the Tunnel and down the ladder to the Treasure Room.
Play the Hidden Object Scene in the chest.
Screenshot
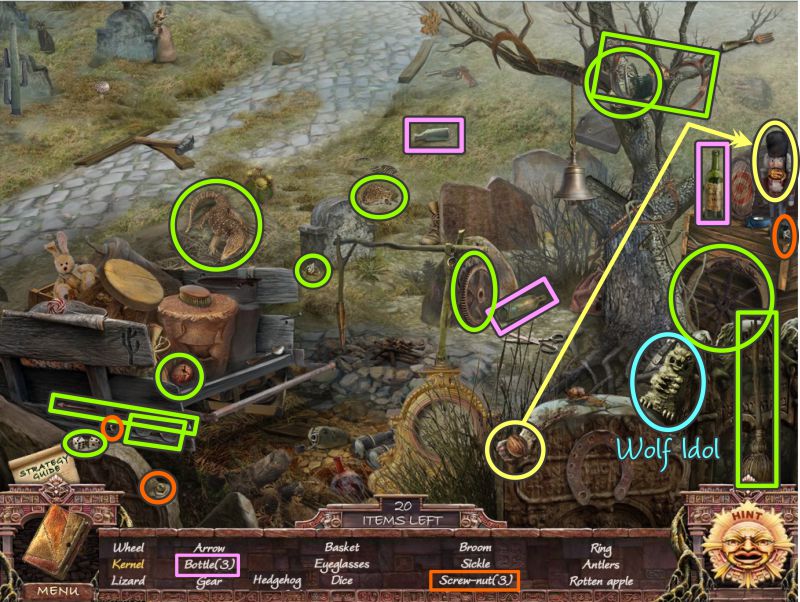
Cemetery Hidden Object Scene
Place the walnut in the nutcracker's mouth to get a Kernel.
You will get a Wolf Idol for your Inventory.
Screenshot
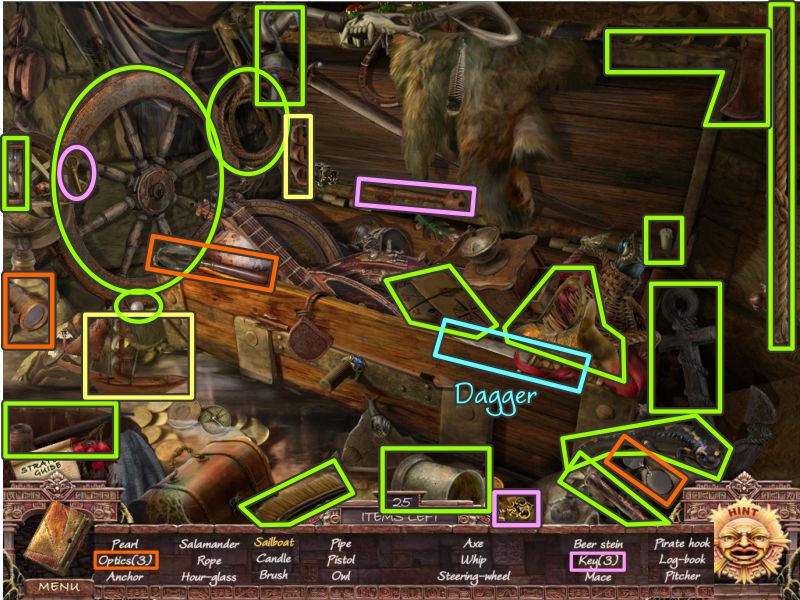
Treasure Room Hidden Object Scene
Your Inventory item will be a Dagger.
Screenshot
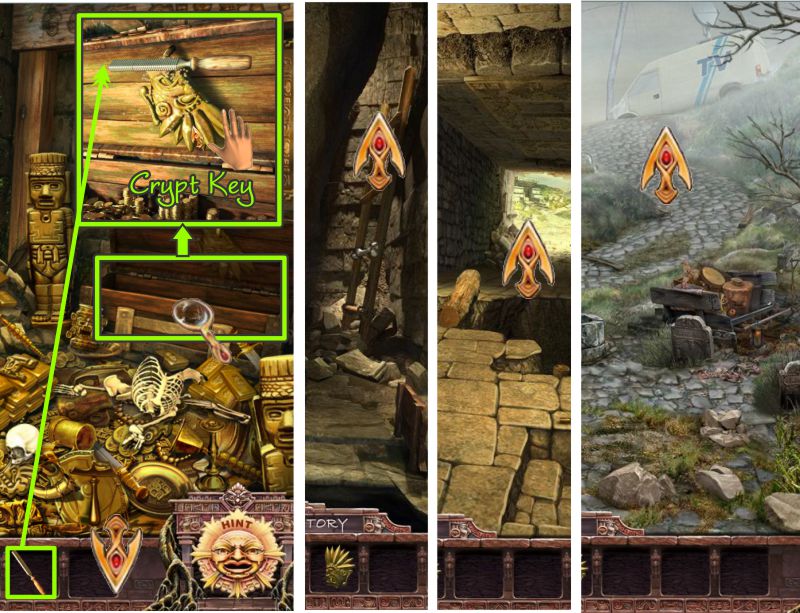
Treasure Room
Zoom in on the large chest to the right and use your File to remove the Crypt Key.
Exit the room, go up the ladder, across the chasm, through the Cemetery to the TV Van.
Screenshot
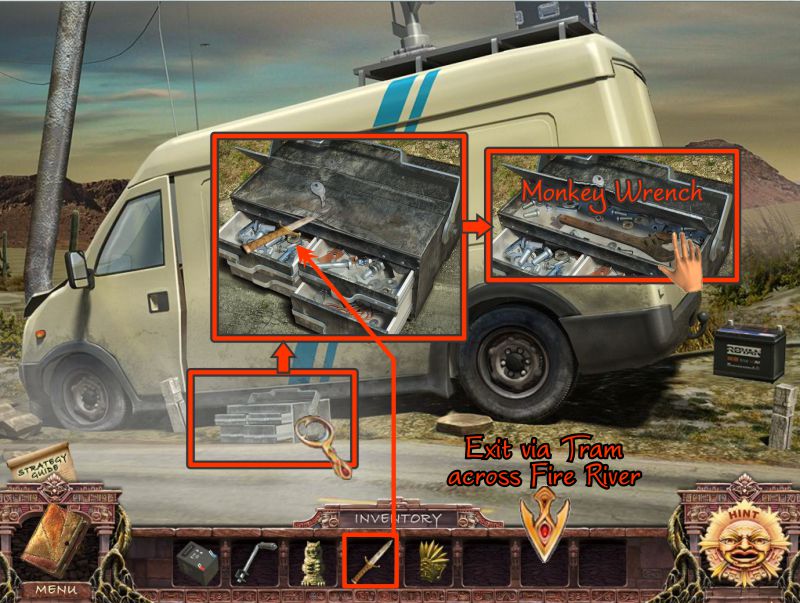
TV Van
Zoom in on the Toolbox.
Use the Dagger to open the locked portion, and take the Monkey Wrench.
Exit down to the Tram, and cross the Fire River.
Screenshot
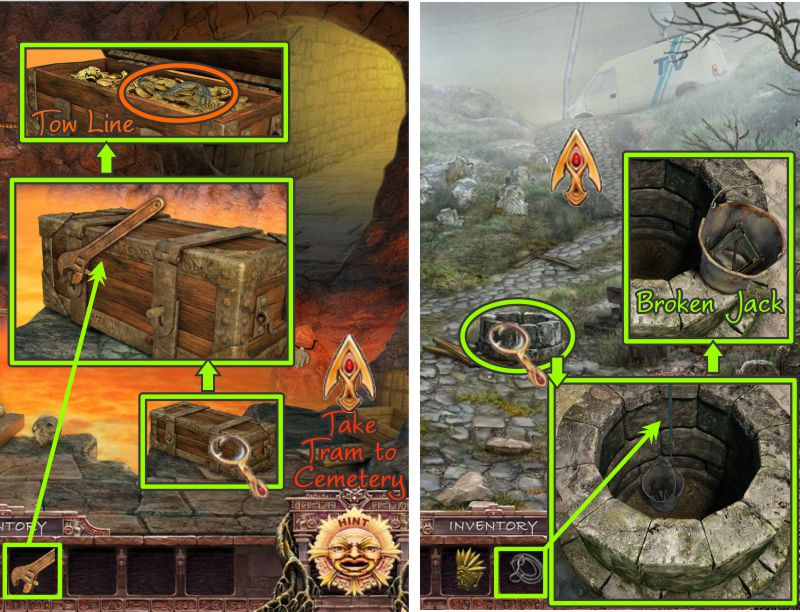
Fire River and Cemetery
Zoom in on the box at the right and use the Monkey Wrench to open it.
Take the Tow Line, and return to the Cemetery.
Zoom in on the well, and use your Tow Line to retrieve the bucket.
Take the Broken Jack, and head up to the Van.
Screenshot
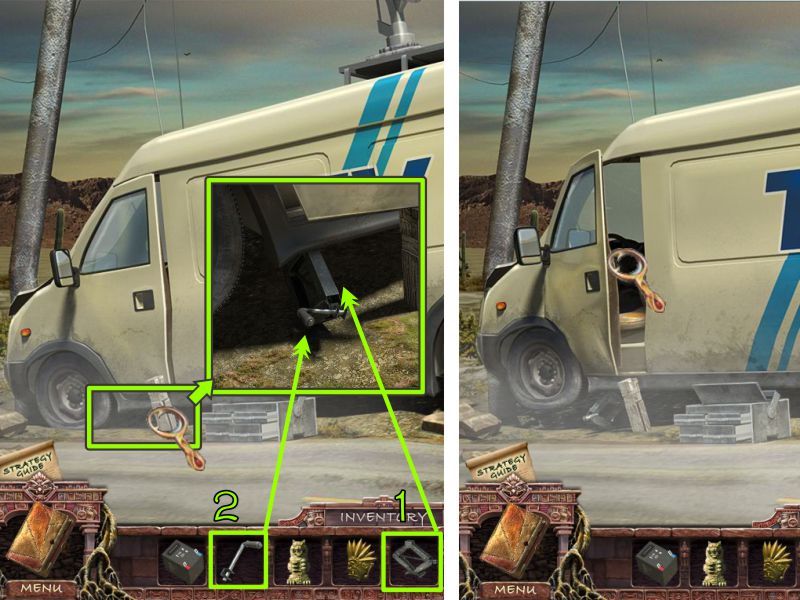
TV Van
Zoom in on the post area, and place the Broken Jack.
Place the Jack Handle to automatically raise the van so the door will open.
Zoom in on the inside of the van.
Screenshot
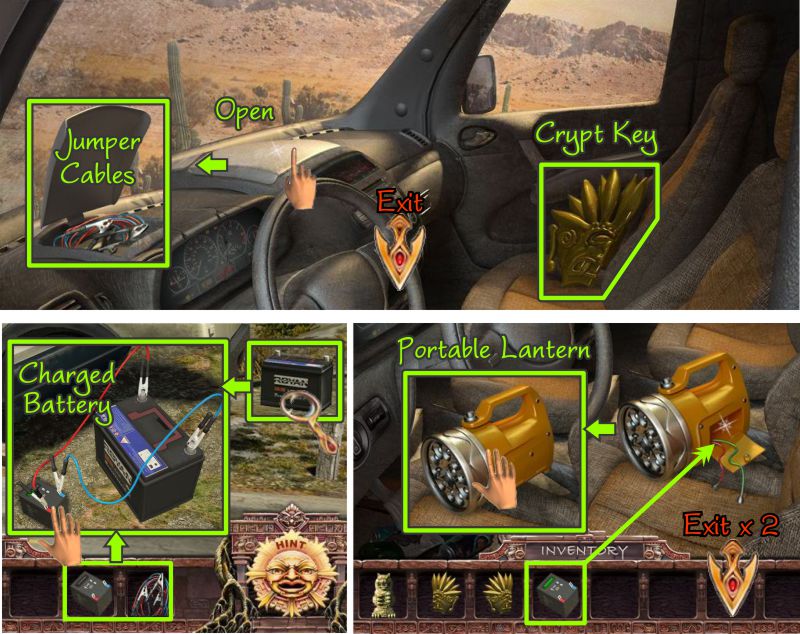
Pick up the Crypt Key, open the compartment on the dashboard, and take the Jumper Cables.
Exit the van and zoom in on the battery on the ground to the right.
Place your Jumper Cables on the battery and your small Dead Battery on the ground.
The cables will automatically connect to it.
When it is fully charged, it will show green.
Collect it, and go back inside the van.
Place the battery inside the Portable Lantern, and collect it.
Exit down twice to the Cemetery.
Screenshot
Cemetery Crypt
Zoom in on the Crypt door and place both of your Crypt Keys.
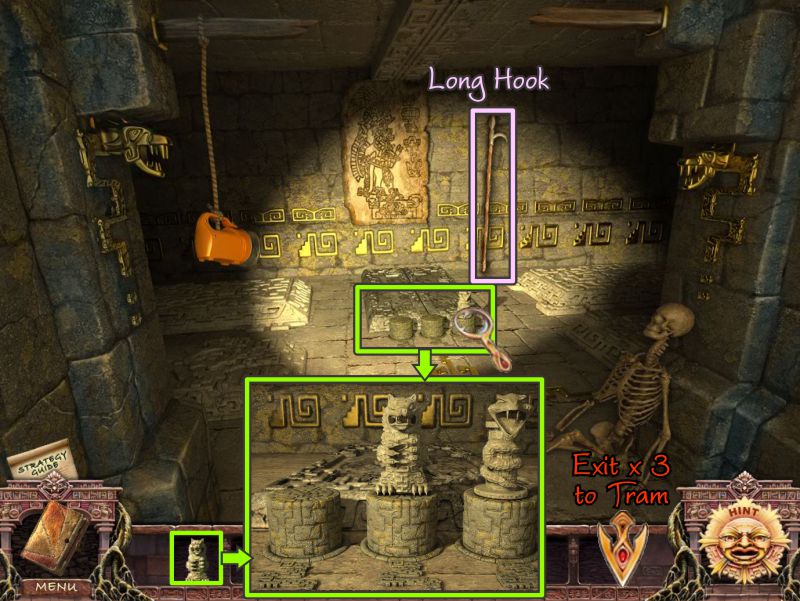
Enter and place you Portable Lantern on the rope so you can have a look around.
Screenshot
Pick up the Long Hook, and zoom in on the figures in front of the sarcophagus.
It is missing 2 figures, so place your Wolf Idol for now.
Exit down 3 times to the Tram.
Screenshot
River of Fire and Skull Room
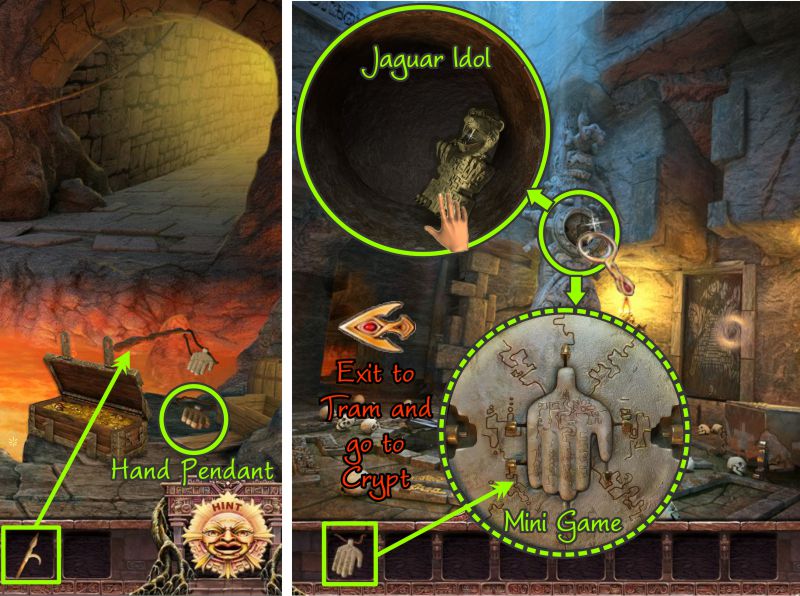
Cross to the other side of the River of Fire.
Use your Long Hook to get the Hand Pendant off the rock.
Exit down to the Skull Room, and zoom in on the statue.
Place the Hand Pendant to trigger a Mini Game to get the Jaguar Idol.
Screenshot
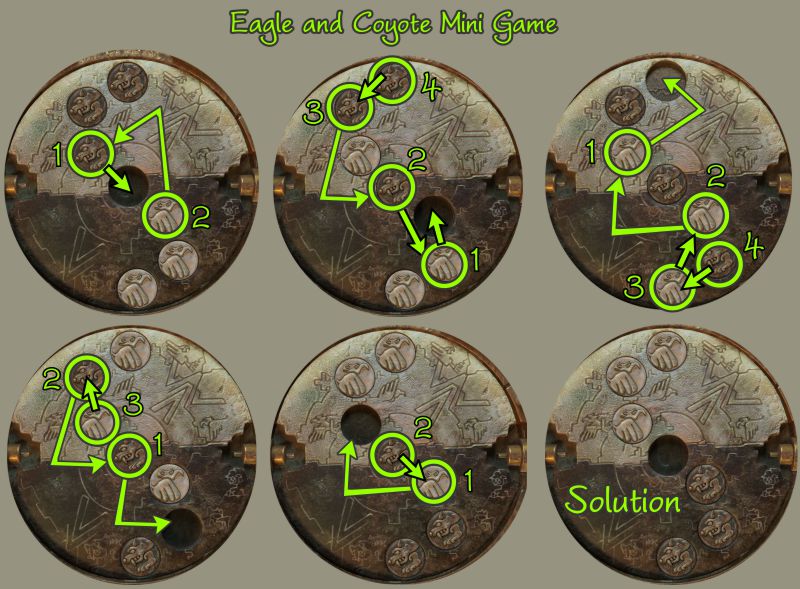
Eagle and Coyote Mini Game
Your goal is to move the eagles to the top and the coyotes to the bottom.
See the screenshot for one step-by-step solution.
Take the Jaguar Idol, and return to the Cemetery Crypt.
Screenshot
Cemetery Crypt
Zoom in on the figures, and place the Jaguar Idol.
The sarcophagus rises, so zoom in for a Mini Game to open it.
When you have completed the Mini Game, take the Book of the Dead, and exit to the Skull Room in the Town Hall.
Screenshot
Sarcophagus Mini Game
Your goal is to connect all of the outer crystals to the center crystal.
See the screenshot for the solution.
Screenshot
Skull Room and Display Room
Once you reach the Skull Room, change the illumination to light.
Place the Book of the Dead in the display, and watch the cut scene.
Screenshot
Congratulation! You have returned the Book of the Dead to its rightful place, so you are now ready to find The Magic Crystals.
Posted by: Jazz |
July 18, 2011 5:41 PM
|
July 18, 2011 5:41 PM
Secrets of the Dark: Temple of Night
The Magic Crystals Bonus Adventure Walkthrough
General Comments
The Demon of Darkness has been destroyed, and the Book of the Dead has been returned to its rightful place, but there is still more left-over business to be taken care of.
Your goal for the second bonus adventure is to destroy the areas of the town that have turned into the ancient dark versions of themselves.
The Town Hall is where it all started, so that is where you will need to get rid of the evil so you can finally leave the town.
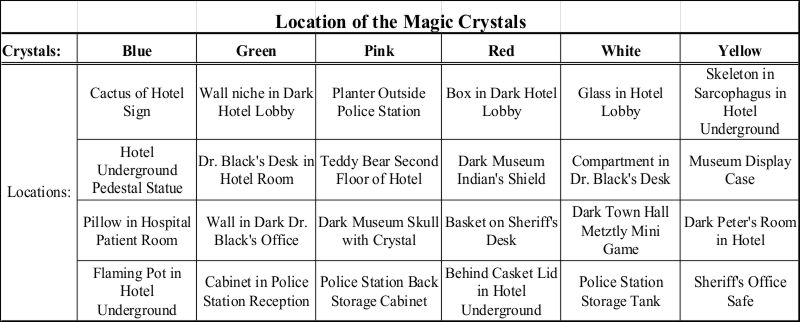
In order to set things right, you will need to collect all of the Magic Crystals and take them to the Town Hall.
The Crystals are all labeled and marked in a light turquoise blue.
There is a chart of where you can find all the Crystals at the end of this walkthrough.
Do not press Play from the Main Menu, or you will start the Basic Adventure all over again unless you exit via the "X" in the upper right corner of the box asking what mode you wish to play.
To play the Bonus Adventure, click on "Extras" on the Main Menu.
The Magic Crystals adventure is now unlocked.
The necessity to change illumination remains in this Bonus Adventure.
When you see the illuminated circle by a window, you can change from light to dark or vice versa.
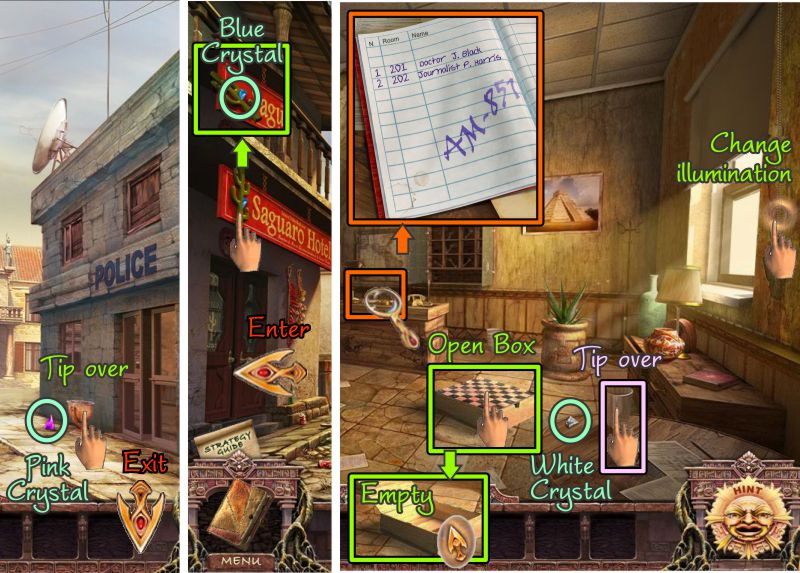
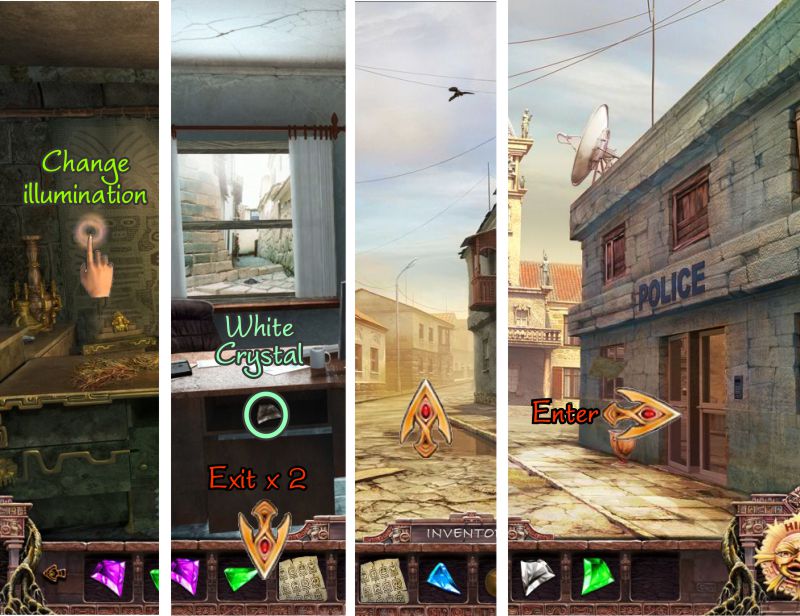
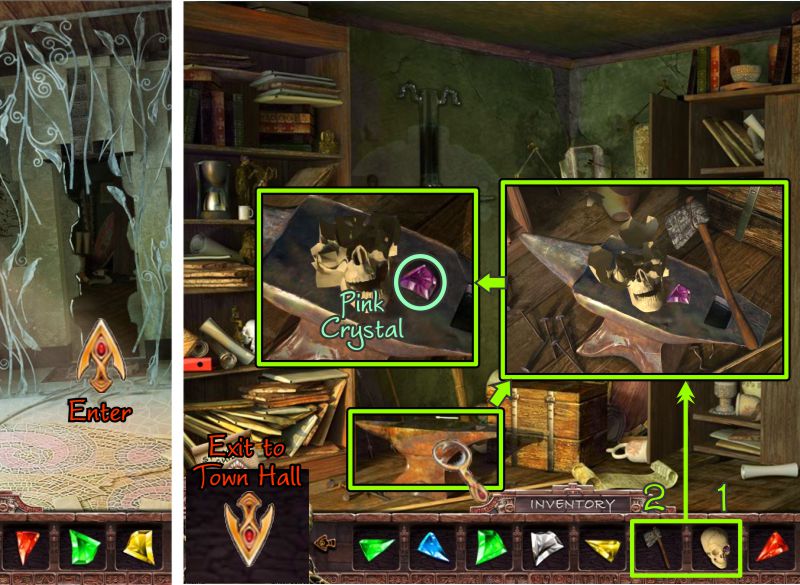
Outside Police Station and Hotel, Hotel Lobby
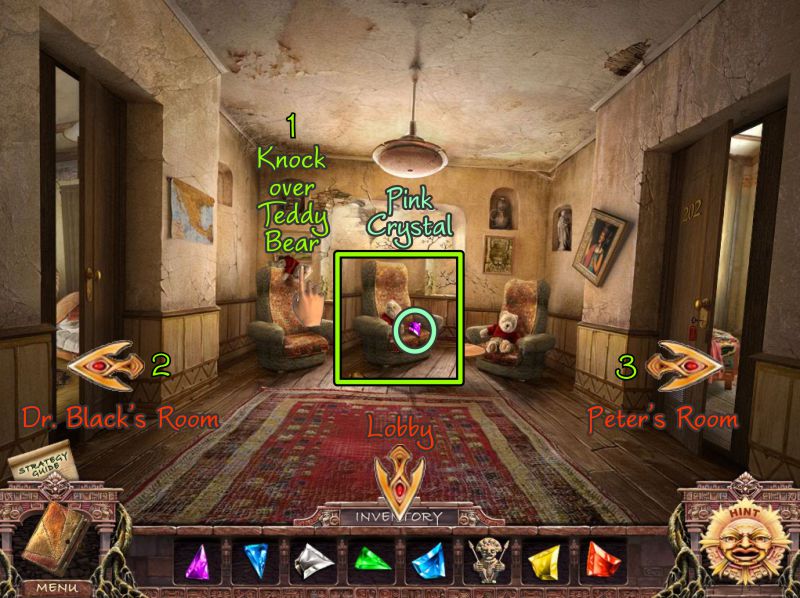
After you finish listening to Peter, tip over the planter outside the Police Station and take the Pink Crystal.
Head down to the Hotel and click on the cactus on the sign.
When it tips over, take the Blue Crystal and enter the Hotel.
Tip over the glass on the table, and take the White Crystal.
Open the checkered box on the floor; it turns out to be empty, but the cursor tells you to look in the dark scene.
Zoom in on the desk to see that the guest book has a code to enter in your Journal.
Change the illumination to see what you can find.
Screenshot
Hotel Lobby
Move the coyote plaque on the wall, then take the Green Crystal.
Grab the Red Crystal on the box, and play the Hidden Object Scene before going to the Hotel underground area.
Screenshot
Dark Hotel Lobby Hidden Object Scene
Your Final Object will be a Stone Figurine.
Screenshot
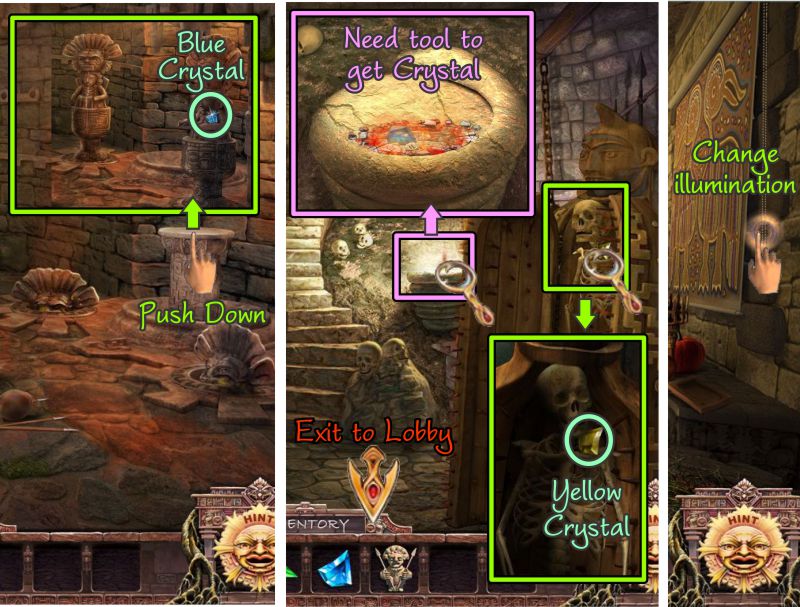
Hotel Underground
Push down on the pedestal and the two statues will rise.
Take the Blue Crystal off the one statue and go forward two rooms.
Zoom in on the skeleton in the sarcophagus and take the Yellow Crystal.
Check out the flaming pot to see that you need a tool to get the crystal.
Exit to the Lobby and change the illumination.
Screenshot
Second Floor Landing
Knock over the Teddy Bear on the left chair and collect the Pink Crystal.
Go into Dr. Black's Room on the left.
When you are finished there, go across the hall to Peter's Room.
Screenshot
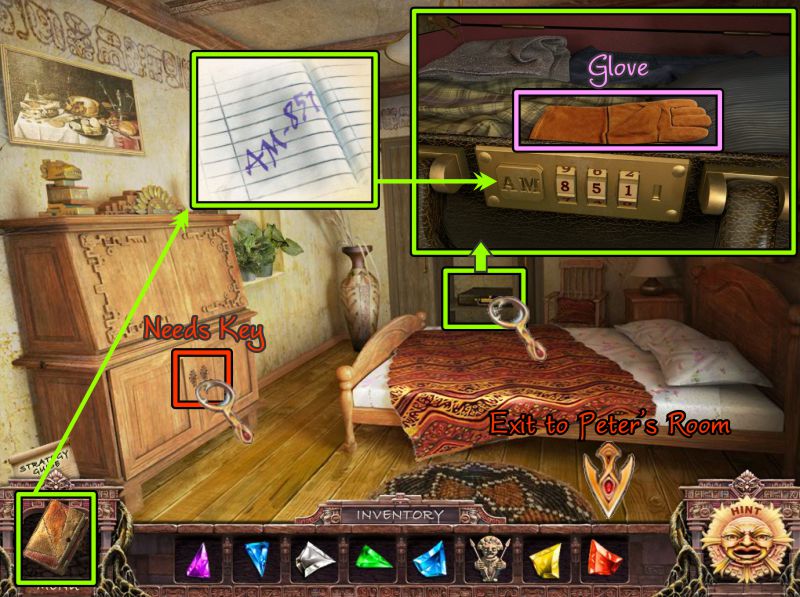
Dr. Black's Room
The writing desk is locked, so check the suitcase in the closet.
The suitcase is locked, but you have the combination in your Journal.
Enter 851, then take the Glove inside the suitcase.
Screenshot
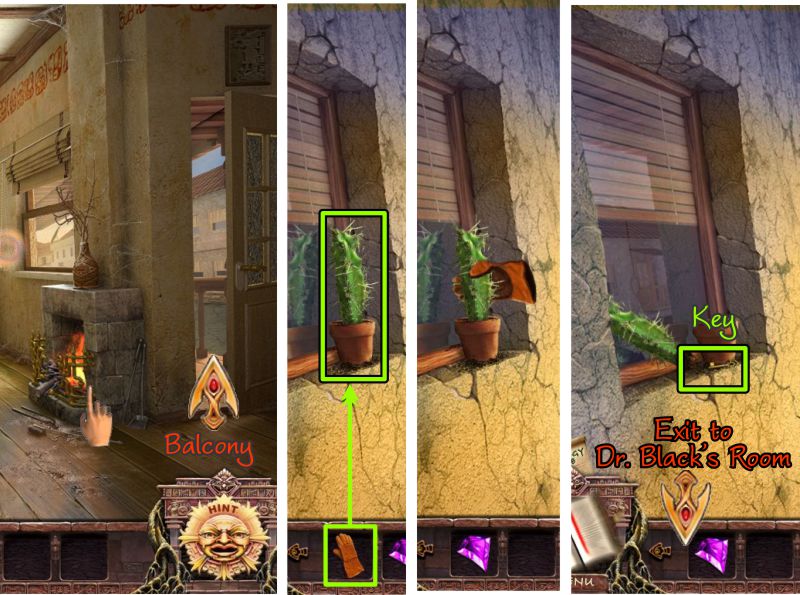
Peter's Room and Balcony
Note the fire in the fireplace, then go out on the Balcony.
Use your Glove to uproot the cactus and take the Key.
Return to Dr. Black's Room.
Screenshot
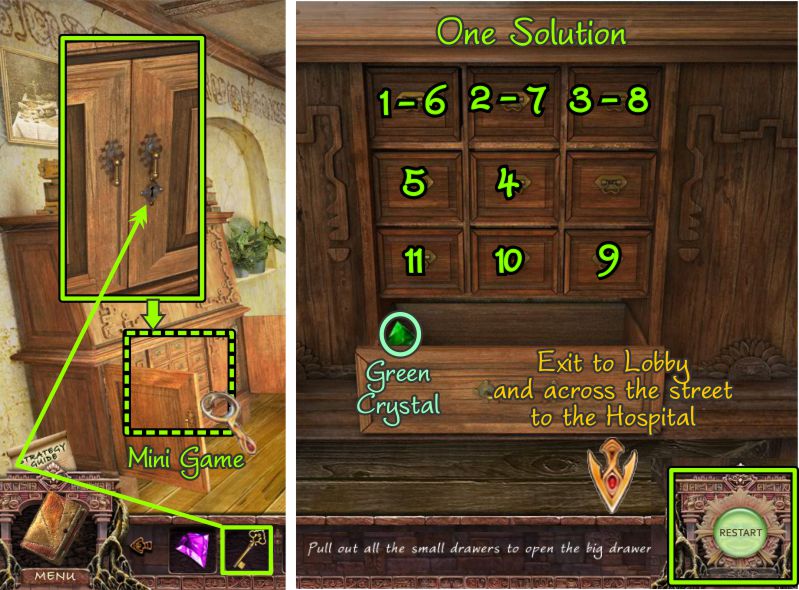
Writing Desk Mini Game
Zoom in on the lower part of the writing desk and open it with your key for a Mini Game.
Your goal is to pull out all the small drawers in order to open the big drawer.
In case of need, there is a Restart button for you to give the game another try.
Each drawer opens another drawer; see the screenshot for one solution.
Take the Green Crystal, then exit to the Lobby and across the street to the Hospital.
Screenshot
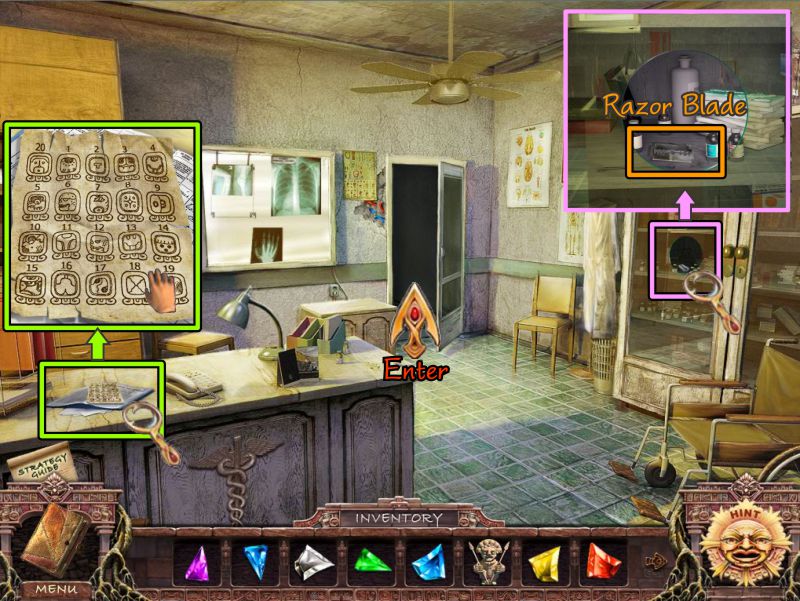
Hospital Reception
Zoom in on the desk and take the diagram.
Zoom in on the medicine cabinet and take the Razor Blade.
Enter Dr. Black's Office.
Screenshot
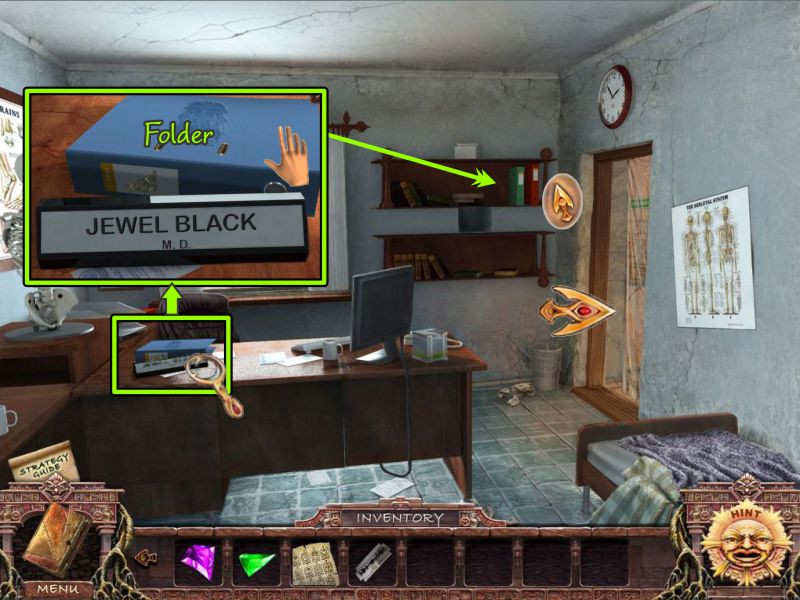
Dr. Black's Office
Zoom in and grab the blue folder on the desk.
Place it on the bookshelf. Note that your cursor says there may be something to do in another illumination.
Go into the Patient Room.
Screenshot
Patient Room
Zoom in on the shelves and take the Beaker.
Use the Razor Blade to slice open the pillow so you can retrieve a Blue Crystal.
Screenshot
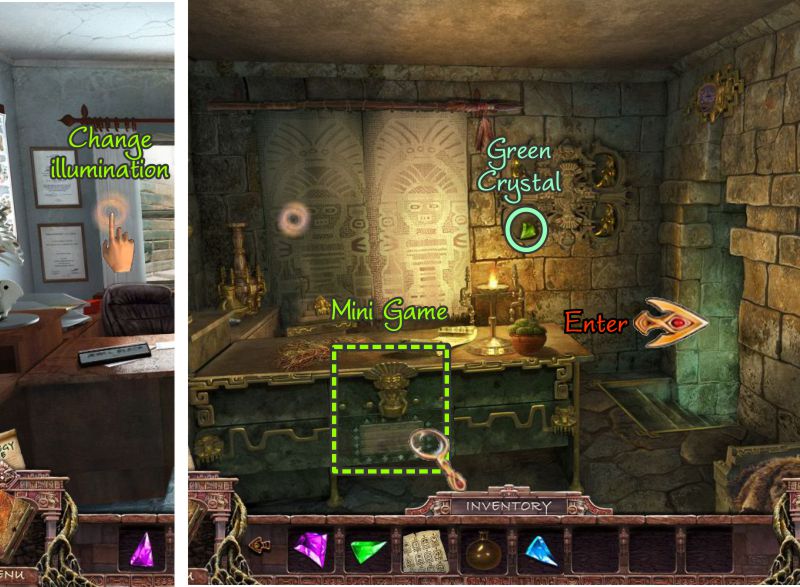
Dr. Black's Office
Return to Dr. Black's Office and change the illumination.
Take the Green Crystal on the wall, then check out the front of the desk for a Mini Game.
Screenshot
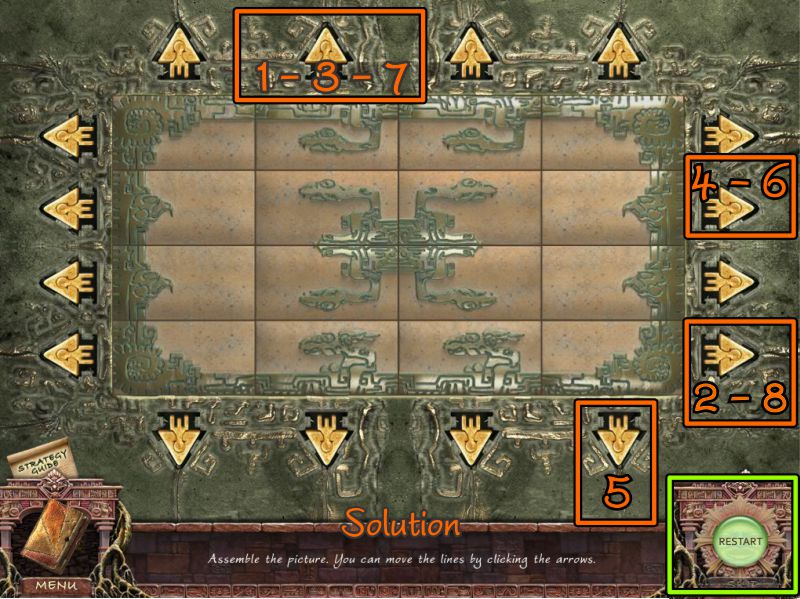
Desk Mini Game
Your goal is to assemble the picture to look like the screenshot solution.
Use the arrows to move the horizontal and vertical rows as numbered in the screenshot.
In case of need, there is a Restart button.
Screenshot
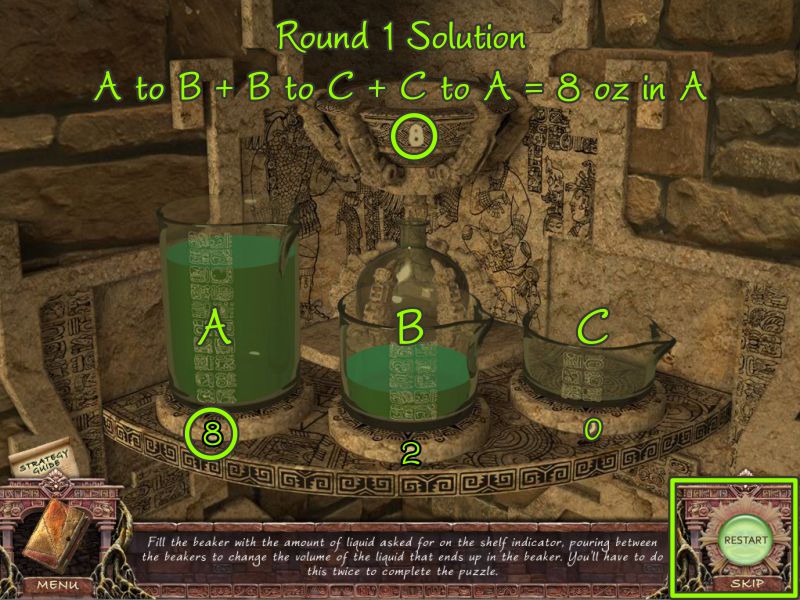
Beaker Mini Game
Go into the back room and zoom in on the area at the right for a Mini Game.
Place your Beaker to activate the game.
Screenshot
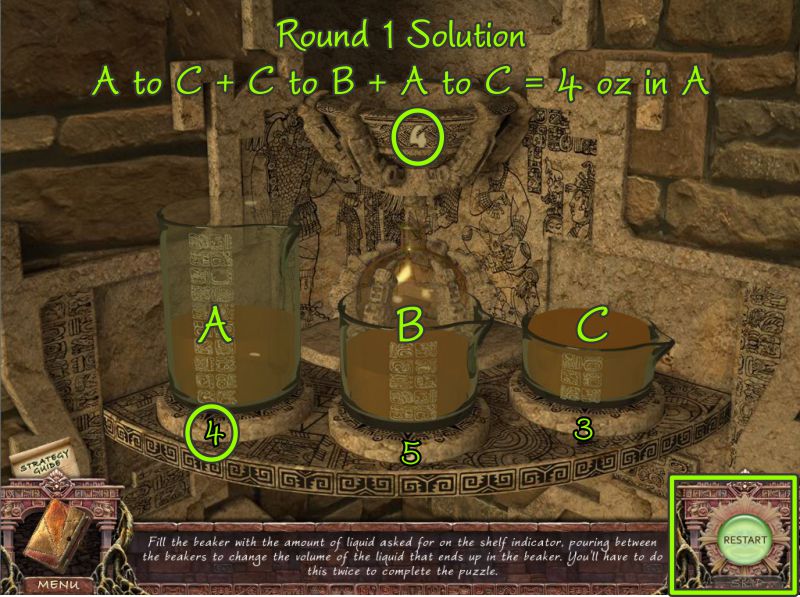
Round 1
For Round 1, your goal is to end up with 4 ounces in Beaker A.
See the screenshot for the solution.
Screenshot
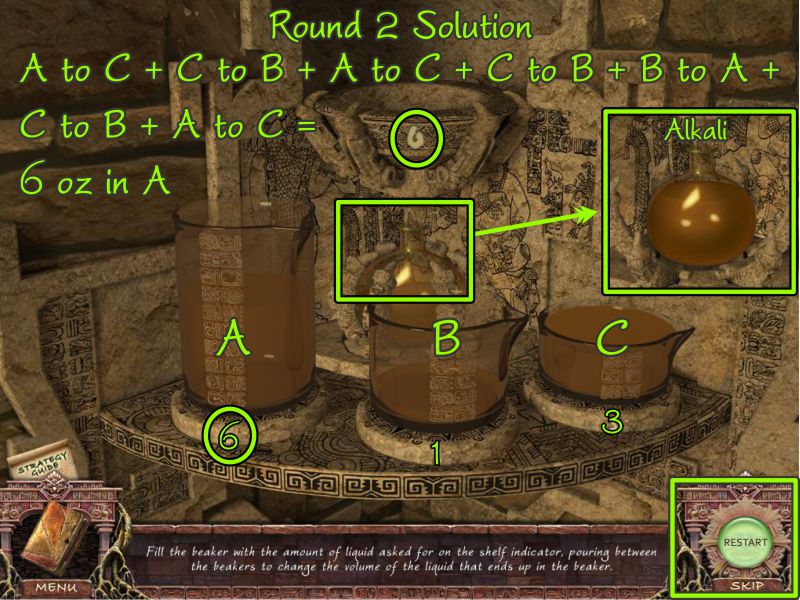
Round2
Your goal for Round 2 is to have 6 ounces left in Beaker A.
See the screenshot for the solution.
Take the round beaker of Alkali for your Inventory.
Screenshot
Dr. Black's Office and Police Station
Go back into Dr. Black's Office and change the illumination.
Take the White Crystal from the compartment at the front of the desk.
Exit twice to the street, go forward and enter the Police Station.
Screenshot
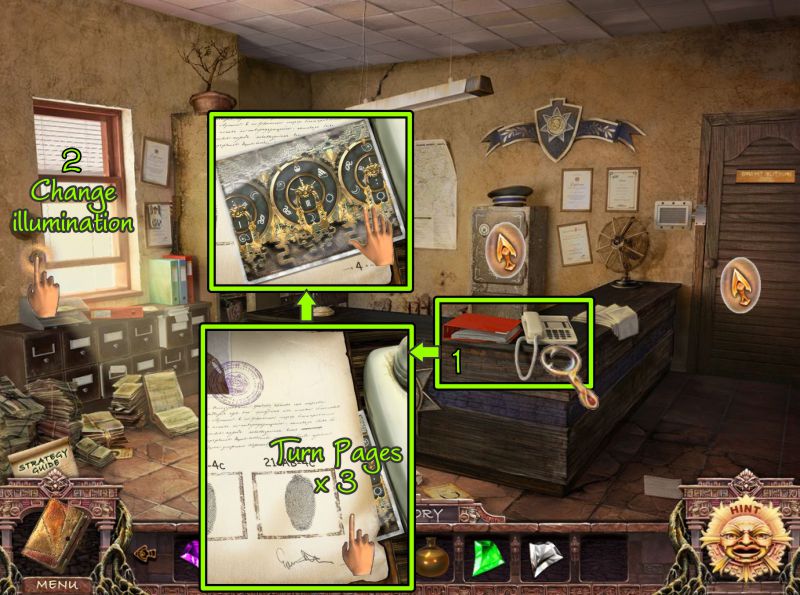
Police Station Reception
Zoom in on the desk, turn the pages on the evidence book 3 times, and take the diagram.
Note the illuminated cursors in the screenshot and change the illumination.
Screenshot
Dark Police Station
Go through the door to the back room.
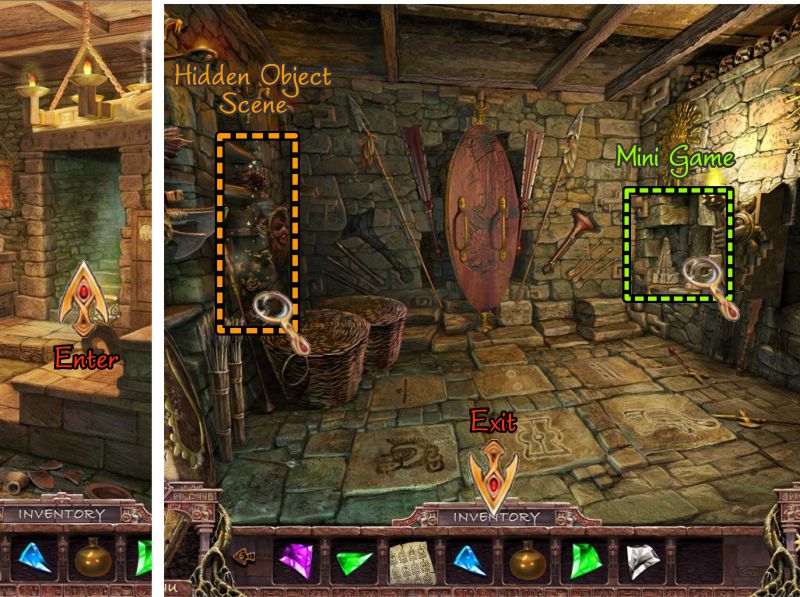
Play the Hidden Object Scene and the Mini Game.
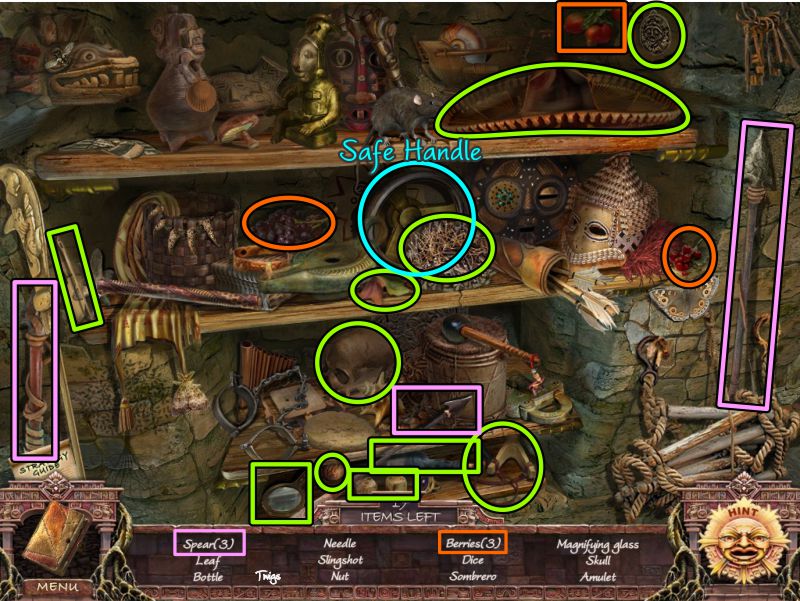
Screenshot
Shelves Hidden Object Scene
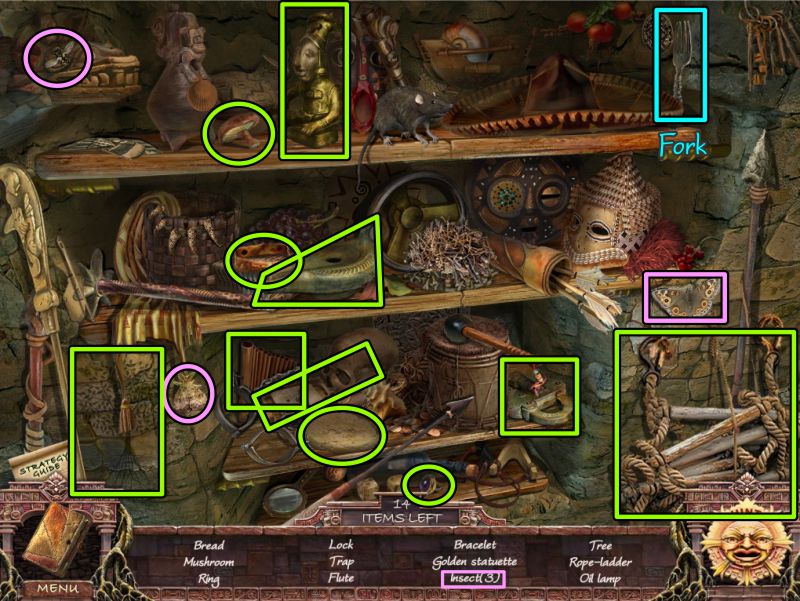
Your Final Item will be a Fork.
Screenshot
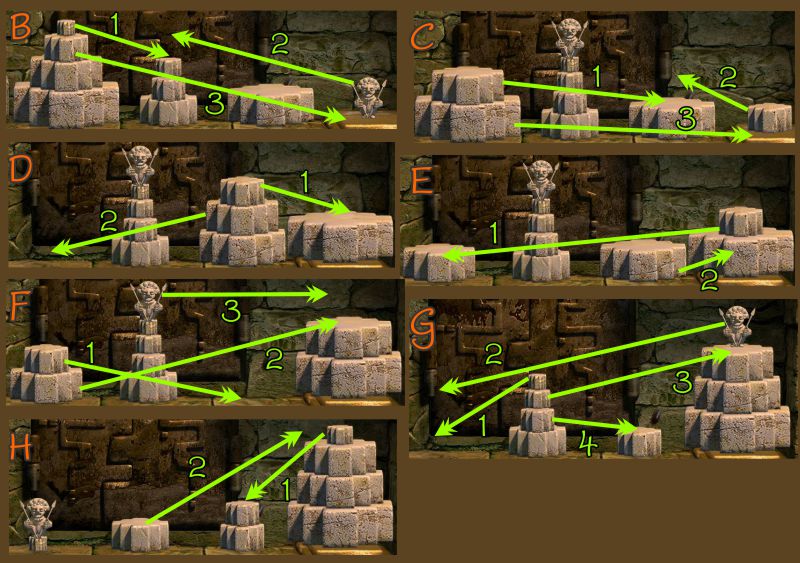
Pyramid Mini Game
Your goal is to create the same pyramid you see at the left on the gold pad at the right.
To activate the Mini Game, place your Stone Figure on the stone shown in the screenshot.
Move the stone discs as numbered in the screenshot.
Screenshot
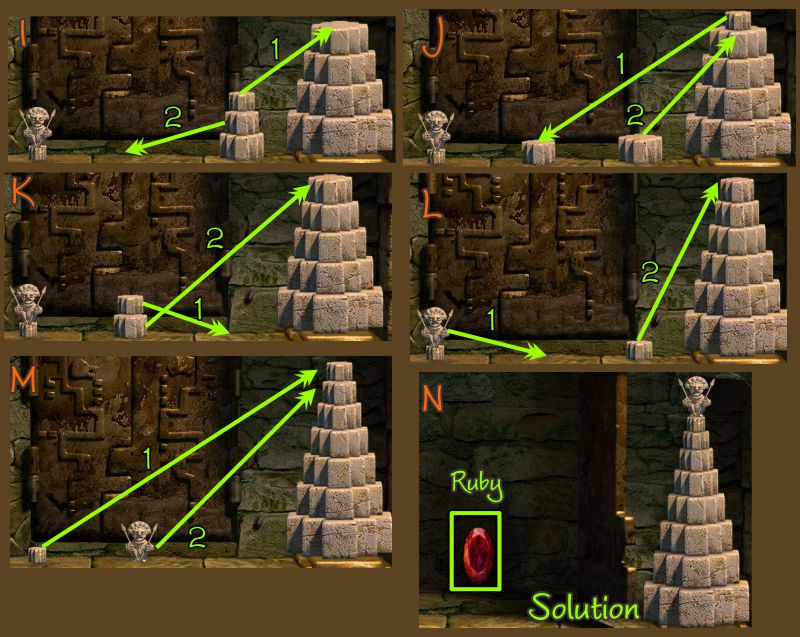
Continue moving the stone discs as numbered in the panels of the screenshot.
Screenshot
A few more moves to go and the doors in the back will open for you to take the Ruby.
Screenshot
Police Station and Museum
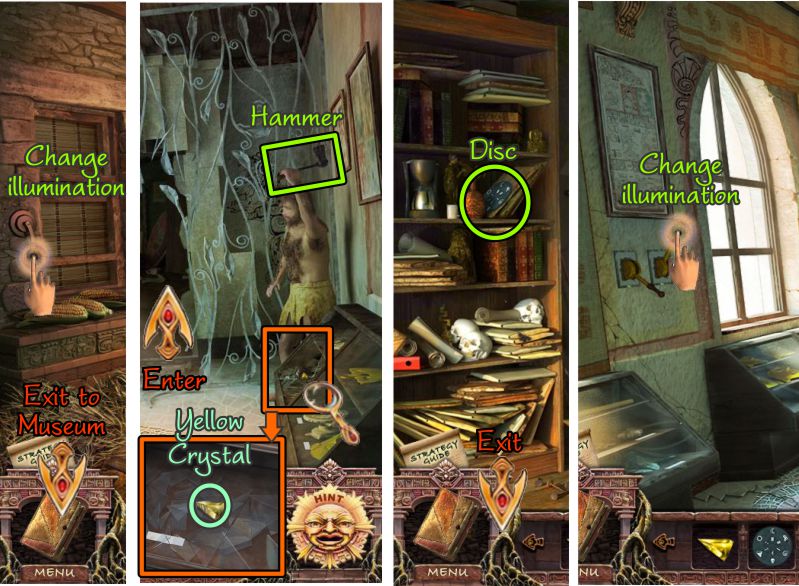
Return to the front room, change the illumination, and go across the street to the Museum.
Take the Hammer from the statue, then zoom in on the display case.
Take the Yellow Crystal, then go to the back room.
Collect the Disc from the bookcase, return to the front room, and change the illumination.
Screenshot
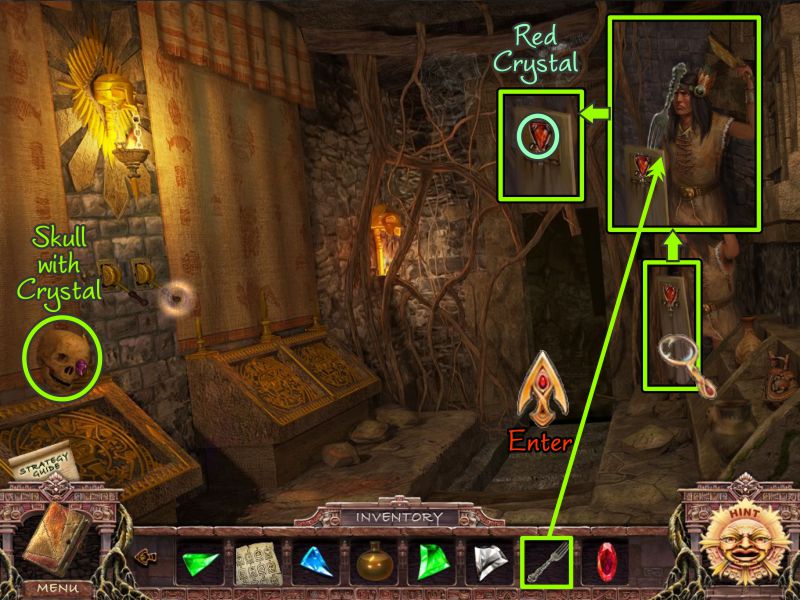
Dark Museum
Take the Skull with Crystal, then zoom in on the Indian.
Use your Fork to dig out the Red Crystal on his shield.
Go to the back room.
Screenshot
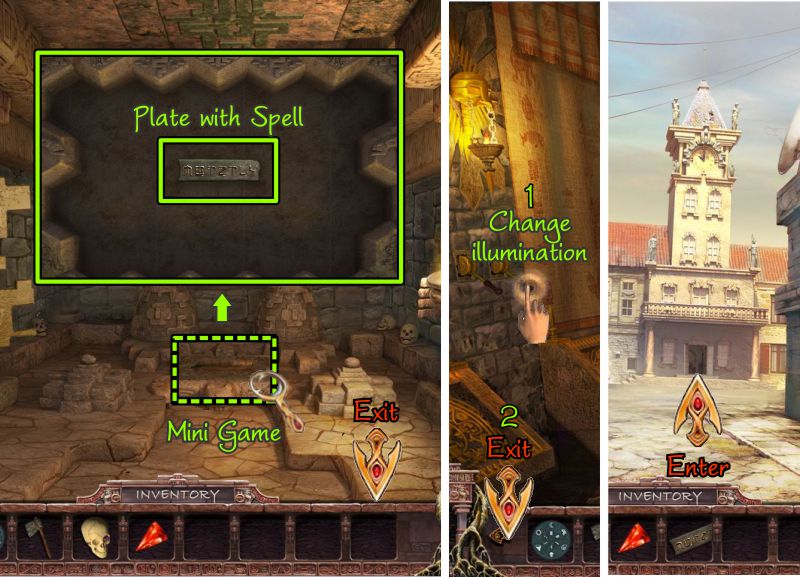
Museum and Street
Zoom in on the floor area for a Mini Game to get the Plate with Spell.
Return to the front room after the completed game and change the illumination.
Exit and go to Town Hall.
Screenshot
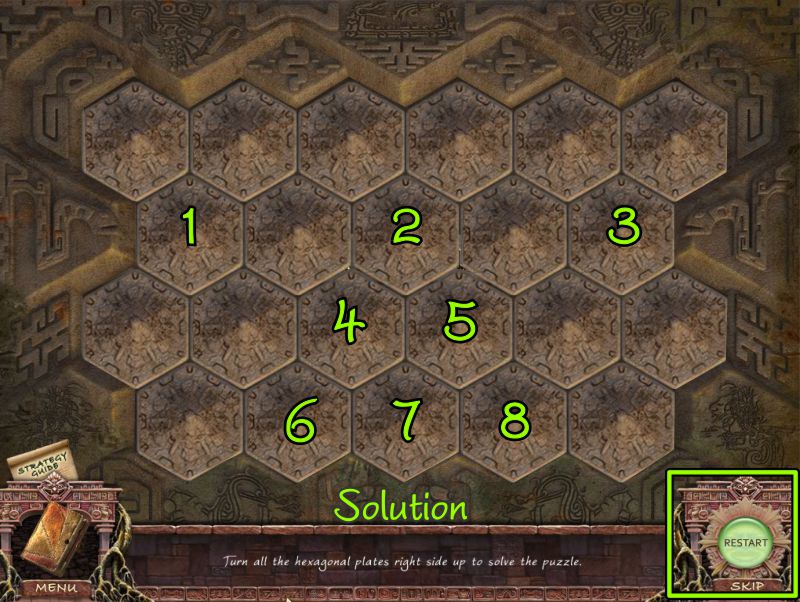
Hexagon Plate Mini Game
Your goal is to turn over all the plates as shown in the screenshot solution.
Each plate turns other plates. There is a Restart button if you make a wrong move.
Screenshot
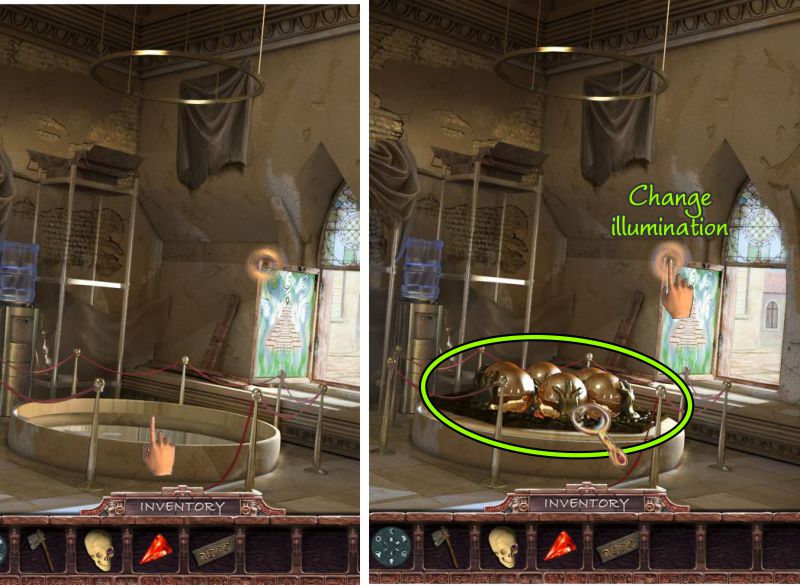
Town Hall
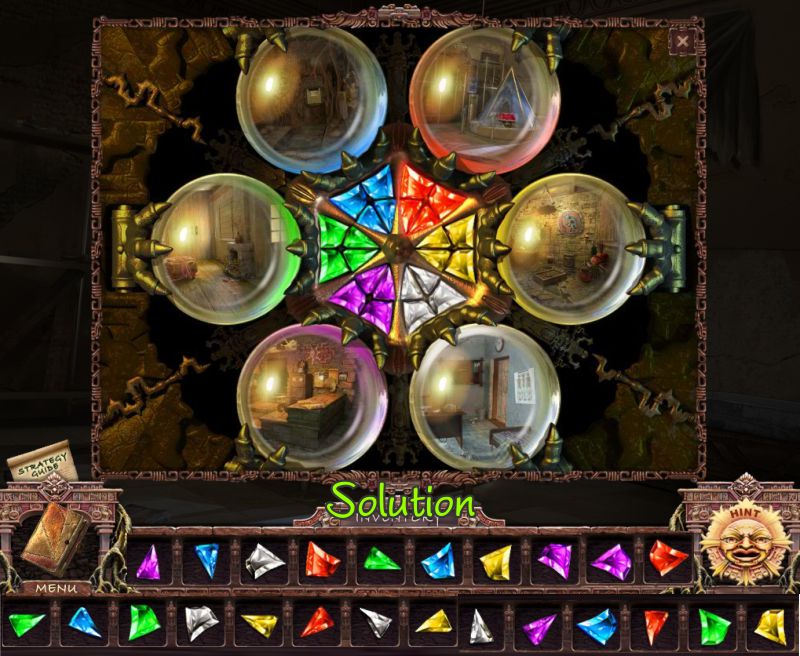
Click on the roped off area, and a bunch of spheres will rise to the surface.
Zoom in on them to have a look, and then change the illumination.
Screenshot
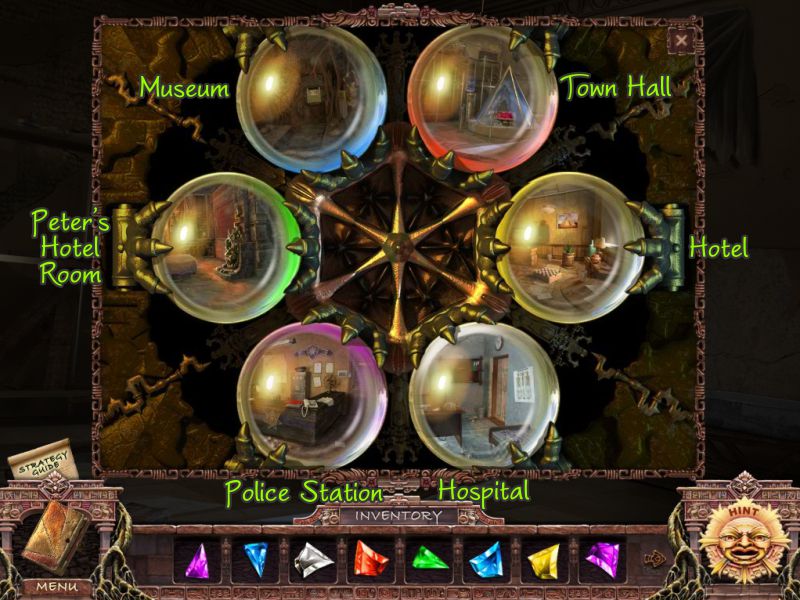
Spheres
Each sphere represents a location that is under the control of the dark forces.
There is a place in the center for you to place all the magic crystals when you find them.
Screenshot
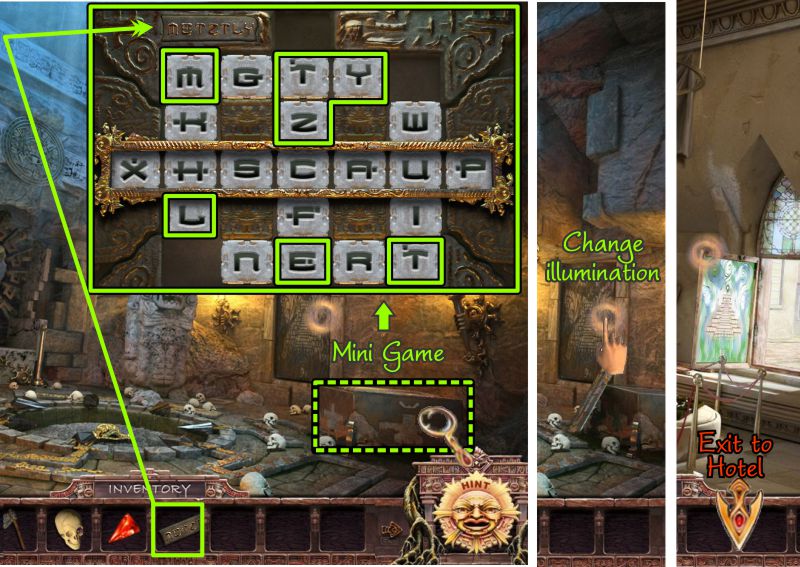
Spell Mini Game
Zoom in on the chest for a Mini Game.
Place the plate from your Inventory as shown to activate the game.
When you have completed the game, change the illumination, then exit to the Hotel.
Screenshot
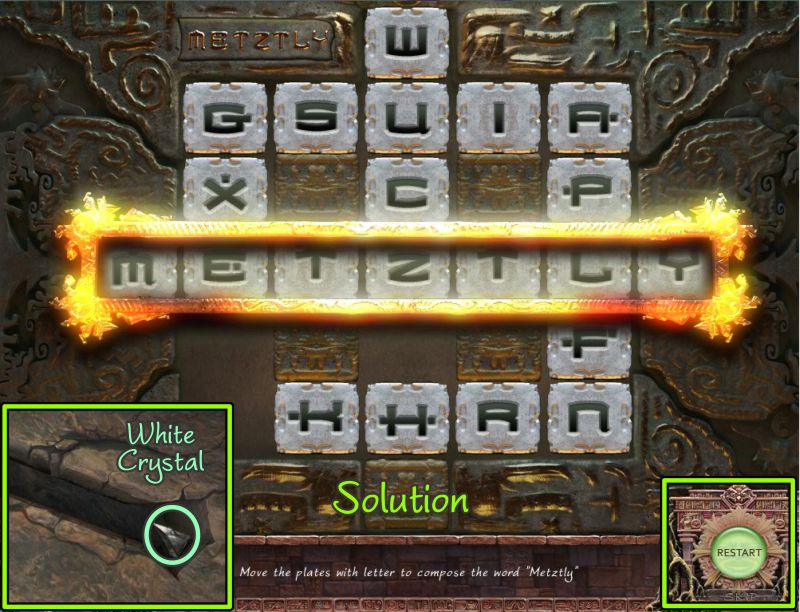
Your goal is to slide the letters around to spell the word Metztly in the center bar.
Collect the White Crystal when you arrive at the solution shown in the screenshot.
Screenshot
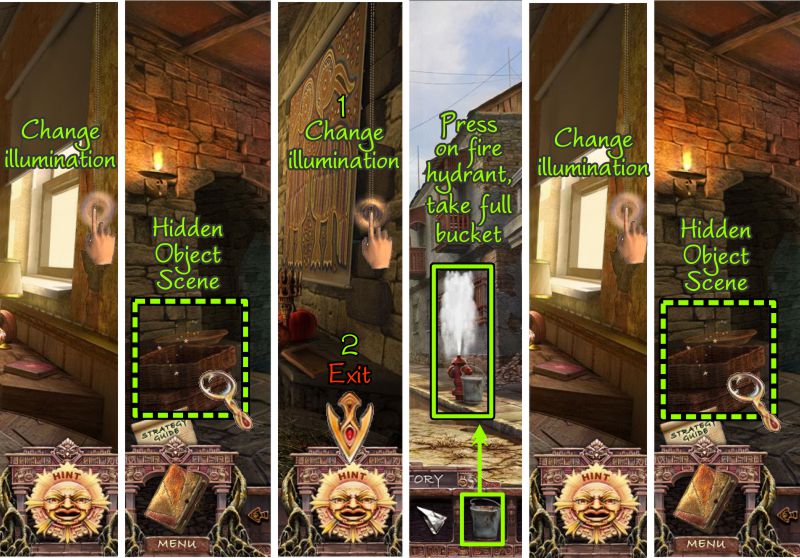
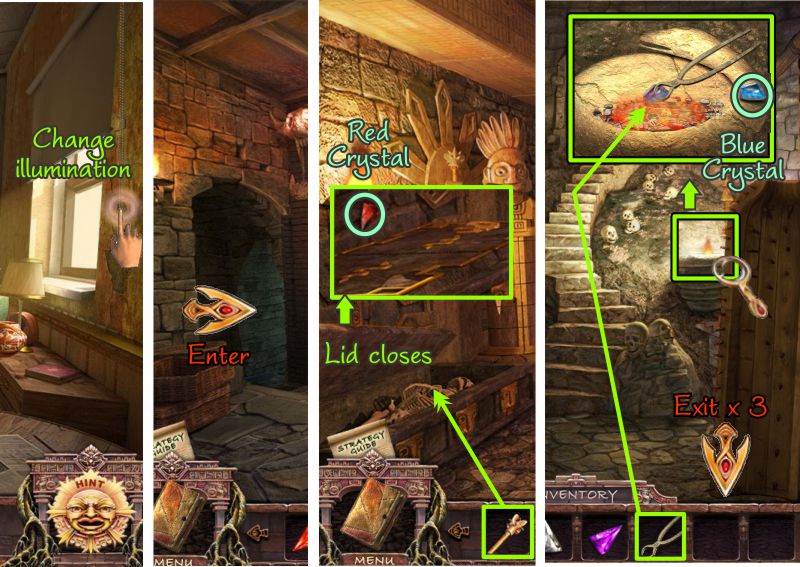
Hotel Lobby
Change the illumination and play the Hidden Object Scene to get the Empty Bucket.
Change the illumination so you can leave the building.
Place your Empty Bucket by the fire hydrant and press on the fire hydrant to fill the bucket.
Collect the full bucket and return to the Hotel.
Change the illumination and play the Hidden Object Scene.
See the screenshot for the transition.
Screenshot
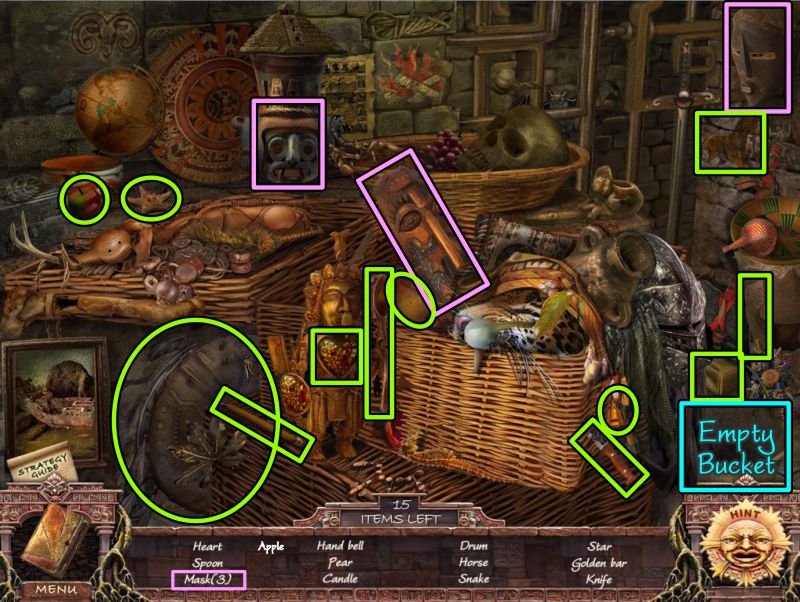
Hotel Lobby Hidden Object Scene 1
Your Final Item will be the Empty Bucket.
Screenshot
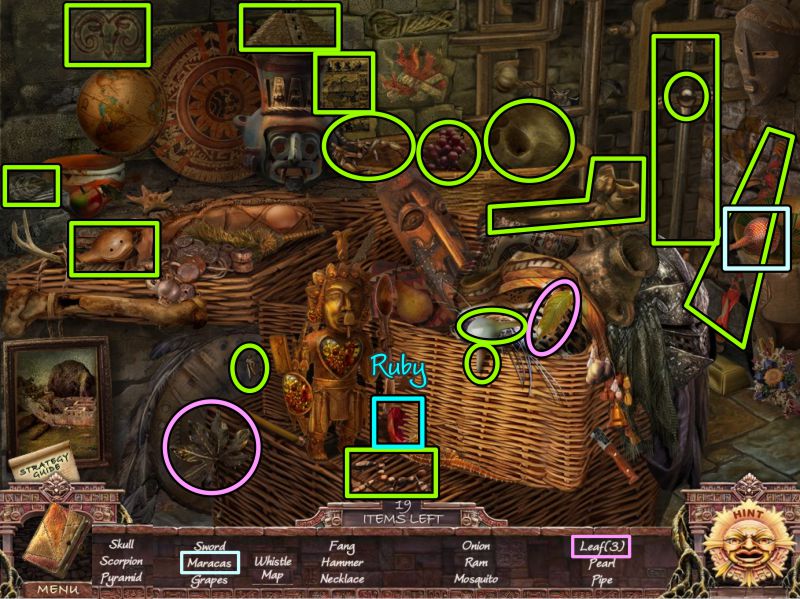
Hotel Lobby Hidden Object Scene 2
A Ruby will be your Final Item.
Screenshot
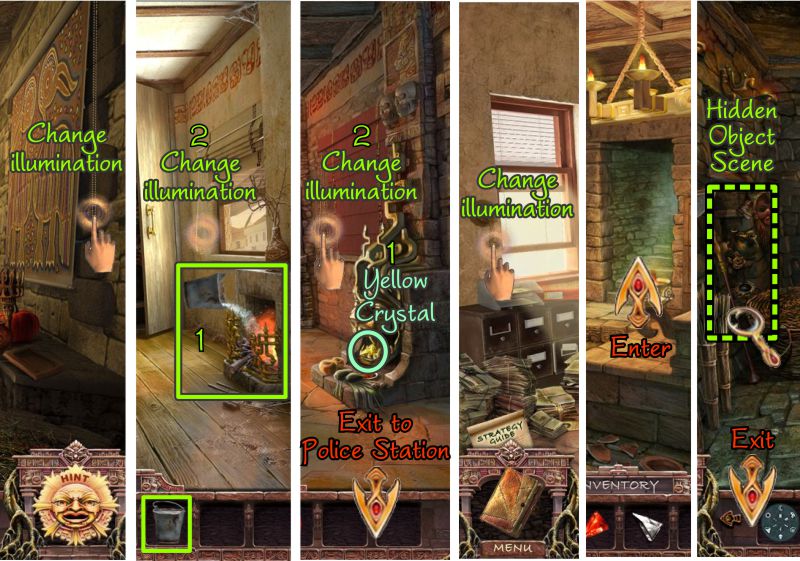
Hotel and Police Station
Change the illumination to light, then go upstairs to Peter's Room.
Douse the fire with your Bucket of Water.
Change the illumination to dark, then take the Yellow Crystal.
Change the illumination back to light and exit to the Police Station.
Change the illumination to dark and go to the back room.
Play the Hidden Object Scene on the shelves.
Screenshot
Shelves Hidden Object Scene
Collect another Ruby as your Final Item.
Screenshot
Police Station
Go back to the front room and zoom in on the wall.
Place your 3 Rubies as shown in the screenshot in order to trigger a Mini Game.
Change the illumination to light to play the Mini Game.
Screenshot
Sheriff's Office Door Mini Game
Your goal is to find 2 sets of numbers that add together to make the third number.
When you find the correct set of numbers for each section, the bulb will light up.
See the screenshot for the solution. Enter the Sheriff's Office when the door opens.
Screenshot
Sheriff's Office
The safe is missing a handle.
Zoom in on the desk and take the Red Crystal out of the basket.
Play the Hidden Object Scene, then zoom in on the panel by the back door.
Place the diagram with the symbols on the panel.
Translate the symbols on the panel using the diagram and enter the code shown in the screenshot.
Screenshot
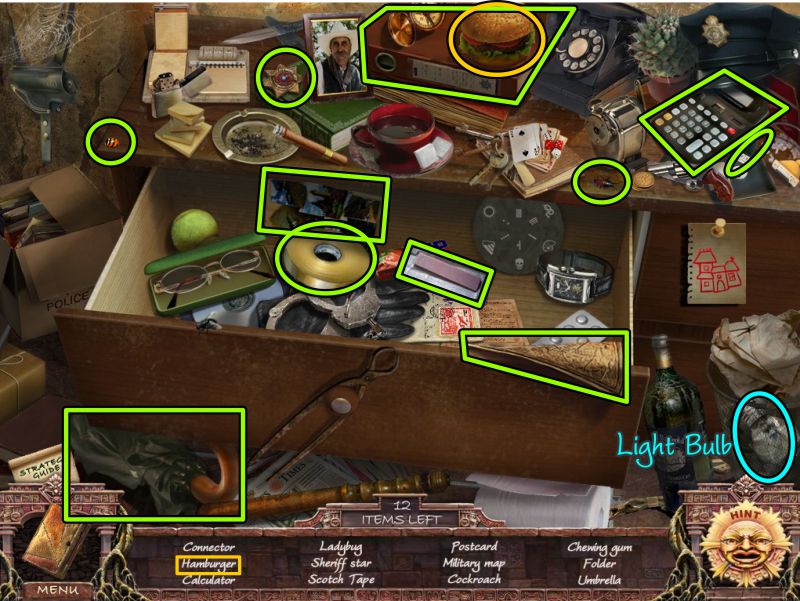
Desk Hidden Object Scene
Your Final Item is a Light Bulb.
Screenshot
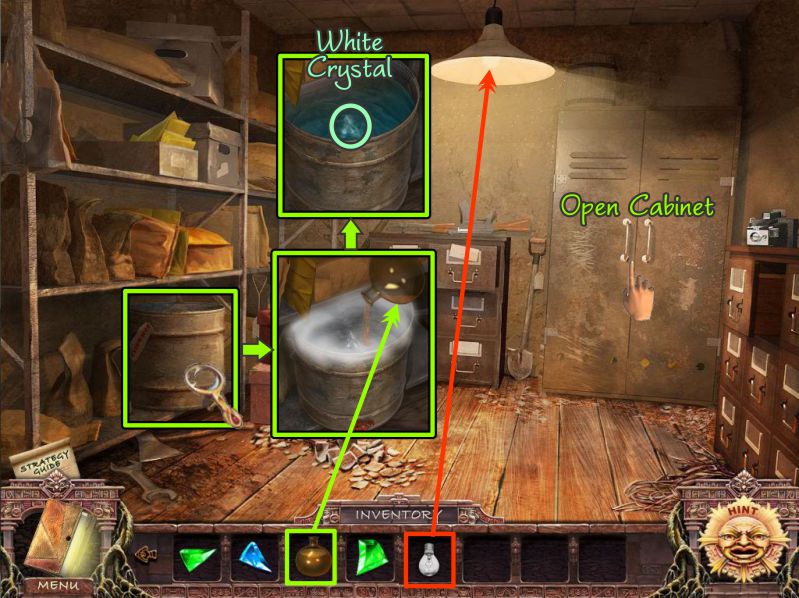
Storage Room
Once in the Storage Room, it is too dark to look around, so put your Light Bulb in the light fixture.
Open the cabinet doors and zoom in on the storage tank at the left.
Use your Alkali to neutralize the acid in the tank, then take the White Crystal.
Screenshot
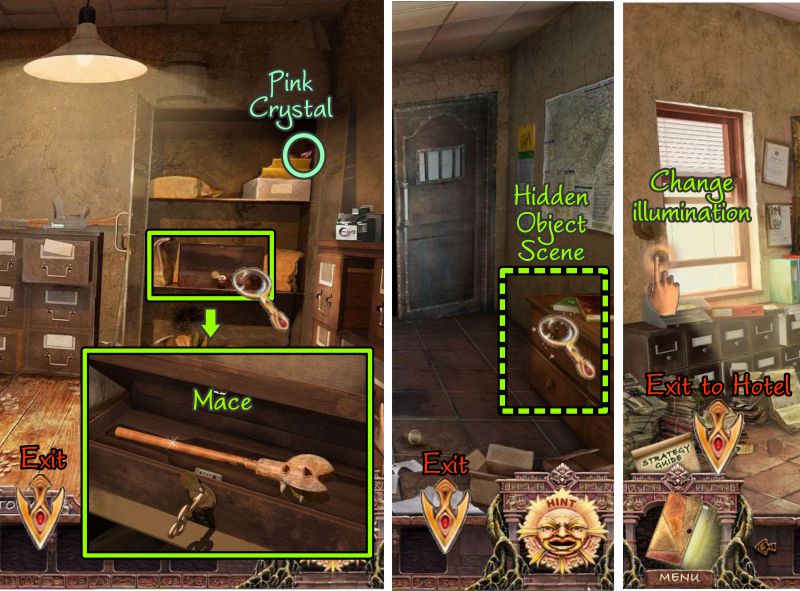
Police Station
Take the Pink Crystal on the top shelf of the cabinet, then zoom in on the open box.
Pick up the Mace, then return to the Sheriff's Office for a Hidden Object Scene at the desk.
When you are finished at the Police Station, change the illumination and exit to the Hotel.
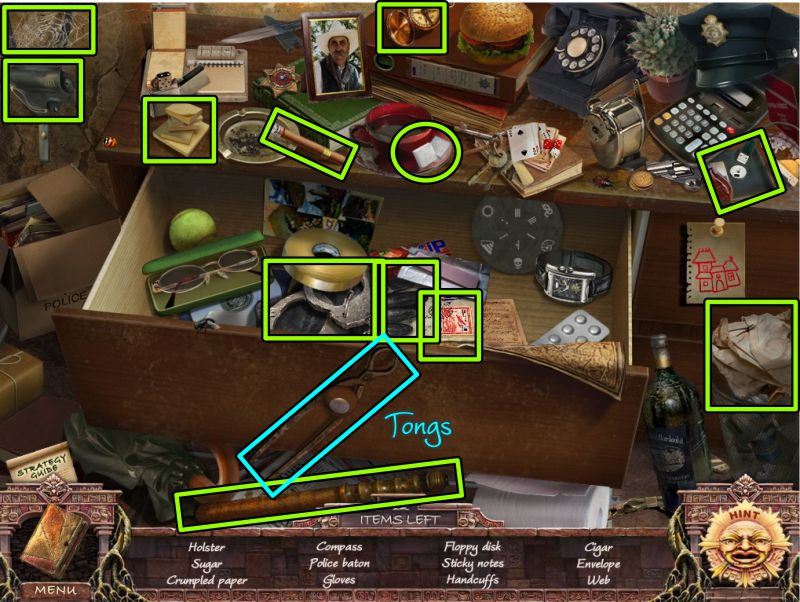
Screenshot
Desk Hidden Object Scene
You will collect a pair of Tongs as your Final Item.
Screenshot
Hotel Lobby and Underground
Change the illumination and go underground to the second room.
Place the Mace in the coffin and the lid will close.
Collect the Red Crystal, then keep going to the room with the guillotine.
Zoom in on the flaming pot and use your Tongs to remove the Blue Crystal.
Screenshot
Hotel Lobby
Return to the Lobby, change the illumination, then exit to the Police Station.
Go to the Sheriff's Office and play the Hidden Object Scene to get the Disc.
Return to the reception area and change the illumination.
Zoom in on the area shown in the screenshot.
Place your 2 Discs to trigger a Mini Game.
Screenshot
Desk Hidden Object Scene
Your Final Item will be a Disc.
Screenshot
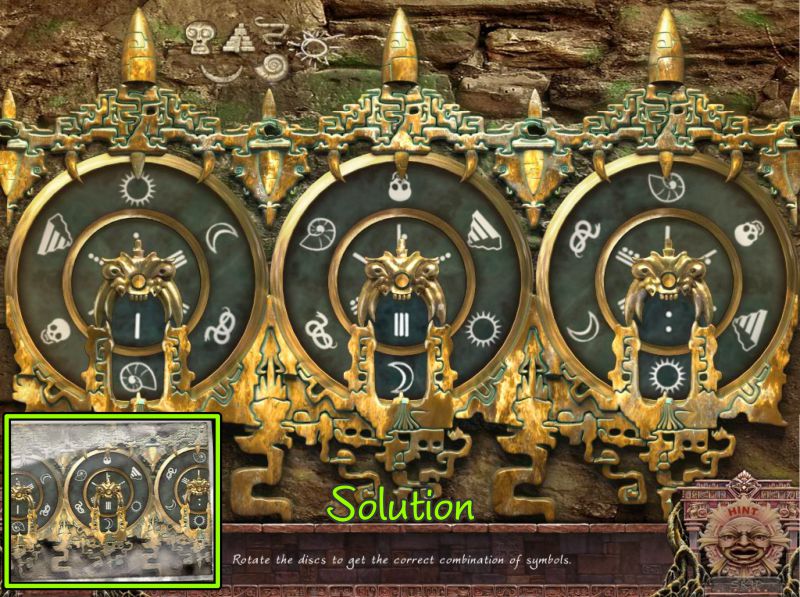
Discs Mini Game
Your goal is to rotate the discs to match the diagram in your Journal.
See the screenshot for the solution.
Screenshot
Police Station
The cabinet opens, but your cursor shows it needs another illumination.
Go to the back room and play the Hidden Object Scene on the shelves.
Return to the front room and change the illumination.
Take the Green Crystal from the cabinet, then go to the Sheriff's Office.
Zoom in and place the Handle to open the safe.
Take the Yellow Crystal, then exit to the Museum.
Screenshot
Shelves Hidden Object Scene
Final Item is the Safe Handle.
Screenshot
Museum
Go to the back room, then place the Skull with the Crystal on the anvil.
Use your Hammer to break the Skull so you can take the Pink Crystal.
Exit to Town Hall.
Screenshot
Spheres
Zoom in and place all of the magic crystals in the center of the spheres to match the color of their sphere.
Once all of the crystals are in place, you will have removed the evil that has had a grip on the town.
You have completed The Magic Crystals, the second bonus adventure of Secrets of the Dark: Temple of Night.
Screenshot
Location of the Magic Crystals
The screenshot below lists where you can find the 4 crystals for each crystal color.
Screenshot
Posted by: Jazz |
August 10, 2011 11:13 AM
|
August 10, 2011 11:13 AM