
Royal Envoy: Campaign for the Crown
Platform: Windows
![]() A long time ago, in a kingdom far, far away, lived a rather hapless population, governed by a king who was pretty snooty but ran a rather tight ship. Then one day things began to fall apart and it was all blamed on the king. Now a mysterious stranger has come to town and challenged the king's right to rule. Can the royal envoy fix things before the general election? Yes rejoice time management fans, because a certain snooty king and an incompetently run kingdom are back for a third time to test our puzzle solving reflexes. Playrix Entertainment is back with Royal Envoy: Campaign for the Crown and the action is faster, more frantic, and much more puzzle driven than ever before!
A long time ago, in a kingdom far, far away, lived a rather hapless population, governed by a king who was pretty snooty but ran a rather tight ship. Then one day things began to fall apart and it was all blamed on the king. Now a mysterious stranger has come to town and challenged the king's right to rule. Can the royal envoy fix things before the general election? Yes rejoice time management fans, because a certain snooty king and an incompetently run kingdom are back for a third time to test our puzzle solving reflexes. Playrix Entertainment is back with Royal Envoy: Campaign for the Crown and the action is faster, more frantic, and much more puzzle driven than ever before!
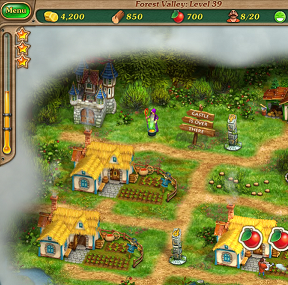 If you've played any of the first two Royal Envoy games the basic gameplay should be pretty familiar: Each level has a set of goals which can be accomplished by constructing housing or buildings to meet the needs of the local residents. Solving a level is a matter of marshaling certain resources such as labor, gold, lumber, and food and applying them to create housing, buildings, or other specialized structures needed by the residents. Everything can be accomplished either by a click of a mouse to set tasks or just a sweep of the cursor to pick up food, gold, or lumber that has been produced.
Each area of the kingdom has its own particular climate and challenges, whether it is snow, desert, or swamp. There are a small variety of houses to produce rent, buildings to produce goods, and decorations to produce happiness with which to work as you attempt to repair the kingdom and kick out Swindler before he completely ruins everything. Along the way you are helped or hindered by a wide variety of characters including blackmailing pirates, mad hatters, greedy gluttons, helpful elephants, bored druids, and many more. Can you win the election for the king?
 Analysis: Royal Envoy: Campaign for the Crown does something highly unusual in a time management game of the Build-a-Lot type that it started out as. Rather than pile on a ton of new stuff, the game first strips back a lot of the basic gameplay. There are now only three types of housing available, and the buildings such as the sawmills and markets never get any bigger than the beginner's level which offers 50, 100, and 250 of each resource. By stripping the core gameplay back in this way Playrix can add on the new stuff that is unique to each region of the kingdom without overwhelming with useless details, making the gameplay even more thoughtful and puzzle-centric.
 Getting used to the more basic gameplay allows you, the player, to enjoy the new stuff even more. The mad hatters and their amazing magical tunnels, the bribable (and helpful) elephants, and all of the other new characters and challenges. Especially fun in the dark and the fog levels are the drunken pirates and the druids, who will light up bonfires to illuminate an area, but only for money and only for a limited time. If you want the light to continue, the gold must continue to flow. It's a very old lesson but a good one: Once you pay the danegeld, baby, you never get rid of the Dane!
Royal Envoy: Campaign for the Crown is packed with a ton of gameplay. With 63 regular adventure levels, and another 63 expert adventure levels (reachable if you can three-star all of the regular adventure levels), you are looking at hours and hours of fun, frantic time management gameplay. Playrix proves that less is more with this third entry into the Royal Envoy series. For fans of the genre, this is unique and challenging entertainment and the answer to the eternal question: what do you do with a drunken sailor? In this game, you pay him. Lots.
Note: Royal Envoy 3 is currently only available in a Collector's Edition, which includes bonus gameplay (30 challenge levels), wallpapers, a screensaver, the soundtrack, and a built-in strategy guilde. Remember that Big Fish Game Club Members pay only $13.99 for Collector's Editions, and collector's editions count 3 card punches of 6 total needed for a free game.
![]() Windows:
Windows:
Download the demo
Order the full version
![]() Mac OS X:
Mac OS X:
Not available.
Try Boot Camp or Parallels or CrossOver Games.


Walkthrough Guide
(Please allow page to fully load for spoiler tags to be functional.)
Royal Envoy: Campaign for the Crown Walkthrough
General Information
From the Main Menu, you can play the Adventure or Exit the game, choose your Settings and your player name, review the Intro, and view your Achievements, the Credits or other Playrix games.
Settings include Music, Sound volume, choice of Full or Windowed Screen, Custom Cursor, and whether you wish to view game Hints.
If you purchased the Collector's Edition, Challenges and Extras will be available to you.
After you have begun play of a Level and wish to quit in the middle, it will be saved.
There is no Hint button, but you will have a Tutorial at the beginning that you can then skip if you wish.
If you pause game play, the menu will give you your choice to Resume, Restart the current Level, change your Settings, or exit to the Main Menu.
There is a timer in the game that keeps track of how many stars will earn for the Level.
If you run out of time before you reach your goal, you will need to restart the Level.
There is no choice of difficulty in the game because the Levels get more complicated as the game progresses.
Achievements
As you progress through the game, you will collect Achievements that can be viewed from a link on the Main Menu.
Unanimous Support: Palm Coast: Complete all Palm Coast levels with 3 stars for 50 points.
Unanimous Support: Tropical Marshes: Complete all Tropical Marshes levels with 3 stars for 50 points.
Unanimous Support: Flying Islands: Complete all Flying Islands levels with 3 stars for 50 points.
Unanimous Support: Jolly Rodger Strait: Complete all Jolly Rodger Strait levels with 3 stars for 50 points.
Unanimous Support: Wastelands: Complete all Wastelands levels with 3 stars for 100 points.
Unanimous Support: Islandshire: Complete all Islandshire levels with 3 stars for 100 points.
Unanimous Support: Forest Valley: Complete all Forest Valley levels with 3 stars for 100 points.
Unanimous Support: Artic Circle: Complete all Artic Circle levels with 3 stars for 150 points.
Unanimous Support: Heaven's Gate: Complete all Heaven's Gate levels with 3 stars for 150 points.
Unanimous Support: Centerra: Complete all Centerra levels with 3 stars for 150 points.
Landslide Victory: Palm Court: Complete all Palm Court levels with 3 stars in Expert Mode for 150 points.
Landslide Victory: Tropical Marshes: Complete all Tropical Marshes levels with 3 stars in Expert Mode for 150 points.
Landslide Victory: Flying Islands: Complete all Flying Islands levels with 3 stars in Expert Mode for 150 points.
Landslide Victory: Jolly Rodger Strait: Complete all Jolly Rodger Strait levels with 3 stars in Expert Mode for 150 points.
Landslide Victory: Wastelands: Complete all Wastelands levels with 3 stars in Expert Mode for 150 points.
Landslide Victory: Islandshire: Complete all Islandshire levels with 3 stars in Expert Mode for 150 points.
Landslide Victory: Forest Valley: Complete all Forest Valley levels with 3 stars in Expert Mode for 150 points.
Landslide Victory: Artic Circle: Complete all Artic Circle levels with 3 stars in Expert Mode for 150 points.
Landslide Victory: Heaven's Gate: Complete all Heaven's Gate levels with 3 stars in Expert Mode for 150 points.
Landslide Victory: Centerra: Complete all Centerra levels with 3 stars in Expert Mode for 150 points.
Incredible Feat: Earn all the achievements for 350 points.
Elections Won!: Complete all levels in Adventure Mode for 250 points.
Kingdom's Best Fisherman: Catch 250 fish for 100 points.
Royal Coffers: Accumulate 500,000 gold over the course of the entire game for 150 points.
Rabbit Hole Wizard: Use the rabbit holes 1,000 times for 100 points.
Trading Money for Light: Ignite 100 pirate bonfires for 100 points.
A Little Help from the Druids: Light fires under 100 druid cauldrons for 100 points.
Urban Renewal: Build 500 houses for 100 points.
Royal Dovecote: Buy 150 doves for 100 points.
Let There Be Light!: Repair 100 lanterns for 100 points.
Fog No More: Repair 100 obelisks for 100 points.
Bee Whisperer: Build 50 beehives for 100 points.
Food Supply: Accumulate 10,000 food on any level
You Can't Have Too Much Wood: Accumulate 10,000 wood on any level for 200 points.
Get Rich Quick: Gather over 2,000 gold from rent in two seconds for 100 points.
One Click - One Worker: Catch 20 workers without missing a single one in the Rescue Mission quest for 200 points.
Royal Forester: Grow 100 palm trees on level 27 for 200 points.
Royal Gardener: Grow 100 food bushes on level 27 for 200 points.
No Time to Haggle: Pay pirates 100,000 gold over the course of the entire game for 150 points.
Nobody Goes Hungry: Give 100,000 food to gluttons over the course of the entire game for 150 points.
Guarding the Royal Coffers: Catch all the thieves after the robbery at the Central Bank in level 34 for 200 points.
Say No to Drought: Build 50 wells for 200 points.
Building on Water: Create 50 building lots on the water for 50 points.
Royal Aim: Whitewash the rival team in the snowball fight for 50 points.
Decoration Nation: Build 100 flowerbeds, 75 gramophones, 50 fountains, and 25 statues for 100 points.
Treasure Hunter: Open 100 treasure chests for 100 points.
Money Can't Buy Happiness: Earn more than 2,500 happiness on any level without using decorations for 150 points.
Decent Landlord: Collect 500,000 gold in rent for 150 points.
Kind King - Happy Nation: Collect 10,000 happiness over the course of the entire game for 150 points.
Achievement locked: Complete all Adventure levels to unlock 2 more achievements for 150 points each.
Achievement locked: Complete all Adventure levels to unlock 1 more achievement for 200 points.
Achievement locked: Complete all Adventure levels to unlock 4 more achievements for 250 points each.
Scene Navigation
On the top of the scene, next to Menu, is your Resource Bar with the number of various items in your Inventory, as well as the number of available workers.
Next is the list of Tasks for that Level.
At the left, under the Menu, is your timer.
At the bottom of the scene is your list of goals for each Level, and a list of your Tasks.
Each task you perform to reach your goals has a box next to it that will be checked off when you have completed your task.
If you choose to go to the Menu, you will be given a choice of continuing the game, changing your Settings, restarting the current level, or exiting to the Main Menu.
At the end of each level, you will see your statistics and be given a choice as to whether you wish to continue on to the next level or restart the current level to perhaps improve your star score.
If you wish to go back and play a particular Level, just click on that Level on the Map.
Keeping your workers producing resources is important, so make certain they are busy, and then don't forget to pick up your resources when they become available.
When you need to build a Sawmill or Market for a location, it's a good idea to build them as close to the Worker's Castle as possible so your workers don't have too far to run to buy the resources.
href="https://jayisgames.com/images/royal-envoy-campaign-for-the-crown/01.jpg">Screenshot
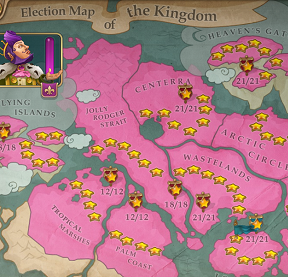
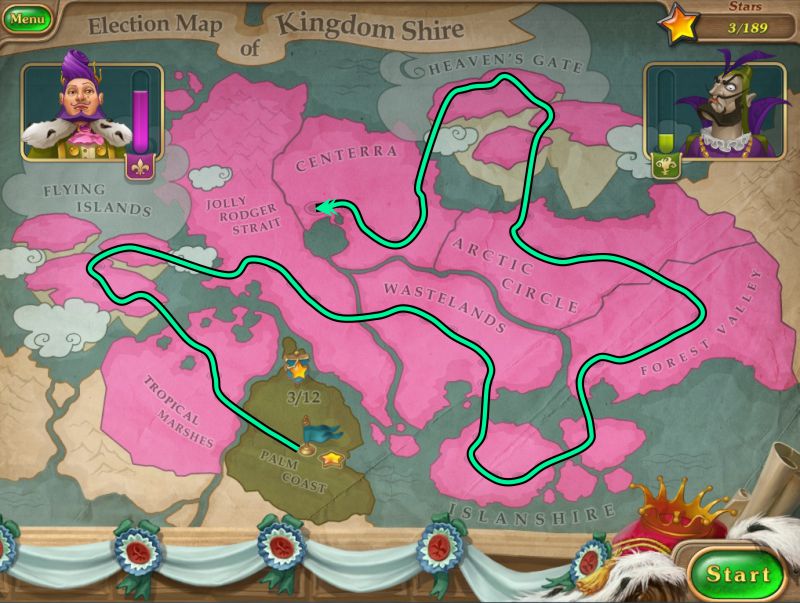
Election Map of Kingdom Shire
The map shows your path throughout the 63 levels of the kingdom, a tally of the current leader in the campaign race, and gives news broadcasts when available.
Your flag follows your travels, and a star is recorded when you earn your 3 stars for that level.
You are required to choose the location you wish to play, and can go back at any time to replay a level. Press the Start button when you are ready to begin the level you have chosen or just double click on it.
If you decide to replay a level to better your stars, it will not affect any other levels you have played.
After you start a replay, you can change your mind and exit without losing the stars you previously accumulated.
Screenshot
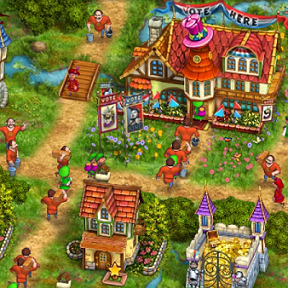
Buildings Lots
When you select a Building Lot, you then need to choose what you wish to build on that lot if it isn't dictated by your goal for that level.
Sometimes buildings and houses will already be built, but will need to be restored or are inaccessible because of broken bridges, road blocks, gluttons, pirates, etc.
If your do not already have buildings on a lot, your choices are houses that produce varying amounts of rent if gold is your primary needed resource.
Commercial type buildings supply you with needed resources and will be discussed as they become available in the game.
Level Goals and Strategies
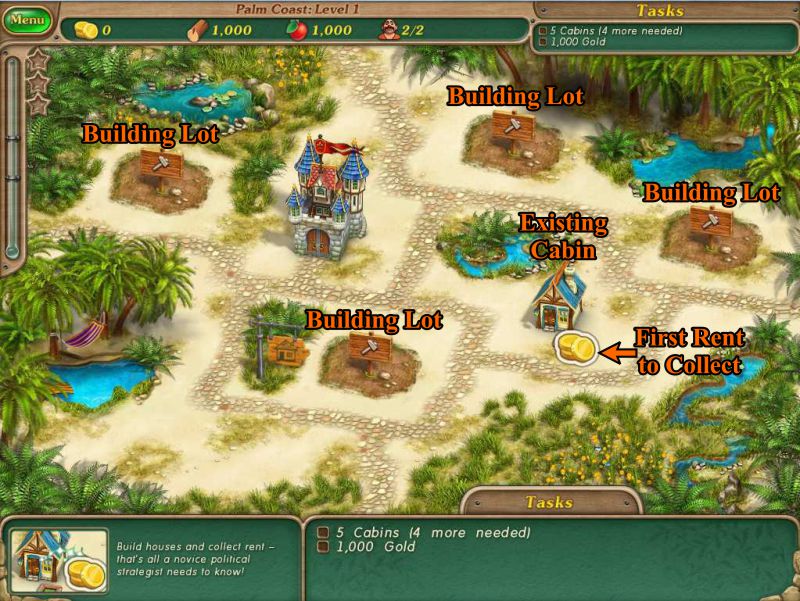
Level 1: Palm Coast
Goal: Build 5 cabins, and collect 1,000 gold.
Resources: zero gold, 1,000 wood, 1,000 food, and 2 workers.
You begin with 1 cabin, so get busy and build the other 4 cabins because they will earn you the needed gold.
Basic Cabins produce 100 gold in rent and require 25 wood, 25 food and 1 worker to build.
Screenshot
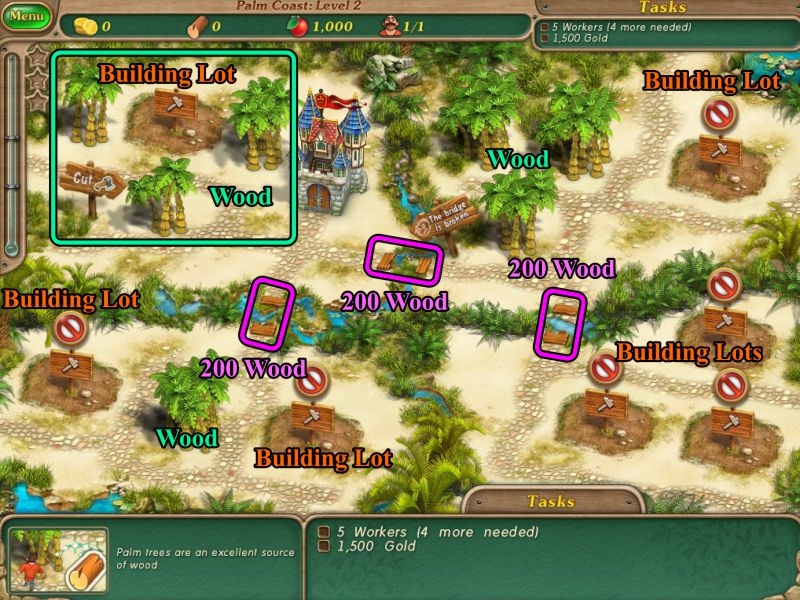
Level 2: Palm Coast
Goal: Collect 1,500 gold and increase your workers to 5.
Resources: zero gold and wood, 1,000 food, and 1 worker.
To hire one worker requires 50 food, so select the castle and click on the worker in the bottom bar to hire him.
There are 7 building lots available for your cabins, but 6 of them require you to repair bridges first.
If you hire all your workers first, you can use them to chop down the existing palm trees at 25 wood per tree so you have wood to build cabins and repair the bridges.
You have plenty of food to begin with, so no worries there.
Repairing bridges cost 200 wood for each bridge, so if you repair the one at the upper middle one first, you can cut down more trees and build on that lot.
Repairing the bridge at the lower right will gain you access to 3 more lots to build on.
Since nothing is said about how many bridges to repair nor how many houses to build, the choice to build or upgrade is up to you as long as you reach your goal.
To upgrade a Cabin costs 25 wood and requires 1 worker. It will then produce 150 gold.
Screenshot
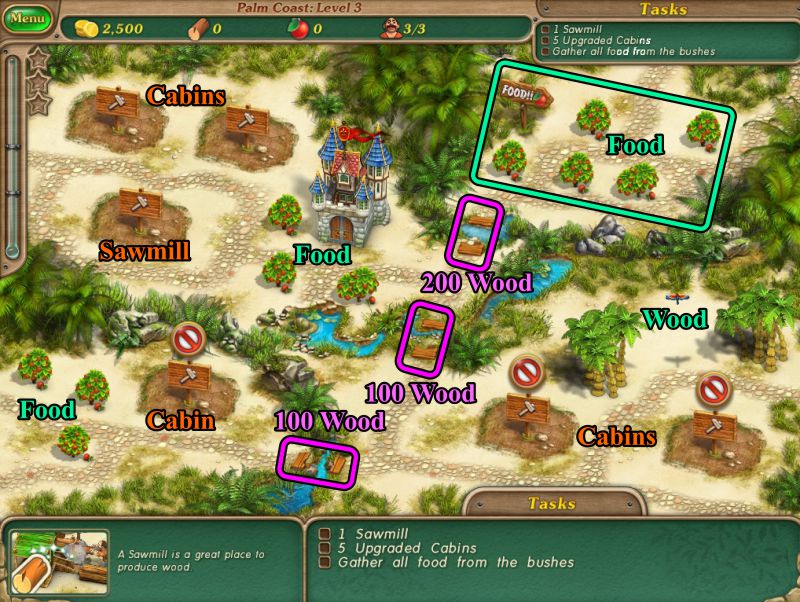
Level 3: Palm Coast
Goal: Build a Sawmill, build 5 Cabins and upgrade them, and gather all the food from the 11 bushes at this location.
Resources: 2,500 gold, zero wood and food, and 3 workers.
In order to reach your goal, you will need to repair 3 bridges, so see the screenshot for the cost of each.
There are 6 building lots, so you need to use one for the Sawmill and the other 5 for cabins.
To upgrade a Cabin costs 25 wood and requires 1 worker. It will then produce 150 gold.
Since you will be collecting plenty of food, your most important resource to gather is wood.
There are some trees available for cutting once you repair one of the bridges, but you need to get the Sawmill built and producing wood.
A Sawmill produces varying amounts of wood for you to choose depending upon your gold resources. It costs 1,000 gold and 2 workers to build.
Buying 50 wood requires 400 gold, 100 wood requires 800 gold, and 250 wood requires 2,000 gold.
Keep in mind that it takes the same amount of time to buy the varying amounts of wood, so try to buy as much as you can according to what you need.
Screenshot
Level 4: Palm Coast
Goal: Build a Market, then rebuild the 3 houses and 8 piers so you can catch 25 fish from the piers.
Resources: 1,500 gold, zero wood and food, 4 workers, and a Sawmill.
Cut down the available trees to increase your wood and build the Market.
A Market requires 1,000 gold and 2 workers to build. It produces varying amounts of food which you can choose depending upon your gold resources.
Buying 50 food requires 400 gold, 100 food requires 800 gold, and 250 food requires 2,000 gold.
Keep in mind that it takes the same amount of time to buy the varying amounts of wood, so try to buy just as much as you need without over buying.
Purchase just enough wood from the Sawmill to make certain you have sufficient supply to build and repair.
One worker can chop wood, buy wood from the Sawmill and food from the Market while the other 3 are repairing and upgrading cabins.
Once you have accomplish all of the above, repair 4 piers so all your workers can be catching fish.
Once you have your 25 fish, dismiss all of your workers from the piers and repair the remaining piers.
To rebuild each pier requires 50 wood and 1 worker.
If you work efficiently, you don't need to hire more workers, but you may want to think about 1 extra worker to repair the remaining 4 piers while the others are catching fish.
Screenshot
Level 5: Tropical Marshes
Goal: Build 3 Cabins, 4 Cottages (a new available house), and collect 2,000 gold.
Resources: zero gold, 150 wood, zero food, and 7 workers.
First thing you probably want to do is repair the lower left bridge for 150 gold, so go cut down all the trees in that area.
The upper left bridge requires 150 gold to rebuild and will give you access to the 3 cabins that need to be rebuilt so you can start earning gold.
Now that you have wood and gold, repair the expensive bridge for 350 gold so you can get to the food and the Blue Elephant.
You need 250 food and 1 worker to lure the Thirsty Blue Elephant to the marsh so he will drain it for you.
Since you need more food, building a market next to the castle seems like a good idea once you have collected enough gold.
You can acquire additional wood from the trees near the cabins and in the drained marsh which is where you want to build your 4 cottages.
A Cottage requires 50 wood, 50 food, and 2 workers to build, and it will produce 150 gold.
Screenshot
Level 6: Tropical Marshes
Goal: Build and upgrade 7 houses of any type, and collect 10,000 gold.
Resources: 2,500 gold, zero wood and food, and 4 workers.
Remove all the fallen trees to gain some wood, and build a market to buy food.
Restore the 2 gold mines, and build a sawmill.
A Gold Mine requires 50 wood and 2 workers to restore.
There is a total of 100,000 gold to be mined from one gold mine, and you need to provide at least 1 full-time worker for the mine to produce 250 gold each time.
2 workers in each mine will produce more gold, so consider hiring more workers. Also keep in mind that Gold Mines can sometimes run out of gold, so don't forget to dismiss your workers if necessary.
Once you have enough food, get your elephant to drain the marsh so you can build more houses.
Building all cabins can work for you, but you will need to upgrade them.
Screenshot
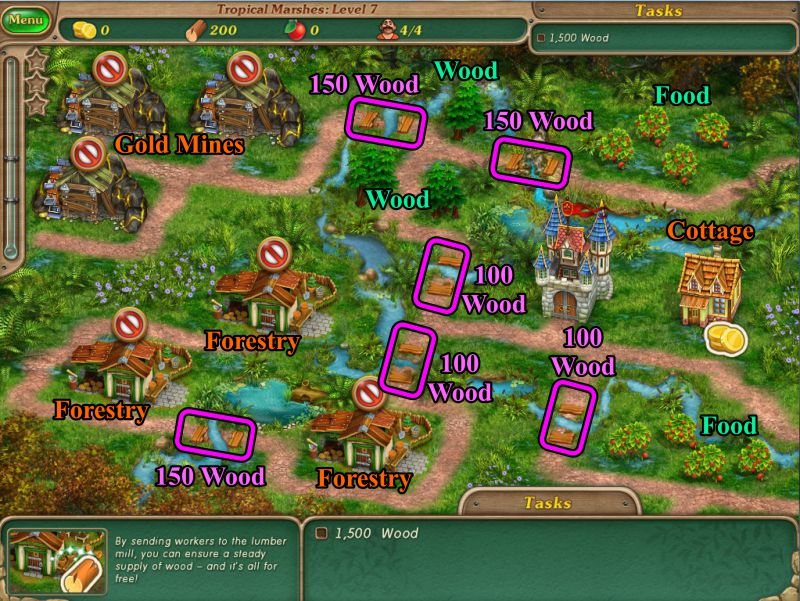
Level 7: Tropical Marshes
Goal: Collect 1,500 wood.
Resources: zero gold, 200 wood, zero food, and 4 workers.
Before you can do too much of anything, you will need to make a decision about repairing bridges, so see the screenshot for how much each costs and what they give you access to.
You don't really need to restore the gold mines because you do have one cottage that is producing rent and you can choose to upgrade it if you wish.
Upgrading a Cottage requires 50 wood and 1 worker. It will then produce 225 gold.
You actually only need to repair the 3 lower bridges so you can gain access to the Forestry section and harvest some food.
A Forestry is capable of supplying wood without spending gold, but requires at least 1 worker to be there full-time.
Food is needed to hire more workers so you want to hire 2 more so you can have 2 workers producing wood at each Forestry.
If one of your Forestry buildings ever runs out of wood, don't forget to dismiss your workers, if necessary.
Screenshot
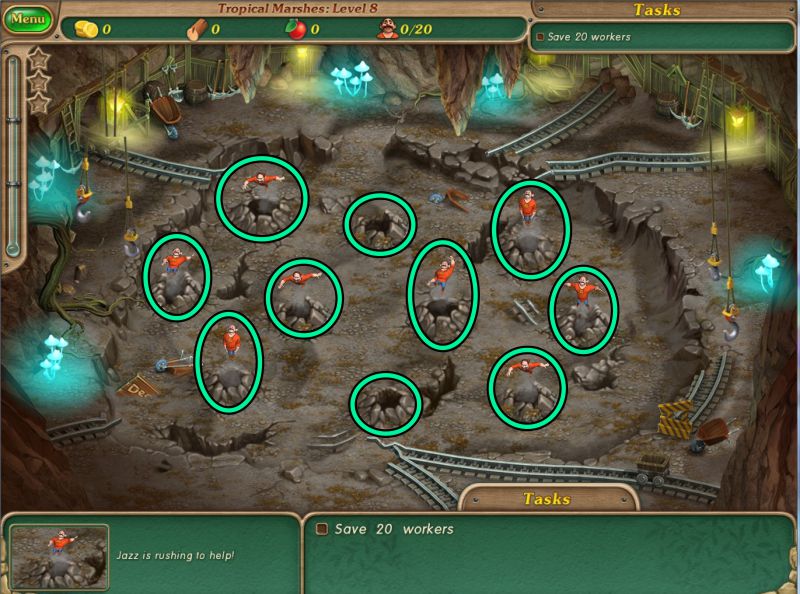
Level 8: Tropical Marshes
Everything is looking great, even though you start with zero resources, because you have 20 workers filling up the carts in the gold mine, but then something goes very wrong.
Goal: Rescue 20 workers.
Timing is everything in this level because you need to save the workers as they pop out of the marked holes in the ground, so be sure to click just under them so you aren't too high and miss.
Once you've saved a few of them, they can pop up from any hole, but they seem to float longer when there are a number of them at once.
Screenshot
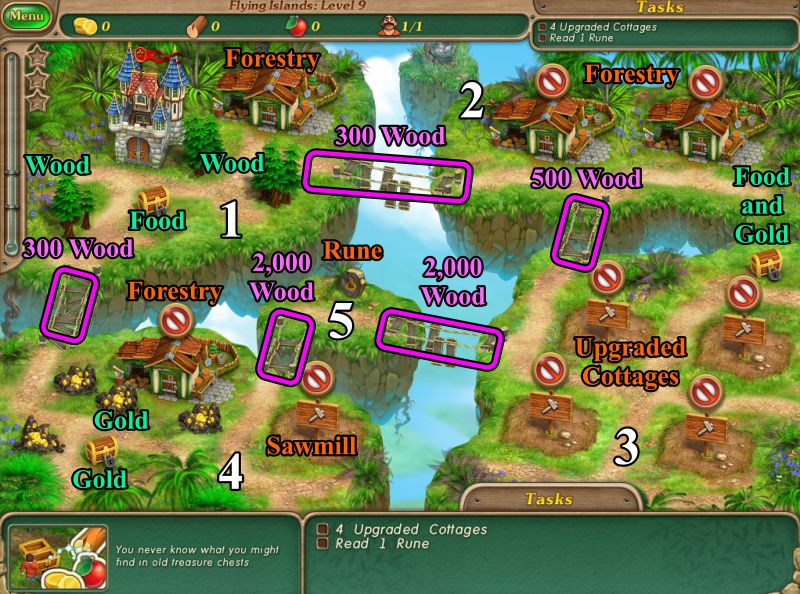
Level 9: Flying Islands
Goal: Build and upgrade 4 Cottages, and read the Rune on the center island.
Resources: zero gold, wood, food and 1 worker.
The biggest resource you need is wood, so think about hiring 9 more workers in order to have 2 for each Forestry and 2 to build and upgrade Cottages.
Opening the treasure chest near the Castle will get you 200 food that is enough to hire 4 more workers, so assign 2 to the Forestry on Island 1 and have the other 3 chopping trees for wood.
Check the screenshot to see how much wood you need for each bridge and the numbering of the islands.
When you have 300 wood, rebuild the first bridge at the top to gain access to the two Forestry buildings on Island 2.
You have 3 workers at your disposal, so assign 1 to each of the now available Forestry sites.
When you have the 500 wood, build the next bridge to get access to the treasure chest with food and gold on Island 3.
Time to buy more 5 more workers, since you now have sufficient food available, and assign 2 for each Forestry and 2 to build and upgrade Cottages.
Build the bridge to Island 4, assign 2 workers to the Forestry, collect the gold and build a Sawmill on the lot.
You only need to build one of the 2,000 wood bridges to get to the Rune, so buy sufficient gold to build the bridge to Island 5 and read the Rune.
Screenshot
Level 10: Flying Islands
Goal: Collect 4,000 gold and 400 food.
Resources: zero gold, wood, food and 3 workers.
Rather than building a bridge from Island 1 to Island 2, you can teleport workers by clicking on the rabbit hole where they are currently located.
See the screenshot for the island numbers and cost of restoring the bridges.
You have 2 Farms to produce sufficient food, so dedicate a worker to the one near the Castle, and teleport 2 workers to Island 2 to chop wood and harvest food.
A Farm will supply food without spending gold and requires at least 1 full-time worker, but 2 workers will provide more food.
Hire another worker to build the bridge to the next Farm and summon him to work it.
When you have sufficient wood to build the bridge to Island 3, have your 2 remaining workers build Cottages on the 3 building lots and upgrade them.
Have 1 worker chop the wood on Island 3 and send the other worker to finish chopping wood on Island 2.
When your Island 3 worker is finished, teleport him back to Island 1 and have him build the bridge from Island 1 to Island 4.
Teleport your other worker back from Island 2 and have your workers build and upgrade Cottages on Island 4.
Doesn't really matter which Cottages you build first as long as you get them all earning as much gold as possible so you can achieve your goal.
Screenshot
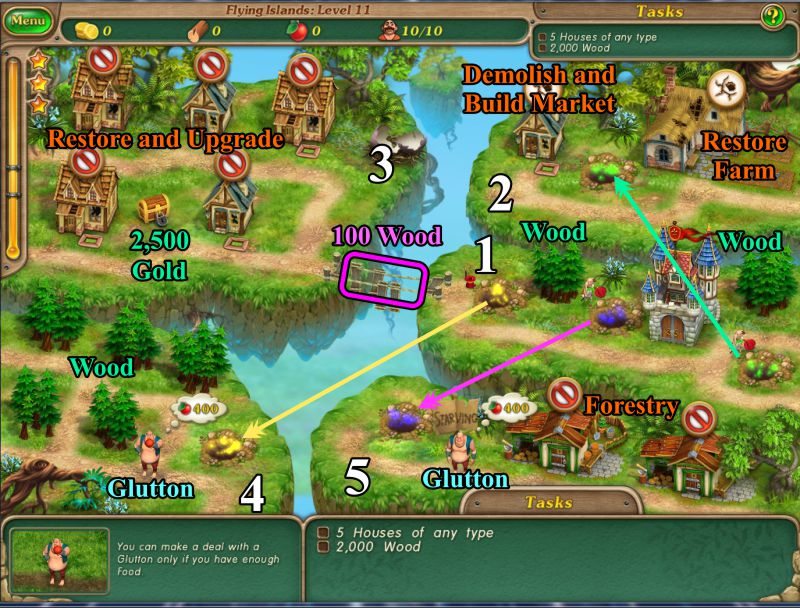
Level 11: Flying Islands
Goal: Build 5 houses of any type and collect 2,000 wood.
Resources: only 10 workers.
There is one bridge to build for 100 wood in order to get from Island 1 to 3.
Start by having 2 workers chop down the trees on Island 1 so you have some wood resource.
Build your bridge to Island 3 and collect your 2,500 gold from the chest.
You can access Island 2 by teleporting your workers using the green rabbit hole.
Send 2 workers to demolish the Cabins and build a Market and Sawmill, then restore the Farm, and send the 2 workers to take care of the Farm.
The Market is important because you need to feed the 2 Gluttons 400 food each so you can gain access to the Forestry buildings and the wood.
The Sawmill is to help you reach your wood goal.
Pick a Glutton to feed so you can either send 5 workers to chop down trees, or summon 4 workers for the Forestry buildings.
Meanwhile, restore the 3 Cottages on Island 3 and upgrade them so you can get the rent to buy more food for the other Glutton, and don't forget to collect your gold from the chest.
Screenshot
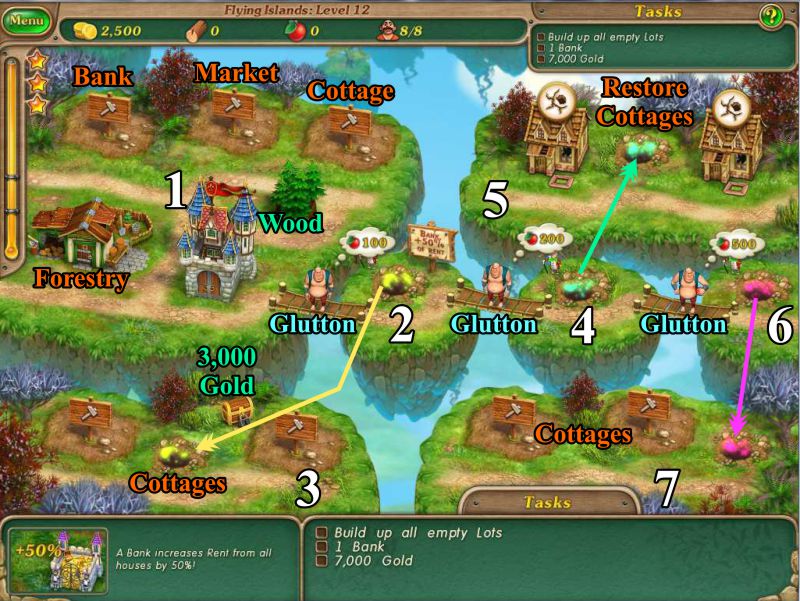
Level 12: Flying Islands
Goal: Build something on all the lots, including a Bank, and collect 7,000 gold.
Resources: 2,500 gold and 8 workers.
In order to have access to all the other islands, you are going to have to deal with 3 Gluttons who want varying amounts of food.
Gather the wood on your home island and summon 2 workers to the Forestry.
Build a Bank, Market, and Cottage on your available lot on Island 1.
A Bank requires 100 each of wood and food, plus 2 workers to build, and will increase the rent on your houses by 50%. Building more than one Bank won't get you any more money.
As soon as you have enough food, deal with the first Glutton so you can access Island 3, collect your 3,000 gold in the chest and build 2 Cottages.
Buy sufficient food to feed the Glutton on the bridge to Island 4 so you can teleport a couple workers to Island 5 to restore the Cottages.
You need to college lots to gold so you can feed the greedy Glutton on the bridge to Island 6 because you want access to Island 7 to build Cottages on your last 2 lots.
Screenshot
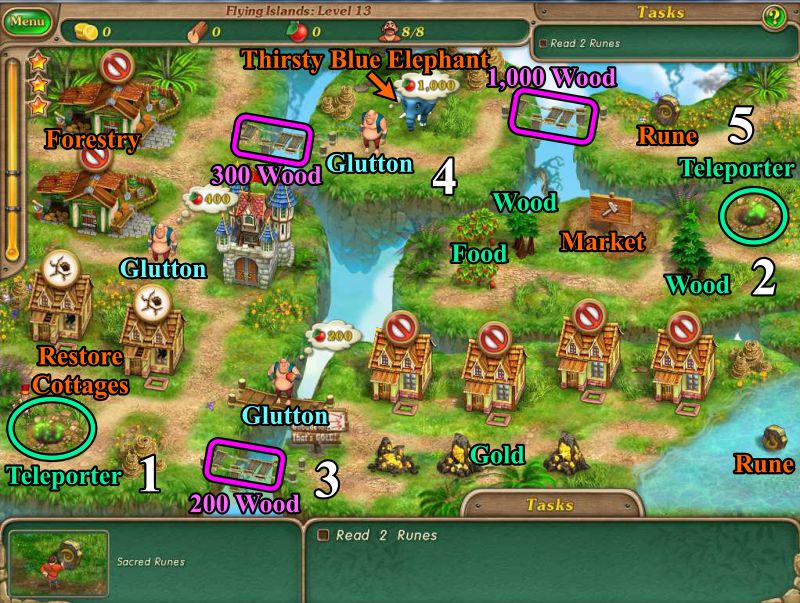
Level 13: Flying Islands
Goal: Read 2 Runes.
Resources: 8 workers.
There are 3 Gluttons and a Thirsty Blue Elephant who need to be fed, so teleport some workers to Island 2 to chop wood and harvest food to build a Market there.
Use other workers to restore the Cottages on Island 1 so you can get some rent money.
Once you have enough to feed the Glutton on the bridge to Island 3, do so and you will have access to your Cottages as well as the gold veins.
Now, we need to deal with the middle left Glutton to get access to the Forestry.
Once you feed him, summon 2 men to each Forestry building.
To get to the Rune on Island 5, you are going to need to build 2 bridges with 300 and 1,000 wood.
It's important to buy sufficient food to negotiate with the very hungry Glutton so you can get access to the Thirsty Blue Elephant who is hidden under the Glutton's sign.
For 250 food, the elephant will suck all the water out of the pool on Island 3 to give you access to the other Rune you need to read.
Actually, you have a choice for Island 3: you can ignore the Glutton and save your food for the greedy one, because you can build the lower bridge for 200 wood and still gain access to the cottages, gold, and Rune.
Screenshot
Level 14: Flying Islands
Goal: Unblock entrance to the cave.
Resources: 15 workers.
In order to unblock the entrance, you will have to perform 3 unblocking procedures that cost 1,000 gold and require 3 workers each time.
Send 3 workers to Island 2 to chop wood and open the chest.
I built a Bank, Market, Sawmill, and 3 upgraded Cottages on my lots. The Bank increases your rent, you need food to feed the Glutton, and additional wood to build your buildings and the bridge to Island 4.
When you have sufficient food, you can choose to demolish the Market and build another Cottage.
Once you have 1,000 gold, perform your first unblocking of the Cave.
Now the fog rolls in and you need to find a Rune underneath.
The first Rune seems to be consistently under the fog outside the entrance, but the other 2 Runes are randomly located under the fog, so you need workers to clear off each fog puff after you perform your subsequence unblocking efforts.
Screenshot
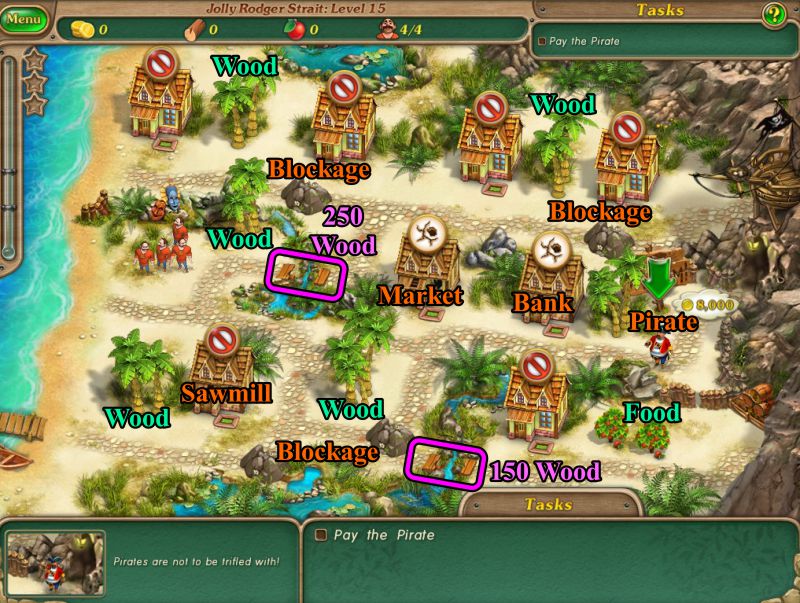
Level 15: Jolly Rodger Strait
Goal: Pay the Pirate his 8,000 gold.
Resources: 4 Workers.
There is no Castle, so get your 4 workers busy removing the blockages, and cutting down trees so your Cottages will earn gold.
You will need more wood than the trees can supply, so build a Sawmill on your vacant building lot.
If you work it out right, you should be able to do with the food from the two bushes that are available, otherwise consider demolishing a Cottage and building a Market.
Upgrade your Cottages, and consider building a Bank to increase your rent so you can pay off the Pirate faster.
There are also 2 bridges to repair so you can expand and reach all your available resources.
Screenshot
Level 16: Jolly Rodger Strait
Goal: Earn 15,000 Gold.
Resources: 150 gold and 6 workers.
In order to achieve your goal, you are going to have to light all the lanterns to see what's going on.
Chop down the wood near the Castle so you have the wood to light the top 2 lanterns.
Remove the obstruction so you can get to the lower right lantern.
You now have access to more wood so you have enough to light the lower left lantern.
Lighting the lanterns requires 1 worker and 50 wood, and removing large obstructions requires 3 workers.
In order to get to the wood by the lower right cottage, you need to pay 800 gold to the pirate, and then remove the other obstruction.
As soon as you have enough wood, light the last lantern.
To gain access to the 2 left cottages, you must repair the bridges at a cost of 150 wood.
Upgrade all your cottages as soon as you have sufficient resources.
When you have 3,500 gold, pay off the pirate blocking the chest so you can get the gold.
You have enough wood so there really isn't any need to pay off the lower left pirate.
In order to build something on the vacant lot, you would need food, so you would have to build a Market to buy it, and then destroy it to perhaps build a Bank so the gold comes in faster.
Screenshot
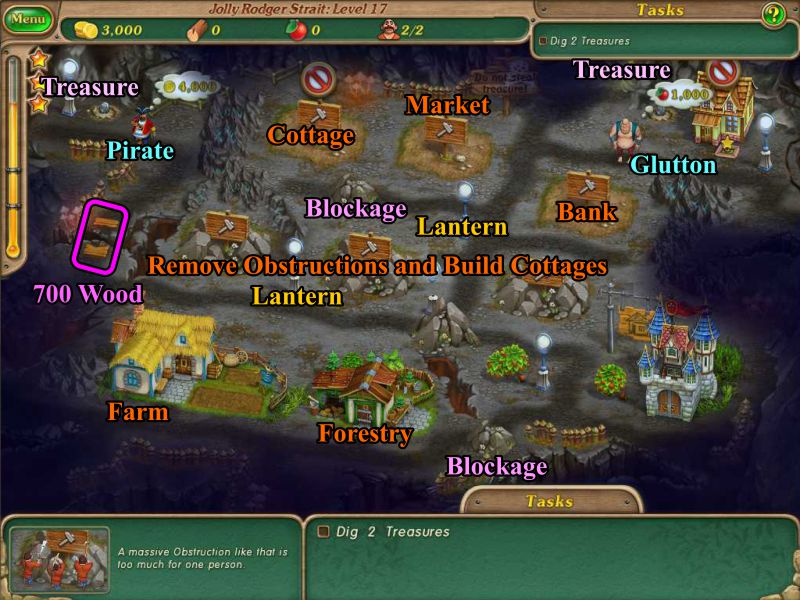
Level 17: Jolly Rodger Strait
Goal: Dig up 2 Treasures.
Resources: 3,000 gold and 2 workers.
In order to get to the Treasurers, you need to pay off the Glutton with 1,000 food and the Pirate with 4,000 gold.
Send your workers to collect the food near the Castle so you can hire 4 more workers.
Clear all the large obstructions and the smaller blockages, and light the other 2 Lanterns so you can see what you have to work with.
Send 2 workers each to the Forestry and Farm, which leaves you 2 workers for building and negotiating.
I built 4 Cottages, a Bank and a Market.
If you feed the Glutton first, you get more wood to build the bridge to get to the Pirate.
If you pay off the Pirate first, you get more food to feed the Glutton.
Screenshot
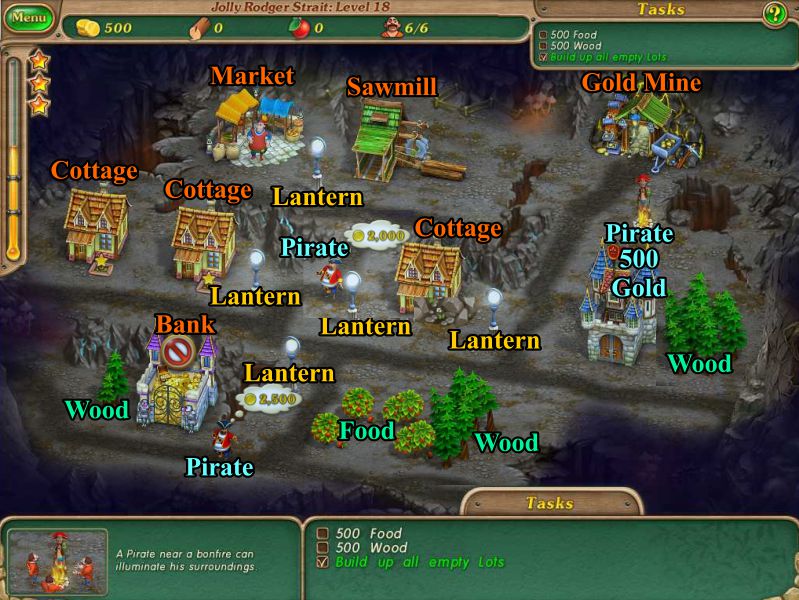
Level 18: Jolly Rodger Strait
Goal: Collect 500 Food, 500 Wood, and build on all the empty lots.
Resources: 500 gold, zero wood and food, and 6 workers.
Unless you pay Louie, the pirate by the bonfire, his 500 gold, you won't be able to go to the Gold Mine.
Chop down the wood by the Castle so you can repair the Lanterns and see what's going on around town.
Once everything is lit, collect the food and other wood, and build and upgrade 3 Cottages.
Once you pay Louie, make the most of your time because you will have to pay him again if you want more illumination from his fire.
If you pay off the lower pirate, you get access to the Bank and faster gold earning.
If you pay off the middle pirate, you can build a Market and Sawmill so that you don't need Louie to get gold from the Gold Mine.
Screenshot
Level 19: Jolly Rodger Strait
Goal: Collect 10,500 Gold, and build all the empty lots with 6 upgrades houses of any type.
Resources: 1,500 gold, zero wood and food, and 4 workers.
There are 3 bonfire pirates in this level who want 500 gold each for you to access the Bank.
Send 3 of your workers to gather wood, and 1 to get the food from the first bush next to Louie #1 because you cannot access the second bush until the lantern is repaired.
You will begin to see the rest of the town as soon as you can repair the unlit Lanterns.
I didn't find it necessary to pay off any more bonfire pirates than Louie #1 because that takes 1,500 gold to get you to the bank and the minus outweighed the plus for me, but you can make your own choice.
Remove the blockages and obstructions so you can repair all the Lanterns on the right path and build a Sawmill and 2 upgraded Cottages.
Upgrade the rest of your Cottages and then demolish the Sawmill and build an upgraded Cottage.
Screenshot
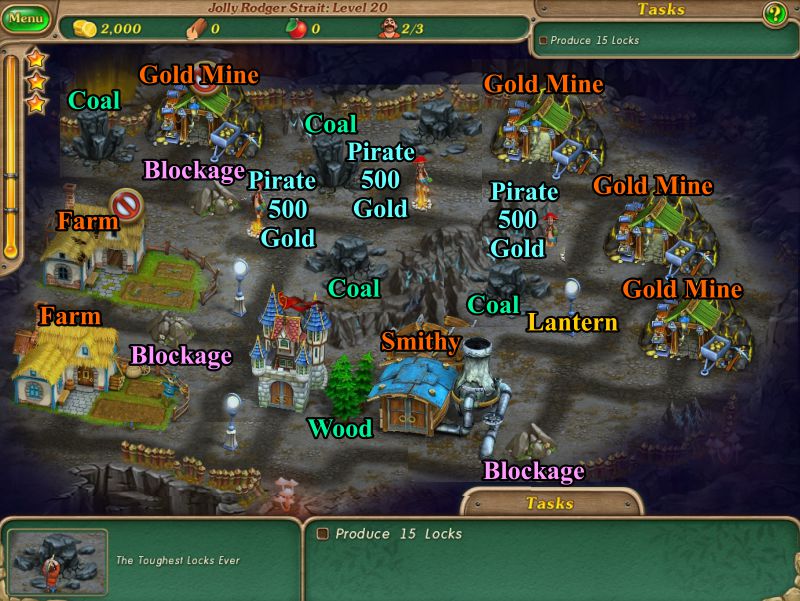
Level 20: Jolly Rodger Strait
Goal: Produce 15 locks.
Resources: 2,000 gold and 3 Workers.
In order to melt solid metal for locks at the Smithy, you need coal which you can get from coal stalactites.
Since you don't have any food available at the moment, send 2 workers to your first available Farm.
Chop down the wood next to the Castle so that is an available resource.
Get the other worker to remove the Blockage to the second Farm and send him there.
When you collect sufficient food from the Farms, hire more workers because you will need 5 dedicated workers for the Smithy, as well as workers for the Gold Mines, plus additional workers to pay off Pirates, remove Blockages, and collect Coal.
In this level, you are going to have to keep paying off the Pirates to get access to everything.
Also, you will gain workers as you pay off the Pirates so consider that in your decision as to how many additional workers you decide to buy.
You will need to light one Lantern to get access to the final Gold Mine at the far right.
Screenshot
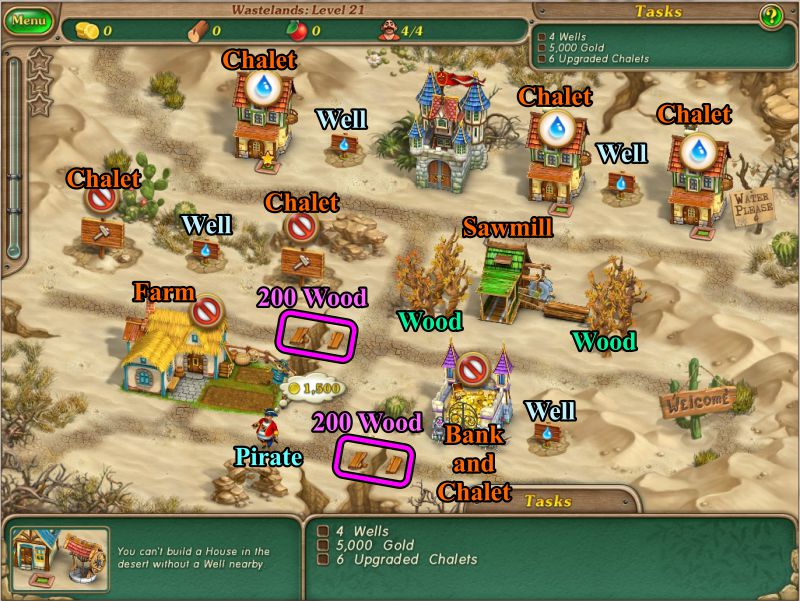
Level 21: Wastelands
Goal: Sink 4 Wells, collect 5,000 Gold, build and upgrade 6 Chalets.
Resources: Only 4 available workers.
New house is a Chalet that takes 75 wood, 75 food, and 3 workers to build, and will give you 200 gold in rent.
To upgrade a Chalet requires 50 wood and 3 workers, and you will receive 300 gold in rent.
Since houses in the desert require a well, your wells need to be next to a house. Take that into consideration when you are building houses because you don't need one for commercial buildings.
Wells cost 50 wood and require 1 worker. The location is already marked in the scene.
Chop down the available wood so you can sink the wells by the already built Chalets.
As soon as you have 2,000 gold, start buying your first batch of 250 wood at the Sawmill so you can repair the bridge to give you access to the bank and collect gold faster.
In order to gain access to the farm, you will have to pay 1,500 gold to the Pirate.
You can summon 1 worker to the Farm and keep 3 workers for building and upgrading Chalets, or you can use 2 workers at the Farm until you have sufficient food, and then dismiss one to build your other Chalets.
An additional choice is to keep 2 workers at the Farm and hire another worker once you have 50 food.
Meanwhile, you can sink the other two Wells, and when you have sufficient gold to build and upgrade the Chalets, you can demolish the Bank in order to build a Chalet on that lot.
Screenshot
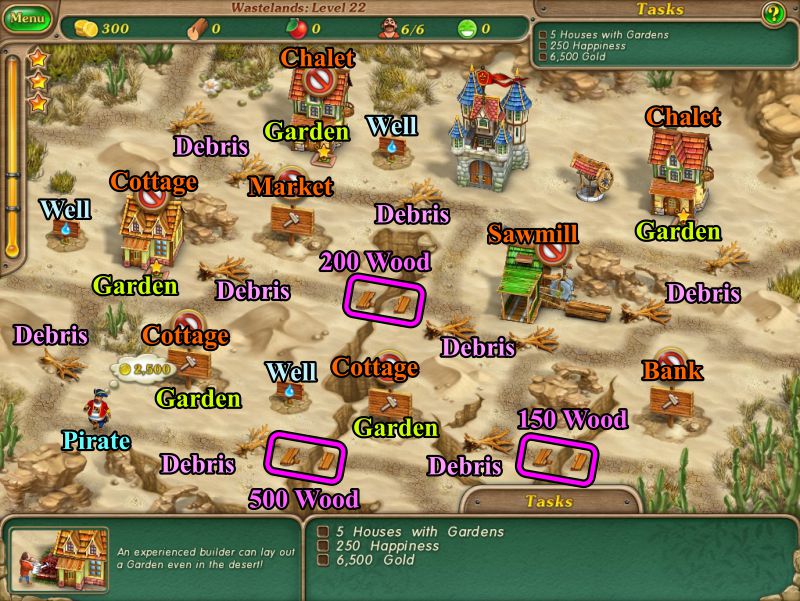
Level 22: Wastelands
Goal: Collect 250 Happiness, 6,500 Gold, build 5 houses with Gardens.
Resources: Only 6 Workers.
You have acquired a new resource called Happiness, and in this level, 50 units can be acquired for each garden you build.
Gardens cost the same amount of food and workers that you need to build the house.
Begin by having your workers clear as much of the wood blockages as they can so you can build the Well next to the Castle and repair the 200 wood bridge.
Now, you can remove the blockage and build the Well next to the Cottage as well as a Market next to the Cottage.
As soon as you have enough money, you can pay off the Pirate, buy food and wood, and build some Gardens.
See the screenshot for the cost to repair the other bridges and a suggested layout for this level.
Screenshot
Level 23: Wastelands
Goal: Collect 600 Happiness, build 8 Chalets, 2 Flowerbeds, and 3 Gramophones.
Resources: 8 Workers.
New innovations are the Flowerbeds and Gramophones: these decorations are important to the Happiness of the residents.
Flowerbeds give 25 Happiness points and cost 25 each wood and food to build.
Gramophones give 50 Happiness points and cost 75 each wood and food to build.
Send your workers to collect all the available wood and food: you will end up with 300 wood and 225 food, which is enough to build a couple of Chalets after you demolish a couple of cabins.
Take care of all your building first so you can get gold to buy wood and food, and then build the decorations.
In order to gain enough Happiness, you will need to build gardens for all your Chalets.
Screenshot
Level 24: Wastelands
Goal: Build 7 upgraded houses of any kind with Gardens, and amass 500 Food.
Resources: 800 Gold and 6 Workers.
Since Gold isn't part of your goal, there is no reason to build any houses fancier than Cabins, and it will also cost you less to build the Gardens.
You need to clear all the Debris, including from the top row of lots, and sink the 2 top Wells.
More than one Bank does you absolutely no good, so demolish the 2 Banks in the middle row.
You now have sufficient resources to build 4 Cabins.
Once you have enough gold, build a Market on one of the 2 middle lots.
You need to pay off the Glutton with 300 food to get access to the Bank and Sawmill.
Keep buying food and wood when you have 2,000 gold to buy the maximum amount.
Repair the bridge for 300 wood and build 2 Cabins.
Sink your Well and build your last Cabin and Garden on the other middle row lot.
Make sure to upgrade all your Cabins and build your Gardens.
Screenshot
Level 25: Wastelands
Goal: Collect 300 Happiness, 400 Wood, and put up 3 Gramophones.
Resources: 500 Gold and 5 Workers.
Get your workers chopping wood and harvesting food so you can build your Wells.
Summon 2 workers to the Farm, and build 4 Chalets on your lots.
Once you have 2,000 gold, pay off Willy so you gain access to the Forestry buildings.
I hired 2 more workers so I had 2 at one Forestry and 1 at the other which left me 3 workers to upgrade the Chalets and build Gardens.
All the Chalets need Gardens in order to gain enough Happiness.
You don't really need the Gold Mines so you save 500 wood by not repairing the bridge.
When you have the 8,500 gold, pay off the Pirate at the top so you can build your Gramophones.
Decorations such as the Gramophones don't have to be in the middle of town, they just need to be accessible to the inhabitants.
Screenshot
Level 26: Wastelands
Goal: 8 Flowerbeds and 700 Happiness.
Resources: 12 Workers and 200 Happiness.
The reason you begin with 200 Happiness is because of the Statue in the middle of town, but you don't have any wood or food.
You need to demolish the Statue to get 375 wood and 375 food, but you also lose your 200 Happiness.
Build a Bank on the lower lot, and build 6 Cabins on the lots next to the Wells that are already built.
It doesn't matter what kind of house you build because they all only produce 50 Happiness points each for a Garden.
As soon as you have enough money, build a Market and Sawmill on the lots next to the Castle.
Buy the maximum wood and food when you can, upgrade all your Cabins and add Gardens to gain 300 Happiness.
When you have sufficient resources, build your 8 Flowerbeds in the park to gain another 200 Happiness points.
Keep buying food until you have 750 food so you can rebuild the Statue at the center to get your 200 Happiness points back.
Screenshot
Level 27: Wastelands
Goal: Build a Ship.
Resources: 200 Gold and 6 Workers.
You have a new inhabitant called a Woodcutter who has fast growing seeds for trees that you can buy for 100 gold per seed.
In this level, you meet a new Glutton who has food seeds to sell for growing a food bush at 100 gold per seed.
You will need 1,500 wood to build your Ship to sail to Islandshire, and can summon up to 5 workers for the building process.
Summon 2 workers to the Gold Mine, chop down the trees near the Castle, and buy seeds for food and wood to get started.
Repair the other Gold Mine and summon 2 workers.
When you have 5,000 gold, pay off the Pirate so you have access to more wood and Woodcutters.
Remove the blockage so you can get to the Sawmill and start buying wood.
Hire more workers and get them started building the Ship, because the more workers you have on a large project, the faster it will get done.
Screenshot
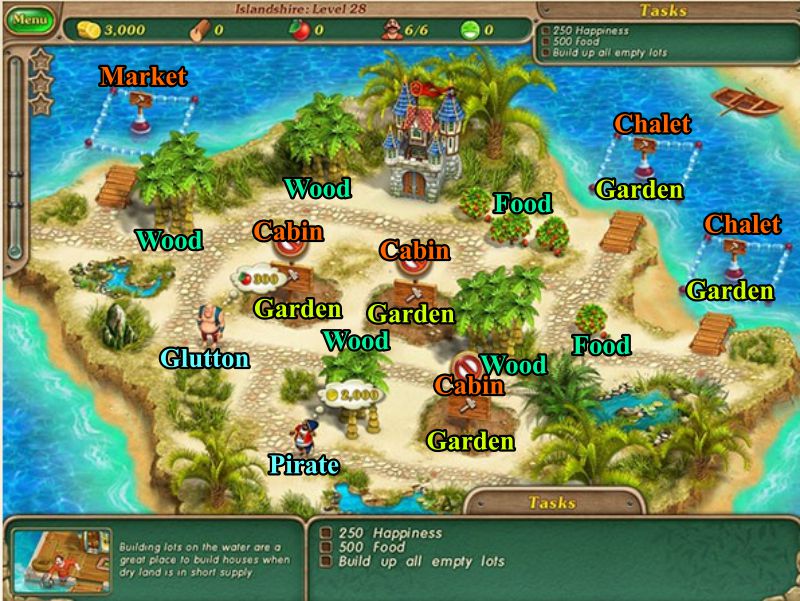
Level 28: Islandshire
Goal: 250 Happiness, 500 Food, and build on all the lot.
Resources: 3,000 Gold and 6 Workers.
You need 5 Houses of some type with Gardens in order to collect 250 Happiness points.
You can add building pads to the water building sites at a cost of 50 wood, 50 food, and 1 worker.
Chop all available wood and collect all available food.
Build a Market on one of your water lots and Chalets on the other two.
When you have purchased enough, give 300 food to the Glutton.
After you pay 2,000 gold to the Pirate, you will have enough wood to complete everything.
Chop down the trees and build Cabins on the 3 land lots, upgrade all your houses and give them Gardens.
Buy sufficient food to reach your goal.
Screenshot
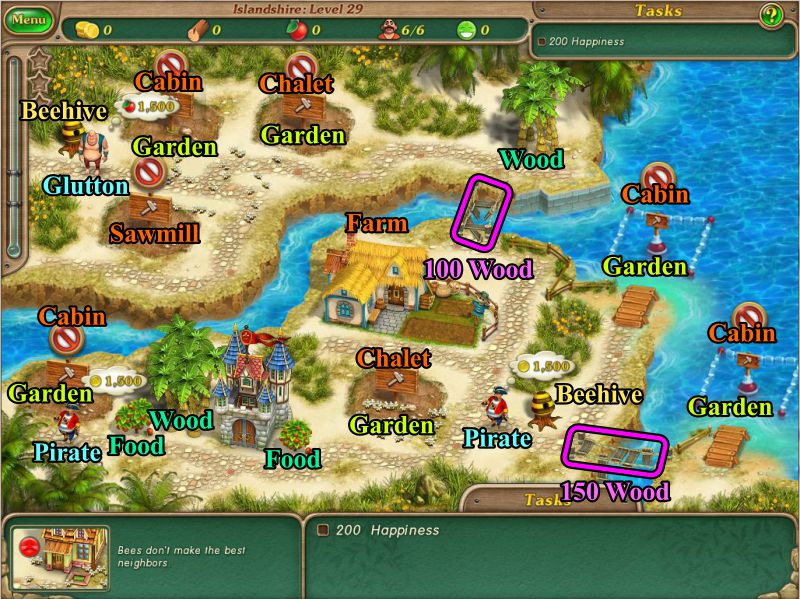
Level 29: Islandshire
Goal: Collect 200 Happiness.
Resources: 6 Workers.
Chop down available wood, collect food from the bushes, and summon 2 workers to the Farm.
When you have sufficient resources, build a Chalet with Garden next to the Castle.
100 Wood will repair the top bridge, so chop down the wood, build a Chalet with Garden on one of the lots, a Cabin with Garden on another, and a Sawmill.
If you don't build the Gardens right away, you will end up with negative Happiness points because the bees have a negative impact on nearby houses.
Forget the Glutton because you have no need to pay him off.
Once you have 1,500 gold, pay off the Pirate on the right by the Beehive, build the Beehive for 50 wood and 1 worker, and build the left building pad.
Put a Cabin with Garden on your water lot, repair the lower bridge for 150 wood, build another pad on your water lot and construct a Cabin with Garden.
Pay off the left Pirate, build a Cabin with Garden, and you have your 200 Happiness.
Screenshot
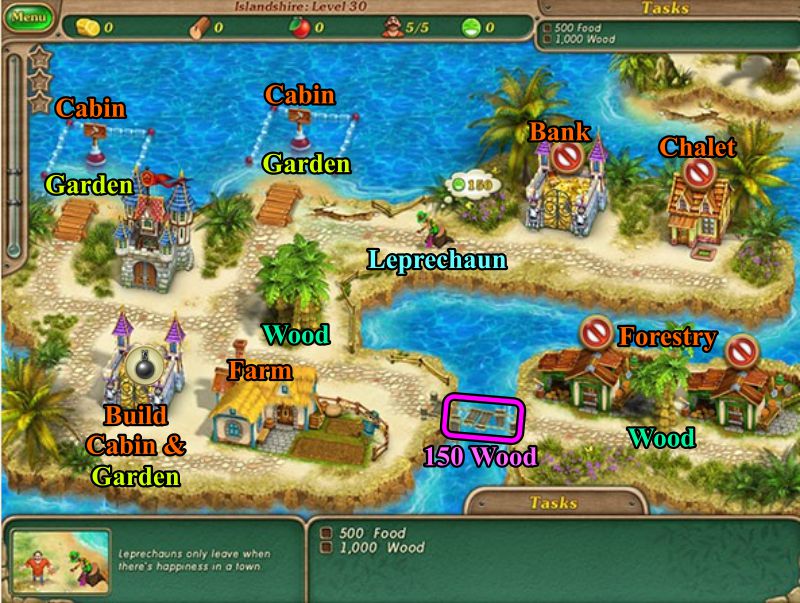
Level 30: Islandshire
Goal: 500 Food and 1,000 Wood.
Resources: 5 Workers.
Summon 2 workers to the Farm, chop down the trees for 150 wood, and demolish the bank to receive 50 each wood and food.
Repair the bridge for 200 wood in order to get access to the 2 Forestry buildings, and then summon 1 worker to each Forestry.
Have your other available worker chop the wood on the Forestry island.
When you have sufficient resources, construct building pads on your 2 water lots and build Cabins with Gardens on all 3 of your lots.
You should now have enough Happiness to give to the Leprechaun so you can gain access to the Bank and Chalet.
Each Forestry will only produce 250 wood before it runs out, so you will need to demolish one of your cabins and build a Sawmill in order to reach your goal of 1,000 wood.
Think about hiring another worker and upgrading your Chalet.
Screenshot
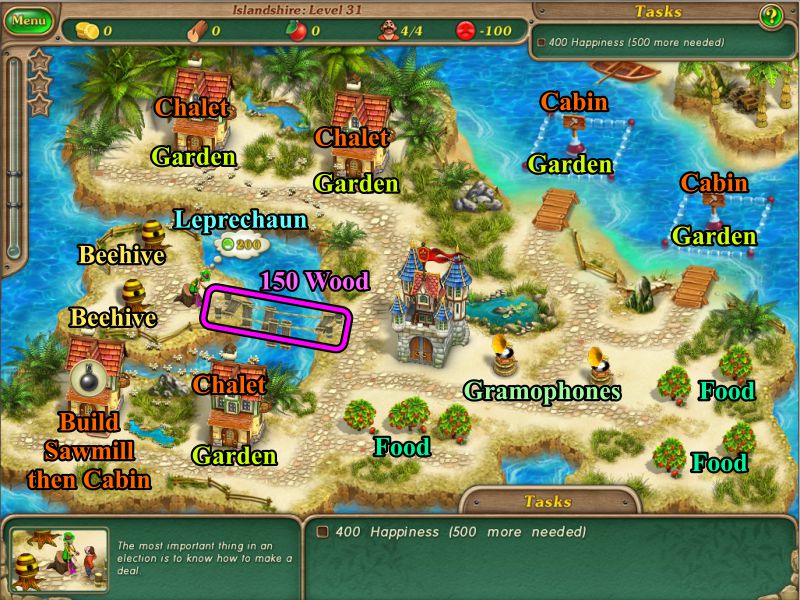
Level 31: Islandshire
Goal: 400 Happiness.
Resources: 4 Workers and 100 negative Happiness.
Collect all the available Food, add Gardens to 3 Chalets, and demolish one Chalet to build a Sawmill.
Once you have sufficient wood to repair the bridge and Cabins on your water lots, demolish the Sawmill and build a Cabin.
Add Gardens to your Cabins, make the Leprechaun happy, and build the 2 Behives.
Screenshot
Level 32: Islandshire
Goal: 10,000 Gold and build 6 houses of any type.
Resources: 2 Workers.
Use your workers to chop Wood and collect Food.
Once you have sufficient resources, build 2 Cabins on your vacant lots, and pay off the Glutton to get access to a third Cabin.
Build Gardens for all the Cabins and make the Leprechaun happy.
Chop the wood near the water lot, build on the building pad and a Market on it.
Upgrade one of the Cabins and repair the bridge.
When you have enough Gold, pay off the Pirate so you can hire another Worker at the now accessible Castle.
Remove the Obstruction, demolish 2 of the Chalets and restore the other one.
Build a Bank and 2 Cabins on your available lots, and collect your rents.
Screenshot
Level 33: Islandshire
Goal: 250 Happiness.
Resources: 8 Workers.
Demolish the Market and Sawmill that need repair and build new ones.
Summon 2 workers to the available Gold Mine that will run out of Gold once you collect 5,000 from it.
Build pads on your water lots and Cabins with Gardens on your 3 available lots, repair the damaged Gold Mine and summon 2 workers.
You now need 100 more Happiness so your choice whether you wish to pay off the Pirate and build on your water lots, or buy sufficient Wood and Food, demolish the Sawmill and Market in order to build 2 more Cabins with Gardens.
Screenshot
Level 34: Islandshire
Goal: Fill the Central Bank.
Resources: 5,000 Gold and 10 Workers.
Repairing the Central Bank takes 1,000 Wood.
Demolish 2 of the damaged Cottages to build a Market and Sawmill.
Forget about the Pirate because you don't need to worry about the Beehive.
Buy sufficient Food and Wood to restore the 5 Cottages and build a Cabin on the water lot.
Add Gardens to all your houses and make the Leprechaun happy so the Bank Tellers can go to the Central Bank and you can collect the Food available.
Deposit 10,000 Gold in the Central Bank by selecting it and making deposits 500 Gold at a time, but then disaster strikes again and the bank is robbed.
The robbers run to the rabbit holes that are created where the aqua circles are marked in the screenshot.
Click to catch as many robbers as you can, and once they stop their getaway, start filling up the bank with more gold deposits.
If you've lost too much Gold, you may want to demolish the Sawmill and Market to build Cabins on the lots, but make sure you have enough Wood before doing so.
Screenshot
Let us know if you need any other tips for Royal Envoy: Campaign for the Crown!
Posted by: Jazz |
September 12, 2013 11:55 PM
|
September 12, 2013 11:55 PM