

![]() Great, you've been called into work early. Well, at least you finally talked to that cute girl on the subway. This small victory is cut short however, when you get to the lab only to find your brilliant physicist boss has been the victim of a mysterious explosion. Was it an accident, or is someone after his Resonance research, which has the potential to change the world? Perhaps someone is trying to prevent the research from reaching the light of day? Enter Ed, the mild mannered scientist, and Anna the intelligent doctor with a troubled past. Meet Ray, the nosy investigative reporter, and Detective Bennett, the good cop... or is he? Fate pushes these four unlikely heroes together in Resonance, a classic style point-and-click adventure by xii games and Wadjet Eye Games, of Gemini Rue fame. Can the gang solve the mystery and recover the research? Or is one of them responsible for the crime?
Great, you've been called into work early. Well, at least you finally talked to that cute girl on the subway. This small victory is cut short however, when you get to the lab only to find your brilliant physicist boss has been the victim of a mysterious explosion. Was it an accident, or is someone after his Resonance research, which has the potential to change the world? Perhaps someone is trying to prevent the research from reaching the light of day? Enter Ed, the mild mannered scientist, and Anna the intelligent doctor with a troubled past. Meet Ray, the nosy investigative reporter, and Detective Bennett, the good cop... or is he? Fate pushes these four unlikely heroes together in Resonance, a classic style point-and-click adventure by xii games and Wadjet Eye Games, of Gemini Rue fame. Can the gang solve the mystery and recover the research? Or is one of them responsible for the crime?
 Any adventure game fan will be familiar with the basic controls of the game. For those new to the genre, simply click to move your character around the screen, click on an object to try to pick it up or otherwise interact with it, or right-click on an object for a detailed description. Click the inventory button to see what your character is holding, or to grab an object to use it to interact with the environment. Unique to Resonance are the the long and short term memory options. When your character has an important conversation, it will be stored in the long term memory. You can open this menu and revisit these conversations at any time, or click them during a dialog to talk about them with other characters. Short term memory works in a similar way, only you drag objects that may (or may not) be important, from the environment into the short term memory slots in order to bring them up in conversation with others at a later point in the game. Also singular to the game is the ability to play as all four characters, using another menu at the top of the screen to decide who you'd like to be.
Analysis: Resonance takes old-school, wraps it in a great story, and spits out a wonderful game with unique mechanics. The graphics wouldn't be out of place in any of the old Sierra adventure games in all their pixely glory. The memory options add a dimension and difficulty that a lot of point and click adventures are missing these days. The game is fully voice-acted, which is done well and really brings the characters to life. Detective Bennett is voiced by Logan Cunningham, well known in gaming circles as the voice in Bastion. The story is not totally linear, which is nice if you get stuck. If you do find yourself out of ideas, you can have the four main characters ask each other what they think should happen next. This can give you vague hints as to what you are supposed to accomplish next and how. The option of changing characters keeps the gameplay fresh, and there are parts of the plot that can only be completed by certain characters. Also several important scenes can be solved in more than one way. This is made even more interesting by involving some tough moral and ethical decisions in your choices.
 There are achievements included with the game, accessed through the main menu, but you aren't made aware of when you accomplish them, so they aren't really a driving force in the game. To get all of them would require playing the game through a second time, as some are linked to the different ways to solve puzzles. It would be nice to be able to change the resolution from the option menu, as I had an issue with it fitting on my screen without changing my monitor's resolution. There were also a couple times when I loaded and wished I could skip through a cut scene I had already watched. But these are minor complaints. The music throughout is very atmospheric, and adds to the moodiness of the game, while the unraveling story line will keep you coming back to find out what happens next. There is also a handy auto-rewind system, should one of your characters not make it through a tricky situation. So no worries if you're not a save-all-the-time freak like me.
All in all, Resonance is an excellent game, as one would expect from Wadjet Eye. It is challenging enough without being frustrating, and captures the nostalgia of the original adventure games perfectly, while adding a modern touch. Did I mention there are two endings depending on your choices? And that the game conveniently auto saves before the final scene so you can go back and experience them both? There is a lengthy demo available, but with over ten hours of gameplay, it's definitely worth the purchase price.
![]() Windows:
Windows:
Download the demo
Get the full version
Get the full version from GOG.com (includes bonus content)
![]() Mac OS X:
Mac OS X:
Not available.
Try Boot Camp or Parallels or CrossOver Games.


Walkthrough Guide
(Please allow page to fully load for spoiler tags to be functional.)
Resonance walkthrough
Basic Gameplay
The basic interface is similar to many modern adventure games. Left-click an area to walk there. Left-click a named area to interact with it. Right-click a named area to examine it.
The console appears when you move the mouse to the upper left corner of the screen. The console lets you access the menu screen, Inventory, Short-Term Memory, Long-Term Memory, and lets you switch characters.
To access the menu, click the red "power" button. You can set options, save, load, or quit.
To switch characters, move the mouse to the right side of the console, then pick your character. The character you are currently controlling has a red light flashing above.
To reveal your inventory, hover your mouse over the INV button.
Scroll through your inventory by moving your mouse to the top or bottom of the list of items.
Examine an item by right-clicking it.
Use an item by left-clicking it.
To use an item with something in the scene, click and drag it to where you want to use it. This is how you give characters an item. You can also combine items in your inventory this way.
To reveal your Short-Term Memory, hover your mouse over the STM button.
Short-Term Memory is sort of like your inventory, except that you can put any named person or object in your Short-Term Memory. Do this by clicking and dragging any named object to the upper left corner to reveal the console, then dragging it to the STM button.
Short-Term Memory is only used in dialogs.
To reveal your Long-Term Memory, hover your mouse over the LTM button.
Long-Term Memory is like Short-Term Memory, except that long-term memories are added automatically. Like Short-Term Memory, Long-Term Memory is only used in dialogs.
Some long-term memories belong to particular characters, while others are added to all characters (even ones that were formed where some characters weren't present).
Dialogs usually happen when you start a conversation with another character, but they also occur when you have several ways to interact with an object.
Click a dialog button to pick one of the available options.
If there is a square above the dialog options, you can also use an Inventory item or a Long-Term or Short-Term Memory to further the dialog. To do this, click the item or memory in question.
Instead of clicking on a character to start a conversation, you can click and drag a named object to that character to ask about that object.
To ask a player-character to follow a character you control, talk to that character and ask him or her to follow.
You can also ask player-characters for hints.
Get used to using Short-Term and Long-Term Memories to solve dialog puzzles. If it seems like there should be an option available that isn't, you either haven't looked at your available memories, or you haven't formed the required Short-Term Memory.
Main Walkthrough
Introducing Ed, Anna, Ray, and Bennet
Introduction
Click the hamper, then click the pants Ed pulls out to find the phone.
Walk right. The drawer is locked, but you can find the key atop the microwave on the floor along the left wall.
Use the key with the drawers on the left side of the desk (Go to your inventory and click and drag the key to the drawer. Access your inventory by opening the console hiding in the upper left corner and clicking INV).
Click to open the drawer. In your inventory, use the battery with the cell phone.
Click the phone in your inventory. Choose "Use Caller ID", then "Call Dr. Morales."
When he asks you if you have the equations, click the notes in your inventory if you picked them up already; otherwise, click "Hold On" and pick up the paper in the middle of the floor. Then use the phone and use the papers.
For the next four scenes, pick one of the squares to play the corresponding scene. The order doesn't matter.
6:55 (Ed)
Pick up the Coin the woman drops.
Click to start a conversation. She'll give you the brush-off if you try any of the conversation options offered (though attempting it will earn you an achievement).
Instead, click the Coin in your inventory to talk about it. Finish the conversation.
When the train stops, click on the doors to move them ajar.
Take the loose Pipe on the upper right of the door, then use the Pipe on the door to open it.
Exit into the darkness.
7:30 (Ray)
Check the notes in your smartphone to know what's going on. Note when Emma the secretary is supposed to leave.
Click and drag on the mainframe to your Short Term Memory (STM in the console).
Do the same with the clock.
Talk to Emma. Select the mainframe from your short term memory.
Keep talking and ask her about the clock. She'll leave.
Click the computer on the desk. Use the password cracker in Ray's inventory on the USB port on the bottom left corner to snag Emma's password. It's saved on your smartphone.
"password", naturally
Login to Emma's email. Read the "WHAT'S MY USER NAME?" email to get another email to check out.
Read the email in the "Drafts" menu for a clue for how to login the mainframe room.
Logout and enter "ajones" in the login field. Use the password cracker again to find the password. Again, it's saved on your smartphone.
"qwerty"
Login to enter Dr. Jones' email. Note his full name at the top of the email. You now have enough info to know his username for the mainframe.
Click "back" and use the terminal to the right of the mainframe. Enter Dr. Jones' username.
"alejon"
If you try any old password, it tells you to type "/help" for help. Do so (note the backslash).
Type "/passwordreset," then back out.
Go back to the computer and login to Dr. Jones' email. Check the "Antevorta Password Reset" email to get his password.
Go back to the terminal, login and use the password.
username "alejon", password "qp3a"
You also need a DNA sample. Check the drawer under the terminal to collect some swabs, useful for collecting DNA.
If you remember reading Emma's email to Dr. Jones, you should figure out where to find Dr. Jones' DNA.
He throws his cans away in the trashcan. Look in the trash and take the can. Use the swab on the can.
Login the terminal again and use the Can Swab in the slot that opens on the right side.
You're in! If you type "/help", you'll see all the available commands.
Type "/search". One option is to "search by sample," so let's try it: Type 3 and use the Can Swab in the slot.
Click the swabs to get Ray's sample, then run another "search by sample" with Ray's swabs (type "/back" to go back).
You've figured out what Ante Vorta is, but you still have another goal to complete. Type "/search", then "1", then enter the name you came to find. Look at your notes in your smartphone if you don't remember:
Search for "A Batra".
Note the file name. Head over to the filing cabinet.
Pick a drawer and type the name of the file to search for it. If you right-click the drawer, you'll know what files can be found inside.
Look for FJ437, in the top drawer
6:25 (Anna)
Quickly click the door to lock it.
Look at the teddy bear. Check out the Long Term Memory of the bear (Click LTM in the console) for a clue.
Right-click the Bear in your inventory to check it out. It's the code to the chest.
591 (It's viewed upside-down when you look at the bear)
Click the chest and click the numbers to enter the code. Click "Open the chest".
Take Anna's "treasure" and view the long-term memory.
Click the Treasure in your inventory to take a Coin (you have to view the long-term memory first).
Click under the bed (not on the bed) to hide.
Use the Coin to open the vent.
7:05 (Bennet)
The goal is to watch the suspect without him noticing. "Eyes in the back of my head" is actually a clue.
Pick up the crumbling brick on the right side of the Cell Fish store.
Use the Brick on the mirror of the stripped car to get the Mirror.
Click Bennet's wallet in the inventory to see its contents. Use the credit card on the yellow newspaper machine to get a paper.
Use the Brick on the Mirror in your inventory to get a Mirror Shard.
Use the Shard with the Paper, then use the Paper with the bus stop bench to nonchalantly observe the suspect without looking at him.
Juno Labs, Attack and Aftermath
Getting Inside Juno Labs
Talk to Saul the janitor to find out what happened.
Go towards the doors, then take a look at the concrete slab. Put the slab in your Short Term Memory.
Go back to Saul, talk to him, and ask him about the slab (using your Short Term Memory). He can't help, but this cues Bennet to show up.
You can now switch between characters by bringing up the console. Get both Ed and Bennet to move closer to the door by switching between them. You can also ask one character to follow the other.
Switch to Ed and ask Bennet about the slab. As he tries to move it, click on it to help him.
Look at the broken window and put it in your Short Term Memory. Ask Bennet about the window, and he'll give you a boost inside.
Stopping the leak
Chaos! Look at the door on the left to learn it's the maintenance door. Put it in your Short Term Memory.
Go back out, go back to Saul, and ask him about the door. He'll give you his Keys.
Get Bennet to boost you back inside, then use Saul's Keys on the maintenance door.
Pick up the Screwdriver and Duct Tape from the closet, then click the ladder so Bennet can come inside.
Use the Screwdriver on the ventilation access.
If you crawl in the vent, you'll find there's a leaky pipe that's blocking the sprinkler from flowing. You can't repair it without first turning the valve outside, and you need a wrench to turn it.
Put the valve in your Short-Term Memory, go outside, and talk to Saul about the valve. He says his wrench is in the maintenance closet, but you know it isn't.
Access Saul's Story from your Long-Term Memory. He'll give you his Wrench.
Go back in the lab. Ed isn't strong enough to use the Wrench, so give it to Bennet. Give him the Screwdriver while you're at it.
Have Ed crawl into the ventilation shaft and crawl forward to the leak, then switch to Bennet.
Use the Wrench on the valve and turn it to the right to stop the leak.
Use the screwdriver on the fuse box to the right of the valve to open it. Use it to turn off the power to the main hallway.
Switch to Ed. Click the rusty pipe where the leak was to disintegrate it.
Use the Pipe from the subway in its place, then use the Duct Tape to seal it in place.
Switch back to Bennet. Use the Wrench with the valve again and turn to the left.
Keypad puzzles
After Ed crawls down from the ventilation shaft, have Bennet use the panel leading into the security door.
Click the panel cover to remove it, then use the Screwdriver to remove the keypad.
Switch to Ed and have him use the panel. Complete the puzzle.
Turn the power off with the switch at the top.
Click the burnt wire to remove it.
To attempt to complete the puzzle, click the wires at the bottom of the keypad, then click the primary pin at the top of the circuit board, then thread the wire through the proper pins and click on the terminal pin.
Primary and Terminal Pins
Each pin has a unique numerical value, most of which are negative, a few of which are positive. When you turn the switch back on, the sum of the values of the pins the wire contacts is shown by the indicator lights at the bottom of the circuit board.
To find the values of each pin, start by connecting the wire to the southwest or southeast pin only (if the pins were a phone keypad, they would be numbered 7 and 9 respectively). Note that you don't have to trace the paths to the pins embossed on the circuit board.
Flick the switch on, and you'll see the value of those pins. Just count the indicators that light up at the bottom of the circuit board.
Turn the switch off, click the wire, and then the primary pin, to try another set of pins.
By combining pins you know the value of with ones you don't, you can use some basic algebra to figure out the value of each pin. The values of each pin are shown below.
-3 -5 -4-6 -1 -8
+17 -9 +12
Pin values
The solution is shown below. Flick the switch, and the door will open.
Solution
Go through the door and use the door to Dr. Morales' lab. It's the nearest door on the right wall of the main entrance.
Use the keypad at the base of the simulator to open it.
You can tell it's a four-digit code, and given the wear on the keypad, you can tell the code has at least one 1, 3, and 4.
You can figure out the solution by methodical trial-and-error. Or, if you look at the terminal on the left side of the screen, you'll find a reference to a famous irrational number that's also a clue to the keycode.
3141 (the first four digits of pi)
Hospital
Watch the cutscenes.
When the Journal comes up, look at Anna's Hospital ID. Note her birthday: it's the code for the Journal:
422
Anna's Dream
Click and hold left to crawl around the ducts. The scene will spin around periodically to represent Anna's disorientation.
As you crawl around, look for hatches, so you can fall to the next level of the maze.
Also, look for memories, represented by electric-blue orbs. The memory gives you a clue to keep from getting lost.
Use the coins in your inventory anywhere you want to mark a passage to keep from getting lost. This is especially helpful at intersections.
When you get to the end of the final level, you can choose to wake up, or to go back to try and collect any memories you may have missed. Doing the latter will earn you an achievement.
Anna's escape
This seems familiar. Quickly use the bookshelf, then choose to push it so you block the door.
Use the window to open it and exit to the fire escape.
Go down the ladders until you get to the broken ladder. Use the mechanism.
Since it's broken, you can't fully lower the ladder. Instead, click the release button in the middle of the mechanism to get the crank.
Go up the ladders until you get to another ladder mechanism. Click the mechanism, use the Crank, then click and drag to turn it to raise the ladder to the roof.
Go up and click the broken window of the rooftop access to get a Shard of glass.
Use the Shard on the rope. Click and drag it to slowly slice through the rope. You have to be slow enough so you can still slice through the rope, but quick enough so that the intruder doesn't catch you. Just stay calm and you ought to be able to just beat him.
Morales' Vault
Making plans
Watch the cutscenes and complete the conversations.
When Ray shows up, use Bennet's Long Term Memory to remember that you saw Ray at the hospital.
Complete the conversations for the evening and morning at the park.
Javier Morales' Financial Records
$10,000?
Have Ray go to National Credit Systems. Click on the red curtain to talk to Ozzie.
Pick up the bottle. Look at it to see it's "Comfocil".
Switch to Anna. Go to the hospital ICU.
Go left of the desk and look at files until you find a patient that needs Comfocil. It's in the lower file near the left door.
Note the code.
Look at the AutoPharm machine. Use Anna's ID.
Use the code from the file.
8468-E
Take the bottle.
Javier Morales' FTTN
Have Ray give his Swabs to Anna.
Have Anna go to the morgue. Use her ID in the card reader in the elevator at the hospital, then click "9".
Use the Swabs with Morales' body to get Morales' Swab. Grab the Death Certificate from the examining table on the left.
Give Morales' Swab to Ray. Switch to Ray and have him go to the 7th floor of the hospital.
Put the Mainframe in your Short-Term Memory, then talk to Emma the secretary about the Mainframe.
Use the terminal. Type "/search", then "3", then insert Morales' Swab. Ray will write down Morales' FTTN for your inventory.
Javier's Credit Records and Will
Have Ray and Anna go to National Credit Systems.
Have Ray use the FTTN number with the red curtain.
Have Anna do the same with the Prescription Meds.
Look at the records in Anna's inventory. Head to Tortoise Security.
Ring the bell on the counter to summon Tortoise. Talk to Tortoise about Javier's records. A new entry appears in all the characters' Long Term Memory: "Get will and death cert."
Have Bennet go to Police Administration. Go upstairs and through the passage on the left.
Keep going left and talk to Officer Johnson. Ask about the Will from your Long-Term Memory. Click the City Archive terminal when prompted, then click again to scan your fingerprint.
Give the Will to Anna, then have her and Bennet go to Tortoise Security.
Give him the Will and the Death Certificate (which Anna can find in the morgue at the hospital).
Take the Photo from Tortoise.
Vault Plans
Show the Photo Tortoise give Anna (after giving him Javier's Will and Death Certificate) to Bennet. Use "The Alleyway Door" from Bennet's Long-Term Memory.
At the alley, look at Bennet's "The Alleyway Door" Long-Term Memory. Note the knocking pattern.
Use the middle door. Pick the dialog options for the pattern of knocks, then select "Stop knocking" to enter the pattern.
Pick "knock twice," "knock once," then "knock three times."
Watch the scene to get a Paper Swan.
Back at the baseball fields, use the Paper Swan in Bennet's inventory to unfold it. It's the Vault Plans.
Juno Lab Blueprints
Tortoise's Puzzle Safe
Have Anna go to the morgue. Use her ID in the card reader in the elevator at the hospital, then click "9".
Take the Ultra Sonograph from the examining table on the right.
Go to Tortoise Security. Tortoise Security will show up on the map when you look at Javier's credit records, or at the certificate on the left wall of the police archives in Police Administration.
Use the Sonograph on the puzzle safe.
Pick a side. Click and drag the Sonograph from left to right to see inside the puzzle.
Click and drag the hexagon button in the middle of the screen to move the small bracket into the highlighted area. Click the button on the right to reset.
Repeat for each side. Solutions are as follows:
For these solutions, D = down, U = up, L = left, and R = right.
Blue:
The solution is at the bottom-left corner. Starting from the center, drag the button D, R, U, U, L, L, D, D.
Green:
The solution is at the left-center. Starting from the center, drag the button R, U, moving the small bracket to the top right corner.
From there, drag the button L, D, R, D, L, so you're inside the C-shaped bracket. From there, move U, U, L, to get the C-shaped bracket out of the way in the upper left corner.
Then drag the button to R, D, L, D, so it's inside the U-shaped bracket. Move R, R, so the U-shaped bracket is below the small bracket.
From there, move U, L, U, R, then D, D, so the small bracket is inside the U-shaped bracket. Then move to L, L, to the solution.
Yellow:
The solution is at the left-center. Starting from the center, drag the button L, moving the large U-shaped bracket with it.
Move U, R, R, then D, D, so the other large bracket is in the bottom-right corner.
From there, drag the button L, U, U, L, D, so it's inside the U-shaped bracket, then drag R to move the bracket to the right.
Drag the button U, L, D, D, so it's inside the little bracket, then move R, R, so the little bracket is inside the big bracket in the bottom right corner.
Move U, U, L, L, D to the solution.
Red:
The solution is at the upper-right. Starting from the center, drag the button D, R, U, U, so you move two of the large brackets out of the way to the bottom right and upper right corners.
From there, move D, L, L, D, moving the small bracket to the bottom-left corner.
Drag the button R, U, U, L, moving the last large bracket to the upper-left corner.
Drag the button D, R, D, L, U, to return the small bracket to its starting point.
From there, move R, R, D, L, to return the U-shaped bracket to its starting point.
Drag the button U, L, so it's inside the small bracket. Then move U, R, D, D, R, U, U, to the solution.
Once the Puzzle Safe is solved, asked Tortoise how to get into the city archives. He gives you the Master Keycard.
Infiltrating the Archives
Give Ray the Master Keycard.
Have Bennet, Ray, and Anna go to Police Administration. Have Bennet go upstairs, taking Ray with him when prompted.
Have Bennet go left to the archive room. If you talk to Johnsen about his duties, you'll learn that they partly deal with helping technophobes like Bennet in the copy room.
Put the Copy Room door (just to the right of Johnsen's desk) in your Short-Term Memory, then ask Johnsen about the copy room.
Johnsen is out of the way, but Officer Berry still needs to be distracted before Ray can proceed into the Archives. There are two ways to do this:
Wait for Berry to get a phone call, then send Ray down the hall when Berry begins speaking.
Or, switch to Anna, put the Control Panel in her Short-Term Memory, then ask Berry about the Control Panel. Switch to Ray and send him down the hall while he's distracted.
Hacking the Archives
Have Ray use Johnsen's computer. Click the space in the lower right to reveal the USB slot, then use the Password Cracker to get his password. Click "Enter" on the screen.
You can't make a new file search, but you can view the two most recent searches and their locations in the archives by clicking "Recent Documents".
Logout, then use the Master Keycard (which Tortoise gives you upon completing his safe) with the City Archive terminal. Click "Retrieval Arm Manual Alignment."
Center the recticle on the cross on the file you want to calibrate to so it turns green. Move the camera with the big arrow buttons, and change rows with the smaller buttons in the upper right.
Remember that you want to misalign the arm so that it grabs the blueprints when you ask for another file (Morales' Will, in this case). Example solution:
Say the Will is in I-11 and the blueprints are in H-09. This means the Will is one letter more and two numbers more than the the blueprints.
A properly calibrated arm is centered on M-20, but you want to misalign it so that it is one letter less and two numbers less than that.
L-18
Send Ray down the hall to the right. He's caught, but it's not that big a deal.
Switch to Bennet and Interrupt his scintillating conversation with Johnsen.
Ask Johnsen for another copy of the will (via Long-Term Memory). Use the City Archive terminal again, and you should get the Lab Blueprints.
Angelo's Grave
Have Anna talk to Ed about Angelo's grave. Watch the cutscenes.
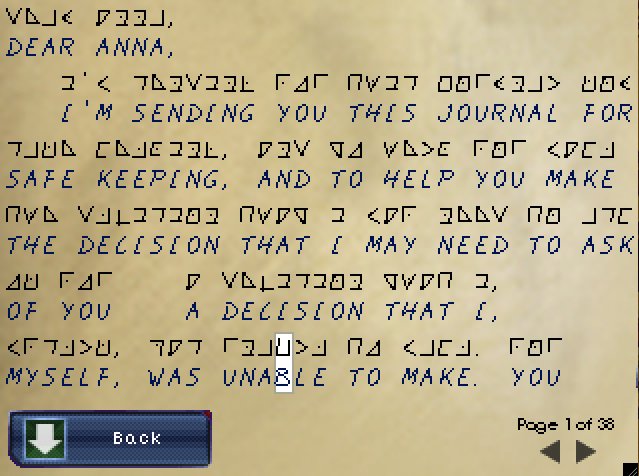
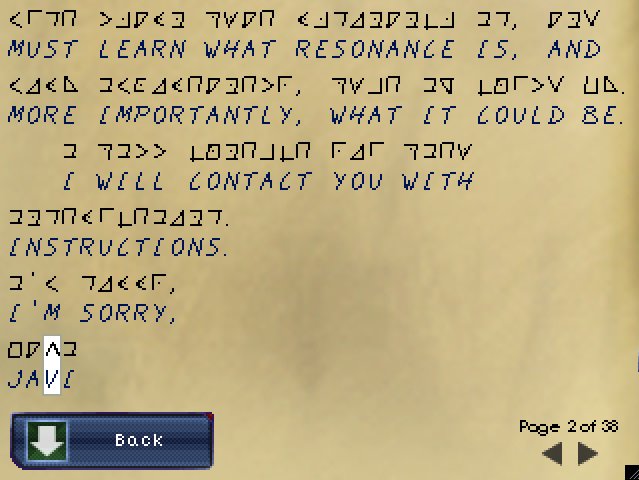
Javier's Journal
Use the Journal in Anna's inventory.
It's basically a cryptogram. Click a symbol, then type in a letter to assign that letter everywhere the symbol appears.
Some letters correspond to more than one symbol.
Hint: The first two words on the first page are
Dear Anna
The first two pages will get you most of the symbols you need. Read the rest of the journal, filling in missing letters as needed.
Page 1
Page 2
Finding the Vault
Have Bennet give Ed the Vault Plans, then have Ed go to Morales' Lab at Juno Labs.
Examine the Vault Plans (which Bennet got from the room in the alleyway). Note the temperature.
Have Ed use the terminal near the door on the left. Click the screen to access the terminal.
Go to "Utilities," then "Thermal Scan." Enter the temperature written on the vault plans using the slider on the left side of the screen.
185°
You have to scan one floor at a time. Do so by picking a floor using the slider on the right, then clicking the "Scan for Anomaly" button. Keep searching until Ed finds what he's looking for.
The vault is on B8
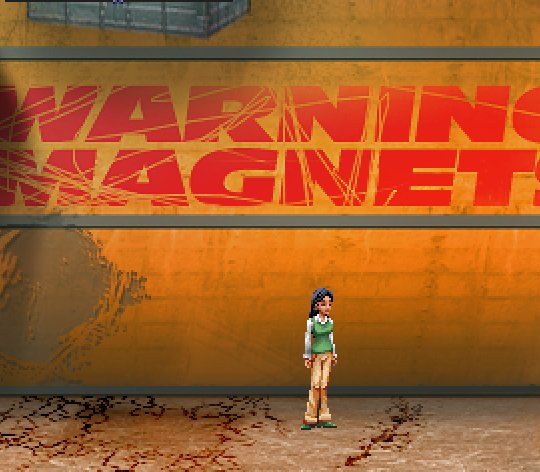
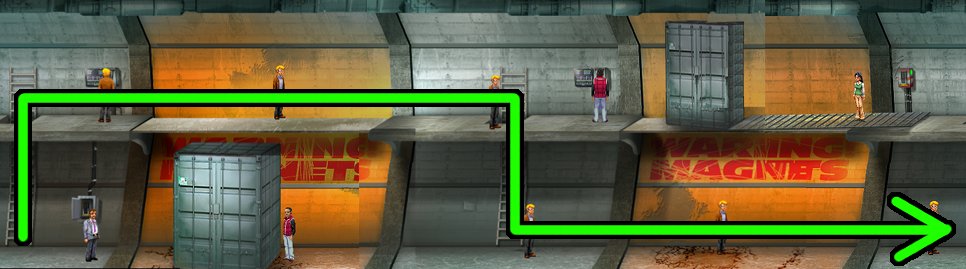
The Magnetic Tunnels
Get to the end of the tunnels, using the magnets and walkways to clear the path.
Anyone can use any of the switches, but only Ray and Anna can walk under a magnet while it is on.
A character needs to be holding a switch for a magnet to keep it turned on.
The walkway switch and fusebox won't operate if there is a crate on the walkway.
For these steps, you could use Bennet instead of Ed, and have Ray and Anna take each others steps.
Send Ed down the hall and have him open and turn on the fuse box. Send him up the ladder and have him turn on the first magnet.
Send Ray down the hall, under the first magnet, and up the second ladder. Have him turn on the second magnet.
Send Anna all the way down the end of the hall and open and use the fuse box near the door. This activates power to the walkways.
Have Ray release his magnet, then turn it on again.
Have Anna stand under the second magnet, the one Ray is operating. Position her between the two damaged areas on the floor.
Screenshot
Now that she is safely positioned, have Ray release his magnet. The crate should land to Anna's left, and the ramp to her right.
Have Anna go up the ramp so she has access to the walkway switch.
Have Ray turn his magnet on again, and have Ed turn his off.
Have Anna turn on the switch to deploy the walkways.
Move Anna a little to the right, so she won't be crushed by the ramp. Then have Ray turn his magnet off.
All the magnets should be off, and there should be a clear path to the door. Have Ed walk to the right across the walkway, then down the ladder, then under the second magnet and to the right.
Have Bennet follow Ed's path: Up the first ladder, across the first walkway, down the second ladder, and continuing to the right.
The clear path
With Ed and Bennet safely on the other side, have Ray turn his magnet on again, and have Ed turn the fusebox for the walkway off.
Get Anna out of the way and have Ray turn his magnet off. Send Anna down the ramp so she is standing between it and the crate.
Have Ray turn the magnet on again, then Ed turn the fusebox on again.
Have Anna head right to the door. Have Ray release the magnet, climb down the ladder, and follow Anna's steps.
Click the door to open it and enter.
Getting into the Vault Room
After the cut scene, look at the fuse panel on the right side of the console. Take the Pencil and the Small Box.
Use the Box in your inventory to get the Fuse.
Look at the Yellow Pad, in the middle of the console. Use the Pencil and click and drag it across the pad until you reveal and eight-digit code.
Use the Door Keypad to open the door on the left.
Have Ray give his Pipe to Ed. Look in Ed's inventory and use the Duct Tape with the Pipe.
Use the bars, then use the Pipe with Tape to retrieve the Fuse on the floor on the other side of the bars.
Give all the Fuses to the same character and have that character look at the fuse panel again. Take the last Fuse from its slot.
If you try to put all the Fuses back in, you'll discover that one of them won't go in. Examine it in your inventory and click the bent pin to straighten it.
Note that the Fuse has a number. Examine each Fuse to see what number it is.
Put all the Fuses back in their slots. Put Fuse 1 in the top slot, 3 in the middle, and 2 in the bottom (it actually doesn't matter which Fuse goes where, but this will correspond to the keypad solution below).
Zoom in on the Small Keypad on the left side of the console. There should be three buttons lit up, each connected to three fuse icons. If you followed the step above, the left button is 1, the middle is 2, and the right is 3.
Enter the eight-digit code you revealed from the yellow pad:
31322133
Opening the Vault
Have Anna use the Vault computer. When it asks for a key phrase, go back.
Head up the stairs and watch the cutscenes.
Zoom in on Anna's uncle's tombstone. But which uncle?
If Javi was Anna's father, like he said, then your "Father's Tombstone" is really your uncle's tombstone.
Use the Uncle's Key on the tombstone, then click and drag the pencil as before to reveal the key phrase:
"Te promoto" (which means "I promise you")
Enter the key phrase, then click "OK."
Watch the cutscene, then hit "Play" to watch Javier's video.
Choose to "Destroy Vault" or "Open Vault."
The scene switches to Ray. Start asking questions, and pick "What about the note?" when that option becomes available.
Pick Bennet's Letter from your Long-Term Memory and watch the scene. Then pick Morales' Note.
When Bennet asks you to "connect the dots," use the item in your inventory that can answer his question:
Maybe you noticed that Ed's commute and Anna's commute can't possibly overlap?
Use the Subway Map.
And now we have our bad guy. You'll never make it to the door keypad; instead, use the fuse panel to unplug the fuses.
Finding a Killer
Talk to Reggie
Ray and Bennet reconnoiter at the baseball fields. When Reggie shows up, ask him what he means.
When he asks why he should believe you, use "The Blackout" from your Long-Term Memory.
When he asks what you're going to do next, use "The Alley Door" from your Long-Term Memory.
Take the Paper Swan from Reg. Head to Edgetown.
Edgetown
Click the Paper Swan in Bennet's inventory, then examine it for a clue.
Go down the alley. Use door XI and enter the secret knock. If you use the knock from before, you'll find that it's been changed. The note on the Paper Swan has a clue.
The first line says "Once four, now two."
Use the door and pick "Knock once," "knock four times," "knock twice," then "stop knocking."
Enter the door.
Hey, we know who this guy is! Go through all the conversation options, saving "Arrest them" for last.
When Amul asks for evidence, use the Surveillance Photo from Bennet's inventory.
Continue the interview. Ask how to stop Ed.
When the conversation ends, Amul gives you a Compass. Use the Compass with the Subway Map in Ray's inventory.
Click the scale at the top of the map so that the compass has a radius of 4 km, like Amul said.
Click Juno Labs on the map to find where the blast came from:
Go to Ed's apartment.
Phone Numbers
Ed's Apartment
Open the Cabinet Door to reclaim Ed's inventory.
Take the Resonance Device from the tripod in Ed's apartment.
Use it in your inventory to get a phone number, 14B, which will go into everyone's Long-Term Memory.
Check the text messages to get another phone number, 14A, which will also go into everyone's Long-Term Memory.
Have Ray call Reggie. Do this by using the Smart Phone from Ray's inventory, then clicking the Phone button, then picking Reggie's Number from the Long-Term Memory.
Ask Reggie about the 14A number (from your Long-Term Memory).
Head to Police Administration.
Police Administration
Go upstairs and down the hall to the right.
Use Bennet's Credit Card on the Tech Room door to open it. Enter the Tech Room.
Examine the magnetic lock to the cage. Note the serial number.
Go downstairs and use the Control Panel on the left side (i.e. "Oink's favorite toy").
Click the screen, then click the "Manage" button in the magnetic locks panel in the lower left. Enter the serial number for the lock and hit the green button to unlock it:
8422
Go back to the tech room. You should be able to open the cage door now by clicking on the lock.
Use the Terminal Screen. Trace the 14A number (from your Long-Term Memory) when prompted.
Use the Screwdriver (probably in Bennet's inventory) on the Magnet on the cage door to take it (it's what grabs the magnetic lock).
There's an Ultra-Sonograph on the foreground table: take it if you don't have the one from the hospital.
Leave Police Administration and head to the warehouse.
The Warehouse
Have Ray call the 14A number. It's coming from inside the warehouse!
Look at the Sticky Note on the forklift. Note the clue.
Examine the lockers until you find Todd's locker.
Use the Sonograph on the locker to see inside it. Click and drag the Sonograph to deploy it.
Scroll up and down until you find the key. Use the Magnet (from the cage door in the tech room at Police Administration) on the key.
Click and drag the Magnet to maneuver the key where you can get it. The coat is pressed against the locker in places, so you have to move the magnet down and around the coat, then up to the top vent.
Don't move too fast, or you'll drop the magnet.
Move the key with the magnet to the large gap in the top vent of the locker to get the Forklift Key.
Use the Forklift Key with the forklift to turn it on.
Have Ray stand on the forklift forks, then have Bennet use the forklift.
Click and drag the green lever into the green zone, then move the red lever up until the forklift extends as high as it will go.
Move the green lever into the blue zone and move the red lever up to extend the forklift further up.
Ray should be able to access the second floor now. Go back and switch to Ray.
Have Ray call 14A again. Click the glowing pipe to grab the other Resonance Device.
Stand on the forklift again and have Bennet use the forklift to bring Ray down. Use the levers as before, pulling the red lever down this time.
Use Resonance Device A in Ray's inventory to look at the phone. Check the text messages for another phone number.
Trace Ed's Phone
Go back to the tech room at Police Administration. Use the Terminal Screen to trace the Cellfish Number. Bennet won't be able to trace it, but suggests Ray trying calling Ed to see if the line can be traced.
If you ask "What do I say?", Bennet mentions to be aggressive first, then interrogative.
Pick "I'm calling him now" to call Ed. Using Bennet's advice, try to keep Ed on the line as long as possible.
General advice: Be pushy, but don't be too pushy. Don't make him think you're going to get him.
When Ray says, "Make me understand," switch to interrogation.
When Ed says, "I don't have time for all your questions," switch to aggression.
The following sequence works, but other sequences are possible:
Go aggressive.—Threaten to write about him.
Tell him he betrayed you.
Go interrogative.—Ask why he did it.
Ask about Amul and Reno.
Showdown
At the hospital, go upstairs to the seventh floor.
As Emma about the DNA database to find out where Ed is.
Go to the basement. You can kick in all the maintenance doors without a problem, but what you're looking for is in the door at the end of the hallway.
Take the Live Resonance Device, then head to the first floor.
Go through the gate on the left (someone managed to unlock it). Watch the cutscene.
Use the crane elevator to ride to the top of the crane. There are two endings to choose from:
Stop Ed
While talking, have whoever is holding the Resonance Device take a step back.
Then have the other guy alternate between stepping forward and talking to Ed.
Ed will say time is up when he's in the middle of the crane, hopefully while halfway between two resonance devices.
Watch the cutscenes. When Ray's phone comes up, choose to either Publish or Delete. Watch the credits.
Stop Antevorta
Have Ray say "You're a sociopath."
Then ask "How do we stop them?"
Then choose to tell Ed about the Resonance Device. Pick "News Reports" from your Long Term Memory to steel your resolve.
Watch the cutscenes. Watch the credits.
Posted by: Mike |
June 19, 2012 3:22 PM
|
June 19, 2012 3:22 PM