
PuppetShow: Return to Joyville
Platform: Mac, Windows

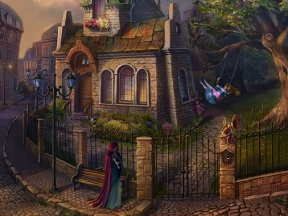
![]() The living, walking, ne'er-do-gooding puppets are back in ERS Game Studio's latest hidden object adventure hybrid, PuppetShow: Return to Joyville. The latest in the PuppetShow series goes back to the beginning to visit what is possibly the most imprecisely named place since Greenland. As an unnamed detective, you are here to help the old and decrepit Felicia who has traveled back in time to save her father, the maker of living puppets, and her younger self from the terrible fire that started the whole mess. Armed with tomorrow's newspaper, you immediately set forth to fix what is broken so you can get yourself back to the (not-as dismal) future!
The living, walking, ne'er-do-gooding puppets are back in ERS Game Studio's latest hidden object adventure hybrid, PuppetShow: Return to Joyville. The latest in the PuppetShow series goes back to the beginning to visit what is possibly the most imprecisely named place since Greenland. As an unnamed detective, you are here to help the old and decrepit Felicia who has traveled back in time to save her father, the maker of living puppets, and her younger self from the terrible fire that started the whole mess. Armed with tomorrow's newspaper, you immediately set forth to fix what is broken so you can get yourself back to the (not-as dismal) future!
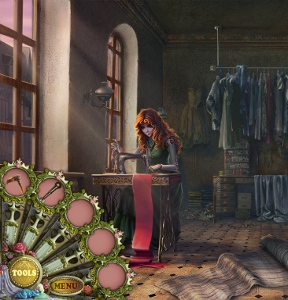
 PuppetShow: Return to Joyville situates itself a few seats closer to the adventure section in the theater of casual hidden object games. You'll spend more time exploring, picking up items, and solving puzzles than you will sifting through crowded screens of unusual items, which definitely works in the game's favor. Some puzzles function as little mini-games (mini-mini-games?) that only take a few moments to complete, but breaking up the detective work is an important part of the experience, as it can get pretty intense dealing with freaky automaton puppets that inhabit the town. Seriously, who thought living mannequins were a good idea?
Analysis: ERS Game Studio knows its casual adventure games, as evidenced in the previous PuppetShow releases, as well as nearly two dozen other games like the Dark Tales series or Redemption Cemetery series. The formula stays pretty similar for each title, sticking close to a horror theme while wrapping hidden object puzzles around a reliable adventure backbone. Even with an obvious design, PuppetShow: Return to Joyville spins a great tale with a fantastic atmosphere.
 Some of the puzzle solutions in Return to Joyville sit on the border of obtuse, mostly because the game requires a specific item to solve a riddle, even though several other objects in your tool belt would do the job just as well. The hint system (and in-game strategy guide in the Collector's Edition) do a good job smoothing over those rough edges, and three selectable difficulty levels allow you to customize the challenge to your liking. Hidden object scenes are short, easy, and unfortunately repetitive, as you'll visit identical areas multiple times to look for key items.
If you're not familiar with the first three PuppetShow games, you don't have to worry about playing catch-up before diving in to Return to Joyville. The story is self-contained enough to keep you interested even if you don't know the first thing about the series. The level of challenge will suit just about everyone, especially since you can change it on the fly, and the animations and visuals are the usual top-notch ERS fare. It may be a predictable experience, but even if you know what to expect, that doesn't change how good it is!
A Collector's Edition is also available. It contains bonus gameplay, an in-game strategy guide, wallpapers, concept art, a soundtrack, and more. Remember that Big Fish Game Club Members pay only $13.99 for Collector's Editions (or 2 club credits), and collector's editions count 3 card punches of 6 total needed for a free game.
![]() Windows:
Windows:
Download the demo
Get the full version
Also available: Collector's Edition
![]() Mac OS X:
Mac OS X:
Download the demo
Get the full version
Also available: Collector's Edition


Walkthrough Guide
(Please allow page to fully load for spoiler tags to be functional.)
Puppet Show: Return to Joyville
Starting Information
From the options menu, you will have the options to change the music and sound volume.
You can also change your screen size between full screen and widescreen.
You can choose to opt out of using the custom cursor and use the normal arrow instead.
Clicking on the More Info tab will give you the option to select the help button or the credits button. There's also an option to take you to forums for the game.
After clicking play, you will be presented with three different difficulty options:
Casual: The hint and skip options recharge rapidly, and active areas will sparkle.
Advanced: The hint and skip options recharge slowly, and active areas will have no indicative sparkles.
Hard: Hint and skip options recharge very slowly, and active areas will have no indicative sparkles. The black bar tips will also not be available.
Your difficulty can be changed at any time during the game.
On the bottom left of your screen is the tools button, which is where your inventory items go. You must click on it in order to reveal the inventory items.
The menu button is also on the bottom left of the screen. Clicking on this allows you to access the options button, credits, return to game, and exit.
On the bottom right side of the screen is your hint button.
Also on the bottom right are your notes, which will update as information becomes available. Helpful tips will be found here.
When you start the game, there is a tutorial you can choose to do or to skip.
Your cursor will change to a magnifying glass when you hover over an area that can be investigated or is a hidden object scene.
The cursor will change to a hand when hovering over something that can be picked up.
The cursor will change to an arrow when you can go into another location.
Hidden object scenes are randomized and what is written in the walkthrough may not match what you have.
Items written in red for a hidden object scene require an extra action to reveal or create the item.
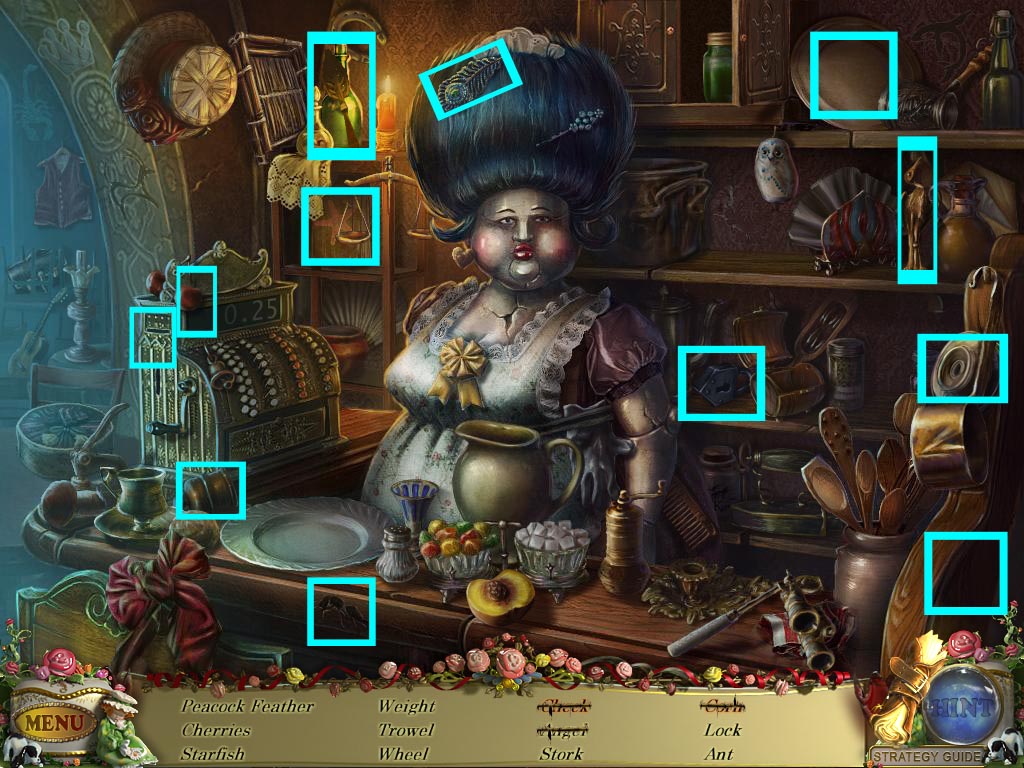
Chapter One: The Puppeteer's House
Getting the Fader
Click on the woman to start and get some information.
Pick up the newspaper she's holding.
Investigate the bench to the left of the gates.
Click on the cork on the top of the jar to receive it.
Inspect the boy with the horn at the top right of the gates, then open your tools to pick up the cork and use it on the horn.
Go forward through the gate.
Click on the window to see the cat puppet being wound up, then pick up the latch knob that's in the bushes to your right.
Go forward to the backyard and click on the suitcase.
Pick up the razor.
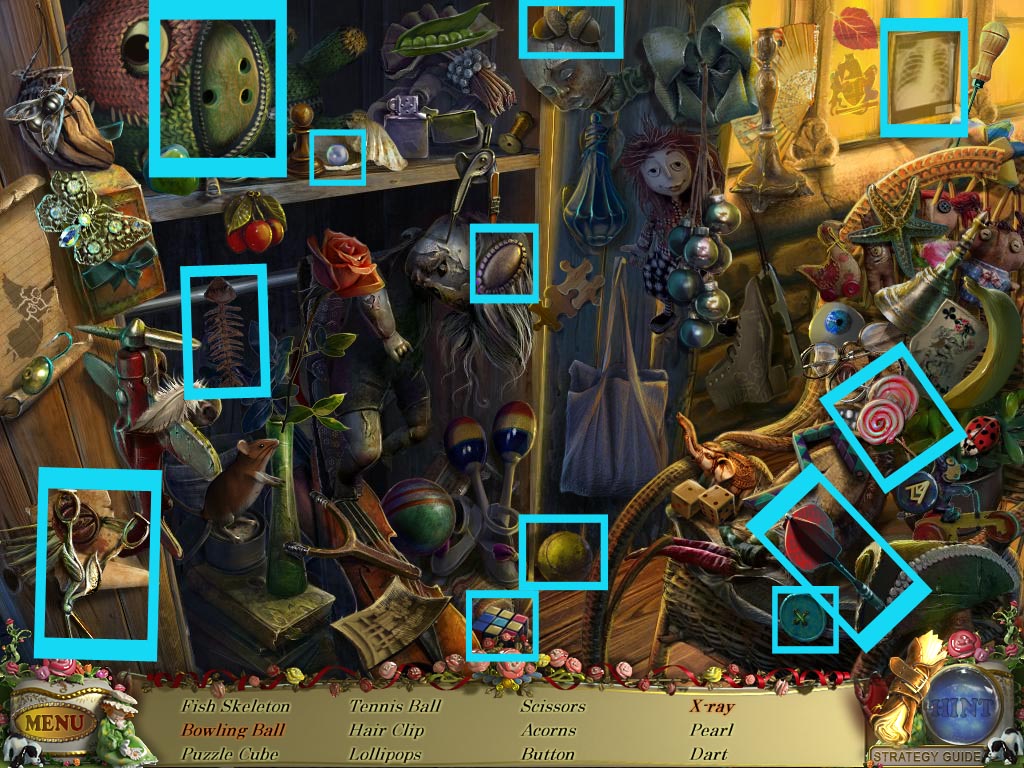
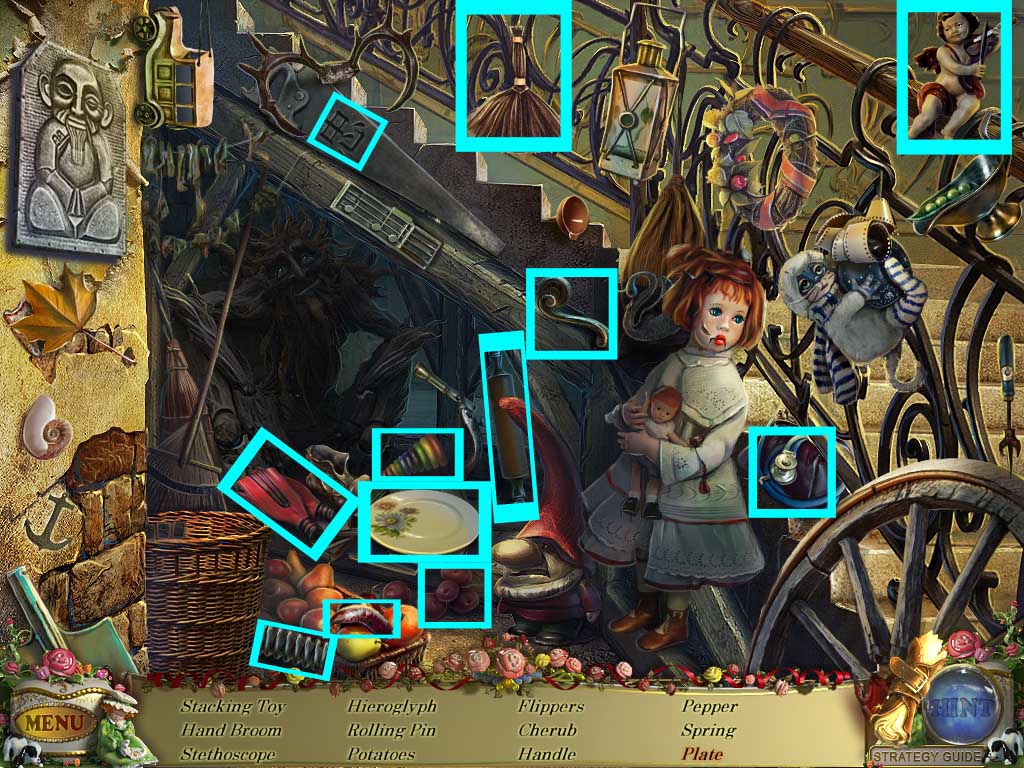
Investigate the latch to the right of the door and place the latch knob on it. This will start a hidden object scene.
To reveal the x-ray, click on the black sheet of paper and it will create the xray on the window.
To get the bowling ball, click on the zipper bag with the eye on it.
Screenshot
You receive a ball.
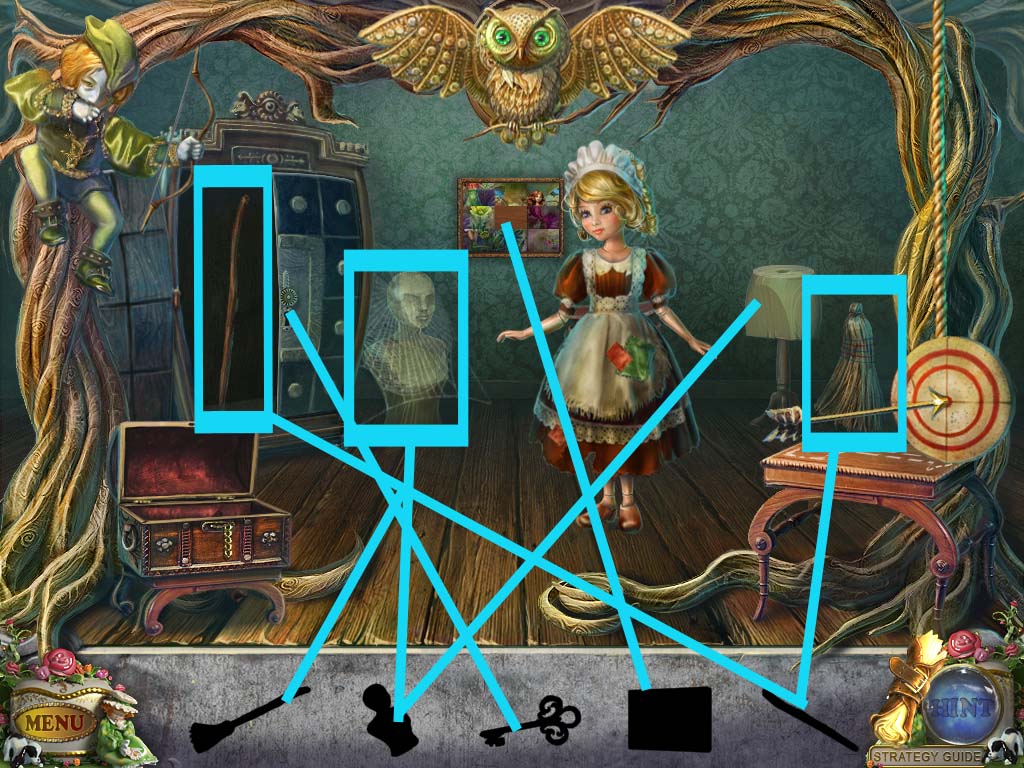
Go through the door into the house and click on the puppet master.
Give him the newspaper.
After he leaves, investigate his desk and read the letter from Cricks, then pick up the telescope.
Click on the umbrella holder to the back left and pick up the cane and elastic band.
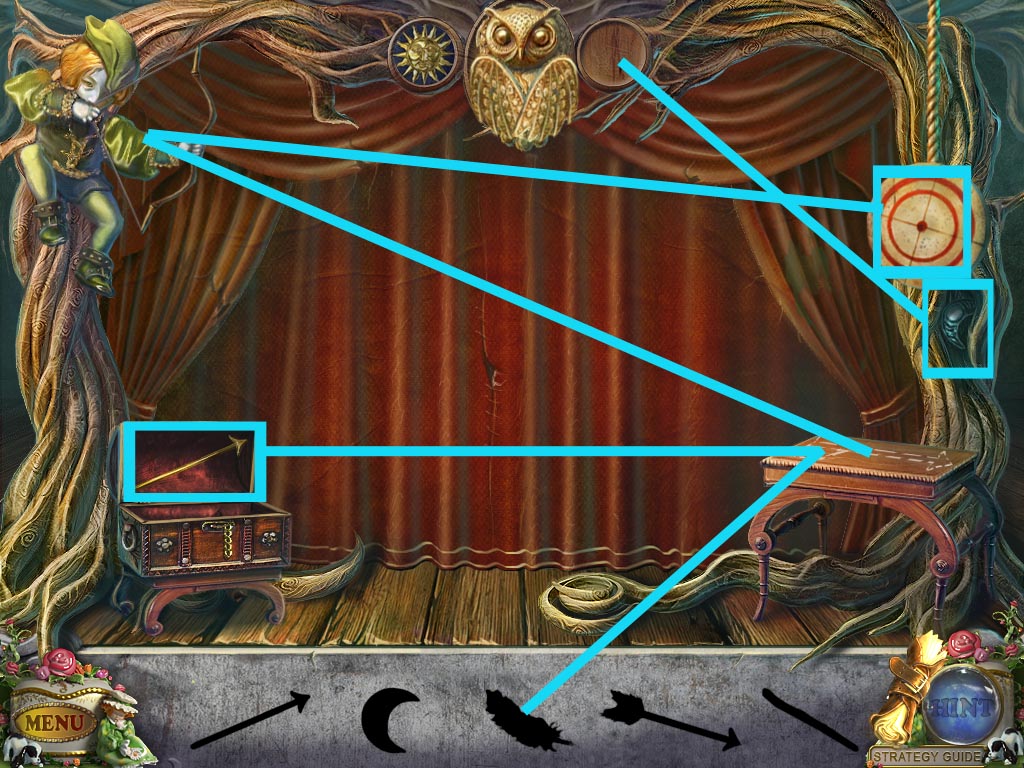
Start the hidden object puzzle.
Open the chest to reveal one of the arrows.
Place the body of the arrow on the table with the arrow outline.
Pick up the lunar crescent and place it in the empty circle to the right of the owl.
Grab the feather that falls once the owl opens its wings.
Place the feather on the arrow body that's on the table.
Pick up the arrow and place it on the bow. The arrow will be shot at the target and will cause the curtains to open starting the next part of the hidden object puzzle.
Screenshot
Part two of the hidden object puzzle.
Click on the left door of the dresser in back to open it and reveal a stick. Pick it up, then click it again and attach it to the broom.
Use the broom to sweep away the spider web on the bust and pick up the top half of the mannequin.
Click on the top half of the mannequin and attach it to the lower half of the mannequin.
Pick up the key, then use it on the right half of the dresser. Pick up the puzzle piece.
Click on the puzzle on the back wall and place the puzzle piece on it to start the puzzle.
Click a box, then click one next to it to swap their positions. You can only pick a square close to the one you've already picked.
Screenshot
After the little Cinderella moves, pick up the fader.
Screenshot
You receive a fader.
Getting the Tweezers
Invesigate the logs to the left of the furnace and click on them once. Pick up the glove.
Use the glove to open the top of the furnace. Click on the picture to reveal a doll, then pick it up.
Leave the house and investigate the tricycle in the sandbox. Place the elastic band on it.
Place the ball on the elastic band and then click on the completed product to shoot at the ladder on the treehouse.
Go up the newly unraveled step ladder and into the treehouse.
Inspect the doll caricature on the left of the wall and use the razor to cut down the doll.
Zoom in on the telescope stand. Pick up the doll on the windowsill, then place the telescope on the stand.
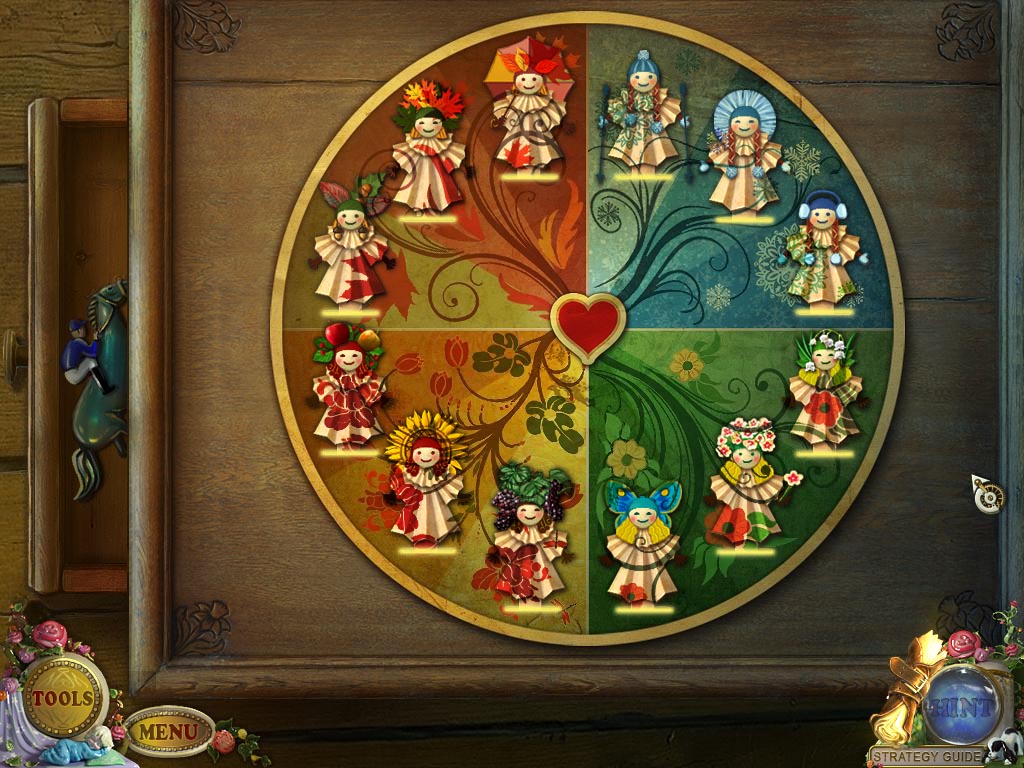
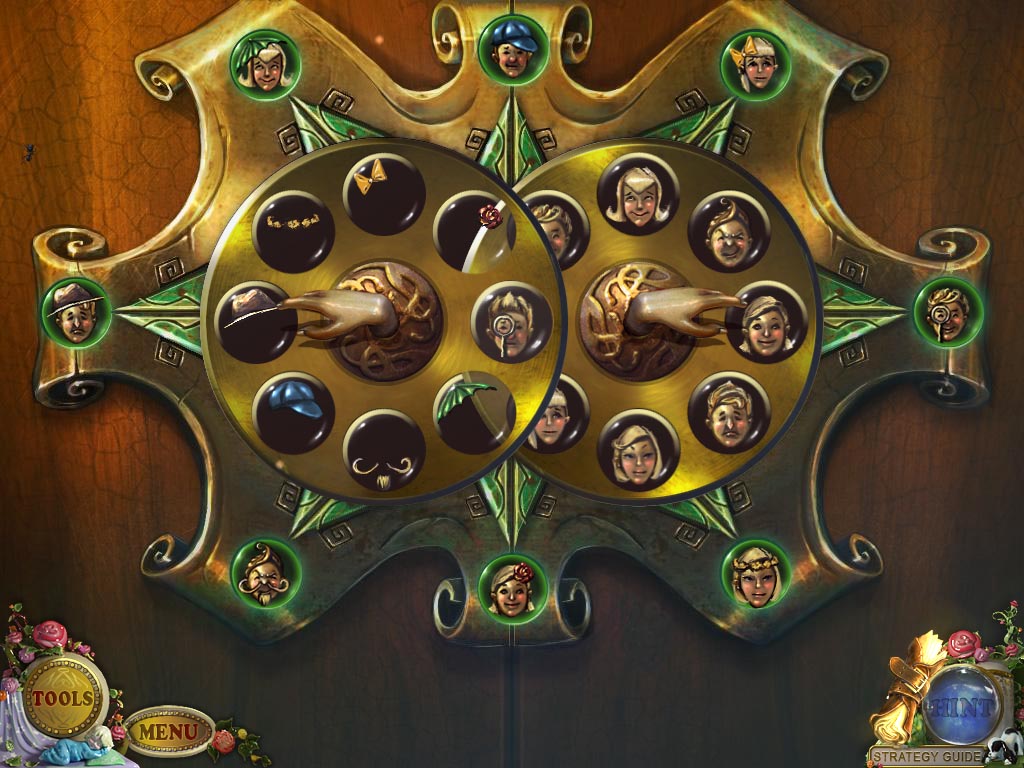
Inspect the puzzle box on the table and place all three dolls on it to start the puzzle.
You must place all dolls on the proper season in comparison with their clothing and coloring.
Screenshot
Pick up the rider.
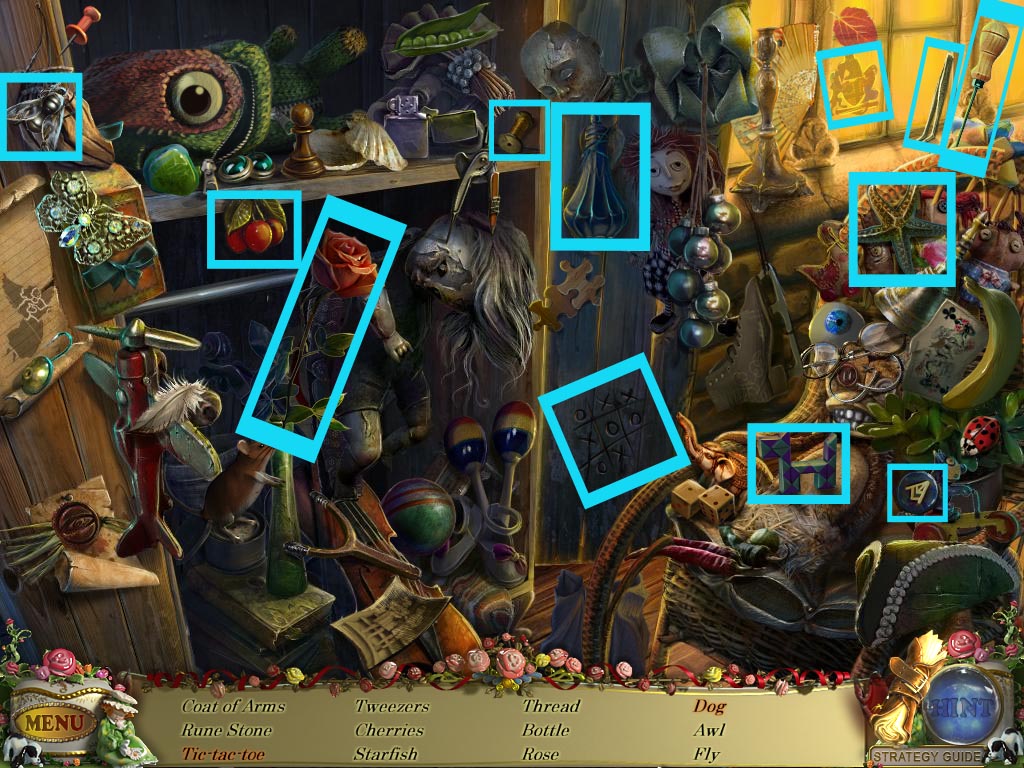
Go back down and start the hidden object scene.
Click on the tote bag to reveal the tic-tac-toe.
Click the block object three times to create the dog.
Screenshot
You receive tweezers.
Getting to the Tailor's
Inspect the suitcase and place the rider on his track.
Place the fader on the zipper.
Click on the riders to put them in the correct winning order.
Red goes on the left side, closest to the numbers.
Blue goes in the middle.
Green goes on the right side, closest to your view.
Pick up the helmet.
Go back once.
Click on the robot girl, then click on her chest to reveal the inside gears. Use the tweezers to remove the bug.
Pick up the jump rope.
Go back once and head to the left up the street.
Click on the motor at the back of the cart and pick up the lever handle. Place the jump rope on the motor.
Place the helmet on the puppet.
Zoom in on the motor once more and press on the rope to start it.
Go forward through the front door and into the Tailor's.
Chapter Two: The Tailor's
Getting the Scissors
Investigate the drawer to the right of the room. Pick up the picklock.
Click on the mannequin to get the numbers for a future code.
Inspect the dresses at the back and click on them until you pick up the handle.
Go back once and go up the street to the left.
Speak with the puppeteer.
Investigate the wall with the posters on it and pick up the matches and hammer.
Zoom in on the door and put in the code to open it.
8, 35, 62.
Go in through the door and inspect the woman's face. Remove the tape.
Grab the chain from the second chair.
Go back once, then move forward.
Zoom in on the lamp post to the right and use the picklock on the padlock. Pick up the ladder from the gate.
Investigate the water stand and place the handle on the syphon. Pick up the soda syphon.
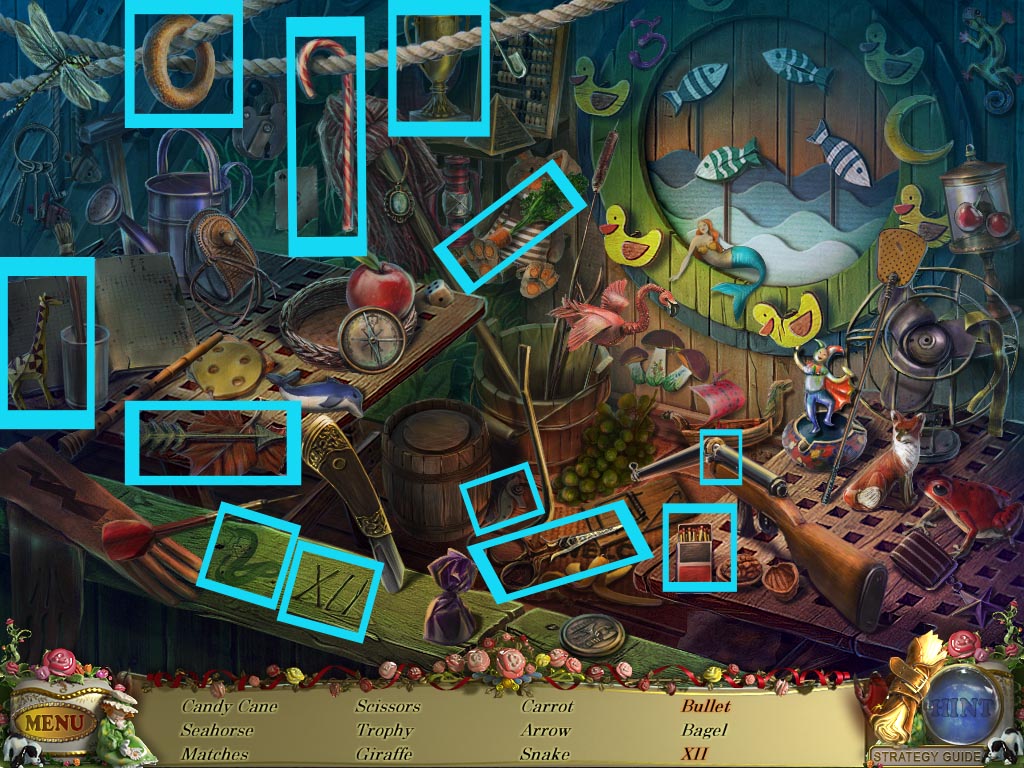
Start the hidden object scene.
Click on the rifle to reveal the bullet.
Click on the knife to hae it cave XII into the wood.
Screenshot
You receive scissors.
Getting the Jester
Go forward towards the big building.
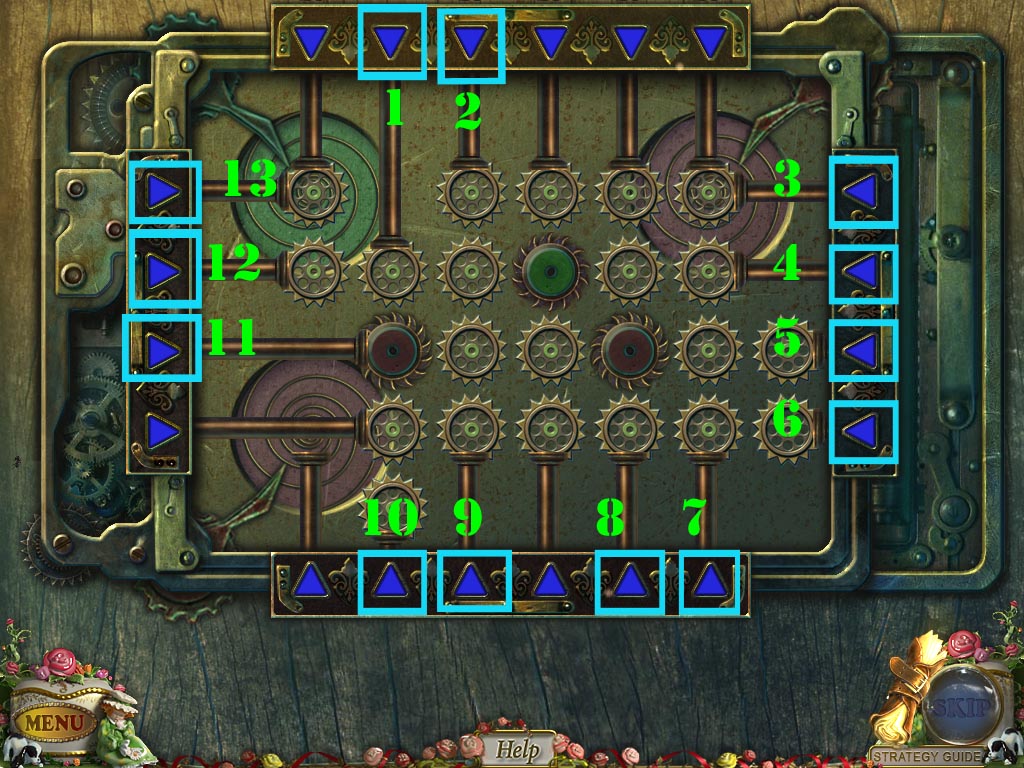
Zoom into the front door and inspect the guard on the right. Use the scissors to cut the straps on his shirt and click on his chest to start a puzzle.
Click the triangles in this order: 4, 2, 5, 10, 9, 13, 10, 3, 11, 1, 6, 8, 12, and 7.
Screenshot
Pick up the sword.
Go back once and inspect the bushes to the right. Use the sword to cut them away.
Use the hammer three times on the window to break it. Click on it to open it, then go inside.
Inspect the puppet and click on the patch on his head twice, then pick up the carabiner.
Click on the door and place the chain on it.
Use the carabiner to attach the two chains together.
Investigate the furnace and place the lever in the rightful spot, then click on it.
Zoom in on the area behind the door and use the cane to bring the bag closer. Click on it and pick up the fingers.
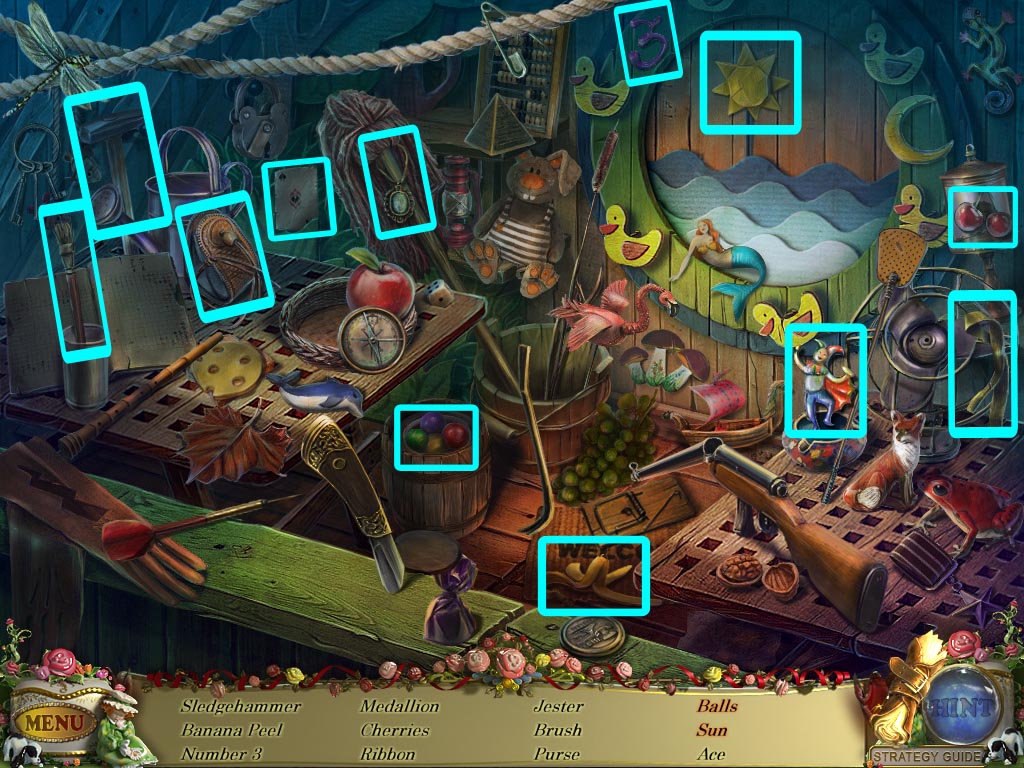
Go back twice and start the hidden object scene.
Click on all four fish to reveal the sun.
Click on the crowbar to have it reveal the balls.
Screenshot
You receive a Jester.
Getting into the Theatre
Go back once more.
Place the ladder underneath the lamp, then inspect it. Click the cover to open it and use the matches to light the candle.
Pick up the lamp.
Go back once, then go forward into the Tailor's Shop.
Zoom in on the tailor and replace her fingers.
Read the message on the silk trail.
Inspect the sewing machine and click on the needle area twice, then grab the dowel.
Leave the tailor's shop, then go forward. Go left through the door.
Zoom in on the chains on the girl and place the dowel on the pin, then use the hammer to hit the pin out.
Take the key from the hand of the girl.
Go to the theatre.
Zoom in on the lock and place the key in the lock, then turn it three times. Enter the theatre.
Chapter Three: The Theatre
Getting the Club
Inspect the puppet. Read the note and pick up the spring pin.
Go through the middle door on the left wall.
Use the lamp in the room and pick up the oil can in the top center of the room.
Go back to the hall and inspect the suit of armor. Use the oil can on the helmet, then click on it to open it.
Pick up the clasp.
Go through the last door on the left side of the room.
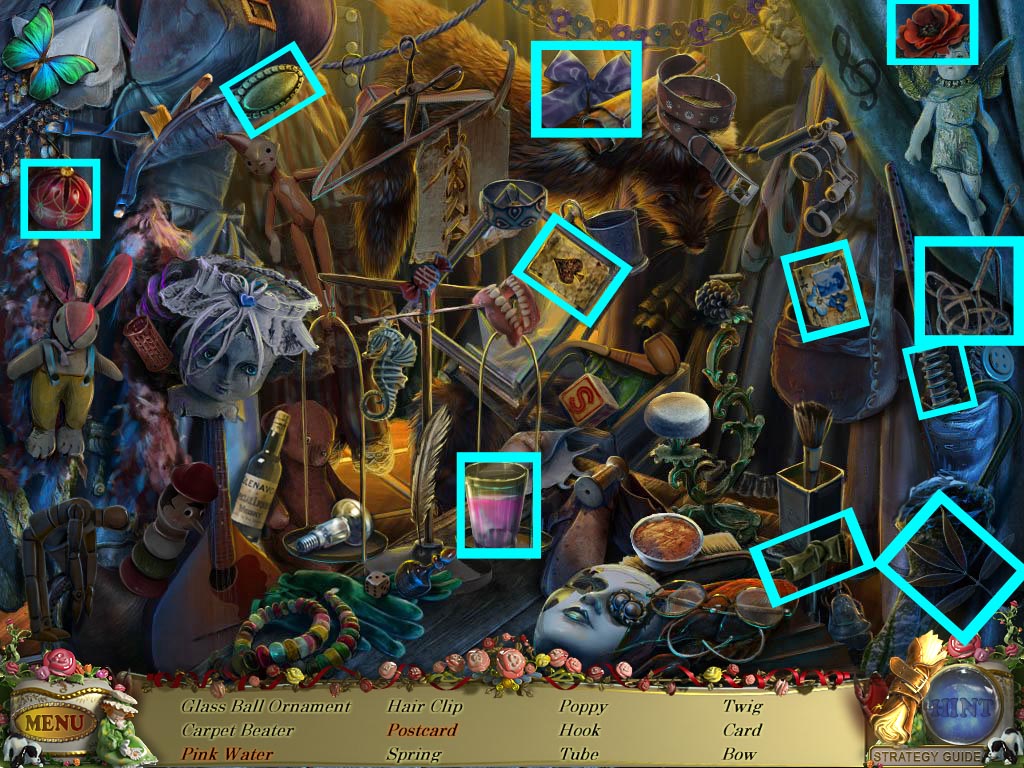
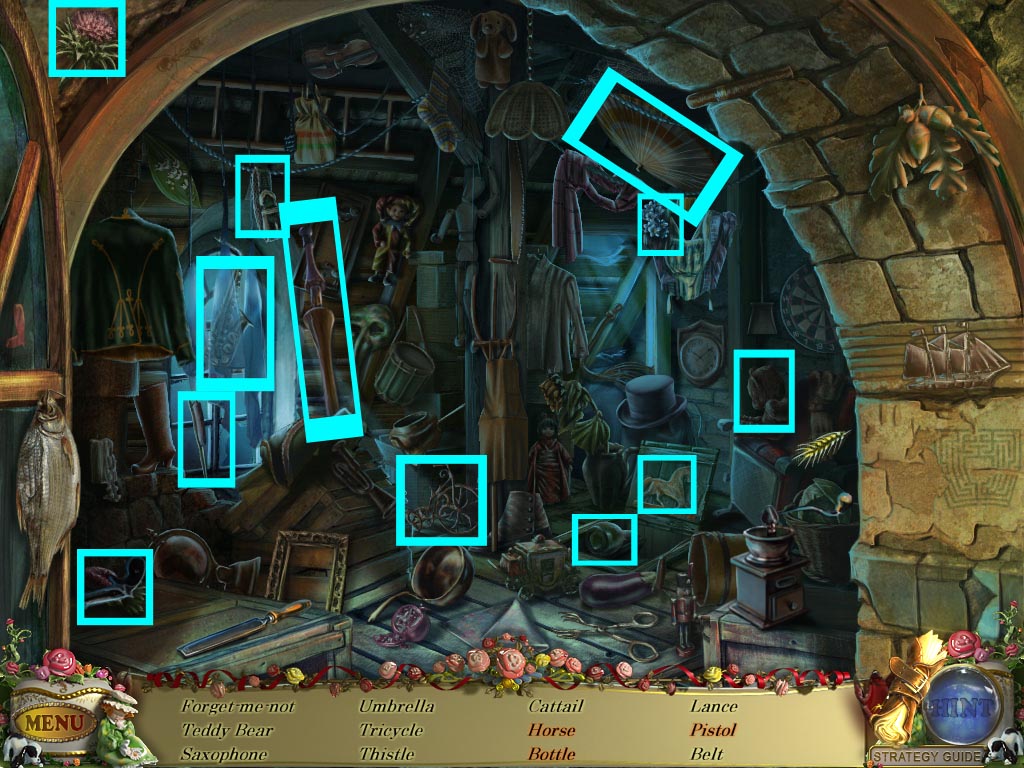
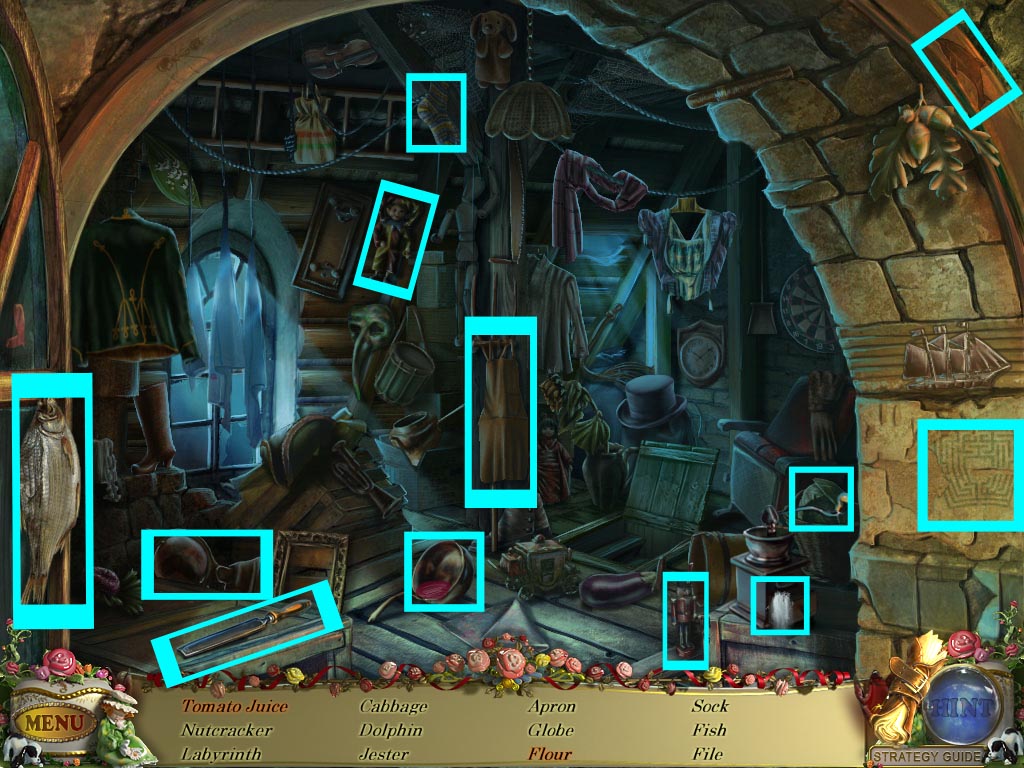
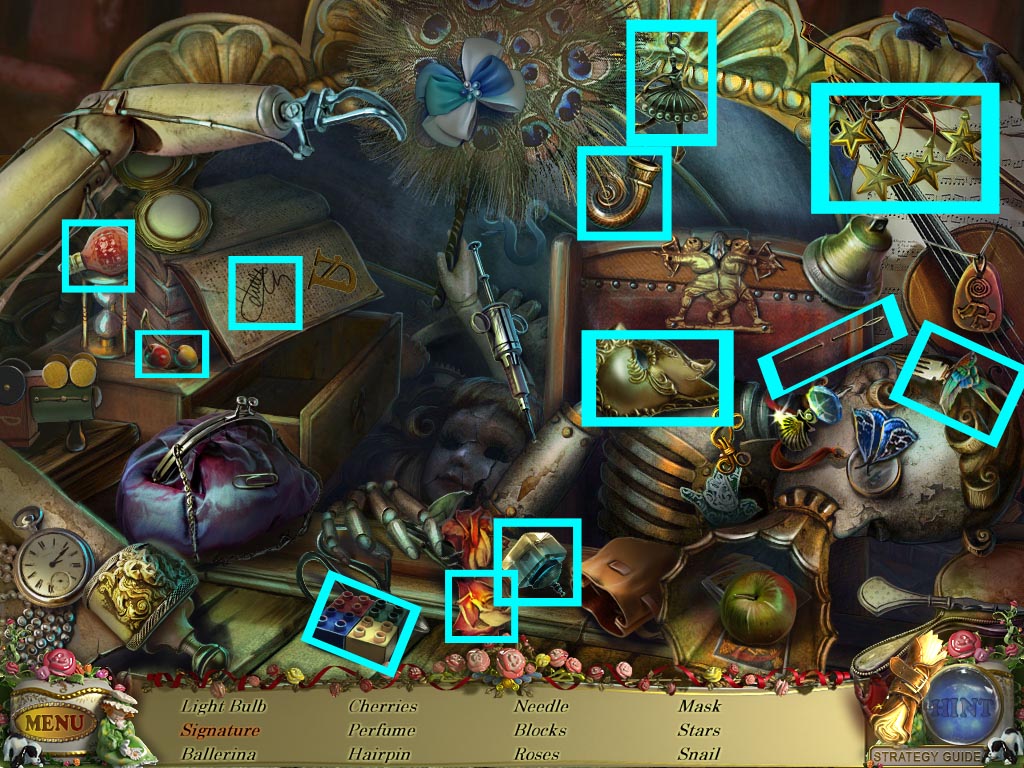
Click on the partition to reveal a hidden object scene, then start it.
Click on the paintbrush to wash off the pink in the cup of water.
Click on the purse to reveal the postcard.
Screenshot
You receive a carpet beater.
Go back once and investigate the door on the far left side, the door closest to the suit of armor.
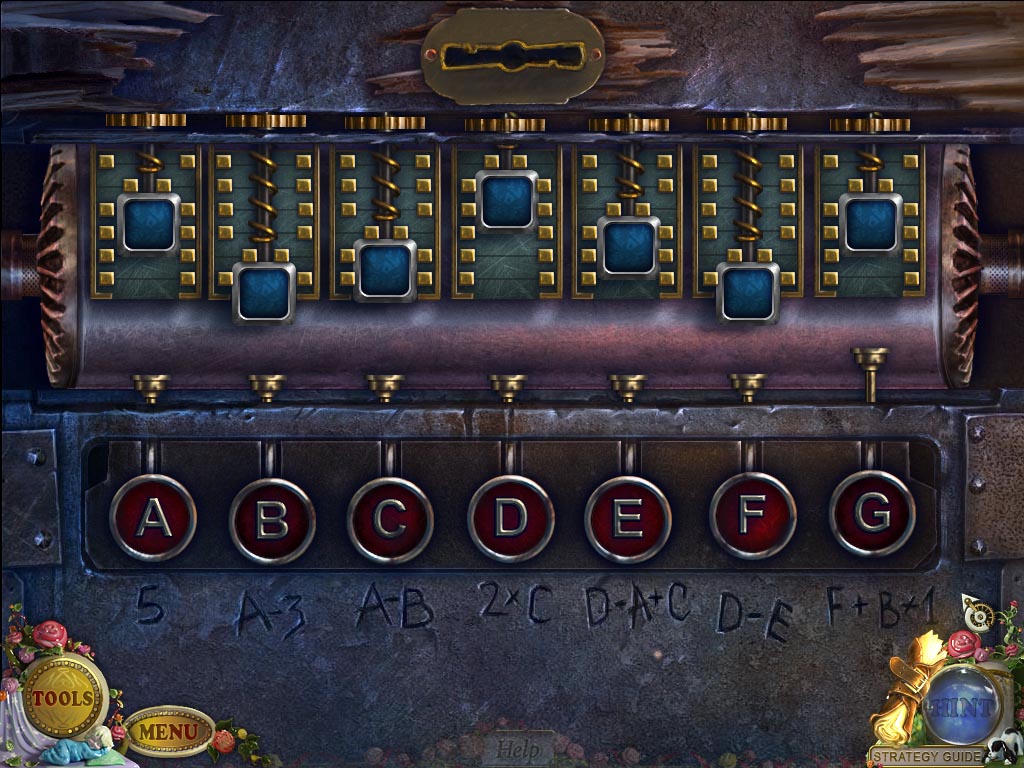
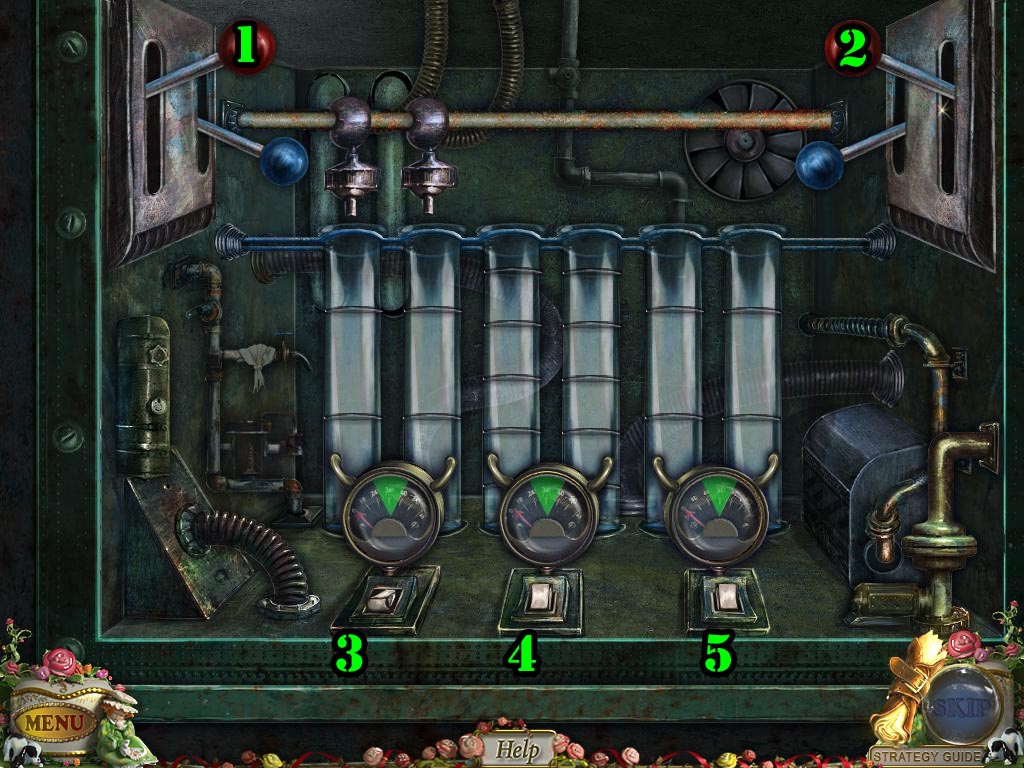
Place the spring pin on the puzzle to start it.
A-Push the button five times.
B-Push the button two times.
C-Push the button three times.
D-Push the button six times.
E-Push the button four times.
F-Push the button two times.
G-Push the button fives times.
Screenshot
Go through the door.
Investigate the jester, pull the lever, and pick up the club. Click on the hanging puppet to remove it.
Getting the Ruler
Go back once, then go through the middle door.
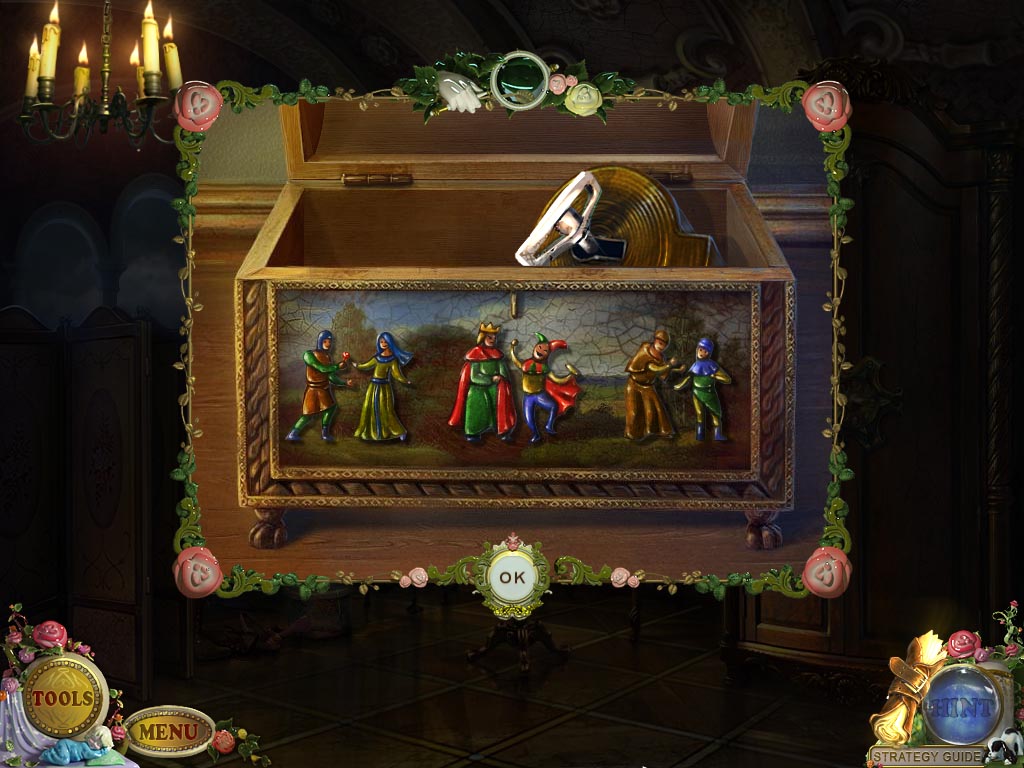
Zoom in on the chest and use the club to prop it open.
Pick up the tapestry.
Leave the room and go into the room with the jester.
Zoom in on the jester and place the tapestry on the holder and place the carpet beater in the hands of the jester. Click the lever.
Return to the dressing room.
Investigate the desk, click on the note and pick up the Lady.
Inspect the puzzle box and place the Lady and the Jester on it to start the puzzle.
On the far left, place the Lady and the man with the rose.
In the middle, place the King and the Jester.
On the far right, place the monk and the boy.
Screenshot
Pick up the puzzle core.
Go back once and examine the door at the very back of the hall.
Place the puzzle core on the puzzle to start it. Starting from the center, move the rings to fit one another. When you've put a piece in the correct spot, it will get dark and be unable to be moved.
Screenshot
Go through the door.
Use the soda syphon to extinguish the flames.
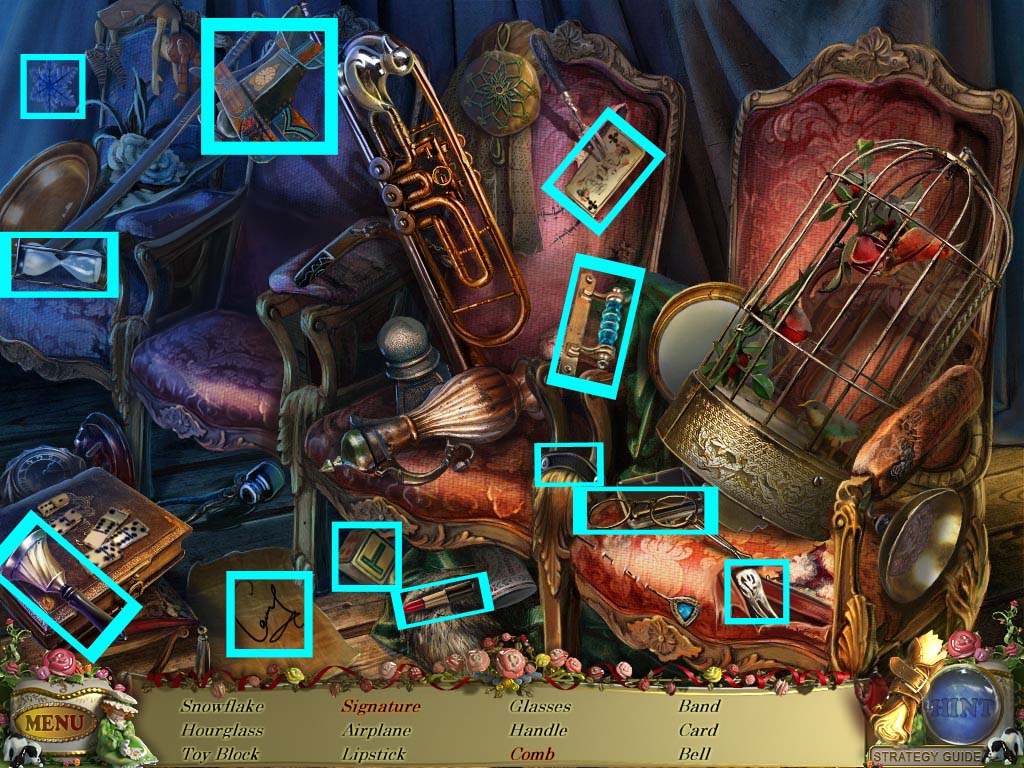
Start the hidden object scene.
Click on the spoon to reveal the tea bag.
Click on the lapel to reveal the feather.
Screenshot
You receive a ruler.
Growing a Beanstalk
Go through the door that's to the immediate right of the statue on the right side of the main door.
Zoom in on the table and pick up the bolts.
Investigate the vent at the back right of the room and use the ruler to get the beans.
Start the hidden object scene.
Click the pastry bag to create cake.
Click on the cupboard to reveal the matches.
Screenshot
You receive a knife.
Go back once, then go through the curtains on the right side of the room.
Inspect the painting and pick up the key.
Go back once and go through the door on the left.
Examine the bag, then place the clasp on the right latch. Click to open the bag, then pick up the bicycle key.
Inspect the puppet and use your knife to remove the screw around the badge.
Investigate the plank and grab the Mahout.
Go back twice, then go left into the room with the Jester puppet.
Investigate the back of the elephant and place the Mahout in the display.
Inspect the cage and put the key in the lock. Click it three times, then pick up the comb
Go back once, then forward through the door at the end of the hall. Go through the curtains on the right.
Investigate the puppet and place the beans in his hand.
Inspect the bottom of the statue and put the bolts in the empty spots for them. Use the badge to tighten the bolts.
A beanstalk grows. Go through the door at the top left.
Chapter Four: The Beanstalk
Getting the Wheel
Investigate the archway to the left of the puppet and pick up the poker.
Click on the curtains and go through the doorway.
Inspect the balcony and pick up the polygon.
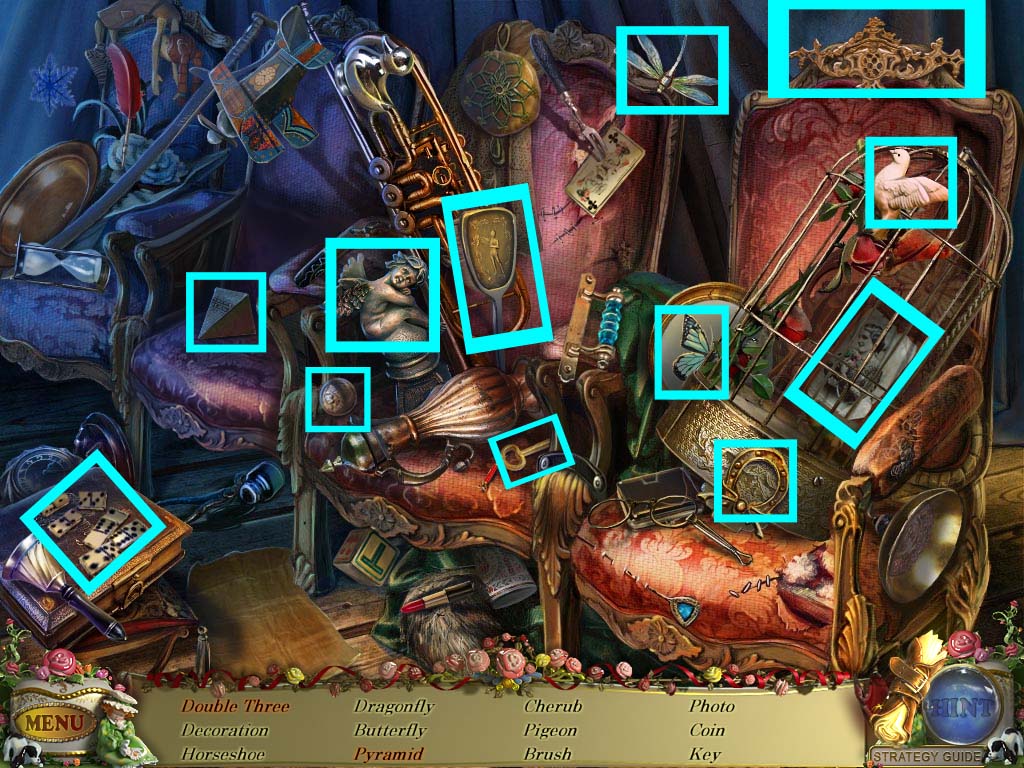
Start the hidden object scene.
Click on the dominoes to create the double three.
Click on the chair cushion to reveal the pyramid.
Screenshot
You receive a coin.
Go back once and inspect the monk puppet.
Place the coin in the coffer. Pick up the hand.
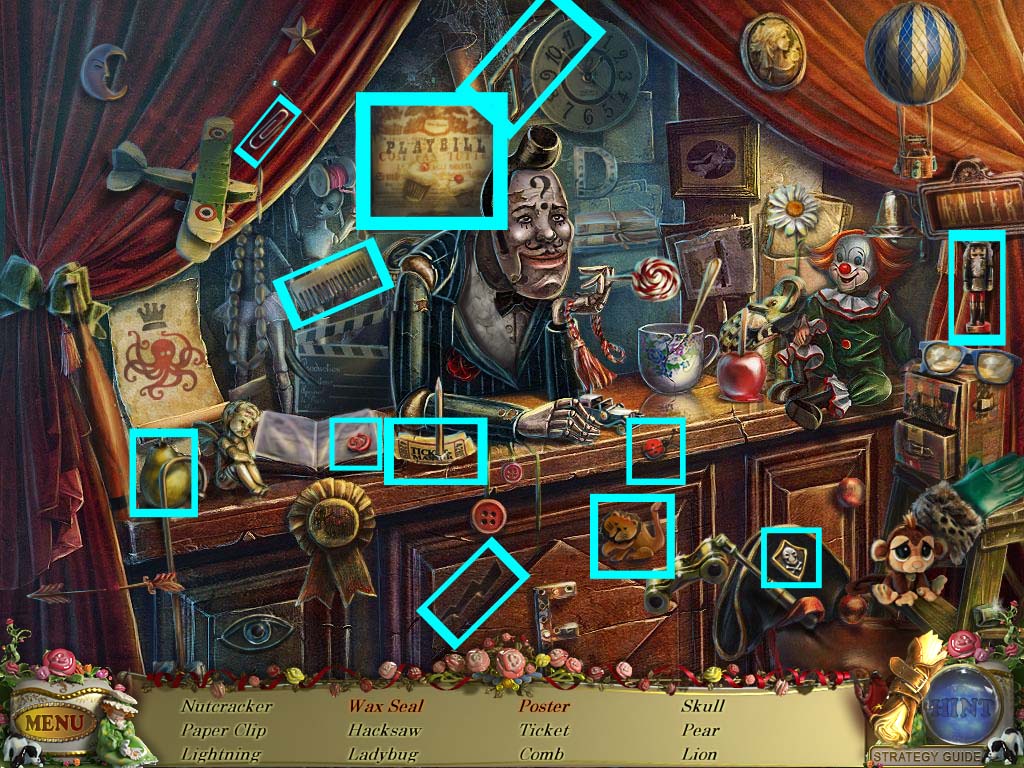
Go back twice into the second corridor and start the hidden object scene.
Click on the scroll to reveal the poster.
Click on the pages to flip them and reveal the wax seal.
Screenshot
You receive a hacksaw.
Go through the left door.
Zoom in on the plank of wood and use the hacksaw to saw off the fastenings. Pick up the board.
Go out once, then go through the right door, into the restaurant.
Inspect the box with the monkey puzzle and add the polygon to it to start the puzzle.
You must link all the monkies together so that all of them are linked. The eyes will light up when you've properly connected a monkey.
Screenshot
Zoom in on the bottom of the box and pick up the crown.
Start the hidden object scene.
Pick up the coin and put it in the coin slot on the register to reveal the check.
Click on the handkerchief to reveal the corn.
Screenshot
You receive a wheel.
Getting the Lance
Go back twice and then go left into the dressing room.
Start the hidden object scene.
Drag the powder puff to the powder to make the handprint.
Screenshot
You receive a light bulb.
Zoom in on the dresser and place the hand on the puzzle to start it.
The goal is to choose the right face and right accessory to match the arrow opposite from the circle you've chosen. If the top row middle arrow has a boy with a sad face, then your bottom row middle arrow should have a girl with a sad face and proper accessory.
Screenshot
Investigate the dresser and pick up the helmet.
Go forward until you're once more at the beanstalk and go through the door on the left.
Go through the curtained doorway and zoom in on the balcony. Put the board down, then go across.
Zoom in on the light, click the cover and place the light bulb inside.
Investigate the mechanism to start a puzzle.
Screenshot
Go through the door on the right that has opened.
Investigate the window and use the poker three times to remove the boards.
Open the window to reveal a hidden object scene and start it.
Open the trapdoor to reveal the horse and the bottle.
Use the carpet beater to beat the jacket and reveal the pistol.
Screenshot
You receive a lance.
Getting to the Tower
Go back twice and start the hidden object scene.
Bring the quill to the inkpot to create the signature.
Click on the tear to reveal the comb.
Screenshot
You receive a band.
Move forward once and investigate the panel to the right of the door.
Place the band on it and click on the handle.
Grab the puzzle key, then go back down to the beanstalk.
Inspect the door at the top.
Chapter Five: The Tower
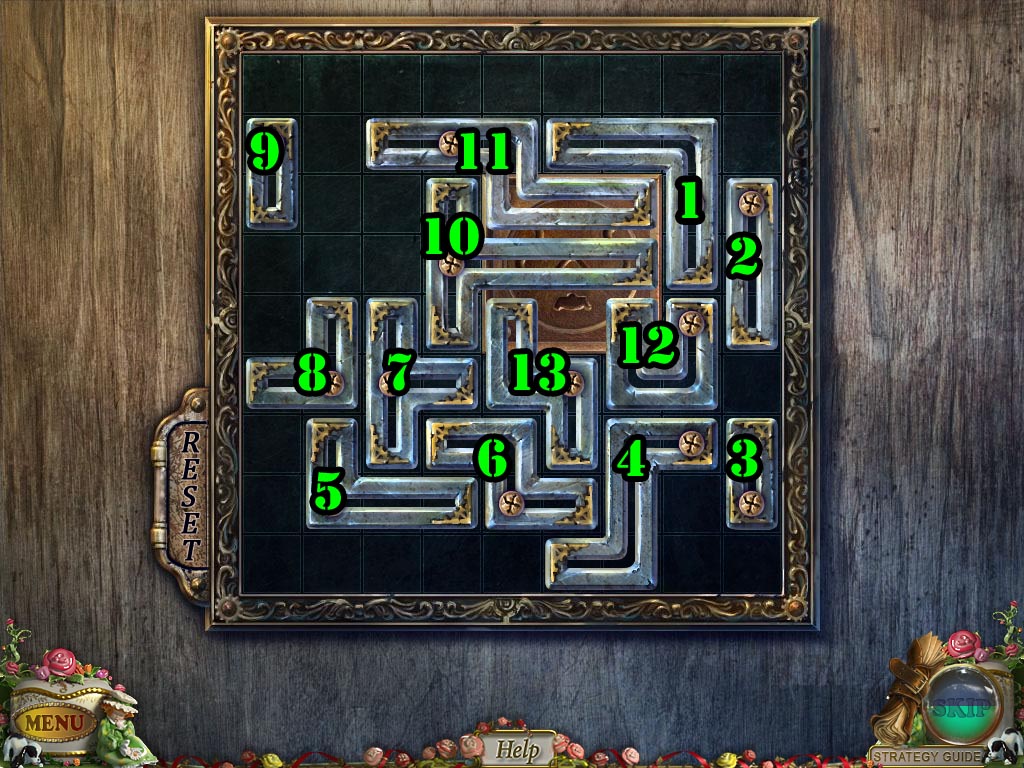
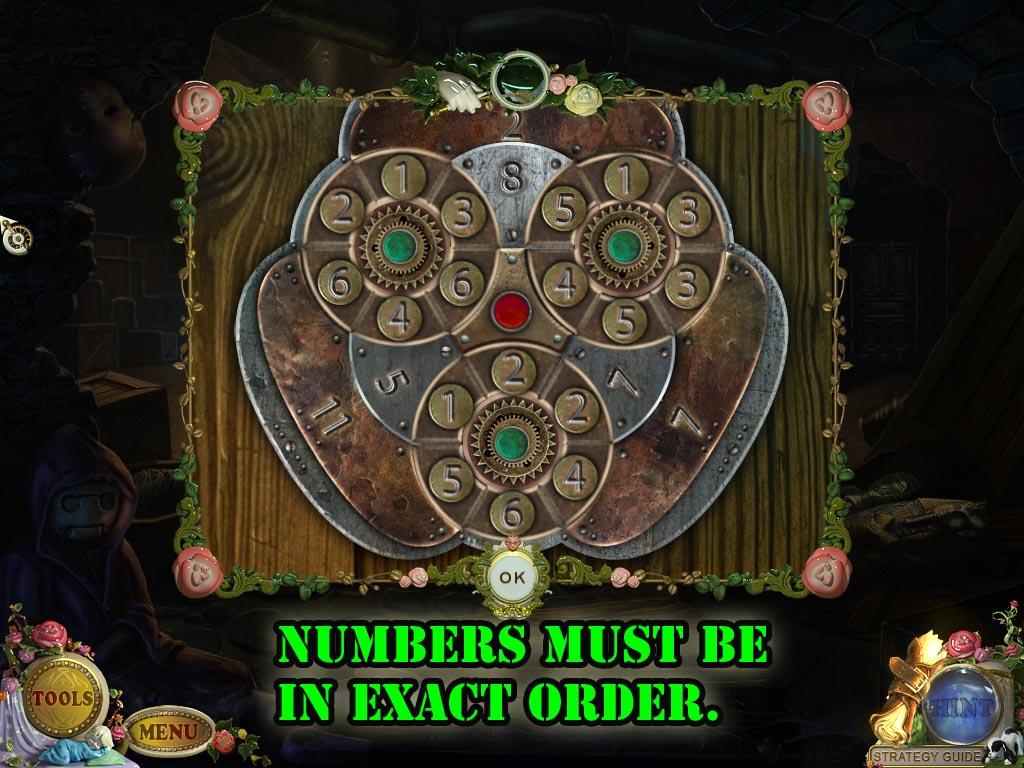
Investigate the door to start the puzzle.
Move block 1 up.
Move block 2 up.
Move block 3 down.
Move block 4 right.
Move block 5 down.
Move block 6 down.
Move block 7 down.
Move block 8 down.
Move block 9 up.
Move block 10 left.
Move block 11 left and up.
Move block 12 up and right.
Move block 13 right and down.
Screenshot
Place the puzzle key in the revealed lock.
Go through the open door.
Click on the dragon statue.
Inspect the hanging chain above the gears and pick up the valve.
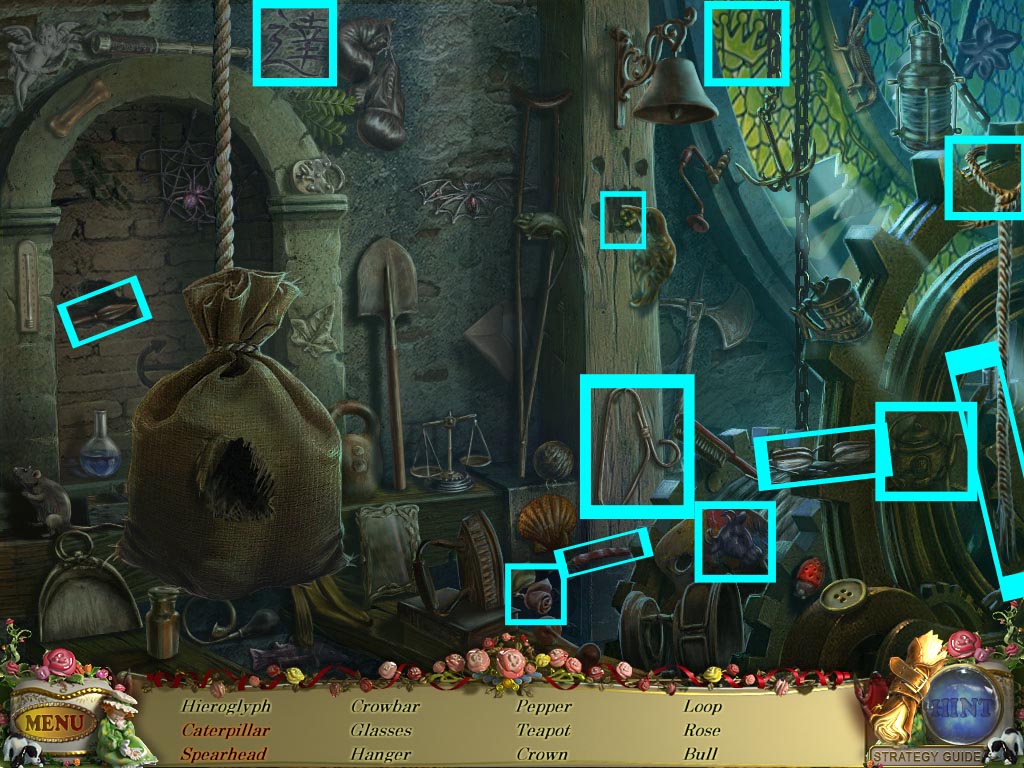
Start the hidden object scene.
Click on the rope to reveal the pelican.
Use the glass shard to cut open the sack and reveal the spring.
Screenshot
You receive pincers.
Go back once, then move through the left door and continue forward until you're on the roof once more.
Start the hidden object scene.
Use the prongs to squeeze the tomato and make tomato juice.
Click on the grain and put it in the grinder to create flour.
Screenshot
You receive a file.
Zoom in on the shield and use the pincers to remove each nail individually.
Pick up the shield.
Go back twice, then right into the room with the monk. Investigate the mechanism and use the file to remove the rivet and pick up the tank valve.
Go back once, then up through the door on the right.
Start the hidden object scene.
Pick up the mallet and use it on the wall to reveal the spearhead.
Click on the bird to have it reveal the caterpillar.
Screenshot
You receive rope.
Go back three times, then go left through the middle door.
Investigate the puppet on the stretching wheel and place the valve on the nut. Click it twice, then pick up the Prince.
Go back once, then forward once, then right through curtained doorway. Then go into the room with the dragon statue.
Zoom in on the mount and place the prince on it. Give the prince the helmet, lance, and shield.
Click on the prince to make him move forward, and time it so that he hits the dragon while it's not breathing fire.
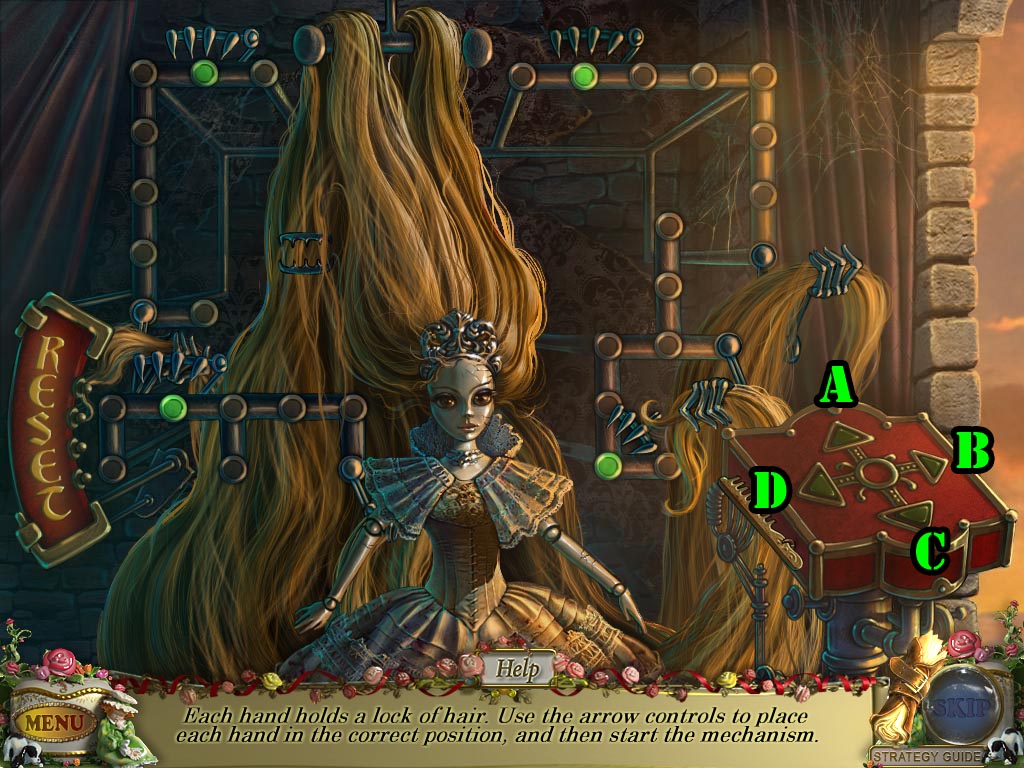
Go forward through the door and click on the little girl to speak with her.
Inspect the puppet and place the comb in the side of the red box to start a puzzle.
Hit D twice.
Hit C twice.
Hit B once.
Hit A once.
Hit D four times.
Hit A four times.
Hit D four times.
Hit C twice.
Hit B once.
Hit A twice.
Hit D once.
Hit B twice.
Hit D once.
Screenshot
Click on the bottom of the puppets hair and go out the window.
Investigate the cherub.
Place the rope around the hand holding the gem. Tug on the rope once it's secured.
Pick up the heart.
Go back four times into the second corridor.
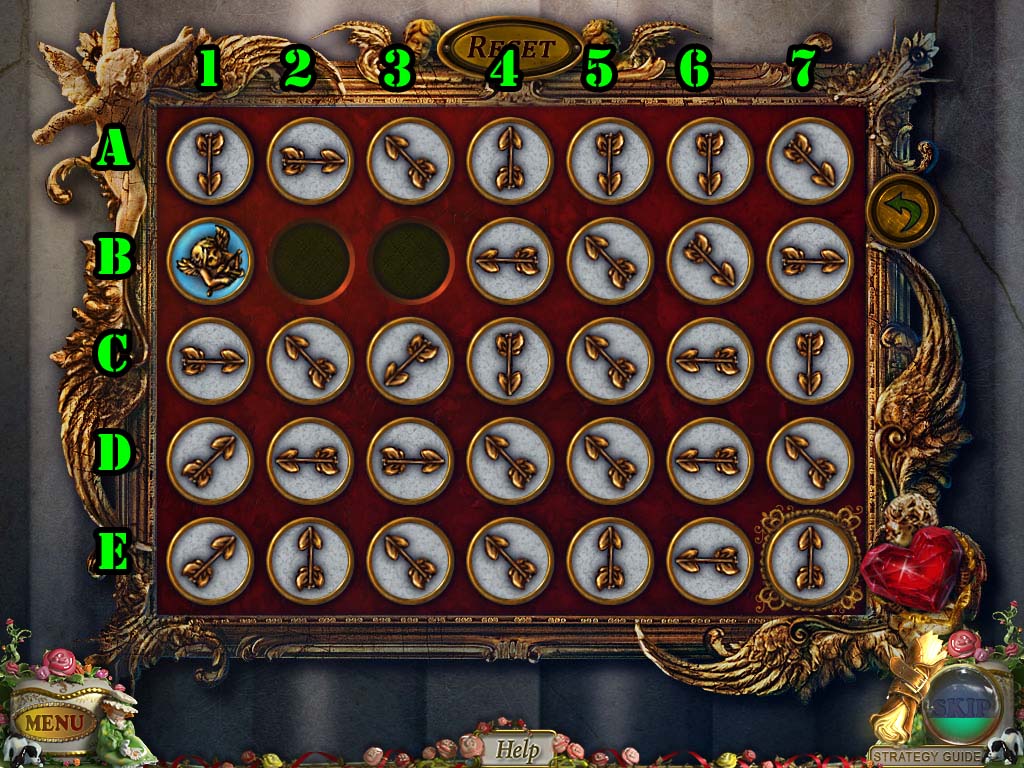
Investigate the podium at the back of the corridor and place the heart on the bottom cherub.
You must get the cherub to the heart. Arrows will only move the way they are already pointing.
B1 move right.
C2.
D1, then D2.
C3, then B2 move right.
B3 move down, then move B4.
B3, then move C3 up.
D4, then move C4.
Move B3 right.
D5, then move C4.
Move B4 down.
C5, then move D6 down.
D7, then move E7.
Move D6 right.
Screenshot
Go through the door into the auditorium.
Chapter Six: The Auditorium
Getting the Axe
Investigate the chair and place the crown on the top of it.
Pick up the chest key.
Go through the door on the left side and investigate the chest.
Use the chest key on the lock, then click on it to remove the lock and open the latch.
Click to open the drawer and pick up the beard.
Go back and then go forward towards the stage.
Click on Felicia to speak with her.
Start the hidden object scene.
Open the drawer to reveal the opera glasses.
Screenshot
You receive eyes.
Go to the right of the stage and investigate the tank. Place the tank valve on it.
Pick up the balloons.
Go back once.
Start the hidden oject scene.
Click on the quill to make the signature.
Screenshot
You receive a snail.
Go to the left side of the stage and investigate the man with the axe. Put the eyes on his face.
Grab the axe from the floor.
Getting into the Storage Room
Investigate the bottom of the set decoration and place the wheel on it.
Go back twice and go through the door on the left.
Click on the wall paper to remove it, then investigate it closer. Click on it again to tear it more.
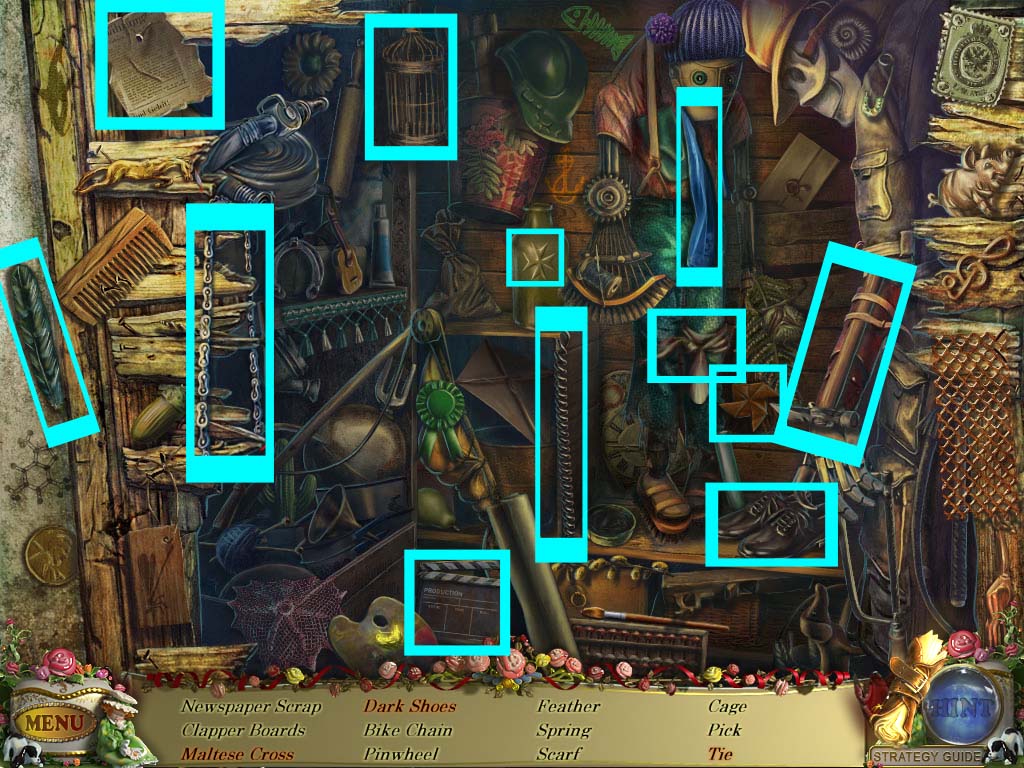
Use your axe three times on the boards to remove them and to activate a hidden object scene. Start the hidden object scene.
Wipe the bottle with the cloth to reveal the Maltese cross.
Click on the untied tie to get a tie.
Move the brush into the dip to create the dark shoes.
Screenshot
You receive a chain.
Go to the stage and go to the right side.
Investigate the mechanism and place the chain on it, then pull the handle.
Go up the ladder to the control room and inspect the desk, then click on the diagram to look at it.
Start the hidden object scene.
Click on the tennis shoe to reveal gum.
Click on the box to open it and reveal the prawn.
Screenshot
You receive pins.
Go to the left side of the stage and investigate the cupboard.
Place the bicycle key into the appropriate lock, based on the diagram in the control room.
Click the set decorations aside, then go right. You can only do this part if you have placed the wheel to the set decoration and have seen the diagram in the control room.
Use your lamp to shine light in the room.
Inspect the fire hydrant and pick up the snail.
Return to the auditorium, then go left.
Investigate the back door and place the pins on the lock to start a puzzle.
Click on the third lever twice.
Go through the door.
Chapter Seven: The Storage Room
Getting the Propeller
Inspect the phonograph and take the mechanism button.
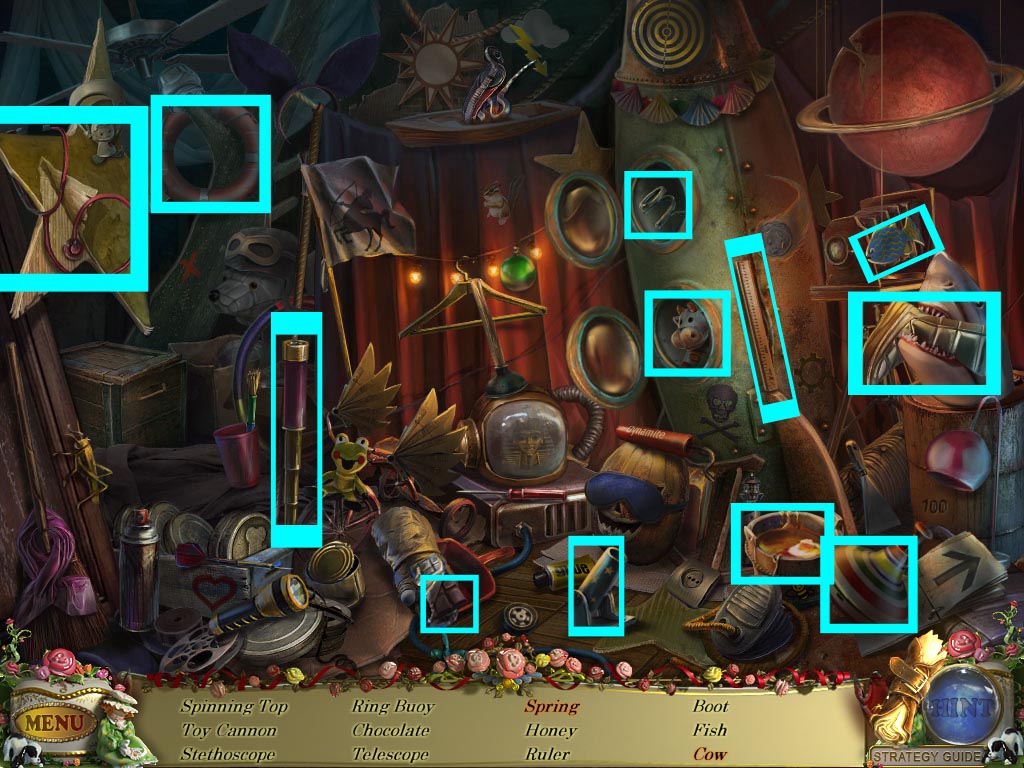
Start the hidden object scene.
Click on the lid to reveal the spring.
Click on the lid to reveal the cow.
Screenshot
You receive honey.
Go through the left door.
Click on the rope to pull it which will open the back door. Go through the back door.
Examine the diagram on the wall.
Inspect the shelf and take the monkey jack.
Zoom in on the right door and place the two snails on it to start a puzzle.
Click on the red buttons to move the crab legs so they are in the snail shells.
Press button 6 once.
Press button 8 three times.
Press button 5 two times.
Press button 1 two times.
Press button 2 once.
Press button 3 once.
Press button 5 once.
Press button 3 once.
Press button 4 twice.
Press button 7 once.
Press button 8 twice.
Press button 3 once.
Press button 2 twice.
Press button 5 twice.
Screenshot
Start the hidden object scene.
Click on the fly to reveal the coccoon.
Click on the box to open it and reveal the devil.
Screenshot
You receive a propeller.
Getting the Pot
Go back once and place the honey on the bear. When it lands on the floor, examine the blob and place the balloons in the honey bucket.
Inspect the fan, click on the screen to open it, then place the propeller on the center wheel.
Click on the handle to start the fan.
Investigate the chest to start a puzzle.
You want to grab the mushroom that has the hedgehog on it and then drop the mushroom in the chute at the bottom of the puzzle.
The arrows on the right rotate the board, and when you press on the acorns, it rotates the items on the board that they're attached to.
Go through the chest to get into the basement.
Start the hidden object scene.
Place the piece of fabric on the doll's hair in order to get the hair bow.
Screenshot
You receive a hook.
Go through the door on the right.
Inspect the book that's on the table.
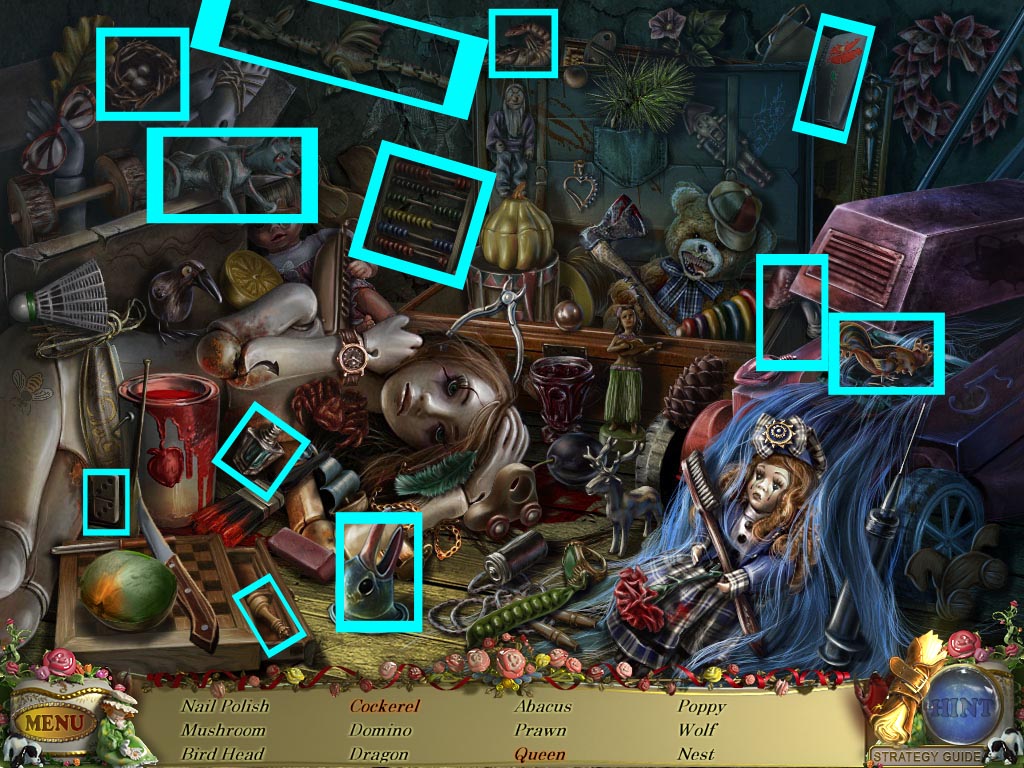
Start the hidden object scene.
Click on the cover to reveal the cockerel.
Click on the chessboard to reveal the queen.
Screenshot
You receive a penguin head.
Go back twice, then go through the back door.
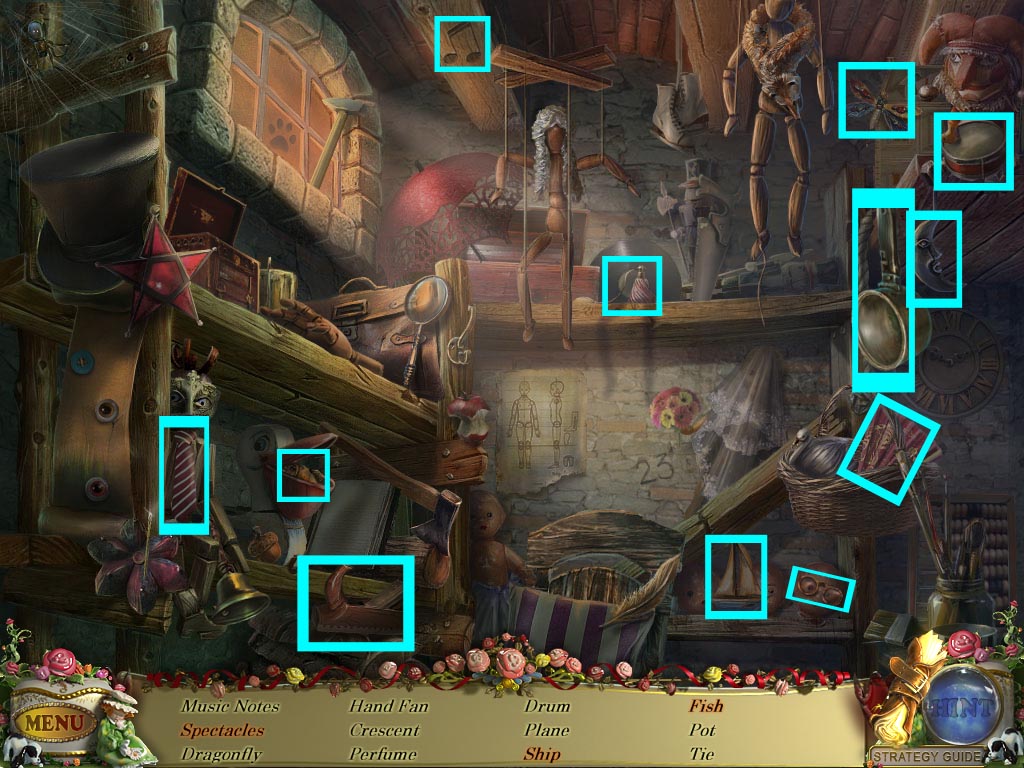
Start the hidden object scene.
Click on the cloth to reveal the ship and the spectacles.
Click on the beak of the pelican to reveal the fish.
Screenshot
You receive a pot.
Reaching the Finale
Go back four times, then move forward. Go through to the right stage, then up into the control room.
Start the hidden object scene.
Click on the jacket to reveal the mitten.
Click on the box to open it and reveal the harmonica, toothbrush, hand crank, ballerina, purse, and bee.
Screenshot
You receive a hand crank.
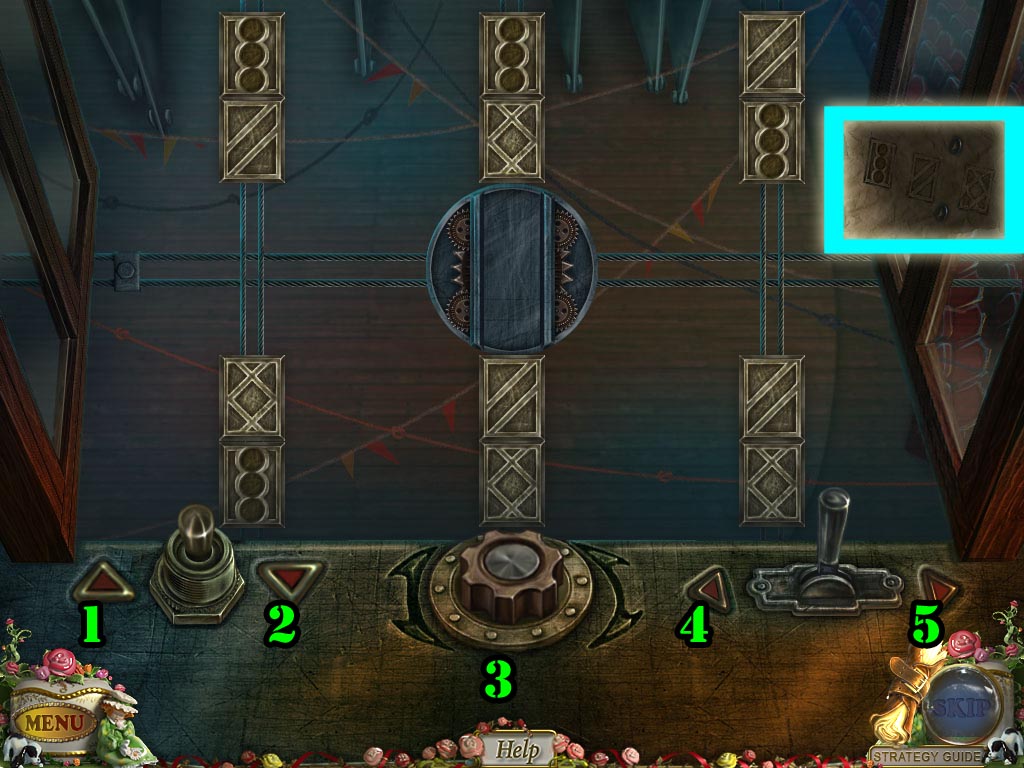
Inspect the control board and place the mechanism button on the device to start a puzzle.
Use the arrows to move the objects and press on the button to rotate them. You want to place the items in the proper spots as shown in the piece of paper on the screen.
Hit button 1 two times.
Hit button 3 once.
Hit button 2 once.
Hit button 5 once.
Hit button 1 once.
Hit button 3 once.
Hit button 2 once.
Hit button 4 once.
Hit button 2 three times.
Hit button 3 once.
Hit button 1 once.
Hit button 4 once.
Hit button 2 once.
Hit button 3 once.
Hit button 1 once.
Hit button 5 once.
Hit button 2 once.
Hit button 3 once.
Hit button 1 once.
Hit button 5 once.
Hit button 2 once.
Hit button 4 once.
Hit button 1 once.
Hit button 5 once.
Hit button 2 once.
Hit button 3 once.
Hit button 1 once.
Hit button 4 twice.
Hit button 1 once.
Hit button 3 once.
Hit button 1 once.
Hit button 4 once.
Hit button 2 once.
Hit button 3 once.
Hit button 1 once.
Hit button 4 once.
Hit button 1 once.
Hit button 2 twice.
Screenshot
Investigate the right wheel and pick up the resin.
Go to the basement once more and investigate the statue.
Place the monkey jack at the top of the box, then attach the hand crank to the monkey jack.
Click to turn the crank and pick up the record.
Go back twice.
Chapter Eight: The Finale
Getting the Penguin Flippers
Zoom in on the record player and place the record on it.
Inspect Humpty Dumpty after he falls and pick up the wrench.
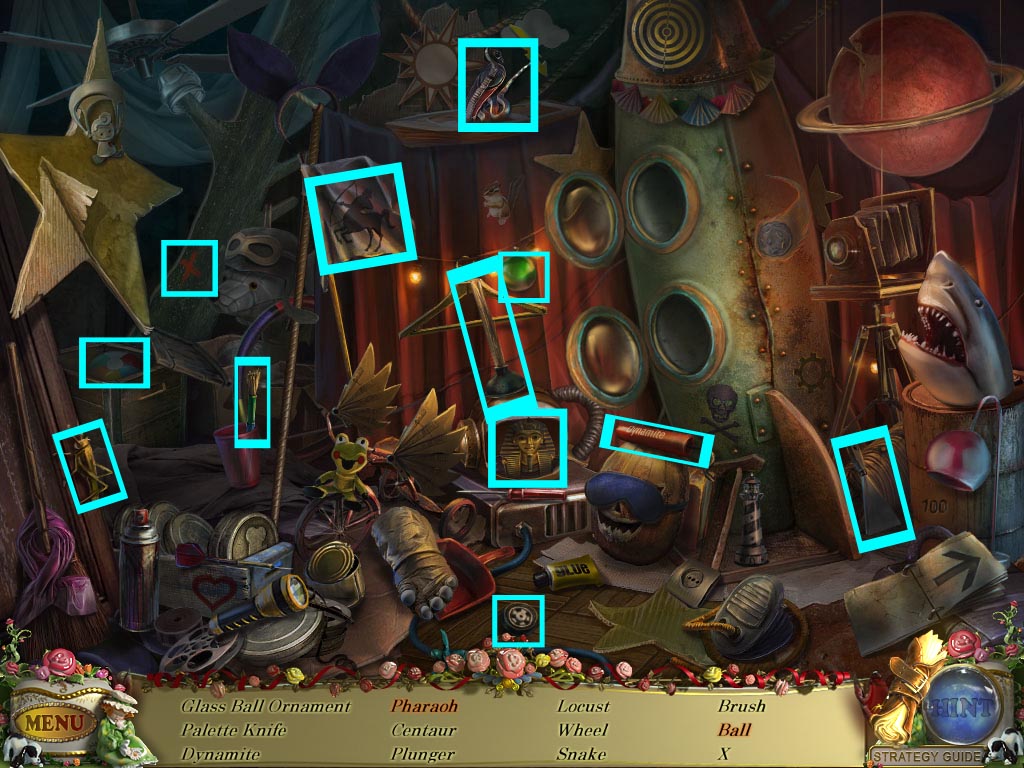
Start the hidden object scene.
Click on the screen of the TV to reveal the pharoah.
Open the crate in the back left to get the ball.
Screenshot
You receive a snake.
Go to the basement and go through the door on the right. Open and inspect the furnace.
Place the pot inside the furnace, then put the resin inside the pot.
Pick up the liquid resin.
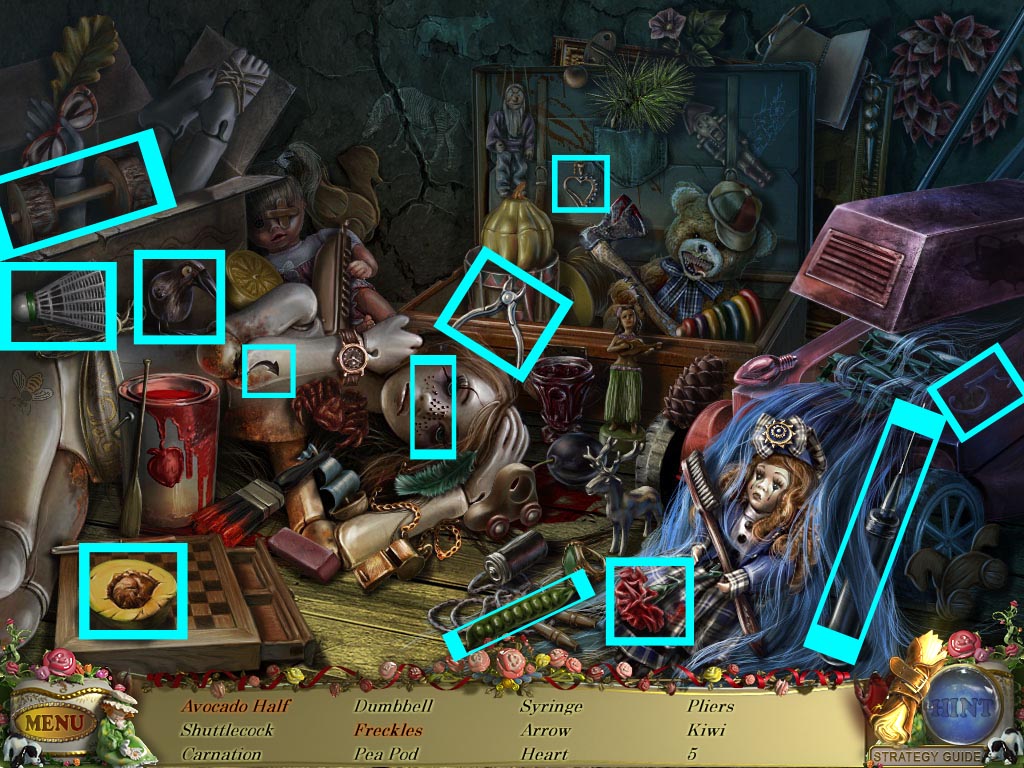
Start the hidden object scene.
Click on the ball to reveal the freckles.
Click on the knife to create the avocado half.
Screenshot
You receive cutting pliers.
Go back once.
Inspect the sarcophagus and place the snake and beard on the face.
Pick up the bandage.
Go to the left and investigate the pipe. Place the bandage on it, then place the liquid resin on top of it.
Go back once and start the hidden object scene.
Take the glue to the broken plate to fix it and create the plate.
Screenshot
You receive penguin flippers.
Getting to Ornella
Go back once, then go through the back door and inspect the table.
Place the penguin flippers and penguin head on the penguin body, then pick up the penguin.
Go back to the basement and go through the left door.
Place the hook on the grate.
Investigate the hole and put the penguin into the water.
Inspect the other side of the hole and pick up the lock gear.
Zoom in on the generator and use the wrench to remove the two bolts.
Click on the cover to open it and to start a puzzle.
Levers will normalize pressure, white buttons move the nozzles, the red lever adds liquid, and the blue lever takes away liquid.
Hit the left red lever (1) one time.
Hit the right red lever (2) three times.
Hit the middle button (4) once.
Hit the left red lever (1) three times.
Hit the right red lever (2) five times.
Hit the far right button (5) one time.
Hit the left red lever (1) two times.
Hit the right red lever (2) three times.
Screenshot
Go back once and investigate the back door.
Place the lock gear on it to start the puzzle.
Move the dials so that the numbers facing each other will add up to the number shown on the plate. The center dial with the red button moves numbers off the wheels.
Screenshot
Click on Ornella to speak with her.
Putting Out the Fire
Inspect the crate to activate a puzzle.
You have to move the gears in the correct order to release the wires.
Hit button 1 one time.
Hit button 2 three times.
Hit button 3 three times.
Hit button 4 four times.
Screenshot
Cut the wires with the cutting pliers.
Go back four times and start the hidden object scene.
Open both pocket to reveal the cornflower and the coral.
Place the brush on the palette to create the sun.
Screenshot
You receive a hose.
Go back once, then move towards the stage.
Pick up the button from the ground.
Go back once and inspect the fire alarm box. Click on the cover to open it and place the button inside.
Click on the button to turn the sprinklers on.
Go on stage and release Ornella, then go to the left side of the stage.
Go right, past the set decoration and zoom in on the fire hydrant. Place the hose on the fire hydrant.
Use the hose to put out the fire.
Posted by: Meaghan |
April 23, 2012 6:20 PM
|
April 23, 2012 6:20 PM