
Natural Threat:
Ominous Shores
Platform: Windows

![]() If you want a hidden-object adventure that offers all the ghoulish, cheesy thrills of a late-night made-for-TV 1980s horror movie, look no further. Natural Threat: Ominous Shores by Alawar Games stars flesh-eating plants, mad scientists, and a gaggle of spring-break teenagers stranded on an island full of mutated monstrosities! Reeeeeeeee!... that, uh... that was a horror movie sound effect? You know, like... the monster is behind you! Reeeeeeeeee!... yeah, don't worry, I'm keeping my day job. With a gorgeous presentation, delightfully campy surprises, and all the genetically manipulated carnivorous creatures your little heart could desire, it's the perfect choice for an evening of monstrous, goofy fun.
If you want a hidden-object adventure that offers all the ghoulish, cheesy thrills of a late-night made-for-TV 1980s horror movie, look no further. Natural Threat: Ominous Shores by Alawar Games stars flesh-eating plants, mad scientists, and a gaggle of spring-break teenagers stranded on an island full of mutated monstrosities! Reeeeeeeee!... that, uh... that was a horror movie sound effect? You know, like... the monster is behind you! Reeeeeeeeee!... yeah, don't worry, I'm keeping my day job. With a gorgeous presentation, delightfully campy surprises, and all the genetically manipulated carnivorous creatures your little heart could desire, it's the perfect choice for an evening of monstrous, goofy fun.
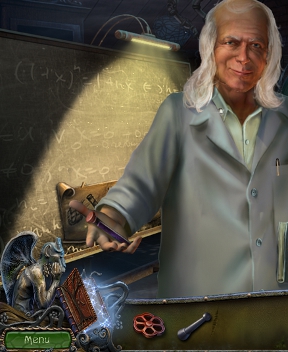 After a short tenure as an assistant for a creepy Jimmy Buffet-turned-mad scientist, you find yourself stranded on an island with a bunch of teenage stereotypes after your boat turns over in the storm. When you come to on the shore and find yourself alone, it's up to you to track down your helpless friends and avoid being turned into fertilizer. Eeeeeeevil fertilizer! Gameplay is rote for something of this type; whenever you're not busy being attacked by eyeball snake plant beasts, you'll be tracking down items and using complex things to solve simple tasks. Hidden-object scenes are marked with some lovely voluminous purple swirlies, the cursor changes to let you know when you can interact with something, and of course the hint and skip buttons are around if you're stuck or just don't feel like using your brain today.
Analysis: With so many games married to the concept that horror has to be grey and serious and full of intense operatic musical scoring, it's a relief to have one grab you by the hand and go, "Wheeeee!" Natural Threat: Ominous Shores is gloriously campy and just plain fun. Packed full of goofy cut-scenes, monsters, mayhem, and more dun-dun-dun than you can shake a stick at, it feels like a celebration of everything wonderful and weird about low-budget horror films. The game is lovely to look at, with its rich colours and imaginative locales, but also features a disappointingly coy soundtrack that kicks in whenever it feels like it, and then vanishes shyly in a flutter if you glance at it sideways. It doesn't really interfere too much with the game, which has a robust amount of ambient sound at least, but it is distracting.
 The gameplay unfortunately doesn't share the same wild abandon as the concept and presentation, going for your tried-and-true adventuring and hidden-object seeking. This isn't necessarily a bad thing, but it is sort of like someone giving you a glass of water to go with your peanut cheese bar. Satisfying and sufficient, perhaps, but not nearly as fun and indulgent as the rest. of your dessert. Click detection to pick up or use certain items can be annoyingly fiddly at time, especially when trying to combine things in hidden-object scenes, and it can lead to some confusing moments when you think your solution has failed. In general, however, you'll usually find what you need to get past any given obstacle fairly close by. On the whole, in fact, the game isn't particularly difficult (unless you're bug-phobic), which means it might be less for veterans who're looking for something to stimulate their brains and more for those of us who want a game to unwind with.
Natural Threat: Ominous Shores suffers from a few minor technical flaws and might not be for players who like games with serious drama, but if you're looking for something that doesn't take itself too seriously, this is definitely the game to check out. At around four hours or more, it's a solid length, and is the sort of experience best enjoyed with a big bowl of popcorn on hand. Give the demo a try; while it might not win any awards for gameplay innovation, it's the perfect cure for the "nothing's on TV" blah's, and is just plain fun.
![]() Windows:
Windows:
Download the demo
Get the full version
![]() Mac OS X:
Mac OS X:
Not available.
Try Boot Camp or Parallels or CrossOver Games.


Walkthrough Guide
(Please allow page to fully load for spoiler tags to be functional.)
Natural Threat: Ominous Shores Walkthrough
General Info, Chapters 1-3
General Information
At the start of a new game, you have a choice between two difficulties: Casual Mode and Expert mode.
In Casual Mode the Hint and Skip buttons will recharge more quickly, sparkles will indicate active areas, and there is no mis-click penalty.
In the Expert mode the Hint and Skip buttons have a slower recharge timer, sparkles indicating active areas are disabled, and there is a penalty for too many mis-clicks.
Use the cursor to interact with the environment.
The cursor will change to a magnifying glass when you can investigate an area or start a puzzle or hidden object scene.
The cursor changes to a directional arrow when you can move to a different location.
The cursor changes to a hand when you can pick up an item to add it to your Inventory.
The cursor changes to an arrow with a rotating gear when you can interact directly with the environment, or if an inventory item is needed to use on the object.
The Inventory is the toolbar located at the bottom of the screen.
Your Inventory bar contains all of the items you will need to progress through the game.
Click an item in your Inventory to select it, then click on an area in the game to attempt to use the item.
Often, once an item is used, it will disappear permanently from your Inventory.
To the right of the Inventory bar is the Hint button, shaped like a gargoyle with a jar.
The Hint button can be used to reveal an item during a hidden object scene or to show you the next step of your adventure if you're stuck.
While solving a puzzle, the Hint button will change into a Skip button.
Wait for the jar to fill completely, then press the Skip button once it is fully charged to immediately complete the puzzle.
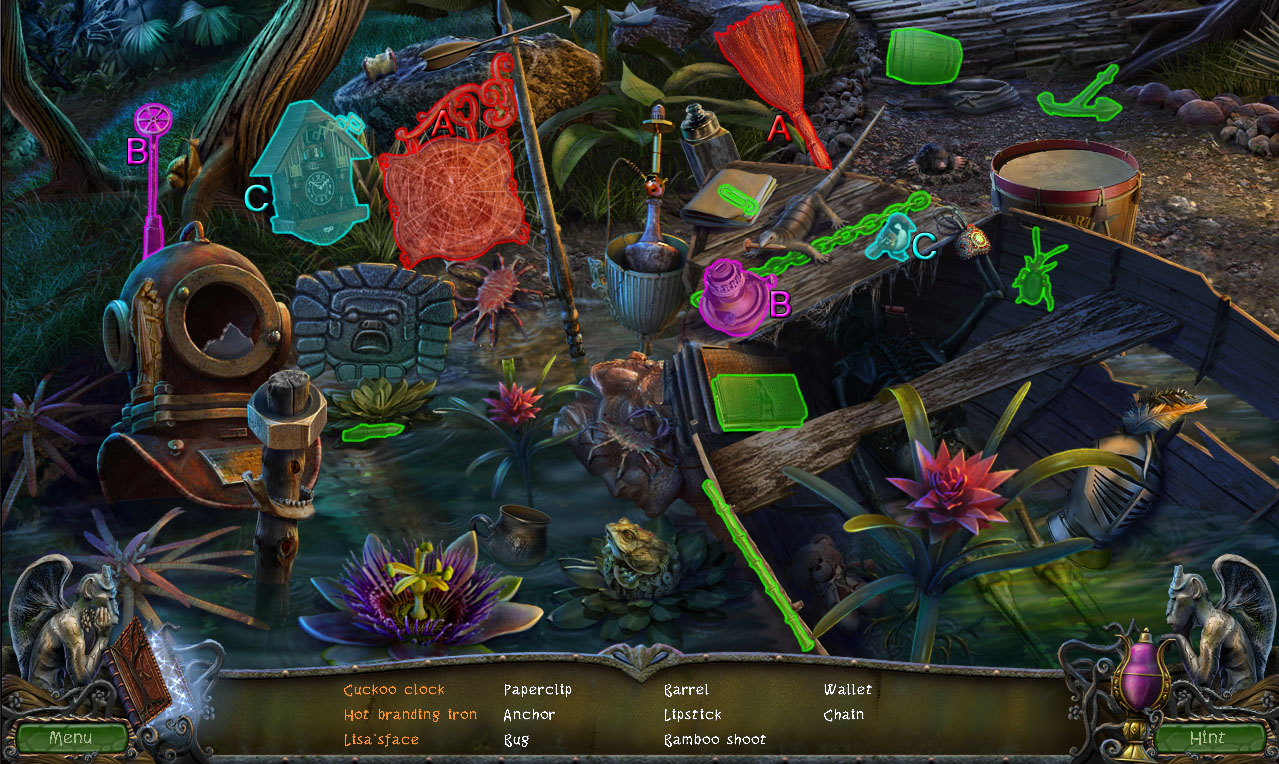
Hidden object scenes are areas indicated by sparkles where you must collect various randomized objects listed at the bottom to receive a new inventory item upon completion.
In the screenshots of this guide, the random items are highlighted in green and the inventory item you receive at the end is labeled and highlighted in yellow.
Sometimes the item you receive at the end of the hidden object scene may not be any of the items from the list.
On the left side of the Inventory bar is the Journal.
The Journal contains helpful information and tracks your progress through the game.
Access the Journal to find pictures and text that can help you solve puzzles and follow the story.
Click the left or right arrows at the sides of the Journal to flip through the pages.
To the left of the Journal button is the Menu button.
Click the Menu button to return to the Main Menu where you can edit the audio or video Options, change the Cursor, return to the Main Menu, or Quit the game.
Chapter 1
Garden
Click Professor Steiner to speak with him.
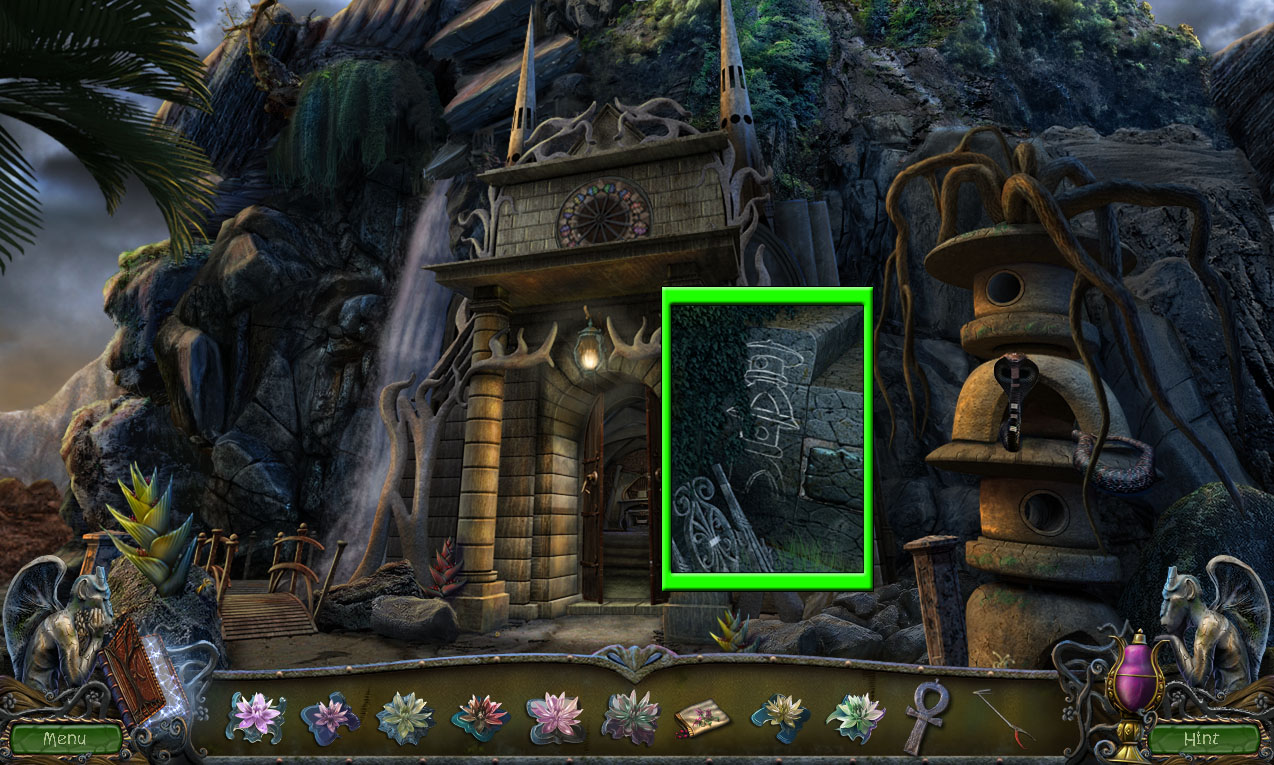
Click the wall to the right of the round window to start the hidden object scene.
Collect all 24 of the insects hidden around the scene.
Screenshot.
Once the hidden object scene is complete, you will receive the INSECTS.
Pick up the PRUNING SHEARS on top of the mushrooms attached to the far right tree trunk.
Click the statue in the middle of the fountain to zoom in.
Use the PRUNING SHEARS to cut away the vines wrapped around the statue.
Take the KEY from the necklace around the statue's neck.
Click the large gate for a closer look.
Give the INSECTS to the spider in the center of the gate.
Use the KEY on the padlock to open the gate.
Continue forward to the Mansion Entrance.
Mansion Entrance
Click the hollow in the tree trunk to zoom in.
Use the PRUNING SHEARS to cut through the vines.
Take the RULER inside of the hollow.
Inspect the window to the left of the door.
Use the RULER on the gap between the window panes to open it.
Take the SUGAR CUBES from the bowl.
Click the envelope to read the letter.
Take the SMALL WHEEL on top of the brick at the lower right side of the window.
Click the ant hill beside the path for a closer look.
Place the SUGAR CUBES on top of the ant hill to lure away the ants.
Pick up the DOOR KNOB from the ground.
Click the door to the mansion to zoom in.
Add the DOOR KNOB to the left door.
Go through the open door to the Mansion Foyer.
Mansion Foyer
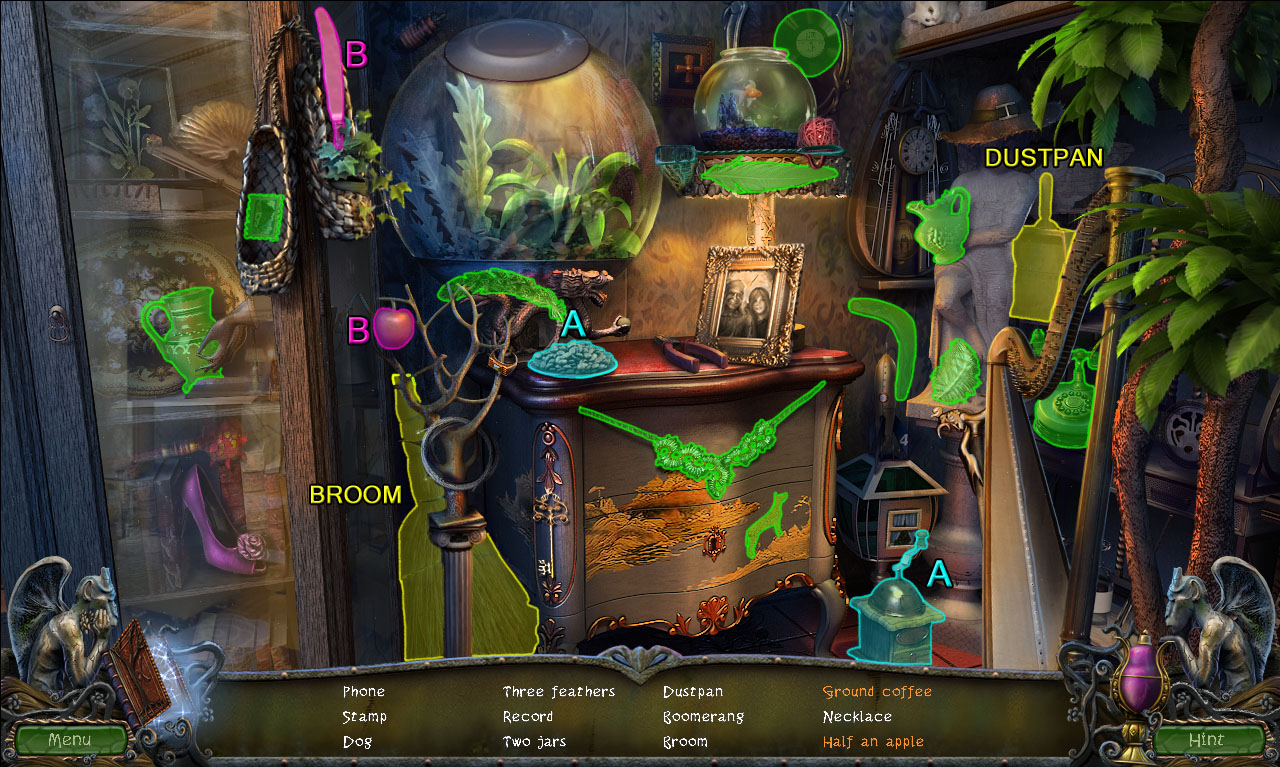
Click the cabinet to the left of the stairs to start the hidden object scene.
Add the coffee beans to the grinder to make the Ground Coffee (A).
Cut the apple with the knife to make Half An Apple (B).
Screenshot.
Once the hidden object scene is complete, you will receive the BROOM AND DUSTPAN.
Click the sofa chair for a closer look.
Place the SMALL WHEEL (from the window at the Mansion Entrance) at the corner of the base.
Click the sofa again to roll it out of the way.
Inspect the broken planter that falls to the floor.
Use the BROOM AND DUSTPAN to clean up the dirt.
Pick up the revealed ACCESS CARD from the floor.
Click the glass double doors to zoom in.
Insert the ACCESS CARD into slot under the right handle.
Go through the open door to the Plant Sample Room.
Plant Sample Room
Click the electrified plant holder for a closer look.
Take the VALVE HANDLE next to the glasses on the table.
Continue forward to the Laboratory.
Laboratory
Speak with the professor to receive the GENETIC MATERIAL (1/3).
Click the microscope under the window to zoom in.
Take the KNIFE from the windowsill.
Move forward to the Storage Room.
Storage Room
Take the BROOM HANDLE leaning against the right shelves.
Inspect the package on top of the barrel.
Read the note on the side of the box.
Use the KNIFE (from the windowsill in the Laboratory) to cut through the rope.
Take the BATTERY from the opened box.
Click the lock box on the middle shelf for a closer look.
Add the BATTERY to the flashlight, close the lid, then pick up the FLASHLIGHT to add it to your inventory.
Pick up the GENETIC MATERIAL (2/3) on top of the lock box.
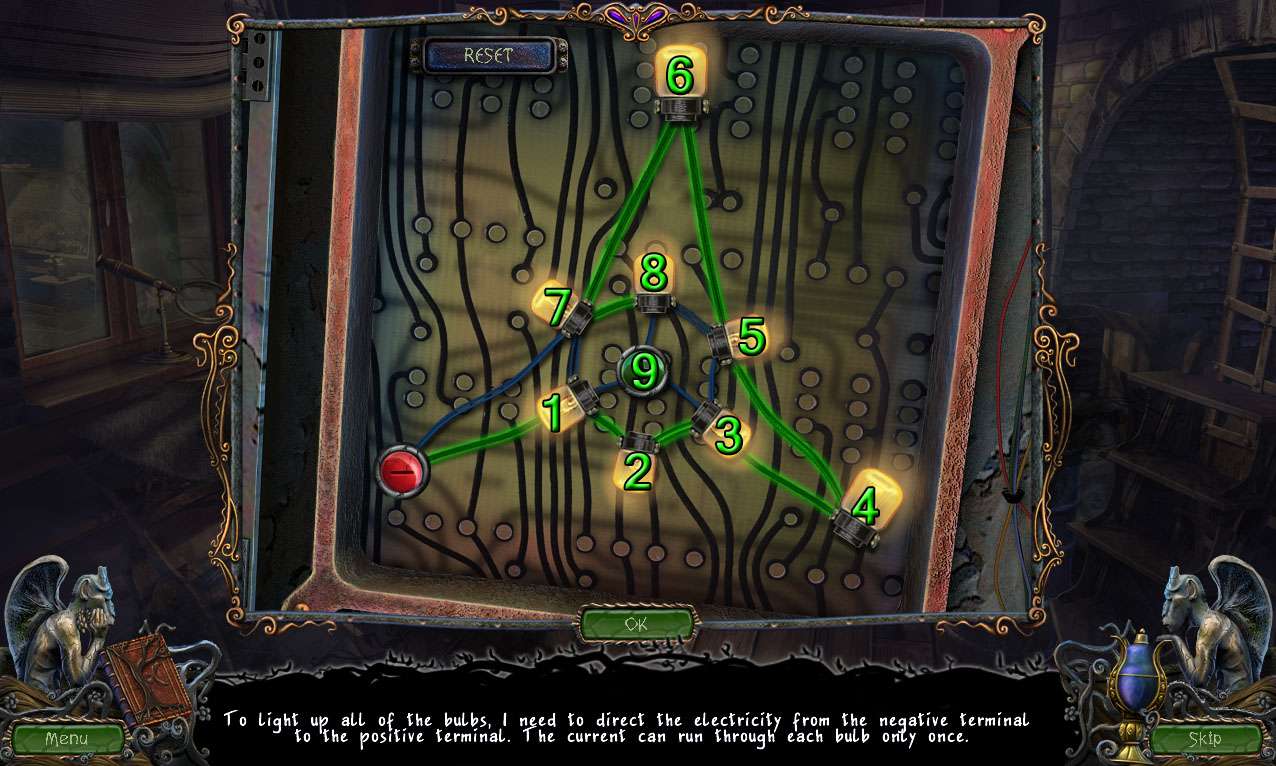
Click the fuse panel on the wall beside the window to start the puzzle.
Create a path from the negative (-) button to light all of the bulbs and end at the positive (+) button.
Click a flashing bulb to light it; only bulbs that share the same wire can be clicked.
Solution.
Completing the puzzle restores the power to the Laboratory.
Click the bottom of the left shelves to look underneath.
Take the SAFETY PIN stuck to the wood base.
Place the FLASHLIGHT on the floor to light the area.
Use the BROOM HANDLE on the pile of junk on the floor to pull in the MAGNIFYING LENS.
Click the magnifier in front of the window for a closer look.
Take the GENETIC MATERIAL (3/3) on the windowsill.
Place the MAGNIFYING LENS inside the magnifier to view a close-up of the chain.
Return to the Mansion Foyer.
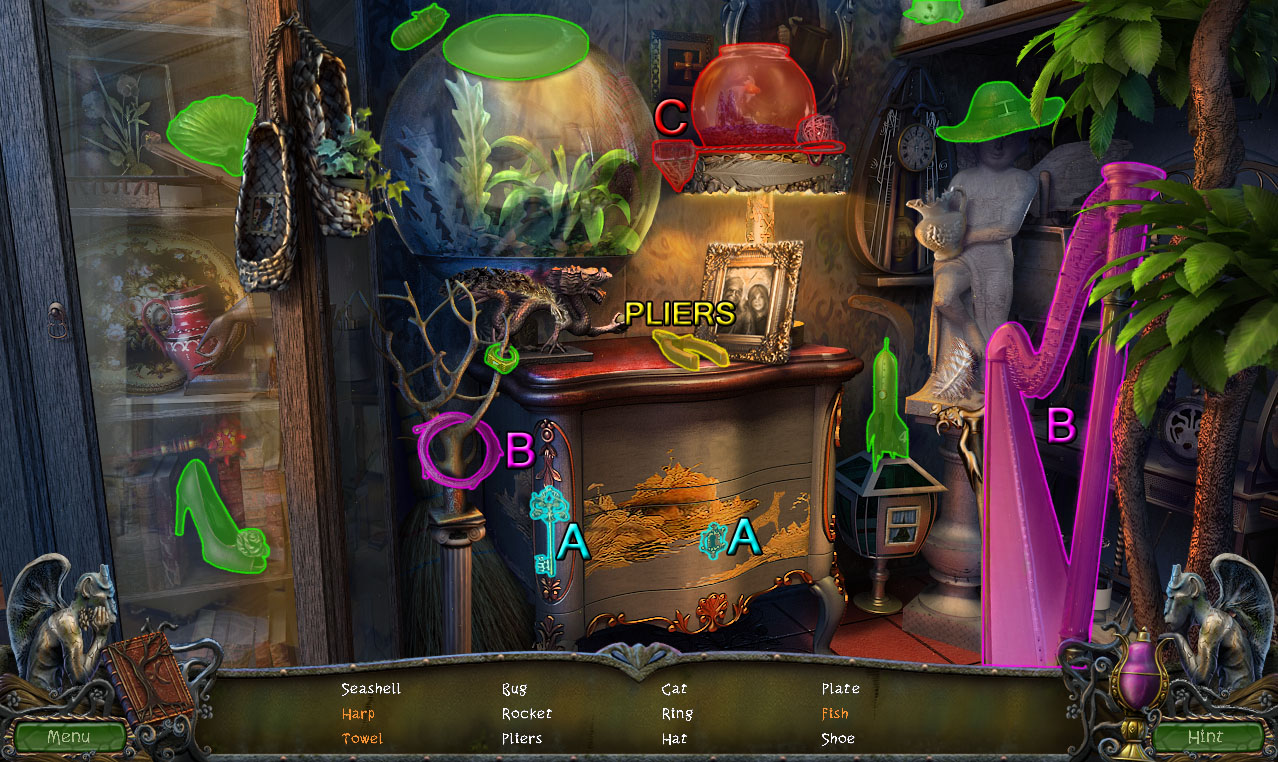
Mansion Foyer
Click the cabinet to repeat the hidden object scene.
Use the key on the drawer lock to find the Towel (A).
Add the strings to complete the Harp (B).
Use the net on the fishbowl to scoop out the Fish (C).
Screenshot.
Once the hidden object scene is complete, you will receive the PLIERS.
Go back to the Garden.
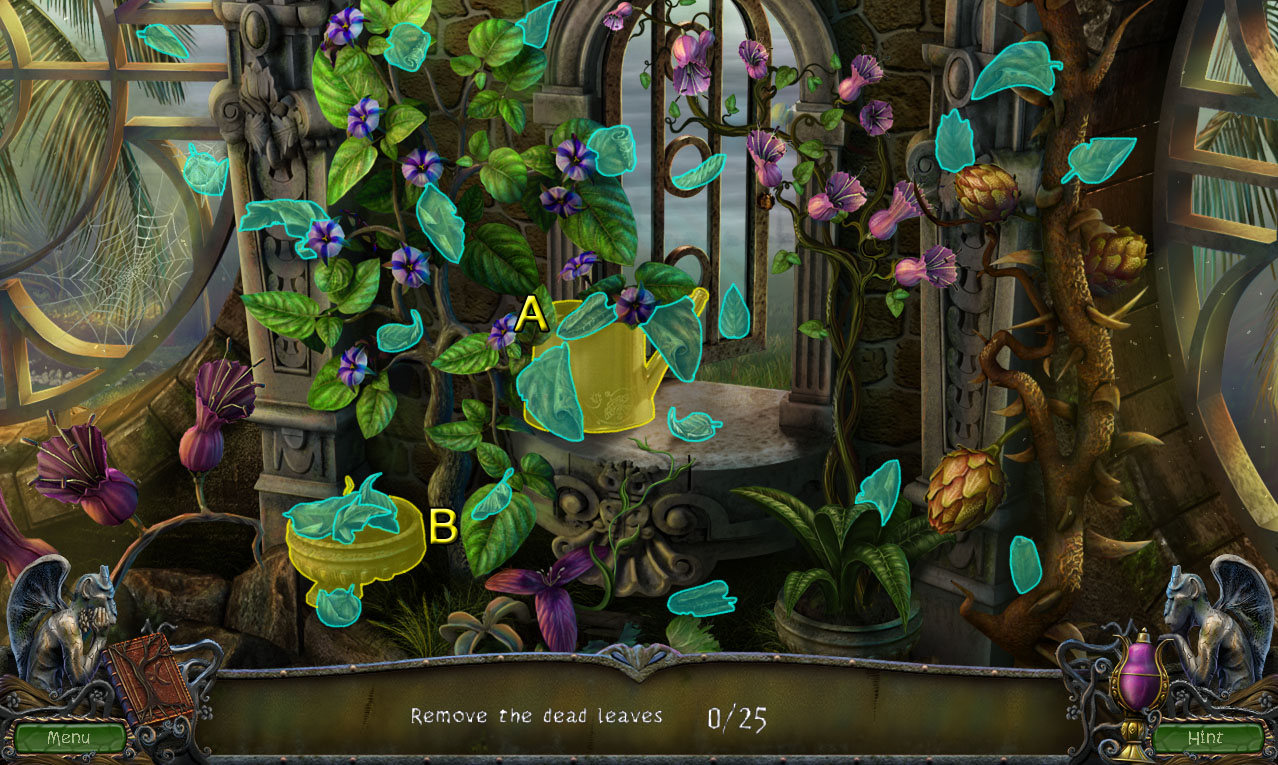
Garden
Click the wall to the right of the round window to repeat the hidden object scene.
Use the watering can (A) on the planter (B) to grow the flower.
Screenshot.
Once the hidden object scene is complete, you will receive the DRAGONIUM MUTANA.
Return to the Storage Room.
Storage Room
Click the magnifying glass on the windowsill to zoom in.
Use the PLIERS (from the Mansion Foyer hidden object scene) to repair the bent chain link.
Pick up the repaired CHAIN.
Go back to the Laboratory.
Laboratory
Inspect the broken scale on the right table.
Add the CHAIN (from the windowsill in the Storage Room) to the left balance on the scale.
Place the three GENETIC MATERIALS into the stand on the counter to start the puzzle.
GENETIC MATERIAL (1/3) is given to you by the professor.
GENETIC MATERIAL (2/3) is on top of the lock box in the Storage Room.
GENETIC MATERIAL (3/3) is on the windowsill in the Storage Room.
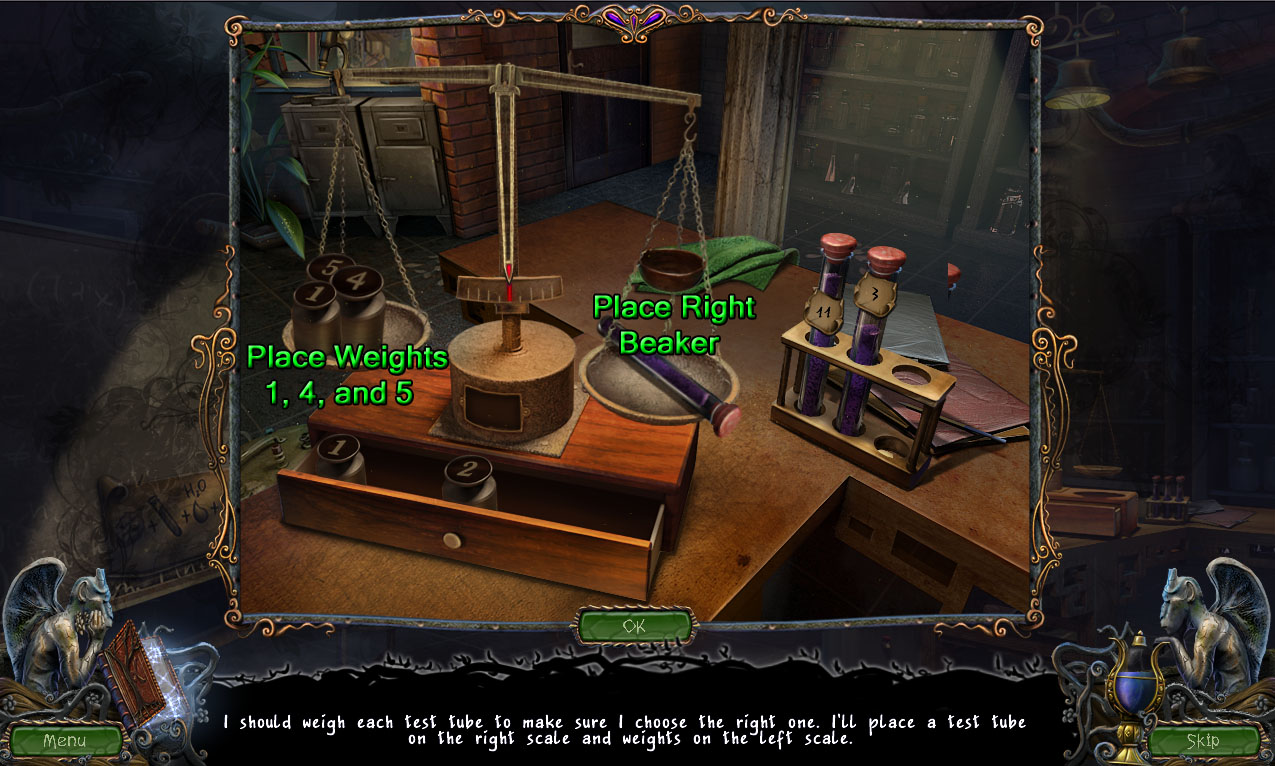
Weigh each test tube to find the one that weighs 10 grams.
Place the test tube on the right balance, then place the weights on the left balance to measure them on the scale.
If the needle moves to the left of the red line, then the weights are too light.
If the needle moves to the right of the red line, the weights are too heavy.
If the needle points directly at the red line, the bottle and weights are even.
Place the right bottle on the scale.
Add weights 5, 4, and 1 to the left balance.
Solution.
Once the puzzle is solved, you will receive the 10 GRAMS OF GENETIC MATERIAL.
Click the stand in front of the blackboard to zoom in.
Place the DRAGONIUM MUTANA (from the Garden hidden object scene) inside the bowl.
Pour the 10 GRAMS OF GENETIC MATERIAL into the bowl.
Add the VALVE HANDLE (from the table in the sample room) to the sink.
Turn the sink handle to pour the water into the bowl.
Pick up the PESTLE next to the bowl on the stand.
Use the PESTLE to crush the contents inside the bowl.
Take the completed EXPERIMENTAL SOLUTION.
Go back to the Plant Sample Room.
Plant Sample Room
Click the electrified plant holder to zoom in.
Use the SAFETY PIN (from the base of the left cupboard in the Storage Room) to unlock the case.
Click the handle to shut off the power.
Take the SPRAY BOTTLE NOZZLE from the opened plant holder.
Inspect the bottles next to the radio on the table.
Pour the EXPERIMENTAL SOLUTION (created in the Laboratory) into the large bottle with the flower label.
Add the SPRAY BOTTLE NOZZLE to the top of the bottle.
Take the completed SPRAY BOTTLE WITH SOLUTION.
Go forward to the Laboratory.
Laboratory
Click the microscope in front of the window for a closer look.
Use the SPRAY BOTTLE WITH SOLUTION (assembled on the table in the Plant Sample Room) on the large flower of the plant.
Click the microscope to observe the results.
Speak with the professor to receive the MICROSCOPE CASE KEY.
Go forward into the Storage Room.
Storage Room
Inspect the lock box on the shelf of the middle cupboard.
Use the MICROSCOPE CASE KEY (from the professor in the Laboratory) on the X-shaped lock to open the box.
Take the lens from the open case.
Chapter 2
Shore
Pick up the photograph that flies to the side of the rock.
Click the rock on the wooden ramp to zoom in.
Click the ROCK again to add it to your inventory.
Pick up the HARPOON TIP that was underneath the rock.
Click the stick pointing out of the ground for a closer look.
Use the ROCK to knock the NAIL out of the post.
Add the HARPOON TIP to the the top of the stick.
Put the NAIL into the hole of the harpoon tip.
Hammer the nail in with the ROCK.
Take the completed HARPOON.
Inspect the hook at the corner of the net blocking the cave entrance.
Use the HARPOON to tear down the net.
Continue forward to the Swamp.
Swamp
Click the hole at the bottom of the door to look inside.
Use the HARPOON to pull the CABIN KEY from the figure's hand.
Click the door to zoom in.
Use the CABIN KEY to open the padlock.
Go inside the Cabin.
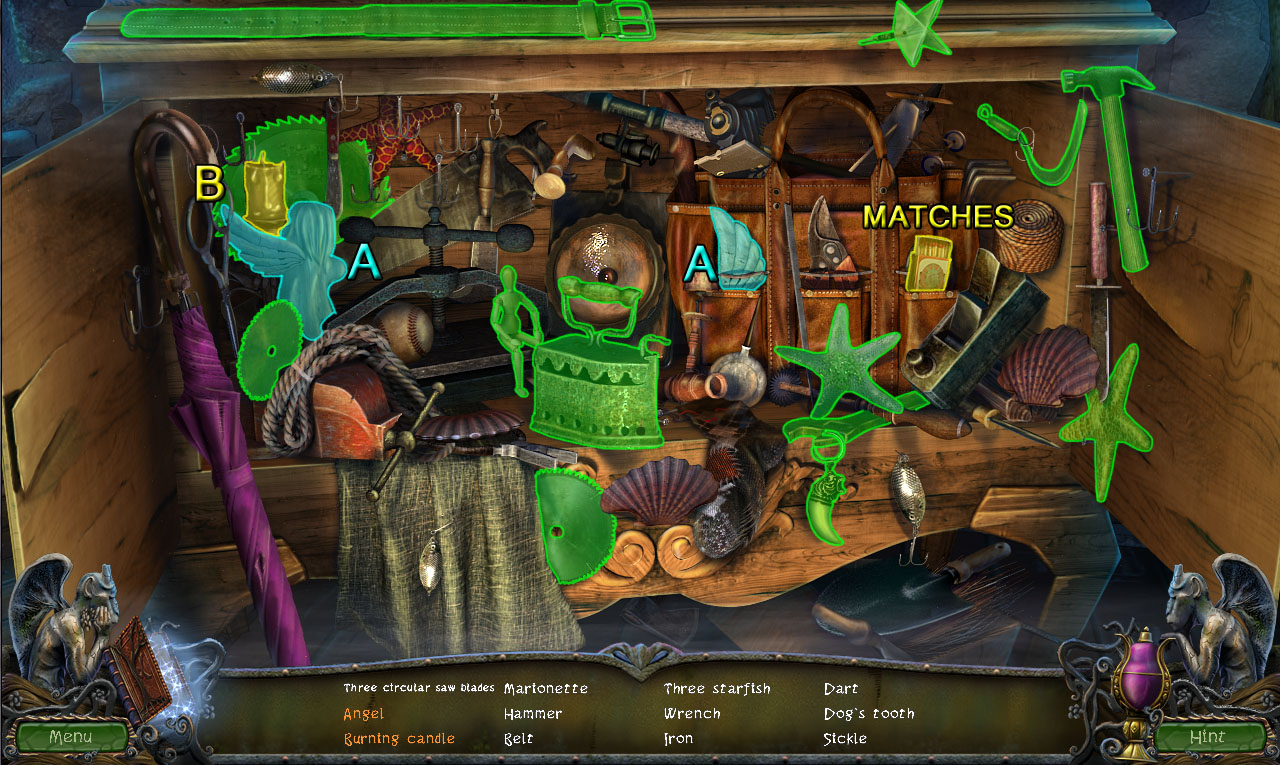
Cabin
Click the bottom of the cupboard to start the hidden object scene.
Add the wing to the statue to complete the Angel (A).
Light the candle with the matches to make the Burning Candle (B).
Screenshot.
Once the hidden object scene is complete, you will receive the MATCHES.
Inspect the round table for a closer look.
Take the TWEEZERS and the CORKSCREW beside the picture frame.
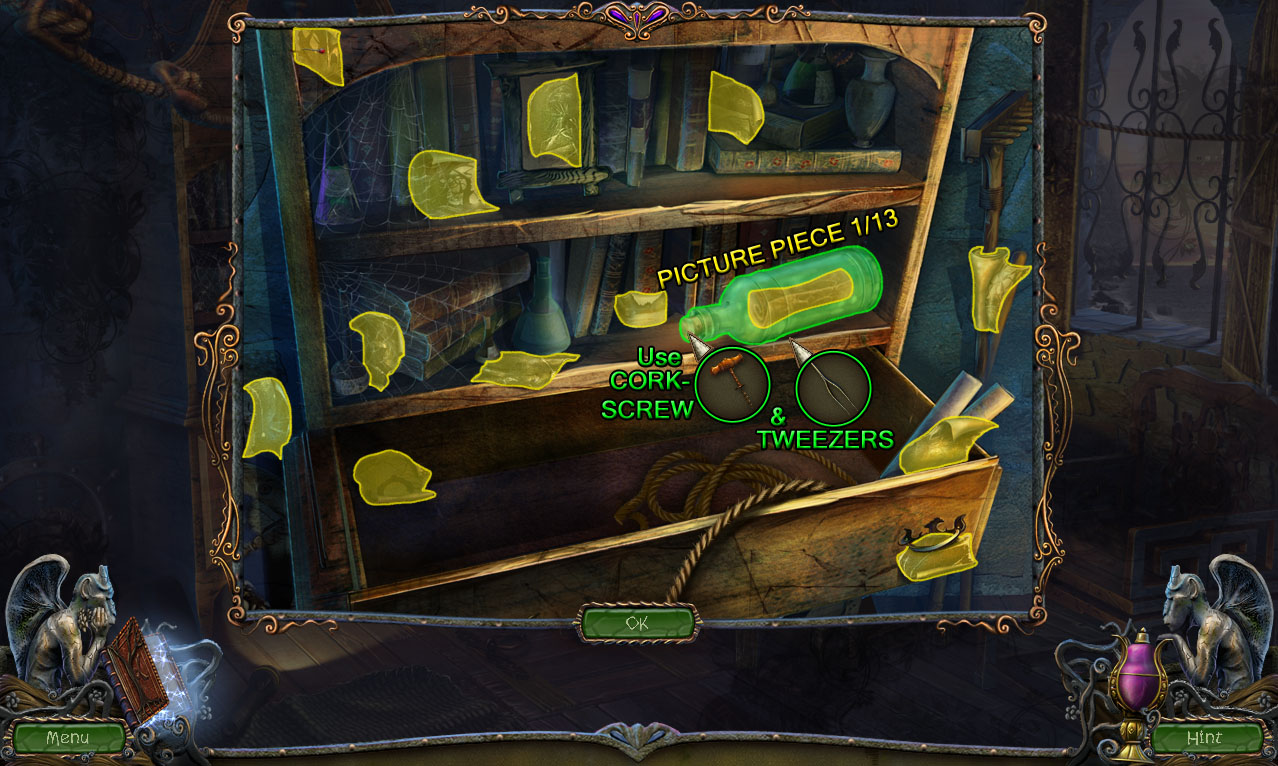
Click the top of the cupboard to zoom in.
Use the CORKSCREW to open the bottle.
Take the PIECE OF THE PICTURE (1/13) out of the bottle with the TWEEZERS.
Collect the remaining 12 PIECES OF THE PICTURE hidden around the shelves.
Screenshot.
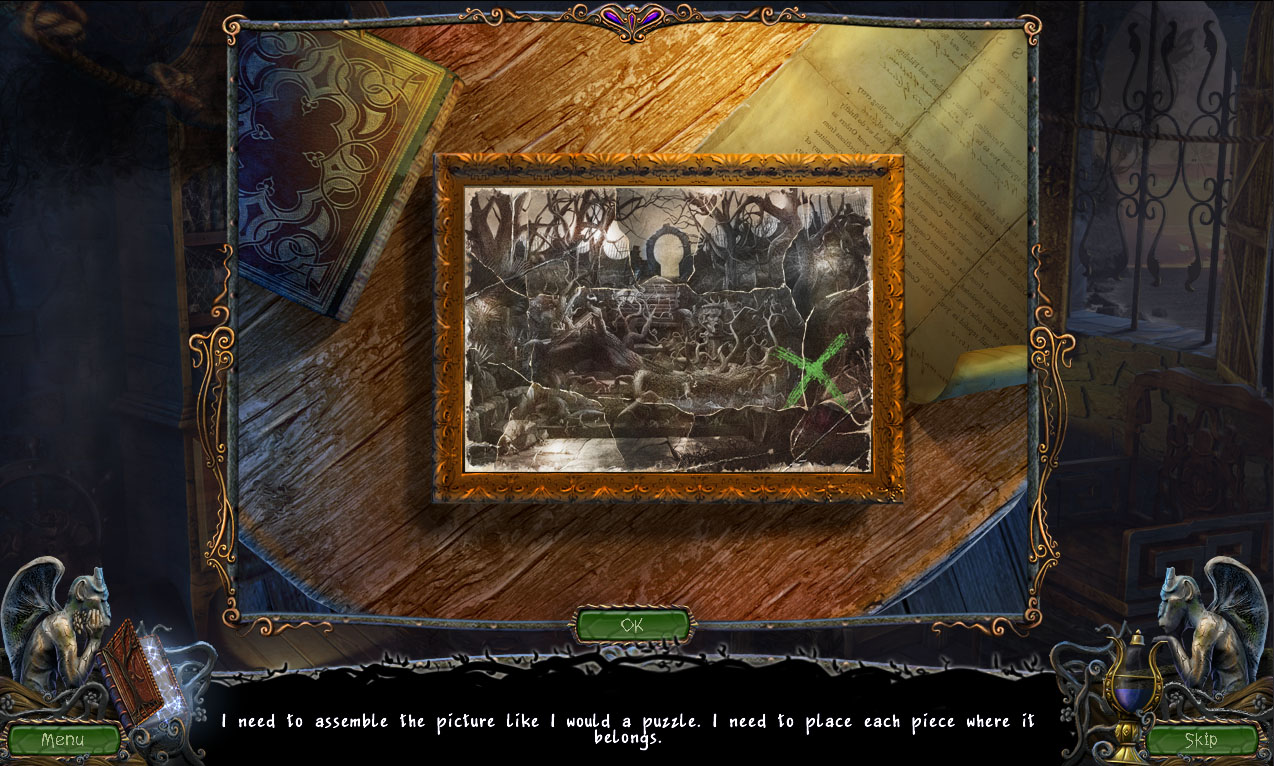
Click the round table again to zoom in.
Add the 13 PIECES OF THE PICTURE to the picture frame to start the puzzle.
Arrange the photo scraps inside the frame to complete the picture.
Click a piece on the table to select it, then click an area in the frame to set it down.
If a photo piece is correctly positioned, it will lock in place.
Solution.
Go back outside to the Swamp.
Swamp
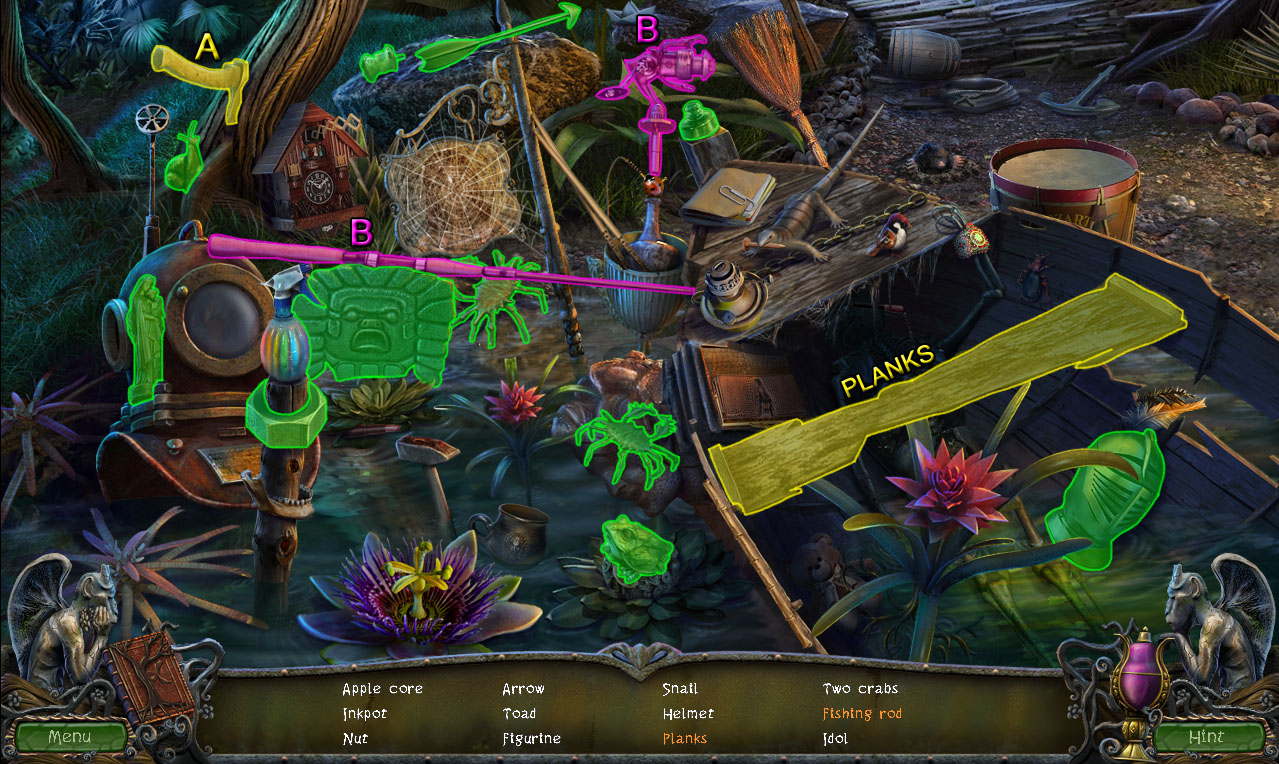
Click the destroyed boat to start the hidden object scene.
Use the axe to chop the boards into Planks (A).
Add the reel to the rod to complete the Fishing Rod (B).
Screenshot.
Once the hidden object scene is complete, you will receive the PLANKS.
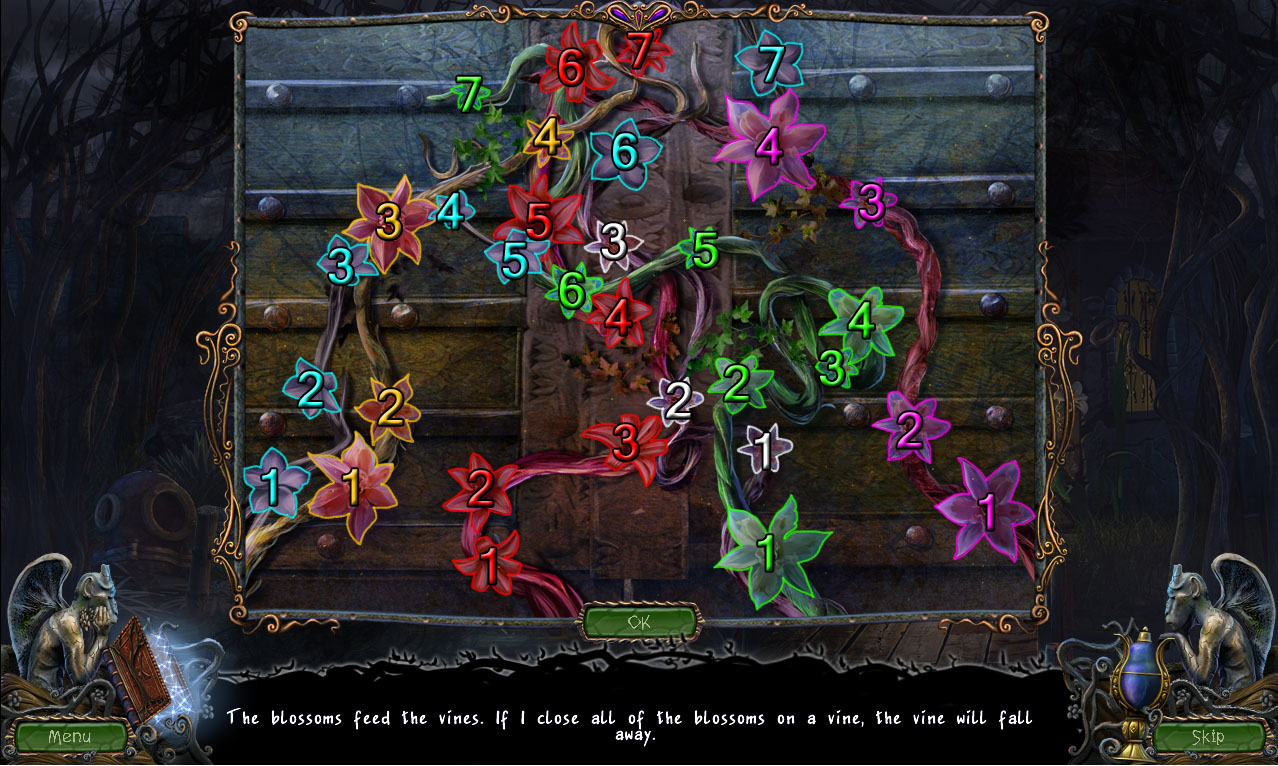
Click the gate at the end of the path to start the puzzle.
Remove the vines by closing all of the flowers on each vine.
If you mis-click a flower from a different vine, then all of the flowers on the first vine will reset.
Solution Part 1.
Solution Part 2.
After the puzzle is solved, go through the open gate to the Stairway.
Stairway
Click the base of the right tree to zoom in.
Take the HAY on top of the branch.
Place the HAY on top of the stacked firewood under the tree.
Use the MATCHES (from the Cabin hidden object scene) on the hay to light the fire.
Put the PLANKS (from the Swamp hidden object scene) over the gap in the stairs.
Continue forward to the Vine Gates.
Vine Gates
Take the GLASS BELL DOME (1/2) on top of the steps.
Click the cupboard for a closer look.
Pick up the BIRDCAGE on the bottom shelf.
Read the professor's notes on top of the small barrel.
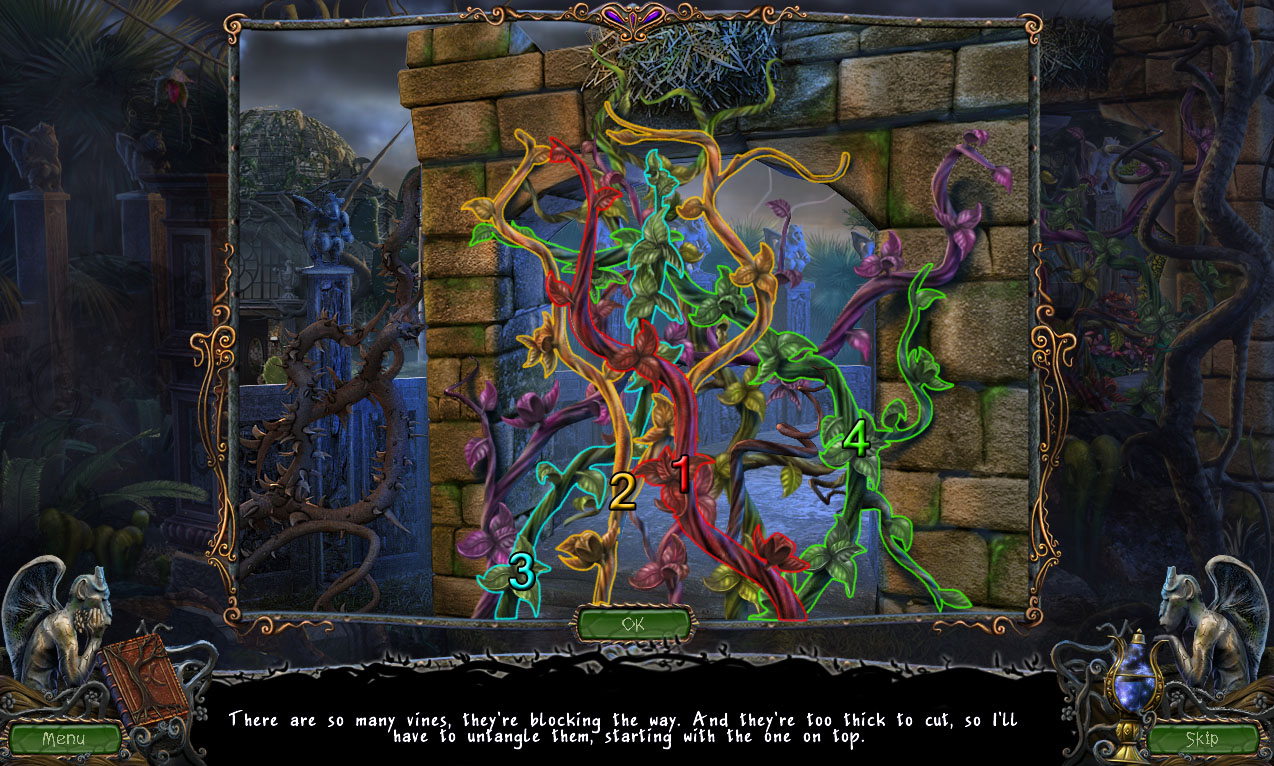
Click the right archway to raise the vines, then click the vines to start the puzzle.
Click the vines in order from top to bottom to remove all of them.
A vine must not be underneath any other vine in order to be removed.
If you mis-click a vine, the puzzle will reset.
Solution Part 1.
Solution Part 2.
Use the BIRDCAGE to capture the owl on the steps; you will receive the CAGED BABY OWL.
Continue through the right archway to the Poison Garden.
Poison Garden
Click the fountain to zoom in.
Take the EMPTY GLASS at the side of the empty basin.
Click the faucet valve to turn on the water.
Use the EMPTY GLASS on the flowing water to receive the GLASS OF WATER.
Inspect the woman lying on the ground to make the hidden object scene available.
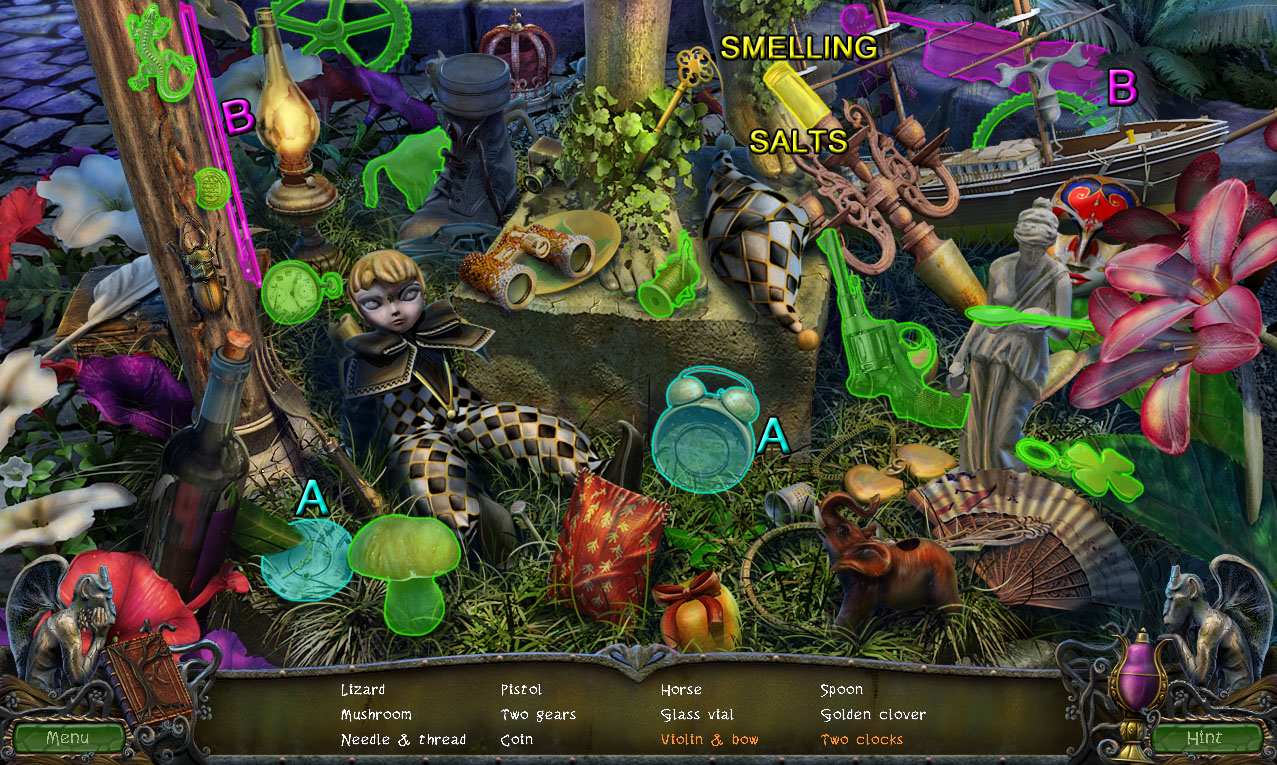
Click the vine-covered statue to start the hidden object scene.
Add the clock face to the alarm clock to complete the Clock (A).
Place the bow on the violin to complete the Violin & Bow (B).
Screenshot.
Once the hidden object scene is complete, you will receive the SMELLING SALTS.
Click Carrie again to zoom in.
Use the SMELLING SALTS to revive her.
Give Carrie the GLASS OF WATER to receive the GLASS EYE.
Go back to the Swamp.
Swamp
Click the debris in the water to repeat the hidden object scene.
Spray the colored bottle to create the Rainbow (A).
Use the hammer on the diving helmet to make the Broken Glass (B).
Add the drumsticks to the drum to play the Drumming (C).
Screenshot.
Once the hidden object scene is complete, you will receive the EMPTY BAG.
Go into the Cabin.
Cabin
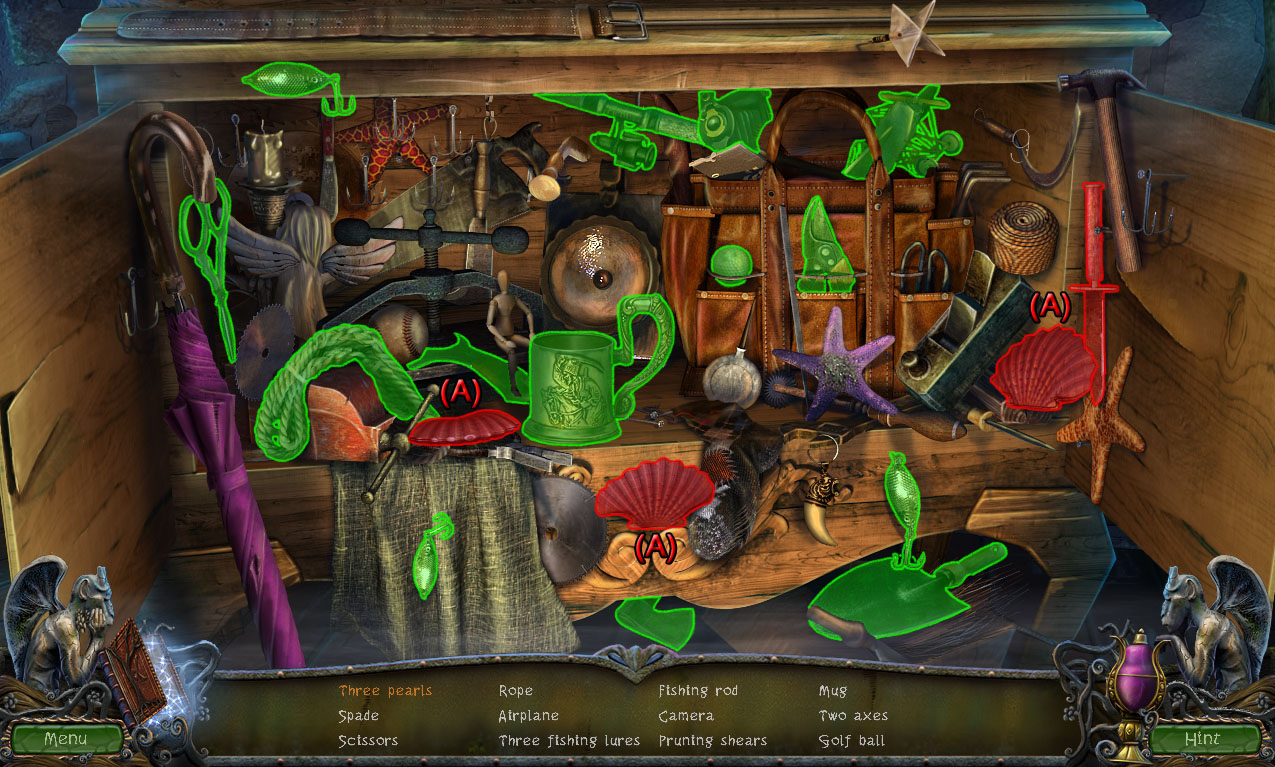
Click the cupboard under the bookshelf to repeat the hidden object scene.
Use the knife to open the three oysters, revealing the Three Pearls inside (A).
Screenshot.
Once the hidden object scene is complete, you will receive the SLEDGE HAMMER.
Click the box under the table for a closer look.
Use the EMPTY BAG (from the Swamp hidden object scene) on the sand in the box to fill the BAG OF SAND.
Return to the Stairway.
Stairway
Click the chasm at the base of the steps to look inside.
Pour the BAG OF SAND (from the sand box in the Cabin) onto the flames.
Use the SLEDGE HAMMER (from the Cabin hidden object scene) to break the chisel out of the melted sand.
Click the CHISEL to add it to your inventory.
Click the trunk of the right tree for a closer look.
Use the CHISEL on the cracked bark at the base of the tree.
Take the CRYSTAL FLOWER 1/12 inside the tree.
Go back to the Shore, then continue up the ramp to the Stone Bridge.
Stone Bridge
Click the statue to zoom in.
Place the CRYSTAL FLOWER 1/12 (from the tree trunk at the Stairway) into the flower-shaped slot.
Take the AXE from the raised stone platform.
Return to the Vine Gates.
Vine Gates
Click the left gateway for a closer look.
Use the AXE (from the platform at the Stone Bridge) to chop through the vines.
Continue right to the Poison Garden.
Poison Garden
Inspect the purse on the ground that Carrie left behind.
Take the OILER next to the purse handle.
Go back to the Vine Gates.
Vine Gates
Click the left gate to zoom in.
Use the OILER (from Carrie's handbag at the Poison Garden) on the rusted hinges at the sides of the gate.
Go through the open gate to the Courtyard.
Courtyard
Click the broken fountain to look inside.
Take the SPADE from the basin of the fountain.
Inspect the cactus bench beside the right lamp post.
Use the SPADE to dig up the dirt around the glass bell dome.
Click the freed GLASS BELL DOME (2/2) to add it to your inventory.
Move left to travel to the River.
River
Click the right gargoyle near the edge of the water for a closer look.
Place the GLASS EYE (from Carrie at the Poison Garden) into the statue's empty eye socket.
Take the LADDER under the gargoyle's lifted paw.
Go back to the Courtyard.
Courtyard
Place the LADDER (from the gargoyle at the River) at the base if the right lamp post.
Click the light at the top of the pole to zoom in.
Take the CRYSTAL FLOWER (2/12) inside the lamp shade.
Click the LADDER to place it back into your inventory.
Go back to the Vine Gates.
Vine Gates
Place the LADDER (from the lamp post at the Courtyard) against the left side of the archway.
Click the nest at the top of the archway for a closer look.
Place the CAGED BABY OWL (captured on the steps of the Vine Gates) inside the nest.
Take the STONE BLOSSOM 1/2 inside the nest.
Move right to the Poison Garden.
Poison Garden
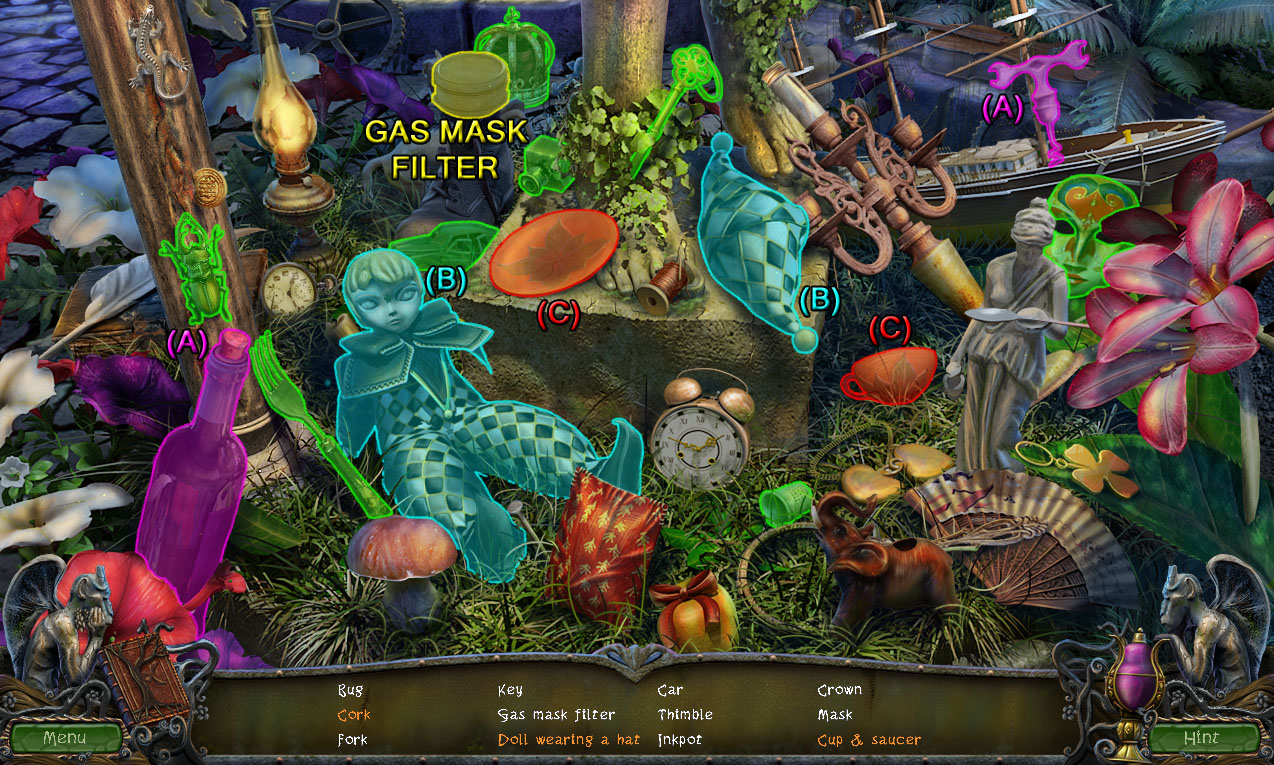
Click the statue to repeat the hidden object scene.
Use the corkscrew on the bottle to remove the Cork (A).
Place the harlequin hat on the doll to complete the Doll Wearing a Hat (B).
Place the cup on the dish to make the Cup & Saucer (C).
Screenshot.
Once the hidden object scene is complete, you will receive the GAS MASK FILTER.
Go back to the Vine Gates.
Vine Gates
Click the top shelf of the cupboard for a closer look.
Add the GAS MASK FILTER (from the Poison Garden hidden object scene) to the gas mask.
Click the completed GAS MASK to add it to your inventory.
Go right to the Poison Garden.
Poison Garden
Use the GAS MASK (from the cupboard at the Vine Gates) on the pink cloud of poison gas to move to the back of the area.
Place the GLASS BELL DOME 1/2 (from the steps at the Vine Gates) on top of the left poison plant.
Place the GLASS BELL DOME 2/2 (from the dirt at the Courtyard) over the right poison plant.
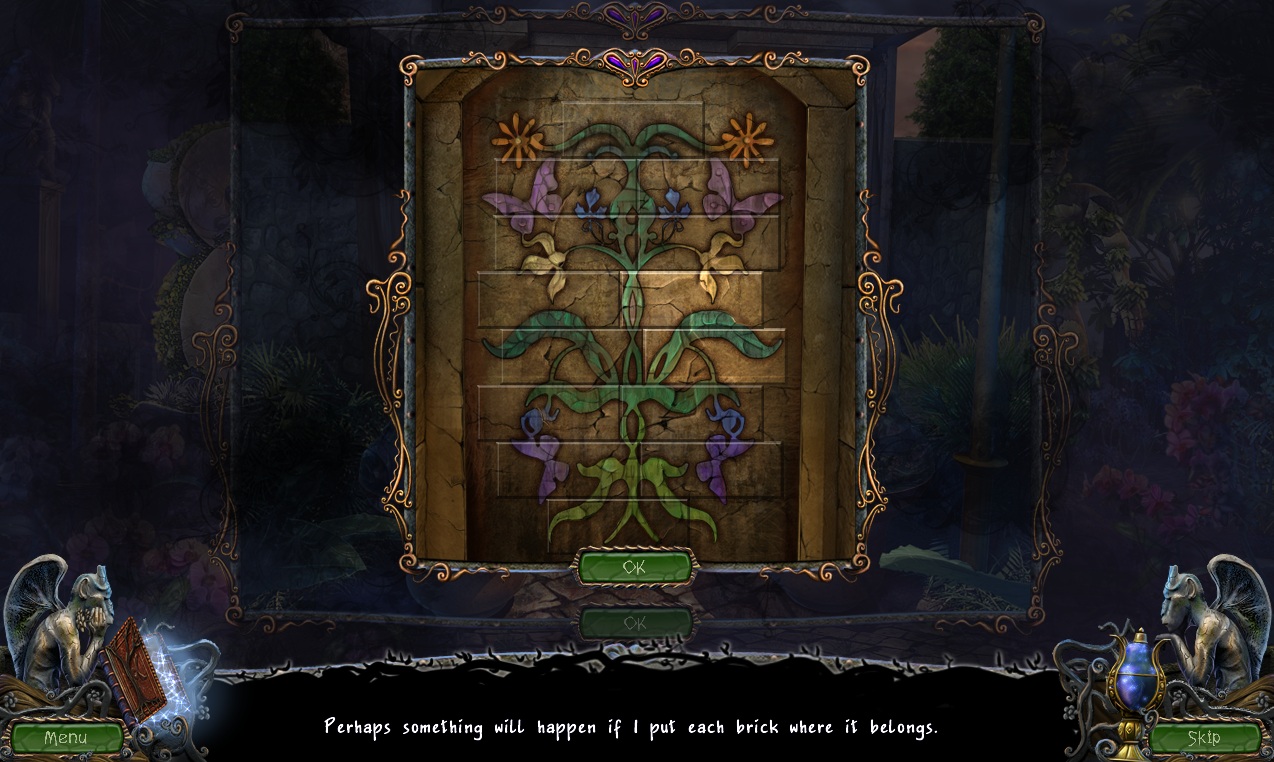
Click the painted brick wall to start the puzzle.
Arrange the bricks to complete the image on the wall.
Click one brick to select it, then click a different brick to swap their positions.
Solution.
After the puzzle is solved, take the STONE PHALANX from the revealed wall cache.
Click the large stone hand under the gazebo to zoom in.
Add the STONE PHALANX to the empty space in the middle finger.
Take the SCISSORS from the compartment in the center of the palm.
Return to the Courtyard.
Courtyard
Click the cactus bench for a closer look.
Use the SCISSORS (from the stone hand at the Poison Garden) to clip the thorns from the round cactus.
Take the STONE BLOSSOM (2/2) and the note with the growth acceleration formula on top of the trimmed cactus.
Click the door to move to the mansion entrance, then inspect the lock in the middle of the front door.
Add the two STONE BLOSSOMS to the sockets between the tiles to start the puzzle.
Use the stone blossoms to rotate the tiles into an image of a face.
Click a blossom to move the four adjacent tiles one space clockwise.
Solution.
After the puzzle is solved, continue through the open door to the Mansion Foyer.
Chapter 3
Mansion Foyer
Click the sign on the middle of the stairs to zoom in.
Click the sign again to flip it over, and note the numbers written on the back: 1-2-3-blank-5-6.
Go out the right door up the stairs to the Patio, then continue forward towards the left door to drop to the Plant Sample Room.
Plant Sample Room
Click the planter on the cabinet for a closer look.
Take the WEIGHT (1/5) next to the pocket watch on the surface of the cabinet.
Click the radio on the right table to zoom in.
Take the WEIGHT (2/5) on top of the radio.
Continue forward to the Laboratory.
Laboratory
Click the sink beside the black board to zoom in.
Pick up the WEIGHT (3/5) on the floor under the sink.
Inspect the microscope on the locker beside the open door.
Take the RED RAG covering the microscope.
Take the WEIGHT (4/5) beside the microscope.
Click the glass dish under the scope to zoom in.
Use the RED RAG on the glass to wipe off the dirt.
Take the revealed LIGHT BULB taped to the glass.
Click the scale on the counter top for a closer look.
Pick up the GARDENING GLOVES next to the sample rack.
Click the fruit plant to the left of the microscope to zoom in.
Use the SCISSORS (from the stone hand at the Poison Garden) to cut off the piece of fruit.
Take the CRYSTAL FLOWER (3/12) on top of the lowest leaf.
Go through the open door to the Storage Room.
Storage Room
Click the barrel for a closer look.
Pick up the WEIGHT (5/5) on the floor to the upper right of the can.
Inspect the three flasks on the shelf of the middle cabinet.
Take the PESTLE on the shelf in front of the right flask.
Click the skeleton's hand to zoom in.
Take the RING (1/2) around the skeleton's finger.
Pick up the MICROSCOPE LENS on the floor beside the hand.
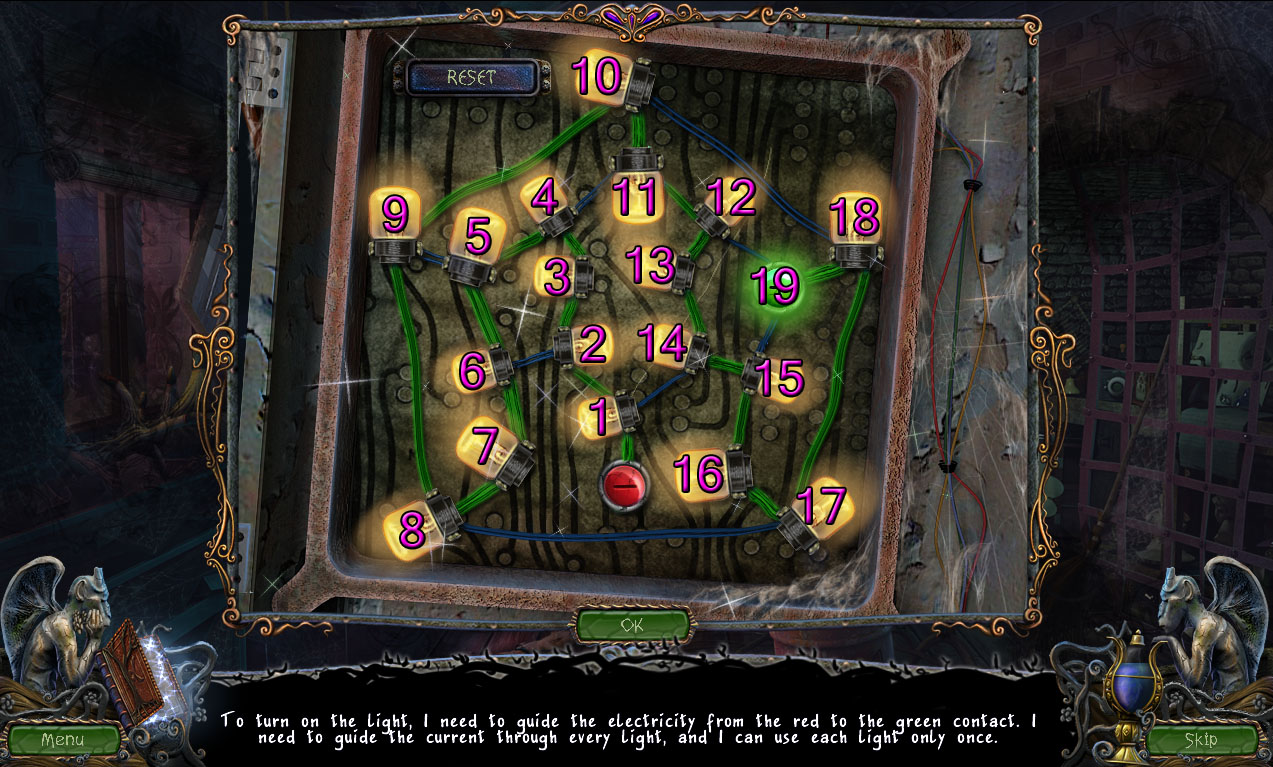
Inspect the open fuse panel on the wall beside the window.
Add the LIGHT BULB (from the microscope sample dish at the Laboratory) to the panel to start the puzzle.
Click the bulbs to create a path of light through each light bulb to the positive (+) contact.
Flashing light bulbs indicate the the next possible move.
If there are no available unlit bulbs to click, the puzzle will reset.
Solution.
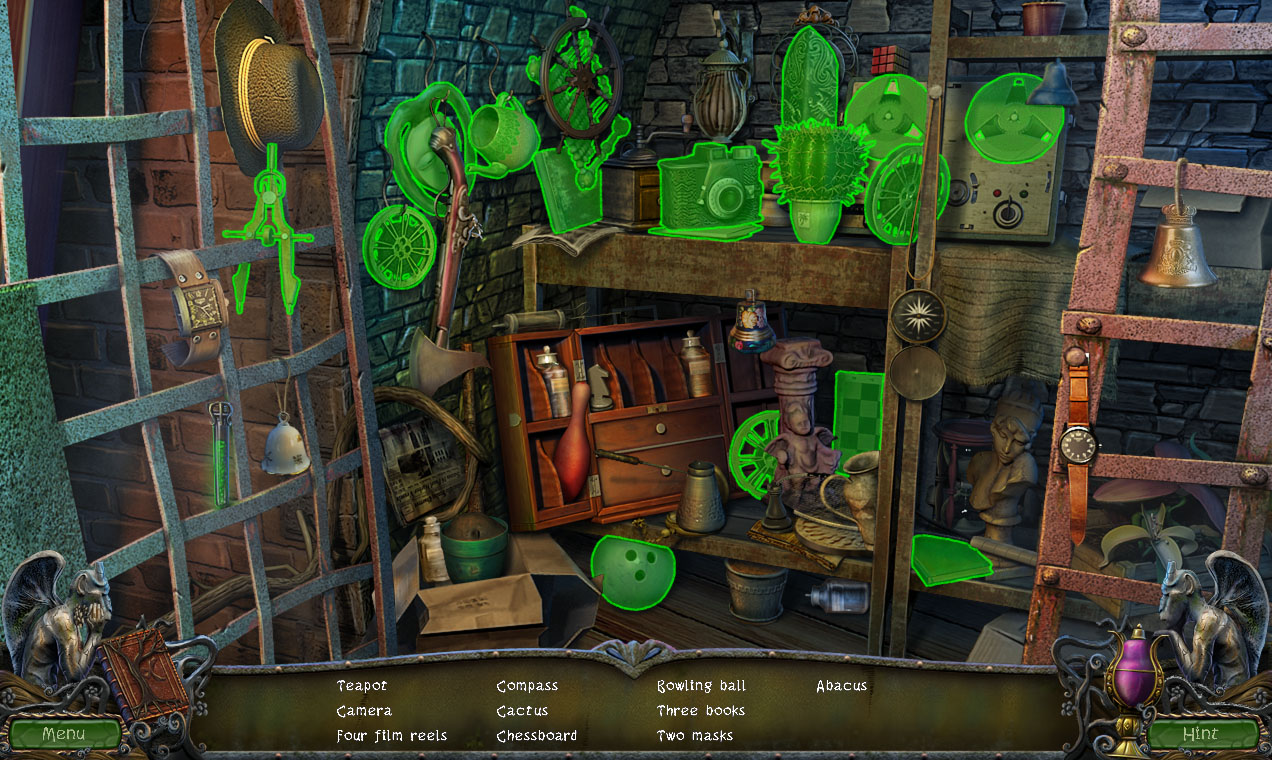
After the puzzle is solved, click the pile of junk in the gated alcove to start the hidden object scene.
Place the horn on top of the record player to complete the Gramophone (A).
Use the air pump to fill the deflated Ball (B).
Screenshot.
Once the hidden object scene is complete, you will receive the FOUR TEST TUBES OF GROWTH POWDER.
Go back to the Laboratory.
Laboratory
Inspect the scale on top of the counter.
Place the FOUR TEST TUBES OF GROWTH POWDER (from the Storage Room hidden object scene) inside the sample rack.
Add the 5 WEIGHTS to the shelf at the bottom of the scale to start the puzzle.
WEIGHT (1/5) is from the planter table at the Plant Sample Room.
WEIGHT (2/5) is on the radio in the Plant Sample Room.
WEIGHT (3/5) is from the floor by the sink in the Laboratory.
WEIGHT (4/5) is from the microscope at the Laboratory.
WEIGHT (5/5) is on the floor by the barrel in the Storage Room.
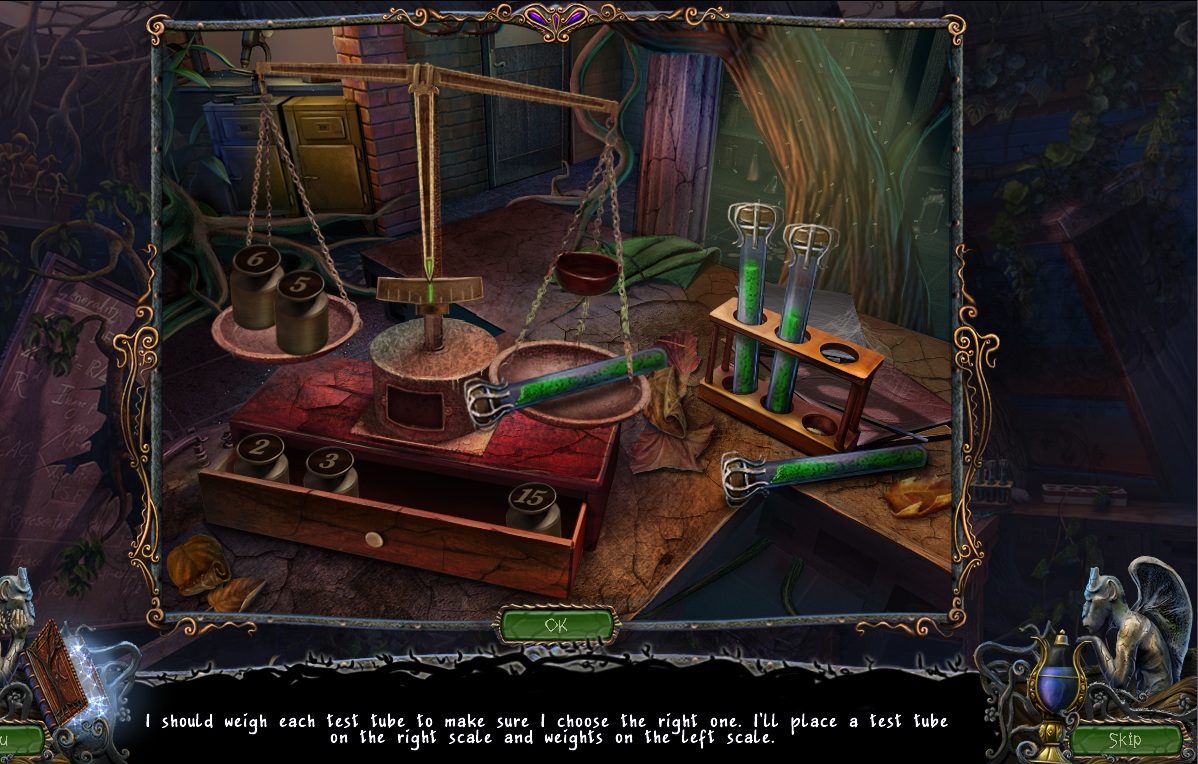
Find the 11 grams test tube by balancing the samples with the weights on the scale.
Click one of the four samples to select it, then click the right balance to place it on the scale.
Place the weight on the left scale, then note the position of the needle in the middle.
If the needle is moved to the left of the center, then the object on the right is heavier and vice versa.
Solution.
After the puzzle is solved, you will receive the 11 GRAMS OF GROWTH POWDER.
Click the sink for a closer look.
Turn the valve by the faucet to pour the water into the bowl.
Add the EXOTIC FRUIT (from the fruit plant in the Laboratory) and the 11 GRAMS OF GROWTH POWDER to the bowl.
Use the PESTLE (from the cabinet shelf at the Storage Room) to complete the recipe.
Take the filled watering can of GROWTH ELIXIR.
Go back to the Plant Sample Room.
Plant Sample Room
Click the planter on top of the cabinet to zoom in.
Use the GROWTH ELIXIR (from the mixing bowl at the sink in the Laboratory) on the bamboo sprouts inside the planter.
Climb up the bamboo ladder to return to the Patio.
Patio
Click the glass doors to the tower for a closer look.
Use the GARDENING GLOVES (from the scale table at the Laboratory) to remove the thorny vine blocking the entrance.
Go back to the Mansion Foyer.
Mansion Foyer
Speak with Max to receive the SCREWDRIVER.
Return to the Plant Sample Room.
Plant Sample Room
Click the radio on the table to zoom in.
Use the SCREWDRIVER (from Max's cut scene in the Mansion Foyer) to remove the screws at the corners of the radio.
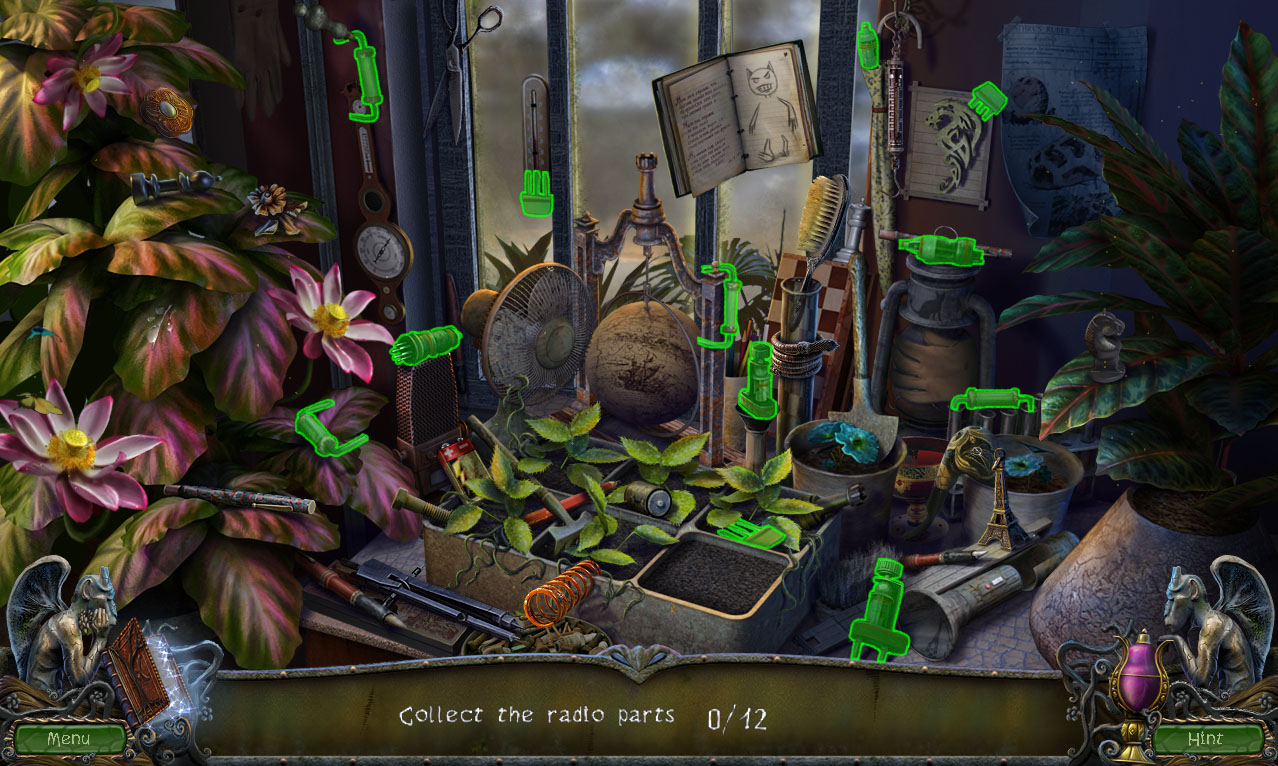
Click the plants in front of the right window to start the hidden object scene.
Screenshot.
Once the hidden object scene is complete, you will receive the RADIO PARTS.
Click the radio again for a closer look.
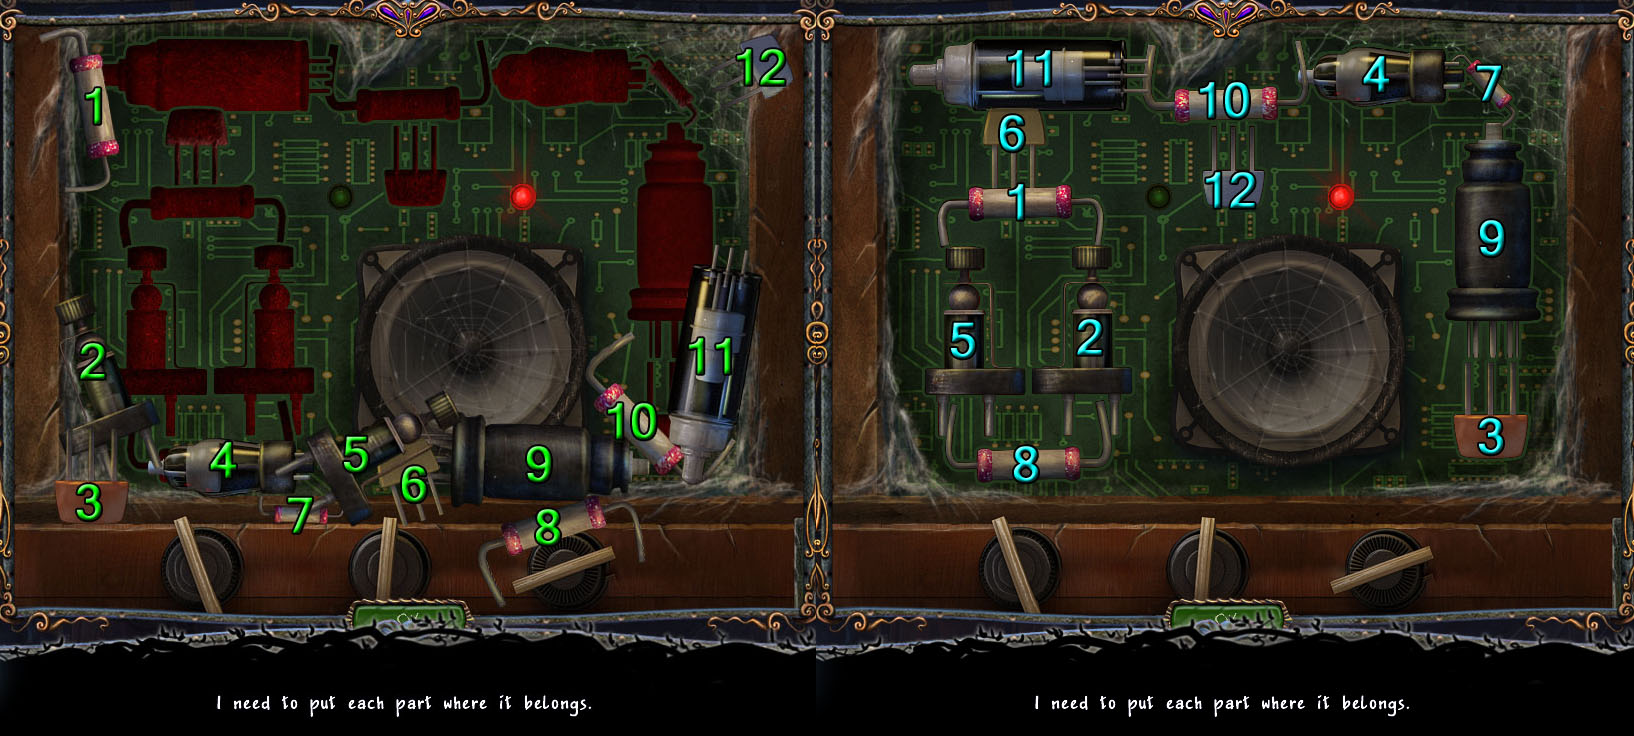
Add the RADIO PARTS to the radio to start the puzzle.
Place the mechanical parts in the correct slots to assemble the radio.
Click a part to select it, then click an open space to set it down.
If positioned correctly, the part with lock in place.
Solution.
After the puzzle is solved, click the cover to place it back over the radio.
Click the radio to zoom in, then note the time shown under the watch drawing: 10:45:35.
Go forward twice to reach the Storage Room.
Storage Room
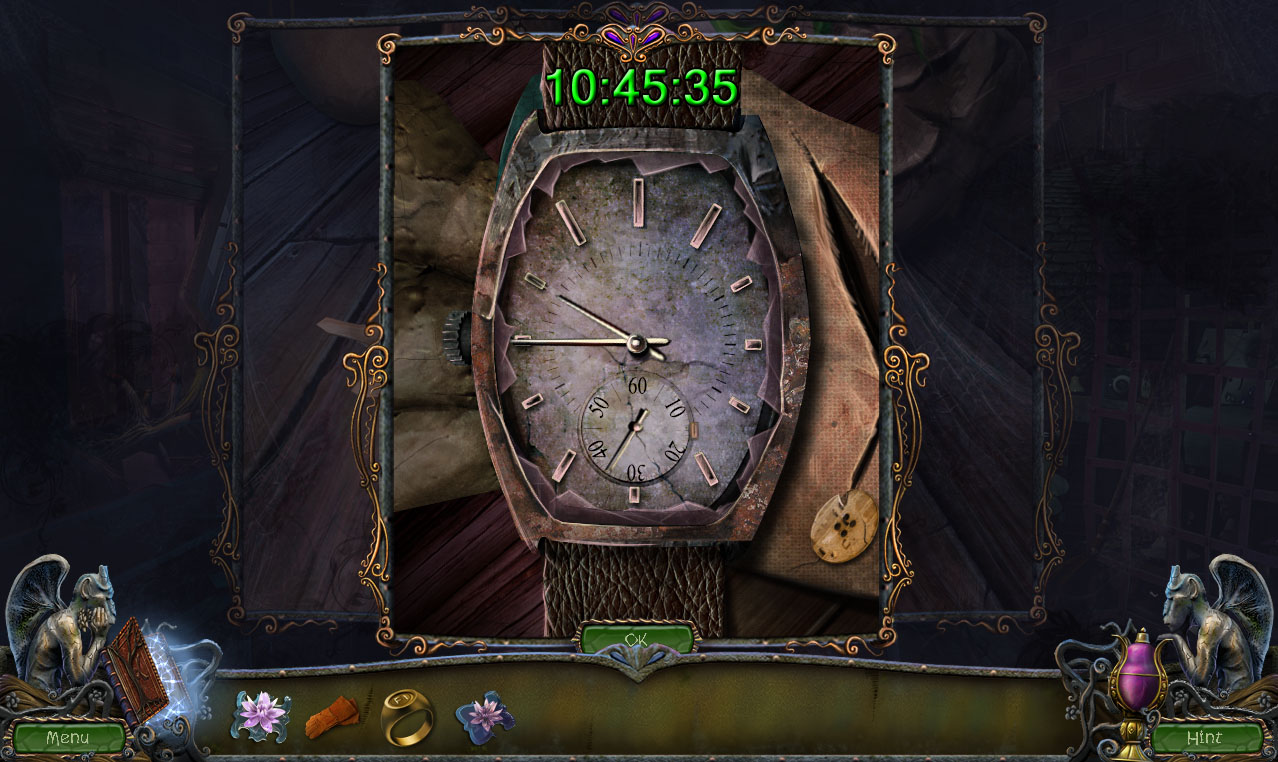
Click the skeleton lying on the floor for a closer look.
Inspect the watch around the skeleton's hand to get a view at the face.
Drag the hour, minute, and second hands of the watch to set the time to the same time found on the note on the radio (10:45:35).
Screenshot.
Take the small note from the revealed compartment inside the watch to find the frequency needed to send the SOS on the radio: 500 kHz.
Go back to the Plant Sample Room.
Plant Sample Room
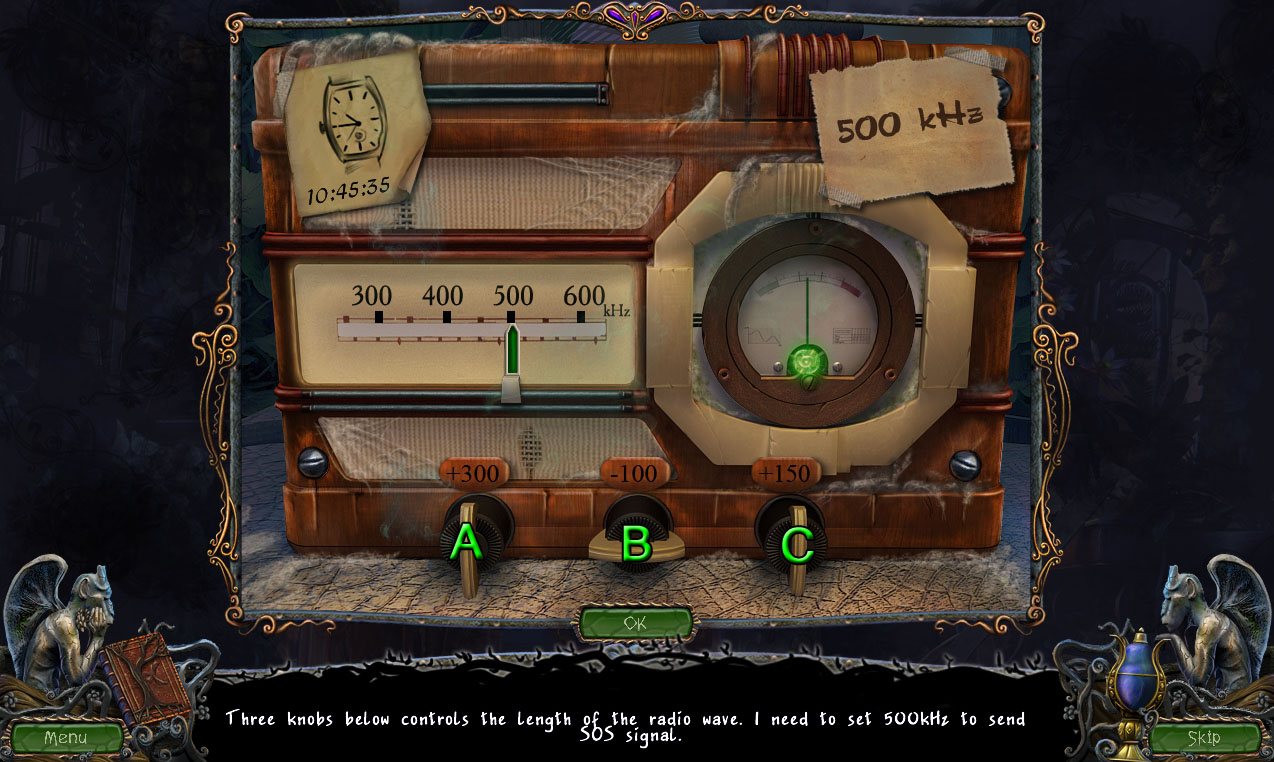
Click the radio on the table to start the puzzle.
Turn the knobs in the correct order to set the frequency to 500 kHz.
Click each of the three knobs to add or subtract the amount shown above each knob: +300, -100, +150.
Watch the dial in the middle of the radio to see how far you are from 500 kHz - the needle starts at the 250 point.
Click the needles in the following order: A, B, C, B.
Solution.
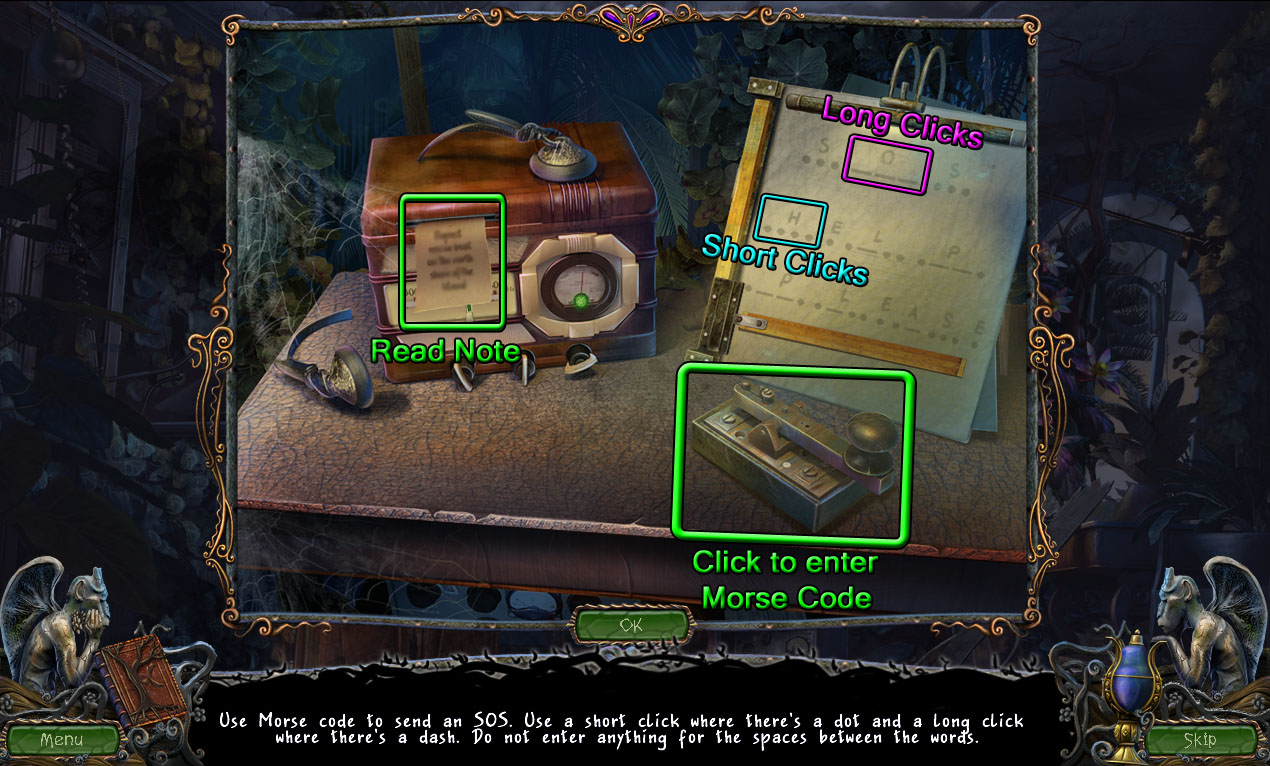
After the radio frequency is correctly set, the next part of the puzzle will begin.
Click the transmitter to send the morse code message shown on the paper "SOS Help Please".
The dots under each letter signify a short click, while the lines under a letter represent a long held click.
For example, the first word "SOS" which is dot-dot-dot, line-line-line, dot-dot-dot would be 3 consecutive short clicks with the mouse, 3 long consecutive clicks where you hold and release the left mouse button each time, followed by another three short clicks.
As each letter in the message is completed, it will fade to grey on the paper.
If a letter is entered incorrectly, the puzzle will reset from the beginning of the line.
Screenshot.
After the second part of the puzzle is complete, read the responding message that is printed through the slot in the radio which will cause the radio speaker to break.
Remove the broken speaker at the right side of the radio to find the CRYSTAL hidden inside.
Return to the Mansion Foyer of the mansion.
Mansion Foyer
Click the left doorway up the stairs for a closer look.
Add the CRYSTAL (from the radio puzzle in the Plant Sample Room) to the framed board on the wall to start the puzzle.
Arrange the gems around the board into their identically shaped slots.
Click a gem to move it into an empty adjacent space along the track.
Solution.
After the puzzle is solved, go through the open doorway to the Upstairs Hallway.
Upstairs Hallway
Click the lamp on the right wall to zoom in.
Take the NUMBER WHEEL wedged between the lamp wires.
Go through the right door to the Bathroom.
Bathroom
Click the large hole in the floor for a closer look.
Pick up the TONGS on the floorboards above the lantern.
Go back out to the Upstairs Hallway.
Upstairs Hallway
Click the left door to zoom in.
Use the TONGS to remove the three boards nailed to the wall left of the door.
Take the revealed DOOR HANDLE from the hole in the wall.
Add the DOOR HANDLE to the socket in the wall.
Open the door, then take the SAW stuck in the vines in the doorway.
Return to the Patio.
Patio
Click the glass doors to the tower for a closer look.
Add the NUMBER WHEEL (from the lamp wires in the Upstairs Hallway) to the lock.
Enter the combination found on the back of the sign in the Mansion Foyer: 1-2-3-0-5-6.
Click the unlocked green button to open the doors.
Screenshot.
Click the stairway through the open door to zoom in.
Take the STONE HORN from the beam in the center of the stairs.
Go back to the Courtyard.
Courtyard
Click the door to the mansion to zoom in, then inspect the stone head carving on the wall under the light.
Add the STONE HORN to the hole in the carving.
After the head is lowered, take the GLASS CLEANER from the revealed wall cache.
Return to the Patio.
Patio
Click the stairs in the glass building for a closer look.
Use the GLASS CLEANER (from the stone carving cache in the Courtyard) to clean the mud from the steps.
Go up the stairs to the Museum.
Museum
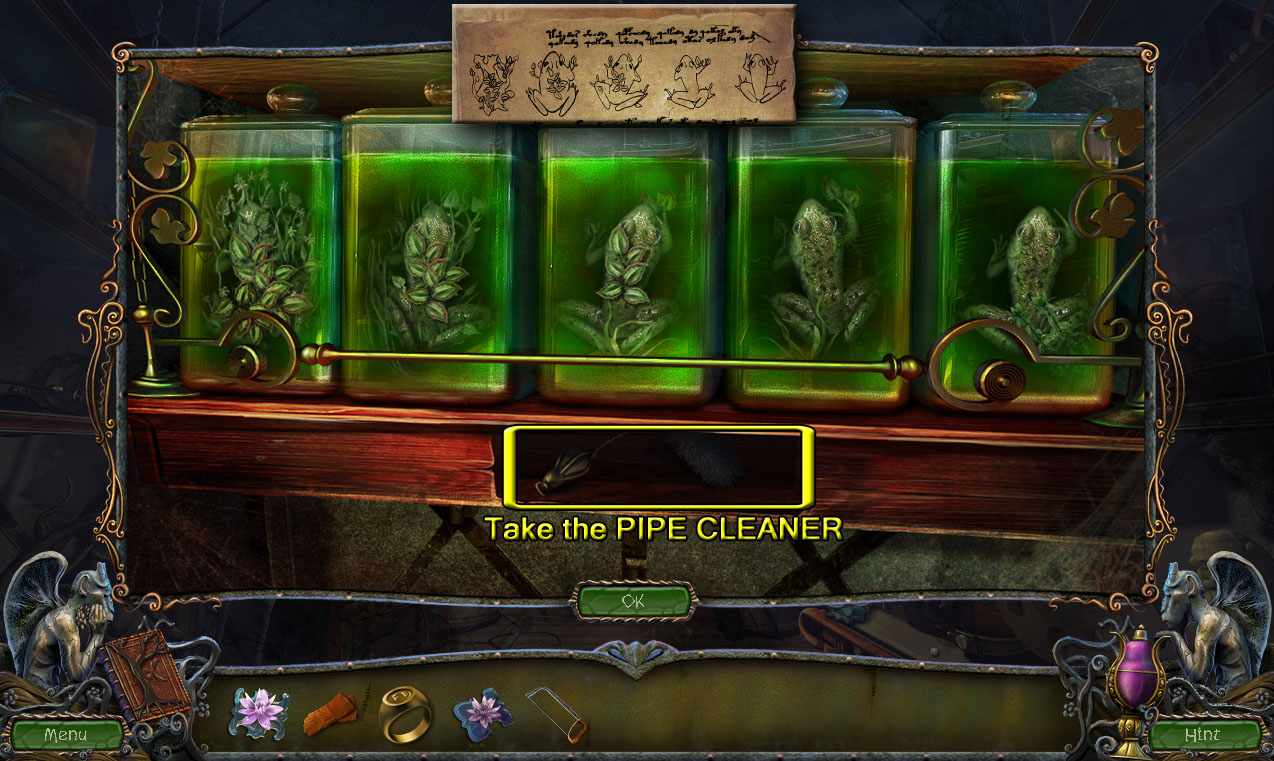
Inspect the paper in the middle of the left pillar to add it to your Journal; note the order of the frogs in the top image, the unplugged fountain in the middle image, and the skeleton with two eyes in the bottom image.
Click the jarred frogs on the red shelf to start the puzzle.
Organize the jars in order from left to right by their degree of plant transformation, the most plant-like transformed frog being on the left and the least transformed normal frog placed on the right.
Click one jar to select it, and then click a different jar to swap their positions.
Refer to the paper found on the pillar for an image of the correct order.
Solution.
After the puzzle is solved, take the PIPE CLEANER from the opened compartment below the jars.
Click the projector machine to zoom in.
Take the CRYSTAL FLOWER (4/12) on the base of the projector.
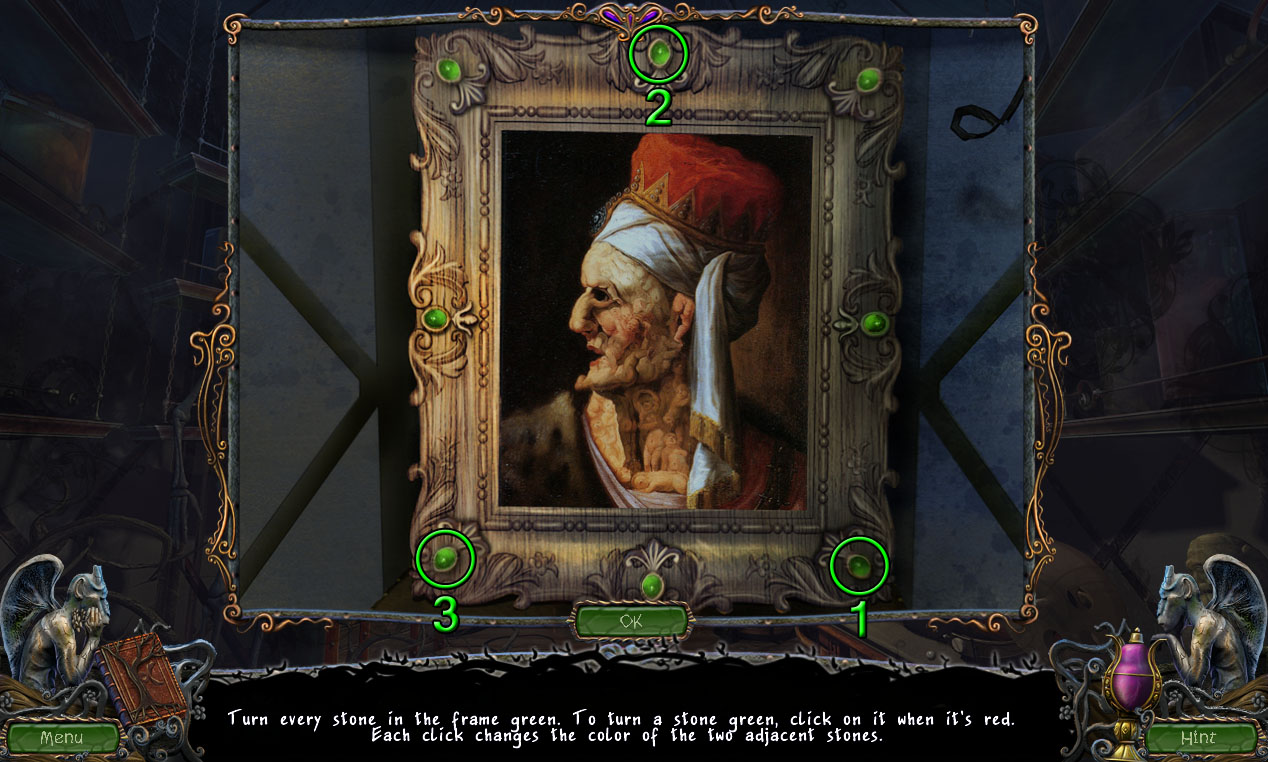
Click the framed painting in the middle of the room to start the puzzle.
Click the stones around the frame to change their color from red to green.
Click a stone to alter its color: this will also affect any adjacent stones on the frame.
Solution.
After the puzzle is solved, the rolled projector screen will lower half-way over the painting, but it cannot yet be moved all the way down.
Go back to the Courtyard.
Courtyard
Click the fountain to zoom in.
Use the PIPE CLEANER (from the frog jar puzzle in the Museum) to remove the moss clogging the fountain spout.
Take the EYE that floats to the top of the water.
Return to the Museum.
Museum
Click the skeleton's head for a closer look.
Place the EYE (from the unclogged fountain in the Courtyard) into the empty eye socket.
Take the HOSE from the skull's open mouth.
Go back to the Laboratory.
Laboratory
Inspect the sink in front of the black board.
Attach the HOSE (from the skeleton's mouth in the Museum) to the faucet of the sink.
Follow the path of the hose into the Storage Room.
Storage Room
Click the empty barrel to zoom in.
Place the other end of the HOSE (from the sink in the Laboratory) inside the barrel to fill it with water.
You will receive the ANTIQUE KEY when it floats to the top of the barrel.
Return to the Museum.
Museum
Click the wooden chest beside the skeleton for a closer look.
Use the ANTIQUE KEY (from the barrel filled with water in the Storage Room) to open the lock.
Take the EXTENSION CORD inside the open chest.
Go back to the Mansion Foyer.
Mansion Foyer
Inspect the glass sphere attached to the right wall.
Attach one end of the EXTENSION CORD (from the unlocked chest in the Museum) to the plug hung over the top of the green striped couch.
Click the left doorway to zoom in.
Insert the other end of the PLUG into the power outlet underneath the framed gemstones on the wall.
Close the window, then look again at the glass sphere on the right wall.
Use the GARDENING GLOVES (from the scale table at the Laboratory) to take the DIAMOND-SHAPED KEY inside the glass orb.
Move towards the locked cupboard to the left of the stairs for a closer look.
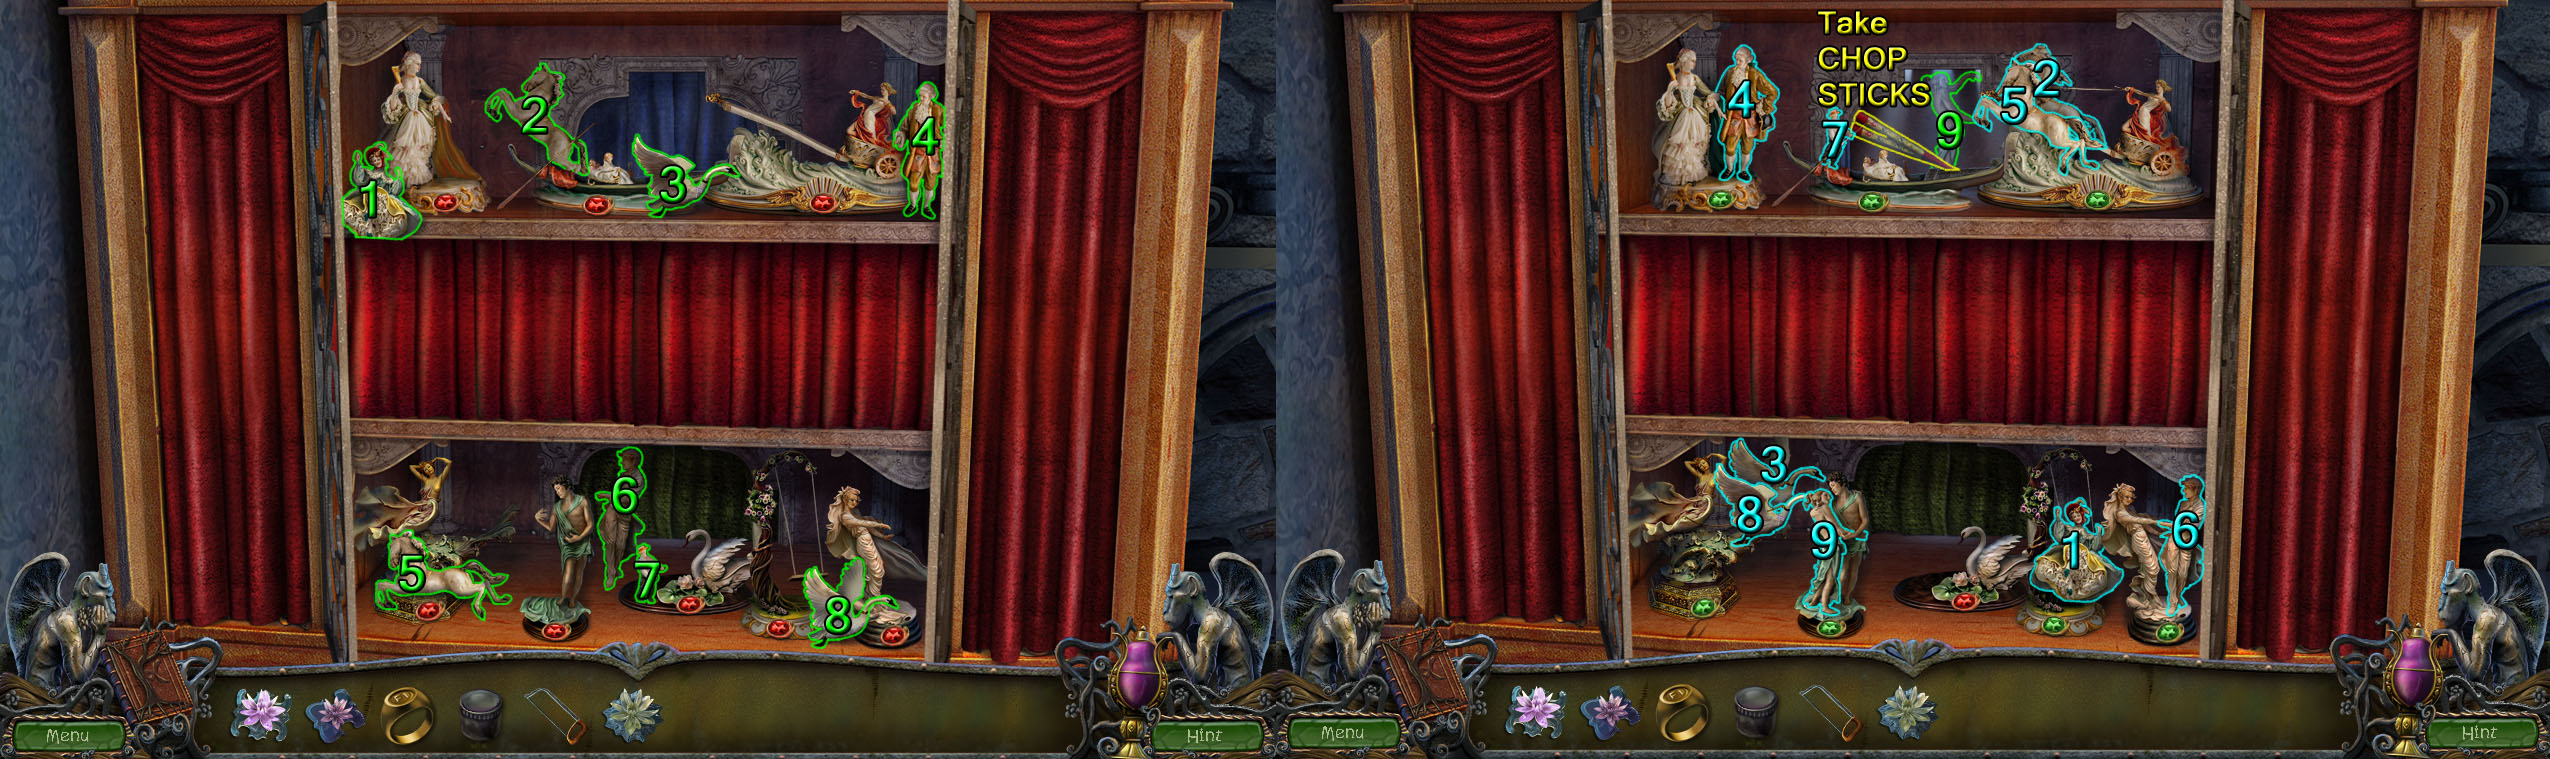
Use the DIAMOND-SHAPED KEY to open the lock in the center of the door and start the minigame.
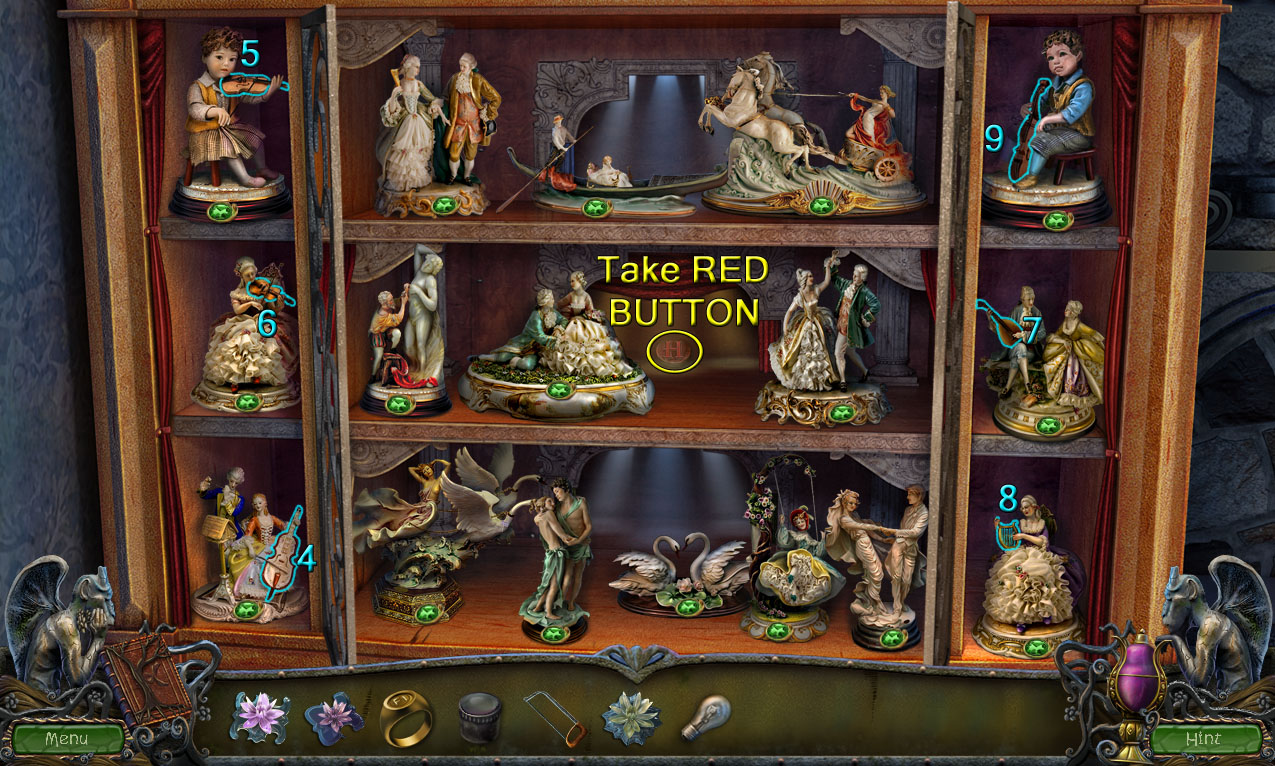
Place the figurines with their appropriate scenes to open the red curtains around the cabinet.
Click a figurine to select it, then click a stand to attempt to position the figurine.
If an object is correctly placed and the scene is complete, the gem at the bottom of the stand will change from red to green.
After the first 8 pieces are placed, the blue curtain at the top will open, revealing the 9th figurine and the CHOPSTICKS.
Solution.
Return to the Storage Room.
Storage Room
Click the flasks on the shelf in the middle cabinet to zoom in.
Use the CHOPSTICKS to remove the PORCELAIN SWAN inside the center flask.
Click the pile of junk in the alcove to repeat the hidden object scene.
Screenshot.
Once the hidden object scene is complete, you will receive the LIGHT BULB.
Go back to the Mansion Foyer.
Mansion Foyer
Inspect the porcelain figurine cabinet to the left of the stairway.
Place the PORCELAIN SWAN (from the flask on the shelf in the Storage Room) with the other swan in the middle scene on the bottom shelf to start the second half of the puzzle.
Place the figurines with their appropriate scenes to open the red curtains around the cabinet.
Click a figurine to select it, and then click a stand to attempt to position the figurine.
If an object is correctly placed and the scene is complete, the gem at the bottom of the stand will change from red to green.
Solution Part 1.
After the first 3 pieces are placed, the red curtains at the sides will open, revealing the final part of the puzzle.
Solution Part 2.
After the puzzle is solved, take the RED BUTTON WITH A LETTER from behind the open red curtain in the middle shelf.
Return to the Bathroom upstairs.
Bathroom
Click the hole in the floor for a closer look.
Add the LIGHT BULB (from the Storage Room hidden object scene) to the empty lantern to light the room.
Pick up the two long wood planks leaning against the base of the sink, then place the planks over the hole in the floor.
Inspect the vent in the wall across the gap in the floor.
Use the SAW (from the open left doorway in the Upstairs Hallway) to cut through the bars over the vent.
Take the WRENCH in front of the fan.
Click the mirror above the sink to zoom in.
Take the RAZOR from the upper left bolt in the glass.
Use the WRENCH to remove the four bolts from the corners.
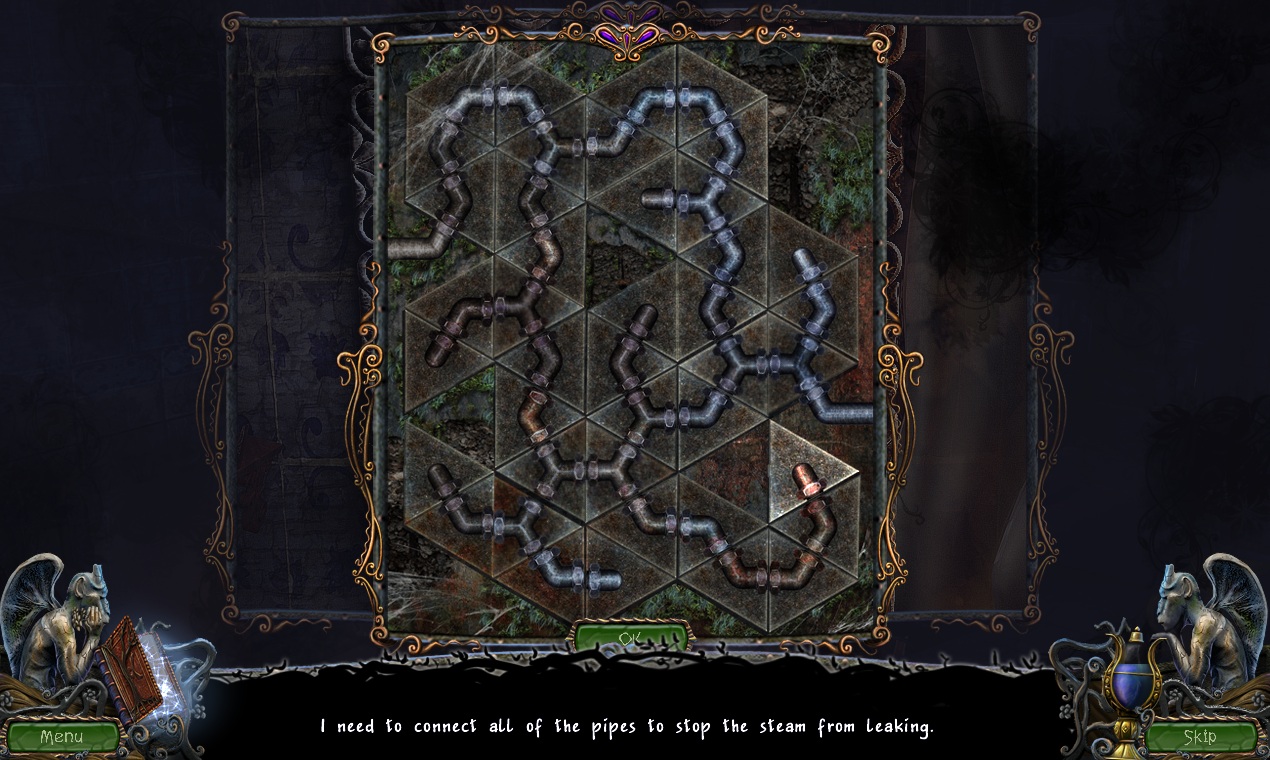
Click the panel behind the removed glass to start the puzzle.
Rotate the pipes to complete an uninterrupted path with no steam leaks from the starting pipe on the left side to the ending pipe on the right side.
Click one of the triangular tiles to rotate each pipe clockwise.
Solution.
After the puzzle is solved, the steam blocking the Upstairs Hallway will disappear.
Back out to the Upstairs Hallway.
Upstairs Hallway
Click the rear right door to zoom in.
Pick up the THIN ROPE tied around the broken door handle.
Take the BASEBALL BAT from the right side of the door frame, then use the bat to smash through the glass.
Click the opposite door handle through the smashed glass pane to open the door.
Continue right to the Balcony.
Posted by: Trinn |
March 21, 2012 1:07 PM
|
March 21, 2012 1:07 PM
Natural Threat: Ominous Shores Walkthrough
Chapters 4-6
Chapter 4
Balcony
Inspect the case on top of the stone bench.
Pick up the GLUE on the bench beside the wood case.
Place the RING 1/2 (from the skeleton's hand in the Storage Room) into the right button labeled F1.
Click the broken chair underneath the tree to zoom in.
Use the GLUE on the cracked leg of the chair, then bind the leg with the THIN ROPE (from the door handle in the Upstairs Hallway).
Click the telescope stand for a closer look.
Take the LAMPSHADE hanging over the side of the metal railing.
Inspect the lock mechanism in the middle of the door.
Add the RED BUTTON WITH A LETTER (from the porcelain figurines puzzle in the Mansion Foyer) to the lock.
The correct combination is still unknown, so you will have to return later.
Click the torn length of rope tied to the railing to look over the side.
Pick up the CRYSTAL FLOWER (5/12) on the ledge under the railing.
Go back to the Plant Sample Room.
Plant Sample Room
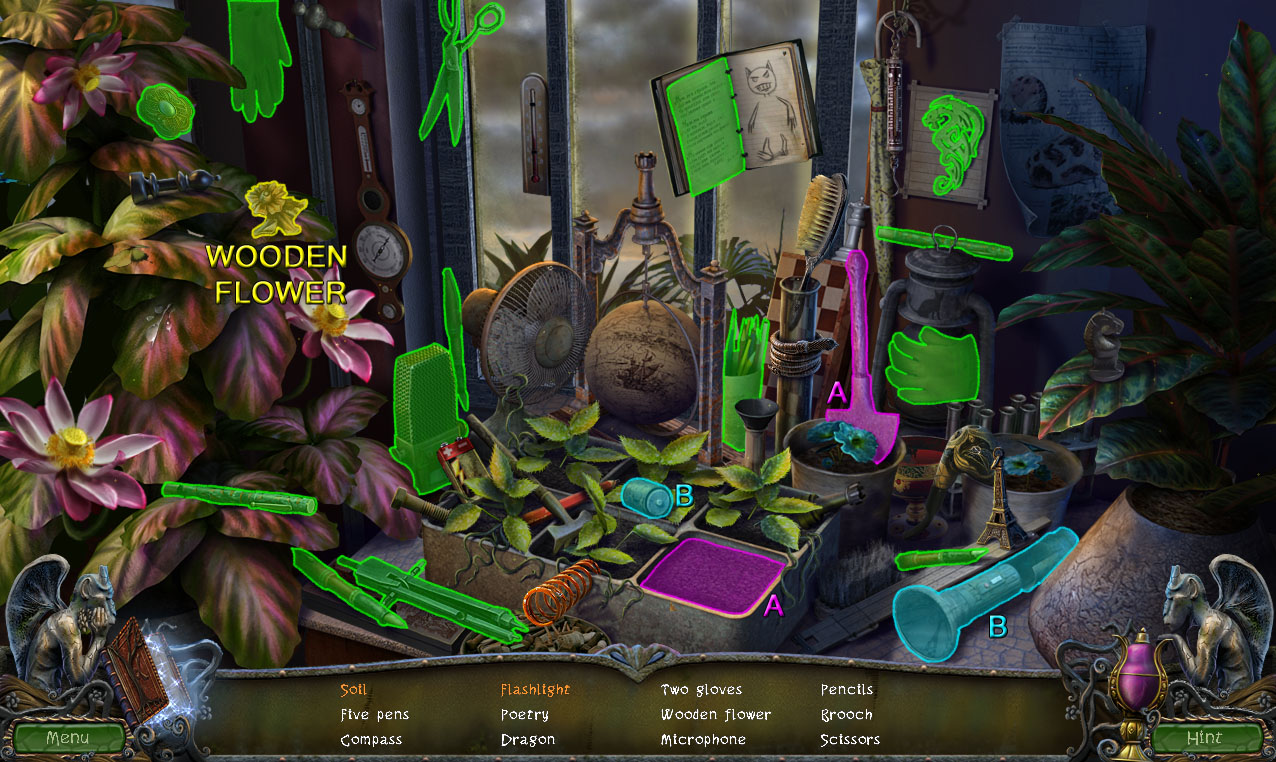
Click the plants to the right of the table to repeat the hidden object scene.
Use the shovel on the dirt in the planter to dig up the Soil (A).
Insert the battery to complete the Flashlight (B).
Screenshot.
Once the hidden object scene is complete, you will receive the WOODEN FLOWER.
Click the cabinet under the bamboo ladder to zoom in.
Add the WOODEN FLOWER to the missing knob on the left cabinet door.
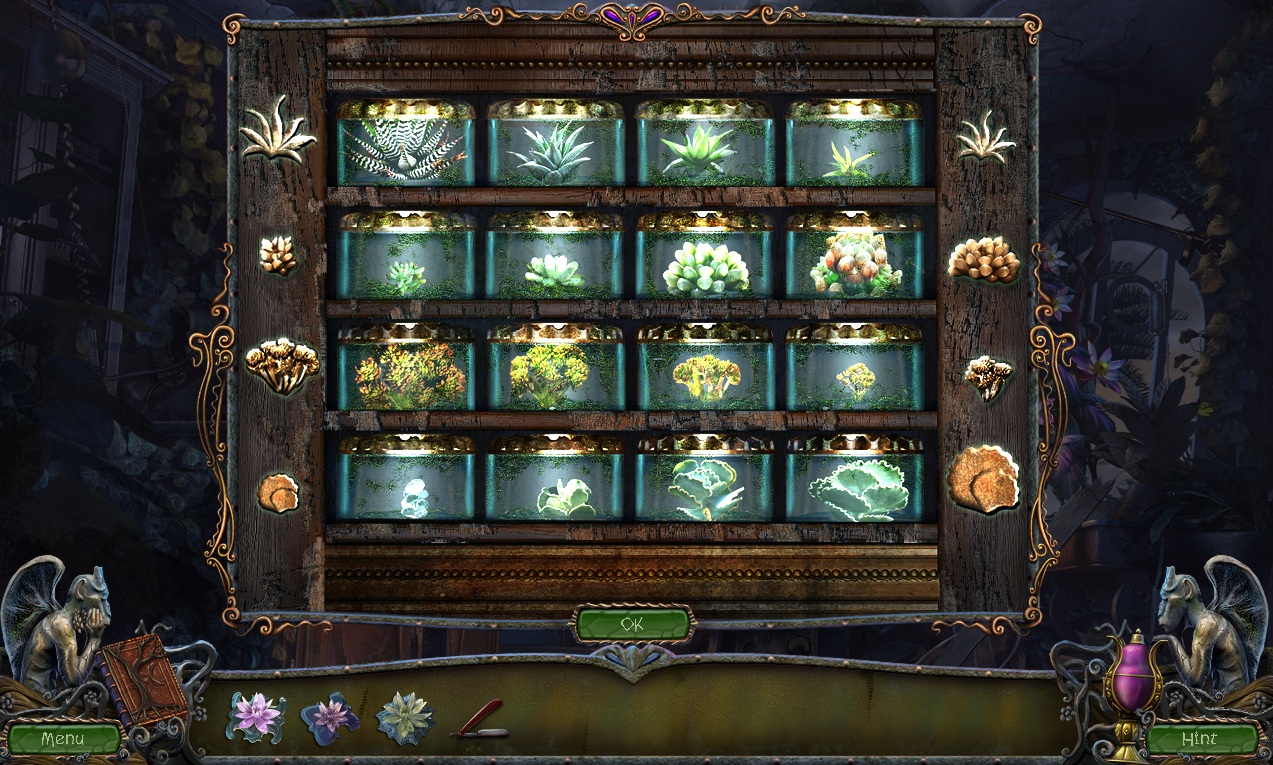
Click the open cabinet to start the puzzle.
Organize the plants in the jar by type and by size as indicated by the symbols on the left and right sides of the cabinet.
Click a jar to select it, then click another jar to swap their positions.
Arrange the plants from left to right in order of either largest to smallest or vice versa based on the size of the plant indicated at the sides of each row on the cabinet.
When a plant is correctly positioned, its jar will light up.
Solution.
After the puzzle is solved, take the paint PALETTE from the revealed compartment at the top of the cabinet.
Click the plants to the right of the table to repeat the hidden object scene again.
Open the case to find the Harmonica (A).
Use the pencil on the notepad to complete the drawing of the Monster (B).
Screenshot.
Once the hidden object scene is complete, you will receive the BATTERY.
Return to the Balcony.
Balcony
Click the toy monkey hanging from the tree to zoom in.
Place the BATTERY inside the toy monkey.
Take the THICK ROPE hanging from the branch.
Inspect the rope tied to the side of the railing.
Tie the THICK ROPE to the torn rope.
Pick up the PAINT BRUSH on the roof at the bottom of the rope.
Go back to the Upstairs Hallway.
Upstairs Hallway
Click the painting at the end of the hall for a closer look.
Add the PALETTE (from the plant jar puzzle in the Laboratory) and the PAINT BRUSH (from the rooftop at the Balcony) to the painting frame to start the puzzle.
Paint the damaged parts of the picture with the correct colors to restore the painting.
Click a color on the palette to cover the brush, then click an area on the painting to fill it in with the selected color.
Solution.
After the puzzle is solved, take the CRYSTAL FLOWER (6/12) and the paper with the Balcony door code "ARCHIMBOLDO" from the revealed cache at the bottom of the painting.
Continue forward to the Balcony.
Balcony
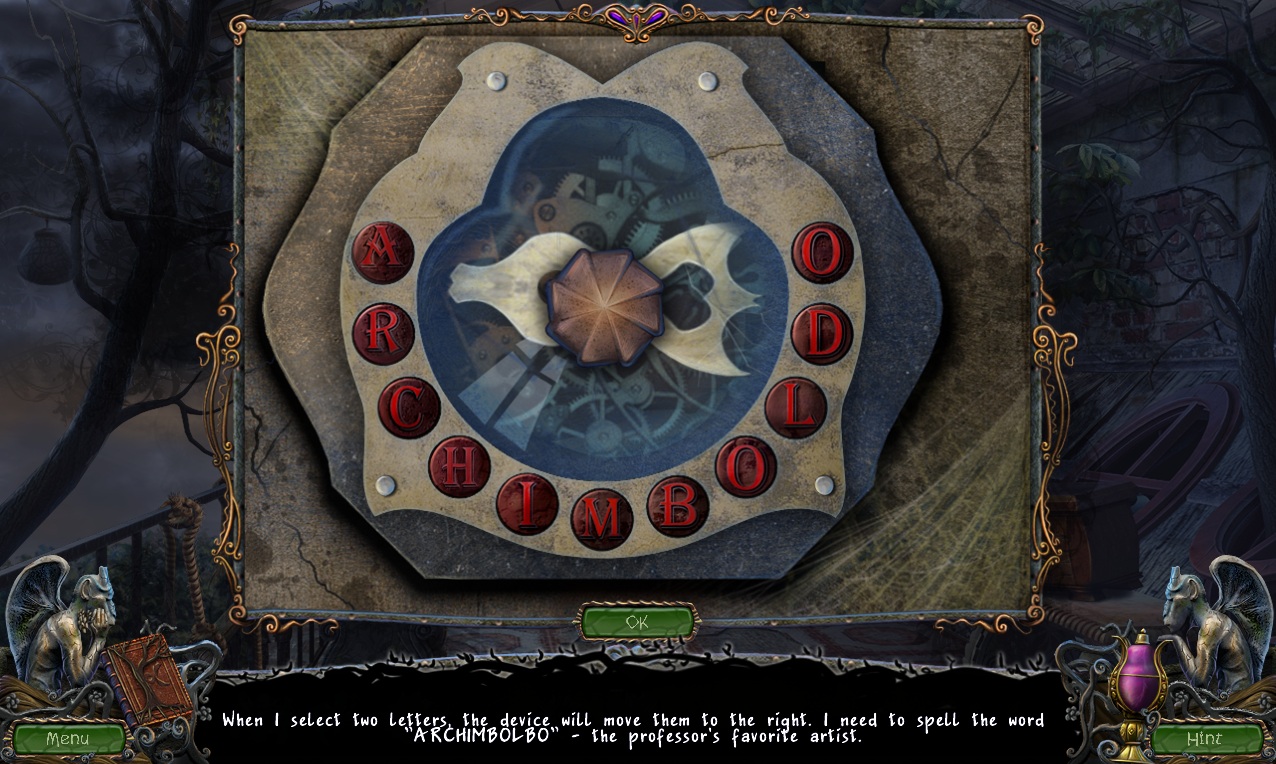
Click the lock on the door to start the puzzle.
Arrange the letters to spell out the word found from the painting puzzle: "ARCHIMBOLDO".
Move the arrow to select two letters at a time, then click to move them to the far right side of the board.
Solution.
After the puzzle is solved, go through the open door to Steiner's Office.
Steiner's Office
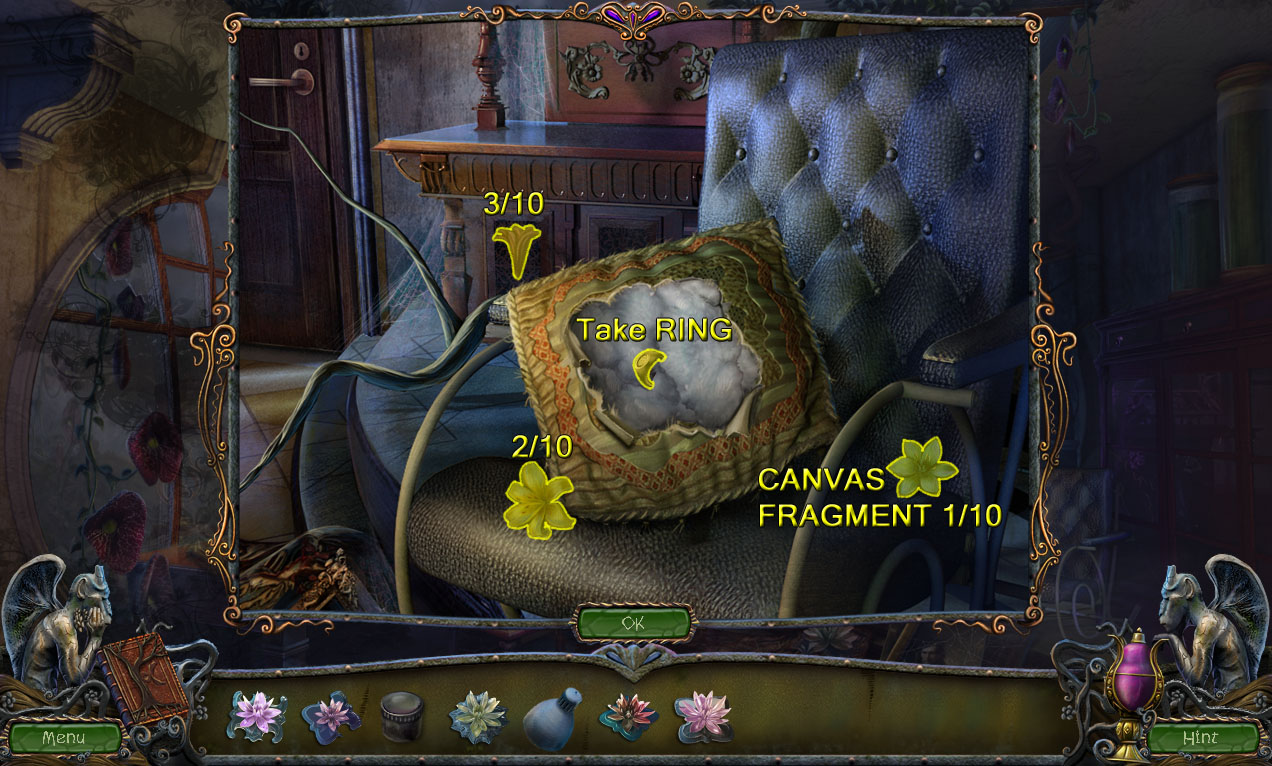
Take the CRYSTAL FLOWER (7/12) beside the portrait on the steps.
Click the rocking chair for a closer look.
Use the RAZOR (from the mirror in the bathroom) to cut through the seam in the middle of the throw pillow.
Take the RING (2/2) inside the pillow.
Collect the 1-3/10 CANVAS FRAGMENTS around the area, two are on the seat of the chair and one is on the cabinet door behind the chair.
Screenshot.
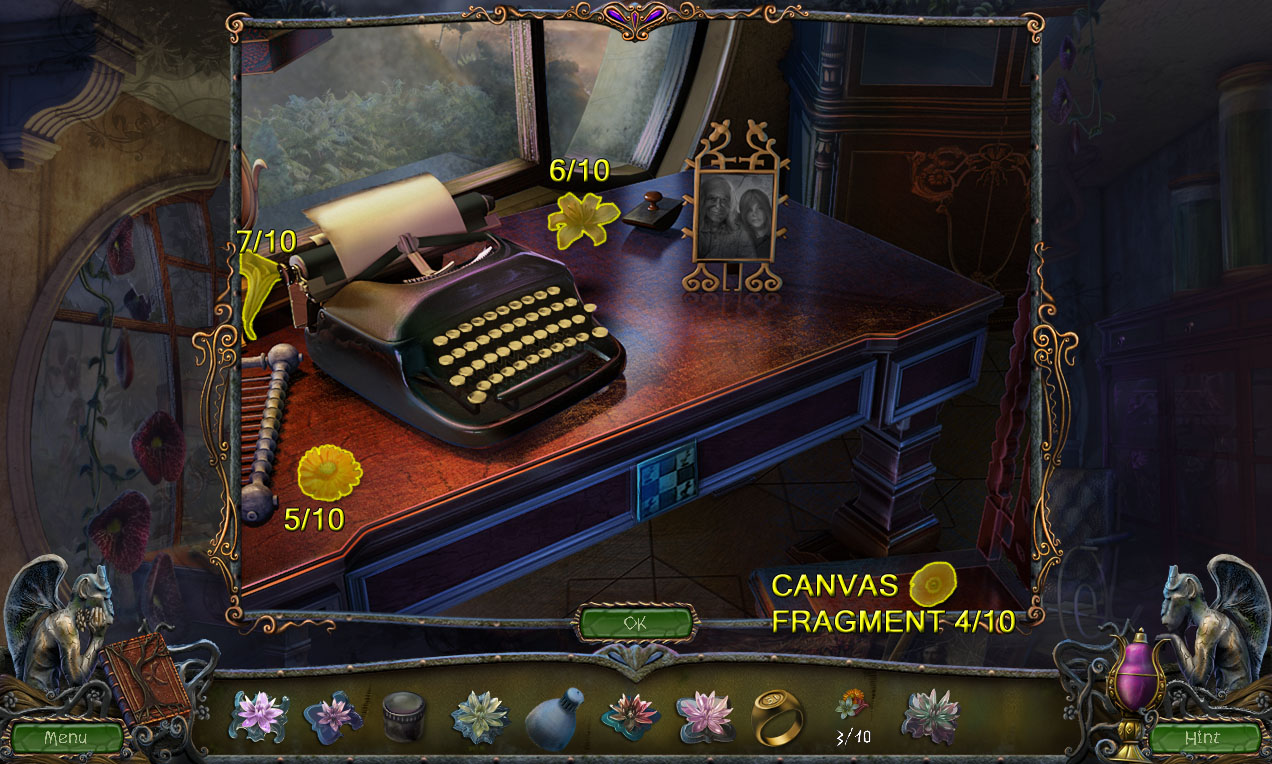
Click the writing desk to zoom in.
Pick up the 4-7/10 CANVAS FRAGMENTS around the area, two are on the desk, one is on the windowsill and one is on the chair.
Screenshot.
Back out to the Balcony.
Balcony
Click the case on the stone bench to zoom in.
Add the RING 2/2 (from the pillow in Steiner's Office) to the left button labeled 31.
Take the WIRE CUTTERS inside the open case.
Move forward to Steiner's Office.
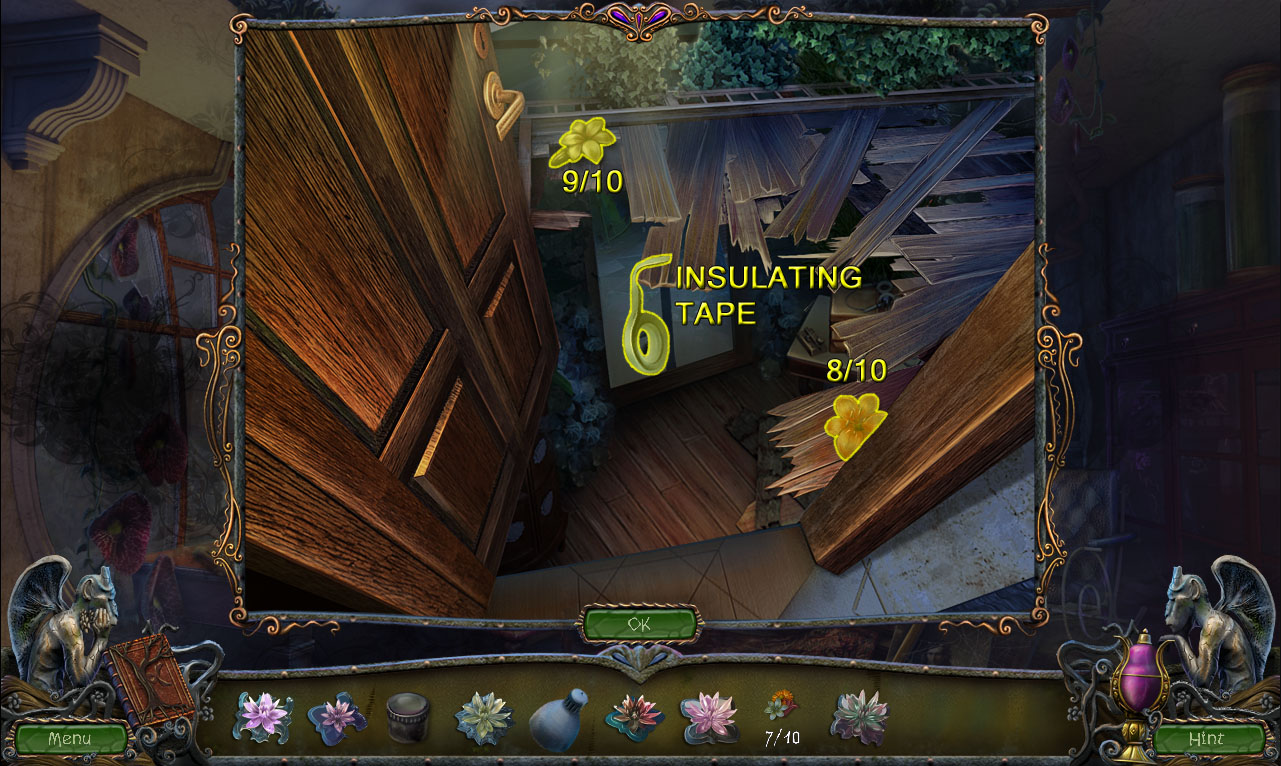
Steiner's Office
Click the partially open door for a closer look.
Use the WIRE CUTTERS (from the unlocked case in the Balcony) to cut through the wires.
Pick up the INSULATING TAPE as well as the 8/10 and 9/10 CANVAS FRAGMENTS from the floor boards.
Screenshot.
Go back to the Upstairs Hallway.
Upstairs Hallway
Inspect the lamp on the wall beside the Bathroom door.
Use the INSULATING TAPE (from the open doorway in Steiner's Office) to repair the broken wire of the lamp.
Click the red knob to turn on the light.
Take the CANVAS FRAGMENT (10/10) just under the light bulb.
Return to Steiner's Office.
Steiner's Office
Click the framed portrait on the wall to zoom in.
Add the 10 CANVAS FRAGMENTS to the portrait to start the puzzle.
CANVAS FRAGMENT 1/10 and CANVAS FRAGMENT 2/10 are on the seat of the rocking chair in Steiner's Office.
CANVAS FRAGMENT 3/10 is on the door of the cupboard behind the rocking chair.
CANVAS FRAGMENT 4/10 is on the seat of the chair beside the writing desk.
CANVAS FRAGMENT 5/10 is on the writing desk between the abacus and the typewriter.
CANVAS FRAGMENT 6/10 is on the writing desk beside the stamp.
CANVAS FRAGMENT 7/10 is on the windowsill behind the typewriter on the desk.
CANVAS FRAGMENT 8/10 and 9/10 are on the broken floor boards behind the opened doorway.
CANVAS FRAGMENT 10/10 is inside the lit lampshade in the Upstairs Hallway.
Place the flowers into their matching spaces around the portrait.
Click a flower to select it, then click a cutout in the painting to place it.
If a flower is correctly positioned, it will lock in place.
Solution.
After the puzzle is solved, click the revealed wall safe for a closer look.
Take the note with symbol runes under the bar of the safe.
Click the writing desk to zoom in.
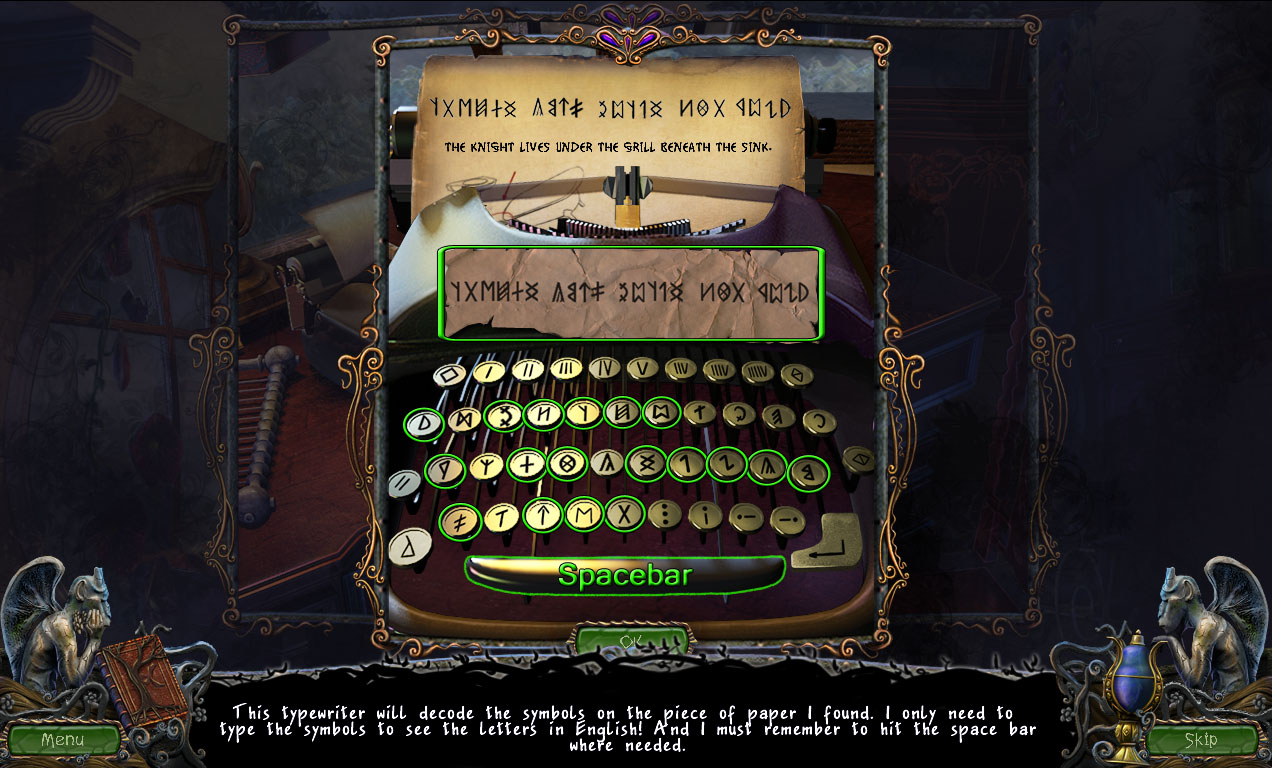
Click the typewriter with the cipher note to start the puzzle.
Click the keys of the typewriter that match the symbols in the order shown on the note at the top of the typewriter.
When a key is correctly selected, its symbol will be typed onto the sheet of paper.
Click the spacebar key at the bottom of the typewriter to separate the words.
Solution.
After the puzzle is solved, read the translated message on the sheet of paper: The knight lives under the grill beneath the sink.
Go back to the Bathroom.
Bathroom
Click the grill in the floor under the sink for a closer look.
Take the PLIERS sticking through the bars of the grill.
Travel to the Museum.
Museum
Inspect the rolled white poster hanging over the framed portrait.
Use the PLIERS (from the grill in the Bathroom) to bend the nail under the poster.
After watching the projector film, take the MAGNET that drops from the poster to the top of the cupboard.
Return to the Bathroom.
Bathroom
Click the grill in the floor under the sink to zoom in.
Use the MAGNET (from the projector poster in the Museum) to pull out the KNIGHT.
Go to Steiner's Office.
Steiner's Office
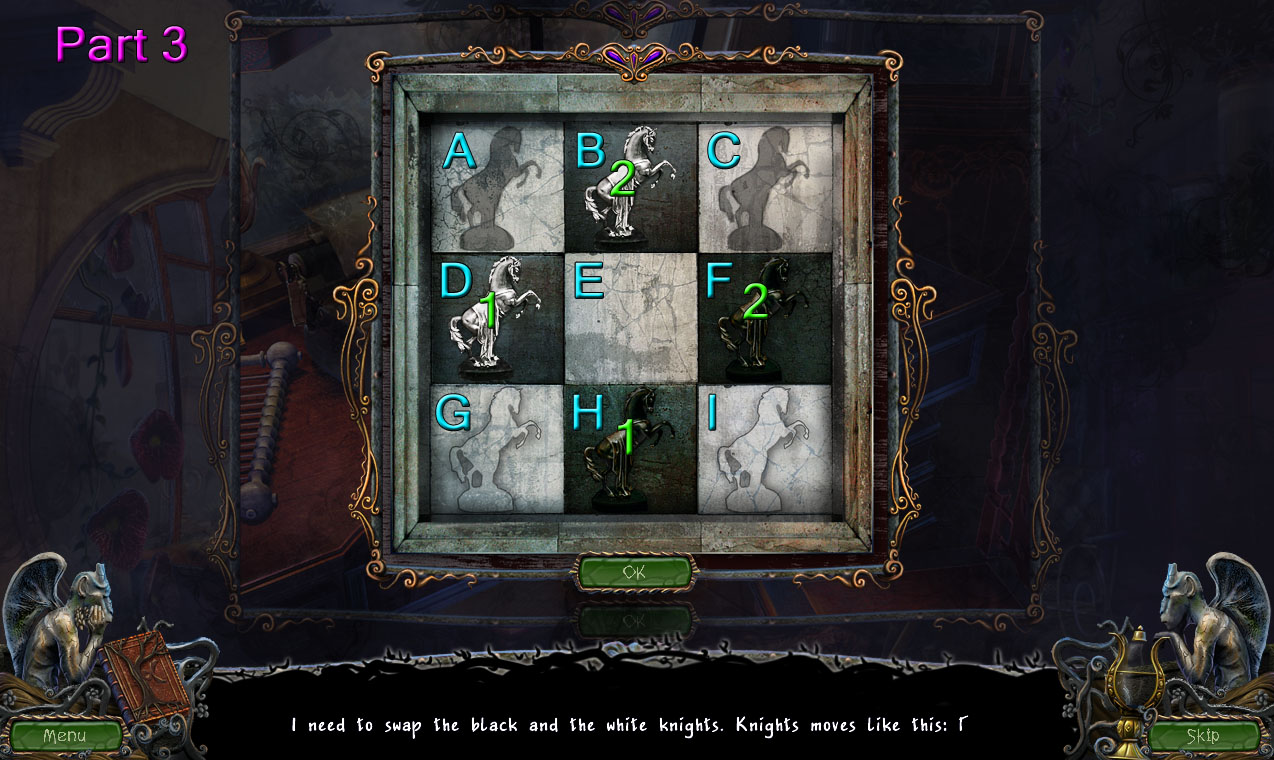
Inspect the chess board lock in the middle of the writing desk drawer.
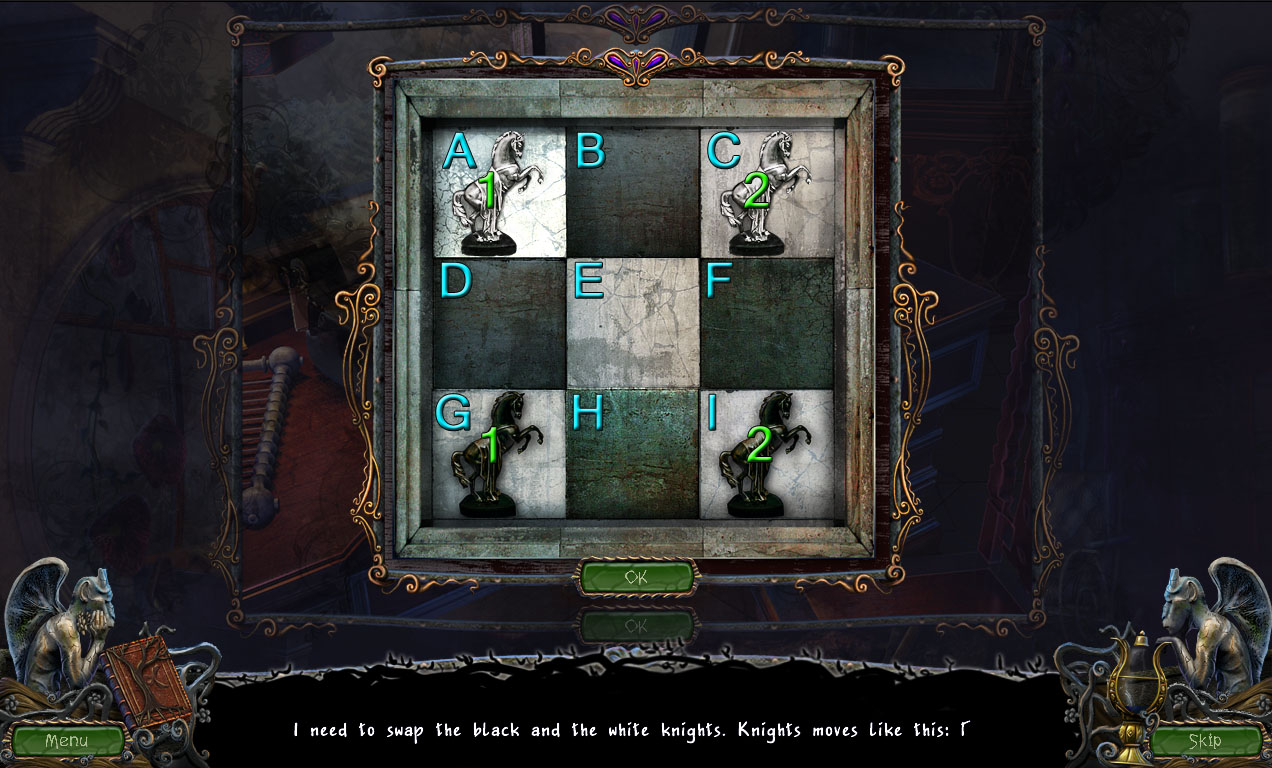
Add the KNIGHT (from the grill in the Bathroom) to the lock to start the puzzle.
Move the two white knights to the bottom left and right corners and the two black nights to the top left and right corners.
A knight can only move in the same directions as a knight in a game of chess: two spaces down/up and one spaces left/right, or one space down/up and two spaces left/right.
Click a knight to select it, then click a flashing tile to move it to that space.
Screenshot.
Move the knights in the following order:
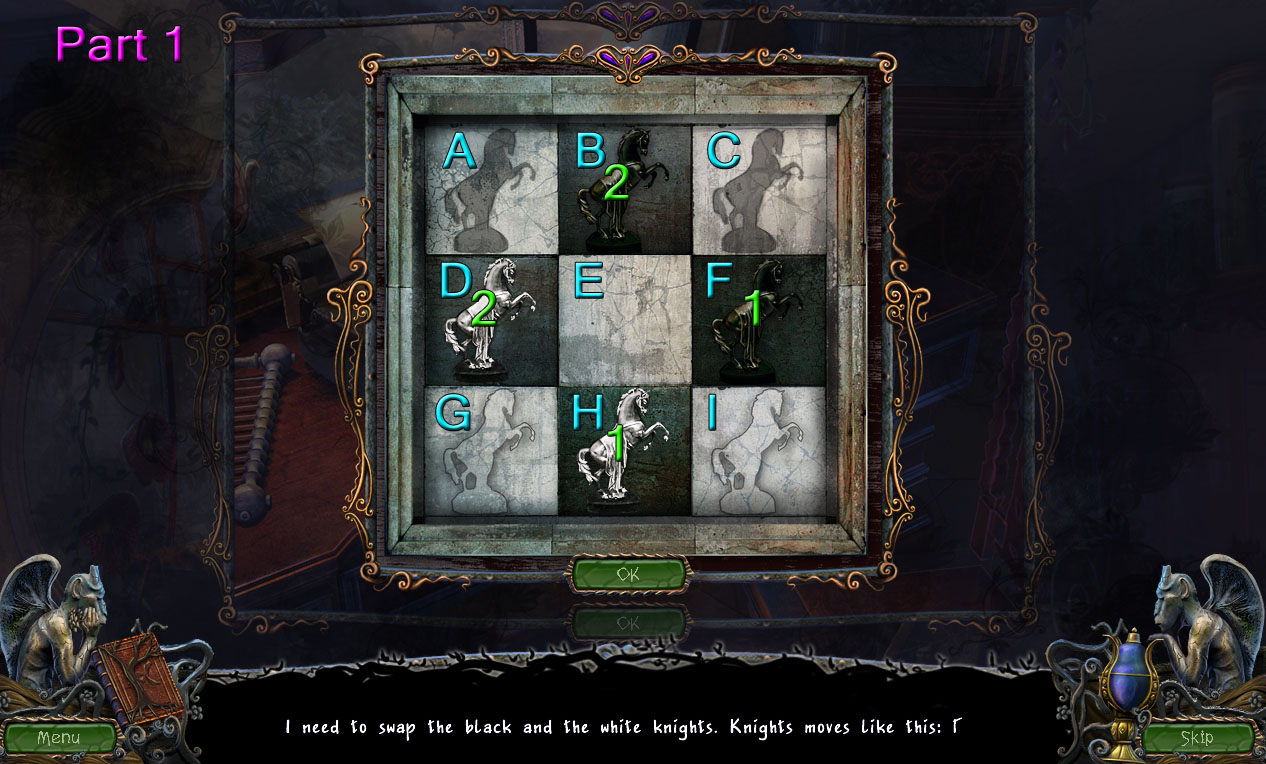
Move White Knight 1 to tile H, move White Knight 2 to tile D, move Black Knight 1 to tile F, move Black Knight 2 to tile B.
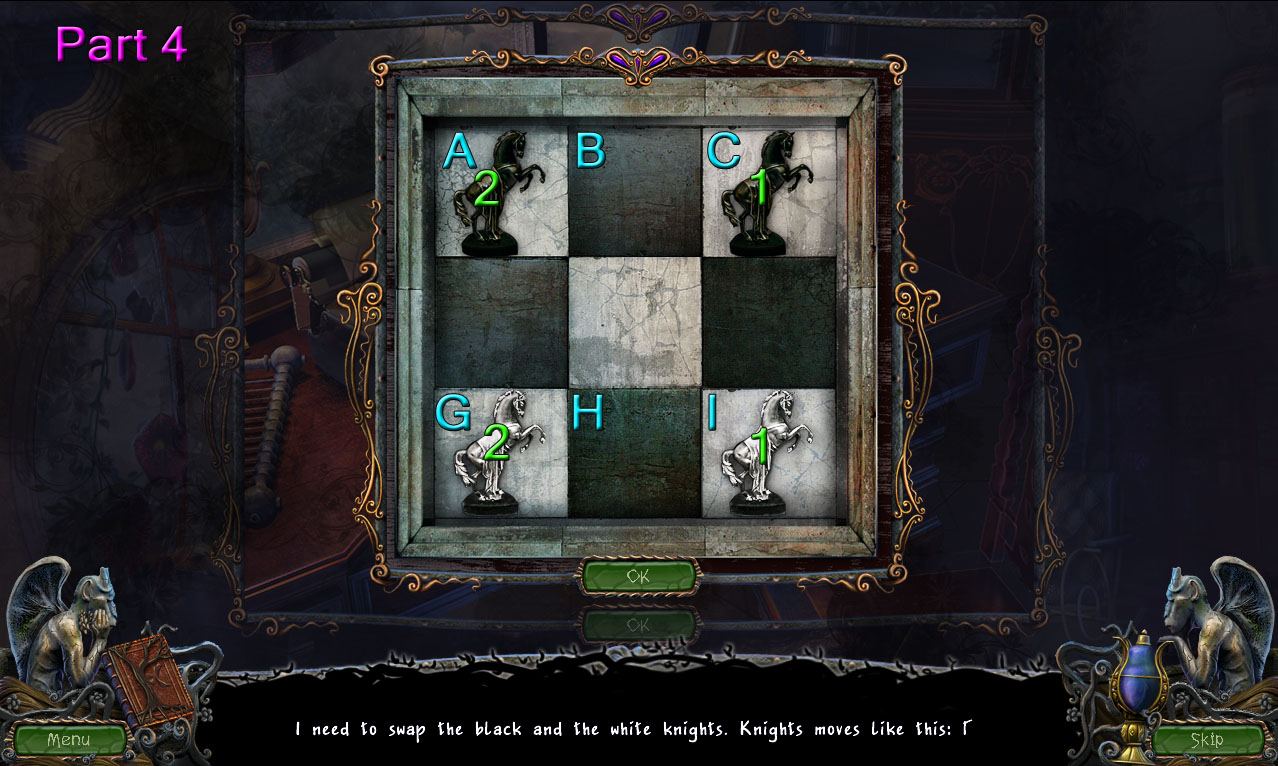
Solution Part 1.
Move White Knight 1 to tile C, move White Knight 2 to tile I, move Black Knight 1 to tile A, move Black Knight 2 to tile G.
Solution Part 2.
Move White Knight 1 to tile D, move White Knight 2 to tile B, move Black Knight 1 to tile H, move Black Knight 2 to tile F.
Solution Part 3.
Move White Knight 1 to tile I, move White Knight 2 to tile G, move Black Knight 1 to tile C, move Black Knight 2 to tile A.
Solution Part 4.
After the puzzle is solved, take the FILM REEL from the open desk drawer.
Return to the Museum.
Museum
Click the projector machine for a closer look.
Add the FILM REEL (from the desk drawer puzzle at Steiner's Office) to the projector to play the cut scene revealing the false bottom on the desk drawer in Steiner's Office.
Go back to Steiner's Office.
Steiner's Office
Click the writing desk to zoom in.
Click the open drawer to reveal the false bottom.
Take the VARIOUS SEEDS and Steiner's notes on the Lilium aqua regia plant from the hidden compartment.
Go all the way back to the Laboratory.
Laboratory
Inspect the glowing lamp hanging over the microscope.
Place the LAMPSHADE (from the railing by the telescope tripod at the Balcony) over the light bulb.
Add the MICROSCOPE LENS (from the floor beside the skeleton's hand in the Storage Room) to the top of the microscope.
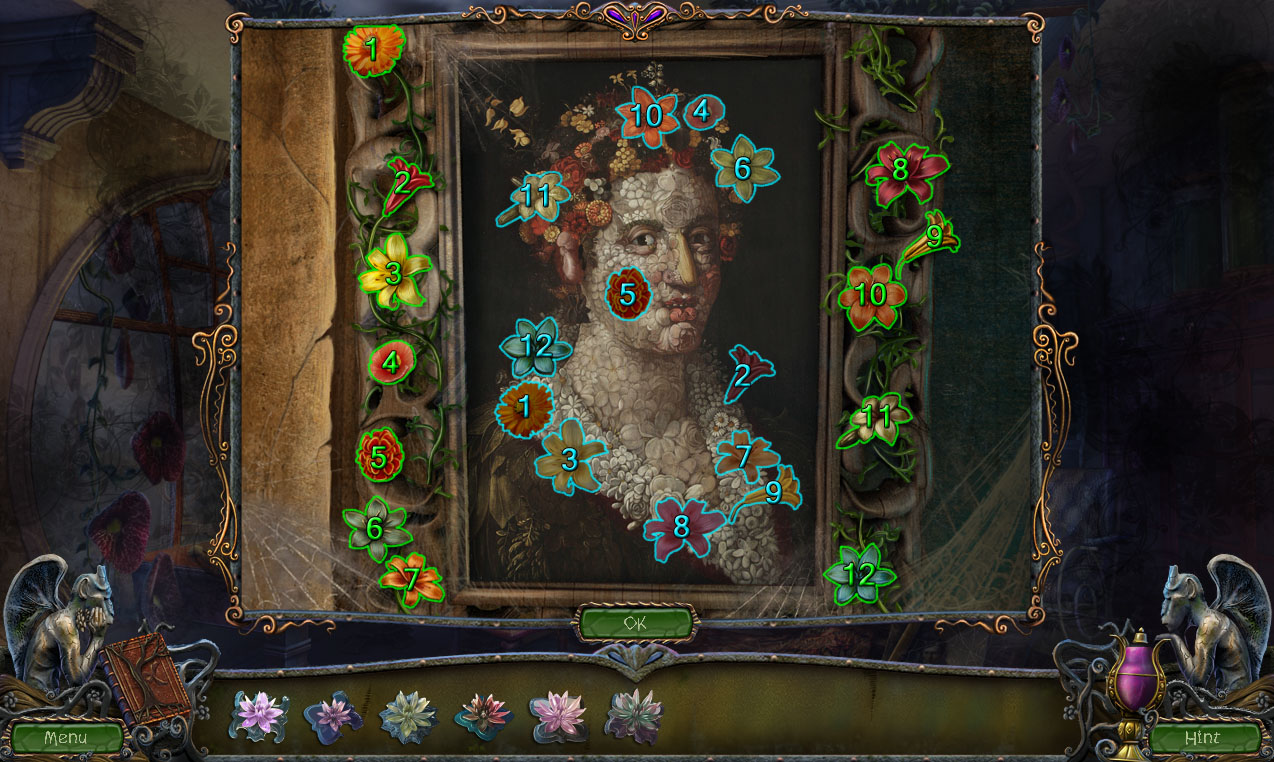
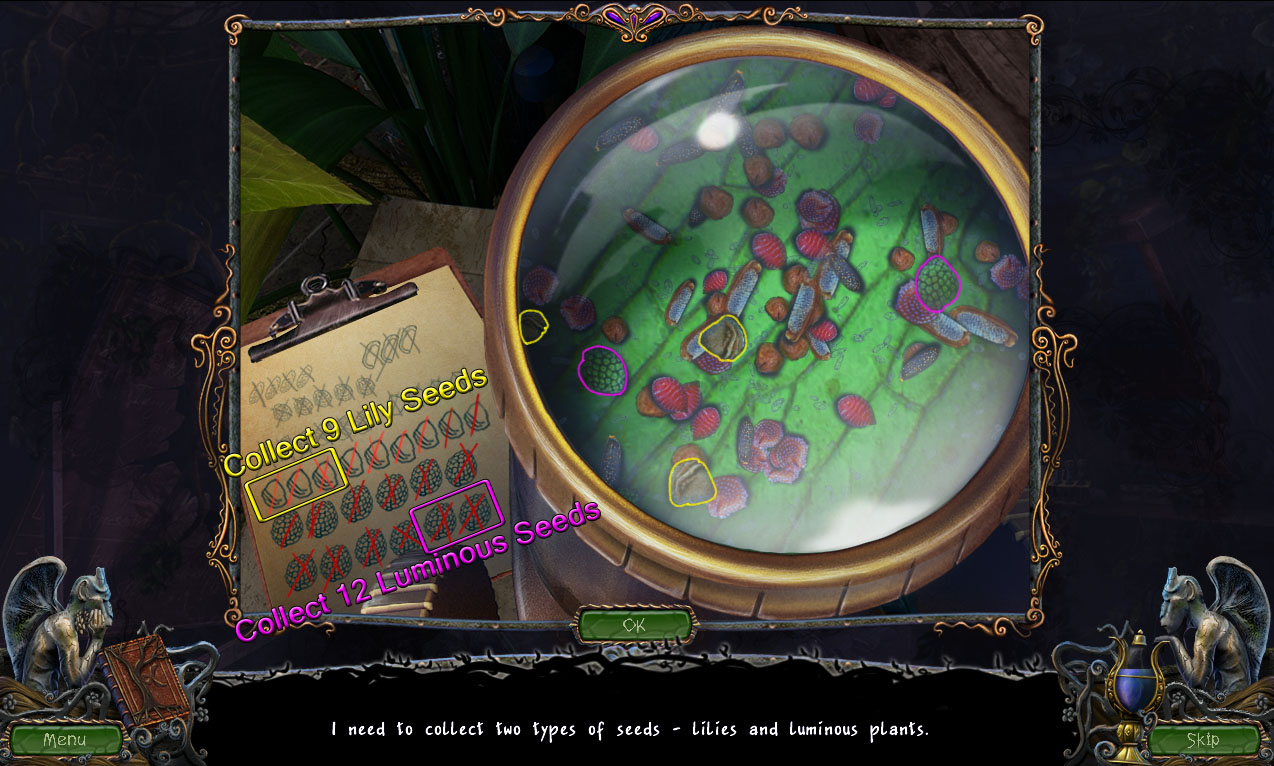
Put the VARIOUS SEEDS (from the secret compartment in the desk drawer at Steiner's Office) in the microscope sample dish to start the puzzle.
Find the seeds under the microscope that match the image from the clipboard on the left.
Click a seed as it floats under the scope to select it.
Each time the correct seed is located, it will be crossed off the list.
9 Lilies and 12 Luminous plant seeds must be found to complete the puzzle.
Screenshot.
After the puzzle is solved, you will receive the PLANTA LUMINOSUS SEEDS and the LILIUM AQUA REGIA SEEDS.
Exit the mansion to return to the Courtyard, then continue left to the River.
River
Drop the LILIUM AQUA REGIA SEEDS (from the microscope puzzle in the Laboratory) into the water.
Go across the lilies in the river to the Chapel Entrance.
Chapter 5
Chapel Entrance
Click the front door to the chapel for a closer look.
Take the paper scrap with the picture of a fish to add it to your Journal.
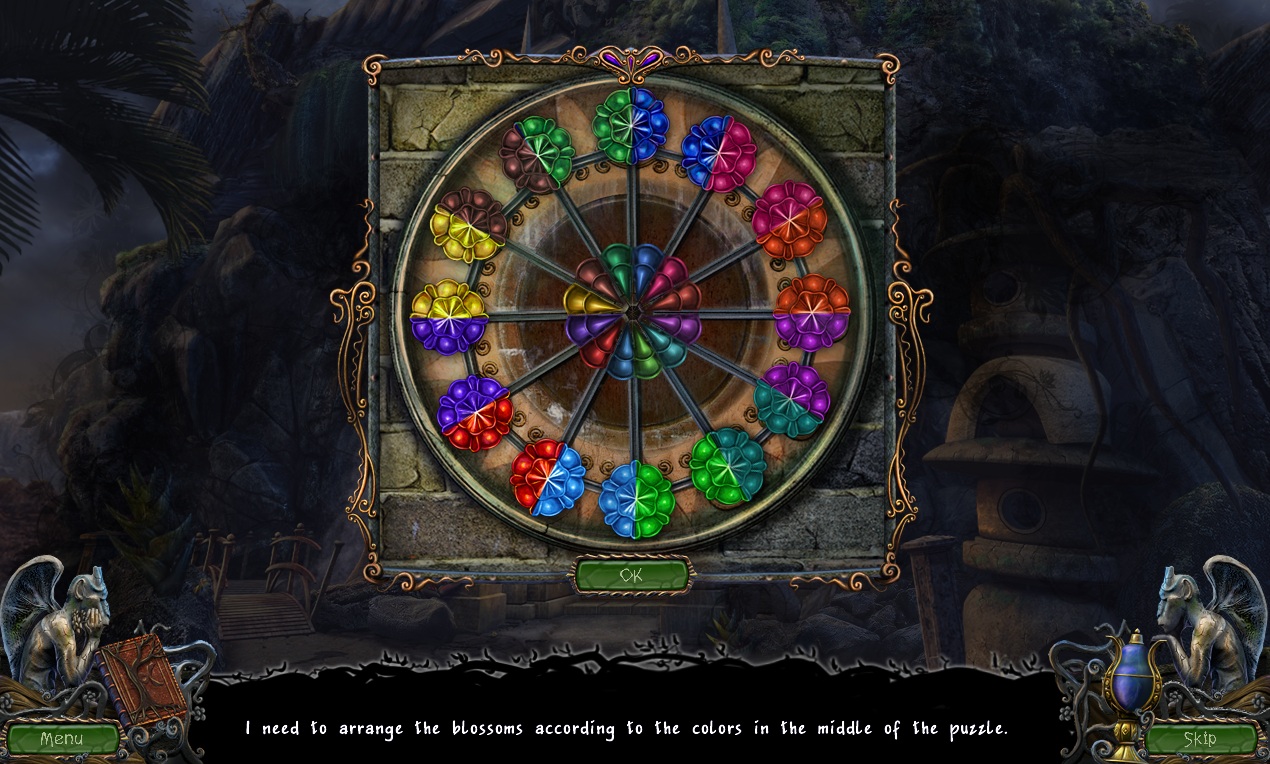
Click the ring of flowers on the wall above the chapel door to start the puzzle.
Arrange the blossoms into the positions that match in color to the sections of the ring in the center.
Click a blossom to hold it at the center, then click a different blossom to move it into the adjacent empty space.
Click the center blossom to put it back in the outer ring.
When a blossom is correctly positioned, it will sparkle briefly after being placed.
Solution.
After the puzzle is solved, take the DRAGONFLY FIGURINE from the revealed wall cache in the center of the flowers.
Go left to the Waterfall Bridge.
Waterfall Bridge
Take the BUTTERFLY NET hanging on the post of the bridge.
Go back to the River.
River
Inspect the three lilies on the stone at the riverside.
Add the DRAGONFLY FIGURINE (from the blossom ring puzzle at the Chapel Entrance) to the figurines board to start the puzzle.
Arrange the animals into their proper positions on the food chain (i.e. which animal eats or is eaten by the other animals).
The creature by the start of an arrow indicates the animal at the top of that food chain, and the end of the arrow indicates the second animal that is eaten by the first.
The food chain works in the following order:
The stork eats the lizard, snake, and frog.
The snake eats the lizard and frog.
The lizard eats the butterfly, dragonfly, and fly.
The frog eats the butterfly, dragonfly, and fly.
The dragonfly eats the fly.
The butterfly eats none of the other animals.
The fly eats none of the other animals.
Solution.
After the puzzle is solved, click the center of the figurine board to find the PIECE OF MOSAIC.
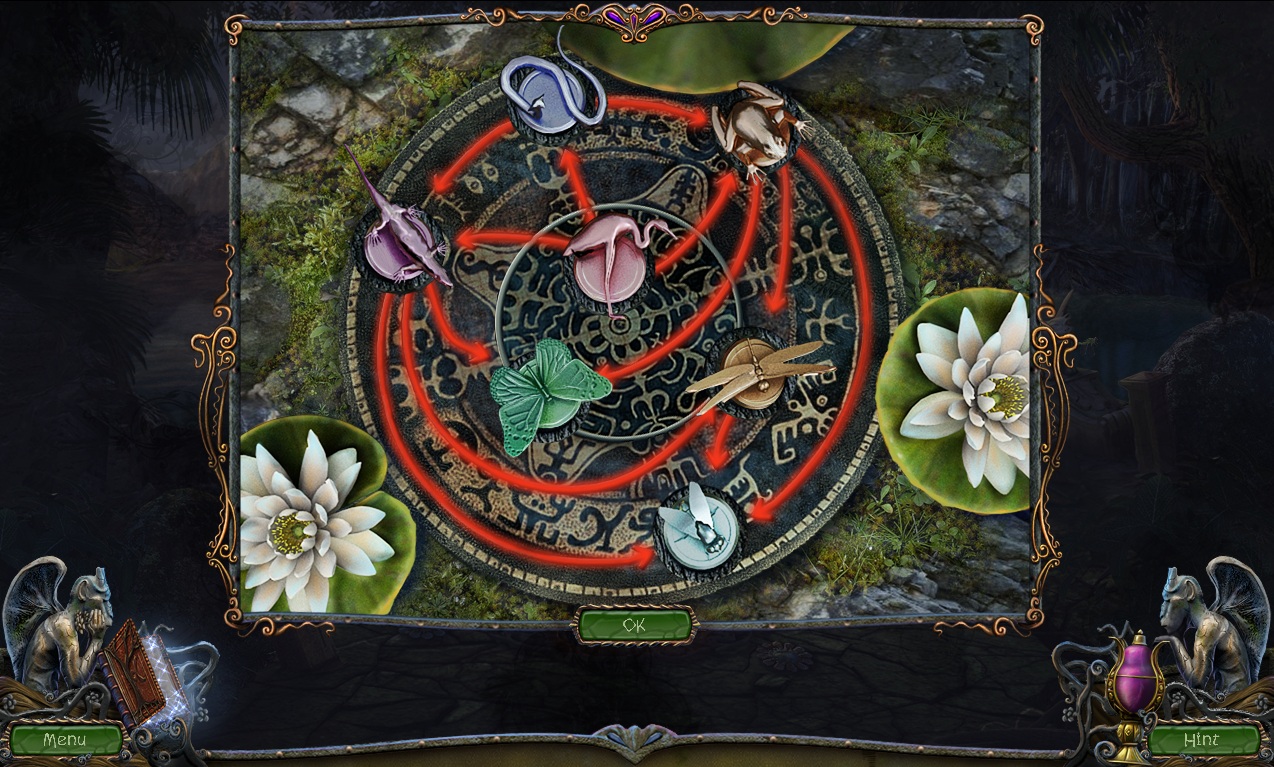
Click the ring of purple glass mosaic on the ground for a closer look.
Add the PIECE OF MOSAIC to the missing space on the mosaic to start the puzzle.
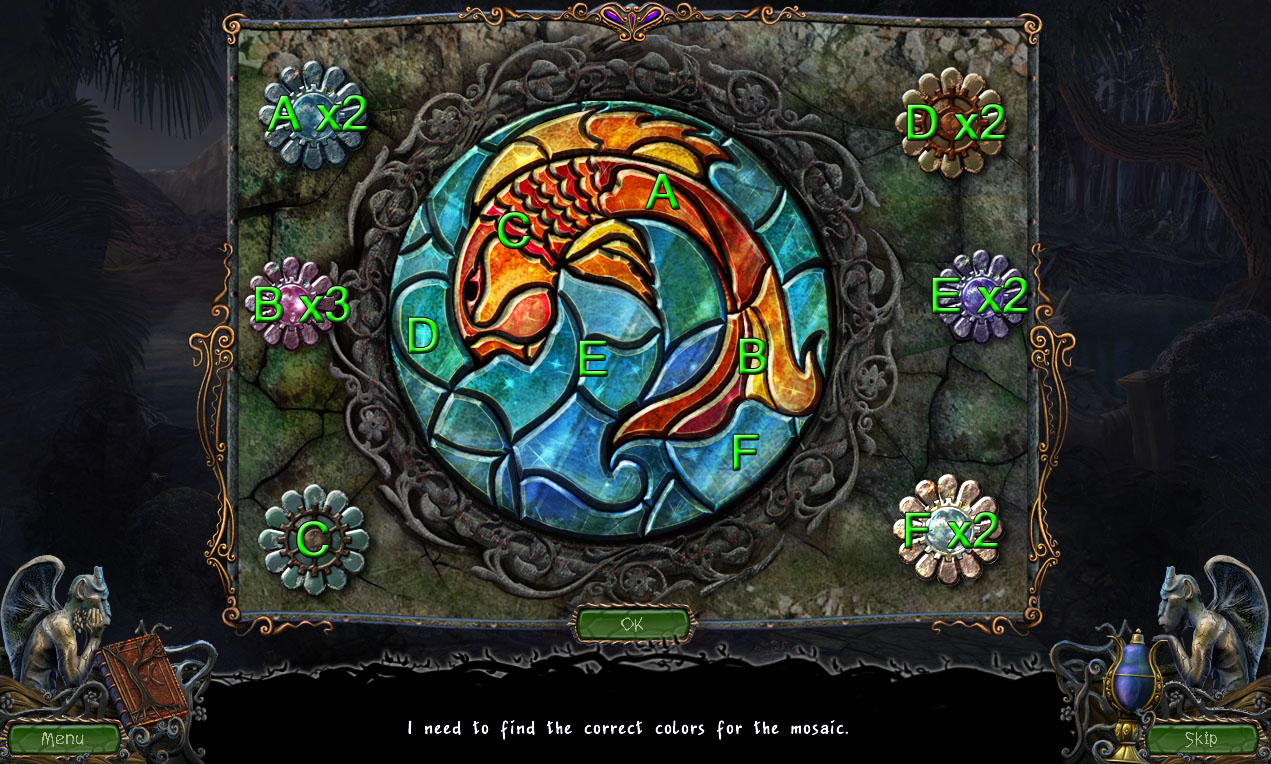
Paint the fish the correct color according to the drawing found on the chapel door.
Click the flower mechanisms at the sides of the mosaic to alter the colors for the sections of the mosaic.
The fish itself should be orange, while the surrounding mosaic pieces should be colored blue.
Click flower A twice, flower B three times, flower D twice, flower E twice, flower F twice.
Solution.
When the puzzle is complete, click the green water tank that rises from the ground to zoom in.
Open the drawer at the bottom of the tank to find the DRIED FROG and the CRYSTAL FLOWER (8/12).
Remove the top of the tank, then click the water to look inside.
Drop the DRIED FROG into the water to feed the fish.
Use the BUTTERFLY NET (from the bridge post at the Waterfall Bridge) to capture the fish and start the puzzle.
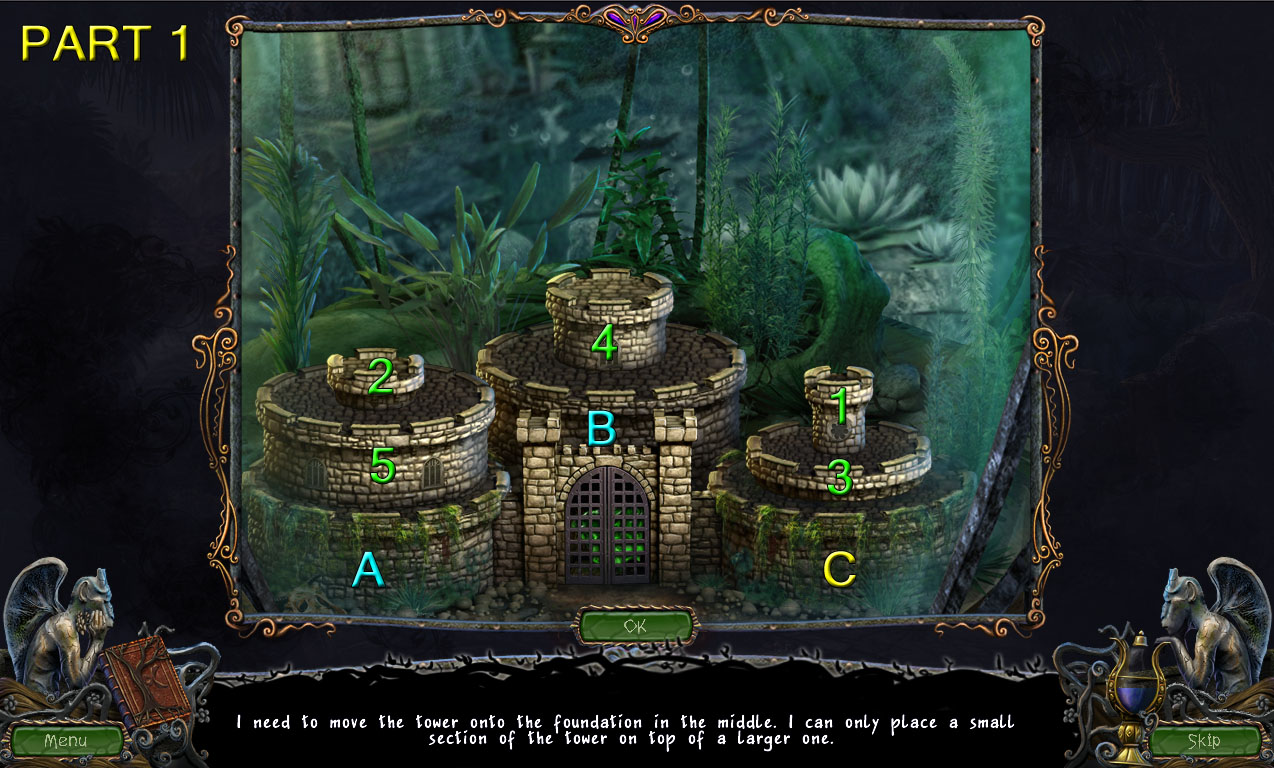
Move the towers of the castle from the left foundation to the middle foundation.
Click a tier of the tower to select it, then click a foundation or another tier to place it on top.
Only smaller tiers can be placed on top of larger tiers.
Screenshot.
Move the tiers onto the platforms in the following order:
Place tier 1 on platform B, tier 2 on platform C, tier 1 on platform C, tier 3 on platform B, tier 1 on platform A, tier 2 on platform B, tier 1 on platform B, tier 4 on platform C, tier 1 on platform C, tier 2 on platform A.
Solution Part 1.
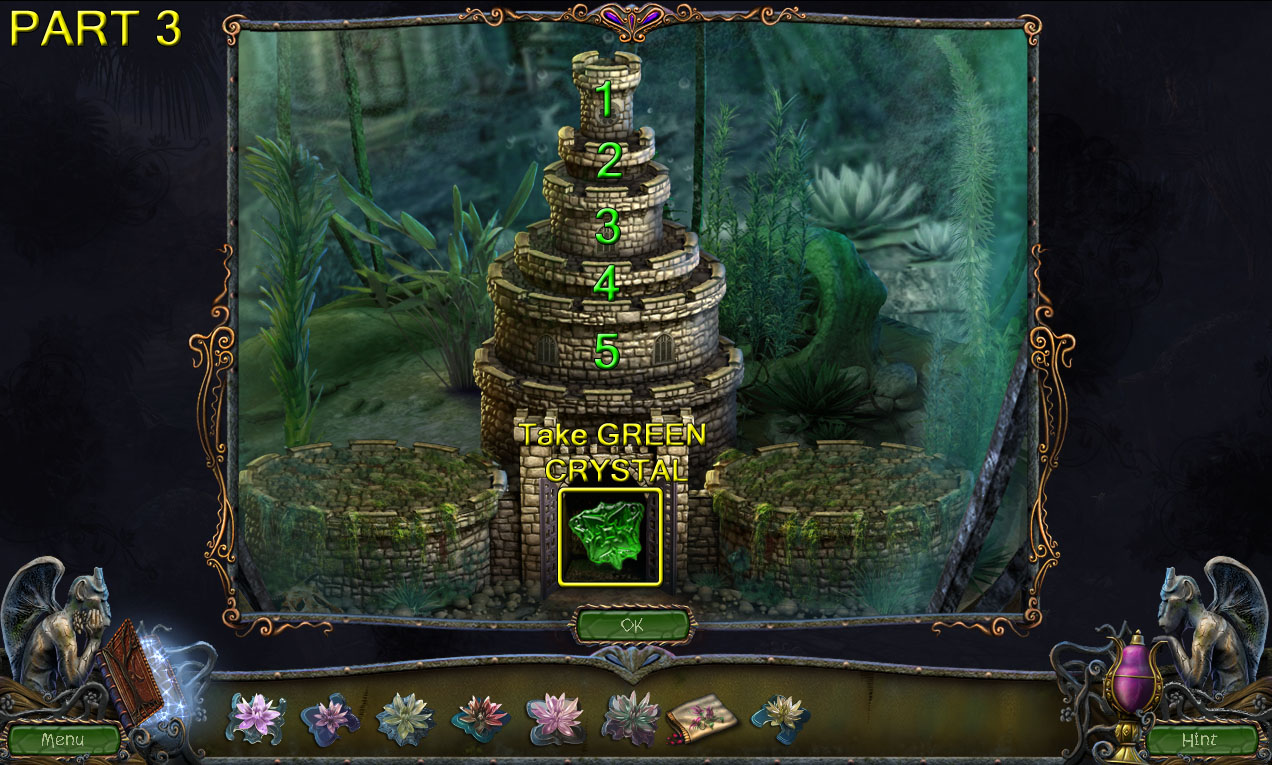
Place tier 1 on platform A, tier 3 on platform C, tier 1 on platform B, tier 2 on platform C, tier 1 on platform C, tier 5 on platform B, tier 1 on platform A, tier 2 on platform B, tier 1 on platform B, tier 3 on platform A.
Solution Part 2.
Place tier 1 on platform C, tier 2 on platform A, tier 1 on platform A, tier 4 on platform B, tier 1 on platform B, tier 2 on platform C, tier 1 on platform C, tier 3 on platform B, tier 1 on platform A, tier 2 on platform B, tier 1 on platform B.
Solution Part 3.
After the puzzle is solved, take the GREEN CRYSTAL from the open gate at the bottom of the castle.
Continue forward to the Chapel Entrance.
Chapel Entrance
Click the front door to the chapel to zoom in.
Insert the GREEN CRYSTAL (from the castle puzzle at the River) into the space between the hand-shaped frame.
Go through the open door to the Chapel.
Chapel
Take the CRYSTAL FLOWER (9/12) on top of the female statue's shoulder.
Inspect the mechanism in the shrubbery beside the large flower urn.
Note the drawing on the stone steps depicting the three-tiered structure found at the chapel entrance.
Take DANIEL'S ANKH hanging above the rope ladder mechanism.
Continue forward to move towards the organ.
Take the SNAKE CLAMP on top of the lower left bowl.
Go back to the Chapel Entrance.
Chapel Entrance
Rotate the tiers of the stone structure to match the image found on the steps in the chapel.
Turn the top tier to face the left, and the middle tier and the bottom tier directly forward.
Screenshot.
When the tiers are correctly positioned, click the snake at the center piece to zoom in.
Use the SNAKE CLAMP (from the bowl in the Chapel) to capture the cobra.
Take the STONE PALM the snake was guarding in the middle tier.
Go back to the Poison Garden.
Poison Garden
Click the stone hand structure to zoom in.
Insert the STONE PALM (from the center stone tier at the Chapel Entrance) into the space in the middle of the hand statue.
Take the PART OF STONE MUSIC TABLET from the revealed cache inside the palm.
Return to the Chapel.
Chapel
Move towards the end of the room to face the organ.
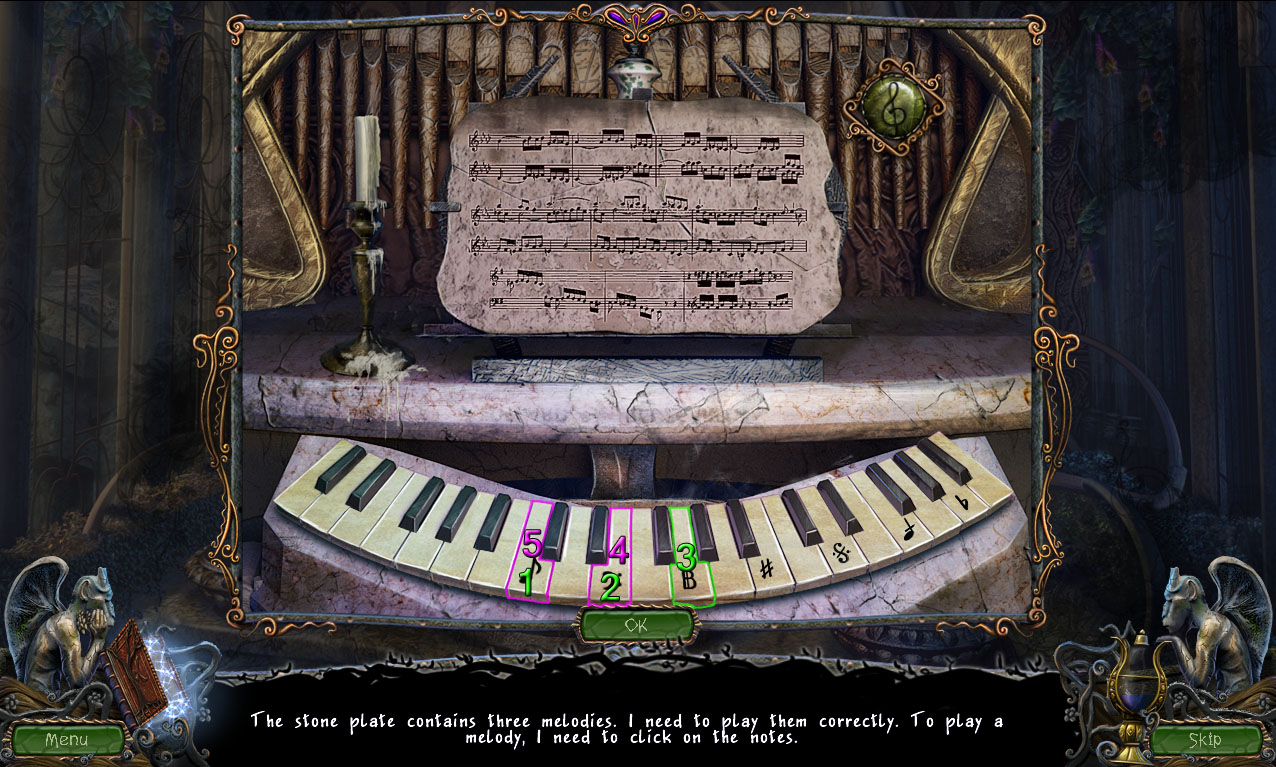
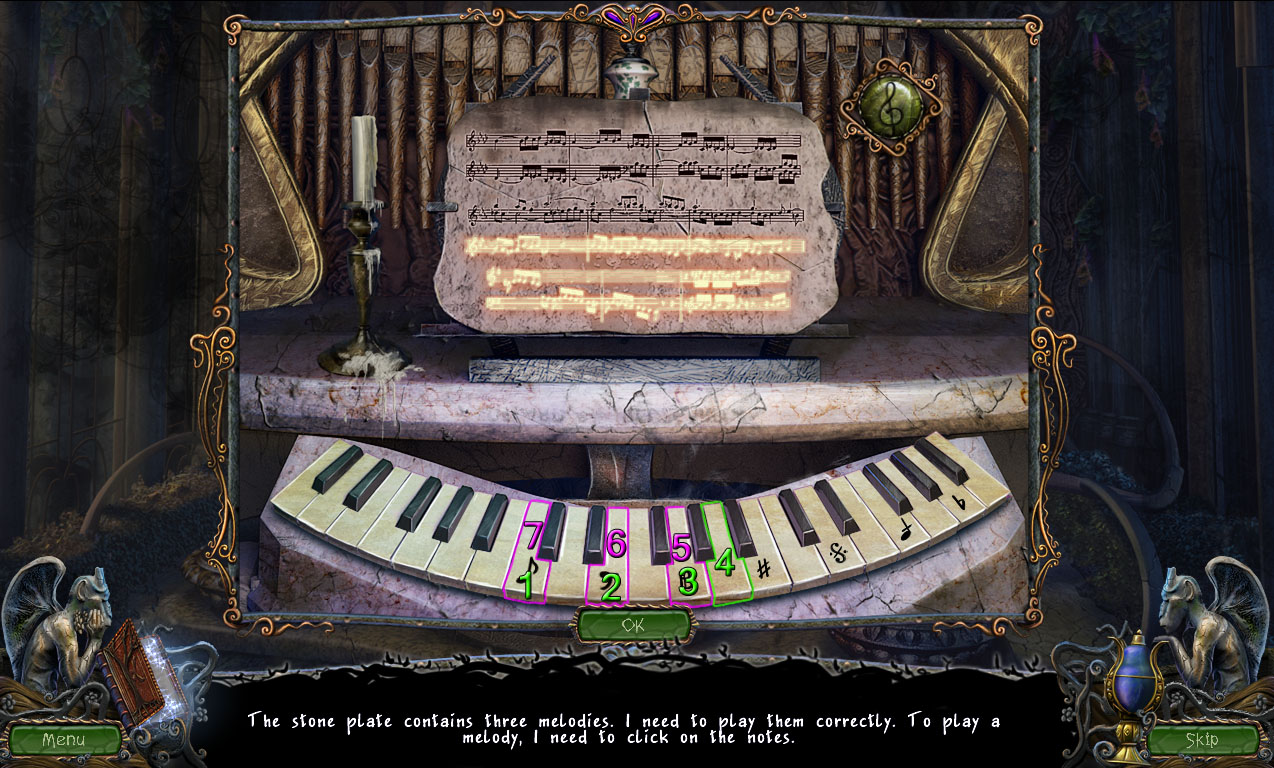
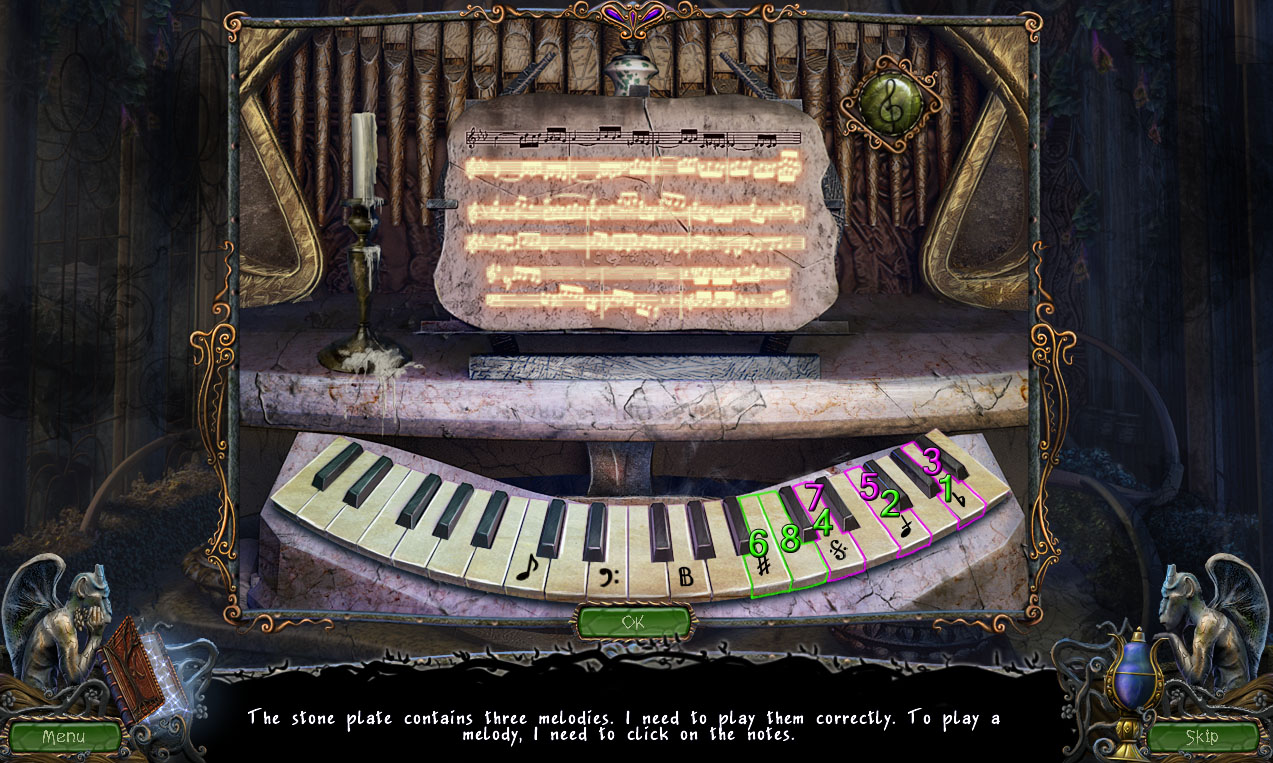
Place the PART OF STONE MUSIC TABLET (from the hand statue at the Poison Garden) onto the tablet on the music stand to start the puzzle.
Play the notes on the keyboard in the correct order.
Click the green treble clef button in the upper right corner to highlight the keys on the keyboard in order.
Click the corresponding keys to play the melody - if the tune is repeated correctly, the line on the music sheet will light up and the next line will play.
There are three melodies and two lines per melody for 6 lines total.
Solution Part 1.
Solution Part 2.
Solution Part 3.
Solution Part 4.
Solution Part 5.
Solution Part 6.
After the puzzle is solved, the water will be diverted from the Waterfall Bridge to the sides of the Chapel.
Go outside and to the left to travel to the Waterfall Bridge.
Waterfall Bridge
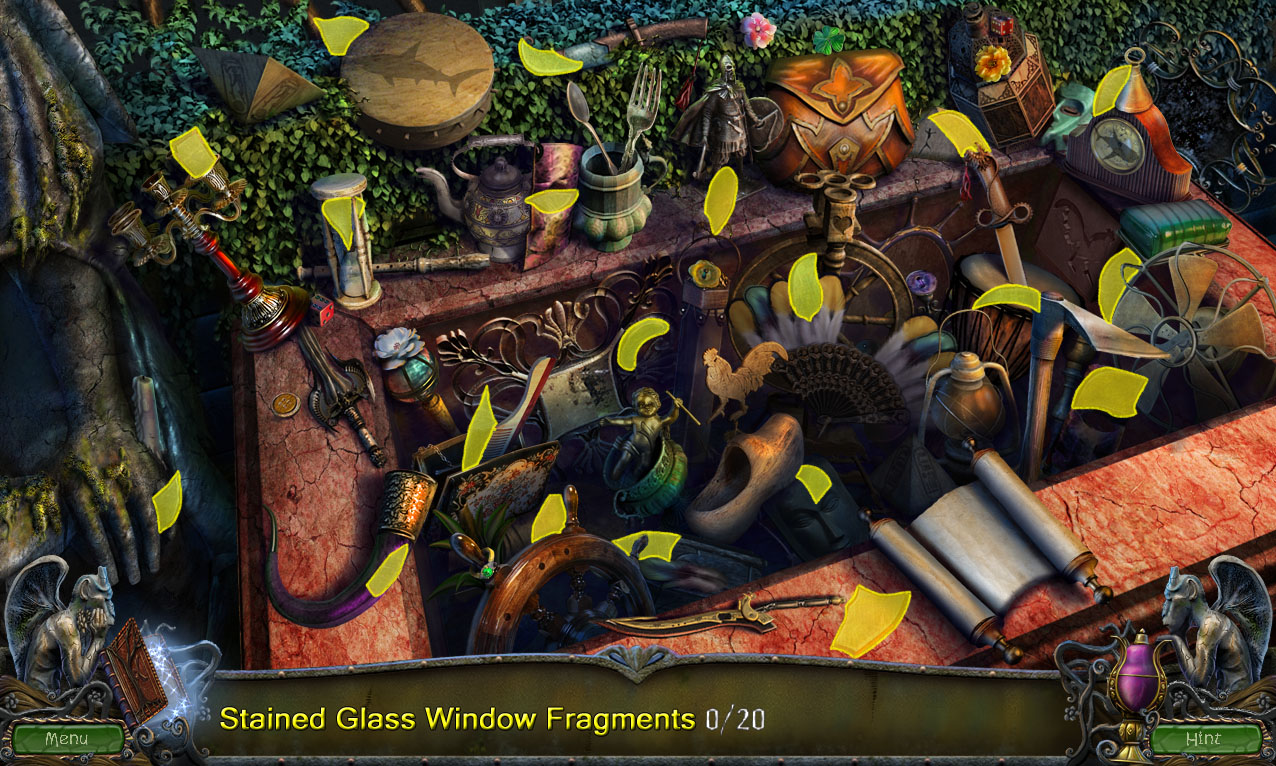
Click the stone chest next to the statue to start the hidden object scene.
Collect the 20 glass shards hidden around the area.
Screenshot.
Once the hidden object scene is complete, you will receive the STAINED GLASS WINDOW FRAGMENTS.
Click the lock mechanism beside the large stone door for a closer look.
Take the HANDLE on the ledge above the mechanism.
Go back to the Chapel.
Chapel
Click the rope ladder mechanism in the shrubbery to zoom in.
Add the HANDLE (from the wall ledge at the Waterfall Bridge) to the mechanism.
Click the handle to lower the rope ladder.
Inspect the stained glass window at the top of the ladder.
Pick up the ROUND GEM on the left side of the window pane.
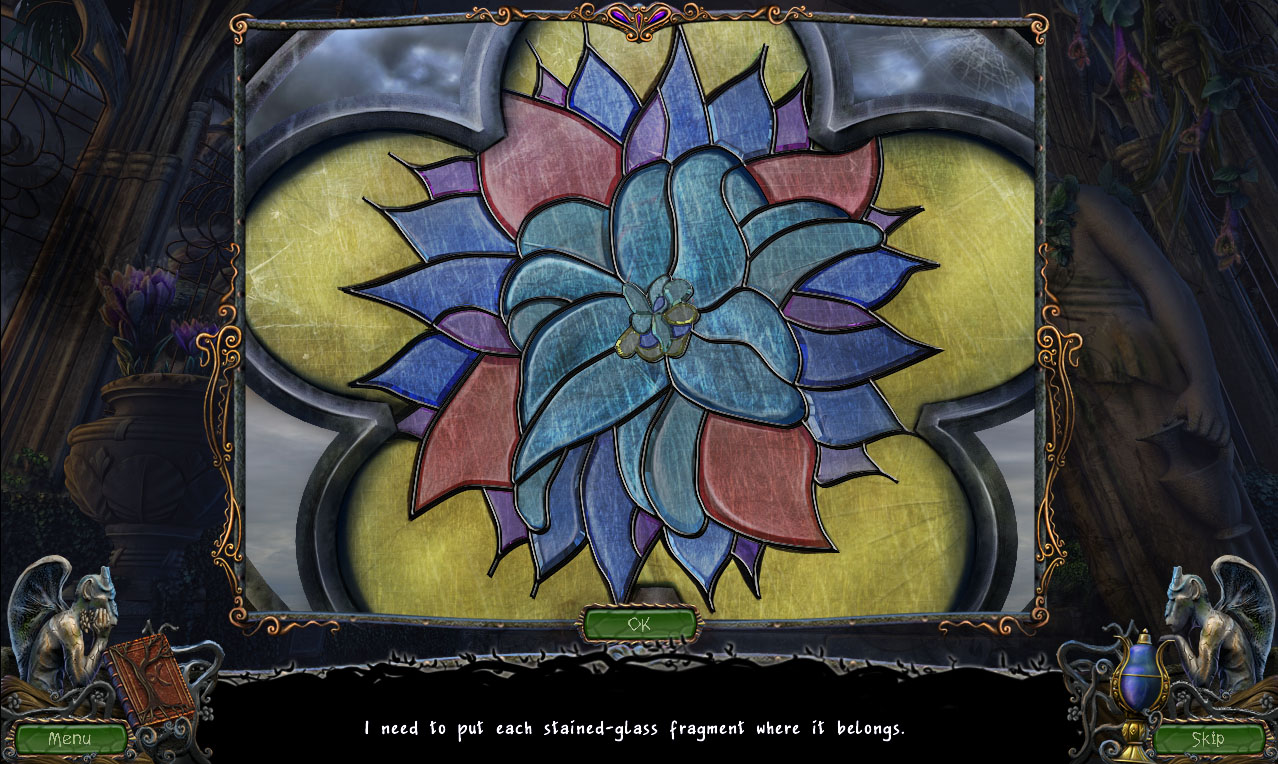
Add the STAINED GLASS WINDOW FRAGMENTS to the window to start the puzzle.
Place the glass fragments into the correct spaces to repair the stained glass window.
Click a shard to select it, then click a space in the window to place it.
If a fragment is correctly positioned, it will lock in place.
Solution.
After the puzzle is solved, follow the light from the window and click the bowl in the statue's hand for a closer look.
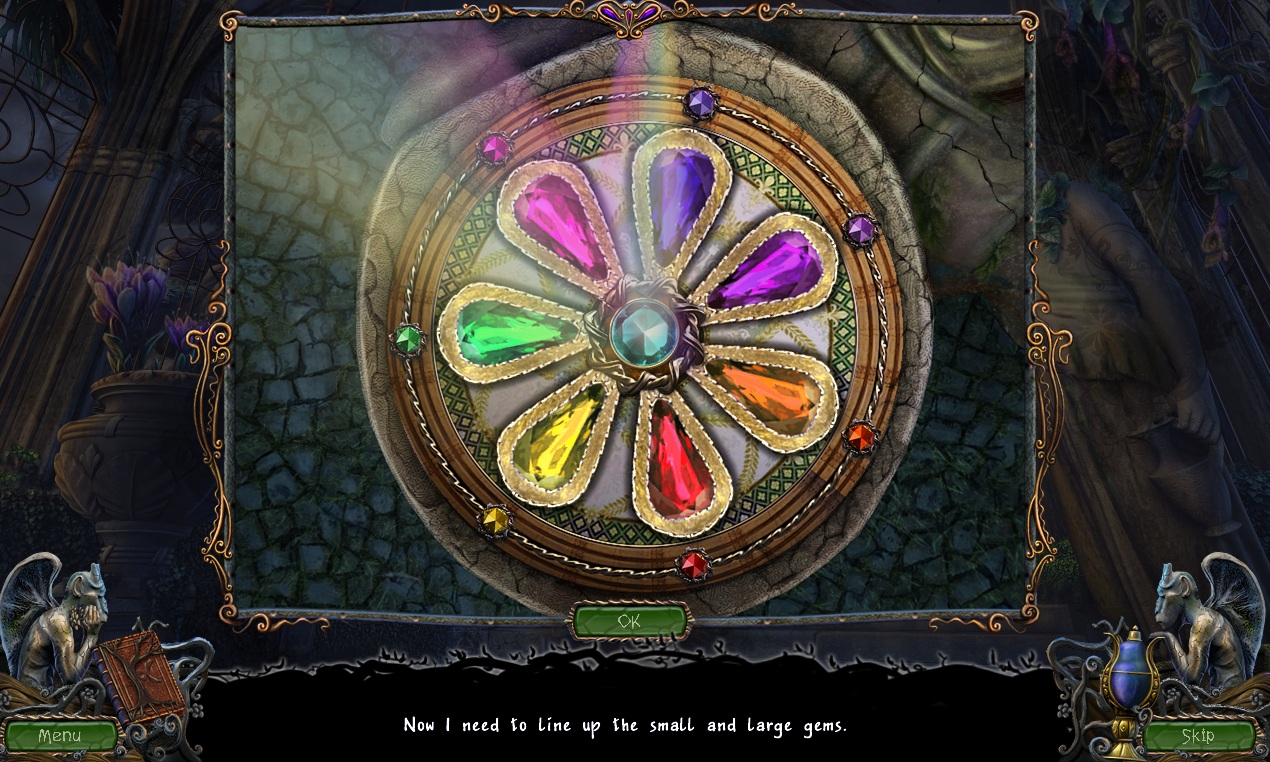
Place the ROUND GEM into the center of the bowl to start the next puzzle.
Align the teardrop-shaped gems in the inner ring with the matching colored round gems in the outer ring.
Click a large gem two swap the positions of the two gems at its left and right sides; the middle gem will not be moved.
When a gem is correctly positioned, it will light up.
Solution.
When the puzzle is solved, zoom in to the highlighted section of the left wall indicated by the beam of light reflecting off the bowl.
The hidden object scene at the Waterfall Bridge will reactivate after you view the mossy wall.
Waterfall Bridge
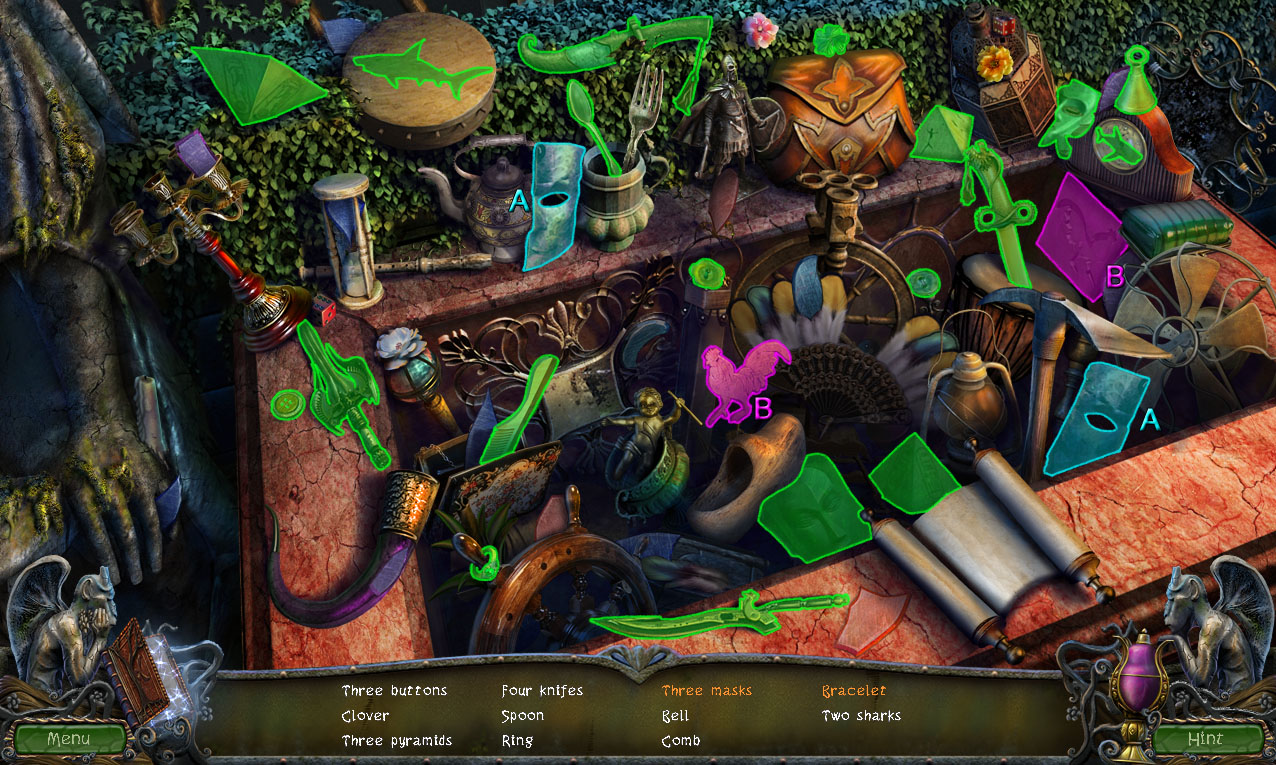
Click the case beside the statue to repeat the hidden object scene.
Combine the two halves to complete the Mask (A).
Insert the rooster into the carving to reveal the Bracelet (B).
Screenshot.
Once the hidden object scene is complete, you will receive the PUTTY KNIFE.
Go back to the Chapel.
Chapel
Inspect the mossy section of the wall indicated by the beam of light from the statue.
Use the PUTTY KNIFE (from the Waterfall Bridge hidden object scene) to scrape off the moss.
Insert DANIEL'S ANKH (from the shrubbery by the handle in the Chapel) into the revealed slot in the wall.
Take the GEARS from the hole in the wall.
Return to the Waterfall Bridge.
Waterfall Bridge
Click the mechanism on the wall to the left of the stone door for a closer look.
Add the GEARS (from the mossy wall cache in the Chapel) to the mechanism to start the puzzle.
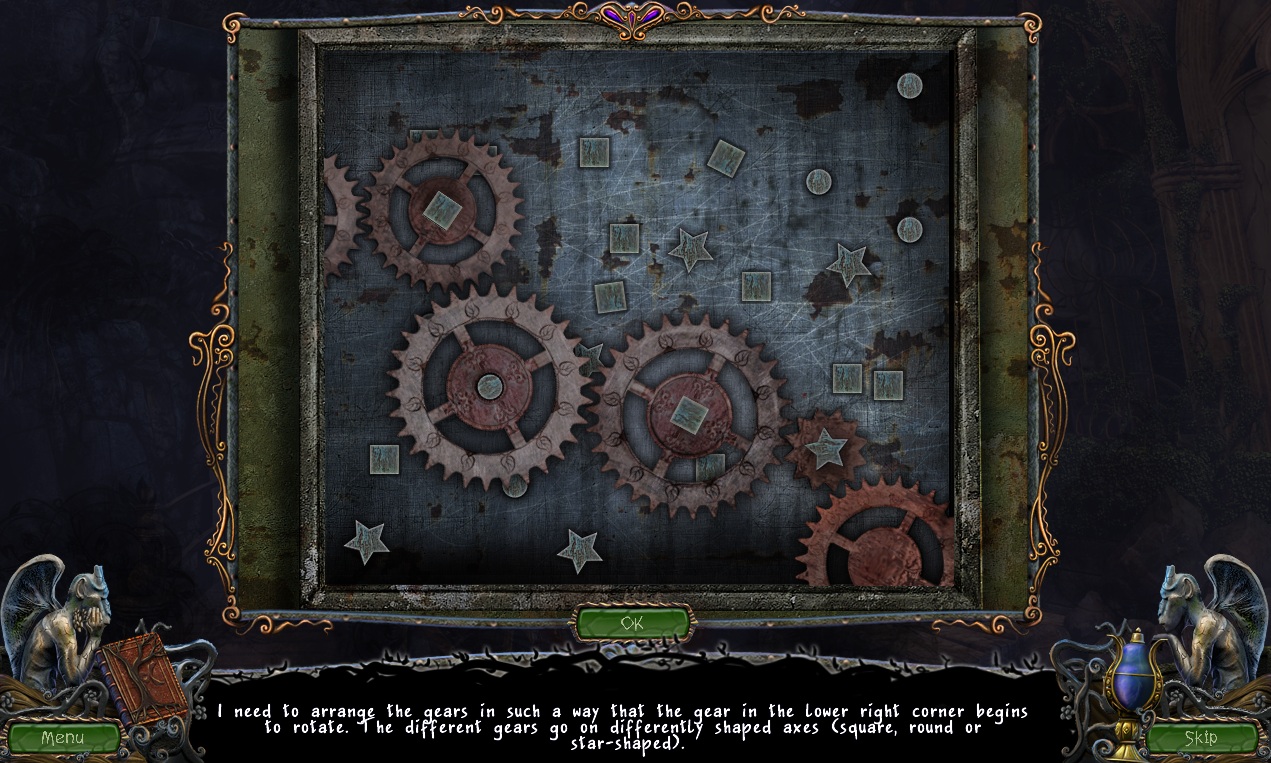
Arrange the movable gears to rotate the gear in the lower right corner.
Click a gear to select it, then click a peg to place it.
Each gear can only fit on certain shaped pegs: one large gear fits the round pegs, one large gear fits the square pegs, one medium gear fits the square pegs, and one small gear fits the star pegs.
Solution.
After the puzzle is solved, go through the open archway to the Elevator - 1st Floor.
Chapter 6
Elevator - 1st Floor
Pick up the Professor Steiner's note, on the Predator Somnum plant, attached to the side of the smashed emergency cabinet.
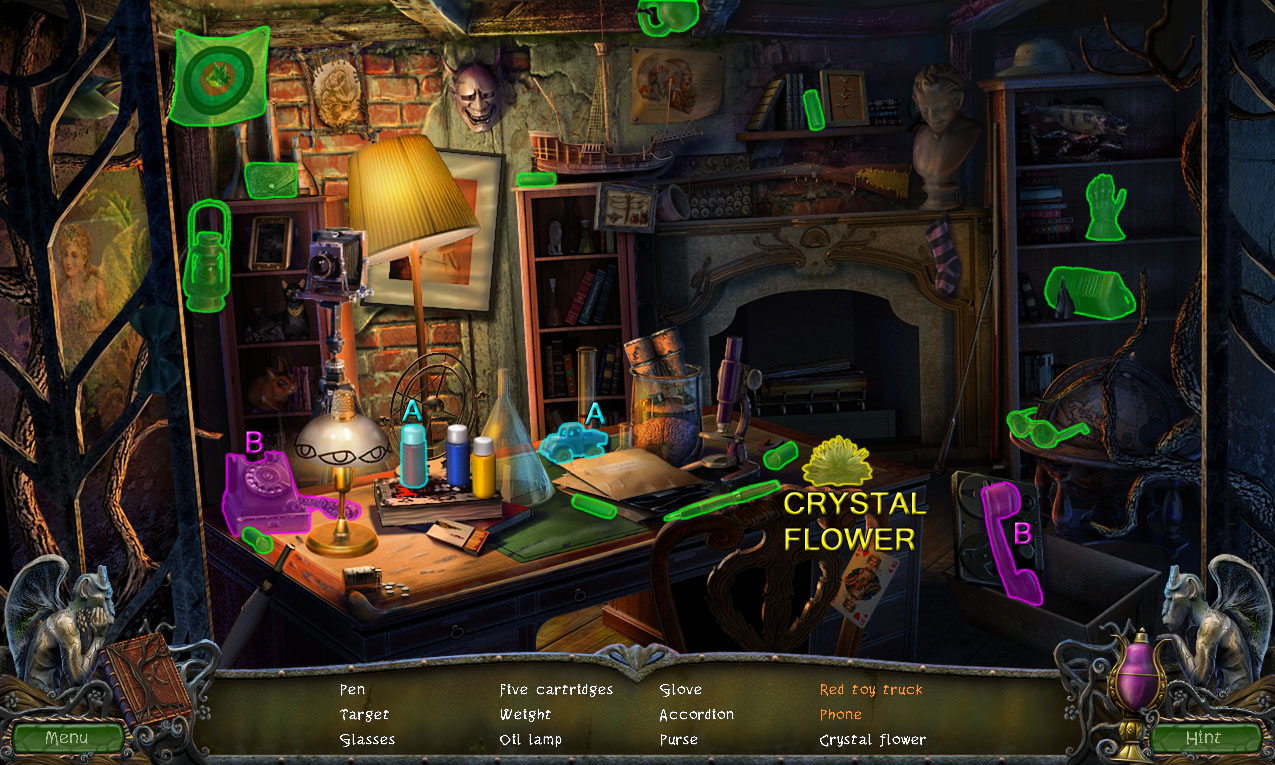
Click the desk through the doors of the elevator to start the hidden object scene.
Use the red paint on the car to paint the Red Toy Truck (A).
Place the receiver on top of the dialer to complete the Telephone (B).
Screenshot.
Once the hidden object scene is complete, you will receive the CRYSTAL FLOWER (10/12).
Click the elevator button panel to zoom in.
Note the symbols scratched at the top of the panel.
Take Steiner's destroyed elevator access card out of the slot.
Click the large hole in the middle of the floor for a closer look.
Click the planks of wood to move them away from the pit.
Take the paper on the floor and note the symbols that match the ones scratched on the elevator button panel.
Go back to Steiner's Office.
Steiner's Office
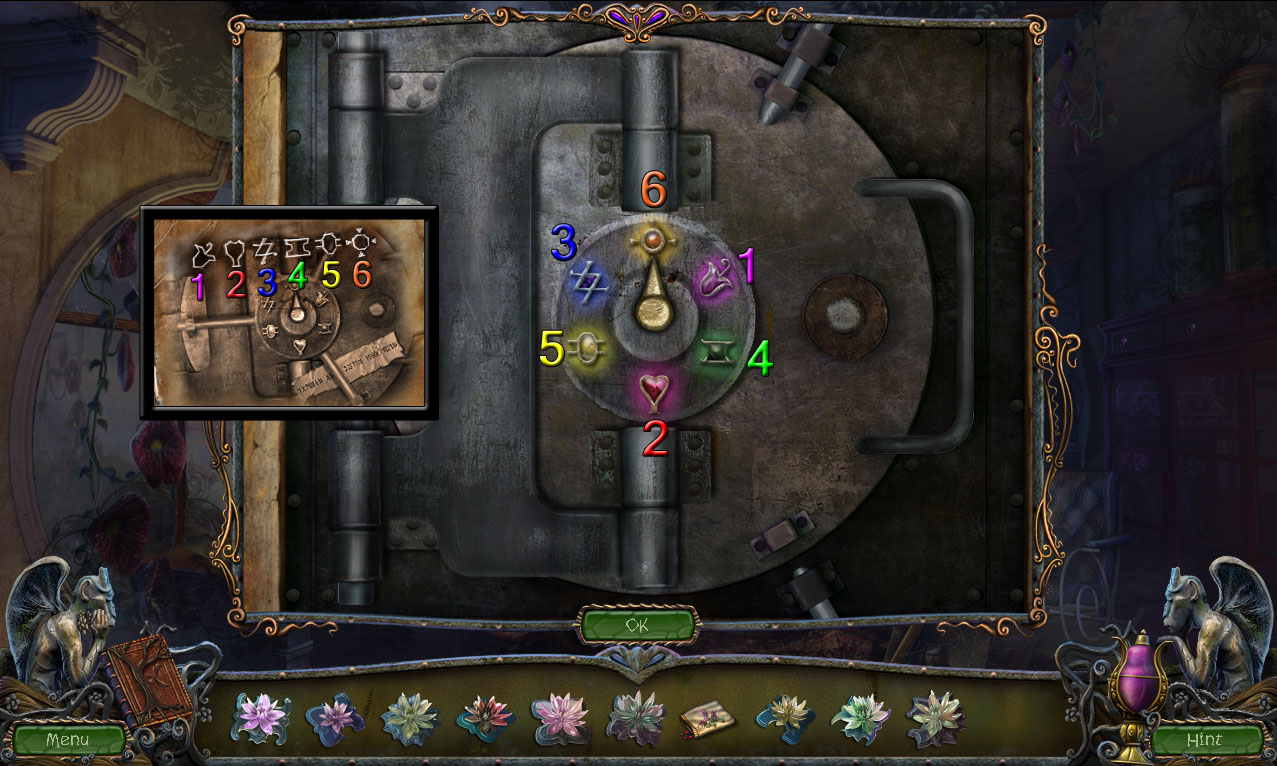
Click the locked wall safe to zoom in.
Enter the combination by clicking the symbols in the order shown from the note on the Elevator - 1st Floor.
Screenshot.
Take the SPYGLASS from the open safe.
Go back out to the Balcony.
Balcony
Click the tripod at the side of the railing for a closer look.
Place the SPYGLASS (from the open safe in Steiner's Office) onto the stand.
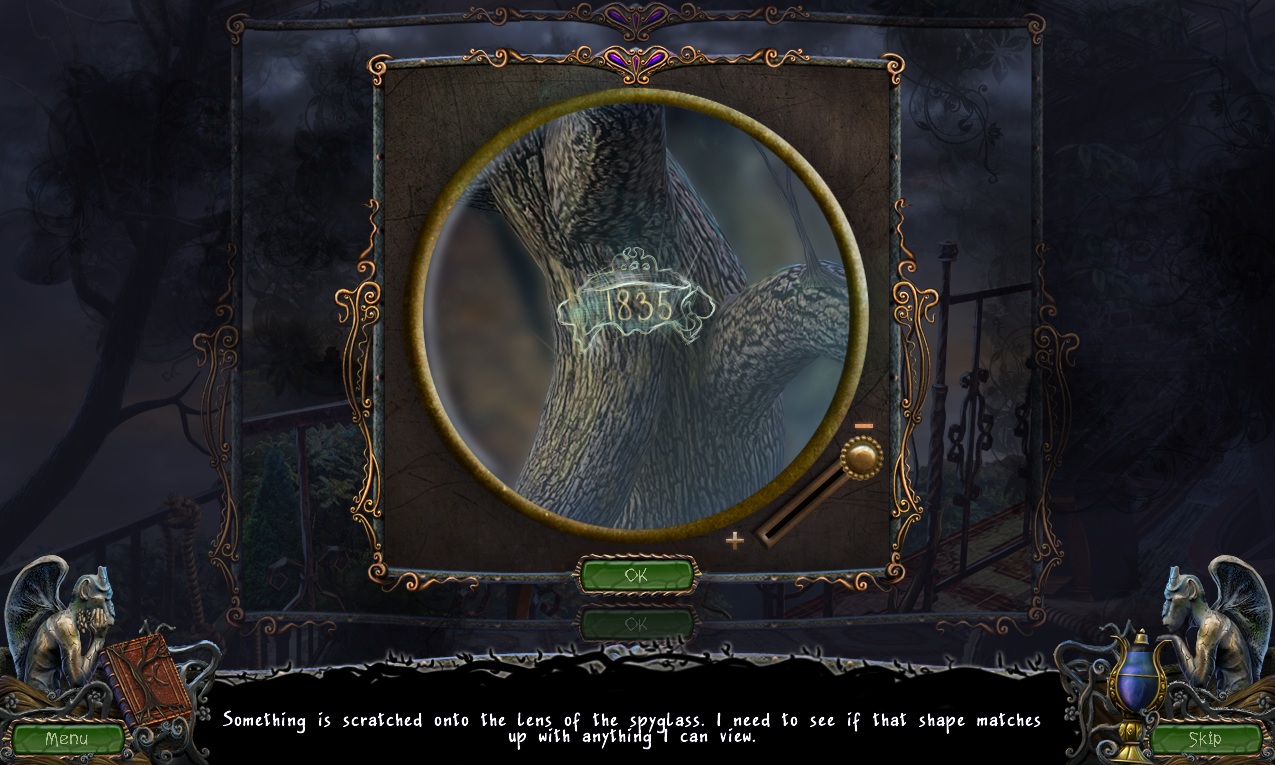
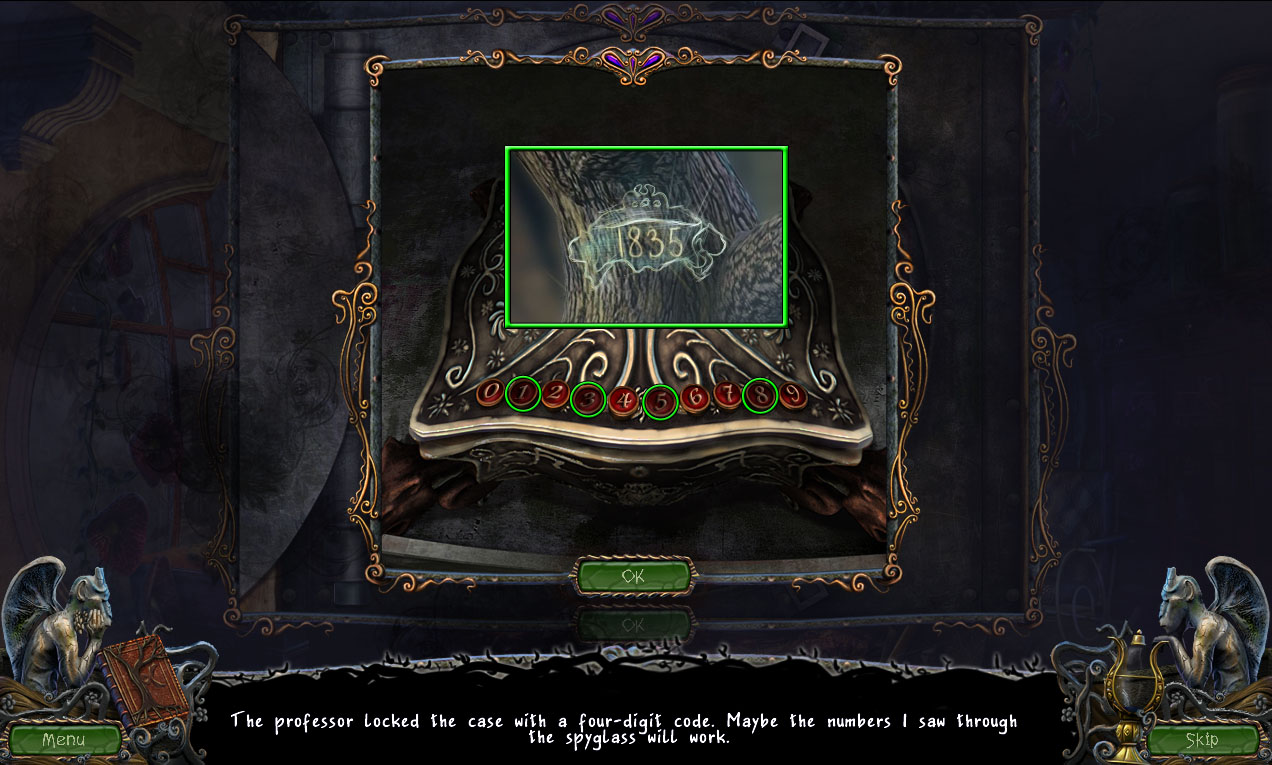
Click the spyglass to start the minigame.
Move the spyglass to find the shape that matches the scratched outline on the lens.
Click and drag the cursor to move the telescope; the controls are inversed so dragging up moves the scope down and vice versa.
Move the scope all the way to the lower left corner to find the image on the trunk of the tree.
Move the zoom all the way up to the (-) sign to view the 4 digit combination.
Solution.
Continue forward to Steiner's Office.
Steiner's Office
Click the open wall safe to look inside.
Click the lock box, then press the buttons to enter the 4 digit combination found by looking through the spyglass.
The correct combo is 1-8-3-5.
Solution.
Take the PROFESSOR'S STAMP, PROFESSOR'S PHOTO, and the note on the four element bowls from the open lock box.
Inspect the drawer in the middle of the writing desk.
Place the PROFESSOR'S PHOTO in the drawer, then use the scissors to cut off one of the pictures.
Use the glue in the drawer on the blanks square in the access card, then place the photo over the glue.
Add the PROFESSOR'S STAMP to the drawer, then use it on top of the photo.
Pick up the pen and sign the card to complete the NEW ACCESS CARD.
Return to the Elevator - 1st Floor.
Elevator - 1st Floor
Click the elevator button panel to zoom in.
Insert the NEW ACCESS CARD (from the desk drawer at Steiner's Office) into the card slot.
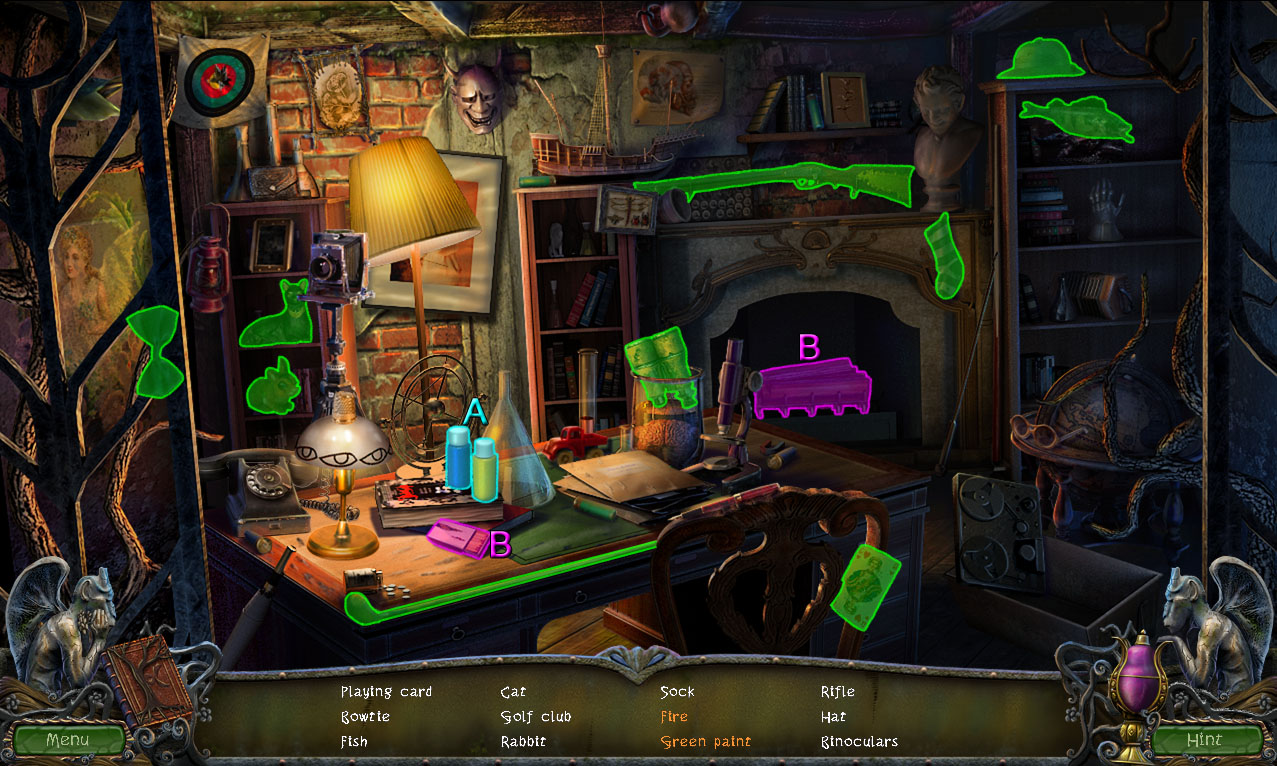
Click the desk in the 1st floor room to repeat the hidden object scene.
Mix the blue and yellow paint tubes to create the Green Paint (A).
Use the matchbox on the logs in the fireplace to light the Fire (B).
Screenshot.
Once the hidden object scene is complete, you will receive the PAPERCLIP.
Click the elevator button panel for a closer look.
Press button 2 to travel to the 2nd Floor.
Elevator - 2nd Floor
Click the roots of the carnivorous plants in the 2nd floor room to zoom in.
Pick up the WATERING CAN on the floor at the base of the plants.
Go back to the Poison Garden.
Poison Garden
Click Carrie's purse on the ground for a closer look.
Add the PAPER CLIP (from the Elevator - 1st Floor hidden object scene) to the zipper, then click the zipper to open the purse.
Take the jar of SLEEPING PILLS inside the open purse.
Return to the Courtyard.
Courtyard
Click the fountain to zoom in.
Use the WATERING CAN (from the ground at the Elevator - 2nd Floor) to collect the water from the basin.
Add the SLEEPING PILLS (from Carrie's open purse in the Poison Garden) to the watering can.
Take the WATERING CAN WITH SLEEPING PILLS from the side of the fountain.
Go to the Elevator - 2nd Floor.
Elevator - 2nd Floor
Inspect the stem of the carnivorous plants in the 2nd floor room.
Pour the WATERING CAN WITH SLEEPING PILLS (assembled at the fountain in the Courtyard) onto the base of the plant to put it to sleep.
Click the elevator button panel for a closer look.
Press button 3 to travel to the 3rd Floor.
Elevator - 3rd Floor
Click the sleeping carnivorous plants in the 3rd floor room to zoom in.
Take the HARPOON hanging from the ceiling.
Click the elevator button panel for a closer look.
Press button 1 to travel to the 1st Floor.
Elevator - 1st Floor
Click the large hole in the floor for a closer look.
Use the HARPOON (from the ceiling at the Elevator - 3rd Floor) on the folder on top of the pit of carnivorous plants.
Open the folder to find the cassette tape.
Add the cassette tape to the tape player, then click the TAPE WITH STEINER'S VOICE to add it to your inventory.
Go back out to the Waterfall Bridge.
Waterfall Bridge
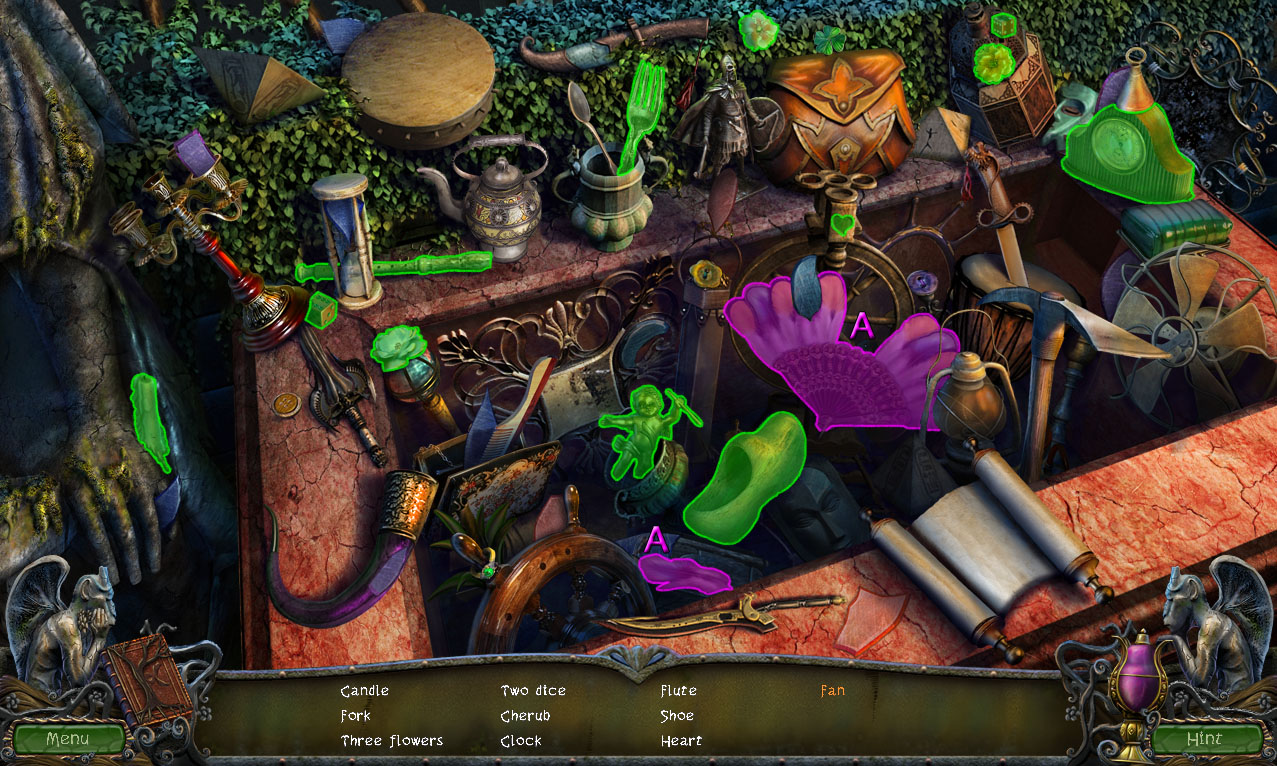
Click the chest beside the statue to repeat the hidden object scene.
Add the feather to the empty space in the middle to complete the Fan (A).
Screenshot.
Once the hidden object scene is complete, you will receive the PICKAXE.
Click the pile of boulders on the right side of the archway to zoom in.
Use the PICKAXE to break away the middle stone.
Take the revealed GEAR.
Go to the Elevator - 4th Floor.
Elevator - 4th Floor
Inspect the pot hanging by the chains from the ceiling.
Place the PLANTA LUMINOSUS SEEDS (from the microscope puzzle in the Laboratory) into the dirt to light the room.
Click the shaft above the door to zoom in.
Pick up the CRYSTAL FLOWER (11/12) in front of the mechanism.
Add the GEAR (from the split boulder at the Waterfall bridge) to repair the mechanism.
Take the revealed CROWN at the back of the shaft.
Go back out to the Waterfall Bridge.
Waterfall Bridge
Click the lion head at the top of the chapel wall to zoom in.
Place the CROWN (from the gear mechanism cache in the wall at the Elevator - 4th Floor) on top of the lion's head.
Take the GLASS SPHERE from its open mouth.
Go into the Chapel.
Chapel
Move to the back of the room towards the organ.
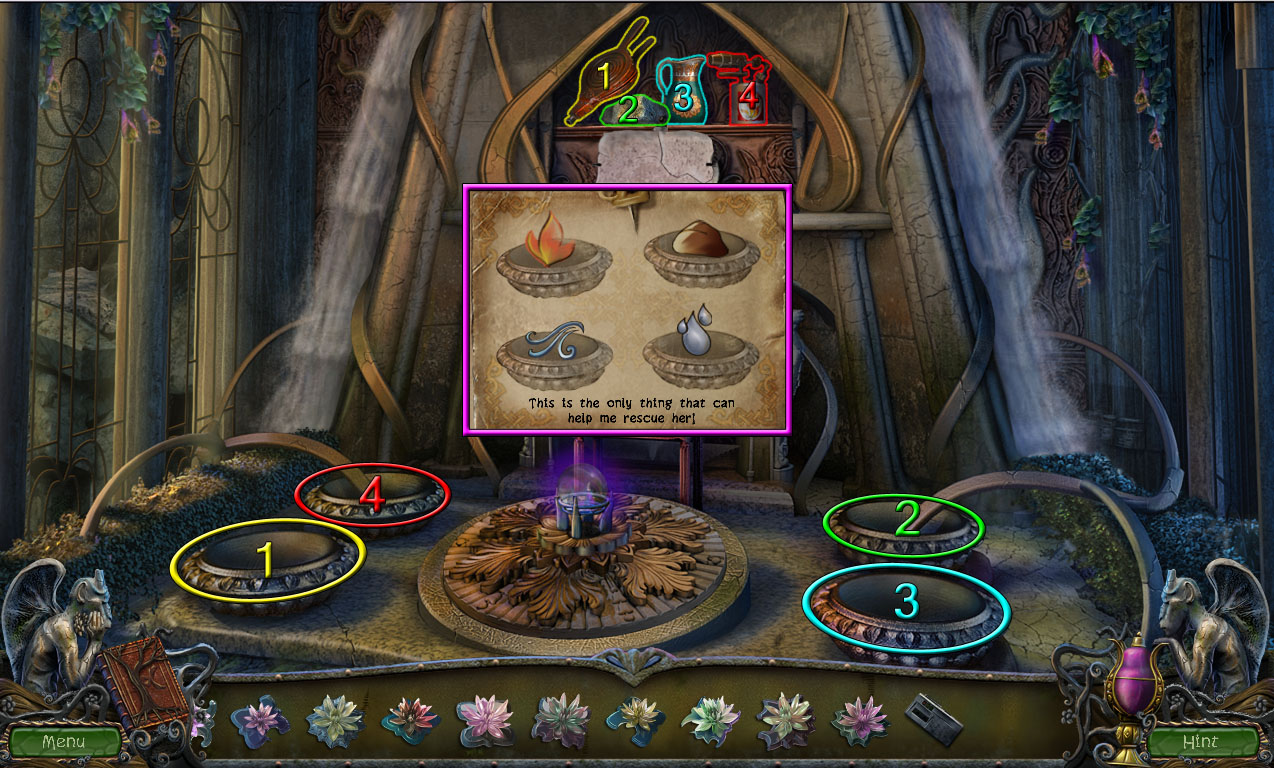
Place the GLASS SPHERE (from the stone lion head at the Waterfall bridge) on the stand in the middle of the four bowls.
Use the four items from the shelf above the organ on the bowls that correspond with their element types.
Refer to the note from the lock box in Steiner's Office for the order of the elements in each bowl.
Use the Bellows on the lower left bowl (1).
Use the Rock on the upper right bowl (2).
Use the Pitcher on the lower right bowl (3).
Use the Flame-thrower on the upper left bowl (4).
Screenshot.
Click the revealed tank in the center of the floor to zoom in.
Click the monitor to speak with Lisa, then take the CRYSTAL FLOWER (12/12) from the middle of the tank.
Go back to the Swamp.
Swamp
Click the sunken boat in the water to repeat the hidden object scene.
Use the broom on the cobwebs to reveal Lisa's Face (A).
Use the branding iron on the flame from the burner to make the Hot Branding Iron (B).
Add the bird to the clock to complete the Cuckoo Clock (C).
Screenshot.
Once the hidden object scene is complete, you will receive the CARABINER.
Go all the way back to the Stone Bridge.
Stone Bridge
Click the female statue for a closer look.
Add all of the remaining CRYSTAL FLOWERS to the flower-shaped slots.
CRYSTAL FLOWER (1/12) is from the tree hollow at the Stairway.
CRYSTAL FLOWER (2/12) is from the lamppost at the Courtyard.
CRYSTAL FLOWER (3/12) is from the fruit plant in the Laboratory.
CRYSTAL FLOWER (4/12) is from the projector in the Museum.
CRYSTAL FLOWER (5/12) is from the ledge over the railing at the Balcony.
CRYSTAL FLOWER (6/12) is from the painting puzzle at the Upstairs Hallway.
CRYSTAL FLOWER (7/12) is from the steps in Steiner's Office.
CRYSTAL FLOWER (8/12) is from the drawer in the water tank at the River.
CRYSTAL FLOWER (9/12) is from the statue in the Chapel.
CRYSTAL FLOWER (10/12) is from Elevator - 1st Floor hidden object scene.
CRYSTAL FLOWER (11/12) is from the shaft in the wall at the Elevator - 4th Floor.
CRYSTAL FLOWER (12/12) is from Lisa's tank in the Chapel.
Go across the raised bridge to the Cave.
Cave
Click the stone at the end of the platform to zoom in.
Pick up KEVIN'S DEFLATED BALL on the ground.
Attach the CARABINER (from the Swamp hidden object scene) to the chain.
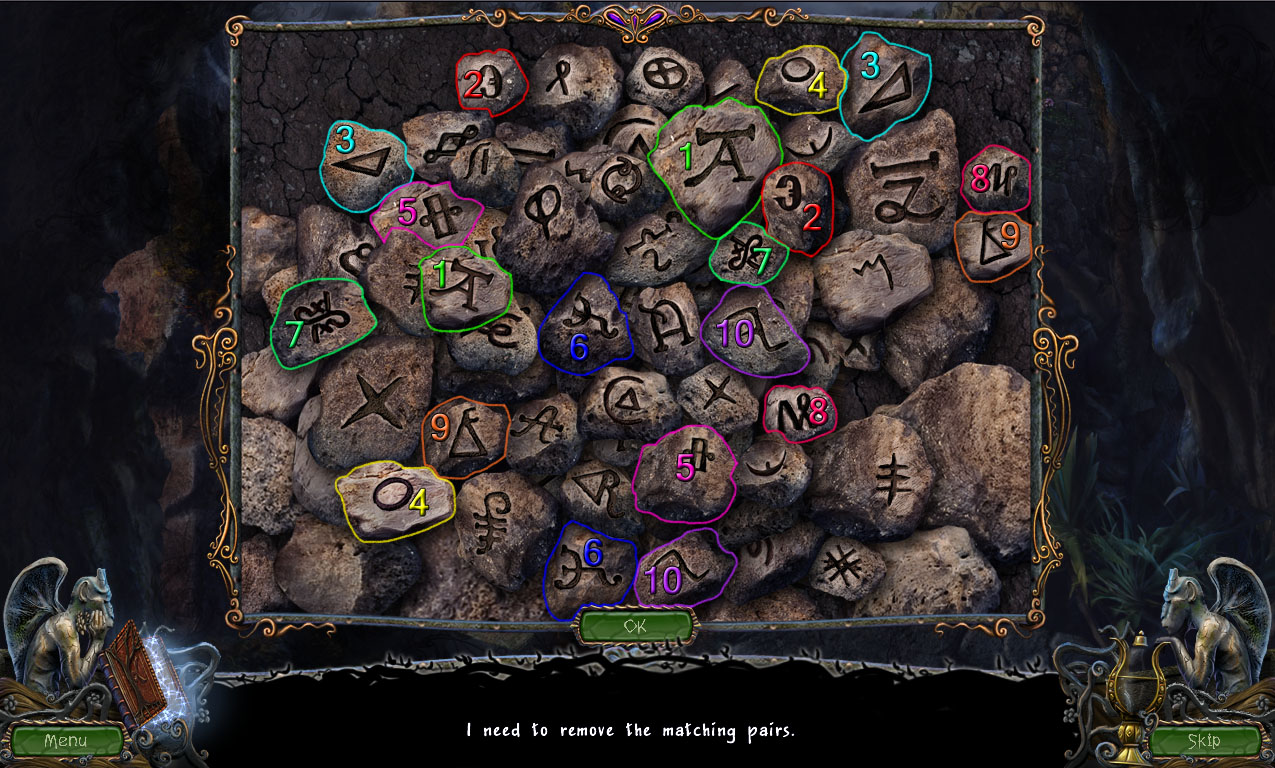
Click the torn down section of the right wall for a closer look.
Take the PUMP from the pile of stones to start the puzzle.
Find the matching rune stones.
Click one stone to select it, then click the second stone with the identical symbol to match the pair.
When a matching pair of stones is found, they will disappear from the pile.
Example.
After the puzzle is solved, remove the lid from the crate in the rocks, then take the GILDED AXE AND GILDED SHIELD inside.
Click the platform above the gap in the stairs for a closer look.
Place KEVIN'S DEFLATED BALL under the stone on the lever.
Inflate the ball with the PUMP.
Click the lever to raise the stairs.
Click the door to the Dome to zoom in.
Place the GILDED AXE in the left gargoyle's hands.
Place the GILDED SHIELD in the right gargoyle's hands.
Click the audio lock for a close-up, then play the TAPE WITH STEINER'S VOICE (from the tape player in the pit at the Elevator - 1st Floor) to open the lock.
Go through the open door to the Dome.
Dome
Pick up the note on the ground at the bottom of the tree.
Inspect the figures stuck in the lower right section of the tree.
Take the from Tony's hand, then back out to the main view of the room.
Click the plant creature to see a vision of the first neutralizer at the left doorway in the Foyer.
Go back to the Foyer.
Foyer
Click the left doorway to zoom in.
Click the door to move it away from the wall.
Remove the cobwebs off the wall, then take the revealed MUTATION NEUTRALIZER (1/6) from the hole in the wall.
Return to the Dome.
Dome
Click the upper left figures in the tree for a closer look.
Place the MUTATION NEUTRALIZER (1/6) into the matching space in the bark over Harry's chest.
Click the plant creature to see a vision of the second neutralizer in the stone steps by the rope ladder mechanism in the Chapel.
Click the suitcase beside the far left root of the tree to zoom in.
Pick up the FISHING ROD next to the suitcase.
Open the case, then take the KNIFE inside.
Go back to the Chapel.
Chapel
Click the rope ladder mechanism to zoom in.
Use the KNIFE (from the suitcase in the Dome) on the loose brick at the side of the steps.
Take the MUTATION NEUTRALIZER (2/6) from behind the stone.
Return to the Dome.
Dome
Click the upper left figures in the tree for a closer look.
Place the MUTATION NEUTRALIZER (2/6) into the matching space in the bark beside Daniel's head.
Click the plant creature to see a vision of the third and fourth neutralizers over Lisa's preservation tank in the Chapel.
Go back to the Chapel.
Chapel
Move to the back of the room towards the organ.
Click Lisa's preservation tank to zoom in.
Speak with Lisa, then take the MUTATION NEUTRALIZER (3/6) and (4/6) on top of the tank.
Return to the Dome.
Dome
Click the lower right figures in the tree for a closer look.
Place the MUTATION NEUTRALIZER (3/6) and MUTATION NEUTRALIZER (4/6) in the matching spaces in the bark beside Tony's head and Carrie's arm.
Click the plant creature to see a vision of the fifth neutralizer beside the stone lion head at the Waterfall bridge.
Go back to the Waterfall Bridge.
Waterfall Bridge
Click the stone lion head on the chapel wall to zoom in.
Click the STONE ELEMENT (the tile with the crown) in the lower left section of the ring around the lion head.
Place the STONE ELEMENT in the missing space at the upper right section of the ring.
Take the revealed MUTATION NEUTRALIZER (5/6) on the wall.
Return to the Dome.
Dome
Click the lower left figures in the tree for a closer look.
Place the MUTATION NEUTRALIZER (5/6) in the matching space in the bark over Max's chest.
Click the plant creature to see a vision of the sixth neutralizer in the pit between the steps at the Stairway.
Go back to the Stairway.
Stairway
Click the gap between the steps at the upper section of the stairway to zoom in.
Use the FISHING ROD (from the suitcase at the Dome) to reel in the MUTATION NEUTRALIZER (6/6).
Return to the Dome.
Dome
Click the lower left figures in the tree for a closer look.
Place the MUTATION NEUTRALIZER (6/6) in the matching space in the bark over Kevin's chest.
Posted by: Trinn |
March 21, 2012 1:08 PM
|
March 21, 2012 1:08 PM