
Mystery Trackers: The Void
Platform: Mac, Windows

![]() With his last batch of books being spectacular flops, horror writer Kevin Sting seeks out an old house with a bad reputation, looking for some inspiration, but vanishes without a trace. An illusionist who's made a career on defrauding his fellow magicians insists he can locate the missing writer, but promptly goes missing as well. And when a broadway starlet completes the odd list of characters that vanish into the mansion, well... it's time to call in the big guns. Mystery Trackers: The Void is a hidden object adventure game from developers Elephant Games (Lost in the City) that will take you beyond even mysterious Void house to an unlikely world. Exceptionally good looking with a creative story, The Void is a lot of fun despite some relatively easy gameplay, and absolutely worth a look if you're a fan of the genre.
With his last batch of books being spectacular flops, horror writer Kevin Sting seeks out an old house with a bad reputation, looking for some inspiration, but vanishes without a trace. An illusionist who's made a career on defrauding his fellow magicians insists he can locate the missing writer, but promptly goes missing as well. And when a broadway starlet completes the odd list of characters that vanish into the mansion, well... it's time to call in the big guns. Mystery Trackers: The Void is a hidden object adventure game from developers Elephant Games (Lost in the City) that will take you beyond even mysterious Void house to an unlikely world. Exceptionally good looking with a creative story, The Void is a lot of fun despite some relatively easy gameplay, and absolutely worth a look if you're a fan of the genre.
 You, of course, are a detective in the employ of the Mystery Trackers, which, as goofy as it may sound, is actually the modern day offshoot of an ancient order of knights whose duty was to track down mysteries and horrors before hysteria took over the populace. The mansion you arrive at is called The Void after its owner, Malleus Void, whose reputation as a mad scientist who conducted strange experiments garnered the place a lot of attention before his death. But just because Malleus is gone doesn't mean the mansion has given up all its secrets, and together with your tiny, trained frog in a monocle and Victorian clothing, you'll uncover them all! You heard me.
You'll search the mansion for clues, paying attention to your environment to find suspicious places that may hold clues or other secrets. Just click to interact, and click on your little frog for a hint, if you need one. Hidden object scenes yield the items you'll need to progress, but you can also find a lot hidden everywhere in the areas you travel. Be sure to refer to your journal frequently, not only to keep abreast of the plot, but to refer to the clues you'll write down when you find them. You'll need them to solve the various puzzles you'll come across, but if you get stuck, you can simply skip them.
It should also be mentioned that the full install of the Collector's Edition weighs in at a meaty 722 MB. So, you know, forewarning and all. Maybe this is the excuse you've been looking for to finally kick the habit and delete all those Britney Spears MP3s you think nobody knows about?
 Analysis: Games are best when they surprise you. Going into Mystery Trackers: The Void I didn't have high expectations; I was expecting a cut'n'paste haunted house story. What I got was... well, imagine if someone put "The Island of Doctor Moreau" and "Charlie and the Chocolate Factory" and the complete works of Agatha Christie in a blender and hit puree and you'll get a sense of what The Void is like. The initial hour or so of the game is extremely straight-forward, but the farther you go, the stranger and more interesting things become. Don't get me wrong, we're not talking Bram Stoker Award stuff here. But after so many casual adventure games with boring, no-frills plots, the twists and weird reveals The Void offers up are a breath of fresh air. The game is absolutely beautiful as well, with incredibly detailed, atmospheric environments and a great soundtrack.
The game is also chock full of references (subtle or not) to classic horror movies and culture. It's got a few creepy moments, but the overall strangeness keeps it from ever becoming actually scary. There is an imaginary scene in my head I have grown quite fond of, having played the game, and it goes thusly; the developing team for The Void, all wearing power suits, are sitting around a massive table, backlit by lightning crashes. A man wearing no less than twelve crazy hats slams a fist down into his palm. "Not good enough," he says, a mad glint in his eye, "make it crazier." The designers begin to sweat.
 The Void's only shortcoming might actually be that it takes a while to really start showcasing how good it is, and never gets particularly difficult. The puzzles range from logic to math to other odd challenges, and manage to be more creative and engaging the farther you go. You also never repeat a hidden-object scene, and you're always moving forward through a series of unique environments with little to no backtracking. When you do return to an area you've already explored later in the game, you'll usually find it significantly transformed.
Mystery Trackers: The Void is one of the few games that managed to keep me interested and engaged in both plot and gameplay until the very end. Which, incidentally, was for quite a while; around six hours, not including the bonus episode available in the Collector's Edition. If you're hoping for something serious and dark, The Void's slightly goofy tone and increasingly elaborate plot reveals might not be for you. But if what you've been craving is a hidden-object casual adventure title with tons of polish and originality, you should definitely check this one out. The Void gives fantastic value, and the Mystery Trackers series has earned a permanent place on my radar.
A Collector's Edition is also available. It contains a built-in strategy guide, as well as a bonus chapter to play, and other bonus materials. Remember that Big Fish Game Club Members pay only $13.99 for Collector's Editions (or 2 club credits), and collector's editions count 3 card punches of 6 total needed for a free game.
![]() Windows:
Windows:
Download the demo
Get the full version
Also available: Collector's Edition
![]() Mac OS X:
Mac OS X:
Download the demo
Get the full version
Also available: Collector's Edition


Walkthrough Guide
(Please allow page to fully load for spoiler tags to be functional.)
Mystery Trackers: The Void Walkthrough
General Information and Chapters 1 - 4
General Information and Tips
The Main Menu will give you the opportunity to choose your profile, play or quit, select your options which include Music and Environmental and Sound Effects volume, full screen versus windowed, and game or your cursor, plus the opportunity of viewing the developer's credits.
If you have the Collector's Edition, you can access the Strategy Guide from the Main Menu. If you have the regular edition, you still have a link on the menu for the ability to go purchase the guide.
The game provides you with relaxed play without a timer and hints are unlimited once you meet the magician's frog in the foyer of the Void Mansion.
There is no click penalty, so feel free to search the areas as much as you wish.
Scene Navigation
Sometimes, you will collect items that will not go into your inventory but will be recorded in the Diary.
Be sure to look at anything that has a sparkle or magnifying glass so everything will be recorded in the Diary.
The Diary is located at the far left of the bottom of the scene. You may want to check it when it is open because that indicates a new entry has been made. A new entry may provide you with information to solve a puzzle, or with the next task on your journey.
Below the Diary, you can access the Menu to change your Options or go to the Main Menu.
In the middle of the bottom of the scene will be Inventory items you have collected for future use or an item list when you are playing a Hidden Object Scene.
Hidden Object Scenes are not random and will be marked. You will come away with a key object (marked in turquoise) for your Inventory by finding all the objects.
Hidden Objects that require you to find more than one item will be color coded.
To find out the name of an Inventory item, put your cursor over the item.
When you meet our Froggy Friend, he will sit at the far right of the lower scene and willingly help when you need a hint.
Below the frog is also a link to go purchase the Strategy Guide.
If you are not automatically returned to the main scene after a close up, you will need to exit out of it by clicking the "X", somewhere on main scene, or at the bottom where the orange arrow appears.
Be sure to check out the screenshots for additional information.
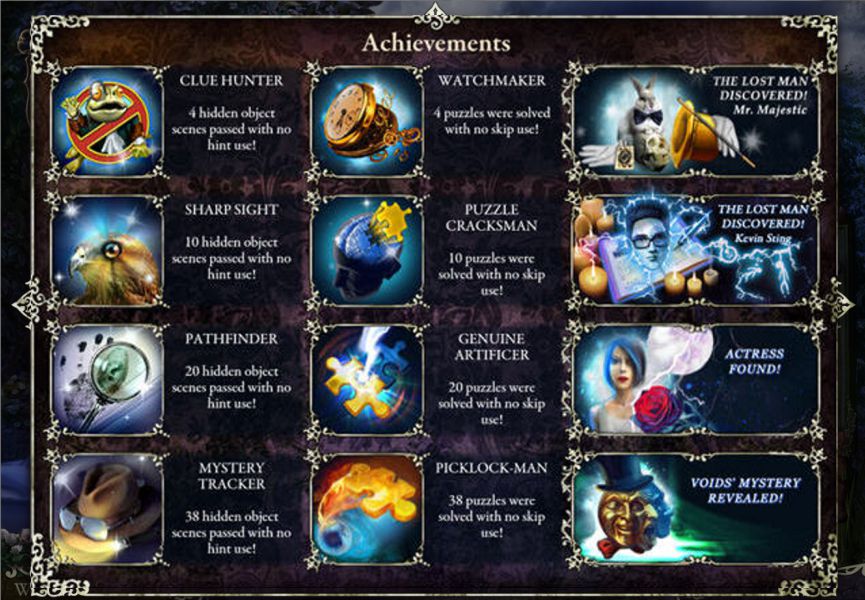
Achievements
You will collect 12 Achievements throughout the game, and you can go check them out from the Main Menu to see what you've earned.
When you earn a new Achievement, a box will appear on the left of your screen to tell you what you have achieved.
Achievements as shown in the screenshot include:
Clue Hunter: Complete 4 Hidden Object Scenes without using a hint.
Sharp Sight: Complete 10 Hidden Object Scenes without using a hint.
Pathfinder: Complete 20 Hidden Object Scenes without using a hint.
Mystery Tracker: Complete 38 Hidden Object Scenes without using a hint.
Watchmaker: Solve 4 puzzles without using the Skip option.
Puzzle Cracksman: Solve 10 puzzles without using the Skip option.
Genuine Artificer: Solve 20 puzzles without using the Skip option.
Picklock Man: Solve 38 puzzles without using the Skip option.
The Lost Man Discovered: Mr. Majestic.
The Lost Man Discovered: Kevin Sting.
Actress Found
Voids' Mystery Revealed
Screenshot
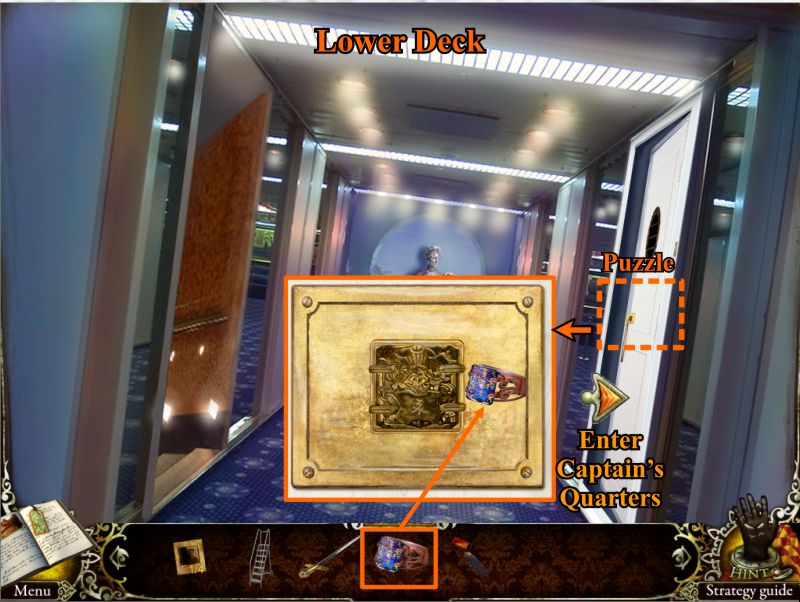
Chapter 1: The Void Mansion
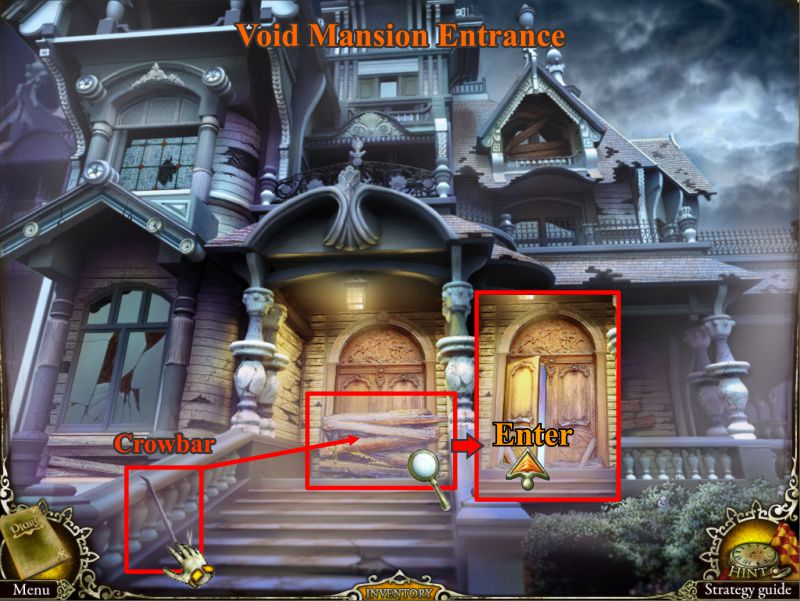
Void Mansion Entrance
Pick up the crowbar at the bottom left of the stairs so you can use it to rip off the boards on the door.
Click for a close up of the door and use the crowbar 3 times to remove the boards so you can enter the Mansion.
Screenshot
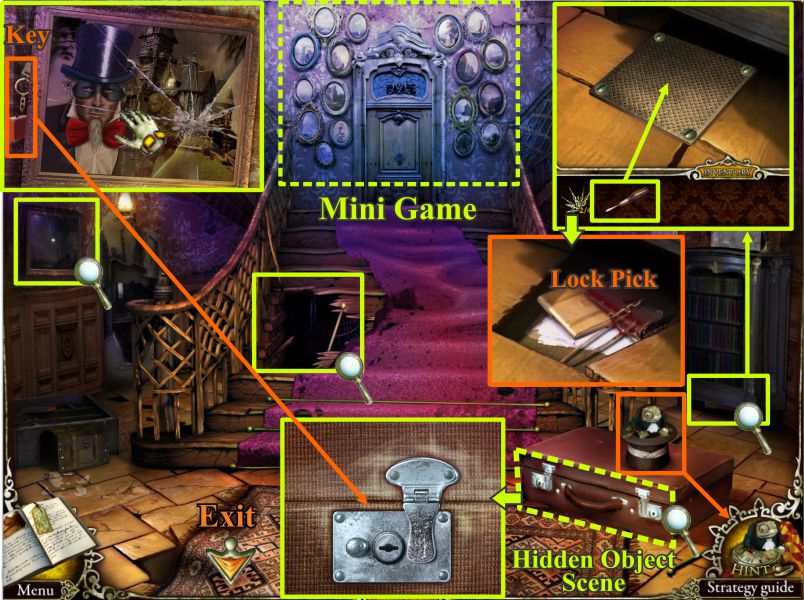
Mansion Foyer
Pick up the frog on top of the suitcase and he will transform himself into your Hint button.
Check out all of the close ups in the screenshot marked with the magnifying glasses.
The basement is too dark. You are missing a picture for the gallery surrounding the upstairs door, and you need a screwdriver to remove the grate to later get the lock pick.
The portrait at the left has a key for the suitcase so you can open it to play the Hidden Object Scene.
Be sure to collect the portrait picture for the Diary.
Once you have the screwdriver from the Bedroom desk drawer, come back downstairs and click for a close up of the grate in front of the bookcase at the right. Use the screwdriver to remove the screws so you can take the lock pick that is there and go back to the Bedroom.
Screenshot
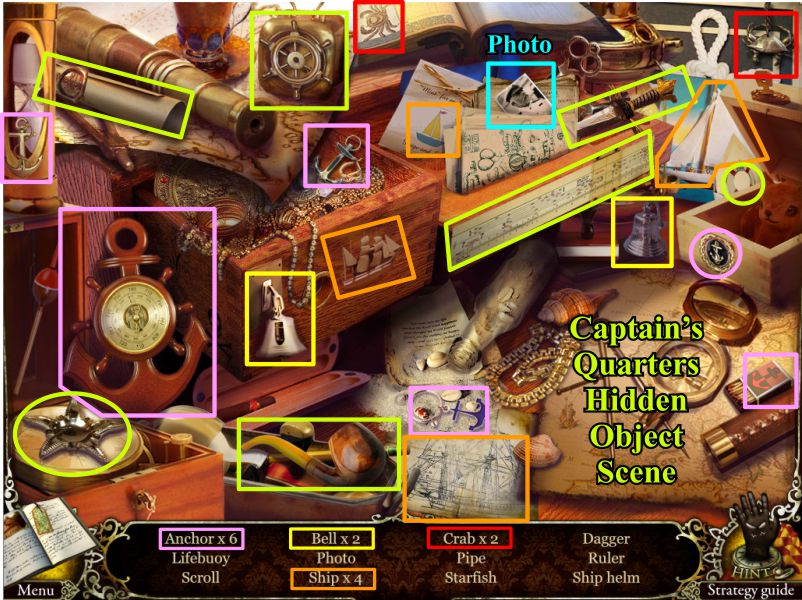
Suitcase Hidden Object Scene
Find all the objects listed and marked in the screenshot to get the picture of the chick.
Screenshot
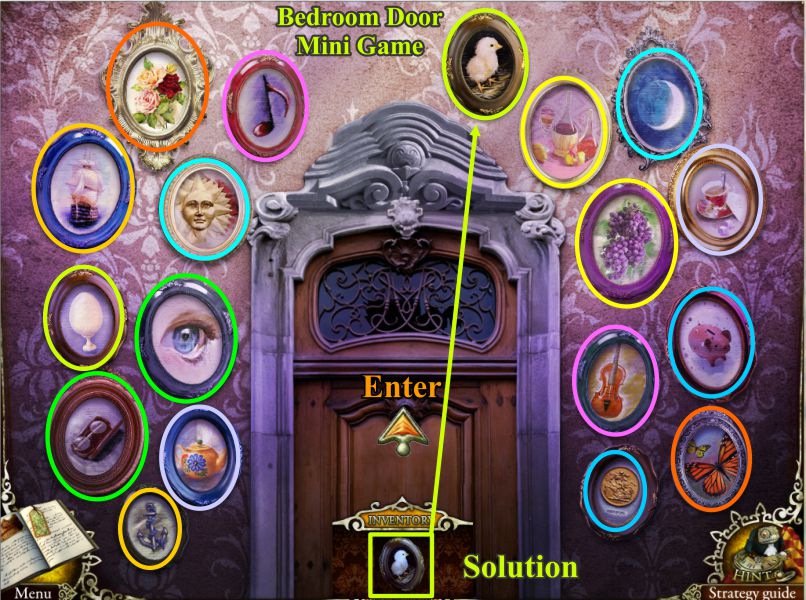
Bedroom Door Mini Game
Click on the Bedroom Door for a matching Mini Game.
Place the picture of the chick on the wall above the Bedroom Door and match all the related pairs that are color coded in the screenshot.
Once you have matched everything, the door will open for you to enter the Bedroom.
Screenshot
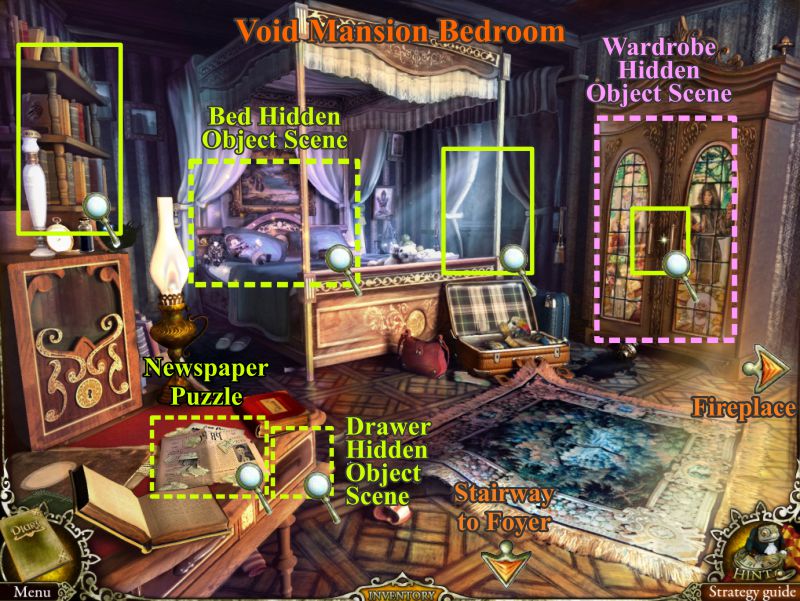
Bedroom
Close ups of the magnified scenes marked in the screenshot are discussed and shown in the next section marked Bedroom Close Ups.
There are 3 Hidden Object Scenes in the Bedroom, but you cannot play the Drawer or Wardrobe scenes until you have activated them.
The Hidden Object Scenes will be played in this order: Bed, Drawer, and Wardrobe.
There is a puzzle on the table when you get the newspaper pieces from the Bed Hidden Object Scene and another Mini Game at the window when you get the missing mask.
Screenshot
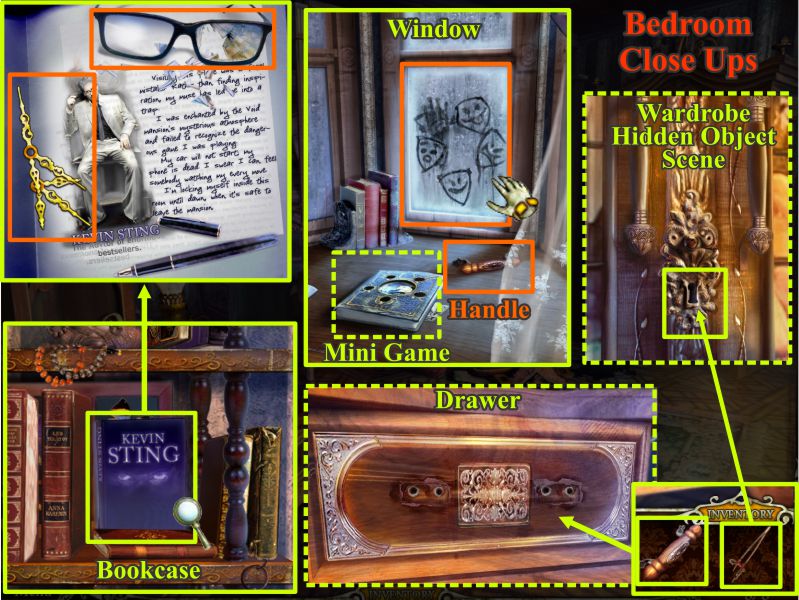
Bedroom Close Ups
Check the bookcase, click on Kevin Sting's book and collect the clock hands and glasses.
Look at the window and collect the handle for the drawer and the drawing on the window.
Place the handle on the drawer to play that Hidden Object Scene.
Once you have retrieved the lock pick from under the grate in the Foyer, use it to pick the lock on the Wardrobe so you can play that Hidden Object Scene.
All close ups are shown in the screenshot.
Screenshot
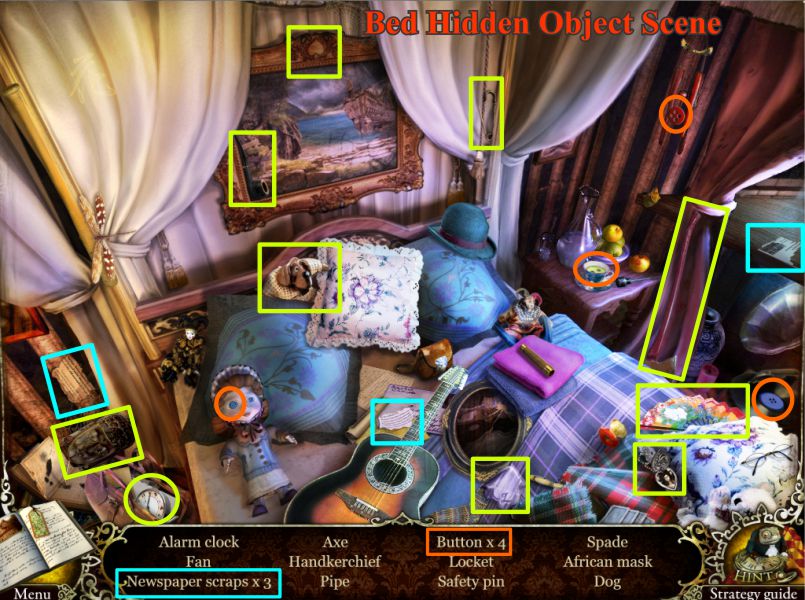
Bed Hidden Object Scene
Collect the 3 pieces of newspaper and the rest of the list as marked in the screenshot.
Screenshot
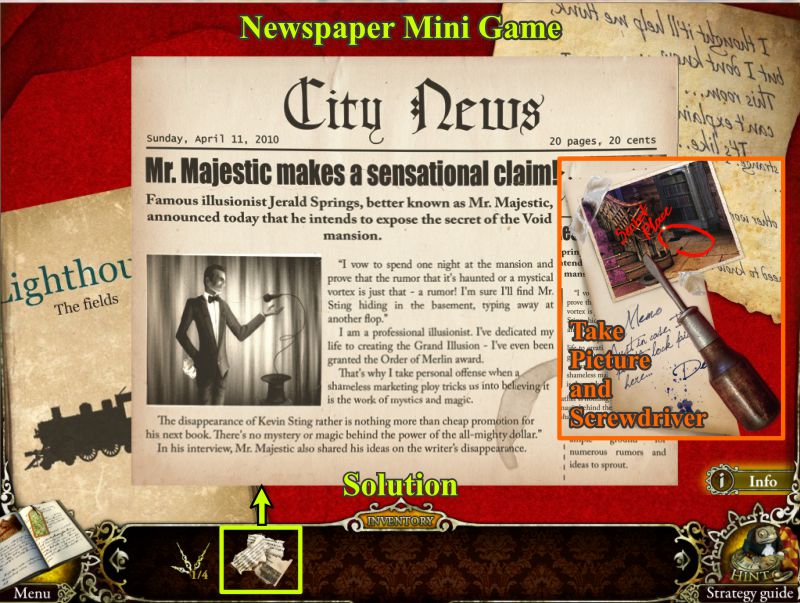
Newspaper Mini Game
Place the newspaper pieces from your inventory on the desk and piece together the newspaper jigsaw as shown in the screenshot.
When you have completed the newspaper jigsaw, collect the screwdriver and picture that appear.
Screenshot
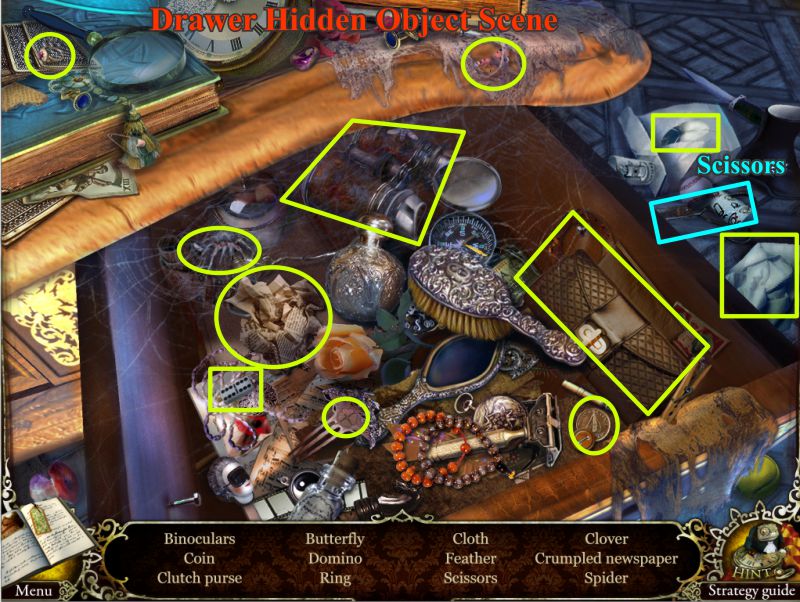
Drawer Hidden Object Scene
Once you place the handle on the drawer, the scene will be activated; click on the drawer.
Collect everything on the list including the screwdriver, all of which are marked in the screenshot.
Go back to the Foyer section listed above to see how to use the screwdriver on the grate and retrieve the lock pick.
Screenshot
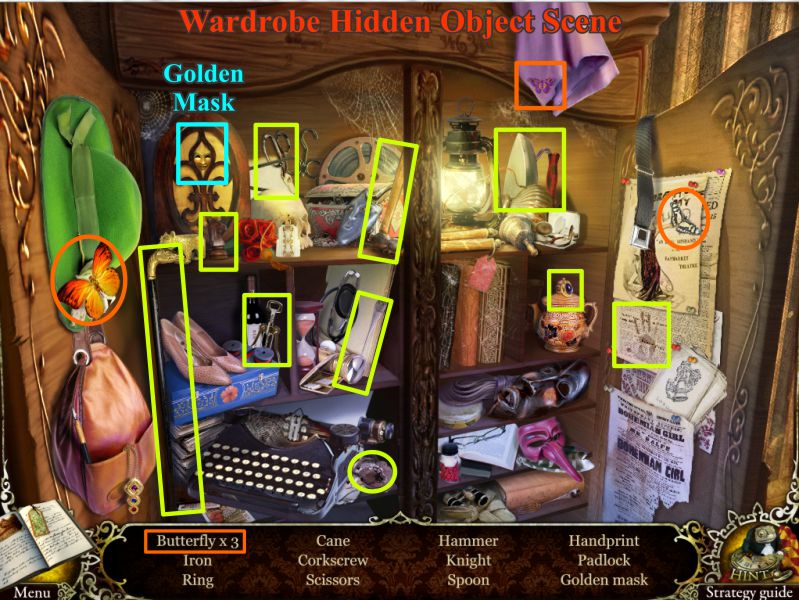
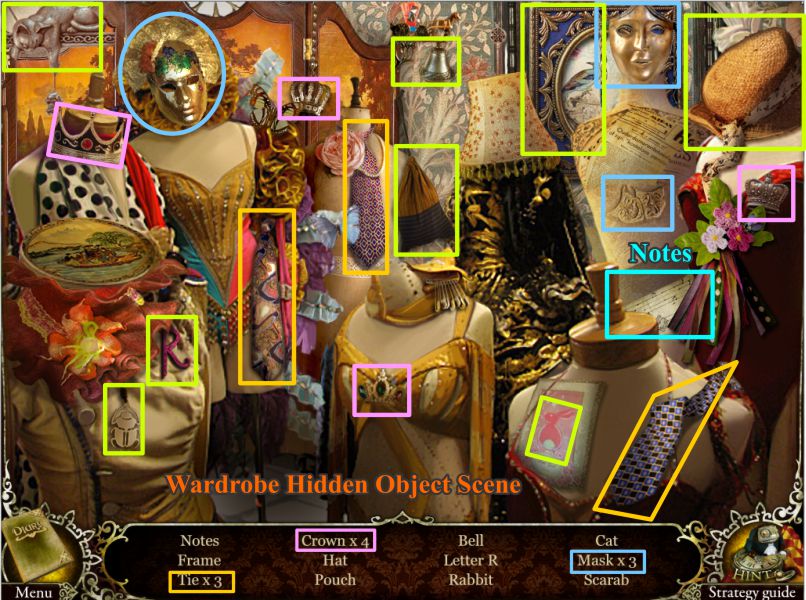
Wardrobe Hidden Object Scene
Using the lock pick will activate the scene. Click on the Wardrobe for a close up as shown in the Bedroom Close Ups screenshot.
Collect everything marked on the screenshot to get the Golden Mask.
Screenshot
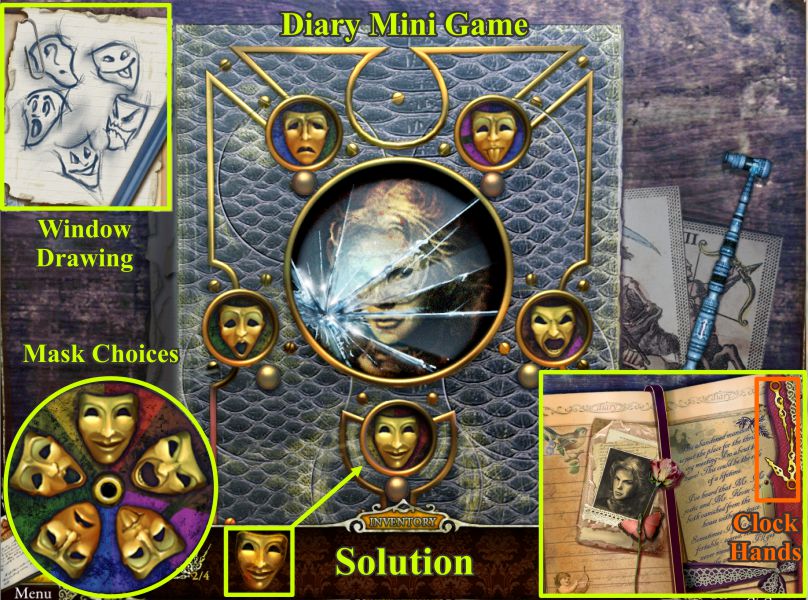
Diary Mini Game
Go to the Window and click for a close up of the Diary.
Place the Golden Mask in the missing circle.
Click on each of the masks to cycle through the 5 different choices. Select the ones to make the Diary look like the drawing from the window and the solution shown in the screenshot.
Collect the Clock Hands from the opened Diary.
Screenshot
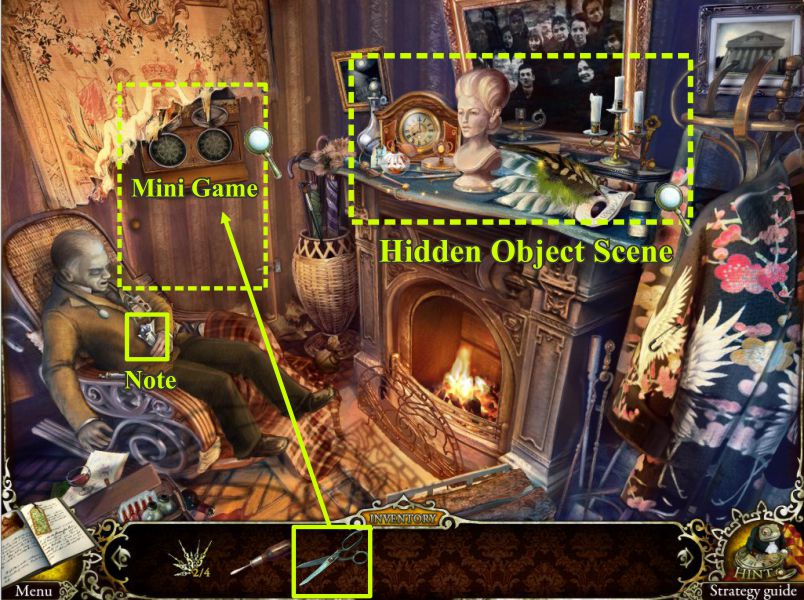
Fireplace
Exit right to the Fireplace and remove the note from the Doctor's Hand.
Use the scissors from your Inventory to cut part of the tapestry revealing a door with a strange lock, as shown in the screenshot.
Click on the mantel to plan a Hidden Object Scene.
Screenshot
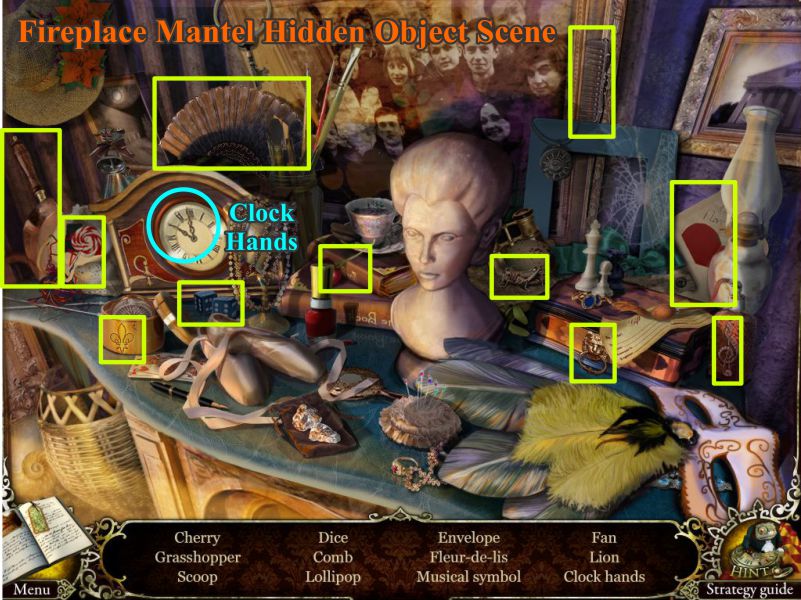
Fireplace Mantel Hidden Object Scene
Collect the Clock Hands and the rest of the list marked in the screenshot.
Screenshot
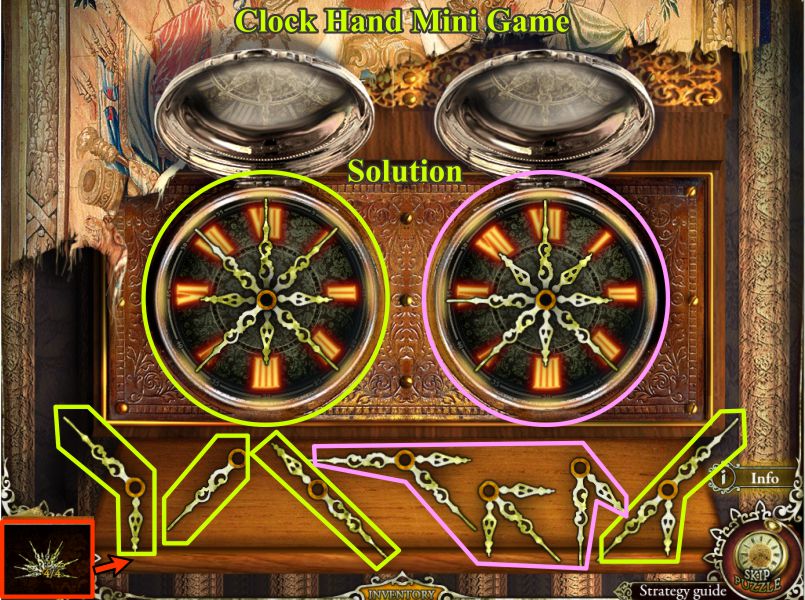
Clock Hand Mini Game
Click the door with the strange lock, place the Clock Hands from your Inventory on the door and they will spread out underneath the 2 clock faces.
Place the hands in the configurations shown in the screenshot and the door will open for you to exit.
The hands are color coded to the clocks. Left click to rotate the hands clockwise and right click to rotate them counterclockwise.
Screenshot
Chapter 2: Secret Chambers
Right Corridor
Once you go through the open door, you find yourself in a corridor and the door slams shut behind you. There is no apparent way to get back through it from your side since the door mechanism is broken.
Check out all of the close ups in the screenshot marked with the magnifying glasses.
Click on the door and take the ring in the lower right corner of the broken mechanism.
Look at the book on the floor with the fish diagram and grab the page for your Diary.
Check the electric box at the end of hall. There is a bulb missing, so you cannot turn on the aquarium light.
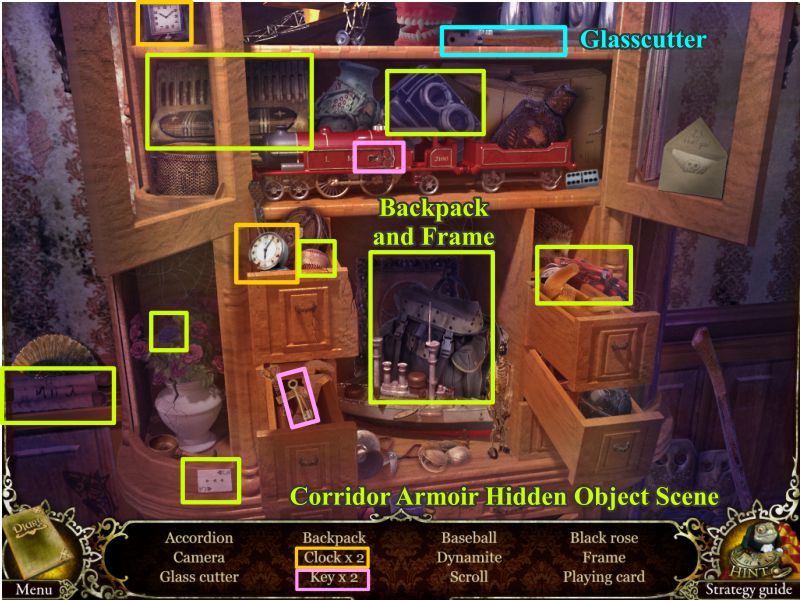
Click on the armoire for a Hidden Object Scene.
Screenshot
Corridor Armoire Hidden Object Scene
Collect everything marked in the screenshot to get the Glasscutter.
Screenshot
Left Corridor and Portrait Mini Game
Go left to the other part of the Corridor.
Use the glasscutter to get rid of the glass covering the painting.
Click on the painting for a puzzle and cycle through the pieces until you have a complete portrait.
There is only one solution that is shown in the screenshot along with the number of clicks on each section in order to complete it.
Take the Lab Journal and Whistle that appear.
Click on the cabinet under the portrait for a Mini Game.
Use the whistle on Gargantua; he will leap through the wall, creating a breach.
Screenshot
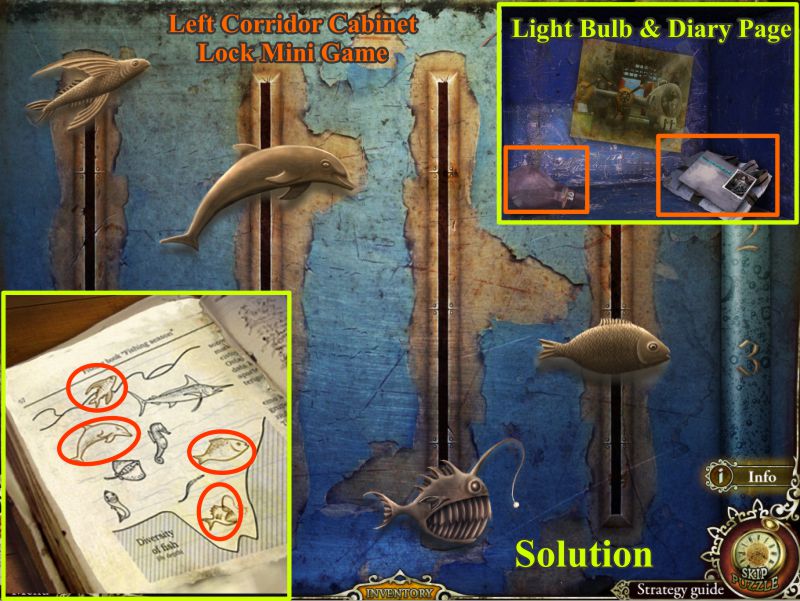
Cabinet Fish Mini Game
The lock has 4 fish that need to be arranged according to the depth at which they swim in the water, as shown in the book you looked at in the other part of the Corridor.
There should be a copy of the page in your Diary if you grabbed it from the book.
The solution is shown in the screenshot.
When the cabinet opens, take the Light Bulb and Diary Page.
Screenshot
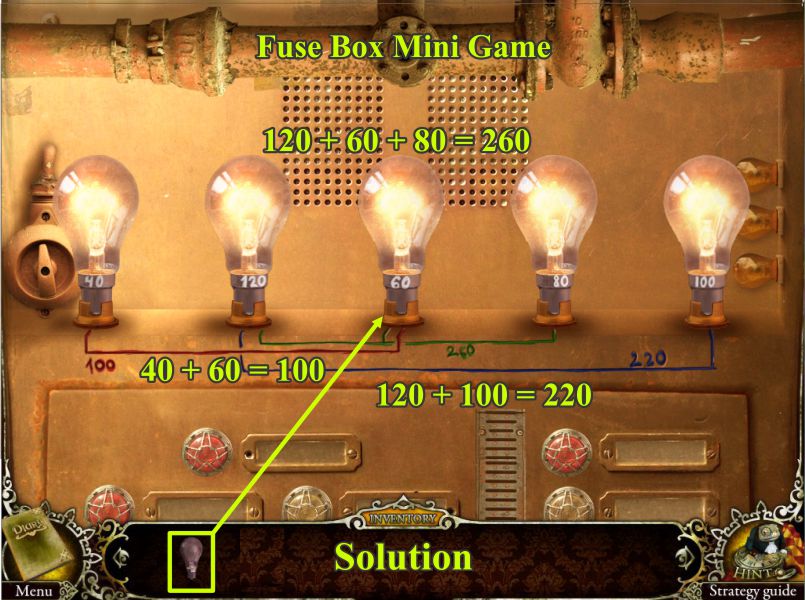
Fuse Box Mini Game
Go right to the other end of the Corridor and click on the Fuse Box for a Mini Game.
Place the light bulb from your Inventory. Arrange all of the light bulbs so that the wattage equals the numbers shown below the bulbs. The Aquarium light will go on.
The solution is shown in the screenshot.
Screenshot
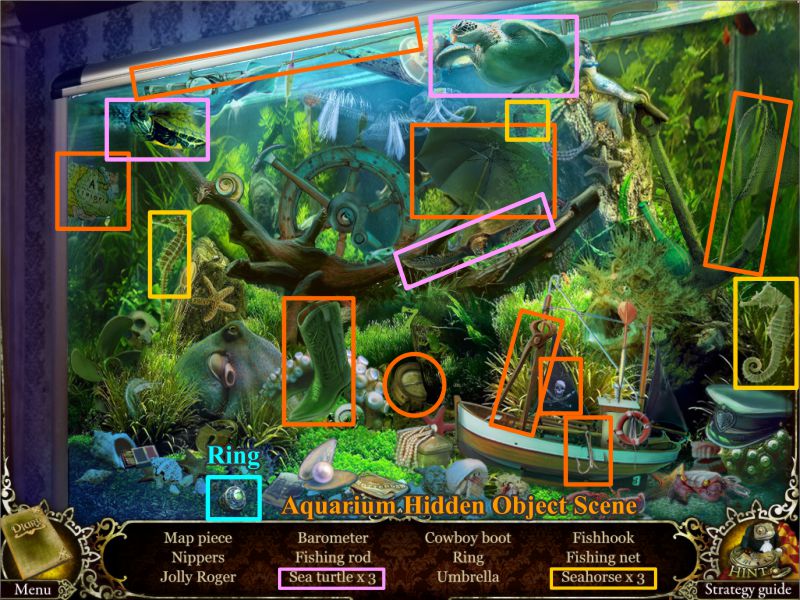
Aquarium Hidden Object Scene
The Aquarium light is on. Click for a close up and the Hidden Object Scene.
Collect everything listed and shown in the screenshot, including the Ring.
Screenshot
Magician's Dressing Room
Since Gargantua is no longer a threat, go to the Magician's Room at the other end of the Left Corridor.
Note the Gold Statue is hollow. Click on the Dressing Table for a Hidden Object Scene.
Once you have the third ring, click on the suitcase to unlock it and place the rings as shown in the screenshot.
You have activated a puzzle. The object is to swap the red and blue hearts so the blue is on top and the red on the bottom.
If you make a mistake, use the undo button to back up as many moves as you need.
Screenshot
Dressing Table Hidden Object Scene
Collect all the objects marked in the screenshot, including the ring.
Screenshot
Magician's Suitcase Puzzle
There is more than one way to arrive at the solution. The screenshot shows one step-by-step means of completing the puzzle in order to get the Rope Ladder that appears when the suitcase opens.
Screenshot
Breach in the Wall
Go to the Breach in the Wall that Gargantua made when he jumped. Place the rope ladder on the hook as shown in the screenshot so you can descend to the Void Veranda.
Screenshot
Void Veranda
Gargantua made a mess out of the Veranda when he jumped, but the footprints look like he ran off to Void's World.
Click to play the Hidden Object Scene at the far right as marked in the screenshot.
Screenshot
Veranda Hidden Object Scene
Pick up everything on the list that's marked in the screenshot and you will get the Mailbox Key.
Screenshot
Go toward the gate, where you will see Gargantua. Click on him, and he will disappear.
Use the key on the mailbox and pick up the Starry Sky Circle. Pick up an advertisement for the park, as shown in the screenshot.
Click on the "Void's" sign and take the other Starry Sky Circle.
Click for a close up of the gate to open the lock.
Screenshot
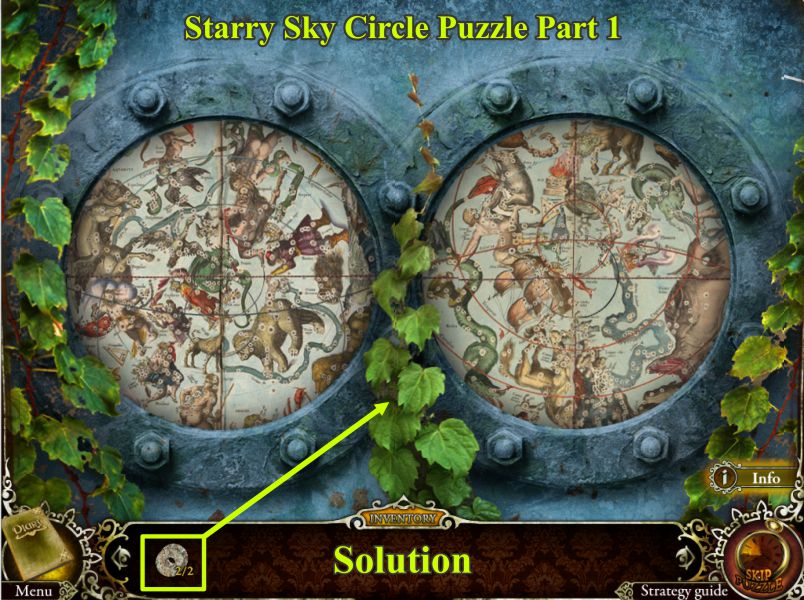
Starry Sky Circle Puzzle Part 1
Place the circles on the lock to activate the first puzzle.
The inner circle of each gear is already permanently in place, so your goal is to line up the two outer circles.
The crosshatch lines will guide you to the alignment so that the circles will pop into place, as shown in the screenshot.
Screenshot
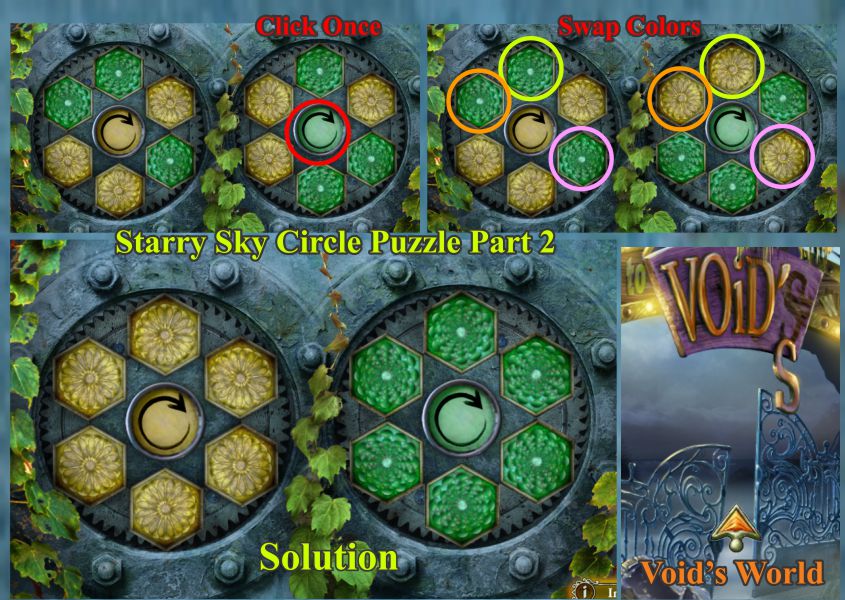
Starry Sky Circle Puzzle Part 2
Once you have completed the first part of the puzzle, the locks will swirl around and give you a second puzzle to solve.
Your goal in Part 2 is to arrange all the yellow hexagons around the left gear and all the green ones around the right gear.
Use the round green button to rotate the hexagons once around the right gear.
Click on the color-coded hexagons as shown in the screenshot to swap them. You will solve the puzzle for the gate to open so you can enter Void's World.
Screenshot
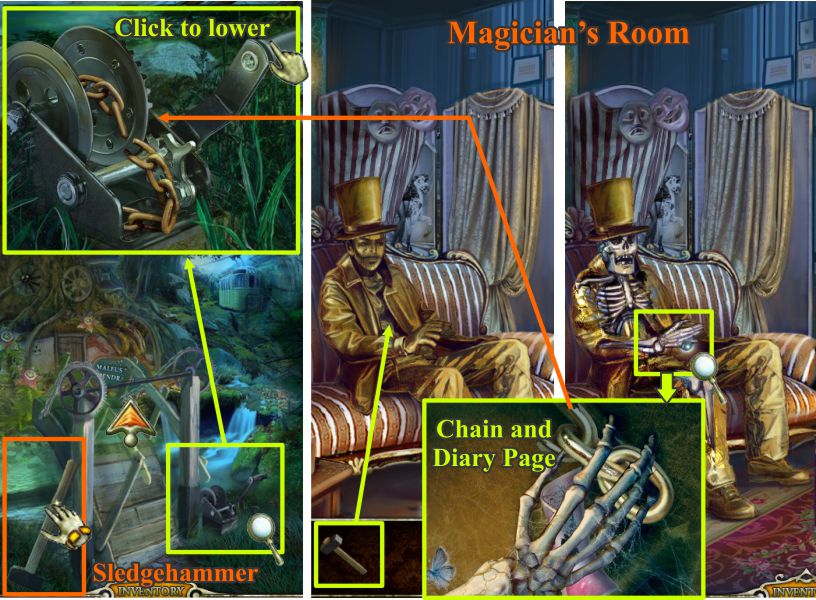
Dendrarium and Magician's Room
There is a bridge to cross to the Dendrarium but the chain is broken. Pick up the Sledgehammer, check the screenshot, head back to the rope ladder and go up to the Magician's Room at the end of the hall.
Hit the Gold Statue until it breaks and reveals that it is actually a gold-covered skeleton.
Click on the hand and remove the chain piece and diary page.
Screenshot
Go back to the drawbridge.
Chapter 3: Void's World
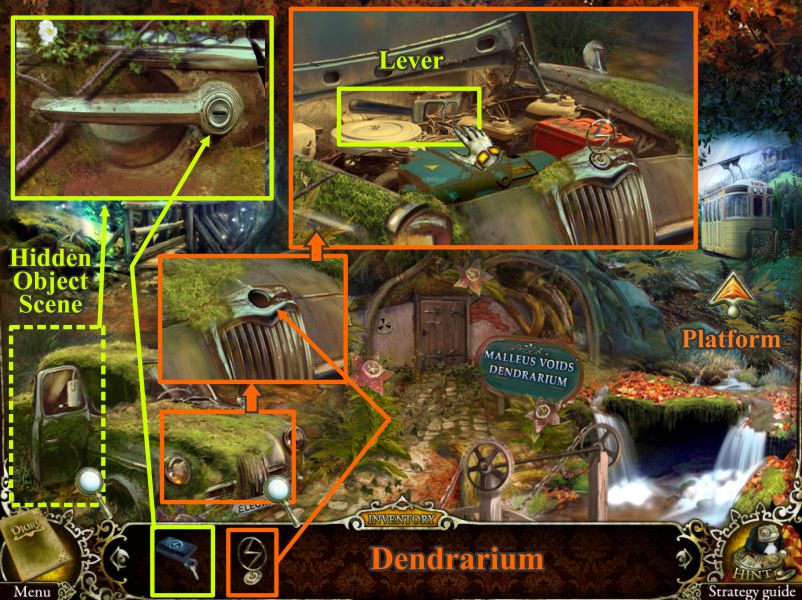
The Dendrarium (Botanical Garden)
Check out all the magnifying glasses for close up views, as shown in the screenshot.
You need a key for the car and a hood ornament to open the hood, but you can collect a gas can at the hood close up.
Check the sign that spells Void's first name wrong and take the Diary page.
If you touch the Bridge Lever again, the bridge will collapse. You need to find another way out of the park.
Check the Platform and Bridge and go inside the tree.
Screenshot
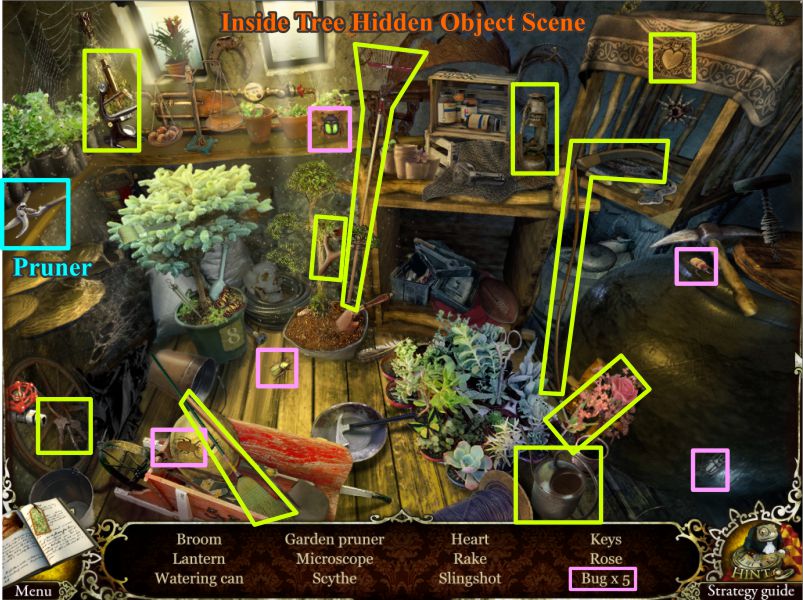
Inside Tree
Pick up the Diary page on the stairs at the left and play the Hidden Object Scene that is sparkling.
Screenshot
Inside Tree Hidden Object Scene
Collect everything listed and marked in the screenshot to get the Pruner.
Screenshot
Forest Path to Platform
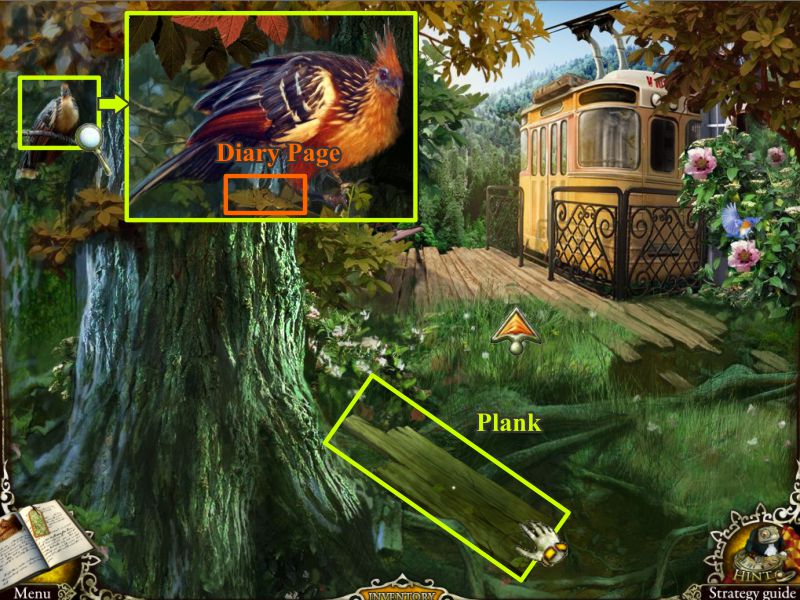
Go toward the Platform, grab the Plank next to the tree and click for a close up of the bird to get a Diary page (see screenshot).
Screenshot
Bridge
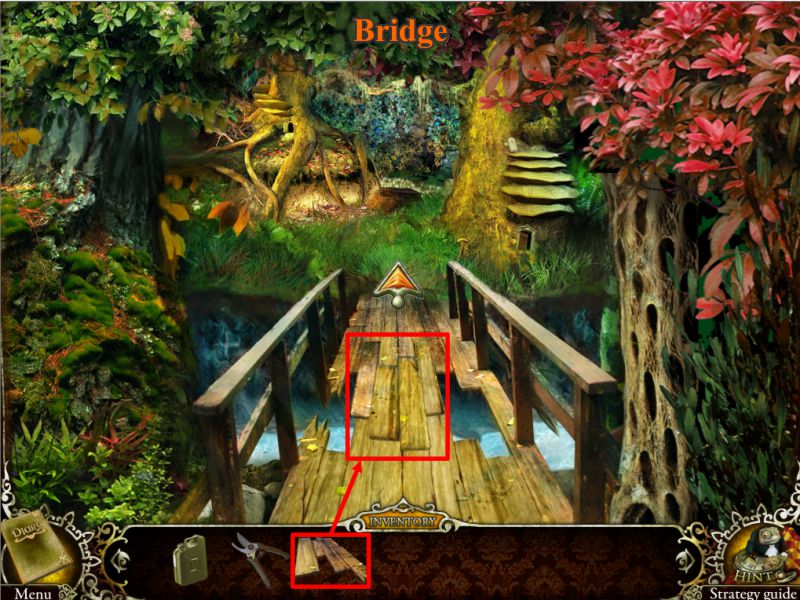
Go to the Bridge at the left of the garden and place the plank so you can go across the Bridge.
Screenshot
Fairy Garden
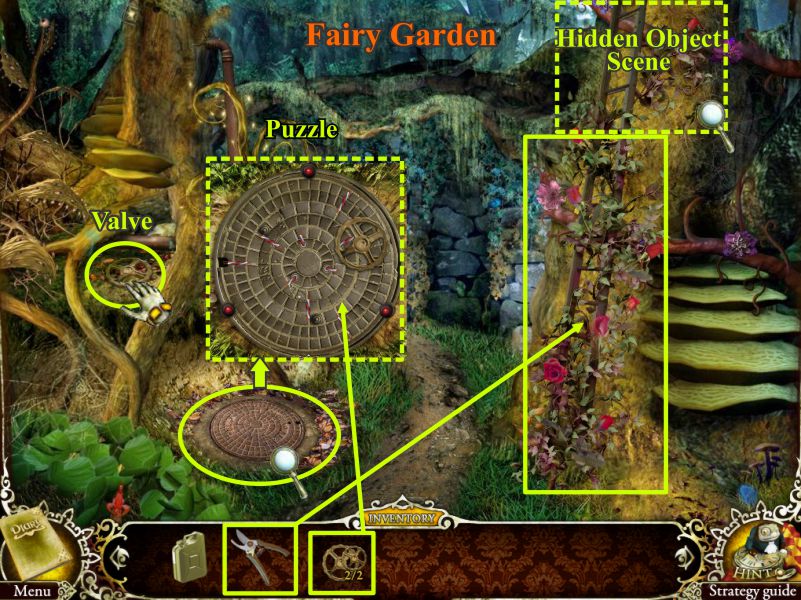
Grab the valve in the roots at the left and use your pruner on the lattice on the tree to activate a Hidden Object Scene to get the second valve.
Click on the hatch and place the valves to start the puzzle.
Check the screenshot for additional help.
Screenshot
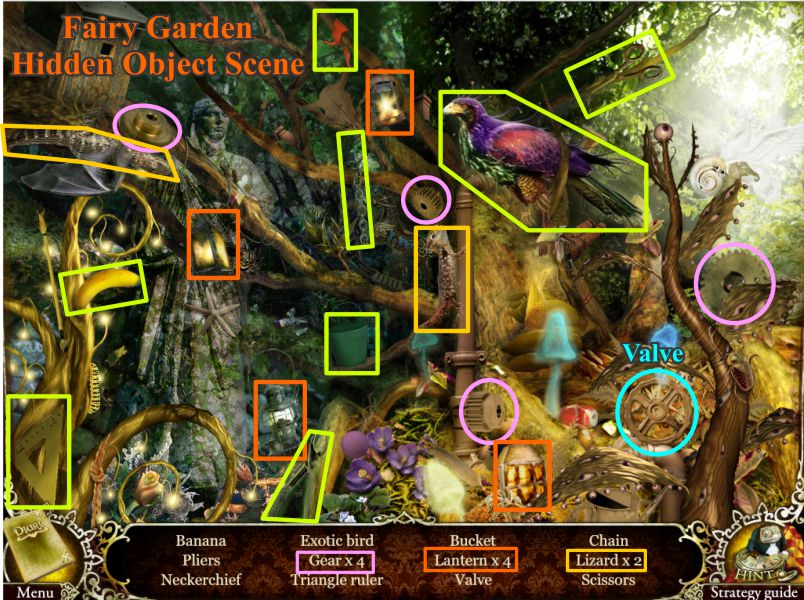
Fairy Garden Hidden Object Scene
Collect the list marked in the screenshot to get the Valve so you can play the puzzle to open the hatch.
Screenshot
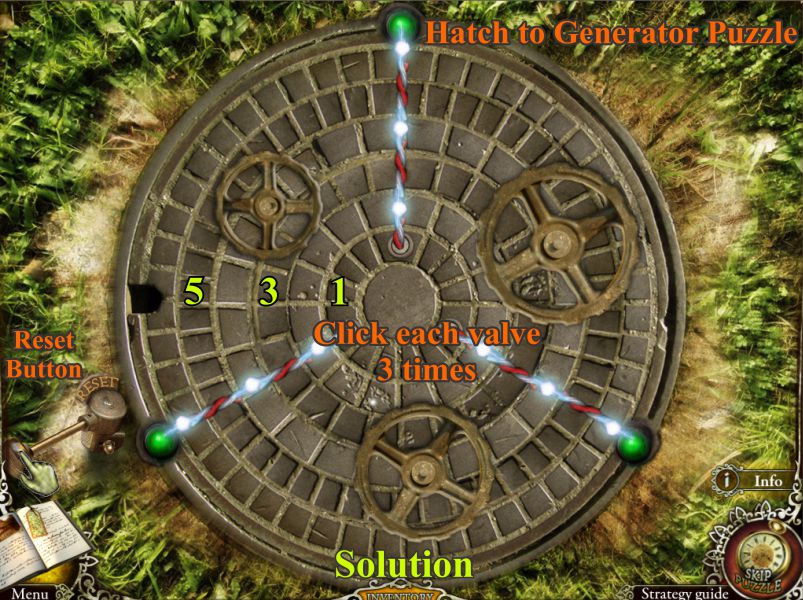
Hatch to Generator Puzzle
Once you've placed the valves and activated the puzzle, click the valves to rotate the hatch rings.
Each valve rotates 2 rings. Your goal is to connect the 3 wires in the center to the red bulbs in order to unlock the hatch.
If you make a mistake, you can click the reset button.
The small valve rotates rings 1 and 5 clockwise.
The medium valve rotates rings 1 and 5 counterclockwise.
The large valve rotates rings 3 and 5 clockwise.
Solution is shown in the screenshot.
Screenshot
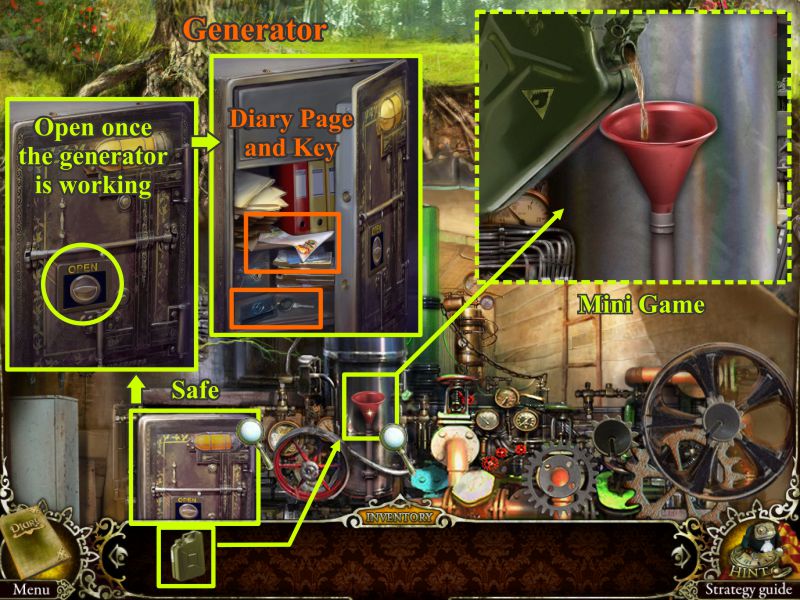
Generator
Click on the funnel for a close up and pour the fuel from your gas can into the funnel to activate a Mini Game.
Once the generator is started, click on the safe and turn the Open button so you can pick up the Diary page and the key.
Close ups are shown in the screenshot.
Screenshot
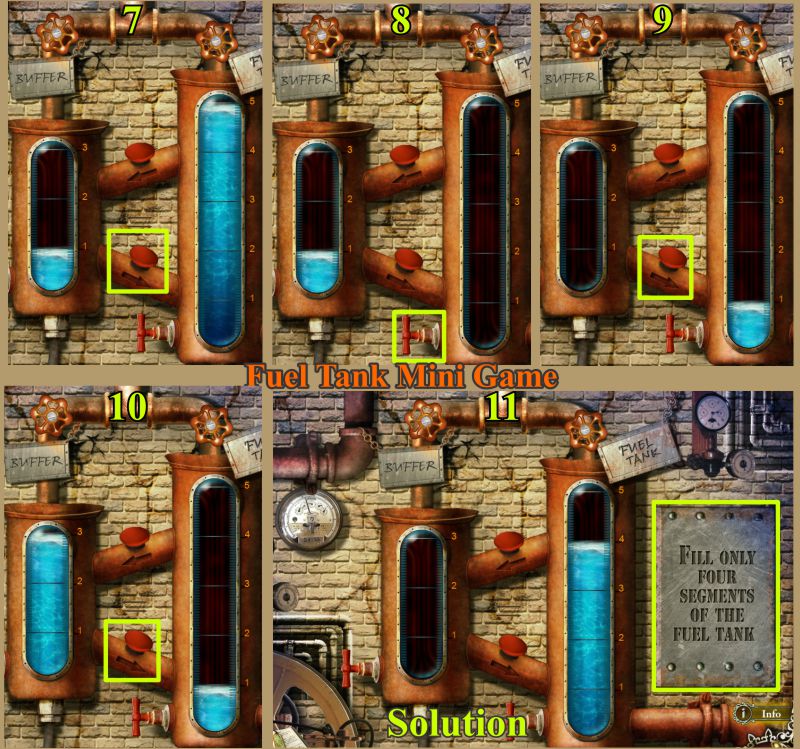
Fuel Tank Mini Game
Your goal is to fill the fuel tank with 4 gallons of gas. Check the 2 screenshots to see the progress of how to reach your goal.
The valves on the upper pipe open the gas flow to the tanks and the red buttons in the center transfer gas from one tank to the other.
Use the red handle at the bottom of the tank to dump excess fuel.
Screenshot
Screenshot
Once the generator is working and you've opened the safe, climb back up the ladder. Cross the Bridge just in time to not be caught by the tree that falls on the Bridge.
Dendrarium
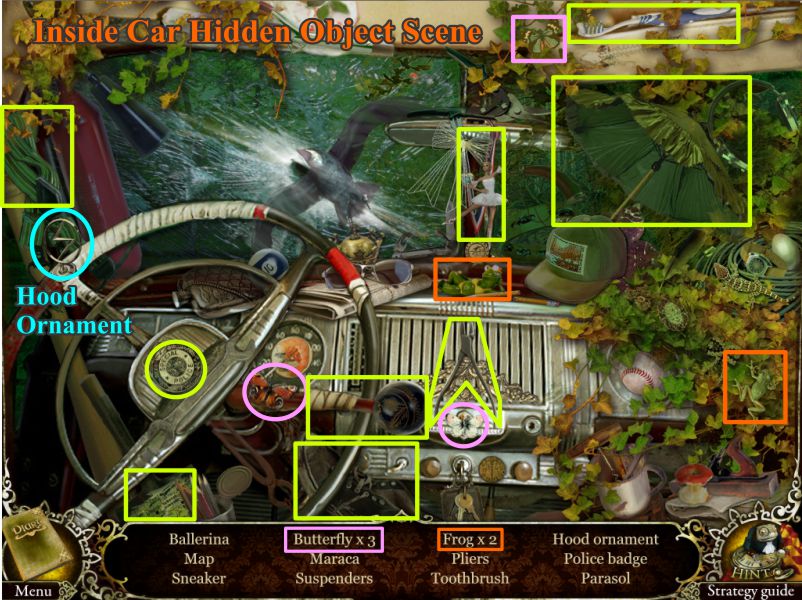
Click on the door of the car and use the key to open it for a Hidden Object Scene.
When you get the hood ornament, place it on the hood, which will open so you can take the lever.
Check the screenshot for close ups and extra help.
Go to the Tram Platform.
Screenshot
Inside Electric Car Hidden Object Scene
Collect everything shown in the screenshot to get the Hood Ornament.
Screenshot
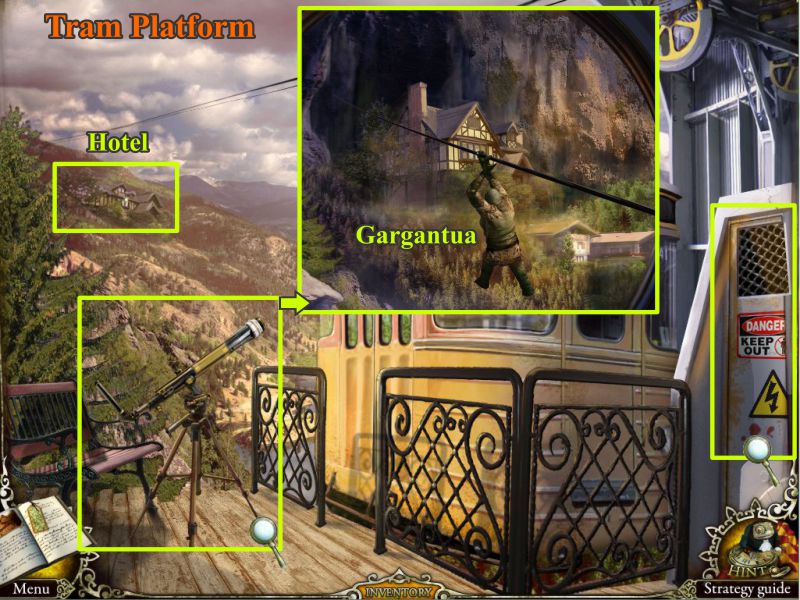
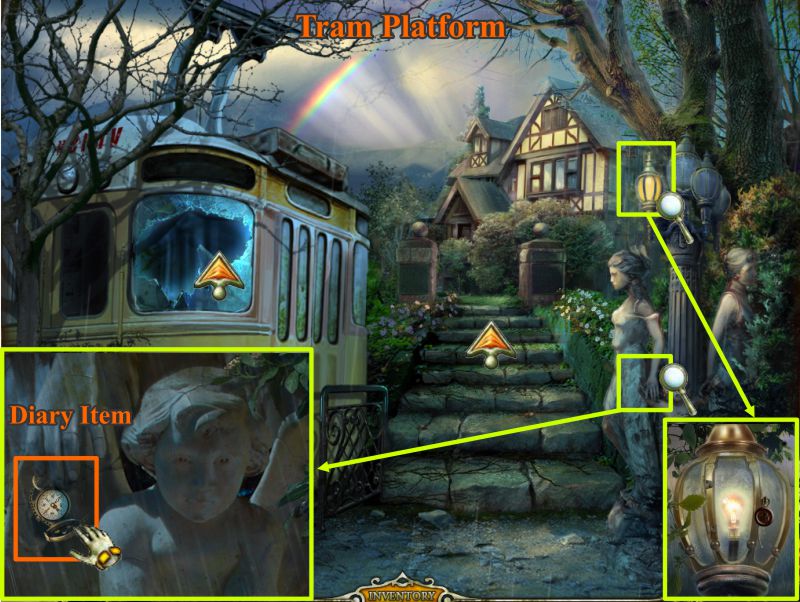
Tram Platform
Click on the telescope to get a close up of the Hotel and watch Gargantua using the tram cable to get to the Hotel.
Click on the electrical panel door for a close up to fix it.
Screenshot
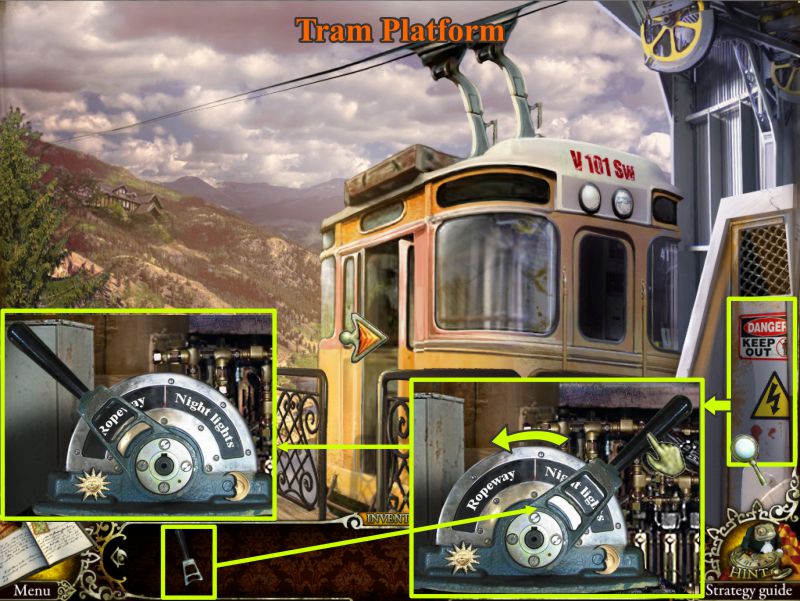
Tram Electrical Panel
Place the lever from your Inventory and throw the switch to Ropeway. The Tram door will open for you to enter (see screenshot).
Screenshot
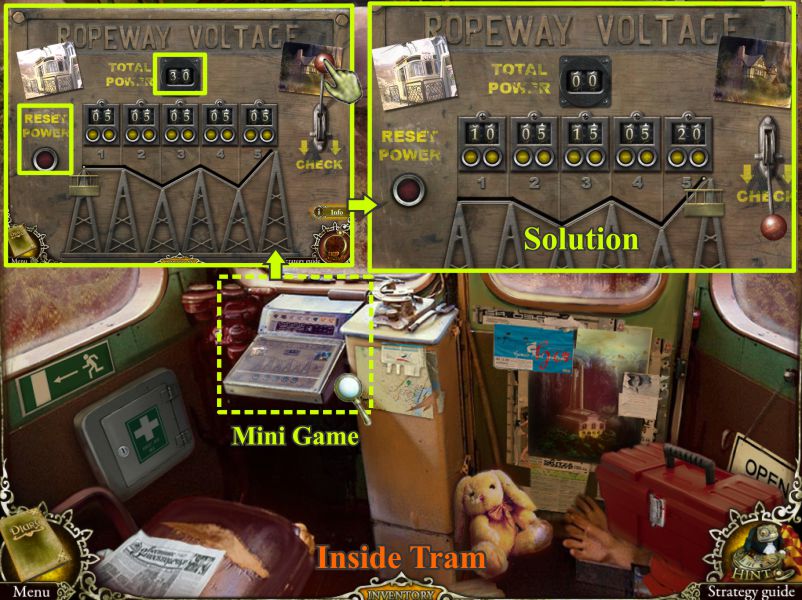
Ropeway Voltage Allocation Mini Game
Click on the controls for a Mini Game.
Your goal is to allocate the power supply so the tram can get to the Hotel. Check the screenshot to help with your progress.
The counter at the top shows the total voltage available is 30.
The 5 small counters show the voltage for each segment of the trip. Keep in mind that fewer volts are necessary when the tram is going downhill.
Press the yellow buttons below the small counters to allocate each segment of the trip.
When you are finished, use the lever on the right to start the tram and check the voltage.
If necessary, you can reset the power by using the button on the left.
Screenshot
Chapter 4: Mountain Hotel
Inside Tram
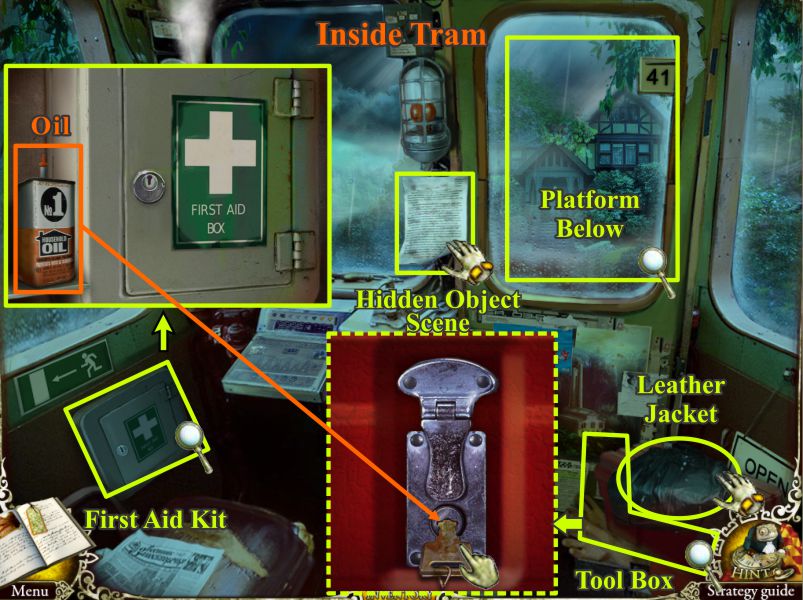
It starts to rain and just as you get to the Hotel, lightning takes out the Tram power supply so you're trapped inside.
Check the First Aid Kit that is locked. Take the Oil can that is available now.
Take the paper above the controls for the Diary.
Note the platform is below the window. You need something the break the glass.
Grab the Leather Jacket and take a closer look at the Tool Box.
The key is in it, but it's rusted. Use the oil on it and click to turn the key.
Check the screenshot for close ups.
Screenshot
Toolbox Hidden Object Scene
Once you've opened the Toolbox, collect everything marked in the screenshot. You will end up with an Ice Axe.
Screenshot
Tram Window
Click for a close up and hit the window of the Tram with the Ice Axe until it breaks.
Place the Leather Jacket on the sharp edges and leave the Tram.
Screenshot
Tram Platform
Check the close ups in the screenshot marked with the magnifying glasses.
Note the lamp with the bulb is locked.
Click on the statues and take the compass part from the left statue's hand. It will go to your Diary.
Go toward the Hotel and to the gate at the left.
Screenshot
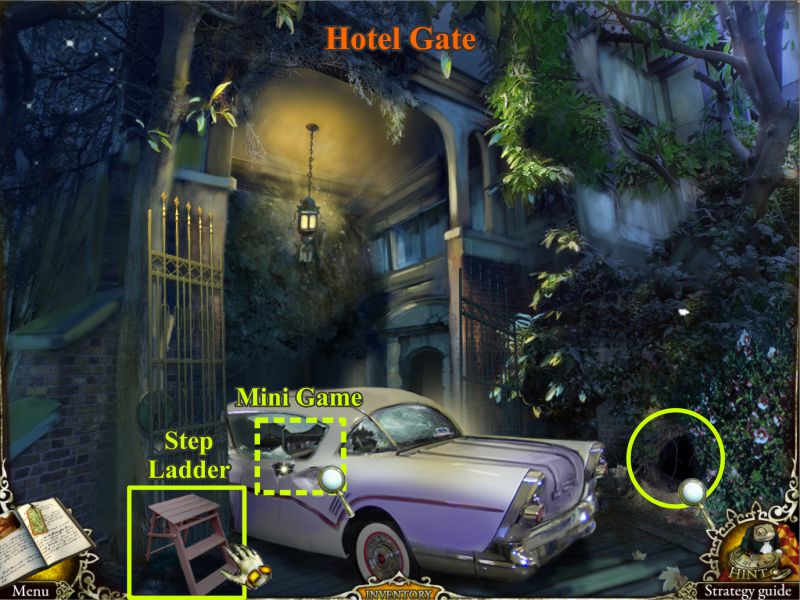
Hotel Gate
Check out the close ups in the screenshot marked with the magnifying glasses.
Gargantua is behind the gate. When you click for a close up, he will wave you to follow him.
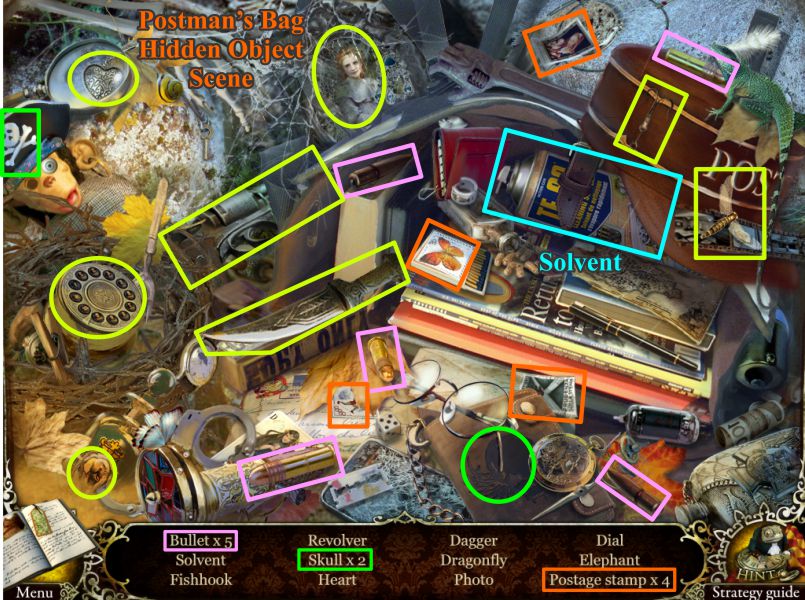
Click on the skeleton in the bushes and open the camera to take the film.
Open his pocket and take the badge to find out he was actually an agent rather than a postman.
Click on the mailbag next to him for a Hidden Object Scene.
Screenshot
Postman's Bag Hidden Object Scene
Collect everything marked in the screenshot to get the Solvent.
Screenshot
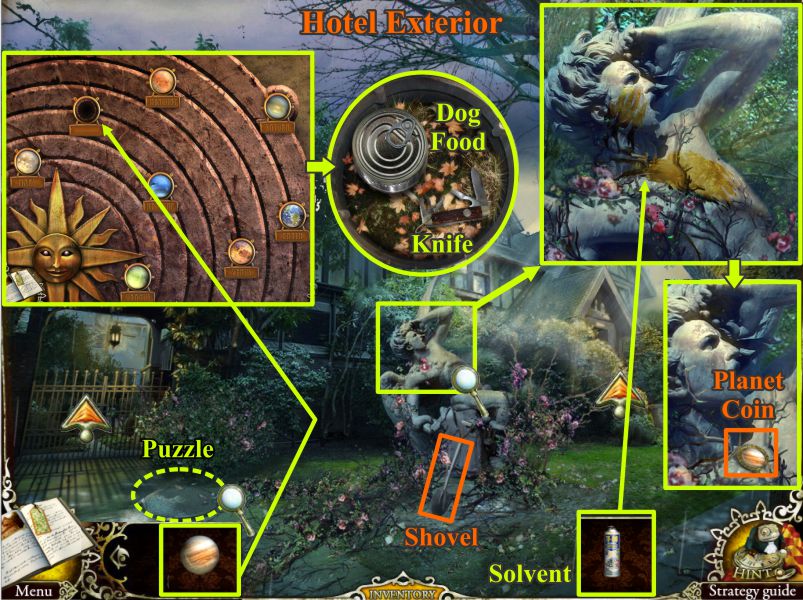
Hotel Exterior
Check out the close ups in the screenshot marked with the magnifying glasses.
Pick up the shovel by the statue. Click on the statue for a close up to see it is stained with paint.
Use your solvent to remove the stains and take the Planet Coin.
Click on the round flagstone in the path to the gate for a puzzle.
Place the Planet Coin you collected in the empty slot to activate the puzzle.
Check the screenshot for locations and more information.
Screenshot
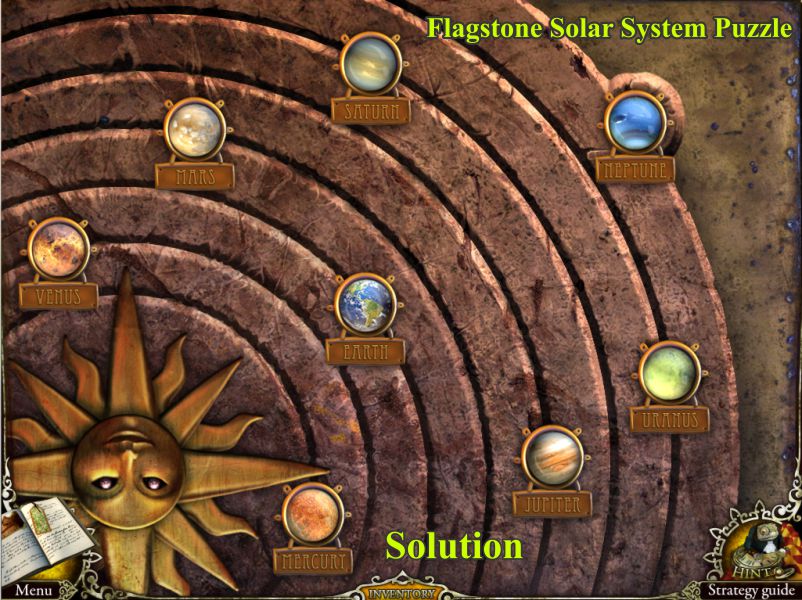
Flagstone Solar System Puzzle
Your goal is to arrange the planets in order of their distance from the Sun.
Individually click on each of them until you get the correct planet as shown in the screenshot solution.
At the end, you will get a can of dog food and a pocketknife for your Inventory.
Screenshot
Hotel Door
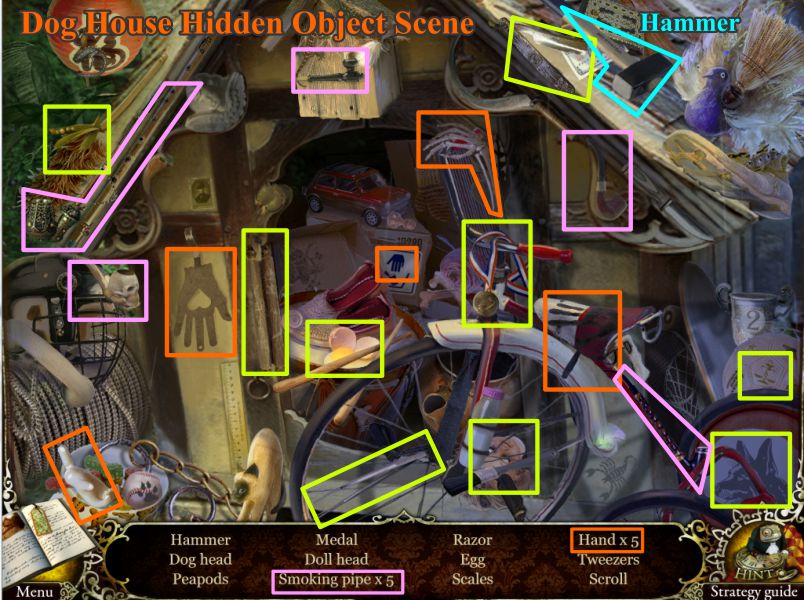
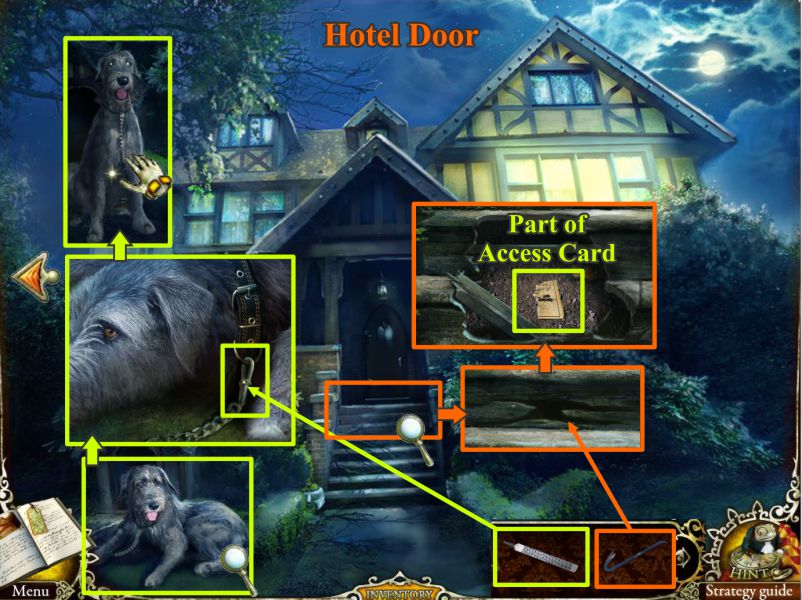
Click on the unhappy dog in the doghouse (see screenshot) and give him the dog food to activate a Hidden Object Scene.
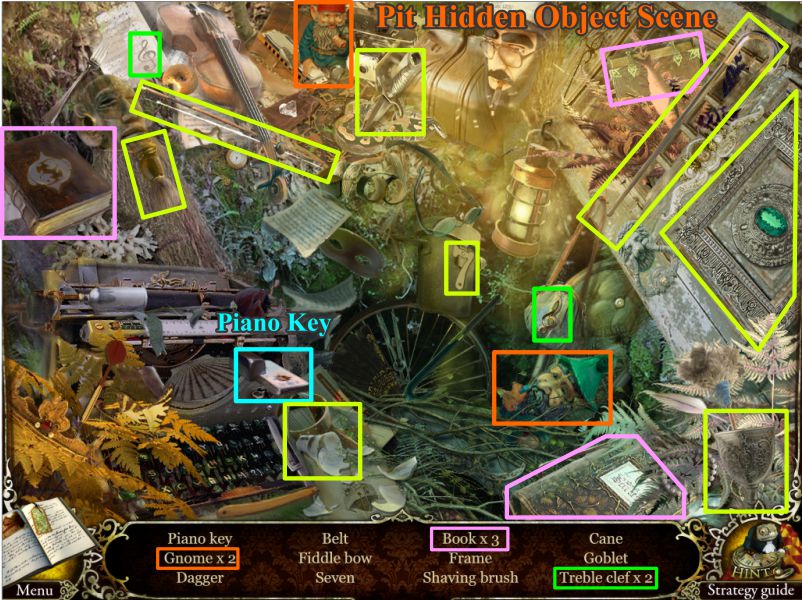
Use your shovel to dig the mound of dirt at the right to activate a Hidden Object Scene with Kevin Sting's possessions in the pit.
Screenshot
Dog House Hidden Object Scene
Collect everything shown in the screenshot and you will get a Hammer.
Screenshot
Pit Hidden Object Scene
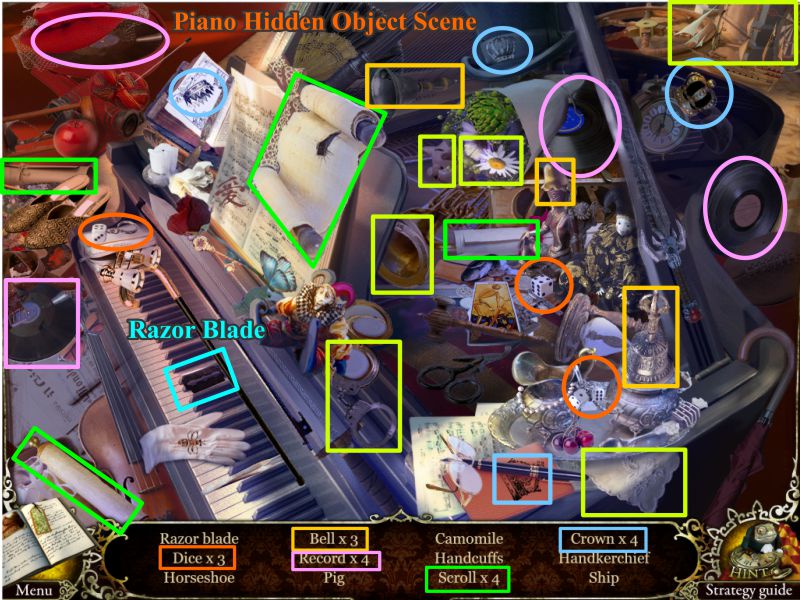
Collect all objects marked in the screenshot to get the Piano Key.
Screenshot
Hotel Porch
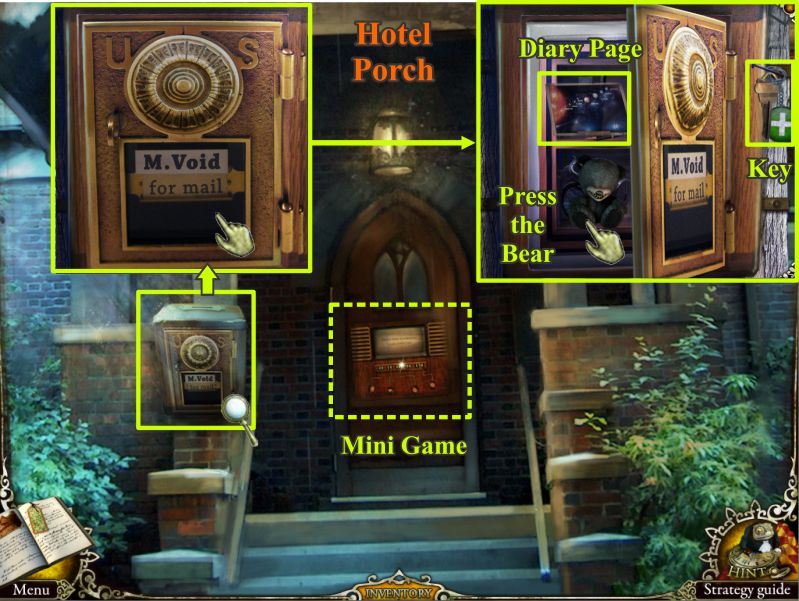
Click on the mailbox for a close up and touch to open it.
Take the Diary page and the First Aid key.
Press on the bear and see what he has to say.
Check out the Intercom for a Mini Game to play.
Screenshot
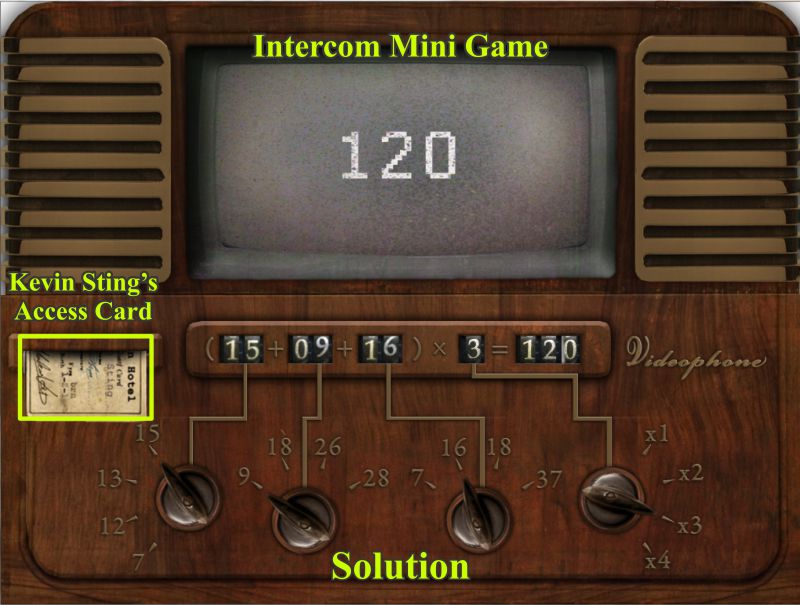
Intercom Mini Game
Kevin Sting's Access Card is stuck in the Intercom. Your goal is to remove it.
Turn the frequency knobs to make the necessary equation to equal 120.
Screenshot shows the solution.
Screenshot
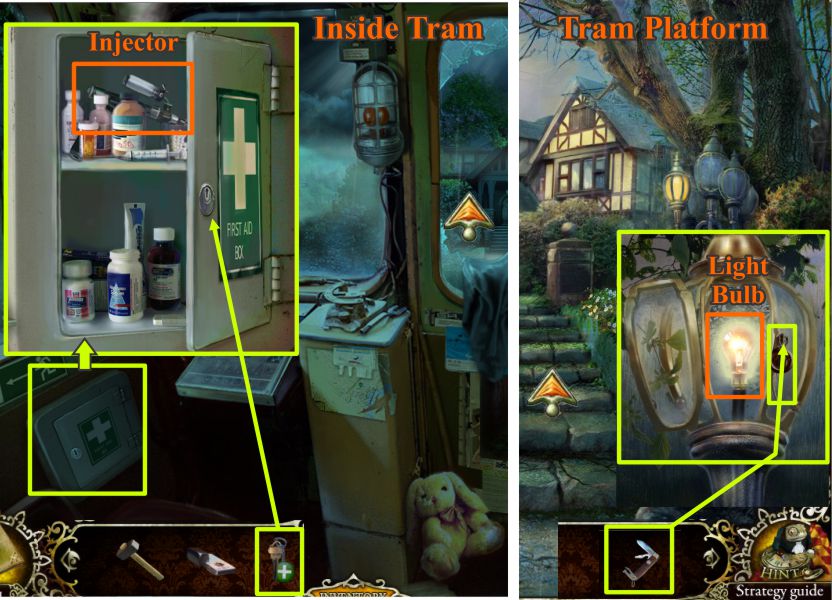
Tram and Platform
Go to the Platform and enter the Tram through the broken window.
Now that you have a key to open the First Aid Kit, use it and take the Injector that is inside.
Use the pocketknife from your inventory to cut the light on the lamp after you go for the close up.
Open the lamp and take the light bulb.
Check out the screenshot and go back toward the Hotel.
Screenshot
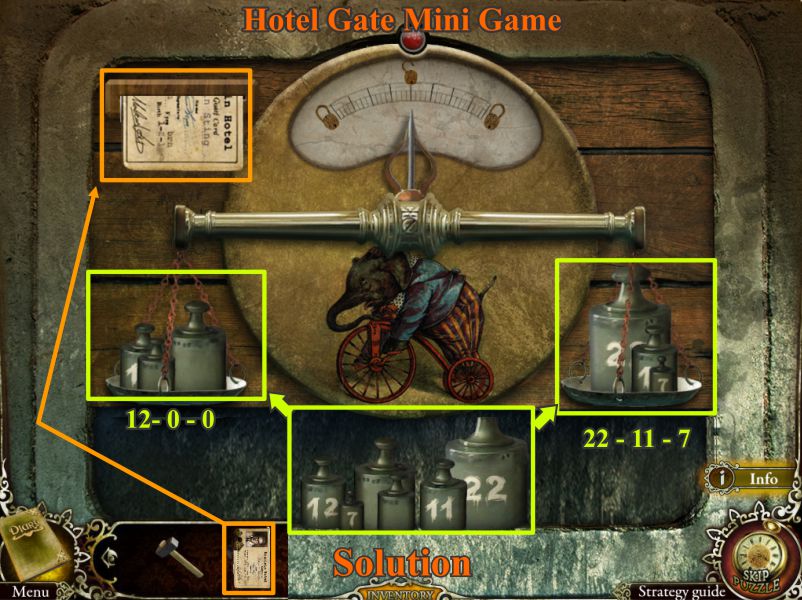
Hotel Gate Mini Game
Go to the Gate at the left and click on the lock for a Mini Game.
Use Kevin Sting's Access Card as shown in the screenshot and it will reveal the necessary weights to play the game.
Place the 12 and two blanks on the left side of the scale and the 22, 11, and 7 on the right side to balance it. The gate will open for you to enter.
Screenshot
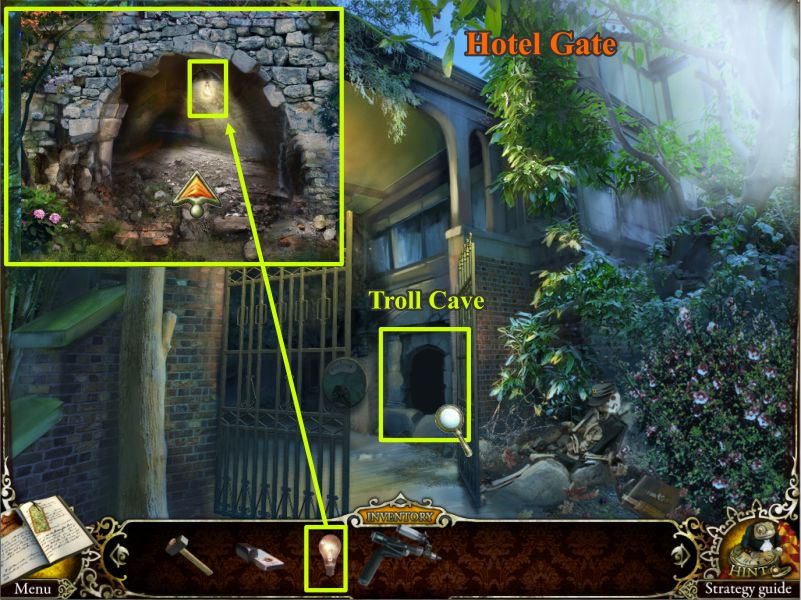
Hotel Gate and Troll Cave
When the gate opens, go to the Troll Cave where Gargantua beckoned you to follow him.
It's dark, so place the light bulb from your Inventory in the light (see screenshot) and enter.
Screenshot
Troll Cave
Gargantua is in the cave and being tended to by another troll. Give him the Injector and both of them will leave.
Pick up the board and a copy of the poster on the right wall.
Click on the cabinet at the left for a Mini Game and place the piano key on it.
After the Mini Game, you will get nails. When you click for a close up of the ladder, place the board and nails. Hit them with the hammer to secure them so you can climb up the ladder.
Check screenshot for locations and more information.
Screenshot
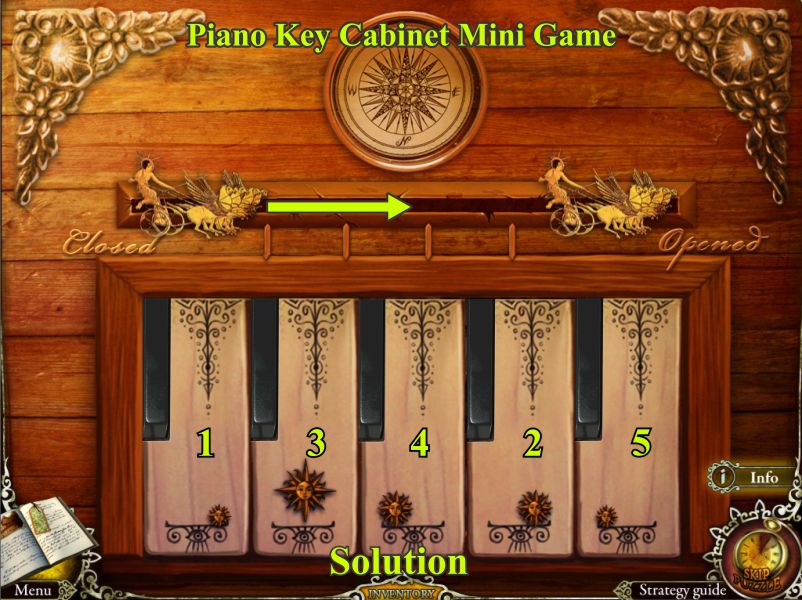
Piano Key Cabinet Mini Game
Your goal is to move Helios from closed to opened.
Click the keys in the order indicated in the screenshot and the chariot will move forward a space at a time.
When it opens, take the nails.
Screenshot
Posted by: Jazz |
December 8, 2010 2:46 PM
|
December 8, 2010 2:46 PM
Mystery Trackers: The Void Walkthrough
Chapters 5 - 9
Chapter 5: Inside Hotel
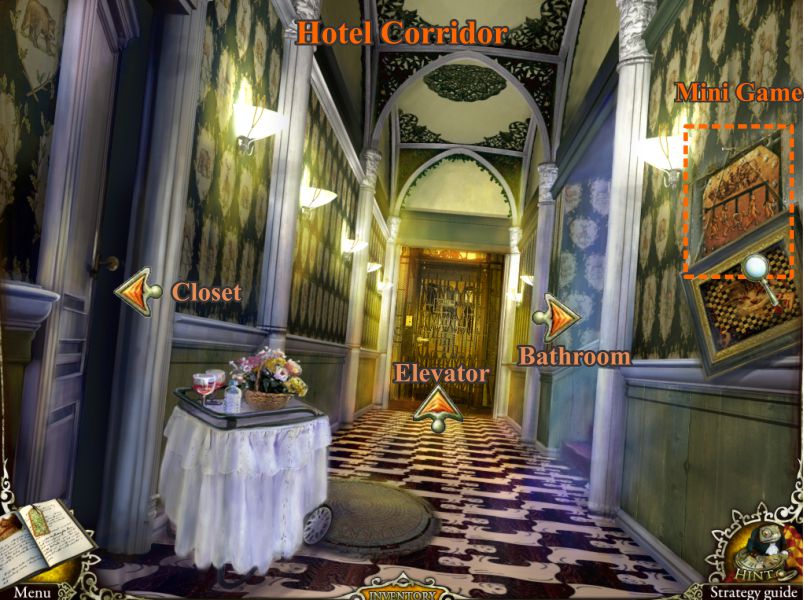
Corridor
Check the wall on the right for a Mini Game. You can probably play without the help of the postcard you will find on your way to the closet.
The Bathroom is up the stairs and the Elevator at the end of the hall is locked, so turn to the closet on the left.
Screenshot
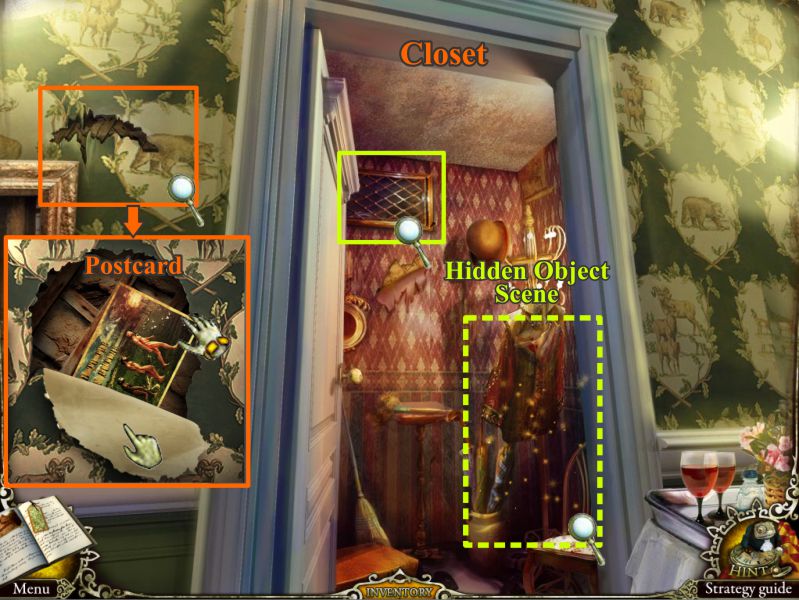
Closet
Click on the wall at the left with the ripped wallpaper. Peel off the wallpaper so you can take the postcard for the Diary (see screenshot).
Check the vent. It is too high to reach at the moment, so play the Hidden Object Scene.
Screenshot
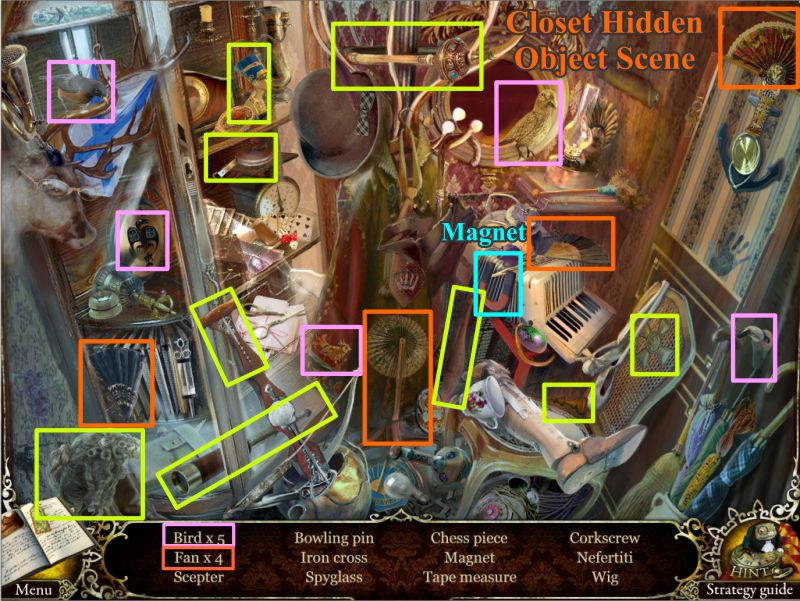
Closet Hidden Object Scene
Collect everything marked in the screenshot and you will come away with a Magnet.
Screenshot
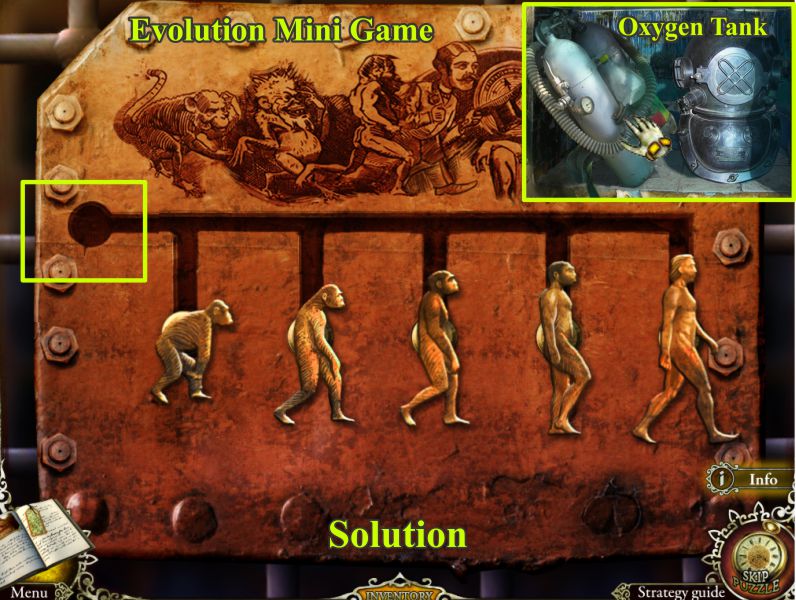
Corridor Evolution Mini Game
If you need to do so, check the postcard in the Diary.
Your goal is to line up the figures from earliest to recent times.
The round portion of the slider is a holding area, so you can move the figures on the slider to the proper slot as shown in the screenshot.
When it opens, take the Oxygen Tank.
Screenshot
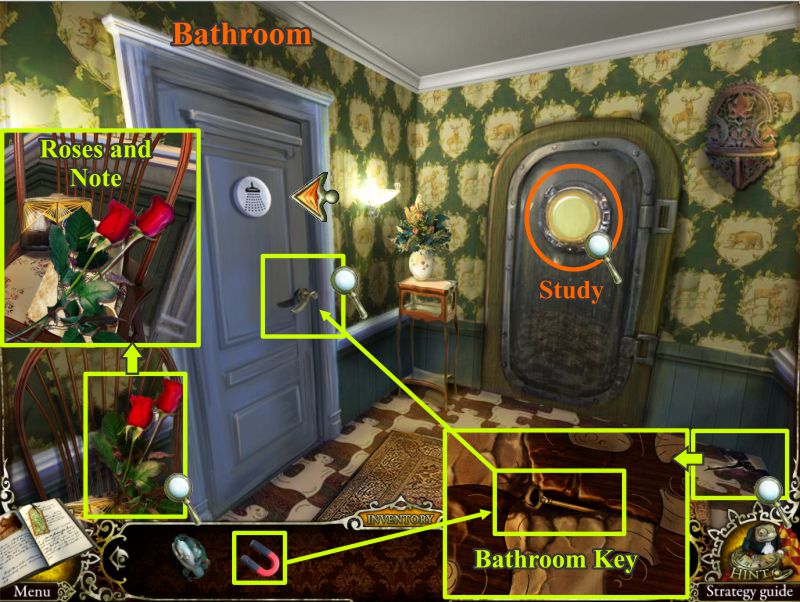
Bathroom Hall
Go upstairs and peek through the Study porthole. You can't get in there from the hall because the door has no handle or keyhole.
Pick up the roses and the note for your Diary.
Look at the right corner and use your magnet to retrieve the Bathroom Key to open the Bathroom door and enter (see screenshot).
Screenshot
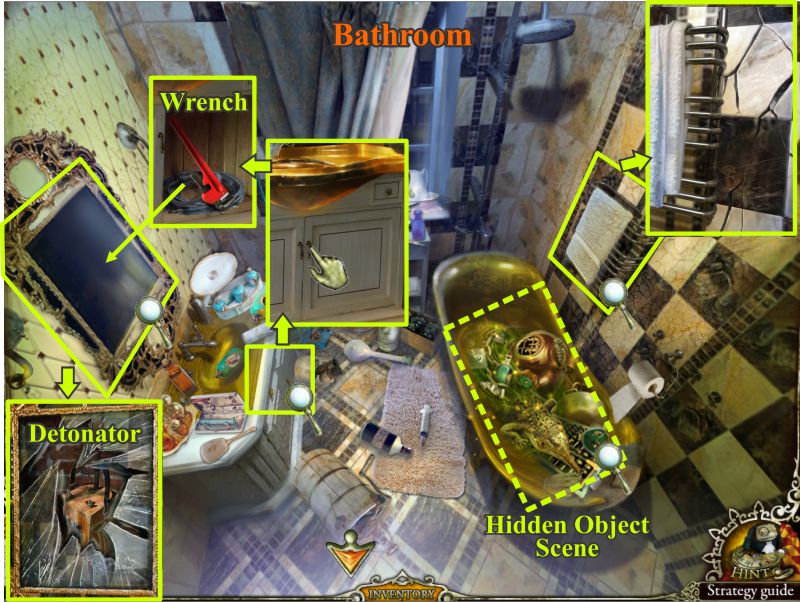
Bathroom
Check out the close ups in the screenshot marked with the magnifying glasses.
Open the vanity door, take the wrench and use it on the mirror to get the Detonator.
Click on the wall on the right and note the cracks next to the towel rack.
Play the Hidden Object Scene.
Screenshot
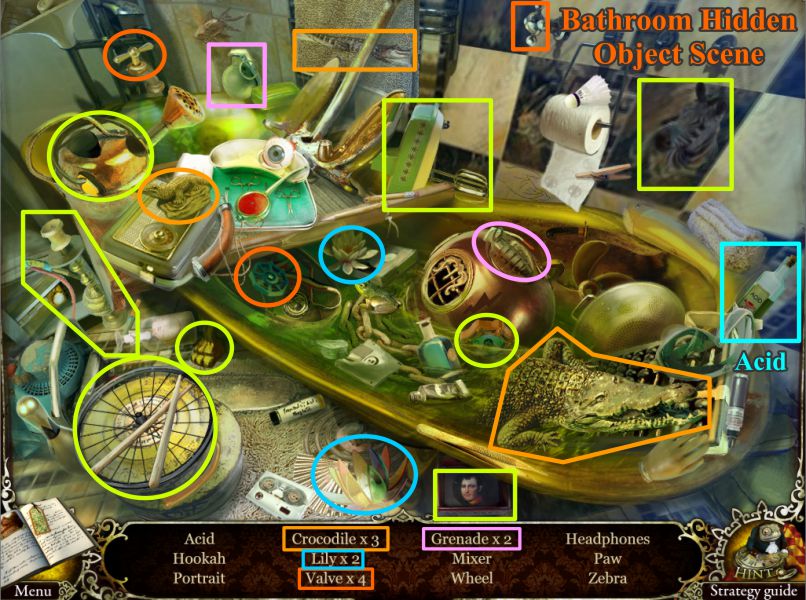
Bathroom Hidden Object Scene
Collect everything marked in the screenshot to get the bottle of Acid. Go back downstairs to the Elevator.
Screenshot
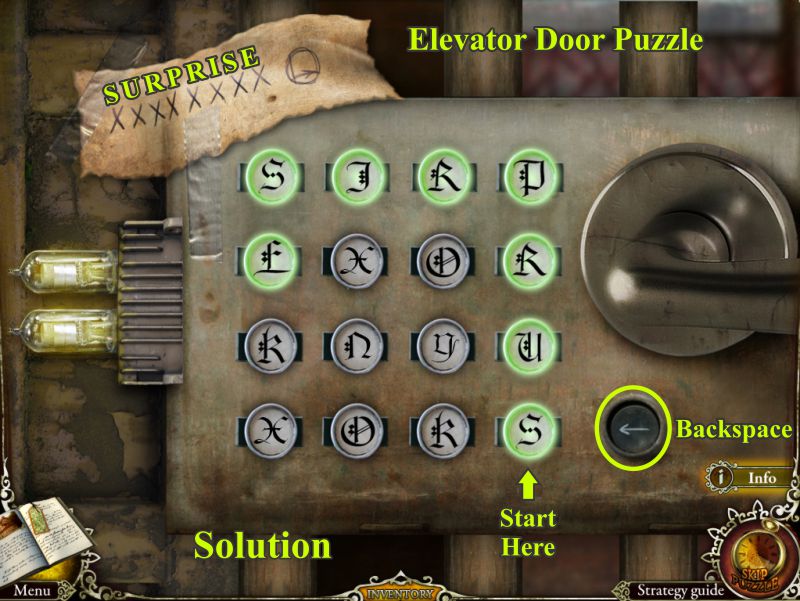
Elevator Door
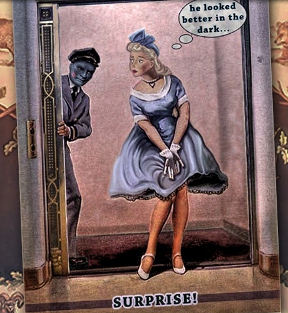
Click on the poster on the right wall and take a copy for your Diary.
Click on the Elevator handle for a close up to play the puzzle to open the door.
Screenshot
Elevator Door Puzzle
You need to enter a word code to open the door. That word is "Surprise," which was at the bottom of the poster.
There is a backspace button if you take a wrong turn, but the screenshot will give you the solution.
Screenshot
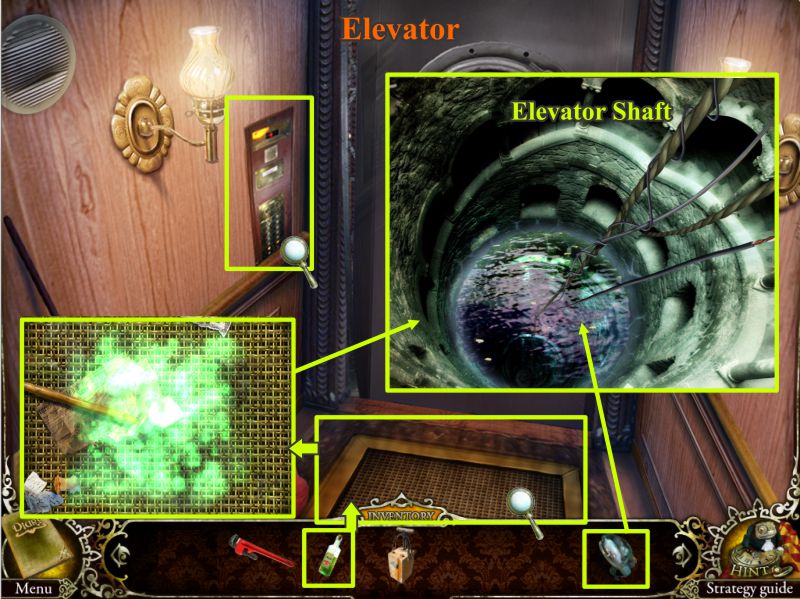
Elevator
The elevator button is missing ,but something is under the grate. Pour your bottle of acid on the grate to get a look at the elevator shaft (see screenshot).
The shaft is filled with water. Use your oxygen tank to go down and look around and play a Hidden Object Scene.
Screenshot
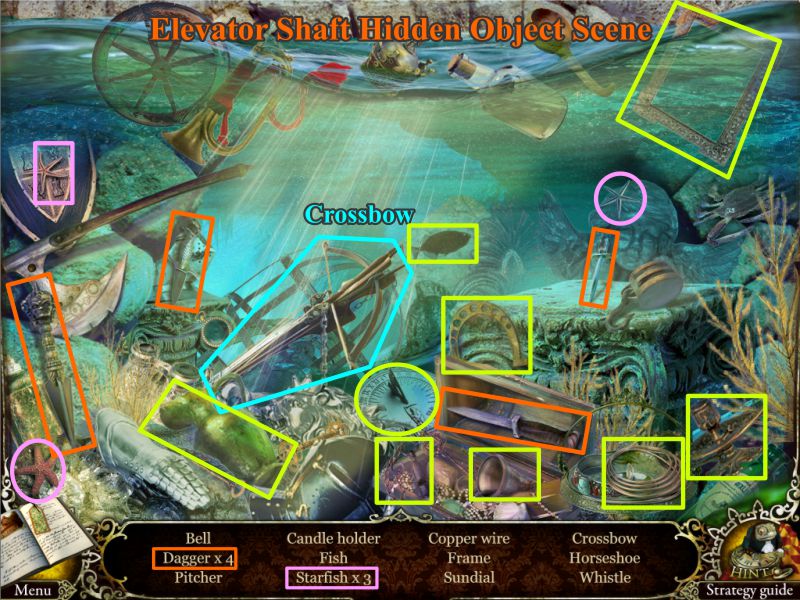
Elevator Shaft Hidden Object Scene
Collect everything marked in the screenshot and you will come away with a Crossbow.
Screenshot
Corridor Closet and the Bathroom
Go down the Corridor to the Closet. Shoot the crossbow at the vent area so you can get to the vent.
Place your wrench on the bolts on the vent and it will undo all four at once.
Take the Dynamite and head upstairs to the Bathroom.
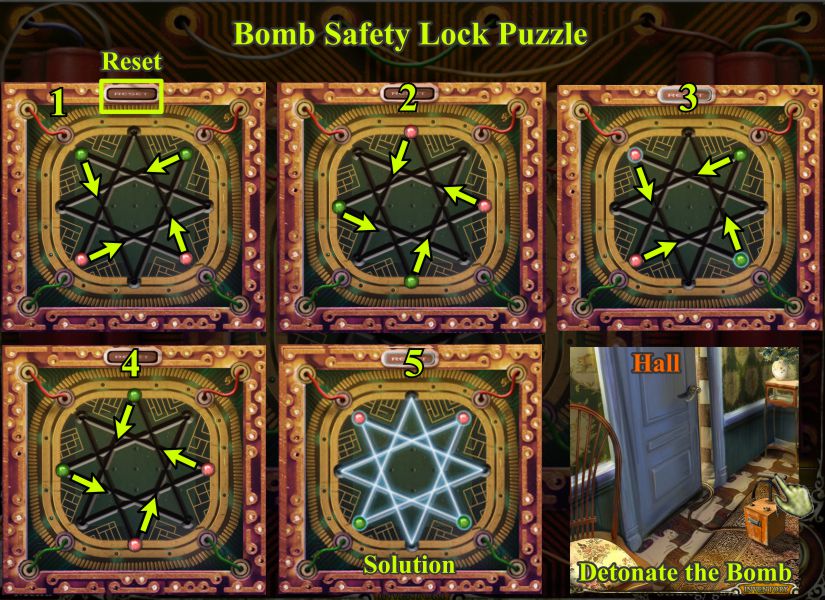
Click on the towel rack and place the dynamite there.
There is a safety lock on the bomb. Click on it for a puzzle.
Check the screenshot for locations and more information.
Screenshot
Bomb Safety Lock Puzzle
Your goal is to move the balls along the star path so that they match up with the same color wires.
If you make a mistake, press the reset button to try again.
One solution is shown in the screenshot.
Once you have removed the safety lock, go into the hall and place the detonator at the end of the wire.
Press the detonator and stand back.
Screenshot
The bomb made a little more damage to the Bathroom than anticipated, but it did create a hole in the wall. You can enter the Study through the hole.
Study
Check out the close ups in the screenshot marked with the magnifying glasses.
The Study turns out to be some sort of a laboratory for Void's experiments.
Click on his portrait and note someone used the cigarette on his eyes. Take the page for your Diary.
Check the pillar to the left of the body. Note the missing battery which, when found, will activate a Mini Game.
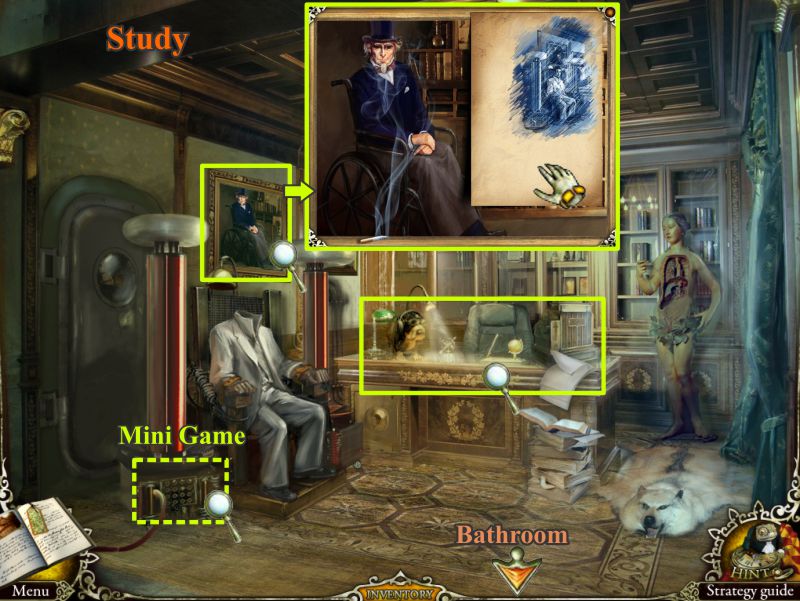
Click for a close up of the Desk.
Screenshot
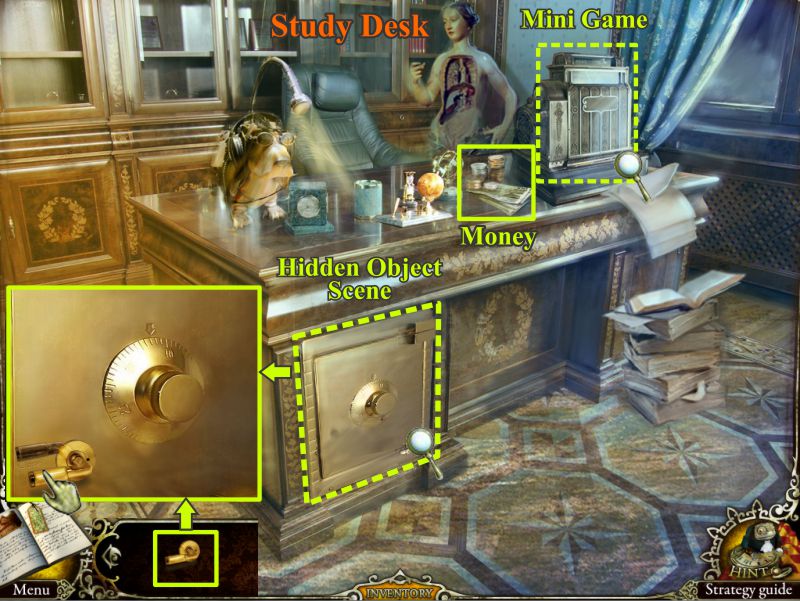
Study Desk
Pick up the money on the desk and note the safe is open but missing a handle. Click on the slot machine for a Mini Game (see screenshot).
Screenshot
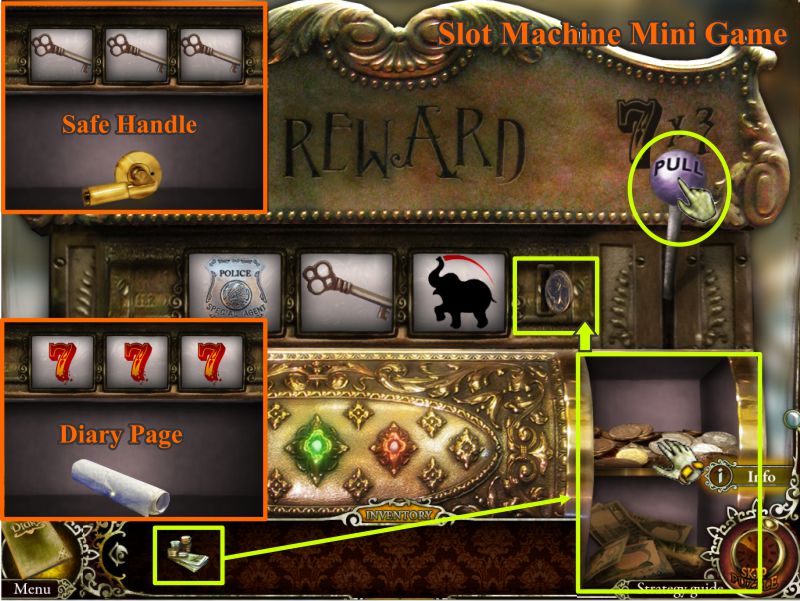
Slot Machine Mini Game
Place the money on the slot machine to activate the game.
You have two goals in this game: one is to get 3 keys to be rewarded with the safe handle and the other is to get 3 sevens to acquire a Diary page.
You money funds are unlimited, so feed the coins in the slot and pull the handle until you achieve both of your goals (see screenshot).
Screenshot
Study Safe Hidden Object Scene
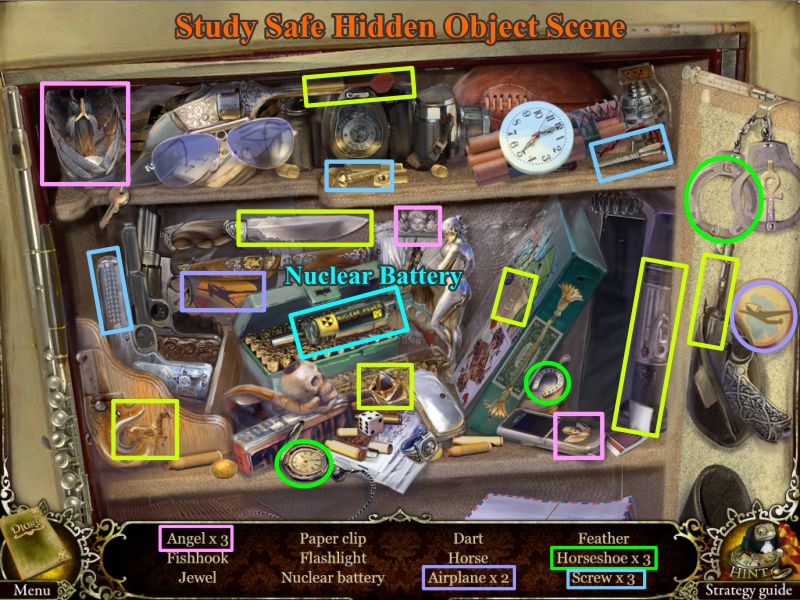
Place the handle on the safe and open it for a Hidden Object Scene.
When you collect everything that is marked in the screenshot, you will come away with a Nuclear Battery.
Screenshot
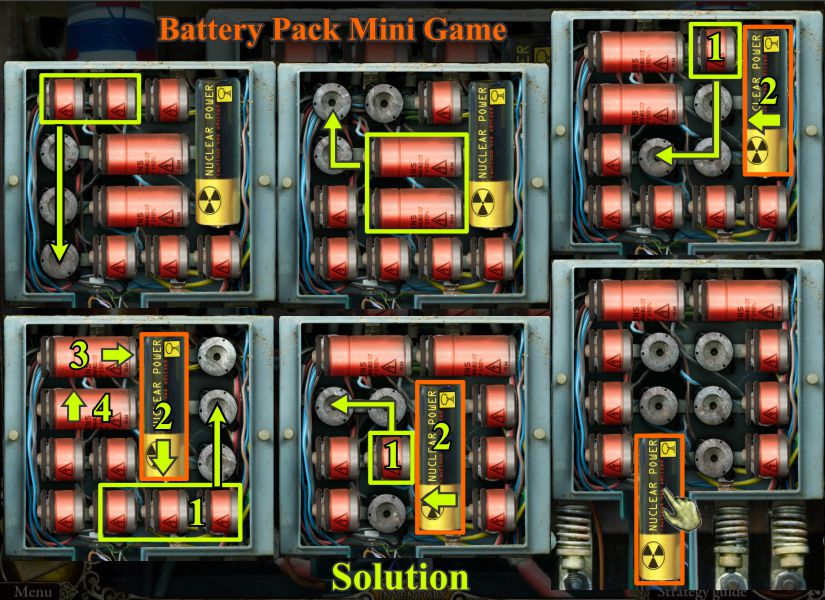
Battery Pack Mini Game
Go back to the left pillar and click for a close up to place the Nuclear Battery in the battery pack to activate the game.
This is actually a slider game where you need to move the red batteries to get the nuclear battery into the slot at the bottom of the box.
There is more than one way to solve the puzzle. One step-by-step solution is shown in the screenshot.
Screenshot
After the game, and after witnessing Kevin Sting, pick up in button on the floor. Click down 3 times and forward twice to the Elevator.
Click for a close up of the panel and place the button over the wires.
Press the button and you will go down to the subway level.
Chapter 6: Subway
Elevator Hidden Object Scene
Somewhere on the way down you acquired a bunch of objects. Click on them for a Hidden Object Scene.
Collect everything marked in the screenshot to get the Glass Eye.
Screenshot
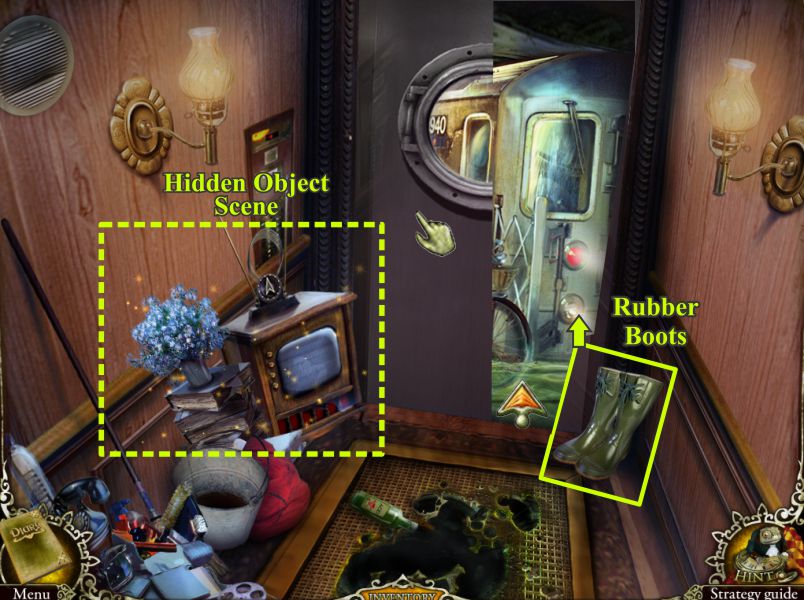
Elevator
Slide the door open, only to find out the Subway is flooded. Grab the Rubber Boots shown in the screenshot and place them on the water so you can enter the Subway.
Screenshot
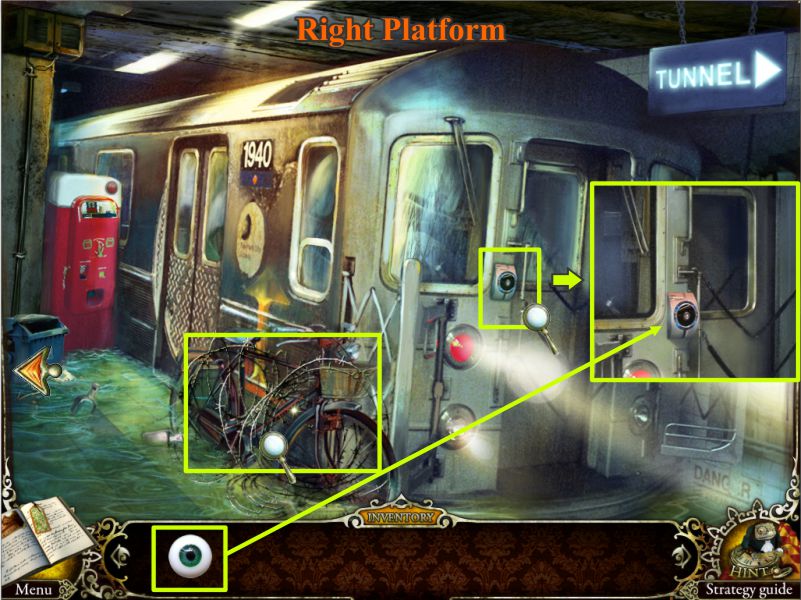
Right Subway Platform
Check out the bikes to find out you need a tool to get rid of the barbed wire.
Click for a close up of the door to see that it needs an eyeball scanner. Since you have the eyeball in your Inventory, place it there to open the door.
You can enter the cab if you wish, but you don't have what you to start the subway cars. Wait until later and go left to the another platform.
Screenshot
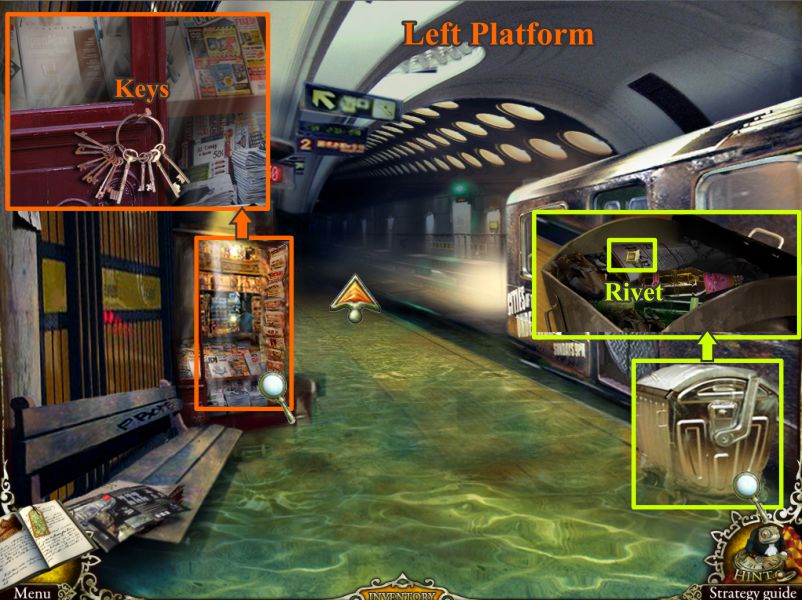
Left Platform
Check out the close ups in the screenshot marked with the magnifying glasses.
Click on the dumpster at the right and collect the rivet.
Click for a close up of the kiosk and pick up the set of keys.
Go forward to the end of the tunnel.
Screenshot
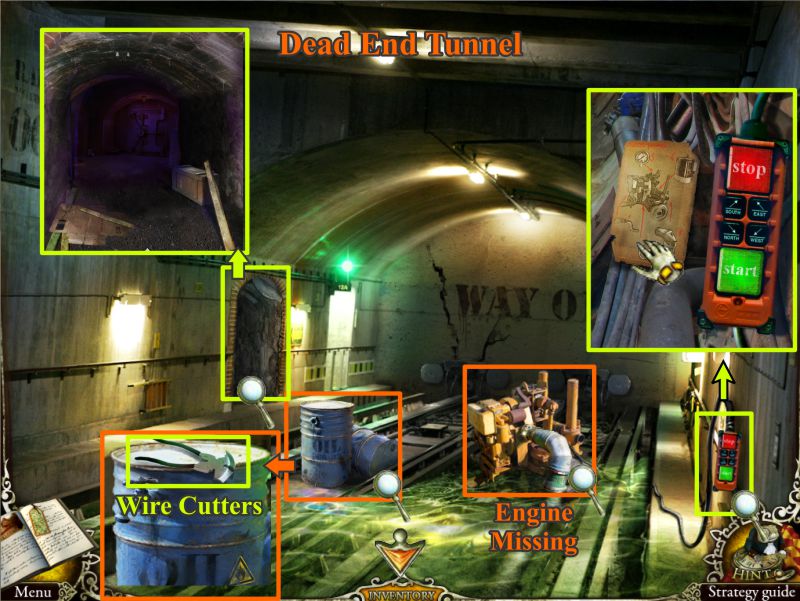
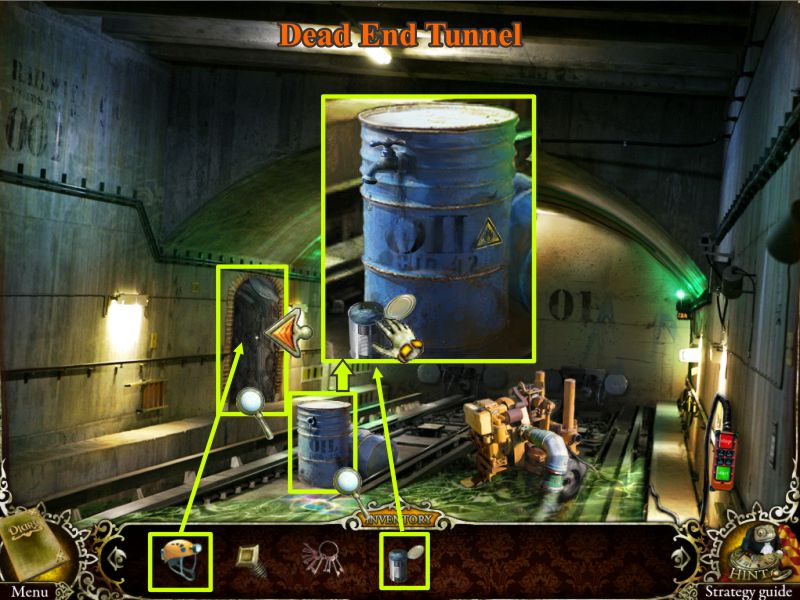
Dead End Tunnel
Check out the close ups in the screenshot marked with the magnifying glasses.
Click the switch and take the diagram.
Click on the entrance to the left to find out you need something to light your way.
A close up of the Water Pump will show you the engine is missing.
Clicking for a close up of the blue barrel will allow you to pick up the wire cutters.
You are done here for now, so click down twice to the Right Platform.
Screenshot
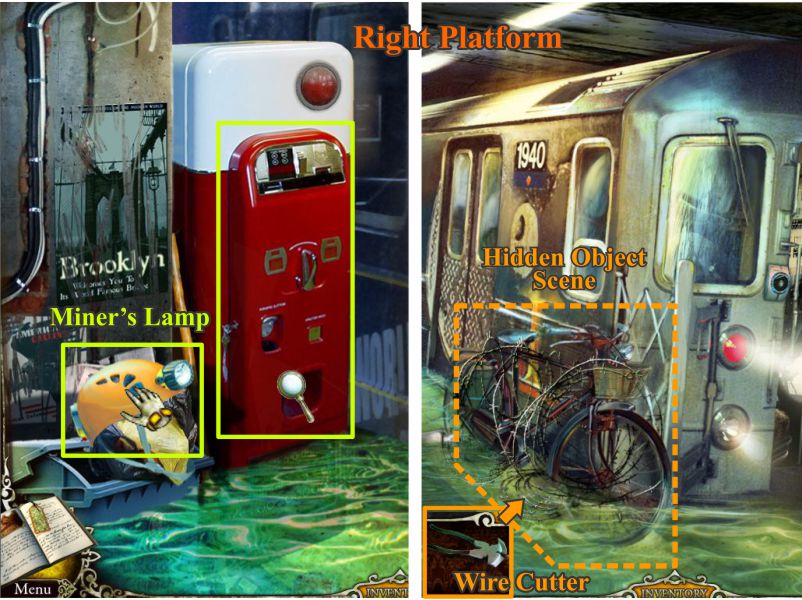
Right Platform
Go to the Cola Machine and note Void made his own cola. The machine needs fixing before you can get a sample.
Pick up the miner's helmet with the light (see screenshot).
Use your wire cutters on the barbed wire holding the bicycle to trigger a Hidden Object Scene.
Screenshot
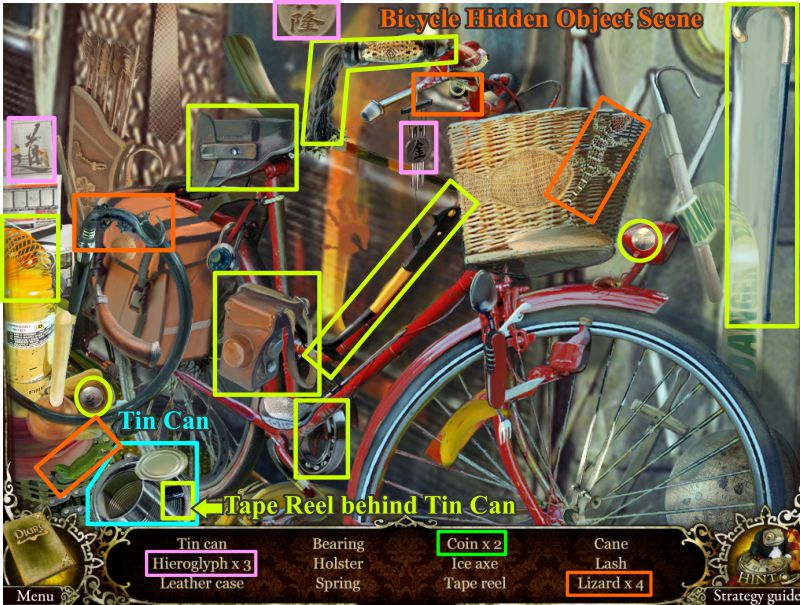
Bicycle Hidden Object Game
Collect everything marked in the screenshot and you will get a Tin Can.
Screenshot
Dead End Tunnel
Go left and forward to the end of the tunnel.
Click on the blue barrel and place your tin can under the spigot to collect the gas (see screenshot).
Collect the tin can and then go left to the entrance.
Use your miner's helmet light on it and enter.
Screenshot
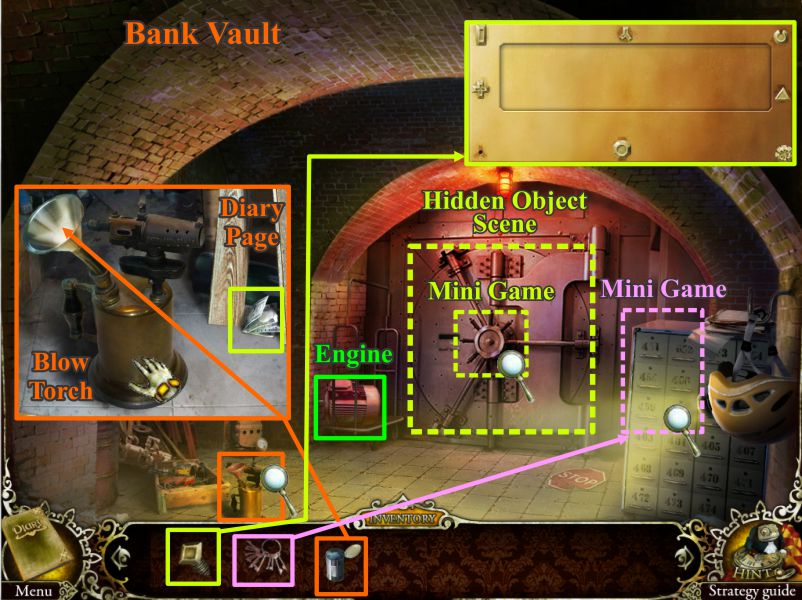
Bank Vault
Check out the close ups in the screenshot marked with the magnifying glasses.
You have found Void's Bank Vault. Pick up the Engine on the cart and click on the torch with the funnel so you can fill the torch with your tin can of gas. Collect it when you are done, along with the page for your Diary.
Check out the vault. You have the missing rivet and can place it to activate the Mini Game.
You can also play the Lock Box Mini Game. Once you pick up the Diary Page by the Torch, you can choose which to play.
If you choose to deal with the Vault first, you will also trigger a Hidden Object Scene to complete.
Screenshot
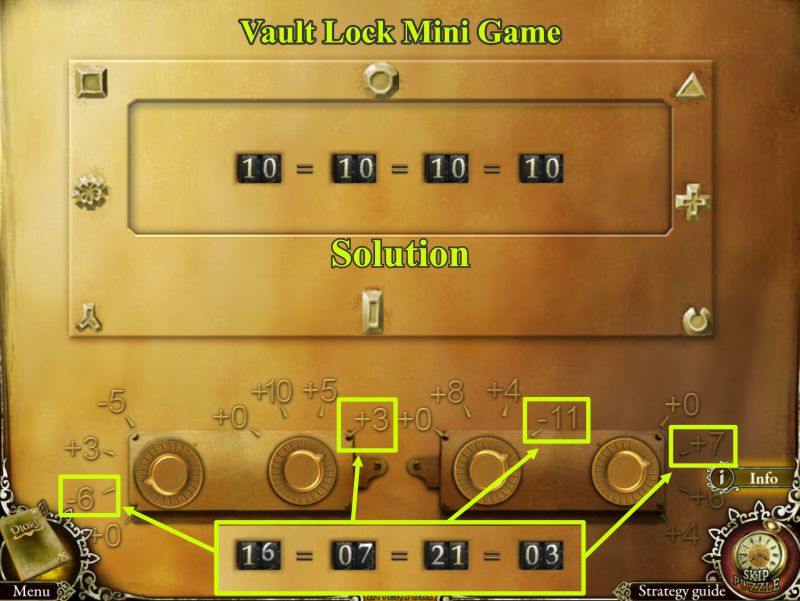
Vault Lock Mini Game
Place the rivet from your Inventory in the missing rivet hole.
Your goal is to swap the rivets so they are in their proper places.
Drag one rivet onto another to swap them. Pay attention to the stains that will appear when you lift up a rivet because they will give you the location of each shape.
Once you have completed that portion of the game, you will get a new challenge.
The screenshot shows the location of the rivets and the solution to the number correction.
The original numbers are shown at the bottom portion of the screenshot, as are the necessary corrections you will need to make to solve the game.
Screenshot
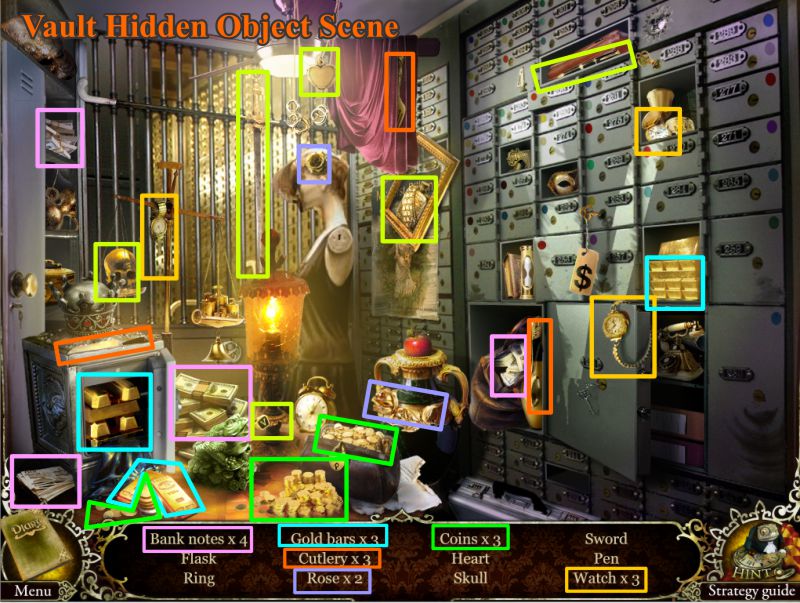
Vault Hidden Object Scene
Collect all objects shown in the screenshot and you will end up with a gold bar for your Inventory.
Screenshot
Lock Box Mini Game
Your goal is to close all of the boxes so the one in the upper right corner will open for you to take the Record.
The Diary Page tells you to press the boxes in the order shown in the screenshot: 401, 408, 412.
Screenshot
Water Pump Puzzle
Go back to the end of the tunnel and click on the Water Pump for a puzzle.
You have a diagram of how to assemble the pump in your Diary.
Place the engine in the scene and it will go to the box with the rest of the parts.
The screenshot shows where the numbered parts in the box go on the pump.
When you have assembled the pump, the water will drain from the Subway. Click down to the Right Platform and up to the Cola Machine.
Screenshot
Cola Machine
The Cola Machine needs a fuse so you still can't sample it.
Click for a close up of the Subway Car door. Use your blowtorch on the chains so the door will open for you to enter.
Screenshot
Inside Subway Car
Check out the close ups in the screenshot marked with the magnifying glasses.
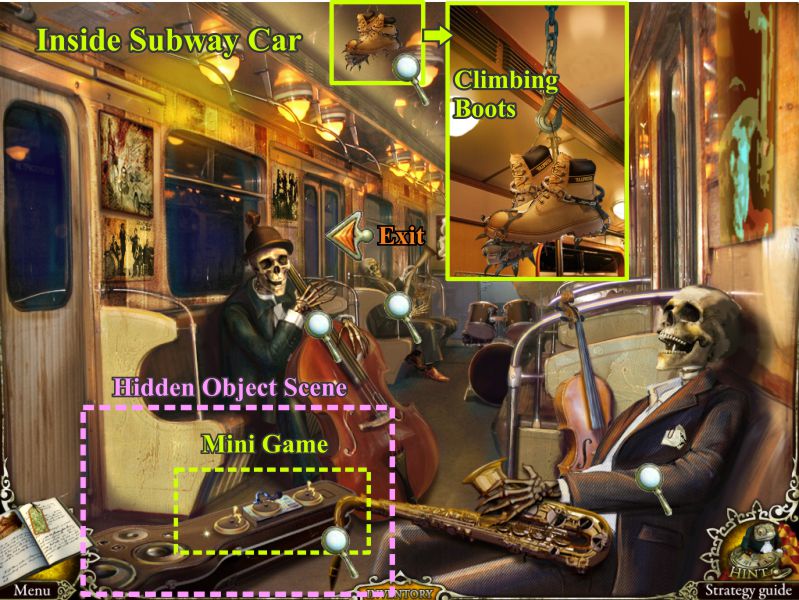
Grab the Climbing Boots from the ceiling close up.
Click on the guitar case for a Mini Game which will turn into a Hidden Object Scene when solved.
Screenshot
Guitar Case Record Player Mini Game
Click for a close up of the guitar case and place the record from your Inventory on the table to activate the game.
Since the record is cracked, your goal is to adjust the needle so that it reaches the center of the record.
The record has 5 paths and the needle can go along the right edge, left edge and center of each one.
Press the direction buttons on the remote to program the needle and then press Start.
If you make a mistake, you can readjust the needle from the beginning and try again.
The solution is available in the screenshot, which will show you the highlighted buttons to press.
Once you have played the record, it will stop and activate a Hidden Object Scene.
Screenshot
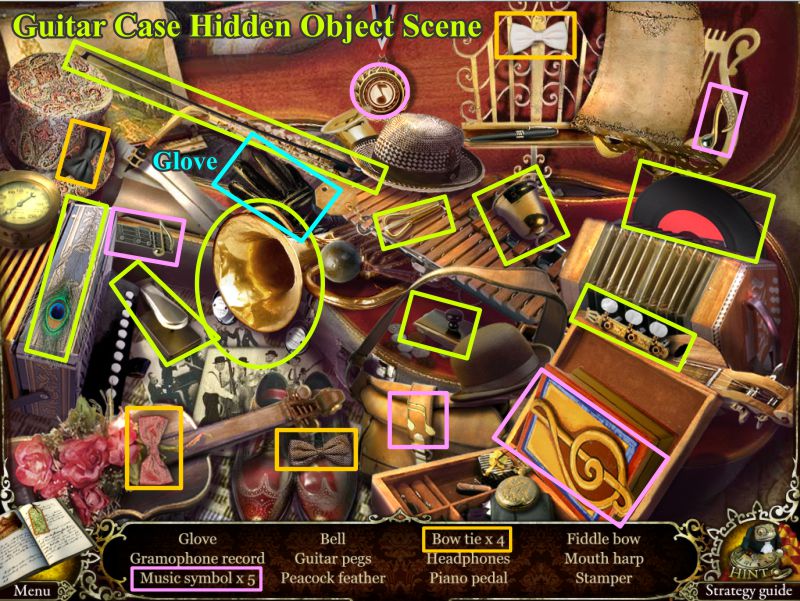
Guitar Case Hidden Object Scene
Pick up everything marked in the screenshot to end up with the Glove.
Screenshot
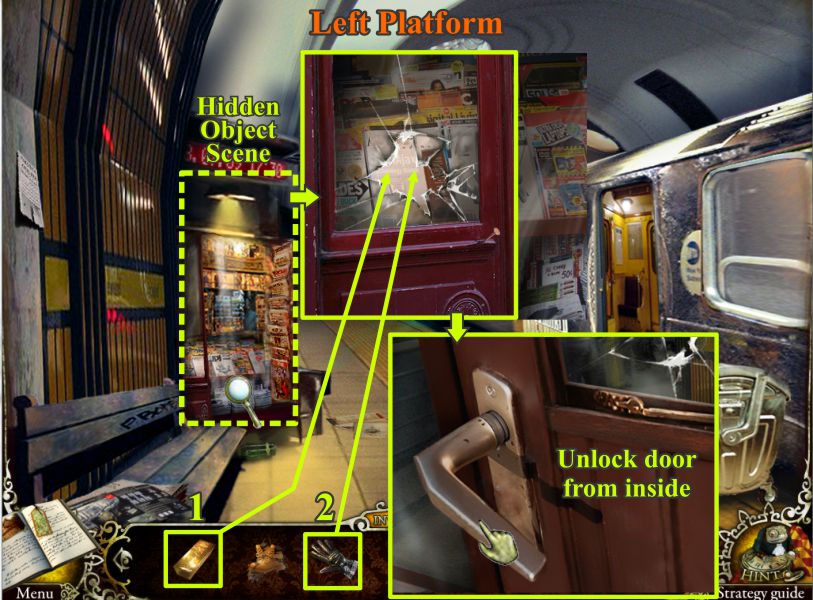
Left Platform
Click left out of the far left door of the Subway Car to the Left Platform.
Click on the Kiosk and use the Gold Bar to smash the glass.
Place the glove on the broken glass to be able to reach the inside door handle and press it to unlock the door and trigger a Hidden Object Scene.
Screenshot
Kiosk Hidden Object Scene
Collect all objects shown in the screenshot and you will get a Coin.
Screenshot
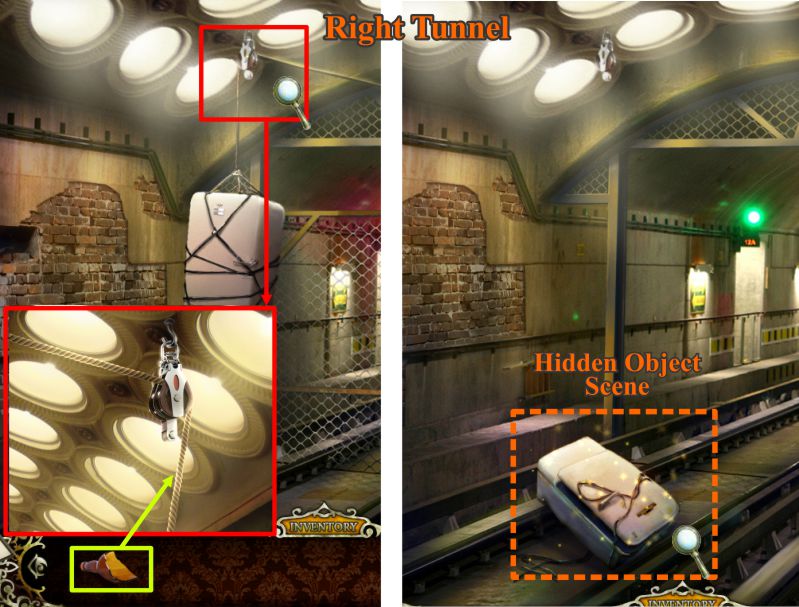
Right Tunnel
Click down and to the right. Use your Climbing Boots (see screenshot) on the wall to get to the top of the refrigerator and grab the fuse.
Click down, then go forward to the Cola Machine.
Screenshot
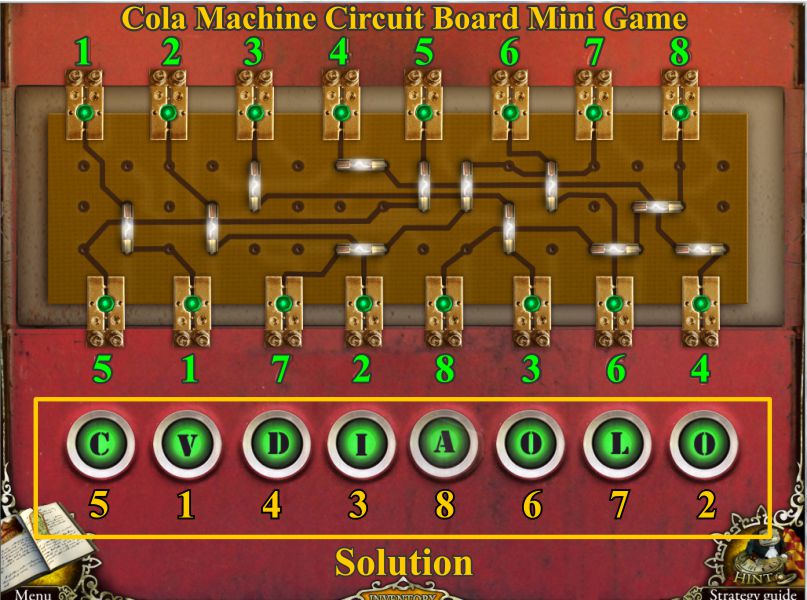
Cola Machine Circuit Board Mini Game
Click for a close up of the lower portion of the Cola Machine and place the fuse from your Inventory on the circuit board to trigger a Mini Game (see screenshot for Mini Game below).
Once you have repaired the Cola Machine, place the coin from your Inventory in the Cola Machine and press the handle to get the Void Cola.
Pick it up only to find the bottle is cracked so that you end up with the bottle top.
Screenshot
Cola Machine Circuit Board Mini Game
Move the fuses on the circuit board so that the circuit between each pair of contacts is connected. For instance, Contact 1 on the top row should connect to Contact 1 in the lower row as shown in the screenshot.
Once all the circuits are connected, press the buttons with letters in sequence so they spell out Void Cola.
Screenshot
Right Tunnel
With Void Cola broken bottle in hand, go down and right to the other tunnel.
Climb back up the wall to the pulley and cut the lower rope with the broken bottle glass.
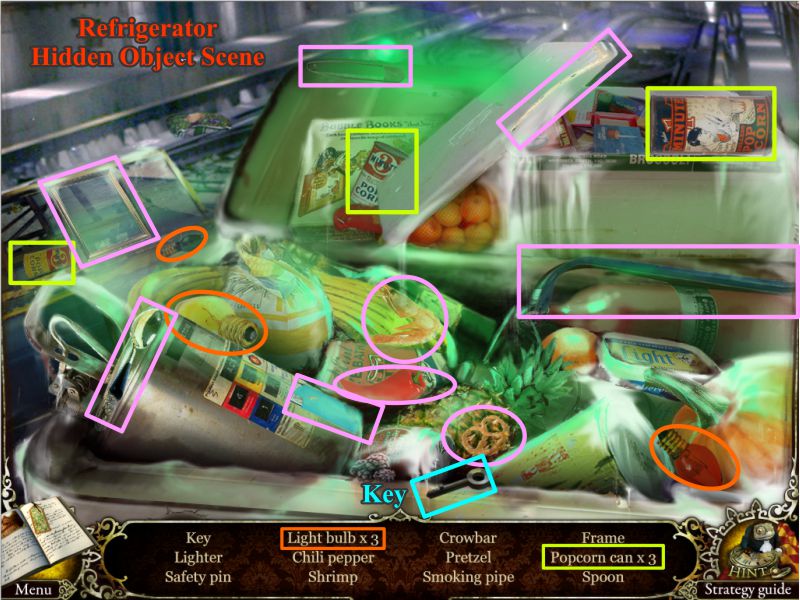
The refrigerator will fall to the ground and the gate will lower into the ground. Click on the refrigerator for a Hidden Object Scene.
If you need more information, check the screenshot.
Screenshot
Refrigerator Hidden Object Scene
Collect all objects marked in the screenshot and you will get a Key.
Screenshot
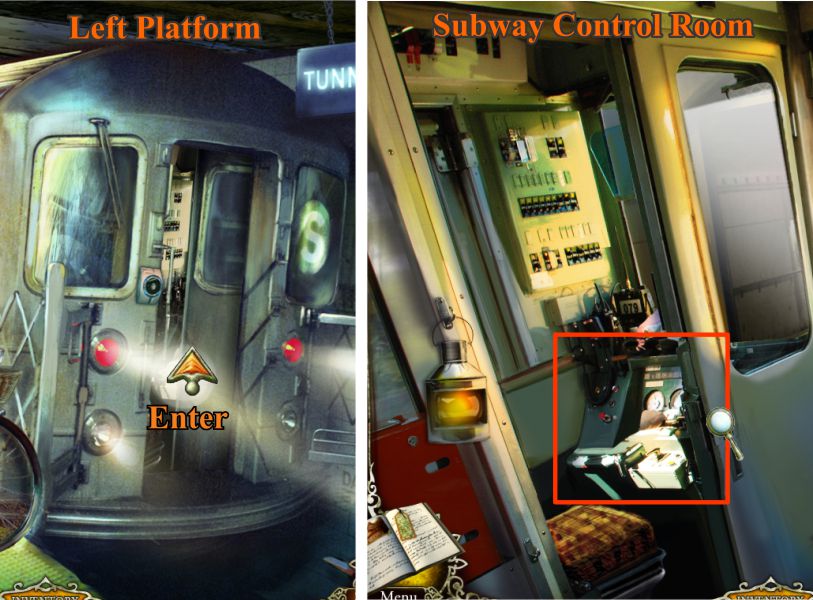
Left Platform and Subway Control Room
Click back to the Left Platform and enter the Subway Car where you originally placed the Eyeball.
Once inside, click for a close up of the Control Room.
Screenshot
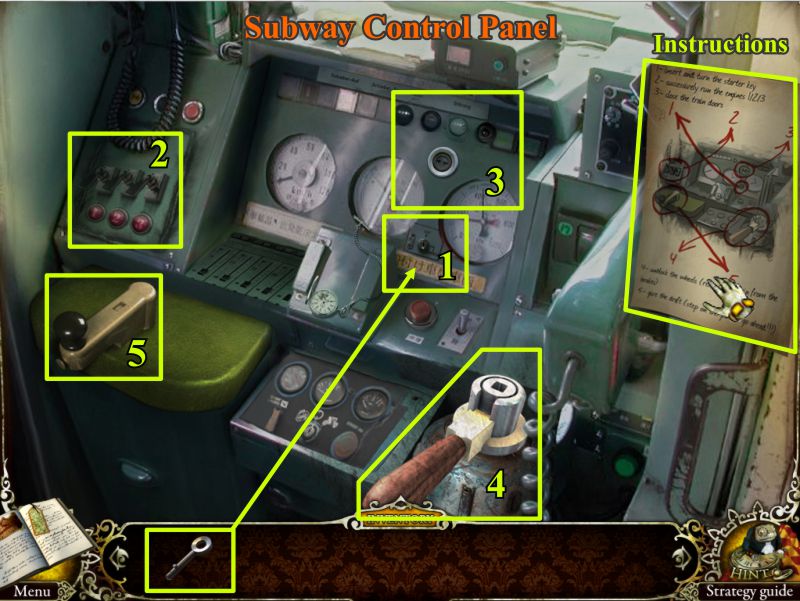
Subway Control Panel
Pick up the Instructions at the right of the screen and then check the screenshot for the order in which you need to deal with the controls.
First close up is the ignition to insert the key from your Inventory.
Screenshot
Subway Control Panel Close Ups
Click on the screenshot to see the close ups and follow the instructions to get the subway car moving.
Once you have inserted the key in the ignition, click on it to turn it on.
Click on each of the Toggle Switches to start the engines.
Next task is to close the doors. Click on the close up of the button between the dials.
Click to release the brake.
Click on the Main Throttle and you are on your way.
Screenshot
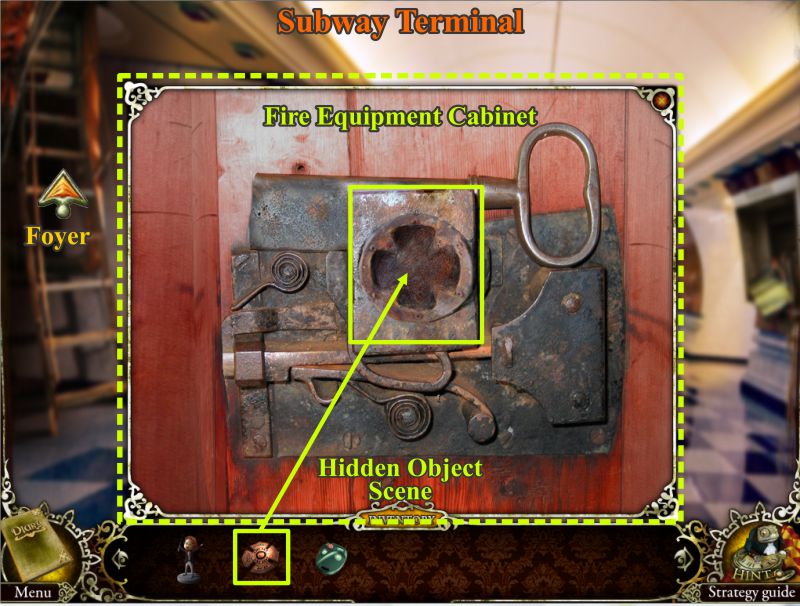
Subway Terminal
You arrive at a fancy terminal under the Void Mansion.
Check out the Fire Equipment Cabinet to see that you need to find a missing badge (see screenshot).
Climb the ladder at the left to get to the Mansion Foyer.
Screenshot
Chapter 7: Return to Void Mansion
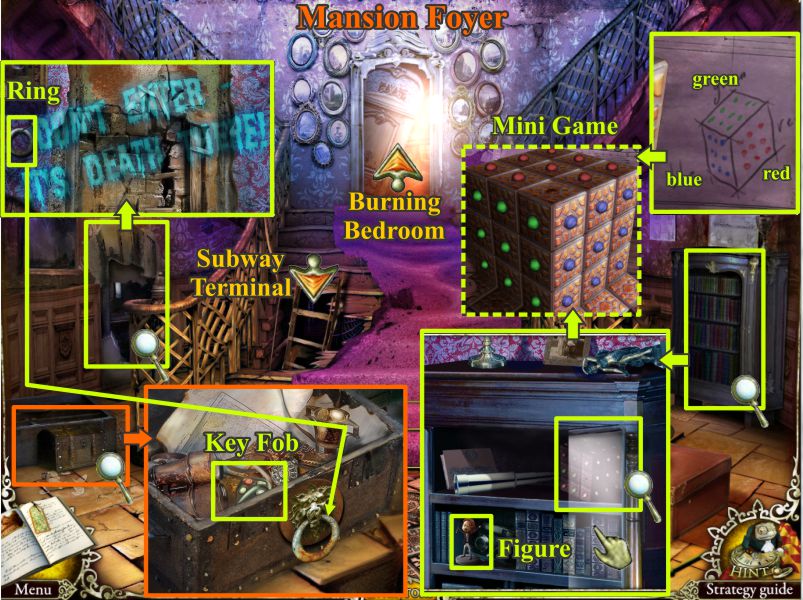
Mansion Foyer
Check out all the magnifying glasses in the screenshot.
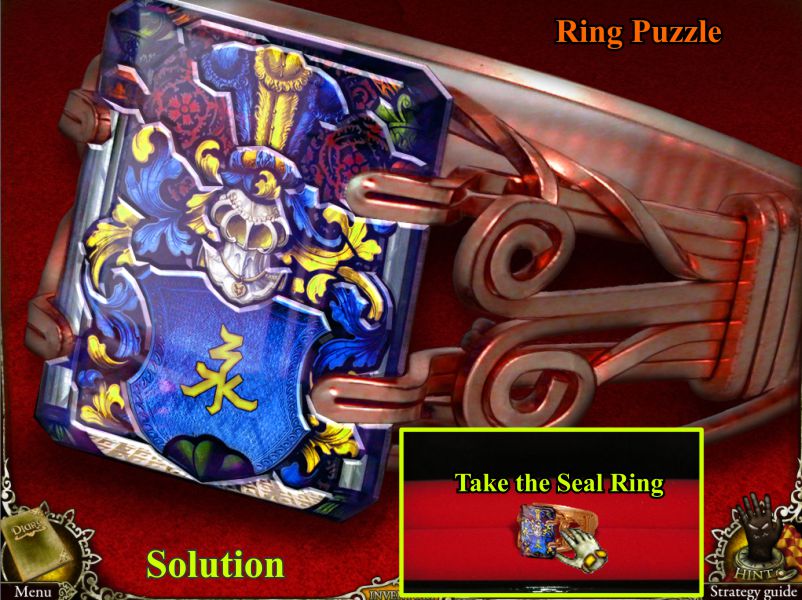
Take the Ring from the door at the left. Place it on the chest on the floor at the left to open it and get the Key Fob.
Click on the bookcase at the right. Open it and take the Figure.
Click on the cube on the top shelf for a Mini Game. Note the scheme on the right wall that shows how you need to play the game.
Screenshot
Cube Mini Game
Your goal is to move all the balls so the green is on top, blue on the left, and red on the face at the right, as shown in the solution in the screenshot.
Click a ball to move it to the empty slot in the corner of the cube and leave another empty slot where it was.
The balls will jump over another ball so that is the fastest way to move them.
It doesn't matter which slot is empty on the finished red side.
Once you have completed the game, take the Fireman's Badge.
Screenshot
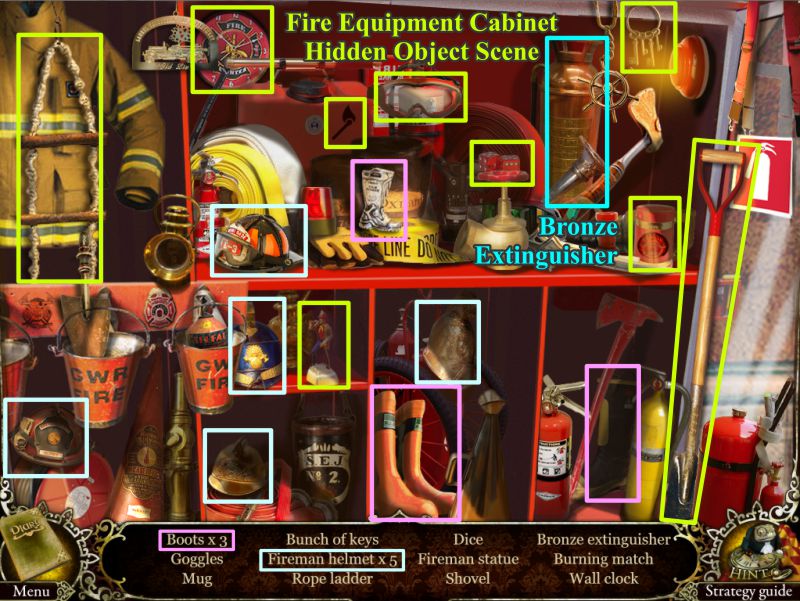
Subway Terminal
Go back down to the Subway Terminal. Click for a close up of the Fire Equipment to place the badge and trigger a Hidden Object Scene.
Screenshot
Fire Equipment Cabinet Hidden Object Scene
Collect all the items marked in the screenshot and you will come away with a Bronze Extinguisher.
Screenshot
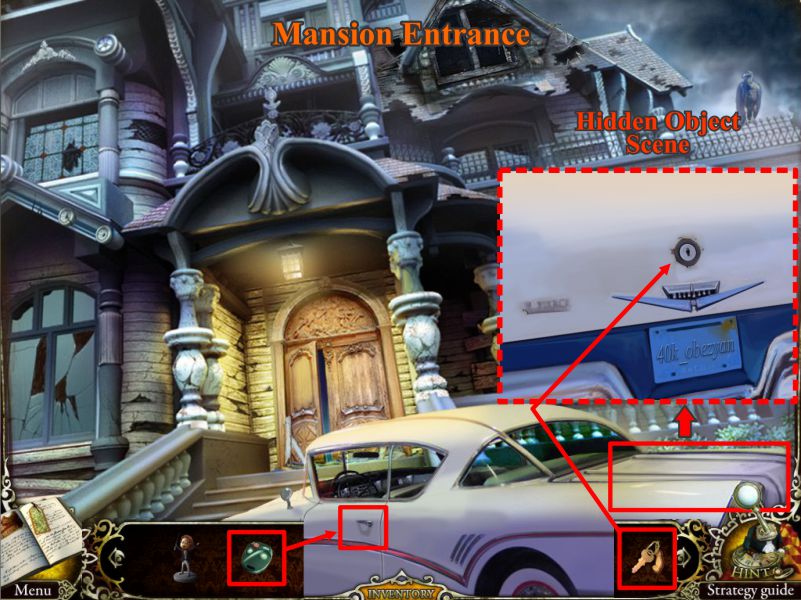
Mansion Entrance
Go back up the ladder and click down once to go outside the mansion.
Use the Key Fob from your inventory on the car door and go inside.
When you are finished inside the car, you will have the keys to the trunk. Use them to trigger a Hidden Object Scene.
Screenshot
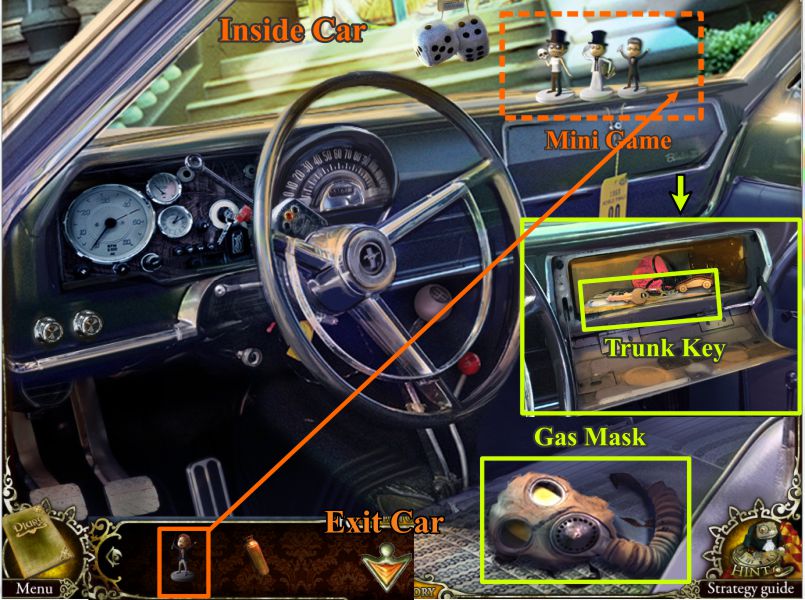
Inside Car
Take the Gas Mask and place the Figure from your Inventory as shown in the screenshot to trigger a Mini Game.
After the Mini Game, the glove compartment will open for you to take the Trunk Key.
Screenshot
Figure Puzzle
The Figures are labeled on their stands. Your goal is to rearrange the heads and torsos so that the Figures match up with their names.
The body parts are labeled in the screenshot and the solution is shown.
Screenshot
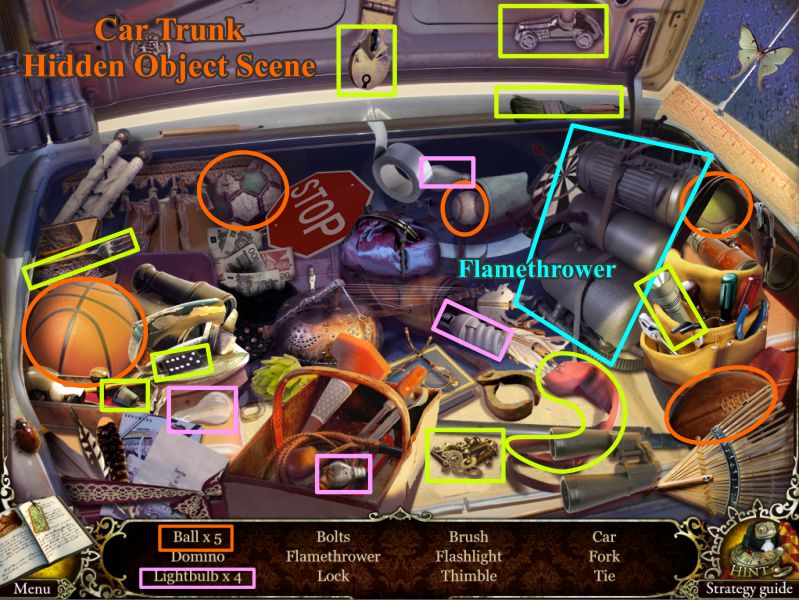
Car Trunk Hidden Object Scene
Collect everything marked in the screenshot and you will get a Flamethrower.
Screenshot
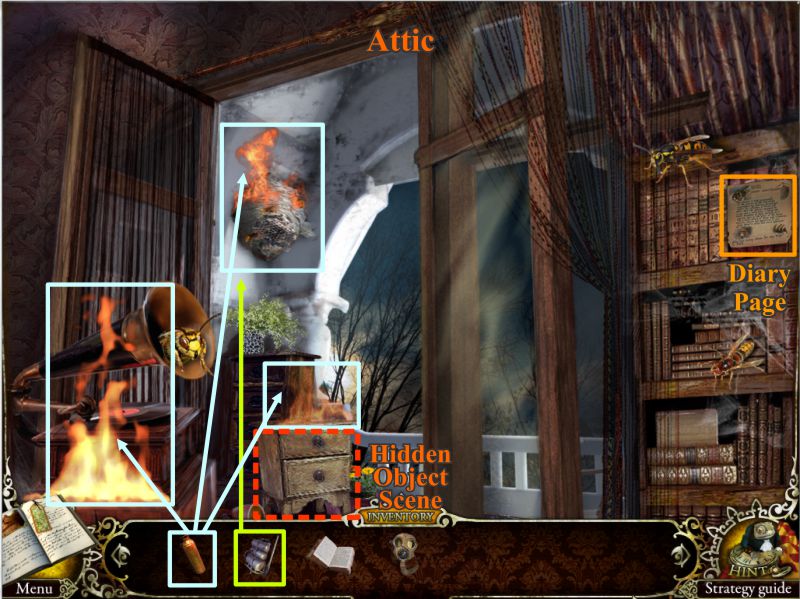
Attic
Go back into the house and up the stairs and left to the Attic.
Use the Flamethrower anywhere in the scene to kill the hornets.
Use the Extinguisher to put out the flames shown in the screenshot. Take the Diary Page and click the small chest for a Hidden Object Scene.
Screenshot
Attic Hidden Object Scene
Collect everything marked in the screenshot to get the Tweezers.
Screenshot
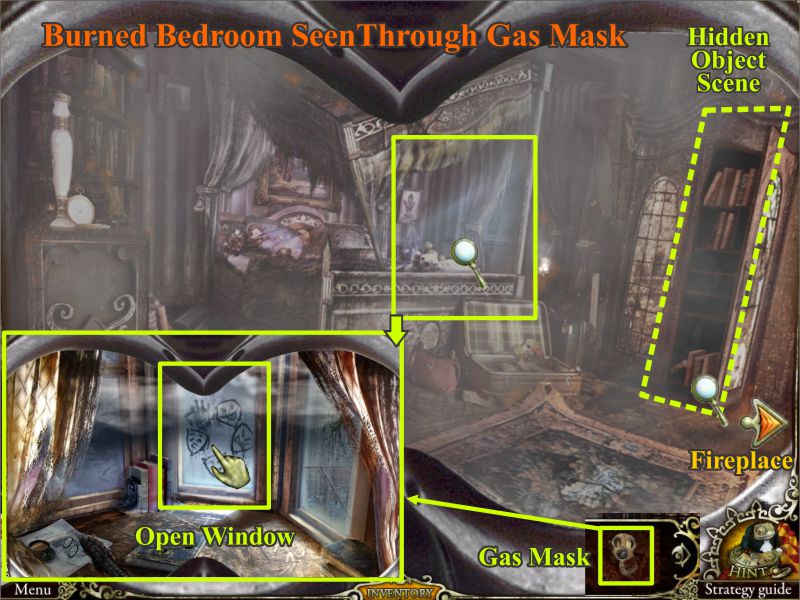
Burned Bedroom
Go downstairs and enter the Burned Bedroom.
Place the Gas Mask from your Inventory anywhere in the scene.
Go to the window marked in the screenshot and push it open to get rid of the smoke.
Once the smoke is gone, click on the Wardrobe for a Hidden Object Scene.
Screenshot
Burned Wardrobe Hidden Object Scene
Pick up everything in the screenshot to get the Book.
Screenshot
Burned Fireplace
Go right to the Burned Fireplace and extinguish the flames marked in the screenshot.
Pick up the Jackhammer and click for a close up of the fireplace.
Use the Tweezers from your Inventory to take the hot ball in the fireplace.
Screenshot
Attic Balcony
Go back through the Bedroom and upstairs to the Attic.
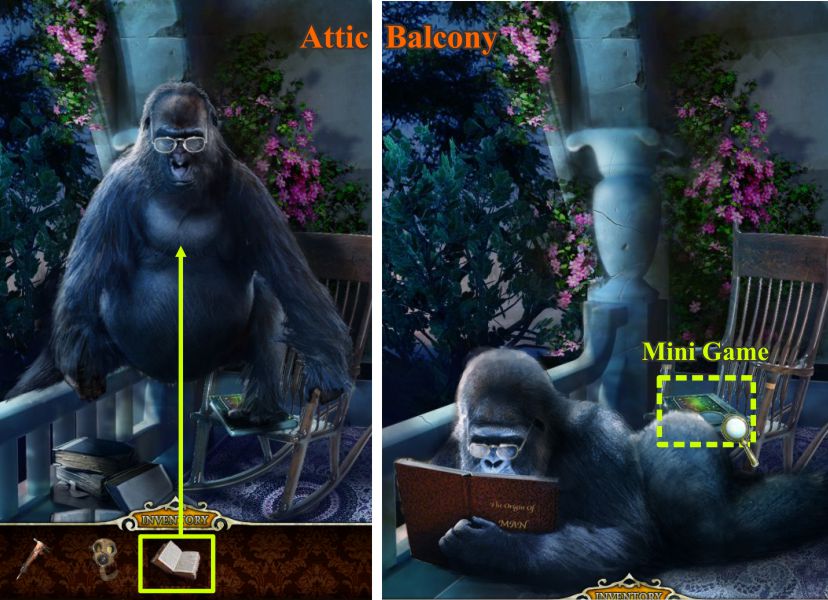
Go out on the Balcony and give the book to the gorilla.
The gorilla will move out of the way of the chair (see screenshot). Click on the chair for a Mini Game.
Screenshot
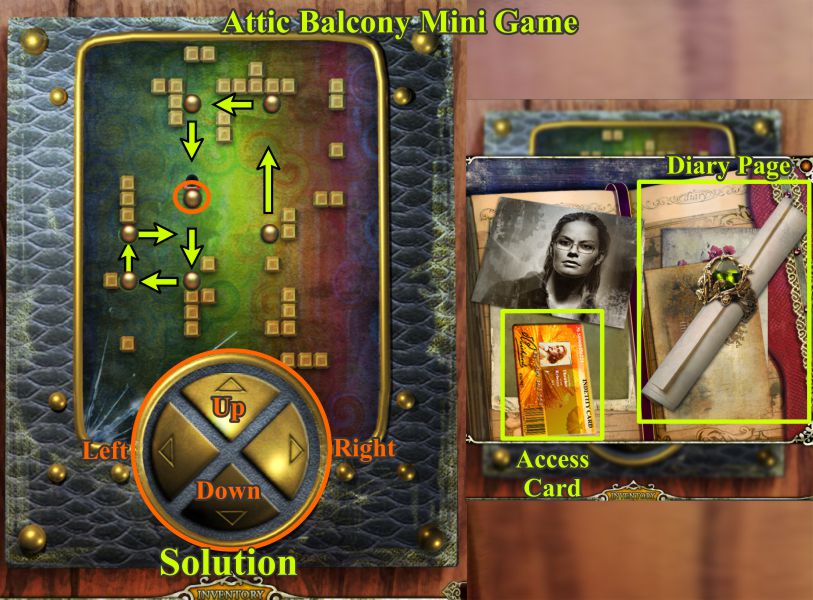
Attic Balcony Mini Game
Place the ball from your Inventory on the board to start the game.
Your goal is to move the ball around the board to get it into the hole by using the arrows in the sphere at the bottom of the scene.
Check the screenshot to see the path to use and click the sphere as follows: Down, Left, Up, Right, Up, Left, Down.
When you have completed the game, take the Diary Page and Access Card.
Screenshot
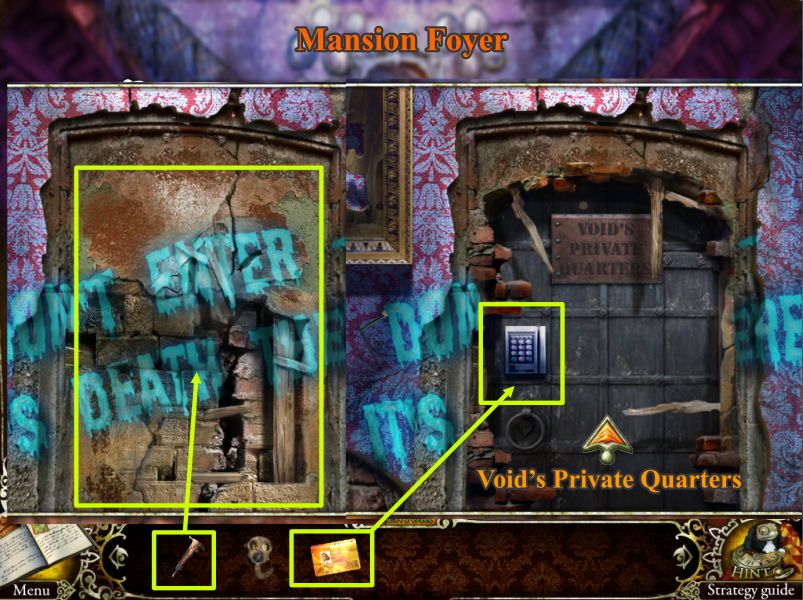
Mansion Foyer
Go downstairs to the Foyer and click on the door at the left with the message on it.
Use your Jackhammer on the door. You will reveal a lock (see screenshot) that requires an Access Card. Open the door with the card in your Inventory and enter Void's Private Quarters.
Screenshot
Chapter 8: Void's Private Quarters
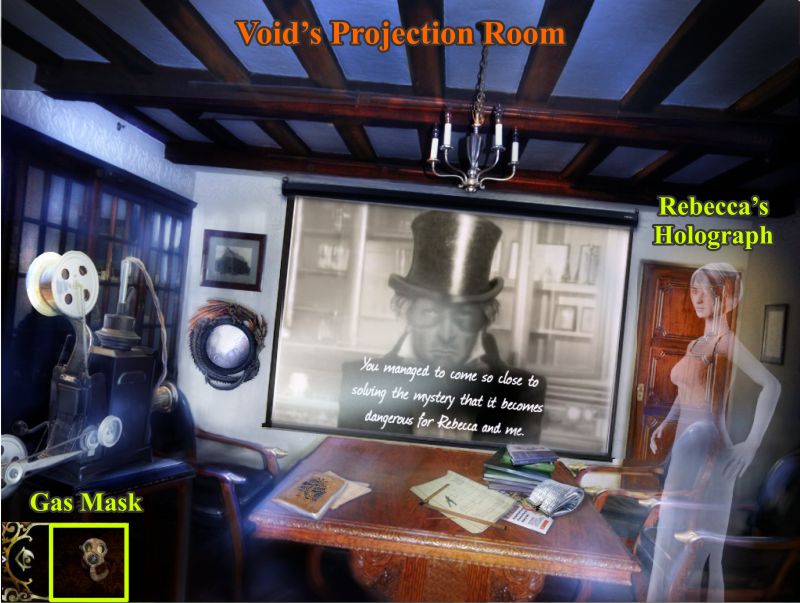
Void's Projection Room
A Holograph of Rebecca appears (see screenshot), then Void appears on the projection screen with a message for you.
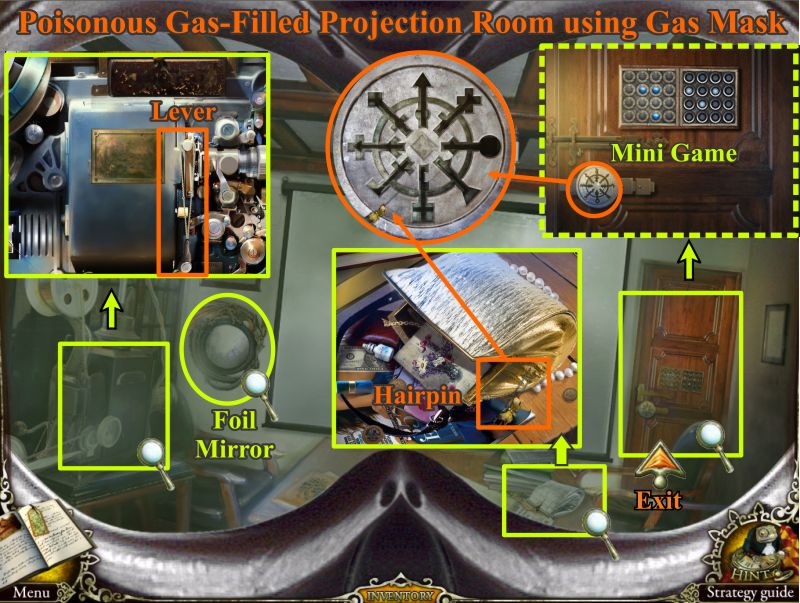
After the movie, the room fills with poisonous gas. Place your Gas Mask anywhere in the scene.
Screenshot
Gas Mask View of Projection Room
Check out all the magnifying glasses in the screenshot.
From the close up of the projector take the Lever.
Note the Foil Mirror. Click on Rebecca's purse to pick up the Hairpin.
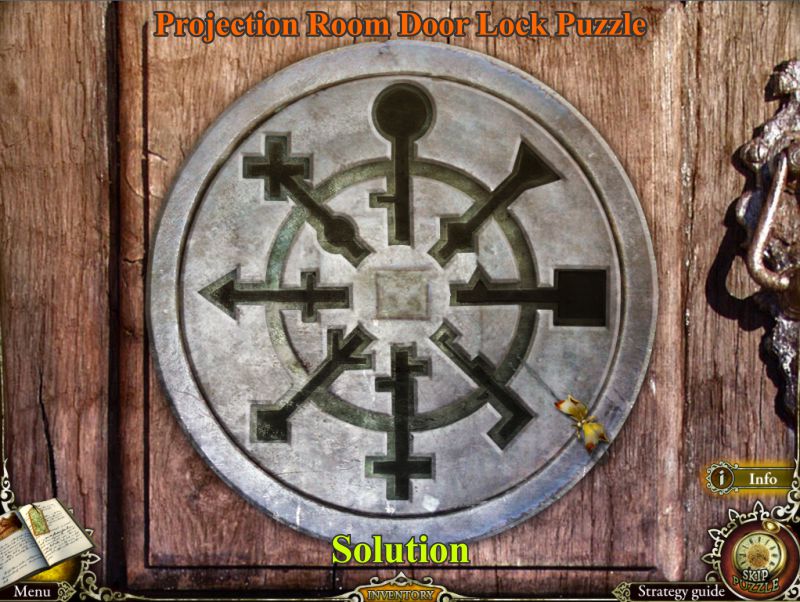
Click on the door for a 2-part Mini Game to get out of the room.
Place the Hairpin on the lock to activate the game.
Screenshot
Projection Room Door Lock Puzzle
Rotate the 2 discs so the shapes line up with the keyhole contours, as shown in the screenshot solution.
Screenshot
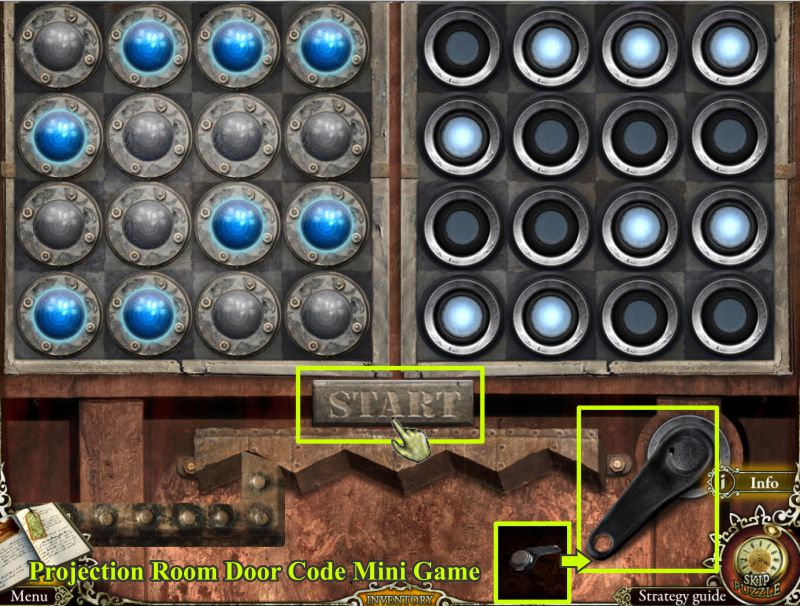
Projection Room Door Code Mini Game
Once you have picked the lock, you will need to enter the code.
Place the Lever from your Inventory as shown in the screenshot and press start to begin the game.
The panel on the left will display a random combination of lights for you to memorize before they go out.
When they go out, your goal is to press the buttons on the right panel to light up the same combination.
If you are correct, the latch at the bottom will advance once to the left to open a portion of the lock.
There are 4 rounds to complete successfully. If you make a mistake, you will go backwards once and need to start from that level.
If you get frustrated, you can skip the game once the Skip Button is full.
Screenshot
Void's Library
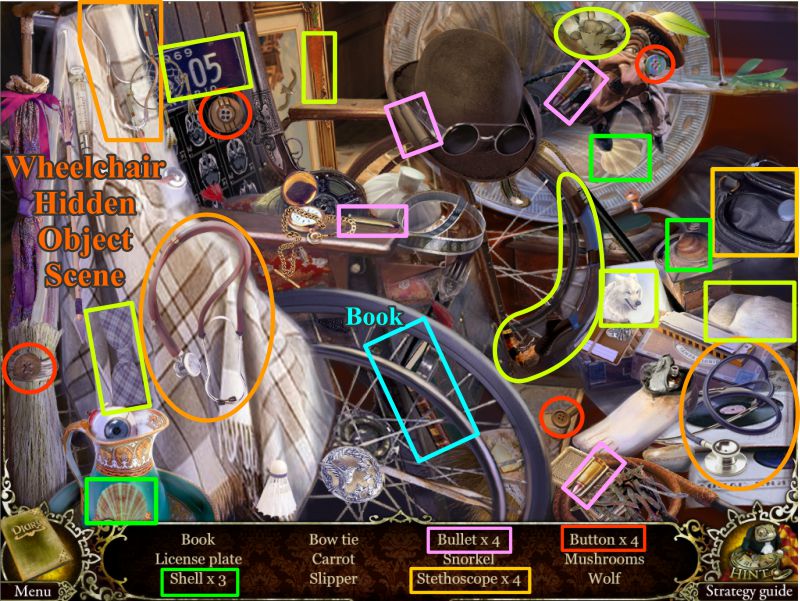
Once the door is open, you will be in Void's Library with a Grand Piano and empty Wheelchair.
Pick up the Diary Page shown in the screen shot. Check out the piano to see it requires strange sheet music.
Click on the Wheelchair for a Hidden Object Scene.
Screenshot
Wheelchair Hidden Object Scene
Pick up the Book and the rest of the items shown in the screenshot.
Screenshot
Library Window
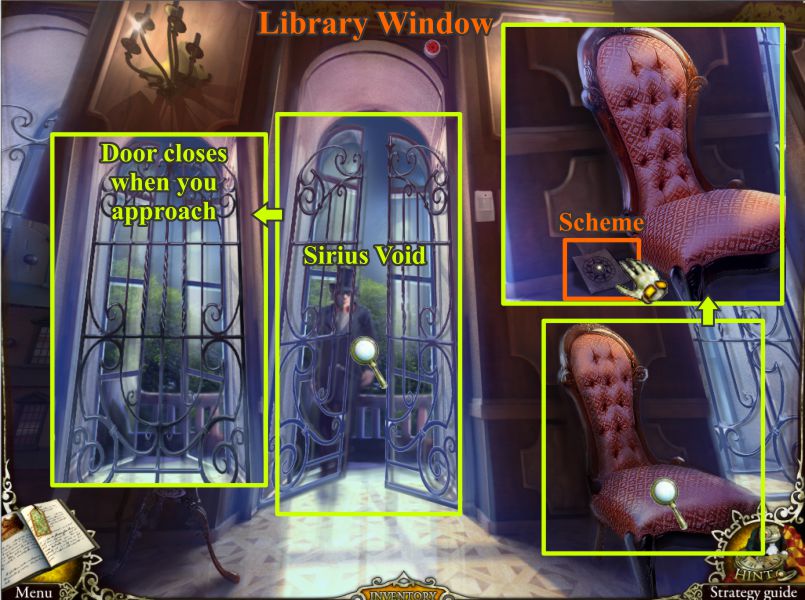
Go left to the Window. You will get a glimpse of Sirius Void (see screenshot) but when you try to go out the door, it will close.
Click for a close up of the chair and pick up the Scheme.
Screenshot
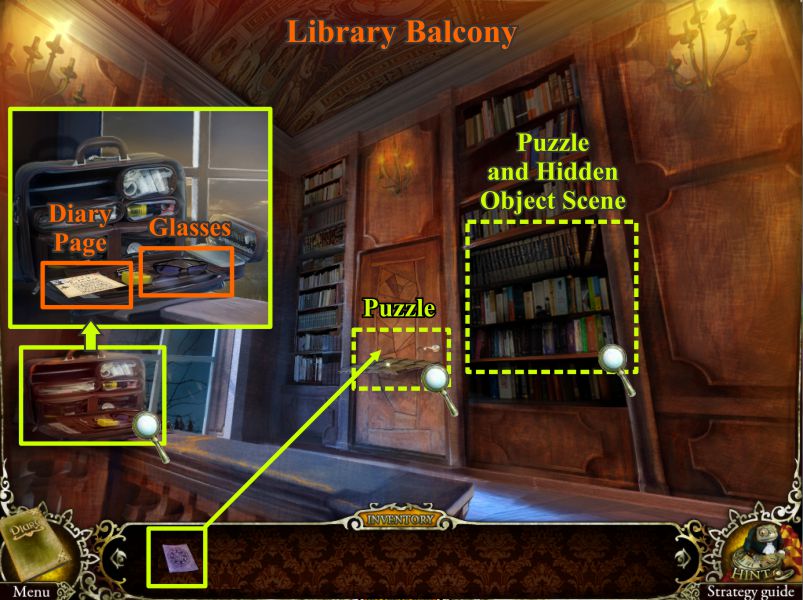
Library Balcony
Go back in the Library and upstairs to the Balcony.
Click on the Doctor's Bag at the left and pick up the Diary Page and Glasses (see screenshot).
Click on the door for a puzzle. Later on you will come back to the bookcase on the right for a puzzle and Hidden Object Scene.
Screenshot
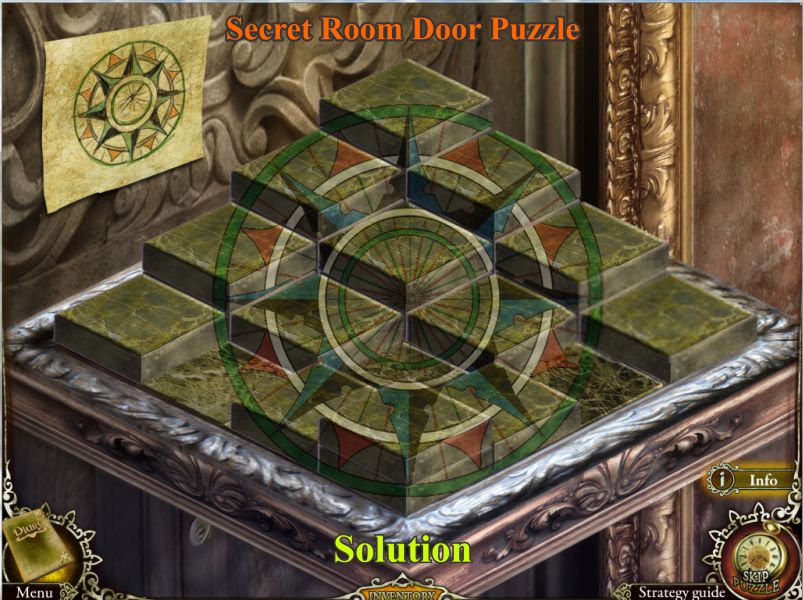
Secret Room Door Puzzle
Place the Scheme from your Inventory in the scene to start the puzzle.
Your goal is to arrange the tiles on the board to match the picture in the Scheme.
The image is painted on various sides of the tiles. You need to stack them to reveal the flat image that is shown in the screenshot solution.
Screenshot
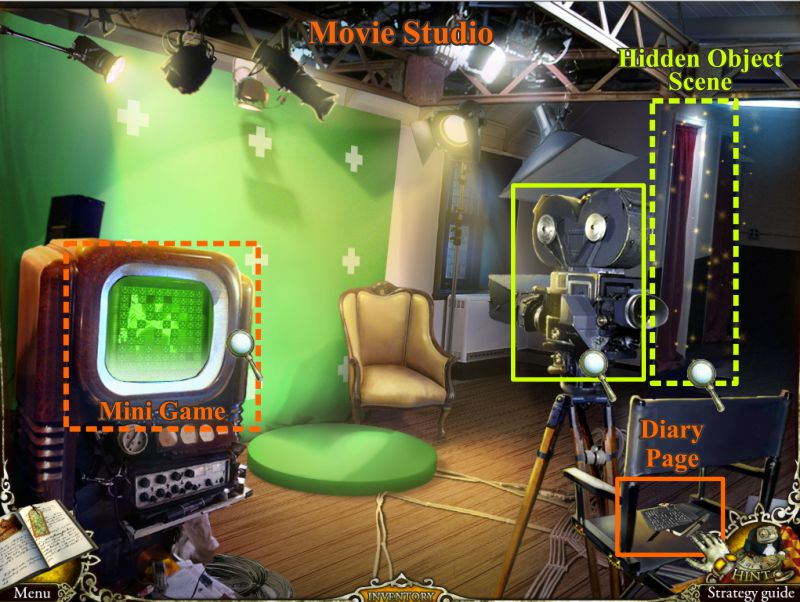
Movie Studio
Once the door is open, you will have found Void's secret Movie Studio. Grab the Diary Page and check out all the magnifying glasses in the screenshot.
First play the Hidden Object Scene and then the Mini Game.
Screenshot
Wardrobe Hidden Object Scene
Collect the Notes and the rest of the objects marked in the screenshot.
Screenshot
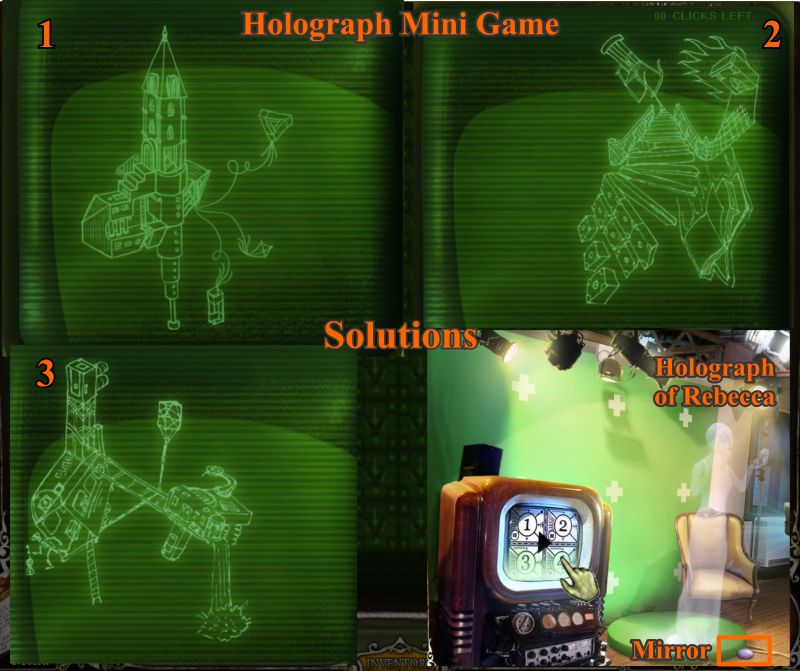
Holograph Mini Game
Click on the monitor to see 100 green cubes that actually cover a graphic.
Your goal is to flip over the cubes to reveal the graphic. Your number of clicks is limited as shown in the upper right hand corner of the scene.
You only need to uncover one graphic, but if you make a mistake, you will have to try again with a new graphic.
The possible graphics are shown in the screenshot in the order in which they appear, should you need to try again.
You get 41 cubes for the first graphic, 49 for the second, and 39 for the third.
After the completion of the Mini Game, click on the monitor. A Holograph of Rebecca will appear, and she will drop a mirror for you to pick up.
Screenshot
Puzzle Lock of Sirius' Altar of Love
Go back to the Library Balcony and click on the right bookcase.
Place the Book from your Inventory on the bookcase to trigger the puzzle.
Your goal is to press the necessary books in the correct order as shown in the Diary.
Check the screenshot for the books and the order to press them to trigger the Hidden Object Scene.
Screenshot
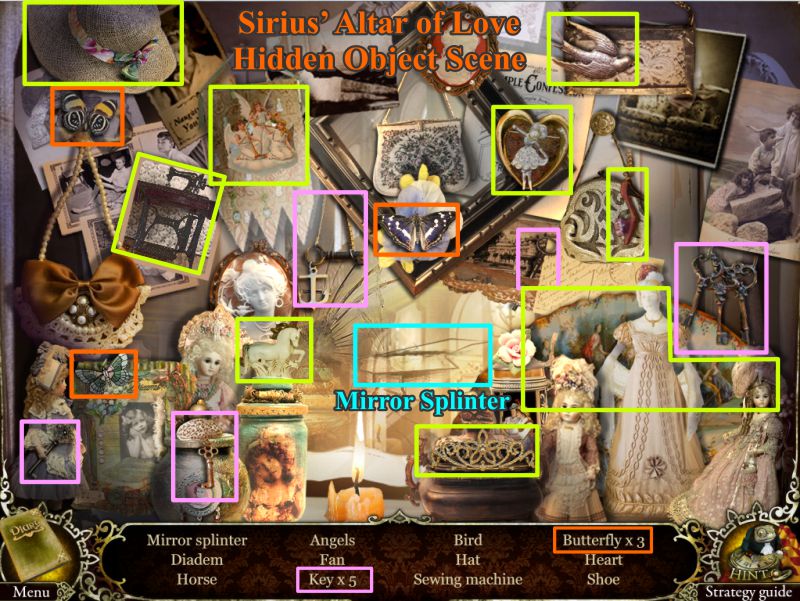
Sirius' Altar of Love Hidden Object Scene
Collect everything shown in the screenshot and you will come away with a Mirror Splinter.
Screenshot
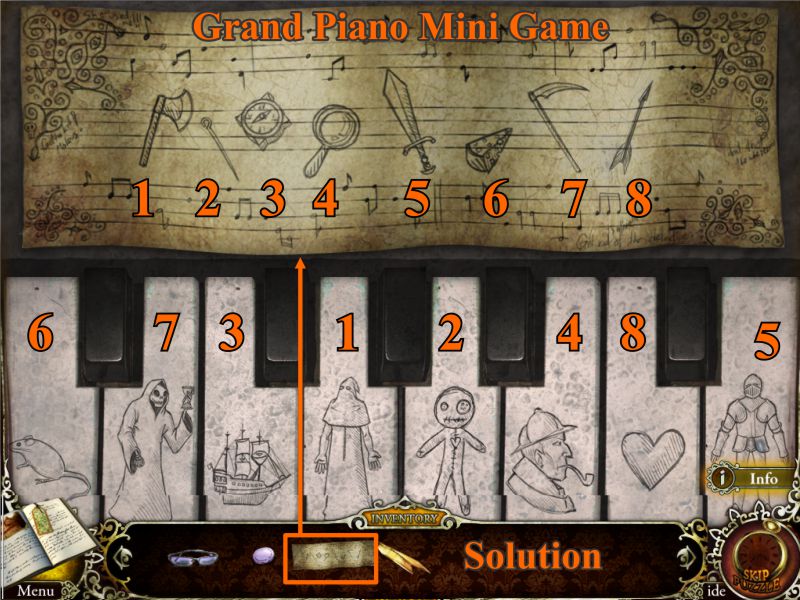
Grand Piano Mini Game
Go downstairs to the Library the click on the piano.
Place your sheet music in the scene and click on the piano keys in the order shown in the screenshot to play the melody.
The images on the piano keys relate to the objects on the sheet music, such as pin and voodoo doll.
Screenshot
Piano Hidden Object Scene
Correctly playing the melody will trigger a Hidden Object Scene.
Pick up the Razor Blade and the rest of the objects marked in the screenshot.
Screenshot
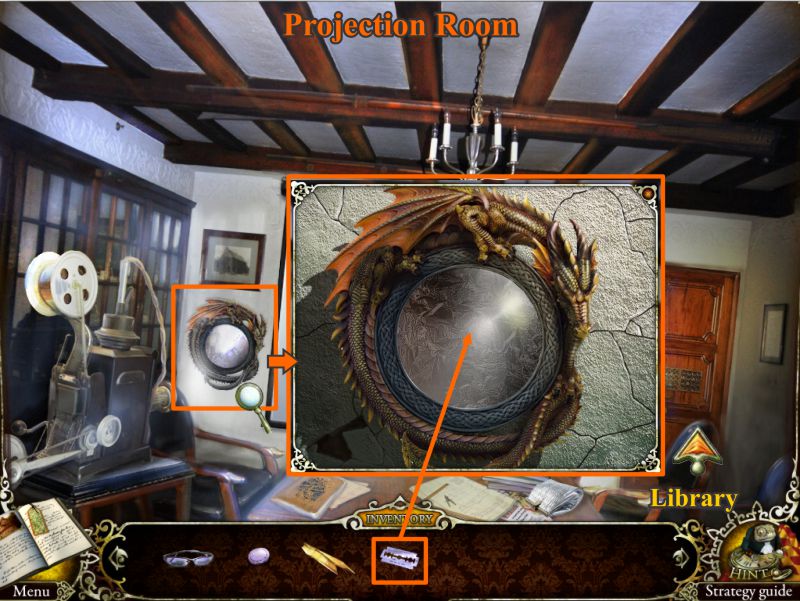
Projection Room
Click down once to the Projection Room. Click for a close up of the foil mirror.
Use the Razor Blade from your Inventory to slice off a piece of foil.
Screenshot
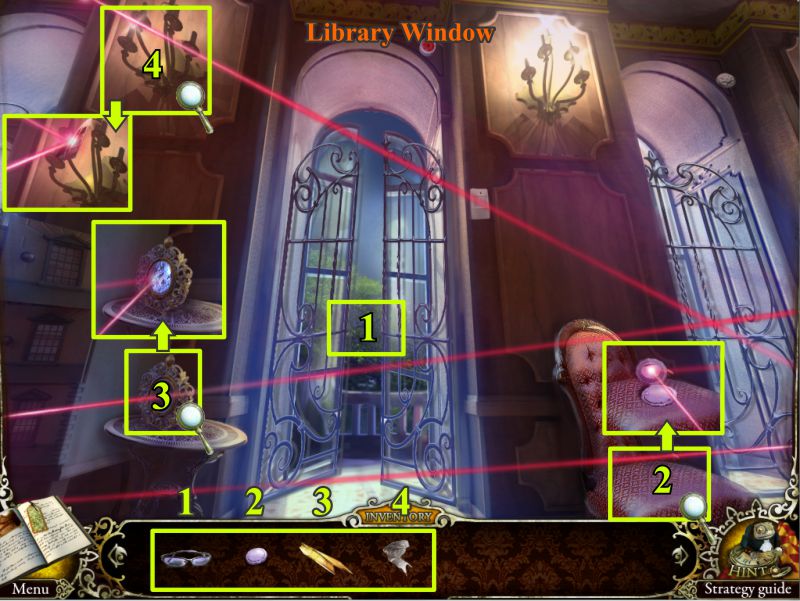
Library Window
Return to the Library. Go to the window and place the glasses from your Inventory on the door.
You will now be able to see where the laser beams are so you can deflect them.
See the screenshot for the numbered items in your Inventory and where to place them.
Once the system is blocked, exit through the door.
Jump in your car and follow Sirius back to the hotel.
Screenshot
Chapter 9: Return to the Mountain Hotel
Inside Car
When the car comes to a stop, take the Diary Page and click on the close ups shown in the screenshot.
Take the Battery and note that you need to find a cassette for the tape recorder.
Exit to the left through the door and go to the Telephone Booth.
Screenshot
Telephone Booth, Hotel Door and Porch
Take the Face Cube (see screenshot) from the Telephone Booth. Note the phone has no receiver.
At the Hotel Door, notice the dog is still chained up. You want to release him but need a tool.
Go to the Porch and check the Videophone. It is a mess, but there is a part of Void's Access card, so take it.
You need a tool to make the hole in the step larger to see what is there.
Screenshot
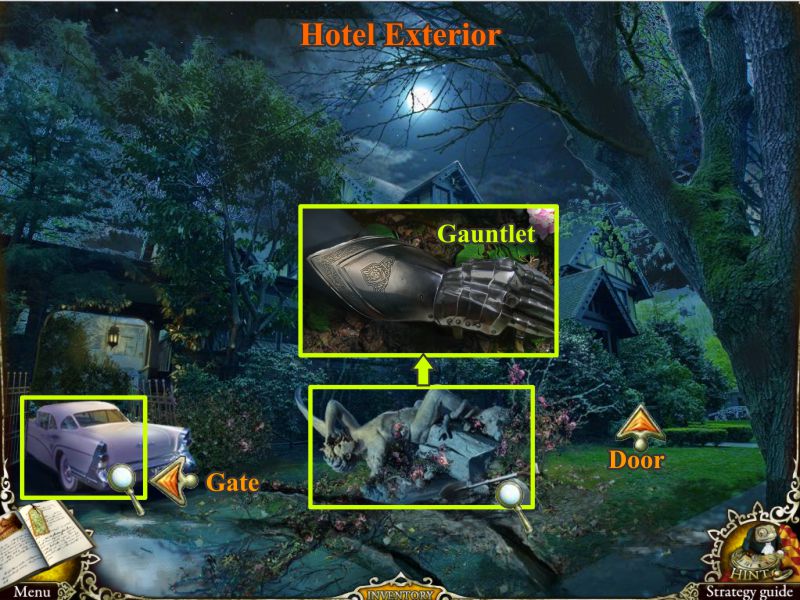
Hotel Exterior
Go left and find that Void's car hit the angel and rammed into the gate (see screenshot).
Click on the angel and take the Gauntlet.
Go to the Gate and click on the car.
Screenshot
Hotel Gate
Pick up the Step Ladder by the gate (see screenshot). Click for the car Mini Game to fix the Electrical Lock.
Screenshot
Electrical Lock on Sirius' Car Mini Game
Place the Battery from your Inventory on the board.
Your goal is to arrange the fuses to complete each circuit.
First, you must complete the red circuit by connecting it to each end of the battery.
Then complete the blue circuit so that all of the fuses light up and the green light comes on, as in the solution shown in the screenshot.
Screenshot
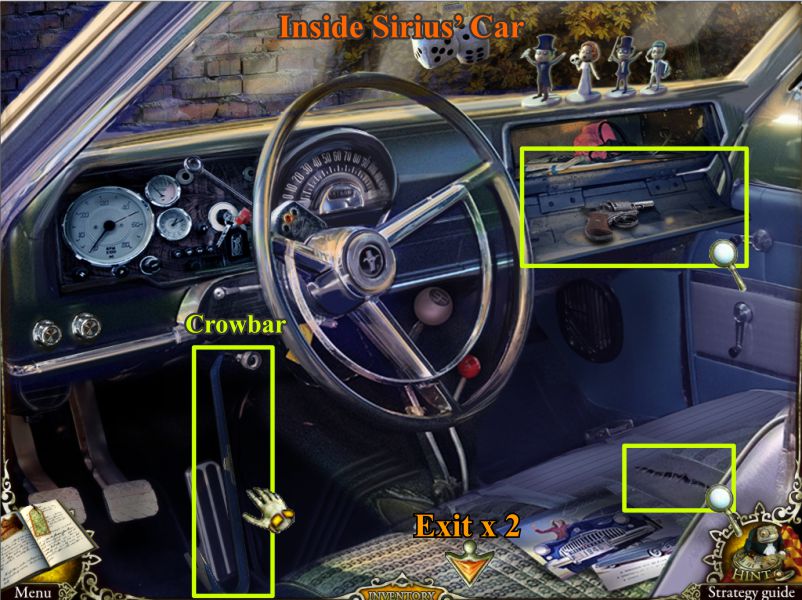
Inside Sirius' Car
Take the Crowbar and check the magnifying glasses in the screenshot.
Exit down twice to the Tram Platform.
Screenshot
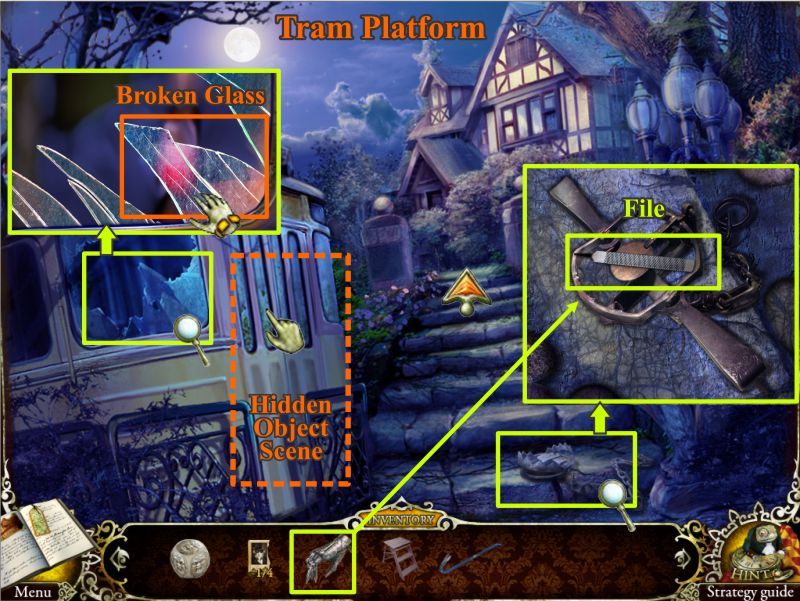
Tram Platform
Check the screenshot for magnifying glasses and click for the close ups.
Take the Broken Glass from the Tram Window and use the Gauntlet to pick up the File from the trap.
Open the Tram Door for a Hidden Object Scene.
Screenshot
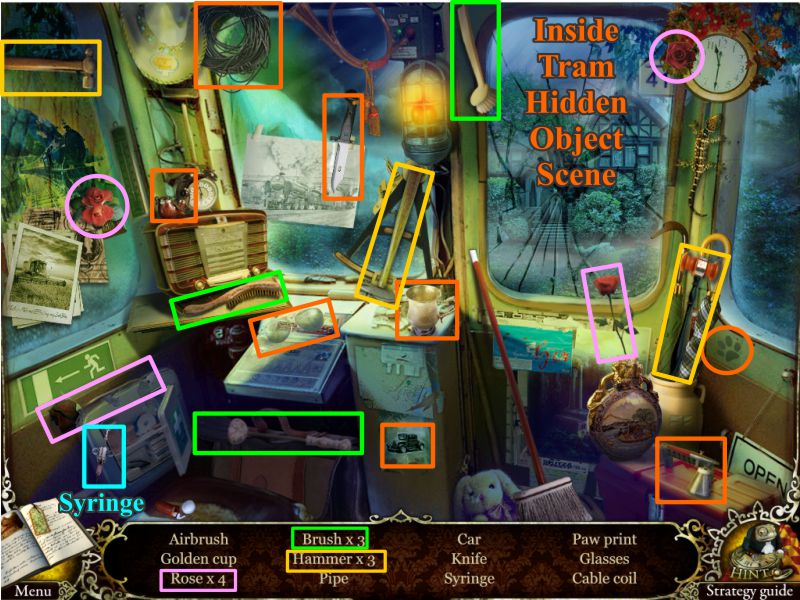
Inside Tram Hidden Object Scene
Pick up the Syringe and the other items marked in the screenshot.
Screenshot
Hotel Door
Go back to the Hotel Door, click on the dog, and use your File on the chain as shown in the screenshot to free him.
Collect the dog and go toward the porch step with the hole in it.
Use the Crowbar to open the hole and take another part of Void's Access Card.
Screenshot
Hotel Gate
Click on the Car and see the screenshot close up of the stitched area in the seat.
Use the Broken Glass to rip the stitches and take another part of Void's Access Card.
Click on the hole at the right and place the dog in the hole. He will fetch a suitcase for a Hidden Object Scene.
Screenshot
Buried Suitcase Hidden Object Scene
Pick up the last part of Void's Access Card and the other items marked in the screenshot.
Screenshot
Front Door Mini Game
Go to the Porch and click on the Videophone to place Void's Access Card to trigger the Mini Game.
The Dials all spin at different speeds. Your goal is to make them all run at the same speed in order to unlock the door.
The buttons on the side of each dial alter their speed. Click the buttons shown in the screenshot to solve the game.
Screenshot
Hotel Foyer
Check all the magnifying glasses in the screenshot.
Place the Stepladder to have a look into the Guest Room.
Click on the door at the left and place the Face Cube to trigger the puzzle.
Screenshot
Bedroom Door Mini Game
Your Goal is to remove all the faces at the same time. Use the arrows in the square in the upper right to move them in the direction you want them to go.
If you make a mistake and one or more of the faces disappear too soon, you can use the reset button to try again.
See the step-by-step solution in the screenshot.
The completion of the game will trigger a Hidden Object Scene in the Bedroom.
Screenshot
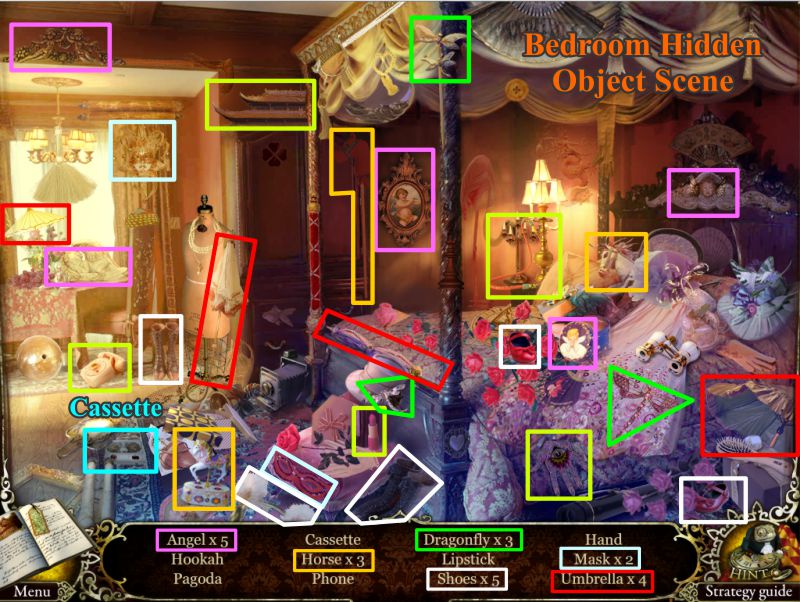
Bedroom Hidden Object Scene
Collect everything shown in the screenshot and you will get a Cassette.
Screenshot
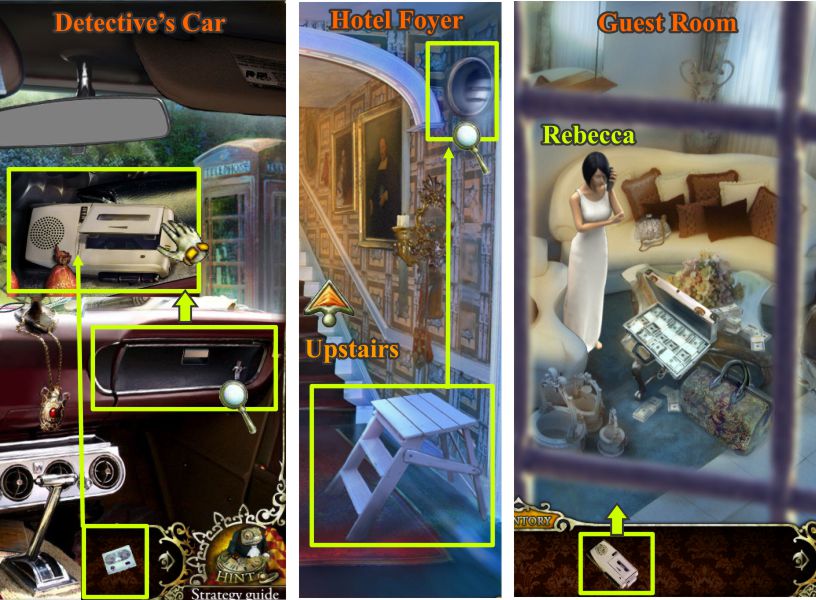
Detective's Car, Hotel Foyer and Guest Room
Go to your car, place the Cassette in the tape recorder (see screenshot) and collect the tape recorder.
Go back to the Hotel Foyer and up on the stepladder to peek in the Guest Room.
Place the tape recorder anywhere in the scene to record Rebecca's conversation.
Screenshot
Upstairs Hall and Void's Office
Click on the panel at the left and place the tape recorder anywhere in the scene to unlock the door to Void's Office.
Click on Void and take Diary Page shown in screenshot.
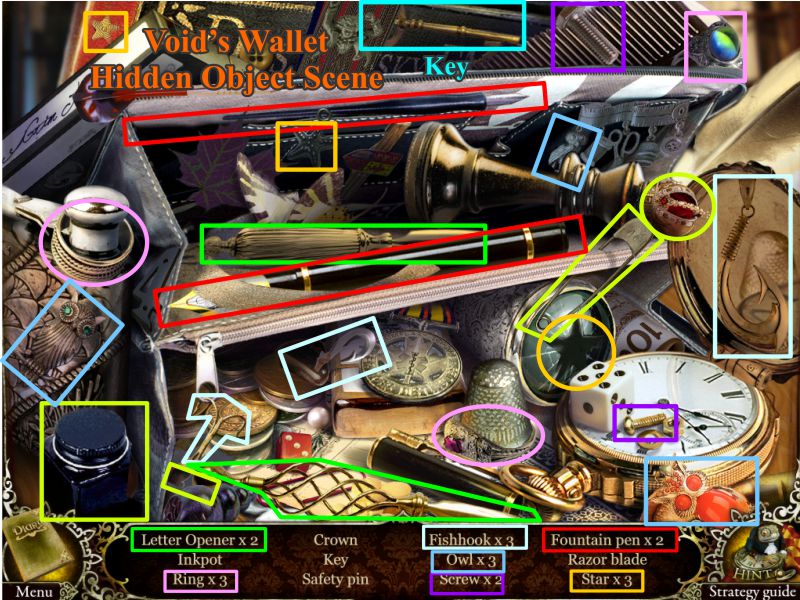
Click on Void's Wallet on the floor for a Hidden Object Scene to get the key to unlock the desk drawer.
Screenshot
Void's Wallet Hidden Object Scene
Collect everything in the screenshot including the Key.
Screenshot
Sirius Void's Desk
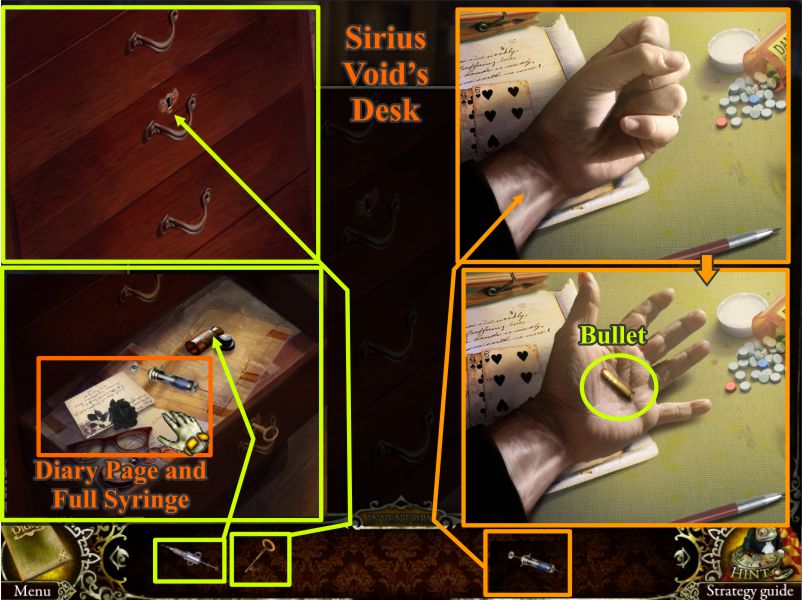
Use the key to open the Desk Drawer and fill the syringe with the vial shown in the screenshot.
Collect the full syringe and the Diary Page.
Click on Sirius and use the syringe on his wrist. His hand will open for you to take the bullet that is in it.
Screenshot
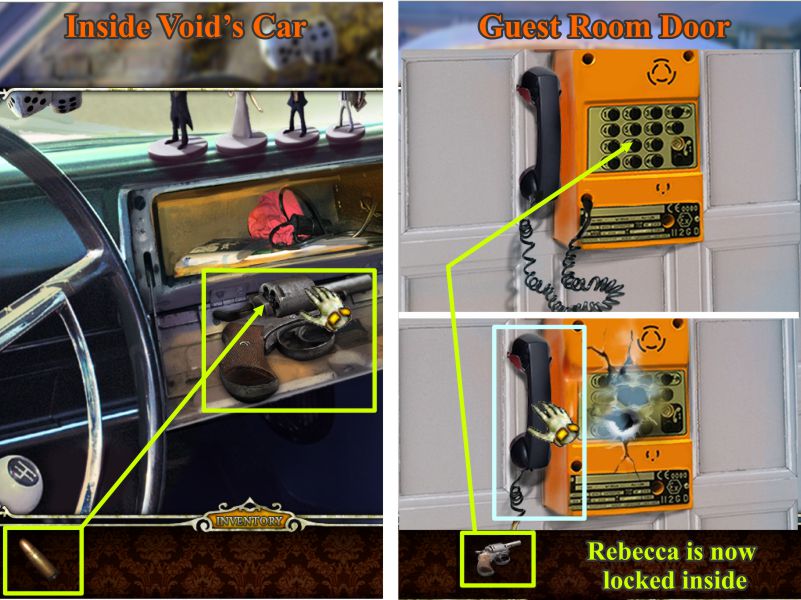
Void's Car and Guest Room Door
Go outside and left to Void's Car. Go inside.
Place the Bullet in the gun and take the gun.
Go back inside the Hotel and click on the Guest Room Door.
Shoot the lock. Rebecca will be trapped in the room.
Pick up the phone receiver.
Screenshot
Phone Booth
Go outside and to the right to the Phone Booth.
Place the Receiver on the phone.
Check the paper for the number of the Police and dial it as shown in the screenshot.
Screenshot
Congratulations! You are now officially a Mystery Tracker, having solved the Mystery of The Void.
Posted by: Jazz |
December 8, 2010 2:56 PM
|
December 8, 2010 2:56 PM
Mystery Trackers: The Void Bonus Content Walkthrough
General Information and Tips
If you purchased the Collectors Edition of the game and completed the Basic Adventure, you now have access to the Bonus Content.
You also have access to the Strategy Guide rather than just the link to go buy it, but please understand that Strategy Guides sometimes have their imperfections and don't always show the complete solution to your questions or needs.
Same General Information and Scene Navigation applies to the Extra Play as for the Basic Adventure, except that your Hints are in the form of a gloved hand rather than the frog.
Don't forget to check what is now Sirius' Diary for more information and tips because you will now be playing as Sirius Void.
Be sure to check the screenshots for information and close ups.
The Bonus Content as shown in the screenshot includes:
Music: 4 Soundtracks are available.
Screen Savers: 1 screen saver you can set up for your desktop.
Wallpaper: 18 scenes to use wallpaper on your desktop as a reminder of your achievement in solving the game.
Concept Art: 19 drawings to view to see how the developers arrived at their final drawings.
Papercraft: Instructions for making handmade paper examples of the figures of Sirius Void, Kevin Sting, Jerald Springs, and Rebecca Thatcher you've seen in the Basic Adventure.
Extra Gameplay: An Epilogue of what happens after Sirius Void is arrested and put in prison.
We will be dealing with the Extra Game portion of the Bonus Content in this walkthrough, so select "Play Game" under Bonus Content Extra Gameplay.
Screenshot
Epilogue to the Basic Adventure
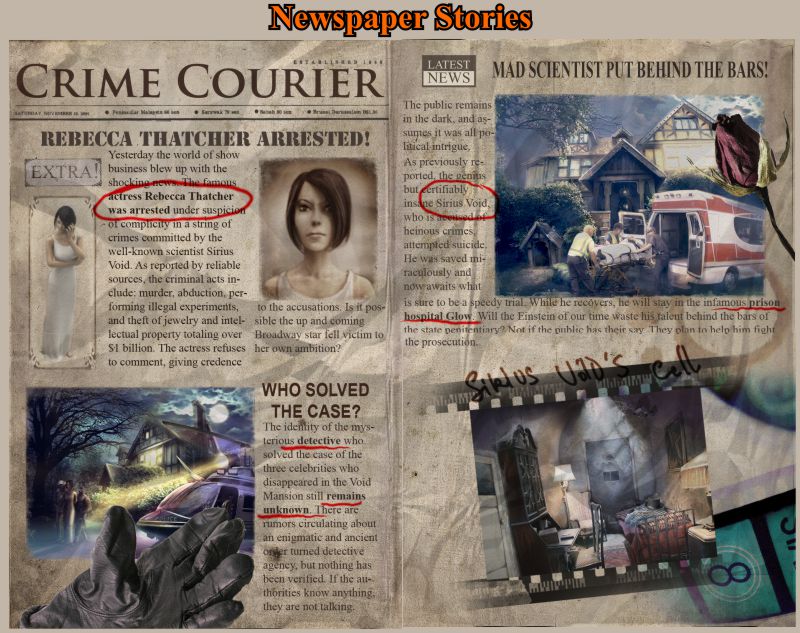
Rebecca was arrested for complicity in the series of crimes that Void committed.
Void was sent to Glow, a prison hospital in the middle of a sea.
It wasn't discovered who solved the case.
Check the screenshot for the newspaper stories and then go for a visit to Void's prison cell.
Screenshot
Chapter 1: Glow Hospital of High Security
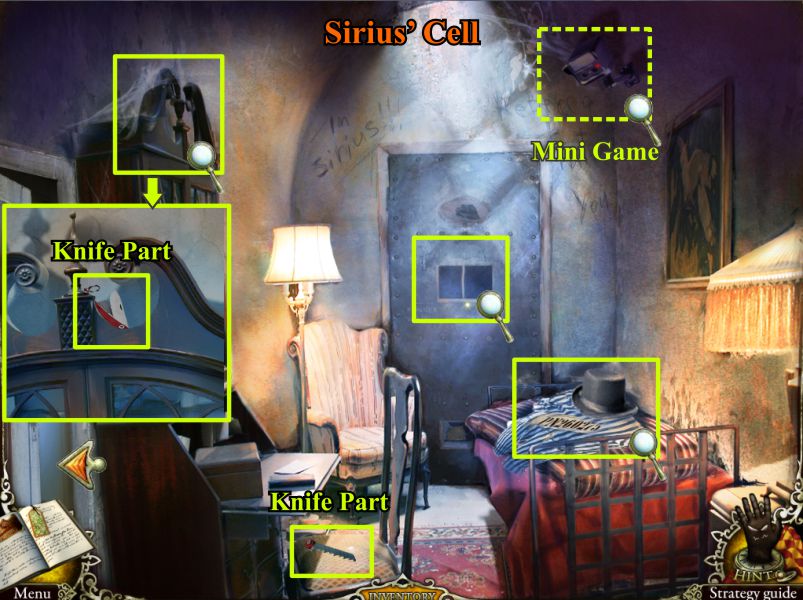
Sirius Void's Prison Cell
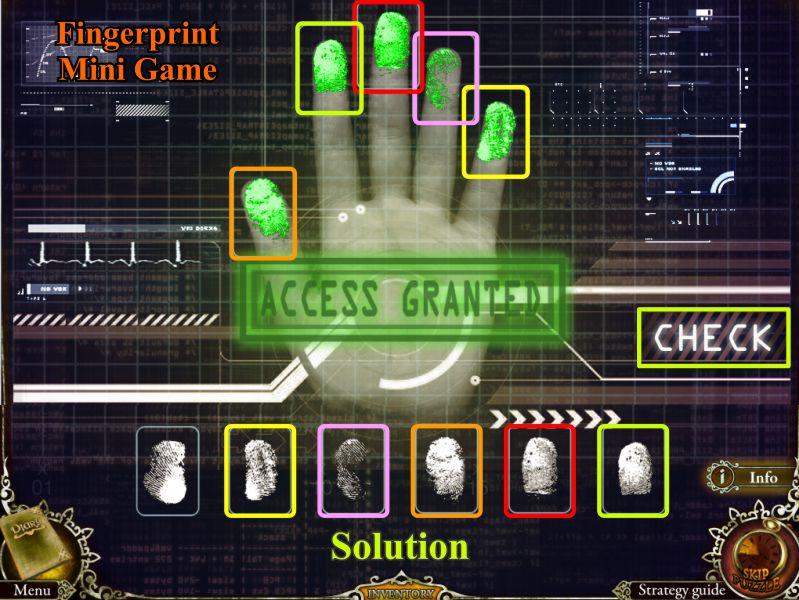
Check the magnifying glasses in the screenshot and pick up the knife part from the floor.
Another knife part can be picked up at the top of the desk.
Click on the surveillance camera for a Mini Game.
Screenshot
Sleeping Sirius Mini Game
Sirius wants to fix the video camera to show him always sleeping.
Your goal is to put the frames in proper order to show the time passing in 5-minute increments starting at 12:00.
Drag the frames to swap them.
Once you have the solution as shown in the screenshot, press the orange Play button to check the video.
Screenshot
Cell Bunk Hidden Object Scene
Find everything marked in the screenshot to get a Spring that is part of the knife.
Screenshot
Cell Bathroom
Go to the Cell Bathroom at the left.
Check the magnifying glasses to see what's there. Collect the knife part.
Pick up the Diary Page and Slippers shown in the screenshot.
Screenshot
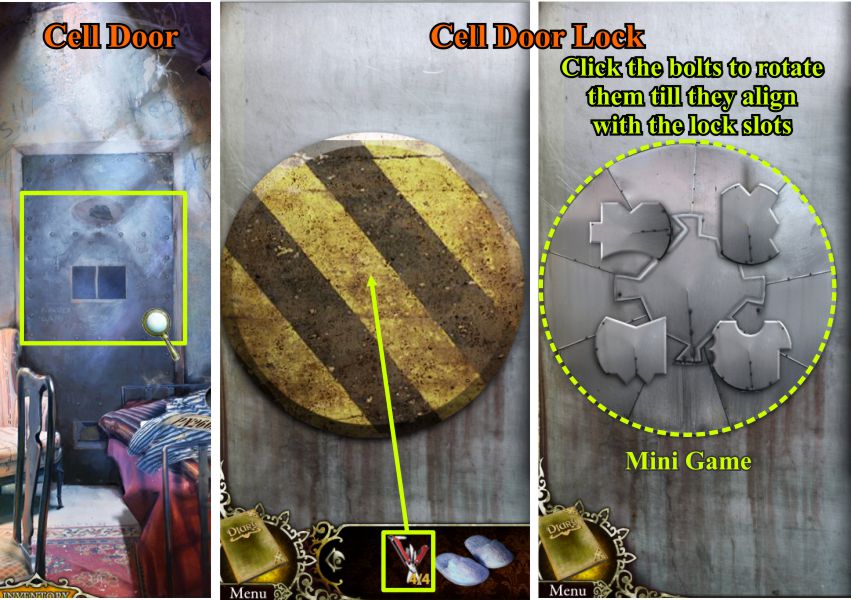
Cell Door Lock
Go back to the Cell and click on the door.
Use the knife to pry off the cover to get to the bolts as shown in the screenshot.
Your goal for the Mini Game is to rotate the bolts until they align with the lock slots.
Screenshot
Cell Door Mini Game
Rotate the bolts the number of times shown in the screenshot to complete the first part of the game.
Your goal for the second part of the game is to move a ball around the board from the beginning arrow to the exit arrow without falling into one of the traps.
Place the magnetic arrows to direct the ball around the traps.
See the solution in the screenshot.
You will find as you are placing the magnets that there is a slight difference in magnets of the same shape, so check the arrows on each one to make sure you are going in the correct direction.
Press the Start button to begin the ball on its way.
If the ball falls into a trap, swap the magnet that didn't work with another one of the same shape until the ball completes the entire journey.
Screenshot
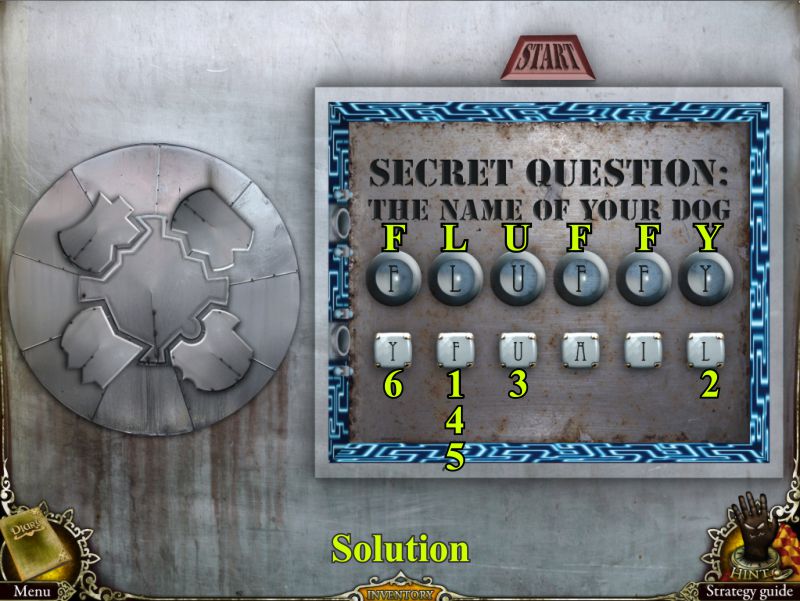
Once the ball reaches its destination, you will be asked a secret question.
Check the Diary for the name of the guard's dog and enter it using the buttons under the bubbles.
Click on the letters as numbered in the screenshot to get the name Fluffy.
Screenshot
Prison Corridor
Check the Medicine Cabinet and Computer before going to the Security Room.
Screenshot
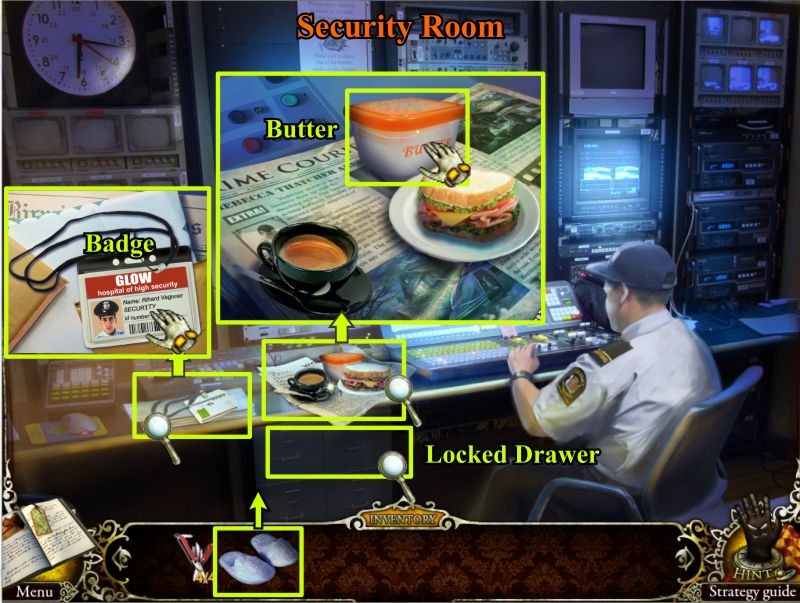
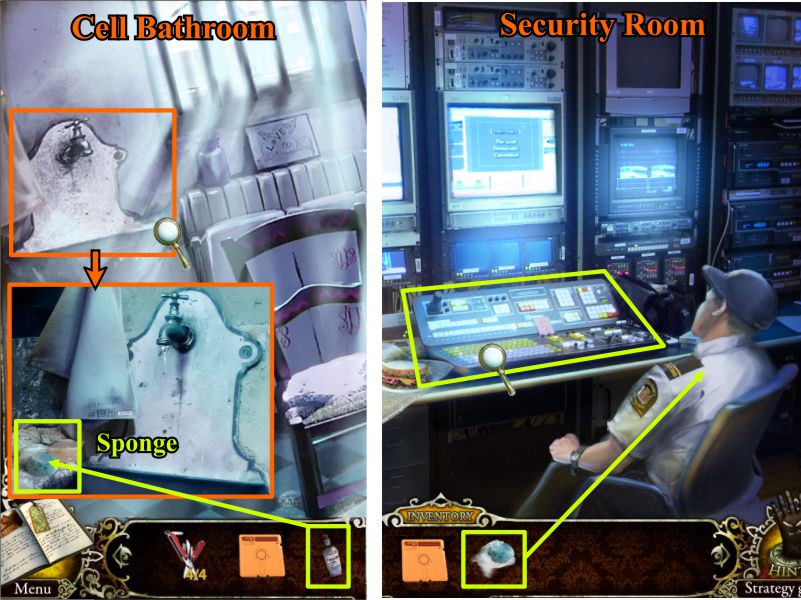
Security Room
The guard is intently watching the monitors. Place the slippers anywhere in the scene and check out the magnifying glasses in the screenshot.
Pick up the Badge and collect the Butter.
Screenshot
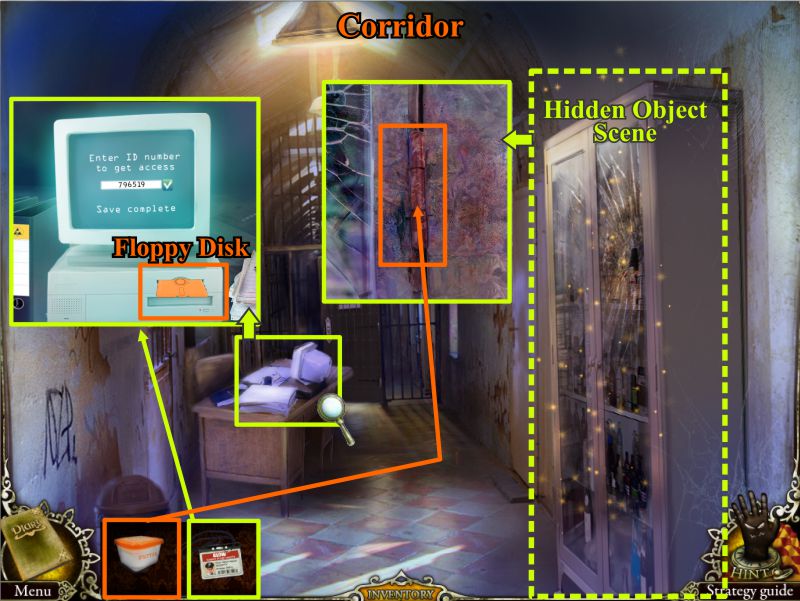
Corridor
Go back into the Corridor and place the Badge in the slot in the Computer to get access and retrieve a Floppy Disk.
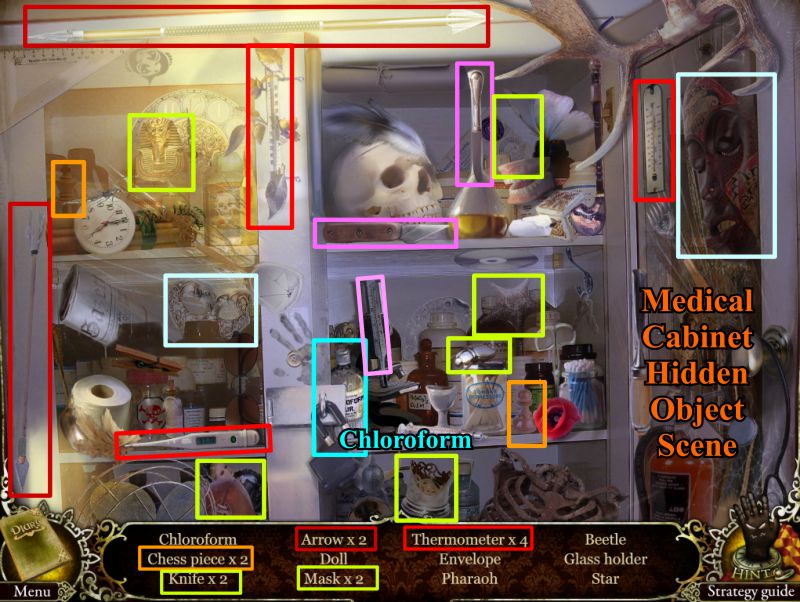
Click for a close up of the Medicine Cabinet and use the Butter to grease the rusted hinge and activate a Hidden Object Scene.
Check the screenshot for more information.
Screenshot
Medical Cabinet Hidden Object Scene
Pick up the Chloroform and the rest of the items marked in the screenshot.
Screenshot
Cell Bathroom and Security Room
Go to the Cell Bathroom. Click for a close up, as shown in the screenshot, so you can place the Chloroform on the Sponge.
Collect the Chloroformed Sponge and go to the Security Room.
Place the Sponge anywhere on the guard and he will be out cold. Click for a close up of the controls.
Screenshot
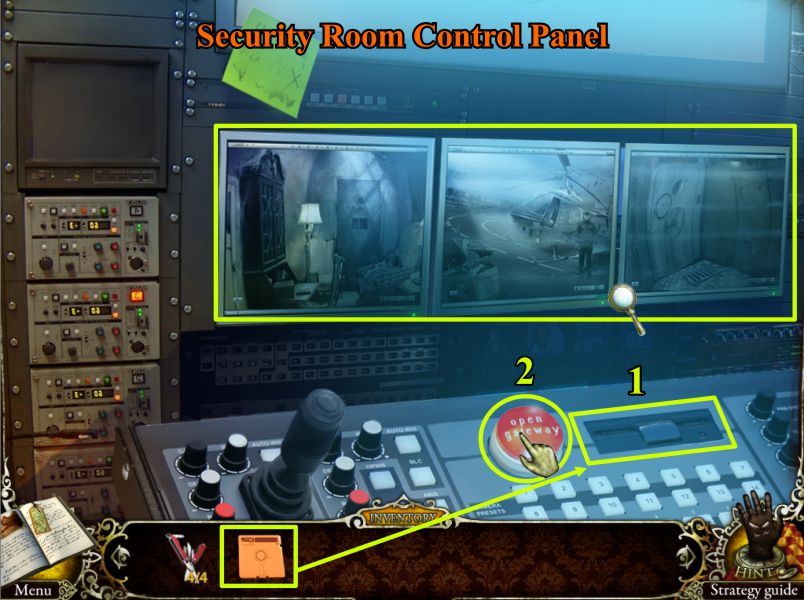
Security Room Control Panel
Place the Floppy Disk as shown in the screenshot and press the Open Gateway button.
Check the close ups of the monitor screens.
Screenshot
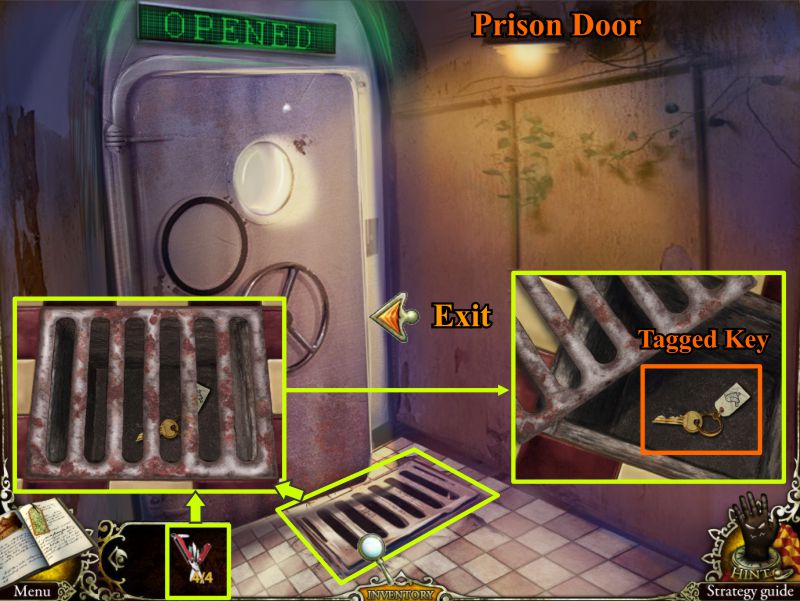
Prison Door
Go to the Prison Door that you opened.
Before going through the door, click for a close up of the grate and use your Knife to open it.
Pick up the Tagged Key shown in the screenshot.
Screenshot
Bridge to Heliport and Locker Room Door Mini Game
Sirius discovers he is in the middle of a sea, and the only way out is the helicopter protected by a guard.
Click on the door at the right for a Mini Game.
Place your Tagged Key on the door.
Your goal is to swap the keys so that they relate to the proper picture as shown in the screenshot.
Go into the Locker Room when the door opens.
Screenshot
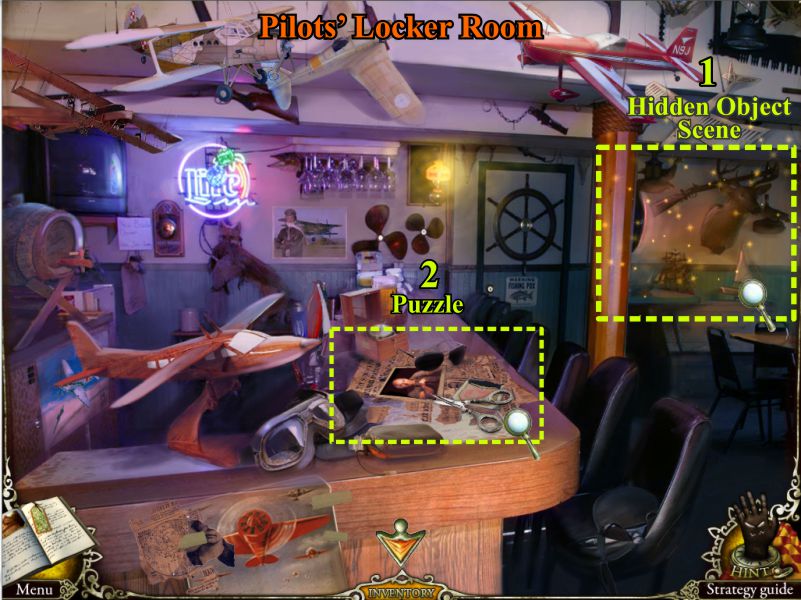
Pilots' Locker Room
Play the Hidden Object Scene at the right and then click on the puzzle marked in the screenshot.
Screenshot
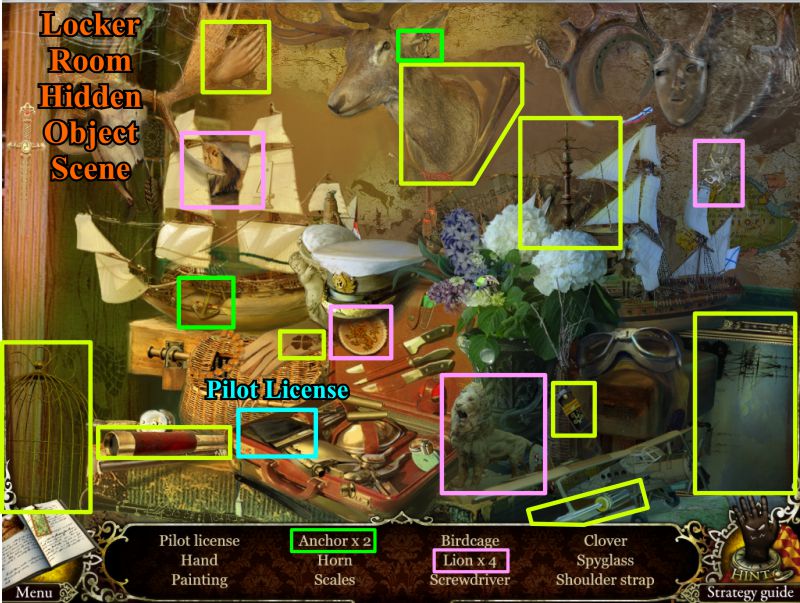
Locker Room Hidden Object Scene
Collect all the items shown in the screenshot and you will get a Pilot License.
Screenshot
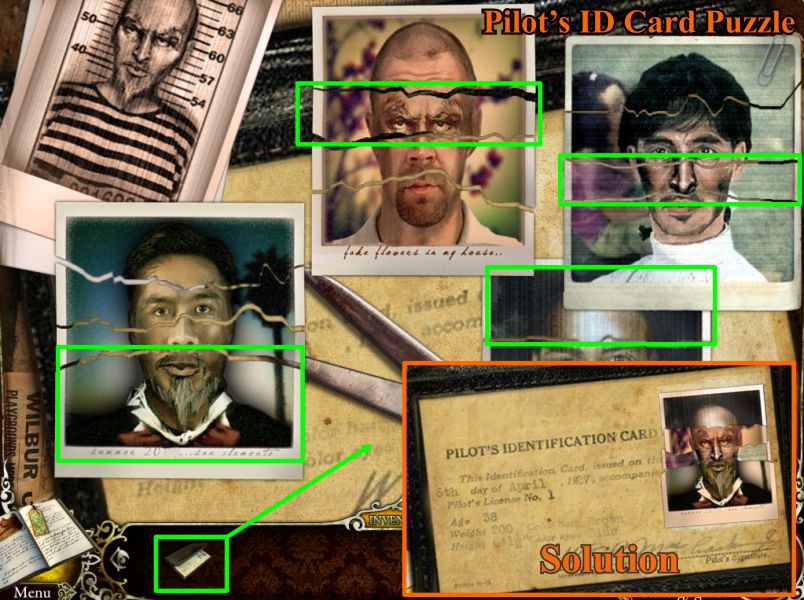
Pilot's ID Card Puzzle
Place the blank Pilot License in the scene.
Your goal is to pick out the proper set of facial features to make up an ID Card for Sirius.
There is a picture of Sirius in the upper corner of the scene to help with your decision.
The features are marked in the screenshot and the completed solution is shown.
Screenshot
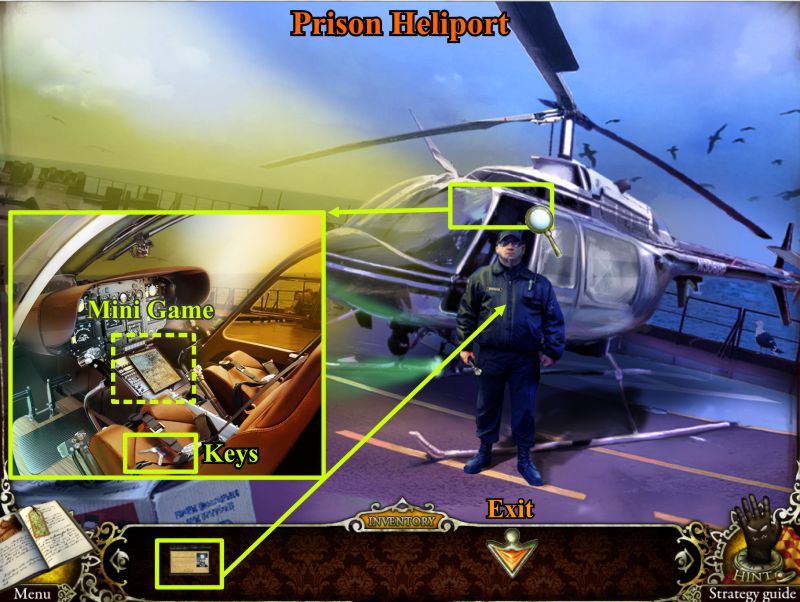
Prison Heliport
Go to the Heliport and give the fake ID to the guard who will step aside to let you into the cockpit.
Pick up the Keys and go back inside the Prison to the Security Room.
When you come back to the helicopter, you will play the Mini Game that is marked in the screenshot.
Screenshot
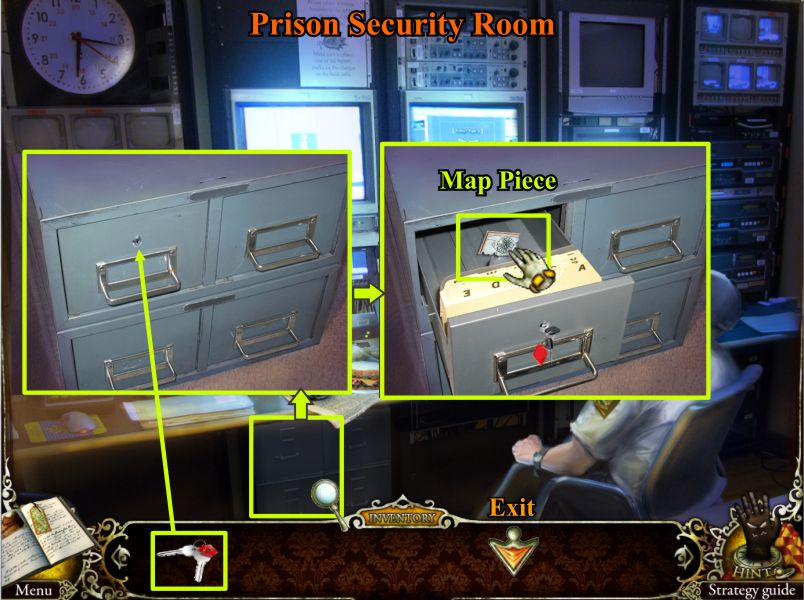
Prison Security Room
Click for a close up of the file drawers, unlock the top left one with your key and take the Map Piece.
Go back to the Heliport.
Screenshot
Helicopter Route Mini Game
Place the Map Piece in the upper left corner of the map to trigger the Mini Game.
Your goal is to route the helicopter's course to Sunset City.
Each point that you fly to must be the same distance.
The points you can go to are highlighted each time you move.
If you can't go anywhere, click on Glow and start over again.
One route is shown in the solution in the screenshot.
Screenshot
Chapter 2: Sunset City
Yacht Docked at Sunset City
Sirius lands the helicopter on a yacht docked at Sunset City.
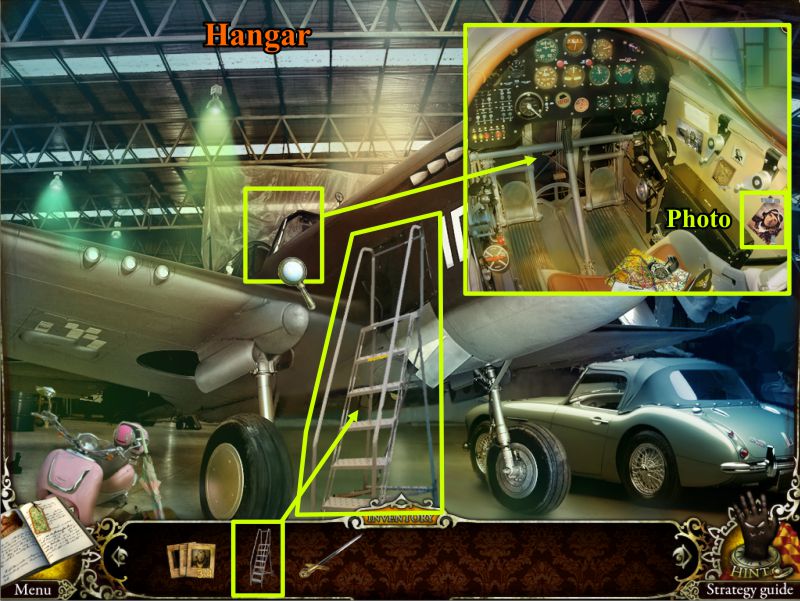
See screenshot for available locations. Go to the Hangar.
Screenshot
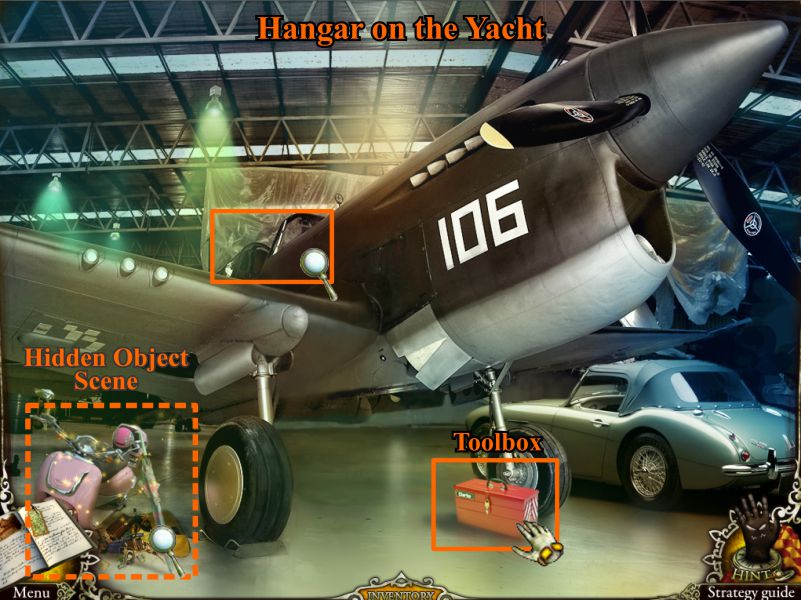
Hangar on the Yacht
Pick up the Toolbox. Note that you can't reach the cockpit.
Click for the Hidden Object Scene marked in the screenshot.
Screenshot
Hangar Hidden Object Scene
Collect everything shown in the screenshot, and you will come away with a Signal Flare.
Screenshot
Main Deck
Go to the Main Deck and note all the people in the Salon having a party.
Use the Signal Flare on the smoke alarm and everybody will flee, giving you a chance to enter an empty Salon.
Screenshot
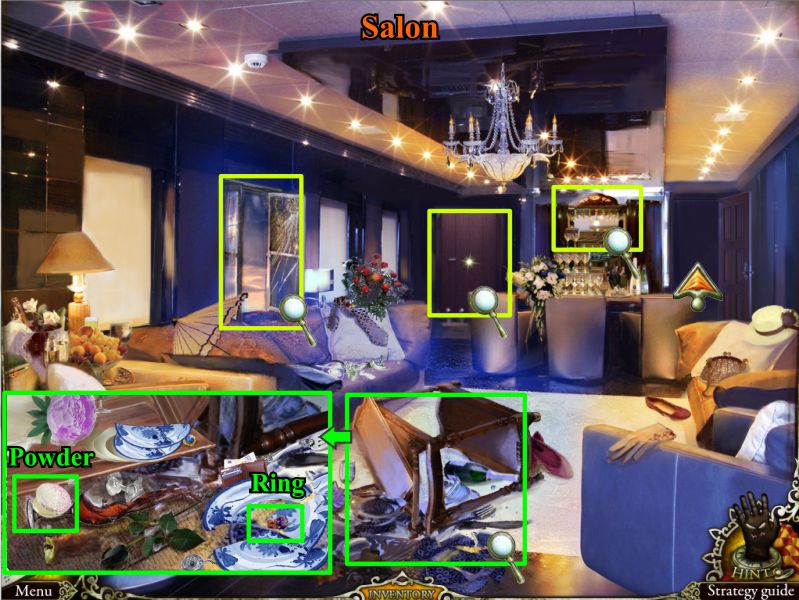
Salon
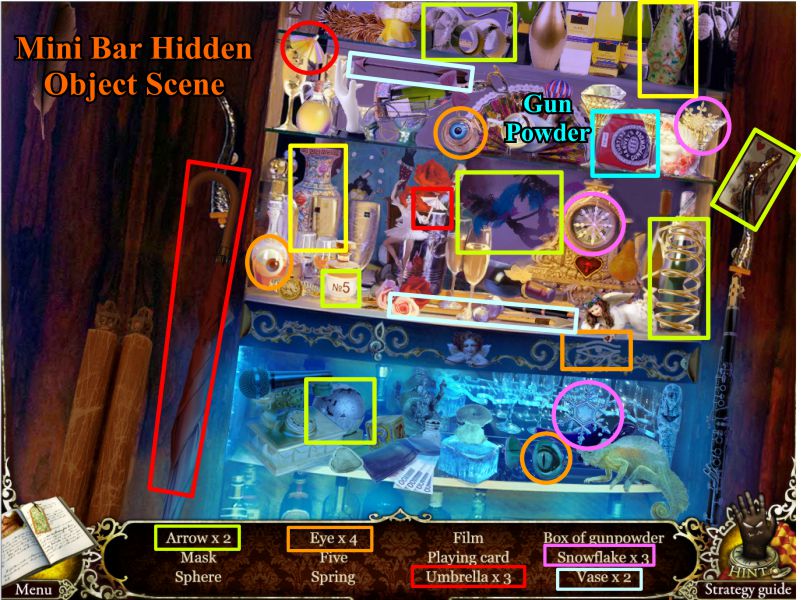
Check all the magnifying glasses in the screenshot.
The mess on the floor has Powder and a Ring for you to take.
The radio and door at the left require Inventory items you don't have, so go through the door on the right.
Screenshot
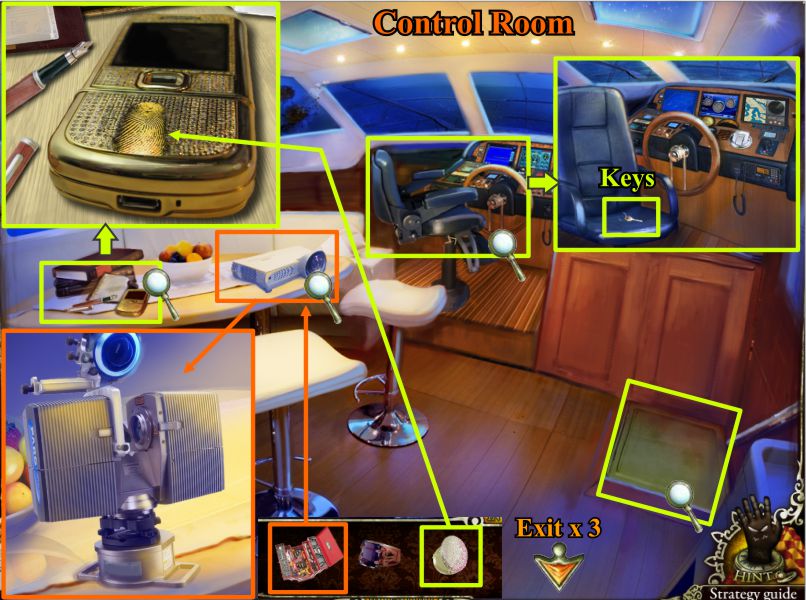
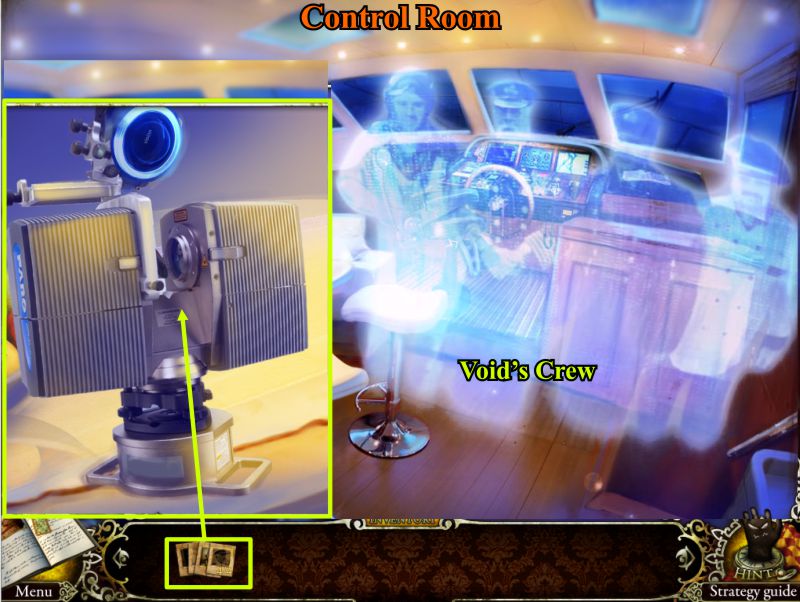
Control Room
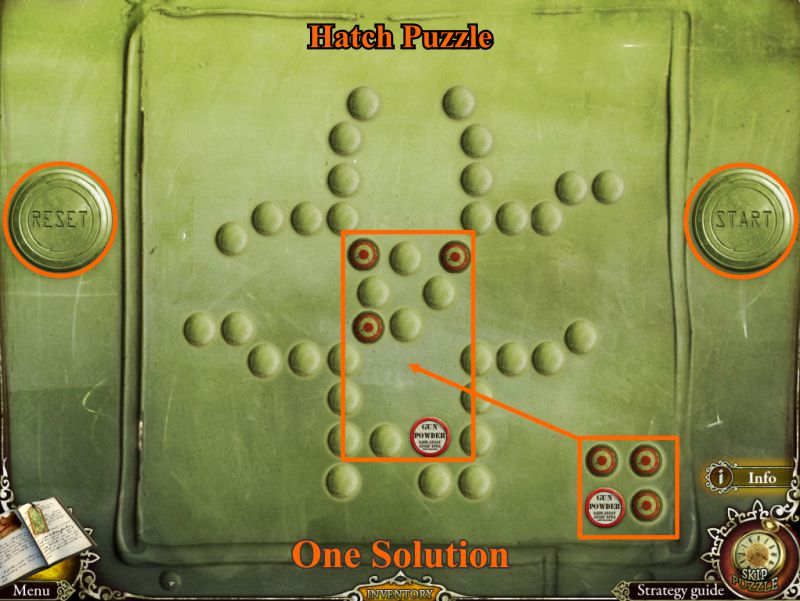
Click on the magnifying glasses in the screenshot.
You can't open the hatch yet, but there is a set of Keys on the chair in front of the controls.
Click on the cell phone and dust it with the powder from your Inventory.
You don't have anything to lift the fingerprint, so you will have to do that later.
Combine your tools with the video camera on the table and turn it into a holograph machine.
Exit down 3 times back to the landing site.
Screenshot
Yacht Landing Site
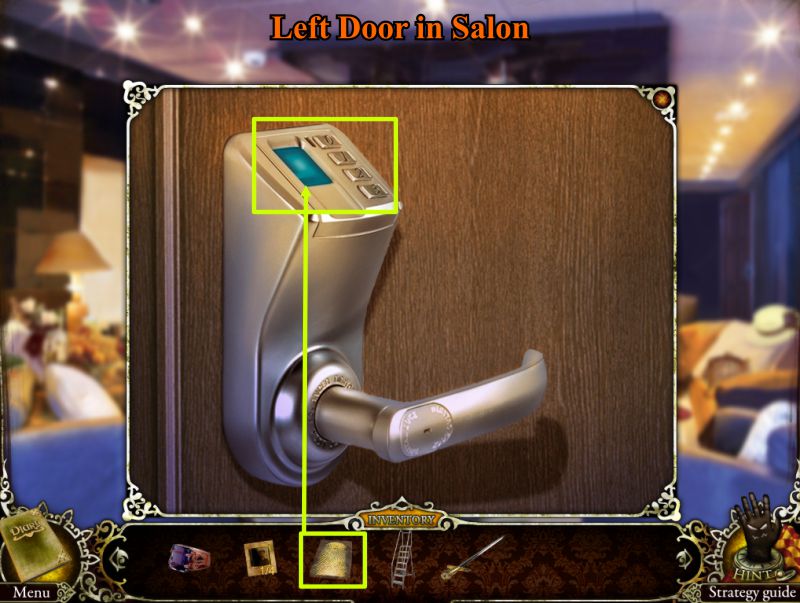
Go to the Lower Deck entrance and use the Key from your Inventory to open the door.
Enter and go down the stairs at the left to the Galley.
Screenshot
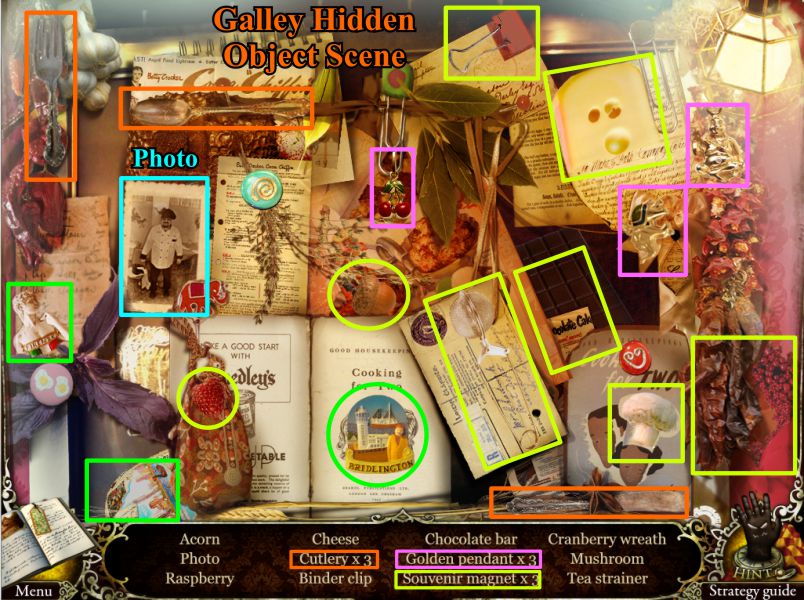
Galley
Check the close ups marked in the screenshot.
Pick up the Tape in the sink and the Antenna on the chair by the counter.
Look at Void's picture on the screen and click to play the Hidden Object Scene.
Screenshot
Galley Hidden Object Scene
Collect all the objects marked on the screenshot and you will get a photo of a crew member.
Screenshot
Salon
Go back to the Salon and click on the radio.
Connect your Antenna to trigger a Hidden Object Scene.
Screenshot
Mini Bar Hidden Object Scene
Collect all the items marked in the screenshot to get the Gun Powder.
Screenshot
Control Room
Go to the Control Room and use your roll of tape to lift the fingerprint off the cell phone.
Click on the Hatch and place your Gun Powder on it as shown in the screenshot in order to trigger a puzzle.
Screenshot
Hatch Puzzle
Your goal is to place the gunpowder and 3 additional rivets so they will trigger a chain reaction to destroy all the other rivets on the hatch.
Once you have placed them, press the Start button to explode the gunpowder.
If it doesn't work, you have a Reset button available.
There is more than one way to place everything, but one solution is shown in the screenshot.
Screenshot
Fore Deck
Go through the Hatch down to the Fore Deck.
Pick up the Ladder and Dagger as shown in the screenshot.
Screenshot
Left Door in the Salon
Click for a close up and place the fingerprint from your Inventory on the lock to trigger a Mini Game.
Screenshot
Fingerprint Mini Game
In order to gain access, you need to place 5 of the 6 fingerprints on the hand.
The screenshot shows the color-coded solution.
Once you have placed the fingerprints, press Check to see if you are granted access.
If any of the fingerprints are wrong, they will show up red rather than green, so change any loose prints and check again.
Screenshot
Stateroom
Click on the model ship and pick up the Diary Page and Flag-Bearing Arm shown in the screenshot.
Click on the box on the bed and place the ring from your Inventory in it to trigger a puzzle.
Screenshot
Ring Puzzle
Put the jigsaw puzzle together as shown in the screenshot, then take the Seal Ring.
Screenshot
Lower Deck
Go to the Lower Deck and click on the door to the right.
Place the Seal Ring on the marking to open the door and enter the Captain's Quarters.
Screenshot
Captain's Quarters
Use the Dagger in your Inventory to remove the picture of a crewmember from the journal on the table.
Click on the figure on top of the box marked Mini Game in the screenshot and place the Flag-Bearing Arm on it to trigger the Mini Game.
Once the game is over and the box opens, play the Hidden Object Scene.
Screenshot
Semaphore Mini Game
Click on the sailor's arms to move them to form a letter in the semaphore alphabet.
Your goal is to select the letters to reveal the secret note on the buttons under the sailor.
The positions necessary to arrive at the solution are shown in the screenshot.
Screenshot
The Letters are marked on the semaphore alphabet on the screenshot and the solution is shown.
It isn't necessary to repeat a letter if it is used more than once.
Screenshot
Captain's Quarters Hidden Object Scene
Collect all items shown in the screenshot to get another Photo for the crew.
Screenshot
Hangar
Click down to the landing site and go to the Hangar.
Place the ladder next to the plane and go to the cockpit.
Take the photo of the pilot. Go up to the Main Deck and to the Control Room.
Screenshot
Control Room
Click on the make-shift Holograph Machine and enter the photos to see Void's Crew as shown in the screenshot.
Screenshot
Historical Journal
Check out the Historical Journal with the account of Void's journey.
Screenshot
Congratulations! You have completed the Bonus Game of The Void, but we may not have seen the last of Sirius Void.
Posted by: Jazz |
December 10, 2010 6:08 PM
|
December 10, 2010 6:08 PM