
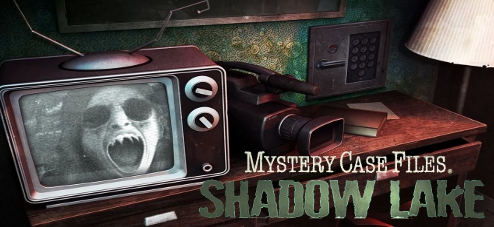
Mystery Case Files: Shadow Lake
Platform: Mac, Windows
![]() I imagine, being a member of the Mystery Case Files celebrated detective agency, you're probably used to getting crank calls. You know... the people telling you the ghost of Elvis is living in a peanut butter jar in their fridge, or a poltergeist called Windows Vista is living inside their computer. But when one particular psychic who acts as a consultant on a ghost hunting television show calls begging for your help in the deserted town of Bitterford, Maine, you suspect there might just be something bigger happening than someone wanting their fifteen minutes of fame. But in Mystery Case Files: Shadow Lake, the latest hidden-object horror adventure from Big Fish Studios, there might be something more sinister afoot than heavy fog and low-budget reality television. As you travel throughout the lonely streets, it quickly becomes clear that something dark doesn't want you there, and it might be bigger than you can handle alone. Unfortunately, that's just how you're going to tackle it... minus a little eccentric radio support.
I imagine, being a member of the Mystery Case Files celebrated detective agency, you're probably used to getting crank calls. You know... the people telling you the ghost of Elvis is living in a peanut butter jar in their fridge, or a poltergeist called Windows Vista is living inside their computer. But when one particular psychic who acts as a consultant on a ghost hunting television show calls begging for your help in the deserted town of Bitterford, Maine, you suspect there might just be something bigger happening than someone wanting their fifteen minutes of fame. But in Mystery Case Files: Shadow Lake, the latest hidden-object horror adventure from Big Fish Studios, there might be something more sinister afoot than heavy fog and low-budget reality television. As you travel throughout the lonely streets, it quickly becomes clear that something dark doesn't want you there, and it might be bigger than you can handle alone. Unfortunately, that's just how you're going to tackle it... minus a little eccentric radio support.
 Once you finally meet up with Cassandra, the psychic who summons you, you quickly discover Bitterford has a shadowy past. With Cassandra's direction, you'll be forced to travel all over the town, visiting various locations and hunting down clues and information that will slowly give you a better idea of the mystery hanging over the town. Seems like one mysterious, irresistible item might be at the center of it, but considering the bloody path its left in its wake, do you really want to find it? Luckily for you, you've got a trusty scooter, and simply clicking on the map, then any known destination, will immediately take you right to it. Cassandra will give you drawings of locations the spirits have revealed to her, and you'll need to track down each spot depicted to imbue it with the psychic energy there. Additionally, you can expect hidden-object scenes to send you crawling all over different locations and perspectives to find everything listed. Don't worry... the hint function will point you where you need to go if you need a bit of help.
 Analysis: In a way, Shadow Lake is at once scarier and darker, and somehow simultaneously cornier than its predecessors, packed with tense moments and jump scares that you'd think would clash with the likes of Jack Talon and even Cassandra's incessant nattering... and yet they don't. Apart from Jack "YO PRISONERS" Talon being the actual best, the patter and cheese feels like it rides comfortably alongside the quiet, frightening mood of the rest of the game, providing a sort of wonderfully self-aware humour and over-the-top characters. In one case, really, really over the top. Really. The actual mystery you'll be solving is surprisingly intriguing because it gives you so little of the big picture in the beginning, and the slow revelation as you travel around town is handled very well. The downside is that if you miss finding the two "secret" tapes left behind by Ghost Patrol, you'll also be missing out on some backstory and exposition that fleshes out the game's narrative. And more Jack Talon.
Luckily, Shadow Lake is surprisingly big, and definitely easy on the eyes as a whole. It also doesn't hurt that there are both big and subtle scares that do a lot to keep you on your toes and dreading every corner and closed door. Shadow Lake asks you to be more of a detective in its gameplay at times, instead of leading you around by the nose. While some of the puzzles are still a little silly, a lot of the typical adventuring comes down to spotting clues and tracking down all the little hints and items you need to put it all together, which is somehow more satisfying than having it all spelled out for you. You're always given a direction, but the game stops short of making you a little bagged lunch, ensuring your hair is properly combed, and then driving you straight there itself. The downside is that Cassandra's constant nagging starts to grate, especially since her gameplay elements are so repetitive. Lady, just post your drawings on the fridge or something and I'll get to them when I'm good and ready! And stop giving me supernatural shopping lists! Tell the spirits I said they're obsessive-compulsive jerks!
 The inventory items available on the small radial menu quickly become annoying to have to rotate through. The multi-room hidden-object hunting is an interesting idea and actually handled fairly well, though the premise for it is sort of silly, especially when piled on top of the whole Auto-Drawing thing. At least the hint function has been significantly improved since its horrible mangling in Escape from Ravenhearst, making for a much more player-friendly experience overall. With the map allowing you to leap around at a click and the uses for items typically being logical and straightforward, Shadow Lake's gameplay is largely grounded in a way players who hate fashioning keys out of rubber duckies and soda cans in other games will appreciate.
Mystery Case Files: Shadow Lake isn't quite a perfect game, but its gorgeous production values and dedication to providing an engrossing experience make it easy to recommend checking out for any fans of spooky mysteries. Ultimately its biggest flaw winds up being repetition, and the constant Auto-Drawing reconstruction and item hunts in dark locations won't be for everyone. However, the game's fantastic atmosphere, impressive length, and unexpected gruesomeness at times make it a ton of fun. Especially if you don't mind a little harsh language. "Butthead"? MY VIRGIN EARS. I just hate to think of what it's doing to Maine's tourism board. Castle Rock, Derry, and now Shadow Lake? "Come to beautiful Maine, where the sunsets are gorgeous, and the unspeakable ancient evils stay with you forever! Buy one get one ice cream sundaes!... the sundaes are also cursed."
A Collector's Edition is also available. It contains a bonus chapter, art gallery, strategy guide, and more. Remember that Big Fish Game Club Members pay only $13.99 for Collector's Editions (or 2 club credits), and collector's editions count 3 card punches of 6 total needed for a free game.
![]() Windows:
Windows:
Download the demo
Get the full version
Also available: Collector's Edition
![]() Mac OS X:
Mac OS X:
Download the demo
Get the full version
Also available: Collector's Edition


Walkthrough Guide
(Please allow page to fully load for spoiler tags to be functional.)
Mystery Case Files: Shadow Lake walkthrough
Part 1: Ch 1-5
Chapter 1: Drive Motel
Motel Entrance
Click the garbage bin at the side of the building to zoom in.
Take the PHONE RECEIVER and the PHONE BASE on top of the pile of trash.
Move forward to the Motel Parking Lot.
Motel Parking Lot
Click the back of the Ghost Patrol van to start the cut scene.
After the van leaves, go through the right door into Motel Room 2.
Motel Room 2
Inspect the open handbag at the corner of the bed.
Open the Ghost Patrol production notebook.
Read the sticky note to learn that the equipment room key is in a safe with a password composed of 3 pieces of information:
The letters of the Ghost Patrol van license plate.
Kelly's birthday.
Jack's apartment number.
Click the television to zoom in.
Open the drawer to look inside.
Take the QUARTER at the lower right corner of the drawer.
Note Kelli's uncovered cell phone number written on the envelope (these numbers are randomized each game).
Click the right antenna on the television to add the BENT ANTENNA to your inventory.
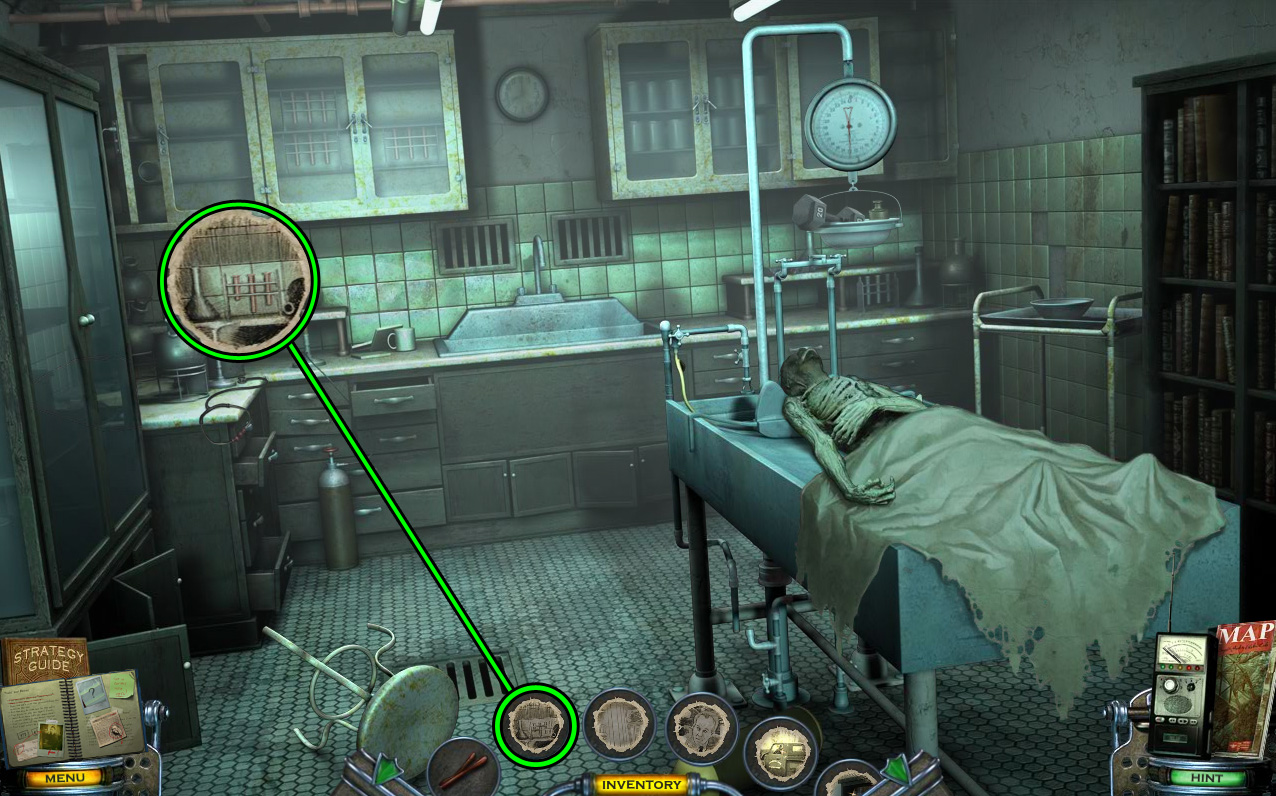
Click the oscillator control panel on the wall to the right of the bathroom door for a close-up view.
Insert the QUARTER into the coin slot.
Lift the slider all the way to the highest vibration setting.
The vibrating bed will slide slightly, revealing a phone jack on the wall. Click the small shelf next to the jack to zoom in.
Place the PHONE BASE and the PHONE RECEIVER (from the garbage bin at the Motel Entrance) on the shelf, then plug the cord into the wall.
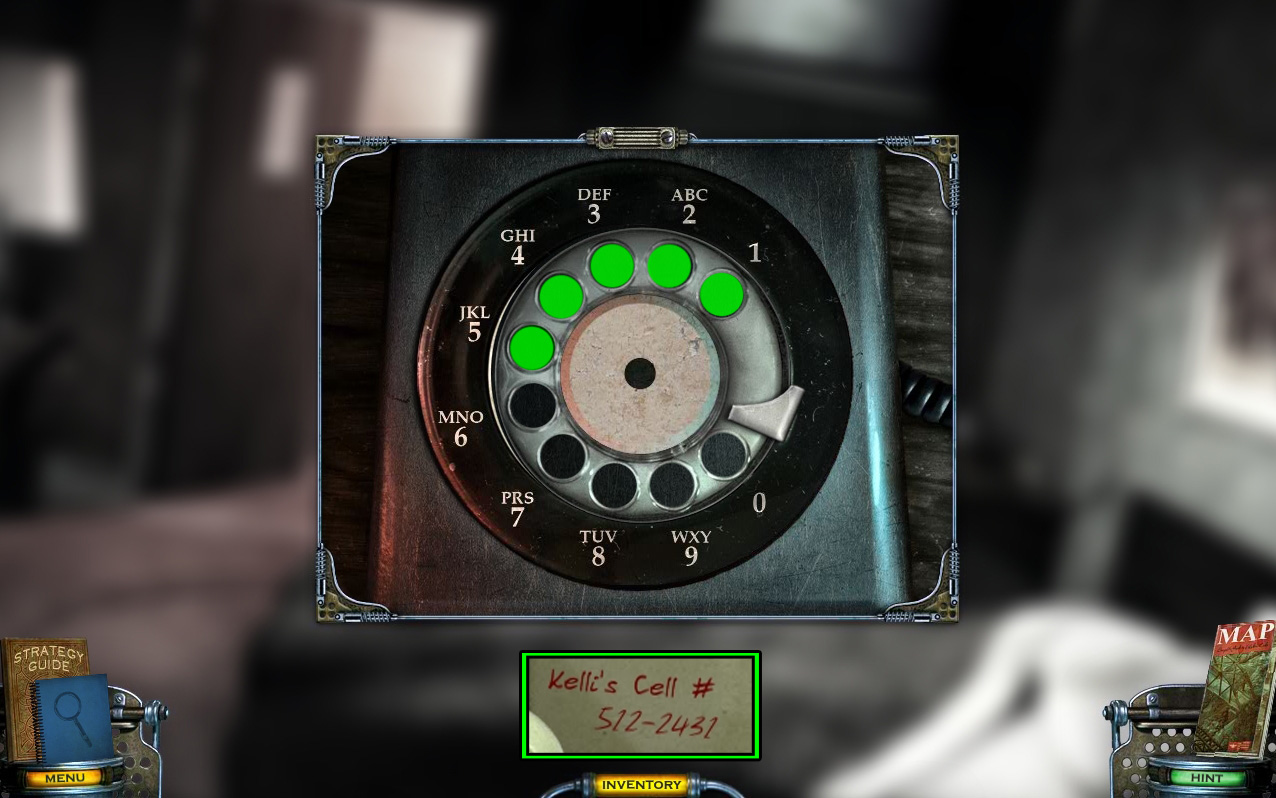
Click the telephone to view the dial.
Dial Kelli's telephone number that you found inside the drawer.
Again, this is a random number that is changed for each profile.
Screenshot.
Look under the cabinet, then inspect the flashing light inside the heel on the floor.
Click the phone to view the message inbox.
Note the date of the birthday message from "Daddy", October 7th.
Go through the open door into the Motel Bathroom.
Motel Bathroom
Inspect the poster on the wall and note the required steps to develop a photo.
Take the piece of PHOTO PAPER next to the box on the wall shelf.
Click the projector to zoom in.
Place the PHOTO PAPER on the plate.
Press the button to turn on the light.
Wait for the timer to reach between 6 and 8 seconds, then press the button a second time to turn the light off.
Take the EXPOSED PHOTO PAPER from the plate.
Click the trays on top of the sink counter for a closer look.
Place the EXPOSED PHOTO PAPER into the left tray to dip it into the solutions.
Click the developed photo once it reaches the right tray to view an image of the Ghost Patrol crew.
Note the license plate at the back of the van. The three letters on the plate are randomized each game.
Go back to the Motel Entrance.
Motel Entrance
Click the office window to zoom in.
Use the BENT ANTENNA (from the television in Motel Room 2) to pull out the guest book on the other side of the window.
Open the register and note the address beside Jack Talon's name.
The last three digits of the address are randomized.
Return to Motel Room 2.
Motel Room 2
Click the cabinet, then click the wall safe beside the television for a close-up view.
Now that you have all three pieces of information, enter the correct combination to open the safe.
Remember the message in the production notes: you need the letters on the Ghost Patrol van license plate, the date of Kelly's birthday, and Jack's apartment number.
The van license is found in the developed photo in the Motel Bathroom.
Kelly's birthday is found in the cell phone under the cabinet at Motel Room 2.
Jack's apartment number is found in the guest register from the reception window at the Motel Entrance.
Screenshot.
Open the safe and take the MOTEL KEY inside.
Exit to the Motel Parking Lot.
Motel Parking Lot
Click the door to room 1 to zoom in.
Use the MOTEL KEY (from the unlocked safe in Motel Room 2) to open the door.
Enter Motel Room 1.
Motel Room 1
Take the NIGHT VISION GOGGLES and the INFRARED CAMERA on top of the left stack of crates.
Walk towards the other side of the room to start the cut scene.
Six DRAWINGS will be added to your inventory, the Radio will be added to your toolbar, and a new location will appear on the Map.
You must find the actual locations depicted in each of the six drawings before you can return to Cassandra.
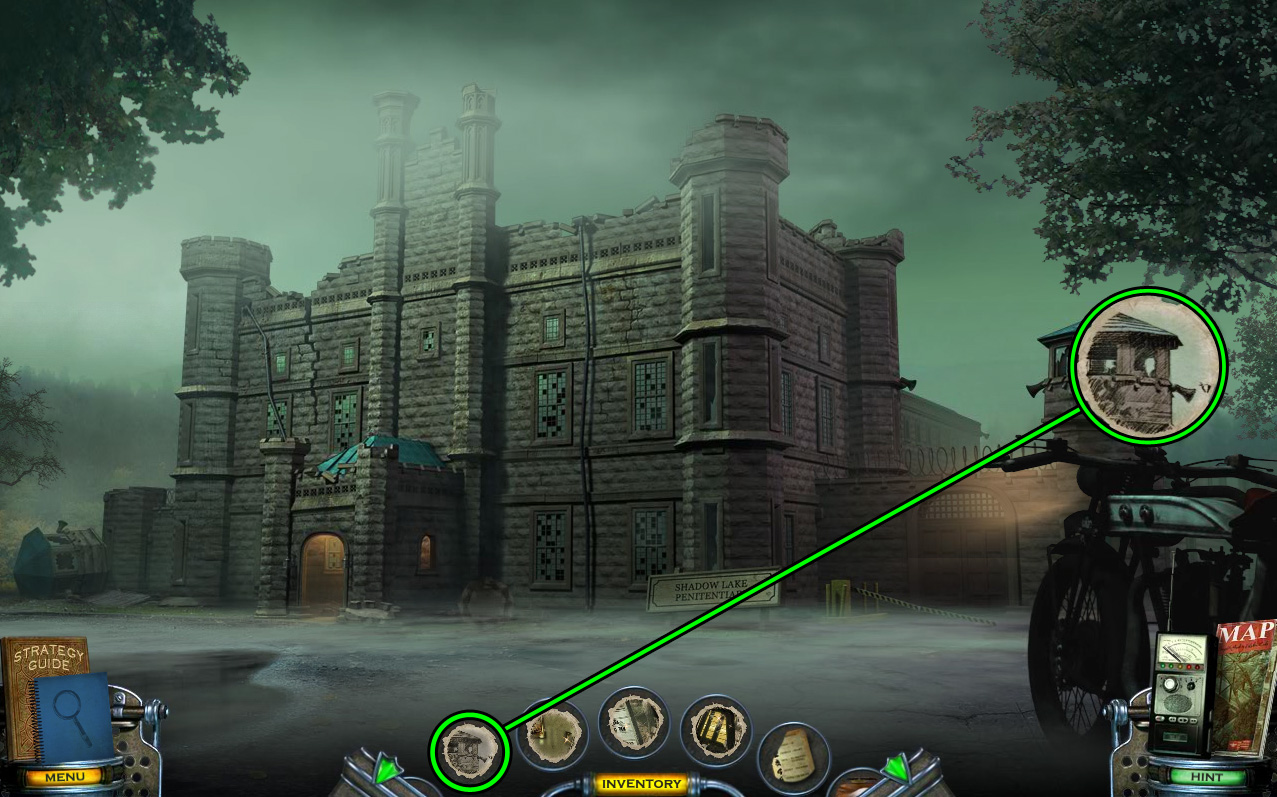
Use the Map to travel to Shadow Lake Penitentiary.
Chapter 2: Shadow Lake Penitentiary
Penitentiary Road
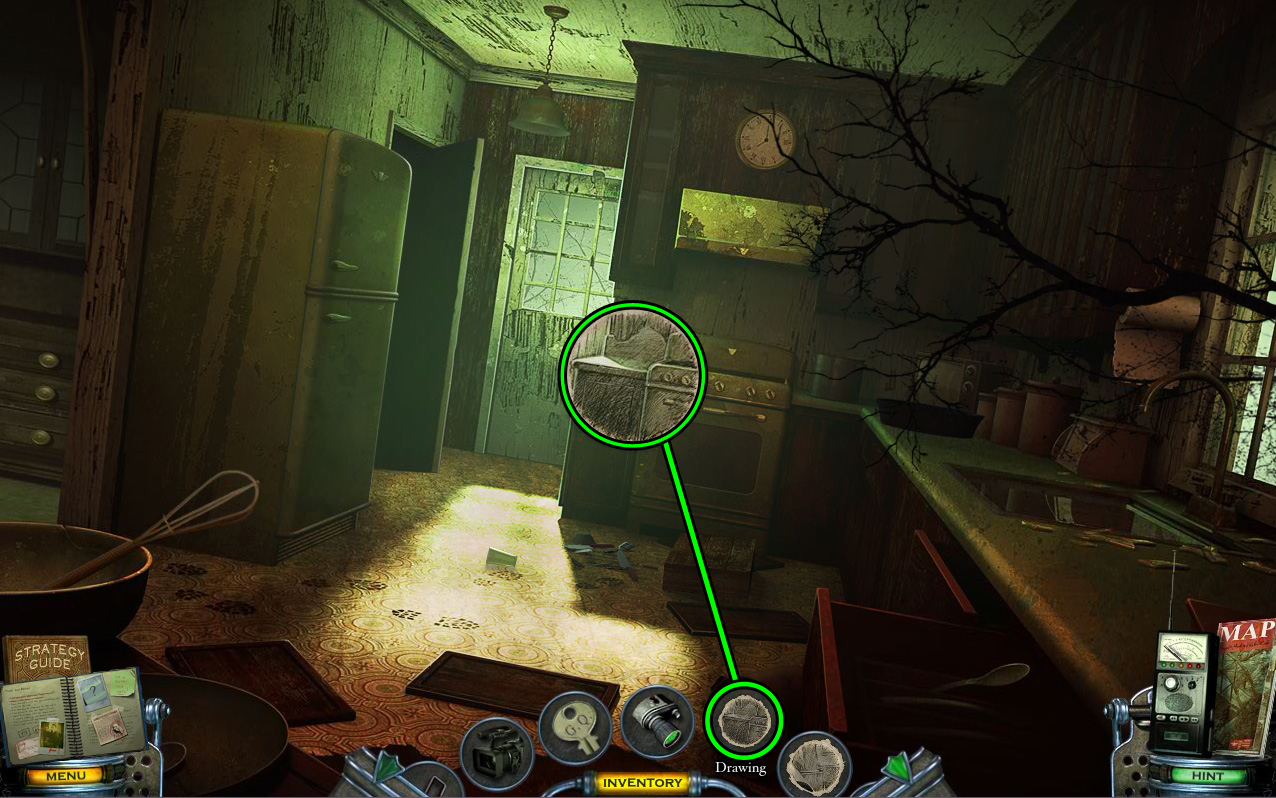
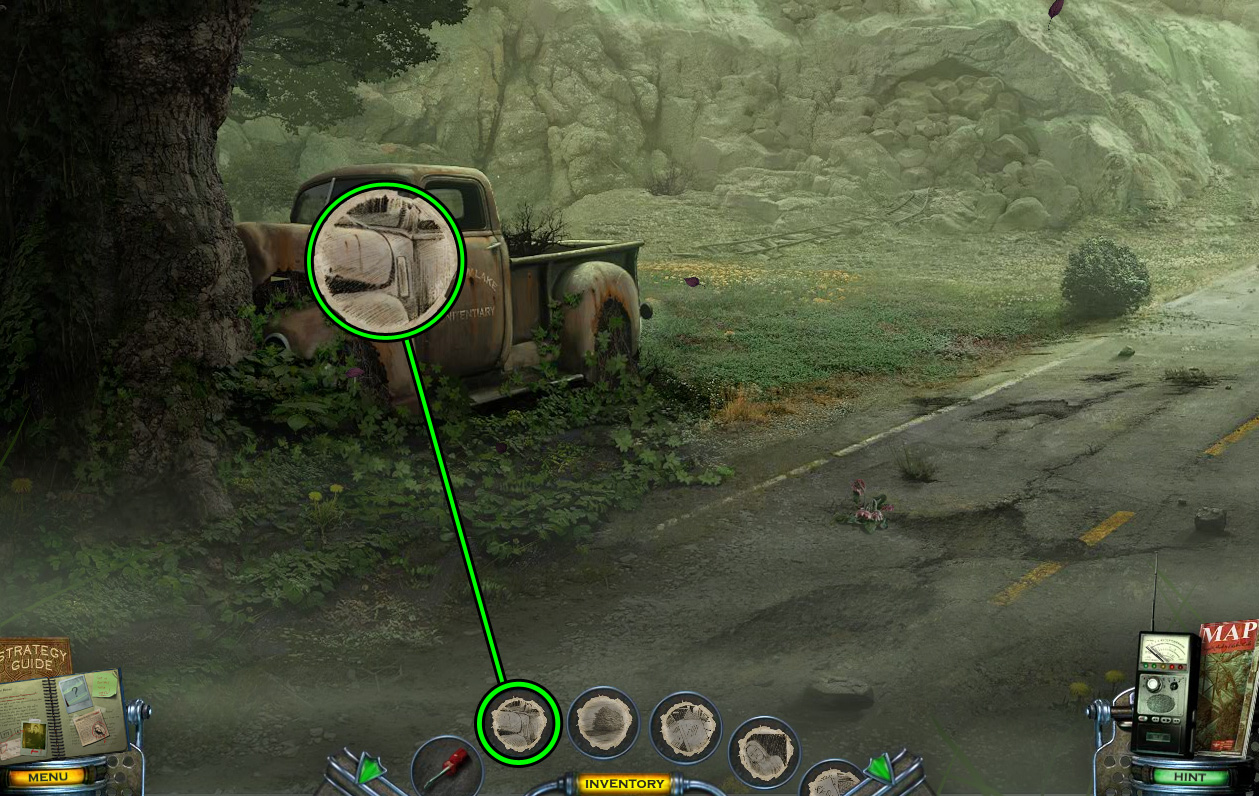
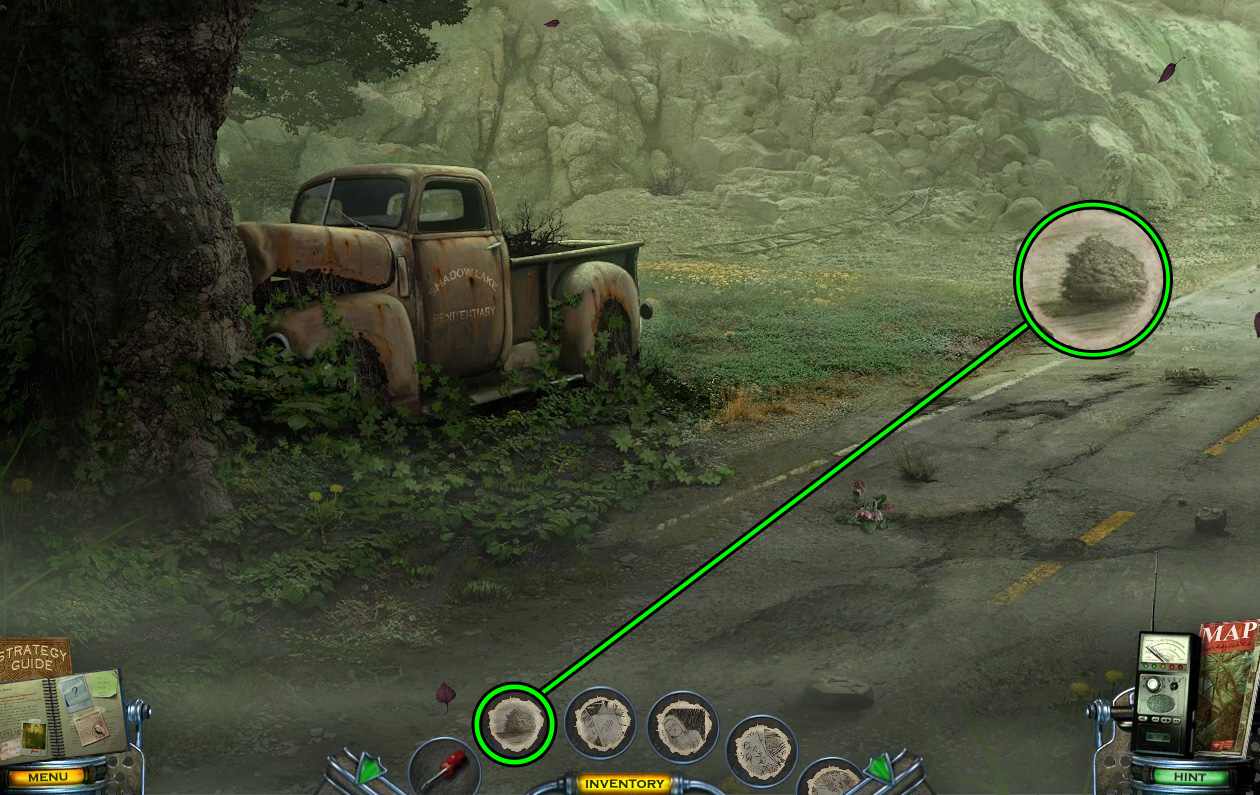
Select DRAWING 1/6 from your inventory and find its matching location in the scene.
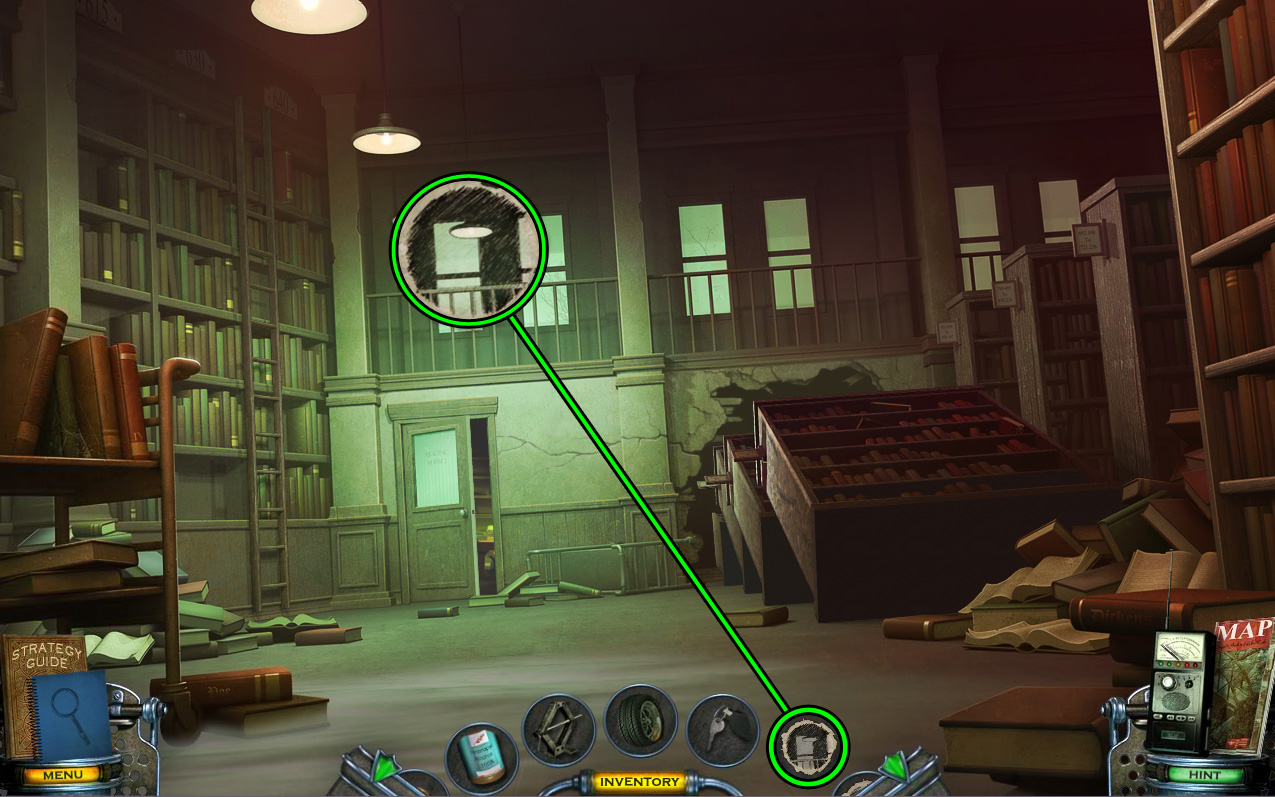
Align the paper with the far right window in the middle row, then click to create the CHARGED DRAWING 1/6.
Screenshot.
Move forward to the Penitentiary Entrance.
Penitentiary Entrance
Select DRAWING 2/6 from your inventory and find its matching location in the scene.
Align the paper with the large, octagonal piece of rubble on the stairs and the top of the left banister, then click the create the CHARGED DRAWING 2/6.
Screenshot.
Click the area below the left row of bars to zoom in.
Press the button at the side of the recording device to listen to the tape.
Remove the stone ball at the top of the right banister.
Pick up the STONE BALL after it falls to the ground to add it to your inventory.
Click the right banister to zoom in and take the PRISON KEY.
Click the padlock chained around the door handles for a close-up view.
Use the PRISON KEY to open the lock.
Go through the open door into the Prison Foyer.
Prison Foyer
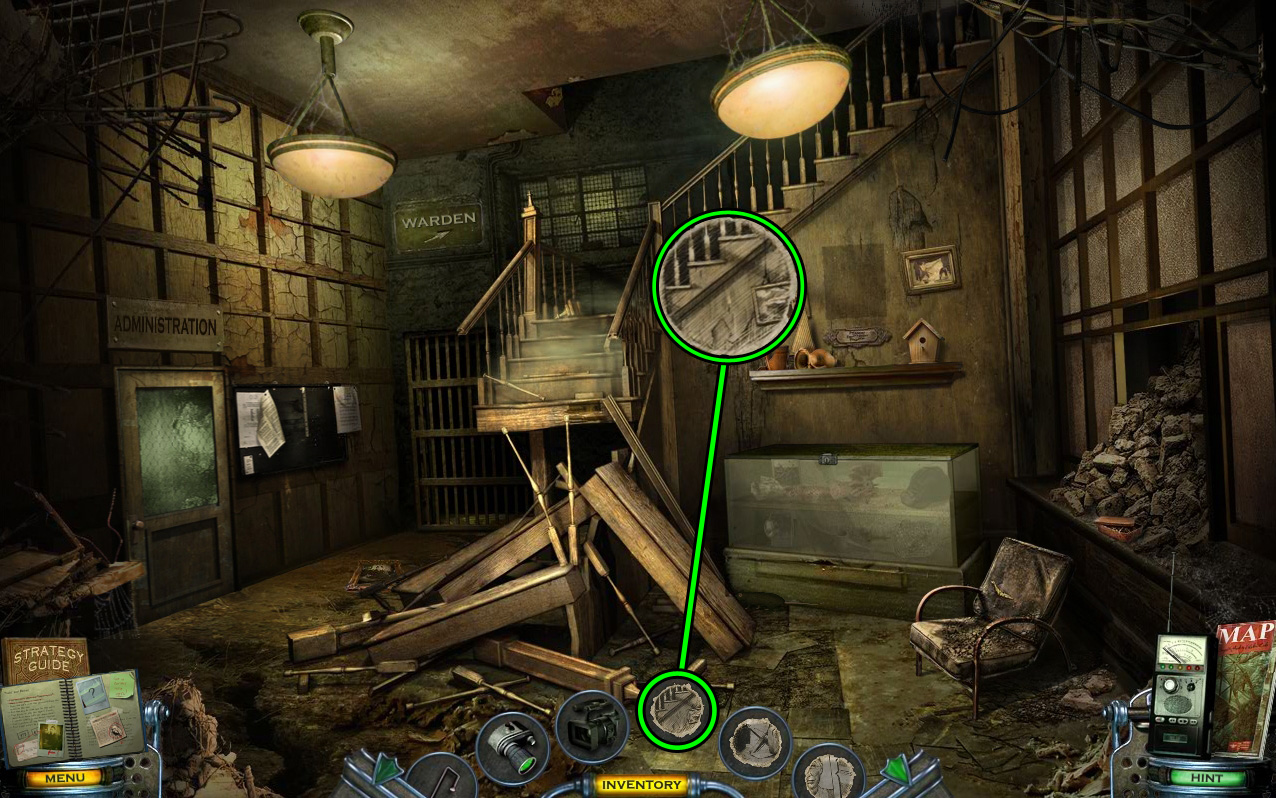
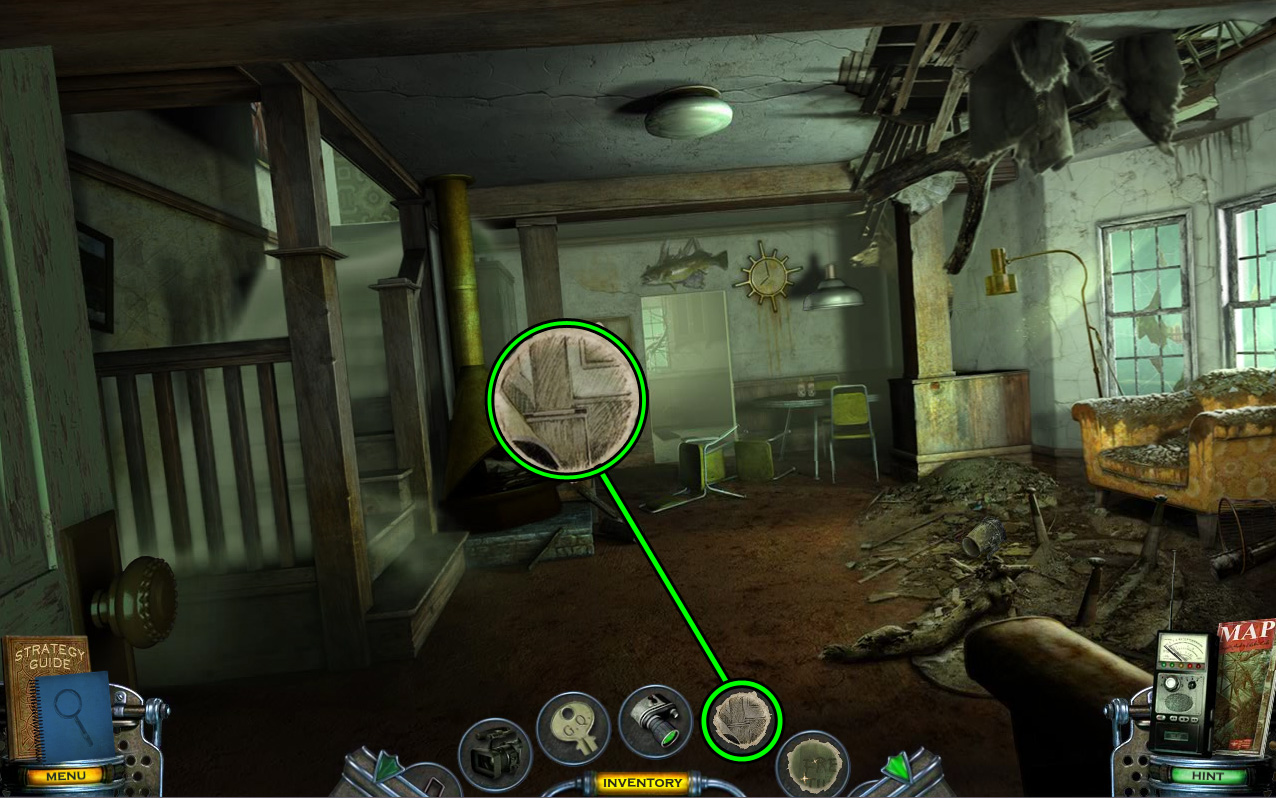
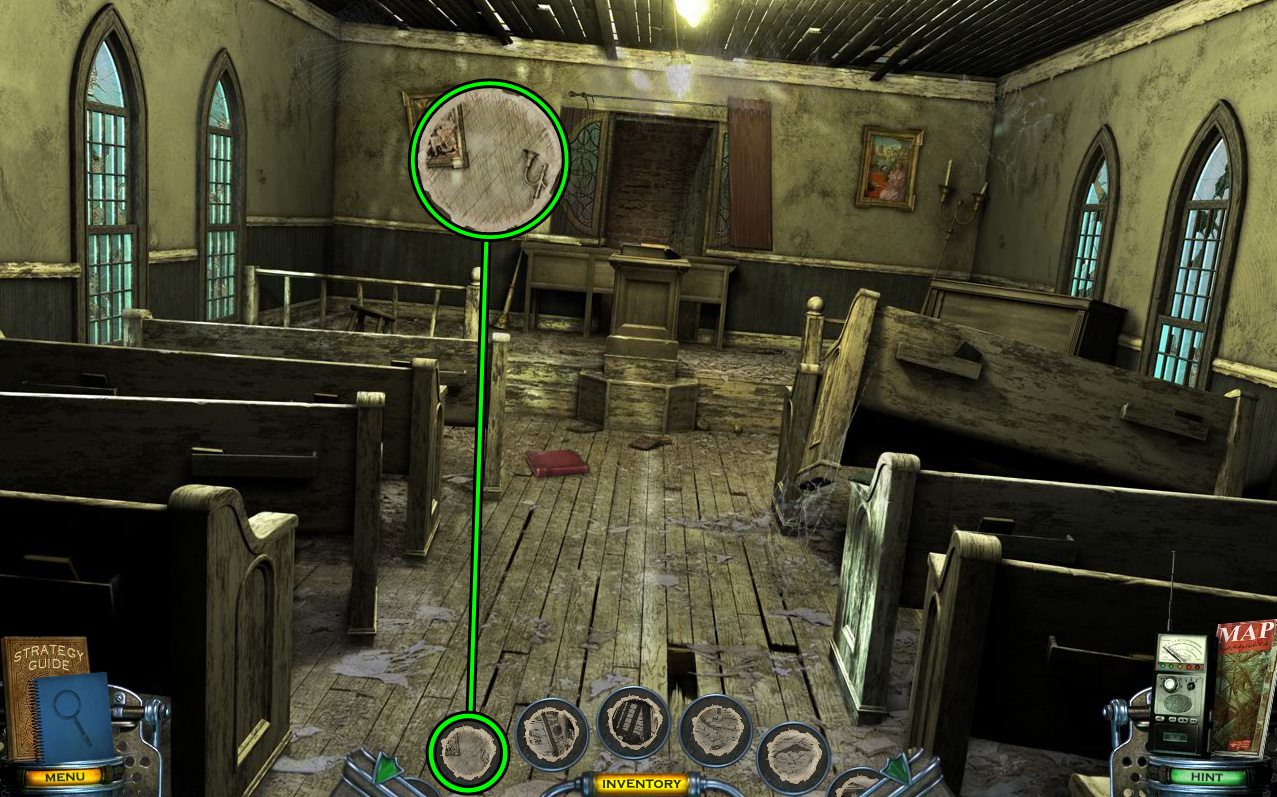
Select DRAWING 3/6 from your inventory and find its matching location in the scene.
Align the paper with the side of the stairway and the left framed picture, then click to create the CHARGED DRAWING 3/6.
Screenshot.
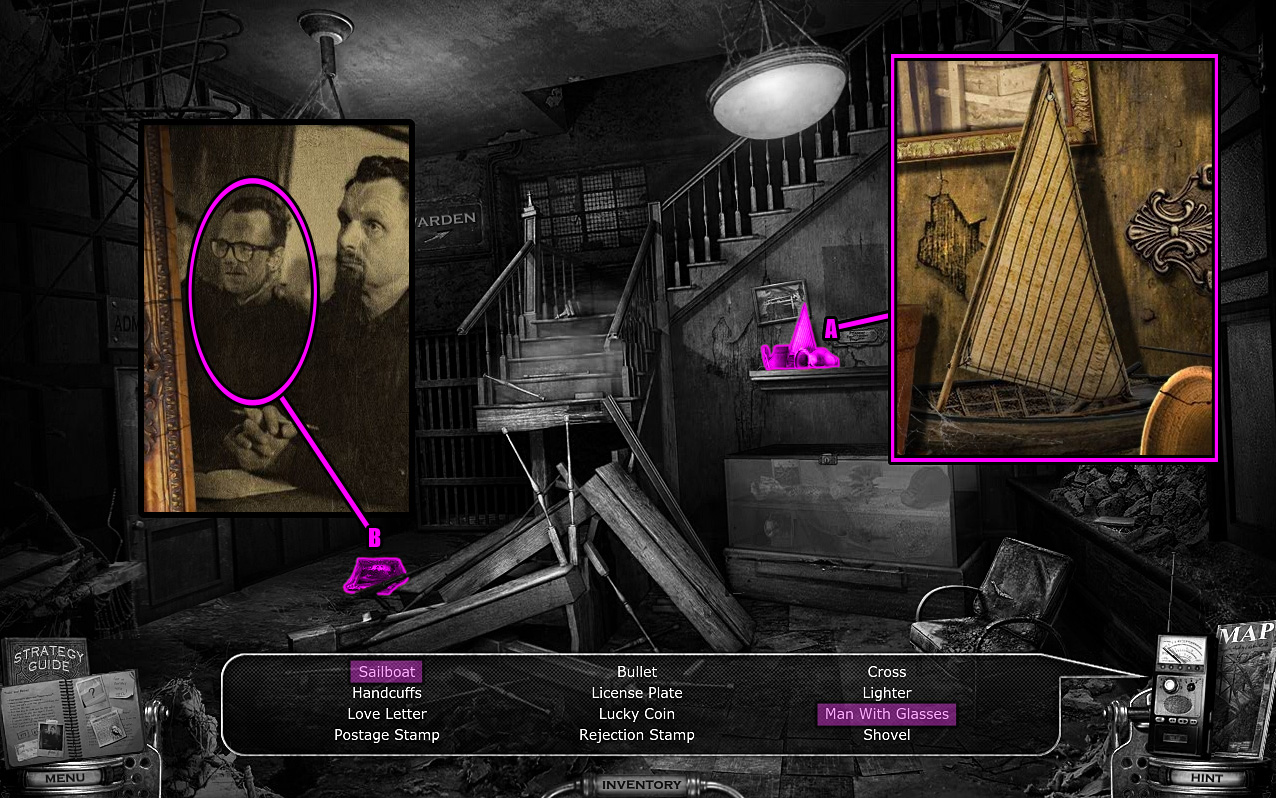
You can now find 2 of the hidden objects in this room.
Click the wall shelf at the side of the stairs (A) to zoom in.
Move aside the pieces of pottery to uncover the Sailboat.
Inspect the painting on the floor to the left of the collapsed stairway (B) to find the Man With Glasses.
Screenshot.
Open the left door and enter the Administration Room.
Administration Room
Select DRAWING 4/6 from your inventory and find its matching location in the scene.
Align the paper with the base of the overturned chair beside the middle desk, then click to create the CHARGED DRAWING 4/6.
Screenshot.
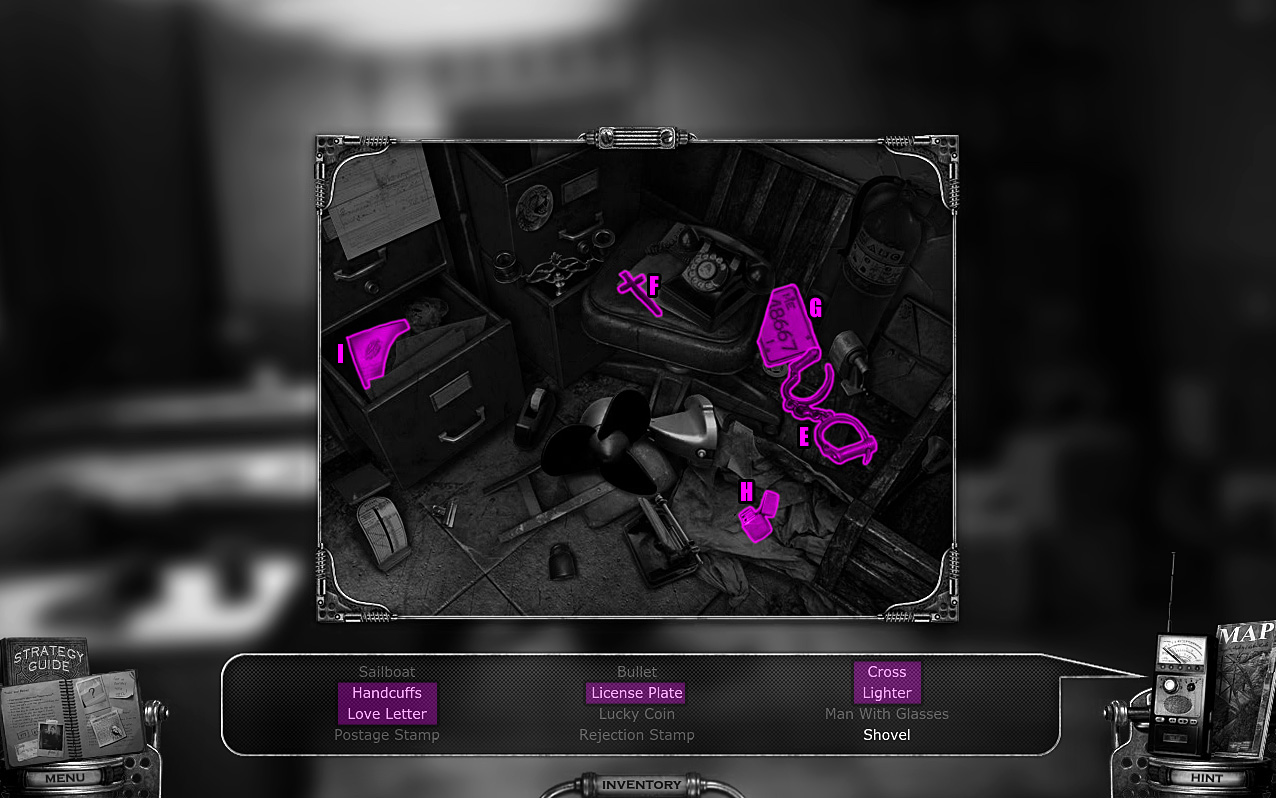
You can now find 8 of the hidden objects in this room.
Click the nearest desk for a close-up view.
Take the SMALL SILVER KEY from the upper drawer.
Open the small metal case on the tabletop to reveal the Bullet (A).
The Rejection Stamp (B) is found beside the bottom of the vintage calculator.
The Postage Stamp (C) is on the pile of letters just below the location of the Rejection Stamp.
The Lucky Coin (D) is just below the scalpel in the lower drawer.
Screenshot.
Inspect the filing cabinets in the corner of the room.
The Handcuffs (E) are on the ground in front of the fire extinguisher.
The Cross (F) is beside the telephone on the seat of the chair.
The License Plate (G) is to the left of the fire extinguisher and pencil sharpener.
The Lighter (H) is at the middle of the dirty cloth on the ground.
Open the bottom drawer of the left filing cabinet to reveal the Love Letter (I).
Screenshot.
Go back out to the Prison Foyer.
Prison Foyer
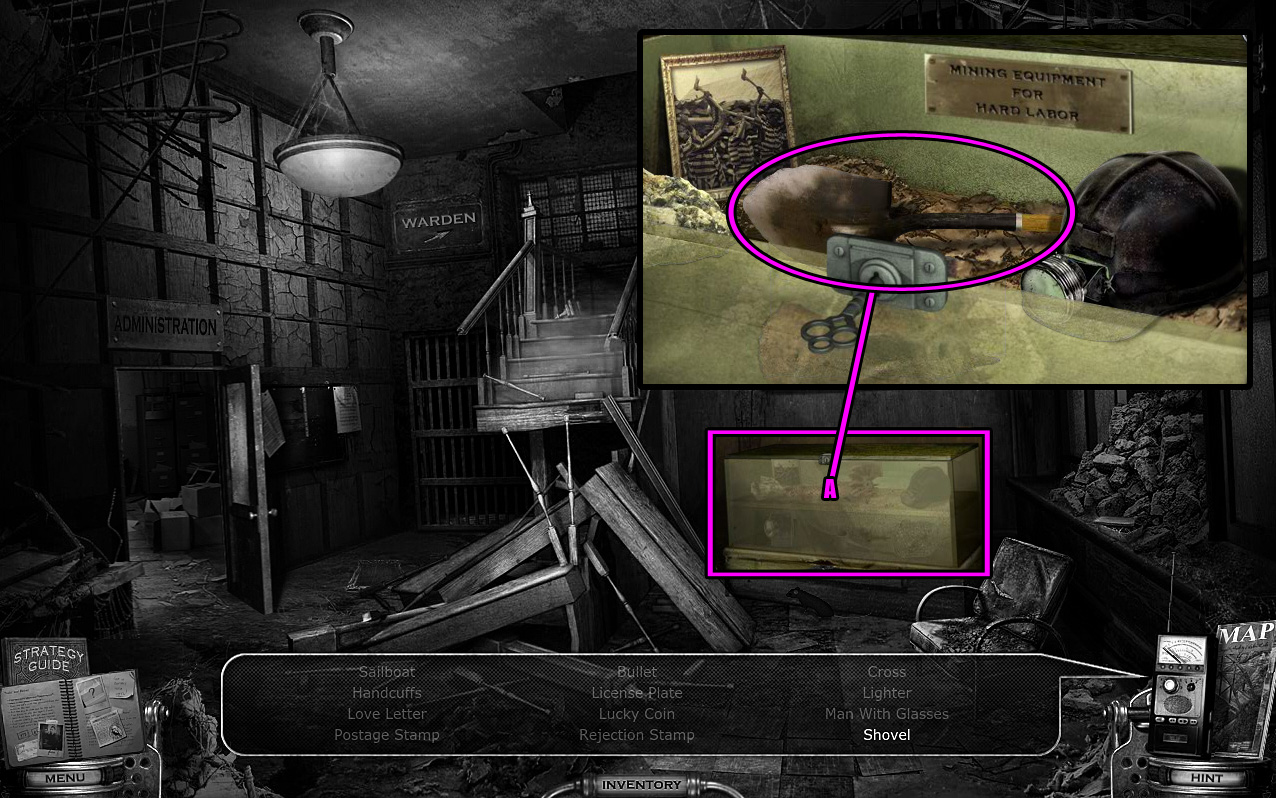
You can now find the last hidden object in this room.
Click the glass display case (A) to zoom in.
Use the SMALL SILVER KEY (from the desk drawer in the Administration Room) to unlock the lid.
Take the Shovel from the opened display case.
Screenshot.
After you've collected all of the hidden objects, Cassandra will ask you to look for information on Jamie Monihan in the Records Room.
Return to the Administration Room.
Administration Room
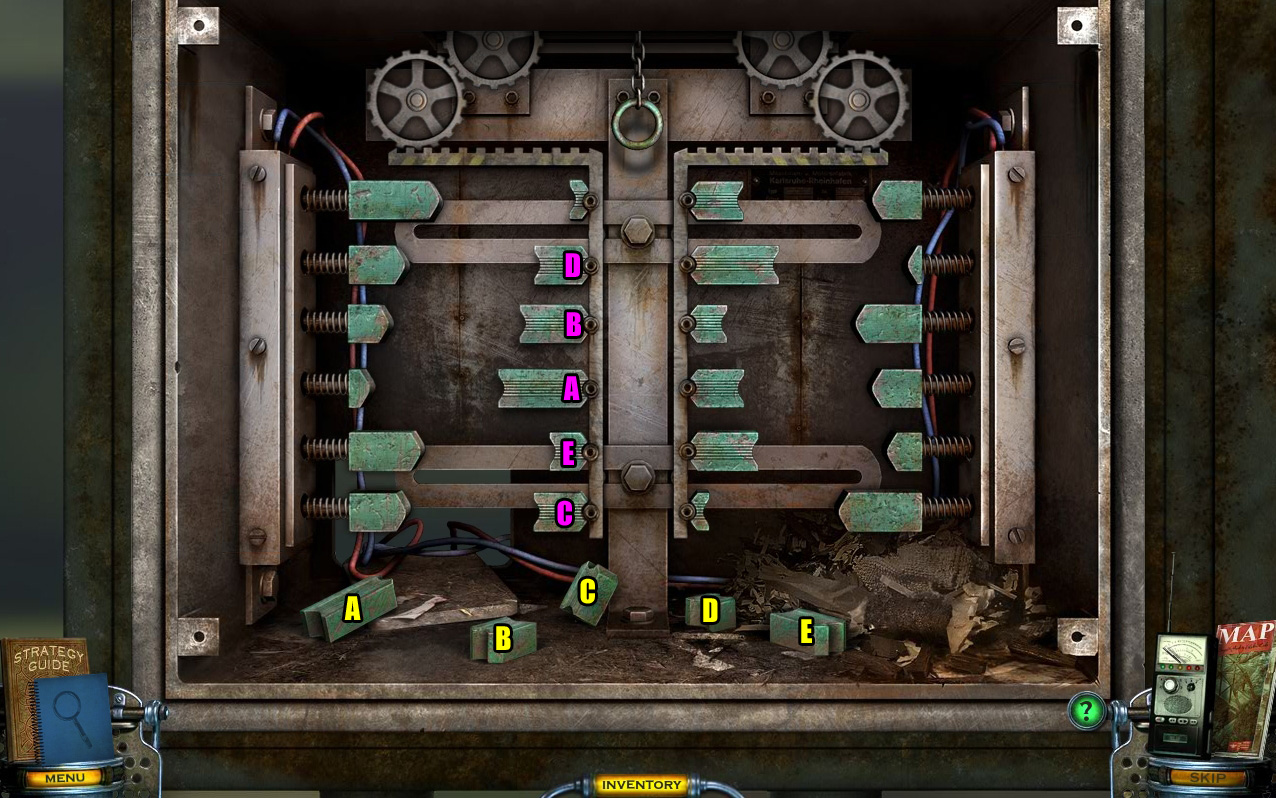
Click the lock on the gate blocking the doorway to start the puzzle.
Place the teeth on the sockets at the middle of the lock so that they fit perfectly into the pieces on the left side of the lock.
Click a tooth to select it, then select a socket to place it.
Pull the chain at the top to test your solution.
If the teeth fit together without overlapping or without a gap between the two, it is correctly positioned.
Screenshot.
After the puzzle solved, continue forward to the Records Room.
Records Room
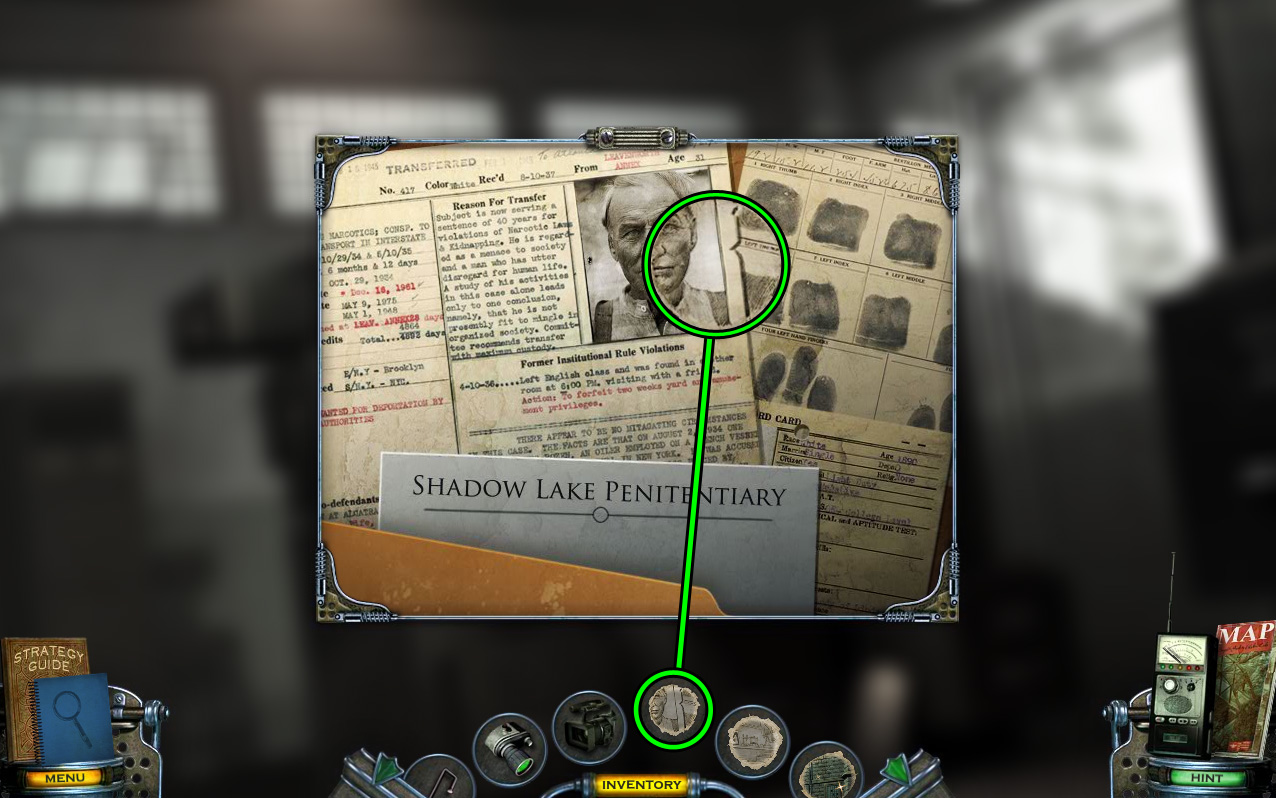
Click the file cabinet labeled "M" to zoom in.
Open the "Monihan, Jaime" folder.
Select DRAWING 5/6 from your inventory and find its matching location in the scene.
Align the paper with the right side of Jaime Monihan's photograph, then click to create the CHARGED DRAWING 5/6.
Screenshot.
Place the STONE BALL (from the banister at the Penitentiary Entrance) inside the open drawer at the top of the left file cabinet in the middle of the room.
Go up through the hole in the ceiling to the Warden's Office.
Warden's Office
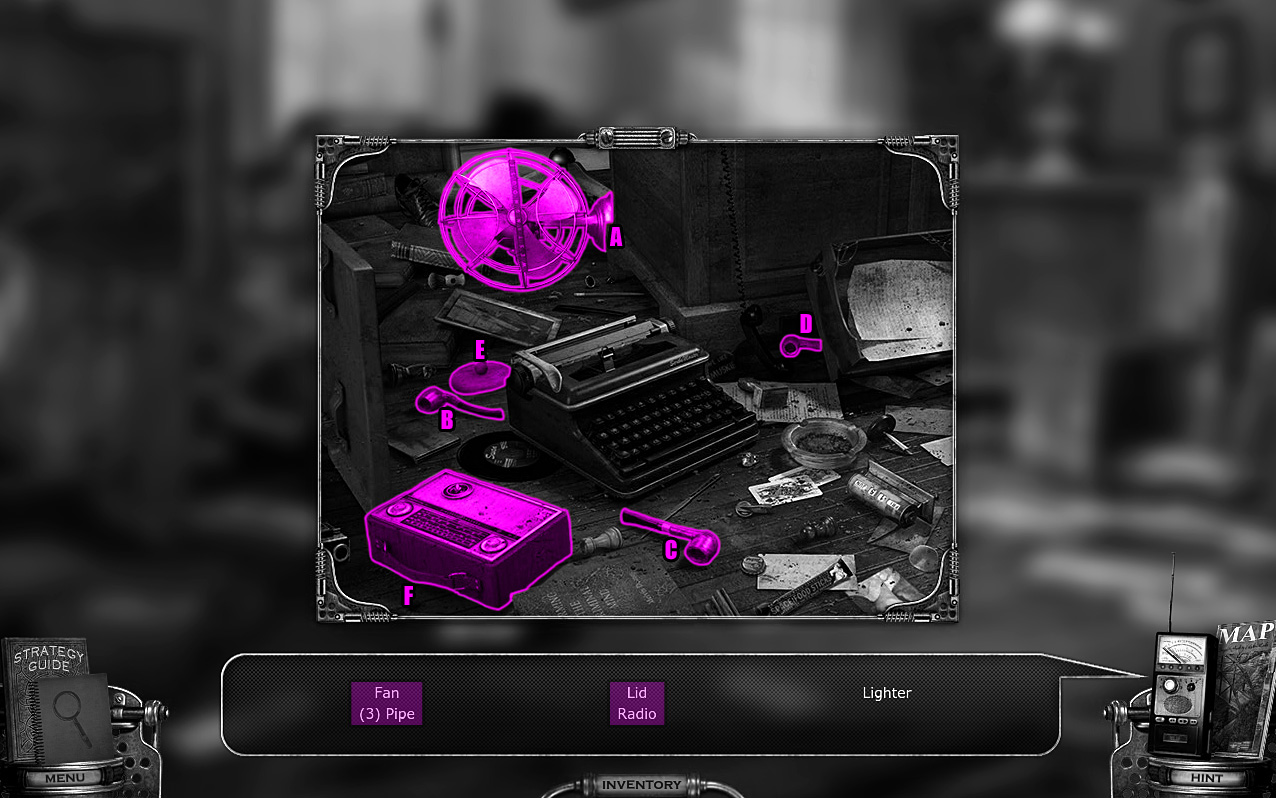
Click the bookshelf beside the left window to start the hidden object scene.
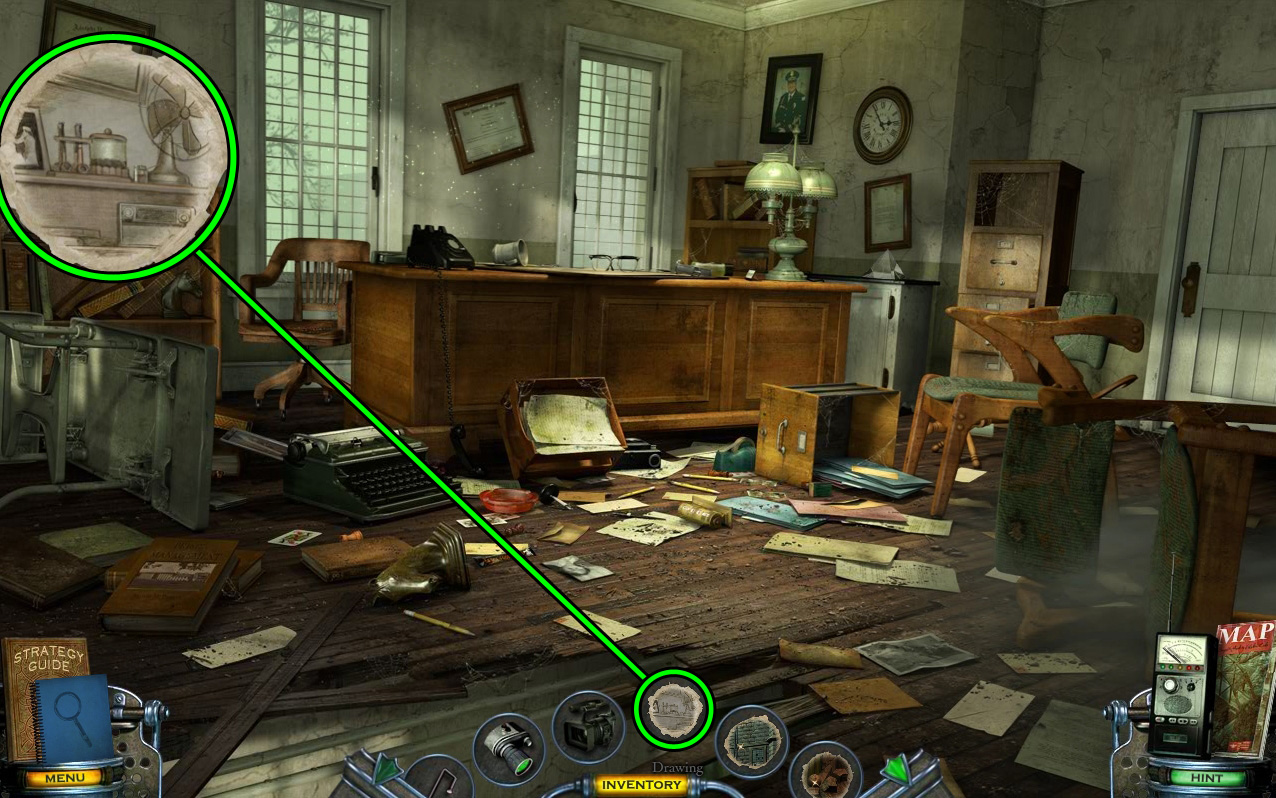
Inspect the area of the floor around the typewriter.
The Fan (A) is on the ground behind the bottom of the desk.
Pipe 1 (B) is on the floor to the left of the typewriter.
Pipe 2 (C) is below the lower left corner of the typewriter.
Pipe 3 (D) is underneath the bottom of the fallen box full of papers.
The Lid (E) is on the ground between the framed picture and the typewriter.
The Radio (F) is beside the surface of the overturned table.
Screenshot.
Click the top of the desk (G) to zoom in and find the last hidden object, the Lighter.
Next, place each of the items onto the shelves beside the window to recreate how the area would have looked in the 1970's (H).
The 70'S FAN goes on the far right side of the top shelf.
The 70'S PIPE goes on the pipe rack between the framed picture and the jar on the top shelf.
The 70'S LID goes on top of the glass jar on the top shelf.
The 70'S RADIO goes in the empty space at the right side on the second shelf.
The 70's LIGHTER goes between the glass jar and the fan on the top shelf.
Screenshot.
Select DRAWING 6/6 from your inventory and find its matching location in the scene.
Align the paper with the arranged objects on the bookshelf, then click to create the CHARGED DRAWING 6/6.
Screenshot.
Use the Map to travel to the Drive Motel, then walk to Motel Room 1.
Motel Room 1
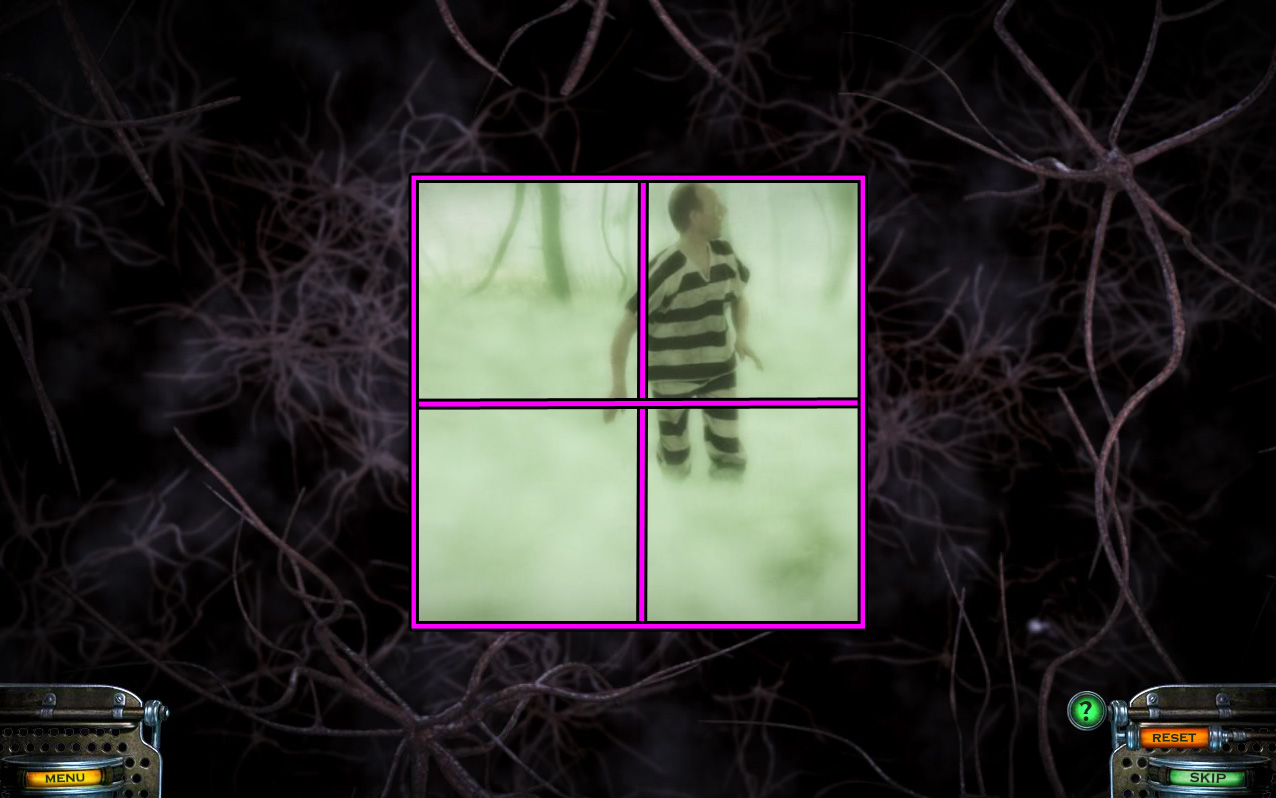
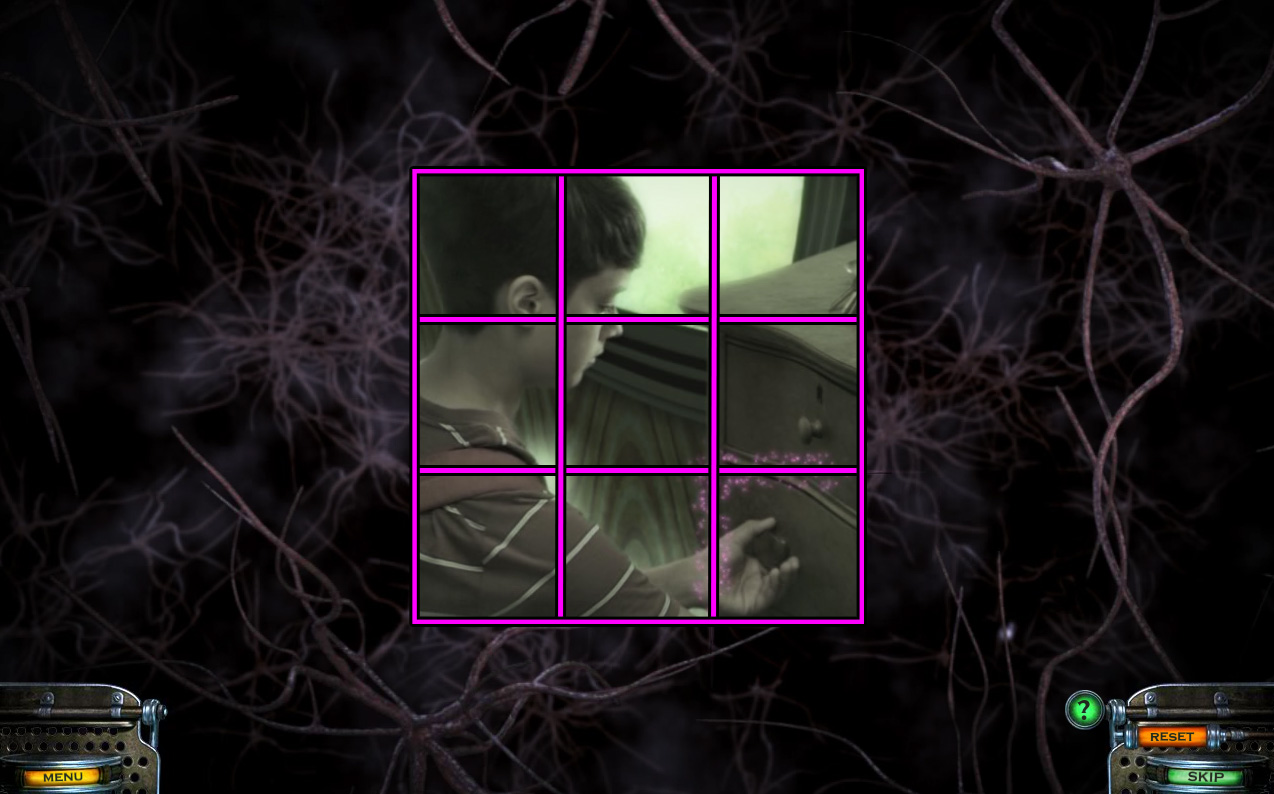
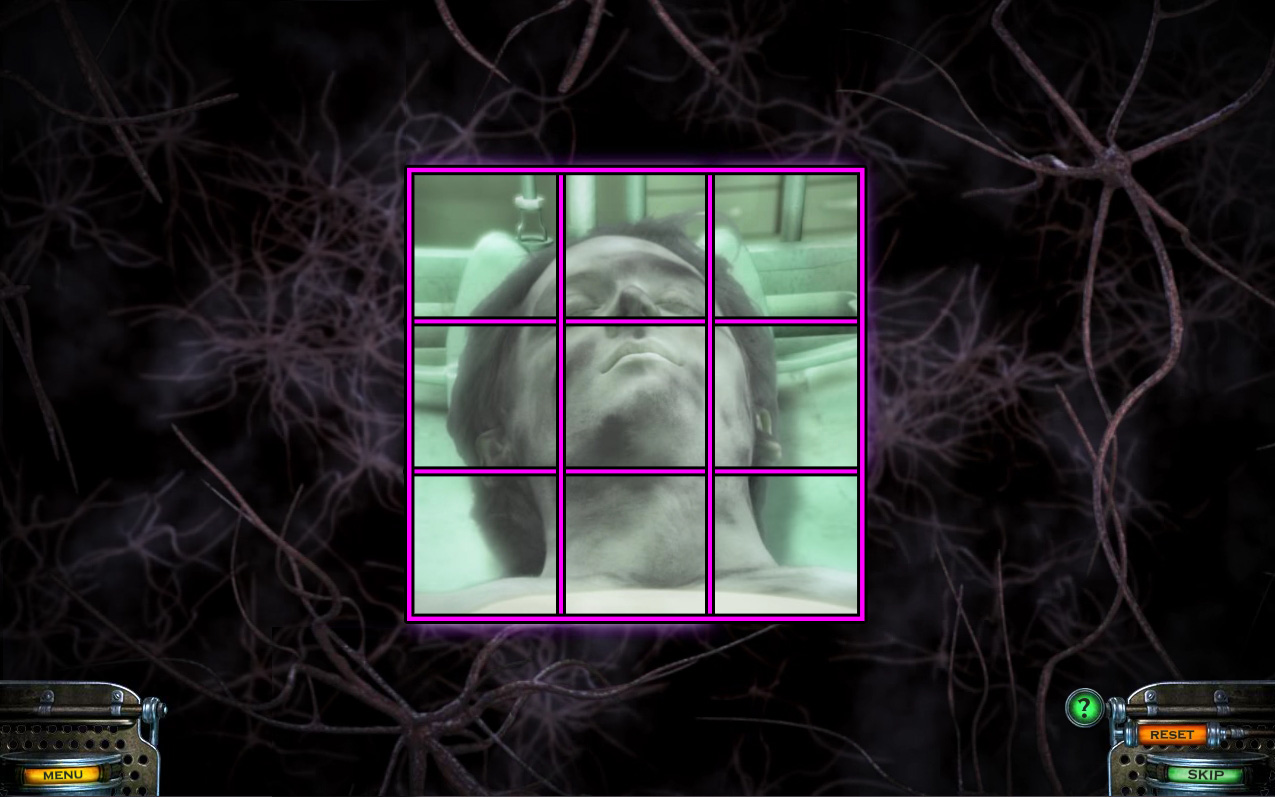
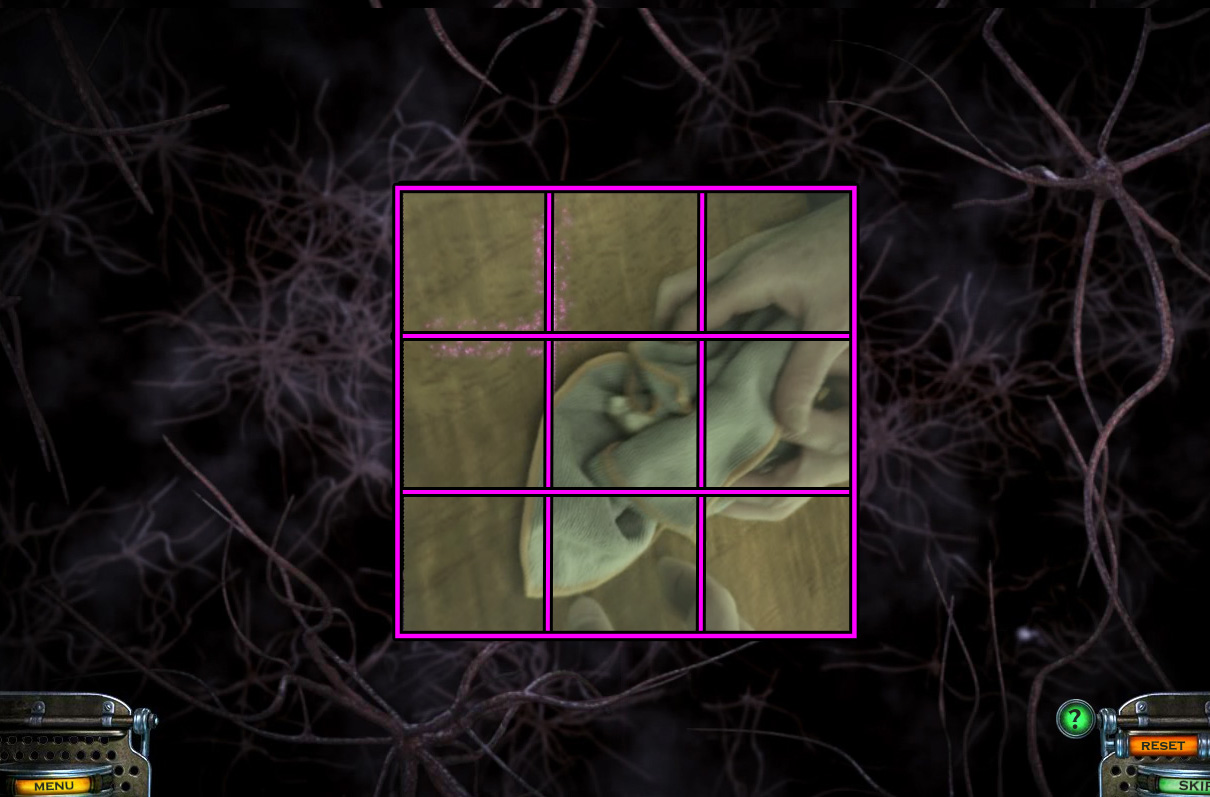
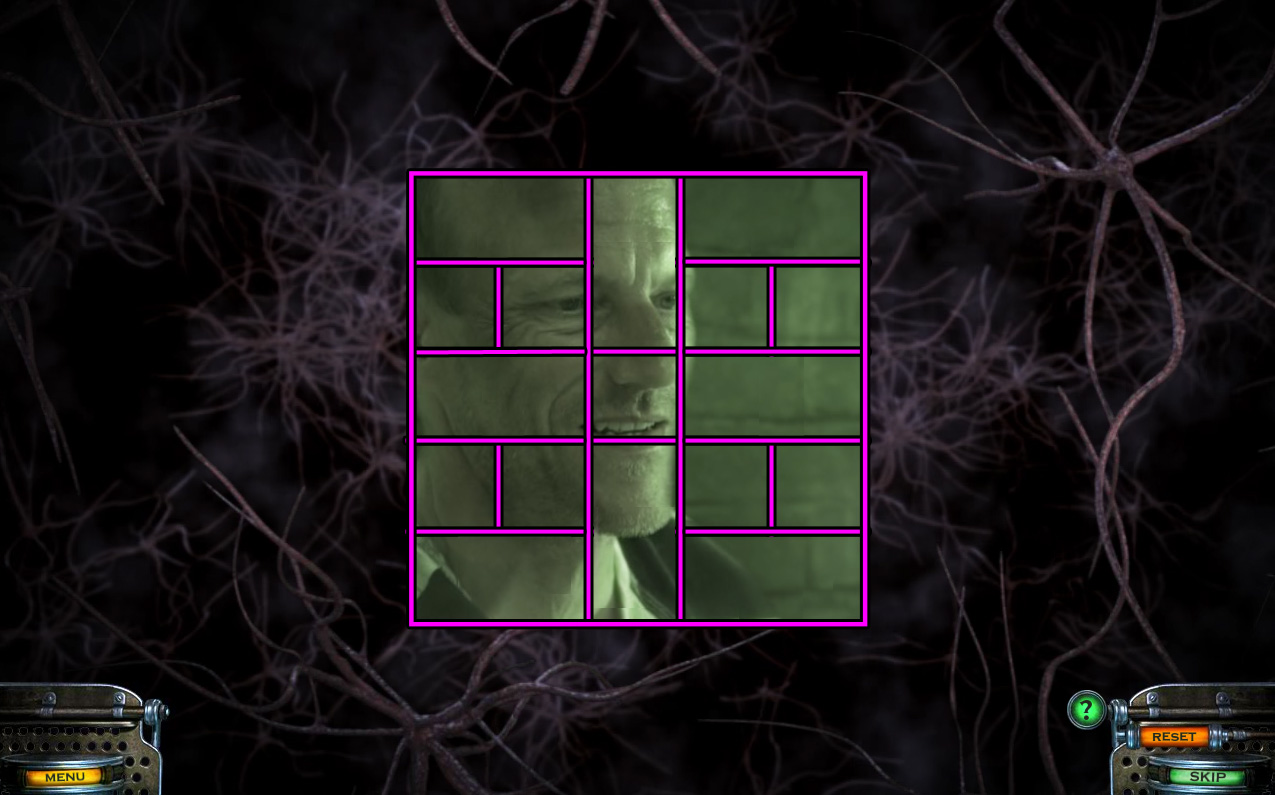
Move to the other side of the room to speak to Cassandra and start the puzzle.
Arrange the pieces correctly to complete the animated picture.
Click and drag a piece to move it around the board or to turn it to a different angle.
Be careful not to accidentally collide the pieces while you are moving them.
When two adjacent pieces are correctly assembled, they will fuse together.
Screenshot.
Return to the Warden's Office in the Shadow Lake Penitentiary.
Warden's Office
Walk towards the other side of the room to view the desk.
Click the papers on the desk to the right of the cup and small plate to zoom in.
Read the note and take the QUARRY KEY, which will unlock a new location on your Map.
Open the upper left drawer, then click the drawer to look inside.
Move the newspaper article aside to reveal an envelope and discover another Map location.
Use the Map to travel to the Warden's House.
Chapter 3: Warden's House
Warden House Driveway
Click the stump on the lawn to zoom in and take the RUSTY AXE.
Go through the front door into the Living Room.
Living Room
You can find 3 of the hidden objects in this room.
The Cat is on the surface beside the right pillar.
Click the fireplace to zoom in and take the Poker (B).
Inspect the area under the couch and take the Casette (C).
Screenshot.
Go through the doorway into the Kitchen.
Kitchen
Look inside the opened junk drawer to the right of the oven to find the remaining hidden objects.
The Bobber (A), Corkscrew (B), and Peeler (C) are all around the ladel inside the drawer.
The Foreign Condiment (D) is on the upper right side of the counter.
The Giraffe (E) is beside the red rubber ball at the bottom of the television.
The Five (F) is on the counter beside the egg timer.
Penny 1 (G) is under the bloody blade of the knife.
Penny 2 (H) is on the side of the dirty green bottle in the drawer.
Penny 3 (I) is on top of the blund end of the meat mallet.
The Four (J) is on the die beside the cleaver in the drawer.
The Three (K) is on the bottle cap on the counter above the bottle opener.
Screenshot.
Pull out the open junk drawer, then click the unblocked space under the counter to zoom in.
Take the FUSE from the top of the left bottle.
Click the left door to open it.
Use the NIGHT VISION GOGGLES (from the crate at Motel Room 1) inside the dark doorway to go to the Basement.
Basement
Click the fusebox on the wall to open the small door, then click it again to zoom in.
Add the FUSE to the panel above the "Basement" label.
Click the storage shelves beside the large pile of wood for a close-up view.
Take the SMALL BOLT CUTTERS leaning against the side of the shelf.
Go back to the Living Room, then move up the stairs to the Hallway.
Hallway
Open the left door.
Continue left into the Child's Bedroom.
Child's Bedroom
Click the front of the tent to look inside.
Take the bundle of WIRES on top of the toy lab kit.
Go back outside to the Warden House Driveway.
Warden House Driveway
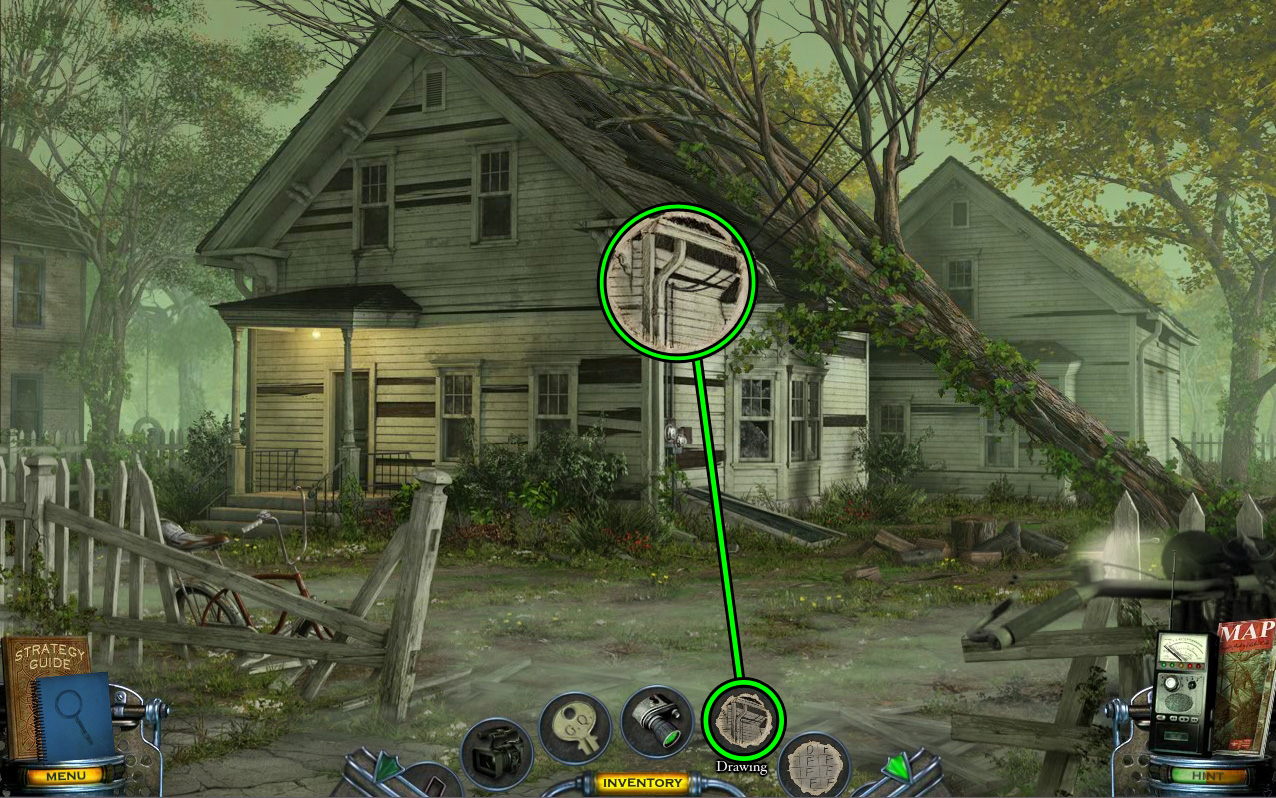
Inspect the power box beside the drain pipe at the corner of the building.
Use the SMALL BOLT CUTTERS (from the storage shelf at the Basement) to cut through the padlock.
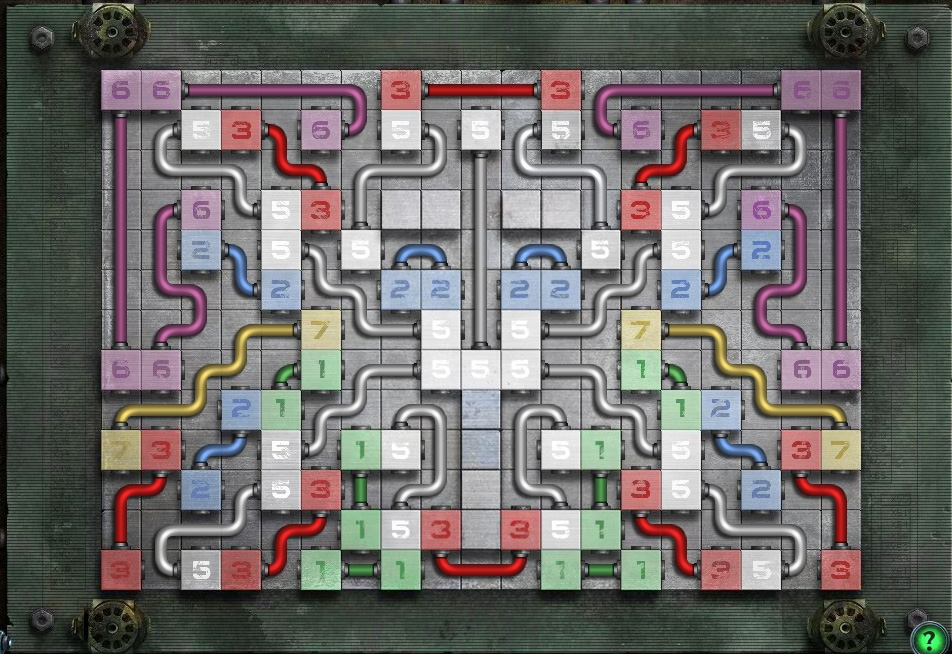
Add the WIRES (from the tent in the Child's Bedroom) to the fuse panel to start the puzzle.
Click and drag to connect the matching colored boxes on the panel.
The number on each box indicates the amount of squares the wires must cross between the pair of boxes.
For example, a purple box with the number 6 on it must cross over 6 square tiles to connect with another matching purple box.
When the wires are connected, their boxes will change color, and the wire will lock in place.
If you want to disconnect one of the wires, simply click one of its boxes.
HINT: Each half of the puzzle is a mirror image of the other side. So when you solve one part, you can recreate the same solution on the other side in reverse.
Screenshot.
After the puzzle is solved, the power will be restored to the house, and Cassandra will contact you on the walkie talkie to see her for more drawings.
Use the Map to return to Motel Room 1 at the Drive Motel.
Motel Room 1
Walk towards the other side of the room to speak with Cassandra and receive a new bundle of 6 DRAWINGS.
Return to the now lit Basement at the Warden House.
Basement
Select DRAWING 1/6 from your inventory and find its matching location in the scene.
Align the paper with the message "FREE THEM" on the wall, then click to create the CHARGED DRAWING 1/6.
Screenshot.
Click the whetstone wheel on the work table to zoom in.
Use the RUSTY AXE (from the stump at the Warden House Driveway) on the grindstone to sharpen it into a SHARPENED AXE.
Back out to the Warden House Driveway again.
Warden House Driveway
Select DRAWING 2/6 from your inventory and find its matching location in the scene.
Align the paper with the top of the drain pipe and the gutter, then click to create the CHARGED DRAWING 2/6.
Screenshot.
Re-enter the house and go up the stairs to the Hallway.
Hallway
Click the tree branches blocking the right doorway to zoom in.
Use the SHARPENED AXE (from the the grindstone at the Basement) three times to clear the area around the door.
Move right into the Master Bedroom.
Master Bedroom
Look under the bed to start the cut scene.
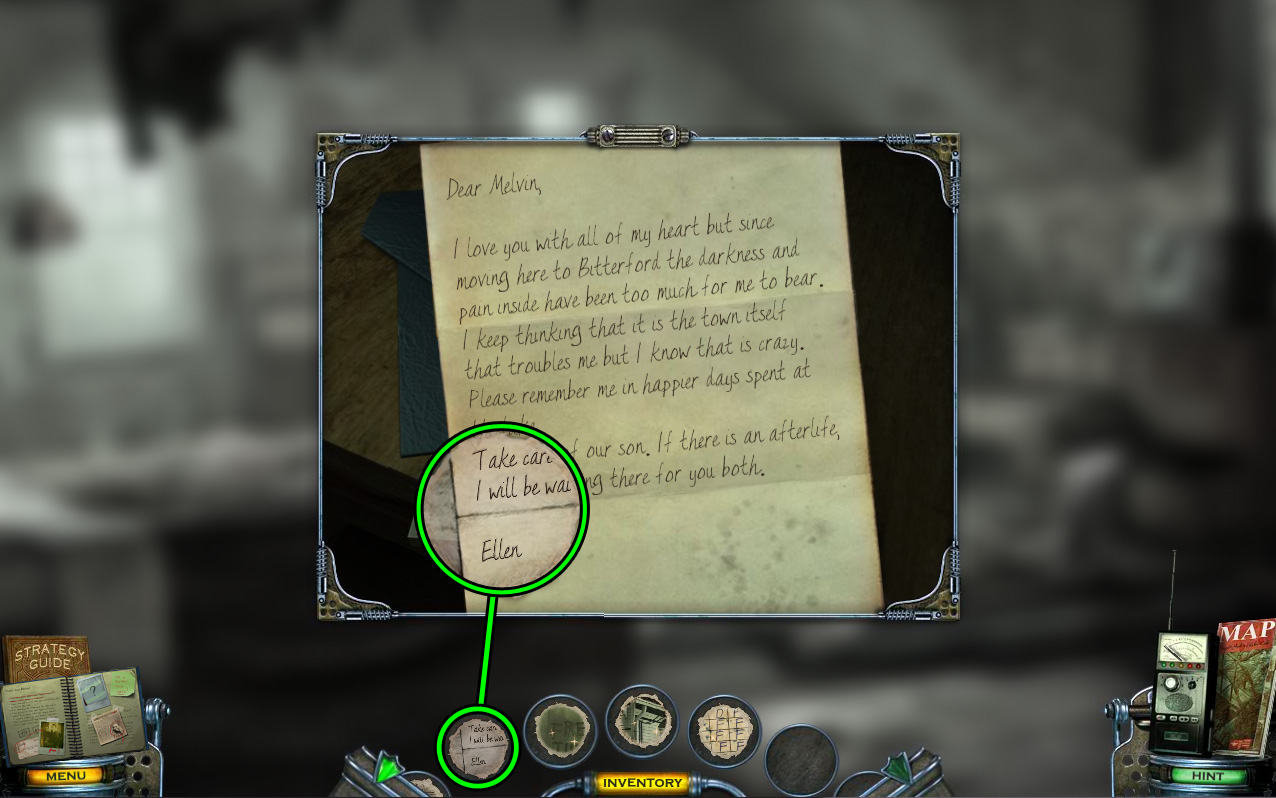
Inspect the framed photograph beside the television on the dresser.
Slide the latches at the back of the frame and remove the back section to find a hidden note.
Select DRAWING 3/6 from your inventory and find its matching location in the scene.
Open the letter and align the paper with the first few words at the two bottom lines, then click to create the CHARGED DRAWING 3/6.
Screenshot.
Exit the room and go left into the Child's bedroom.
Child's Bedroom
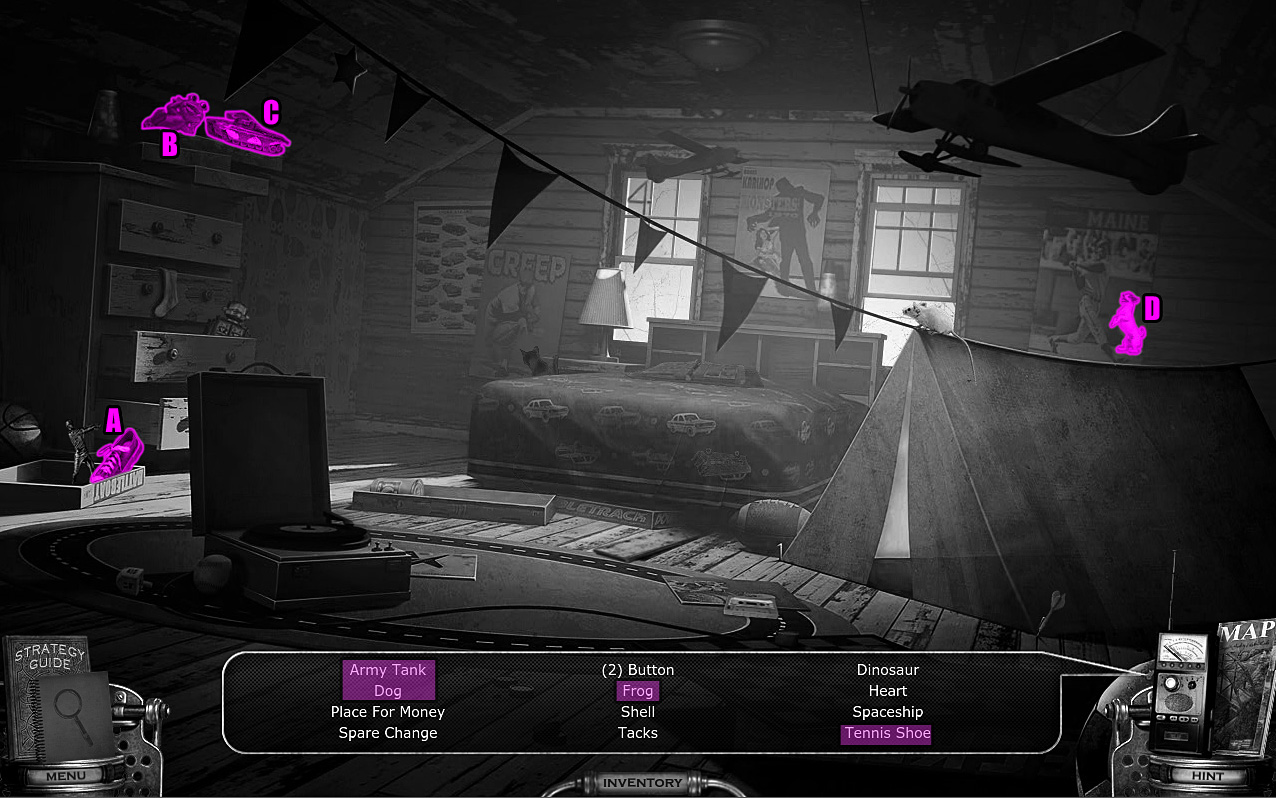
You can find 4 of the hidden objects around the room.
The Tennis Shoe (A) is in the box beside the baseball figurine.
The Frog (B) and the Army Tank (C) are on the stack of boxes at the top of the dresser.
The Dog (D) is in the baseball poster on the wall behind the tent.
Screenshot.
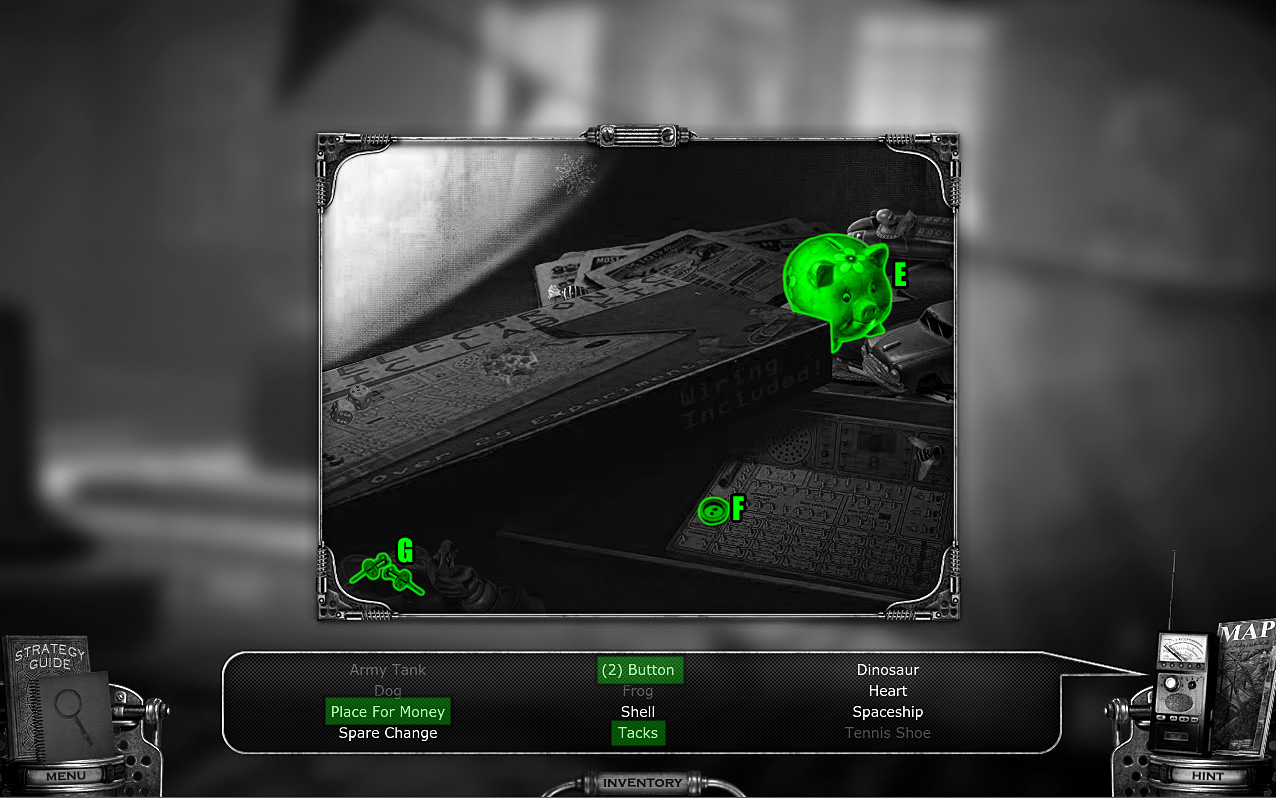
Look inside the tent to find another 3 hidden objects.
The Place For Money (E) is the piggy bank beside the toy car.
Button 1 (F) is on the side of the toy electronic lab kit.
The Tacks (G) are at the bottom left corner of the area.
Screenshot.
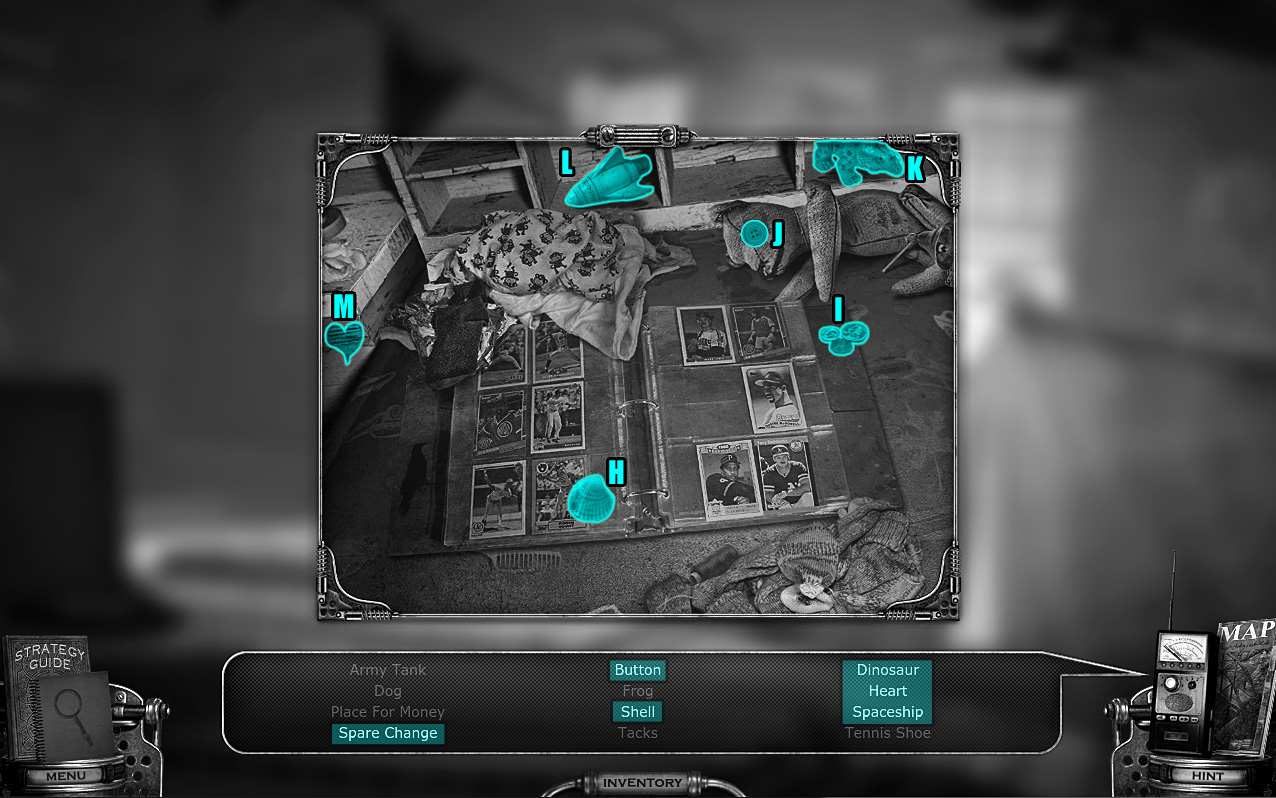
Click the top of the bed to find the last 6 hidden objects.
The Shell (H) is at the lower left corner of the baseball card collection.
The Spare Change (I) is at the upper right corner of the baseball card collection.
Button 2 (J) is over the teddy bear's eye.
The toy Dinosaur (K) is in the large right compartment.
The Spaceship (L) is in the large left compartment.
The Heart (M) is on the side of the end table beside the bed.
Screenshot.
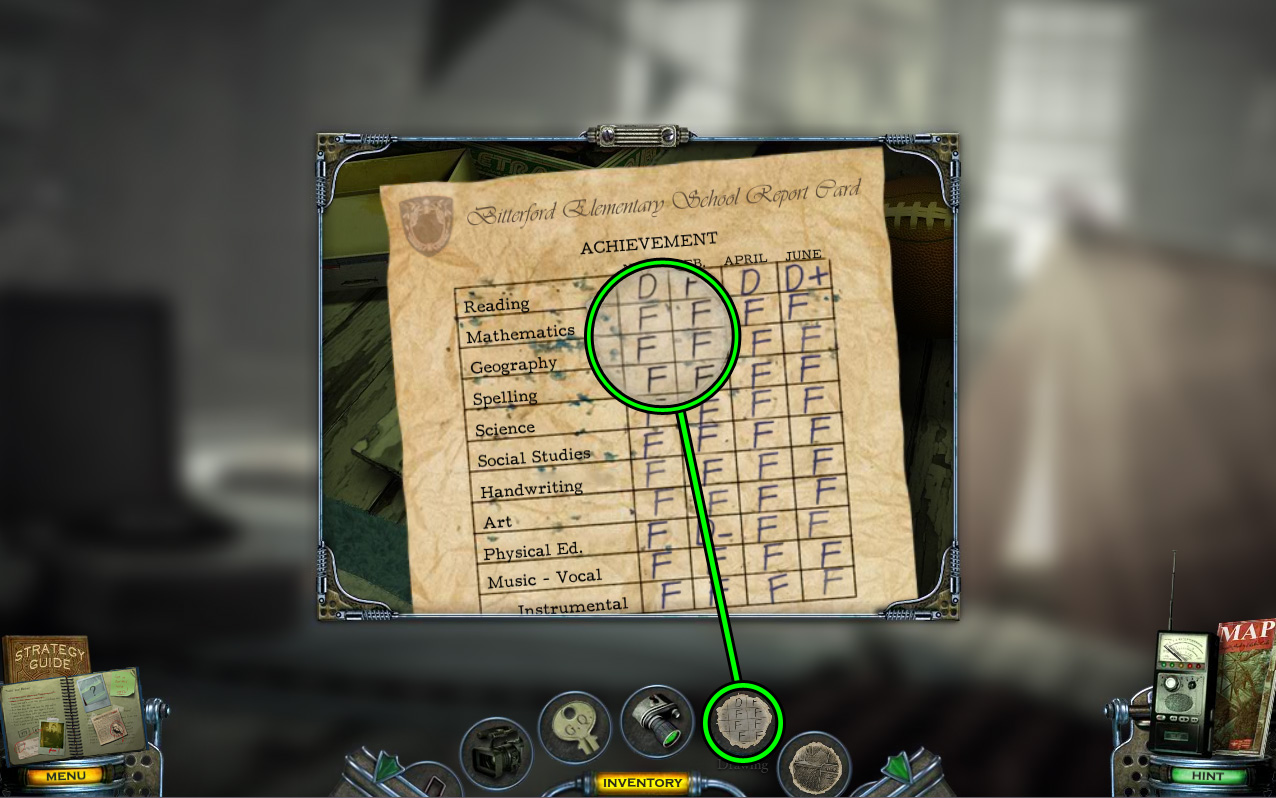
Inspect the loose floorboard under the foot of the bed.
Lift the board to reveal a hidden cache.
Select DRAWING 4/6 from your inventory and find its matching location in the scene.
Pick up the report card and align the paper with the grades at the top left corner of the list, then click to create the CHARGED DRAWING 4/6.
Screenshot.
Go downstairs to the Kitchen.
Kitchen
Select DRAWING 5/6 from your inventory and find its matching location in the scene.
Align the paper with the upper left side of the stove and oven, then click to create the CHARGED DRAWING 5/6.
Screenshot.
Move back once to the Living Room.
Living Room
Select DRAWING 6/6 from your inventory and find its matching location in the scene.
Align the paper with the framed picture on the wall and the left column, then click to create the CHARGED DRAWING 6/6.
Screenshot.
After you've charged the last drawing, Cassandra will ask you to talk to her again.
Use the Map to travel to Motel Room 1 at the Drive Motel.
Motel Room 1
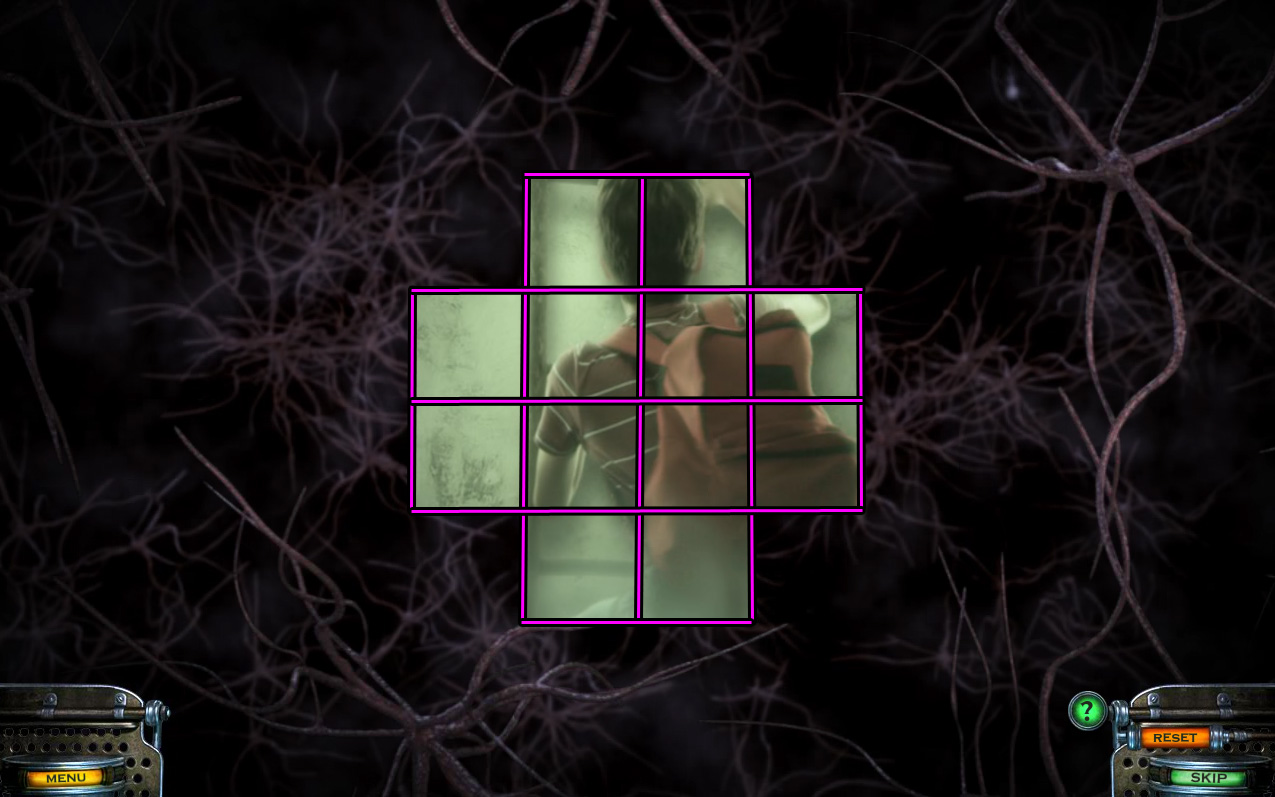
Walk to the other side of the room give Cassandra the CHARGED DRAWINGS and start the puzzle.
Arrange the pieces correctly to complete the animated picture.
Click and drag a piece to move it around the board or to turn it to a different angle.
Be careful not to accidentally collide the pieces while you are moving them.
When two adjacent pieces are correctly assembled, they will fuse together.
Screenshot.
After the puzzle is solved, use the Map to travel to the new location, the School.
Chapter 4: The School
School Yard
Click the shed in the background for a closer look.
Take the CROWBAR leaning against the door.
Open the front door and continue forward into the School Entrance.
School Entrance
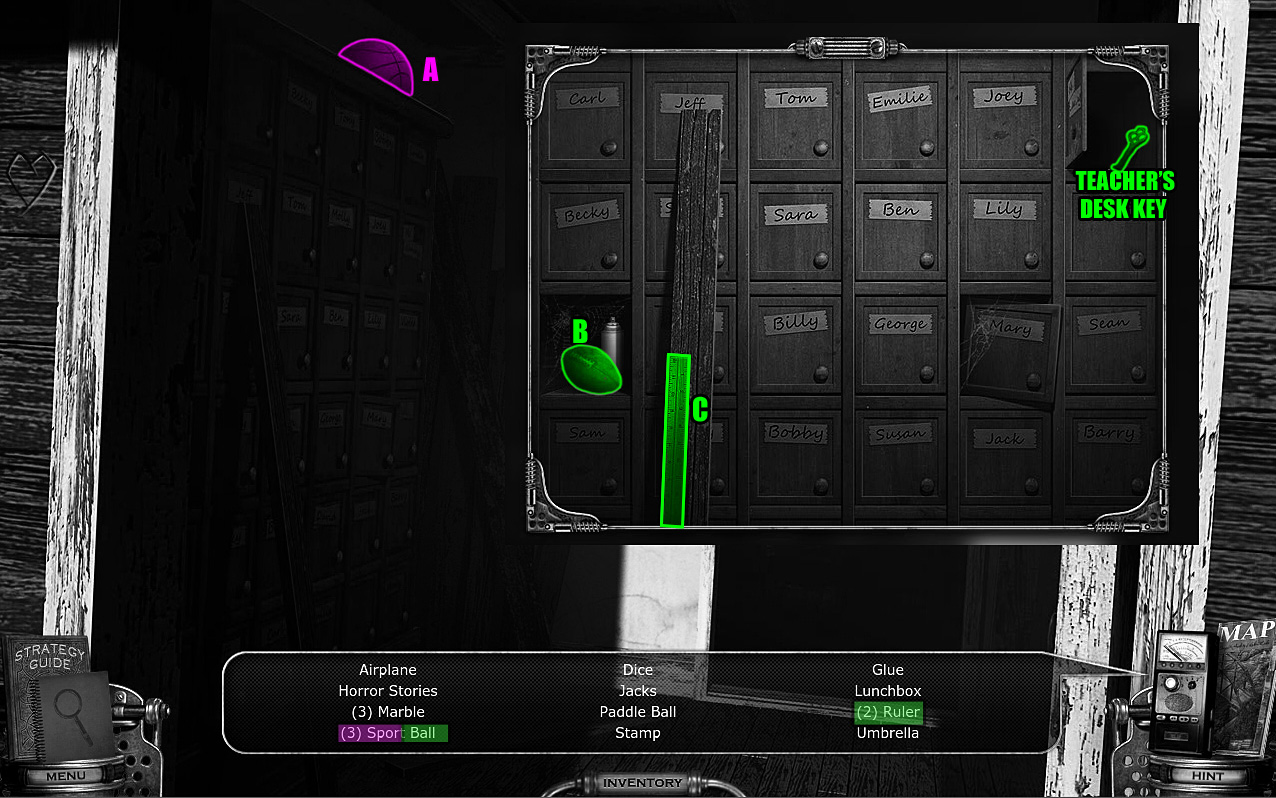
One of the hidden objects can be found as soon as you enter the room.
Sport Ball 1 (A) is at the top of the storage cubbies.
Inspect the rows of storage cubbies on the left side of the room to find two more of the hidden objects.
Open the door labeled "Mr. Hanson" and take the TEACHER'S DESK KEY inside.
Sport Ball 2 (B) is inside the open compartment between Sam and Becky's cubbies.
Ruler 1 (C) is at the bottom of the large plank leaning against the cubbies.
Screenshot.
Use the NIGHT-VISION GOGGLES (from the stack of crates in Motel Room 1) on the dark doorway to look into the Classroom.
Classroom
Click the figure standing in the corner of the room to start the cut scene.
Click the boards covering the window to zoom in.
Use the CROWBAR (from the outside of the shed at the School Yard) to pry off the boards and light the room.
Seven of the hidden objects can be found around the room.
The paper Airplane (A) is beside the stack of books on the desk in the middle of the room.
Marble 1 (B) and the Paddle Ball (C) are on opposite sides of the false teeth on the desk.
Marble 2 (D) is beside the brim of the yellow hat on top of the stack of books.
The Umbrella (E) is leaning against the back of the front right desk.
The Lunchbox (F) is on the surface of the front left desk.
The Glue (G) is on the seat of the chair in front of the middle desk with a stack of books on it.
Screenshot.
Click the desk beside the bookcase at the far left side of the room to zoom in.
Take the stack of CHALK from the corner of the small chalk board.
Find five more hidden objects in the area.
Marble 3 (H) and Ruler 2 (I) are at the top left corner of the map on the floor.
The Sport Ball (J) is at the heel of the roller skate.
The Jacks (K) are on the side of the small chalk board.
The Stamp (L) is between the spoon and the blue disc on top of the book.
Screenshot.
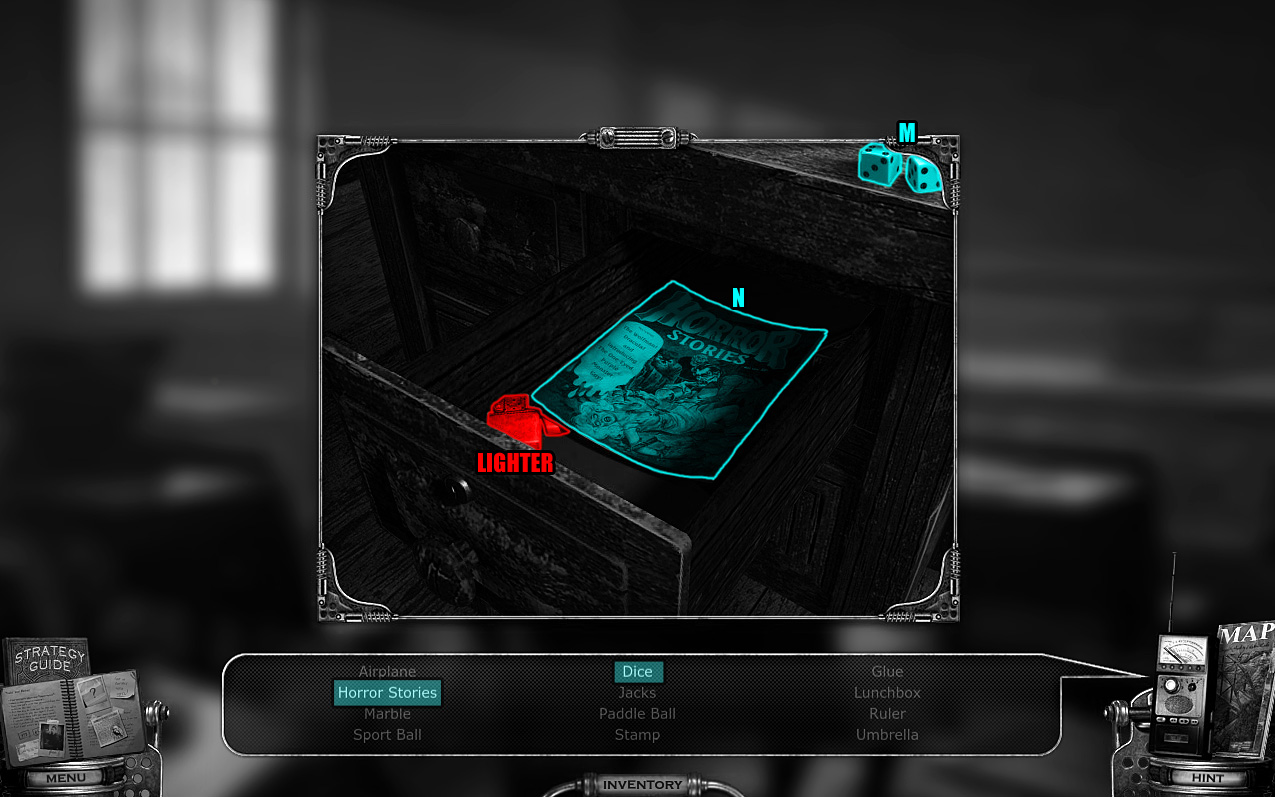
Click the left side of the teacher's desk for a closer look.
Use the TEACHER'S DESK KEY (from the storage cubby at the School Entrance) to unlock the upper right drawer.
The Dice (M) are at the top right corner of the desk.
The book of Horror Stories (N) is inside the drawer.
Take the uncovered LIGHTER and KNIFE.
Screenshot.
After the hidden object scene is complete, Cassandra will contact you to tell you the name of the warden's son.
Click the blackboard to start the puzzle.
Play a game of "Hangman" by guessing the correct letters to complete the phrase.
Using the CHALK in your inventory, select a letter from the list on the board to guess that it is one of the letters in the secret phrase.
If you guess correctly, the letter will be added to one or more of the blank lines at the bottom.
However, an incorrect guess will cause a piece of the hanged man to appear on the noose.
HINT: Start with common letters like E, T, A, or R.
Screenshot.
Go back to the School Entrance.
School Entrance
Click the rows of storage cubbies to zoom in.
Open the small door labeled "Billy" and take the BASEBALL CARD inside.
Use the Map to travel to Motel Room 1 at the Drive Motel.
Drive Motel
Move to the other side of the room to speak with Cassandra and receive another 6 DRAWINGS.
Return to the School Entrance.
School Entrance
Select DRAWING 1/6 from your inventory and find its matching location in the scene.
Align the paper with the center of the little league baseball poster on the wall, then click to create the CHARGED DRAWING 1/6.
Screenshot.
Go back out to the School Yard.
School Yard
Click the black equipment crate on the ground in front of the fence to zoom in.
Open the crate and read the notes on the IR camera.
Take the bright orange EXTENSION COARD and the SECRET VIDEO TAPE inside the crate.
Inspect the tripod set up next to the crate.
Place the INFRARED CAMERA (from the stack of crates in Motel Room 1) on top of the tripod.
Click the lens to look through the camera.
Go forward to the Playground.
Playground
Click the moving swing set to zoom in.
Flip the seat of the swing over to find the name "Sam".
Return to the School Entrance.
School Entrance
Open the cubby at the lower left corner labeled "Sam".
Take the M80 firecracker found inside.
Go back out to the School Yard.
School Yard
Click the small shed to zoom in.
Stick the M80 (from Sam's cubby at the School Entrance) into the space in the padlock.
Light the M80 with the LIGHTER (from the teacher's desk in the Classroom).
Open the doors and walk forward into the Tool Shed.
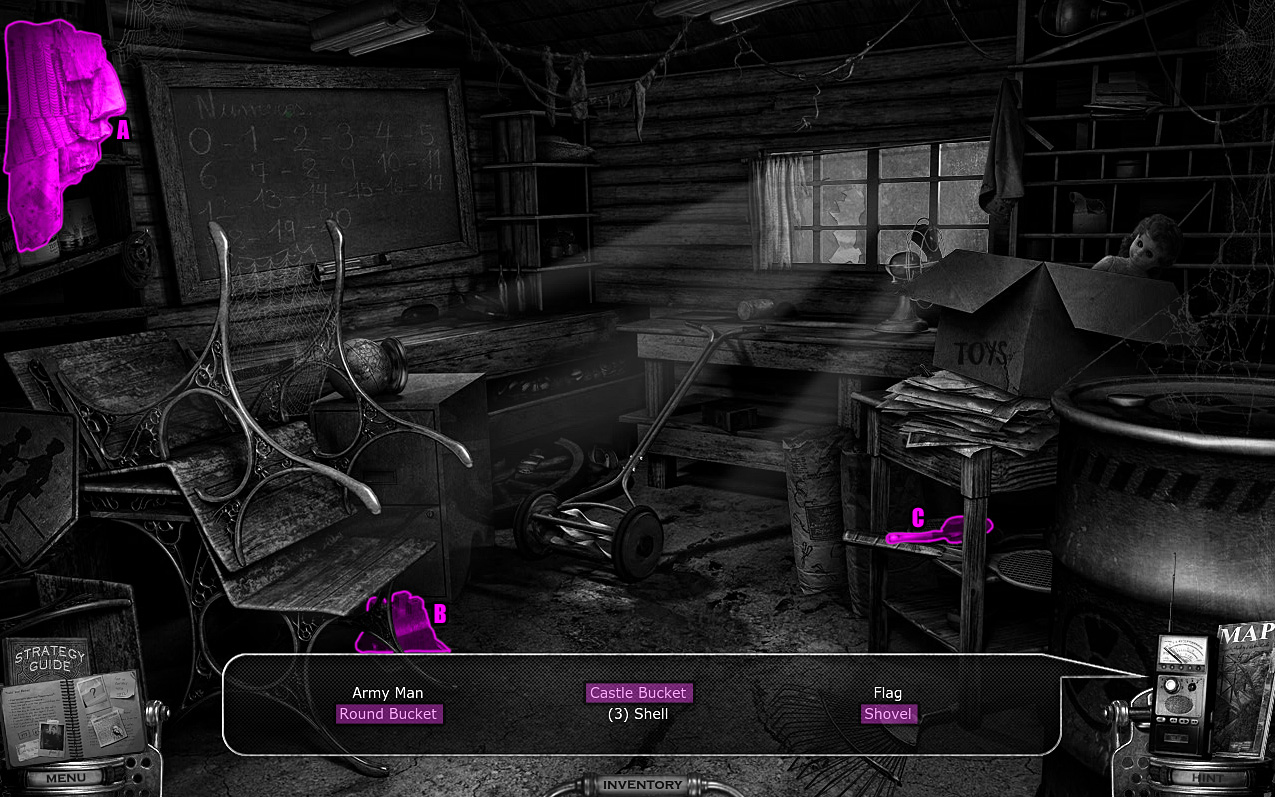
Tool Shed
Three of the hidden objects can be found around the room.
Move the bundle of fabric (A) aside to reveal the Round Bucket.
The Castle Bucket (B) is on the ground under the seat of the bench.
The Shovel (C) is on top of the tennis rackets under the right table.
Screenshot.
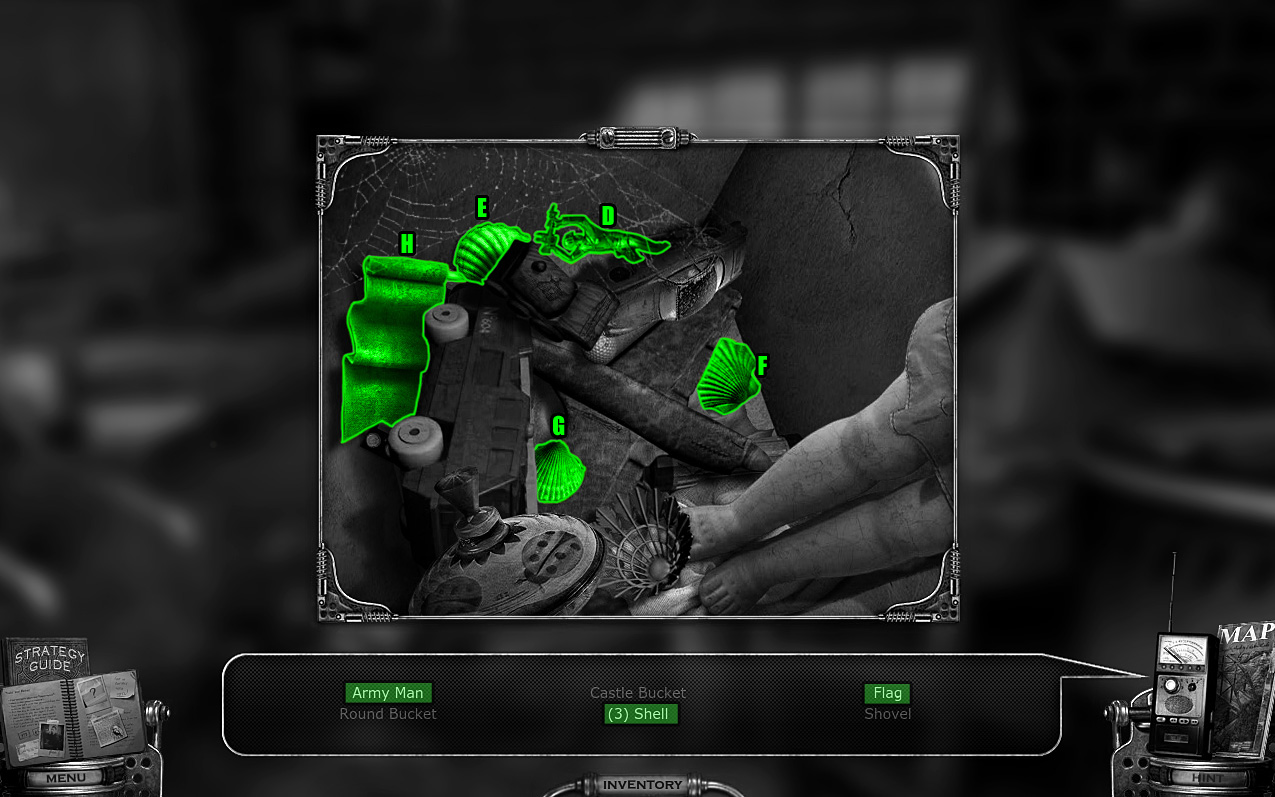
Click the toy box on the right table to find the remaining hidden objects.
The Army Man (D) is beside the toy car at the top of the box.
Shell 1 (E) is to the left of the Army Man.
Shell 2 (F) is on the toy plane's left wing.
Shell 3 (G) is on the toy plane's right wing.
The Flag (H) is beside the toy fire truck on the left side of the box.
Screenshot.
Return to the Playground.
Playground
Click the left side of the sandbox for a close-up view.
Use the items from the Tool Shed hidden object scene to construct a sand castle.
First use the CASTLE BUCKET on the pile of sand to make it a FILLED CASTLE BUCKET.
Make three towers in the flat section of the sandbox with the FILLED CASTLE BUCKET.
Next, gather some sand from the pile with the ROUND BUCKET to make the FILLED ROUND BUCKET.
Use the FILLED ROUND BUCKET on the middle sand tower to add a second level.
Put the toy ARMY MAN and the FLAG on top of the middle tower.
Place the three SHELLS on the sides of each of the three towers.
Select DRAWING 2/6 from your inventory and find its matching location in the scene.
Align the paper with the completed sand castle, then click to create the CHARGED DRAWING 2/6.
Screenshot.
Move back once to the School Yard.
School Yard
Select DRAWING 3/6 from your inventory and find its matching location in the scene.
Align the paper with the right side of the tool shed, then click to create the CHARGED DRAWING 3/6.
Screenshot.
Return to the Classroom.
Classroom
Select DRAWING 4/6 from your inventory and find its matching location in the scene.
Align the paper with the stack of books on the teacher's desk, then click to create the CHARGED DRAWING 4/6.
Screenshot.
Go back to the Tool Shed.
Tool Shed
Select DRAWING 5/6 from your inventory and find its matching location in the scene.
Align the paper with the tennis rackets under the right table, then click to create the CHARGED DRAWING 5/6.
Screenshot.
Use the Map to travel to the Child's Bedroom at the Warden's House.
Child's Bedroom
Click the top of the bed to zoom in.
Add the BASEBALL CARD (from billy's cubby at the School Entrance) to the space in the collection.
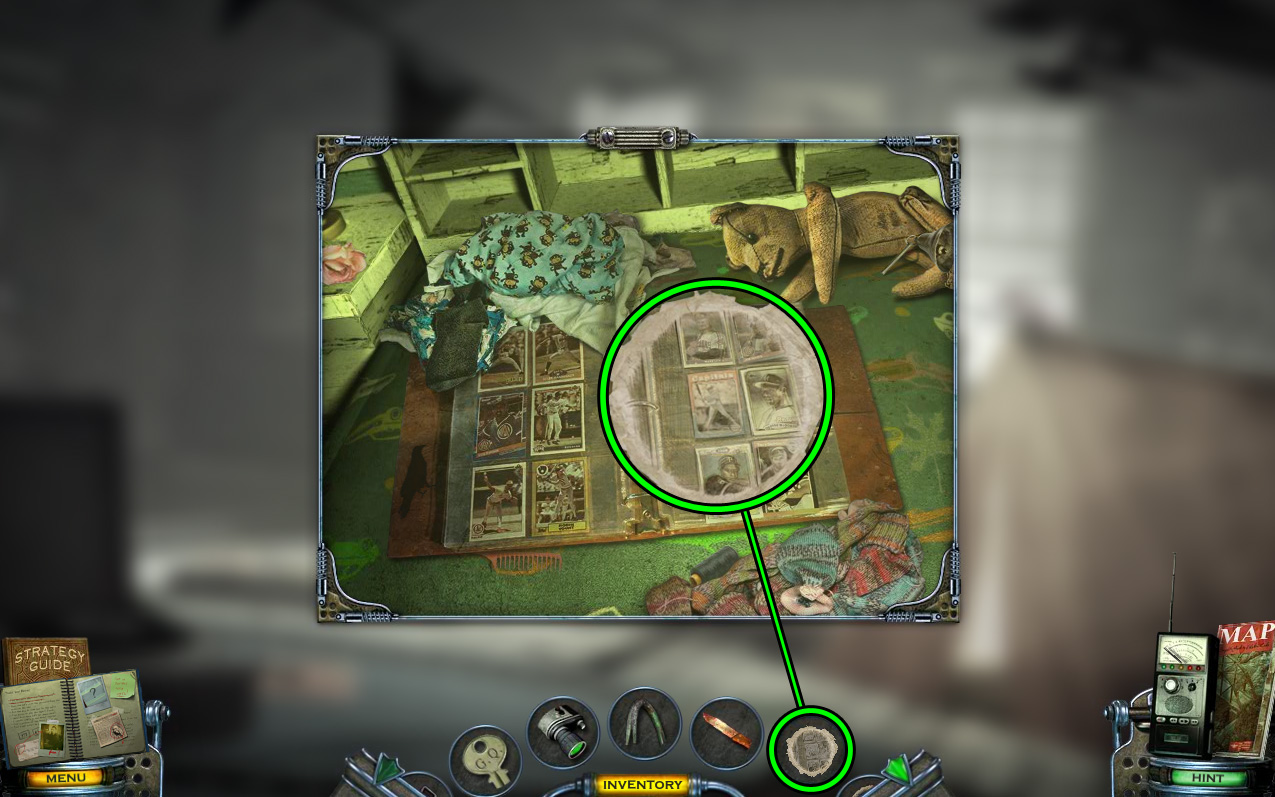
Select DRAWING 6/6 from your inventory and find its matching location in the scene.
Align the paper with the baseball card you placed in the album, then click to create the CHARGED DRAWING 6/6.
Screenshot.
Return to Motel Room 1 at the Drive Motel.
Drive Motel
Move to the other side of the room to speak with Cassandra and start the next puzzle.
Arrange the pieces correctly to complete the animated picture.
Click and drag a piece to move it around the board or to turn it to a different angle.
Be careful not to accidentally collide the pieces while you are moving them.
When two adjacent pieces are correctly assembled, they will fuse together.
Screenshot.
Use the Map to return to the School Entrance.
School Entrance
Move aside the planks of wood leaning against the wall beside the poster.
Click the revealed mechanism to zoom in.
Click the lever to try to turn the wheel.
Use the KNIFE (from the drawer in the teacher's desk at the Classroom) to cut through the rope just barely visible inside the hole in the wall above the mechanism.
Climb up the ladder to the Bell Tower.
Bell Tower
Click the pile of junk in the corner for a closer look.
Read the piece of paper inside the open satchel to find a new map location, the Teacher's House.
Travel to the Teacher's House, then immediately walk towards the left side to enter the Garage.
Chapter 5: Teacher's House & Downtown
Garage
Take the pair of CINDER BLOCKS on the ground.
Open the right door of the green locker, then take the LUG WRENCH inside.
Click the shelf in the locker to zoom in and take the ISOPROPYL ALCOHOL.
Place both CINDER BLOCKS beside the jack underneath the car.
Take the freed CAR JACK from under the wheel.
Move back once to exit to the Driveway, then go forward into the Burned Building.
Burned Building
Click the bathroom mirror to zoom in.
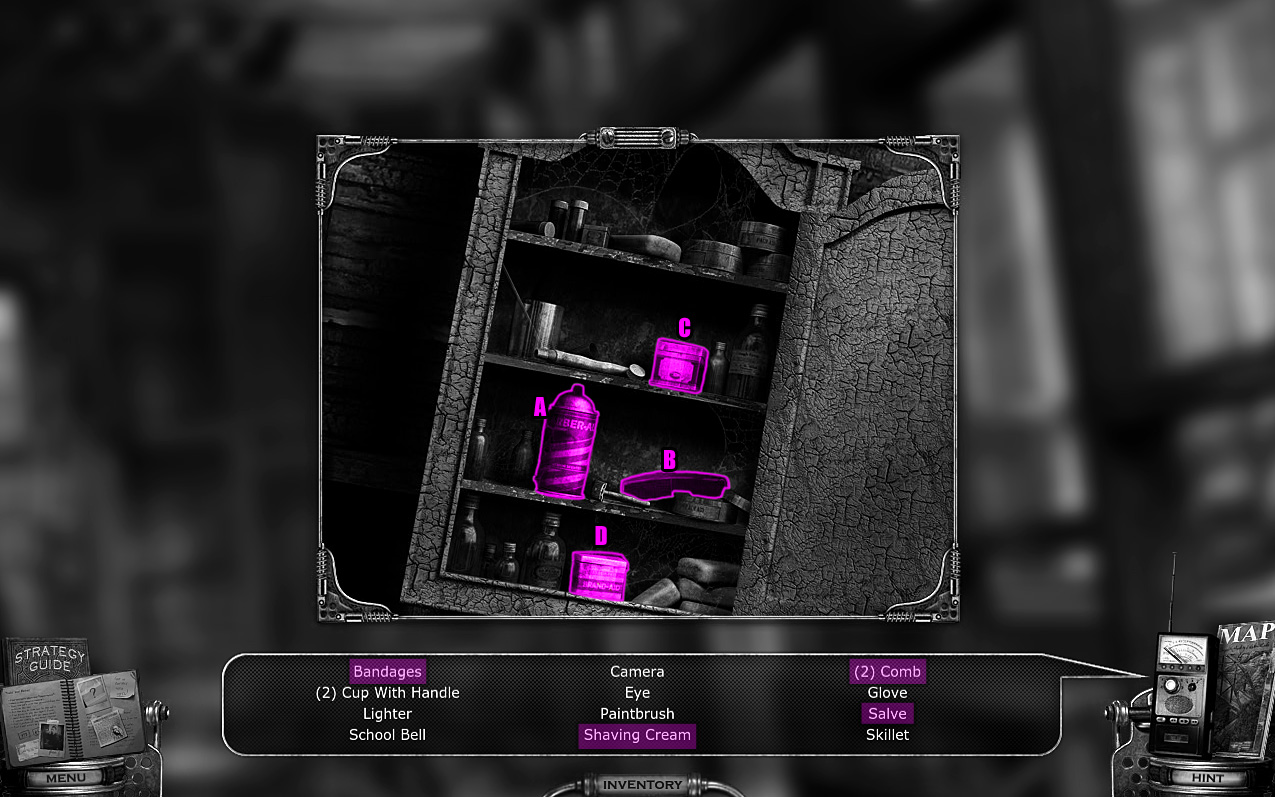
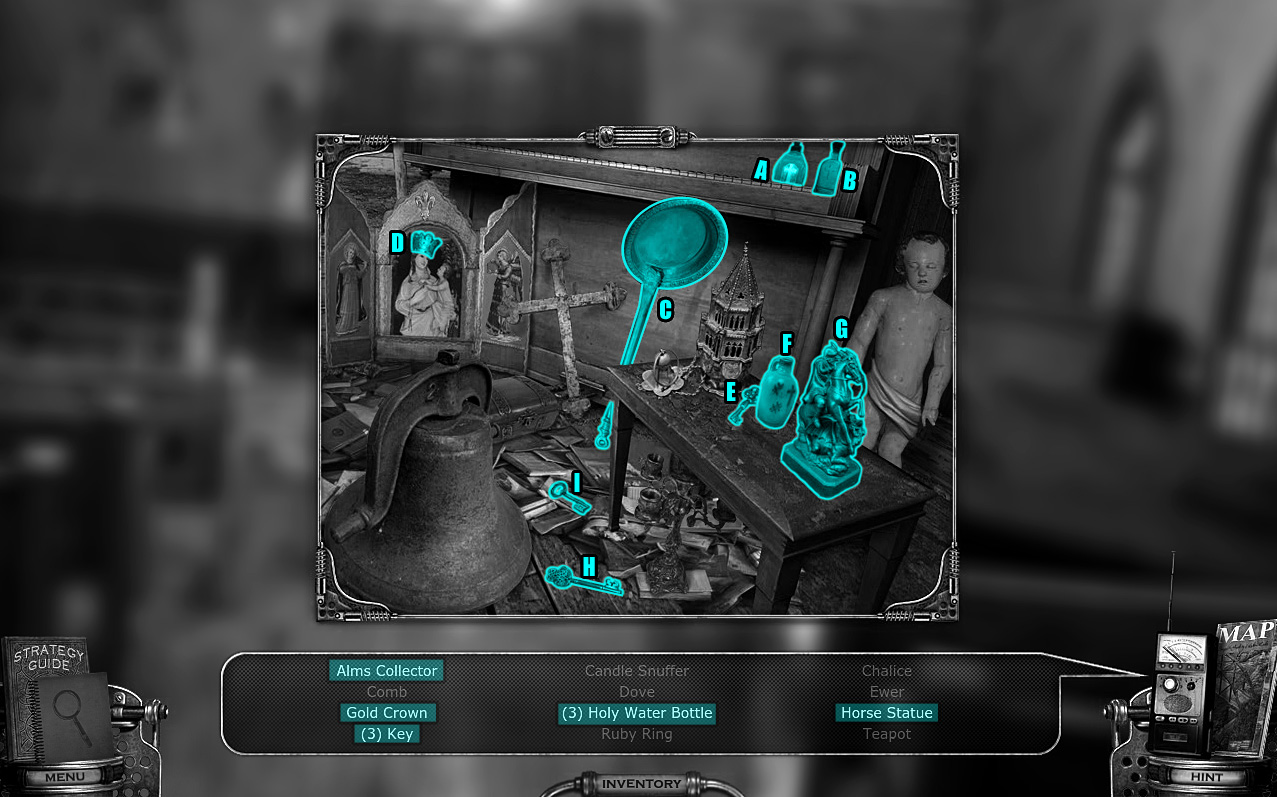
Open the door to the medicine cabinet and find 4 of the hidden objects.
The Shaving Cream (A) is on the third shelf down.
Comb 1 (B) is on the right side of the same shelf as the Shaving Cream.
The Salve (C) is the green box beside the tooth paste on the second shelf down.
The Bandages (D) are at the middle of the bottom shelf.
Screenshot.
Inspect the pile of junk at the corner of the room to find another 5 hidden objects.
Cup With Handle 1 (E) is by the gear at the top left corner of the area.
The Lighter (F) is on the ground beside the record.
The School Bell (G) is on the floor below the red bucket.
The Glove (H) is beside the pipe and under the charred wooden beams.
The Skillet (I) is on the ground behind the fire extinguisher.
Screenshot.
Click the small bookcase to zoom in and find the remaining hidden objects.
Comb 2 (J) is beside the spine of the single book on the lower shelf.
Cup With Handle 2 (K) is on top of the two books on the upper shelf.
The Eye (L) is on the spine of the book Moby Dick on the upper shelf.
The Camera (M) is underneath the far right book on the upper shelf.
The Paintbrush (N) is beside the book Celsius 233 on the upper shelf.
Screenshot.
Inspect the small bookcase again and pick up the book labeled "Stories of the Amesconti Tribe" from the upper shelf.
Turn the page to find the address to the town library.
Use the Map to travel Downtown.
Downtown
Click the car crushed under the telephone pole to zoom in.
Take the SPARE TIRE from the bottom of the car.
Move forward twice to the Bitterford Library Entrance.
Library Entrance
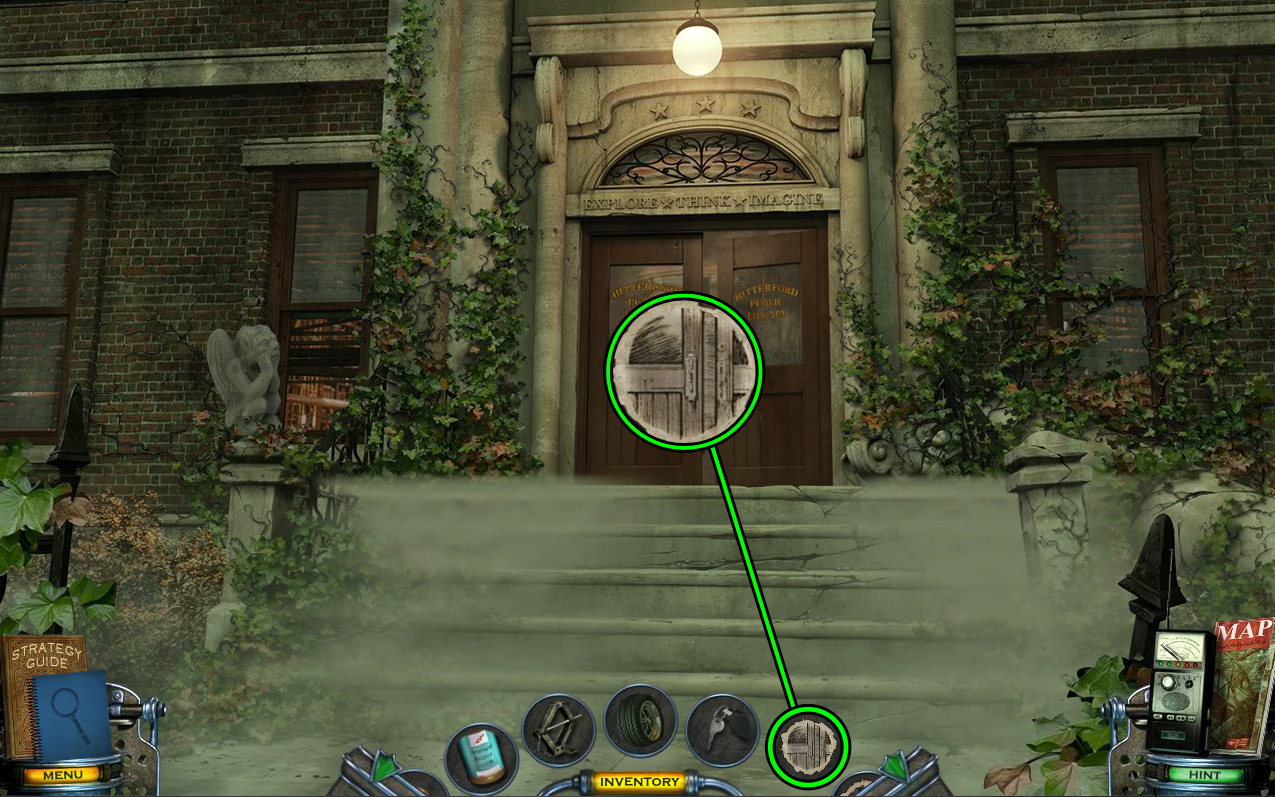
Click the front doors for a closer look.
Use the CROWBAR (from the tool shed at the School Yard) to break through the cracked glass section at the middle of the right door.
Look through the hole in the glass and turn the lock to open the door.
Go through the open door to the Lobby.
Lobby
The hidden object scene will begin when you enter the room, where you can also find one of the hidden objects.
The Flag (A) is hanging from the column at the right side of the room.
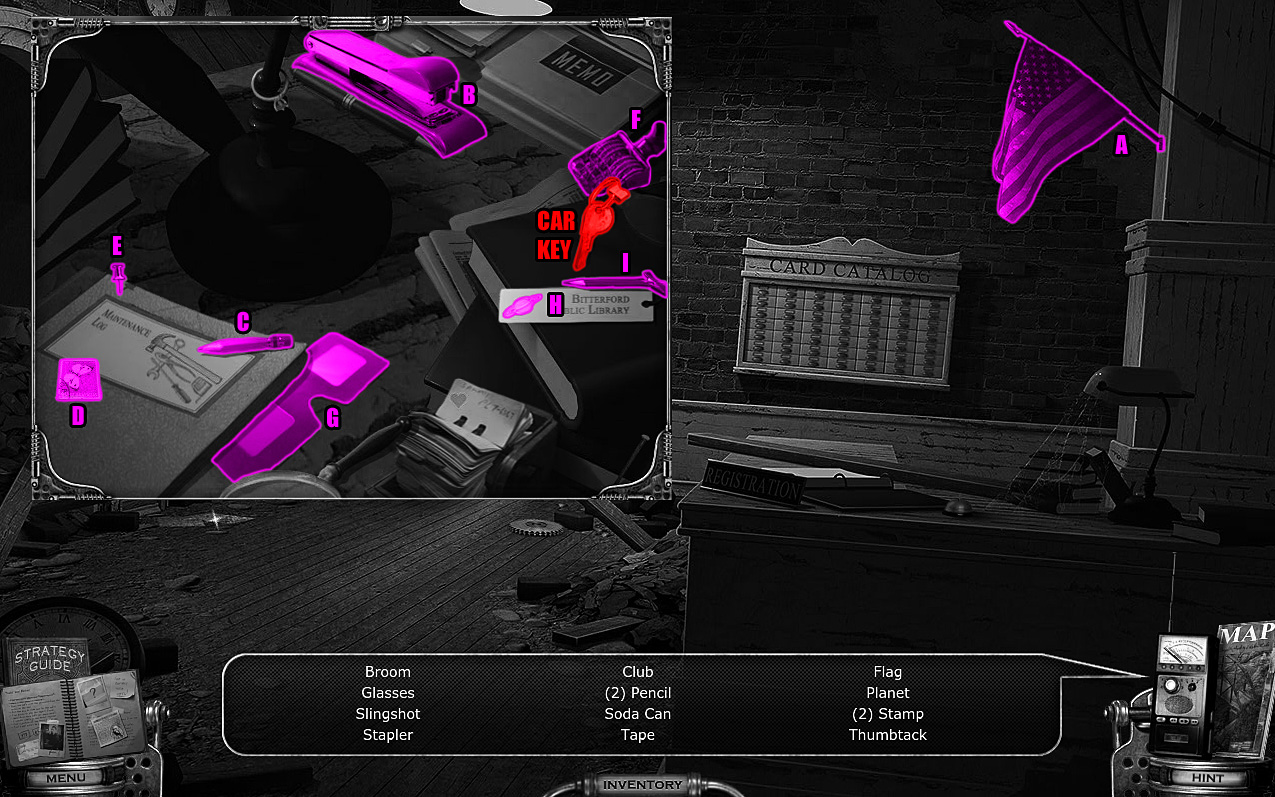
Click the right side of the registration desk to zoom in.
Take the CAR KEY on top of the black book, then find another 8 hidden objects.
The Stapler (B) is beside the fountain pain at the upper right side of the table.
Pencil 1 (C), Stamp 1 (D) and the Thumbtack (E) are all on top of the maintenance log.
Stamp 2 (F) is beside the lower right corner of the memo book.
The Glasses (G) are to the right of the maintenance log.
The Planet (H) is on the left side of the library book mark.
Pencil 2 (I) is at the top of the library book mark.
Screenshot.
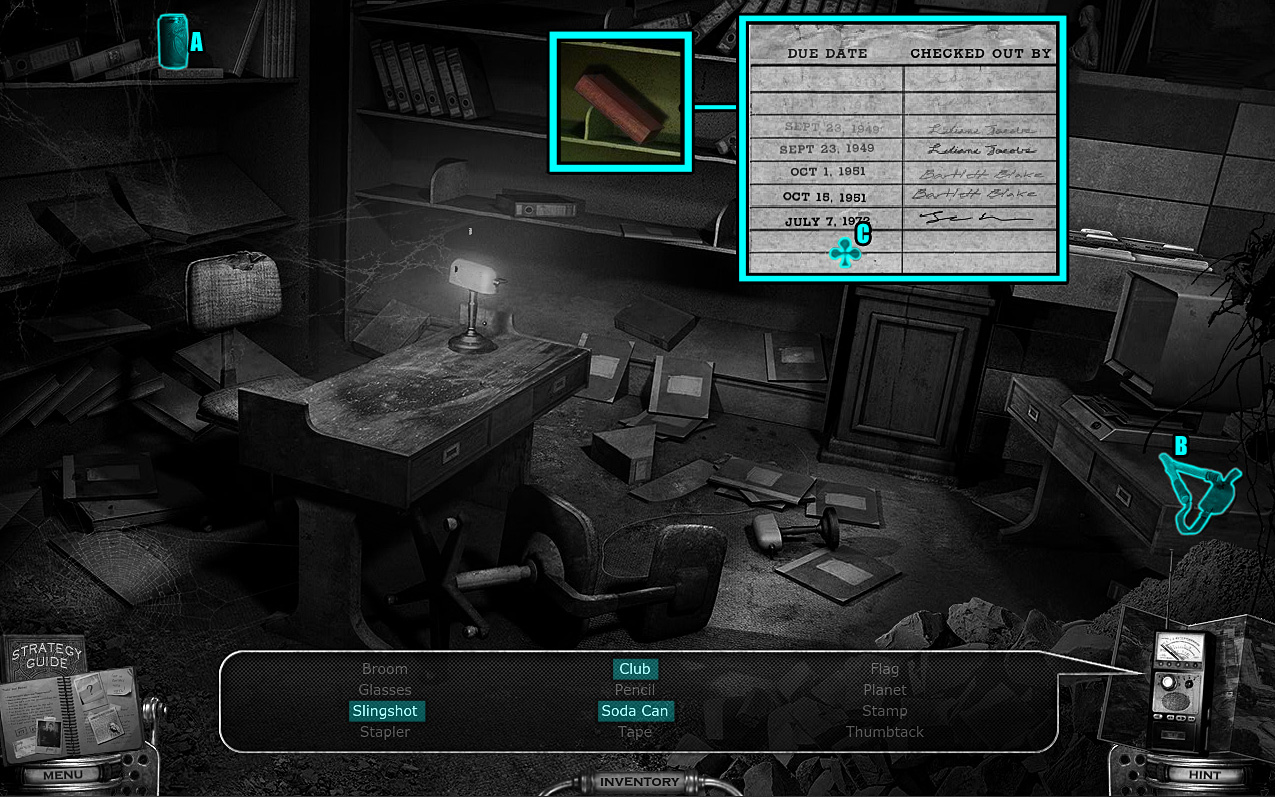
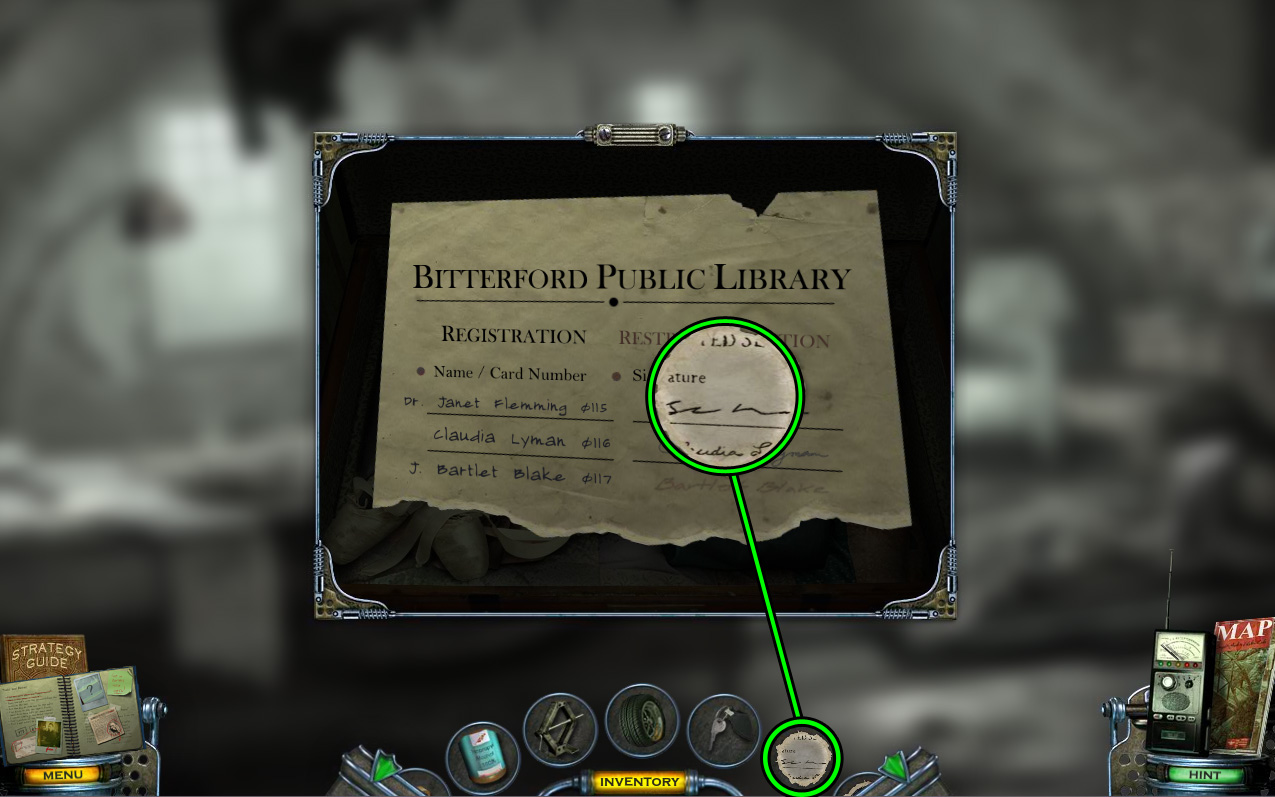
Inspect the registration book on the desk beside the registration sign.
Click the pile of junk in the right alcove to zoom in.
Move the small card away from the paper to reveal the message; note that the Auto Repair section is organized into the 600's group.
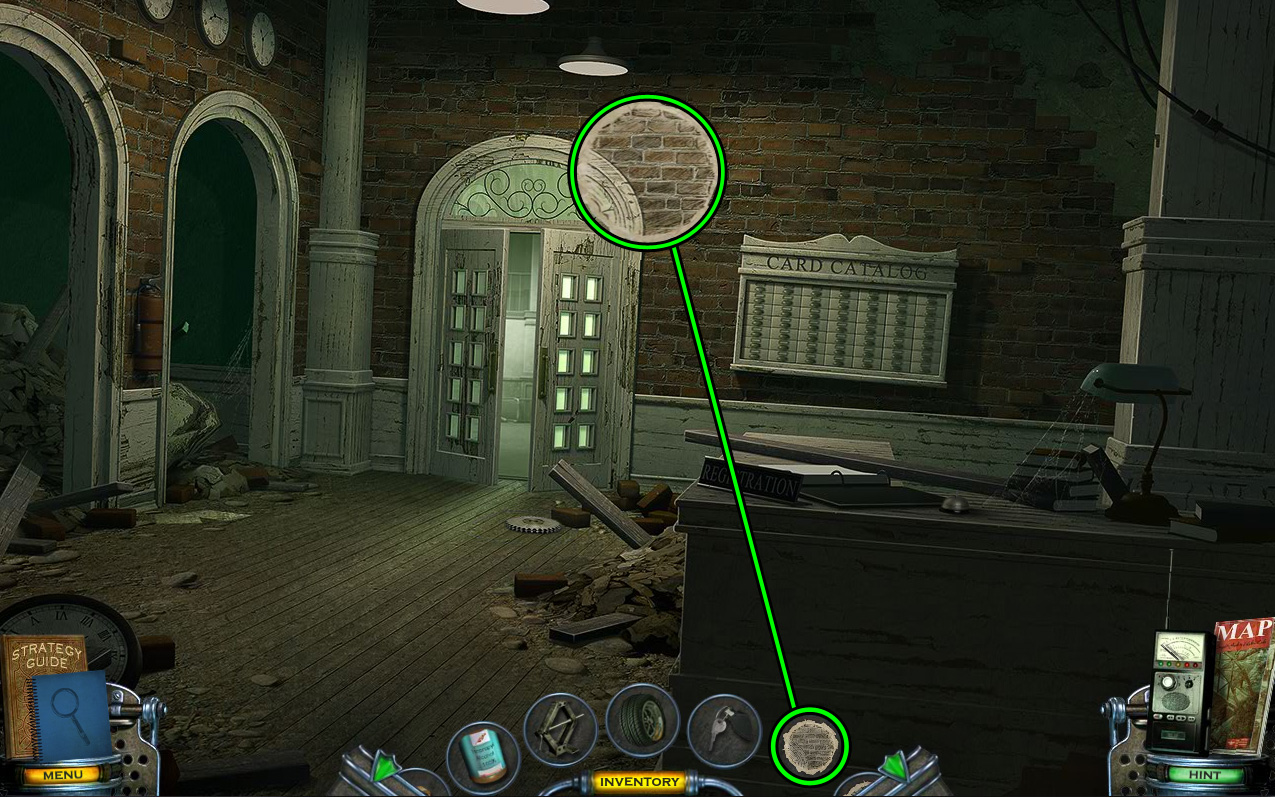
Click the card catalog on the back wall for a closer look.
Open the drawer labeled "600".
Look inside the files and note the number of the book written at the top left corner: 629.287
Go through the doors into the Library.
Library
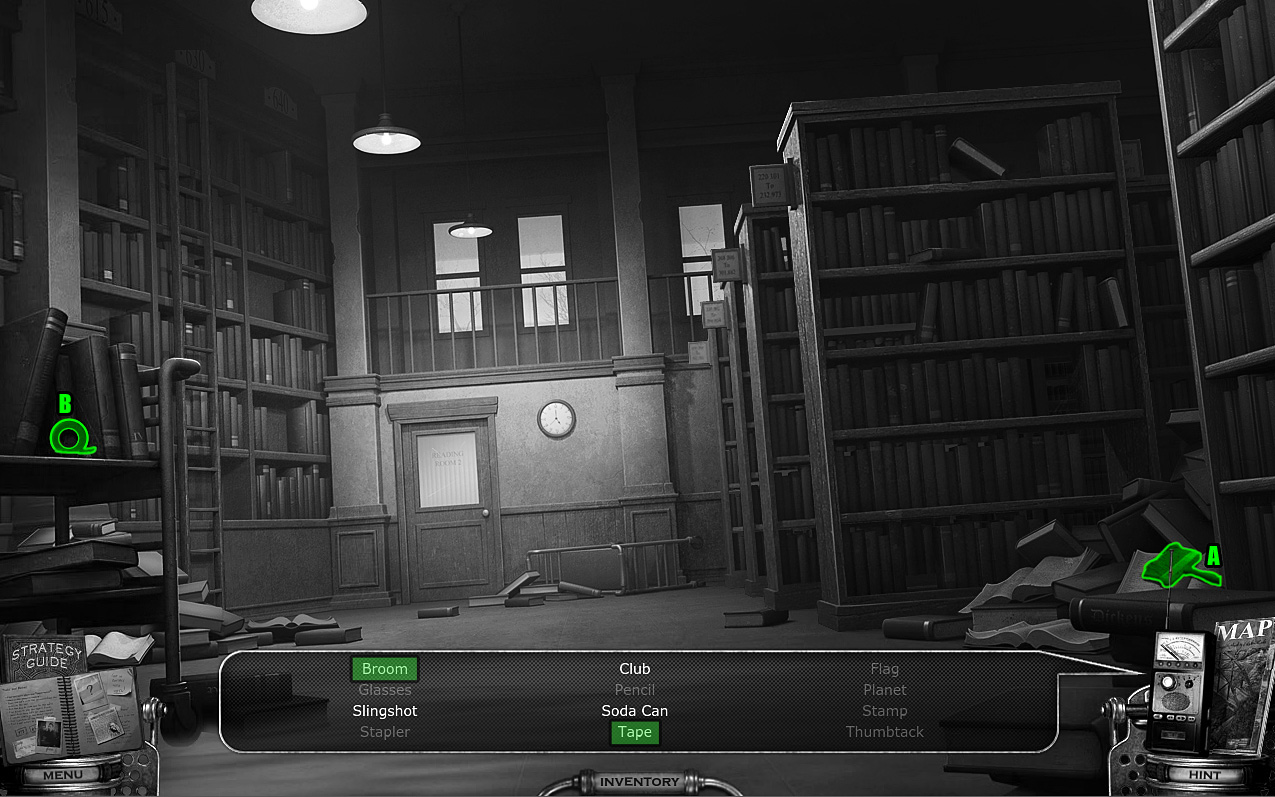
You can find 2 more hidden objects around the room.
The Broom (A) is on top of the pile of books on the floor, between the two front bookshelves at the right side of the room.
The Tape (B) is against the sides of the books on the top of the cart.
Screenshot.
Push the tall ladder at the row of bookcases on the left side of the room to move it to the right.
Inspect the top bookshelf to the right of the ladder.
Open the book with the same label you found earlier in the card catalogs, 629.287, and turn the page to find the note on Isopropyl Alcohol.
Click the rows of bookcases on the right side of the room to zoom in.
Place the CROWBAR (from the tool shed at the School Yard) at the bottom of the nearest bookcase.
Click the CROWBAR twice to tip the bookcase over.
Go through the open door into Reading Room 2.
Reading Room 2
Click the red book on the middle shelf of the right bookcase to place it on the table, then click it again to zoom in.
You can find 2 more hidden objects around the room.
The Soda Can (A) is on the top shelf of the left bookcase.
The Slingshot (B) is beside the computer on the right desk.
Open the book and lift the small check-out card from the pocket.
Find the last hidden object, the Club (C) under the bottom date on the card.
Screenshot.
Use the Map to travel to Motel Room 1 at the Drive Motel.
Motel Room 1
Move to the other side of the room to receive 6 new DRAWINGS from Cassandra.
Return to Reading Room 2 in the Library.
Reading Room 2
Select DRAWING 1/6 from your inventory and find its matching location in the scene.
Align the paper with the fallen lamp on the ground, then click to create the CHARGED DRAWING 1/6.
Screenshot.
Use the Map to travel to the Master Bedroom in the Warden's House.
Warden's House
Open the trunk in the corner of the room beside the green sofa chair, then click it to look inside.
Select Drawing 2/6 from your inventory to find its matching location in the scene.
Pick up the torn piece of paper at the top of the pile of clothing.
Align the paper with the top signature on the paper, then click to create the CHARGED DRAWING 2/6.
Screenshot.
Return to the Library in the Downtown area.
Library
Select DRAWING 3/6 from your inventory and find its matching location in the scene.
Align the paper with the farthest lamp hanging from the ceiling, then click to create the CHARGED DRAWING 3/6.
Screenshot.
Go back out to the Library Entrance.
Library Entrance
Select DRAWING 4/6 from your inventory and find its matching location in the scene.
Align the paper with the center of the front doors, then click to create the CHARGED DRAWING 4/6.
Screenshot.
Move back once to the Main Street.
Main Street
Select DRAWING 5/6 from your inventory and find its matching location in the scene.
Align the paper with the doctor sign at the top of the right building on the corner, then click to create the CHARGED DRAWING 5/6.
Screenshot.
Return to the Lobby inside the library.
Lobby
Select DRAWING 6/6 from your inventory and find its matching location in the scene.
Align the paper with the upper right side of the door and the adjacent brick wall, then click to create the CHARGED DRAWING 6/6.
Screenshot.
Use the map to return to Motel Room 1 at the Drive Motel.
Motel Room 1
Walk to the other side of the room to give Cassandra all 6 DRAWINGS and start the puzzle.
Arrange the pieces correctly to complete the animated picture.
Click and drag a piece to move it around the board or to turn it to a different angle.
Be careful not to accidentally collide the pieces while you are moving them.
When two adjacent pieces are correctly assembled, they will fuse together.
This time, the center piece will also constantly rotate clockwise.
Screenshot.
After the puzzle is solved, return to Main Street in the Downtown area.
Main Street
Click the exterior of the coroner's office to zoom in.
Pick up the SANDBAG on the ground under the right boarded window.
Inspect the abandon car's rear flat tire.
Use the CAR JACK (from the broken car at the Garage) to lift the weight off the wheel.
Remove the hub cap, then use the LUG WRENCH to remove the bolts from the center of the wheel.
Click each of the four bolts to put them on the ground.
Take off the flat tire and replace it with the SPARE TIRE (from the crushed car at the start of Downtown).
Put the bolts into the new tire and tighten them back on with the LUG WRENCH.
Click the gas cap at the side of the car for a close-up view.
Lift the cover and remove the cap.
Pour the ISOPROPYL ALCOHOL (from the locker in the Garage) into the gas tank.
Click the driver side window for a closer look.
Use the BENT ANTENNA (from the television set in Motel Room 2) to unlock the door.
Take a look inside the car at the driver's seat.
Insert the CAR KEY (from the registration desk at the library Lobby) into the ignition, and turn it to start the car.
Place the SANDBAG onto the gas pedal.
Move left into the Drug Store.
Posted by: Trinn |
November 20, 2012 4:17 PM
|
November 20, 2012 4:17 PM
Mystery Case Files: Shadow Lake walkthrough
Part 2: Chapter 6 & 7
Chapter 6: Drug Store and Clinic
Drug Store
Click the shelf behind the cash register for a close-up view.
Take a QUARTER from the roll of coins.
Inspect the display shelves under the cosmetics.
Take the PLASTER and the SCREWDRIVER.
Inspect the arcade machine in the corner of the room.
Insert the coin into the machine to start the game.
Click the slider at the top of the game to drop the ball.
The ball will bounce and roll of the pegs of the rotating board and fall to the bottom.
If it falls into one of numbered holes, you will earn points. The higher the multiplier (1x, 2x, and 4x) the more points you will earn. If it falls into the empty space, you will receive zero points.
Reach 100,000 points to light the highest box on the score board.
Use the SCREWDRIVER to unscrew the four screws at the corners of the scoreboard.
Remove the board and take the PHARMACY KEY inside.
Go up the stairs to view the door.
Use the PHARMACY KEY to open the lock, then move forward to the Rooftops.
Rooftops
Place the LADDER (from the bookcase at the Library) over the gap between the two adjacent buildings.
Walk across the ladder to the other side of the roof.
Click the drain pipe near the rear right corner of the building to zoom in.
Attach the EXTENSION CORD (from the equipment crate at the School Yard) to the pipe.
Climb down the cord to hang beside the window.
Click the latch at the middle of the window pane for a closer look.
Use the KNIFE on the small hole in the glass to open the window.
Enter the Doctor's Bedroom.
Doctor's Bedroom
Click the right door to look inside the closet.
You can locate 3 hidden objects here.
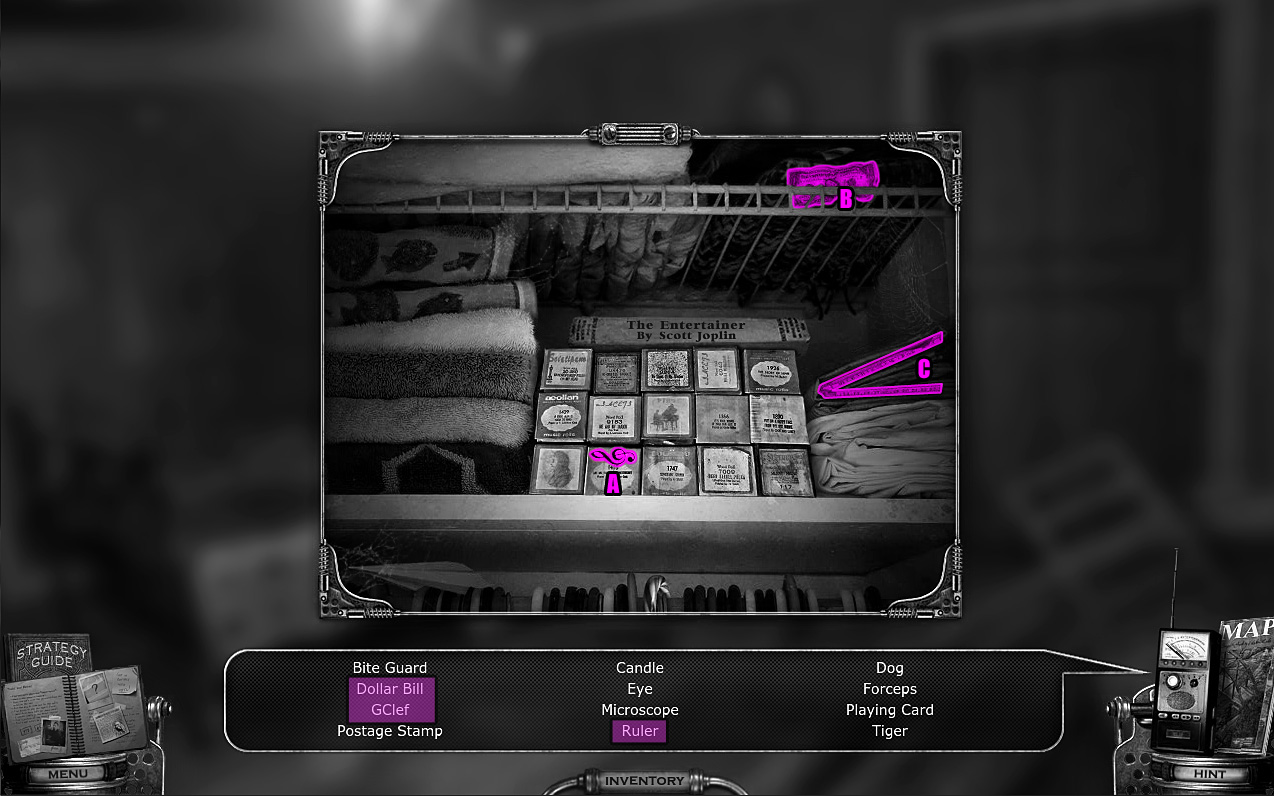
The G Clef (A) is on the side of the green box on the bottom row of music roll boxes.
The Dollar Bill (B) is on the right side of the rack at the top of the closet.
The Ruler (C) is inside the creases of the folded yellow blanket.
Screenshot.
Go through the left door to the Upstairs Hallway.
Upstairs Hallway
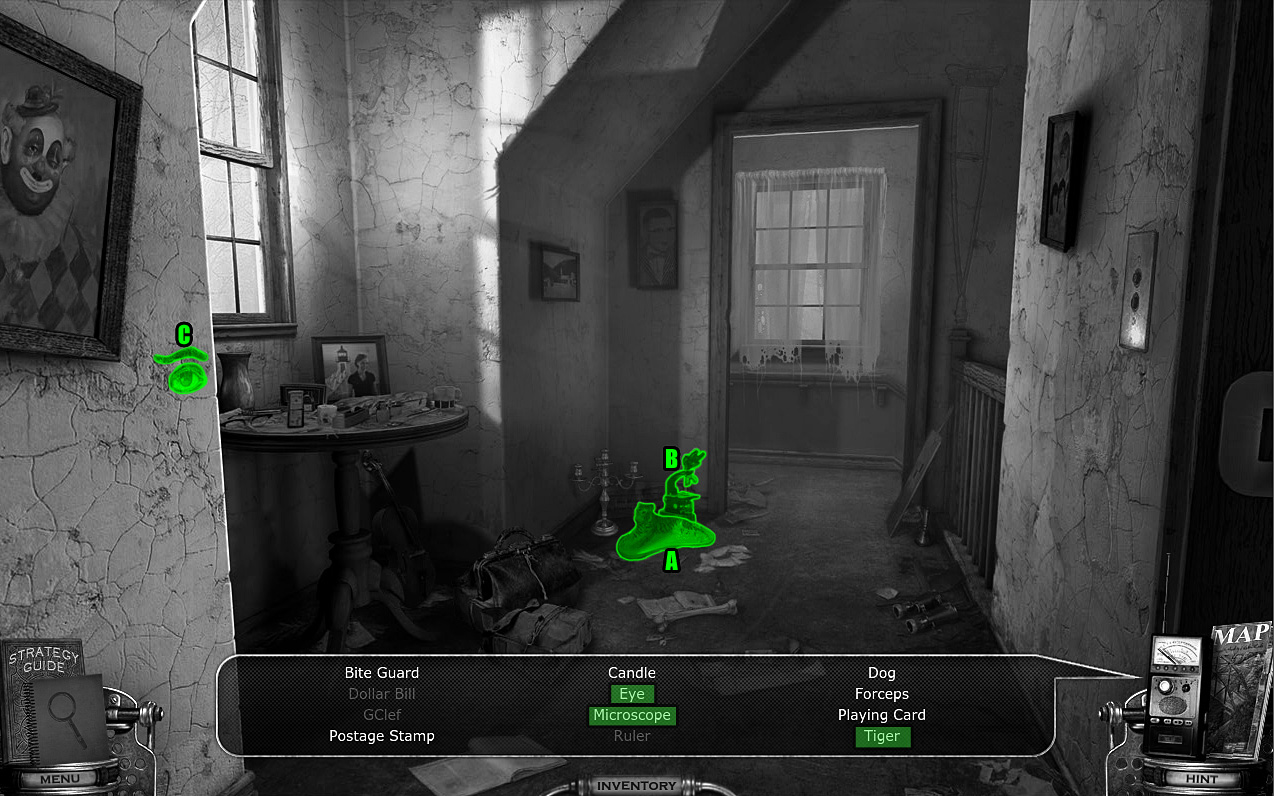
You can find 3 hidden objects around the area.
The Tiger (A) and the Microscope (B) are on the floor at the corner of the room.
The Eye (C) is on the wall beside the framed picture of the clown.
Screenshot.
Click the round table under the window to zoom in.
Take the roll of TAPE at the front of the table.
Find the remaining hidden objects.
The Playing Card (D) is underneath the bottom of the tape.
The Candle (E) is behind the tape and playing card.
The Dog (F) is in the photograph on the left side of the table.
The Forcepgs (G) are below the pair of glasses.
The Stamp (H) is on the corner of the papers at the lower left side of the table.
The Bite Guard (I) is on the left side of the surgical tools kit.
Screenshot.
Go back to the Doctor's Bedroom.
Doctor's Bedroom
Click the right door to look inside the closet.
Take the PIANO ROLL labeled "The Entertainer" on top of the stack of boxes.
Return to the Upstairs Hallway, then go down the stairs to the Lounge.
Lounge
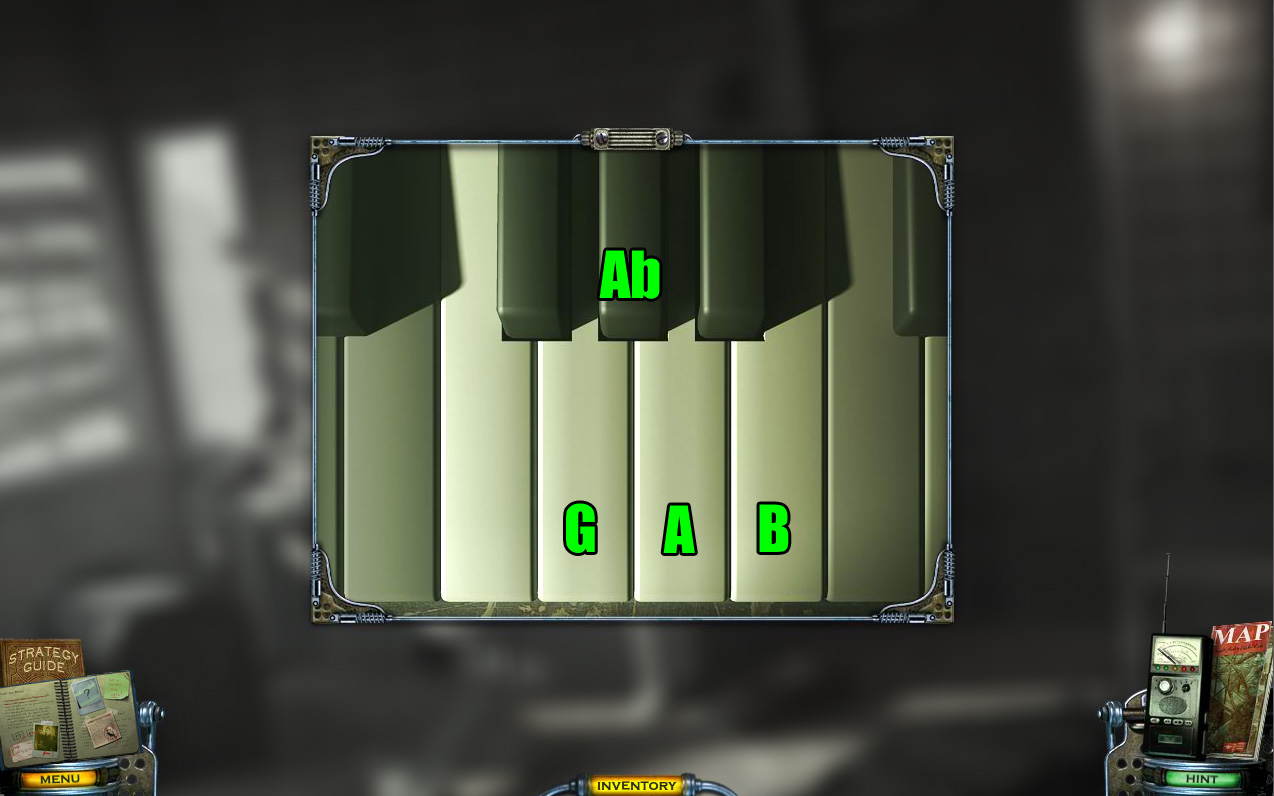
Click the top of the piano for a closer look.
Click the handle to open the small window.
Add the PIANO ROLL (from the closet at the Doctor's Bedroom) to the cylinder in the piano.
Note that only one section of the piano role is circled with red pen.
Use the roll of TAPE (from the table at the Upstairs Hallway) to cover the other markings on the piano roll.
Pull the handle at the right side of the piano to play the music on the piano.
Memorize the order of the notes played on the piano keys. If you can't read notation, please refer to the screenshot below.
A - B - A - Ab - G - G
Screenshot.
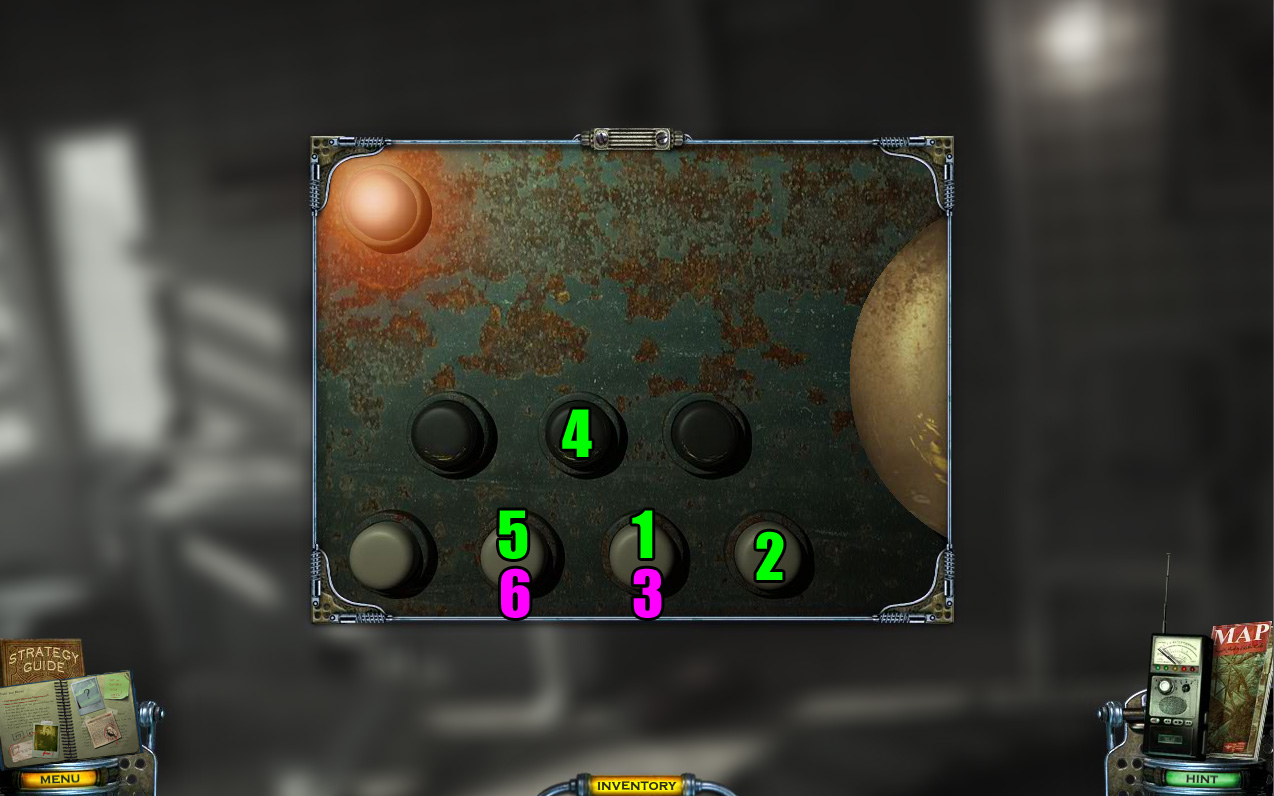
Click the lock on the office door to zoom in.
Press the black and white buttons in the same order as the black and white keys played on the piano.
Screenshot.
Go through the open door into the Doctor's Office.
Doctor's Office
Click the cork board on the wall to zoom in.
Take the BOBBY PIN that's hanging from the top of the large brown paper at the upper right corner of the board.
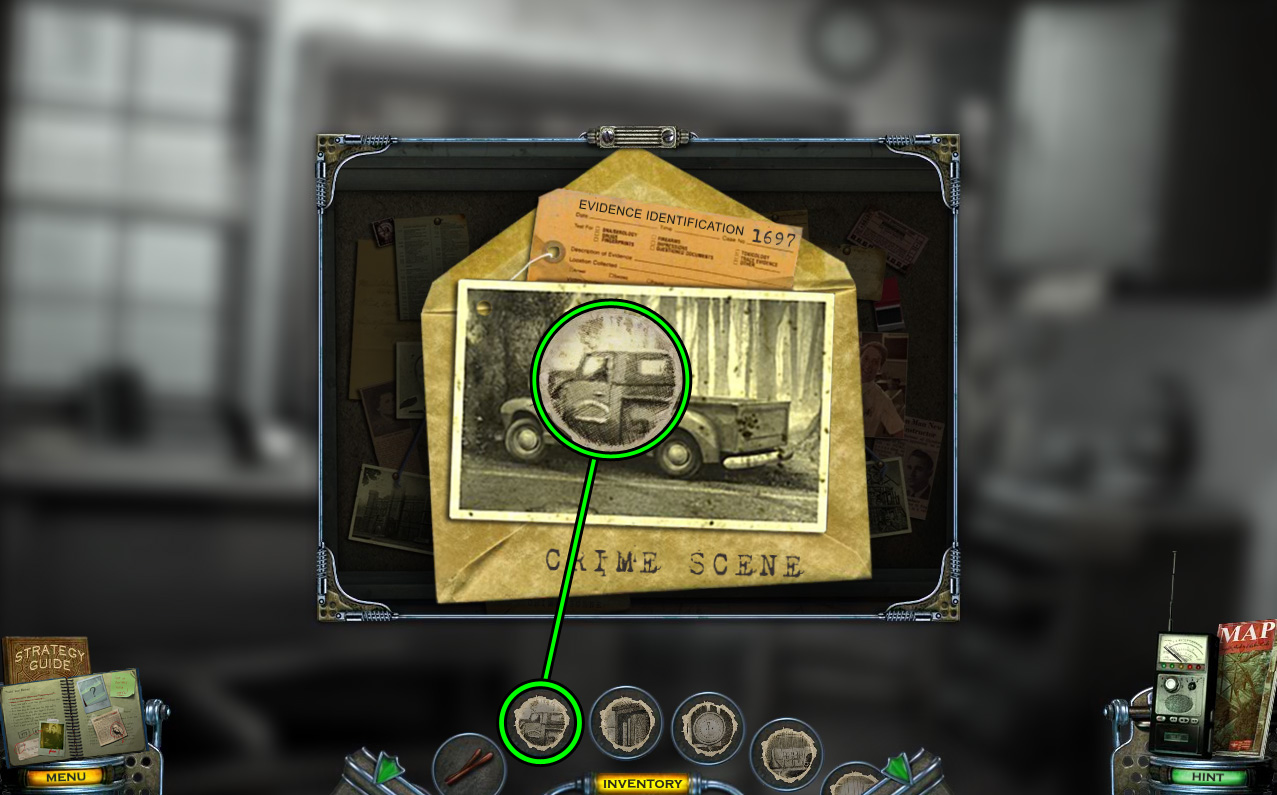
Open the envelope at the bottom to view the crime scene evidence.
After you investigate the board, Cassandra will contact you to offer more drawings.
Use the Map to travel to Motel Room 1 at the Drive Motel.
Drive Motel
Walk to the other side of the room to receive another 6 DRAWINGS from Cassandra.
Return to the Doctor's Office in the Downtown area.
Doctor's Office
Click the cork board for a closer look.
Open the envelope to view the crime scene evidence again.
Note the file number on the identification tag.
Select DRAWING 1/6 from your inventory and find its matching location in the scene.
Align the paper with the upper right side of the door and the adjacent brick wall, then click to create the CHARGED DRAWING 6/6.
Screenshot.
Continue right into the Operating Room.
Operating Room
Pick up the TORN PAGE beside the corpse on the operating table.
Click the sink for a close-up view.
Pour the PLASTER OF PARIS (from the shelves at the Drug Store) into the mold in the sink.
Cover the bottom half of the mold with the top half, then turn on the sink to pour the water into the plaster.
The plaster will not dry immediately, so we will have to return later.
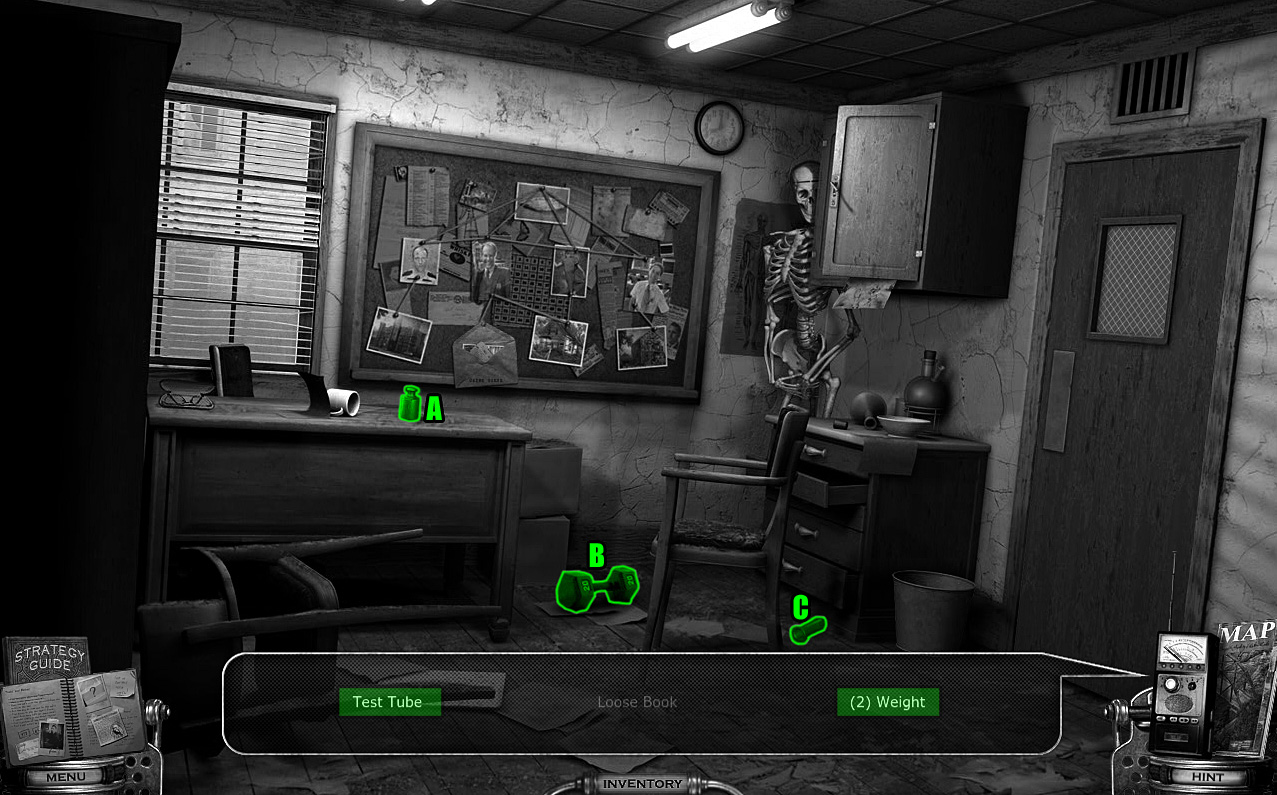
Find 9 of the hidden objects around the room.
Test Tube 1 (A) is on the counter next to the left side of the sink.
Weight 1 (B), Book 1 (C), and Test Tube 2 (D) are on the right side of the counter.
Weight 2 (E) is on the floor beside the oxygen tank at the corner of the room.
Weight 3 (F) and Book 2 (G) are on the floor underneath the operating table.
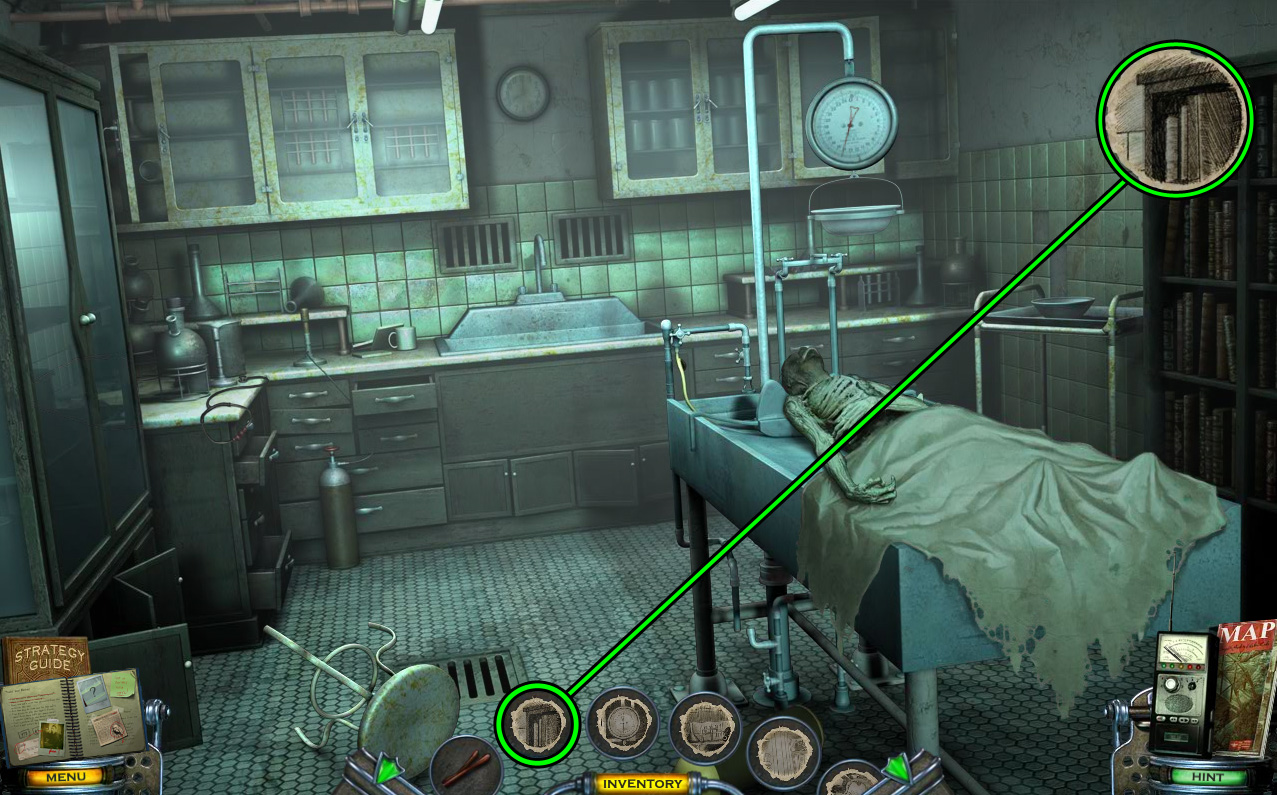
Book 3 (H) is on the far left side of the counter, directly beside the left bookcase.
Book 4 (I) is on the lower left shelf of the far left wall cabinet.
Screenshot.
Place all four of the LOOSE BOOKS into the top left shelf of the right bookcase.
Select DRAWING 2/6 from your inventory and find its matching location in the scene.
Align the paper with the books you placed in the upper left corner of the bookcase, then click to create the CHARGED DRAWING 2/6.
Screenshot.
Go back to the Doctor's Office.
Doctor's Office
Find the remaining hidden objects around the room.
Weight 4 (A) is on top of the desk.
Weight 5 (B) is on the floor to the left of the standing chair.
Test Tube 3 (C) is on the floor to the right of the standing chair.
Screenshot.
Return to the Operating Room.
Operating Room
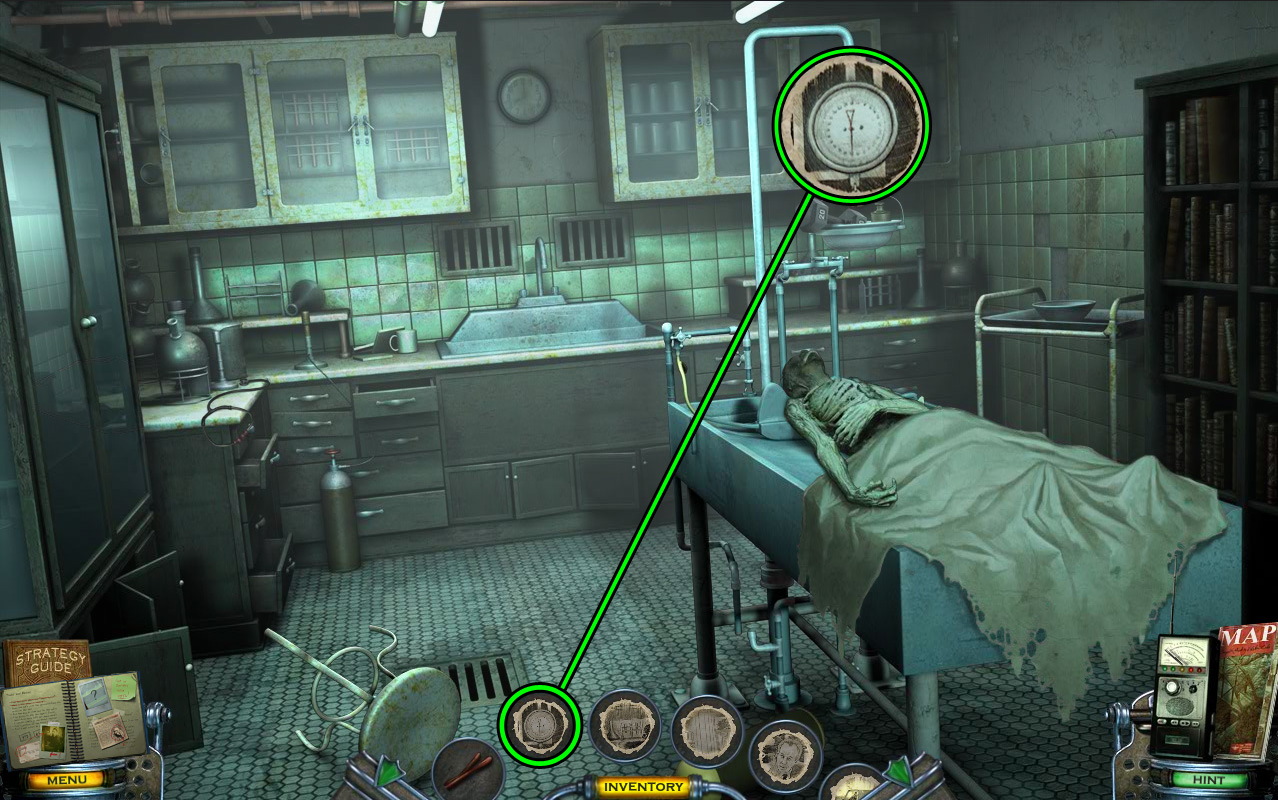
Click the scale hanging above the operating table for a close-up view.
Place all of the WEIGHTS from your inventory into the scale.
Select DRAWING 3/6 from your inventory and find its matching location in the scene.
Align the paper with the fully weighted scale, then click to create the CHARGED DRAWING 3/6.
Screenshot.
Inspect DRAWING 4/6 in your inventory.
You'll see that it aligns with the rack at the far left side of the counter.
Pay attention to the order of the test tubes in the image by size: Left = Short Tube, Middle = Long Tube, Right = Medium Tube.
Click the rack to zoom in and place the TEST TUBES from your inventory into the rack in the same order.
Select DRAWING 4/6, and align the paper with with the test tubes in the rack, then click to create the CHARGED DRAWING 4/6.
Screenshot.
Go back to the Drugstore.
While you are crossing over the Rooftops, collect your LADDER between the two buildings.
Drugstore
Select DRAWING 5/6 from your inventory and find its matching location in the scene.
Align the paper with the left side of the arcade machine and the boxes on the right side of the shelf, then click to create the CHARGED DRAWING 5/6.
Screenshot.
Go back to the entrance of the Downtown area, then click the front right building to go to the Sheriff's Office Entrance.
Sheriff's Office Entrance
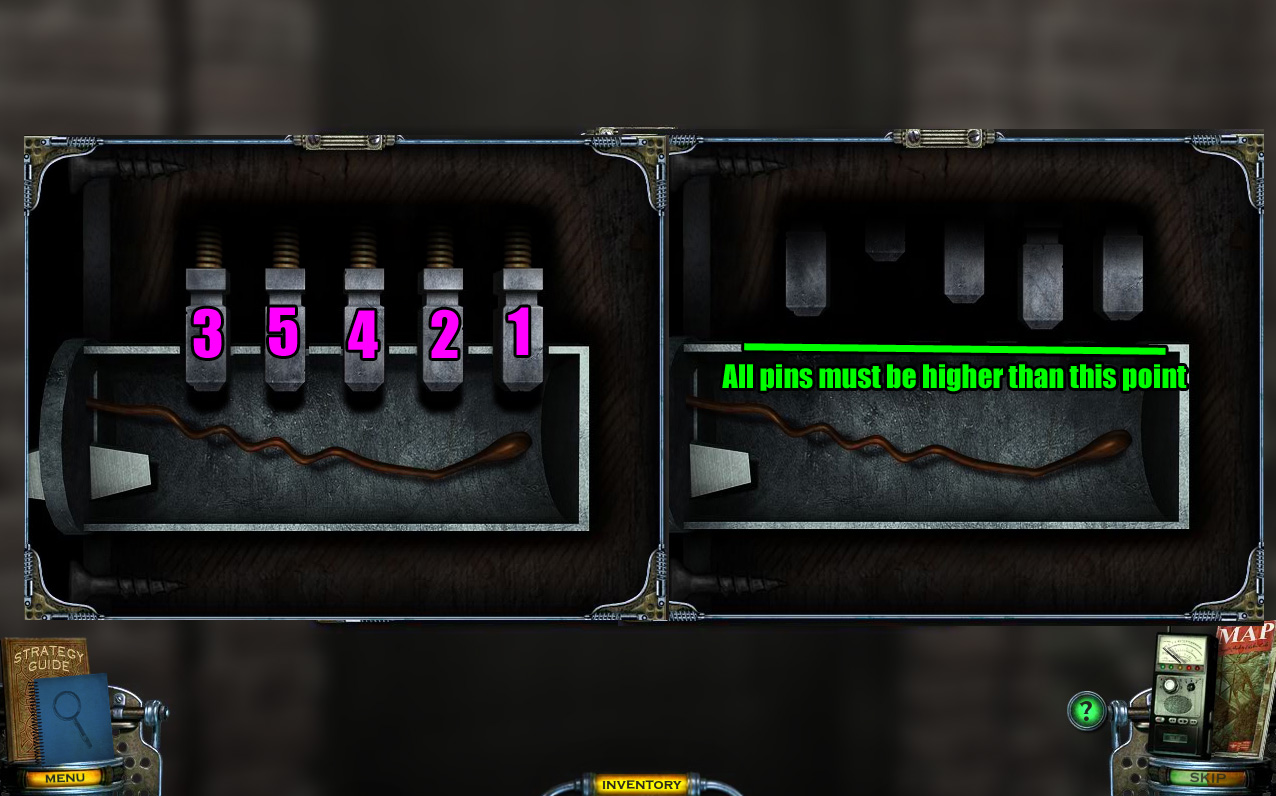
Click the doorknob on the front door to zoom in.
Insert the HAIRPIN (from the cork board at the Doctor's Office) and the SCREWDRIVER (from the shelf at the Drugstore) into the keyhole to start the puzzle.
Lift the lock pins in the correct order so that they are all raised from the lock at the same time.
First, raise each pin to test how long it takes for the pin to slide back down.
Quickly lift each pin in order from slowest to fastest; the lock will only open if all of the pins are out the lock simultaneously.
Screenshot.
Go through the opened door into the Sheriff's Office.
Sheriff's Office
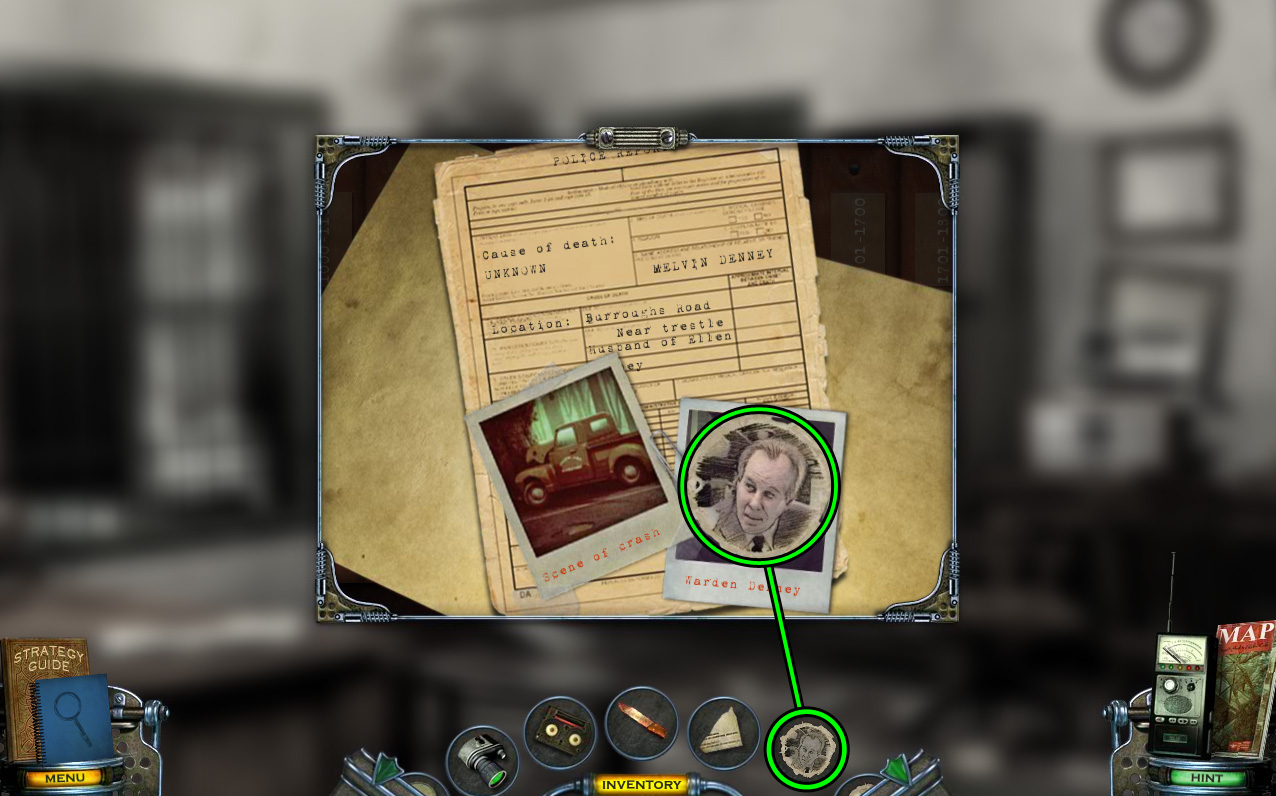
Inspect the map on the wall and note the location.
Click the folders at the top of the bookcase for a closer look.
Open the file labeled 1601-1700.
Select DRAWING 6/6 from your inventory and find its matching location in the scene.
Align the paper with the picture of the warden in the file, then click to create the CHARGED DRAWING 6/6.
Screenshot.
Use the Map to return to Motel Room 1 at the Motel Drive.
Motel Room 1
Walk across the room to give the drawings to Cassandra and start the puzzle.
Arrange the pieces correctly to complete the animated picture.
Click and drag a piece to move it around the board or to turn it to a different angle.
Be careful not to accidentally collide the pieces while you are moving them.
When two adjacent pieces are correctly assembled, they will fuse together.
This time, you'll notice a number of flashing red pieces.
These pieces are weighted and have a sort of magnetism that causes them to not be able to move far from their original location and will also cause them to stick to other nearby pieces.
Start by finding the adjacent pieces to the four magnetized squares at the center, then building outward from there.
Screenshot.
After the puzzle is solved, use the Map to travel to Trestle Road.
Chapter 7: Trestle Road & Sheriff's Building
Trestle Road
Click the driver's side window of the pickup truck to look inside.
Find all of the hidden objects around the area.
Open the glove compartment to reveal the Badge (A), Flashlight (B), and the Playing Card (C).
The Gear (D) is on the top corner of the car seat.
The Rope (E) and the Flask (F) are on the middle of the seat.
The Comb (G) is on top of the seatbelt at the bottom of the seat.
The Stick (H) and the Beetle (I) are near the edge of the seat, to the right of the steering wheel.
The Moth (J) is on the far right side of the ivy growing on under the passenger window.
The Harmonica (K) and the Bottle Cap (L) are on top of the dashboard.
Screenshot.
Inspect the area under the bottom of the truck.
Pick up the wallet on the ground and read the note in the right pocket.
Use the Map to travel to Motel Room 1 at the Drive Motel.
Motel Room 1
Walk to the other side of the room to receive another 6 DRAWINGS from Cassandra.
If she does not yet have them, try going to the Sheriff's Office first, then returning to her.
Use the Map to travel to Trestle Road.
Trestle Road
Select DRAWING 1/6 from your inventory and find its matching location in the scene.
Align the paper with the hood of the truck, then click to create the CHARGED DRAWING 1/6.
Screenshot.
Select DRAWING 2/6 from your inventory and find its matching location in the scene.
Align the paper with the bush at the side of the road, then click to create the CHARGED DRAWING 2/6.
Screenshot.
Return to the Sheriff's Office at the Downtown area, then continue through the door into the Evidence Room.
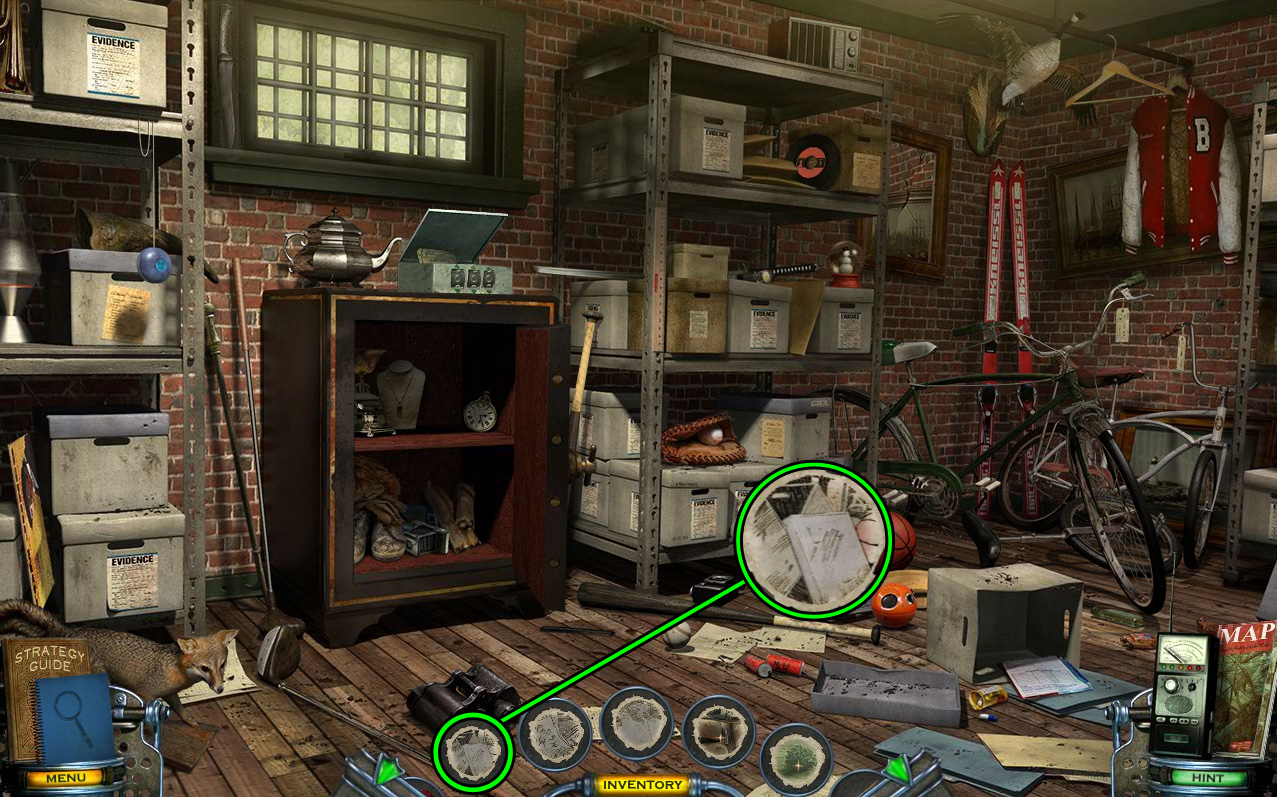
Evidence Room
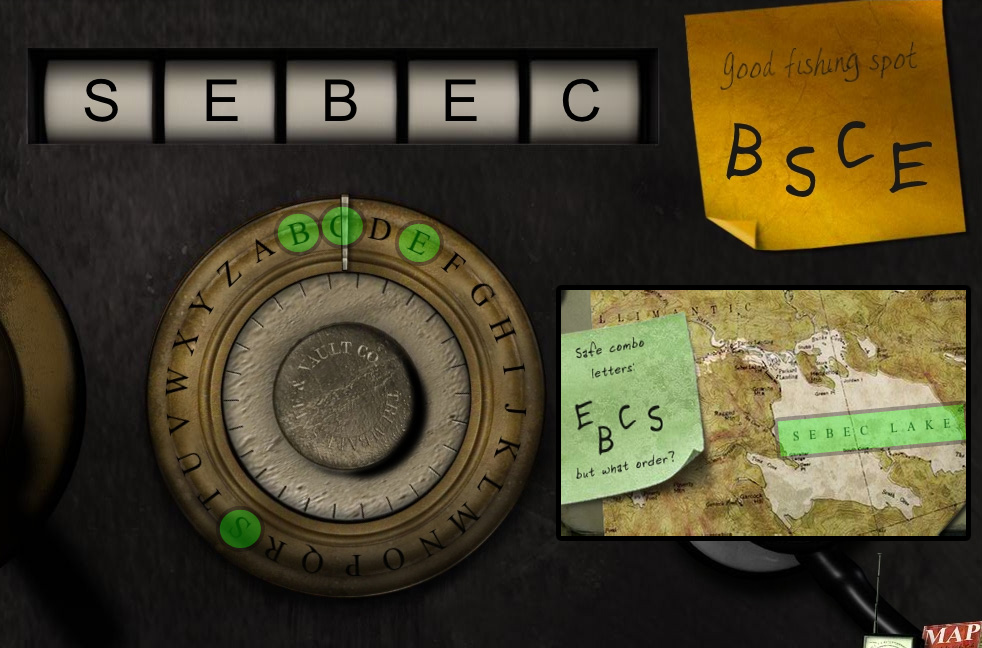
Click the large safe for a closer look.
Use the STETHOSCOPE (from the counter at the Operating Room) on the safe to start the puzzle.
Click and drag the dial clockwise or counterclockwise, and listen for a loud knocking sound.
Release the dial on the letter that it was passing when it made the sound.
Immediately move the dial in the opposite direction to add that letter to the yellow note at the upper right corner of the safe.
Do this until you have found all four letters: B-S-C-E.
Read the hint at the top of the note: "Good Fishing Spot".
Organize the letters (letters can be repeated more than once) to spell the word of a good spot for fishing.
Remember the map in the Sheriff's Office?
On the map, you'll see a large body of water named "Sebec Lake".
Turn the dial clockwise and release it at each letter in the word "SEBEC".
Screenshot.
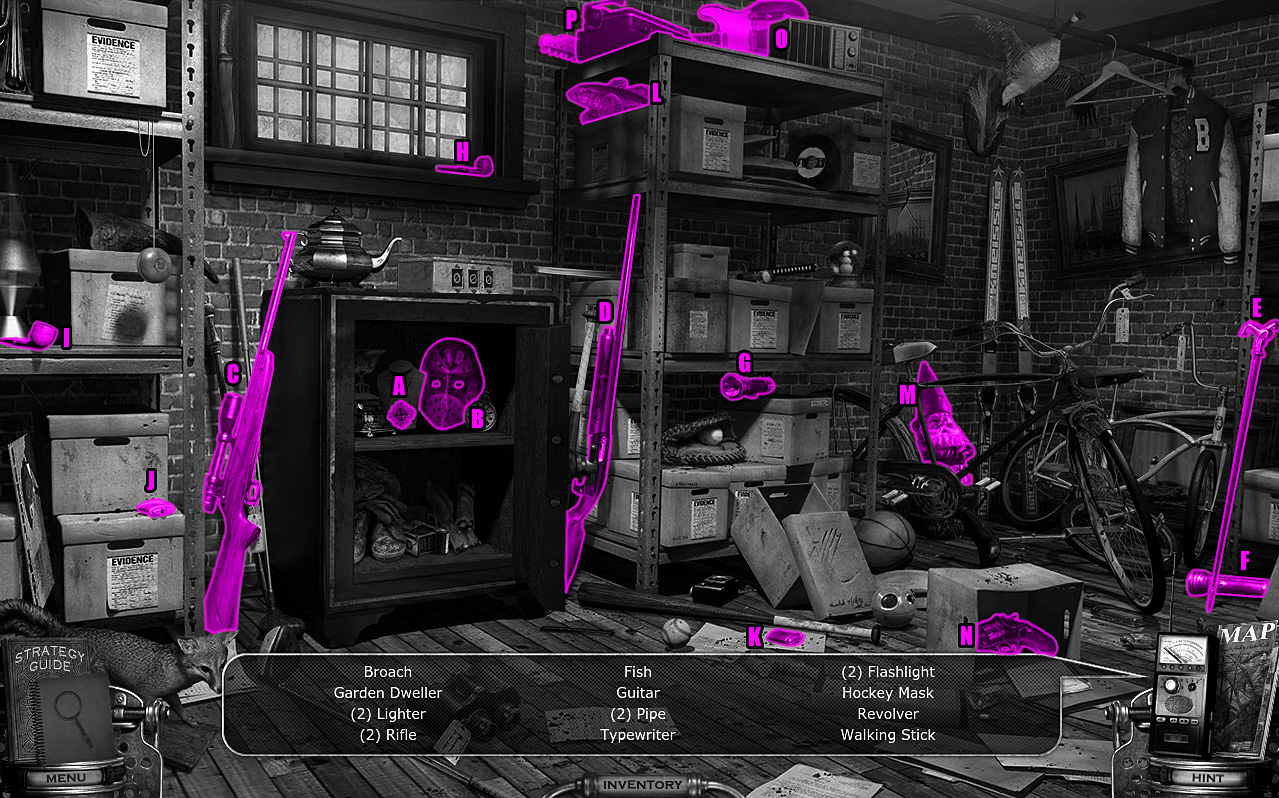
Find all of the hidden objects around the scene.
The Broach (A) and the Hockey Mask (B) are inside the opened safe.
Rifle 1 (C) is on the left side of the safe.
Rifle 2 (D) is on the right side of the safe.
The Walking Stick (A) is leaning against the rack on the far right storage shelves at the side of the room.
Flashlight 1 (F) is on the floor at the bottom of the walking stick.
Flash Light 2 (G) is on top of the stack of grey boxes on the bottom rack of the middle storage shelves.
Pipe 1 (H) is on the right side of the windowsill.
Pipe 2 (I) is below the lava lamp on the middle rack of the left storage shelves.
Lighter 1 (J) is on top of the evidence box on the bottom rack of the left storage shelves.
Lighter 2 (K) is on the floor beside the baseball bat.
The Fish (L) is above the grey box on the top rack of the middle storage shelves.
The "Garden Dweller" (M) is the garden gnome leaning against the brick wall beside the pair of skis.
The Revolver (N) is inside the overturned box on the floor.
The Guitar (O) and the Typewriter (P) are on the top of the middle storage shelves.
Screenshot.
After the hidden object scene is complete, Cassandra will ask you to search for the number 1142.
Go back to the Sheriff's Office.
Sheriff's Office
Click the folders at the top of the bookcase for a closer look.
Open the folder labeled 1101-1200 to find file 1142.
Select DRAWING 3/6 from your inventory and find its matching location in the scene.
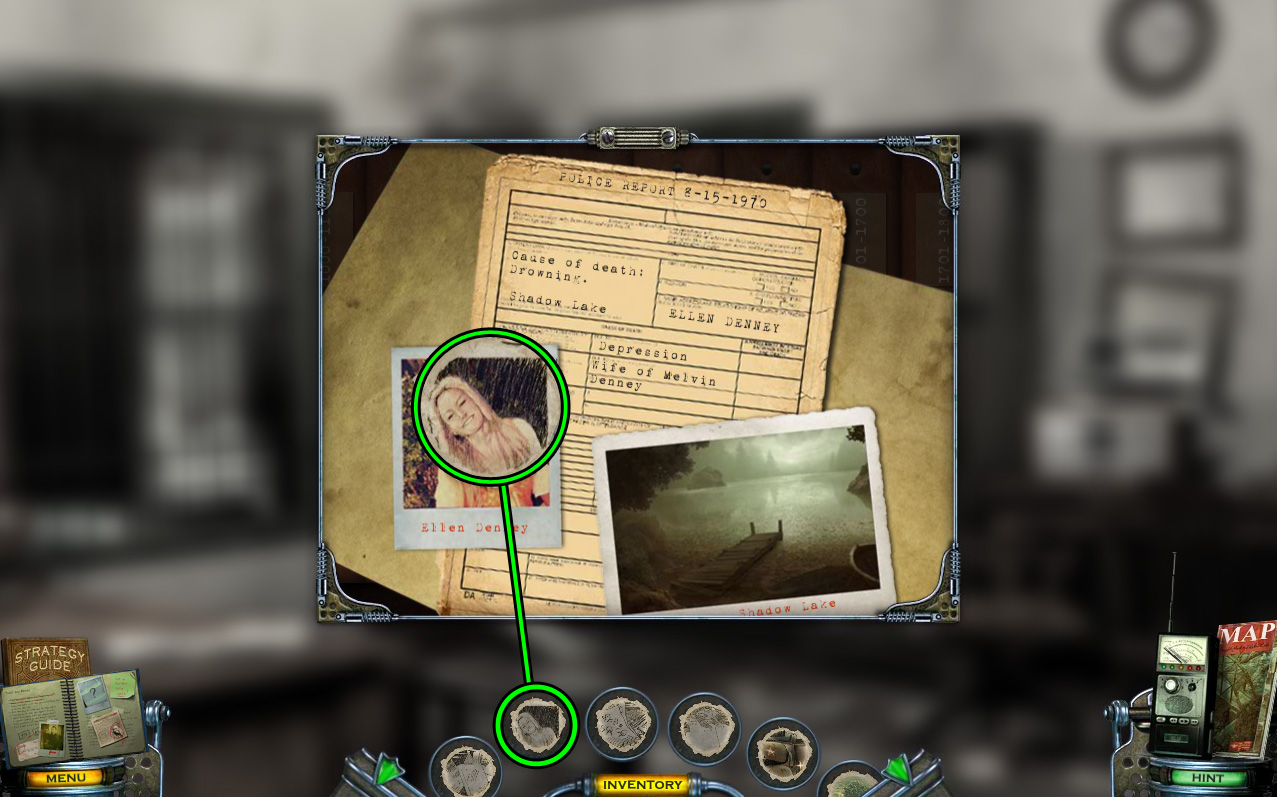
Align the paper with the photograph of Ellen Denney, then click to create the CHARGED DRAWING 3/6.
Screenshot.
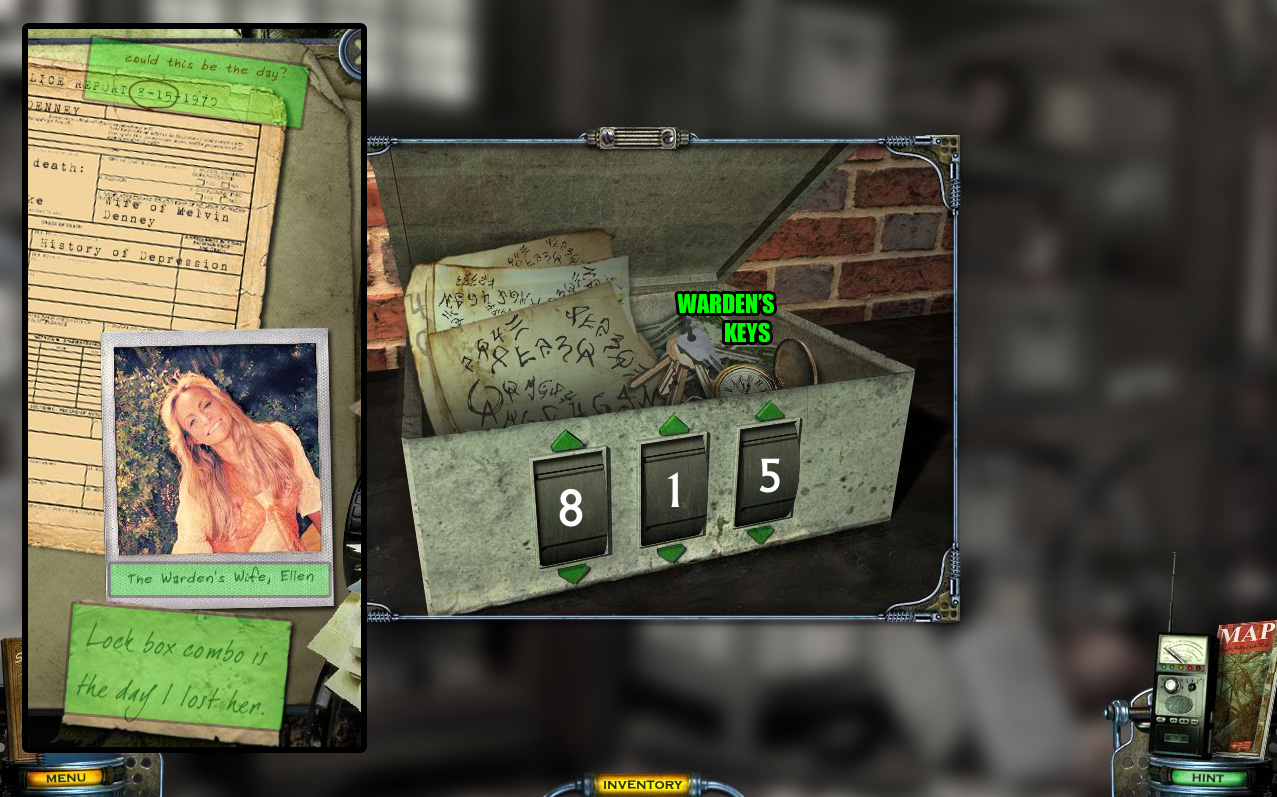
Remember the note from the wallet at Trestle Road, "Lock box combo is the day I lost her."
Note the date of Ellen Denney's death at the top of the file: 8-15-1970.
Return to the Evidence Room.
Evidence Room
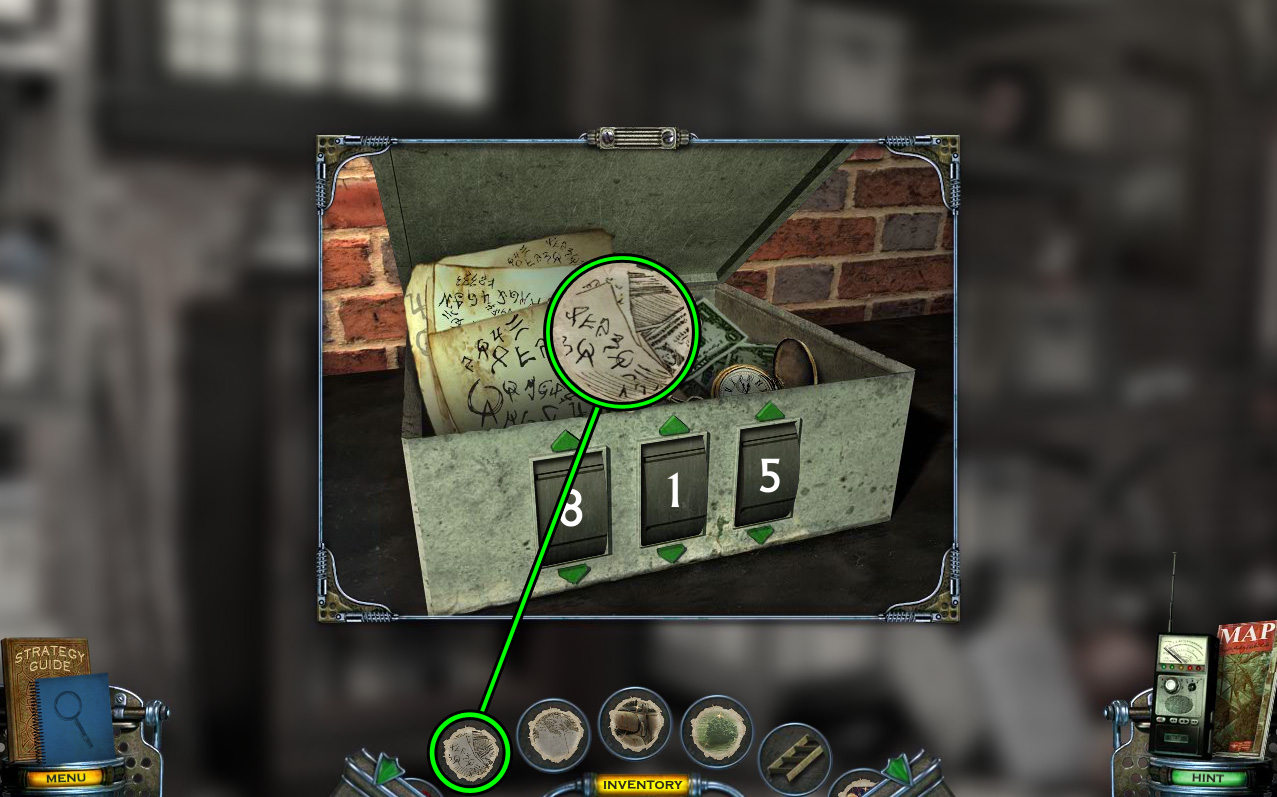
Select DRAWING 4/6 from your inventory and find its matching location in the scene.
Align the paper with the scratched lid of the open evidence box, then click to create the CHARGED DRAWING 4/6.
Screenshot.
Click the small metal lock box on top of the safe.
Enter the combination from the folder in the Sheriff's Office.
Enter the month and day of Ellen's death, 8-1-5.
Screenshot.
Take the WARDEN'S KEYS from the opened box.
Select DRAWING 5/6 from your inventory and find its matching location in the scene.
Align the paper with the right side of the papers covered in strange symbols and the dollar bills inside the lockbox, then click to create the CHARGED DRAWING 5/6.
Screenshot.
Go back again to the Sheriff's Office.
Sheriff's Office
Click the map on the wall to zoom in.
Select DRAWING 6/6 from your inventory and find its matching location in the scene.
Align the paper with the peninsula at the north side of Sebec Lake on the map, then click to create the CHARGED DRAWING 6/6.
Screenshot.
Use the Map to return to Motel Room 1 at the Drive Motel.
Motel Room 1
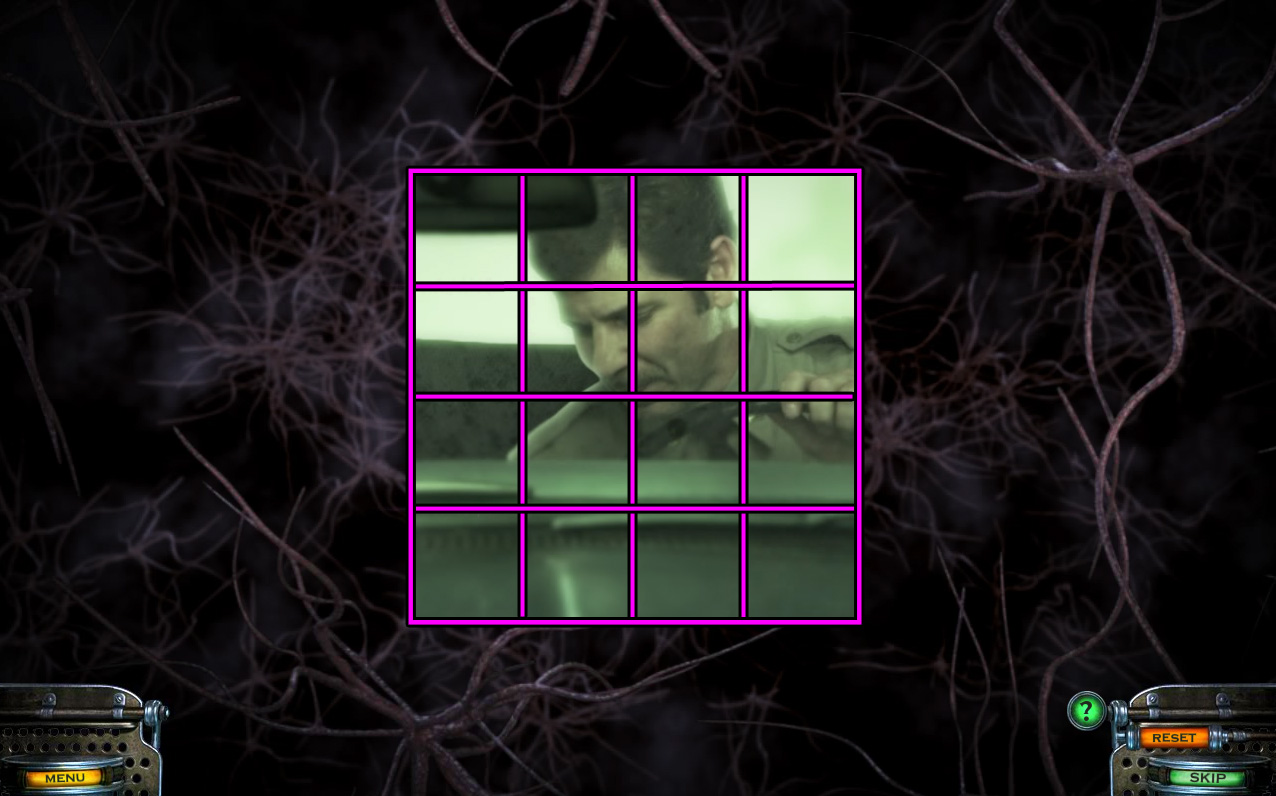
Walk across the room to give the 6 DRAWINGS from your inventory to Cassandra and start the puzzle.
Arrange the pieces correctly to complete the animated picture.
Click and drag a piece to move it around the board or to turn it to a different angle.
Be careful not to accidentally collide the pieces while you are moving them.
When two adjacent pieces are correctly assembled, they will fuse together.
This time, each of the pieces are weighted, and will drop down when you release them.
The center piece will remain in place, but will swing towards the side that is the "heaviest."
Screenshot.
Use the Map to travel to the Church Ruins.
Chapter 8: Church
Sinkhole
Place the LADDER over the ravine and against the steeple of the church building.
If you don't have the LADDER in your inventory, go back to the Rooftops to retrieve it.
Walk across the ladder to the Steeple.
Steeple
Click the hatch to try to lift it.
After the handle breaks, stick the KNIFE (from the teacher's desk in the Classroom) into one of the boards.
Click the knife to open the door.
Go down the ladder into the Church.
Church
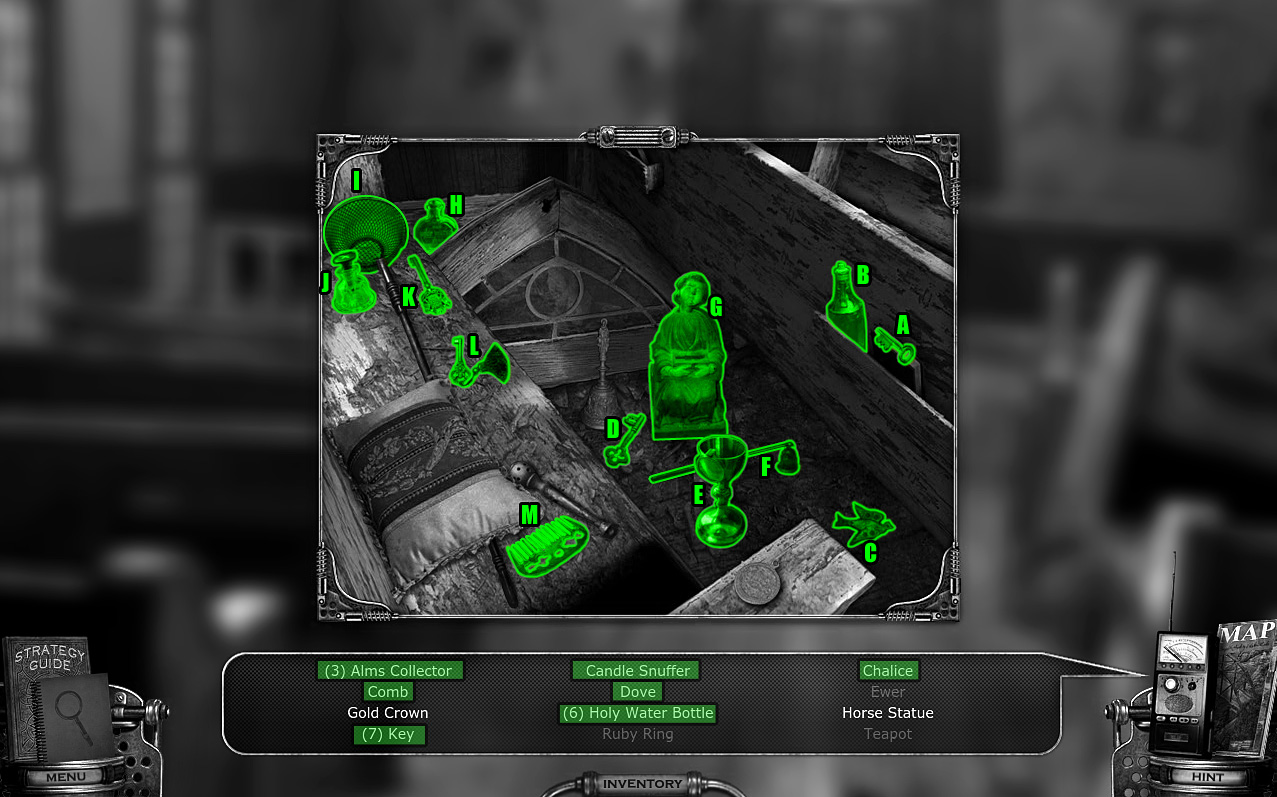
Inspect the raised pew in the right aisle to locate 8 of the hidden objects.
Alms Collector 1 (A), the Ewer (B), and the Ruby Ring (C) are on the seat of the bench.
Key 1 (D) is on the arm rest in the lower left corner.
Key 2 (E) and the Teapot (F) are on the floor beside the top of the fallen cross.
Key 3 (G) and the Holy Water Bottle 1 (H) are on the floor to the left of the fallen cross base.
Screenshot.
Click the middle pew in the left aisle to find another 13 hidden objects.
Key 4 (A) and Holy Water Bottle 2 (B) are in the pocket at the back of the bench.
The Dove (C) is on the floor between the arm rest and the back of the bench.
Key 5 (D), the Chalice (E), and the Candle Snuffer (F) are all on the floor around the bottom of the statuette.
The sitting statuette on the floor is Alms Collector 2 (G).
Holy Water Bottle 3 (H) is at the upper left side of the stained glass window.
Alms Collector 3 (I), Holy Water Bottle 4 (J), and Key 6 (K) are at the back of the pew seat.
Key 7 (L) is at the middle of the bench, near the upper right corner of the pillow.
The Comb (M) is at the front of the pew seat near the arm rest.
Screenshot.
Click the organ in the corner of the room to locate the remaining hidden objects.
Holy Water Bottle 5 (A) and Holy Water Bottle 6 (B) are on top of the keys of the organ.
Alms Collector 4 (C) is leaning against the front of the organ.
The Gold Crown (D) is on Mary's head in the middle image of the triptych.
Key 8 (E), Holy Water Bottle 7 (F), and the Horse Statue (G) are on top of the bench seat.
Key 9 (H) is on the floor to the right of the bell.
Key 10 (I) is on top of the pile of books on the floor.
Screenshot.
Inspect the red book on the floor at the end of the aisle.
Open the cover and take the CHURCH KEY inside.
Move the curtain on the wall behind the altar to uncover the window.
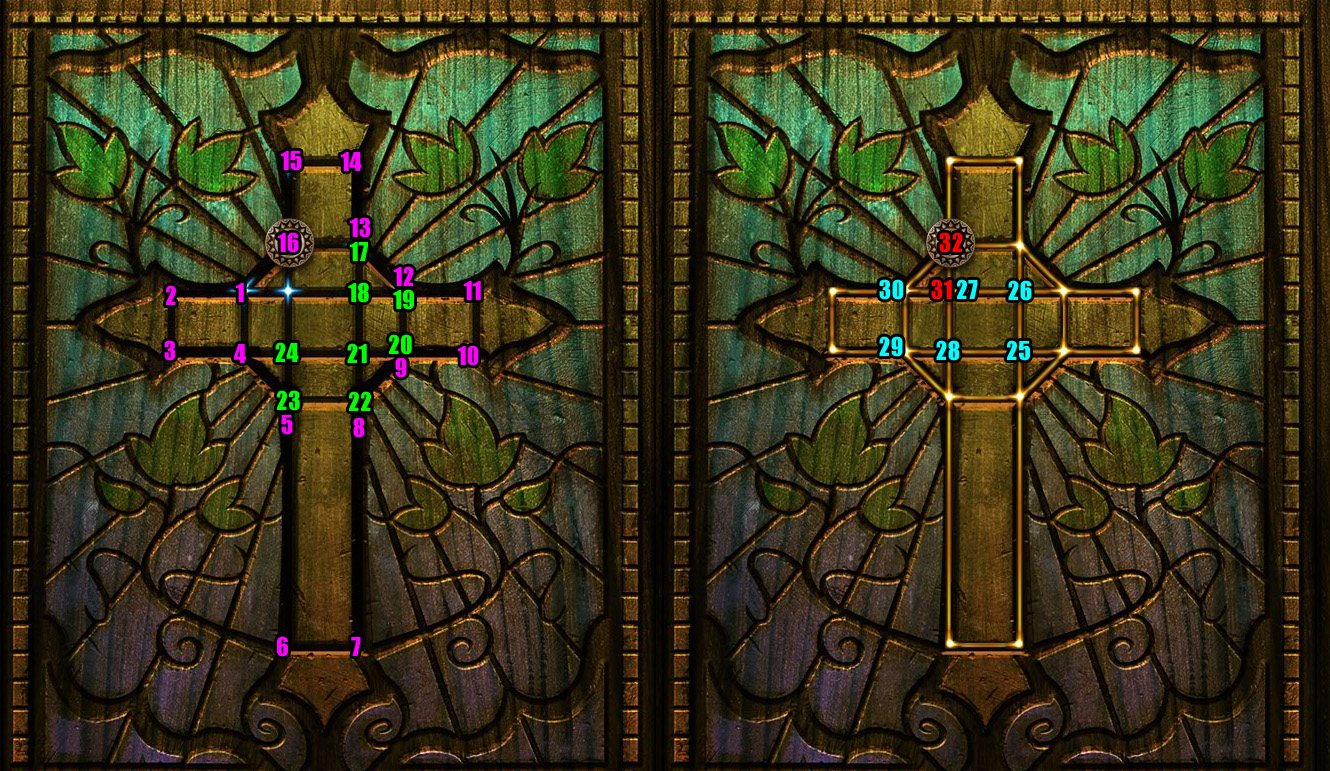
Click the carved cross on the wall for a closer look.
Add the CHURCH KEY to the cross relief to start the puzzle.
Move the key all around the cross to trace a line between each of its points.
Click an adjacent point to move the key to that position; an available move is indicated by a small blue line at that point.
When the key moves between two points, it will draw a blue line along its path.
Every piece of the outline of the cross must be traced by this blue line in order to complete the puzzle.
You cannot move over the same path more than once. If there are no available moves left, the puzzle will reset.
Screenshot.
Use the Map to return to Motel Room 1 at the Drive Motel.
Motel Room 1
Walk to the other side of the room to receive another 6 DRAWINGS from Cassandra.
Return to the main room of the Church.
Church
Select DRAWING 1/6 from your inventory and find its matching location in the scene.
Align the paper with the left framed picture on the wall, then click to create the CHARGED DRAWING 1/6.
Screenshot.
Go back out to the Sinkhole.
Sinkhole
Select DRAWING 2/6 from your inventory and find its matching location in the scene.
Align the paper with the right side of the church sign, then click to create the CHARGED DRAWING 2/6.
Screenshot.
Move across the ladder to the Steeple.
Steeple
Select DRAWING 3/6 from your inventory and find its matching location in the scene.
Align the paper with the lower left corner of the opened hatch, then click to create the CHARGED DRAWING 3/6.
Screenshot.
Go down into the Church, then continue forward to the Cellar.
Cellar
Take the TORN PAGE 2/2 from the hand sticking up behind the table.
Pick up the DOCTOR'S BAG at the middle of the right pillar.
Click the stones at the base of the rear pillar for a closer look.
Clear away all of the stones to uncover the relic.
Use the DOCTOR'S BAG to pick it up, making it a RELIC IN BAG.
Select DRAWING 4/6 from your inventory and find its matching location in the scene.
Align the paper with the spread out stones at the base of the rear column and the pile of rubble on the broken table, then click to create the CHARGED DRAWING 4/6.
Screenshot.
Now that you're done in this area, go back out to the Sinkhole to retrieve the LADDER, then use the Map to travel to Trestle Road.
Trestle Road
Select DRAWING 5/6 from your inventory and find its matching location in the scene.
Align the paper with the pile of rocks at the end of the train tracks, then click to create the CHARGED DRAWING 5/6.
Screenshot.
Use the Map to travel to the road outside Shadow Lake Penitentiary.
Penitentiary Road
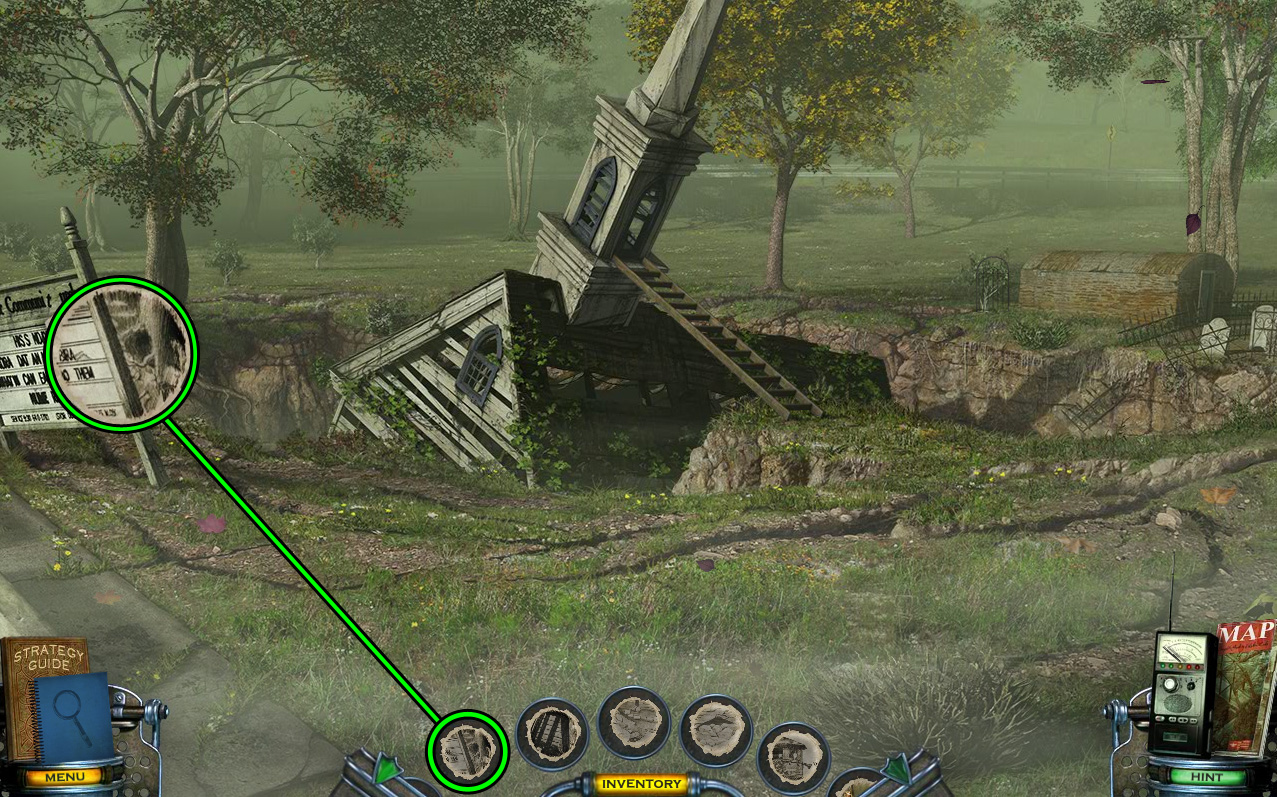
Select DRAWING 6/6 from your inventory and find its matching location in the scene.
Align the paper with the guard tower behind the right wall, then click to create the CHARGED DRAWING 6/6.
Screenshot.
Use the Map to travel to Motel Room 1 at the Drive Motel.
Motel Room 1
Walk to the other side of the room to give Cassandra the RELIC IN BAG and the 6 DRAWINGS, then start the puzzle.
Arrange the pieces correctly to complete the animated picture.
Click and drag a piece to move it around the board or to turn it to a different angle.
Be careful not to accidentally collide the pieces while you are moving them.
When two adjacent pieces are correctly assembled, they will fuse together.
This time, some pieces will be larger than others.
You must be more careful not to block out the small square spaces, or the puzzle will reset.
Screenshot.
Return to Trestle Road.
Chapter 9: Tunnel & Cavern
Trestle Road
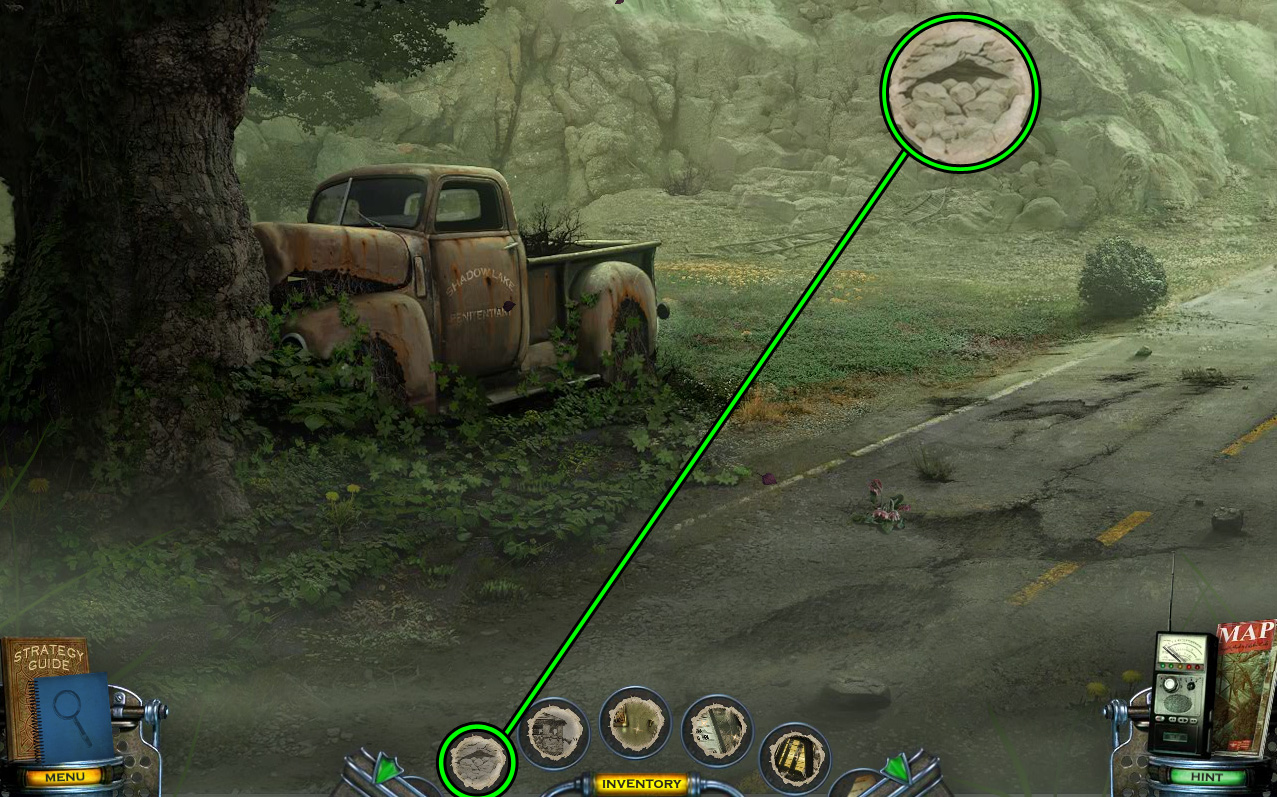
Click the pile of boulders at the end of the train track to zoom in.
Remove the rocks blocking the tunnel, starting with the upper right rock on top of the pile.
After you clear enough of the rocks away, move forward into the Tunnel.
Tunnel
Click the skeleton to start the cutscene.
Inspect the markings on the wall to find a diagram of a vent passage in the prison.
Use the Map to travel Downtown, then go to the Operating Room in the clinic.
If the LADDER isn't in your inventory, return to the Sinkhole around the Church to retrieve it.
Operating Room
Click the sink in the back counter for a close-up view.
Remember the mold we made in Chapter 6? It should be ready by now.
Open the casing and take the FAKE RELIC inside.
Exit the building (remember to pick up your LADDER again on the way out!), then walk to Reading Room 2 of the Library.
Reading Room 2
Inspect the red book on top of the left desk.
Turn the right page to view the section with the strange symbols.
Add the TORN PAGE 2/2 (from the corpse's hand at the Cellar) to the book to complete the chart of symbols.
Next, use the Map to travel to the burned interior of the Teacher's House.
Burned Building
Click the small bookcase for a closer look.
Open the book on the "Anescoti Tribe".
Add the TORN PAGE 1/2 (from the corpse's hand at the Operating Room) to the right page to find the translated prayer.
Use the Map to travel to the Administration Room in the Shadow Lake Penitentiary.
Administration Room
Place the LADDER against the vent at the top of the right wall.
Click the vent above the ladder for a close-up view.
Use the SCREWDRIVER (from the shelf at the Drug Store) to remove the screws at the four corners of the vent, then click the cover to remove it.
Use the NIGHT-VISION GOGGLES (from the equipment crates at Motel Room 1) on the ventilation shaft to continue forward into the Chamber.
Chamber
Look in the corner of the room to find the SECRET VIDEO TAPE (2/2) on the floor.
If you want to watch the SECRET VIDEO TAPES, travel to Motel Room 2 at the Motel Drive.
Inspect the video camera beside the television on the table.
Next, insert either video tape into the camera and press the play button to watch the recording.
Hit the eject button to replace the tape.
Use the WARDEN'S KEYS (from the lockbox at the Evidence Room) to open the cell door.
Continue forward into the Prison Cell.
Prison Cell
Click the poster on the back wall for a closer look.
Remove the poster to expose a hidden carved-out tunnel.
Take the SPOON from the dirt at the left side of the passage.
Go through the tunnel and move forward once to enter the Cavern.
Cavern
After the cut scene, click the candle behind Cassandra to zoom in.
Use the SPOON (from the tunnel in the Prison Cell) to douse the candle's flame.
While Cassandra is distracted, quickly inspect the ground around the relic.
Replace the real RELIC with the FAKE RELIC in your inventory (from the plaster mold at the Operating Room).
Walk towards the altar at the end of the cave.
Add the RELIC to the carved space at the bottom of the stone slab to start the puzzle.
Arrange the runes and the pegs in the correct order to complete the puzzle.
First, use the notes from the symbol guide book in Reading Room 2 of the Library to translate each of the runes.
Starting with the first rune at the lower left, they are "Must", "Spirits", "Release", "Us/We", "With", and "You".
Next, arrange the words in the correct order according to the clue from the Anescoti Tribe book at the Teacher's House.
Click and drag a rune to select it, then release it on top of a different rune to swap their positions.
Organize the runes to make the phrase "We Must Release You Spirits."
There's a twist, however: the correct order is not from left to right.
Note the arrows above the relic, indicating you must follow the directions of the lines when organizing the correct phrase.
Also, pay attention to the small squares sticking out of the sides of the runes; these squares indicate where the line passes through the rune and can help you determine where that rune belongs on the stone slab.
You'll see that one rune, "With" does not have any of the small squares at its sides. This works out perfectly, since it's the one word that's also not in the prayer.
Find the location on the slab for the "With" rune that separates it from the others.
Lastly, you must place each of the stone pegs in the correct holes at the sides of the runes.
Click and drag a peg at the left or right side of the stone slab to select it, then release it over one of the holes at the top, bottom, left, or right sides of the runes to insert it into the hole.
Use the clue from the symbol guide again, noting which dots in the guide are circled in red to indicate where a peg belongs.
Final Solution.
After the puzzle is solved, use the Map to travel to Shadow Lake.
Shadow Lake
Click the end of the dock to zoom in.
Place the RELIC into the water.
Return to Motel Room 1 at the Drive Motel.
Motel Room 1
Walk across the room to speak with Cassandra.
Posted by: Trinn |
November 24, 2012 6:25 PM
|
November 24, 2012 6:25 PM
Ok, I dedicated myself to a scene by scene search and can report that I do have ALL of the morphing objects. I'll try to be as specific as possible:
All Morphing Objects
Quarry
"Office" sign
Paint can in office
'Q' on entrance sign
Truck crash
flower in road
Church
(outside) fence behind tomb
gum on sill (as you're going down ladder)
picture to the right of altar
(behind altar) brick by skeleton
Downtown
chimney above Dr. Pepper sign
railing on top of library
Library
statue on pillar
(first room) gear on floor
(second room) panel by door
(third room) book on top shelf behind desk
Drugstore
(inside) RX sign
(on roof) can on ledge
Dr's Office
jewelry on dresser
light switch in hall
ashtray in piano room
glasses case on desk in office
tiles to left of sink
Sheriff's Office
clock in office
vinyl record on shelf in evidence room
Burned House
(outside) picket on fallen fence
(inside) board at back of room
(shed) cushion rip
School
(outside) cap on gate post
(shed) can on shelf
(room) assignment on board
(upstairs) paint brush
(playground) rail behind swing
Warden's House
(front room) debris in front of chair
(kitchen) whisk in bowl
(basement) bottle on shelf
(hall) picture on left wall
(R. bedroom) clock on headboard
(L. bedroom) sock on dresser
Prison
(outside) bottom L window
(vestibule) plant in corner
(front office) can by front desk
(admin.ofc) lightbulb on desk
(records room) letter on file cabinet
(warden's ofc.) glass under clock
(warden's ofc.) card on warden's desk
(prisoner's cell) handprint under sink
Motel
'ice' on ice machine
(room #2) vent over bathroom door
(room #2) handle on dresser drawer
(room #2) Q-tip jar in bathroom
(room #1) recycle symbol on box
I hope that helps...if anyone has a question, I'll try to help further.
Posted by: Shari Plecenik Malcomb |
December 16, 2012 11:38 AM
|
December 16, 2012 11:38 AM