
Mystery Age: The Dark Priests
Platform: Windows
![]() Sometimes I feel like I haven't done enough with my life. I mean, look at Amber; thirty years ago, with the help of a pair of shamans, she managed to defeat the Chaos God. Way more Gods than I have ever defeated. I kind of feel like I'm slacking here. Especially since, upon receiving a letter from her friend Sister Martha, Amber is hurrying back to Westwind Village to finally deal with the Chaos God's disciples once and for all. Mystery Age: The Dark Priests is a hefty hidden-object adventure game that brings some serious eye-candy to the table. After all, just because you're defeating ancient unspeakable evils doesn't mean you can't look good doing it.
Sometimes I feel like I haven't done enough with my life. I mean, look at Amber; thirty years ago, with the help of a pair of shamans, she managed to defeat the Chaos God. Way more Gods than I have ever defeated. I kind of feel like I'm slacking here. Especially since, upon receiving a letter from her friend Sister Martha, Amber is hurrying back to Westwind Village to finally deal with the Chaos God's disciples once and for all. Mystery Age: The Dark Priests is a hefty hidden-object adventure game that brings some serious eye-candy to the table. After all, just because you're defeating ancient unspeakable evils doesn't mean you can't look good doing it.
 Part adventure game, part hidden-object, Mystery Age: The Dark Priests blends both genres and adds a shiny coat of polish. As Amber, you'll have to unlock the secrets and mysteries surrounding Westwind Village in order to save the villagers (and the world!) from the plan the Dark Priests are hatching. It's a little less pot-luck charity luncheon and a little more darkness overwhelming the land and turning you and all you love into cold, unfeeling stone. Which is a little unfair; the least they could do is give you a hot meal first.
Rather than rummaging through a list of unrelated items to find the single thing you really need, you'll be hunting down bits and pieces of contraptions you'll need to assemble to use within the scene. Hidden-object enthusiasts will be happy to hear that the game is actually fairly long, and with a plethora of scenes to hunt through and items to assemble. While some of the items you'll encounter during regular gameplay can be carried with you to use later, others are actually just interactive bits of scenery, so you'll have to experiment to make sure you leave no stone unturned, no snake un-poked, no bees nest un-prodded. Come on, it's for the villagers.
 Analysis: If the whole casual download market were a prom, then Mystery Age would be the Prom Queen, or at least a strong contender. This game is pretty. No, wait, strike that... this game is gorgeous, and as much love has been put into everything from its art to its audio to its general gameplay design. The assembly aspect of the object hunting is actually a good excuse to be looking for all the items you are, and in most cases they're usually all things you'd expect to find within your location anyway. A pleasant change, then, from hunting down three pineapples, a tin soldier, and a bulldog in an apothecary. The gameplay is also, happily, quite varied; instead of collecting a slew of puzzles pieces to solve one problem and then repeating that ad nauseam, you'll find yourself performing a multitude of different tasks in every area, complete with tricky puzzles, that keeps the experience from getting stale.
The downside is that the items you're putting together rarely seem as if they'd actually be required; one scene has you scavenging bits of food you need to lure a mouse away from a magnet that's part of a group of items you need to lift a weight out of a jar. Not, you know, a Saw-style jaw with boobytraps and spinning blades. A jar you could easily tip over or reach inside. Because you wind up carrying so many items, you also have the potential to be more easily frustrated by adventure game logic; a window can be broken by a rock, for example, but not a hammer. You can't use a ladder to reach something on a high shelf, because you need it to reach something else that's high up. Apparently, in this world, ladders have a very strict one-time usage retirement plan.
But what it gets right is providing stunning, immersive environments that are a real joy to explore, and it's hard to stay mad at something that looks and plays this smoothly. While you might wind up wishing the story had been a bit more intertwined with the gameplay, Mystery Age: The Dark Priests is a beautiful adventure that will provide just the sort of meaty chunk of soothing gameplay we could all use once in a while. Fans of the genre should definitely check out the demo; whether the story and setting appeals to you or not, it's hard to deny that more developers of the genre should be putting at least half as much love into their creations as is present here.
![]() Windows:
Windows:
Download the demo
Get the full version
![]() Mac OS X:
Mac OS X:
Not available.
Try Boot Camp or Parallels or CrossOver Games.


Walkthrough Guide
(Please allow page to fully load for spoiler tags to be functional.)
Mystery Age: The Dark Priests. Walkthrough
General
There is no time limit.
Mini games can be skipped without any penalty.
The journal in the lower left has information about your task and drawings that might be helpful for some of the quests.
A black screen with a gear means the game is loading, so no reason for panic!
Once you collect the Imperial Staff, it will always be your inventory. Use it on ghosts and animals to make them disappear.
When the cursor changes to a magnifying glass, click again. You may get more information about the item at the top of the screen, trigger a mini-game, or open a hidden-object scene. A pointing hand cursor indicates the location of a quest or an animation trigger, like a candle lighting.
You can return to previous locations, or go to the next location, with the arrow that shows up when you hover over the scene with the mouse.
Some items will be used later in another location. You will need to revisit some locations several times before you will be able to complete all the activities there.
There are three kind of hidden-object scenes.
You will have to look for the parts of the shown objects. The number of parts is shown when the objects are broken into pieces.
After finding all pieces of an object, it will go into the empty slot on the right side of this bar. Most of them you will need in the same hidden-object scene to reveal other parts. One stays in your inventory for later use.
You will have to find all objects from a list. One item will go into your inventory.
You will have to find a listed number of items of the same kind. One of each will go into your inventory.
In several locations, hidden-objects scene will be available again after triggering them by other actions.
The hint button recharges very quickly.
The hint will show you either an needed object or, if there is none, where to use an object, or let you know that there is nothing to do at this location for the moment.
Many puzzles have a random starting position, which means the solutions shown in the walkthrough may be random.
The reset button on the puzzles does not always return to your original starting position; it might be random.
Arriving
Click the Imperial Staff on the right. Get it back from your inventory and click it on the ghost to chase him away.
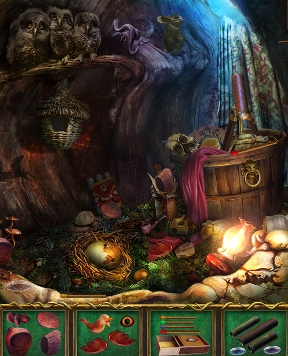
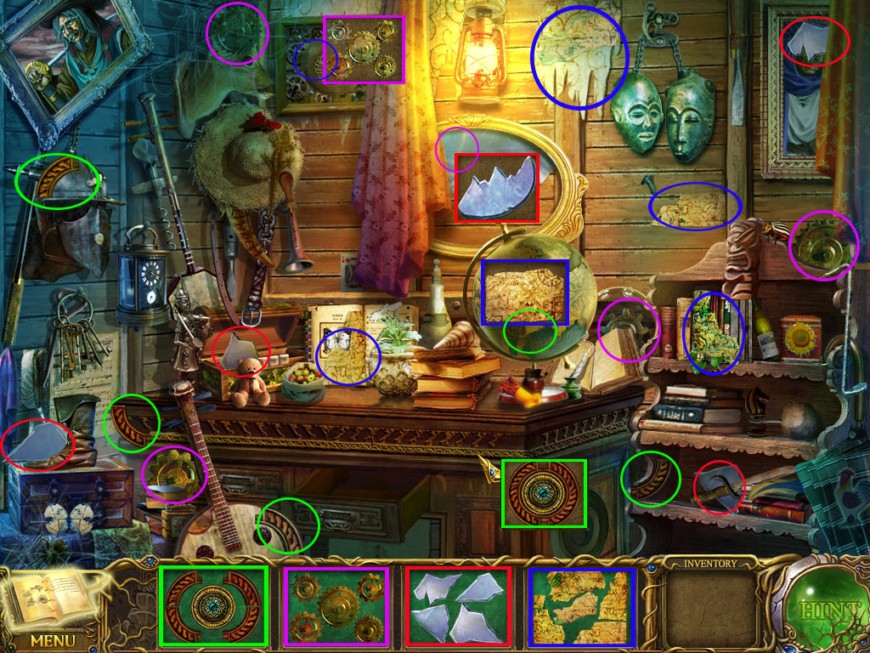
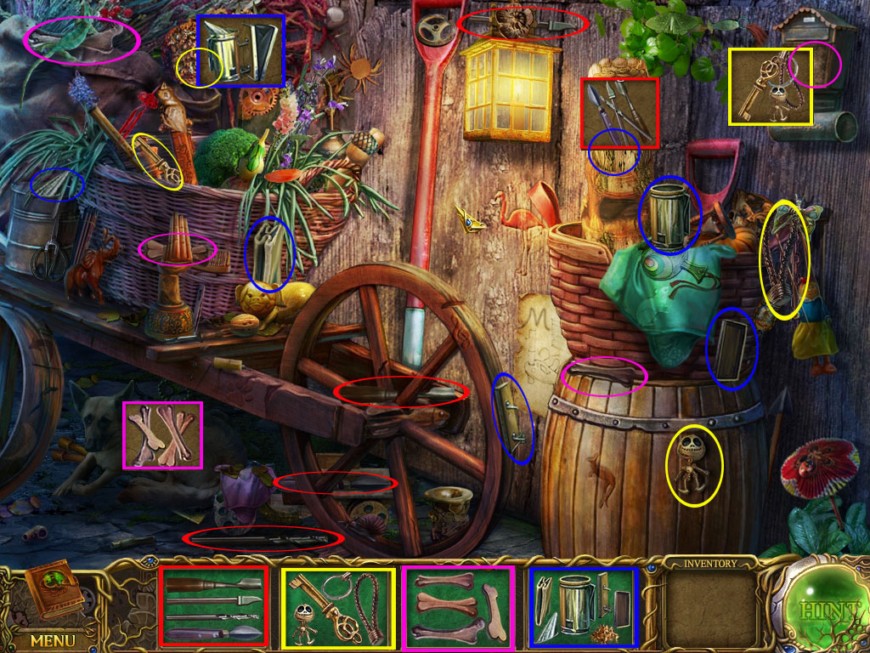
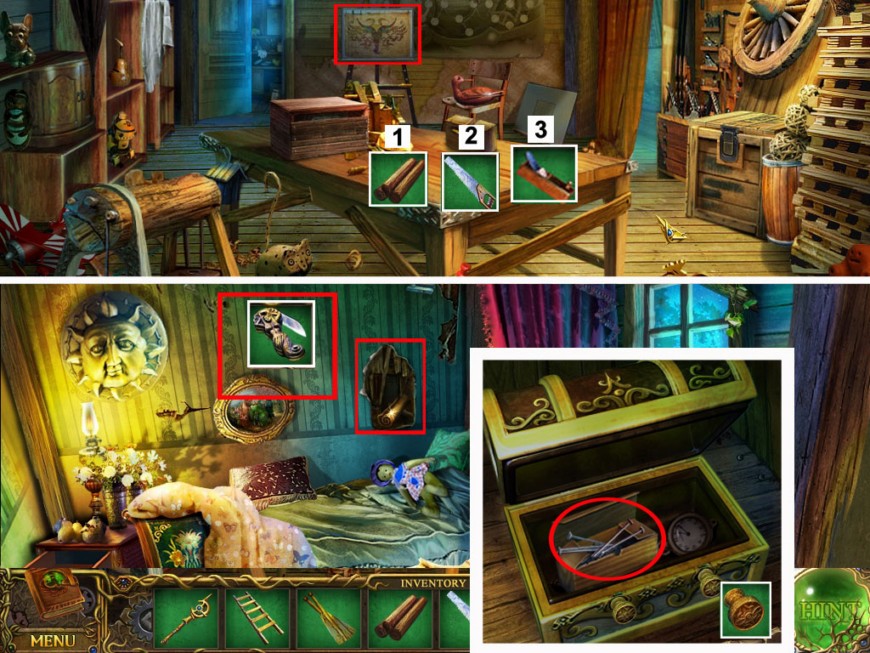
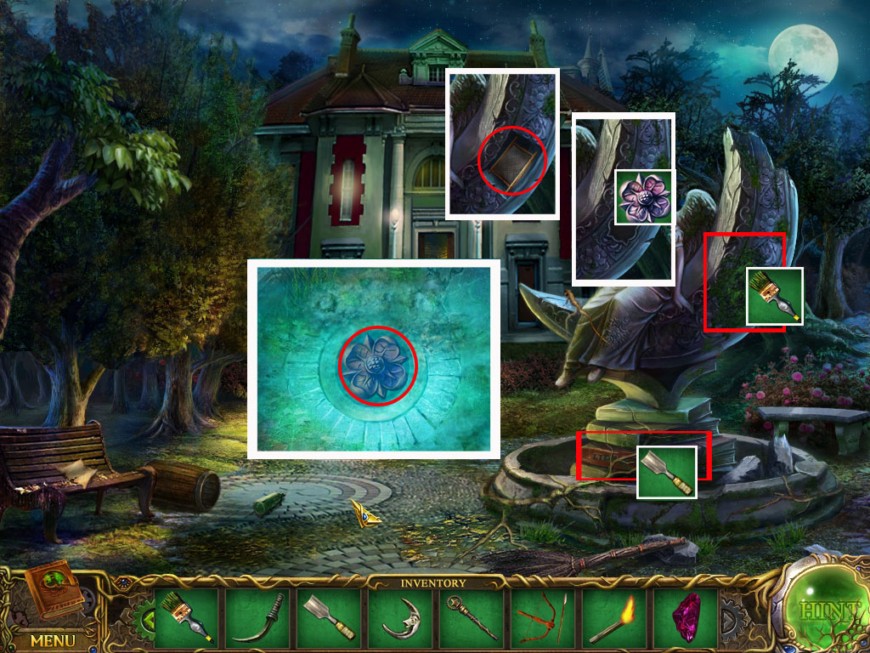
Go one step forward and click the front side of the caravan to play a hidden-object show.
Find all mirror shards and place them on the broken mirror on the back wall to obtain a gear.
Find all gears and place them on the device on the top right to get a piece of the map.
Find all pieces on the map and place them on the globe on the desk to find a part of the desk lock.
Find all parts of the desk lock and place them into the slot on the right side of the desk.
The lock will open and you can grab the key of the forest spirit out of the compartment.
Screenshot
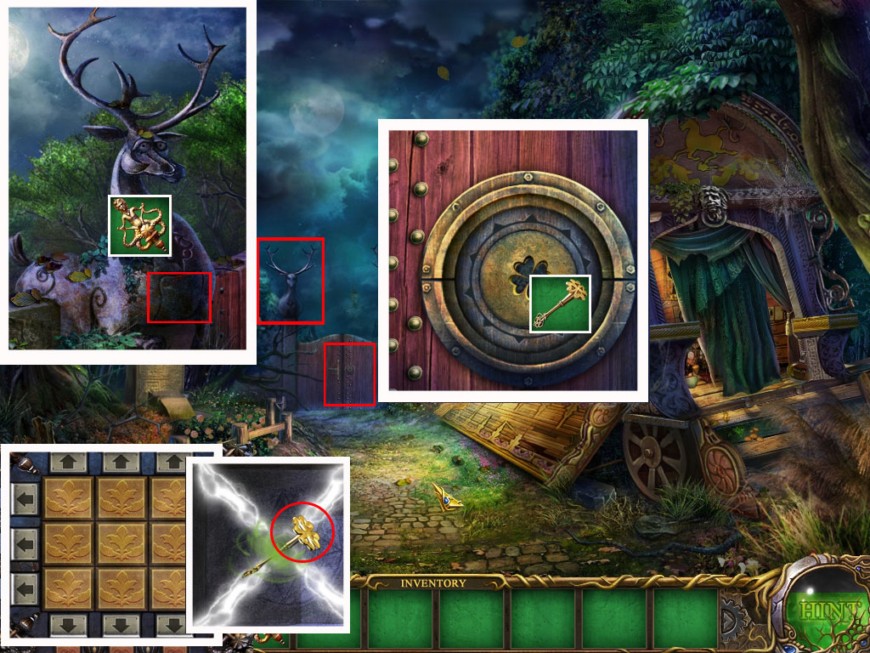
Back in the main scene, click the deer statue above the the gate and place the key of the forest spirit in the slot on its chest.
Click the panel below to open it and click again to play a mini game.
Use the arrows to move the tiles until all nine tiles in the middle show the same color. It doesn't matter which color you choose.
The starting positions are random.
When all tiles show the same colors, they will reveal a four clover key.
Click the gate, place the hook on the lock, and click once to open the gate.
Screenshot
Click the gate again to enter the village.
Repair the Boat
The Dock
Use the Imperial Staff on the three ghosts. Go forward three times to come to the river.
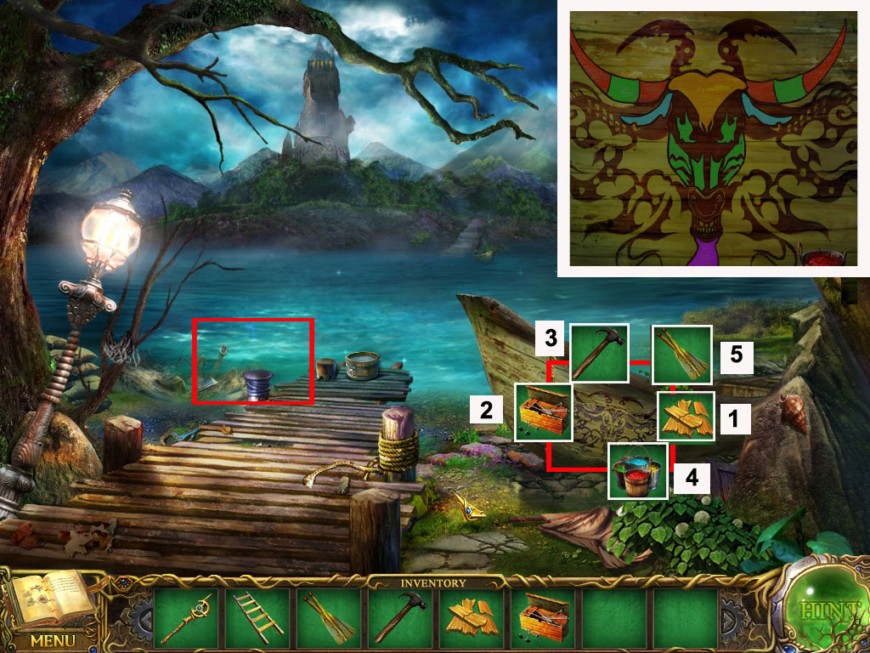
Click the broken boat on the right side. The repair instructions are now available in your journal.
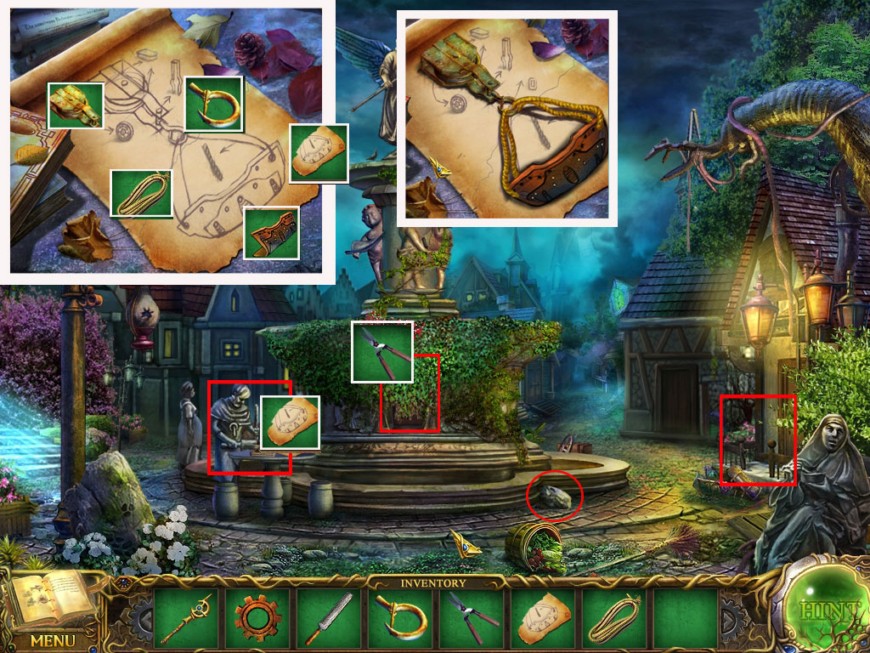
Click the hidden-objects scene on the left side.
Find the parts of the slingshot and use it on the crow. When the crow is gone, you will reveal a part of the cannon pieces.
Find the cannon pieces and use them on the cannon in the low left corner. The cannon will shoot a hole into the rock on the right side and reveal a piece of the paper lantern.
Find the parts of the paper lantern and place it on the broken lantern above the cannon. It will fly away and you can grab a part of the code.
Find all parts of the code and place them on the colored chest inside the water in front of the anchor. The chest opens and you can grab the key from the carpenter's house.
Screenshot
Back in the main scene, click the eagle on the branch on the top right side. Information will be stored in your journal.
Click the water basin at the end of the bridge. Information about how to build a fishing rod will be stored in your journal.
Get the ladder from the low right corner.
Go back one time.
House of the Carpenter. Outside
Click on the firewood on the left side to enter a hidden-object scene.
Find the carving tools and use them on the wooden statue to reveal a part of the bee smoker.
Find the parts of the bee smoker and use it on the bee hive to reveal a part of the key.
Find the parts of the key and use it on the mail box to reveal a part of the bone.
Find the parts of the bone and use it on the dog to reveal oars.
Screenshot
Back in the main scene, grab some wooden logs and click the door to the carpenter's house.
Use the key from your inventory and enter.
House of the Carpenter. Inside
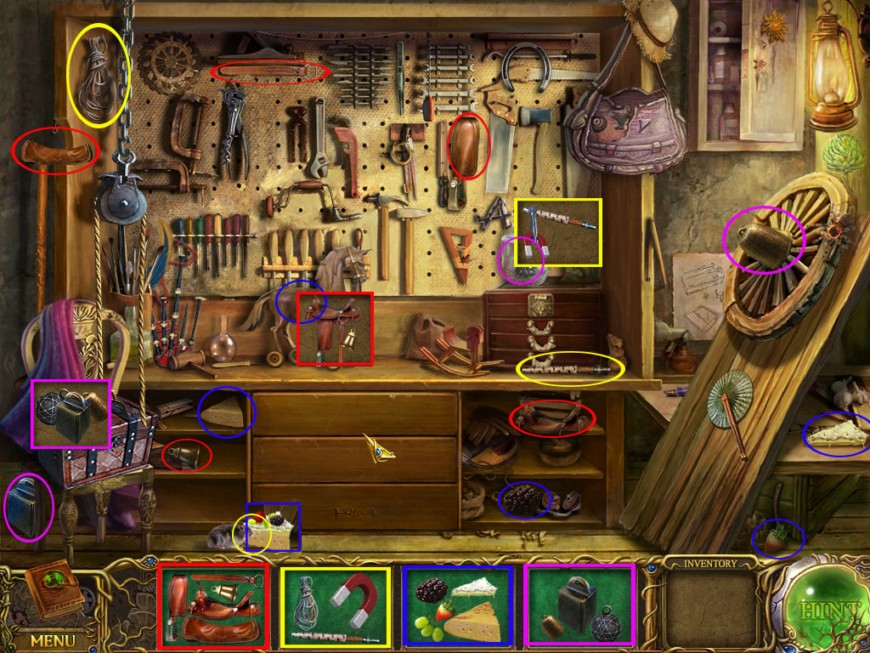
Play the hidden-object scene on the right side.
Find all parts of the saddle and place it on the wooden horse to reveal a piece of food.
Find all pieces of the food and place it on the mouse to reveal a part of the magnet.
Find all parts of the magnet and use it on the jar to get the weight.
Find all weights and use them with the chest to reveal a saw.
Screenshot
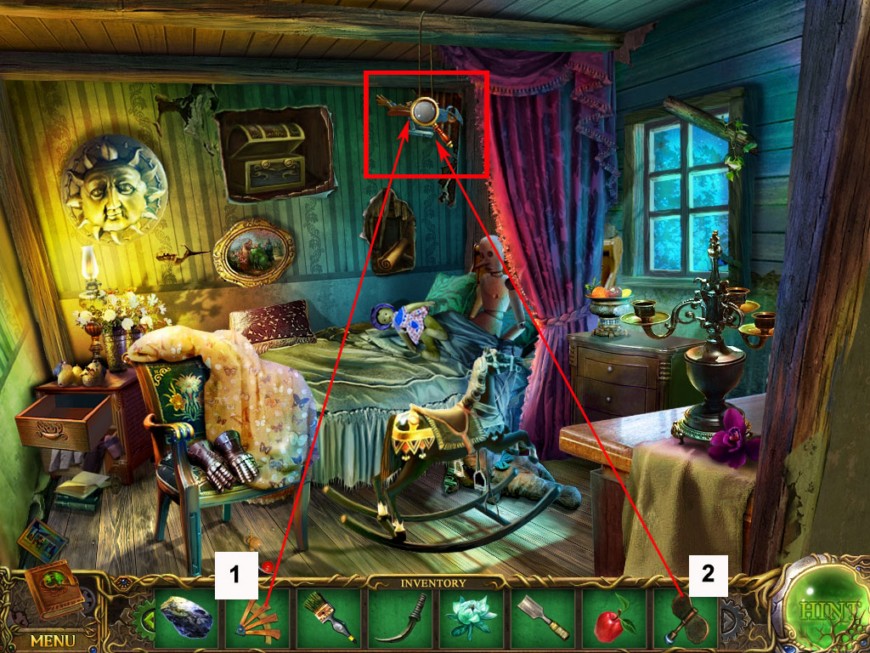
Enter the bedroom through the curtain on the far right side.
Open the drawer of the nightstand on the far left side and take the hammer.
Take the feather duster on the low right side.
Leave the room and enter the kitchen on the far left side.
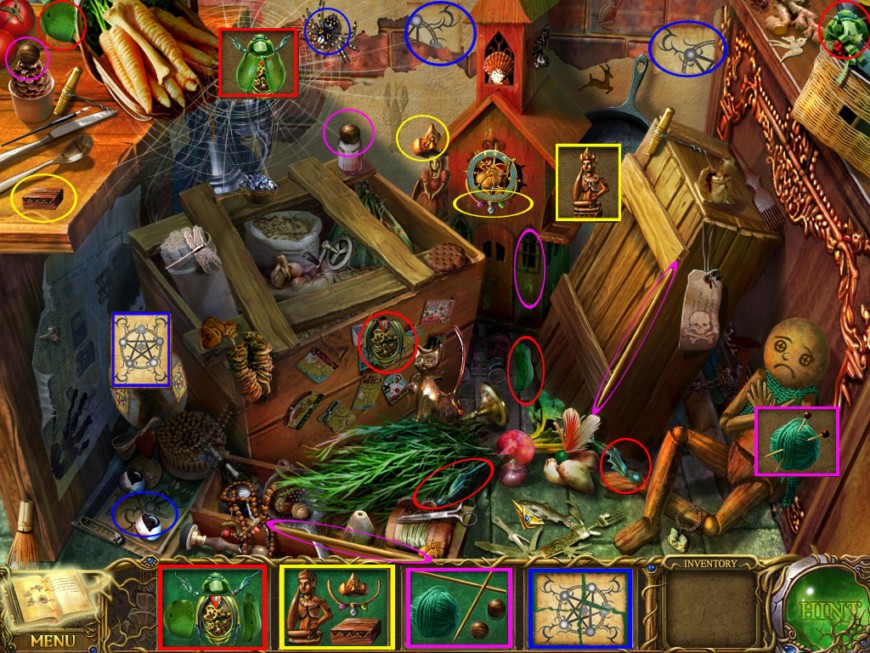
Click the cabinet door on the far left side to play a hidden object scene.
Find all parts of the beetle and place it on the spider net to reveal a piece of the paper.
Find all pieces of the paper and place them on the magic jug to reveal a piece of the prince.
Find all parts of the prince it place him on his seat on the clock to reveal a part of the yarn.
Screenshot
Find all parts of the yarn and place it on the doll to get a box handle (not the one for the box on the table in the carpenter's house).
Go 3x down and then left.
The broken Bridge
Grab the wood plane on the low right side.
Use the feather duster on the spider net on the left.
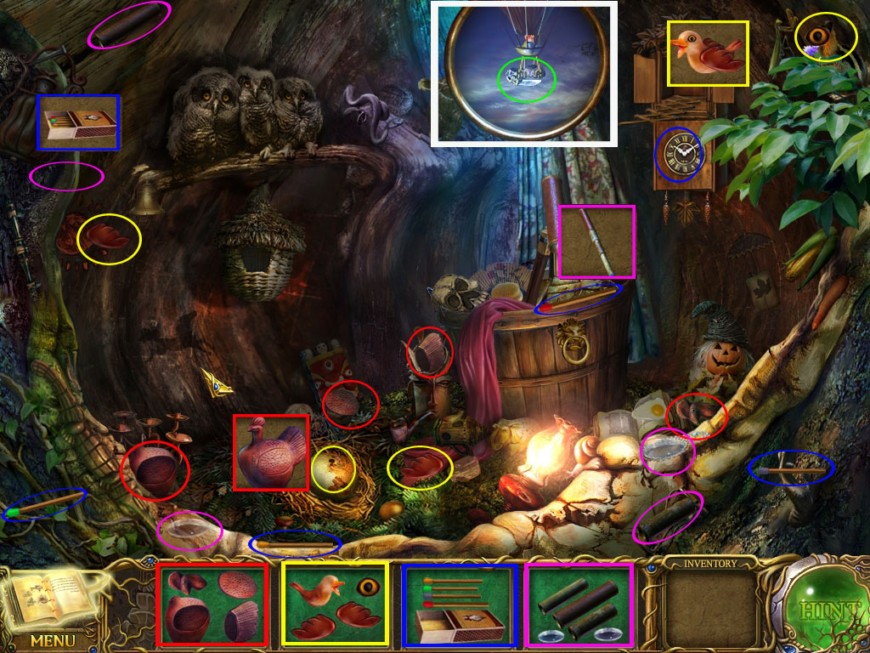
Click again to play the hidden-object scene.
Find all parts of the chicken and place it on the egg to reveal a part of the cuckoo.
Find all parts of the cuckoo and place it on the clock to reveal a part of the matchbox.
Find all parts of the matchbox an place it on the lantern to reveal a part of the telescope.
Find all parts of the telescope and place it on the tripod. Get the pocket knife hanging from a balloon in the sky.
Screenshot
Go 1x down, 1x forward and enter the Carpenter's House again.
Carpenter's House. The Boards
First place the board, then the saw, and at last the wood plane on the table.
Take the boat boards when ready.
Enter the bedroom through the curtains.
Click the right painting. It will fall down. Grab the scroll and look at it.
Seems there is a hidden compartment above the middle painting.
Use the pocket knife 4x at the wall to reveal a box.
Click the box and use the box handle from your inventory on the right side.
Take the nails.
Screenshot
Go 2x down and 1x forward.
The Dock
Play the hidden-object scene on the left side. You have to find 15 buckets (buckets and paint cans).
The paint cans will go into your inventory.
Place the wooden boards on the hole on the boat.
Click to trigger a mini game.
Place the boards into their places. A board on the right place can't be moved anymore.
When done, first place the nails, then the hammer, on the boards.
Click the boat again and use the paints to color the boards.
You can find an example in your journal.
To paint, first click the paint can, then the spot where you want to use this color.
To change the color, simply click with another color on the already painted spot.
Screenshot
Go back 1x
Tower
Main Street/Dock
Play the hidden-object scene next to the Carpenter's house.
It is a normal scene. Find all listed objects to obtain a scorpio ball.
Go 1x forward.
Click the boat to cross the river.
Tower Door
Play the hidden-object scene on the right side.
Find the items on the list to obtain a clothes pole.
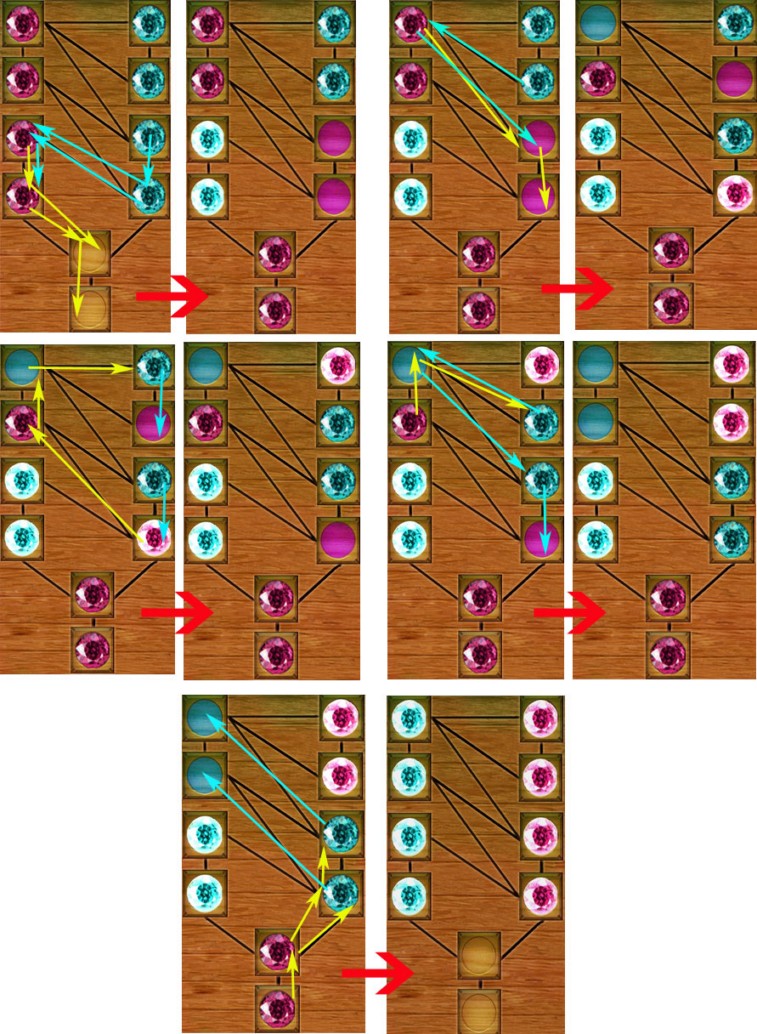
Click the door and place the scorpio ball on the empty spot on the right side.
Click again to see the puzzle full screen.
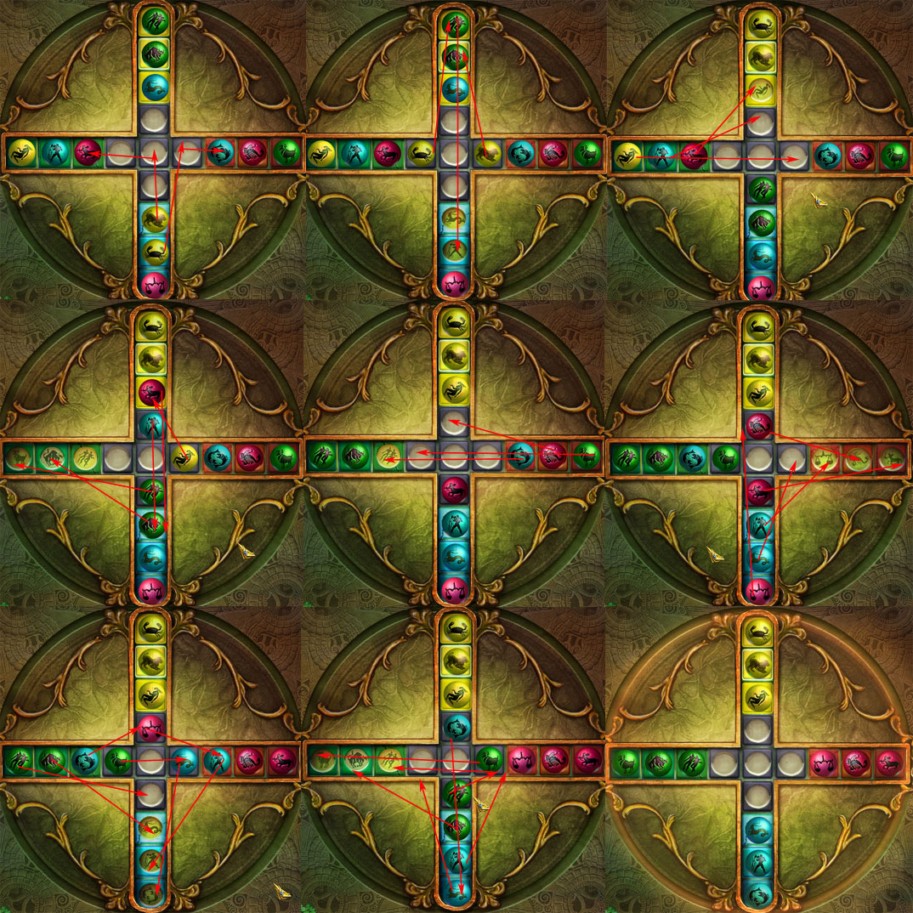
You need to bring each ball on its matching color/picture slot.
You can move each ball from one space into an empty slot. You can do this with the same ball several times.
You do not want to jump over other balls.
To see the final positions, you may want to look in your journal.
There are several ways to come to an successful end.
For a sample step by step solution please see spoiler.
Move the two yellow balls from the bottom into the left and right bars.
Move the three balls from the top to the bottom bar.
Move the yellow cancer first into its slot, then the yellow lion.
Move the first two balls from the left bar into the top bar and the yellow ball to the right ball.
Move the two green balls from the bottom to the left and the first two balls from the top to the bottom.
Move the yellow ball to its spot in the top bar.
Move the blue ball from the right to the left, the red one from the right to the top, and the blue one from the right to the left.
Move the red ball from the bottom bar to the right, then the red ball from the top bar into its slot on the right.
Move both blue balls from the bottom to the right and now the red ball from the bottom to the top.
Move both blue balls back to the bottom bar and the red ball from the top to the right.
Move the green ball from the left to the right and the blue one from the left to the top.
Move the two green balls from the left to the bottom bar.
The last steps: Move the green ball from the right to the left bar.
Move the first green ball from the bottom to the right and the second green ball from the bottom to the left.
Move the green ball from the right to the left bar.
Move the two blue balls from the bottom one to the right, one to the left.
Move the blue ball from the top to the bottom and now the last two blue balls in the order corresponding to the pictures.
Screenshot
When all balls in the right spot, the gate will open
Go back 2x.
Grow the Vine
Carpenter's house/Dock
Enter the kitchen in the Carpenter's house and use the clothes pole from your inventory to get the meat from the hook on the ceiling.
Click the door of the hanging counter on the left side and grab the bread.
Go back to the docks and give the meat to the eagle.
Pick up the mask. The eagle will let it fall down.
Screenshot
Use the boat to cross the river.
Tower Garden
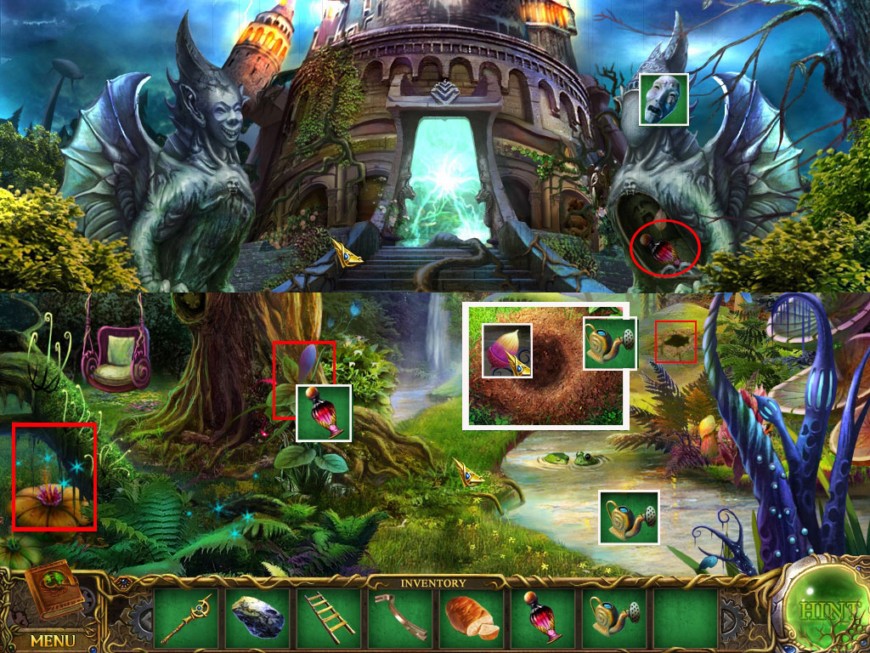
Use the mask on the right statue in front of the gate to give it a face.
Grab the growth potion that will be revealed.
Enter the garden.
Play the hidden-object scene on the left side to obtain a watering can.
Fill the watering can with the water on the right side.
Use the growth potion on the flower in front of the tree.
Pick up the blossom.
Click the hole on the far right and place the blossom in it.
Click to fill the hole with sand.
Use the watering can to water the seed.
It will grow and give you an entrance to the next tower level, the ice level.
Screenshot
But first, go outside the tower.
Feed the Bear
Tower Garden/Dock/Carpenter's House
Play the hidden-object game outside the tower to obtain a fishing rod.
Go back to the Docks and play the hidden-object scene to obtain an ice axe.
Go to the Carpenter's house and play the hidden-object scene in the first room to obtain eyeballs.
Go into the kitchen and play the hidden-object scene to receive a fishing reel.
Ice Level/Tower Garden
Go back to the tower and climb the vines to the ice level of the tower.
Give the eyes back to the guard skeleton on the left side.
The top of his staff will open. Grab the sinister key.
Use the ice axe on the ice in front of the ice bear to reveal a fish hook.
Screenshot
Go back to the Tower Garden and play the hidden-object scene to get a hack saw.
Go back 5x.
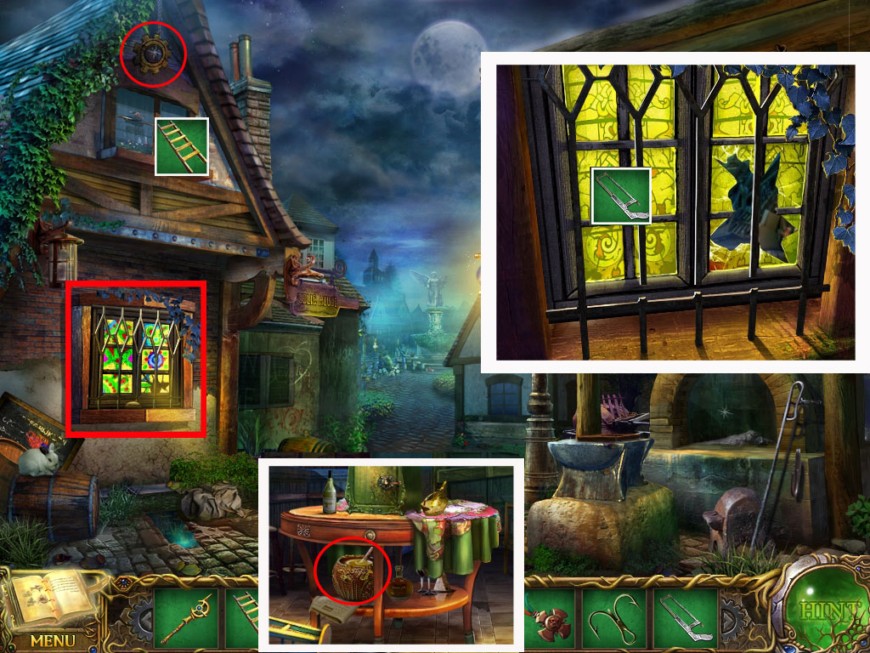
Pub
Use the ladder at the top window and grab the gear on top of the pub.
Click the lower window and use the hack saw to cut the bars (click 3x).
Enter the pub and grab the wicker honey bowl from under the table.
Screenshot
Click the hidden-object scene on the far left side.
Find all parts of the music sheet and place it on the music stand to reveal a part of the teapot.
Find all parts of the teapot and place it on the teapot stand to reveal a part of the candle.
Find all parts of the candle and place it in the candle holder. After melting down, it will reveal the green ball.
Find all balls and put them on the wall panel. The panel opens and you can get the game ball.
Screenshot
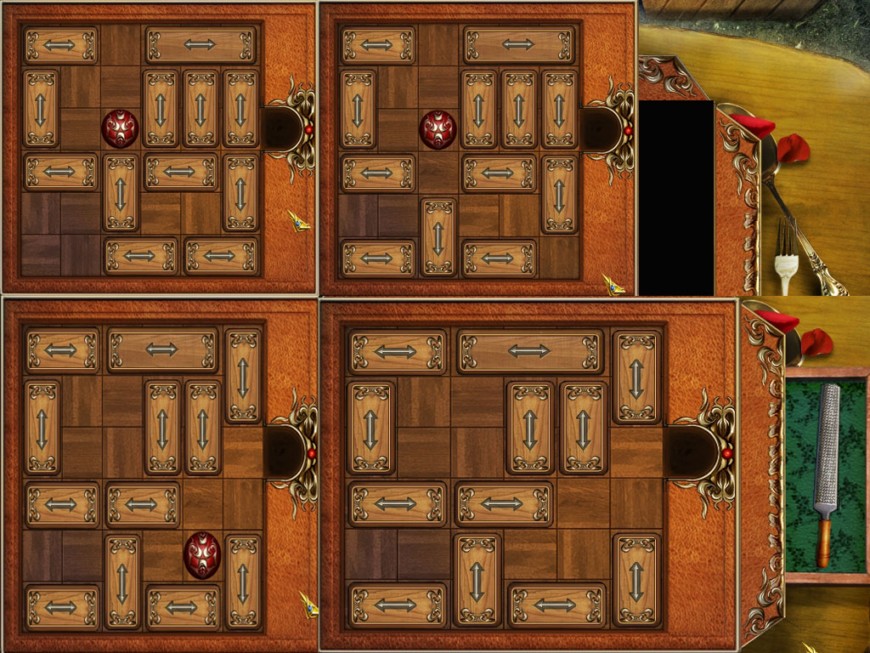
Click the box on the table on the left side and put the game ball into the slot.
A slider puzzle opens. You will need to bring the red ball to the right side.
Tiles can only move in the directions the arrow shows. The game ball can move in all directions.
There are several solutions possible. The spoiler shows an example step-by-step solution.
Move the left tile in the bottom row to the left.
Move the tile below the game ball down.
Move the right tile in the bottom row to the left.
Move the bottom tile in the right column down.
Move the right tile in the third row seen from the bottom to the right.
Move the right tile in the top row to the left.
Move the top tile in the right column to the top.
Move the game ball to the second row seen from the bottom as far left as possible.
Move the right tile in the third row seen from the bottom to the right.
Move the ball into the target.
Screenshot
When the ball is in its spot, a drawer on the left side opens, and you can take a file.
Go back to the Dock.
The Dock
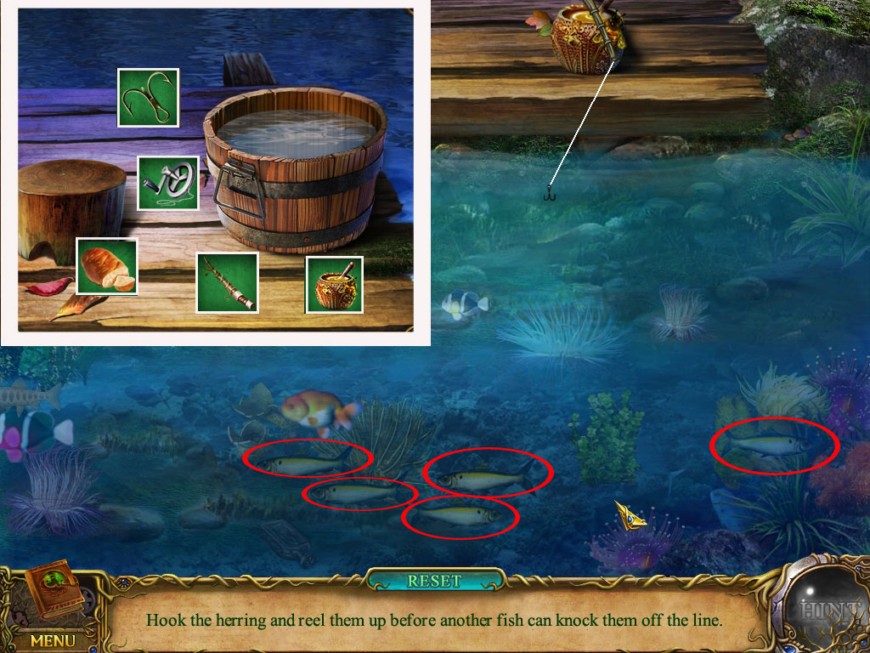
Click the bucket on the end of the bridge and place the fishing rod, the reel, the hook, the bread and the honey in any order and at at place you want.
Click the bucket again to activate the mini game.
There are five herrings. These are the slowest fish in the water, and they swim at the bottom.
Your goal is to catch all five of them.
Click to send the line down below the herring, click it again to bring it back up. It will hook the fish on the way up.
The best thing to do is to send the line down on the right side.
If you bump into another fish, the herring will fall off the line.
Once the herring is on the line, you can move your pole to the left or right to avoid other fishes.
When you are on the top, the fish will disappear from the hook but will be counted. You can't see that.
When you have all five herrings, the game is over. One herring will go into your inventory.
When you leave the mini game with the arrow on the bottom, you will have to start over again. As this happens easily, you should take care that your cursor is always on top of the screen.
Screenshot
Use the boat, go back to the Tower and up to the ice level.
Ice Tower
Give the herring to the polar bear.
You will need to click the bear again to make it go away.
Use the stairs up the fire level of the tower and click the Cerberus on the left once to activate the next scenes.
Go back to the bridge.
Go 6x down and then left.
Sky Tower Level
Bridge/Caravan/Pub/Carpenter's House
Play the hidden-object scene on the right side to obtain a drawer handle.
Go 2x down to the Caravan and play the hidden-object scene.
You will have to find 15 screw drivers. One will go into your inventory.
Go 1x forward and enter the pub through the window.
Click the panel on the right wall and use the screwdriver on the screws.
Take the oiler and click the safe on the table.
Use the oiler on the safe handle and click it to open the safe.
Screenshot
Take the ornament and go to the Carpenter's house.
Enter the kitchen and use the handle on the top drawer on the far left side.
Take the mirror.
Return to the fire level of the Tower.
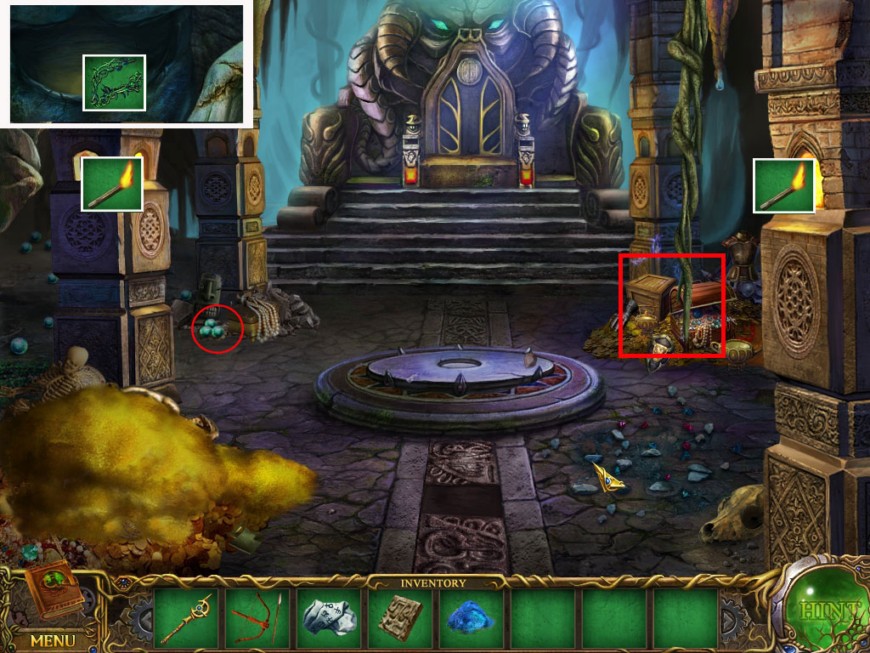
Fire Level
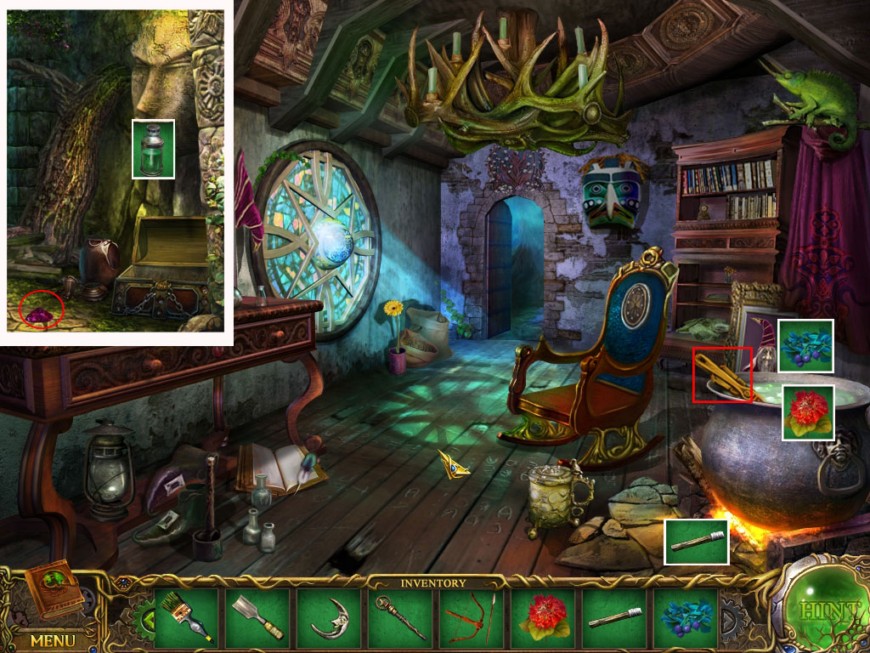
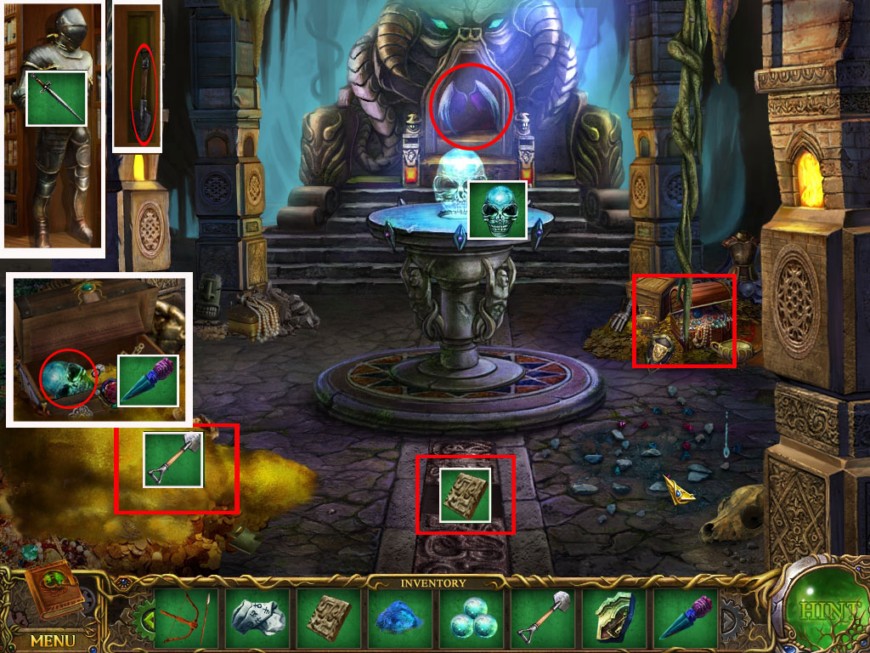
Place the ornament on the cauldron in the middle and a mirror stand will appear.
Place the mirror on the stand and click it to turn the beam onto the chest on the right side.
The chest opens. Take the stone helmet.
Go back to the two statues in front of the tower and place the stone helmet on the left statue.
Grab the mirror that will fall on the stairs and return to the fire level.
Place the mirror on the hand on the left side.
Click the mirror on the cauldron until the beam hits the mirror on the hand.
The beam will be directed to the Cerberus, which will disappear.
Click the lever at the far back wall. Steps will appear and give you access to the sky level of the Tower.
Screenshot
Go upstairs
Cross the Bridge
Sky Level/Tower Laboratory
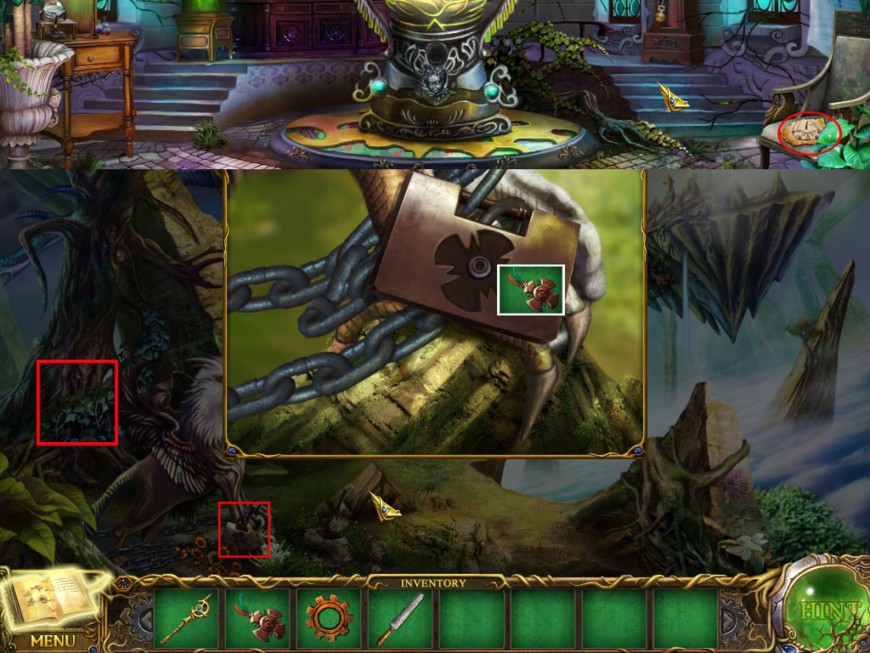
Click the Griffin's lock at its feet and use the sinister key from your inventory.
Back in the main scene, play the hidden object scene behind the Griffin to obtain garden shears.
Click the Griffin to reach the Tower Laboratory and grab the part of the blueprint from the chair on the right side.
Screenshot
Go back outside the Tower and play the hidden-object scene to obtain a rope.
Go to the Carpenter's house.
Carpenter's House/Town square
Play the hidden object scene on the right side to obtain a hook.
Go 1x back to the town square.
Grab the stone from the ground in front of the fountain.
Use the garden shears with the vines on the fountain to reveal a door. Click the door to learn that you will need a gear and a handle.
Play the hidden-object scene on the right side.
Find the parts of the horn and place it on the skull on the left to obtain a part of the shoe.
Find all parts of the shoe and place it next to the other one, take the part of the train that appears.
Find all parts of the train and place it at the locomotive to find a part of the puppet.
Find all parts of the puppet and place it at the puppet on the top right side. You will be rewarded with a cushion.
Screenshot
Go to the left and play the hidden-object scene to obtain a pulley.
Go back to the Town Square and click the Carpenter, sitting on the left of the fountain.
First place the blueprint on his blueprint part.
Now place the hook, the rope, the pulley and the cushion from your inventory onto the blueprint.
Take the zip line that appears.
Screenshot
Go left to the bridge.
Bridge
Place the zip line on the rope and use the arrow to reach the Library.
Library
Enter the Library
Click the paper on the bench on the left side. It shows a time: 20:55
Pick up the butterfly net on the far left.
Click the base of the statue on the right side to learn that you will need a chisel.
Click the library door to activate a puzzle.
You want to move the blue and red balls by just one space along the grid until each one is on the opposite side.
To move a ball, click and drag it along the line to an empty spot.
You do not want to jump over another ball.
There are several solutions possible. For a step-by-step-example please see spoiler.
Move the two lower red balls into the middle spots.
Move the two lower blue balls to the left.
Move the top red ball to the bottom spot on the right.
Move the second blue ball first to the top left and then down, above the red ball you just placed.
Move the top blue ball one down and the red ball on the left one up and to the right.
Move the low red ball on the right side to the left.
Move the low blue ball on the right side down.
Move the upper blue ball to the left and then to the right above the other blue ball.
Move the two blue balls to the left and the two red balls from below up.
Screenshot
When you are done, the door to the library opens. Enter.
Library - Inside
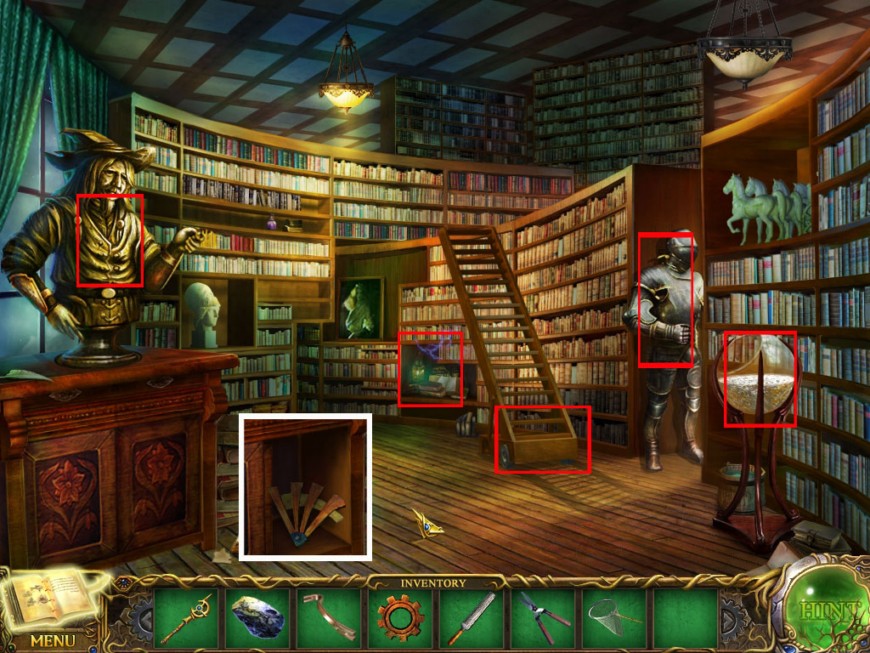
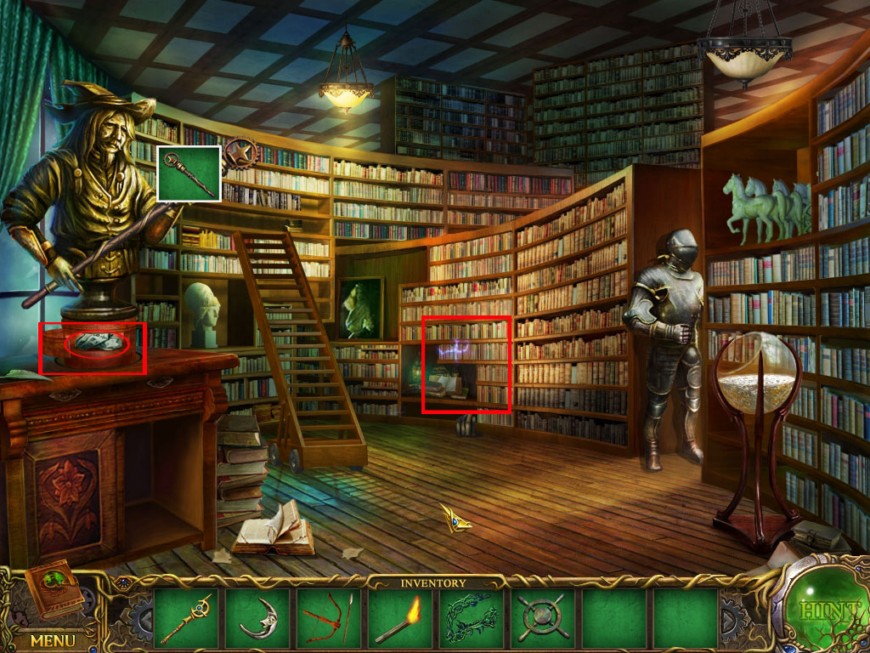
Play the hidden-object scene on the far right side to obtain a fire starter.
Open the right cabinet door on the left side and grab the wooden wing.
Click the bust, the knight, the ladder and the bowl to learn that there are things missing.
Screenshot
Exit the Library and go back to the Town Square (Fountain).
The Statue
Town Square/Carpenter's House/Pub
At the Town Square, play the hidden object scene on the right side to obtain a door handle.
Go to the pub and play the hidden-object scene to obtain clay.
Use the handle from your inventory on the oven door.
Take the coal and leave the pub.
Go to the Carpenter's house and play the hidden-object scene in the kitchen to obtain scrap iron.
Go to the Sky Level and play the hidden-object scene to obtain a brush.
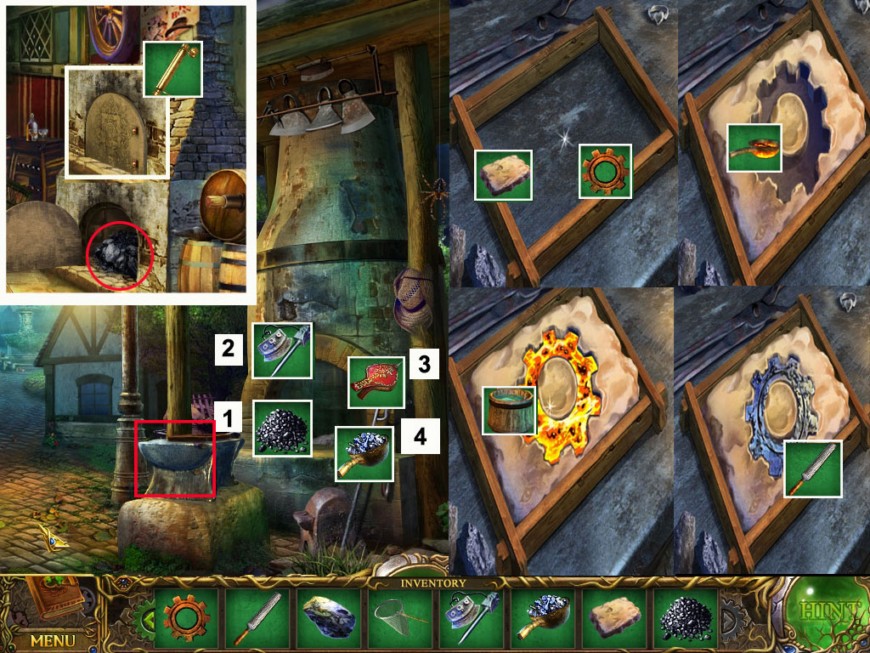
Go back to the pub and stay outside.
Use the coal to put it into the forge and light it with the fire starter.
Enter the pub and play the hidden-object scene to obtain bellows.
Use the bellows to heat up the fire.
Put the iron scraps into the forge to melt them.
Take the melted iron back into your inventory.
Click the anvil to get a close up view.
Place the clay in the mold. Use the gear from your inventory and place it on the clay.
Take the gear back into your inventory.
Pour the melted iron in the mold and use the water bucket to cool it down.
Use the file to straightened it.
Click the gear into your inventory.
Screenshot
Go to the Carpenter's house and play the hidden-object scene in front of the house to obtain a valve handle.
Go to the Town Square.
Town Square
Click the door at the statue's base (if you do not see it, use the garden shears from your inventory to cut the leaves) and place the handle in the middle.
The new (silver) gear goes on the top; the old (bronze) gear goes at the bottom.
Click the handle to activate a mini game.
Place the gears so that all gears are moving.
There are several solutions possible. The screenshot shows one example.
You can use all gears, but you don't have to.
Screenshot
The door to the Angel Statue is open now.
Play the hidden-object scene on the Town Square to obtain a bottle of wine.
Now enter the Angel Statue.
The Unicorn
Angel Statue/Caravan/Carpenter's House/Tower Laboratory
Get the sickle from the right statue and play the hidden-object scene on the left to obtain needle and thread.
Go to the Caravan and play the hidden-object scene to obtain bandages.
Go to the Carpenter's House. Click the umbrella at the left to find the crowbar.
Use the crowbar on the box on the table to obtain the tweezers.
Go to the Tower Laboratory (use the Griffin in the Sky Level) and click the table on the left side.
Pour the wine from your inventory into the left beaker to get alcohol in the right beaker.
Grab the alcohol.
Screenshot
Go back to the Ice Level.
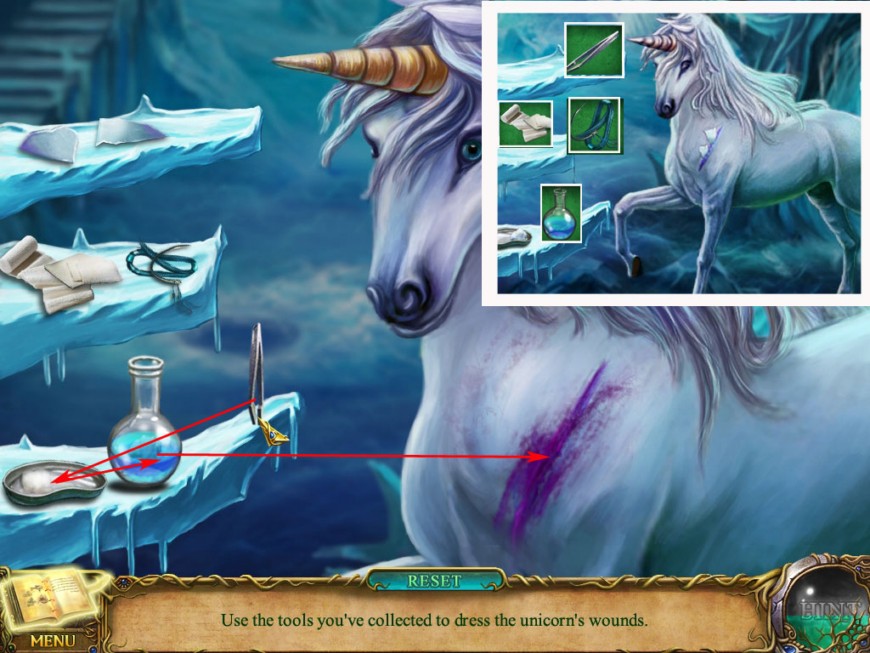
Help the Unicorn
Click the Unicorn and place the tweezers, bandages, needle and thread and the alcohol on the ice on the left side.
Click the Unicorn again to get a full screen.
Use the tweezers to remove the shards from the Unicorn's wound.
Place the shards on the ice panel the tweezers were laying on.
Use the the tweezers to place one cotton ball into the alcohol, to get it out again, and to clean the wound.
Click the needle (the tweezers will go back in place when you click the needle) to close the wound.
Use the bandages.
Screenshot
The Unicorn will move and you can take the snow lotus.
Exit to the Tower Garden.
The Eagle
Tower Garden/Angel Statue/Carpenter's House
Play the hidden-object scene on the left side inside the Angel Statue to obtain a scoop/shovel
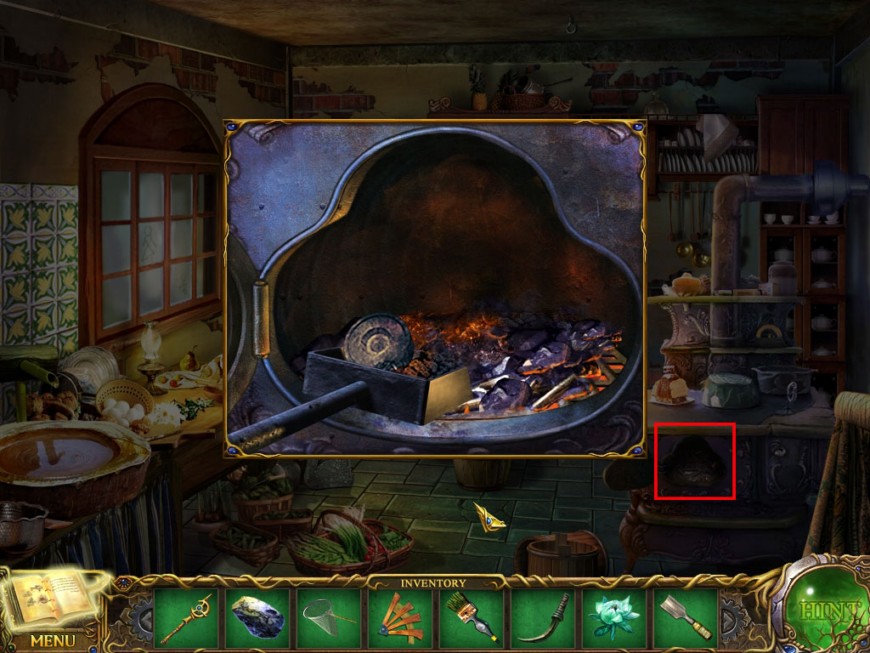
Go to the Carpenter's house and enter the kitchen.
Click the oven and use the shovel to get the wheel out of the coal.
Screenshot
Head over to the Bridge and use the zip line to go to the Library.
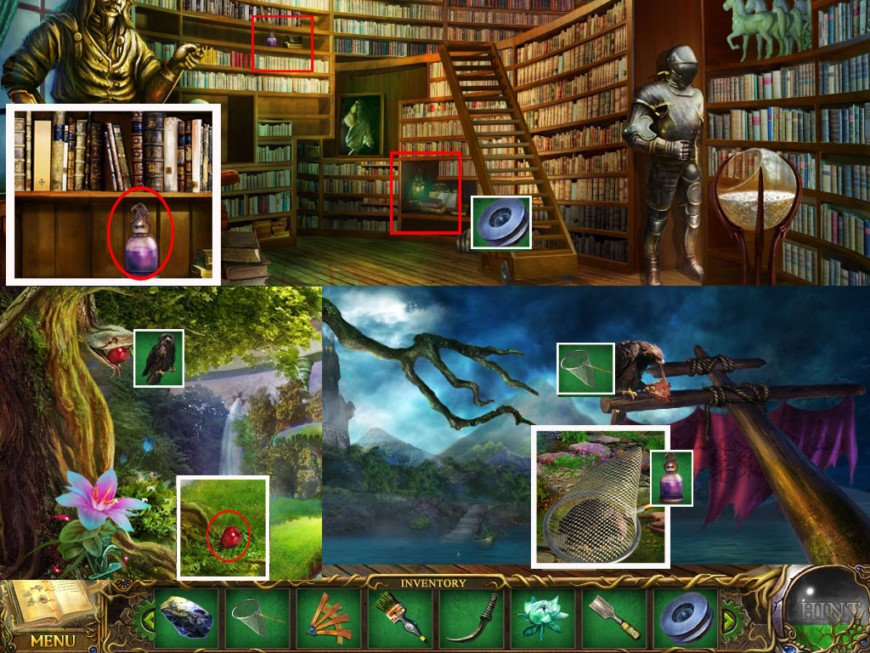
Library/Dock/Tower Garden
Enter the Library and play the hidden object scene to obtain a clock hand.
Place the wheel at the ladder.
Click the ladder to move so you can reach the upper shelf.
Get the taming potion from the upper shelf on the left side.
Go to the Dock.
Use the butterfly net to catch the eagle on the top right side.
When it is on the ground give him the taming potion.
Click the eagle to get him into the inventory.
Go to the Tower Garden.
Click the eagle on the snake in the tree on the right side.
He will attack the snake until the snake drops the apple.
Pick up the apple.
Screenshot
Head up to the Tower Laboratory.
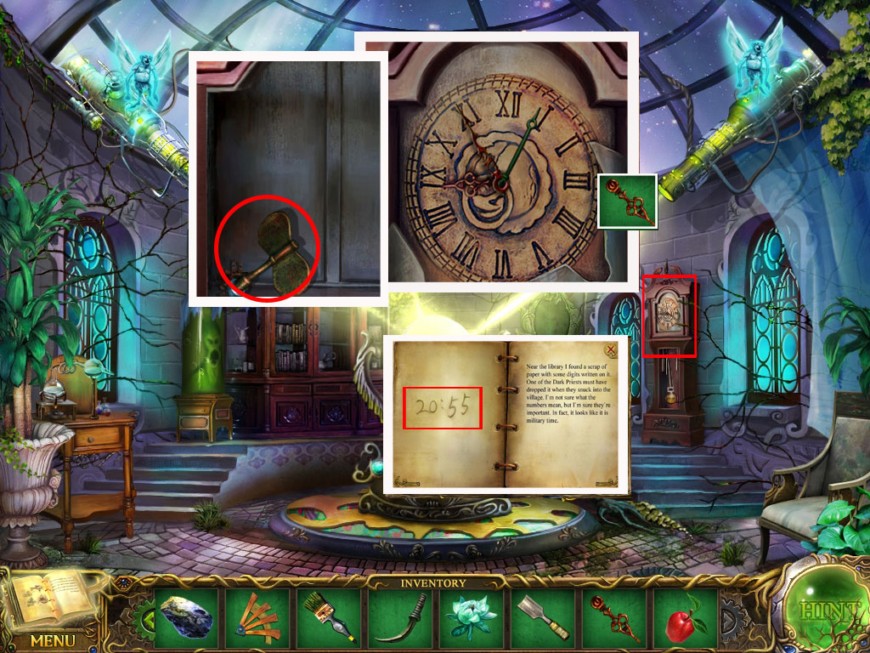
Tower Laboratory/Carpenter's House/Sky Level
Click the grandfather clock on the far right side.
Place the clock hand on the the clock face.
Click again to get the puzzle full screen.
You have found earlier a note with a time on the bench in front of the Library.
The time (20:55/8:55) was copied into your journal.
Move the clock hands around until the clock is on exactly the right time.
When you do this, the green clock hand (for the seconds) will start to move and the clock will open.
Get the wind up key.
Screenshot
Head back to the Carpenter's House and enter the bedroom on the right side.
Click the wooden dragon above the bed. First place the wooden wing, then place the wind up key on it.
Click the dragon again to get it into your inventory.
Screenshot
Go to the Sky Level.
Place the wooden dragon on the big one and collect the blue pearl when the dragon is gone.
Go back to the Carpenter's House.
Carpenter's House/Library.
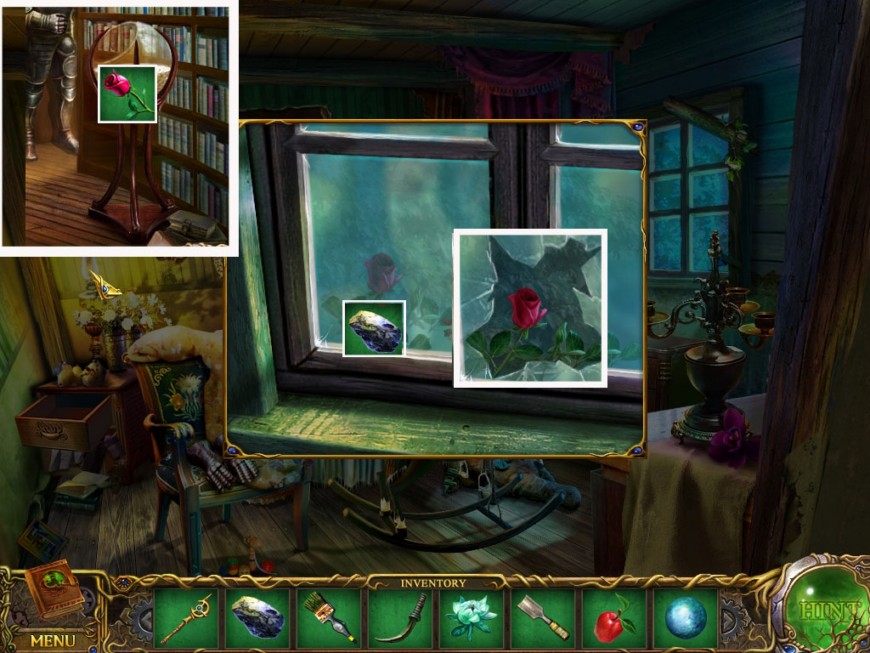
Enter the bedroom and click the window.
Use the stone from your inventory and tap the window 3 times.
Take the red rose.
Go to the Library. Dip the red rose into the silver sand in the bowl on the right side.
A silver rose will go into your inventory.
Screenshot
Go to the Tower Laboratory.
Tower Laboratory/Sky Level
Click the magic mirror on the wall in the far back.
Place the snow lotus into the slot and click two times to receive a snow lotus logo.
Do the same with the silver rose and the apple.
Go to the Sky Level and play the hidden-object scene to obtain a crescent moon.
Go to the Witch House on the Main Street, opposite the Carpenter's house
Witch House
The Door
Click the door to trigger a mini game.
Place the magic pearl, the snow lotus, the silver rose and the apple in the corresponding slot.
The magic pearl will show some red dots.
Move the circles below until the dots on the circles are in the same position as shown on the pearl.
When a dot is in the right position, the red dot on the pearl will change to orange.
You will have to do this three times.
Screenshot
The door opens. Enter.
The Witch Yard
Grab the crosier on the far left side under the window.
Enter the yard through the back door.
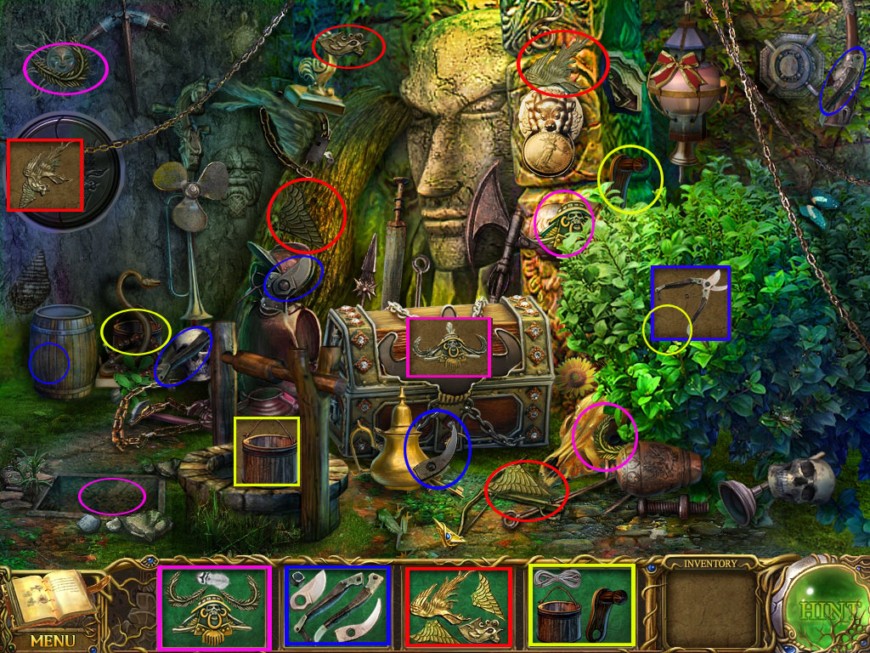
Play the hidden-object scene behind the chest.
Find all parts of the Phoenix and place it on the picture on the left side. The barrel below will break and reveal a part of the shears.
Find all parts of the shears and cut the leaves on the right side to reveal a part of the bucket.
Find all parts of the bucket and place it on the well to reveal a part of the pirate logo.
Find all parts of the pirate logo and put the logo on the chest. Grab the axe.
Screenshot
Grab the red herb in the low left corner and the demon crossbow from the statue on the left.
Use the axe to chop down the fence.
When the axe disappears from your inventory, click the fence again.
Pick up the unlit torch between the fence wood.
Go one step further and take the blue herb on the far left side.
Return inside the house.
Screenshot
Witch House/Yard
Light the torch at the fire.
Put the red herb into the cauldron and click the spoon to stir.
Put the blue herb into the cauldron and click the spoon to stir.
Click again and a bottle with sneeze potion will go into your inventory.
Return to the Yard and place the sneezing potion on the stone head on the right side.
Pick up the ruby the stone head sneezes out.
Screenshot
If you do NOT have already a chisel and/or a brush in your inventory, go to the Sky Level and play two hidden-object scenes once or twice to obtain the brush and/or chisel.
If you do NOT have already the crescent moon (moon key) go to the Tower Garden and play the hidden-object scene to obtain the moon key.
If you already have these objects head over to the library, but do not enter.
The Treasure Vault
Library. Fountain
Click the base of the fountain and use the chisel to clear the debris.
You want to click several times until the stone flower appears.
Click the stone flower and exit the close up view.
Use the brush to clean the wing of the fountain statue to reveal a flower-shaped slot.
Place the stone flower into the slot. It will move and reveal a sieve.
Click it into your inventory
Screenshot
Go to the giant statue behind the Witch Yard
Giant Statue/Witch Yard
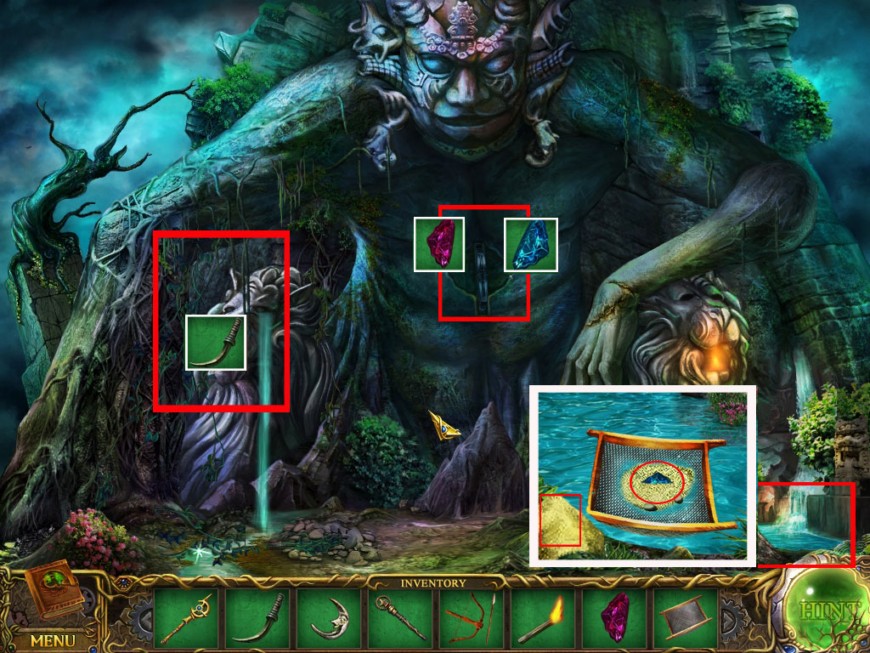
Click the water on the low right side for a close up view.
Place the sieve on the water.
Click the sand in the low left corner once and it will go on the sieve.
Click the sieve until the sand is gone.
Do the same again and a gem will appear.
Pick it up.
Use the sickle from your inventory on the vines on the left side of the giant statue.
The vines will fall on the ground. Click them into your inventory.
Place the two gems from your inventory on the lock on the statue's chest.
The door to the Treasure Vault opens.
Screenshot
Go into the Witch Yard and play the hidden-object scene to obtain a helm.
Head over to the Library
The Secret Chamber
Library
Place the Crosier into the bust's hand on the left side.
The bust will raise a bit. Click the base and grab the rune decoder out of the now open compartment.
Play the hidden object scene on the far right side to obtain a sun key.
Screenshot
Go inside the Angel Statue.
Angel Statue/Secret Chamber
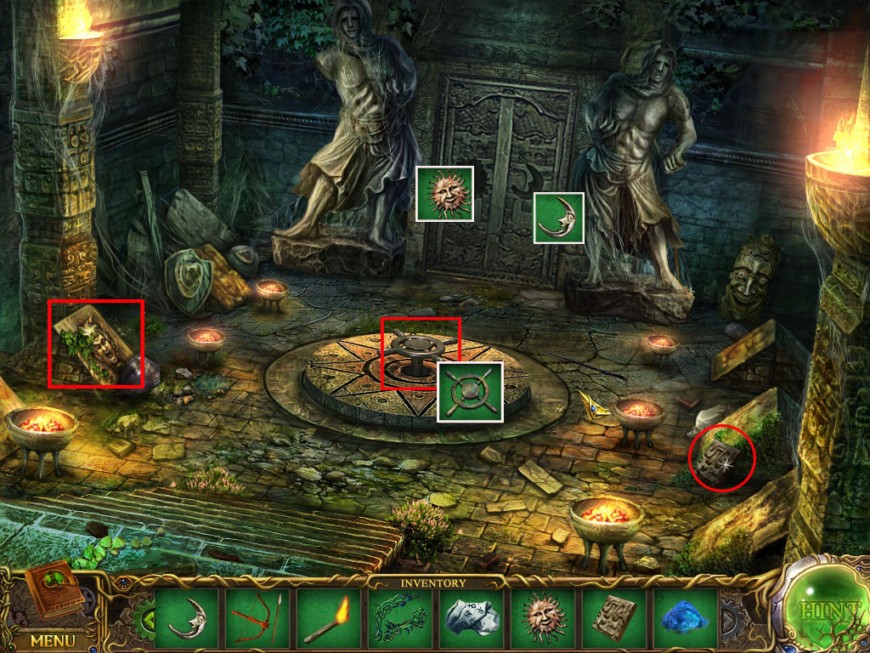
Pick up the tile on the low right side.
Play the hidden-object scene on the left side to obtain magic salt.
Click the helm on the wheel pin and click it until the door in the back is completely free.
Place the moon and the sun stone in the corresponding slots on the door.
Screenshot
Enter the Secret Chamber.
Click the statue once to learn that she will need a heart, helmet and wings.
Go to the Giant Statue.
Angel's Wings
The Treasure Vault
To enter the Treasure Vault, click the vines from your inventory on the opening and climb in.
Use the lit torch on the columns to the right and left to brighten the room.
Pick up the blue crystal balls on the ground in front of the far left column.
Screenshot
Play the hidden-object scene on the right side.
Find all coins and place them on the skull to reveal a part of the crest.
Find all parts of the crest and place it on the frame to reveal a part of the helmet.
Find all parts of the helmet and place it on the armor to reveal a part of the lid.
Place the lid on the magic lamp. The lamp will capture the ghost. Grab the sword.
Screenshot
Move your cursor to the top right to find the exit arrow.
Go to the Library.
Library/Witch Yard/Treasure Vault
Give the Knight on the far right the sword. Take the shovel that is revealed.
Go to the Witch Yard and play the hidden-object scene to obtain a monument piece.
Enter the Treasure Vault and play the hidden-object scene on the right side to obtain a bottle stopper.
Place the tile on the ground in front of the wheel. A stand will appear.
Use the shovel to remove the dirt from the pile on the low left side.
Use the bottle stopper to open the chest that appears and take the skull.
Place the skull on the stand and the mouth behind will open.
Take the Angel's wings.
Screenshot
Play the hidden-object scene which is now activated again on the right side.
You will receive a calabash bottle.
Exit to the Witch House
Witch House
Place the magic salt on the crystal ball on the left side.
Place the Calabash Bottle onto it. It will be filled and goes into your inventory as Exorcism Calabash
Go to the Caravan.
Angel's Helmet/Angel's Heart
Caravan
Click the monument piece on the Monument on the right side.
Click the rune decoder on the Monument.
Click again to trigger a mini game.
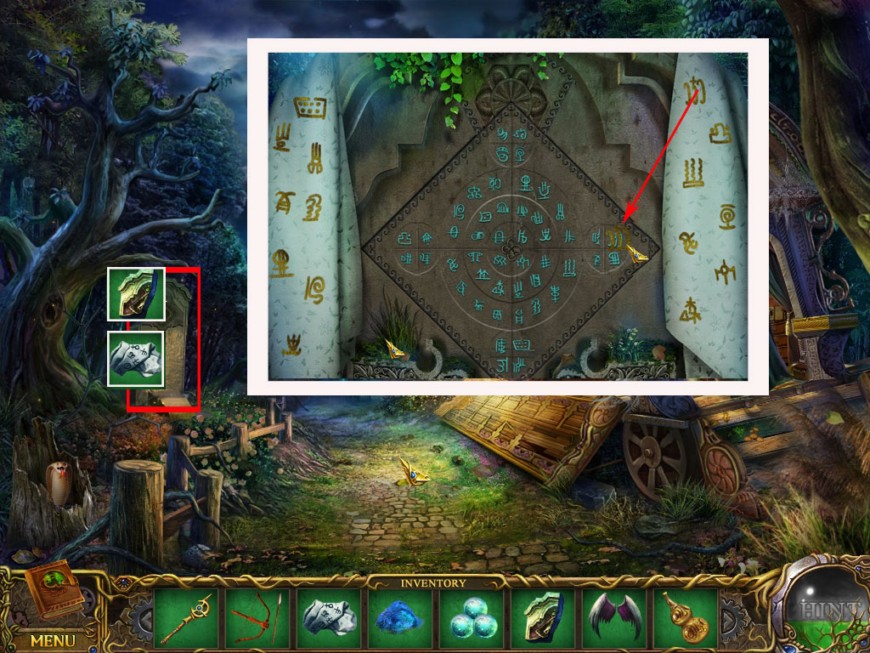
Click and drag the symbols from the decoder on the corresponding symbols on the Monument.
When all symbols are placed, the Angel's Helmet will go into your inventory automatically.
Screenshot
Go to the Tower Laboratory.
Tower Laboratories
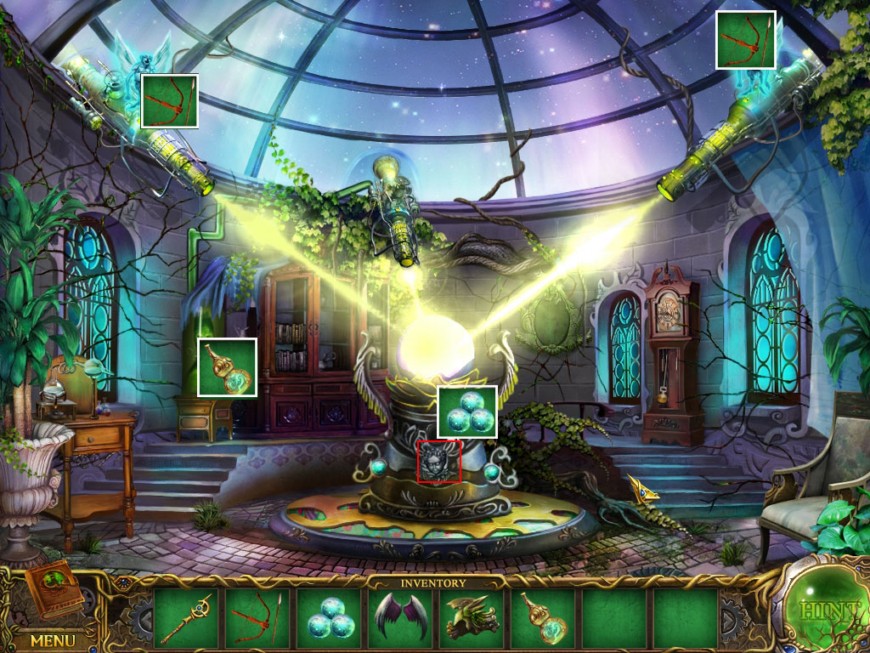
Place the Exorcism Calabash on the ghost in the green tank on the far left side.
Use the Demon Bow to shoot the two demons on the top right and top left.
Place the crystal balls in the slot underneath the heart and click to trigger a mini game.
Screenshot
Your goal is to make all squares pink.
To do this, drag the spheres from on the squares. A sphere may only be placed on a pink square.
Once a sphere is placed on a pink square, it will stay pink.
Each sphere will change all empty squares in the same row and column
You can take a sphere off the board again and put it back. This will change back all squares the sphere affected by placing it.
There are several solutions possible. For an example step-by-step-solution please see spoiler.
Number the squares from top right to bottom right from 1-22
Add spheres in the following order:
7,3,1,6,2,5,8,18
Remove sphere 8.
Add spheres in the following order:
12,13,16,20,21,4,8,10,9
Remove sphere 16.
Add the last spheres in the following order:
14,11,17,16,19,22
When the purple glass opens, click twice to obtain the Angel's Heart.
Go back to the Secret Chamber.
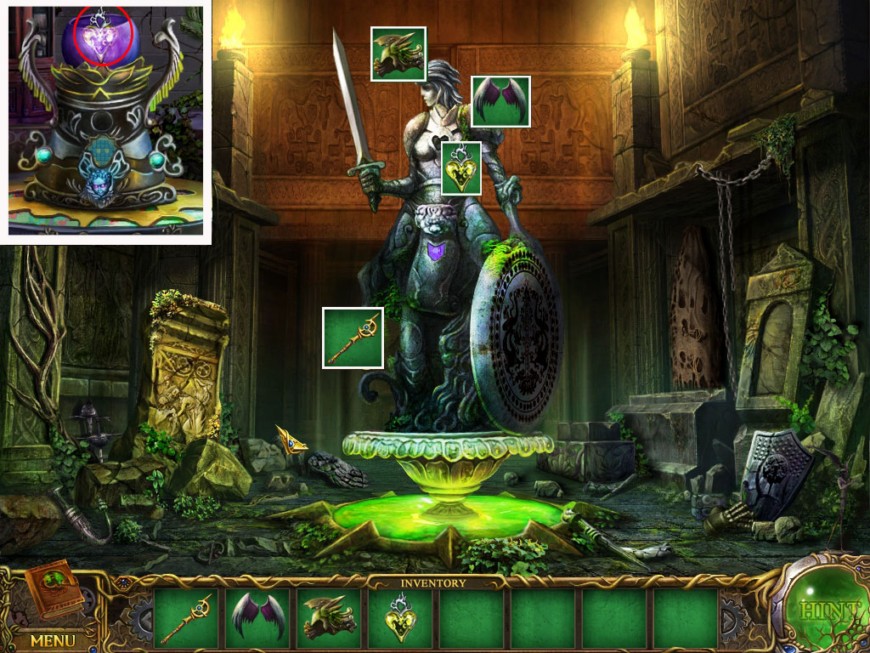
Finale
Place helmet, wing and heart on the statue and use your Imperial Staff once to bring the Guardian Angel back to life.
Screenshot
Enjoy the END!
Thanks to Kayleigh for the walkthrough!
Posted by: Mike |
November 29, 2010 11:32 PM
|
November 29, 2010 11:32 PM