
Insider Tales:
The Stolen Venus 2
Platform: Windows

![]() You might think that if a large, priceless statue is stolen in a cruise ship the police would simply prevent the ship from docking and conduct a thorough search until they find it. But where would be the fun in that? Where would be the opportunity for hidden object searching for clues in tourist locations across the Mediterranean? Maybe Italian police really do handle things differently. In Insider Tales: The Stolen Venus 2, a new adventure game from Intenium, Detective di Porta indulges in a little pizza making and even surreptitiously enters a Greek archaeological site on her leisurely course towards nabbing the culprit.
You might think that if a large, priceless statue is stolen in a cruise ship the police would simply prevent the ship from docking and conduct a thorough search until they find it. But where would be the fun in that? Where would be the opportunity for hidden object searching for clues in tourist locations across the Mediterranean? Maybe Italian police really do handle things differently. In Insider Tales: The Stolen Venus 2, a new adventure game from Intenium, Detective di Porta indulges in a little pizza making and even surreptitiously enters a Greek archaeological site on her leisurely course towards nabbing the culprit.
 Your cursor is your friend here. Sparkly areas might be hiding hidden object scenes, where you'll be given a list of objects to find. Sometimes you'll have to manipulate the scene by using an object on an area in order to uncover more hidden objects. You'll usually receive an inventory item from a successful hidden object scene, and you can also pick up inventory items in regular scenes. Watch out for your cursor's shape changing to indicate if you can pick something up or zoom in on it. Most of the puzzles are solved entirely by left clicking with the mouse, but occasionally, usually for tile swapping and assembly puzzles, you may need to right click to rotate pieces.
Analysis: If you're getting sick of hidden object adventures where it's always midnight, the crimes are disturbing and probably occult, and the "happy ending" is stopping the serial killer at his seventh human sacrifice, this light and frothy cruise ship romp might just lift your spirits. True, it doesn't have the big budgets of many other series, but it's done pretty well in prioritizing. The art is clean and crisp and easy on the searching eyes. I've played enough games with horrific voice acting not to feel like I'm missing much by that missing feature. The length is fairly decent as well, between three and four hours, depending on how much you use skips and hints.
 The game's big drawback is some sloppiness with the writing or perhaps the translation, with some glaring mistakes. Not only is this unprofessional, but in a few cases it actually causes confusion. At one point, the detective is presented with what appears to be some boxes under a tarp. I tried clicking on it. "I can lift it with my bare hands" said the detective. But nothing happened. I tried clicking again. She said the same thing. I was worried I had hit a bug and consulted a walkthrough. From context, she should have been saying "I can't lift it with my bare hands" and it ought to have been a clue to find some other method of lifting the tarp. The game also is fairly light on instructions for solving puzzles. If you're the kind of person who considers figuring out what to do to be part of the fun, this will be a feature and not a bug, however.
Insider Tales: the Stolen Venus 2 doesn't do anything Earth-shattering. You're not going to be rushing to write about this in your diary or kept up at night by dreams about it. In fact, in some ways it's a nice trip down memory lane to the kind of hidden object game that got me hooked on the genre in the first place, before success brought the big budget hits that aimed to tell huge, sweeping stories with gorgeous art, amazing soundtracks, and often, huge amounts of creepiness. It's nice to know there's still a place in gaming for a humble little stress reliever like this one. (Although the identity of the villain is a little bit creepy... did not see that one coming.)
![]() Windows:
Windows:
Download the demo
Get the full version
![]() Mac OS X:
Mac OS X:
Not available.
Try Boot Camp or Parallels or CrossOver Games.


Walkthrough Guide
(Please allow page to fully load for spoiler tags to be functional.)
Insider Tales: The Stolen Venus 2 Walkthrough
General Information
From the Main Menu, you can Play and Exit the game or choose your Profile and Options.
Options consist of Music and Effects volume or you can just mute everything.
You also have your choice of playing with a Full Screen or in Window Mode.
There is no timer or choice of game play mode.
Scene Navigation
Hidden Object Scenes are semi-random but will be marked in the screenshots because many items are repeated for every profile.
You will always come away with at least one object for your Inventory, those object are marked and labeled in bright turquoise.
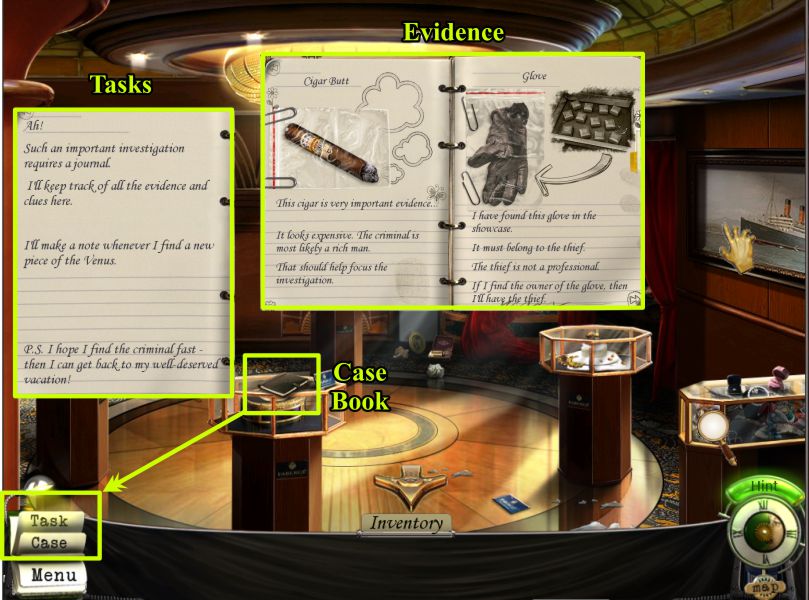
Check out anything marked with a magnifying glass, and be sure to check the Case Book for notes, tasks and evidence.
When you find evidence or a clue, it will be added to your Case Book.
Francesca will also take notes during her investigation and they will appear in the Case Book as will whatever portions of the Venus she locates.
Tasks not only shows you what you need to do at the moment, it also has instructions for Mini Games.
From the Menu, you can resume the game, change your options, and access the "Help" file.
You Inventory is shown on the bottom of the scene in the middle.
Hints are unlimited when the button refills.
Below the Hints is the Map that will help you move to other locations.
Some scenes scroll left and right, so you can move the screen with your cursor at the far left or right of the screen, or you can put your cursor on the screen and a fist will appear to help you move where you want to go.
Screenshot
Cursors and Other Help
Usually, your cursor will just be normal, but sometimes it will get a circular attachment when you need to perform a task such as combining two items to collect an object you need.
A magnifying glass means you should take a closer look at something.
A hand is telling you to pick something up or move it.
A fist allows you to move the screen in a scrolling scene.
Arrows in different directions are to let you know you can exit to another location or out of a close up or Hidden Object Scene.
Maps allow you to move from location to location without moving around with cursors.
Some locations are only accessible by using the maps.
Screenshot
Chapter 1: Empire Liner
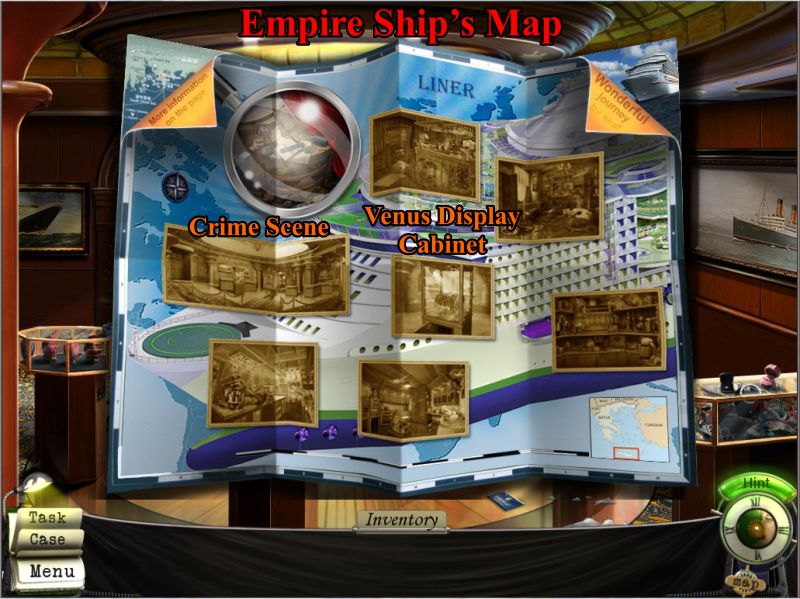
Liner Map
All locations on the Map will not be available this go 'round.
You will have access to the Exhibit Room, the Crime Scene, and the Venus Display Cabinet.
Screenshot
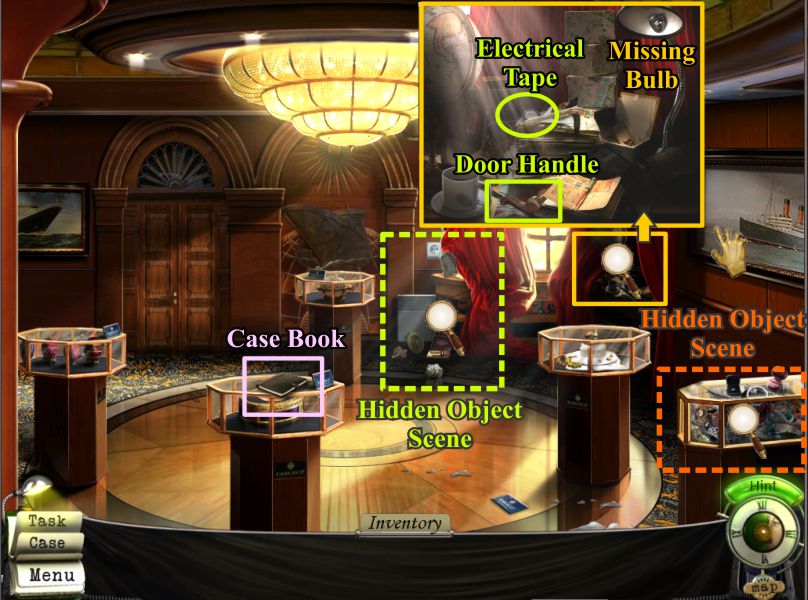
Exhibit Room
Locate and pick up Francesca's Case Book.
Zoom in on the curtain area to pick up some Electrical Tape and a Door Handle.
Play the two Hidden Object Scenes.
Move the painting on the right wall.
Screenshot
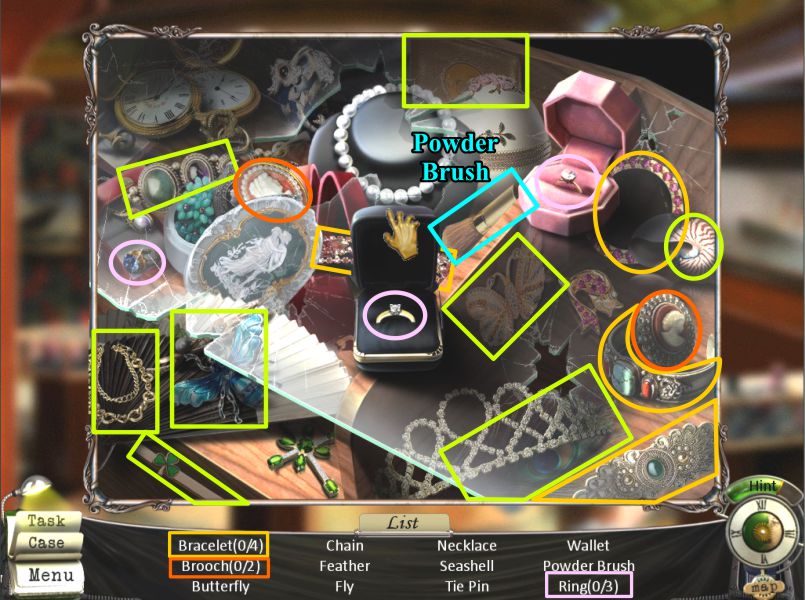
Display Case Hidden Object Scene
When you have collected everything, you will get a Powder Brush.
Screenshot
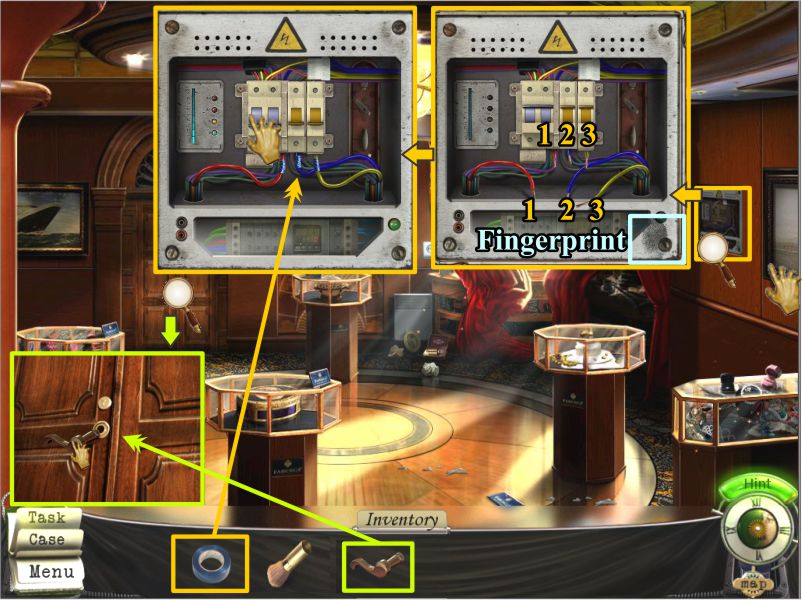
Electrical Panel
Behind the painting is an electrical panel.
Collect the fingerprint and connect the color-coded wires as shown in the screenshot.
Use the electrical tape from your Inventory on each of the bare wires.
Throw all 3 switches and you will turn on the lights in the next room, after you plug in the cord.
Zoom in on the door and place the door handle so you can enter the room after you play the next Hidden Object Scene.
Screenshot
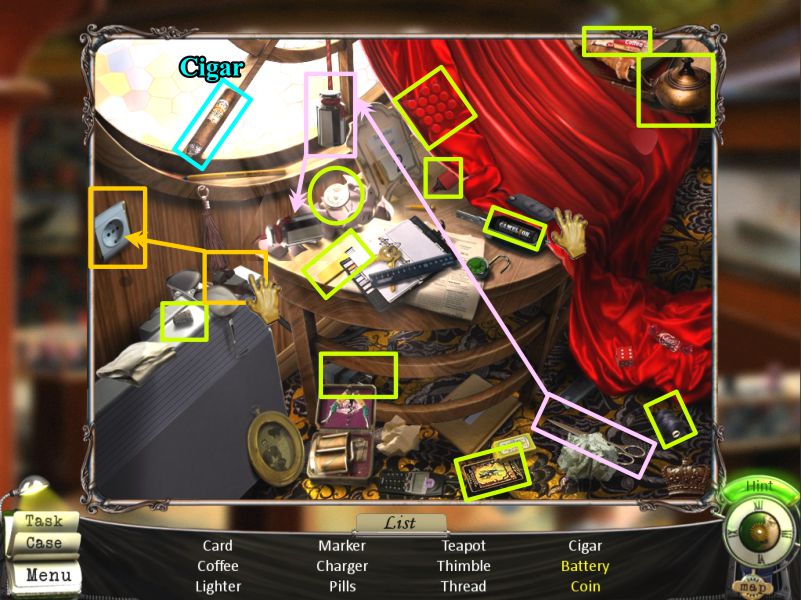
Curtain Hidden Object Scene
Use the scissors to cut the rope holding the bottle so the bottle will drop and smash the piggy bank.
Move part of the electrical screwdriver so you can grab the battery.
Collect everything else to get the Cigar as evidence.
After you have fixed the electrical panel, you will need to come back and plug the cord into the wall socket before you can enter the next room.
Screenshot
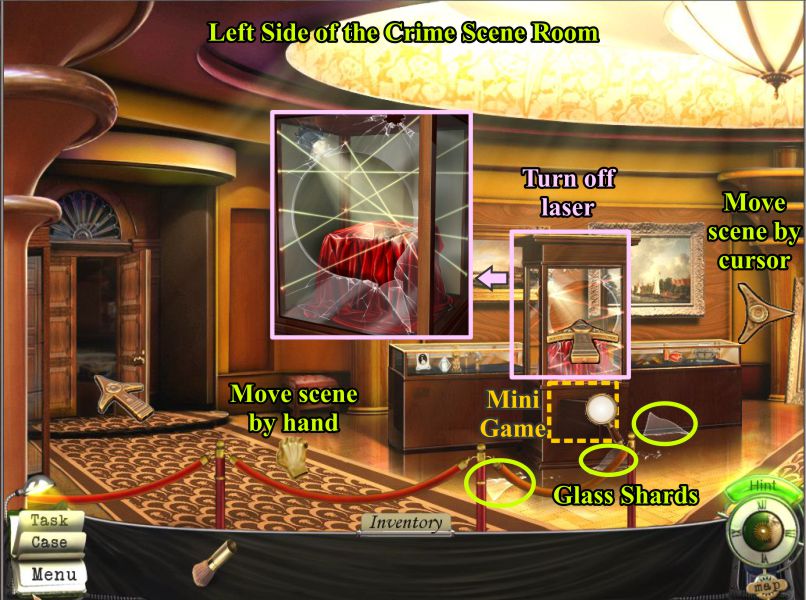
Left Side of the Crime Scene Room
The Venus statue display room is a scrolling scene so we will first look at the left side of the room.
Pick up the 3 shards of glass marked in the screenshot.
Go to the Venus display to determine you need to find out how to turn off the laser security.
Look at the painting which needs rearranging when you find something to remove the glass.
Screenshot
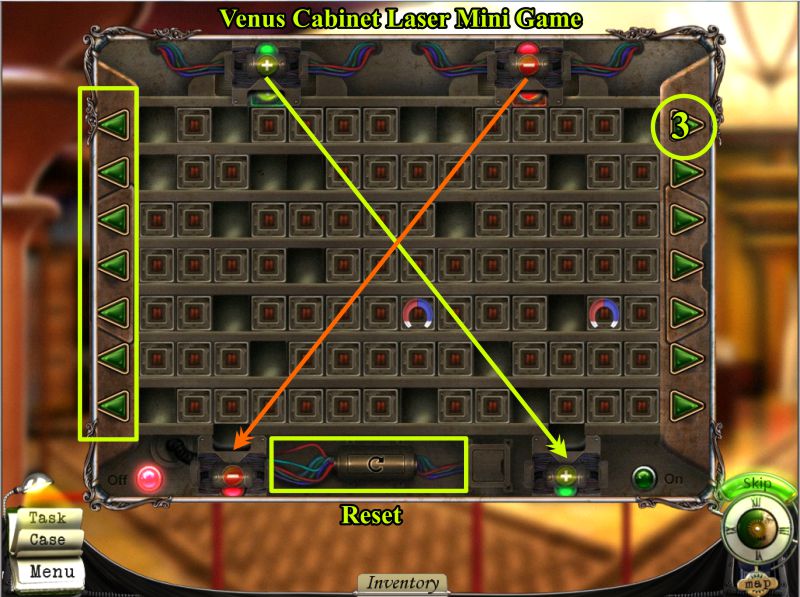
Venus Cabinet Laser Mini Game
To remove the lasers, you need to lower the positive and negative discs to each of their places at the bottom of the mechanism.
Use the arrows to move the rows left and right so the discs will fall into an empty space.
There is a resent button at the bottom in case you need to start over.
Move the top right arrow 3 times and both discs will fall.
Screenshot
Move the second right arrow 3 times and the third left arrow 2 times.
Move the third right arrow 5 times and the fourth left arrow 3 times.
Move the sixth right arrow 2 times and the seventh right arrow once.
Move the first left arrow 6 times, the second left arrow 2 times, the third left arrow once, and the fourth right arrow 3 times.
Move the fifth right arrow 2 times, the fifth left arrow 2 times, the sixth left arrow 3 times, and the seventh right arrow once.
Both discs should be in the proper places as shown in the screenshot.
Screenshot
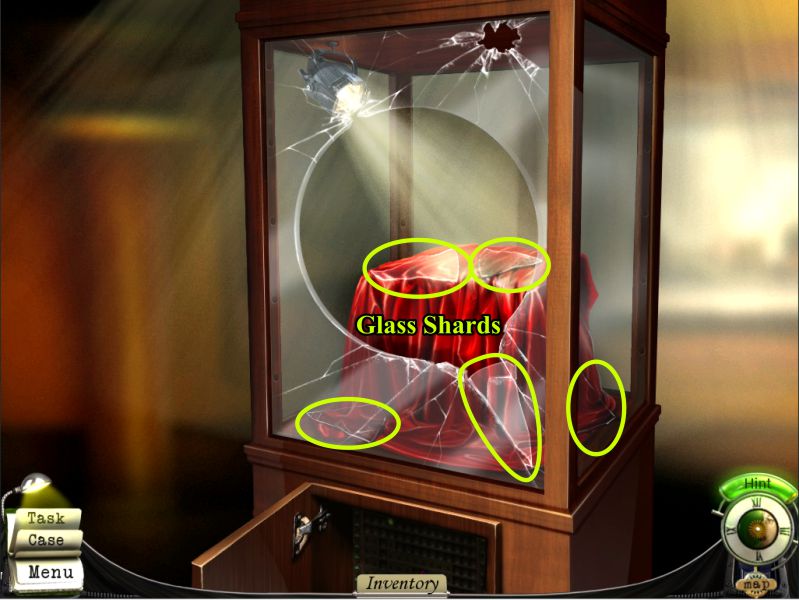
Venus Display Cabinet
Zoom in on the Venus Display Cabinet and collect the 5 Glass Shards marked in the screenshot.
Screenshot
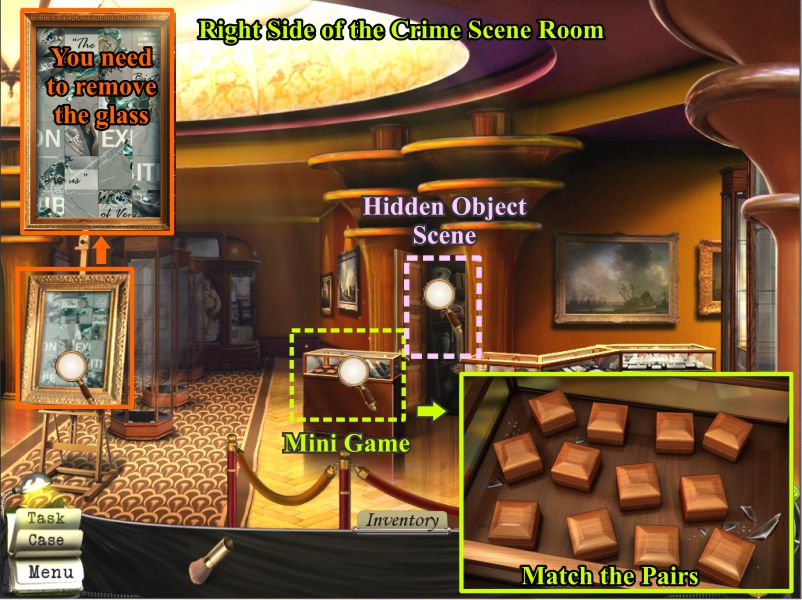
Right Side of the Crime Scene Room
Scroll to the right past the painting using either the fist on the screen or the cursor at the right of the screen.
Click the display case for a Mini Game and then play the Hidden Object Scene.
Screenshot
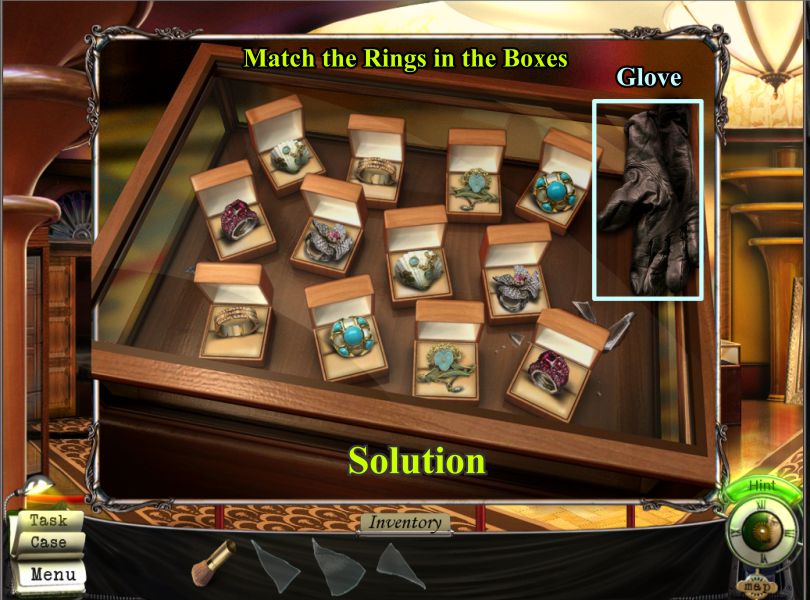
Ring Matching Mini Game
The matches will be the same for everyone so are shown in the screenshot.
Open the boxes and match two look-alike rings.
When you have finished the game a Glove will appear for you to collect as evidence.
Screenshot
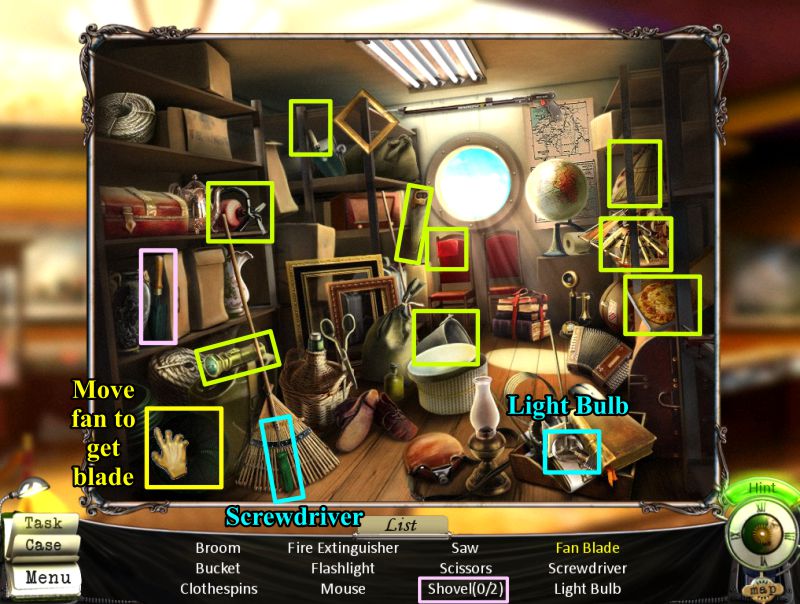
Closet Hidden Object Scene
Collect everything on your list to get a Light Bulb and Screwdriver.
Move the fan grill to get the Fan Blade.
Screenshot
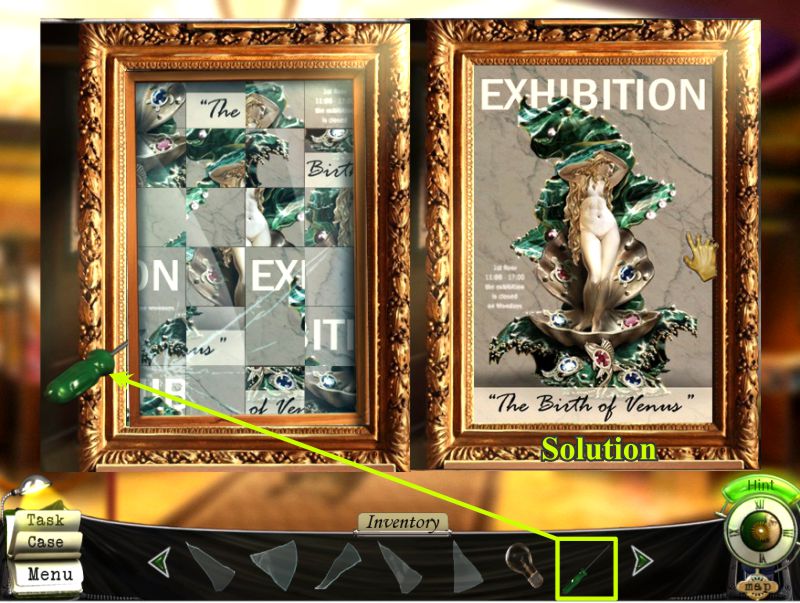
Exhibition Poster Puzzle
Click on the poster on the easel and use the screwdriver to remove the glass.
Swap adjoining pieces of the picture until it looks like the solution in the screenshot.
Take the completed poster.
Screenshot
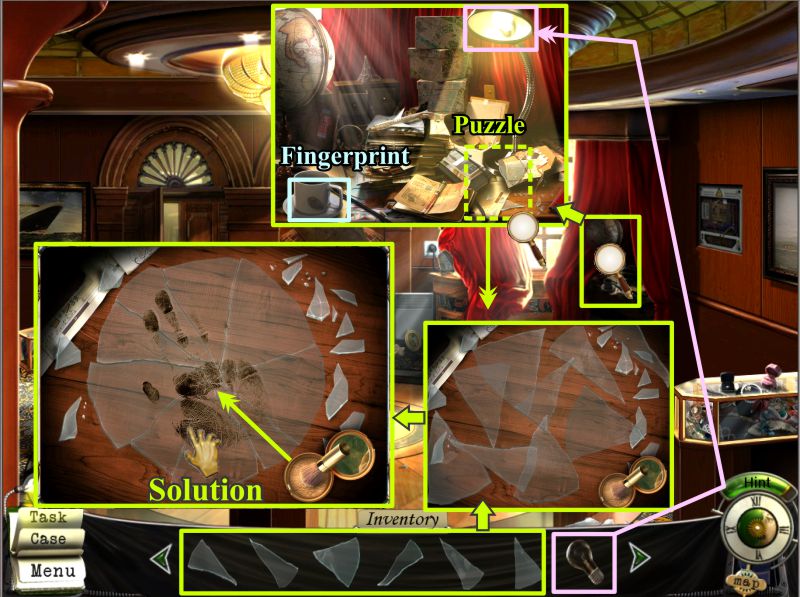
Exhibit Room
Exit left to the Exhibit Room
Zoom in for a close up of the curtained area and put the Light Bulb in the lamp.
Collect the Fingerprint on the cup and click on the sparkling glass shards for a puzzle and the glass from your Inventory will be ready for you to assemble.
When you have completed the glass circle as shown in the screenshot, dust it for fingerprints.
Collect the handprint you find.
Screenshot
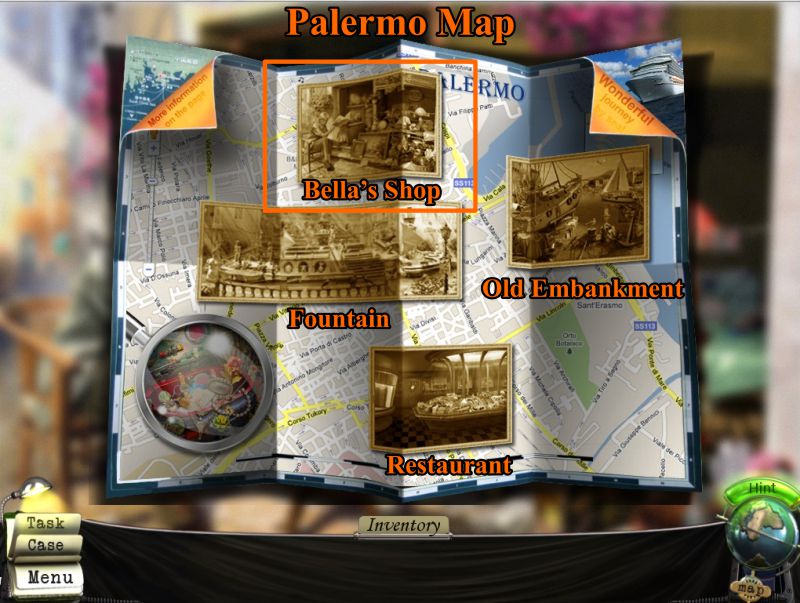
Chapter 2: Palermo
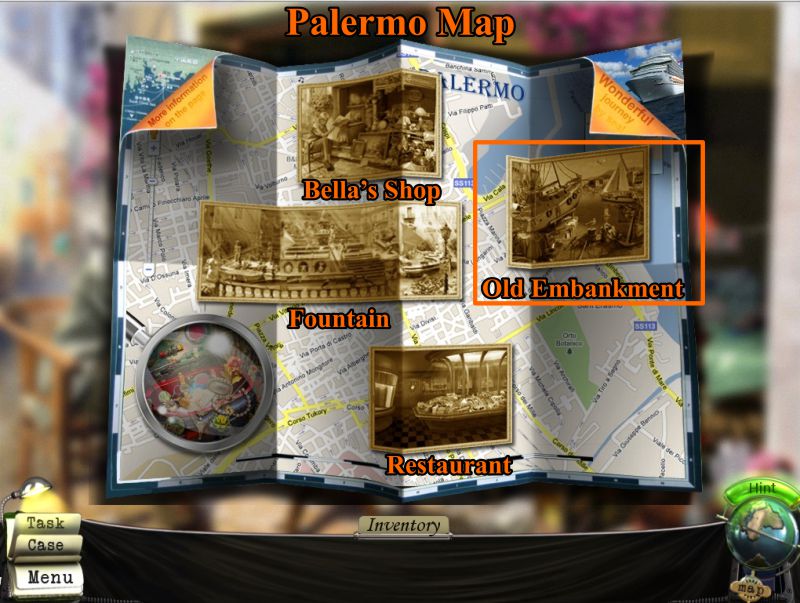
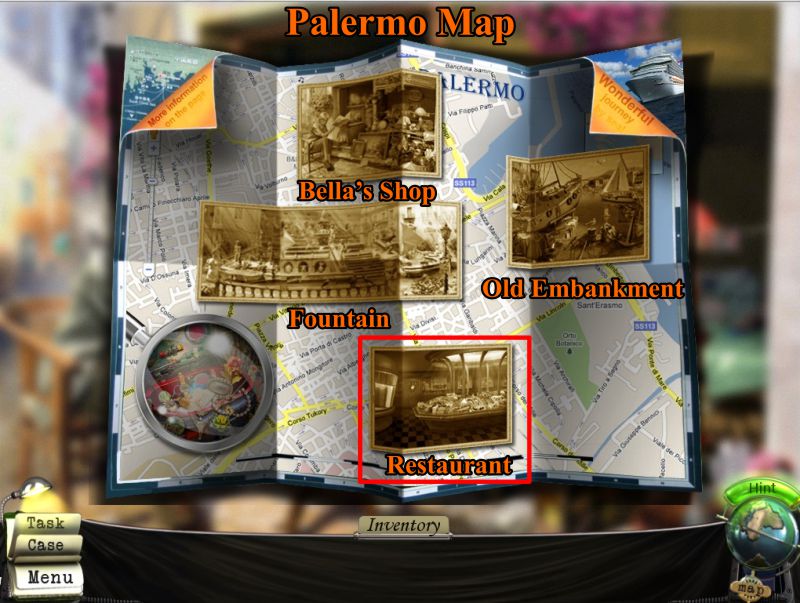
Map
Francesca is given a brochure with a Map so you can find the locations in Palermo where the passengers on the ship visited.
You will be transported to the Fountain but you need some valve parts to fix it so click on the Map under Hints and choose Bella's Shop.
Screenshot
Bella's Shop
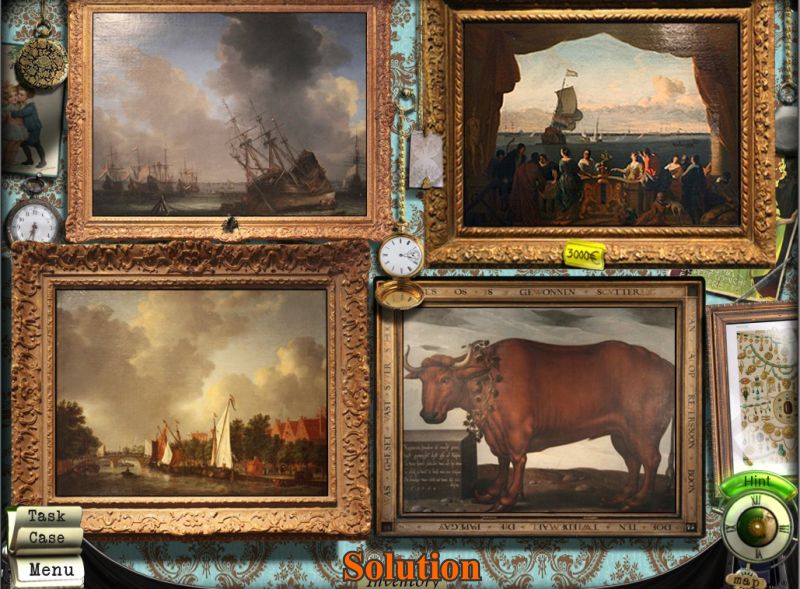
Talk to Bella and click on the paintings next to her for a puzzle.
Painting Mini Game
Swap tiles between the paintings until they match the solution shown in the screenshot.
There is a safe behind the upper right painting but you don't have the combination so go talk to Bella.
Screenshot
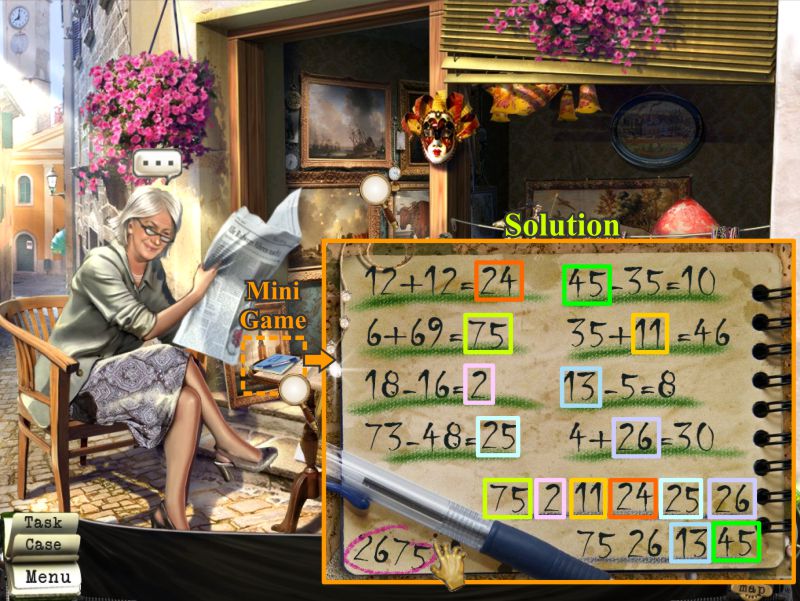
Safe Combination Mini Game
Bella says her granddaughter wrote it down for her so check out the notebook next to Bella to trigger a Mini Game.
Use the numbers at the bottom of the page to fill in the blanks in the equations.
The solutions are color matched in the screenshot.
Take the number 2675 that appears on the lower left corner of the page.
Screenshot
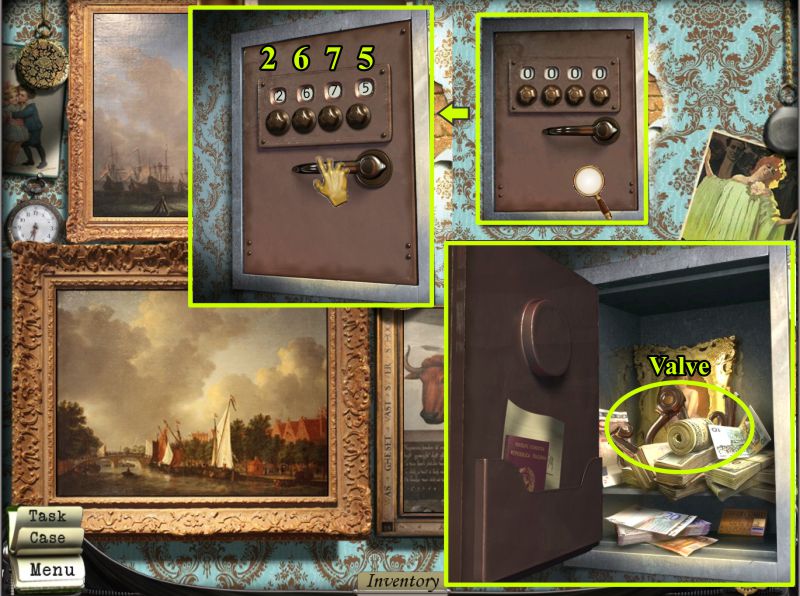
Safe
Return to the safe and enter the numbers 2675 with the dials.
Press down on the handle and open the safe.
The valve part you are looking for is there so you decide to ask Bella if it is ok to take it.
Screenshot
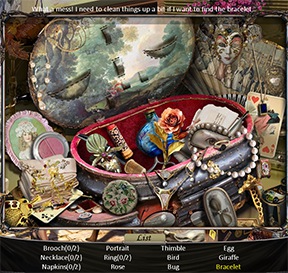
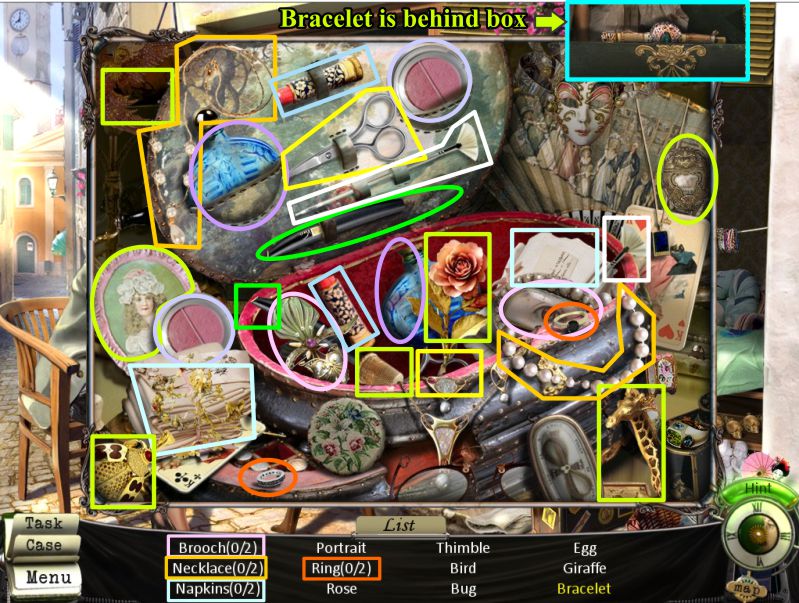
Bella's Bracelet Hidden Object Scene
In exchange for the valve part Bella asks if you will help her find her bracelet to click on the open box on the counter for a Hidden Object Scene.
Collect all the items on your list and move the color coded objects to the holders in the lid: perfume bottle, lipstick, scissors, brush, rouge compact, mascara.
The lid will close and you will find Bella's bracelet behind the box.
Screenshot
Bella's Shop
Give the bracelet to Bella and go to the safe to collect the valve part.
Palermo Map
Time to move on to another location to find the rest of the valve parts, so click on the Map and choose Old Embankment.
Screenshot
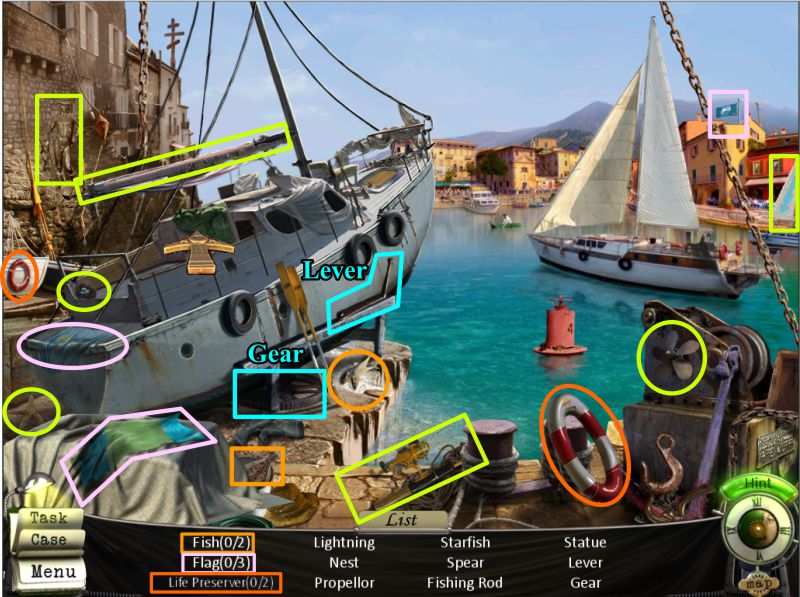
Old Embankment Hidden Object Scene
Collect everything on your list to get a Gear and Lever.
Go inside the boat on the left.
Screenshot
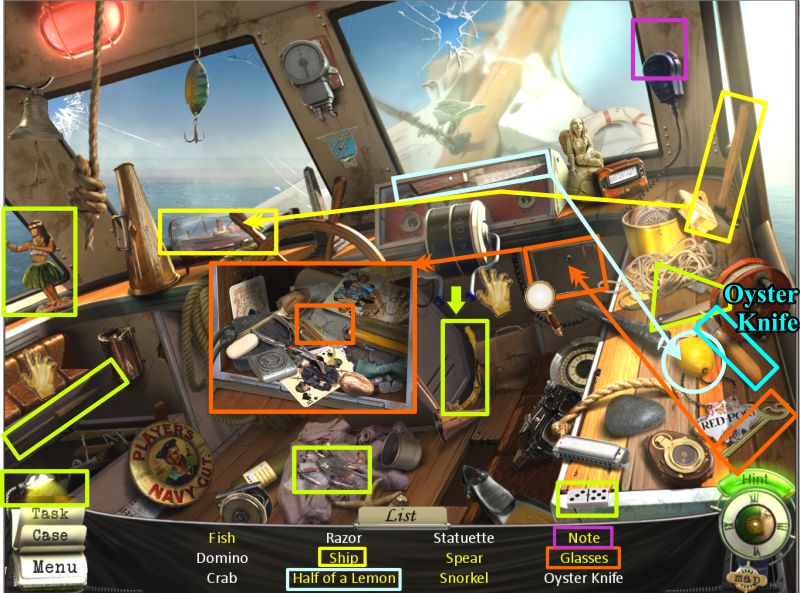
Boat Hidden Object Scene
Collect everything on your list to get an Oyster Knife.
Lift the seat at the left to get the Spear.
Use the key to open the compartment and take the Glasses.
Use the knife to cut the Lemon in half.
The Snorkel will pop out if you lower the accelerator lever.
Break the bottle with the hammer to get the Ship.
Screenshot
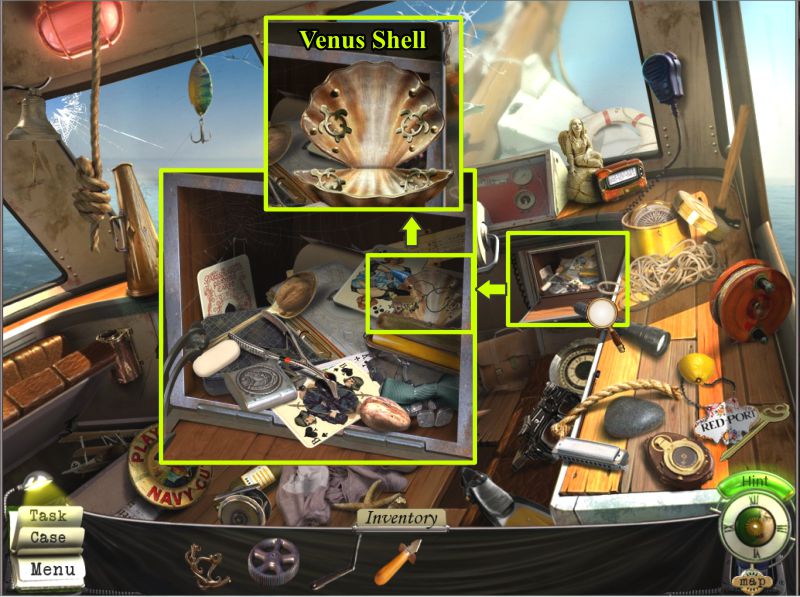
Venus Shell
When you've completed the Hidden Object Scene, zoom in on the compartment again and take the Venus Shell.
Screenshot
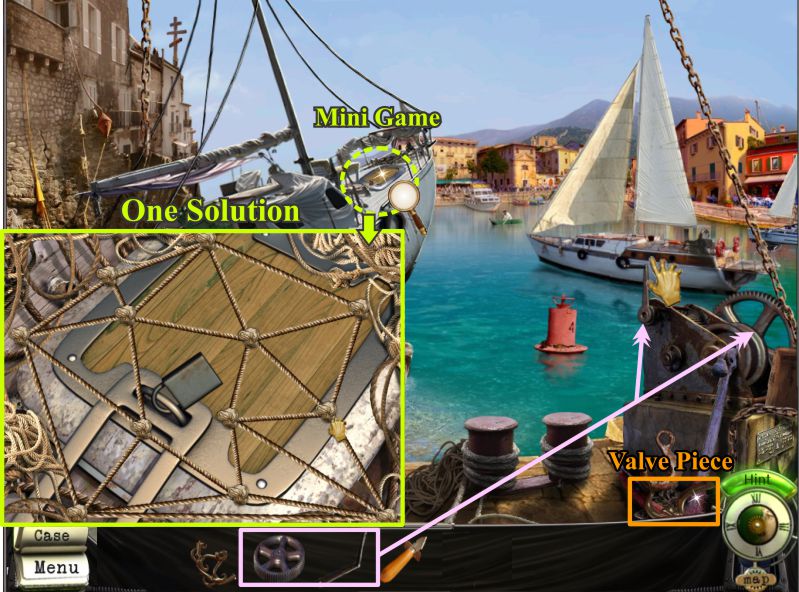
Boat Hatch Mini Game
Zoom in on the hatch at the bow of the boat for a Mini Game.
Untangle the ropes so none of the red is left as shown by one example in the screenshot.
Pick up the Valve Piece and place the gear and handle on the hoist.
Click on the handle to lower the chain.
Screenshot
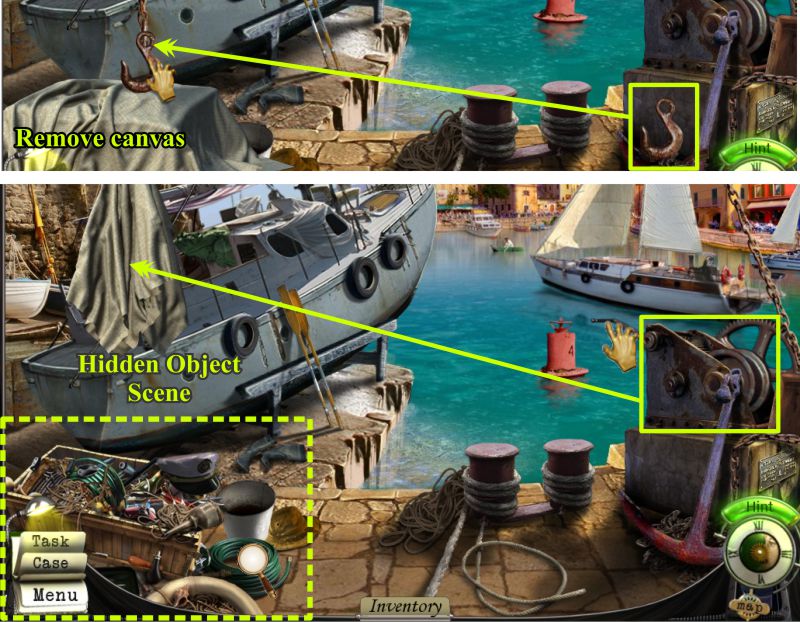
Remove the Canvas
You cannot remove the canvas by hand, so place the hook on the lowered chain and hook it to the canvas.
Click on the hoist to remove the canvas revealing a Hidden Object Scene.
Screenshot
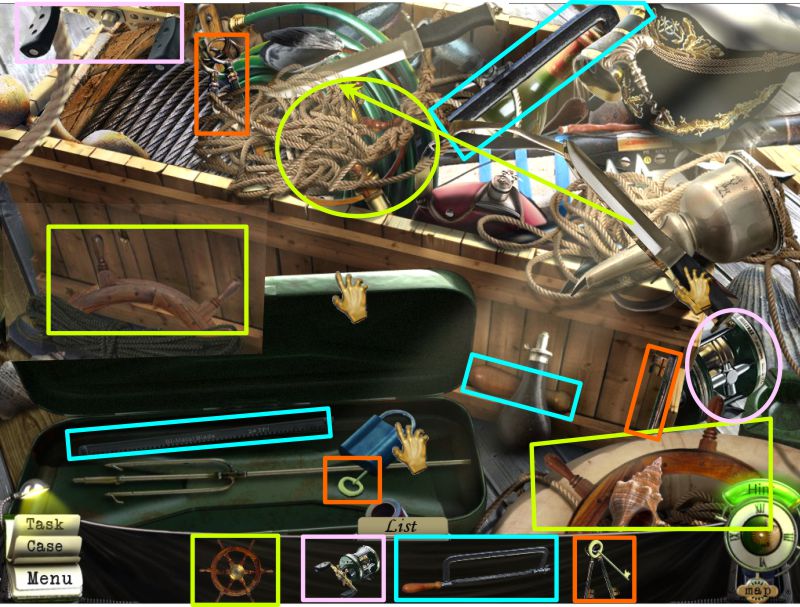
Dock Hidden Object Scene
Your goal in this Hidden Object Scene is to collect the pieces that make up the object shown.
Open the toolbox to grab the parts there.
Use the knife to cut the rope for a piece of the wheel.
When you have collected all of the parts, you will come away with a saw.
Screenshot
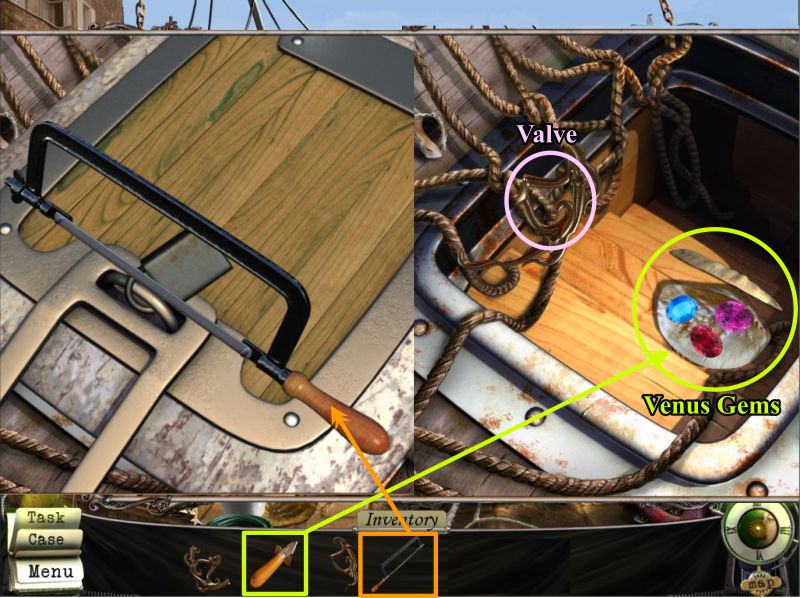
Boat Hatch
Zoom in on the boat hatch and use the saw to remove the lock.
Open the oyster with the oyster knife and collect the Venus Gems.
Pick up the valve part to complete your visit to the Old Embankment.
Screenshot
Palermo Map
You have the complete valve so click on the Map and let's go to the Fountain.
Screenshot
Fountain
The Fountain is a scrolling scene so will be split in half for the screenshots.
As before, you have your choice of moving to other portions of the scene by scrolling with the arrows or moving with the hand.
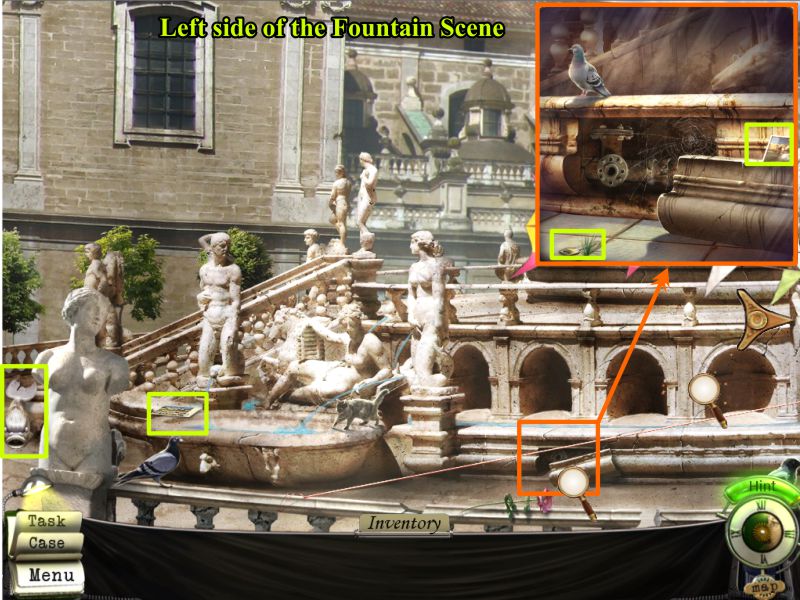
Left Side of the Fountain Scene
Collect the fish head, postcard, and zoom in on the broken part of the fountain to pick up the postcard and key.
Screenshot
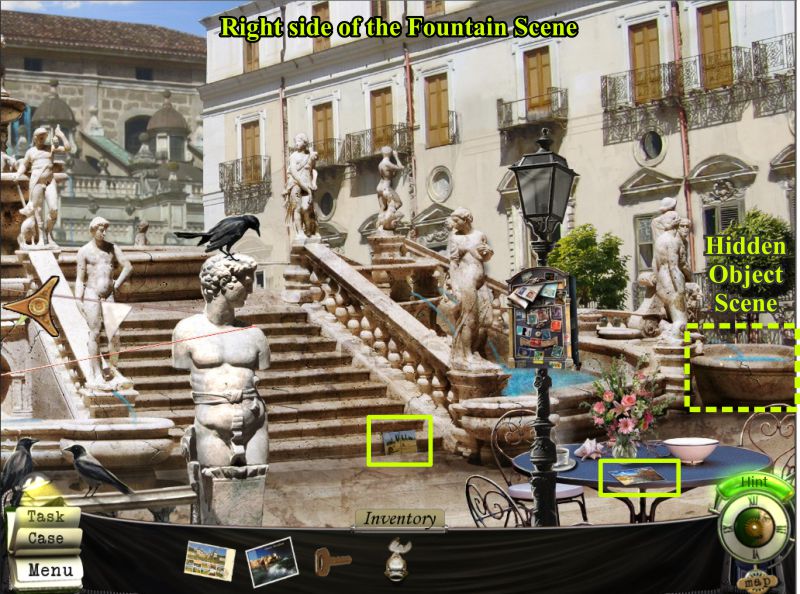
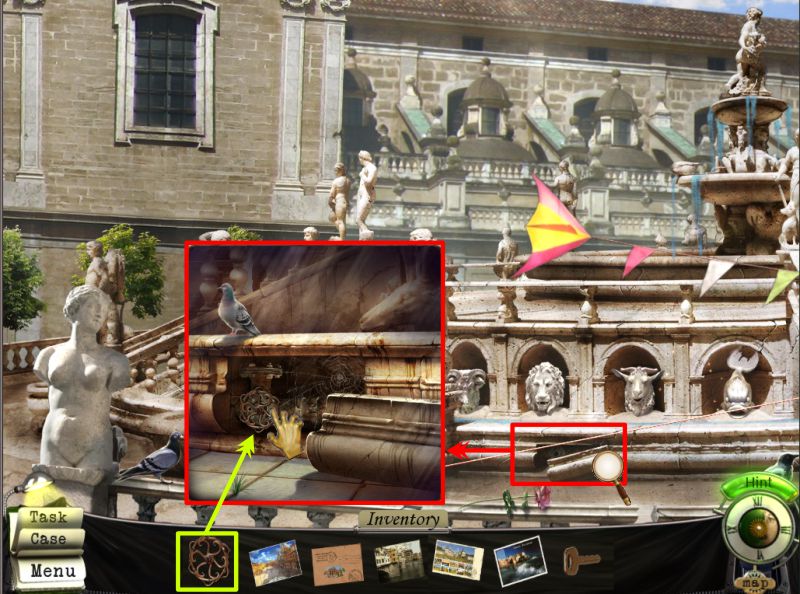
Right Side of the Fountain Scene
Go to the right side of the scene, pick up the 2 Postcards, and play the Hidden Object Scene.
Screenshot
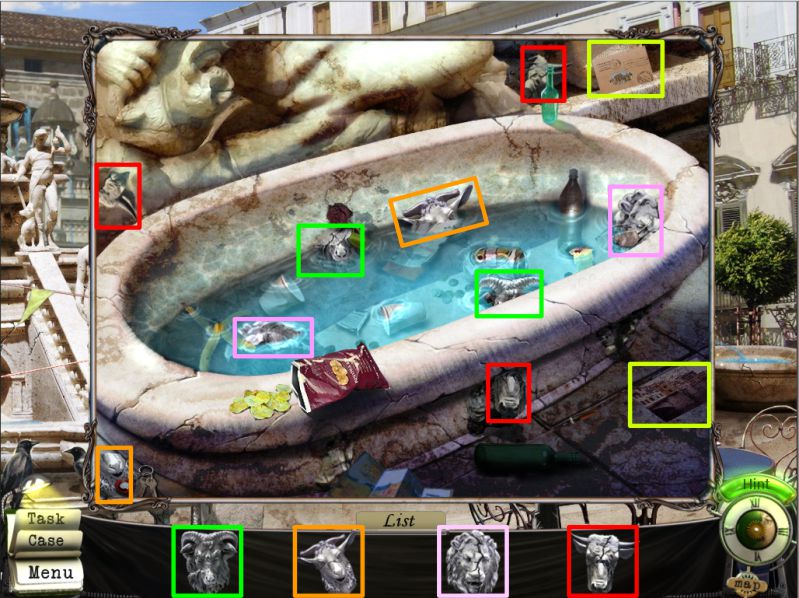
Fountain Hidden Object Scene
Collect the various parts of the animal heads.
When you have all of the heads, zoom back in and pick up the 2 Postcards.
Screenshot
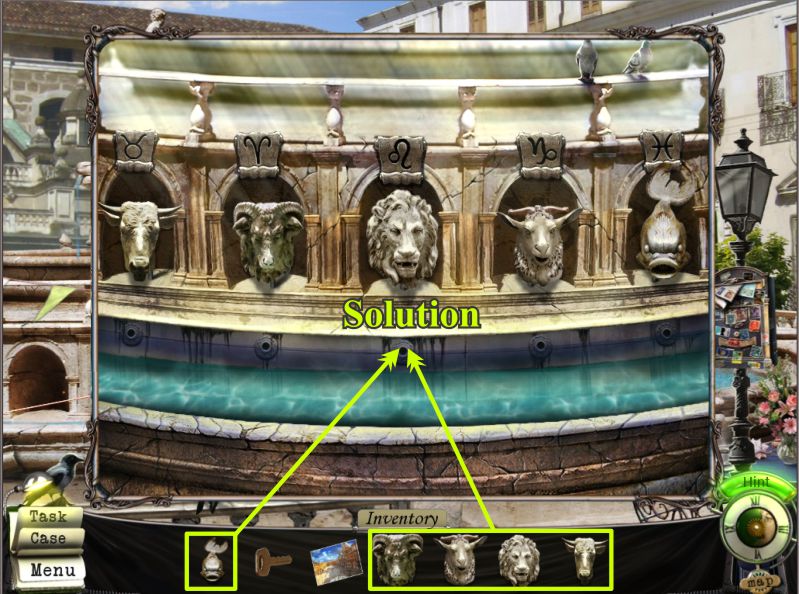
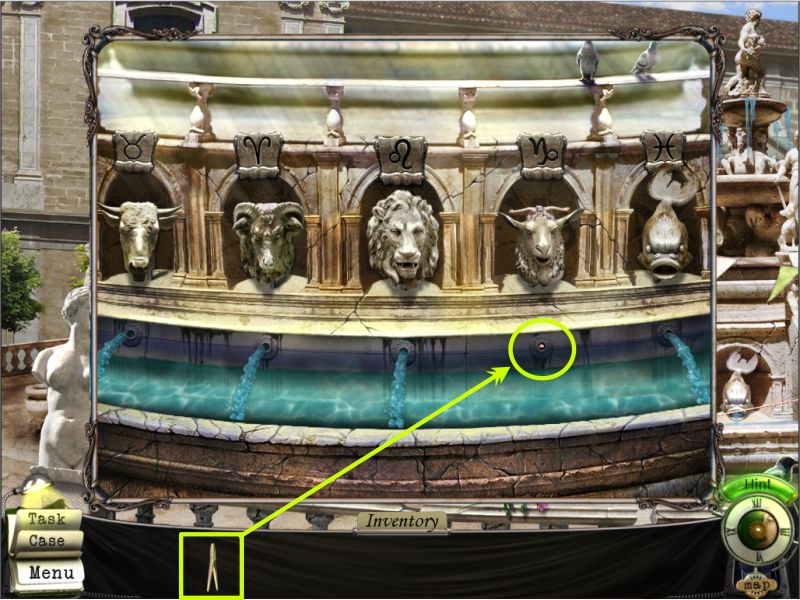
Animal Head Mini Game
Return to the left side of the scene and zoom in on the niches at the back of the fountain.
Place all of the animal heads according to their astrological signs above the niches.
The correct order is shown in the screenshot.
Screenshot
Left Side of the Fountain Scene
Zoom in on the broken part of the fountain, place the valve and turn it.
There is still something wrong with the fountain so zoom back in on the animal heads to discover something is stuck in one of the water holes.
Screenshot
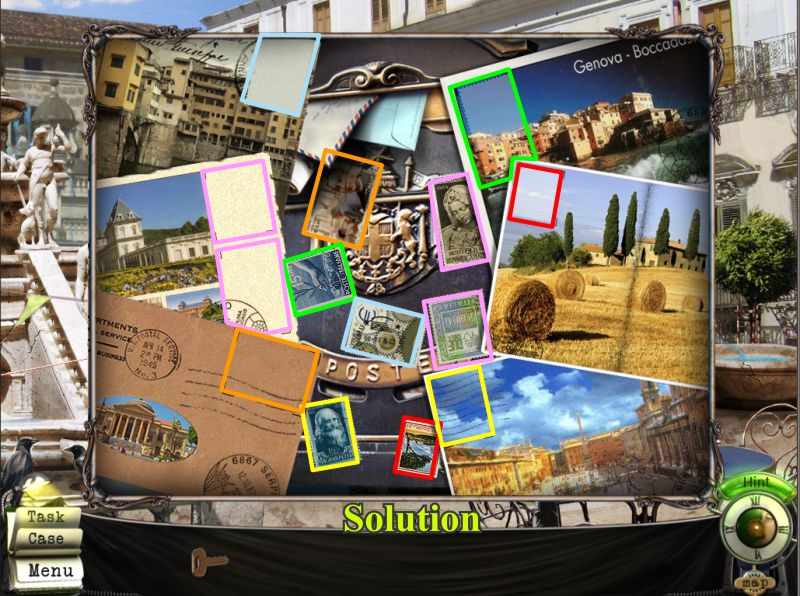
Post Box Mini Game
Go back to the right side and zoom in on the Post Box.
All of your postcards will automatically be displayed so your goal is to match up the stamps with the postcards.
The solution is color-coded in the screenshot.
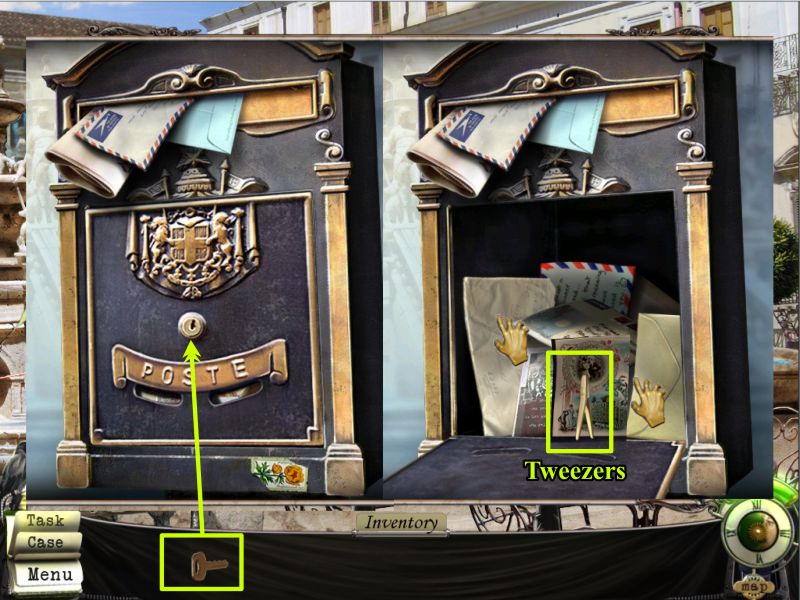
Screenshot
Use your key to open the box.
Sort through all of the mail until you find the Tweezers.
Screenshot
Left Side of the Fountain Scene
Go back to the left side of the fountain, zoom in on the animal heads, and use the tweezers to remove the blockage.
Screenshot
Palermo Map
You are finished at the Fountain so click on the map and choose the Restaurant.
Screenshot
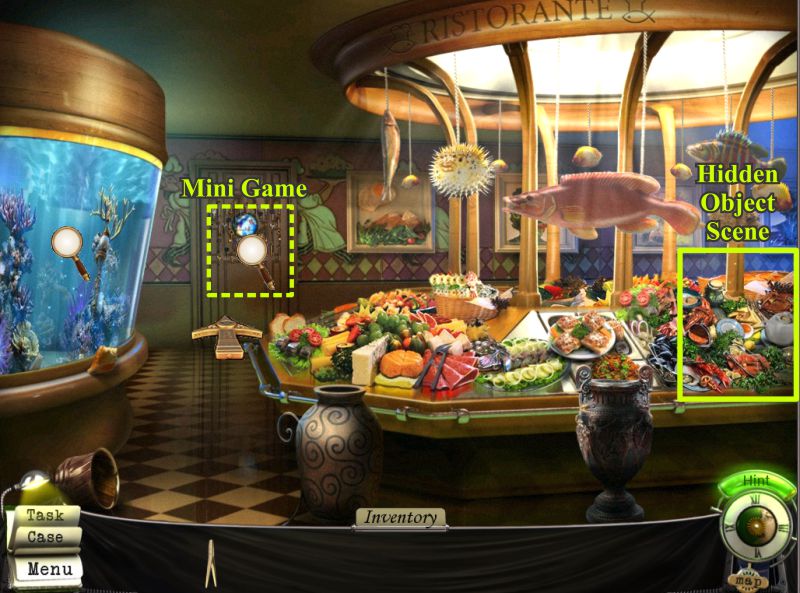
Restaurant
Check out the Aquarium and note there is a piece of the Venus tied up in the tank.
Play the Hidden Object Scene and then zoom in on the door for a Mini Game.
Screenshot
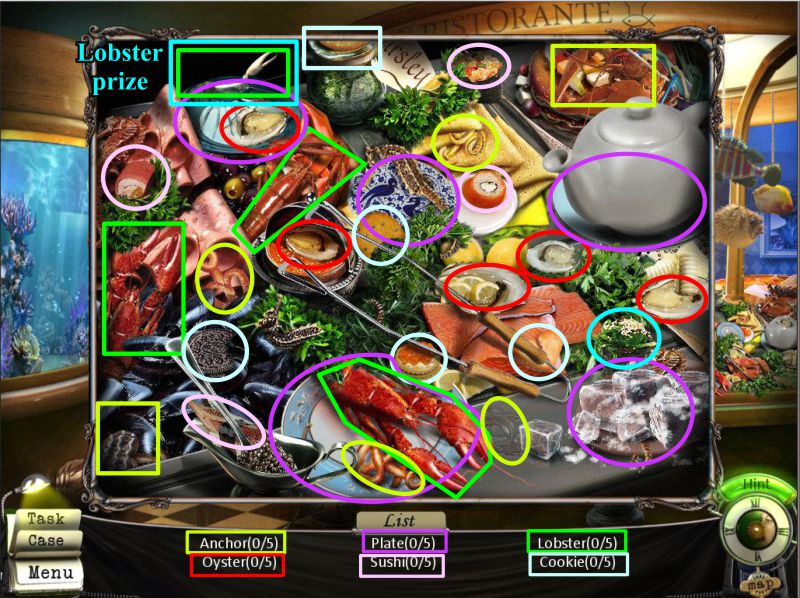
Restaurant Hidden Object Scene
Collect all the items marked in the screenshot and you will get a Lobster.
Screenshot
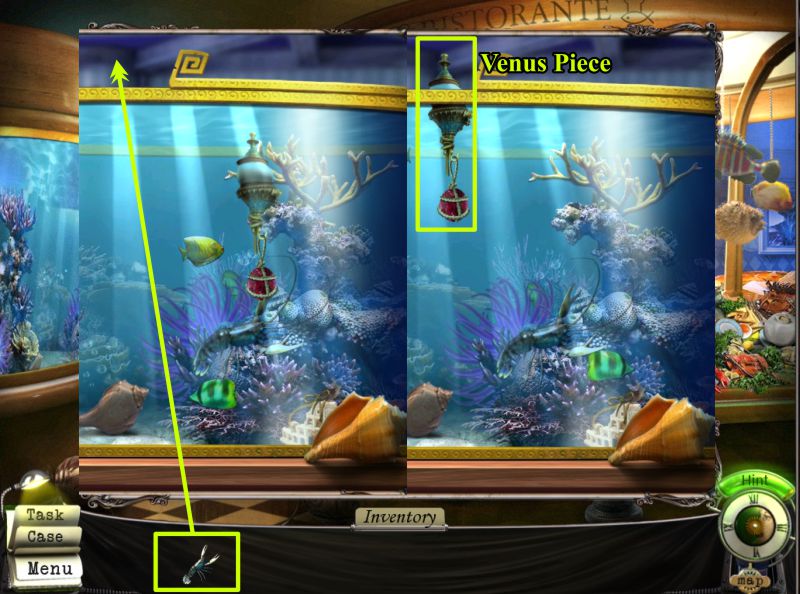
Aquarium
Place your Lobster in the tank as shown in the screenshot.
Direct him to the rope by clicking on it so he will cut it and the Venus Piece will rise to the top for you to collect it.
Screenshot
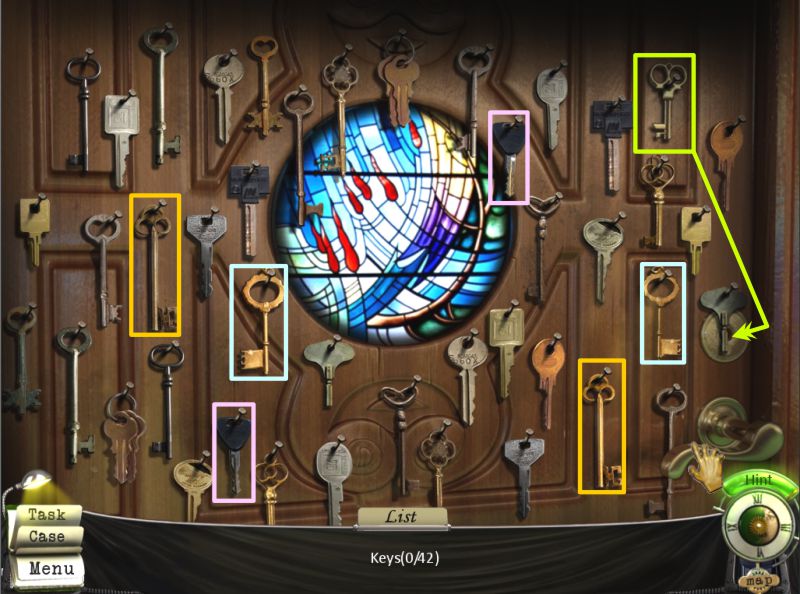
Match the Keys Mini Game
Your goal is to match up all the keys so there is only one left that will open the door.
Sever matches are shown in the screenshot as well as the remaining key.
Place the remaining key in the keyhole and click on the handle to open the door so you can enter.
Screenshot
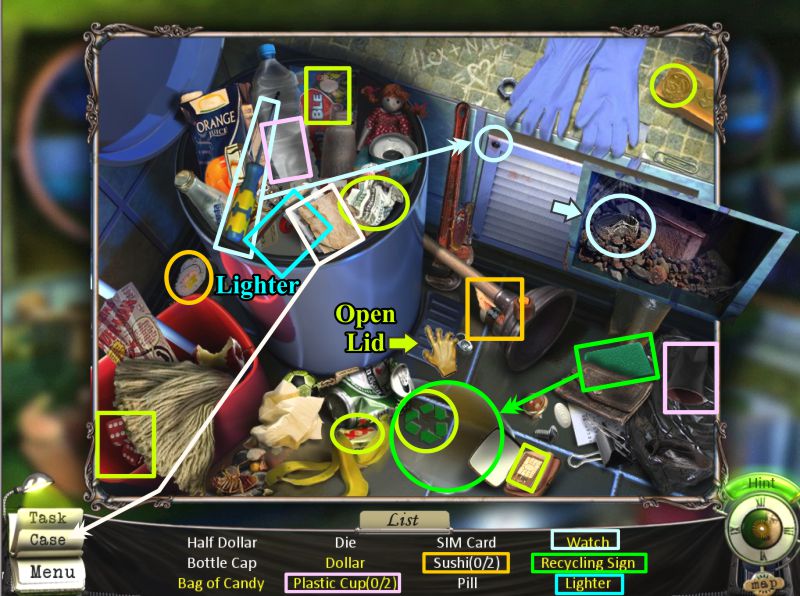
Bathroom Hidden Object Scene
Click on the area at the right for a Hidden Object Scene to get a Lighter.
Open the wastebasket lid with the pedal.
Use the screwdriver to remove the vent to take the Watch.
Sop up the liquid with the sponge to get the Recycling Sign.
Screenshot
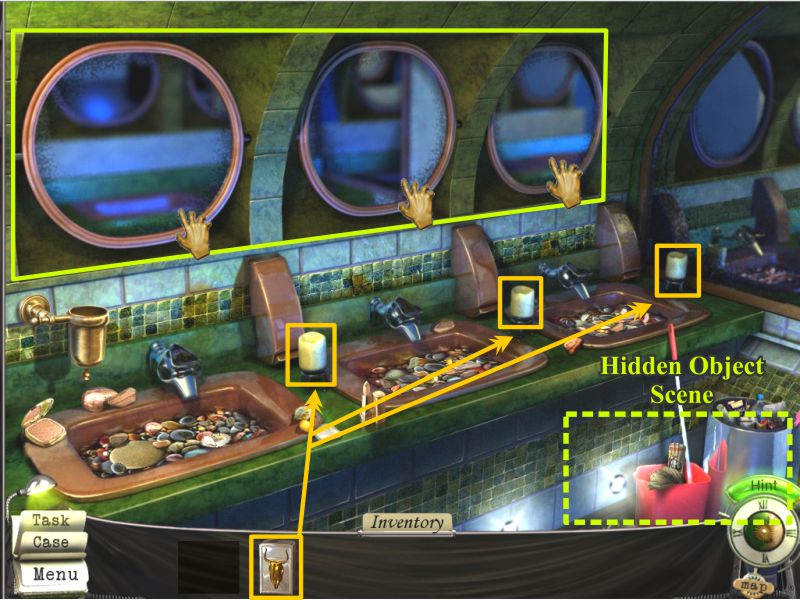
Sinks
Use the lighter to light the candles.
Tip the mirrors down to reflect more light on the sinks.
Screenshot
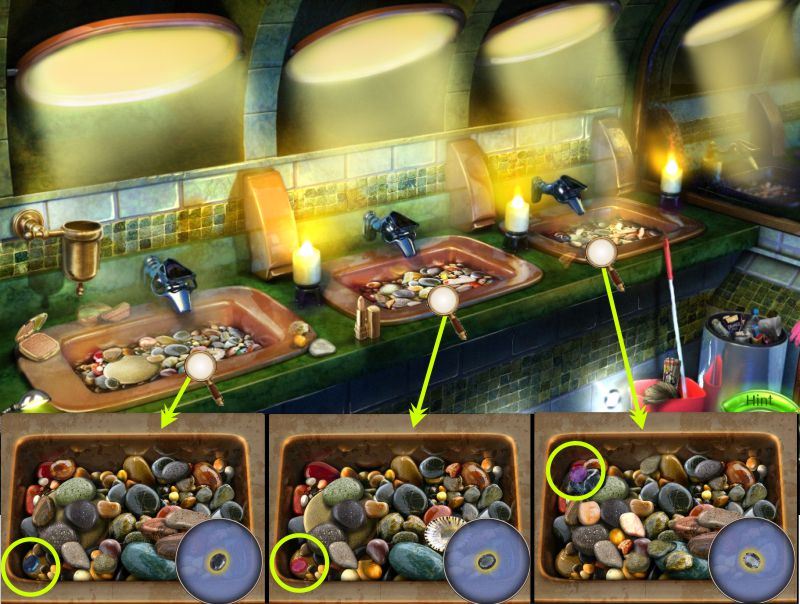
Venus Gems Mini Game
Zoom in on each sink one at a time for 3 rounds of the Mini Game.
Your goal is to match the stones pictured in the lower right corner of each sink until you uncover the Gems shown in the screenshot.
Screenshot
Chapter 3: Empire Liner
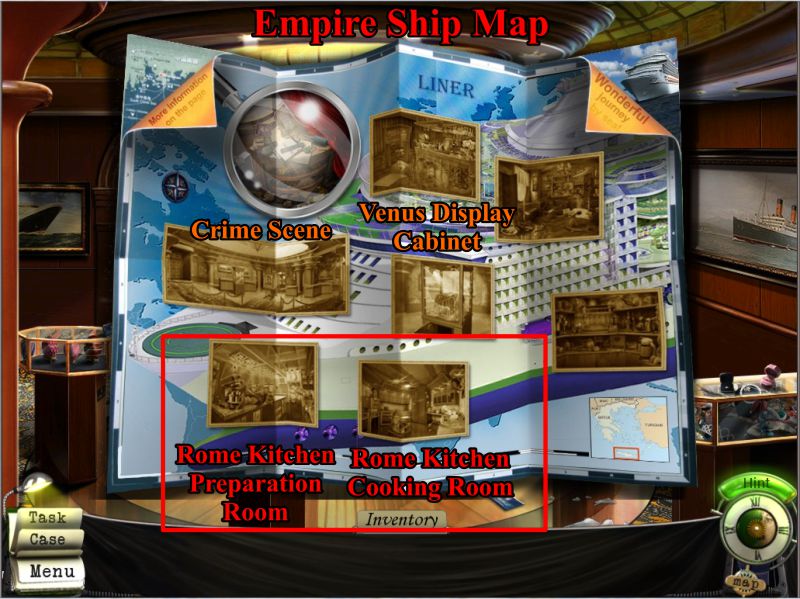
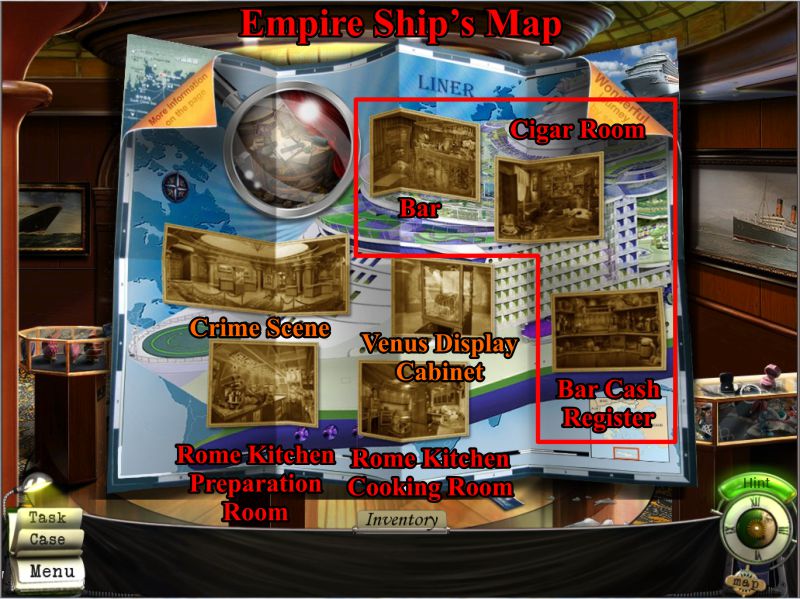
Empire Ship's Map
Francesca is back aboard the ship and needs to talk to the chef of the kitchen the passengers are allowed to visit.
The location, Rome, is marked on the Map.
Screenshot
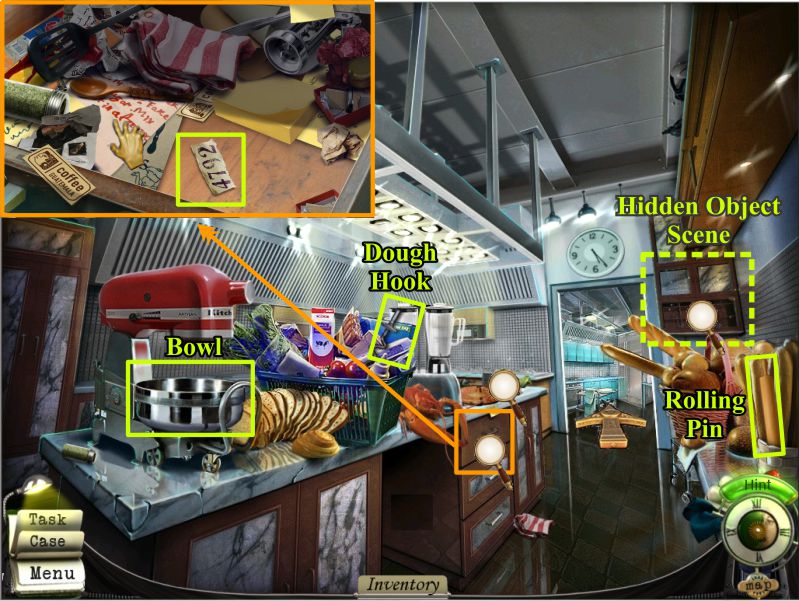
Rome Kitchen Preparation Room
Talk to the chef and ask for a list of the passengers who visited the kitchen.
He is very busy but will help since you volunteer to make Pizza.
Collect the Bowl, Dough Hook, and Rolling Pin.
Zoom in on the drawer shown in the screenshot and move everything until you uncover and can pick up a piece of paper with 4792 written on it.
Play the Hidden Object Scene.
Screenshot
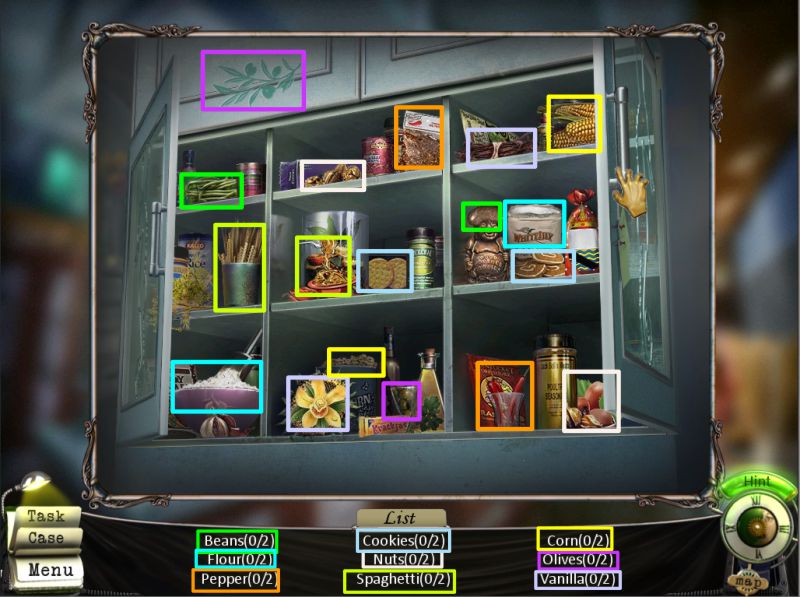
Rome Kitchen Cabinet Hidden Object Scene
Match 2 of the same Objects to get some flour.
Screenshot
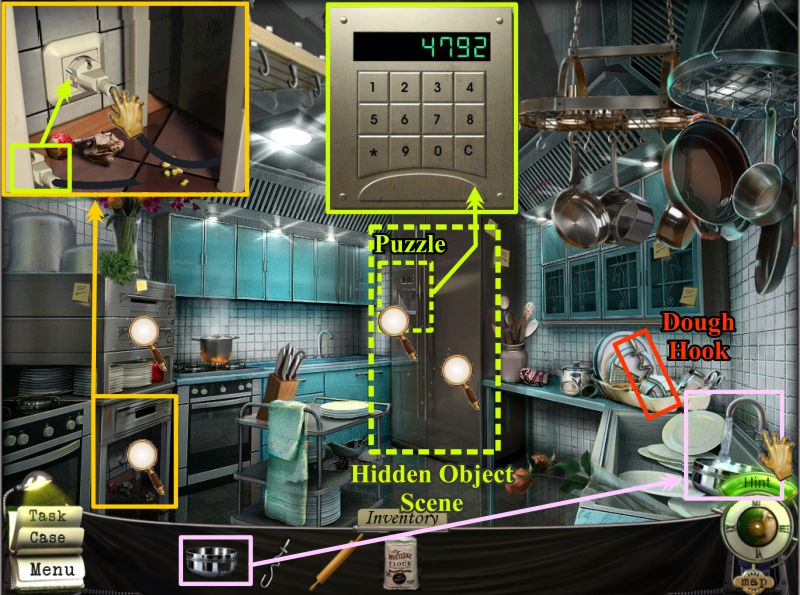
Rome Kitchen Cooking Room
Go to the next room and click on the refrigerator for a Puzzle to open it and play the Hidden Object Scene.
Zoom in on the area between the two ovens and plug in the cord.
Take the Dough Hook and place the bowl from your Inventory in the sink.
Turn on the faucet to fill the bowl for your Inventory.
Screenshot
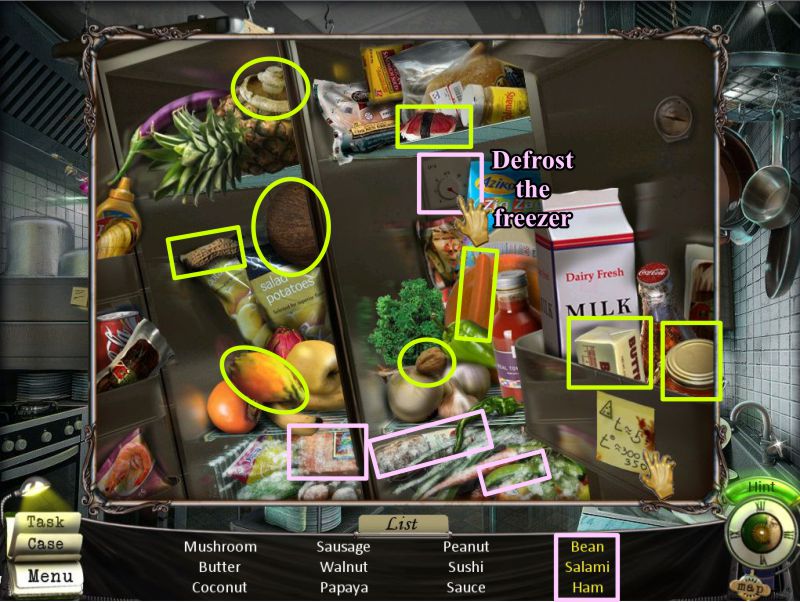
Refrigerator Hidden Object Scene
Pick up the sticky note on the bin and turn off the switch to defrost the freezer.
Collect everything to get the ingredients for the Pizza.
Once the freezer is defrosted, you can collect the items marked in pink.
Screenshot
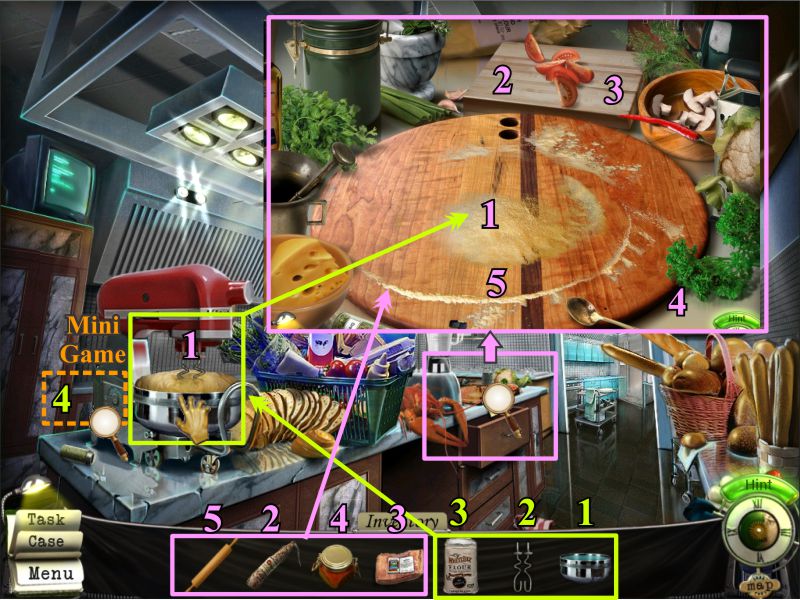
Time to Make the Pizza
Return to the preparation part of the kitchen and place your bowl of water and the dough hooks on the mixer.
Pour the flour in the bowl and click on the switch on the side for a Mini Game.
When you have completed the items numbered in lime green, zoom in on the counter where the pizza board is located.
Place the items numbered in pink to start the preparation of the pizza: dough, salami, ham, sauce, and rolling pin to flatten the dough.
Screenshot
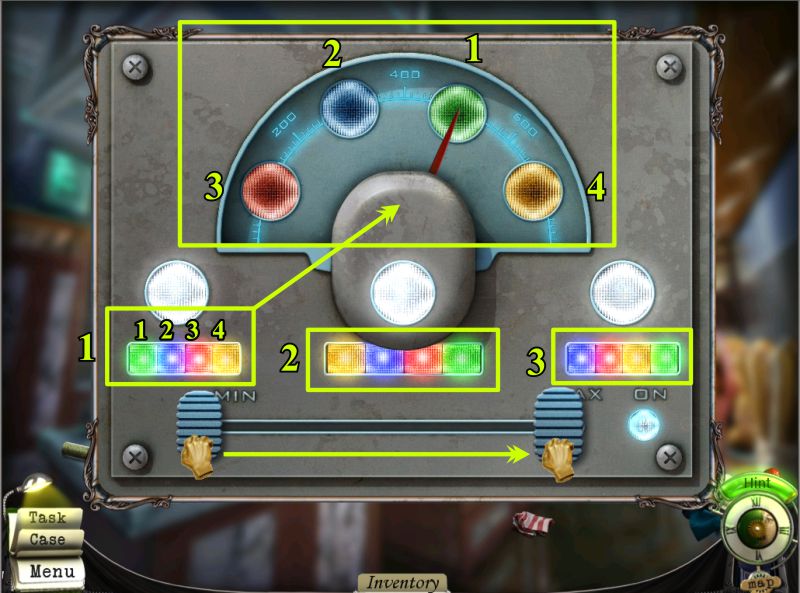
Turn on the Mixer Mini Game
In order to mix the dough, you need to turn on the mixer.
This is a sort of repeat the sequence Mini Game, except that the sequence you need to select is shown in each of the 3 rounds marked in the screenshot.
Round 1 is green, blue, red, and yellow, so select those colors on the dial.
Do the same for the sequences in the next two rounds.
Once you have completed the sequences, move the lever at the bottom from MIN to MAX and your dough will be completed.
Screenshot
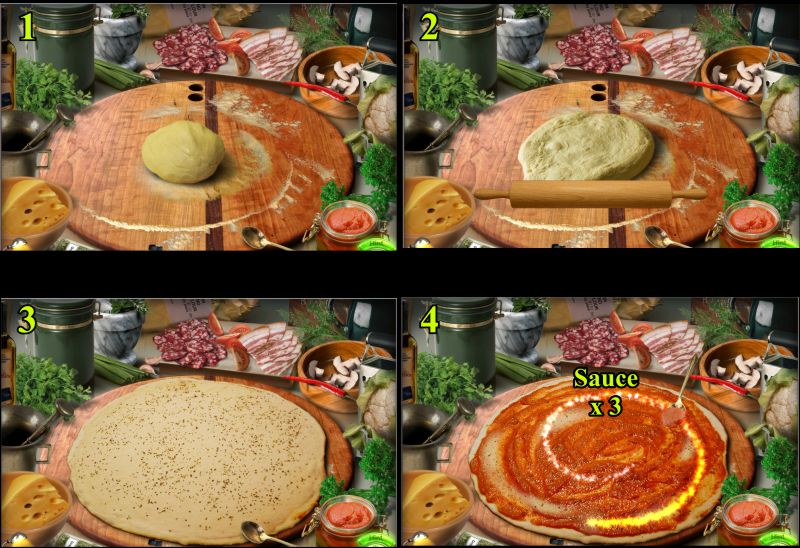
Assemble the Pizza
Now that you have placed the ingredients on the board, roll out the dough.
Place the spoon in the sauce and follow the highlighted spiral on the dough three times to complete the sauce.
Screenshot
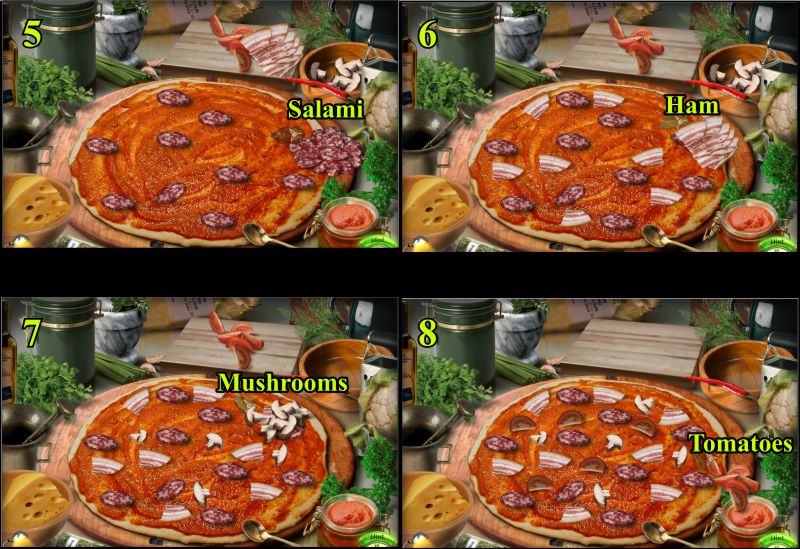
You can actually place the toppings in any order you wish as long as you get the job done.
Pick up the Salami and the positions to place them will show up on the pizza.
Click on each of the positions to complete the placement.
Do the same sort of thing for the Ham, Mushrooms, and Tomatoes.
Screenshot
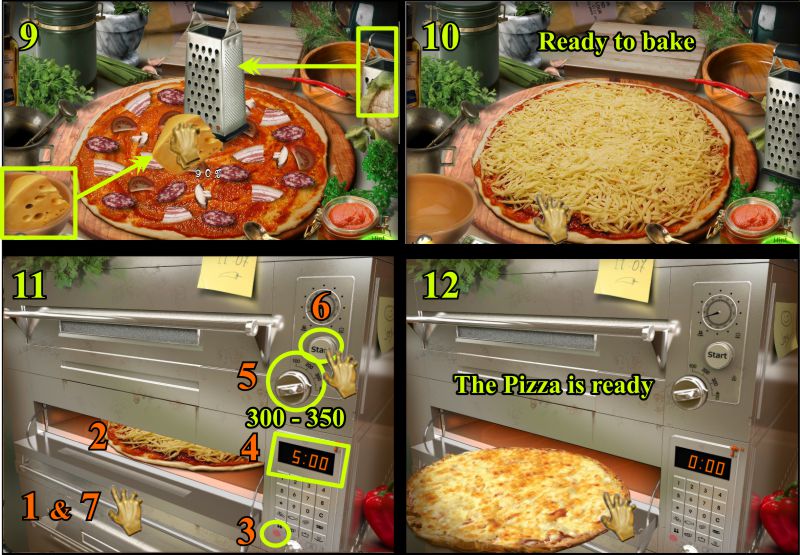
Move the cheese grater to the pizza and grate the cheese by using a circular motion from the top of the grater all the way past the grater to the pizza.
Continue grating the cheese until the percentage shows 100% and the cheese distributes all over the pizza.
Collect the pizza and go to the oven in the Cooking Room.
Zoom in on the oven and your instructions will be on the sticky note at the top.
Open the oven door.
Place the pizza from your Inventory in the oven.
Press the little red keypad button.
Select a time of 5:00 on the keypad.
Set the temperature to 325 which is between 300 and 350 as the note shows.
Press the Start button to begin the cooking process.
When the time runs down, your pizza will be ready so pick it up.
Screenshot
The chef is very impressed with your pizza and produces the list you wanted.
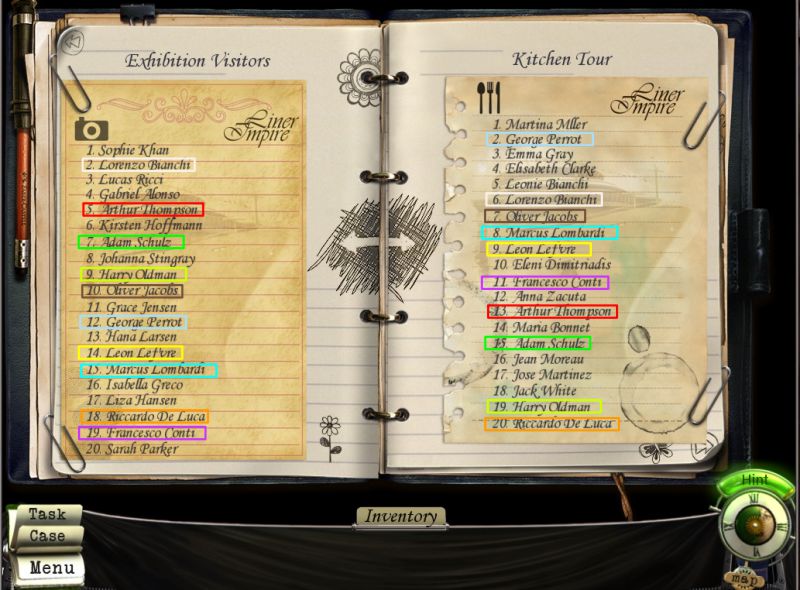
Compare the Lists
Compare both lists of the Exhibition Visitors with those passengers who took the Kitchen Tour.
The matching names are color-coded in the screenshot.
Screenshot
Empire Ship's Map
You now need to investigate other locations on the ship so are going to check out the Bar and the Cigar Room since you previously collected an expensive cigar as evidence.
Screenshot
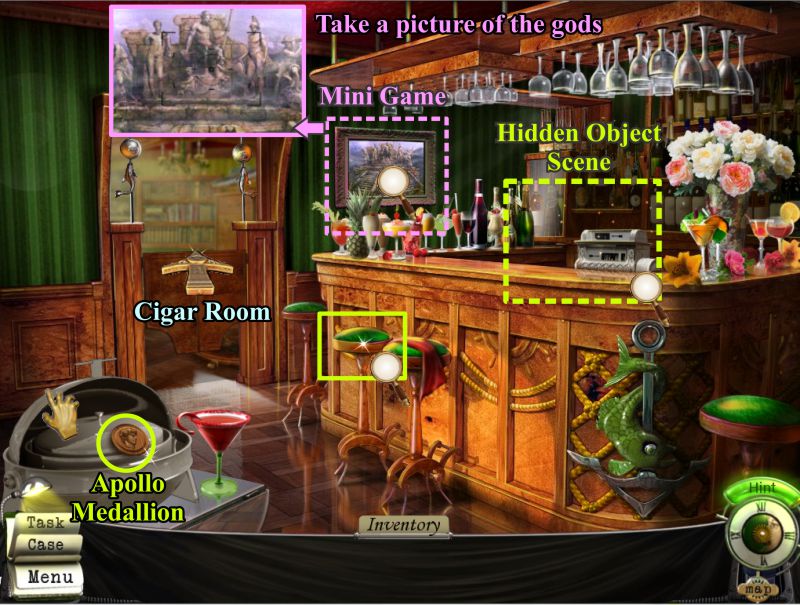
Ship's Bar
Open the lid to collect the Apollo Medallion, play the Mini Game and the Hidden Object Scene.
Check out the stool and go to the Cigar Room to find a scissors to cut the stitching.
Screenshot
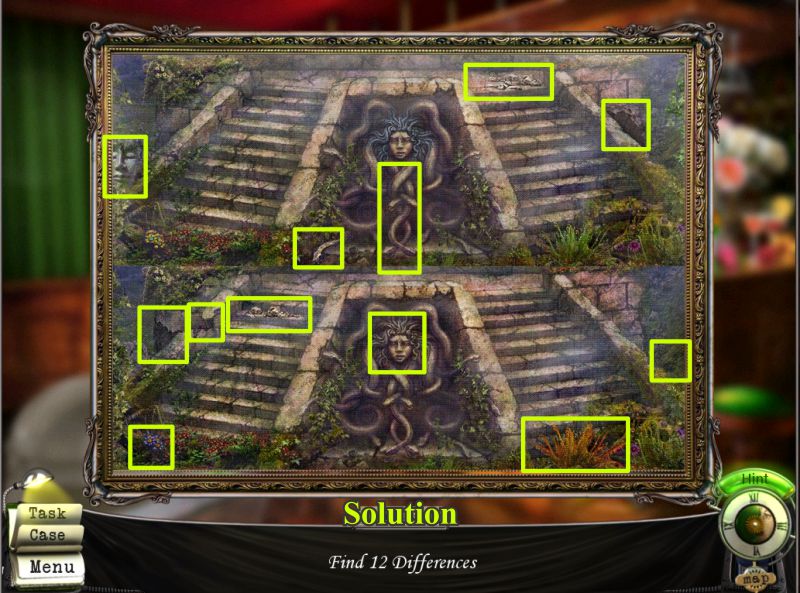
Find the Differences Mini Game
Find all the differences in the two pictures as marked on the screenshot.
When you have completed the Mini Game, take a picture of the gods.
Screenshot
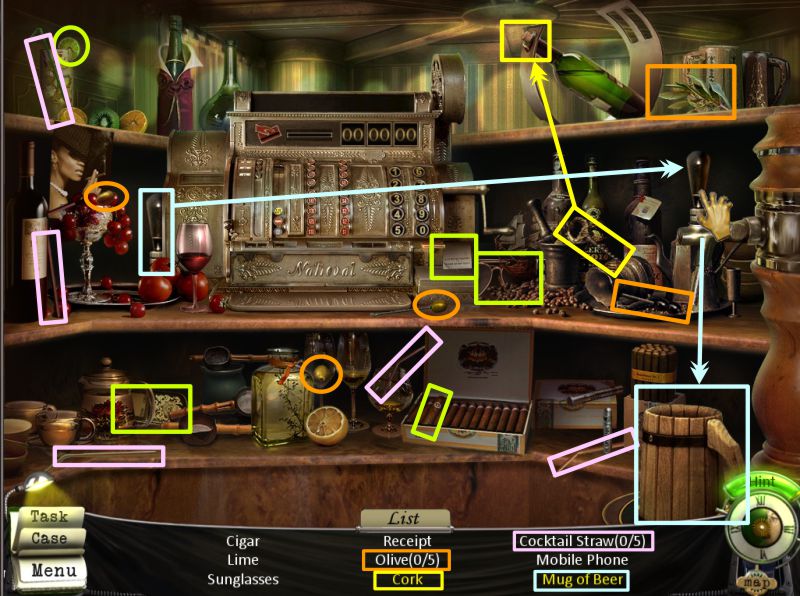
Behind the Bar Hidden Object Scene
Collect everything on your list.
Use the corkscrew to remove the cork from the bottle.
Place the tap on the beer keg, turn it on to pour been into the mug below so you can collect a Mug of Beer.
Screenshot
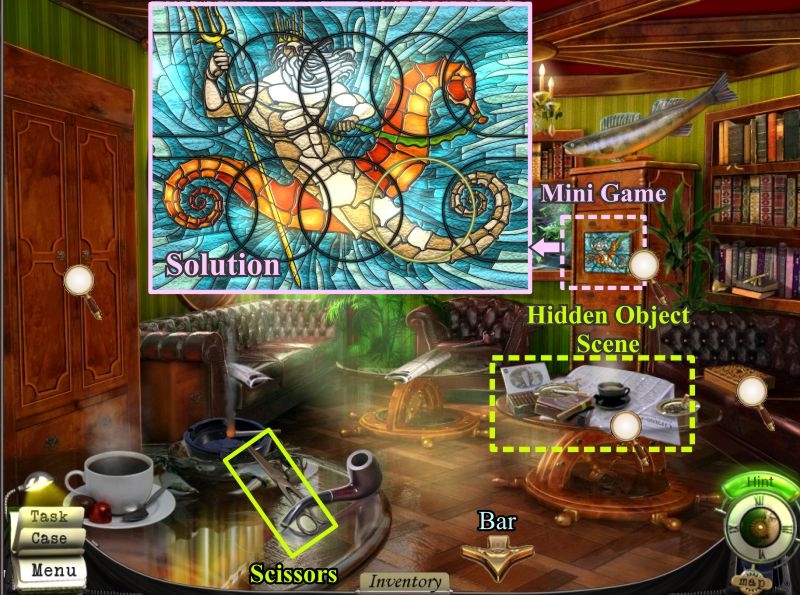
Cigar Room and Neptune Mini Game
Go to the Cigar Room and pick up the Scissors.
Play the Hidden Object Scene as well as the Mini Game to open the cabinet at the back of the room.
Rearrange the circles of Neptune and the seahorse to look like the picture in the screenshot to open the cabinet.
There is another cabinet to open that needs a key and a puzzle box to open when you have all of the medallions.
Screenshot
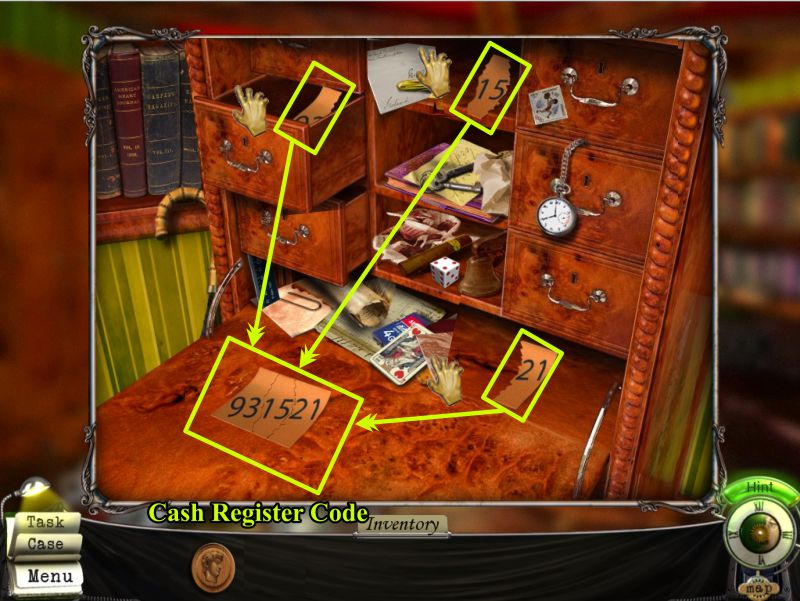
Neptune Cabinet
When you have finished the Neptune Mini Game, the cabinet will open.
Open drawers and move everything around until you find the 3 pieces of paper shown in the screenshot.
Click on them to assemble them indo a paper that says 931521.
Screenshot
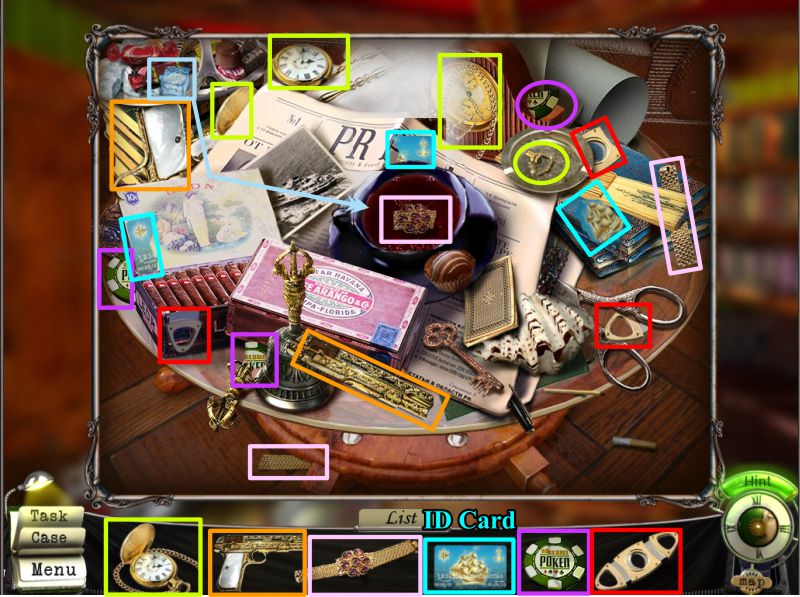
Cigar Room Hidden Object Scene
Collect everything on your list.
Place the ice cube in the steaming cup to cool it off so you can get the piece of the watch.
Screenshot
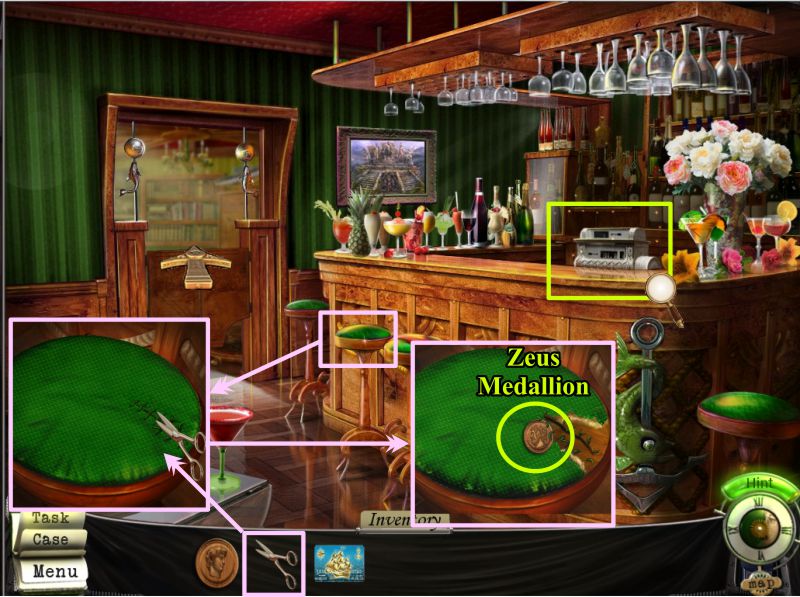
Ship's Bar
Use your scissors to remove the stitches in the bar stool padding so you can get the Zeus Medallion.
Zoom in on the cash register.
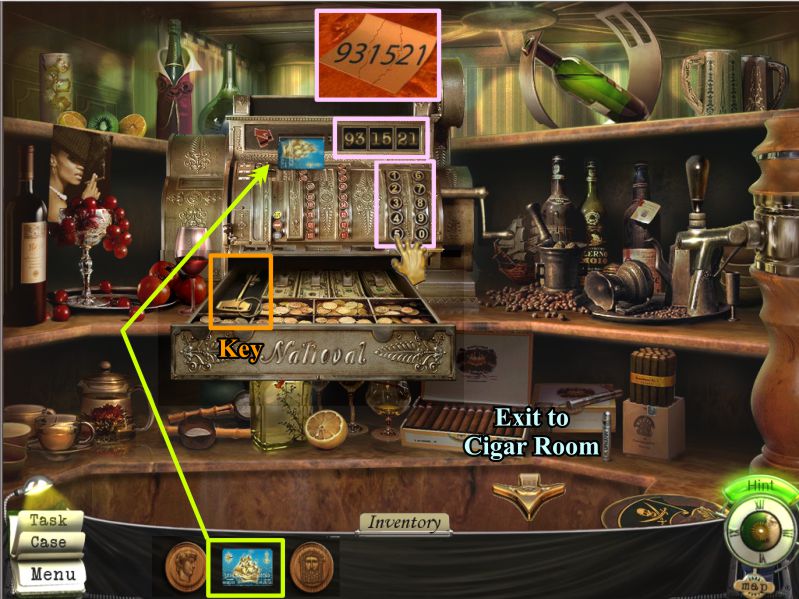
Screenshot
Place the ID card in the cash register as shown, and enter 931521 on the keys.
Click on the handle, the register will open, and you can take the key.
Go to the Cigar Room.
Screenshot
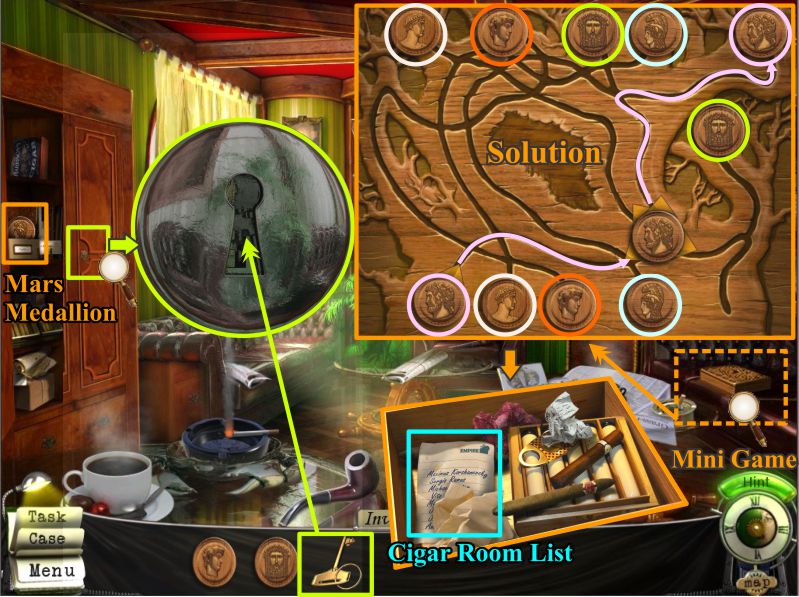
Cigar Room
Use the key to open the cabinet at the left and take the Mars Medallion.
Zoom in on the box at the right for a Mini Game.
The medallions will automatically place themselves on the box lid.
Your goal is to move the medallions to their proper position at the top of the lid using the arrows that appear when you get to a crossroads.
Follow the paths to get the medallions to the top.
When are correctly placed as shown in the screenshot, you will not be able to move them again.
The box will open for you to collect the Cigar Room List.
Screenshot
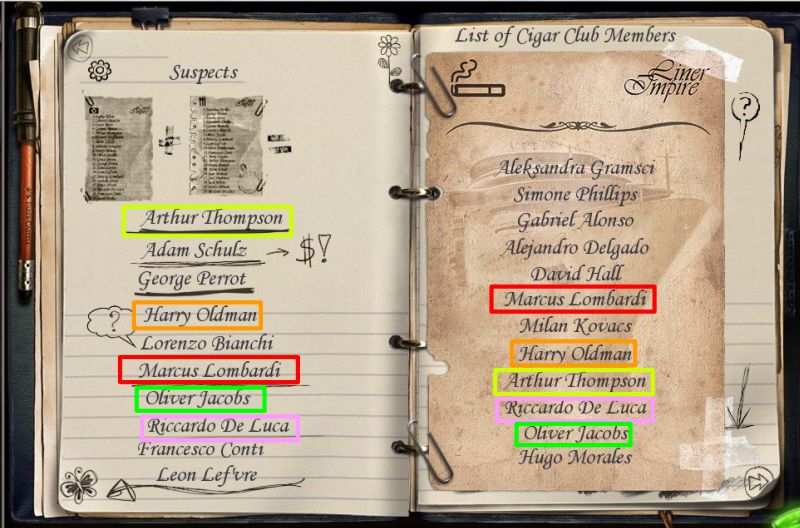
Compare the Lists
Find the matching names on the Suspect List and the List of Cigar Club Members.
Screenshot
Chapter 4: Island of Crete
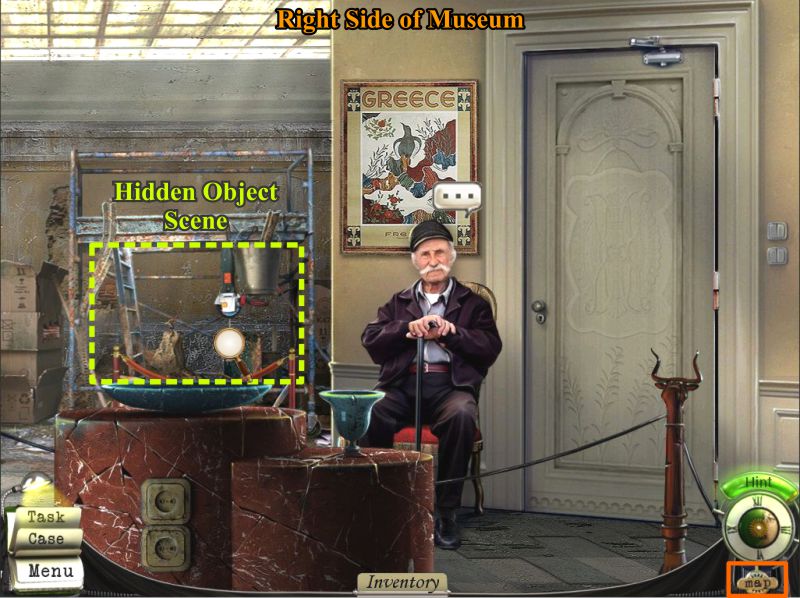
Museum of Archeology
When the ship lands in Crete, you will be transported to the Museum, so talk to the old man.
Play the Hidden Object Scene and then click on the Map for a new location.
Screenshot
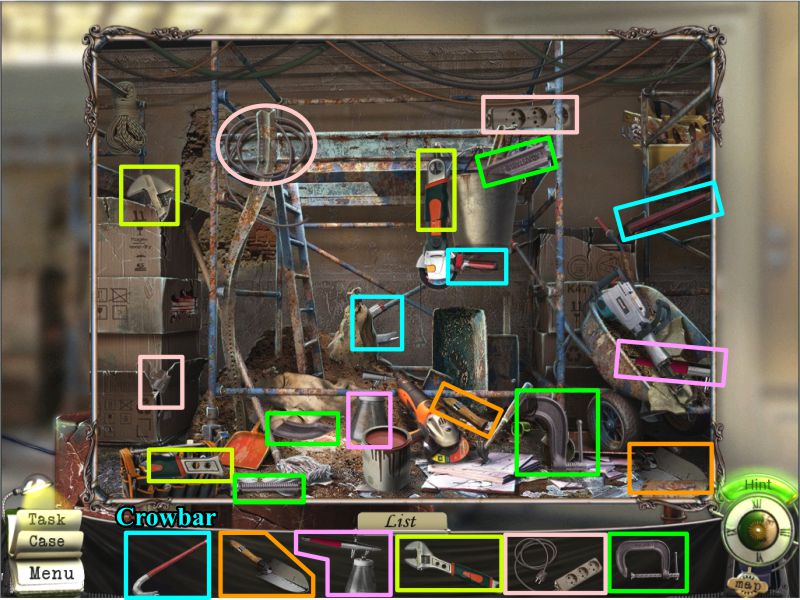
Museum Hidden Object Scene
Collect the pieces of the objects shown at the bottom of the scene and you will get a Crowbar for your Inventory.
Screenshot
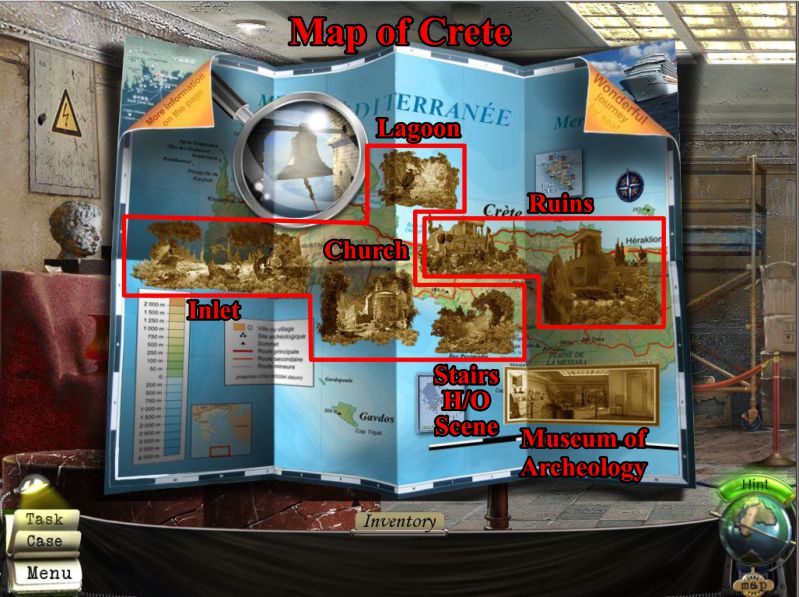
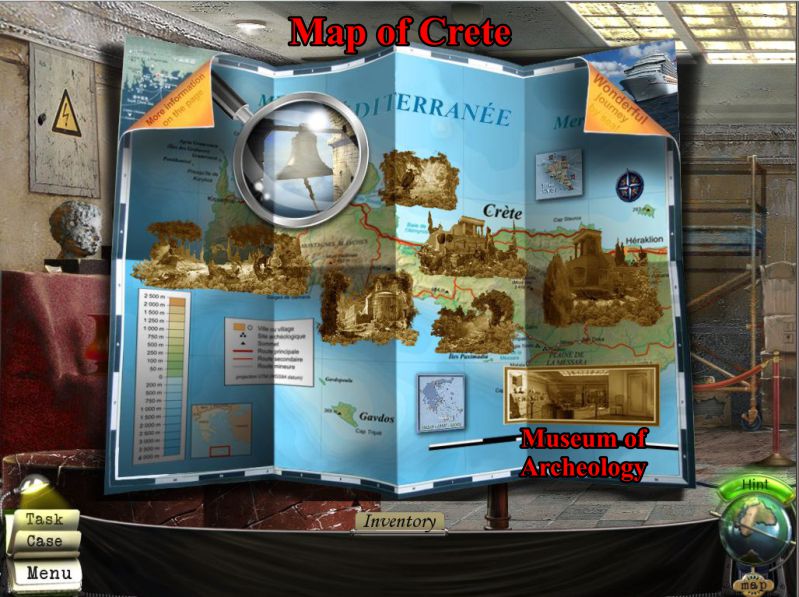
Map of Crete
Our next stop will be the Ruins which consists of two locations that you can access from each other without using the Map.
The next area is a scrolling scene from the Inlet to the Church.
The Stairs area can be accessed from the Inlet and the Lagoon is located between the Inlet and the Church.
You can use the Map or access these areas by following the arrows in the various parts of the scenes.
Screenshot
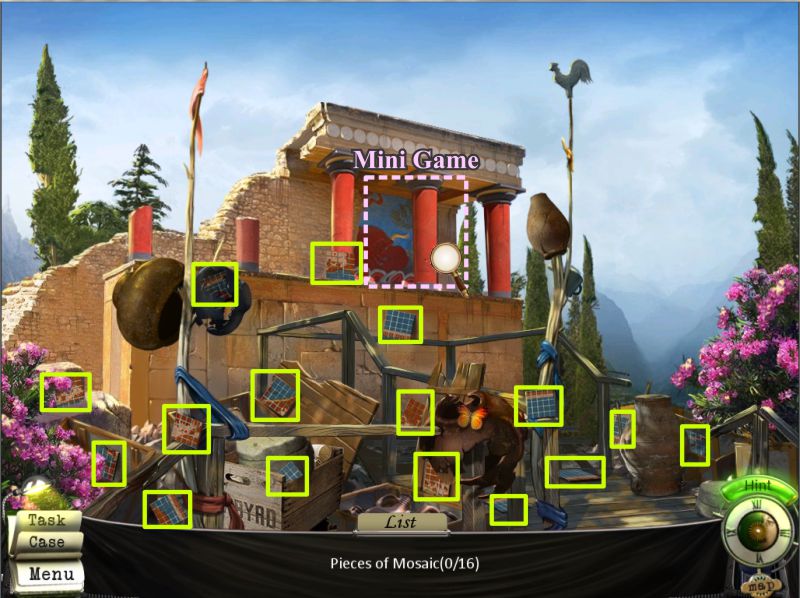
Ruins Mosaic
Pick of the 16 pieces of Mosaic scattered all over the scene and then zoom in to the Mosaic for a Mini Game.
Screenshot
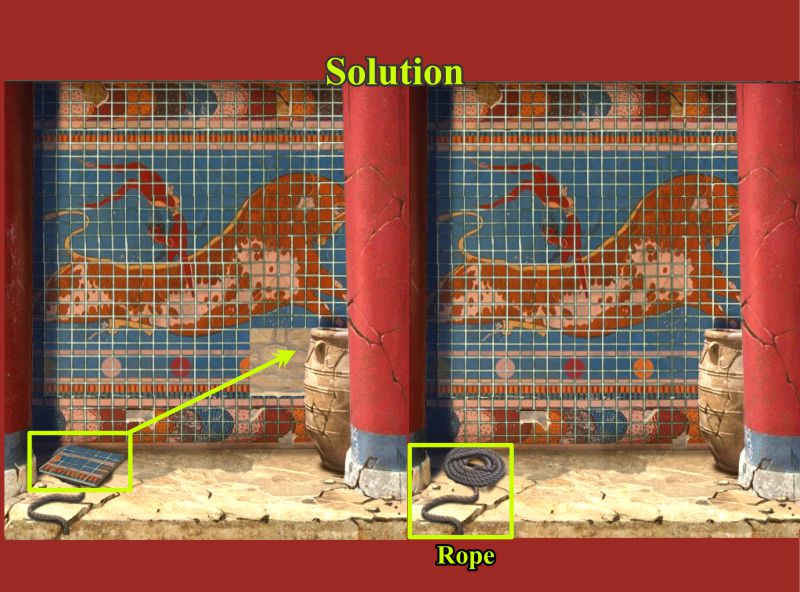
Mosaic Mini Game
Swap the Mosaic sections to assemble the picture as shown in the screenshot.
There will be a left-over piece on the ground that you will need to pick up and place.
You have uncovered some Rope, so pick it up for your Inventory.
Screenshot
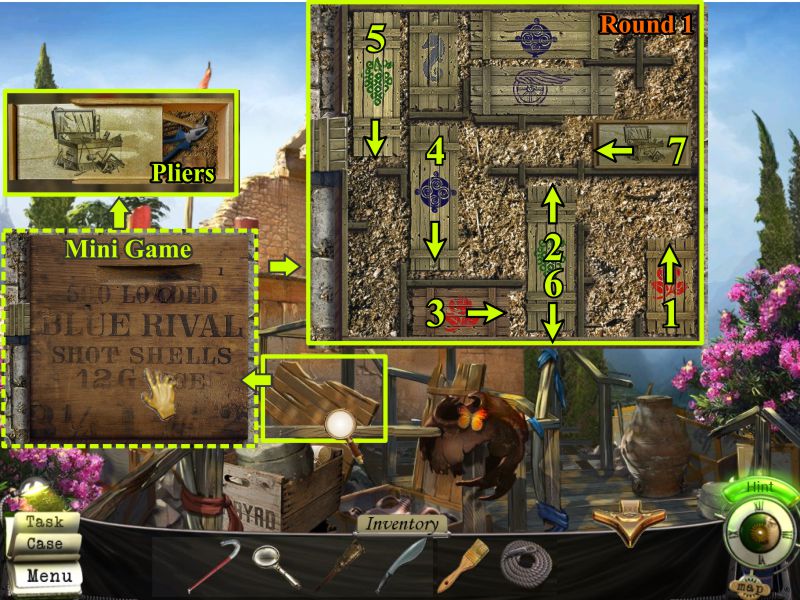
Tool Box Mini Game
Click for a close up of the cart and remove the cover of the box to reveal a slider mini game.
There are 3 rounds in the game and each time you will have to remove the cover to trigger the next round.
When you have completed the game, you will collect a pair of Pliers for your Inventory.
Your goal for each round is to move the box with the pliers to the ramp on the left side.
The solutions for each round are shown in the screenshots.
When you have finished everything, exit down to the right side of the Ruins.
Screenshot
Screenshot
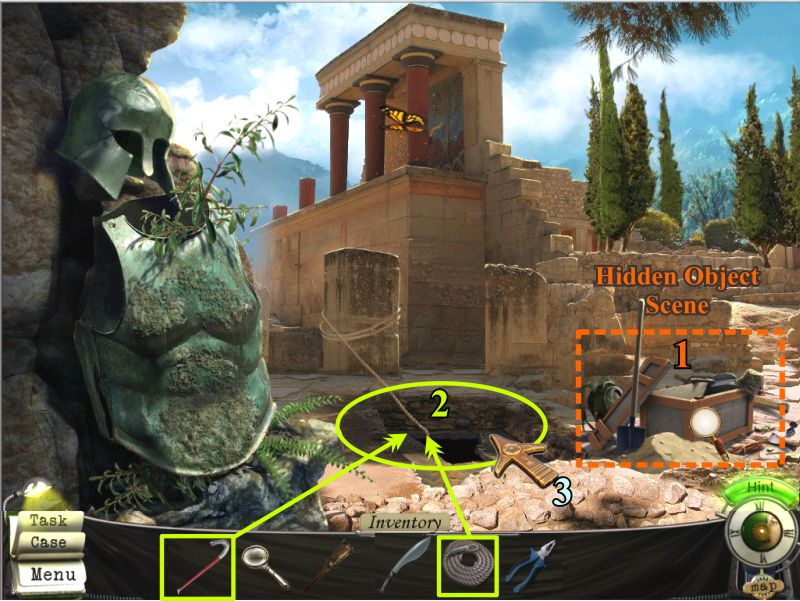
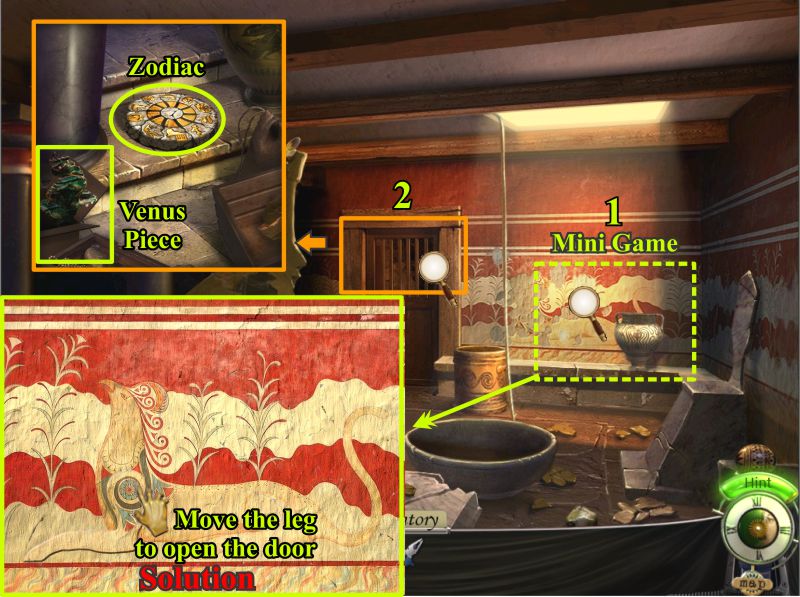
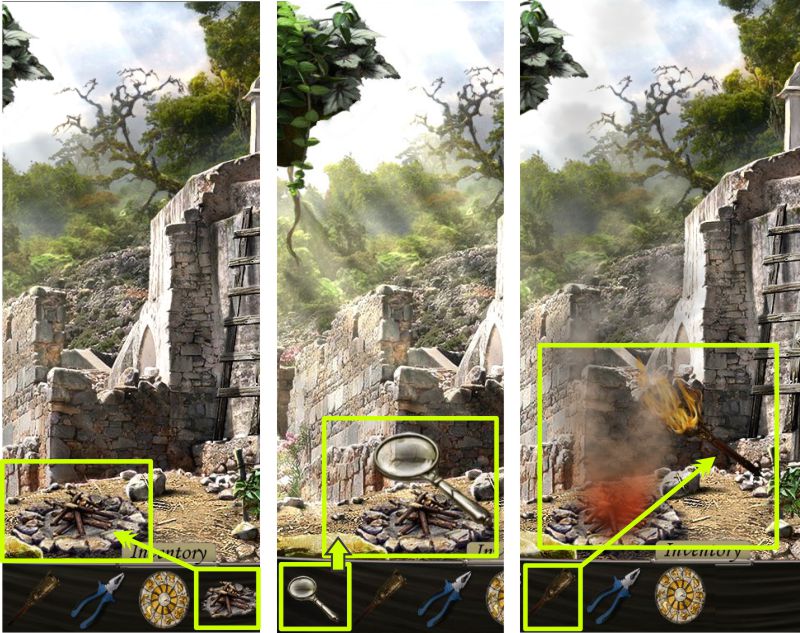
Side of the Ruins
Play the Hidden Object Scene to get a Brush for your Inventory.
Then, use the crowbar from your Inventory on the hatch.
Place the rope in the hole and it will attach itself to the column.
Go down the rope to see what is below.
Screenshot
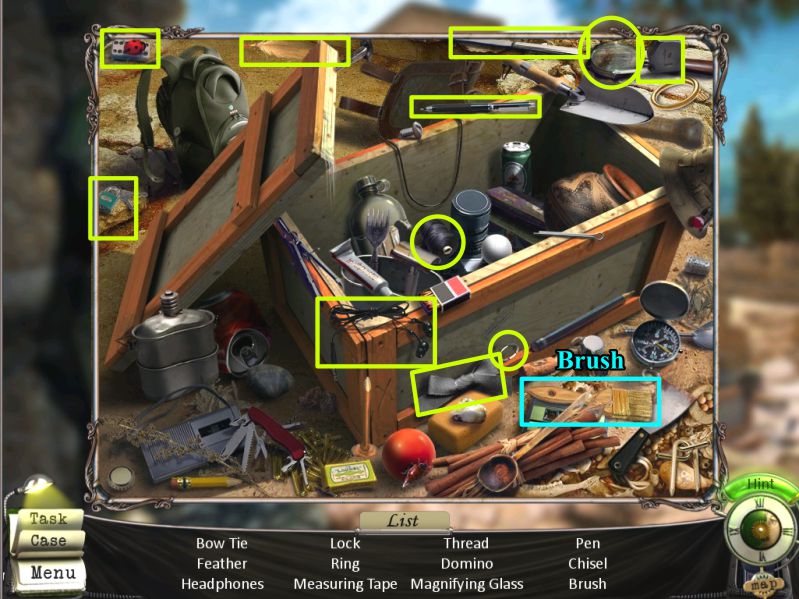
Side of the Ruins Hidden Object Scene
Collect your list to get the Brush.
Screenshot
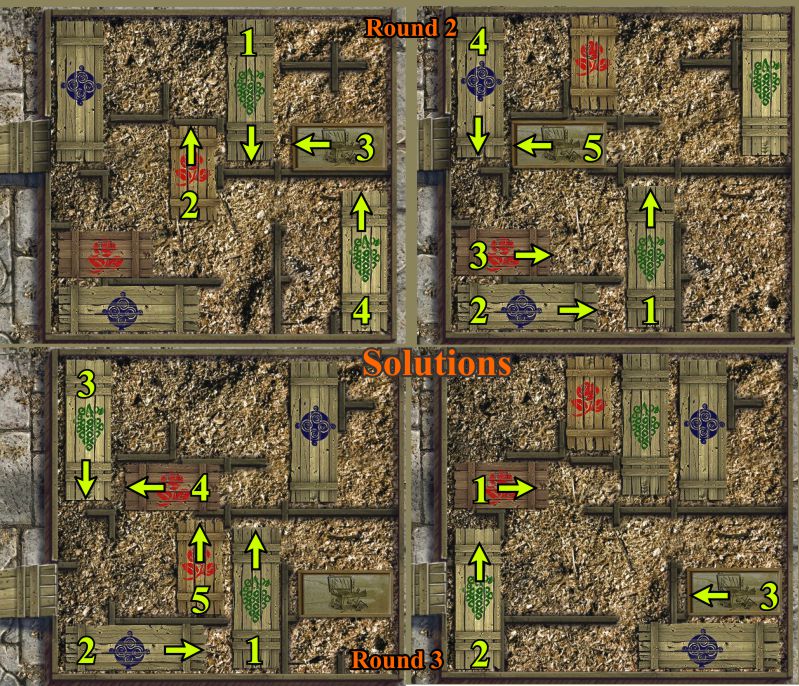
Underneath the Ruins
Zoom in on the back wall for a Mini Game.
Place all the pieces in the mural and click on the leg so it will move and open the door.
Pick up the Venus Piece and Zodiac inside the door and go back up the rope.
Screenshot
Map of Crete
Click on the Map and go to the Inlet.
Screenshot
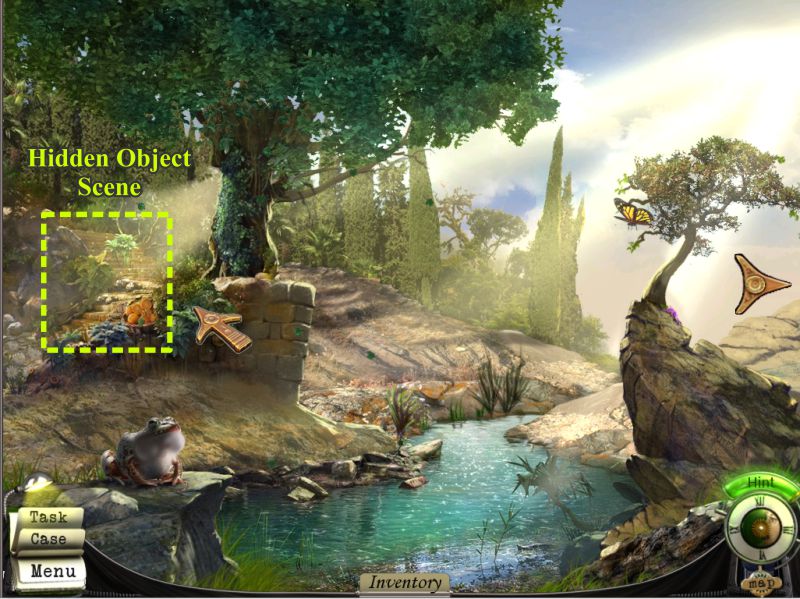
Water Inlet
This is a scrolling scene so you can use the cursor or fist to move to the right side of the scene.
First, go to the left to play the Hidden Object Scene on the Stairs.
Screenshot
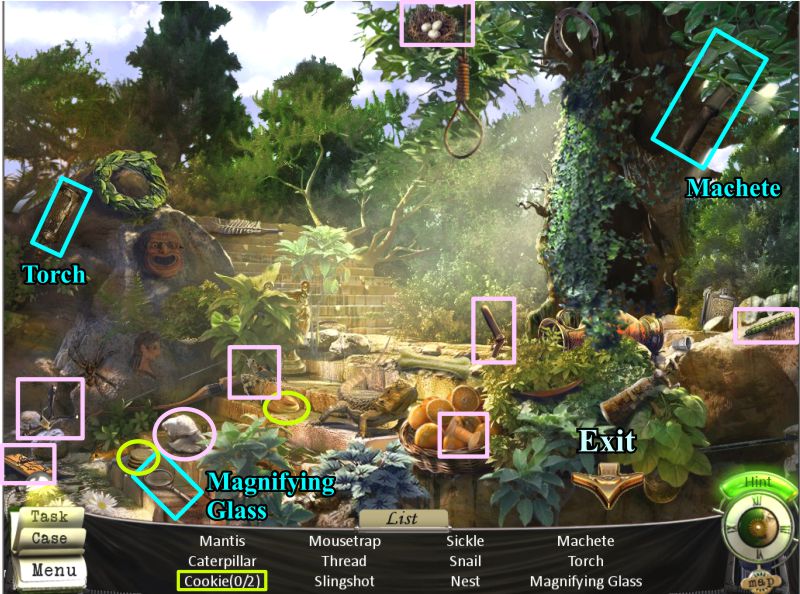
Stairs Hidden Object Scene
Collect your list of items to get a Machete, Torch, and Magnifying Glass.
Exit down to the Inlet and cross to the right of the scene.
Screenshot
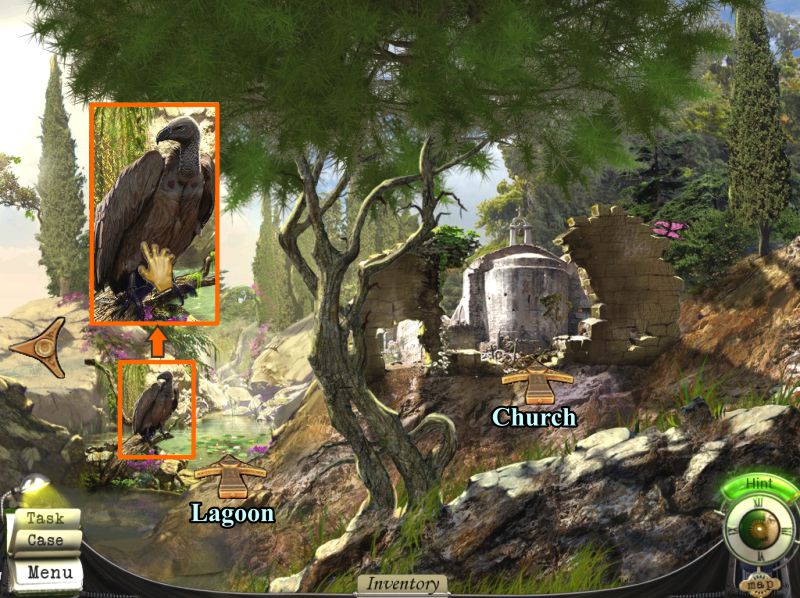
Lagoon
Go to the Lagoon and touch the Vulture to determine you need to do something to get rid of him.
Exit and go to the Church.
Screenshot
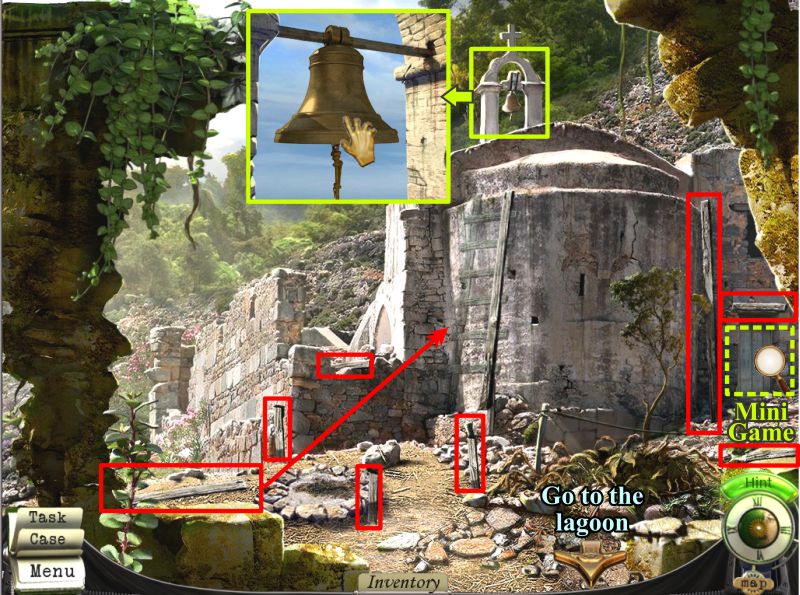
Church
There is a bell on the Church that would scare the Vulture away but you need a ladder to get to it.
Pick up the two long pieces of the ladder and then all the rungs.
Climb the ladder and ring the bell.
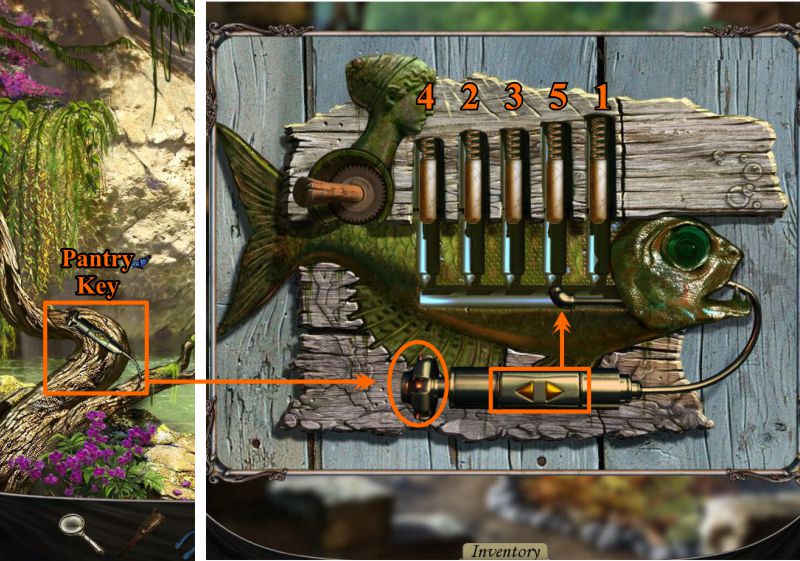
There is a Pantry to the right of the scene but you need a key before you can play the Mini Game to open the door, so go to the Lagoon.
Screenshot
Lagoon and Pantry Door Mini Game
The Vulture of gone so grab the key and go to the Pantry Door.
Place the key as shown in the screenshot.
To open the door, you need to lift the tumblers in the order shown in the screenshot.
In order to lift them, use the arrows on the key to move the pick to a tumbler and then press the plunger at the end of the key.
Screenshot
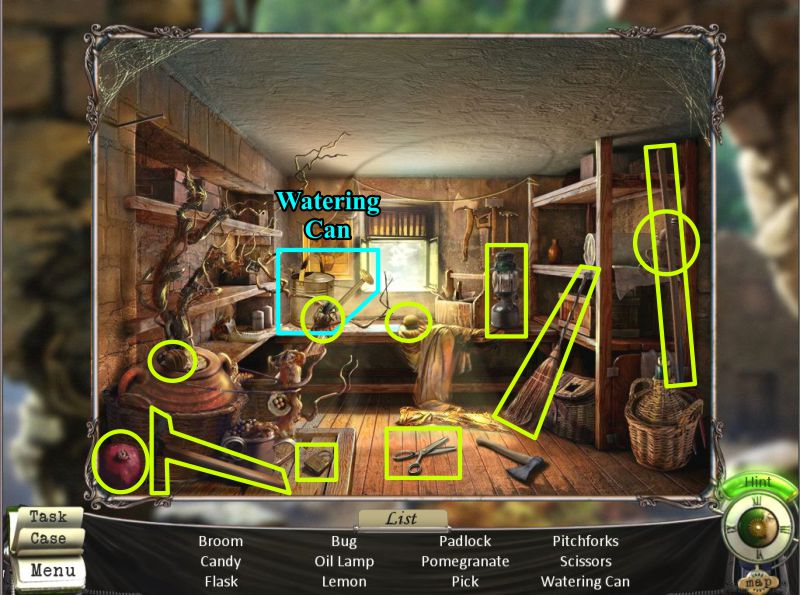
Pantry Hidden Object Scene
Collect everything and you will get the Watering Can.
Screenshot
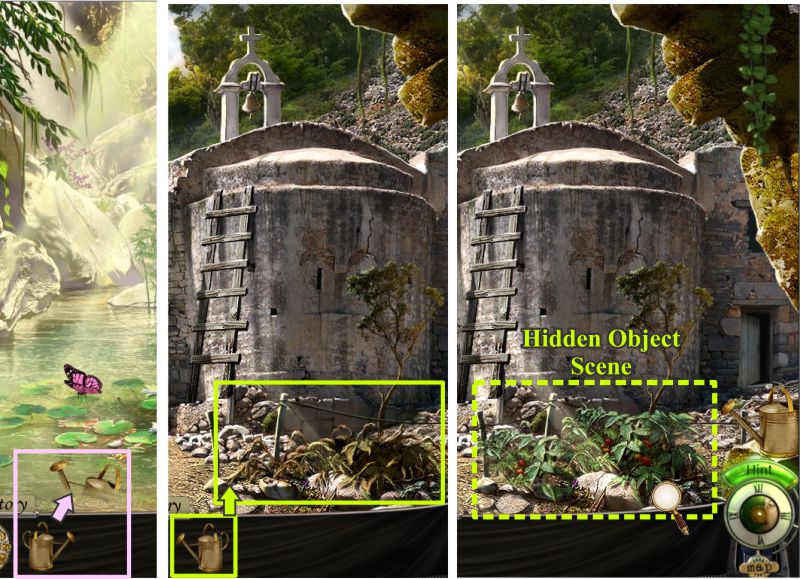
Lagoon and Church
Go to the Lagoon and fill the Watering Can with water.
Return to the Church and water the tomatoes to create a Hidden Object Scene.
Screenshot
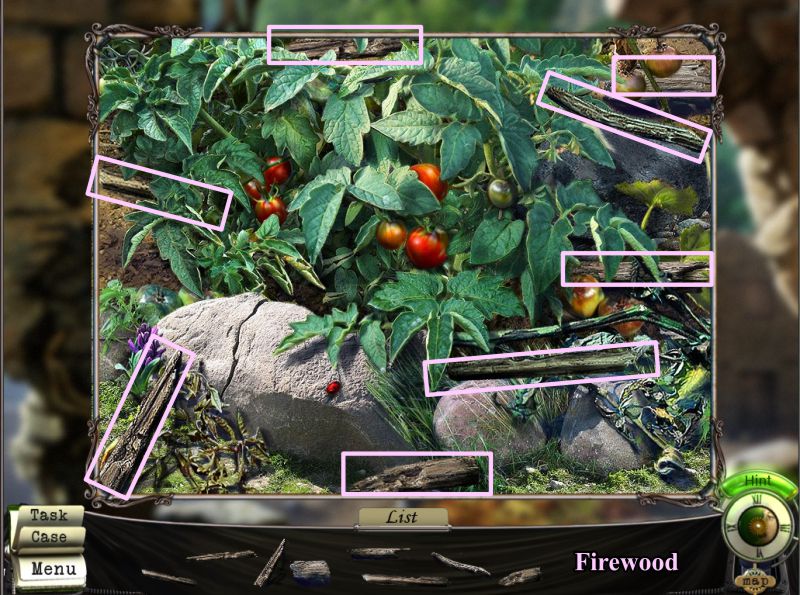
Tomato Plant Hidden Object Scene
Collect all of the Firewood.
Screenshot
Light the Torch
Place the wood on the fire ring.
Use the magnifying glass to light the fire, and light your torch.
Go to the Stairs to the left of the Inlet.
Screenshot
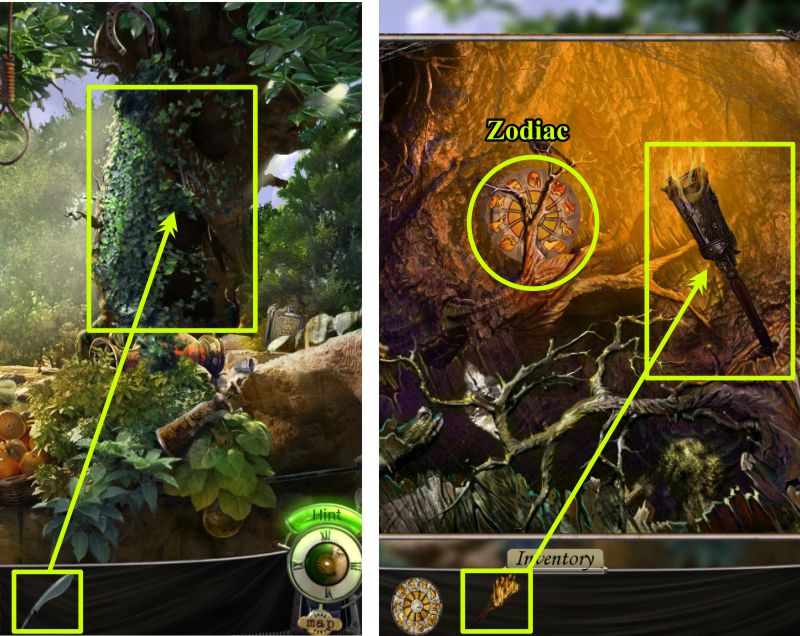
Water Inlet
Use your machete 3 times on the tree to remove the foliage.
Zoom in on the tree and place your lit torch as shown.
Take the Zodiac from the hollow of the tree.
Screenshot
Map of Crete
The Map will automatically appear so select the Museum.
Screenshot
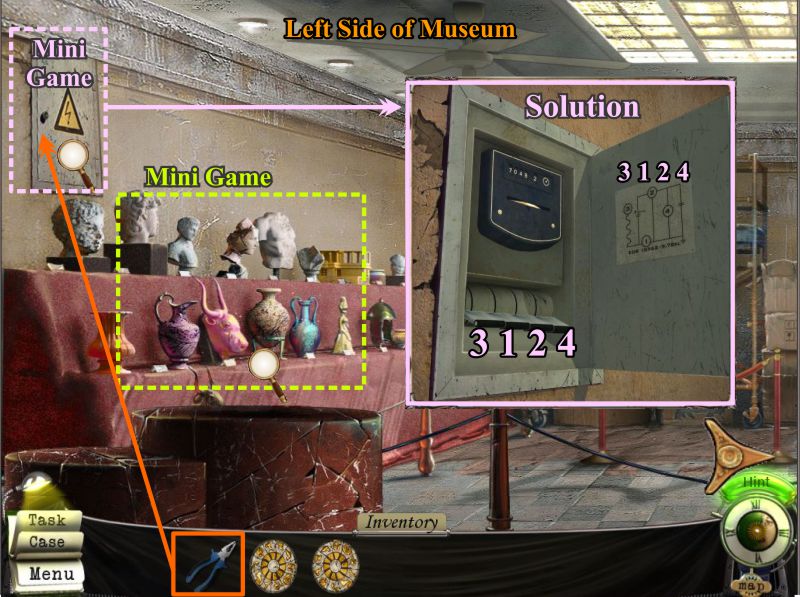
Left Side of Museum
The Museum is a scrolling scene of which you saw the right side when talking to the old man.
Zoom in on the electric box and open it with your pliers to play a Mini Game.
The schematic on the door shows the order in which you should press the switches to turn off the fans, so press them as shown in the screenshot.
Zoom in on the display for another Mini Game.
Screenshot
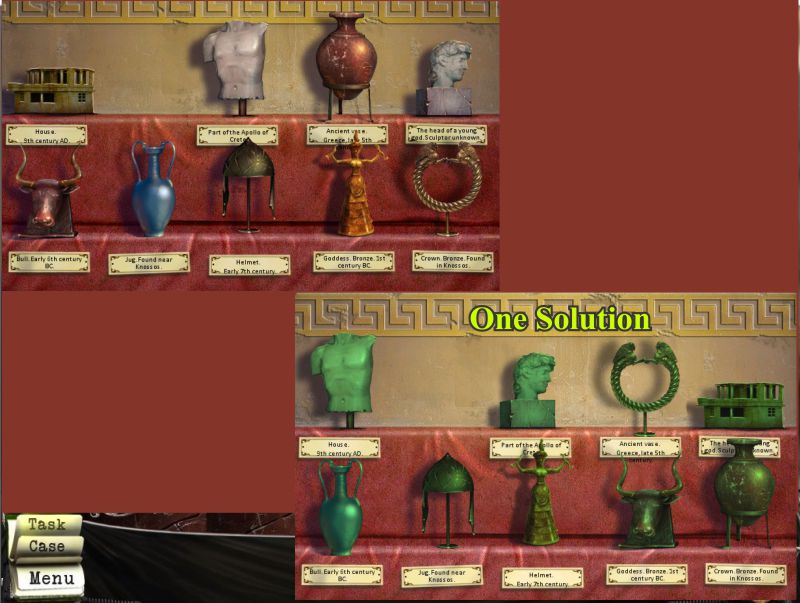
Display Mini Game
Rearrange the display anyway you feel like it so that the pieces are not in their original places.
When they are in the wrong place, they will turn green.
Screenshot
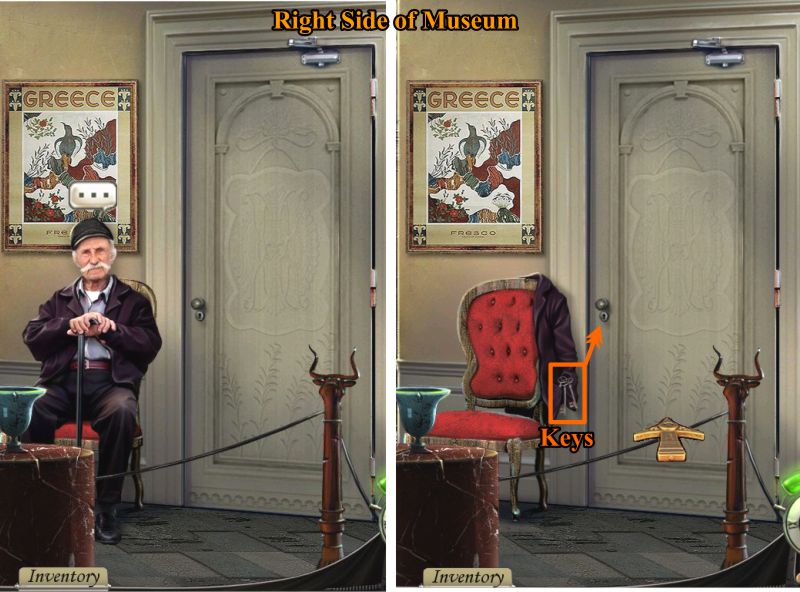
Right Side of Museum
Talk to old man to tell him the tourists mixed up his display.
Since you turned the fans off, he will get warm and take off his coat.
Grab the keys and open the cellar door so you can check out the storage area.
Screenshot
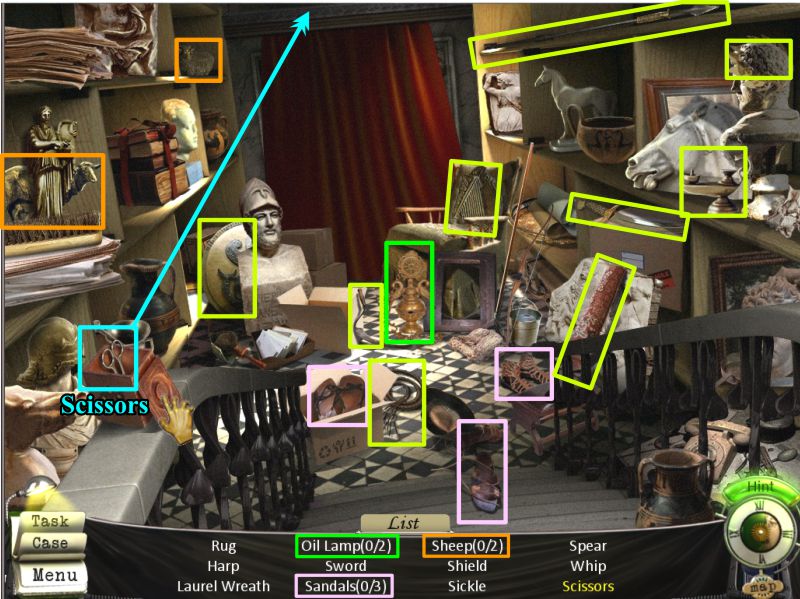
Museum Storage Hidden Object Scene
Collect everything on your list to get the Scissors.
In order to find the Scissors, open the box at the left.
Use the Scissors on the top of the curtain at the back to remove it.
Screenshot
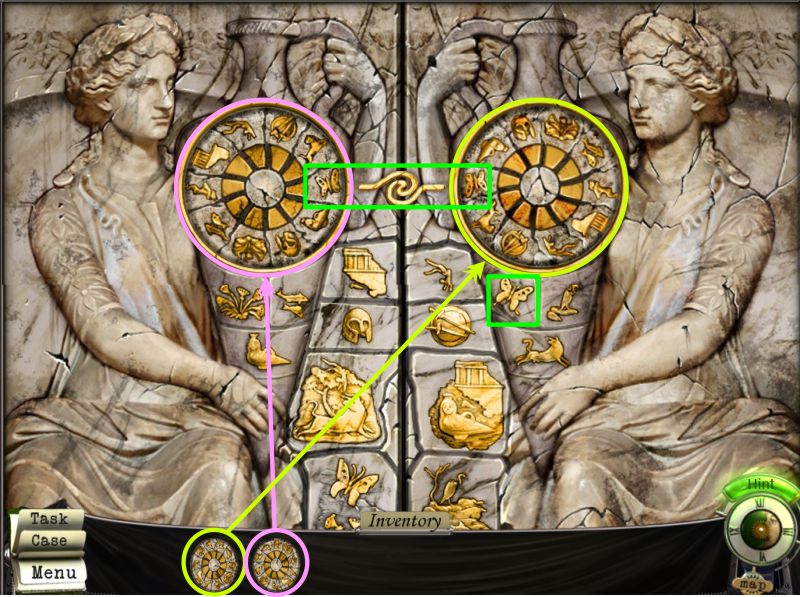
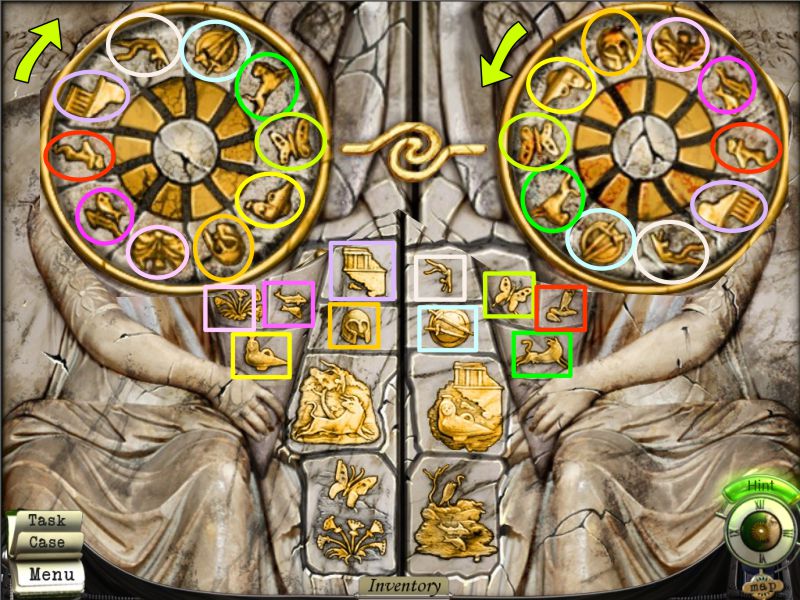
Zodiac Mini Game
Zoom in on the area under the curtain for a Mini Game.
Place your two Zodiac discs in the proper places.
The one you picked up from the tree will go on the left.
Your goal is to use the two discs as a key to enable you to press in the matching symbols below.
The butterflies are shown as a sample in the screenshot.
Screenshot
I enlarged the discs so you can better see the images to match them as they are color-coded in the screenshot.
The left disc moves clockwise and the right disc moves counterclockwise.
Screenshot
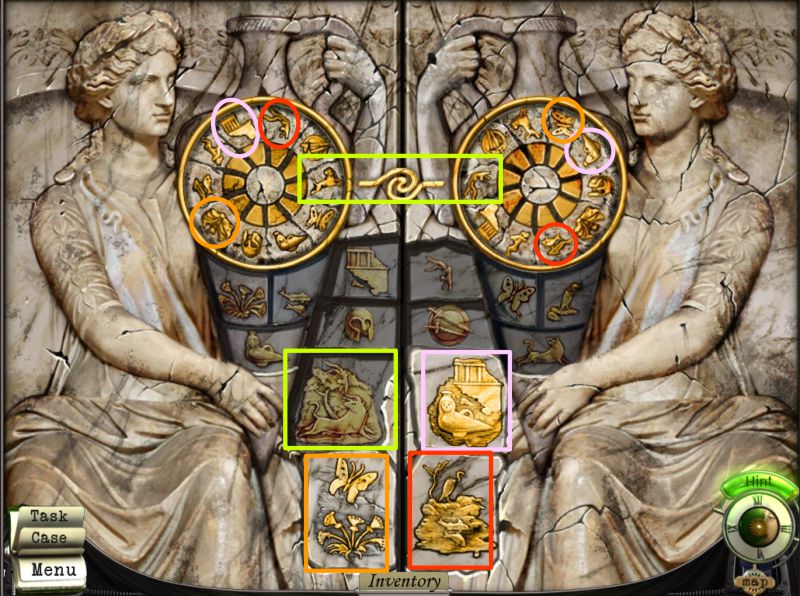
After you have matched all the small symbols, it's time to deal with the four large stones that have two symbols on each of them.
Move the discs so that both symbols are selected as shown in the screenshot and press the correct stone.
The symbols in the screenshot are color-coded.
Screenshot
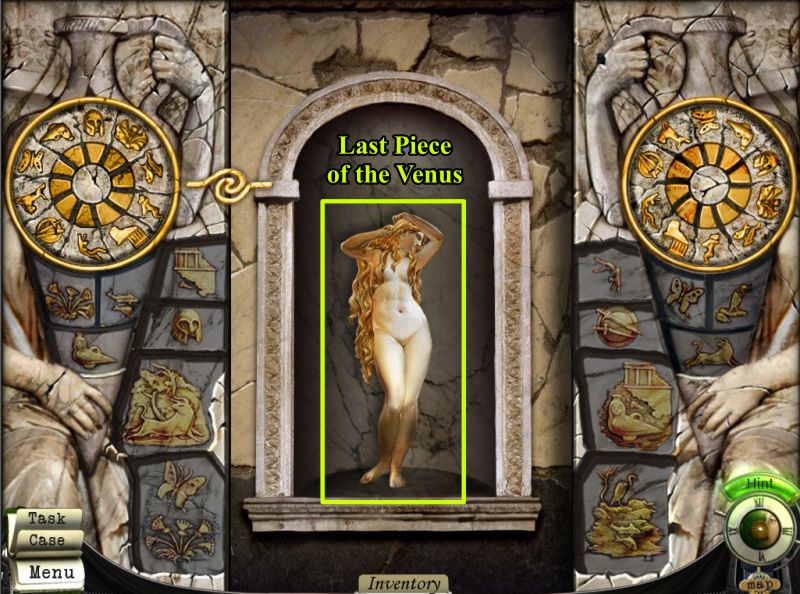
When all of the stones are pressed in, the doors will open for you to collect the last piece of the Venus statue.
Screenshot
Liner Empire
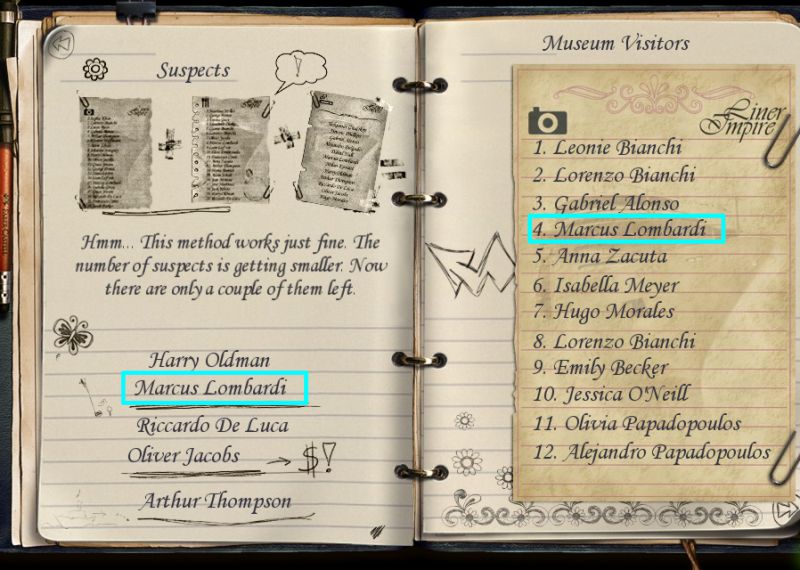
You will be transported back to the ship and Joshua will get you a copy of the tourists who visited the Museum.
When you compare the Suspects to the Museum Visitors, there will be one name that matches.
Screenshot
Congratulations! You have solved the case, so watch the ending scenes.
Posted by: Jazz |
April 3, 2011 7:47 PM
|
April 3, 2011 7:47 PM