
Hallowed Legends: Samhain
Platform: Mac, Windows

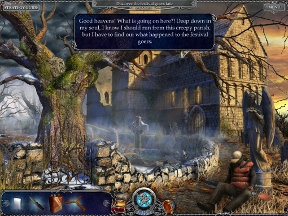
![]() Something unusual is going down at the Cornwall Celtic Festival. And we're not just talking about the Gaelic language workshop. Your ex-fiance Robert called you out of nowhere. Then, a scream. Static. And the phone goes dead. You know Robert has a habit of investigating supernatural occurences, but this seems... different. Naturally, you set out to investigate, beginning the new hidden object adventure release from Elephant Games, Hallowed Legends: Samhain.
Something unusual is going down at the Cornwall Celtic Festival. And we're not just talking about the Gaelic language workshop. Your ex-fiance Robert called you out of nowhere. Then, a scream. Static. And the phone goes dead. You know Robert has a habit of investigating supernatural occurences, but this seems... different. Naturally, you set out to investigate, beginning the new hidden object adventure release from Elephant Games, Hallowed Legends: Samhain.
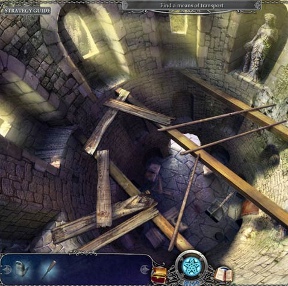
 Following most hidden object conventions closely, Hallowed Legends: Samhain takes you on a somewhat spooky journey through dark and haunted areas surrounding the festival grounds and well beyond. You navigate with the mouse, clicking arrows that appear to move from scene to scene. Hints appear to show you areas you can investigate further, and more often than not, these lead to short hidden object scenes with a dozen or so items to find. Complete the scene, get an item, and use that item to solve a puzzle so you can continue on your adventure.
Objectives are displayed clearly at the top of the screen, but you'll usually need to do a bit of poking around to find the things you need to proceed. Hallowed Legends: Samhain isn't as straightforward of a march as some hidden object games can be, allowing you the freedom (and affording you the challenge) to explore, experiment, and solve puzzles on your own. You'll even encounter a smattering of mini-games while you play, though many of them are pretty standard fare.
Story and setting are important aspects in Hallowed Legends: Samhain, and even though the plot begins with a few tired ideas, things really pick up once you get in to the game. You'll need to keep an eye on your journal to uncover new plot details, many of which are vital to proceeding. And, as always, a handy hint button is there, ready to nudge you out of a tight spot, whether that be in the midst of a hidden object scene or without.
 Analysis: Elephant Games has established itself as a studio capable of creating good hidden object adventures with releases like Mystery Trackers: The Void and Lost in the City. Now, with Hallowed Legends, the team twists things a little and proves its also capable of improving upon established ideas, honing the interface of this latest release to make it much more enjoyable to play. From the fast-moving cursor to the no-fuss scene transitions, journal system, and lovely hint system, Hallowed Legends makes itself easy and accessible to play.
Lengthwise, expect a sturdy four or five hours from Hallowed Legends, a bite or two more than most hidden object games provide these days. The experience is satisfying from beginning to end, but keep in mind that the first portion of the game is more plodding and unoriginal than the latter bits. You likely won't be able to see many of the game's better moments from the demo, which is a real shame, considering how good it gets a few hours in.
Apart from the slow start, Hallowed Legends doesn't really have any major flaws worth delineating. There's a good stock of unlockables to be had, achievements to uncover, a good story with strong puzzles, and scenes that are well-illustrated. If you aren't opposed to dipping your cursor into another "scary" themed hidden object game, Hallowed Legends: Samhain will prove itself worthy of plenty of praise!
A Collector's Edition is also available. It contains a bonus chapter to play, wallpapers, strategy guide, and more. Remember that Big Fish Game Club Members pay only $13.99 for Collector's Editions (or 2 club credits), and collector's editions count 3 card punches of 6 total needed for a free game.
![]() Windows:
Windows:
Download the demo
Get the full version
Also available: Collector's Edition
![]() Mac OS X:
Mac OS X:
Download the demo
Get the full version
Also available: Collector's Edition


Walkthrough Guide
(Please allow page to fully load for spoiler tags to be functional.)
Hallowed Legends: Samhain
Basic Adventure Walkthrough
General Information
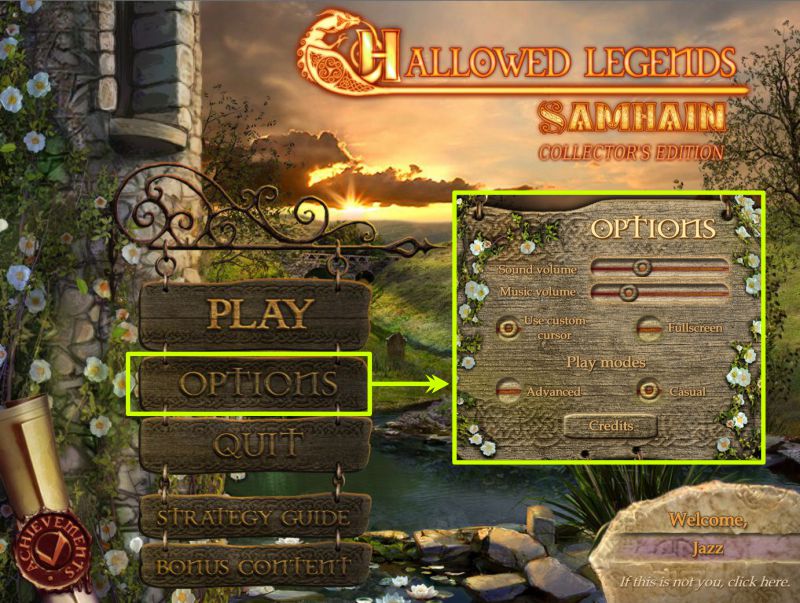
Menu and Options
From the Main Menu, you can Play and Quit the game, choose your Profile and Options.
You can also access the Strategy Guide and Bonus Content if you purchased the Collector's Edition.
On the Main Menu you can access and view the Achievements you have collected.
Options consist of Music and Sound volume, use of a custom cursor, and choice of Play Modes.
You also have your choice of playing with a Full Screen or in Window Mode, and you can view the Credits.
Casual Mode is suggested for new players or those who prefer a fast revelation of the mystery. All significant location and items are marked with sparkles in Casual Mode.
Advanced Mode is for those players who want the challenge of overcoming all the obstacles without extra help.
Screenshot
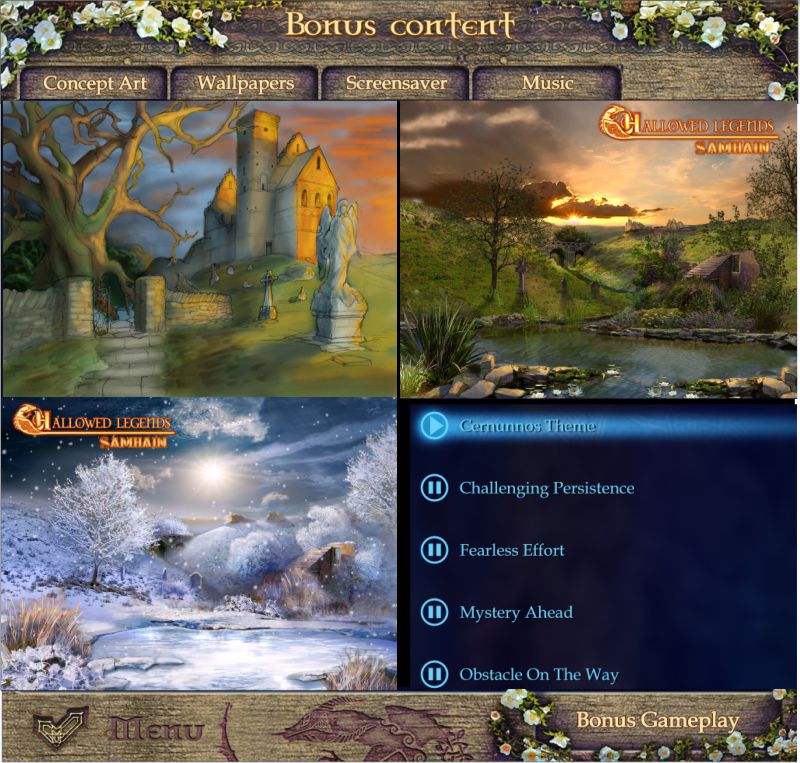
Bonus Content
If you have the Collector's Edition, you will have Bonus Content that includes Concept Art, Wallpapers, Screensaver, and Music.
Once you have completed basic game play, you will be able to play the Bonus Game.
Screenshot
Scene Navigation
Hidden Object Scenes are marked in the screenshots, and items you come away with for your Inventory are marked and labeled in bright turquoise.
Your current Goal is shown in the center top of the scene.
From the Menu in the upper right corner, you can go back to the game, change your options and play mode, and access the Main Menu.
If you purchased the Collector's Edition, you can access the Strategy Guide in the upper left corner.
Check out anything marked with a magnifying glass Items marked with an eye want you to look for additional information.
Your Inventory is located in the bottom of the scene to the left of the Hint Button.
If the Inventory isn't visible, you can open it by the chest to the left of the Hint Button.
Be sure to check the Diary to the right of the Hint Button for important notes.
Hints are unlimited when the button refills.
Arrows will show you where you can travel to another location.
Different Hands will allow you to pick up or move items. A gear attachment lets you know you need to perform a task.
Achievements
You will collect Achievements as you progress in the game and can check out those Achievements from the Main Menu.
A list of all the Achievements and screenshot will be provided at the end of the walkthrough.
Some Achievements have more than one level.
You can complete more than one Achievement at a time. For instance, if you use the screenshot for your first Hidden Object Scene at the Bus Stop, you can complete 4 Achievements: Time's running out, Observer, Sharp eye, High-class Accuracy.
Level 1: To the Chapel
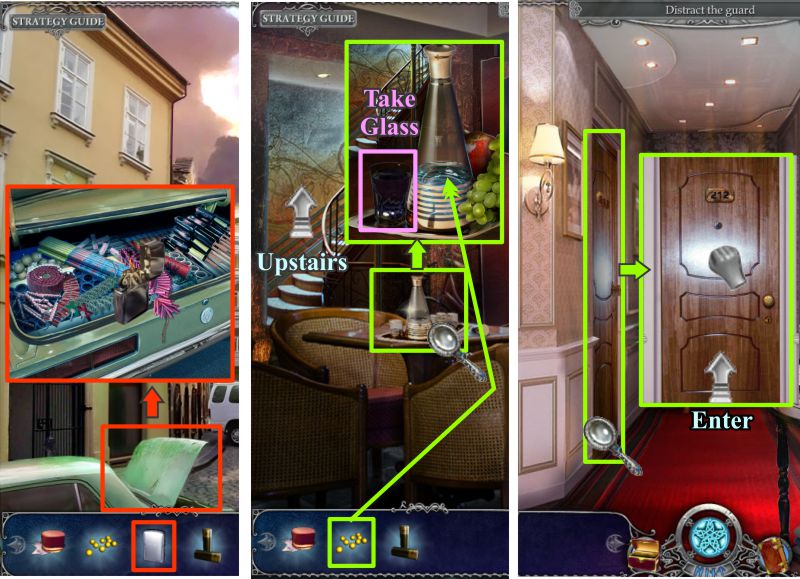
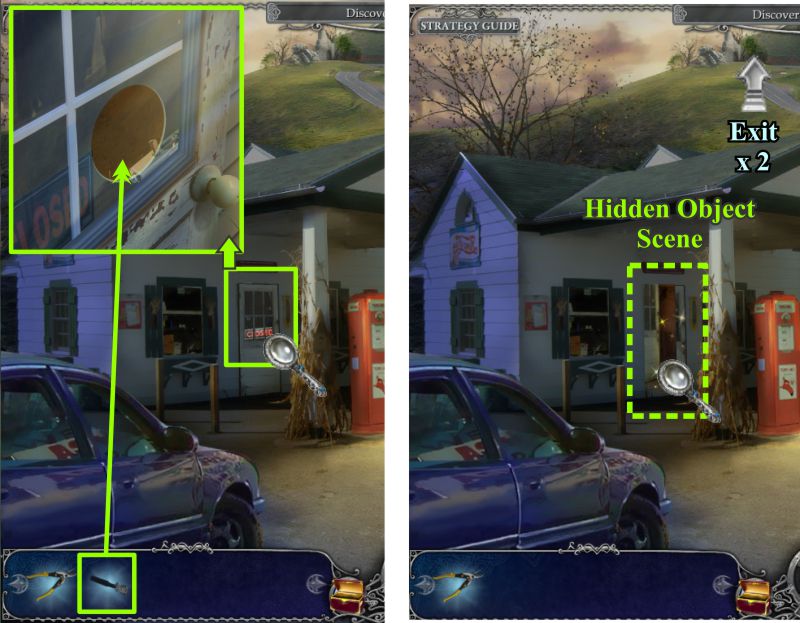
Bus Stop
Look at the sign to see the name of the town.
You can't open the gate to the Chapel as yet until you play the Hidden Object Scene to get the lever to open it.
Once you get the lever, place it in the zoomed in scene. When to try to open the gate it won't work.
Open the box to discover a lighter is jamming the gears, so take the lighter and then flip the lever to open the gate.
You will be transported up the path to the Chapel.
Screenshot
Bus Stop Hidden Object Scene
Collect everything and you will get the lever to open the gate.
Screenshot
Chapel Pathway
Your goal is to get into the Chapel.
Touch the dead body and pick up the Knife. He will tip over, revealing a Gas Can for you to collect.
Use the knife twice to scrap the bark on the tree.
Note the Butterfly net caught on the branch.
Use the knife 3 times to remove the vines on the gate, and then enter the cemetery.
Screenshot
Cemetery and Chapel Pathway
Grab the Boomerang and return to the pathway.
Use the Boomerang to make the Butterfly Net fall to the ground so you can collect it.
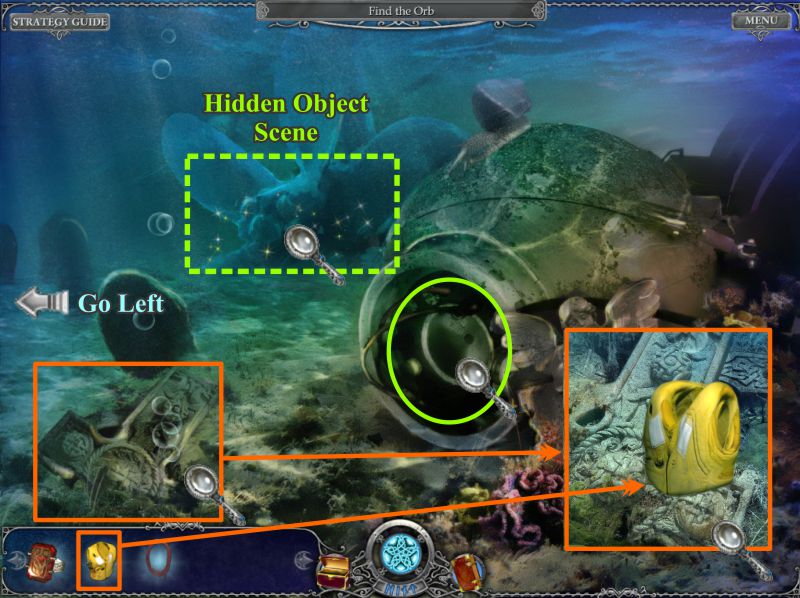
Return to the Cemetery and play the Hidden Object Scene.
Screenshot
Cemetery Pond Hidden Object Scene
Collect all the items on dry land, and use the Butterfly Net to retrieve those items under water.
You will get a Tile for your Inventory.
Screenshot
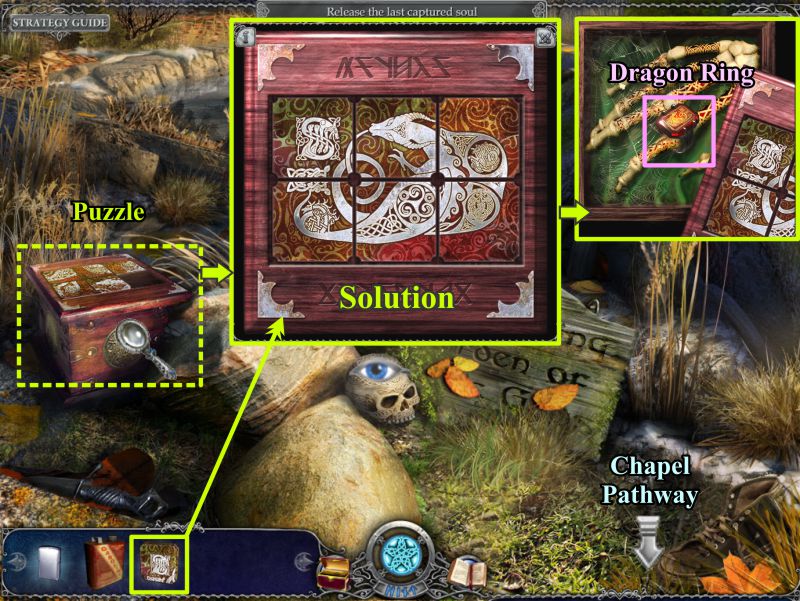
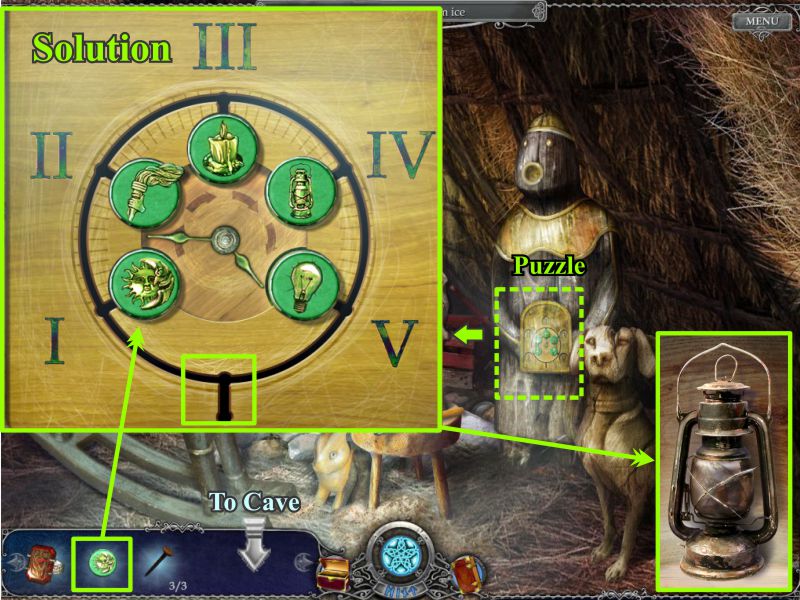
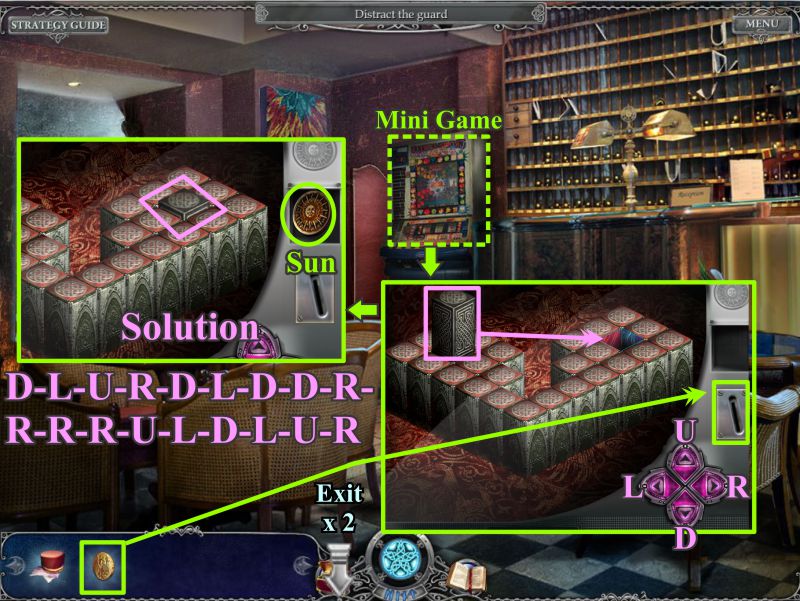
Tile Box Puzzle
Click on the box shown in the screenshot and place the Tile from your Inventory.
Rearrange the tiles to match the Solution, and the box will open for you to take the Dragon Ring.
Go to the Chapel Pathway.
Screenshot
Chapel Pathway
Place the Dragon Ring on the symbol on the tree and watch what happens.
In order to remove all the evil, you need to pour the gasoline on the tree and light it with the lighter in your Inventory.
Once the evil is gone, you can play the Hidden Object Scene.
Screenshot
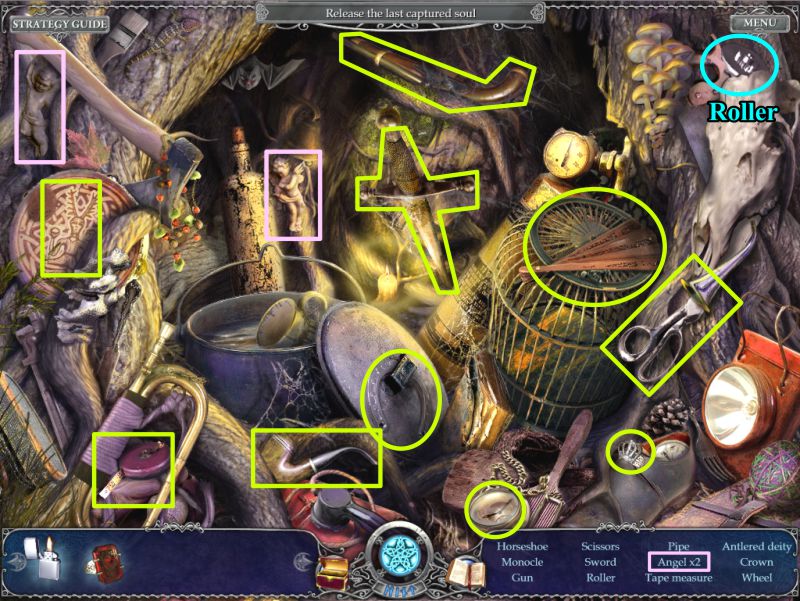
Hollow Tree Hidden Object Scene
When you have collected everything, you will get a Roller.
Head off to the Chapel Door.
Screenshot
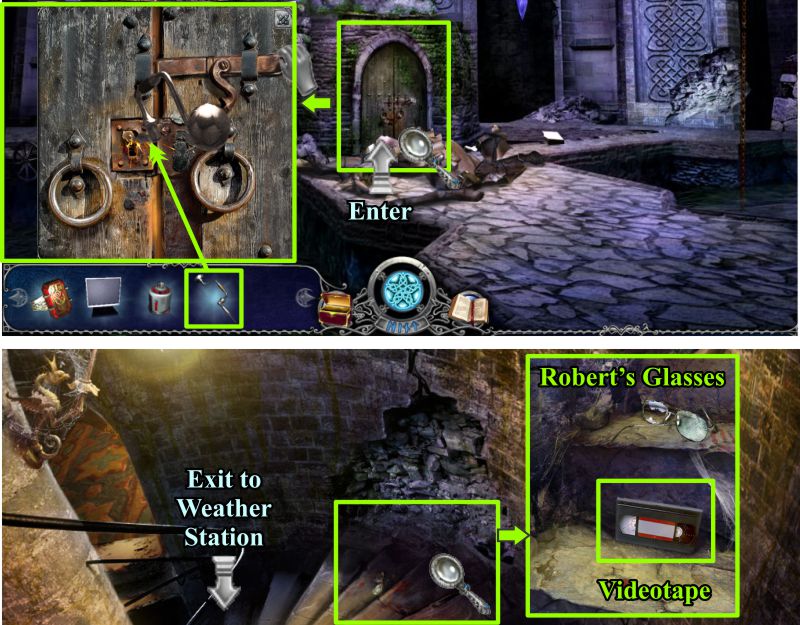
Chapel Door
Click on the door and place your Roller in the space.
Your goal is to arrange the symbols in order from the biggest to the smallest one.
Use the arrows below the rollers to rotate them to the solution, shown in the screenshot.
Enter the Chapel.
Screenshot
Level 2: The Chapel
Inside the Chapel
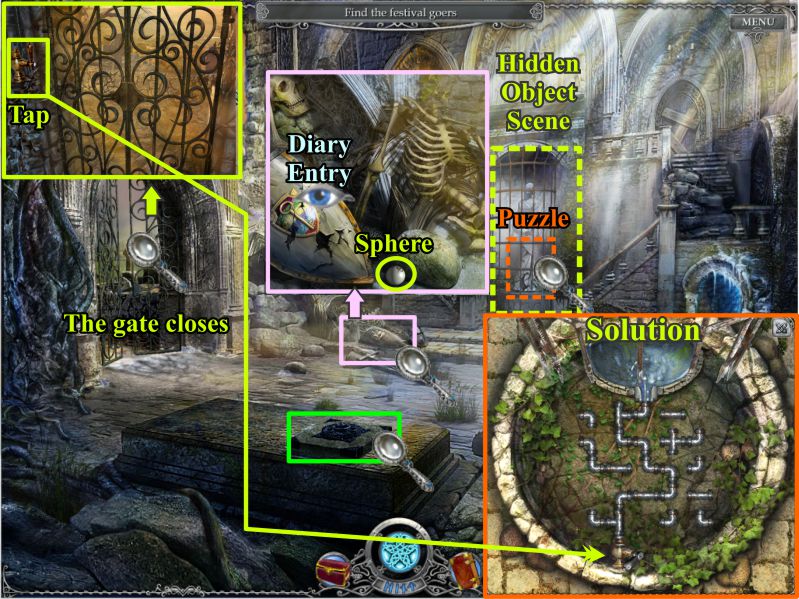
Once you are inside, the gate closes behind you, so you need to find another way out.
Zoom in on the gate and take the Tap.
Check out the skeleton and pick up the Sphere.
Click on the shield next to the skeleton and you will pick up an entry for your Diary.
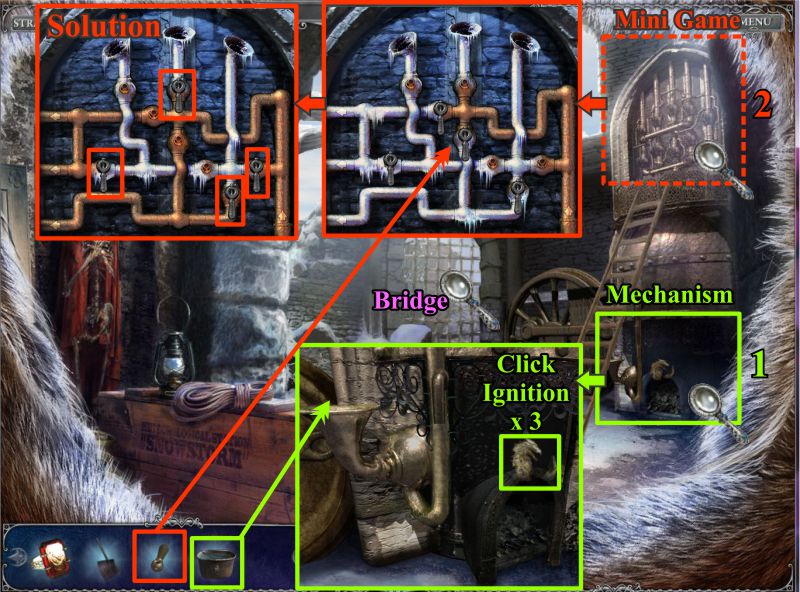
Zoom in on the gated water carrier and play the Pipe Puzzle to make the water flow and remove the gate.
You have triggered a Hidden Object Scene with the puzzle solution shown in the screenshot.
Screenshot
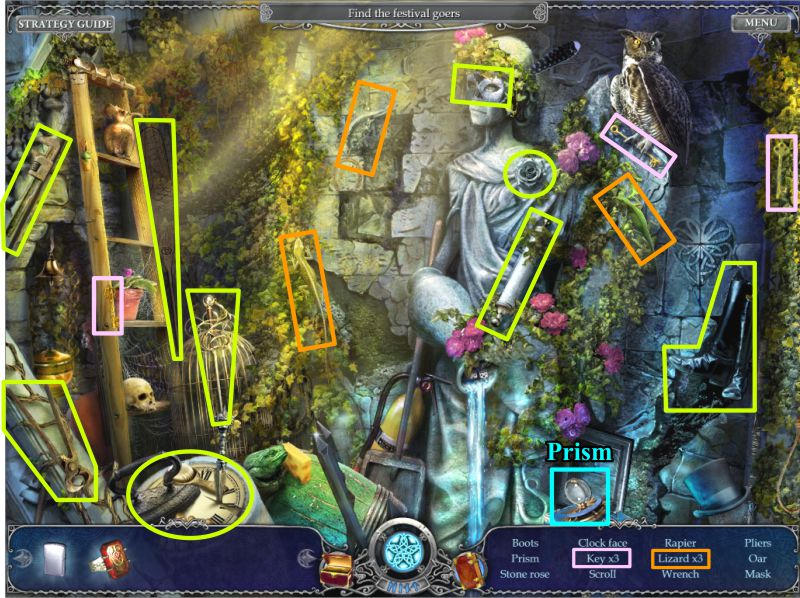
Water Carrier Hidden Object Scene
Collecting everything will get you a Prism.
Screenshot
Frozen Pond and Scriptorium Door
Go through the blue door at the right of the scene.
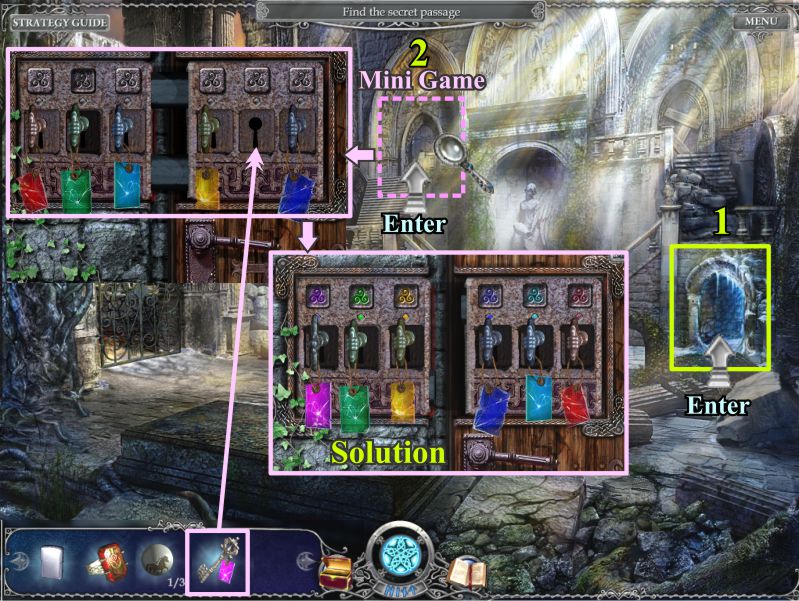
When you are done there, zoom in on the door up the stairs and place the key you have collected.
Arrange the tagged keys as shown in the screenshot to open the door.
Screenshot
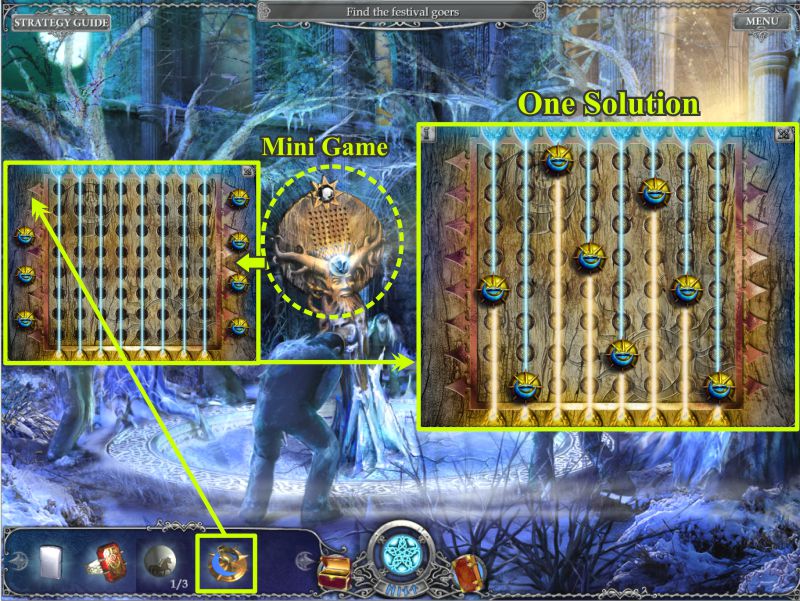
Frozen Pond Mini Game
Zoom in on the statue and place the Prism in the blank spot to trigger the game.
Your goal is to arrange the tokens so that all of the beams of light turn yellow.
You can only have one token on each beam of light.
There is more than one solution, but one that works is shown in the screenshot.
Screenshot
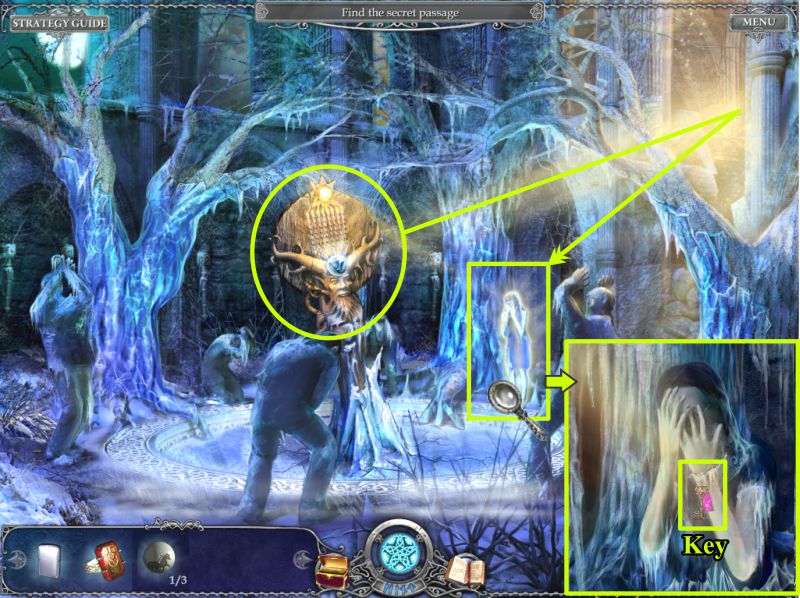
Frozen Pond
The light will reflect from the statue and bounce back to the girl with her face covered.
It will melt her frozen arm, so you can take the tagged Key.
Return to the main part of the Chapel and play the Scriptorium Door Mini Game.
Screenshot
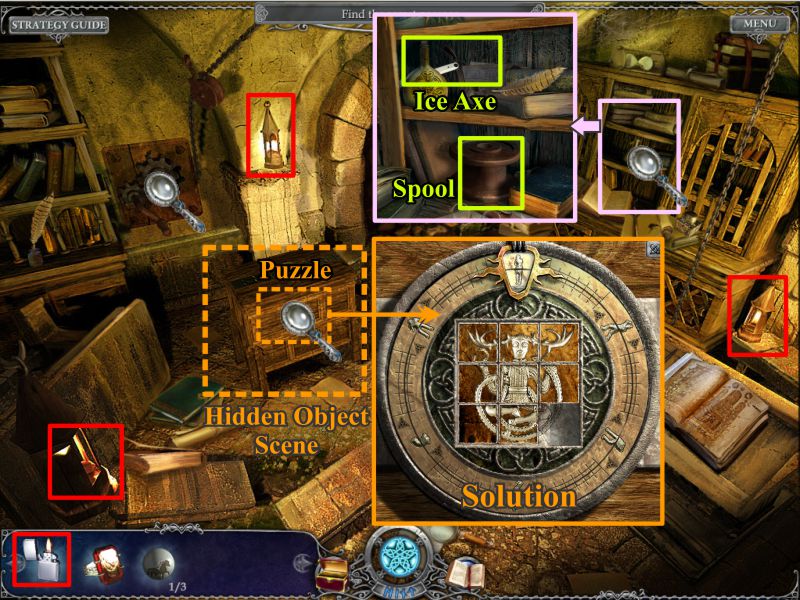
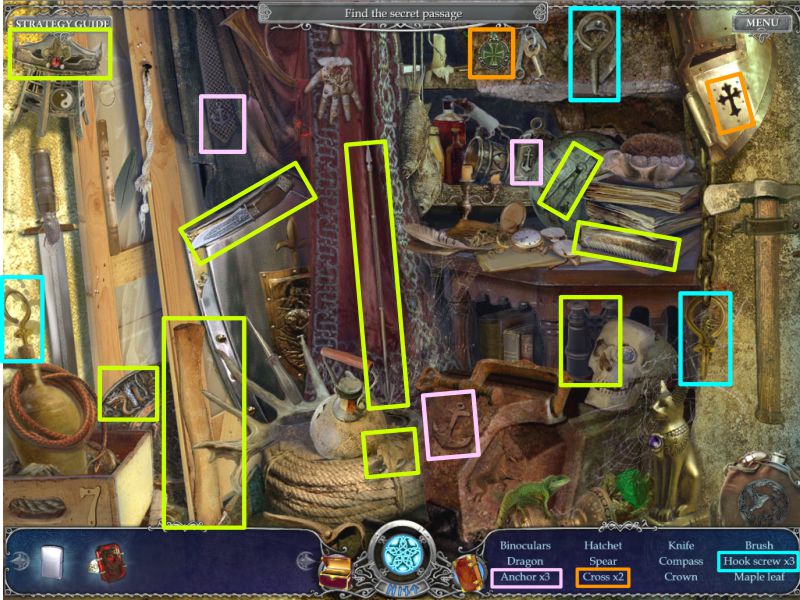
Scriptorium
The room will be dark when you enter, so you will need to use your lighter to light the 3 lamps marked in red in the screenshot.
Zoom in on the bookcase to pick up the Ice Axe and Spool.
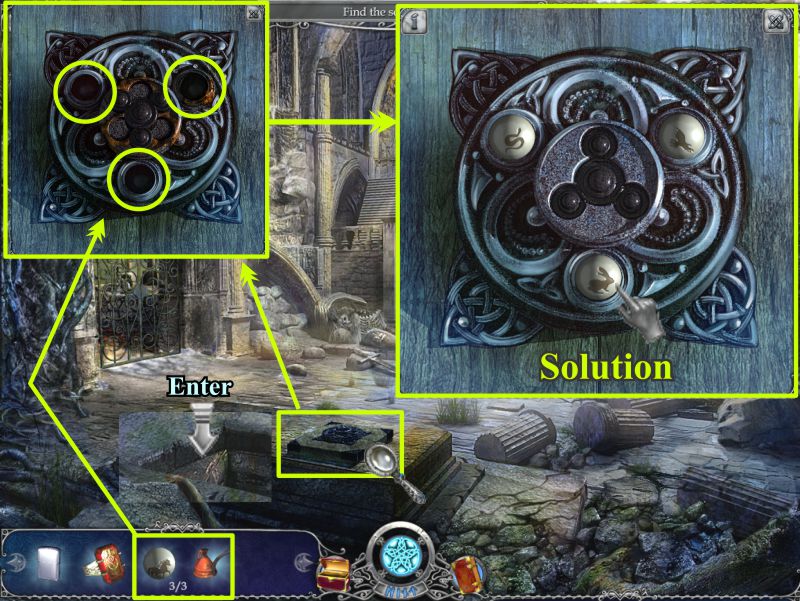
Click on the chest and solve the puzzle to open the lock and trigger a Hidden Object Scene.
The puzzle solution is shown in the screenshot.
Screenshot
Scriptorium Chest Hidden Object Scene
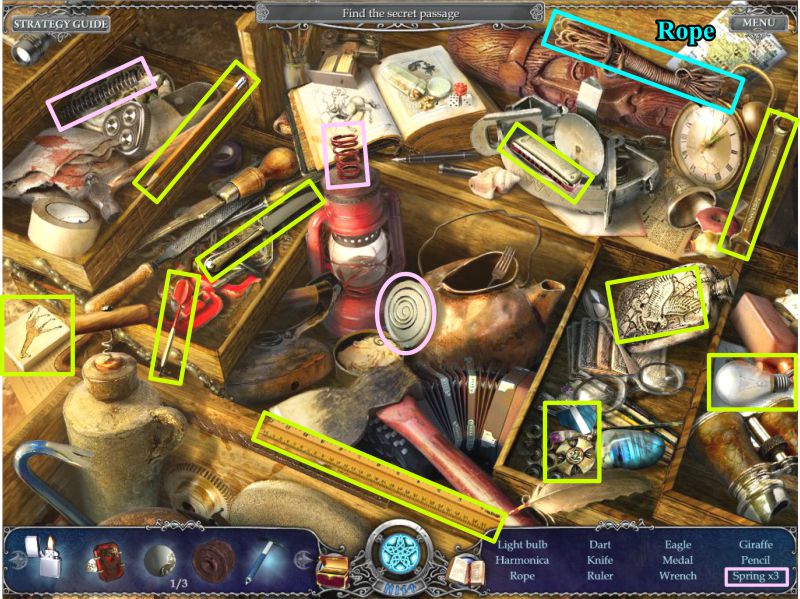
Collect everything to get the Rope.
Screenshot
Scriptorium
Move the podium to reveal a hatch.
Place the rope on the chain and it will attach itself to the hatch ring.
Zoom in on the mechanism on the wall, place the spool on it and click the lever.
The hatch will open. Zoom in for a puzzle.
Place all the pieces in the puzzle, and the center will open for you to collect another Sphere.
Screenshot
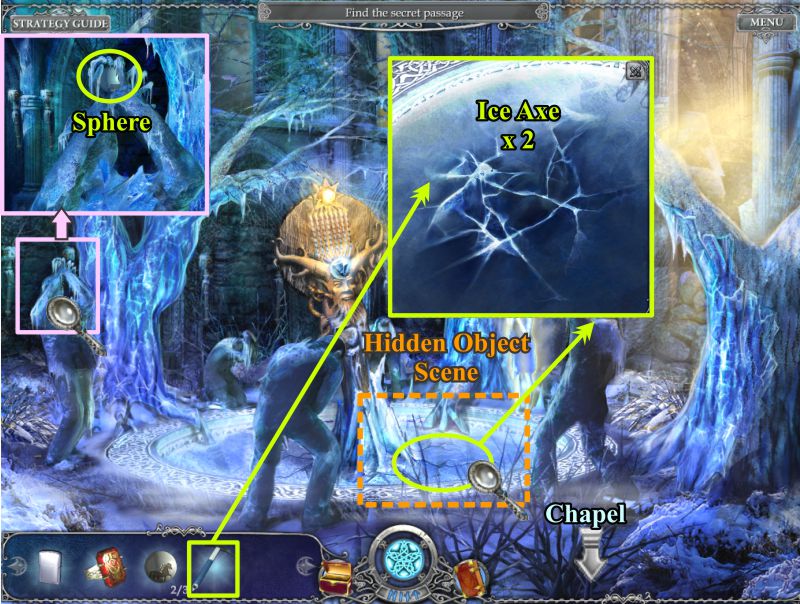
Frozen Pond
Return to the Frozen Pond and collect another Sphere from the frozen being at the left.
Use the Ice Axe twice on the pond to trigger a Hidden Object Scene.
Screenshot
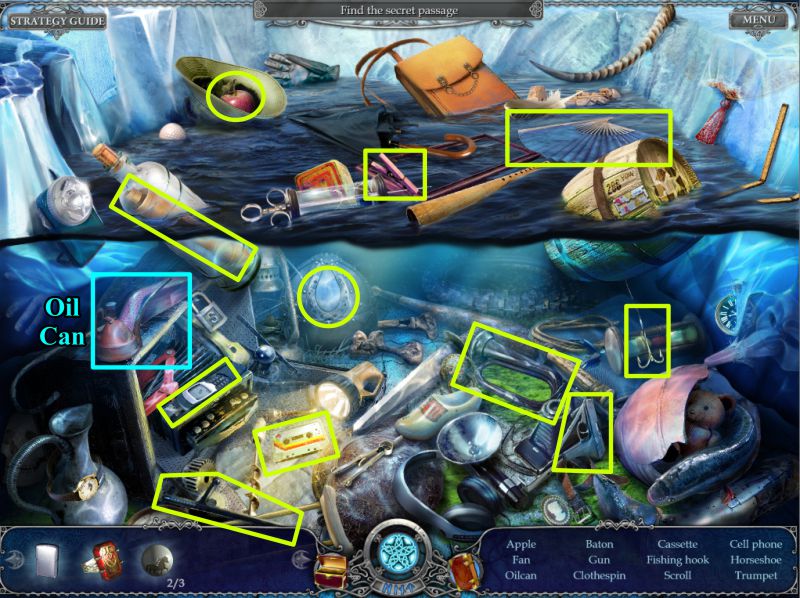
Frozen Pond Hidden Object Scene
You will get an Oil Can for your Inventory once you have collected all the items.
Screenshot
Chapel
Go to the main part of the Chapel and zoom in on the coffin.
Place the 3 Spheres you have collected.
Rotate the spheres so that there is a snake, eagle and rabbit to match the screenshot solution.
The coffin will move after your unexpected confrontation, so go down the stairs.
Screenshot
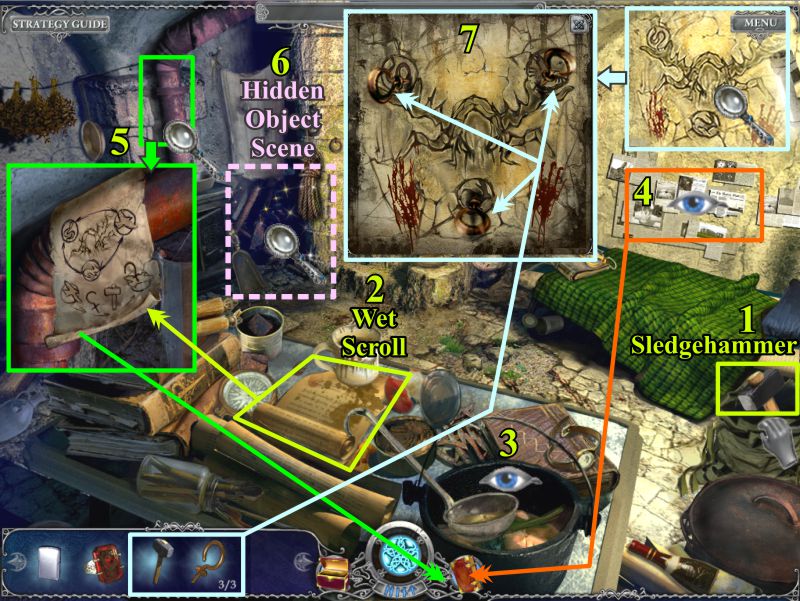
Chapel Cellar
Pick up the Sledgehammer.
Collect the Wet Scroll.
Check out the caldron.
Look at the newspaper clippings on the wall.
Place the Wet Scroll on the pipe to dry it, and a copy will go into your Diary.
Play the Hidden Object Scene to get the 3 Eye Hook Screws.
Place the 3 Eye Hooks on the wall as shown, and use the sledge hammer to pound them in.
Screenshot
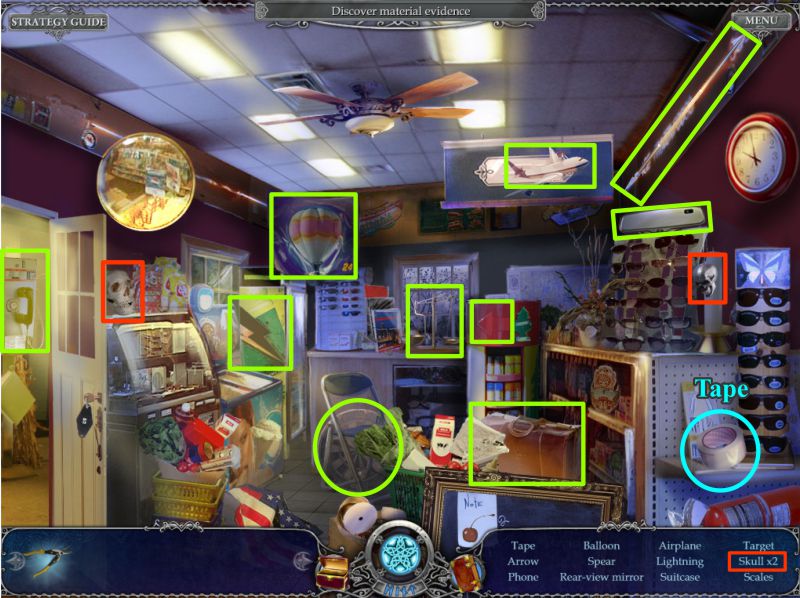
Cellar Hidden Object Scene
Collect everything to get the 2 Eye Hook Screws.
Screenshot
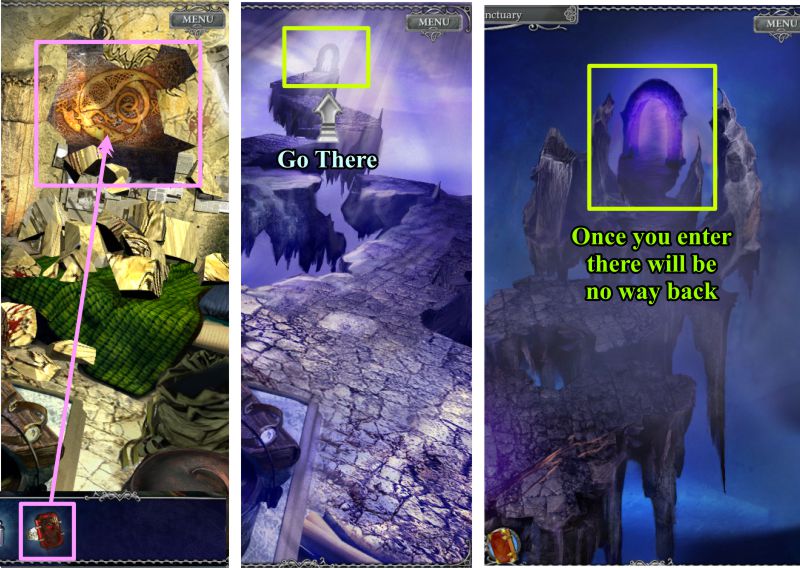
Dragon Symbol and Path to the Sanctuary
When the wall crumbles, use your Dragon Ring on the symbol and watch what happens.
Tale the path to the Sanctuary and enter.
Screenshot
Level 3: Epona Hall
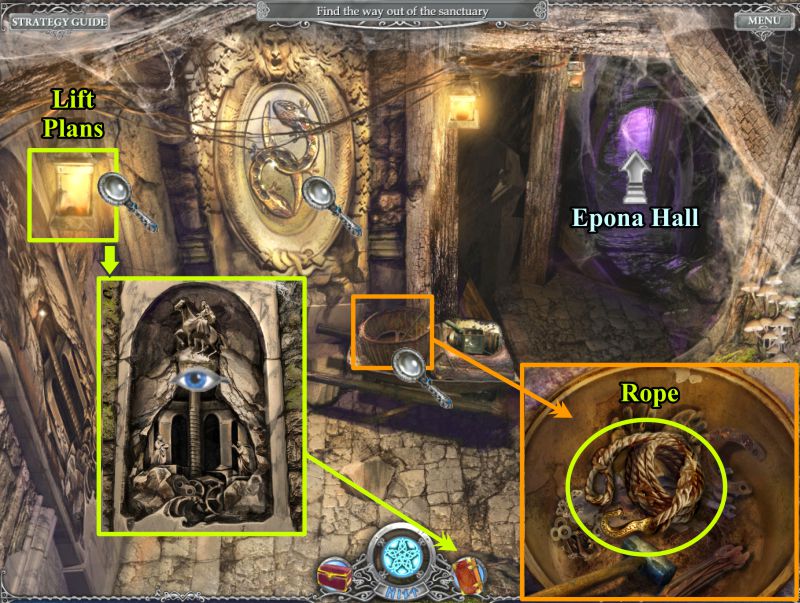
Sanctuary
Check out the Lift Plans to get a notation in your Diary.
Zoom in on the basket and pick up the rope.
Note the picture on the wall and head off to Epona Hall.
Screenshot
Epona Hall Drawbridge
When you first arrive, there will be a man dangling from a rope, but he will be pulled up out of sight.
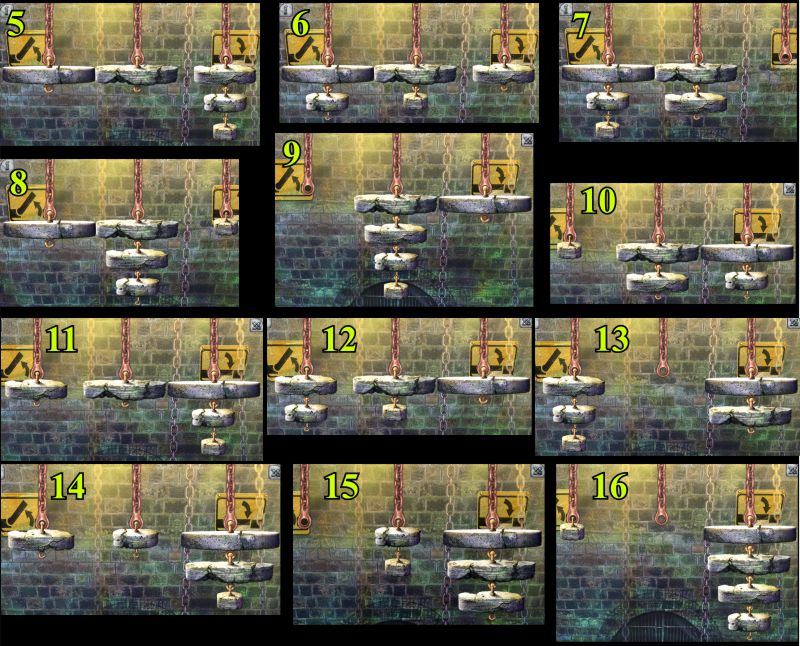
Check the various magnifying glasses and click on the Drawbridge for a Mini Game.
Your goal is to move all of the stone rounds from the first chain to the last chain.
The progressive solution is shown in the screenshots below.
Screenshot
Screenshot
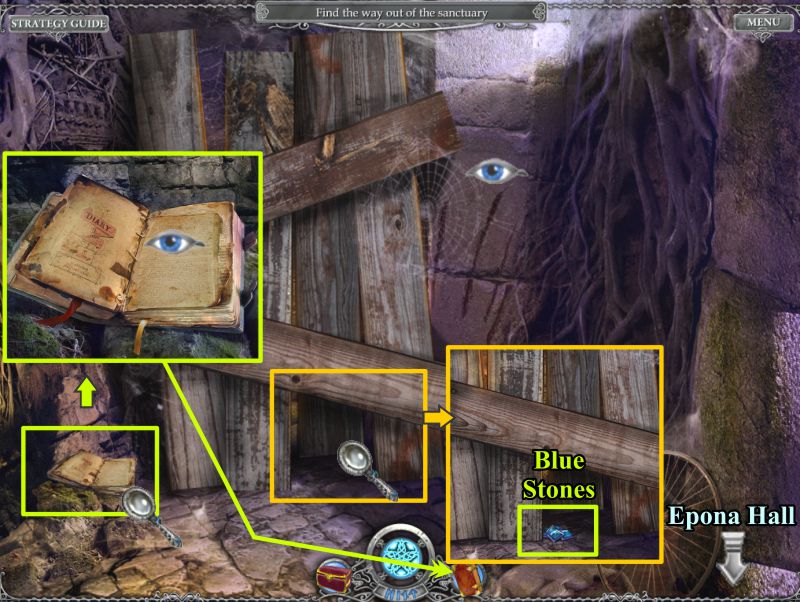
Epona Hall Corridor
Cross the Drawbridge to the Corridor. You can't get out because it's boarded up.
Something made strange, large claw marks.
Zoom in under the boards and pick up the Blue Stones.
Check out the book to get information for your Diary.
Go back across the Drawbridge to the main hall.
Screenshot
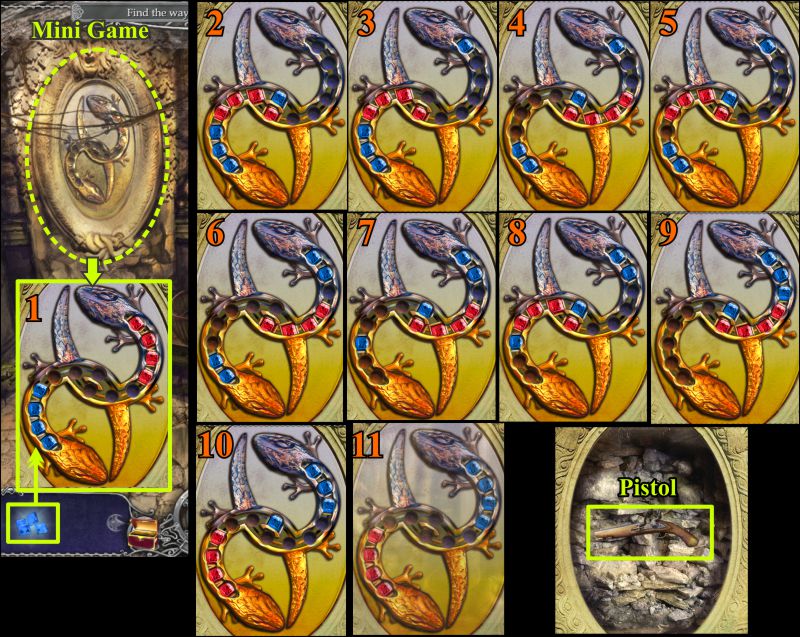
Sanctuary Lizards Mini Game
Return to the Sanctuary and click on the wall for a Mini Game.
Place the Blue Stones to trigger the game.
Your goal is to move the red stones to the bottom and the blue stones to the top.
You cannot jump over stones, but you can move multiple empty spaces.
There is a crossover section in the middle that you can use to exchange the different colored stones.
A progressive solution is shown in the screenshot, as is the prize pistol you receive when you've completed the game.
Screenshot
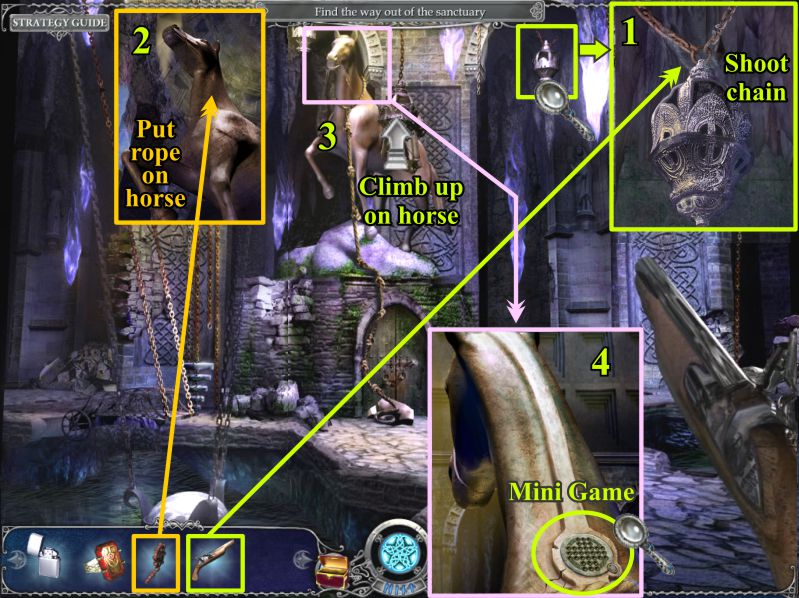
Epona Hall
Return to Epona Hall and use the pistol to shoot the chain, as shown in the screenshot.
The object hanging from the chain will swing over and take out part of the statue. The horse will remain, so put the rope on the horse and climb up it to the back of the horse.
Zoom in on the dial on the horse's back for a Mini Game.
Screenshot
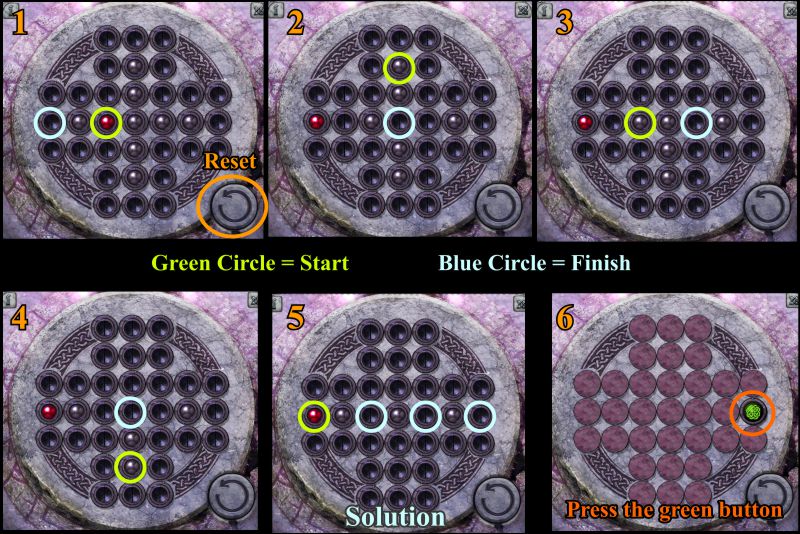
Horse Lock Mini Game
This is a jump the ball game. Play until there is only the one red ball left.
A step-by-step solution is shown in the screenshot. The lime green circles are the beginning move and the light blue circles are where you want to end up.
There is a Reset button if you need it. In the end, you need to press the green button.
Once you press the green button the horse will rise to the upper level.
Screenshot
Above Epona Hall
The man you saw before dangling from the rope is lying on the ground, suffering from hypothermia because the door is open to the severe weather outside.
Use your lighter to light the fire.
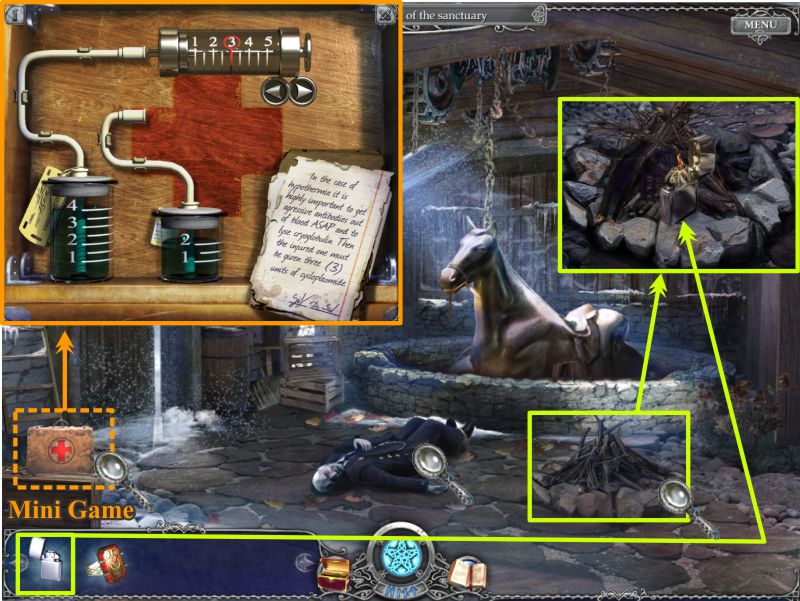
Click on the first aid kit for a Mini Game.
Screenshot
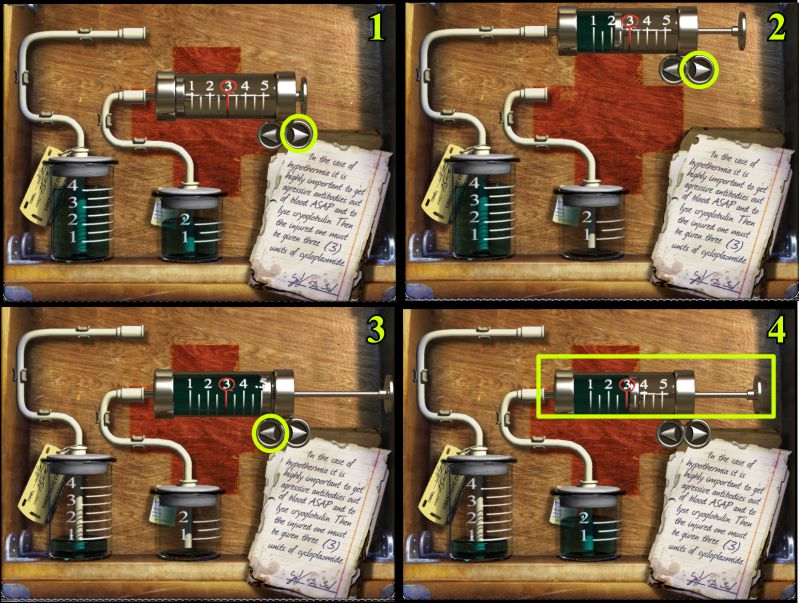
Syringe Mini Game
This game is just like when you have to transfer liquid from a beaker, but this time we have a syringe to use.
Your goal is to end up with 3 ounces or cc's in the syringe.
You need to move the syringe from beaker to beaker and use the arrows under the syringe to move the liquid.
See the progressive solution in the screenshot.
Screenshot
Revive the Man
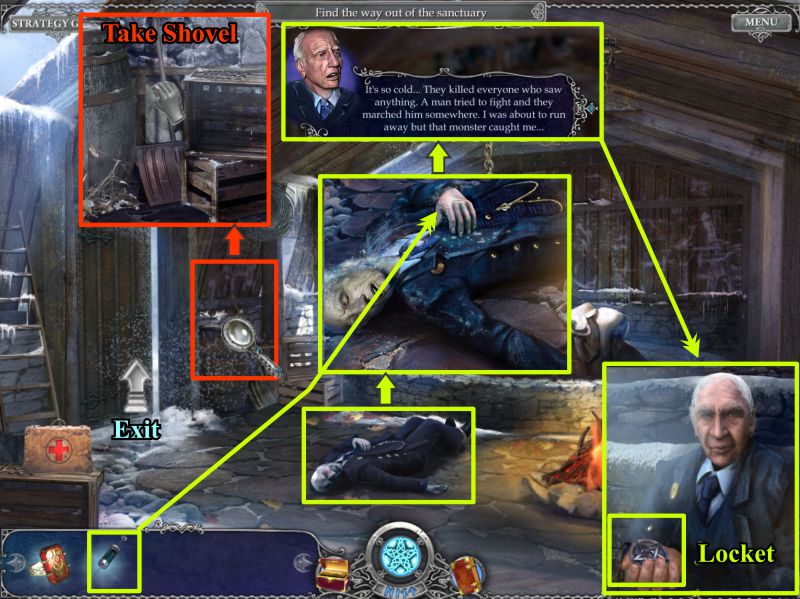
Give the man the shot from the syringe. You will revive him, and he will ask you to find his daughter and give you a Locket.
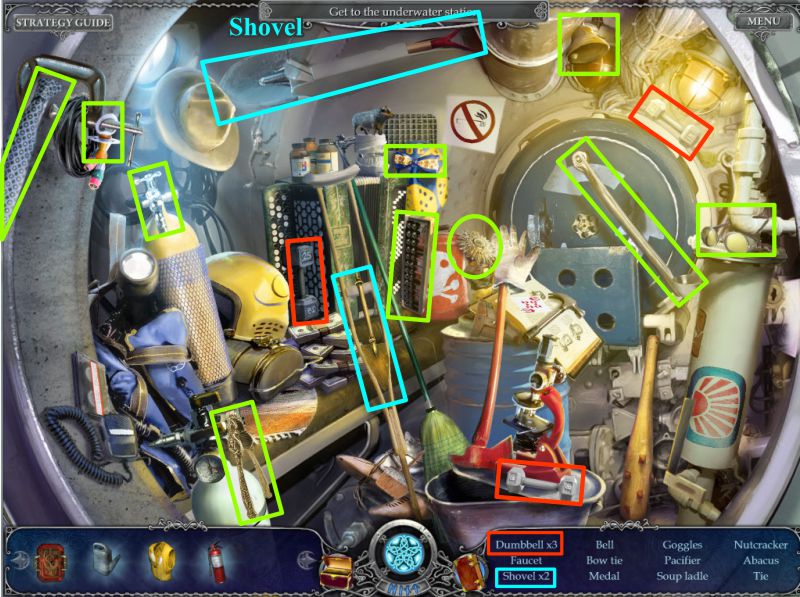
Zoom in on the box area near the door and take the Shovel.
Go outside and move quickly to your next task, or you will end up back at the Sanctuary because of the cold.
Screenshot
Level 4: Across the Bridge
The Peak
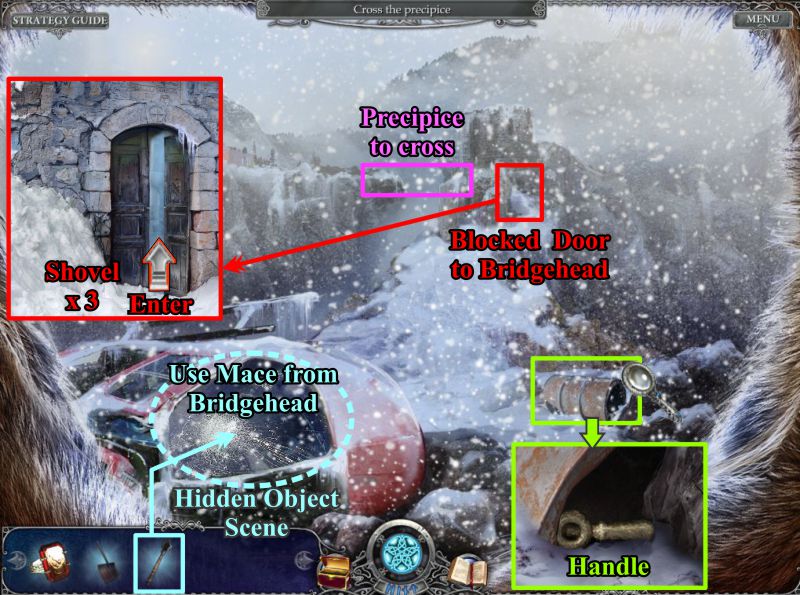
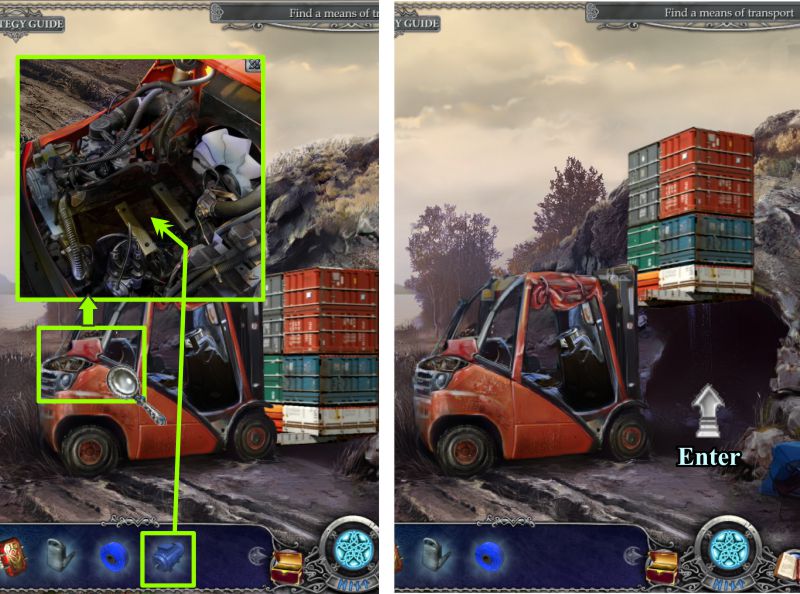
Your ultimate goal is to be able to cross the precipice. Zoom in on the oil can and grab the handle on your way up the Peak.
Hurry to the Blocked Door and use the shovel 3 times so you can enter.
After you get the Mace, you will be back to smash the helicopter window to play the Hidden Object Scene.
Once you have cleared the snow, enter the Bridgehead.
Screenshot
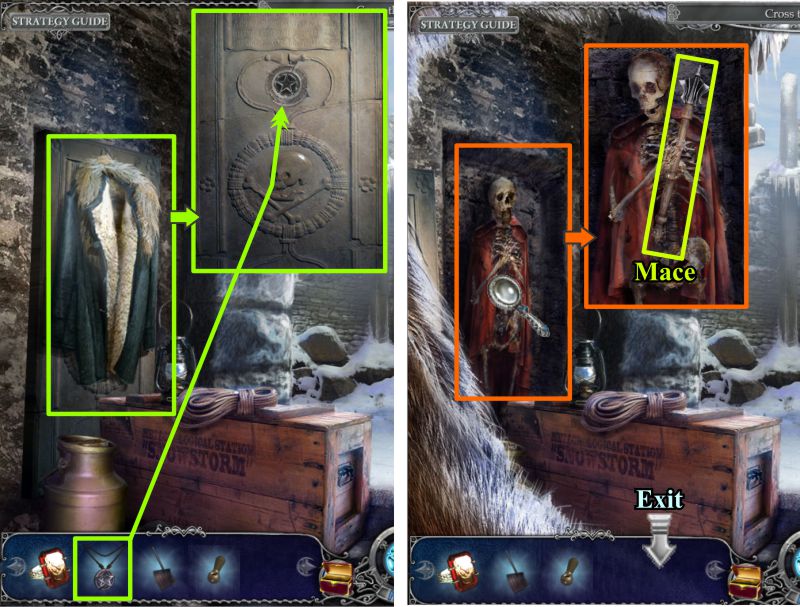
The Bridgehead
Grab the warm jacket and put it on. You will now be looking through the fur collar in the screenshots.
Once the jacket is removed, there will be a panel behind it.
Place the locket Mr. Gray gave you to open the panel.
There is a skeleton behind it, so zoom into him and take the Mace he is holding.
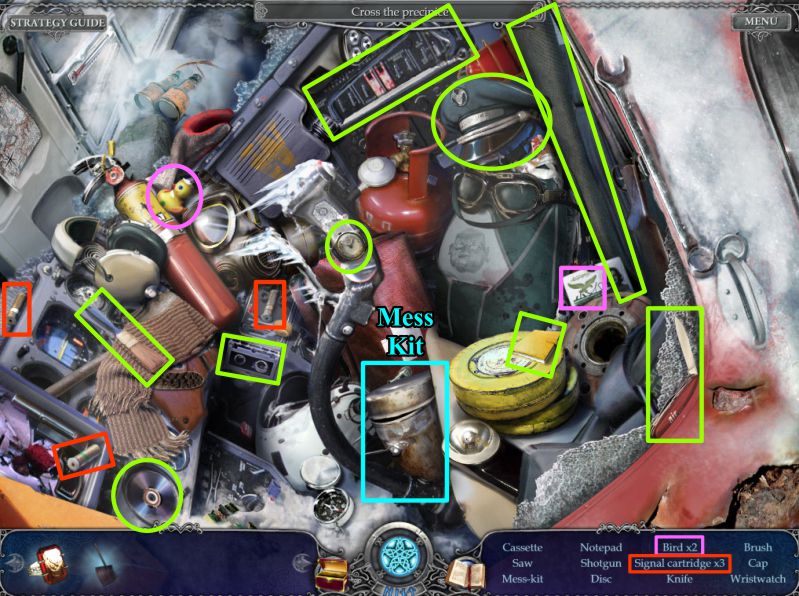
Exit back outside and smash the window of the helicopter with the Mace to trigger the Hidden Object Scene.
Screenshot
Helicopter Hidden Object Scene
Collect everything to get the Mess Kit for your Inventory.
Screenshot
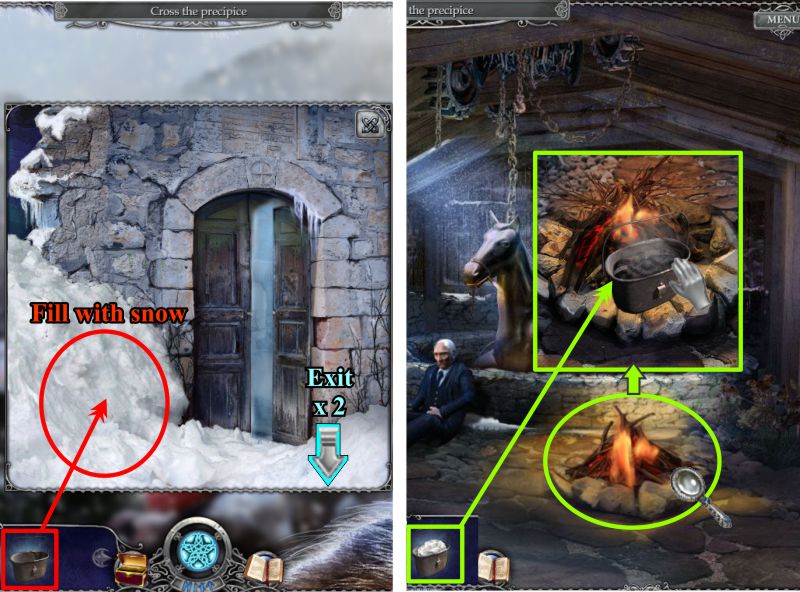
The Bridgehead Door and Above Epona Hall
Go to the Bridgehead Door and fill the Mess Kit with snow.
Head back to the room above Epona Hall and zoom in on the fire.
Place the snow-filled Mess Kit to melt it, and then collect it for your Inventory.
Screenshot
The Bridgehead
Return to the Bridgehead and zoom in on the Bridge Mechanism.
Fill the boiler with the mess kit hot water and click 3 times on the mechanism head to ignite with fire.
Click on the steam pipes for a Mini Game.
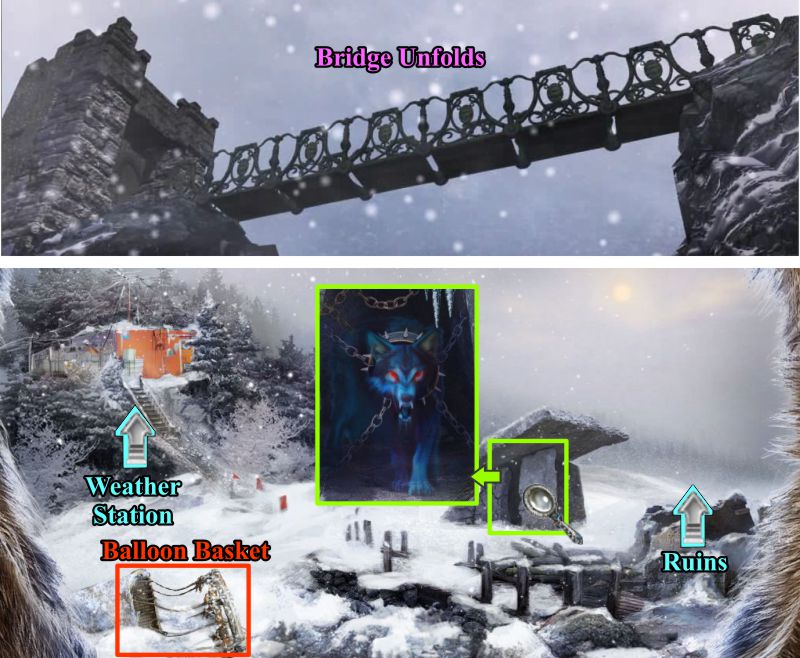
Place the missing switch and rearrange the switches as shown in the screenshot solution to allow the hot water to flow. The mechanism will start to rotate and the bridge will unfurl.
Screenshot
The Bridge
Watch the bridge unfurl across the precipice, then go through the lattice gate and cross the bridge.
Grab the Balloon Basket and note the standing stones with the fierce wolf changed up inside.
There are two directions to go, but let's first travel toward the Weather Station.
Screenshot
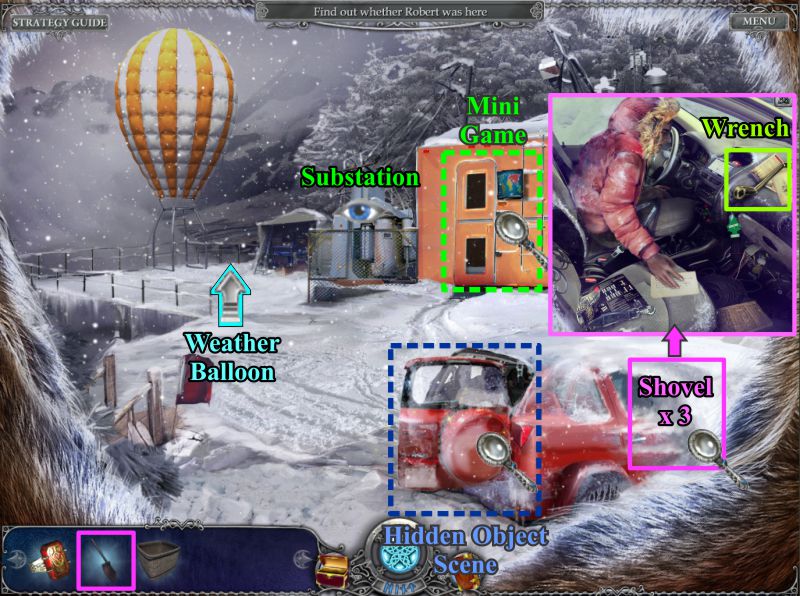
Outside the Weather Station
Note the Substation and Weather Balloon.
You will need to play a Mini Game to enter the Weather Station, but you have other tasks to finish first.
Use the shovel 3 times on the snow pile by the car door so you can look into the front seat.
The body is dead. Grab the Wrench and go to the trunk.
Play the Hidden Object Scene.
Screenshot
Car Trunk Hidden Object Scene
When you have collected everything, you will get a Monitor for your Inventory.
Screenshot
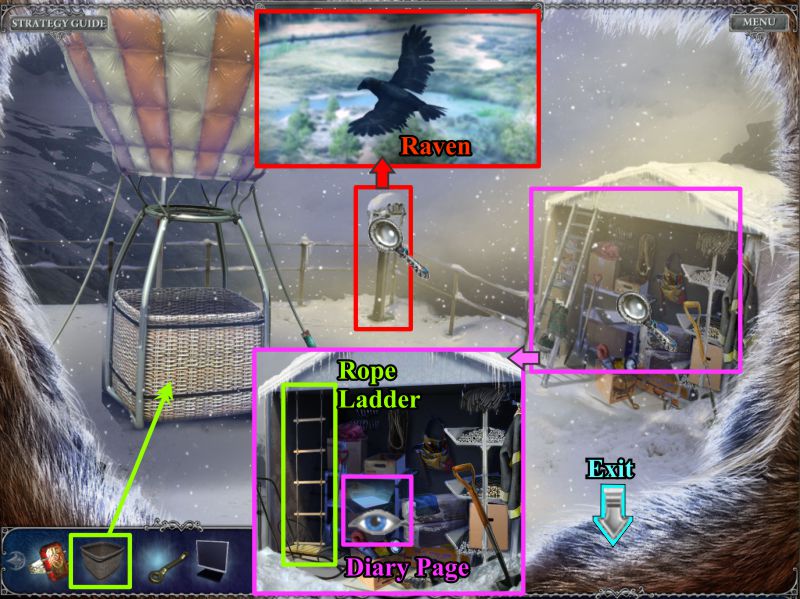
Weather Balloon
Go toward the Weather Balloon.
Place the basket and zoom in on the storage shed.
Look at the area marked in the screenshot to find a page for your Diary and grab the Rope Ladder.
Zoom in on the telescope and then zoom in again to have a look through it.
A Raven flies by, which is sort of strange considering how high you are in elevation.
Screenshot
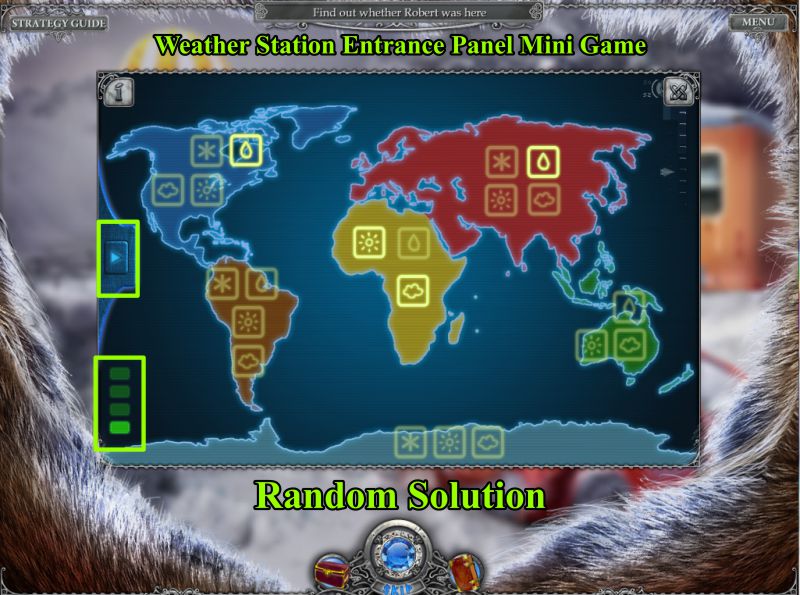
Weather Station Entrance Panel Mini Game
Go back to the Weather Station Entrance and click on the panel for the Mini Game to open the door.
You will need to successfully complete 4 rounds or Skip the game to enter the Weather Station.
To start the game, click the arrow at the left and note the lighted symbols. Your goal is to click on the symbols you see as shown in the sample in the screenshot.
The lighted symbols are random but do not need to be chosen in any particular order, as long as you get all those lit for a particular round.
Once you have completed the game, enter the Weather Station.
Screenshot
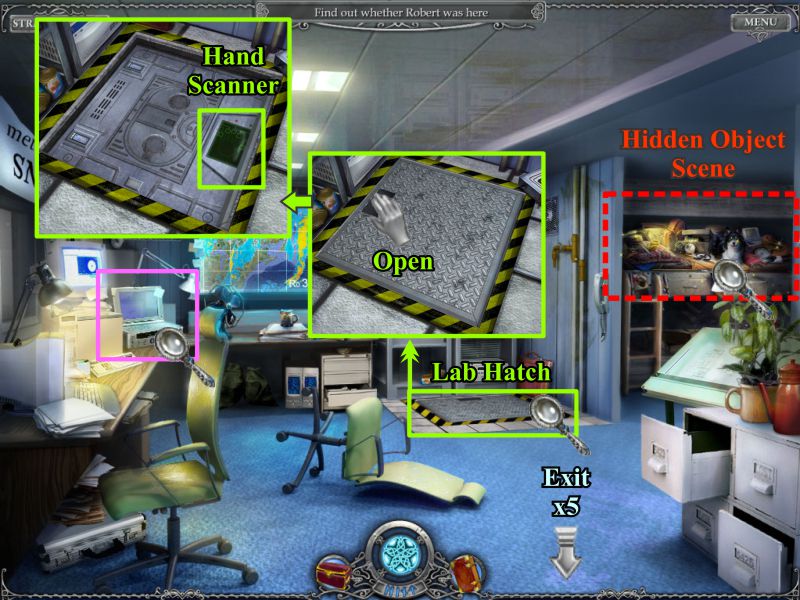
Weather Station
Zoom in on the Lab Hatch and try to open it to discover that you need a Hand Scanner.
Look at the Desktop to find out you need a videotape; play the Hidden Object Scene.
Screenshot
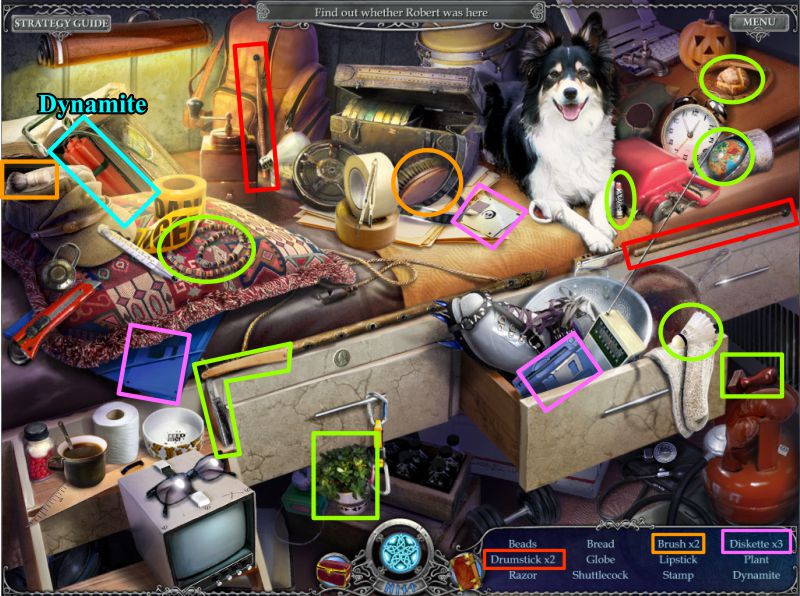
Corner Stuff Hidden Object Scene
Once you find all the stuff in the corner, you will get some Dynamite.
Screenshot
Epona Hall
Go to Epona Hall and touch the elevator horse.
The horse will fall to the floor below, so place your rope ladder to descend below.
Cross the drawbridge to the Corridor.
Screenshot
Epona Hall Corridor
Zoom in on the blocked passage and place your dynamite. It will self-detonate, revealing a Hidden Object Scene.
Screenshot
Epona Hall Corridor Hidden Object Scene
You will get a Caulking Gun with silicone when you complete the scene.
Screenshot
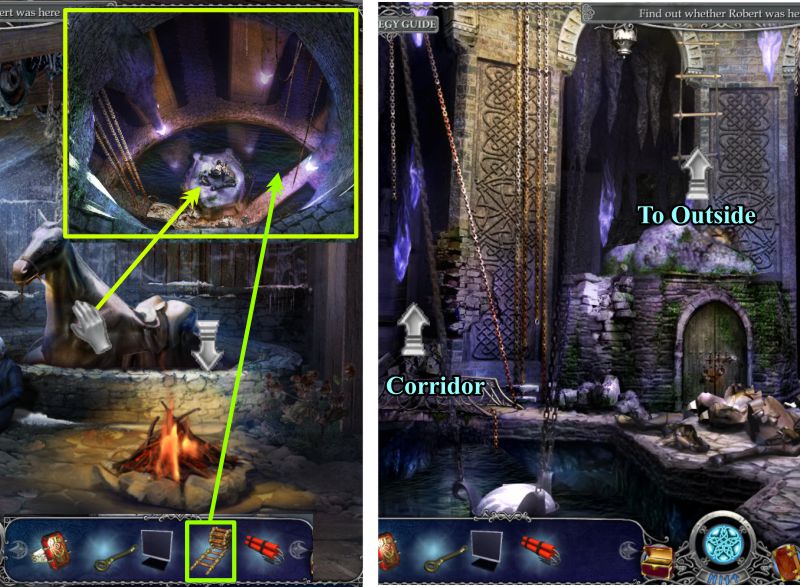
Fort Ruins
Exit to the rope ladder, go up and forward until you are across the bridge.
Choose to go forward at the right of the scene to the Ruins.
Check the hole at the left of the scene and discover a man holding on there. He will talk to you and then slip down the hole.
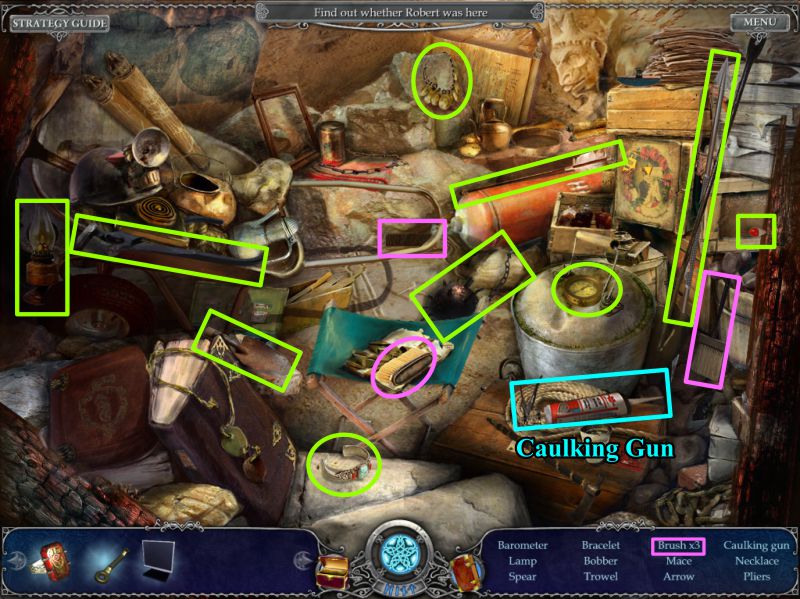
Grab the Gas Tank and click on the Ancient Altar.
You have triggered a Mini Game lock. Your goal is to remove all the buttons by rotating the rings to line up groups of 3 in any of the 4 marked sections of the circle.
3 samples are shown in the screenshot.
Just keep rotating the rings until you match up 3 buttons. If you don't have sufficient buttons of a certain color, the game will give you more buttons until you complete it.
When you have completed the game, a pedestal will rise, producing a hand impression. Fill the hand impression with silicone from your Inventory via the caulking gun and then collect the hand mold.
Screenshot
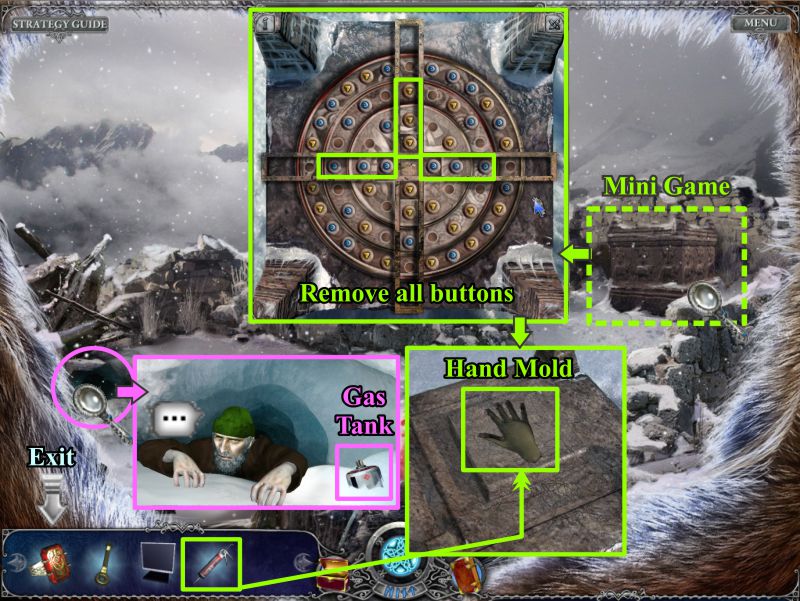
Weather Station
Return to the Weather Station.
Zoom in on the gas valve shown in pink in the screenshot.
Place the valve handle and the gas tank to fill the tank with gas.
Collect the filled tank and then click on the Lab Hatch.
You now have the hand mold you can use on the scanner, so place it to open the hatch.
Go down the stairs.
Screenshot
Lab Corridor
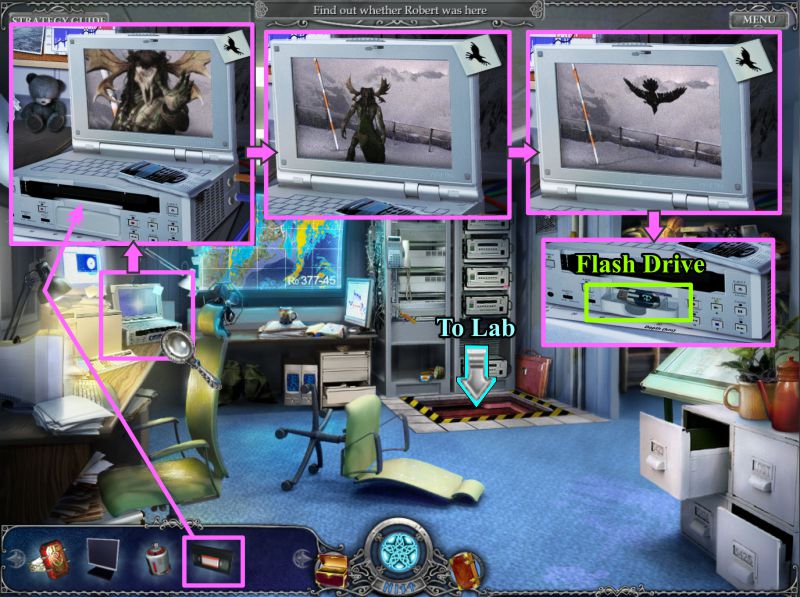
Click in the Weapons Handle and then the shelf to find out a flash drive is missing.
Play the Tool Stand Hidden Object Scene.
Screenshot
Tool Stand Hidden Object Scene
You will get a Hand Drill once you collect everything.
Screenshot
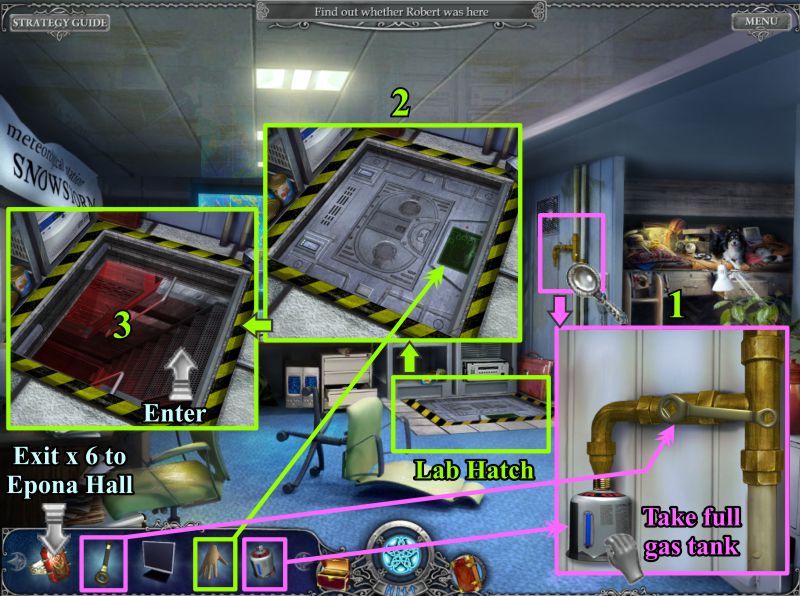
Epona Hall
Go to Epona Hall by going up the stairs to the Weather Station and clicking down 6 times.
Zoom in on the door and use the Hand Drill to remove the key from the lock.
Open the latch and enter through the door.
Zoom in on the area shown in the screenshot and discover Robert's glasses.
Pick up the Videotape, exit the stairwell and return to the Weather Station.
Screenshot
Weather Station
Zoom in on the Desktop and put the Videotape in the machine.
Watch Cernunno turn into a raven and fly away.
Take the Flash Drive and go down the Lab Hatch.
Screenshot
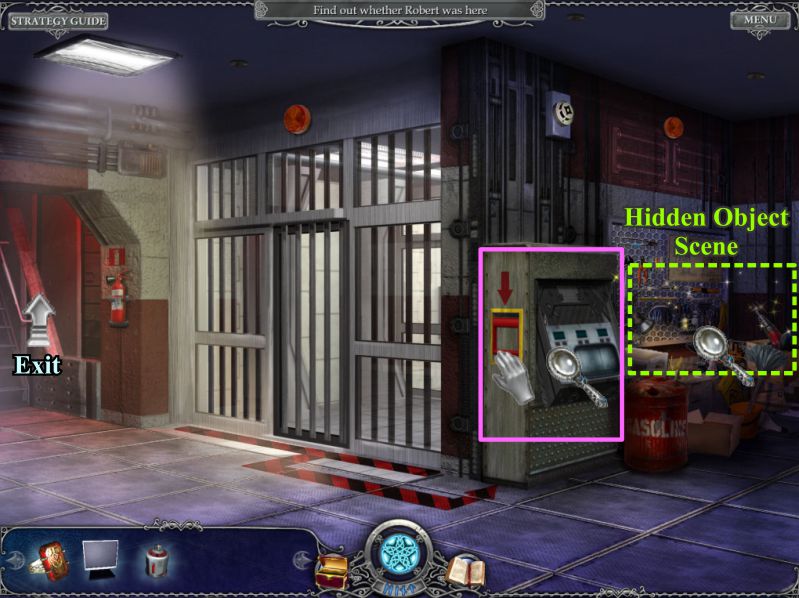
Lab Corridor
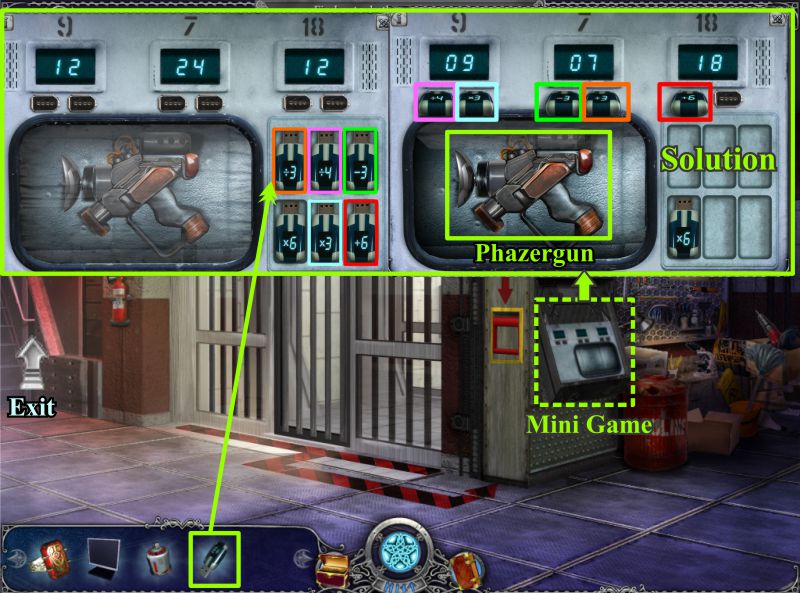
Click on the weapons drawer, or open it first if you didn't open it on an earlier visit to the corridor.
Place the flash drive in the empty slot to trigger the Mini Game.
Numbers will appear in the small screens below the numbers on top.
Your goal is to place the flash drives in the slots so that the screens match the numbers above.
The first one is 12 divided by 4 times 3 equals 9.
The second one is 24 minus 3 divided by 3 equals 7.
The third one is 12 plus 6 equals 18.
The drawer opens for you to take the Phazergun.
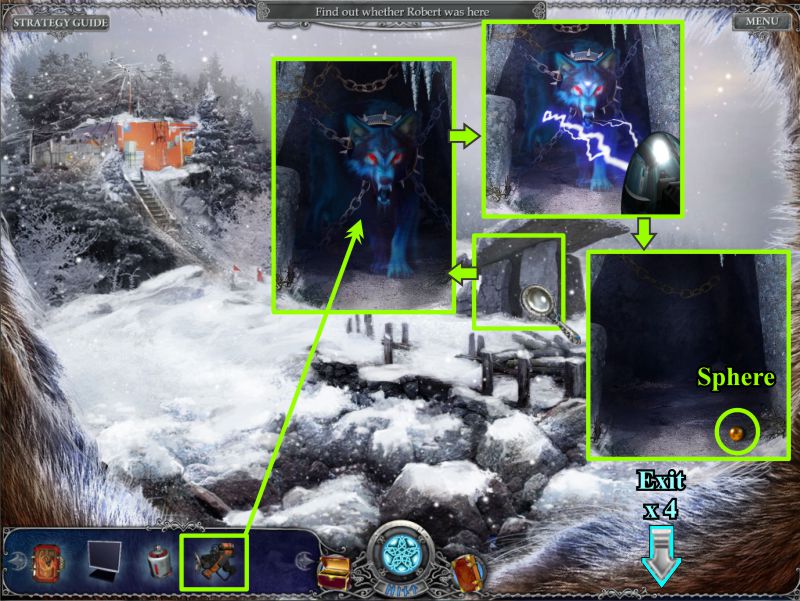
Exit back upstairs, go outside and down to the standing stone formation.
Screenshot
The Peak
Zoom in on the standing stones and the wolf-like creature chained inside.
Use your Phazergun on him and he will turn into a Sphere for you to collect.
Exit the area 4 times at the bottom of the screen.
Screenshot
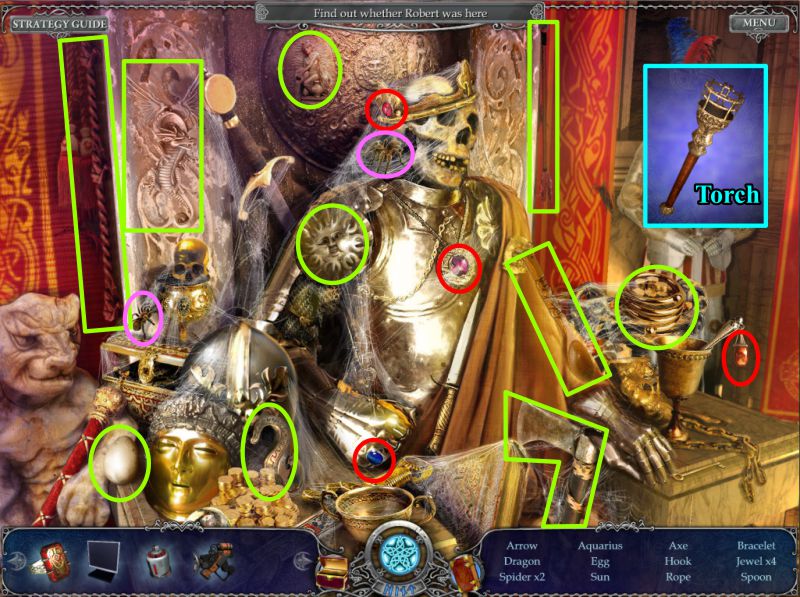
Throne Room
Go into the Crypt and down the stairs to the Throne Room.
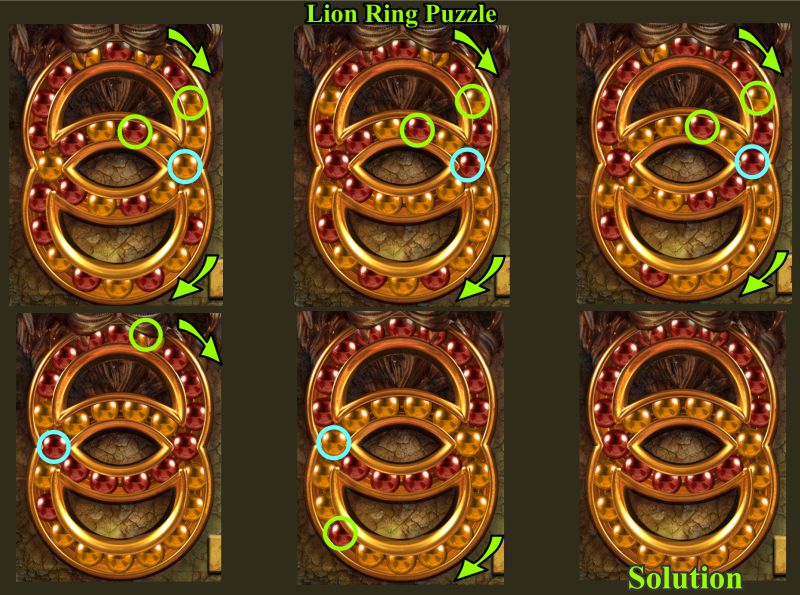
Zoom in on the Lion and place the Sphere to trigger a puzzle.
Your goal to to make the spheres in the rings match the diagram to the right.
If you wish to play the puzzle on your own, the solution is shown in the screenshot.
There is a Reset button if you need to use it.
If you require further help, there is a step-by-step solution that follows.
Once you have completed or Skipped the puzzle, the King will rise for a Hidden Object Scene.
Screenshot
Lion Ring Puzzle
The screenshot shows a step-by-step solution to the puzzle.
The arrows show how to rotate the rings.
The green circles show where the sphere begins and blue circle shows where it should end.
For the top row of pictures, move the top circle first and then the bottom one.
Screenshot
The King Hidden Object Scene
The lighted Torch you get for your Inventory is not part of the list you need to collect in order to get it.
Exit down twice, up the ladder in Epona Hall, go forward 5 times, and down the hatch to the Lab Corridor.
Screenshot
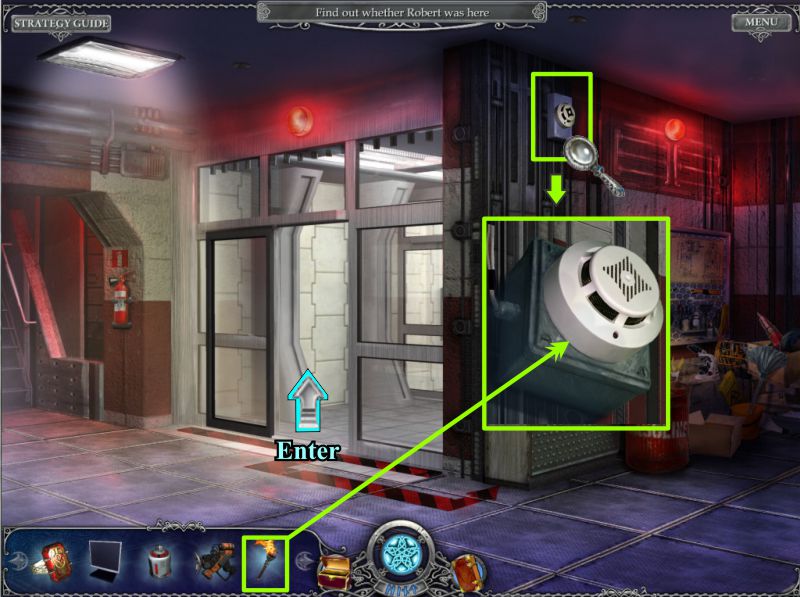
Lab Corridor
Click on the smoke alarm and place the lit torch to trigger the alarms and open the Lab Door for you to enter.
Screenshot
The Lab
Zoom in on the Capsule on the right.
Your choice what you want to do with the entity in the capsule.
I tried 3 different scenarios and it didn't seem to make a difference, so you can use the buttons to release it, destruct it, or just do nothing.
Your reason for going there is to grab the Gas Burner next to the capsule.
Zoom in on the Scientist's Desk and place the Monitor from your Inventory.
Press the icon to unlock the Weather Balloon and exit outside to the balloon.
Screenshot
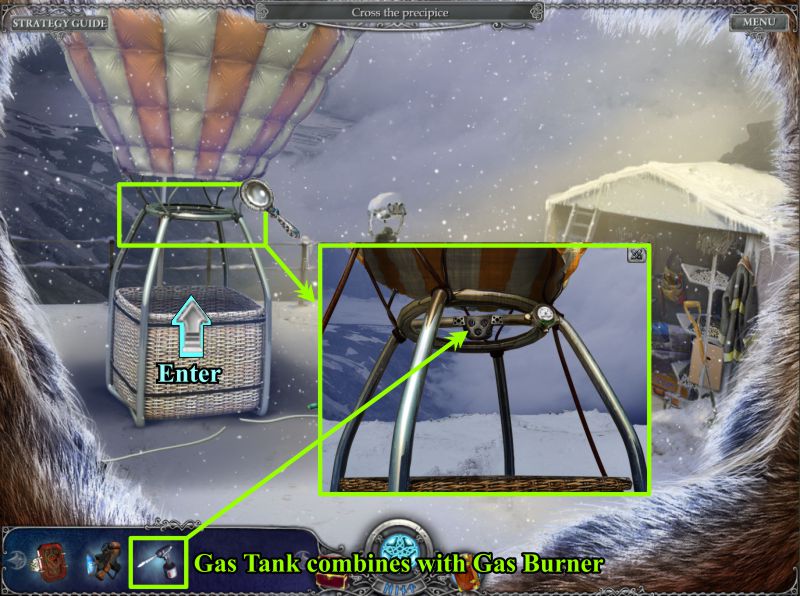
Weather Balloon
When you collected the Gas Burner, it combined with the Gas Tank you already had in your Inventory.
Zoom in on the balloon and place the burner and tank.
Enter the balloon and take a ride.
Screenshot
Level 5: The Swamp
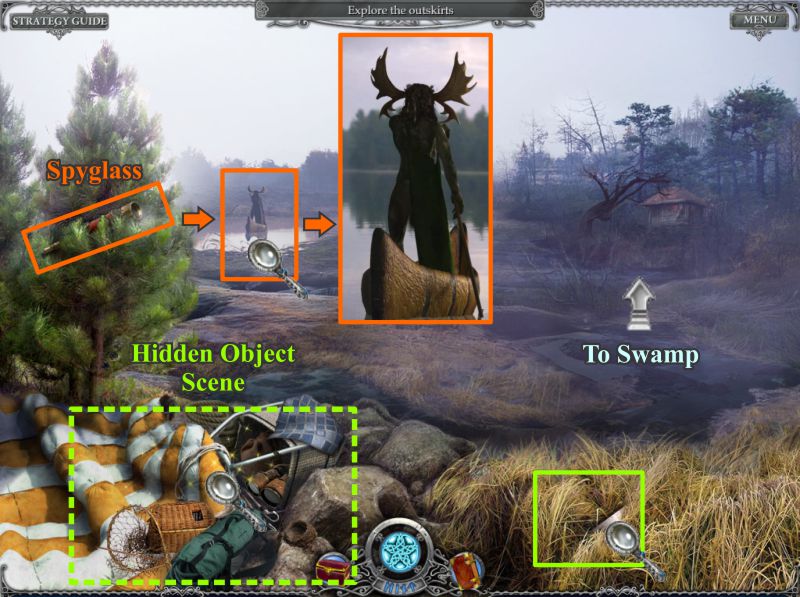
Swamp Outskirts
The balloon crash lands on the outskirts of a swamp.
Grab the Spyglass to take a look at what is in the water. It turns out to be Cernunno, who is going down river in a canoe.
There is something hidden in the tall grass at the right, but you cannot get it without a tool.
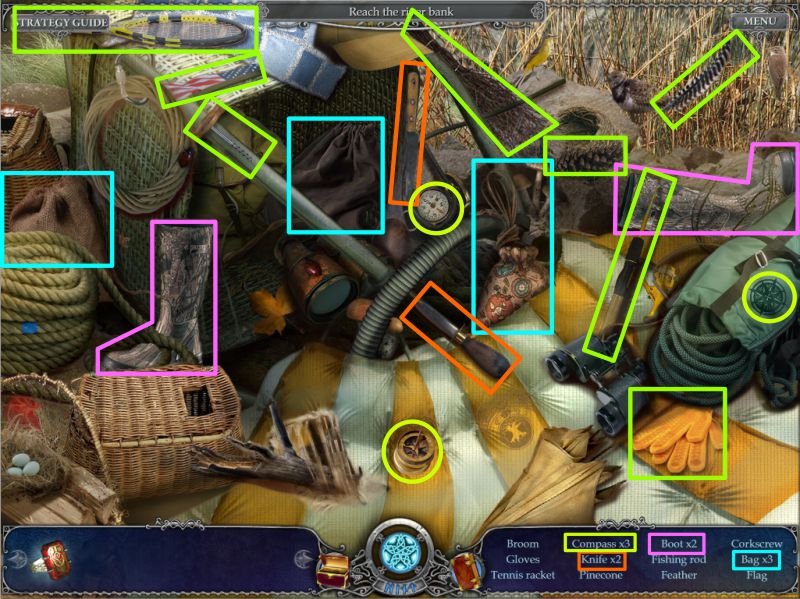
Play the Hidden Object Scene and then take off toward the Swamp.
Screenshot
Balloon Hidden Object Scene
Collect everything to get 3 bags.
Screenshot
Marshlands
Zoom in and pick up the Machete at the left. You can't reach the old box without help.
Zoom in on the edge of the swap at the right and place your 3 bags so you can cross to the other side.
Examine the weird tree and zoom in on the Hut door.
Click on it to get a page for your Diary.
Head up the path at the right.
Screenshot
Sawmill
Check out the cave; it's to dark to enter without a light.
Zoom in on the bushes ahead and use your Machete three times to clear the thicket.
Go into the Sawmill and check out the magnifying glasses.
Pick up the Scythe and head back to the balloon.
Screenshot
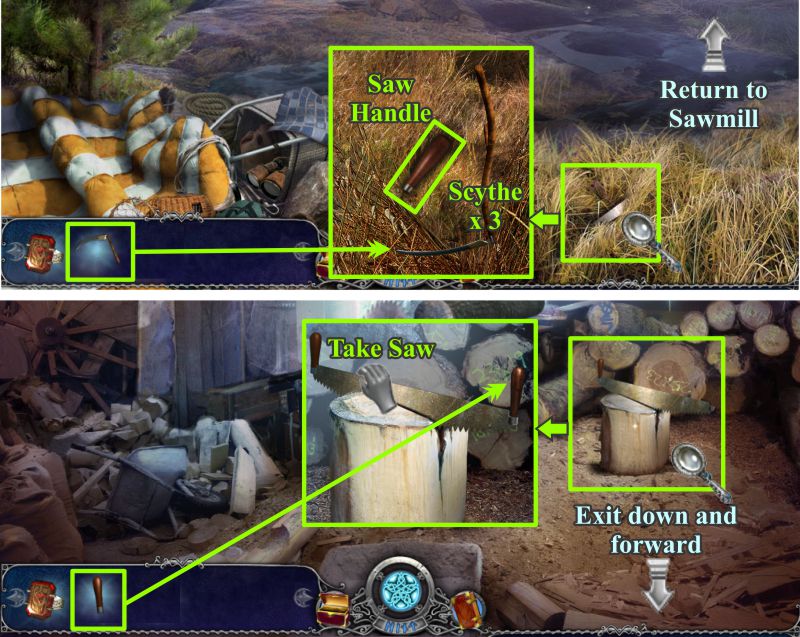
Swamp Outskirts
Zoom in on the tall grass and use the Scythe three times to clear the area.
Pick up the Saw Handle and head back to the Sawmill.
Zoom in and place the Saw Handle on the saw.
Exit the Sawmill and go forward through the clearing to the River.
Screenshot
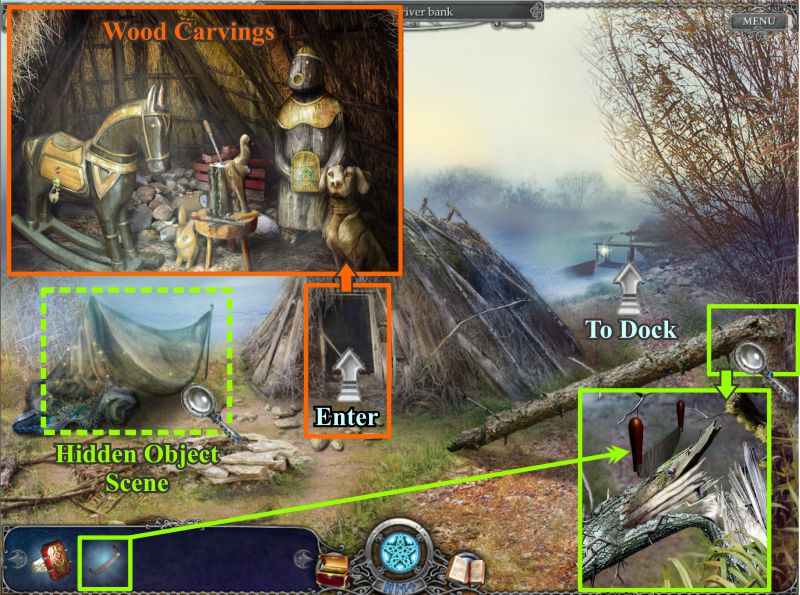
The River
Zoom in on the broken tree and use the saw to cut some wood.
Peek in the shack to see the wood carvings.
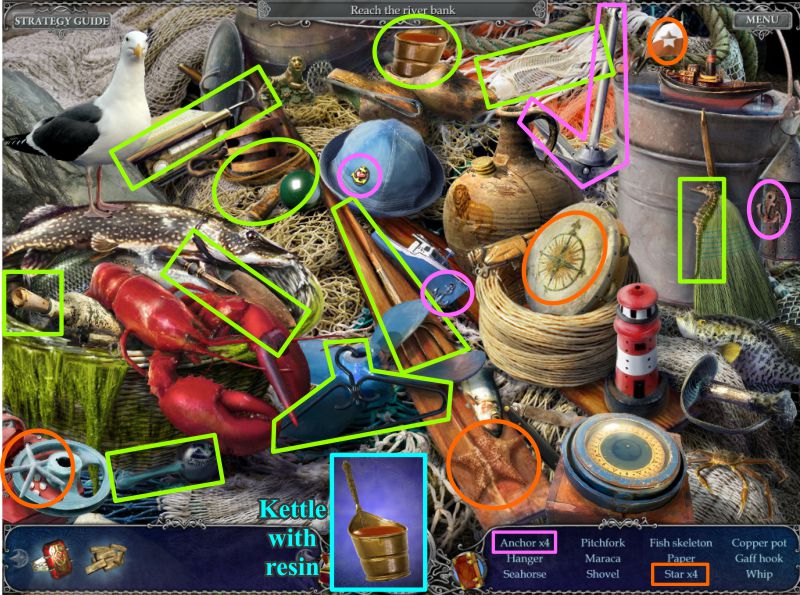
Play the Hidden Object Scene, and then go forward to the Dock.
Screenshot
River Hidden Object Scene
Collect everything, and you will be presented with a Kettle of Resin.
Screenshot
The Dock
Just as you get to the Dock, Cernunno surrounds the boat in ice.
Check out the missing windlass and zoom in on the Dock.
Take the Screwdriver and head back to the Hut by the Swamp.
Screenshot
The Dock
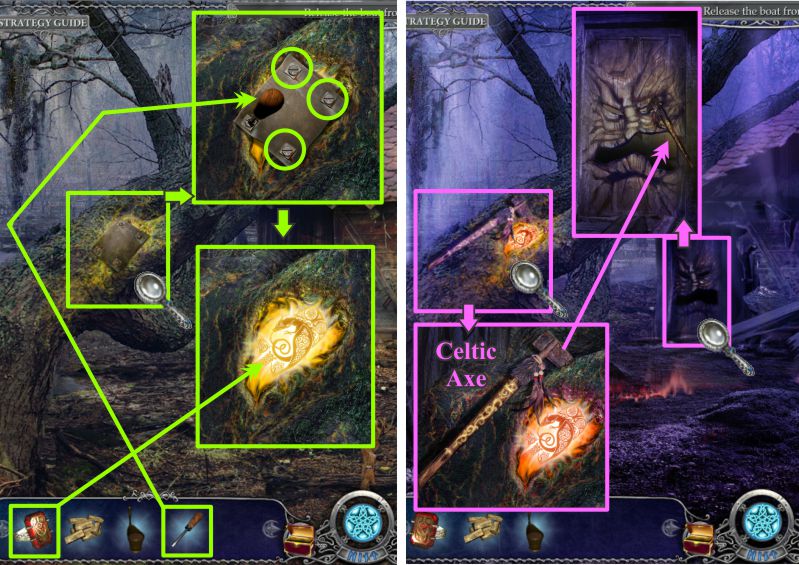
Zoom in on the weird tree and remove the screws with your screwdriver.
There is a dragon symbol underneath, so place your ring on it and watch the scene change.
Zoom in again on the tree and pick up the Celtic Axe.
Go to the door and use the Celtic Axe on the demon.
Screenshot
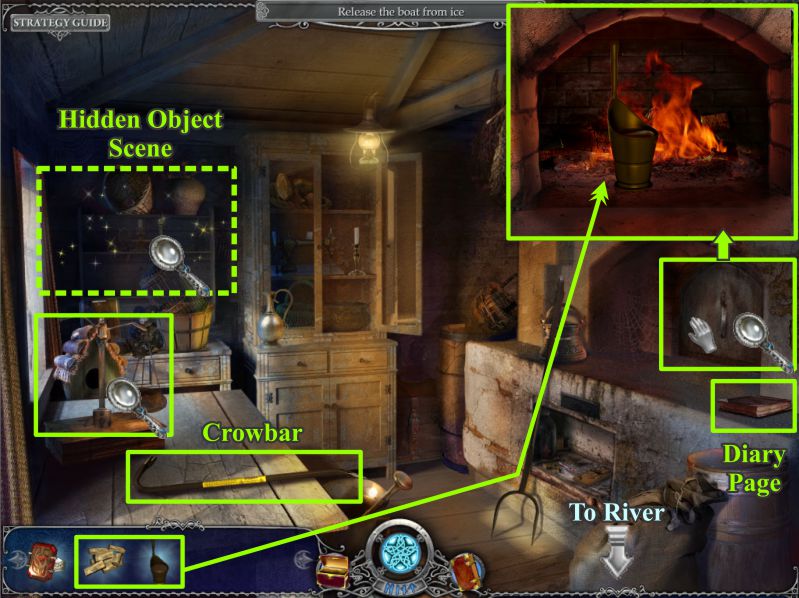
The Hut
The evil has been removed, so enter the Hut.
Pick up the Crowbar and click on the old book to get a Diary Page.
Open the oven door, place your wood to start a fire, and put the resin kettle in front of the fire.
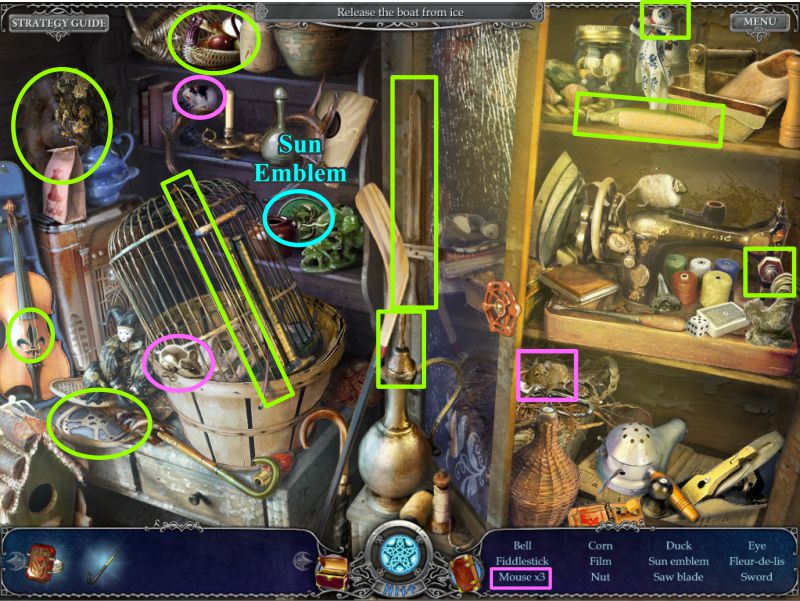
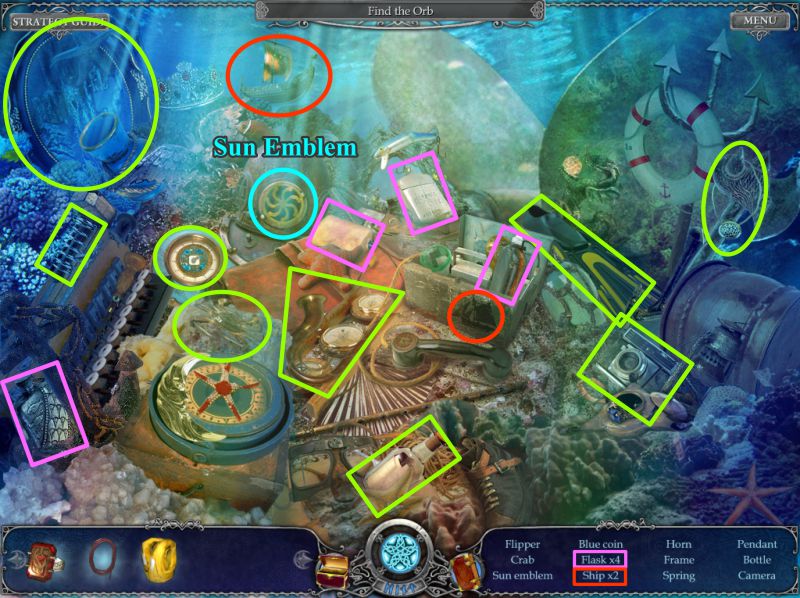
Check out the scale to see a pan is missing, and play the Hidden Object Scene.
Screenshot
Hut Hidden Object Scene
Once you collect everything, you will get a Sun Emblem.
Go to the River and enter the shack.
Screenshot
Woodcarving Puzzle
Zoom in on the woodcarving marked in the screenshot and place the Sun Emblem.
Your goal is to rearrange the emblems chronologically from the oldest to newest light source.
Move and emblems around the circle and into the slots using the slot at the bottom as a spare space to temporarily store the emblems.
Take the lamp inside the opening and head to the Cave.
Screenshot
The Cave
Zoom in on the Cave and place the lamp.
Enter the cave and check out all the magnifying glasses.
Take the Scales Pan from the close up of the cave drawings.
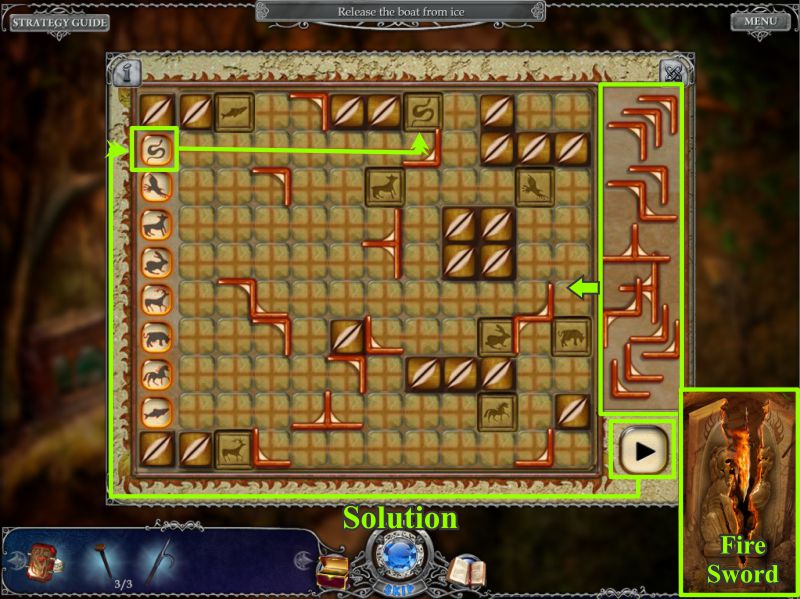
Grab the Boat Hook and play the Mini Game.
Screenshot
The Fire Dog Mini Game
Your goal is to place at the emblems at the left in their respective places on the board.
Use the orange barriers at the right to set up a track to direct where they travel.
Once you have the track set up, as shown in the screenshot, press the black triangular button in the lower right corner to send the emblems on their way.
The fire dog image will split apart at the end, so take the Fire Sword.
Screenshot
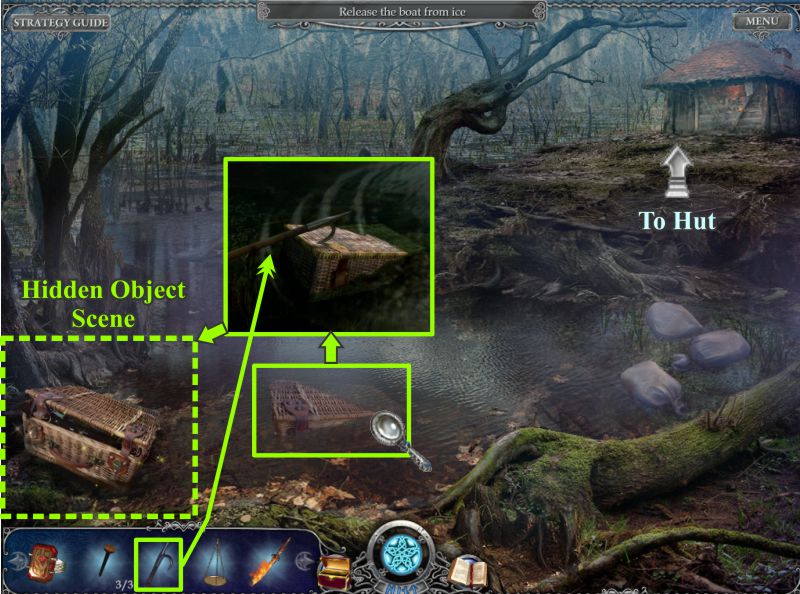
The Marshlands
Exit the Cave and head down to the Marshlands.
Zoom in on the old box and use the boat hook to retrieve it.
Play the Hidden Object Scene and then go to the Hut.
Screenshot
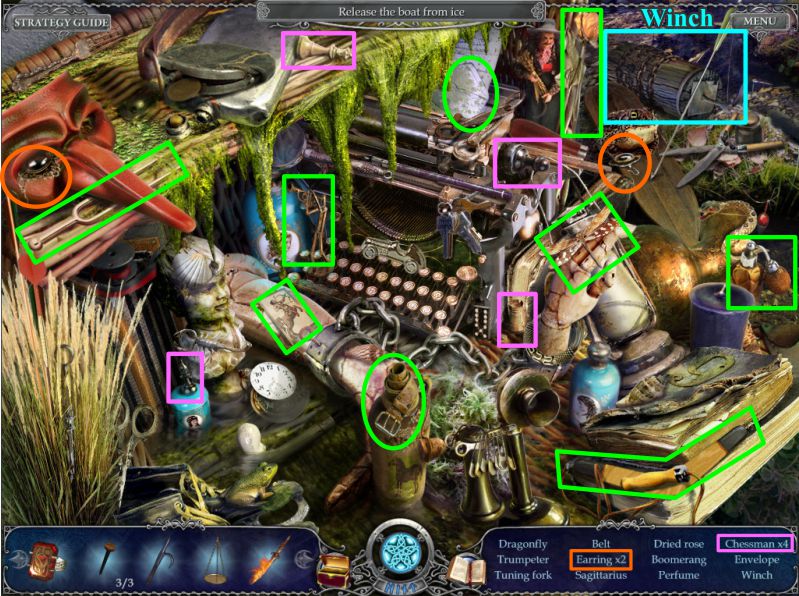
Old Box Hidden Object Scene
When you have collected everything, you will have a Winch for your Inventory.
Screenshot
The Hut
Zoom in on the fire and resin and use the boat hook to push the resin kettle into the fire.
The molten resin will go into your Inventory.
Zoom in on the Scale at the left and place the pan.
Place the weights on the pans so the scale is balanced.
See the screenshot for a color-coded solution.
A drawer opens, so take the coin.
Screenshot
The Cave and River Shack
Go to the Cave and zoom in on the hand organ.
Place the coin in it and the pictures will switch producing a key in an open drawer.
Take the Key and go to the River Shack.
Zoom in on the rocking horse and use the key to open the lock.
Take the Hammer and head off to the Dock.
Screenshot
The Dock
Zoom in on the boat and place the Fire Sword in the ice to melt it.
Go to a close up view of the windlass and place the Winch.
Screenshot
Turn the winch and it will haul in the boat.
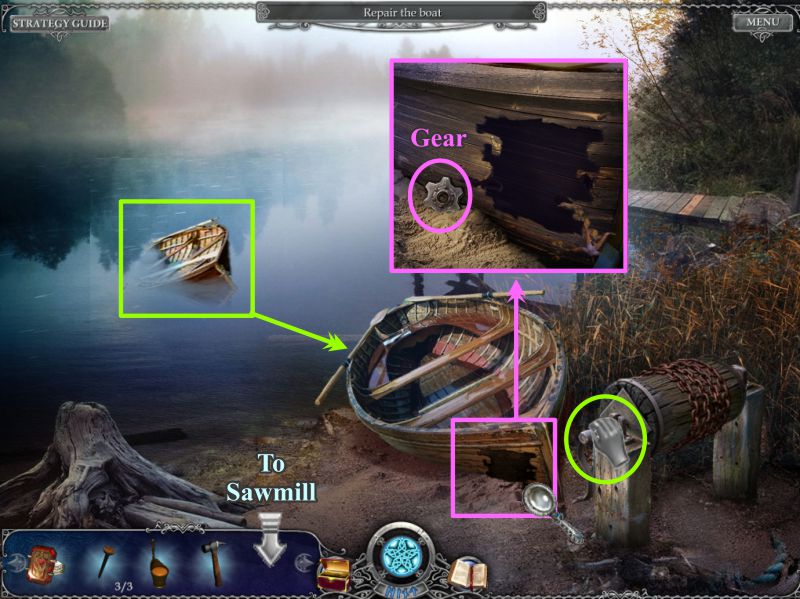
Zoom in on the hold in the boat and take the Gear.
Go to the Sawmill.
Screenshot
Sawmill
Zoom in on the saw mechanism and place the gear to trigger a Mini Game.
Your goal is to arrange the gears so the saw will run.
See the screenshot for the solution.
The saw starts up and cuts the log on the table into boards that go into your Inventory.
Return to the Dock.
Screenshot
The Dock
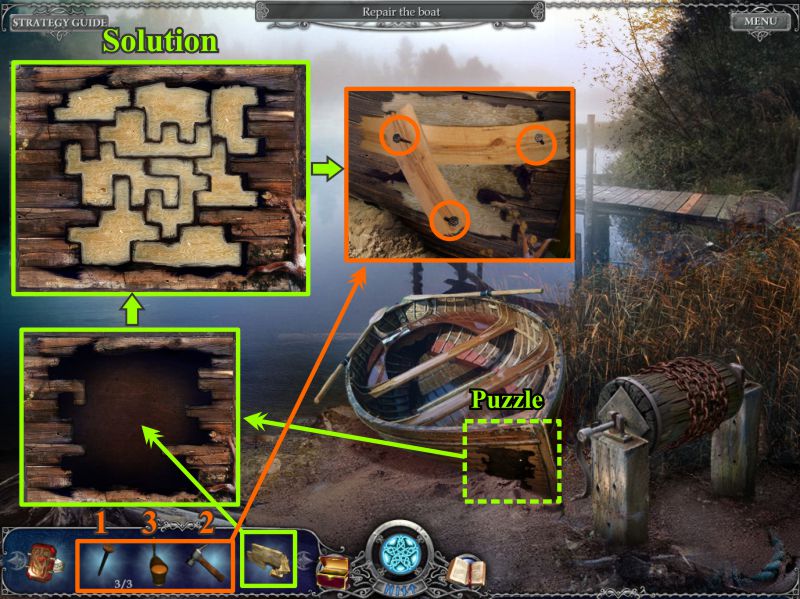
Zoom in on the hole in the boat and place the boards to trigger a puzzle.
Put the puzzle pieces together as shown in the screenshot solution.
Zoom in on the patch in the boat and place your 3 nails on the boards.
Hammer the nails in and apply the resin.
You are now ready for a ride on the River.
Screenshot
Level 6: Before the Falls
Pontoon Dock
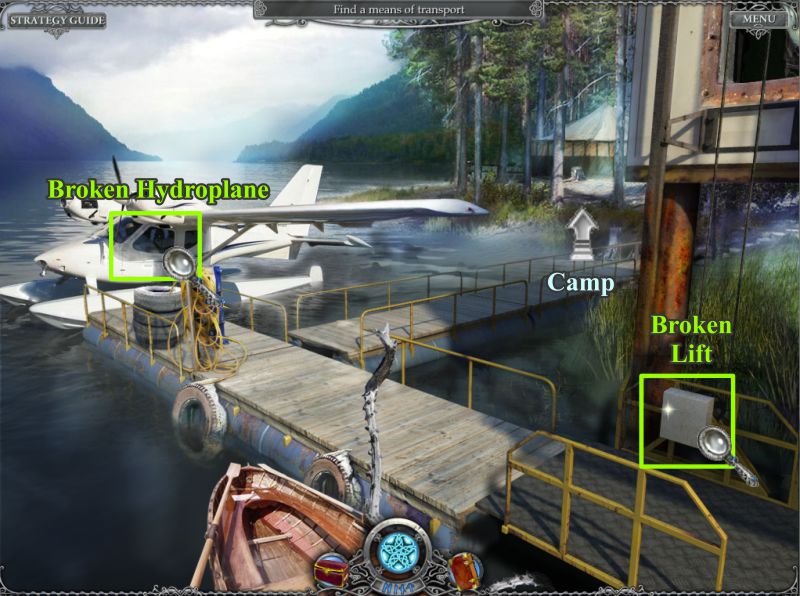
You barely make it to shore before you would have gone over a waterfall.
There is a broken life and broken hydroplane, so head up the Dock to what turns out to be a Camp.
Screenshot
Camp
Check the Information Board to get a Diary Page and pick up the Watering Can.
Note the Ritual Circle and entrance to Underwater Gateway.
Take the path past the truck up to the Tower.
Screenshot
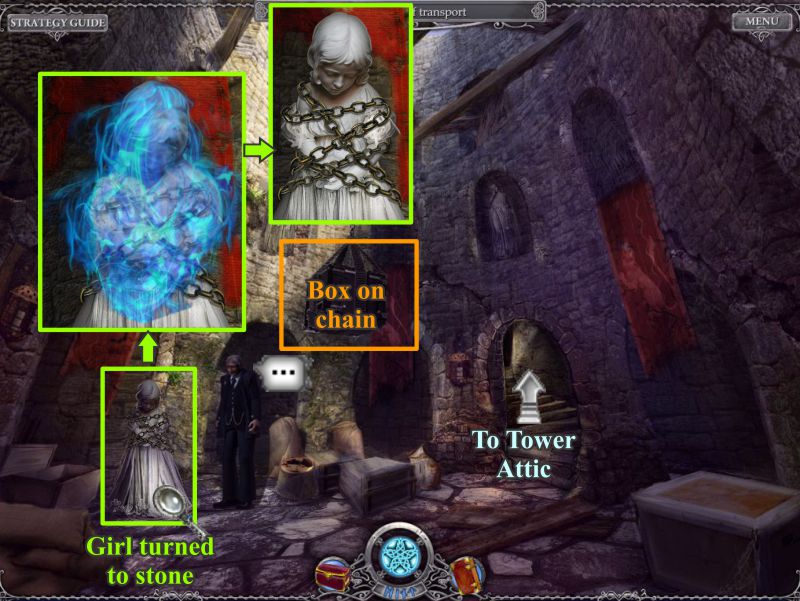
Tower
Talk to Mr. Grays, the man you saved at Epona Hall, to discover that the girl turned to stone is the daughter he asked you to save.
Click on her and view what happens.
Note the box on the chain and go up the stairs to the Tower Attic.
Screenshot
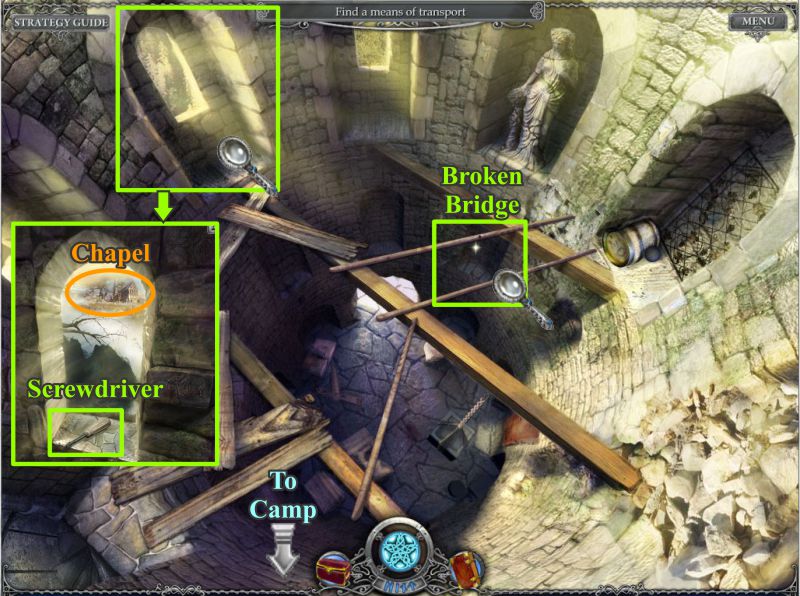
Tower Attic
Note the broken bridge and zoom in on the niche at the left. You can see the Chapel where you started your quest.
Take the Screwdriver and go back to Camp.
Screenshot
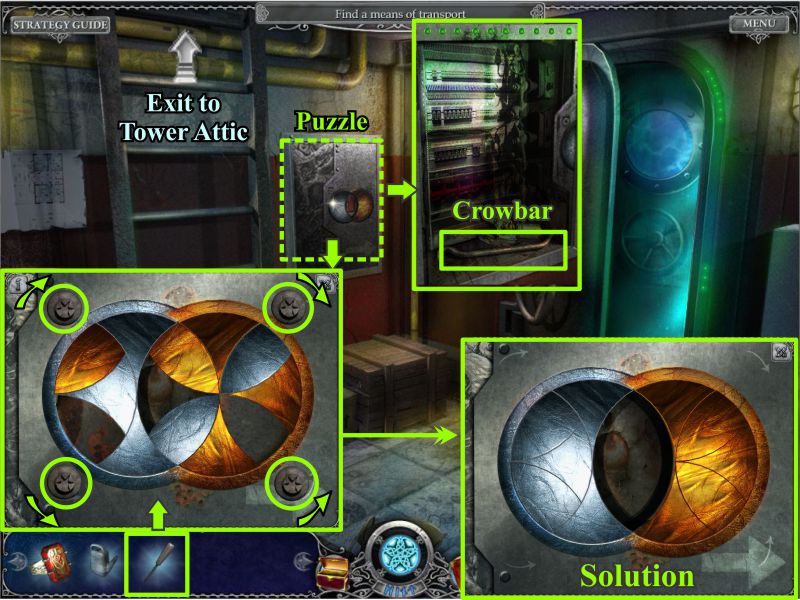
Underwater Gateway
Go down the ladder to the Underwater Gateway and zoom in on the board for a puzzle.
Place the screwdriver from your Inventory on any of the screws to trigger the puzzle.
Your goal is to make the pattern so it is all silver on the left and all gold on the right,
Click the 4 screws and the screwdriver will appear to turn them in the directions shown.
The metal sections will then transfer until you get the solution shown in the screenshot.
The mechanism will open for you to take the Crowbar, and go to the Tower Attic.
Screenshot
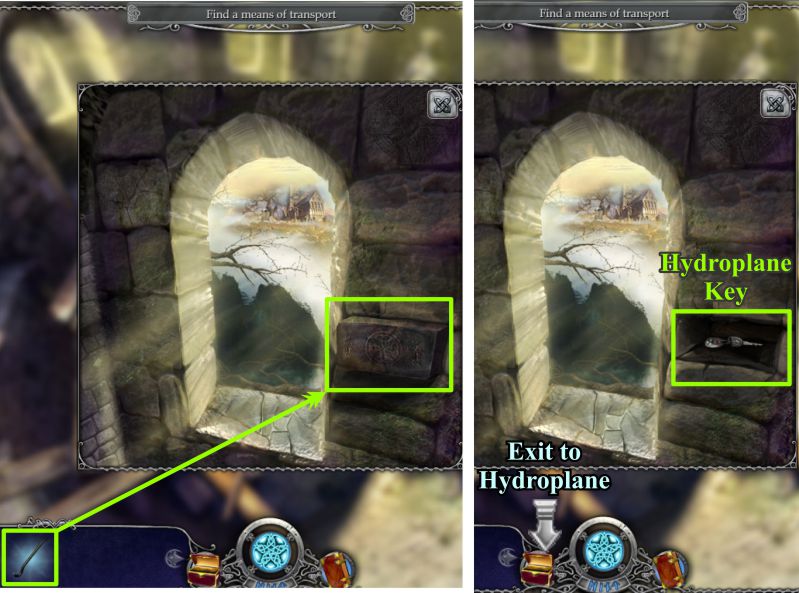
Tower Attic
Zoom in on the niche at the left and use the crowbar to remove the loose stone.
Take the Hydroplane Key and head off to the Hydroplane.
Screenshot
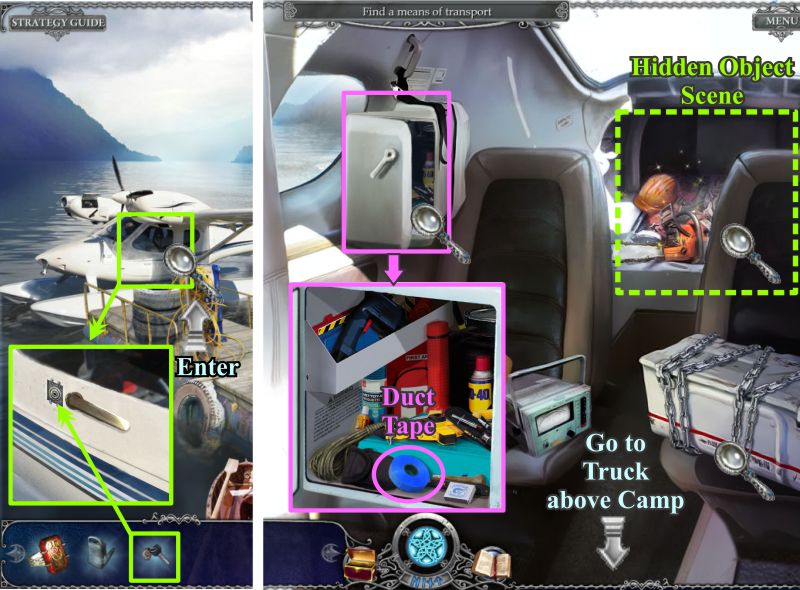
Hydroplane
Zoom in on the door and use the key to open it and go inside.
Check out the chained footlocker and zoom in on the storage compartment.
Take the Duct Tape, and go play the Hidden Object Scene.
Screenshot
Hydroplane Hidden Object Scene
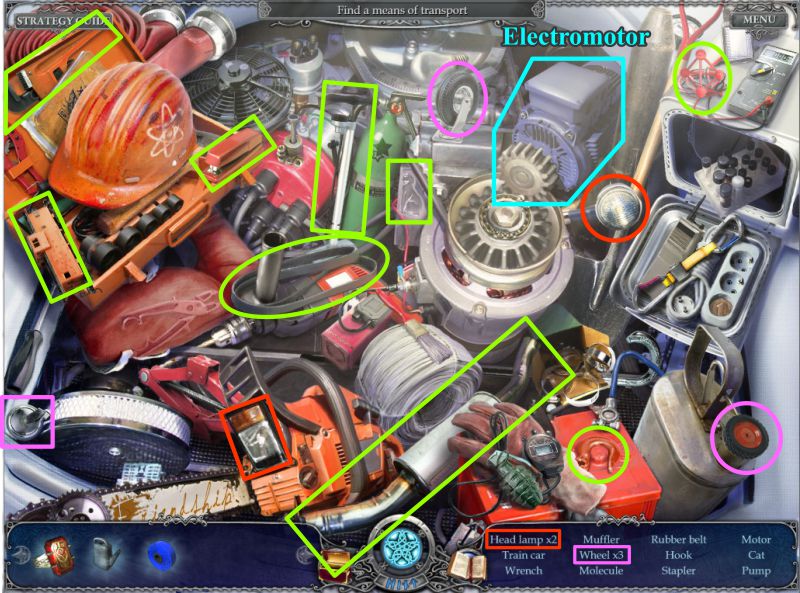
Collect everything to get the Electromotor.
Head off to Camp and go to the Truck.
Screenshot
Truck
Zoom in on the truck's engine and place the electromotor.
The lift will rise so you can enter the Cave.
Screenshot
Cave City
Zoom in on the lighting apparatus and take the Lift Switch.
You can't drain the standing water because the pump needs a part, so go to the back and enter the smithy shop.
Talk to the man turned into wood and touch the leaf to get a Diary Page.
Go to the Pontoon Dock.
Screenshot
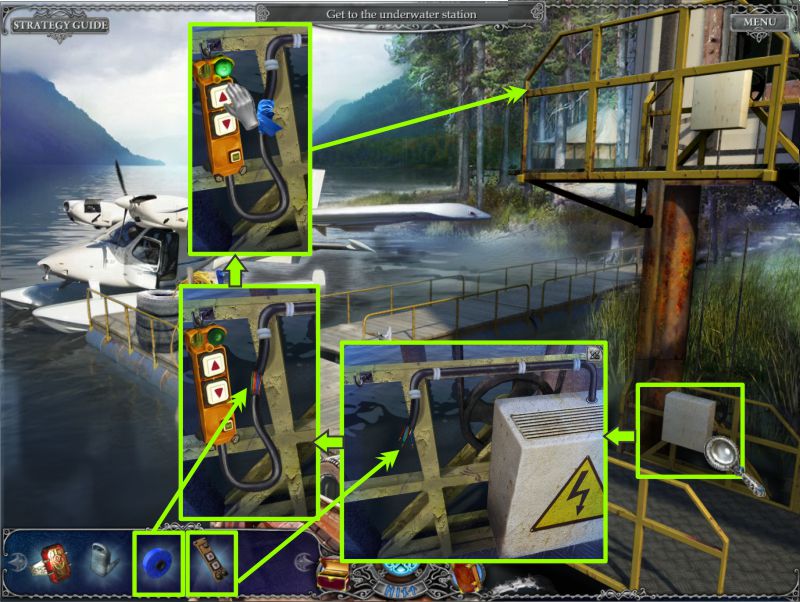
Lift
Zoom in on the Lift and place the Lift Switch.
Tape the exposed wires with your duct tape, and press the top button.
The Lift will rise for you to access the Water Station.
Screenshot
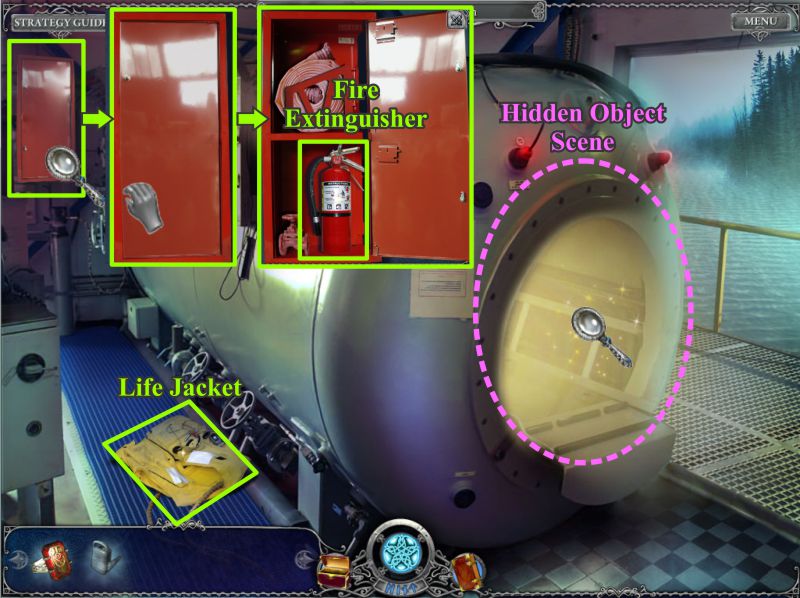
Water Station
Pick up the Life Jacket and zoom in on the red cabinet.
Open the cabinet and take the Fire Extinguisher.
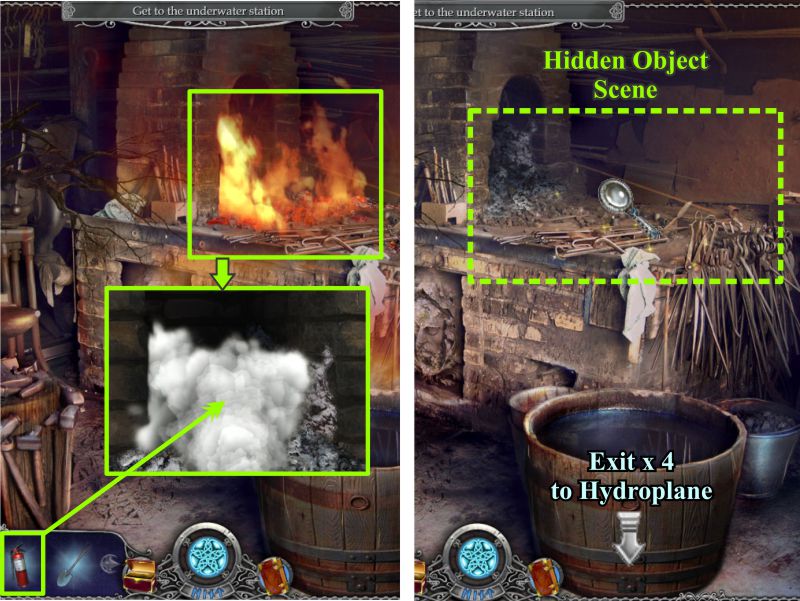
Play the Hidden Object Scene in the tube.
Screenshot
Tube Hidden Object Scene
There are two shovels to find on your list of items.
When you have collected everything, you will get the one shovel for your Inventory.
Screenshot
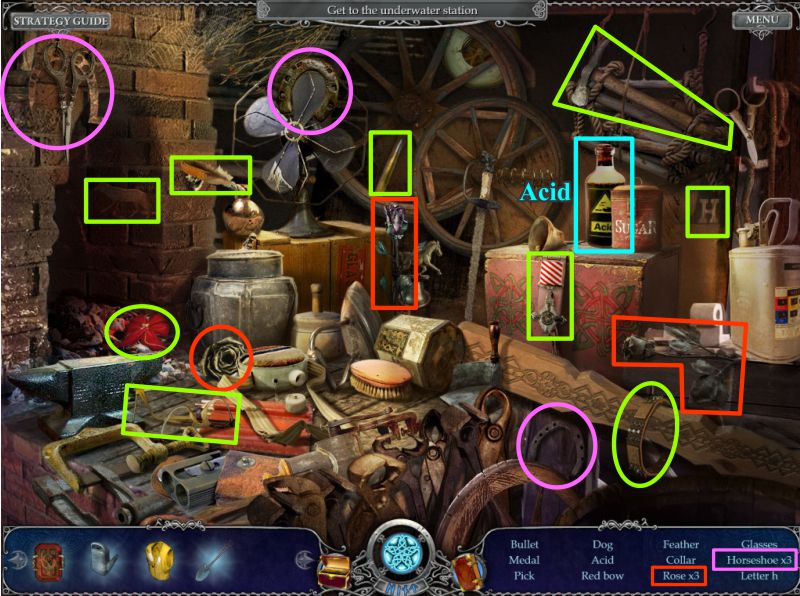
Cave Smithy Shop
Use your fire extinguisher to put out the fire so you can trigger and play a Hidden Object Scene.
When you have finished, go to the Hydroplane.
Screenshot
Workbench Hidden Object Scene
You will get a container of Acid once you collect everything.
Screenshot
Hydroplane
Zoom in on the footlocker and use the acid on the chains.
Move everything inside the footlocker out of the way so you can collect 12 boards.
Go to the Tower.
Screenshot
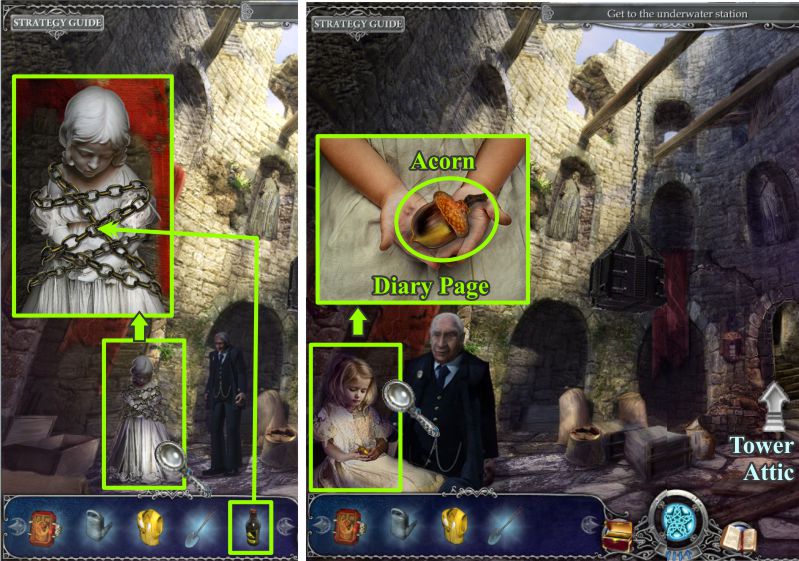
Save Mr. Grays' Daughter
Use the acid on the chains binding the little girl.
She will come back to life and talk to you about a special acorn.
Zoom in for a close up of her hands and take the acorn. You will also get a Diary Page.
Screenshot
Tower Attic
Go up to the Tower Attic and place the boards on the broken bridge to trigger a Mini Game.
Your goal is to arrange the boards as shown in the screenshot so that you can cross the bridge to the niche and get the wire.
Go to the Camp.
Screenshot
Camp
Zoom in on the Ritual Circle and use your shovel to dig a hole in the center.
Place the acorn in the hole and water it with your watering can.
The acorn will sprout with one very green leaf.
Take the leaf and go to the Smithy Shop in the Cave.
Screenshot
Cave Smithy Shop
Zoom in on the wooden man and place the Oak Leaf.
The tree will blossom, so zoom in the take the Aqualung you were promised.
Head back to Camp and down the ladder to the Underwater Gateway.
Screenshot
Underwater Gateway
Zoom in on the outside door behind the water-tight lock up.
Place the aqualung on the porthole, and you will be transmitted to the underwater scene.
Screenshot
Underwater Left
There are two sections to the underwater scene.
Check out all the things to look at that are shown in the screenshot and then go right.
Screenshot
Underwater Right
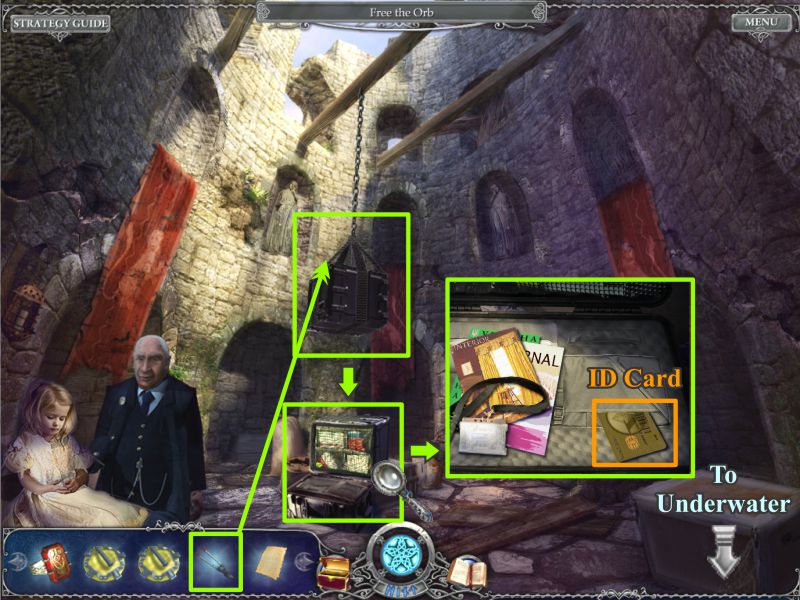
Check the mechanism to see you need to swipe an ID card to open it.
Zoom in on the cross and place the life jacket over the air bubbles to inflate it.
Play the Hidden Object Scene and then return to the left underwater scene.
Screenshot
Underwater Hidden Object Scene
Once you've collected everything, you will have a Sun Emblem.
Screenshot
Underwater Left
Zoom in on the slab holding the diver and place the inflated life jacket.
It will raise the slab for the diver to escape and for you to grab the Rotary Key.
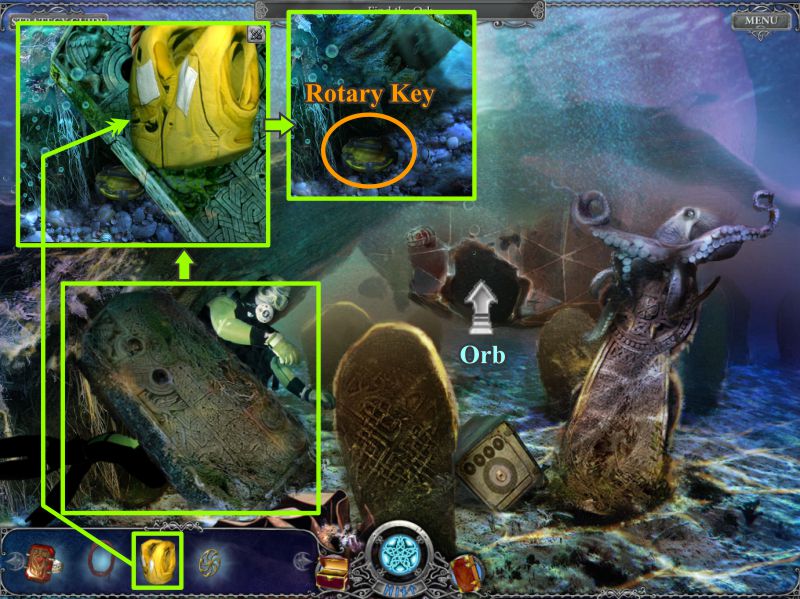
Go into the wreckage at the back to find the Orb.
Screenshot
Pick up another Rotary Key at the left, and click on the Orb mechanism to trigger a Mini Game.
Your goal is to arrange the dials so that they add up to the number plaques.
The numbers must match in both directions as shown in the screenshot in order for you to get the hose.
Return to the Underwater Gateway and talk to the diver before taking off to the Cave.
Screenshot
Cave City
Zoom in on the pump and place the hose. It will drain the water revealing a Mini Game.
Your goal is to press the stones in the correct order so that they stay depressed.
If you hit the wrong one in sequence, you will need to start over.
The solution is random and you will be rewarded with Bolt Cutters.
Go to the Cave Smithy Shop when you are finished.
Screenshot
Cave Smithy Shop
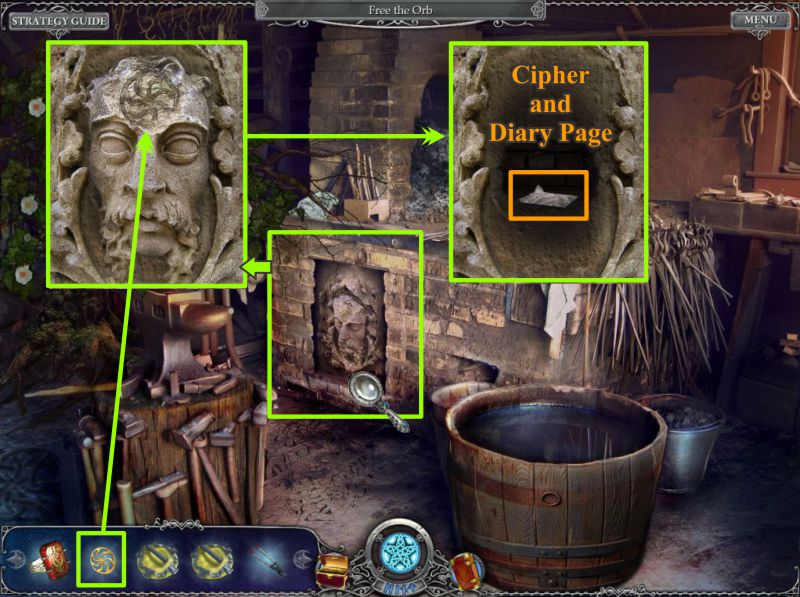
Zoom in on the bas relief.
Place the sun emblem in the indentation and a niche will open.
Take the Cipher Code and Diary Page before going to the Tower.
Screenshot
Tower
Use the bolt cutters on the box attached to the chain.
Zoom in on the plastic container inside and take the ID Card.
Go to the Underwater Gateway and enter the Underwater scene.
Screenshot
Underwater
Go right and zoom in on the mechanism.
Swipe the ID card and take the Rotary Key that is inside.
Return to the left side and zoom in on the safe.
Place the cipher on the safe to find out that L = R.
Turn the dial on the safe so that one set of L and R line up.
Turn the upper dials to read 4, 1, 3, 5, and the safe will open for you to collect the fourth Rotary Key.
Go to the Orb.
Screenshot
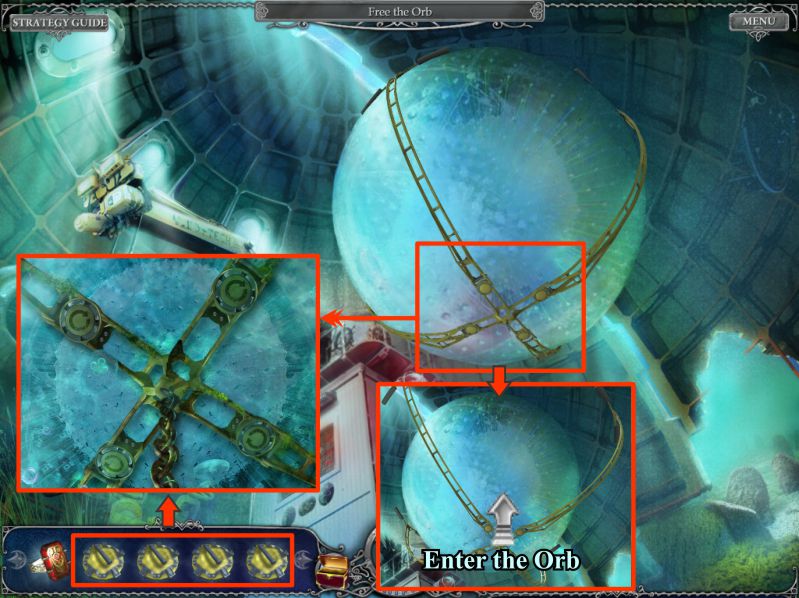
Unlock the Orb
Zoom in on the underside of the Orb and start placing the rotary keys.
Each time you place one, it will unlock a strap and you will have to zoom in again to place the next key.
Once all 4 straps are removed, enter the Orb.
Screenshot
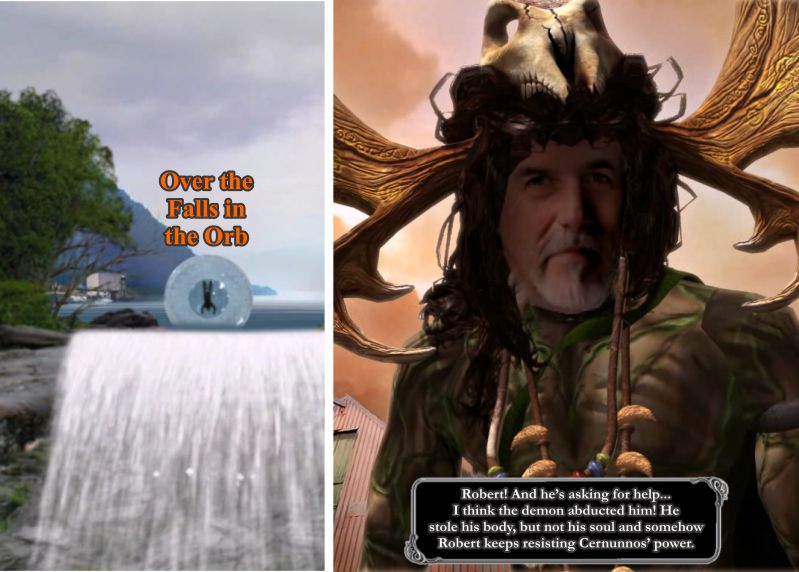
Over the Falls
You will be transported safely over the falls in the Orb, and arrive in Town just in time to see Robert dressed up like Cernunnos.
Screenshot
Level 7: The Town of Stithians
Dock
After having gone over the waterfall and run into Robert, you find yourself at the Dock in Stithians.
Something has happened to the town since you last saw it before the start of your adventure.
Fire is destroying the town.
Check out all the magnifying glasses marked in the screenshot.
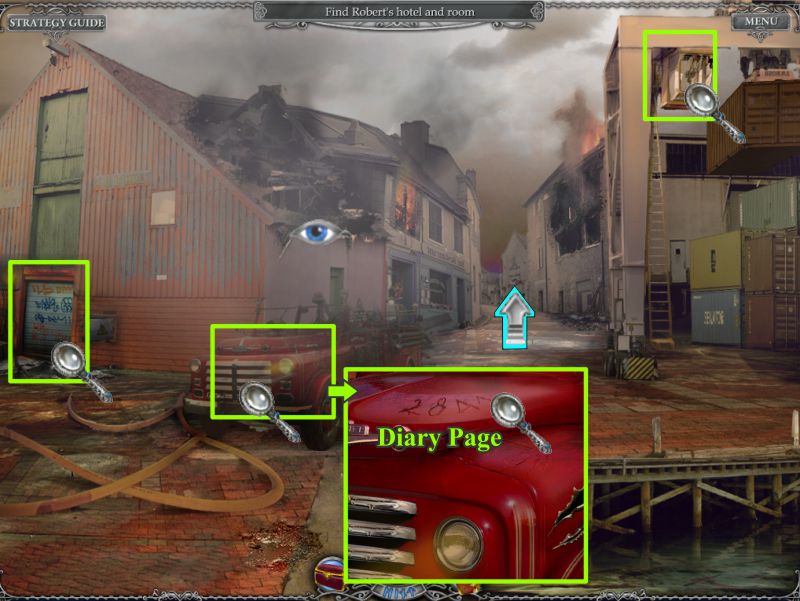
Zoom in on the fire truck and take the etched number for your Journal.
Screenshot
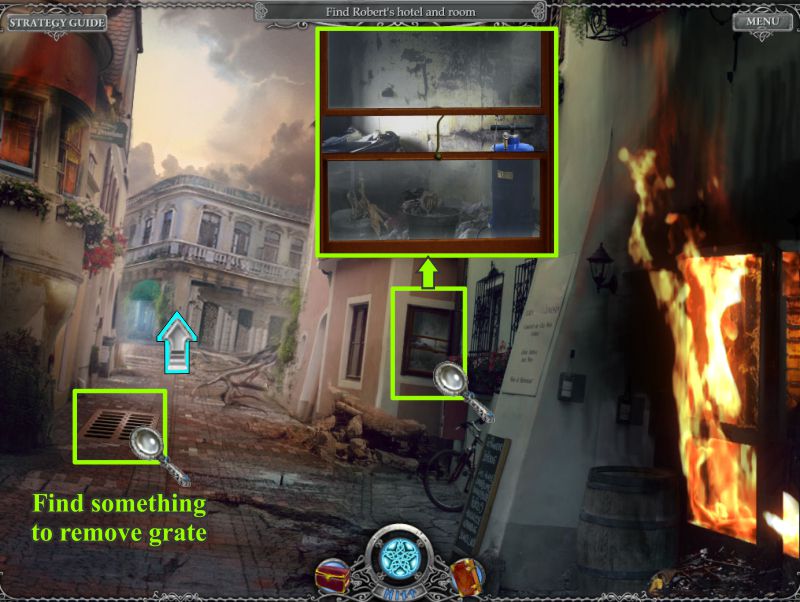
Street
Venture up the street and look at the window and sewer grate.
Continue on up to the crossroads outside the Hotel.
Screenshot
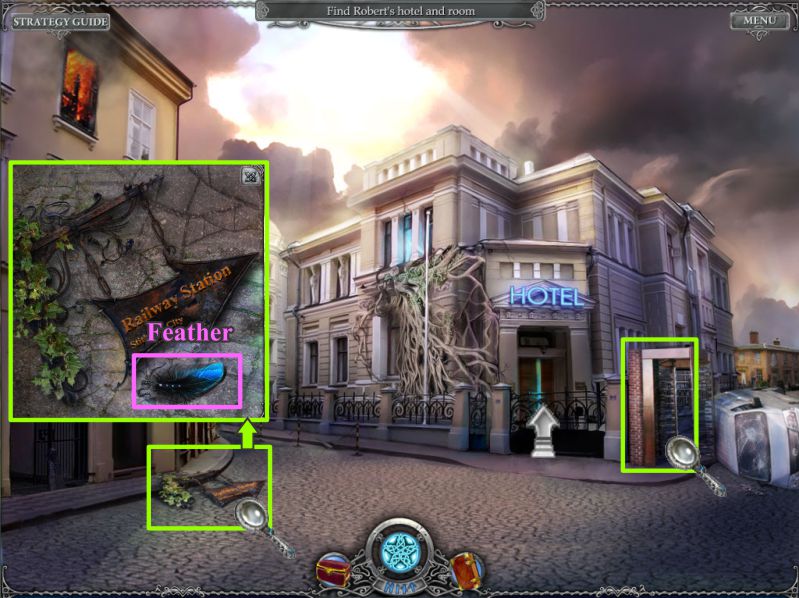
Outside the Hotel
Zoom in on the fallen Railway Station sign and take the blue feather.
Check out the Railway Station entrance to find out you need a ticket to proceed any farther.
Enter the Hotel.
Screenshot
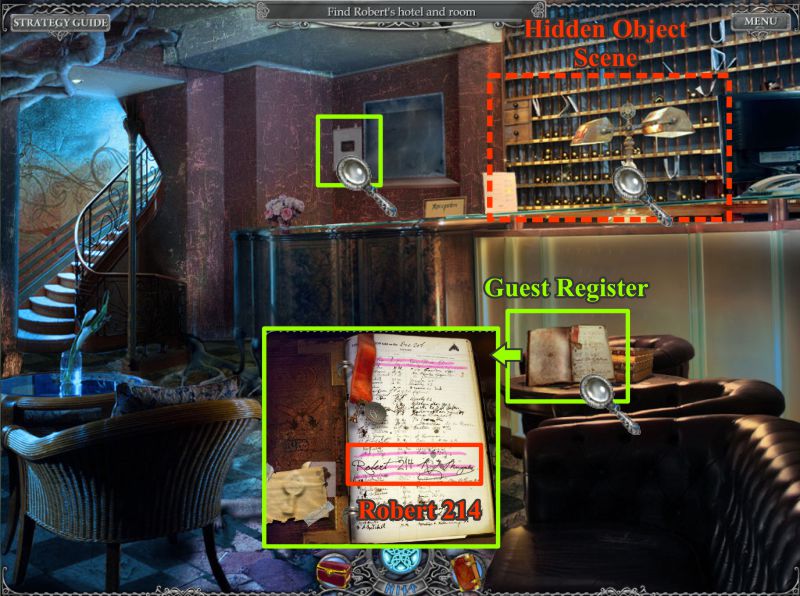
Hotel Lobby
Check out the Guest Book to find out what room Robert was staying in.
Note that you need to find a badge to work the lift.
Play the Hidden Object Scene.
Screenshot
Reception Hidden Object Scene
When you find all the objects, a Rubber Mat will be added to your Inventory.
Screenshot
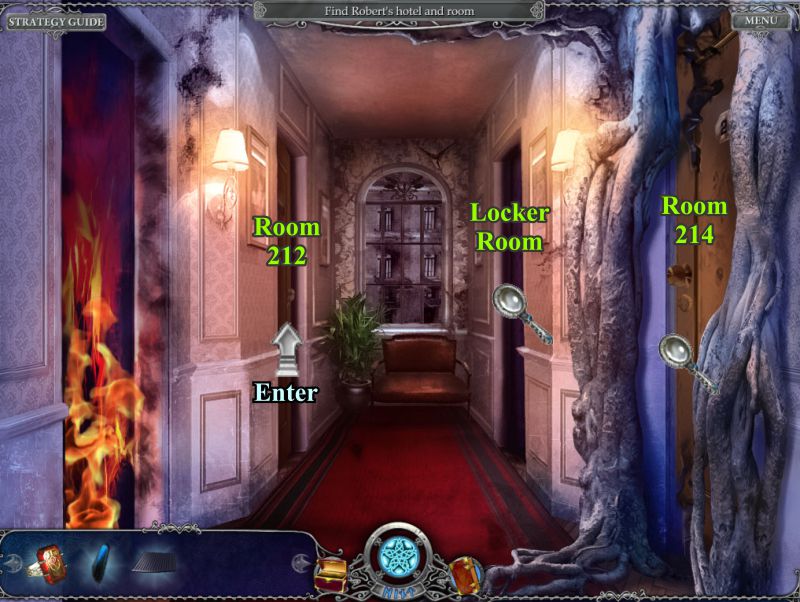
Corridor
Head upstairs, ignore the room on fire. Robert's Room is locked; you need a container to get sand in the Locker Room, so enter Room 212 across the hall.
Screenshot
Room 212
The radio on the piano is missing a keypad.
Zoom in on the armchair, and collect the Notebook and Ticket.
The Notebook will be recorded in your Diary.
Screenshot
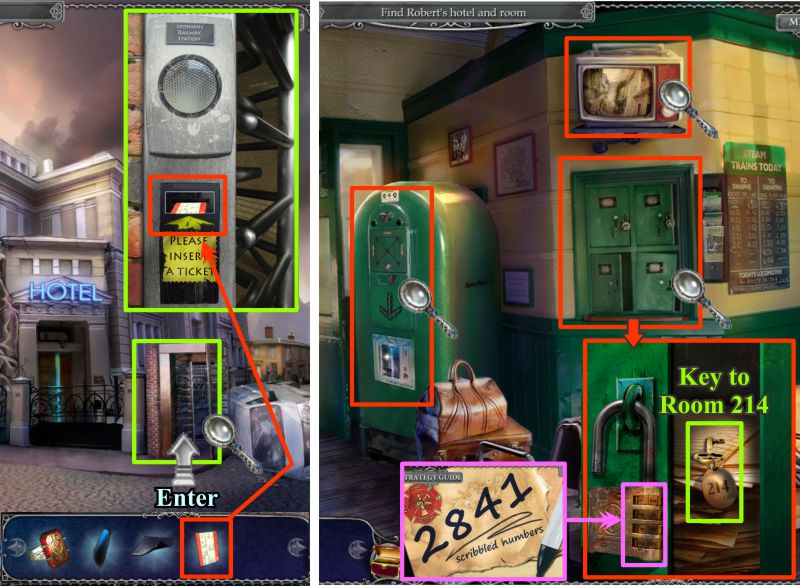
Railway Station
Go downstairs and outside to the Railway Station.
Zoom in and insert the ticket in the slot.
Have a look at the TV and vending machine, and zoom in on the lockers.
Enter 2841 (the number from the fire truck) on the combination lock, and take the key to Robert's Room.
Screenshot
Go through the door to the train platform.
Check out the Toolbox and locked Cabin.
Play the Hidden Object Scene before returning to the street and going to the Warehouse.
Screenshot
Baggage Hidden Object Scene
You will receive a Badge for your Inventory once you have collected everything.
Screenshot
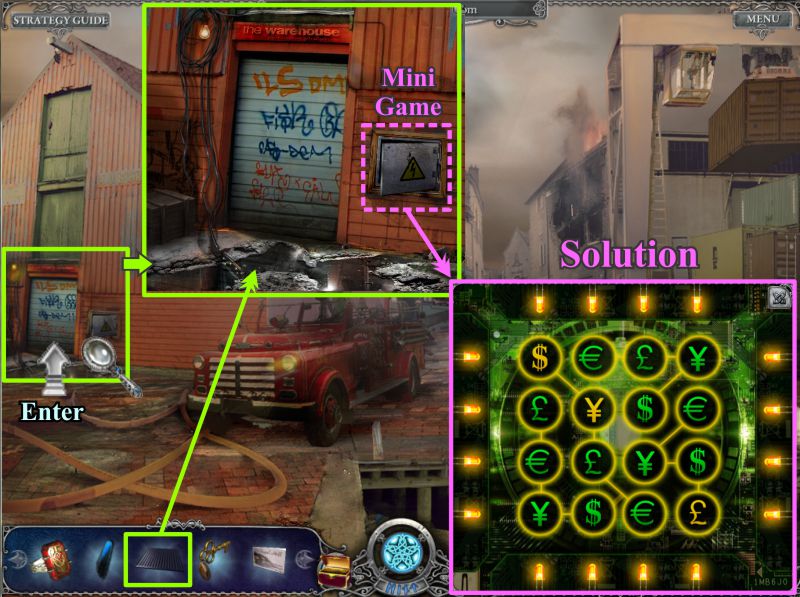
Warehouse
Zoom in on the Warehouse door and place your rubber mat over the puddle.
The electric box is a Mini Game that will open the door.
Your goal is to arrange the symbols so that each column and row has a combination of 4 different symbols.
When a row or column is correct, its lights will turn on.
The solution is shown in the screenshot.
Screenshot
Just as you go inside the Warehouse the roof caves in, so grab the keypad on the drum and get out fast.
Head back to the Hotel.
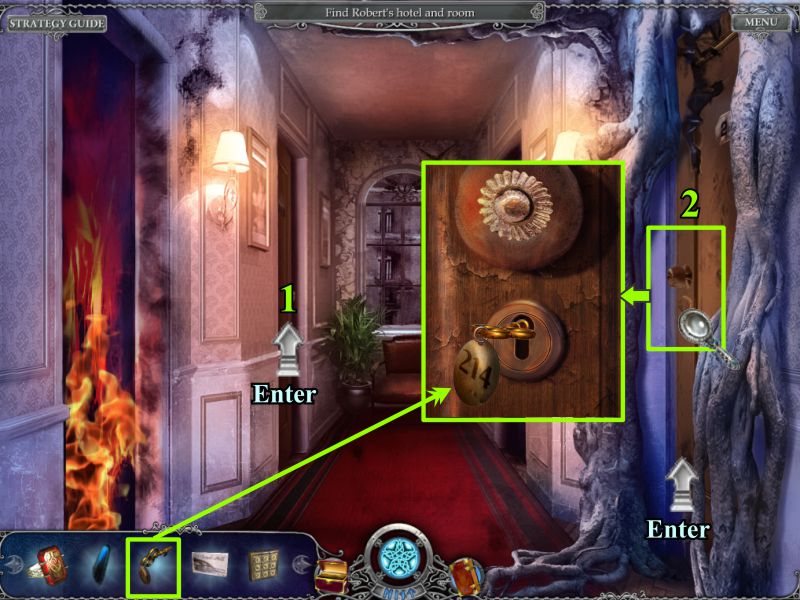
Corridor
Go to Room 212 first and then zoom in on the door to Robert's Room.
Open it with the key and enter.
Screenshot
Room 212
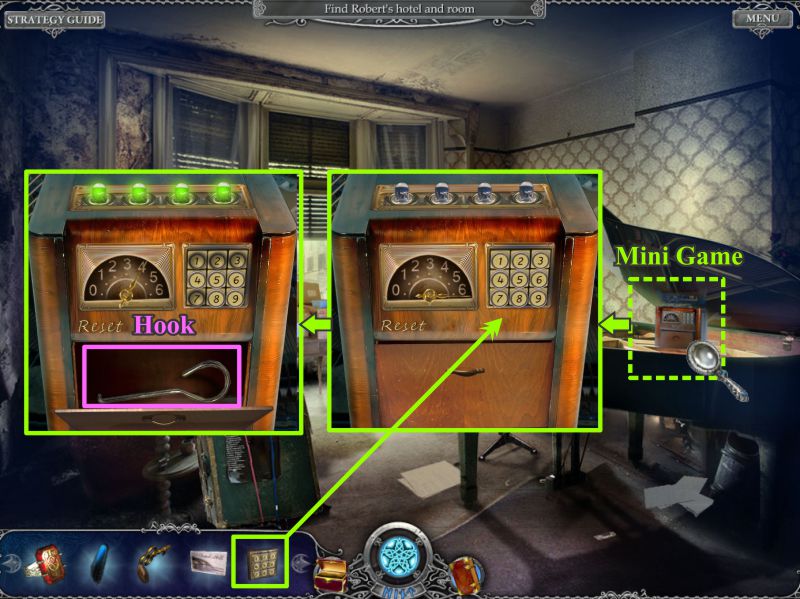
Zoom in on the radio and place the keypad to activate a Mini Game.
You have 6 chances to find the 4 random numbers to open the compartment.
When a number is correct, a green light will come on above the radio.
If you get 3 green lights, it means 3 of the numbers you picked are correct but not necessarily in the order you entered them.
A solid green light means a number is entered correctly, but a flashing light means the number is correct but not in the right order.
If you don't get the combination correct within 6 tries, the dial resets with a new combination.
When you have correctly entered all the numbers, the compartment will open for you to take a hook.
Screenshot
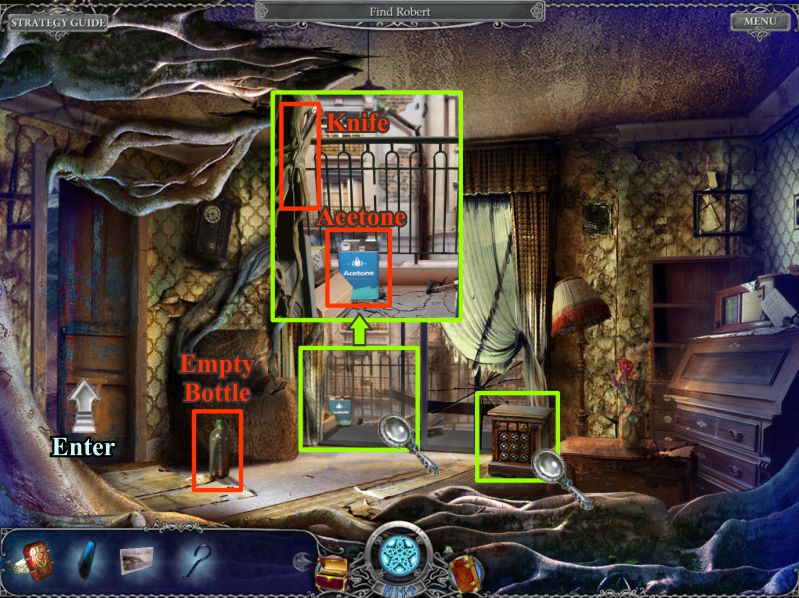
Room 214
Open and enter Room 214.
Pick up the empty bottle, check out the box on the floor and go to the balcony.
Pick up the Knife and Acetone, and then go through the door at the left.
Screenshot
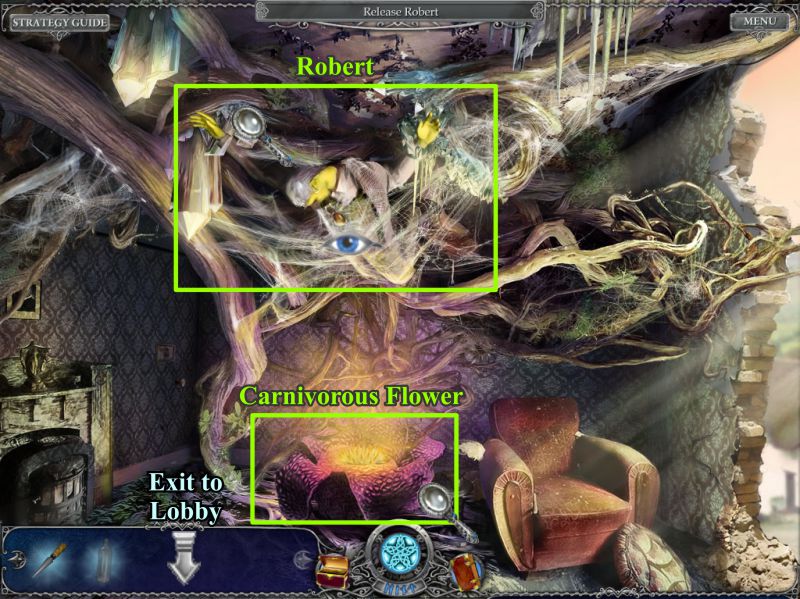
You've found Robert being held by crystal chains and cobwebs above a carnivorous flower.
Screenshot
Hotel Lobby
Go to the Lobby and zoom in on the Lift Shaft.
Insert the badge in the electronic lock.
Press the up and down buttons to move the lift and stop it in front of the window.
When the red light goes on, it will open so you can take the Stamp.
Zoom in on the Guest Book and use your knife to collect the small key.
Next stop is the Railway Station.
Screenshot
Railway Station
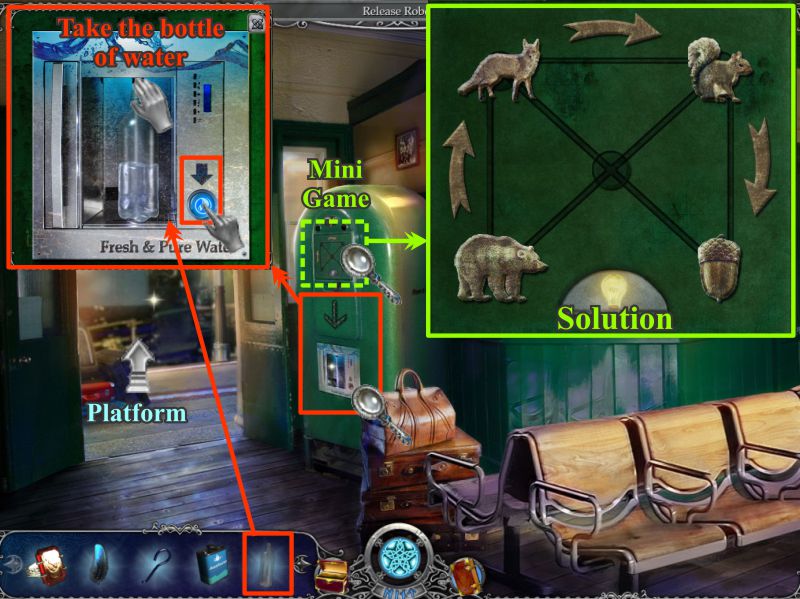
Click on the vending machine for a Mini Game.
Your goal is to arrange the acorn and animals in food chain order, as shown in the screenshot.
Completion of the game activates the vending machine, so zoom in and place your empty bottle.
Press the button to fill the bottle with water and then collect it.
Head toward the Platform.
Screenshot
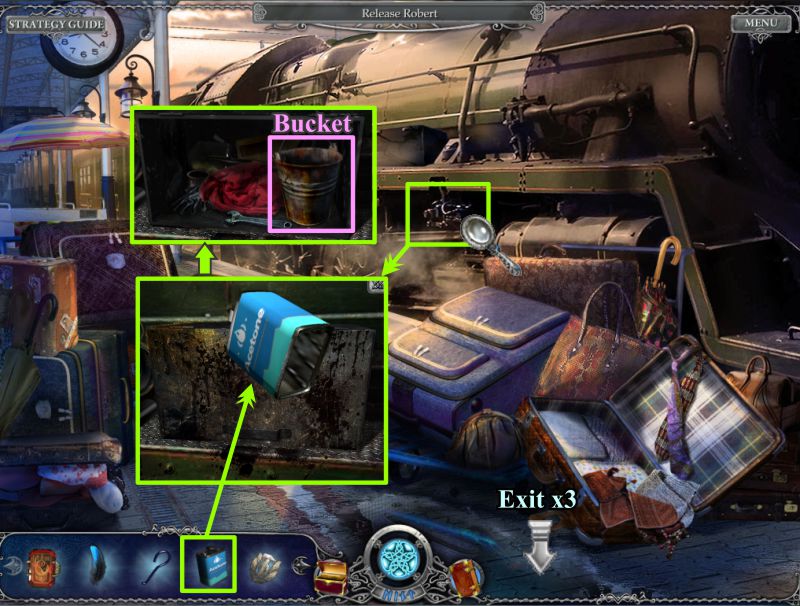
Zoom in on the toolbox, pour acetone on it, and open it so you can take the Bucket.
Screenshot
Hotel Corridor
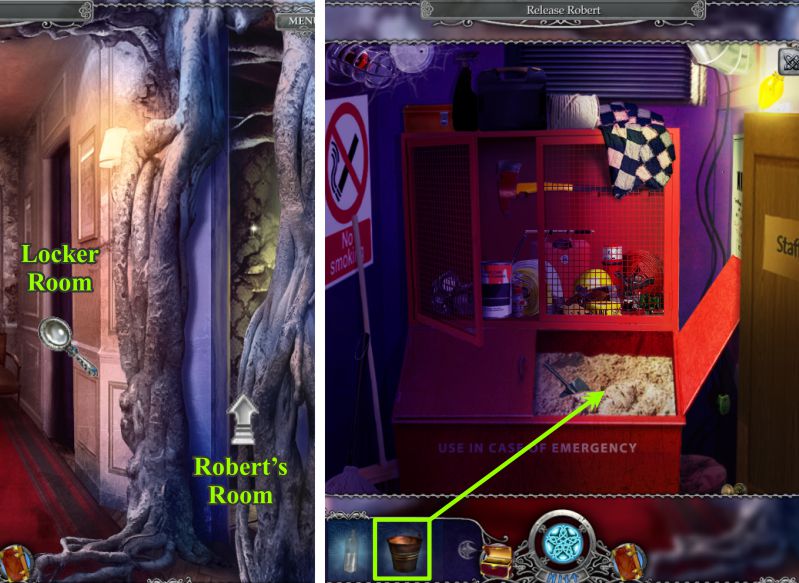
Go to the Hotel and up to the Corridor.
Zoom in on the Locker Room and place the bucket in the sand.
Screenshot
Street
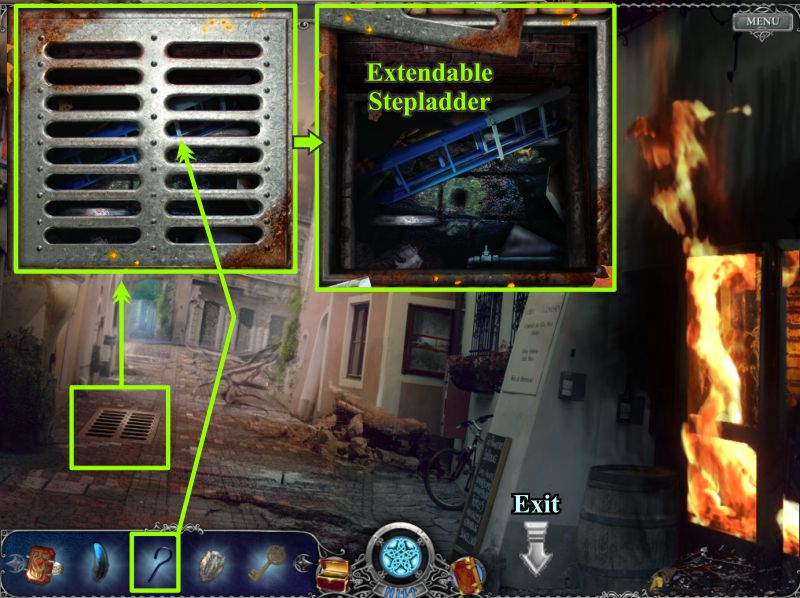
Leave the Hotel and head down the street.
Stop at the drainage grate and use your hook to remove the grate.
Take the Extendable Stepladder.
Screenshot
Warehouse
Go to the Warehouse and enter.
Zoom in and pour the buck of sand on the fire to put it out.
Zoom in on the shelves in the back and play the Hidden Object Scene.
Screenshot
Warehouse Shelves Hidden Object Scene
Collect everything to get the Knitting Needles.
Screenshot
Warehouse and Crane Cabin
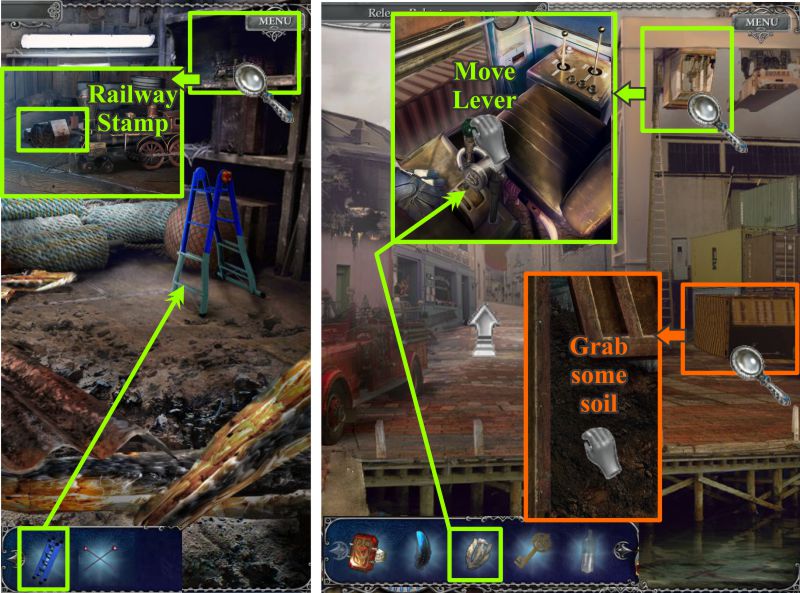
Place the stepladder next to the shelves at the right and zoom in to get the Railway Stamp.
Go outside and zoom in on the Crane Cabin.
Place the stamp from your Inventory as shown in the screenshot.
Move the lever and the transport container will fall to the ground.
Zoom in on the container and grab a handful of soil.
Screenshot
Window and Railway Station
Head up the street and stop at the window on the right.
Zoom in and use the knitting needles to release the hook so you can take the Weed Killer.
Go to the Railway Station and enter.
Head to the Platform and zoom in on the Locomotive Cabin.
Place the Railway Stamp to open the door, then take the Sledgehammer inside.
Screenshot
Robert's Room
Go to the Hotel and enter Robert's Room.
Zoom in on the wooden box for a Mini Game.
Place the water bottle, soil, and feather as color-coded in the screenshot.
Your goal is to arrange the elements in their correct columns from smallest to largest.
The solution is shown in the screenshot.
Collect the Sharp Hairpin and go into the next room.
Screenshot
Release Robert
Zoom in and use the weed killer on the carnivorous flower.
Zoom in on the crystal chain and use the sledgehammer 4 times to break the crystal.
Zoom in on the web and you will get a Diary Page.
Use the sharp hairpin on the spider voodoo doll to release the web.
Screenshot
Robert is confused but starts to remember what happened.
He says there is a secret door to Cernunnos' Room, so zoom in on the painting with the outline of a door surrounding it.
Use your small key in the lock and enter the room.
Screenshot
Cernunnos' Room
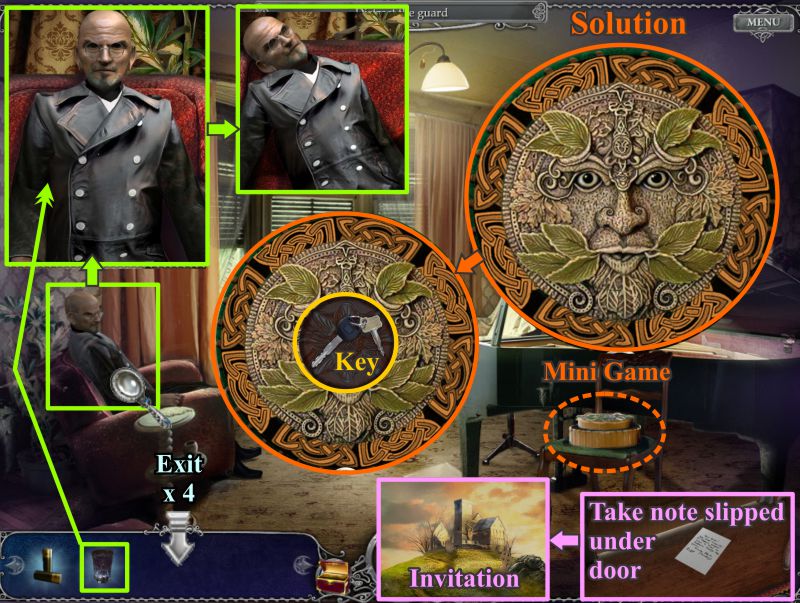
Zoom in on the Celtic Dragon symbol and use your ring on it.
Cernunnos appears and has a conversation with you.
He uses the ring to trigger a Mini Game.
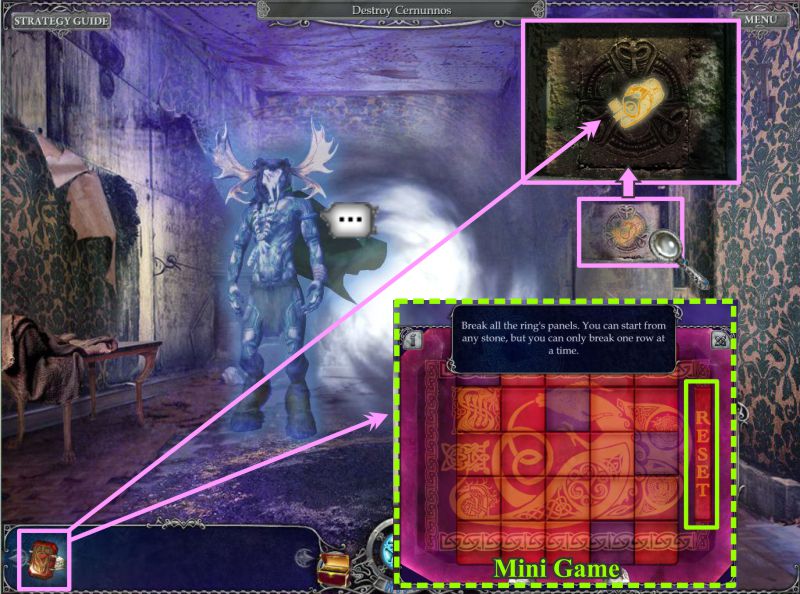
Your goal is to break all the ring's panels.
There is a reset button if you need to start over.
Screenshot
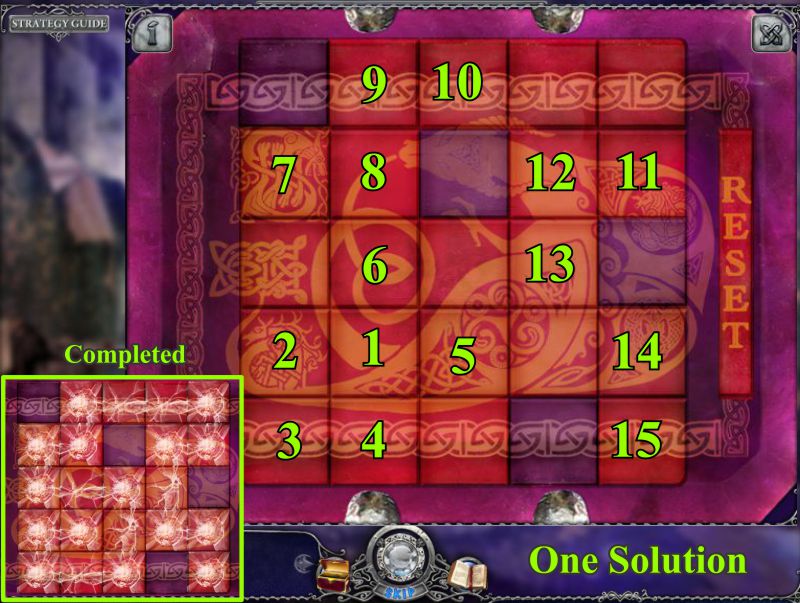
Dragon Ring Mini Game
You can start with any stone, but you can only break one row at a time.
One solution is shown in the screenshot.
The screenshot also shows what the completed ring should look like.
Watch the cut scene to see what happens next.
Screenshot
Congratulations, you have defeated Cernunnos and closed the portal to Sidhe.
Watch the ending cut scene.
Posted by: Jazz |
April 11, 2011 8:40 PM
|
April 11, 2011 8:40 PM
Hallowed Legends: Samhain Collector's Edition
Bonus Game Walkthrough
General Information
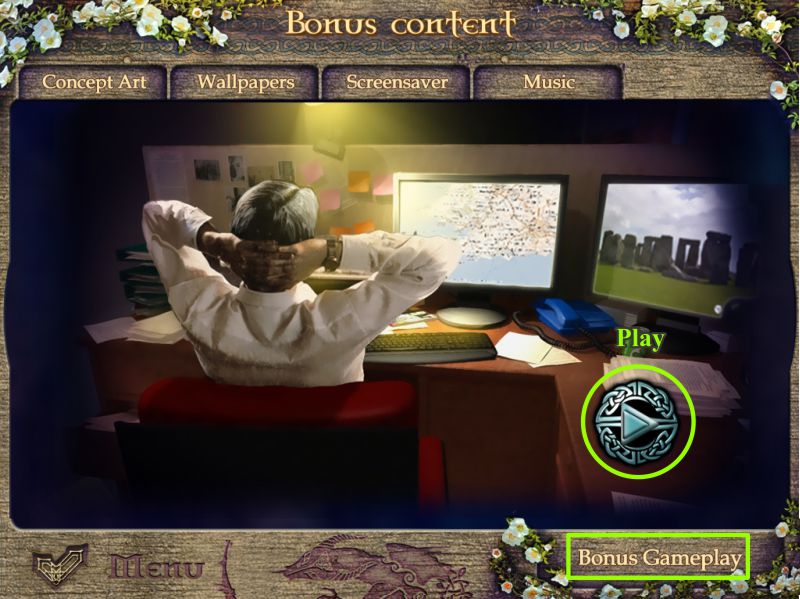
If you purchased the Collector's Edition, you previously had the Bonus Content of Concept Art, Wallpapers, Screensaver, and Music available to you.
Now that you have completed the basic adventure, if you click on Bonus Content on the Main Menu, you will have the option of selecting "Bonus Gameplay".
Once you select it, a scene with Robert at his desk will appear with a play arrow for you to press to begin the bonus game.
The Bonus is a prologue to the basic adventure and explains how Robert got himself into the whole mess.
Screenshot
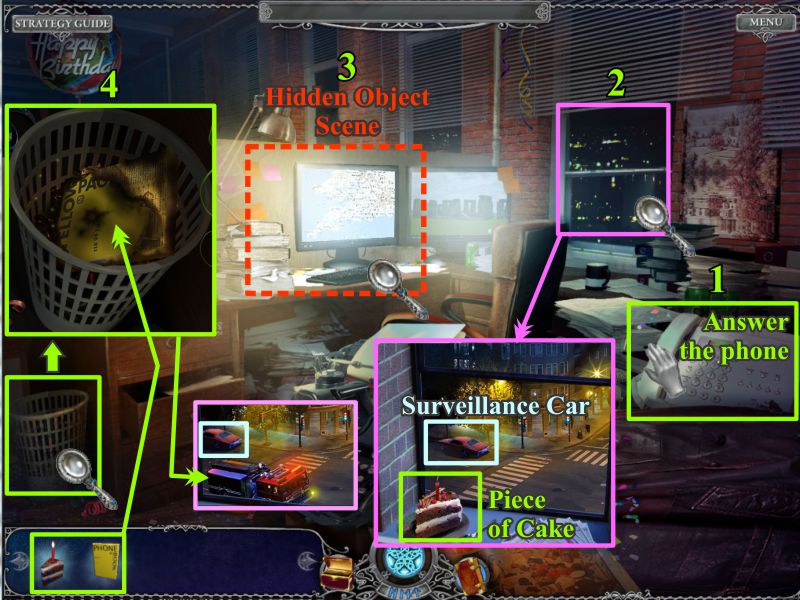
Robert's Office
Answer the phone and find out there has been a car parked outside all day.
Look out the window to see the car and pick up the Piece of Cake.
Play the Hidden Object Scene to get a phonebook.
Zoom in on the wastebasket, place the piece of cake and then the phonebook in the wastebasket.
The fire attracts the Fire Department, so the surveillance car pulls away.
Robert leaves for the Railway Station for a trip to Cornwall and the Samhain Festival.
Screenshot
Hidden Object Scene in Robert's Office
Collect everything to get the Phonebook.
Screenshot
Railway Station in Stithians
Talk to the conductor to get a page for your Diary.
He can't leave his post, so he asks you to find him something to drink.
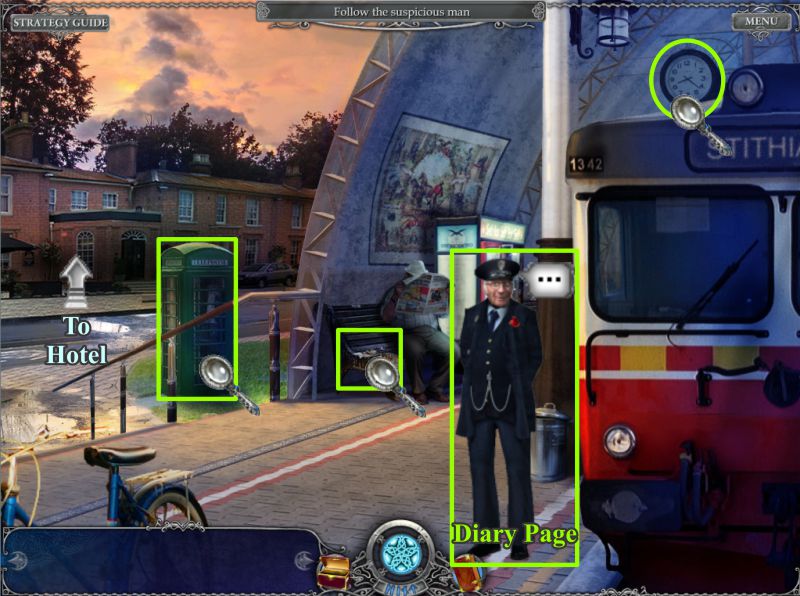
Check out the clock, suspicious man and phone booth before heading up the street.
Screenshot
Crossroads Outside the Hotel
Check out all the magnifying glasses shown in the screenshot, and then enter the Hotel.
Screenshot
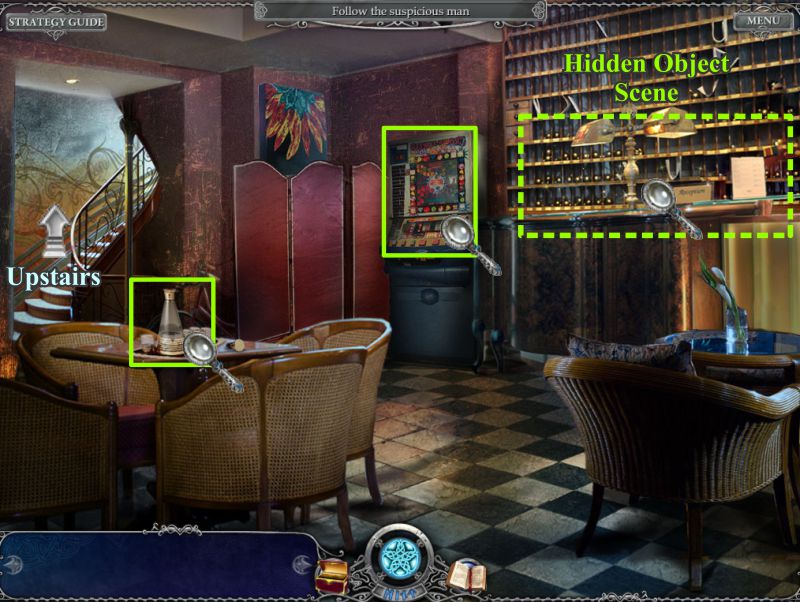
Hotel Lobby
Check out the tray on the table, game machine, and play the Hidden Object Scene before going upstairs.
Screenshot
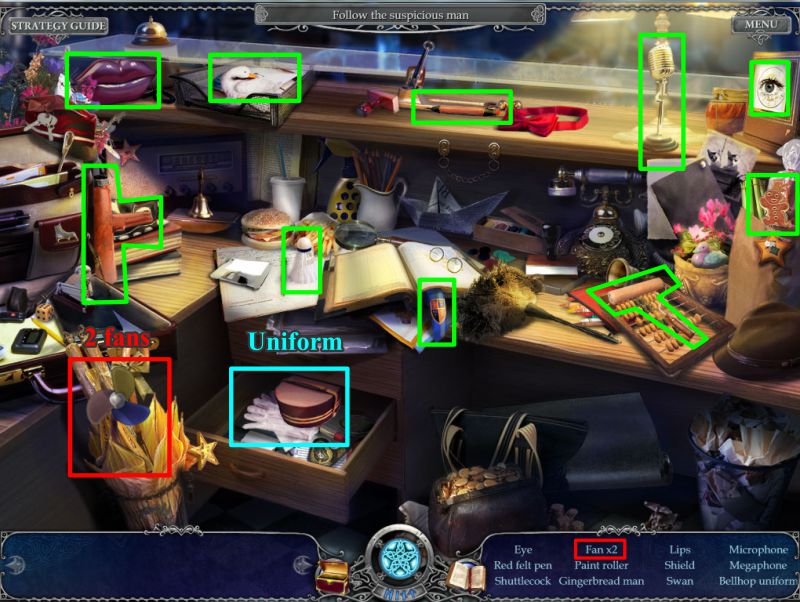
Reception Hidden Object Scene
Collect everything to get the Uniform.
Screenshot
Hotel Corridor and Railway Station
Click on the guard to get a page for your Diary.
Zoom in on the cart and pick up the Small Key.
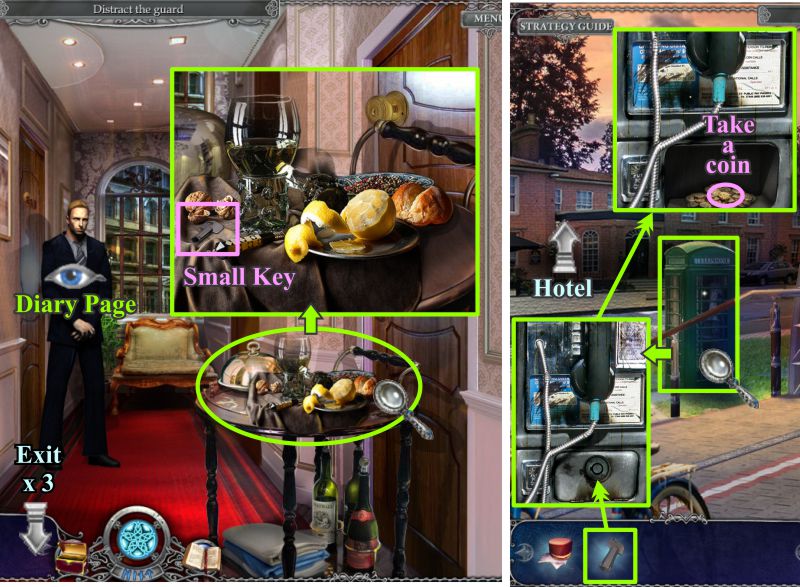
Exit down 3 times to the Railway Station and enter the phone booth.
Use the small key to open the coin box and take a coin.
Screenshot
Hotel Lobby Game Machine Mini Game
Return to the Hotel and zoom in on the game machine.
Place your coin in the machine to activate the Mini Game.
Your goal is to get the block from its present position to the hole.
If the block falls off any of the sides, you have to begin again.
To move the block, use the arrow keys labeled U - D - R - L in the screenshot.
See the screenshot for the solution and take the Sun when you have completed the game.
Exit twice to the Railway Station.
Screenshot
Railway Station Clock Mini Game
Zoom in on the Clock and place the sun emblem in the empty space.
Your goal is to press the emblems so that all the suns are up and all the moons are down.
Each emblem changes the emblem on either side of it.
See the screenshot for which two emblems to press and in which order.
Take the Claw when you have solved the puzzle.
Screenshot
Outside Hotel, Hotel Corridor, and Railway Station
Go to the crossroads outside the Hotel and zoom in on the corporate limo.
Place the claw on the door and it will scratch it, setting off the alarm.
The guard gets excited and drops his soda on the sofa while he's trying to turn off the alarm.
Go to the corridor and grab the soda.
Return to the Railway Station and give the soda to the conductor, who will give you a Hot Dog.
Screenshot
Pharmacy
Return to the crossroads and enter the Pharmacy.
Give the hot dog to the guard dog, who will eat it and fall asleep.
Zoom in on the shelves and take the Sleeping Pills.
Zoom in on the video equipment and take the Badge.
Screenshot
TV Video Van
Leave the Pharmacy and enter the minivan.
Zoom in on the scanner and place the badge on it. The scanner will retract and allow you to roam around.
Check out the ashtray and take the lighter.
Zoom in on the circuit board for a Mini Game.
Your goal is to place the connectors at the right on the left board as shown in the screenshot solution.
At the end of the game, the console will open for you to zoom in and take the Batteries.
Screenshot
Car Trunk, Hotel Lobby and Corridor
Go to the open car trunk and zoom in on it.
Use your lighter to set off the fireworks, which will cause the guard outside Room 212 to draw his gun and run off.
Go inside and zoom in on the tray on the table in the Lobby.
Place the sleeping pills from your Inventory in the water bottle, and the glass will start to bubble a little. Take it and head upstairs.
Zoom in on Room 212, knock on the door, and enter when it opens.
Screenshot
Room 212 and The Crafty Casket Mini Game
Zoom in on the Vad, Inc. corporate chief and give him the glass of water.
He immediately falls asleep, so you can now look around the room.
Zoom in on the Crafty Casket for a Mini Game.
Your goal is to swap pieces within their same circles until the casket looks like the one in the screenshot.
The casket will open for you to take the key inside. Meanwhile, somebody slips a note under the door.
The not turns out to be an invitation to take part in a ritual of "implementing a spectral matrix". Robert decides he should find out what's happening and take the corporate limo for the trip.
Screenshot
Railway Station and Corporate Limo
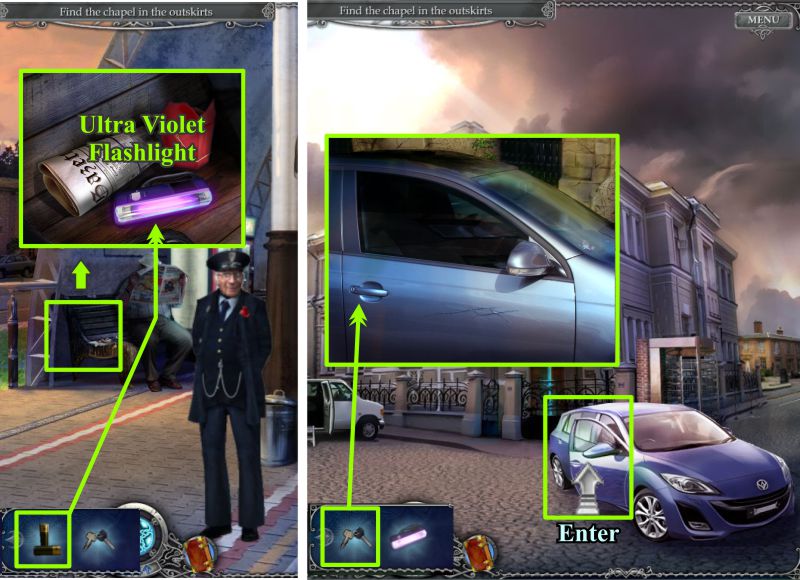
Go to the Railway Station and zoom in on the suspicious man.
Place your batteries in the flashlight to collect an Ultra Violet Flashlight.
Go to the crossroads and click on the Corporate Limo.
Use the key in your Inventory to open the door so you can enter.
Screenshot
Corporate Limo
Zoom in on the instrument board for a Mini Game.
Use your ultra violet flashlight on the keypad to see fingerprints from the keys that have been pressed.
Find the correct order for the numbers highlighted in green: 7 5 9 1.
The compartment divider will open for a Hidden Object Scene to find a map.
When you have the map, zoom in on the map holder and place the map.
The Limo will take off on your trip.
Screenshot
Limo Hidden Object Scene
When you have collected everything, you will get the Map you need.
Screenshot
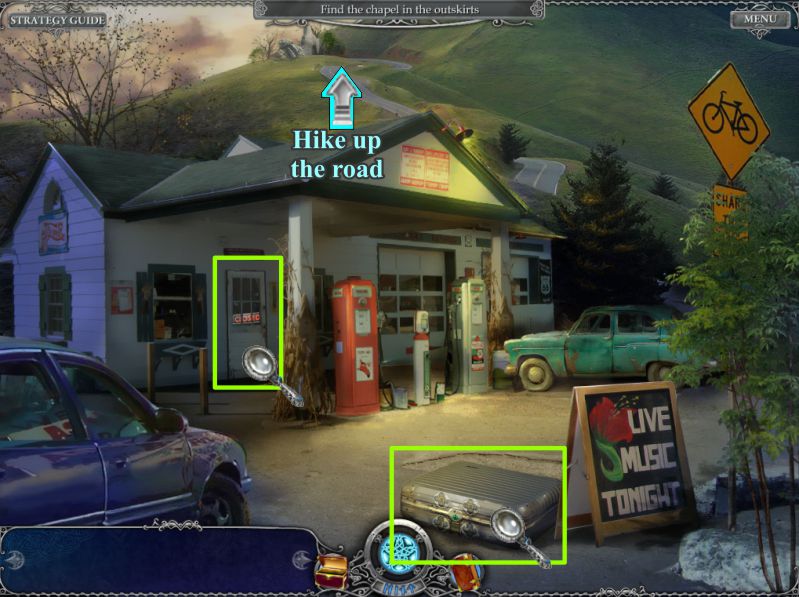
Gas Station
You trip is cut short by a tire blowout, and the Gas Station is closed.
Check out the office door and metal case before hiking up the road.
Screenshot
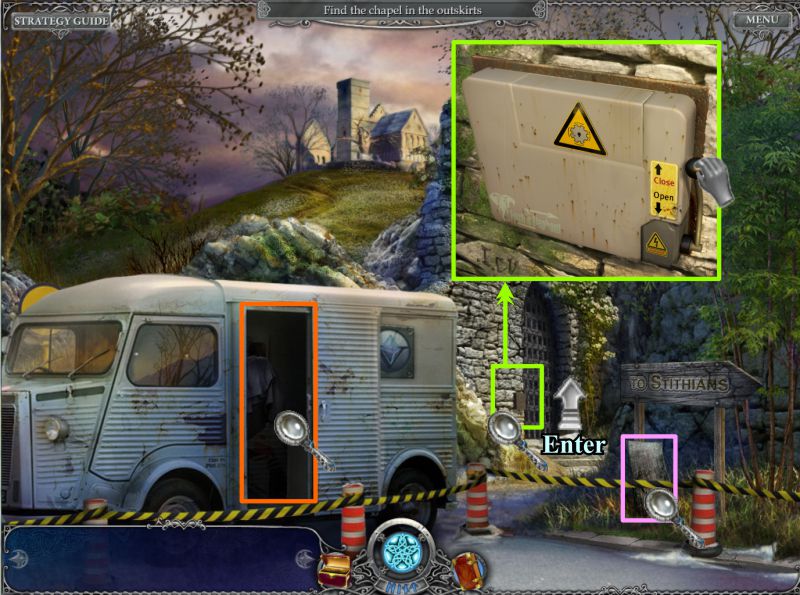
Chapel Gate
Check out the van and metal sheet.
Zoom in on the gate mechanism and pull the lever to open the gate.
You will automatically be transported to the Chapel when you enter through the gate.
Screenshot
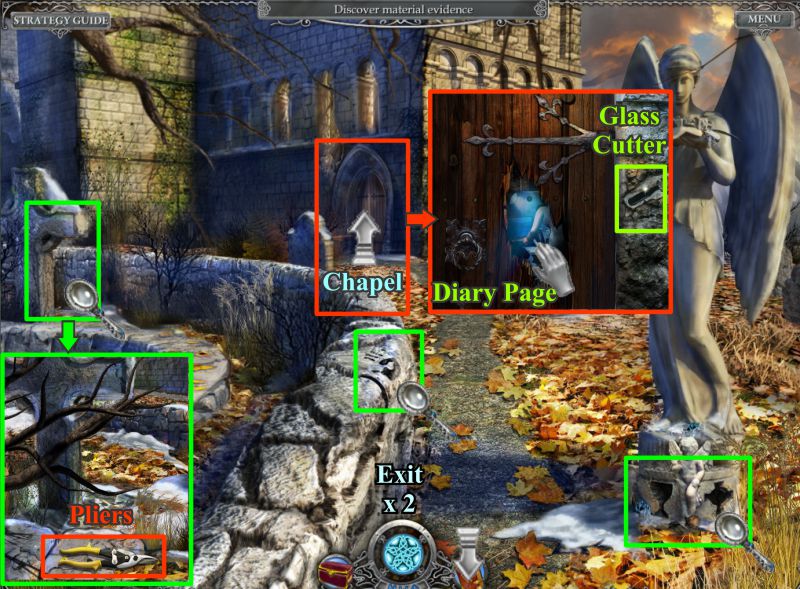
Chapel
Zoom in on the cross and take the Pliers.
Note the handprint on the wall and the indentations at the bottom of the statue.
Go to the Chapel door and touch the peephole for a page for your Diary.
Take the Glass Cutter and head down the hill to the Gas Station.
Screenshot
Gas Station
Zoom in on the door's window and use your glass cutter to trigger a Hidden Object Scene.
Screenshot
Wayside Store Hidden Object Scene
Collect everything to get the Tape.
Head back to the Chapel.
Screenshot
Chapel and Chapel Gate
Zoom in on the handprint on the wall and place your tape on the index finger.
Take the fingerprint and exit to the Chapel Gate.
Use your pliers on the metal sheet to finish cutting out the cross.
Enter the van and use your fingerprint on the console to open the closet and take the costume.
Return to the Chapel.
Screenshot
Outside and Inside the Chapel
Go to the door and place your costume on it to enter.
Zoom in on the tombstone and take the Star.
Exit to the Gas Station.
Screenshot
Gas Station
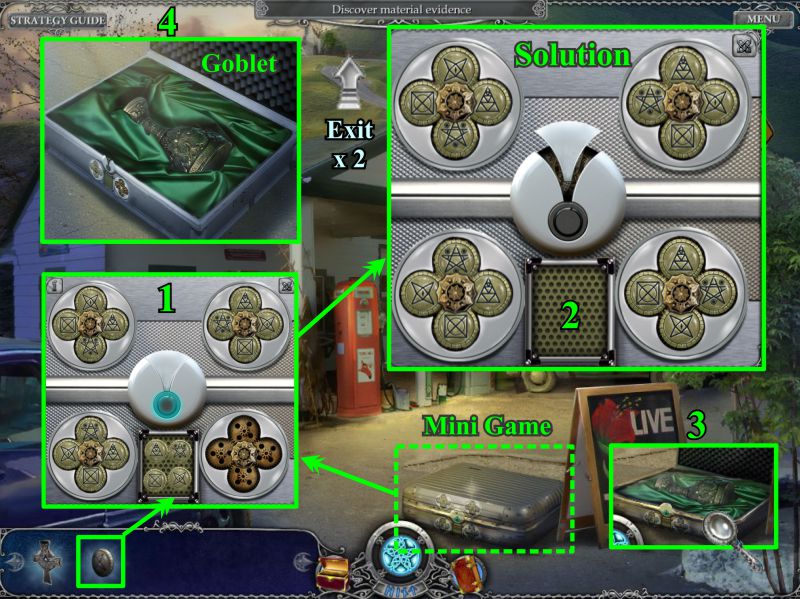
Click on the metal case and place the star icon in the missing space in the square to trigger the Mini Game.
Your goal is to arrange the 4 icons into the cylinder on the right as shown in the screenshot solution.
The suitcase opens when you have solved the game.
Zoom in and take the Goblet.
Screenshot
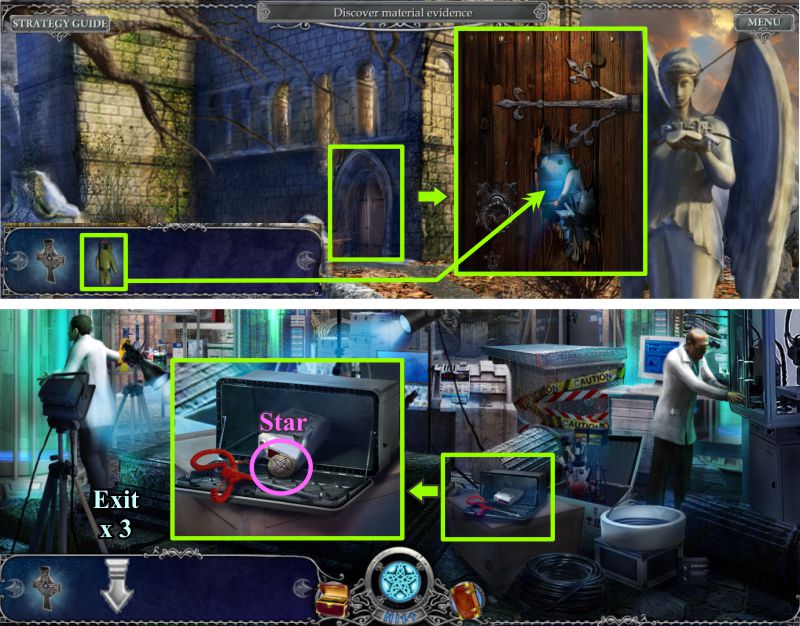
Chapel
Head back uphill to the Chapel and zoom in on the bottom of the statue.
Place the goblet and cross, and a compartment will open for you to collect a Metal Switch.
Enter the Chapel.
Screenshot
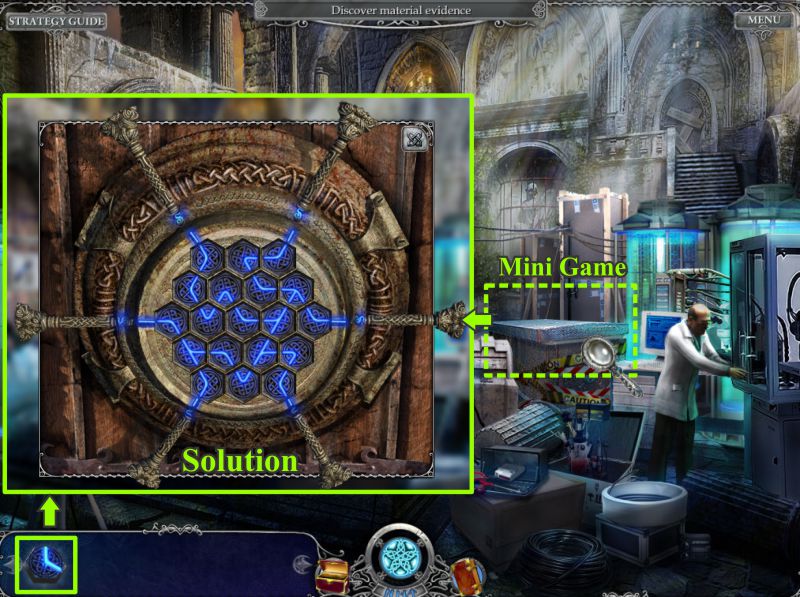
Scientific Equipment Mini Game
Zoom in on the sarcophagus for a Mini Game.
Place your metal switch in the middle.
Your goal is to arrange the pattern as shown in the screenshot solution.
Click on the switches to turn them to connect the circuits.
When a circuit is complete a rod on the lock will open.
All 6 circuits need to be completed for the lid to open.
Screenshot
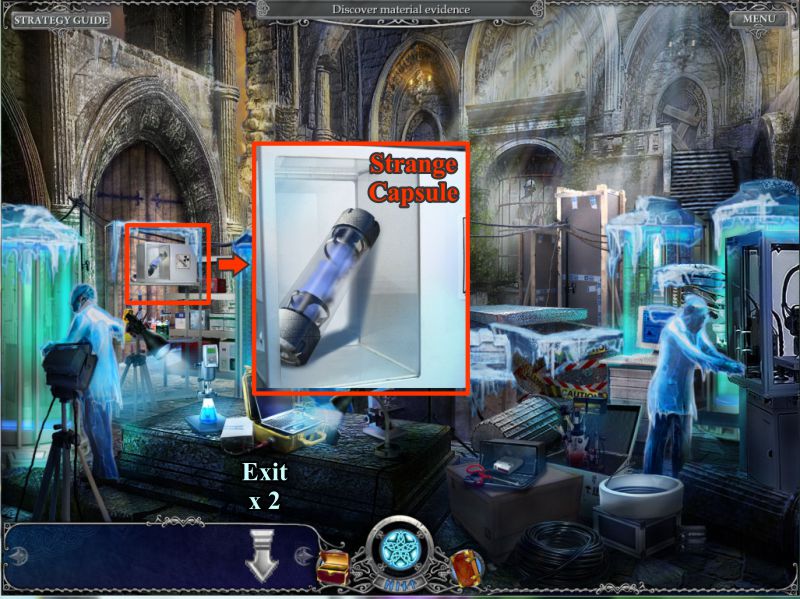
Frozen Chapel
When the lid opens, all the cylinders and workers touching them freeze.
Zoom in on the Strange Capsule and collect it.
Screenshot
Leave the Chapel and continue down the hill.
The guard from the Hotel comes out of the van at the gate, and Robert drops the capsule.
Watch the cut scene to see what happens.
Posted by: Jazz |
May 19, 2011 10:52 AM
|
May 19, 2011 10:52 AM
Hallowed Legends: Samhain
Achievements
Screenshot
I don't have names for some of the Achievements with more than one level, but I have listed the Achievement.
Hidden Object Scenes
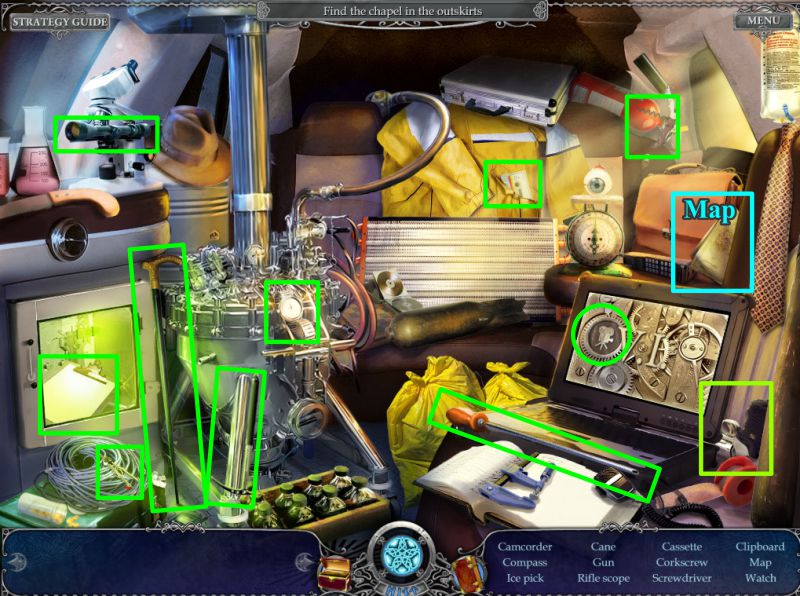
A Matter of Minutes: Find all items in an HO scene in less than 3 minutes.
Only Speed Matters: Find all items in an HO scene in less than 2.5 minutes.
?????: Find all items in an HO scene in less than 2 minutes.
Time's Running Out: Find all items in an HO scene in less than 1 minute.
Like the Wind: Find all items in an HO scene in less than 45 seconds.
Master of Swiftness: Find all items in an HO scene in less than 30 seconds.
Observer: Finish 1 HO scene without using a hint.
Seek and you will find: Finish 3 HO scenes without using any hints.
?????: Finish 5 HO scenes without using any hints.
Attention comes first!: Finish 10 HO scenes without using any hints.
?????: Finish all 20 HO scenes without using any hints.
Sharp Eye: Finish 1 HO with fewer than 10 wrong clicks.
High-class Accuracy: Finish 1 HO without wrong clicks.
Perfect Trick: Find 3 objects in 3 seconds.
Sleight of Hand: Find 10 objects in 10 seconds.
Slowly but surely: Finish a HO scene in more than 10 minutes.
Mini Games
Unbeatable Combination: Finish a mini game in less than 3 minutes.
At the Velocity of Sound: Finish a mini game in less than 1 minutes.
Pure Excellence: Finish a mini game in less than 30 Seconds.
Lateral Thinking: Finish 1 mini game without skipping.
Puzzle Cracker: Finish 3 mini games without skipping.
Secrets of Mechanics: Finish 5 mini games without skipping.
Runs Like Clockwork: Finish 10 mini games without skipping.
That's Awesome: Finish all 20 mini games without skipping.
Calm before the storm: Finish a mini-game in more than 10 minutes.
Game Elements
First Bell: Finish the tutorial.
Investigation Complete: Finish the game.
I Need More!: Finish the additional content of the game.
The Loremaster: Get all the achievements.
Part of the Investigation
The Last Survivor: The hermit's mystery is revealed.
Temple Destruction: Destroy the statue of the goddess Epona.
Vad Inc. Laboratory: Find the true purpose of the metro station.
Illegal Activities: Investigate corporation complicity to calling forth creatures from Sidhe.
Mercy and Sympathy: Save Steven Grays and his daughter.
Deity Expulsion: Cast out the Celtic god Cernunnos from the human world. Life is a miracle.
Posted by: Jazz |
May 20, 2011 11:00 AM
|
May 20, 2011 11:00 AM