

![]() A ghost, a wolf, a dark and isolated castle, and possibly even a werewolf? Looks like you've got your hands full in the latest hidden object adventure hybrid from Elephant Games, Grim Tales: The Legacy. A sequel to Grim Tales: The Bride, the story and setting are connected between the two games, only this time around, you're stalking through a castle while a peculiar wolf hunts you from the shadows.
A ghost, a wolf, a dark and isolated castle, and possibly even a werewolf? Looks like you've got your hands full in the latest hidden object adventure hybrid from Elephant Games, Grim Tales: The Legacy. A sequel to Grim Tales: The Bride, the story and setting are connected between the two games, only this time around, you're stalking through a castle while a peculiar wolf hunts you from the shadows.
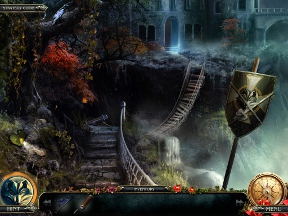 You're off to your long-lost sister's son's christening, which naturally takes place in a remote castle in the middle of a dark and stormy night. You get into a little accident just outside of the residence, but you manage to pick your way indoors all the same. Only... something's not quite right. Namely, a giant wolf that destroys the bridge leading to the manor's entrance! To top it off, a ghost haunts the premises, the Gray family was apparently trying to hide a great secret, and you swear there's a werewolf stomping around, too. Time to do some investigating as you worm your way into the castle.
A mouse-driven game to the core, Grim Tales: The Legacy is structured in a similar manner to the previous Grim Tales game and shares quite a bit with other hidden object adventures on the market. One notable difference is the manner in which puzzles are spread out across a number of screens. Instead of giving you a small array of zones to explore, each containing a few items you'll need to solve puzzles blocking your progress, you have many more scenes to check out with twice as many puzzles to work through. Often, you'll need to leave interesting things behind until you get the item you need much further down the road, adding a bit of difficulty not present in other casual adventure games since you have to pay more attention and actually recall details down the road.
Mini-games are strewn about and stick to the main core of tile-swapping, broken picture arranging fare, and the hidden object scenes appear from time to time to give you a few extra items to horde in your inventory. You can also choose between three modes of play, allowing you to customize the amount of help you'll get in the form of fast-recharging hint/skip timers and "sparklies" that show you areas of interest.
 Analysis: Grim Tales: The Legacy sticks a little closer to the market-established hidden object adventure hybrid formula than its predecessor, though the gameplay doesn't really suffer for the step back in originality. The plot takes its time revealing any details of substance, and when it does, you might struggle to piece facts together. The holes in the story are small enough that you can fill them in with your imagination, just as long as you keep it to creepy, wolf-and-ghost-related things (or clowns).
What Grim Tales: The Legacy gets right are the visuals, the quick-travel map, a longer than average length, and the hint system, which is surprisingly smart and always directs you to where you need to go. It favors puzzles and mood over story, which could be a pro or a con depending on your preferences, but apart from a few slight pauses when initiating an animated scene, everything plays out smooth and snappy, just the way it should be.
Even though the hidden object scenes are scarce, they're the weakest part of the game. The spooky-meets-hauntey atmosphere demands equally spooky items, not USB flash drives, hot dogs, toy police cars, and batteries. It's jarring to see oddities such as this littering a dark mansion where wolves stalk you from the shadows.
Another strong entry from Elephant Games, a studio with the knowhow and experience to pull off a satisfying hidden object adventure game. Despite a few storypoint omissions and a reliance upon well-used tropes, Grim Tales: The Legacy is a great ride from beginning to end!
A Collector's Edition is also available. It contains bonus content not found in the standard edition: additional gameplay, integrated strategy guide, and more. Remember that Big Fish Game Club Members pay only $13.99 for Collector's Editions (or 2 club credits), and collector's editions count 3 card punches of 6 total needed for a free game.
Play Grim Tales: The Legacy
(free browser version)
![]() Windows:
Windows:
Download the demo
Get the full version
Also available: Collector's Edition
![]() Mac OS X:
Mac OS X:
Download the demo
Get the full version
Also available: Collector's Edition


Walkthrough Guide
(Please allow page to fully load for spoiler tags to be functional.)
Grim Tales: The Legacy Walkthrough
General Information and Chapters 1 through 3
General Information
Main Menu
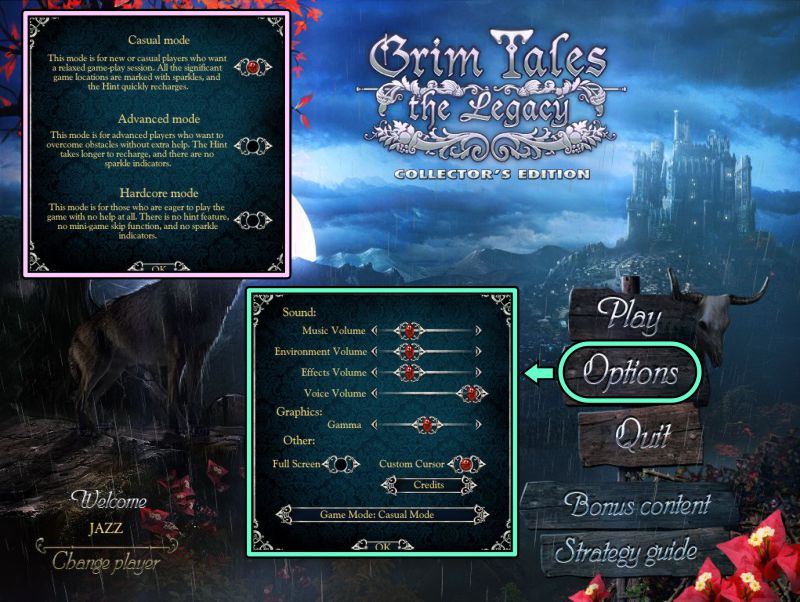
From the Main Menu, you can Play or Quit the game, choose your Options and Profile.
Options include Music, Environment, Effects, and Voice volume, Full or Windowed screen, use of a custom cursor, plus Game Mode, and an opportunity to view the Credits.
If you purchased the Collector's Edition, there is a Strategy Guide and the Bonus Content will become available when you have completed the basic adventure.
Game Modes are Casual, Advanced, or Hardcore Mode.
Casual Mode provides you with a more relaxed game-play with lots of sparkles and a Hint button that recharges quickly.
If you choose Advanced, you won't get that extra help because the Hint button takes longer to refill and there are no sparkles.
Hardcore Mode is for those of you who really don't want any sort of help; you get no hints or skips for mini games as well as no sparkles, so you are entirely on your own.
As you begin play, you will get a choice of having Interactive Help.
Screenshot
Scene Navigation
Hints are unlimited once the Hint button in the lower left corner refills.
In the lower right corner is your Compass/Map to help you navigate to other rooms and areas.
Below the Compass is the Menu where you can change your Options and Game Mode, resume the game, or quit to the Main Menu.
In the lower center of your screen is your Inventory, and where Hidden Object Scene lists are shown.
If you need to identify an item in your Inventory, mouse over it for its name.
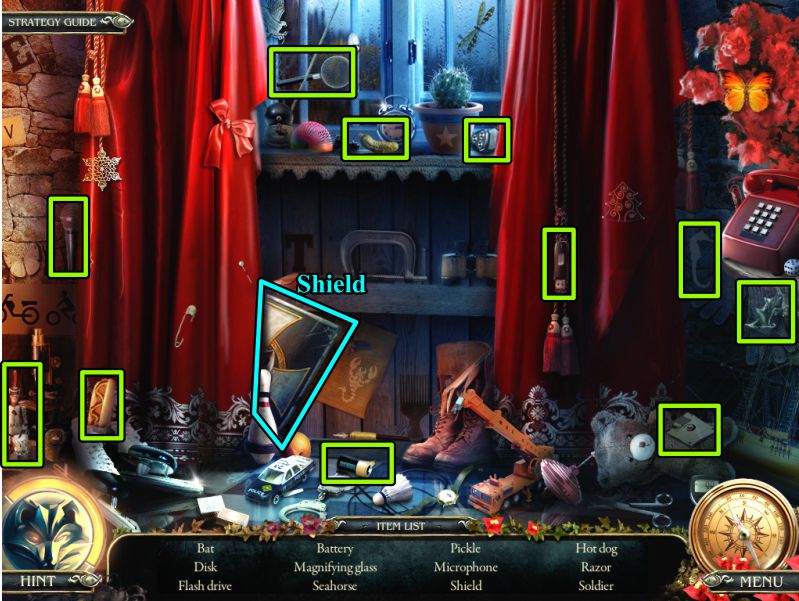
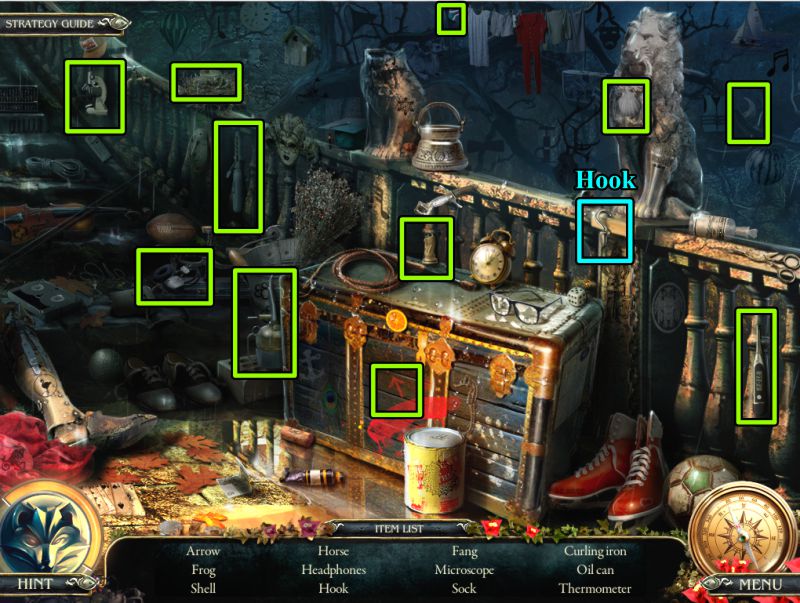
There are 12 items to locate in the Hidden Object Scenes including one item for your Inventory.
The items to locate are the same for everyone so are marked in the screenshots, and the Inventory item is marked in bright blue.
Mini Games have a Skip option when the button becomes full.
All Mini Games also have an Info Button to tell you what is expected for you to complete the game.
There is also a Restart Button if you need to begin again.
Some games also have an "Undo Button" so that you can back up a few moves without having to completely restart.
Objects and locations with a Magnifying Glass will have a name tag and need to be checked out for more information or to perform a task.
A Hand wants you to pick something up, move, or open an object.
A Hand with gears means there is a task you cannot as yet complete, but you will be provided with more information about what you need to complete it.
Arrows to move on to another location will tell you where you are going or need to go.
Sometimes you won't need to travel to a location because a photo you find will automatically transport you there.
Also, you may not always need to pick up an item because it will automatically go to your Inventory or instant use.
Most times you will need to back out of a close-up scene, unless you have completed all your tasks there.
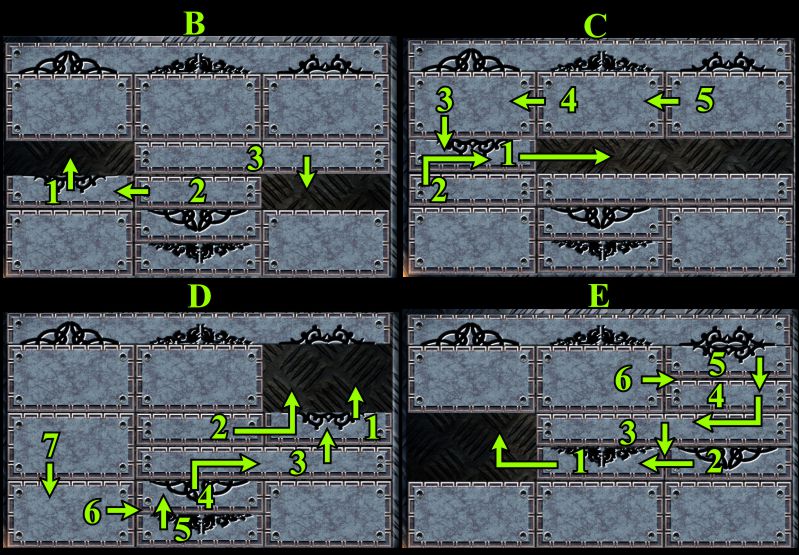
Maps
When you click on the Compass in the lower right corner of the scene, you will find a map for the chapter you are currently playing in the game.
Below, you will find all of the maps for the game with the locations marked for each chapter.
The legend shows you shows you where you are, what you have yet to discover, any level changes, and those areas that have tasks for you to complete.
When you have completed a task, it isn't always removed from the map, so don't worry about it.
This first map is the main castle and has the locations for Chapters 1, 3, and 5.
Screenshot
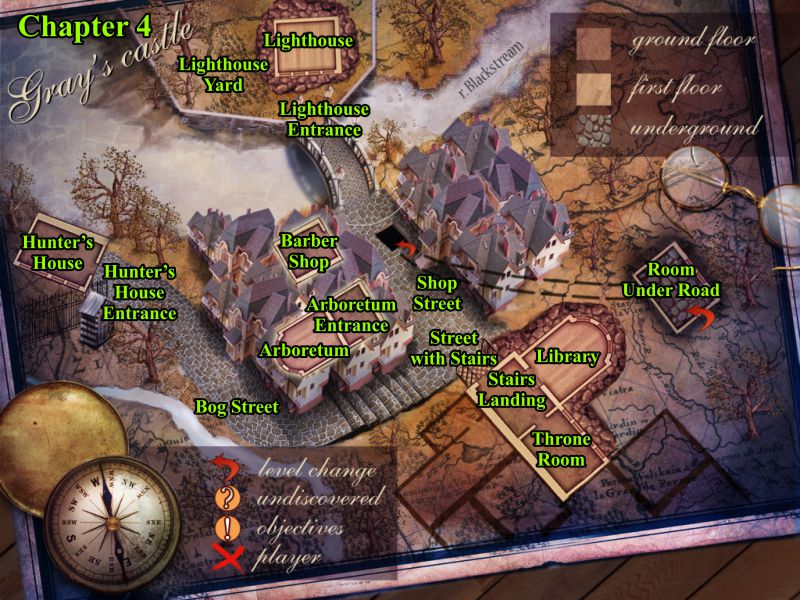
The map for Chapter 4 shows the exterior locations in the town and outskirts of the Castle.
Screenshot
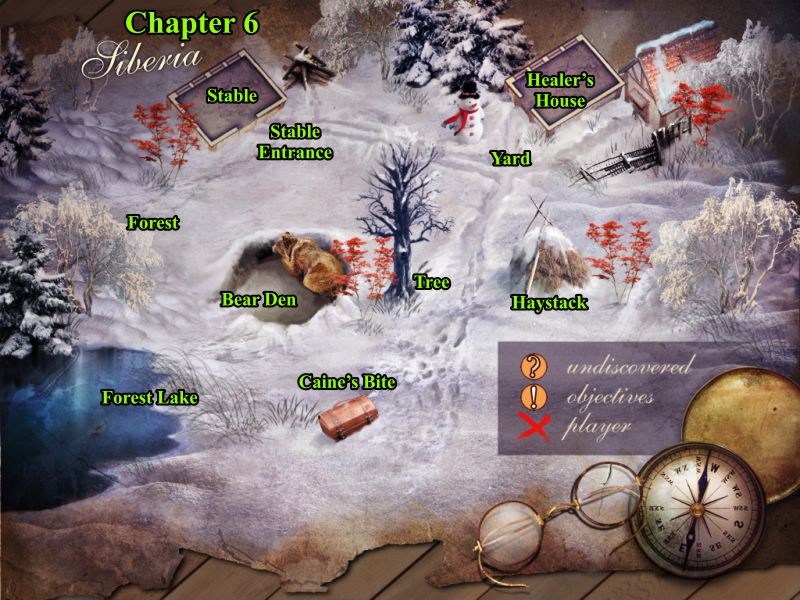
For Chapter 6, we moved on to Siberia, so all those locations are indicated on this map.
Screenshot
Chapter 1: Arrival at the Castle
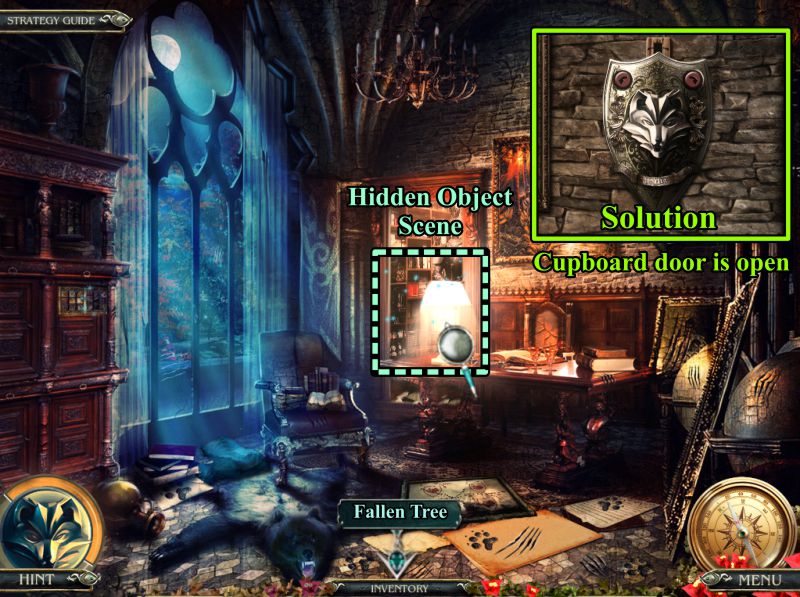
Fallen Tree
Check the magnifying glasses, play the Hidden Object Scene and head toward the Castle.
Screenshot
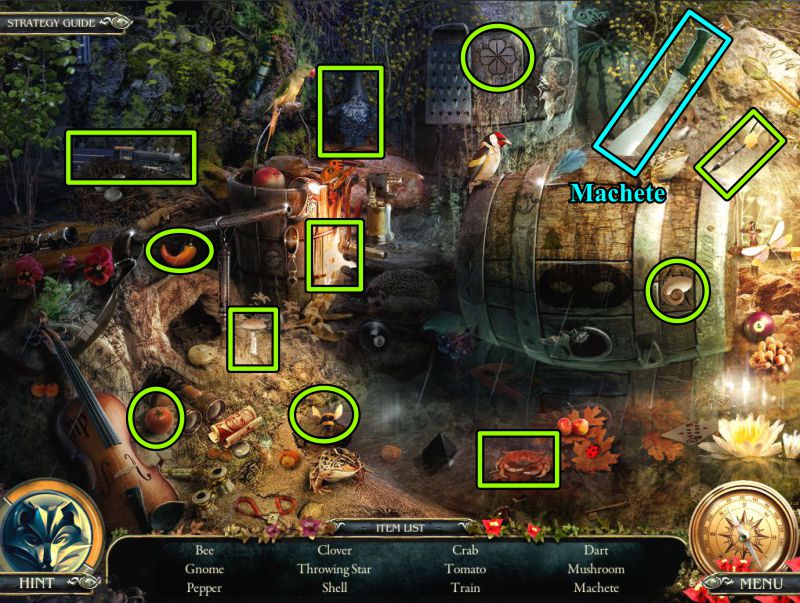
Fallen Tree Hidden Object Scene
Collect everything to get a Machete.
Screenshot
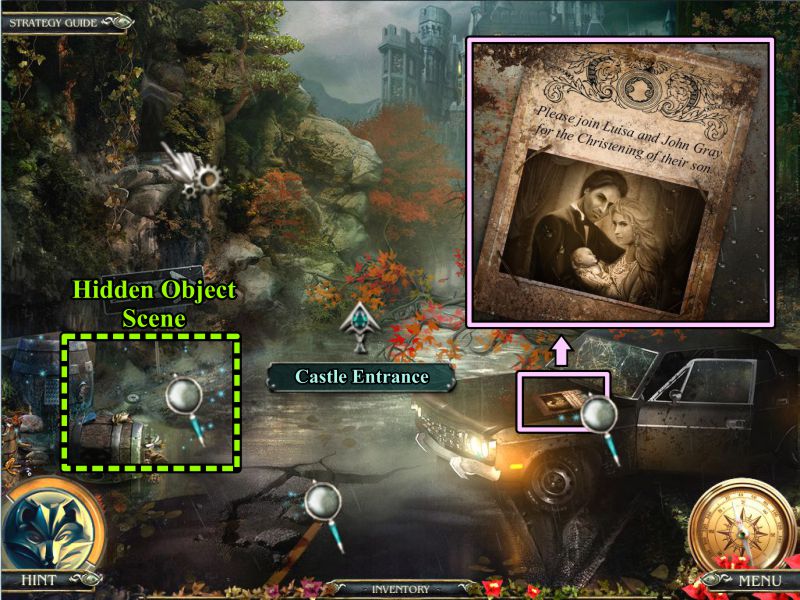
Castle Entrance
Try to cross the Moat; a wolf pushes a statue that destroys the bridge over the Moat, so you now need to find another way into the Castle.
Check the sign next to the gate and take the Awl and Rag.
Use the Machete twice on the bush at the right to find the Jack.
Screenshot
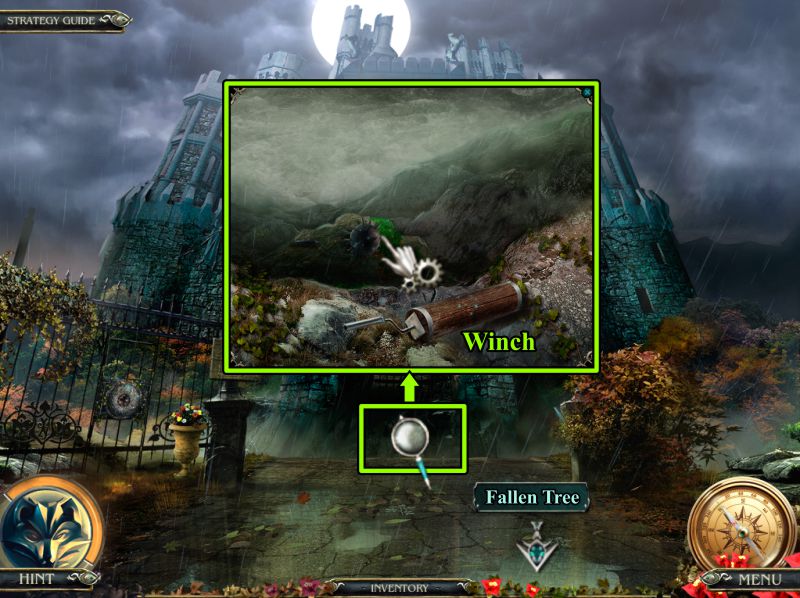
Moat
Zoom in on the Moat, take the Winch, and note the Mace you can't reach at the moment.
Return to the Fallen Tree.
Screenshot
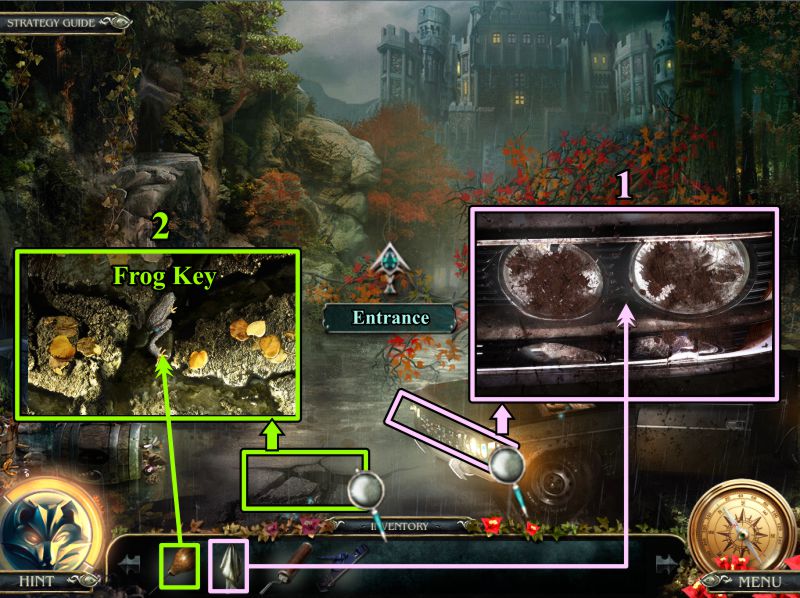
Fallen Tree
Zoom in on your car headlights and clean them with the Rag so you can see down the crevice.
Zoom in and use the Awl to get the Frog Key, and return to the Entrance.
Screenshot
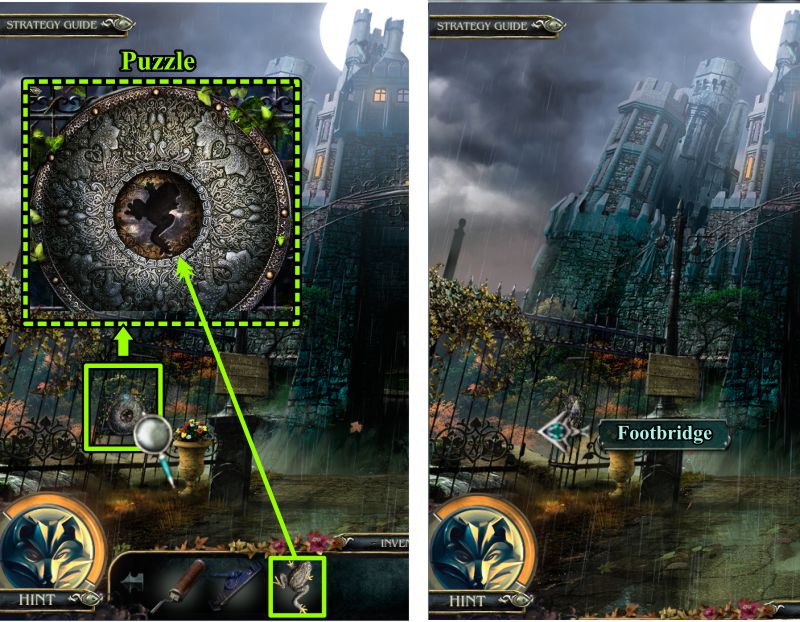
Castle Entrance
Use the Frog Key on the gate to trigger a Puzzle.
Once you have completed the Puzzle, go through the gate to the Footbridge.
Screenshot
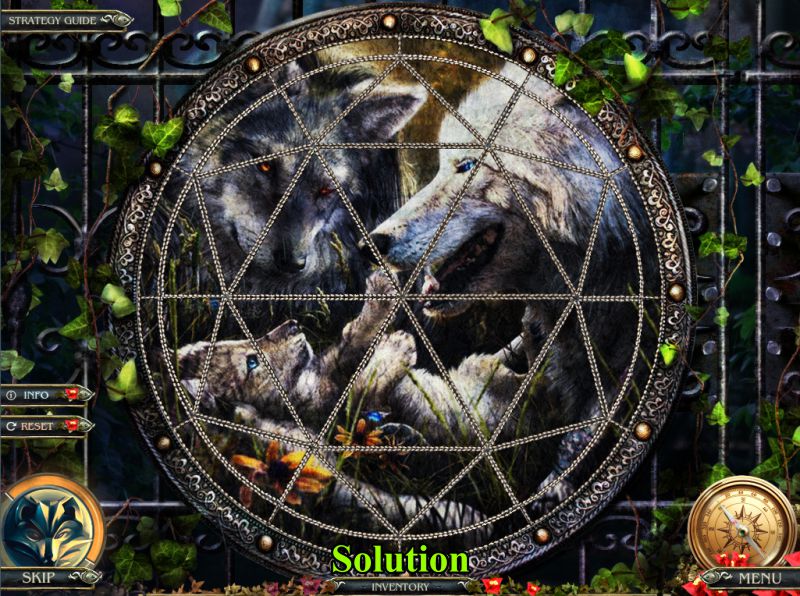
Gate to Footbridge Puzzle
Place all the pieces of the Puzzle as shown in the screenshot.
Screenshot
Footbridge
Zoom in at the left and move the leaf to find the Flashlight.
Zoom in on the bridge mechanism and place the Jack to straighten the post.
Place the Winch, then click on it 3 times to tighten the Footbridge.
Pick up the Rope.
Screenshot
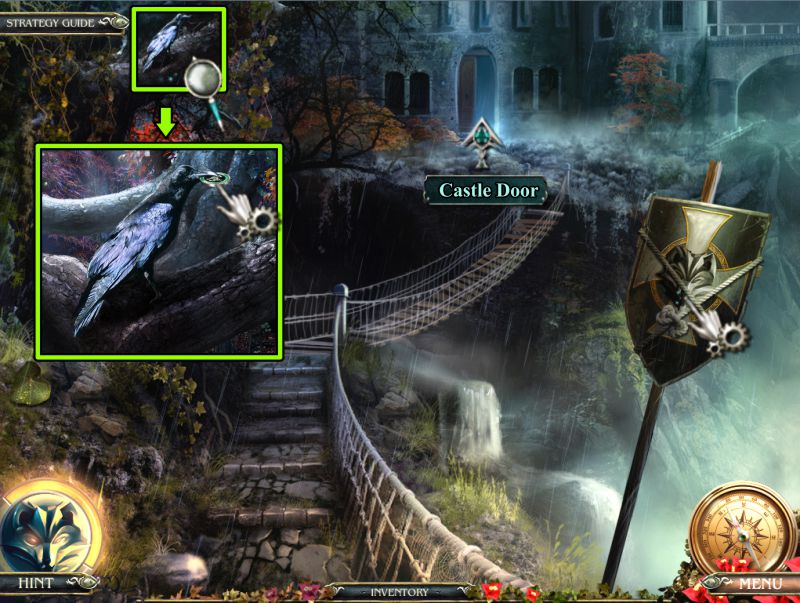
Note the tied up wolf shield.
Check out the Raven; he won't give up the token, so cross the now repaired Footbridge to the Castle Door.
Screenshot
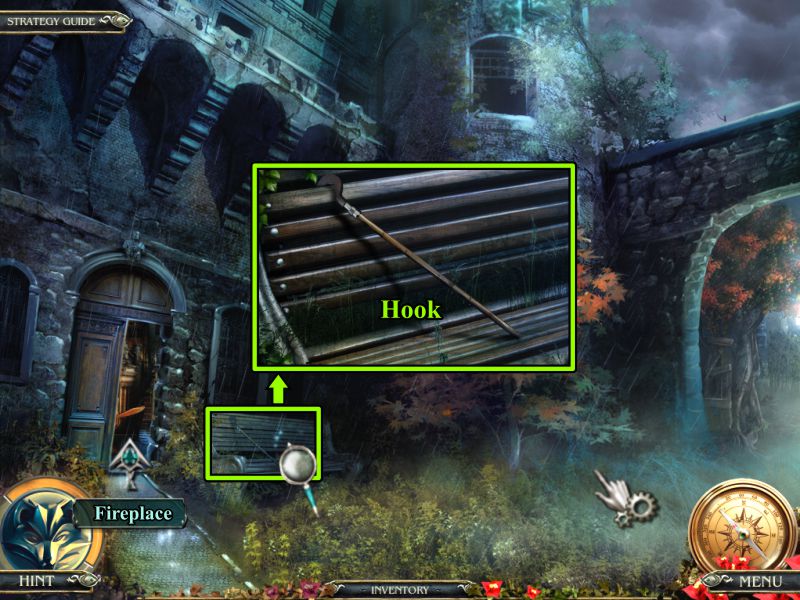
Castle Door
Zoom in on the bench and grab the Hook.
You can't clear the fog now, so enter the Castle to the Fireplace.
Screenshot
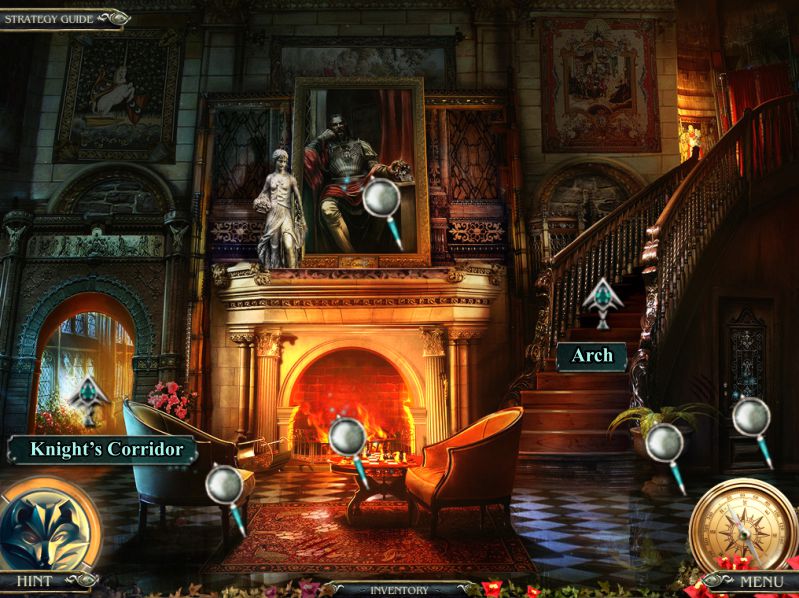
Fireplace
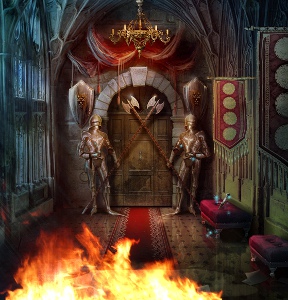
Check all the magnifying glasses, then go to the Knight's Corridor.
Screenshot
Knight's Corridor
There a couple of tasks you need to take care of, but first you need to put out the fire, so return to the Fireplace and to upstairs to the Arch.
Screenshot
Arch
Zoom in on the draperies and place the rope to open them.
Move the picture to uncover a niche, then check the suit of armor at the left.
Screenshot
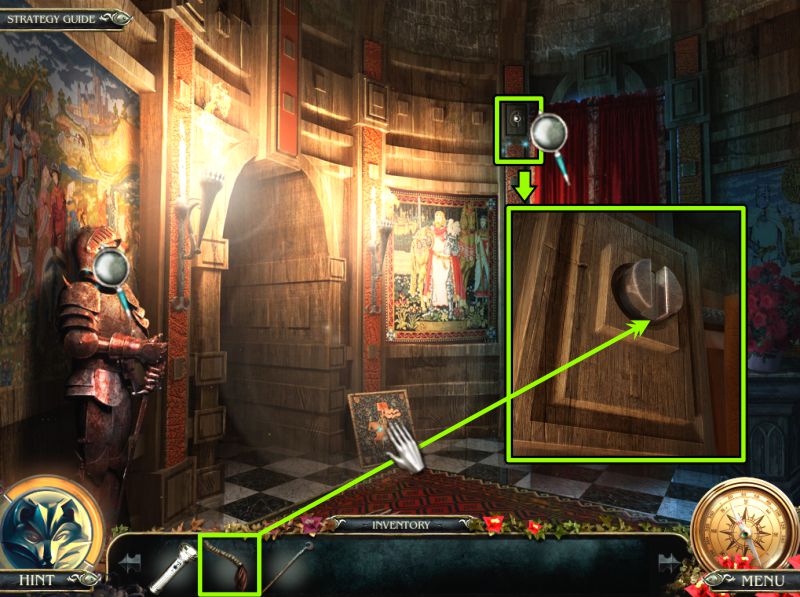
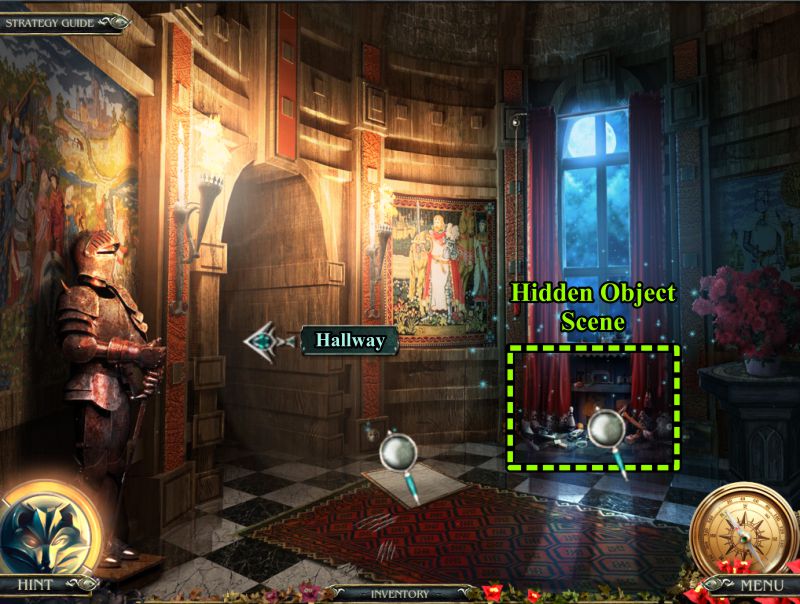
Arch
Check out the niche, play the Hidden Object Scene, and go to the Hallway.
Screenshot
Arch Hidden Object Scene
When you collect everything, you will get a Shield for your Inventory.
Screenshot
Hallway and Moat
Use your Flashlight to check out the electric panel, only to find out the Knife Switch is missing so you cannot turn on the lights.
Go to the Castle Entrance and zoom in on the Moat.
Use you Hook to get the Mace.
Return to the Arch.
Screenshot
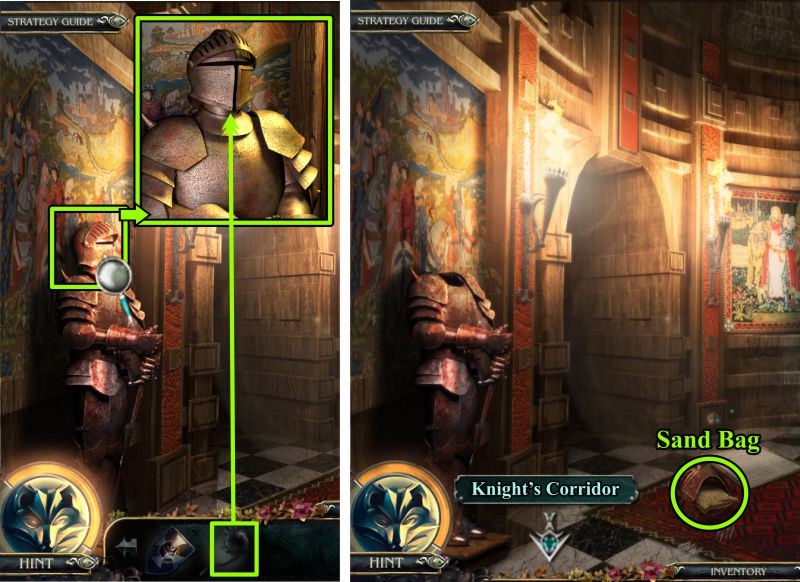
Arch
Zoom in on the armor and use your Mace to knock off the helmet.
Collect the Sand Bag that was inside, then go to the Knight's Corridor.
Screenshot
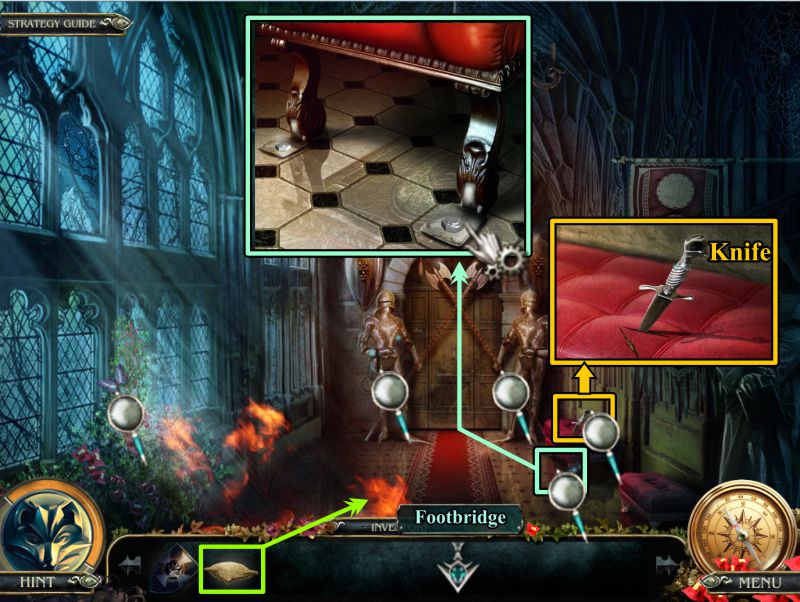
Knight's Corridor
Use the Sand Bag to put out the fire.
Zoom in and pick up the Knife.
Note everything you still need to complete your tasks, then go to the Footbridge.
Screenshot
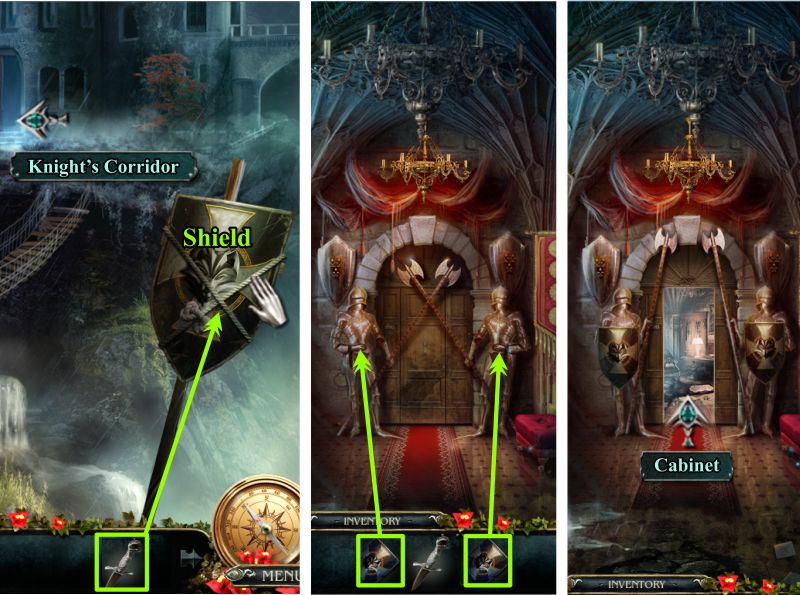
Footbridge and Knight's Corridor
Use the Knife to cut the rope securing the Shield and collect it.
Return to Knight's Corridor and give your Shields to each of the knights, who will open the door for you to enter the Cabinet.
Screenshot
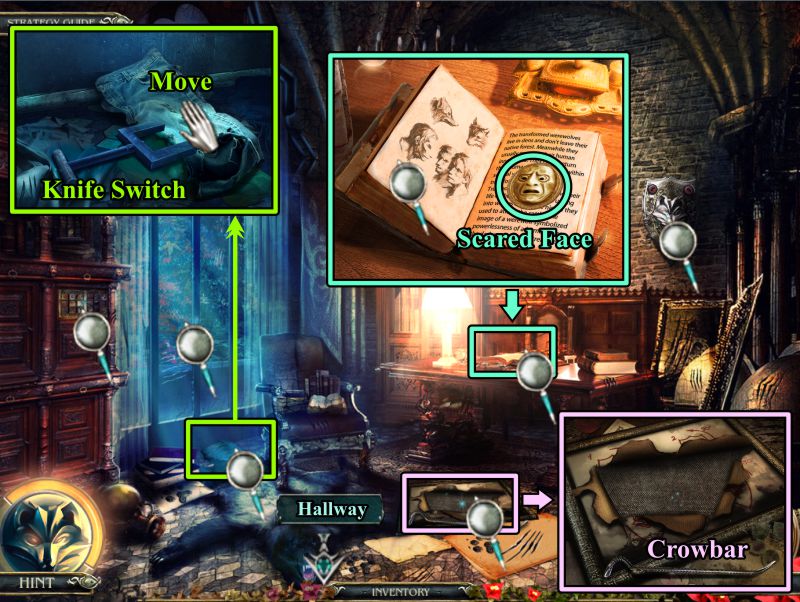
Cabinet
Zoom in on the clothes to the left of the chair, move them to find the Knife Switch.
Check out the ripped up picture on the floor and take the Crowbar.
Zoom in on the desk, take the Scared Face, and examine the book.
Investigate the other magnifying glasses, and then go to the Hallway.
Screenshot
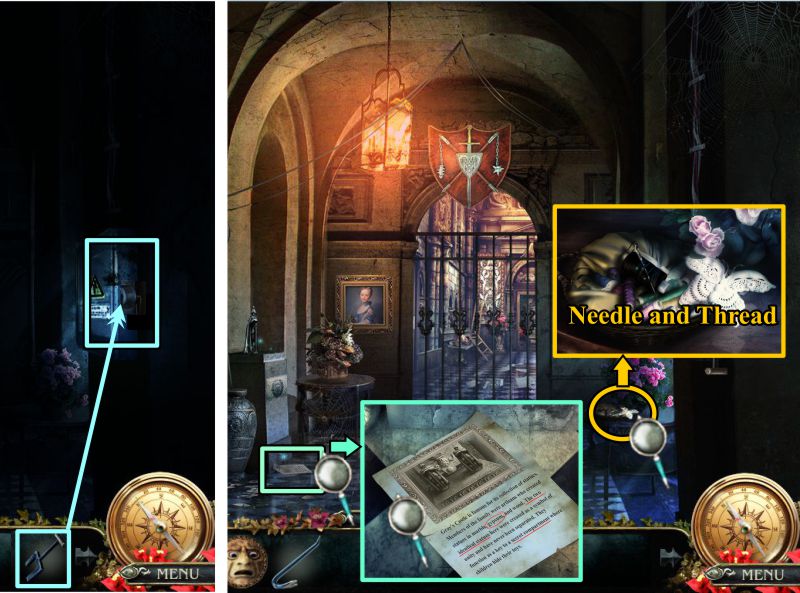
Hallway
Since you already used your Flashlight to look at the electric panel, it will still be light for you to place the Knife Switch.
The room will automatically become light, and a gate will come down to save you from the wolf.
Zoom in on the table to the right to take the Needle and Thread.
Look at the papers on the floor.
Screenshot
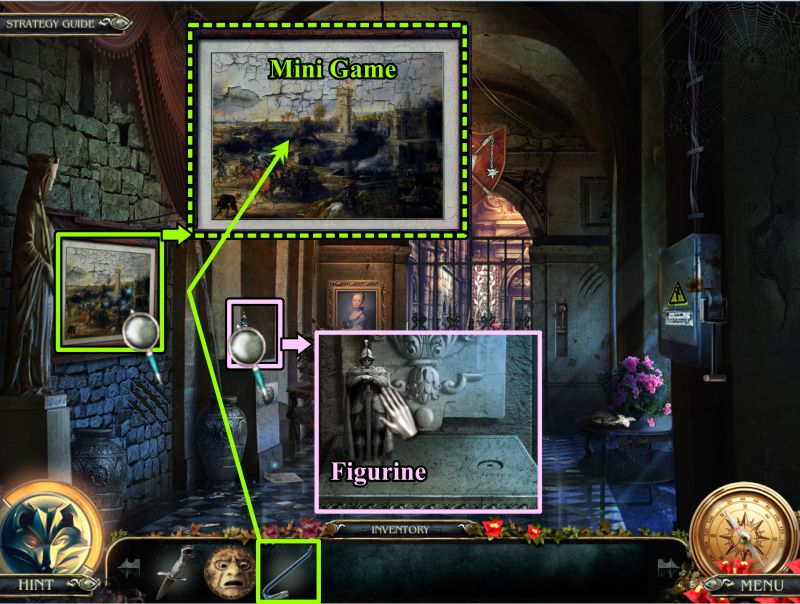
Zoom in on the pedestal and take the Figurine.
Zoom in on the painting and use the Crowbar to remove it and trigger a Mini Game.
Screenshot
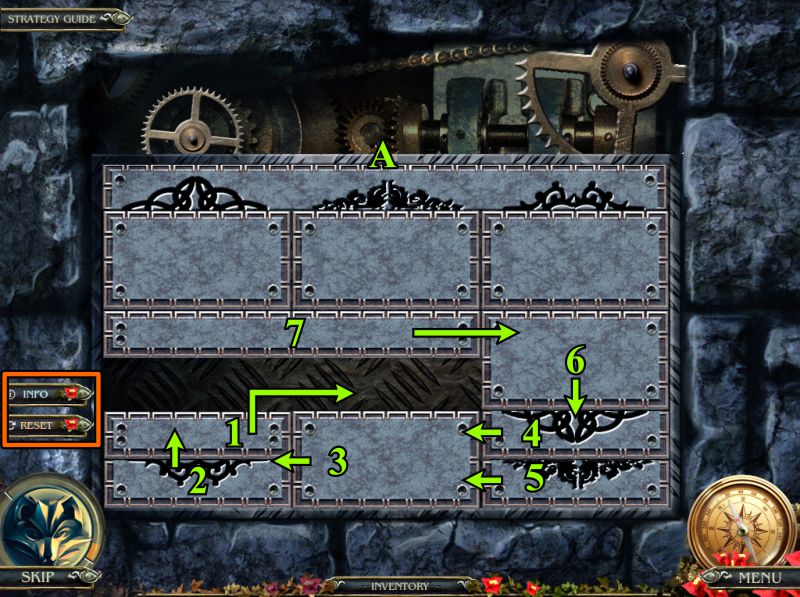
Gate Mechanism Mini Game
Your goal is to move the tiles to form complete pictures in the top blocks.
See the screenshot for the first set of moves.
Screenshot
See the screenshot for the next 4 sets of moves.
Screenshot
You are getting there, so have a look at the screenshot for help.
Screenshot
The solution is shown, and the gate opens for you to go to the Main Corridor.
Screenshot
Main Corridor
Zoom in on the window where the wolf escaped and take the Batteries.
Go to the Bedroom at the end of the corridor.
Screenshot
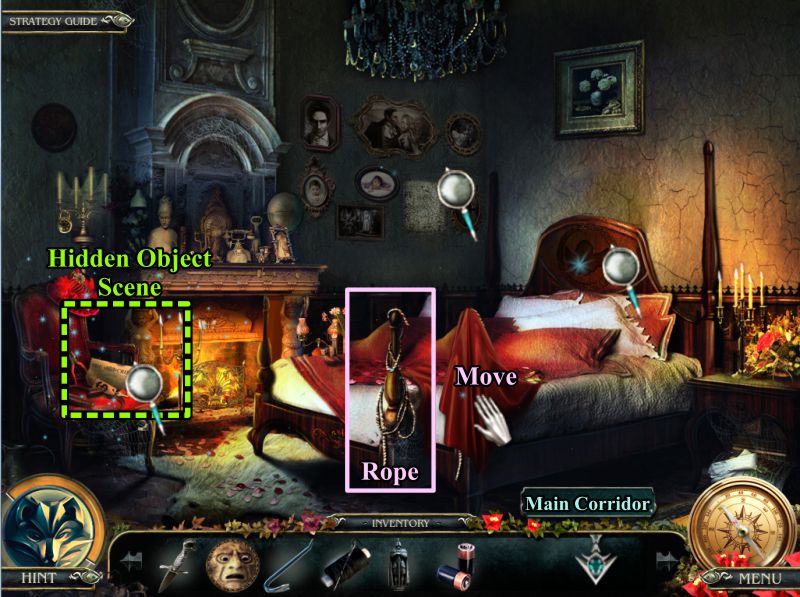
Bedroom
Note the photos and headboard, move the cloth from the bedpost, and take the Rope.
Play the Hidden Object Scene and return to the Main Corridor.
Screenshot
Bedroom Hidden Object Scene
Collect everything to get a Screwdriver.
Screenshot
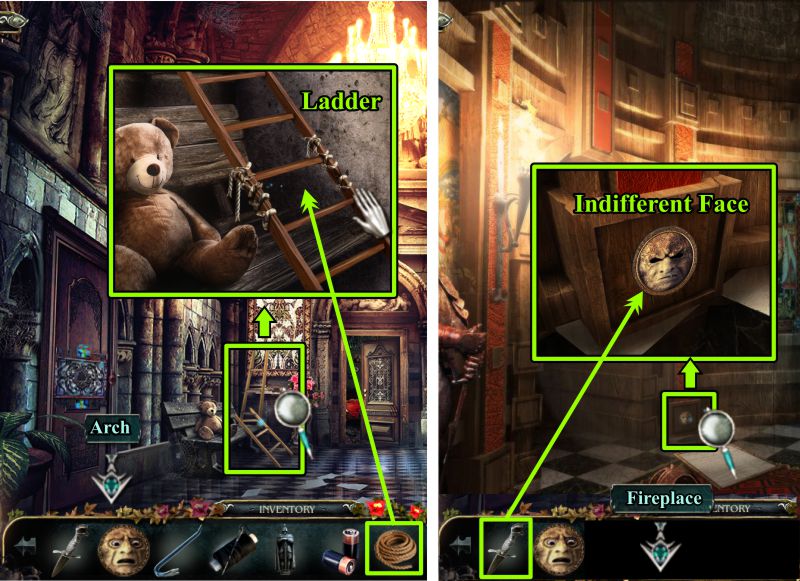
Main Corridor and Arch
Zoom in on the two ladder pieces and use your Rope to tie them together.
Stop at the Arch on your way to the Fireplace, so you can dig the Indifferent Face out of the niche with your Knife.
Screenshot
Fireplace and Cabinet
Zoom in on the plaque of Lord Caine Gray that is under his portrait.
Use the Screwdriver to remove the screw so you can take the Leaf.
Go to the Cabinet and zoom in on the turn picture.
Use your needle and thread to sew up the instructions for what to do with the wolf shield on the wall.
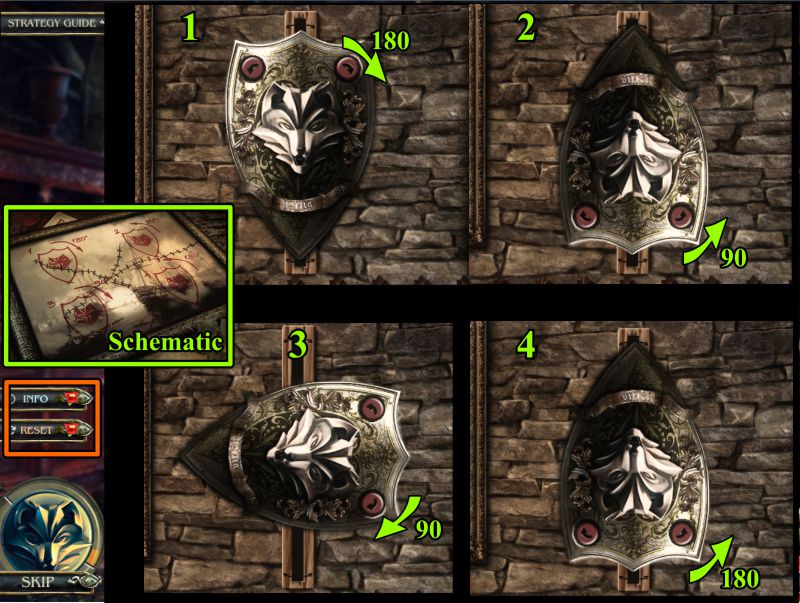
Screenshot
Wolf Shield Mini Game
Use the rotation arrows in the upper corners of the shield to rotate it.
Turn it 180 degrees to the right.
Turn it 90 degrees back the same way.
Turn it 90 degrees to the right.
Turn it 180 degrees left to where you started.
See the screenshot for help.
Screenshot
Once you have the solution, the Cupboard door will open for a Hidden Object Scene.
Go to the Fallen Tree.
Screenshot
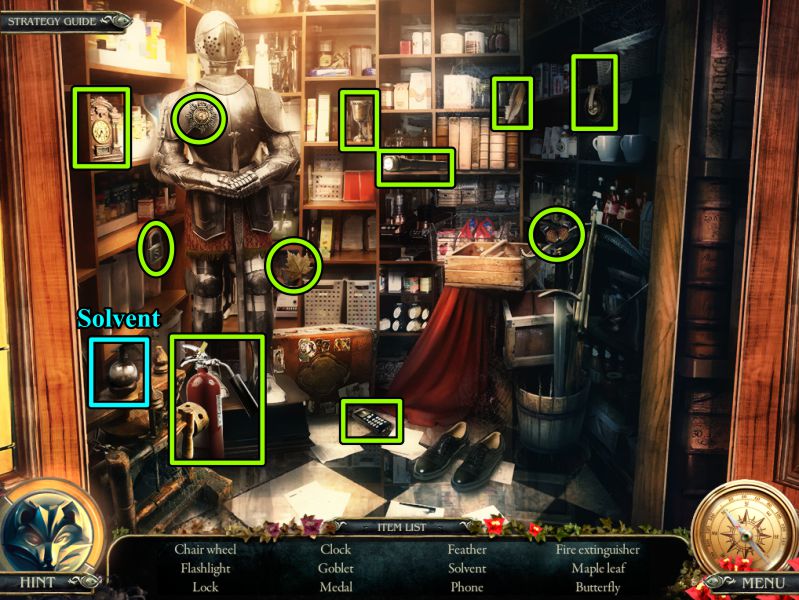
Cupboard Hidden Object Scene
Your final object will be some Solvent.
Screenshot
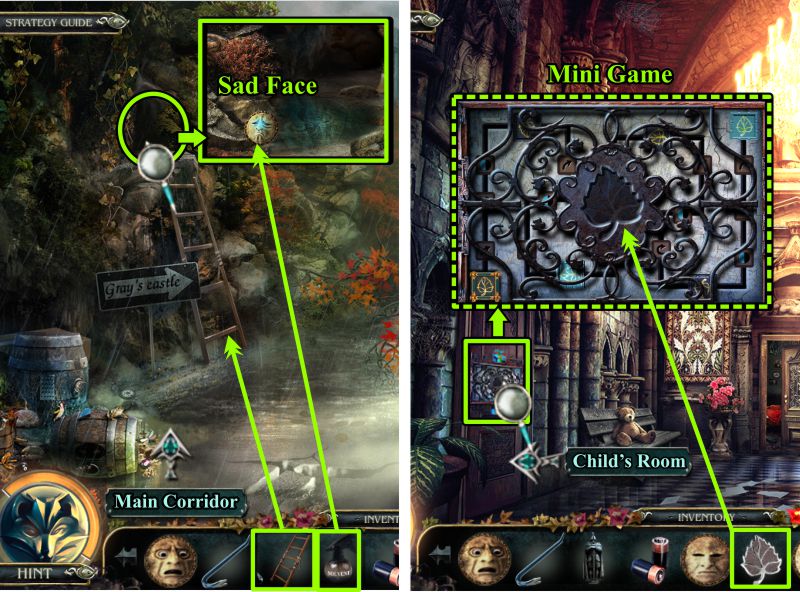
Fallen Tree and Main Corridor
Place the ladder by the ledge at the left.
Use the Solvent on the rusty disc to get the Sad Face.
Go to the Main Corridor and zoom in on the Child's Room door, then place the Leaf to trigger a Mini Game.
Screenshot
Child's Room Door Mini Game
Your goal is to move the Leaf from the start to finish by clicking on certain parts of the diagram.
The symbols will rotate the Leaf, so choose your stops carefully.
Press the red button when you have completed your choices to confirm they are correct.
The screenshot shows a path that works.
Screenshot
Child's Room
Check out all the magnifying glasses even if you cannot act on them at this time.
The crib has a cuddly little wolf rather than Brandon.
Zoom in on the book on the floor and place your Faces to trigger a Mini Game.
When you have finished your stay here, go to the Fireplace.
Screenshot
Child's Room Mini Game
Your goal is to match up the Faces with what is going on in the pictures.
See the screenshot for the solution. Take the Storeroom Key at the end.
Screenshot
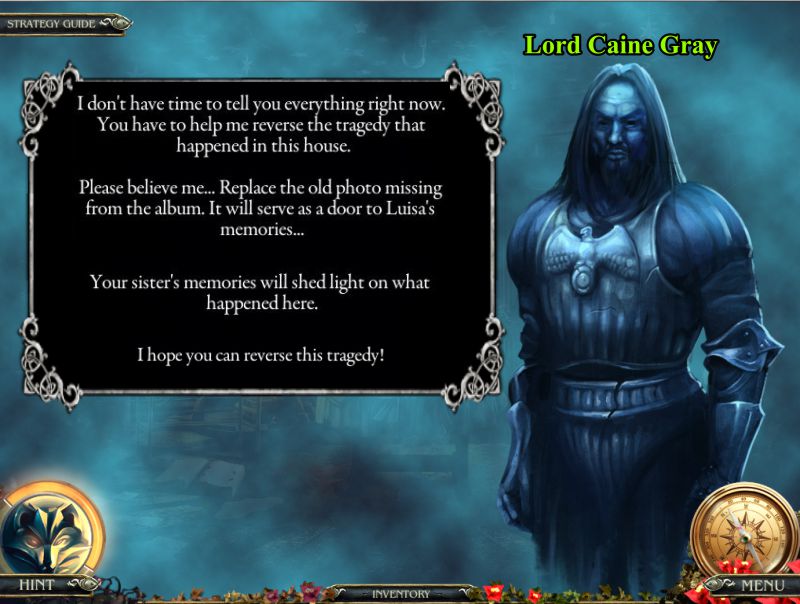
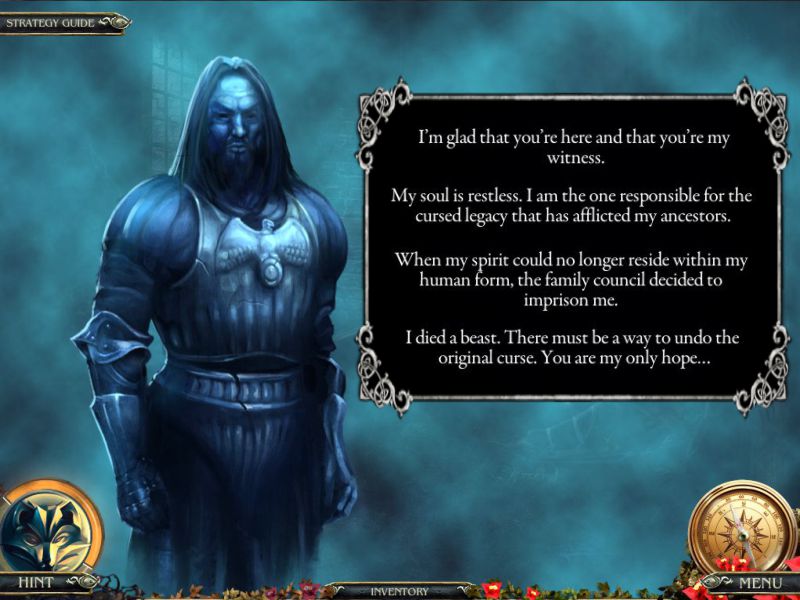
Lord Caine Gray
You get a visit from Caine, who has important information for you.
See the screenshot for the information.
Screenshot
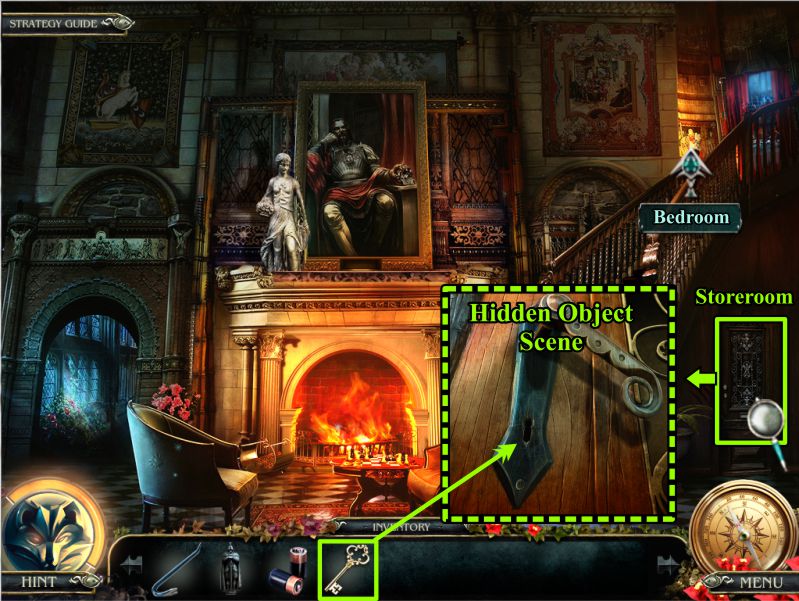
Fireplace
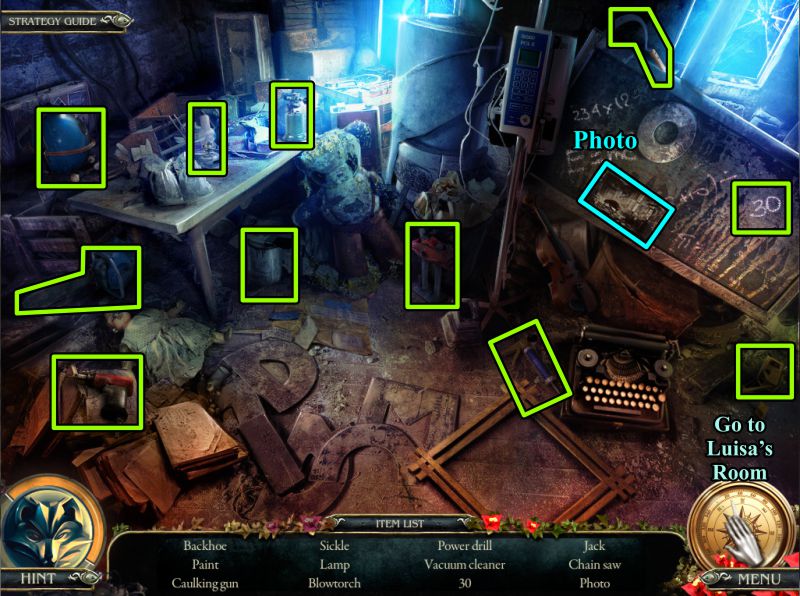
Zoom in on the Storeroom and use the Key to trigger a Hidden Object Scene.
Screenshot
Storeroom Hidden Object Scene
Your Inventory item is a Photo.
Go to the Bedroom.
Screenshot
Bedroom
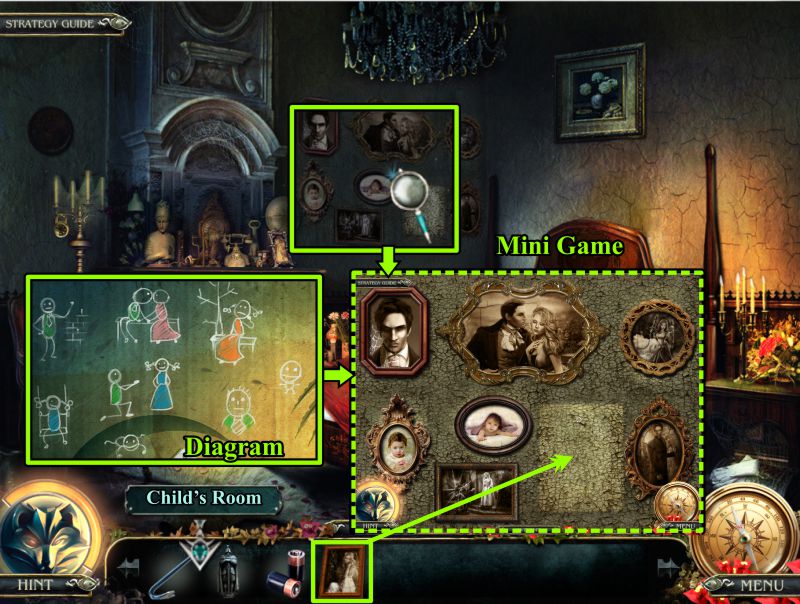
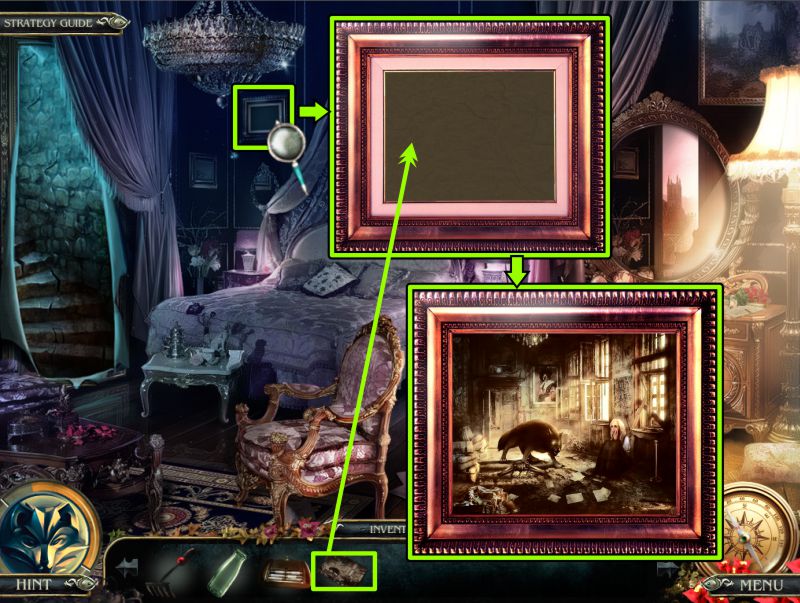
Zoom in on the photos on the wall and place the Photo you just collected in the vacant spot to trigger a Mini Game.
Use the Diagram from the Child's Room as a placement guide for the photos.
Screenshot
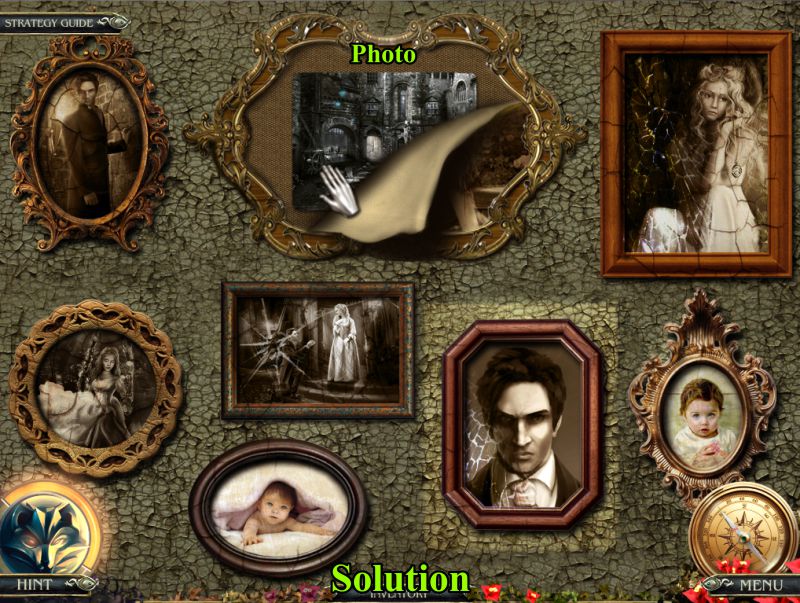
Photo Mini Game
Arrange the photos as shown in the screenshot.
Take the Photo behind the top center picture.
Go to the Child's Room.
Screenshot
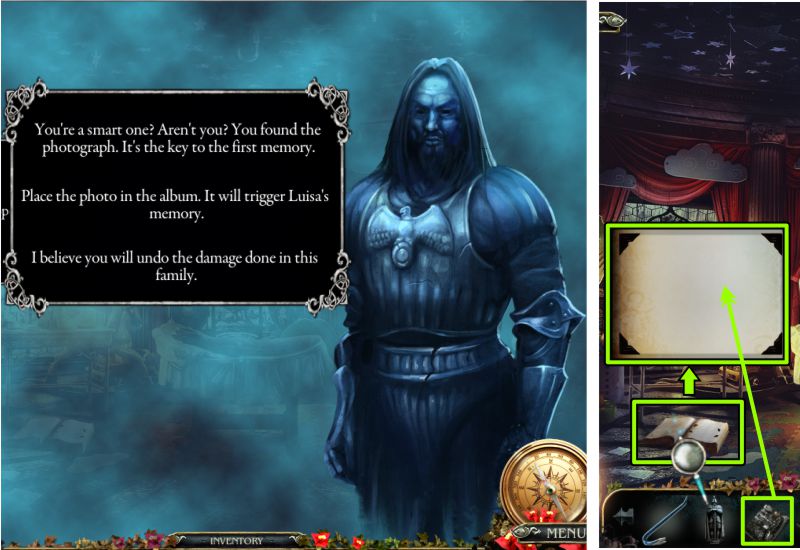
Caine
Caine returns with more instructions.
Zoom in on the book on the floor and place the Photo.
Screenshot
Chapter 2: Luisa's Memories
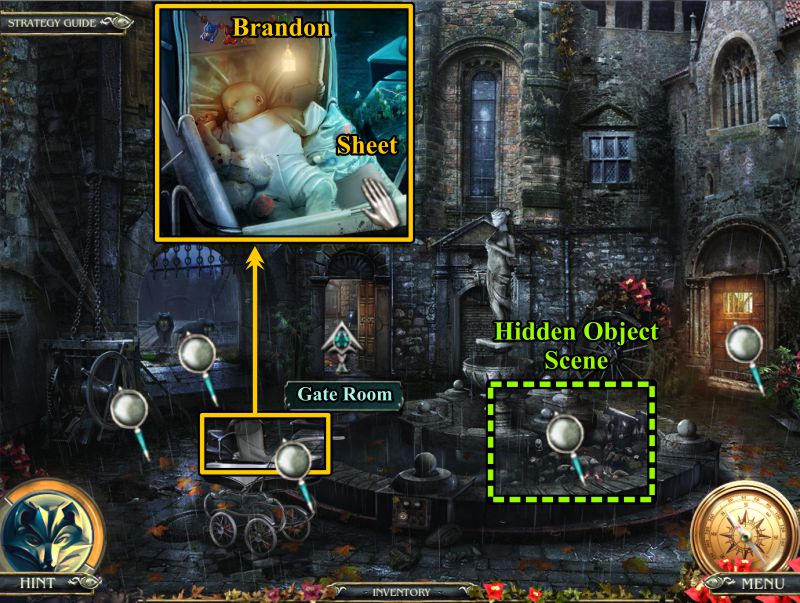
Castle Yard
Check out all the magnifying glasses, zoom in on Brandon in the baby carriage, and take the Sheet.
Play the Hidden Object Scene and go to the Gate Room.
Screenshot
Castle Yard Hidden Object Scene
Collect everything to get a Pin.
Screenshot
Gate Room
Zoom in on the wheelbarrow and take the Blunt Shears.
Use the Pin to unlock the cabinet, take the Rod, and zoom in to find the Puzzle Piece.
Return to the Yard.
Screenshot
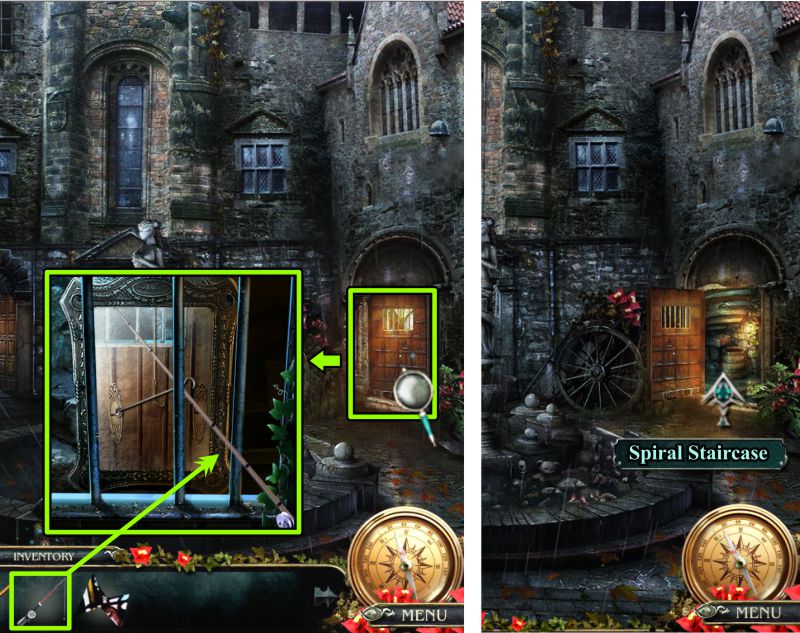
Yard
Zoom in on the door at the right and use the Rod to open the latch.
Go through the door to the Spiral Staircase.
Screenshot
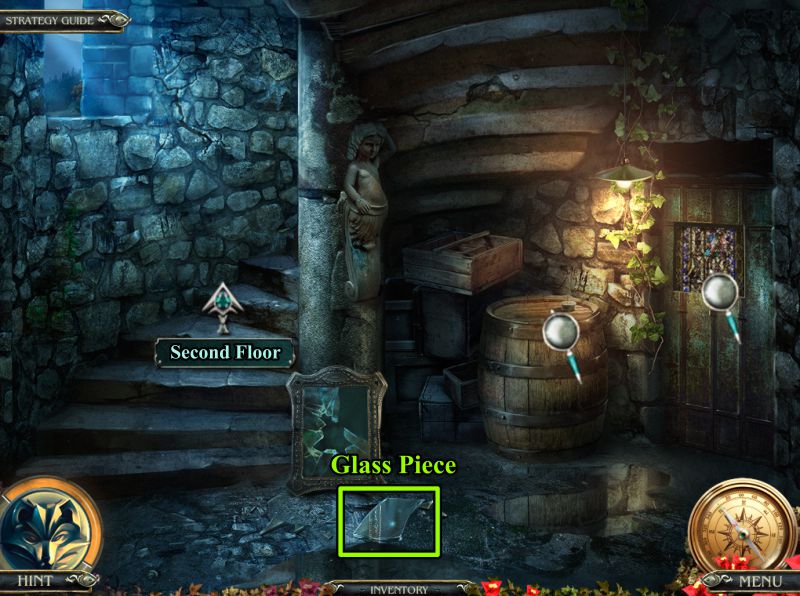
Spiral Staircase
Pick up the Glass Piece on the ground, check out the magnifying glasses, and go to the Second Floor.
Screenshot
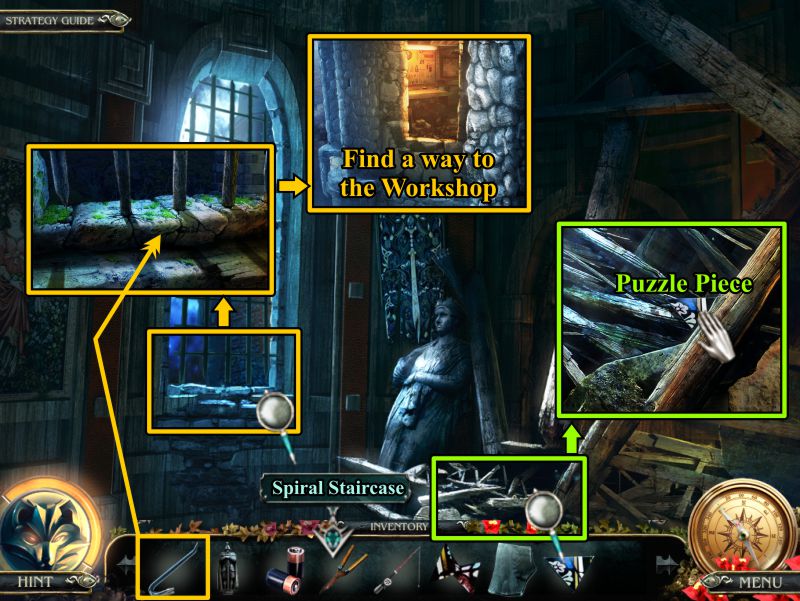
Second Floor
Zoom in on the rubble and take the Puzzle Piece.
Check out the window and use the Crowbar on the bars.
There is a Workshop across the way that you need to find a way to get to.
Return to the Spiral Staircase.
Screenshot
Spiral Staircase
Zoom in on the door at the right that leads to the Stone Stairs, then place your 2 Puzzle Pieces to trigger a Puzzle to open the door.
Screenshot
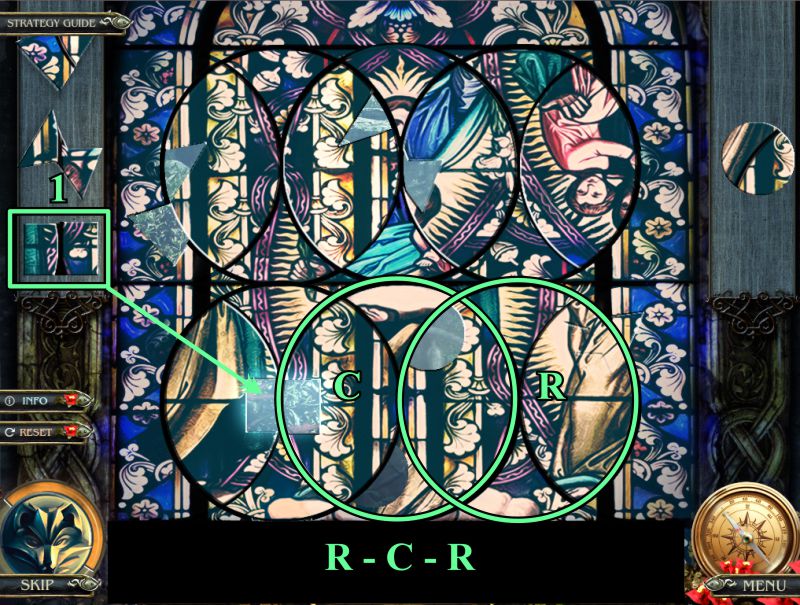
Stained Glass Puzzle
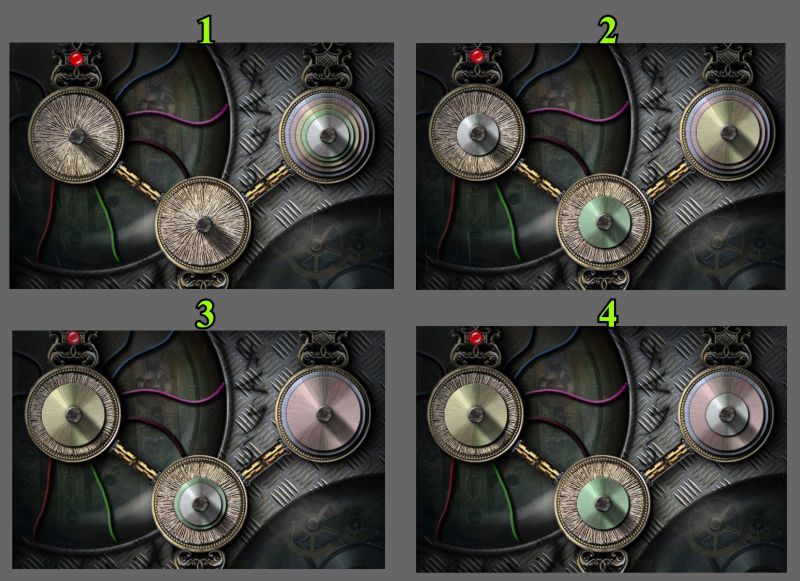
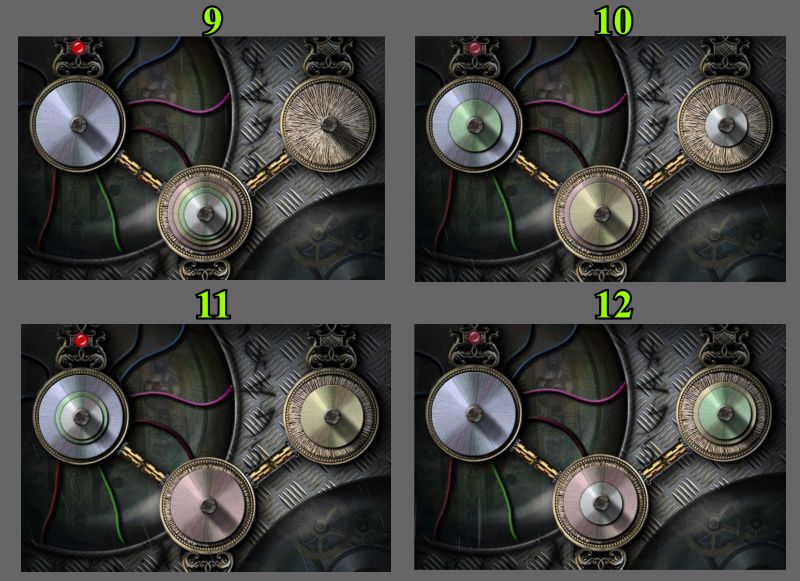
Your first goal is to rotate the circles so the window cutouts match up and you can place the pieces where they belong.
Second, you will need to continue rotating the circles until the picture is complete.
Place the 2 pieces in the cutouts, as shown in the screenshot, and rotate the center circle in the lower row.
Screenshot
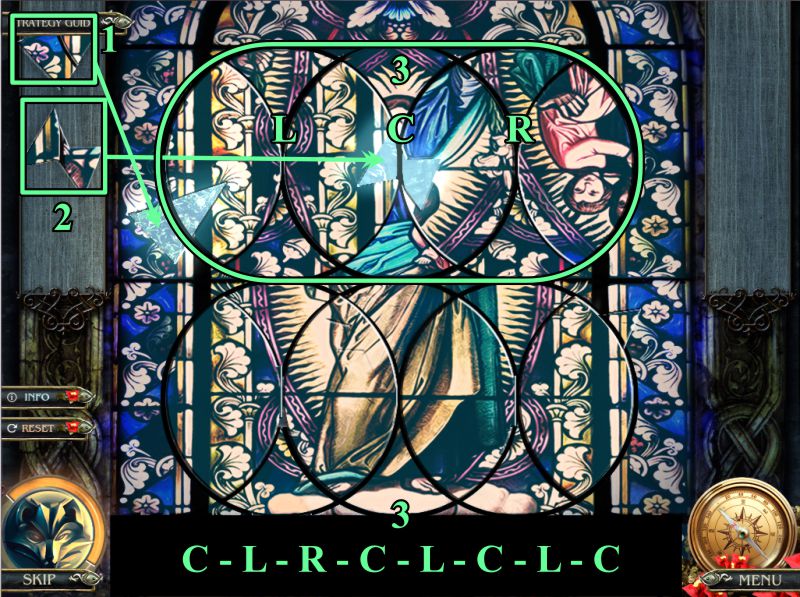
Still working on the lower row, place the next cutout and rotate the circles as shown in the screenshot.
Screenshot
Place the next cutout and continue to rotate the circles as shown in the screenshot.
You have now completed the lower set of circles so rotate the top left circle once.
Screenshot
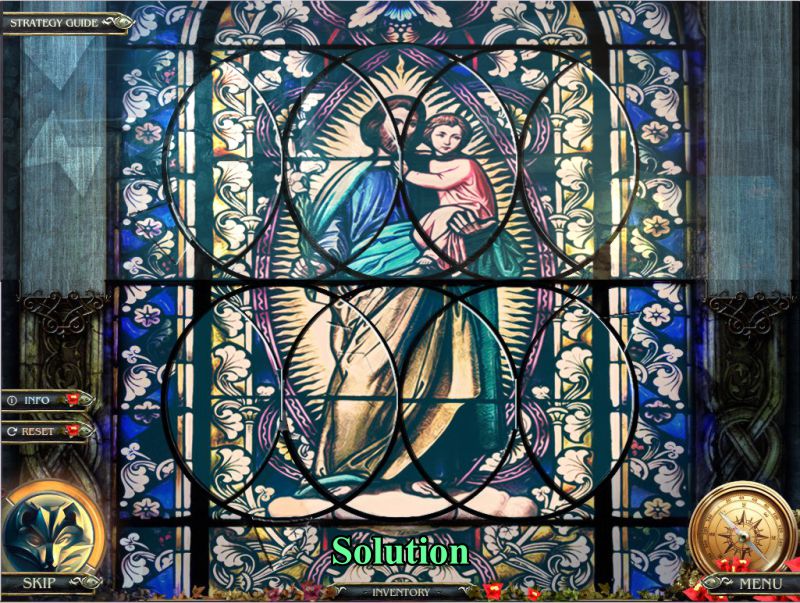
Place the last two pieces, then continue rotating the top circles as shown in the screenshot.
Screenshot
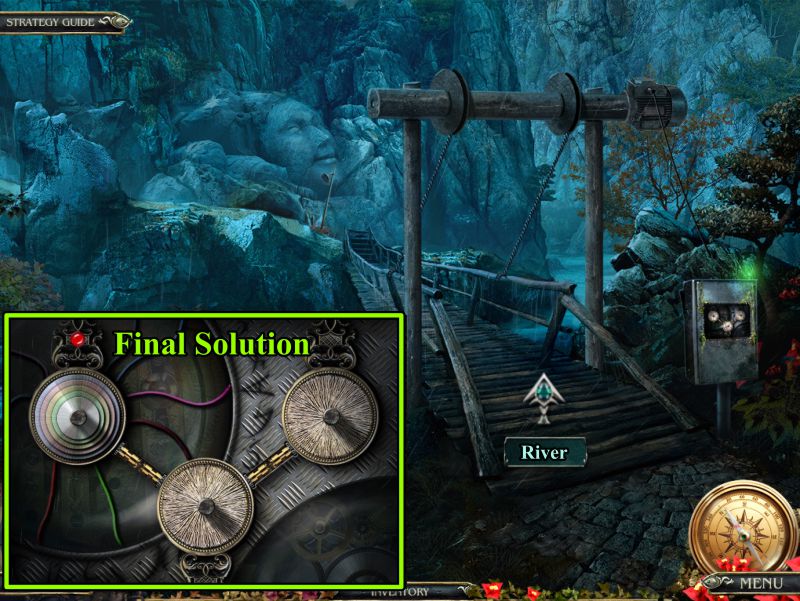
The screenshot shows the solution. Go through the open door.
Screenshot
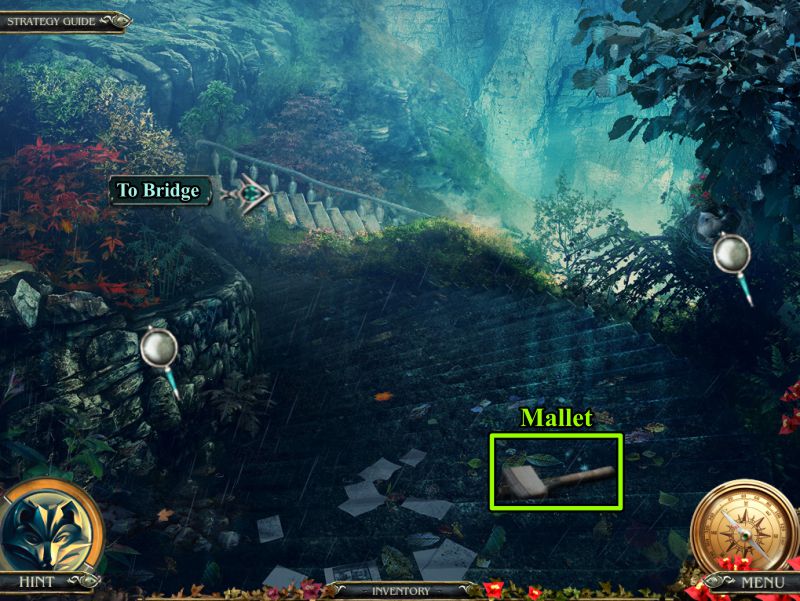
Stone Stairs
Pick up the Mallet, check the magnifying glasses, and go down the stairs to the Bridge.
Screenshot
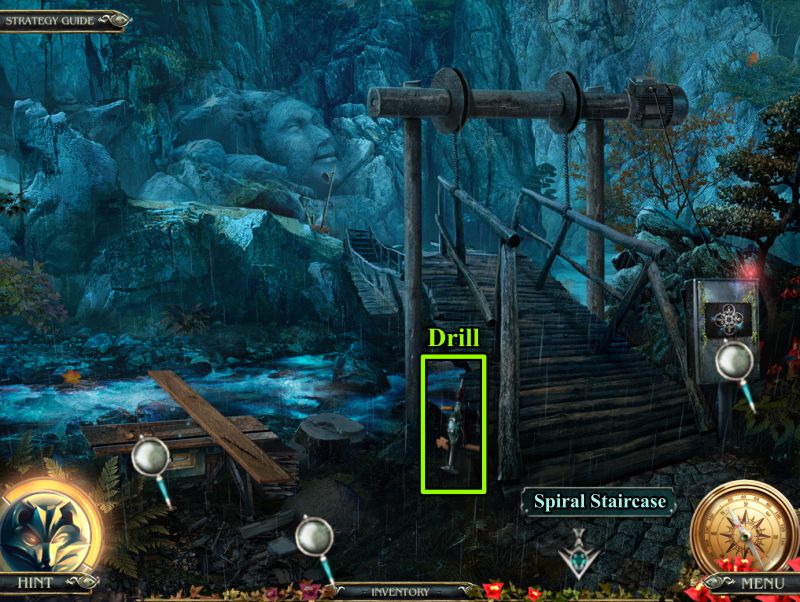
Bridge
Grab the Drill, check out the magnifying glasses, and return to the Spiral Staircase.
Screenshot
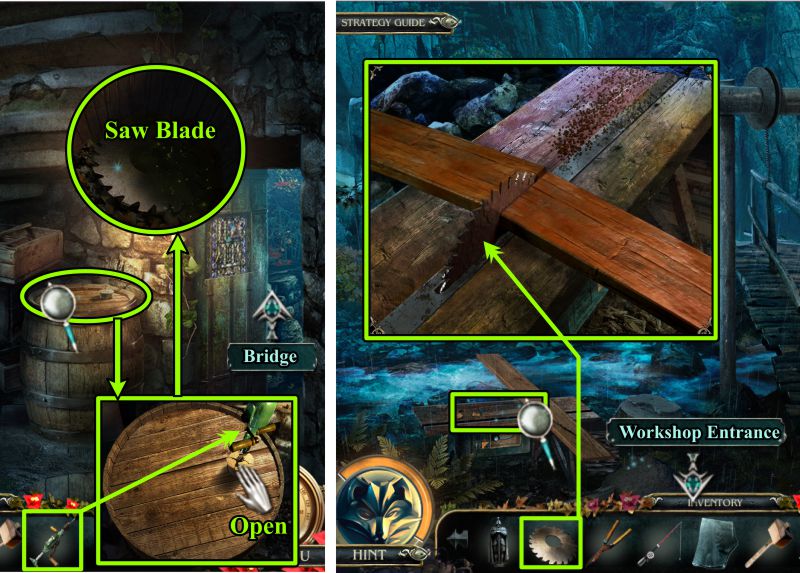
Spiral Staircase and Bridge
Zoom in on the barrel and use the Drill on the cork.
Open the lid and take the Saw Blade.
Return to the Bridge and place the Saw Blade on the saw: It will cut the wood board into two pieces that will automatically go into your Inventory.
Go to the Second Floor Workshop Entrance.
Screenshot
Workshop Entrance
Zoom in on the window and place your two Boards so you can walk across to the Workshop.
Screenshot
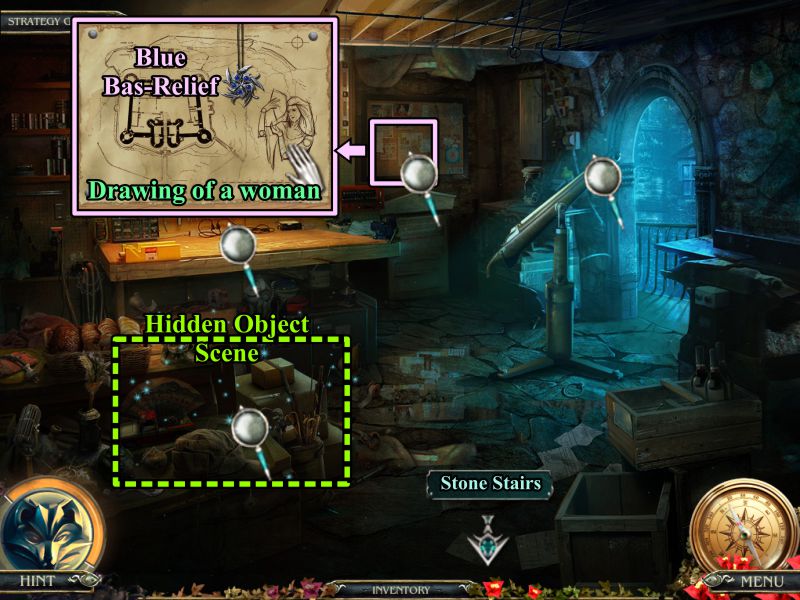
Workshop
Zoom in on the wall and take the Blue Bas-Relief and the Drawing of a Woman.
Play the Hidden Object Scene, then go to the Stone Stairs.
Screenshot
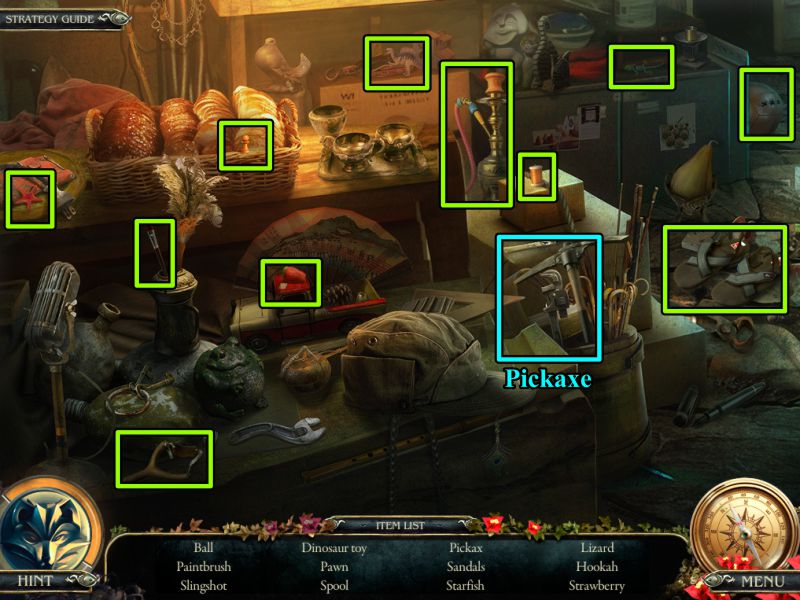
Workshop
Your final object will be a Pickaxe.
Screenshot
Stone Stairs and Bridge
Zoom in on the stones at the left and use your Pickaxe to get some Stones.
Go to the Bridge, zoom in on the mechanism, and place the Blue Bas-Relief to trigger a Mini Game.
Screenshot
Bridge Mechanism Mini Game
Your goal is to move all the stone plates on the right to the left rod.
A larger stone cannot be placed on a smaller one.
Use the middle rod to help with the transfer.
See the screenshot for the first steps.
Screenshot
The next screenshot continues your progress.
Screenshot
Keep up the good work and check the screenshot for some help.
Screenshot
You're almost done with just a few more moves to go in this screenshot.
Screenshot
Final solution, and you can now cross over the River.
Screenshot
River
Place your Stones in the River to be able to grab the Bas-relief.
Zoom in on the ground, take some Soil and the Worm, and return to the Stone Stairs.
Screenshot
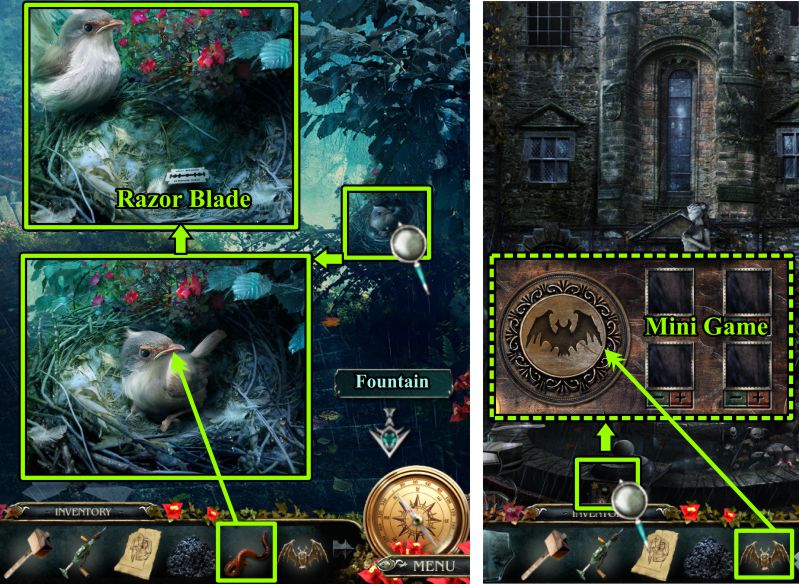
Stone Stairs and Fountain in Castle Yard
Zoom in on the bird nest, give the worm to the bird, and take the Razor Blade.
Go to the Yard and zoom in on the fountain.
Place the Bas-relief to trigger a Mini Game.
Screenshot
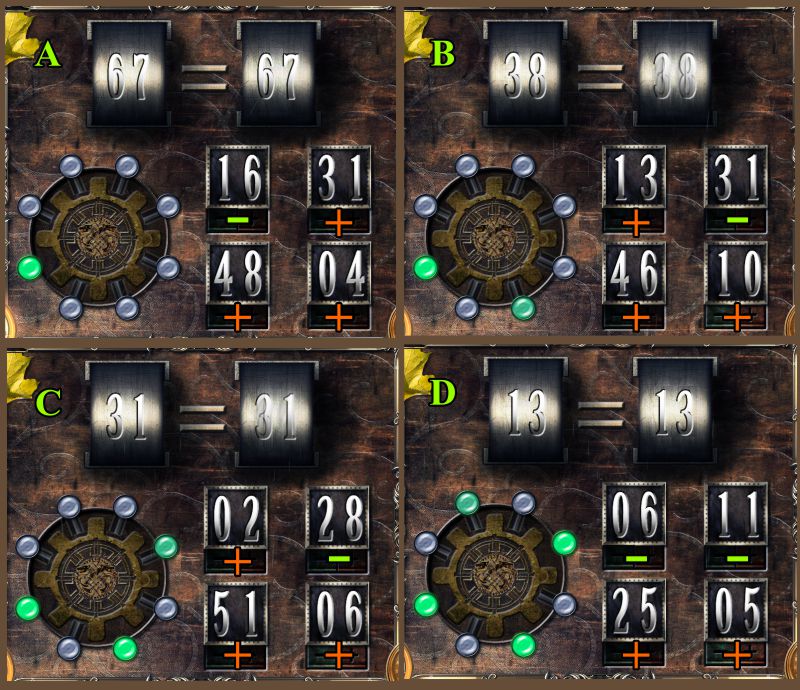
Fountain Mini Game
Your goal is to make the equation at the top match by using the 4 plus and minus numbers below.
When you have correctly completed the equation, a green light will appear in the circle at the left and you will go on to the next equation.
See the screenshot for the solutions to the first set of equations.
Screenshot
See the screenshot for the solutions to the remaining set of equations.
Screenshot
Yard
The Fountain turns into a set of stairs to the Underground, so go there.
Screenshot
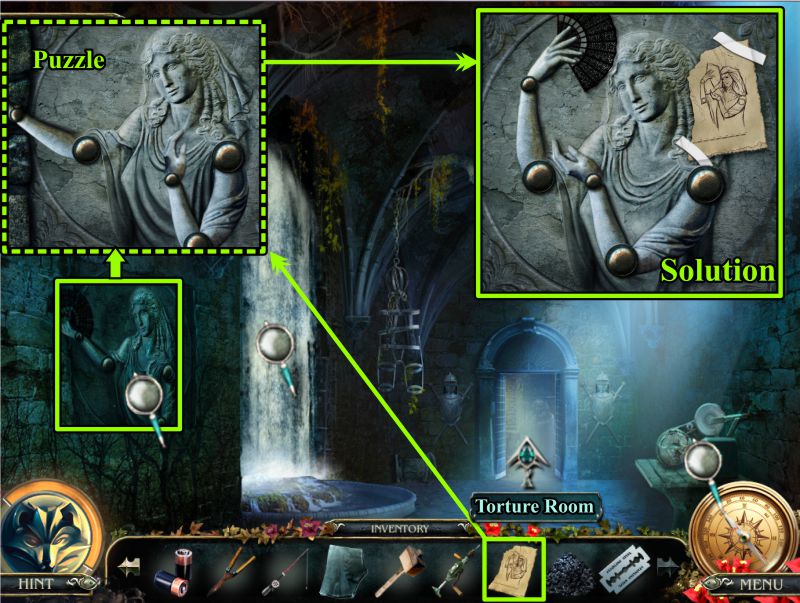
Underground
Zoom in on the stone woman relief and place your Drawing of a Woman on it to trigger a Puzzle.
Move the hinges on the figure to match the drawing.
See the screenshot for the solution.
The Fan will automatically go into your Inventory.
Go through the door in the back to the Torture Room.
Screenshot
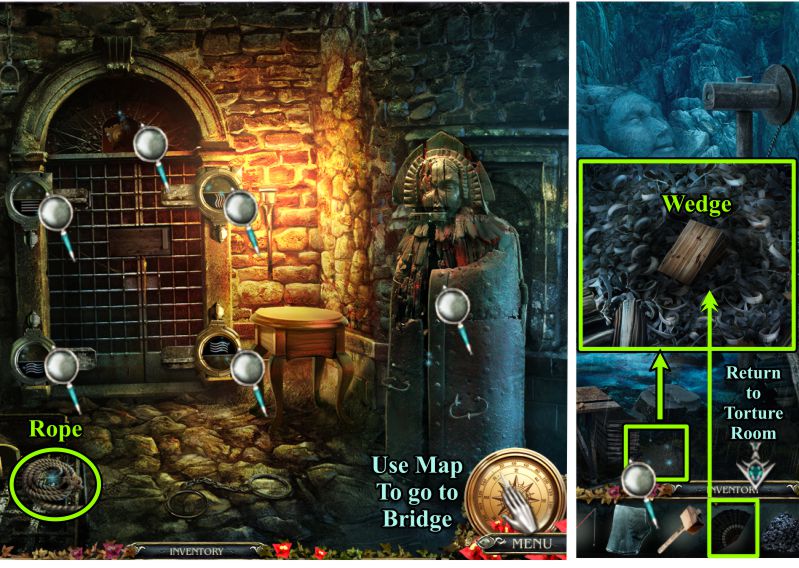
Torture Room and Bridge
Check out all the magnifying glasses, pick up the Rope, and use the Map to go to the Bridge.
Zoom in on the wood chips and use the Fan to blow them away so you can take the Wedge.
Return to the Torture Room.
Screenshot
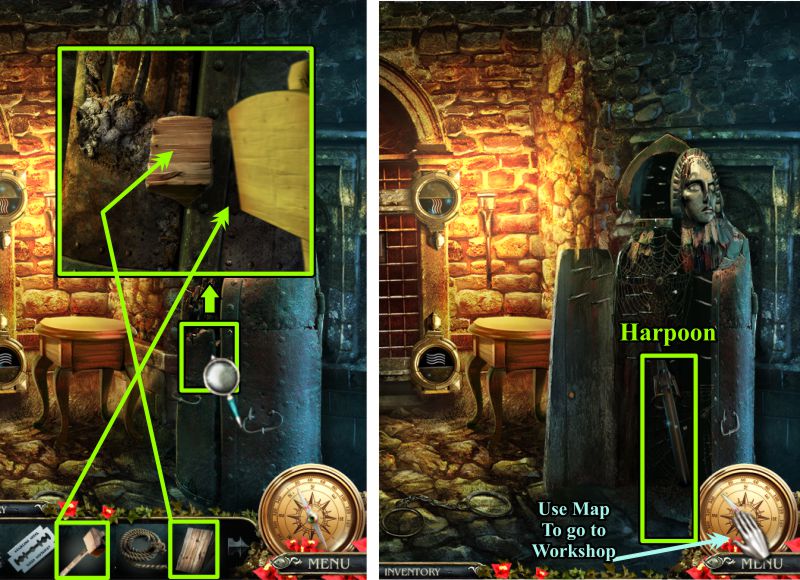
Torture Room
Zoom in and insert the Wedge into the iron maiden, then use the Mallet to drive the Wedge.
Take the Harpoon, then use the Map to go to the Workshop.
Screenshot
Workshop
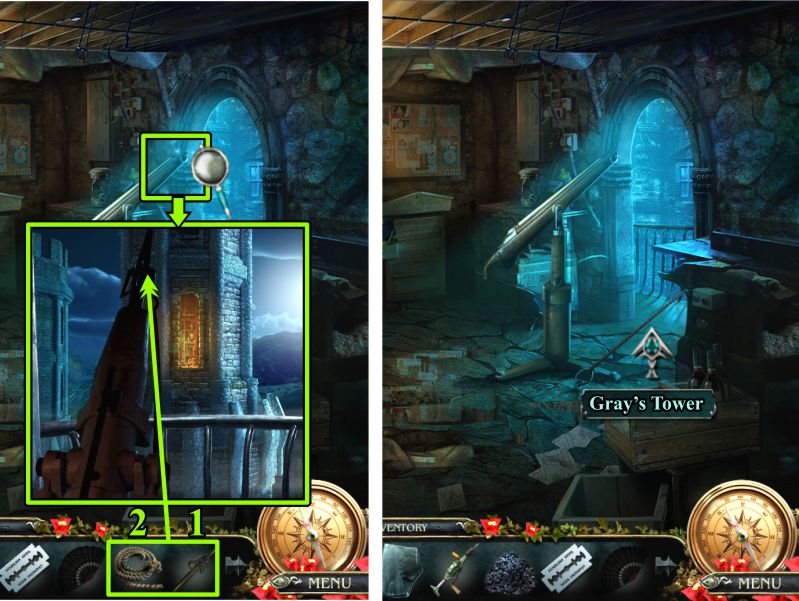
Zoom in on the harpoon cannon, place the Harpoon, and then the Rope.
The cannon will fire over to Gray's Tower so you can go there.
Screenshot
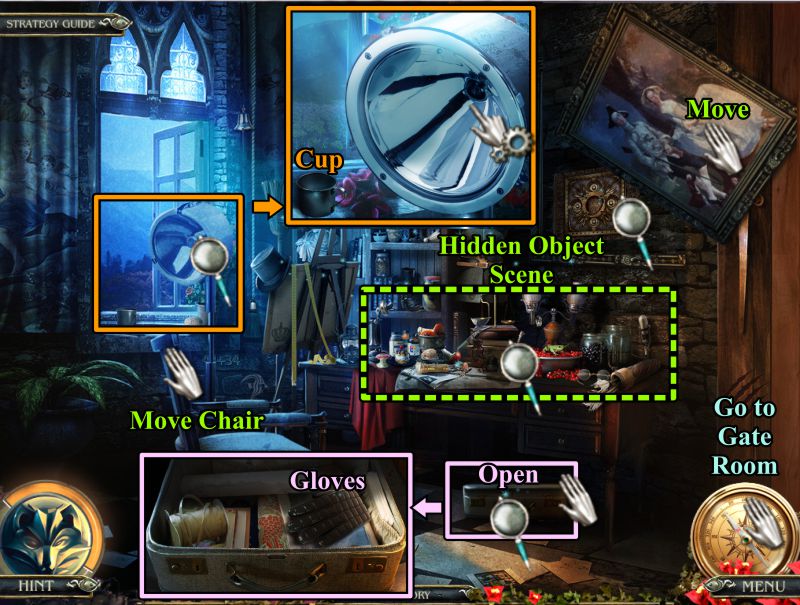
Gray's Tower
Zoom in on the lamp, take the Cup, and note you need a bulb.
Open the suitcase and take the Gloves.
Move the painting to reveal the safe.
Play the Hidden Object Scene, and then go to the Gate Room.
Screenshot
Gray's Tower Hidden Object Scene
You will get a Cross Key for your Inventory.
Screenshot
Gate Room and Underground
Zoom in on the box in the cabinet and place the Cross Key to open it.
Take the Bulb and go to the Underground.
Zoom in and fill your Cup with water from the waterfall.
Use the Map to go to Gray's Tower.
Screenshot
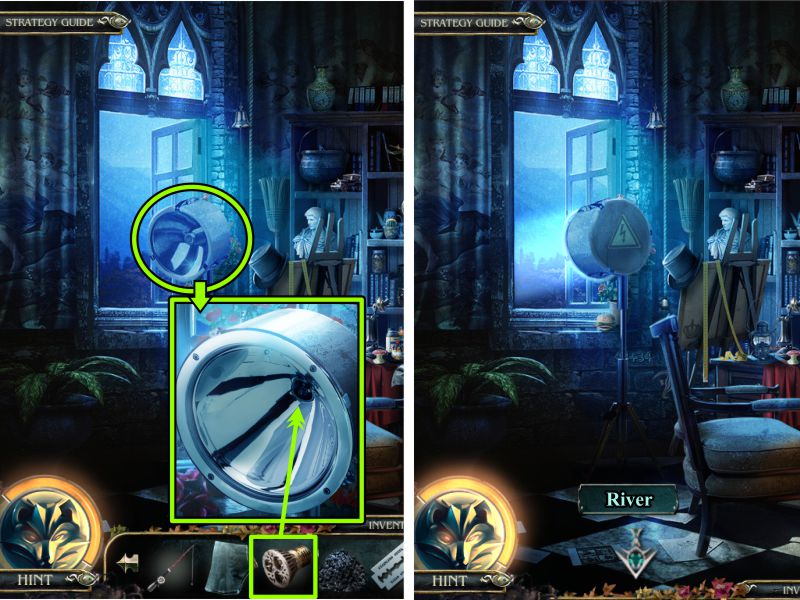
Gray's Tower
Zoom in on the lamp, place the Bulb, and the lamp will shine out the window.
Go to the River.
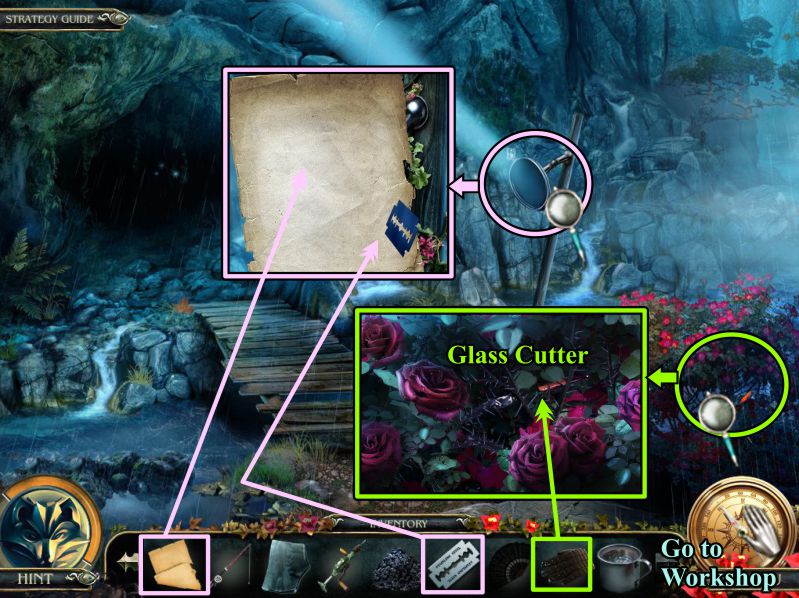
Screenshot
River
Zoom in and place the Sheet of Paper over the lamp.
Use the Razor Blade to cut a pattern.
Use the Glove on the bush to pick up the Glass Cutter.
Go to the Workshop.
Screenshot
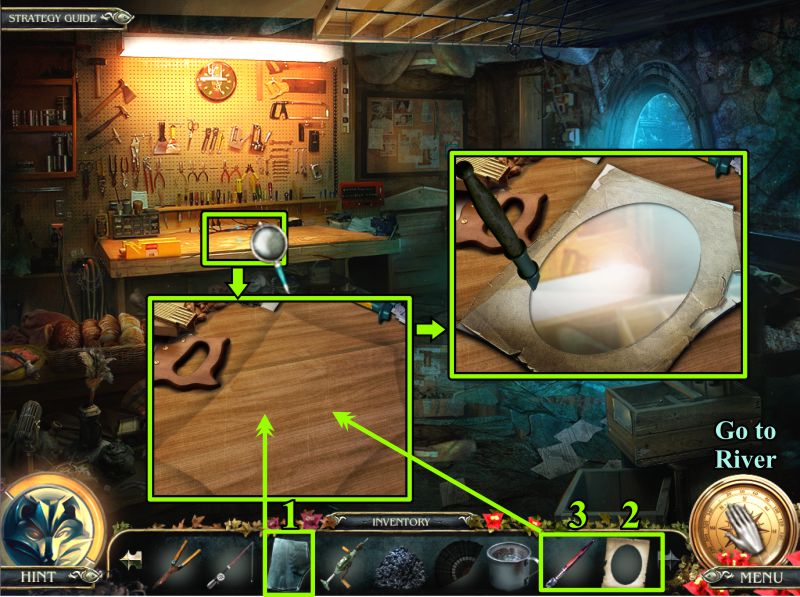
Workshop
Zoom in on the workbench and place the Glass and Template.
Use the Glass Cutter to cut a lens for the lamp.
Go to the River.
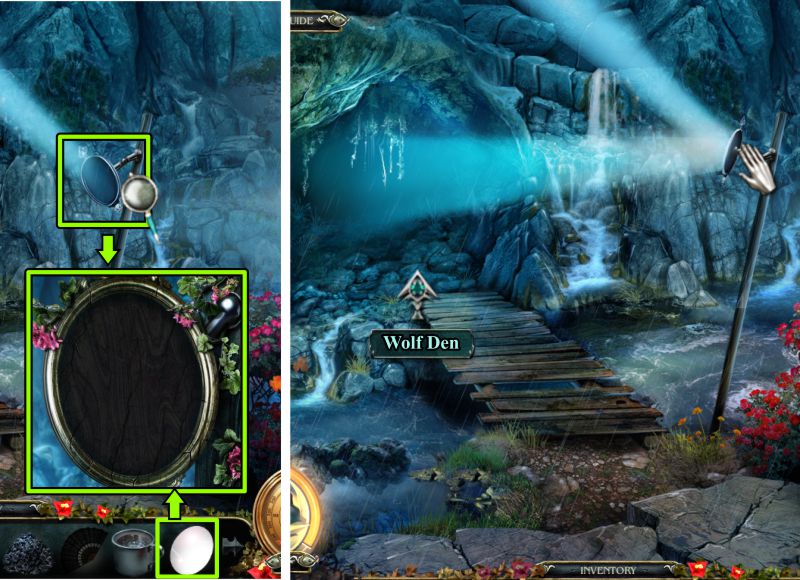
Screenshot
River
Zoom in and place the Lens on the Lamp.
Turn the lamp so the reflection you set up from the Workshop now reflects into the Wolf Den.
Enter the Wolf Den.
Screenshot
Wolf Den
You're safe since there is no wolf around, so zoom in on the fire ring and take the Flint.
Check out the magnifying glasses for more information, then play the Hidden Object Scene.
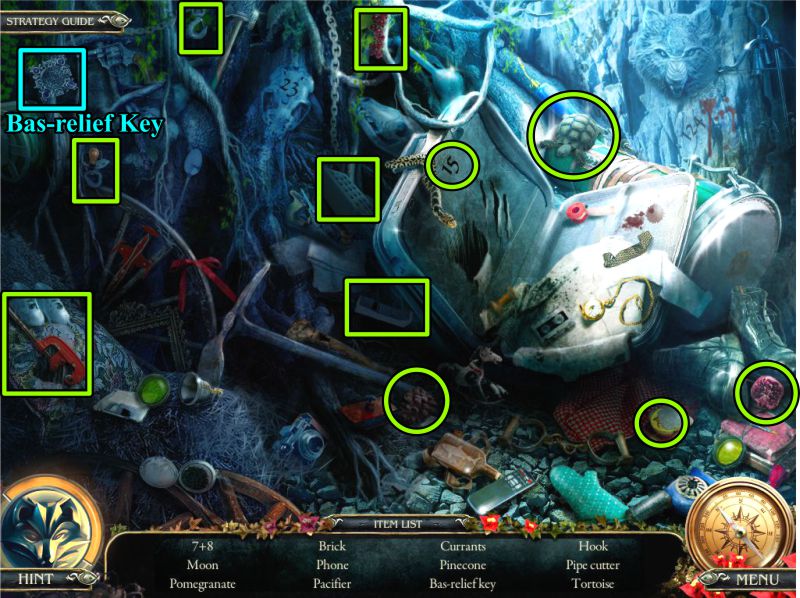
Screenshot
Wolf Den Hidden Object Scene
There is a Bas-relief Key that will go to your Inventory.
Screenshot
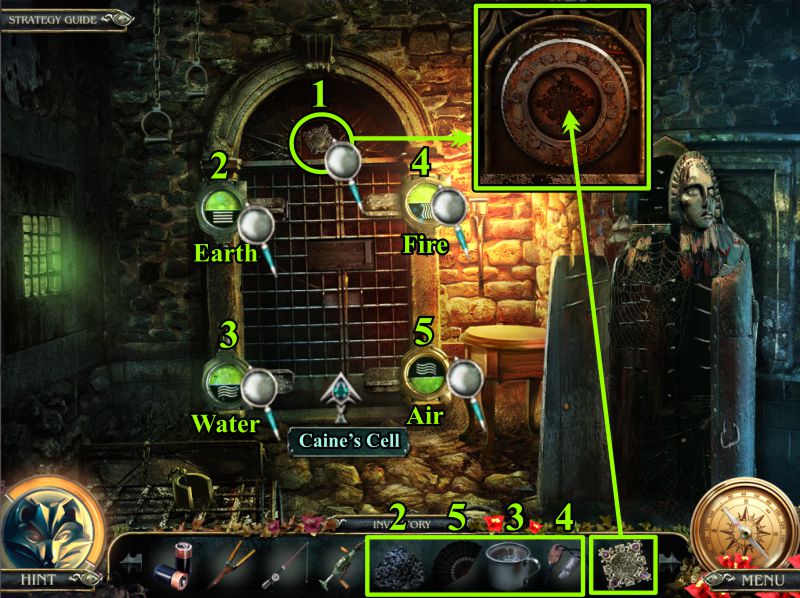
Torture Room
Go to the Torture Room to be tortured with the next Mini Game.
Place the Bas-relief Key in the #1 area shown in the screenshot to trigger an extensive Mini Game.
There are 4 parts to this game, and they encompass all of the elements: Earth, Water, Fire, and Air as numbered in the screenshot.
In order, you will need to place the object shown in the screenshot to trigger each Mini Game.
For Earth, you must supply the Soil.
For Water, you will give up your Cup of Water.
For Fire, you must supply your Flint.
For Air, your Fan will provide the wind.
Screenshot
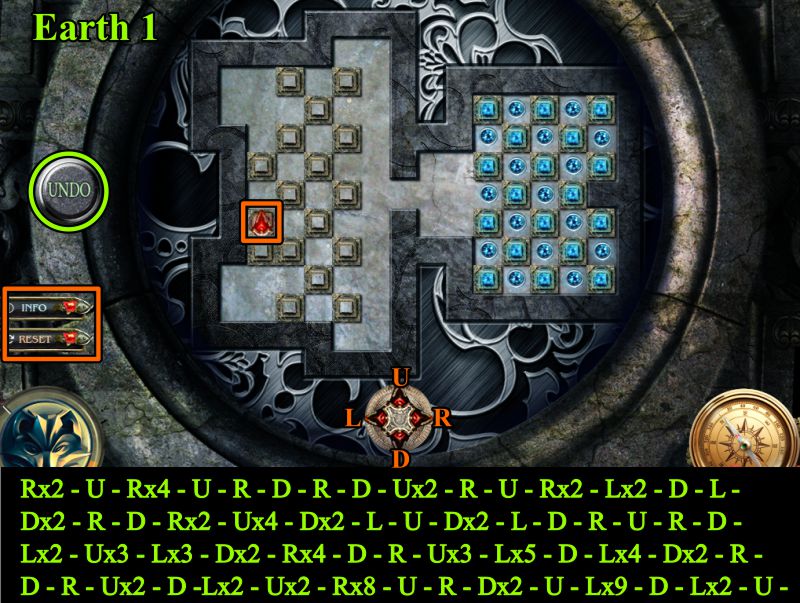
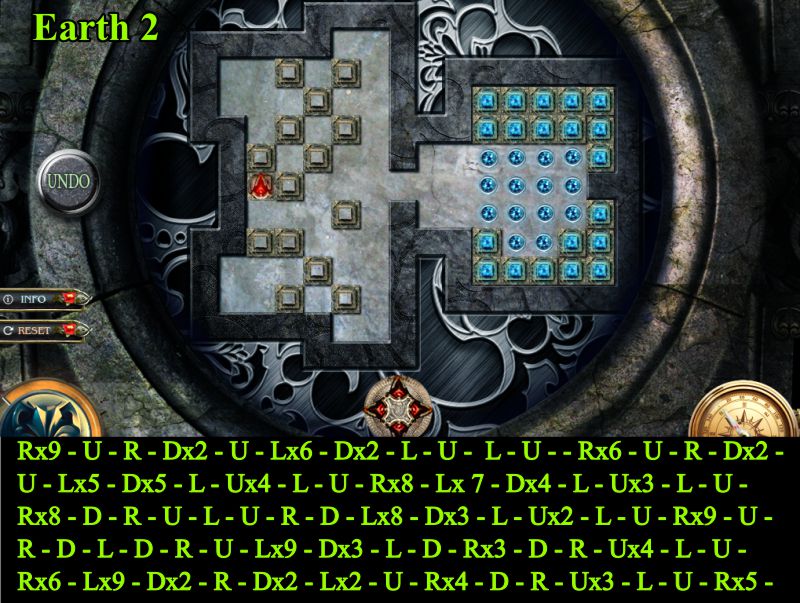
Earth Mini Game
First, you must tackle Earth as part of your 4-part adventure to open the next door.
Your goal is to use the red arrow to move all the blocks on the left into the blue squared on the right.
To do so, you will have to move both sets of squares in some sort of order.
If you need to reset, there is a button to do so.
There is also an UNDO button to move you back a couple of moves so you don't have to reset.
The red arrows will help you with the moves.
Please see this screenshot for the first part of what you need to do.
Screenshot
You've passed the first part of this level, so see the screenshot for help to continue this level.
Screenshot
We are still dealing with moves for the Earth level, so check the screenshot to help with the completion.
Screenshot
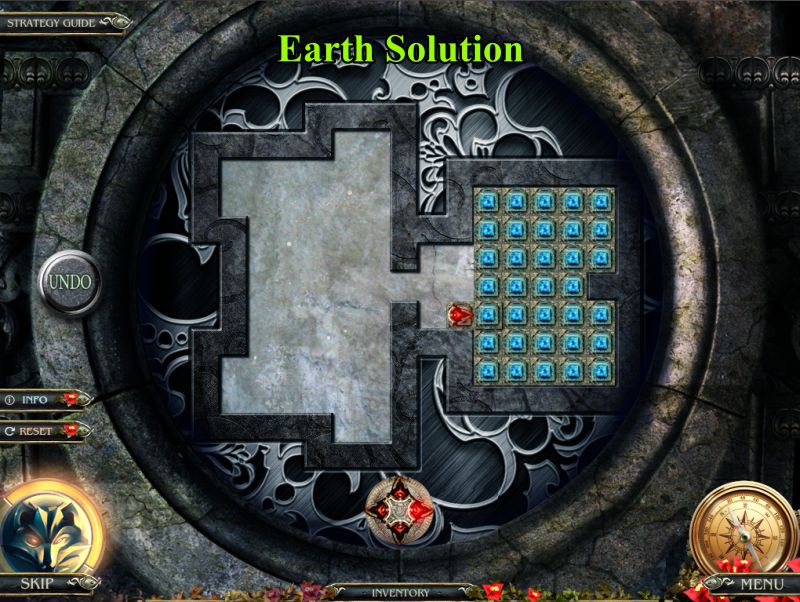
You made it, so here is the Earth Solution.
Screenshot
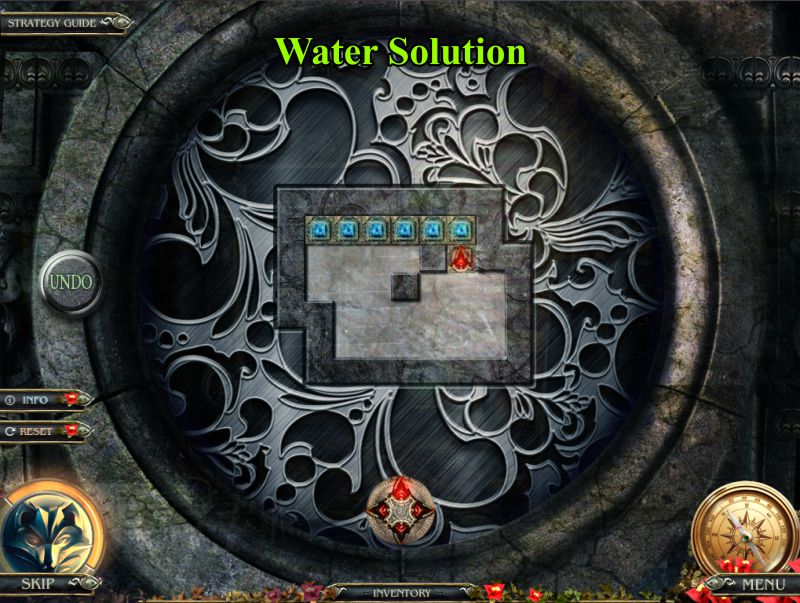
Water Mini Game
Again, you need to use the red arrow to help you move the gray buttons to become blue in the top area.
See the screenshot for the needed moves.
Screenshot
Here is your goal for the Water Solution.
Screenshot
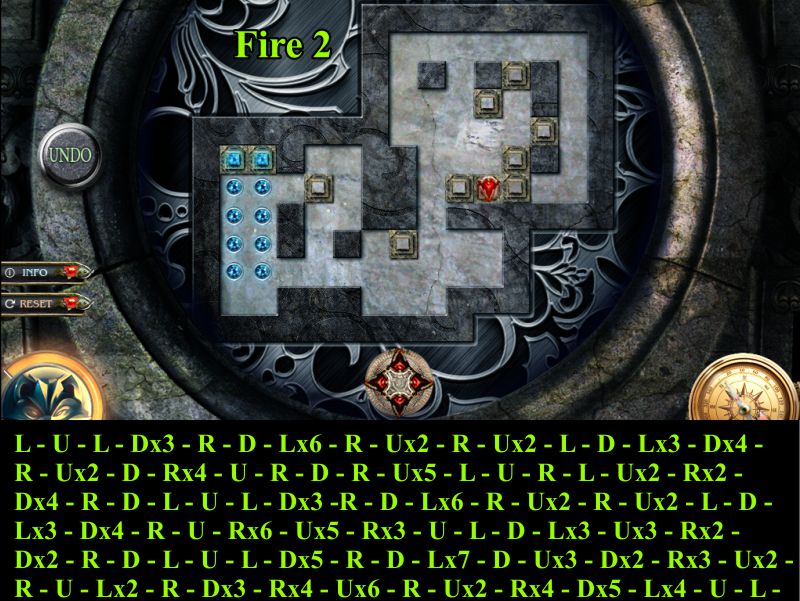
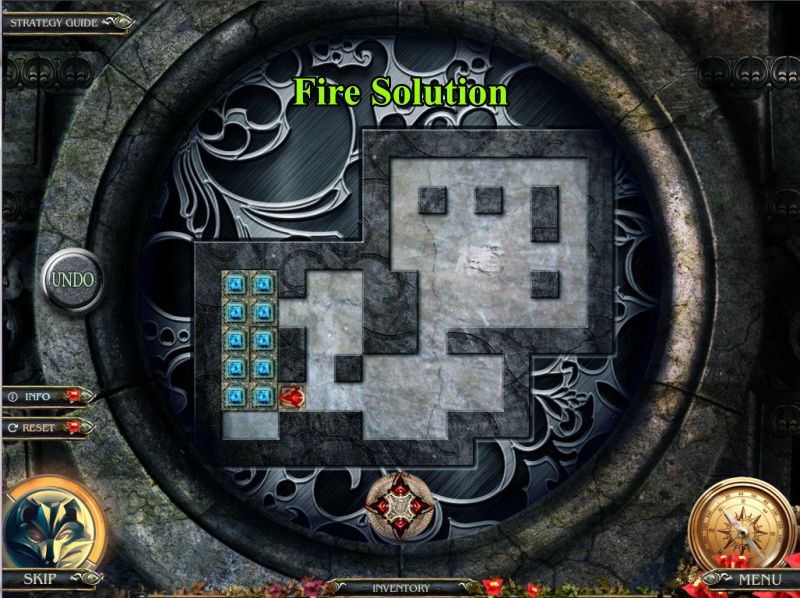
Fire Mini Game
Start with your red arrows and do all the moves shown in the screenshot to complete this level.
Screenshot
This screenshot is a continuation of the last one to help you complete the Fire level.
Screenshot
Keep going because the end for the Fire level is in sight.
Screenshot
Here is the Fire solution, so on to the next level.
Screenshot
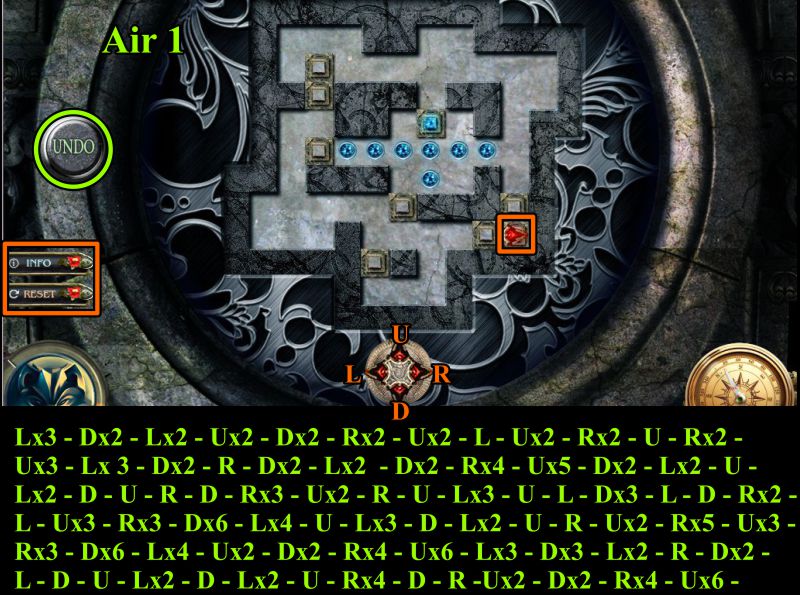
Air Mini Game
Your last element is Air. See the screenshot for the first solution moves.
Screenshot
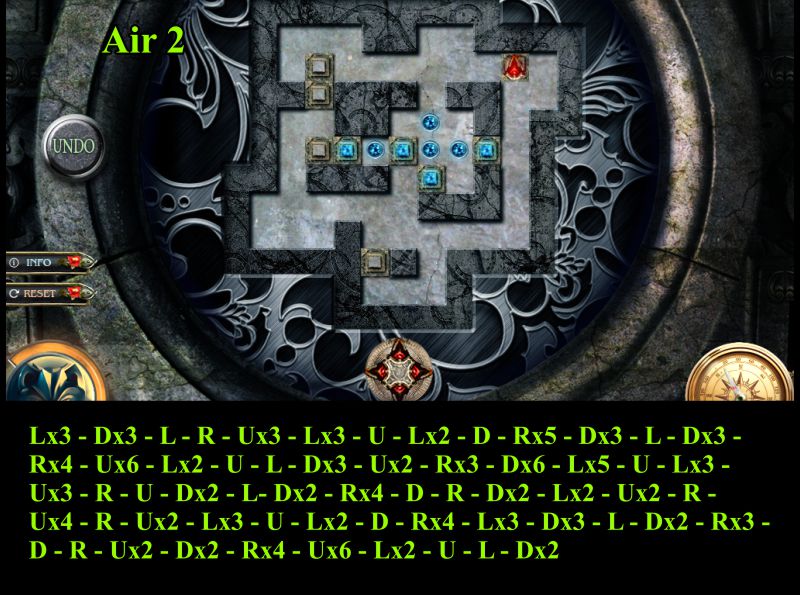
More to go to solve Air, so keep up the good work and check the screenshot.
Screenshot
You did it, you solved all the elements and the door will now open.
Screenshot
Caine is Back
Caine is proud of you for what you have done but still needs your help.
Check the screenshot in case you skipped the conversation.
Screenshot
Caine's Cell
Use the Flint to burn the straw so you can pick up the Grinding Wheel.
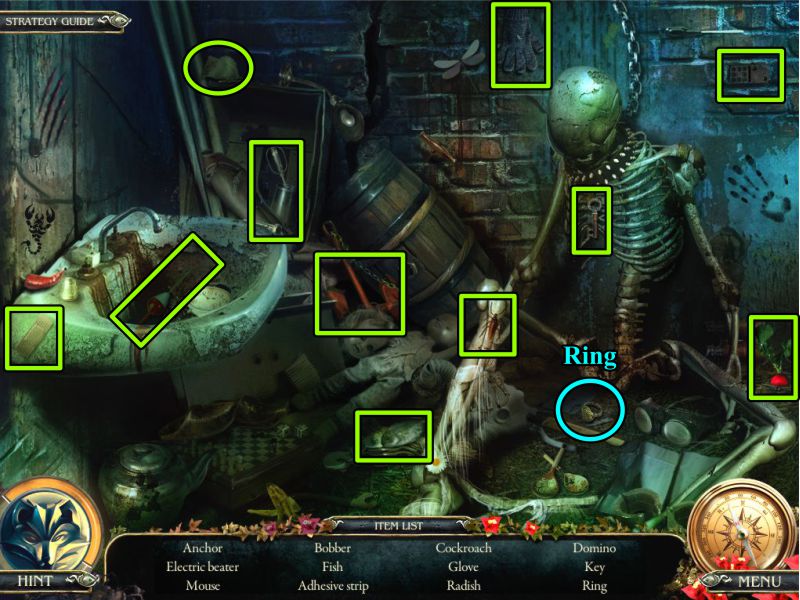
Play the Hidden Object Scene and go to the Underground.
Screenshot
Caine's Room Hidden Object Scene
Your final object is a Ring.
Screenshot
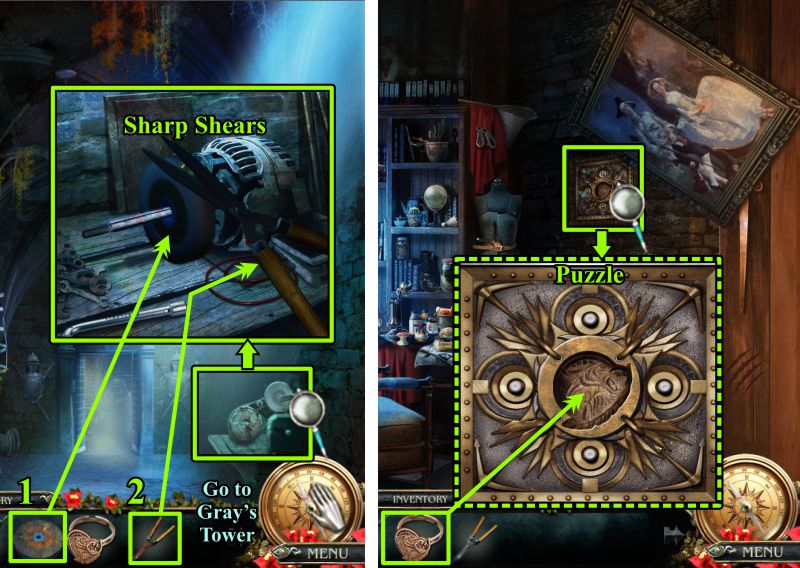
Underground and Gray's Tower
Zoom in on the grinder and place the Grinding Wheel.
Sharpen your Dull Shears, then go to Gray's Tower.
Zoom in on the safe and place the ring in the center to trigger a Puzzle.
Screenshot
Safe Puzzle
Arrange the pieces as shown in the screenshot, then collect the Dynamite when the safe opens.
Go to the Wolf Den.
Screenshot
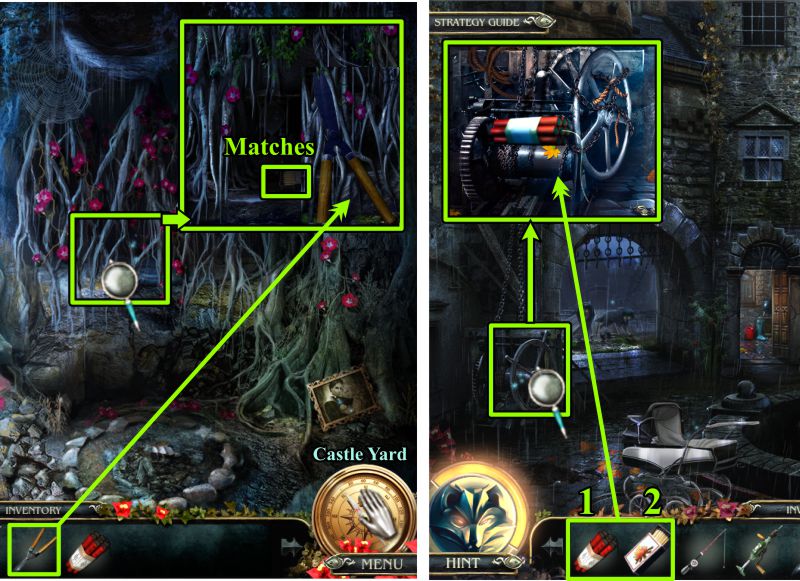
Wolf Den and Castle Yard
Zoom in and use the Sharp Shears to remove some of the vine.
Collect the Matches and go to the Castle Yard.
Zoom in on the mechanism, place the Dynamite, and use the Matches to light it.
Screenshot
Chapter 3: Caine
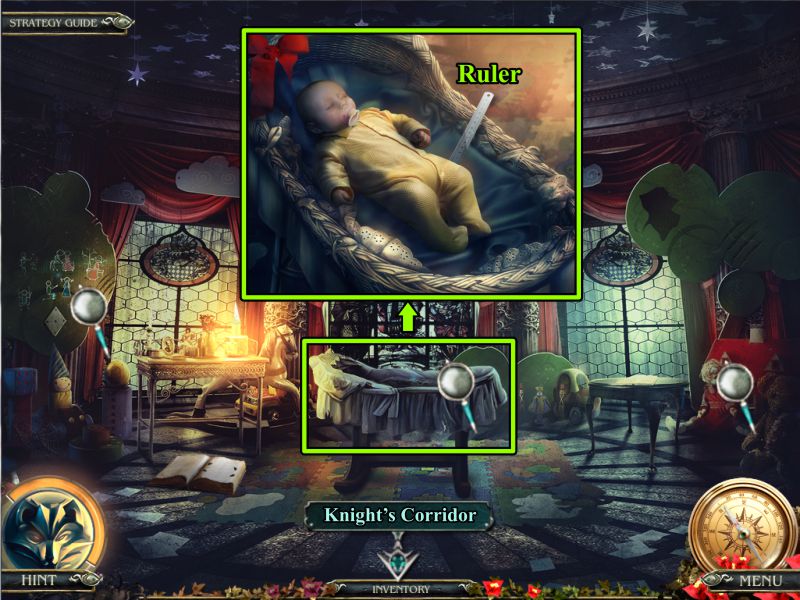
Child's Room
You find yourself in the Child's Room, so look around and zoom in on the crib.
Take the Ruler and go to the Knight's Corridor.
Screenshot
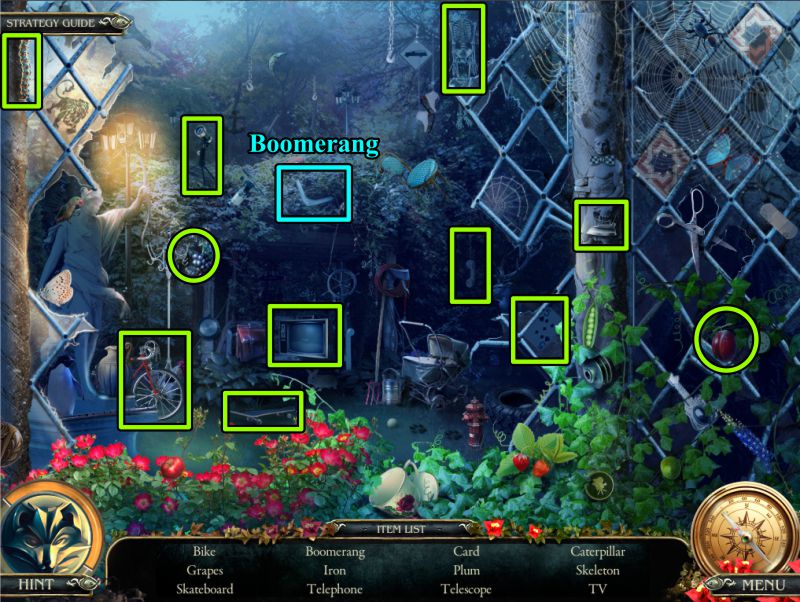
Knight's Corridor
Use your Shears to trim the bush at the left to trigger a Hidden Object Scene.
Next stop is through the door to the Cabinet.
Screenshot
Outside Hidden Object Scene
You will get a Boomerang for your Inventory.
Screenshot
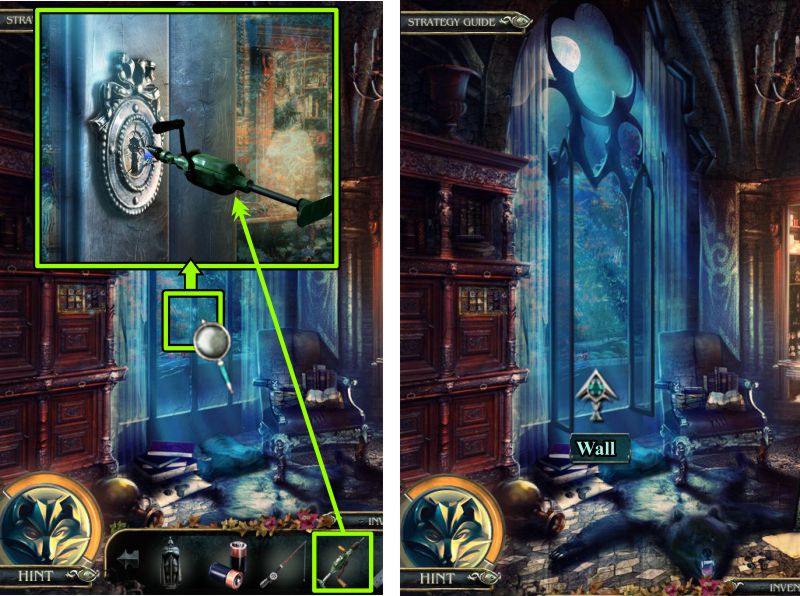
Cabinet
Zoom in on the door lock and use your Drill on it.
Go outside to the Wall.
Screenshot
Wall
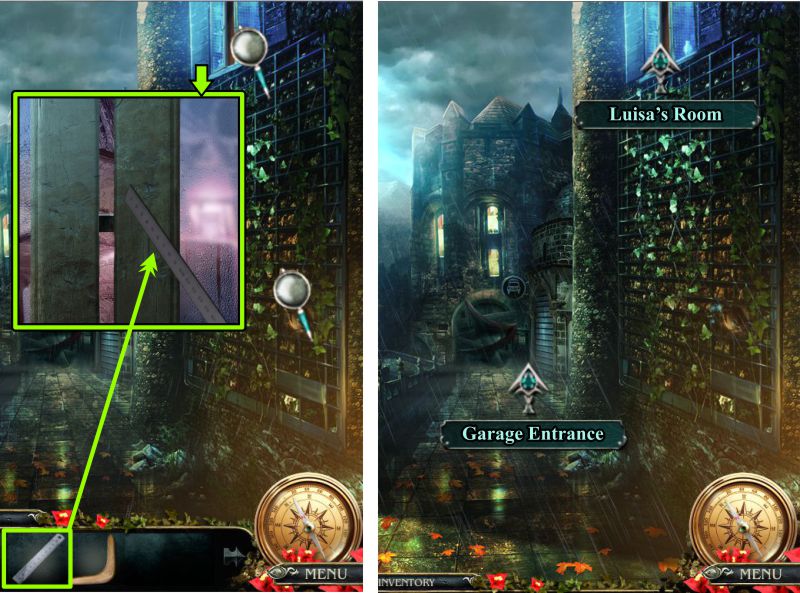
Zoom in on the window above and use your Ruler to open the latch.
Go into Luisa's Room first, and later to the Garage Entrance.
Screenshot
Luisa's Room
Zoom in on the picture and photo frame to pick up the 2 Chess Pieces.
Zoom in on the dressing table to read Luisa's notes and take the Cancer zodiac symbol.
Zoom in under the bench to get the Rope and Bag.
Go to the Garage Entrance.
Screenshot
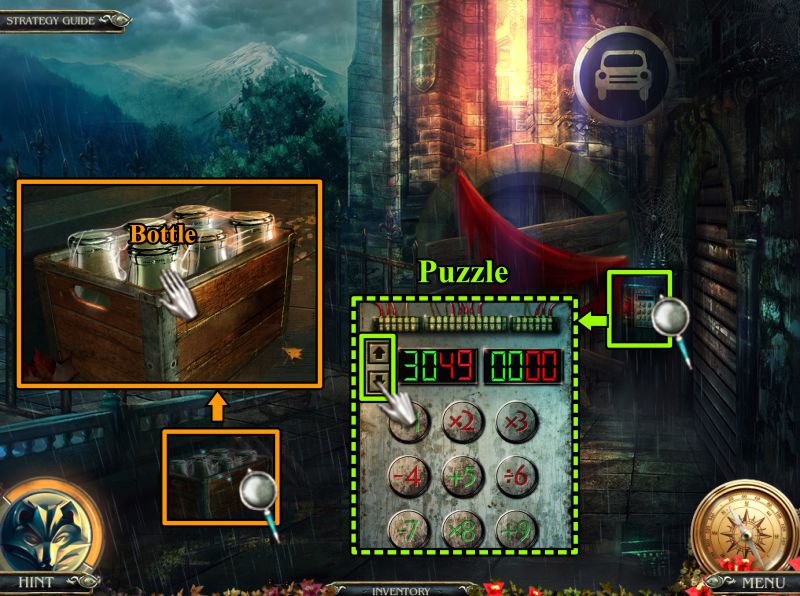
Garage Entrance
Zoom in on the Crate and take the empty Bottle.
Take a closer look at the panel to open the door.
Press the lower arrow to start the Puzzle.
Screenshot
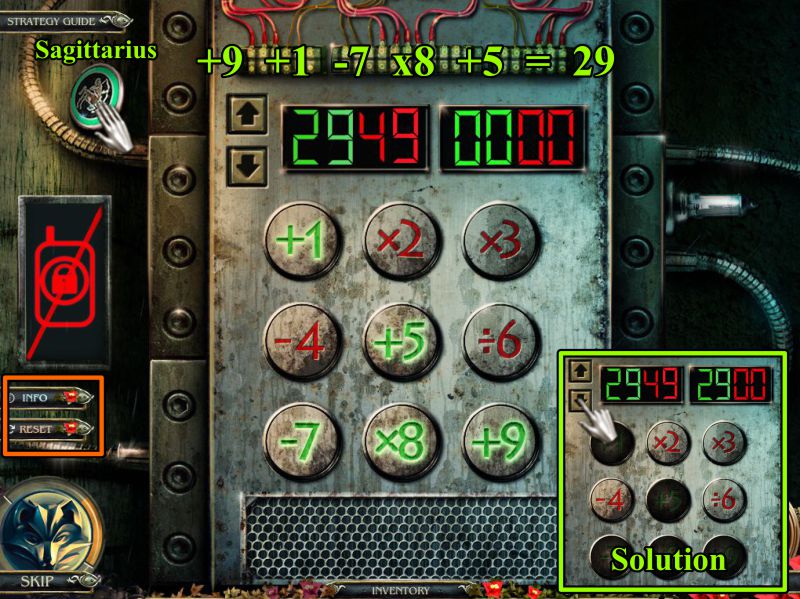
Garage Door Puzzle
Take the Sagittarius zodiac symbol.
Your goal for the Puzzle is to press the buttons in the correct order so that both sets of LED number match.
See the screenshot as to how to arrive at the green solution of 29.
Press the lower arrow to change the numbers for the red sequence.
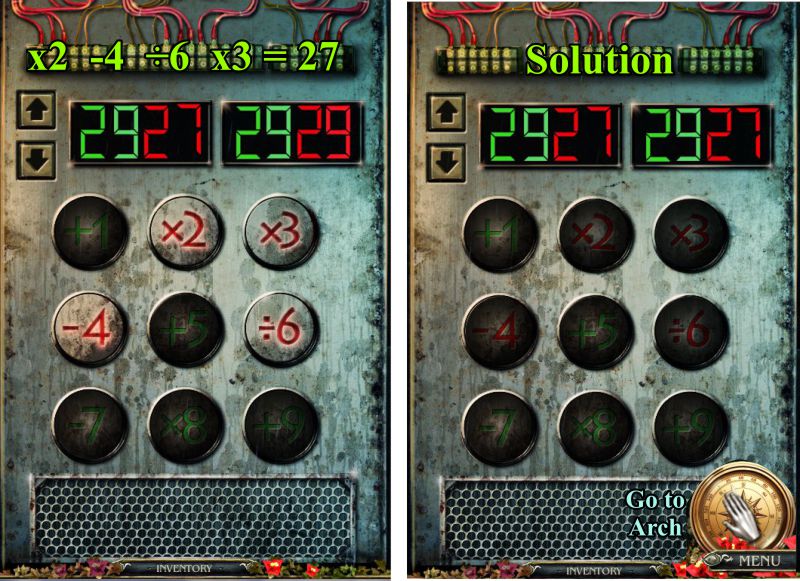
Screenshot
The red number to match had now changed to 27.
See the screenshot for the equation and the solution.
You can't open the door as yet because you need to find the remote, so go to the Arch.
Screenshot
Arch
Zoom in on the suit of armor and use your Rod to fish out the Remote.
Return to the Garage Entrance, place the Remote on the panel, and enter the Garage.
Screenshot
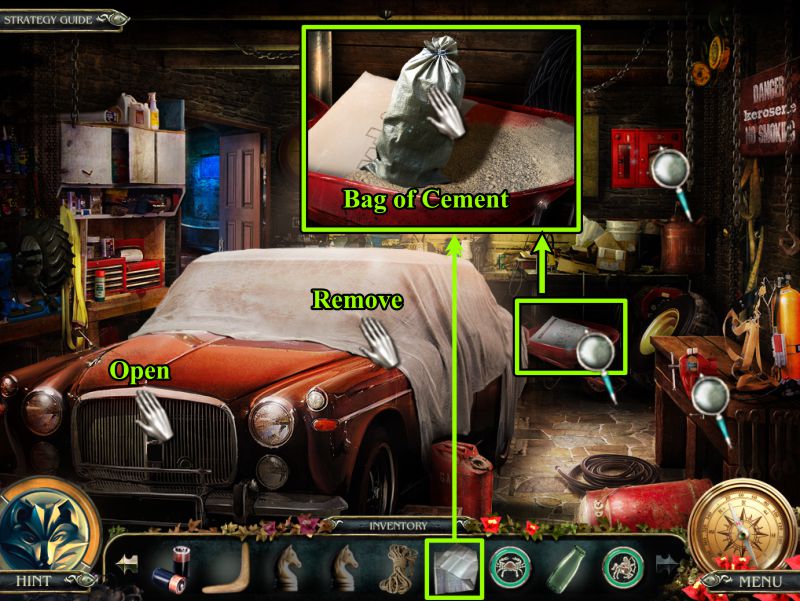
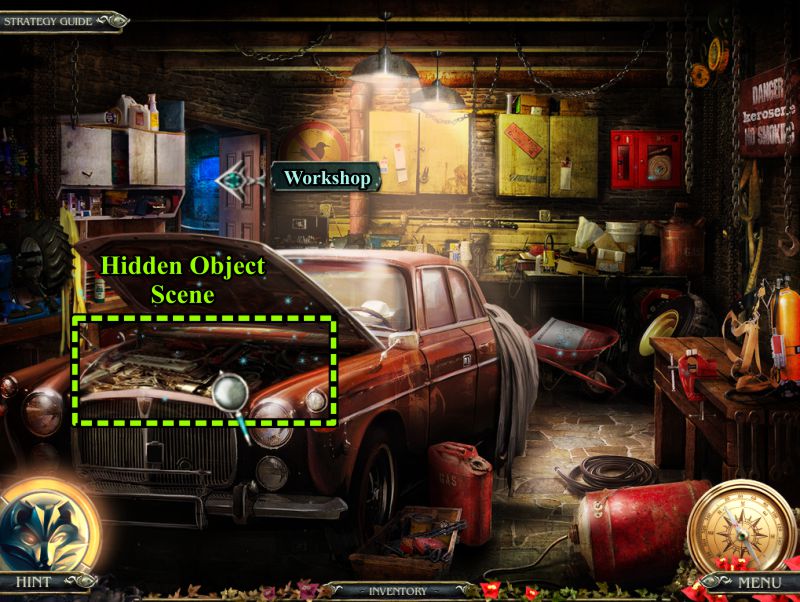
Garage
Zoom in on the wheelbarrow and fill your Bag with Cement.
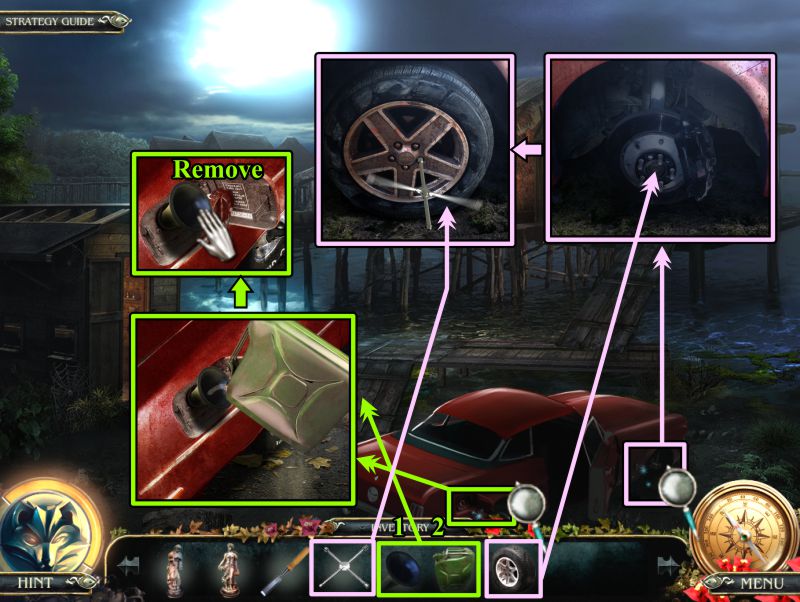
Check out the magnifying glasses.
Remove the cover from the car and open the hood.
Screenshot
Play the Hidden Object Scene in the engine, and then go through the door at the rear to the Garage Workshop.
Screenshot
Engine Hidden Object Scene
Your final item is a Jacket for your Inventory.
Screenshot
Workshop
Lots of magnifying glasses to check out, including a Puzzle on the wall.
When you have completed the Puzzle, you will get a Leo zodiac symbol and a Flare Gun.
Go to the Garage Entrance.
Screenshot
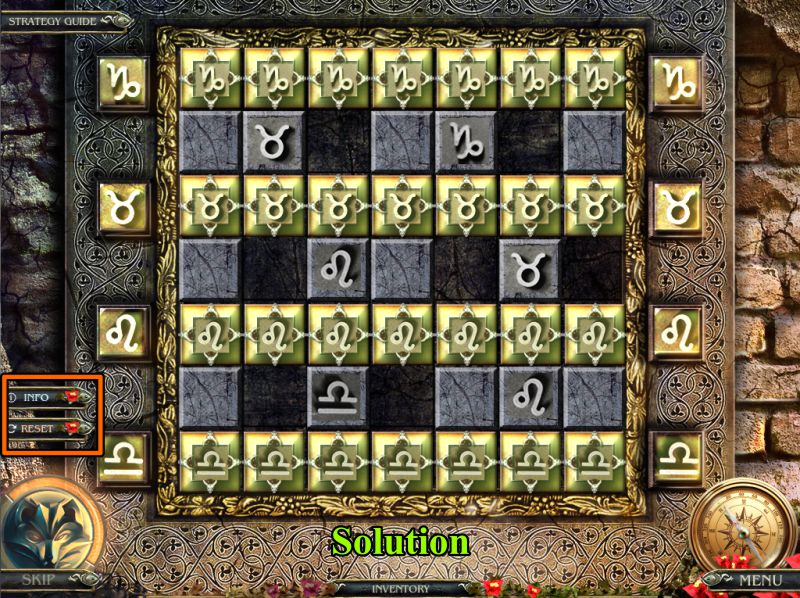
Workshop Wall Puzzle
Your goal is to move the zodiac cubes into the rows with their matching symbols.
Use the vacant spaces to move the cubes around.
See the screenshot for the solution.
Screenshot
Garage Entrance
The wolf is outside the Garage, so use the Flare Gun to scare him off.
Go to the Footbridge.
Screenshot
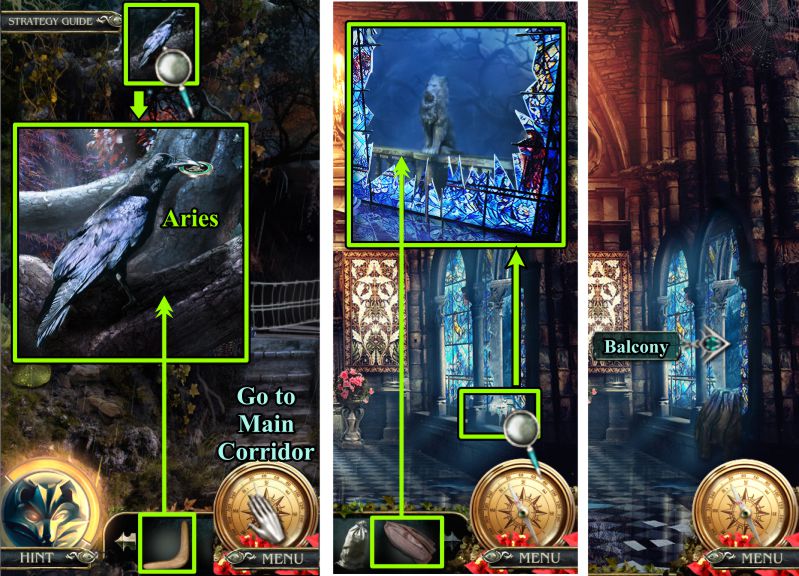
Footbridge, Main Corridor, and Balcony
Use the Boomerang to scare off the Raven and the Aries zodiac symbol will go into your Inventory.
Go to the Main Corridor.
Place the Jacket on the jagged glass of the window and go to the Balcony.
Screenshot
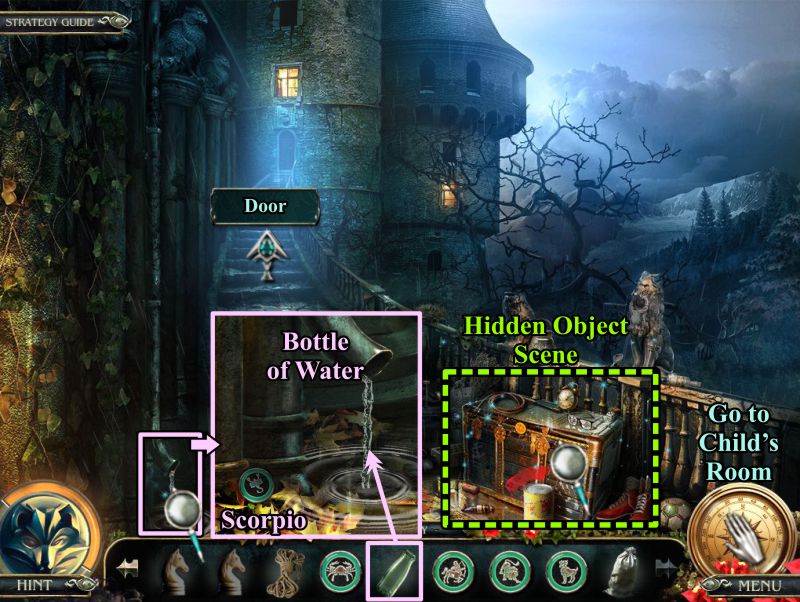
Balcony
There's a Door you will need to open to get to the Attic.
Zoom in on the drain pipe, pick up the Scorpio zodiac symbol, and fill your bottle with the water.
Play the Hidden Object Scene and go to the Child's Room.
Screenshot
Balcony Hidden Object Scene
You will get a Hook for your Inventory once you collect everything.
Screenshot
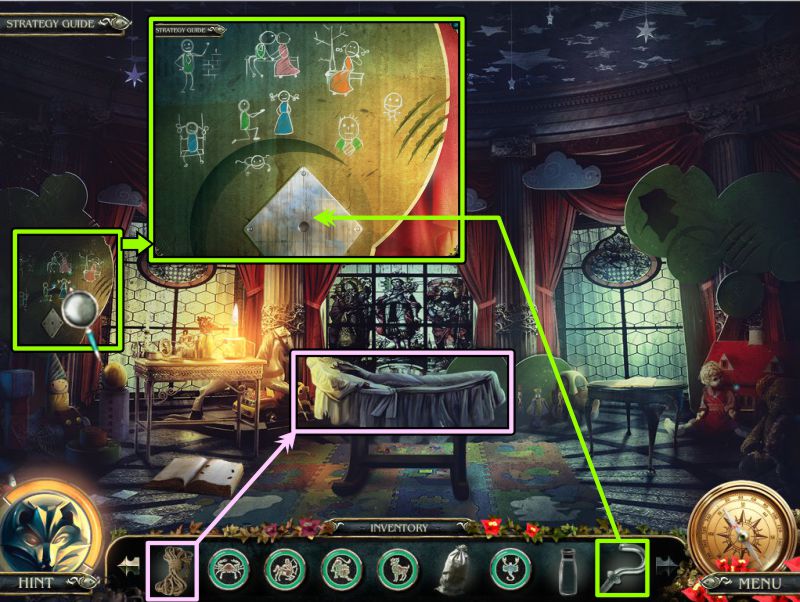
Child's Room
Zoom in on the stick figures and place the Hook.
Put the rope around the cradle.
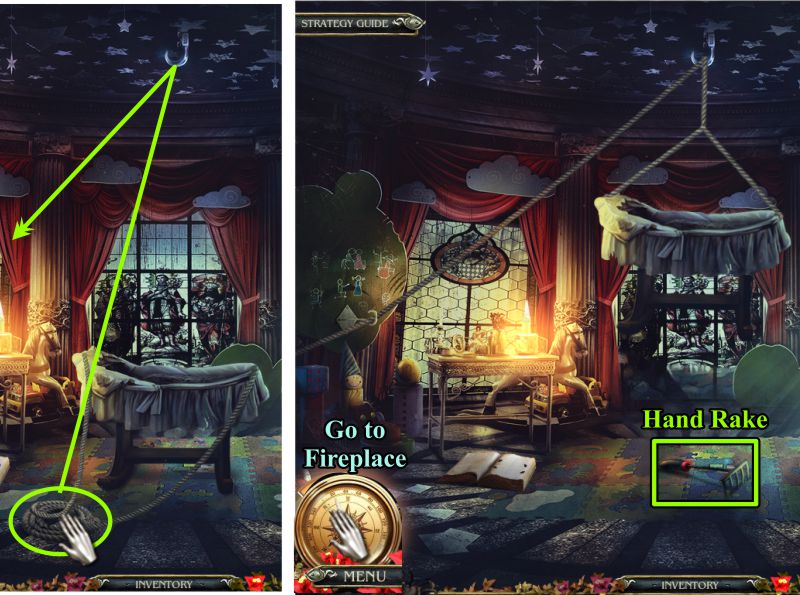
Screenshot
Click on the Rope, and it will transfer to the Hook you just placed and to the one on the ceiling above the cradle.
The cradle will rise for you to take the Hand Rake underneath.
Go to Caine's Room.
Screenshot
Fireplace and Luisa's Room
Zoom in on the potted plant, then use your Hand Rake to dig and get the Razor.
Go to Luisa's Room and zoom in for a close up of the picture at the left.
Use the Razor to slick it and reveal an opening with stairs to Caine's Room. Enter the opening.
Screenshot
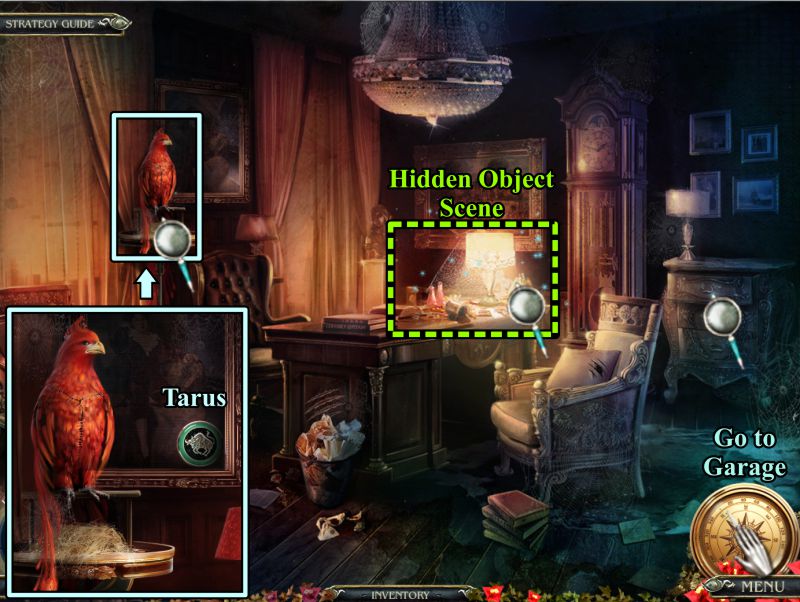
Caine's Room
Zoom in on the phoenix, take the Taurus zodiac symbol, play the Hidden Object Scene, and go to the Garage.
Screenshot
Caine's Room Hidden Object Scene
You will get the Key to the emergency cabinet in the Garage.
Screenshot
Garage and Fireplace
Zoom in, open the emergency cabinet, take the Tongs and Virgo zodiac symbol.
Go to the Fireplace and zoom in on it.
Use the Tongs to grab one of the red-hot embers.
Go to Caine's Room.
Screenshot
Caine's Room and Wall
Zoom in on the phoenix and place the Ember on the sawdust.
Take the Tweezers and go to the Wall.
Zoom in on the Wall and use the Tweezers to get the Pen.
Go to the Garage.
Screenshot
Garage and Caine's Room
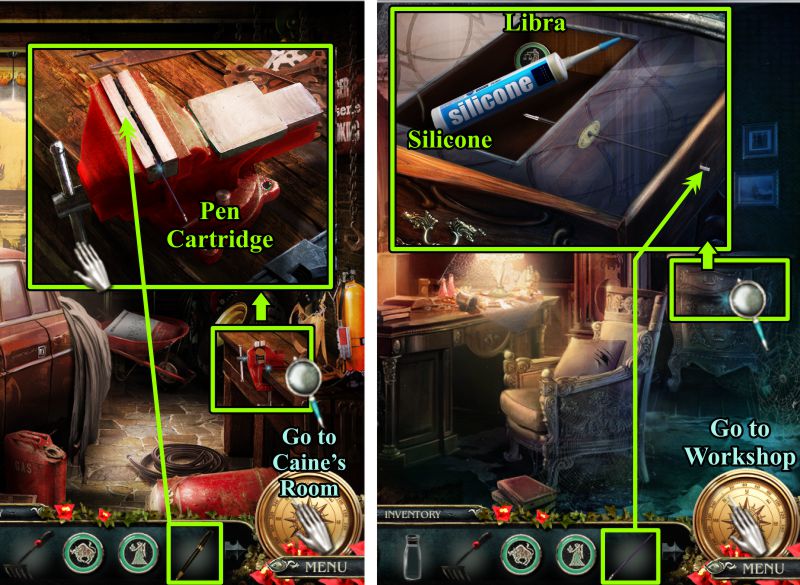
Zoom in on the vice, place the Pen, turn the handle on the vice, and take the Pen Cartridge.
Go to Caine's Room.
Use the Pen Cartridge to remove the cover from the drawer so you can take the Libra zodiac symbol and the Silicone.
Go to the Workshop.
Screenshot
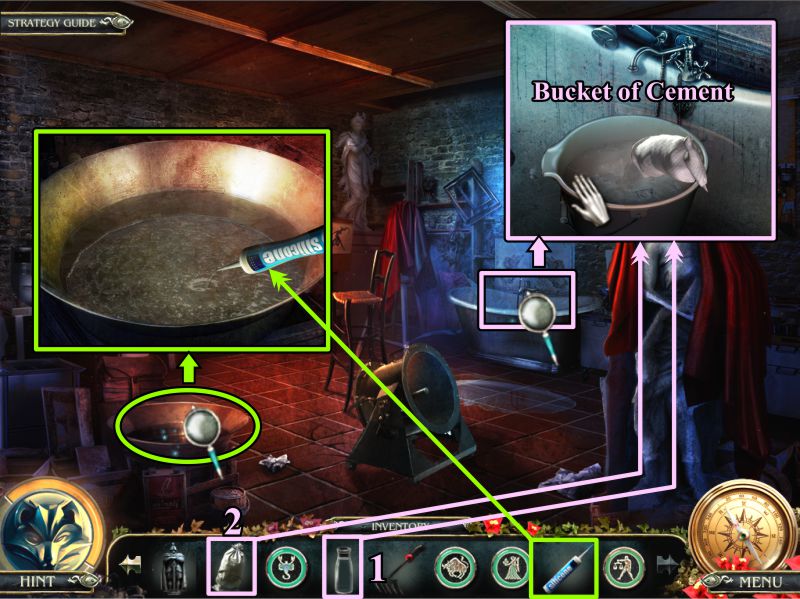
Garage Workshop
Zoom in on the sink and place the Water from the Bottle and the Bag of Cement in the bucket.
Take the Bucket of Cement.
Zoom in on the pan on the floor and fill it with Silicone.
Screenshot
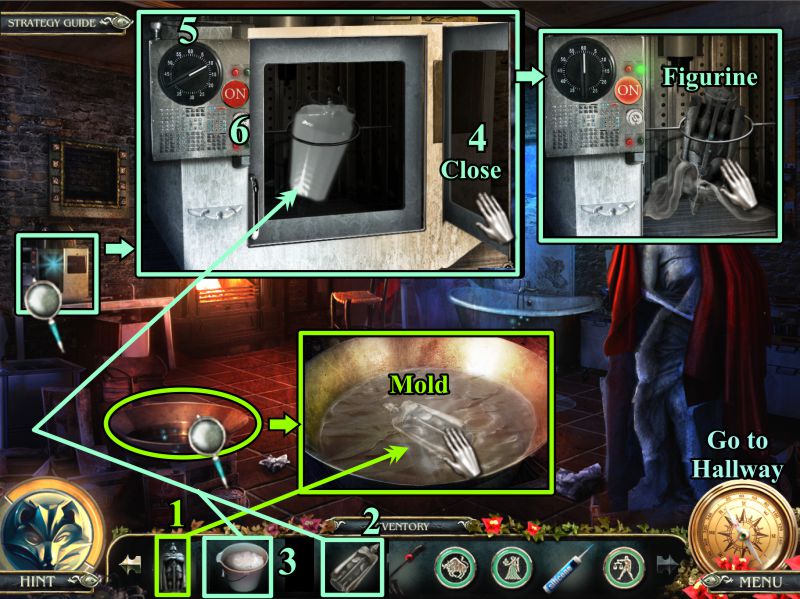
Place the Figurine in the silicone to make a Mold.
Take the Mold and place it in the drier.
Pour in the Cement, close the door, set the timer, and press the ON button.
When the door opens, take the duplicate Figurine, then go to the Hallway.
Screenshot
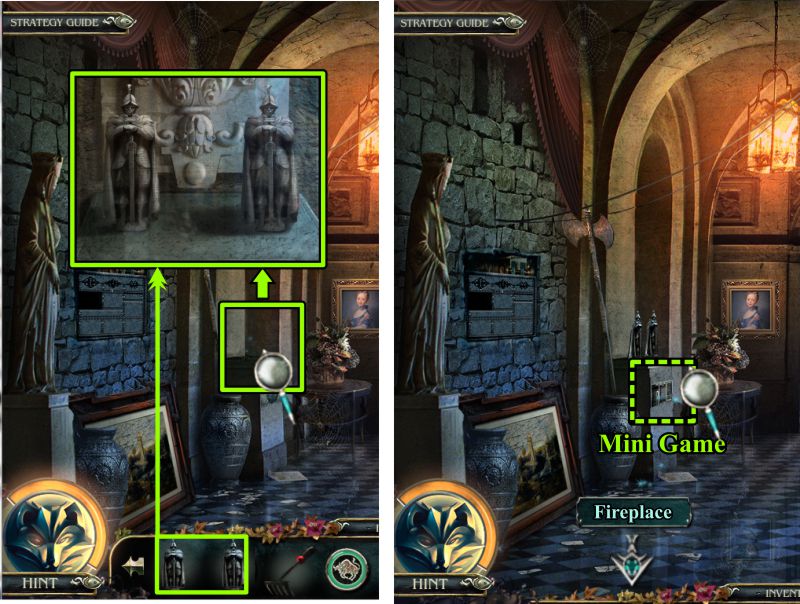
Hallway
Zoom in on the pedestal and place both Figurines.
Zoom in just under the Figurines for a Mini Game.
When you have completed the Mini Game, go to the Fireplace.
Screenshot
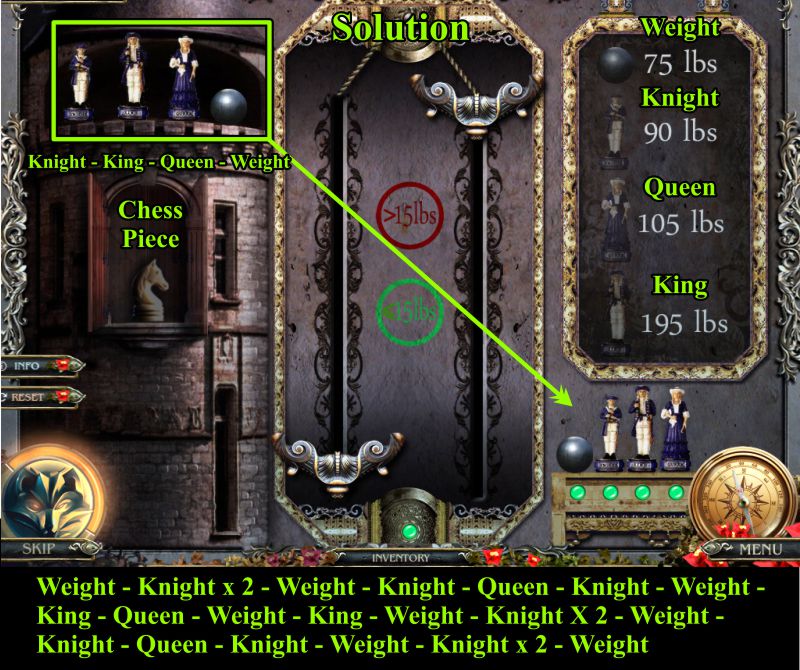
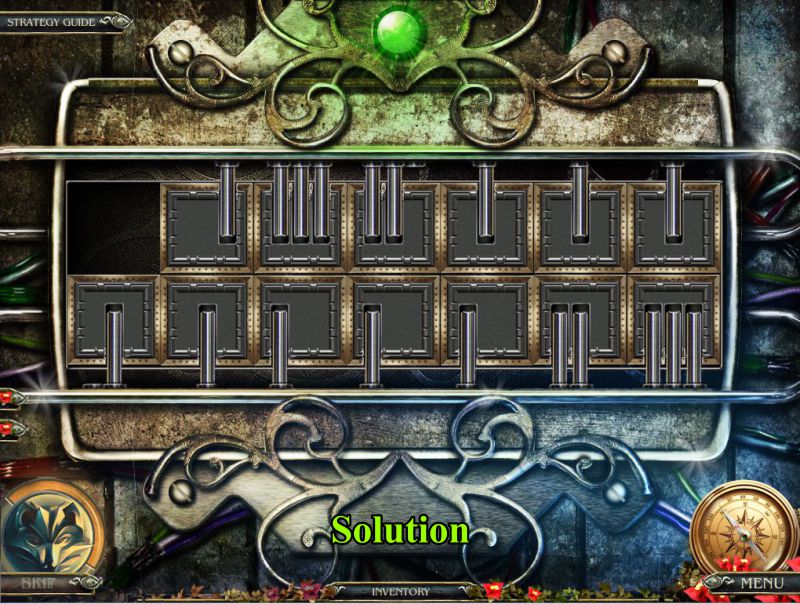
Hallway Figurine Mini Game
Your goal is to transfer all the figurines and the weight from the upper left down to the lower right.
To do so, you need to use the mini elevators in the center of the screen.
At the right, you can see the weight of each figurine.
During your transfer, you cannot have a difference of more or less that 15 lbs. on the mini elevators.
Your prize for completion of the game is a Chess Piece.
See the screenshot for the step-by-step solution.
Screenshot
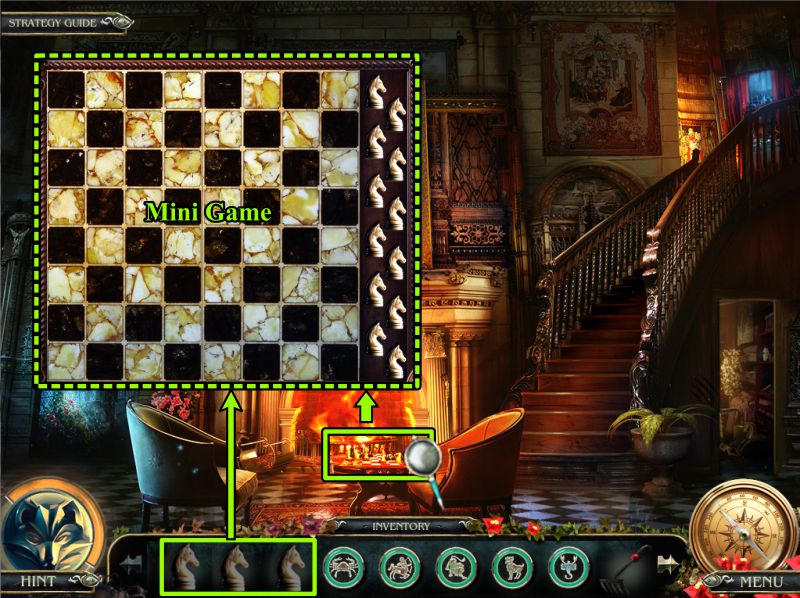
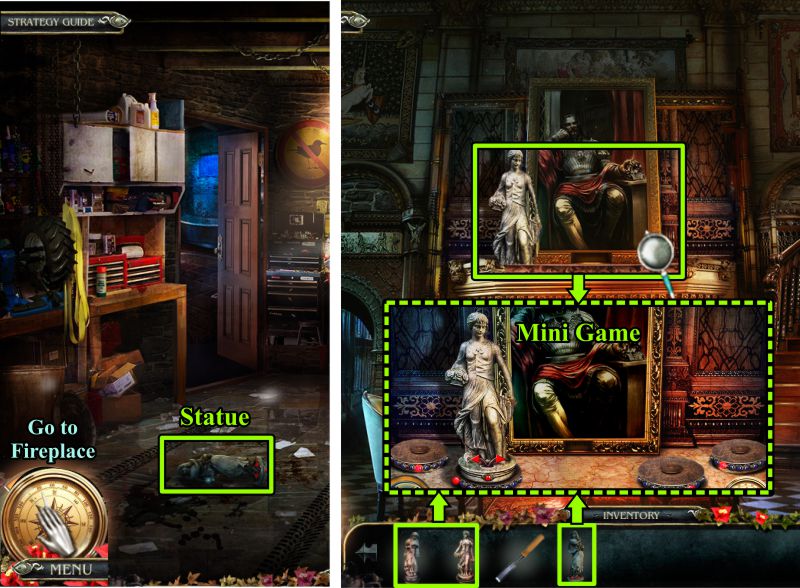
Fireplace
You now have all three Chess Pieces, so zoom in on the Chess Board.
Place your Chess Pieces to trigger a Mini Game.
Screenshot
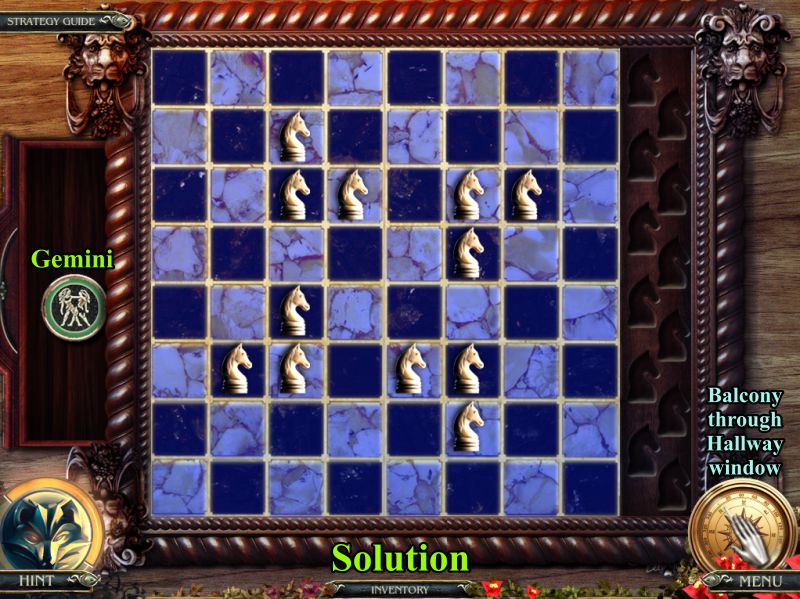
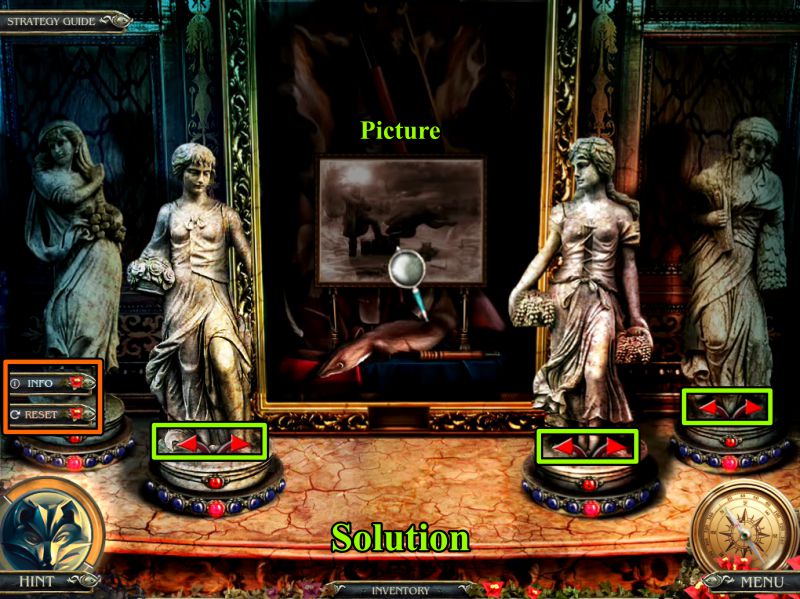
Chess Mini Game
As a bonus, pick up the Gemini zodiac symbol by the board.
Your goal is to place all the Knights on the board so that all the squares on the board turn color as shown in the screenshot solution.
Screenshot
Balcony
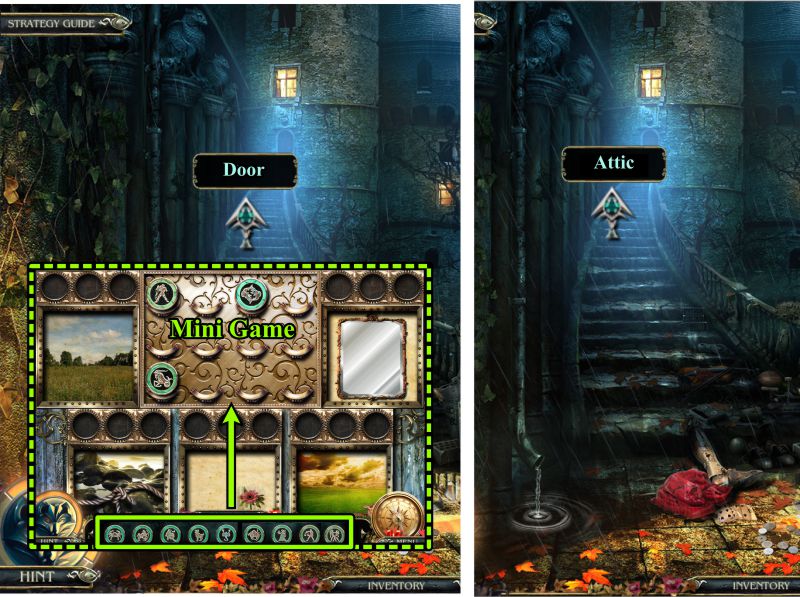
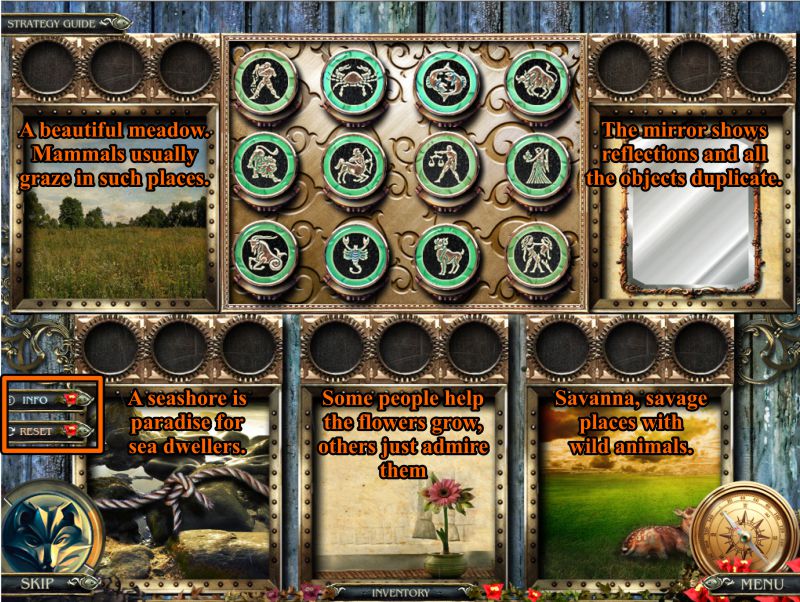
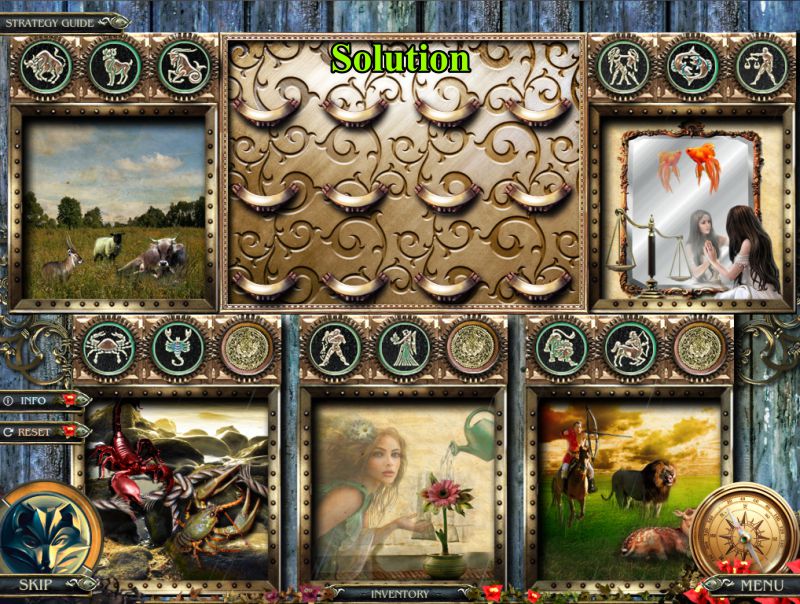
Zoom in on the Door, for you now have all the zodiac symbols. Place them to trigger a Mini Game.
After the game, go to the Attic when the Door opens.
Screenshot
Attic Door Mini Game
Your goal is to place all the zodiac symbols according to the instructions in each picture in the scene as shown in the screenshot.
Screenshot
See the screenshot for the solution.
Go to the Attic.
Screenshot
Attic
Zoom in on the shelf, place your Batteries, and pick up the Car Remote.
Play the Hidden Object Scene, and go to Luisa's Room.
Screenshot
Attic Hidden Object Scene
You will get a Photo for your Inventory.
Screenshot
Luisa's Room
Zoom in on the photo frame and place your Photo.
Watch what happens when the Photo comes to life.
Screenshot
Posted by: Jazz |
February 4, 2012 10:50 PM
|
February 4, 2012 10:50 PM
Grim Tales: The Legacy Walkthrough
Chapters 4 through 6
Chapter 4: The Wolf
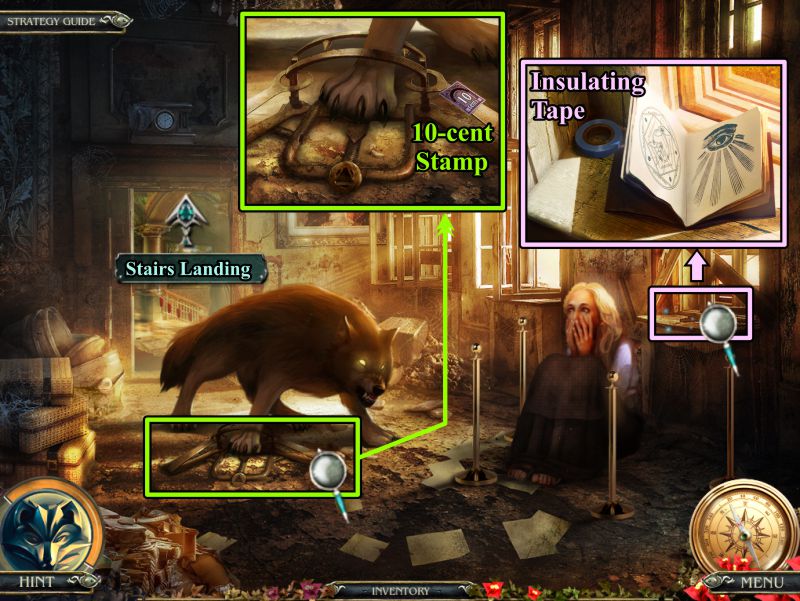
Throne Room
Luisa is trapped in the photo with a familiar wolf, glaring at her with his foot in a trap. Zoom in on the table next to her and take the Insulating Tape.
Examine the trap and take the 10-cent Stamp.
Go through the door to the Stairs Landing.
Screenshot
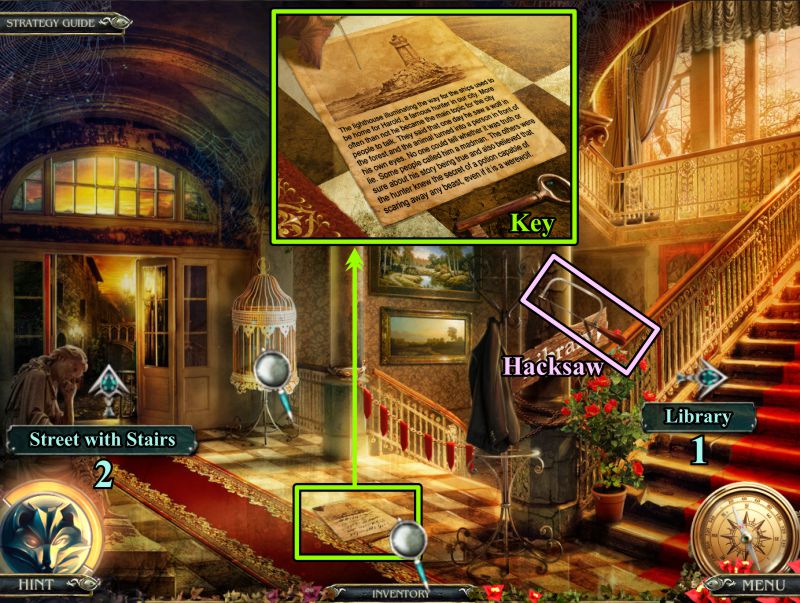
Stairs Landing
Grab the Hacksaw, read the note on the floor, and take the Key.
Go to the Library and then the Street with Stairs.
Screenshot
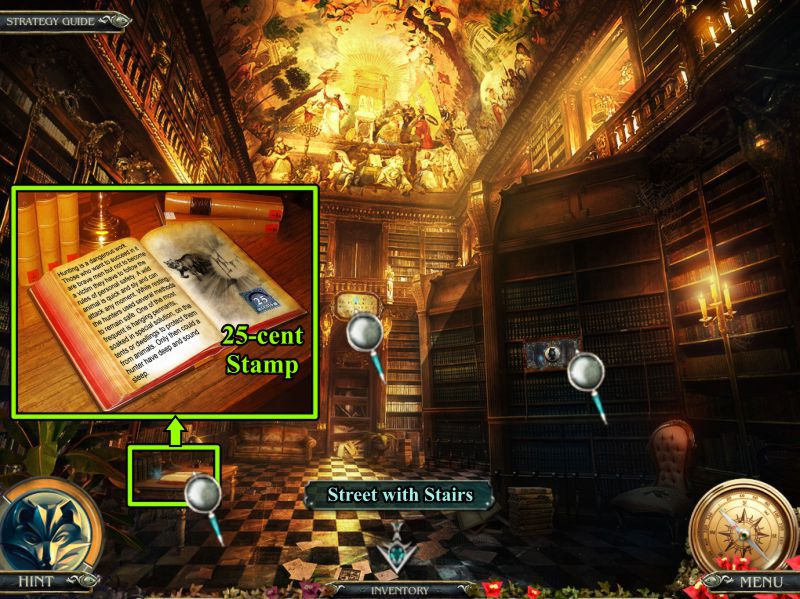
Library
Check out all the magnifying glasses and zoom in on the book at the left.
Take the 25-cent Stamp, then go to the Street with Stairs.
Screenshot
Street with Stairs
Zoom in on the window and take the 15-cent Stamp.
First, go to Bog Street, then to Shop Street.
Screenshot
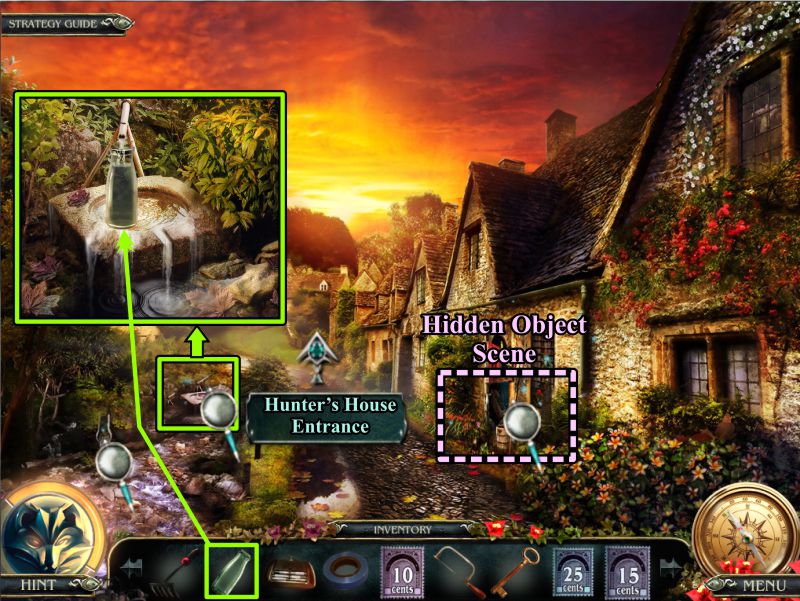
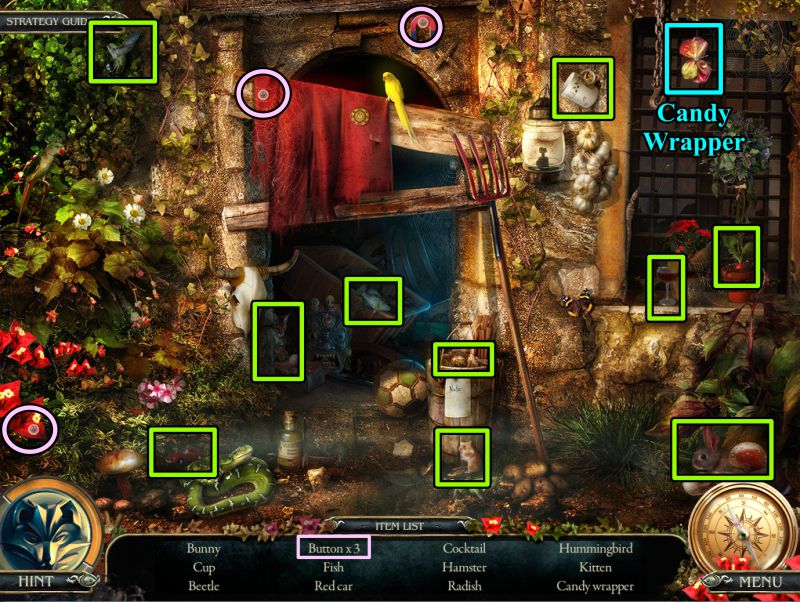
Bog Street
Zoom in on the waterfall and fill your Empty Bottle with water.
Play the Hidden Object Scene, and then head off to the Hunter's House.
Screenshot
Bog Street
Your final object is a Candy Wrapper.
Screenshot
Hunter's House Entrance
You can't get into the house, so check out all the magnifying glasses to see what you need.
Go to Shop Street.
Screenshot
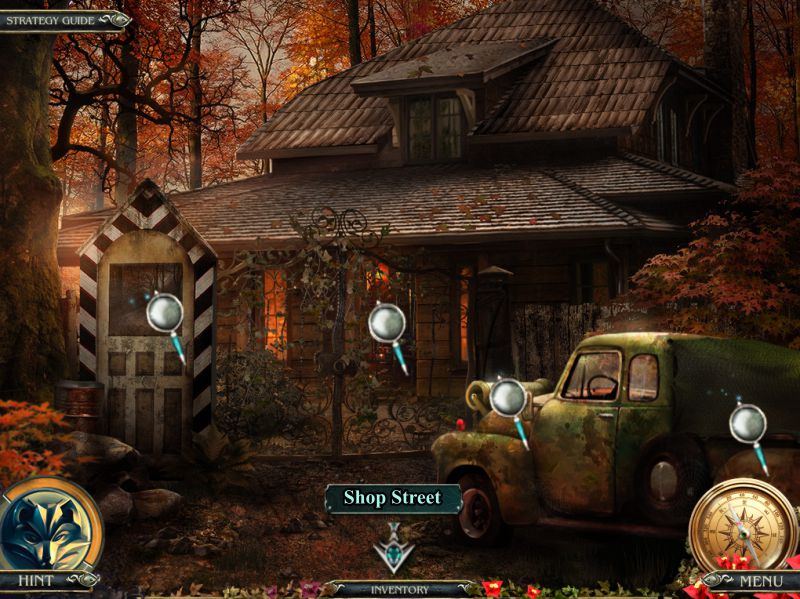
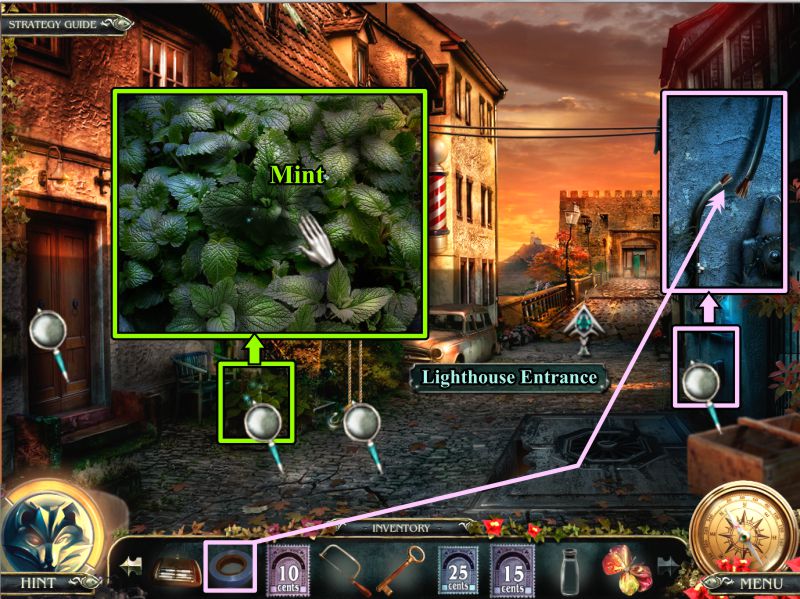
Shop Street
Zoom in on the box at the left and take a piece of Mint.
Use your Insulation Tape to fix the bare wires on the mechanism to the right.
Head toward the Lighthouse.
Screenshot
Lighthouse Entrance
Try to go through the door to the Lighthouse Yard.
Zoom in on the lamp post and use your Hacksaw to cut it.
The statue is now shooting one arrow after another, so you need a way to stop him.
Zoom on the letter at the right, take the Red Button, and the 20-cent Stamp.
Return to Shop Street.
Screenshot
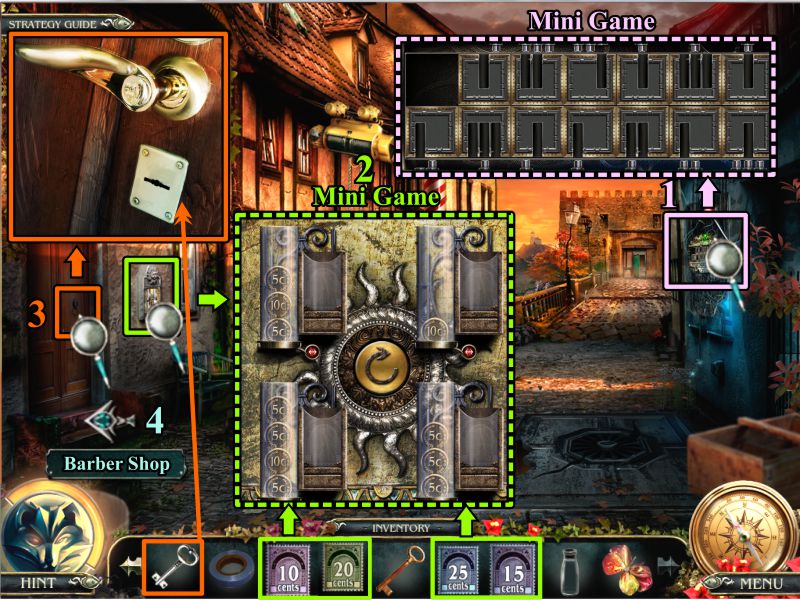
Shop Street
Zoom in on the mechanism at the right for a Mini Game.
Then, zoom in on the postal box on the left wall for another Mini Game.
Place your Stamps to trigger the start of the game.
Use the Key you get from the postal box on the door at the left.
Enter the Barber Shop.
Screenshot
Road Mechanism Mini Game
Your goal is to slide the blocks so their slots line up with the rods of the upper and lower sections.
Use the vacant areas to move the blocks around.
See the screenshot for the solution.
Screenshot
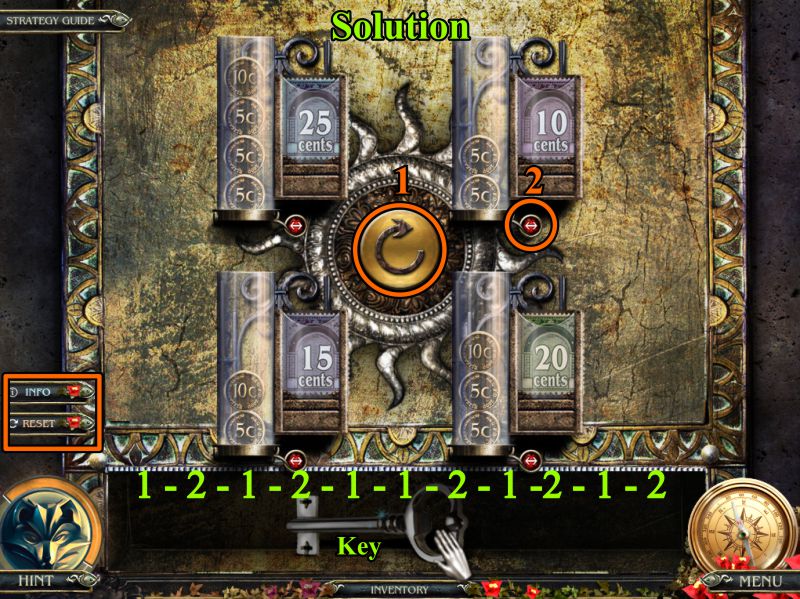
Stamp Mini Game
Your goal is to arrange the coins so that the total of each slot matches the amount written on that adjoining stamp.
See the screenshot for the solution.
Take the Key.
Screenshot
Barber Shop
Zoom in on the chair at the left, open the seat, and take the Brush.
Go to the Street with Stairs.
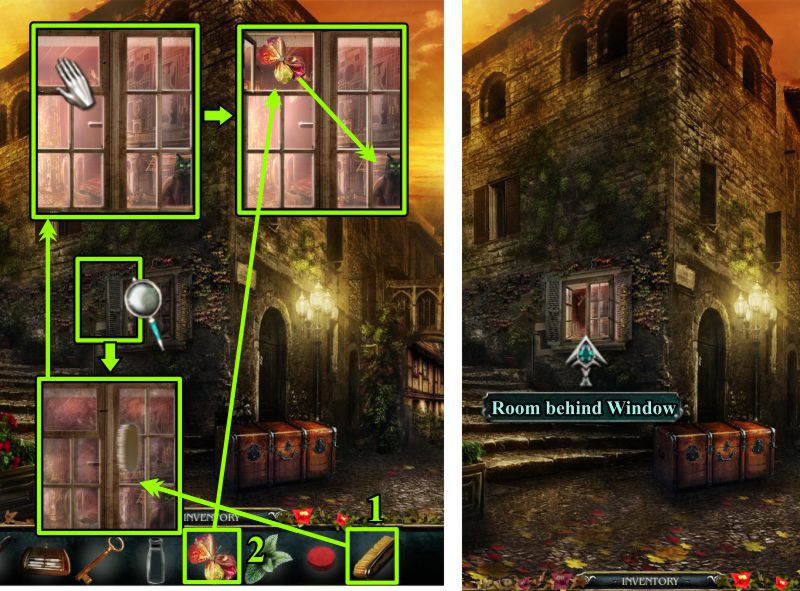
Screenshot
Street with Stairs
Zoom in on the Window and use your Brush to clean it off.
The window is locked, so push in the upper left pane, and toss in the Candy Wrapper: The cat will catch it and unlock the window.
Enter the room behind the window.
Screenshot
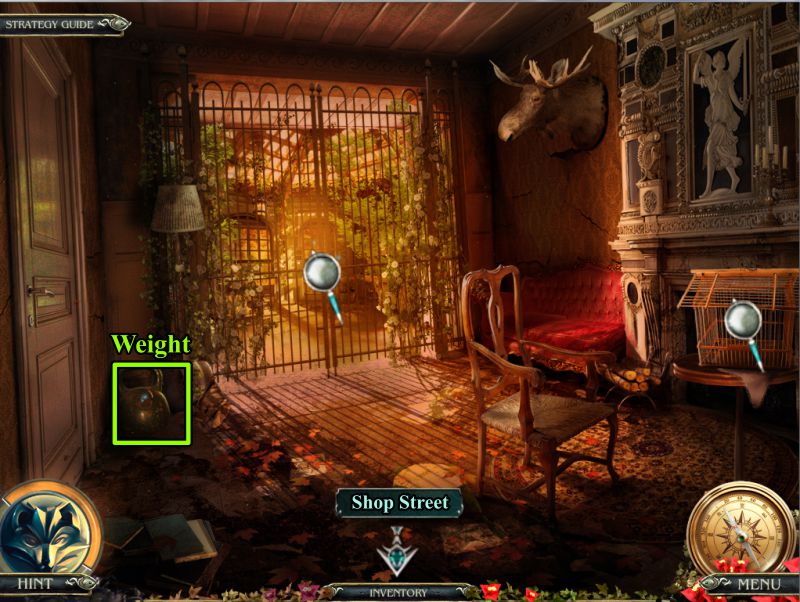
Room Behind Window
Pick up the Weight, check out the magnifying glasses, and go to Shop Street.
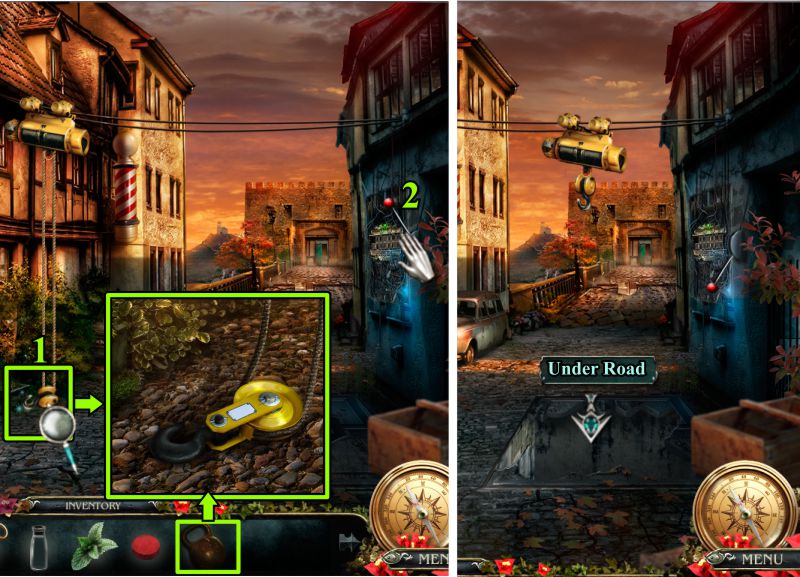
Screenshot
Shop Street
Zoom in on the pulley, attach the Weight, and throw the lever on the road mechanism.
The pulley will move across the street and drop the Weight on the sewer lid, opening up the area.
Go to the room under the road.
Screenshot
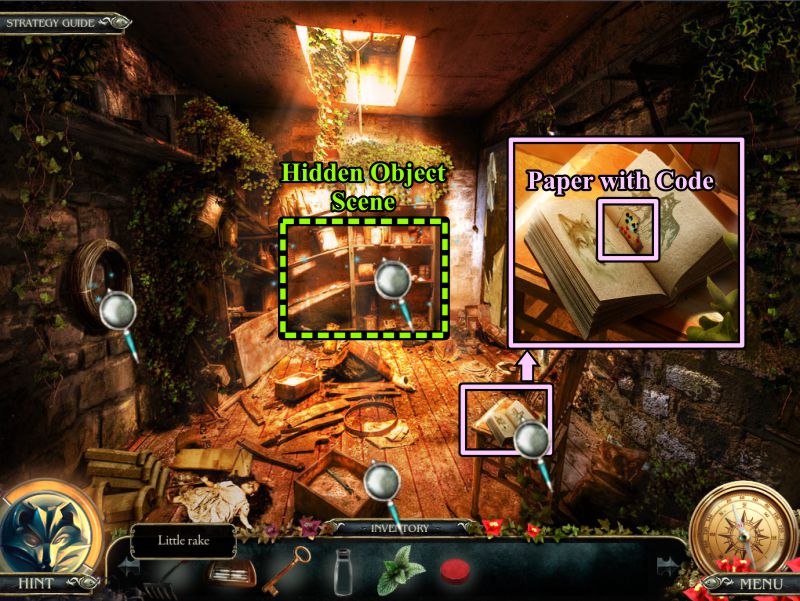
Room Under Road
Zoom in on the book on the floor and take the Paper with Code.
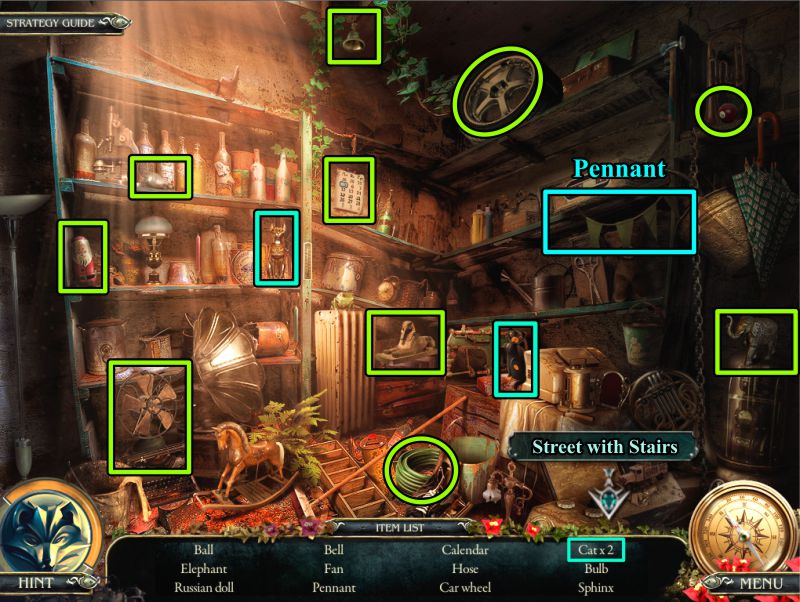
Check out the other areas, then play the Hidden Object Scene.
Screenshot
Under Road Hidden Object Scene
Your Inventory item is a Pennant.
Go to the Street with Stairs.
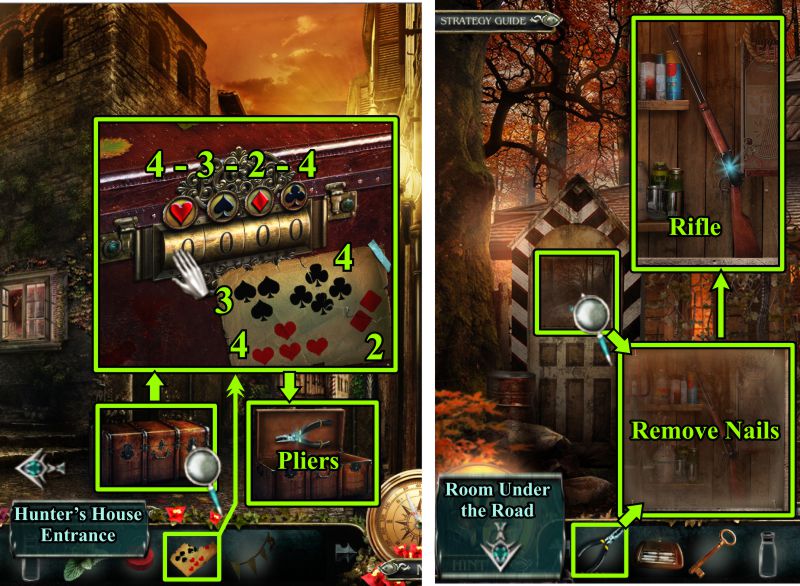
Screenshot
Street with Stairs and Hunter's House Entrance
Zoom in on the chest and place the paper with the rest of the code to open the chest.
Count the number of each of the suits and enter those numbers on the lock: 4-3-2-4.
Take the Pliers, then go to the Hunter's House Entrance.
Zoom in on the guard post, use your Pliers to remove the nails, and take the Rifle.
Go to the Room Under Road.
Screenshot
Room Under Road and Lighthouse Entrance
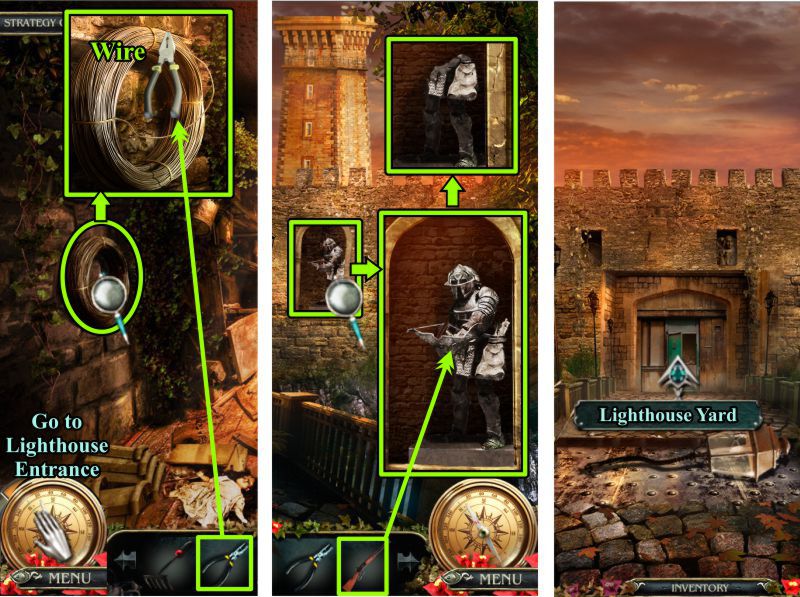
Zoom in on the roll of wire and use your Pliers to cut off what you need.
Go to the Lighthouse Entrance, zoom in on the statue shooting arrows, and shoot it with the Rifle.
Enter the Lighthouse Yard.
Screenshot
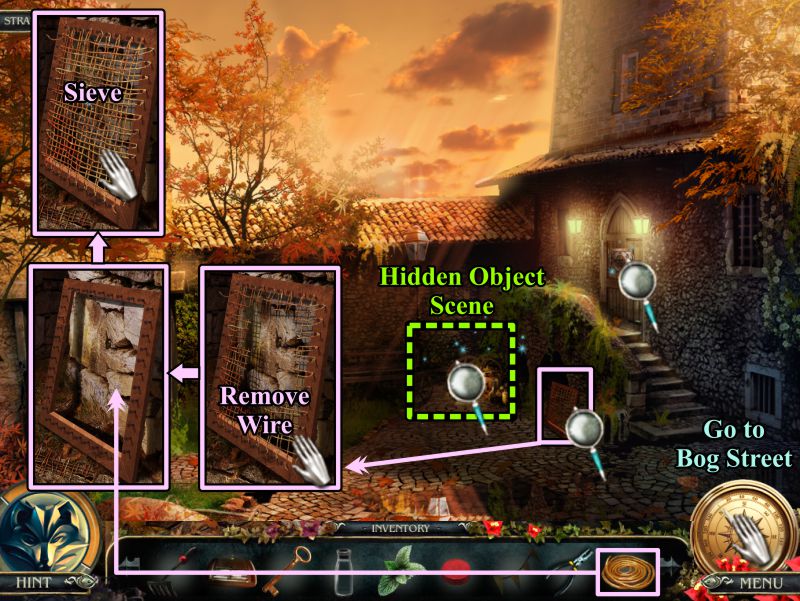
Lighthouse Yard
Zoom in on the area next to the stairs to find a broken sieve.
Remove the wire and replace it with the wire from your Inventory.
Collect the Sieve, play the Hidden Object Scene, and go to Bog Street.
Screenshot
Lighthouse Yard Hidden Object Scene
You will get a Steel Cable for your Inventory.
Screenshot
Bog Street, Room Under Road, and Barber Shop
Zoom in on Diamond Spring and place your Sieve under the water.
Take the Diamond and go to the Room Under Road.
Zoom in on the box on the floor, place your Diamond, and take the Glass Cutter you've created.
Go to the Barber Shop, zoom in on the display case, and use your Glass Cutter to make a hole in the glass.
Take the Rose Bas-relief, then go to the Stairs Landing.
Screenshot
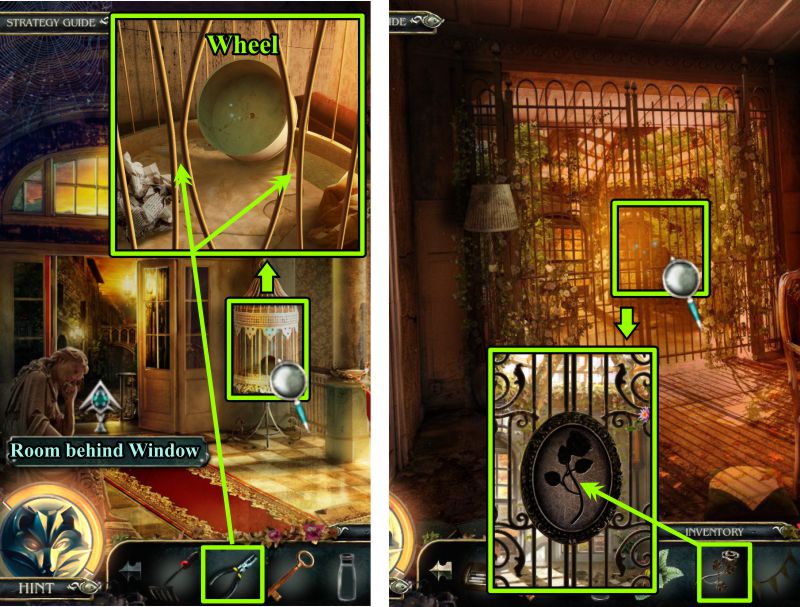
Stairs Landing and Room Behind Window
Zoom in on the cage and use your Pliers to pinch the bars.
Take the Wheel, then go to the Room Behind Window.
Zoom in on the gate and place the Rose Bas-relief.
Screenshot
Room Behind Window
Zoom in on the hamster cage, place the Wheel, and take the Roller.
Enter the Arboretum.
Screenshot
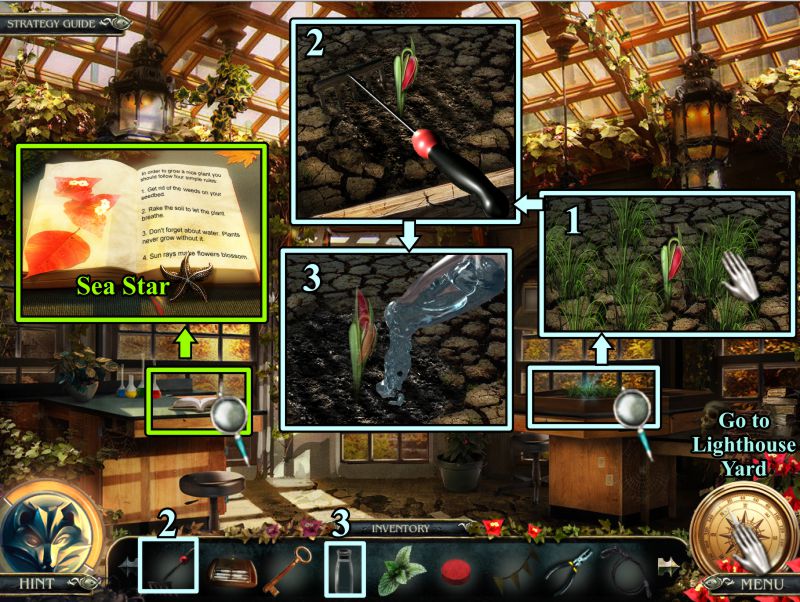
Arboretum
Zoom in on the flowerbed and remove the weeds.
Use your Hand Rake to loosen the dirt, then pour your Bottle of Water on the flower.
Zoom in on the book on the table at the left and take the Sea Star.
Go to the Lighthouse Yard.
Screenshot
Lighthouse Yard
Zoom in on the door and place your Sea Star to trigger a Mini Game.
Once you have opened the door, enter the Lighthouse.
Screenshot
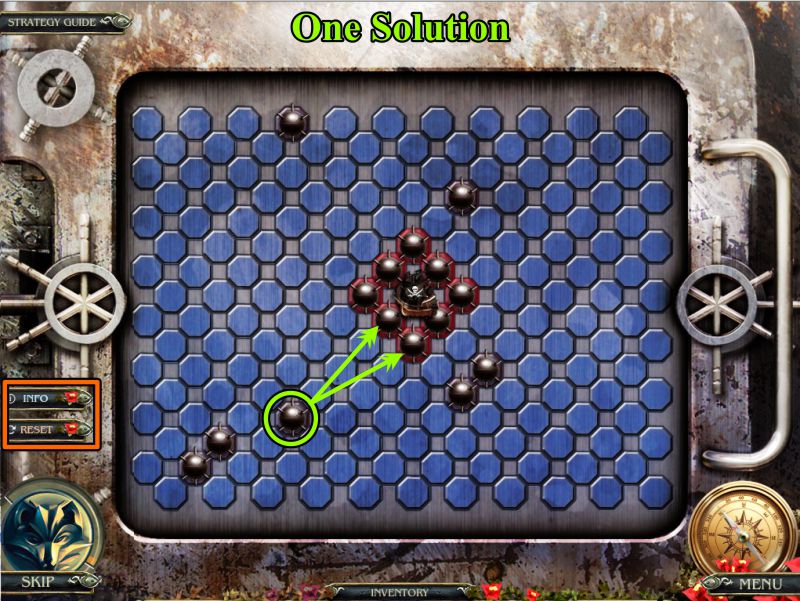
Lighthouse Door Mini Game
Your goal is to surround the pirate's ship with the mines so it cannot sail away.
Click on one of the mines, then on where you want to place a mine.
Try to cut off the ship's escape route with your placement of the mines.
See the screenshot for an ideal solution.
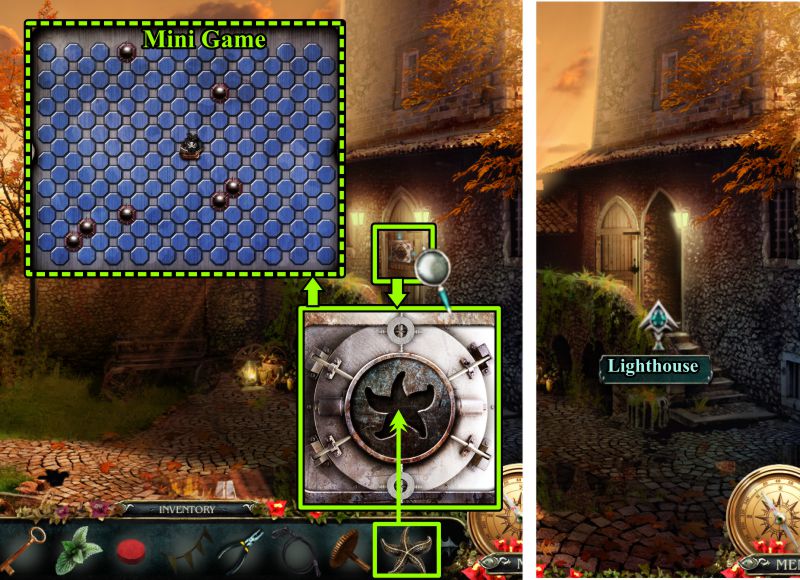
Screenshot
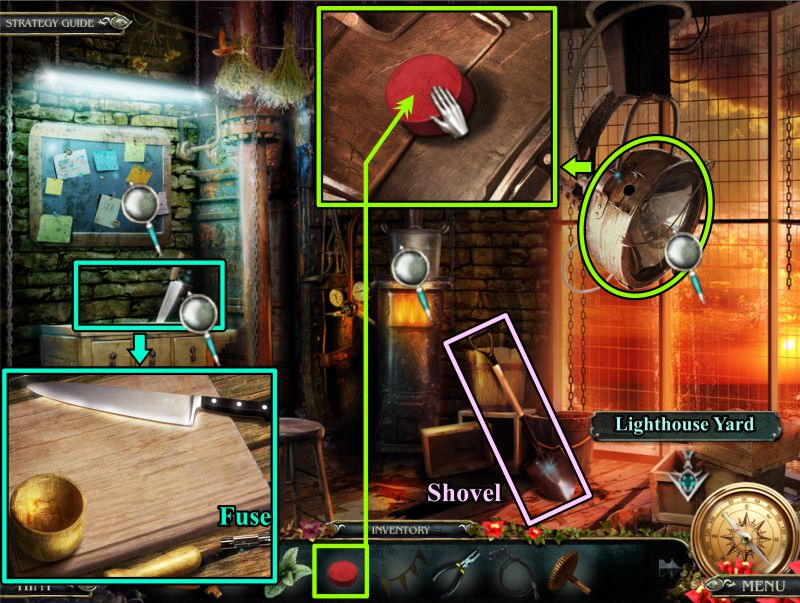
Lighthouse
Zoom in on the table and take the Fuse.
Take the Shovel, then zoom in on the light.
Place the Red button and push it to turn on the light.
Go to the Lighthouse Yard.
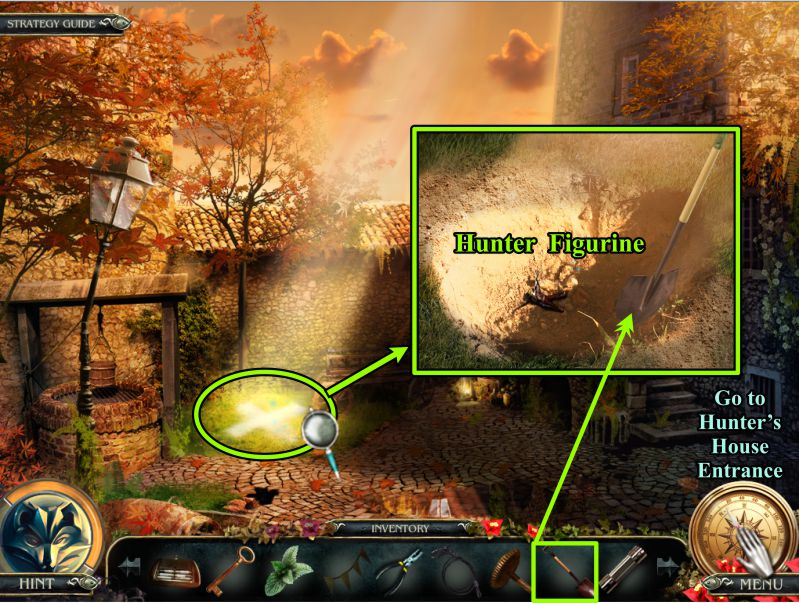
Screenshot
Lighthouse Yard
Zoom in where the light is shining and use your Shovel to dig up the Hunter Figurine.
Go to the Hunter's House Entrance.
Screenshot
Hunter's House Entrance
Zoom in on the front of the truck and place the Steel Cable.
Turn on the winch, and the gate will be removed so that you can enter the house.
Screenshot
Hunter's House
Zoom in on the desk, use your Key to open the book, and take the Crystal Eye.
Check out the figure on the fireplace mantel and place that Crystal Eye.
Take the Liquid Smoke when its mouth opens.
Screenshot
Zoom in on the pipes at the right and take the Wrench.
Look closely at the map above the fireplace.
Place your Hunter's Figurine to trigger a Mini Game.
Once you have completed the game, go to the Throne Room.
Screenshot
Hunter Mini Game
Your goal is to help the hunter to get to his house.
You need to move him along his path according to the time of day shown in the upper left corner.
He also needs to acquire food and equipment along the way to help him with his journey.
See the screenshot for a step-by-step solution to his journey.
Once he arrives home, you will be able to collect the Triangle Key.
Screenshot
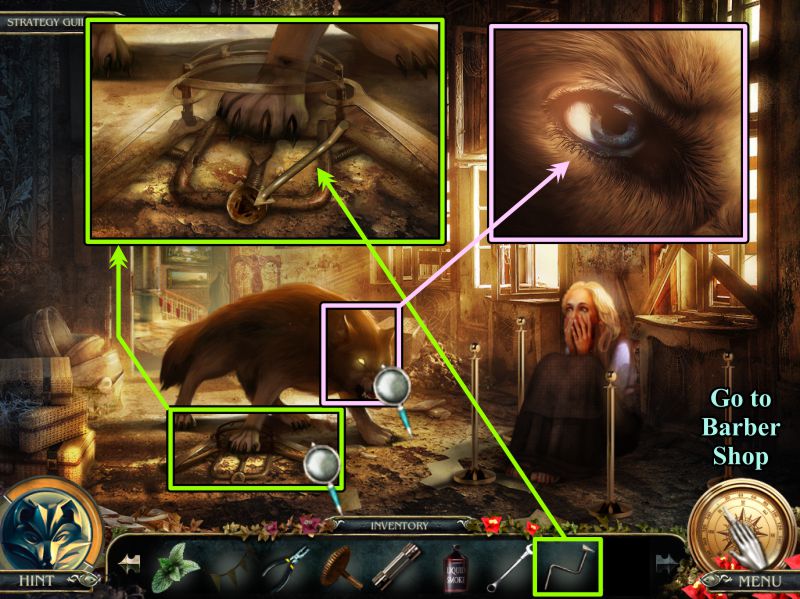
Throne Room
Zoom in on the trap and free the wolf with the Triangular Key.
Since you are actually in a photo in this scene, don't worry about Luisa, because she will not be harmed. Zoom in on the wolf's face, and you will see why.
Go to the Barber Shop.
Screenshot
Barber Shop
Zoom in on the mirror and use the Wench to open it to get the Sickle.
Go to Bog Street.
Screenshot
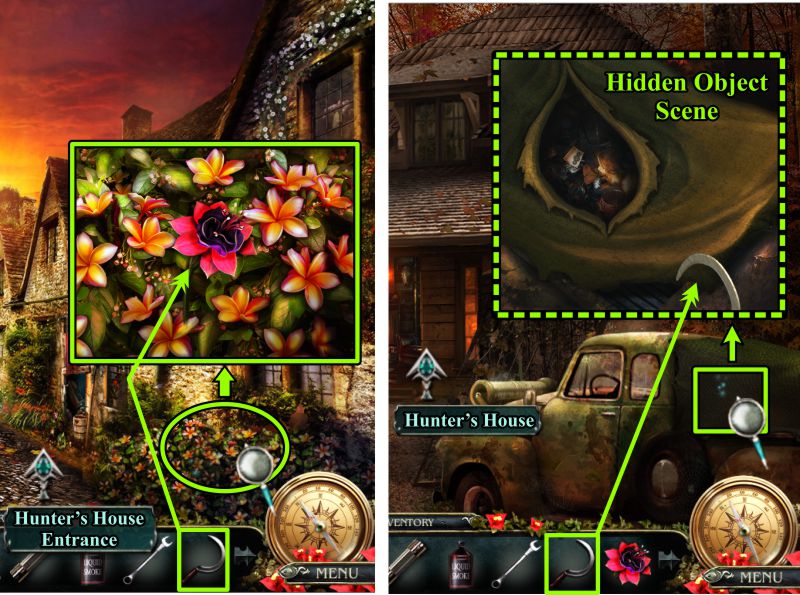
Bog Street and Hunter's House Entrance
Zoom in on the plant at the right and use the Sickle to collect the flower.
Go to the Hunter's House Entrance.
Zoom in on the back of the truck and use the Sickle to cut the tarp to trigger a Hidden Object Scene.
When you have completed all your tasks, go inside the house.
Screenshot
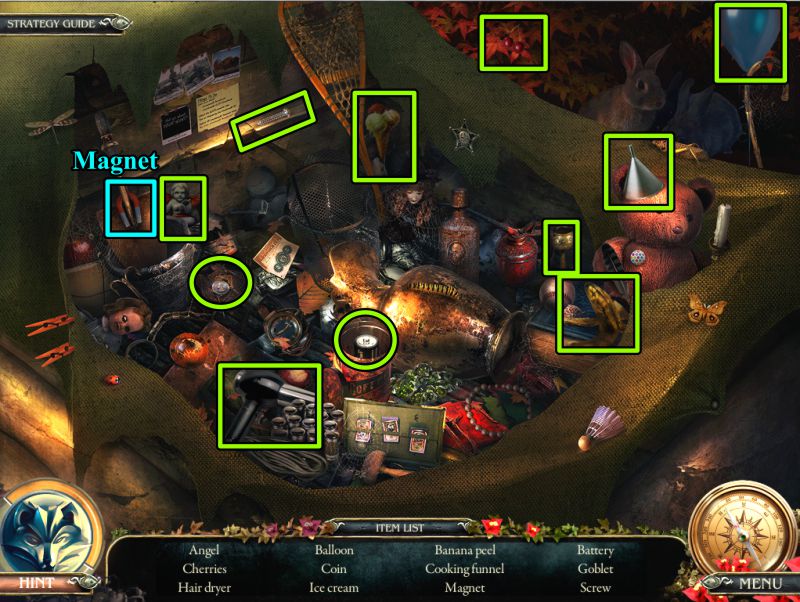
Tarp Hidden Object Scene
Your final object is a Magnet.
Screenshot
Hunter's House and Library
Zoom in on the glass pipe and use the Magnet to extract the Metal Owl.
Go to the Library.
Zoom in on the shelf and place the Metal Owl to trigger a Mini Game.
Screenshot
Library Mini Game
Your goal is to rearrange all of the statue pieces to make all four complete.
See the screenshot for the step-by-step solution.
Screenshot
Library
Zoom in on the lamp, take the Fuse, and place the Roller to light the lamp.
Zoom in again for a Hidden Object Scene, then go to the Arboretum.
Screenshot
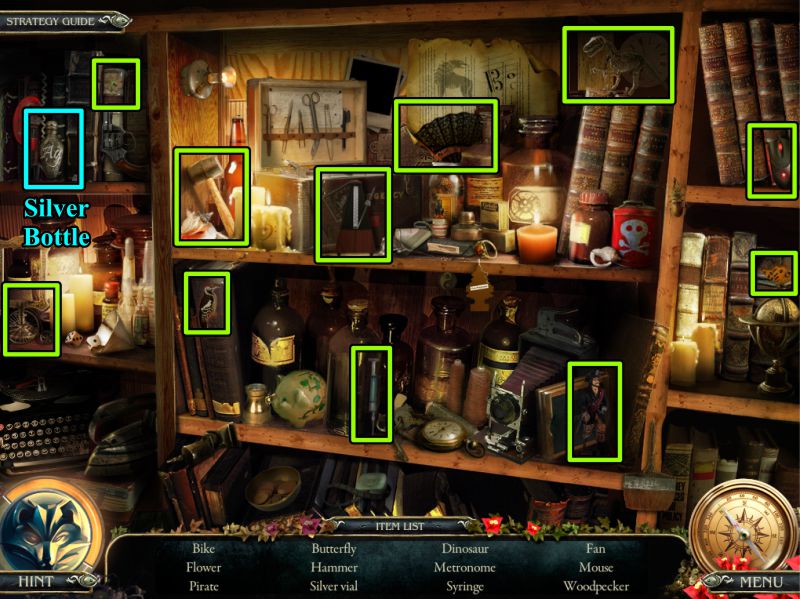
Library Hidden Object Scene
You will get a Silver Bottle for your Inventory.
Screenshot
Arboretum
Zoom in on the mechanism on the back wall and place your two fuses to produce light for the flower.
Press the button, go to the flowerbed, and pick the Divine Flower.
Go to the Lighthouse.
Screenshot
Lighthouse
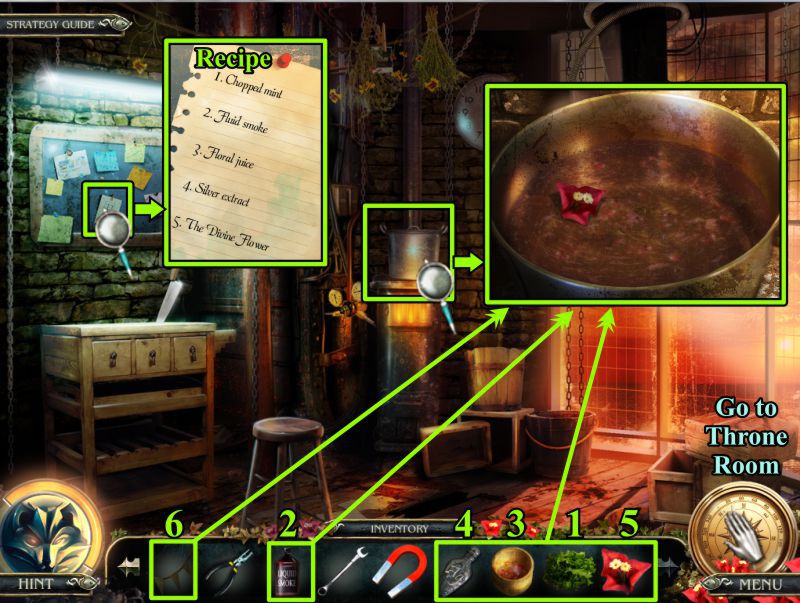
Your now have all the ingredients for the potion, so zoom in on the table.
Place the Mint and use the Knife to chop it up.
Place the Flower in the mortar and use the pestle to make flower juice.
Screenshot
Check the Recipe on the wall and continue with the potion.
Zoom in on the pot and place your ingredients in this order: Mint, Liquid Smoke, Floral Juice, Silver Bottle, and Divine Flower.
Then place your Pennant into the solution to soak up the potion.
Next stop is the Throne Room.
Screenshot
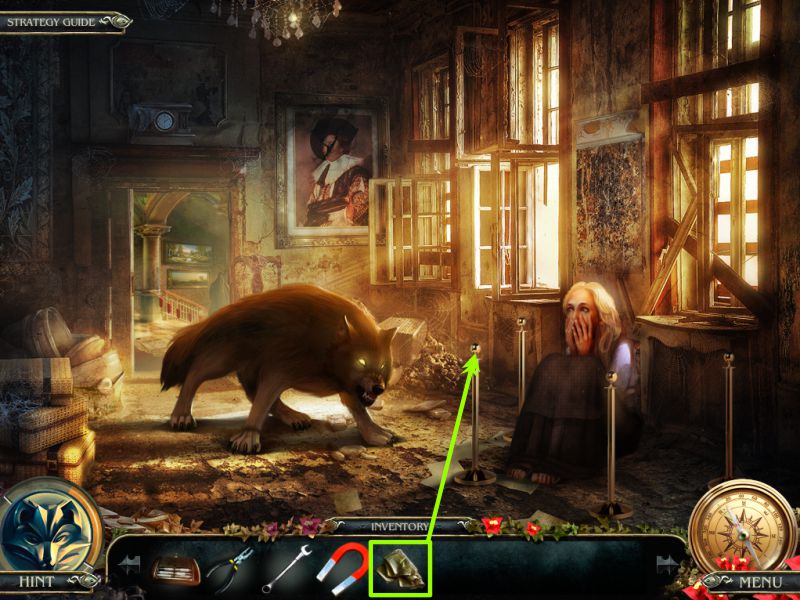
Throne Room
Place your Pennant on the poles surrounding Luisa, and the Wolf will jump out of the window.
Screenshot
Chapter 5: Escape the Castle
Luisa's Room
Luisa is now safe and in her room. Talk to her, then pick up the Baby Chair so you can rescue Brandon and they can leave the Castle.
Screenshot
Luisa
In case you skipped over this important discussion, see the screenshot.
Screenshot
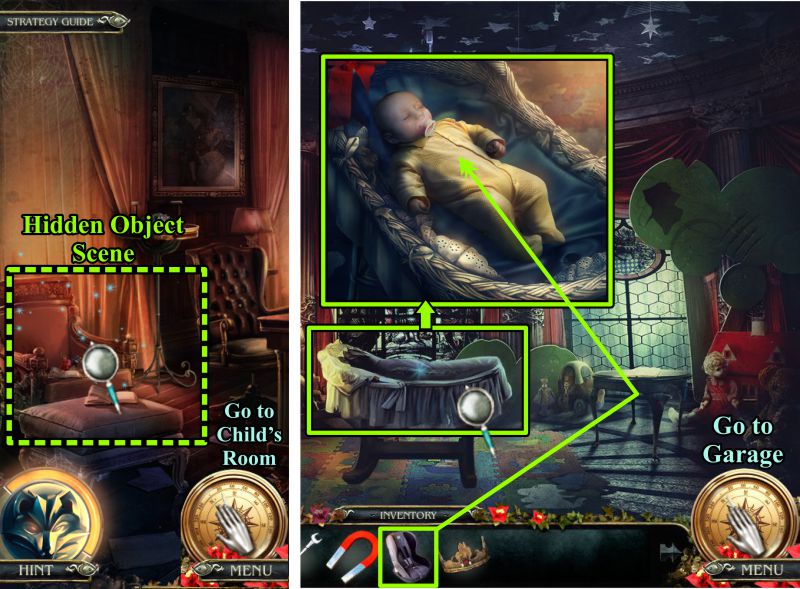
Luisa's Room and Child's Room
Play the Hidden Object Scene, then go to the Child's Room.
Zoom in on the cradle and place the Baby Seat to be able to pick up Brandon.
Go to the Garage.
Screenshot
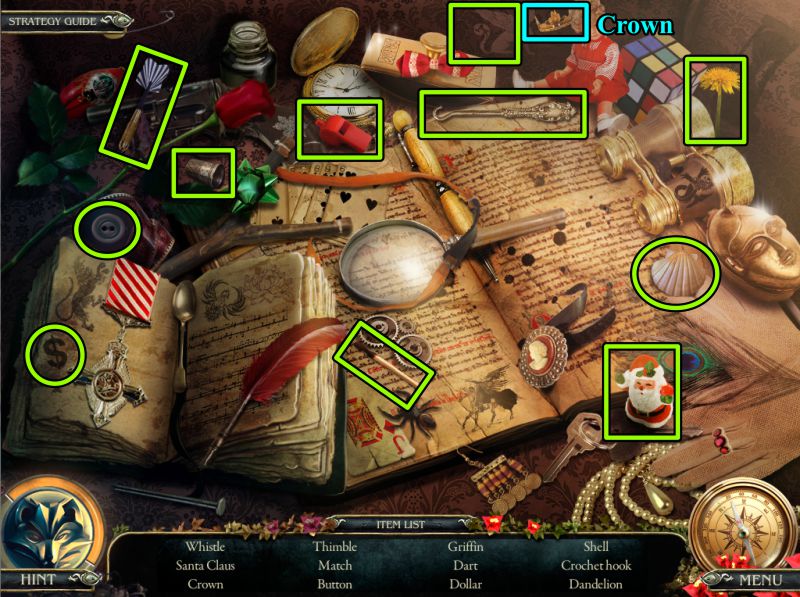
Luisa's Hidden Object Scene
Collect the Crown for your Inventory.
Screenshot
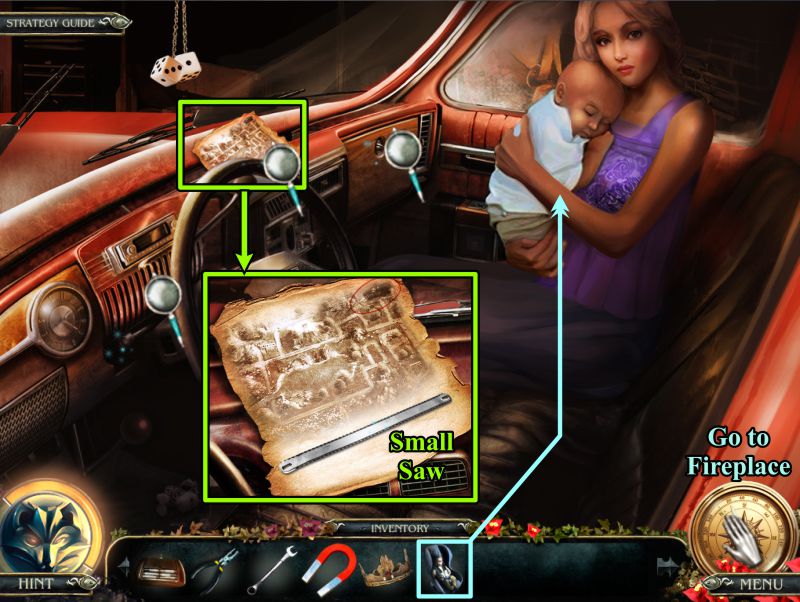
Garage
Give Brandon to Luisa.
Check out the dashboard and take the Small Saw.
Go to the Fireplace.
Screenshot
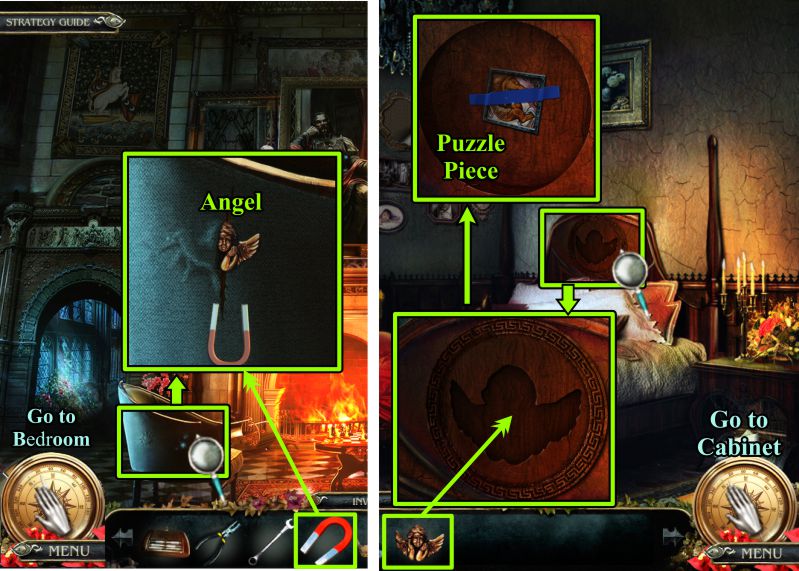
Fireplace and Bedroom
Use the Magnet to remove the Angel that is embedded in the side of the chair.
Go to the Bedroom.
Zoom in on the headboard and place the Angel to take the puzzle piece.
Go to the Cabinet.
Screenshot
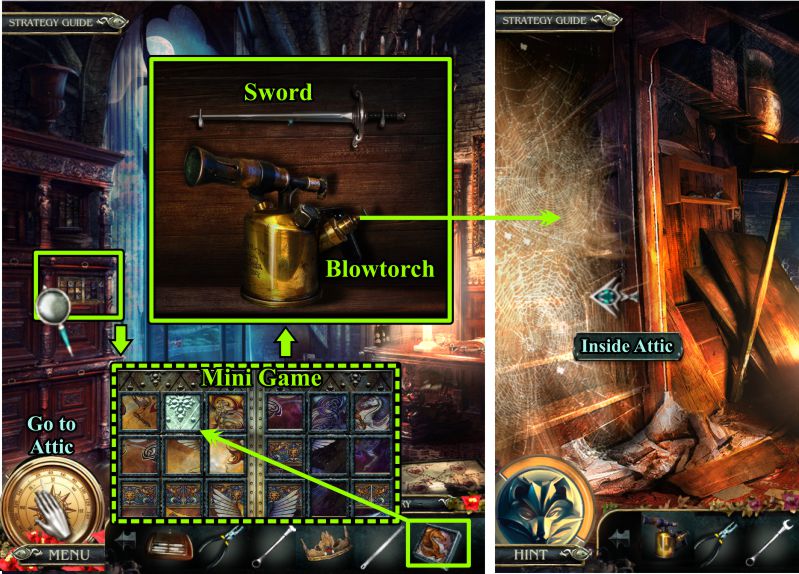
Cabinet and Attic
Zoom in on the shelf at the left and place your Puzzle Piece to trigger a Mini Game.
You will get a Sword and a Blowtorch when you solve the game.
Go to the Attic and use the Blowtorch on the cobwebs so you can go inside the attic.
Screenshot
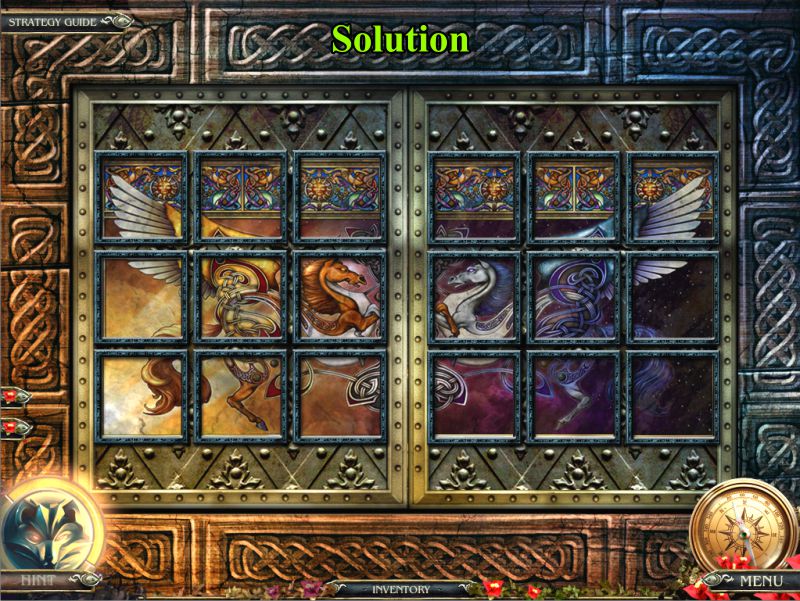
Cabinet Mini Game
Swap the pieces to make a complete picture on each side, as shown in the screenshot solution.
Screenshot
Inside Attic
Zoom in on the charging unit and take the Token.
Use your Car Remote to move the truck to you.
The Fan will automatically go into your Inventory.
Play the Hidden Object Scene.
Screenshot
Inside Attic Hidden Object Scene
Once you get the Propeller Blade for your Inventory, go to the Main Corridor.
Screenshot
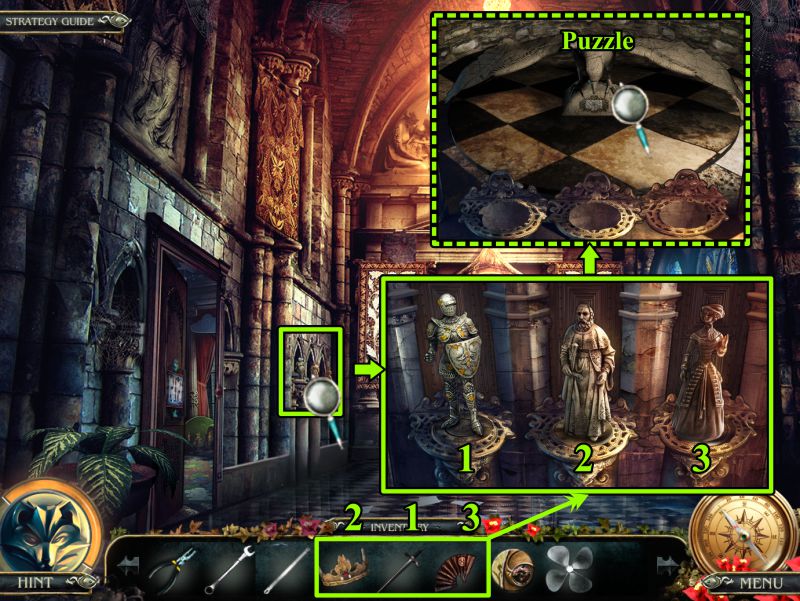
Main Corridor
Zoom in on the left wall and place the Crown, Sword, and Fan, as shown in the screenshot.
The figures will disappear, so click on the Puzzle to begin it.
Screenshot
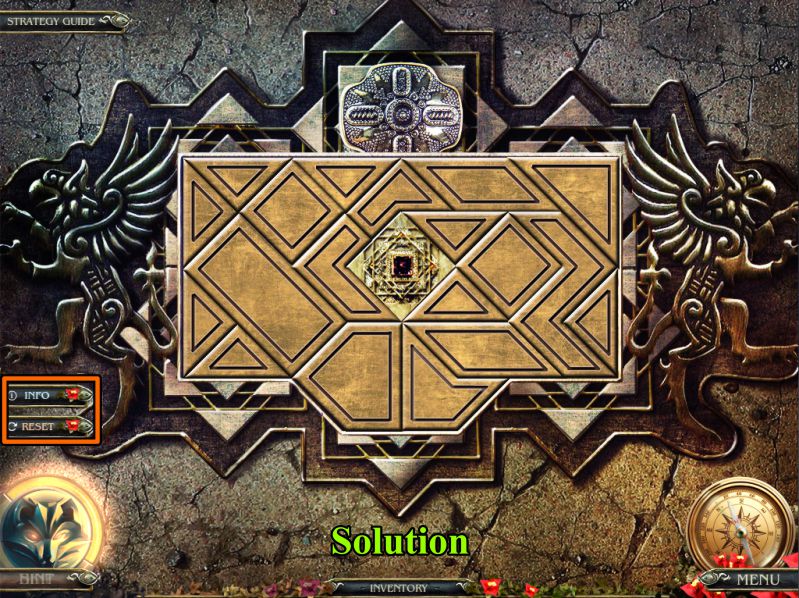
Main Corridor Puzzle
See the screenshot for the solution.
Screenshot
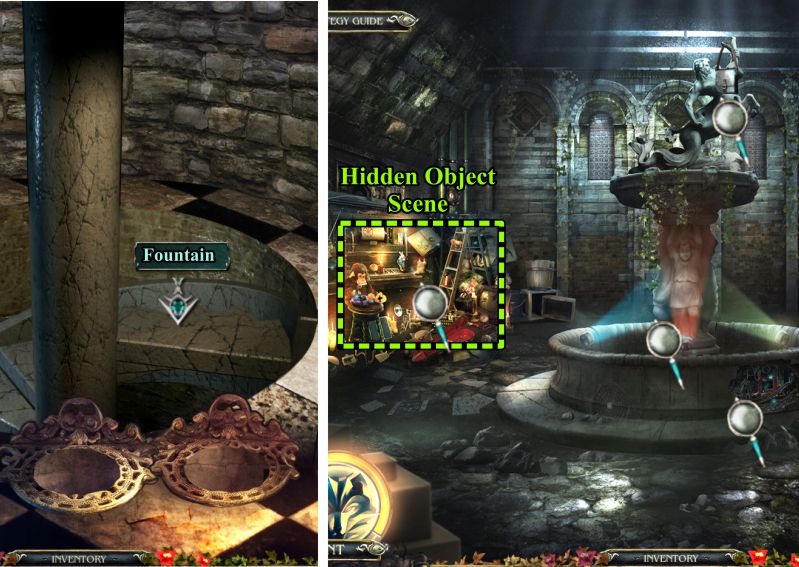
Fountain
The floor will open with a stairway to a Fountain.
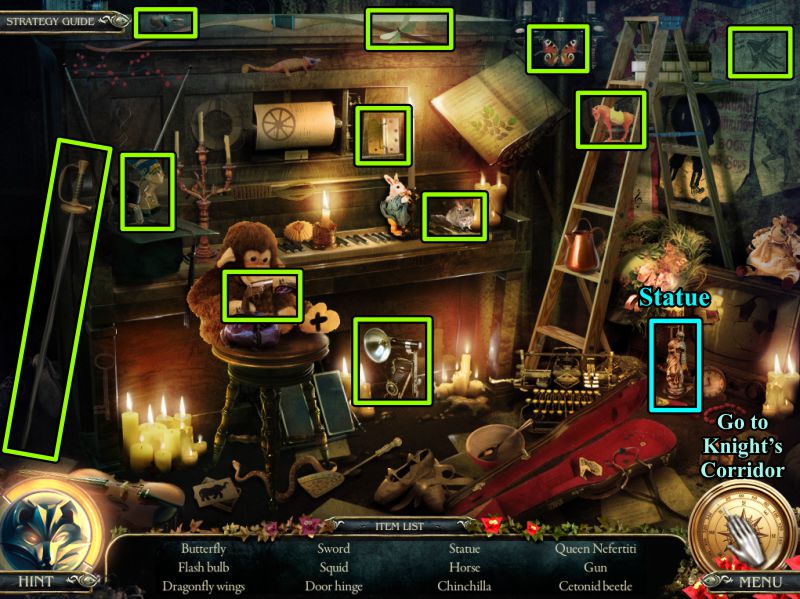
Go there, have a look around, and play the Hidden Object Scene.
Screenshot
Fountain Hidden Object Scene
Your Inventory item is a Statue.
Go to the Knight's Corridor.
Screenshot
Knight's Corridor
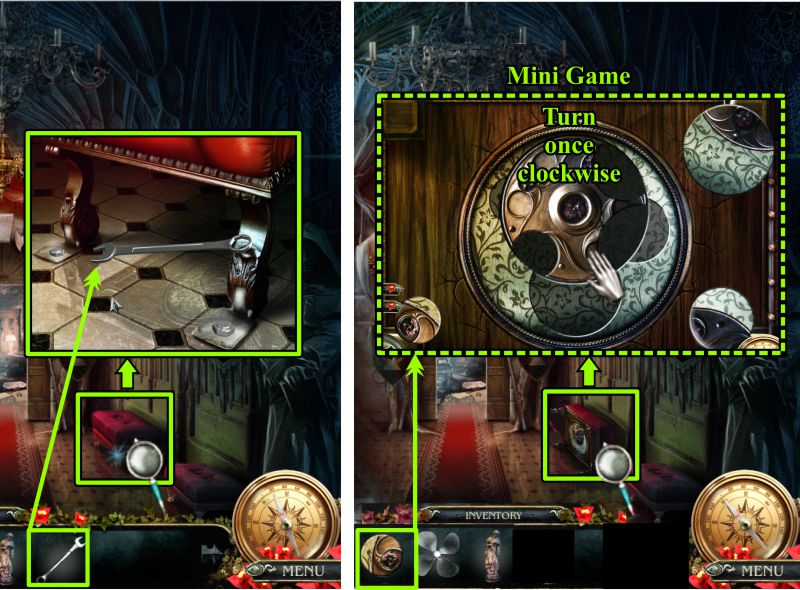
Zoom in on the stool and use your Wrench to remove the bolts.
Place the Token in the underside of the stool to trigger a Mini Game.
Rotate the center once clockwise so you can place the circles.
Screenshot
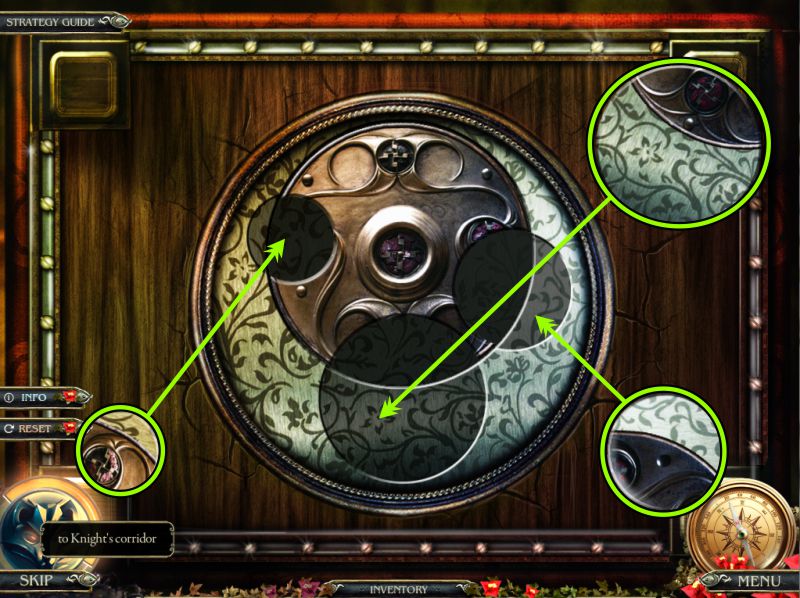
Knight's Corridor Mini Game
Place the circles as shown in the screenshot.
Screenshot
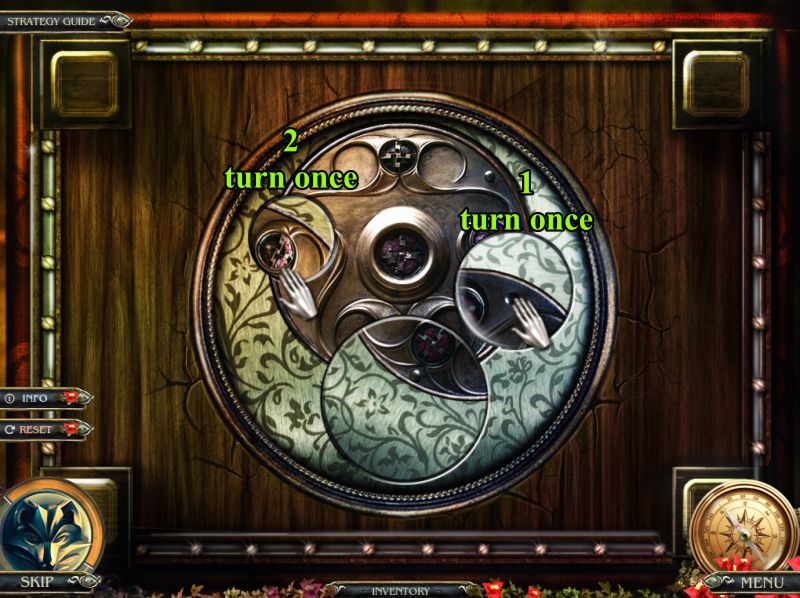
Turn the medium circle once and the small circle once as shown in the screenshot.
Screenshot
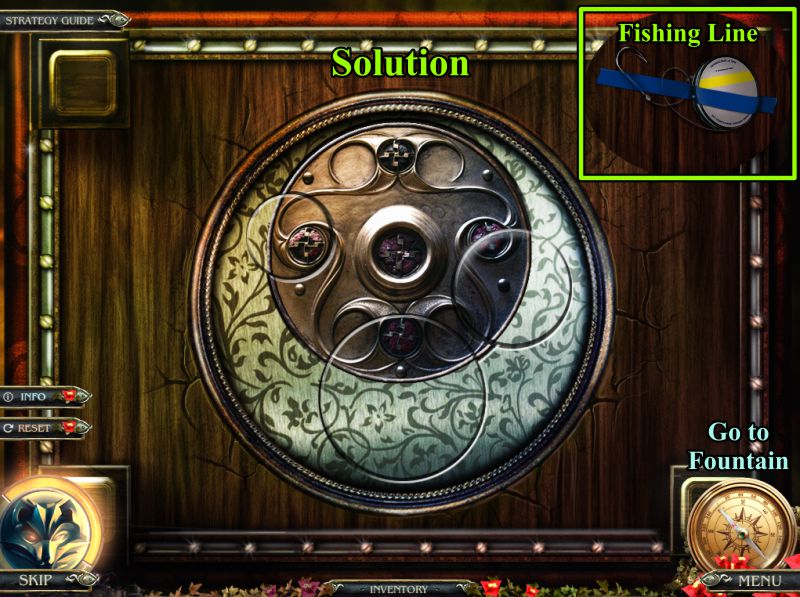
Check the screenshot for the solution. Pick up the Fishing Line when the hiding place opens.
Go to Fountain.
Screenshot
Fountain and Child's Room
Zoom in on the Fountain and fish the Cork Screw out of the water.
Go to the Child's Room and zoom in on the house.
Use the Cork Screw to open the wooden bolt.
Zoom in again for a Hidden Object Scene.
Screenshot
Child's Room House Hidden Object Scene
Your final object will be a Switch.
Go to the Fountain.
Screenshot
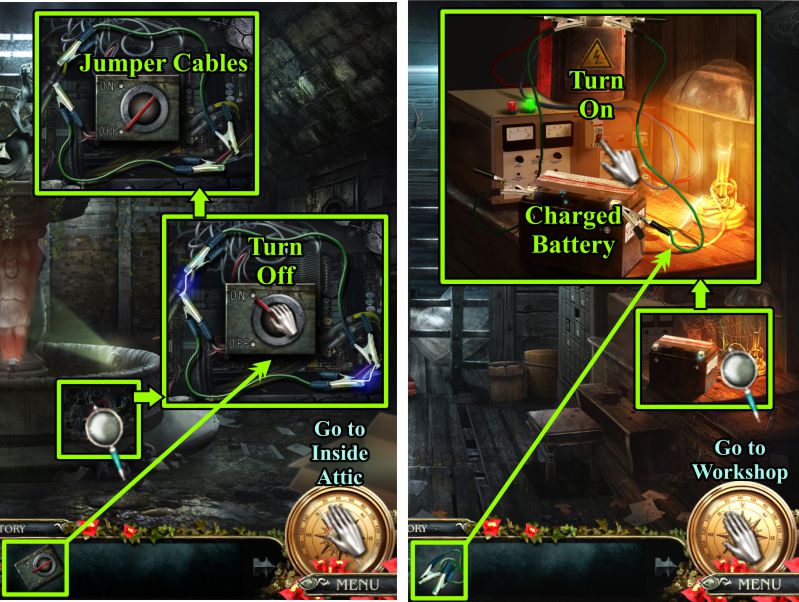
Fountain and Inside Attic
Zoom in on the Fountain electric scheme and place the Switch.
Turn off the switch and take the Jumper Cables.
Go to Inside Attic and zoom in on the charging unit.
Place the Jumper Cables, turn on the switch, and take the Charged Battery.
Go to the Workshop.
Screenshot
Workshop and Castle Door
Place the Propeller Blade on the Generator and collect the Generator.
Go to the Castle Door, place the Generator, and install the Battery.
When the Generator blows away the fog, go to the Cliff.
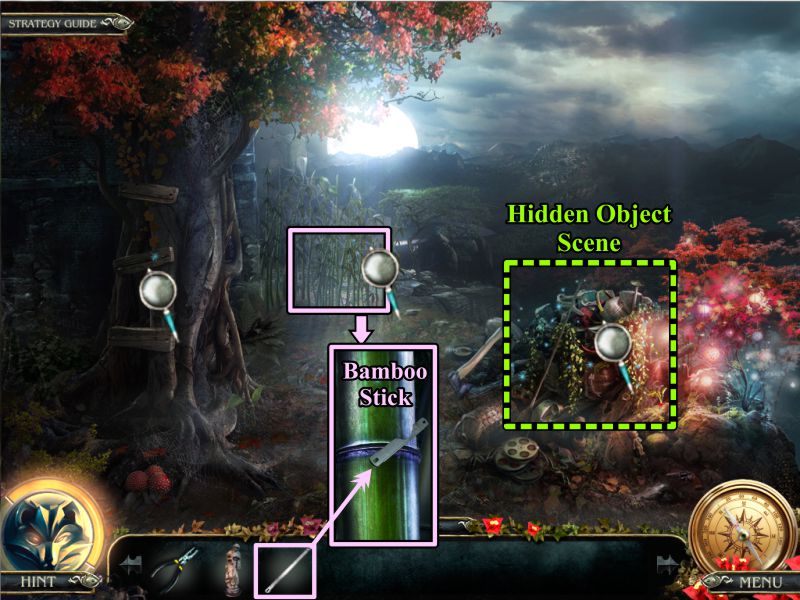
Screenshot
Cliff
Zoom in on the bamboo and use the small saw to get a Bamboo Stick.
Play the Hidden Object Scene.
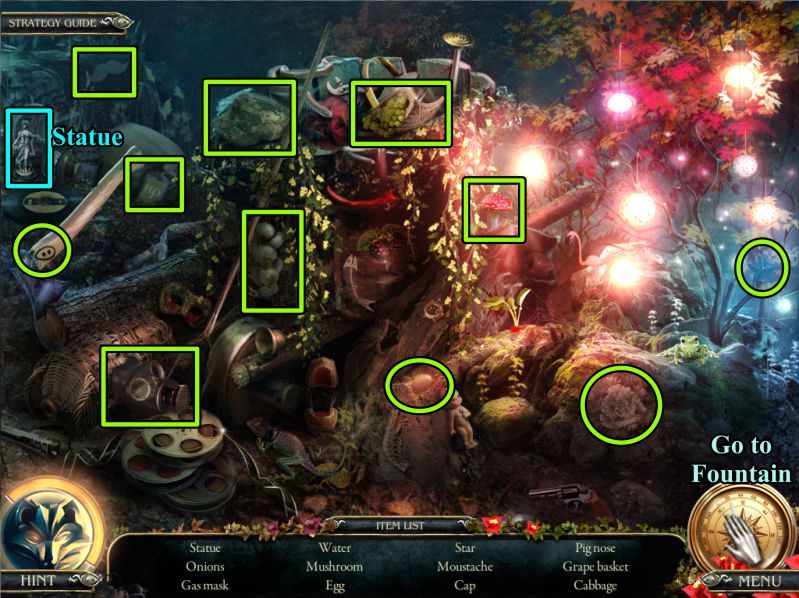
Screenshot
Cliff Hidden Object Scene
You will get a Statue as your final object.
Go to the Fountain.
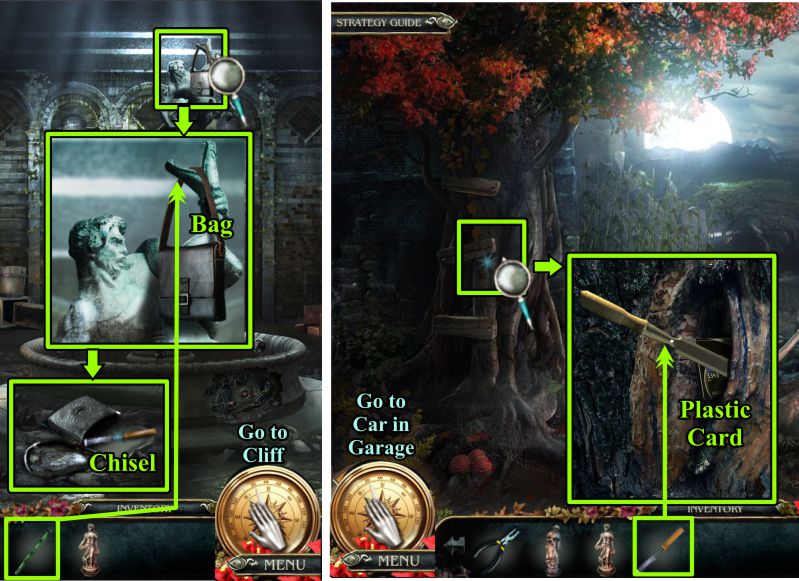
Screenshot
Fountain and Cliff
Use the Bamboo Stick to get the Bag from the top of the Fountain.
Take the Chisel from the open Bag and return to the Cliff.
Zoom in on the tree and use the Chisel to widen the gap so you can take the Plastic Card.
Go to the Garage.
Screenshot
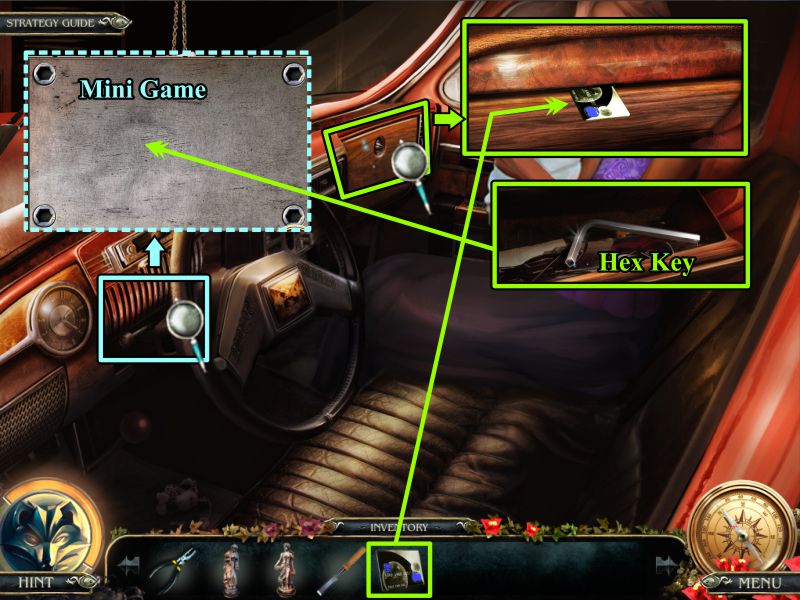
Car in Garage
Zoom in on the glove compartment and use the Plastic Card to open it.
Take the Hex Key and zoom in on the ignition.
Use the Hex Key to open the panel and trigger a Mini Game.
Screenshot
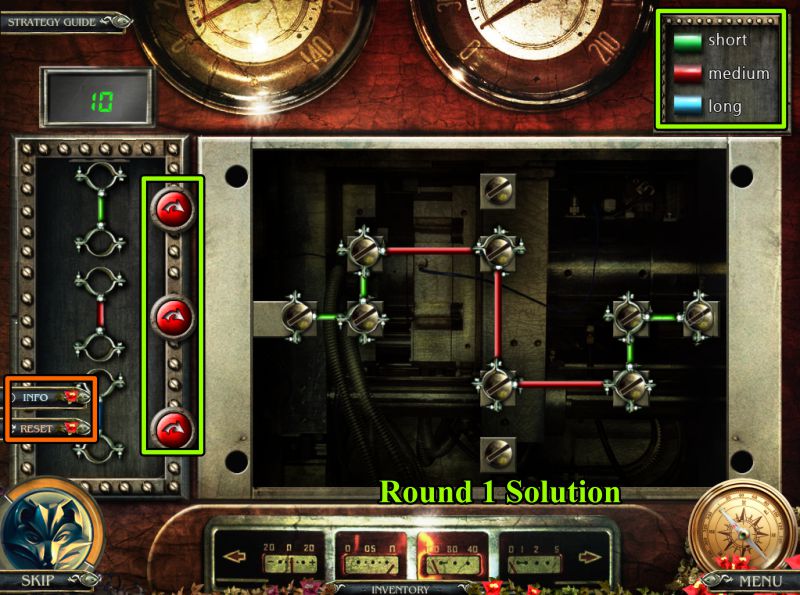
Car Ignition Mini Game
There are 3 segments to this game.
Your goal is complete the connections, using a total of 17 wires of various lengths, so you can start the car.
The color chart in the upper right corner shows the lengths of the wires.
The red knobs at the left rotate the wires .
The screenshot shows the solution to Round 1, in which you have used 7 of your wires.
Screenshot
See the screenshot for the placement of the 5 wires for Round 2.
Screenshot
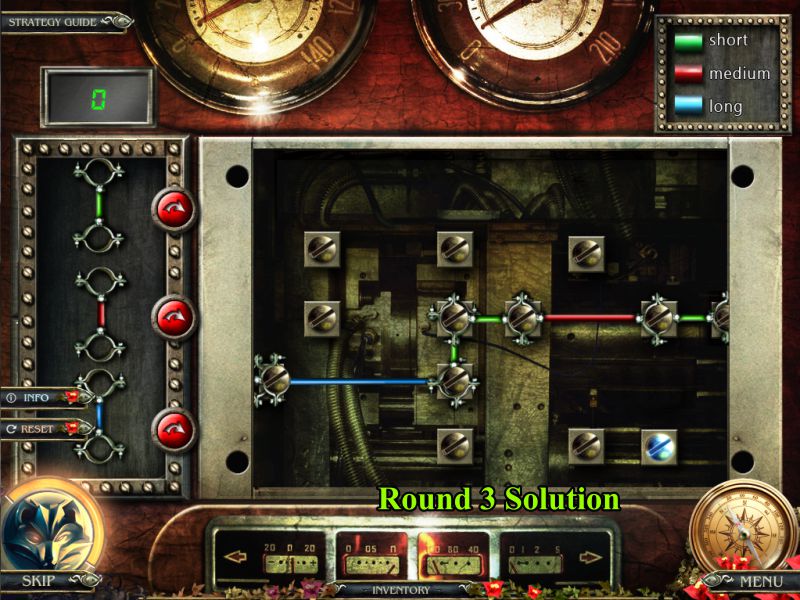
Round 3 uses the remaining 5 wires; see the screenshot for the solution.
Screenshot
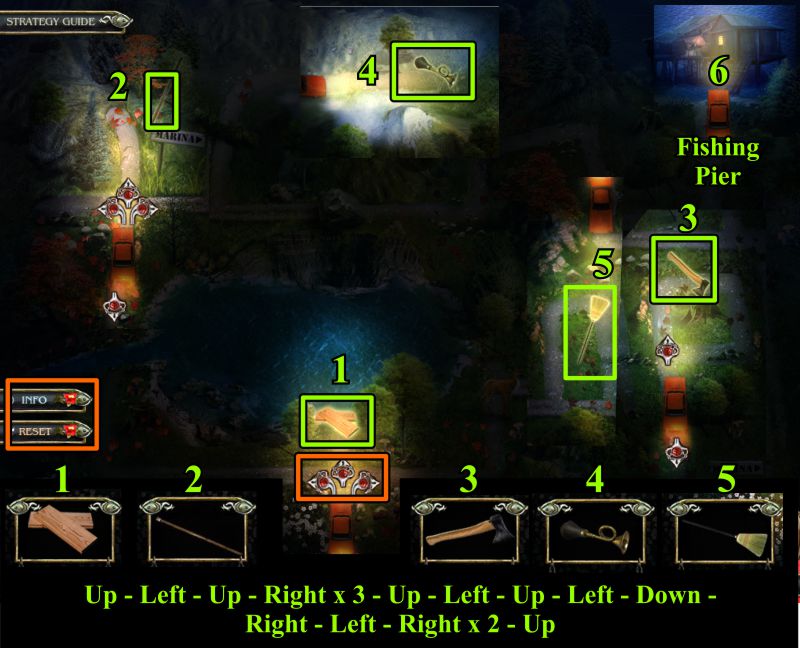
Route to Fishing Pier Mini Game
You succeeded in starting the car and have taken off for the Fishing Pier, but you can't drive there directly because you have to overcome a few obstacles along the way.
The items you pick up are numbered in the screenshot and will automatically be used when necessary.
First, you pick up the Boards to use when you cross the stream.
Secondly, you obtain a Lever that is used to move a rock.
The Axe is used to get rid of a log across the road.
The Horn will scare away a deer.
The Broom brushes away cobwebs on the way to the Fishing Pier.
See the screenshot for the direction to move the car using the arrows attached to the car.
Screenshot
Luisa
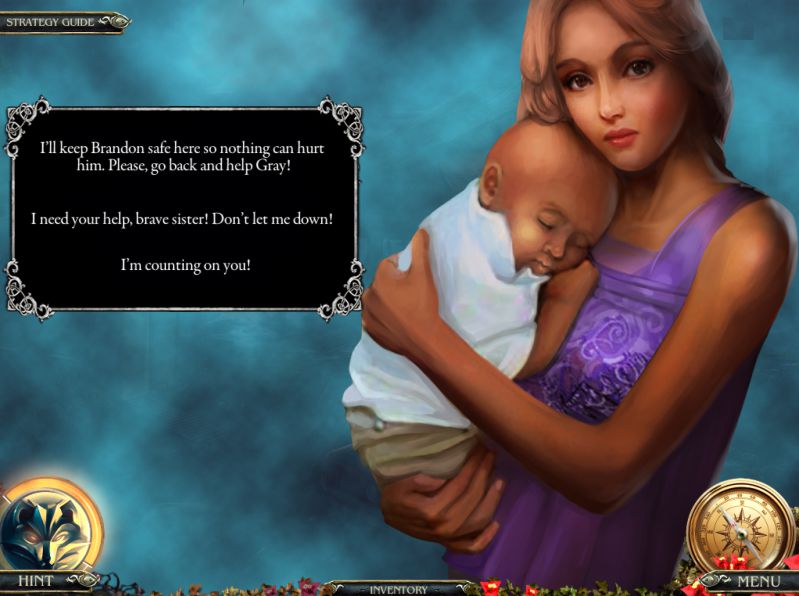
Luisa takes Brandon into the hut and asks for your help.
Screenshot
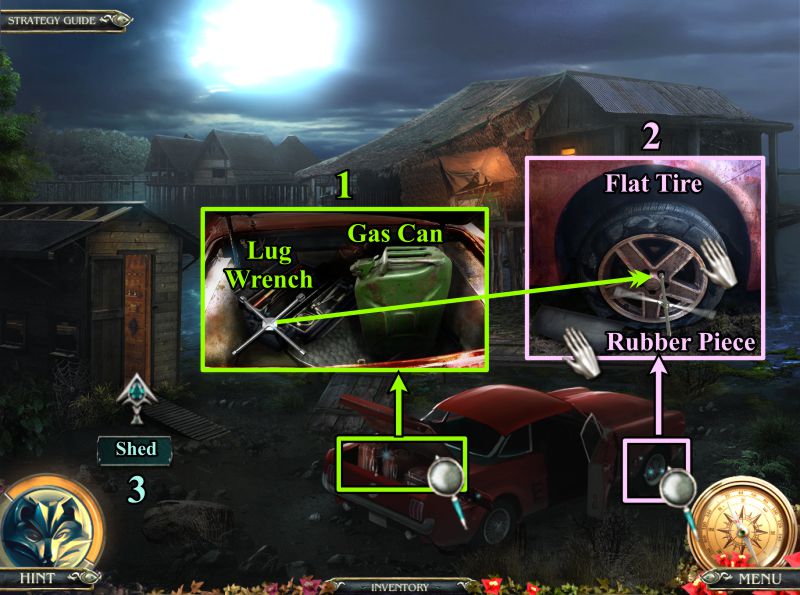
Fishing Pier
Open the trunk of the car to get a Lug Wrench and Gas Can.
Zoom in on the front tire, pick up the Rubber Piece, and use the Lug Wrench to remove the Flat Tire.
Enter the Shed.
Screenshot
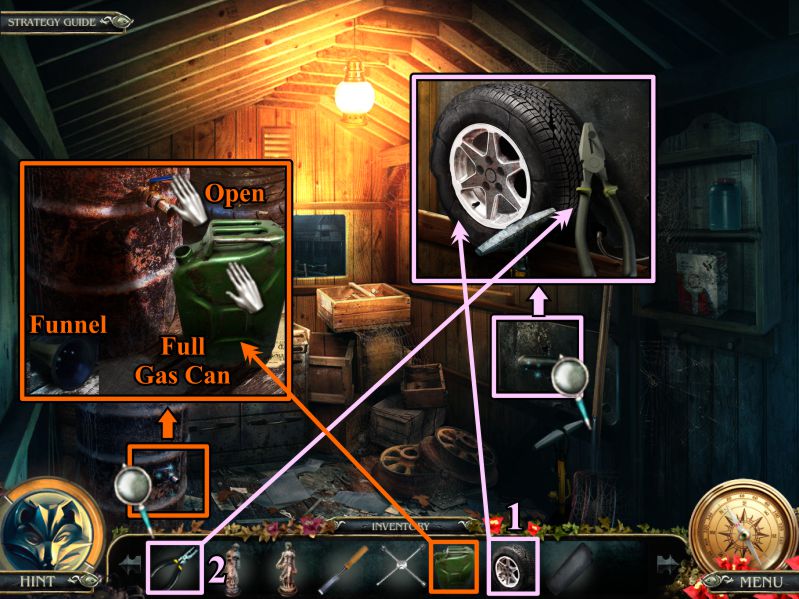
Shed
Zoom in on the barrel, pick up the Funnel, place your Gas Can, turn the lever, fill the can, and take it.
Zoom in on the tire rack at the right.
Place the tire, then use the Pliers to remove the nail.
Screenshot
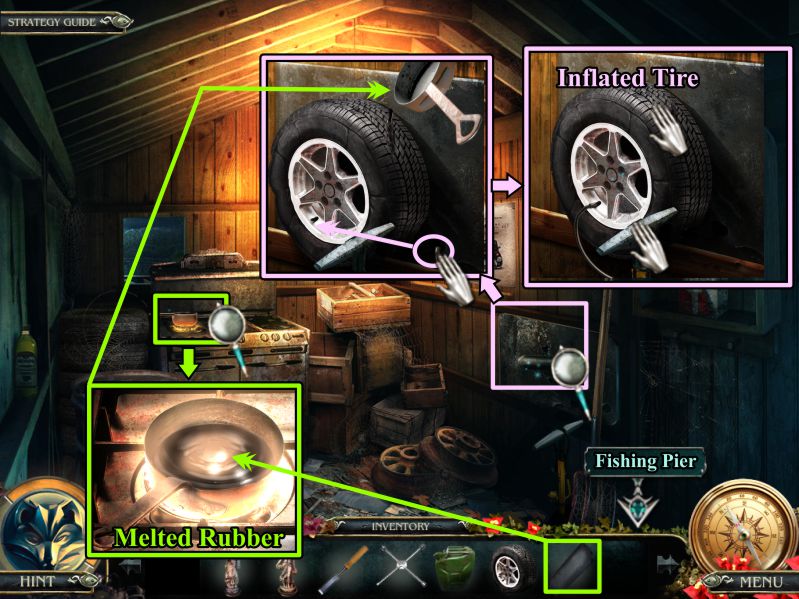
Zoom in on the burner and melt your Rubber Piece.
Take the pan and pour the Melted Rubber on the hole in the tire.
Connect the hose, pump air into the tire, and take the Inflated Tire.
Return to the Fishing Pier.
Screenshot
Fishing Pier
Zoom in on the gas tank, place the Funnel, and fill the tank from the Gas Can.
Remove the Funnel, and the flap will close.
Zoom in on the wheel, place the Tire, and use the Lug Wrench to tighten the bolts.
Screenshot
Fishing Pier to Garage Entrance
Get in the car, and it will automatically retrace your route to the Garage Entrance.
After your chat with Caine, go into the Garage.
Screenshot
Caine
Check the screenshot to find out how to cure the curse.
Screenshot
Garage and Fireplace
Grab the Statue on the Floor and go to the Fireplace.
Zoom in on the mantle and place the 3 Statues to trigger a Mini Game.
Screenshot
Fireplace Mantle Mini Game
Your goal is to match the lower red light with the upper one for each of the statues.
The left on is already solved, so use the red arrows to make the others match.
The portrait of Caine will disappear, and there will be a picture for you to zoom in on to find your next journey.
Screenshot
Chapter 6: Siberia
Caine's Bite
Check out the magnifying glasses, grab the Twine, and go to the Tree.
Screenshot
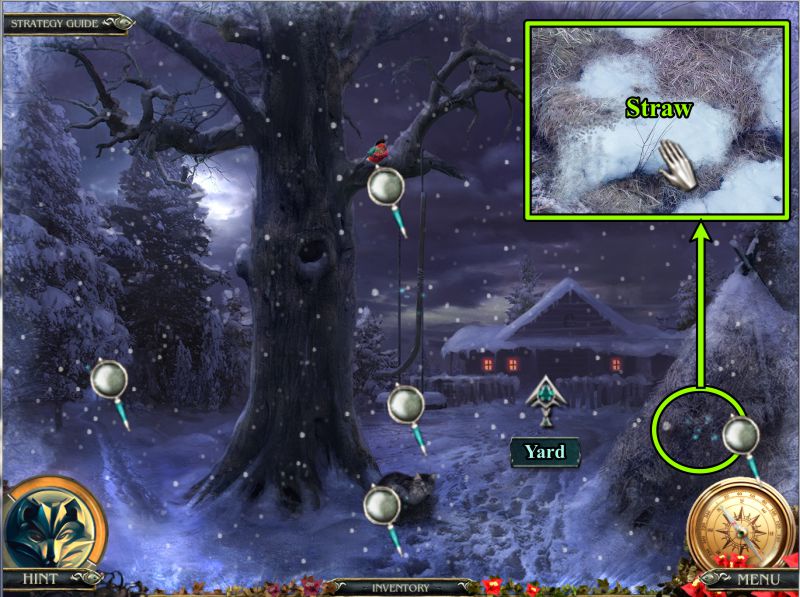
Tree
Check the magnifying glasses to see what you need.
Zoom in on the haystack, take some Straw, and head to the Yard.
Screenshot
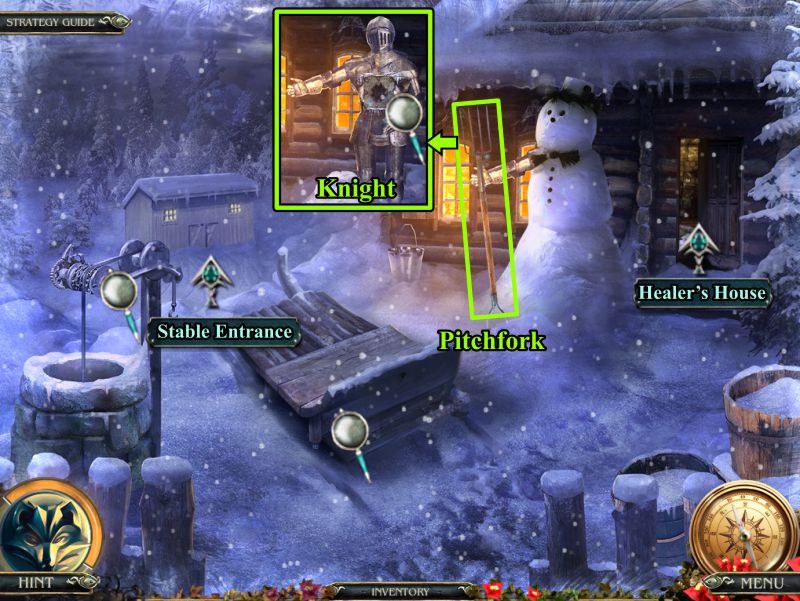
Yard
Pick up the Pitchfork, and the snowman will turn into a Knight.
After you look around, note the direction to the Stable, then go into the Healer's House.
Screenshot
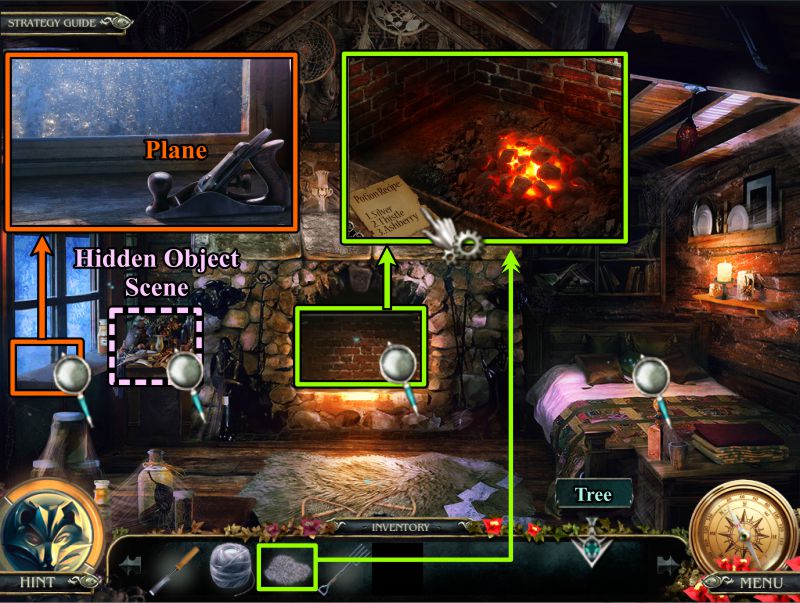
Healer's House
Zoom in on the fireplace and take note of the recipe.
Check out the window area and grab the Plane.
Play the Hidden Object Scene and go to the Tree.
Screenshot
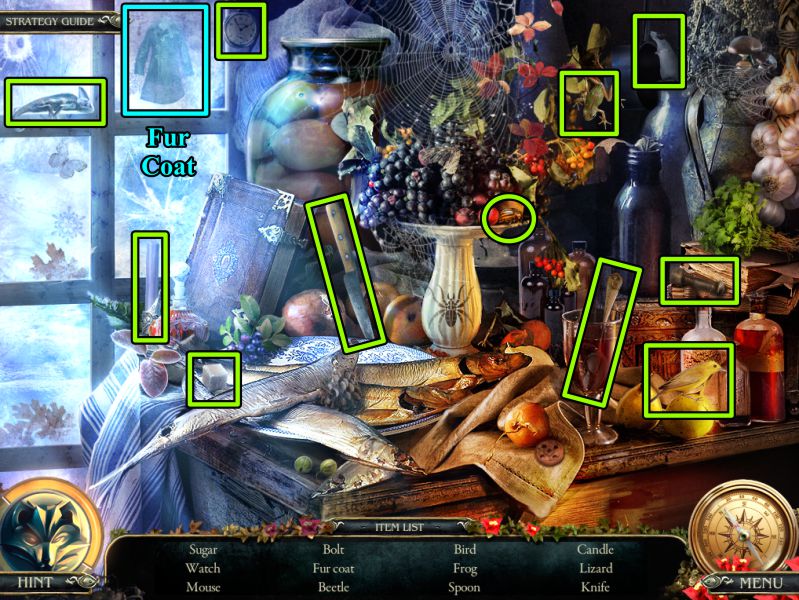
Healer's House Hidden Object Scene
Your final object is a Fur Coat that will not go into Inventory, but on you to keep you warm.
Screenshot
Tree
Zoom in on the Haystack and dig around with your Pitchfork to get the Bag to trigger a Mini Game.
Screenshot
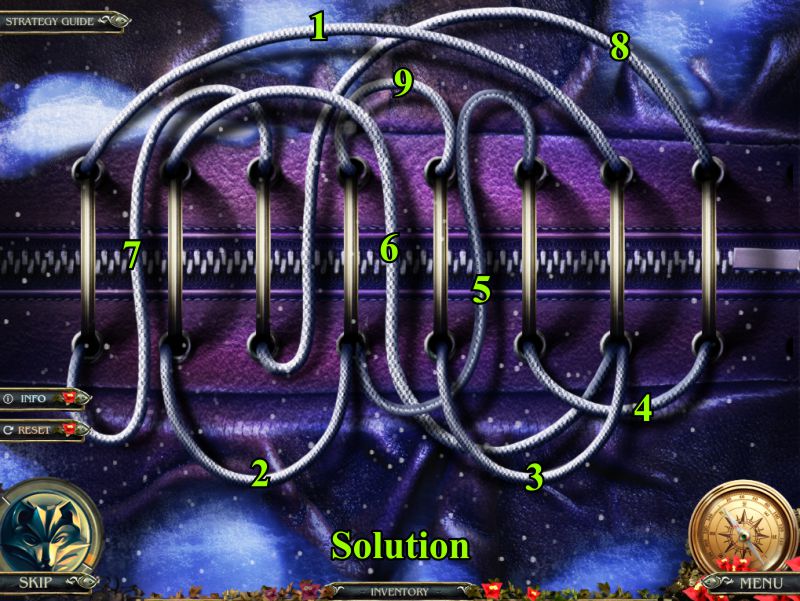
Bag Mini Game
Your goal is to remove the laces from the bag, starting with the uppermost lace.
See the screenshot for the solution.
Screenshot
Take the Rifle Bolt and Glass from the opened bag.
Screenshot
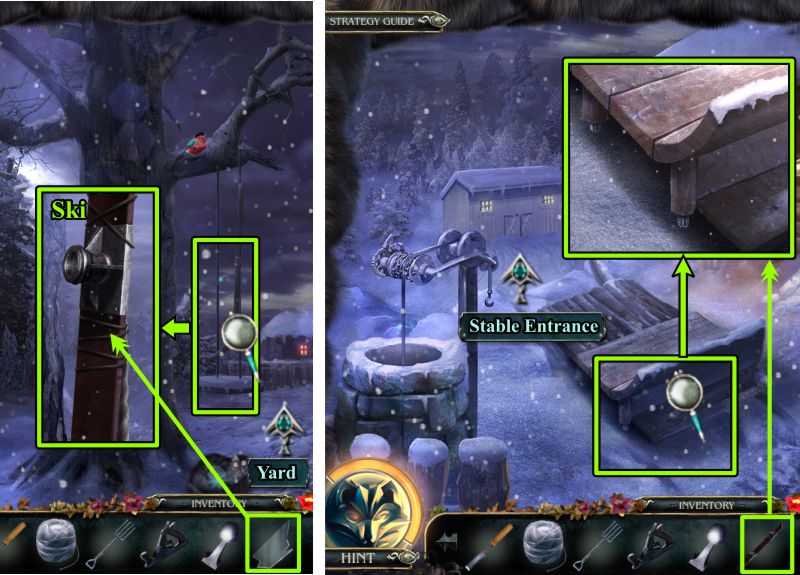
Tree and Yard
Zoom in on the swing and use the Glass to remove the Ski.
Go forward to the Yard and zoom in on the sled.
Place the Ski on the sled, and the sled will take off toward the stable.
Go to the Stable Entrance.
Screenshot
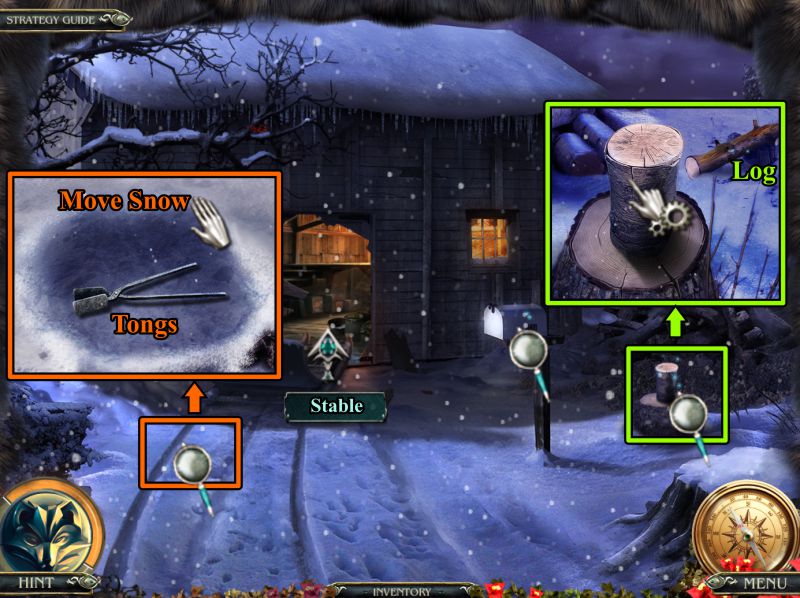
Stable Entrance
Check out the mailbox and stump.
Pick up the Log next to the stump.
Move the snow as shown in the screenshot, then take the Tongs.
Go inside the Stable.
Screenshot
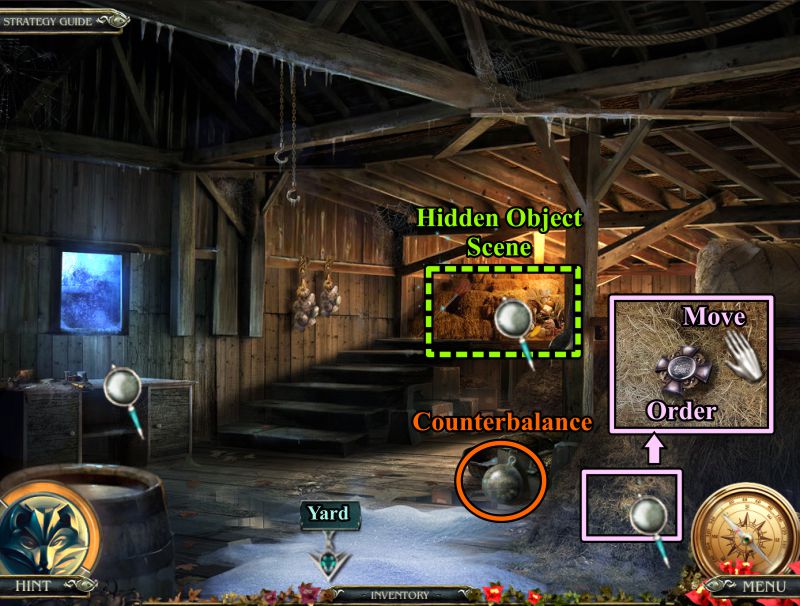
Stable
Pick up the Counterbalance, move the straw in the haystack, and pick up the Order.
Play the Hidden Object Scene and return to the Yard.
Screenshot
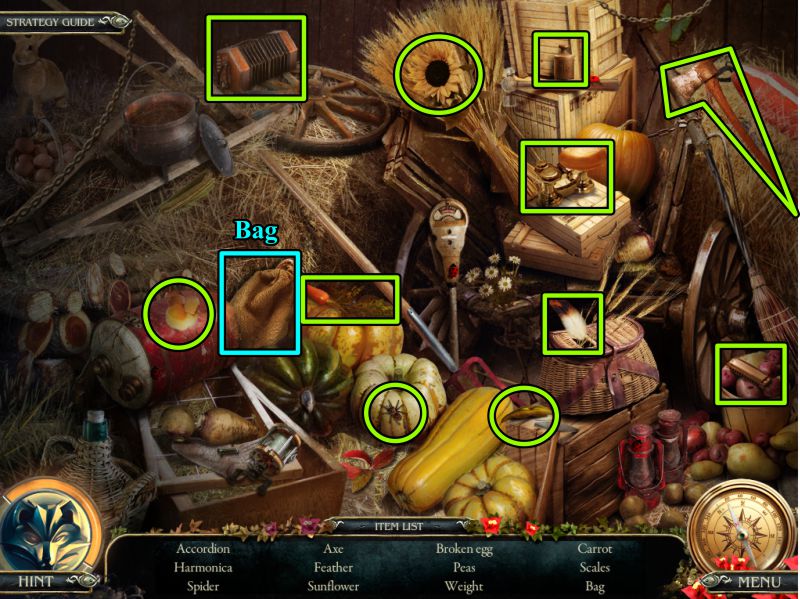
Stable Hidden Object Scene
You will get a Bag for your Inventory.
Screenshot
Yard
Place the Counterbalance in the well and take the Bucket that appears.
Zoom in on the knight and place the Order to trigger a Mini Game.
When you have completed the game, enter the Healer's House.
Screenshot
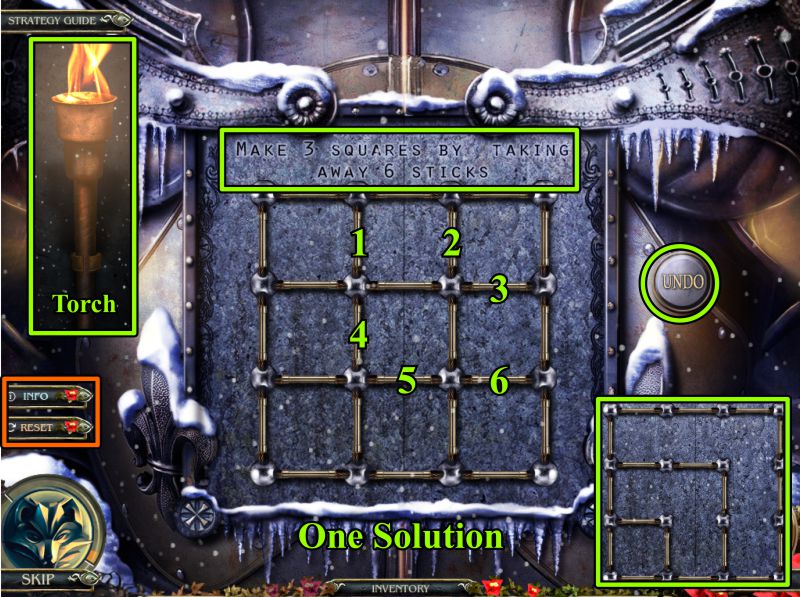
Knight Hidden Object Scene
Your goal is to remove 6 sticks in order to form 3 squares.
If you need it, there is an Undo Button in addition to the Reset.
See the screenshot for one solution to the game.
Take the Torch as your reward.
Screenshot
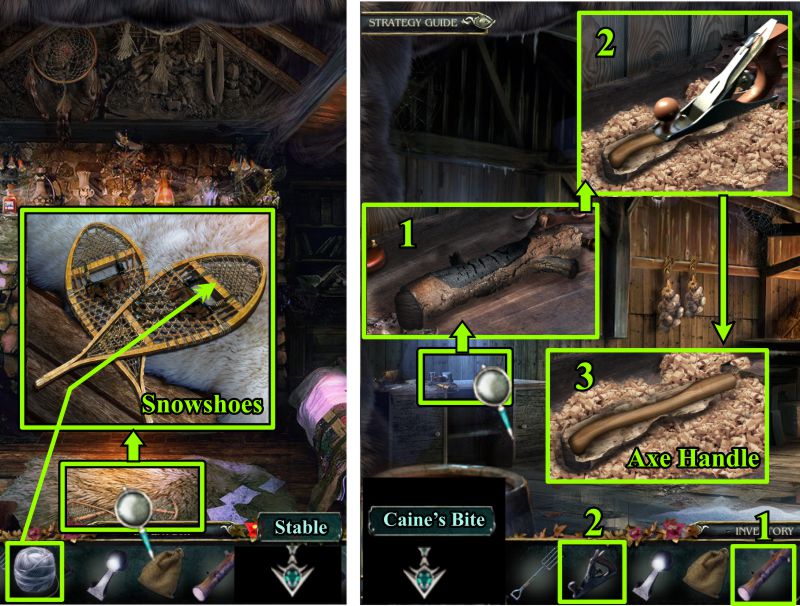
Healer's House and Stable
Zoom in on the floor, repair the Snowshoes with your Twine, and head to the Stable.
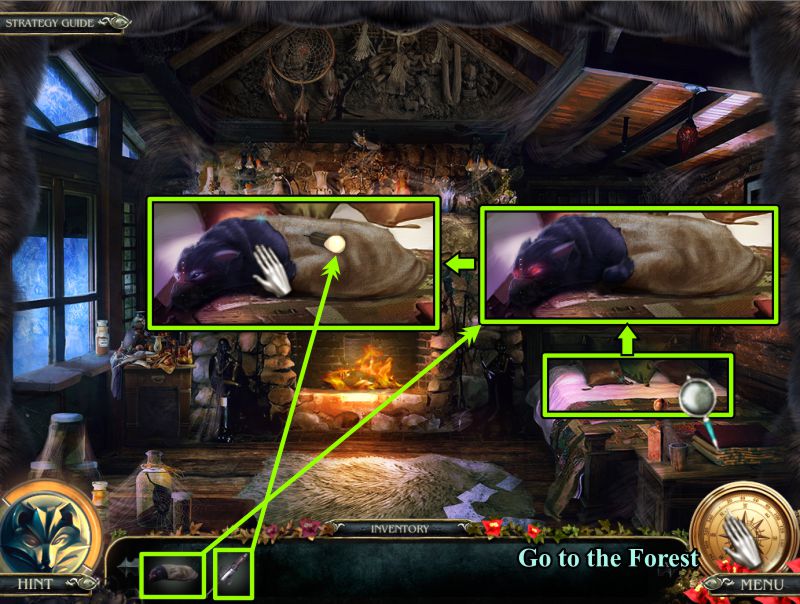
Place the Log on the workbench, use the Plane to create an Axe Handle, and go to Caine's Bite.
Screenshot
Caine's Bite and Tree
Zoom in on the shutter of the rifle, place the Rifle Bolt, move it, and take the Silver Bullet.
Go to the Tree, place your Snowshoes on the path to the Forest, and go down the path.
Screenshot
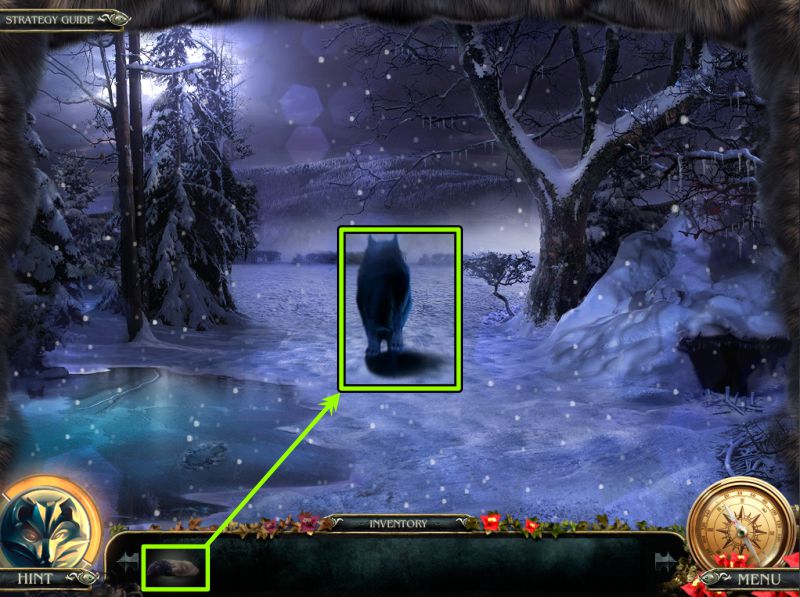
Forest
Zoom in on the lake and use your Chisel to remove the Fish from the ice.
Check out the tree with the axe blade, place your Axe Handle, and take the completed Axe.
Go to the Bear Den only to find out it is covered with icicles.
Use the Pitchfork to remove the icicles. It's too dark to enter, so place your Torch at the entrance and enter the Bear Den.
Screenshot
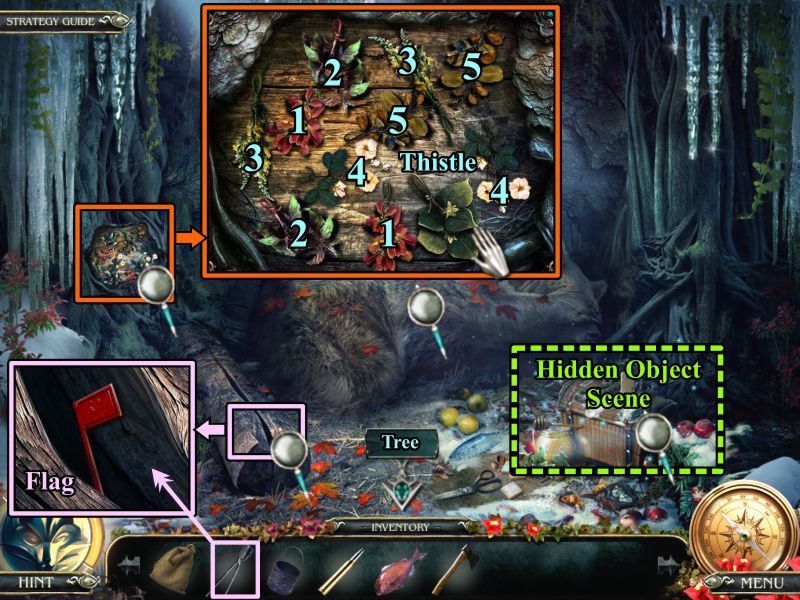
Bear Den
Fortunately, the bear is hibernating, so everything needs to be taken care of quietly.
Zoom in on the log at the left and use the Tongs to widen the gap so you can grab the Flag.
Check out the hole in the tree for a matching situation to find some Thistle for your recipe.
See the screenshot for a numbered match of the herbs.
Play the Hidden Object Scene, then go to the Tree.
Screenshot
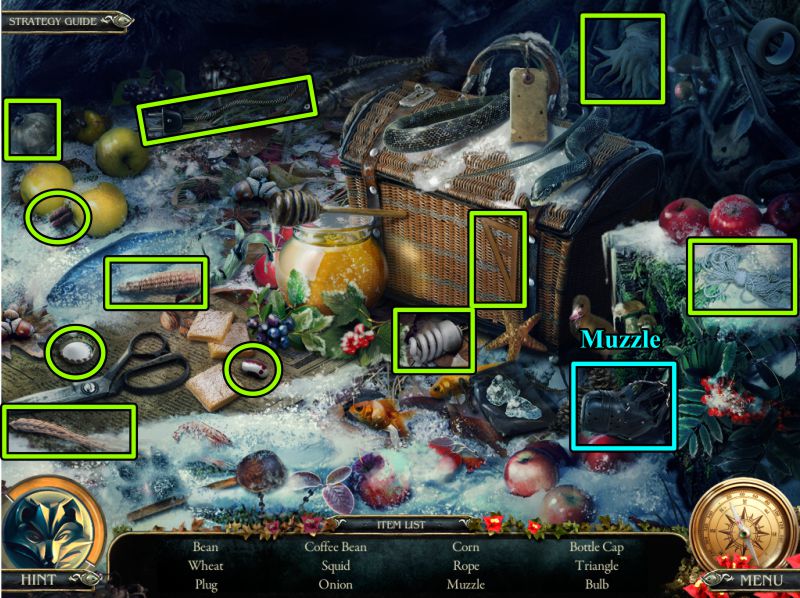
Bear Den Hidden Object Scene
You will come away with a Muzzle.
Screenshot
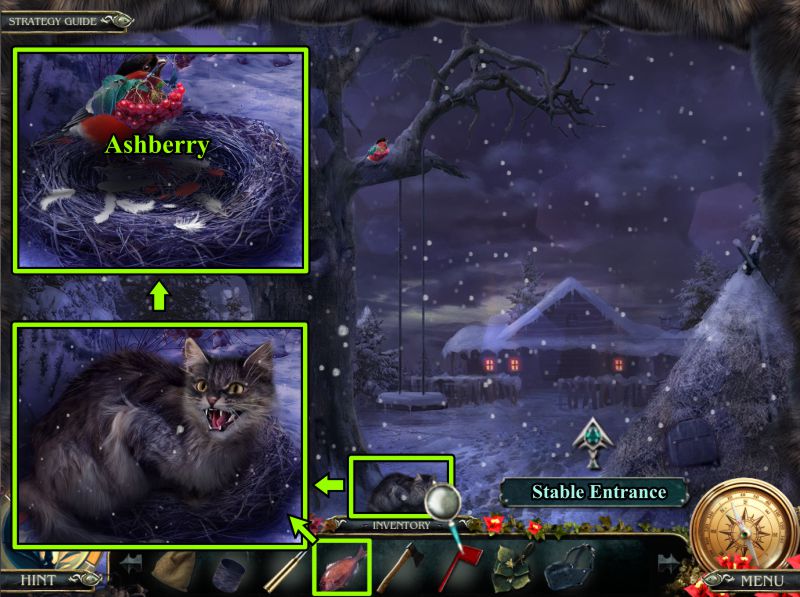
Tree
Zoom in on the hungry cat, give it the Fish, and it will abandon the bird's nest.
Take the Ashberry and go to the Stable Entrance.
Screenshot
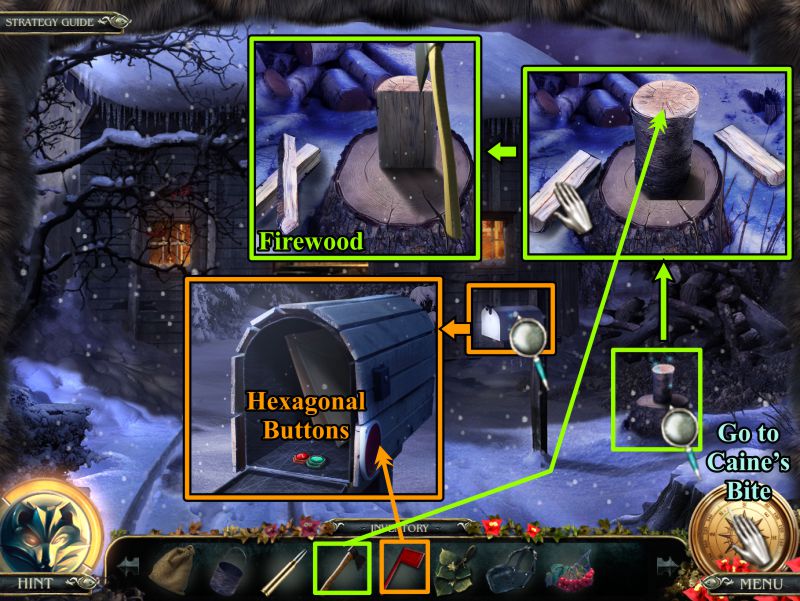
Stable Entrance
Zoom in on the mailbox, place the flag, and take the Hexagonal Buttons.
Go for a close up of the stump, then use your Axe to split it.
You will end up with two halves, so pick each one up separately and split them.
All of your Firewood will go into your Inventory.
Go to Caine's Bite.
Screenshot
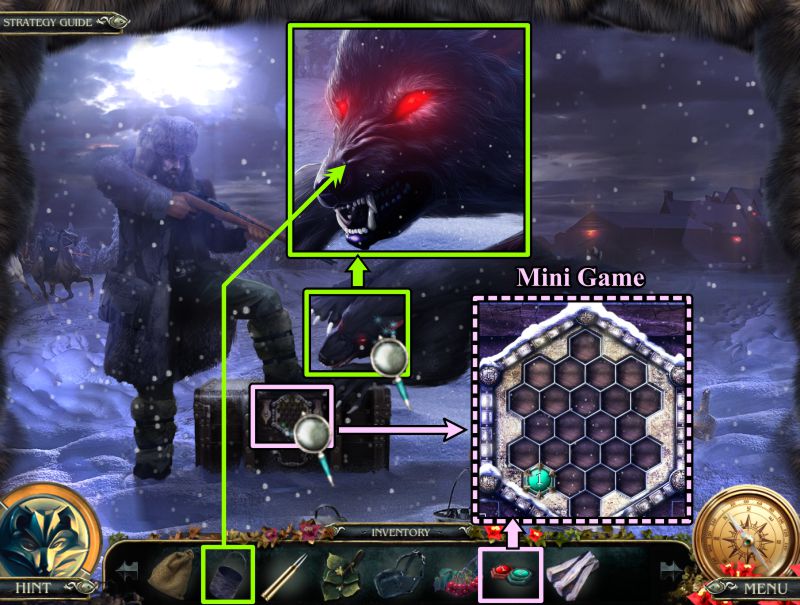
Caine's Bite
Zoom in on the wolf's snout and place the Muzzle.
You now have the Hexagonal Buttons to place on the chest, so zoom in and place them to trigger a Mini Game.
Screenshot
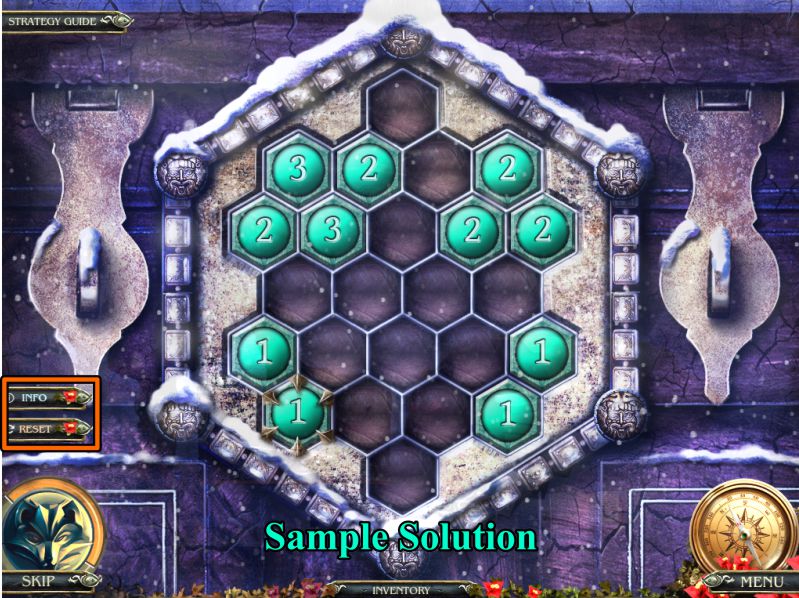
Caine's Chest Lock Mini Game
Each of the tokens has a number that represents how many other tokens can touch it.
Arrange the tokens so they all turn green.
See the screenshot for a sample solution.
Screenshot
Caine's Bite
Take the Syringe from the open chest.
Bag the wolf and collect him.
Go to the Healer's House.
Screenshot
Healer's House
Zoom in on the fireplace and place the Firewood, Bucket, Silver Bullet, Thistle, and Ashberry in the Bucket.
See the screenshot to see what you need to use and in what order.
Use the Syringe to extract the potion from the Bucket.
Screenshot
Place your bagged wolf on the bed.
Give him the Syringe of the potion, collect him again, and head to the Forest.
Screenshot
Forest
Release your wolf in the tundra and watch the cut scene.
Screenshot
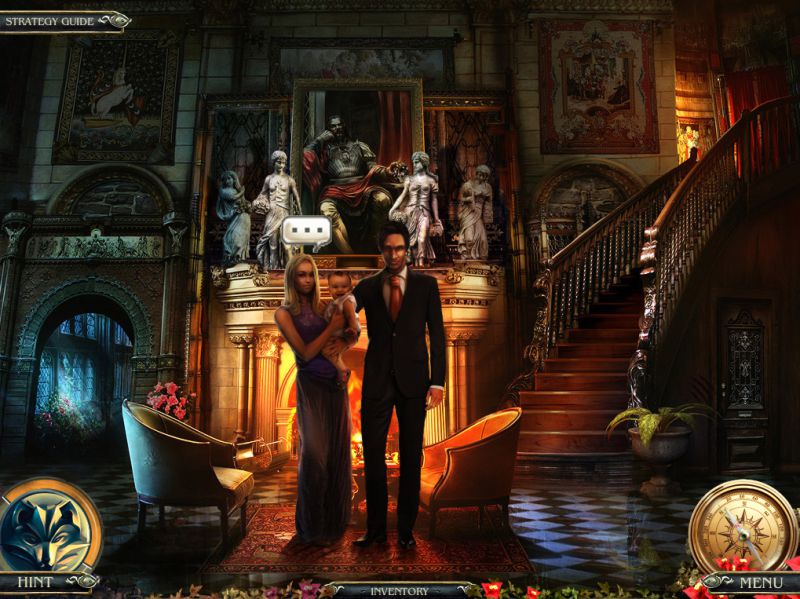
Fireplace
You are transported to the Fireplace where Luisa, Brandon, and John Gray are gathered.
Talk to Luisa.
Screenshot
Luisa
See the screenshot for what Luisa has to say.
Might this be a clue for another sequel?
Screenshot
Congratulations! You have saved and reunited the Gray family, and completed the basic Grim Tales: The Legacy game.
Posted by: Jazz |
February 6, 2012 3:11 PM
|
February 6, 2012 3:11 PM