
Golden Trails:
The New Western Rush
Platform: Mac, Windows
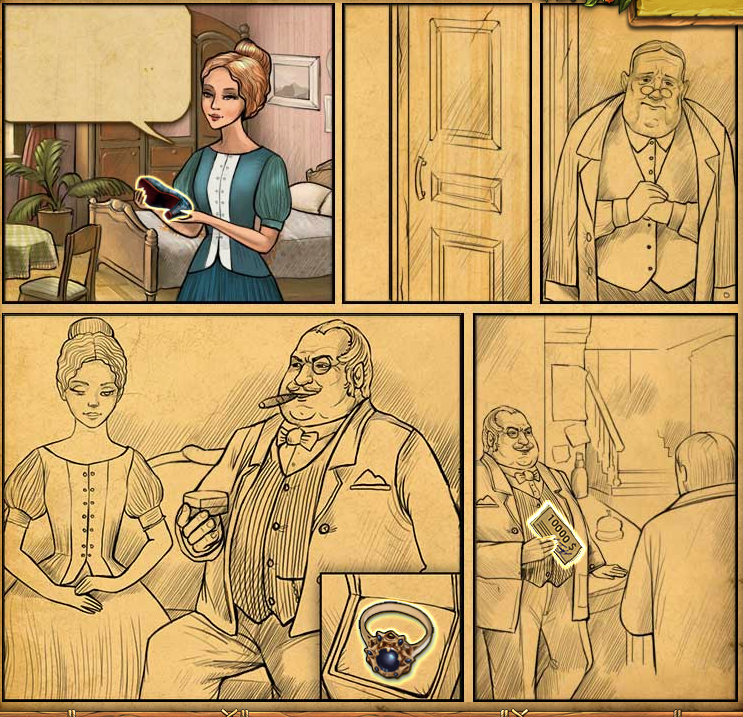
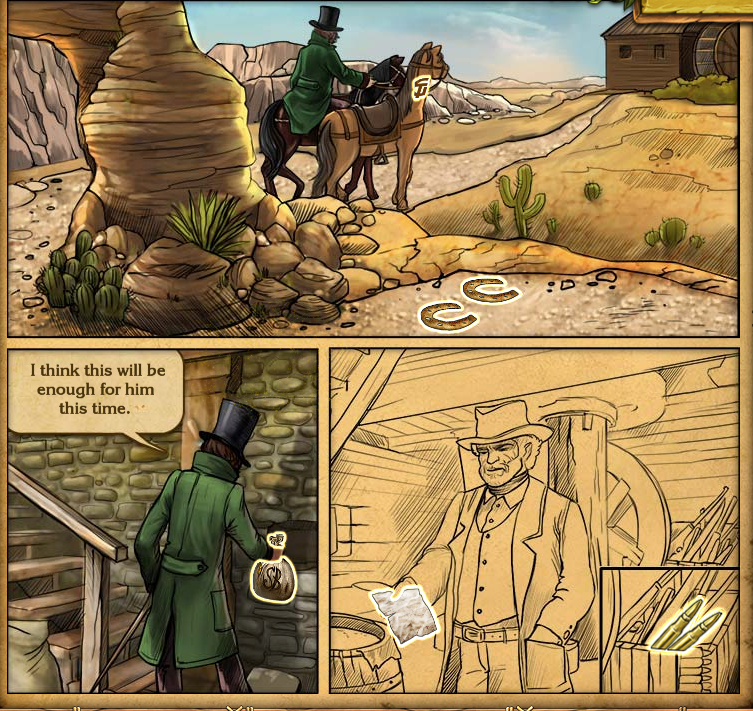
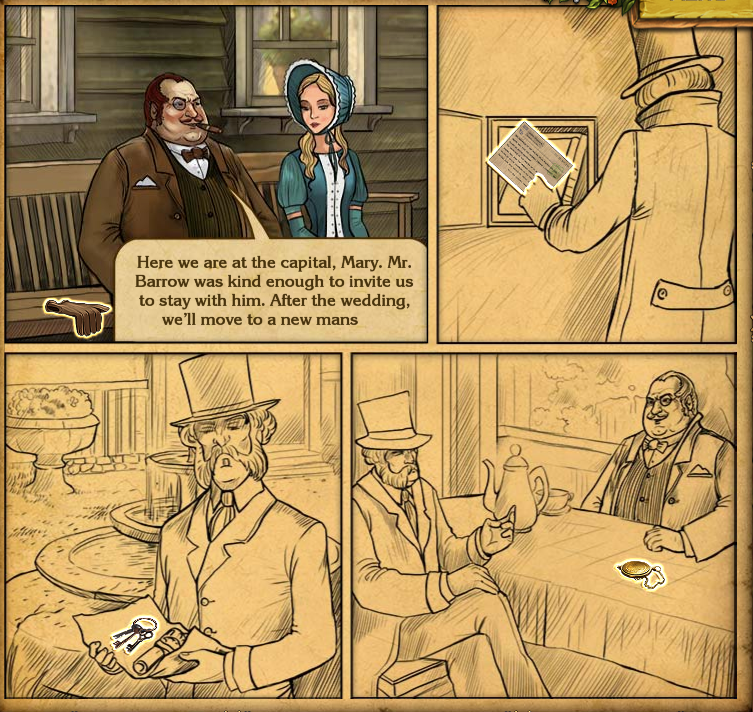
![]() Golden Trails: The New Western Rush is a new hidden object game from Awem Studio. Set in the frontiers of the old American west, you fill the boots of Jack, a sheriff on a forced vacation to the "quiet" town of Sunnyvale. Trouble finds him as soon as he arrives, however, as the bank has just been robbed and everyone else seems to be in a predicament of one kind or another. Good thing Jack wasn't interested in relaxing, anyway!
Golden Trails: The New Western Rush is a new hidden object game from Awem Studio. Set in the frontiers of the old American west, you fill the boots of Jack, a sheriff on a forced vacation to the "quiet" town of Sunnyvale. Trouble finds him as soon as he arrives, however, as the bank has just been robbed and everyone else seems to be in a predicament of one kind or another. Good thing Jack wasn't interested in relaxing, anyway!
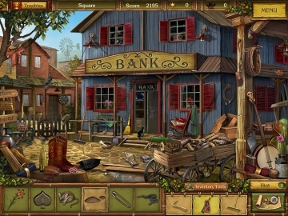 The gameplay in Golden Trails is, for the most part, a straight-up hidden object game. As you investigate each scene, pictures of items will appear at the bottom of the screen. Find and click the item to clear it from your list, opening a spot for something new. Some items will land in your inventory and can be used to access hidden parts of the stage, such as keys that unlock doors, a rake to move a pile of hay, or a crowbar to pry open a box. If something needs an inventory item to be found, the game lets you know, so you'll never feel lost or have to fumble around to find your next task.
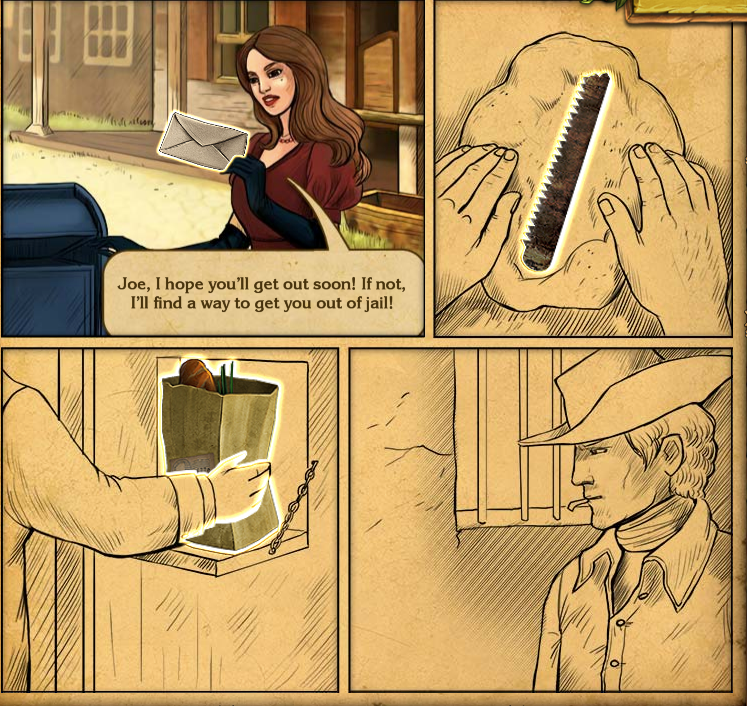
The story is a huge part of the experience in Golden Trails, and you'll find more than just a few cowboys and bank robbers as you move through the towns. Each new character is introduced with a brief bio that brings with him/her a new level of intrigue. Did this four-flusher do something serious or is he just the town drunkard? You find new clues in every scene, thickening the plot like a good mystery novel.
A few neat events take place during the hidden object portions of the game, such as gangsters popping their heads in at strange moments. "Shoot" them with your cursor and you'll earn a hint, possibly the neatest hint system in any hidden object game. You'll also encounter sparkling stolen items that are worth a ton of points, useful for unlocking the game's Secret Mission. Ooh, capitalization!
 Analysis: Golden Trails: The New Western Rush will immediately impress you with its broad strokes of gameplay. Mini-games, bonus items, trophies, unlockable extras, secret missions, key items, hidden portions of the scenery, the list goes on and on. Discovering these little bonuses brings that same sense of achievement as, well, earning an achievement! Developer Awem Studio wasn't afraid to cloak a hidden object game in a few bonuses, and the end result feels fresh and interesting at every moment.
Golden Trails offers way more than just a good story, a well-presented game, and a balanced hidden object experience. Available from the top left corner of the main menu is something you rarely see in a casual game: extras. Several wallpapers are available, as well as the game's original (and superb) soundrack. You can even check out a comprehensive game guide and get some info about the making of the game! A shooting gallery is also available, pitting your cursor against a handful of pop-up bad guys to see how many you can take down before time runs out.
Once you beat the game, you'll get access to bonus challenges and, if you find the hidden sheriff badges, a brand new unlimited mode. Unlimited lets you play any stage against the timer, racing to see how many items you can find before the clock strikes nil.
Although it doesn't stretch the genre out in any new directions, Golden Trails: The New Western Rush packs several servings of extras in a casual game that's straight-up fun.
![]() Windows:
Windows:
Download the demo
Get the full version
![]() Mac OS X:
Mac OS X:
Download the demo
Get the full version


Walkthrough Guide
(Please allow page to fully load for spoiler tags to be functional.)
Golden Trails: The New Western Rush Walkthrough
General Tips:
Basics:
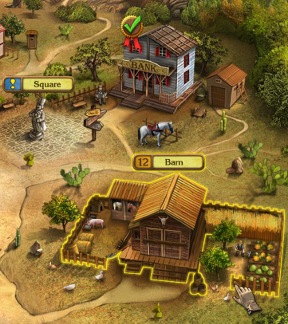
The main part of the game is the "Adventure Mode." If you earn 50,000 points in Adventure Mode, you unlock "Unlimited Mode" which is a find-all mode. When you complete Adventure Mode, you also unlock some Bonus Challengs in the Extras section (in the top left corner of the main screen). You can also unlock a Secret Mission by collecting 150 Sheriff's Badges.
You can only play scenes in Unlimited Mode if you have already completed them in either Adventure Mode or in the Bonus Challenges.
Sheriff's Badges start in the sixth room of chapter 1, the Sheriff's office. After that, 3 or 4 badges appear in every place you search. All the badge locations marked in this walkthrough. You also earn badges in the shooting gallery mini-game.
Once you complete a hidden object scene, you cannot return to it. Make sure you get the optional badges and stolen items first.
There are also trophies for doing things like completing the entire game without using any hints, but frankly if you can accomplish that you're a better gamer than I am. The tropies do not unlock anything extra.
Sometimes a bandanna'd menace will pop out from the edge of the screen or behind an object within the scene. If you click on him, you will shoot him and earn a hint. This is the only way to earn hints in the game.
Item Finding Tips:
Stolen, missing, or otherwise vamoosed objects appear in some rooms. They sparkle when you move your mouse over them, but the sparkling is rather subtle. Finding stolen items unlocks a trophy and gives you bonus points. All stolen items are marked in this walkthrough.
In this game, you find items based on pictures of them. However, the items may not look exactly like the picture. It may be larger or smaller--sometimes MUCH larger or smaller. It may also be faded or washed out to blend better, and it may be partially or mostly hidden behind other objects.
You can only collect an object if it is one of the six objects in your item finding window at the bottom left. It doesn't matter if you know that you have pick up the bloody handprint--until it comes up, clicking on it will count as a misclick.
The misclicking penalty is quick and harsh in this game. You lose control of your mouse for several seconds, and you have to look at a little animation of Jack leading some criminal away, while the voiceover mocks you. Avoid misclicking.
A hotspot (a place where you can use an object, or uncover an object) will highlight when you mouse over it. However, be aware that if you try to click on an hotspot that requires an inventory item, it will count as a misclick.
Guide to the Screencaps:
I have tried to be consistent in these screencaps. Screencaps only show plot items that never change location. You will always have to find these items; other items are random.
PINK: indicates an inventory item that is just sitting out. Simply click on it.
GREEN: indicates an inventory item that is hidden. If there is no line pointing to it, then just click on it to reveal an item. Otherwise there will be a…
BLUE line drawn from the inventory tool to the place where it should be used. In one location, one item must be used before the other; the items are numbered.
BLUE is also used for entrances to other rooms, and marked with text that says where they lead.
YELLOW circles are around sheriff badges.
RED circles/squares are around stolen items, which are also labeled "stolen".
TEXT appears as a label and in other areas where I thought it might be helpful.
Walkthrough (Adventure Mode and Secret Mission):
Chapter 1:
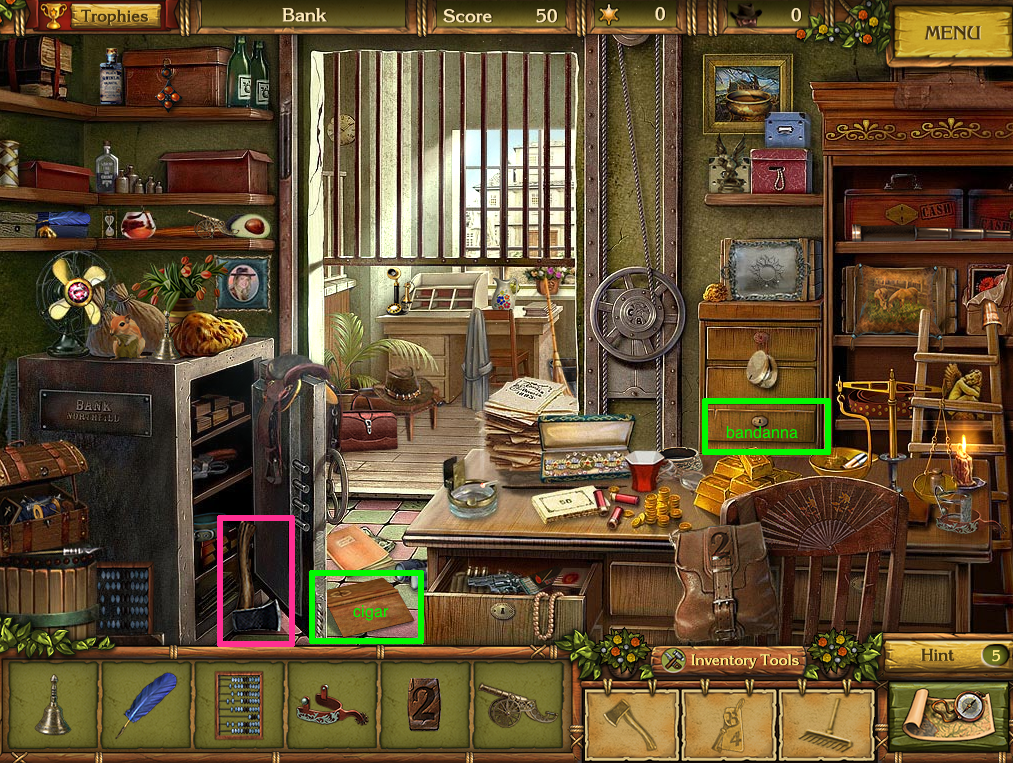
The Bank:
Collect the axe in the safe, a cigar under a fallen cigar case on the floor, and a bandanna in a drawer. Screenshot.
The Square:
Collect the footprint under the umbrella, the handkerchief behind the broom, and the rake. You'll have to click on a pile of boxes to continue, but the item is further hidden by a piece of wood, and for some reason the axe in your inventory won't work. Oh well. Screenshot.
The Stable:
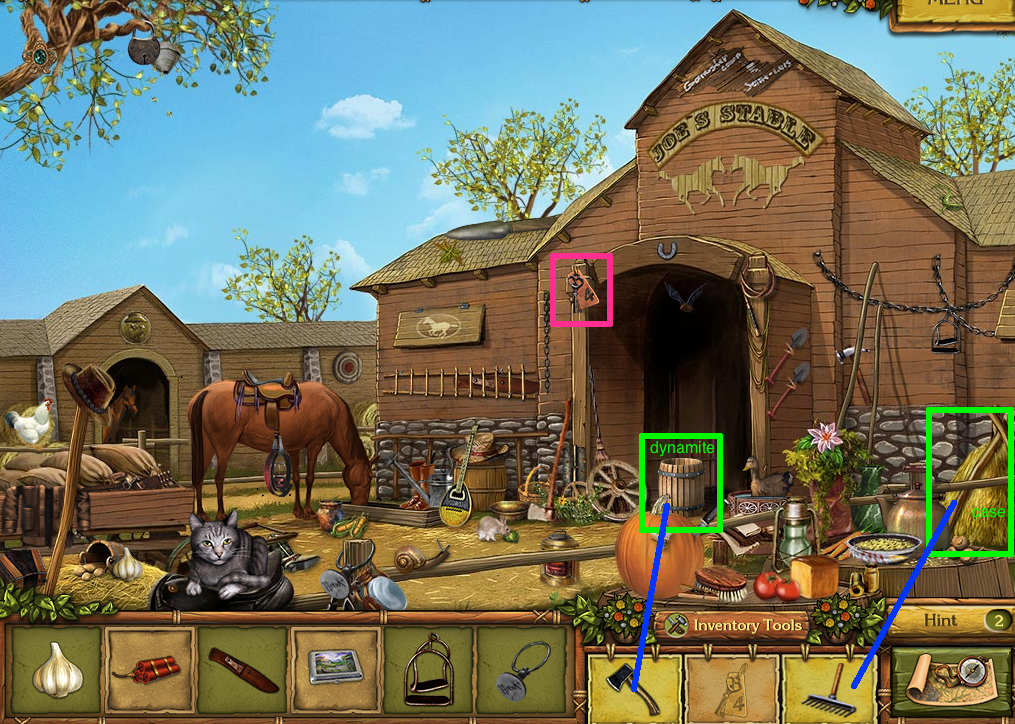
Collect the number four key hanging from the main doorway. Use the axe on the barrel to get the dynamite, which seems dangerous. Hmm. Use the rake on the pile of hay to get a case. Screenshot.
The Hotel/Mary's Room:
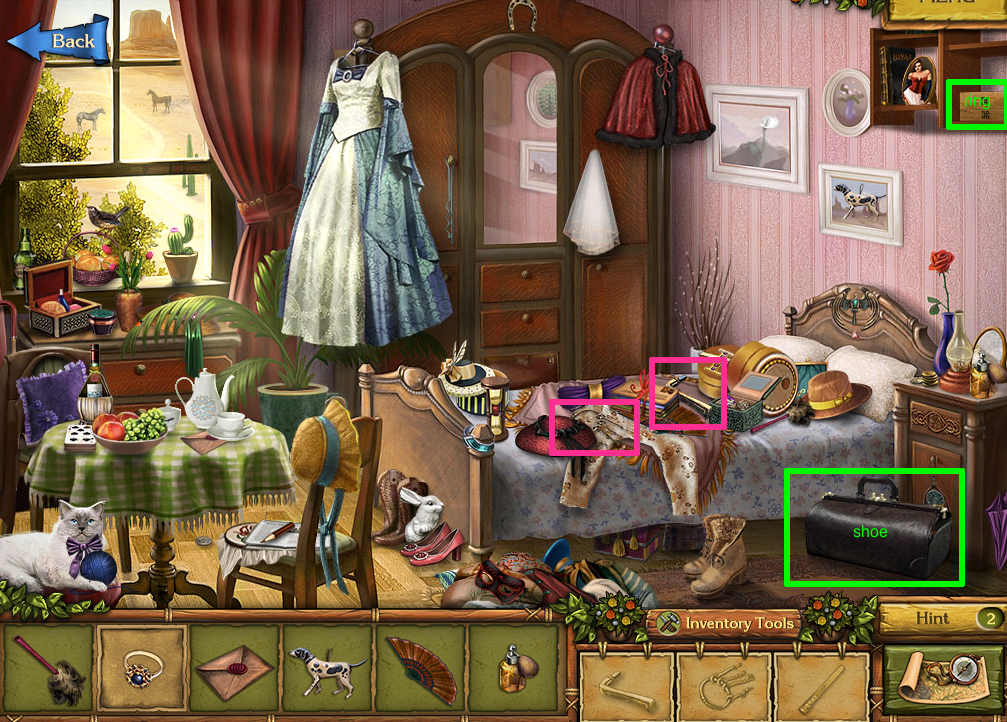
Before poking around in the hotel lobby, use the #4 key on the door at the top of the stairs to enter Mary's room.
The shoe is inside a black leather case in the lower right. The keychain and the handle are on the bed. The ring is in a jewelry box on the upper right. Screenshot.
Now go back to the hotel lobby. First, take the stolen bible from the stool. The letter opener is on top of the suitcase. Use the handle on the cabinet missing one to get the $10000. Use the letter opener on the envelope on the suitcase to get a letter. Screenshot.
Sheriff's Office:
This is the first room that has sheriff's badges. From now on, always look for them on the screenshot.
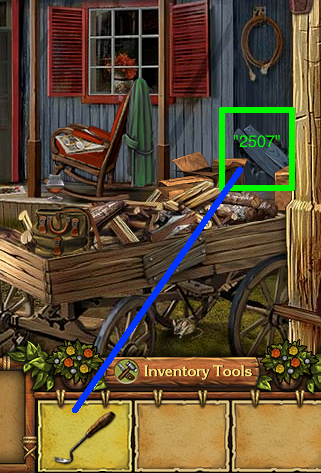
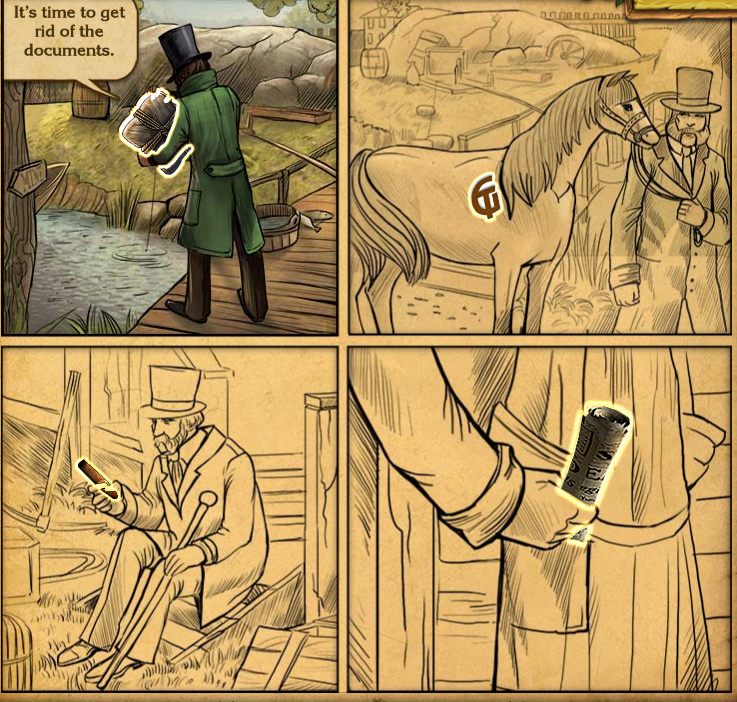
The horseshoe in the door window is stolen. The bloodstained receipt is under the hat, the hook is in the bottom drawer. Use the keychain on the box on top of the shelf to get the documents. Screenshot.
Now go back to the Square.
The Square:
Use the hook on the piece of wood to get the paper. Screenshot.
Mini-games:
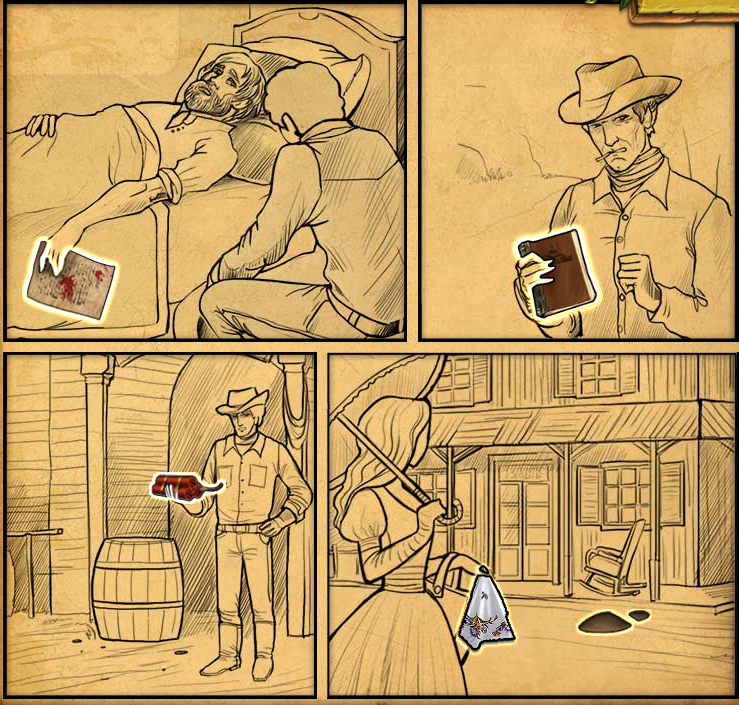
You must return the pieces of evidence to their blank spaces in the flashback to understand the story. I skip over the shooting galleries in this walkthrough.
The receipt goes in the upper left, the documents in the upper right, the dynamite in the lower left, and the handkerchief in the lower right. Screenshot.
The shoe to the upper left. Ring to the lower left. $10000 to the lower right. (Incidentally, do the game makers understand just how much money that was back then?) Screenshot.
Chapter 2:
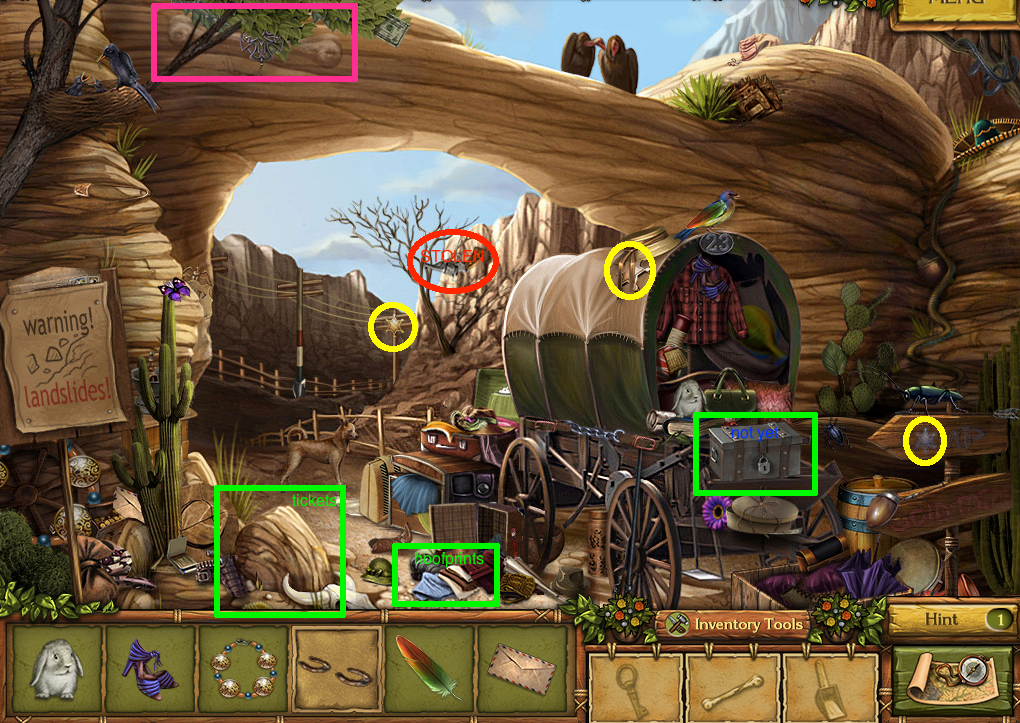
The Canyon:
A stolen gun upside down in the tree. A bone in the upper left. Hoofprints under the clothing in the lower center. Tickets under the boulder near the clothing. You cannot yet open the locked box. Screenshot.
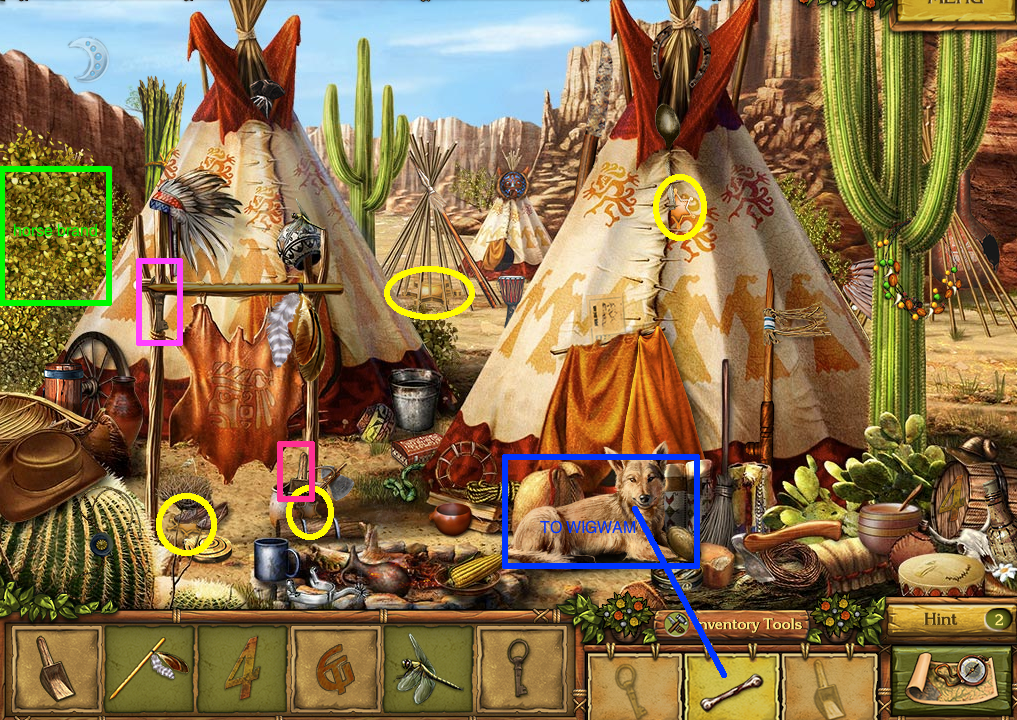
The Indian Camp:
The key is hung near the skin. The horse brand is hidden behind the bush on the left. The scoop is leaning against the pole of the skin dryer. Use the bone on the dog to enter the wigwam. Screenshot.
Wigwam:
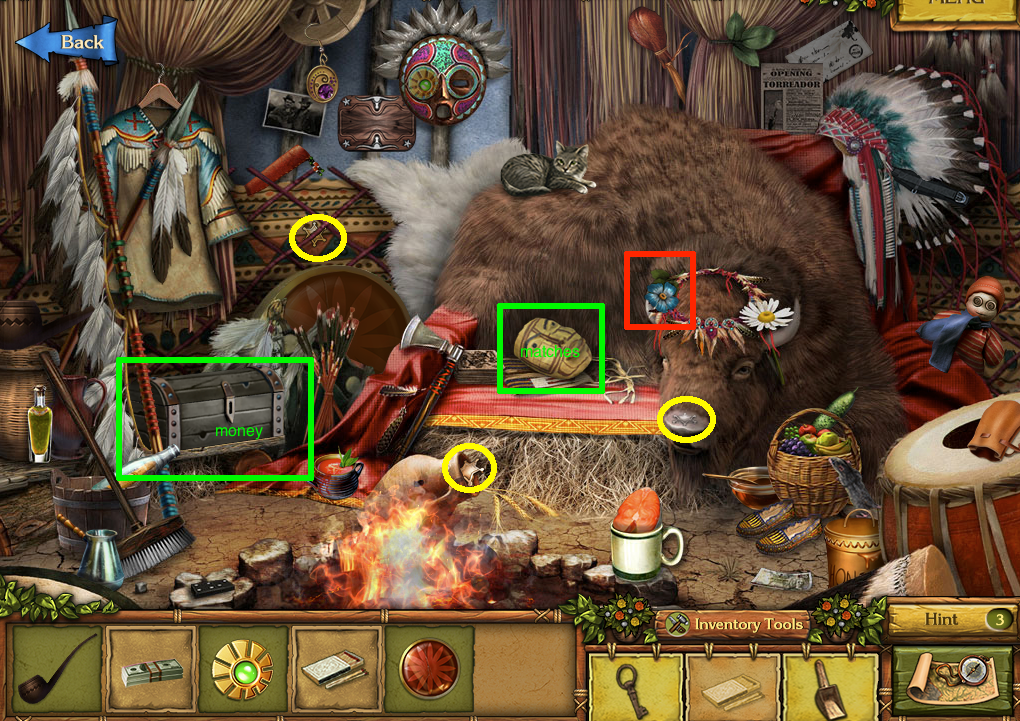
The blue flower on the bison's head is stolen. The money is inside the trunk, and the matches are under the mask near the bison. Screenshot.
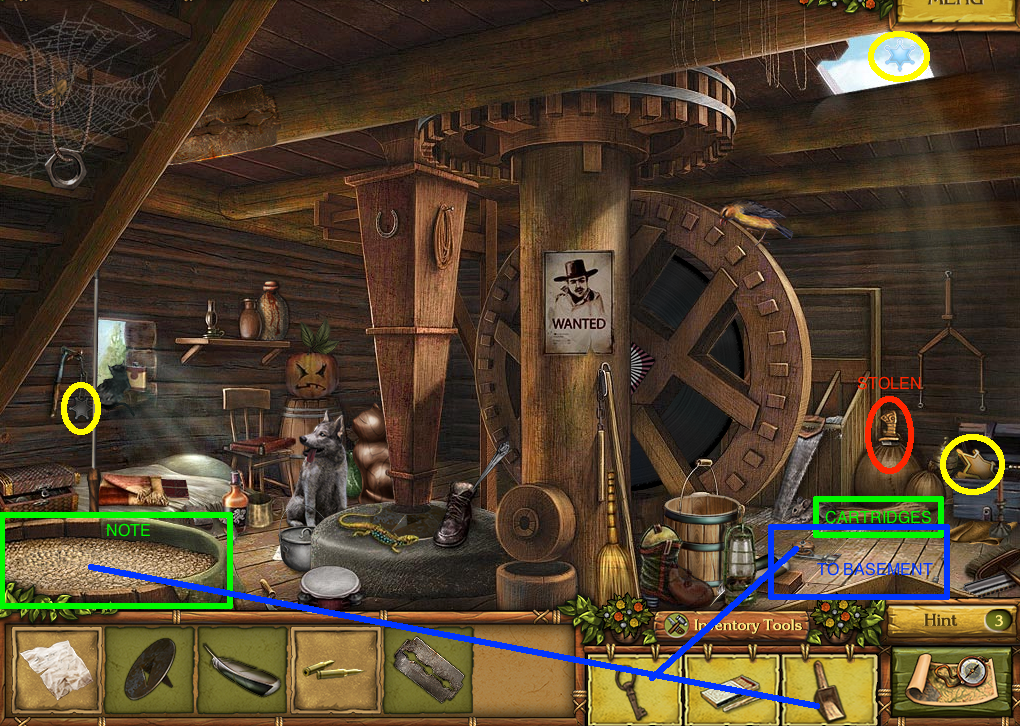
The Watermill:
There is a stolen knife mimicking a squash top in the right. Use the scoop on the big container of grain to get the note. The cartridges are next to the trapdoor. Use the key on the trapdoor to go to the basement. Screenshot.
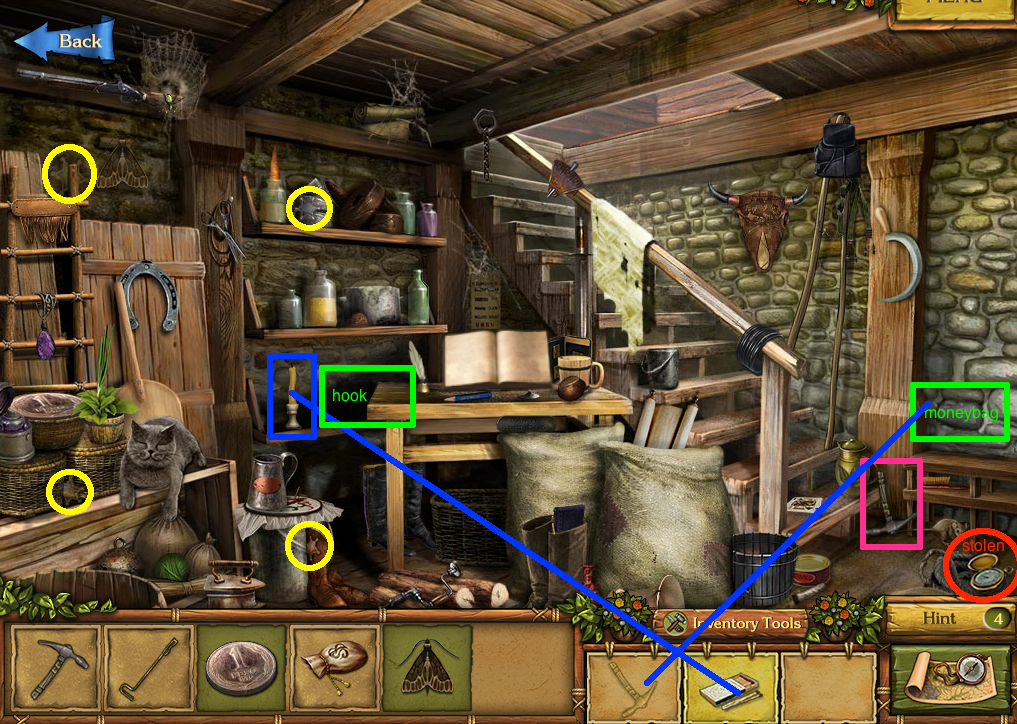
The Basement:
There is a stolen pocketwatch in the lower right corner. Near it is the pickaxe. Use the pickaxe on the loose stone in the wall on the right to get the moneybag. Use the matches on the candle to light up the dark area on the shelf and get the hook. Screenshot.
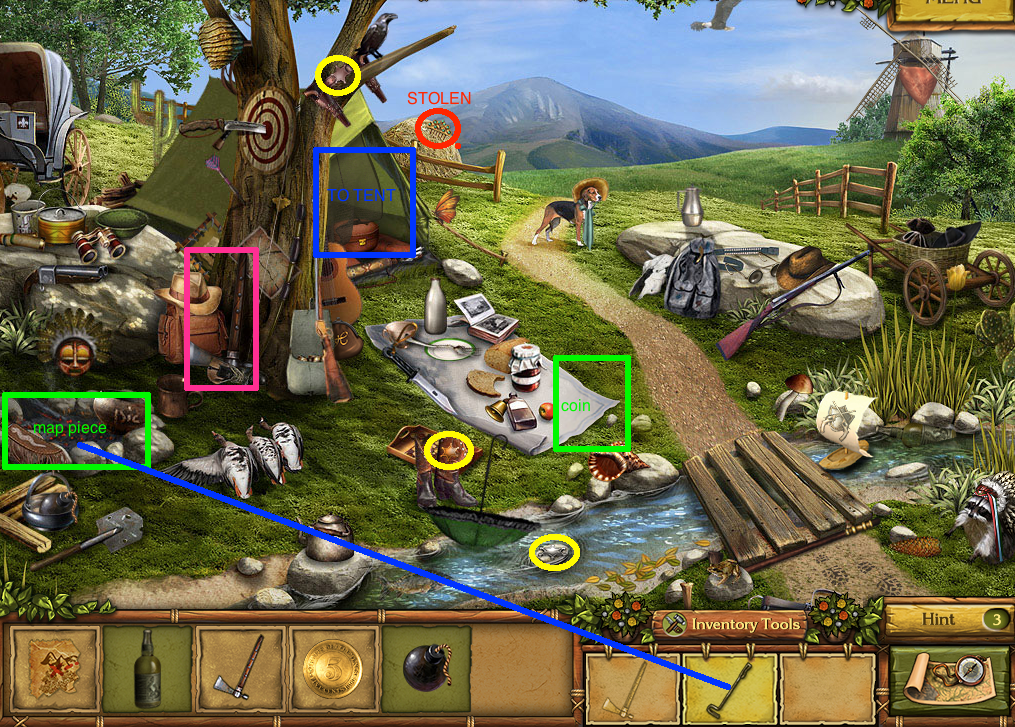
The Brook:
There is a stolen haircomb sticking out of the haybale in the back. Take the axe leaning against the tree. Click on the right corner of the blanket to uncover the coin. Use the hook on the embers of the fire to get a map piece. The tent flap leads inside the tent. Screenshot.
Inside the Tent:
The photo is inside the righthand book on the bed. Screenshot. Now go back to the canyon.
The Canyon:
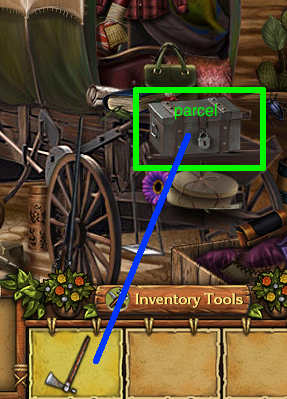
Use the axe on the locked box to get the parcel. Screenshot.
Mini-game:
Hoofprints on top, moneybag on lower left, paper in lower center, cartridges in lower right corner. Screenshot.
Chapter 3:
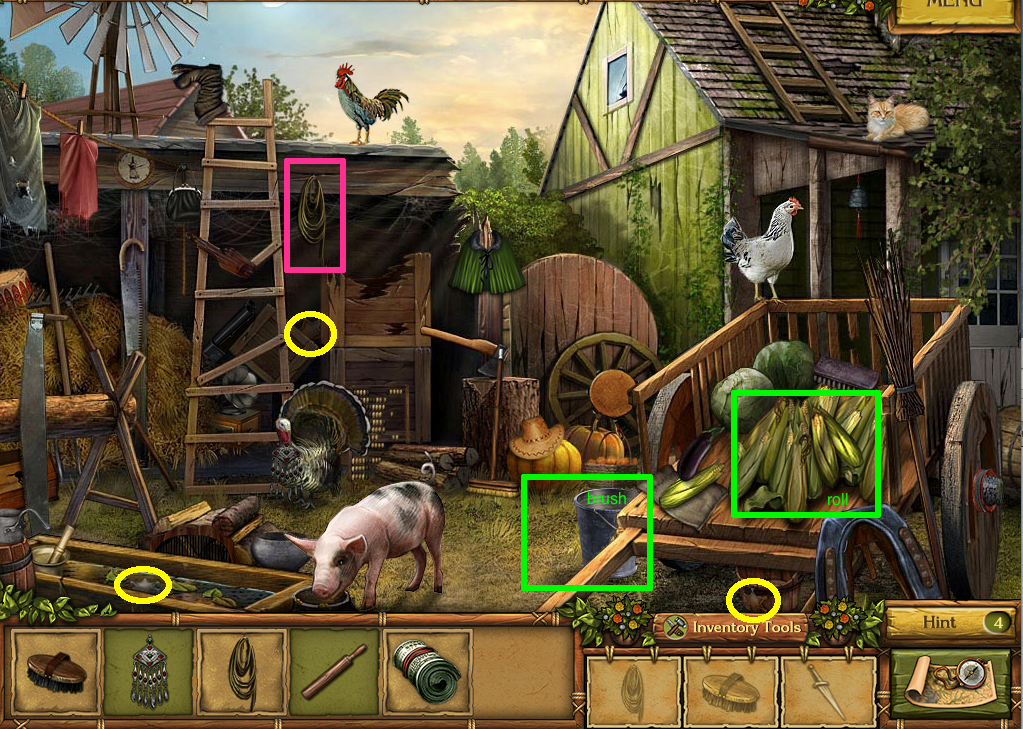
The Farm:
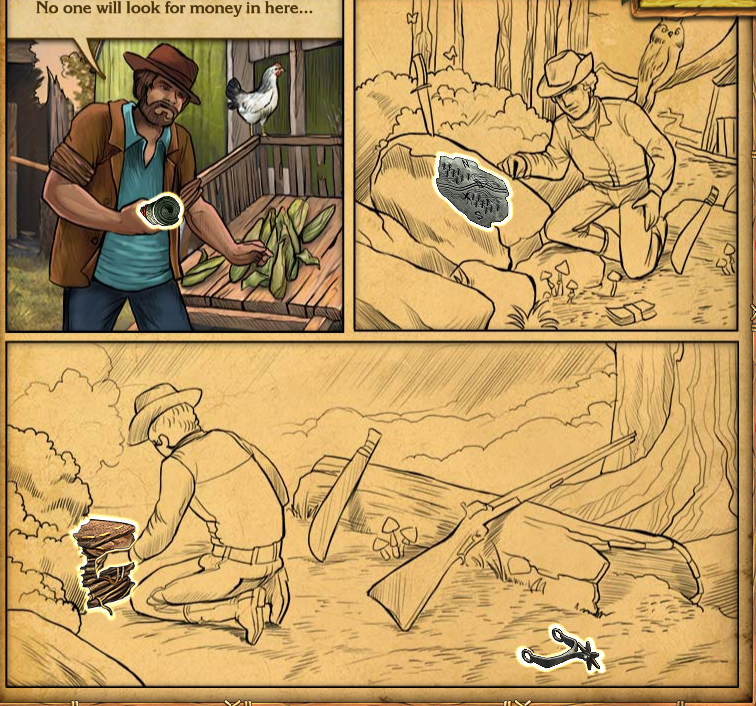
The rope is hanging from the roof of the left building. The brush is behind the bucket near the cart. The roll is inside the corn on the cart. Screenshot.
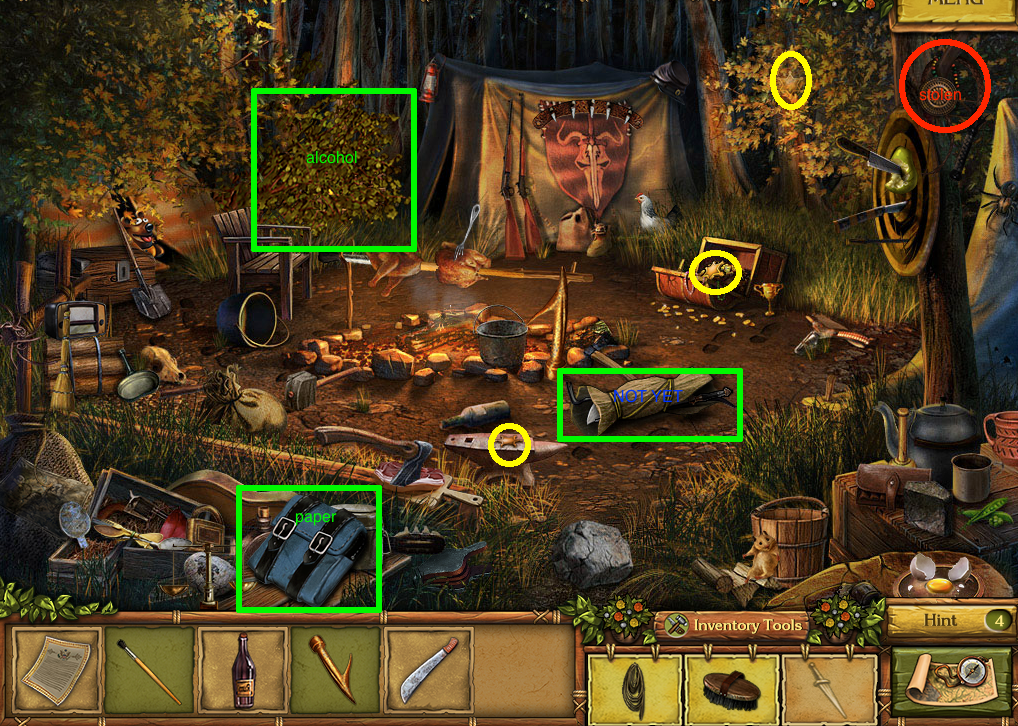
The Bandit Camp:
The jewelry hanging in the upper right corner is stolen. The paper is inside the blue knapsack. The alcohol is hidden in the bush to the left of the tent. You cannot get the machete out of the tied up blanket yet. Screenshot.
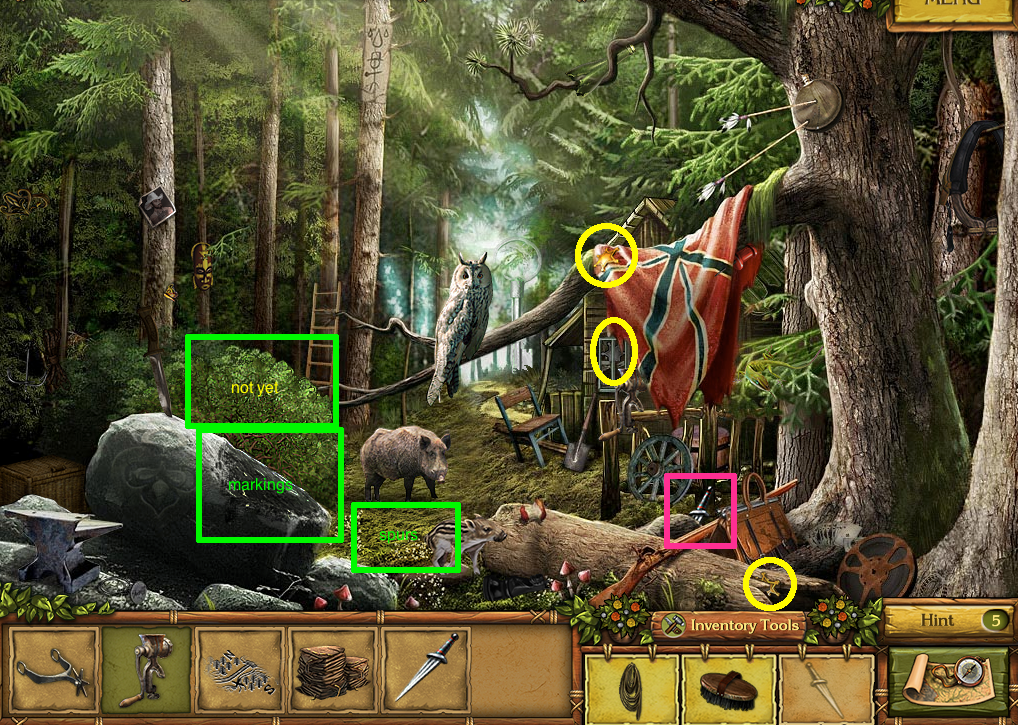
The Forest:
Take the knife hidden behind the logs and rocks, under the confederate flag. Click on the moss under the pig to get the spurs. Use the brush on the dirty part of the rock to get the etchings. You cannot get the sacks yet. Screenshot.
The Bandit Camp:
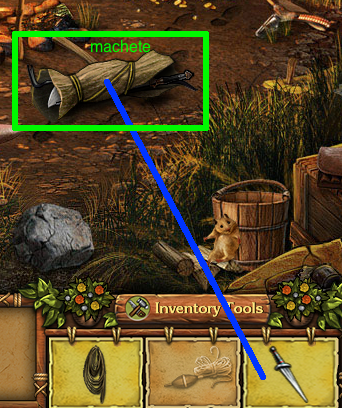
Go back to the bandit camp and use the knife on the rolled up bundle to get the machete. Screenshot.
The Forest:
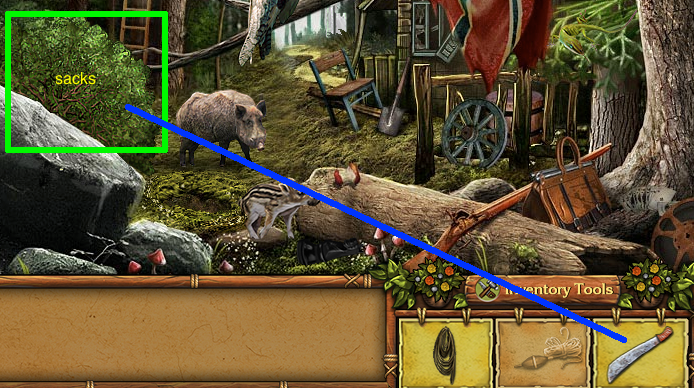
Go back to the forest and use the machete on the bush to get the sacks. Screenshot.
The Bridge:
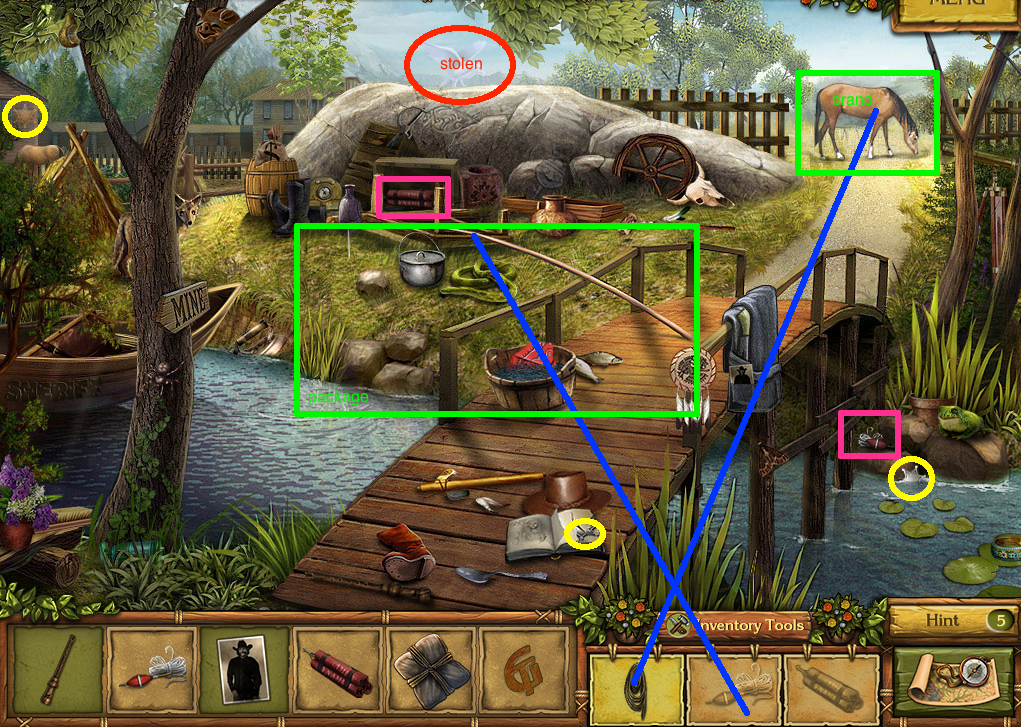
The dove statue floating in the sky above the boulder is stolen. The dynamite is in a box in front of the rock. The fishing lure is on the rock right of the bridge. Use the rope on the horse to get the bran. Use the fishing lure on the fishing pole to get a package. Screenshot.
The Mine Yard:
The bracelet over the "MINE" sign is stolen. The newspaper is in the robe hanging on the house. The cigar is hidden in/behind the box on the front steps. Use the dynamite on the mine entrance to enter the mine. Screenshot.
The Mine:
There is a stolen drum in the lower center portion of the screen. The locket is behind a piece of cloth hanging on a pickaxe. Screenshot.
Mini-game:
The rolled up money goes in the upper left, the etching in the upper right, the sacks in the lower left, and the spurs in the lower right. Screenshot.
The package goes in the upper left, the brand in the upper right, the cigar in the lower left, and the paper in the lower right. Screenshot.
Chapter 4:
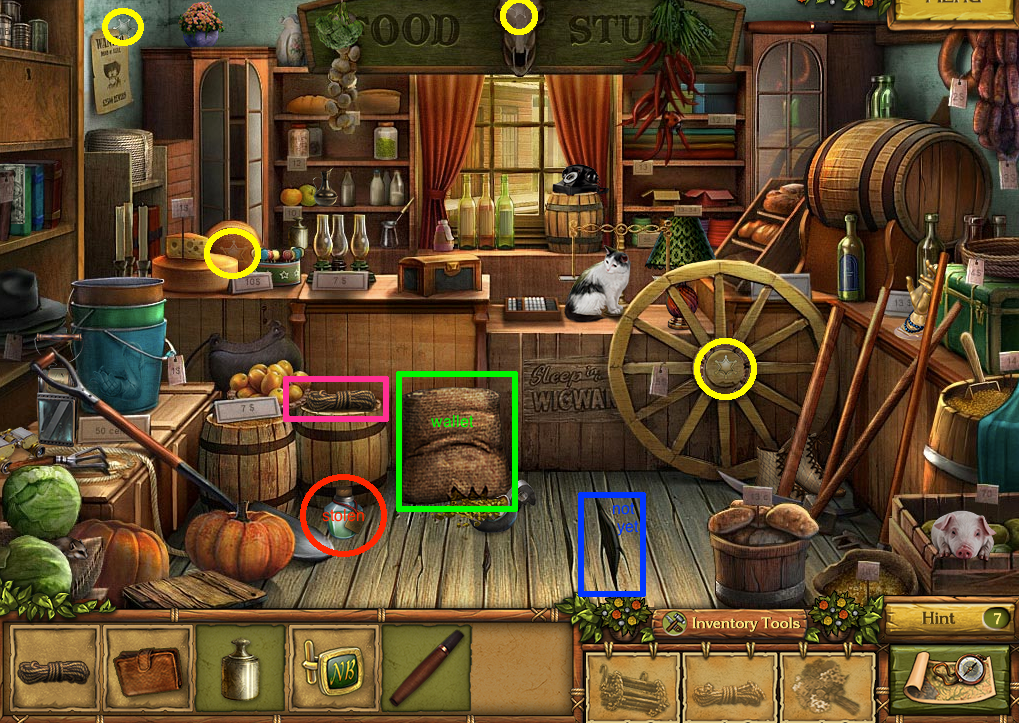
The Trading Post:
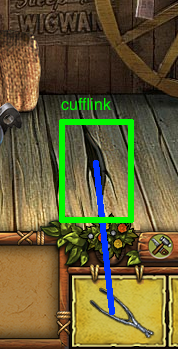
The glass bottle on the floor right of the pumpkin is stolen. The rope is on top of the barrel over the stolen bottle. The wallet is inside the grain sack to the immediate right. You cannot get the cuff/images/golden-trails-new-western-rushs yet. Screenshot.
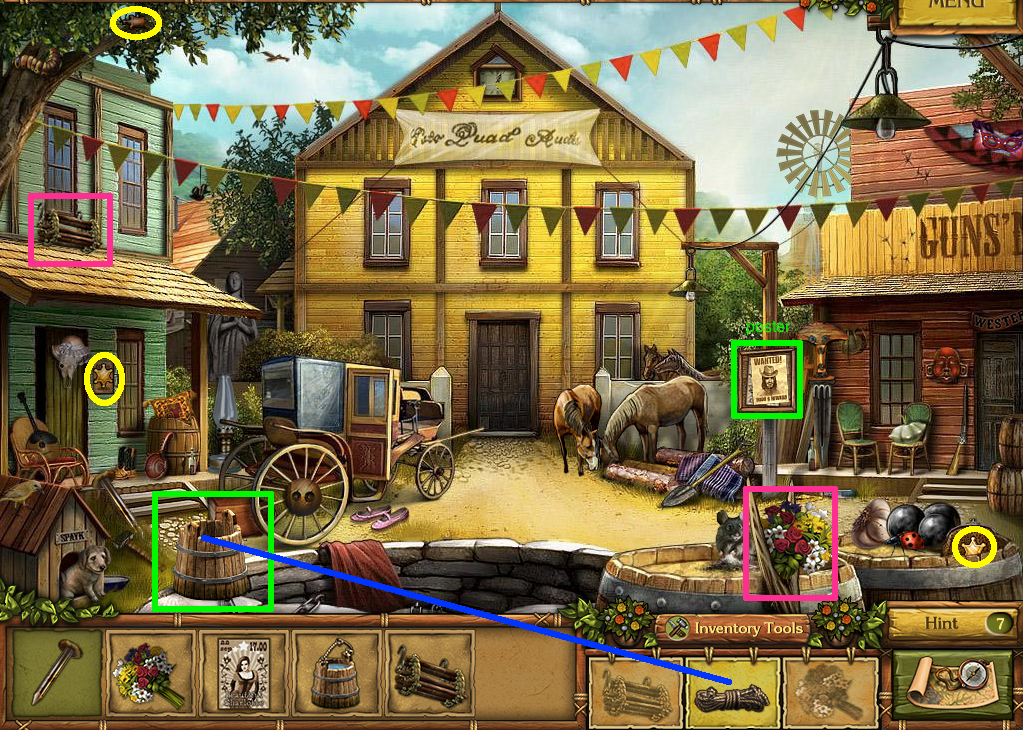
The Church:
The flowers are over the inventory tools bar. The poster is hidden behind the poster over top of the flowers. The rope ladder is on a window in the upper left. Use the rope on the bucket by the well to get a bucket of water. Screenshot.
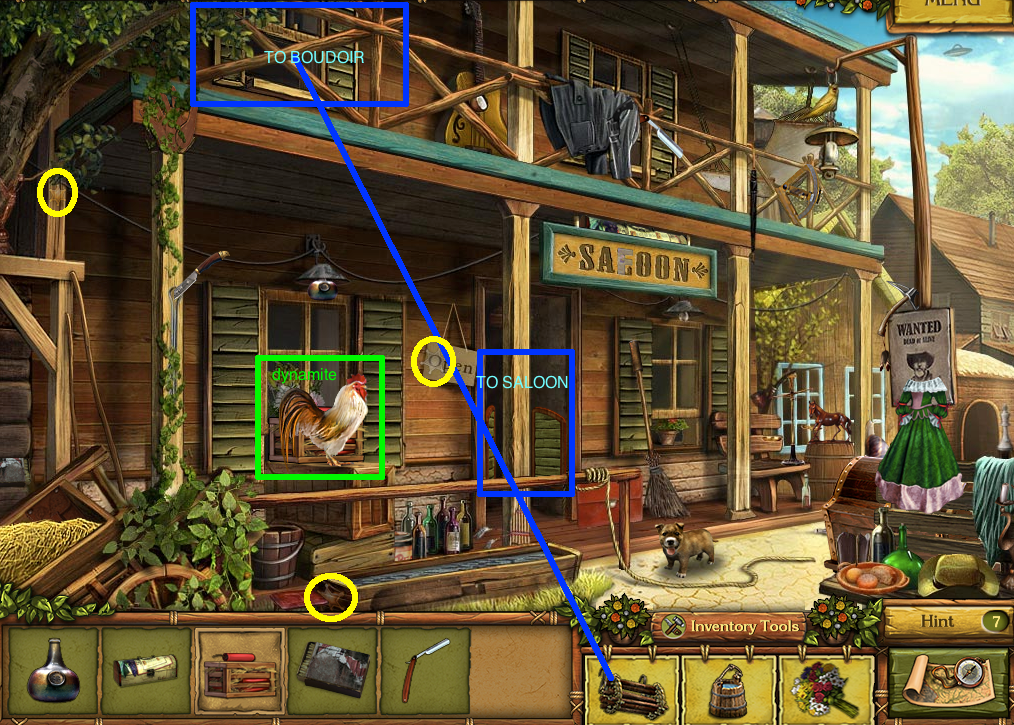
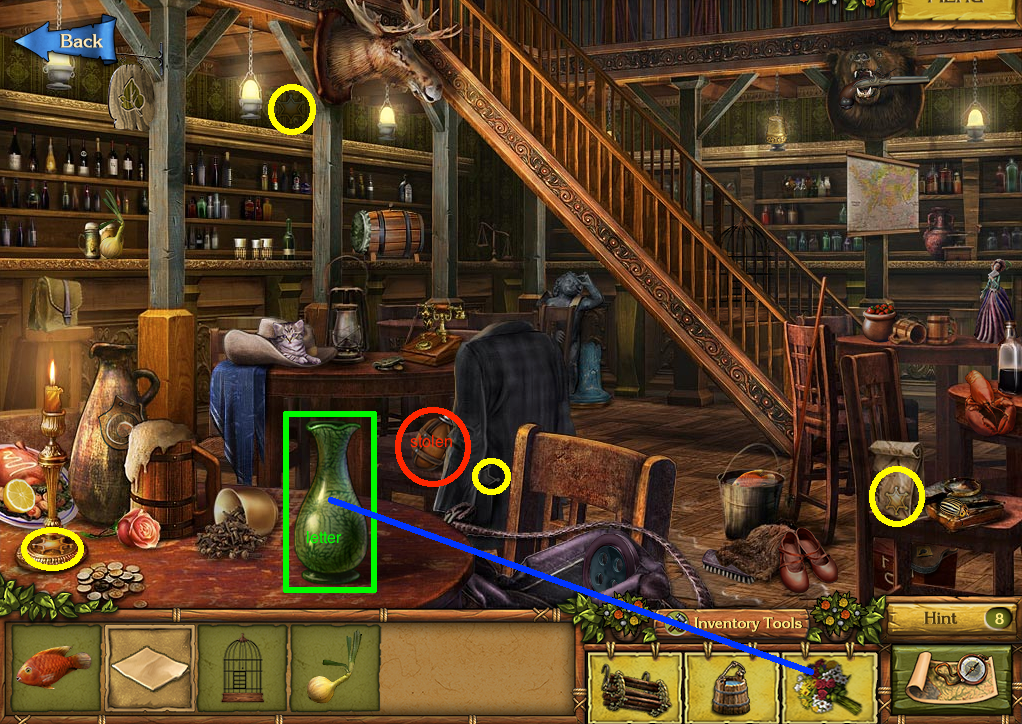
The Street/Saloon/Boudoir:
The dynamite is behind the rooster. Click the center doors to go to the saloon. You will use the rope ladder on the upper left window to go to the boudoir later. Screenshot.
The flask on the chair in the center is stolen. Use the flowers on the vase to get a love letter. Screenshot.
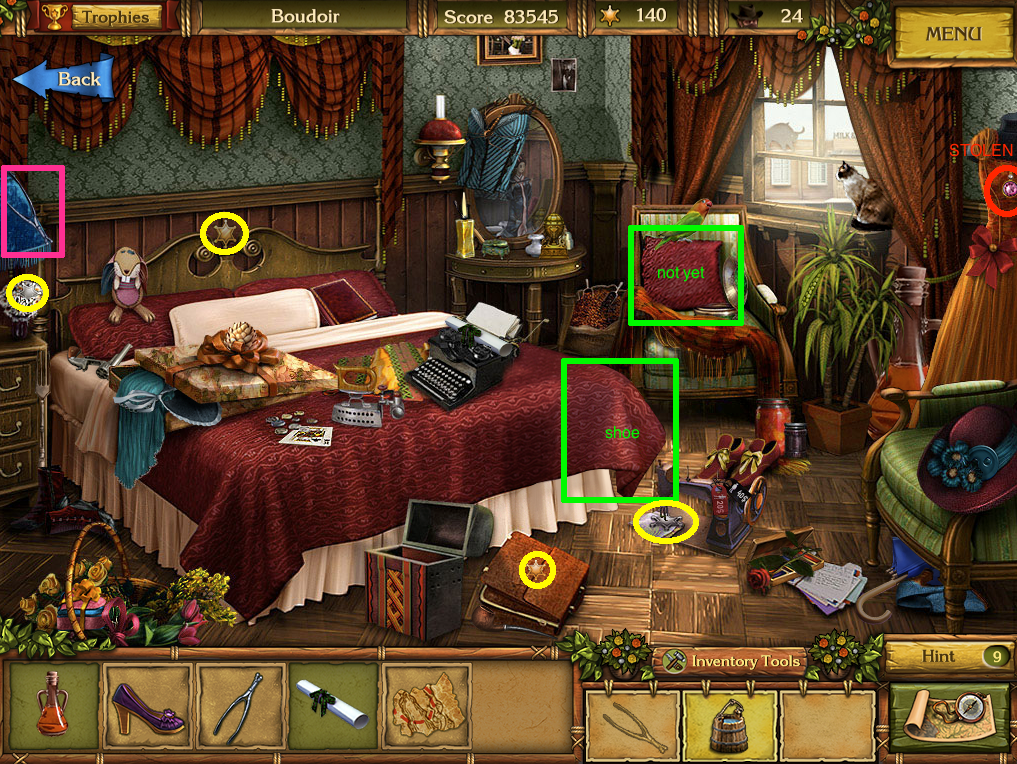
Go up to the boudoir. The pink jewel on the mannequin on the right is stolen. The tweezers are in the upper left. Click on the righthand corner of the bed to reveal the shoe. You cannot get the map piece yet. Screenshot.
The Trading Post:
Go back to the trading post and use the tweezer on the crack in the floor to get the cuff/images/golden-trails-new-western-rushs. Screenshot.
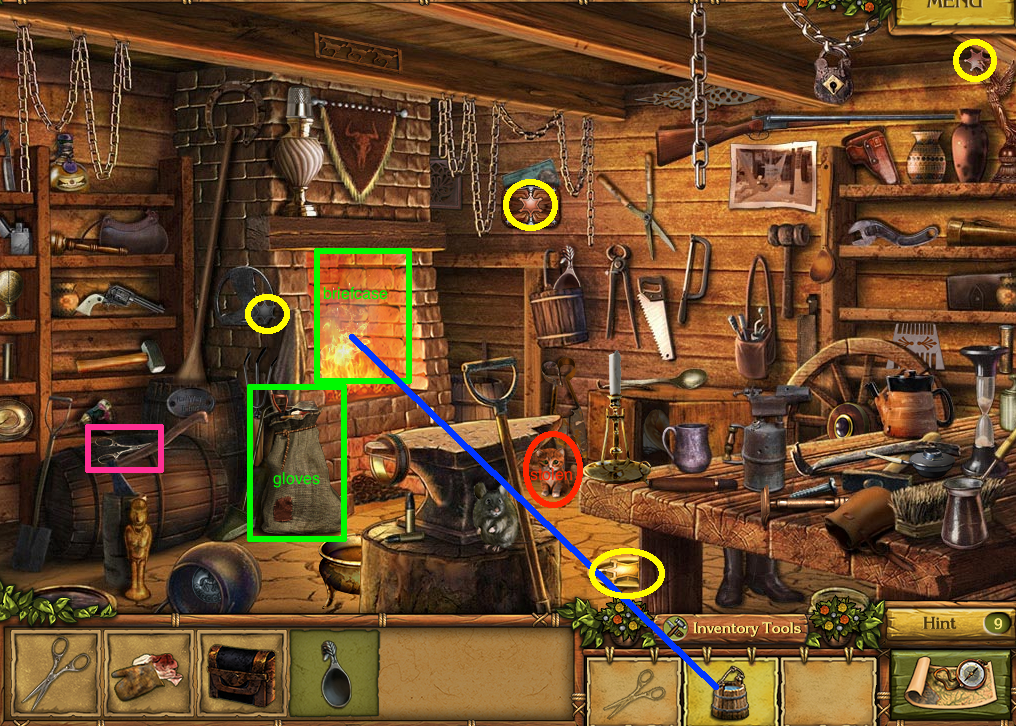
The Blacksmith:
The kitten in the center is stolen. Awww. The scissors are atop the barrel to the left. The gloves are hidden in the sack below the forge. Use the bucket of water on the forge to reveal the briefcase. Screenshot.
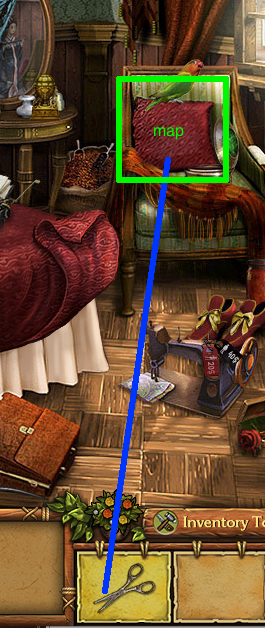
The Boudoir:
Go back to the boudoir and use the scissors on the cushion in the chair to get the map piece. Screenshot.
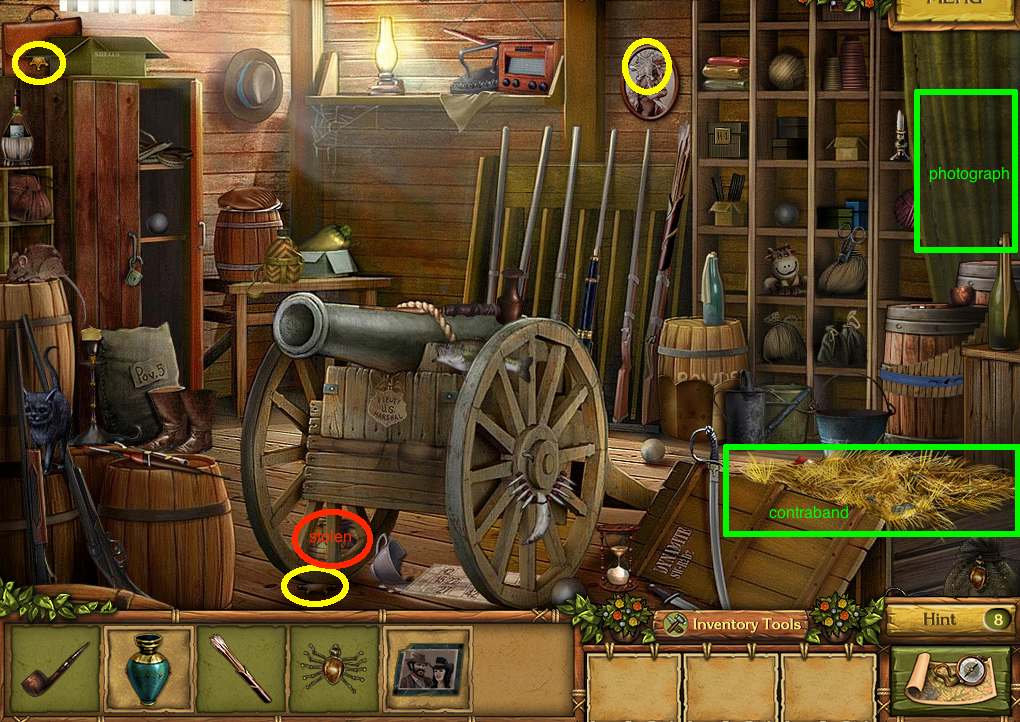
The Depot:
The pot behind the left cannon wheel is stolen. Click on the curtain in the right to reveal the photograph. Click on the box of straw to reveal the contraband vase. Screenshot.
Mini-games:
Use the wanted poster in the upper left, the note in the upper right, the map piece in the lower left, and the shoe in the lower right. Screenshot.
Use the wallet in the upper left, the cuff/images/golden-trails-new-western-rush in the upper right, the briefcase in the lower left, and the glove in the lower right. Screenshot.
Chapter 5:
Train Station:
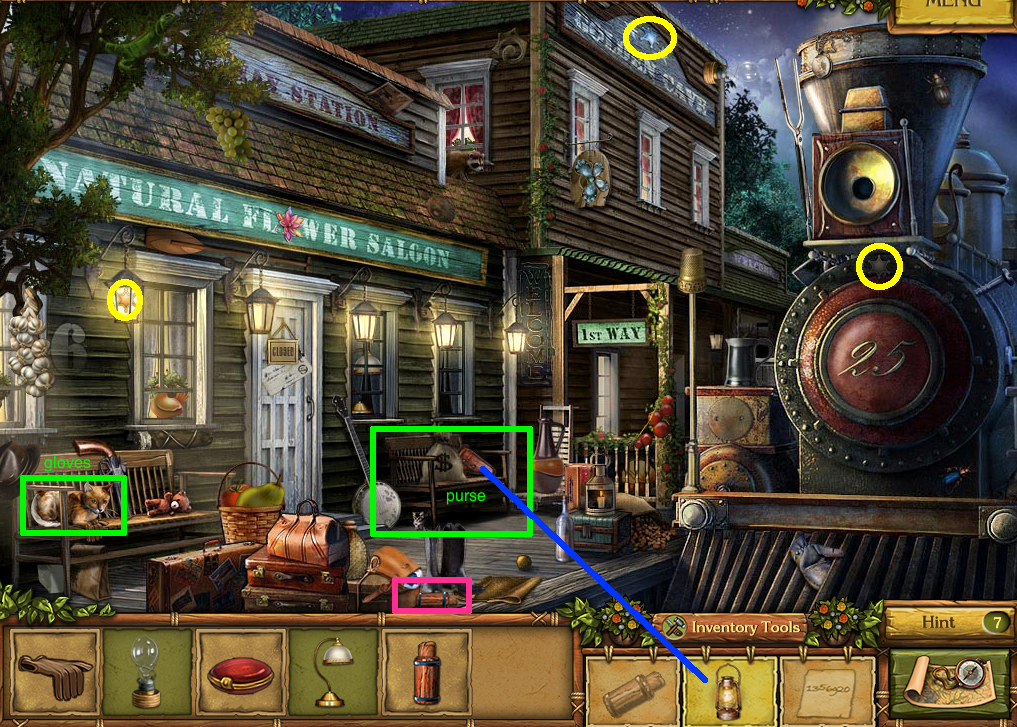
The stopper is directly above the fifth box of the item finding window. The gloves are behind the cat on the bench. The lantern isn't marked on the screencapture (sorry!) but it's on the windowsill over the cat, on the far left. Use the lantern on the right bench to reveal the purse. Screenshot.
The Mansion and Garden:
The scissors are to the left of the fountain. The pocketwatch and code are inside the vase of flowes and under the napkin cone on the right--I'm not quite sure which is which. Use the stopper on the top of the fountain to empty the fountain. Use the scissors on the lower left corner of the fountain to get the keys. Use the keys on the door to go inside the mansion. Screenshot.
The pipe on the mantlepiece is stolen. The monocle is under the tophat on the sofa. The opener is atop the wardrobe. Use the opener on a brick in the right side of the fireplace to get a telegram. Click on the mirror to reveal a safe, and then use the code on the safe to get a moneybag. Screenshot.
The City Square:
There is a stolen pig in on the right, just below the doors. (Aww, again.) The trowel is in the lower right corner. The key is on the curb to the right of the poster. The letter is inside the newspaper at the bottom of the fountain. The knife is to the right of that. Screenshot.
The Jail:
The ring on the folded prison uniform is stolen. The address is hidden by the bag of groceries on the left (which is also hiding a sheriff's badge, btw). Use the trowel on the cracked wall in the upper left to find the letter. Use the knife on the bread to find the file. Screenshot.
City Hall:
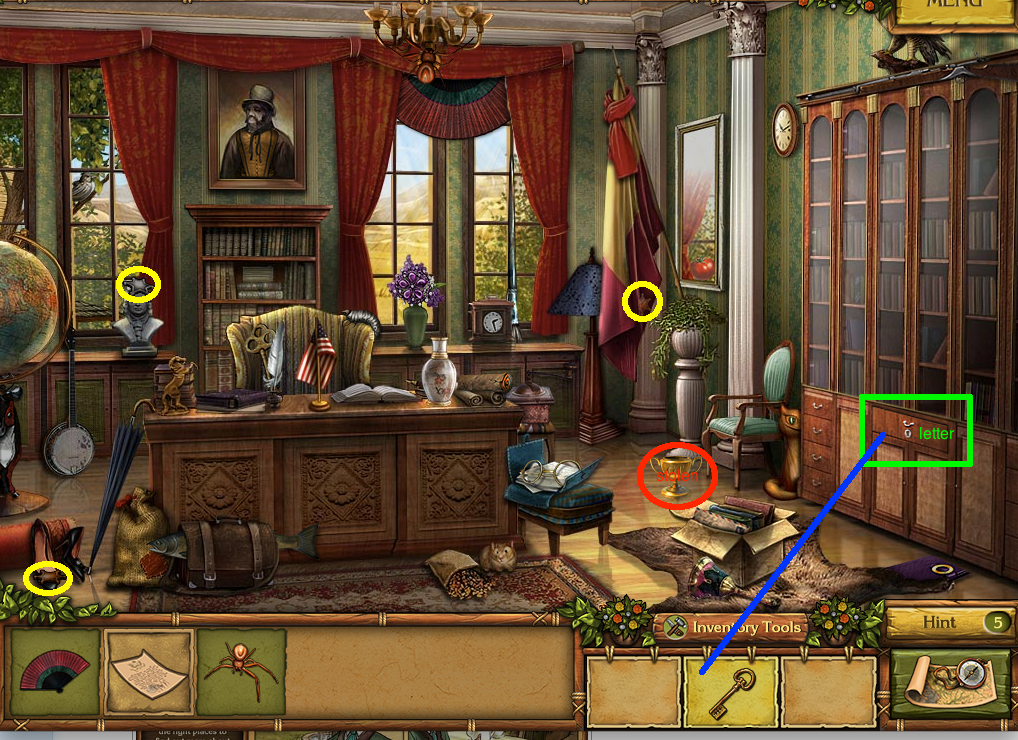
The trophy on the right on the floor is stolen. Use the key on the locked drawer on the right to get a letter. Screenshot.
Mini-games:
The gloves go in the upper left, the telegram goes in the upper right, the keys go in the lower left, and the pocketwatch goes in the lower right. Screenshot.
The envelope goes in the upper left, the file in the upper right, the groceries in the lower left. Screenshot.
That's it for the main story! You have now unlocked the Bonus Challenges in the extras menu. If you have gotten 150 or more badges (not difficult, even if you aren't following the walkthrough) you will also have unlocked the Secret Mission…
Secret Mission:
The Secret Mission contains no stolen items and no badges.
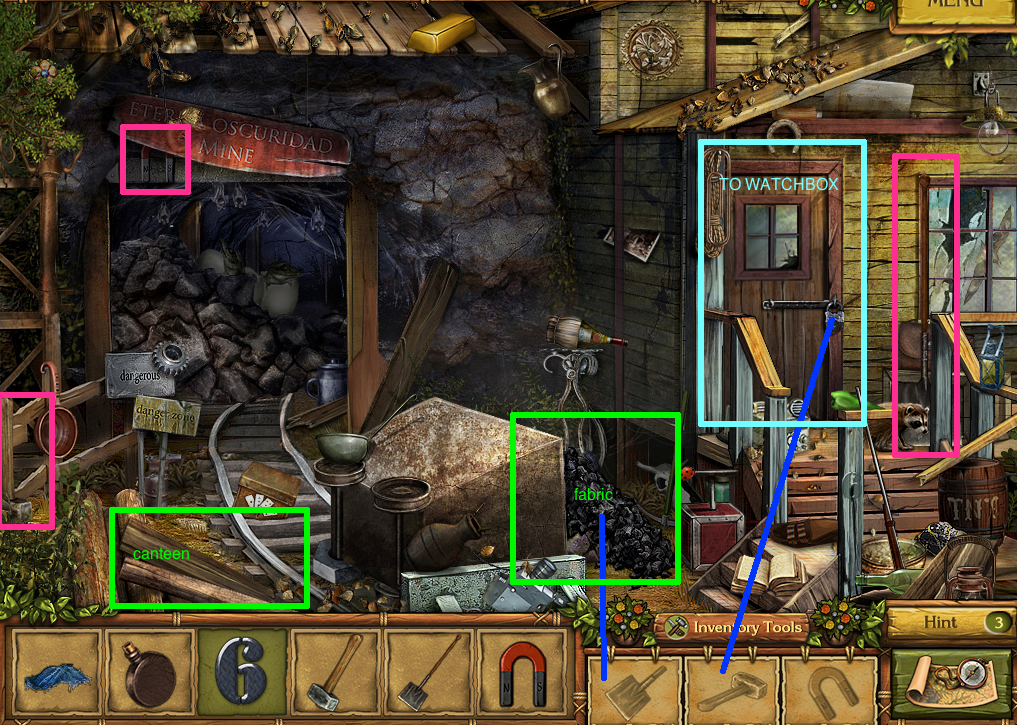
The Mine Yard:
The magnet is under the "MINE" sign. The hammer is in the lower left edge. The shovel is on the right, hidden very well (the scoop part of the shovel is behind the raccoon). The canteen is under the loose planks on the left. Use the shovel on the coal in the lower center to get a piece of fabric. Use the hammer on the lock on the door to enter the watchbox. Screenshot.
Watchbox:
The sacks are in the torn basket on the left. Screenshot.
Railway Construction Site:
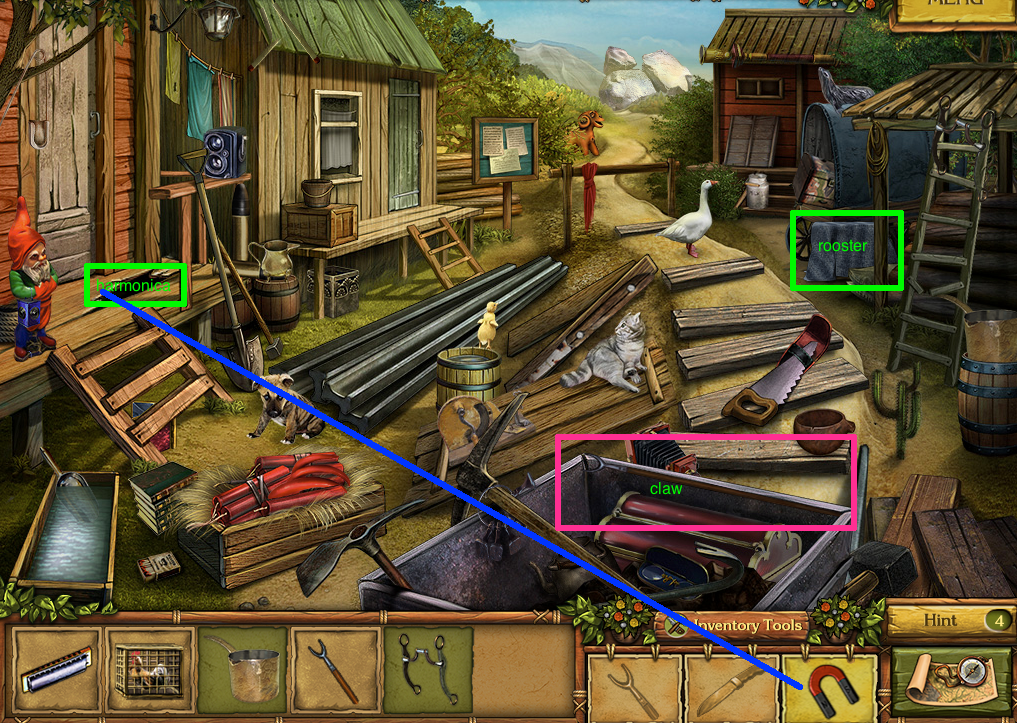
The claw is flush against the far edge of the mining cart. The rooster's cage is under a blue cloth in the upper right. Use the magnet on the hole in the porch of the house on the left to get a harmonica. Screenshot.
Colonist Settlement:
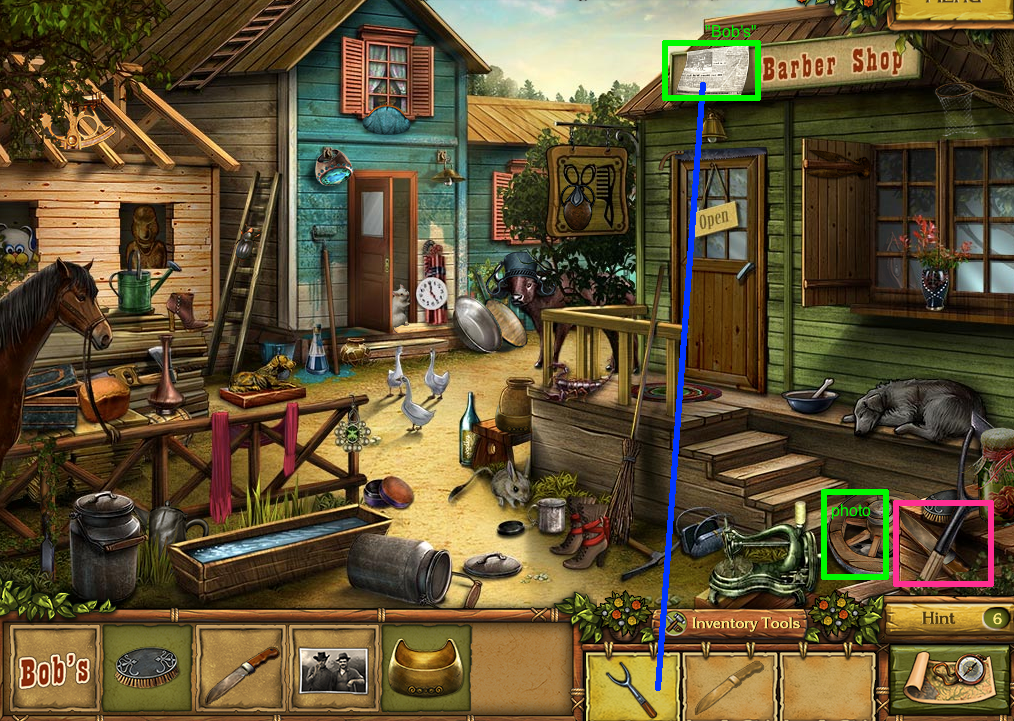
The knife is on the side of the box in the lower right corner. The photo is under the wheel next to the box. Use the hook on the newspaper on the "Barber Shop" sign to uncover "Bob's". Screenshot.
Farm Basement:
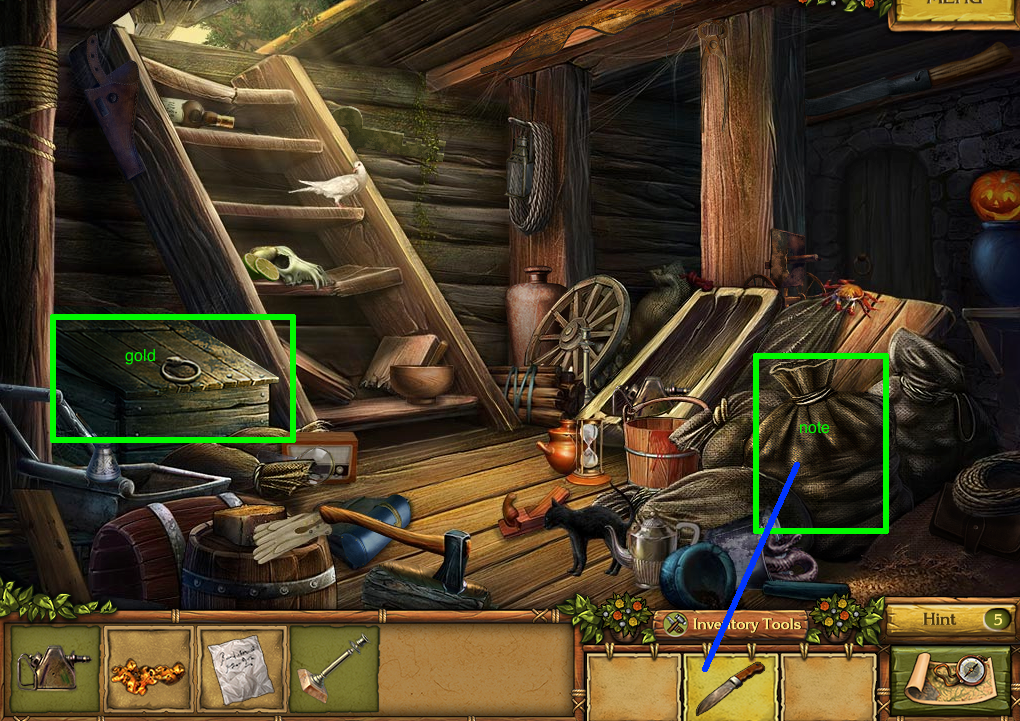
Use the knife on the sack on the right to get a note. Open the box on the left to find the gold. Screenshot.
Posted by: joye |
July 24, 2010 3:42 AM
|
July 24, 2010 3:42 AM