
Fantastic Creations: House of Brass
Platform: Mac, Windows
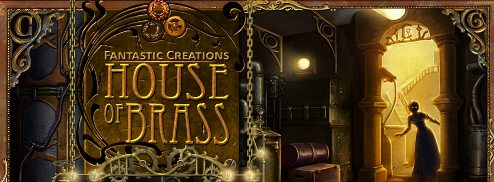
![]() Even before computers and smart phones, mankind loved to dream up gadgets. Some men merged science with imagination to invent light bulbs, create telephonic conversations, or write stories about extraordinary voyages. Likewise, in the 1880s, Edwin Cogglethorpe built many Fantastic Creations to amuse and convenience; the House of Brass being his wildest and most elaborate. Yet Cogglethorpe's attempts to live forever in a hermetically sealed, windowless, fully-automated home had one big downside: it left him trapped, alone with only mechanical animals and robots as company.
Even before computers and smart phones, mankind loved to dream up gadgets. Some men merged science with imagination to invent light bulbs, create telephonic conversations, or write stories about extraordinary voyages. Likewise, in the 1880s, Edwin Cogglethorpe built many Fantastic Creations to amuse and convenience; the House of Brass being his wildest and most elaborate. Yet Cogglethorpe's attempts to live forever in a hermetically sealed, windowless, fully-automated home had one big downside: it left him trapped, alone with only mechanical animals and robots as company.
 This steampunk fantasy adventure hybrid from GameInvest could have easily come from the imagination of Jules Verne or H.G. Wells if they were in the game design business; the furnishings have Captain Nemo appeal while fanciful machines echo the Time Traveler's handiwork. Amazement and curiosity bring you to the now powered down and deteriorating House of Brass where upon you must escape, your steps dogged along the way by an adversarial robot housekeeper and multitudes of overly complicated contraptions. The fantastical structure is chock-full of strange rooms including a gallery, a planetarium and even a zoo (all mechanical or steam powered, by the way.) Soon you'll be asking, "Just what kind of place is this?"
Despite the elaborate environment, navigation and interaction take only a simple click wherever you want to move, grab an object, play a mini-game, or inspect an area more closely. A changing cursor helps with this but your explorer's skills are also needed. The House of Brass is built for discovery, every room full of interesting things and puzzles to work out. You'll encounter, and repeat, the familiar but there's several more unique puzzles such as a gorgeous planetary orbits game and a series of charming clockwork theatre productions. Hidden object scenes are few and require you find twelve of an item genre to allow focus on the search rather than reading and rechecking a random list of things.
 Analysis: House of Brass is extremely enjoyable if you love exploration and discovery with plenty of mini-games to reward your powers of deduction and reasoning skills. On the other hand, those who prefer the standard hidden object game will be disappointed. In the main story campaign, I counted only five or six different hidden object scenes and revisited only a few of them. On the other hand, almost every room is filled with mini-games. In the case of the zoo, you're called on to repair several broken mechanical animals by solving a small puzzle for each. Meanwhile, after finding a slew of bird books stashed in all sort of places around the house, you'll need to arrange them in order but, in that odd quirk of physics common to adventure games, by moving one book, two others are moved as well.
While adventuring and puzzle-solving are the main focus of Fantastic Creations: House of Brass, the narrative elements of the game are noticeably light. Cut scenes are almost nonexistent; the story progresses visually as you discover the full structure of the house and through Cogglethorpe's explanations. Although you are asked at the beginning to keep your sound on for the best experience, it's only a good experience of you want to hear a cogged old centenarian blathering on at your every move. Fortunately, there are separate volume controls for sounds, music and voices, so your preferences can be matched. I recommend treating yourself to the Collector's Edition if you can; in it you'll have access to the prologue, letting you see the house in its prime, and replay the mini-games to your heart's content. The back story is even more interesting and compelling and being able to revisit the mini-games increases replay value.
 Without the title to give it away, your first impressions would lead you to believe this a sequel to The Clockwork Man. It all has a fantasy meets steampunk feel as if you've been granted admission to tour a museum of oddities. Sarah Winchester's mansion has nothing on this place in terms of architectural eccentricities. The hands on mechanics of the mini-games will draw you in and your efforts at exploration are rewarded with the sordid revelation that living forever has no good effects on sanity. It's a Wellsian lesson worth a second study.
A Collector's Edition is also available. It contains bonus content not found in the standard edition: an extra chapter, mini-game access, wallpapers, strategy guide, and more. Remember that Big Fish Game Club Members pay only $13.99 for Collector's Editions (or 2 club credits), and collector's editions count 3 card punches of 6 total needed for a free game.
![]() Windows:
Windows:
Download the demo
Get the full version
Also available: Collector's Edition
![]() Mac OS X:
Mac OS X:
Also available: Collector's Edition


Walkthrough Guide
(Please allow page to fully load for spoiler tags to be functional.)
Fantastic Creations: House of Brass
Game Information
Basic Information
Click settings to change sound, music, and voice volume though the game insists you should leave sound on for full effect.
You can also change screen resolution.
You have the option to change the cursor.
The extras are locked until you complete the game.
On the bottom left of your screen is the hint button.
On the bottom in the center is your inventory bar.
On the bottom right, your objectives will be listed.
To the right of the objectives is your menu button and journal.
In a scene, when you hover over an item to be investigated, your cursor will become a magnifying glass.
When you hover over an object that can be picked up, the cursor will change to a grabbing hand.
When an object needs an item used on it, the cursor will change to gears.
Your cursor will change to an arrow when you can go into a different scene.
You have the option to skip the tutorial.
If an area is sparkling in the game, that means it is a hidden object scene.
There is only one mode of play.
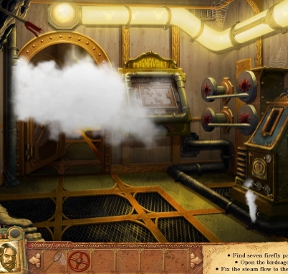
If you click too many times, the screen will fog up for a few seconds, pausing play.
Chapter One
Waking the Robot
When at the door, enter the code: 4936.
Pick up the transmitter: it will become your handy dandy hint button.
You must go forward to get the lights working.
Pick up the net.
Use the net to get the fireflies.
Place the net back in your inventory, then return to the cave entrance.
Use your net to grab all the fireflies in the entrance as well.
Place the fireflies in the machine that already has fireflies in it, then close the lid.
Pick up the paper.
Pick up the battery.
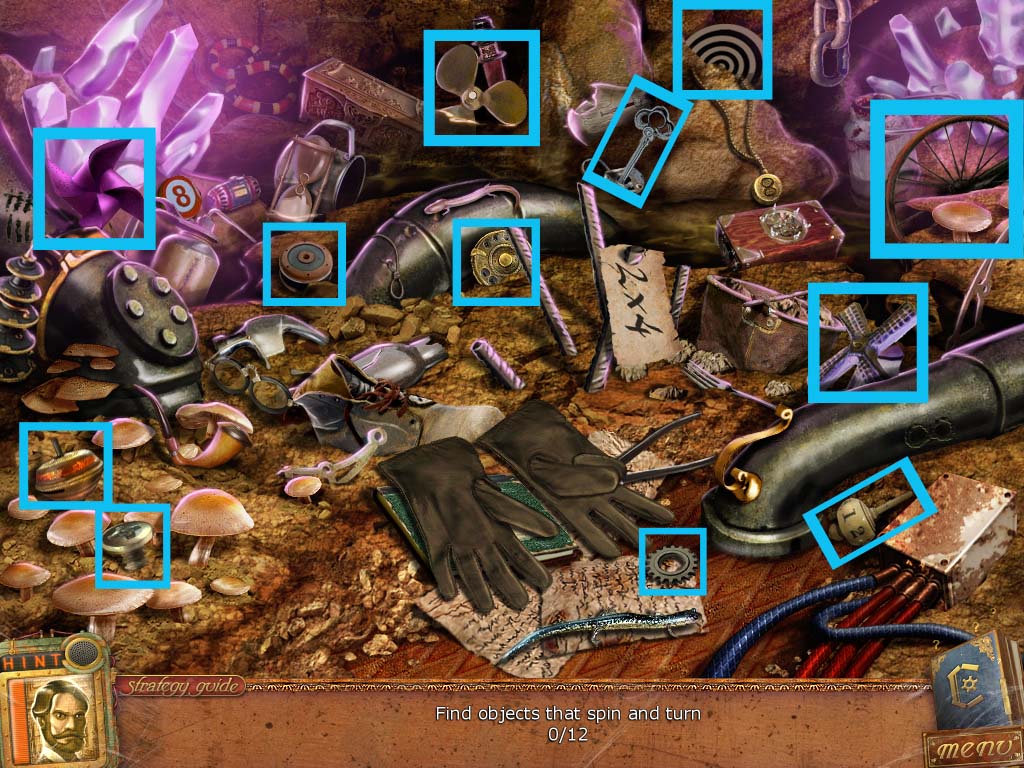
Start the hidden object scene.
Screenshot
You receive a small key.
Go forward once more into the machine room.
Pick up the awning crank.
Investigate the robot woman.
Place the battery in the empty spot.
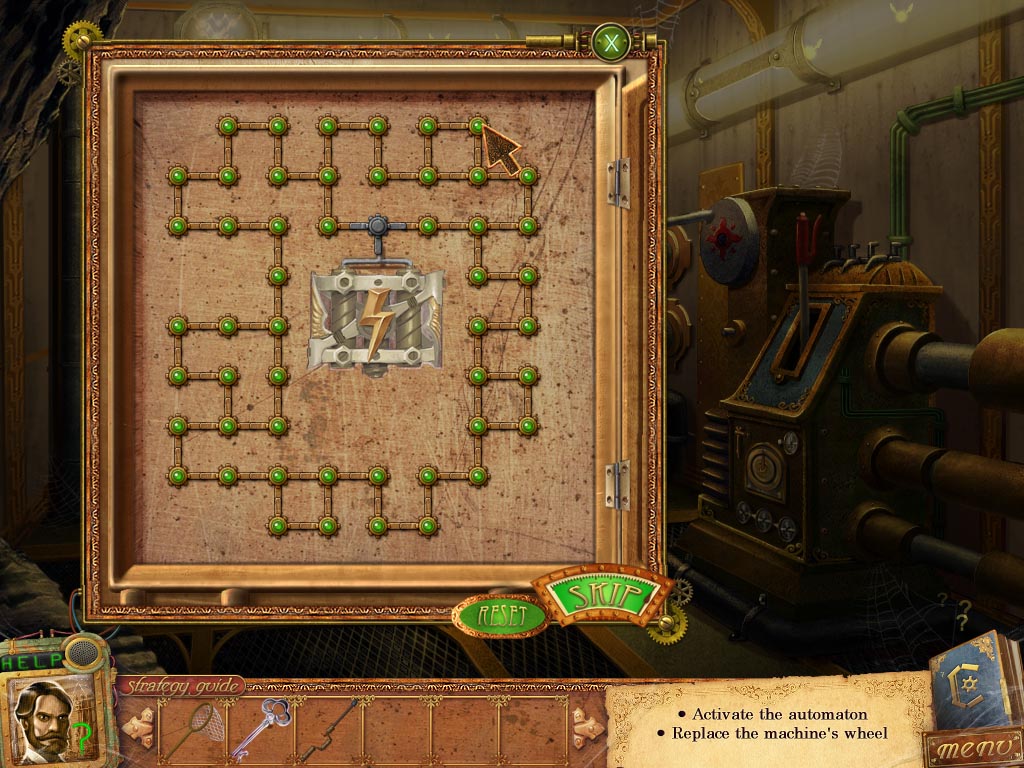
Connect all the pieces together.
Screenshot
Getting the Starshaped Lever
Follow the robot through to the next room.
Pick up the paper to the right.
Grab the pipe.
Start the hidden object scene.
Screenshot
You receive a keyhole.
Use the awning crank on the platform next to the ladder to pull it down, then go through to the next room.
Investigate the middle of the room.
Pick up the paper and the firefly head.
Investigate the picture frame on the left and pick up cabinet base.
Go back to the previous room and investigate the wall where the open hatch with gears is.
Place the cabinet base on the wall followed by the keyhole.
Place the small key in the lock.
Pick up the valve and the workshop key.
Go forward once more into the control room.
Investigate the door with the two sun shapes on it and place the workshop key there.
Go through the door into the workshop.
Grab the machine wheel.
Return to the machine room.
Place the machine wheel on the empty wheel barring and click on the bar to connect it to the wheel.
Put the pipe on the floor in the empty spot to connect the piping.
Screenshot
Pull down on the lever.
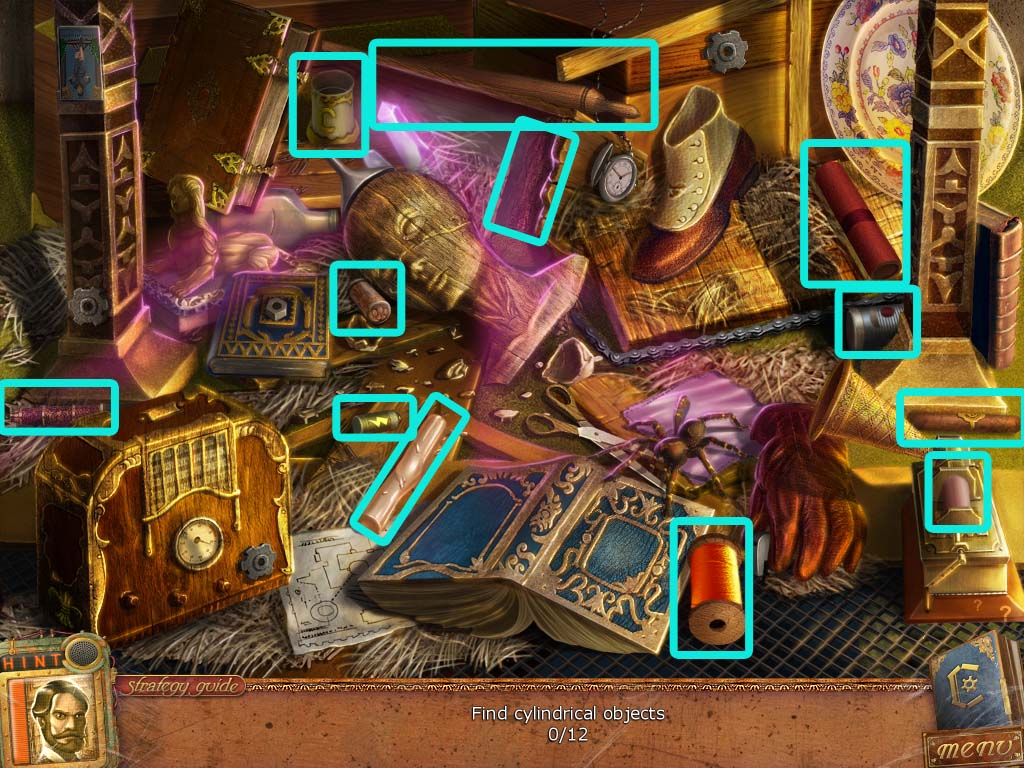
Go back into the cave entrance and start the hidden object scene.
Screenshot
You receive an hourglass.
Investigate the steaming vent on the machine to your right.
Solve the puzzle and you receive a star shaped lever.
Getting to the Next Floor
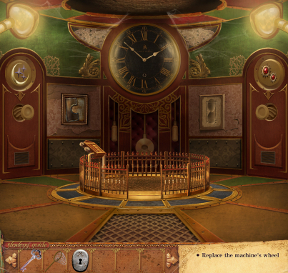
Go to the clockwork room.
Place the hourglass in the hourglass portrait.
Pick up the vinyl record and the elevator button half.
Investigate the platform controls and place the starshaped lever by placing it on the star shape to the top right of the panel.
Pick up the door handle and place the elevator button half down on the slot above the clockwork floor button.
Enter the workshop.
Place the door handle on the door and go through into the spare parts room.
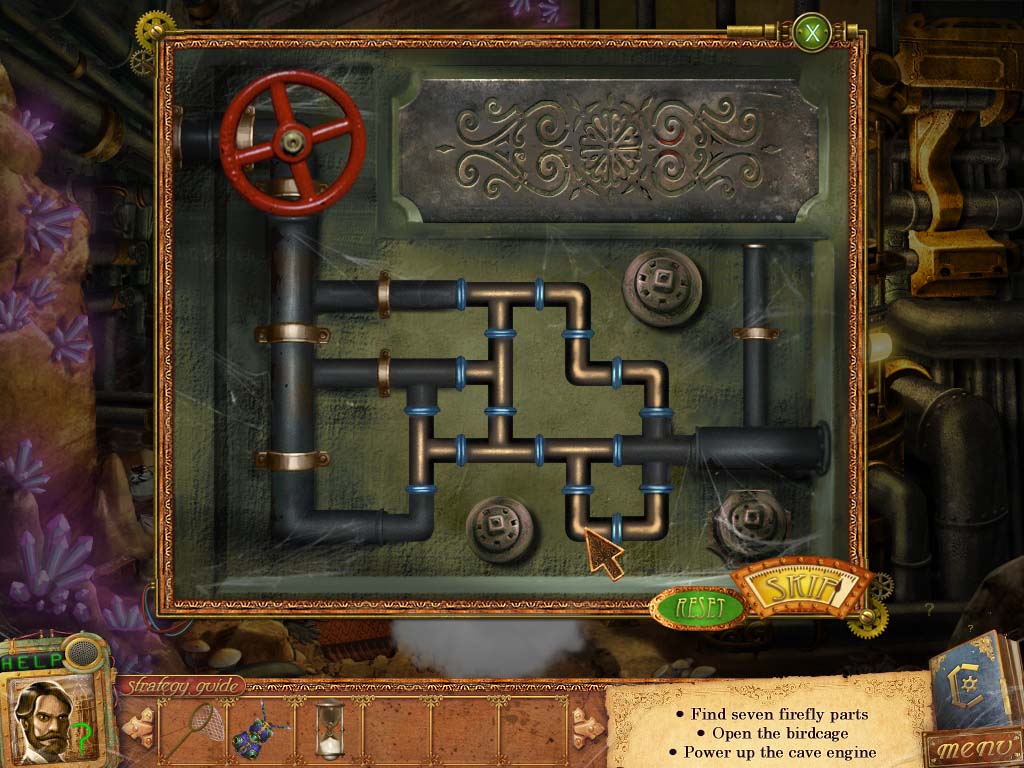
Click on the machine with the question mark label.
You want each tube to be at three.
Open the first and third valve.
Click open the second then the first valve.
Open the third then second valve.
Open the first then third valve.
Open the fourth then first valve.
Open the third then fourth valve.
Open the first then third valve.
Pick up the firefly wings and all three train track parts.
Place the train track parts on the wall then pick up the red ball.
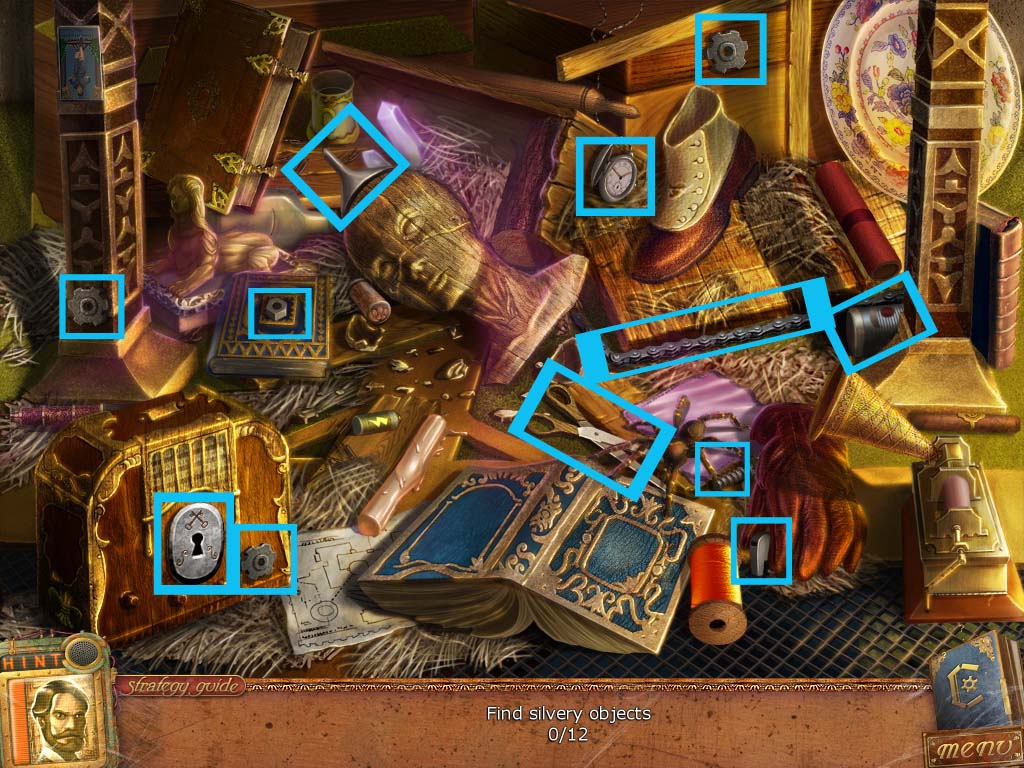
Go back to the storage room and do the hidden object scene.
Screenshot
You receive a battery.
Go back once and click on the Magnavault.
Place the red ball on the surface.
Start the puzzle. A ball cannot go into the wrong colored slot so you don't have to worry about losing it or having to restart.
Pick up the elevator button half and return to the platform room.
Chapter Two
Getting the Last of the Firefly Parts
Investigate the platform controls and place the elevator button half on the slot with the other half.
Click on the diamond button to go to the luxury level.
Use the net to catch the fireflies.
Pick up the piece of paper, then head through the door on the left.
Pick up the next piece of paper.
Click on the window with the open curtains, then follow the story in the proper order.
Click the scissors button.
Click the staircase button.
Click the rose button.
Click the button of the woman.
You receive a small lightbulb.
Leave the room and go to the platform. Go down, then head through the door to the workshop.
Investigate the birdcage and enter the shaped code that had been above the robot parts.
Circle, triangle, square, upside down Y.
Pick up the firefly body and the firefly leg set.
Place the record on the player underneath the mechanical bird.
Pick up the firefly leg set.
Getting into the Bedroom
Investigate the desk and place all the firefly parts, the battery, and the light bulb down on the tray.
Place the battery and light bulb down first.
Then put down both firefly leg sets followed by the firefly body.
Finish the mechanical firefly by placing the firefly head down and then the firefly wings.
Follow the firefly out of the workroom, onto the platform, up to the next level, and through the newly opened door on the right.
Once in dining room, use your net to catch the two fireflies.
Place the fireflies in the lamps on the ceiling.
Pick up the mallet after the robot woman chases you.
Use the mallet on the statue to the right of the far right door.
Pick up the study key.
Click on the middle door and place the study key in the circle.
Open the closed cabinet on the back bookcase and pick up the wardrobe key.
Start the hidden object scene.
Screenshot
You receive a screwdriver.
Investigate the door to the right and use the screwdriver to open the lock.
To complete the puzzle, you must align the panels.
Start by aligning the innermost circle first.
Align the outermost circle second.
Align the fourth circle third.
Align the third circle fourth.
Align the second circle last.
Screenshot
Go into the bedroom.
Getting to the Planetarium
Open the cabinet to your left.
Pick up the right weight and journal page.
Click on the rug and pick up the left weight.
Open the right dresser on the bed and pick up the right weight.
Pick up the left weight from the bed canopy.
Open the book on the desk and pick up the right weight.
Investigate the wardrobe to the right and place the wardrobe key in the circle.
Pick up the visible left weight, then click on the suit that's hanging and recover the fourth and final left weight.
Investigate the right post of the bed and place all the right weights on it.
Investigate the left post of the bed and place all the left weights on it.
Pick up the book and the theatre doll.
Leave the room and go back to the gallery room.
Investigate the second open scene and place the theatre doll on it.
Press the tree branch button.
Press the Gwen button.
Press the Cogglethorpe button.
Press the camerea button.
You receive the planetarium key.
Go down to the clockwork level and investigate the door to your left.
Place the planetarium key in the circle to open the door then go through.
Getting the First Elevator Button Half
Pick up the journal paper from the chair.
Click on the curtains to your right and go into the forge.
Pick up the book.
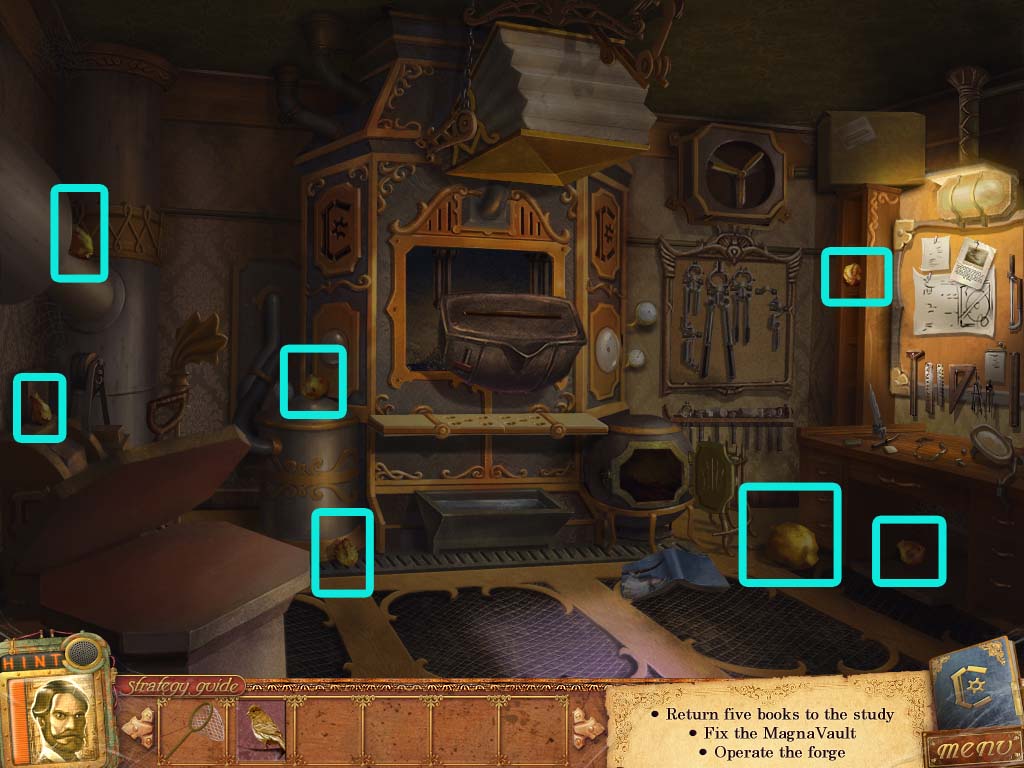
Pick up all seven gold ore.
Screenshot
Click on the journal page in the top right corner of the bulletin board.
Click on the box to make it fall down and reveal a hidden object scene. Start the hidden object scene.
Screenshot
You receive a shovel.
Place the gold ore on the machine to the left that flattens it into a sheet.
Click on the bucket and place the gold sheet inside it.
Leave the room and go to the luxury floor, then go into the study.
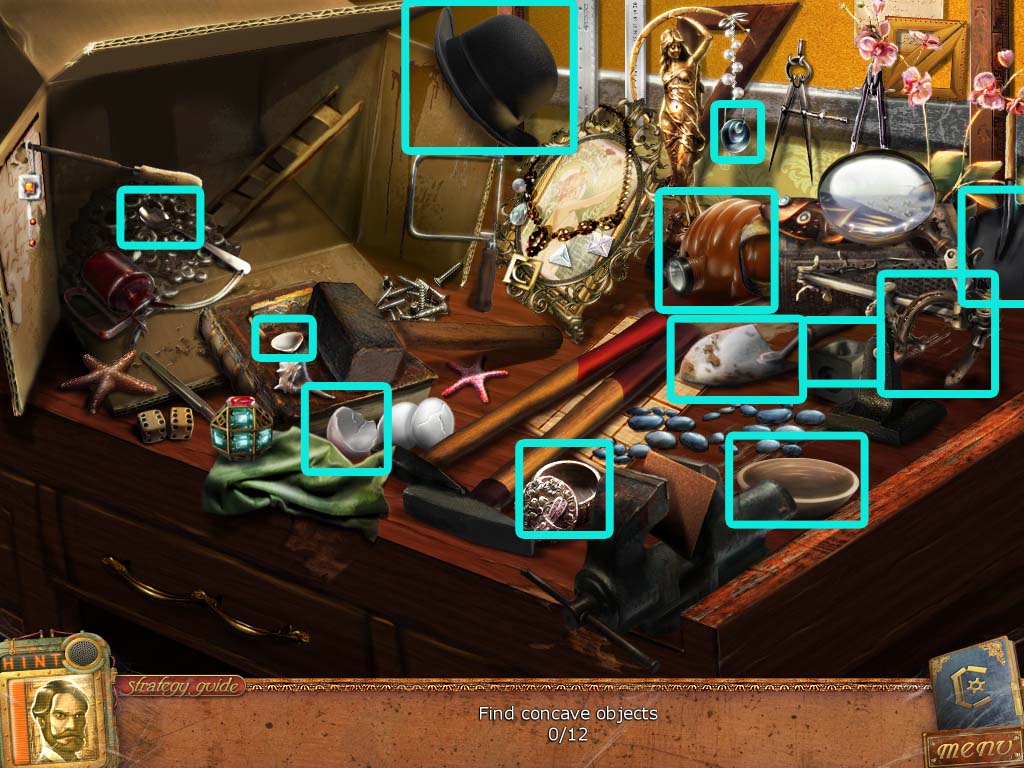
Start the hidden object scene.
Screenshot
You receive a piece of painting.
Use your shovel and click on the fireplace to receive a shovel with embers.
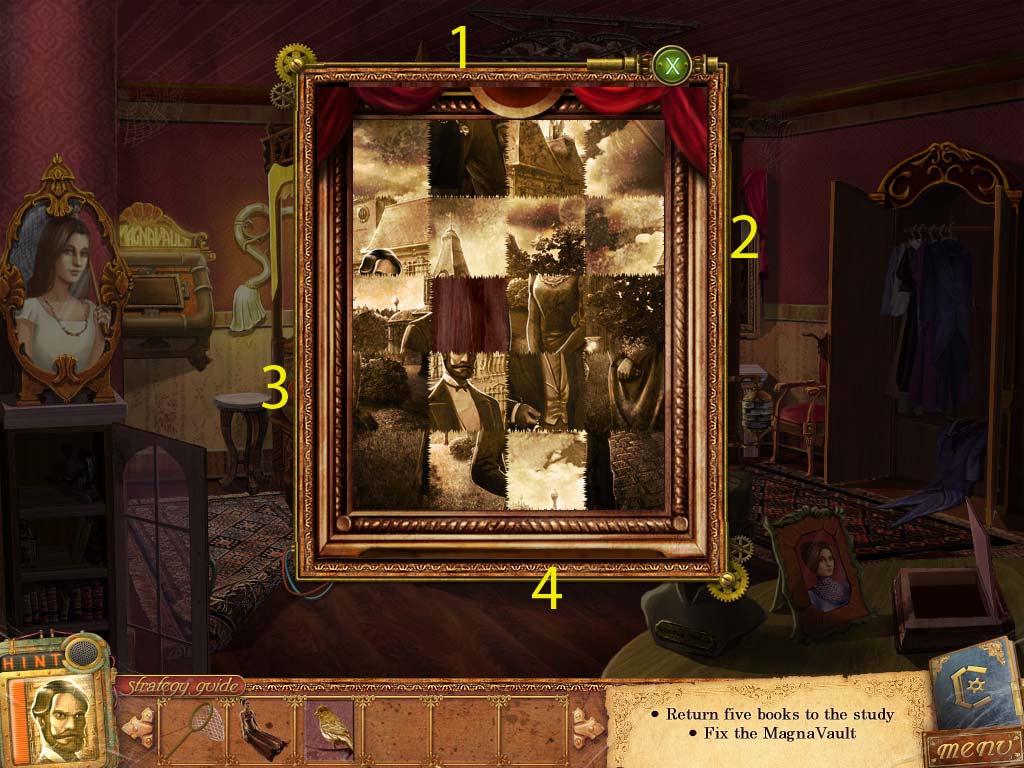
Go into the bedroom and click on the painting, then place the piece of painting on the canvas.
The up and down arrowed lines are columns.
The left and right arrowed lines are rows.
Pull the second column up once.
Make the second row from the top go right once.
Have the fourth row go left once.
Move the third column down once.
Screenshot
You receive an elevator button half.
Getting the Final Book
Go back down to the clockwork level and go into the planetarium.
Pick up the bird book.
Go back once and then up to the luxury floor. Go into the dining room.
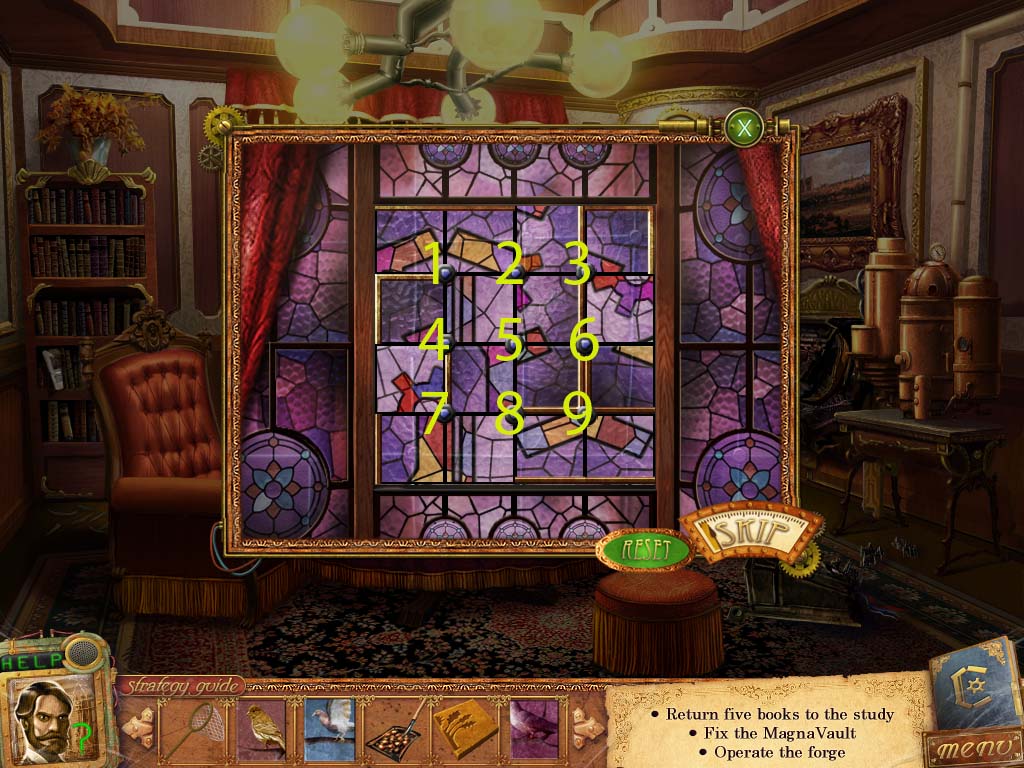
Open the curtain and start the puzzle.
Press 2, 1, 4, 4, 9, 9, 8, 7, 5, 8, 6, 9, 9, 6, 6, 6, 9.
Screenshot
You receive pliars.
Pick up the magnavault button and the journal page.
Leave the dining room and go to the bedroom.
Use the pliars to get the spring from the bed.
Click on the Magnavault and put the magnavault button on the empty spot.
You receive a bird book.
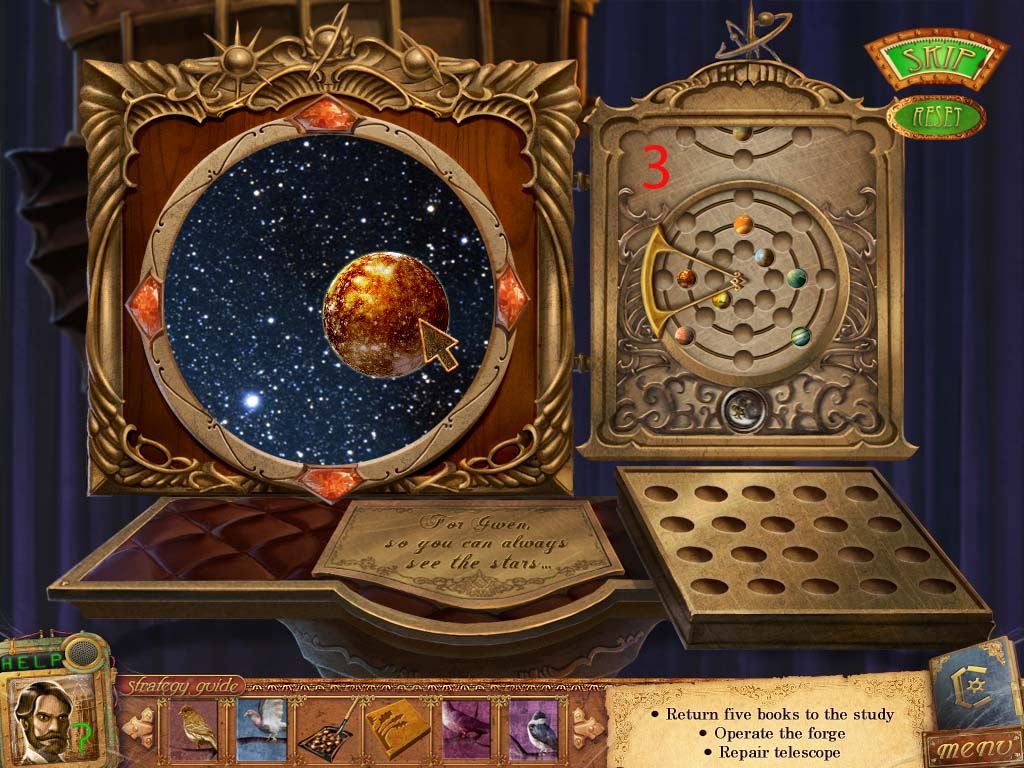
Go back downstairs and go into the planetarium.
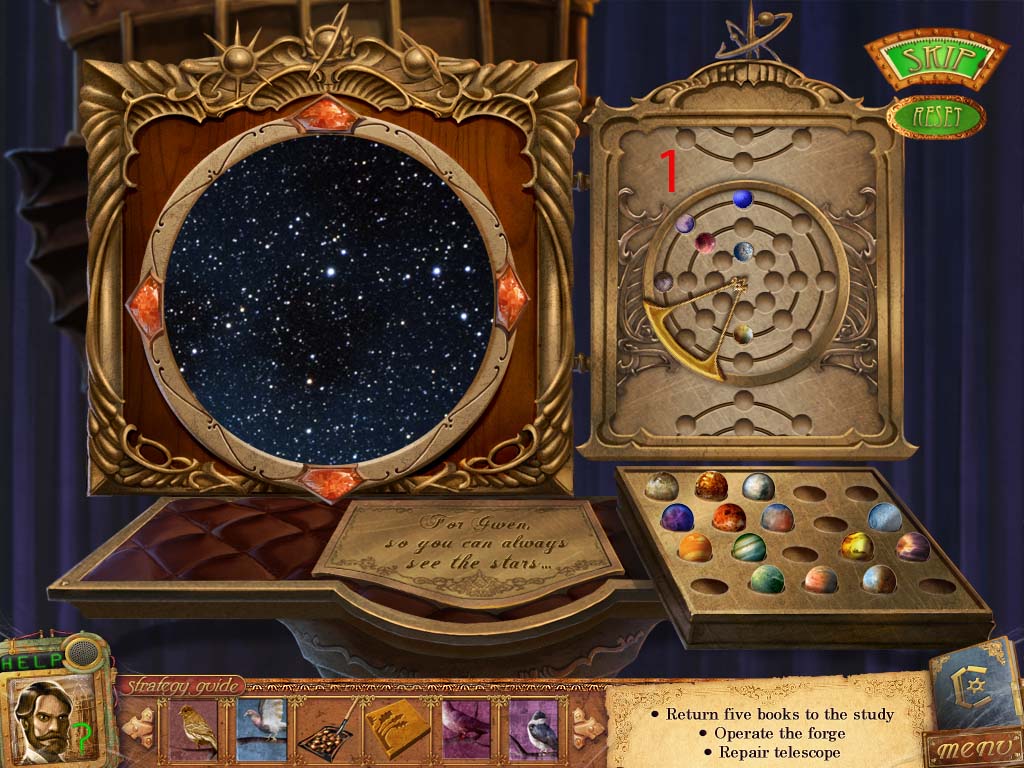
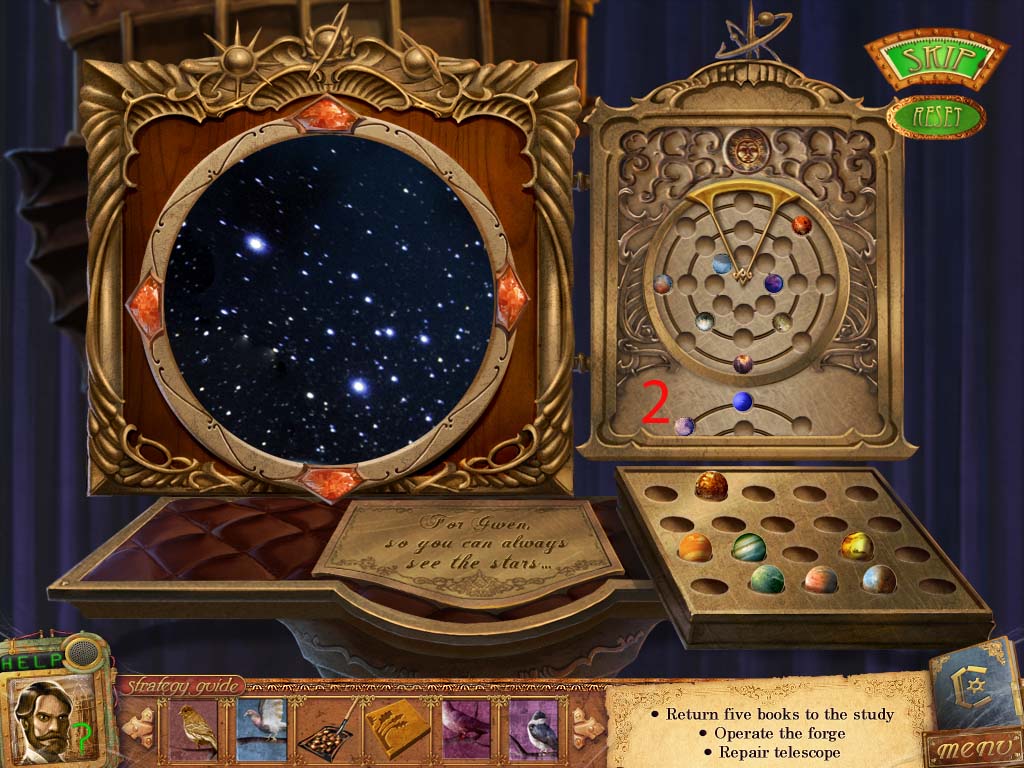
Click on the projector and place the spring on it to start the puzzle.
The left and right arrows will scroll through the sky and show you the planets for each subdivision on the "map."
The up and down arrows will take you to the other "maps," offered. There are three total.
When you place a planet down onto the map, it will spin if it's in the correct spot.
The closer a planet is on the telescope screen the closer to the middle of the circle it is.
Screenshot 1
Screenshot 2
Screenshot 3
Go into the forge.
Put the shovel with embers in the furnace.
Click on the mold and start the puzzle.
Screenshot
You receive the book box key.
Go to the study and use the book box key on the book box.
Pick up the bird book.
Getting to the Nature Level
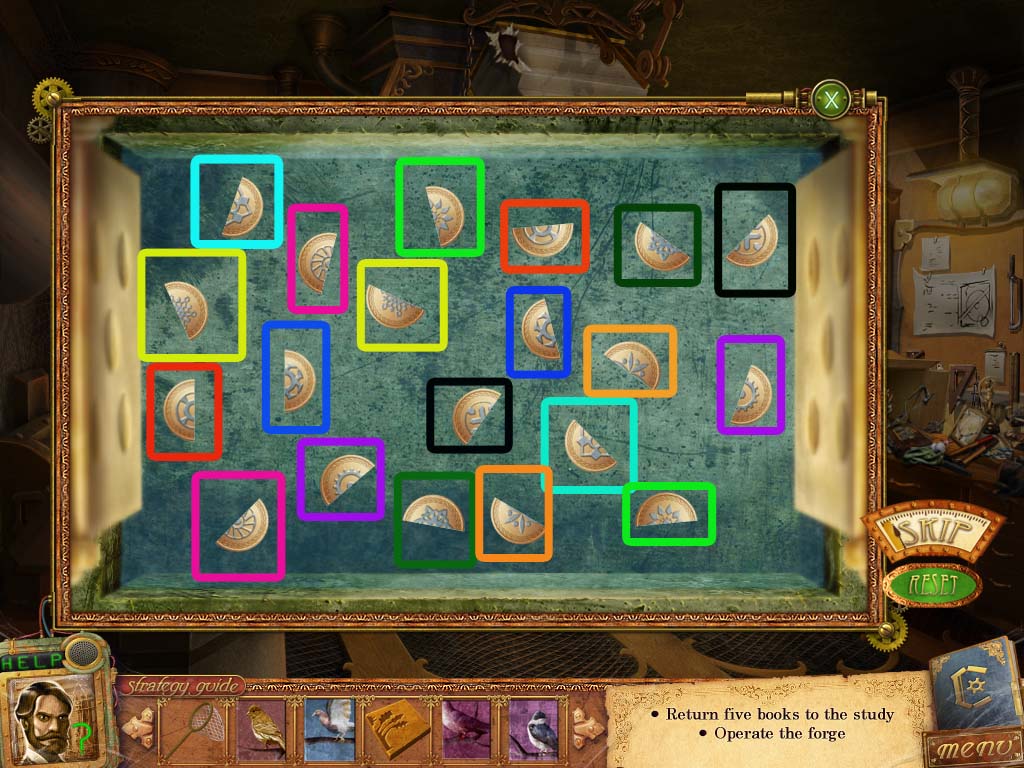
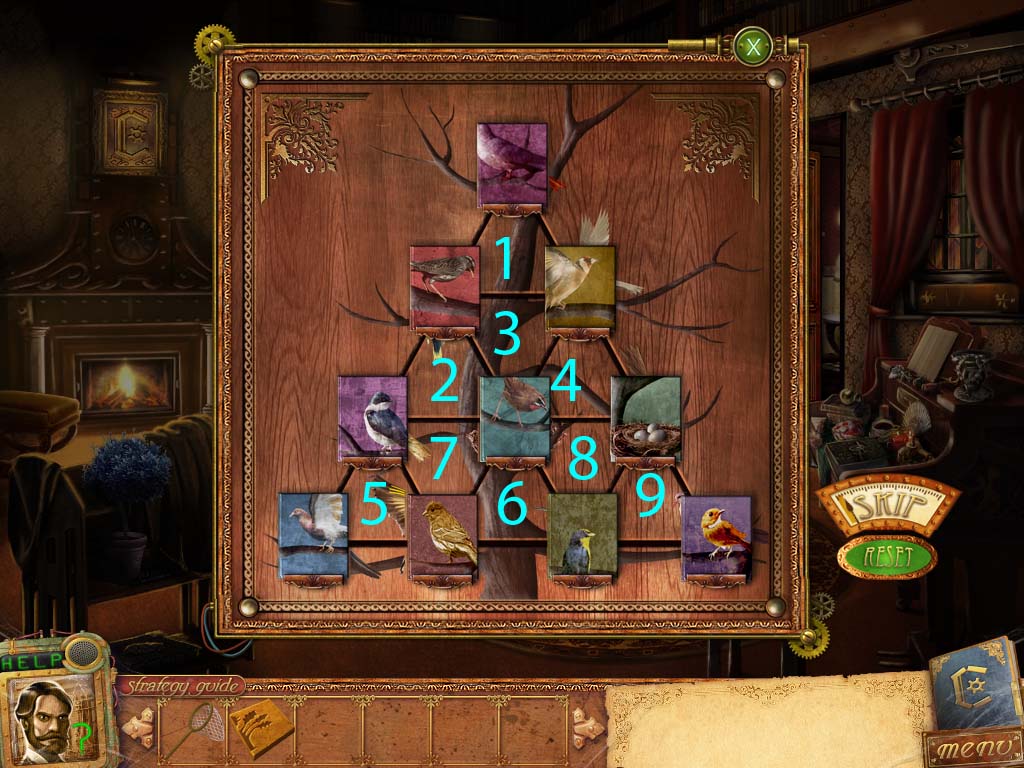
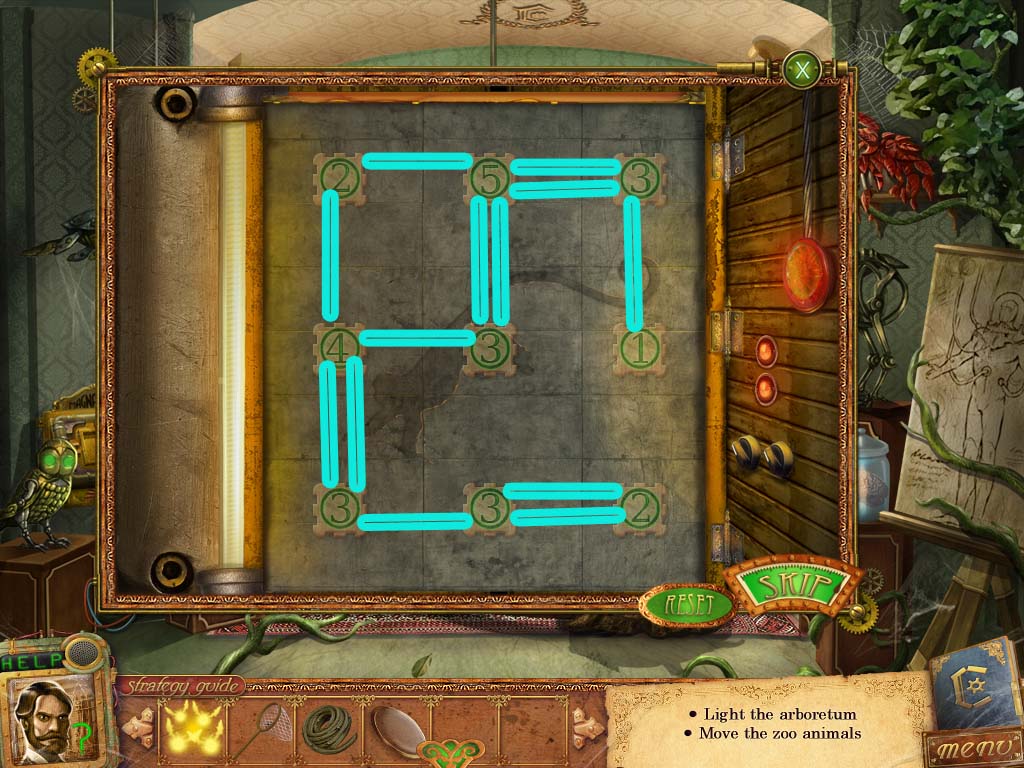
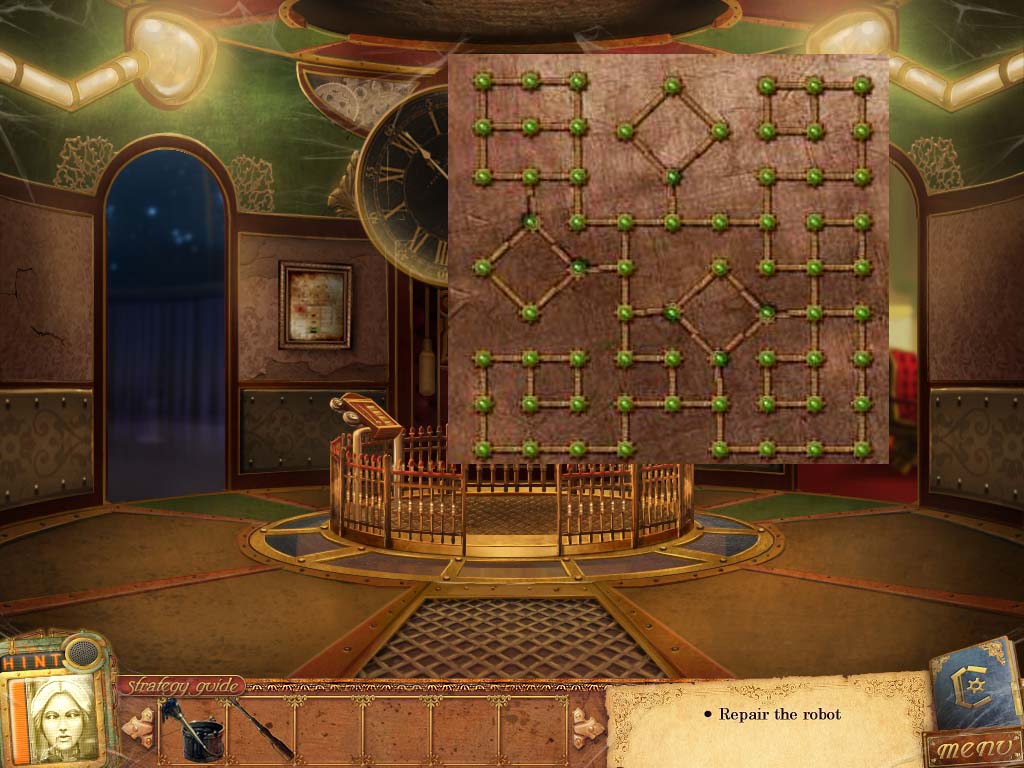
Click on the bookshelf and place all the bird books on it to start the puzzle.
Click 5, 5, 3, 7, 7, 3, 1, 4, 9, 4, 8, 4, 1, 1, 4.
Screenshot
Enter the mailroom.
Hover your cursor over items to keep them from falling.
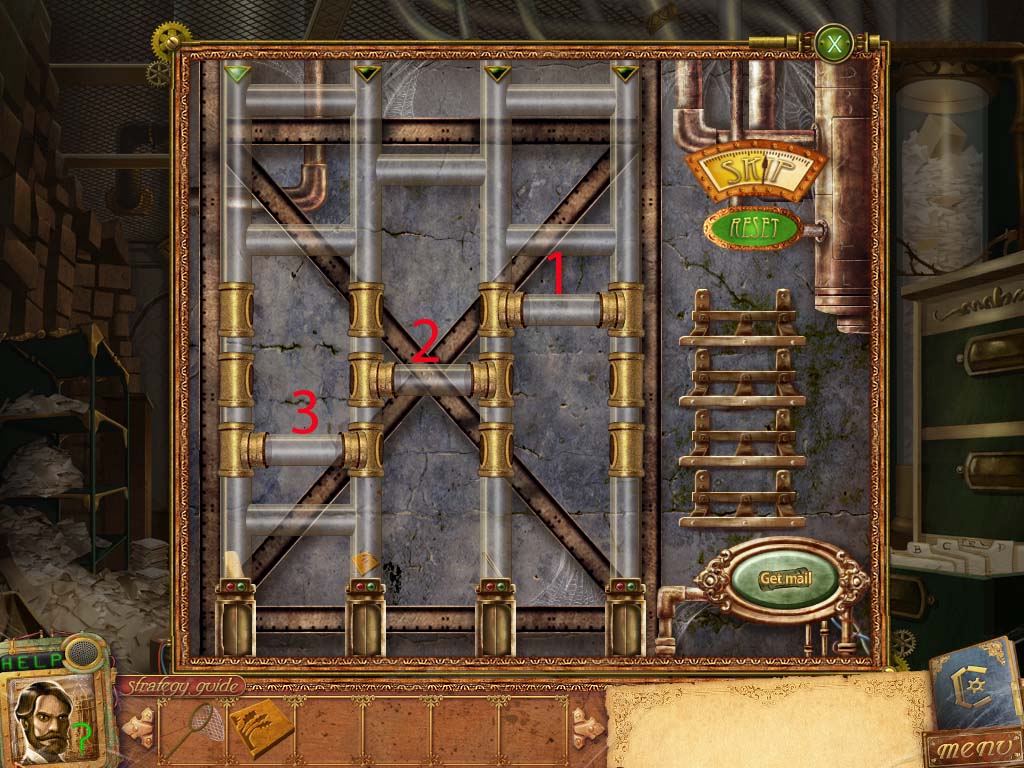
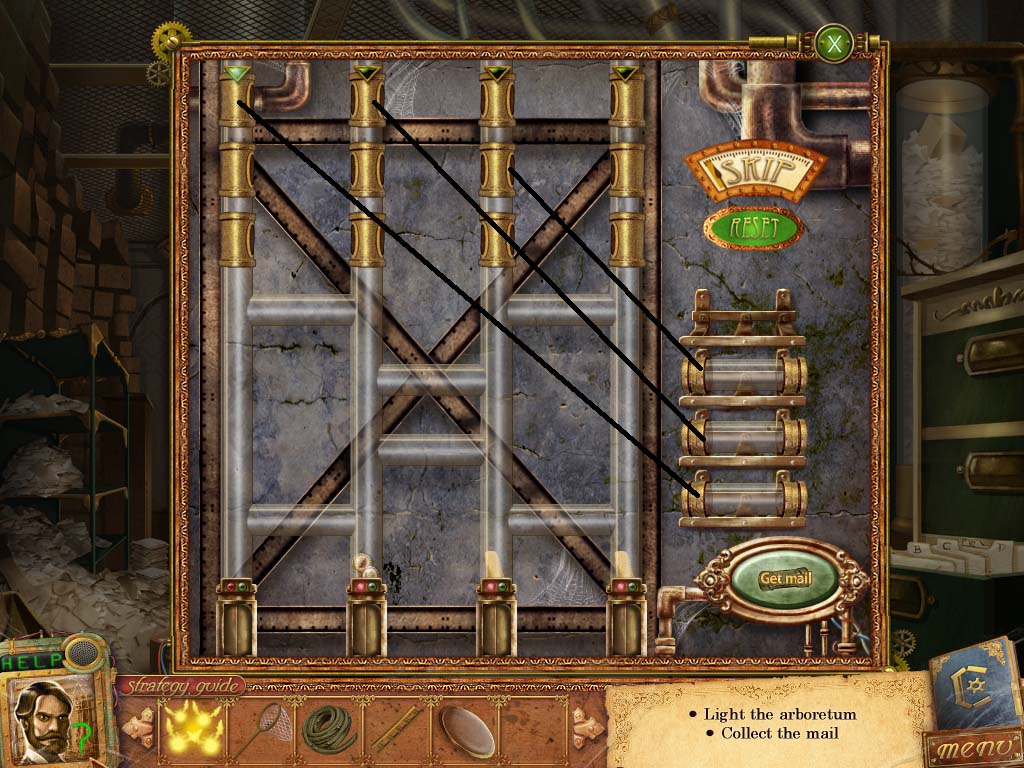
Investigate the mail machine.
Place your first tube on top most level of the far right tubing, then press the mail button.
Take your second tube and put it on the middle level of the middle tubing then press the mail button.
Grab the third tube and put it on the bottom most level of the far left tubing, then press the mail button.
Screenshot
You receive a crowbar and elevator button half and a journal page.
Use the crowbar on the crate to release the fireflies.
Catch the fireflies quickly or else you'll have to get them from the study, bedroom, and the platform controls.
Go to the platform controls and zoom in on the platform.
Place the two elevator button halves on the empty slot above the luxury level button.
Press on the nature level button.
Chapter Three
Getting the Rail Track
Pick up the journal page.
Click on the lamp with the fireflies in it already to move them to the right side.
Start the hidden object scene.
Screenshot
You receive a patch.
Go down to the clockwork level and head to the forge.
Place the patch on the bellows that's above the fire.
Click on the mold and pick up the shears.
Go back up to the nature level and place the shears on the robot.
Screenshot
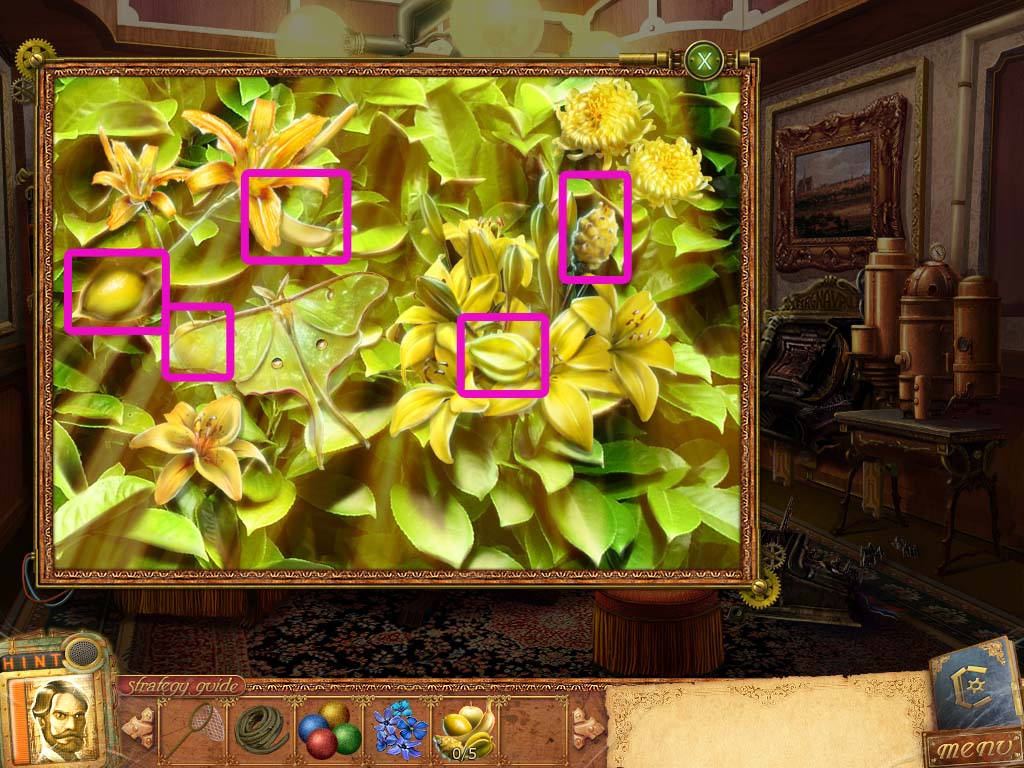
Go into the arboretum.
Grab the vine.
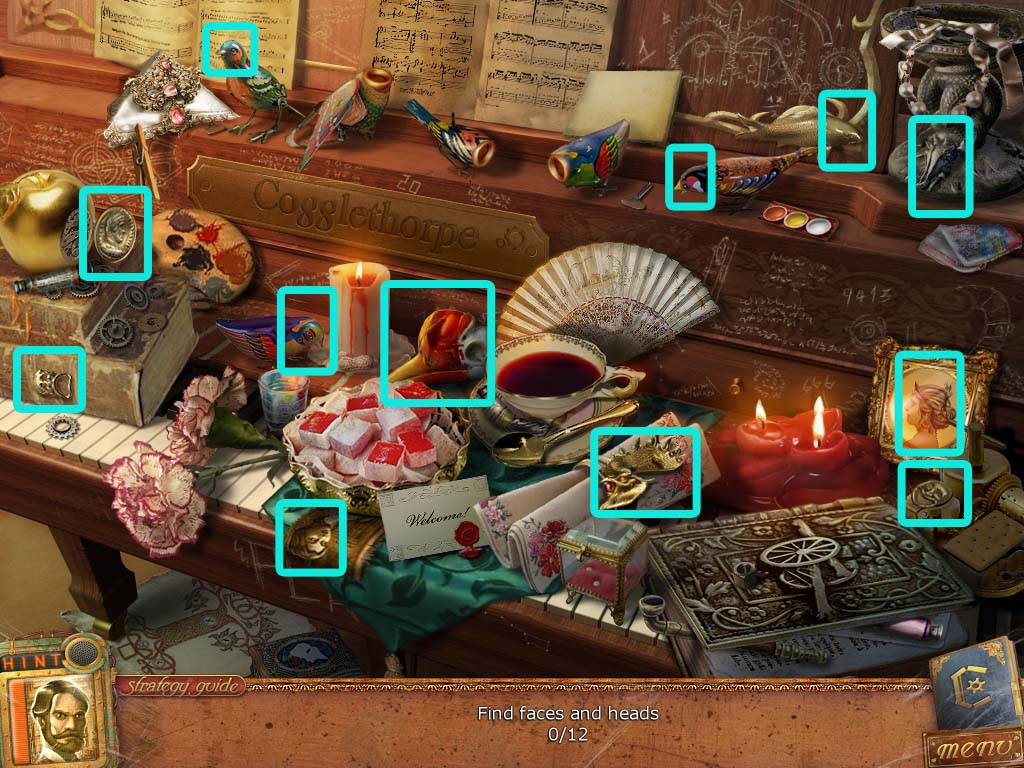
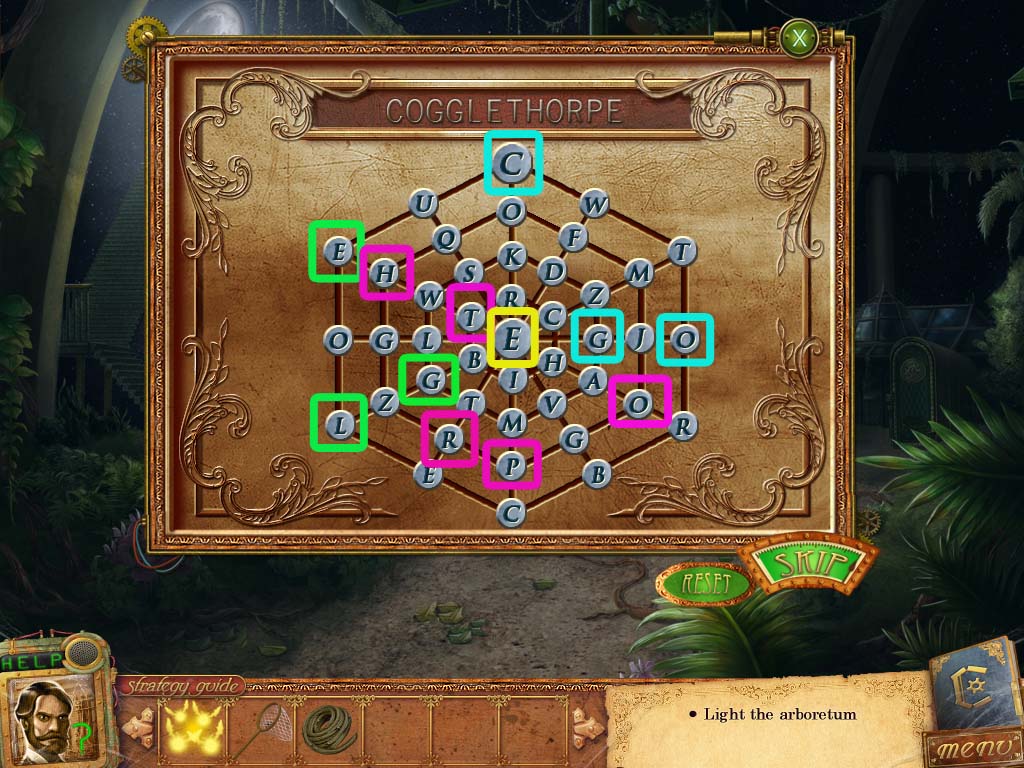
Investigate the machine.
You will have to spell out Cogglethorpe by pressing the letters in the correct sequence.
In the screenshot start with the letters boxed in blue.
Then go to the letters boxed in green.
Do the letters boxed in fuschia.
End with the letter in yellow.
Screenshot
Click on the right side of the sun to receive a bent sun dome lid.
Investigate the broken part of the dome to the left of the sun and remove the branches.
Go back to the forge.
Place the bent sun dome lid on the press and pick up the newly made sun dome lid.
Start the hidden object scene.
Screenshot
You receive rail tracks.
Getting the Hexagonal Key
Go back and then head to the mailroom.
Investigate the mail machine.
Your first tube should go on the top most bracket on the far left. Press the get mail button after.
Your second tube should go on the top most bracket of the middle. Press the get mail button after.
Your third tube should go on the middle bracket on the far right. Press the get mail button after.
Screenshot
You receive theater buttons and a journal page.
Go to the gallery room.
Place the theater buttons on the third play screen.
Hit the ladder button first.
Hit the valve button.
Hit the pipe button.
Hit the stairs button.
Hit the machine button.
You receive the clockwork zoo key.
Go back to the nature level.
Make sure the light is on the right side and place the rail track down.
Use the clockwork zoo key on the door and go in.
Pick up the journal page and the armadillo tail.
Place the armadillo tail back on the armadillo.
Investigate the armadillo to start the puzzle.
Screenshot
You receive a monkey arm.
Place the monkey arm on the monkey, then investigate to start the puzzle.
Screenshot
You receive an iguana neckpiece.
Place the iguana neckpiece on the iguana and investigate to start the puzzle.
Screenshot
You receive eagle talons.
Place the eagle talons on the eagle and investigate to start the puzzle.
Screenshot
You receive a hexagonal key.
Getting the Theatre Doll
Leave and go to the arboretum.
Place the sun dome lid on the sun, then put the fireflies inside it.
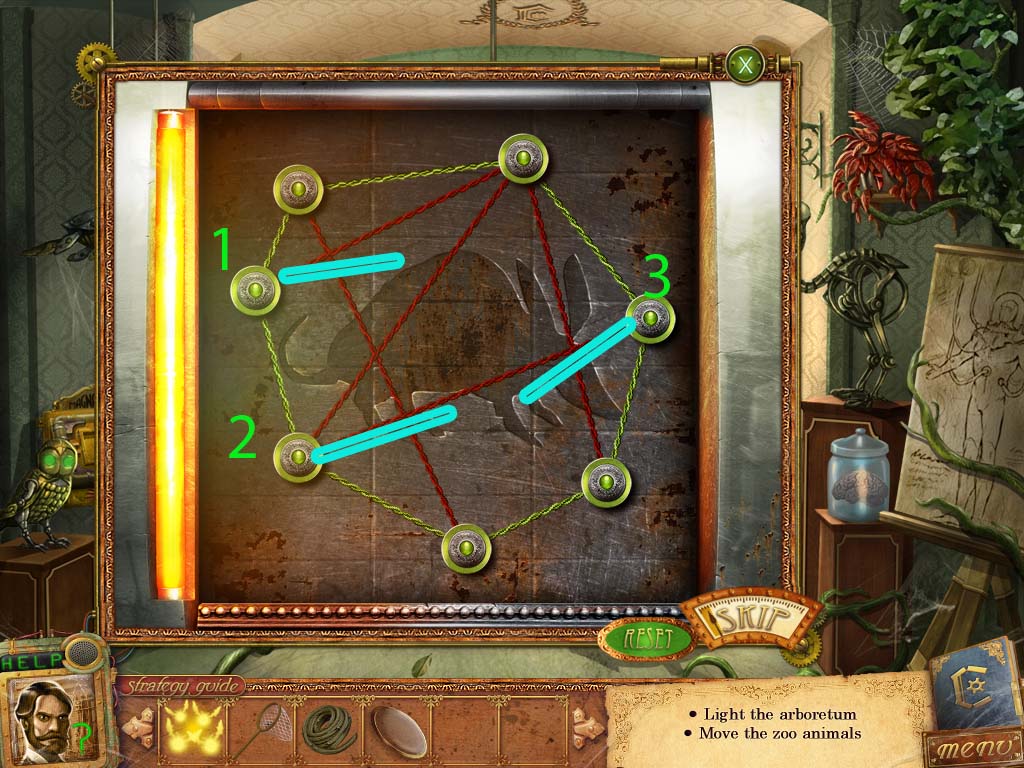
Click on the door, then use the hexagonal key.
Solve all three variations of the lock puzzle, then go inside.
Screenshot
Screenshot
Screenshot
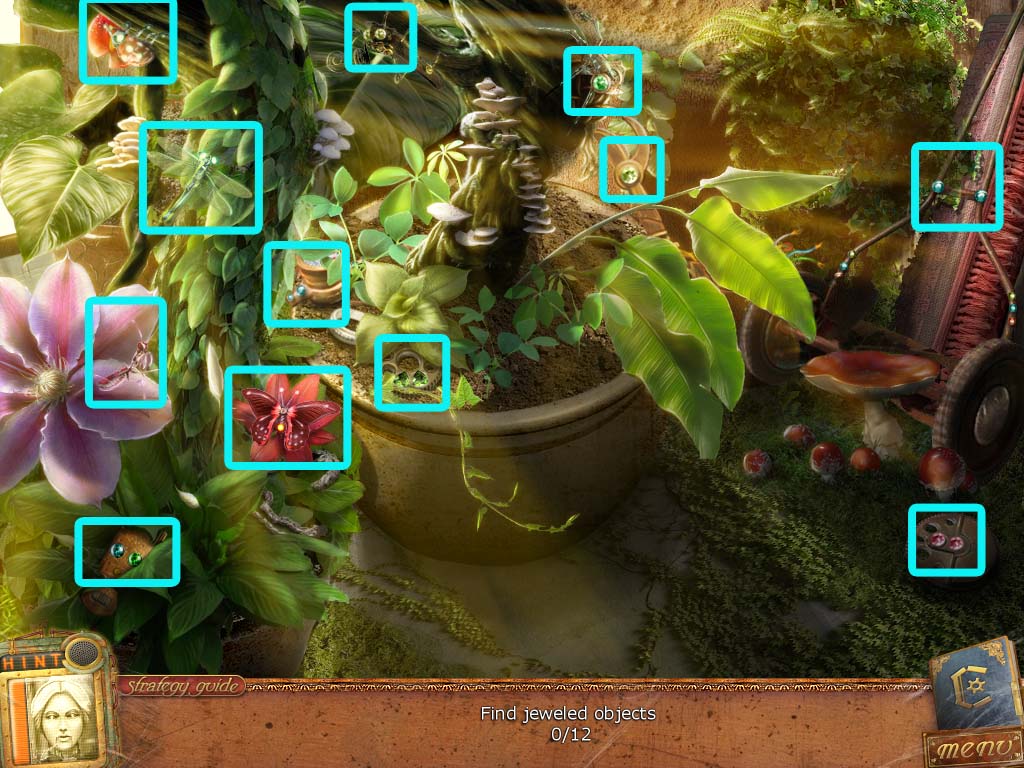
Pick up the colored spheres.
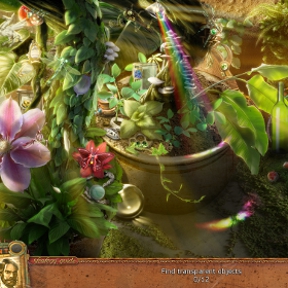
Start the hidden object scene.
Screenshot
You receive beakers.
Investigate the chemistry set and pick up the plant sample kit and the journal page.
Place the beakers on the stands.
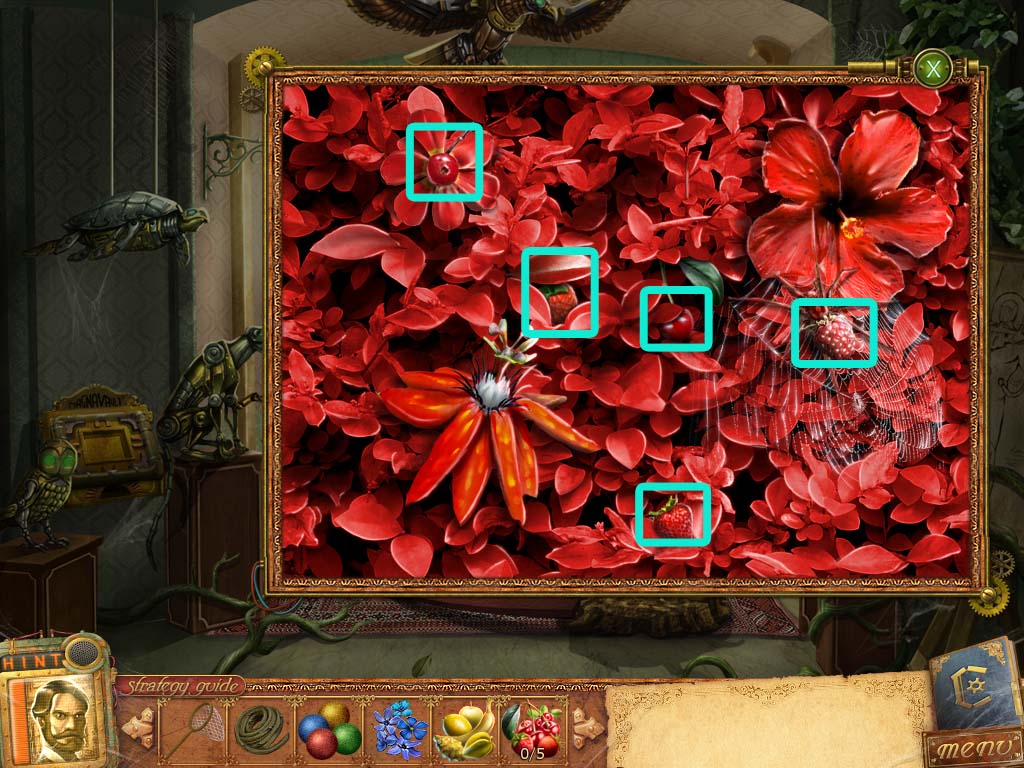
Leave and go up to the clockwork zoo.
Use the plant sample kit on the red berries.
Snip five red berries.
Screenshot
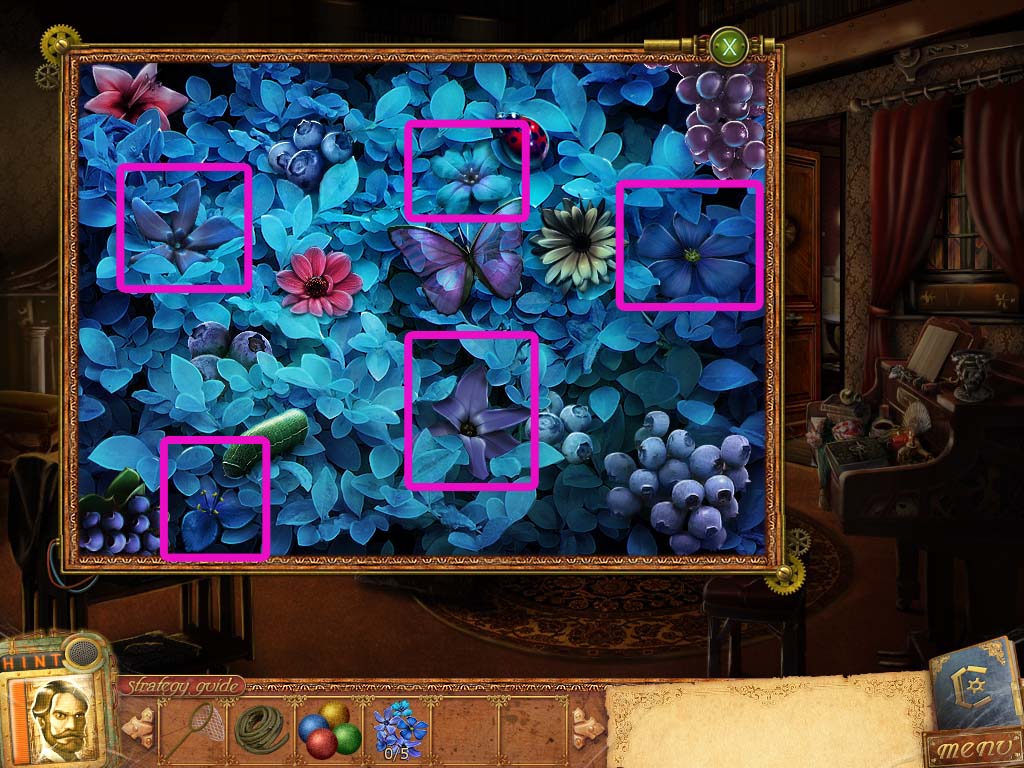
Leave and go down to the study.
Use the plant sample kit on the blue flowers to your left.
Snip five blue flowers out of the scene.
Screenshot
Go to the dining room and use the plant sample kit on the yellow fruit plant on the top of the bookshelf on the back left wall.
Snip five yellow fruits.
Screenshot
Go back up into the greenhouse and zoom into the chemistry set.
Place the proper colors in the matching beakers.
Pick up the nutrient chemical, then click on the nutrient distribution system.
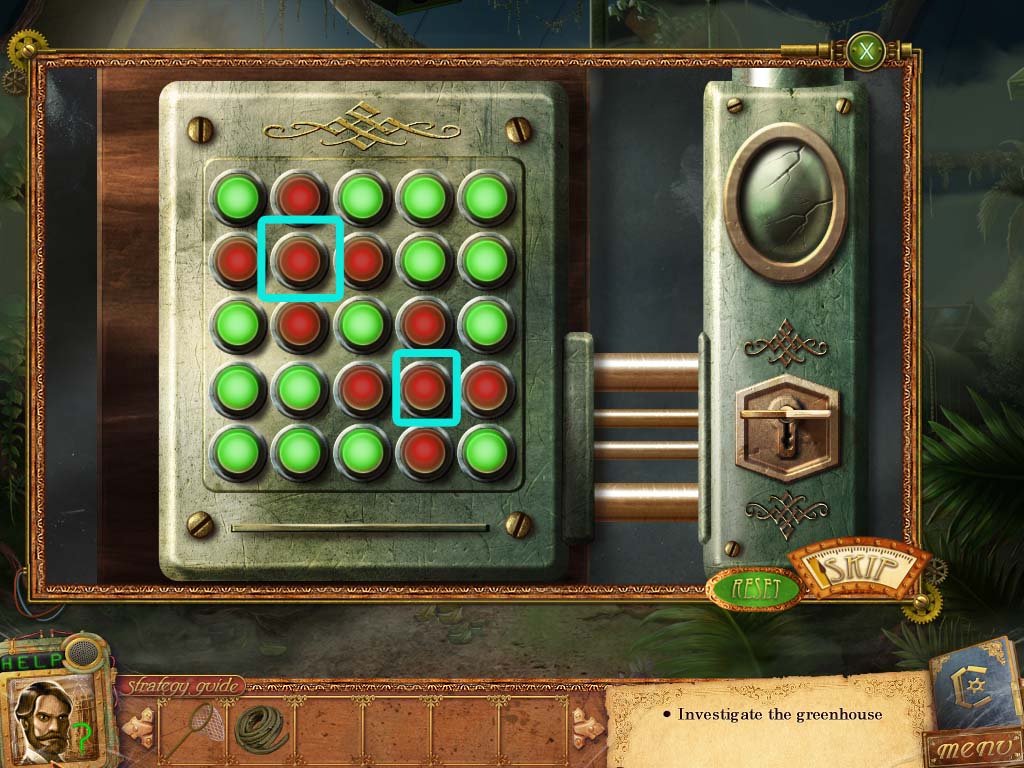
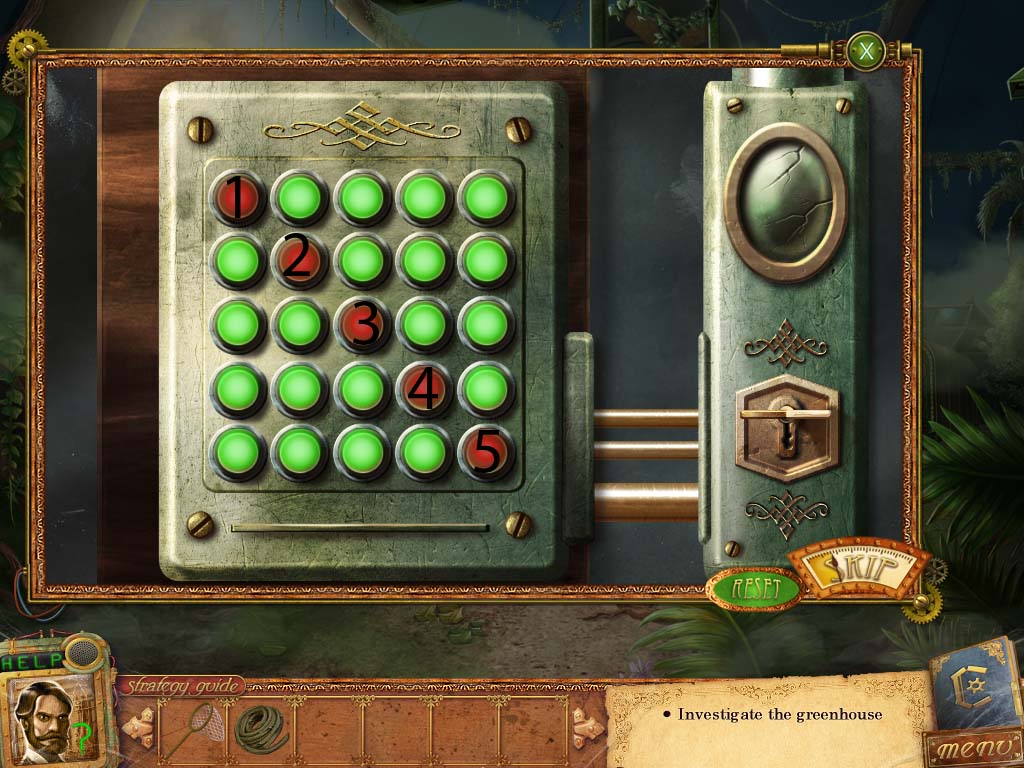
Pour the nutrient chemical into the funnel. You must get all levels to three.
Open valve three and valve one.
Open valve three and valve two.
Open valve four and valve three.
Open valve one and valve four.
Open valve two and valve one.
Screenshot
Pick up the theatre doll.
Getting to the Next Level
Go to the clockwork zoo and click on the magnavault box.
Place the colored spheres on the box and start the puzzle.
You receive an elevator button half.
Go down to the gallery and click on the final scene remaining. Place the theatre doll on the scene.
Lower the claw.
Pick up the dome.
Use the claw.
Raise the claw.
Release the fireflies.
Show the finished dome to Gwen.
You receive elevator button half.
Go to the platform controls and place both elevator button halves on the final available slot.
Press the button to go up to the final level.
Chapter Four
Get the Filled Blowtorch
Use your net to capture the fireflies.
Pick up the journal page in the broken dresser.
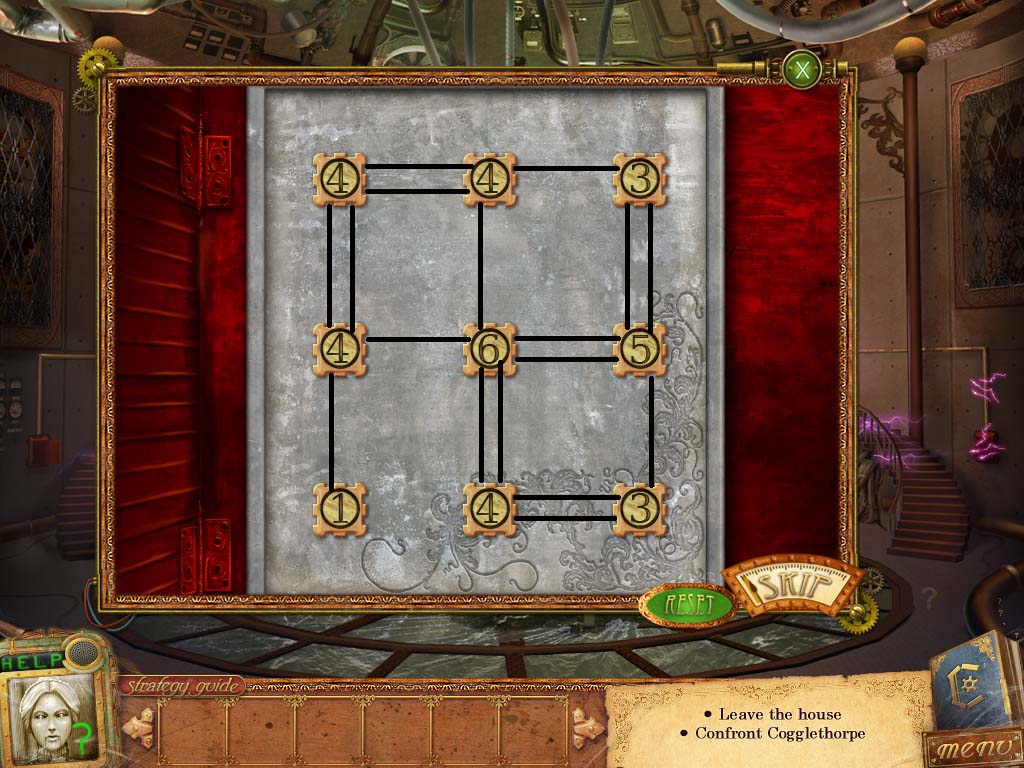
Investigate the dresser with the triangle on it and start the puzzle.
Turn the triangles in this order: 16, 16, 12, 10, 11, 10, 5, 7, 7, 4, 4, 1, 3, 2, 3, 1.
Screenshot
You receive the lock ring.
Click on the door and place the lock ring down and set the rings to start the puzzle.
Start with the first ring.
Turn the fifth ring.
Turn the fourth ring.
Turn the second and third. Order is interchangeable for these two.
Screenshot
Head into the room and use the net to catch the three remaining fireflies.
Go through the door.
Start the hidden object scene.
Screenshot
You receive a pneumatic tube key.
Go back to where the platform controls were and use the vine on the hook, then go down.
Go into the dining room.
Investigate the control panel and place the pneumatic tube key on it.
Go down to the spare parts room and pick up the tar bucket.
Go back twice and investigate the broken clock to start the puzzle.
Screenshot
You receive a screwdriver.
Take the platform up to the nature floor, then start the hidden object scene.
Screenshot
You receive a filled blowtorch.
Escape the Brass House
Go to the greenhouse and investigate the robot.
Use the tar bucket to stop the leaks.
Use the filled blowtorch to fix the cracks.
Use the screwdriver on all the screws.
Go back up to the surface floor and enter Cogglethorpe's room.
Investigate the box at the bottom of the left staircase and start the puzzle.
Screenshot
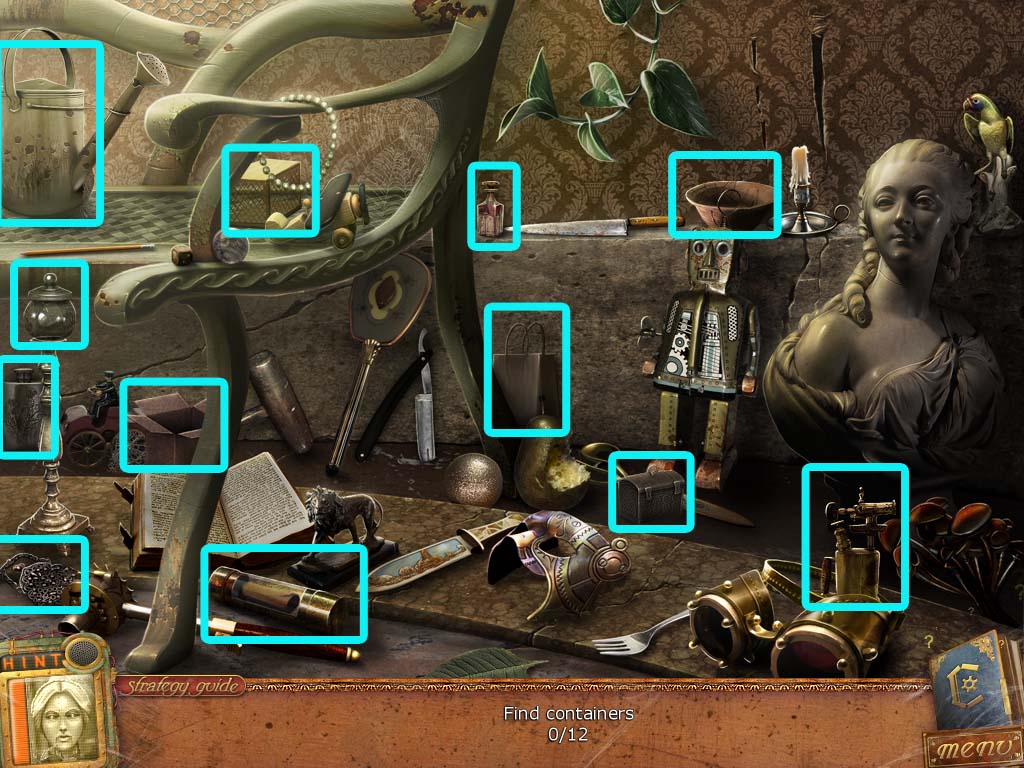
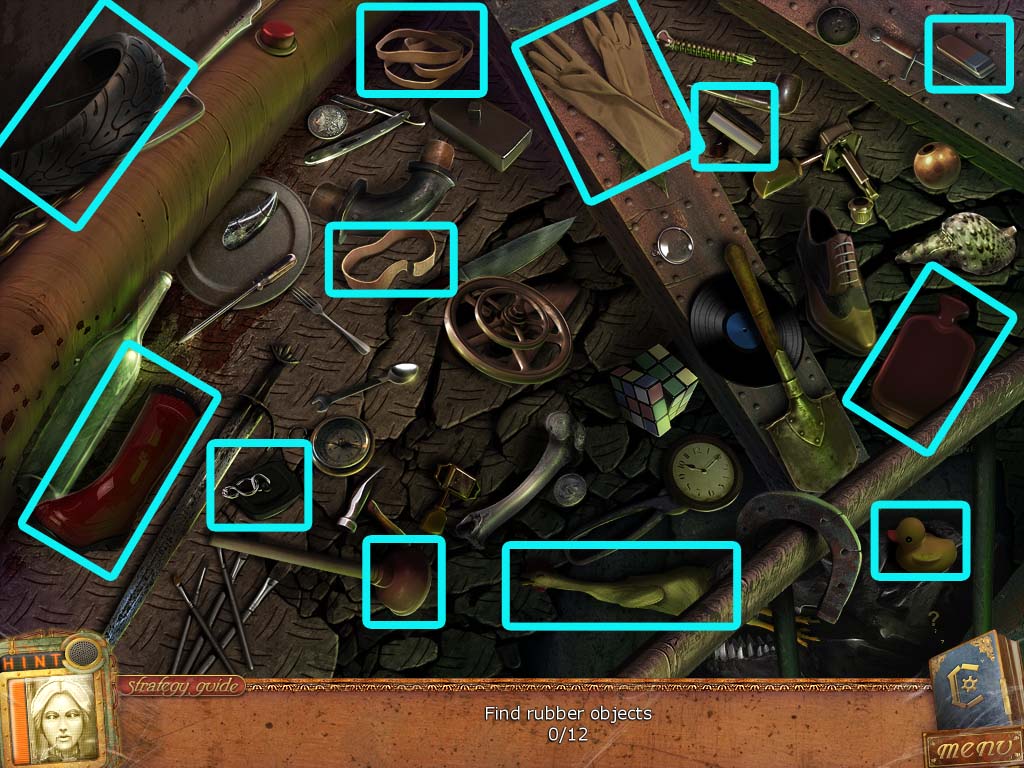
Start the hidden object scene.
Screenshot
You receive rubber gloves.
Use the rubber gloves on the box at the bottom of the right staircase and start the puzzle.
Screenshot
Pick up the electrical coil.
Use the electrical coil on the claws to prevent them from grabbing you.
If you hold the coil on a claw long enough, it blows up.
You escaped!
Posted by: Meaghan |
March 10, 2012 7:24 PM
|
March 10, 2012 7:24 PM