
Eternity
Platform: Mac, Windows
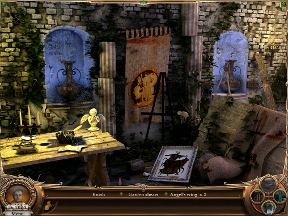
![]() Eternity is a unique sort of hidden object game in that there aren't so many objects to find. Instead, you pick up a few items and spend your time using them to solve inventory puzzles or complete tasks in each area. The set-up is different than usual, giving Eternity a different flavor than most hidden object games you come across, and the variety of locations and strength of puzzles make it an interesting experience.
Eternity is a unique sort of hidden object game in that there aren't so many objects to find. Instead, you pick up a few items and spend your time using them to solve inventory puzzles or complete tasks in each area. The set-up is different than usual, giving Eternity a different flavor than most hidden object games you come across, and the variety of locations and strength of puzzles make it an interesting experience.
 You play as yourself in Eternity, and your crazy ole grandpa has just invented a time machine. Wouldn't you know it, though, he needs your help completing it, so your first set of tasks revolve around finding the missing pieces and assembling them in his workshop. Once you do, gramps takes a trip through time and gets lost, so it's up to you to visit different eras and find clues to learn where grandpa has ended up.
Eternity takes place in a series of historical locations (ancient Egypt, ancient Rome, etc.), each with a small handful of scenes. You can flip between scenes using the convenient tool at the bottom right corner of the screen. Within each area you'll have a few tasks to complete, each involving locating a few items, combining them with other items or objects on the screen, and moving on to the next task. Mission objectives are listed in small print just above your inventory, including a list of which items you'll need to find or what you need to do next.
Mini-games are scarce in Eternity, which isn't necessarily a bad thing, and while finding items isn't the central focus of the game, you will get to complete a hidden object-centric scene from time to time. The name of the game is key items and how to correctly use them, so you'll need to travel back and forth between locations to make sure you've gathered everything you need to complete an objective. When you've done all you can in a particular area, a small check mark appears over its icon.
 Analysis: Eternity has an ambitious design that wants to stray from traditional hidden object gaming and focus on inventory puzzles. Whether or not it succeeds is up to your taste in games. Eternity doesn't hold your hand and tell you exactly what you need to find and where it is. You'll spend a lot of time clicking, wandering, searching, and clicking some more. It's frustrating compared to modern hidden object games that like to shove answers in front of your face, but when compared to classic adventure games, Eternity offers little challenge. If you like your games vague, Eternity will deliver.
Despite its lofty design goals, Eternity does fall a bit short of its intended splendor. This is largely due to the strange fact that hints are almost required to complete some puzzles. Having obtuse solutions is one thing, but when the next step is so ambiguous you couldn't have guessed your way there, clicking the hint button is the only way through. You're not limited in how many times you can call for help, and the timer only takes a minute or two to refill, but I can't help but feel this reliance on "cheating" is a bit of a crutch the game would do well to lose.
Eternity is a little different than most games in the genre, which for many will be reason enough to give it a try. The variety of locations is great, the puzzles are interesting, and you'll have a good time moving between locations solving the riddles in each scene.
![]() Windows:
Windows:
Download the demo
Get the full version
![]() Mac OS X:
Mac OS X:
Download the demo
Get the full version


Walkthrough Guide
(Please allow page to fully load for spoiler tags to be functional.)
Eternity: Walkthrough
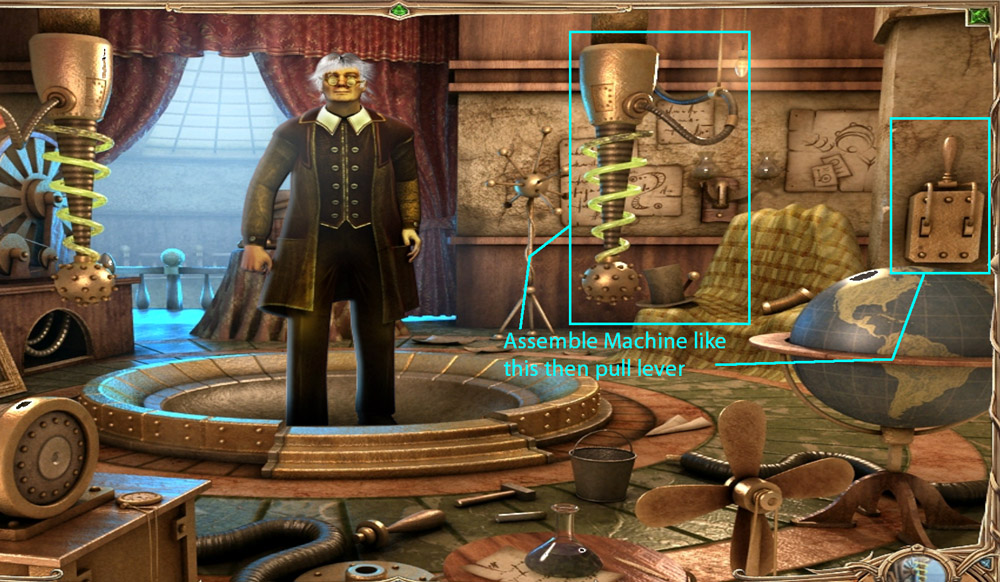
Grandfather's Lab
Find parts to assemble Grandfather's time machine. Look at unit on the left to see the parts you need and where to put them.
Click on the Garden Shears in the front left. Use locator on the bottom right of the screen to go to the Greenhouse.
Click Garden Shears in your inventory then click the center right bushes to enter Cellar. Enter Cellar on locator.
You must find a Lamp for the Cellar. Go to Lab. In lab, pick up Lamp on top right. Go to Time Machine Stand.
Pick up Matches on front table. Combine Matches and Lamp in inventory. Return to Cellar.
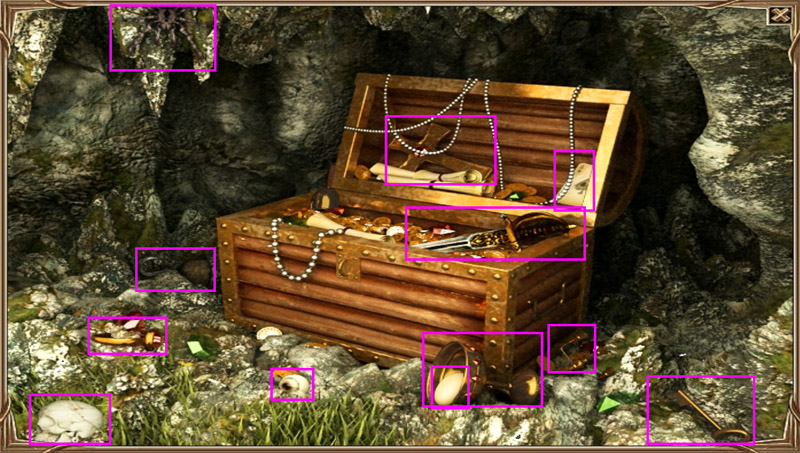
Put Lamp on barrel on right. Click on round object to left of barrel and find the hidden objects
Screenshot
Return to Lab. Pick up Oil Can on far left table.
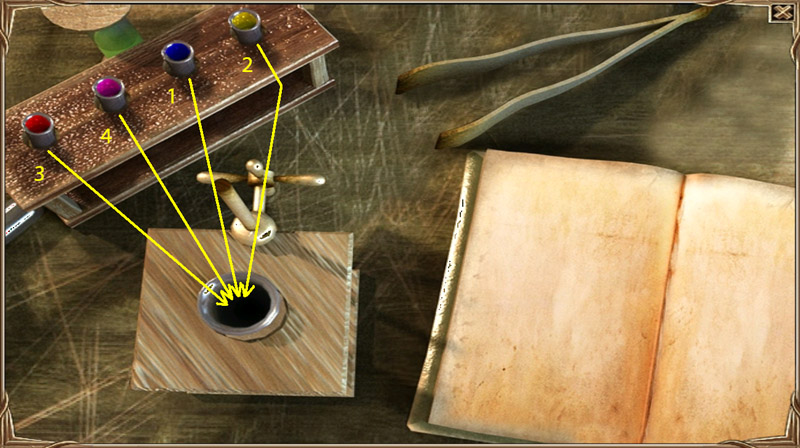
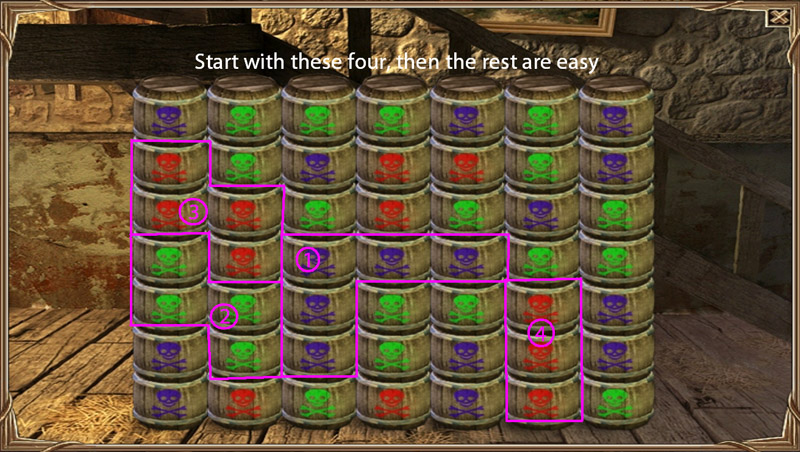
Click on test tubes on center table. Complete the puzzle by clicking the colored test tubes in the proper order. With a little trial and error the pattern should develop.
Screenshot
Pick up Green Liquid. Pick up Coil on desk. Combine the Liquid and the Coil. Return to Greenhouse
Pick up Wire on railing above center door. Pick up Coal by stairs to Cellar. Return to Cellar
Put Oil into funnel on furnace. Open door of coal hopper. Place Coal inside. Use Match to light coal. Return to Time Machine.
Assemble Time machine parts
Screenshot
Pick up note. Return to Greenhouse. Pick up Shears by stairs to Cellar. Use them to cut away plants and click on Capsule. Return to Time Machine.
Place Capsule in center of Time Machine, enter the Capsule and pull the lever.
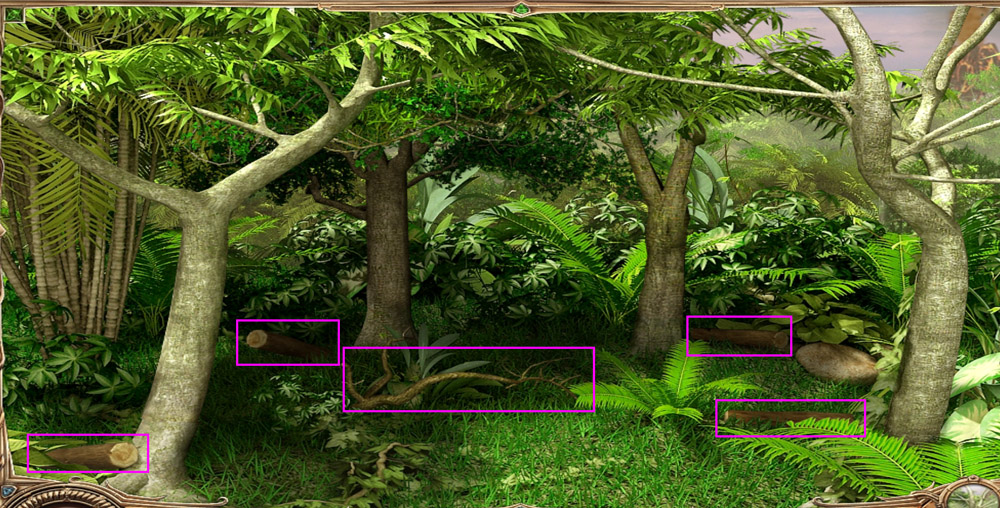
9384 BC
You must make a fire. Go to the Forest and pick up 4 pieces of Wood. Combine the pieces.
Screenshot
Go to Volcano Valley and click Tree Branch into inventory. Place it on volcano vent on right and return to the Cave.
Place Firewood in the pit and put Burning Branch on wood. Go to the Forest.
Pick up the Dragonfly then go to the Swamp.
Give Dragonfly to the Plant then place the Burning Branch in the water. Return to Cave.
Use Charred Wood to draw Cart on cave wall on the right. Click on the ground to the left of the caveman. Find the objects to get the Axe.
Screenshot
Combine the three Axe parts, then go to the Jungle and cut down four trees. Pick up the Logs and Vine on the ground. Return to Swamp.
Pick up two round Stones, then go to Volcano Valley and pick up three more. Combine the 5 Stones, then combine the Wheel, Vine and Logs. Return to the Cave.
2470 BC
Gather timber by picking up the Axe at the pharaoh's feet. Go to the Forest Use Axe to clear the forest. Pick up the Logs and return to Pharaoh.
Got to the Marble Mine. Pick up Rope in center and Pick Axe on far left. Go to the Nile.
Use Pick Axe on rock in front left to dig trench. Use Logs to make dam by clicking on shore to right of trench. Place Rope on the logs to complete dam. Return to Pharaoh.
Go to Temple of Ra. Notice the three items needed in center (Fish, Skull, Clam). Go to the Nile.
Pick up the Clam. Go to the Forest and tip over cauldron to find Fish. Pick up the Cauldron Base. Return to Temple.
Place Fish and Clam in the correct bowls. Pick up Mirror and Scrolls. Pick up Round Stone on right. Return to Pharaoh.
Take Emerald from Pharaoh's head gear. Combine the five items to make Laser. Finish the Mahjong style puzzle. Return to the Mine.
Use the Laser on cliff to the right. Return to Pharaoh. Then, return to the Nile
Pick up Skull in the river then return to the Temple.
Put Skull in the center then find the objects.
Screenshot
Combine Scepter and Regalia then return to the Pharaoh. Pick up artifact.
1640 BC
Got to the Workshop and pick up Shears next to the vase on the right. Pick up the Angel Wings on sculpture and Brush on the table. Go to the Forest.
Use Shears on the forest - make sure to click on the right, left and center. Pick up the Key from the sculpture on the left. Go to the Depot.
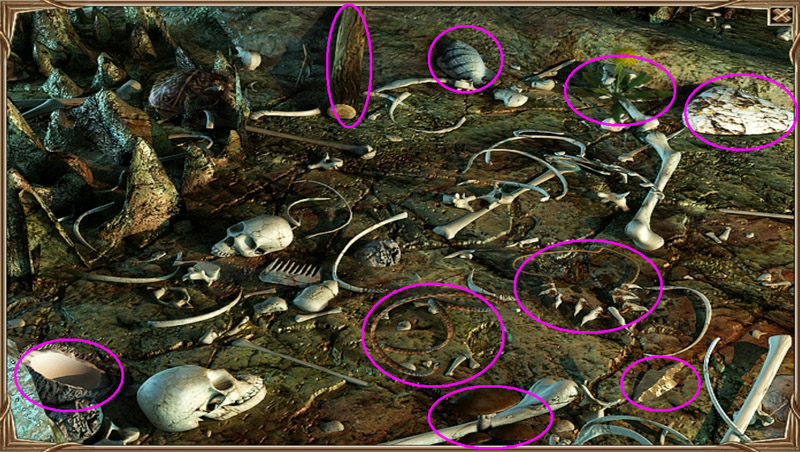
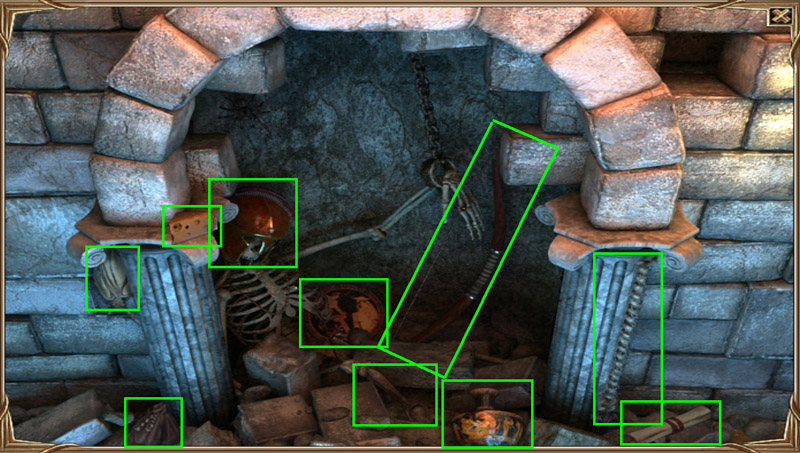
Pick up the Hammer, the Axe, the six pieces of the Bowl and the two Sandals off the skeleton
Screenshot
Combine the pieces of the Bowl do the puzzle (see image below) then return to the Forest.
Screenshot
Put the Bowl beneath the dripping tree branch. Use Axe to cut that branch. Pick up the Bowl once it is full. Return to the Depot.
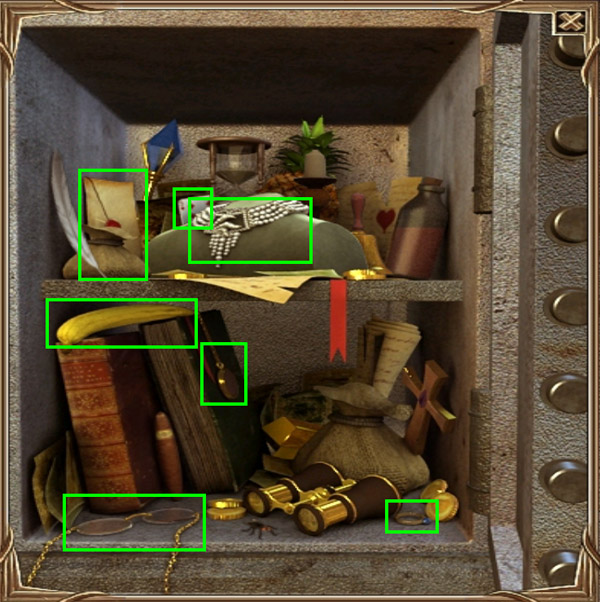
Use the Key on the locked cabinet. Find the objects to get the Shield. (Warning: the objects to find may vary. I tried to mark most you will need to find)
Screenshot
Combine Shield, Tree Juice and Brush. Return to Perseus.
Give Perseus the Sandals and the Shield. Distract Medusa by clicking on her. After he defeats her, smash her statue with the Hammer.
1138 BC
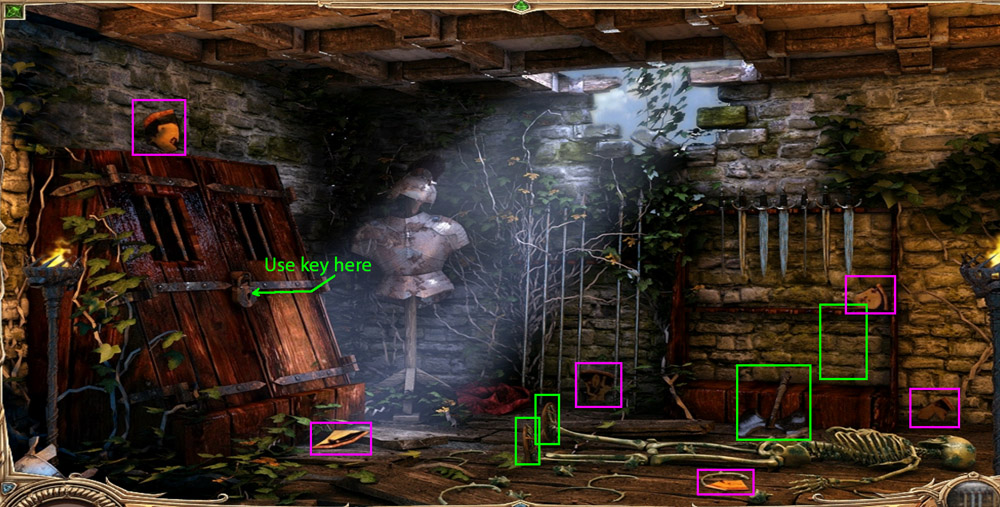
You must hide the sacred papyrus. Get the Papyrus from the chief's hand. Go to the Tunnel of Silence.
Pick up three Skulls (all on right: one on the column, one on the ledge and one on the ground. Pick up Wooden Board on top of ledge to the left. Go to Moon Temple.
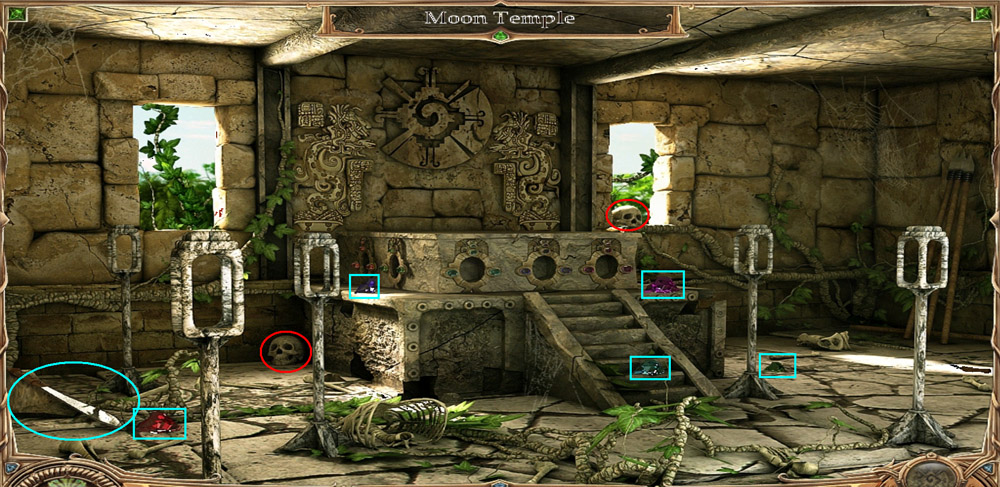
Pick up two Skulls and the five Glass pieces. Also, pick up the Machete
Screenshot
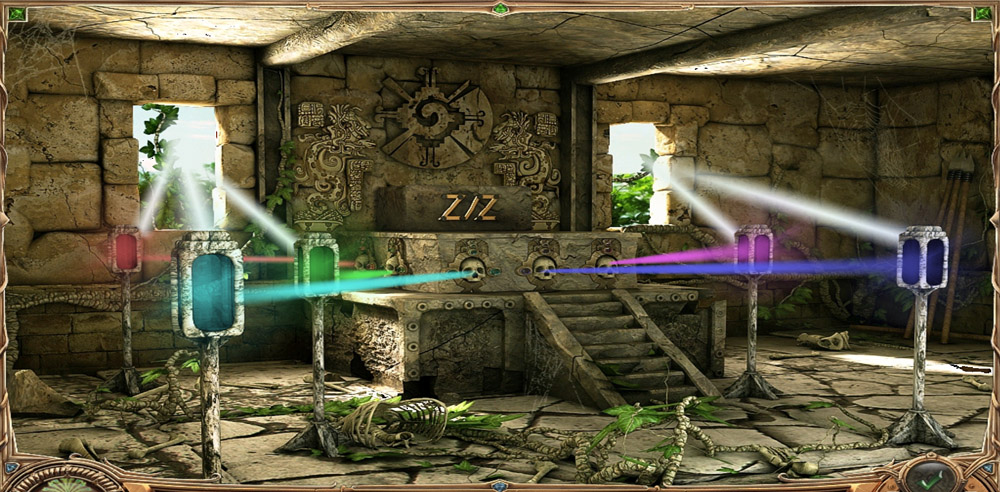
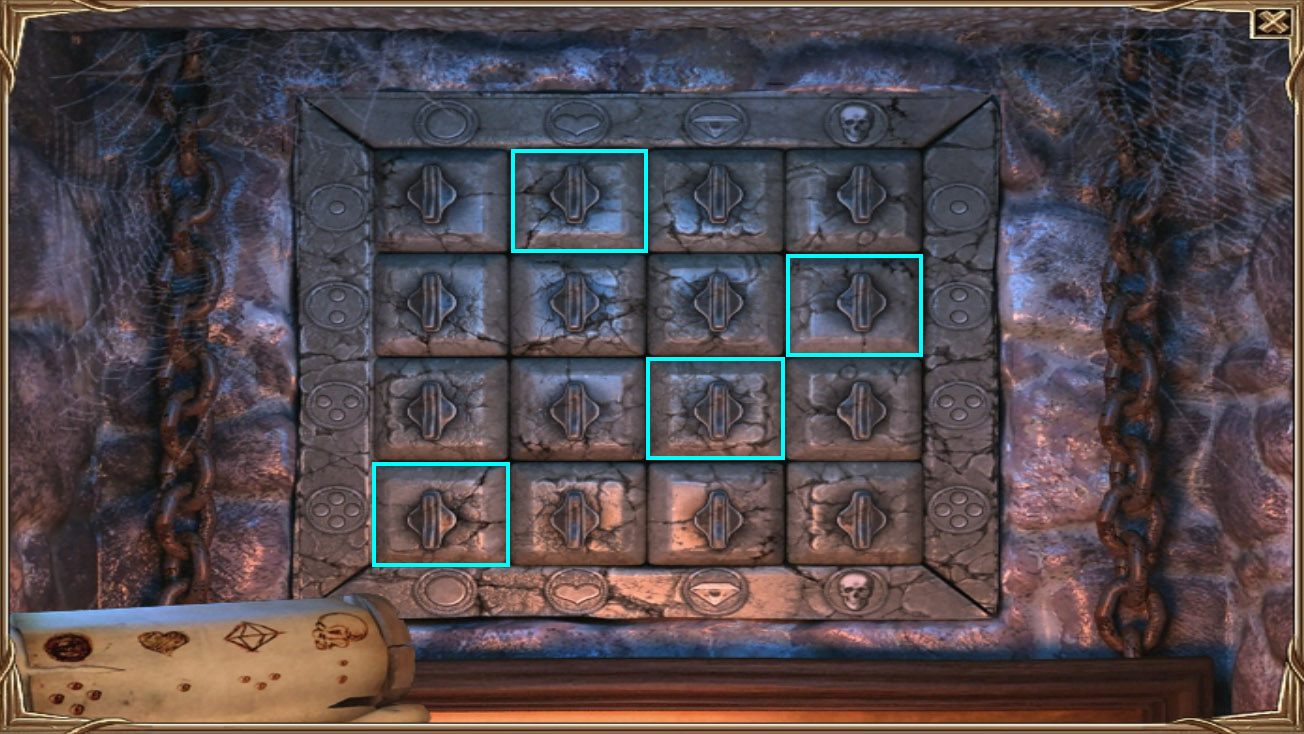
Place the Skulls in the five indents and place the colored Glass pieces in the appropriate mounts so the light hits the correct place on the altar.
Screenshot
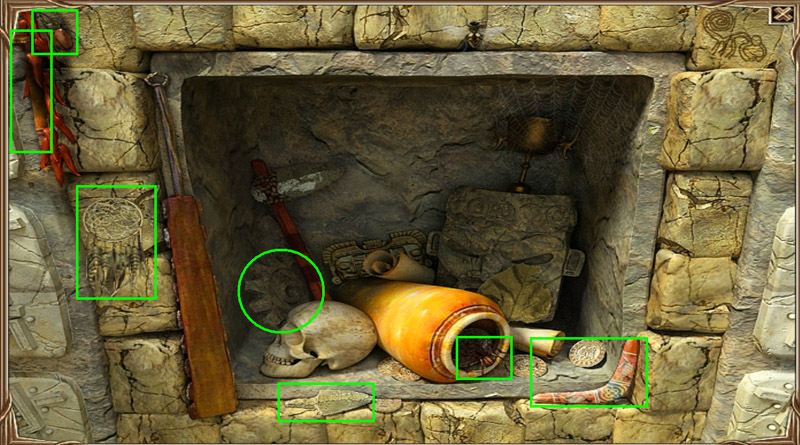
Memorize, or write down the pattern revealed on the altar. Return to the Tunnel
Hit the stone faces in the order you saw on the Altar. Find the objects to get the Gear.
Screenshot
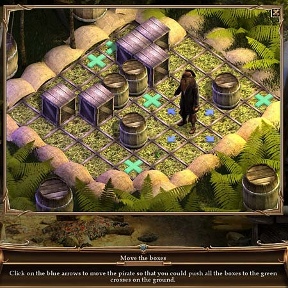
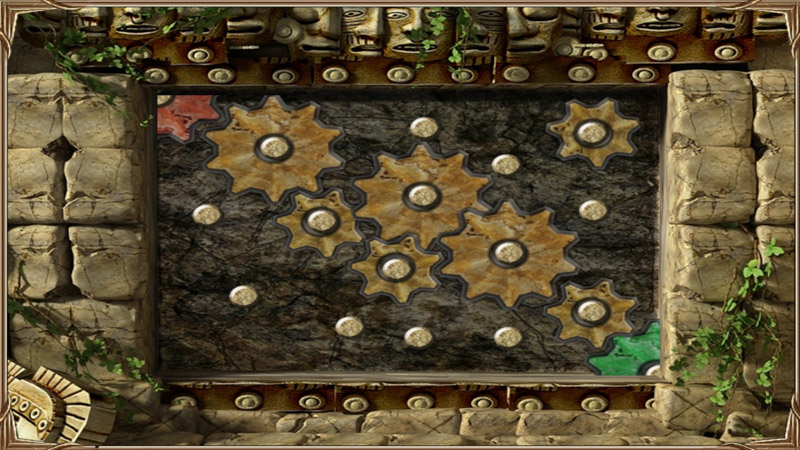
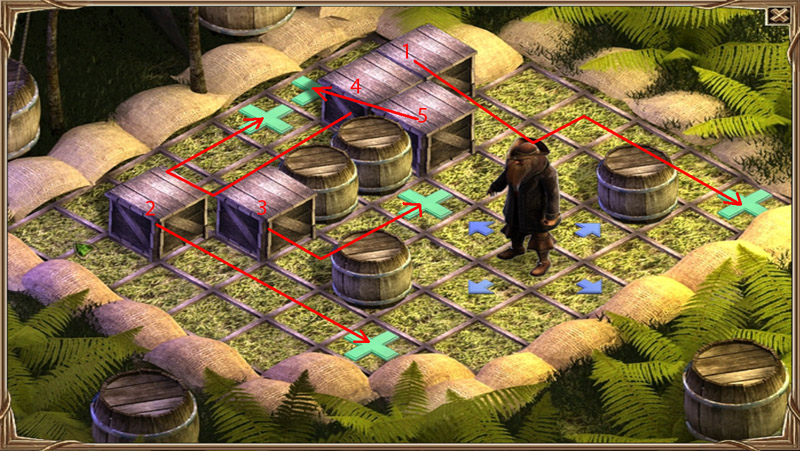
Go to Eagle Canyon. Put the Wooden Board on the bridge. Place the Gear in the temple then do the puzzle. (Note: You don't have to use all the gears to finish the puzzle)
Screenshot
Place the Papyrus on the altar. Use the Machete to cut the bridge. Return to the Chief.
225 BC
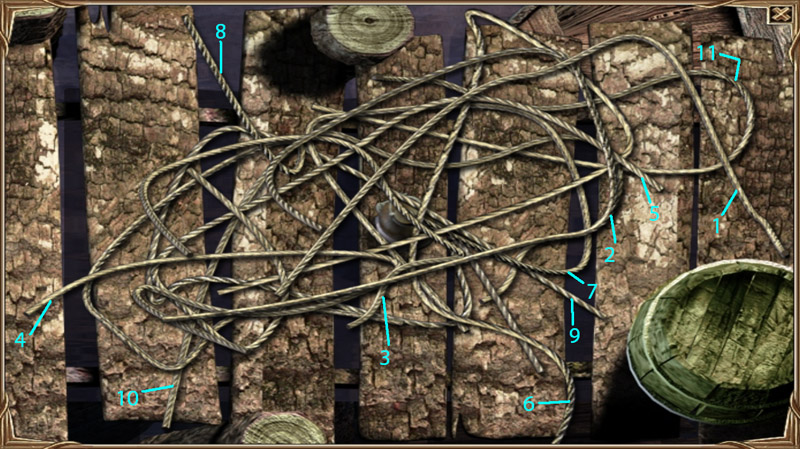
First you must find the String. Go to the Mystic's Sanctuary. Pick up the String on stand then use it to click on the floor of every room. Return to Theseus.
Now find the Bow and Arrow. Return to the Sanctuary.
Pick up the Stick on the left behind the plant. Go to Zeus' Pool and pick up Sword above left door. Return to Hall of Fame.
Pick up Arrow Head at base of back gate. Pick up Hand of Zeus on floor to left. Return to Zeus' Pool.
Place Zeus' Arm on statue and find objects to get Bow.
Screenshot
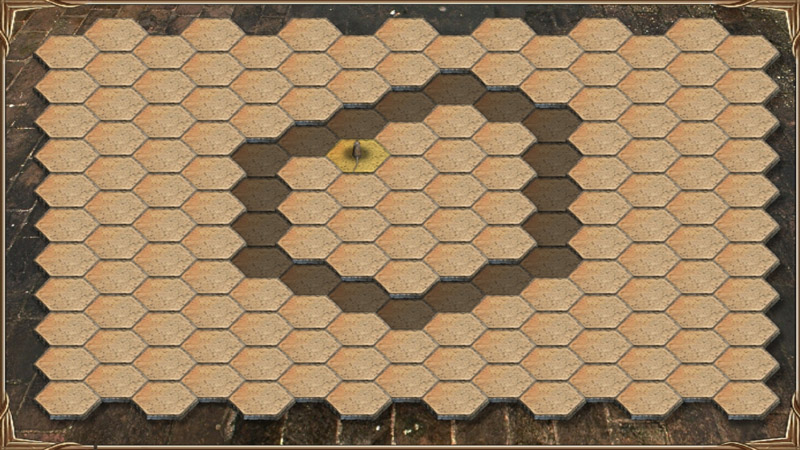
Go to Lair and turn large wheel on right. Return to Zeus' Pool and pick up Key. Go to Sanctuary. Place Cheese on mouse hole to left of altar.
Trap the mouse. Hint: Click a few tiles ahead of where the mouse is pointing. Keep following ahead of him until you're able to enclose him. After that, simply start removing tiles inside the loop.
Screenshot
Return to Hall of Fame and place Mouse on floor. Open bird cage with the Key. Pick up the Feather. Combine Feather, Sword, Stick and Arrowhead. Then, combine Bow and Arrow. Return to Lair.
Give Bow and Arrow to Theseus. Pick up Golden Horn and give it to Theseus.
545 AD
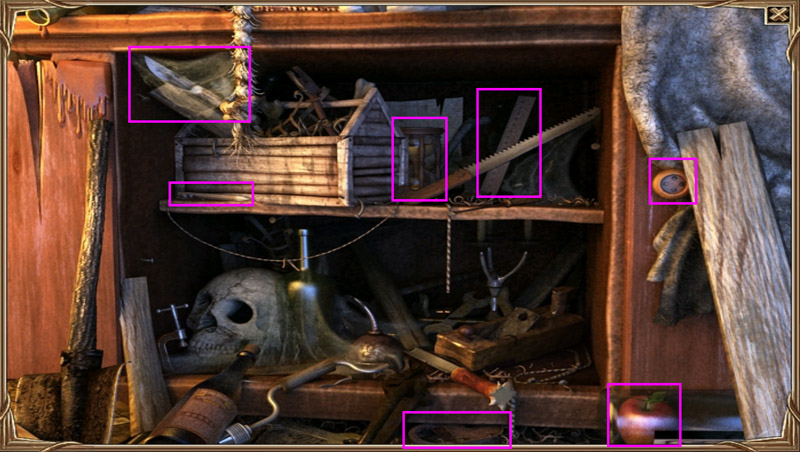
Prepare the Castle. Go to Forge and pick up Sickle Mold and Sword Mold on right. Put Sword Mold on anvil. First click on bellows then click on bucket in fire. Pick up Key on wall to right and go to Barn.
Use Key to open chest. Find objects to get Hammer.
Screenshot
Pick up Hammer and pick up Logs behind the chest. Return to the Forge.
Use Hammer on Sword Mold and pick up Blunt Sword. Place Blunt Sword on grinding wheel on left. Do all the same steps with the Sickle Mold. Return to Inner Yard.
Pick up Axe in hand of jousting dummy. Combine Logs and Axe and pick up War Dredges then place them outside of front of castle.
Use Hammer on top right section of the moat to open it up. Do the moat puzzle by connecting the top with the bottom.
Screenshot
Use Sickle on field in front of castle. Pick up the Wheat. Return to the Barn.
Place Wheat in wooden hopper on left then return to Arthur.
Give the Sword to Arthur and click on wheel to close the gate.
1066 AD
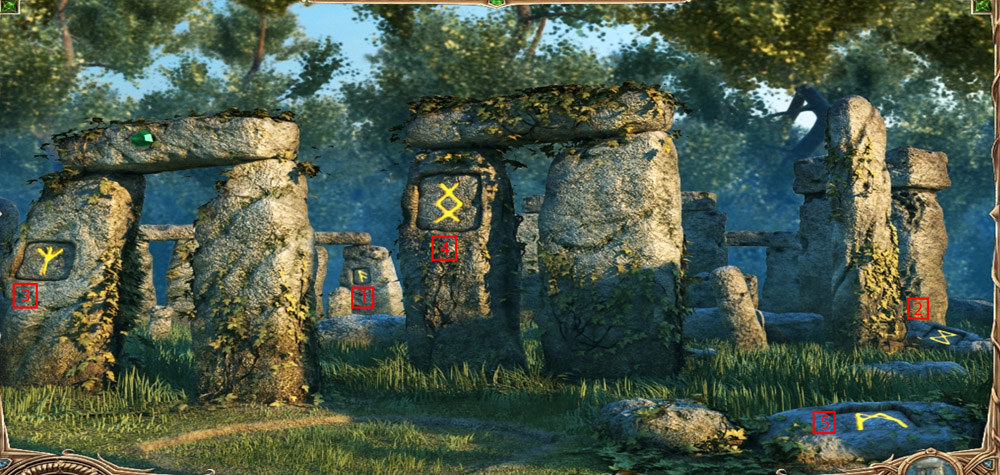
You must fix the catapult. Pick up the Rope on the floor. Go to Stonehenge.
Pick up catapult Handle on ground beneath left-most stones. Go to Red Dogs Village.
Pick up Stone on the right. Put Rope around the back of catapult. Attach Handle on right side of catapult. Place stone in the catapult and turn handle.
Go to King's Hall and memorize the sequence on the shield on the walls. Go to Stonehenge and touch the symbols in the order on the walls.
Screenshot
Pick up Emerald above left-most stones. Look in the Sanctuary. You need the three items on the wall. Go to King's Hall and pick up Helmet. Return to Village.
Click on pile of wood to the left. Find the objects to get Key.
Screenshot
Return to Hall and unlock chest with the Key. Pick up Goblet and return to the Sanctuary.
Place the three items in their proper place. Do the puzzle and pick up Odin's Horn. Return to the Village.
Use Horn on the Village Walls and return to the King's Hall.
1492 AD
First you must disembark. Go to Offering Beach. Pick up the two Paddles. Return to the Caravan.
Place both Paddles on the landing Boat. Go to the Native Settlement.
Pick up the Black Stone (flint) on the ground to the right. Pick up the Tomahawk on stump top the left. Go to Green Meadow.
Throw Tomahawk at branch above the wolf. Pick up the Tinder beneath the tree on the left. Pick up three Magic Herbs and combine them on the rock. Wait until they dry and pick them up. Return to Village.
Place Tinder on the fire pit. Place Flint on the Tinder. Place Dried Herbs on the fire. Go to Offering Beach.
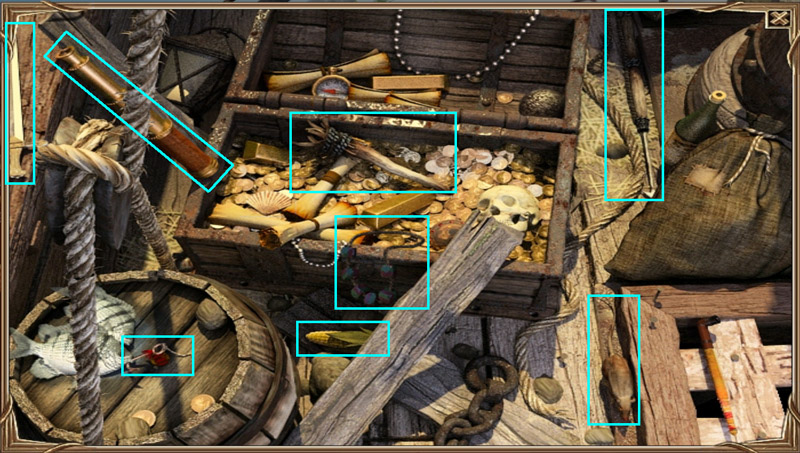
Pick up Log on the right. Pick up Pick in sand on far right. Return to the Caravel.
Pick up Key around Columbus' neck. Use the Key to open the chest on right. Find the objects to get the Torch and Necklace then return to the Settlement.
Screenshot
Place the torch into the fire and return to the Beach.
Place the Necklace in front of the idol. Go to the Secret Mine.
Put the Log on the beam on the right. Put the Torch into the mine. Use Pick Axe on the back wall. Click on the gold and do the puzzle.
Screenshot
Return to Columbus and give him the gold.
1529 AD
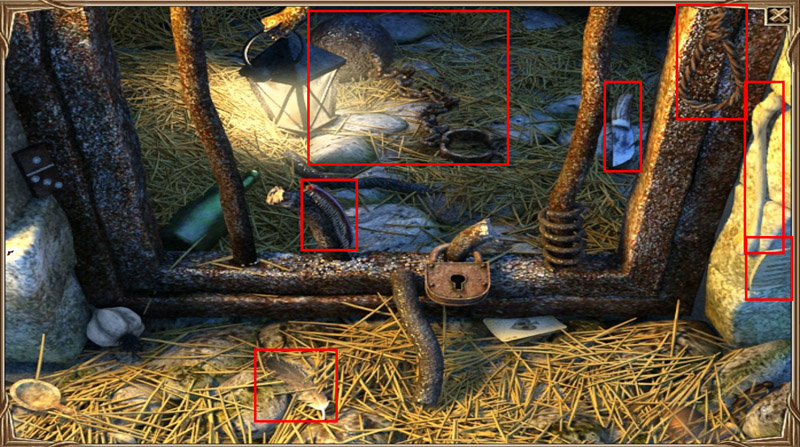
Go to the Barn and pick up the Crowbar behind the barrel on the back wall. Pick up the file on the table.
Go to Sheriff's Office and pick up the Fire Poker to the left of the fire. Go to the Prison.
Pick up the Bat on the hook on the wall to right of the prison door. Use File on the prison gate. Find objects to get the Ball and Chain. Then, return to the Office.
Screenshot
Use Bat on the glass case. Pick up the Scroll. Place Ball and Chain on hook in back on the left. Click to reveal the puzzle.
Screenshot
Return to the Barn. Use the Crowbar on the crate in the back right. Pick up the Bucket. Return to the Village.
Use the Bucket to scoop water from the puddle. Pick up the Bucket and return to the Office.
Click on the fireplace and pour the water on the fire. Use the Poker to pick up the Key from the coals. Use the Key to open the chest and pick up the Money.
Return the Money to Robin Hood.
1572 AD
Find the captain's sword. Pick up the Machete on the ground to the left. Pick up the Scroll on the crate to the right. Click on the crate in back. Do the puzzle
Screenshot
Pick up the Ink then go to the Rain Forest.
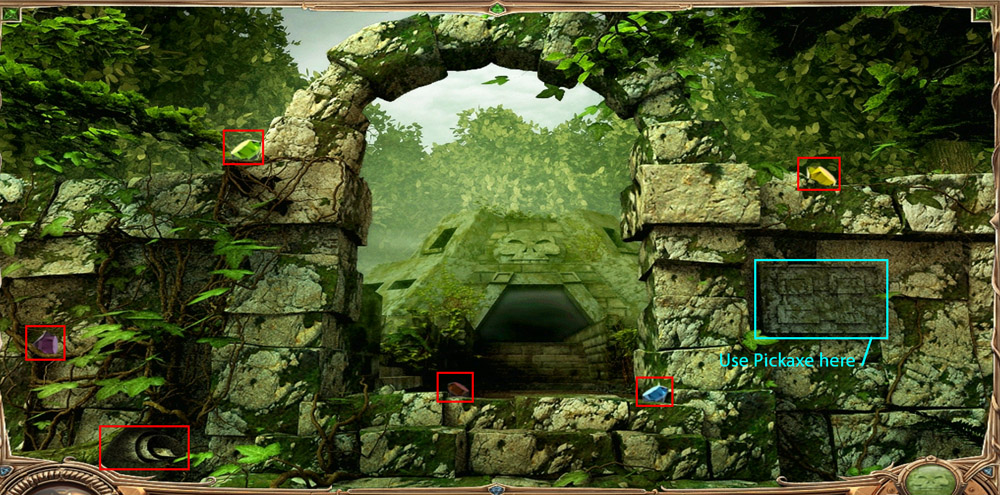
Get the Papyrus in the tree on the right. Use the Machete to clear the bushes on the right and left. Pick up the Papyrus on the left and the Pick Axe on the right. Go to the Meadow.
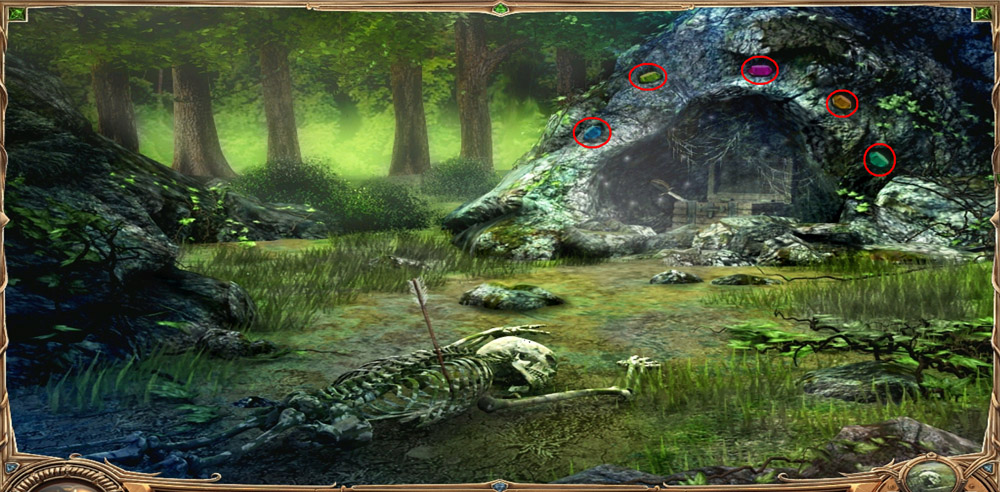
Pick up the five Gems and Papyrus.
Screenshot
Combine the Papyrus. Use the Pick Axe on dark stone on the right. Pick up the Map. Combine the Map, Ink and Papyrus. Click on the Map.
Place the Gems in their proper places above the cave.
Screenshot
Click on the cave and find the objects to get the Sword.
Screenshot
Pick up the Sword and take it to the Pirate.
1661 AD
Return the necklace to the queen. Click the Sword. Go to the Duke's Room.
Use the Sword to slice the curtain between the back shelves. Click on the safe. (Use the clock on the left for the combination: 11, 3, 7 o'clock) Look in the safe
Screenshot
Pick up the Necklace and return it to D'artagnan. Go to the Monastery.
Pick up the Scissors, Wagon Wheel and Candle on the left. Go to the Forest.
Place Wheel on the carriage. Return to the Tavern.
Click barrel in the back left. Play the puzzle.
Screenshot
Combine the Barrel and the Fuse. Return to the Forest.
Place the Barrel under the tree blocking the road. Light the fuse with the Candle. Return to D'artagnan.
1814 AD
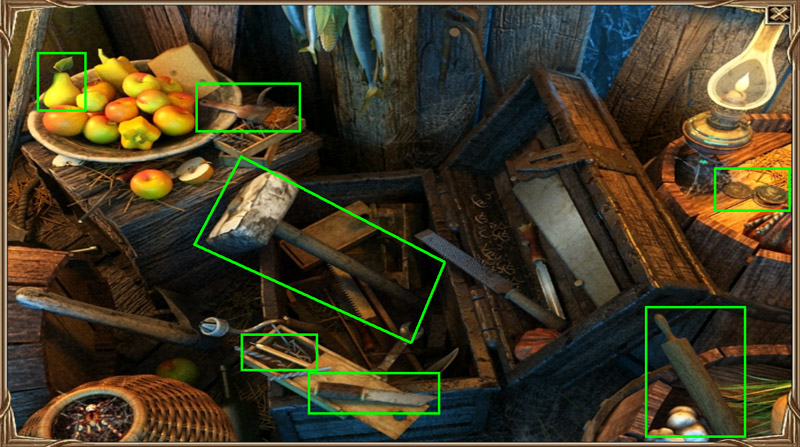
Go to Coffin Maker's Workshop and click on the cabinet to pick up the Knife and the Screwdriver.
Screenshot
Click on the drawing on the wall. You'll need a Nail, Coffee Grinder, Chisel and Saw Handle.
Pick up the seven boards on the floor. Pick up the Saw Handle on back wall. Combine the Saw and Screwdriver. Pick up the Chisel from the Chair on the right.
Pick up the Nail from the top of the coffin on the left. Go to the Kitchen.
Pick up the Coffee Grinder on the shelf. Click on the recipe hanging between the utensils on the right for instructions. Make the recipe.
The Flour is on the table. The Egg is on the shelf above the Coffee Grinder. Pick up the Bowl to the right of the flour. Pick up the spoon on the stove. Combine the four ingredients.
Get the Pot from the stove. Combine the Grinder and the Pot. Put the Chisel, Saw Handle and Nail in the dough then put it in the oven. Go to the Pier.
Pick up the Paddle. Pick up the Lamp down the pier. Do the puzzle.
Screenshot
Place the Lamp and Paddle on the boat. Pick up the Rope from the pier and return to the Prison.
Put Pot on the bed and place the Bread on the bed. Click on it and click on the Pot. Pick up the Wall Hammer. Click below the window. Return to the Pier.
Combine the Rope and the seven Boards to make the Ladder. Cut the rope holding the boat with the Knife. Go to the Castle.
Place the Ladder on the upper window of the castle.
1869 AD
Close the Shutter. Go to the Corridor.
Screenshot
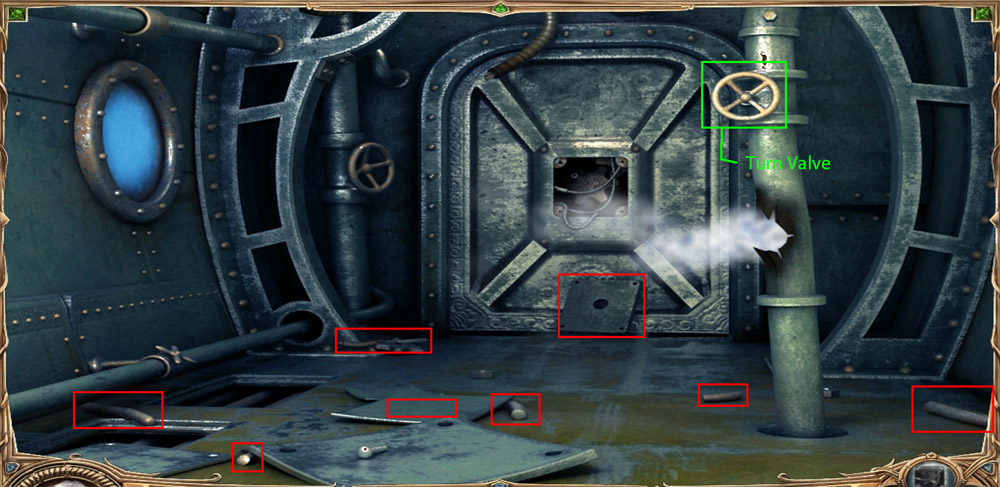
Pick up the Screwdriver and the six Handle Parts. Combine the Handles. Pick up the Door Panel. Turn the valve to shut off the steam. Go to the Lock Chamber.
Pick up the Oil Can on the very top left. Return to the Corridor.
Place the Oil on the door mechanism. Place the Panel on the door. Place the Handle on the door. Turn the handle. Go to the Workshop.
Pick up the yellow Fuse on the far left below the window. Return to the Bridge.
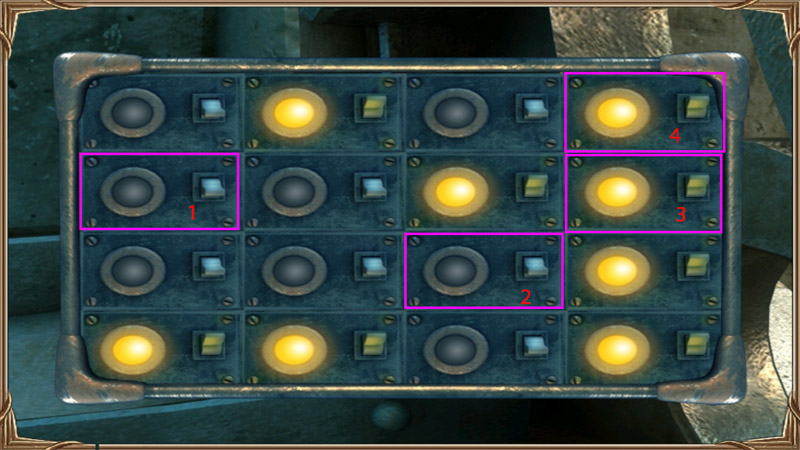
Use the Screwdriver on the panel to the left below the door switch. Place the Fuse in the panel and do the puzzle.
Screenshot
Pull the lever. Return to the Workshop.
Click the work shelves. Find the objects to get the Harpoon parts.
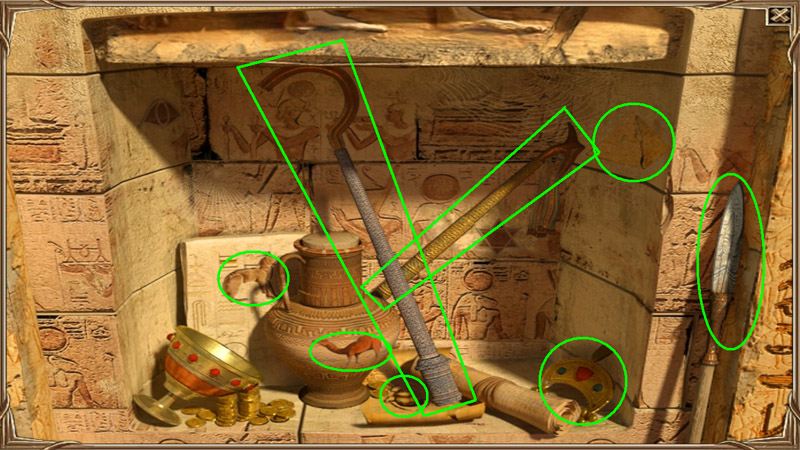
Screenshot
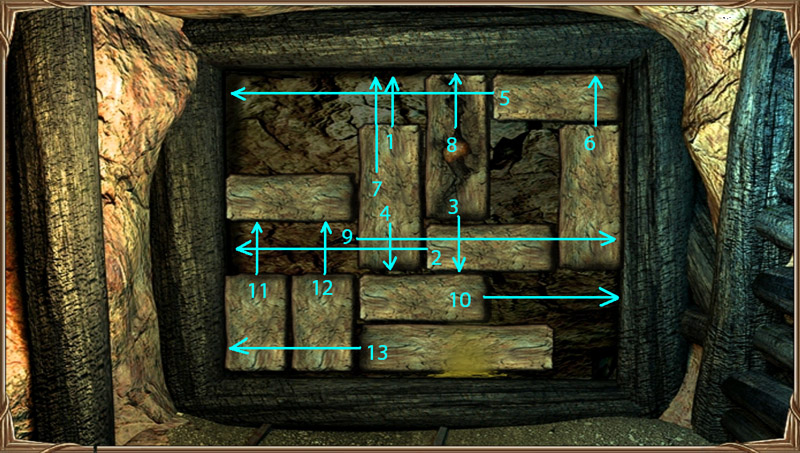
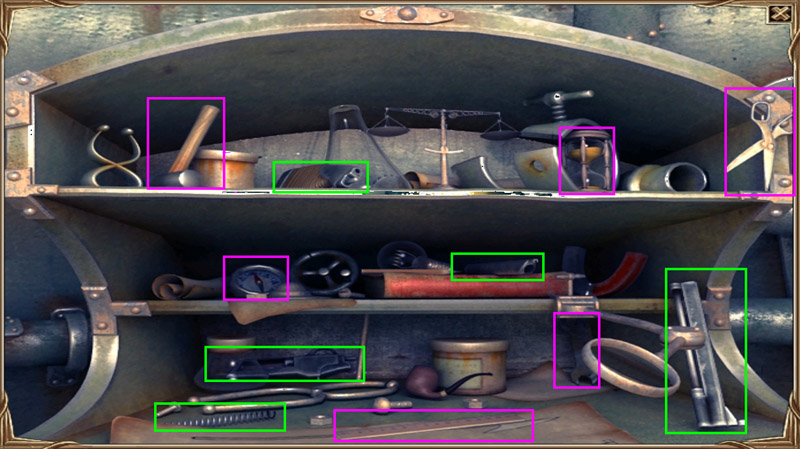
Go to the Lock Chamber. Pick up Harpoon on the floor. Find the ten parts of the diving suit like the image on the right.
Screenshot
Assemble the Suit from the helmet down to the boots in order. Go underwater.
Harpoon the squid then after the cut scene, pull the lever!
Special thanks to Walzar for this fantastic walkthrough!
Posted by: grinnyp |
June 7, 2010 3:46 PM
|
June 7, 2010 3:46 PM