
Eternal Night: Realm of Souls
Platform: Windows
![]() New from Namco comes Eternal Night: Realm of Souls, a finely-crafted adventure game that employs hidden object elements and some very creative puzzle solving. It appears the great Ra has abandoned his people, forcing them to starve under harsh, sunless conditions. To discover the cause of the god's anger, the pharaoh asks for a volunteer to venture to the afterlife. You are that volunteer, and you must root around in the mystical ancient Egyptian afterlife as you search for clues, solve puzzles, and experience some genuinely strange imagery.
New from Namco comes Eternal Night: Realm of Souls, a finely-crafted adventure game that employs hidden object elements and some very creative puzzle solving. It appears the great Ra has abandoned his people, forcing them to starve under harsh, sunless conditions. To discover the cause of the god's anger, the pharaoh asks for a volunteer to venture to the afterlife. You are that volunteer, and you must root around in the mystical ancient Egyptian afterlife as you search for clues, solve puzzles, and experience some genuinely strange imagery.
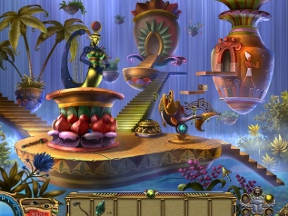 As you probably guessed, the Underworld isn't the friendliest of places, and you'll encounter danger after danger after puzzle as you trek through the territory. Most of your time will be spent searching for items to store in your inventory to use to solve puzzles in nearby areas. The very first room, for example, asks you to locate various foods to make an offering that will open a door. The cursor helpfully changes when you can manipulate, collect, or inspect objects further, so no pixel hunting will be necessary!
Eternal Night: Realm of Souls employs an attractive and extremely useful task system represented by a series of orbs. Each orb outlines an objective in just one or two words. Once it's completed, a check mark appears over it. Orbs connect to each other to form a series of tasks that need to be completed to move on to the next room. Using the game's hint feature uncovers an orb ahead of time, allowing you to peer a few moves ahead to see what needs to be done. Not only does this feature look great on the screen, but it manages to nudge you along without spoiling any of the puzzles.
Mini-games are also appear in Eternal Night: Realm of Souls, and you can even consider the sparse hidden object areas to be just another mini-game. We're not talking simple sliding puzzles or rudimentary number riddles, either. Eternal Night features several unique and interesting mini-games that both remain true to the ancient Egyptian theme and get you to do a little thinking outside of the box.
 Analysis: It seems like we say this often, but Eternal Night: Realm of Souls is a very good looking game. It doesn't need to take rooms full of artists to produce a title that's pleasing to the eyes, just a little attention in the right places. Eternal Night has that attention, as everything from the interface to the world itself is smooth, crisp, and very friendly to look at. The storytelling and voice acting trip up a bit from time to time, but when you're immersed in something this good, it isn't really an issue.
From a gameplay point of view, Eternal Night: Realm of Souls takes a few steps in the direction of adventure gaming, leaving hidden object finding covered in shadows exactly where it should be. Solving puzzles is satisfying. Very satisfying. Your hands are never held, your cursor is never guided. At the same time, you're never really stuck thanks to the slick task bubble menu. Eternal Night hits the sweet spot between challenge and casual entertainment, and for that alone, this game is worth checking out!
With its originality, though, comes a bit of repetition. The first time you see one of the game's neat mini-games, you'll grin. The second time, smirk. After that, you'll just kinda shrug, as the novelty has worn off. You won't be bored, of course, but when presented with original content, you kind of get spoiled, especially with the hidden object "find then place" sections.
Plenty of content to stir your interest, a great presentation to keep you enthralled, and perfectly-honed puzzles to keep your brain intrigued. Eternal Night: Realm of Souls gets everything just right!
![]() Windows:
Windows:
Download the demo
Get the full version
![]() Mac OS X:
Mac OS X:
Not available.
Try Boot Camp or Parallels or CrossOver Games.


Walkthrough Guide
(Please allow page to fully load for spoiler tags to be functional.)
Eternal Night: Realm of Souls Walkthrough
General Information
There is a mini-tutorial at the beginning of the game to teach you the navigation and hint system. In case you forget, or click through to fast, though, here are what the various icons mean:
Open hand: You can pick up an object
Pointing finger: You can interact with the scenery
Magnifying glass: Examine the object further. Often this will lead to a minigame or a hidden object scene.
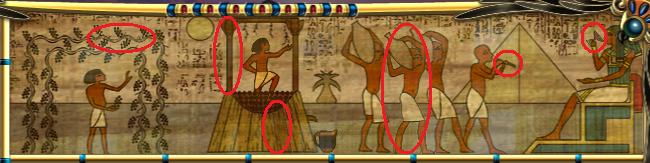
There are two types of hidden object scenes: regular scenes, where you must find the items from a written list, and animated scenes, in which a wall painting is missing six items. You must figure out what the items are, find them in the cluttered scene, and then place them in the correct location on the painting.
There are several types of minigames. The first time you encounter each type of game, instructions for that game will appear. If you need to the instructions again, click the hint button to display them.
If you get stuck, open your task list, and then click on the task you are stuck on. Then click the Hint button to see a short description of the next task you need to complete.
Chapter 1: Enter the Afterlife
Task: Open the False Door
There will be a mini tutorial on how to navigate and collect items. The walkthrough will pick up where the mini tutorial ends.
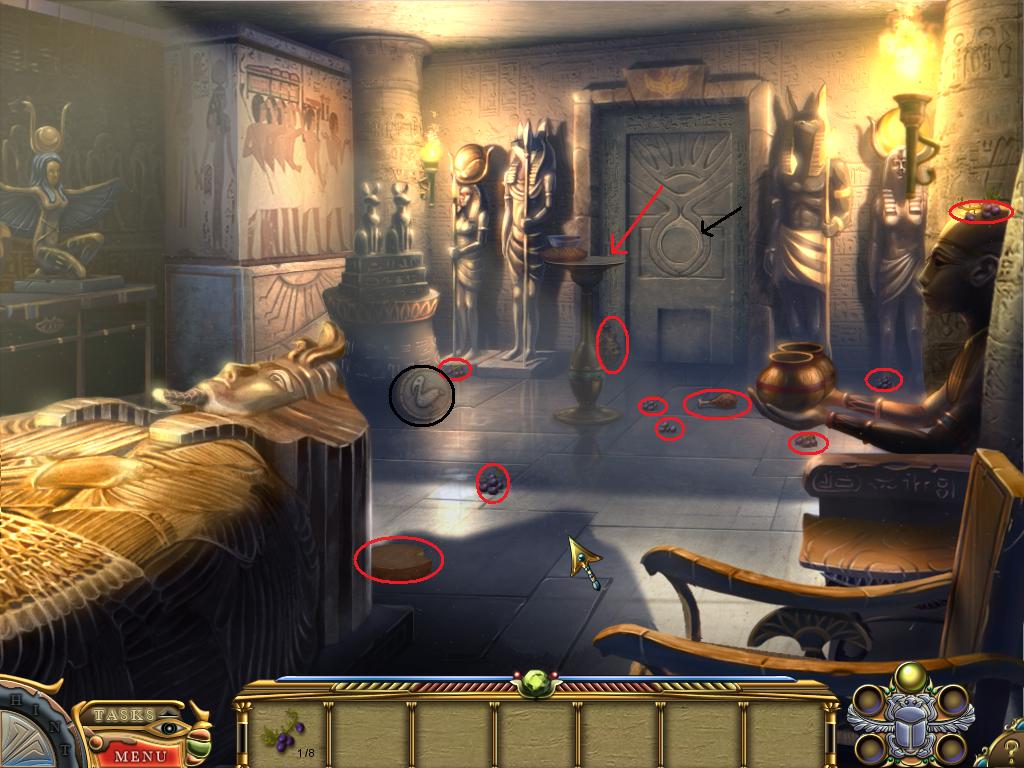
Collect the rest of the food and drink items.
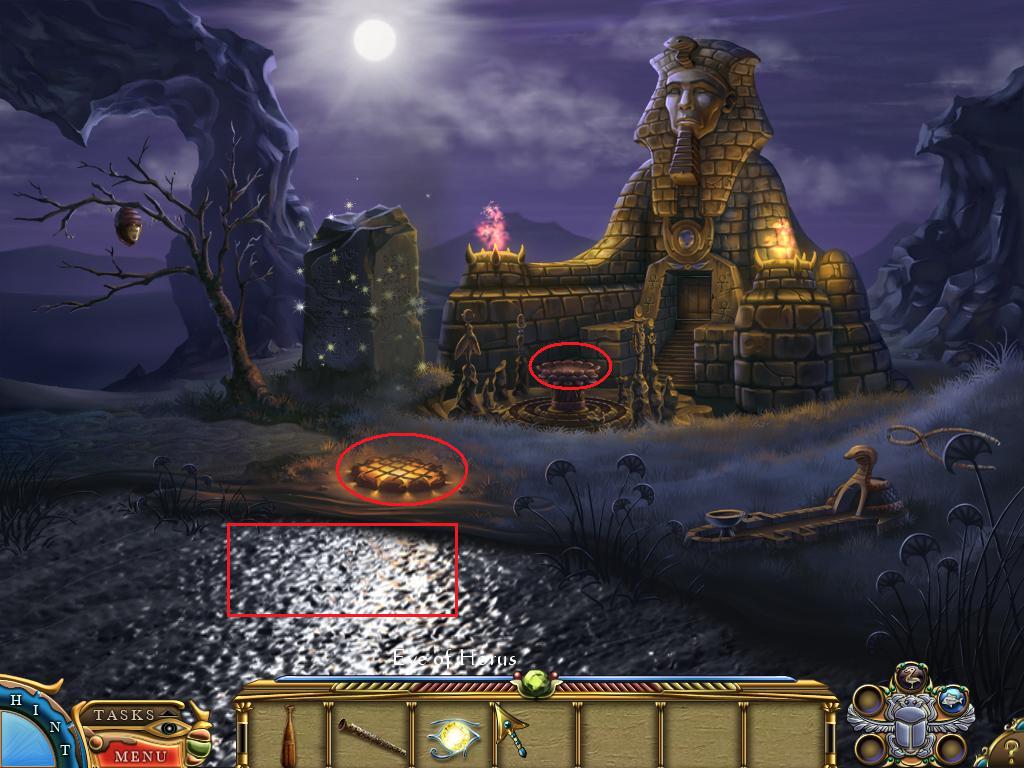
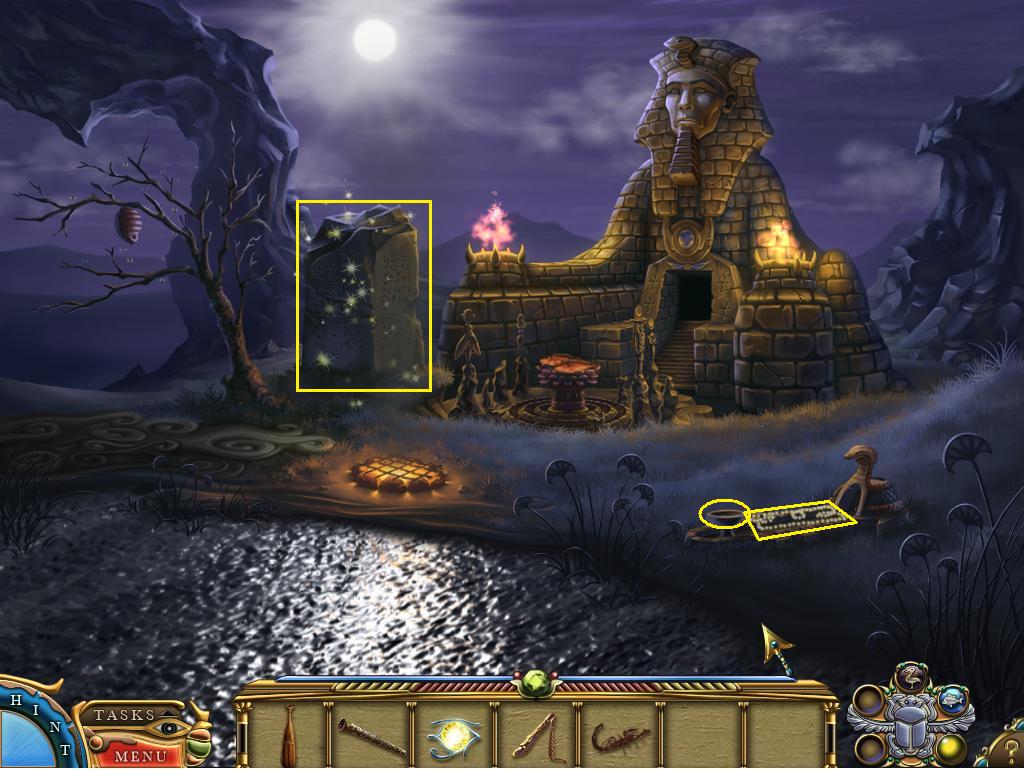
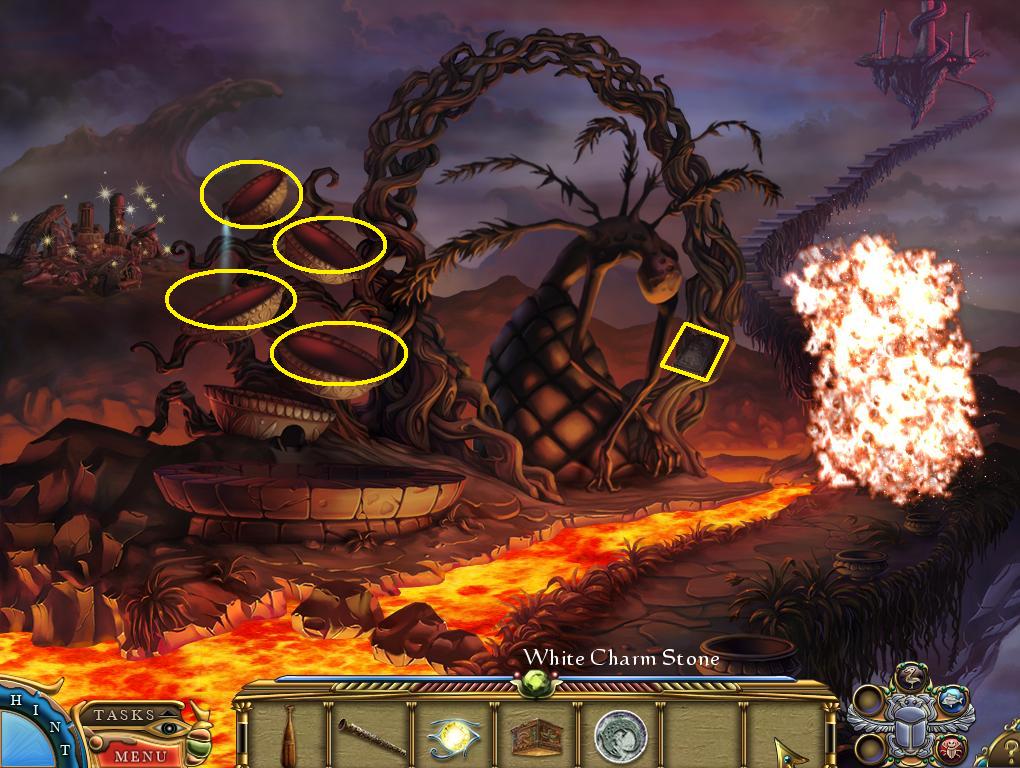
Take the Charm Stone
Screenshot: Charm Stone and Food Offerings
Make an offering by placing all the food items on the offering pedestal.
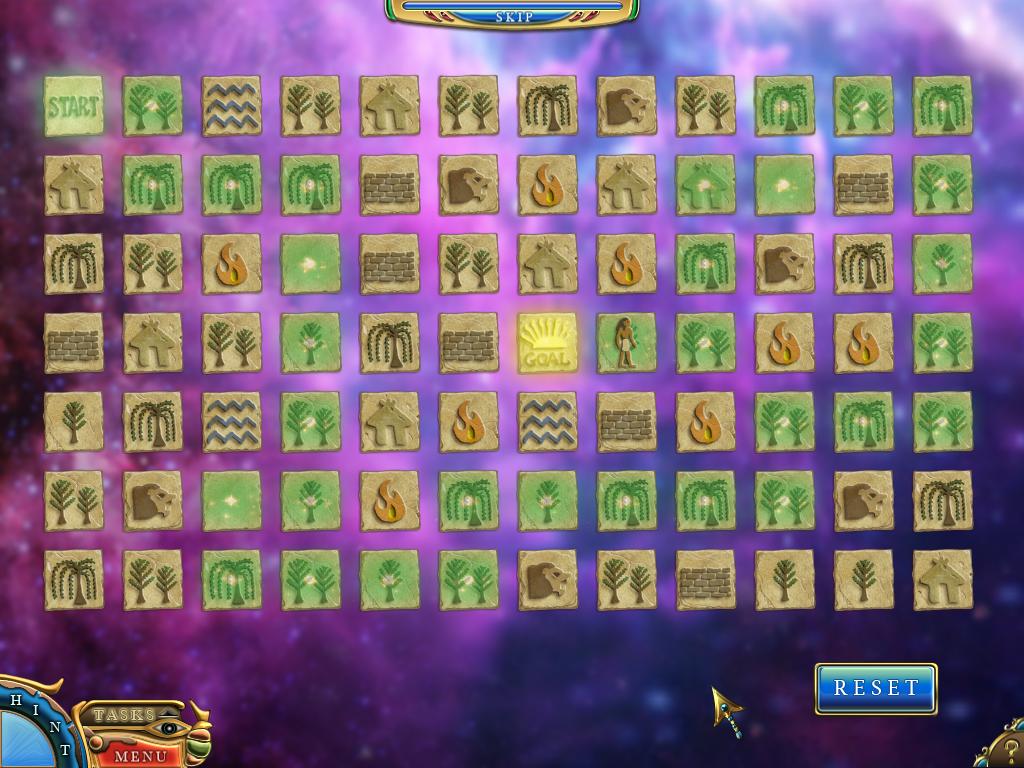
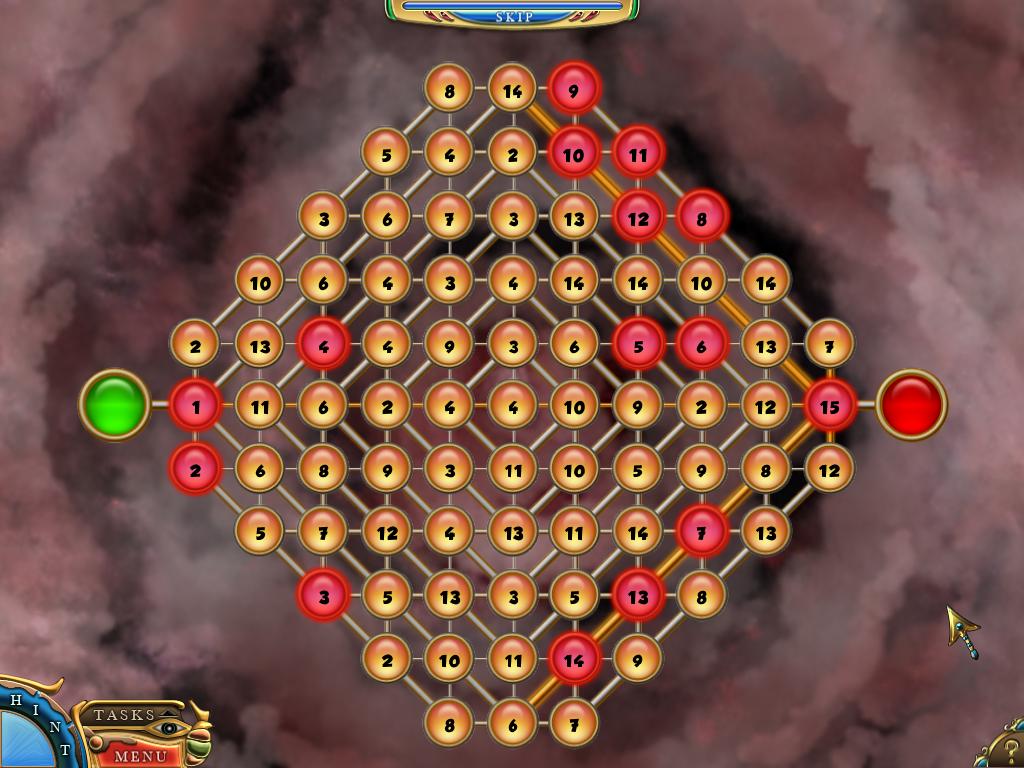
Use the Charm Stone on the door to launch a minigame.
Screenshot: Minigame Solution
Exit Room
Task: Cross the Bridge
As you enter the new scene, there will be a cutscene, then a mini tutorial on how to open hidden object scenes.
Screenshot: Finding the Hidden Objects
Screenshot: Placing the Hidden Object
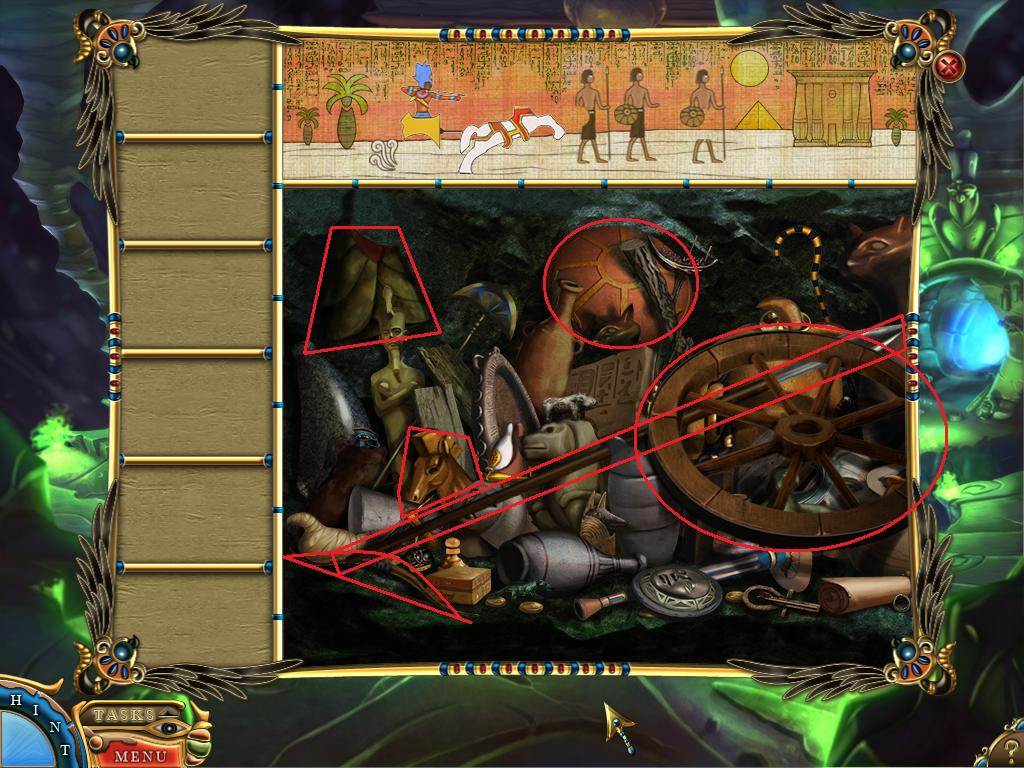
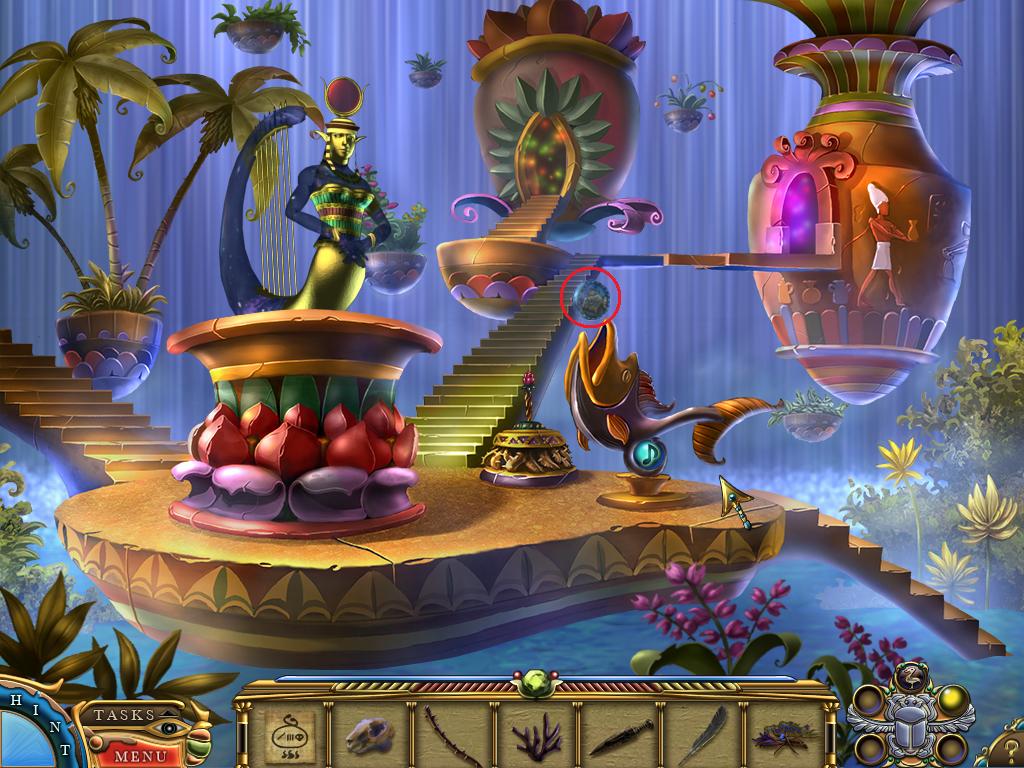
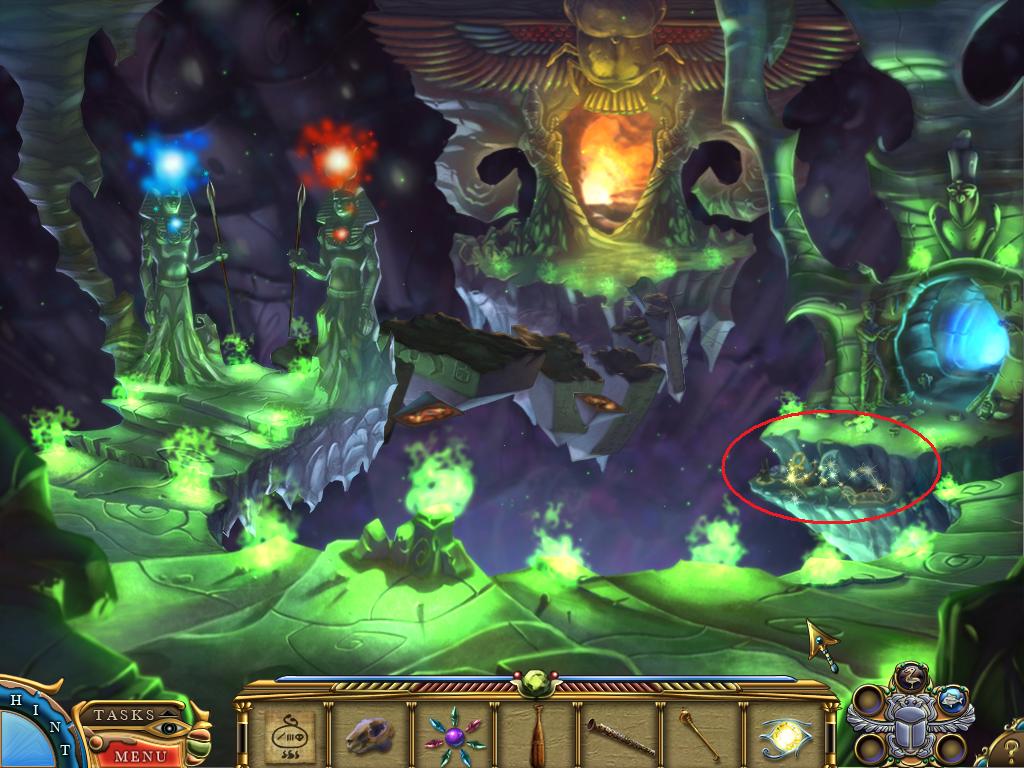
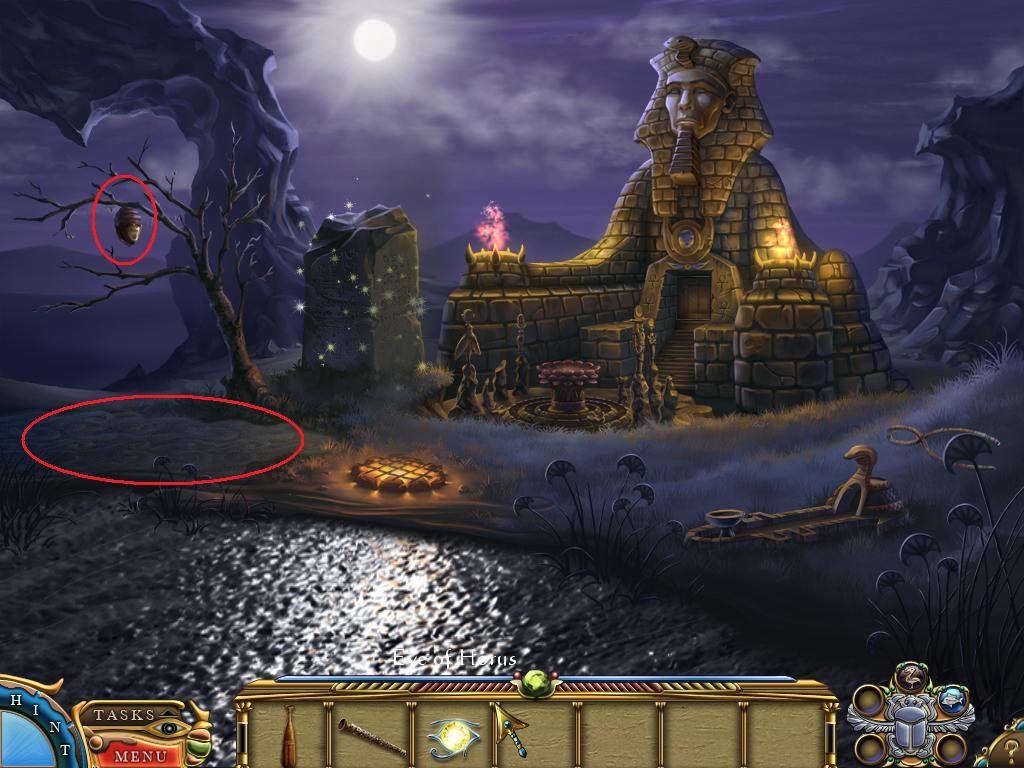
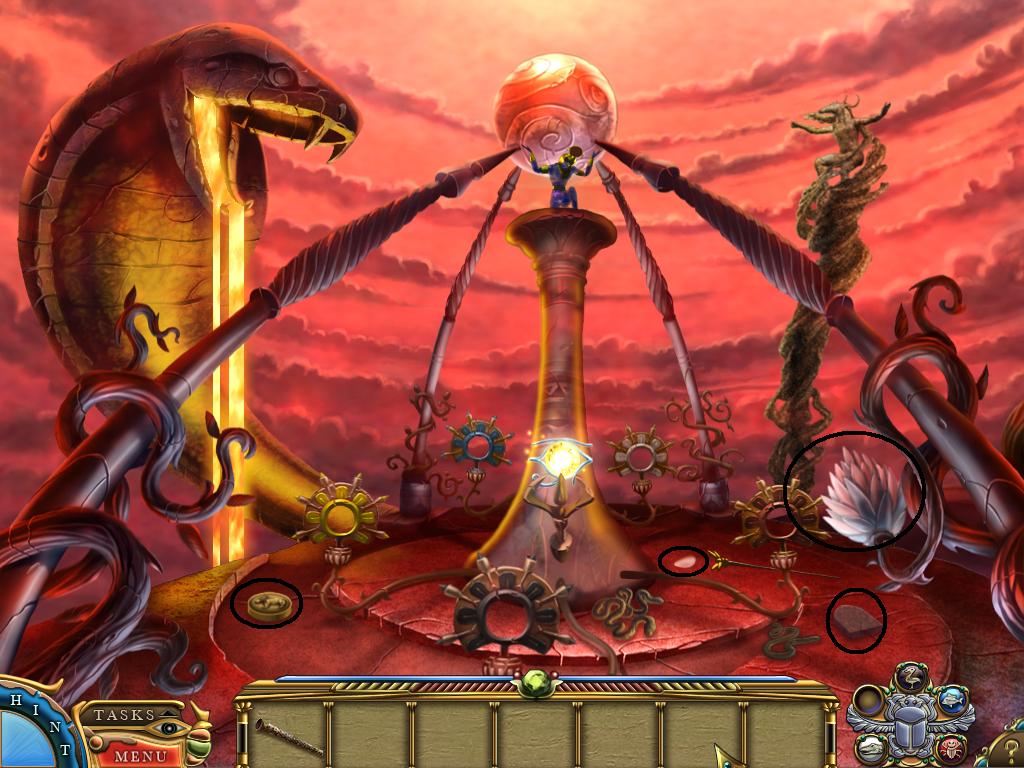
Collect pieces of fur and the red lens. These items are marked with circles in the following screenshot:
Screenshot: Anubis Scene
Once you have all the pieces of fur, the blue scarab in the lower right will glow. Click on it to complete the frost charm. If the minigame for completing the charm is too difficult, you can wait until the timer at the top fills, then click 'Skip' to exit the game.
Click on the cave entrance, marked with an arrow in the screenshot above.
Click on the lost soul standing behind the pool to learn that it will trade you a pretty necklace for some moonflower seeds.
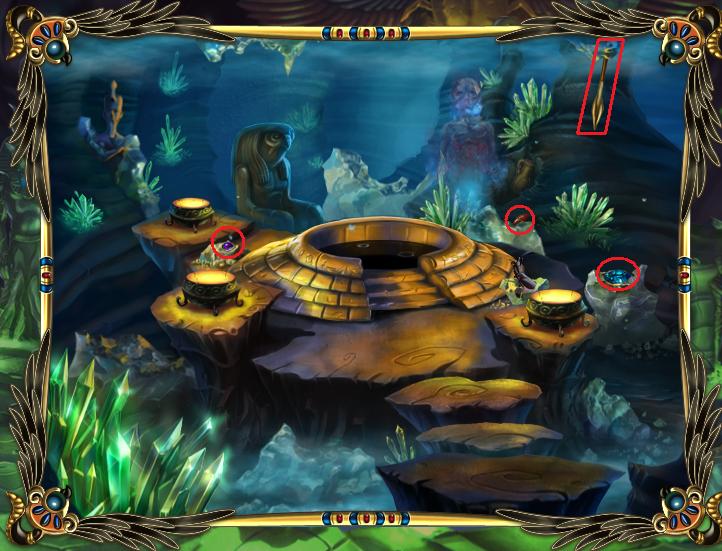
Now that you have the frost charm, you can click on all the pieces of ice to shatter them. Collect two gems, a spear, and a blue lens.
Screenshot: Pool scene
Click anywhere outside the borders of the pool scene to return to the Anubis scene.
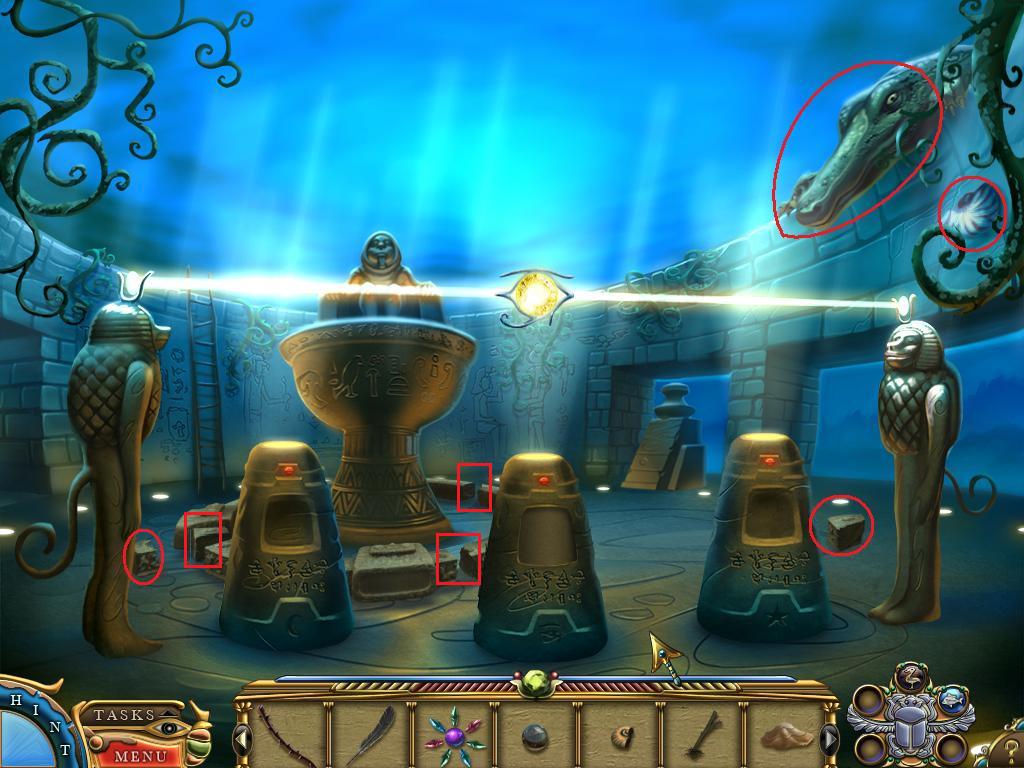
Take the shovel handle from the statue's hand, indicated with a rectangle in the following screenshot. Follow the mini tutorial on combining items.
Place the spear in the statue's hand. Place the blue lens in the left statue's headdress and the red lens in the right statue's headdress, indicated with squares in the following screenshot.
Screenshot: Anubis Scene
Click on the sparkling blue light on the left statue to launch a minigame. Play the minigame, or wait for the skip timer, to repair the bridge.
Exit the area.
Chapter 2: Explore the Afterlife
Task: Find an Escape
Enter the fire portal scene. Collect the gems from the ground.
Use the shovel on the rubble in the upper right of the screen.
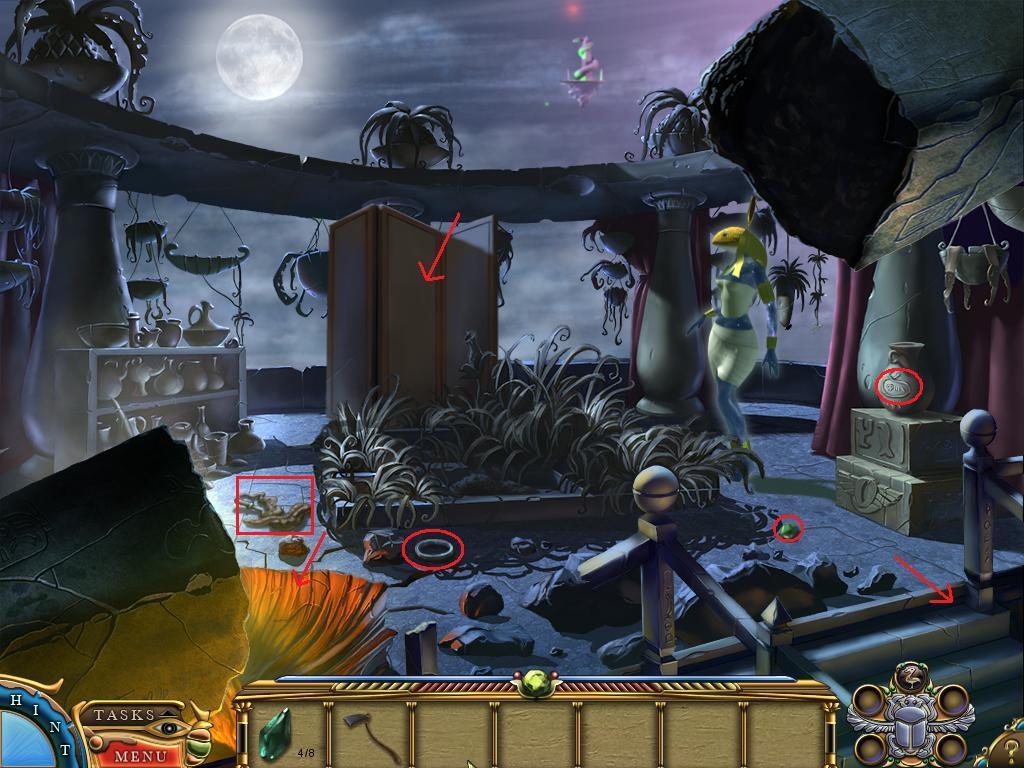
Screenshot: Gems and Rubble
Exit the scene to the goddess' garden
Click on the goddess and listen to her speech.
Task: Help the Goddess
Collect the gem, metal ring, and code from the brazier (indicated with circles in the following screenshot)
Click on the screen, removing the shadow from the garden plot (indicated by the arrow in the screenshot.
Screenshot: Goddess' Garden
Click on the shelves, and note that one of the seed jars is missing.
Click on the snake to learn that you can't move it. Trying to kill it with the shovel won't work either.
Exit from the bottom right of the screen to Hathor's pool.
In Hathor's pool, take the gem, tablet, blue flower and lever.
Screenshot: Hathor's Pool
Click the fish to wake Hathor. She sings strangely - something must be wrong with her voice.
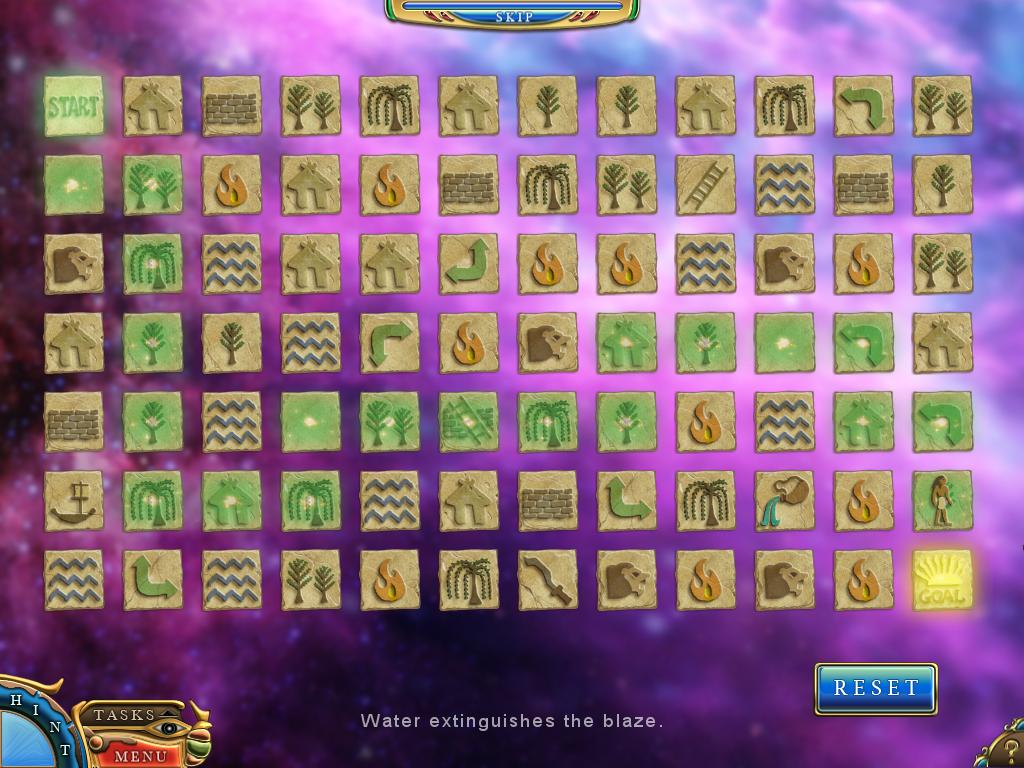
Click on the door in the upper center of the screen - exit number 2 in the screenshot above - to launch a minigame.
Screenshot: Maze Minigame
After you've solved the maze, enter the river bank scene. Take the two blue flowers, the thorny branch, gem, and clay.
Use the shovel on the dirt pile to get the skull.
Exit the river bank scene.
Use the lever on the flower pedestal by the singing fish.
Enter the workshop - doorway three in the screenshot of Hathor's pool.
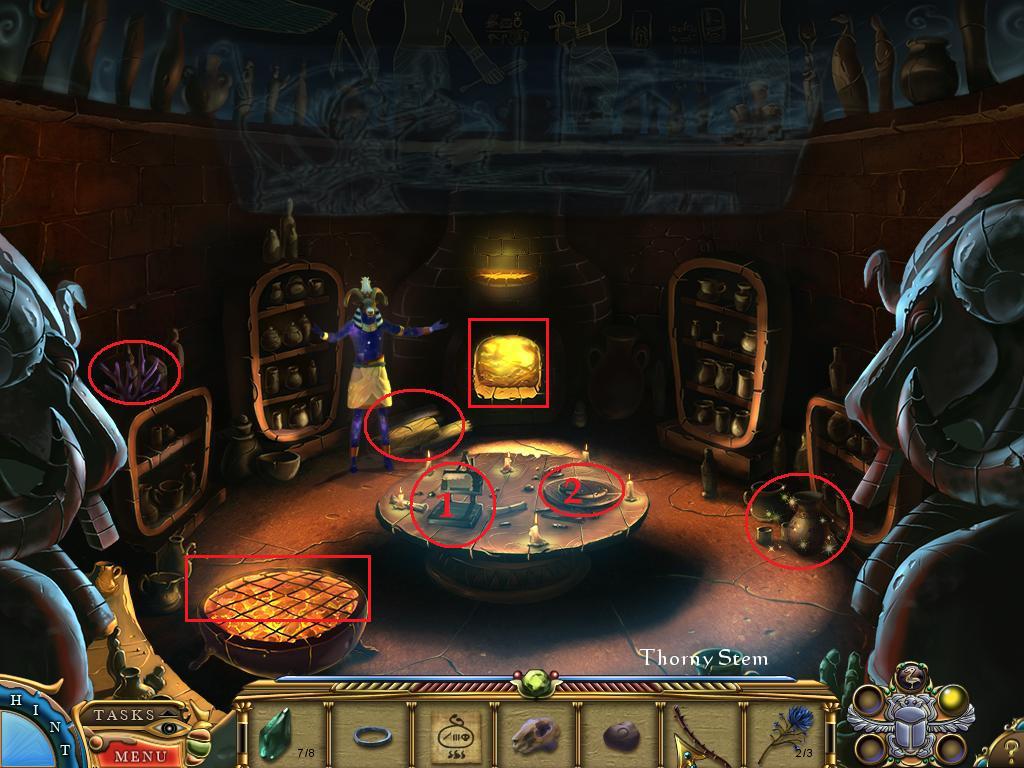
Take the coral
Screenshot: Khnum's Workshop
Click on the god and learn that he needs clay. Give the clay to the god.
Click on the pottery wheel - area number 2 in the above screenshot - and play the minigame.
After completing the clay baby minigame, the god will leave. Take the log from behind him and put it in the fire. Take the ashes from the fireplace.
Place the blue flowers on the warm grate in the front of the scene. Wait a moment, then take the dried flowers.
Click on the vase with sparkles on the right of the screen and play the hidden object scene. Use the arrows on either side of the vase to rotate it.
Screenshot: Hidden Object Solution
Take the necklace and then return to the screen with the lost soul (in the cave off the screen where you met Anubis).
Give the necklace to the lost soul, and take the seeds.
Screenshot: Trading for Seeds
Return to the goddess' garden.
Use the ash on the ground in the center of the screen.
Use the seeds on the fertilized ground.
Talk to the goddess and receive the harp string.
Task: Gain Hathor's Help
Return to Hathor's pool and give the harp string to Hathor.
Now that Hathor has her voice back, click on the fish again. Hathor will sing sweetly. After the duet, a blue charm stone will appear above the fish. Take it.
Screenshot: Blue Charm Stone
Click on Hathor again and learn that you need a flute to overcome the snakes.
Click on the blue scarab and complete the underwater charm.
Take the far right exit (labeled number four) to the underwater pyramid.
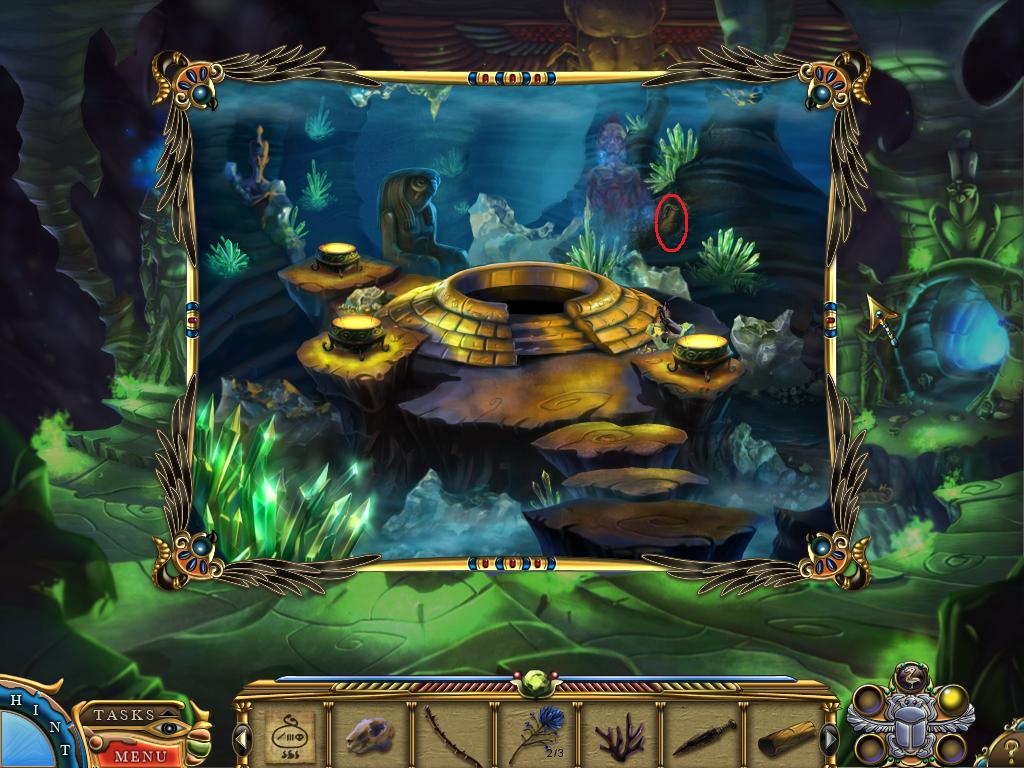
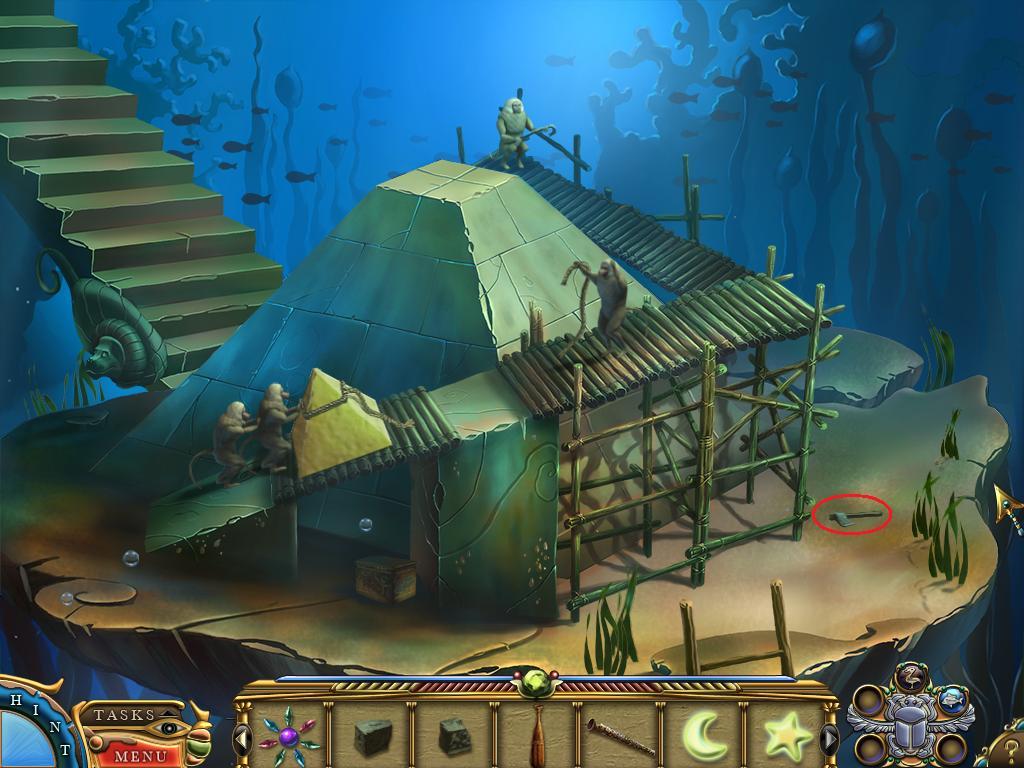
Take the gem, metal sphere, sand, stick, and seashell piece.
Screenshot: Underwater Pyramid
Note that you cannot open the chest. Click on the workers to learn that the rope and logs are used to move the capstone to the pyramid. The worker at the top has a crowbar and the worker on the ground is holding an axe, neither of which you can take right now.
Exit by the bottom of the screen to the portal scene. Take the portal pieces and seashell pieces, indicated by circles on the following screenshot.
Screenshot: Portal Scene
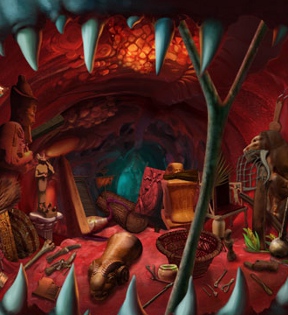
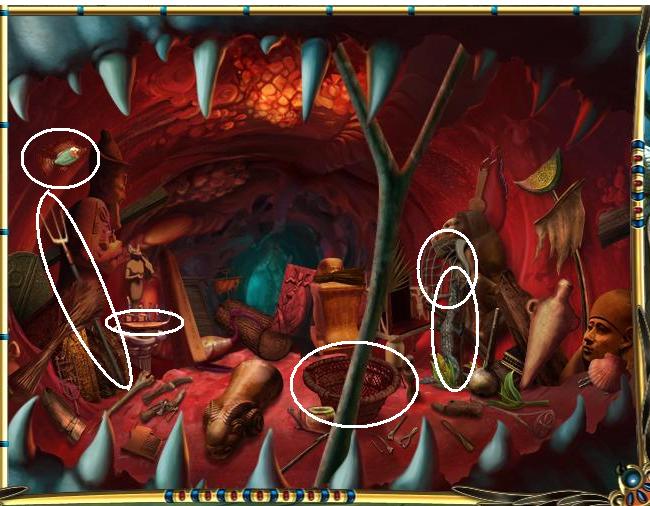
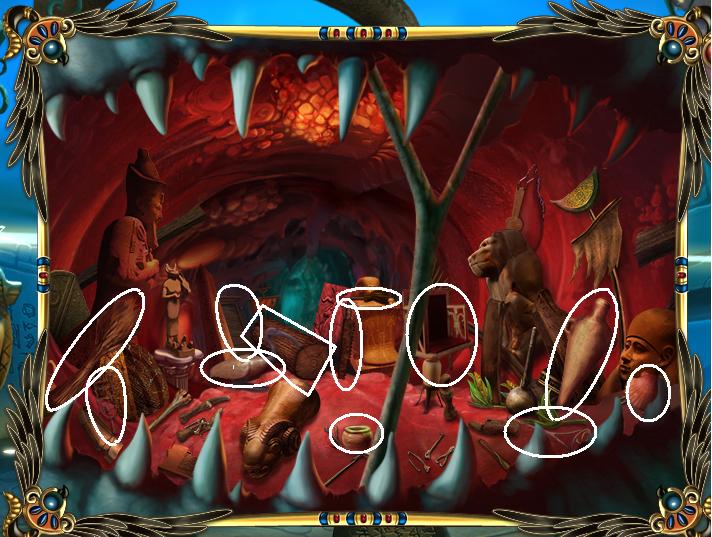
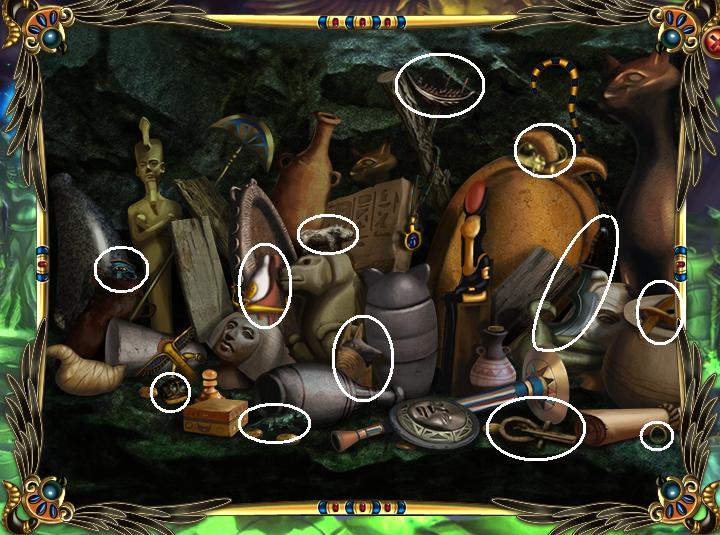
Use the stick on the alligator in the upper right. Click on the alligator's open mouth to launch a hidden object scene.
Screenshot: Hidden Object Locations
Screenshot: Hidden Object Solution
Take the bottle of magic potion and return to the workshop.
In Khnum's workshop, click on the pottery wheel and play the minigame to get a clay flute.
Take the flute and exit the pottery wheel. Click on the workspace and place the flute there.
Use the sand on the flute, then use the potion on the flute. Take the completed flute.
Exit the workshop and click on Hathor to receive the cats-eye stone.
Task: Repair the Portal
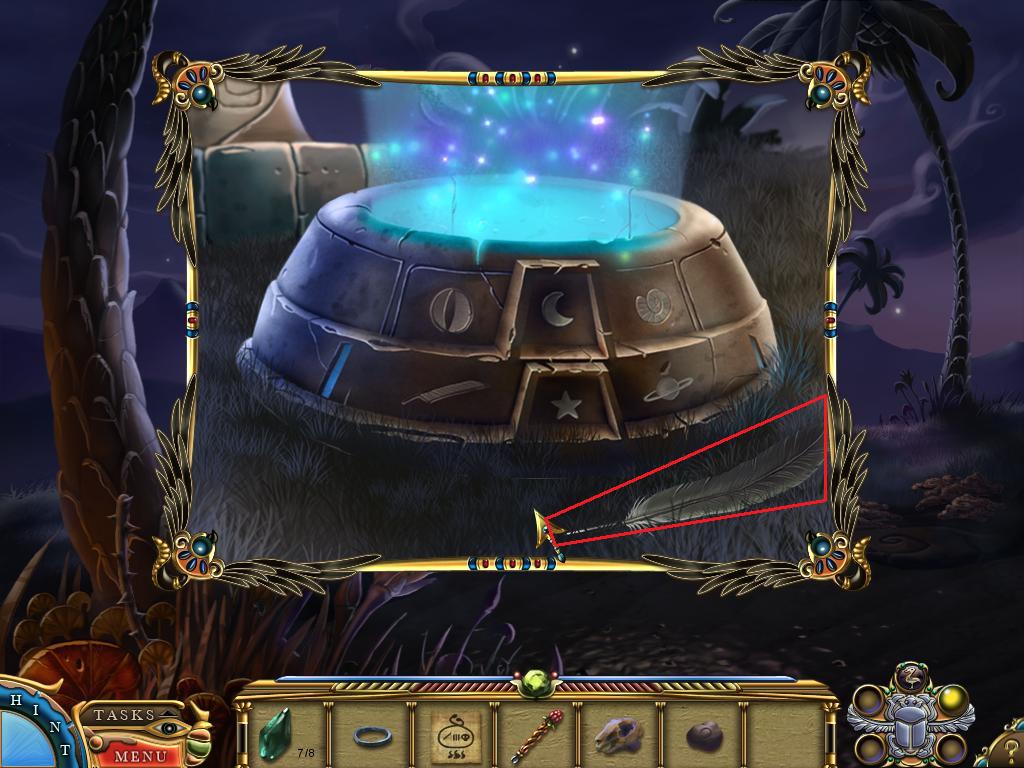
Exit to the river bank scene. Click on the shining pedestal and take the feather.
Screenshot: Pedestal and Feather
Combine the metal sphere and metal ring. Combine the two seashell pieces.
Use the metal saturn, feather, seashell, and cat-eye stone on the pedestal. Take the glowing moon and star.
Go to the goddess' garden. Use the flute on the snake marked with a square in the following screenshot. After the snake moves, take the scythe.
Screenshot: Goddess' Garden
Exit and go to the underwater pyramid. Use the scythe on the rope.
When the capstone crashes, the worker on the ground will abandon his axe. Take the axe.
Screenshot: Axe
Use the axe on the logs under the capstone. The chest will break, but you still can't take the sceptre inside it.
Continue to the portal scene. Click on the alligator for another hidden object scene.
Screenshot: Hidden Object Locations
Take the gold paint.
Go back up to the workshop. Click on the sparkles on the vase to launch another hidden object scene.
Screenshot: Hidden Object Locations
Take the rough capstone.
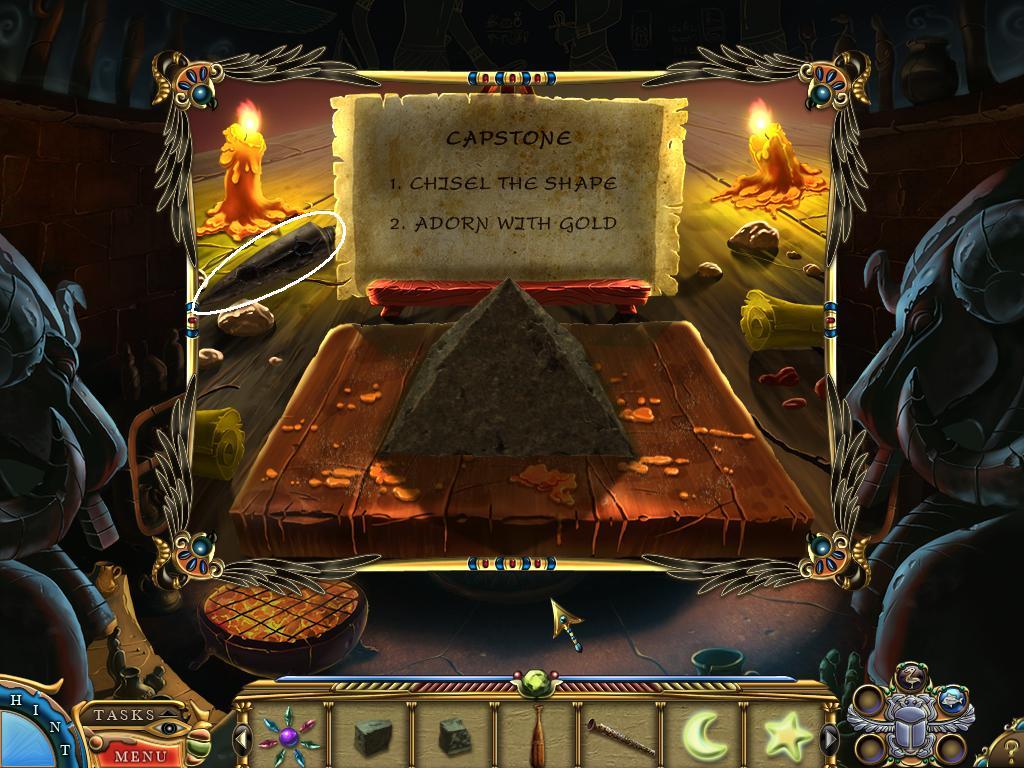
Go back up to the workshop. Click on the work area and use the rough capstone on it.
Take the chisel, and use the chisel on the capstone.
Screenshot: Chisel
Use the gold paint on the capstone. Take the completed capstone.
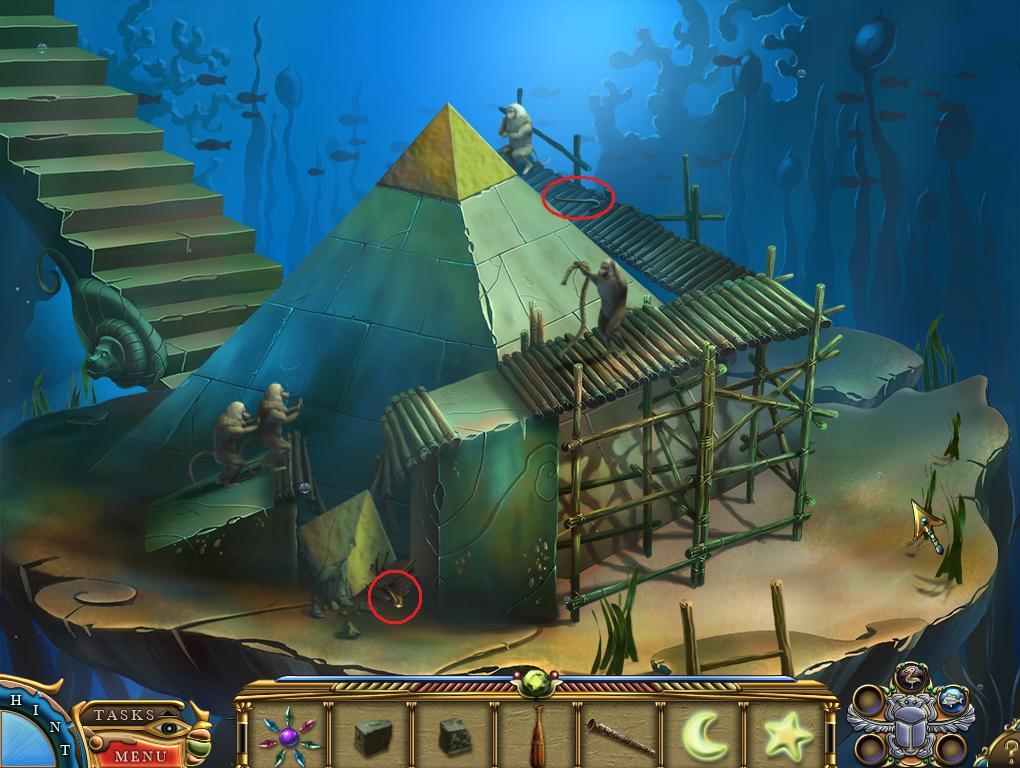
Go back to the underwater pyramid. Use the gold capstone on top of the pyramid. Take the pry bar that the worker dropped.
Use the pry bar on the crushed chest to get the sceptre.
Screenshot: Pry Bar
Exit to the portal scene. Place the glowing moon in the opening on the left pedestal. Place the glowing star in the right pedestal.
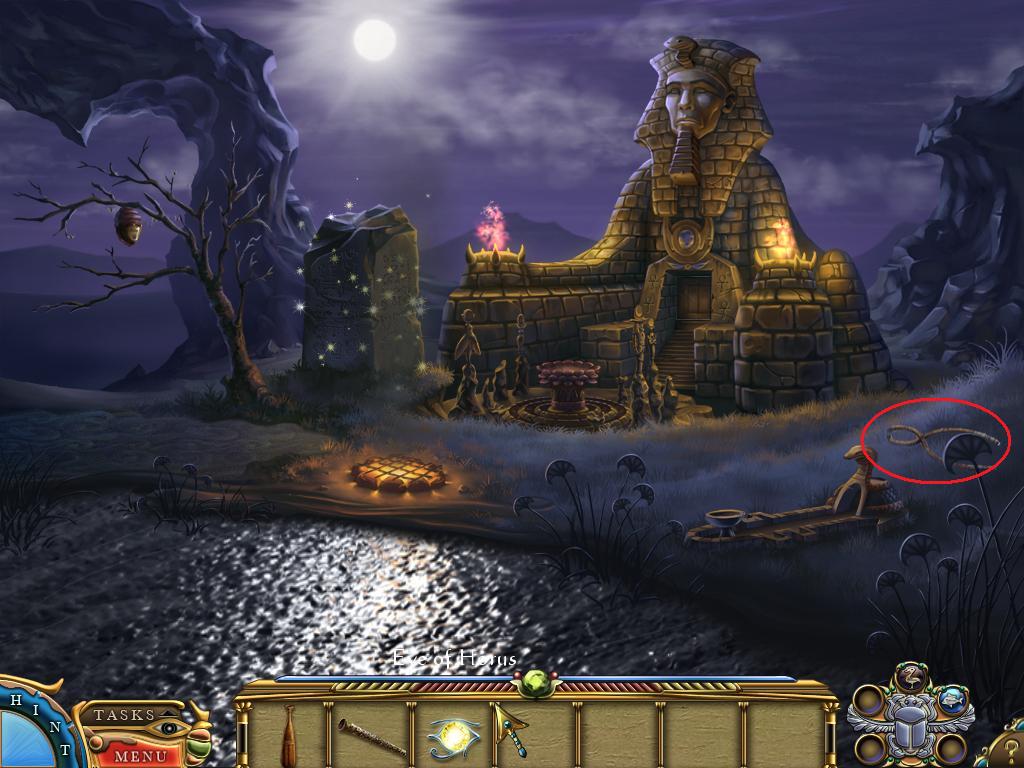
Take the Eye of Horus from the center of the screen.
Task: Restore the King
After you take the Eye of Horus, the center pedestal will open. Take the last portal piece.
Place the portal pieces in the ring.
Screenshot: Repairing the Poral
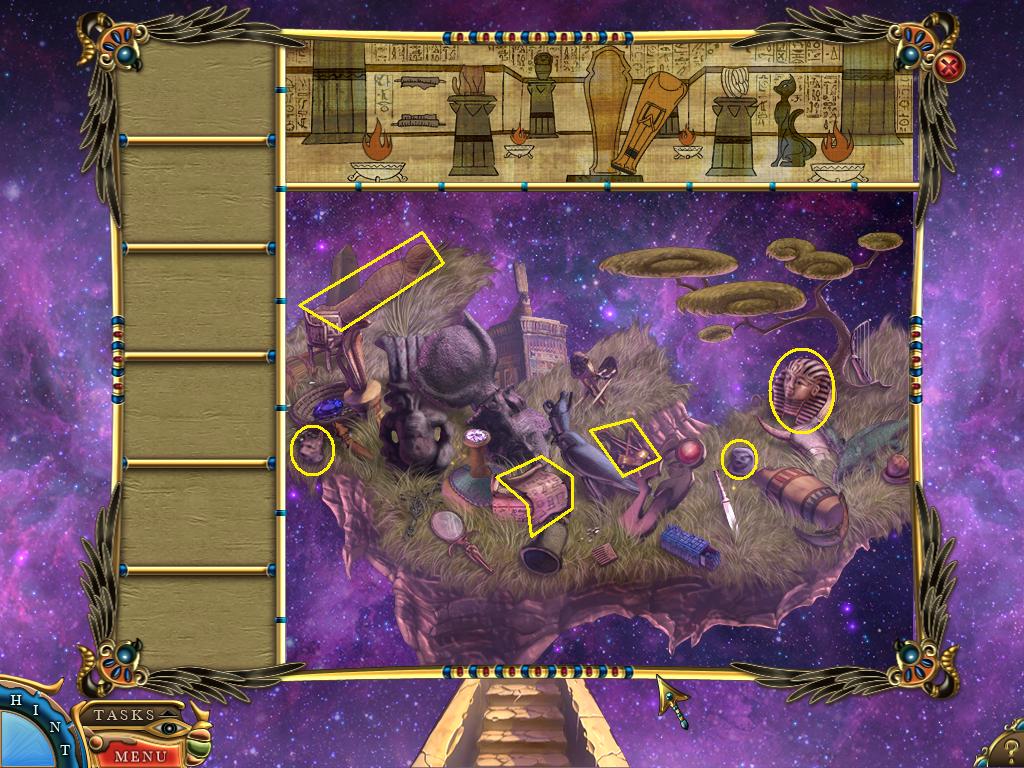
Return to the cave entrance where you met Anubis. Click on the sparkling area to launch another hidden object scene.
Screenshot: Anubis Scene
Screenshot: Hidden Object Locations
Complete the hidden object scene to acquire a crown without jewels.
Combine the crown with the collected gemstones.
Return to the underwater portal. Give the king the crown and the sceptre.
Click on the sparkles to launch another minigame. Complete the minigame to restore the king.
Return to the scene with the fire portal. The king has returned and now you can cross.
Take the barley.
Place the items from the brazier code - the thorny branch, barley, and skull, in that order - in the brazier.
Screenshot: Fire Portal
Exit through the fire portal you just opened.
Chapter 3: The Sphinx
Task: Obtain the Sphinx's help
Click on the sphinx to zoom in on it. Click again to hear it tell you that you need to make an offering first.
While zoomed in on the sphinx, click on the insect that is flying around the left edge of the view.
Zoom out. Click on the sparkling area to open a hidden object scene. Solve the scene to get a fishing net.
Screenshot
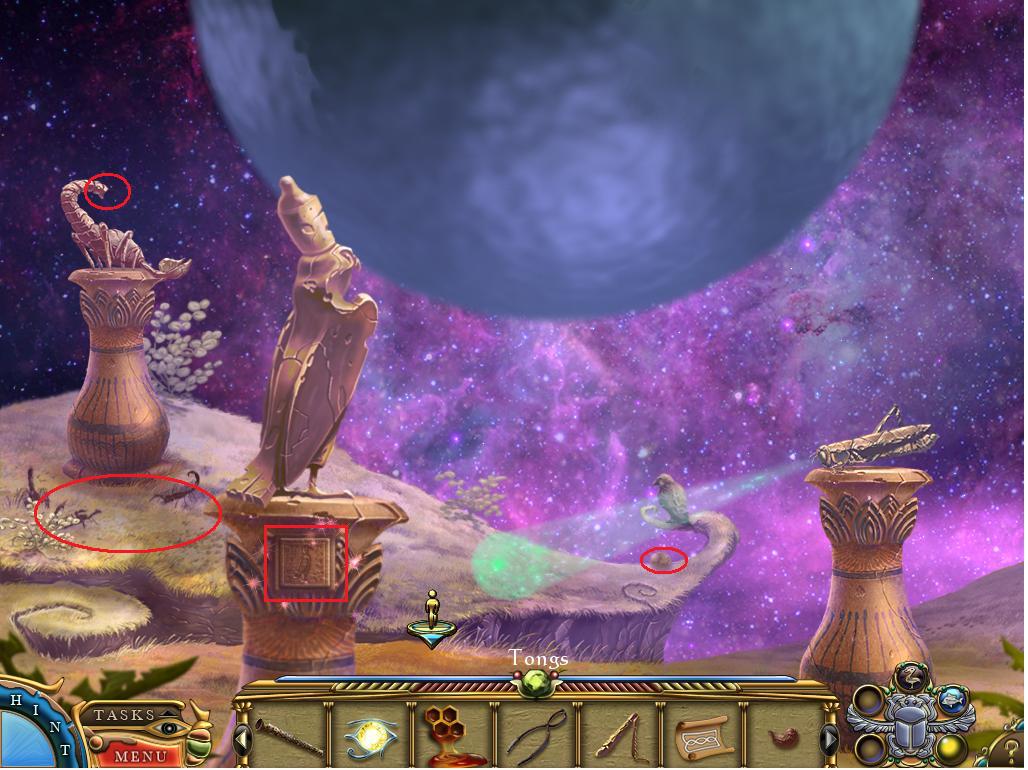
Take the tongs.
Screenshot
Use your magic potion on the quicksand to turn it to stone. Click on the beehive and take some honey.
Screenshot
Use the net on the water to catch a fish.
Put the fish on the stove to cook it, then use the tongs to retrieve the fish.
Put the cooked fish on the offering plate.
Screenshot
Zoom in on the sphinx and click on it to get your next task.
Task: Find the Box
Enter the sphinx
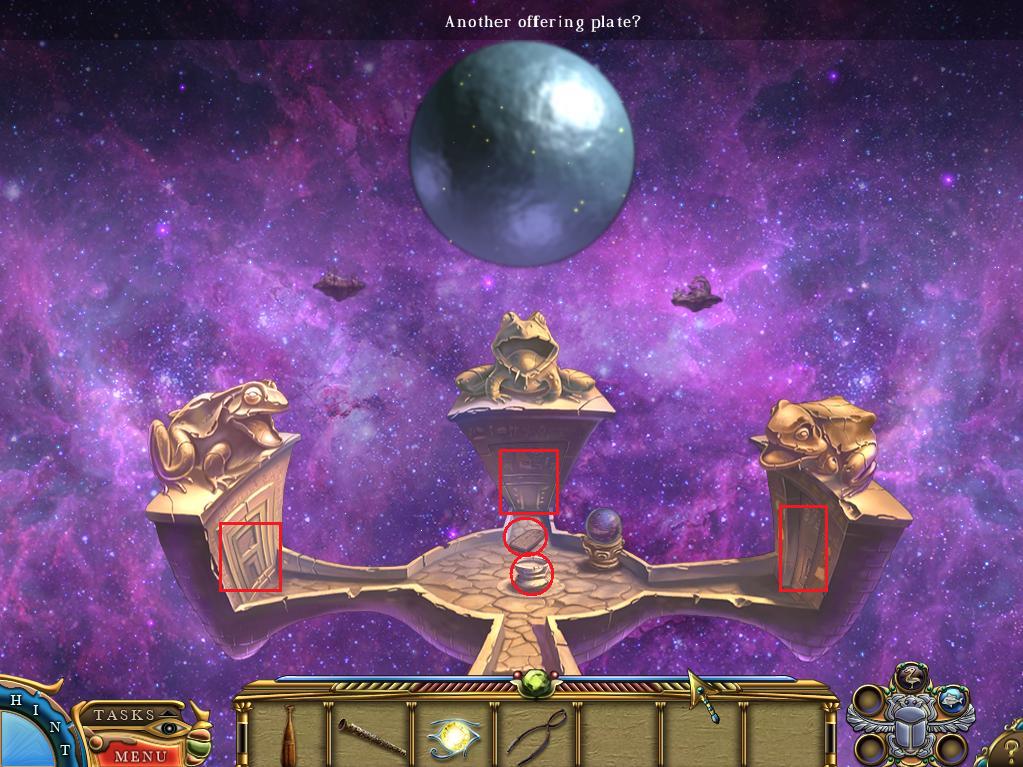
Pick up the tablet
Click on each frog door to activate it. Once all the frogs are activated, put the bug on the offering pedestal in the center.
Screenshot
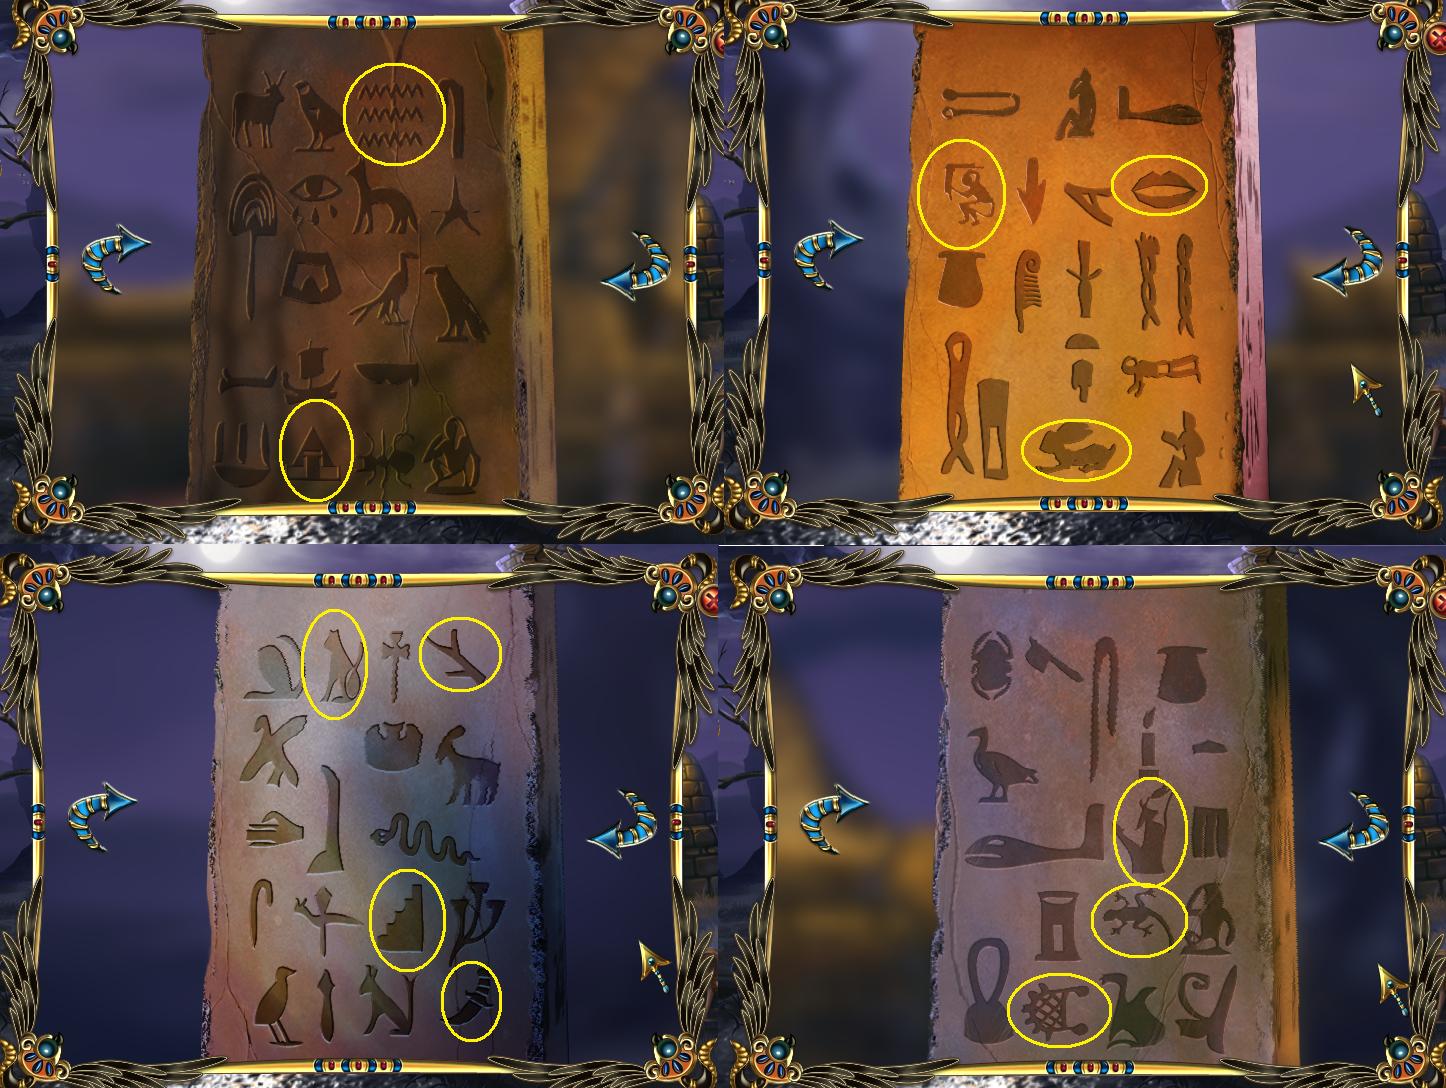
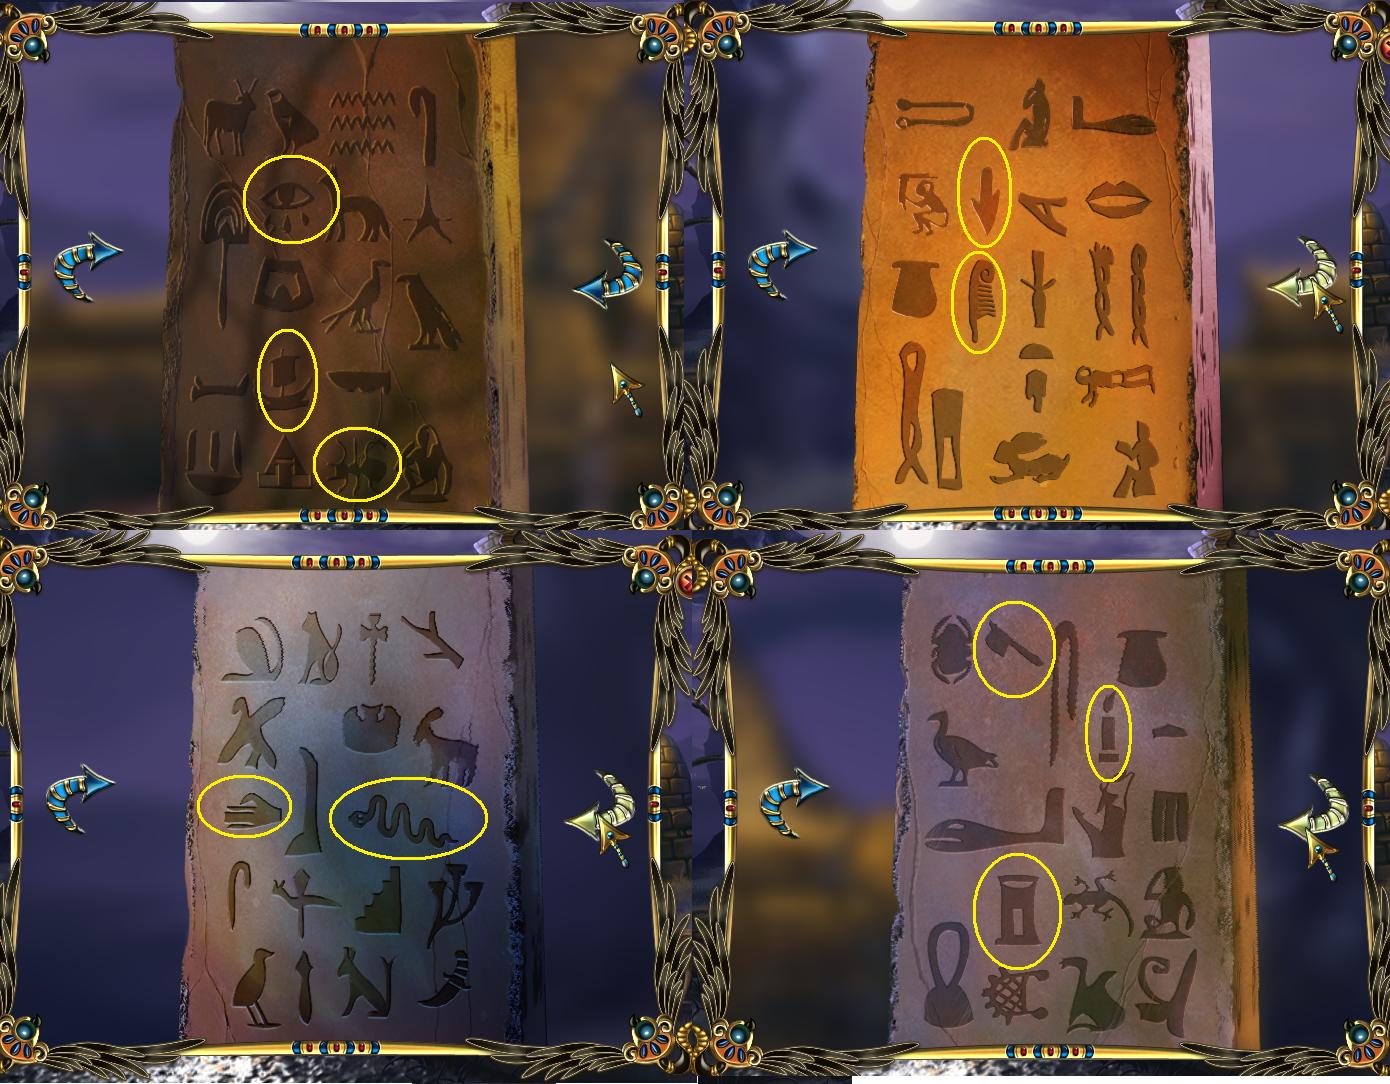
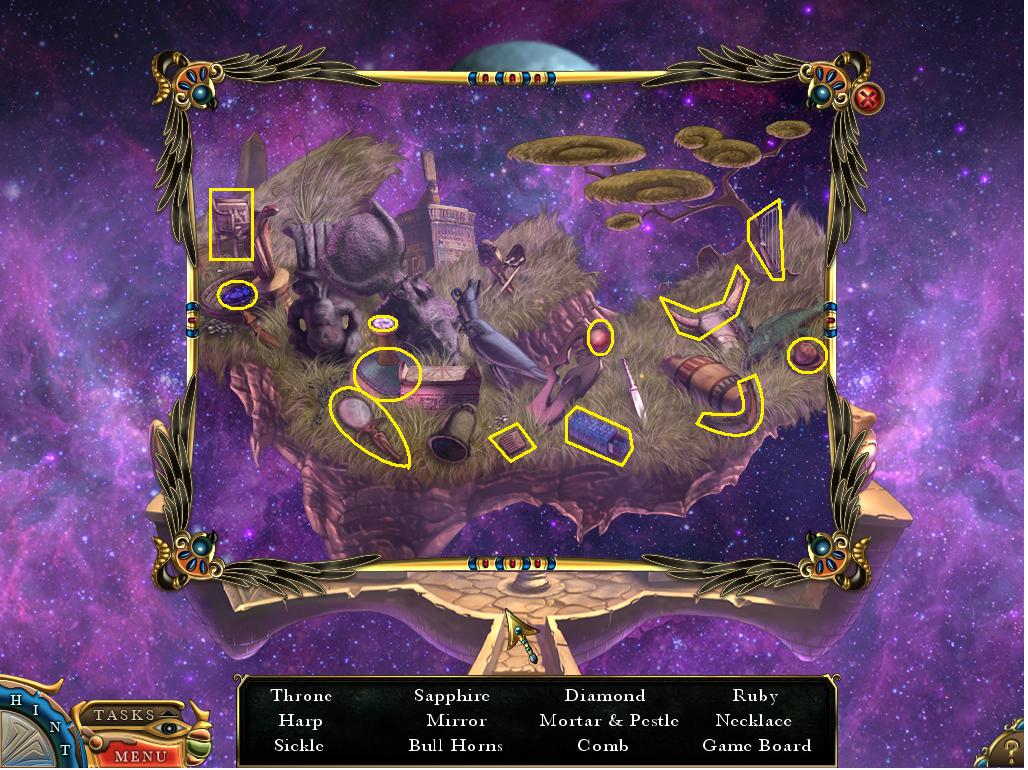
Click on the center door and complete the hidden object scene to gain a toy mouse.
Screenshot: Hidden Object Locations
Screenshot: Scroll Placement
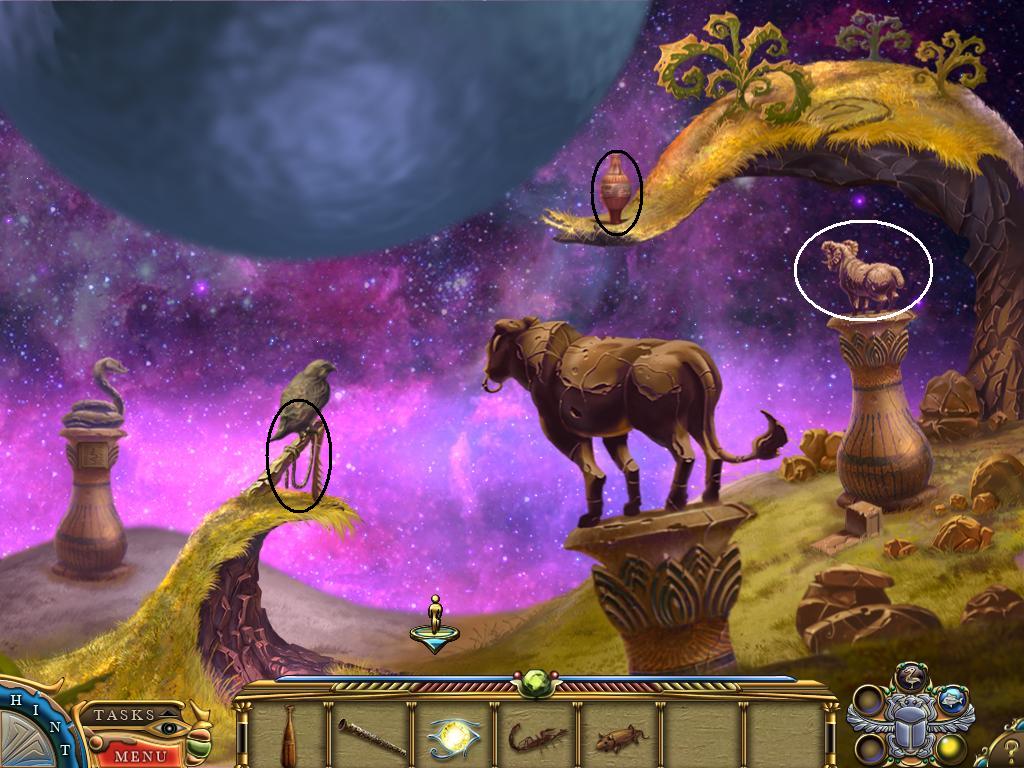
Enter the right door. Click on the ram to light it.
Take the string that is tying down the falcon.
Click on the vase to knock it over.
Screenshot
Combine the string with the mouse.
Put the toy mouse in the mouse hole.
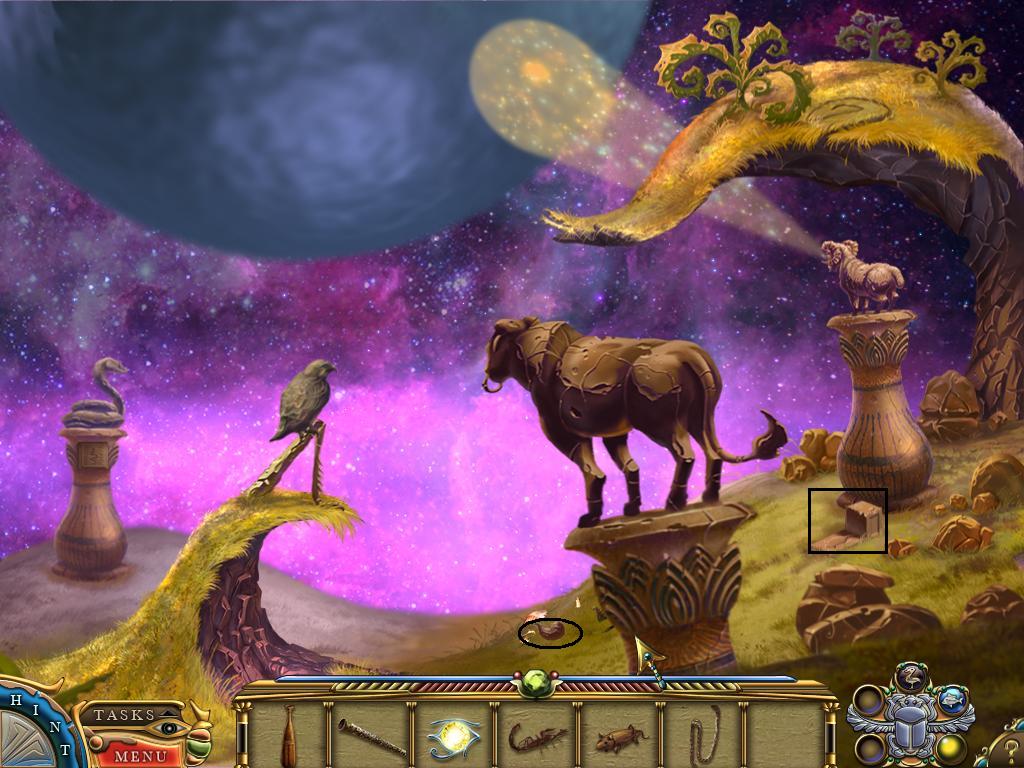
Take the scorpion stinger from the broken vase.
Screenshot
After the falcon flies off, take the leg it was standing on. Also click on the pattern it drew in the air to collect it.
Screenshot
Click on the bull to learn that it is missing its horns.
Exit the area. Go through the left door.
Click the sparkling area on the pedestal the falcon is standing on to launch a minigame. Click the indicated areas in the screenshot to solve the game.
Screenshot
Use the honey on the scorpions to stick them in place. Use the tongs to collect a scorpion.
Use the scorpion tail on the scorpion statue to light it.
Take the falcon egg from the falcon.
Screenshot
Exit the area, then exit the sphinx. Use the falcon egg on the snake temple. After the snake leaves, click on the pattern it left behind.
Screenshot
Click on the sparkling area to launch another hidden object scene. Solve the scene to get the red charm stone.
Screenshot
Click on the blue scarab and complete the strength charm.
Go back into the sphinx. Click on the center door for another hidden object scene. Solve the scene to gain a pair of bull's horns.
Screenshot
Enter the left door. Now that you have the strength charm, you can use the grasshopper leg on the grasshopper to light it up. Exit.
Enter the right door. Use the bull's horns on the bull to light it up.
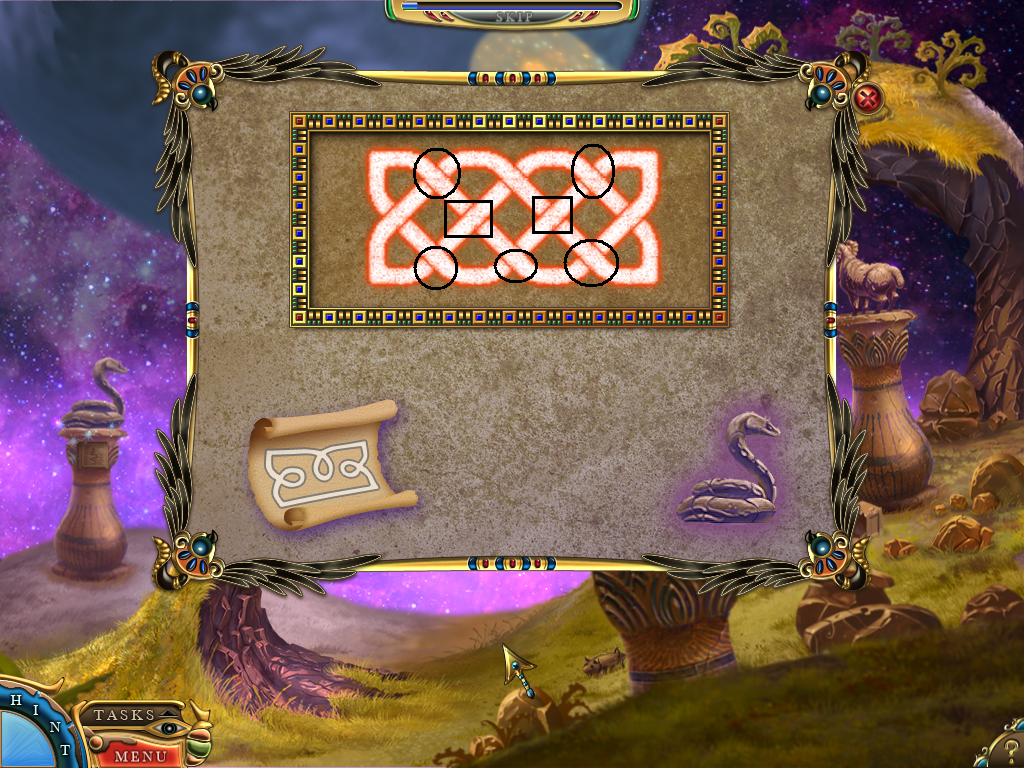
Use the snake pattern on the snake's pedestal. To solve the minigame, click the circled crossings once, and the crossings marked with a square twice.
Screenshot
Exit the area.
Click on the globe. After the world explodes, take the box from the ground.
Screenshot
Exit the sphinx. After the cutscene with Set, zoom in on the sphinx. Give the sphinx the box.
After you speak to the sphinx, a hand will descend into the screen. Click on it to launch a series of minigames.
Restore each constellation by dragging the stars to the points in the constellation. Purple stars cannot be moved. Each constellation has its own timer that you can click to skip it.
After restoring three constellations a goddess will give you a white charm stone. There will be another cut scene before you are given your next task.
Chapter 4: The Heavens
Task: Locate Ra
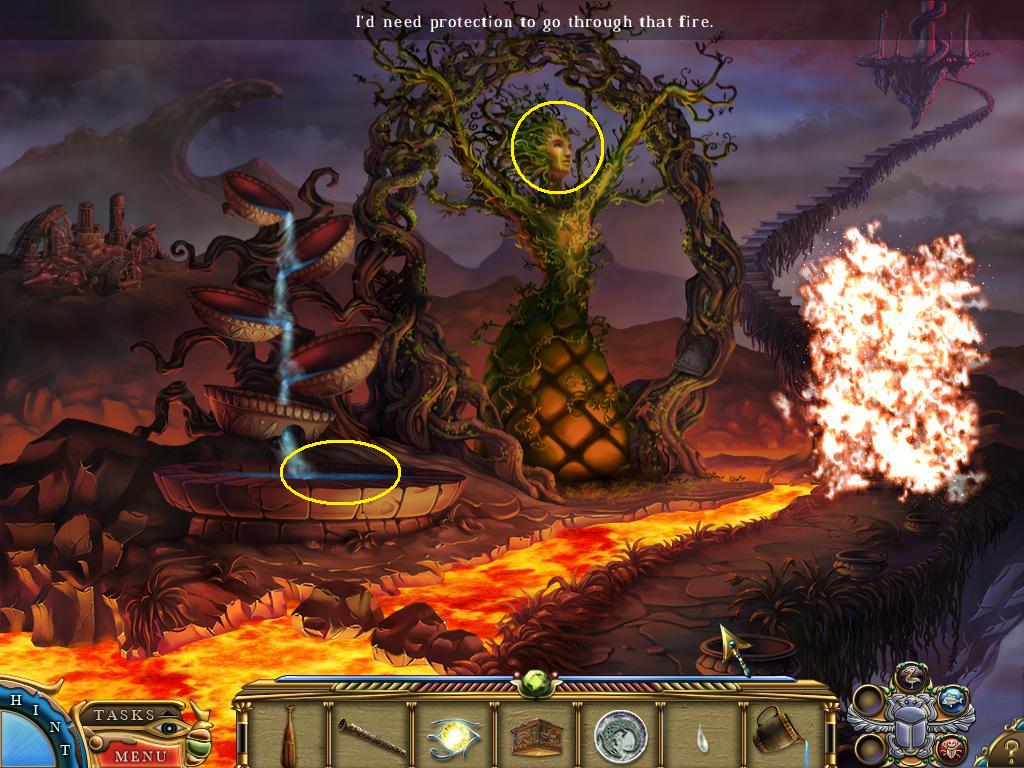
After the cutscene, you will find that you cannot proceed through the fire.
Take the tablet. Conveniently, this is the recipe for the fire charm.
Click on the bowls in the fountain to repair the fountain.
Screenshot: Tablet and Fountain
Click on the sparkles on the left of the screen to launch a hidden object scene. Solve the scene to get a pitcher.
Screenshot: Hidden Object Locations
Screenshot: Hidden Object Solution
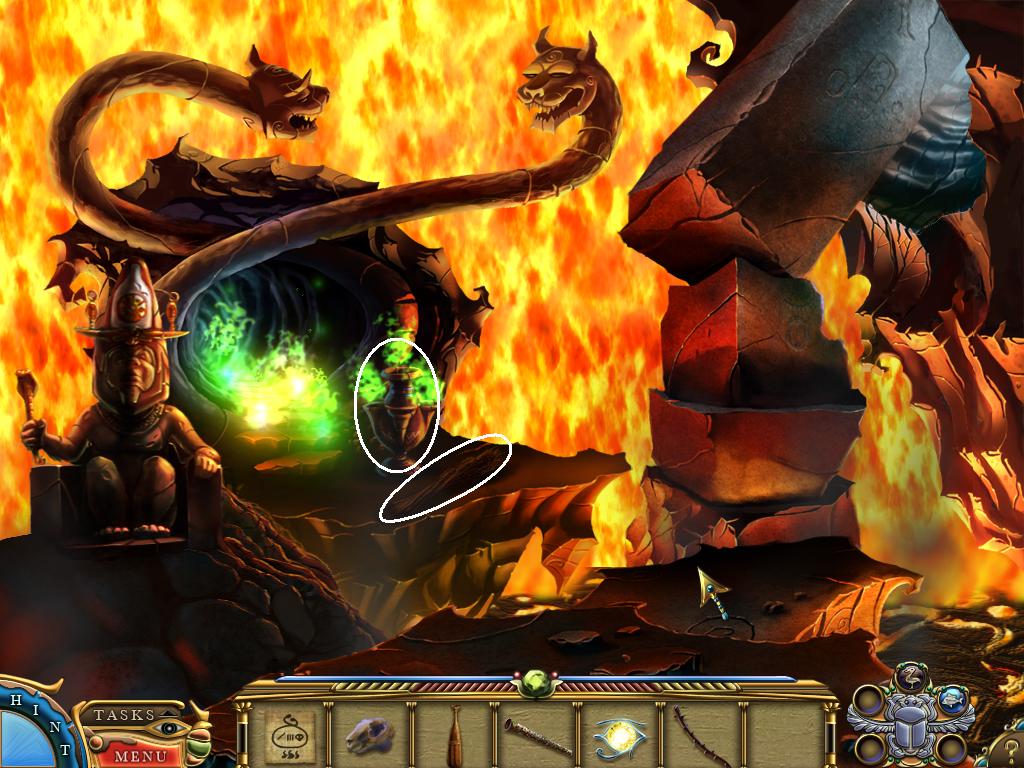
Use the pitcher on the fountain to get some water. Use the pitcher of water on the wall of flame to get a steaming pitcher.
Screenshot
Click on the restored goddess statue to zoom in. Talk to the goddess.
Click on the goddess' cheek to collect goddess tears.
Click on the blue scarab to complete the fire charm.
Exit the scene now that the the fire is out.
Task: Defeat Set
Use the flute on the snakes at the base of the tower.
Screenshot
Put the Eye of Horus in the holder where the snakes were. Watch the cutscene.
When the tornado appears, use the breath of the sphinx on the tornado to open a minigame.
Screenshot
Once you have won the wind battle, the tornado will move to Set. Use the magic potion on the tornado to turn Set to stone.
Task: Release Ra
Use the flute on the snakes on the ground.
Take the tablet, white flower, snake scale, and gold charm stone.
Screenshot
Click on the blue scarab and complete the rebirth charm.
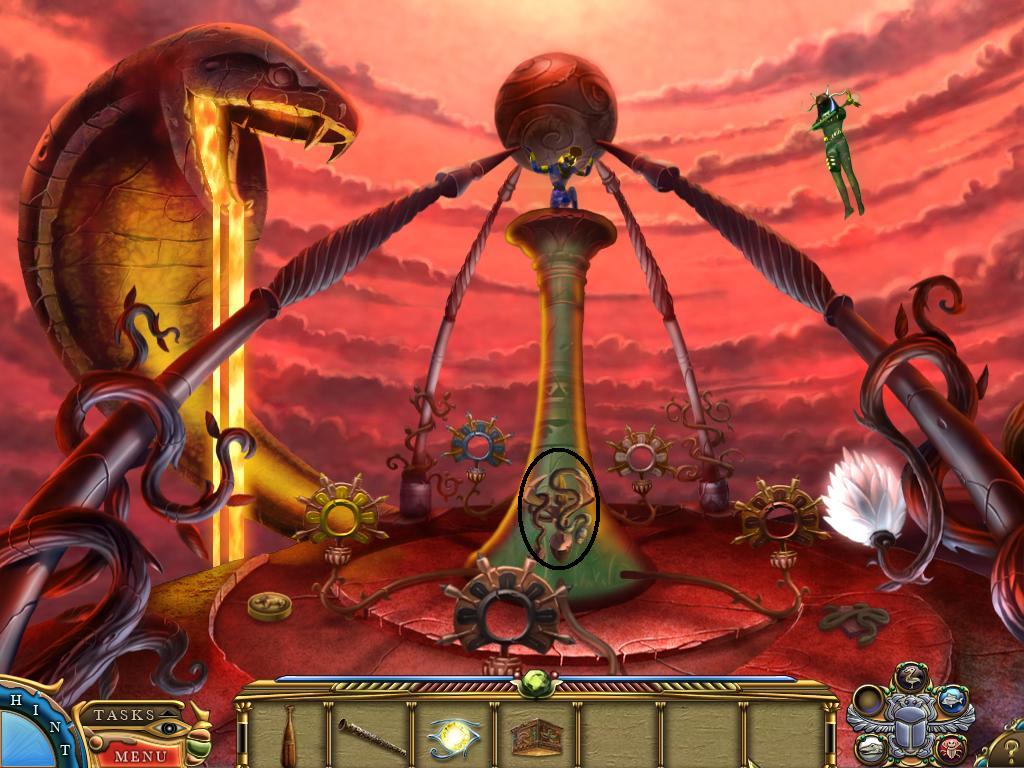
Place each charm stone in the pedestal that matches its color.
Screenshot
Posted by: MmeTurbulence |
February 4, 2011 3:00 PM
|
February 4, 2011 3:00 PM