
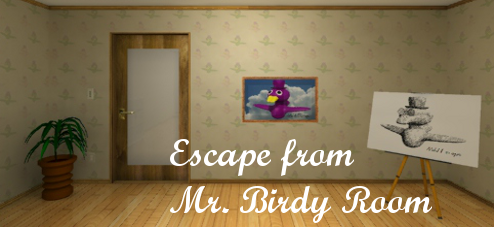
![]() A funky beat, a big screen television, a bunch of puzzles, and several not at all creepy bird statues watching you from every single angle... it beats me why you'd want to Escape from Mr. Birdy Room (apart from the aforementioned peeping peepers), but Tesshi-e's latest free escape game wants you to do just that. Come to think of it... I had originally assumed this room belonged to Mr. Birdy, but... he never struck me as an egomaniac. Which means... this place belongs to someone with one serious Mr. Birdy fetish! I'm not saying that if you don't find your way out before they get back they'll glue feathers and a bow tie to you and force you to live out the rest of your life caged within this twisted shrine, but that is exactly what I'm saying. No, you have an overactive imagination!
A funky beat, a big screen television, a bunch of puzzles, and several not at all creepy bird statues watching you from every single angle... it beats me why you'd want to Escape from Mr. Birdy Room (apart from the aforementioned peeping peepers), but Tesshi-e's latest free escape game wants you to do just that. Come to think of it... I had originally assumed this room belonged to Mr. Birdy, but... he never struck me as an egomaniac. Which means... this place belongs to someone with one serious Mr. Birdy fetish! I'm not saying that if you don't find your way out before they get back they'll glue feathers and a bow tie to you and force you to live out the rest of your life caged within this twisted shrine, but that is exactly what I'm saying. No, you have an overactive imagination!
 After choosing English from the main menu if that's your lingo, click around to explore and interact, gathering items and keeping your eyes peeled for the clues you'll need to eventually find your way out. This is one of those escape games that sets out to be mystifying from the get-go, not just because of the all-encompassing bird motif, but because of the sheer amount of abstract clues and the lack of a changing cursor. Like all the best escape games, however, it's only confusing until you start putting the pieces together... and it includes a Happy Coin to boot. Plus, the soundtrack makes me feel like I'm wandering around inside of Earthbound, or maybe a Persona game, and that's always a plus. So start hunting for clues and cracking puzzles and find your way out! And then maybe if you haven't already, consider picking up Tesshi-e's first and currently only paid game, Escape from Mr. M's Room, and support a developer who continues to give us years of quality free escape games just like this one.
Play Escape from Mr. Birdy Room
Thanks to Sam for sending this one in!


Walkthrough Guide
(Please allow page to fully load for spoiler tags to be functional.)
Escape from Mr. Birdy Room Walkthrough
Starting Out & Solving the Couch Puzzle
You start the game facing the area around the exit door. Click the canvas on the easel to take a closer look.
It's a sketch of a Mr. Birdy who's accessorized with a stylish pair of sunglasses. Maybe it's just a fashion tip or maybe this is a clue... Let's remember it for later, just in case.
Back up and turn left towards the couch. Let's examine the red stool beside the couch more closely.
Click the stack of books to look in the middle of them, revealing a REMOTE CONTROL.
Take a quick look at the REMOTE CONTROL in your inventory. Click the panel at the bottom of the remote to see it's missing some batteries.
Lower the books and away from the stool, then click the sofa to zoom in on the seats.
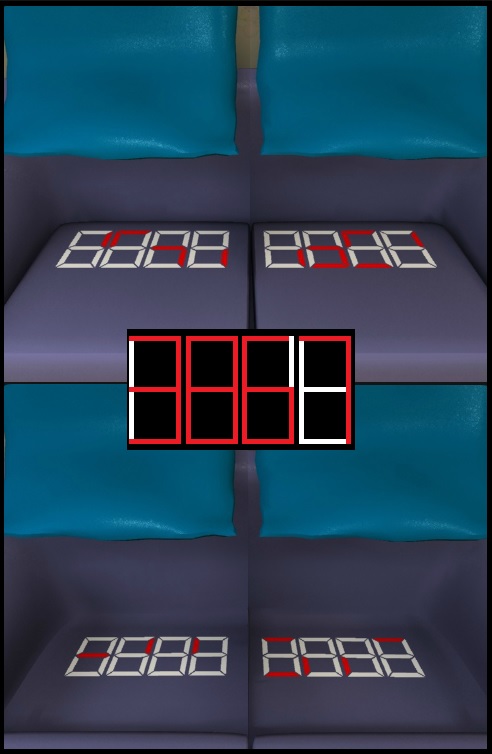
If you lift the left pillow, you'll see a series of symbols on the left couch cushion that look like the blank numbers you'd see on a digital clock.
Notice how most sections are white, but each digit also has pieces of red.
Click and hold the left couch cushion to remove it, where you'll find even more white and red digits under the seat.
Lift the right pillow and then check under the right couch cushion to discover the remaining two series of symbols.
On their own the symbols on the couch don't make much sense, but if you put them all together, you'll discover an interesting clue.
The red sections of each digit combine to form a single number. The white sections are blank spaces, so you can ignore them.
Let's start with the digit on the left. Add together every red piece in the first digit on all of the cushions and you'll find that they combine into the shape of the number 3.
Do the same for the next three digits to find the complete combination.
From left to right the numbers are: 3 8 6 7.
Solution
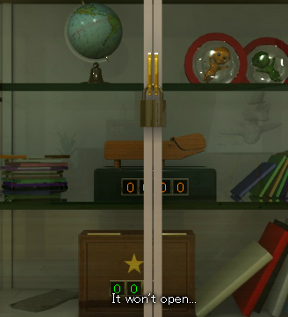
Now that we have all four numbers, let's find a place to use them. Turn left twice to face the television and then inspect the stair-shaped stack of drawers.
Click the bottom right drawer for a close-up view.
How convenient! This drawer has a 4-digit combination lock and you just happen to know four very important numbers.
Enter the four numbers you found on the couch - 3 8 6 7 - to unlock the drawer, which then opens automatically.
Take the pair of BATTERIES from the opened drawer.
Inspect the REMOTE CONTROL in your inventory again.
Open the panel at the bottom of the remote, then select the BATTERIES and put them inside the empty space. Ta-dah! Now you've got a powered remote. Close the item window when you're done combining the two items.
The Mr. Birdy Puzzle
Return to the view of the stair-shaped drawers.
Click the bottom left drawer to open it and take the can of LUBRICATING OIL inside.
Next, open the top left drawer to look inside and find a NOTE.
Examine the NOTE in your inventory.
There are three letters here which appear to have been split in half. We'll have to keep an eye out for where the other half of the paper might be.
Step back from the drawers, then click the television to zoom in. The REMOTE CONTROL will appear at the left side of the screen, which you can click to use
First push the power button at the upper left side of the remote to turn on the TV.
Press the buttons on the numpad to cycle through the first six channels. Pay close attention to the images that appear on each channel.
Channels 1 to 6 all have a picture of Mr. Birdy, which appears as one of four possible colors.
The Mr. Birdy on Channel 1 is red, Channel 2 is white, Channel 3 is blue, Channel 4 is white again, Channel 5 is blue again, and Channel 6 is green.
There's another place in the apartment where the red, white, blue, and green Mr. Birdys all appear together. Let's take a look there now.
Back up and then turn right twice to return to the view of the couch. Click the cork board on top of the glass cabinet for a closer look.
At each corner of the board is a picture of our old friend Mr. Birdy.
Green Mr. Birdy is at the top left corner, Red Mr. Birdy is at the top right corner, Blue Mr. Birdy is at the bottom left corner, and White Mr. Birdy is at the bottom right corner.
Step back and turn right towards the exit door. Click the framed painting of a purple Mr. Birdy on the wall to zoom in.
Any escape artist worth their salt can tell you a picture frame is meant for shaking! Click the corners of the frame and you'll find the picture does just that.
But clicking randomly won't do you any good, there must be a specific order. I wonder if the clues we've found so far can be of any help...
Remember the pictures on the cork board you saw a few moments ago? Each picture was attributed to a specific corner.
Green was the upper left, Red was the upper right, Blue was the lower left, and White was the lower right.
The corners of the cork board obviously correspond to the corners of the Mr. Birdy painting, but that's only half of the puzzle.
You will also need to recall the clues from the television.
Red Mr. Birdy was on Channel 1, White Mr. Birdy was on Channels 2 and 4, Blue Mr. Birdy was on Channels 3 and 5, and Green Mr. Birdy was on Channel 6.
In order, that's: Red - White - Blue - White - Blue - Green.
Now combine the information from the two clues. If you match each Mr. Birdy color with its specific corner, the code translates to:
Upper right - Lower right - Lower left - Lower right - Lower left - Upper left.
Click the corners of the painting in that order to remove it from the wall.
Once the puzzle is solved, the Mr. Birdy painting will fall to the floor and two odd compartments in the wall will be uncovered.
Opening the Glass Cabinet
Examine the section of the wall that the Mr. Birdy painting was covering. Click the open left compartment in the wall to zoom in and take the COIN.
If you click and hold the left compartment, you'll notice the cover over the right compartment slides over to the left side and then slides back as soon as you release it.
Looks like we'll have to find something that can keep it in place.
Back up from the left side and then click the right compartment in the wall to inspect it next.
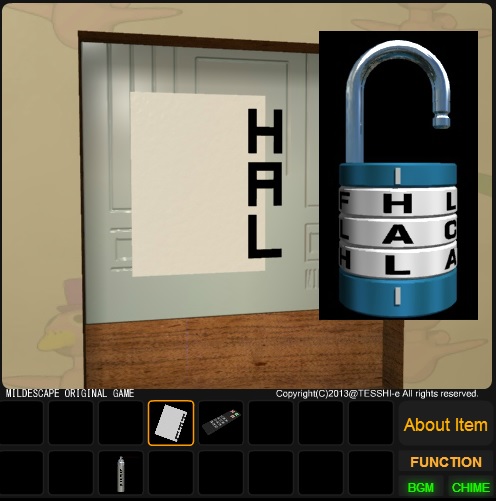
On the front of the cover over the right side you'll see three odd shapes that look like letters cut in half. Oooh, now this is familiar.
Select the NOTE from your inventory and hold it on top of the cover to combine the two halves, revealing 3 letters: H A L.
Step away from the wall and turn left to view the couch again. Click the top of the glass cabinet to take a closer look.
Pick up the tin of rose tea for a close-up view.
Insert the COIN into the round section at the top of the tea tin to remove the lid.
Take the PADLOCK from inside the opened tin.
Examine the PADLOCK in your inventory.
You can click the three sections of the lock to rotate them, which changes the letters in the center.
Arrange the lock sections to spell out the letters you found by combining the NOTE half with the right wall compartment: H-A-L.
Solution
Once the right combination is entered, the top of the PADLOCK will pop open.
Back up and turn right towards the exit door once again. Click the left wall cache twice to zoom in.
Select the opened PADLOCK, then click the left compartment one last time. The cover will move to the left side where it will be locked in place.
Look inside the now uncovered right compartment in the wall to find a pair of SUNGLASSES.
Move back twice and then turn right to face the television. Examine the blue Mr. Birdy statue to the right of the TV.
That red outlined section of the pedestal below the statue sure looks suspicious...
Recall the stylish Mr. Birdy drawing we took a look at earlier and match the image in the drawing by placing the SUNGLASSES on the Mr. Birdy Statue.
Take the KEY (1) from the opened panel at the middle of the pedestal.
Back up and move right twice to return to the view of the glass cabinet, then click the front of the cabinet to zoom in.
Use the KEY (1) to open the padlock attached to the handles. Now you can click the doors to open the cabinet.
The Star Box
Now that the glass cabinet is open, let's have a look inside.
Take the DVD from the stack of discs to the left of the hippo box.
Next, pick up the DUST CLOTH beside the star box.
Step back from the cabinet and turn left towards the window. Click the window to take a look through it.
There appears to be a message at the lower right corner of the window, but it's covered in a layer of dirt.
The dust cloth isn't able to remove the dirt, so we'll have to try again once we've found something more effective.
In the middle of balcony wall are three small windows, each underneath a star that looks exactly like the star on the box in the glass cabinet.
These windows have a lot in common, but there is one key difference worth noting.
If you click the right window to look more closely you can count 6 iron bars. The middle window, on the other hand, only has 3 iron bars.
We can't get a good look at the left window from this angle, so let's try from a different perspective.
Back up from the large window, click glass door to move closer, then click the bottom of the door to look through the glass.
Ahh, it's much easier to see the left star window this way. You can easily count that this window has 4 iron bars.
So in order from left to right that's: 4 bars on the left, 3 bars in the middle, and 6 bars on the right.
Now that we've got our numbers, let's go try them on the box!
All you have to do is plug in the amount of bars in each window to its matching space on the star box (left window = left space, middle window = middle space, right window = right space).
Enter 4-3-6 to open the box - easy as pie!
Once the puzzle is solved, take the BOTTLE OPENER from the opened box.
Exploring the Balcony & Solving The Hippo Puzzle
Turn to face the television, then click the the glass bottle on top of the stair-shaped stack of drawers to zoom in.
Remove the cork at the top of the bottle with the BOTTLE OPENER to receive the CLUB KEY.
Back up twice and turn right once. Click the glass door for a closer look.
Select the CLUB KEY and click the door handle to unlock and open the door.
Click forward to step out onto the balcony.
Examine the back of the red towel hanging from the bar.
It's Mr. Hippo! Below him is the world's most obvious clue: the combination 2915.
Back up a few times to return inside the apartment. Turn right towards the couch, open the glass cabinet, then click the wooden hippo for a close-up view.
Simply enter in the combination you saw on the towel: 2-9-1-5.
Well, that was easy! Take the KEY (2) from the hippo's opened mouth.
The Dirt Stain & The Shapes Device Puzzles
Go out to the balcony again, then examine the lockbox on the floor.
Oil the rusty padlock with the LUBRICATING OIL. Now you can open the lock with the KEY (2).
Lift the lid and take the SCREWDRIVER inside the opened box.
Move back inside the apartment. Turn left to the stair-shaped stack of drawers. Click the middle drawer at the bottom row to zoom in.
Remove the screws on the upper corners of the drawer with the SCREWDRIVER.
Take out the DIAL and the CAN OF WATER from the opened drawer.
Examine the CAN OF WATER in your inventory.
Just like the tin of rose tea, you can open the lid of this can with the COIN.
Dip the DUST CLOTH into the water to make it a WET CLOTH.
Return to the balcony and then click the lower left side of the window to take a closer look.
Use the WET CLOTH on the window to wipe off the stains of dirt, revealing an odd series of symbols on the window.
Although the symbols look exactly the same from either side of the window, they're a little easier to see if you view them from the inside.
Step back inside the apartment and click the lower right corner of the window if you want to view them more closely.
Look carefully and you'll see the string of shapes is actually a series of arrows.
If you use the left circle as your starting point and the right circle as the end point, the order the arrows point in is: Right - Right - Left - Right - Left - Left.
Let's go back once again to the view of the stair-shaped drawers. Inspect the second highest drawer (the one directly underneath the glass bottle).
Here you'll see some very familiar symbols: a left arrow, a circle, and a right arrow.
Looks like we've got another simple plug-in puzzle.
Press the buttons in the same order as the code you found on the window, don't forget the start and end points!
Circle - Right - Right - Left - Right - Left - Left - Circle.
After the puzzle is solved, you can take an odd handheld DEVICE from the opened drawer.
Examine the DEVICE in your inventory. It seems to be missing something...
Insert the DIAL into the socket at the center of the device to power it on.
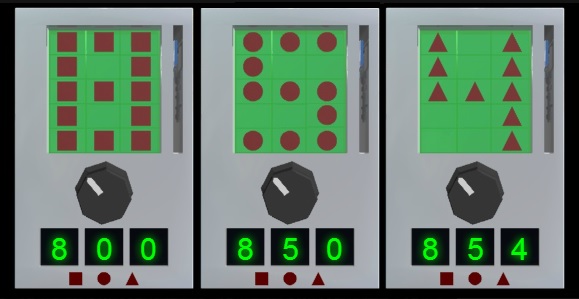
Once the device is powered, a bunch of shapes inside a grid will appear on the screen at the top of device.
Additionally, you can turn the dial to the left, middle, or right setting to cycle through three different screens.
At the bottom of the device you'll find the same three shapes seen on the screen: a square, a circle, and a triangle. Above these shapes are three numbers which you can click to change from 0 to 9.
There are more than 9 squares and circles, so it obviously won't be as simple a matter as just counting the shapes.
What we need to do here is decipher the clues on the device and find the number that corresponds to each of the three shapes.
Think back to the first puzzle we solved on the couch, when we combined the red sections of the digits to make a single number. In a way, this puzzle is very similar.
This time, however, you're combining each section on the 3x5 grid that is filled with a specific geometric shape to make the shape of an actual number.
All it takes is a few short steps, it's easiest if you take it one shape at a time:
First, turn the dial to the left and note each space that has a square.
Now turn the dial to the middle and again note the spaces where there is a square.
Finally, turn the dial to the right and note the last spaces that are filled with a square.
Combine all of the spaces where you found a square as if they appeared together on the same grid (it might be easier to visualize if you create your own grid to fill in the spaces yourself). Together, the squares make the shape of a single number: 8.
Repeat the same process with the circle shape next. If you combine each space on the grid that has a circle shape, together they form the number 5.
Do the same thing one last time with the triangle shape. Altogether, the position of each triangle on the grid combines to form the number 4.
Enter the combination 8 - 5 - 4 at the bottom of the device.
Solution
When the correct combination is entered, you'll be able to take the DIAMOND KEY from the slot at the right side of the DEVICE.
Escape with the Happy Coin!
Return to the view of the stair-shaped drawers.
Unlock the middle drawers with the DIAMOND KEY.
Click the unlocked drawers once to move the doors to the right, revealing a pair of PLIERS.
Back up and turn right towards the window. Click the right side of the window to zoom in on a key hanging from a chain.
Use the PLIERS to snip the HEART KEY off of the chain.
Move back twice and turn right twice to face the exit. Now would be a great point to save, just in case!.
Click the door to zoom in and use the HEART KEY to unlock the exit door.
WARNING: Do not open the door yet! If you do, you will receive the "Normal Ending." If you wish to earn the "Happy Coin Ending" please follow the steps below.
Carefully step away from the door and turn right towards the television. Click the TV for a closer look.
Press the Eject button (the orange arrow button near the upper right side of the remote) to open the disc tray on the DVD player below the TV screen.
Insert the DVD from your inventory (the one you got from the cases in the glass cabinet) into the DVD player, then press the Eject button again or the green button at the top right corner of the remote to view the DVD.
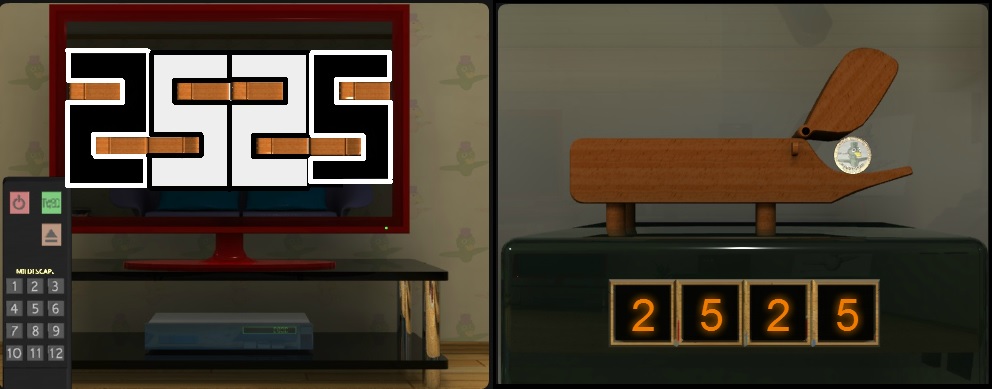
Take a close look at the clue that appears on the screen...
The screen is split into three sections, black on the left, white in the middle, and black on the right.
Inside each section are multiple Mr. Hippos. Don't worry about the way each hippo is facing, that's not important. What is important is the position of each Mr. Hippo inside each section of the screen.
Imagine each hippo as a cut-out space. Now can you see the pattern? The black sections of the screen are the easiest to see, while the white middle section is a little more difficult.
It's a series of numbers! There's a black 2 on the left, a white 5 and a white 2 in the middle, and a black 5 on the right.
The hippos are a double clue: they indicate both the gaps in the numbers and where you need to enter this combination!
Turn around to face the glass cabinet, then open the doors and inspect the wooden Mr. Hippo inside.
Enter the 4-digit combination from the TV to open the hippo's mouth: 2-5-1-5.
Solution
Take the HAPPY COIN from the hippo's opened mouth.
Back up and turn right towards the exit. Go out the door to complete the game, Happy Coin in hand.
Congratulations!
Posted by: Trinn |
August 13, 2013 2:39 AM
|
August 13, 2013 2:39 AM