
Echoes of the Past:
Royal House of Stone
Platform: Mac, Windows

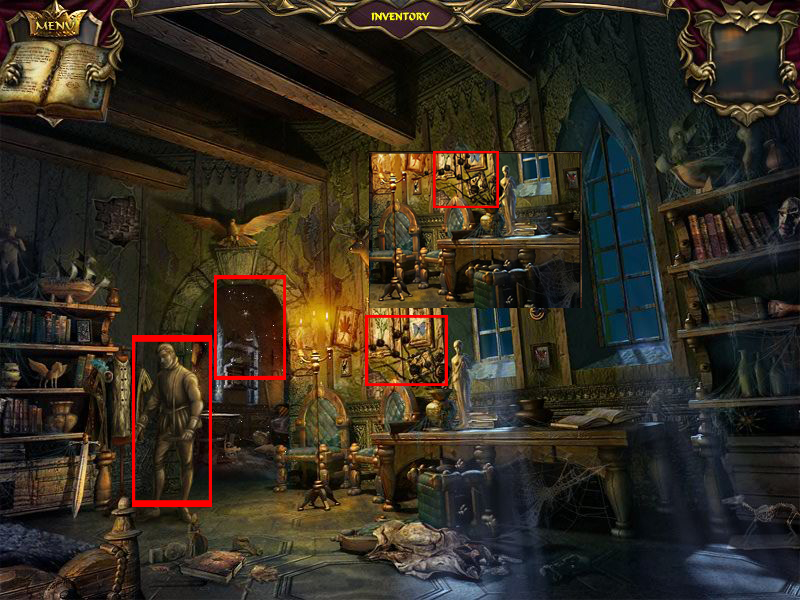
![]() Hey good lookin'. Whatcha got cookin'?... what's that? You say, "A hidden-object game that isn't a well known and established series but isn't mediocre?" Echoes of the Past: Royal House of Stone is a fun first chapter in a new series that may be small in scope, but has a heart as big as a whale. Or, uh, something.
Hey good lookin'. Whatcha got cookin'?... what's that? You say, "A hidden-object game that isn't a well known and established series but isn't mediocre?" Echoes of the Past: Royal House of Stone is a fun first chapter in a new series that may be small in scope, but has a heart as big as a whale. Or, uh, something.
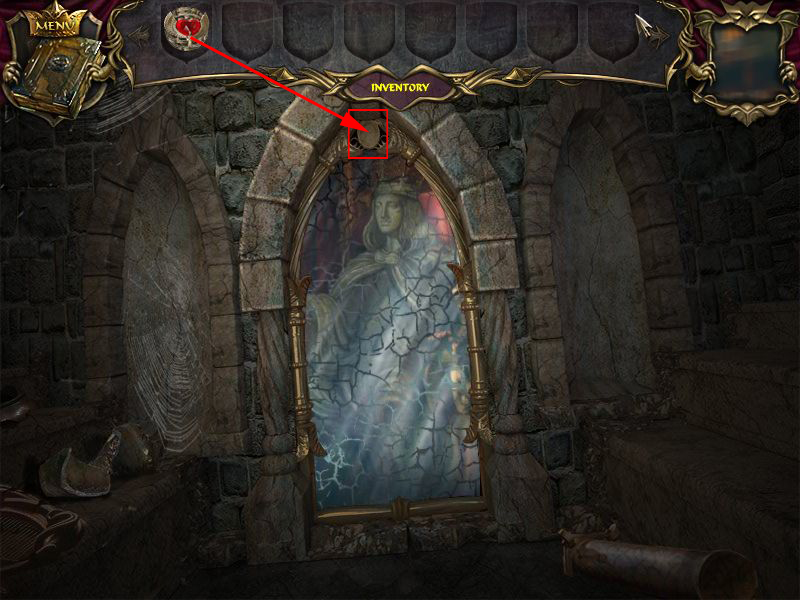
 The story, which I would call "like Princess Isabella, but... " begins with you touring a museum that features an exhibit on an ancient medieval family that met with strange and unfortunate circumstances. Upon examining a portrait of the prince, who vanished on the eve of his coronation, you find yourself getting dizzy... and wake up in a darkened room... apparently hundreds of years in the past. How are you going to get home? Who was that mysterious woman? What happened to the inhabitants of the castle? And more importantly, I don't think cappuccinos were invented until after the twentieth century!! Clearly you need to unravel the mystery, post-haste.
If you're a regular visitor to this site, you're probably familiar with the controls for a hidden object game. But just in case these intricacies are new to you, let me help you with them; there are none. Intricacies, that is. You navigate by clicking your way around the screen. If the cursor changes to an arrow, clicking that area will move you to a new location. If the cursor changes to a magnifying glass, you can click on that spot for a closer look. Cursor changes to a hand? You can interact with something. And if you see sparkling on the screen, click on it to trigger a hidden object scene.
Royal House of Stone also flirts with the point-and-click genre, having you collect items you'll need to complete puzzles. Find yourself getting stumped? Don't worry, as your handy-dandy magic mirror (yes, really) is there to provide hints and clues, as long as you keep finding other mirrors in hidden object scenes. Add in the fact that you can skip most (but not all) puzzles simply by waiting around a bit and then hitting the big ol' "skip" button in the upper right corner and the game is accessible to pretty much anyone.
It doesn't hurt that Royal House of Stone is a handsome little HOG if ever their was one, either. The environments are lovely, with lots of little touches, like the spiders that scurry past you, and the strange things you'll never quite be sure you actually did see out of the corner of your eye. No slouch, either, the audio, with an atmospheric soundtrack and voice-actors who, by and large, are surprisingly inoffensive to your tender ears. I just wish the story had kept up that same level of quality. No, it's not "Ayn Rand" bad, thank goodness, but... Tragedy befalls kingdom and only one lone adventurer can lift the curse? Been there, read that, seen the Disney film adaptation.
 Analysis: I'd imagine that a hidden object game is pretty easy to make, since the market seems to be sopping with them these days, but it seems to be hard to make well. With the exception of the Mystery Case Files series and a few other titles, any time I usually spend with a hidden object game is time steeped in boredom and resentment, like some foul yet mediocre blend of tea. I'm not saying Royal House of Stone is revolutionary and is going to change your life. It's just a game that manages to avoid most of the pitfalls other games in the same genre fall into, such as poor object design, bad translation, pointless to-and-fro-ing, and the like.
Which, you know, helps to take some of the sting out of the unreasonable item requirements that are a staple of the point-and-click genre. At one point, for example, you need to gather some seeds. Not particularly ominous seeds, mind you. Just seeds. But you can't just pick them up and put them in your pocket, oh no. Nor can you put them in any of the items in your inventory that could be used to hold anything or simply bundle them up in a bit of rag that's lying right freaking there. You have to find a special bag to carry these seeds. Not that there appears to be anything special about it. If you've played a point-and-click game before, you're probably used to this sort of "because I said so" school of restriction, but it's still a bit ridiculous.
Thankfully, if "no, only this item will do the job" is standard, the puzzles here are not. While you've got your share of tasks that need to be solved by using the appropriate item in the appropriate, obviously marked location, that's not the only solving you'll do. A goodly portion of the game's puzzles actually require logic. One puzzle, for example, requires you to paint sections of a map representing a feuding kingdom, and to keep identical colours from sharing the same border. Another has you use a series of weights to trigger a mechanism. None of them really qualify as brain busters, or are even terribly unique, but it's still nice to have a game treat me like I'm capable of basic function beyond knowing not to try to fit my whole fist into my mouth. Thanks for always believing in me, Royal House of Stone.
But the biggest flaw? The length. Royal House of Stone feels about half as long as it really should be, and most players will probably breeze through in a matter of hours. Whether you find this a Misery-esque fatal hobbling depends largely on how much game time you demand for your buck. Royal House of Stone is high quality, entertaining, and worth a look if hidden objects are your "thing". If quality over quantity is what you're looking for, then you won't be disappointed here.
![]() Windows:
Windows:
Download the demo
Get the full version
![]() Mac OS X:
Mac OS X:
Download the demo
Get the full version


Walkthrough Guide
(Please allow page to fully load for spoiler tags to be functional.)
Echoes of the past: The Royal House of Stone, Walkthrough
General Tips
There is no time limit.
Ho-scenes are random except objects you need for a mini-game, mirrors and inventory objects.
You will find ho-scenes by clicking on sparkling areas.
When your mouse cursor turns into a hand you can pick up an object.
When your mouse cursor turns into a finger you can touch objects.
A magnifier at the mouse cursor indicates a nearby view.
You will find your inventory on top of the screen, it will open when you hoover over it with the mouse.
Arrows show you where you can go, click the arrow to go into this direction/room.
The mirror top right is your hint button, it will help you in ho-scene as well as in other scenes where it shows you what to do or where to go.
In each ho-scene you can find two mirrors for additional hints.
If you enter a Ho-Scene a second time the mirrors will not be there if you have already found them.
Some objects from your list are hidden as words.
Objects on your list written in red, indicate interaction such as a mini game or opening a drawer for example.
Mini-games can be skipped after short waiting time.
Chapter 1: The Petrified Nanny
Level 1: Throne Room/Studio
Follow the Tutorial and pick up the book.
Go left into the studio.
The mirror shown from the tutorial is your base of 10 hints.
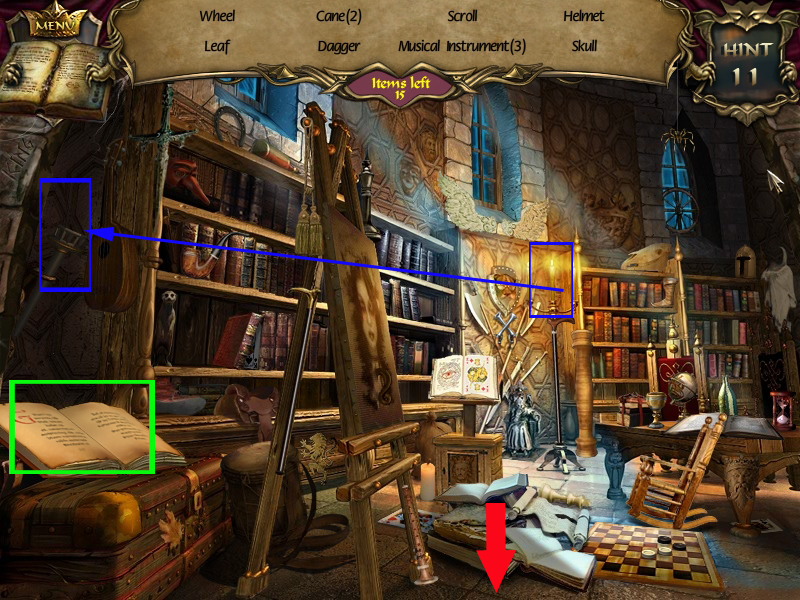
Find the objects from your list.
The letter will be found by clicking the book low left corner, since you find the red written letter.
At least you will be asked to return to throne room with a burning torch.
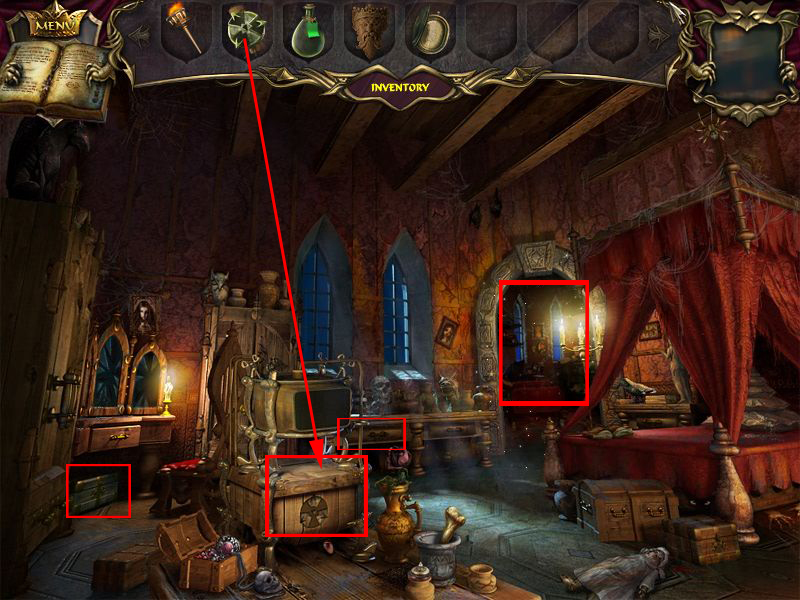
Grab one of the burning candles far left and light the torch left side with it.
Click the torch to get it into your inventory.
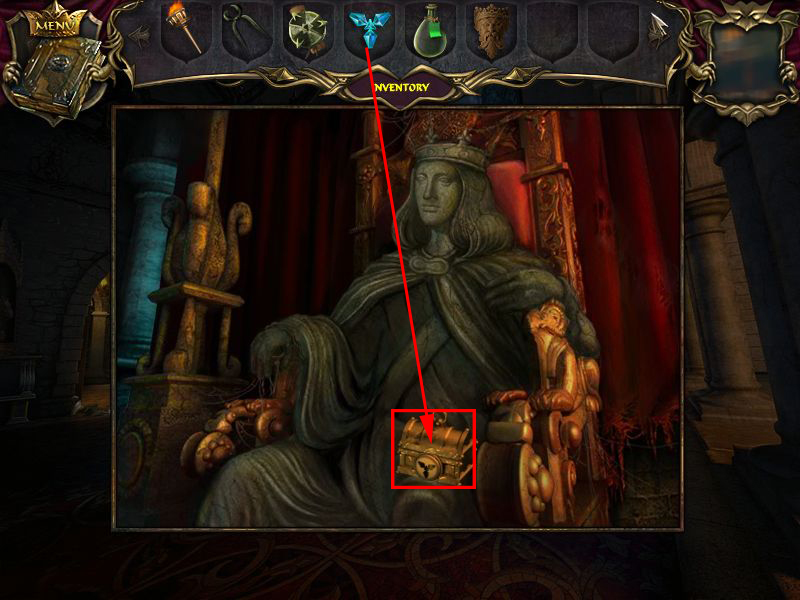
Go back into the throne room.
Screenshot
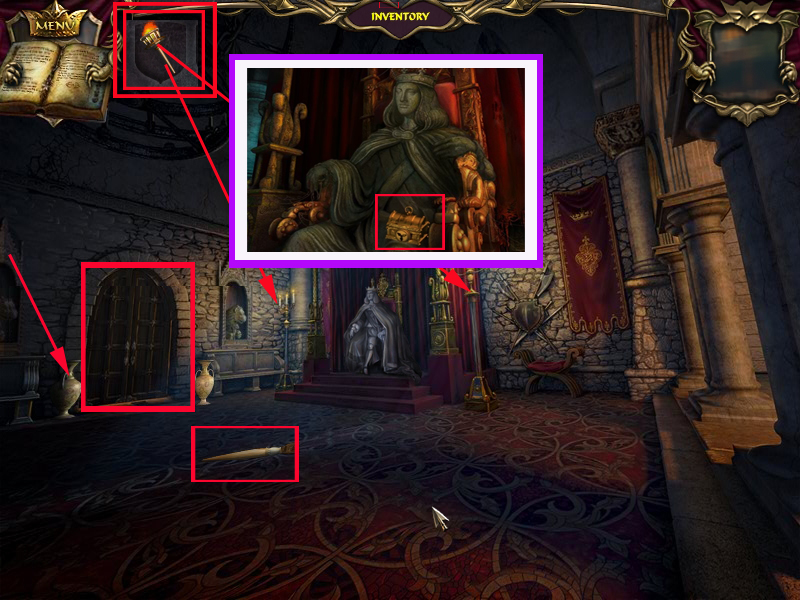
Get the torch out of your inventory and light the candles left and right to the throne.
Click the prince on the throne, he is holding a locked casket, you will need to find the key.
Click the vase left from the door on the ground, it will break a brush will fall on the ground.
Pick it up.
Screenshot
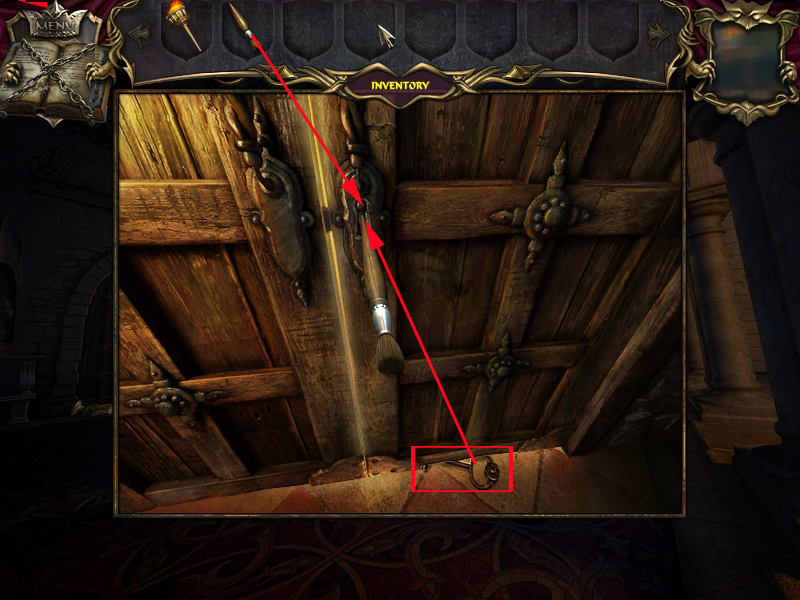
Use the brush to pick the lock, a key will fall to the ground on the other side but luckily you can pick it up from here.
Screenshot
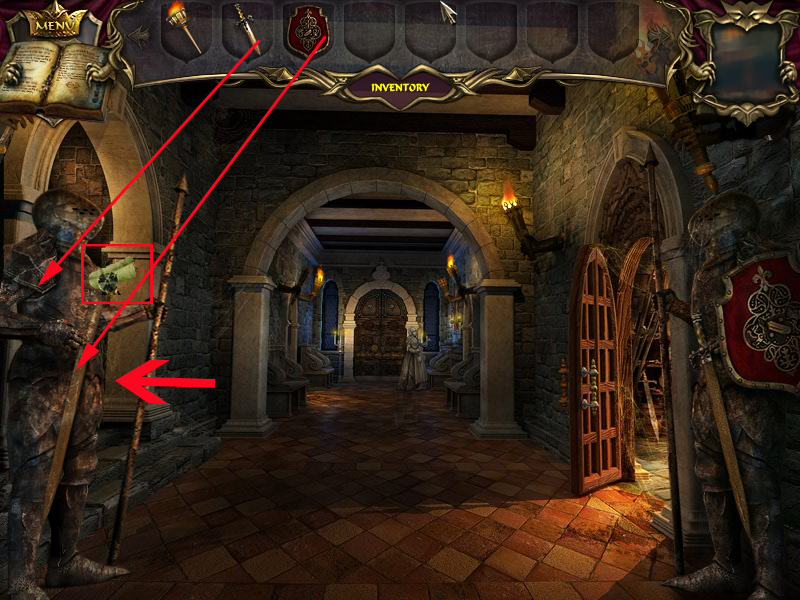
Level 2: Hallway
Screenshot
There is nothing to do here right now, so into the back part of the hallway.
The doors to the left and right are locked, the Nanny is petrified.
Pick up the paper scraps right next to the Nanny on the ground.
Click the frame's right side and in the nearby view the scraps into the frame.
Screenshot
You will have to reassemble the picture.
When you click a scrap into the frame it will be shown completely.
A part at the right place will be locked, at the wrong place it will fall down again.
When you are done click the crest of the prince's shield, it will be copied into your journal.
Screenshot
Use the arrow to go back into the front part of the hallway and enter the armory room
Level 3: Armory Room
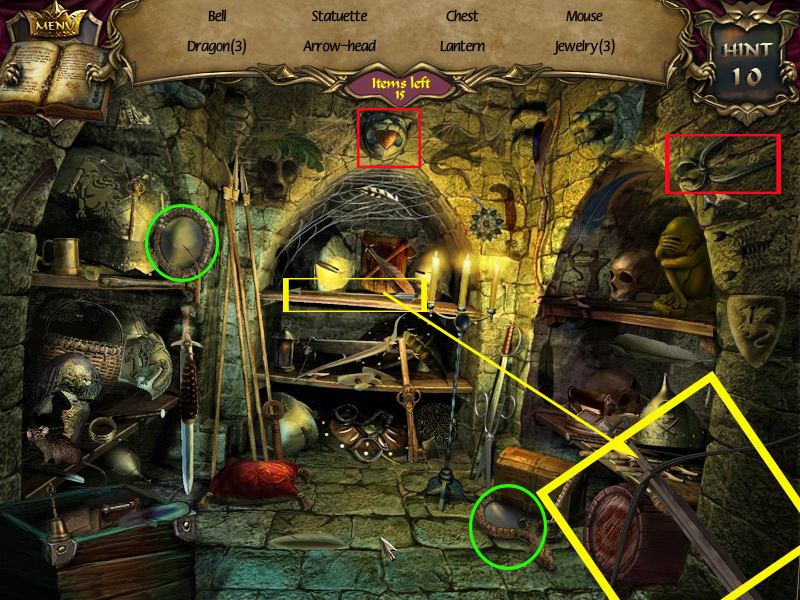
Click the sparkling area far left to enter the ho-scene.
Find all the listed object.
To get "heart with arrow" pick up the arrow from the top shelf, far middle below the heart.
Click the arrow onto the bow bottom right corner.
Now you can get the "heart with arrrow".
At the end you will asked to find the tongs, they are in the upper right corner.
Also collect the two mirrors.
Screenshot
Leave the room
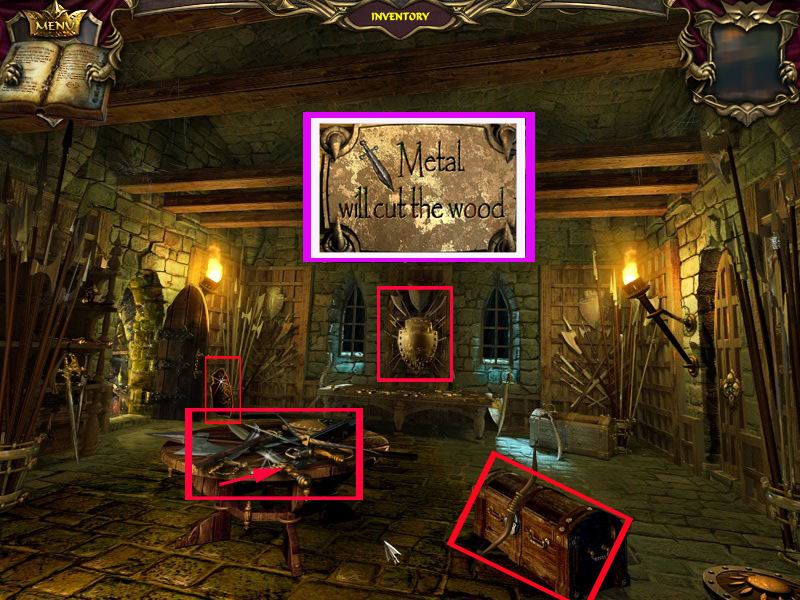
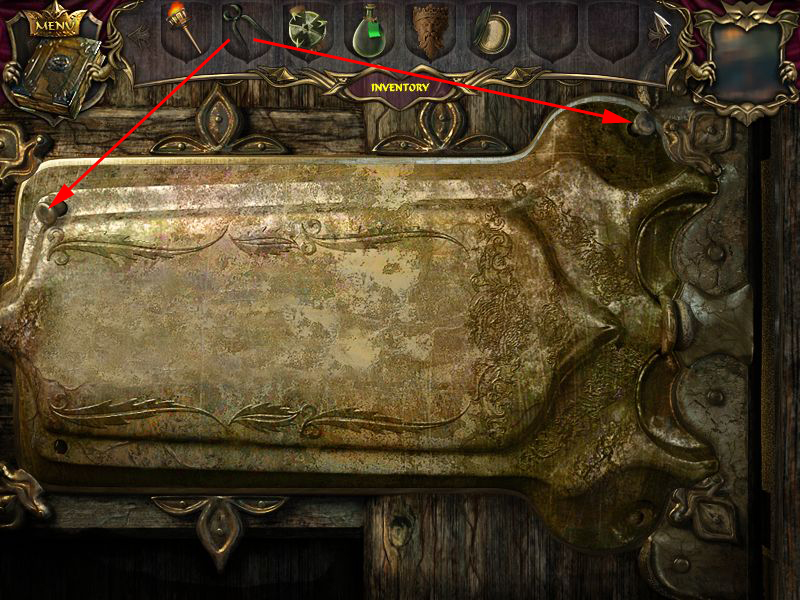
Far left behind the door you can find a shield.
At the wall far middle click the shield, it will fall down and you can see a metal plate saying: "Metal will cut the wood".
Click the table in the middle and one of the weapons will fall on the ground. Do this until there is only a sword left.
Pick it up, it will go into your inventory.
Leave the room
Screenshot
Level 4: Hallway
Put the shield and sword from your inventory onto the knight to your left.
Grab the scroll that will appear in the knight's hand.
Screenshot
The knight has moved and you can enter the hallway of the royal family chambers.
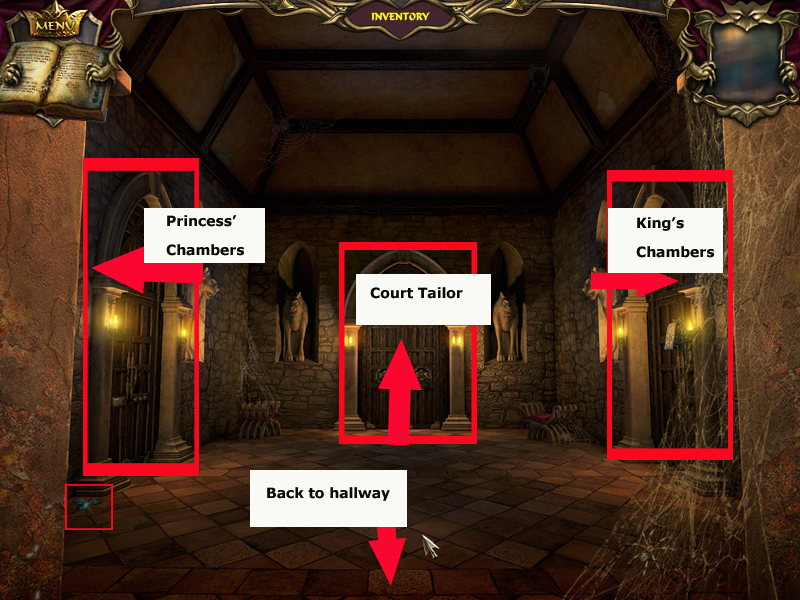
Level 5, Hallway Royal Family's Chambers
Screenshot
The rooms left and right are locked.
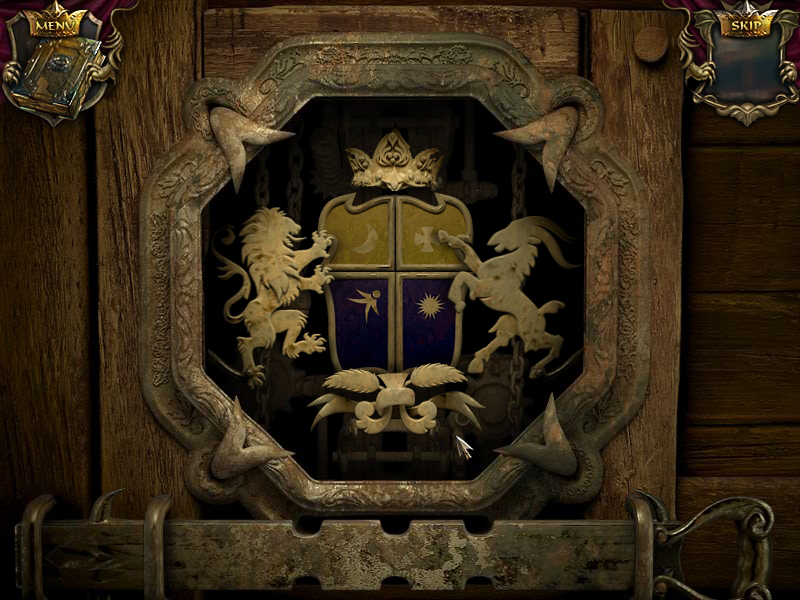
Pick up the crystal key left side on the ground and click the door in the back.
You will have to reassemble the crest according to the example in your journal.
To do so; click the four parts of the crest and the symbols right, left, above and below, until you have the right combination.
Screenshot
Enter the court tailers room.
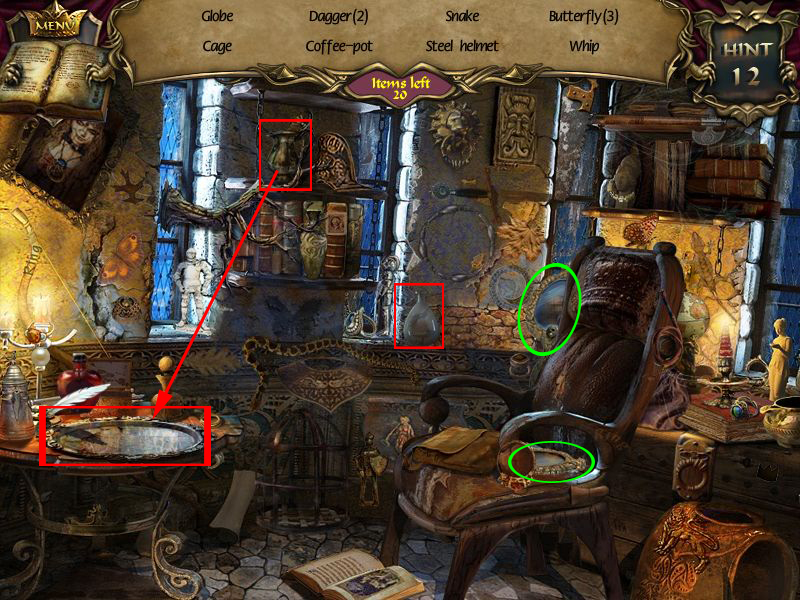
Level 6, Court Tailor
Click the sparkling area to activate the ho-scene and find all objects from your list.
For the jug's shadow place the jug from the shelf onto the silver plate on the table.
At the right of it you now can get the shadow.
Lastly you will be asked to get a beaker you will find far middle in the scene.
Screenshot
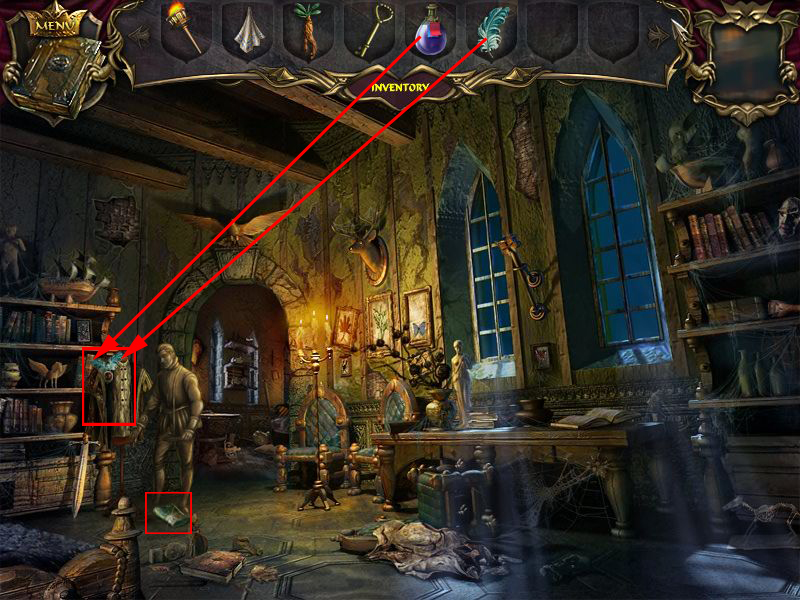
Now click the petrified tailor and learn that a feather is missing.
Click the tree on the table right side to get a nearby view.
Clicking the branches will shake some seeds down, but you will have to come back as you do not have anything to grab it with.
Screenshot
Go back to the studio
Level 7, Studio/Throne Room
Click the sparkling area to activate the ho-scene and find the 14 royal symbols.
Some objects are to be found as written words.
Click the checkered board on the ground low left, two tiles will place one on top of each other, this is a royal symbol as well, click it to get it into your inventory.
Screenshot
Now you will play memory.
Click on 2 doors to see what is underneath. If the pieces match the doors will disappear.
When there is only one door left, click it and a bas-relief with King's Image will go into your inventory.
Go back into the throne room
Click the petrified prince and use the crystal key from your inventory to open the casket.
Get the medallion.
Screenshot
Go back to the hallway of the royal family's chambers.
Level 8, Hallway Royal Family's Chambers
Click the left door for the princess room.
Use the tongs from your inventory to loosen the screws upper right and left.
Screenshot
A mini-game opens.
Your goal is to unlock the key block by moving the wooden bars and gears in order to open the latch.
The wooden bars can go into the spots in which nothing is blocking them
You can see a white outline behind the bars when they are in a spot you can place them in.
First place the two gears left below the big moving one.
The latch moves a little to the right.
Screenshot
Now place the longer bar of the two right side completely to the left.
Leave a space of a bar size and place then the other bar.
Place the bigger of the two gears right side below the moving one.
Below this one place the smaller on.
The latch moves to the right and opens the lock.
Screenshot
Enter the princess' room.
Level 9, The Princess' Room
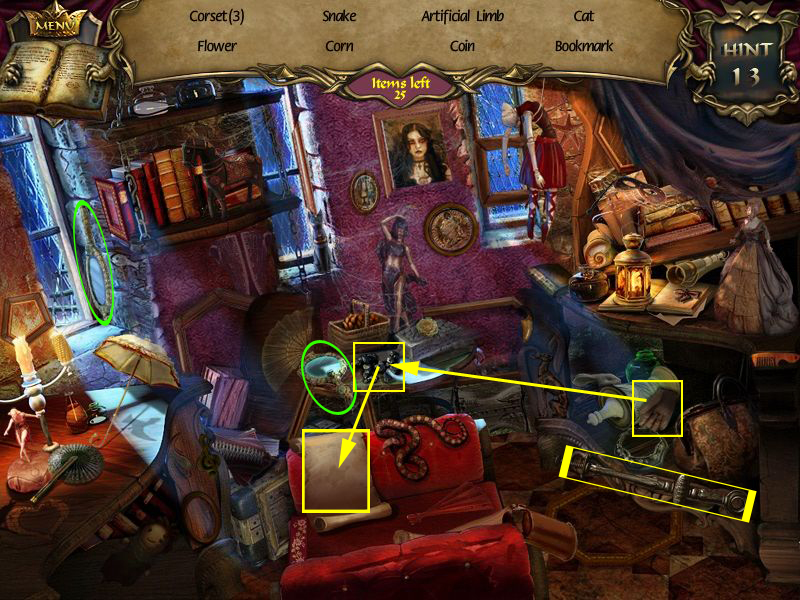
Click the sparkling area to activate the ho-scene and find the lists from your objects.
Don't forget to look for the mirrors.
For the hand print, get the hand right side and click it onto the coal on the table.
Now get it back and click it on the scroll at the back of the chair.
The lever you will find right side under the desk.
Screenshot
Click on the drawer on the left to open it.
Click on the green chest in the lower left to open it.
Pick up the paint inside the green chest.
Place the green scroll on the device in the lower middle.
Screenshot
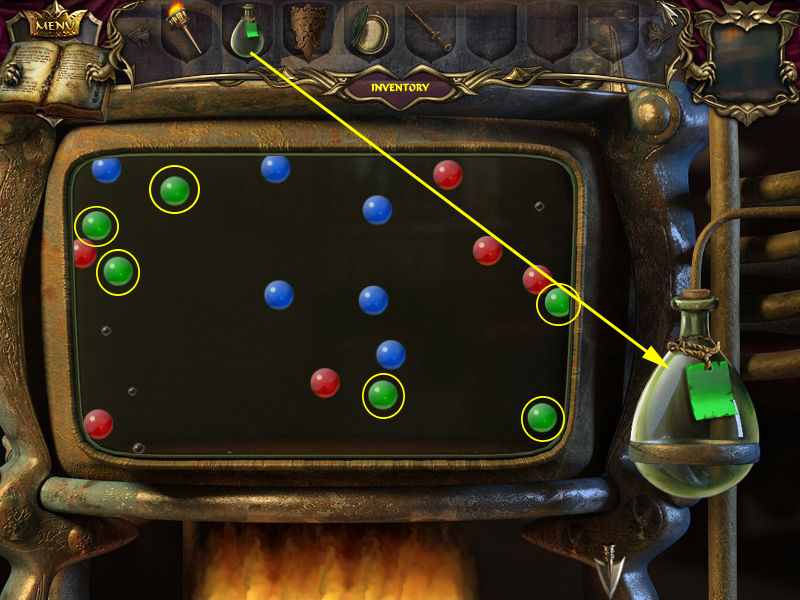
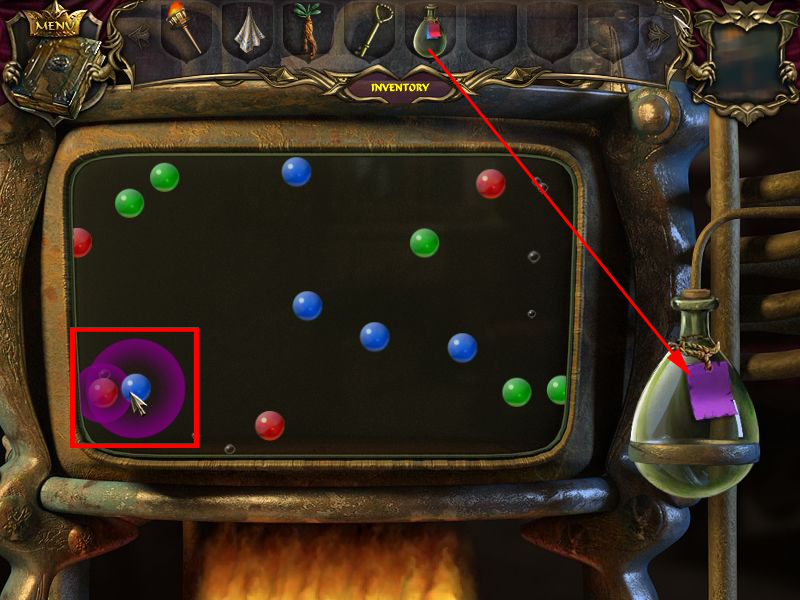
Click on the device again to get a nearby view.
Place the beaker from your inventory on the screen to trigger a puzzle.
Your goal is to collect only the green balls into the beaker.
Hover your mouse over ball and a sphere or spheres will appear over all the elements which are touching.
You only want to click the balls when the green ones are the only ones highlighted.
As this the beaker will be filled with green liquid.
Clicking the wrong spheres will make your liquid evaporate and you will have to start over.
Click the beaker once it has been filled up.
Screenshot
Leave the room
Level 10, Hallway Royal Family's Chambers
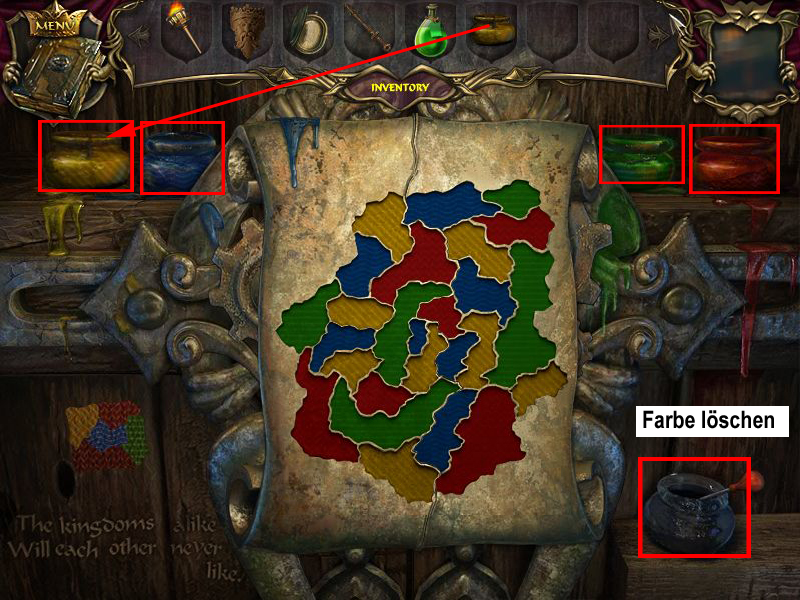
Now click the right door to the king's room.
Get the paint out of your inventory and place it upper left.
Your cursor will change to a brush automatically.
Click on the color you want to use and it will be added to your paintbrush.
Click the color onto the spot you want it to go into.
If you want to clear a color you can simply paint over it or click the water jar in the lower right corner.
There are several solutions possible, the screenshot shows one example.
Screenshot
Enter the king's room.
Level 11, King's Room
Click the far center of the scene, open your inventory and place the king's relief into the empty spot.
The compartment opens, pick up the prince's picture, it will combine with the medallion.
Now use the lever at the device right next to it.
You can see that somewhere a door opens.
Screenshot
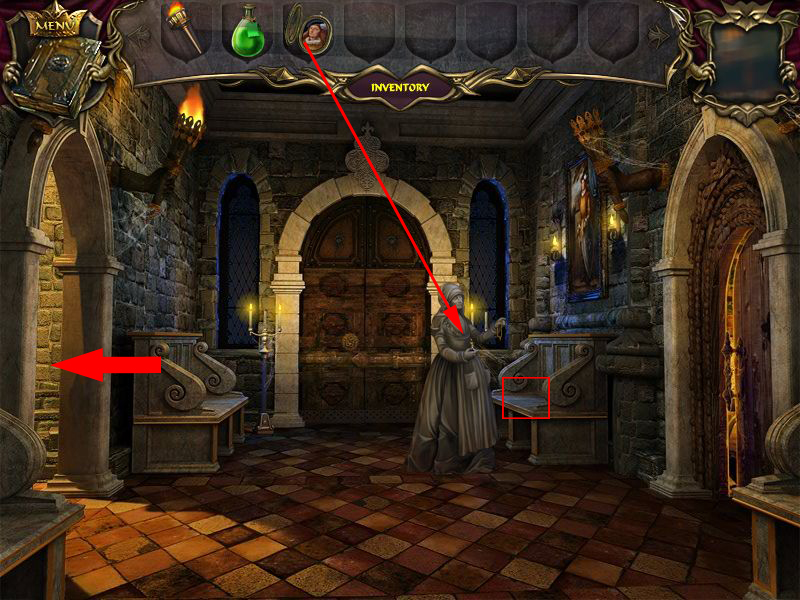
Leave the room and go back to the petrified nanny.
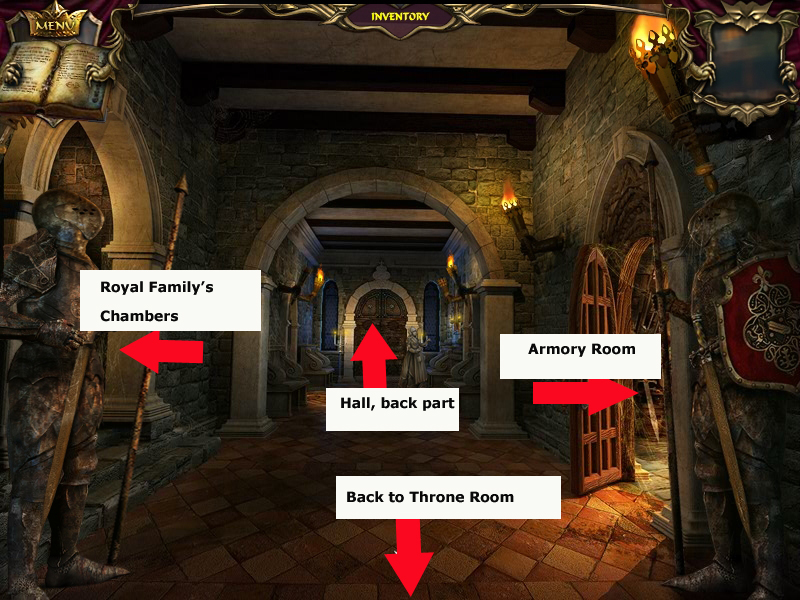
Level 12, Hallway, back part
Get the medallion out of your inventory and give it to the nanny.
This will free the nanny and she will leave a handkerchief on the bench for you, which could be of further use.
Get it into your inventory.
Screenshot
Go left to enter the tower.
Chapter 2: The Enchanted Gardener
Level 13, Tower Stairway
Click the stone standing out of the wall right side 2 to 3 times.
It falls down and from the compartment you can grab a golden key.
There is nothing more you can do here right now, so go up the stairs.
Screenshot
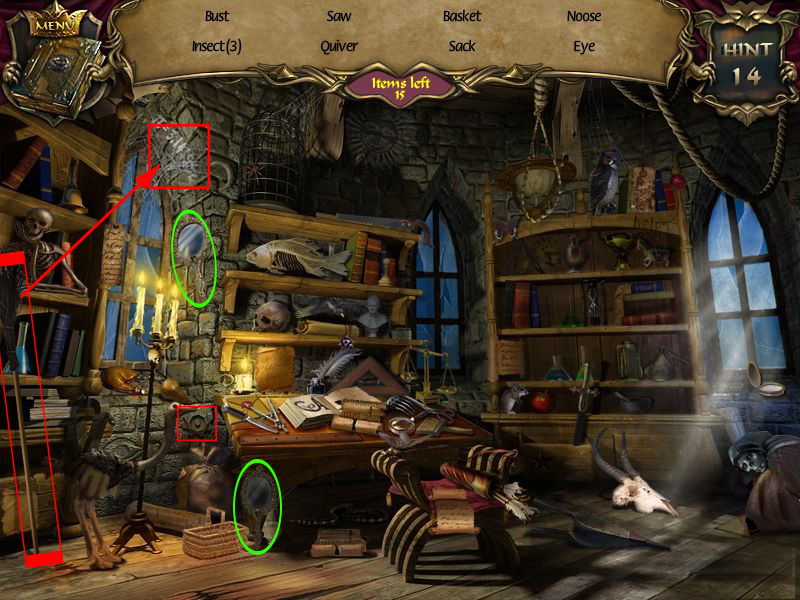
Level 14, Tower
Click the sparkling area to trigger the ho-scene and find the listed objects.
Don't forget to look for the mirrors.
To get the 5 grab the broom left corner and remove the spider webs at the left window.
Click the now to see 5 to get it into your inventory.
The gear you will find at the wall below the left window.
Screenshot
Now grab the red bag from the top shelf left side.
Click the right window, but it is closed and you have no key and nothing to pry the wooden floor boards either so go down stairs again.
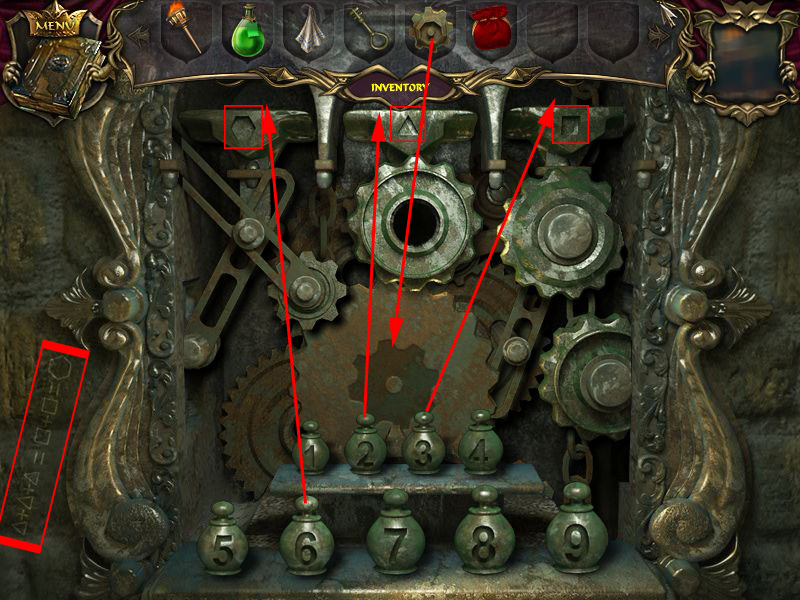
Level 15, Tower Stairway
Click the horned face at the right side, open your inventory and place it in the middle of the mechanism.
Now you have to find out, which weigth goes where.
Low left you will find a hint, showing a geometrical shape.
There are also some etchings in the lower left with the same shapes
Place gears on the pedestals in the upper center to bring the gears to the correct positions so they can move.
Click on a weight to pick it up and attach it to your cursor.
To remove a weight simply click on it and place it in another spot, or at the bottom of the scene.
You can only place one weight in each spot.
The solution is 6,2,3
Screenshot
You will see an image of the door to the square opening.
But first go downstairs into the armory room.
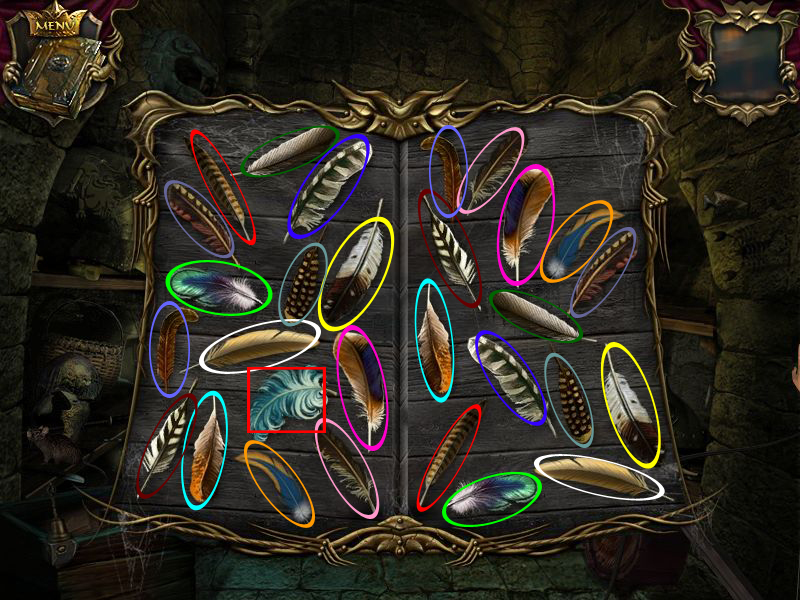
Level 16, Armory Room
Click the sparkling area to enter the ho-scene and find all feathers.
For one feather get the scissors at the bottom of the right arch column and cut open the red pillow at the bottom of the left column.
Click the feather you see then.
Screenshot
In the following mini-game you will need to click the matching feathers right and left side, until only one is left.
Click this one to get it in your inventory.
Screenshot
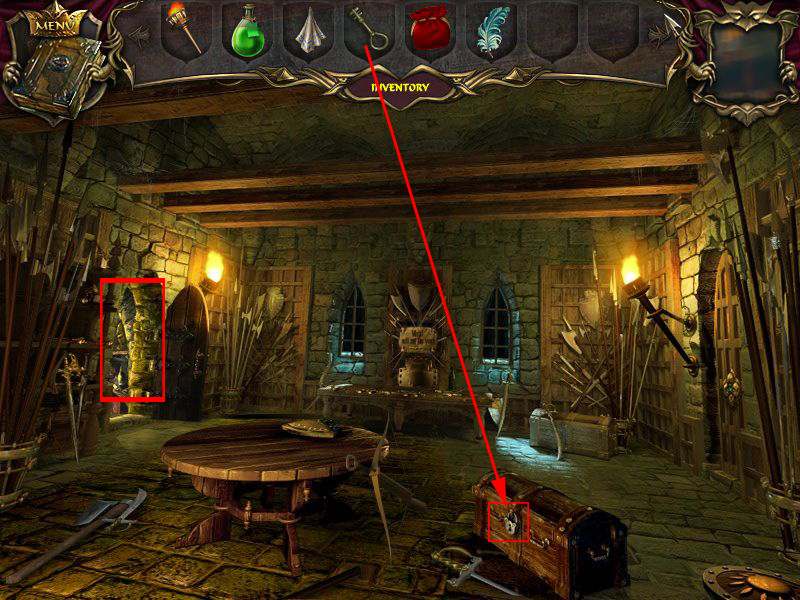
Use the key from your inventory to open the trunk on the ground, low right side.
Get the crowbar out und go back to the tower.
Screenshot
Level 17, Tower
Get the crowbar out of your inventory and pry open the wooden floor boards below the right window.
Get the knife out of the compartment.
Use the crowbar again to pry open the windows lock.
The window shutter opens and a metal ring falls on the window sill.
Pick it up, looking down you see a place with a well.
Screenshot
Leave the tower and go back to the court tailor.
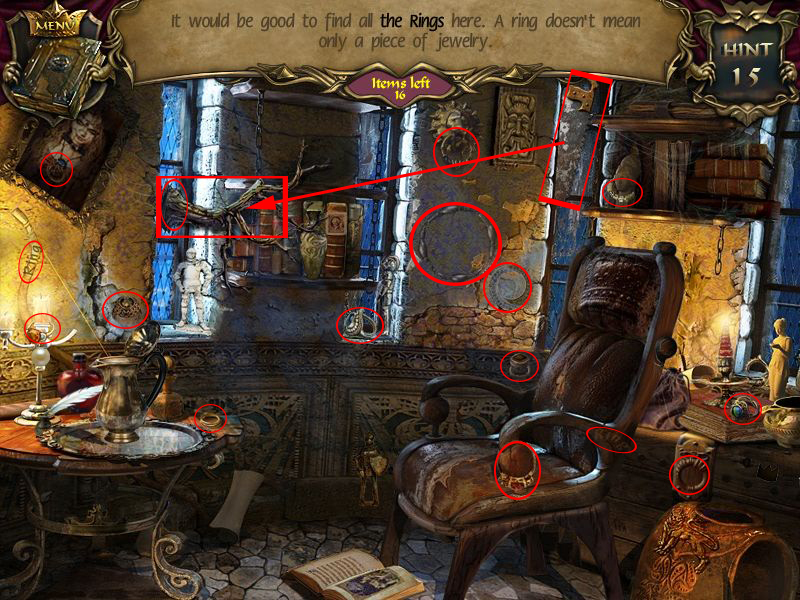
Level 18, Court Tailor
Click the sparkling area to access the hidden object scene.
Find 16 rings (not only jewelery).
One you will get by using the saw hanging far middle at the wall and using it with the branch at the left window.
Click the ring the cut branch shows now.
Screenshot
Another memory mini-game follows.
You will need to match equal rings or ring or words in the same color.
A door knocker will be last, click it to get it into your inventory.
Click the little tree under the window.
Get the red bag out of your inventory and click it onto the seeds.
(If you did not do it before, click the trees branches to let the seeds falls down).
Get the bag back into your inventory.
Screenshot
Go back to the back part of the hallway, where the petrified Nanny was standing and click the door in the back.
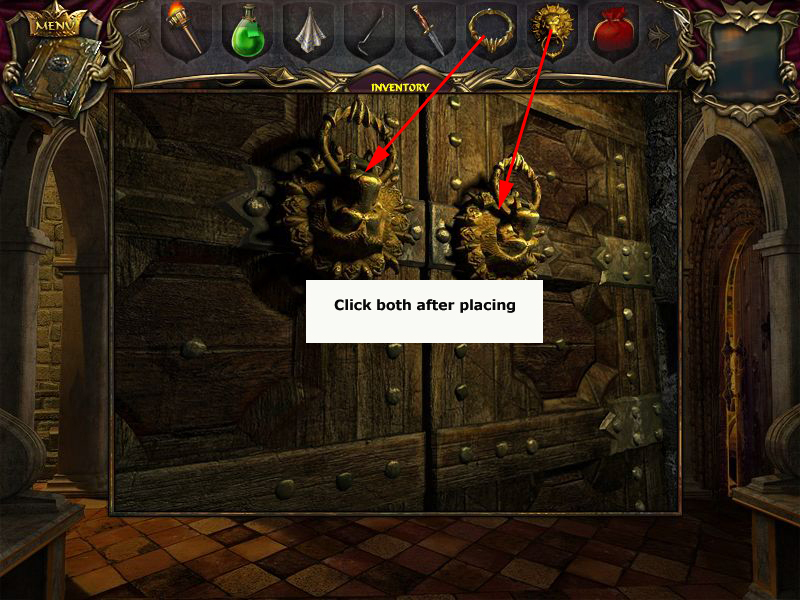
Level 19, Hallway back part
Click the door and open your inventory, place the ring left and the lion door knocker right side at the latch.
Click both door knockers to open the door.
Screenshot
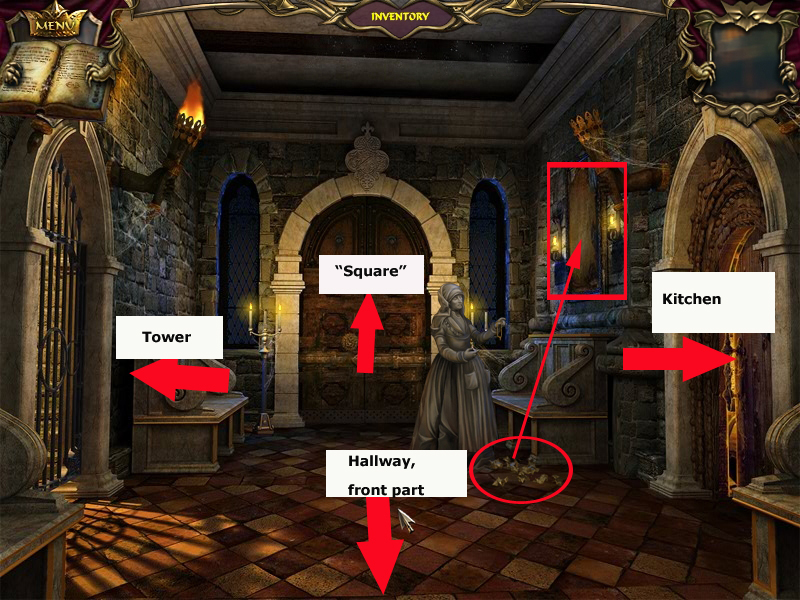
Enter the square.
Level 20, Square/Well
You see the enchanted gardener.
Get the garden shears, laying at his feet.
Open your inventory and get the seeds out.
Click them onto the green next to the gardener.
Pour the green liquid over it, the plants growing and the gardener is released.
He tells you, that the tailor maybe knows more.
At the place where he stands a good smelling herb will be left, click it.
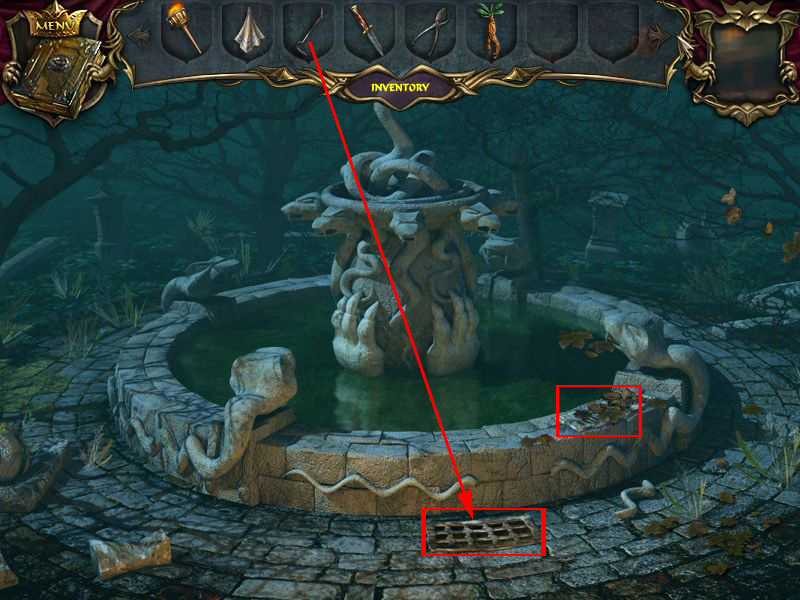
Now click the the well
Screenshot
Right side leaves are laying, click to make them disappear.
Click the plate underneath and read : Water defeats the fire.
Use the crowbar from your inventory to pry open the grate in front of the well and click the hole.
Screenshot
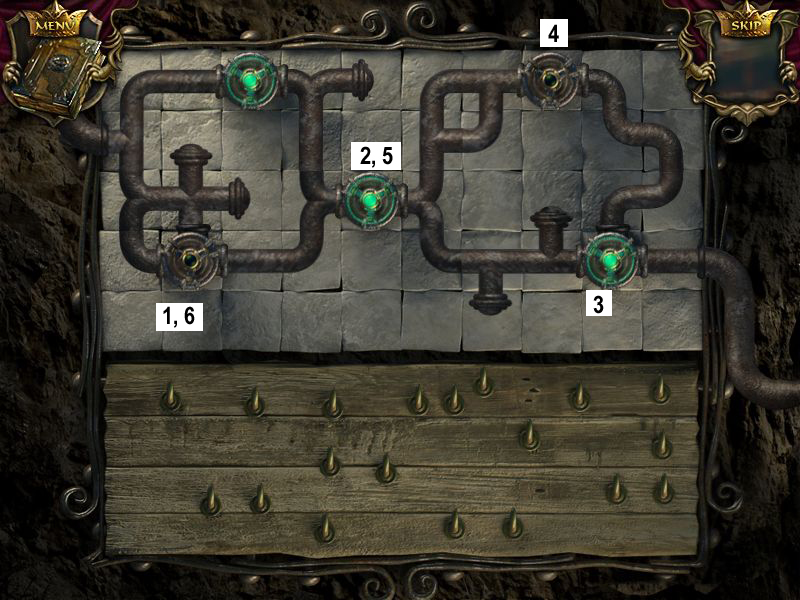
A mini game opens.
You will have to assemble the pipes and turn on all the taps.
Drag the pipe pieces at the bottom of the puzzle and place them on the taps.
Pipes in the right spots will darken and lock.
Once the pipes are in place, you have to click on the valves in the right order until they are lit in green.
Clicking one valve will cause reactions of other valves.
Click first the low left valve, then the middle one, followed by low right, top right, middle, low left.
Screenshot
Go to the right and enter the backyard.
Chapter 3: The Court Tailor and the Cook
Level 21, Backyard
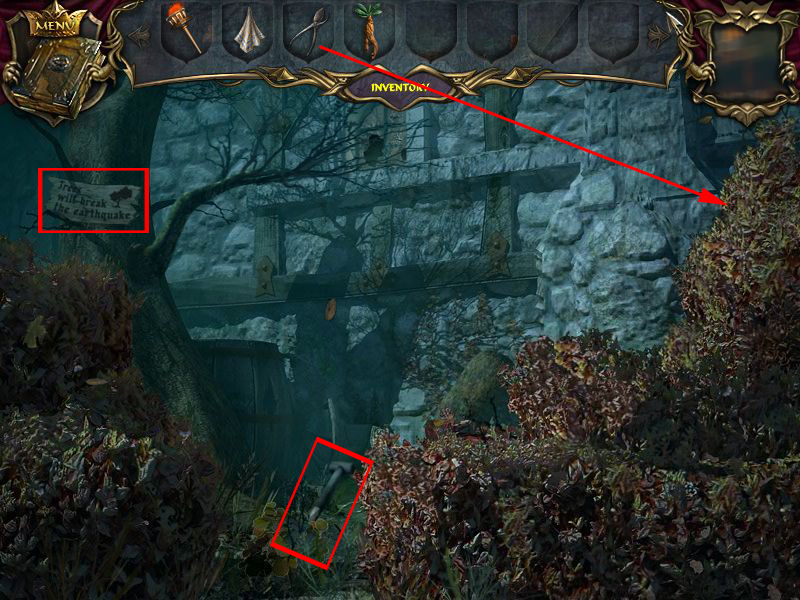
Get the garden shears out of your inventory and use them to cut the bushes.
Click the spade a few times to get it into your inventory.
Click the plate at the tree saying: Trees will break the earthquake
Screenshot
Go back to the square and choose left the way to the crypt.
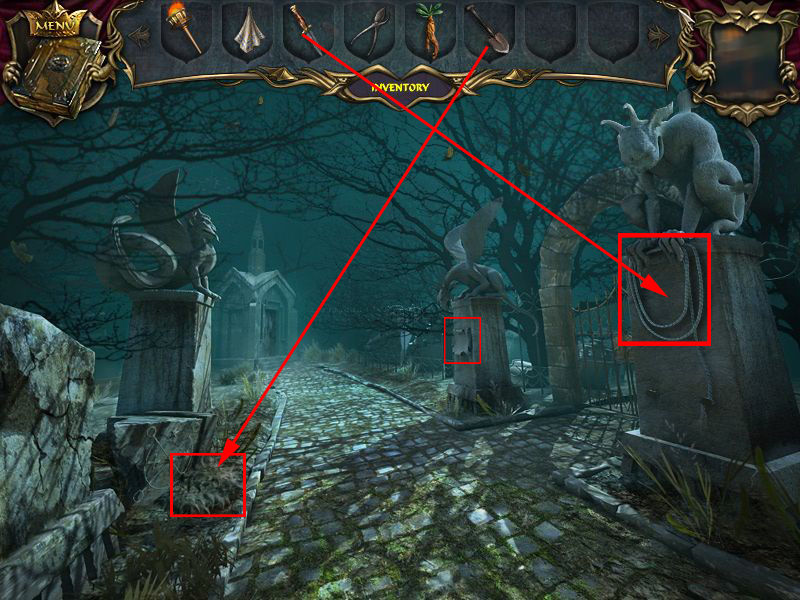
Level 22, Statue Alley
Open your inventory and use the knife to cut the rope at the right statue.
It will fall down, click to get it into your inventory.
Now get the spade and use it at the soil low left.
Get the hook out of the hole, it will combine automatically with the rope inside the inventory.
At the bottom of the second statue you will find another plate: Earth will stop the water.
Click the plate and it will lower.
Get the key behind it.
Screenshot
Go back to the backyard.
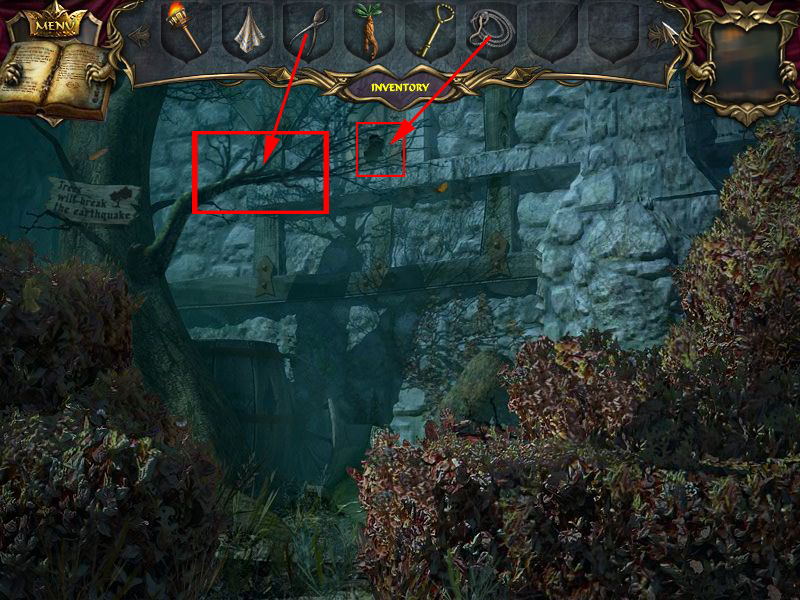
Level 23, Backyard
Get the garden shears from your inventory and cut the branch right of the right.
Use the rope/hook and click the window with it.
To climb up, click the window again.
Screenshot
As it you enter the kitchen.
Level 24, Kitchen
Get the empty beaker from the shelf right side.
Click the barrel in front of the door very fast ever and ever again until it lays left side and fluid is running out.
Click the hole to learn that it is oil.
Remove the spiderwebs above the fire place with a click and click again to read the plate: Fire destroys the metal
Screenshot
Click the door and your are in the back hallway.
Go left to the tower
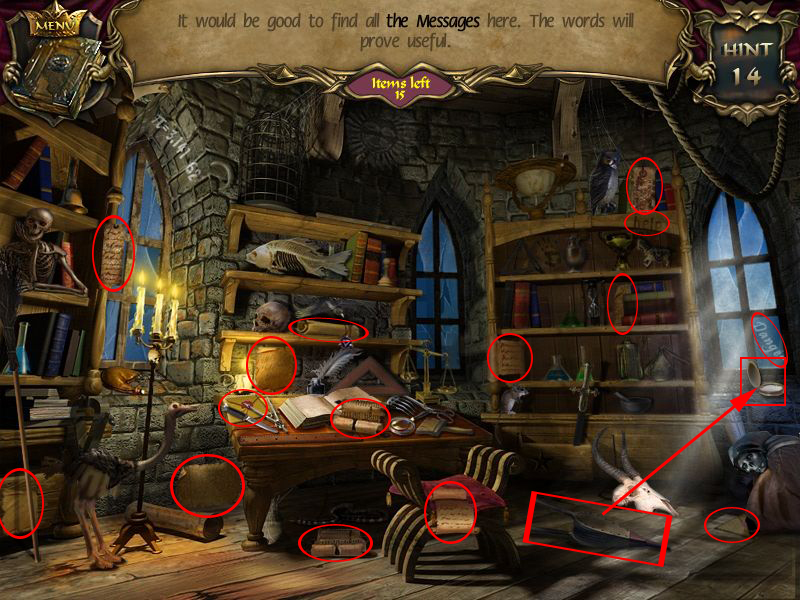
Level 25, Tower
Click the sparking area to access the ho-scene.
Find 15 of all kind of notes.
For one use the bellows from the ground with the powder box on the right windowsill.
The powder will bring the word "Danger" onto the window, click it.
Screenshot
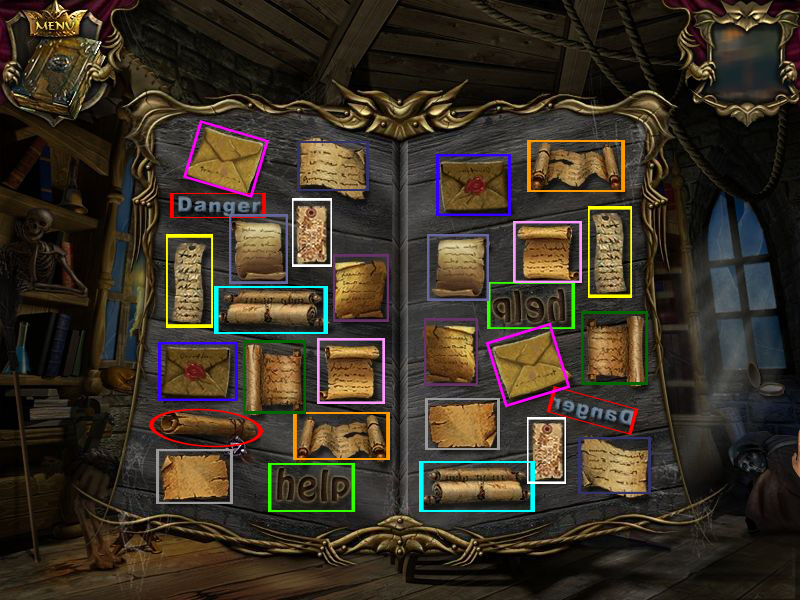
Match identical notes and click the last object left, a violet scroll.
Screenshot
The scroll says: Violet powder will make the old look new
Leave the scene and the tower and go back to the princess' room.
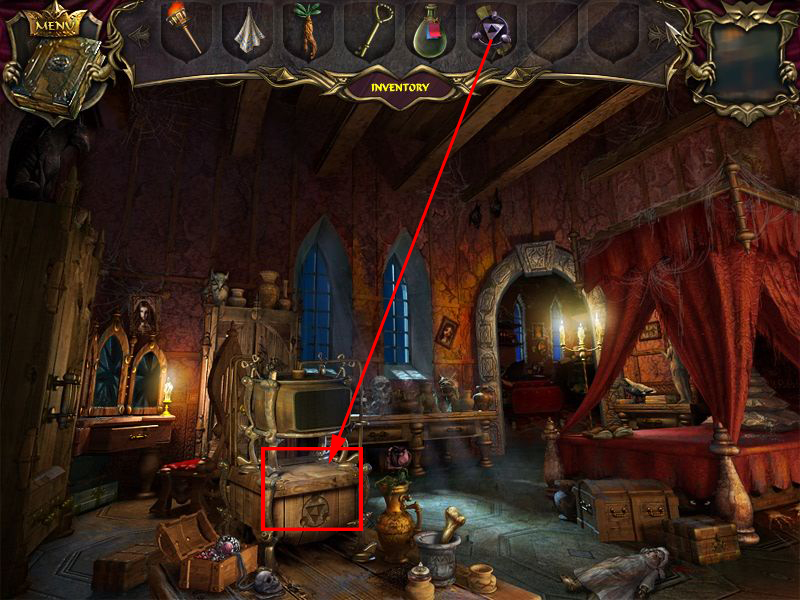
Level 26, Princess' Room
Place the Violet Scroll at the bottom of the device in the lower center of the scene.
Click on the device again for a closer view.
Screenshot
Place the Empty Beaker anywhere on the scene.
It is the same mini-game as befor, but this time you collect only the red and blue (=violet) balls into the beaker.
Screenshot
Click the bottle into your inventory, when it is full and leave the room.
Go and see the court tailor.
Level 27, Court Tailor
Get the feather out of your inventory and click it onto the unfinished suit.
Now pour the violet liquid over it.
The tailor tells you that he saw someone behind the mirror in the prince's room.
He will leave a oven mitt for you to pick up.
Screenshot
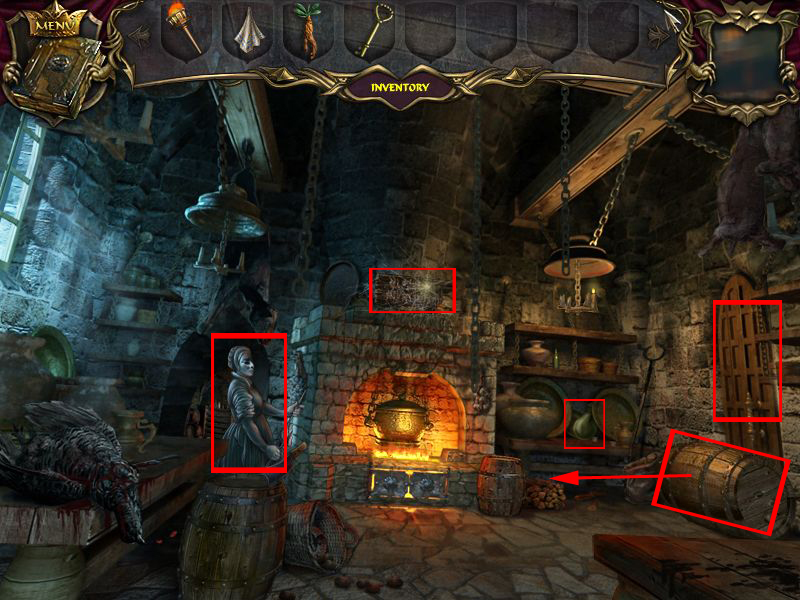
Go into the kitchen.
Level 28, Kitchen
Open your inventory and get out the oven mitt.
Use it to take away the pot lid at the fire place.
Throw the good smelling herb from your inventory into the pot.
The cook awakes and tells you, that the king seems to have a dark secret, which has to do with the tower, but the tower is always locked.
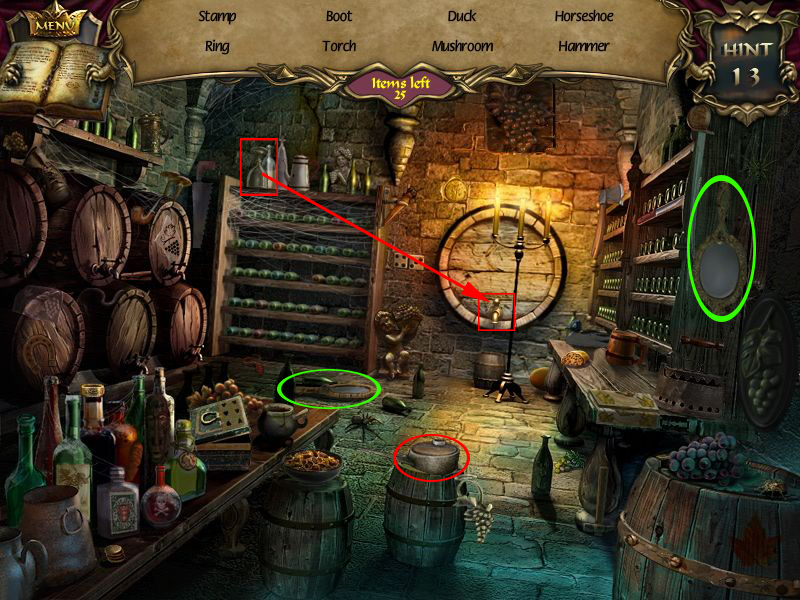
Click the sparkling area to access a ho-scene.
Find the objects from your list and the two mirrors.
For the glass of wine get the glass from the shelf left side and click the wine barrel faucet.
Click the filled glass.
The oil can you will find on the right front barrel.
Screenshot
Exit the ho-scene and get the oil can out of your inventory.
Place it at the leaking oil barrel and get the filled oil can back into your inventory.
Screenshot
Leave the kitchen, go to the square and choose the way to the crypt.
Chapter 4: The Coffin-Maker
Level 29, Cemetery Gates
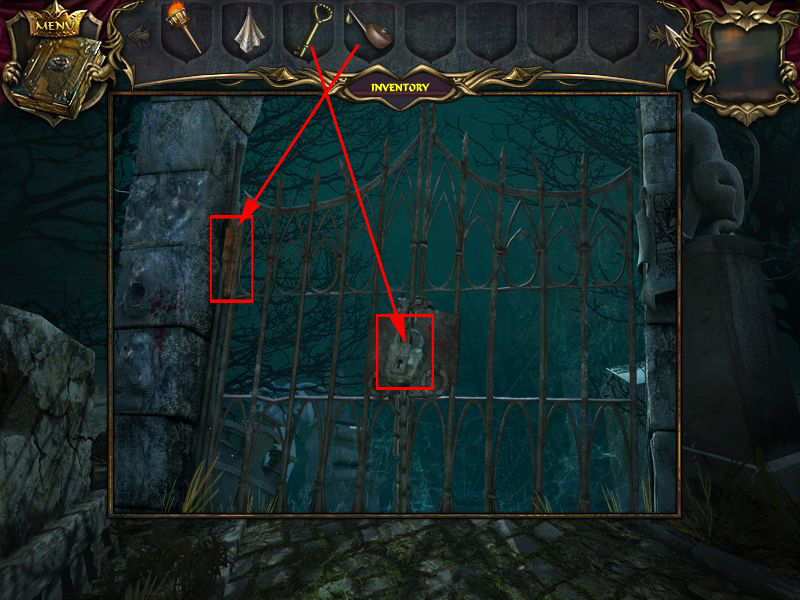
Click the gate right side between the two statues.
Open your inventory, get the oil can out and used it with the hinge left side.
Use the key from your inventory with the lock.
Screenshot
The door opens, click the sparkling area for the ho-scene.
Find all objects from your list and do not forget the mirrors.
For the smoke get the jug far left and pour its content about the fire place.
Click the smoke.
The door opener you will find left side at the grave stone.
Screenshot
Go back to the well and from there to the tower.
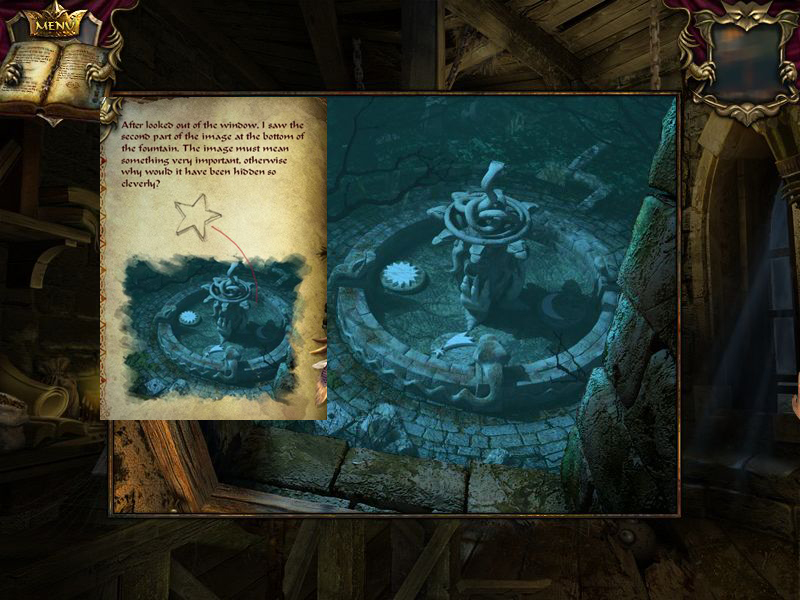
Level 30, Tower
Click the right window to see the well.
Now that the water is gone, your can easily see the symbols, which will be copied into your journal.
In your journal you finally have all four symbols for the locked door in the armory room.
Screenshot
Leave the tower and go to the armory room.
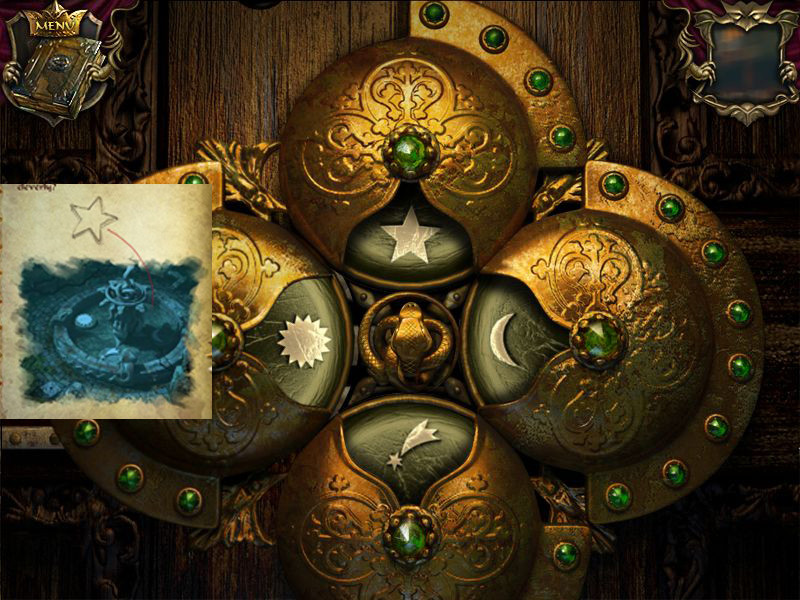
Level 31, Armory Room
Click the door to your right to get a nearby view of the look.
Click the symbols until you have the right ones.
Top: star, left: sun, right: moon, bottom: comet
Screenshot
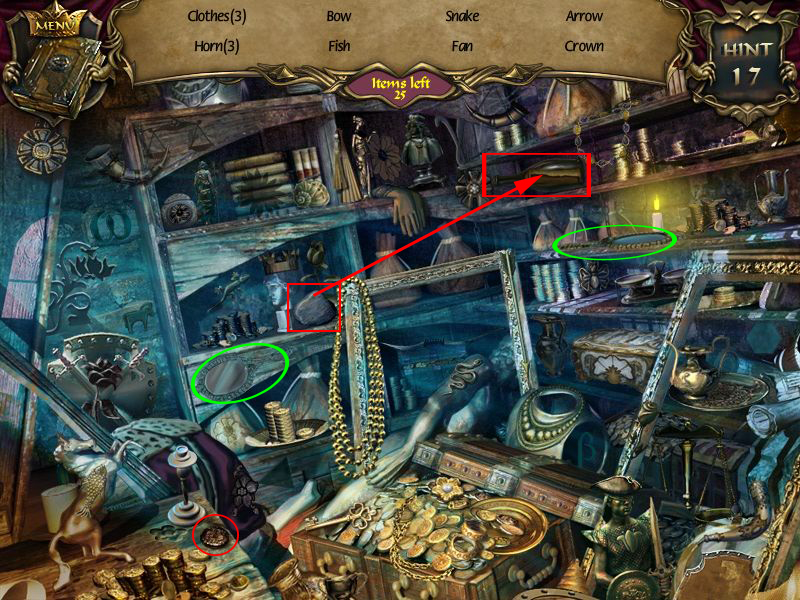
Doing it right will give you a sparkling area you have to click to access the ho-scene.
Find the listed objects and the two mirrors.
For the letter you need to smash the stone from the shelf and smash the bottle mail on the right shelf.
Click the letter.
The dirty coin lays on the table left.
It will be automatically cleaned by the handkerchief inside the inventory.
Screenshot
Leave the scene and the armory room and go to the crypt.
Level 32, Crypt
In front of the crypt open your inventory, get the door opener and click it on the crypt's door.
Click the door once again and enter.
Screenshot
Give the gold coin to the petrified coffin maker, next to the left coffin.
He tells you about as he followed the princess, wondering what she wants here.
He leaves a magic blue sphere for you to take.
Screenshot
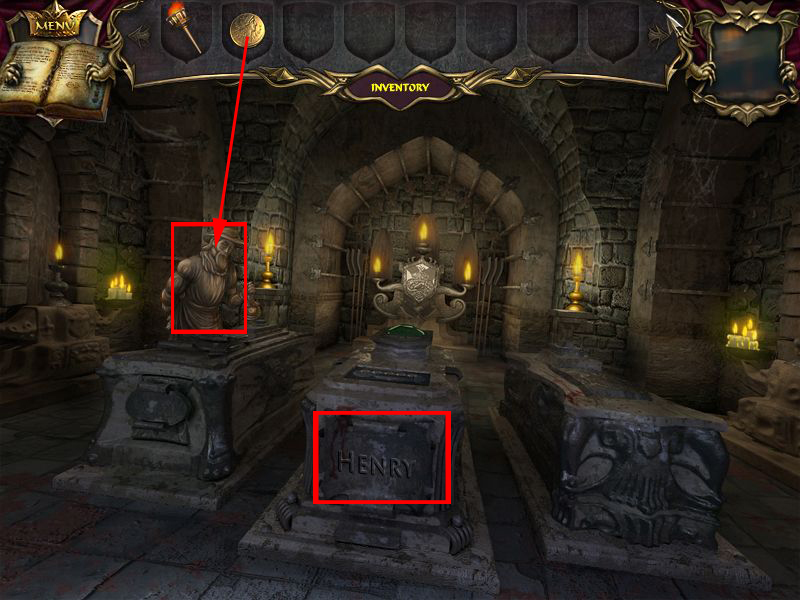
Click the middle coffin to trigger a mini-game.
You will need to decipher the king's name by rearranging the letters.
You can only click on the letters at the right and left ends of the puzzle.
When you click on a letter on the left end, it will travel through the top bar and land on the next to last slot.
When you click on a letter on the right end, it will travel through the bottom slot and land in the 2nd slot.
Click the letters in the following order: H, E, Y, E, N, E
The coffin opens, go inside.
Chapter 5: The Princess
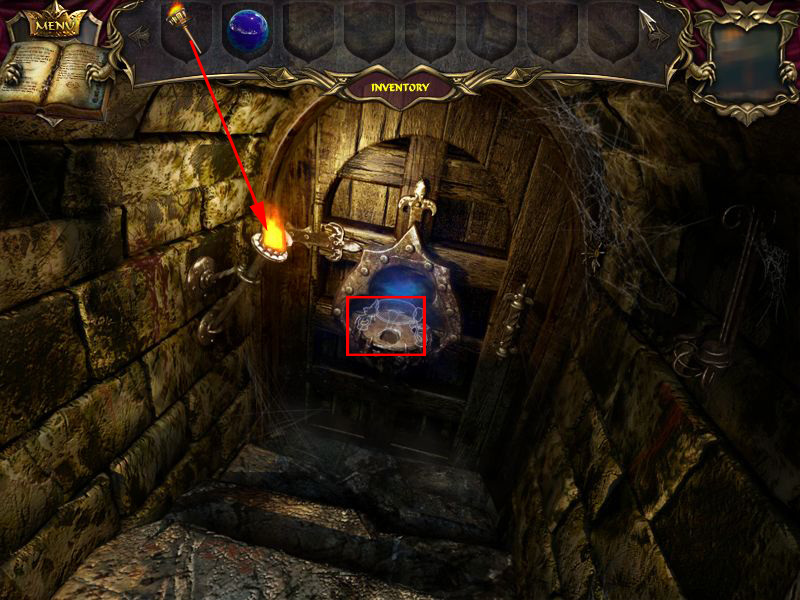
Level 33, Underground Stairs
Open your inventory and get the torch out, place it left next to the door.
The door in front is locked and only the blue magic sphere can open it but the parts of the stand are scattered all around the castle.
Screenshot
A note is in your book that strangely enough, everyone has been talking not very nicely about the princess.
Go back and stop at the iron door.
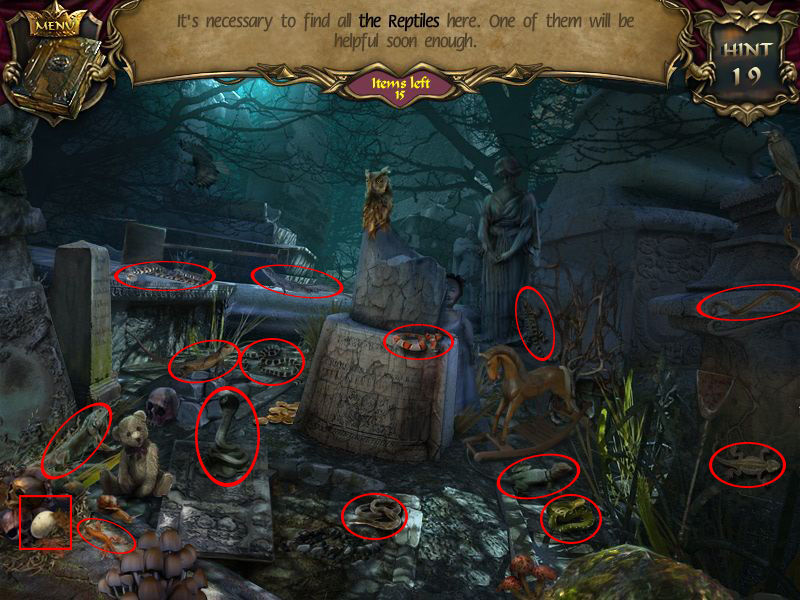
Level 34- Iron Door
Click the sparkling iron door to activate a mini-game.
Find all 15 reptile.
The last one is the egg in the low right corner.
Click the egg several time to get a hole where a snake will come out, click the snake.
Screenshot
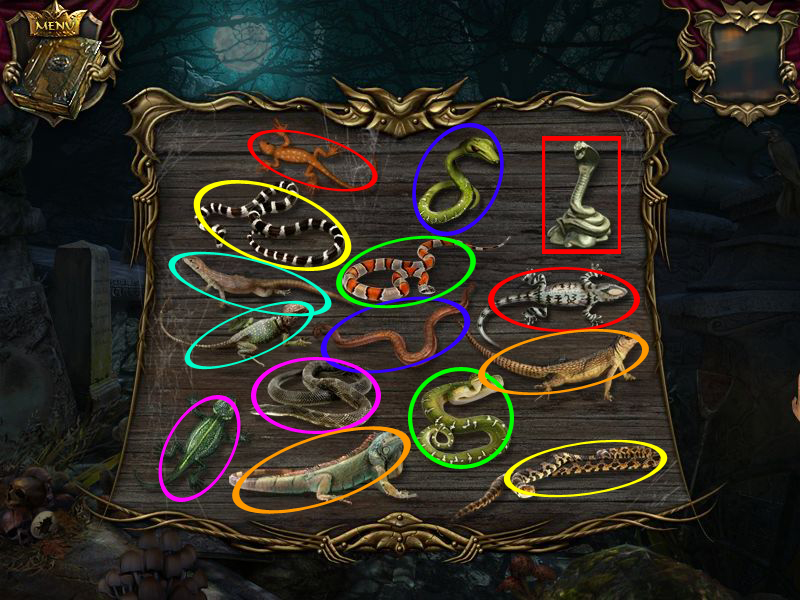
A mini-game opens.
Click snake and have a look at the colored notes above.
Match the snake with the same order of notes.
The left over snake goes with a click into your inventory.
Screenshot
Go back into the kitchen
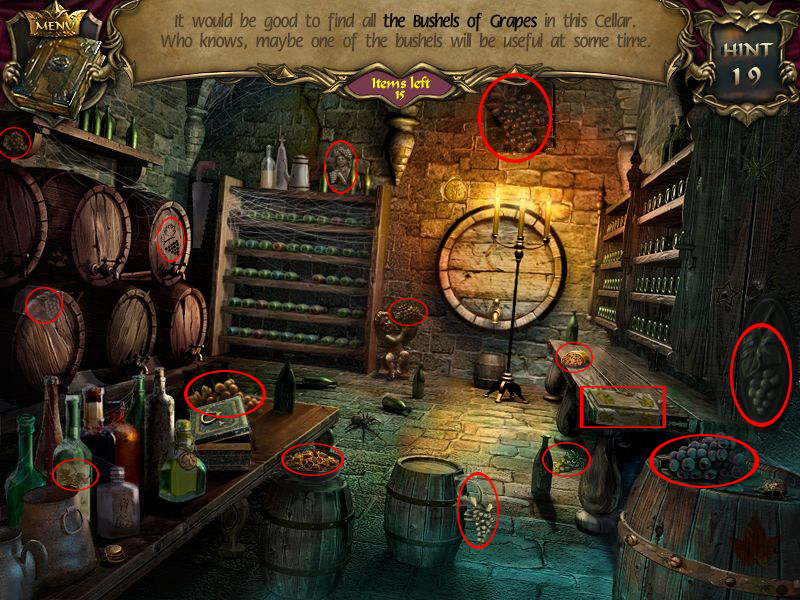
Level 35- Kitchen
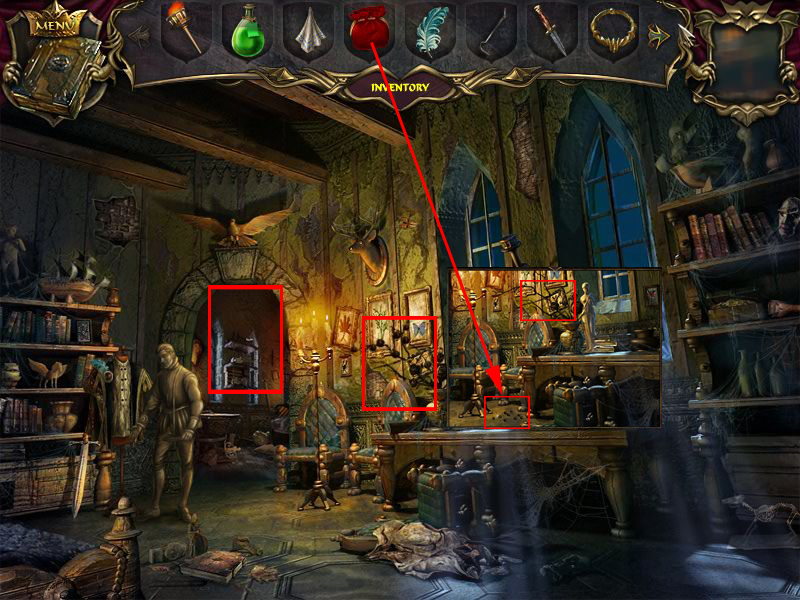
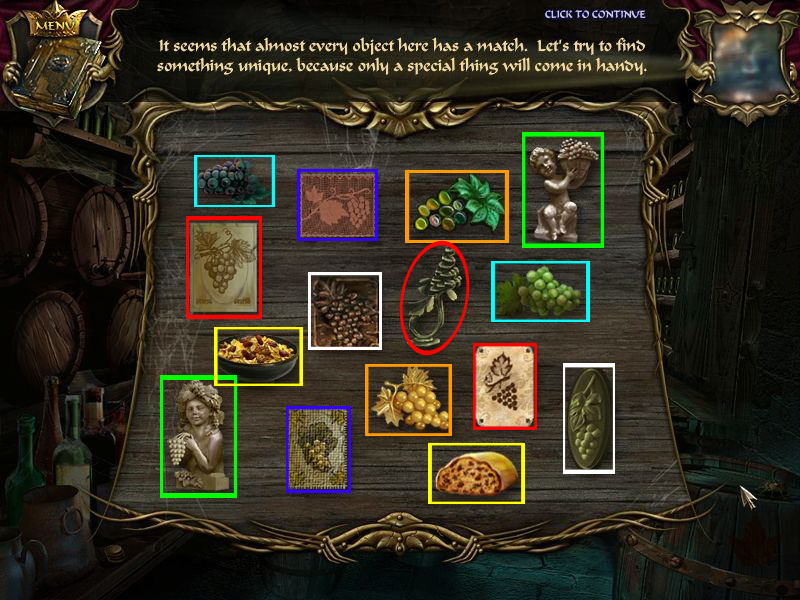
Click the door to the left and play the ho-scene.
Find 15 grapes.
Click the paper on the bench right side two times to unfold it.
Click the grape on it.
Screenshot
Again you will have to match pairs, this time it is about two of a kind as a statue and a drawing of a statue.
Click the last one to get it into your inventory.
Screenshot
Leave the ho-scene and the kitchen and go back to the armory room.
Level 36- Armory Room
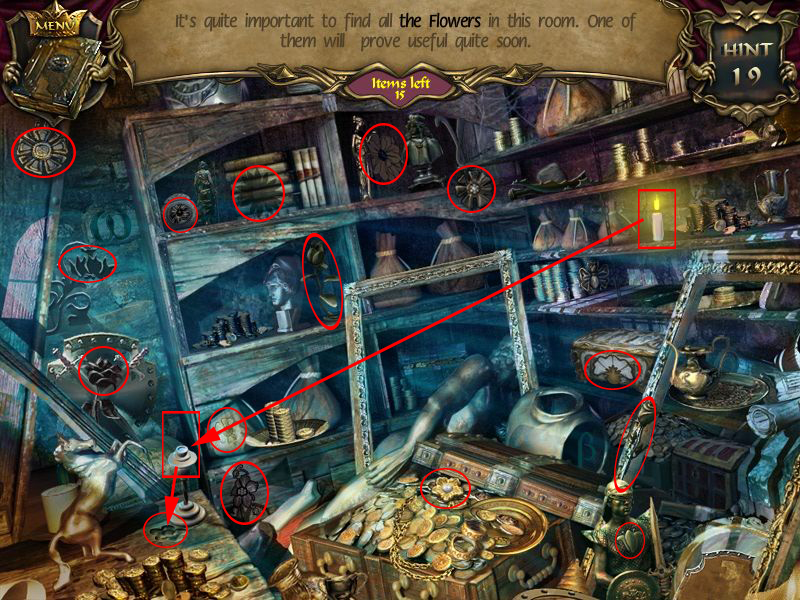
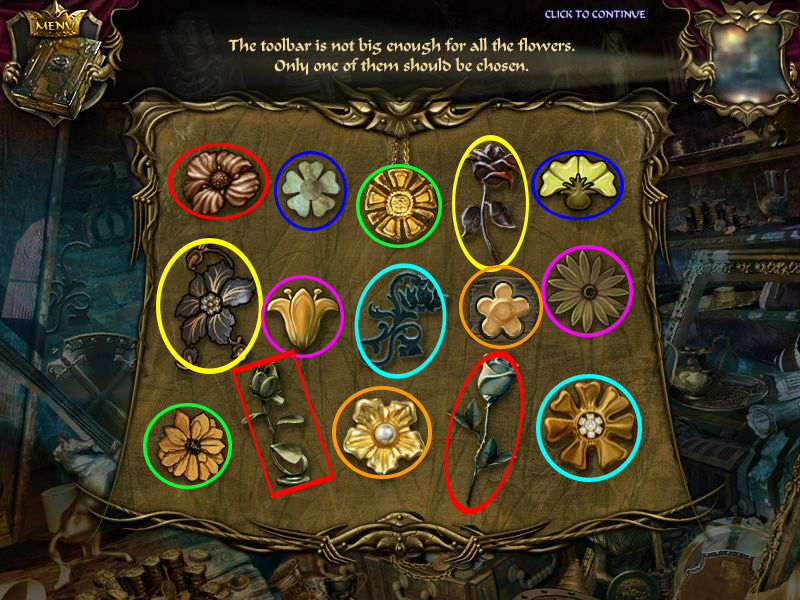
Play the ho-scene to find all flowers.
For the last one get the candle from the shelf and put is into the candle holder on the table.
The wax drops down, click the wax flower from the table.
Screenshot
Another memory, match the flowers with the same order of notes.
One will stay, click it into your inventory.
Screenshot
Enter the princess' room.
Level 37- Princess' Room
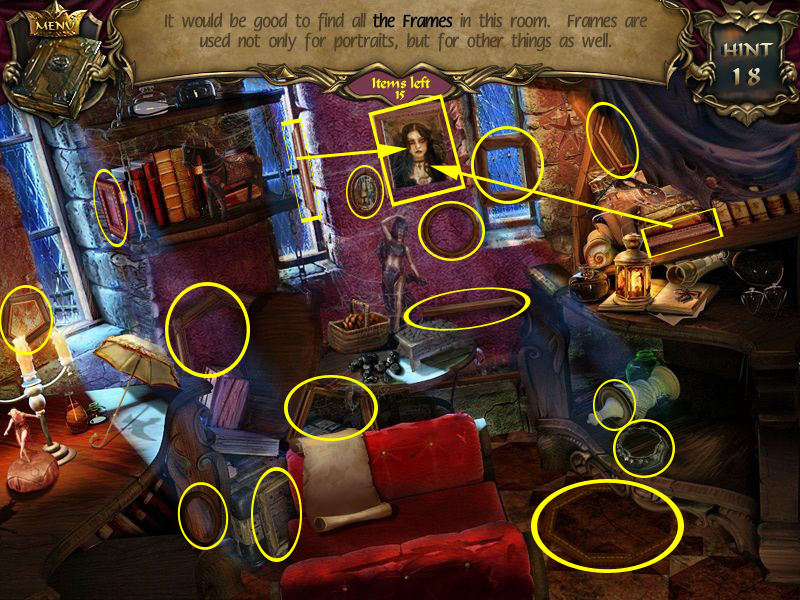
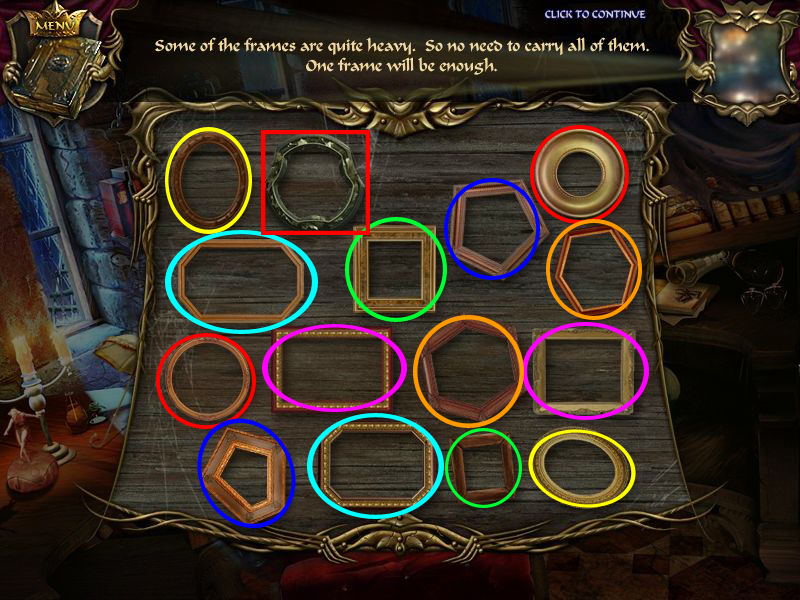
Click the ho-scene right side and find 15 frames.
The last one has to be repaired, find the two frame parts and click then at the princess' portrait.
Click the repaired frame.
Screenshot
Match the frame with the same shape.
Click the last on into your inventory
Screenshot
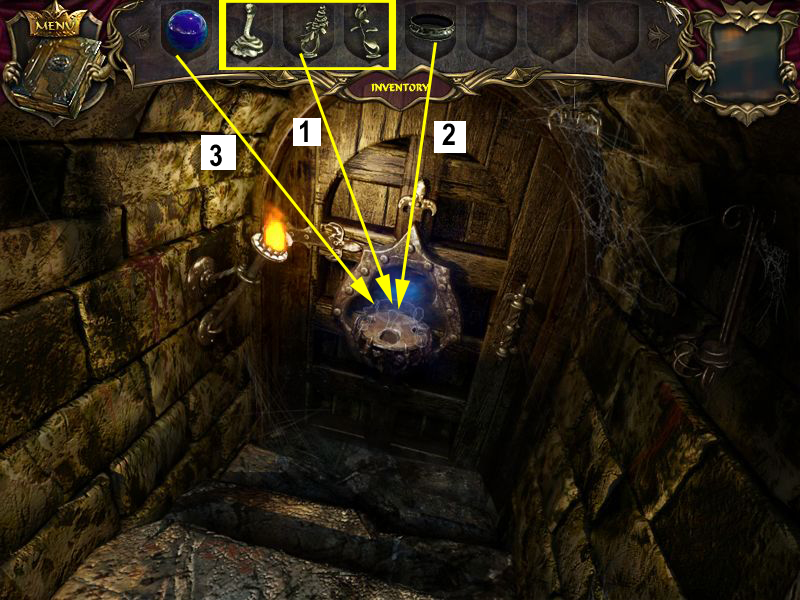
Go back to the underground stairs
Level 38, Underground Stairs
Place first snake, grapes and flower, then the frame and at last the magic sphere.
Screenshot
Enter and find the princess.
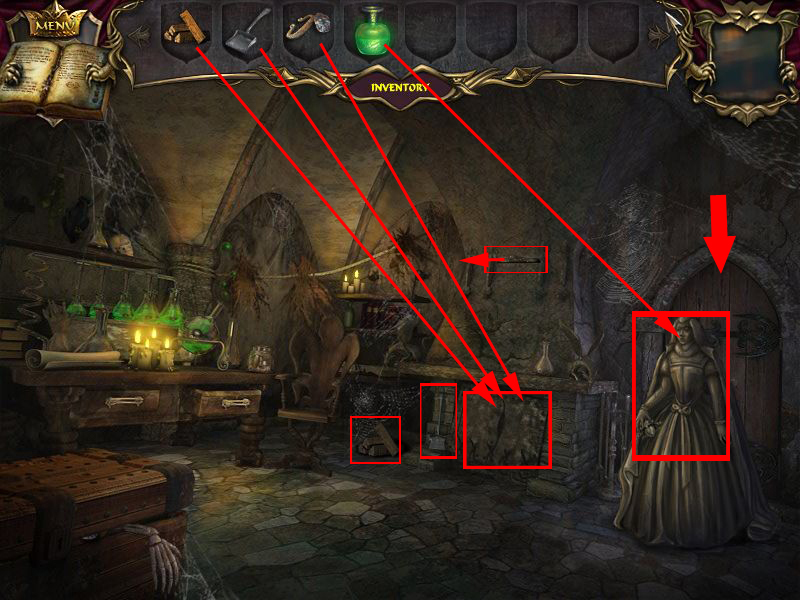
Level 39, Secret Room
The princess is also petrified.
Get the fire woods and the dustpan into your inventory.
Click the chest low right corner and get out the flint.
Click the fire place cover to remove it.
Click the fire place and put the first the fire wood into the fire place.
Use the flint to light it.
Click the lever that comes out of the wall above the fireplace to flame the fire.
When only coal is left, get the dustpan out of your inventory to get the coal.
Click the dustpan again to get it back into your inventory.
Now click the bottle collection and place the coal in the compartment below the bottles.
To make the magic potion place the lightest items in the smallest beakers and the heaviest ones in the largest beakers.
Use the scale on the right to determine the weight of the items.
Please look at the screenshot for the solution.
Click on the potion left side of the scene to get it into your inventory.
Screenshot
Give the potion to the princess.
She tells you about the king's second wife and gives you an amulet that will help free the prince.
Enter the door behind the princess.
Screenshot
Chapter 6: The Prince
Level 40, Blue Gem
The door closes behind you and the room is filled with water.
Pick up the mallet lower left.
Grab the torch upper left.
Pick up the Saplings in the lower right.
Get the jug in the upper right.
Grab the spade on the right.
Use the spade at the dirt soil left.
Click the dirt on the spade and click the dirt now in the middle of the water to fill the hole.
Screenshot
Click the blue gem at the left gargoyle.
Level 41, Orange Gem
When the earthquake starts get the plant out of your inventory and place it on the soil.
The earthquake stops.
Get the orange gem from the gargoyle far right.
Screenshot
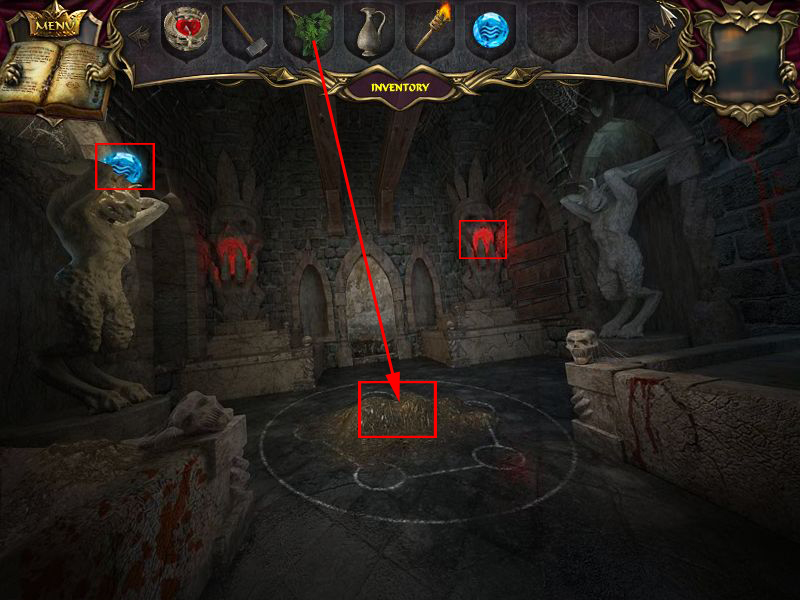
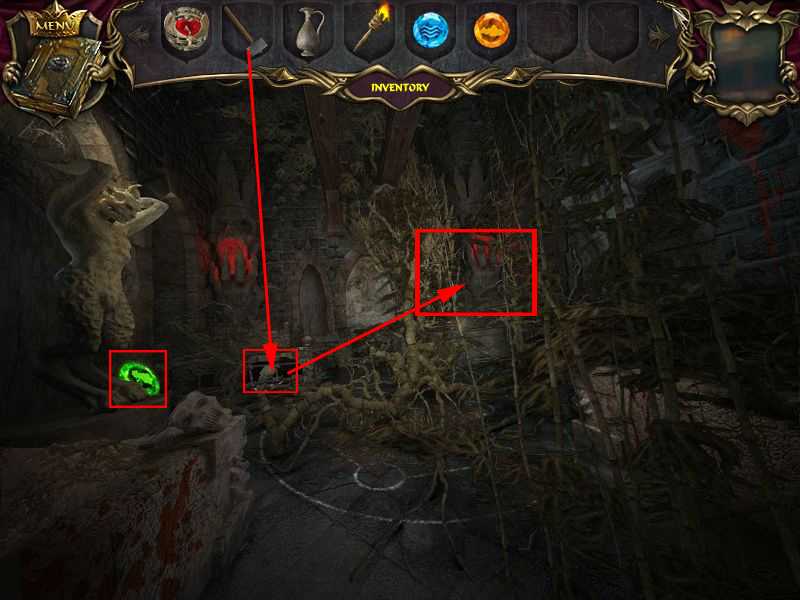
Level 42, Green Gem
Open your inventory, get the hammer and smash the skull low left in front of the door.
Get the machete into your inventory and use it then to cut the roots.
Get the green gem from the left gargoyle.
Screenshot
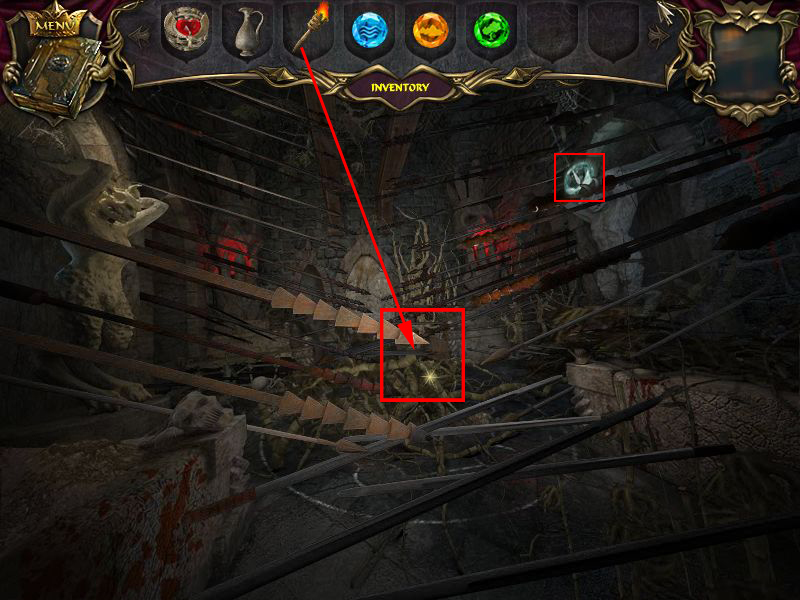
Level 43, White Gem
Get the torch out of the inventory and click it in the middle of the spears.
Get the white gem from the right gargoyle.
Screenshot
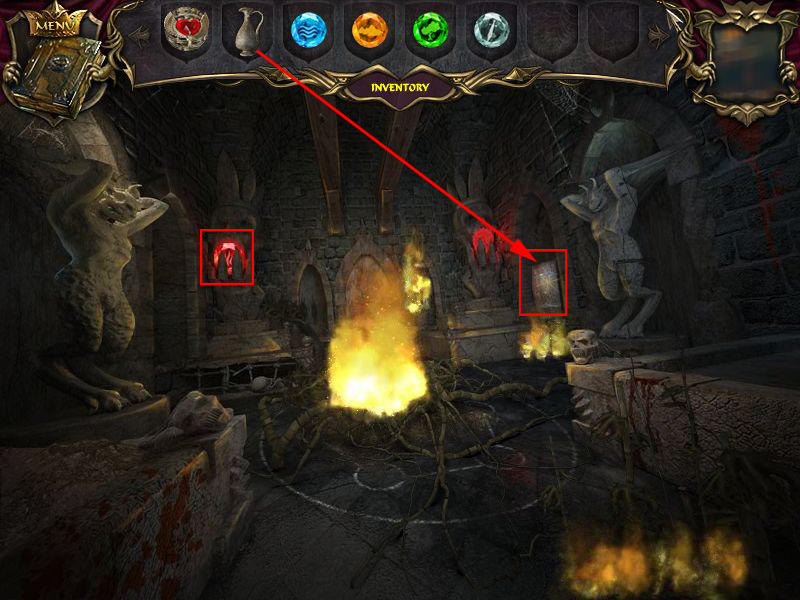
Level 44, Red Gem
Open the inventory and get out the jar.
Click the barrel at the right wall to fill it with water.
Pour it over the fire.
Get the red gem from the far left gargoyle.
Screenshot
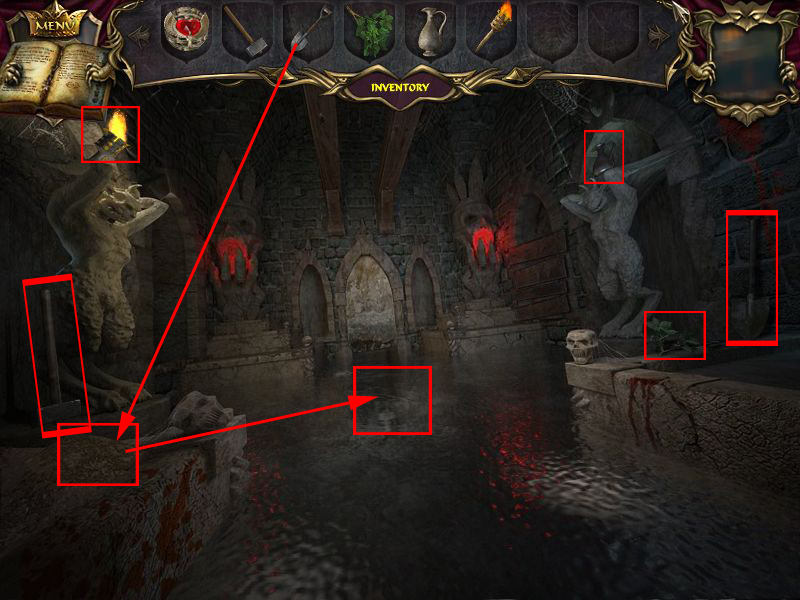
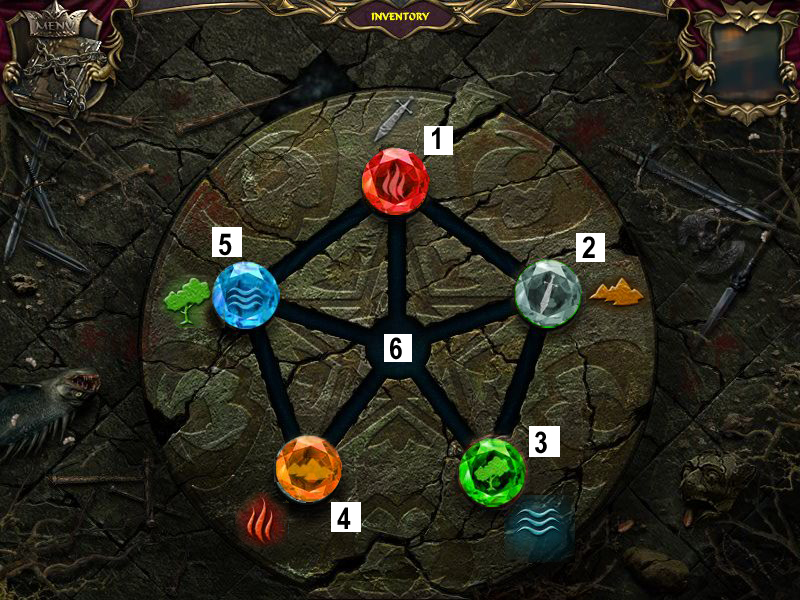
Level 45, The five Elements
Click the middle of the room.
The puzzle solution depends on wher your place your gems.
Open your inventory and place the gems where ever you want.
After placing them you will see symbols next to the gems as well as on the gema.
Your goal is it to place each gem to its according symbol.
Clicking a gem makes it go into the next empty slot.
Now click the places in the following order by using the screenshot as help.
The numbers do mark the slots not the gems.
4, 5, 1, 6, 4, 5, 6, 3, 2, 1, 5, 6, 3, 2, 1, 6, 3, 2, 6.
Screenshot
Click the mirror in the back of the scene to see the petrified prince.
Get the amulet out of your inventory and place it in the slot above the prince.
Screenshot
Enjoy the end!
(Walkthrough by Kayleigh of JIG.)
Posted by: Kero |
December 5, 2009 11:14 PM
|
December 5, 2009 11:14 PM