
![]() Department 42: The Mystery of the Nine is a hidden object adventure game from Frogwares, creator of Sherlock Holmes: The Awakened and Secret Missions: Mata Hari and the Kaiser's Submarines. Take the role of an agent working for Department 42, a secret organization that investigates paranormal events. Yes, kind of like X-Files! Nine malevolent artifacts that were sealed away in Grimstone mansion have gone missing, and it's your job to find them before their evil influence spreads chaos around the world.
Department 42: The Mystery of the Nine is a hidden object adventure game from Frogwares, creator of Sherlock Holmes: The Awakened and Secret Missions: Mata Hari and the Kaiser's Submarines. Take the role of an agent working for Department 42, a secret organization that investigates paranormal events. Yes, kind of like X-Files! Nine malevolent artifacts that were sealed away in Grimstone mansion have gone missing, and it's your job to find them before their evil influence spreads chaos around the world.
 The core of Department 42 is a straight-up hidden object game with a number of adventure-style puzzles and mini-games lining its perimeter. You'll spend most of your time looking at lists of objects and scanning the scenery for cleverly hidden items. Occasionally one of these items will make its home in a menu bar at the bottom of the screen. This inventory comes into play during special puzzle scenes where your goal is to complete a few objectives by manipulating objects on the screen. Lighting an oil lamp, for example, could require finding items as well as using bits from your inventory.
In an always-welcome break from convention, the mini-games in Department 42 are more than just cheap clones of every puzzle game you've ever played. Instead, nearly two dozen diversions are woven right into the game. And you know what? They're really, really good! Without giving much of the story away, the first game you'll play involves deciphering a set of runes using an unlabeled key. All puzzles, mini-games and scenes are accessible from the main menu after completion, so you can go back and replay them at any time.
 Analysis: Frogwares studio, the developer of Department 42: The Mystery of the Nine, is well-known for high-quality games with breathtaking scenery, good (if sometimes predictable) puzzle design, and the occasional awkward piece of dialogue. That's exactly what Department 42 delivers, with all the implied (cute) quirks intact. The visuals are intimately detailed from the backdrops to the items themselves. Sometimes you'll swear you're looking at a photograph. In particular the lighting effects are well-done, and Frogwares wasn't afraid to show this off whenever possible.
One annoyance makes itself immediately apparent in Department 42: click detection. In the beginning of a hidden object scene, I have the habit of clicking a few random items before looking at the list, just to see if I can clear a few things out of luck. I was surprisingly unsuccessful in Department 42, but after examining the list I noted several items I had already found and clicked. As it turns out, sometimes you have to click just the right cluster of pixels to collect an item, a mechanic that, I suppose, doesn't affect the basic gameplay all that much, though it's a disappointing oversight on the developer's behalf that stands out because the rest of the game is so highly-polished.
Department 42: The Mystery of the Nine is a great game no matter which angle you view it from. With beautiful locations to scrutinize, mini-games that almost overshadow the game itself, and excellent puzzle-themed scenes, there's no shortage of goodness to be found.
![]() Windows:
Windows:
Download the demo
Get the full version
![]() Mac OS X:
Mac OS X:
Download the demo
Get the full version


Walkthrough Guide
(Please allow page to fully load for spoiler tags to be functional.)
Department 42: The Mystery of the Nine Walkthrough
General Information
There are 9 missions to complete during the game, finding each of the 9 missing artifacts.
Each mission will consist of 2 or 3 locations.
On the bottom lower left of your screen is a map showing the locations within a mission.
On the map a green dot indicates your current location. A dot flashing between blue and green is the location you need to go to next.
Use the map to move quickly between locations by clicking on the dots.
Hidden object game scenes (HOG) are located throughout the game. The lists of objects to find are ramdomly generated (with one exception) so each time you go in it will be different.
One object in each HOG will go into your inventory to be used later.
HOG are marked by a curtain of sparkles. If you see the sparkles there's a HOG there.
Multiple wrong clicks will cause your cursor to spin around.
Hints are on a refilling timer. Mini-games can be skipped once the timer fills up.
The cursor will change to a wrench for things that need to be done, a spyglass for things that need a close-up, and a hand for things that can be taken.
Click on people (and ghosts) to speak to them.
Fang of the Packleader
Crime Scene
The tutorial will walk you through the first scene. When you are done you will have matches in your inventory. screenshot.
Go to the bar.
Bar
Open the HOG scene and find all objects listed. The scroll will go into your inventory. screenshot.
Pick up the handle and attache to the fridge to open.
Take the slab of ice from the fridge and lay on the cutting board.
Take the icepick and chip away the ice (several clicks).
Take the silver knife.
Click on the secret panel and unscrew the screws with the silver knife.
Take the notebook and the vial of saliva (ew!).
Go to werewolf's lair.
Werewolf's Lair
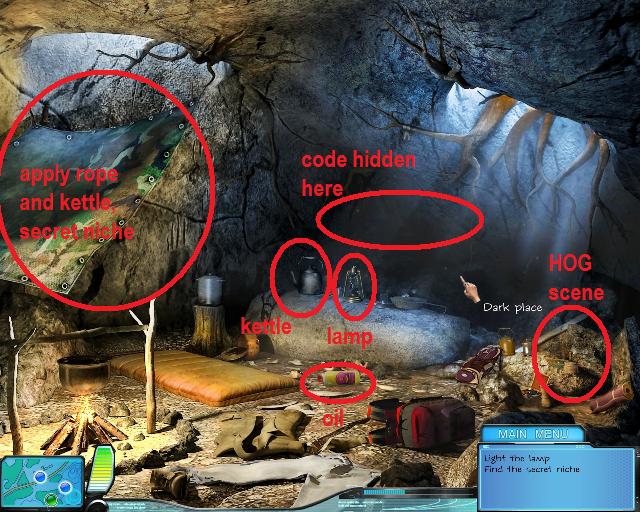
Find and pick up the lamp oil. screenshot.
Fill the lamp and light it with matches. This will reveal a code on the back wall.
Open HOG scene and play to receive rope.
Apply rope to the tarp.
Take the kettle and attach to the rope. This will reveal the secret niche.
Use code on the back wall to open the secret niche. Push the buttons in this order: quarter moon, full moon, half moon, new moon.
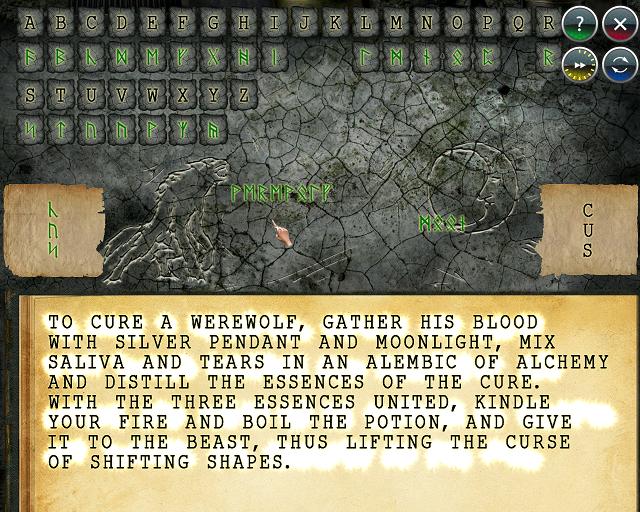
When the niche opens take the scroll from your inventory and place it on the book. This triggers a mini-puzzle.
The solution to the mini-puzzle is: "To cure a werewolf, gather his blood with silver pendant and moonlight, mix saliva and tears in an alembic of Alchemy and distill the essences of the cure." screenshot.
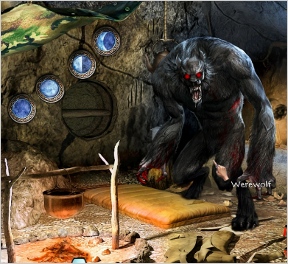
When the puzzle is solved the werewolf appears. Go back to the bar.
Bar
Open the HOG scene to get the beaker. screenshot.
Click on the bottles on the wall for a close-up.
Click on any of the bottles and they will disappear.
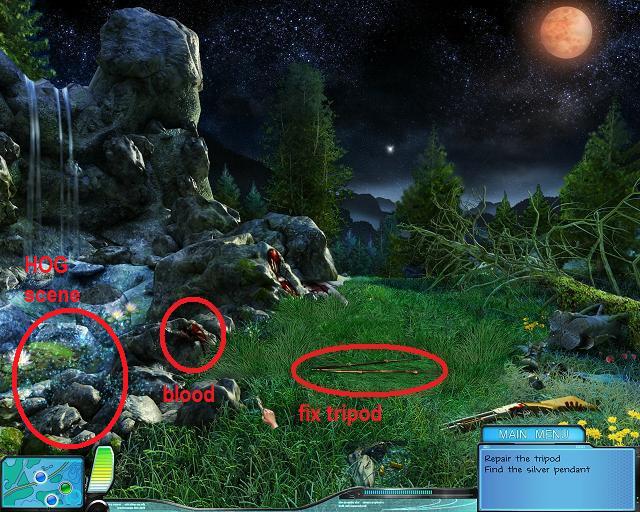
Take the bulb and the tripod leg. screenshot.
Put the bulb in the burnt out lamp and see a clue.
The clues around the room give the solution to the puzzle. The first skull is 2, the second skull is 6, and the third skull is 3. Enter the numbers and the secret lab is revealed.
Go back to the Crime Scene.
Crime Scene
Put tripod piece from your inventory on the rest of the tripod to repair it. screenshot.
Open the HOG scene to get the pendant.
Put the pendant on the repaired tripod to illuminate the blood.
Collect the blood with the beaker in your inventory.
Go back to the Bar.
Bar
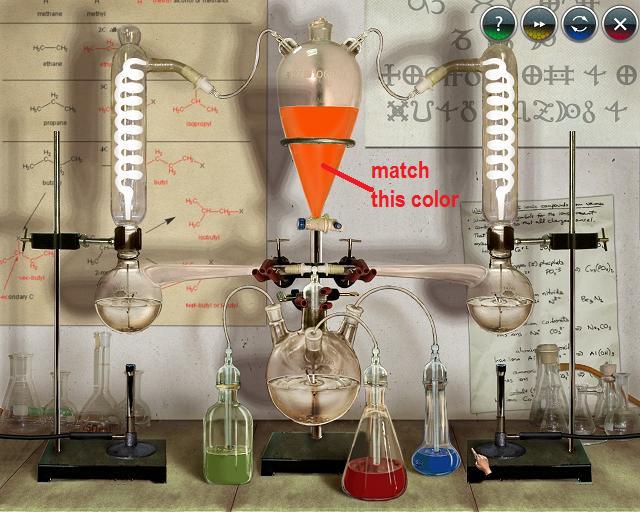
Click on the hidden lab for a close-up.
Add the blood and the saliva to the machine to unlock a mini-puzzle. screenshot.
Each beaker has 4 units of color. Combine the units to match the color in the central alembic.
Color 1 - bright orange - 4 units red, 1 unit green.
Color 2 - light orange - 4 units red, 3 units green, 1 unit blue.
Color 3 - yellow - 4 units red, 4 units green, 1 unit blue.
Take the cure and head back to the Lair.
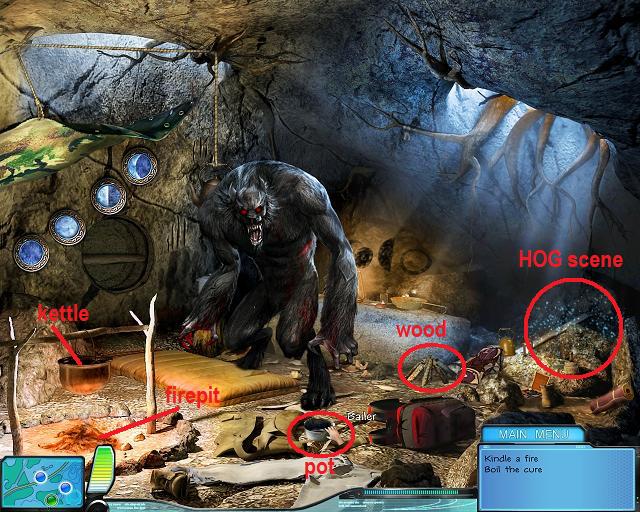
Lair
Take the wood and place it in the fireplace. screenshot.
Open HOG scene to get paper.
Put paper on the wood and light with the matches in your inventory.
Put the potion in the kettle to boil.
Pick up the pot (bailer) and use to scoop out the potion.
Give the potion to the werewolf (make sure you click right on his mouth).
Take the fang necklace.
Mission accomplished!
Dream Catcher
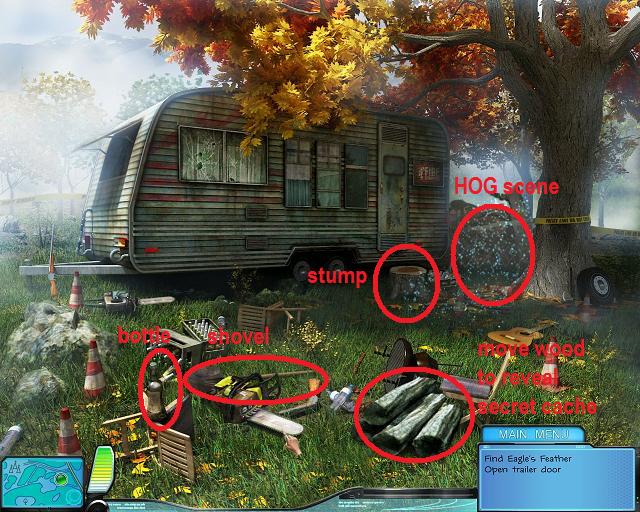
Trailer
Open the HOG scene to get the feather. screenshot.
Take the shovel and use it on the log pile to reveal a green plastic container (secret cache).
Open the secret cache to reveal a corkscrew.
Use the corkscrew on the bottle sitting on the overturned chair.
Take the key from the bottle and open the trailer door.
Read the note that is revealed.
Go to the Reservation.
Reservation
Pick up the logs and put them into the stove. screenshot.
Pick up the iron & flint and use to light the logs in the stove.
Open the wicker basket to reveal tobacco and a piece of wampum. Take both.
Pick up piece of wampum from the floor.
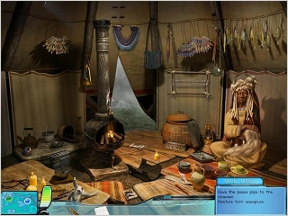
Pick up the pipe and give to the shaman.
Put tobacco in the pipe.
Click on the fire in the stove to create embers. Click on the embers to pick one up.
Put ember on pipe. The shaman will give you a piece of wampum (you should now have 3).
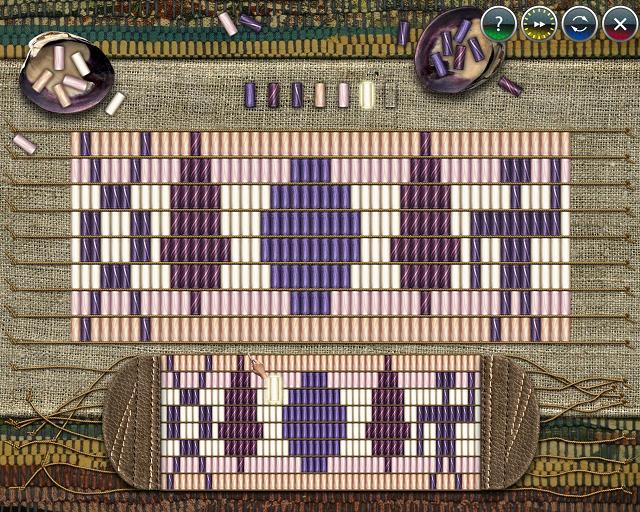
Put all three pieces of wampum on the string frame on the wall to open the mini-puzzle.
Fill in the correct colored beads to repair the wampum. screenshot.
Go to the Sacred Grove.
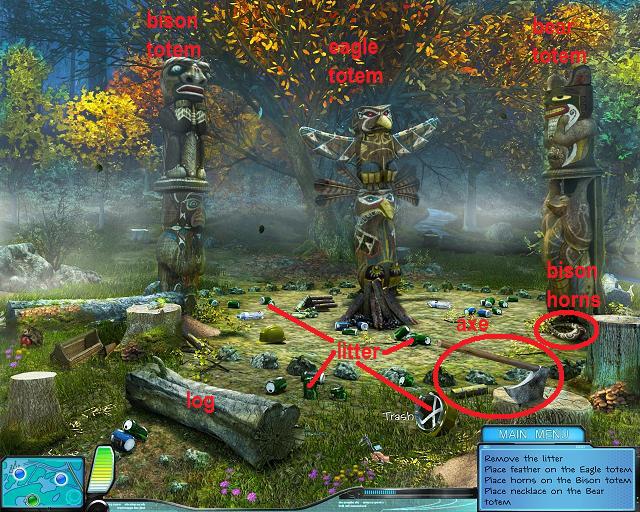
Sacred Grove
Remove the trash (click on anything that looks like a soda can, should take at least 4 clicks to clear the area). screenshot.
Pick up the bison horns.
Pick up the axe and use it on the large log in the foreground. This reveals the bear amulet.
Place the eagle feather on the eagle totem.
Place the bison horns on the bison totem.
Go back to the Reservation.
Reservation
Open the HOG scene to get the necklace.
Go back to the Sacred Grove.
Sacred Grove
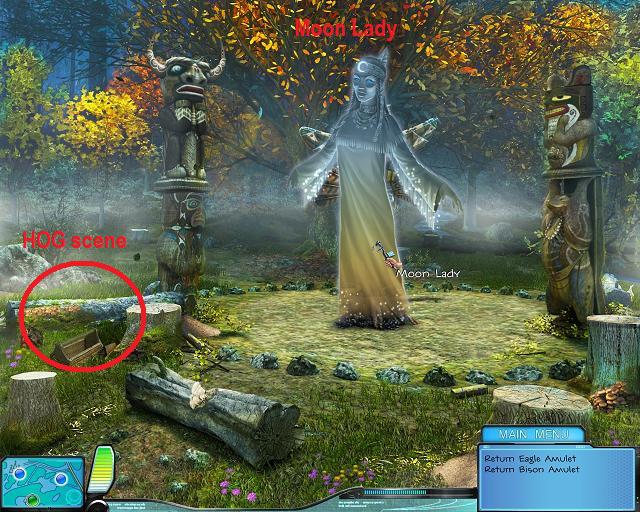
Place the now complete necklace on the bear totem. The Moon Lady will appear. screenshot.
Open the HOG scene to get the eagle's wings.
Go back to the Reservation.
Reservation
Open the HOG scene to get the Bison Amulet.
Go back to the Crime Scene.
Crime Scene
Open the HOG scene to get the eagle's head.
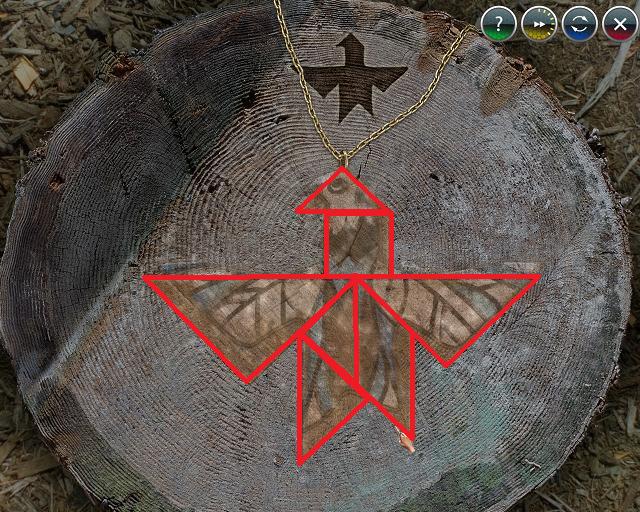
You now have all three amulets, but the eagle amulet is in pieces.
Place the pieces of the eagle amulet on the stump in front of the trailer. This will unlock a mini-puzzle.
Piece together the eagle amulet. Click on a piece to pick it up and right click on a piece to rotate it. screenshot.
Go back to the Sacred Grove.
Sacred Grove
Give each amulet to the Moon Lady.
She will give you a tambourine.
Go back to the Reservation.
Reservation
Give the tambourine to the Shaman.
Play the dice game. This game is based on a random roll of the dice, so there is no walkthrough.
When you win the Dream Catcher will appear above the wicker basket.
Take the Dream Catcher. Mission Accomplished!
Sleep Sand
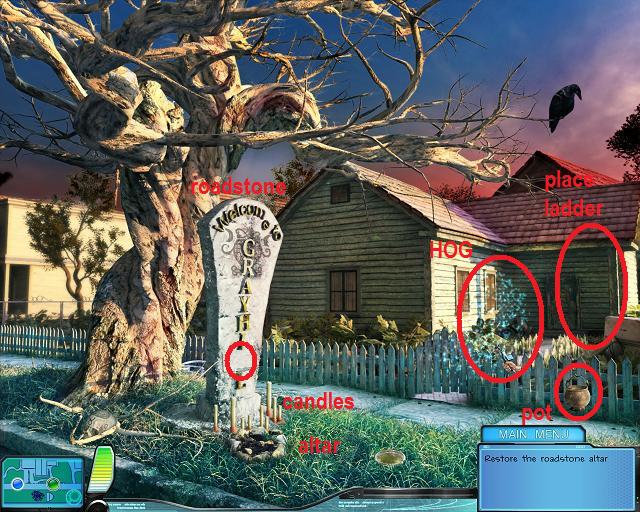
Grayhill Roadstone
Open the HOG scene to receive a brass "L". screenshot.
Place the "L" on the roadstone.
Take the pot that is hanging on the fence.
Go to Grayhill Street.
Grayhill Street
Pick up the ladder. screenshot.
Pick up all three magic symbol pieces.
Go back to the Roadstone.
Grayhill Roadstone
Place the magic symbol pieces on the Roadstone. This opens a mini-puzzle.
Put together the magic symbol. Left click on a piece to pick it up and right click to rotate. screenshot.
A drawer in the Roadstone will open up revealing the book of spirits.
Read the book of spirits. When you have, a knife and a key will appear in the book. Take them both.
Place the ladder against the wall of the house and go up to the roof.
While on the roof use the knife to collect the three roots.
Go back to Grayhill Street.
Grayhill Street
Use the key to unlock the Garage.
Go into the Garage.
Garage
Open the HOG scene to get the sickle. screenshot.
Use the sickle the three mushrooms in the scene.
Go back to Grayhill Roadstone.
Grayhill Roadstone
Open the HOG scene to get the lighter.
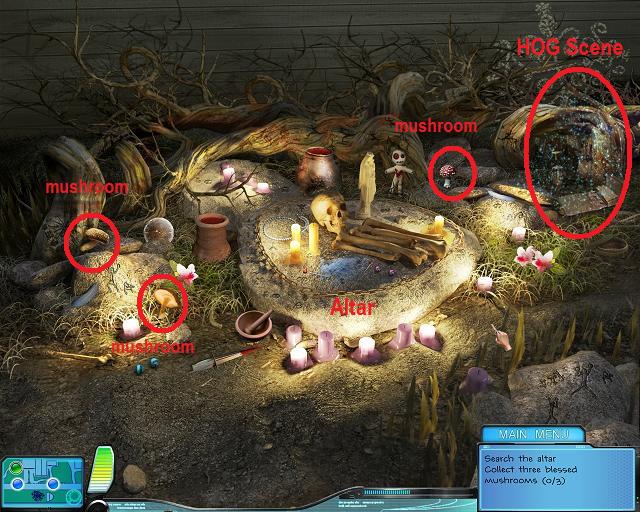
Place the pot on the altar at the base of the Roadstone.
Put all roots and mushrooms (3 of each) in the pot.
Light the candles with the lighter.
Take the resulting potion and go back to the Garage.
Garage
Open the HOG scene to get the plaque.
Place the magic potion on the altar/shrine. Legba will appear.
Place the plaque on Legba and he will challenge you to a game.
This game is a mini version of "Othello" (some might know it as "Reversi"). It is a strategy game, so there is no walkthrough. Play until you beat Legba.
Once Legba is beaten take the Dream Sand. Mission Accomplished!
Stopwatch
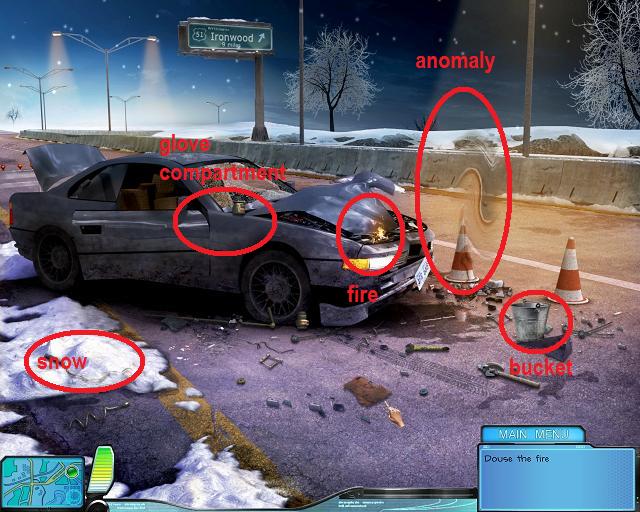
Car Wreck
First you need to put out the fire. screenshot.
Take the bucket.
Fill the bucket with snow.
Place the snow-filled bucket on the burning car engine. The snow will melt.
Take the bucket of water and put it on the fire.
A HOG scene will appear once the fire is out. Open HOG scene to receive magnet.
Use the magnet on the anomaly to get the keys.
Click on the car to get a close-up of the glove compartment. Use the keys to open the glove compartment.
Take the map and ID.
Proceed to the Car Dump.
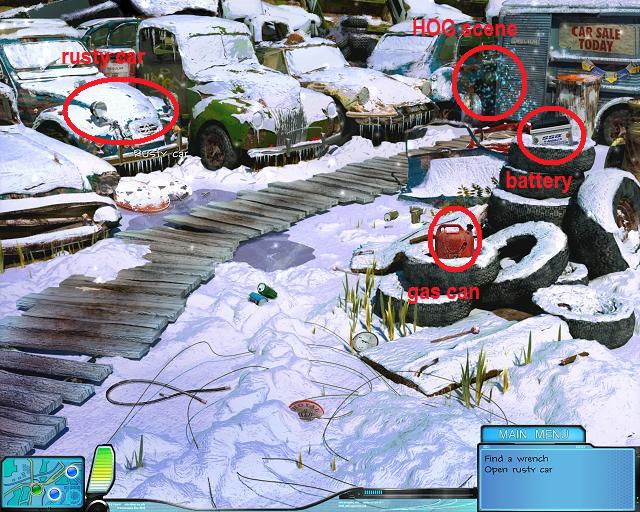
Car Dump
Open the HOG scene to get the wrench. screenshot.
Pick up the car battery and the gas can.
Use the wrench to open the hood of the rusty car. You will be unable to proceed further with the secret locker until you get the battery recharged.
The HOG should appear again. Open it to get the wire cutters.
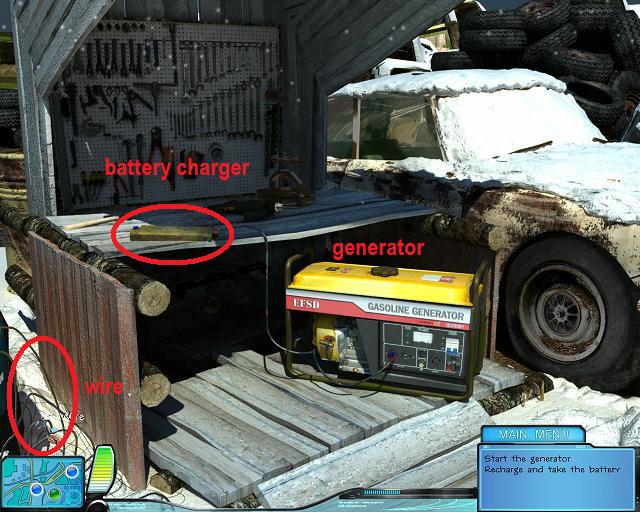
Go to the Tool Shed
Tool Shed
Cut the wires in the lower left with the wire cutters. screenshot.
Place the battery on the charger.
Place the wires on the generator to complete the circuit to the charger.
Put the gas can on the generator to fuel it. The battery will recharge.
Take the recharged battery and go back to the Car Dump.
Car Dump
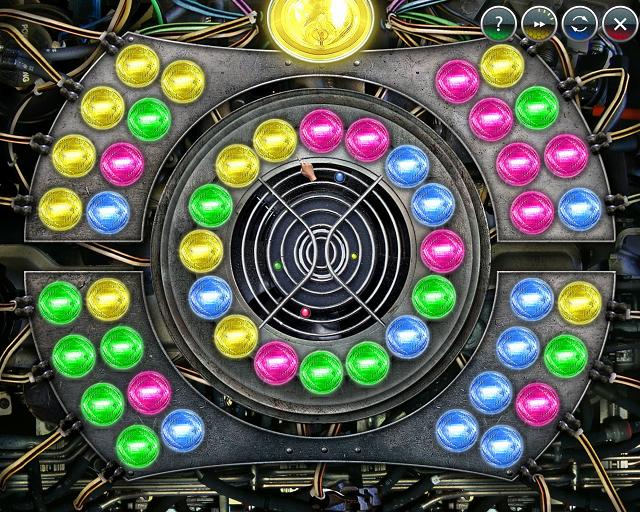
Click on the secret locker (the open hood of the rusty car) for a close up.
Place the batter in the secret locker to open the mini-puzzle.
In this mini-puzzle there is a single inner ring of lights and a double outer ring of lights. The inner ring can glow yellow, green, blue, or pink. The task is to light up the inner ring so that all the outer lights are on. Here is the pattern for the inner lights.
When the puzzle is solved it reaveals a diary. Read the diary and go back to the Crash Site.
Crash Site
Open the HOG scene to get the stopwatch.
Use the stopwatch on the anomaly to open the minipuzzle.
Click on the road pieces to rotate a clear path to the finish line before the car crashes. Here's a screenshot of the solution to the game.
Pick up the stopwatch. Mission Accomplished!
Rabbit's Paw
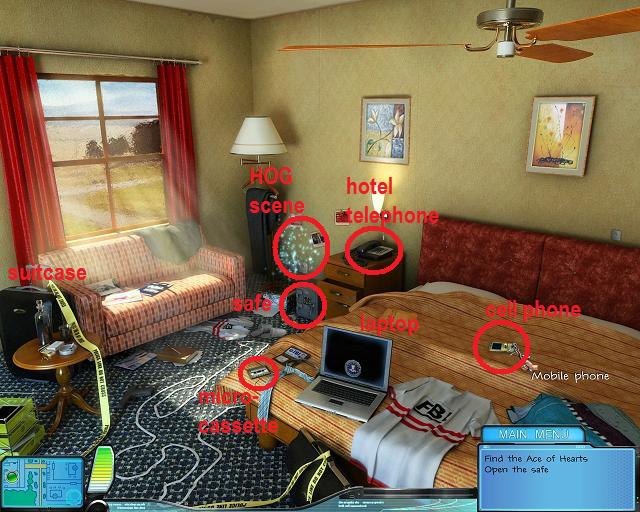
Hotel Room
Open the HOG scene to get the Ace of Hearts. screenshot.
Pick up the micro-cassette.
Click on the room telephone for a close-up and place the micro-cassette in it.
Play the micro-cassette to get the code for the safe.
Click on the safe and push 5 9 8 to open. Take the flashcard.
Put the flashcard in the laptop and read the diary entries.
Go to the Casino Roulette.
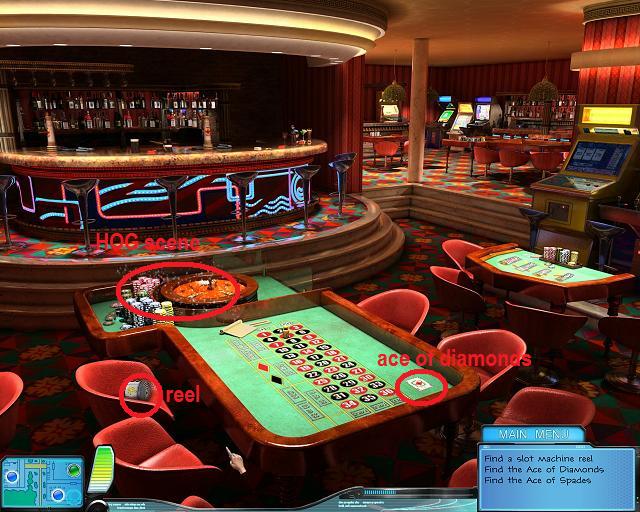
Casino Roulette
Open the HOG scene to get the Ace of Spades. screenshot.
Pick up the reel and the Ace of Diamonds.
Go to the Slot Machines.
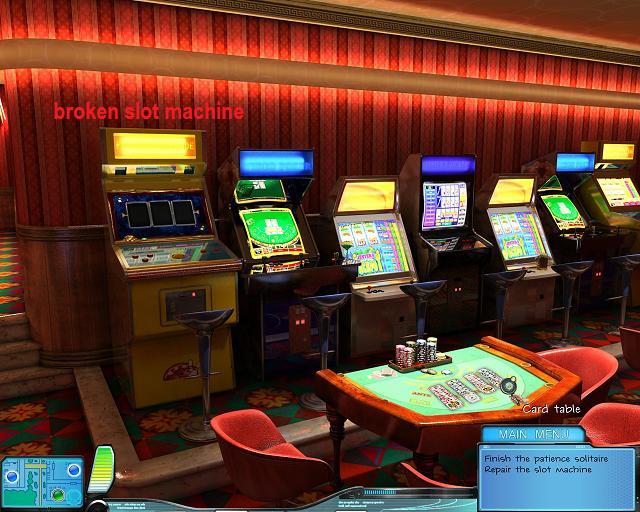
Casino Slot Machines
Complete the card game on the table. screenshot.
Take the reel.
Go back to Roulette.
Casino Roulette
Open the HOG scene to get the lever.
Go back to the Hotel Room.
Hotel Room
Open the HOG scene to get the charger.
Attach the chargher to the cell phone.
Click on the now charged phone to get the code.
Click on the suitcase and dial in the code 2 2 1.
Get the reel and head back to the Slot Machines.
Casino Slot Machines
Place all three reels and the lever on the broken slot machine. screenshot.
Click on the repaired slot machine to open the mini-puzzle.
This mini-puzzle is a game of slots. As with real slot machines, it is a random game, so there is no walk-through. The best strategy is to bet five coins at once.
When you beat the slot machine mini-puzzle you should have enough chips to play Roulette.
Go to Roulette.
Casino Roulette
Talk to the ghost.
Click on Roulette to play.
The ghost will give you a sequence of numbers. The number you should bet on is the next in the sequence.
The number sequence is always a logical one. For example, one sequence that can come up is: 0, 4, 2. 6, 4. The sequence is +4, -2, so the next number in the sequence is 8. Click on the number 8 on the Roulette table to place your bet.
The sequences come up randomly, so there is no way to give all the answers.
Once you have one three stacks of chips you have won the game and will get the Rabbit's Paw.
Mission Accomplished!
Sphere of Life
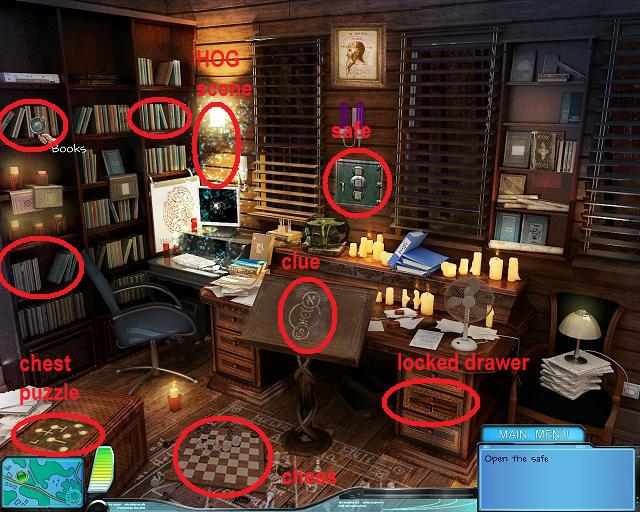
Study
Open HOG scene to get the stone crown. screenshot.
Examine the bookshelf. There are three areas that will cause the cursor to turn into a spyglass. Click on each area and look for a book that carries one of the symbols that show on the podium in the center of the room.
Click on each of the individual books and you will see a series of numbers written in them. The numbers to look for are the ones that are circled.
The specific books and numbers are: Book of Psalms (5), Monas Hieroglyphica (7), and Shakespeare (4).
The numbers found in the books are the combination to the safe, arranged in the same order as the symbols on the podium.
Click on the safe and open it with the combination, from top to bottom, 5 7 4.
Take the diary from the safe and read it. It will tell you that the sphere was placed in the golem and that the following letters are important: Aleph, Mem, and Thav.
Go to the Cemetery.
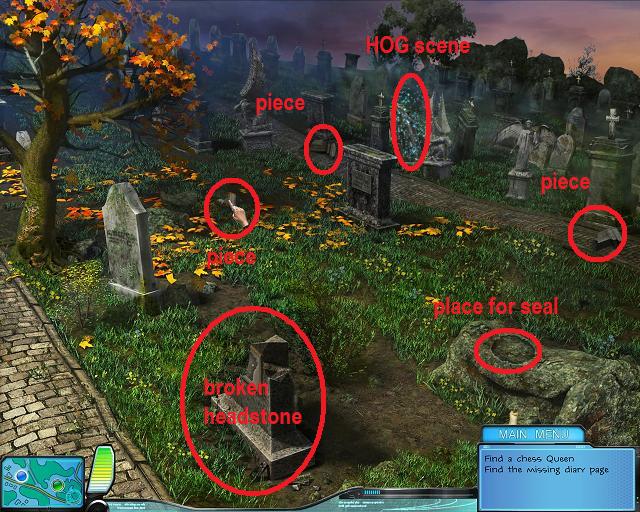
Cemetery
Open the HOG scene to receive the diary page. screenshot.
Read the diary page.
Pick up the three stone pieces scattered around the area.
Place all three pieces on the broken headstone to repair.
Place the stone crown on the restored headstone, a chesspiece will appear (queen). Take it.
go back to the Study.
Study
Click on the chessboard for a close up and place the queen anywhere on the chessboard.
A sephira (gold coin) will be revealed, take it.
Put the sephira on the chest to open a mini-puzzle.
The object of the minipuzzle is to rotate the coins and connectors until everything is lit up. Solution.
When the chest opens take the seal and the letter Mem.
Go back to the Cemetery.
Cemetery
Put the seal on the ritual stone. The seal will move away and hover over the ground.
Put the letters on the seal. As each letter is added the golem will slowly appear.
Once the golem appears a mini-puzzle will be activated.
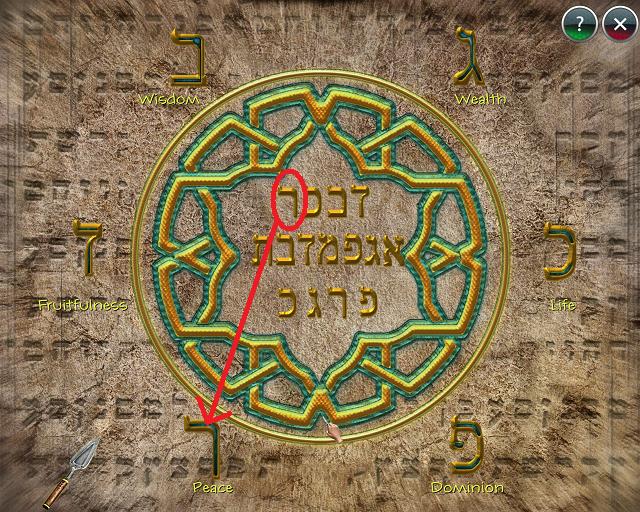
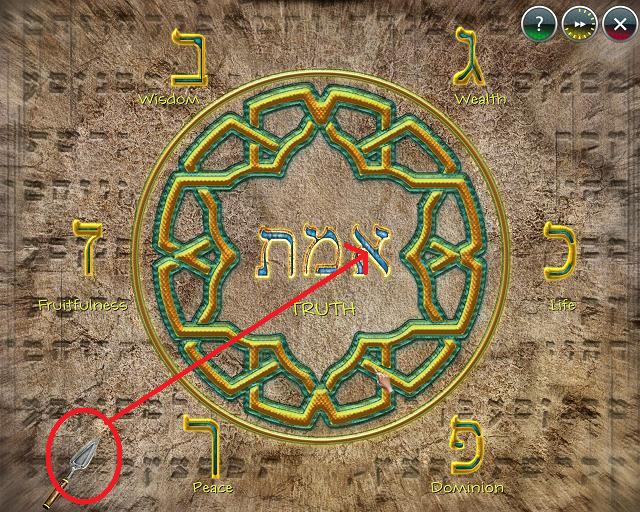
In the center of the puzzle are a bunch of letters. Around the outside of the puzzle are six letters. Click on letters inside the puzzle that match one of the letters on the outside, then put it on the matching letter. When you do this the letter will disappear. screenshot. Continue to do this until you are left with three letters in the center, which will spell out the word "truth". screenshot. Click on the silver spear and put it on the last letter of the word to destroy that letter. This will kill the golem.
Take the Sphere of Life. Mission Accomplished!
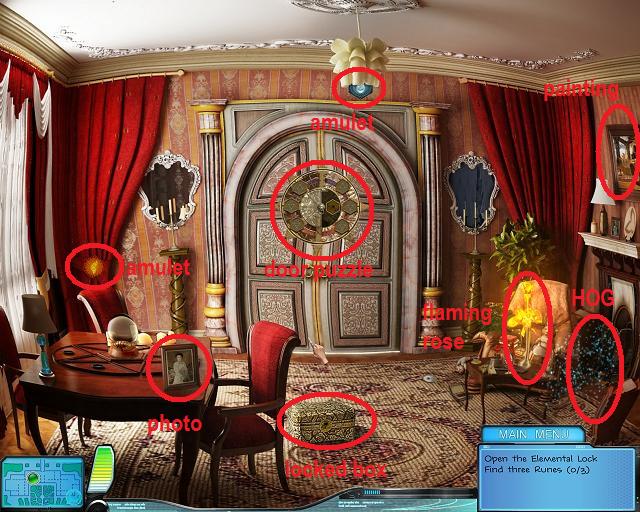
Flaming Rose
Living Room
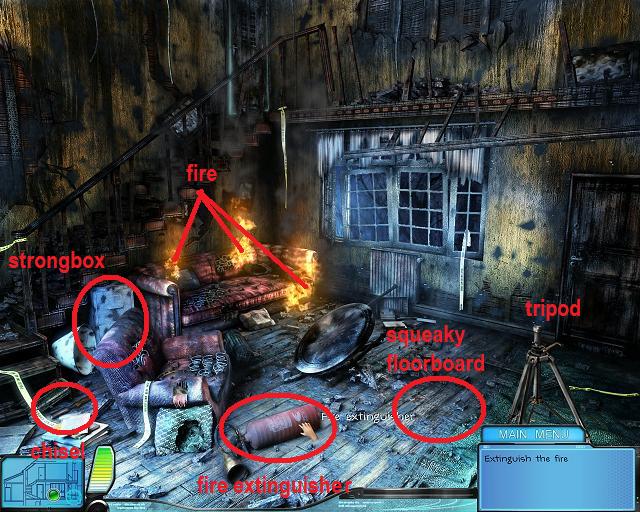
Take the fire extinguisher. screenshot.
Use the fire extinguisher three times to put out all three areas of fire. This will open an HOG scene.
Open HOG scene to get the hammer.
Pick up the chisel.
Place the chisel on the strongbox. Hit the chisel with the hammer.
Take the key from the strongbox and use it to unlock the upstairs door.
Go Upstairs.
Upstairs
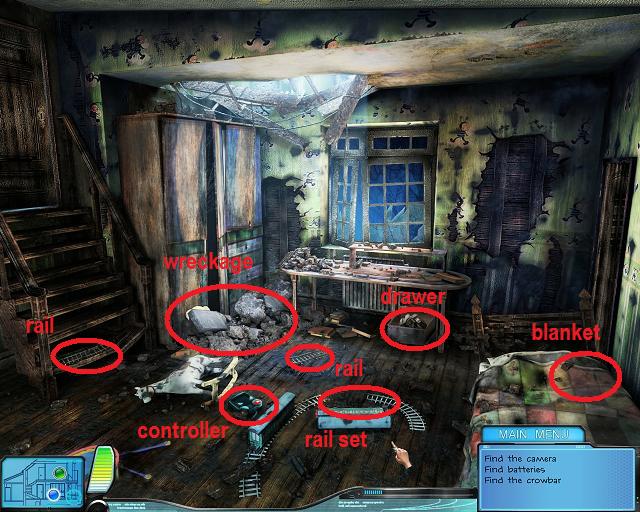
Open the desk drawer and take the camera. screenshot.
Move the blanket on the bed to expose the crowbar. Take the crowbar.
Use the crowbar on the wreckage three times to open the HOG scene.
Open the HOG scene to get batteries.
Take the rails on the stairs and the floor (2).
Go back to the Living Room.
Living Room
Put the camera on the tripod.
Put the batteries in the camera.
Use the crowbar on the squeaky floorboard to expose the photopaper.
Put the photopaper in the camera.
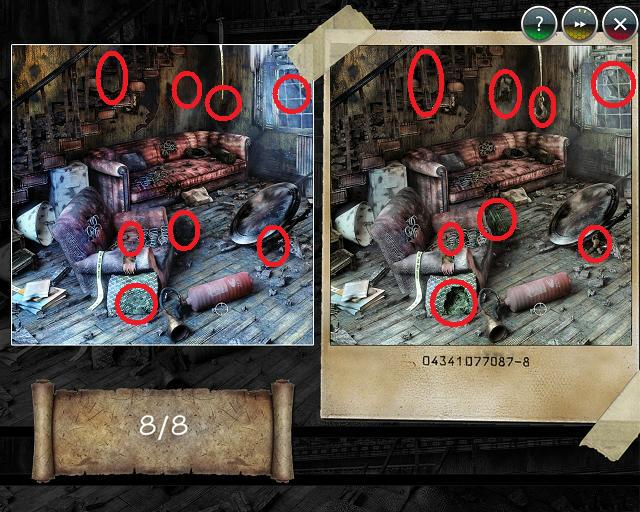
Click on the camera to take a picture. This opens a mini-puzzle.
In the mini-puzzle you are trying to find the 8 differences between the pictures. Don't pay attention to color changes, just look for physical differences. Solution.
A ghost will appear when you finish the mini-puzzle, talk to her.
Open the HOG scene to get the rail (you should now have 3).
Go back Upstairs.
Upstairs
Open the HOG scene to get the joystick.
Place the three rails on the railway.
Place the joystick on the controller then click on it. A train should appear with a key.
Take the key and use it to unlock the attic door.
Mini-puzzle. You need to sink all parts of the puzzle. Each piece you click on will affect itself and surrounding pieces. Here's one solution. Click on the pieces in the order shown.
Take the Flaming Rose and go downstairs.
Put the rose on the ghost and she will disappear. Mission Accomplished!
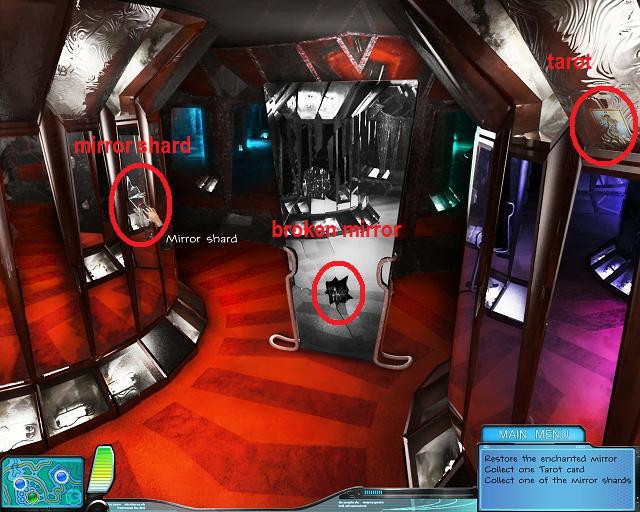
Mirror of Dreams
Parlor
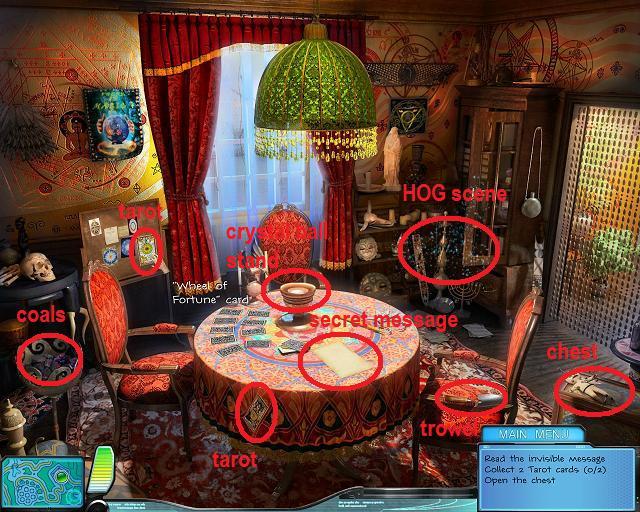
Open the HOG scene to get the iron. screenshot.
Find the two tarot cards in the room.
Pick up the trowel.
Put the iron on the blank piece of paper on the table.
Use the trowel to get some coals from the brazier and put the coals in the iron.
Move the iron and click on the paper to read the secret message.
Go to the Mirror Room.
Mirror Room
Open the HOG scene to get a tarot card. screenshot.
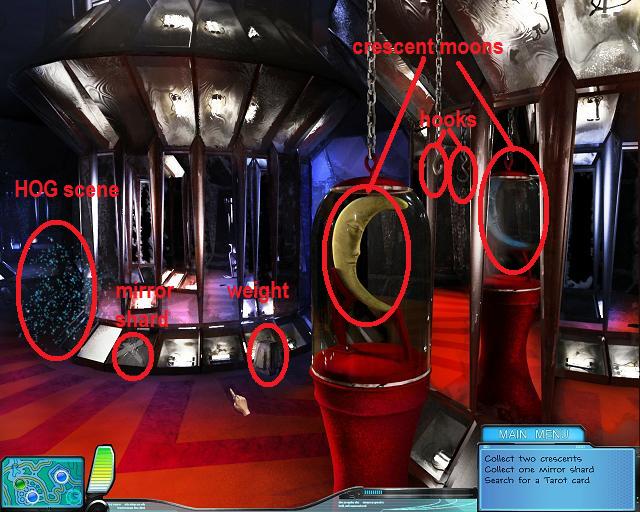
Pick up the weight.
Click on the taped, broken mirror for a close-up.
Peel back the tape and take the mirror shard.
Take the weight and place it on the first hook. Take the yellow crescent moon.
Take the weight and place it on the second hook. Take the blue crescent moon.
Go to the Great Mirror.
Great Mirror
Take the mirror shard. screenshot.
Take the tarot card.
Go back to the Parlor.
Parlor
Open the HOG scene to get a brass sun.
Click on the chest for a close-up and place the sun and both crescent moons in the pattern.
Take the crystal ball and place it on the crystal ball stand (on the table).
Click on the crystal ball to open the mini-puzzle.
In this puzzle you will see a pattern in the crystal ball on the left. You need to reproduce this pattern by clicking the cards on the right. If you click on an incorrect card you will get the death card and lose a life. You only have 3 lives, if you lose them all you will have to start over. Once you begin, the pattern will start to fade from the crystal ball so move quickly. In this mini-puzzle the patterns are generated at random. Here's one such pattern. You must complete 5 patterns without losing all of your lives to win the game.
When the puzzle is completed you will receive a tarot card.
Go to the Mirror Room.
Mirror Room
Open the HOG scene to get a mirror shard. You should now have three.
Go to the Great Mirror.
Great Mirror
Place all three shards in the broken mirror to repair it.
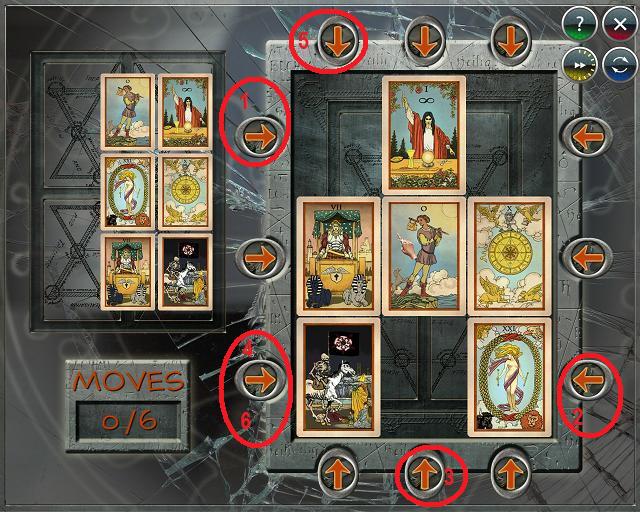
Place all five tarot cards on the repaired mirror.
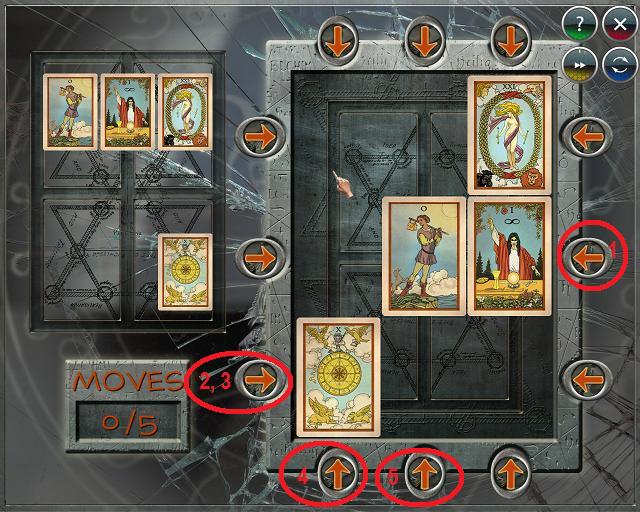
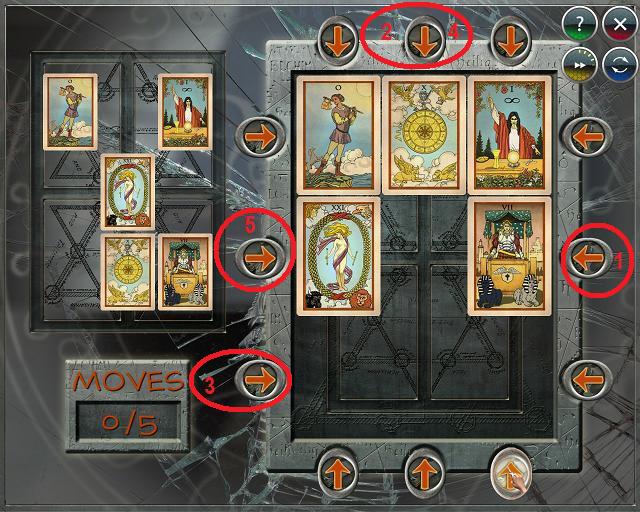
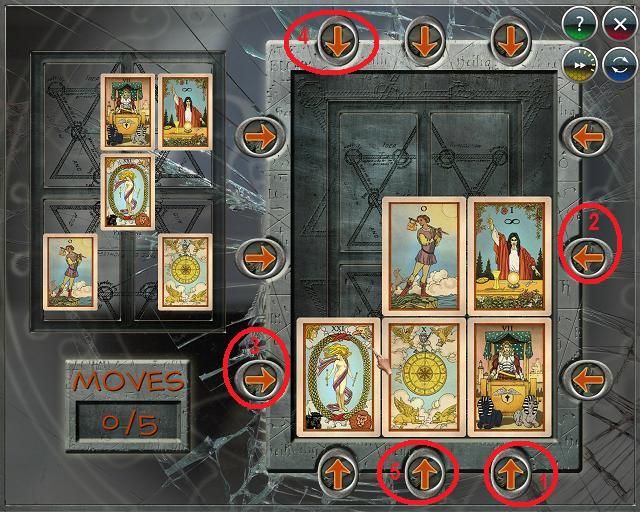
Click on the mirror to open the mini-puzzle.
In this mini-puzzle you need to move the cards to match the pattern using the arrow keys around the game. You must move the cards into position using the number of moves indicated, no more. There are five patterns to reproduce.
Pattern 1
Pattern 2
Pattern 3
Pattern 4
Pattern 5
When you complete the mini-puzzle the mirror of dreams will appear in the Great Mirror.
Click on the Mirror of Dreams to free the fortuneteller.
Click on the Mirror of Dreams to take it. Mission Accomplished!
Eye of Evil
Grimstone Mansion
Look in your inventory, you now have the eight objects from your missions.
Pick up all three pieces of paper and read them. screenshot.
Put the Rose in the vase.
Put the Sphere of Life and the Dreamsand on the pentagram (table).
Put the Mirror of Dreams on the wall to the left of the door.
Go through the portal.
Restored Mansion
Open the HOG scene to get a key. screenshot.
Use the key to open the box on the floor. Take the stone amulet.
Find and pick up the flame amulet (in the curtains) and the water amulet (behind the ceiling light fixture).
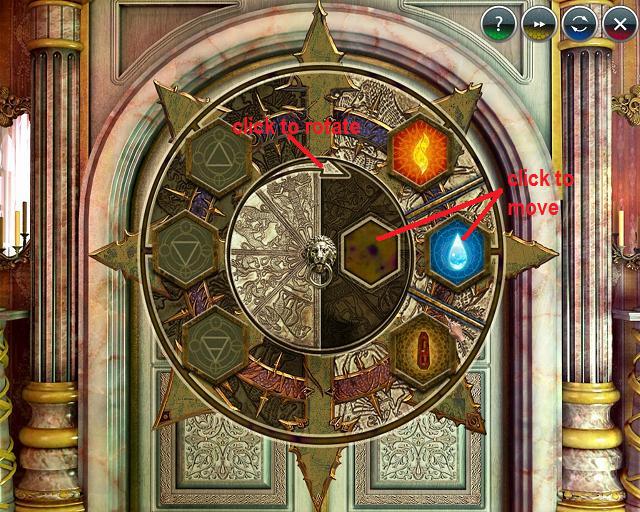
Place all three amulets in the door lock to open a mini-puzzle.
In this mini-puzzle you need to move all three amulets to the left side of the puzzle. Move an amulet by clicking on it to place it in the center. Click on the arrow to rotate and click on the amulet again to place in the left. screenshot. However, some elements don't like to be next to each other so you must move them in a particular order.
Move the amulets in this order: (1) Click on the water amulet, rotate the center, and click on the water amulet to place it on the left. (2) Rotate the center around and click on the fire amulet to move it into the center. Rotate and click on the fire amulet to move it to the left. (3) Now click on the water amulet to move it back to the center. Rotate and click the water amulet to move it back to the right. (4) Click on the stone amulet to move it to the center, rotate, and click to move it to the left. At this point the fire and stone amulets should be on the left and the water amulet on the right. (5) Rotate the center, click on the water amulet, rotate again, and click on the water amulet to place it on the left. Puzzle complete.
Once the puzzle is complete the door will open. Go through the door to the Second Room.
Second Room
Open the HOG scene to get a hammer. screenshot.
Use the hammer to break the big retort to the left of the fireplace. Take the rune of spirits.
Put the Dream Catcher on the Book of Nightmares.
Open the book and take the tongs.
Go back to the Restored room.
Restored Mansion
Click on the photo sitting on the table for a close-up. Use the stopwatch on the photo and take the rune of gods.
Use the tongs on the Flaming Rose to get a flaming petal.
Click on the painting on the right wall for a close-up. Place the flaming petal in the firepit to get the sigil of fire.
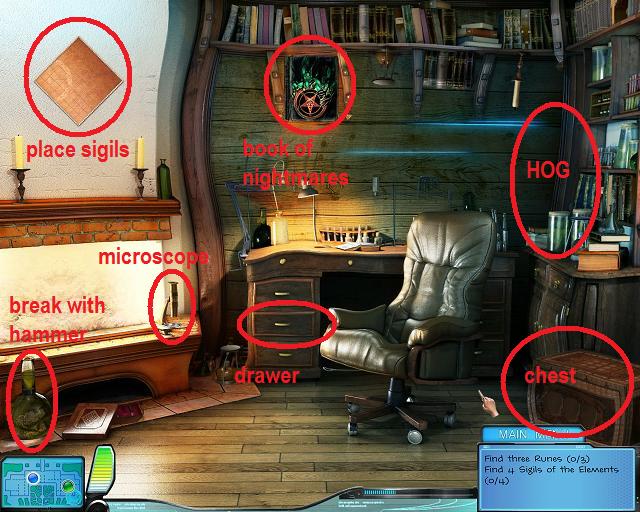
Go back to the second room.
Second Room
Use the Fang of the Packleader on the stuck drawer to open it. A bunch of runes will appear.
Use the Rabbit's Paw on the runes and the correct one will appear. Take the rune of giants.
You should now have three runes. Place the runes on the chest to activate a mini-puzzle.
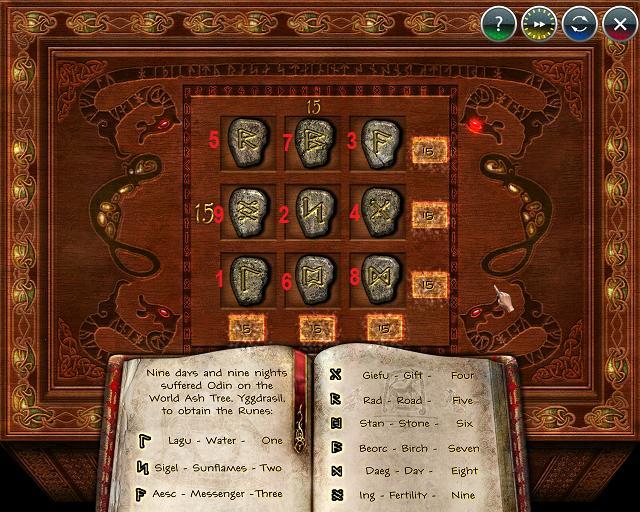
In the mini-puzzle each rune represents a number. Check the book to see which rune represents which number. The object is to place the runes in the grid so that each row and column add up to 15. There may be more than one solution, here's a screenshot of one.
When the mini-puzzle is solved you should receive the sigil of air.
Go back to the Restored room.
Restored Mansion
Open the HOG scene to receive the sigil of earth.
Go back to the second room.
Second Room
Open the HOG scene to get the microscope lens.
Place the microscope lens in the microscope.
Click on the microscope for a close-up and take the sigil of water. You should now have all four sigils.
Place the sigils in the shield over the fireplace. This unlocks the last mini-puzzle.
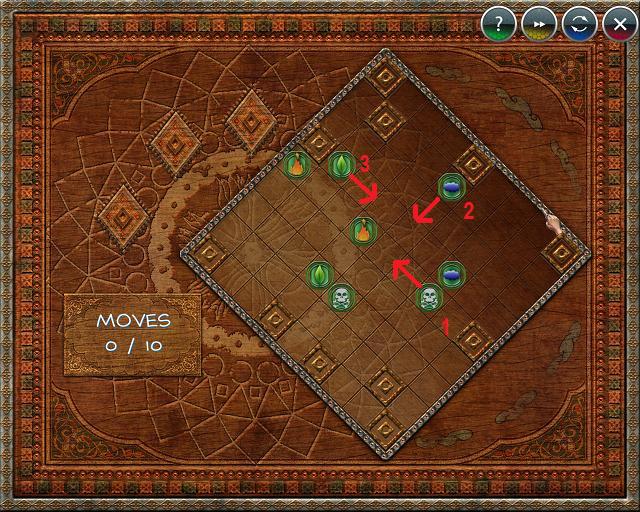
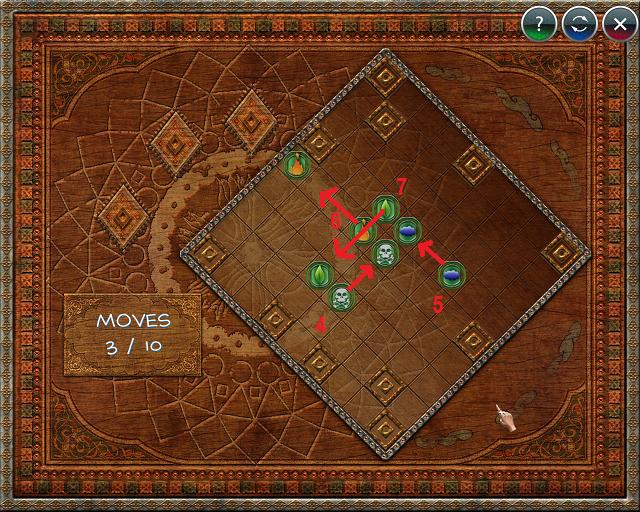
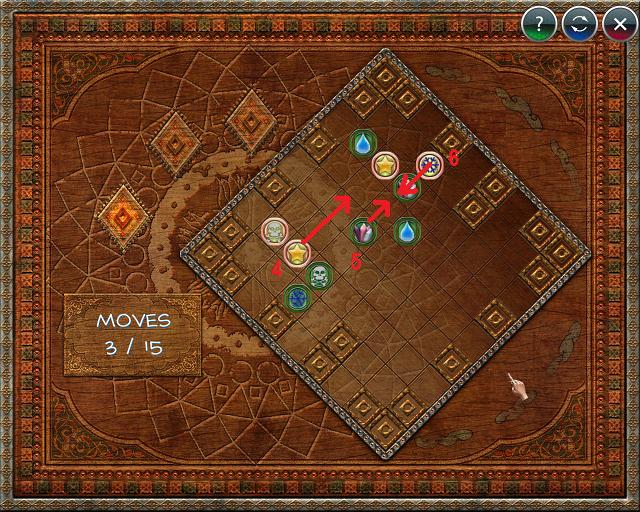
In this mini-puzzle you are trying to remove all the sigils from the board. You can remove a sigil by having it collide with a sigil that is the same symbol and color.
If sigils of opposite colors hit, they will change colors.
To move a sigil simply click on it and drag until an arrow appears in the direction you want it to go. Sigils will move until they hit another sigil or the edge of the board.
Each board has to be cleared in the number of moves given (or less).
There are three sigil puzzles to be solved to win the mini-puzzle.
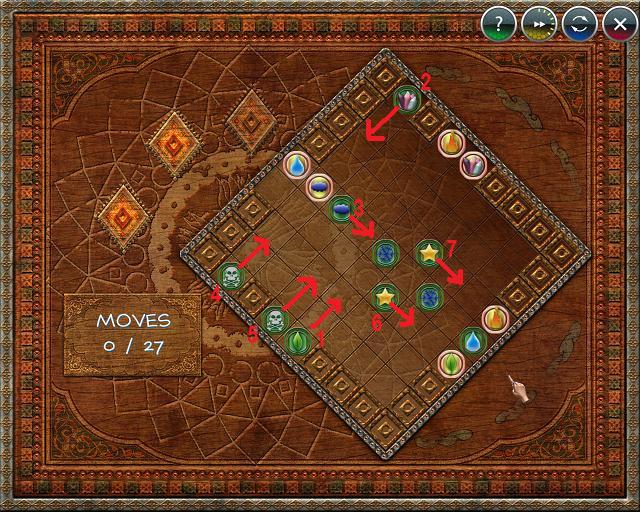
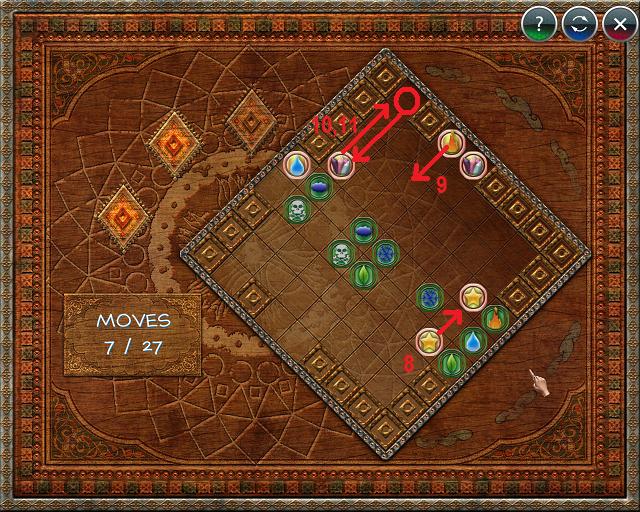
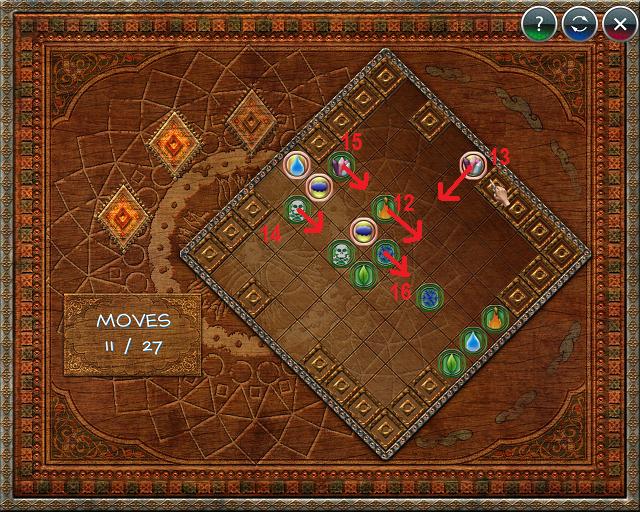
When using the screenshots to solve the mini-puzzles remember to move the pieces in the direction of the arrows and in the numbered order.
Solution 1: screenshot, screenshot.
Solution 2: screenshot, screenshot, screenshot.
Solution 3: screenshot, screenshot, screenshot, screenshot.
Once the mini-puzzle is solved the Eye of Evil appears below the shield.
Take the Eye of Evil.
Mission Accomplished!
Posted by: grinnyp |
July 21, 2009 11:22 AM
|
July 21, 2009 11:22 AM