
The Fool and His Money
Platform: Mac, Windows
![]() In 1987, a seminal work of the puzzle game genre was released: Cliff Johnson's The Fool's Errand. The tale of a Fool seeking his fortune in the land of Tarot, battling against the challenges
In 1987, a seminal work of the puzzle game genre was released: Cliff Johnson's The Fool's Errand. The tale of a Fool seeking his fortune in the land of Tarot, battling against the challenges  of warring kingdoms and the manipulation of the High Priestess. It brought the concept of the Meta-Puzzle to the world of computer games, with the solution of each cryptogram, maze, tetramino, jigsaw, word square and so forth contributing to a larger whole. It sported a novel's worth of prose both elegant and confounding, and a silhouetted aesthetic, unique then as now. It was a masterful Alternate Reality Game on a single diskette, any fan of logic and word puzzles owes it to themselves to play it for the price of one shiny "fooling around a bit with the emulator".
 Finished? Good. Spoiler: Having emerged victorious in his quest, the stolen fourteen treasures of Tarot in his possession, The Fool set out to return them to their rightful owners. But Cliff was certain that the High Priestess wasn't done with her mischief, and began sketching out plans for a sequel, where the fool would be parted with his gold and, with the help of the player, find it once again. As so often occurs, other projects took his attention, and Johnson became known as a puzzle-master par excellence, developing new kinds of brainteasers and treasure hunts for various clients, including one for David Blaine which boasted a $100,000 prize at the end. But still, Cliff's thoughts returned to The Fool and His Money. In January 2003, he began accepting pre-orders for the long awaited sequel. Fans waited with bated breath. And waited. And waited. Time went on, almost a decade, and projected release date after projected release date passed on the calendar. Those who had invested began to get antsy. After all, if you are trying to convince your audience that your promise of a game is not, in actuality, some kind of elaborate performance art piece, then titling your work as such is not particularly conducive to your cause. But happily, the sayers of nay were proven wrong, and The Fool and His Money has finally gone gold. Look out next week for the pigs flying and Satan getting whacked in the head with a snowball.
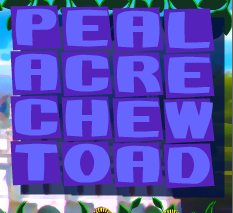
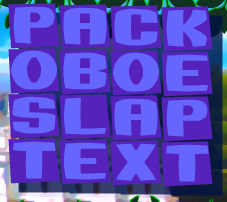
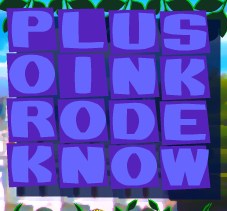
It's hard to describe the nature of the game to those who have never played it, since there are so few other works like it. Broadly, though, upon starting the game and choosing a save file, you will be presented with a list of names corresponding to pages in the book of the Fool's journey. Clicking a name will send you to a screen with an incomplete text describing part of the fool's adventure, setting up puzzles of all types to be solved. Using clues in the text and the often-required instructions provided by the [HELP] Button at the bottom of the screen, solve the puzzle, and the rest of the text on the page will be filled in. The more puzzles you solve, the more pages are unlocked. Every page solved also adds a piece to the Moon Map, a jigsaw that shows the path the Fool takes through the countryside as hinted at through the text. Completing the map unlocks the concluding pages and the final battle of wits.
 Analysis: It was worth the wait. It was worth all the wait. If you loved The Fool's Errand, you'll love The Fool and His Money, and even if you've never played the original, those among us who fill out Games Magazine's Pencilwise section in ink, will have a lot to like. It is by no means a game that can be rushed through with no effort. To beat this game, you will have to take notes on scrap paper, call over your family member that's great at word square, quit in frustration while cursing Cliff Johnson's name, then immediately re-open the game a second later when the pieces mentally snap into place and you figure that IBNRAGA unscrambles into BARGAIN. It's a tough game, but it's fair. Every puzzle has a logic to it that may be befuddling at first but perfectly obvious in retrospect. Every tiny step you push forward in the plot will make you feel very smart indeed.
There's a nice variety of different kinds of puzzles. Overall, those with the mind of a wordsmith will probably have an advantage, but all parts of your brain will be required to make any headway. A particular stand-out is a type returning from the first game, where the Fool is challenged to a Tarot card game with concealed rules. While your opponent is good, they're nowhere near perfect, and if you can just figure out the rules by observation, you're certain to beat them. There's a certain amount of repetition in the various puzzle types as the game progresses, genres popping up more difficult forms as you get closer to the game's completion. Really, it comes off as a natural feeling progression, though if a puzzle gives you particular trouble early on, then it might cross the line into frustration when it shows up again. (In particular, this reviewer still cannot quite get the hang of the "Press the letter-adding buttons in a certain order, so as to make a final coherent sentence" type, and unfortunately, that seems to be one of Johnson's favorites.)
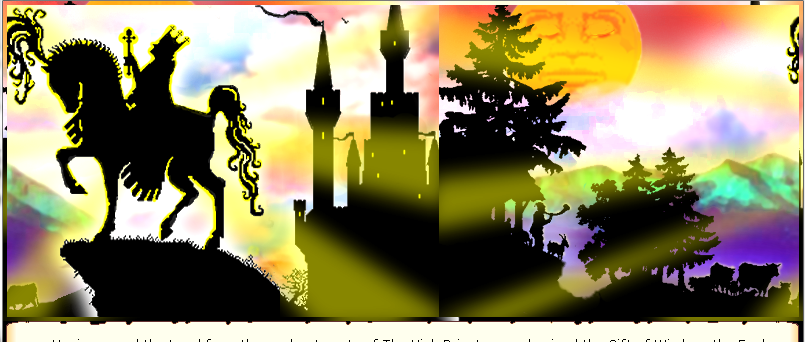
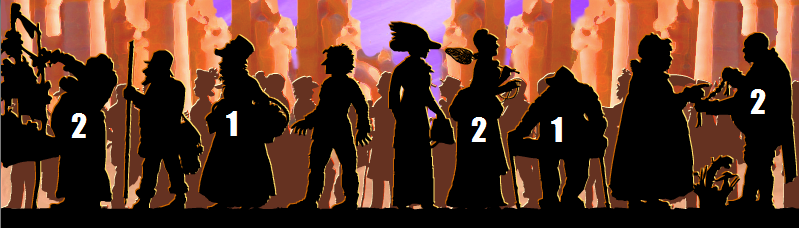
 Aesthetically, the game is a bit of a mixed bag. The black silhouettes combined with evocatively colored backgrounds are nothing short of beautiful, though they lose a lot of their appeal the few times they are animated. It almost seems a little ungrateful to complain that a one-man project with excellent writing, puzzles, and graphics kind of drops the ball on the tweening, but there you have it. Also, the musical cues, while jazzy and interesting, seemed a little out of place for the pseudo-medievalism of the story, and was often distracting during play (though this may be a personal opinion).
Quibbles with window-dressing aside, The Fool and His Money is a worthy successor, and, maybe the best puzzle game of 2012. Even after all this, Johnson has still dropped hints about the possibility of completing a trilogy with "The Fools Paradise". From current data, we can extrapolate that we should be seeing it sometime around the fall of 2037. Well, The Fool and His Money lived up to the hype, and it contains a good twenty-five years of challenge that every sort of fool should rush in to immediately.
![]() Windows:
Windows:
Download the teaser demo
Get the full version
![]() Mac OS X:
Mac OS X:
Download the teaser demo
Get the full version


Walkthrough Guide
(Please allow page to fully load for spoiler tags to be functional.)
The Fool and His Money Walkthrough
Part 1: Puzzles 1-70
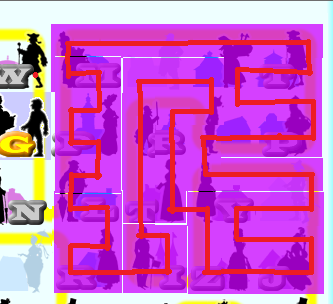
Puzzle 1: Payne
This is a jigsaw puzzle, but occasionally pirates will show up and start shooting at the pieces that are in the correct places. You can click on the skulls to make them disappear, and the piece won't be affected, but the best way to defeat this puzzle is to complete the left half of the puzzle on the right half of the screen, and the right half of the puzzle on the left half of the screen, then switch them for your last move to complete the puzzle, as in the images below:
Screenshot 1
Screenshot 2
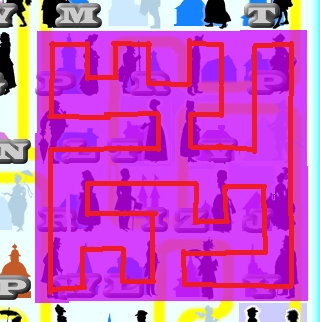
Puzzle 2: Ursula
In this puzzle, clicking a letter in the word BETRAYAL will cause three of the seven shapes in the sky to cycle forward through one of its four iterations, three of which are nonsense, and one of which is a pirate. The goal is make it so all seven of the shapes are in the pirate iteration.
One way to do this is as follows:
Click "L" one time
Click both of the "A" three times each
Click the "Y" twice
Click the "R" twice
The pirates should look as in this image:
Screenshot
Puzzle 3: Lawley
Each of the five hunters, left to right, when clicked on, has something to say; however, they say it rather cryptically. By clicking the letters in any order, you will come up with a cryptogram to decipher, and is solved by inputting them in the order in which they first appear in the puzzle.
Proper Letter Clicking Order:
First Hunter - THEPRISANFOMDC -
"The Priestess transformed him into a card?"
Second Hunter - BUTHEFOLDCSPAKR -
"But the fool deflected the spell."
Third Hunter - HEKPTFOURNASIML -
"He kept the fourteen treasures for himself?"
Fourth Hunter - ANDOWHECMSTBKF -
"And now he commands the Book of Thoth?"
Fifth Hunter - HISBEWTCMNPOLAD -
"His bewitchments poison the land."
Puzzle 4: Wyck
Imperial Tarot! The first of the hidden rules card puzzles. Each round you and your opponent will trade taking cards, and whoever has the highest ranking hand of three wins the round, and a certain number of points depending on the hand. Winner is the first to 666 points. Naturally, you will want to go for high scoring hands when possible, but denying your opponent points by choosing a card he would need is sometimes the best course of action.
Scoring: There are 14 levels of scoring. Along with some special combinations, points are scored by having cards of a certain class, doubles from a certain class, or triples from a certain class.
You're awarded points based on your highest possible score for any trio of cards. A Triplet is always worth more than any Doublet, and a Doublet is always worth more than any Singlet
Look out for the Book of Thoth! It can be used as a wild card to complete a Triplet, but otherwise it will put you into Rupture and you'll lose 99 points!
Bewitchment: Hand contains Book of Thoth, Priestess, Prince. Only works as a Triplet (111 Points)
Duality: Hand contains Magician and Priestess OR Moon and Sun OR Moon God and Sun God. Only works as a Doublet (108 Points)
Imperial: Hand contains Emperor, Empress, Hierophant, Prince. Triplet (105 Points), Doublet (69 Points), Singlet (39 Points)
Perdition: Hand contains The Fool AND two of the following: Justice, Judgment, Devil Death. Triplet Only (102 Points)
Malevolent: Hand contains The Fool AND two of the following: Emperor, Empress, Hierophant. Triplet Only (99 Points)
Rhadamanthine: Hand contains Justice, Judgement, Devil, Death. Triplet (96 Points), Doublet (66 Points), Singlet (36 Points)
Celestial: Hand contains Sun, Moon, Star, World. Triplet (93 Points), Doublet (63 Points), Singlet (33 Points)
Enchanted: Hand contains Temperance, Strength, Devil, Star. Triplet (90 Points), Doublet (60 Points), Singlet (30 Points)
Gifted: Hand contains Hanged Man, Hermit, Wheel of Fortune, Hierophant. Triplet (87 Points), Doublet (57 Points), Singlet (27 Points)
Wordly: Hand contains World, Lovers, Chariot, Prince. Triplet (84 Points), Doublet (54 Points), Singlet (24 Points)
Treacherous: Hand contains The Fool, Magician, Sun, Tower. Triplet (81 Points), Doublet (51 Points), Singlet (21 Points)
Insidious: Hand contains Prince, Priestess, Moon, Hierophant. Triplet (78 Points), Doublet (48 Points), Singlet (18 Points)
Feminine: Hand contains Moon God, Moon, Priestess, Empress. Triplet (75 Points), Doublet (45 Points), Singlet (12 Points)
Masculine: Hand contains Sun God, Sun, Magician, Emperor. Triplet (72 Points), Doublet (42 Points), Singlet (12 Points)
Puzzle 5: Needham
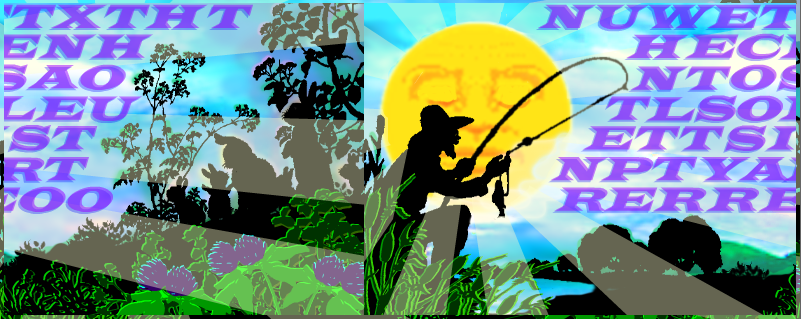
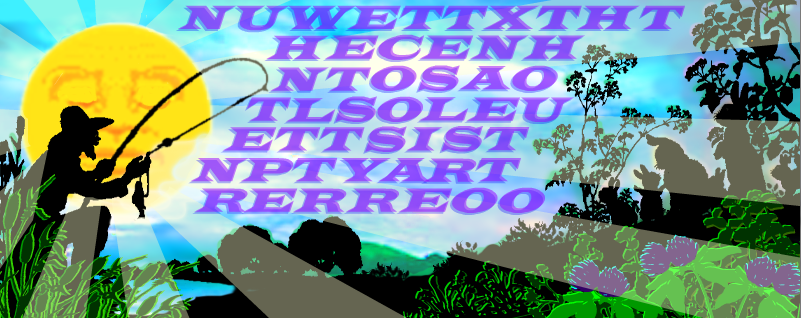
Clicking each of the floating cups will add letters to the front or back of a constructed sentence. Spacing and punctuation is always the same, to it is a matter of clicking the cups in the correct order.
As each game seems to randomize what button adds what group of letters, some note-taking will be require. However, once you know what button will do what, you can get the solution by clicking in the following order:
The one that adds ECO
The one that adds NDTH
The one that adds ENCO
The one that adds LUMN
The one that adds ROWS
The one that adds RONE
The one that adds AFTE
Final Completed Sentence:
AFTER ONE, ROW SECOND, THEN COLUMN
Puzzle 6: Garrison
Each soldier, left to right, when clicked, has a word square to be solved. Here are images with the solution for each. As a starting hint, the letter in the top left corner of each is an "S".
Here are images of the four completed word squares:
Solution 1
Solution 2
Solution 3
Solution 4
Puzzle 7: Quentin
Okay this is a tricky one. There are six coins floating above you. Each one has two faces. Click two coins to reveal their opposite sides. If you then click two coins that reveal the same match of faces again, those two will vanish. The goal is to remove all the coins.
Since they're magic coins, they'll switch faces on you. But The Fool knows where they're going! Notice that every time you click on a matching pair, the Fool's head will turn left or right. That shows where the other pair are!
In other words, click on a matching pair. Now you must find them behind two of the other four unclicked coins. If The Fool's head is facing left, you'll find the pair by clicking the two coins, farthest to the left, that have not been clicked. If the Fool's head is facing right, you'll find the pair by clicking the two coins, farthest to the right, that have not yet been clicked. The coin faces will vanish from the pool, so repeat until all the coins are gone!
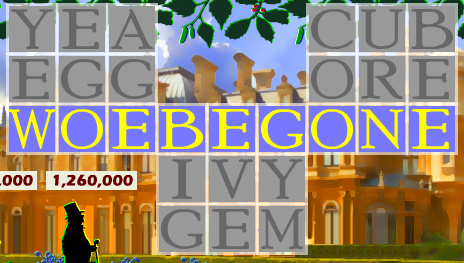
Puzzle 8: Moxley
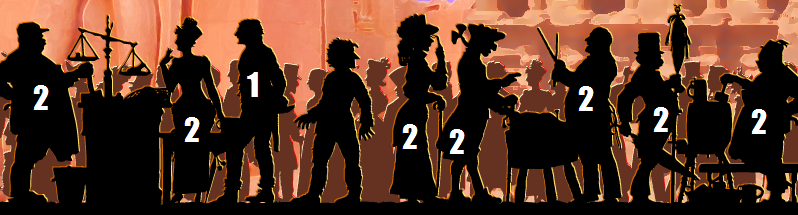
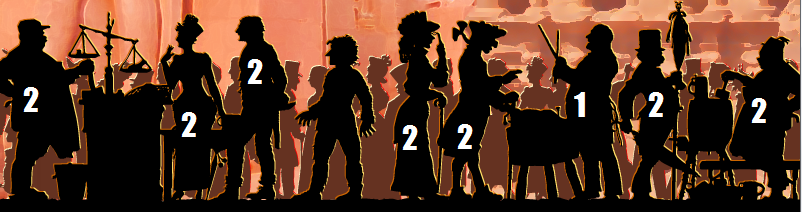
There are eight non-Fool characters on screen, and clicking each will change two of the letters in the word floating above them. Thus they must be clicked in the proper order. The word you are trying to make is EARNEST
Here is an image that shows one solution. The number on each figure shows how many times that figure should be clicked. Figures without numbers should not be clicked at all.
Screenshot
Puzzle 9: Sabina
A jigsaw, but one that must be completed by trading horizontal square pairs of puzzles pieces. Generally it's best to work in rows from the top right to the bottom left.
Here is an image of the completed puzzle:
Screenshot
Puzzle 10: Jasper
There are 11 merchants with questioning letters about their head. Clicking on each will reveal anagram crossword puzzles of seven letter words.
Here are images of the solutions for each puzzle:
S? Merchant
C? Merchant
V? Merchant
F? Merchant
A? Merchant (Top Row Left)
A? Merchant (Top Row Right)
A? Merchant (Bottom Row)
E? Merchant (Top Row)
E? Merchant (Bottom Row)
T? Merchant
W? Merchant
Puzzle 11: Agar
You have 10 letters to sell to the ten characters bidding, and require 1,000,000 gold coins to complete the puzzle. Each character has a series of letters beneath them, and while they'll purchase letters that complete words with their letters, they'll REALLY bid up letters that will help them form names of five letters.
Sell the letters in this order:
S G C P H A B Y T E
Puzzle 12: McGucken
There are eight non-Fool characters on screen, and clicking each will change two of the letters in the word floating above them. Thus they must be clicked in the proper order. You must go through the process twice.
The first word you are trying to make is:
FINICKY.
The second word will be:
MAIDENS.
Here are images that shows a solution for each. The number on each figure shows how many times that figure should be clicked. Figures without numbers should not be clicked at all.
Solution 1
Solution 2
Puzzle 13: Horton
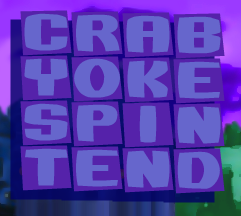
Sliding the rows left and right, you must spell six highlighted words. Each time a word is spelled, the letters disappear. A name will be spelled out with the letters remaining.
The words are as follows:
ABRASIVE, CONTEMPT, FEARSOME, JEALOUSY, UNLAWFUL, and VIOLENCE.
This leaves you with the name:
PIERPONT.
Puzzle 14: Caine
This one is a pretty standard cryptogram. However, both the man on the left and the man on the right have a saying for you to solve, so make sure you click on both.
Solution for Left Man's Puzzle:
RIDICULE IS THE FIRST AND LAST ARGUMENT OF A FOOL
Solution for Right Man's Puzzle:
TALK SENSE TO A FOOL AND HE CALLS YOU FOOLISH
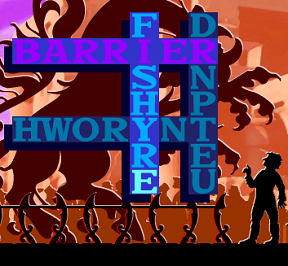
Puzzle 15: Voorst
To solve this puzzle, you must have solved all the other puzzles up to 16: MASSEY. Do so before even attempting.
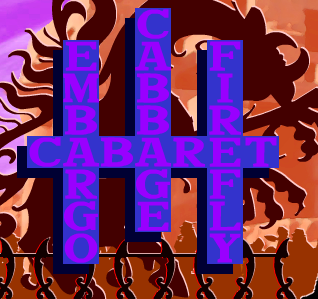
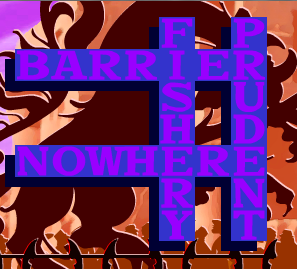
Ready? Okay. You must sell all 63 words for over two million coins. Characters will pay big bucks for sets of seven that all share a common scheme. You're looking to sell sets of seven words that all contain the same three letter word within. Selling sets randomly will give you a scrambled clue from the losers of what three letter words to look out for, though one (ALL) is a red herring.
The sets to sell are as follows. Always sell to the highest bidder:
AGE: AVERAGE, CABBAGE, EAGERLY, MANAGER, PAGEANT, TRAGEDY, and VILLAGE
BAR: BARGAIN, BARRIER, BAROQUE, CABARET, CROWBAR, EMBARGO, and RHUBARB
CAT: CATALOG, CATERER, COPYCAT, EDICATE, POLECAT, SCATTER, and WILDCAT
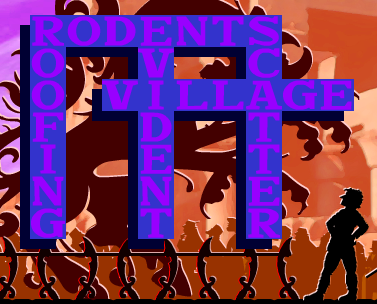
DEN: BROADEN, DENIZEN, EVIDENT, MAIDENS, PRUDENT, RODENTS, and STUDENT
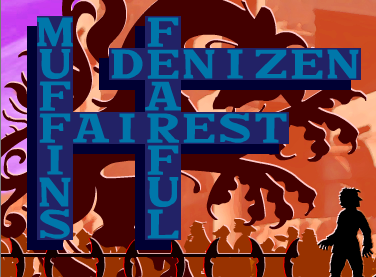
EAR: CLEARLY, EARNEST, FEARFUL, FOREARM, MIDYEAR, TEAROOM, and UNEARTH
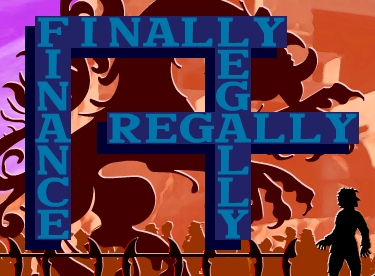
FIN: CONFINE, FINALLY, FINANCE, FINICKY, GRIFFIN, MUFFINS, and ROOFING
GAL: FUGALLY, GALLANT, GALLERY, GALLOWS, ILLEGAL, LEGALLY, and REGALLY
HER: BUTCHER, CHERISH, FISHERY, HERETIC, INHERIT, NOWHERE, and THERAPY
IRE: ACQUIRE, ESQUIRE, FAIREST, FIREFLY, HEIRESS, INQUIRE, and REQUIRE
Puzzle 16: Massey
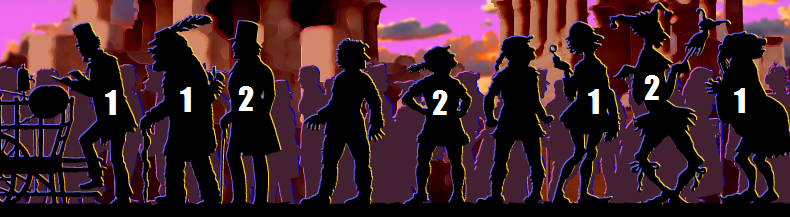
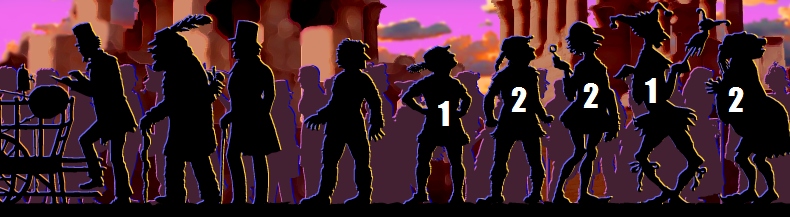
There are eight non-Fool characters on screen, and clicking each will change two of the letters in the word floating above them. Thus they must be clicked in the proper order. You must go through the process three times.
The first word you are trying to make is:
STUDENT.
The second word will be:
FOREARM.
The third word will be:
CLEARLY.
Here are images that shows a solution for each. The number on each figure shows how many times that figure should be clicked. Figures without numbers should not be clicked at all.
Solution 1
Solution 2
Solution 3
Puzzle 17: Wallop
Cutthroat Tarot! Taking turns, The Fool and The Hook will swap one card from their three card hand with a card from either the pool at the bottom, or one of their opponent's cards. A card taken from you by an opponent cannot be immediately swapped back. Once The Fool or The Hook has completed a Triple in their hand, points are awarded and a new hand is dealt. The goal is to get to 777 points.
This is a game of straights. Get in your hand a string of three cards in order from Queen, Knight, Page, Ten, Nine, Eight, Seven, Six, Five, Four, Three, Two, Ace, and you'll score big. No wrap-arounds and, apart from the King of Swords with a Queen and a Knight, no King will be a part of a straight.
If you have the highest card for your straight in hand, you can substitute the lower cards as follows:
Queen: High Priestess
Knight: Devil
Page: Moon
Ten: Death
Nine: Tower
Eight: Hanged Man
Seven: Hermit
Six: Fool
Five: Judgment
Four: Wheel of Fortune
Three: Star
Two: Hierophant
Ace: World
Scoring for Straights (with or without substitutions) as is follows:
King of Swords, Queen, Knight - Berserk (151 Points)
Queen, Knight, Page - Ferocious (143 Points)
Knight, Page, Ten - Rampant (135 Points)
Page, Ten, Nine - Vigilant (127 Points)
Ten, Nine, Eight - Desolation (119 Points)
Nine, Eight, Seven - Anguish (111 Points)
Eight, Seven Six - Powerless (103 Points)
Seven, Six, Five - Theft (95 Points)
Six, Five, Four - Abandon (87 Points)
Four, Three, Two - Revenge (71 Points)
Three, Two, Ace - Betrayal (63 Points)
There are other hands which score points, though less than a straight. Of course, it is always better to complete a low-scoring hand, then to let your opponent score at all.
Fool, Wheel of Fortune, Any Ship - Prospect (55 Points)
High Priestess, Hermit, Any Ship - Portent (47 Points)
Pirate King, Star, Any Ship - Pillage (39 Points)
Isis, Horus, Any Ship - Plunder (31 Points)
Three Ships - (25 Points)
Three Tarot Kings - Parley (15 Points)
Two Tarot Kings and the King of Pirates - Counsel (7 Points)
Puzzle 18: Pringle
This is a jigsaw puzzle, but occasionally pirates will show up and start shooting at the pieces that are in the correct places. You can click on the skulls to make them disappear, and the piece won't be affected, but the best way to defeat this puzzle is to complete the left half of the puzzle on the right half of the screen, and the right half of the puzzle on the left half of the screen, then switch them for your last move to complete the puzzle, as in the images below.
Screenshot 1
Screenshot 2
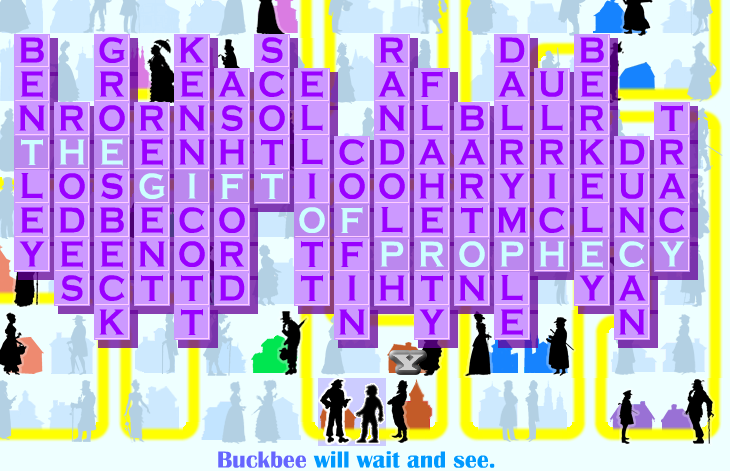
Puzzle 19: Buckbee
Here you must create Seventeen Four Letter Words Seventeen Two-Letter Halfs. In other words, each half will be used once as both the start of a word, and of the end. The words will wrap around, but one solution is as follows:
ALLY - LYRE - REAP - APEX - EXAM - AMID - IDLE - LEAK - AKIN - INTO - TOUR - URGE - GEAR - AREA - EACH - CHOP - OPAL (which would then connect to ALLY)
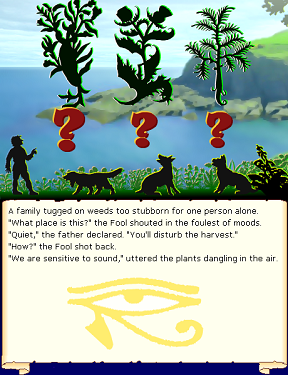
Puzzle 20: Radcliff
There are four different pictures of herbs being shown. Each herb represents one letter A, E, P, or T. Once you figure out what herb represents each letter, you will use them to spell out ten 3-letter words. Since what herb represents what letter is randomized every time you reset the puzzle, some experimentation will be necessary.
The words you will spell, in some order, are as follows:
APE, APT, ATE, EAT, PAT, PEA, PEP, PET, TAP, TEA
Puzzle 21: Norfolk
Clicking each of the floating leaves will add letters to the front or back of a constructed sentence. Spacing and punctuation is always the same, so it is a matter of clicking the leaves in the correct order.
As each game seems to randomize what button adds what group of letters, some note-taking will be require. However, once you know what button will do what, you can get the solution by clicking in the following order:
The one that adds AP
The one that adds BLE
The one that adds ITA
The one that adds ROF
The one that adds PEA
The one that adds RSI
The one that adds UNP
The one that adds NPA
The one that adds IRS
Final Sentence:
UNPROFITABLE APPEARS IN PAIRS
Puzzle 22: Gliston
Each guard, left to right, when clicked, has a word square to be solved. Here are images with the solution for each. As a starting hint, the letter in the top left corner of each is a "W".
Here are images of the four completed word squares.
Solution 1
Solution 2
Solution 3
Solution 4
Puzzle 23: Yapp
First you must harvest your letter crop. Carefully move your mouse over an individual letter to harvest it. Once you collect a given letter, you must collect it from every place it appears before you can continue to collect a different one.
Once you've collected all the letters (ABCNPSY) you must use them to spell out three seven-letter "Harvestable" words. And, since the only vowel is A, you can expect that to show up a lot.
The three words to spell are:
PAPAYA, CASABA, and BANANA.
Puzzle 24: Hayden
Sliding the rows left and right, you must spell six highlighted words. Each time a word is spelled, the letters disappear. A name will be spelled out with the letters remaining.
The words are as follows:
ANNOYING, EDGEWISE, JEOPARDY, NEUROTIC, OFFICIAL, and UNLIKELY.
The name that remains is:
INGRAHAM.
Puzzle 25: Roderick
There are five different pictures of herbs being shown. Each herb represents one letter I-L-O-P-T. Once you figure out what herb represents each letter, you will use them to spell out fifteen 3-letter words. Since what herb represents what letter is randomized every time you reset the puzzle, some experimentation will be necessary.
The words you will spell, in some order, are as follows:
ILL, LIP, LIT, LOP, LOT, OIL, OPT, PIP, PIT, POP, POT, TIP, TOO, TOP, and TOT.
Puzzle 26: Vibbard
To solve this puzzle, you must have solved all the other puzzles up to 29:JOST. Do so before even attempting.
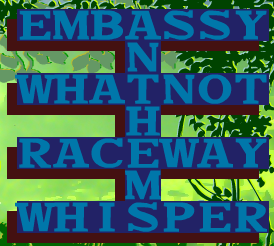
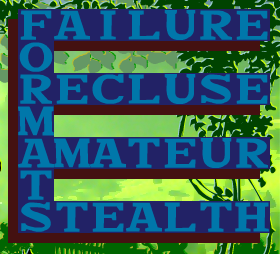
Ready? Okay. You must sell all 63 words for over four million coins. Characters will pay big bucks for sets of seven that all share a common scheme. You're looking to sell sets of seven words that contain a plural containing two three-letter words, and three each that contain one of those words. Selling sets randomly will give you a scrambled clue from the losers of what three letter words to look out for, though there are a lot of red herrings.
The sets to sell are as follows. Always sell to the highest bidder:
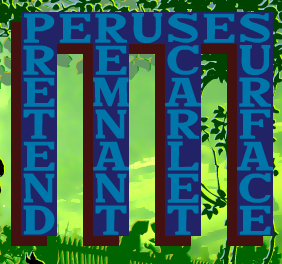
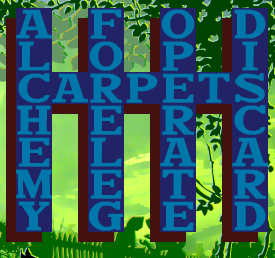
ANT/HEM: ANTHEMS, LANTERN, PHANTOM, REMNANT, ALCHEMY, HEMLOCK, CHEMIST
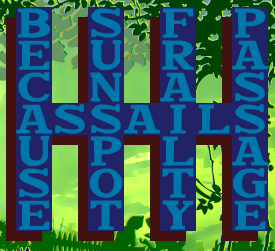
ASS/AIL: ASSAILS, CLASSIC, EMBASSY, PASSAGE, CURTAIL, FAILURE, FRAILTY
CAR/PET: CARPETs, DISCARD, MASCARA, SCARLET, COMPETE, PETRIFY, TRUMPET
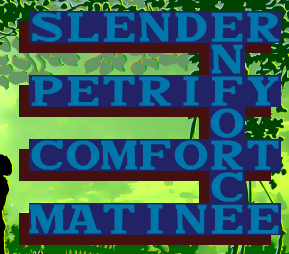
FOR/MAT: FORMATS, COMFORT, ENFORCE, UNIFORM, AMATEUR, DOORMAT, MATINEE
LEG/END: LEGENDS, COLLEGE, ELEGANT, FORELEG, ENDORSE, PRETEND, SLENDER
MEN/ACE: MENACES, ABDOMEN, ELEMENT, IMMENSE, EMBRACE, RACEWAY, SURFACE
NOT/ICE: NOTICES, ANOTHER, KEYNOTE, WHATNOT, ICEBERG, LICENSE, OFFICER
PER/USE: PERUSES, EMPEROR, OPERATE, WHISPER, BECAUSE, RECLUSE, USELESS
TEA/POT: TEAPOTS, CHATEAU, INSTEAD, STEALTH, JACKPOT, POTENCY, SUNSPOT
Puzzle 27: Lommis
Each of the six farm folk (including the calf), left to right, when clicked on, has something to say. However, they say it rather cryptically. By clicking the letters in any order, you will come up with a cryptogram to decipher, and is solved by inputting them in the order in which they first appear in the puzzle.
Proper Letter Clicking Order:
First Farmfolk: OURPAENTSHYILDW -
"Our parents? They sailed with the three ships."
Second Farmfolk: WEOULDFTHPIRAKNGC -
"We would follow the Pirate King if we could."
Third Farmfolk: MYBROTHESADWNU -
"My brothers' Bad Yam Brewery went bust."
Fourth Farmfolk: WERFUSDTOPCIHB -
"We refused to pepper our recipe with Herbs."
Fifth Farmfolk: AKINGSROMWULDTE -
"A King's ransom would not dissuade us!"
Calf: IDONTMHASLERYF -
"I don't mind. That's all the more yams for me!"
Puzzle 28: Cutting
This one is a pretty standard cryptogram. However, both the man on the left and the man on the right have a saying for you to solve, so make sure you click on both.
Solution for man on left:
EVEN A FOOL MUST NOW AND THEN BE RIGHT BY CHANCE
Solution for man on right:
A GREAT FORTUNE IN THE HANDS OF A FOOL IS A GREAT MISFORTUNE
Puzzle 29: Jost
There are 11 villagers with questioning letters about their head. Clicking on each will reveal anagram crossword puzzles of seven letter words.
Here are images of the solutions for each puzzle.
D? Villager
O? Villager
A? Villager
G? Villager
R? Villager (Left)
I? Villager (Left)
S? Villager
E? Villager
I? Villager (Right)
R? Villager (Right)
F? Villager
Puzzle 30: Rymore
There are six different pictures of herbs being shown. Each herb represents one letter E-H-M-N-O-W. Once you figure out what herb represents each letter, you will use them to spell out twenty 3-letter words. Since what herb represents what letter is randomized every time you reset the puzzle, some experimentation will be necessary.
The words you will spell, in some order, are as follows:
EON, EWE, HEM, HEN, HEW, HOE, HOW, MEN, MEW, MOM, MOO, MOW, NEW, NOW, ONE, OWE, OWN, WEE, WOE, WHO.
Puzzle 31: Argyle
You have 20 letters to sell to the ten characters bidding, and require 3,000,000 gold coins to complete the puzzle. Each character has two series of letters beneath them and will leave after they have purchased two letters. While they'll purchase letters that complete any word with one of their string of letters, they'll REALLY bid up letters that will help them form pairs of opposites.
Sell the letters in this order:
O B D G N U L L B W N U C Y B K R Q G Y
Puzzle 32: Snodgrass
A jigsaw, but one that must be completed by trading vertical square pairs of puzzles pieces. Generally it's best to work in columns from the top right to the bottom left.
Here is an image of the completed puzzle:
Screenshot
Puzzle 33: Ingram
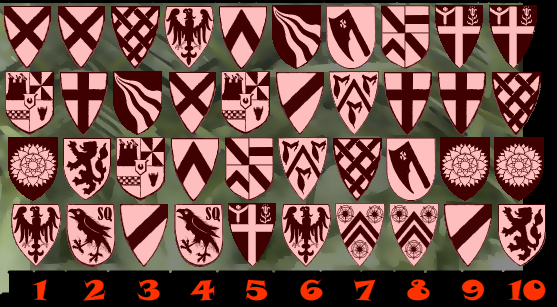
You must arrange the heralds so that the total value of the columns reads 1-10. Each herald pattern has a positive or negative value you can see by moving your mouse over it. Each column must contain four unique heralds.
One possible solution can be found in the following image:
Screenshot
Puzzle 34: Wentworth
Remedial Tarot! Another hidden rule card puzzle. This time the game is based around the main suits of Herb Cards and Tarot Cards. The goal is 888 points. You and your opponent will take turns either picking a card to form a couplets, or moving the columns that determine what cards each player can take. You can only select a card if it is in the right two columns (with a couplet needing one from each), and your opponent can only pick from the left two columns (with a couplet requiring one from each). Therefore the goal is to create a high scoring couplet, while also preventing your opponent from scoring at all.
Both the Tarot Cards and the Herb Cards have a secret "rank" which determines their scoring. Making a couplet of a Tarot Card with a Herb card of the same rank grants you a Boon and big points. A couplet with two herbs of adjancent rank (like a straight) is a Balm and scores medium points. A couplet with two Tarot cards of adjacent rank is a Bane and scores small points.
A list of Herb Ranking and Scores. Boon refers to the amount of points scored for a couplet with an equally ranking Tarot card. Balm refers to the amount of points scored for a couplet with the Herb Card directly below it in rank. Ranks do not wrap around.
18 Rottenroot - Boon: 171 - Balm: 117
17 Lynchwort - Boon: 168 - Balm: 114
16 Dungthorn - Boon: 165 - Balm: 111
15 Cankerspore - Boon: 162 - Balm: 108
14 Oysterbeard - Boon: 159 - Balm: 105
13 Bungleweed - Boon: 156 - Balm: 102
12 Angelpike - Boon: 153 - Balm: 99
11 Wormsfoot - Boon: 150 - Balm: 96
10 Goosebane - Boon: 147 - Balm: 93
9 Monkthistle - Boon: 144 - Balm: 90
8 Peepfeather - Boon: 141 - Balm: 87
7 Toadsilk - Boon: 138 - Balm: 84
6 Nightclaw - Boon: 135 - Balm: 81
5 Jackclover- Boon: 132 - Balm: 78
4 Hogsalt - Boon: 129 - Balm: 75
3 Sandpepper - Boon: 126 - Balm: 72
2 Eagleberry - Boon: 123 - Balm: 69
1 Firegrass - Boon: 120
A list of Tarot Ranking and Scores. Boon refers to the amount of points scored for a couplet with an equally ranking Herb card. Balm refers to the amount of points scored for a couplet with the Tarot Card directly below it in rank. Ranks do not wrap around.
18 Book of Thoth - Boon: 171 - Bane: 63
17 Seven of Pentacles - Boon: 168 - Bane: 60
16 Prince - Boon: 165 - Bane: 57
15 Fool - Boon: 162 - Bane: 54
14 King of Wands - Boon: 159 - Bane: 51
13 Queen of Wands - Boon: 156 - Bane: 48
12 Knight of Wands - Boon: 153 - Bane: 45
11 Page of Wands - Boon: 150 - Bane: 42
10 Ten of Wands - Boon: 147 - Bane: 39
9 Nine of wands - Boon: 144 - Bane: 36
8 Eight of Wands - Boon: 141 - Bane: 33
7 Seven of Wands - Boon: 138 - Bane: 30
6 Six of Wands - Boon: 135 - Bane: 27
5 Five of Wands - Boon: 132 - Bane: 24
4 Four of Wands - Boon: 129 - Bane: 21
3 Three of Wands - Boon: 126 - Bane: 18
2 Two of Wands - Boon: 123 - Bane: 15
1 Ace of Wands - Boon: 120
Puzzle 35: Riason
There are seven different pictures of herbs being shown. Each herb represents one letter B-D-E-G-N-R-U. Once you figure out what herb represents each letter, you will use them to spell out twenty-five 3-letter words. Since what herb represents what letter is randomized every time you reset the puzzle, some experimentation will be necessary.
The words you will spell, in some order, are as follows:
BED, BEE, BEG, BUD, BUG, BUN, DEN, DUB, DUD, DUE, DUG, EBB, EGG, END, ERR, GNU, GUN, NUB, NUN, RED, RUB, RUE, RUG, RUN, URN
Puzzle 36: Handel
Sliding the rows left and right, you must spell six highlighted words. Each time a word is spelled, the letters disappear. A name will be spelled out with the letters remaining.
The words are as follows:
HORIZONTAL, INSIGHTFUL, OBLIGATION, PARTICULAR, QUEASINESS, and SCANDALOUS.
This leaves you with the name:
ROSENCRANS
Puzzle 37: Payne
This is a jigsaw puzzle, but occasionally pirates will show up and start shooting at the pieces that are in the correct places. You can click on the skulls to make them dissappear, and the piece won't be affected, but the best way to defeat this puzzle is to complete the left half of the puzzle on the right half of the screen, and the right half of the puzzle on the left half of the screen, then switch them for your last move to complete the puzzle, as in the images below:
Screenshot 1
Screenshot 2
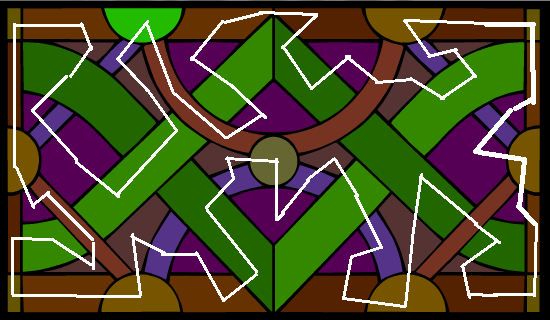
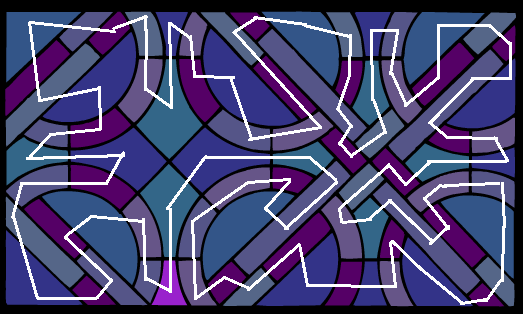
Puzzle 38: Telfair
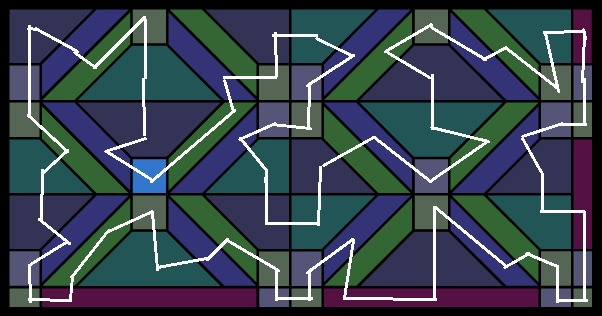
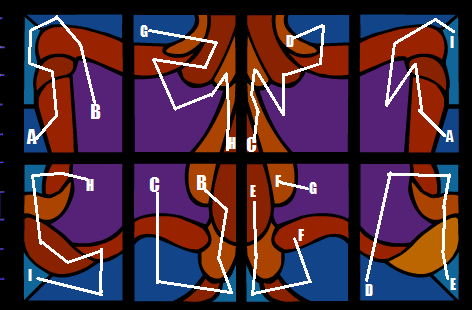
The stained-glass window lights up panels in a specific order, making a circuit. Starting from any pane, you must click them all in the shown order, completing the circuit.
Here is an image that shows the path you must click the panels of the stained-glass, going clockwise:
Screenshot
Puzzle 39: Naire
Clicking each of the animal shapes on the right will add letters to the front or back of a constructed sentence. Spacing and punctuation is always the same, so it is a matter of clicking the animals in the correct order.
As each game seems to randomize what button adds what group of letters, some note-taking will be require. However, once you know what button will do what, you can get the solution by clicking in the following order:
The one that adds EVE
The one that adds NTE
The one that adds ENF
The one that adds ROM
The one that adds THE
The one that adds SEA
The one that adds ERS
The one that adds ISP
The one that adds SWH
The one that adds EET
The one that adds STR
Final Completed Sentence:
STREETS WHISPER SEVENTEEN FROM THE SEA
Puzzle 40: Harleigh
Sliding the rows left and right, you must spell six highlighted words. Each time a word is spelled, the letters disappear. A name will be spelled out with the letters remaining.
The words are as follows:
COINCIDENCE, ELIMINATION, INDIFFERENT, OPPORTUNITY, PICTURESQUE, UNCERTAINTY
This leaves you with the name:
ABERCROMBIE
Puzzle 41: Girdwood
Each guard, left to right, when clicked, has a word square to be solved. Here are images with the solution for each. As a starting hint, the letter in the top left corner of each is an "C".
Here are images of the four completed word squares:
Solution 1
Solution 2
Solution 3
Solution 4
Puzzle 42: Soule
A jigsaw, but one that must be completed by trading horizontal square pairs of puzzles pieces. Generally, for each row, it's best to get the left piece in place, assemeble the center and right pieces in another row, then swap them in. Once you realise that the purple heart-like pattern forms a frame, the puzzle becomes a lot easier.
Here is an image of the completed puzzle:
Screenshot
Puzzle 43: Thwaite
The stained-glass window lights up panels in a specific order, making a circuit. Starting from any pane, you must click them all in the shown order, completing the circuit.
Here is an image that shows the path you must click the panels of the stained-glass, going clockwise:
Screenshot
Puzzle 44: Augustine
You have 30 letters to sell to the ten characters bidding, and require 5,000,000 gold coins to complete the puzzle. Each character has three series of letters beneath them. While they'll purchase letters that complete any word with their letter strings, they'll REALLY bid up letters that will help complete a triplet of rhyming words. Once a character has bought three letters, they'll leave, so note that the story says that the woman with a book, and the wigged man with spectacles will be the last to go.
Sell the letters in this order:
K F B T W W T T E L Y A W M C T T A G F G K K F H H W W H L
Puzzle 45: Crichton
This one is a pretty standard cryptogram. However, both the minister on the left and the minister on the right have a saying for you to solve, so make sure you click on both.
Solution for Left Man's Puzzle:
THE FELLOW WHO DECLARES HE IS NO FOOL USUALLY HAS HIS SUSPICIONS
Solution for Right Man's Puzzle:
THE BEST WAY TO CONVINCE A FOOL THAT HE IS WRONG IS TO LET HIM HAVE HIS OWN WAY
Puzzle 46: Huddleston
Sliding the rows left and right, you must spell six highlighted words. Each time a word is spelled, the letters disappear. A name will be spelled out with the letters remaining.
The words are as follows:
BANKRUPT, FESTIVAL, IGNORANT, NICKNAME, LAUGHTER, ORGANIZE
The name that remains is:
TREMAINE
Puzzle 47: Iacobbe
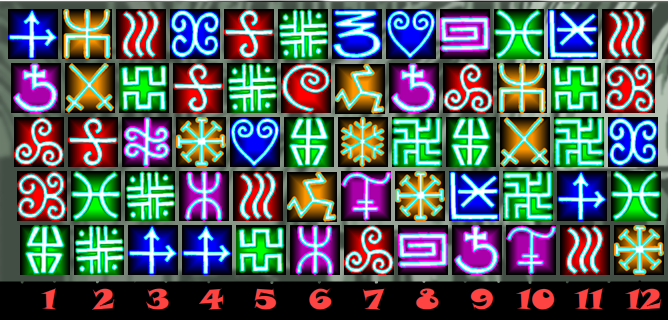
You must arrange the runes so that the total value of the columns reads 1-10. Each herald pattern has a positive or negative value you can see by moving your mouse over it. Each column must contain five unique runes.
One possible solution can be found in the following image:
Screenshot
Puzzle 48: Tilton
The stained-glass window lights up panels in a specific order, making a circuit. Starting from any pane, you must click them all in the shown order, completing the circuit.
Here is an image that shows the path you must click the panels of the stained-glass, going clockwise:
Screenshot
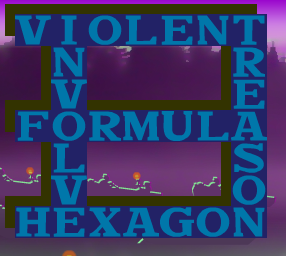
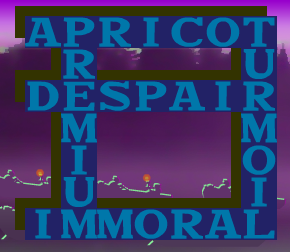
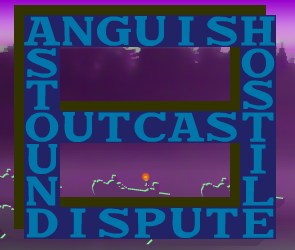
Puzzle 49: Vranken
To solve this puzzle, you must have solved all the other puzzles up to 50: Jeckel. Do so before even attempting.
Ready? Okay. You must sell all 63 words for over six million coins. Characters will pay big bucks for sets of seven that all share a common scheme. You're looking to sell sets of seven words that contain the same three vowels in any order
The sets to sell are as follows. Always sell to the highest bidder:
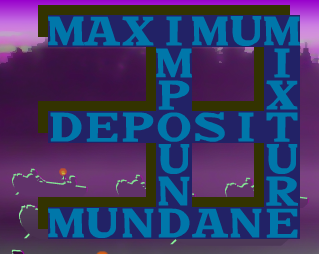
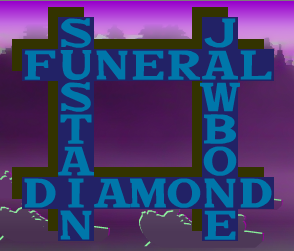
AIU: ANGUISH, CRUCIAL, HALIBUT, LUNATIC, MAXIMUM, PAINFUL, SUSTAIN
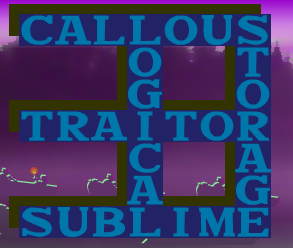
AIO: APRICOT, CONTAIN, DIAMOND, IMMORAL, LOGICAL, MANSION, TRAITOR
AOU: ASTOUND, CALLOUS, FORMULA, JOURNAL, OUTCAST, POPULAR, SQUALOR
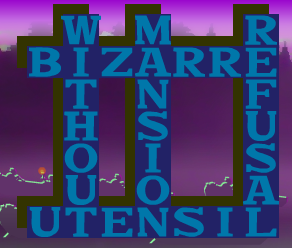
AEU: BANQUET, CAREFUL, FUNERAL, MUNDANE, PASTURE, QUARREL, REFUSAL
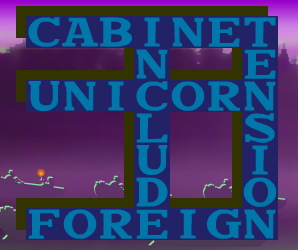
AEI: BIZARRE, CABINET, DESPAIR, ELASTIC, MIRACLE, PRIVATE, VINEGAR
AEO: COMPARE, HEXAGON, JAWBONE, OVERALL, ROMANCE, STORAGE, TREASON
IOU: COUNCIL, IMPOUND, NOURISH, SUCTION, TURMOIL, UNICORN, WITHOUT
EIO: DEPOSIT, FOREIGN, HOSTILE, INVOLVE, PROFILE, TENSION, VIOLENT
EIU: DISPUTE, INCLUDE, MIXTURE, PREMIUM, SUBLIME, TRIBUNE, UTENSIL
Puzzle 50: Jeckel
There are 11 performers with questioning letters about their head. Clicking on each will reveal anagram crossword puzzles of seven letter words.
Here are images of the solutions for each puzzle:
A? Performer (Left)
O? Performer (Left)
I? Performer (Left)
E? Performer
W? Performer
A? Performer (Center)
R? Performer
O? Performer (Right)
K? Performer
I? Performer (Right)
A? Performer (Right)
Puzzle 51: Lydia
Each of the seven hikers, left to right, when clicked on, has something to say; however, they say it rather cryptically. By clicking the letters in any order, you will come up with a cryptogram to decipher, and is solved by inputing them in the order in which they first appear in the puzzle.
Proper Letter Clicking Order:
First Hiker - WEVFOUNDTHSPRIGCALX -
"We found the spring, the source of all Elixer"
Second Hiker - UNTREHFIVOCPSBWD -
"Untrue. The Five of Cups brewed this concoction."
Third Hiker - SHEWOPILDTRCUANK -
"She who spilled three cups and kept two?"
Fourth Hiker - HERLIXSPADTOVYBKN -
"Her Elixer spreads to every brook and pond."
Fifth Hiker - ANDTHISEOGFCRL -
"And this is the doing of the Enchantress alone?"
Sixth Hiker - DOUBTFLISPECHANRW -
"Doubtful. I suspect the fallen Priestess. Or worse."
Seventh Hiker - BUTWHOELSCDMANRK -
"But who else could command the sacred book?"
Puzzle 52: Hyde
Sliding the rows left and right, you must spell six highlighted words. Each time a word is spelled, the letters disappear. A name will be spelled out with the letters remaining.
The words are as follows:
ADVANTAGE, IDENTICAL, ONSLAUGHT, QUICKSAND, UNINVITED, WILLPOWER
The name that remains is:
ETHELBERT
Puzzle 53: Tassel
The stained-glass window lights up panels in a specific order, making a circuit. You must click them in the order they light up. However, in this puzzle, the path will jump to each of the eight sections.
Here is an image that shows the path you must click the panels of the stained-glass, starting from the upper left panel. Whenever you come to a letter on a path, the next panel to click will be in a different section marked with that letter.
Screenshot
Puzzle 54: Weir
Drunken Tarot! This game's gimmick is that the rules are constantly changing. Notice the changing banner of text over the Cloaked Woman and The Fool playing the game. This will let you know what rules are in play. In general, however, you and the Cloaked Woman will take turns picking cards to add to your column. What card is on top, and what card is on the bottom will make a difference depending on the rules, but switching the cards currently in your hand is a free move. The first to 999 points wins.
Note the four suits of cards: The Standard Cups (Example: Five of Cups), The Reverse Cups (Example: Cups of Five), The Standard Arcana (Example: High Priestess), and the Reverse Arcana (Example: Priestess High).
The three parts of the banner that determines the rules are as follows:
The Elixer:/ There are seven elixers in play: CALM, HEAL, RELAX, RELIEF, REPOSE, REST, SOOTHE. When a certain elixer is in play, if you are able to place that elixer card in your hand above its special Arcana card, you will score big. Put it on the bottom of your hand, or mismatch it with the wrong card, though and you're Poisoned, and lose 99 points! A full list of elixers and pairings are below.
The Trick: The middle part will say ASCEND, DESCEND, or MIRROR. This tells you what standard hands you can turn in for points.
ASCEND means you will score if the card on the bottom of your hand is one rank higher than the one on top.
DESCEND means you will score if the card on the bottom of your hand is one rank lower than the one on top.
In both cases, you will score more points if both cards belong to either the Standard or Reverse suit, though matching a Standard with a Reverse card of the proper rank (and vice versa) will still gain you points. Unlike in other games, the Arcana and the Cups cards cannot be matched.
MIRROR means you will score if your hand has both a card and its reversed equivilant. (Example: Queen of Cups paired with Cup of Queens, The Hanged Man paired with Man Hanged The)
Scoring: The last part of the banner will say CUPS TO ARCANA, ARCANA TO CUPS or ALL. The first word of the phrase tells you whether Cups pairs or Arcana pairs are worth more, depending on their rank. If it says ALL, then both kinds will score the more
The Trick and Scoring will change whenever the current Elixer is used in a pair and replaced.
Elixers and their Arcana Pairing:
CALM - High Priestess OR Priestess High
HEAL - The Prince OR Prince The
RELAX - The Hermit OR Hermit The
RELIEF - Book of Thoth OR Thoth of Book
REPOSE - The Fool OR Fool The
REST - The Hanged Man OR Man Hanged The
SOOTHE - The Star OR Star The
Arcana Cards Ranking
7 - Book of Thoth - Thoth of Book
6 - The Prince - Prince The
5 - High Priestess - Priestess High
4 - The Star - Star The
3 - The Hermit - Hermit The
2 - The Hanged Man - Man Hanged The
1 - The Fool - Fool The
Cups Cards Ranking
14- King of Cups - Cups of King
13- Queen of Cups - Cups of Queen
12- Knight of Cups - Cups of Knight
11- Page of Cups - Cups of Page
10- Ten of Cups - Cups of Ten
9 - Nine of Cups - Cups of Nine
8 - Eight of Cups - Cups of Eight
7 - Seven of Cups - Cups of Seven
6 - Six of Cups - Cups of Six
5 - Five of Cups - Cups of Five
4 - Four of Cups - Cups of Four
3 - Three of Cups - Cups of Three
2 - Two of Cups - Cups of Two
1 - Ace of Cups - Cups of Ace
Since the rules change so often, quite a bit of this game is indeed luck-based, and any scores we could give would probably be obselete by the next round. Just try to score on every hand or, if not possible, prevent your opponent from scoring, and you'll win soon enough!
Puzzle 55: Playfair
This is a jigsaw puzzle, but occasionally pirates will show up and start shooting at the pieces that are in the correct places. You can click on the skulls to make them dissappear, and the piece won't be affected, but the best way to defeat this puzzle is to complete the left half of the puzzle on the right half of the screen, and the right half of the puzzle on the left half of the screen, then switch them for your last move to complete the puzzle, as in the images below:
Screenshot 1
Screenshot 2
Puzzle 56: Zachariah
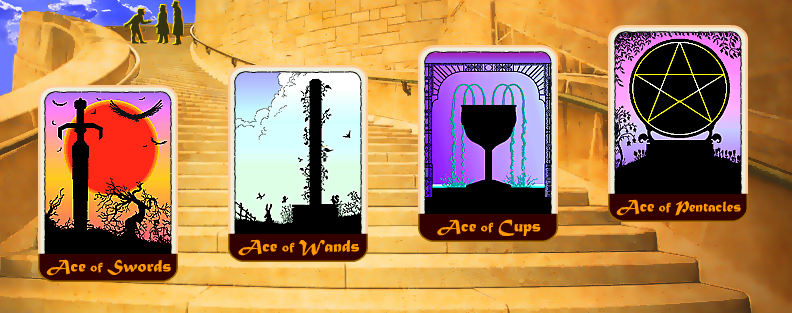
This is a sliding puzzle where you have 48 square sections of tarot card that you must arrange into four full versions in their proper frames. The arrows on the top, bottom and sides of each frame move the pieces. Once a card is complete, the arrows around it disappear. The orange arrows only cycle pieces through one card, and the yellow arrows cycle pieces through two cards, in the direction the arrow points. It's best to start with the Ace of Pentacles, the most recognizable card, building it up from top to bottom. This will change the arrows on the Ace of Cups, making it easier to complete. From there you can build from the sun on the back of the Ace of Swords, leaving you with the Ace of Wands.
The finished cards will look like this:
Screenshot
Puzzle 57: Granville
Each sentinel, left to right, when clicked, has a word square to be solved. Here are images with the solution for each. As a starting hint, the letter in the top left corner of each is a "P".
Here are images of the four completed word squares:
Solution 1
Solution 2
Solution 3
Solution 4
Puzzle 58: Jurchik
There are 11 sages with questioning letters about their head. Clicking on each will reveal anagram crossword puzzles of seven letter words.
Here are images of the solutions for each puzzle.
E? Sage
O? Sage (left)
A? Sage (Left)
W? Sage
U? Sage
M? Sage
H? Sage
D? Sage
A? Sage (Right)
S? Sage
O? Performer (Right)
Puzzle 59: Vanderveer
To solve this puzzle, you must have solved all the other puzzles up to this one, Vanderveer. Do so before even attempting.
Ready? Okay. You must sell all 63 words for over eight million coins. Characters will pay big bucks for sets of seven that all share a common scheme. In this case, you are selling groups of words which each contain the same letter, but in a different position (first letter, second letter, third letter etc.) in each.
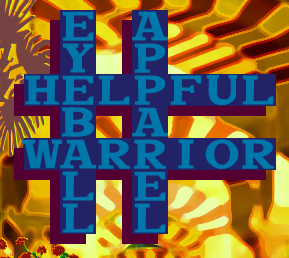
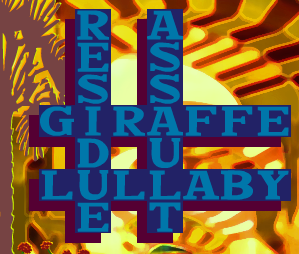
The sets to sell are as follows. Always sell to the highest bidder:
B: BELIEVE, OBVIOUS, LIBRARY, EYEBALL, VISIBLE, LULLABY, DISTURB
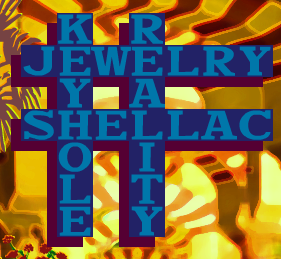
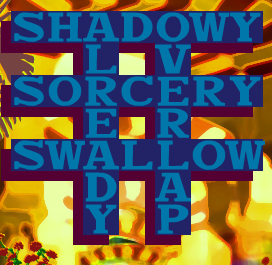
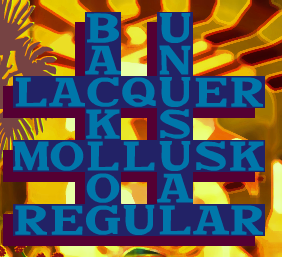
C: CARAMEL, SCHOLAR, LACQUER, SORCERY, VEHICLE, AVARICE, SHELLAC
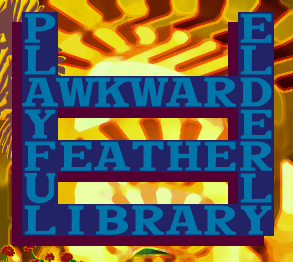
D: DISMISS, ODYSSEY, ELDERLY, HUMDRUM, RESIDUE, ALREADY, EMERALD
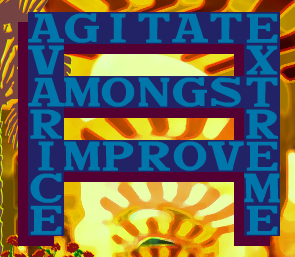
G: GIRAFFE, AGITATE, REGULAR, FORGIVE, AMONGST, SAUSAGE, BACKLOG
K: KEYHOLE, SKETCHY, AWKWARD, HICKORY, WHISKEY, MISTAKE, MOLLUSK
N: NERVOUS, UNUSUAL, MINERAL, ILLNESS, JOURNEY, INFERNO, HORIZON
P: PLAYFUL, APPAREL, IMPROVE, HELPFUL, EXAMPLE, PERHAPS, OVERLAP
T: TRIVIAL, STYLISH, EXTREME, FEATHER, VISITOR, REALITY, ASSAULT
W: WARRIOR, SWALLOW, JEWELRY, HAYWIRE, FARAWAY, SHADOWY, RAINBOW
Puzzle 60: Ostheim
There are three 3x3 word squares here, and they come together to make one nine letter word. The higher the bids you get, the closer you are to the solution.
The following image is of the completed puzzle:
Screenshot
Puzzle 61: Iver
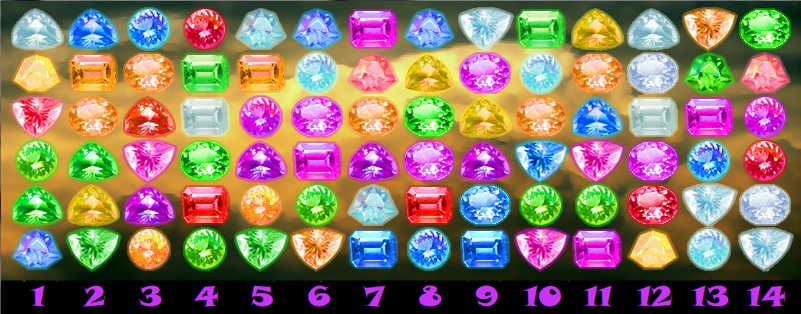
You must arrange the gems so that the total value of the columns reads 1-14. Each gem has a positive or negative value you can see by moving your mouse over it. Each column must contain five unique runes.
One possible solution can be found in the following image:
Screenshot
Puzzle 62: Conklin
This one is a pretty standard cryptogram. However, both the man on the left and the man on the right have a saying for you to solve, so make sure you click on both.
Solution for Left Man's Puzzle:
THE TROUBLE WITH FOOLS IS THAT THEY LACK THE POWER OF CONVERSATION BUT NOT THE POWER OF SPEECH
Solution for Right Man's Puzzle:
THE MAN WHO SAYS A THING CANNOT BE DONE IS QUITE APT TO BE INTERRUPTED BY SOME FOOL DOING THAT VERY THING
Puzzle 63: Skidmore
A jigsaw, but one that must be completed by trading horizontal square pairs of puzzles pieces. Generally, if you can get the top left part in place, then construct the middle and bottom left pieces in another location, it should be easy enough to start working to the right
Here is an image of the completed puzzle:
Screenshot
Puzzle 64: Ockley
There are three 3x3 word squares here, and they come together to make one nine letter word. The higher the bids you get, the closer you are to the solution.
The following image is of the completed puzzle:
Screenshot
Puzzle 65: Laroche
Each of the eight partiers, left to right, when clicked on, has something to say; however, they say it rather cryptically. By clicking the letters in any order, you will come up with a cryptogram to decipher, and is solved by inputing them in the order in which they first appear in the puzzle.
Proper Letter Clicking Order:
First Partier - ILHAVEYOUKNWSDZ -
"I'll have you know we own Sees, Seas, and Seize."
Second Partier - REGADLSWONPT -
"Regardless, we own Palate, Palette, and Pallet."
Third Partier - INSPTEOFHAWCRG -
"In spite of that, which is Right... Rite or Write?
Fourth Partier - ENOUGHWRDAYCITSK -
"Enough wordage. Why do Ancient Gods awaken?"
Fifth Partier - FLIMAPERCDSNTBKY -
"Flimflam, Imperial cards can't be taken literally."
Sixth Partier - STRIKNGLYADHOEFU -
"Strikingly, Ra and Thoth are the Eyes of Horus"
Seventh Partier - DUSTONPARCHMEWYLB -
"Dust on parchment. Why would they trouble us?"
Eight Partier - PERHASITWOVUBLDM-
"Perhaps it is we who have troubled them."
Puzzle 66: Hernshaw
Sliding the rows left and right, you must spell six highlighted words. Each time a word is spelled, the letters disappear. A name will be spelled out with the letters remaining.
The words are as follows:
ABSENTMINDED, BEWILDERMENT, ECCENTRICITY, HELPLESSNESS, INARTICULATE, NEGLECTFULLY
The name that remains is:
SCHERMERHORN
Puzzle 67: Nisbett
Clicking each of the floating carvings will add letters to the front or back of a constructed sentence. Spacing and punctuation is always the same, so it is a matter of clicking the carvings in the correct order.
As each game seems to randomize what button adds what group of letters, some note-taking will be require. However, once you know what button will do what, you can get the solution by clicking in the following order:
The one that adds IO
The one that adds ZAT
The one that adds ALI
The one that adds RCI
The one that adds MME
The one that adds RCO
The one that adds OVE
The one that adds NME
The one that adds AND
The one that adds ERS
The one that adds CLO
The one that adds CKW
The one that adds ISE
Final Completed Sentence:
OVERCOMMERCIALIZATION MEANDERS CLOCKWISE
Puzzle 68: Olmstead
There are three 3x3 word squares here, and they come together to make one nine letter word. The higher the bids you get, the closer you are to the solution.
The following image is of the completed puzzle:
Screenshot
Puzzle 69: Aldridge
You have 40 letters to sell to the ten characters bidding, and require 10,000,000 gold coins to complete the puzzle. Each character has four series of letters beneath them. While they'll purchase letters that complete any word with their letter strings, they'll REALLY bid up letters that will help complete two pairs that can be combined to form compound words. Once a character has bought four letters, they'll leave, so note that the story says that the hatless man and the man with a goatee will be the last to go.
Sell the letters in this order:
M G D B M S I F C K M T C U W E I M H D W W R K D E S T D T K L N P Y U S M B A
Puzzle 70: Wickliff
Kingdom Tarot! This time the deck features all four suits (Cups, Pentacles, Swords, Wands), and eight total Pirate and Egyptian wild cards! And the help text is surprisingly useful! As it says, taking turns, each player swaps a card from their hands and tries to build a Trio Linneage. In other words, you're attempting to build a straight flush of three cards from a single suit. The ranks are as follows: Ace, Two, Three, Four, Five, Six, Seven, Eight, Nine, Ten, Page, Knight, Queen, King, Ace. Note that Aces can act as high or low, but "King, Ace, Two" will not be valid. The goal is 1111 points.
The Egypt and Pirate cards (Horus - Father, Thoth - Moon, Isis - Mother, Ra - Sun, King of Pirates, The Errant, The Paradist, and The Monet) act as wild cards. They can take the place of any card in a straight, but one will half the points you'd get, and two will half it again. However, since, unlike in the other Tarot games, the cards of your opponent won't be reshuffled when you score, you need to balance scoring at every opportunity, but not using so many wild cards that you can't catch up.
Pentacle Hands score the most (~250-200 Points), then Cups (~200-150), Wands (~150-100), and Swords the least (~100-50). While obviously you should shoot for the higher scoring suits, those wild cards will make a difference! Good luck!
Posted by: Tricky |
November 12, 2012 10:54 AM
|
November 12, 2012 10:54 AM
The Fool and His Money Walkthrough Part 2
Window Puzzles
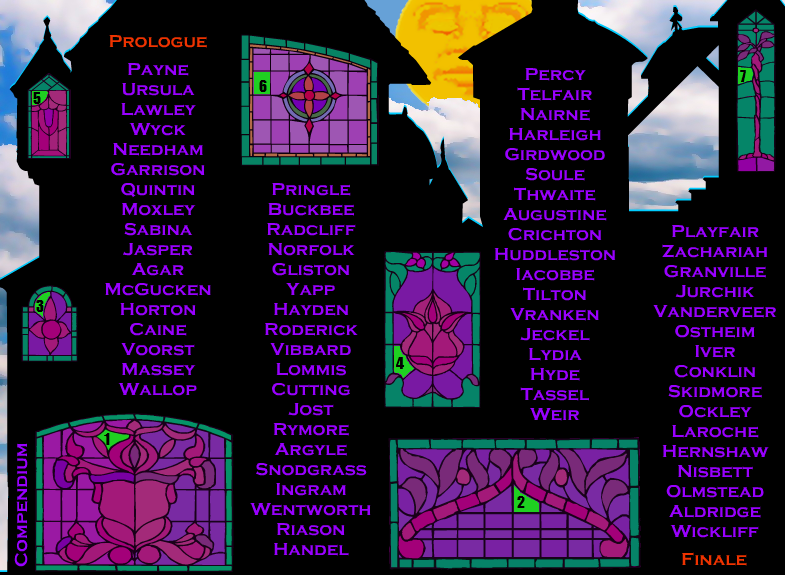
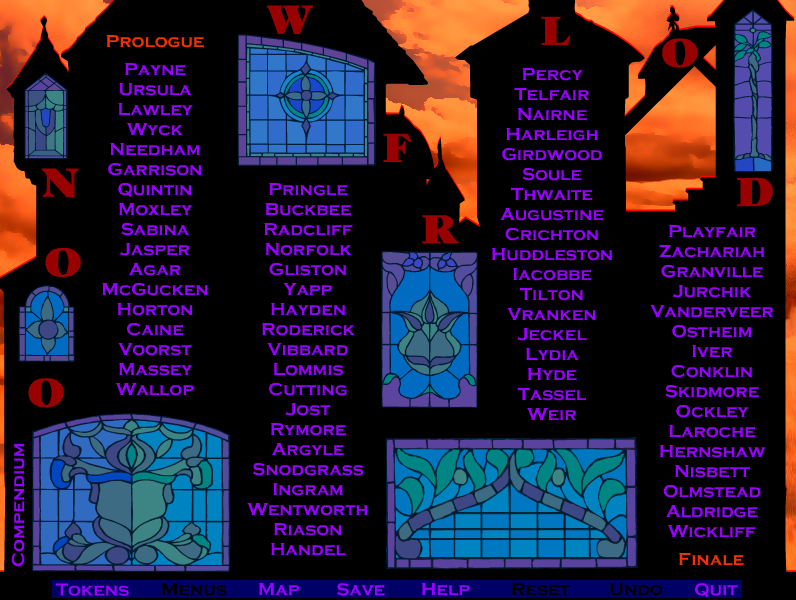
Intro
So. You've solved all seventy titled puzzles. But some pieces of the Moon Map are still missing! Here's the trick: Those seven windows on the puzzle selection screen can be clicked, and have puzzles to solve. Watch out, though. You will have to run through different puzzles for all seven, along with a gateway puzzle at the end of each set.
Top Left Window - Puzzle 1
First: You have ten letters to spell a five, a six, and a seven letter word. The last four letters of the first word you spell will be repeated as the last four letters of the other two words.
Second: You have ten letters to spell a five, a six, and a seven letter word. The first four letters of the first word you spell will be repeated as the first four letters of the other two words
Third: You have ten letters to spell a five, a six, and a seven letter word. The last four letters of the first word you spell will be repeated as the last four letters of the other two words.
Proper Letter Clicking Order:
First -
D A N C E G L R O M - DANCE GLANCE ROMANCE
Second -
M O D E L R N S T Y - MODEL MODERN MODESTY
Third -
U N D E R W O S L A - UNDER WONDER SLANDER
Top Center Window - Puzzle 1
First: You have ten letters to spell a five, a six, and a seven letter word. The last four letters of the first word you spell will be repeated as the last four letters of the other two words.
Second: You have ten letters to spell a five, a six, and a seven letter word. The first four letters of the first word you spell will be repeated as the first four letters of the other two words
Third: You have ten letters to spell a five, a six, and a seven letter word. The last four letters of the first word you spell will be repeated as the last four letters of the other two words.
Proper Letter Clicking Order:
First -
B R E A D T H M I S - BREAD THREAD MISREAD
Second -
S T O R K M Y A G E - STORK STORMY STORAGE
Third -
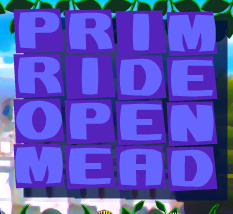
P R I D E S T H A Y - PRIDE STRIDE HAYRIDE
Top Right Window - Puzzle 1
First: You have ten letters to spell a five, a six, and a seven letter word. The last four letters of the first word you spell will be repeated as the last four letters of the other two words.
Second: You have ten letters to spell a five, a six, and a seven letter word. The first four letters of the first word you spell will be repeated as the first four letters of the other two words
Third: You have ten letters to spell a five, a six, and a seven letter word. The last four letters of the first word you spell will be repeated as the last four letters of the other two words.
Proper Letter Clicking Order:
First -
S T A I N O B C E R - STAIN OBTAIN CERTAIN
Second -
P A S T Y O R I M E - PASTY PASTOR PASTIME
Third -
F A B L E V I N O T - FABLE VIABLE NOTABLE
Center Left Window - Puzzle 1
First: You have ten letters to spell a five, a six, and a seven letter word. The last four letters of the first word you spell will be repeated as the last four letters of the other two words.
Second: You have ten letters to spell a five, a six, and a seven letter word. The first four letters of the first word you spell will be repeated as the first four letters of the other two words
Third: You have ten letters to spell a five, a six, and a seven letter word. The last four letters of the first word you spell will be repeated as the last four letters of the other two words.
Proper Letter Clicking Order:
First -
D I T C H S W B E W - DITCH SWITCH BEWITCH
Second -
S T R I P V E N G Y - STRIP STRIVE STRINGY
Third -
L E A K Y C R S Q U - LEAKY CREAKY SQUEAKY
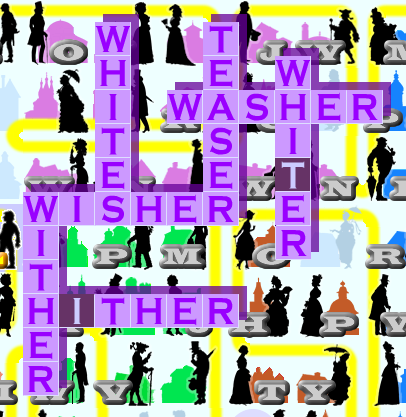
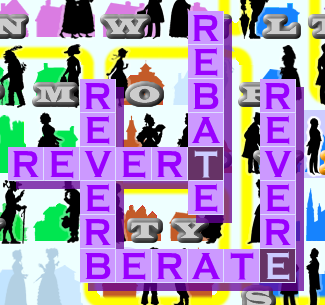
Center Right Window - Puzzle 1
First: You have ten letters to spell a five, a six, and a seven letter word. The last four letters of the first word you spell will be repeated as the last four letters of the other two words.
Second: You have ten letters to spell a five, a six, and a seven letter word. The first four letters of the first word you spell will be repeated as the first four letters of the other two words
Third: You have ten letters to spell a five, a six, and a seven letter word. The last four letters of the first word you spell will be repeated as the last four letters of the other two words.
Proper Letter Clicking Order:
First -
O T H E R W I P A N - OTHER WITHER PANTHER
Second -
C H A R M G E I O T - CHARM CHARGE CHARIOT
Third -
E N T R Y P A C O U - ENTRY PANTRY COUNTRY
Bottom Left Window - Puzzle 1
First: You have ten letters to spell a five, a six, and a seven letter word. The last four letters of the first word you spell will be repeated as the last four letters of the other two words.
Second: You have ten letters to spell a five, a six, and a seven letter word. The first four letters of the first word you spell will be repeated as the first four letters of the other two words
Third: You have ten letters to spell a five, a six, and a seven letter word. The last four letters of the first word you spell will be repeated as the last four letters of the other two words.
Proper Letter Clicking Order:
First -
B L O C K U N H E M - BLOCK UNLOCK HEMLOCK
Second -
G R O U P N D C H Y - GROUP GROUND GROUCHY
Third -
M I G H T W E U P R - MIGHT WEIGHT UPRIGHT
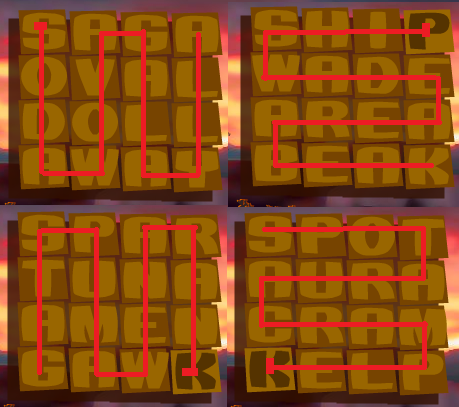
Bottom Right Window - Puzzle 1
First: You have ten letters to spell a five, a six, and a seven letter word. The last four letters of the first word you spell will be repeated as the last four letters of the other two words.
Second: You have ten letters to spell a five, a six, and a seven letter word. The first four letters of the first word you spell will be repeated as the first four letters of the other two words
Third: You have ten letters to spell a five, a six, and a seven letter word. The last four letters of the first word you spell will be repeated as the last four letters of the other two words.
Proper Letter Clicking Order:
First -
F O U N D A R I M P - FOUND AROUND IMPOUND
Second -
H A N D Y L E O U T - HANDY HANDLE HANDOUT
Third -
W A G O N D R H E X - WAGON DRAGON HEXAGON
Gateway Puzzle 1
Now that you've solved all the seven windows, one of the panels on the puzzle choosing screen should be blinking green. This is a hint. Once you've solved each of the word challenges in the window, the stained glass window in the picture begins to flash, in a particular way. You must note which panel it is that flashes, then click them in the proper order on the puzzle menu screen. And do it quickly! Once you do that, you'll unlock the next set of window puzzles!
Here is an image showing what panels you should click in what order:
Screenshot
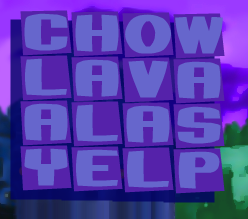
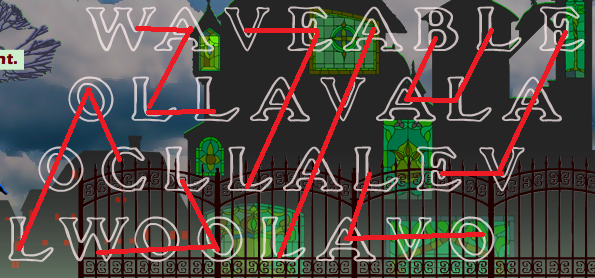
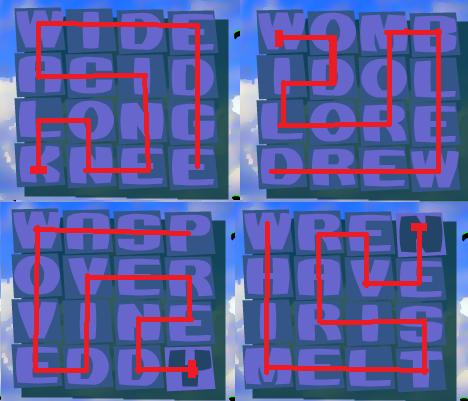
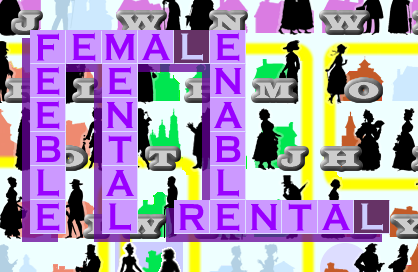
Top Left Window - Puzzle 2
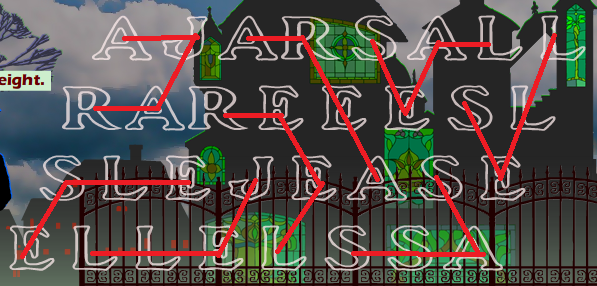
For this puzzle, you must spell out eight four-letter words from the given characters, by clicking adjacent letters. There are many words you can make, but as you can only use each letter once, only one full set of eight can be made.
Here is an image that shows the proper words to click:
Screenshot
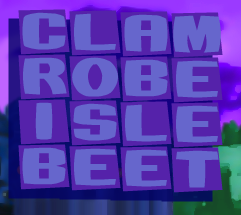
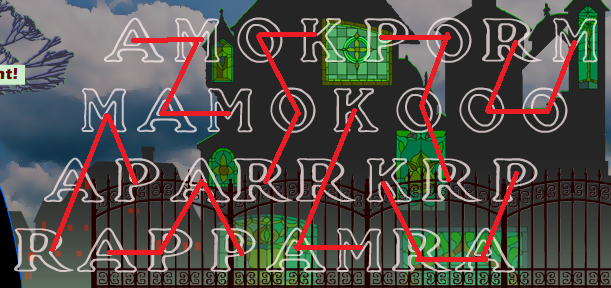
Top Center Window - Puzzle 2
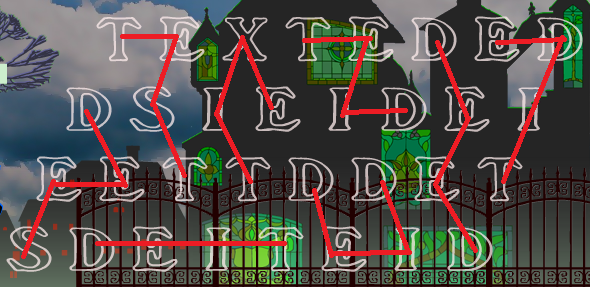
For this puzzle, you must spell out eight four-letter words from the given characters, by clicking adjacent letters. There are many words you can make, but as you can only use each letter once, only one full set of eight can be made.
Here is an image that shows the proper words to click:
Screenshot
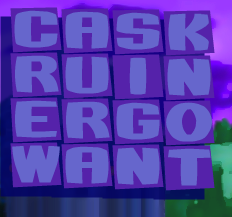
Top Right Window - Puzzle 2
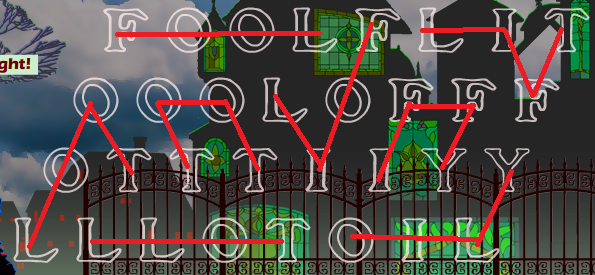
For this puzzle, you must spell out eight four-letter words from the given characters, by clicking adjacent letters. There are many words you can make, but as you can only use each letter once, only one full set of eight can be made.
Here is an image that shows the proper words to click:
Screenshot
Center Left Window - Puzzle 2
For this puzzle, you must spell out eight four-letter words from the given characters, by clicking adjacent letters. There are many words you can make, but as you can only use each letter once, only one full set of eight can be made.
Here is an image that shows the proper words to click:
Screenshot
Center Right Window - Puzzle 2
For this puzzle, you must spell out eight four-letter words from the given characters, by clicking adjacent letters. There are many words you can make, but as you can only use each letter once, only one full set of eight can be made.
Here is an image that shows the proper words to click:
Screenshot
Bottom Left Window - Puzzle 2
For this puzzle, you must spell out eight four-letter words from the given characters, by clicking adjacent letters. There are many words you can make, but as you can only use each letter once, only one full set of eight can be made.
Here is an image that shows the proper words to click:
Screenshot
Bottom Right Window - Puzzle 2
For this puzzle, you must spell out eight four-letter words from the given characters, by clicking adjacent letters. There are many words you can make, but as you can only use each letter once, only one full set of eight can be made.
Here is an image that shows the proper words to click:
Screenshot
Gateway Puzzle 2 - Part One
Once you've solved the second set of window puzzles, return to the puzzle screen. Click the flashing purple dot in the lower right. Now you must move your mouse around the path laid out by the moving dot. Go off the path and you must restart. Get all the way around and... Oh no! Have all of your saved games been deleted? No. You can click on the "menu" button still to get back to the puzzle menu. To go back to the card puzzle you now see, simply click the red eye of Ra near the top of the puzzle menu.
Gateway Puzzle 2 - Part Two
In this card puzzle, you rebuild the Arcana through solving card movement puzzles.
In the first part of this card puzzle, to release the power of the Empress, you must move all the cards out towards the top and bottom edges. Clicking a card will switch its position and that of two other cards, from edge to center or vice versa.
The solution to the first iteration is to
click the Star, Devil, Hierophant and Lovers cards.
Now the Empress rides again!
Now that all the cards are on the edges, you must release the power of the Star by moving all cards towards the center. However, each card now affects different cards than before!
The solution to the second iteration is to
click the Star, Devil, Chariot and Strength cards.
Now the Star is risen!
Now that all the cards are in the center, you must summon Justice by moving all cards to the edge. However, once again, each card now affects different cards than before!
The solution to the third iteration is to
click the Hermit, Devil, Justice, and Star cards.
Now Justice is back!
Now that all the cards are on the edges, you must summon Strength by moving all cards to the center. However, blast it, each card now affects different cards than before!
The solution to the fourth iteration is to
click the Priestess, Star, Chariot and Death cards.
Now Strength returns!
Now that all the cards are in the center, you must summon The Lovers by moving all cards to the edge. However, wouldn'tcha kNow each card now affects different cards than before!
The solution to the fifth iteration is to
click the Magician, Star, Strength and Justice cards.
Now the Lovers are back together!
Now that all the cards are on the edges, you must summon Strength by moving all cards to the center. However, believe it or not, each card now affects different cards than before!
The solution to the sixth iteration is to
click the Priestess, Strength, Chariot and Empress cards.
The Devil is summoned!
Now that all the cards are in the center, you must summon Death by moving all cards to the edge. However, blow me down, each card now affects different cards than before!
The solution to the seventh iteration is to
click the Star, Hierophant, Lovers and Devil cards.
Death has come knocking!
Now that all the cards are on the edges, you must summon The Hermit by moving all cards to the center. However, and this will knock your socks off, each card now affects different cards than before!
The solution to the eighth iteration is to
click the High Priestess, Star, Empress and Strength cards.
The Hermit has rejoined society!
Now that all the cards are in the center, you must summon the chariot by moving all cards to the edge. And each card affects the same ones as the last one! No, wait, I'm lying. It affects different ones.
The solution to the ninth iteration is to
click the Devil, Hermit, Star and Lovers cards.
The chariot has arrived!
Now that all the cards are on the edges, you must summon The Hermit by moving all cards to the center. However, each card now affects different cards than before!
The solution to the tenth iteration is to
click the Justice, Lovers, Hierophant and Death cards.
The Magician re-appears!
Now that all the cards are in the center, you must summon the Hierophant by moving all cards to the edge. However, each card now affects different cards than before!
The solution to the eleventh iteration is to
click the Devil, Star, Empress, and Lovers cards.
The Hierophant is now in our presence!
Now that all the cards are on the edges, you must release the High Priestess by moving all cards to the center. However, each card now affects different cards than before!
The solution to the twelfth iteration is to
click the Devil, Hierophant, Empress and cards.
The High Priestess is released. Is she really going to help you out? Well, at least she helped finish the puzzle and sorted out the main menu!
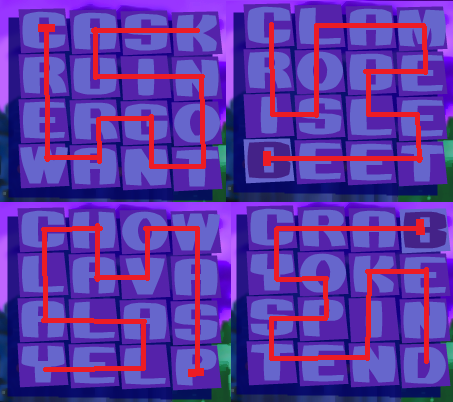
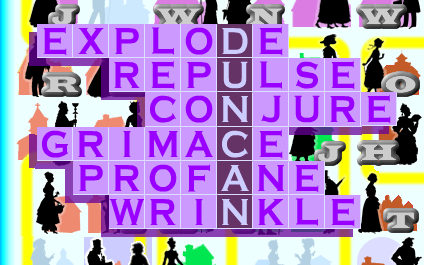
Top Left Window - Puzzle 3
For the third set of window puzzles, you must construct three seven-letter words. For each, you will be given a set of seven jumbled letters, plus one extra at the "pool" at the bottom that you may swap in and out. You only need seven letters for each word, so one of the eight letters is a red herring. As an additional hint, the letter that starts out in the "pool" is ALWAYS used in the word.
Solution:
BIGOTRY TWINKLE VERDICT
Top Center Window - Puzzle 3
For the third set of window puzzles, you must construct three seven-letter words. For each, you will be given a set of seven jumbled letters, plus one extra at the "pool" at the bottom that you may swap in and out. You only need seven letters for each word, so one of the eight letters is a red herring. As an additional hint, the letter that starts out in the "pool" is ALWAYS used in each word.
Solution:
RHYMING OUTLIVE MUDPACK
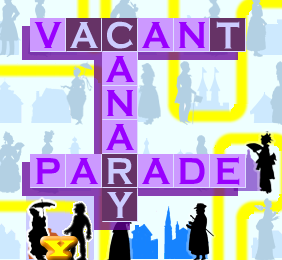
Top Right Window - Puzzle 3
For the third set of window puzzles, you must construct three seven-letter words. For each, you will be given a set of seven jumbled letters, plus one extra at the "pool" at the bottom that you may swap in and out. You only need seven letters for each word, so one of the eight letters is a red herring. As an additional hint, the letter that starts out in the "pool" is ALWAYS used in each word.
Solution:
JASMINE HAYLOFT CONFIRM
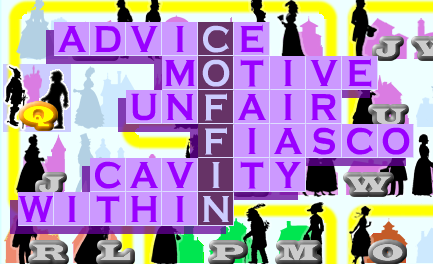
Center Left Window - Puzzle 3
For the third set of window puzzles, you must construct three seven-letter words. For each, you will be given a set of seven jumbled letters, plus one extra at the "pool" at the bottom that you may swap in and out. You only need seven letters for each word, so one of the eight letters is a red herring. As an additional hint, the letters that start out in the "pool" is ALWAYS used in the words.
Solution:
IMPEACH DEFUNCT KINGDOM
Center Right Window - Puzzle 3
For the third set of window puzzles, you must construct three seven-letter words. For each, you will be given a set of seven jumbled letters, plus one extra at the "pool" at the bottom that you may swap in and out. You only need seven letters for each word, so one of the eight letters is a red herring. As an additional hint, the letter that starts out in the "pool" is ALWAYS used in each word.
Solution:
WARTHOG STOMACH GLORIFY
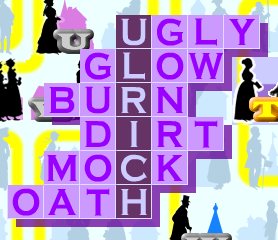
Bottom Left Window - Puzzle 3
For the third set of window puzzles, you must construct three seven-letter words. For each, you will be given a set of seven jumbled letters, plus one extra at the "pool" at the bottom that you may swap in and out. You only need seven letters for each word, so one of the eight letters is a red herring. As an additional hint, the letter that starts out in the "pool" is ALWAYS used in each word.
Solution:
UPFRONT EXPLOIT NAUGHTY
Bottom Right Window - Puzzle 3
For the third set of window puzzles, you must construct three seven-letter words. For each, you will be given a set of seven jumbled letters, plus one extra at the "pool" at the bottom that you may swap in and out. You only need seven letters for each word, so one of the eight letters is a red herring. As an additional hint, the letter that starts out in the "pool" is ALWAYS used in each word.
Solution:
PRODUCT ABUSIVE FASHION
Gateway Puzzle 3 - Part 1
When all seven window puzzles are solved, the puzzle menu screen will change. In particular the Eye of Ra will begin to blink red, and you must click it to start the next puzzle.
Moving about the black areas of the screen, the orange beam of light you control with your mouse will reveal the letters D O W N F L O O R one by one, providing you shine it in the right place.
If you're having trouble locating the letters, this image will show their hiding places:
Screenshot
Still, those letters only get us part of the way there. Remember how there were three letters left over in each of the window puzzles? Now's the time that they'll come in handy! If you recall, they were URT OCE EPM IDN BMU ILE and SFE. Or, if we reverse each group:
"TRUE COMPENDIUM BELIEFS"
Gateway Puzzle 3 - Part 2
So, we've got D O W N F L O O R, and we're looking for a TRUE COMPENDIUM BELIEFS. Or, if you will, a compendium of true believers. And if we look down and to the left on the puzzle menu, why there appears to be a COMPENDIUM button. But that's just an acknowledgement screen! What sort of mad genius would put a puzzle there? Well, the Cliff Johnson kind of mad genius. Click on COMPENDIUM and pause for a moment to thank all those who supported the game through its darkest hours.
Done? All right. Now, if you recall the words of the Prince, he said that Two Words would seal The Fool's fate. And luckily for the Prince, here on the compendium screen, The Fool is about to take a walk into a river! If you start typing any of the D O W N F L O O R letters, they'll start flying off into the distance with the other true believers. What we need now is to use those letters to form two words that would solve the Prince's problem. Now, you can make a lot of word pairs with D O W N F L O O R, but the only one right for the occasion is
DROWN FOOL
, so type it in, and the fourth set of window puzzles will be unlocked.
Top Left Window - Puzzle 4
For the fourth set of window puzzles, you must construct a sentence by clicking the connecting letters in a certain order that will form a complete sentence. As the help screen states, nine letters will be used more than once (and the letters will turn gray after being used enough times), and two letters are not what they appear. In this case, the W at the top right will actually give you an O when clicked, and the S on the far right will give you the two letters AS.
Solution: Starting with the W on the bottom:
WEALTH... THE SERVANT OF A WISE MAN, THE M[AS]TER OF A FO[O]L.
Top Center Window - Puzzle 4
For the fourth set of window puzzles, you must construct a sentence by clicking the connecting letters in a certain order that will form a complete sentence. As the help screen states, ten letters will be used more than once (and the letters will turn gray after being used enough times), and two letters are not what they appear. In this case, the C on the bottom will actually give you an F and the G on the top will give you the two letters OL.
Solution: Starting with the A in the second row:
A WISE MAN MAKES PROVERBS, BUT A [F]O[OL] REPEATS THEM
Top Right Window - Puzzle 4
For the fourth set of window puzzles, you must construct a sentence by clicking the connecting letters in a certain order that will form a complete sentence. As the help screen states, seven letters will be used more than once (and the letters will turn gray after being used enough times), and five letters are not what they appear. In this case, the P on the left will actually give you the two letters FF, the C in the top row will give you EL, the V in the second row will give you a W, the U in the bottom row will give you OO, and the B on the bottom right will give you an F.
Solution: Starting with the V in the second row (which will give you a W):
[W]ISE MEN THINK ALIKE AND [F][OO]LS S[EL]DOM DIFFER
Center Left Window - Puzzle 4
For the fourth set of window puzzles, you must construct a sentence by clicking the connecting letters in a certain order that will form a complete sentence. As the help screen states, eight letters will be used more than once (and letters will turn gray when used enough), and one letter are not what they appear. In this case, the O on the bottom right will add the two letters OO.
Solution: Starting with the A in the third row:
ADVICE, THE WISE WON'T NEED IT, THE F[OO]L WON'T HEED IT.
Center Right Window - Puzzle 4
For the fourth set of window puzzles, you must construct a sentence by clicking the connecting letters in a certain order that will form a complete sentence. As the help screen states, sixe letters will be used more than once (and letters will turn gray after being used enough), and six letters are not what they appear. In this case, the X in the first row will add the two letters NG, the Y in the second row will add the two letters LP, the B on the bottom right will add the two letters AN, the K in the bottom row adds the two letters IS, the C in the bottom row will add the two letters RA, and the V on the bottom left will add the two letters EM.
Solution: Starting with the I on the far left of the second row:
IF A FOOL HOLDS HIS TO[NG], HE WIL[L P]ASS FO[R A] W[IS][E M][AN]
Bottom Left Window - Puzzle 4
For the fourth set of window puzzles, you must construct a sentence by clicking the connecting letters in a certain order that will form a complete sentence. As the help screen states, four letters will be used more than once (and letters will turn gray when they have been used enough), and two letters are not what they appear. In this case, the E in the second row will actually add an A, and the U in the bottom row will add the two letters OO.
Solution: Starting from the E in the second row (which will actually give you an A):
[A] F[OO]L M[A]Y T[A]LK, BUT [A] WISE M[A]N SPEAKS.
Bottom Right Window - Puzzle 4
For the fourth set of window puzzles, you must construct a sentence by clicking the connecting letters in a certain order that will form a complete sentence. As the help screen states, eight letters will be used more than once (and letters will turn gray after being used enough), and four letters are not what they appear. In this case, the top left W will actually add a V, the Z in the top row will add a S, the E in the top row will add the two letters OO and the B in the bottom row will add the two letters PP.
Solution: Starting with the rightmost A in the third row:
A F[OO]L WILL ADMIRE WHERE A WI[S]E MAN A[PP]RO[V]E[S].
Now the moon map can be completed!
Posted by: Tricky |
November 19, 2012 3:59 PM
|
November 19, 2012 3:59 PM
The Fool and His Money Walkthrough Part 3
Moon Map Puzzles
Constructing The Moon Map
All right. Now we can finally begin work on constructing the Moon Map. The first step, of course, is to click all the starred pieces on the map to reveal their contents. Done that? Okay. Like the Help screen says, we're looking to create a single, circuitous path with no pieces left over.
The key to constructing the Moon Map is heeding the advice of the N's: NEEDHAM, NORFOLK, NAIRE, and NISBETT.
Needham told you AFTER ONE, ROW SECOND, THEN COLUMN. Look at all the pieces of the Moon Map that have numbers on them. It looks like the first number is always 1, the second number is always 1-7, and the last two numbers are always 0-11. In other words, what Needham is telling you is that, after the initial "1", the second number will tell you what row the piece should be in, and the last two numbers tell you what column. Just like that, a third of the map can be put into place!
Norfolk told you UNPROFITABLE APPEARS IN PAIRS. Have you noticed those gray letters hanging out above some of the houses? It's no coincidence that those letters are all in the word UNPROFITABLE, and that six of them are on the right of their piece, and six of them is on the left. In other words, "UN" "PR" "OF" "IT" "AB" and "LE" are formed by adjacent pieces! Keeping the pieces with coordinates where they are, you should be able to fill in quite a bit more of the path.
By this time you should start to notice that all houses of the same color form a contigeous neighborhood. Though the blue houses are a little unwieldly...
Naire told you that STREETS WHISPER SEVENTEEN FROM THE SEA. Looking on the streets, we see duos of orange letters. 34 duos in fact, making seventeen pairs. But which duo is paired with which? Well, for that, we look to the sea. Remember Buckbee the pirate? He had us make seventeen four letter words. That's right! Those seventeen words (ALLY - LYRE - REAP - APEX - EXAM - AMID - IDLE - LEAK - AKIN - INTO - TOUR - URGE - GEAR - AREA - EACH - CHOP - OPAL) are formed by pairs of orange letters on the path!
Finally, Nisbett told you that OVERCOMMERCIALIZATION MEANDERS CLOCKWISE. This tidbit of knowledge refers to the light purple houses in the upper left. Each of them has a dark purple letter on them. Starting from the 1206 house with an O, you can spell out the word OVERCOMMERCIALIZATION with the houses in a path that goes up, then right, then down, then around clockwise in a spiral. This path won't follow the yellow street, but it should help fill in the blanks you have left!
The Completed Moon Map: Screenshot
Moon Map Puzzles - General
Now that the Moon Map has been completed, Buckbee the pirate will present you with an acrostic challenge to put together. However, his clues are so obtuse, that you have to figure that the map has not yet revealed all of his secrets. And it hasn't. Click on the map, and you'll see that where once there were coordinates and pairs, nearly every square of the board has had giant gray letters added to it!
When clicked on, each kind of letter will present you with a certain type of puzzle, as explained below; however, one thing is common to most of them. Remember how, in the main story, the last line of each page would be a strange little phrase? Like, for instance, PAYNE ended with "Montes Cut Off His Nose". Well, those little bits are key, and by following their instructions to start with a word, then remove certain letters, you'll often have the first step of the puzzles.
For instance, in the "Montes Cut Off His Nose" case, Take MONTES subtract NOSE and that leaves you with MT. You'll see how that fits in when we get to those puzzles, but for now, let's go in alphabetical order. As you solve each letter, you'll be given a name to put in Buckbee's puzzle, seventeen in all. He'll always be chilling out by that brown house in the center of the bottom row.
Moon Map Puzzles - A
Start by clicking the A next to the Blue House on the left of the top row. Seems he's willing to pay for an ARGYLE word. So we check that page in the story, and find that "Mogate Left The Team" : MOGATE - TEAM = OG. Return to the house on the Moon Map, and type in OG. Now that we have ARGYLEOG, we just need to unscramble that to give him a word:
GARGOYLE
Click at the bottom of the screen where it says "Argyle of Wands Reclaims His Name". This will send you to a word construction puzzle, where you must use eight of the ten floating letters to make a word. In Argyle's case the word is
PUSHCART, which leaves you with ND.
Now, click the A next to the light purple house on the right of the third row. Seems he's willing to pay for an ALDRIDGE word. Check that page in the story to find that "Cathryn hurled her tray, yet Driden never died": CATHRYN - TRAY = CHN and DRIDEN - DIED = RN. Return to the house on the Moon Map and type in CHNRN. Now we have ALDRIDGECHNRN, and we unscramble that to find
GRANDCHILDREN
Click at the bottom of the screen where it says "Aldridge of Pentacles Reclaims His Name". This will send you to a word construction puzzle, where you must use eight of the ten floating letters to make a word. In Aldridge's case the word is
BONEYARD which leaves you with PH.
Now, let's click the A on the right of the sixth row. She's willing to pay for an AGAR word. The AGAR page tells us that "Davies retired her dais": DAVIES - DAIS = VE. Return to the house on the Moon Map and type VE in. Now we have AGARVE, and we unscramble that to find
RAVAGE
Click at the bottom of the screen where it says "Agar of Swords Reclaims Her Name". This will send you to a word construction puzzle, where you must use eight of the ten floating letters to make a word. In Agar's case the word is
SLIPKNOT, which leaves you with RA
Finally, click the A by the green house on the left of the bottom row. Huh. She just has AUGUS to work with, but that has to mean the AUGUSTINE page. Perhaps we'll need to find two words? Checking that out, we find that "Bonmite forfeits ten. Caddaham hates ham.": BONMITE - TEN = BOMI and CADDAHAM - HAM = CADDA. Return to the house on the Moon Map and type BOMI. Now unscramble AUGUSBOMI to find
AMBIGUOUS
Huh. Now she wants a TINE word. Type in CADDA to form TINECADDA. Now unscramble that to find
CANDIDATE
Click at the bottom of the screen where it says "Augustine Reclaims Her Name". This will send you to a word construction puzzle, where you must use eight of the ten floating letters to make a word. In Augustine's case the word is
MISJUDGE leaving you with OL
Now you have eight leftover letters: ND PH RA OL. Unscramble them to get
RANDOLPH
Make a note of that.
Moon Map Puzzles - C
Start by clicking the light purple C house in the top left corner of the Moon Map. Seems like she's willing to pay big bucks for a CUTTING word. Go and check out that page from the puzzle menu. "Wodderspoon is unable to respond." WODDERSPOON - RESPOND = WODO. Go back to the house on the Moon Map and type in WODO. Now you have CUTTINGWODO. Unscramble that to get
WOODCUTTING
Click at the bottom of the screen where it says "Cutting of Wands reclaims her name." Here you will have to unscramble two eight-letter words, by clicking the man on both the left and right of the screen:
FISHERMAN and HAILSTORM
Now click the dark purple C house on the right side of the third row. He wants a CAINE word. Go check the Caine page in the puzzle menu. "Bronte threw off her robe." BRONTE - ROBE = NT. Go back to the house on the Moon Map and type in NT. Now you have CAINENT. Unscramble that to get
ANCIENT
Click at the bottom of the screen where it says "Caine of Swords reclaims her name." Here you will have to unscramble two eight-letter words, by clicking the fighting men on both the left and right:
NIGHTMARE and CONFIDENT
Now click the brown C house in the middle of the fourth row. She wants a CONKLIN word. Go check the Conklin page in the puzzle menu. "Bridgette disregarded her debt": BRIDGETTE - DEBT = RIGTE. Go back to the house on the Moon Map and type in RIGTE. Now you have CONKLINRIGTE. Unscramble that to form
INTERLOCKING
Click at the bottom of the screen where it says "Conklin of Pentacles reclaims her name." Here you will have to unscramble two eight-letter words, by clicking the man on both the left and right of the screen:
PARCHMENT and SPECIALTY
Now click the peach C house. He wants a CRICHTON word. Go check the Crichton page in the puzzle menu. "Fogerty misplaced forty". FOGERTY - FORTY = GE. Go back to the house on the Moon Map and type in GE. Now you have CRICHTONGE. Unscramble that to form
CROCHETING
Click at the bottom of the screen where it says "Crichton of Cups reclaims his name." Here you will have to unscramble two eight-letter words, by clicking the man on both the left and right of the screen:
REVOLTING and CORNFIELD
Return to the Moon Map. Click the Conklin house in the middle of the fourth row. Here there is an acrostic puzzle, where you will use the eight words you've just unscrambled.
C House Acrostic Solution: Screenshot
Make a note of that name you spell:
DALRYMPLE
Moon Map Puzzles - G
Start by clicking the light purple G house on the left of the second row. A purple path will trace out in an 8x8 grid. You must copy the circuit completely by clicking, to continue.
Picture of first moon map circuit: Screenshot
Once you've done so, the lady will ask for a GRANDVILLE word. Go to that page in the puzzle menu, and we find out "Wheatley squandered his wealth" WHEATLEY - WEALTH = EY. Return to the Moon Map and type in EY to give you GRANDVILLEEY. Unscramble that to get
REVEALINGLY
Click "Granville of Pentacles Reclaims Her Name" at the bottom of the screen. This takes you to a series of four word squares whose letters you must click in the order indicated by the swirling lines of the moon map. Making a single mistake will force you to start over. Note that once it is cleared, the word squares are replaced by the letters FZ.
Picture of first word square circuits: Screenshot
Now click the light purple G house on the right of the second row. A purple path will trace out in an 8x8 grid. You must copy the circuit completely by clicking, to continue.
Picture of second moon map circuit: Screenshot
Once you've done so, the lady will ask for a GLISTON word. Go to that page in the puzzle menu, and we find out "Ellysha avoided the alley" ELLYSHA - ALLEY = SH. Return to the Moon Map and type in SH to give you GLISTONSH. Unscramble that to get
SLINGSHOT
Click "Gliston of Wands Reclaims Her Name" at the bottom of the screen. This takes you to a series of four word squares whose letters you must click in the order indicated by the swirling lines of the moon map. Making a single mistake will force you to start over. Note that once it is cleared, the word squares are replaced by the letters SL.
Picture of second word square circuits: Screenshot
Now click the dark purple G house on the right of the seventh row. A purple path will trace out in an 8x8 grid. You must copy the circuit completely by clicking, to continue.
Picture of third moon map circuit: Screenshot
Once you've done so, the lady will ask for a GIRD word, and presumably after that, she'll want a WOOD word. Go to the GIRDWOOD page in the puzzle menu, and we find out "Periphetes is allergic to thrips. Pindarus never said." PERIPHETES - THRIPS = PEEE. PINDARUS - SAID = PNRU. Return to the house on the Moon Map and type in PEEE to give you GIRDPEEE. Unscramble that to get
PEDIGREE
Now type in PNRU to get WOODPNRU. Unscramble that to get
DOWNPOUR
Click "Girdwood of Cups Reclaims Her Name" at the bottom of the screen. This takes you to a series of four word squares whose letters you must click in the order indicated by the swirling lines of the moon map. Making a single mistake will force you to start over. Note that once it is cleared, the word squares are replaced by the letters FM.
Picture of third word square circuits: Screenshot
Now click the green G house in the middle of the bottom row. A purple path will trace out in an 8x8 grid. You must copy the circuit completely by clicking, to continue.
Picture of fourth moon map circuit: Screenshot
Once you've done so, the lady will ask for a GARRISON word. Go to that page in the puzzle menu, and we find out "Odwulf released her owl" ODWULF - OWL = DUF . Return to the house on Moon Map and type in DUF to give you GARRISONDUF. Unscramble that to get
FAIRGROUNDS.
Click "Garrison of Swords Reclaims Her Name" at the bottom of the screen. This takes you to a series of four word squares whose letters you must click in the order indicated by the swirling lines of the moon map. Making a single mistake will force you to start over. Note that once it is cleared, the word squares are replaced by the letters CF.
Picture of fourth word square circuits: Screenshot
Keep in mind those eight letters we just got: FZ SL FM CF
Moon Map Puzzles - H
Click on the brown H house in the middle of the fifth row. It looks like the lady wants a HORTON word. Go to the Horton page in the puzzle menu. The story tells us "Trelawney will never learn." TRELAWNEY - LEARN = TWEY. Go back to the Moon Map House and type in TWEY. This will give you HORTONTWEY. Unscramble that to get
NOTEWORTHY
Click "Horton of Swords Reclaims Her Name" at the bottom of the screen. At this point you will cycle through the seven H page scenes, with three flashing letters on each. You must build a name by clicking the correct letter on each, in order. When you've selected the correct letter, the scene will stop flashing. The name you are looking to spell is
ASHFORD
Remember it!
Moon Map Puzzles - I
Click on the dark purple I House on the right of the fourth row. That fellow wants an IACOBBE word. Go to the Iacobbe page in the puzzle menu. We learn "Jonella forfeits her loan while Diamont discharged her maid." JONELLA - LOAN = JEL. DIAMONT - MAID = ONT. Return to the house on the Moon Map and type in JELONT, to make IACOBBEJELONT. Unscramble this to spell
OBJECTIONABLE
Click the "Iacobbe of Cups reclaims his Name" at the bottom of the screen. You must select five letters on the runes to form a single word. The runes you are looking for will spell
VAULT
Click on the peach I house on the left of the sixth row. This fellow wants an INGRAM word. Go to the Ingram page in the puzzle menu. We learn "Astyrian ceased her rants." ASTYRIAN - RANTS = YIA. Return to the Moon Map house and type YIA to get INGRAMYIA. Unscramble to get
IMAGINARY
Click on the "Ingram of Wands reclaims his Name" at the bottom of the screen. You must select five letters on the shield to form a single word. The shields you are looking for will spell
ROUGH
Remember those two words!
Moon Map Puzzles- J
Click on the light purple J house in the center of the first row. It seems this fellow want a JUR word, which means he'll probably want a CHIK word next. Go to Jurchik page on the puzzle menu. Here we learn "Priestly checked off his list. Stretton held back his snort." PRIESTLY - LIST = PREY and STRETTON - SNORT = ETT. Return to the Moon Map House. Type in PREY to get JURPREY. Unscramble this to get
PERJURY
Now type ETT to get CHIKETT. Unscramble this to get
THICKET
Click "Jurchik of Pentacles reclaims his Name" at the bottom of the page. Hmm. The hint screen says that you can make an 11 letter word by unscrambling the middle letters of the 11 floating words. That word will be
DISGRACEFUL
Return to the house at the moon map. Look's like there's a sentence to de-scramble. However, it can easily be solved by typing in the 11 letter word you just discovered. Type it in to get
"Keep the third and discard the rest." Looks like we'll be holding on to that S, the third letter in DISGRACEFUL
Click on the light purple J house on the left of the third row. It seems this lady want a JEC word, which means she'll probably want a KEL word next. Go to Jeckel page on the puzzle menu. Here we learn "Lamorak missed the mark. Windhouse never showed." LAMORAK - MARK = LAO. WINDHOUSE - SHOWED = INU. Return to the Moon Map House. Type in LAO to get JECLAO. Unscramble this to get
CAJOLE
Now type INU to get KELINU. Unscramble this to get
UNLIKE
Click "Jeckel of Cups reclaims her Name" at the bottom of the page. Hmm. The hint screen says that you can make an 11 letter word by unscrambling the middle letters of the 11 floating words. That word will be
THUNDERCLAP
Return to the house at the moon map. Looks like there's a setence to de-scramble. However, it can easily be solved by typing in the 11 letter word you just discovered. Type it in to get
"Mererly the eighth is essential." Looks like we should hold on to that C, the eight letter in THUNDERCLAP
Click on the light purple J house on the right of the fourth row. It seems this lady want a JAS word, which means he'll probably want a PER word next. Go to the JASPER page on the puzzle menu. Here we learn "Whiting has no hint. Maitlyn alienates many." WHITING - HINT = WIG and MAITLYN - MANY = ITL. Return to the Moon Map House. Type in WIG to get JASWIG. Unscramble this to get
JIGSAW
Now type in ITL to get PERITL. Unscramble this to get
TRIPLE
Click "Jasper of Swords reclaims her Name" at the bottom of the screen. Hmm. The help screen says that you can make an 11 letter word by unscrambling the middle letters of the 11 floating words. That word will be
PERSONALITY
Return to the house at the moon map. Look's like there's a sentence to de-scramble. However, it can easily be solved by typing in the 11 letter word you just discovered. Type it in to get
"Only the tenth is necessary." Looks like we should hold on to that T, the tenth letter in PERSONALITY
Click on the green J house in the middle of the fifth row. It seems this lady wants a JOST word. Go to the Jost page on the puzzle map. Here we learn "Kearney won't take any." KEARNEY - ANY = KERE. Return to the moon map house. Type in KERE to get JOSTKERE. Unscramble that to get
JOKESTER
Click "Jost of Wands reclaims her Name" at the bottom of the screen. Hmm. The help screen says that you can make an 11 letter word by unscrambling the middle letters of the 11 floating words. That word will be
COUNTRYSIDE
Return to the house at the moon map. Look's like there's a setence to de-scramble. However, it can easily be solved by typing in the 11 letter word you just discovered. Type it in to get
"The second and fifth are required." Looks like we should hold on to an O and a T, the second and fifth letters in COUNTRYSIDE.
Now we are left with five letters. You can unscramble them to get the name
SCOTT
Remember it!
Moon Map Puzzles - L
Click the blue L house on the right of the third row. This fellow wants a LAWLEY word. Go to the Lawley page on the puzzle menu. Here we learn that "Alcyoneus dismisses his counsel" ALCYONEUS - COUNSEL = AY. Return to the Moon Map house. Type in AY to get LAWLEYAY. Unscramble that to get
ALLEYWAY
Click "Lawley of Swords reclaims his Name" at the bottom of the map. Looks like the word INFORMATION is flashing on that screen. You must select the letters of the word to make five six-letter words. They are
NATION, NOTION, INFORM, FORMAT, RATION
Return to the Moon Map, and there will be a crossword you must fill in with these words. Here is an image of the solution. Note the highlighted letter: Screenshot
Click the peach L house on the left of the fourth row. This lady wants a LAROCHE word. Go to the Laroche page on the puzzle menu. Here we learn that "Kolby broke his yolk." KOLBY - YOLK = B. Return to the Moon Map house. Type in B to get LAROCHEB. Unscramble that to get
BACHELOR
Click "Laroche of Pentacles reclaims her Name" at the bottom of the map. Looks like the word WHITEWASHER is flashing on that screen. You must select the letters of the word to make seven six-letter words. They are
WHITER, WASHER, WISHER, HITHER, TEASER, WHITES, WITHER
Return to the Moon Map, and there will be a crossword you must fill in with these words. Here is an image of the solution. Note the highlighted letters: Screenshot
Click the blue L house on the right of the fifth row. This fellow wants a LYDIA word. Go to the Lydia page on the puzzle menu. Here we learn that "Williamson sacrificed millions." WILLIAMSON - MILLIONS = WA. Return to the Moon Map house. Type in WA to get LYDIAWA. Unscramble that to get
WAYLAID
Click "Lydia of Cups reclaims her name" at the bottom of the map. Looks like the word REVERBERATE is flashing on the screen. You must select the letters of the word to make five new six-letter words. They are
REVERB, BERATE. REVERT, REBATE, REVERE
Return to the Moon Map, and there will be a crossword you must fill in with these words. Here is an image of the solution. Note the highlighted letters: Screenshot
Click the Green L house on the right of the bottom row. This lady wants a LOMMIS word. Go to the Lommis page on the puzzle menu. Here we learn that "He knocked the grim outta Grimsby" GRIMSBY - GRIM = SBY. Return to the moon map house and type in SBY to make LOMMISSBY. Unscramble that to get
SYMBOLISM
Click "Lommis of Wand reclaims her name" at the bottom of the map. Looks like the word FERMENTABLE is flashing on the screen. You must select the letters of the word to make five new six-letter words. They are
FEMALE, FEEBLE, ENABLE, MENTAL, RENTAL
Return to the Moon Map, and there will be a crossword you must fill in with these words. Here is an image of the solution. Note the highlighted letters: Screenshot
Now you have the highlighted letters LLETOI. They can be rearranged to form the name
ELLIOT
Remember it!
Moon Map Puzzles - M
Start by clicking the light purple M House in the top left corner. It seems this guy has a sentence to de-scramble by putting in a seven-letter secret word. Click the "He returns to the Kingdom of the Swords" text at the bottom of the screen, and it will take you to the Massey page. What's that the clown says? "Adverbs are known for their restorative powers"? So a seven letter adverb. And it just so happens that this page starts with the word USUALLY. What an astounding coincidence! Go back to the Moon Map House, type USUALLY in, and you'll get the sentence
Fifth and Fourteenth are Third and Seventh.
All right! That got him to ask for the MASSEY word! Let's go back to that page. We learn that "Wilbert cannot write." WILBERT - WRITE = LB. Return to the Moon Map House and type in LB to get MASSEYLB. Unscramble that to get
ASSEMBLY
Click where it says "Massey of Swords reclaims his Name" at the bottom of the map. Now you've got a row of 14 gems, and a row of letters. This looks like a substitution code to me! A fourteen letter word, and every time a gem repeats, so does the letter. It's an adverb, I'm guessing. How about
UNCONVINCINGLY? And the fifth and fourteen letters are N and Y!
Now click the blue M house on the left of the top row. Another scrambled sentence, and another seven letter word to find. Click the "She returns to the Kingdom of the Swords" text, and it will take you to the McGucken page. Adverbs have restorative power, and we're looking for a seven-letter one... like FRANKLY, which starts off the page. Return to the Moon Map house, type FRANKLY in, and you'll get the sentence
Fourth and Thirteenth and Eleventh are First and Fifth and Sixth
Now she wants a MCGU word, and presumably after that a CKEN word. Return to the McGucken page. There we find that "Oliphant didn't halt... [and] Wallace ignored the law." OLIPHANT - HALT = OIPN and WALLACE - LAW = LACE. Return to the Moon Map House. Type in OIPN to get MCGUOIPN. Unscramble that to get
UPCOMING
Now type LACE to get CKENLACE. Unscramble that to get
NECKLACE
Click where it says "McGucken of Swords reclaims her Name" at the bottom of the page. Now you've got a row of 14 runes, and a row of letters. This looks like a substitution code to me! A fourteen letter word, and every time a rune repeats, so does the letter. It's an adverb, I'm guessing. How about
FEEBLEMINDEDLY? And note that the fourth and thirteenth and eleventh letters of that word are B and L and E
Now click the green M house in the middle of the fourth row. Another scrambled sentence, and another seven letter word to find click "She returns to the Kingdom of the Swords" at the bottom of the map, and we will be taken to the Moxley page. A seven letter adjective? Well, how about IDEALLY, the first word on the page. Return to the Moon Map House and type in IDEALLY to get the sentence
Seventh and Twelfth are Second and Fourth.
The lady now requests a MOX word, and presumably a LEY word soon after. Return to the Moxley page. There we find that "MacAlpine cured her mania. Lancaster quit his tales." MACALPINE - MANIA = CLPE and LANCASTER - TALES = NCAR. Return to the Moon Map house. Type in CLPE to get MOXCLPE. Unscramble that to get
COMPLEX
Now type in NCAR to get LEYNCAR. Unscramble that and you'll have
LARCENY
Click where it says "Moxley of Swords reclaims her Name" at the bottom of the map. Once more a row of 14 shields and letters to assign in a substitution cipher. This time, the word you are looking for is
INCONVENIENTLY. And note that the Seven and Twelfth letters are E and T.
Now we can build a seven letter word. Remember those three sentences? And the fourteen-letter words that went with it? The word you construct from those clues is
BENTLEY
Remember it!
Moon Map Puzzles - N
Start by clicking the peach N house on the left of the bottom row. This fellow wants a NEEDHAM word, so go to the NEEDHAM page in the puzzle menu. There we learn that "Chatterton refuses another." CHATTERTON - ANOTHER = CTT. Return to the moon map house and type in CTT to get NEEDHAMCTT. Unscramble that to get
DETACHMENT
Click at the bottom of the map where it says "Needham of Swords reclaims his Name". You will be taken to the Needham page. Here you will use your keyboard to play a variation of Simon. Type the string of letters in the order in which they flash (they likely won't spell anything), and they will transform into the words EXPLODE, CONJURE and REPULSE. Return to the Moon Map.
Then click the light purple N house on the left of the third row. The lady there wants a NISBETT word, so go to the Nisbett page in the puzzle menu. There we learn that "Goliath extinguished the light." GOLIATH - LIGHT = OA. Return to the Moon Map house and type in OA to get NISBETTOA. Unscramble that to get
OBSTINATE
Click where it says "Nisbett of Pentacles reclaims her Name" at the bottom of the map. You will be taken to the Nisbett page. Type in the word REPULSE to get the word GRIMACE. Return to the Moon Map.
Then click the light purple N house on the right of the third row. The lady there wants a NORFOLK word, so go to the Norfolk page in the puzzle menu. There we learn "Desiree rids and Wallbrydge, barely". DESIREE - RIDS = EEE and WALBRYDGE - BARELY = WDG. Return to the moon map house and type in EEEWDG to get NORFOLKEEEWDG. Unscramble that to get
FOREKNOWLEDGE
Click where it says "Norfolk of Wands reclaims her name" at the bottom of the map. You will be taken to the Norfolk page. Type in the word EXPLODE to get the word WRINKLE. Return to the moon map.
Now click the blue N house at the right of the bottom row. This man wants a NAIRE word, so go to the NAIRE page in the puzzle menu. There we learn that "Venfield dislikes endive" VENFIELD - ENDIVE = FL. Return to the moon map house and type in FL to get NAIRNEFL. Unscramble that to get
INFERNAL
Click where it says "Nairne of Cups reclaims his Name" at the bottom of the map. You will be taken to the Nairne page. Type in CONJURE to get the word PROFANE. Return to the moon map. The man now says "I relay to Needham", so once again click the peach N house on the left of the bottom row.
There you have an acrostic with six seven-letter words to fill in. The words are going to be CONJURE, EXPLODE, GRIMACE, PROFANE, REPULSE and WRINKLE. Putting them in the correct order will spell a name.
Here is an image of the acrostic solution: Screenshot
Take a note of the highlighted name!
Moon Map Puzzles - O
Start by clicking the light purple O house on the left of the top row. Seems he wants an OCKLEY word. Go to the Ockley page on the puzzle menu. There we learn that "Hortensius escaped the riots." HORTENSIUS - RIOTS = HENUS. Return to the moon map house. Type HENUS to get OCKLEYHENUS. Unscramble the letters to get
HONEYSUCKLE
Click where it says "Ockley of Pentacles reclaims his Name" at the bottom of the map. We're taken to the Ockley page. The help screen says to select the letters "TT" and two others. The correct ones to select are the ones that won't activate any other letters when clicked. The ones you should select are
R G T T
Now click the brown O house in the middle of the fourth row. Seems she wants an OSTHEIM word. Go to the Ostheim page on the puzzle menu. There we learn that "Gardener had no reader." GARDENER - READER = GN. Return to the moon map house. Type GN to get OSTHEIMGN. Unscramble the letters to get
SOMETHING
Click where it says "Ostheim of Pentacles reclaims his Name" at the bottom of the map. We're taken to the Ostheim page. The help screen says to select the letters "EE" and two others. The correct ones to select are the ones that won't activate any other letters when clicked. The ones you should select are
E R E N
.
Now click the peach house on the left of the fifth row. Seems she wants an OLMSTEAD word. Go to the Olmstead page on the puzzle menu. There we learn that "Brighton dropped his thong and Molyneux squeezed his lemon." BRIGHTON - THONG = BRI and MOLYNEUX - LEMON = YUX. Return to the moon map house. Type BRIYUX to get OLMSTEADBRIYUX Unscramble the letters to get
AMBIDEXTROUSLY
Click where it says "Olmstead of Pentacles reclaims his Name" at the bottom of the map. We're taken to the Olmstead page. The help screen says to select the letters "EE" and two others. The correct ones to select are the ones that won't activate any other letters when clicked. The ones you should select are
E E G N (that's the first two E's)
.
You have a number of letters left over:
R G T T E E G N E R E N
Remember those!
Moon Map Puzzles - P
Click the blue P house on the far right of the second row. This lady wants a PAYNE word. Go to the Payne page in the puzzle menu. Here we learn "Montes cut off his nose". MONTES - NOSE = MT. Return to the moon map house. Type in NT to get PAYNEMT. Unscramble this to get
PAYMENT
Click where it says "Payne of Swords reclaims her name" at the bottom of the map. Hmm. Animation and music and not much else. However, this page talks about the fool daydreaming. Indeed each of the P pages involves a daydream. This is the key to the rest of the puzzle!
Return to the moon map. Click the green P house on the left of the fourth row. A scrambled sentence, and it looks like it needs a six letter word. Click where it says "He returns to the Kingdom of the Wands" at the bottom of the map. This takes you to the the Pringle page. This talks about the Fool's second daydream. You know. His SECOND daydream. Hey! That's a six letter word right there! Return to the moon map house and type in SECOND. The sentence is descrambled into:
The husband plants his berries, left to right, while the wife plants each orchard from bottom to top.
That man requests a PRINGLE word. Return to the Pringle page. There we learn "Rexton didn't rent." REXTON - RENT = XO. Return to the moon map. Type XO to get PRINGLEXO. Unscramble that to get
EXPLORING
Click where it says "Pringle of Wands reclaims his name." Look at those letters in the sky. You must read them as the descrambled sentence suggests:
Reading each group left to right, bottom to top: TO BEGIN PICK BARREL THEN GATE THEN NOSE
Click those three items in that order, and the three letters MAT will appear.
Now click the brown P house in the middle of the fifth row. Another sentence to descramble, and you need a five-letter word to do so. Click "She returns to the Kingdom of the Cups" at the bottom of the screen. This takes you to the Percy page, which talks about the Fool's THIRD daydream. THIRD! Five letters! Get it? Return to the moon map and type in THIRD. This descrambles the sentence to read:
The fisherman throws back the second and third, and keeps the fourth, and so on, until all the fish are claimed.
That woman now requests a PERCY word. Return to the Percy page. There we learn "Elphinstone dismissed her sentinel." ELPHINSTONE - SENTINEL = PHO. Return to the moon map. Type PHO to get PERCYPHO. Unscramble that to get
PROPHECY
Now click "Percy of Cups reclaims her name" at the bottom of the map. This will take you to another page with floating letters. Read them as the descrambled sentence suggests:
Starting with the first letter, then every third thereafter: NEXT CHOOSE TINY TROUT THEN STOUT SPARROW THEN TALLEST TREE.
Click those three items in that order, and the three letters URE will appear.
Now click the blue P house just to the right of center of the second row. Another sentence to descramble, this time needing a six-letter word. Click where it says "She returns to the Kingdom of the Pentacles" at the bottom of the page. This takes you to the Playfair page, which talks about the Fool's fourth daydream. Fourth. F-O-U-R-T-H. Six letters! Return to the moon map and type in FOURTH. This descrambles the sentence:
The grandchildren descend like a tornado around the clock.
The woman now requests a PLAY word, and presumably a FAIR word soon after. Return to the Playfair page. There we learn "Dominick had no kin. Mespronius forgot her prism." DOMINICK - KIN = DOMIC and MESPRONIUS - PRISM = ESONU. Return to the moon map house. Type in DOMIC to get PLAYDOMIC. Unscramble this to spell
DIPLOMACY
Now type in ESONU to get FAIRESONU. Unscramble this to spell
NEFARIOUS
Click where it says "Playfair of Pentacles reclaims her name" at the bottom of the map. Floating letters once more! Read them as the descrambled sentence suggests:
Starting in the lower left, reading up and around in a clockwise spiral: LAST SELECT CROWN THEN A LONG HORN THEN THE HIGHEST WINDOW.
But wait! Those three items aren't in the picture! But, they are in the Payne scene! Go to the Payne scene, click the three items in the stated order, the letters PRE will appear! Return to the moon map.
Click the blue house on far right of the second row, where we submitted the PAYNE word. Now it has a scrambled sentence! But I bet those three groups of letters we revealed will tells us what to type in!
PREMATURE
This reveals the sentence: From those which pose a premature presumption, select the one, and only one, that is common to all three. Looks like we need to check out the Payne, Pringle and Percy pages, and click the one unique element that is common to all three.
That would be the letter P, which appears only once in each image. PRE changes to GRO. MAT changes to ESB. URE changes to ECK. Put those three together, and you get the name GROESBECK!
Remember that name!
Moon Map Puzzles - Q
Start by clicking the light purple Q house on the left of the second row. He wants a QUINTIN word. Go to the Quintin page on the puzzle menu. There we learn "Burgess resigned the rebus". BURGESS - REBUS = GS. Return to the moon map house. Type in GS to get QUINTINGS. Unscramble this to get
SQUINTING
Click where it says "Quintin of Swords reclaims his Name" at the bottom of the page. You will be taken to the Quintin page. When you click the coins, they will now flip around to reveal various letters. You must use the coins now to spell six six-letter words:
ADVICE, CAVITY, FIASCO, MOTIVE, UNFAIR and WITHIN
Return to the Moon Map, and there will be an acrostic to fill in, using the six words you just spelled. Putting them in correctly will spell out the name
COFFIN
Here is an image that shows the proper solution: Screenshot
Remember that name!
Moon Map Puzzles - R
Start by clicking the light purple R house in the middle of the second row. This fellow is looking for a RYMORE word. Go to the Rymore page in the puzzle menu. Here we find out that "Demason exorcised his demon". DEMASON - DEMON = AS. Return to the moon map house. Type in AS to get RYMOREAS. Unscramble that to get
ROSEMARY
Click where it says "Rymore of Wands reclaims his Name" at the bottom of the map. You will be taken to the Rymore page, where several new letters will appear in the air. As the help text says, you must remove as few letters as possible and still have an acceptable jumbled word. In this case
remove I, K, and V to leave you with PROWL
Return to the moon map. Now click the blue R house on the right of the second row. Looks like the fellow there wants a RADC word, and probably a LIFF word soon after. Go to the Radcliff page in the puzzle menu. There we find that "Aherin cannot hear... [and] Cupere hides the cure". AHERIN - HEAR = IN and CUPERE - CURE = PE. Return to the moon map house and type in IN to get RADCIN. Unscramble this to get
RANCID
Now type in PE to get LIFFPE. Unscramble this to get
PIFFLE
Click "Radcliff of Wands reclaims his Name" at the bottom of the map. You will be taken to the Radcliff page, where several new letters will appear in the air. As the help text says, you must remove as few letters as possible and still have an acceptable jumbled word. In this case
remove I, P, and U to leave you with ABOVE
Return to the moon map. Click the blue R house on the right of the fourth row. This lady would like a RODE word, and presumably a RICK word soon after. Go to the Roderick page in the puzzle menu. There we learn that "Memucan forgot his name and Clemento dropped his melon". MEMUCAN - NAME = MUC and CLEMENTO - MELON = CET. Return to the moon map house. Type in MUC to get RODEMUC. Unscramble that to get
DECORUM
Now type in CET to get RICKCET. Unscramble this to get
CRICKET
Click "Roderick of Wands reclaims his Name" at the bottom of the map. You will be taken to the Roderick page, where several new letters will appear in the air. As the help text says, you must remove as few letters as possible and still have an acceptable jumbled word. In this case
remove M, V, and P to leave you with WHEAT
Return to the Moon Map. Click the peach R house on the left of the fourth row. This man wants a RIASON word. Go to the Riason page in the puzzle menu. There we learn that "Isabella mislaid her allies". ISABELLA - ALLIES = AB. Return to the moon map and type in AB to get RIASONAB. Unscramble this to get
ABRASION
Click "Riason of Wands reclaims his Name" at the bottom of the map. You will be taken to the Riason page, where several new letters will appear in the air. As the help text says, you must remove as few letters as possible and still have an acceptable jumbled word. In this case
remove M, O, and V to leave you with PLANK
Return to the moon map. Now you have an acrostic with six five-letter words you to fill in, and a highlighted name to be spelled. You've just come up with four words, so where do we get the other two? Well, remember those three five-letter words you got at the end of the I Puzzles? Here's where you use them! The words to use are
ABOVE, FLANK, PROWL, ROUGH, VAULT and WHEAT
Here is an image that shows the proper solution: Screenshot
The highlighted letters spell out the name
BARTON
Remember it!
Moon Map Puzzles - S
Click the blue S house on the right of the bottom row. The man there wants a SKID word, presumably followed by a MORE word. Go to the Skidmore page on the puzzle menu. There we learn "Arcistenen ceased his antics. Clayborne quit his labor". ARCISTENEN - ANTICS = REEN and CLAYBORNE - LABOR = CYNE. Return to the moon map and type in REEN to get SKIDREEN. Unscramble this to get
DEERSKIN
Now type in CYNE to get MORECYNE. Unscramble this to get
CEREMONY
Now click where it says "Skidmore of Pentacles reclaims his name" at the bottom of the map. Other than a little music and animation, it looks like the Skidmore page hasn't changed that much. Clicking the giant letter though will take you through the four S pages, each of which displays a monogram: FHAL, or HALF rather. Returning to the moon map, we see that now the Skidmore house offers a sentence to descramble. Enter the word HALF, and we get
Her whole is mixed HALF and TREY
Remember that sentence!
Moon Map Puzzles - T
You should probably complete the U and Z puzzles before starting in on this one.
Ready? Okay. Start by clicking the blue T house in the upper right corner. The man there wants a TASSEL word. Go to the Tassel page in the puzzle menu. There we learn "Trachonitis doubted the historian." TRACHONITIS - HISTORIAN = TC. Return to the moon map house. Type in TC to get TASSELTC. Unscramble that to get
TACTLESS
Click where it says "Tassel of Cups reclaims his Name" at the bottom of the map. It takes you back to the Tassel page, though not a whole lot seems changed. However, if you click the glowing orb, the word MOCK is revealed. Return to the moon map.
Now click the green T house on the left of the fifth row. The man there wants a THWAITE word. Go to the Thwaite page on the puzzle menu. There we learn "Rutgers wasn't sure". RUTGERS - SURE = RTG. Return to the moon map house. Type in RTG to get THWAITERTG. Unscramble that to get
WATERTIGHT
Click where it says "Thwaite of Cups reclaims his Name" at the bottom of the map. It takes you back to the Thwaite page, though not a whole lot seems changed. However, if you click the glowing orb, the word BURN is revealed. Return to the moon map.
Now click the brown T house in the middle of the sixth row. The man there wants a TILTON word. Go to the Thwaite page on the puzzle menu. There we learn "Capulet fled the cult". CAPULET - CULT = APE. Return to the moon map house. Type in APE to get TILTONAPE. Unscramble that to get
POTENTIAL
Click where it says "Thwaite of Cups reclaims his Name" at the bottom of the map. It takes you back to the Thwaite page, though not a whole lot seems changed. However, if you click the glowing orb, the word DIRT is revealed. Return to the moon map.
Now click the dark purple T house on the right of the third row. The lady there wants a TELFAIR word. Go to the Telfair page on the puzzle menu. There we learn "Bishop lost his". BISHOP - HIS = BOP. Return to the moon map house. Type in BOP to get TELFAIRBOP. Unscramble that to get
PROFITABLE
Click where it says "Telfair of Cups reclaims her Name" at the bottom of the map. It takes you back to the Thwaite page, though not a whole lot seems changed. However, if you click the glowing orb, the word GLOW is revealed. Return to the moon map.
Now we have an acrostic with six four-letter words. We just revealed four of them, so we need two more. We will find them by solving the U and Z House puzzles, so go do those now if you haven't already. The words you are using will be
BURN, DIRT, GLOW, MOCK, OATH, and UGLY.
Here is an image showing the solution for the acrostic puzzle: Screenshot
The highlighted letters will spell out the name
ULRICH
Remember it!
Moon Map Puzzles - U
Click the dark purple U house in the middle of the second row. Looks like this lady wants an URSULA word. Go to the Ursula page on the puzzle menu. There we learn that "MackIntosh needs no thanks" MACKINTOSH - THANKS = MCIO. Return to the moon map house. Type in MCIO to get URSULAMCIO. Unscramble that to get
MIRACULOUS
Click where it says "Ursula of Swords reclaims her Name" at the bottom of the map. Doesn't look like much has changed on the Ursula page. If you read the help text though, it says to "free the word by curse". In other words, move your cursor up and down the tree to reveal the word OATH. Remember it, you'll need it for the T puzzles.
Moon Map Puzzles - V
Start with the light purple V house on the left of the top row. She wants a VRAN word, and presumably a KEN word soon after. Go to the Vranken page in the puzzle menu. There we learn "Richson ate her corn. Bucklin drank from the bin." RICHSON - CORN = IHS and BUCKLIN - BIN = UCKL. Return to the moon map house. Type in IHS to get VRANIHS. Unscramble this to get
VARNISH
Now type in UCKL to get KENUCKL. Unscramble this to get
KNUCKLE
Click where it says "Vranken of Cups reclaims her Name" at the bottom of the page. You will be taken to the Vranken page. You must type or click the flying letters in the proper order, while they are on the screen to spell a seven-letter word. You have a limited amount of time. The word you should spell is
CRYSTAL
Return to the moon map. Now click the Blue V house on the right of the third row. She wants a VIBBARD word. Go to the Vibbard page in the puzzle menu. There we learn "Eastcote ignored the cost". EASTCOTE - COST = EATE. Return to the moon map. Type in EATE to get VIBBARDEATED. Unscramble this to get
ABBREVIATED
Click where it says "Vibbard of Wands reclaims her Name" at the bottom of the page. You will be taken to the Vibbard page. You must type or click the flying letters while they are on the screen to spell a seven-letter word. You have a limited amount of time. The word you should spell is
WHIMPER
Return to the moon map. Now click the dark purple V house on the right of the fifth row. He wants a VANDE word, and presumably a RVEER word soon after. Go to the Vanderveer page in the puzzle menu. There we learn "Tracie will never tire. Follet will never tell." TRACIE - TIRE = AC and FOLLET - TELL = FO. Return to the moon map. Type in AC to get VANDEAC. Unscramble this to get
ADVANCE
Now type in FO to get RVEERFO. Unscramble this to get
FOREVER
Click where it says "Vanderveer of Pentacles reclaims his name" at the bottom of the page. You will be taken to the Vanderveer page. You must type or click the flying letters while they are on the screen to spell a seven-letter word. You have a limited amount of time. The word you should spell is
PADLOCK
Now click the green V house on the left of the sixth row. This man wants a VOORST word. Go to the Voorst page in the puzzle menu. There we learn that "Corybantes need not boast". CORYBANTES - BOAST = CRYNE. Return to the moon map house. Type in CRYNE to get VOORSTCRYNE. Unscramble this to get
CONTROVERSY
Click where it says "Voorst of Swords reclaims his name" at the bottom of the page. You will be taken to the Voorst page. You must type or click the flying letters while they are on the screen to spell a seven-letter word. You have a limited amount of time. The word you should spell is
SPARKLE
Return to the moon map. Now you have a crossword to fill in, using the four words you just created.
Here is an image of the completed crossword: Screenshot
The highlighted letters will spell out a name when unscrambled. That name is
RHODES
Moon Map Puzzles - W
Start by clicking the light purple W house in the middle of the top row. That man wishes for a WALLOP word. Go to the Wallop page on the puzzle menu. There we learn that "Archimedes wasn't harmed". ARCHIMEDES - HARMED = CIES. Return to the moon map. Type in CIES to get WALLOPCIES. Unscramble this to get
PILLOWCASE
Click where it says "Wallop of Swords reclaims his Name" at the bottom of the page. You will be taken to the Wallop page. There's a grid of letters there, and as you move your mouse over each letter, it transforms. It sure looks like two letters pop up more than usual though: Keep transforming the letter until they are all K or I. Music will play, and then you can return to the moon map.
Now click the the light purple W house in the left of the third row. That woman wishes for a WYCK word. Go to the Wyck page on the puzzle menu. There we learn "No clam for Balcombe and no egg for Jagger." BALCOMBE - CLAM = BOBE and JAGGER - EGG = JAR. Return to the moon map. Type in BOBE and EGG to get WYCKBOBEEGG. Unscramble this to get
JABBERWOCKY
Click where it says "Wyck of Swords reclaims her Name" at the bottom of the map. You will be taken to the Wyck page. There's a grid of letters there, and as you move your mouse over each letter, it transforms. It sure looks like two letters pop up more than usual though: Keep transforming the letters until they are all T or O. Music will play, and then you can return to the moon map.
Now click the the light purple W house in the middle of the third row. That man wishes for a WENTWORTH word. Go to the Wentworth page on the puzzle menu. There we learn "Edwardson never owned". EDWARDSON - OWNED = ARDS. Return to the moon map. Type in ARDS to get WENTWORTHARDS. Unscramble this to get
NORTHWESTWARD
Click where it says "Wentworth of Swords reclaims his Name" at the bottom of the map. You will be taken to the Wentworth page. There's a grid of letters there, and as you move your mouse over each letter, it transforms. It sure looks like one letter pops up more than usual though: Keep transforming the letters until they are all N. Music will play, and then you can return to the moon map.
Now click the blue W houe on the right of the fifth row. That man wants a WICK word, and presumably a LIFF word soon after. Go to the WICKLIFF page on the puzzle menu. There we learn. "Polyeidus shunned the pious. Gullinburtis neglected his billings." POLYEIDUS - PIOUS = LYED and GULLINBURTIS - BILLINGS = UURT. Return to the moon map. Type in LYED to get WICKLYED. Unscramble this to get
WICKEDLY
Now type in UURT to get LIFFUURT. Unscramble this to get
FRUITFUL
Click where it says "Wickliff of Pentacles reclaims his Name" at the bottom of the map. You will be taken to the Wickliff page. There's a grid of letters there, and as you move your mouse over each letter, it transforms. It sure looks like two letters pop up more than usual though: Keep transforming the letters until they are all N or T. Music will play, and then you can return to the moon map.
Now click the green W house at the left of the sixth row. The man wishes for a WEIR word. Go to the Weir page on the puzzle menu. Here we learn "Perceval wasn't clear". PERCEVAL - CLEAR = PEV. Return to the moon map. Type in PEV to get WEIRPEV. Unscramble this to get
PREVIEW
Click where it says "Weir of Cups reclaims his Name" at the bottom of the map. You will be taken to the Wickliff page. There's a grid of letters there, and as you move your mouse over each letter, it transforms. It sure looks like two letters pop up more than usual though: Keep transforming the letters until they are all E or C. Music will play, and then you can return to the moon map.
Now when you click each of the W houses, it will tell you that the people there set "ONE of each aside" So we take one of those more-than-usually-appearing letters from the five screens: K I N T O N T E C. This can be unscrambled to the name
KENNICOTT
Remember it!
Moon Map Puzzles - Y
Click the brown Y house in the middle of the sixth row. Looks like this lady wants a YAPP word. Go to the Yapp page on the puzzle menus screen. There we learn "Escalibor lost a rib". ESCALIBOR - RIB = ESCALO. Return to the moon map. Type in ESCALO to get YAPPESCALO. Unscramble this to get
APOCALYPSE
Click where it says "Yapp of Wands reclaims her Name" at the bottom of the map. This will take to the Yapp page, but the animation heralds that there is now a new puzzle to solve. The help text informs us that we should flip nine letters to spell three new words. Clicking each letter will flip it to a new letter, and clicking it again will flip it back. As a further hint, you should flip three letters in each of the three words. The three words to spell are:
VACANT, CANARY, and PARADE
Return to the moon map. There you will find a crossword puzzle where you will enter in the three words you just created.
Here is an image of the correct solution: Screenshot
The highlighted letters, when unscrambled, will spell out a name. That name is
TRACY
Remember it!
Moon Map Puzzles - Z
Click the dark purple Z house on the right of the fourth row. The lady will request a ZACH word, and presumably an ARIAH word next. Go to the Zachariah page on the puzzle menu. There we learn "Hippomenes couldn't shop. Clarette lost her ear". HIPPOMENES - SHOP = IPMENE and CLARETTE - EAR = CLTTE. Return to the moon map house. Type in IPMENE to get ZACHIPMENE. Unscramble that to get
CHIMPANZEE
Now type CLTTE to get ARIAHCLTTE. Unscramble that to get
THEATRICAL
Now click where it says "Zachariah of Pentacles reclaims her Name" at the bottom of the map. You will be taken to the Zachariah page, though it looks like not much has changed. The help text tells you to "free the word by curse". In other words, move your cursor across each of the four cards to reveal the word UGLY. Remember it, you'll need it for the T puzzles.
Moon Map Puzzles - Buckbee
Buckee the pirate hangs out in the center of the bottom row of the moon map. As you complete all the other puzzles, you can click there to bring up his acrostic and fill in names.
There are seventeen names to fill in on this acrostic. You will find the names by completing the letter puzzles of the moon map, then placing them in the proper order according to the given clues. The appropriate moon map puzzles must be completed, or else Buckbee will not accept the names.
Here is an image of the proper word placements: Screenshot
Explanations for each, in order, left to right:
"She is British, adverbially": Remember all the adverbs of the M puzzles? They gave us BENTLEY, and, if you get what I'm driving at, that's quite a British name!
"He is Greek from floating fonts": The V puzzles had us typing out floating letters. That road led us to RHODES
"He is Dutch, the daydreamer": All the P pages and puzzles featured a daydream. They gave us the word GROESBECK, and that guy loves going Dutch!
"He is Irish and heeds only half": The O puzzles left us with a string of letters: R G T T E E G N E R E N. I'm doubly sure it's no coincidence that each of them appears an even number of times: RR EE GG EE NN TT. If we halve every occurrence of a letter and unscramble, we get REGENT
"He is British and wagers his wages": The W puzzles of card games all involved wagering wages. They lead us to KENNICOTT
"She is neither Colburn nor Barclay": At the end of the H series of puzzles, we cycled through several screens trying to get the right name. Two possibilities, Colburn and Barclay, were red herrings, meaning that we are left with ASHFORD
"She is Scottish, signifying Junction": All the J puzzles had those floating crosswords to deal with, filled with all sorts of junctions. From there we got the name SCOTT.
"He is British, literally" A literary British guy? What was that name we got from the L puzzles! Ah yes, ELLIOTT! Of course, his name had only the one T, but we'll let it slide.
"He is Welsh and counts his coins": That Q puzzle had quite a bit of coin counting. Or flipping at any rate. From there we got the name COFFIN, dead to rights.
"He is German and does his bidding": The auctioneers of the A puzzles know that it's RANDOLPH
"She is Irish, meaning monogram": Well, those S puzzles had us construct those giant floating monograms. From there we got the sentence "Her whole is mixed HALF and TREY". Taking HALFTREY and unscrambling it gives us FLAHERTY, Irish all the way!
"He is Saxon and Mostly Herbal": Those R puzzles had us memorizing all sorts of herbs! From them, we got BARTON.
"They are Scottish and quote fools": Those C puzzle guys sure love their quotes about fools, right? And the C puzzles gave us the world DALRYMPLE, a true Scotsman indeed!
"He is German and nearly stained": Those P puzzles sure pained us with all that stained glass clicking. They led us to the name ULRICH, though, and that goes here.
"He is Saxon and takes one step backwards": The G puzzles were all about stepping all over the screen. They left us with the letters FZ SL FM CF. Move each of those letters one step back in the alphabet, and you get EY RK EL BE. A little re-arranging gives us the Saxony beast of a name: BERKELEY
"She is Gaelic, derived from knowledge": It's DUNCAN, and, well, besides the fact that it's the only one that fits, I can't really say I'm able to derive the logic. After all, it seemed like the N puzzles required just as much knowledge as everything else...
"She is British, from the harvest": We harvested casabas, bananas and papayas in that Y puzzle. Fruitfully, it led us to the name TRACY.
Every time you enter a name, a sound will play and the related letter will disappear from the map.
The message you are left with is
THE GIFT OF PROPHECY
Posted by: Tricky |
November 24, 2012 10:30 PM
|
November 24, 2012 10:30 PM
The Fool and His Money Walkthrough - Part 4
The Finale
The Seven Cups
Once you complete Buckbee's acrostic, you will be taken automatically to the screen of seven cups. If you click away, you can also access it by clicking the Moon in the puzzle menu.
You must select each vertical pair of key and elixir. Once you have done so, the cup at the top of the screen will be filled. Once this occurs, you have unlocked the final puzzle!
The Finale Awaits
Before the fool can abscond with his gold, he needs to solve one final puzzle and drive away the pirate spirits which have dogged him so. The puzzle is structured like the N puzzles we've seen previously, where clicking each of the spirits will add letters to the front and back of a phrase. However, the spirits can each be clicked more than one time and you'll need to make seventeen clicks in all. What spirit adds what letter is randomized in each game, so some note-taking will be required
Here is the order the letters should be added.
Click the spirit that adds the single letter N to start.
Click the spirit that adds EY to the end.
Click the spirit that adds MO to the front.
Click the spirit that adds AR to the end.
Click the spirit that adds IS to the front.
Click the spirit that adds ES to the end.
Click the spirit that adds DH to the front.
Click the spirit that adds OO to the end.
Click the spirit that adds AN to the front.
Click the spirit that adds OL to the front.
Click the spirit that adds NP to the end.
Click the spirit that adds FO to the front.
Click the spirit that adds AR to the end.
Click the spirit that adds TE to the end.
Click the spirit that adds HE to the front.
Click the spirit that adds the single letter T at the front.
Click the spirit that adds the single letter D to the end.
This leaves you with the entirely apt sentence
THE FOOL AND HIS MONEY ARE SOON PARTED
And so they will. But that alone does not an unhappy ending make!
One Last Thing...
The Fool was walking through an unfamiliar land without benefit of map or guide. The obstacles in his path were minimal, and The Fool had always though "forward" to be the only direction ever needed, regardless of any review or discussion.
Upon his path, he came across a man casually leaning against an apple tree, a book of various puzzles in one hand, a pencil in the other.
"Who are you?" inquired The Fool.
"Me?" replied the man. "I thought you would have guessed. I, young fool, am games!"
The Fool was somewhat puzzled by the man's statement. A single claiming to be a plural seemed inappropriate on its face, be it grammatically or philosophically. He told the man as such.
"I see no reason why that should be the case. One man in his time may play many parts, and often at the same time too. Are you yourself not currently both a fool and The Fool?"
The Fool was about to argue that there were two levels on which he'd argue non-equivalence, but before he could, the man waved his pencil and the air filled with a multitude of letters:
DTYGR FXS YPP DESK UKPQKHKEZ! Q TXIK DTYD DTQZ JSQNK TYZ UKKG XB TKPI. YGN EKOKOUKE: DTK BQEZD IEQGMQIPK QZ DTYD FXS OSZD GXD BXXP FXSEZKPB, YGN DTYD FXS YEK DTK KYZQKZD IKEZXG DX BXXP!
The man walked away, dancing a happy JiG and whistling "Yardstick is not sad."
Posted by: Tricky |
November 29, 2012 5:34 AM
|
November 29, 2012 5:34 AM