JayisGames.com is now available ad-free!
Jay is Games recommends Cheat Happens with 8,000+ games and 35,000+ trainers!

Weekday Escape N°99


Comments (24) | Views (22,849)

Weekday Escape

DoraHold on to your socks, folks, and if you aren't wearing any, then go find as closely matched a pair as you can, put them on, and then hold them, because to help distract from the inexorable march of time, this week's Weekday Escape serves up some of your favourite creators in a big way! TomaTea brings you something sweet to eat, but you'll need your most obnoxious fake French laugh to get it. Neutral has the place all done up for Halloween for you, though the language may be a barrier for some. And Ichima offers you a cozy place to get snuggled up and wind down with one fantastic view.

Candy Shop Escape
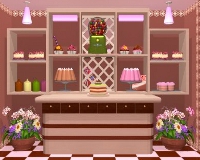
Candy Shop Escape - "But Dora," I can hear you saying, "why would you possibly want to escape from a candy store? Much less one designed by TomaTea?" Well, to put it bluntly, if it were a Pizza and Garlic Bread store, I would feel quite differently, since I've never been much for sweets, even those hiding cunning puzzles and clues. As it is, I'm going to need your help to get out of this swanky little boulangerie, so let's get clicking!


Wicked Room
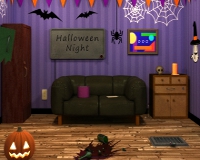
Wicked Room - If you can't read Japanese, this mini room escape by none other than Neutral might give you a hard time, at least when it comes to reading the paper clues you'll find. I suggest we give it the old college try, clean up that broken glass, and then throw something spooky, old, and grainy on the television. If you're *filled with d e t e r m i n a t i o n, however, well, I guess those ghosts and ghouls better beware.


Room 10: Heart
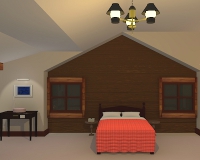
Room 10: Heart - So maybe you want a room escape game that's a little more cozy? That's cool, I gotchu. Or, well, Ichima does, so if you want to be locked up somewhere that seems expressly designed for snuggling with a view, look no further. With some gorgeous windows and a big comfy bed, this is one set of puzzles you can solve in comfort. So leave your shoes and your cares at the door, and some space for me on that bed, because I am all about a nap, like, you don't even know.


We love escape games, and our readers love talking about them and sharing hints! How about you? Let us know what you think, ask for clues, or help out other players in the comments below.

Walkthrough Guide


(Please allow page to fully load for spoiler tags to be functional.)

There are only two parts where you need to read the Japanese in Wicked Room:

You don't actually need to read until you have picked up the fourth set of notes. Note however that most puzzles cannot be brute-forced until you have seen the required information to solve them.

Reading through the fourth set of notes will unlock the hotspot on the closet. This will make a different sound when you click near it.

You should have five sets of notes for the final puzzle. Taking symbols from the eleven notes will give you the clue in Japanese. You could brute-force the required combination (after viewing all the required information), but here it is:

Yellow eye, red hand and skull, green cat.

How to figure out the math puzzle in Wicked Escape

First, note that the white shapes are different numbers than the black shapes, and each shape is a different number. Also, remember that zero is a perfectly good number, and that when you're adding two base-10 numbers, the most you're ever going to carry is a 1.

  abcb
+abde
-----
ccfgh

We know f is 3.

Starting from the end, cc can only be 11, since even the next possibility (22) would require us to carry a 4, which ain't happening. (Two times 9, the largest digit, is 18, plus 4 is 22.) This means that a must be 5, and we need to carry a 1 from the previous column.

There isn't an integer solution to 2b = 3, so we need to carry a 1 from c+d = g. This means that b is either 1 or 6, but a 1 wouldn't let us carry anything to the next column. So b = 6.

This gets us to:
  5616
+56de
-----
113gh

The remaining digits are 0, 2, 4, 7, 8, 9.

The unique digits constraint means that e can't be 0 (because then h would need to be 6, which is already taken), 7 (because 3 is taken), or 9 (because 5 is taken). If we try 8 in that spot, that means h is 4 and we carry a 1, but then d must be 9 (because we need to carry a 1), but that makes g a 1, which is already taken. If we try 4 as e, then d can be 8 (since we already know 9 would be a problem), but that makes both g and h into zeroes. So e must be 2, which makes h an 8.

This means that d must be 9, since that's the only number that would let us carry the one, and that makes g into a 0.

So the equation is
  5616
+5692
-----
11308

and the shapes are: star = 8, circle = 2, square = 9, diamond = 0.

Candy Shop Escape Walkthrough/Solutions Guide

The Puzzles

Drawer 1 (up-down buttons)

Clue: cake slices

on the shelves, there are 6 slices of cake, 3 on the left and 3 on the right. Note which way the slices point.

up, down, up, up, down, up

Get: donut

Drawer 2 (4 colors)

Clue: cake squares with berries

Each table has a square of cake. Note the color of the icing, as well as the number of berries on top.

red: 3, blue: 2, yellow: 4, green: 1.
Colorblind:

1 click, 4 clicks, 2 clicks, 3 clicks

Get: puzzle piece

Drawer 3 (4 numbers)

(This'll be the last puzzle you solve) You will need:

  • Green lollipop

    Solve the cupcake picture

  • Pink donut

    1st drawer

  • Candy cane #1

    in one of the cupcakes above the brown gelatin dessert

  • Candy cane #2

    4th drawer

  • Candy cane #3

    5th drawer

  • Candy cane #4

    4x4 picture

  • Broken fork

    Get the (whole) fork from the red cake, then use it to pry open the green canister, breaking it in the process

Put everything in place, then do some math.

The lollipop and the donut should be obvious. Use the broken fork to open the cabinet under the two displays, then put the candy canes in the indentations. Note the shape made by the canes.

It's supposed to be a multiplication sign. Yes, I know.

Look at the faces of the two displays and note the numbers in the highlighted wedges.

Lollipops = 47, donuts = 63

Do the math.

2961

Get: the key!

Drawer 4 (4 letters)

Clue: canisters plus letter hint (see 5th drawer)

The canisters have numbers on the underside of their lids. Use the fork (from the red cake square) to pry open the green canister.

The drawer hint says O=15; that's a letter O, not a numeral zero.

It's a standard "number the letters of the alphabet" cypher. Brown = 3 = C, yellow = 1 = A, green = 6 = F, pink = 5 = E.

Get: candy cane

Drawer 5 (4 shapes)

Clue: 3 pink cupcakes on bottom right shelf

Count each shape. Hint: there's more than one circle.

1 square, 2 hearts, 3 stars, 4 circles

Get: candy cane, O=15 clue

Drawer 6 (4x4 buttons)

Clue: the incomplete puzzle

Note which pieces are missing from the puzzle. Click those buttons.

Bottom left to top right diagonal, plus bottom right corner

Get: puzzle piece

Cupcake picture

Clue: gumball machine and the cupcake on the shelf that greatly resembles the picture (on the right above the pink gelatin dessert).

That thing you get from the gumball machine is a maraschino cherry. Yes, really. (Solve the triangles picture to get the coin.)

Put the cherry on the cupcake, then note the colors (green stem, red cherry, brown frosting, pink cupcake, yellow paper). Set the cupcake picture accordingly.
Colorblind:

stem = 3 clicks, cherry = 4 clicks, frosting = 5 clicks, cupcake = 1 click, paper cup = 2 clicks.

Get: green lollipop

4x4 picture

Clue: under yellow cake triangle; also need to solve the puzzle picture.

Put the teapot in the top left dot, then move it along the path indicated by the clue by clicking each dot in turn.

Get: candy cane

Triangles picture

Clue: the cake squares on the tables and the yellow cake triangle on the counter.

The yellow triangle is for orientation; you need to set the corner squares to the appropriate colors. The middle "+" shape remains black, except for that yellow wedge of course.

Top left = green (2 clicks on each wedge), top right = red (1 click), bottom left = yellow (3 clicks), bottom right = blue (4 clicks).

Get: coin

Puzzle picture

Pieces:

  • 2nd drawer

  • Behind pink gelatin dessert

  • 6th drawer

  • On table with green cake

  • On the counter next to yellow cake triangle

Picture:

The cup of coffee (or is that tea?) goes in the middle of the top row. The strawberries are mostly on the leftmost square of the 2nd row from the top. You should be able to figure it out from there.

Get: strange spiky teapot

Order of Operations (aka Walkthrough Schematic)

  1. Drawer 1

  2. Drawer 2

  3. Drawer 5

  4. Drawer 4

  5. Drawer 6

  6. Puzzle picture

  7. 4x4 picture

  8. Triangle picture

  9. Cupcake picture

  10. Drawer 3

Wicked Room Walkthrough

Hatbox

For this, you need the clue page set #2, which is along the right wall, to the right of the pumpkin picture/decal.

The sequence for pressing the buttons is right there on the card.

left, right, top, bottom, top.

Get: a pumpkin. Well, except you can't actually take it out. And if you close the box, you need to solve it again if you want to open it. So make sure you note everything that's notable about the pumpkin.

Pumpkin Math

Clue page #1 is on the couch. Underneath it is a formula for getting a key.

Note the directions the triangles are pointing.

The pumpkin in the middle of the floor has upward-pointing triangles for the eyes, and it has an 11 written on its bottom. The pumpkin on the right wall has its eyes pointing at each other, and if you peel up the bottom, it says 31. And the pumpkin in the hatbox had downward-pointing eyes and had a 10 on its bottom.

Plug in the numbers and get a 3-digit number. (Remember your order of operations: multiply first, then add.)

321

Now, where could you use a three-digit number?

The only place is that Mondrianic picture on the wall.

Get: clue papers #3, #4, and #5, plus some shape math.

Shape math

In the clue packet you get from the picture, there's a card with shapes on it. Solve for the white shapes.

In addition to the black star = 3 hint that's right on the card, you also need to know that the white shapes are different numbers than the black shapes, and each shape is a different digit. (Oh, and 0 is a perfectly valid digit.)

I've already posted a detailed explanation for solving the equation, so I won't repeat it here. The solution is
  5616
+5692
-----
11308

and the shapes are: star = 8, circle = 2, square = 9, diamond = 0.

Get: code for the restroom door. (Make sure you write it down or remember it, because the bathroom door locks again if you leave.)

Phone

There's some writing on the right wall of the restroom. Most of it is useless to us clueless westerners, but that "SOaP-ElSE" on the top looks... intriguing.

Look in the mirror.

That's not SOaP-ElSE, that's 3213-9602.

Dial the number (the phone is in the alcove right above the writing) and listen. Why is it ringing twice?

It's not one phone ringing twice, it's two different phones. Go back in the room and look under the couch for your wayward cell phone (admit it: you use this method to find your phone all. the. time), and some clue papers.

Get: clues 6-9, and a very strange crossword. Or word search. Or something.

GGG

After reentering the bathroom code (Neutral, did you get so exhausted by the out-of-this-world Elements that you forgot to pay attention to these little details?), look at the blue box, the very strange crossword, and the maze on the wall under the broken green cabinet.

Read the "crossword" as given by the maze, then do as instructed.

(Key)=GEA PUSH"OPEN"TEN TIMES

Get: extension cord

Halloween Night

If you've been observant, you know exactly where the extension cord is needed.

Plug in the "Halloween Night" sign, silly.

Wonder what this button does?

Press the button repeatedly, and notice what the sign does each time.

First, most of the letters turn red, but "o", "w", and "t" remain dark. Next, the letters turn blue, except for "e", "n", "N", and "i". Then we get green with "o", "e", and "n" staying off, and lastly, it's white, with "e" and "ight" dark.

Get: a color + number clue.

Grate

Use the clue from the Halloween Night sign to open the padlock and get the corkscrew.
Colorblind:

The dials are in the same order as the clues.

Paul:

2918

Now, why on earth do we need a corkscrew? The only wine bottle in the room is in teeny-tiny pieces.

Examine the corkscrew to get a key.

Cabinets

First, the obvious one: use the corkscrew/key to open the bottom half of the broken green cabinet. Get a flashlight. (No batteries, of course.)

Next, a bit of language barrier to overcome: one of the clue papers says that the brown cabinet door isn't locked, it's just stuck. (Or something to that effect.)

Try knocking on the edges and corners of the cabinet door; one spot sounds different. Knock there repeatedly, then try the handle.

If you don't have sound, it's the bottom left corner.

Get: clue papers #10 and #11, and a card that says TEXT.

EXIT

Hmm, TEXT and EXIT have an awful lot of letters in common. And that door is the same color as the the last T in TEXT.

Click the E, X, and T of EXIT, then click the grid below to form a blue T shape.

Freedom! Or maybe not. That's one dark hallway, sure wish the flashlight had batteries.

Look at the lamp, or rather, next to the lamp.

Get the battery and put it into the flashlight. Don't worry about the switch not staying on; you can still use the flashlight.

Use the flashlight to examine the hallway.

The switch on the right doesn't seem to do anything, and won't stay down. There's a pit in the middle of the floor. On the left, there's a calendar with some days circled, and a panel of some sort with a big red button. Go ahead and press the big red button.

This is language barrier #2, and way more serious than the first: you need to combine the circled days on the calendar with the corresponding clue papers to get certain words/syllables, which you then combine into colors for the eye, hand, skull, and cat. Yeah, just go ahead and read the solution.

Yellow eye, red hand and skull, green cat.
Colorblind: that's 4 clicks on the eye, 1 click each on the hand and skull, and 6 clicks on the cat.

Once you've set the picture colors correctly, press down the switch on the right, then wait. Eventually, a bit of checkerboard floor fills the pit, and there's all sorts of goodies on it.

Examine the goodies.

The key is right there in the middle. And you don't even have to use it, it's enough to just touch it. (Must be a portkey.)

Room 10: Heart Walkthrough

As per my usual, I'm assuming you've already taken a look around the room, and have at least a vague idea of where things are, so there will be no "turn right twice and click the doohickey" types of instructions. There will be colorblind instructions for the one puzzle that needs them.

Nightstand box

The clue is one of the cowbells around the room; just make sure it matches exactly.

Only one of the cowbells has a small button on top and a large button on the bottom.

It's the one on the exit door (the one with no window): blue red yellow yellow red blue (that's left to right, top to bottom).
Colorblind: 1 click = red, 2 clicks = yellow, 3 clicks = blue, then 4 clicks takes you back to red. If you zoom out, it'll reset to all white.

Get: a diamond-shaped chocolate

Top desk drawer (3 buttons)

First, find a knob.

Check the alphorn.

Next, find a place to use said knob. (It might help if you turn the knob around and look at its post.)

Maybe that other drawer with three buttons? With that flat slot underneath?

Look at the table to the right of the curtains. Put the knob into the slot. Turn the knob to each position and open the drawer.

Left: coat hook. Middle: picture of the Matterhorn. Right: tea kettle.

Now it's time to find some, um, "numbers".

Look for each of the items in the room, and note the symbols on it.

For example, underneath the teapot's lid (on the desk) there are three symbols. The first looks like a Roman numeral 3, then there's something that looks like an 8 with an extra crossbar, then there's a backwards 4. (I'm not even going to attempt to describe the symbols on the coat hook.)

Where else have we seen symbols like this?

Check the book (on the desk). The pages are "numbered" with exactly the same symbols.

Translate the symbols on the items into numbers, then press the corresponding buttons.

Left, middle, right, right, left, left, right, middle.

Get: a back-scratcher

Bottom desk drawer (4 digits)

The book tells you how to get this number.

The second page gives the height of the Matterhorn as 4478 meters, and the third and fourth pages say to subtract from this height a number that has to do with a house with trees next to it.

Hmm... maybe that's not a house, maybe that's a cuckoo clock.

Use the back-scratcher to pull the chain of the clock repeatedly and note the numbers. (You'll need to extend the back-scratcher first.)

2854

Do the math to get

1624

Get: a key

Arrow box in closet

(The closet is the door with a window. The key is in the bottom desk drawer.) You need two sets of arrow clues.

One set ("B") is right there on the skis. The other is in the main room, but it's initially hidden.

Open the curtains to see the "A" arrows.

Put the two clues together as indicated.

Down, left, right, left, down, right, up, down. (Note that those are the directions the arrows are pointing, but if you look at the flower on the box, you're actually pressing opposite to those directions. E.g. the arrow pointing left is the right side of the flower.)

Get: a round chocolate

Middle desk drawer

The key is in the right bedpost. Well, gee, that got us far. Not.

Box in middle desk drawer

There are five pictures in green frames in the room and the closet. Put them together.

The picture in the closet says "CHEESES". The four pictures in the room all have words that happen to start with those letters (egg, cowbell, swiss, honey).

TR, BR, TL, TL, BL, TL, BL

Get: a square chocolate

Round box connected to blue picture

On the table to the right of the curtains, there's a round pink box. In the box, there are three indentations: square, heart-shaped, and circular.

You have things to put in the diamond-shaped and circular spaces: the chocolates from the nightstand and arrow box. You have a third chocolate, but it's the wrong shape. If only there were a way to melt it down and reshape it.

In the closet, when you're looking at the skis, there's a darker spot on the floor. Use the ski pole to smash it open.

This gets you a heart-shaped mold. Now for a source of heat...

Look at the radiator in the closet. Is it on?

Turn the knob so the red lines match up.

Put the square chocolate into the dish that's conveniently sitting on the radiator. Wait for it to melt (which in game world means zoom out and come back). Collect the dish.

Look at the heart-shaped mold, then pour in the melted chocolate.

Put the chocolates into the round pink box, then get the key from behind the picture.

24 Comments

Night Stryke October 28, 2015 11:28 AM

I'm afraid that not being able to read Japanese makes the last puzzle of Wicked Room actually impossible.

Reply

Stuck in Wicked Room. I have:

A torch with no battery
A whole bunch of notes in Japanese.

Have I reached the point where I can't go further without knowing what the notes say?

Reply
Daibhid C October 28, 2015 1:10 PM

POP! (Well, power of desperate clicking!)

I've now opened the EXIT door and acquired a battery. Looked through the exit hall, but no idea what to do next. I guess this is the last puzzle?

Reply

Dora, I am 100% behind you if you want to Kickstart that Pizza and Garlic Bread Store idea. :-)

Reply
Night Stryke October 28, 2015 1:34 PM replied to Daibhid C

Yes, and you cannot solve it if you can't read Japanese.

You have to read the words on each note that correspond to the circled days on the calendar, and that tells you which picture is which color. I had to look it up myself. The eye is yellow, the hand and skull are red, and the cat is green.

Reply
Daibhid C October 28, 2015 1:37 PM replied to Night Stryke

Thank you!

It was a great game right up until that point.

Reply

There are only two parts where you need to read the Japanese in Wicked Room:

You don't actually need to read until you have picked up the fourth set of notes. Note however that most puzzles cannot be brute-forced until you have seen the required information to solve them.

Reading through the fourth set of notes will unlock the hotspot on the closet. This will make a different sound when you click near it.

You should have five sets of notes for the final puzzle. Taking symbols from the eleven notes will give you the clue in Japanese. You could brute-force the required combination (after viewing all the required information), but here it is:

Yellow eye, red hand and skull, green cat.

Reply

Question about Wicked Room.

I watched a video explaining how to open up the brown cabinet that is to the left of the couch and Halloween Night sign.

I tried what the video did and was able to open the cabinet.
.
.
.
But I do not understand how one could figure it out from the clues in the game.

I just clicked on the bottom left a few times and then on the bottom of the cabinet and it popped open. Made no sense to me at all.

.
.
.
I will say that the message clue with the various shapes - circle, square, star, diamond - was quite interesting and challenging. I was stuck for a while until I realized that...

the filled in shapes represented different numbers than the white (or unfilled) shapes. And that each number had to be different. If you don't apply those rules, you cannot figure out the numbers.

Reply
Patreon Donator Reka October 28, 2015 4:06 PM replied to WillYum

I assume the explanation of why the cabinet opens the way it does is contained in the text of one or more of the cards we get, but since it's in Japanese, we (well, most of us) can't read it.

Reply
Patreon Crew SonicLover October 28, 2015 5:21 PM replied to Reka

I think I can offer an explanation for the cabinet, as I remember a similar scenario in one of Neutral's older games.

The cabinet door was never locked, it was just stuck. Striking the door in that spot got it unstuck.

Reply

Candy Shop

Supposedly I have the clue to solve the drawer with the 4letter word, but I cant for the life o f me figure it out. And yes I did try cake.

Reply

How to figure out the math puzzle in Wicked Escape

First, note that the white shapes are different numbers than the black shapes, and each shape is a different number. Also, remember that zero is a perfectly good number, and that when you're adding two base-10 numbers, the most you're ever going to carry is a 1.

  abcb
+abde
-----
ccfgh

We know f is 3.

Starting from the end, cc can only be 11, since even the next possibility (22) would require us to carry a 4, which ain't happening. (Two times 9, the largest digit, is 18, plus 4 is 22.) This means that a must be 5, and we need to carry a 1 from the previous column.

There isn't an integer solution to 2b = 3, so we need to carry a 1 from c+d = g. This means that b is either 1 or 6, but a 1 wouldn't let us carry anything to the next column. So b = 6.

This gets us to:
  5616
+56de
-----
113gh

The remaining digits are 0, 2, 4, 7, 8, 9.

The unique digits constraint means that e can't be 0 (because then h would need to be 6, which is already taken), 7 (because 3 is taken), or 9 (because 5 is taken). If we try 8 in that spot, that means h is 4 and we carry a 1, but then d must be 9 (because we need to carry a 1), but that makes g a 1, which is already taken. If we try 4 as e, then d can be 8 (since we already know 9 would be a problem), but that makes both g and h into zeroes. So e must be 2, which makes h an 8.

This means that d must be 9, since that's the only number that would let us carry the one, and that makes g into a 0.

So the equation is
  5616
+5692
-----
11308

and the shapes are: star = 8, circle = 2, square = 9, diamond = 0.

Reply

@me,

the middle drawer says O=15, the four covered jars have numbers that need translating to letters

Reply
RamblinRob October 28, 2015 7:50 PM

Am I the only one who realizes that next week (Wednesday, November 4) will be the 100th Weekday Escape? Congratulations!

Thanks for all the hints everyone. You're making Wicked Room much easier to get through.

Reply

I LOVE TomaTea so much, I really do.

However, I do have one issue with this latest game.

TomaTea gives us a

fork

inside this beautiful and rather appetising shop, but

doesn't let us use it to eat CAKE?!

:)

Reply

Congratulations, Dora and JIG, on the upcoming 100th anniversary! I have been visiting here for many years and wanted to thank you for all the fun escaping!

Reply
me October 29, 2015 12:49 AM replied to lorac

Of course - zero, circle, letter O it always defeats me in my thought process.

Reply

@bluebird

Considering what happens to that particular item it's probably for the best. :(

Reply
baileydonk October 29, 2015 9:01 PM

In Candy Shop, I can't figure out the 4x4 grid, although I assume the clue is

under the triangular cake.

Reply
nerdypants October 29, 2015 9:36 PM

baileydonk, the 4x4 grid in Candy Shop:

It's hanging on the wall somewhere.

Check the unfinished puzzle to the left of the counter.

Reply

Candy Shop Escape Walkthrough/Solutions Guide

The Puzzles

Drawer 1 (up-down buttons)

Clue: cake slices

on the shelves, there are 6 slices of cake, 3 on the left and 3 on the right. Note which way the slices point.

up, down, up, up, down, up

Get: donut

Drawer 2 (4 colors)

Clue: cake squares with berries

Each table has a square of cake. Note the color of the icing, as well as the number of berries on top.

red: 3, blue: 2, yellow: 4, green: 1.
Colorblind:

1 click, 4 clicks, 2 clicks, 3 clicks

Get: puzzle piece

Drawer 3 (4 numbers)

(This'll be the last puzzle you solve) You will need:

  • Green lollipop

    Solve the cupcake picture

  • Pink donut

    1st drawer

  • Candy cane #1

    in one of the cupcakes above the brown gelatin dessert

  • Candy cane #2

    4th drawer

  • Candy cane #3

    5th drawer

  • Candy cane #4

    4x4 picture

  • Broken fork

    Get the (whole) fork from the red cake, then use it to pry open the green canister, breaking it in the process

Put everything in place, then do some math.

The lollipop and the donut should be obvious. Use the broken fork to open the cabinet under the two displays, then put the candy canes in the indentations. Note the shape made by the canes.

It's supposed to be a multiplication sign. Yes, I know.

Look at the faces of the two displays and note the numbers in the highlighted wedges.

Lollipops = 47, donuts = 63

Do the math.

2961

Get: the key!

Drawer 4 (4 letters)

Clue: canisters plus letter hint (see 5th drawer)

The canisters have numbers on the underside of their lids. Use the fork (from the red cake square) to pry open the green canister.

The drawer hint says O=15; that's a letter O, not a numeral zero.

It's a standard "number the letters of the alphabet" cypher. Brown = 3 = C, yellow = 1 = A, green = 6 = F, pink = 5 = E.

Get: candy cane

Drawer 5 (4 shapes)

Clue: 3 pink cupcakes on bottom right shelf

Count each shape. Hint: there's more than one circle.

1 square, 2 hearts, 3 stars, 4 circles

Get: candy cane, O=15 clue

Drawer 6 (4x4 buttons)

Clue: the incomplete puzzle

Note which pieces are missing from the puzzle. Click those buttons.

Bottom left to top right diagonal, plus bottom right corner

Get: puzzle piece

Cupcake picture

Clue: gumball machine and the cupcake on the shelf that greatly resembles the picture (on the right above the pink gelatin dessert).

That thing you get from the gumball machine is a maraschino cherry. Yes, really. (Solve the triangles picture to get the coin.)

Put the cherry on the cupcake, then note the colors (green stem, red cherry, brown frosting, pink cupcake, yellow paper). Set the cupcake picture accordingly.
Colorblind:

stem = 3 clicks, cherry = 4 clicks, frosting = 5 clicks, cupcake = 1 click, paper cup = 2 clicks.

Get: green lollipop

4x4 picture

Clue: under yellow cake triangle; also need to solve the puzzle picture.

Put the teapot in the top left dot, then move it along the path indicated by the clue by clicking each dot in turn.

Get: candy cane

Triangles picture

Clue: the cake squares on the tables and the yellow cake triangle on the counter.

The yellow triangle is for orientation; you need to set the corner squares to the appropriate colors. The middle "+" shape remains black, except for that yellow wedge of course.

Top left = green (2 clicks on each wedge), top right = red (1 click), bottom left = yellow (3 clicks), bottom right = blue (4 clicks).

Get: coin

Puzzle picture

Pieces:

  • 2nd drawer

  • Behind pink gelatin dessert

  • 6th drawer

  • On table with green cake

  • On the counter next to yellow cake triangle

Picture:

The cup of coffee (or is that tea?) goes in the middle of the top row. The strawberries are mostly on the leftmost square of the 2nd row from the top. You should be able to figure it out from there.

Get: strange spiky teapot

Order of Operations (aka Walkthrough Schematic)

  1. Drawer 1

  2. Drawer 2

  3. Drawer 5

  4. Drawer 4

  5. Drawer 6

  6. Puzzle picture

  7. 4x4 picture

  8. Triangle picture

  9. Cupcake picture

  10. Drawer 3

Reply

Wicked Room Walkthrough

Hatbox

For this, you need the clue page set #2, which is along the right wall, to the right of the pumpkin picture/decal.

The sequence for pressing the buttons is right there on the card.

left, right, top, bottom, top.

Get: a pumpkin. Well, except you can't actually take it out. And if you close the box, you need to solve it again if you want to open it. So make sure you note everything that's notable about the pumpkin.

Pumpkin Math

Clue page #1 is on the couch. Underneath it is a formula for getting a key.

Note the directions the triangles are pointing.

The pumpkin in the middle of the floor has upward-pointing triangles for the eyes, and it has an 11 written on its bottom. The pumpkin on the right wall has its eyes pointing at each other, and if you peel up the bottom, it says 31. And the pumpkin in the hatbox had downward-pointing eyes and had a 10 on its bottom.

Plug in the numbers and get a 3-digit number. (Remember your order of operations: multiply first, then add.)

321

Now, where could you use a three-digit number?

The only place is that Mondrianic picture on the wall.

Get: clue papers #3, #4, and #5, plus some shape math.

Shape math

In the clue packet you get from the picture, there's a card with shapes on it. Solve for the white shapes.

In addition to the black star = 3 hint that's right on the card, you also need to know that the white shapes are different numbers than the black shapes, and each shape is a different digit. (Oh, and 0 is a perfectly valid digit.)

I've already posted a detailed explanation for solving the equation, so I won't repeat it here. The solution is
  5616
+5692
-----
11308

and the shapes are: star = 8, circle = 2, square = 9, diamond = 0.

Get: code for the restroom door. (Make sure you write it down or remember it, because the bathroom door locks again if you leave.)

Phone

There's some writing on the right wall of the restroom. Most of it is useless to us clueless westerners, but that "SOaP-ElSE" on the top looks... intriguing.

Look in the mirror.

That's not SOaP-ElSE, that's 3213-9602.

Dial the number (the phone is in the alcove right above the writing) and listen. Why is it ringing twice?

It's not one phone ringing twice, it's two different phones. Go back in the room and look under the couch for your wayward cell phone (admit it: you use this method to find your phone all. the. time), and some clue papers.

Get: clues 6-9, and a very strange crossword. Or word search. Or something.

GGG

After reentering the bathroom code (Neutral, did you get so exhausted by the out-of-this-world Elements that you forgot to pay attention to these little details?), look at the blue box, the very strange crossword, and the maze on the wall under the broken green cabinet.

Read the "crossword" as given by the maze, then do as instructed.

(Key)=GEA PUSH"OPEN"TEN TIMES

Get: extension cord

Halloween Night

If you've been observant, you know exactly where the extension cord is needed.

Plug in the "Halloween Night" sign, silly.

Wonder what this button does?

Press the button repeatedly, and notice what the sign does each time.

First, most of the letters turn red, but "o", "w", and "t" remain dark. Next, the letters turn blue, except for "e", "n", "N", and "i". Then we get green with "o", "e", and "n" staying off, and lastly, it's white, with "e" and "ight" dark.

Get: a color + number clue.

Grate

Use the clue from the Halloween Night sign to open the padlock and get the corkscrew.
Colorblind:

The dials are in the same order as the clues.

Paul:

2918

Now, why on earth do we need a corkscrew? The only wine bottle in the room is in teeny-tiny pieces.

Examine the corkscrew to get a key.

Cabinets

First, the obvious one: use the corkscrew/key to open the bottom half of the broken green cabinet. Get a flashlight. (No batteries, of course.)

Next, a bit of language barrier to overcome: one of the clue papers says that the brown cabinet door isn't locked, it's just stuck. (Or something to that effect.)

Try knocking on the edges and corners of the cabinet door; one spot sounds different. Knock there repeatedly, then try the handle.

If you don't have sound, it's the bottom left corner.

Get: clue papers #10 and #11, and a card that says TEXT.

EXIT

Hmm, TEXT and EXIT have an awful lot of letters in common. And that door is the same color as the the last T in TEXT.

Click the E, X, and T of EXIT, then click the grid below to form a blue T shape.

Freedom! Or maybe not. That's one dark hallway, sure wish the flashlight had batteries.

Look at the lamp, or rather, next to the lamp.

Get the battery and put it into the flashlight. Don't worry about the switch not staying on; you can still use the flashlight.

Use the flashlight to examine the hallway.

The switch on the right doesn't seem to do anything, and won't stay down. There's a pit in the middle of the floor. On the left, there's a calendar with some days circled, and a panel of some sort with a big red button. Go ahead and press the big red button.

This is language barrier #2, and way more serious than the first: you need to combine the circled days on the calendar with the corresponding clue papers to get certain words/syllables, which you then combine into colors for the eye, hand, skull, and cat. Yeah, just go ahead and read the solution.

Yellow eye, red hand and skull, green cat.
Colorblind: that's 4 clicks on the eye, 1 click each on the hand and skull, and 6 clicks on the cat.

Once you've set the picture colors correctly, press down the switch on the right, then wait. Eventually, a bit of checkerboard floor fills the pit, and there's all sorts of goodies on it.

Examine the goodies.

The key is right there in the middle. And you don't even have to use it, it's enough to just touch it. (Must be a portkey.)

Reply

Room 10: Heart Walkthrough

As per my usual, I'm assuming you've already taken a look around the room, and have at least a vague idea of where things are, so there will be no "turn right twice and click the doohickey" types of instructions. There will be colorblind instructions for the one puzzle that needs them.

Nightstand box

The clue is one of the cowbells around the room; just make sure it matches exactly.

Only one of the cowbells has a small button on top and a large button on the bottom.

It's the one on the exit door (the one with no window): blue red yellow yellow red blue (that's left to right, top to bottom).
Colorblind: 1 click = red, 2 clicks = yellow, 3 clicks = blue, then 4 clicks takes you back to red. If you zoom out, it'll reset to all white.

Get: a diamond-shaped chocolate

Top desk drawer (3 buttons)

First, find a knob.

Check the alphorn.

Next, find a place to use said knob. (It might help if you turn the knob around and look at its post.)

Maybe that other drawer with three buttons? With that flat slot underneath?

Look at the table to the right of the curtains. Put the knob into the slot. Turn the knob to each position and open the drawer.

Left: coat hook. Middle: picture of the Matterhorn. Right: tea kettle.

Now it's time to find some, um, "numbers".

Look for each of the items in the room, and note the symbols on it.

For example, underneath the teapot's lid (on the desk) there are three symbols. The first looks like a Roman numeral 3, then there's something that looks like an 8 with an extra crossbar, then there's a backwards 4. (I'm not even going to attempt to describe the symbols on the coat hook.)

Where else have we seen symbols like this?

Check the book (on the desk). The pages are "numbered" with exactly the same symbols.

Translate the symbols on the items into numbers, then press the corresponding buttons.

Left, middle, right, right, left, left, right, middle.

Get: a back-scratcher

Bottom desk drawer (4 digits)

The book tells you how to get this number.

The second page gives the height of the Matterhorn as 4478 meters, and the third and fourth pages say to subtract from this height a number that has to do with a house with trees next to it.

Hmm... maybe that's not a house, maybe that's a cuckoo clock.

Use the back-scratcher to pull the chain of the clock repeatedly and note the numbers. (You'll need to extend the back-scratcher first.)

2854

Do the math to get

1624

Get: a key

Arrow box in closet

(The closet is the door with a window. The key is in the bottom desk drawer.) You need two sets of arrow clues.

One set ("B") is right there on the skis. The other is in the main room, but it's initially hidden.

Open the curtains to see the "A" arrows.

Put the two clues together as indicated.

Down, left, right, left, down, right, up, down. (Note that those are the directions the arrows are pointing, but if you look at the flower on the box, you're actually pressing opposite to those directions. E.g. the arrow pointing left is the right side of the flower.)

Get: a round chocolate

Middle desk drawer

The key is in the right bedpost. Well, gee, that got us far. Not.

Box in middle desk drawer

There are five pictures in green frames in the room and the closet. Put them together.

The picture in the closet says "CHEESES". The four pictures in the room all have words that happen to start with those letters (egg, cowbell, swiss, honey).

TR, BR, TL, TL, BL, TL, BL

Get: a square chocolate

Round box connected to blue picture

On the table to the right of the curtains, there's a round pink box. In the box, there are three indentations: square, heart-shaped, and circular.

You have things to put in the diamond-shaped and circular spaces: the chocolates from the nightstand and arrow box. You have a third chocolate, but it's the wrong shape. If only there were a way to melt it down and reshape it.

In the closet, when you're looking at the skis, there's a darker spot on the floor. Use the ski pole to smash it open.

This gets you a heart-shaped mold. Now for a source of heat...

Look at the radiator in the closet. Is it on?

Turn the knob so the red lines match up.

Put the square chocolate into the dish that's conveniently sitting on the radiator. Wait for it to melt (which in game world means zoom out and come back). Collect the dish.

Look at the heart-shaped mold, then pour in the melted chocolate.

Put the chocolates into the round pink box, then get the key from behind the picture.

Reply

In case this happens to anyone else, I encountered bugs/glitches in Wicked Room with

the hatbox

and

the phone in the bathroom.


For the first one,

I had to enter the correct code on the hatbox repeatedly until it arbitrarily decided to work once.

For the second,

whenever I tried to enter a number on the phone, the majority of the time it entered each number twice - i.e., if I pressed "3", the phone showed "33".


I restarted my game multiple times, but it didn't help.

If anyone else is playing on Firefox and having these problems, the only semi-solution I found was to update from the previous version to the most up-to-date version of Firefox (42.0), which was released yesterday (3 November). After doing that and loading Wicked Room again, the bugs were still there, but their severity was lessened. For example,

it took fewer tries to get the hatbox open, and it took less than ten tries for me to be able to consecutively enter each number as a single number on the phone.

I didn't have any other problems with the game and was able to complete it successfully.

Reply

^ Scroll Up | Homepage >

Leave a comment [top of page]

Please consider creating a Casual Gameplay account if you're a regular visitor here, as it will allow us to create an even better experience for you. Sign-up here!
  • PLEASE UNDERSTAND SITE POLICIES BEFORE POSTING COMMENTS
  • You may use limited HTML tags for style:
    (a href, b, br/, strong, em, ul, ol, li, code, spoiler)
    HTML tags begin with a less-than sign: < and end with a greater-than sign: >. Always. No exceptions.
  • To post spoilers, please use spoiler tags: <spoiler> example </spoiler>
    If you need help understanding spoiler tags, read the spoiler help.
  • Please Preview your comment before posting, especially when using spoilers!
  • No link dropping, no domains as names; do not spam, and do not advertise! (rel="nofollow" in use)
chrpa Jayisgames needs your help to continue providing quality content. Click for details Hi! Weekday Escape and Weekday Puzzle are here! First we have two new cans from tomoLaSiDo and then two small rooms from isotronic. That's all for this...  ...
6,365 Views
0 Comments
chrpa Jayisgames needs your help to continue providing quality content. Click for details Welcome to Mobile Monday! We have another beautiful game from Nicolet and it's a winter game as it should be. Tasuku Yahiro have released another of their...  ...
6,161 Views
2 Comments
chrpa Jayisgames needs your help to continue providing quality content. Click for details We've got a new game from Rinnogogo's magical world and this time it really is magical.. Not only do you get to meet cute animals that express themselves...  ...
chrpa Jayisgames needs your help to continue providing quality content. Click for details After a few weeks of patient waiting, we have been rewarded - the new game from Ichima Coffeedo is here. We got a wonderful new game - it's...  ...

HELP Jayisgames.com

Recent Comments


Display 5 more comments
Limit to the last 5 comments

Game of the week


Dark Romance: Vampire Origins Collector's Edition

Your Favorite Games edit

add
Save links to your favorite games here. Use the Favorites editor.

Monthly Archives