

![]() It's time again for Weekday Escape, and since I'm feeling a little bit adventuresome, let's take a look at three escape games that remind us that escape-the-room games are really a spinoff of the classic point-and-click adventure genre. Each of the following creations from Selfdefiant, Tototo Room and Esklavos—while distinctly different in their artistic renderings—are replete with rewards for those willing to explore and experiment. Best of all, you don't need to pack your bags, stand in airport security lines, or learn to talk like the locals. Just point and click...
It's time again for Weekday Escape, and since I'm feeling a little bit adventuresome, let's take a look at three escape games that remind us that escape-the-room games are really a spinoff of the classic point-and-click adventure genre. Each of the following creations from Selfdefiant, Tototo Room and Esklavos—while distinctly different in their artistic renderings—are replete with rewards for those willing to explore and experiment. Best of all, you don't need to pack your bags, stand in airport security lines, or learn to talk like the locals. Just point and click...
 Break Free the Temple - If that little Indiana Jones sitting on your shoulder is becoming a nag, this escapade from Selfdefiant is just the thing to shut him up, at least for the 5 or 10 minutes it'll take you to break out of your makeshift prison inside this labyrinth temple. While part of a themed series of Break Free titled escapes, it stands on its own merits and feels satisfyingly complete with a clean interface, changing cursor, no pixel hunts and rather strait-forward puzzling while puzzles have minigame aspects to them. There are a lot of rooms and walls to explore so it's possible to lose your bearings and get a bit lost, but that's all part of the adventure. You can't earn your dusty leather fedora and whip without upsetting a few local tribes. What are you, after all, a tourist or a great explorer?
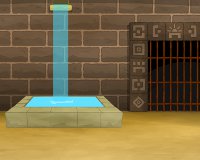
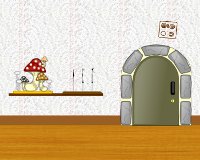 Button Escape 14 - Until last week's Button Escape 24, all the find-the-button entries we've featured from Tototo Room have been single-walled affairs. While Tototo Room does a fine job of packing in lots to do within those flat scenes, I must admit I enjoy being able to turn around and scan what's behind me. So #14 merits a spin of the time-turner to find another once-overlooked gem. The hand-drawn artwork is humble and charming while the challenge paddles close to the shallow end of the pool, yet the multiple rooms and cleverly-presented puzzles keeps it interesting. With the simple goal of looking for and clicking on eleven buttons, this might not be a grandiose exploit worthy seasoned escapers yet it's an enjoyable sojourn all the same. Because of those moments when you just need to chill.
 Ancient Forest Escape - Once upon a time, the world was infused with magical places where enchanted portals could transport you wherever you needed to go. Esklavos harkens back to those times with this beautiful and atmospheric escape. The interface will feel rather clunky for those of us spoiled by the likes of Robamimi and Kotorinosu, yet it's mostly a matter of remembering to select the hand icon before highlighting and using objects and, if you do find reason to combine your inventory, selecting the plus icon is the way to go. Sure, we think it's time for new music and more originality in the puzzles department, but it's the richly saturated artwork and a chance to be part of a fantasy adventure that makes Ancient Forest Escape worth our notice. Success requires some inference and experimentation, but otherwise escape is easy: just collect the four colored keys and turn them in their respective keyholes. I only wish all means of transportation were so magical.
We love escape games, and our readers love talking about them and sharing hints! How about you? Let us know what you think, ask for clues, or help out other players in the comments below.


Walkthrough Guide
(Please allow page to fully load for spoiler tags to be functional.)
Walkthrough for Ancient Forest Escape
Abbreviations used in the walkthrough:
LS = Left scene
MS = Middle scene
RS = Right scene
Getting started
1. RS: take the knife (from the stone left of the pillar)
2. RS: take thestick (slightly to the top left of the knife)
3. LS: use the knife on the stone on the left to get the cloth
4. Combine the cloth and stick to create a torch
5. MS: light the torch by holding it at the lantern
6. RS: use the burning torch to scare away the spider
Yellow key
7. RS: take the shovel
8. RS: use the knife to get the flower (bottom right)
9. LS: use the knife to cut the mushroom (bottom of the screen)
10. LS: use the shovel on the pink pile and pick up the roots from the hole
11. LS: put the flower, roots and mushroom in the bowl (as instructed on the stone on the right)
12. LS: use the burning torch on the bowl
Red key
13. LS: click the yellow stone. What could that message mean?
What do you use to look at someone?
14. LS: change all 4 icons (show up after getting the yellow key) to the eye-icon
Blue key
15. RS: read the clue on the pillar
16. RS: take the urn (on top of the pillar)
17. RS: use the urn on the white eyes in the background to catch a demon
18. MS: use the urn on the white eyes in the background to catch a demon
19. LS: use the urn on the white eyes in the background to catch a demon
20. RS: put the urn back on top of the pillar
White key
21. MS: press the branches at the bottom left for a close-up view (at the base of the tree)
22. MS: replicate the pattern you found on the pillar in the RS (step 15 in the Blue key section)
Final step
23. MS: add all keys to their respective locks
Posted by: Crouch |
October 8, 2014 6:21 AM
|
October 8, 2014 6:21 AM
Button Escape 14
Buttons
1-5 on top, 6-10 on bottom, plus 11
1
Behind the llama, when the pool is ready
2
Above the faucet
3
Under the J's box
4
Behind the cane stand
5
By the circles and X over the stone door
6
By the mirror
7
Behind the mushroom art
8
Be certain that when you find this one you'll not miss it.
9
Behind the cat (it's a cat, I'm telling you) when the pool is ready
10
Behind the llama poster
11
Below the faucet
Exploration
View with the door and buttons
That message poster, the llama loves the cool biz. Also,
Grab the note behind the poster
The cane stand
Nice how it levitates, isn't it?
Safe
Seems securely shut, for now
Going right, we see...
The llama isn't loving the cool biz just now
And that big llama ball is occluding
One of the buttons that must be pressed, later
Again to the right...
On the shelf, to the left
A wonderful piece of mushroom art
And on the shelf to the right
Are those burned incense sticks?
Looking up
Someone took a crayon to the wallpaper, circles with an X
And a very large
very strong door in a very strong stone frame
To the right one more time
On the floor
It's a cat, I'm sure of it... and it's hot, so hot...
By the cabinet
There's a bear, and even though it's hot, it has a blanket on it's lap!
Above the bear
There's mirror and a panel. Behind the mirror we need numbers.
On the cabinet
A box with some J's? A puzzle!
Oh, and notice the cabinet
Has 4 panels that can be opened, one with an X
Time to solve some puzzles!
Solving
The cabinet
Our clue is written in crayon above the stone door
The picture represents the structure of the cabinet
X marks the spot!
Click between the two top panels. Get the placard, or sign, or whatever it is.
The J's puzzle
This took me the longest time. Truth be told I cheated, Google to the rescue.
Where have we seen 4 things?
4 very artistic things, all together
The mushrooms!
Large red, medium brown, small black, smaller gold. Also note:
The pattern is consistent and points right or left
So the solution is:
Normal red, backward brown, backward black, forward gold
(Colorblind: click 6 on first, 1 on second, 5 on third, 2 on forth). Get the key.
Stone door
Get the key from the J's puzzle, open the door and find...
Hope for relief from this heat, here's a pool here and water! Aw, but:
The pool is deflated and needs water in it
What else do we see...
A faucet that provides water, wasted down the drain
And also
What's that on the lower right, some kind of sign?
The numbers behind the mirror
We need two pieces to solve this
Hang the placard from the cabinet with
The sign from beside the pool to get our answer,
4869, kinda neat! Enter the number and get
A blue noodle?
The safe
So take the notecard from behind the poster
And get it wet using water from the faucet. Half a clue?
What could double it? Make us see two?
The mirror, stick it to the mirror, get the screwdriver and observe the clue.
The "safe" panel opens with the screws pulled, what's the required combo?
The angle is the clue
Turn the A right side up, rotate the plus to make x, etc
AXKE. Take the pump!
Grand Finale
Time to solve this heat problem, go outside.
It's not a noodle, it's a hose! Connect it to the faucet.
Pump up the pool then fill it up
Gotta put the hose in the pool. HINT: If you own a pool, you want to invite as many of your friends as you can to always just come use it whenever, otherwise it's too much work. So...
Go get the llama and the cat, who likes to swim.
Then go out and observe the animals enjoying relief from the heat. What's that llama's name?
That's what the cat is thinking... Mufo, Mafo... then the llama says it's Mofuo. Mofuo the Llama who loves cool biz! One puzzle left.
Craft the M carefully using the buttons, as shown by the dialog. You are out! (?)
Posted by: callmerob |
October 8, 2014 11:04 PM
|
October 8, 2014 11:04 PM