
 Hi! Welcome at the first Weekday Escape in 2020!
With Amajeto's you return to recent Christmas season and may enjoy the magical night once more. With Ichima Coffeedo you return too, their game is a remake of five years old escape. Maroya continues the story about kittens exploring their new home and Spiceapp (earlier Gotmail) presents an escape from a pleasant apartment with own yard.
Have a good time and enjoy!
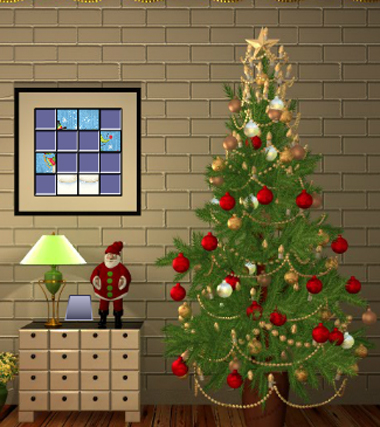
You are trapped in perfectly decorated living room, and to escape it you need to collect ten tiles and solve several puzzles. Amajeto's creativity seems to be bottomless. You need to figure out usual number of codes and some are surprisingly cunning (especially after all the puzzles the devs have already fabricated). Will you escape?
The cursor is changing, no save button, one ending.
Ichima Coffeedo's cute game was released as 'Room 6: Winnie Thick' few years ago (not accessible anymore) - this game is its new version in Unity.
You find yourself locked in a colorful room together with stuffed Poohta but your and Poohta's goals are different. Yes you are both going to leave the room, however, you need to open the big green door and the bear the small blue one - can you solve all the clever puzzles and escape? And what about Poohta?
The cursor isn't changing, autosave, one ending.
P.S. One more transferred game by the same authors is Antique Green in WE N°142.
Maro and New Home - 1st Floor - Part 4

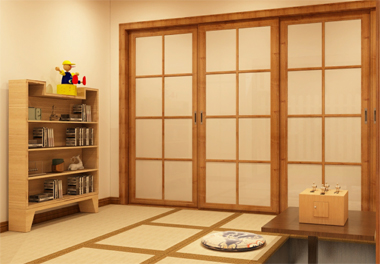
Maroya's kitties continue in exploring the new house which haven't changed much from the last time you saw it. Boxes and hardly any furniture, simply a house right after moving in. And many puzzles which aren't very common in new houses (as far as I know). Start to look for items and hints and if you get stuck you've probably overlooked something - notice, that red arrows used for moving around are important as they may help to discover an unexpected view. This isn't the last room in the house - we have ahead of us the second floor!
The cursor is changing, no save button, one ending.
P.S. Prequels are here: WE N°204, WE N°217, WE N°227.
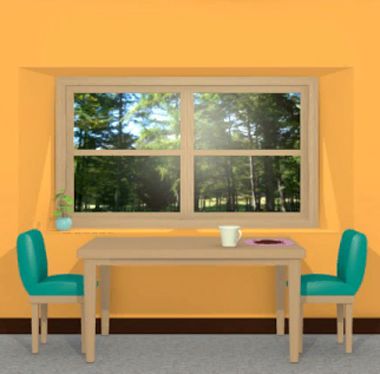
Spiceapp locked you in a really nice apartment in Japanese style where everything is warm, homey and overall inviting; you are supposed to leave it though. The gameplay is quite linear and hotspots aren't very obvious (some not at all) so you have a lot of clicking to do. Dramatic soundtrack suggests a game twist but none comes (no blood stains or hidden ghosts), this is just a regular escape.
The cursor isn't changing, autosave, one ending.
The game is available for Android too.
We love escape games, and our readers love talking about them and sharing hints! How about you? Let us know what you think, ask for clues, or help out other players in the comments below.


can't wait for these :)
no hurry. just reminding.
Do you need one walkthrough in particular? I have never written one, but I could give it a try =)
Amajeto Holiday:
Puzzle pieces locations:
-Puzzle piece 1 on the left of the Santa decoration
-Puzzle piece 2 in front of the glass of milk
-Puzzle piece 3 in front of the digital clock
Hidden puzzle pieces:
-Puzzle piece 4 in the first cabinet door under the TV
-Puzzle piece 5 in the second cabinet door under the TV
-Puzzle piece 6 in the fourth cabinet door under the TV
-Puzzle piece 7 in the fifth cabinet door under the TV
-Puzzle piece 8 behind the painting of the snowman between the two doors
-Puzzle piece 9 on the bed, in front of the green cushion
-Puzzle piece 10 in the third cabinet door under the TV
Solving Puzzles:
TV view:
1st cabinet door:
The color code can be seen somewhere in the room
Sofa view: Note the light colors
(Yellow, White, Red, Green, Yellow, White)
Take the puzzle piece and the TV remote.
2nd cabinet door:
Where have you seen green and red numbers?
On the digital clock
2 1 4 7
Take the puzzle piece
3rd cabinet door:
This puzzle will be solved later.
4th cabinet door:
Turn on the TV using the remote
Notice the numbers align with the letters underneath the screen
H A L O
Take the golden key and the puzzle piece
5th cabinet door:
This color is reminiscent of a decoration element in the room
The stars hanging in front of the two doors have the same color
Match the heights on the cabinet door with the heights of the hanging stars
Click on the parts: 2 times, 3 times, 0 times, 1 time
Take the puzzle piece
Left door and related puzzle:
Use the key to open the left door and enter.
Notice the shapes in the frame.
Go back to the TV
Change the channel using the TV remote. Notice the same shapes that were in the frames in the other room.
Face the two doors again, notice that the frame with the snowman painting can be tilted.
Click on the corners matching the location of the red shapes (Angel, Tree, Deer, Snowman, Tree)
Down-Left, Up-Left, Down-Right, Up-Right, Up-Left
Turn the painting over and get the puzzle piece.
3rd cabinet door :
Go back to the bedroom. Notice the four frames above the bed are now all tilted.
Turn the frames over to reveal numbers.
Back to the 3rd cabinet door under the TV, click on the squares in the order indicated behind the four frames.
Up-Right, Up-Right, Up-Left, Down-Right, Down-Left, Down-Right
Take the piece puzzle
End :
Place the 10 puzzle pieces in the puzzle frame by the Christmas Tree and turn them to match.
Take the key.
Escape using the right door!
All walkthroughs would be helpful and welcome, especially because the new year/decade has brought me a more hectic schedule that affects how much I can write and proofread.
(I already wrote this one, so here it is.)
Amajeto Holiday
We may be over a week into the new year, but the holiday doesn't have to end!
Exploration
You start off facing an incomplete picture, a Christmas tree, and a surprised Santa figurine next to a square tile. (The huge grid of tiny drawers is purely decorative.)
Turn right. This screen is lit by some colorful lights above, but the only spot you can interact with is the food on the table, which lets you zoom in to find a square tile.
Turn right to find two locked doors. Some stars hang above, and a picture in between them tilts when you click its corners. (Surprisingly, you can't do anything with the lamp and table.)
Turn right to find a television screen above a festive message on the wall. There's a digital clock that, after removing the square tile from it, changes its time and color entirely when you click and hold on it. Below that, there are some cupboards which have on their locks:
four buttons in different colors,
four digit buttons in red and green,
four white buttons arranged in a grid,
four letter buttons,
and four light-brown bars that extend vertically.
Duality
Use the clue from the digital clock to unlock the second cupboard (from the left) under the TV.
Reading the first two digits of the red time and the last two digits of the green time gives you the code 2147.
Enter that in the lock and open the cupboard to find a square tile.
Look up!
Use clues in the room to unlock the leftmost and rightmost cupboards under the TV.
The lights above the couch are (from left to right) yellow, white, red, green, yellow, white.
So push the 2nd, 1st, 4th, 3rd, 2nd, 1st buttons on the left cupboard, then open it to find a square tile and remote control.
Similarly, the stars above the doors have different heights, with the 2nd one being highest followed by the 1st, 4th, 3rd.
Click the bars on the right cupboard 2, 3, 0, 1 times, then open it to find a square tile.
Screen
Use the remote to turn on the TV screen, which shows some digits.
Then use the remote on the TV again to change its clue to a square above some Christmas-themed decorations.
Label
Use a clue from the TV to unlock the fourth cupboard beneath.
Change the TV to the first channel (displaying the digits), then back out so you can view that clue and the words under the TV together.
The letters under the digits 1, 2, 3, 4 spell out the code HALO, so enter that into the cupboard and open it to find a square tile and a key.
Unlock / Exploration 2
Use the key to unlock and open the left door.
Surprisingly, you find yourself in a bedroom. There isn't much to do other than pick up the square tile leaning against the green pillow, but the framed pictures on the wall look familiar.
Square
Use clues from the TV and bedroom to unlock the tilty snowman picture.
The second clue from the TV shows the angel, tree, reindeer, snowman, tree decorations (and the square represents the tilty picture), which appear in the lower-left, upper-left, lower-right, upper-right, upper-left frames in the bedroom.
So click the ⌞⌜⌟⌝ ⌜ corners of the picture to make it come loose, then flip it over to find a square tile.
If you're familiar with the previous games, you might remember that unlocking a tilty picture makes all of them come loose.
Go back into the bedroom and flip each framed picture over to find numbers behind.
Then use that clue to unlock the middle cupboard under the TV.
Following the numbers behind the pictures, push the ⌝⌝ ⌜⌟ ⌞⌟ buttons on the cupboard to open it and find the last square tile.
Complete
Place all 10 square tiles into the incomplete picture on the first screen, which activates its randomized picture puzzle where you have to rotate the tiles until they align.
Once you're done (be careful of the top right corner!) the picture slides up to reveal another key. Use that key to unlock the door and escape!
Poohta's Room
Rather unusually for Ichima, this remade room is not numbered as part of the series. As it was the first game remade for practice with Unity (and released as a mobile app), it has a shorter length and less features compared to the more recent games.
Which is to say, it shouldn't cause you too much oh bother.
Exploration
You start off facing a table beside a window. One side of the table has a cup and a pink placemat covered with a thick brown sauce. There's also a potted plant, but it's a tiny one on the windowsill with a letter clue printed nearby.
Turn right to find a shelf with several irregular-shaped compartments. Clicking around, you find that you can zoom in on the locked compartment at the top right, the wooden box with a four-digit lock, and a white-and-red bag with some digits on its front. The framed certificate to the right has a three-button lock on its glass case.
Clicking the right edge of the blue shelves reveals that something is hidden behind.
Turn right to find a bear sitting on a red leather couch, beside which you can zoom in on the potted plant and move it to find a clue on the wall. The glass table in front holds an apple in a center compartment that's covered a screwed-down glass/plastic panel. On the right, you see a locked door and a locked wall box beside.
Turn right. A panel on the wall has four buttons arranged in a diamond formation. A five-legged table has a locked drawer and a four-digit yellow box. But five-legged tables are rare, so you check more closely and find that the leg in the middle is a stick you can remove. On the right, a small blue door can't be opened, but it has a sign saying that someone is out.
Reach
Use the stick to retrieve the ball behind the blue shelf.
Steps
Use the clue behind the potted plant to unlock the wall panel near the table.
As the numbers suggest, each arrow should run from one number to the next. Since each number only appears once, you need to mentally rearrange the clue to make this possible.
For example, the bottom two clues must combine in such a way that 2 ends up at the start of the arrow leading to 3, which means that 1 and 4 would overlap in the same position.
Piecing the clues together gives you the numbers in the positions
__ 14 __

_5 __ 26

__ 37 __
so push the URDULRD buttons and unlock the panel to get a silver key.
As the color suggests, this key unlocks the top right compartment of the blue shelf.
Inside, you find an orange and a photo frame with an unusual shape cut out of its upper area.
Yellow
Use the clue from the photo frame to unlock the box on the table.
The cut-out area is formed from the shapes of four digits: 7426.
Enter that into the box and open it to find a screw driver.
Use it to unscrew the cover on the glass table and remove the apple inside.
Bag
Use the clues from the windowsill and bag to unlock the glass case beside the blue shelf.
There are seven digits on the bag, but the windowsill clue tells you to read the red, white, red, red, white, red, white halves of the digits.
Those halves appear as ◻◻⊏⊐◻⊐⊏, so push the CCLRCRL buttons and open the case to find a green block with three round indentations.
Orbs
Place the ball, orange and apple in the green block (they will automatically find their places), which gives you a golden key.
As you might expect from the key color, it unlocks the drawer of the side table. Inside, you find a towel and a memo that looks like a picture of several objects.
Stars
Use the towel to clean the dining table, revealing a clue with digits and thin lemniscates (I'll just call them lines).
Use that clue to unlock the wooden box on the blue shelf.
The cross on the left of the box is formed from diagonal lines, represented by the digits 4 and 1 on the placemat. The cross on the right is formed from horizontal and vertical lines, represented by the digits 3 and 5. And the star in the middle is formed from both crosses, represented by all four digits.
This suggests that the code should start with 4+1=5 and end with 3+5=8, and in between is 5+8=13.
Enter 5138 into the box and open it to find a pot of hunny, I mean honey.
Yummy
As you turn around to give the honey to Poohta, you find that he's already stood up. Give it to him!
Look around the room, and you'll notice him suddenly missing. Where could he have gone?
The sign on the door now tells you to "please knock".
So click the door to invite him out, and he brings you a pink key.
Use the pink key to unlock the wall box beside the (large) room door. Inside, you find five buttons marked with shapes.
Shapes
Use the remaining clues from the game to unlock the five-button panel you just found.
The items shown on the memo appear on the blue shelf in different compartments, and the shapes on those compartments match those on the 3rd, 1st, 4th, 2nd, 5th buttons.
Push those buttons (and then the enter button beneath) to unlock the door, then open it to escape!
If you played a certain very early escape game featuring this pair of cats, you might recognize the references in this one.
Maro and New Home - 1st Floor - Part 4
Reminders: Komaro will give hints in Japanese if you click him. When unlocking things, the sound effect will confirm that your code is correct, and you usually have to back out before you can open them.
Previously!
(Picture of Komaro on the left and Maro on the right.)
Maro and Komaro arrived at their new house!
They explored the house to conquer all the rooms!
They finished the second floor and are now searching the first!
Even though every room was locked,
there's no lock Maro can't open!
So this one will also be an easy win!
Proceed to the next room for exploration!
Maro: Let's go!
Exploration
There's a map/floor plan on the wall. Since the layout of this room is confusing, let me explain how it works. You may want to play around with the navigational arrows to understand better.
For clarity, I'll name directions according to the map, so for example, you start out facing north.
The map only shows areas you can access in this game, not those from previous games.
The gray lines on the big room divide it into screens, 4 on the east side, 4 on the west, 2 on the north and 2 on the south. Every object can only be interacted with on one of these 12 screens. Notice that 8 of these screens are facing the outside (i.e. walls), while 4 of them face the inside.
The pink arrows represent the pairs of arrows you can use to change screens. The 4 interior views contain only one pink arrow: they can only be entered and exited using downward-pointing arrows. As for the 8 wall views, you can use the left and right arrows to cycle through them.
To minimize confusion, let's explore the walls first and then the inside thing.
The door on the starting screen is where you first saw the "fierce beast" (in part 1). You have no need to go back up, but you can click the stairs to find some black squares painted on them.
Turn right to face east. There are two doors here, and the left one is the bathroom you escaped into/from in part 1, which means you don't have to go back there. The right door has a lock with four colored digit buttons.
Turn right to face south. This door is the one you came back through (in part 3), so you have no need to open it either. The metal locker has two arrow buttons with a stair symbol.
Komaro: There's a hidden item that's not completely hidden.
Click just above the locker to find a house piece on top. This piece has a drawing of a house and a red triangle at the corner.
Move right. This door opens to the outside, and you get a sudden urge to leave…
Maro: Let's not explore any more and just escape to the wide world.
Maro: Now, this is the beginning of Maro's adventure!
("Lost cats in care" poster.)
Maro: If that's the case, it's better not to go out.
Continue to examine the framed picture on the left, the locked cupboard on the right, and the pink mat with flowers.
Move right to find a locked door and a wall panel. The panel has a grid of gray squares, a rectangular area you can't open, and a red triangle at the corner.
Turn right to face west. There's only a pair of locked double doors here.
Turn right to face north again. A narrow corridor on the left is blocked by a stack of three Catmazon crates.
Move right to face a perfectly normal blank wall.
That completes the walls, so now click the bottom of the screen to turn around. This huge glass mirror has a hammer drawn on it in red.
Back out, go right until you're facing east, and turn around again. This narrow edge of the mirror has a long vertical slot running down it.
Back out, go right until you're facing the south exit, then turn around again. This side of the mirror is yellow with colorful digits. Taking a closer look at the top where the arrow is, Maro points out that part of the digit pattern is above the surface of the glass and another part is under the glass.
Back out, go right until you're facing west, then turn around. There's nothing on this screen you haven't seen before.
Left Right
Use the clue from the staircase to unlock the metal locker along the south wall.
The clue on the locker tells you that you need to read the stairs from bottom up.
The squares on the stairs are, in that direction, on the LRRLLR sides, so push those buttons to open the locker and find a wooden hammer and a screwdriver (behind the right and left doors).
Smash
The clue on the north side of the mirror clearly tells you to smash with a hammer, but it would be too dangerous to do so.
Instead, you need to turn around and smash the north wall.
Either by wild experimentation or carefully estimating the distance from the floor and edge of the mirror, you reveal the hidden spot on the wall by tapping it with the hammer.
Inside, you find a silver key.
Unlock 1
This key unlocks the cabinet near the south exit. Looking inside, you find a magnifying glass on the right side among lots of colorful shoes.
Four colors
Komaro: These are colorful buttons. I think there's something that matches these colors somewhere.
Use the clues from the shoes to unlock the door on the east side.
Including the shoes on the floor, there are a total of 3 red, 2 blue, 5 yellow, 2 green pairs of shoes.
Enter 3252 into the door and open it.
Exploration 2
You're now in another bathroom. (The room in part 1 contained the bath tub, and this one has the toilet bowl.)
You can't use the sink, but beside its large mirror you see a framed picture with colored letters on the front and screws on the back. The cupboard under the sink has a lock with two rows of three buttons controlling the shape and number of the middle row.
Go forward to the toilet, where everything is pink. You can close the lid to find a pattern of three blue flowers.
Unscrew / Unlock 2
Unscrew the back of the picture frame to find a green key.
Use this key to unlock the door in the southwest area.
Inside this storage cupboard, you find a four-digit red box, a flat package with four buttons surrounding the Catmazon logo, and two boxes decorated with yellow tulips.
Smile
The pattern on the box reminds you of the crates stacked beside the west door. Where can you find the clue?
Use the magnifying glass on the corners of the top and bottom crates to find numbers there.
Then use that clue to unlock the flat box.
Mentally rotating the bottom box into an upright position, you find that the digits on the top/bottom boxes are
8/7 1/4

5/3 2/6
The numbers from 1 to 8 are in the
⌝⌟ ⌞⌝ ⌞⌟ ⌜⌜
positions, so push those buttons on the flat box and open it to find a large board.
Big
Or is it a stack of large boards? Either way, you have no problem inserting the board into the mirror from the slot on the east side.
Viewing the mirror from the south side, you find that only four digits remain visible. Where does that code go?
Using the arrow as a guide, enter the code (8534) into the red box in the southwest storage cupboard, then open it to find a fence piece.
Flowers
Komaro: Pictures of flowers. I remember seeing one near the genkan (entrance area).
Use clues you've seen to unlock the cupboard under the sink.
The flowers you've seen are:
Blue (toilet bowl lid): 3, with 4 petals.
White (welcome mat): 7 with 5 petals.
Yellow (boxes in storeroom): 6 with tulip shape.
Click the buttons
0 1 2

2 6 5
times to set the lock accordingly, then unlock and open the cupboard to find a turnip piece and a box with three patterned buttons.
Left Center Right
Use the clues from the framed pictures to unlock the box under the sink.
Komaro: I saw the letters L, C, R nearby.
As the labels above the buttons indicate, the left, center, right patterns are represented by the letters L, C, R.
Comparing the framed pictures, you find that they are red-on-gray cross, yellow-on-green circle and white-on-blue flower.
Click the buttons 2, 0, 1 times and open the box to find a tree piece.
Triangle
Place the pieces into the grid panel at the southwest area.
Komaro: Match the upper-left corner of the pieces to the squares you want to place them.
(In case that got lost in translation: with the pieces selected, click where you want the red triangle to land.)
By considering the shapes, you see that the fence piece must occupy one whole row, which must be the bottom row in order for the tree piece to fit. The tree piece must be at the upper left, otherwise it wastes too much space to its right. And there's only one way the remaining pieces can fit.
In short, the squares you need to click are
2 - 4 -

- 3 - -

- - - -

1 - - -
where the numbers 1 to 4 represent the fence, tree, turnip, house pieces.
Once done, the panel opens up to give you a silver key.
Unlock 3
Use this key to unlock the door on the west side and leave!
4th area conquered!
Maro: We're smoothly filling in the map. Let's keep this steady rhythm.
Komaro: As expected of Maro. Just a bit more and we'll dominate the whole house.
Maro: Well, let's rush into the yet-unseen next room!
Maro: This time, it seems we'll see some familiar scenery, but don't worry about it.
Komaro: Somehow I also feel that next traditional room has two rooms… probably just my imagination.
Maro: Let's go! To the room with kotatsu!
Komaro: There's a kotatsu? How did you know?
Komaro: I'm looking forward to it!
(Congratulations, thank you for helping out, we want you to help again if there's a chance.)
Maro: Charge at the unknown world!
Camouflage
When bank robbers disappeared into the mountains, you (a freelance writer) visited an unusually impressive house to pick up the story, but you ended up trapped inside. Surely the billion-yen secret is here, but is it hidden or just disguised?
Exploration
The shelf on the left looks full of stuff, but you can only zoom in on the colorful wooden figure at the top, which has a hole in the back of its head. On the right, a small table has a box on top with four birds you can rotate.
Open the doors to the backyard. You see, from left to right, a tall crate with a metal padlock, a shiny box on the floor with a keyhole, and an unusual-shaped shed with a metal plate bolted on (as well as a fake window).
Click the back arrow to face the doorway. There's nothing to do here, so click it to reenter the house.
Turn right to face the bedroom. Under a pillow, you find a controller for the air-conditioning that you can turn over to reveal some screws. The left door is locked and the right wardrobe contains lots of cushions that spill out into a pile that you then gather into a stack.
Clicking the lantern gets you a better view of the floor panel it's on, which has some sort of circular wooden handle.
While zoomed out, you notice something on the wall between the door and wardrobe. It would normally be too high to reach, but the stack of cushions is now conveniently placed directly under, allowing you to reach the blue dart.
Turn right to find another doorway, flanked by a cupboard with a box on top that's too high to reach, a potted plant and a dartboard you can't use.
Through the doorway, you see some furniture. You can click the left side to find a four-letter safe on the set of drawers. Or you can click the right side to zoom in on the gray desk with a bunny that would be very friendly if it just had one more eye. One of the desk drawers is empty, and the other is locked with a keyhole.
Turn right. The right side of this screen has a shelf divided into nine compartments with color-changing buttons in eight of them. Under that shelf, there's a wooden box with a colorful clue on its front and a carrot-shaped hole on its top.
Click the left side of the screen to take a closer look at the main door. The shoe cabinet looks pretty normal except that its upper-right compartment is locked.
Flock
There aren't many puzzles in the room, but you can solve the bird box without using any other clues.
The birds labeled W, N, E, S should point West, North, East, South, so click them 1, 2, 3, 0 times.
Unlock the box and take the knife from it.
Blade
Use the knife to pry up the tatami mat that the lantern rests on, revealing a single piece of string.
Aim
Tie the string to the dart and throw it at the box on top of the cupboard (near the dartboard).
Then click the string to pull the box down to the ground. Inside, you find an orange key.
Use the key to unlock the top-right compartment of the shoe cabinet. Inside, you find a chisel.
Strike
Use the chisel to remove the padlock on the tall crate in the backyard.
Then open the crate to find a flathead screwdriver.
Unscrew the controller you found under the pillow.
This gets you a note with some animal pictures and incomplete names.
Spell
Use the clue from the note to unlock the four-letter safe (to the left of the rabbit).
As you probably figured out, there pictures are of a dog, lion, tiger and fox, which means the missing letters form the code GIEF.
Enter that into the safe and open it to find a golden key.
Use this key to unlock the right desk drawer, which contains a pen.
Mightier
Insert the man into the back of the wooden figure on the first screen.
You hear a click, which means you can move the figure off its base to reveal a small blue bead.
Give the bead to the rabbit, and a carrot appears in its mouth.
Place the carrot into the colorful wooden box and open it to find a helpful clue card.
Colors
Use the clues from the carrot box and the card you took from it to unlock the middle shelf above.
(If you mess up the puzzle, back out to reset.)
Each button starts off with the same color as indicated in the grid clue. But then the card tells you to click the buttons additional times depending on their color.
For me, it's much less confusing to figure out that every button ends up getting clicked 1+2 times, except for the top, left and bottom-right ones.
Click the buttons
3 5 3
5 0 3
3 3 2
times, and the buttons all turn off. Open the middle compartment to find a small key.
Use this key to unlock the box in the backyard, which contains a spanner.
Then use it to remove the bolts blocking your way into the shed, and then open the door.
(You found an unknown man behind the door, and fled down the hill. When the robbers were arrested, it turned out that you had found their hideout. Because you tracked down the missing money, the article you wrote was the best.)
Click the doorway again to end the game, and click the escape icon in your inventory to return to the title screen.
Update