
 Hi! The new Weekday Escape is out!
This week's featured games are cute, sweet and overcrowded by cuddly animals. Except Amajeto. Their pleasant living room lacks any life but not puzzles. After that we got two really nice games from Chotto series by Kamonosoukutsu - the very first one and the newest one (so far) - both transferred from Android to PC. The last comes awsome game by Nicolet bringing an exciting adventure of not very well recognizable foxes and their friend, a mouse maybe (some small rodent for sure). Excellent in all aspects!
Have a good time and enjoy!
The place where Amajeto closed you up is overall white, beige and brown, soaked in soft light and surely peaceful - suitable for perfect morning and slow start of a day. Scattered around the room you find usual pieces of puzzle and various hints for all the locked cupboards - can you escape?
The cursor isn't changing, no save button, one ending.
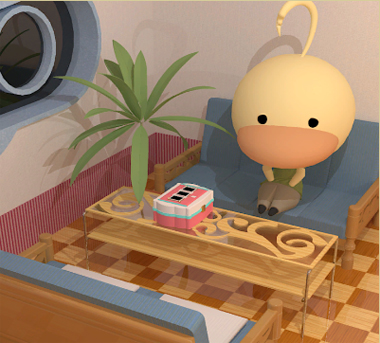
I don't know how Kamonosoukutsu does that but their anthropomorphised animals look quite touching. Like Duckie right at the beginning. It's obviously sad. What now? Maybe you can cheer Duckie up somehow? It wants a book which doesn't lie anywhere near - that would be too easy - must be safely hidden in one of those drawers or cases. Or somewhere else. The only certainty is that it would be the last place you opened!
Also, you've met the Duckie before (recently in WE N°229) in Chotto Escape 012 and solved here a problem with a book too.
The cursor isn't changing, save button, one ending.
The game is available for Android too.
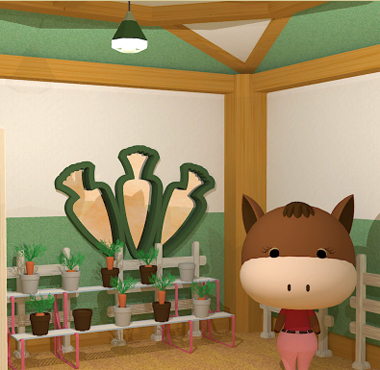
The Kamonosoukutsu's Horse living in a carrot room wants a brush. What wants sleepy Rooster sitting on top bunk bed we don't know. Doesn't communicate (yet). Surprisingly, nobody wants a carrot and it's a pity as you'd certainly know where to get it...what can't be said about nine horse coins needed for that strange vending machine over there in the corner. To collect them, you have to look everywhere and also get into all drawers and cupboards. Can you solve all the puzzles and escape?
The cursor isn't changing, save button, one ending.
The game is available for Android too.
Nicolet's game is a kind of quest. One sunny day were foxes and their friend chatting outside when a bird, who seemed to be listening to them, suddenly took fox's pink beret and flied away! And so the intricate adventure begins. Many obstacles have to be overcomed and there will be traps on foxs' way, not talking about puzzles - one would say that it's a hunt for a giant diamond not a hat! Eventually they get it (the hat not the diamond) and turns out that everything was a game of some kind. The bird is their friend afterall. It's complicated.
The cursor isn't changing, autosave, one ending.
The game is available for Android (as a bundle of six games), iOS and on Steam (also a bundle). You may buy authors a coffee.
P.S. Thinking about foxes...let me remind you of an awesome adventure/platform games (a bit of doable jumping) William and Sly and its sequel William and Sly 2 by Lucas Paakh. Higly recommended. The Everloom by the same author is pure adventure (no jumping) and a pleasure to play. Also recommended.
We love escape games, and our readers love talking about them and sharing hints! How about you? Let us know what you think, ask for clues, or help out other players in the comments below.


Dango is weird
because there's one point where the only way I could progress was to go to the home screen and continue
when your friend is stuck in a hole in the floor near the ladder with the colors.
I did not have issues. You had to use the hand crank and the guy below him pushes him out with a stick.
looks like cool games to me. Nicolet are my persona favorite lately. looking forward to the walkthroughs as usual :)
Good Morning
Wakey wakey!
Exploration
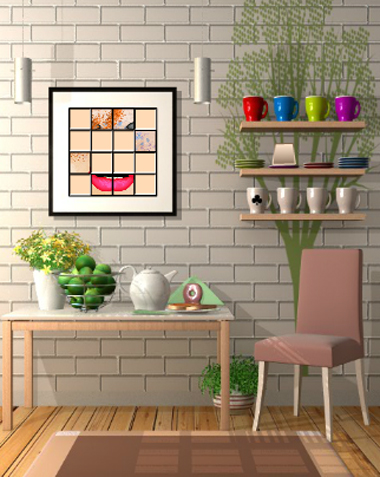
The morning light illuminates the features of the room: a picture divided into tiles with several missing, hanging over a table which you can't zoom in closer on. There are three wall shelves on the right over the chair. The top shelf holds four colored cups, the middle shelf holds four stacks of colored plates (click-and-hold them to zoom in) with a square tile placed on top of the second stack, and the bottom shelf holds four porcelain cups with a club suit marked on the leftmost one.
Turn right. The bed is just a bit messy, and the table on the left holds a square tile next to a stopped clock. Click-and-hold the clock to zoom in and find a diamond marked on its face. There are four framed pictures above, but each of them actually shows words. In particular, you can click-and-hold the second one to zoom in on its letter grid, and you can click the corners of the third one to tilt it.
Turn right to face the locked exit door. A television is turned off, and under it words of a greeting are mounted to the wall. At the bottom, there are two locked drawers, the left one having four square buttons each split into two colored halves, and the right one having a grid of buttons that turn gray when clicked. At the right end of those drawers, you spot a colorful sculpture that you can click to zoom in on, finding a distorted-looking square tile beside.
Turn right to face windows with their blinds partially drawn. Between two armchairs, there's a cupboard with three compartments. The left one has four colored vertical bars, the middle one has four colored digit buttons, and the right one has four symbol buttons. On top of those cupboards and under a spade suit marked on the wall, you can zoom in on the decorations to find a square tile in front of the tree.
(Check that you have four square tiles.)
Double
Use the clue from the shelves on the first screen to unlock the left drawer under the TV.
The colored objects on the top shelf are red, blue, green, purple, and those on the bottom shelf are green, purple, red, blue.
So click the buttons
3 0 2 1

3 0 1 2
times, then open the drawer to find a square tile.
Heights
Use a clue from the first screen to unlock the left cupboard under the windows.
The red, blue, green, purple stacks of plates contain 2, 4, 3, 1 plates.
Click the bars 1, 3, 2, 0 times to grow them proportionally, then open the cupboard to find another square tile.
Colored digits
Unlock the middle cupboard under the windows using a similar-colored clue from the room.
The sculpture near the TV has the same colors, and the orange, pink, cyan, brown parts are shaped like the digits 8073.
Enter that into the door and open it to find a square tile and remote control.
Screen
Use the remote on the TV to turn it on and view a clue with four letters.
Then use the remote on the TV again to view another clue with a square grid above four more letters.
Corners
Use clues from and under the TV to unlock the tilty picture.
The letters that appear on the first clue of the TV are precisely the brown letters under it.
Reading those letters from left to right gives you OOMORN, which appear on the
⌝⌝ ⌜⌝ ⌞⌟
corners of the screen. Click those corners of the tilty picture, which makes all four pictures come loose.
The second picture still can't be flipped over, but behind the third picture (which you just solved, ooooh) you find a square tile, and behind the rightmost one (LOVE) is a red heart.
Grid
Use the other clue from the TV to unlock the right drawer under the TV.
The grid on the clue matches that of the letter grid on the second framed picture, and the letters from the TV appear on the grid in the
A - - -

W - - -

- D - -

- - - N
positions, so push those buttons on the drawer and open it to find a square tile.
Symbols
Use clues throughout the room to unlock the right cupboard door under the windows.
Three of the card suit clues you've seen appear near items that come in fours:
Club on leftmost white cup
Heart behind rightmost picture
Spade under second window
The remaining card suit (diamond) appears at the 3 o'clock position on the clock.
This means the 1st, 2nd, 3rd, 4th positions in the code contain the club, spade, diamond, heart suits. Click the buttons 1, 6, 4, 3 times, then open the cupboard to find the last square tile.
Complete
Place all 10 square tiles into the picture on the first screen, which activates its randomized puzzle that you have to solve by clicking the tiles to rotate them until they align.
Once you're done piecing together this quirky face, the frame slides up to reveal a golden key. Use it to unlock the door and escape!
Chotto Escape 001 - Let's Find Duckie's Book
Your eyes don't deceive you — this game is number 001, the start of the Android app series! Its mobile version was released way back in December 2016.
Exploration
A duck asking for a book sits in front of a table with a three-digit box. The bench on the opposite side of the table has two cushions that you can lift, and under the right cushion is a screwdriver with a duck handle.
Click the top left corner (where the window is) to find a duck coin hidden there.
Turn right to face a locked door. A small table beside it has some kind of dispenser that requires three coins.
Turn right. The table here has several things but zooming in only gets you a closer look at the spill, as well as a reflection of the shelves above. There are actually four shelves attached to the wall, and the eight bears on them hold eight flags.
Turn right. This dressing table has bottles of colored nail polish on both sides of the mirror. The left cupboard is locked and needs a key, while the right cupboard has a lock with two flag buttons. Clicking the drawer in the middle gets you a super closeup of the screw holding it shut. And in front of the table is a small cushion that contains a duck coin.
Wait, did we forget a spot?
Looking at the reflection in the mirror, you see something pink on the bottom of the shelf.
So click beneath the bottom-right bear shelf to find a clue hidden there.
Flags
Use the clues from the wall shelves to unlock the right compartment of the dressing table.
If you follow the clue under the shelves, the bears numbered 1 to 5 have flags pointing LRLLR.
Push the matching flag buttons to open the compartment, which contains a hammer.
(Even if you don't follow the hidden clue and just read the bears from left to right across each row, that sequence contains the right answer so it works too.)
Unscrew
Use the screwdriver to unscrew the drawer, which contains a tissue box.
Clean
Use the tissues to clean up the spill, revealing a clue printed on the table.
Math
Use the clue from the cleaned table to unlock the box in front of the duck.
Counting the bottles visible on both sides of the dressing table, you find that there are 6 red, 2 blue and 3 green.
Adding the numbers from the clue gives you the final code 746, so enter that into the box to open it and find a clear acrylic cube with a coin trapped inside, as well as a clue with some green shapes.
Use the hammer on the cube to release its duck coin.
Collection
Place all three coins into the dispenser, which activates its letter buttons.
Then use the clue from the box to unlock it.
The shaded regions in the letters are the same color as the clue in the box, and the only letters which match those shapes form the code BDA.
Enter that in the dispenser to get a yellow key.
Use the key to unlock the left compartment of the table, which contains the missing book!
(Yes, its title reads "My Boyfriend's Very Rich", but you shouldn't judge a book by its cover.)
Give the book to the duck, who gives you a silver duck key (and then thanks you).
Use the key to unlock the door and leave!
good games so far. can't wait for the last 2. thanks as always kk.
Chotto Escape 013 - Horse and carrot room
This time, we don't have to fret about translating the title correctly: it's in English on the title screen!
(If you prefer more visual hints, try out the Hint button at the corner of your inventory which shows you the next puzzle and clue.)
Exploration
(Some hotspots are actually invisible because they're part of puzzles. I'll only mention those later.)
A horse asks for a brush, and beside it on the left are two shelves of plant pots having different colors and carrots growing to different sizes. Two of the pots are completely empty.
Looking very carefully, you find something hidden on the right shelf: a coin behind the bottom-right pot.
(The coin has a horse and carrot design.)
Turn right to face a table with a box on it. The box has two buttons which flash pictures of houses, and between them is the outline of a dog. Behind it in the corner, several baby sparrows (?) surround a dispenser requiring nine coins.
Turn right. There's a set of pink drawers on the left:
Top drawer: three potted carrot pictures over three potted carrot buttons.
Middle drawer: unlocked, contains a coin in front of a clue.
Bottom drawer: a column of buttons that show yellow stars when turned on, but the middle button is stuck showing a pink star.
Next to it, there's a set of shelves with dogs and houses. You can click to zoom in (the white arrows that appear are just for convenience), which helps you find that the houses in the corners are colored, that the one on the bottom shelf also has a clue and there's a hexagonal bolt near it on the left side, and that there's a coin on the second shelf from the top.
Next to that, there's a horseshoe-shaped door surrounded by holes, some of them containing yellow and pink stars.
Finally, turn right once more to find a bunk bed with a rooster sitting on top that you can't reach because the ladder is missing. This bed has a locked green door and a grid of symbols on the left side.
Climb into bed to find a pillow with a coin under it, as well as a clue on the wall near the right side.
Still in bed, click the left arrow to turn around. At this end, a picture clue is painted above and between two boxes on shelves. The left box has a round keyhole and its buttons don't seem to work, while the right box has a star button lock similar to the one you saw on the bottom pink drawer.
Stars
(The hint button should tell you about this step. If not, it should be telling you that you missed one of the 4 coins mentioned above.)
Use the clue from the door to unlock the bottom pink drawer.
The side with the pink star in the middle is the right side, and it has yellow stars in the second and bottom positions.
Push those buttons on the drawer and open it (by clicking the handle) to find a coin.
As the hint button tells you (after you pick up the coin), the door clue also fits the left box at the bottom bunk.
This time, you need to read the left side of the door, which has yellow stars in the second and fourth positions.
Push those buttons on the box and open it to find another coin.
Fenced
Follow the picture clue under the bed to find a hidden spot.
The picture represents a top-down view of the room, and the lines on it represent fences.
The bottom-right corner of the picture is the corner of the room with fences on the left but no fences on the right. Looking around, you find that this corner appears on the same screen as the door, but the fence that the arrow points to is offscreen there.
Turn left to face the table (represented by the top-right corner of the map), and click the rightmost fence on that screen to find a coin behind it.
Growth
Use the clue from the plant pots to unlock the top pink drawer.
Since the buttons are arranged horizontally, the pictures on the drawer (and its buttons) can be read as a sequence of three columns, with the colors and carrots of the top spots specified.
Which pots appear below the given ones?
Paying attention only to the top row of carrot pots, the dark short, white tall, white short pots appear at the 5th, 1st, 2nd spots from the left, so the pots under them are dark tall, dark short, dark empty.
Click the buttons 5, 4, 3 times and open the drawer to find a chicken horse key!
Unlock 1
Use this key to unlock the door under the bed. Amidst the dim lighting you can see some cats, a clue with houses, and a coin on the middle shelf with another clue beneath it.
Houses
Use the house clues to unlock the box on the table.
Hint: the interpunct, or middle dot, can be used in Japanese to separate items in lists, or to replace other kinds of separator punctuation in vertical writing.
The clue among the cats (when read from top to bottom) tells you to start with pink before going through the sequence from pink to blue.
Based on the positions of the houses on the shelf, pink is on the right, and the houses from pink (bottom) to blue (top) are on the RLLRRL sides.
Putting those together, you need to push a total of seven buttons: RRLLRRL. Open the box to find the brush and a clue with some circled silhouettes.
Give the brush to the horse to get the ninth coin.
(Click the horse again, and it thanks you with a wink.)
Collection
(If you're missing any of the coins, the hint button should tell you where to look.)
Use all nine coins on the dispenser behind the table, then take the spanner from it.
Use that spanner to remove the bolt at the left of the shelf with houses. As you may have noticed, the shelf is a ladder!
(The houses and dogs are now neatly arranged on the floor.)
Climb
Place the ladder on the bunk bed, then click it to climb up.
There's much less room up here than you might expect, and so you sit very close to the rooster who asks for some sort of walkie-talkie. Turn right to find a chest of drawers above two blue birds. The top drawer has three animal buttons, while the bottom drawer has three digit buttons.
Chain
Use the clue from the opened box on the table to unlock the top drawer on top of the bed.
The circled silhouettes are those of the sparrow, blue bird, cat.
Counting those animals in the room, you find that there are fewest of the blue bird (only two), followed by the cat (seven), followed by the sparrow (nine).
Click the buttons 4, 1, 5 times to show those animals, then open the drawer to find a telescope.
Overhead
Use the clue from the middle pink drawer to view another clue.
The telescope shown on the clue is longer than the one you have, so examine the telescope you're holding and extend it.
The triangle in the clue refers to the white roof panel in the corner above the horse, and when you click it you notice some tiny black markings on a wooden beam.
So use the extended telescope there to view a close-up of that clue.
Math
Use the clue you just saw (and card suit clues in two other places) to unlock the bottom drawer on top of the bed.
The clues in the pink house and behind the pillow tell you that the Club and Spade represent the digits 3 and 4.
This means the clue on the beam works out to 33×4 = 132, so enter that into the drawer and open it to find a carrot-themed shovel.
Dig
As hinted by the other clue in the cat cupboard, you need to use the shovel to dig in a (dark-colored) pot.
The only pot that lets you do this is the second one on the bottom row (dark empty), and digging there gets you a blue key with a round blade.
Unlock 2
Use the key on the left box on the bottom bunk of the bed.
This activates its four buttons, which have different colors and cycle between different symbols.
Shapes
Use the grid clue on the left side of the bed to unlock the colored symbol box.
The clue's a little vague, so here's a hint: the thing you're looking for is the same size.
You're looking for a particular arrangement of blue, red, white and green symbols, all adjacent to each other in a 2 by 2 square.
There are several of these squares in the grid but none of them have exactly the same color layout, so the next best thing you can get is to have the colors just rotated.
Since red and white need to be diagonally adjacent, the only place where this is possible is the bottom two shapes of the second and third columns.
Matching those shapes to the colors on the box, you find that the buttons need to show:
Circle(2) Cross(1)
Square(4) Blobs(0)
Click them that many times and open the box to find the walkie-talkie.
Radio
Give the walkie-talkie to the rooster, who makes a call…
and then a green duck shows up at the open doorway!
(The rooster thanks you, and you can) escape through the door.
Dango
This game is about much more than sweet rice flour balls. For starters, you'll need to help the fox get its hat back!
Exploration
The game starts at a stone path which forks in two. A large stone tablet has a dark stain on it.
Go left to another fork in the path facing a bamboo forest.
Go left to a well with an unusual marking on its front.
Back out and go right to find a tiger wielding a katana and asking for a plate of dango. There's one conveniently placed on the left… but it's a trap and now the tanuki is in a bamboo cage! (Thankfully, this party also includes a fox and mouse so all is not lost.)
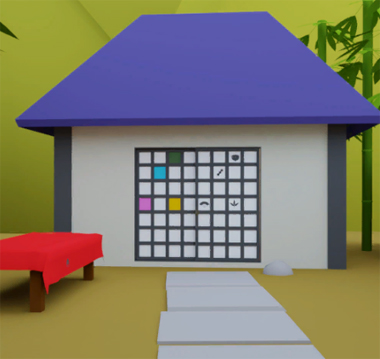
Back out twice to the start screen and take the right path. This blue-roofed house has an unusual pattern on its locked doors. The table on the left has another animal symbol on its red tablecloth. And the rock on the right can be lifted to reveal a key.
Use the key to unlock the house (and click the left door to open it).
There are two wooden panels on the left. One has bolts on its corners while the other has four picture buttons that change their background colors.
Next to that, there's a fireplace. It looks like there's a lock on the back wall behind the fire. The top of the fireplace has a wooden lid with an animal symbol on it.
Pick up the bucket on the right of the fireplace.
Colors
Use the clue on the house doors to unlock the four-button panel inside.
The symbols on the right door appear at the same spots as the colored squares on the left door.
In the order indicated by the panel, the color sequence is yellow, blue, pink, green.
Click the buttons 4, 1, 3, 2 times and open the panel to find a rope.
Water
Examine the bucket and attach the rope to it, then fill it in the well.
Then pour the water onto the fire to extinguish it.
Now you can access the lock at the back, which has a row of lights above three animal buttons.
You still have the bucket, so fill it in the well again and splash the water onto the stained stone tablet to reveal a clue.
Structure
Use the clue from the stone tablet to unlock the panel in the fireplace.
The symbols on the well, fireplace, table, table, fireplace match the RCLLC buttons on the lock.
Push those buttons and open up the panel to find a spanner.
Use the spanner to remove the bolts on the left floor panel. Beneath, there's a shovel.
Underground
Use the shovel on the bottom of the bamboo cage to dig a way out.
After getting the dango from the tanuki, give it to the tiger, who cuts a path through the bamboo and then stands there staring at you.
Exploration 2
Move on through the gap. The stone path continues, and you see a pagoda across a river.
The path ahead passes by three stone lanterns with colored fish-shaped holes inside. Each lantern has a maple leaf on top, and you can click the tops of the lanterns to find symbols painted there.
The left path splits again. One end has an animal (I can't identify) waving a pair of shears. The other end has a plate of dango on the ground, but it's another trap!
(The animal with shears now suggests that you bring it a ladder.)
The right path also splits. One end has a tree with three holes, and the other is a house with a purple roof. In between them, there's a patch of mushrooms.
Enter the house, and you'll see a ladder padlocked to the wall, a picture of colorful fish, and a box with three picture buttons above a maple leaf mark.
Leave the house and visit the tree. The bottom hole is boarded up, with the board held in by nails.
Climb to the middle hole to find a framed picture over a three-digit box with shapes over the buttons.
Almost hidden in the darkness is a golden key beside the box.
Back out and climb to the top hole, where a brown mouse/rat asks for the plate of dango that you already failed to get. There's a hexagonal framed picture on the back wall.
Release
Use the key you picked up to free the ladder from the wall of the house.
Then give the ladder to the animal with shears, who climbs up and cuts the trap. Once again, the tanuki is free and you have a plate of dango.
Give the plate to the mouse in the top hole, who gives you a red fish piece in return.
Fall
Use the clues from the stone lanterns to unlock the box in the house.
The clue from each lantern has to be rotated so that the maple leaf faces up, which means the rounded parts (as I interpret them) have to point up for the last button and right for the other two.
Click the buttons 1, 1, 2 times and open the box to find a crowbar.
Force
Use the crowbar to remove the board from the bottom hole of the tree. After taking the green fish piece, you can squeeze in to take a closer look at its framed picture.
Environmental
Use clues from all three holes of the tree to unlock the box in the middle hole.
The framed pictures with circle, hexagon, square shapes (in the bottom, top, middle holes of the tree) show a mushroom, stone lantern, and hanging acorn.
Counting those objects, you find that there are 8, 3, 2 of them, so enter that into the box and open it to find a blue fish piece.
Swimmer
Use the clue from the fish picture in the house to place all three fish pieces into the stone lanterns.
From left to right, the lanterns have red, blue, yellow holes, so they should get the blue, red, green pieces.
Place them accordingly, and a boat appears on the water! Click it to cross.
Exploration 3
The way forward is blocked by an animal (similar to the one with shears from before) standing next to a cart, and asking for an onigiri (wrapped rice ball).
Stone paths extend out both sides, and the path to the left ends at a group of five stone mice carrying staves and crystal balls. Beside the path, a four-slider box has its sliders labeled with patterns of horizontal and vertical lines.
Back out and follow the right path which splits in two. The right end has a gray box with five symbol buttons that change in size, and the left end has three molehills but the middle one is covered in tall grass.
Crawl into each of the side molehills, and you'll find hanging lanterns.
Elemental
Use the clue from the stone mice to unlock the gray box.
The mice holding the balls with tree, mountain, water, ice, fire symbols have staves that feature 3, 1, 3, 2, 2 circles at their top ends.
Since each additional circle increases in size, those symbols should be large, small, large, medium, medium. Click the buttons 0, 1, 0, 2, 2 times and open the box to find a sickle.
Cut
Use the sickle on the middle molehill, and now you can climb in. There's another lantern here, but also a mole holding a rice ball and asking for an acorn.
Diced
Use the clues from the lanterns to unlock the box near the mice.
Each of the four lanterns you've seen has a different pattern, matching those on the box. For easy reference, I'll refer to those patterns as having 2, 3, 5, 4 lines.
Using the gray mouse as a guide, you find that the lanterns with those patterns are in the low, low, high, middle positions.
Set the sliders accordingly, then open the box to find an acorn.
Trade
Give the acorn to the mole to get its onigiri.
Then give that to the cart puller to get a ride forward!
Exploration 4
Each of the stone birds to the left and right of the stairs has a small white handle in front, actually a square cycling through various symbols. Beside the left bird is a screwed-down wooden panel, and beside the right bird is a panel with five symbol buttons in between two symbols.
Climb the stairs to arrive at the locked door. A small panel on the right has four circle buttons that rotate their lines when clicked.
Groove
The buttons on the panel beside the door remind you of something nearby…
The line on each screw points in a different direction.
Click the buttons
3 2
0 1
times, then activate the panel to release a rope ladder from the ceiling.
Rise
Click the ladder to zoom in on it, getting a good view of the different-colored lashings used. (This ladder doesn't look very safe to me, but perhaps it's good enough for animals.)
Click it again to climb up. In this cutscene, the tanuki looks around the room and then falls into the floor in front of another ladder. You can zoom in to see it struggle, but it's just hopelessly stuck for now. You can also zoom in on the ladder but you can't climb.
The box on the left has two panels. The left panel has five sliders labeled with colors, but the middle one seems stuck. The right panel has a row of lights above a pair of drop-shaped buttons.
Levels
Use the clue from the ladders to unlock the left panel (near the tanuki).
The ladder in the same room tells you that green is one level above black while pink is two levels below, and the ladder downstairs tells you that purple is one level below black while blue is two levels above.
This means the sliders, from bottom to top, must be pink, purple, (black), green, blue.
Click the leftmost slider 4 times, the slider next to it one, and the rightmost slider thrice, then open the box to find a screwdriver.
Use the screwdriver on the panel beside the left stone bird, which contains a crank handle.
Drop
Use the clue from the tanuki to unlock the right panel (near it).
When you click on the tanuki, the sweat drops appear on the RRLRL sides.
Click those buttons on the panel to unlock it and find a key.
Use the key to unlock the front door.
Whoa, there's a golden fox in here! Also, the rear end of the tanuki is hanging from the ceiling. The two urns on the sides have small clues printed on their rims (but thankfully they're still readable when you zoom in). On the floor, you spot a trapdoor which hides a small squarish protrusion.
Protrude
Use the handle on the floor under the trapdoor, which quickly gets your friend free from the hole.
It's holding some kind of blue stick.
You can now climb the ladder to the top floor.
In front of a golden tanuki, four vases are arranged in a square, with colored sticks placed in them. Two of the sticks seem to be missing.
Forecast
Use the clue from the urns to unlock the panel beside the right stone bird.
Counting the crescent moon as the first symbol and the sun as the seventh, the clues on the urns tell you to pay attention to the 4th and 5th symbol from the left side and the 2nd, 3rd, 6th symbols from the right side.
Putting them in order (two symbols from the right sequence, two from the left and then one from the right) gives you the missing symbols as Wind Lightning Flower Wind Flower.
Click the buttons 2, 1, 0, 2, 0 times and open the box to find a red stick.
Complete
Place both sticks into the matching vases on the top floor, which opens up a five-button panel with all the characters you've met.
Use clues from the game (or your memory) to unlock the panel.
You may recognize the first two silhouettes as the sword and shear specialists. The third one is the mouse who took the dango way too big for it, the fourth one is the mole who traded for your acorn, and the fifth one pulled your cart all the way here.
Click the buttons 4, 3, 1, 2, 0 times, then push the button below to end the game.
When I get done with the Nicolet ones, I usually watch a walkthru video to see how quickly it can be done. I was amused that the walkthru I watched for Dango brute-forced the puzzle that kktkkr called "Fall", rather than using the clues provided.
Due to minimal use of animations and cutscenes, Nicolet games can be completed really fast if you allow yourself to skip steps.
I don't know if anyone else has this problem, but Nicolet's games in particular will lag to the point of annoyance if you have lots of cache and save data from the site. Before I cleaned it up from the browser settings, I worked around the issue by opening them in a private/incognito window (but of course that breaks autosave functionality).
Update