
 Hi, the half of the week is behind us and relaxing Weekday Escape here!
In the first and the second game, Amajeto wants you to escape from two colorful rooms. After you get out from the later, the blue one, another blue room is ahead, tomoLaSiDo's, and this time are retro office supplies hidden there. Flash512 wants you to escape stylish traditional room and did their best to make the game as enjoyable as possible for us, players.
Have a good time and enjoy!
Tidy Amajeto's beige room, locked of course, is full of puzzles, clues and tiles, and definitely not boring!
The cursor is not changing, no save button, one ending.
Now you arrived to Amajeto's blue room. Nicely blue, as the sea, as the skies, and as the carbon paper in the next game. You need to find eight tiles to complete the final jigsaw puzzle, some just lying around, some inside lockes drawers. Can you escape?
The cursor is not changing, no save button, one ending.
P.S. Here is beautiful and atmospheric Blue Sunset by TomaTea. For maze lovers, Escape from the Triangle Maze (Hottategoya) from WE N°11 is as blue as possible.
In the blue room where tomoLaSiDo's trapped you are hidden five sheets of carbon paper. Once upon the time, before copy machines were invented, sheets of carbon paper were important part of office everyday life - irreplaceable, in fact - and now you can try how to work with them! Only one sheet is usable though, the one in the leftmost inventory slot. Changing cursor is your good friend, as some hotspots are sneaky and easily missed. Can you open the door and leave?
The cursor is changing, no save button, one ending.
Flash512's released this game in December last year, but many players complained about glitches. I tried to replay it this week (in Firefox and Edge), and found out that the gameplay is fluent now and the big glitches fixed, so here we go!
You're locked in an elegant room indeed. Explore the room carefully as few hotspots aren't obvious, and some, on the other hand, may be useless. After you get the key from exit door and open it, you get into another room! Looks a bit familiar, right? Well, it's Dream House Escape from WE N°220...
The cursor is not changing, autosave, one ending.
We love escape games, and our readers love talking about them and sharing hints! How about you? Let us know what you think, ask for clues, or help out other players in the comments below.


Is that Peppa Pig in the elegant room? I approve
The Elegant Room is still glitchy.
I had a problem getting the domino clock code to work.
I put the film over the picture with black background and letters. The letters highlighted made no sense until I checked the walk through (video). The highlighted letters are the "shape" of the letters. No need to tilt your head.
925
I entered that code several times. I zoomed out and back in, spun around the room, and finally after the 8 or 9th attempt it worked.
Kind of frustrating.
The clock works for me, but it was the three-digit box that forced me to check the walkthrough. After trying every reasonable code and cycling through all combinations thrice, it turns out I didn't let the correct code sit there for long enough.
List of nitpicks:
Unlocked chest keyhole described as locked
Bad grammar on "part is missing" and "no code" text
Incorrect description on dog statue
Incorrect description on silver key
Silver key can be skipped
Inconsistent animations on star drawers
Slightly different appearance on robot
Unused puzzles everywhere
In-game walkthrough link incorrect
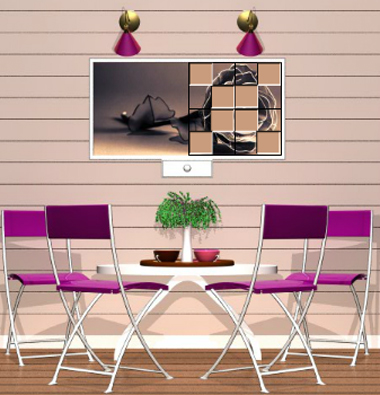
Color Room: Beige
I think there's too much purple in this beige room.
Exploration
Four chairs are set up around a table under a picture with some pieces missing. On the table, there's a plant in a vase growing over four colored teacups, as well as a square tile on the side nearest to you.
Turn right. Looks like nice weather to go outside! But if you want to escape, you need to pay attention to the shelves of decorated colored cups with lollipops in them. The two striped cabinets have a four-digit lock and a four-color lock.
Turn right to face a locked door next to a picture of flowers which, predictably, tilts when you click its corners. The armchair beneath has a bright pink cushion that hides a square tile.
Turn right to face some cupboards arranged around a television that's turned off, above a row of colored decorations and a digital clock that you can turn to find its empty battery compartment. Checking the compartments, you find that the lower white one on the left has a four-letter lock, while the beige and brown (dark beige?) ones under the TV have a four-symbol lock and a lock with a grid of buttons.
Palette
Use clues you've seen around the room to unlock the tilty picture.
The ornament under the TV has its pieces in a sequence of colors.
Those colors (purple brown beige pink brown) appear on the UR LL UL LR LL cups, so click the ⌝ ⌞⌜⌟ ⌞ corners of the picture to loosen it, then turn it over to find a square tile and a rectangular plate with a hole.
Space
Examine the loosened picture again, and use the long rectangular piece on it to cover up all but four letters.
Then use that clue to unlock the white cupboard to the left of the TV.
The remaining letters spell out SAND, so enter that in the cupboard and open it to find a square tile and a battery.
(Sand lily is also the name of several flowers, all genetically distinguished from lilies.)
Charged
Place the battery into the clock, which displays the current time in colorful digits.
Palette 2
Use the clue from the clock to unlock the cupboard underneath the shelves with cups.
The digits on the clock are blue, red, green, yellow. (The cups also have these colors in the same order.)
So click the buttons 1, 0, 3, 2 times and open the cupboard to find a square tile.
Grid
Use the clue from the cup shelves to unlock the bottom-right cupboard under the TV.
Only seven cups have lollipops in them, and those cups appear on the shelf in the
O--O

-O--

-O-O

-OO-
positions. Click the corresponding buttons to light them up, and open the cupboard door to find a square tile in front of some black silhouettes of cups.
Symbol
Use the silhouette clue and the clues on the cups to unlock the beige cupboard under the TV.
The cups on the shelf that have the shapes indicated by the silhouettes have card suit patterns printed on them: club, heart, spade, diamond.
Click the buttons 1, 3, 6, 4 times and then open the cupboard to find a square tile and a clue with circles on lines.
Product
Use the clue with circles on lines you just found to unlock the left cupboard under the window.
Each of those circle-lines represents a lollipop, and those have the digit 9 printed on them. However, the last two are upside-down, which suggests that the digit 6 be used instead.
Since 99×66 = 6534, enter that into the lock and open the door to find a square tile.
Complete
Place all eight square tiles into the picture above the table, then solve the randomized puzzle that appears by clicking the tiles to rotate them until they match.
Once done, the drawer under the picture opens up. Take the gold key, then use it to unlock the door and leave!
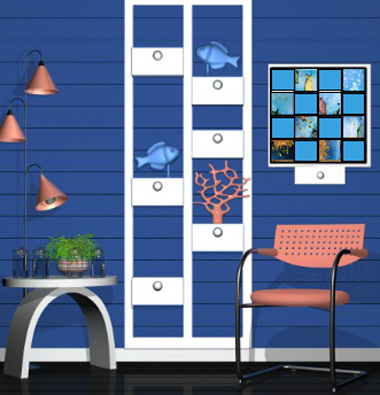
Color Room: Ocean Blue
An ideal room for deep relaxation.
Exploration
You start off on a screen with an incomplete picture over the pink chair. There are six drawers scattered across the middle columns of the wall, but only the fourth one can be opened to reveal a square tile. Zooming in on the table, you find a rather distorted square tile next to four jars of ocean water. Also, the nearest lamp to the table is missing a bulb.
Turn right to find a picture of fish between two windows which tilts when you click its corners. The cupboards beneath have a two-button lock, a four-vertical-bar lock, nothing at all, and a button grid lock. There's also a white box with some ocean-themed words.
Turn right to face the locked door. Nothing on this screen responds to your clicks, but you should be able to guess from experience that the colored fish pictures are a clue.
Turn right to find a television that's turned off. Of the three compartments underneath, the white one in the middle is fake, the left one has four colored dials, and the right one has four color-changing buttons.
Swim
Use the clue from the colored fish pictures to unlock the left cupboard under the TV.
The yellow, red, blue, green pictures show the fish swimming towards the ↘↙↗↖ directions.
Click the dials 3, 5, 1, 7 times accordingly, then open the cupboard to find a square tile and a remote control.
Screen
Turn on the TV, and continue using the remote on it to view a total of three clues!
Swim 2
Use the second clue from the TV to unlock the right cupboard beneath it.
The fish swimming in the ↗↙↘↖ directions are blue, red, yellow, green, so click the buttons 1, 0, 2, 3 times and open the cupboard to find a square tile.
Word
Use a clue from the TV to unlock the black cupboard underneath the box with words.
Just click all five buttons labeled with the letters in MUSIC:
--U-

-IS-

C--M

----
Open the cupboard and then take a square tile and purplish light bulb from it.
Name
Use the other clue from the TV to unlock the tilty painting.
The letters BENNY are at the ⌜⌝ ⌞⌞⌟ corners of the letter grid, so click the same corners of the painting to loosen it. On the back, you find a square tile.
Violet
Place the light bulb in the lamp next to the table, which reveals some numbers printed onto the jars.
Use that clue to unlock the second cupboard beneath the windows.
The jars labeled 1, 2, 3, 4 are already in order from least to most filled.
So make a staircase shape with the vertical bars by clicking them 0, 1, 2, 3 times, then open the cupboard to find a square tile.
Pair
Use the clue from the wall drawers on the first screen to unlock the leftmost cupboard beneath the window.
From top down, the drawers appear on the LRRLRL sides, so push those buttons on the cupboard, then open it and find the last square tile.
Complete
Place all eight square tiles into the picture, and solve its randomized puzzle by rotating the tiles until they match.
When you're done, take the golden key that shows up, then use it to unlock the exit door and leave!
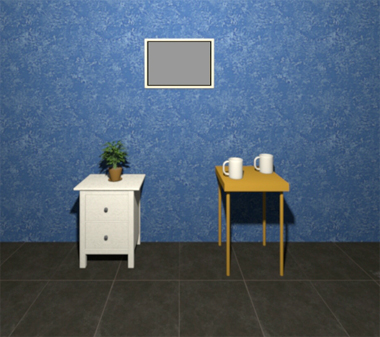
Escape Challenge 84: Room with Carbon Paper
Don't worry, the puzzles in this game won't all be carbon copies.
Exploration
The first screen this time has just a simple table (no chair) in front of a large rectangular window divided into five panes. The table has two clipboards with circles drawn on paper, and the potted plant on the left holds a capsule with a key piece.
Also take the key piece under the table.
Turn left. Underneath a blank picture frame, there's a small table with two white cups and a chest of drawers, the top one having a three-digit lock and the bottom one having a two-button lock with different-shaped buttons.
Under the table, you find a pen/stylus on the floor.
Turn left. As usual, the door is locked and the wall clock doesn't even have hands. Instead, it has several shapes drawn on it, and four buttons protruding out from it around the edge. The small table beneath has a glass case covering a capsule, along with a hole in the white box that connects to the inside of the case.
Also look under the table to find a clue with shapes.
While looking at that clue, click the top of the screen to find a bluish square.
(If the game extends off the edges of your screen (as it does with mine), make sure you scroll or zoom until you can see it.)
Turn left. There's a wall box with five buttons that change colors, next to a television with something hanging from its top edge. Turning on the TV, you find a pattern containing two rows of colored stripes. Also there's an empty blue bin with a key piece beside it.
The corridor on the right leads to the toilet, where you can sit down, look right, look up and look left to find a drawing of… something. Is it a letter, or an email? What's up with all these nicknames, and why is someone in the CC field for a message containing a castella recipe? It doesn't really matter.
Plain
The blank picture frame isn't really blank, as you can tell when you click it and it starts filling up a tiny bit with gray.
If you click and hold, the white part falls out the bottom and now you have a piece of blank paper in your inventory. Also, a brand new clue with squares and lines.
Hairy
The picture frame now slides downwards slightly when you click it.
So use the new clue from the blank picture frame to unlock it.
Each square has a different number of lines extending from it, so click the squares in that order, from 1 line to 6.
Actually, the game only cares whether you click the left or right side of the picture, so you can just click the RLRRLL sides.
The frame dispenses a sheet of blue carbon paper!
Tipped
You can try to use the stylus to get into the glass case, but even after trying thrice all that achieves is knocking the capsule even further away from the hole.
Push the button accessible on the bottom of that table, which dislodges the glass case from its base so you can take the key piece.
Mysteriously, all that's left of the case is a single glass pane in your inventory.
Two shapes
Use the clue under the glass case table to unlock the bottom drawer.
Following the code under the table, push the RLLLR buttons on the drawer to open it and find a key piece on a sheet of carbon paper.
Cycle
Use the clue on the clock face to unlock it.
Comparing the shapes on the inner ring with the ones outside of it, you find that the bottom triangle is rotated, forming an arrow pointing to the left.
So read the shapes in clockwise order from the bottom to find that they appear on the RUDLRRRU edges of the clock. Push those buttons, and the clock dispenses a sheet of carbon paper (item)!
Trace
The two pieces of paper (one white, one carbon) should both occupy the first slot in your inventory, and you can now select and examine them.
Place the paper set on each clipboard, and use the stylus to trace out each circle.
Hmm, it feels like something's missing.
Also use the paper set on the cups, which makes two more circle markings appear.
Value
You've seen lots of clues but none of them have numbers for the top drawer. Or do they?
The five circles on the paper form the code 808. Enter that into the drawer and open it to find a key piece and more carbon paper.
Spots
Now that you're done putting circles on the paper, you can hang your masterpiece on the TV. Wait, why would you do that?
Clearly the circles and TV are clues for the wall box, but if you try to solve it that way you'll find that the required colors are missing.
Let's try something else.
Examine the paper and use the glass pane on it to transfer the circles. Hanging that on the TV, the weight of the pane makes it descend to the bottom row.
Turning on the TV, you find that the left, middle, right circles are green, blue, yellow, so click those buttons 2, 3, 1 times and then open the wall box to find more carbon paper.
Escape
Oh right, I almost forgot about that. You have all the key pieces, so just open the door and leave!
Item list
6 key pieces:
Top left: in top drawer
Top middle: in bottom drawer
Top right: beside blue bin
Bottom left: in glass case
Bottom middle: under table
Bottom right: on potted plant
5 carbon paper sheets:
1 item from clock
1 from picture frame
1 in bottom drawer
1 in top drawer
1 in wall box
3 other items:
Paper from blank picture
Pen under cup table
Glass from the glass case
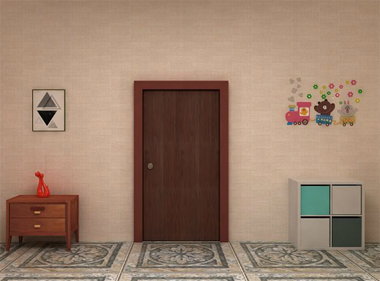
Elegant Traditional Room Escape
It's elegant, but is it traditional?
Exploration
The room door is missing a handle. To its left under a small geometric picture, there's a chest of drawers where the bottom drawer is empty and the top has four wooden dials with arrow markings. On the right, there are some cute decorations on the wall, as well as a grid of large greenish drawers that light up with star shapes when pushed in.
Click just beyond the right of that green drawer cabinet to find a stick hidden beside it.
Turn right to face a table under a black wall picture with a grid of white letters that has "some secrets". All the table drawers are unlocked and empty, and the only thing you can look at on the table is a robot with one arm missing. On the left, a spiky cactus pot (wrapped in cellophane?) hides a heart-shaped object, while the small table it rests on can be rotated to find a tiny compartment with a lock (that has an incorrect description). On the right under a green picture, an armchair looks perfectly normal, but
you can click the back/top cushion and then the bottom cushion to open up a space containing a domino tile.
Also, you can click below the armchair. You can't see anything hidden there, but this view shows that the right wheel is missing.
Turn right to find a flame-shaped wall decoration with a clock in the green area, but one needle is missing. Underneath, there's a flowery box with a three-digit lock and a locked chest beside. The left side of the screen has some pottery with long thin ears under something in the ceiling that you can't look at, while the right side has a lamp with a shape clue printed on it.
The box and chest are on a board that's hovering off the ground, but you can't reach whatever's inside just by clicking.
Turn right. This time, the wall is more complicated, so examine the rainbow-colored framed painting on the left which appears to have something attached to its corner, the dark gray clock with dominos instead of numbers but two dominos are missing, and the pink shelves which have various figurines (that's definitely Peppa Pig) among which the porcelain animals on the bottom shelf are definitely a clue. Along the floor, you see some potted plants with lots of leaves (weirdly, one pot vanishes when you zoom in), a cupboard with two empty drawers and a missing round piece on its lock, and a small round table with a white dog missing its bowtie.
There's a hole in the upper-left corner of the rainbow frame.
Head
Use the clue from the row of animal figurines to unlock the top drawer to the left of the door.
The arrow next to the figurines points from left to right, and in that order they face the ↖↙↘↗ directions.
Click the dials 7, 5, 3, 1 times to open the drawer and find a white bowtie.
Neck
Place the bowtie on the dog under the small round table. You don't get a key, but you can push the tie in to open the drawer above, getting a pair of gloves!
Hands
Reach into the cactus with your gloves and pull out a heart key.
Heart
Then use that key to unlock the chest, which contains another domino tile.
Pair
Place the dominos into the empty positions of the black clock, and they mysteriously lose one dot each to fit in.
Sweep
Use the stick to get a toy's arm from under the chest.
Repair
Place the arm into the robot on the table, then click its head to raise/spin it and get a silver key.
Silver
Use this key in the table under the cactus to unlock it and find a round object, actually a round button.
(This was already unlocked due to a bug that only requires you to unlock the chest earlier.)
Shape
Place the round button into the cupboard under the black clock.
Where's the clue for that cupboard lock?
The shapes on the lamp match the CRCLR buttons, so push them to unlock the cupboard and find a wheel.
Roll
The wheel fits perfectly on the armchair.
While still on that screen, click the chair (or wheels) to shift it aside and find a card (transparent sheet) behind.
Filter
Place the sheet over the grid of letters. Instead of making them darker, some of them become lighter.
Numbers
Use the clue from the filtered letter grid to unlock the black clock.
The lit letters spell out the code 925, so push the dominos with 9, 2 and 5 dots (which would be in the 6, 11, 2 o'clock positions on a normal clock.)
This makes the hands spin around and stop at new positions. You can continue pushing the buttons but nothing happens.
(You can also guess the code 925 by reading the first number words that appear in the letter grid: twenty-five past nine.)
Flowers
Use the clue from the wall decoration to unlock the flower box beside the chest.
The flowers on the box match those on the decoration. Including the three flowers/gears on the duck engine, this makes a total of 5 yellow, 6 green and 8 pink.
Enter 568 in the box and open it to find a small black knob.
Identical
Place the knob on the rainbow-framed picture. This makes some star shapes appear on the rainbow.
Fivefold
Use the clue from the rainbow picture to unlock the greenish star drawers.
The stars on the picture match those on the LR UR UL LL UR drawers.
So pull on the ⌟⌝ ⌜⌞⌝ drawers, and the bottom-left one opens up to reveal a needle/clock hand.
Adjustment
Place the missing needle on the colorful clock, then adjust it to show the correct time using the clue from the other clock.
As the dominos indicate, the black clock has been rotated. To set the colorful clock correctly, the hour hand needs to point to 11 and the minute hand to 9.
Click the short hand thrice and then the long hand eight times. The clock opens up into a flower shape, eventually leaving just a hidden compartment with a door handle inside.
Use the handle on the door and turn it. As you back out, you find that the door is now open for you to leave!
Update