
 Welcome to the new Weekday Escape!
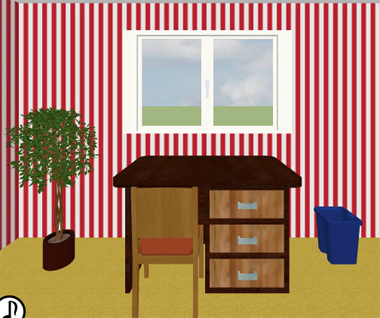
No surprises this week. You came here to play some good escape games, and that's exactly what you get - another stylish Amajeto's living room, new great game by Nicolet (not cube this time), and standard tomoLaSiDo's room decorated with red and white stripes wallpaper. And after you escape it, you should reserve some time for the last Selfdefiant's asylum. It's vast.
Have a good time and enjoy!
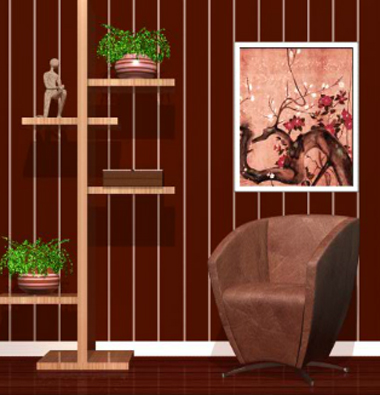
Amajeto's started series of rooms in one color recently, and now it's brown's turn. If there were some ashtrays around and velvet smoking jacket with cap hanging on a coat-stand, it would be nice smoking room, but what we find are coded drawers and cabinets, and TV without controller. You need to crack several codes to collect all the tiles for final jigsaw puzzle which gives you the key from exit door.
The cursor is not changing, no save button, one ending.
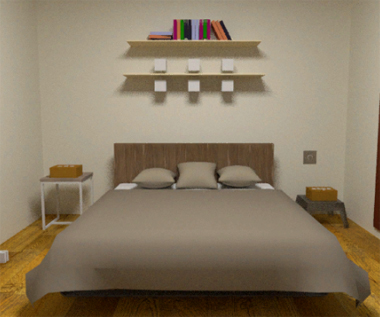
From Nicolet's tiny cubes through bigger cubes we finally get to a proper room (nothing wrong with the cubes!). The room has big bed (what do you think, is there anything under the pillow?), working desk with PC and an unaccesible (at the moment) balcony. You are locked here of course, and the door can be opened only with correct code and the boxes by the bed as well, so look around for hints and clues, and enjoy all the clever and intuitive puzzles Nicolet's prepared for us.
The cursor is not changing, autosave, one ending.
The game is available for Android and iOS too.
Typical tomoLaSiDo's room went through a change - has a new tune (this time quite recognizable) and the exit key's turned yellow. Otherwise nothing has changed - you need to get six components of the key (obligatory task) and find ten small bottles of liquid paste (optional task); one bottle is important and you use it several times, nine are just part of the quest. Puzzles are cunning with twists, as usual.
The cursor is changing, no save button, one ending.
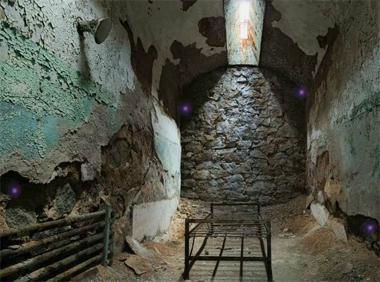
The skippable intro at the beginning explains, why would you enter such a dark and dangerous place as Selfdefiant's haunted asylum is. The reasons are serious and valid. Your girlfriend influenced by a strange book went missing, and you need to explore the whole building infested by evil spirits and find her. Not an easy task - the asylum is huge! First get the green bottle for purple orbs; then find the 'shop' and change the orbs for a map and necessary items. Take the crystal ball as the last thing - teleportation is very helpful, but the ball too expensive and you may stay trapped. Changing cursor is your good friend as some items are small and difficult to spot.
You need to place seven magical gems into the sockets (they appear on walls when you find the seventh gem) to get rid of Evil and rescue your girlfriend, can you?
The cursor is changing, autosave, one ending.
We love escape games, and our readers love talking about them and sharing hints! How about you? Let us know what you think, ask for clues, or help out other players in the comments below.


Color Room: Brown
Take a break from the brightly colored rooms, we're going brown this week!
Exploration
There's no better time to have a leather armchair in a room, and the tilty painting on top complements it perfectly. Click the box on the shelf to look at its symmetric pattern, and you find a narrow slot in its corner.
Turn right to face windows with a relaxing city view. Under it, there's a cube which you can click to spin around, as well as a cupboard with three doors. The left one has a grid of sixteen buttons, the middle one has a row of four buttons that change color, and the right one has four buttons that change their letters.
Turn right to face the locked exit door. There's a grid on the left with some tiles clearly missing. The bowl on the table has a variety of fruit, and you notice a square tile behind it.
Turn right to find a television that's currently off, over another cupboard with three doors. The left one has a row of three buttons, the middle one has four digit buttons, and the right one is unlocked and contains a square tile in its compartment.
Colorful
Use the clues from the fruit bowl to unlock the middle cupboard door under the windows.
The fruit bowl contains 1 kiwi, 2 bananas, 3 oranges and 4 strawberries, so the first color in the code is green and so on.
Make the buttons green, yellow, orange, red by clicking them 1, 3, 5, 2 times.
Then open the door to find a square tile and a number painted on the back.
Facet
Use the clue from the spinnable cube to unlock the left cupboard beneath it.
Combining the positions of the holes on all four faces, you find that you have to push the buttons on both diagonals:
X--X

-XX-

-XX-

X--X
Take the square tile and remote control, and read the number clue.
Screen
Use the remote to turn on the TV, which shows you some windows with unusual lights.
Use it on the TV again to switch to a clue with boxes and crosses.
Use it on the TV again to switch to a squarish word clue.
Halved
Use clues from the TV and ornate box to unlock the painting above the armchair.
The window patterns on the first TV clue match the LR LR LL UR UL LR squares on the box.
So click the ⌟⌟ ⌞⌝ ⌜⌟ corners of the painting, which comes loose, and flip it over to find a square tile and a grid of letters.
Squared
Use clues from the TV and painting to unlock the right cupboard door beneath the windows.
If you try the "word" from the TV, you'll notice that the last letter isn't available on the lock.
Instead, you need to interpret the symbols as representing spaces on the letter grid (behind the painting). For example, the first symbol appears in black around the letter W, which would be the first letter of the code.
Do so for all four symbols, and you'll get WOOD. Enter that in the lock and open the door to find a square tile and another number clue.
Math
Use the number clues from the window cupboard and the remaining clue from the TV to unlock the middle cupboard door beneath the TV.
The white crosses are multiplication signs and the brown squares represent the numbers:
11×12×13
This works out to 1716, so enter that in the lock and open the door to get yet another square tile.
Counting
Use the number clues from the window cupboard again to unlock the left cupboard door beneath the TV.
Click the 1st, 1st, 1st, 2nd, 1st, 3rd buttons from the left, i.e. the LLLCLR buttons.
Then open the door and take the last square tile.
Fill
Place all 8 square tiles in the grid device beside the door, and click it.
Then solve the randomized image puzzle by rotating the pieces until they match. (Hint: focus on the centers of the flowers.)
Once you're done, a small drawer opens beneath the device, containing a coin.
Finish
Place the coin in the ornate box on the shelf, which pops open to reveal a key!
Then use that key to unlock the door and escape.
Gadget Room
You might be expecting to pick up a whole suite of spy equipment, but it's just a room with techie stuff.
Exploration
You start off facing a locked door. The three-digit lock next to it has an X and a red light above its buttons.
Turn right to face a bed under some messy shelves. Don't panic, the bottom shelf just has three pairs of lamps and the top shelf has colored books, some with markings on their spines. To the left of the bed, there's a pair of white blocks with matching vertical grooves in front of a slightly dark square on the floor, as well as a box with three buttons and five lights on the bedside table. From here, you can see a smartphone on the bed and can lift the left pillow to find a battery. On the right side of the bed, there's a box with four abstract face buttons under a button that flashes the shelf lights on and off.
Turn right to face a huge glass window/door facing a small garden. The door is missing a handle.
Turn right to find a desk with a computer which has two monitors. Clicking the left/larger/white one gives you access to the ports on its back, and clicking the right/smaller/black one gets you a closer look at the clues pasted on it. On the CPU, you see a small white device that looks like a kitchen scale, but it's missing a battery. The small green table to the right has a box with four arrow/triangle buttons.
Left box
Use the clue from the shelf lamps to unlock the box to the left of the bed.
Following the order that they light up, push the CRLRC buttons.
Inside, you find a yellow bottle (rather, a glass bottle with a yellow label).
Right box
Use the clue from the books to unlock the box to the right of the bed.
The books with 1, 2, 3, 4 stripes all have faces, with 1 and 4 being circular while 2 and 3 are square, and 3 and 4 having antennae.
Click the buttons 3, 0, 1, 2 times, then open the box and take a red bottle.
Triangles
Flip the phone over to find a pattern with colored triangles.
Then use that clue to unlock the box on the green table.
Proceeding in clockwise order, the triangles pointing U, R, D, L on the box are those on the D, L, U, R of the phone clue.
So make those buttons green, black, purple, red by clicking the buttons 1, 4, 2, 3 times, then open the box to find a blue bottle.
Sum
Place the battery in the weighing scale, and then use clues from the right monitor to unlock the door lock.
The red, yellow and blue bottles weigh 110, 105 and 100 grams, which makes a total of 315.
Enter that into the door and open it.
Exploration 2
This next room has a comfy couch with colorful paintings hanging over. You can zoom in on the middle three paintings to find symbols drawn on them.
Turn left to face a window covered with blinds. On the glass coffee table, you see what looks like a quadcopter fastened down with tape.
Turn left to face the doorway back.
Turn left to face a dining room with a small kitchen area. On the right, you see a projector screen and a panel with a keyhole. On the left, the table has a blue package secured (how?) with a small four-letter lock. And directly behind it under the counter, you see a box with a three-digit lock and another box with eight buttons vaguely arranged in a grid, that turn black when clicked.
Click the door to take a closer look. It has a lock with four green buttons that show bent lines ending in small dots. On the left, the counter has a large box that contains three cylindrical glasses connected with red wires in a loop together with a small grate covering a red button.
Click the area to the right of the cupboard to walk around it. From here, you can see a panel on the wall fastened with screws. The counter itself has a cupboard door locked with a keyhole.
Reaction
Use the clue from the framed paintings to activate the wire contraption on the counter.
The symbols on the left, middle, right glasses also appear on the blue, yellow, red paintings, so pour the bottles into those glasses accordingly. (There's no way to fail this, so you can just pour them anywhere they fit.)
The grate opens and you can push the button.
(In case you missed it, you can push the button again to watch what happened.)
The darkened floor area in the first room raised up to reveal a robotic vacuum cleaner, which passed under the bed and then around it back to its original position before getting stored in the floor again.
As you can see from the overhead view, the vacuum cleaner dislodged a white cable to the right of the bed.
Mobile
Connect the cable to the left monitor, and then the phone to it. Now the phone seems to be active, but it needs a four-digit passcode.
Look around for a clue.
The code is on the yellow note on the smaller monitor: 5827.
After entering it, the phone now shows two apps: a tiny version of Reversi and a drone app with options to move to two points (both fail, unsurprisingly).
Black and White
Use a clue from the phone to unlock the right (eight-button) box under the counter.
Just reproduce the pattern from the Reversi board by clicking the buttons corresponding to the black pieces:
wBw

Bww

BB
Opening the box, you find a pair of wire cutters.
Fly
Use the cutters to free the drone on the coffee table.
Then use the phone to fly it to Point 1, just above the ceiling fan where you see a three-digit code. Where can you use that?
Enter the code (788) into the left box under the counter, and open it to find an L-shaped piece that you identify as a door handle.
Potted
Place the door handle on the glass door and open it to enter the garden.
There's not much room to maneuver your view, but you can still access a box on the right with six colored squares (the middle four are buttons), a pot with a yellow triangle sign pointing at a hanging key, and a long planter with each plant labeled with a colored shape.
Colors
Use the clue from the books to unlock the box outside.
Starting from purple and ending at blue, the books are orange, green, black, black.
Click the buttons 2, 4, 3, 3 times, then open the box to find a screwdriver.
Unscrew
Use the screwdriver to unscrew the panel in the kitchen. Behind, all you see is a hole with a four-letter clue.
Thankfully, there's a four-letter lock nearby…
Enter the code (AFCB) into the lock on the package on the table, then push the small button on top to release the lock.
The entire wrapper vanishes, leaving just a projector.
Unlock 1
Use the key to unlock the cupboard beneath the counter. Take a thin wooden board and examine the box which has four buttons that change their colored shape when clicked.
Shapes
Use the clue from the garden to unlock the box you just found.
The shapes which are yellow, purple, red, black are the triangle, star, hexagon, circle.
So click the buttons 3, 2, 1, 0 times, and open the box to find a plastic card.
Slot
Back in the first room, place the board in between the white blocks on the ground to the left of the bed.
Now go back to the kitchen and push the button on the counter to start up the vacuum cleaner.
It gets stopped by the board, where you can pick it up and take the key from its bottom-left corner.
Unlock 2
Use this key to unlock the projector screen.
All that you see on screen is four circled numbers.
Fly 2
Fly the drone to Point 2, which is just over the garden fence, and you see a clue written in green.
Squarish
Use the clues from the drone and projector to unlock the kitchen door.
The circled numbers tell you to use the symbols on the top-left, bottom-right, bottom-left, top-right of the garden clue.
Click the buttons 0, 3, 2, 1 times to produce these symbols, and unlock the panel to reveal a scanner with instructions to tap a card.
So tap the card you got earlier on it, and a circle appears.
That means the door is unlocked, and you can leave!
Escape Challenge 81: Room with Liquid Paste
Keep a lookout for important glues.
Exploration
This time, the room is wrapped in dazzling (and entertaining) wallpaper, and you start off facing a small window and simple desk, with nothing interesting on the potted plant and blue bin beside it. Looking closer at the window, you see a code written on it. Looking at the desk, you see a piece of paper with a diagram. The desk drawers have a two-button lock, three-digit lock and three-digit lock but in cyan.
Turn left to find a simpler table, as well as a painting and box on the wall. The wall box has a three-digit lock with colored outlines around its digit buttons. Looking closer at the table, you see a glass case with a four-digit lock and some blue markings on its top, a seemingly blank piece of paper with corners that fold over when clicked, and a plain manila envelope.
Turn left to face the locked exit door. Here you can see a huge glue bottle, large enough to read its label ("Ah, surprising glue", but it's a pun on "gum arabic"). There's also a wall clock with colored numbers, no hands, and a dashed/dotted line with "taniori" under it (valley fold? but that's usually indicated without dots in the line). On the small table, there's a box with a keyhole in the front.
Click the left side of the box to find a symbol depicting reception bars.
Also check under the table to find a key piece.
Click the right edge of the label on the giant glue to open it. In addition to the shape clue that shows up, you see a normal-sized glue bottle and capsule containing a key piece.
Turn left. In addition to the giant glue and blue bin from before, you also see a machine with some hiragana on it (that don't spell out anything meaningful as far as I can tell). It also has a glowing bar, two colored buttons, a start button opposite a score display, and two prizes (glue and a key piece) with the left one requiring 200 points.
Click the right edge of the machine to find a hole that lets you pick up the key piece!
Also look under the machine to find a glue bottle.
Enter the corridor to the toilet, which is also covered in the same disorienting wallpaper. After you sit down, look right, look up and look left, you see a drawing of glue being applied to fingernails.
Shapes
Use the clue from the giant glue bottle to unlock the top drawer.
After opening the compartment, you see a sequence of circles and squares around its rim.
Click the RLLRLLR buttons accordingly, and open the drawer to find a key piece and glue bottle.
Vocab
Play a minigame with the machine, hitting the left button when the halves are about to match, and the right button otherwise.
You get points for deciding correctly and early, so one tactic is to just push a button as early as possible without looking.
Once you reach the required point amount, the game gives you a glue bottle (item).
Seal
Use the glue to seal the envelope. Oh no, it seems like you used too much and now it's uneven!
The protrusions form a code (253) which you can enter into the middle drawer. Open it to find a key piece and a glue bottle.
Underside
The piece of paper on the long table clearly has a clue hidden under its corners. If only you could piece it together…
Apply glue to each corner to make them stick, revealing a three-digit code.
But that code doesn't work in the bottom drawer. Is something missing?
Fold the top corner of the paper down to complete the code: 593.
Enter that in the bottom drawer and open it to find a key piece and glue bottle.
Transparency
The code on the window doesn't open the glass case. What's up with that?
You need to combine the window code with the blue markings on the glass case.
The easiest way to do this is to just pour glue onto the case, where it peels off easily, and then apply the glue peel to the window.
Or you could just combine those parts mentally to get the code (9848) to enter in the case.
With the case open, you can just take the key piece from it.
You should have all the key pieces now, but maybe you're curious about the other puzzles.
Harden
Following the instructions on the table, pour the glue into the mold, and it quickly comes out as a glue key.
Use that key to unlock the box beside the door… Oh no, it's not hard enough!
The key is now useless junk, so toss it in the blue bin.
A glue bottle magically comes out of it!
Colored
Use the clue from the wall clock to unlock the wall box.
If you imagine folding the clock over the line, the green and red numbers match up.
This suggests that you add them up: 3+1=4, and 6+10=16.
Enter 416 in the lock and open the box to find a glue bottle.
Wireless
You've run out of things to glue, which means it's time to leave. (You might want to make sure you have 9 glue bottles, including the item.)
But as you open the door, you spot something…
The dark spot on the right edge of the open door isn't a hinge, it's a switch that activates a transmitter!
Carefully back out from the door and open the box beside it to find a glue bottle, and now you can leave.
Item list
6 key pieces:
Top left: in top drawer
Top middle: in middle drawer
Top right: in bottom drawer
Bottom left: in machine
Bottom middle: in glass case
Bottom right: in giant glue
10 glue bottles:
Item, in machine
In giant glue
Under table beside door
Under machine
In top drawer
In middle drawer
In bottom drawer
From blue bin
In wall box
In box beside door
The other 2 items are crafted and consumed during the game.
Asylum 2019
In order to save your girlfriend entranced by a strange book, you've come to an abandoned asylum, but even the best laid of plans were undermined by an unmaintained floor.
First room
(Since we haven't done this in a while, a quick reminder that you can scroll and rearrange your inventory by using items on empty spaces.)
All these orbs are distracting and you don't have a jar to collect them, and worse, the door behind you is locked!
So hunt around until you find a piece of sharp metal on the ground next to the radiator in the bottom left.
Then use it to remove the loose cover of the power socket on the right wall, revealing a silver key.
Then use that key to unlock the door.
Exploration 1
(As a spoiler: you don't get a jar for quite a while, so don't worry about it for now.)
A green spirit blocks your way forward! Go south instead by clicking the bottom of the screen, and you reach a wide corridor.
Go east to an area under the stairs, which is tidy enough that you easily find a candle on the mop rack.
Go north to a sunlit corridor, which has
an empty bottle on the ground along the left wall.
Go north to a more messy corridor, then go left to a wall with a wheelchair, a clue in red paint and a candle on the right window. The left door here has a green keyhole.
Go east and north. The corridor here is slowly being taken over by plants, but you can still find
a candle on the bottom-left window pane.
Go west to a room with two beds. The shelf here has two candelabra with room for three candles each.
Go east and then north. Other than the beautiful ceiling vaults, this screen is uninteresting.
Go west to a room with lots of cabinets. Before you panic about the vast number of hiding spots, notice
the lighter on the windowsill.
Go north to a room with an uncomfortable-looking bed/table and a candle on its windowsill.
Go north to a room with lots of beds but no mattresses. Among all this white, the can of lighter fluid on the far right bed stands out.
Go west to what looks like a dentist's room. On top of the box in the middle, you find a candle.
Go east twice to a messy room with lockers, where you find another candle on the middle windowsill.
Light
Whew! Backtrack until you reach the screen with vines, then go west.
You should now be able to place all six candles on the candelabra, as well as fill the lighter with fluid (use the fluid on the lighter) and light the candles.
Take the green key that appears.
Green
From the room where you lit the candles, go east, south, and west twice, using the key to unlock the door.
This puts you in an orangey corridor.
The jar and the map
Go west to a room with a sofa.
Go west to a corridor with open metal doors.
Go north to another corridor with its walls only half-painted.
Go west to another room with bed frames.
The sacred jar should be sitting on the windowsill! Click all 5 purple orbs in the room to pick them up.
From here on, I'll give the number of orbs I found on each screen in parentheses.
Backtrack your way east (5) and south (4).
Take a quick detour west (4) to pick up the orbs there, then go east, south (4) and west (5). The hooded figure here is the orb shop!
With just 27 orbs, you should be able to buy the map. Despite the warning given above, I found that you can't get yourself stuck by buying the wrong items.
Exploration 2
Check your map regularly, since I'll name all the rooms by their map letters.
From the orb shop, go east to I. The door to the south has a blue keyhole.
You'll also find a screwdriver on the ground where the wall juts out towards you.
Go north and west to N. Searching the drawers under the beds, you find a flashlight in the second farthest one.
If you go east and north to U, you'll notice that the north door has a purple keyhole.
So leave that alone and make your way to P(5). From here, you can go south to J(4), where it looks like the main door has been bricked up.
Go north twice to V(4). The keyhole here is gold.
Towards the east, W(4) looks like yet another dentist's room. Here, you can check the (left) sink to find a key stuck under the drain cover.
Blue
Use the screwdriver from I to pop the drain cover at W, and take the blue key there.
Then use the blue key on the door at I.
At C(5), two staircases merge into one. They look really fragile even without their railings.
Go east to D(4), a room with lots of complicated equipment. In the rightmost table drawer, you see a blank piece of paper that covers a pair of batteries.
Go west twice to B(4), which is a close-up view of some objects but with nothing useful to you.
Go west to A(4), a laundry room where you find
a plunger along the right wall.
Go north to G(4), where some dryers are marked with numbers. Two of them are open but their insides are too dark to find anything.
Light 2
Insert the batteries from D into the flashlight from N, and then use it on the dryers at G.
The dryer on the right is empty, but the one in the middle has a purple key!
Purple
Make your way north to U, and open the north door with the purple key.
AA(4) is an empty room with a wall panel at the back that has wheels, slots and levers. (Feel free to play with it, the wheels reset when you back out.)
Go west to Z(4), where your path is blocked by a giant ice wall.
Go east and north to AG(4), a bathroom which has a red slider on one of the cubicle dividers. After pulling the slider down, it rises very slowly.
Go west to AF(4), where a strange eye emanates darkness throughout the room.
Thankfully, you can pass straight through it and go north to AL(4), which has a mysterious barrel of some chemical on the right.
Go west to AK(4). You can check each of the toilet cubicles here to find that the second toilet bowl is clogged.
Unstuck
Use the plunger from A to unclog the toilet at AK and find a gold key.
Warp (optional)
You should now have enough orbs to buy the crystal ball from the orb shop.
Once you do so, you can teleport to any room you've visited by clicking it on the map.
Gold
Go to V, and use the gold key to unlock the door to the north.
AB(5) has lots of orbs but otherwise nothing interesting.
Go east to AC(4), where the locker toppled onto the ground has a rotary combination lock.
Go west and north to AH(4). Is that your shadow on the wall?
Go east to AI(5). A wooden panel in the wall has a round slot.
Go west and north to AN(5), where a golden door in the middle of an empty pool gives you a bad feeling.
Go west to AM(4), a bathroom that looks very similar to the one at AG except that it has a blue slider.
Go east twice to AO(4), where a wall panel with red and blue circles stands out among the apparatus.
Go west and north to AT(4), where you find a floating wraith.
Go west to AS(4), which is another room full of small broken cabinets. A circular panel on the right has symbol buttons connected in pairs.
Go east twice to AU(4). What looks like a magic portal in the drawer just turns out to be a minigame.
Swirl
The memory game at AU is pretty easy…
…since it doesn't seem to randomize between games. Here's the grid I got, giving the items very short abbreviations:
Gm GK Cs Dr Bl Cs

Qn Ja Qn Cs Sl RK

Cs Bl Bk Gm GK RK

Ja Bk Sl Kg Dr Kg
Clear out the cards pair by pair, and a red gem materializes in the middle.
Duality
The panel at AO obviously requires the sliders at AM and AG to be activated. Now, this should be really easy since you have the crystal ball.
But if you don't, you can just start the red slider at AG and go south 3, east 1, north 4, west 1, activate the blue slider, then go east 2 to reach the panel.
The sliders are slow enough that you can mess up the order slightly and still make it, and once you reach AO the wall panel stays open and you can just take the magic wand.
Energy
You could think of various ways to attack the ice wall at Z, but the only one that works is taking the magic wand you just found and blasting it apart.
All that's left of it is a round amulet on the floor.
Bring the amulet to AI and place it in the wooden wall panel there. It slides open halfway and you see a puzzle with platforms and bottles.
Mass
The puzzle at AI requires you to balance the pans with at least 4 bottles placed. You can click the hand to switch sides, add bottles on the side that the hand points to, or remove them by clicking their ghosts.
There's only about seventy reasonable possibilities so you can easily try them all, but after a while you realize that (labelling the bottles A to F from biggest to smallest):
A = B+E
B = C+F
C = D+E
which gives you the reasonably short solutions
A = C+E+F
B = D+E+F
A+D = B+C
(I'm not sure these are the only solutions, but one is all you need!)
Once you've balanced the pans, another red gem appears in between them.
Numbers
Use the clue from the dryers at G to unlock the safe at AC.
Click the left side of the dial to turn it counterclockwise until the pointer rests on 13, then the right side until 26, then the left side until 6.
Open the safe to find an old book.
Reading
Use the clue from the wall at R to unlock the old book you just found.
You need to form a circle with an arc across the upper middle, so click the buttons
5 2 7

1 2 0

4 6 3
times, and open the book. Surely nothing bad can come of reading it!
The first few pages are relatively sparse and uninteresting, but on page 5 some pictures appear, on page 11 you get colorful icons and on page 14 something seems to be missing from the page.
Develop
Go to AL and use the empty bottle from M to collect the chemical.
Then pour it onto page 14 of the book to make a red gem appear.
Connection
Use a clue from the book to unlock the wall panel at AS.
(In case you mess up: the starting symbol on all the buttons looks like an anchor with an arrow pointing down.)
The four symbols outside the circle on the book correspond to four of the buttons on the wall panel. What about the other four?
Each of the four buttons in the clued positions is connected via a bent line to a button that's not.
Each of those four clued symbols is also a different color, and the symbols in the circle on the book appear in pairs which match in color.
This suggests that the buttons which are connected should show symbols with the same color. Click the buttons (clockwise from top) 3, 12, 4, 10, 3, 7, 5, 8 times, and a red gem appears.
Cycle
Use another clue from the book to unlock the wall panel at AA.
The vertical lever rotates the three rings by fixed amounts, according to the position of the horizontal lever:
Left: Green 2, Yellow 3, Blue 2
Middle: Green 1, Yellow 0, Blue 3
Right: Green 0, Yellow 1, Blue 0
This doesn't look like it's enough to cover every possibility, but you manage to match the green and blue dials up and set them both to "bird".
The easiest way to do so is to pull the vertical lever once with the horizontal lever at the left position, and once with it at the middle position. Doing so also settles the yellow ring and makes a red gem appear.
Cleanup
Alright, that's enough puzzles. Aren't you forgetting something?
Go back for the rest of the purple orbs.
In the southeast area as you backtrack to the start, you pass Q(4), R(4), S(5), M(4), F(4), E(4), L(5), K(4).
That's enough orbs to buy the rest of the shop, but for completeness you can return to the northeast area to revisit Y(5), X(4), AE(5), AD(4), AJ(4), AQ(4), AP(4), AR(4).
Buy the sacred dagger and the light bow and arrow from the shop and enjoy your surplus of 40 orbs.
Use the dagger to remove the spirit at L and the bow to remove the eye at AF, getting the remaining 2 red gems.
Seven
Now that you've gathered seven gems (from L, AA, AF, AI, AS, AU and the book), something's changed about the asylum.
Hexagonal sockets are now visible at B, F, T, W, AL, AM, and AR, so place the gems there.
The gate at AN is now open, and you can take Pandora's box from it.
Bring the box to AT and use it to defeat the wraith!
You can finally go north and pick up your girlfriend to view the ending.
had a problem with Asylum
when i got to the swirl matching game, after 3 matches, i got a BSOD 5 times in a row. when i restarted finally, the game reset back to the beginning.
not sure if anyone got that as well but i am npt sure if i'll restart this or not. it's supposed to autosave,
also, i think i mentioned this in the past but everytime i want to make a post on this board, i always have to reset my password. you'd think this site would remember it. not sure what's up with that. Anyway...
I've found the autosaves on the Asylum series to be not very reliable, and unfortunately Swirl is very far into the game. I can't help on that, but I did notice something while rereading that part:
In the grid for Swirl I called both the compass and chess king "Cs". If my memory (ha!) serves me right, then the ones in the first and last column are compasses and the ones next to each other are chess kings.
Thanks for fixing the links, but those for Lost Article's Android and original versions are still messed up.
I was easily able to get the original working on Chrome (only http in the url), so I might do that walkthrough too. TellPopeyes
TellPopeyes
Update