
 Hi! Let me welcome you to the new Weekday Escape!
Again you start in cosy Amajeto's room, and after you fight your way through all the codes you will find yourself in nice small room by Nicolet. Hopefully we'll see more from them, such a game with clean and polished graphics and clever puzzles is a pleasure to play. No1game tricks you (not for the first time) and what should have been a quick shopping trip turned into much more - into hunt for green sneaky guys. Bonus game by InkaGames is purebred adventure in nineties style.
Have a good time and enjoy!
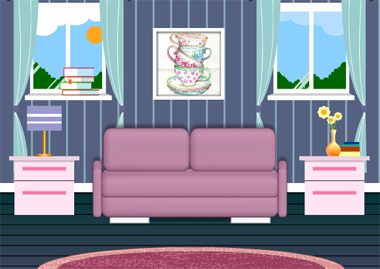
To the typical Amajeto's setting has been added a kitchenette! Otherwise you are trapped in their comfortable living room with new codes and jigsaw puzzles prepared for you together with tea set. Can you escape?
The cursor is changing (its color), no save button, one ending.
Nicolet obviously isn't a beginner. The small room you are locked in is simple yet stylish with carefully chosen colors, and well thought puzzles which require players to take a bit different approach to them. No need to hunt for items or pixels to click - thinking is important here.
The cursor is not changing, autosave, one ending.
The game is available for Android too.
You decided to buy some quality chocolate for your beloved Dennis and set out for famous No1game's store, EM's Chocolate. Things didn't go as expected. The door closed shut behind you and there are no employees around to help you...and there is this poster on the door which informs about company's new campain - apparently you need to find ten little green green men hidden in the store to be able to leave. Bright side of this arrangement is that they give you a box of their recommended product for free at the end!
The cursor is not changing, no save button, one ending.
Bonus InkaGames's game is quite long adventure in classic style - comical and absurd, with funny dialogues, amusing characters and loads of items.
However, you may get into the situation (and you will very probably) trying everything on everything because some hints are vague or totally missing...but it's fun. The game is just designed to cheer you up.
Switch to English version unless you understand Spanish, watch a short intro and start. Look everywhere, pick up everything you can and talk to everyone. If you have a silly idea, try it anyway. You never know. So, will you rescue your family?
The cursor is changing, autosave (not reliable, try it), one good ending (and many bad ones).
We love escape games, and our readers love talking about them and sharing hints! How about you? Let us know what you think, ask for clues, or help out other players in the comments below.


I've had not much progress on the bonus, but here's the others.
Tea for Two
That title is getting really close to a sneaky Tomatea reference.
Exploration
You start off facing a scrambled picture over the armchair. On the left, there's a grid of shelves with labeled boxes at the bottom that expand when you hover on them, and there's some compartments at the top which have: a two-button lock with orange and gray buttons, a nine-button lock whose buttons turn gray, a four-letter lock, and a square tile.
Turn right. There's a another picture of teacups (which tilts when you click its corners) above the couch, as well as a four-color drawer under the left window.
Turn right to face a locked door. There's a grid device above the table with teapots and teacups, and there's a digital clock with mathematical symbols around the digits.
Turn right to find a kitchen area. It looks well-equipped and therefore extra complicated, but the changing cursor helps you find that the microwave has buttons in two different colors and that one of the knobs above the oven is missing. There are also some suspiciously colorful jars on top of the fridge, each having a different number of white dots.
Scrambled
Start by solving the randomized picture on the first screen, rotating its tiles until they align.
When you're done, the picture slides aside and you find a square tile in the hidden compartment.
Blue
Use the clue from the microwave to unlock the top right compartment on the first screen.
Following the pattern of blue-labeled buttons on the microwave, push the top left, center, right, bottom left buttons on the compartment, then open it to find a square tile.
Colors
Use the clue from the jars on the fridge to unlock the drawer to the left of the couch.
The jars with 1, 2, 3, 4 dots are yellow, green, red, blue, so click the buttons 2, 3, 0, 1 times.
In the drawer, you find a square tile, a circular knob and an equation involving A and B.
Letters
Use the letter clues to unlock the bottom left compartment on the first screen.
The +1 in the equation represents counting past A in the alphabet to reach B.
Looking at the boxes on the first screen, you find the initials BTOR, and you can count past each one in the alphabet to get the code CUPS.
Enter that in the compartment, and open it to find a square tile and a crumpled note with colored arrows on the inside. Also, there's something different about this compartment…
Click the light-colored rectangle at the back to view another clue, this one with an up arrow and four colored squares.
Rotate
Place the missing knob on the oven. This activates the other four knobs.
So use the arrow clues to set the knobs correctly.
Follow the clue at the back of the compartment you just unlocked: the red, yellow, green, blue arrows on the note point towards the ↘↗↙↖ directions.
So turn the knobs 3, 1, 5, 7 times, then push the button. This opens up the cabinet just beside so you can take the square piece.
Also, some of the lights above the stove are now glowing red.
Red
Use the clue from the lights above the stove to unlock the top left compartment on the first screen.
Since the 3rd, 4th and 6th lights are glowing red, you need to push the RRLLRL buttons to match. Open the compartment to find a square tile and a clue with symbols.
Corners
Use the symbol clues to unlock the tilty corner picture.
The symbols on the compartment clue appear on the ⌜⌜⌟⌝ ⌞ corners of the clock, so click those corners of the picture, which comes loose.
Then flip the picture over to find the last square tile.
Complete
Place all eight square tiles in the grid device next to the clock. Now you can solve its randomized image puzzle by swapping the pieces into position.
(Hint: start with the saucer and work your way up the middle.)
When you're done, the device opens up and you can take a golden key. Use it to unlock the door and escape!
Tiny Cube
What's really tiny here? The cube, the things in it, or the game window?
Exploration
(Navigation arrows are below your inventory.)
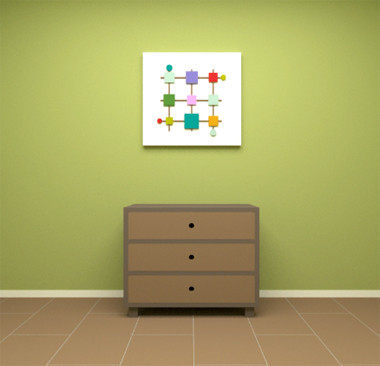
Looking at the first screen, you see a door that you can zoom in really close on, a white structure on the left composed of partial rectangular outlines, and a coat rack composed of three round knobs.
Clicking around, you find that the middle knob comes off.
Turn right to find a table with a red box on it. The box has three digit buttons arranged vertically and labeled with digits, but the bottom label seems to be upside-down.
Turn right to find a board with a simple instruction containing some not-so-simple colored lines. On the right, you find a box with four digits arranged around a central button. (Click the digits to change them.)
Turn right to find a chest of drawers with all the handles missing, as well as a piece of artwork with colored squares and circles on a grid of brown lines. Tan lines, even.
Bottom drawer
Use the round knob on the bottom drawer, and open it to find a purple box with colored circles, arrows and colored buttons.
Traffic lights
Use the clue above the chest of drawers to unlock the bottom drawer.
The pair of arrows on the left tell you to start from the red circle and follow its line two steps to reach the teal square.
Similarly, the square next to yellow is red, and the square two away from light blue is also light blue.
Click the buttons 6, 1, 3 times accordingly, and open the box to find a folded note with equations involving colored lines and boxes.
White
Looking closely at the white object to the left of the door, you find that its protruding lines aren't all the same thickness. Or are they?
You can make them the same thickness by tracing vertical and horizontal lines through the center of the clue, dividing it into four parts.
Each quadrant then forms the shape of a digit:
5 3

6 2
Enter that in the white four-digit box and open it to find a square handle.
Top drawer
Insert the square handle into the top drawer, and open it to find a two-toned rectangular slab. Can you tell what it is just by looking?
Reveal
The slab is actually an eraser! Use it on the Escape board to remove most of its lines.
Countdown
Use the clue from the "cleaned-up" Escape board to unlock the red box.
Hint: Each digit of the solution comes from a different row.
The numbers on the box suggest that you look at the 4th symbol on the top row, the 3rd on the middle row and the 2nd on the bottom row.
That makes the code 70E, but since the 2 of the clue is upside-down you have to turn the E upside-down too.
Enter 703 into the box to find a triangular handle.
Middle drawer
Attach the triangular handle on the middle drawer, and open it to find a light blue box with three digit buttons in colored square outlines.
Total
Use the clues from the Escape board and the folded note to unlock the three-digit box in the middle drawer.
Substitute each colored line in the equations with the number of times it appears in that orientation on the board:
1 + 3 = 4

3 + 2 = 5

2 × 1 = 2
The orders of the colored outlines already match, so just enter 452 into the box and open it to find a key.
Zoom in on the doorknob and unlock it with the key to escape!
Find the Escape-Men 197: Valentine's Day 2
The (rumored) best chocolate shop makes the perfect Valentine's gift, but first you have to deal with an unusual campaign, a recorded message, locked doors and of course, ten pesky green men.
Exploration
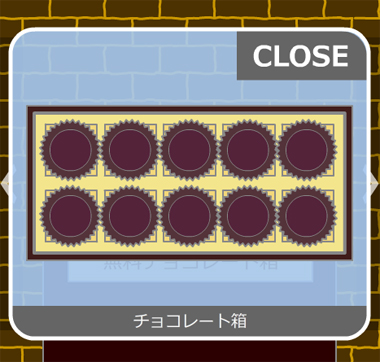
You can't go looking around until you pick up the Free Chocolate Box. Do so, and the arrows appear on the sides of the screen.
But first, what's that bright-colored thing behind the chocolate box pedestal? It's a Valentine's day poster, with a chocolate heart on a background divided into four colors!
Flip down the corners to find an Escape-Man behind the top-left one.
Turn right to face the entrance. The doors are now firmly locked, and the paper on it tells you what's up. Even if you try the sensor, all that happens is an Escape-Man greets you with a tiny bugle.
Both corners of the carpet hide nothing, but that's because the Escape-Man is hidden under the middle.
Turn right to face a glass display case filled with all kinds of round chocolates. On top of it, there's a Free Sample box where you can pick up and flip over each of the samples.
Peel off the right edge of the Free Sample label to find an Escape-Man on the back.
While staring at the display case, you notice a little movement…
It's an Escape-Man trying to steal a chocolate piece from the top right! Click his arm to catch him green-handed, and if you fail you can just back out and try again.
Look behind the right corner of the display case to find a key.
Turn right to find a smaller locked glass case with a safe inside. There's also a cash register and a call button next to it.
Stare at the cash register for long enough, and an Escape-Man appears on the screen.
Turn right to face the door to the staff room. Did you call beforehand? Anyway, there's a poster on the left showing a weekly ranking of chocolates.
Ring
Knocking on the staff door does nothing, but if you use the bell beside the cash register then an Escape-Man comes through the staff door for a short while.
Box
Examine the free chocolate box, and then flip it over to find another Escape-Man.
Heart
Use the clue on the Valentine's poster to solve its puzzle.
The colors on the year number match the corners of the poster, which tells you how many times to click each corner.
So click the top right corner twice, the bottom right once and the bottom left nine times. Once you have it correct, the heart pops open to reveal a dancing Escape-Man.
Unlock
Use the key to unlock the smaller glass case and get to the safe inside. The safe has eight buttons with pictures of chocolates, but two of them seem to be stuck.
Taste
Use the clues around the room to unlock the chocolate safe.
Hint: Each row has a pattern that you can guess from the stuck buttons.
Since the coffee chocolate is third ranked, the pattern on the bottom row is simply the ranking of chocolates. This suggests that the top row represents the numbers 1 to 4.
If the second most popular chocolate is called Four Lines Chocolate, then the other chocolates with lined patterns might also be named by the number of lines! So the numbers 1 to 4 are represented by the chocolates with that many lines.
Click the buttons
- 7 4 2

8 2 - 5
times, then open the box to find an Escape-Man.
Complete
The chime informs you that you have all 10 Escape-Men in your box:
Behind corner of heart poster
Welcoming you at the door
Under carpet
Behind sample label
In display case
On cash register
From staff door
Under free chocolate box
Inside heart poster
In chocolate safe
However, they still remain as 10 little green chocolate men.
Turn back to the cashier, where a non-green man is standing by. After you use the box on him, he congratulates you and you get to keep the most popular item in the shop, the green man chocolates!
Leave through the door to end the game.
Nevermind! I managed to trial-and-error my way to the end of the bonus, but wow it's difficult.
Gumball Saw Game
Note: I'm writing this without having seen Gumball or anything else in the Saw Game series. And just in case, this is for the English version.
Some parts of this game require you to click rapidly, but don't click too fast or you'll skip the dialogue! While I'm described lots of Game Overs, they're all optional and you get no reward for avoiding all of them anyway.
Intro
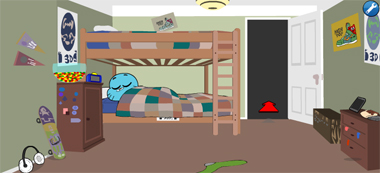
Right after getting out of bed on Christmas Eve, you find nobody in the house. The only thing you can use is the remote on the table, which gets you into a conversation over the TV with Pigsaw, who's kidnapped your family! Not only that, he locks down your house and blocks the windows right afterwards.
Exploration
(There's basically only one music track in the whole game, so feel free to mute it in the options.)
The only thing left to do on this screen is click the taped piece of fabric behind to pull it off. There's two colored rows of symbols that you'll have to decipher.
(Click the red arrow to) turn/go left, facing the living room. Both of the closed doors are locked. Pick up the candy cane on the left.
Enter the left doorway to the kitchen. You can't use the door here, but you can pick up the bowl of sugar and the empty pitcher from the counter, as well as look in the fridge to get some ice cubes. Unfortunately, you can't get any water to go with those because the city water supply is under repair for two days!
Go back to the living room, and then go up. At the top landing, you see a ceiling hatch that's too high to reach.
Go left to the bathroom. The medicine box on the wall is too high to reach normally, but you can climb on the toilet to open it and find an old key.
Go back the the landing, and then go forward. You can clean up the bedroom a little by picking up the earmuffs, skateboard, skateboarding helmet (and the pillow it rests on), green sock and phone.
Unlock
Use the old key to open the brown door at the back of the living room, and take the stool from the storeroom.
Climb
Use the stool on the ground under the trapdoor (you can click it even if the cursor doesn't change), then climb on it and use the candy cane to reach the handle.
A ladder drops down, and you can click it to climb up to the attic. The only interesting items there are a stick of glue on the ground and a locked safe wired up to a keypad/keyboard.
Pieces
Use the clue beside the television to unlock the safe in the attic.
The top and bottom halves of the clue combine to form a (slightly randomized) four-digit code, so enter that in the keypad and open the safe, which contains a golden key and pocket watch.
Unlock 2 / Exploration 2
Use the key to unlock the house door, and you're out! Ohhh… there's a magic map teleporter with so many places to go.
Let's stay in the neighborhood for now. Next to you, you see a human! Bryan Gámez Contreras asks to join you. (He's a lucky winner, so let's not treat him too badly.)
Click the red arrow to walk behind the house, where you can pick up a photographic camera (as opposed to a video camera), a small goal without a net, and an entire portable bathroom.
Go left. You can see another house in the background, but you can't do anything with it. There's also a slide next to you and a treehouse across the screen.
Go right twice. Mr. Robinson is in a bit of trouble, and Gumball immediately hatches a plan.
After talking to him, the door opens and you can enter the house… and immediately get tied up!
Thankfully, it takes almost no effort to chew through the rope.
Now that you're free, you can look across the room at Mrs. Robinson (who's busy reading), a blue rotary phone, and some gray object on the television. But crossing the line gets you immediately spotted, for the first possible Game Over.
Use the map to teleport to the Mad Hatter's, who's severely lacking sleep because of his stopped clock. Unfortunately, the clock is way too high to reach and you have no more items to climb with.
Teleport to the school. Tobias stands right outside and offers to rent you some markers, but only for money.
Before you enter, go to the left to find Jamie standing outside a Ripley 2000. He has a video game cassette he needs to return.
You can enter the store where Larry is waiting there. Try to give him the cassette, and he tells you about his abusive boss preventing him from accepting the return.
Go back and enter the school, where you find Joe and Leslie in the hallway. Turns out Leslie thinks Joe's weak so they're no longer friends and Leslie has no one to watch movies with. There's also a water cooler (I'll stop mentioning them) and a red cross on the floor.
Going up the stairs, you find Carrie who's desperate to have food, and she decides to possess you. That's a Game Over.
Back in the corridor, go right to find an open door through which you can see a teacher, whose face also appears on a locker to the right which you don't know the safe combination for.
Enter the classroom and talk to Ms. Simian, who explains that Roberto's in detention.
Back out and go right. You're now outside the principal's office, and you peek through the keyhole to see him sleeping. There's also a blank sheet on the floor and a sad-looking Teri, who's lost her doll Daisy in the trash.
Go right to a basketball court, where Alan and Carmen are having thorny issues with hugging. On the ground, you also see a whistle, a ramp and a cross on the left side.
And finally, we're teleporting straight to the junkyard. A crane has its magnet stuck in a tall pile of metal, and you can click anywhere on it to climb into the cabin, but it seems like you need the ignition key to do anything useful. Pick up the tire on the ground, and the large wooden board on the left.
Go right. This screen doesn't seem to have anything interesting on it.
Go right into the warehouse. Here you can interact with Tina (the dinosaur) and Daisy (the doll). However, try to grab Daisy and you will immediately wake Tina up and get a Game Over. Pick up the gasoline on the right.
Quick recap
If you followed up to here you should be holding the following 23 items, in reverse order of you picking them up:
Teleporter
Gasoline, Wooden board, Tire
Ramp, Whistle, Blank sheet, Video game cassette
Portable bathroom, Small goal, Photo camera, Bryan Gámez
Pocket watch, Glue, Gumball's phone, Green sock, Helmet, Pillow, Skateboard, Earmuffs, Ice, Pitcher, Sugar
Aside from the main quest, you need to help out these people:
Mr. Robinson: scare his wife
Mad Hatter: fix his clock
Tobias: rent his markers
Jamie/Larry: get the cassette return accepted
Joe/Leslie: improve Joe's image
Carrie: let her eat
Roberto: end his detention
Teri: retrieve the doll
Alan/Carmen: let them hug
Sliding
[Neighborhood] On the leftmost screen, find a way up to the treehouse.
You'll need to gain extra speed off the slide, and you can do so with the skateboard. Gumball reminds you that he needs to wear the helmet.
So combine the skateboard and helmet, and then use it on the slide while you're standing at the top. Whoops! There's a pothole in the ground, Game Over.
Cover the ground in front of the slide with the wooden board. Of course, this still gets you a Game Over when you reach the end of the board and slam into the tree.
Place the ramp at the end of the board. Now you can finally skate down the slide, up the ramp and into the treehouse. Inside, you find Masami who's just meditating.
You're not in the clear yet! If you try to leave the treehouse, the long fall will hurt you, for another Game Over.
Even if you hadn't planned ahead for this, you can still use the pillow on the red arrow to drop it out of the treehouse and make the fall safe.
Storm
Being basically a floating aggregation of condensation, there is one thing that Masami can really help you with.
Place the pitcher on the ground beneath her to collect water. But how do you convince her to produce that water?
Use your phone to show her a sad video. It's really sad, so she storms off (wait, that's the wrong phrase) and you can pick up the pitcher, now full of water.
Persuasion
[School] Maybe if you try really hard, you can get Larry to accept the game return anyway. One of your items can help.
Use the pocket watch on Larry to hypnotize him. Now if you try to return the game, Larry will accept but his boss will come out to reject it. Are you quick enough to stop him?
Use the phone on the boss to do a little recording. Blackmail gets the job done!
Once you've returned the game and returned Larry to normal, Jamie rewards you with lemons and a rope. You don't get to keep the 10 dollars from the return though.
Lemons
Nobody wants to eat lemons! Turn them into something more tasty.
Add the ice, sugar and lemons to the water to make lemonade. Who's thirsty?
Give the lemonade to Tobias, just outside the school. He won't give you any markers in return, but give it to him for free anyway.
Hmm, looks like he urgently needs to go to the bathroom. Let's grant him some relief.
Give Tobias the portable bathroom (or just place it on the ground). This time, you ask him for the markers and he agrees.
Scary
[Neighborhood] It's time to deal with Mrs. Robinson. Enter her house, and use your phone to call hers.
Now's your chance to hide behind the couch before she sits back down. If you take too long to hide or if you try to leave the hiding spot, you will get spotted and it's another Game Over.
Next up, you need to do something scary.
Use the markers to decorate the green sock into a snake.
Then use the fake snake on Mrs. Robinson to complete the plan.
Their romance is saved! With them gone, you can finally take the selfie stick on the left. Alas, you've used your phone way too much and it's now out of battery.
Exploration 3
Now that the car is gone, you can continue to the right.
Penny is a little upset about her missing spider, and she gives you her spider food so you can help search.
At the back of her house, you find a hole in the ground, a small tap, and a cardboard cutout of a bush.
Go back to the street, and keep going right. There's an entrance to the grocery store here, with a blank whiteboard just outside and an extra small karate costume on the ground.
Enter the grocery store- oh no, it's a robbery and you get hit with a spoon! Game Over.
Instead, go down from the entrance. This brings you beside a bridge, where you find a Tasmanian Devil next to a can of spray deodorant. There's also a small Wanted notice posted at the top of the sloped wall.
Poster
You have the option to take the poster at the bridge, but it turns out to be just a bit too high when you try it.
Go back to the garden beside the treehouse, and pick up the wooden board from the ground.
Then place it against the sloped wall. If you try climbing, the board just falls to the ground.
So block the board with the tire, and now you can climb up to get the poster.
Ravenous
[School] Go up the stairs and let Carrie talk again. This time, you have what you need to prevent yourself from getting possessed.
At the end of her speech, just as she's about to attack, place the Tasmanian Devil on the floor next to you.
He gets possessed instead, and proceeds to eat all the food in the cafeteria and chase the other guy away. Looking around, you find a tray on the floor next to you as well as a plastic dome on the counter.
Lure
[Neighborhood] You can get the spider out of its hole by offering it spider food, but if you don't act within the timer, it will soon lead to a Game Over.
You can protect yourself from the spider by hiding behind the cardboard bush, but what you need is a way to contain it.
Thankfully, you have loads of food to use as you figure it out, but just remember that you have to come out from behind the bush before you can do anything.
You can set up a trap by following these steps (some of them can be done by using the items on each other):
Place the small goal on the ground between the hole and the tap.
Place the tray under the small goal. (If you omit this step, it's an eventual Game Over.)
Combine the dome and rope, and use it on the goal (hooking over it and tying to the tap).
Finally, place the spider food under the dome, and hide. As the spider comes out, you have another 2 seconds to untie the rope. Once you're done, pick up the whole trap with Mr. Cuddles in it.
Then return it to Penny, who rewards you with a gift.
Open the gift to find that it's a magnet.
Self-defense
Go back into the grocery store. This time, you have the perfect thing to defeat the spoon.
Just before Thumb is about to throw the spoon, select the magnet in your inventory, which pulls it out of the air.
Oh no, he's got a boot!
To avoid another Game Over, you'll need to duck by clicking the new arrow that appears.
The police arrive just in time. Surely they can help stop the notorious- um, it looks like you're the robber now? Game Over!
Place the poster on the white board before you enter. After going through the fight once more, you successfully deal with the thief and everything is peaceful again.
Larry tells you that he quit his job and now works here (indeed, the Ripley 2000 store closed a while ago), and helps you out by giving you a fishing rod, a black crayon, a pair of scissors and a master key that starts any vehicle.
Sneaky
[Junkyard] Now that you have the fishing rod, you can retrieve Daisy without climbing the junk pile.
Unfortunately, Tina still notices and gets you a swift Game Over. Hmm, you need to "prepare a trap and seek reinforcements".
Start by getting the crane ready. As you use the master key to start it, you find that it's out of gas. So use the gasoline on the crane to fuel it up, then climb back into the cabin and use the master key.
The icons might not be self-explanatory, but you can just experiment to find out that you have to hit the green button to deactivate the magnet before you can grab the wheel and drive off. Wonder what the yellow button does then…
Anyway, you park right outside the building and can go back to pick up the wooden strip that was hidden behind.
Now for the reinforcement part. For this plan to work, someone needs to control the crane while you run from Tina. That someone is Bryan Gámez, who's been patiently waiting in your inventory for this moment!
Use him on the crane to explain the rest of the plan. You're going to use the fishing rod to grab the doll, then whistle as you run out, and then Bryan will drop the magnet.
If all works well, you get to keep Daisy and Bryan leaves.
[School] As you return Daisy to Teri, you ask her for the favor of unlocking the principal's office.
Principal Brown is indeed sound asleep in his seat. Pick up the ladder and handsaw from the floor, the smartphone off his table, and even his glasses.
Authority
Principal Brown certainly has the power to end the detention, but you're not him. Maybe you could become him for a while.
Attach his phone to the selfie stick. Now you can call Ms. Simian, but the conversation wakes the principal up, which is a Game Over.
Place the earmuffs on the principal's head. The call still won't work because Ms. Simian notices that his eyes are closed, but at least you don't get any actual consequences for it.
Make some fake eyes by using the scissors to cut circles out of the blank sheet and then using the black crayon to draw dots on them.
Add some glue to the glasses and attach the fake eyes, then place the glasses back on his head.
Finally, make the call again. It works and Roberto is out of detention! Since you don't need the smartphone any more, you return it.
Talk to Roberto, who tells you about accidentally seeing Ms. Simian's locker combination, which he prints onto a sheet.
Spin
Refer to the sheet to enter the (randomized) combination into the locker.
Once it's correct, the locker door springs open and you take two thick books from it.
Strength
There's no way you can make Joe a stronger banana, but it's all about looks.
Place both thick books on the cross on the ground and then the wooden strip on top, then give the karate costume to Joe… seems like he doesn't actually have enough strength and that's a Game Over!
Take the strip and weaken it with the saw first, then place it down and give the karate costume to Joe. Now the plan works out and they go to the movies together, but Joe first rewards you with a can of lubricating oil.
Sleepy
[Mad Hatter] You can now use the ladder to reach the clock. But when you climb up and push on the hour hand you find that it's rusted in place.
Use the oil to loosen the hour hand, and push it to 7.
Before he goes to sleep, the Hatter offers to make you a custom hat of someone you can get a photo of.
Also, the ladder magically disappears and is replaced by a trampoline.
Customized
[School] Use the camera to sneak a photo of Carmen (in the basketball court), and then bring it back to the Mad Hatter, who gives you a cactus hat, which fits perfectly on her.
As they leave for the park, you can grab the basketball from the ground.
Score
You can shoot the ball through the left hoop, which momentarily makes a portal appear.
In order to go through the portal yourself, you need to place the trampoline on the ground, allowing you to perform a slam dunk.
Finale
There's no going back now, even your teleporter is gone. A single red arrow floats next to you, but you can't get around on the momentum of a single jump, and you get a Game Over for being stuck in space.
While you walk around and think, you notice a red spider glove just behind where you spawn.
Click the red arrow to float, then use the spray deodorant to propel yourself.
It turns out that the villain of this game is Rob! With his time-controlling remote, he quickly turns your family and then you into babies. Game Over.
But you have a spider glove, and can use it while he's talking!
If you use it when he faces away, the glove just gets stuck to his body, which leads to another Game Over.
So wait for him to shrink your family, and then pull the remote off his hands. Before he can get to you (also a Game Over), use the remote on him.
With Rob paused in midair, you can just click him to take his cage key.
Unlock the cage and use the remote to return your family back to normal. You push each of them through the portal, and then there's just one thing left to do.
Use Rob's remote control to save him. After a short conversation, the family thanks you and you get a simple ending screen.
having a problem with Gumball
At the end when you see the villain, it says that while he is shrinking the family, to use your spider glover to snatch the remote away. i did that. but then then when it says while in midair use the controller on him, i click him several times and he just lands and snatches it back every time. there;s no way to do this. i'm confused.
Please help.
sorry i figured it out. I just assumed it would automatically worked but i didnm;t see it in the inventory. great games and thanks for the walkthroughs as usual,KK. you rock :)
Update