
 Hello! The week is over and another Weekday Escape here!
Back to the roots of genre! Three escape games - by Maymay, Dasyutu and Maroya - are very classical and as close to the core as possible, just puzzles, codes, hints and clues. Graphics is basic, no music, only clicking sound here and there, and no story (almost). All three games are very well done though and definitely entertaining!
Neat Escape, on the other hand, is colorful, with polished graphics, pleasant music and a lot of adrenaline.
Have a good time and enjoy!
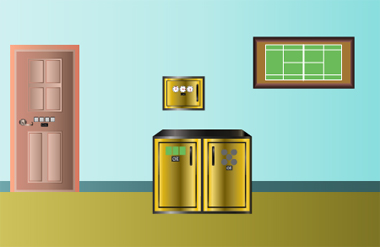
Maymay wants you to find five yellow tennis balls hidden in three rooms. You can see only one wall from each room, but there is enough locked cupboards and boxes for the whole apartement! Just look for clues and hints, solve few puzzles, open three doors and you are out and can go play tennis with your friends. Or skip tennis and go play more escape games.
The cursor is not changing, no save button, one ending.
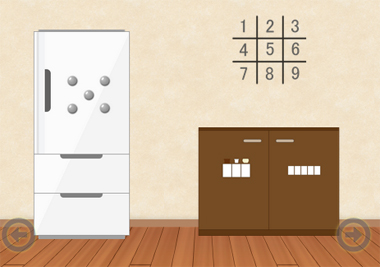
Dasyutu keeps supplying us with new and quality games in quick sequence and this one is, again, very well done. Setting is usual, a room with two locked doors, many hints around and a big TV set providing hints, obviously keeping up with your actions. Mostly it's looking for ingrediences as your final task is to cook hot pot.
The cursor is not changing, save button, one ending.
P.S. Here is how a proper Hot Pot Party seems and what happens after HPP!
Few years ago, Maroya created several cute escape games - Marshmellow's New Home 3, 4, 5, 6 - with simple and clean graphics and clever and fresh puzzles. They are back! Their kittens have moved to a new address so this game is hopefully the start of another serie. The graphics hasn't changed, kittens are still lovely and puzzles are good - just follow your changing cursor as few hotspots are well hidden. Intro in Japanese is skippable and you don't need to know what it says. The starting gamescreen seems inactive - red arrows on its sides aren't responding - yet there is something what can be done here. Later you can move around freely.
The cursor is changing, no save button, one ending.
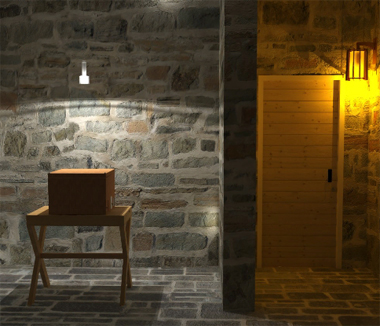
You are trapped Neat Escape's room, in front of you is a table with a bomb and you need to disable it. Not much to do around the room, your goal is to figure out mechanism of the bomb step by step and dismantle it. Every wrong action leads to abrupt end (sharply interrupted scream and blood stains on monitor). Luckily you aren't under pressure as there isn't any countdown timer and you have enough time for thinking about puzzles' solutions. Will you escape i̶n̶ ̶o̶n̶e̶ ̶p̶i̶e̶c̶e̶ after all?
The cursor is not changing, autosave plus save button, one good ending and numerous bad - depends on your pyrotechnic skills.
The game is available for Android too.
We love escape games, and our readers love talking about them and sharing hints! How about you? Let us know what you think, ask for clues, or help out other players in the comments below.


Things were going well on Bomb, but now I seem stuck. I *think* my next task is to
get the iron ball out of the tube I dropped it into. I have the spade in the little drawer but not the heart. I also need to get the green ball out of its "cage", but I think that's a task for later in the game.
Never mind! Finally got out. :-)
I'm really fan of this kind of games, mysterious scene with scary music :)))
Find 5 Tennis Balls
Do you ever wonder if snails can play tennis?
Exploration 1
The first screen of the game has you looking at a diagram of a tennis court next to a wall safe with clock faces on its dials.
The left door of the cupboard has a lock with three green rectangular buttons, and the right door has five round buttons that flash orange when clicked.
The door of the room has a lock with four buttons that show a flower slowly sprouting more petals.
Lines
Use the clue from the picture to unlock the left cupboard door.
Looking through the available patterns on the buttons, you find that they seem to correspond to half of the tennis court's length.
So make them show the left, center, right portions of the court by clicking them 3, 1, 4 times, then open the cupboard to find a tennis ball and a four-digit clue.
Numeric
Use the four-digit clue to unlock the door of this room.
Make the buttons show 5, 2, 4, 3 petals by clicking them 4, 1, 3, 2 times.
Exploration 2
Out with the green, in with the red! This very rectangular couch has some brown muddy stains on it, as well as a purple book full of colorful dots.
Look at the cabinets on the right. The top one has four digit buttons which change color when clicked, the middle one has four black buttons which look like sliders but are actually just rectangles which change their patterns of gray stripes, and the bottom one has four normal red-and-yellow digit buttons.
The door to this room needs a key to unlock.
Colorful
Use the clue from the book to unlock the top cabinet.
The groups with 1, 2, 3, 4 colored dots are yellow, blue, green, red in color, so click those buttons 1, 3, 0, 2 times and then open the cabinet to find another tennis ball and a key.
Use that key to unlock the door to the next screen.
Exploration 3
This wardrobe has a tennis ball on top, too high to reach. Open the right door to find a vacuum cleaner, and notice that the left door has a four-letter lock where the buttons actually don't just show letters.
The locked door has three yellow circular buttons that rotate their U-shaped markings when clicked.
Clean
Use the vacuum to clear out the stains on the couch in the second room. It doesn't all go away, and the remaining mud spells out the word Ball.
Stained
Use the clue from the "cleaned" couch to unlock the bottom cabinet on the same screen.
The stains also look a lot like the digits 8011, so enter that and then open the cabinet to find two tennis rackets and a smartphone which shows an interesting clue when you turn it on.
Five
Use the clue from the smartphone to unlock the right cupboard door on the first screen.
Click the buttons in the order shown on the screen: top right, bottom right, middle, top left, bottom left.
Hit OK, then open the door to find another two tennis rackets and a tennis ball.
Doubles
Combine the pairs of tennis rackets to form an exciting message.
Then use that clue to unlock the left closet door on the third screen.
The darker patterns across the rackets spell out the message
HIT!, so enter that in the door, open it, and take the folding chair from inside, as well as a note with a simplistic description of tennis scoring.Elevated
Unfold the chair and place it to the right of the closet, which lets you take the tennis ball up there.
Arrow
Use the clue from the note to unlock the wall safe on the first screen.
Interpreting the arrows on the safe as minute hands, you notice that their starting positions indicate minute values of 0, 15, 30. The note suggests that you need to advance them to the positions corresponding to 15, 30, 40 minutes.
So click the dials 3, 3, 2 times, then open the safe to find a roll of black tape.
Stuck
There's nothing that you need to attach with the tape, but there is something you need to attach the tape to.
Use the tape on the tennis rackets to form better grips.
Then use the clue that appears to unlock the middle cabinet on the second screen.
Click the racket grips to zoom in on the pattern of stripes.
Replicate that pattern on the buttons by clicking them 5, 3, 6, 2 times, then open the door to find a tennis ball and a three-digit code on the inside of the door.
Match
Now that you have all five tennis balls, examine them and then click on them. The balls rotate to face different directions.
Three of those balls will form the clue for the last door, but which three?
The three-digit code tells you to look for the balls numbered 3, 5, 1. Referring to the phone clue again, you find that those are the middle, bottom left, top right balls.
The U shapes on those balls have openings facing the top right, bottom right, bottom, so click the buttons on the door 1, 3, 4 times, then open it and leave!
Maymay reminds you to hit and smash (with!) your friends.
Game 0005: Season of Hot Pot
No more heated competition! What you need in the coming winter is a heated concoction.
Exploration
"Please make a delicious hotpot. Check the television for instructions!"
And those are very simple instructions: just add a pot and gas cylinder to the stove. The cupboard doors under the TV are marked with the letters L and R, and the main door to the right is just locked.
Turn right to find a shelf with four cups, three plant pots, and a basket holding a clay pot. The door on the right has a four-digit lock.
Turn right to find a fridge with five buttons. Under a grid of numbers on the wall, the cupboard doors have a three-digit lock with pictures of plant pots and a five-letter lock.
Turn right to face a table with the stove on it. Lifting the cushions on the sides, you find a clue on the wooden floor and a small golden key. On the wall, you see some colorful framed pictures of food with small digits in different positions on each one, and also a small slot for a card reader.
Disconnect
Use the clue from the plant pot shelf to unlock the left cupboard door beside the fridge.
Thin lines separate the parts of the shelf which are in the shapes of the digits 8 2 3, but matching the plant pots to the clue on the lock indicates that you need to enter those digits in the order 382.
Do so, and open the door to find a gas canister.
Ignition
You can now add the pot and gas cartridge to the stove. What next?
Checking the TV again, you find the next set of instructions telling you to add water and konbu before lighting it.
Trace
Use the other clue from the picture frames to unlock the right cupboard door on the fridge screen.
Drawing lines to connect the numbers, you find that the placement of numbers on the frames forms the letters NLIZV.
Enter that in the door, then open it to find a bottle of water.
One–two
Use the clue from the floorboards to unlock the cupboard beneath the TV.
The picture frames have 1, 2, 1, 1, 2 pieces of each ingredient on them, and the clue on the floor tells you that those correspond to the LRLLR doors.
Click those doors accordingly to open the cupboard and find a lighter and a packet of dashi konbu.
Infuse
Now you can perform the next steps: add the water and then konbu to the pot, then use the lighter to light the stove.
(The game has different messages if you try to do things in the wrong order, including a reminder that heating an empty claypot can be dangerous.)
The TV tells you to add some dashi stock to the soup, but you can't seem to find that anywhere.
Warm
Check back on the hot pot to find steam emanating from it. Some digits appear on the konbu strips in the pot.
So use that clue to unlock the door beside the shelves.
The line at the top of the last strip needs to be an underline, which is a clue that you're reading the number upside-down.
The correct code for the door is 6812. Enter that and open the door to freedom! Nope, of course it's just another room.
Exploration 2
There's only one screen for this room, and it has a shelf of drawers which have, from top to bottom, a keyhole, four round buttons under a color clue, five digit buttons under a symbol clue, and no lock. Opening the bottom drawer, you find the bottle of dashi soup stock.
On the right side, you see a shelf of vegetables which is locked up tight, and its four-digit lock has a complicated formula clue.
Base
Add the dashi to the pot (removing the konbu in the process).
The TV now shows a wide variety of ingredients you need to add to the pot.
Boiling
Check the pot again to find bubbles appearing at several positions on the soup surface.
Then use that clue to unlock the fridge.
After a short pause, the bubbles appear in the bottom right, top left, bottom left, center, top right.
So push the buttons in that order, then open the fridge and take the meat, tofu and fish.
(The other compartments of the fridge refuse to budge, so don't bother with them.)
Unlock
Use the small golden key to unlock the top drawer in the second room, which contains a metal tray.
Four colors
Use the clue from the mugs on the plant pot shelf to unlock the second drawer.
The colored mugs each have three white dots in different positions, suggesting that one dot is missing out of four in a different position on each mug.
The colored stripes tell you to look at the green, yellow, blue, red mugs, whose missing dots are in the 1st, 3rd, 4th, 2nd positions from the left.
So push the buttons in that order and open the drawer to find a kitchen knife.
Five digits
Use the clue from the fridge screen to unlock the third drawer.
The symbols on the drawer represent the lines adjacent to digits on the grid clue.
Those digits form the code 61572, so enter that and then open the drawer to find a smartphone (which requires a passcode to unlock) and an ID card.
Scanner
Use the ID card in the card reader slot near the pot, and the pictures on the wall flip over.
Math
Use the new picture clues to unlock the vegetable shelf.
Interpreting the shapes as mathematical symbols, you find that the picture clues now spell out 27−2.
Matching that up with the last picture, you deduce that ★=2 and ♪=5.
The formulas on the lock evaluate to (2+5)×8=56 and 5×3+2=17, so enter 5617 to open it.
It's a veggie bonanza! Take the mizuna, carrot, shiitake mushrooms, bok choi, and spring onions.
Complete
Use the knife to cut each ingredient and arrange it on the tray.
Once you're done, use the tray on the pot to complete the preparation.
Key
Check the TV again to find an unusual code on it.
Enter that code (#5631*) into the phone to unlock it and get a Success screen.
"Looks like you finished the hot pot! Good work. You may leave."
Indeed, you hear the door unlock automatically.
Open the door to leave… leave not a bit of that soup behind, that is. It's too good of a hot pot to walk away from!
Maro and the New Home: First Floor 1
In case you missed the last part (New Home 6), the two cats, locked in their owner's parents' home, have explored every corner of the second floor and finally got themselves access to the stairs. Now it's time to do it all over again on the ground floor.
But their exploration has been abruptly interrupted by a fierce animal, and they retreated to the nearest room! There must be another exit somewhere…
Secure
As usual, Maro (that's you) will comment on things as you go along and Komaro will give advice when you click on it. (I'll loosely translate some of the lines which are hints.)
Maro: "We can't relax until that door is shut!"
Unfortunately, the door has no lock.
Komaro: "Maro wants to keep the door shut? Since it's a sliding door, why not support with a pole?"
After taking the noren curtain from the door, you find that there's indeed a long rod inside it.
Place that to the right of the door, and the room's now safe to explore!
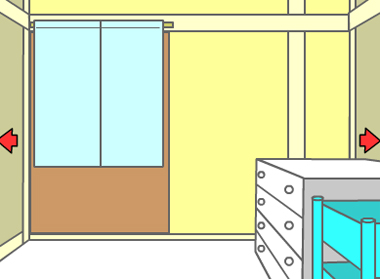
Exploration
Other than the door and the rod you just placed there, you can also examine the curtain left on the floor, which has some red stitching under a corner.
Turn right. The chest of drawers on the left has a pair of scissors on top. The top drawer has a keyhole, the second one has a grid of four colored buttons, the third one has a book with some clues, and the bottom one has a four-digit lock with a crescent moon.
The wall shelf has a four-digit safe with the buttons in pairs. Looking in the blue rack beneath, you find some folded towels and lift the right one to find a blank note with a water drop symbol, as well as another locked box with three not-really-digit buttons and an unusual hole beside them. (Komaro knows what that hole is, and asks you to look for the missing OK button.) The washing machine (dryer?) is locked, but you have access to two fancy tulip buttons on it.
Check the bottom-left corner of the dryer to find something underneath: a round card with a pattern of stars.
Turn right. The only thing to examine on this screen is the door out, which is definitely locked.
Turn right to find four colored towels. You can flip the bottom corners of each towel to find green digits stitched into them. There's also a mirror on the wall (no reflection though), and Komaro points out the asymmetry of its left and right sides. You can click the brackets on the left to find out why: the screws are on that side.
Cut
Use the scissors on the curtain corner to cut it open and find a key.
Unlock 1
Use the key you just got to unlock the top drawer, then take the battery from inside.
Two by two
Komaro: "I think there's something with the same colors in this room!"
Use the clue from the hanging towels to unlock the second drawer.
The digits that appear on the towel corners are
41 37

62 85
(You can tell it's a 6 because the bottom-left corners are oriented the same way.)
This means the digits 1 to 8 appear on the ⌜⌞⌝ ⌜⌟ ⌞⌝⌟ towels, so click the drawer buttons in the same order, and then open the drawer to find a green key.
Unlock 2 / Exploration 2
Use the green key to open the door to the bathroom.
And what a nice bathroom it is! The bathtub is even half-filled. You also see some colorful bottles blocking your way to the window, a smaller washing basin in the corner, and a small round drain in the middle with what looks like a string tied to the screwed-down grate.
Look up to find a trapdoor on the ceiling, which you certainly can't reach.
(Look back down and) turn right to find a shower. The towel rack on the right has only a yellow towel with a flower, bird and star.
Turn right to face the doorway back. Since this is also a sliding door, you can close it from this side to find a mathematical sum on the wall.
Turn right to find some flower tiles above the bathtub, which has a fish toy submerged in the water. Since you're a cat, you can't just reach in to pick it up.
Komaro: "There's a small gap with the wall here."
Indeed, you can click the left edge of the tub to find something. Turn it over, and you realize it's an OK button!
Diamond
Replace the OK button on the box under the towels.
Komaro: "I've seen the mark on the lid in two other places."
So use the clues marked with diamond shapes to unlock the box.
The sum on the bathroom wall has a diamond mark, which means you need to solve it for the clue.
What about the book in the third drawer, which also has a diamond on its cover?
Maro: "Aren't these calculations incorrect?"
Maro: "Two squares… it seems the overlapped portion has been erased."
The calculations on the left page do make a lot more sense if you consider that the digits are being combined and the overlapping part erased.
Following the same procedure for the bathroom clue gives you the surprisingly readable code
LoE, which you can enter by clicking the buttons 1, 2, 3 times.Open the box to find a weird device which you recognize as a remote control that's missing two batteries.
Lunar
Komaro has something to say about that bottom drawer.
"There must be a moon clue somewhere, let's look for it!"
A moon logo appears on the bottles in the bathroom.
Komaro: "A moon marking. I've seen these four colors elsewhere."
Where would that be, and how does that give you the code?
The colors on the bottles match those of the towels in the first room. Since the moon appears on the left, left, left, right corners of the green, pink, orange, blue/purple bottles, the digits for the clue are 6, 4, 8, 7.
That code doesn't work! What's wrong?
Maybe the digits aren't in order. If you arrange the bottles from largest to smallest, then you'll need to look at the digits on the pink, green, blue, orange towels, which form the code 4678. (Coincidentally, this also has the digits in increasing order.)
Enter that code in the drawer and open it to find a screwdriver (or as Maro calls it, a screw turner).
Unscrew
Use the screwdriver to open the mirror up. There's a fishing rod behind!
Also use the screwdriver to open the drain cover, and then click the key attached to the thread to pick it up.
There's an obvious place to use the key, but it's not really accessible right now.
Sunk
Use the fishing rod to retrieve the toy fish from the bathtub. While examining it, you can click to turn it over and find a blue number on it.
Soak
Fill the small basin under the shower tap, and then dip the paper in it to find a clue with a flower outline and the digit 4.
Dry
Use the clue above the bathtub to unlock the washing machine.
The tulips appear on two rows of tiles, giving the clue (from left to right) DUDUUDDUDU.
So push those buttons and open the machine door to find a crinkly towel.
Beside
Komaro: "Looks like there's room to hang one more towel."
Hang the towel you found on the rack in the bathroom. (You can already see the towel there from outside, probably a bug.)
A fish-patterned towel, how interesting.
Pictures
Komaro: "The input squares have different colors on the left and right."
Use the clues from the two towels to unlock the box on the shelf.
The left (blue) towel gives the first two digits, and the right (yellow) towel gives the last two.
From the digit on the toy fish, you know that (fish up) is 6, but if you mentally rotate the fish so its head points down, you'll see that (fish down) is 9.
The paper tells you that the digit for flower is 4.
That leaves the swan and the star…
You've seen many stars in the shape of a swan before, in the Cygnus constellation printed on the card beside the washing machine. (Cygnus means swan.)
A total of ten stars are shown, which is too many for one digit, but luckily Komaro reminds you (when you're looking at the towel) that you only need to count star shapes, of which there are 5.
Enter 6945 in the box, which contains the other battery. Whew!
Power
Komaro: "I can't reach the ceiling door with my paw. There should be some way to open it without touching."
Place both batteries in the remote, and use it on the trapdoor. A ladder drops down!
Unfortunately, the ladder doesn't lead upstairs. Maro figures that the trapdoor's just for ladder storage.
What's it good for then?
Look down (back to the normal bathroom view), and click the ladder. Maro climbs up to the window ledge and knocks all the bottles off!
Exit
Komaro: "The only exit of the room is this window."
Use the last key to unlock the window, then open it and leave!
First Sector Conquered!
Maro: The bathroom's dangerous, let's get out!
Maro: We've come out in the garden, but it was necessary to avoid that beast.
Komaro: Shall we continue hiding?
Maro: (…we can't go in with the beast in the house.)
Human voice: Thank you for today.
Other human: Come play anytime.
Vrooom.
Maro: THE DANGER IS GONE!
Maro: The hunt's back on! Let's go back in.
*jump*
Maro: …
Komaro: This window is a little high to jump.
Maro: There must be some other entrance. Let's look for another way in next.
Komaro: That's the positive Maro I know! Next will be an entering game.
End screen:
"Congratulations! Thank you for helping out. With the beast gone we can explore with peace of mind.We'd like your help again in the next one if you want to. But right now the sun is nice and warm, so we'll have an afternoon nap. Good night."
(The green text returns you to the title screen.)
The Bomb video walkthrough (linked on the game page) is currently the only video in Neat Escape's new gaming channel. Even more help for those who are stuck!
Bomb
(Japanese title: Bomb Disarming - Remake)
If you wish to play the originals, they are number 78 and 86 in Neat Escape's list. However, the death effects in this one are much more entertaining than the Dark Souls-esque game over of the originals.
Inspection
Thankfully you don't get any stressful ticking or beeping, just super solemn piano music.
Let's not touch the bomb for a while. The door on the right is indeed locked, and you notice the lighting at eye level has a screwdriver in it. On the left, you can check everywhere but only the bomb box and its table is clickable. In particular, you can look under the table to find a stick.
The box itself has a top fastened by screws, but you can also look at the left side to find a locked drawer and a white circle marking, and the right side to find an unusual shutter with two red lights, a switch set to OFF, and a featureless metal panel.
Flipping the switch gets you a combination of *boom* and *yeaarghhhh* sounds, as well as a combination of a game over screen with a ripply effect and juicy blood animation.
But don't worry, you can just click YES to the Retry prompt to respawn at the starting view, no progress lost. From here on, I'll indicate every possible Boom with the symbols [!!].
Unscrew
Use the screwdriver you picked up to remove the lid.
Inside, there's some sticks of dynamite with colored wires running across it to a lock with only the big white button [!!] available. On the left, there's some color-coded electrical components running horizontally, and then two rows of plain ones arranged vertically, with a literally shiny red button [!!] in the gap beneath and some instructions on when you can touch it. There's also three colored buttons [!!] nearest to you, and a round hole near the edge of the box.
The lid of the box is now on the ground, and you can turn it over to find a pair of pliers in a hidden compartment with some colored roman numerals. Of course, you shouldn't cut the wires [!!] without instructions.
Safe
There aren't many things you can do safely, but if you try everything again…
…you'll find that you can turn on the switch on the right of the box. What does that change?
The red backlit button has turned green. Push it to make a satisfying beep and a sequence of light-ups on the left.
Sequence
The lights in the box flash next to the blue, yellow, blue, pink, yellow, yellow components.
So push the LRLCRR buttons. The white box at the top rotates to reveal a big PUSH button. But as you go to push it, you realize the button is covered in a glass case!
(If you try to guess the color code by trial-and-error without having flipped the switch, the bomb will still go off when you complete the sequence.)
Numerals
The lock in the bottom-right corner of the box is now active, so use the clue from the lid of the box to solve it.
The red, blue, yellow roman numerals are Ⅸ, Ⅲ, Ⅵ, so click the buttons 8, 2, 5 times accordingly and then push the white button.
A chime sounds, so you look up at the display the lock is connected to. What's this?
Disconnect
Since the display shows a yellow stripe cut in two, use the pliers to cut the yellow wire (on the right).
The glass case opens!
Push the PUSH button, and the top layer of the box slides up to reveal another set of puzzles.
On the right, there's a jumble of wires in plastic tubes covering… a green ball? On closer look, you find that it's a hand grenade, with the trigger held shut. The wires (which you can't cut) run from numbers on the top to a five-digit lock [!!] at the bottom.
On the left, you faintly see a key behind some frosted glass. The compartment next to it has two holes carved in the wood, in the shape of heart and spade suits. There's more colored components above another five-digit lock [!!] with colored digits. Further down, you see a gray box, a small glass screen, and five numbered star buttons that display hearts and spades on the screen. Finally, you see a glass channel that runs around that whole section and ends in a small case with a spade piece.
Connect
Solve the puzzle on the right by entering the correct code in its five-digit lock.
The buttons of the lock are connected to the numbers 4, 2, 6, 5, 3 on the top.
So enter that in the lock and push the button. The panel on the right side opens up to reveal a holesaw.
Looking in the hole where you found the saw, you see a bright white circle.
Numerous
Use the clue from the colored components to unlock the five-digit lock next to them.
Count the colors before you zoom in: there are 2 yellow, 5 blue, 1 light gray, 3 red and 4 green components.
Enter 25134 in the lock. Pushing the OK button makes a tray open up with a red key.
Looking at the digit panel again, you find that the blank space on the left has been replaced with a star shape.
Unlock
No, you're not free to go yet. This key unlocks the drawer on the left side, which contains an electric drill.
Punch
Attach the saw to the drill, and use it to cut a round hole where the white circle is, on the left side of the box.
Pick up an iron ball from inside the hole, and push the red stripe button.
Don't forget the other white circle where you found the saw. Cut a hole there too. There's no iron ball this time, but there's another red stripe button to push.
Wait, it's too far to reach!
Use the stick to push this red stripe button.
As you back out, you notice the stripes on the left compartment have turned green. So open it up to find a small red heart piece.
Track
Clearly you need the spade piece, and you'll have to reach it through the tube. Where does that tube come from anyway?
Look at the upper layer of the box again, and the game automatically zooms you in on the hole you saw earlier.
Place the iron ball in it, and it rolls to the end, replacing the spade piece.
Looking at the left side of the box, you realize the spade piece must have landed in the drawer.
Ordered
Place both pieces in the indentations at the top left of the bottom layer, and then use the remaining clues from the box to solve that puzzle.
The star clue where you entered the colored digits indicate the order to press the star buttons [!!].
The star buttons marked 2, 5, 1, 3, 4 make the screen show ♡♠♠♡♡, so push the LRRLL buttons. This makes the gray box open up. It now contains four colored wires [!!] and another PUSH button.
Snip
Pushing the button makes the screen change to four colored stripes. The second stripe is divided into two.
So cut the second (blue) wire beside the PUSH button. The frosted glass case opens with a satisfying clunk, and you can take the blue key from it.
The bomb is almost entirely disarmed now, but you don't have to worry about it anymore as you can just use the blue key to unlock the door and leave!
Every wrong action leads to abrupt end (sharply interrupted scream and blood stains on monitor). Luckily you aren't under pressure as there isn't any countdown timer and you have enough time for thinking about puzzles' solutions. Psiphon
Update