
 Hello and welcome! Yes it's Wednesday again and this means new Weekday Escape!
Luckily for PC players, Kamonosoukutsu recently ported few games from Android to PC so we get two this week! Meet Mr. Bear and Mr. Tiger, and try to get out from their beautiful residences! Next escape is from classical Dasyutu's room, and you need to find red maple leaves here, so instead of running around woods and picking them, you can do that virtually, and continue in No1game's autumn game; however, more important is to look for the cunning green guys there - their mimicry is a bit useless this time...
Have a good time and enjoy!
To get out from Kamonosoukutsu's lovely room you need to find five giant acorns (unless Mr. Bear is very, very tiny), seven bear coins, get a honey pot and open several drawers and chests. Don't underestimate the game. It has good looks, clean and polished graphics, good music, but also quite elaborated puzzles so you might need to put down some notes, and few not obvious hot spots.
The cursor is not changing, save button, one ending.
The game is available for Android too.
P.S. If you can't get enough of picking acorns, you may go on here: Aries Escape: Episode No. 15 by Ariesescape (or Libertechno).
Tip: disable any adblockers if the game does not appear in the page
Kamonosoukutsu's Mr.Tiger is a simple creature - he's feline so he wants meat. Let's not question his relationship to the cute defenceless penguins and possible outcome in case of Mr. Tiger's starvation, there are too many horror games out there anyway, and concentrate on puzzles and looking for ten tiger coins. As in previous game, it's more to do and solve here than it seems!
The cursor is not changing, save button, one ending.
The game is available for Android too.
New developer Dasyutu must know escape games laws very well, this one is only their third creation and it's satisfying also for much experienced players. Well known puzzles we all have solved many times have interesting twists, so the game feels fresh and new (creators have even resisted the urge to hang up a wobbling picture in their room!), and solutions are logic and intuitive. Very well done, hope to see the next room soon!
The cursor is not changing, save button, one ending.

Few years ago No1game released Find the Escape-Men 121: Appetite for Fall Food and though there were some sweet potatoes involved, the main plot turned around jammed toilet door. Today you're closer to the game title, it's autumn again, and the cottage in woods where you are staying lets you cook your own dinner from ingrediences collected by yourself. There are more guests around (small and green, needless to say) and apparently no rules, as nobody asks you with raised voice where exactly have you found this sticky rice? There isn't the slightest difference between mushrooms found in the woods and food 'found' in someone's food box. Pure anarchy. But that's what Escape-Men has always been like, right?
The cursor is not changing, no save button, one ending.
We love escape games, and our readers love talking about them and sharing hints! How about you? Let us know what you think, ask for clues, or help out other players in the comments below.


Warning for slider puzzle challenged. Petit Maple Hunting has one. No skip option. No warning in game description. Two strikes.
The numbers in the game titles aren't on the title screens, but you can find them in the descriptions and on the Android app pages.
Chotto Escape 006: A bear and acorns and honey
Exploration
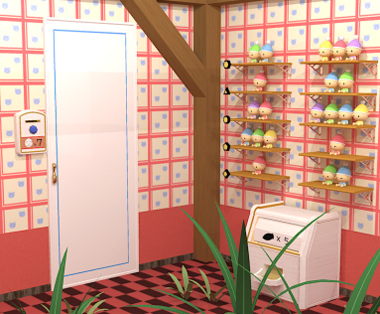
The game doesn't hesitate to get straight to the title: a bear asks you for honey and there's an acorn on the ground next to him, as well as another on the wooden pillar in the background.
Turn right. The unusual camera angle allows you to see another acorn on the floor, and you can take a closer look at the couch which has a bear coin under its left cushion, as well as the cupboard on the right which has a cactus in the center, wire tied around its upper door handles, and locked lower doors which require a key. As you take a closer look at the chest of drawers with colored mushrooms on top and drawer locks with three digits and two buttons in unusual shapes (why doesn't the top drawer open?), you also notice an acorn to its left.
Turn right to face a bed with a huge fish pillow on it that hides another coin. Each of the buttons on the clock change its display from green digits (showing the time) to red digits. Under the bed, you see a bear-shaped lock with some clues as well as another compartment containing a broom.
Turn right to find a locked door which requires 7 coins. There are some figures in colorful hats and clothes sitting on shelves with shapes at their left ends, and a bin below has instructions to insert five acorns. In case you missed it, there's another acorn in the middle of the floor.
Collection 1
Use the broom to get the last acorn from the first screen.
Then place all five acorns in the bin, which dispenses a pair of pliers.
Snip
Use the pliers to cut free the upper cupboard doors. Inside, you find some honeybee-striped cups as well as pink and blue stacks of bowls. The blue stack has a bear coin in it.
Three digits
You've seen a code of three red digits and a lock with three red digit buttons. Where are those?
The three-digit code (223) comes from the clock and the three-digit lock is on the middle drawer. Enter it, then open it to find a bear coin.
More or Less
Use a clue from the figures on the shelves to unlock the bottom drawer.
The > and < signs tell you to compare the number of figures on each pair of shelves: if the left shelf has more figures, you press the left (>) button.
From top down, the shelves with more figures are on the RRRLR sides, so push the <<<>< buttons to open the drawer and find a toy hammer.
Mushrooms
Use the colored mushroom clue to unlock the drawer under the bed.
The markings on the drawer just indicate that you need to look at the mushrooms from left to right. Since the eye buttons differ in the positions of their circular markings, you should observe the dots on the mushrooms, which match the patterns on the LRRRL eyes.
After pushing those buttons and opening the drawer, you find a bear coin and an unusual clue.
Mushrooms 2
Use the clue from the bed drawer to solve the mushroom puzzle.
The clue tells you to look at the figures between the triangle and circle shelves in the order from right to left, and then hit the mushrooms with the same color using the hammer.
Those six figures are (from right to left) yellow, blue, green, purple, pink, purple, and the matching mushrooms are in the 2 5 4 3 1 3 positions from the left.
After hitting those mushrooms with the hammer, the top drawer opens so you can take a key in the shape of a honey pot.
Unlock
Use the honey pot key to unlock the lower cupboard doors. Inside, there's a bear coin and a pot of honey.
Quest
Give the honey to the bear, who returns your favor with a bear coin (and thanks you when you talk to him again).
Collection 2
Place all 7 coins in the device next to the door, and you can leave!
Chotto Escape 009: He wants to eat meat
The tiger's friendly but let's not keep him waiting.
Exploration
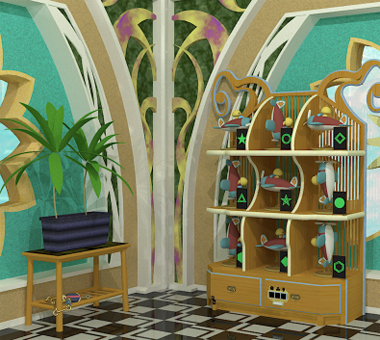
In addition to the hungry tiger, you see a table and a duck box on top with three plane buttons, as well as a reddish penguin with two different colors of toes and what appears to be a leaf in its mouth. While looking at the table, you also spot a coin hidden on the bench to the right.
Turn right. A shelf has an unusual device with a small hole on top and a wire connecting it to the wall. A tall chest of drawers has a (bluish) gray penguin with a clover, and the drawers have a lock with four buttons with pictures of furniture, a lock with a square grid of nine buttons, no lock but a tiger coin inside, and a lock with three brown digit buttons. At the right of the screen, a chain hangs from the ceiling directly above what appears to be a stone block with a metal ring embedded in it.
Turn right. There's a planter with another tiger coin in it, and something appears to be secured to its shelf with a chain whose lock has an unusual keyhole. On the right, a shelf has toy planes in various orientations with arrows on their tail fins. You can navigate quickly through any row, which helps you find the tiger coin behind the top-left plane. The left drawer of this shelf is bolted shut, and the right drawer has a lock with penguin buttons and plant clues.
Turn right to find a green penguin sitting on a bed beside a leaf and a tiger coin. While zoomed in, you can look behind it to find a golf club (which you can also find by pixel hunting from the first screen).
Speaking of pixel hunting, you can look under the bed but not reach whatever's underneath. Do you see another clue?
Turn right to face a door. It has no handle, so you look at the panel beside it which needs a key to open. Take the tiger coin from the left.
(Check that you have six coins.)
Coloring
Use the clues from the penguins to unlock the right drawer beneath the plane shelves.
(Each button starts at brown and cycles through gray, white, red and green before returning to brown.)
The plant clues on the drawer appear next to the red, gray, green penguins in the room.
So click the buttons 3, 1, 4 times, then take the tiger coin from the drawer and read the clue there.
Orientate
Use the clue from the plane shelf and its right drawer to unlock the box on the first screen.
The symbols on the clue indicate compartments of the shelf that are surrounded by those lines, namely the left, center, lower-right compartments.
Those planes are facing down, left, up, so click the buttons 1, 2, 3 times. Open the box and take the tiger coin.
Mix and match
Use the clues from the room to unlock the top drawer.
Look closely at the bed, chest of drawers, chairs and table (under the planter) in the room, and click the buttons until they appear:
1 1

3 2
Open the drawer and take the tiger coin.
Pickup
Use the golf club to retrieve the handle from under the bed.
Place the handle in the device on the shelf, and pull it. What changed?
The chain hanging from the ceiling is now a little lower. You still can't do anything with it for now, so let's continue.
(If the change isn't obvious, you can move the handle back and look again.)
Three digits
Use the clue you saw on the bedframe to unlock the bottom drawer.
While looking under the bed, the wood of the bedframe reads 672. Enter that in the drawer, then open it.
It's another tiger coin, and the clue beneath has two shapes within four arrows.
(Check that you now have 10 coins.)
Navigate
Use the clues from the bottom drawer and the plane shelf to unlock the second drawer from the top.
Starting from the filled circle symbol in the middle right shelf, you can follow the arrows to form a path leading to the filled hexagon:
-32

541

6--
Click the buttons in that order and open the drawer to find a purple tiger key.
Unlock 1
The blade of this key is split into two, so use it to unlock the chain beneath the planter box.
You get a long tool with a tiger-shaped handle and a hexagonal metal loop at the end… it's a spanner!
After you take the spanner, you can also pick up the chain.
Use the spanner to unbolt the left drawer of the plane shelf. Inside, there's a box which needs 10 tiger coins.
Payment
Place all 10 coins in the box in the left drawer, and it dispenses a green meat-shaped key.
Unlock
Use the key on the panel next to the door. The compartment inside has a penguin-shaped hole.
Tension
Use the chain in your inventory to tie together the chain hanging from the ceiling and the loop on the floor.
Then push the handle back up to raise the box from the floor. Inside, there's a white penguin piece and a clue with filled and hollow circles.
Shading
Place the penguin piece in the compartment beside the door, and you find that you can click its feet.
So use the remaining clues from the room to unlock it.
The first row of the clue in the floor box matches the toe colors of the gray penguin's left foot (which is the right foot for us). Similarly, the other rows appear on the red, gray, green, green, penguins on the (our) right, left, right, left sides.
Click the RRLRL buttons on the penguin piece, then open the compartment to find a huge juicy chunk of meat.
Fierce
Give the meat to the tiger, who holds it like a sword and follows you around in your inventory. What's happening?
If you examine him, he talks about the door, so use him on the door to open it. The tiger now stands beside the door so he can thank you, but you're free to leave!
You get a fancy congratulations screen with falling tigers and a few ducks.
So, I just found out that it's possible to badly mess up in the Escape-Men game...
There's a point where you need to use some carved mushrooms for a code to unlock a box and get a pike (fish, not weapon)... DON'T grab the pike until you've placed the mushrooms into the rice. They seem to disappear and become unusable after you grab the pike.
If I have the time later this afternoon, I'll see if I can do up a guide for that one. No promises, though.
On Escape Men...Not only do the mushrooms disappear when you get the pike, they disappear the moment you unlock the box. But, if you try to put the mushrooms in the rice before you unlock the box, the game won't let you. Are we sure the mushrooms need to go in the rice?
Okay, that's odd that they disappear when you unlock the box...
Because they do in fact need to be put into the rice. It's how you get one of the Escape Men, mushrooms in the rice, make sure the fire's lit, then come back and one of the mushrooms will have turned into a green Escape Man.
I can confirm Thorzdad's spoiler: you can't mess up that way.
Anyway, here's the next walkthrough. While the URL does say Game0003, the title screen literally translates to
Escaping 3: Petit Maple Hunting
Exploration
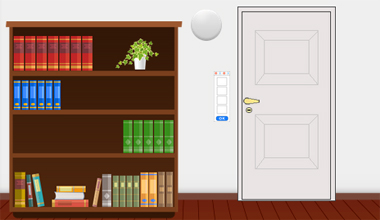
The locked door comes with a four-digit lock beside it, and the bookshelf doesn't just have three series of colored books, but also a potted ornamental plant. After picking up the plant, you notice a dark hole in the bookshelf behind where you took it.
Turn right. While the previous screen had only one wall lamp, this one has two. There's a grid of dark squares with a metal plate beside fastened by screws. On the left, you also see a square panel with a hole beneath.
Turn right to find three lamps, a panel with three maple leaf indents, a locked compartment with a golden keyhole, and a bed.
Under the bed, you find a maple leaf.
Turn right to find two lamps. Some strands of colorful beads hang on the left, while the panel on the right has three colored switches. The chest of drawers has a slider puzzle on top (you might want to save before touching it), and the drawers have a silver keyhole and three colored buttons.
Plant
Place the potted plant in the hole on the second screen, and the panel above it slides down to reveal a puzzle with 8 buttons around the edge of a square.
Switches and buttons
Use the clues from the bookshelf to unlock the bottom drawer and the panel with switches.
There are 7 red, 6 blue and 5 green books, so click the buttons on the drawer that many times, then open it to find a flashlight with the batteries already inside. (You can click them in any order, but if you mess up you need to back out and retry)
The red, green, blue books are on the left, right, left sides of the bookcase, so click the red and blue (top and bottom) switches to move them to the left side, then open the panel to find a puzzle piece.
Brighten
Use the flashlight on the hole in the bookshelf to find another maple leaf.
Slider
You need to solve the slider puzzle (click tiles to slide them into the empty space) before inserting the last piece in the lower right.
Start by numbering the pieces according to where their final positions will be:
751

824

63_
I'll list the tile number and tile direction for each move, so "4↓" means move tile 4 down.
The first few moves try to get the top pieces in place. Here I do this by moving the pieces 1 to 3 until they're adjacent, then moving the space beside 1 and then cycling the top half of the puzzle:
4↓2→3↑ 6→8↓7↓5← 1←2↑3→7→5↓1←2←3↑
The position now looks like this:
123

57_

864
By cycling the bottom half, the pieces in the left column can be moved into place, and then the last two tiles.
4↑6→8→5↓7←4←6↑8→5→7↓4← 5↑8←
And you're done! I've always been able to solve this kind of puzzle by intuition, but this time I looked it up anyway to check that there's an algorithm which guarantees a solution (when the puzzle is solvable):
For the technically minded, each valid move is actually a swap between the empty space and another tile. If you drop tiles into the puzzle at random, there's always exactly a 50% chance that the puzzle is solvable, because the sign of the permutation and the number of moves made by the empty space must have the same parity. (An example of an unsolvable slider is the Fifteen Puzzle.)
There are a few core ideas involved in the general solution. Firstly, any loop of adjacent tiles that contains an empty space can be cyclically permuted, which is what happens when you repeatedly move the space around the loop. In the case of a 3x3 grid, you will almost always be able to move the empty space into a loop if it isn't already included.
Secondly, you can always manipulate 2 tiles within a 3x2 rectangle to form the following configuration:
AB

**

**
This rectangle has three possible loops, one large and two small. Cycle the tiles using the small loops until A and B are no longer adjacent. If A is in the middle row, cycle it (using a small loop) into the top right/bottom left corner; otherwise if B is in the middle row, cycle it into the top left/bottom right. (If neither, choose A or B and cycle it into the nearest mentioned corner.) Then move the other tile (B or A) to the middle row adjacent to it, and you should be able to cycle the large loop to form the required pattern.
Let's start with the solution. Move tile 1 to the top left (by repeatedly moving the empty space to its top/left and then moving tile 1 into that space) and leave it there forever. Cycle/manipulate the two bottom rows until tiles 2 and 3 are not in the left column, then manipulate the two right rows until tiles 2 and 3 are in the correct positions. Leave them there forever; now we only have to worry about the bottom two rows. Manipulate 4 and 7 into the correct positions, which leaves only the last three tiles (5 6 8) unsolved in the lower right.
This 2x2 square is always solvable by cycling those tiles, because the 50% of configurations that have the correct parity are precisely those which end up with 5, 6, 8 in clockwise order in the square.
Phew! Don't forget to insert the puzzle piece from your inventory, then remove the whole puzzle to find a small golden key.
Unlock 1
Use the golden key on the golden keyhole to open the panel beside the bed. Inside, there's eight switches with colored markings on their tops and bottoms.
Paired
Use the clue from the hanging beads to unlock the eight-switch panel.
The top four switches can be toggled between blue and red. Since only the first and fourth strands have red beads, you should only flip those switches. Similarly, you should only flip the first and third switches on the bottom row to make them orange.
(Notice how the positions of the sliders now match those of the beads.)
Take another look around the room. The lights are now on!
Glow
Use the clue from the lamps to unlock the panel above where you placed the potted plant.
The buttons on the panel match the layout of the wall lamps. Each wall has exactly one lamp lit, which is the right one if there are two and the center one if there are three.
So click the 1st, 3rd, 5th, 8th buttons counting clockwise from the top, and the panel opens to let you take a small key.
Unlock 2
Use this key on the keyhole above the top drawer, then open it to find a screwdriver and maple leaf.
Collection
Place all three maple leaves above the bed, and you find a cryptic memo.
Unscrew
Use the screwdriver to unscrew the panel beside the large gray grid. The switch inside turns the grid "all on" with one letter in each square.
Toggle
Use the remining clues you have to unlock the door.
Notice that each letter on the memo appears on the grid when lit up. Why does the circle have "on" written beside while the line has "off"?
Imagine turning all the lights off (setting the light switch to circle) and then turning on only the lights labeled by the letters in FALCHIDOG, and you'll see that the lit squares form a pattern. Similarly, the line below that requires you to imagine turning all the lights on and then the four labeled lights off.
Doing this for each line, you find the patterns
A.C ### ..C ###

D.F ..# ..F #.#

GHI ### ..I ###

..L ..# ..L #.#

..O ### ..O ###
where the lit letters form the digits 4318. Enter that in the door to open it and escape!
Oh, just saw your comment. No, it's not mushrooms you add, but
peeled chestnuts.
*facepalm* Well, I'm a derp... Got confused from the time I originally completed to when I put that up about the problem...
Just ignore my rambling about it, then...
Walkthrough - Escape Men Number 194
Explorating and Collecting
Cabin Screen
There is a cabin with two windows and autumnal trees in the background.
Click on the left-hand window and there is a pack of aluninium foil. Pick this up.
Click again to the left of the window to find some fire lighters. Pick these up.
Clicking to the right of the cabin, there is a fire ready for lighting and a pot ready for cooking. In the pot there is some sticky rice.
Return to the cabin screen and turn right.
Trees and Path Screen
A screen with trees and bushes with a path leading into the distance.
Click on the base of the first tree on the right to collect the mushrooms.
Then click further up the trunk to find the poison mushroom.
Return to the path and click on the sky above. An enormous green man appears that is too big to collect so we'll ignore him for the moment.
Return to the path and click on the brown area beneath the tree to find some chestnuts. Pick them up, click on them again to peel them and search beneath the outer shells for green man number 1.
Return to the path and turn right.
BBQ Screen
There is a barbecue with a piece of salmon on it and symbols on the locked door. To the left of the BBQ is a carving knife. Pick it up.
Click on the blue table to the right of the BBQ to find two tongs. Pick them up.
Return to the BBQ screen and click beneath the table where there is a safe needing a 4-symbol code.
Return to BBQ screen and turn right.
Woodland Screen
Another autumnal woodland scene with a poisoned green man lying on the ground asking for help. Ignore him for now.
Click on the base to the left of the first tree and then on the green leaves to discover a sweet potato. Pick it up.
Return to the woodland taking note of the position of the branches on the big tree. Turn left to return to the BBQ screen.
Cracking the Safe
Retrieve the mushrooms from the inventory and use the knife on them to reveal a code.
Enter the code into the safe under the BBQ
There are two parts to the code.
1 Symbols
2 Markings that tell you which order.
* + # x
Enter the code and find a pike.
In the lid there is green man number 2.
Close the lid and find a gas lighter. Pick it up.
Return to the BBQ screen.
Place the pike on the BBQ.
Cracking the BBQ
The door of the BBQ is locked and has a diagram of small and large V's on it.
Retrieve the tongs from the inventory and click on them using the pattern indicated on the door. A red exclamation mark should appear. Now the BBQ door is open.
L, S, S, L, L, S, L, S, S
The Gas Lighter
To activate the gas lighter, the five black squares need to be in the correct positions.
The code is in the woodland screen.
Look at the branches of the large tree.
R, L, R, C, L
Once you have entered the correct code the lighter will work. Press the black button once and green man number 3 appears. Pick him up.
Lighting the Fires
Open the BBQ door, place some of the fire lighters and use the gas lighter to ignite. Close the door.
Turn left twice to Cabin Screen.
Click right of the cabin to the fire area. Once again, place the remaining firelighters and ignite.
Cooking
Open the lid of the pot above the fire and place the chestnuts inside.
Retrieve the aluminium foil from the inventory.
Click on the rear of the box to turn it around, open the box by tugging on the red strip. Return to the front of the box.
Click on the box five times to reveal green man number 4.
Click on the sweet potato and wrap it in the foil.
Place the potato into the fire.
The Other Six Green Men
Go to the trees and path screen and click on the sky.
Hurl the poisonous mushroom at the giant green man and he will shrink and fall to the ground.
Wait a few monents and watch the sky. A box with a question mark appears. Click on it and a mushroom falls from the sky.
Pick up green man number 5 from the ground and click on the super mushroom moving in the distance.
Go to the woodland screen and give the super mushroom to the poisoned green man on the ground. He recovers miraculously. Pick up green man number 6.
Return to the BBQ screen.
Using the tongs, peel back the skin near the white area on the pike and do the same to the right of the salmon to find green men numbers 7 and 8.
Return to the fire.
Open the lid and one of the chestnuts has transformed into green man number 9.
Using the tongs, pick up the baked potato from the ashes. Click on it to remove the foil and click again to split it in two, revealing green man number 10.
Supper
You receive an invitation to sit at the outside table.
Return to the BBQ screen and the scene now has a table with chairs.
Select the green men from the inventory and click on a chair.
Enjoy the feast!
Click anywhere for the final scene.
My first walkthrough. Apologies for clumsy formatting. Will use spoilers within spoilers next time.
Update