
 Welcome! The invitation to play is here - the new Weekday Escape is out!
Maymay doesn't want you to collect fruits or candies - it's fixing time. You are do-it-yourself guy now and the game gives you valuable know-how which you may use in real life. Amajeto kindly provides a shelter in heavy rain...and suddenly locks you in. Without any rest you need to solve many puzzles to get out (and get soaked, probably). Finally you get home with No1game, but your apartment is unbearably hot - your mother says, that if you find ten green escape men, they would help...do you believe her?
Have a good time and enjoy!
Maymay is going to explain step by step how to transfer a picture to wooden board. This isn't instructional video though; you have to find all stuff you need, pictures and boards included, solve few puzzles to open coded doors and cabinets, and do it by yourself. After you transfer the pictures to Maymay's satisfaction, you'll get shiny golden key from exit door and can leave. Perfect for coffee break!
The cursor is not changing, no save button, one ending.
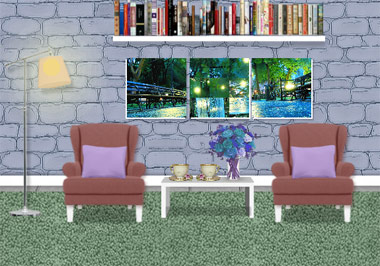
Amajeto takes you to their cosy living room with comfortable armchairs, full bookshelf and TV unit - good, you need a shelter, it's raining outside - but all doors are locked and you can't go neither to the bathroom nor to the balcony...yes, escaping process starts! Amajeto knows very well how to construct solid puzzle and keeps showing us, again and again, how to make much from little. Can you escape, again?
The cursor is changing (its color), no save button, one ending.
It's so hot - the thermometer in your apartment shows 45°C/130°F! It's a small wonder you can breath and move! And the air conditioner is broken...again...are you feeling a bit déjà-vu-y? Your memory is right, hot wave in August back in 2014 inspired No1game's game Find the Escape-Men 120: Scorching Heat 2014 in WE N°45. Now you are four years ̶o̶l̶d̶e̶r̶ wiser, living in another apartment - nevertheless, the solution haven't changed at all - find ten green ecape men! Trying to call emergency AC repair is useless. Developers didn't give you a phone anyway.
The cursor is not changing, no save button, one ending.
We love escape games, and our readers love talking about them and sharing hints! How about you? Let us know what you think, ask for clues, or help out other players in the comments below.


Find the escape men has the wrong pic.
Picture Transfer
It's easy and it's pretty. Okay, in this game it's slightly more difficult.
Exploration 1
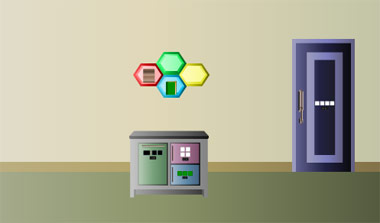
You start off in a room with four colored hexagonal shelves over a small cupboard. The hexagons hold a small wooden block and a book detailing the steps involved in "picture transfer".
The cupboard below has three locked doors, the left having red number buttons, the top-right having four digit buttons in a square grid, and the bottom-right having three letter buttons.
The door to this room has a four-color lock on it.
Three letters
Use a clue from the book to unlock the lower-right cupboard door.
Three of the letters on the front of the book are darker than the others, and they read PCU.
So enter that in the lock, and open the door to find a bottle of water.
Four colors
Use another clue from the book to unlock the door to this room.
Flipping to the back of the book, you find four numbered hexagons.
The shelves in the same places are colored yellow, red, blue, green, so click the buttons on the door 2, 1, 5, 3 times to unlock it. Now you can proceed.
Exploration 2
The shelf on the wall has three piles of neatly folded colored towels, and two safes are built into it, with the left one having a grid of four animal buttons and the right one having four buttons with color stripes.
Under it, a cupboard has unlocked double doors which hide a jar of gesso, and you can blow out the candle above that to find a clue.
The door to this room has a three-digit lock.
Stripes
Use the clue from the towels to unlock the right safe above them.
Click the buttons 4, 3, 1 times to match the color patterns on the towels, then open the safe to get a hammer with a serial number on its handle.
Three digits
Use the clue from the extinguished candle to unlock the door.
The clue tells you to replace a double 0 with + and a single 0 with −.
Applied to the hammer number, you get 96−5+87, which works out to 178. So enter that in the door and open it.
Exploration 3
There's yet another cupboard in the middle of this screen. Other than the lines that stand out from the checkered pattern on its top, you also see two locked doors with clear glass in their top halves, which have four-digit and three-letter locks.
The small safe on the right has four letter buttons arranged in a grid.
And the door to this room needs a key to unlock.
Four digits
Use the clue from the cupboard in this room to unlock its left door.
The lines on top form the digits 2893.
So enter that in the door, then open it to find another wooden block and 4 pictures of animals.
Team
Use the clues from the animal pictures to unlock the left safe in the second room.
(Hint: pay close attention to the details.)
Click the buttons
2 1

7 4
times to match the pictures, and open the safe to find a wooden block resting on a rectangular alarm clock.
Awake
Use the clue from the clock to unlock the left cupboard door in the first room.
The time on the clock (10:38 PM) can be written in 24-hour time as 22:38.
So click the buttons until they read 22, 3 and 8, then open the door to find a wooden block that's nailed to the back and a paintbrush. Click the paintbrush to turn it horizontal and read the text near the bristles.
Removal
Use the hammer to remove the nail holding the wooden block to the cupboard.
Three letters, again
Use the clue from the paintbrush to unlock the right cupboard door in the third room.
Enter INK in the lock, then open the door to find a sponge.
Process
You have almost everything the book tells you to use, so let's start.
Uncap the jar of gesso and apply it to the wooden blocks, then spread evenly with the paintbrush.
Then place the pictures on the wooden blocks.
Uncap the bottle and use it to wet the sponge.
Then use the sponge to wet the pictures.
Now all that's left is to find a paint roller!
Corners
Use the clue from the wet blocks to unlock the top-right cupboard door in the first room.
The digits that appear at the corners of the blocks read
90

16
so enter that in the door to open it. Indeed, there's a paint roller inside.
Press
Use the roller on the blocks to finish the transfer, and click once more to peel the pictures off.
Now all you have in your inventory are the blocks with the transferred pictures. The digits seem to have transferred too, but they're somehow different.
Mirrored
Use the clue from the blocks to unlock the safe at the right of the third room.
The letters at the corners of the blocks read
p o

l a
so enter that in the safe, and open it to find the room key.
Use the key on the last door to escape!
When I did Picture Transfer I skipped
the steps you have labelled "corners" and "press".
I noticed the numbers on the back of the pictures were not on the last safe's buttons and deduced that they were reflected. You can get the key and escape without having to open the door to get and use the roller
Spring Rain
Play your favorite rainy background music.
Exploration
As usual, the game starts you off with a scrambled image puzzle on the wall. You can click the picture on the left to flip it over and find a clue with a green umbrella.
Turn right. You can see the rain through the locked balcony door. To the right of that door, an upside-down yellow umbrella is painted on the wall over a cupboard whose lock has four colored bars.
Turn right. In between two doors, a television screen is turned off and the grid device beneath that can't be used yet.
Turn right to face a screen with two rows of cupboard doors and a picture in the middle with tilty corners. The clock on the right catches your attention as it keeps ticking, but then you realize it's just showing the real time. If you open the top row of cupboards, you find that the middle one doesn't open and the fourth one has a clue with a yellow drop and a shaded rectangle. The bottom row of cupboard is locked (except for the middle one, which doesn't work): the first has a lock with four colored digits, the second has a lock with four colored letters and a number clue beneath, the fourth has a lock with three colored buttons, and the last has a lock with four dials and a color clue beneath.
Unscramble
Go back to the first screen, and rotate the tiles on the (randomized) picture puzzle to solve it.
The right picture frame slides over to the right so you can take a square tile.
Now you can click both the middle frame (that you just solved) and the right frame (that just slid over) to find clues with colored raindrops.
Three colors
Use the raindrop clues from the picture frames to unlock the second-right cupboard.
The drops, from left to right across the frames, are purple, green, red, purple, red.
So click the right, center, left, right, left buttons, then open the cupboard to find a silver key and another clue with a red drop.
Unlock 1 / Exploration 2
Use the key to open the door to the balcony.
Here, you get a nice view of the spring rain on the forest outside. Move the flower pot to find a square tile behind. You also see four pairs of boots with raindrops on them, except for the third one from the right. So pick up that pink boot, which also seems to have a muddy sole. You can also click all the other boots to view letters on their soles.
Four digits
Use a clue from the boots you didn't pick up to unlock the leftmost cupboard.
The green, yellow, blue, pink boots have 5, 4, 2, 3 raindrops in total.
So enter that in the cupboard and open it to find a remote control and a square tile.
Four letters
Use another clue from the boots to unlock the second-left cupboard.
The first letter in the code is on the first (1.) pink boot, so D.
The second letter is on the second (2.) blue boot, so R.
The third letter is on the second (2.) green boot, so O.
The fourth letter is on the first (1.) yellow boot, so P.
Enter DROP in the cupboard and open it to find a golden key and a clue with a sideways red umbrella.
Unlock 2 / Exploration 3
Use the gold key to unlock the door to the left of the TV.
It opens into a very familiar bathroom. This time, the wall in the shower is clean, and you can check the cupboards on the right to find a blue umbrella clue and a square tile.
Cleanup
Turn on the shower tap and use the boot in the water to clean off the mud, then look at its sole to find a clue with weather symbols.
Screen
Use the remote on the TV to turn it on and find a clue with a square frame and weather symbols beneath.
So use that clue to unlock the tilty corner picture.
The clue on the sole of the boot tells you that the symbols on the TV correspond to the UL LR UL LL UR corners.
So click the ⌜⌟ ⌜⌞⌝ corners of the frame, which unlocks the middle cupboard above. Take another square tile which covers a green drop clue.
Four directions
Use the colored umbrella clues to unlock the rightmost cupboard.
The blue, yellow, green, red umbrella clues point in the ↖↓↗← directions.
So click the dials 7, 4, 1, 6 times and open the cupboard to find a square tile and a blue drop clue.
Four bars
Use the raindrop clues from the cupboards to unlock the other cupboard beside the balcony door.
Opening all the cupboards on the screen with the clock, you find on the drop clues have horizontal bars at different heights, with the highest being green, followed by yellow, blue and red.
So the bars in the lock (which are red, yellow, green, blue) need to be clicked 0, 2, 3, 1 times.
Open the cupboard to find the last square tile.
Jigsaw
Place all the tiles in the grid beneath the TV, and swap them to form a picture of a rose amongst a rainy background.
When you're done, the compartment opens up with another golden key that you can use to unlock the door and escape!
Find the Escape-Men 189: Scorching Heat 2018
The temperature's up, the AC's down, the weathermen are worried but Mom has a plan.
Exploration
Flip over Mom's letter to read her suggestion: find the Escape-Men!
The main door is locked at both its top and bottom, and you can't see anything through the peephole except for the color green. Beside the (working) sink, the pan on the stove is filled with greenish dirty oil. The left cupboard beneath has a four-digit lock, and the right is unlocked and contains an oil-absorbing sponge which is infused with green tea for some reason.
Turn left. The wall thermometer is showing some scary readings. Looking in the closet behind the sliding doors, you find a packet of cat food behind the futons on the left side.
Turn left. The cat is sleeping on the right and its empty cat bowl is on the left. The paper hanging above the locked window is attached to the AC unit, out of order of course. Unlock the window and look out at a wall with a tree in front. Some of the wall tiles are different.
Click the top of the screen to look up at the top of the tree, where an Escape-Man hides out of reach.
Turn left. Opening the fridge doesn't cool you down much, but you find loads of green vegetables. You can pick up (and put back) the blender on top of the fridge. Look in the mirror… wow, you're sweating a lot in that T-shirt!
Click your hair to part it. That spike coming out from your head is actually a boomerang!
Click the bottom-right of the fridge to look at the sockets. Might as well plug that gray one in.
Outside / Exploration 2
Click both of the locks on the main door, and open it.
It feels even hotter outside! Pick up the Escape-Man hanging on your door. Maybe your neighbor could help with the heat, but knocking on his door doesn't seem to do anything.
Keep knocking, and he finally opens the door after 21 clicks. He's an Escape-Man too, and you find an electric fly swatter on the floor behind.
Outside again
Go back to your room, then out through the door again.
Great, now there's an annoying greenish fly moving around the screen.
Click on the fly with your swatter equipped (hard to catch, but you can just come back and keep trying).
Then examine the swatter and pick up the fly, which turns out to be another Escape-Man.
Reach
Use the boomerang to pick up the Escape-Man from the tree.
Sliding
Use the clue from the wall outside the window to find a secret in the closet.
The colored tiles on the wall correspond to the left and right doors of the closet. From top down, they are on the RRLRLRRLLRR sides.
So click the doors in that order (11 clicks only, but you have to pay close attention since they overlap) and an Escape-Man appears behind the right door at the end.
Feed
Use the cat food on the bowl, and wake the cat up. It moves off the ice pad to eat, so click the pad to find an Escape-Man underneath.
Numeric
Use the clue from your shirt to unlock the four-digit cupboard.
As you can see in the mirror, your shirt reads
C x F, which is a clue to multiply the temperature readings on the thermometer.Since 45×130=5850, enter that in the cupboard to open it and find an Escape-Man and an empty glass under the sink.
Juicer
Place the vegetables in the blender and put it back on the stand (which you plugged in earlier).
Click it once to blend, then pick up the blender of juice again and pour it in the glass.
And click the glass to drink the refreshing juice.
Look in the blender to find an Escape-Man at the bottom.
Look in the mirror again, then stick out your tongue. It's turned green and there's an Escape-Man on it.
Soak
Remove the sponge from its packaging, and use it to clean the pan.
Then squeeze the sponge until it forms the shape of an Escape-Man.
Complete
The chime indicates that you've found all 10 Escape-Men:
On outside of door
Behind neighbor's door
Flying in corridor
In tree
In closet
Under cat
Under sink
In blender
On tongue
Deformed sponge
They transform into… a greenish God! With a wave of his staff, he sends you to a cool place.
Hmm, you're still in this very hot room. Looking around, you find that the window is now blocked by an enormous pink wardrobe!
Click on it, and it transports you to a very cool place.
Perhaps too cool, as you now have to deal with a summer cold!
Update